Matrox Monarch HDX User Guide
|
|
|
- Letitia Jenkins
- 6 years ago
- Views:
Transcription
1 Matrox Monarch HDX User Guide December 14, 2015 Y
2 Contents Chapter 1 Introduction Welcome to Matrox Monarch HDX... 2 Supported input formats... 2 Supported operating systems and web browsers... 2 Operating systems... 2 Web browsers... 3 Streaming... 3 Recording... 3 About this guide... 3 Style conventions... 3 Chapter 2 Matrox Monarch HDX Hardware and Connections Matrox Monarch HDX hardware... 6 Input select button (SDI/HDMI)... 6 Encoder buttons (ENCD 1 and ENCD 2)...7 USB ports 1 and SD card... 8 LAN... 9 RS Video/audio inputs and outputs... 9 Powering Monarch HDX...11 Using the Reset button Status LEDs Chapter 3 Network Connection and Setup Introduction Monarch HDX Utils application Network connection and IP address Finding the Monarch HDX s current IP address Connecting to a network with a DHCP server (DHCP IP mode) Connecting to a network without a DHCP server (Static IP mode) Accessing the Command Center... 22
3 xii Updating the Monarch HDX firmware...22 Chapter 4 Using the Command Center Introduction...26 Command Center control buttons...26 Status page Previewing the input...27 Monarch HDX errors...28 Input Settings...30 Video Input Settings...30 Audio Input Settings...30 Encoder Settings...32 Profiles...32 Audio Codec Settings...33 Monarch HDX encoding modes...33 Presets...34 Resolution...35 Frame rate...35 Target video data rate...36 Include audio...36 Advanced settings...37 Destination settings (streaming)...37 Destination settings (record)...39 Device page...43 Control tab...44 Account tab...45 Automatic Configuration...46 IP Setup tab...49 Date and Time tab About tab...52 Appendix A Recording file size and duration Recording file sizes and duration...56 Appendix B Contents
4 Sharing a Mac OS X folder using NFS protocol Introduction Folder sharing with a Mac OS X Yosemite system Appendix C Matrox Monarch HDX Specifications General Connections Environmental specifications Dimensions Top Front Side Appendix D Matrox Customer Support How to get Matrox customer support Registration Keep up to date with our website Contacting us Index...69 xiii Contents
5 2 Welcome to Matrox Monarch HDX The Matrox Monarch HDX is a simple and versatile video encoding appliance specifically designed for broadcasters and webcasters who need a flexible solution that is powerful enough to take on today s demanding video delivery workflows. Monarch HDX offers 3G-SDI and HDMI inputs with frame-synchronization to correct any discontinuity at the input, and two independent H.264 encoders that can be assigned to individual tasks. By providing two encoders in a single device, Monarch HDX can tackle any job; from streaming to two different locations, to recording a proxy quality file while simultaneously recording master quality version for post-event editing, to using one encoder for streaming while the other records at higher quality for VOD downloads. Whether used as a live streaming encoder or video recorder, the Monarch HDX can integrate seamlessly into virtually any SD and HD installation. Supported input formats Matrox Monarch HDX supports the following video input formats: p at 23.98/24/25/29.97/30/50/59.94/60 fps i at 25/29.97 fps p at 50/59.94/60 fps p at 50 fps (HDMI only) i at 25 fps (SDI only) i at fps (SDI only) p at fps (HDMI only) p at 60 fps (HDMI only) Supported operating systems and web browsers Operating systems The Matrox Monarch HDX Utils application is used to perform firmware updates and acquire the device network IP address when connected to a network with a DHCP server. The application supports the following operating systems: Mac OS X Yosemite. Microsoft Windows 8.1 (64-bit). Note You must have Microsoft.NET Framework installed. This release was tested with the latest version: Chapter 1, Introduction
6 3 Other operating systems may work but have not been fully validated through internal testing. Before trying another operating system, please contact with any questions. Web browsers Matrox Monarch HDX has been tested for use with the following Web browsers: Microsoft Internet Explorer. Apple Safari. Other browsers may work but have not been fully validated through internal testing. If you experience display issues in the Command Center when using Monarch HDX with Internet Explorer (11 or higher), disable Compatibility View and set the Document mode to Edge: 1 From Internet Explorer, go to Tools > Compatibility View Settings, clear Display intranet sites in Compatibility View, and then click Close. 2 Press F12 to open the developer tools interface, select Edge (default) from the document mode drop-down menu, and then press F12 to close the tools. The Command Center should now display properly. Streaming Monarch HDX provides streaming settings for using RTSP and RTMP streaming protocols for use on Adobe Media Server, Wowza Media Server, a software video player, such as QuickTime and VLC, or any of the popular Content Delivery Networks (CDNs), such as YouTube Live and Ustream. Recording Monarch HDX provides settings for recording your input source for video on demand (VOD), high-quality editing, and archiving/previewing purposes. You can record to MOV and MP4 file formats on FAT32 or NTFS file systems. About this guide This guide provides you with information about connecting and using your Matrox Monarch HDX device. Style conventions The following style conventions are used in this guide: The names of files, folders, and documents appear in italics. For example: $ The data is stored in the Sample.mov file. Streaming
7 4 $ The file is located in the Clips folder. $ Please refer to your Matrox Monarch HDX Release Notes. Menus and commands that you need to choose are displayed in the form Menu > Command. For example, File > Save means click File in the menu bar, and then click Save in the menu that appears. Chapter 1, Introduction
8 2 Matrox Monarch HDX Hardware and Connections This chapter describes the Matrox Monarch HDX connections (video/audio, LAN, and recording), buttons, status LEDs, and shows how to power and reset Monarch HDX.

9 6 Matrox Monarch HDX hardware This section explains the Matrox Monarch HDX hardware components. For hardware technical specifications, see Appendix C, Matrox Monarch HDX Specifications. Encoder 1 Encoder 2 Input select Power LED USB port 1 USB port 2 See Status LEDs on page 15. SD card slot Reset button Warning LED Power LAN RS-232 HDMI in HDMI out SDI out SDI in AUX output input (Analog audio) Input select button (SDI/HDMI) With the Input select button, you can select from either an HDMI or SDI input source, and an LED illuminates indicating which source is in use. You can also select the input source in the Command Center. Important While streaming or recording, any attempt to switch between inputs by pressing the Input select button will not have any effect, whether or not the front panel buttons have been disabled. This is the case only for the Input select button; however, selecting Disable front panel buttons on this Monarch HDX device under the Control tab of the Device page disables all three buttons. Chapter 2, Matrox Monarch HDX Hardware and Connections
10 Encoder buttons (ENCD 1 and ENCD 2) The encoder buttons functionality depends on the encoding mode you have selected for each encoder in the Command Center. Press the selected encoder's button to start streaming or recording your input source to the media or location specified in the Command Center. Pressing the selected encoder's button starts the streaming or recording for that Monarch device only. When streaming or recording, the selected encoder's LED flashes. Press the selected encoder's button again to stop streaming/recording. You can also use the control buttons in the Command Center to control the Monarch HDX device. If your Monarch HDX is set to control multiple Monarch HDX devices, you must use the Command Center control buttons. For more information, see Command Center control buttons on page 26. Note An encoder button activates when you release the button. If you want to start/stop streaming and/or recording on both encoders at the same time, press and hold the encoder buttons and then release them at the same time. You can also start/stop both encoders at once in the Command Center (see Command Center control buttons on page 26). Encoder button use differs depending on whether you are recording, or the stream mode you selected in the Command Center: RTSP mode If Monarch HDX is set to stream in RTSP mode, the encoder's LED will be on (solid). The unit delivers stream data once the encoder button is pressed, and then the selected encoder's LED flashes, but the data will only start to stream when a client connects to Monarch HDX using the RTSP streaming protocol. Pressing the encoder button enables a connection to the Monarch device, and pressing it again will sever the connection and the LED will return to the solid lit state. RTMP mode If Monarch HDX is set to stream in RTMP mode, press the selected encoder's button to begin streaming your input source to the stream destination specified in the stream settings. Pressing the encoder s button starts the stream for that device only. Record mode If the Monarch HDX is set to record, press the selected encoder's button to begin recording your input source to either an SD card, a USB device, or a network folder, as specified in the record settings. Pressing the encoder s button starts or stops the recording for that device only. For information on specifying your settings, see Encoder Settings on page USB ports 1 and 2 Use the USB ports to connect a USB 2.0 or 3.0 media device for recording the source connected to one of the Monarch HDX inputs. To select USB port 1 or 2 as the recording destination, see Encoder Settings on page 32. Matrox Monarch HDX hardware
11 8 Please note the following about using USB devices: Monarch HDX writes to all USB devices (including USB 3.0 devices) at USB 2.0 speeds. The performance of USB keys or thumb drives varies. Many of these devices are optimized for read operations, while the Monarch HDX requires sustained write capabilities. For best results, especially at higher recording data rates, powered USB drives are recommended. In some cases, SD cards may be more suitable when small portable media is required. Monarch HDX supports USB devices with FAT32 or NTFS file systems. Media may need to be reformatted if not recognized by the Monarch. USB devices with password protection are not supported. It may take a few seconds for Monarch HDX to detect a newly connected USB device (verified on the Status page--see Status page on page 27). For USB 3.0 hard drives without a dedicated power supply, Monarch HDX may not be able to sufficiently power more than one USB 3.0 drive at a time. When a recording is stopped, it may take a few moments for Monarch HDX to finalize the file, during which the USB LED continues to flash. To avoid corrupted video files, do not remove the USB device when its LED is flashing. Connecting a USB device to USB port 2 and then performing a device reboot allows you to save the Monarch s current IP address and status as a text file (see Device reboot on page 13). Connecting a USB device to USB port 2 and then performing a factory reset allows you to load pre-configured Monarch settings (see Automatic Configuration on page 46). SD card Use the SD card slot for recording the source connected to one of the Monarch HDX inputs to an SD card. Monarch HDX supports SD and SDHC cards with FAT32 or NTFS file systems. To ensure that your SD card is fast enough to record at higher bit rates, we recommend using an SD card with a Class 10 speed rating. To select the SD card slot as the recording destination, see Encoder Settings on page 32. Remarks It may take a few seconds for Monarch HDX to detect a newly inserted SD card. When a recording is stopped, the SD card LED continues to flash while the Monarch HDX finalizes the file. It is recommended to not remove the SD card when its LED is flashing. SD cards with password protection are not supported. Chapter 2, Matrox Monarch HDX Hardware and Connections
12 9 LAN The LAN port is an auto-sensing 10/100/1000 Base-T Ethernet port used to connect Monarch HDX to an Ethernet network via a standard RJ-45 Ethernet cable. For information on how to connect to a network, see Chapter 3, Network Connection and Setup. RS-232 The RS-232 port is currently for internal use only. Video/audio inputs and outputs Matrox Monarch HDX supports both SD (SDI only) and HD video signals, and auto-detects input source information; however, it does not support upscaling the input source for streaming or recording. Note If you apply the encoder settings before the input is connected, and the actual input resolution or frame rate is smaller than the resolution or frame rate you specified in the encoder settings, the Monarch will stream/record at the input resolution/frame rate since upscaling is not supported. However, the Status page will display the previously selected encoding resolution/frame rate, and not the actual input resolution/frame rate. HDMI out Provides a preview of the selected SDI or HDMI input. For audio, you have the following options: Use the first pair of embedded HDMI audio channels. Use the first pair of embedded SDI audio channels. Use the analog pair. For more information, see Audio Input Settings on page 30. To display your input source, your monitor must support the input resolution. If your monitor does not, an error message will appear. For supported resolutions, see HDMI in and SDI in. Note While SD resolutions are not supported at the HDMI output, if the SDI input is SD, the HDMI output will display a windowboxed version of the picture in HD. HDMI in Provides an input for HD HDMI video (YUV or RGB) from a digital HDMI device for streaming and recording. The HDMI input supports the following video input formats: p at 23.98/24/25/29.97/30/50/59.94/60 fps i at 25/29.97 fps Matrox Monarch HDX hardware
13 p at 50/59.94/60 fps p at 50 fps p at fps p at 60 fps Monarch HDX supports the first two channels of uncompressed embedded audio from the HDMI input source for streaming and recording. HDCP and SD sources are not supported on this input. You can monitor the HDMI input source by connecting an HDMI monitor to Monarch HDX's HDMI output. To select whether to stream and record the first two audio channels present in the HDMI input or the audio connected to the Monarch HDX analog audio input, see Audio Input Settings on page 30. SDI out Provides a preview of the selected SDI or HDMI input. For audio, you have the following options: Use the first pair of embedded HDMI audio channels. Use the 16 SDI audio channels. Use the analog pair. Note For more information, see Audio Input Settings on page 30. To monitor your input source, the SDI monitor must support the video input format. SDI in Provides an input for SDI video (YUV only) from an SDI device for streaming and recording. The SDI input supports the following video input formats: p at 23.98/24/25/29.97/30/50/59.94/60 fps i at 25/29.97 fps p at 50/59.94/60 fps i 25 fps i at fps Monarch HDX supports the first two channels of uncompressed embedded audio from the SDI input source for streaming and recording. You can monitor the SDI input source by connecting an SDI monitor to Monarch HDX's SDI output. To select whether to stream and record the first two audio channels present in the SDI input or the audio connected to the Monarch HDX analog audio input, see Audio Input Settings on page 30. AUX The AUX connector is currently for internal use only. Chapter 2, Matrox Monarch HDX Hardware and Connections
14 11 Analog audio output Provides an unbalanced stereo analog audio output for monitoring the audio selected as the audio input source. The analog audio output will always be in sync with the HDMI video output when coming from embedded SDI or HDMI inputs or analog input as long as this analog signal is already in sync with the selected video input. Analog audio input Allows you to input an unbalanced stereo analog audio source for streaming and recording. To select whether to stream and record the first two audio channels present in the selected video input or the audio connected to the Monarch HDX analog audio input, see Audio Input Settings on page 30. Powering Monarch HDX Power the Monarch HDX device using an AC outlet via the external power supply and a power cord. When power is supplied to Monarch HDX, the Power ( ) LED goes on, and the device begins a power-up sequence during which various LEDs will flash on and off. The Warning LED ( ) will begin to flash early during the boot up sequence, and once it stops flashing, the Monarch HDX is ready for use. Note The Warning LED ( ) may remain on if there is an error condition (see Status page on page 27 for more information). To power off Monarch HDX, disconnect Monarch HDX from the power source. For power specifications, see Appendix C, Matrox Monarch HDX Specifications. Matrox Monarch HDX hardware
15 12 Note When the device is powered off, all current settings are maintained and any logged errors are cleared (see Monarch HDX errors on page 28). ²Caution When disconnecting the power supply from Monarch HDX, make sure that you slide back the casing on the connector to release the locking mechanism. To AC outlet Monarch HDX External power supply Power cord Using the Reset button You can use the Monarch HDX Reset button to reboot the device (quick button press), or reset the device to factory defaults (long press of at least five seconds). In addition to the typical reasons for rebooting the Monarch (fixing errors or other issues), a reboot (see Device reboot on page 13) also saves the Monarch s IP address and status (see Status page on page 27) to a connected USB device (USB port 2) as a text file. This is a convenient way to find the Monarch s IP address. A reset allows you to switch to a Static IP (see Switch to Static IP mode on page 13), or load pre-configured Monarch settings from a configuration file on a USB device connected to USB port 2 (see Automatic Configuration on page 46). Remarks The Reset button is recessed in order to prevent unintended activation. Use a straightened paper clip, or similar device, to press the Reset button. A power cycle of the Monarch HDX performs a simple reboot, not a reset to factory defaults. Chapter 2, Matrox Monarch HDX Hardware and Connections
16 13 When using the Reset button, any saved profiles for streaming and recording are maintained, and all logged errors are cleared (see Monarch HDX errors on page 28). Holding the Reset button pressed for more than five seconds will reset the device to factory defaults. Device reboot When performing a device reboot, all current settings are maintained, including the IP mode (DHCP or Static) that was set prior to the reboot. Note To reboot the device and switch to Static IP mode, see Switch to Static IP mode on page 13. If you have a USB device connected to USB port 2 on the Monarch device, the Monarch s current IP address and status is saved to the USB device as a text file. This is a convenient way to find the Monarch s IP address. To reboot Monarch HDX, do one of the following: Using a paper clip, press the recessed pinhole Reset button on the front of the device. Open the Matrox Monarch HDX Utils application, select the Monarch HDX device you wish to reboot, and then click Reboot Selected. During a standard boot up sequence, various LEDs will flash on and off. The Warning ( ) LED will begin to flash early during the boot up sequence, and once it stops flashing, the Monarch HDX is ready for use. Switch to Static IP mode You can switch your Monarch HDX device to Static IP mode by pressing the ENCD 2 button while the Encoder 2 LED flashes during the power-up sequence. 1 Press the Reset button on the device to initiate a device reboot. During the power-up sequence (see Powering Monarch HDX on page 11), the Encoder 2 LED flashes for three seconds. 2 Press the ENCD 2 button on the device while the Encoder 2 LED is flashing. This sets the device to Static IP mode and the Static IP address to its default address ( ). The device is ready when the Warning ( ) LED stops flashing; however, the Warning LED ( ) may remain on if there is an error condition (see Status page on page 27 for more information). Reset to factory defaults When resetting Monarch HDX using this method, all Monarch HDX settings reset to factory defaults, the device password resets to admin, and the device powers up in DHCP IP mode for connecting to a network with a DHCP server, Matrox Monarch HDX hardware
17 14 such as a router. To switch the device to Static IP mode after performing a factory reset, see Switch to Static IP mode. You can also use a factory reset to load pre-configured Monarch HDX settings from a configuration file. For more information, see Automatic Configuration on page 46). To reset Monarch HDX to factory defaults, press and hold the Reset button on the device for at least five seconds. The device begins a power-up sequence during which various LEDs will flash on and off. The Warning ( ) LED will begin to flash early during the boot up sequence, and once it stops flashing, the Monarch HDX is ready for use. The Warning LED ( ) may remain on if there is an error condition (see Status page on page 27 for more information. Chapter 2, Matrox Monarch HDX Hardware and Connections
18 Status LEDs This section explains the Monarch HDX status LEDs. 15 LED State Condition Green Device is powered. Indicates that an error has occurred. This includes streaming, recording, fan or temperature-related errors, and/or a physical disconnection of the network cable. The LED turns off when the error is cleared in Yellow the Command Center (e.g. streaming error) and/or when the error has been resolved (e.g. temperature-related error). For information on how to view and clear errors, see Monarch HDX errors on page 28. SDI/HDMI Green Indicates which input is in use (HDMI or SDI). OFF Indicates that the encoder is not in use. ENCODER 1/2 USB ports 1/2 and SD CARD Blue (solid) Blue (flash) Blue (flashing fast) Indicates that the channel is in streaming mode and ready to stream. The LED will return to solid blue when the streaming is stopped. The LED switches from solid to flashing blue when you start the streaming process, and will revert to solid blue when you stop it. The behavior is the same for RTMP and RTSP. The channel is trying to (automatically) reconnect to a media server. Red (solid) Indicates that the channel is ready to start recording. Indicates that the channel is recording. The LED will Red (flash) toggle between the two states (flashing and solid red) when the recording operation is turned on or off. Indicates that the port/slot is not selected and/or that OFF neither encoder is in Record mode. Indicates that the port/slot has been selected and that Red (solid) an encoder is in Record mode. Monarch HDX is currently writing to the media device (USB device or SD card). Do not remove the Red (flash) media device when its LED is flashing. Doing so may result in corrupted video files. Status LEDs
19 3 Network Connection and Setup This chapter explains how to connect Monarch HDX to a network, and how to obtain the Monarch HDX IP address to access the Monarch HDX Command Center. It also explains how to update the Monarch HDX firmware.
20 18 Introduction The network connection and setup instructions depend on whether you ll be connecting Monarch HDX on a network with a DHCP server, such as through a router, or a network without a DHCP server. If connecting to a network with a DHCP server, Monarch HDX must be set to DHCP IP mode. If your network does not have a DHCP server, Monarch HDX must be set to Static IP mode. By default, Monarch HDX is set to DHCP IP mode. Once connected to a network, the stream and record settings are specified using the Monarch HDX Command Center. To access the Command Center, you can enter the network IP address of your Monarch HDX device or use the Monarch HDX Utils. When connecting to a network with a DHCP server, the Monarch HDX IP address is assigned by the DHCP server. In this case, you can use the Matrox Monarch HDX Utils to find the Monarch HDX IP address. When connecting to a network without a DHCP server, you must assign a static IP address to Monarch HDX. A default IP address is provided when in Static IP mode. Monarch HDX Utils application The Monarch HDX Utils application is available for both Mac OS and Windows systems, and you can use it to do the following: Identify Monarch devices on a network and list their IP addresses. Open the Monarch HDX web based UI (Command Center) by double-clicking an identified device on the displayed list. Update Monarch HDX firmware (see Updating the Monarch HDX firmware on page 22). Reboot Monarch HDX devices (see Device reboot on page 13). Important It is not recommended to simultaneously update the same Monarch HDX device using more than one instance of the Monarch HDX Utils. Do not sever the network connection during the update process. Network connection and IP address This section explains how to connect Monarch HDX to a network with or without a DHCP server, and describes how to acquire the Monarch HDX IP address. Note If you switch the network connection while Monarch HDX is powered and the switch results in Monarch HDX getting a new network IP address, you must power cycle the device to apply the new IP address. To power cycle the device, use the Reset button on the Monarch HDX device (see Using the Reset button on page 12). Chapter 3, Network Connection and Setup
21 19 Finding the Monarch HDX s current IP address You must know your Monarch device s IP address to access the Command Center. There are three ways to find the Monarch HDX s current IP address: You can see it displayed on an HDMI monitor at device boot up. You can have it automatically saved to a connected USB device when rebooting the Monarch HDX. Use the Monarch HDX Utils application to view all connected Monarch HDXs and their IP addresses. Displaying the IP address on an HDMI monitor The Monarch HDX s IP address is displayed on a connected HDMI monitor at device bootup: 1 Connect the Monarch HDX to an HDMI monitor. 2 Power up the Monarch HDX. When the Monarch HDX boots up, the IP address appears on the screen for approximately 30 seconds before being replaced by the passthrough signal. Saving the IP address and status to USB You can save a file containing the Monarch HDX s IP address and current status to a USB device, making this information easily accessible (see Status page on page 27). 1 Insert a formatted USB device into the USB port 2 (see USB ports 1 and 2 on page 7). 2 Reboot your Monarch HDX. It is complete once the Warning ( ) LED stops flashing (see Device reboot on page 13). The Monarch HDX IP address and status information are now saved to a text file on the USB device. This file can be helpful if you do not have an HDMI monitor (see Finding the Monarch HDX s current IP address on page 19), or if you need to share status information for your unit. Finding the IP address with Monarch HDX Utils The Monarch HDX Utils application will indicate the IP addresses of the Monarch devices in your network. See Connecting to a network with a DHCP server (DHCP IP mode) for details. Network connection and IP address
22 20 Connecting to a network with a DHCP server (DHCP IP mode) When connecting to a network with a DHCP server, such as through a router, the Monarch HDX IP address is assigned by the DHCP server. Although other methods exist for obtaining the IP address of a device on a DHCP server, such as from a DHCP-server client list, these instructions detail how to use the Matrox Monarch HDX Utils to find the IP address of your Monarch HDX device. 1 Connect an Ethernet cable between Monarch HDX s LAN port and a network port. 2 Make sure that power is supplied to Monarch HDX (see Powering Monarch HDX on page 11). 3 Monarch HDX must be set to DHCP IP mode (default). If you need to switch the device from Static IP mode to DHCP IP mode, you can either reset the device to factory defaults (see Reset to factory defaults on page 13), or set it to DHCP using the Command Center (see IP Setup tab on page 49). 4 From a computer that is on the same network subnet as your Monarch HDX device, download the Matrox Monarch HDX Utils at The Matrox Monarch HDX Utils is available for both Mac OS and Windows systems (see Monarch HDX Utils application on page Double-click the downloaded file to open the Monarch HDX Utils. If Universal Plug and Play (UPnP) is enabled on your network, the utility will automatically scan for Monarch devices. To scan manually, click the Find All button. All the Monarchs on the same network subnet as your computer will be displayed, along with their IP addresses and other information. 6 Open the Command Center (see Accessing the Command Center on page 22). Tip If you have multiple Monarch HDX devices, you may want to change the name of each device for easier identification (see Account tab on page 45). Chapter 3, Network Connection and Setup
23 21 Connecting to a network without a DHCP server (Static IP mode) When connecting to a network without a DHCP server, the network does not assign an IP address to your Monarch HDX device. In this case, you must assign a static IP address to Monarch HDX and you may be required to change your computer s network configuration to establish a connection between your computer and Monarch HDX. 1 Power Monarch HDX (see Powering Monarch HDX on page 11). 2 Monarch HDX must be set to Static IP mode. By default, Monarch HDX is set to DHCP IP mode. You can switch Monarch HDX to Static IP mode using the Reset button (see Switch to Static IP mode on page 13). 3 Establish a connection between Monarch HDX and your computer using one of the following methods: $ Connect an Ethernet cable from Monarch HDX s LAN port directly to your computer s Ethernet port. $ Connect an Ethernet cable from Monarch HDX s LAN port to the same network switch as your computer. 4 In order for your computer to communicate with Monarch HDX, your computer s IP address must be in the same network range as your Monarch HDX s IP address. If it isn t, then you must change your computer s IP address accordingly. By default, the Monarch HDX static IP address is set to If you re using the default static IP address, you must change your computer s IP address and subnet mask to the following: $ IP address $ Subnet mask Note The default static IP address is designed primarily for the initial setup of Monarch HDX using a point-to-point connection (direct connection between your computer and Monarch HDX). The default IP address is not recommended for a traditional network setting. If you wish to use Monarch HDX in Static IP mode over a network, after the initial setup we recommend that you change the static IP address of the Monarch HDX device to an address that is more suitable to your network. You can change the static IP address in the Command Center as specified in IP Setup tab on page Open the Command Center (see Accessing the Command Center on page 22). Note For more details on Monarch HDX IP modes, see IP Setup tab on page 49. Network connection and IP address
24 22 Accessing the Command Center The Monarch HDX Command Center is where you specify the Monarch HDX settings and control the streaming and recording for a single Monarch HDX device or multiple devices on the same network. The Command Center is accessible via the Monarch HDX Utils (see Monarch HDX Utils application on page 18) or by typing your Monarch HDX s network IP address in the address field of your web browser (see Network connection and IP address on page 18). To access the Command Center, power the Monarch HDX and connect it to an Ethernet network, and then do one of the following: From your web browser, type the Monarch HDX IP address in the address field, and then press ENTER. With Matrox Monarch HDX Utils open, double-click any of the listed devices to open the Command Center. The Command Center opens to configure your Monarch HDX settings and control streaming and recording (see Chapter 4, Using the Command Center ). The Command Center opens on the Status page, which you can access without logging in (see Status page on page 27). To access other pages, click the menu item for the page that you want, and then enter your username and password. By default, the username and password are set to admin. You cannot change the username but you can change the password (see Device name and password on page 46). Updating the Monarch HDX firmware The firmware on your Monarch HDX device is updated using the Matrox Monarch HDX Utils. To view the current firmware version of your Monarch HDX, see About tab on page 52. The Matrox Monarch HDX Utils is available for both Mac OS and Windows systems. For more information on the Utils application, see Monarch HDX Utils application on page 18. A Monarch HDX device s network IP address is required to update its firmware (see Network connection and IP address on page 18). 1 Power Monarch HDX and connect it to an Ethernet network. 2 On a computer that is on the same network subnet as the Monarch HDX that you want to update, download the latest version of the Matrox Monarch HDX Utils at Note You cannot update the Monarch HDX firmware over a wireless network. The Matrox Monarch HDX Utils must be on a computer that is connected to the network/router using a wired Ethernet connection. Chapter 3, Network Connection and Setup
25 23 3 Double-click the MatroxMonarchHDXUtils.exe (Windows) or MatroxMonarchHDXUtils.app (Mac OS) file to open the Monarch HDX Utils. 4 Open the Matrox Monarch HDX Utils, select the network IP Address of the Monarch HDX device that you want to update, and then click Update Selected. If you have multiple Monarch HDX devices on the network, select the IP address for every device in the Matrox Monarch HDX Utils by clicking Select All, and then all Monarch HDX devices will update in series. Important Do not disconnect the Monarch HDX from the network or power source during the firmware update. During a firmware update, the USB 1, USB 2 and SD card LEDs will cycle on and off. Once complete, the device will automatically reboot, and the Warning ( ) LED will begin to flash. Once it stops flashing, the device is ready to use. Note The Warning LED ( ) may remain on if there is an error condition (see Status page on page 27 for more information). Updating the Monarch HDX firmware
26 4 Using the Command Center This chapter describes how to specify settings in the Monarch HDX Command Center, and view Monarch HDX information.
27 26 Introduction The Monarch HDX Command Center is a web-based application that allows you to configure Monarch HDX settings, and control streaming and recording sessions.you can enter the network IP address of your Monarch HDX device in your browser, or use the Monarch HDX Utils to access the Command Center (see Accessing the Command Center on page 22). Command Center control buttons Each encoder has its own button for starting or stopping sessions. Their appearance changes based on the encoding mode you select for that encoder. The top button is for Encoder 1, and the bottom button is for Encoder 2 (see Monarch HDX encoding modes on page 33). You can also control the Monarch HDX by using the encoder buttons on the Monarch HDX device. For more information, see Chapter 2, Matrox Monarch HDX Hardware and Connections. The following table details the different states of the control buttons. Stream Record Disabled Button Function This button indicates that an encoder is set to stream (but not which streaming mode). Click this button to start streaming the input source. If controlling multiple Monarch HDX devices, those devices set to stream will begin to stream their input sources as well. This pulsing button indicates that an encoder is currently streaming. Click this button to stop streaming. If controlling multiple Monarch HDX devices, those devices set to stream will stop streaming as well. Click this button to start recording the input source. If controlling multiple Monarch HDX devices, those devices will begin to record their input sources as well. This pulsing button indicates that an encoder is currently recording its input source. Click this button to stop recording. If controlling multiple Monarch HDX devices, those devices will stop recording their input source as well. Although not a button, this is the placeholder of a disabled encoder s control button. This is only seen when no encoding mode (None) is selected on the Encoder Settings page. Chapter 4, Using the Command Center

28 27 Link Button Function This button links both encoder buttons. Operating as a single button, pressing it starts or stops the sessions (streaming or recording) of active encoders (one or both). Status page The Status page in the Command Center provides a summary of the Monarch HDX status and settings, as well as any logged errors. You can view this page without logging in. To access the Status page, open the Monarch HDX Command Center (see Accessing the Command Center on page 22), and then click Status. Previewing the input Click Show preview to display a real-time preview of what you are streaming or recording. The preview is independent of your primary encoding channels. Important QuickTime 7 must be installed on the connected computer for preview to work (see Apple.com or Microsoft.com for download). The Show preview button launches or hides the viewing window. What you see and hear in the viewing window depends on your input source. The preview stream can also be accessed by a third party device using the address on the Status page. Tip If you have trouble viewing the preview stream, try setting QuickTime's streaming transport protocol to UDP mode. Status page
29 28 Note The Show preview option is enabled by default, but you can disable it from the Control tab on the Device page. Preview window limitations To ensure the highest quality delivery of streaming and/or recording processes, the preview may be unavailable when the encoders are set to operate at specific settings. In these cases, the Show preview button is still clickable, but only a blank preview display and an error message appears. The following are the settings at which a preview will not be available: Encoder 1 Encoder p, 60/50 fps None None p, 60/50 fps Both at p, 30/25 fps with one encoder Streaming in RTMP mode Both encoders in use with at least one encoder at p, 60/50 fps Monarch HDX errors The Warning LED illuminates on the Monarch HDX device when an error occurs. Unless you receive a pop-up error when using th e buttons in the Device page's Control tab (see Control tab on page 44), the error will display in the Messages section on the Status page (see Status page on page 27). Note The Status page displays the errors pertaining to that Monarch HDX device only. To monitor device function when controlling multiple devices (see Enabling multi-device control on page 45), we recommend that you open the Command Center for each Monarch HDX device. When you click the Clear messages button on the Status page, the logged errors are deleted from the list and the Warning LED will turn off if it is not a fan or temperature-related error (see Fan and Temperature errors ). Note An error will not be reported if the audio connected to Monarch HDX's analog audio input is lost or missing. If this occurs, the stream and/or recording continues, but will not contain audio. Chapter 4, Using the Command Center
30 29 Streaming and recording errors Streaming and recording errors that don't appear as a pop up error on the Control tab are instantly logged in the Messages section of the Status page. Clicking the Clear messages button on the Status page deletes the logged error from the list and the Warning LED turns off (see Status page on page 27). The Warning LED will also turn off if you successfully start a new stream and/or recording. Note Powering off or resetting Monarch HDX will clear streaming and recording errors from the device. Fan and Temperature errors The fan is located under the device, and a constant readout of both the fan and the temperature statuses appear above the Messages section of the Status page. A fan or temperature error will be indicated in this area as well. No fan or temperature-related error message will be shown in the Messages section (see Status page on page 27). Important This error won't stop the device; however, we recommend that you address the issue as soon as possible. The display reads Normal for the fan and temperature when the fan is operating without a problem. If a fan and/or temperature error occurs, the status will change to Faulty and/or Critical. The error status will remain as long as a problem is detected and has not been resolved. The Warning LED will turn off when the condition is corrected, and the Status page will automatically update the fan/temperature status back to Normal. The temperature may come down on its own over time, and so the Warning LED will turn off and the fan and temperature statuses will return to Normal; however, the Warning LED will light up again and the error status will display if/when the temperature rises once more. The fan operates as an uptake under the device. For good fan operation, ensure that the device is not placed on top of paper, and that it used in an area with adequate air circulation. If a fan or temperature error occurs: Check that the fan is spinning and is unobstructed. Verify that the area has suitable sufficient ventilation and that the ambient temperature has not risen. Status page
31 30 Input Settings The Input Settings page in the Command Center lets you set the video and audio input sources used for streaming and recording.when controlling multiple devices, each device on the network streams and records the video and audio based on its individual settings. Important To save changes made on the Input Settings page, you must click the Apply button. If you leave the Input Settings page before applying the settings, all changes will be lost. To access the video and audio settings, open the Monarch HDX Command Center (see Accessing the Command Center on page 22), and then choose Input Settings. Video Input Settings Monarch HDX has two selectable video input settings in the Input Type drop-down list on the Input Settings page: HDMI and SDI. Inputs for both formats are on the back of the device, and only one can be the source for streaming and recording at a time. You can switch between inputs from the Command Center or by using the control button; however, only after a streaming or recording session has been stopped. If you attempt to switch the inputs while encoding, the encoder will stop, and will have to be restarted to encode from the new input. Audio Input Settings On the Input Settings page, you can set the audio sample rate, the source for your audio source, and even choose to mute the audio. Audio Source You can select either Analog or Digital (embedded) as the audio input source to be used for streaming/recording. Chapter 4, Using the Command Center
32 31 Remarks Monarch HDX supports two audio channels for streaming and recording, and whether you are using an SDI or HDMI source, only the first two channels are selected by the device for encoding (see Video/audio inputs and outputs on page 9). The number of available audio channels per input source can be found in the following table: HDMI out SDI out Analog out HDMI in (8) SDI in (16) Analog in (2) The embedded audio from an SDI source is only available when SDI video is selected, and the embedded audio from an HDMI source is only available when HDMI video is selected. Note For more information, see Video/audio inputs and outputs on page 9). Monarch HDX uses the AAC audio format for streaming and recording. To monitor the selected audio source, you can use any of the audio outputs (SDI, HDMI or analog). Audio Sample Rate You can select the desired sample rate for either your digital or analog audio input source. Remarks Both digital (HDMI or SDI) and analog audio can be sampled, or re-sampled at the embedded rates of 22.05, 24, 32, 44.1 and 48 khz. The analog audio input is converted to the selected sample rate before encoding. Selecting the highest sample rate provides the best audio quality, but also increases the total bit rate required to maintain this quality for streaming and/or recording. For information on audio bit rate, see Audio Codec Settings on page 33. Mute audio Mute audio lets you mute the audio at any time while streaming or recording, without interrupting your session. Selecting Mute audio disables all audio. Input Settings

33 32 Note You can also choose to not include the audio when streaming or recording from within the encoder settings, before your session begins (see Include audio on page 36). Encoder Settings The Encoder Settings page in the Command Center lets you set stream and record settings for the Monarch HDX device. Monarch HDX also lets you save profiles and has several presets that can speed up the start of a project, meaning that you do not have to recall every parameter for repeated encoder settings (see Profiles and Presets ). Note If controlling multiple devices, each device on the network operates based on its own stream/record settings (see Enabling multi-device control on page 45). Important To save changes made in the Encoder Settings page, you must click the Apply button. If you leave the Encoder Settings page before applying the settings, all changes will be lost. To access the stream and record settings, open the Monarch HDX Command Center (see Accessing the Command Center on page 22), and then choose Encoder Settings. Profiles Monarch HDX lets you save up to eight profiles that you can load at any time. Profiles apply to both encoders, and contain encoding parameters and destination information detailing where the encoded video and audio is being sent (see Status page on page 27), whether you are recording or streaming. Chapter 4, Using the Command Center
34 33 You can save multiple profiles to the Monarch HDX based on your needs, and saved profiles can be loaded instantly without having to re-enter data. Whether you use preset or custom parameters, you only need to enter them once, and then save them as a unique profile. Loading a profile 1 From the Profile list, select a profile. 2 Click Load. The loaded profile will appear in the Save field. If a change is then made to any of the settings, the Save button will become red, indicating that clicking it will save the new settings over the current profile. Saving a profile 1 Specify your record or streaming settings. 2 From the Profile list, select an empty profile, or a previously saved profile that you want to overwrite. 3 Type a Profile name. 4 Click Save. Audio Codec Settings Select the bit rate at which you want to stream the audio. This setting applies to both the stream and record settings. Depending on the option you select, this setting has an effect on the Audio Input Settings. See Audio Input Settings on page 30 for more information. Monarch HDX encoding modes As the Monarch HDX offers two encoders in a single device, it is a versatile tool that allows a variety of operations, including but not limited to: Streaming to two different locations (maximum average video data rate: 20 Mb/s total). Recording a proxy quality file, while simultaneously recording master quality version (maximum average video data rate: 30 Mb/s). Using one encoder for streaming while the other records at higher quality for VOD downloads. The Monarch HDX has three encoding modes with their own options and capabilities: Record, RTMP (streaming), and RTSP (streaming). Record Record mode saves the source to a USB device, an SD card, or to a network shared folder. Recordings can be done at different bit rates in case you need to deliver content to devices with varying decoding capabilities. Encoder Settings
35 34 When a recording is stopped, it may take a few seconds for Monarch HDX to finalize the file. If recording to a USB device or SD card, the USB/SD card LED continues to flash during the finalization process. To avoid corrupted video files, do not remove the USB device or SD card when its LED is flashing. Monarch HDX provides settings for recording your input source for video on demand (VOD), high-quality editing, and archiving/previewing purposes. Content can be recorded to MOV and MP4 file formats on a FAT32 or NTFS file system. Note If you need to record files exceeding 4 GB, an NTFS drive should be used. For approximate recording file sizes based on the average video data rate and recording duration, and approximate maximum file durations given the average video data rate and available disk space, see Appendix A, Recording file size and duration. RTMP and RTSP streaming There are two types of streaming standards available: RTMP Real-time Messaging Protocol: A popular protocol for transmitting audio, video, and data with Flash media. RTSP Real-time Streaming Protocol: A network control protocol for media servers, controlling media sessions between end points. Having two separate encoders allows you to stream to two different destinations, or have a higher quality stream sent to a single destination. Whether streaming in RTMP or RTSP mode, either encoder can stream up to 10Mb/s, allowing you to simultaneously stream to two destinations, or you can set the device for up to 20Mb/s streaming quality for a single encoding destination; however, to achieve this, you must set the other encoder to None. Note The maximum frame rate for streaming in RTMP mode is 30 fps when both encoders are in use. Presets Monarch HDX is preloaded with several streaming and recording presets that define all the encoding parameters, including resolution and bit rate. A preset automatically sets all encoder settings. Whether streaming or recording, you can also use a preset as a starting point when specifying your encoder settings: Monarch HDX provides standard definition and HQ streaming presets; however, some presets may not be compatible for use with all CDNs. To avoid streaming issues, ensure that a preset s settings, such as video resolution and video data rate, are supported by your CDN. Besides standard definition presets, Monarch HDX provides the following recording preset types: Chapter 4, Using the Command Center
36 35 $ HQ Used for creating recorded files that will be edited for high-quality production. $ Proxy Suitable for creating recorded files at smaller file sizes. This is especially useful when creating files for previewing or archiving, or when recording long-duration content. $ YouTube Used for creating recorded files for delivery to most video on demand (VOD) streaming applications. Use a preset by selecting one from the Preset list. Resolution You can select the stream/record resolution you want by entering values for the width and height. You can also select Use input resolution to stream or record at your input source's original resolution. The Monarch HDX does not support upscaling the resolution or frame rate of the input source (for streaming or recording). Note If you apply the encoder settings before the input is connected, and the actual input resolution is smaller than the resolution you specified in the encoder settings, the Monarch will stream/record at the input resolution since upscaling is not supported. However, the Status page will display the previously selected encoding resolution, and not the actual input resolution. Frame rate The Frame rate drop-down menu lists the available resolution options, based on your source's frame rate. You can choose to stream or record at your input source's frame rate, or at a lower frame rate. The Monarch HDX does not support upscaling the resolution or frame rate of the input source (for streaming or recording). Note The maximum frame rate for streaming in RTMP mode is 30 fps when both encoders are in use. Encoder Settings
37 36 The following table lists the frame rates (in fps) and their associated Command Center selections: Source Frame rate Note Prior to connecting your input source, if you select 60/50 as the frame rate, but your source is only 30, or 25 fps, the Frame rate selection will switch to the source's frame rate (30/25 - see the table above) when the source is connected (24 is the only option for input sources at either or 24 fps). The Status page will display the previously selected encoding frame rate, and not the actual input frame rate. Target video data rate Enter the target video data rate for your recording (average data rate). The default minimum and maximum values (see Minimum and Maximum target video data rates on page 37) are suitable in most instances, however, you can change the minimum and maximum values to suit your needs. When entering an average data rate, the Minimum and Maximum target video data rates are automatically set to 90% and 110% of the target video data rate, respectively. The maximum average video data rate for streaming or recording depends on the encoding mode (see Monarch HDX encoding modes on page 33). Monarch HDX uses a variable data rate when encoding. Include audio You must select Include audio to stream/record the selected audio source (see Audio Source on page 30) along with the video. If you want to change this setting, you must do so before starting a streaming/recording session; otherwise, you will need to stop the session, make the change, and then restart. Chapter 4, Using the Command Center Command Center Selection Encoded Frame rate 60/ or or 60 30/ or 30 15/ or 15 60/ / / or 30 30/ or 30 15/ or / / or or 24
38 37 Monarch HDX uses the AAC audio format for streaming and recording. Advanced settings GOP structure Enter the GOP structure (distance between I frames) to which you want to encode your input source for streaming or recording. Remarks Monarch HDX uses the IP pattern when encoding for streaming. For example, a GOP structure of 10 creates a GOP of IPPPPPPPPPI. Profile Set the H.264 encoder profile for your stream or recording to either Baseline, Main, or High. Typically, the High profile provides the best image quality and is suitable in most instances. However, depending on the decoder used when viewing the stream or the recorded file, such as with mobiles devices, a Main or Baseline profile may be required. Frame slices You can choose to slice each frame into 2, 4, or 8 sections when encoding, or you can select 1 to encode the frame as a whole. Slicing each frame when encoding the video for streaming or recording may be useful when a multi-slice decoder device is used to view the stream or recorded file. Minimum and Maximum target video data rates The Minimum and Maximum video data rates are automatically set to 90% and 110% of whatever you set as the target video data rate. For more information on minimum and maximum video data rates and how they are used with the Target video data rate, see Target video data rate on page 36. Deblocking filter Select this option to remove blockiness from the encoded video when streaming or recording. This option is especially useful when a low video data rate is required (see Target video data rate on page 36). Destination settings (streaming) Monarch HDX provides options for using RTSP and RTMP streaming protocols for use on Adobe Media Servers, Wowza Media Servers, software video players such as QuickTime and VLC, or any of the popular Content Delivery Networks (CDNs), such as YouTube Live and Ustream. In RTSP mode, Monarch HDX acts as a streaming server to which clients can connect via a media server, software video player, or CDN that supports the RTSP streaming protocol. If you want to stream to more than a handful of clients, we recommend using a dedicated media server to send streams to clients. In RTMP mode, Monarch HDX can send stream data to a CDN or media server that supports the RTMP streaming protocol. Encoder Settings
39 38 Using the RTSP streaming protocol 1 Select RTSP mode. 2 Enter a Stream name. 3 Enter the network Port through which the clients will connect. 4 A Stream URL is automatically generated based on your settings. Provide this URL to a client to connect to your Monarch HDX network via a Wowza Media Server, software video player, or CDN that supports the RTSP streaming protocol. 5 (Optional) Enable jumbo frames. Enabling jumbo frames changes the IP packet size of the stream from 1500 bytes to 9216 bytes. This option may improve performance on certain networks; however, not all networks support larger packet sizes. This option is disabled by default. Remarks In RTSP mode, Monarch HDX will only start streaming data to clients once the selected encoder button (on the front panel or in the Command Center) is pushed. The streaming will continue until it is stopped, by pressing the encoder button once more (see Command Center control buttons on page 26). If you get choppy video when streaming to VLC media player, you must enable the Real-time Transport Protocol (RTP) in VLC. Proceed by doing one of the following: $ Windows Open the VLC media player, open Tools > Preferences, and then choose the Input / Codecs tab. In the Network section, select RTP over RTSP (TCP). $ Mac Open the VLC media player, open VLC > Preferences, and then choose the Input / Codecs tab. In the Codecs / Muxers section, select Use RTP over RTSP (TCP). Using the RTMP streaming protocol 1 Select RTMP mode. 2 Click Browse... to load the Server URL and Stream name from an XML file (Wowza Streaming Engine only), or enter the Server URL and Stream name manually in the fields provided. You can only load destination information (server URL and stream name) from an XML file. Encoding information will not be loaded. Clear the Server URL field to remove the XML file. Clear the Stream name field to remove the loaded streaming XML file. Important Please note the following: $ If the stream name, username, or password is included in the stream URL, do not enter the information in the respective text boxes. Chapter 4, Using the Command Center
40 39 $ Streaming XML files are not the same as Monarch HD configuration XML files. 3 If your Flash-based server or CDN uses the ModuleRTMPAuthenticate method for RTMP authentication, a username and password are used for authentication, however, username and password information is not included as part of the stream URL or streaming XML file. In this case, you must enter the stream Username and Password in the text boxes provided. 4 Start streaming the Monarch HDX input source to a CDN or media server. Note The maximum frame rate for streaming in RTMP mode is 30 fps when both encoders are in use. Destination settings (record) Specify the following settings for recording: Media Select the media to which you want to record your input source. You can choose either a USB or SD card slot on the Monarch HDX device, or a network location. For more information on using USB devices or SD cards, including the known limitations of each, see the sections USB ports 1 and 2 on page 7, and SD card on page 8. Save file as The Save file as option allows you to choose the filename format of your recorded files. You can choose from three formats: Filename only Uses your specified filename to identify recorded files (e.g. Basename.mov/mp4). If a recording session results in a file being segmented into multiple files, a three-digit incrementing number (starting at 001) will also be added to the filename from the second file onwards (e.g. Basename001.mov/mp4, Basename002.mov/mp4, etc). The three-digit value is needed to differentiate between the multiple files created by file segmentation. For more information on how file segmentation works, see File Segment Duration on page 41. ³Warning $ If you use this filename format, you must make sure to change the filename before manually starting a new recording, otherwise the old recorded file will be overwritten. A recording is manually started by pressing the appropriate encoder button(s) on the device or by clicking the Record button in the Command Center. $ Do not use the Filename only option if you plan on consolidating your files with the Matrox File Consolidator. Because the filename differs from Encoder Settings
41 40 the second file onwards, the consolidator will not be able to recognize that the segmented files are part of the same recorded sequence. Filename with date/time Uses your specified filename, adds the start date/time of the recording session, and adds a three-digit number that increments when file segmentation occurs (e.g. Basename-[YYYY-MM-DD_HH-MM-SS]-000.mov/mp4). For more information on how file segmentation works, see File Segment Duration on page 41. If file segmentation occurs, each file will have the same date/time in the filename; that is, the start date/time of the first file in the sequence. The three-digit incrementing number is then used to differentiate the files. For example, a recording that is segmented into three (3) files will result in the following: $ MyRecordedFile-[ _ ]-000.mov/mp4 $ MyRecordedFile -[ _ ]-001.mov/mp4 $ MyRecordedFile -[ _ ]-002.mov/mp4 The date/time in the filename only changes when you manually stop a recording and then start a new one, in which case it will be the start date/time of the first file in the new sequence. Filename with numeric counter Uses your specified filename, adds a two-digit number that increments when you manually stop/start the recording, and adds a three-digit number that increments when file segmentation occurs (e.g. Basename00000.mov/mp4). For more information on how file segmentation works, see File Segment Duration on page 41. The two-digit number increments with each manual stop/start of the recording, up to 99 times, after which it resets to 00. As with date/time, this number does not increment with file segmentation. For example, if you have three (3) files that you created by manually starting and stopping the recording session, it will result in the following: $ MyRecordedFile00000.mov/mp4 $ MyRecordedFile01000.mov/mp4 $ MyRecordedFile02000.mov/mp4 The three-digit number increments when file segmentation occurs. For example, a recording that is segmented into three (3) files could look as follows: $ MyRecordedFile00000.mov/mp4 $ MyRecordedFile00001.mov/mp4 Chapter 4, Using the Command Center
42 41 $ MyRecordedFile00002.mov/mp4 Another example would be if you have multiple files created by manual stop/start, and only the third file is segmented into two additional files. That would look as follows: $ MyRecordedFile00000.mov/mp4 $ MyRecordedFile01000.mov/mp4 $ MyRecordedFile02000.mov/mp4 $ MyRecordedFile02001.mov/mp4 $ MyRecordedFile02002.mov/mp4 Important Blank spaces are not supported in the base name. Use underscores in place of blank spaces. For example, enter Recording1_Stage1 instead of Recording1 Stage1 as the base name for the file. Maximum recording duration Enter a duration to set an overall time limit for your recording session. The session will automatically end when this limit is reached, or when the selected storage media is full (whichever occurs first). If you enter a value of 0, the recording session will continue indefinitely until manually stopped; otherwise, it will stop only when your storage media is full. This setting represents your desired recording length. The actual length is determined by the size of your storage device. Note The number of files created at the end of the session is dependent on the overall length of your recording session and whether or not you have entered a value in the File Segment Duration fields (see File Segment Duration for more information). Assuming the storage media has enough space, an entry in the Maximum file duration field will result in the Monarch HDX creating multiple recording files when: You have entered a maximum recording duration longer than 4 hours and 50 minutes. You have entered a file segment duration of 0, and your recording lasts longer than 4 hours and 50 minutes. You have entered a file segment duration longer than 1 minute. File Segment Duration If you enter a duration in the File Segment Duration fields (hr and/or min), at the specified interval, the Monarch HDX will create a new file, splitting your recording session over multiple files. For example, if you enter a duration of 30 minutes, Monarch HDX will close the current file and start recording to a new file every 30 minutes. Encoder Settings
43 42 The maximum file segment duration you can set is 4 hours and 50 minutes. If you leave the setting at the default duration of 0, the Monarch HDX will automatically switch to a new file every 4 hours and 50 minutes. The size of the created files (in approximated MBs) is displayed next to the duration. The file size adjusts depending on the video data rates you set in the encoding options (see Target video data rate on page 36). Important Please note the following: On FAT32 storage media, file segmenting will occur automatically after 4 GB. Because FAT32 limits the recording file size to 4 GB, you must use an NTFS drive if your recording file will be greater than 4 GB. File type Select the type of file that will be recorded. You can create either an MOV or MP4 file. Path and filename Specify the destination and filename for your recording based on your recording destination. When specifying the path, all folders in the path must already exist. Monarch HDX will not create new folders. Important Blank spaces are not supported in the base name. Use underscores in place of blank spaces. For example, enter Recording1_Stage1 instead of Recording1 Stage1 as the base name for the file. USB or SD card When recording to a USB device or SD card, enter the folder(s) on the recording device to which you want to record, if applicable, followed by the base name. For example, if you want to name your file Recording1, and save the file in a folder named Files that is contained within another folder named Project on the root directory, enter Project/Files/Recording1. If you want to save the file in the media device's root directory, enter Recording1. Network Use this option to record your input source to a shared folder on the network. The method for entering the path and filename depends on the operating system of the computer that contains the shared folder. Note For more information on supported operating systems, see Supported operating systems and web browsers on page 2. $ Windows When recording to a shared folder that is on a Windows system on the network, you must enter the IP address of the location on the network to which you want to record, followed by the shared folder name, and then the base name for the file in the following format: //IP address/shared folder name/basename Chapter 4, Using the Command Center
44 43 For example, if you want to name your file Recording1, and save the file to a shared folder named Files that is located on a network computer with an IP address of , enter // /Files/Recording1. Important If the network destination has a firewall, it must be disabled in order to record to the network location. $ Mac OS X Yosemite When recording to a shared folder that is on a Mac OS X Yosemite system on the network, the folder to which you want to save the file must be shared using the Network File System (NFS) file-sharing protocol (see Appendix B, Sharing a Mac OS X folder using NFS protocol ). Important Shared folders that use a file-sharing protocol other than NFS are not supported with Monarch HDX for recording. When entering the path and filename, you must enter the IP address of the location on the network to which you want to record, followed by the full path to the shared folder from the root directory, and then the base name for the file in the following format: //IP address:/full path to shared folder/basename For example, if you want to name your file Recording1 and save the file to a shared folder named Files that is located on the Desktop under Matrox in the Users root directory folder on a network computer with an IP address of , enter the following: // :/Users/Matrox/Desktop/Files/Recording1 Tip You can obtain the full path to the shared folder by right-clicking the folder, and then clicking Get Info. Domain, Username, and Password When recording your source input to a network location (see Media on page 39) and Monarch HDX is not on the same domain as the network, enter the network domain. If required, also enter the Username and Password that is used to access the network. Device page The Device page is where you access various settings related to all aspects of the Monarch HDX and its operation. You access these settings by clicking the tabs at the top of the Device page. A username and password are required to access the options and features of the Device page. Device page
45 44 Control tab The Control tab lets you control the streaming and recording for your Monarch HDX device, and up to four other Monarch HDX devices connected on the same network. You can also use the encoder buttons on a Monarch HDX device to stream and record for that device, but you cannot control other devices with the encoder buttons. For more information, see Encoder buttons (ENCD 1 and ENCD 2) on page 7. To access the Control tab, open the Monarch HDX Command Center (see Accessing the Command Center on page 22), and then click Control. Disabling the front panel buttons on the Monarch HDX device You can disable the encoder control buttons on the Monarch HDX device to prevent someone from inadvertently switching inputs or stopping a streaming or recording session. This option only applies to the Monarch HDX you are connected to, and not other Monarch HDX devices you may be controlling. To disable the encoder buttons: 1 In the Command Center, click Device > Control. For more information, see Accessing the Command Center on page Select Disable front panel buttons on this Monarch HDX device. The input select and encoder buttons on the Monarch HDX device are disabled. Note This button disable feature is off by default and, when required, would also need to be performed after a factory reset. Disabling the preview When the Monarch HDX is idle and you do not want to display what the camera/input is sending the device, you can disable the preview of what will be captured or streamed by selecting Disable preview stream (see Previewing the input on page 27 for more information). Chapter 4, Using the Command Center
46 45 Enabling multi-device control Monarch HDX allows you to start and stop the streaming and recording for itself and four other Monarch devices on the network at the same time. Each device streams and records the input source connected to its HDMI input based on its own stream and record settings. To control multiple devices, you must use the control buttons (see Command Center control buttons on page 26) in the Command Center instead of the encoder buttons located on a Monarch HDX device, which control the streaming and recording for that device only. You can control multiple Monarch HDX devices from any of the devices on the network. When enabling the control of multiple devices in a device s Command Center, that device becomes the primary device and the devices being controlled become secondary devices. The control buttons in the Command Center of the primary device can then be used to control the other devices on the network. You can have more than one primary device on the network, with each primary device controlling its secondary devices. For example, if you have three Monarch HDX devices on the network, you can set device one to control devices two and three, and you can also set device two to control devices one and three. To enable multi-device control: 1 In the Command Center, click Device > Control. 2 Select Enable multiple Monarch HDX device control. 3 For each Monarch HDX device that you want to control, enter the network IP address of the device. Click Scan after entering the IP address to verify if the device can be found on the network. Activate or deactivate the control for a Monarch HDX device by selecting or clearing the device s Active box. Account tab The Account tab in the Command Center is where you give a descriptive name to your Monarch HDX device and change your Monarch HDX password.to access the Account tab, open the Monarch HDX Command Center, and then choose Device > Account. Device page
47 46 Device name and password By default, the device name is set to Monarch HDX. You can give a unique name to each Monarch HDX device for easy identification within the Command Center and the Matrox Monarch HDX Utils (see Monarch HDX Utils application on page 18). This is especially useful when you have multiple Monarch HDX devices on the same network. To change the name of your Monarch HDX, type the desired name in the Device name box, and then click Change. By default, the Monarch HDX username and password are set to admin. The device username cannot be changed, however, we do suggest that you change the device password. To change the Monarch HDX password, enter the current and new passwords, and then click Change. For information on resetting the password to factory default, see Reset to factory defaults on page 13. Automatic Configuration The Automatic Configuration tab in the Command Center is where you can export the current Monarch HDX settings to an XML file (called the Monarch HDX configuration file), import settings from a previously-created configuration file, or import settings from the same XML file hosted on a web page. When you have a Monarch HDX configuration file, you can copy it to a USB device, connect the device to USB port 2, and then perform a factory reset to automatically load the settings. For more information on performing a factory reset, see Network connection and IP address on page 18. The option to boot up Monarch HDX with all settings loading automatically from a USB device, or loading settings from a web page at device reboot, allows you to deploy other Monarch devices without logging in to the Command Center. Chapter 4, Using the Command Center

48 47 Accessing the Automatic Configuration tab To access the Automatic Configuration tab, open the Monarch HDX Command Center (see Accessing the Command Center on page 22), and then choose Device > Automatic Configuration. Loading settings from a Monarch HDX configuration file You can import settings from a previously-generated Monarch HDX configuration file. The file must be located on your computer or somewhere that is accessible from your computer (see Generating a configuration file on page 48). 1 Go to the Automatic Configuration tab of the Command Center. 2 Under Load settings from a Monarch HDX configuration file, click Browse. 3 Select the file you want to load. 4 Click Load. Your Monarch HDX settings will now match those of the chosen configuration file. Loading settings from a web page You can import Monarch settings from a specific web page that is hosting the configuration file generated in the Command Center (see Generating a configuration file on page 48). This option is particularly useful when there is a need to oversee the Monarch HDX operation from a central control environment. You can set bit rates and destinations by managing a web page instead of logging into the Monarch HDX Command Center. Device page
49 48 1 Go to the Automatic Configuration tab of the Command Center. 2 In the Load settings from a web page field, type the URL address of a page hosting the configuration parameters. 3 Click Load. 4 (Optional) Select Load settings at device reboot if you want to have your Monarch HDX automatically load the settings from the specified URL the next time it boots up. Your settings will now match those of the chosen configuration file. Note With Load settings at device reboot selected, you only need to reboot/reset your Monarch HDX and it checks the specified URL for updated settings. Generating a configuration file You can export your current settings as a Monarch HDX configuration file, which you can then save to your computer, to a USB device connected to your computer, or to a network drive. You can then use the configuration file to configure other Monarch HDX devices. Note You cannot save to a USB device connected to the Monarch HDX. 1 Go to the Automatic Configuration tab of the Command Center. 2 Under Export current settings to a Monarch HDX configuration file, click Generate file. 3 Select a save location. Do not change the filename (MonarchHDXSettings.xml) if you plan to automatically configure a Monarch from a USB device (see Automatically importing Monarch settings on factory reset ). The Monarch HDX configuration file is created, and contains all the Monarch settings as XML parameters. Automatically importing Monarch settings on factory reset On factory reset, the Monarch HDX can automatically import configuration settings from a Monarch HDX configuration file that is on a USB device connected to the USB port 2. 1 Copy the Monarch HDX configuration file to a USB device (see Generating a configuration file ). Note The configuration file must have the original filename, given by the Monarch HDX when the file was generated (MonarchHDXSettings.xml). 2 Connect the USB device to the Monarch HDX's USB port 2 (see USB ports 1 and 2 on page 7). Chapter 4, Using the Command Center

50 49 3 Perform a factory reset by pressing and holding the Reset button on the device for at least five seconds (see Reset to factory defaults on page 13). The Monarch HDX boots up with your settings loaded. Note For more information on Monarch configuration files, including generating or editing configuration files, consult the Matrox Monarch HDX Dev Tools Reference Guide, which is provided in PDF format in the Matrox Monarch HDX Support section of our website at IP Setup tab The IP Setup tab in the Command Center lets you switch the Monarch HDX IP mode between DHCP and Static. By default, Monarch HDX is set to DHCP mode. Important Changing the IP mode will end the current Command Center session. To access the Monarch HDX Command Center again via IP address, you will need to enter a different Monarch HDX IP address in your browser s address field. If switching to Static mode, you may also be required to change your computer s network configuration. For information on obtaining the Monarch HDX IP address and accessing the Command Center in DHCP or Static mode, see Chapter 3, Network Connection and Setup. To access the IP Setup tab, open the Monarch HDX Command Center, and then choose Device > IP Setup. Device page
51 50 Setting the IP mode to DHCP Set Monarch HDX to DHCP IP mode when connecting to a network with a DHCP server, such as through a router. 1 Select DHCP. 2 Click Apply. Tip See Network connection and IP address on page 18 for instructions on how to connect Monarch HDX to a network with a DHCP server, and how to acquire the Monarch HDX network IP address to access the Command Center. Setting the IP mode to Static Set Monarch HDX to Static IP mode when connecting to a network without a DHCP server. 1 Select Static. 2 Enter a static IP address for your Monarch HDX. Unless you change this address, the default static IP address will be used ( ). If you reset the device in Static IP mode (see Switch to Static IP mode on page 13), the static IP address reverts to default. Note When connecting multiple Monarch HDX devices on the same network, each Monarch HDX device must have a unique network IP address. 3 Enter the Subnet mask on your network to which Monarch HDX is connected. By default, the subnet mask is set to Enter the Gateway IP address and DNS server. 5 Click Apply. Tip See Chapter 3, Network Connection and Setup for instructions on how to connect Monarch HDX to a network without a DHCP server, how to change your computer s network configuration to establish a connection between your computer and the Monarch HDX device, and how to access the Command Center. Preventing Monarch HDX from appearing as a UPnP device on the network The Monarch HDX uses the Simple Service Discovery Protocol (SSDP) to broadcast itself as a Universal Plug and Play (UPnP) device. This means that it will appear in Windows Explorer (not visible in Mac OS) as if it were a printer, external hard drive, or similar UPnP device. This feature is enabled by default, and makes it easier to find the Monarch HDX on a network if you do not know the device IP address. However, for security reasons you may not want the Monarch HDX to appear on your network for anyone to see. If so, you can disable SSDP to prevent the Monarch HDX from appearing as a UPnP device. Chapter 4, Using the Command Center

52 51 To prevent the Monarch HDX from appearing: 1 Access the Monarch HDX Command Center (see Accessing the Command Center on page 22). 2 Choose Device > IP Setup. 3 Clear Display this Monarch HDX on the network as a UPnP device. 4 Click Apply. The Monarch HDX will no longer be visible in Windows Explorer as a UPnP device. You may need to restart Windows Explorer for Monarch HDX to no longer appear on the network. Note By using this option, this Monarch device will not automatically appear on the Monarch HDX Utils list of connected devices. You must use the Find All button for the Monarch HDX to appear. Date and Time tab The Date and Time tab in the Command Center lets you set the date and time for your Monarch HDX device. The date and time are used in the naming of the recorded files (see Path and filename on page 42). To access the Date and Time tab, open the Monarch HDX Command Center, and then choose Device > Date and Time. Setting the device date and time You can set the date and time manually or automatically by using an NTP server. Important To save changes made in the Date and Time tab, you must click the Apply button. A Monarch HDX hardware reboot is required to apply the changes. If you leave the Date and Time tab before clicking Apply, all changes will be lost. Device page
53 52 Manually 1 Select Manual. 2 Set the Time, and enter a Date in the format DD/MM/YYYY, or click to select a date from the calendar. 3 Click Apply. You ll be notified that Monarch HDX will be rebooted in order to apply the changes. Automatically* 1 Select Automatic. 2 Enter a local or public NTP server address. The default NTP server address is time.nrc.ca. 3 Select a Time zone from the list. The current date and time associated with the selected NTP server and time zone are displayed next to Current date and time. 4 Click Apply. You ll be notified that Monarch HDX will be rebooted in order to apply the changes. *Setting the date and time automatically requires a local or public NTP server address. An Internet connection is required to use a public NTP server. About tab The About tab in the Command Center lets you see the serial number and current firmware version of your Monarch HDX device, provides a link to the latest Monarch HDX documentation (an Internet connection is required), and displays the Matrox Limited Warranty for Monarch HDX. Note To update the Monarch HDX firmware, see Updating the Monarch HDX firmware on page 22. To access the About tab, open the Monarch HDX Command Center, and then choose Device > About. Chapter 4, Using the Command Center

54 53 Device page
55 A Recording file size and duration This appendix contains tables of approximated recording file sizes and recording lengths.
56 56 Recording file sizes and duration The following tables list the approximate recording file size based on the average video data rate and recording duration, and the approximate maximum recording duration given the average video data rate and available disk space. Note Unless a specific recording duration limit was set in the record settings, Monarch HDX limits the duration of each recording to 4 hours and 50 minutes. The recording will automatically stop when the duration limit is reached. Recording Duration Approximate file size Average Video Data Rate (kb/s) min 18.8 MB 75 MB 188 MB 563 MB 938 MB 30 min MB 450 MB 1.1 GB 3.4 GB 5.6 GB 60 min 225 MB 900 MB 2.3 GB 6.8 GB 11.3 GB 3 hrs 675 MB 2.7 GB 6.8 GB 20.3 GB 33.8 GB 4 hrs 50 min 1.1 GB 4.5 GB 11.3 GB 33.8 GB 56.3 GB Approximate maximum recording duration Disk Space Average Video Data Rate (kb/s) GB 17.8 hrs 4.4 hrs 107 min 36 min 21 min 16 GB 71.1 hrs 17.8 hrs 7.1 hrs 2.4 hrs 85 min 32 GB hrs 35.6 hrs 14.2 hrs 4.7 hrs 2.8 hrs 64 GB hrs 71.1 hrs 28.4 hrs 9.5 hrs 5.7 hrs 256 GB 1138 hrs hrs 114 hrs 38 hrs 22.8 hrs 1 TB hrs hrs hrs hrs 89 hrs Appendix A, Recording file size and duration
57 B Sharing a Mac OS X folder using NFS protocol This appendix provides instructions for sharing Mac OS X Yosemite folders using NFS protocol.
58 58 Introduction To record to a shared folder that is on a Mac OS X Yosemite system on the network (see Destination settings (record) on page 39), the folder must be shared using the Network File System (NFS) file-sharing protocol as explained below. Note To share a folder using the NFS protocol, the full path to the folder that you want to share is required. You can obtain the full path to the folder by right-clicking the folder, and then clicking Get Info. Folder sharing with a Mac OS X Yosemite system 1 On the computer that contains the folder that you want to share, make sure that you're logged in as an administrator and that your user account has a password. User accounts that do not have a password cannot be used to share a file using the NFS protocol. 2 In the Finder menu, choose File > New Finder Window. 3 In the Applications folder, click the Utilities folder, and then click Terminal. 4 In the Terminal window, type the following command, where Path is the full path to the folder that you want to share: echo /Path -mapall=$(logname) sudo tee /etc/exports For example, to share a folder named Files that is located on the Desktop under Matrox in the Users root directory folder, type the following command: echo /Users/Matrox/Desktop/Files -mapall=$(logname) sudo tee /etc/exports For added security, you can restrict write access to the folder to one device by adding the IP address of the Monarch HDX that you want to use to write to the folder. For example, if the IP address of the Monarch HDX device is , type the following command: echo /Users/Matrox/Desktop/Files mapall=$(logname) sudo tee /etc/exports 5 Press ENTER. 6 Type your user account password, and then press ENTER. 7 Type the following command: Appendix B, Sharing a Mac OS X folder using NFS protocol
59 59 sudo nfsd restart 8 Press ENTER. 9 Close the Terminal window. Folder sharing with a Mac OS X Yosemite system
60 C Matrox Monarch HDX Specifications This appendix provides specifications for the Monarch HDX hardware.
61 62 General Regulatory compliance $ EMC: FCC Class A, CE Mark Class A, ACMA C-Tick Mark $ RoHS Directive 2011/65/EU Weight $ 0.6 kg Power $ Input: 9-24 VDC $ Connector: DIN4 $ Total power consumption: Watts (42 max) Power Supply $ Line voltage: VAC $ Frequency: Hz $ Input connector: IEC320-C8 $ Output connector: DIN4 Locking power $ Output: 12VDC (42 W) International Adapter $ US/UK $ European Connections HDMI input $ Supported video input formats (auto-detected): p at 23.98/24/25/29.97/30/50/59.94/60 fps i at 25/29.97 fps p at 50/59.94/60 fps p at 50 fps p at fps $ HDMI YCbCr 4:2:2 / RGB $ HDMI embedded audio, 2-channel $ HDCP not supported $ Standard Type A HDMI connector (19 pins) HDMI output HDMI YCbCr 4:2:2 / RGB HDMI embedded audio, 2-channel Appendix C, Matrox Monarch HDX Specifications
62 63 Standard Type A HDMI connector (19 pins) SDI input $ Supported video input formats (auto-detected): p at 23.98/24/25/29.97/30/50/59.94/60 fps i at 25/29.97 fps p at 50/59.94/60 fps i at 25 fps i at fps $ 8-channel (16 passthrough), 24-bit SDI embedded audio, 48 khz sample rate, synchronous $ SDI compliant with SMPTE 259M/292M/424M(Level A)/425M $ BNC connector (75 Ω), terminated $ Full audio and VANC preservation $ Passthrough of video input signal (SDI or HDMI) and up to 16 channels of audio $ Automatic video relay bypass SDI output $ SDI compliant with SMPTE 259M/292M/424M(Level A)/425M $ 8-channel (16 passthrough), 24-bit SDI embedded audio, 48 khz sample rate, synchronous $ BNC connector (75 Ω) Unbalanced analog audio input $ 1x stereo pair $ 3.5 mm (1/8") stereo jack $ Input impedance: Hi-Z Unbalanced analog audio output $ 1x stereo pair $ 3.5 mm (1/8") stereo jack $ Output impedance: 25 Ω $ THD+N at 1 khz, 10 kω, nominal level: < 0.05% $ Frequency response: 20 Hz to 20 khz +/- 1 db $ Channel separation, nominal level: -85 db $ Signal-to-noise ratio: -88 db Data ports $ 2 x 2.0 USB ports General

63 64 $ 1 x auto-sensing 10/100/1000 Base-T Ethernet J-45 port $ 1 x SD/SDHC card slot. Environmental specifications Minimum/maximum room operating temperature: 0 to 40º C Minimum/maximum storage temperature: 20 to 60º C Maximum altitude for operation: 3,000 meters Maximum altitude for transport: 12,000 meters Operating humidity: 20 to 80% relative humidity (non-condensing) Storage humidity: 5 to 95% relative humidity (non-condensing) Dimensions The dimensions for the Monarch HDX are as follows. Top Appendix C, Matrox Monarch HDX Specifications

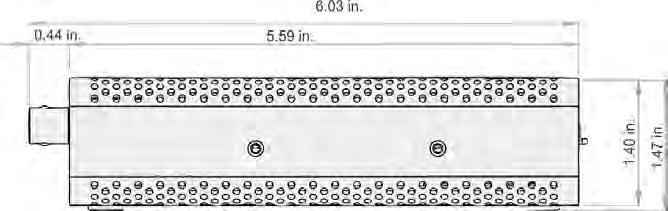
64 Front 65 Side Dimensions
H.264 VIDEO STREAMING SERVER NVS-30 Instruction Manual
 H.264 VIDEO STREAMING SERVER NVS-30 Instruction Manual Table of Contents FCC COMPLIANCE STATEMENT... 4 WARNINGS AND PRECAUTIONS... 4 WARRANTY... 5 STANDARD WARRANTY... 5 THREE YEAR WARRANTY... 6 DISPOSAL...
Legaltek Monarch HDX Technical Specifications
 Legaltek Monarch HDX Technical Specifications Inputs and Outputs Supported HDMI Video Input HDMI Video Output Supported SDI Video Input Progressive 1920x1080 @ 60/59.94/50/30/29.97/25/24/23.98 Frames per
GoStream Mini 100 GSM 100
 GoStream Mini 100 GSM 100 User Guide V3 1/10/2017 1 P a g e Contents 1. GSM 100 Overview... 3 2. IP Finder... 4 3. Responsive Bootstrap... 5 4. GSM 100 Log in... 5 5. Network Setup... 6 6. Stream Server...
SC601. User Guide V *EARLY VERSION 0.99* JMC Systems Engineering AB
 SC601 User Guide V5. *EARLY VERSION 0.99* 2016.09.09 JMC Systems Engineering AB www.jmc.se +46-8-82 82 70 Index SC601 Overview... 3 1.IP Finder... 4 2.Responsive Bootstrap... 6 3.Login SC601 Web Server...
Videon Product Manual. Shavano Encoder
 Videon Product Manual Shavano Encoder Copyright 2018 Videon Central, Inc. All rights reserved. No part of this publication may be reproduced, distributed, or transmitted in any form or by any means, including
Videon Product Manual
 Videon Product Manual Greylock and Sorona Encoders/Decoders Document Number 10004134-R06 Copyright 2018 Videon Central, Inc. All rights reserved. No part of this publication may be reproduced, distributed,
LS-300 Media Station
 LS-300 Media Station User Manual English AREC Inc. All Rights Reserved 2017. l All information contained in this document is Proprietary Table of Contents Introduction Specifications Package Contents Product
Web and Social Media Broadcasting
 Stream at 2. 720p25 Stream at 1080p25 Web and Social Media Broadcasting Live Streaming to your social media platform Live Streaming to your own website Event producers can add Monarch HDX to their existing
Stream and Record Lectures
 VOD Download Live Streaming Remote Student Stream and Record Lectures Remote Student Central Media Library VOD 10 Mbps MP4/MOV 3 Mbps Streaming Wowza or Adobe Flash Live Streaming Servers Educational facilities
Voice Cable Modem User Manual
 User Manual Model CM500V September 2017 202-11792-01 350 E. Plumeria Drive San Jose, CA 95134 USA Support Thank you for purchasing this NETGEAR product. You can visit www.netgear.com/support to register
Quick Install Guide. Model: PLC-223W, PLC-233W
 Quick Install Guide Model: PLC-223W, PLC-233W This installation guide provides basic instructions for installing the PLC-213W/ PLC-223W/PLC-233W indoor wireless IP camera on your network. By following
Table of Contents. Encoder to Decoder... Audio & Antenna Connections... Encoder to Software Decoder... Encoder to Internet...
 Table of Contents Introduction... 4 Video Manual... 5 Mounting Options... 6 Power Connection... 7 Encoder & Decoder LEDs... 8 Audio & Antenna Connections... 8 Encoder to Software Decoder... 9 Encoder to
HELO H.264 Streaming and Recording Encoder
 HELO H.264 Streaming and Recording Encoder Installation and Operation Guide Version 2.0r2 Published January 29, 2018 Notices Trademarks AJA and Because it matters. are registered trademarks of AJA Video
Voice Cable Modem User Manual
 User Manual Model CM1150V July 2018 202-11879-01 350 E. Plumeria Drive San Jose, CA 95134 USA Support Thank you for purchasing this NETGEAR product. You can visit www.netgear.com/support to register your
8-Port Gigabit Ethernet Smart Managed Plus Switch with Integrated Cable Management User Manual
 8-Port Gigabit Ethernet Smart Managed Plus Switch with Integrated Cable Management User Manual Model GS908E November 2017 202-11807-02 350 E. Plumeria Drive San Jose, CA 95134 USA Support Thank you for
DVS-200 Configuration Guide
 DVS-200 Configuration Guide Contents Web UI Overview... 2 Creating a live channel... 2 Inputs... 3 Outputs... 6 Access Control... 7 Recording... 7 Managing recordings... 9 General... 10 Transcoding and
8-Port Gigabit Ethernet Smart Managed Plus Switch with Integrated Cable Management User Manual
 8-Port Gigabit Ethernet Smart Managed Plus Switch with Integrated Cable Management User Manual Model GS908E December 2017 202-11807-03 350 E. Plumeria Drive San Jose, CA 95134 USA Support Thank you for
Steady green On hook. Slow flashing green Off hook. Off Port not ready. Off No link. Fast flashing green Upgrading firmware.
 Product Features Product Features Top Panel Feature Description Steady green On hook. Phone Phone 2 Slow flashing green Off hook. Off Port not ready. Flashing green Transmitting or receiving data through
Discover Video. Mantis Encoder. User Guide. Version 1.2. Discover Video LLC 10/7/2016
 Discover Video User Guide Version 1.2 10/7/2016 Discover Video LLC www.discovervideo.com Contents General Description...3 Installation...4 Find IP Address...5 Configuration...5 Setting...5 Record...8 Status...9
1. Press "Speed Test" to find out your actual uplink and downlink speed.
 ASRock G10 Gaming Router 6.4 QoS Settings QoS Add Gaming Boost web page. Gaming Boost: Enable or disable the Gaming Boost. Bandwidth The router supports Gaming Boost natively, which identifies and intelligently
STUDIO NDI THE WORLD S BEST NDI ENCODER AND DECODER.
 THE WORLD S BEST NDI ENCODER AND DECODER. USER GUIDE NOVEMBER 2018 WELCOME TO THE FUTURE. USER GUIDE OCTOBER 2018 4. GETTING TO KNOW Physical connectors Powering Studio NDI PoE (Power over Ethernet) DC/D-Tap
Wireless Network Video Recorder
 LD2R/LD2R500 Wireless Network Video Recorder User Guide Version 1.0 PREFACE Thank you for purchasing the Wireless Network Video Recorder, an IP based device that installed on your network, which can be
IpAlarm Module Set Up VirtuAlarm model
 Page 1 IpAlarm Module Set Up VirtuAlarm model Note: This device is shipped configured for Ethernet connectivity. To use in this mode, connect the BLUE Jack (marked WAN) to your router and wait at least
FULL METAL PLAYER (update 2017/11/24)
") FULL METAL PLAYER (update 2017/11/24) Starting Connect the power supply included in the box to the 5V/3A power plug on the right of the rear panel. Connect the SSTP ethernet cable to the LAN connector
FULL METAL PLAYER (update 2017/11/24) Starting Connect the power supply included in the box to the 5V/3A power plug on the right of the rear panel. Connect the SSTP ethernet cable to the LAN connector
IpAlarm Module Set Up
 Page 1 IpAlarm Module Set Up Note: This device is shipped configured for Ethernet connectivity. To use in this mode, connect the BLUE Jack (marked WAN) to your router and wait for the LEDs to stabilize.
CM500 High Speed Cable Modem User Manual
 User Manual November 2014 202-11472-03 350 East Plumeria Drive San Jose, CA 95134 USA Support Thank you for selecting NETGEAR products. After installing your device, locate the serial number on the label
1. Introduction Overview Product Information... 3
 1. Introduction... 3 1.1 Overview... 3 1.2 Product Information... 3 2. Device Connection... 3 2.1 Connection Diagram... 3 2.2 Wi-Fi Setting... 4 2.2.1 Set up WiFi by Mobile Phone... 4 2.2.2 WPS/QSS One
USER MANUAL. KDS-EN3 HD Video Encoder/Streamer. KDS-DEC3 HD Video Decoder MODELS: P/N: Rev 3
 KRAMER ELECTRONICS LTD. USER MANUAL MODELS: KDS-EN3 HD Video Encoder/Streamer KDS-DEC3 HD Video Decoder P/N: 2900-300375 Rev 3 Contents 1 Introduction 1 2 Getting Started 2 2.1 Achieving the Best Performance
User manual. 1080p HDMI Extender over IP with PoE P2K-HRSL3E1 / P2K-LHRS1E3 P2K-HRSL3E1-P / P2K-LHRS1E3-P
 User manual P2K-HL3E1 P2K-HL3E1-P 1080p HDMI Extender over IP 1080p HDMI Extender over IP with PoE P2K-HRSL3E1/ P2K-LHRS1E3 P2K-HRSL3E1 / P2K-LHRS1E3 P2K-HRSL3E1-P / P2K-LHRS1E3-P Partilink Technology
LevelOne FNS bay/1usb Soho NAS. User s Manual
 LevelOne FNS-1000 1- bay/1usb Soho NAS User s Manual Table of Contents Introduction... 2 The FNS-1000 NAS Server... 2 FNS-1000 Features... 2 Package Contents... 2 System Requirements... 2 Disclaimer...
Version Release Notes
 Version 1.4.3 Release Notes New Features Changes and Improvements Bug Fixes Removed ambiguous error box when failing to pair with Twitch Improved compatibility with DHCP servers that prevented VidiU from
T-RAX ENCODER/DECODER RACK SYSTEM USER GUIDE
 T-RAX ENCODER/DECODER RACK SYSTEM USER GUIDE 2017 Teradek, LLC. All Rights Reserved. 2017, Teradek, LLC. All rights reserved. TABLE OF CONTENTS 1. Physical Properties... 2 Hardware Description... 2 LED
VIDEO PLAYER FOR RASPBERRY PI (update 2017/11/13)
") VIDEO PLAYER FOR RASPBERRY PI (update 2017/11/13) Introduction Welcome to our new Video Player for Raspberry Pi (RPi) B+, 2 and 3. This player up to the latest update 2017/11/13, is able to play H.264
VIDEO PLAYER FOR RASPBERRY PI (update 2017/11/13) Introduction Welcome to our new Video Player for Raspberry Pi (RPi) B+, 2 and 3. This player up to the latest update 2017/11/13, is able to play H.264
VIDEO PLAYER FOR RASPBERRY PI (update 2018/12/25)
") VIDEO PLAYER FOR RASPBERRY PI (update 2018/12/25) Introduction Welcome to our new Video Player for Raspberry Pi (RPi) B+, 2 and 3. This player up to the latest update 2018/12/25, is able to play H.264
VIDEO PLAYER FOR RASPBERRY PI (update 2018/12/25) Introduction Welcome to our new Video Player for Raspberry Pi (RPi) B+, 2 and 3. This player up to the latest update 2018/12/25, is able to play H.264
USB VIDEO BRIDGE. Quick Start Guide. USB3.0 Powered 3G-SDI and HDMI 1080P60 Video Capture DE-INTERLACING FRAME RATE CONVERSION SCALING
 USB VIDEO BRIDGE Quick Start Guide USB3.0 Powered 3G-SDI and HDMI 1080P60 Video Capture SCALING FRAME RATE CONVERSION DE-INTERLACING WINDOWS OS X LINUX All logos and trademarks are the property of their
DVS-200 Configuration Guide
 DVS-200 Configuration Guide Contents Web UI Overview... 2 Creating a live channel... 2 Inputs... 3 Outputs... 7 Access Control... 8 Recording... 8 Managing recordings... 10 General... 11 Transcoding and
Table of Contents. Keyspan:USB Server - User Manual
 Table of Contents 1 Introduction Compatible USB Devices Connectivity to USB Devices Connectivity to Network Requirements What's Inside The Package 2 Installation Instructions Installing the USB Server
Longshine Technologie Europe GmbH
 Longshine Technologie Europe GmbH www.longshine.de TABLE OF CONTENTS COPYRIGHT...2 1. INTRODUCTION...3 PRODUCT OVERVIEW...3 COMPONENTS AND FEATURES...3 HARDWARE INSTALLATION...3 2. MFP SERVER INSTALLATION...5
VEGA-2000(HVC-6300) Full HD HEVC/H.264 Real-time Encoder Module. Quick Start Manual
 Full HD HEVC/H.264 Real-time Encoder Module. Quick Start Manual") VEGA-2000(HVC-6300) Full HD HEVC/H.264 Real-time Encoder Module Quick Start Manual Author: Andrew Huang (Software) Status: Version 0.8 Document ID: History Version Date Software version Handled by Comments
VEGA-2000(HVC-6300) Full HD HEVC/H.264 Real-time Encoder Module Quick Start Manual Author: Andrew Huang (Software) Status: Version 0.8 Document ID: History Version Date Software version Handled by Comments
ENGLISH. Matrox Maevex 5100 Series. Maevex 5150 Encoder Maevex 5150 Decoder. User Guide
 ENGLISH Matrox Maevex 5100 Series Maevex 5150 Encoder Maevex 5150 Decoder User Guide 20176-301-0160 2014.01.15 Contents About this user guide... 5 Using this guide...5 More information...5 Overview...
Express Setup. System Requirements. Express Setup CHAPTER
 3 CHAPTER You access the switch module via the host CGR 2010 router. For more information, see Accessing the Switch Module, page 4-2. To exchange and monitor control messages between the switch module
VGA Recorder Install Guide
 Install Guide Lite Standard Lecture Recorder Pro www.epiphan.com 8 April 2010 Firmware Version 3.7.7 Thank you for choosing Epiphan! At Epiphan, product function and quality are our top priority. We make
Quick Start Guide. Installation Summary
 Quick Start Guide Installation Summary These instructions can help you connect and operate the FS2 quickly. For additional details, please see the FS2 Installation and Operation Guide on the supplied DVD..
Nighthawk S8000 Gaming & Streaming Advanced 8-Port Gigabit Ethernet Switch User Manual
 Nighthawk S8000 Gaming & Streaming Advanced 8-Port Gigabit Ethernet Switch User Manual Model GS808E March 2017 202-11732-01 350 E. Plumeria Drive San Jose, CA 95134 USA Support Thank you for purchasing
Frequently Asked Questions
 Frequently Asked Questions FS-H70 / FS-H60 / FS-H50 v1.2 Inputs/Outputs 4 What are the inputs of each FS-Hxx Recorder? 4 Does the FS-Hxx Recorders support timecode? 4 Can the FS-H70 capture the embedded
ENGLISH. Matrox Maevex Series Encoder 6120 Encoder 6100 Encoder 5150 Encoder 5150 Decoder. User Guide
 ENGLISH Matrox Maevex Series 6150 Encoder 6120 Encoder 6100 Encoder 5150 Encoder 5150 Decoder User Guide 20245-301-0200 2018.09.04 1 Contents Matrox safety information... 5 Installation and operation...5
TABLE OF CONTENTS COPYRIGHT INTRODUCTION...3 PRODUCT OVERVIEW...3 COMPONENTS AND FEATURES...3 HARDWARE INSTALLATION
 TABLE OF CONTENTS COPYRIGHT...2 1. INTRODUCTION...3 PRODUCT OVERVIEW...3 COMPONENTS AND FEATURES...3 HARDWARE INSTALLATION...3 2. MFP SERVER INSTALLATION...5 PREPARATION...5 CONFIGURATION SOLUTION TABLE...5
New Features. Changes/Improvements. o Icon indicates current media selected for recording o Message when Cube fails to write to the SD card
 Teradek Cube/Brik Firmware Version 7.1.4 Release Notes page 1 of 16 New Features Support for Edge platform Added Bonding Dashboard for Link and Edge Support for 480i and 576i HDMI input only on Cube 205,
High Speed Cable Modem
 Model CM1000 User Manual September 2016 202-11620-02 350 East Plumeria Drive San Jose, CA 95134 USA Support Thank you for purchasing this NETGEAR product. You can visit www.netgear.com/support to register
Drobo 5N2 User Guide
 Drobo 5N2 User Guide Contents 1 Drobo 5N2 User Guide... 6 1.1 Before You Begin... 7 1.1.1 Product Features at a Glance... 8 1.1.2 Checking Box Contents...10 1.1.3 Checking System Requirements...11 1.1.3.1
TX G1
 TX G1 www.zerhex.com Zerhex Broadcaster allows you to stream live audio directly from any analog audio source in real time in the format (MP3, OGG PCM, G.711,G.722) and a bit rate of up to 320kbps. This
GV-IP Decoder Box Plus User s Manual
 GV-IP Decoder Box Plus User s Manual Before attempting to connect or operate this product, please read these instructions carefully and save this manual for future use. DBPV10-UM-A 2015 GeoVision, Inc.
Longshine Technologie Europe GmbH LCS-MFP101-2 Multifunction Printserver
 Longshine Technologie Europe GmbH LCS-MFP101-2 Multifunction Printserver www.longshine.de TABLE OF CONTENTS COPYRIGHT...2 1. INTRODUCTION...3 PRODUCT OVERVIEW...3 COMPONENTS AND FEATURES...3 HARDWARE INSTALLATION...3
KUMO Quick Start Guide
 KUMO Quick Start Guide Introduction This Quick Start Guide provides a basic overview of KUMO system connections and configuration. KUMO Router Connections Figure 1. KUMO Rear Panel Connections (3232 shown,
FS-P250 Quick Start Guide
 FS-P250 Quick Start Guide This document is a quick look into using the Vitec FS-P250 with Panasonic AG-HPX250/255. The following will be covered in this document: Getting Started and Recording Proxy Footage
High Definition LCD Digital Signage Display
 High Definition LCD Digital Signage Display User Manual Applicable Models L/PFxxH7(Android Version) MxxSA Cautions 1. Do Not install and use the unit in moisture, high temperature, outdoor and closed environment.
A. Monitor Settings. 1. Right-Click on the desktop. Select Properties. 2. Change color quality to highest (32bit).
.") A. Monitor Settings 1. Right-Click on the desktop. Select Properties 2. Change color quality to highest (32bit). 1 B. Hardware Installation 1. Connector Instruction Connect the power adaptor first and
A. Monitor Settings 1. Right-Click on the desktop. Select Properties 2. Change color quality to highest (32bit). 1 B. Hardware Installation 1. Connector Instruction Connect the power adaptor first and
Drobo B810n Getting Started Guide
 Drobo B810n Getting Started Guide Table of Contents 1: Before You Begin... 4 1.1 Product features at a glance... 4 1.2 Checking box contents... 5 1.3 Checking system requirements... 5 1.4 Checking hardware
VIDEO GRABBER. DisplayPort Standard. User Manual
 VIDEO GRABBER DisplayPort Standard User Manual Version Date Description Author 1.0 2016.03.02 New document MM 1.1 2018.03.22 Update document. Add new functionality: monitor emulation, network bridging,
HD NVR User Manual. High-Definition Network Video Recorder. Model : HD NVR 1 st Edition : 13 Nov nd Edition : 28 Dec Thank You!
 High-Definition Network Video Recorder HD NVR User Manual The picture & functions & supplied items might differ according to the specification and model. Contents of this user manual are protected under
High Speed Cable Modem
 Model CM1000 User Manual September 2017 202-11804-02 350 East Plumeria Drive San Jose, CA 95134 USA Support Thank you for purchasing this NETGEAR product. You can visit www.netgear.com/support to register
Marshall Electronics. VS Manager. Software Manual
 Marshall Electronics VS Manager Software Manual Copyright February 2012, Marshall Electronics, Inc. All Rights Reserved. This document may not be copied. Trademarks Other trademarks used in this document
CM500 High Speed Cable Modem User Manual
 User Manual February 2015 202-11477-03 350 East Plumeria Drive San Jose, CA 95134 USA Support Thank you for selecting NETGEAR products. After installing your device, locate the serial number on the label
Fixed bonding settings not being applied in Sputnik Direct mode.
 Teradek Cube/Brik Firmware Version 7.1.10 Release Notes page 1 of 16 New Features New features for Zixi Streaming: o Dynamic Bitrate Encoder will adapt to the network conditions by adjusting the bitrate
H.264 Network Video Streaming Server NVS-20. Contents
 Contents Warnings and Precautions... 4 Warranty... 5 Disclaimer of Product & Services... 6 Disposal... 6 Product Overview... 7 Features... 7 Front Panel... 8 Rear Panel... 9 System Diagram... 10 How to
Table of Contents. CRA-200 Analog Telephone Adapter 2 x Ethernet Port + 2 x VoIP Line. Quick Installation Guide. CRA-200 Quick Installation Guide
 CRA-200 Analog Telephone Adapter 2 x Ethernet Port + 2 x VoIP Line Quick Installation Guide Table of Contents VoIP ATA Package Contents... 2 Checklist... 2 IMPORTANT SAFETY INSTRUCTIONS... 3 Connecting
ReadyNAS OS 6 Desktop Storage Systems
 ReadyNAS OS 6 Desktop Storage Systems Hardware Manual Models: 102 104 312 314 350 East Plumeria Drive San Jose, CA 95134 USA March 2013 202-11206-02 v1.0 Support Thank you for selecting NETGEAR products.
IAdea Player Firmware User Manual
 IAdea Player Firmware User Manual Firmware version 4.6 Media players : XMP-2200 XMP-2300 XMP-2400 Signboards : XDS-1060 XDS-1062 XDS-1068 Contents IAdea Player Firmware User Manual 0 1. Introduction 1
Echo Digital Audio Corporation AudioFire 2 AudioFire 4 AudioFire 8 AudioFire 12 Release 4.6 for Mac OS X
 Echo Digital Audio Corporation AudioFire 2 AudioFire 4 AudioFire 8 AudioFire 12 Release 4.6 for Mac OS X DISCLAIMER... 2 RELEASE INFORMATION... 2 SUPPORTED OPERATING SYSTEMS... 2 CHANGES... 3 KNOWN ISSUES...
4 channel streaming. encoder/recoder NVS-40
 4 channel streaming encoder/recoder NVS-40 Table of Contents TABLE OF CONTENTS... 2 FCC COMPLIANCE STATEMENT... 4 WARNINGS AND PRECAUTIONS... 4 WARRANTY... 5 STANDARD WARRANTY... 5 THREE YEAR WARRANTY...
Version Release Notes
 Version 1.4.1 Release Notes New Features Added WPA-Enterprise PEAP support Changes and Improvements None Bug Fixes Fixed errors when selecting CDN events with quotes Error message now appears when VidiU
NVMS User Manual
 NVMS-1000 User Manual Contents 1 Software Introduction...1 1.1 Summary... 1 1.2 Operation Environment... 1 1.3 Install and Uninstall... 2 1.3.1 Install the Software... 2 1.3.2 Uninstall the Software...
USER GUIDE. FOR iphone/ipad. Compatibility: Apple ios 5.1 or higher
 USER GUIDE FOR iphone/ipad Compatibility: Apple ios 5.1 or higher 1. Overview... 4 2. Install and Set Up... 4 2.1. Charge your Power Connect... 4 2.2. Charge your iphone battery with Power Connect... 5
MARQUE: GARMIN REFERENCE: EX FRS CODIC: NOTICE
 MARQUE: GARMIN REFERENCE: EX3800-100FRS CODIC: 4121198 NOTICE Model EX3800 User Manual May 2015 202-11488-01 350 East Plumeria Drive San Jose, CA 95134 USA Support Thank you for selecting NETGEAR products.
R4, R8, R16 Digital Video Recorders Quick Setup Guide
 R4, R8, R16 Digital Video Recorders Quick Setup Guide This guide provides instructions to initially setup the R16 (16 channel) digital video recorders (DVR). The DVR supports these advanced features: 2
One Bay SATA/IDE Turbo NAS User Manual
 One Bay SATA/IDE Turbo NAS User Manual Revision: v0117 Date: 2009/07/23 For firmware version v1.17 Table of Contents 1. Introduction... 3 1.1. Key Features... 3 1.2. Network Environment... 3 2. Hardware
DHE-1000 MPEG4 HD ENCODER. MPEG4 system with IP output. Technical documentation / Instruction set
 DHE-1000 MPEG4 HD ENCODER MPEG4 system with IP output Technical documentation / Instruction set Teletechnika Ltd. 3rd Edition / 6 th November 2012 General description The MPEG-2 compression that brought
Setup and Configuration
 Setup and Configuration OmniStream TM Solution Guide OmniStream Atlona Setup Guide Version Information Version Release Date Notes 1 02/19 Initial release 2 03/19 Audio added 3 03/19 USB added OmniStream
User Instructions Compact H.264 Media Encoder and Streamer
 User Instructions Compact H.264 Media Encoder and Streamer Model Name: Z3Stream-SDI-01 Software Version 2.45 Before attempting to connect or operate this product, please read these instructions carefully
Matrox Monarch HD User Guide
 Matrox Monarch HD User Guide June 30, 2014 Y11271-301-0200 Trademarks Matrox Electronic Systems Ltd....Matrox, Monarch Adobe Systems Inc...Adobe Apple Inc...Apple, Mac OS, Safari, QuickTime HDMI Licensing
2 Bay 3.5 HDD SATA NAS Media Server Setting...20 Bonjour...21 TorrentFlux Maintenance...25 Disk Utility...25 RAID Setting...
 Table of contents 1. Overview of the 2 Bay NAS...3 1.1 Introduction...3 1.2 System Requirement...3 1.3 Hardware Installation...3 1.4 Setup the client PC and 2 Bay NAS...3 1.4.1 Setup network configuration
Nighthawk Pro Gaming SX10 8-Port Gigabit Ethernet Switch with 2-Port 10G/Multi-Gig Ethernet User Manual
 Nighthawk Pro Gaming SX10 8-Port Gigabit Ethernet Switch with 2-Port 10G/Multi-Gig Ethernet User Manual Model GS810EMX December 2017 202-11833-01 350 E. Plumeria Drive San Jose, CA 95134 USA Support Thank
8-Port Gigabit Ethernet Smart Managed Plus Switch with 2-Port 10G/Multi-Gig Uplinks User Manual
 8-Port Gigabit Ethernet Smart Managed Plus Switch with 2-Port 10G/Multi-Gig Uplinks User Manual Model GS110EMX December 2017 202-11810-03 350 E. Plumeria Drive San Jose, CA 95134 USA Support Thank you
Print Server. User s Manual. Rev. 01 (April, 2004) Made In Taiwan
 Made In Taiwan") Print Server User s Manual Rev. 01 (April, 2004) Made In Taiwan TABLE OF CONTENTS ABOUT THIS GUIDE... 4 INTRODUCTION... 5 PACKAGE CONTENTS... 6 SYSTEM REQUIREMENTS... 6 GENERAL FEATURES... 7 PRODUCT VIEW...
Print Server User s Manual Rev. 01 (April, 2004) Made In Taiwan TABLE OF CONTENTS ABOUT THIS GUIDE... 4 INTRODUCTION... 5 PACKAGE CONTENTS... 6 SYSTEM REQUIREMENTS... 6 GENERAL FEATURES... 7 PRODUCT VIEW...
Installation Instructions Fig. 3 Side View. No. Label Operation
 One-Camera IP Video Server In G Out G D+ D- Installation Instructions 1507280 Part Number: CM2002 - One-Camera IP Video Server CM2002 IP Video Server Features In G Out G D+ D- DO G DI G Out In Video In
Cruzer flash drive NOT detected by Windows PC
 Cruzer flash drive NOT detected by Windows PC My Cruzer flash drive is NOT detected when plugged in to my PC. What do I do? SOLUTION 1 - Verify if minimum operating system requirements are met. Operating
PTZOptics SDI Camera Quick Start Guide
 PTZOptics SDI Camera Quick Start Guide Step 1: When you first receive your PTZOptics SDI Camera, the first thing you should do is read the included manual. Step 2: Inside your box you will find your camera,
JVA04 HDMI to USB Type-C Game Capture Station Manual Contents
 JVA04 HDMI to USB Type-C Game Capture Station Manual Contents 1. INTRODUCTION... 2 1.1 FEATURES... 2 1.2 PACKAGE CONTENTS... 3 1.3 SPECIFICATIONS... 3 1.4 SYSTEM REQUIREMENTS... 4 Computer... 4 Phone...
Quick Start Guide. Cisco SPA232D Mobility Enhanced ATA
 Quick Start Guide Cisco SPA232D Mobility Enhanced ATA Package Contents Analog Telephone Adapter Ethernet Cable Phone Cable Power Adapter Quick Start Guide Product CD-ROM Welcome Thank you for choosing
VISTA Transfer Station Setup
 Setup Setup The allows your agency to upload video evidence to its WatchGuard Video Evidence Library software from multiple VISTA cameras simultaneously. Each VISTA Transfer Station has eight slots for
ENGLISH. Matrox Maevex Series Encoder 6100 Encoder 5150 Encoder 5150 Decoder. User Guide
 ENGLISH Matrox Maevex Series 6150 Encoder 6100 Encoder 5150 Encoder 5150 Decoder User Guide 20245-301-0150 2017.06.19 1 Contents Matrox safety information... 5 Installation and operation...5 If a power
GETTING STARTED GUIDE. Cisco Small Business. NSS2000 Series Network Storage System
 GETTING STARTED GUIDE Cisco Small Business NSS2000 Series Network Storage System 2008 Cisco Systems, Inc. All rights reserved. OL-17953-01 Contents Chapter 1: Introduction 1 Benefits 1 About this Guide
Added Wowza streaming mode supports Wowza-generated configuration files and configuration URLs
 Firmware Version 7.1.14 Release Notes page 1 of 10 New Features Added Wowza streaming mode supports Wowza-generated configuration files and configuration URLs Added support for Huawei ME909U-521, E3276,
Quick Start Guide. Installation Summary
 Quick Start Guide Installation Summary These instructions can help you connect and operate the FS2 quickly. For additional details, please see the FS2 Installation and Operation Guide on the supplied DVD..
Installation. ProSAFE Wireless Controller Model WC7500 and Model WC7600
 Installation ProSAFE Wireless Controller Model WC7500 and Model WC7600 Hardware Overview Before you install your wireless controller, familiarize yourself with its LEDs, buttons, and ports. Digital access
Video bitrate and framerate could increase if video was reconnected after a long period without sync
 Teradek Cube/Brik Firmware Version 7.0.4 Release Notes page 1 of 14 New Features None Changes/Improvements None Bug Fixes Video bitrate and framerate could increase if video was reconnected after a long
M-DM Download Manager - User Guide
 M-DM Download Manager - Macpower & Tytech Technology Co., Ltd. Date: February 14, 2007 - v1.0 Firmware: V01R88 PCB: MP-LNU27S v1.0 Model: BT-LNU2SA The diagrams and images contained in this manual may
Video Decoder Setup Guide
 Package Content Video Decoder Setup Guide Inspect the packaging carton. Make sure the Video Decoder is properly delivered. Remove all items from the box and make sure the box contains the following items.
IP Camera user manual
 IP Camera user manual Product name:high definition IP Camera Document version:4.2 Editions suit for 1080P IP Camera Precautions Search and Login...1 Device searching...2 Install plugin...3 A. Real-time
High Speed Cable Modem
 Model CM700 User Manual October 2016 202-11696-02 350 East Plumeria Drive San Jose, CA 95134 USA Support Thank you for purchasing this NETGEAR product. You can visit www.netgear.com/support to register