Copyright Daslight, all rights reserved
|
|
|
- Lee Stevens
- 5 years ago
- Views:
Transcription

1 User Manual
2 Index Driver and Install... 5 Package contents... 5 System requirements... 5 Installation and update of the drivers... 5 Software installation and update... 7 SETUP mode... 8 Create a new project... 8 Insert and delete fixtures... 9 Delete and update fixtures Fixture configuration digits display for DMX address Control windows General control window (Standard mode 512) Fixture's control window (From a library) Group window Save a group Cursor Mode Preset pallet mode Pan & tilt selection and position Good points of the control windows Editor mode Scenes / Programs / Steps How to create a scene or a program Modify the scene s parameters Drag and Drop Multi selection and control Triggering priority between scenes Scene generator Create a scene with an effect to the channel Create a scene with a movement or Shape Conclusion LIVE mode Live control Trigger scenes and effects LIVE mode options The Effect buttons Create and program an effect button Options and parameters of the effects Edit and change the content of an effect button Delete an effect ON / LTP / AUTO / MIDI / IN options of the channels Audio BPM on scenes Editor / Live relationship of the scenes Instant TAKE CONTROL of the fixtures
3 Triggering The mouse, standard triggering The shortcut keys, fast triggering HE10, physical triggering Time triggering DMX IN triggering, Trigger from any DMX console MIDI, trigger with MIDI command DaslightRemoteControl.dll, trigger from software DMX IN and MIDI control Software menus The FILE menu The WINDOWS menu The EFFECT menu The TOOLS menu The OPTION menu The LANGUAGE menu The? menu Stand-alone or memory mode Scenes properties Write the memory External contact I/O of the stand alone interfaces Features of the Stand alone interface Interface management
4 Control software suitable for all types of effects: Moving Head, Scanners, Lasers, LEDs, Parscan and Traditional Lighting The user manual will enable you to fully exploit the software environment in no time! It should answer all your questions concerning the way it is operated and it will help you acquire excellent command. The software has been designed for users mainly seeking complete ease of use, optimal power and the best value for money. Thanks to its step-by-step programming features and its ergonomic functions, the software is the best answer to all your projects. Our USB/DMX interfaces have many professional applications like the PC mode or the Stand Alone Hardware memory mode for those wishing to work without a computer. You will note and appreciate the software ease to use and all its possibilities. We wish you a pleasant reading. 4
5 Driver and Install Copyright Daslight, all rights reserved Package contents 1 CD-ROM with software tools for lighting control and user manual 1 USB/DMX Interface 1 USB 2.0 cable System requirements Microsoft Windows XP, VISTA Microsoft DIRECTX 9 or higher 500 Mhz processor (1,5 Ghz) 256 Mb RAM (512 MB) 150 Mb free disk space CD-ROM drive 1 or 2 USB 2.0 ports 1024 x 768 screen definition DIRECTX 9 compatible video card 128 MB video memory (256 MB) Installation and update of the drivers Our USB-DMX interface is a world's innovation. It thoroughly respects the USB 2.0 protocol specifications and DMX512 for output. It is directly powered via a USB 2.0 port and controls all 512 potential channels of a DMX line. Please refer to the HARDWARE user manual for the normal driver installation. To install manually or update the driver or to update your drivers you need to use the DEVICE MANAGER of Windows: Connect your interface to the USB2.0 port. Clic on START button of Windows, select CONTROL PANEL in the Windows menus, double clic on SYSTEM, select the HARWARE section and select the DEVICE MANAGER Button. This window will appear and you can see your interface connected. 5
 Intelligent Usb Dmx Interface (Low cost U6) Unknow Device means that the interface has a problem USB Device or SIUDI-DMX OUT or SIUDI EC means that")
6 List of the possible card detected by the Windows device manager: Intelligent Usb Dmx Interface OUT Economy Intelligent Usb Dmx Interface OUT Intelligent Usb Dmx Interface (Usb powerd 2006) Intelligent Usb Dmx Interface (Stand Alone 2006) Intelligent Usb Dmx Interface (Low cost U6) Unknow Device means that the interface has a problem USB Device or SIUDI-DMX OUT or SIUDI EC means that the drivers must be installed. 6

7 After, you need to follow the instructions of the HARDWARE UPDATE WIZARD and use the option INSTALL FROM A LIST OR SPECIFIC LOCATION. The location can be a folder on your hard drive or in the install Cdrom of the software. List of the driver files: SIUDI5.INF for the new interface with 2 XLR IN and OUT and 1 XLR OUT. SIUDI.INF for the old interfaces with only 1 XLR. After your installation, please check if the file SIUDI5.DAT is in the folder C:\WINDOWS\system32\SiudiLoad. Software installation and update For a normal and full install, you need to insert the install Cdrom and follow the instructions. For a full software installation, you can find in the Cdrom or download from the 7

8 web site the _INSTALL.EXE file. For a software update, you can find in the Cdrom or download from the web site the _UPDATE.EXE file. SETUP mode The software has 3 modes, each of them is important to create a show. Here is a resume of the different modes. SETUP: to setup the fixture configuration. EDITOR: Program and create the scenes and sequences of your show. LIVE: Triggering scenes, update, optimization of your show, and live control. The Setup page allows configuring the software and using the lights required for a show. You can choose and update from over 4,000 different fixtures, allocate a DMX address from a range of 512 on 6 different DMX universes, activate or deactivate a fade-effect or invert the fixture movements. You can also test your fixture to check if they work fine because it is the basic for a good programming. The software uses the SSL libraries, which is currently the best choice you can make and a guarantee of evolution over the next few years. The ScanLibrary editor allows you to create your own library in just a matter of minutes and the fileexchange is possible. (Look up for ScanLibrary user manual) Create a new project For your first use we advise you to create a new project. 8

9 In the FILE menu, you can select the NEW option or you can click on this icon to CREATE a new project, after that save your project. Insert and delete fixtures For the best control, the user needs to use a fixture library. The software will create some powerful control functions corresponding to the fixture functions. As for the objects, the software makes it possible to insert fixtures from the library. Click on the PATCH FIXTURE button. Then you will be able to select the library you require from the PATCH MANAGER window displayed. For traditional lighting, you need to select a file from the _Generic folder. After selecting your fixture, a message box will appear and prompt you to enter some data: - DMX Universe - Starting DMX address of fixtures - Matrix option, to create a matrix - Number of fixtures that need to be added - Patch, to display all the information to the right part of the window Select a fixture from the list and then patch it using the PATCH button after having specified the starting DMX address and the number of devices or by drag&drop. Make sure you select the correct universe first by selecting the right tab. It is also possible from the toolbar or by clicking with the right button of the mouse on a fixture to: 9

10 - copy/paste fixture(s) - delete fixture (s) Type in the information required and confirm. You will see the moving lights and a new control window appear on the bottom of the screen. Delete and update fixtures You need to use the PATCH MANAGER. You will see the changes after that you confirm and close the window. In the PATCH MANAGER, delete some libraries wont change the content of the scenes. But if you change a fixture address, the new address will be use and updated automatically into all the currents scenes. This function is very useful because you don t need to reprogram everything to the new address. Fixture configuration 10
")
11 In a few mouse-clicks, you will set all your fixture-channels. After selecting a fixture in the specific area, you can activate or de-activate those functions. - Change the fixture or family name, just double clic on it - Invert Pan movement - Invert Tilt movement - invert your mouse Pan and Tilt position - Fade time on channels If this option (fade time) is not activated, the channel will not take fade-time transition into account and will be positioned on the next value as rapidly as possible after the end of fade-time. If this option is not activated, the channel won t do a slow movement of fade. The movement between 2 steps of a scene is direct and fast. The cursor of the channel will jump directly to the next DMX value at the end of the fade time. A function can remove quickly all the FADE TIME ON WHEELS (colors, gobo, shutter, prism and effects). 10 digits display for DMX address A 10 digits addressing tool will automatically display the selected address DMX values. Some fixtures use a 9 digits for the DMX address. You just need to setup 11

12 the addressing tool into its 9-digit mode. Control windows Copyright Daslight, all rights reserved It is very important to know how to control your lights. The software has several configurations of the control windows. You can choose the best one for you witch you will like to use when you program your show. You control the lights from the down part of the software. You can choose the best configuration by clicking on these buttons. General control window (Standard mode 512) The window always shows the 512 channels of a DMX universe. Each channel has 0 to 255 values. The window is always displayed and it is possible to use it without any SSL libraries of fixtures. This window is for quick and simple tests and to see the channels DMX values. Here are the possible options: - Display the channels values in percentage or DMX - Display only the used channels - Display the general group window of the fixtures - Switch from cursor mode into digital mode (Theatre mode) - Choose a DMX universe to be controlled - Change the control state of the channel - Start the scene and shape generator Fixture's control window (From a library) When you add a new library into the PATCH MANAGER, a new control window 12
.")
13 will appear over the GENERAL control window. This window is very useful when there is a lot of fixture to control. The window take the fixture name and an additional window will be create for each type of fixture (fixture family). To the left part of the fixture control window, you can see the useful channels of the fixture. Here are the possible options: - Display percentage or DMX values - Display or hide the Group Window - Switch into cursor or preset pallet mode - Switch into cursor or Digital mode - Open the scene and shape generator To the right part, there is the GROUP WINDOW where the fixtures are display as item from the same family. Group window This control window is very important. You can choose with witch fixture you want to control and work with. When you add some fixtures with the PATCH MANAGER, some icon item will be add and display. Each icon is a fixture. Each fixture in a group window is from the same type and the same family. You can do these actions (left options): - Choose the selection mode (orange colour for the selection) or the graphic position mode of the items (blue colour) - Change the size of icon item - Delete all the selections - Select all fixture items - Invert the selection - Select 1 item of 2 - Move up the selection - Move down the selection - Close the beam 13
14 - Open the beam - Centre the fixture position You can also do these actions (up options) - Select several groups simultaneously or select only 1 group - Save a group - Select and activate a group from 1 to 12 (available with F1 to F12 keyboard keys) - Cancel all live actions of the selected items - Cancel all live actions done with the current control window - Cancel all the live actions of all the control windows (general cancel) Save a group To save a group, you need to select the item in the GROUP WINDOW, click on the SAVE option icon showed with a blue floppy disk icon, after click on the group button that you with to save. Your group will be automatically save and use directly. You can use our group when you want just by clicking on it or with the Fx keys or your keyboard. Cursor Mode You can see the used cursor of the fixture to the screen and control easily and quickly the item that you want. To control the fixture, you need to select 1 or some item in the group window. With a right clic on the icon (top of the fader) you display the preset list of the channel. A left clic on one of the preset to select the function and move the cursor to the associate DMX value. This preset list function is also available into the GENERAL CONTROL WINDOW. Preset pallet mode This mode is graphic and gives a direct acces to the fixtures functions. Your libraries must be correct for the best control. After selecting the function, 5 different function of family will appear on the left of the screen. - Pan/Tilt - Gobo - Color - Beam - Other Each family display the channels with the associated presets. You need to select 1 or several item in the GROUP WINDOW to control them. A cursor is affecter to the preset to accurate your DMX levels. A second click to the preset icon will cancel the preset value and gives zero to the dmx level. 14


15 Pan & tilt selection and position To give a position to a fixture, you need to use the GROUP WINDOW and the Pan and Tilt channels of the fixture. Select the fixture item in the GROUP WINDOW, change the values of the Pan and Tilt channels or you use the Pan and Tilt option in the PRESET PALLET MODE. The current position of the fixture is display and you can move them with the mouse or a USB joystick. A right click will bring the fixture position to the mouse position. A left click will move the fixture from its current position. You can use the CENTRE buttons for a quick positioning. 15
16 Good points of the control windows Thanks to its different mode and the graphic features of the fixtures. It is very easy to control the fixtures. Only a single click allows you to control your lights. You need the control windows in each mode of the software, SETUP to test the fixture functioning, EDITOR to quickly program your scenes and programs and in LIVE to take control instantaneously of your fixtures during the show. If you channel addressing is fine and if you know all your light functions you can take control of your fixture and check them. The beam must be open and turn on, you can use the DIMMER, SHUTTER, IRIS and ZOOM fixture functions for that. Some fixtures need few minutes to heat the lamps and turn it on. There are some shortcut buttons in the control windows, they turn on the light, open the shutter and centre the fixture position. If everything work fine and you can control all the lights, you can start to program your show with step by step scenes. /you need to go in the EDITOR mode of the software. Editor mode It allows creating scenes and programs intuitively in very little time. This mode is very important because it will save your programming step by step. The graphic interface has been designed to offer as many options as possible and yet it is extremely easy to use. On the left you have the scenes and the scenes functions. On the right you have the steps and the step functions. When you create a new project, the list of the scenes and the list of the steps are empty. 16

17 Scenes / Programs / Steps A scene or program has 1 or several steps. With several steps you will create a dynamic scene. Each step is a memory and cans tore 512 DMX values and also a fade and wait time. Steps keep the DMX values automatically. Step can have 0, 04 second to 44 minute time with 0, 04 second accurate time (25 Hertz). The time of a scene is he summon of all its steps. Scenes have additional loops, triggering and jump transition functions. Scene options: - New Scene. - Delete the selected scenes. - Insert scene from another project. Old project files are.dlm and new project are.dvc - Copy the selected scene. - Create a new group of scene to organize your scenes well. - Delete the selected group of scene. 17

18 - Play the selected scenes. - Stop the selected scenes. - Display the current running time of the scene. Step options - Add a new step. - Select all the steps of the list. - Delete the selected steps. - Copy the selected steps. - Past the selected steps. - Change the fade and wait time of the selected steps. How to create a scene or a program Add a new scene with the scene options and select its first step. After, to program all your fixtures, you need to use the control windows to change the DMX values and create the good visual effect. Choose the FADE and WAIT TIMES of the selected step. To continue programming the scene, add another step, modify the fixture s DMX values and choose again the WAIT and FADE TIMES. Repeat these actions until you finish your scene at its final state. Notice: A scene contents 1 or several steps. By default, a scene will always loop. The total time of a scene is the sum of all fade and waits time of its all steps. It is possible to play several scenes and work on another one at the same time. When you play a scene, the scene will start at the selected step. When you stop a scene, the current step will be selected automatically. Modify the scene s parameters Scenes and steps have some parameters. The scene s parameters are on the same line of the scene and are display with column. Each column is an option or a different parameter of the scene or the step. To change the parameter of the scenes or the steps, only double click on the information that need to be change. In consequences, it is possible to change the text or use the popup that gives the possible options of the parameter. 18
19 The parameters are these below: - Activate or not the DMX output signal of the scene (you can create scenes and won t disturb the current show). - Activate or not the FADE time between scenes. - Change the NAME of the scene. - Add some SHORTCUT keys to trigger scenes with a keyboard. (5 keys maximum per scene) - Add a PORT for dry and direct contact scene triggering via the HE10. (See stand-alone and memory modes). - Add a channel and MIDI note for the IDI triggering. The Midi values can be detected automatically. The first value give the channel (max 16 channels), the second give the Note (max 127 notes). - Add a DMX value to trigger the scenes. This DMX value can be detected automatically. The first value gives the universe (6 max), the second one the channel (512 max), the last one the DMX value (255 max). - Choose the number of LOOPS to repeat the scene - Choose the JUMP of the scene after the number of loop. - Choose the EXIT MODE of the scene after the loops. - Choose the RELEASE mode of the scenes. This option work when you will trigger the scene. - TIME of 1 loop of the scene - TOTAL TIME of the scene - Add a FADE and WAIT TIME to the scene. For Live mode only. Drag and Drop For Scenes and Steps, it is possible to move them directly with the mouse. Select a scene, left click and hold it, move the mouse and the scene and release the click. Multi selection and control With SHIFT and CTRL keyboard keys you can select several scenes and several steps. You need to keep hold the key. SHIFT key will select everything from the first selected object until the last one. CTRL will select on the chosen one. When you select several steps, all the actions done with the control windows will be apply directly into the step and same on them. It is the same with several scenes selected, all actions are affected automatically. 19

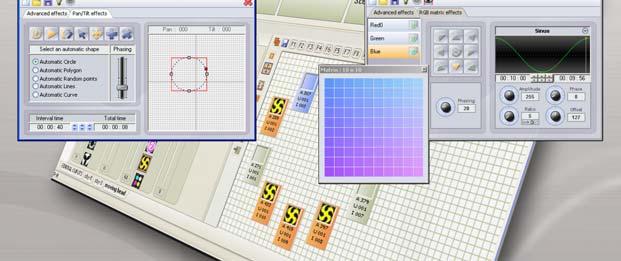
20 Triggering priority between scenes The software allows you to triggering several scenes simultaneously. When you program you scenes, you need to care about few rules to avoid any conflict when you will trigger the scenes in LIVE mode. The last triggered scene will take the priority. The priority will be taken only to the channels that you programmed in the EDITOR mode. A channel that you programmed can take the priority on the previous one. A channel becomes priority if its DMX level is different of zero at least for one steps of the scene. If a channel has all its DMX values to zero into all the steps of the scene, then the software will never play the channel. Scene generator The software has a powerful SCENE GENERATOR. This useful tool can generate in a short time all the steps of a complicated scene and create some wonderful visual effects. To start the SCENE GENERATOR, click on the icon of the software tool bar. 20


21 A window gives you a list of fixture and you can choose some. You can create a scene or visual effect for the selected fixtures. Select your fixtures and validate to start the SENE GENERATOR. You can also start it directly with the button in the control window. In this case the SCENE GENERATOR will create scenes only for the selected items of the group window. 21


22 The SCENE GENERATOR will take priority on the current played scenes, then you can see the result of you scene directly and change the parameter in real time before you confirm and generate the scene. Create a scene with an effect to the channel 22

23 It is possible to affect a signal to a channel, change the parameter of the signal and generate the steps of the scene automatically. You can easily choose the duration of the signal and change its features. Create a scene with a movement or Shape It is possible to affect a shape, a position or a movement to the fixture, change the parameter of the movement and generate the steps of the scene automatically. Important notice: With the SCENE GENERATOR, you must generate the steps of a scene with the GENERATE icon of the window menu. When you create a scene, all the actions done with the control window are apply to the fixtures but will not be included into the generated scene. You need to use the function LIGHT BEAM ON and generate the scene, after you can do some changes directly into the step of the scene with the EDITOR mode. You can generate scenes whenever you want in the 3 modes of the software, the scenes will be added in the list of the scene of the EDITOR mode. Conclusion Thanks to the EDITOR mode, you can create some customs scenes step by steps easily and in a very short time. You can also use the SCENE GENERATOR to create quickly some amazing scenes and wonderful visual effects. When all 23

24 scenes are done, depending of the needs of your show, you can go into the LIVE mode of the software to trigger the scenes and start the show. LIVE mode The Live mode represents your virtual console. All the control and buttons used to play the show are displayed on the screen. You can play your scenes, modify the speed of scenes, play some audio files, play some effects and take a quick control of your fixture when you need it. Live control In Live mode, the scene that has been created in the editor mode are display as a ON/OFF button. Just click on it to play or stop the scene. At any time, you may decide to manually take control of some fixtures with the control and group windows. Choose the control window of the fixture family that you want to control. Select the item in the group window and change the DMX level. You can cancel all the live actions by clicking on the 3 cancel option buttons localized on the right part of the group windows tool bar. 24
25 With the 3 buttons you can cancel these actions: - For all selected item only. - For all the fixture family. - For all the fixtures from all the fixture family. Trigger scenes and effects The orange colour on the scenes and the effect buttons means that the buttons are triggered and their content is playing. A click with the mouse starts or stops the scene. If you control your fixture with your computer instead of using the stand alone mode, you can trigger the buttons via a mouse, a keyboard, a touch screen, a MIDI event, a DMX input, a compatible software, a HTML link or the HE10 connector. The interfaces with a stand alone mode allow direct contact triggering with a contact remote control (check the chapter for dry contacts). It is possible to trigger several scenes together and synchronously with the shortcuts keys of your keyboard, the midi or DMX IN events and with the HE10 port. LIVE mode options The Live tool ribbon is located on top of the screen. You can do these functions: - Display the GROUPS of scene - EXPAND or COLLAPSE the scene buttons - PAUSE all the scenes that are playing - Go to the previous button - Go to the next button for all the scenes that are playing\ - ENABLE FADE TIME, You can use a fade time between each scene, during scene-transition, that takes the fade-time of the first step of the following scene into account. You enable the fade In and Fade Out time of the scene. The effect ribbon allows you these functions: - Create a NEW EFFECT button - DELETE an EFFECT button - EDIT an EFFECT The Effect buttons The live mode allows you to create additional buttons. These buttons use a direct triggering and send the DMX values fast and instantaneously. The effects buttons are used for quick and direct actions, for example when you wish to use the same 25
26 color (red) for all your different fixtures that are not from the same family. An effect button can also play some audio files. Notice: There are no effect buttons when you create a new project. Just click on the button to start or stop it. You can create many effects (no limit). An effect button can also trigger a scene or play an audio file (wav, MP3, CD track, etc ) You can use a shortcut or midi event to trigger the effects. Create and program an effect button In the effect ribbon, click on NEW EFFECT, A window appear to ask you these information: - Name of the effect - Create an empty effect, no DMX levels will be include at the beginning. - Create an effect and INCLUDE LIVE FADERS, to include the DMX level that you previously used on the control windows. - Create an effect button and include the DMX values of another effect. After confirmation, a blue button appears in the Live mode after the liste of the scenes. In addition, a new window appears to modify (edit) the options, parameters and content of the effect. Options and parameters of the effects The option window appears when you create a new effect. The EDIT EFFECT option is available from the Live tool ribbon. When you click to the EDIT EFFECT option, a first window appears and prompts you to choose an effect in the effect list. After confirmation, the EDIT EFFECT window will appear with these functions: - NAME of the effect. - Switch into FLASH MODE, the button will release automatically. - Assign a shortcut key. - Assign a midi event. - Assign a HE10 port number. - Play an audio file from your hard drive - play an audio file from you CD player - Trigger a chosen scene 26

27 Notices: It is possible to open the EFFECT PROPERTIES window with a right clic on the effect button. When the properties window is open, all the DMX levels that you modify from the control windows, will be saved and use when you will close the window. You can install some audio CODEC to read more audio formats. The effect buttons are used for quick actions and specific actions. Edit and change the content of an effect button An effect can record a DMX level for all the channels. With a click on the button, you can play the levels instantaneously. When the EFFECT PROPERTIES window is open, all the actions done on the control windows will be use for the effect button and will be saved. You need to use the faders, the pallet of preset, groups to change the DMX levels of the effect button. You can activate or not the button while you edit it, so it is possible to see 27
28 directly or not what you are programming. If the effect is ON, its color is orange. If the effect button is OFF, its color is blue. Notice: An effect can be also activate while it is edited when the EFFECT PROPERTIES window is display. You can change the content of the effect when the EFFECT PROPERTIES window is open and display. In an effect, the activated channels will use the LTP priority. You can play several effect buttons at the same time. An effect can release another effect button if they work on the same channel. Delete an effect On the effect tool ribbon, click to the DELETE EFFECT button. The list of effect will be display and you can choose witch effect to delete. You can also delete an effect button with a right click on it. ON / LTP / AUTO / MIDI / IN options of the channels In the control window you can see under each fader a AUTO button. With a right click on them, 5 modes are available: - AUTO, channels follow the dmx of the scenes, we cannot change them. - HTP, Highest Takes Priority, the level is at its highest between cursor-level and current scene level. - LTP, Latest Takes Priority, The cursor will take priority on scenes and effects. Another LTP action can also take priority on the fader. - IN, DMX Input, the dmx values receive from the DMX IN will take the priority on the scenes. - MIDI, MIDI input, the midi values receive from the MIDI interface will take the priority on the scenes. 28
29 Audio BPM on scenes You can synchronize the scene to a BPM (Beat Per Minute). The scene will follow the rhythm give by the BPM calculator AUDIO ANALYSIS. Each beat will play the next step pf the scene. Click on the BPM button in the tool ribbon to start audio analysis. This tool will calculate automatically the music beat of your computer. Right click on the scene button to switch the scene into a BPM mode. Play an audio file and check the audio record channel of windows. In the windows audio mixer the microphone channel need to be switch off. You need to minimize the audio analysis for best performances. Audio analysis allows three types of BPM: automatic, Manual or memorized. The scene can play with the following modes: - TIME, the scenes do not use the BPM and play normally. 29

30 - BPM ON STEP, each BPM the scene go directly to the next step. - BPM WITH FADE, each BPM the scenes will go to the next step but will keep the fade time between each step. - BPM ON SCENE, the scenes start on a BPM and play normally, after the scenes finish the loop and wait the next BPM, after the scenes restart on the next BPM. It could be interesting for fast scenes. Editor / Live relationship of the scenes You can use the Editor mode and create some new scene and keep playing the scene trigger in the Live mode. The scenes start or stop in the Editor mode will do the same in Live mode. Same, the scenes start or stop in the Live mode will do the same in the Editor mode. In consequence, you can play several scenes, create and work on different scenes at the same time. It is possible to cancel the DMX signal of a scene, you will be able to create and work on a different scene without disturbs your show. Instant TAKE CONTROL of the fixtures 30

31 The software has several control windows. With them you can take control of your fixtures when you want in Live mode. The triggered scene will keep playing their content, but the live control will take the priority on the scenes. You can easily cancel any of your Live actions and give back the priority to the scenes. You just need to select the fixtures in the group window and use the faders or the preset to take the live control. This function is very useful, if you want to correct the setting of a fixture or if you need to react quickly in a simple way to an event of your show. Triggering The software allows several type of trigger. A good trigger at the good time is very important for the success of your show. It is important to know all of them and to mastering them. The triggering can be used in LIVE mode and in STAND ALONE mode for the physical and time triggers. The mouse, standard triggering The mouse allows you to access to all the software functions and allows you to trigger scene and effect buttons. A click on the buttons (in LIVE mode) will start or stop the buttons. We advise you to use the shortcut triggering for fastest actions. The shortcut keys, fast triggering A key can start or stop a button or a group of button. You can trigger a scene button and an effect button with the same shortcut. For the scenes you choose the key in the EDITOR mode, just double click on the good case. For the effects, you choose the key in the properties of the effect. Each button can have a maximum of 5 shortcuts keys. It is possible to create some groups of shortcuts by choosing the same shortcut for several buttons. You could trigger them all together with a single key action. The shortcut key triggering allows some fast and quick actions that will be very useful in live. 31
32 HE10, physical triggering Copyright Daslight, all rights reserved Some interfaces have a HE10 external port connection. T is also a port for contact closure. A simple contact between the ground of the interface and the port will trigger a chosen scene. The triggerings work in Live mode (PC mode) and in stand alone mode (memory mode). The HE10 external communication will give you a lot of possibilities for your triggering and you can create many simple external control boards for your different applications. Please refer to the STAND ALONE MODE chapter for more explanation about the triggering ports. Time triggering You can trigger until 20 scenes by time or with a yearly calendar. This type of triggering is only available with the stand alone mode and does not works under PC mode (with computer). You will setup your schedules with the STAND ALONE WINDOW. You must connect an interface with the stand alone capability to access to the time functions. DMX IN triggering, Trigger from any DMX console Some of the interface has a DMX IN XLR connector for a dmx input. The DMX IN can receive a DMX signal form any another DMX devices. It is very easy to connect a traditional console to add some manual functions and some triggers to the software. This function will be useful in theatre or for Dimmer packs. You can trigger the scenes and effect on specific level of a DMX-IN channel. In EDITOR mode, for each scene, you can double click on the DMX-IN area of the scene. The software will automatically detect the DMX-IN values from the console after the double click and an action of the console. The DMX-In trigger recorded is like this: - The DMX universe, the channel, the DMX value of the channel. - The format is [universe. Channel. Level/Value]. All the values can be change directly by keyboard. For the effect button, you can record the DMX IN values of triggering during th edition of the effect. The Edition window has an area to save the DMX IN value of triggering. MIDI, trigger with MIDI command It is possible to use the MIDI communication of the PC to trigger scene and effects buttons in Live mode. Your computer must use a MIDI interface. This interface could be include in a MIDI device. The midi device must be activated. For the scene, in EDITOR mode, a double click on the MIDI area will detect the midi values (channels and notes). The software can detect all these midi commands: - MIDI NOTE. - Midi channels and Midi note with this format: [Channel # Note]. - MIDI CONTROL. 32
33 - Midi channel, ID control, Value control [Channel. ID. Value]. - Midi channel and ID control [Channel, ID]. For the effect buttons, you can assign the MIDI value in the EDITION window of each effect. The midi formats will be the same of the scenes ones. DaslightRemoteControl.dll, trigger from software We give some files and code and allow any software or application to communicate and command our DMX control software. A DLL file offer the list of scene and the list of effects and allow to send several commands of triggering to the control software. You can contact the software editors to know the compatibility with our DMX software. With the DLL file it is possible to communicate with any type of software (Audio, Mix, video, multimedia, etc ). DMX IN and MIDI control With the MIDI and DMX IN functions activated in the software, with a MIDI input or a midi keyboard/console, with an interface that has the DMX IN option and a DMX console, you can assign some triggering and command of the software to your console. In the control windows, each fader has a ON/AUTO button below the cursor. Right click on it to display the different modes: ON/AUTO, LTP, HTP, IN, MIDI. The IN and MIDI mode will display this window: 33

34 For the IN and MIDI mode it is possible to use these functions: - DMX / MIDI input. - give the value of the input. - Do a straight patch (all the outputs will match with the inputs). - Choose the outputs parameters. - Choose the last DMX value for the maximum output level. - Choose the first DMX value for the minimum output level. - Choose the DMX universe for the outputs. - Choose the DMX channels that will be assign to the input value. You can also control by MIDI the speed of each scene in the Live mode. Right click on the scene to display the speed cursor and right click a second time to the MIDI CONTROL option to choose witch MIDI channels to assign for the speed fader. 34

35 Software menus On top and left of the screen, the software gives you some useful and important functions. The FILE menu - NEW, to create a new empty project. - OPEN, to open an old project. - SAVE, to save your work in the current project file. - SAVE AS, to save your project on a new.dvc file. - EXIT, to close the software, don t forget to save your project before. The WINDOWS menu - LIVE, to put the software under live mode only. The user cannot access to the other mode (Editor and Setup) and cannot change the content of the scenes of the project. The software secure the project and the user can only trigger the scenes, trigger the affects buttons and take control of the fixtures. - RESET POSITIONS, to put the position of the control windows as their default position in cursor or preset pallet mode. The EFFECT menu This menu can be used only in Live mode. - NEW EFFECT, to add an effect button on the screen, a popup window appears. - DELETE EFFECTS, to remove the effect button of the project. - EDIT EFFECTS, to change the DMX content and the parameters of the effect button. A popup appears. 35

 for each interface and manage the DMX universes. - SCENE GENERATOR, You access to the automatic generator of scenes.")
36 The TOOLS menu - STAND ALONE, You display the window for the stand alone mode to program the scene an interface. In the window, the scenes and options will be display only with a stand alone interface connected. - INTERFACE, to display the interface management window (Hardware explorer) and configure the different interfaces connected to the computer. You can change the signal (Input or Output) for each interface and manage the DMX universes. - SCENE GENERATOR, You access to the automatic generator of scenes. This powerful function will allow you to create a complex scene simply and in a very short time. - IMPORT SCENES, you can add in the current project some scene from another (.DLM or.dvc) project file. The scenes and steps will be add automatically to the list and they will respect the DMX values and DMX channels of the other project. After you can use the Patch manager to change the DMX address of the fixtures and the content of the scenes. - SOFTWARE COMMANDS, you display the Command Manager. You can assigne some midi values and port values to some important functions of the software. The most frequently used functions could be use quickly. The OPTION menu 36
37 - DISABLE THE MOVING FADERS, By default this option is not activated. The faders of the control windows will move with the DMX levels of each channel. Enable this function could affect the computer performances. - LIGHT BEAM ON, Activated by default. When you create a new scenes, all the fixtures selected in the group window will be setup in their CENTRE position with their beam OPEN. You can see if the DMX line works fine. This option uses the libraries. A good library will well setup the lights automatically and you will safe some time for your programming. Disable this function and all the new scenes will have all the channels to Zero DMX values. You will need to turn on each light for your programming. - DMX INPUT, you will activate or not the DMX input functions. - ENABLE MIDI INPUT, you activate or not all the MIDID functions of the software - SELECT FIXTURES TO CONTROL, with a MIDI or DMX IN control, only the item selected in the group window will be under control. The channels of all the fixtures must be previously setup under the MIDI or DMX IN mode. If the function is disable, only the channels previously setup under MIDI or DMX In mode could be controlled and the channels won t care the selected item. - AUTO SAVE, You save the current show every minute. - START THE 3D VISUALIZATION, the software will automatically start the 3D view each time that you start the software. - START THE AUDIO ANALYSIS, this tool is to calculate the Bit Per Minutes of an audio file. Each scene has a BPM function. The LANGUAGE menu You can choose several languages for the software. The? menu - ABOUT, to display the picture of the start. You can see the date of the software version on it. You can also see witch mode the software is running and witch interface is connected. The DEMO mode means that there are no interfaces connected. Stand-alone or memory mode With this mode, you can play scenes without a PC computer. With this function, you are able to save some preprogrammed scenes in the hardware memory, to organize the internal memory of the interface and manage the triggering of the scenes. To access on the Stand Alone mode, you need to click to the STAND ALONE function in the TOOLS menu of the software. 37

38 The window allows you to do all these functions: Part1: - Choose the number of DMX channels. The upper channel wont be use. 512 channel maximum per DMX universe. - Choose the USB/DMX interface to load the scenes. - Choose the DMX univers. - Activate or not the Fade time between scenes option. - Manage the time triggering of the scenes. Part2: - Add a triggering with the HE10 port and contacts. - Change the loop number of scenes. - Choose the jump of the scenes after its loop number. Part 3: - Add scenes in the memory. - Remove scene from the memory. - Change the scene position of the memory. - Write and program the memory. 38
39 - Read the memory. - Delete the memory content. - Setup the clock and time of the interface. - Test the Memory mode. - See and check the memory capacity. The stand alone window has 2 part: the part above with all the scene that you created before in the Editor mode, the part below (MEMORY MAP) to show all the scenes of the interface memory. Scenes properties You can change the scenes properties by clicking to the icon on top and right of the window or click to the Time function in the list of scenes or click to the properties icon if you scene is in the lower part of the window. The properties window has 3 parts: GENERAL part, you can change the loop number and the type of jump of the scene. If you choose a fixed number of loop you must say what could do the scene after run all the loops. TRIGGER part, for HE10 port triggering with direct mechanical contacts. DATE and TIME part, for all the time triggering options and scenes schedule. 39

. After you need to use the WRITE THE INTERFACE STAND ALONE MEMORY")
40 Write the memory To add several scenes in the memory of the interface, you need to select the scenes and click on the INSERT button or you can also drag and drop the selected scene to a free space of the down area (Memory map). After you need to use the WRITE THE INTERFACE STAND ALONE MEMORY function. 40
41 After you choose the parameters and the position of the scenes, you can optimize the memory space. In the channels used scrawling menu, you need to choose the number of channel nearby or superior of the last channel used for the show. When the memory has been optimized youcan download the scene in the interface memory and test: - Click on the WRITE THE INTERFACE STAND ALONE MEMORY button and wait the end of the upload. - Disconnect the interface. - Power on the interface with a 9 Volts power supply. - Put the switch button of the interface to the EXT position. - Select the scene to play with the + and buttons on top of the box. Notice: - You must connect an interface with the stand alone function (hardware memory) to activate the stand alone functions of the software. - You can choose the interface to program because it is possible to connect until 6 interfaces and manage 3072 dmx channels. - You will loose the memory content as soon as you write in the memory some new scenes. Don t loose the previous content of your memory if you need it. - The stand alone mode allow you to play only 1 scene. The order of the played scenes will respect the position of the memory map and the Jump information of each scene. - When you power on the interface, it will always play the first scene of the list. External contact I/O of the stand alone interfaces A stand alone interface can control 512 channels and can trigger 8 scene directly with its external HE10 connector. The HE10 allow you to connect an external switch control (8 buttons with 8 contacts) With the HE10, it is possible to synchronize several interfaces in stand alone mode. So you can manage several DMX universes without computer. The software can load the scenes into several interfaces. With a specific connection on each HE10 connectors, each buttons or contact can trigger a scene of each interfaces and synchronize the DMX universes. This is the schematic of the external switch control that you can use to activate some scenes. 41
42 42
43 It is also possible to use the functions below from the internal HE10 connector of the interface. Pin 1: Ground Pin 2: Ground Pin 3: DMX + Pin 4: Button - Pin 5: DMX - Pin 6: Button + Pin 7: +3V3 Pin 8: 'DMX' Led Pin 9: V. EXT Pin 10: '#' Led Features of the Stand alone interface - A maximum of 512 stand alone channels (only 60 for the economic interface) steps of memory capacity (only 230 steps with 512 channels and 50 steps with the economic 60 channels interface). - Power supply connector for 9 Volts, 500 ma. - Switch button for the external or usb power up. - 2 buttons to select the next and the previous scenes. - 1 button for a dimmer function on selected channels. - 1 external HE10 connector to trigger the scenes via a switch control - 1 internal HE10 connector for the interface function Interface management With this option, you can choose a DMX universe for each output of each interface or change an input into output. The software manage until 6 DMX universes, it is about 6xx512 or 3072 DMX channels. Each interface cans 512 output at least. Some interfaces manage 512 additional outputs. This input can be change into output in a easy way. It is the case for the interface with hardware internal memory, 2 XLR and a build in real time clock. This interface can manage 2 x 512 output so it it 1024 channels. So three interface connected to 3 USB ports can give you 3x1024 (3072) DMX channels. To open the interface management window, you need to check in the TOOLS menu of the software and start the INTERFACE option. 43
. After that, you just need to assign the universe to the output.")
44 You can see the information below: - Type of communication with the PC (USB / Ethernet) - Type of interface connected - Serial number of the interface - Firmware version - DMX Input and Output - Used DMX universe You just need to click on the DMX input and choose the mode (input or output). After that, you just need to assign the universe to the output. 44
ArtDMX DMX control software V1.4
 User manual ArtDMX DMX control software V1.4 1 2 Table of contents : 1. How to start a new Project...6 1.1. Introduction...6 1.2. System Requirements...6 1.3. Installing software and drivers...7 1.4. Software
ATG Electronics DynColor 500-SL RGB DMX Controllers
 Page 1 of 20 ATG Electronics DynColor 500-SL RGB DMX Controllers USER GUIDE Part Number HCD-SL500-000000-0U NOTE: This user guide is to explain the steps necessary to use the specified and assure peak
SUNLITE is a trademark of Bruno Nicolaudie. WINDOWS is a trademark of the MICROSOFT CORPORATION. All rights reserved. No parts of this work may be
 SUNLITE is a trademark of Bruno Nicolaudie. WINDOWS is a trademark of the MICROSOFT CORPORATION. All rights reserved. No parts of this work may be reproduced in any form or by any means - graphic, electronic,
How to create Profiles (Libraries) User Manual
 User Manual") How to create Profiles (Libraries) User Manual (V.1.2) Create Profiles (libraries) User Manual 1 Summary: P. 2 Index of Pictures P. 3 Opening the Profile Editor P. 3 Creating a Profile P. 4 Creating and
How to create Profiles (Libraries) User Manual (V.1.2) Create Profiles (libraries) User Manual 1 Summary: P. 2 Index of Pictures P. 3 Opening the Profile Editor P. 3 Creating a Profile P. 4 Creating and
USER MANUAL HOW TO CREATE PROFILES V
 USER MANUAL HOW TO CREATE PROFILES V. 1.5.4 SUMMARY Introduction... 3 Opening the Profile Editor... 3 Creating a new Profile... 4 Creating and adding Channels... 5 List of available channels types... 6
Show Designer 1. Software Revision 3.11
 Show Designer 1 Software Revision 3.11 OVERVIEW The Show Designer 1 is a lighting controller based on the successful and simple to use Show Designer. The Show Designer 1 adds to the existing features of
Software Revision 1.13
 Software Revision 1.13 OVERVIEW...1 REAR PANEL CONNECTIONS...1 TOP PANEL...1 MENU AND SETUP FUNCTIONS...3 CHOOSE FIXTURES...3 PATCH FIXTURES...4 PATCH CONVENTIONAL DIMMERS...4 COPY FIXTURE...5 LOAD FIXTURE
Software and Hardware Data-sheet
 Software and Hardware Data-sheet V.1.0.5 Summary: P.1 General Information P.2 Standard DMX 512 installation P.2 Recommended DMX512 installation P.3 512 and 1024 Channel USB to DMX interfaces P.4 Front
virtual controller 4
 virtual controller 4 PATCH connect patch arrange Virtual Controller 4 can be used with any DMX512 compatible lighting fixture. Lights are linked to your PC or Mac by connecting an XLR cable to one of Daslight
SUNLITE is a trademark of Bruno Nicolaudie. WINDOWS is a trademark of the MICROSOFT CORPORATION. All rights reserved. No parts of this work may be
 SUNLITE is a trademark of Bruno Nicolaudie. WINDOWS is a trademark of the MICROSOFT CORPORATION. All rights reserved. No parts of this work may be reproduced in any form or by any means - graphic, electronic,
Step Fixed value & transition mode (fade/snap) for each channel, with a duration.
 for each channel, with a duration.") V8.2.13 Conventions Step Fixed value & transition mode (fade/snap) for each channel, with a duration. Scene (or light scene) Sequence of steps. Media file Audio or video file (mp3, wav, avi, jpg, png,...),
V8.2.13 Conventions Step Fixed value & transition mode (fade/snap) for each channel, with a duration. Scene (or light scene) Sequence of steps. Media file Audio or video file (mp3, wav, avi, jpg, png,...),
EasyDMX. User Manual. Please read user manual before operating
 EasyDMX User Manual Please read user manual before operating Interface Configuration: The first time the software is executed it will ask you which controller is installed on your system or you can open
STANDALONE INTERFACES USB-DMX 512 & 1024 CHANNELS V.1.1
 STANDALONE INTERFACES USB-DMX 512 & 1024 CHANNELS V.1.1 SUMMARY Hardware technical specifications... 3 Front Face of the 512 / 1024 channels interfaces... 4 Side Faces of the 512 / 1024 channels interfaces...
Cameo D4 Available on
 Cameo D4 Available on PATCH connect patch arrange Cameo D4 can be used with any DMX512 compatible lighting fixture. Lights are linked to your PC or Mac by connecting an XLR cable to one of Cameo s DVC4
STANDALONE INTERFACES USB-DMX 512 & 1024 CHANNELS V.1.0.5
 STANDALONE INTERFACES USB-DMX 512 & 1024 CHANNELS V.1.0.5 SUMMARY Hardware technical specifications... 4 Top Face of the 512 / 1024 channels interfaces... 5 LED 7-segments display operation:... 5 LED 7-segments
2.028 CODE ELECTRONIC CO., LTD.
 Lighting Console User s Manual Ver. 2.028 CODE ELECTRONIC CO., LTD. Content 1. Welcome to Use the Phantom 2048...1 1.1. Setting up Phantom 2048...1 1.2. The Front Panel of Phantom 2048...1 1.2.1. Unit...2
Table of contents. I Preface. II First steps 1. 3D stage 2. Your first stage
 Table of contents I Preface 1 II First steps 3 1. 3D stage 2. Your first stage III User mode 2 3 7 1. Rendering options 2. Resolution 3. Cameras 4. DMX levels 5. Universes patch 6. Movie recorder 6 7 7
USER MANUAL TROUBLESHOOTING V
 USER MANUAL TROUBLESHOOTING V. 1.7.0 This user guide contains detailed information about all the software and hardware troubleshooting and how to deal with any problems. This guide assumes you have a basic
SUNLITE is a trademark of Bruno Nicolaudie. WINDOWS is a trademark of the MICROSOFT CORPORATION. All rights reserved. No parts of this work may be rep
 SUNLITE is a trademark of Bruno Nicolaudie. WINDOWS is a trademark of the MICROSOFT CORPORATION. All rights reserved. No parts of this work may be reproduced in any form or by any means - graphic, electronic,
Hardware technical specifications Front Face of the 512 / 1024 channels interfaces LED 7-segments display operation:...
 SUMMARY Hardware technical specifications... 4 Front Face of the 512 / 1024 channels interfaces... 5 LED 7-segments display operation:... 5 LED 7-segments Sleep option:... 6 selection Mode button... 6
6. Show Adding Controls to Show Mode * iPhone/iPad/Android (Easy Remote app) * Other Information...
 * Other Information...") mydmx 3.0 English mydmx 3.0 Table of contents 1. Quick Start... 1 1.1.Installing the Software... 1 1.2.Adding Lighting Fixtures... 3 1.3.Programming a Scene... 5 1.4.Controlling Live... 9 1.5.Creating
mydmx 3.0 English mydmx 3.0 Table of contents 1. Quick Start... 1 1.1.Installing the Software... 1 1.2.Adding Lighting Fixtures... 3 1.3.Programming a Scene... 5 1.4.Controlling Live... 9 1.5.Creating
Cobra Dimmer Master DMX Controller User Manual
 Cobra Dimmer Master DMX Controller User Manual User Manual Dimmer Master Dear Customer, Thank you for purchasing the Dimmer Master DMX controller. With decades of experience in design and production, we
User manual DMX CONTROL 512. Table of contents
 User manual DMX CONTROL 512 Table of contents 1. SAFETY INSTRUCTIONS... 4 2. OPERATING DETERMINATIONS... 4 3.OVERVIEW... 6 3.1.REAR PANEL CONNECTIONS... 6 3.2.FRONT PANEL... 6 4.MENU... 6 4.1.CHOOSE FIXTURES...
Manual for DMX-60 Controller Box and Software 1 Introduction 1.1 Software Installation
 Manual for DMX-60 Controller Box and Software 1 Introduction What actually is DMX512? DMX is short for "Digital Multiplex" and is a digital data transmission standard for dimmers, scanners, and their controllers.
SUNLITE is a trademark of Bruno Nicolaudie. WINDOWS is a trademark of the MICROSOFT CORPORATION. All rights reserved. No parts of this work may be rep
 SUNLITE is a trademark of Bruno Nicolaudie. WINDOWS is a trademark of the MICROSOFT CORPORATION. All rights reserved. No parts of this work may be reproduced in any form or by any means - graphic, electronic,
*Note that LL Studio can also work in Stand-alone mode with an SD card.
 PC System requirements: Operating System : Microsoft Windows XP / Windows Vista / Windows 7 / Windows 8 C.P.U : Intel Pentium IV at 2.0 GHz (or higher) Video Card : 128 MB VRAM Memory : 1 GB RAM Hard Disk
4 Getting start manual
 Sunlite 2004 Manual 4 Getting start manual This step-by-step manual has been written especially for you. It describes the main functions and presents the specific features of our product and will be used
Stick 2 (STICK-GU2) Sunlite Touch-Sensitive Intelligent Control Keypad Getting Started Guide
 Sunlite Touch-Sensitive Intelligent Control Keypad Getting Started Guide") 11235 West Bernardo Court, Suite 102 San Diego, CA 92127 888-880-1880 Fax: 707-281-0567 EnvironmentalLights.com Kit STICK-GU2 Stick 2 (STICK-GU2) Sunlite Touch-Sensitive Intelligent Control Keypad Getting
11235 West Bernardo Court, Suite 102 San Diego, CA 92127 888-880-1880 Fax: 707-281-0567 EnvironmentalLights.com Kit STICK-GU2 Stick 2 (STICK-GU2) Sunlite Touch-Sensitive Intelligent Control Keypad Getting
THE LIGHTING CONTROLLER
 Software Version 6.26 User Manual THE LIGHTING CONTROLLER www.thelightingcontroller.com TABLE OF CONTENTS 1. BEFORE YOU BEGIN... 4 WHAT IS INCLUDED... 5 UNPACKING INSTRUCTIONS... 5 MANUAL CONVENTIONS...
MagicQ Tutorial 2015 ChamSys MagicQ Tutorial 1 of 19
 ChamSys MagicQ Tutorial 1 of 19 Tutorial 1 : Windows & Buttons This tutorial introduces MagicQ, showing you how to open and close windows and perform simple operations using the MagicQ interface. It uses
Easy Stand Alone (U8) Getting Started Guide for Pixel Control
 Getting Started Guide for Pixel Control") 11235 West Bernardo Court, Suite 102 San Diego, CA 92127 888-880-1880 Fax: 707-281-0567 EnvironmentalLights.com Kit Front Back Easy Stand Alone (U8) Getting Started Guide for Pixel Control Install "Easy
11235 West Bernardo Court, Suite 102 San Diego, CA 92127 888-880-1880 Fax: 707-281-0567 EnvironmentalLights.com Kit Front Back Easy Stand Alone (U8) Getting Started Guide for Pixel Control Install "Easy
Versa Mix. User Guide and Reference Manual Charter Street Los Angeles Ca /07
 Versa Mix User Guide and Reference Manual 2/07 4295 Charter Street Los Angeles Ca. 90058 www.americanaudio.us Introduction Congratulations and thank you for purchasing the American Audio Versa Mix. Versa
INTERFACES USB-DMX 512 & 1024 CHANNELS V.1.0.5
 INTERFACES USB-DMX 512 & 1024 CHANNELS V.1.0.5 SUMMARY 512 and 1024 Channel USB to DMX interfaces... 3 Hardware technical specifications... 3 Front Face of the 512 / 1024 channels interfaces... 4 Rear
ScanLibrary Editor Manual
 ScanLibrary Editor Manual Table of Contents Part I ScanLibrary Editor 4 5 1 How to... create a new fixture 6 2 How to... create a channel 7 3 How to... create a preset 1 ScanLibrary Editor Scan Library
CUELUX MANUAL VISUAL PRODUCTIONS BV
 CUELUX MANUAL VISUAL PRODUCTIONS BV WWW.VISUALPRODUCTIONS.NL Contents 1 Introduction 4 2 Installing Drivers 7 3 Options 10 4 Patch 14 5 Playbacks 17 6 Groups 21 7 Cuelists 23 8 Stacklists 31 9 Globals
Video Management Software
 Video Management Software User Manual Web: europesecurity.eu Mail: info@europesecurity.eu Tel.: 0541 352 952 User s Manual 2 Contents CHAPTER : XMS CENTRAL USER MANUAL 1 PC REQUIREMENT 3 2 INSTALL 3 3
LED Commander 16/2 DMX controller. user manual
 LED Commander 16/2 DMX controller user manual Musikhaus Thomann Thomann GmbH Hans-Thomann-Strasse 1 96138 Burgebrach Germany Telephone: +49 (0) 9546 9223-0 E-mail: info@thomann.de Internet: www.thomann.de
Manual for DMX-120 Controller Box and Software
 Manual for DMX-120 Controller Box and Software 1 Introduction What actually is DMX512? DMX is short for "Digital Multiplex" and is a digital data transmission standard for dimmers, scanners, and their
Wireless DMX Control. Show Performer DMX Controller. Stage Desk 48 DMX Controller
 Wireless DMX Control SRC-260 Each unit is a transmitter and receiver based on its Dip settings. Connect a DMX 512 standard controller to the SRC-260 and set another SRC-260 set in receivers mode down range
DMX MASTER. Professional Lighting Technology CA-2416W. User Guide Please read these instructions carefully before use
 DMX MASTER Professional Lighting Technology CA-2416W User Guide Please read these instructions carefully before use CONTENTS 1. Features 2 Page 2.General Instructions 3 Page 3.Overview. 2 Page 3-1.Front
Sunlite Suite. English
 Sunlite Suite English SUNLITE is a trademark of Bruno Nicolaudie. WINDOWS is a trademark of the MICROSOFT CORPORATION. All rights reserved. No parts of this work may be reproduced in any form or by any
Bose ControlSpace Designer Software. User Guide
 Bose ControlSpace Designer Software User Guide 2005 Bose Corporation. No part of this work may be reproduced, modified, distributed or otherwise used without prior written permission. Contents Introduction
Controller DMX DC-192
 Manual Controller DMX DC-192 Table of contents 1. Safety instructions... 3 1.1. FOR SAFE AND EFFICIENT OPERATION... 3 2. Overview... 5 2.1. Front view... 5 2.2. Rear view... 6 3. Joystick setup... 7 3.1.
M-480 RCS. User s Guide
 M-480 RCS User s Guide Roland corporation and its affiliates assume no responsibility for any loss or damage (loss of profits, loss of data or other economical losses) caused by use of this software. This
INTERFACES USB-DMX 1024 CHANNELS V.1.0.6
 INTERFACES USB-DMX 1024 CHANNELS V.1.0.6 SUMMARY 1024 Channels USB to DMX interfaces... 3 Hardware technical specifications... 3 Front Face... 4 Rear Face... 4 IR receiver and remote... 5 DMX-IN trigger
ESA2. Table of contents
 ESA2 English SUNLITE is a trademark of Bruno Nicolaudie. WINDOWS is a trademark of the MICROSOFT CORPORATION. All rights reserved. No parts of this work may be reproduced in any form or by any means -
User Manual. Central Monitoring Software for TER-series recorders. CenPro
 EN User Manual Central Monitoring Software for TER-series recorders CenPro Contents CENPRO USER MANUAL 1 PC REQUIREMENT 3 2 INSTALL 3 3 UNINSTALL 5 4 BASIC OPERATION 7 4.1 Log In 7 4.2 Screen Layout 8
Central Management Software for NVR-915 / NVR-1615 CV5-M256
 Central Management Software for NVR-915 / NVR-1615 Table of Contents Chapter 1. Main Console... 4 1.1 Tool Bar... 4 1.2 NVR List... 5 1.3 Division List... 7 1.4 Group List... 9 1.5 PTZ Panel...11 1.6 Operation
STANDALONE INTERFACE USB-DMX DIN V 1.6.1
 STANDALONE INTERFACE USB-DMX DIN V 1.6.1 SUMMARY Hardware Technical Specifications... 3 Dimension of the interface... 4 Front face... 4 Top face... 4 General pinout and device's connector... 5 External
Philips GoGear audio video player SA5225BT SA5245BT SA5247BT SA5285BT SA5287BT. Quick start guide. Install Connect and Charge Transfer Enjoy
 Philips GoGear audio video player SA5225BT SA5245BT SA5247BT SA5285BT SA5287BT Quick start guide 1 2 3 4 Install Connect and Charge Transfer Enjoy Need help? Please visit www.philips.com/welcome where
Panorama Tour Version 2 Quick Start rev Quick Start Guide
 Page Quick Start Guide Contents I.) What s in the Box II.) Setting up Panorama for the first time III.) What s on the Panorama Desktop IV.) Configuring your Control Monitors & Output Displays V.) A brief
PIVOT CMS CLIENT SOFTWARE USER MANUAL
 PIVOT CMS CLIENT SOFTWARE USER MANUAL 1 CMS USER GUIDE 1.1 PC REQUIREMENT Recommended PC Requirement OS CPU VGA RAM HDD Graphics Card OS CPU VGA RAM HDD Windows Vista, 7 or higher Intel Core2Quad Q9400
SCAN OPERATOR FX II. User Manual. For Software Version Internet:
 SCAN OPERATOR FX II User Manual For Software Version 1.5 email: service@glp.de Internet: http://www.glp.de Contents 1 Features... 5 2 Overview... 6 2.1 Front View... 6 2.2 Rear View... 8 2.3 Installation
 INTRODUCTION This controller is suitable for controlling up to twenty four (24) DMX-512 units of any type with maximum 32 channels respectively (scanner, moving head, strobe, etc). The controller s software
User Instructions. Rev. 3/04
 User Instructions Rev. 3/04 Improvement and changes to specifications, design and this manual, may be made at any time without prior notice. All rights reserved. Contents Features 1 General Instructions
Playlist Builder 1.5 Manual
 Playlist Builder 1.5 Manual Playlist Builder is a database and schedule system for your audio files. It supports the following audio formats: WAV SND/MP2 MP3 OTS Before you run the program, make sure you
USER MANUAL. 17R Spot\Beam Light. Please Read Over This Manual Before Operating The Light Fixture
 USER MANUAL 17R Spot\Beam Light Please Read Over This Manual Before Operating The Light Fixture 1 PRODUCT SPECIFICATIONS 1.1 PRODUCT SPECIFICATIONS The 17R Spot\Beam light is an improved version of Beam
LEAP FROG 48/96 OPERATING MANUAL
 LEAP FROG 48/96 OPERATING MANUAL LEAP FROG 48/96 OPERATING MANUAL If a portable or temporary three phase mains supply is used to power this desk, we recommend that the desk mains plug is removed before
USER MANUAL. 10R Spot\Beam Light. Please Read Over This Manual Before Operating The Light Fixture
 USER MANUAL 10R Spot\Beam Light Please Read Over This Manual Before Operating The Light Fixture 1 PRODUCT SPECIFICATIONS 1.1 PRODUCT SPECIFICATIONS The 10R Spot\Beam light is an improved version of Beam
The Lighting Controller. User Guide
 The Lighting Controller User Guide TABLE OF CONTENTS BEFORE YOU BEGIN... 3 INTRODUCTION... 4 USB TO DMX CABLE FEATURES... 4 BOX INTERFACE FEATURES... 4 RACK MOUNT INTERFACE FEATURES... 5 SETUP... 6 CPU
SPOT MOVING HEAD M1S150W USER MANUAL. For safety, please read this user manual carefully before initial use.
 SPOT MOVING HEAD M1S150W USER MANUAL For safety, please read this user manual carefully before initial use. Event Lighting reserves the right to revise the manual at any time. Information and specifications
Viewer 3.0. Operation Guide
 Viewer 3.0 en Operation Guide Viewer 3.0 Table of Contents en 3 Table of Contents 1 Introduction 5 1.1 About this Manual 5 1.2 Conventions in this Manual 5 1.3 Viewer 5 1.4 System Requirements 6 1.5 Additional
Philips GoGear audio video player SA1OPS04 SA1OPS08 SA1OPS16 SA1OPS32. Quick start guide. Install Connect and Charge Transfer Enjoy
 Philips GoGear audio video player SA1OPS04 SA1OPS08 SA1OPS16 SA1OPS32 Quick start guide 1 2 3 4 Install Connect and Charge Transfer Enjoy Need help? Please visit www.philips.com/welcome where you can access
Lorex Client 7.0 & Lorex Message Master
 Lorex Client 7.0 & Lorex Message Master Software Manual English Version 1.0 MODELS: L19WD Series www.lorexcctv.com Includes L19WD800 & L19WD1600 Copyright 2008 Lorex Technology Inc. Table of Contents Table
FOX512. User s Manual MOVING LIGHT CONTROLLER. Net.DO FOSHAN NETDO LIGHTING CONTROL EQUIPMENT CO.,LTD
 FOX512 MOVING LIGHT CONTROLLER User s Manual Net.DO FOSHAN NETDO LIGHTING CONTROL EQUIPMENT CO.,LTD Contents 1. Summary... 3 1.1 Functions... 3 1.2 Specifications (VER: 2.0)... 3 2. Installation... 4 2.1
SLESA-UE7 Quick Start Guide
 SLESA-UE7 Quick Start Guide 11235 West Bernardo Court, Suite 102 San Diego, CA 92127 888-880-1880 Fax: 707-281-0567 EnvironmentalLights.com You will need to install Easy Stand Alone Pro (ESA Pro) or Easy
DMX-Master 3-FX DMX-controller. user manual
 DMX-Master 3-FX DMX-controller user manual Musikhaus Thomann e.k. Treppendorf 30 96138 Burgebrach Germany Telephone: +49 (0) 9546 9223-0 E-mail: info@thomann.de Internet: www.thomann.de 13.08.2013 Table
Copyright 2008 Compulite Systems (2000) Ltd. All rights reserved.
 Ltd. All rights reserved.") Vector PC Copyright 2008 Compulite Systems (2000) Ltd. All rights reserved. This documentation is delivered subject to the following conditions and restrictions: This document is protected by copyright
Vector PC Copyright 2008 Compulite Systems (2000) Ltd. All rights reserved. This documentation is delivered subject to the following conditions and restrictions: This document is protected by copyright
FROG 2 QUICK START GUIDE
 FROG 2 QUICK START GUIDE If a portable or temporary three phase mains supply is used to power this desk, we recommend that the desk mains plug is removed before connecting or disconnecting the supply.
Solution Series. Quick Start Guide English 1.0
 Solution Series Quick Start Guide English 1.0 Introduction This Manual This manual describes the operation of the Solution and Solution XL lighting desks. This chapter contains an overview of the capabilities
Manual Lumikit SHOW (Windows and MAC OS X) Manual Lumikit LED (Windows) Version Lumikit Sistemas para Iluminação
 Manual Lumikit LED (Windows) Version Lumikit Sistemas para Iluminação") Manual Lumikit SHOW (Windows and MAC OS X) Manual Lumikit LED (Windows) Version 2.0 2014 Lumikit Sistemas para Iluminação Minimum recommended system specifications: 1GB of memory RAM; 300MB hard disk free
Manual Lumikit SHOW (Windows and MAC OS X) Manual Lumikit LED (Windows) Version 2.0 2014 Lumikit Sistemas para Iluminação Minimum recommended system specifications: 1GB of memory RAM; 300MB hard disk free
JUST A TOUCH. to control your. Lights
 JUST A TOUCH to control your Lights QUIVER DMX CONTROLLER QUIVER is Sagitter s new lighting console, characterized by an innovative design and dedicated to the control of all the conventional and automated
idmx-1000 Intelligent DMX512 Converter
 Intelligent DMX512 Converter User Manual October 8, 2007 V1.01 Copyright Light O Rama, Inc. 2007, 2008 Table of Contents Introduction... 4 What s in the Box... 4 Important Considerations... 5 Quick Start
Hardware Manual Digital Art System
 Part I Preface 1 Part II USB-DMX interfaces 512 channels 2 1 Introduction 2 Stand alone USB interfaces 3 USB powered interfaces 4 Installing the USB drivers 5 Role played by the Leds
240 Channel DMX Controller
 Page 01 wdmlighting.com Features: A. 240 DMX channels. B. 12 scanners of 16 DMX channels. C. 30 banks of 8 programmable scenes. D. 6 chases of 240 programmed scenes from 30 banks E. 8 faders for manual
Introduction. Thank you very much for trusting us.
 User Manual V 1.1 1 Introduction LightShark series is a new concept within the lighting control systems that adapts to the daily needs, offering a powerful, compact and economical solution. Perfect for
U S E R M A N U A L. Version Rev 1.0. ADJ Los Angeles, Ca
 MAGIC-260 U S E R M A N U A L Version 04-06 Rev 1.0 ADJ Los Angeles, Ca 90058 www.adj.com MAGIC-260 Sections: Table of Contents 1 : General Introduction...3 2 : Safety Information & Maintenance...4 3 :
Philips GoGear audio player SA1ARA02 SA1ARA04 SA1ARA08 SA1ARA16. Quick start guide
 Philips GoGear audio player SA1ARA02 SA1ARA04 SA1ARA08 SA1ARA16 Quick start guide Need help? Please visit www.philips.com/welcome where you can access to a full set of supporting materials such as user
DMX-Master 3-FX DMX controller. user manual
 DMX-Master 3-FX DMX controller user manual Musikhaus Thomann e.k. Treppendorf 30 96138 Burgebrach Deutschland Telephone: +49 (0) 9546 9223-0 E-mail: info@thomann.de Internet: www.thomann.de 08.02.2013
Junior Controller JC Rev1.2
 Junior Controller JC-1 www.prolight.co.uk sales@prolight.co.uk 24-004-1115-00 Rev1.2 1 INRTODUCTION Welcome! You made the right decision by choosing this sophisticated and intelligent product. Every unit
EASI MP-X Series. User Manual EASI MPR. Workstation. MPR Workstation user manual, , rev003
 EASI MP-X Series User Manual EASI MPR Workstation MPR Workstation user manual, 59300234, rev003 Contents MPR Workstation Introduction...1 General...1 Software version...1 Structure of the Network...1 Workstation
LP32. Package Content: Small package + 1 USB cable + 1 USB to DMX Interface (3 Pin XLR)
") LP32 The package works only with the Led Player Software under restricted mode. It is our most economic package. MOQ required. Great products for simple project with few channels and product promotion.
LP32 The package works only with the Led Player Software under restricted mode. It is our most economic package. MOQ required. Great products for simple project with few channels and product promotion.
USO RESTRITO. Getting Started
 Getting Started Original Manual: Synkron Revision and Quality Control: C. Bachmann, H. Bischoff, S. Pfeifer, C. Schomburg The information in this document is subject to change without notice and does not
Сенсорный DMX контроллер STICK-DE3
 Сенсорный контроллер STICK-DE3 +7 (495) 510-71-29 +7 (495) 510-71-52 ps@planeta-sveta.ru www.planeta-sveta.ru Sunlite Touch-sensitive Intelligent Control Keypad Ref. STICK-DE3 Page 1/4 Technical datasheet
VRX 2002 Tel: +44 (0) Page 24. VRX Compact controller Instruction Manual - Issue 1.0: Mar 2002
 Page 24. VRX Compact controller Instruction Manual - Issue 1.0: Mar 2002") VRX 2002 Tel: +44 (0)116 278 8078 http://www.vrx.uk.com Compact controller VRX Compact controller Instruction Manual Issue 1.0: Mar 2002 Written by Sabre Technology (Hull) Ltd: 01482 879229 Page 24 Page
VRX 2002 Tel: +44 (0)116 278 8078 http://www.vrx.uk.com Compact controller VRX Compact controller Instruction Manual Issue 1.0: Mar 2002 Written by Sabre Technology (Hull) Ltd: 01482 879229 Page 24 Page
MA1024 / 2048 / 3000
 MA1024 / 2048 / 3000 MOVING LIGHT CONTROLLER Users Manual (VER:3.9) Net.DO LIGHTING CONTROL EQUIPMENT CO.,LTD Contents 1. Summary... 4 1.1 Functions... 4 1.2 Specification Parameters... 5 2. Installation...
1 Hardware setup. the driver for the Universal USB/DMX interface. interface warnings and errors. XLR cable connnections.
 Contents I Table of Contents Part I Overview 8 1 Contents of help... file 8 2 Using this help... file 10 Part II Quick start and concepts 1 Quickstart 10... 10 2 Basic programming... terms and elements
DMX-Master 3-FX DMX controller
 DMX-Master 3-FX DMX controller user manual Musikhaus Thomann Thomann GmbH Hans-Thomann-Straße 1 96138 Burgebrach Germany Telephone: +49 (0) 9546 9223-0 E-mail: info@thomann.de Internet: www.thomann.de
Elation Professional Los Angeles, Ca
 DMX Partner USER MANUAL Version 1.0 24-004-1631 Elation Professional Los Angeles, Ca 90058 www.elationlighting.com Table of contents 1. General Introduction...3 2. Safety Information & Maintenance...3
lumentouch SPECIFICATION SHEET Client: Project name: Order #: Type: Qty: FEATURES AND BENEFITS PACKAGE CONTENT HOW TO ORDER LTO
 Client: Project name: Order #: Type: Qty: FEATURES AND BENEFITS Flat wall mounted lighting controller Universal mounting plate compatible with any electrical backbox MINI-USB connection for software programming
INSTALLING THE PS3 XBOX READY SOFTWARE:
 INSTALLING THE PS3 XBOX READY SOFTWARE: 1. Insert the Installation CD to CD-ROM drive and execute Ready_Setup.exe NOTE: If it is the first time for the target USB disk using under this software, the software
NUAGE MASTER Ncs500-CT
 CONTROL SURFACE NUAGE MASTER Ncs500-CT Operation Manual Using this manual This operation manual supports keyword searching and linking as follows. Keyword searching Searching for keywords is performed
Quick start guide. Install Connect and Charge Transfer Enjoy. Philips GoGear audio video player
 Philips GoGear audio video player SA3014 SA3015 SA3016 SA3024 SA3025 SA3026 SA3044 SA3045 SA3046 Quick start guide 1 2 3 4 Install Connect and Charge Transfer Enjoy Need help? Please visit www.philips.com/welcome
ArcControl Version: 1.0
 ArcControl 1024 Version: 1.0 User Guide - Getting Started This manual is in three sections: 1. Getting Started: Specifications, installation, and using the controls (p. 2) 2. The Quick-Setup Assistant
Unisight DVR System. Unisight DVR Manual. Ver rev1.3.4
 Unisight DVR Manual Ver2.7.1027 rev1.3.4 1 Table of Contents System Requirements.8 Unisight DVR Server.. 8 Server Hardware Requirements...8 Server Software Requirements 8 Client Hardware Requirements...
Professional DMX Controller
 Professional DMX Controller DMX-4840 Order Number 38.5960 INSTRUCTION MANUAL ELECTRONICS FOR SPECIALISTS ELECTRONICS FOR SPECIALISTS ELECTRONICS FOR SPECIALISTS ELECTRONICS FOR SPECIALISTS CONTENTS 1.
MV-8000 Production Studio. When asked So what s up with the new MV-8000? Here are the opening points to hit The MV-8000 has:
 The Main Points When asked So what s up with the new MV-8000? Here are the opening points to hit The MV-8000 has: Integrated Sampling, MIDI Sequencing, and Audio Recording 2 Samplers In One High Quality
Pharos Designer 2. Copyright Pharos Architectural Controls (15/1/2015)
") Pharos Designer 2 Welcome Welcome to Pharos Designer 2. We are delighted to introduce you to an entirely new version of the Pharos Designer software that picks up where the venerable and much- loved version
Pharos Designer 2 Welcome Welcome to Pharos Designer 2. We are delighted to introduce you to an entirely new version of the Pharos Designer software that picks up where the venerable and much- loved version