Camtasia... 3 What is Camtasia and how do I download it?... 4 How do I record a video in Camtasia?... 6 How do I edit video and audio in
|
|
|
- Claud Harmon
- 5 years ago
- Views:
Transcription
1 CAMTASIA
2 Table of Contents... 3 What is and how do I download it?... 4 How do I record a video in?... 6 How do I edit video and audio in?...14 How do I apply effects in?...19 How do I use a Green Screen with?...29 How do I add media such as a PowerPoint Slide or Facecam to?...33 How do I record a PowerPoint presentation in?...37 How do I work on projects between different computers?...41 How do I add captions to my video file?...44 How do I use to record an audio podcast?...51
3 Page 3
 or Self Service(Mac) to download. is available to all faculty and staff, and can be downloaded by going here : Home/ Personal Use Software.")
4 What is and how do I download it? is an easy to use video editing software that allows you to record, edit, and publish videos with ease. For campus computers, please use Software Center(PC) or Self Service(Mac) to download. is available to all faculty and staff, and can be downloaded by going here : Home/ Personal Use Software. If using a Mac, download Studio 3. If using a Windows, download Studio 9. You may need to sign in with your HSU login in order to access the software download. Page 4
5 For help recording a video inside, head here: How do I record a video in? For help editing your video and audio, head here: How do I edit video and audio in? For help applying effects to your video, head here: How do I apply effects in? Page 5
6 How do I record a video in? You will learn how to record a video in. It is highly reccommended that you watch 's own tutorial videos, found here: Tutorial Videos or at the Help tab at the top of. The 5 basic tutorial videos will take around 20 minutes, and provide all the information needed to create, edit, and produce quality videos. For help editing videos in, head here: How do I edit a video in? For help adding effects in, head here: How do I apply effects in? For help captioning your video, head here: How do I add captions to my video file? For help using to record an audio only podcast, head here: How do I use to record an audio podcast? 1. Start a new project Open 9 (Windows) or 3 (Mac) and select New Project. Page 6


7 2. Start recording Click the Record button in the top left to get ready to record. Page 7

8 3. A small window will pop up with several options For help setting up your Microphone or Webcam, head here: How do I check if my microphone/webcam is working? 1. By default, will record your entire screen. You can change which areas get recorded by clicking Custom and changing the dimensions or by resizing the green dashed box that outlines the screen. 2. If using a webcam, make sure that the camera is turned on. 3. Make sure Audio is being recorded or change your microphone input by opening the drop down menu. 4. Change the sensitivity of the microphone by changing the volume slider. 5. When your preferences are finished, hit record to begin recording. Page 8


9 You can also 'draw' onscreen during your recording by pressing Ctrl + Shift + D and selecting one of the drawing effects in the recording window. 4. Toggling record In the small window, press Pause to pause the recording until you press play again, or click Stop and end the recording and place it within. Pressing F9 will also start the recording and F10 will stop the recording. Page 9
 will allow you to work on the project again in the future, with your tracks and timeline in the same posititoning.")

10 5. The recording is placed onto the timeline Don't forget to save your project periodically overtime for safety. Saving it as a Project (.tscproj) will allow you to work on the project again in the future, with your tracks and timeline in the same posititoning. You can also drag and drop audio or video files onto the timeline to place them directly in the video. You can jump to different points in the video by clicking along the timeline to certain points or by dragging the playhead. Pause and play the video by pressing space. If you want to separate the recorded system audio and video, right click the clip and select Separate Audio and Video. This will split any audio that was playing through your system while you recorded your video. Your recorded audio and video will be placed onto the timeline. The audio and video will be placed on separate tracks, and can be edited independently of each other. 6. The recording viewport The recorded video will display on the canvas. Here you can preview your project and make changes to the video. Page 10


11 7. Share the video Once you are done with your video, hit the Share button at the top right. This will bring a list of options on how you want to share or publish this video. 8. Saving the video as a local file Saving as a Local File will allow you to save the video to your computer, allowing you to keep it for continued future use. Page 11

12 The default settings may be changed if you want, but they are good to go by default. Click Next through several screens. The final screen will allow you to change the name of the file and where it gets saved to. Once you've changed these to your preferences, hit Finish and your video will be created on your computer. Page 12
13 You can also upload the video directly to YouTube or to your Google Drive. Selecting either of these requires you to sign in and fill out some of your video information. Page 13


14 How do I edit video and audio in? You will learn how to edit your video and audio inside. It is highly reccommended that you watch 's own video tutorials, found here: Video Tutorials. Their 5 basic tutorial videos are about 20 minutes long, and provide easy to follow and thorough tutorials for learning the essentials to. 1. How to edit video. If you make any mistakes along the way, you can always press the undo key, Control+Z, or you can click the Edit tab up top and click Undo Page 14

15 1. After you've recorded some video, it will appear in your Media Bin in. Dragging it onto the timeline will place it into the video and allow you to make edits. 2. Placing the mouse on the side of the selected video track will change it to an arrow. Dragging it left or right will shorten or lengthen the track, allowing you to trim off unnecessary parts to the video. If you trimmed off too much, just drag it back and it'll restore the trimmed part. 3. To split the video track, select it in the timeline and press S or go to the Edit tab up top and select Split. Splitting video cuts it into two sections, allowing you to make separate edits on specific parts of your video. 4. You can trim out the middle of the track by dragging the green or red sliders along the play head, and clicking the Cut scissors. 5. To view your whole timeline or to bring all your timeline into view, drag the slider or click the magnifying glass. 2. Editing audio To watch 's video tutorial for editing audio, head here: Audio Editing Tutorial. 1. Splitting and Trimming audio works the same as video, by pressing S or by dragging the sides of it to shorten or lengthen it. Be careful not to put the audio levels too high, as it can blow out the audio and make it sound distorted. Page 15


16 2. You can change the volume of the whole track by selecting it and moving the green line up or down. 3. You can also change the audio gain by moving the slider in the top right while the audio track is selected. Page 16


17 4. You can add audio points by double clicking along the green line or by right clicking and selecting Add Audio Point. Audio points are green dots that allow you to change the volume of a certain section rather than the whole track. You can drag audio points along the selection to get them to your desired position and volume gain. 5. To import a song or audio file, click the File tab at the top and select Import and Media. This opens a window where you can select your audio files to be imported in. Your imported media will be placed within the Media Bin, where you can drag it onto the time line as it's own track. Page 17

18 6. The Library tab contains some simple music tracks that can be used within the video. Select one and drag it onto the timeline to place it in your video. For help adding effects such as a Fade In or Fade Out to your audio, head here: How do I apply effects in? 7. If the music track you added in is too loud over your voice, you can add a fade in and fade out with audio points or by dragging a Fade In/Out Audio Effect onto the audio track. By lowering the audio with audio points at the beginning, it quiets the whole track which allows your voice to be heard easier. You can raise the volumes back up or fade it out at the end by lowering it down to zero. Page 18

19 How do I apply effects in? You will learn how to apply different effects to your video in. It is highly reccommended that you watch 's own video tutorial series, found here: Animation and Effects Video Tutorial. has a variety of effects you can use to help enhance your video and make it more entertaining. They are located on the left side under the Record button. To add most effects, drag and drop them onto your timeline or directly into the video. Video Effects Annotations Drag and drop the desired annotation onto your timeline to apply it. Double click it on the video to edit it and enter text. You can also change the properties of the annotation, such as text size or color, on the right side. Page 19


20 Some other useful annotations include Blur, Highlight, and Spotlight. Transistions To apply a transition, drag and drop it onto an acceptable place on the video timeline. You'll notice that parts of the timeline will light up yellow at their beginning and end, which indicates Page 20


21 where you may place a transition. If you have two split selections placed together, placing a transition over it will apply it to both of them. Behaviors and Animations Behaviors and Animations allow you to add movement into your video in several different ways. Drag and drop a behavior onto a video clip in your timeline to apply it to the section. This is indicated by a green arrow, which turns yellow when selected. You can change the length of the behavior to have it play out over a different length of time by dragging the dot at the tip. Page 21


22 You can change the properties of the behavior effect on the right side, allowing you to change directions, speed, and movement. Animations are similar to Behaviors, but focus more on zooming in and out on specific points. Use the Zoom-n-Pan to zoom in and move around on certain points of your video. Page 22


23 1. Resize the window outline to focus in on points and create a Zoom effect, or drag the Zoom slider to zoom in or out. 2. Creating a zoom will place it onto your timeline as an arrow. You can shorten or lengthen the duration of the zoom by resizing the arrow. Page 23


24 3. By placing the Restore animation after your zoom, you can have your video Zoom in on a point of focus before going back to it's original size. Cursor Effects Cursor Effects can change how your cursor acts when during the video. Drag and drop the cursor effect you want onto the desired video clip in your timeline. You can change the settings of a cursor effect on the right side. 1. Cursor Highlight: Gives a circular highlight around your cursor. 2. Cursor Magnify: Magnifies and section that your cursor hovers over. 3. Cursor Spotlight: Blurs out any section that isn't being hovered over by your cursor. 4. Left Click & Right Click effects: The Left Click tab and Right Click tab have effects that get displayed whenever you clicked in the recording. Page 24

25 Visual Effects Visual Effects can alter how the video looks in several different ways, such as adding or removing certain colors, or changing the speed of the clip. Drag a Visual Effect onto a clip in your timeline to apply it, and change the properties of it on the right side. For help with removing a color for a greenscreen, head here: How do I use a Green Screen with? Captions To add a caption to your video, click the + Add Caption button. This will place a 4 second Blank Caption in your video where you can enter in your text. Page 25

26 1. Click these captions to edit their text. 2. Change the text settings by clicking the drop down arrow. 3. Change the duration of a caption by dragging the slider. 4. Quickly jump between captions by using the arrows. Audio Effects Voice Narration You can record audio straight from to place into your video using Voice Narration. will start recording where your playhead is located, and will automatically play the video while you are recording over it. Page 26

27 1. Select which Mic you want to use and make sure it works. 2. Adjust the Mic sensitivity or use Auto Leveling if needed. 3. Muting your timeline will prevent it playing back sound while you are recording. 4. You can type or paste a script into the text box to help with reading. 5. When ready, press Start Voice Recording. 6. Once finished, click Stop and save the file to your computer. Audio Effects Audio Effects can be dragged and placed onto tracks in your timeline to change the audio in several ways. Page 27

28 1. Noise Removal will attempt to remove any background noise that was recorded, allowing you to remove background chatter or low humming. 2. Volume Leveling will attempt to increase and even out your audio levels, providing a much more consistent volume throughout. 3. Fade In and Fade Out lower volume levels at the beginning or end of the audio. 4. Clip Speed allows you to speed up or slow down the audio in the clip. Page 28

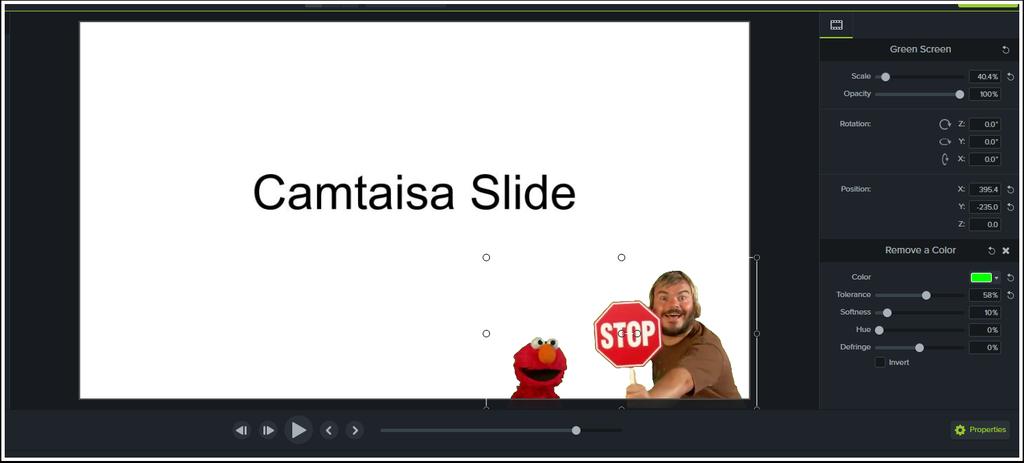
29 How do I use a Green Screen with? You will learn how to use the Green Screen to remove backgrounds while recording in. 1. Record a video with a green screen Make sure the green screen fills up the whole background while recording. After your video is recorded, it will be placed onto your Timeline as the recorded Camera and Screen. 2. Remove the green Use the Remove a Color tool from the Visual Effects section in order to remove the grren in the background. Page 29

30 Under the properties on the right side, select the color drop down menu and use the eyedropper tool to select the green color. With the Eyedropper tool selected, click on the the green part of your Greenscreen to select that color for removal. Page 30


31 Adjust the Tolerance and Softness to get a clean color removal. 3. Adjust the video Adjust and move your now greenless recording to a desired size and position. Page 31
32 Page 32
33 How do I add media such as a PowerPoint Slide or Facecam to? You will learn how to add assorted media types to use inside. 1. Drag and Drop You are able to drag any media file you wish to use into the Media Bin to use it in your video. 2. Importing Media By clicking the Import Media button another window will pop up showing your documents and files. Select one and open it to import it to. You can also click the + button towards the bottom of the Media Bin to Import Media as well as Importing directly from your Google Drive ( You'll need to login to Google) Page 33

34 Other Types of Media Slides To use a slide from a PowerPoint or Google Slides in, you will have to download it as a picture file. In Google Slides, this can be done by going to File-> Download as -> JPEG image or PNG image. Page 34


35 This can also be done in PowerPoint by going to File -> Save as -> and selecting JPEG or PNG from the drop down menu. Page 35

36 Webcam only After recording with the camera, two tracks should be placed onto your timeline. By selecting the (Camera) track, you can edit the size and position of the Webcam recording on the canvas. Media from your phone There are several ways to import Media from your phone, but the easiest way is to yourself the file from your phone. You would then be able to download the file from your on the computer, allowing you to import it into. Page 36

37 How do I record a PowerPoint presentation in? You will learn several ways how to record a PowerPoint presentation. 1. Recording a presentation For help with recording a video in, head here: How do I record a video in? You can record your screen in normally while doing a presentation on PowerPoint or Google Slides. After clicking the rec button, start your presentation and go through it at your own pace. When finished, stop the recording and your recorded presentation will be placed into the timeline. If you want to use the webcam and green screen while recording, simply make sure the Camera is turned on and record normally. Afterwards, you will need to reposition the camera recording and remove the green screen. For additional help removing the green screen in a video, head here: Using a Green Screen with 2. PowerPoint Add In The notes you use at the bottom in your PowerPoint can be transferred over as captions in, allowing for an easy captioning. Page 37


38 When starting a new PowerPoint, should automatically be recognized as an Add-In, allowing you to easily record your presentations. The buttons on the left allow you to turn on/off the Microphone, Camera, see a camera preview, or change the recording options. Click Record to begin. Once you reach the end of the slideshow, you'll be prompted to continue or end the recording. Click end and save your video. 3. Downloading slides This option is a bit more unconventional, but can give a much more precise video presentation as you have full control over the duration slides. 1. Download the individual slides by going to (Google Slides) File ->Download As -> JPEG Image. Page 38


39 (PowerPoint) File -> Save As -> JPEG File 2. Once you've downloaded the slides as JPEG images, you can import them into by dragging the file into the Media Bin or by clicking the Import Media button and selecting the slide file. Page 39


40 3. Create a Voice Narration to add to your slides. Your narrations can be as long as you want, so you could record for a specific slide or for the whole presentation. Page 40
41 How do I work on projects between different computers? Create a Windows Archive or Backup Project You will learn how to work on your project on different computers. Use the Export Project as Zip option to create a zip file to transfer a project to a new location, save a backup copy of the project files, or to send the project file for collaboration. Moving or deleting original files (for example, on a hard drive or network) that are in a video project can break that project. Before moving or deleting any files, open your video projects and export them as a zipped project file. Be sure to select the Include all files from the Media Bin in zip option. This creates a self-contained project with backed up Media Bin files. Page 41


42 1. Create a Zipped Project 1. In, select File > Export As Zip. The Export Project as Zip dialog box opens. 2. Choose a new name for the file, if desired. 3. Click Browse to select a location. 4. Enable the Include all files from Media Bin in zip option to include a copy of all media files in the Media Bin within the zip file. If this option is not enabled, only the media on the timeline will be included in the zip file. 5. Click OK. Page 42

43 2. Import a Zipped Project In, select File > Import Zipped Project. If you receive a warning notice about incompatible media in the project, click OK/ Continue to open the project. Page 43

44 How do I add captions to my video file? You will learn about several ways on how to add captions to your video. For help adding Captions into YouTube, head here: How do I add Captions to YouTube? For TechSmith's guide on Captioning your video, head here: Captions Creating captions in the video To manually add a caption to your video, click the + Add Caption button. This will place a 4 second Blank Caption in your video where you can enter your text. 1. Click these captions to edit their text. 2. Change the text settings, such as font size or color, by clicking the drop down arrow. 3. Change the duration of a caption by dragging the slider. 4. Quickly jump between captions by using the arrows. 5. Move captions or change their duration by dragging the edges along the timeline. Page 44

 for subtitles. The most used is.")
45 There are also 4 other ways to create captions in your video. Sync Captions Sync Captions simply allows you to manually line up your captions with the video by clicking the words to create a new caption as they come up in the video. This may take some time, but will be helpful if your captions are only in one text box. Import Captions Importing Captions requires you to have a file that is compatible (.srt.sub.sbv.smi) for subtitles. The most used is.srt, which is usually created after exporting captions for a video. If you have a usable subtitle file, import it by going to File< Import Media and it will sync up with your video. Page 45

46 Export Captions Exporting Captions creates a.srt or.smi file of the captions you have in your video. It is highly recommended that you create a.srt file, as it can be used for future uses and will automatically set its timings in the video. Speech-to-Text Speech-to-Text automatically transcribes your video by recognizing your voice. For best results, you will need to 'train' your computer to recognize your voice by speaking several lines, which takes several minutes. However, it isn't required. Clicking continue will attempt to transcribe your video, but will most likely contain a fair amount of errors that you can edit out later. Page 46


47 Keeping Captions on your video for future use Click Share at the top left, and choose Custom Production -> New Custom Production Select MP4 - Smart Player and click Next Page 47

48 Go to the Options tab and check the Captions box. There are three types of Captions you can have in your video. Closed Captions: This choice allows Captions to be toggled on or off in the video. It is the recommended choice. Burned in Captions: These captions are 'burned' into the video, always being displayed during the video. They can't be turned off. Under video Captions: These captions create a small, blank space under your video where the captions will be displayed. This does increase the height of your video by a little bit. Page 48


49 Give your video a name and click Finish. Your video should open up in another window, allowing you to preview it. A folder will be created in Studio with your video in it. You can find it automatically by clicking Open production folder after it is complete. The VLC media file (orange cone) is the basic video file, which is in the.mp4 format. If Page 49
50 you want to upload your video onto Canvas or another site, this is the file you will be using. Page 50

, which you can keep")
51 How do I use to record an audio podcast? You will learn how to create an audio podcast using. 1. Create the recording Click the red Record button A small window will pop up, giving a few options. When ready, hit Rec. Make sure the Mic is on. It doesn't matter if any video gets recorded, as we will only export the audio afterwards. You can Record system audio as well (audio that would be playing through the computer such as music), which you can keep in or get rid of later. Page 51

52 When finished, your audio and video will be placed on the timeline. To separate your system audio from the video, right click the Video track and choose Separate Audio and Video. This will create a System Audio track. 2. Make audio track adjustments For help adding Audio Effects, head here: How do I apply effects in? For more help editing your Audio, head here: How do I edit video and audio in? To raise or lower the volume of the whole track, move the green line up or down. To add an Audio Point, double click along the green line. Audio points can be moved to change the volume of a certain section rather than the whole track. To split the track, move the time head where you want the split and press the S key. This will create a split, allowing you to trim out sections if needed. Page 52
![3. Export the audio When finished editing the audio, go to Share[1] and select Export Audio Only[2] There are two audio](/docs-images/89/99061947/images/53-0.jpg "formats to choose from, depending on the file size and desired audio quality.")
, but are a much smaller file size.")
53 3. Export the audio When finished editing the audio, go to Share[1] and select Export Audio Only[2] There are two audio formats to choose from, depending on the file size and desired audio quality..wav files are a slightly higher quality, but are a much larger file size..m4a files have slightly less quality audio (it's not too noticeable), but are a much smaller file size. If your audio is decently long, it's reccommended you choose.m4a so it will be able to fit in your course. Page 53
Creating Machinima using Camtasia
 Creating Machinima using Camtasia Camtasia Studio is a screen video capture software developed by TechSmith. Camtasia is mostly used to create video tutorials demonstrating how to perform tasks on your
Creating in Camtasia
 Creating in Camtasia 1. Import the media of choice (images, videos from camera, etc) by clicking then selecting the file you plan to use in your video. 2. You can select one file at a time, or you can
Camtasia Studio 5.0 PART I. The Basics
 Camtasia Studio 5.0 Techsmith s Camtasia Studio software is a video screenshot creation utility that makes it easy to create video tutorials of an on screen action. This handout is designed to get you
Section 2 - Part A - Setup Start Time End Time Duration Recording Section Overview 0:00 0:33 0:33 Recording Setup Overview 0:33 0:54 0:21 Recording Au
 Section 1 - Part A - Course Introduction Start Time End Time Duration Preparation Overview 0:00 0:49 0:49 Welcome and Congratulations! 0:49 1:26 0:37 Course Overview 1:26 2:52 1:26 Course Resources 2:52
Audacity tutorial. 1. Look for the Audacity icon on your computer desktop. 2. Open the program. You get the basic screen.
 Audacity tutorial What does Audacity do? It helps you record and edit audio files. You can record a speech through a microphone into your computer, into the Audacity program, then fix up the bits that
Want to Create Engaging Screencasts? 57 Tips to Create a Great Screencast
 What makes a screencast interesting, good, or engaging? Want to Create Engaging Screencasts? 57 Tips to Create a Great Screencast We thought you would like to see each of the categories that the focus
Adding Emphasis to Video Content
 Adding Emphasis to Video Content Camtasia Studio: Windows From zooming/panning to adding callouts, there are numerous features in Camtasia studio to help you add emphasis to content in your videos. Preparation
imovie for ipad CREATING A PROJECT
 imovie for ipad CREATING A PROJECT After opening the imovie app select the plus sign located in the dark grey box under the projects tab. A window will pop up asking for whether you want to create a movie
Editing Videos. Overview. 1. Open the Editor
 Editing Videos Overview The Panopto editor allows for easy web-based editing from any modern browser. You can perform quick, non-destructive edits to any video on the Panopto platform and deliver exactly
Shotcut would be suitable for users who are comfortable using MovieMaker.
 Shotcut Page 1 Shotcut Features Friday, August 17, 2018 1:25 PM Shotcut is a video editing application that is suited for the user who has mastered MovieMaker and needs an application that allows for audio
Windows Movie Maker. The Toolbar. The Toolbar
 Windows Movie Maker The Menu Bar The Menu Bar gives access to all parts of the program. On the Menu Bar, click on File. Notice the choices of Save Project As and Save Movie File o Choose Save Project As
Digital Documentaries Premiere Elements 8
 Premiere Elements 8 Creating a new project Select New Project In the Premiere welcome screen and go to File, New Project on the top menu. Type in a project name and select Browse to locate the Desktop
Working with Windows Movie Maker
 518 442-3608 Working with Windows Movie Maker Windows Movie Maker allows you to make movies and slide shows that can be saved to your computer, put on a CD, uploaded to a Web service (such as YouTube)
Layout of Movie Maker. Elements of Movie Maker. Step by step instructions on how to use Movie Maker. Web resources for Movie Maker
 Layout of Movie Maker Elements of Movie Maker Step by step instructions on how to use Movie Maker Web resources for Movie Maker Materials needed to use Movie Maker: Laptop Digital camera Digital video
ACDSee Video Studio User Guide. Contents
 Contents Welcome to ACDSee Video Studio 2 Creating, Saving, and Sharing Projects 3 Adding and Removing Media 4 Organizing, Adjusting, and Displaying Media 7 Timeline Tracks 7 Copying and Pasting Properties
Assistive Technology Training Software Guide
 Assistive Technology Training Software Guide 1 Contents 1. Getting Started 1.1 Starting a new project 4 1.2 The Notetaker window layout 5 2. Importing to the Images Pane 2.1 Importing slides (from PowerPoint)
Creating a Recording in Canvas Embedding a Recording in Canvas To embed a recording into a discussion
 Table of Contents What is Kaltura... 3 Things to Remember... 3 My Media... 3 To access My Media... 3 Upload Media... 4 To perform a media upload... 4 Viewing Videos... 6 Add New List Options... 6 Media
Editing screen recordings with Camtasia Studio
 Editing screen recordings with Camtasia Studio This documentation describes how to edit screen recordings created by Camtasia. Professional effects such as: Pan and Zoom Callouts Audio editing Record Webcam
11 EDITING VIDEO. Lesson overview
 11 EDITING VIDEO Lesson overview In this lesson, you ll learn how to do the following: Create a video timeline in Photoshop. Add media to a video group in the Timeline panel. Add motion to still images.
An Introduction to Video Editing Using Windows Movie Maker 2 Duncan Whitehurst - ICT Advisory Teacher Pembrokeshire County Council
 1. Connect the DV out socket on your video camera to your computer using an IEEE1394 4pin to 4pin or 4 to 6 pin ( firewire ) cable. 2. Switch your camera on to Play and start up your computer. Movie Tasks
Windows Movie Maker / Microsoft Photo Story Digital Video
 Windows Movie Maker / Microsoft Photo Story Digital Video http://intranet/technology/index.html TRC HELP DESK X5092 April 2006 Photo Story and Movie Maker Microsoft Photo Story 3 allows you to create fantastic
First Walkthrough: Fundamentals of Camtasia Studio
 First Walkthrough: Fundamentals of Camtasia Studio First Walkthrough: Fundamentals of Camtasia Studio 2 Table of Contents Recording with Camtasia Studio.............. 3-4 Editing with Camtasia Studio.................
Using imovie to create a Digital Video Marshall G. Jones Winthrop University Edited by Lynn Cecil
 Using imovie to create a Digital Video Marshall G. Jones Winthrop University Edited by Lynn Cecil When you first start up: 1. Notice the number of your ibook. This is the machine you will need to work
Adobe Premiere: Getting Started
 Prepared by Ansel Herz for the UW Department of Communication http://www.com.washington.edu/tech/irc/ Questions? Comments? Contact Kristina Bowman at kriscb@uw.edu. Adobe Premiere: Getting Started This
Creating a slideshow with captions
 Creating a slideshow with captions Follow these instructions to create a slideshow that shows a timeline of events in chronological order. Open Windows Live Movie Maker Add photos - add content by clicking
Camtasia Studio 7 User Guide
 Camtasia Studio 7 User Guide TechSmith & Camtasia Studio: TechSmith Corporation released popular desktop recording tools like Snagit, Jing, and Camtasia. TechSmith also launched Screencast.com, a screencast
Digital Story Telling Microsoft Windows Movie Maker 2.0
 The Windows Movie Maker Interface Movie Tasks: Takes you step by step through the movie making process Document Area TimeLine: This is called the storyboard Project preview Area: Preview your project Saving
How to Make a Movie in imovie How to Make a Movie Trailer in imovie How to Color Correct a Movie in imovie
 How to Make a Movie in imovie How to Make a Movie Trailer in imovie How to Color Correct a Movie in imovie 1. Make sure you are using the Mac. Make a Movie in imovie 2. If your files are on an external
Media Commons Workshop: Final Cut Pro X
 Media Commons Workshop: Final Cut Pro X mediacommons@psu.edu mediacommons.psu.edu/instruction/workshops Description This is the Final Cut Pro Video Basics workshop. In this workshop we will cover how to
imovie: Digital Storytelling
 1 imovie: Digital Storytelling *** imovie s interface with terminology is located on the final page *** 1. Getting Started a) Document your activities by using the provided digital camera b) Using a USB
STEP 1: Import Your Pictures Import pictures *Note:
 STEP 1: Import Your Pictures Transferring your still pictures to your PC is the first step in making your own slide show. Then you'll need to import them into Windows Movie Maker. A tip before you begin
Tech Day Camtasia. What is Camtasia Studio?
 Tech Day 2008 Camtasia What is Camtasia Studio? Camtasia Studio is a video-based screen capturing software program. It is analogous to using a video camera to record your screen. However, unlike using
1 To access Movie Maker
 Windows Movie Maker Handout i What you will be doing in the practical session 1 To access Movie Maker You will be creating a Movie of your choice using text, images, video clips and sound Before you start
GET FAMILIAR WITH WINDOWS MOVIE MAKER
 GET FAMILIAR WITH WINDOWS MOVIE MAKER TASKS SELECTION COLLECTION PALETTE PREVIEW SCREEN PRODUCTION PALETTE The production palette has two modes: storyboard and timeline. To switch between the two click
2018 imovie High Sierra
 2018 imovie High Sierra 1 Create a Movie Open imovie. Select the Projects button from the top menu. Click Create New. Next, Click Movie. You will see a sidebar of libraries and events, browser window with
Opening the Program. Movie Maker II 1
 1 Opening the Program To open the Movie Maker II application, use the Start Programs Movie Maker combination from the desktop. Alternatively, you can create a shortcut on the desktop. After executing this
Version 2.0. Campus 2.0 Student s Guide
 Campus 2.0 Student s Guide Version 2.0 Campus 2.0 Student s Guide Error! No text of specified style in document. i Important Notice Copyright 2008 Tegrity, Inc. Disclaimer 2008 Tegrity, Inc. all rights
Back to the main page Back to the Tutorial Page Digital Audio Rules of Audacity Setup, Audio Import and Playback Recording with Audacity
 Back to the main page Back to the Tutorial Page Digital Audio Rules of Audacity Setup, Audio Import and Playback Recording with Audacity Tutorial - I.Basics Part 4 - Recording with Audacity - Part 4 1.
Selection tool - for selecting the range of audio you want to edit or listen to.
 Audacity Quick Guide Audacity is an easy-to-use audio editor and recorder. You can use Audacity to: Record live audio. Convert tapes and records into digital recordings or CDs. Edit sound files. Cut, copy,
RECORDING WITH CAMTASIA 9
 RECORDING WITH CAMTASIA 9 Griffith College GRIFFITH COLLEGE South Circular Road Table of Contents 1.0 Preparation... 2 1.1 Surroundings... 2 1.2 Lighting... 2 2.0 Pre-recording... 3 2.1 Audio and Equipment
Creating a short stop motion animation with Adobe Photoshop CC. Open Adobe Photoshop CC. A note about embedding
 Creating a short stop motion animation with Adobe Photoshop CC Open Adobe Photoshop CC A note about embedding Photoshop CC never embeds video or sound into your document. Instead, it links to the original
Adding Titles, and Voice-Overs to an Animation Using imovie HD Duncan Whitehurst - ICT Advisory Teacher Pembrokeshire County Council
 1. Your animation opens in imovie. 2. To add a title select the Editing view then click Titles. Choose a text colour here. Choose a font here. Move these sliders to change the speed of the animation and
Teaching with Primary Sources
 Teaching with Primary Sources Joining Educators and Students with Library of Congress Resources Creating a Presentation with PowerPoint 2007 Benefits of using PowerPoint in lectures: PowerPoint encourages
STORYTELLING-PowerPoint-Windows Movie Maker 2
 Judy Honaker Storytelling Using PowerPoint & Movie Maker 2 1 STORYTELLING-PowerPoint-Windows Movie Maker 2 By: Judy Honaker-Instructional Technology Resource Teacher Introduction This tutorial is designed
Creating Interactive Video with Camtasia
 Creating Interactive Video with Camtasia Audio SCORM Quizzes PowerPoint and Screen Shots v1.2: 2009 Page 1 Camtasia Studio 6.0.2 http://www.techsmith.com/camtasia.asp (free trial download) Table of Contents
Video Modeling & Video Self-Modeling: Research to Practice
 Video Modeling & Video Self-Modeling: Research to Practice It s Showtime with ShowBiz Presented by the Virginia Department of Education s Autism Priority Project Developed by Teresa Lyons, T-TAC/VT How
Windows Live Movie Maker for teachers and faculty
 Windows Live Movie Maker for teachers and faculty Step-by-step Get Windows Live Movie Maker Download Download Windows Live Movie Maker at http://windowslive.com/desktop/moviemaker Run After the program
Using Garage Band to Record a Podcast
 Using Garage Band to Record a Podcast 1. Open GarageBand 2. Click on New Podcast Episode 3. If you don t see this screen, go to File -> New 4. Name and save your project 5. If you are NOT using headphones
Windows Movie Maker. Panes (Movie and. Menu Bar. Tool Bar. Monitor. Rewind. Play. Storyboard/Timeline. Playhead. Audio. Microphone Playback
 Menu Bar Panes (Movie and Tool Bar Monitor Rewind Play Storyboard/Timeline Playhead Audio Microphone Playback Zoom In/Out 2004 Teaching Matters, Inc.-Page 1 Importing Video (Transfer the footage from the
TECHSMITH RELAY Santa Ana College Distance Education, Cesar Chavez Building Room A-101, (714) ,
 ,") TECHSMITH RELAY Santa Ana College Distance Education, Cesar Chavez Building Room A-101, (714) 564-6725, DistEd@sac.edu Techsmith Relay is a simple video creation program that allows users to record video
TECHSMITH RELAY Santa Ana College Distance Education, Cesar Chavez Building Room A-101, (714) 564-6725, DistEd@sac.edu Techsmith Relay is a simple video creation program that allows users to record video
Using Garage Band to Record a Podcast
 Using Garage Band to Record a Podcast 1. Open GarageBand 2. Click on New Podcast Episode 3. If you don t see this screen, go to File -> New 4. Name and save your project 5. If you are NOT using headphones
A GET YOU GOING GUIDE
 A GET YOU GOING GUIDE To Your copy here Audio Notetaker 4.0 April 2015 1 Learning Support Getting Started with Audio Notetaker Audio Notetaker is highly recommended for those of you who use a Digital Voice
GETTING STARTED TABLE OF CONTENTS
 imovie 11 Tutorial GETTING STARTED imovie 11 is consumer-level digital video editing software for Macintosh. You can use imovie 11 to edit the footage you film with digital video cameras and HD video cameras.
PowerPoint Intermediate 2010
 PowerPoint Intermediate 2010 I. Creating a Slide Master A. Using the design feature of PowerPoint essentially sets up similar formatting for all of your slides within a presentation. However, there are
CAMTASIA RELAY TUTORIAL Santa Ana College Distance Education, Cesar Chavez Building Room A-101, (714) ,
 ,") CAMTASIA RELAY TUTORIAL Santa Ana College Distance Education, Cesar Chavez Building Room A-101, (714) 564-6725, DistEd@sac.edu Camtasia Relay is a simple video creation program that allows users to record
CAMTASIA RELAY TUTORIAL Santa Ana College Distance Education, Cesar Chavez Building Room A-101, (714) 564-6725, DistEd@sac.edu Camtasia Relay is a simple video creation program that allows users to record
Mississippi University for Women
 Mississippi University for Women Center for Teaching and Learning Objectives Recording in Camtasia Introduction to Camtasia Studio 9 Saving Projects Editing Projects Adding Enhancements Produce and Share
BBFlashBack Training for Library Staff
 BBFlashBack Training for Library Staff Learning outcomes: By the end of the course you will be able to: record a screencast insert/import text, images, audio & video edit text, audio & video files produce
Premiere Pro Desktop Layout (NeaseTV 2015 Layout)
") Premiere Pro 2015 1. Contextually Sensitive Windows - Must be on the correct window in order to do some tasks 2. Contextually Sensitive Menus 3. 1 zillion ways to do something. No 2 people will do everything
Premiere Pro 2015 1. Contextually Sensitive Windows - Must be on the correct window in order to do some tasks 2. Contextually Sensitive Menus 3. 1 zillion ways to do something. No 2 people will do everything
imovie Guide Create a new imovie Project The imovie Interface
 imovie Guide Create a new imovie Project. Open imovie.. From the FILE menu choose NEW PROJECT. Enter an appropriate title, choose WIDESCREEN (6:9) for Aspect Ratio, and leave NONE selected for the theme.
Premiere - Jazz Video Project Tutorial
 -Open Premiere and set up the Premiere Project -At the bottom left of the Project bin change the view from icon view to list view -Import all audio and video clips to the Project Bin window -Right Click
Quick-start guide to creating screencasts using Camtasia Studio 5
 Quick-start guide to creating screencasts using Camtasia Studio 5 1 Access to the software The Camtasia Studio software can be downloaded for a 30-day free trial from: http://www.techsmith.com/camtasia.asp
Photo to Movie Help. LQ Graphics, Inc.
 Photo to Movie Help LQ Graphics, Inc. Table of Contents Photo to Movie... 1 Introduction... 1 Installation... 3 Purchasing... 4 Organizing Your Movie... 5 Planning Your Movie... 5 Adding photos to your
Using Windows MovieMaker pt.1
 Using Windows MovieMaker pt.1 Before you begin: Create and name (use your first name, or the title of your movie) a folder on the desktop of your PC. Inside of this folder, create another folder called
Name: Date: Hour: PowToon Short Movie
 Name: Date: Hour: PowToon Short Movie PowToon ( www.powtoon.com ) is an online web-based animation software tool that allows you to create short movies by manipulating pre-created objects, imported images,
Movie Maker Tutorial created by Cheryl McKnight
 Movie Maker Tutorial created by Cheryl McKnight The Movie Task Pane list the steps necessary in completing an editing project. If the Task Pane is turned off, go to View, and select Task Pane to toggle
Creating a Recording Using Panopto
 Creating a Recording Using Panopto Table of Contents Accessing Panopto... 2 Panopto Recording Screen... 3 Recording a PowerPoint Presentation... 3 Recording Your Desktop... 4 Manage Recordings... 5 Viewing/Managing
Use the Preferred Browser USE FIREFOX ON MAC & PC. If you do not have Firefox on your computer or laptop, please download Firefox by clicking here.
 Working In Mediasite (Part 2) Now that you ve completed Part 1, which included registering Mediasite, Downloading and Installation of the Mediasite Recorder, you re ready to proceed to Part 2 of the tutorial
Windows Movie Maker Reinforcement Handout
 Windows Movie Maker Reinforcement Handout Windows Live Movie Maker is the fast, easy way to turn photos and videos into greatlooking movies and slide shows you can share with your class, on the Web, or
The L&S LSS Podcaster s Tutorial for Audacity
 The L&S LSS Podcaster s Tutorial for Audacity The L&S LSS Podcaster s Tutorial for Audacity... 1 Audacity Quick Reference... 2 About this tutorial... 3 Some Thoughts Before You Get Started... 3 Do Academic
Ways of Working in Camtasia
 Ways of Working in Camtasia Creating a Script and Setting Up Camtasia Recorder for A Demonstration http://webshare.northseattle.edu/tlc/onlineres_camtasia.shtm Topics Opening Wizard Two Main Ways of Working
PowerPoint 2016 Advanced for Windows
 1 PowerPoint 2016 Advanced for Windows PowerPoint 2016 Advanced for Windows Training Objective To learn advanced features of PowerPoint 2016 in order to create more elaborate presentations. What you can
Creating a new Photo Story
 Creating a new Photo Story 1. Right click anywhere on your desktop and create a new folder where you will store all the graphics, scripts, files, etc. associated with this Photo Story. 2. Open Photo Story
CS Multimedia and Communications REMEMBER TO BRING YOUR MEMORY STICK TO EVERY LAB!
 CS 1033 Multimedia and Communications REMEMBER TO BRING YOUR MEMORY STICK TO EVERY LAB! Lab 9: Creating Videos with Shotcut Shotcut is a free, open source, crossplatform video editor. Reference Page: Shotcut
Podcasting: How to Create Your Own in 30-Minutes
 Podcasting: How to Create Your Own in 30-Minutes Podcasts Included in this Tutorial: o What is a Podcast? o What are the Learning Benefits of Podcasts? o Creating a Podcast with Audacity o Creating a Podcast
org How to Import and Edit with Premiere Pro school Uploading Files Determine what kind of camera you used to film for your project.
 j tech org school Uploading Files How to Import and Edit with Premiere Pro Determine what kind of camera you used to film for your project. This document has been written to accommodate the JVC and CanonHD
Creative Uses of PowerPoint 2003
 Creative Uses of PowerPoint 2003 Creating an Audio File 1) Connect your microphone 2) Click on Insert 3) Click on Movies and Sounds 4) Click on Record Sound Play Stop Record 5) Click on the Record button
PHOTO DVD MAKER USER MANUAL
 Photo DVD Maker User Manual 1 PHOTO DVD MAKER USER MANUAL Version 7.04 http://www.photo-dvd-maker.com Photo DVD Maker User Manual 2 0.1 WELCOME TO PHOTO DVD MAKER...4 0.2 GETTING HELP...5 1. GETTING STARTED...6
Panopto. End-User Guide
 Panopto End-User Guide Table of Contents INTRODUCTION... 3 PROVISIONING A COURSE... 3 LOGGING IN... 7 NAVIGATION... 8 PREPARING TO RECORD... 9 CREATING A SIMPLE RECORDING (AUDIO AND VIDEO ONLY)... 10 CREATING
Working With Media 8
 Working With Media 8 CHAPTER Introduction You ve already learned how to add text and graphics. Now it s time to learn how to add other forms of media: Audio: Import or record sound such as narration, music,
3. Edit in SOM ver 2.0 (SOM = Screencast-o-matic)
") 3. Edit in SOM ver 2.0 (SOM = Screencast-o-matic) When you log in to SOM2 you can see all of your recorded screencasts in the main window. If you have recorded a SOM2-file (screencast) on another computer
3. Edit in SOM ver 2.0 (SOM = Screencast-o-matic) When you log in to SOM2 you can see all of your recorded screencasts in the main window. If you have recorded a SOM2-file (screencast) on another computer
imovie Quick Guide Learning Technologies Center Gaskill Hall
 imovie Quick Guide Learning Technologies Center Gaskill Hall Introduction Welcome to the Miami University LTC This quick guide is designed to help acquaint you with some capabilities of imovie HD and idvd
1.1 Considering for Choosing Layout in SmartArt Graphics
 1. SmartArt A SmartArt graphic is a visual representation of your information that you can quickly and easily create, choosing from among many different layouts, to effectively communicate your message
imovie 6HD Basic Editing and Functions Instructions
 -Shut down all other applications -Open imovie -Either Create a new project (See Transfer Instructions) or Open an Existing Project Viewer, where movie or clip is displayed Clips Pane, will change display
Import Footage You can import footage using a USB/1394 cable, 1394/1394 cable or a firewire/i.link connection.
 Windows Movie Maker Collections view screen. Where imported clips, video effects, and transitions are displayed. Preview Screen Windows Movie Maker is used for editing together video footage. Similar to
TABLE OF CONTENTS. Revised 9/2018
 TABLE OF CONTENTS Revised GETTING STARTED WITH YOUR VIDEO PROJECT - OVERVIEW OF THE FINAL CUT PRO X INTERFACE - CREATING A PROJECT 3 - IMPORTING YOUR MEDIA FILES 5 - TRANSFERRING FOOTAGE FROM CANON AND
Digital Video. Part II: Introduction to Editing and Distribution
 Digital Video Part II: Introduction to Editing and Distribution Contact Information The University of Utah Student Computing Labs Macintosh Support mac@scl.utah.edu We Will Cover History of video editing
Digital Video Editing Using imovie
 Digital Video Editing Using imovie This is an introductory tutorial into basic digital video editing. Participants will learn how to transfer video from tape to the computer, plus basic editing techniques
Introduction to Kaltura
 Introduction to Kaltura The Kaltura media content management system allows users to record, stream, and manage multimedia files. This industry-leading enterprise system offers many robust tools. This guide
APPLE IMOVIE HD TUTORIAL
 APPLE IMOVIE HD TUTORIAL O V E R V I E W Movie HD is consumer-level digital video editing software for Mac OS. You can use imovie to edit the footage you film with digital video cameras and HD video cameras.
Microsoft Office 2007
 Microsoft Office 2007 Adding Slide Transitions Transition Sound Transitions Transition Speed Apply to All A slide transition is the way one slide changes to the next in Slide Show view. Animations Tab:
imovie with Still Pictures
 imovie with Still Pictures Where to save Because movies use a lot of hard drive space, they cannot be saved on the server. 1. You must login to your personal file before you start working. When launching
Premiere Pro CC 2018 Essential Skills
 Premiere Pro CC 2018 Essential Skills Adobe Premiere Pro Creative Cloud 2018 University Information Technology Services Learning Technologies, Training, Audiovisual, and Outreach Copyright 2018 KSU Division
Presents: PowerPoint 101. Adapted from the Texas State Library s TEAL for All Texans Student Resources Manual
 Presents: PowerPoint 101 Adapted from the Texas State Library s TEAL for All Texans Student Resources Manual PowerPoint Topics Intro to PowerPoint Designing a Presentation The Next Level Goals and Objectives
Adobe Premiere Elements Tutorial
 Adobe Premiere Elements Tutorial Starting a New Project To import movie clips from a digital video camera, click on the Capture Video button. You will be prompted to name your project and choose a location
Getting started with Microsoft Photostory 3
 Getting started with Microsoft Photostory 3 This tutorial will take you through how to create a digital movie in FIVE BASIC STEPS. At each step, there are also Advanced Features available and these are
Movavi Screen Recorder 5 for Mac
 Movavi Screen Recorder 5 for Mac Don't know where to start? Read these tutorials: Recording screen Recording online video Recording video from players Capture any fragment of your screen or the full desktop.
Prezi PREZI ONLINE ACCOUNT START FROM A TEMPLATE
 Prezi PREZI ONLINE ACCOUNT Go to www.prezi.com/pricing/edu and sign up for an online only account. This account is available anywhere in the world as long as you have access to the internet. After creating
Table of Contents. iii
 Photo to Movie 4.5 Table of Contents Photo to Movie Introduction... 1 Introduction... 1 Installation... 2 Organizing Your Movie... 5 Planning your movie... 5 Adding photos to your slide show... 5 Choosing
WINDOWS MOVIE MAKER CREATING A VIDEO USING STILL PICTURES
 WINDOWS MOVIE MAKER CREATING A VIDEO USING STILL PICTURES 1. Open your My Documents folder. Open the My Videos folder. Under File and Folder Tasks, select>make a new folder. All of the pictures/video clips
Intermediate Training
 Intermediate Training The material in this handout is taken directly from the Picasa Website. It was decided to add all the information in one place so it could be viewed at one time. However, what is