MX Control Console. Administrative User Manual
|
|
|
- Henry Murphy
- 5 years ago
- Views:
Transcription

1 MX Control Console Administrative User Manual
2 This Software and Related Documentation are proprietary to MX Logic, Inc. Copyright 2003 MX Logic, Inc. The information contained in this document is subject to change without notice and should not be construed as a commitment by MX Logic. MX Logic assumes no responsibility for any errors or omissions that may appear in this document. MX Logic, Inc Mount Pyramid Court, Suite 350 Denver, CO This issue: June MX Logic, Inc. All rights reserved. ii
3 Contents 1 Introduction and Login 1.1 About MX Control Console About This Manual MX Control Console Functionality...4 Domain Selection...4 Menu Bars...5 Graphics Display Options (Display Tabs) Logging into the MX Control Console Overview Tab 2.1 Viewing Overview Information Quarantine Tab 3.1 Introduction Quarantine Tab Functionality Viewing & Managing VIRUS Quarantined Messages Viewing & Managing SPAM (Junk ) Quarantined Messages Viewing & Managing ATTACHMENT Quarantined Messages Viewing & Managing CONTENT Quarantined Messages Searching for Quarantined Messages by User (Recipient) Policies Tab 4.1 Introduction Policies Tab Functionality Maintaining Allow/Deny Lists Maintaining the Exempt Users List Maintaining Anti-Spam Policies Maintaining Anti-Virus Policies Maintaining Attachment Policies Maintaining Content Policies Maintaining HTML Shield Policies MX Logic, Inc. All rights reserved. iii
4 5 Setup Tab 5.1 Setting up Inbound Servers Enabling/Disabling Spam Reporting Changing Your Password Users Tab 6.1 Searching for Users & Viewing User Details Changing User Roles & Settings Accessing Quarantined Messages for a User Reporting Tab 7.1 Introduction Reporting Tab Functionality Viewing Traffic Overview Viewing the Threats Overview Viewing a Spam Threats Report Viewing a Virus Threats Report Viewing a Content Threats Report Viewing an Attachment Threats Report Viewing a User Activity Report Viewing an Event Log Report Viewing an Audit Trail Report...70 FAQs 71 Glossary MX Logic, Inc. All rights reserved. iv
5 1 INTRODUCTION & LOGIN 1.1 About MX Control Console About This Manual MX Control Console Functionality Logging into the MX Control Console MX Logic, Inc. All rights reserved. 1
6 1.1 About MX Control Console Welcome to MX Logic s web-based administrative portal: MX Control Console. With its easy-to-use, intuitive interface, the Console allows you to quickly configure and change MX Logic Defense Service s filtering policies for your domain(s). These filtering policies include: Allow/Deny policies Exempt Users policies (creating a list of exempt users) Anti-Spam policies Anti-Virus policies Attachment control policies Content keyword policies HTML shield policies In addition to configuring filtering policies, MX Control Console allows you to: Review and manage quarantined messages Administer setup configurations (including inbound servers and spam reporting) and change your password Managing users within your domain(s) Monitor the threats for all of your domains Obtain message traffic reports and statistics View user activity Audit MX Control Console usage and system changes 2003 MX Logic, Inc. All rights reserved. 2
7 1.2 About This Manual This manual provides step-by-step instructions for performing tasks necessary to maintain your domain s MX Logic Defense Service. It is intended for an MX Logic Defense Service system administrator proficient in general company operating procedures. You need not have an in-depth knowledge of computer systems to use MX Control Console; however, you should be familiar with the Windows environment. If you require more detailed and technical information on how MX Logic Defense Service operates and how changes to the Console settings can affect your environment, see the MX Logic Defense Service Operations Manual. This manual groups together tasks and functions by the MX Control Console tab from which you perform each task: Overview Tab Contains a snapshot of message traffic and general information over the past 24 hours Quarantine Tab Enables you to view and manage quarantined messages Policies Tab Enables you to configure all filtering policies Setup Tab Enables you to configure MX Logic Defense Services to filter your domain(s) Users Tab Enables you to view user details and change user roles and settings Reporting Tab Enables you to generate message traffic and threat reports 2003 MX Logic, Inc. All rights reserved. 3
8 1.3 MX Control Console Functionality When you first enter the MX Logic Control Console, the tab bar displays along the top of the window. Domain Selection The Overview screen presents a snapshot of traffic to your domain and other information from MX Logic. This is the first page you see when you log in. The Quarantine screen allows you to review and take action on any messages quarantined because they contain viruses, unwanted content, attachments, or HTML, or because they are junk ( spam ). Messages are quarantined only if you configure your filtering policies to take this action. The Policies screen allows you to configure and modify policies that will instruct MX Logic Defense Service how to handle viruses, spam, unwanted attachments, unwanted content, and unwanted HTML in messages intended for recipients on your network. You can also create customized Allow and Deny lists (regarding message senders) as well as an Exempt Users list (regarding users/recipients) for your domain. The Setup screen enables you to configure MX Logic Defense Service to deliver inbound SMTP traffic to your domain properly and to enable/disable Spam Reporting. You can also change your password from this screen. The Users screen enables you to manage users within your domain, including reviewing user details and changing user passwords, roles, and Spam Report frequency. The Reporting screen enables you to generate message traffic reports for threats (virus, spam, etc.) intended for your network. You can generate reports and statistics for threat activity for a given domain and time period (one day, one full week, or an entire month). You can also view (audit) MX Control Console usage and policy changes. The Logout tab/button allows you to exit the MX Control Console. You can only configure or modify one domain at a time. If you manage multiple domains, always be sure you have the correct domain selected from the Domain drop-down list: 2003 MX Logic, Inc. All rights reserved. 4
9 Menu Bars The menu bars that display for each tab-screen enable you to navigate through all the functions available for that tab. If the default screen contains all the possible functions for a tab, then no additional navigation is necessary; therefore, no menu bar displays (e.g., the Policies tab-screen). When a menu bar displays, the default screen is the left-most menu item listed. Note: The menu items do not change appearance, no matter which menu-screen you select. The page is noted simply by the page title that appears beneath the Domain. Graphics Display Options (Display Tabs) When graphics are displayed in the MX Control Console, they often have display tabs on the right side of the title bar. These enable you to change the display style of that specific graphic. The options you will see are as follows: This tab displays the graphic as a bar graph. This tab displays the graphic as a line graph. This tab displays the graphic as a solid (filled) line graph [default]. This tab displays the graphic as a pie chart [default]. The following are samples: 2003 MX Logic, Inc. All rights reserved. 5


10 2003 MX Logic, Inc. All rights reserved. 6


11 1.4 Logging into the MX Control Console You can access the MX Control Console from any computer, using any Web browser, as follows: 1. From your Web browser, enter the following URL in the Address field: The MX Control Console login screen displays. 2. Enter your login information. Address Password (provided to you during the provisioning process) 3. Click the login button. If your login is successful, MX Control Console will open, displaying the Overview page. (For details, see section 2.1 Viewing Overview Information, page 9.) If your login is unsuccessful, an error message displays in red font on the login screen: Try entering your information again, or to have information sent to you, click the click here text link and enter your address MX Logic, Inc. All rights reserved. 7
12 2 OVERVIEW TAB 2.1 Viewing Overview Information MX Logic, Inc. All rights reserved. 8
 on the tab bar.")
13 2.1 Viewing Overview Information From the Overview tab-screen, you can view high-level information on the traffic to your domain over the last 24 hours, as well as news and updates from MX Logic. When you log into the MX Control Console, this screen displays by default. After you are logged into MX Control Console, you can access this tab-screen by clicking the Overview tab ( ) on the tab bar. This page contains the following information: 24-Hour Snap Shot Quarantine Levels Traffic This box shows a 24-hour snapshot of your domain s traffic. This box shows an overview of quarantined messages, by category. This box shows a graph of traffic volume for the last 24 hours. You can alter the style of this graph by selecting one of the three 2003 MX Logic, Inc. All rights reserved. 9
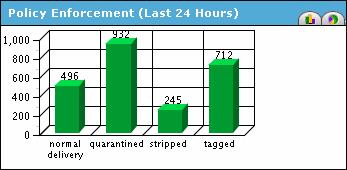
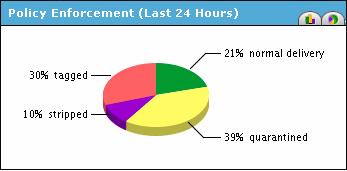
14 graph-format tabs. Policy Enforcement What s New News Updates This box shows the percentage of messages stripped, blocked, tagged, quarantined, cleaned, and normally delivered over the past 24 hours, according to the policies you configured. You can alter the style of this graph by selecting one of the two graph-format tabs. This box shows the latest information from MX Logic via links. This box shows any updates on current threats and other important security news (links) MX Logic, Inc. All rights reserved. 10
15 3 QUARANTINE TAB 3.1 Introduction Quarantine Tab Functionality Viewing & Managing VIRUS Quarantined Messages Viewing & Managing SPAM (Junk ) Quarantined Messages Viewing & Managing ATTACHMENT Quarantined Messages Viewing & Managing CONTENT Quarantined Messages Searching for Quarantined Messages by User (Recipient) MX Logic, Inc. All rights reserved. 11

16 3.1 Introduction Quarantine Tab Functionality The Quarantine tab enables you to review and manage all quarantined messages When you click the Quarantine tab ( ) on the tab menu, the menu bar displays the various screens you can access and includes the current total number of quarantined messages for each category in parenthesis: By default, the first screen that displays is the Virus Quarantined Messages for the selected domain. You can change the domain displayed by selecting another value from the Domain drop-down list. You can sort the list by any of the headings by clicking the heading title. Clicking the heading again will sort the list in the opposite order. Each page lists up to 100 messages. You can view additional pages by either clicking the Next > or < Prev links or clicking on the specific page number link. For each quarantined message, you have the option to delete it completely, or to release it (sending it to the intended recipient). You can empty the entire contents (all pages) of certain quarantines by clicking the empty quarantine button, when available MX Logic, Inc. All rights reserved. 12
17 You can view the actual message before release or deletion by clicking the linked address in the From column. A Safe Message View displays: You can also release or delete a message from this detailed screen, using the Message Action buttons MX Logic, Inc. All rights reserved. 13

18 3.2 Viewing & Managing VIRUS Quarantined Messages Those messages quarantined due to viruses are stored in Viruses Quarantine. Infected messages will appear on this screen only if you have selected Quarantine the message as one of your anti-virus policies. (To view or change virus policies, see section 4.5 Maintaining Anti-Virus Policies on page 33.) This screen provides information on the date and time an infected message was delivered, the sender (From), the recipient (To), the subject of the message, the virus detected, and the message size. When you click the Quarantine tab ( ) on the tab menu, the Virus Quarantined Messages screen displays, by default. You can also access this screen from any other Quarantine tab-screen by clicking Viruses on the menu bar MX Logic, Inc. All rights reserved. 14
 2. To release or delete all messages on the page displayed, click the single checkbox at the bottom of the page, and click either release or delete. 3.")
19 1. To release or delete select messages, check (click) the corresponding checkboxes then either release or delete the selected messages using the buttons at the bottom of the page. (Clicking the checkbox again will deselect it.) 2. To release or delete all messages on the page displayed, click the single checkbox at the bottom of the page, and click either release or delete. 3. To empty the entire contents (all pages) of the quarantine, click the empty quarantine button. 4. To view the actual message, including virus details, before release or deletion, click the linked address in the From column. A Safe Message View displays: You can also release or delete a message from this detailed screen, using the Message Action buttons MX Logic, Inc. All rights reserved. 15
 attachments will appear on this screen only if you selected Quarantine as your Unwanted Attachment policy. (To view or change spam policies, see section 4.")
20 3.3 Viewing & Managing SPAM (Junk ) Quarantined Messages Those messages quarantined due to spam are stored in Junk Quarantine. Messages with unwanted (or over-limit) attachments will appear on this screen only if you selected Quarantine as your Unwanted Attachment policy. (To view or change spam policies, see section 4.4 Maintaining Anti-Spam Policies on page 31.) This screen provides information on the date and time the spam message(s) were delivered, the sender, the recipient, the subject of the message, the spam score (likelihood), and the size of the message. 1. From the Quarantine tab ( ) menu bar, click the Junk text link. 2. To release or delete select messages, check (click) the corresponding checkboxes then either release or delete the selected messages using the buttons at the bottom of the page. (Clicking the checkbox again will deselect it.) 2003 MX Logic, Inc. All rights reserved. 16
 of the quarantine, click the empty quarantine button. 5.")
21 3. To release or delete all messages on the page displayed, click the single checkbox at the bottom of the page, and click either release or delete. 4. To empty the entire contents (all pages) of the quarantine, click the empty quarantine button. 5. To view the actual message, including spam details, before release or deletion, click the linked address in the From column. A Safe Message View displays: You can also release or delete a message from this detailed screen, using the Message Action buttons MX Logic, Inc. All rights reserved. 17
 attachments will appear on this screen only if you selected Quarantine as your Unwanted Attachment policy. (To view or change attachment policies, see section 4.")
22 3.4 Viewing & Managing ATTACHMENT Quarantined Messages Those messages quarantined due to attachment type are stored in Attachments Quarantine. Messages with unwanted (or over-limit) attachments will appear on this screen only if you selected Quarantine as your Unwanted Attachment policy. (To view or change attachment policies, see section 4.6 Maintaining Attachment Policies on page 35.) This screen provides information on the date and time the message(s) with unwanted attachments was delivered, the sender, the recipient, the subject of the message, the type of attachment that resulted in the message being quarantined, and the size of the attachment. 1. From the Quarantine tab ( ) menu bar, click the Attachments text link. 2. To release or delete select messages, check (click) the corresponding checkboxes then either release or delete the selected messages using the buttons at the bottom of the page. (Clicking the checkbox again will deselect it.) 3. To release or delete all messages on the page displayed, click the single checkbox at the bottom of the page, and click either release or delete. 4. To empty the entire contents (all pages) of the quarantine, click the empty quarantine button. 5. To view the actual message, including attachment details, before release or deletion, click the linked address in the From column MX Logic, Inc. All rights reserved. 18

23 A Safe Message View displays. You can also release or delete a message from this detailed screen, using the Message Action buttons MX Logic, Inc. All rights reserved. 19

24 3.5 Viewing & Managing CONTENT Quarantined Messages Those messages quarantined due to content are stored in Content Keyword Quarantine. Messages with unwanted content will appear on this screen only if you selected Quarantine as one or more of your content policies. (To view or change content policies, see section 4.7 Maintaining Content Policies, on page 39.) This screen provides information on the date and time the message with unwanted content was delivered, the sender, the recipient, the subject of the message, the keyword that resulted in the message being quarantined, and the size of the message. 1. From the Quarantine tab ( ) menu bar, click the Content Keyword text link. 2. To release or delete select messages, check (click) the corresponding checkboxes then either release or delete the selected messages using the buttons at the bottom of the page. (Clicking the checkbox again will deselect it.) 2003 MX Logic, Inc. All rights reserved. 20
 of the quarantine, click the empty quarantine button. 5.")
25 3. To release or delete all messages on the page displayed, click the single checkbox at the bottom of the page, and click either release or delete. 4. To empty the entire contents (all pages) of the quarantine, click the empty quarantine button. 5. To view the actual message before release or deletion, click the linked address in the From column. A Safe Message View displays: You can also release or delete a message from this detailed screen, using the Message Action buttons MX Logic, Inc. All rights reserved. 21
 menu bar, click the Search text-link. The Search screen displays: 2. Enter the recipient s exact email address, and click the Search button.")
26 3.6 Searching for Quarantined Messages by User (Recipient) You can search for quarantined messages for a particular recipient. 1. From the Quarantine tab ( ) menu bar, click the Search text-link. The Search screen displays: 2. Enter the recipient s exact address, and click the Search button. All results display on a single page: 2003 MX Logic, Inc. All rights reserved. 22
 4. To release or delete all messages on the page displayed, click the single checkbox at the bottom of the page, and click either release or delete. 5.")
27 3. To release or delete select messages, check (click) the corresponding checkboxes then either release or delete the selected messages using the buttons at the bottom of the page. (Clicking the checkbox again will deselect it.) 4. To release or delete all messages on the page displayed, click the single checkbox at the bottom of the page, and click either release or delete. 5. To view the actual message, including spam details, before release or deletion, click the linked address in the From column. A Safe Message View displays: You can also release or delete a message from this detailed screen, using the Message Action buttons MX Logic, Inc. All rights reserved. 23
28 4 POLICIES TAB 4.1 Introduction Policies Tab Functionality Maintaining Allow/Deny Lists Maintaining the Exempt Users List Maintaining Anti-Spam Policies Maintaining Anti-Virus Policies Maintaining Attachment Policies Maintaining Content Policies Maintaining HTML Shield Policies MX Logic, Inc. All rights reserved. 24
, the Policy Configuration screen displays a The summary screen shows all Policy Types available, their Conditions, the Action assigned for each condition, and the option to Modify each policy type.")
29 4.1 Introduction Policies Tab Functionality When you click the Policies tab ( summary of the current inbound policies. ), the Policy Configuration screen displays a The summary screen shows all Policy Types available, their Conditions, the Action assigned for each condition, and the option to Modify each policy type. The Policy Types are as follows: Allow/Deny Exempt Users Anti-Spam Allow List entries are not filtered for Junk (Anti-Spam) , attachments, or content. (Note: Virus scanning is never disabled.) Deny List entries are refused and not delivered to the recipient(s). The Exempt Users list contains recipients that do not have their mail filtered for Junk (Anti-Spam) , attachments, or content. (Note: Virus scanning is never disabled.) The Anti-Spam settings indicate how you want the system to handle evident (high likelihood) and probable (medium likelihood) Spam MX Logic, Inc. All rights reserved. 25
30 Anti-Virus Attachment Content HTML Shield The Anti-Virus settings indicate how you want the system to handle messages containing a virus. The Attachment settings indicate which file types to allow and size restrictions for those files, how the system will handle disallowed attachments, and the action to take on any specific attachment filenames you identify. The Content policies enable you to indicate unacceptable or suspicious content keywords and the action the system takes when any of those keywords exist in inbound- content. The HTML Shield settings indicate how you want the system to handle HMTL coding in inbound messages MX Logic, Inc. All rights reserved. 26
31 4.2 Maintaining Allow/Deny Lists You can configure MX Logic Defense to recognize specific sender addresses that are either always-acceptable (Allow lists) or never acceptable (Deny lists) for your domain. The Allow/Deny policies contain IP Addresses, Domain Names, and/or Addresses that are allowed or denied, regardless of the other policies applied by the system. (Note: Virus scanning is never disabled.) Allow List entries are not filtered for spam, attachments, content, or HTML. Using Allow lists ensures that from specific sender addresses or domains are always delivered to the recipient (unless they contain a virus). Any newsletters that your employees are permitted to receive should be added to this list to avoid policy-filtering actions. Deny List entries are refused and not delivered to the recipient(s). Using Deny lists ensures that from specific sender addresses or domains are always blocked, whether or not they contain viruses, spam, etc. that would otherwise be detected by the system. To modify the Allow/Deny policies: 1. From the Policies tab ( ), click the corresponding Modify text link. The Allow/Deny List management page displays MX Logic, Inc. All rights reserved. 27
32 The guidelines listed at the bottom of the screen define what entries are valid. 2. To add a value to either list, type the value in the appropriate Add Entry field then click the Add button. The value should appear in the corresponding list box. 3. To upload (add) a list from a file, in the appropriate Upload List field, either enter the file path or click Browse to locate the file, and click the Upload File button. (The file should be formatted with one entry on each line.) 2003 MX Logic, Inc. All rights reserved. 28
33 The file values should appear in the corresponding list box. 4. To remove a value from either list, select the value from the list box then click the Remove button. The page will refresh, and the value should be omitted from the list box MX Logic, Inc. All rights reserved. 29
34 4.3 Maintaining the Exempt Users List The Exempt Users list contains recipients who are exempt from having their mail filtered for Junk (Anti-Spam) , attachments, or content. This may be a useful feature if certain end users frequently receive legitimate that may be confused with spam, such as the classified ads department of a newspaper. Note: Virus scanning is never disabled. To modify the Exempt Users list: 1. From the Policies tab ( ), click the corresponding Modify text link. The Exempt Users page for your domain displays. 2. To add a user to the Exempt list, enter a complete valid address (for your domain only) in the Add Entry field, and click the Add button. The entry should appear in the list box. 3. To remove a user from the Exempt list, select the user from the list box, and click the Remove button. The page will refresh, and the user should be omitted from the list box MX Logic, Inc. All rights reserved. 30
35 4.4 Maintaining Anti-Spam Policies The Anti-Spam settings indicate how you want the system to handle evident (high likelihood) and probable (medium likelihood) Spam . For additional security, you can also enable additional, independent functions. The RBL, RSS, and DUL lists (for definitions, see the Glossary) are services maintained by the Mail Abuse Prevention System (MAPS) SM. These lists, which are databases of known spammer addresses, offer some of the best available protection from spammers. However, they may occasionally block legitimate from getting through, or may block a legitimate sender address that has been wrongly (or unfairly) listed as a spammer. Because these functions operate outside of MX Logic, you should investigate them further before enabling them. More information about MAPS and MAPS databases is available from its website: To modify the Anti-Spam policies: 1. From the Policies tab ( ), click the corresponding Modify text link. The Anti-Spam Policies page displays. 2. Select an action for an inbound message that is probably spam (medium likelihood). The options are as follows: 2003 MX Logic, Inc. All rights reserved. 31
36 Prepend SPAM: to message subject This will deliver the message to the recipient with only the Subject-line altered. Quarantine the message This will place the message in the recipient s Junk Quarantine. Deny Delivery This will prevent the message from being delivered to the recipient. 3. Select an action for an inbound message that is almost certainly spam (high likelihood). The options are identical to those detailed in step 2 for medium likelihood. 4. To enable any of the additional functions offered: The Realtime Blackhole List (RBL) SM, the Relay Spam Stopper List (RSS) SM, and/or the Dial-up User List (DUL) SM, click the corresponding checkbox. (To disable the function, click the checkbox again to remove the checkmark). To review a description of these function, click the corresponding (what s this) text-link. 5. To update the Anti-Spam policy with all your changes, click the Update Policy button. 6. To exit the screen without saving your changes, click Cancel MX Logic, Inc. All rights reserved. 32
37 4.5 Maintaining Anti-Virus Policies The Anti-Virus settings indicate how you want the system to handle inbound messages that contain a virus. MX Logic Defense Service operates on the assumption that viruses are never wanted by your enterprise. Only a network administrator can make the decision to release an infected message to its intended recipient. Note: Recipients who were sent an infected will receive a notice with their message that the virus has been cleaned or stripped. To modify the Anti-Virus policies: 1. From the Policies tab ( ), click the corresponding Modify text link. The Anti-Virus Policies page displays. 2. Select an action for a message containing a virus. The options are as follows: Clean the message This will clean the virus from the message, and still deliver the to the recipient. (Note: Selecting this option requires that you complete step 3.) Quarantine the message This will place the message in the recipient s Virus Quarantine. Strip the attachment This will deliver only the message text to the recipient after removing the attachment. Deny Delivery This will prevent the message from being delivered to the recipient. 3. If you select Clean the message in step 2, then the secondary-action options become active, and you must select an action for messages that cannot be cleaned MX Logic, Inc. All rights reserved. 33
38 The options are similar to those in step 2, as follows: Quarantine the message Strip the attachment Deny Delivery 4. To update the Anti-Virus policy with all your changes, click the Update Policy button. 5. To exit the screen without saving your changes, click Cancel MX Logic, Inc. All rights reserved. 34
 Actions to take on any specific attachment filenames you identify To modify the attachment policies: 1.")
39 4.6 Maintaining Attachment Policies The Attachment policies allow you to indicate the following: File types to allow Size restrictions for each allowed file The action to take on disallowed attachments (any attachment types not specified as allowed are considered disallowed ) Actions to take on any specific attachment filenames you identify To modify the attachment policies: 1. From the Policies tab ( ), click the corresponding Modify text link. The Attachment Control Policies page displays MX Logic, Inc. All rights reserved. 35

40 2. From the Action to take for disallowed attachments box at the top of the screen, select how you want the system to handle all disallowed attachments. The options are as follows: Deny Delivery This will prevent the message from being delivered to the recipient. Strip Attachment This will deliver only the message text to the recipient after removing the attachment MX Logic, Inc. All rights reserved. 36
41 Quarantine Message This will place the message in the recipient s Attachment Quarantine. 3. From the Allowed Attachment Types area, select all attachment types you want allowed by placing a check in the corresponding checkbox. Note: Any attachment types without checkmarks are considered disallowed. To view all qualifying file extensions for an attachment type listed, click on the file extensions for that attachment type. The complete list for that attachment displays next to the Update Policy button. 4. For each allowed (checked) attachment type, set the maximum allowable size for that attachment type by either selecting a value from the corresponding Max Size drop-down list or accepting Any Size (default). 5. To save your Allowed and Disallowed policy changes, click the Update Policy button. 6. To exit the screen without saving your Allowed and Disallowed policy changes, click the Finished button at the bottom of the screen MX Logic, Inc. All rights reserved. 37
. c. From the last drop-down list, select the action to take for the defined filename. d. Click the Add Policy button.")
42 7. To add an Attachment Filename Policy: a. From the first drop-down list, select a filename qualifier. b. In the text box, enter the partial or complete filename (based on the qualifier selected is step a). c. From the last drop-down list, select the action to take for the defined filename. d. Click the Add Policy button. The filename policy you entered should appear in the Attachment Filename Policies list. 8. To delete an existing Attachment Filename Policy, click the corresponding Delete text-link. The filename policy you selected is removed in the list. 9. To exit the page, click the Finished button. Note: Any Allowed and Disallowed policy changes you made are saved only by clicking the Update Policy button at the bottom of the Allowed Attachment Types section. If you have not yet saved changes you made in steps 2 4, go to step MX Logic, Inc. All rights reserved. 38
43 4.7 Maintaining Content Policies The Content policies enable you to indicate unacceptable or suspicious content keywords and the action the system should take when any of those keywords exist in inbound- content. These policies are customizable for your environment: Three static groups exist in the system: Profanity, Racially Insensitive, and Sexual Overtones. These groups can only be enabled or disabled (you cannot modify their contents). You can create new lists (groups) and modify their contents or delete them as needed. To modify the content policies: 1. From the Policies tab ( ), click the corresponding Modify text link. The Current Content Groups page displays MX Logic, Inc. All rights reserved. 39
44 2. To view the contents of any static content group, click the corresponding View text-link. The selected group s content populates the Keywords list box. Note: You cannot modify the contents of these static content groups; you can only disable or enable them (step 3), or change the actions assigned to them (step 4). 3. To enable or disable any Content Group, simply check or uncheck the corresponding Active checkbox. 4. To assign an action to a group, the group must first be Active (see step 3), then you can select from the corresponding Actions drop-down list. The options are as follows: Tag message This will deliver the message, but tag it. Quarantine This will place the message in the recipient s Content Keyword Quarantine. Deny This will prevent the message from being delivered to the recipient. 5. To create a new content group: a. From the top (blank) Content Group line, click the Edit text-link. b. In the Group Name field, enter a new content group name. c. In the Keywords list box, enter the keywords you want include in that group (placing each term on a separate line). d. Click the Save Group button. The new group appears in the Content Group list, disabled (not Active ). e. To activate the new content group and assign an action, see steps To modify a content group: a. Click the corresponding Edit text-link. The selected group s content populates the Keywords list box. b. In either the Keywords list box or Group Name field, change the contents as needed. c. Click the Save Group button. The group appears in the Content Group list, disabled (not Active ). d. To activate the content group and assign an action, see steps To delete a content group, click the corresponding Delete text-link. The selected content group should no longer appear in the Content Group list. 8. To exit the screen, click the Finished button MX Logic, Inc. All rights reserved. 40
45 4.8 Maintaining HTML Shield Policies The HTML Shield settings indicate how you want the system to handle HMTL coding in inbound messages. To modify the HTML Shield policies: 1. From the Policies tab ( ), click the corresponding Modify text link. The HTML Shield Policies page displays. 2. Select your HTML policy from the available radio buttons. The options are as follows: No protection This provides no HTML protection from messages. Low This removes malicious HTML tags from messages. Medium This removes malicious tags, disables all Javascript/Java/ActiveX, removes HTML comments, and removes invalid HTML attributes from messages. High This strips (removes) all HTML from messages. 3. You can also enforce further HTML policies by checking the appropriate checkboxes: 2003 MX Logic, Inc. All rights reserved. 41
46 Enable spam beacon and web bug blocking This blocks spam beacons and web bugs that can access information about the recipient without their knowledge. Replace all image links with a default transparent image This reduces the size of image-intensive messages. 4. To save your changes to the HTML Shield policies, click the Update Policy button. 5. To exit the screen without saving your changes, click the Cancel button MX Logic, Inc. All rights reserved. 42
47 5 SETUP TAB 5.1 Setting up Inbound Servers Enabling/Disabling Spam Reporting Changing Your Password MX Logic, Inc. All rights reserved. 43
.")
48 5.1 Setting up Inbound Servers This page enables you to configure MX Logic Defense Service to deliver inbound SMTP traffic properly to the mail server(s) at your domain. To setup inbound servers: 1. Click the Setup tab ( ). The menu bar displays the various pages you can access within this tab-screen: By default, the first screen that displays is the Inbound Servers setup for the selected domain. You can also access this screen from any other Setup tab-screen by clicking Inbound Servers on the menu bar MX Logic, Inc. All rights reserved. 44
49 2. In a blank line in the SMTP Host Address column, enter your full hostname for your domain s SMTP. Enter either an IP address or a full hostname. 3. Enter the server port for SMTP traffic in the corresponding Port field. Normally this is port Enter a Preference value for each SMTP. Enter the preference value for this mail server (MTA). This value indicates which mail server (if you have multiple MX records) will receive mail first. The higher priority mail server should have the lowest preference value (e.g., 10 for your highest priority mail server, 20 for your secondary mail server, etc.). If for some reason the mail server with highest priority is unable to receive incoming , then will be delivered to the mail server with the next highest priority, and so on. Note: if two mail servers have the same preference value, MX Logic will balance delivery between them. 5. To activate or deactivate a SMTP host, check or uncheck the corresponding Active checkbox. These connections can be turned on and off as needed, without being reconfigured, simply by checking or un-checking the Active box. 6. To ensure that any new configurations or changes are saved and applied, click the corresponding Update button. 7. To delete an STMP, click the corresponding Delete button MX Logic, Inc. All rights reserved. 45
50 5.2 Enabling/Disabling Spam Reporting MX Logic Defense Service enables end users to manage their own spam quarantine, as well as create their own list of allowed senders. However, for this functionality to become operational, as the MX Logic Defense Service administrator, you must first activate Spam Summary Reporting. By enabling the Spam Summary Reporting feature, end users will receive periodic summaries of quarantined spam messages intended for them. By utilizing this feature, the administrator relives the burden of managing the entire spam quarantine at the domain level, instead pushing the responsibility to end users who can view and clean out their personal spam quarantine at their convenience. Recipient spam summary reporting enables delivery of quarantine reports to all users with messages quarantined as junk (spam). Recipients may view and delete or release quarantined messages listed in the delivered report. When initially enabled, reports are delivered daily. However, users may personalize the delivery frequency within the report they receive. To manage spam reporting: 1. From the Setup tab ( ) menu, click the Spam Reporting text-link. The Recipient Spam Reports page displays MX Logic, Inc. All rights reserved. 46

51 2. Enable or Disable this feature completely by selecting the appropriate radio button. 3. To save your change, click Update. 4. To exit the screen without saving any changes, click Cancel. Once the Spam Summary Reporting feature has been enabled, end users will receive Spam Summary Reports by . The Reports appear as follows: With this Spam Summary Report: Users can release [Release] one or more of the s to their inbox (this is especially useful in the case of false positives, i.e., legitimate accidentally captured as spam), and then delete all remaining spam s [Delete All]. Users can also add a sender to their personal Allow List by clicking the [Always Allow] text-link; this will release the quarantined , and will prevent future quarantining of from that particular address. (Note: Because domain-level policies always override end-user policies, from an address on an end user s Allow List will still be blocked if the same address or domain is on the domain-level Deny List. ) Users can each choose the frequency that they receive their Spam Summary Report (every one, two, or three days, every week, or never) MX Logic, Inc. All rights reserved. 47
52 5.3 Changing Your Password You can change your password at any time for the domain ( address) you used to log into the MX Control Console. To change your password: 1. From the Setup tab ( ) menu, click the Password text-link. The Password Change page displays. 2. Enter your Old Password. 3. Enter a New Password. Your password must be at least six-characters long, containing no spaces. 4. Confirm your new password by entering it again in the Retype New Password field. 5. Click the continue button. If your password cannot be changed, a popup message denotes the reason. If your password changed successfully, the page will refresh, displaying Password Changed in red text at the top MX Logic, Inc. All rights reserved. 48
53 6 USERS TAB 6.1 Searching for Users & Viewing User Details Changing User Roles & Settings Accessing Quarantined Messages for a User MX Logic, Inc. All rights reserved. 49
. The User Management page displays.")
54 6.1 Searching for Users & Viewing User Details From the Users tab, you can search for users and view user details. User details include account and login information as well as messaging traffic for that user. To search for users: 1. From the tab menu, click the Users tab ( ). The User Management page displays. The page shows All Users by default. To sort the list by any of the headings, simply click the heading title. Each page lists up to 100 users. You can view additional pages by either clicking the Next > or < Prev links or clicking on the specific page number link. 2. To view only usernames that begin with a specific letter, click the letter on the Quick Jump menu. 3. To view only usernames that begin with a character other than a letter, click the Other option on the Quick Jump menu. 4. To find users via the Search function: a. Click the Search button. The search screen displays MX Logic, Inc. All rights reserved. 50

55 b. From the drop-down list, select a qualifier for your search entry (step c). c. In the text box, enter the characters by which to search. d. Click the search button. The search results display. e. To view user details, see step 5. f. To return to the default page to view all users, click the List All button. 5. To view user details, click the username. The User Details page displays, including a menu: The Users link displays the main User Management page that displays all users. The Details link (the page you are currently viewing) displays the details for the selected user. The Quarantine link displays the quarantined messages for the selected user MX Logic, Inc. All rights reserved. 51
56 The User Details page displays account and user information, as well as recent messaging traffic for the user. To edit user information, see the Changing User Roles & Settings instructions (on page 53). To access quarantines messages for this user, see the Accessing Quarantined Messages for a User instructions (on page 55). To return to the default page to view all users, click Users on the menu bar MX Logic, Inc. All rights reserved. 52

. 2. From the User Details screen, click the Edit User button at the bottom of the screen. The edit user page displays. 3.")

57 6.2 Changing User Roles & Settings From the User Details page, you can change a user s role, spam report frequency, and password. To change this user information: 1. Find the user and access the User Details screen as described in steps 1 5 of the Searching for Users & Viewing User Details instruction (on page 50). 2. From the User Details screen, click the Edit User button at the bottom of the screen. The edit user page displays. 3. To change the user s role, choose another option from the Role drop-down list. Note: You cannot change the role of a user whose role is more senior than your own. 4. To change the user s spam report frequency setting, choose another option from the Spam Report Freq drop-down list. 5. To change the user s password, enter a new password in the Password field and again in the Verify Password field MX Logic, Inc. All rights reserved. 53
58 6. To save your changes, click the Submit button. 7. To exit the screen without saving your changes, click the Cancel button MX Logic, Inc. All rights reserved. 54

59 6.3 Accessing Quarantined Messages for a User From the User Details page, you can access the user s quarantined messages, enabling you to then view, release, or delete those messages. To access and manage a user s quarantined messages: 1. Find the user and access the User Details screen as described in steps 1 5 of the Searching for Users & Viewing User Details instruction (on page 50). 2. From the User Details screen, click Quarantine on the menu bar. The User Quarantine page displays. To sort the list by any of the headings, simply click the heading title. Clicking the heading again will sort the list in the opposite order. Note: Sorting the list automatically transfers you to the Message Quarantine screen for the specific user. The Type column displays the policy enforced in quarantining the message. For each quarantined message, you have the option to delete it completely, or to release it (sending it to the intended recipient). 3. To release or delete select messages, check (click) the corresponding checkboxes then either release or delete the selected messages using the buttons at the bottom of the page. (Clicking the checkbox again will deselect it.) 2003 MX Logic, Inc. All rights reserved. 55

60 4. To release or delete all messages on the page displayed, click the single checkbox at the bottom of the page, and click either release or delete. 5. To view the actual message, before release or deletion, click the linked address in the From column. A Safe Message View displays: You can also release or delete a message from this detailed screen, using the Message Action buttons. To return to the User Quarantine page, click Quarantine on the menu bar. To return to the User Details page, click Details on the menu bar MX Logic, Inc. All rights reserved. 56
61 7 REPORTING TAB 7.1 Introduction Reporting Tab Functionality Viewing Traffic Overview Viewing the Threats Overview Viewing a Spam Threats Report Viewing a Virus Threats Report Viewing a Content Threats Report Viewing an Attachment Threats Report Viewing a User Activity Report Viewing an Event Log Report Viewing an Audit Trail Report MX Logic, Inc. All rights reserved. 57

, the Reports and Statistics page displays with a top menu bar that contains Domain, Report, and Report Period options: 1.")
62 7.1 Introduction Reporting Tab Functionality From the Reports and Statistics page, you can view information such as trends, policy actions, and a summary of traffic and various threats detected. You can also view and download data including the top inbound users; event logs that display actions taken for virus, content, or attachment policy violations; and audit trails that track activity within the system, such as login and system changes. When you click the Reporting tab ( ), the Reports and Statistics page displays with a top menu bar that contains Domain, Report, and Report Period options: 1. As with any other page in the MX Control Console, you must select the correct domain from the Domain drop-down list. 2. The Report drop-down list enables you to select which report to view: Note: The first item listed is always the default page that displays upon clicking the Report tab. 3. The Report Period option enables you to select the time span for which you would like to view the selected reports (the default is the current week). Clicking the Report Period button initiates a popup calendar MX Logic, Inc. All rights reserved. 58

63 To view previous or subsequent months, click the < or > arrow. To select a specific day, click on the date. To select an entire week, click the week number (in the blue-shaded column). To select an entire month, click the this month text at the bottom of the calendar. Note: The report period you choose will apply to all reports you view while still on this tab, unless/until you change it. Clicking another tab then returning to the Reporting tab will set the Report Period back to the default of the current week MX Logic, Inc. All rights reserved. 59
 from the main menu.")
64 7.2 Viewing Traffic Overview The Traffic Overview enables you to monitor your domain s general message traffic, including the total and average size and bandwidth for inbound messages. You can access the Traffic Overview screen two ways: Because the Traffic Overview screen is the default report screen, you can simply click the Reporting tab ( ) from the main menu. Note: Accessing the page this way will reset the Report Period to the current week (default). From the Reports and Statistics page, you can select Traffic: Overview from the Report drop-down list on the top menu bar. The Traffic Overview screen displays for the Domain and Report Period selected. The screen contents include: Traffic Trends This box contains a graphic showing the inbound traffic. Traffic Summary This box details the inbound message traffic, listing the number of inbound messages and the average number of inbound messages per hour. Bandwidth Trends This box contains a graphic showing the inbound bandwidth. Bandwidth Summary This box details the inbound traffic bandwidth, listing the total inbound bandwidth and the average inbound messages size MX Logic, Inc. All rights reserved. 60

65 7.3 Viewing the Threats Overview The Threats Overview enables you to monitor your domain s inbound threat trends and general statistics on violations detected by policy type. You can access the Threats Overview screen by selecting Threats: Overview from the Report drop-down list. The Threats Overview screen displays for the Domain and Report Period selected. The screen contents include: Inbound Threat Trends This box contains a graph showing the number of inbound messages quarantined. The graph is color-coded according to the threat detected: Spam, Virus, Content, Attachments, or Whitelist/Blacklist. Inbounds Threat Summary This box details the threats detected, listing the Total Viruses, Infection Rate, Total Spam Identified, Spam Volume, Spam Beacons Detected, Content Keyword Violations, and Attachment Policy Violations MX Logic, Inc. All rights reserved. 61

66 7.4 Viewing a Spam Threats Report The Spam Threats report enables you to monitor your domain s inbound spam-mail trends, details on the spam detected, and spam policy enforcement statistics. You can access the Spam Threats screen by selecting Threats: Spam from the Report drop-down list. The Spam Threats screen displays for the Domain and Report Period selected. The screen contents include: Spam Volume Trends This box contains a graph showing the total number of inbound Spam messages detected. Spam Detection Summary This box details the spam messages detected, listing the Total Spam Identified, Spam Volume, Spam Beacons Detected, RBL, DUL, and RSS. (For definitions of these terms, see the Glossary.) Spam Policy Actions This box contains a chart showing the Spam Policy actions enforced for the spam-detected messages MX Logic, Inc. All rights reserved. 62

67 7.5 Viewing a Virus Threats Report The Virus Threats report enables you to monitor your domain s inbound virus traffic (volume trends and details), virus policy enforcement statistics, and top viruses detected. You can access the Virus Threats screen by selecting Threats: Viruses from the Report drop-down list. The Virus Threats screen displays for the Domain and Report Period selected MX Logic, Inc. All rights reserved. 63
68 The screen contents include: Virus Volume Trends This box contains a graph showing the total number of inbound virus-infected messages detected. Virus Detection Summary This box provides the Total Viruses Inbound, Inbound Infection Rate, Disinfected (cleaned), and Stripped messages. Virus Policy Actions This box contains a chart showing the Virus Policy actions enforced for the virus-infected messages. Top Inbound Viruses This box lists the most common viruses detected, beginning with the most frequent MX Logic, Inc. All rights reserved. 64

69 7.6 Viewing a Content Threats Report The Content Threats report enables you to monitor your domain s inbound content violation trends, detected content group violations, and content policy enforcement statistics. You can access the Content Threats screen by selecting Threats: Content from the Report drop-down list. The Content Threats screen displays for the Domain and Report Period selected. The screen contents include: Content Policy Violation Trends This box contains a graph showing the total number of inbound content-flagged messages detected. Content Group Violations This box provides the number of violations listed by active Content Group. Content Policy Actions This box provides a chart showing the Content Policy actions enforced for messages containing unwanted content MX Logic, Inc. All rights reserved. 65

70 7.7 Viewing an Attachment Threats Report The Attachment Threats report enables you to monitor your domain s inbound attachment violation trends, the violations detected by attachment type, and content policy enforcement statistics. You can access the Attachment Threats screen by selecting Threats: Attachments from the Report drop-down list. The Attachment Threats screen displays for the Domain and Report Period selected. The screen contents include: Attachment Policy Violation Trends This box provides a graph showing the total number of inbound messages containing unwanted attachments. Attachment Summary This box provides the Average Attachment Size as well as the total number of each attachment type allowed. Attachment Policy Actions This box provides a chart showing the Attachment Policy actions enforced for messages containing policy-limited or disallowed attachments MX Logic, Inc. All rights reserved. 66
MX Control Console. and Spam Summary Reports. End User Manual
 MX Control Console and Spam Summary Reports End User Manual This Software and Related Documentation are proprietary to MX Logic, Inc. Copyright 2003 MX Logic, Inc. The information contained in this document
Symantec Hosted Mail Security Console and Spam Quarantine User s Guide
 Symantec Hosted Mail Security Console and Spam Quarantine User s Guide Copyright 2005 Symantec Corporation and/or its thirdparty licensors. All Rights Reserved. Document Version: RESTRICTION ON USE, PUBLICATION,
Admin Guide Defense With Continuity
 Admin Guide Email Defense With Continuity DOCUMENT REVISION DATE: April, 2010 Email Defense with Continuity--Admin Guide / Table of Contents Page 2 of 41 Table of Contents QUICK STAR T CHECKLIST... 3 USE
Admin Guide Boundary Defense for Anti-Virus & Anti-Spam
 Admin Guide Boundary Defense for Email Email Anti-Virus & Anti-Spam DOCUMENT REVISION DATE: October, 2010 Boundary Defense for Email Admin Guide / Table of Contents Page 2 of 34 Table of Contents 1 INTRODUCTION...
ClientNet Admin Guide. Boundary Defense for
 ClientNet Admin Guide Boundary Defense for Email DOCUMENT REVISION DATE: Feb 2012 ClientNet Admin Guide / Table of Contents Page 2 of 36 Table of Contents OVERVIEW... 3 1 INTRODUCTION... 3 1.1. AUDIENCE
Dataprise Managed Anti-Spam Console
 Dataprise Managed Anti-Spam Console The easy-to-use solution for managing junk and virus-infected email. Use this guide to get started using your personal dashboard. # WinningWithIT What is the Personal
Managing Spam. To access the spam settings in admin panel: 1. Login to the admin panel by entering valid login credentials.
 Email Defense Admin Panel Managing Spam The admin panel enables you to configure spam settings for messages. Tuning your spam settings can help you reduce the number of spam messages that get through to
Comodo Antispam Gateway Software Version 2.12
 Comodo Antispam Gateway Software Version 2.12 User Guide Guide Version 2.12.112017 Comodo Security Solutions 1255 Broad Street Clifton, NJ, 07013 Table of Contents 1 Introduction to Comodo Antispam Gateway...3
Comodo Comodo Dome Antispam MSP Software Version 2.12
 Comodo Comodo Dome Antispam MSP Software Version 2.12 User Guide Guide Version 2.12.111517 Comodo Security Solutions 1255 Broad Street Clifton, NJ, 07013 Table of Contents 1 Introduction to Comodo Dome
Comodo Antispam Gateway Software Version 2.1
 Comodo Antispam Gateway Software Version 2.1 User Guide Guide Version 2.1.010215 Comodo Security Solutions 1255 Broad Street Clifton, NJ, 07013 Table of Contents 1 Introduction to Comodo Antispam Gateway...
Comodo Antispam Gateway Software Version 2.11
 Comodo Antispam Gateway Software Version 2.11 User Guide Guide Version 2.11.041917 Comodo Security Solutions 1255 Broad Street Clifton, NJ, 07013 Table of Contents 1 Introduction to Comodo Antispam Gateway...3
USER GUIDE. Accessing the User Interface. Login Page https://www.contentcatcher.com. Resetting your Password. Logging In
 USER GUIDE This guide walks through the user interface of ContentCatcher, and the features and parameters contained therein. Accessing the User Interface The ContentCatcher user interface is a secure web-based
Panda Security. Protection. User s Manual. Protection. Version PM & Business Development Team
 Panda Security Email Protection Email Protection PM & Business Development Team User s Manual Version 4.3.2-2 1 Table of Contents Table of Contents... 2 1. Introduction to Email Protection... 3 2. Email
How does the Excalibur Technology SPAM & Virus Protection System work?
 How does the Excalibur Technology SPAM & Virus Protection System work? All e-mail messages sent to your e-mail address are analyzed by the Excalibur Technology SPAM & Virus Protection System before being
Admin Quick Start Guide Protection Service Anti-Virus & Anti-Spam
 Admin Quick Start Guide Email Protection Service Anti-Virus & Anti-Spam DOCUMENT REVISION DATE: January, 2010 Email Protection Admin Quick Start Guide / Table of Contents Page 2 of 17 Table of Contents
WEBSENSE PERSONAL MANAGER
 WEBSENSE PERSONAL EMAIL MANAGER Personal Email Manager is a facility for managing email that has been blocked by Websense Email Security. Websense Email Security filters email to protect you and your organization
How do I use ProofPoint anti-spam software at the GC
 How do I use ProofPoint anti-spam software at the GC This FAQ contains: ProofPoint Login instructions Introduction to ProofPoint web interface component Views available in Proofpoint ProofPoint Web Interface
GFI MailSecurity 2011 for Exchange/SMTP. Administration & Configuration Manual
 GFI MailSecurity 2011 for Exchange/SMTP Administration & Configuration Manual http://www.gfi.com info@gfi.com The information and content in this document is provided for informational purposes only and
What's new in Europa?
 What's new in Europa? Quarantine Search Capabilities ( Managing your quarantined items ) Setting Control level in user level in anti spam Auto White List Outbound Recipients Mode Analysis Sender Profile
University Information Technology (UIT) Proofpoint Frequently Asked Questions (FAQ)
 Proofpoint Frequently Asked Questions (FAQ)") University Information Technology (UIT) Proofpoint Frequently Asked Questions (FAQ) What is Proofpoint?... 2 What is an End User Digest?... 2 In my End User Digest I see an email that is not spam. What
University Information Technology (UIT) Proofpoint Frequently Asked Questions (FAQ) What is Proofpoint?... 2 What is an End User Digest?... 2 In my End User Digest I see an email that is not spam. What
WeCloud Security. Administrator's Guide
 WeCloud Security Administrator's Guide WeCloud Security Administrator's Guide WeCloud Security provides a variety of useful features within a user-friendly web console to manage the functions including
Introduction. Logging in. WebMail User Guide
 Introduction modusmail s WebMail allows you to access and manage your email, quarantine contents and your mailbox settings through the Internet. This user guide will walk you through each of the tasks
AT&T Business Messaging Account Management
 Account Management Administrator User Guide July 2016 1 Copyright 2016 AT&T Intellectual Property. All rights reserved. AT&T, the AT&T logo and all other AT&T marks contained herein are trademarks of AT&T
File Cabinet Manager
 Tool Box File Cabinet Manager Java File Cabinet Manager Password Protection Website Statistics Image Tool Image Tool - Resize Image Tool - Crop Image Tool - Transparent Form Processor Manager Form Processor
Protection: End User s Guide. Table of Contents
 Email Protection End User s Guide / Table of Contents Page 1 of 10 Email Protection: End User s Guide Table of Contents Quarantine Report... 2 Links within the Quarantine Report... 3 Login to the Email
Preface Introduction to Proofpoint Essentials... 6
 June 2016 Preface... 4 About this Guide... 4 Intended Audience and Prerequisite Knowledge... 4 Important Terms... 4 Contacting Proofpoint Essentials Support... 5 Knowledge Base... 5 Support Contact Information...
Using the Control Panel
 Using the Control Panel Technical Manual: User Guide Creating a New Email Account 3. If prompted, select a domain from the list. Or, to change domains, click the change domain link. 4. Click the Add Mailbox
Overview. Your Postini Username and Password. Recovering Your Postini Password
 Postini User Guide Overview... 2 Your Postini Username and Password... 2 Recovering Your Postini Password... 2 Logging Into Postini... 6 Viewing Quarantine... 9 Delivering Messages... 9 Accessing Your
Web Mail and e-scout Instructions
 Web Mail and e-scout Instructions To log into e-scout: visit our home page at www.greenhills.net, click on web mail at the top of the page OR click on the customer center tab and then the webmail button,
Blackboard 5 Level One Student Manual
 Blackboard 5 Level One Student Manual Blackboard, Inc. 1899 L Street NW 5 th Floor Washington DC 20036 Copyright 2000 by Blackboard Inc. All rights reserved. No part of the contents of this manual may
ProofPoint Protection Perimeter Security Daily Digest and Configuration Guide. Faculty/Staff Guide
 ProofPoint Email Protection Email Perimeter Security Daily Digest and Configuration Guide Faculty/Staff Guide Contents Introduction and ProofPoint Overview... 2 Daily Email Digest... 3 ProofPoint Portal
On the Surface. Security Datasheet. Security Datasheet
 Email Security Datasheet Email Security Datasheet On the Surface No additional hardware or software required to achieve 99.9%+ spam and malware filtering effectiveness Initiate service by changing MX Record
Personal Dashboard User Guide
 Version 8.1 800-782-3762 www.edgewave.com 2001 2011 EdgeWave. All rights reserved. The Red Condor and EdgeWave logos and brands are trademarks of EdgeWave. All other trademarks and registered trademarks
Proofpoint Essentials: Part of the Proofpoint Family... 5 Proofpoint Essentials Overview Best Practices... 10
 June 2015 Preface... 4 About this Guide... 4 Intended Audience and Prerequisite Knowledge... 4 Other Sources of Information... 4 Contacting Proofpoint Essentials Support... 4 Knowledge Base... 5 Support
Getting Started 2 Logging into the system 2 Your Home Page 2. Manage your Account 3 Account Settings 3 Change your password 3
 Table of Contents Subject Page Getting Started 2 Logging into the system 2 Your Home Page 2 Manage your Account 3 Account Settings 3 Change your password 3 Junk Mail Digests 4 Digest Scheduling 4 Using
700 Fox Glen Barrington, Illinois ph: [847] fx: [847] Webmail System User Guide
![700 Fox Glen Barrington, Illinois ph: [847] fx: [847] Webmail System User Guide](/thumbs/77/75887523.jpg "700 Fox Glen Barrington, Illinois ph: [847] fx: [847] Webmail System User Guide") 700 Fox Glen Barrington, Illinois 60010 ph: [847] 842-9570 fx: [847] 842-0190 www.excaltech.com support@excaltech.com Webmail System User Guide Last Updated May 10, 2010 -2- Table of Contents Welcome and
700 Fox Glen Barrington, Illinois 60010 ph: [847] 842-9570 fx: [847] 842-0190 www.excaltech.com support@excaltech.com Webmail System User Guide Last Updated May 10, 2010 -2- Table of Contents Welcome and
Hostopia WebMail Help
 Hostopia WebMail Help Table of Contents GETTING STARTED WITH WEBMAIL...5 Version History...6 Introduction to WebMail...6 Cookies and WebMail...6 Logging in to your account...6 Connection time limit...7
McAfee (formerly MX Logic) Quick Start User s Guide
 Quick Start User s Guide") McAfee (formerly MX Logic) Quick Start User s Guide About McAfee formerly MX Logic McAfee has acquired MX Logic, a leading global provider of cloud-based email and web security, email archiving, and email
McAfee (formerly MX Logic) Quick Start User s Guide About McAfee formerly MX Logic McAfee has acquired MX Logic, a leading global provider of cloud-based email and web security, email archiving, and email
Contents. Limitations. Prerequisites. Configuration
 Welcome to your Netmail Secure trial The trial version of Netmail Secure allows you to evaluate Netmail Secure from within your own corporate domain. Included is a sample mail feed that is automatically
Managing WCS User Accounts
 CHAPTER 7 This chapter describes how to configure global e-mail parameters and manage WCS user accounts. It contains these sections: Adding WCS User Accounts, page 7-1 Viewing or Editing User Information,
Using Centralized Security Reporting
 This chapter contains the following sections: Centralized Email Reporting Overview, on page 1 Setting Up Centralized Email Reporting, on page 2 Working with Email Report Data, on page 4 Understanding the
Outlook Web Access User s Guide- Paris ISD
 Outlook Web Access User s Guide- Paris ISD 2009-10 Microsoft s Outlook Web Access is the new web-based program that Paris ISD will use for E-mail. You can access your email and folders from any computer
ISOCNET Quarantine. User s Guide
 ISOCNET Quarantine User s Guide Contents Logging in... 2 Password... 3 Successful Login... 3 1-Check Mail, Block Address/Domain, and Trust Address... 4 Check Mail... 4 Blocked Senders List... 4 Trusted
You should not have any other MX records for your domain name (subdomain MX records are OK).
.") Network Configuration In order to properly deploy ExchangeDefender, you need to make several changes on your network. First, you have to change your MX record to point all of your inbound mail to ExchangeDefender.
Network Configuration In order to properly deploy ExchangeDefender, you need to make several changes on your network. First, you have to change your MX record to point all of your inbound mail to ExchangeDefender.
Symantec Security. Setup and Configuration Guide
 Symantec Email Security Setup and Configuration Guide I. Requirements A Symantec Email Security subscription A registered domain name Hosted email service Internet connection 2 II. Getting Started When
Mail Assure Quick Start Guide
 Mail Assure Quick Start Guide Version: 11/15/2017 Last Updated: Wednesday, November 15, 2017 CONTENTS Getting Started with Mail Assure 1 Firewall Settings 2 Accessing Mail Assure 3 Incoming Filtering 4
ESET Mobile Security for Windows Mobile. Installation Manual and User Guide - Public Beta
 ESET Mobile Security for Windows Mobile Installation Manual and User Guide - Public Beta Contents...3 1. Installation of ESET Mobile Security 1.1 Minimum...3 system requirements 1.2 Installation...3 1.2.1
Enabling and Activating Anti-Spam
 Enabling and Activating Anti-Spam NOTE: Anti-Spam does not apply to the SuperMassive 9800. The Anti-Spam > Base Setup page allows you to activate the Anti-Spam feature, configure email threat categories,
Mail Services SPAM Filtering
 Table of Contents Subject Page Getting Started 2 Logging into the system 2 Your Home Page 2 Junk Mail Digests 3 Digest Scheduling 3 Using Your Digest 3 Messaging Features 4 Your Message Queue 4 View Queued
Step 2 - Deploy Advanced Security for Exchange Server
 Step 2 - Deploy Advanced Email Security for Exchange Server Step 1. Ensure Connectivity and Redundancy Open your firewall ports to allow the IP address ranges based on your Barracuda Email Security Service
PowerSchool User Guide For Parents
 PowerSchool User Guide For Parents https://powerschool.gpcsd.ca/public Table of Contents Understanding Power School Parent Portal... 2 Introduction... 2 Let s Get Started... 2 Creating Your PowerSchool
My MessageMedia User Guide
 My MessageMedia User Guide Copyright and Trademark Statement 2011 MessageMedia All rights reserved. Apart from any use permitted under the Copyright Act 1968, no part of this publication may be reproduced,
Managing WCS User Accounts
 7 CHAPTER This chapter describes how to configure global email parameters and manage WCS user accounts. It contains these sections: Adding WCS User Accounts, page 7-2 Viewing or Editing User Information,
Unified Management Console
 Unified Management Console Transition Guide The unified management console provides the same functionality that the older MailGuard and WebGuard management consoles provided if not more. This guide is
IBM Express Managed Security Services for Security. Anti-Virus Administrator s Guide. Version 5.31
 IBM Express Managed Security Services for Email Security Anti-Virus Administrator s Guide Version 5.31 Table of Contents 1. Service overview...3 1.1 Welcome... 3 1.2 Anti-Virus (AV) features... 3 1.3 How
USING PERFORMANCE PRO An Appraiser s Quickstart Guide. Hrperformancesolutions.net 9/2015 v. 3.4
 USING PERFORMANCE PRO An Appraiser s Quickstart Guide Hrperformancesolutions.net 9/2015 v. 3.4 Appraiser Quickstart Guide Employee appraisals can be completed easily and quickly. The steps outlined below
Account Customer Portal Manual
 Account Customer Portal Manual Table of Contents Introduction Dashboard Section Reporting Section My Settings Section My Account Section Billing Section Help Section 2 4 7 15 20 25 27 1 Introduction SMTP
AccessEnforcer Version 4.0 Features List
 AccessEnforcer Version 4.0 Features List AccessEnforcer UTM Firewall is the simple way to secure and manage your small business network. You can choose from six hardware models, each designed to protect
Eftel s Anti-Spam Manual
 Eftel s Anti-Spam Manual Page Table of contents 1 How to switch Eftel Anti-Spam and Anti-Virus service on.1 How to switch Eftel Anti-Spam and Anti-Virus service off 2 How to access the Anti-Spam Interface.2
TOTAL CONTROL SECURITY END USER GUIDE
 TOTAL CONTROL EMAIL SECURITY END USER GUIDE Welcome to the Total Control email security solution, which protects you against spam, viruses, phishing exploits, and other email-borne threats. In this guide,
You can find more information about the service at
 Introduction The purpose of this guide is to familiarize you with ExchangeDefender and walk you through the configuration, management and deployment of the service. ExchangeDefender is a transparent, cloud-based
EVERY NATION OUTLOOK WEB ACCESS (OWA) USER S GUIDE
 USER S GUIDE") EVERY NATION OUTLOOK WEB ACCESS (OWA) USER S GUIDE Exchange 2003 Version Revised September 2005 TABLE OF CONTENTS WHAT S NEW IN OWA 2003?...2 General...2 Inbox and Message Composition...2 Tasks...2 INTRODUCTION
EVERY NATION OUTLOOK WEB ACCESS (OWA) USER S GUIDE Exchange 2003 Version Revised September 2005 TABLE OF CONTENTS WHAT S NEW IN OWA 2003?...2 General...2 Inbox and Message Composition...2 Tasks...2 INTRODUCTION
USING PERFORMANCE PRO An Appraiser s Quickstart Guide. Hrperformancesolutions.net 4/2017 v. 3.9
 USING PERFORMANCE PRO An Appraiser s Quickstart Guide Hrperformancesolutions.net 4/2017 v. 3.9 Appraiser Quickstart Guide You have been asked to provide input on an appraisal as a primary appraiser. If
OUTLOOK WEB ACCESS (OWA) USER S GUIDE. Exchange 2003 Version - OWA Guide
 USER S GUIDE. Exchange 2003 Version - OWA Guide") OUTLOOK WEB ACCESS (OWA) USER S GUIDE Exchange 2003 Version - OWA Guide TABLE OF CONTENTS WHAT S NEW IN OWA 2003?...2 General...2 Inbox and Message Composition...2 Tasks...2 INTRODUCTION TO OWA...3 Web-Based
OUTLOOK WEB ACCESS (OWA) USER S GUIDE Exchange 2003 Version - OWA Guide TABLE OF CONTENTS WHAT S NEW IN OWA 2003?...2 General...2 Inbox and Message Composition...2 Tasks...2 INTRODUCTION TO OWA...3 Web-Based
Mail Assure. Quick Start Guide
 Mail Assure Quick Start Guide Last Updated: Wednesday, November 14, 2018 ----------- 2018 CONTENTS Firewall Settings 2 Accessing Mail Assure 3 Application Overview 4 Navigating Mail Assure 4 Setting up
Introduction This paper will discuss the best practices for stopping the maximum amount of SPAM arriving in a user's inbox. It will outline simple
 Table of Contents Introduction...2 Overview...3 Common techniques to identify SPAM...4 Greylisting...5 Dictionary Attack...5 Catchalls...5 From address...5 HELO / EHLO...6 SPF records...6 Detecting SPAM...6
SECTION 5 USING STUDENT
 SECTION 5 USING STUDENT EMAIL 5. USING STUDENT EMAIL On enrolling at the University all students automatically have an email account created. Account creation depends on a student successfully enrolling
Thank you for choosing Webmail!
 Thank you for choosing Webmail! Section 1: General Features and Layout of Webmail I. After logging in you will be greeted with a page which looks similar to the older version of webmail. You will have
. Help Documentation. This document was auto-created from web content and is subject to change at any time. Copyright (c) 2019 SmarterTools Inc.
 2019 SmarterTools Inc.") Help Documentation This document was auto-created from web content and is subject to change at any time. Copyright (c) 2019 SmarterTools Inc. Mail Folders A folder in SmarterMail is the general method
Help Documentation This document was auto-created from web content and is subject to change at any time. Copyright (c) 2019 SmarterTools Inc. Mail Folders A folder in SmarterMail is the general method
UP & DOMAIN ADMINISTRATION GUIDE
 DOMAIN GROUP & DOMAIN ADMINISTRATION GUIDE Email Security Service MPS 6 for Hosted Service Providers MPS 6 for Hosted Enterprises MPS 6 for Service Providers MPS 6 for Enterprises Disclaimer The information
Reference Guide. McAfee Security for Microsoft Exchange 8.6.0
 Reference Guide McAfee Security for Microsoft Exchange 8.6.0 COPYRIGHT Copyright 2017 McAfee, LLC TRADEMARK ATTRIBUTIONS McAfee and the McAfee logo, McAfee Active Protection, epolicy Orchestrator, McAfee
TREND MICRO. InterScan VirusWall 6. FTP and POP3 Configuration Guide. Integrated virus and spam protection for your Internet gateway.
 TM TREND MICRO TM TM InterScan VirusWall 6 Integrated virus and spam protection for your Internet gateway for Linux TM FTP and POP3 Configuration Guide Trend Micro Incorporated reserves the right to make
File Uploader Application
 File Uploader Application Contents Introduction... 1 Opening File Uploader... 2 Logging In... 2 The Menu Screen... 2 Uploading Files... 3 Sending Files... 4 Opening a Download... 5 Temporary Logins...
Electronic Appraisal Delivery (EAD) Portal. FHA EAD General User Guide
 Portal. FHA EAD General User Guide") Electronic Appraisal Delivery (EAD) Portal FHA EAD General User Guide Last Updated: October 2015 FHA EAD General User Guide Page 2 of 87 Version 1.3.1 TABLE OF CONTENTS INTRODUCTION... 6 WHAT IS THE ELECTRONIC
Electronic Appraisal Delivery (EAD) Portal FHA EAD General User Guide Last Updated: October 2015 FHA EAD General User Guide Page 2 of 87 Version 1.3.1 TABLE OF CONTENTS INTRODUCTION... 6 WHAT IS THE ELECTRONIC
Monterey County Office of Education Quarantine (Spam ) System - User Guide
 System - User Guide") Monterey County Office of Education Quarantine (Spam E-Mail) System - User Guide With the new Spam firewall recently deployed in the MCOE network, e-mail users now have more power and flexibility against
Monterey County Office of Education Quarantine (Spam E-Mail) System - User Guide With the new Spam firewall recently deployed in the MCOE network, e-mail users now have more power and flexibility against
Configuration Section
 8 Configuration Section MailCleaner can be easily customized to fit your needs and your working style. The Configuration menu contains six sections: Interface, Address groups, Address settings, Quarantine
Introducing the CSC SSM
 CHAPTER 1 This chapter introduces the Content Security and Control (CSC) Security Services Module (SSM), and includes the following sections: Overview, page 1-1 Features and Benefits, page 1-2 Available
Mimecast Personal Portal (MPP)
") Mimecast Personal Portal (MPP) Mimecast Personal Portal (MPP) Advanced Bounce Viewer Managed Senders Moderated On Hold Personal On Hold Rejection Viewer Calendars Exchange Folders File Archive Logging
Mimecast Personal Portal (MPP) Mimecast Personal Portal (MPP) Advanced Bounce Viewer Managed Senders Moderated On Hold Personal On Hold Rejection Viewer Calendars Exchange Folders File Archive Logging
Online eopf Self-service Feature for Login ID and Password Retrieval for New Users
 For Employees Online eopf Self-service Feature for Login ID and Password Retrieval for New Users eopf provides web-based access for Federal personnel to view and print employment documents. Employees are
Filtering User Guide. Guide to User Functions of Spam and Virus Filtering Service
 Email Filtering User Guide Guide to User Functions of Spam and Virus Filtering Service Table of Contents Welcome Page 3 Logon Page 3 Home Page 4 Spam Page 5 Message Searching Releasing Held Mail Virus
ClientNet. Portal Admin Guide
 ClientNet Portal Admin Guide Document Revision Date: June 5, 2013 ClientNet Portal Admin Guide i Contents Introduction to the Portal... 1 About the Portal... 1 Logging On and Off the Portal... 1 Language
Important Information
 May 2014 Important Information The following information applies to Proofpoint Essentials US1 data center only. User Interface Access https://usproofpointessentials.com MX Records mx1-usppe-hosted.com
BUSINESS LINE COMMPORTAL GUIDE
 wowforbusiness.com BUSINESS LINE COMMPORTAL GUIDE WOW! Business BCSE.U.1505.O Business Line CommPortal Guide Table of Contents Getting Started...3 Dashboard...4 Messages and Calls...5 Messages...5 Missed
Trustwave SEG Cloud Customer Guide
 Trustwave SEG Cloud Customer Guide Legal Notice Copyright 2017 Trustwave Holdings, Inc. All rights reserved. This document is protected by copyright and any distribution, reproduction, copying, or decompilation
Managing NCS User Accounts
 7 CHAPTER The Administration enables you to schedule tasks, administer accounts, and configure local and external authentication and authorization. Also, set logging options, configure mail servers, and
PowerSchool Student and Parent Portal User Guide. https://powerschool.gpcsd.ca/public
 PowerSchool Student and Parent Portal User Guide https://powerschool.gpcsd.ca/public Released June 2017 Document Owner: Documentation Services This edition applies to Release 11.x of the PowerSchool software
Palisades School District PowerSchool Parent Portal Guide
 Palisades School District PowerSchool Parent Portal Guide Get Started To get started, you must create a parent account in the PowerSchool Parent Portal. Create a Parent Account Use this procedure to create
BBVA Compass Spend Net Payables
 User Guide BBVA Compass Spend Net Payables User Guide Vault Services Table of Contents Introduction 2 Technical Requirements 2 Getting started 3 Sign In 3 General Navigation 4 Upload/Create Payment 5
Protection Blocking. Inspection. Web-Based
 Protection Blocking Inspection Web-Based Anti-Virus & removal of dangerous attachments. Prevent your server from being used as open-relay. Stop mail-loops. Blocks open relay sources. Isolate known spam
Office 365 Integration Guide Software Version 6.7
 rat Office 365 Integration Guide Software Version 6.7 Guide Version 6.7.061418 Comodo Security Solutions 1255 Broad Street Clifton, NJ 07013 Table of Contents 1 Introduction...3 1.1 Email Flow Explanation...3
Centralized Policy, Virus, and Outbreak Quarantines
 Centralized Policy, Virus, and Outbreak Quarantines This chapter contains the following sections: Overview of Centralized Quarantines, page 1 Centralizing Policy, Virus, and Outbreak Quarantines, page
Mail Assure. User Guide - Admin, Domain and Level
 Mail Assure User Guide - Admin, Domain and Email Level Last Updated: Friday, June 15, 2018 ----------- 2018 CONTENTS Getting Started 1 Useful Links 1 What's New 1 Accessing Mail Assure 6 User Permissions
2 User Guide. Contents
 E-mail User Guide 2 E-mail User Guide Contents Logging in to your web mail... 3 Changing your password... 5 Editing your signature... 6 Adding an e-mail account to Outlook 2010/2013/2016... 7 Adding an
SAFETY NOTICE: TO AVOID DANGER, KEEP PRODUCT AND PACKAGE AWAY FROM BABIES AND CHILDREN. THE PRODUCT IS NOT INTENDED FOR BABIES AND CHILDREN.
 www.yoggie.com Legal Notice Legal Notice SAFETY NOTICE: TO AVOID DANGER, KEEP PRODUCT AND PACKAGE AWAY FROM BABIES AND CHILDREN. THE PRODUCT IS NOT INTENDED FOR BABIES AND CHILDREN. Copyright 2006-2008.
Getting Started The Outlook Web Access Window
 QUICK Source Microsoft Outlook Web Access in Exchange Server 2003 Getting Started The Outlook Web Access Window ❶ ❷ ❸ ❹ ❺ ❻ ❼ ❽ Using the Reading Pane The Reading Pane allows you to view your e-mail messages
AccessMail Users Manual for NJMLS members Rev 6
 AccessMail User Manual - Page 1 AccessMail Users Manual for NJMLS members Rev 6 Users Guide AccessMail User Manual - Page 2 Table of Contents The Main Menu...4 Get Messages...5 New Message...9 Search...11
SPAM QUARANTINE. Security Service. Information Technology Services
 SPAM QUARANTINE Email Security Service Information Technology Services help@mun.ca Contents Introduction... 2 Notifications... 2 Accessing SPAM Quarantine... 3 Searching Email in SPAM Quarantine... 4 Releasing
A. Any Corps employee and any external customer or business partner who receives an invitation from a Corps user.
 Attunity RepliWeb (A-RMFT) Frequently Asked Questions (FAQ) https://filetransfer.usace.army.mil Q. What is this software? A. Attunity RepliWeb Managed File Transfer is the File Transfer Protocol (FTP)
 Trend Micro Incorporated reserves the right to make changes to this document and to the products described herein without notice. Before installing and using the software, please review the readme file
This manual is for administrative users of NetIntelligence MailFilter. The following two sections of this guide describe:
 Contents Contents... 2 1 Introduction... 3 1.1 About This Manual... 3 1.2 Technical Requirements... 3 2 Getting Started... 4 2.1 Logging in to the MailFilter Control Centre... 4 2.2 Layout of the Control