Payentry ESS Admin User Guide
|
|
|
- Stella Cannon
- 5 years ago
- Views:
Transcription
1 Payentry ESS Admin User Guide Welcome to the latest version of Payentry ESS! In this document, you ll learn how to: Sentric Payentry ESS Portal Using Payentry ESS as an Administrator o Employee Self Service Portal Configuration Screen Enabling Payentry ESS Access For a Single Employee Payentry ESS Portal Access Employee Portal Access Bulk Update Screen Updating Employees Portal Access in Bulk Navigate Payentry ESS Use the Pay History Screen Use the Employee Screen o Manage Direct Deposit Details o Enroll in Online Tax Forms Review the Benefits Screen Review the Company Screen Use the My Settings Screen o Change Security Questions and Answers o Change Password o Manage Company Setup Use the My Documents Screen Sentric Payentry ESS Portal The Payentry Employee Self Service, or Payentry ESS portal, is an employee s one-stop information hub for tax, insurance, pay history, and benefit information. Payentry ESS is a web-based portal, which allows access from a wide variety of devices, including a desktop computer, tablet, or mobile phone. The portal scales to fit any screen resolution. To ensure that information is secure, the Payentry ESS portal offers two-factor authentication. Administrators can also customize the portal to limit employee access to certain aspects of the system as needed. Before you can take advantage of the functions offered by the Payentry ESS portal, Payentry ESS must be added to your company by Sentric. Upon activation of the service, you will perform a few configuration steps, grant access to employees, and continue to manage the portal. Using Payentry ESS as an Administrator The following topics are for administrators configuring Payentry ESS for their users: Employee Self Service Portal Configuration Screen Enabling Payentry ESS Access for a Single Employee Employee Portal Access Bulk Update Screen Payentry ESS Portal Access Updating Employees' Portal Access in Bulk
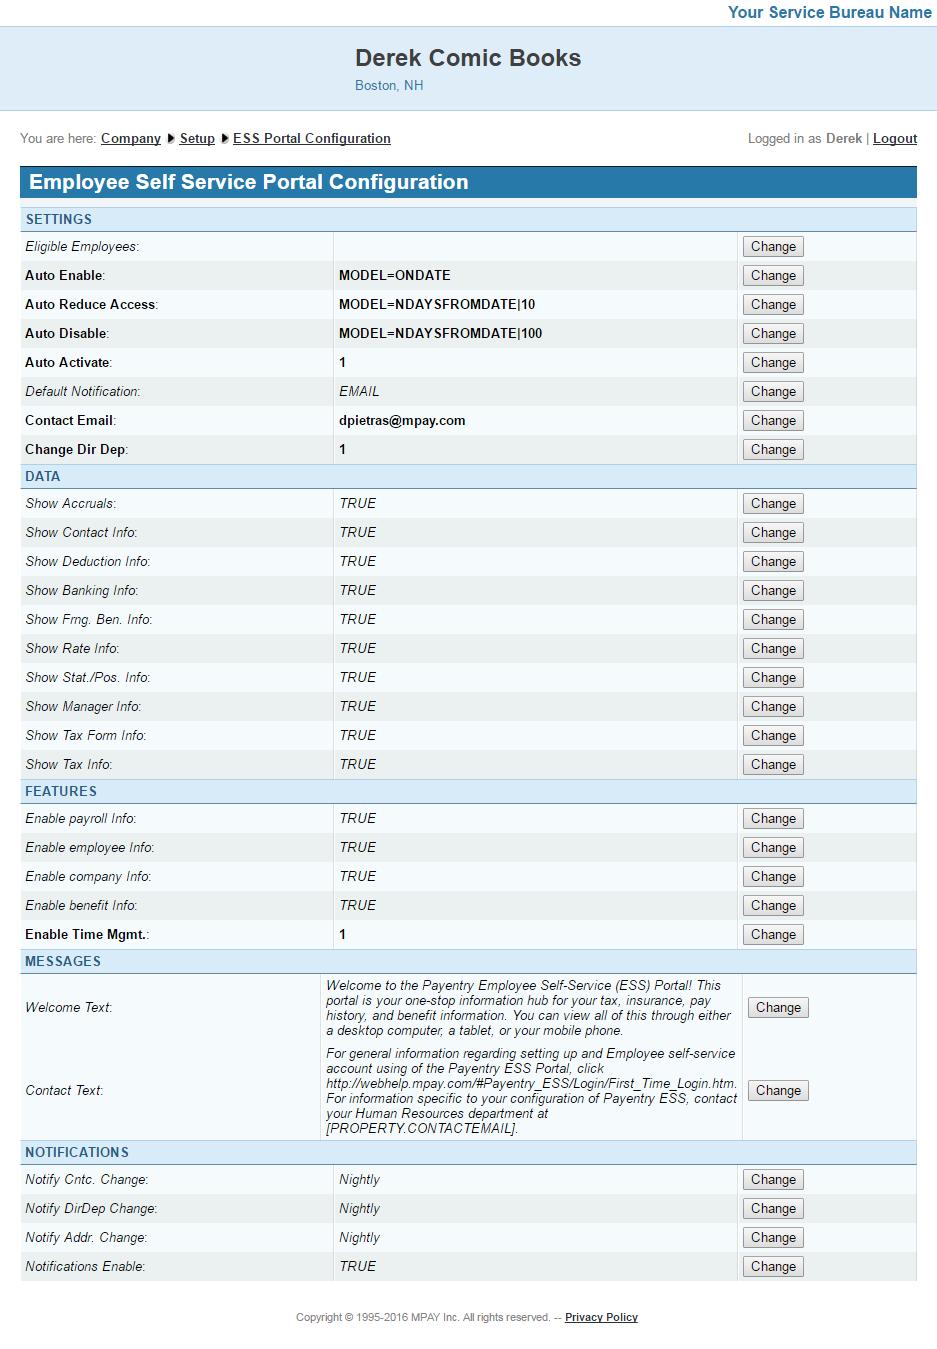
2 Employee Self Service Portal Configuration Screen From the Employee Self Service Portal Configuration Screen, you can configure what information displays in your Payentry ESS portal and what features employees have access to on a company-wide level. To access this screen, Navigate to Main Menu > Additional Options > Setup Section > ESS Portal Configuration.
3

4 For any field that you wish to change the behavior of, click the Change button to the right of the field. This displays a dialog where you can adjust the behavior to suit your needs. The Employee Self Service Portal Configuration screen is divided into 5 categories Settings, Data, Features, Messages, and Notifications. Settings Category The Settings Category contains various settings that determine how certain aspects of Payentry ESS behave, such as employee eligibility and the automatic enabling of employees. You can customize them to suit the needs of your company. Eligible Employees Auto Enable Specifies which employees are eligible for Payentry ESS portal access. You can specify all employees, or select a previously configured payroll group. For more information, see Payroll Groups Tab. Specifies whether the Payentry system automatically enables employee access to Payentry ESS and any associated behaviors. The Payentry ESS job must be scheduled to run daily or nightly for this behavior to occur, otherwise no action is taken. By default, the system does not automatically enable employees, but you can specify a behavior from the drop-down menu: Never Immediately on the Hire Date N Days from the Hire Date On the first of N months after the Hire Date On the first of the month after N full months from the Hire Date When you select an option with an N value, an additional field displays. Use this field to specify the value of N. Auto Reduce Access Specifies whether the Payentry system automatically reduces an employee's access level to Payentry ESS upon termination. The Payentry ESS job must be scheduled to run daily or nightly for this behavior to occur, otherwise no action is taken. By default, the system does not automatically reduce access, but you can specify a behavior from the drop-down menu: Never Immediately on the Termination Date
5 N Days from the Termination Date On the first of N months after the Termination Date On the first of the month after N full months from the Termination Date When you select an option with an N value, an additional field displays. Use this field to specify the value of N. Auto Disable Specifies whether the Payentry system automatically disables an employee's access level to Payentry ESS upon termination. The Payentry ESS job must be scheduled to run daily or nightly for this behavior to occur, otherwise no action is taken. By default, the system does not automatically disable access, but you can specify a behavior from the drop-down menu: Never Immediately on the Termination Date N Days from the Termination Date On the first of N months after the Termination Date On the first of the month after N full months from the Termination Date When you select an option with an N value, an additional field displays. Use this field to specify the value of N. Auto Activate Specifies whether Payentry automatically sends an employee an activation code when the employee creates their Payentry ESS account. By default, this is active. If this is not set, then the employees will not receive activation codes automatically when they create their Payentry ESS accounts. an administrator will need to manually activate each individual employee. Default Notification Contact Change Dir Dep Specifies what the default method in which notifications are sent from Payentry ESS to employees. Specifies the default address used as the point of contact for Payentry ESS. Specifies whether employees have the ability to change, add, or delete direct deposit information in Payentry ESS. Data Category The Data Category allows you to determine what employee information displays in your Payentry ESS portal.


6 Show Accruals: Show Contact Info: Specifies whether employee accrual information displays in Payentry ESS. Specifies whether employee contact information displays in Payentry ESS. Show Deduction Info: Specifies whether employee deduction information displays in Payentry ESS. Show Banking Info: Specifies whether employee banking information displays in Payentry ESS. Show Frng. Ben. Info: Specifies whether employee fringe benefit information displays in Payentry ESS. Show Rate Info: Show Stat./Pos. Info: Show Manager Info: Show Tax Form Info: Show Tax Info: Specifies whether employee rate information displays in Payentry ESS. Specifies whether employee status and position information displays in Payentry ESS. Specifies whether information regarding the employee's manager displays in Payentry ESS. Specifies whether employee tax form information displays in Payentry ESS. Specifies whether employee tax information displays in Payentry ESS. Features Category The Features Category allows you to specify which tabs display in Payentry ESS for the employee to use. Enable payroll info: Specifies whether the Pay History tab displays in Payentry ESS.


7 Enable employee info: Specifies whether the Employee tab displays in Payentry ESS. Enable company info: Enable benefit info: Specifies whether the Company Info tab displays in Payentry ESS. Specifies whether the Benefit tab displays in Payentry ESS. Messages Category The Messages Category section allows to customize certain messages that are sent from Payentry ESS to your employees. Welcome Text: Contact Text: Text that displays in certain s sent from Payentry ESS to the user. This text can be used to give users a brief idea of what Payentry ESS is, for example. Tokens, such as COMPANY, DATE, and EMPLOYEE can be used as well. These tokens are placeholders that will automatically be replaced with new text from Payentry ESS when the is generated. For example, a token of [EMPLOYEE.FIRSTNAME] will be replaced when the is generated by the first name of the employee who is receiving the message. Text that displays in certain s sent from Payentry ESS to the user. This text can be used to give users the address of the point of contact for their Payentry ESS portal, for example. Tokens, such as COMPANY, DATE, and EMPLOYEE can be used as well. These tokens are placeholders that will automatically be replaced with new text from Payentry ESS when the is generated. For example, a token of [EMPLOYEE.FIRSTNAME] will be replaced when the is generated by the first name of the employee who is receiving the message. Notifications Category The Notifications Category lists the kind of notifications that Payentry ESS sends to administrators. You can change when these notifications are sent.
8 Notify Cntc. Change: Specifies when Payentry ESS sends a notification that the employee changed their contact information. Notify DirDep Change Specifies when Payentry ESS sends a notification that the employee changed their direct deposit information. Notify Addr. Change: Specifies when Payentry ESS sends a notification that the employee changed their address information. Notifications Enable Specified whether the company contact will receive notifications summarizing the changes from the Payentry ESS job. Enabling Payentry ESS Access for a Single Employee While your employees may have previously created a Payentry ESS account, they will not have access to your company until you enable them in Payentry. You can do this for both a single employee and in bulk. The instructions for Employee Portal Access Bulk Update Screen are provided next in this document. To enable for a single employee, follow these instructions. 1. Navigate to Main Menu > Employee Information > [Name of Employee] > Miscellaneous. 2. Under Portal Access, click Add. Detailed instruction on how to use this screen are in the section of this document called Payentry ESS Portal Access. 3. In the screen that appears, enter the Access Level and the Notification method for the employee you are adding. 4. Click OK. If you selected notification, the employee will receive an at the specified address containing the link code they need to log into Payentry ESS and directions to log in for the first time, if they have not done so. You can repeat this process as needed for individual employees or you can update in bulk. Payentry ESS Portal Access The Portal Access section allows you to specify any additional portals the employee may have access to outside of the standard Payentry application. This section displays only if the employee has the option to access an additional portal, otherwise, this section does not display on the Employee Miscellaneous Tab. If the company has access to a particular portal, the portal displays in this section. However, a company can limit access to the portal for only a group of employees if they wish. If the portal has an associated service, the company itself can specify the employees who have access when configuring the service. This is done through Payroll Groups. For more information on this topic, contact Sentric. The Payentry ESS Portal Access section allows you to determine the level of access the employee has to Payentry ESS portal. You can, for example, limit the access the employee has, or even disable their access to Payentry ESS altogether. In the figure above, the employee has limited access to their company's Payentry ESS portal. You can adjust the access accordingly.


9 Button Lock/Unlock Enable/Disable Change Access Activate Reset View Notes Toggles between locking an employee's account and unlocking it. Locking an employee's account keeps any configured data for later use, but prevents the user from logging into Payentry ESS and prevents any further updates and configuration until the employee's account is unlocked. The account can be locked regardless of the state it is in. Enables or disables an employee's account in Payentry ESS. If the account is disabled, red DISABLED text displays instead of the green ACTIVE text displayed in the figure above. Clicking this button displays the Payentry ESS Portal Dialog Box where the employee's access can be configured. The Payentry ESS Portal Dialog Box is explained below this chart. Changes the employee's access to Payentry ESS. The options are: Full Employee is an active employee and has access to all Payentry ESS features enabled for the company. Limited Employee has been terminated and can only access certain information for the last year they were employed. Clicking this button displays the Payentry ESS Portal Dialog Box where the employee's access can be configured. The Payentry ESS Portal Dialog Box is explained below this chart. Activates the Payentry ESS portal for the employee. Users can only be activated after they have inputted their link code (a value sent when enabling the account). Clicking this button displays the Payentry ESS Portal Dialog Box where the employee's access can be configured. The Payentry ESS Portal Dialog Box is explained below this chart. Resets the employee's account and access to the Payentry ESS and allows you to reconfigure it. Clicking this button displays the Payentry ESS Portal Dialog Box where the employee's access can be configured. The Payentry ESS Portal Dialog Box is explained below this chart. Displays any notes that were entered on the Payentry ESS Portal Dialog Box and allows you to enter additional notes. These notes are informational only. Payentry ESS Portal Dialog Box Several fields in the Payentry ESS Portal Access section display a Portal Dialog box that, when selected, allows you to specify the details of the employee's Payentry ESS configuration.

10 Depending on the button you clicked in the Portal Access window, the options available in the dialog box will vary. They may be grayed out, but the displayed fields do not vary. Access Level Notification Notes Specifies level of access the employee has to Payentry ESS. The options are: Full Employee is an active employee and has access to all Payentry ESS features enabled for the company. Limited Employee has been terminated and can only access certain information for the last year they were employed. Specifies the methods in which the employee is notified of changes to their Payentry ESS access. The options are: None No notification. notification to the address specified. Displays any notes that were entered on the Payentry ESS Portal Dialog Box and allows you to enter additional notes. These notes are informational only. Employee Portal Access Bulk Update Screen The Employee Portal Access Bulk Update screen allows you to enable access to Payentry Portals, such as Payentry ESS, for multiple employees at a time. This is useful if you are rolling out Payentry ESS and need to enable access for all employees in your company at once. NOTE: Employees must have addresses in the system in order to use this feature. Detailed instruction on portal access are in the section of this document called Payentry ESS Portal Access. To access the Employee Portal Access Bulk Update screen, navigate to Main Menu > Company Setup > EE Bulk Update > EE Portal Access Bulk Update.

11 Using the filters at the top of the screen, you can determine which employees display in the table. You can also specify which portal to enable access to. Portal Filter 1, Filter 2 Value 1, Value 2 ID Name Status Access Notes Update Selected Records Drop-down menu where you specify the portal type to work with. Terms used to filter the list of employees that display in the table. You can set up to two filters. Some filters display as column headers in the table. Terms used to further narrow down the list of employees that display in the table. If, for example, the filter specified was Employee Status, the value would be the specific status, such as Full- Time. Employee identification number. Name of employee. Employee's status in the selected portal. The options vary depending on the portal selected. Level of access the employee has to the specified portal. This can be used to limit the areas of the portal the employee can use. Employee address. Button that allows you to enter any notes for the specified employee. Click View Notes to display a dialog box where notes can be entered for the specified employee. Button that updates the employees you specified to the portal you selected in the Portal dropdown menu. For more information, see the section of this document called Updating Employees' Portal Access in Bulk. Updating Employees' Portal Access in Bulk You can update your employees' access to the Payentry portals in bulk. To do so: 1. Navigate to Main Menu > Company Setup > EE Bulk Update > EE Portal Access Bulk Update. 2. Select the portal to which you wish to enable employee access from the Portal drop-down menu. 3. Enter any filters and values to narrow down the list of displayed employees. 4. Using the checkbox to the left of ID column, select the employees to update. 5. Click Update Selected Records... The following screen displays. The records that display under Selected Records are the statuses of the employees you selected from the table. Clicking the Record link displays all employees that match that condition.
12 6. Using the drop-down menus next to the records, specify the action to apply to the employees. All employees under the same status receive the same value. 7. Change access level if necessary. 8. Specify the method in which your employees will receive their welcome message. 9. Optional. Enter any notes. These notes display on the employee notes section on the Employee Portal Access Bulk Update Screen. 10. Click OK. The employees have all been updated.

13 Navigate Payentry ESS After logging into Payentry ESS for the first time, you see the Home screen each time you log into Payentry ESS. The Home screen contains links to the rest of the functionality available in Payentry ESS. The links that display will vary depending on how your employer configured Payentry ESS. At the top of the screen in the blue bar, your name displays along with the name of your company. Payentry ESS gathers this information from your existing records within the company. Depending on the resolution of the screen you are using, the menu column on the left side of the screen may be hidden. If, for example, you are viewing the Home page on a mobile device, that column does not display. Below is an explanation of options on this screen. Icon/Menu Item Returns you to the Home screen from anywhere in Payentry ESS. Logs you out of Payentry ESS and returns you to the login screen. Pay History Employee Benefits Company My Settings My Documents Opens the My Settings Page where you can change your password, adjust security questions and answers, and switch the company you are currently logged into. Displays your detailed pay history for each check date you have been paid at the company. This includes breakdowns of the funds, deductions and year-to-date (YTD) information. You can also display a scan of the actual pay check. Displays employee information, such as your home address, phone number, and address. In addition, your accrued time off, length of service, and tax information displays here. Displays your benefit information, including any fringe benefits. Displays information about the company, including the address and contact information. Also, displays a searchable company directory to view employees. Opens the My Settings Page where the employee can change their password, adjust their security questions and answers, and switch the company they are currently logged into. Displays any tax forms the employee has available for view. The tax forms only display if the employee is enrolled in online tax forms.


14 Use the Pay History Screen The Pay History screen in Payentry ESS displays your pay information. This information is organized by check date, and includes all check dates you ve been paid at the company. From the Main Menu, select Pay History or use the sidebar menu. The sidebar expands when you hover over it, allowing you to choose from pay history records. Once in the Pay History screen, you will see a list of check dates you have been paid for the company. Below is an explanation of values in this list. Check Date Period End Net Amount View Check Date on which the paycheck was issued to the employee. Date on which the pay period closed for the specified check. Total amount of money netted for the check date. Button that displays a printable PDF version of the specified paycheck. Click one of the check dates in the list at the top of the screen to display several sections of information. The sections displayed vary depending on what information is relevant to you.
15 Below is an explanation of each section. Earnings Employee Taxes Deductions Employer Taxes Benefits Direct Deposits Displays the amount of money you earned for each pay type in the pay period. For example, you could have 40 hours of regular pay and 8 hours of overtime pay. Displays any taxes and the amount of money withheld from your net pay. Displays any funds deducted from your net pay. Displays any employer taxes and associated wages. Lists any benefits and the amount of money for each earned by the employee. This section is not represented in the screenshot above. Lists the bank names and last four digits of any account numbers associated with your direct deposits.

16 Use the Employee Screen The Employee Screen in Payentry ESS displays employee information, such as your phone number, address, deductions and taxes. From the Main Menu, select Employee or use the sidebar menu. Below is an explanation of each section. Contact Information Status/Position Accruals Direct Deposits Deductions Taxes Fringe Online Tax Form Enrollment Lists your contact information, such as home and cell phone number, home address, and work address. Some of these fields can be edited by clicking on the Pencil icon. Displays information about your status in the company, including your hire date and pay rate. Displays your accrual information, such as vacation or sick time. Lists any direct deposit accounts configured for you. Lists any deductions and their amounts. This money is deducted from your net pay and subsequently displayed on the Pay History Screen. Lists any taxes that are applied to you. Displays any fringe benefits you earn. More benefit information can be seen on the Benefits Screen. Allows you to enroll to receive your online tax forms. For more information, see Enroll in Online Tax Forms.

17 Manage Direct Deposit Details If your company is configured to do so, you can add, edit, or delete your direct deposit information through Payentry ESS. The information below explains how to access the Direct Deposit section and its contents. Below that is instruction on how to add, edit, delete, and change the order of your direct deposit accounts. Navigate to Main Menu > Employee and locate the Direct Deposits section, which is shown below. The table below describes the fields displayed above: Order Bank Account Amount Edit Delete Add Direct Deposit Priority in which the direct deposits are deposited for the specified account. The highest priority direct deposit (lowest numbered) is filled first, followed by the next, and so on. If your available funds (net pay) cannot fill all accounts, the lower priority accounts (highest numbered) are not filled. Similarly, if all funds are filled with additional funds left over, you will receive a paper check for the additional funds. Name of the bank in which your funds are deposited. Number used to identify your deposit account. Amount of money to be deposited into the employee's account. This value can be a dollar amount or a percentage. Button that allows you to edit direct deposit information, including routing and account numbers. For more information, see the section named Adding a New or Editing an Existing Direct Deposit. Button that deletes the specified account from the list of available accounts. For more information, see the section named Deleting a Direct Deposit. Button that allows you to add a new direct deposit account. For more information, see the section named Adding a New or Editing an Existing Direct Deposit. Change Order Action that allows you to reorder the accounts to determine which accounts are filled first. For more information, see the section named Change Order of Direct Deposits. Add a New or Edit an Existing Direct Deposit When you add a new direct deposit account or edit an existing account, you will see a screen similar to the image below. Upon choosing to perform either task, you will first be prompted to enter your two-factor authentication code to validate your identity and continue. You will be able to configure aspects of the direct deposit account, including the type of account and the amount of money to deposit.
18 Below is an explanation of each field. Account Type Order Name on Account Account ABA Routing Number Amount Payment Type Drop-down menu that indicates whether the account is a checking or a savings account. Priority in which your direct deposit accounts are filled. The lower the number, the higher the priority. For example, an account with 1 in this field will receive funds first, an account with 2 in this field will receive funds second, and so on. Only when accounts with higher priorities are filled are accounts with lower priority filled. Name that appears on the bank's records for the specified account. Account number used to identify the account. This number can be found on a check issued for the account. ABA routing number used to identify the bank. This number can be found on a check issued for the account. Amount of money that you will deposit into the specified account. This value can be a percentage or a flat amount, depending on what is specified in the Payment Type field. If you want to deposit all net pay into the account, this field should contain 100 and the Payment Type will be Percentage of net pay to be deposited. Method in which payments are calculated. There are four options: Flat Dollar Amount (or remainder of net pay if it is less than the amount) The amount specified is the amount of money that will be deposited into the account. Any additional funds are deposited into the next account by priority, or issued as a paper check. If, for example, you specify an amount of $100, and your net pay is $150, then only $100 is deposited into the account. Using the same configuration, if you were paid $75, then all $75 would be deposited into the specified account. Flat Dollar Amount (or 0 if remainder of net pay is less than the amount) The amount specified is the amount of funds that will be deposited into the account. However, if the funds to deposit are less than the amount, then nothing will be deposited. For example, if you specify an amount of $100 and earn $150, then $100 is deposited. If you are paid $75, then no money would be deposited into the account. Percentage of net pay to be deposited The amount entered is a percentage of your net pay that will be deposited into the account. For example, if you have an amount of 10, then 10% of your net pay will deposit into the account. If you are paid $150, then $15 would be deposited into the account. Note: If you want to deposit all net pay into an account, the amount should be 100 and this option should be selected for the payment type. If you have more than one account and want the lowest priority (highest number) account to be funded with the remainder of your net pay, this is also the appropriate configuration. All Except a Specific Amount All remaining net pay will be deposited except for the amount specified. For example, if you specify an amount of $10 and earn $150, then $140 would be deposited into the account.
19 Deleting a Direct Deposit Deleting a direct deposit account consists of a few steps and cannot be undone, so be cautious when taking this action. To delete a direct deposit, follow the steps below. 1. Navigate to Main Menu > Employee and locate the Direct Deposits section. 2. Click the Delete button next to the account you wish to delete. The screen below displays. 1. Click Continue to proceed or click Cancel to cancel the change. 2. Enter your two-factor authentication code to validate your identity. 3. Click Continue. The direct deposit account has been deleted. Change Order of Direct Deposits You can change the processing order of your direct deposit accounts. Accounts with a higher priority (lower number) are filled before accounts with a lower priority (higher number). To do so, perform the following steps. 1. Navigate to Main Menu > Employee and locate the Direct Deposits section. 2. Click Change Order. 3. Enter your two-factor authentication code to validate your identity. 4. Click Continue. The figure below will appear. 5. Use the orange arrows under Order to rearrange the direct deposit accounts. The higher the account displays in the list, the higher priority it will be, meaning it will receive funds prior to the remaining account(s). 6. When you are satisfied with the order, click Save or click Cancel to cancel the change.

20 Enroll in Online Tax Forms If your company is configured to allow you to view your tax forms online, you must elect to do so. This option is only available if your company has enabled it. To enroll in online tax forms, follow the steps below. 1. Navigate to Main Menu > Employee and locate the Online Tax Form Enrollment section. 2. Click Go to Your Online Tax Form Enrollment in that section, which will display the screen below. 3. Click the orange slider button. The screen below displays. 4. Check the I can view PDF Files if you are able to view PDF files. If you are unsure, click the link to download a sample PDF. If you can view it, you can view the online tax form files. 5. Click OK to proceed or click Cancel to cancel your enrollment. If you click OK, the slider icon moves to the right and you are enrolled. You will be able to view your tax forms online in My Documents.

21 Review the Benefits Screen The Benefits screen lists any benefits including the units, rate, and amount. In the image above, the employee has three benefits configured to display on this screen. Some benefits, such as Group Term Life Insurance, have their own icon and are separated from the other group, while some such as Vacation display under the Other Benefits umbrella. Below is an explanation of each field. Units Rate Amount Frequency Number of units used in the benefit. For example, Units can be hours. Amount of money used for each unit. For example, if units are hours, the rate would be the amount of benefit money earned for each hour. Total amount of benefit money for the specified benefit. This can be a flat amount or an amount calculated from the rate and units. Frequency in which you earn the benefit.

22 Review the Company Screen The Company Screen lists information about your company and includes a company directory look-up. Below is an explanation of each field. Displays the name of the company and its address. Displays the contact information for the primary contacts in the company. This information includes their address and telephone number. Displays the contact information for the tax contacts in the company. These people are the ones to speak to regarding tax-related inquiries. Displays the directory of employees in the company. Entering the employee's name, or part of it, into the search bar displays any matches in the company. For example, in the figure above, the user inputted "Car" and Carson's information was returned. Clicking the orange arrow icon next to the employee's name displays the full information on the employee.

23 Use the My Settings Screen The My Settings page allows you to change certain user settings, such your password and security questions. Below is an explanation of each field. Change Password Change User Name Change Full Name Change Change Security Questions and Answers Two-Factor Authentication Setup Company Setup Changes your password. You must enter the current password before changing to a new one. For more information, see the section named Changing Your Password in Payentry ESS. Changes your user name. Changes your full name. This will not update your payroll processing profile. Changes your address. Changes your security questions and their answers. For more information, see the section named Changing Your Security Questions and Answers in Payentry ESS. Links to a page where you can edit your two-factor authentication settings. For more information, see the section named Logging into Payentry ESS for the First Time. Allows you to add a new company using a link code or switch to another company in which you are enrolled. For more information, see the section named Company Screen.
24 Change Security Questions and Answers When you created your account in Payentry ESS, you selected four security questions and inputted answers for each. These questions are used to verify your identity if, for example, you forgot your password. To change the questions and their answers: 1. In Change security questions and answers, enter your current password. Click Proceed. 2. A screen displays where you can reselect your questions and answers. You must reenter your questions and answers for all four questions, even if you only wish to change one. 3. Click Save and Continue. You will be navigated back to the My Settings page, which displays a message indicting that security questions were changed successfully. Note: You can access this feature from any screen in the Payentry ESS portal by clicking the gear icon in the upper right side of the screen and choosing My Settings from the menu.
25 Change Password You can change your password directly in Payentry ESS. To do so: 1. In Change Password, enter your current password in the first box. 2. Enter the new password in the second box. Note: Passwords must be at least 8 characters and contain an uppercase letter, a lowercase letter, a number, and a symbol. 3. Reenter the new password in the third box. 4. Click Save Changes. If the passwords entered in the New Password and Confirm New Password boxes match, the password has been changed. You will be navigated back to the My Settings page, which displays a message indicting that your password has been changed. Note: You can access this feature from any screen in the Payentry ESS portal by clicking the gear icon in the upper right side of the screen and choosing My Settings from the menu.

26 Manage Company Setup The Company Setup Screen allows you to view the companies you are enrolled in, specify one as the default, and activate additional companies as needed. The upper portion of the Company Setup Screen lists the companies you are able to access. In the figure above, the user is active in Test Company and is waiting to activate Test Company Too. To activate Test Company Too, the user would click Activate and enter the activation code they received in their . The lower portion of the Company Setup Screen allows you to add a new company to the list of available companies by entering its unique link code below. You would receive link codes via . Link codes are sent when your employer adds, enables, or resets your account(s). Below is an explanation of each field. Name of the company. Name of company that you have yet to activate. Selects the company from the list and returns to the home screen, where you can view information. Removes your link to the selected company. Note: This action cannot be undone. Selects the specified company as your default company. You are automatically logged into your default company. Allows you to edit the name of the company. This edit only displays on your login. Navigates to a screen where you can activate a company. Only displays on companies that have yet to be activated.

27 Use the My Documents Screen If you have chosen to enroll in online tax forms, these forms will display in the My Documents tab. In the figure above, the employee can view their 2016 W2 form online. Some additional information about the form is also displayed. Company Company Contact Type Year Released Date Tax Form Name of the company from which the form was issued. If you are enrolled in multiple companies in Payentry ESS, you will receive a tax form from each company. Name of person to contact regarding tax form information. Clicking the name displays their contact information. Type of tax form. Year for which the tax form was issued. Date in which the tax form was released to you and available for view. Link that displays a printable PDF file of the tax form.
Payentry ESS Employee User Guide
 Payentry ESS Employee User Guide Welcome to the latest version of Payentry ESS! In this document, you ll learn how to: Navigate Payentry ESS Use the Pay History Screen Use the Employee Screen o Manage
WEB PAY EMPLOYEE GUIDE
 Revised 4/14/2017 WEB PAY EMPLOYEE GUIDE Client Resource WWW.PAYLOCITY.COM TABLE OF CONTENTS WEB PAY... 2 SELF SERVICE PORTAL... 9 HOME... 26 EMPLOYEES... 35 PAYROLL... 108 NOTIFICATIONS... 113 GLOSSARY...
Employee Online Overview.
 Employee Online Overview https://employeeonline.puyallup.k12.wa.us Employee Online Homepage You will find the site map running down the left side of Employee Online, as shown below: Message Board The Welcome
Using Employee Self. v11.1. Service (ESS) Comprehensive User Guide
 Comprehensive User Guide") Using Employee Self v11.1 Service (ESS) Comprehensive User Guide Table of Contents Table of Contents... 2 Employee Self Service Overview... 4 Features and Information... 4 Logging into Employee Self Service...
Using Employee Self v11.1 Service (ESS) Comprehensive User Guide Table of Contents Table of Contents... 2 Employee Self Service Overview... 4 Features and Information... 4 Logging into Employee Self Service...
DarwiNet Employee Level
 DarwiNet Employee Level Table Of Contents Welcome to the Help area for your online payroll system... 1 Logging In... 3 Login... 3 Forgot Password... 3 Employee Welcome Screen... 5 Personal... 7 Personal...
PeopleSoft Employee Self-Service (ESS)
") PeopleSoft Employee Self-Service (ESS) Version 1.2 Updated May 28, 2015 Contents Overview... 1 Logging In to ESS... 2 Changing Your Password... 3 Setting Up I Forgot My Password VERY IMPORTANT!... 4 Resetting
PeopleSoft Employee Self-Service (ESS) Version 1.2 Updated May 28, 2015 Contents Overview... 1 Logging In to ESS... 2 Changing Your Password... 3 Setting Up I Forgot My Password VERY IMPORTANT!... 4 Resetting
PeopleSoft 9.2 Self-Service Employee Information (SSEI)
") PeopleSoft 9.2 Self-Service Employee Information (SSEI) User Guide 450 E. South Street Orlando, Florida, 32801-2816 Phone: (407) 836 5661 Revised: 01/2018 1 Table of Contents Welcome to Self-Service Employee
PeopleSoft 9.2 Self-Service Employee Information (SSEI) User Guide 450 E. South Street Orlando, Florida, 32801-2816 Phone: (407) 836 5661 Revised: 01/2018 1 Table of Contents Welcome to Self-Service Employee
PARTNER PORTAL TOOLKIT
 Revised 7/26/2018 PARTNER PORTAL TOOLKIT Financial Advisors WWW.PAYLOCITY.COM TABLE OF CONTENTS Partner Portal Toolkit... 3 User Accounts... 4 Partner Portal... 5 Select Company or Set... 6 Recent Hires...
Contacts. Viewing Payroll and Compensation Data
 Contents Contacts... 1 Viewing a Paycheck... 1 Enrolling in Direct Deposit 9.2... 2 Maintaining Direct Deposit Information 9.2... 6 Updating W-4 Information (Federal Tax Withholdings)... 15 Updating M-4
A360 HR/Payroll System
 A360 HR/Payroll System Employee Self Service (ESS) January 2018 Notes: 1 2 Account Activation Last full week of January, 2018 Current users of a360 Financial Management will use existing a360 account.
MyESS Help Table of Contents
 Table of Contents MyESS Background Page 2 Logging into MyESS Page 3 Navigation Tips Page 4 Overview Page Page 5 Information Homepages Page 6 MyESS Navigation Tips Page 7 Changing Information through MyESS
isolved Employee Self-Service User s Guide
 isolved Table of Contents OVERVIEW... 2 EMPLOYEE SELF-SERVICE INITIAL EMAIL... 2 EMPLOYEE SELF-SERVICE INITIAL SIGN-ON... 3 FIRST TIME LOG-IN... 5 PAY HISTORY...7 W2/ACA/1099 FORMS...8 EMPLOYEE MESSAGES...
GRADUATE STUDENT EMPLOYEE SELF SERVICE GUIDE
 GRADUATE STUDENT EMPLOYEE SELF SERVICE GUIDE CONTENTS Click any topic below to go directly to that page. HOW TO USE SELF SERVICE 1.1 How to Access, Log In and Navigate Employee Self Service BENEFITS 2.1
ADDUS Homecare - MyADP Employee Self-Service User Guide
 ADDUS Homecare - MyADP Employee Self-Service User Guide Table of Contents To navigate to a specific topic, click on the title in the table of contents. Registration for Myadp/Navigation... 3 W-4 Changes...
Welcome to the Clackamas County team!!!
 Welcome to the Clackamas County team!!! Starting a new position is an exciting time and we want to help you get acquainted with your new employer, Clackamas County. The Onboarding and Employee Self Service
***First-Time User***
 INSTRUCTIONS FOR ACCESSING THE WIU MAINFRAME ON CAMPUS ***First-Time User*** University Technology Support Center: 298-2704 Administrative Information Management Systems (AIMS): 298-1944 Human Resources
PeopleSoft 9.2 Employee Self Service User Guide
 Employee Self Service User Guide 3280 Progress Drive, Suite 100 Orlando, Florida 32826-0140 Phone: (407) 823-2771 Table of Contents Welcome to Employee Self Service... 1 Who Do I Call For Help?... 1 How
Community Services Group Employee Portal
 Community Services Group Employee Portal https://csgonline.greenemployee.com/ Logging in to GreenEmployee.com Please use the above link to take you directly to a sign-in page or on the Insider you can
Employee Self Service Portal Instructions. Employee Use
 Employee Self Service Portal Instructions Employee Use Enrollment E-mail Employees will receive a no-reply e-mail from proxushr@myisolved.com to activate their account. Employees will have 90 days to perform
Help Contents Manual
 Help Contents Manual TimeClick 18 018 Last Updated: February 18 1 Table of Contents WHAT TO EXPECT WITH THIS MANUAL... 4 Resources Found on Website and Blog... 4 Contact Customer Support Team... 4 PREFERENCES...
ADDUS Homecare - MyADP Employee Self-Service User Guide
 ADDUS Homecare - MyADP Employee Self-Service User Guide Table of Contents To navigate to a specific topic, click on the title in the table of contents. Registration for Myadp/Navigation... 3 W-4 Changes...
Customer User Guide Commercial Online Access
 Customer User Guide Commercial Online Access Getting Started To access the customer portal, enter the following URL: nationwide.com/agclient Once you access this site, save it as a Favorite on your computer
Employee Self Service
 MUNIS Employee Self Service Munis Employee Self Service Administration User Guide Version 9.3 Employee Self Service (ESS) gives current employees the ability to monitor, maintain or estimate some of their
LOGING INTO EVOPAY. Login to evopay for Current Employees. 1. Go to https://paydata.evolutionpayroll.com/ess#/login
 PayData s evopay - Employee Self Serve is a web-based portal which allows employees to access their payroll information via the internet. Employees have the ability to view and print payroll vouchers and
Employee User Guide What Employees Need to Know About Using the Burnham & Flower Wealthcare
 Employee User Guide What Employees Need to Know About Using the Burnham & Flower Wealthcare Table of Contents Getting started...2 My accounts...3 My expenses...13 Communications...15 Enrollment...17 Resources...21
ivisions Employee Guide Portal Employee User Guide Town of Needham Terry Wolfson Created: 1/27/2014 Updated: 10/5/2016
 ivisions Employee Guide Portal Employee User Guide Town of Needham Terry Wolfson Created: 1/27/2014 Updated: 10/5/2016 Contents What is ivisions?... 2 Registering to ivisions Portal... 3 Logging into the
Employer Self Service (ESS) User Quick Guide
 User Quick Guide") Employer Self Service (ESS) User Quick Guide i Table of Contents Getting Started 6 Accessing the Employer Self Service (ESS) Portal 6 Maintaining Account Settings 7 Switching Employers within Session 7
Employer Self Service (ESS) User Quick Guide i Table of Contents Getting Started 6 Accessing the Employer Self Service (ESS) Portal 6 Maintaining Account Settings 7 Switching Employers within Session 7
BLYTHEVILLE EMPLOYEE ACCESS CENTER GUIDE
 BLYTHEVILLE EMPLOYEE ACCESS CENTER GUIDE Table of Contents Section 1 Page 2 About the Employee Access Center (EAC) Section 2 Logging into EAC Page 3 Section 3 Employee Tasks Page 5 -Demographic Information
Getting Started with Employee Access
 Getting Started with Employee Access Using Employee Access, you can view your pay statements online at your convenience, safely and securely. Depending on the features offered by your company, you may
INBUSINESS BANKING SYSTEM
 Introducing your new INBUSINESS BANKING SYSTEM Companion Guide to Business Banking Video Tutorials Updated 0.09.8 WELCOME TO THE INBUSINESS SYSTEM The InBusiness System will help you efficiently and securely
3E Online Analytics Help Guide
 Document Revision History Date Version Change Reference November 16, 2009 AA Original version Table of Contents 1.0 Introduction... 1 2.0 Payroll Menus... 2 3.0 Filtering and Sorting... 3 4.0 Column Selection...
BBVA Compass Spend Net Payables
 User Guide BBVA Compass Spend Net Payables User Guide Vault Services Table of Contents Introduction 2 Technical Requirements 2 Getting started 3 Sign In 3 General Navigation 4 Upload/Create Payment 5
EMPLOYEE REFERENCE WORKDAY EMPLOYEE QUICK GUIDE
 This guide provides navigation help and basic steps for the following Workday topics: Basic Navigation Getting Started Inbox Personal Information Talent Management Time Off Benefits Payroll Medtronic is
Pay Stub and Direct Deposit Self-Service
 Pay Stub and Direct Deposit Self-Service Our Self Service site allows you to view pay stubs and create and update Direct Deposit information on your employee record directly. The Self Service site is accessible
Printing the Study Guide
 Ceridian Self Service Version 2.4 Printing the Study Guide If you are using a version of Adobe Reader that is prior to 6.0, Ceridian recommends clearing the Shrink oversized pages to paper size check box
PeopleSoft Employee Self Service User Guide
 PeopleSoft Employee Self Service User Guide Welcome to the NJTA Employee Self Service (ESS) User Guide. This guide is designed to provide you with the information you need to successfully use the NJTA
Quick Reference Card for Managers
 Time & Attendance Quick Reference Card for Managers Navigator Version 7.0 The following instructions describe a typical Navigator configuration. The names and location of widgets and commands may differ
Employee Dashboard User Manual
 Employee Dashboard User Manual Employee Dashboard... 2 The Actions Bar... 2 Actions... 4 Punch tab... 4 Clock In... 4 Clock Out... 5 Begin Break... 5 Transfer... 6 End Break... 6 Begin Meal... 7 End Meal...
Employee Portal-External Guide
 Employee Portal-External Guide Accesing the employee portal 1) Open your internet 2) Type the following in your address bar: https://my.doculivery.com/external/systems3000-branchb This will bring you to
Welcome to Employee Self- Service! From the District home page, click the Employees link. Next, click Employee Self- Service.
 Welcome to Employee Self- Service! From the District home page, click the Employees link. Next, click Employee Self- Service. Log in to Employee Self Service. You must type district\user name in order
SelfServe WebTIME. Employee User Manual
 SelfServe WebTIME SelfServe is your one stop portal Employee related activities. From logging hours, updating contact information, keeping track of upcoming assignments to reprinting copies of your Check
Web Access User Guide for Employees
 Web Access User Guide for Employees 11/1/12 TABLE OF CONTENTS FUNCTIONS PAGE # Logging In 1 Forgot Username/Password 1 Changing Your Password 1 Logging Out 1 What is Available To You? 1 My Pay Statements
Overview. Business Online Banking BASIC OVERVIEW PAGE 1
 Overview Business Online Banking BASIC OVERVIEW PAGE 1 Basic Overview Business Online Banking Main navigation: My Accounts, Move Money, and Additional Services. Admins have full access to all accounts
Treasury Management User Guide. Online Banking
 Treasury Management User Guide Online Banking Released August 2018 Treasury Management... 4 Logging in to Treasury Management...5 Helpful Hints...10 User Menu... 12 Profile and Preferences... 12 Notification
Welcome to e-people 4. What is e-people? 4. Accessing e-people 4. AHS Accounts 4
 User Guide Table of contents Welcome to e-people 4 What is e-people? 4 Accessing e-people 4 AHS Email Accounts 4 How to Access Your AHS Email Account Externally 4 AHS Outlook Web Access Log Off 5 How to
User s Guide. (Virtual Terminal Edition)
") User s Guide (Virtual Terminal Edition) Table of Contents Home Page... 4 Receivables Summary... 4 Past 30 Day Payment Summary... 4 Last 10 Customer Transactions... 4 View Payment Information... 4 Customers
User s Guide (Virtual Terminal Edition) Table of Contents Home Page... 4 Receivables Summary... 4 Past 30 Day Payment Summary... 4 Last 10 Customer Transactions... 4 View Payment Information... 4 Customers
FirstNet for Business
 Page 1" First State Community Bank FirstNet for Business End-User Guide Page 2" Table of Contents" Logging In... 3% Changing Your Password... 4% Cash User Login Screen... 4% Navigation... 7% Account Listing
Board of Regents of the University System of Georgia etime Employee User Guide
 Board of Regents of the University System of Georgia etime Employee User Guide Project View Time Card for Benefitted Bi-Weekly Employees (Non Manager or Non Supervisor) 1 Log On Access the etime Timesheets
BUSINESS ADVANTAGE USER GUIDE
 Table of Contents Getting Started... Account Summary...5 Navigation Tools...6 Account History...8 Quick Reference Guide...9 Frequently Asked Questions... Need Help?... Getting Started. Visit.. In the Online
Last Updated Feb-2016
 Last Updated Feb-2016 Help Desk Anne Arundel County Public Schools 410.222.5135 Help-Desk@aacps.org Table of Contents What Employees can do in ESS... 3 Things to Remember about ESS... 3 Logging into ESS...
INSTRUCTIONS FOR ACCESSING WIUP ON THE WEB
 INSTRUCTIONS FOR ACCESSING WIUP ON THE WEB University Information Management Systems (UIMS) Help Desk: 298-2104 Administrative Services (Jan Carlson) 298-1800 To access WIUP on the Web, follow the instructions
Common Tasks Within Your ATC Healthcare Services Vibe Portal Login
 Common Tasks Within Your ATC Healthcare Services Vibe Portal Login Within this document you will find easy How To, step by step instructions for many of the tasks you can perform within the Vibe portal.
California Institute of Technology
 California Institute of Technology Human Resources Using Kronos Workforce Timekeeper A User Guide for Payroll Activity Monitors (PAM) Effective 05/18/11 Page 1 of 51 Using Workforce Timekeeper A Guide
How to Enroll into Health Benefits via Employee Self Service: New Hire Event Employee Self Service (ESS):
:") Employee Self Service (ESS): Online New Hire Benefits Enrollment allows fast and convenient processing of your New Hire Benefits Enrollment elections through Employee Self Service (ESS). ESS is an online
Employee Self Service (ESS): Online New Hire Benefits Enrollment allows fast and convenient processing of your New Hire Benefits Enrollment elections through Employee Self Service (ESS). ESS is an online
USER GUIDE Employee Self-Service (ESS)
") USER GUIDE Employee Self-Service (ESS) For Delaware North Associates Delaware North Companies, Rev. 1/7/13 Welcome to the PeopleManager Employee Self-Service (ESS) User Guide. This guide is designed to
USER GUIDE Employee Self-Service (ESS) For Delaware North Associates Delaware North Companies, Rev. 1/7/13 Welcome to the PeopleManager Employee Self-Service (ESS) User Guide. This guide is designed to
NOVAtime 5000 Employee Web Services
 NOVAtime 5000 Employee Web Services Table of Contents Logging In... 2 Accessing Employee Web Services... 3 Using the Dashboard... 3 Viewing Your Timesheet... 4 4.1 Timesheet Summary... 5 Viewing Accrual
Employee Self Service. Getting Started Guide
 Employee Self Service Getting Started Guide https://ess.sccoe.org About Employee Self Service (ESS) Employee Self Service is a secure website where CUSD employees can view their personnel data. This site
Business Online and Mobile Banking User Guide
 Business Online and Mobile Banking User Guide 1. Online Enrollment 2. Login Process & Device Registration 3. Accounts & Accounts Details and Transaction History 4. Activity Center 5. Secure Messages 6.
Online Labor Redistributions Entry Reference Guide
 Online Labor Redistributions Entry Reference Guide Contents: Submitting a Labor Redistribution... 2 Changing Multiple Pay Periods... 13 Additional Search Criteria... 17 Overview: The on-line labor redistribution
NovaTime ~ Employee Training Aid
 NovaTime ~ Employee Training Aid Dana D. Arden TABLE OF CONTENTS Access NovaTime Website 1 NEW Employees Accessing for the First Time 2 Clock In/Out 3 NovaTime Employee Web Services 4 View Timesheet 4
Plan Central Employer Portal Learning Guide
 Plan Central Employer Portal Learning Guide Contents Introduction... 2 Enhancements to the New Plan Central... 2 User Roles... 3 Printer Friendly... 3 Accessing Plan Central... 3 Plan Central Welcome Page...
MoneyGram OfficialChecks
 MoneyGram OfficialChecks Version 2.6 PrimeLink Portal System Guide This system guide contains instructional information for the general use of the PrimeLink Web Portal. If you need specific assistance
Administrator user guide. mybusiness Essentials Payslip
 Administrator user guide mybusiness Essentials Payslip Overview Learn how to start managing your employee payslips with this guide 0 Registration and setup Register and assign the Adminstrator who will
MARCH 15, 2017 EASTCONN EMPLOYEE SELF-SERVICE (ESS) SYSTEM USER GUIDE FOR NON-SUPERVISORY ROLES INCLUDES TIMESHEET ENTRY EASTCONN HUMAN RESOURCES
 SYSTEM USER GUIDE FOR NON-SUPERVISORY ROLES INCLUDES TIMESHEET ENTRY EASTCONN HUMAN RESOURCES") MARCH 15, 2017 EASTCONN EMPLOYEE SELF-SERVICE (ESS) SYSTEM USER GUIDE FOR NON-SUPERVISORY ROLES INCLUDES TIMESHEET ENTRY EASTCONN HUMAN RESOURCES Table of Contents About ESS and How to Login... 1 ESS Dashboard
MARCH 15, 2017 EASTCONN EMPLOYEE SELF-SERVICE (ESS) SYSTEM USER GUIDE FOR NON-SUPERVISORY ROLES INCLUDES TIMESHEET ENTRY EASTCONN HUMAN RESOURCES Table of Contents About ESS and How to Login... 1 ESS Dashboard
Quick Reference for Project View Employees
 Time & Attendance Version 8.0 Quick Reference for Project View Employees Accessing the System The ADP Time & Attendance system, or etime, can be accessed in a number of ways: 1. From any desktop computer
Business Online Banking User Guide
 Business Online Banking User Guide Table of Contents Contents Overview... 2 Logging In... 2 Additional Login Information... 5 Home/Dashboard... 6 Top Line Tool Bar... 6 Bulletins... 7 Dashboard... 8 Accounts...
Getting Started with Transaction Express. Transaction Express User Guide
 Getting Started with Transaction Express Transaction Express User Guide Table of Contents Transaction Express User Guide... 5 Section 1 Getting Started... 5 Welcome Email... 5 Merchant List... 5 Navigation...
People Employee Self Service Reference Guide. August 2017 Version 3.0
 People Employee Self Service Reference Guide August 2017 Version 3.0 What s in this Guide? Section Page Logging on to People 4 Requesting a Password 6 Changing Your Password 8 Changing Your Forgotten Password
Job Aid PSHR: Direct Deposit. Department. Direct Deposit
 Department Finance Responsibility/Role File Name Revision 01 Document Generation Date 12/07/2010 Date Modified 12/7/2015 Last Changed by Status Final Department of Payroll Direct Deposit.pdf Kathy Mazur
Business Portals Guide
 Business Portals Guide The ZipLine (NPCA) Business Portals are three web sites that allow a merchant to launch a payment card program to local businesses. The businesses can save on each transaction by
CONTENTS. SETUP SECURITY ENHANCEMENTS Existing User New User (Enrolled by Employer or Self)... 18
... 18") FSA EMPLOYEE WEBSITE GUIDE CONTENTS BROWSER COMPATIBILITY... 2 ONLINE ENROLLMENT... 3 Online Enrollment Process... 3 Online Enrollment Option for Existing Employees... 11 REGISTERING YOUR ACCOUNT FOR ONLINE
FSA EMPLOYEE WEBSITE GUIDE CONTENTS BROWSER COMPATIBILITY... 2 ONLINE ENROLLMENT... 3 Online Enrollment Process... 3 Online Enrollment Option for Existing Employees... 11 REGISTERING YOUR ACCOUNT FOR ONLINE
Business Bill Pay User Guide
 Business Bill Pay User Guide The screens you will see in this guide were made for demo purposes only, and may contain unrealistic payment and payee information. If you have questions that are not addressed
TSSA PORTAL TRAINING GUIDE
 TSSA PORTAL TRAINING GUIDE Owner Processes Page 0 Table of Contents Contents 1.1 Redeem Invitation... 2 1.2 Reset Password... 5 1.3 Manage Profile... 7 2.1 View Your Record(s) of Inspection... 8 2.2 Validate
Portal User Guide Member Features
 Portal User Guide Member Features Updated: 04/22/2017 Accessing your claims just got easier WorkAbility Absence Management System Our WorkAbility website makes it easy to access your claims. You get online
core user guide business gateway TABLE OF CONTENTS BANKING > WEALTH > INSURANCE
 business gateway core user guide TABLE OF CONTENTS Getting Started... 2 Administration Approval... 8 Logging In... 2 Administration Report... 8 Electronic Report Delivery (ERD)... 17 Security Key... 2
Carpenters Pension Fund of Illinois
 Carpenters Pension Fund of Illinois Online Remittance Processing Page 1 Instructions Carpenters Pension Fund of Illinois Online Remittance Processing Contents Logging In... 3 Agree to Terms of Use... 4
Employer Self Service (ESS) User Guide
 User Guide") MainePERS Employer Self Service Maine Public Employees Retirement System Employer Self Service (ESS) User Guide V10 Version 10.0 December 3, 2018 TABLE OF CONTENTS Table of Contents Logging into ESS 1
MainePERS Employer Self Service Maine Public Employees Retirement System Employer Self Service (ESS) User Guide V10 Version 10.0 December 3, 2018 TABLE OF CONTENTS Table of Contents Logging into ESS 1
/ 1. Online Banking User Guide SouthStateBank.com / (800)
") / 1 Online Banking User Guide SouthStateBank.com / (800) 277-2175 06132017 Welcome Thank you for using South State s Online Banking. Whether you are a first time user or an existing user, this guide will
/ 1 Online Banking User Guide SouthStateBank.com / (800) 277-2175 06132017 Welcome Thank you for using South State s Online Banking. Whether you are a first time user or an existing user, this guide will
Board of Regents of the University System of Georgia etime Employee User Guide
 Board of Regents of the University System of Georgia etime Employee User Guide Project View Time Card for Monthly Employees (Non Manager or Non Supervisor) Contents REGISTERING FOR SELF SERVICE 3 ADDING
Get the most from your Health Savings Account. Your guide to your HSA and online account access
 Get the most from your Health Savings Account Your guide to your HSA and online account access 1 Health Savings Account Investments Contents Getting started... 2 Accessing the BBPadmin Online Portal...
esuite Administrator s Guide October 26, 2017
 new world ERP esuite Administrator s Guide October 26, 2017 2017 Tyler Technologies. All Rights Reserved. All rights reserved. Information within this document is the sole property of Tyler Technologies
KRONOS. Exempt and Salary Non-Exempt Employee Instructions
 KRONOS Exempt and Salary Non-Exempt Employee Instructions WHAT S INCLUDED? How to log in to Kronos Workspaces Tips and Tricks for using Workspaces My Timecard Workspace Review, approve and/or print timecard
Online Banking Overview
 Online Banking Overview Online Banking Services Check you account balances, make a transfer, and view recent activity View, download, or print your monthly statements Set-up and manage custom alerts for
ONLINE PAYROLL REPORTING INSTRUCTIONS
 ONLINE PAYROLL REPORTING INSTRUCTIONS Version 1.1 Online Reporting / Ver. 1.2 / November 2014 1 TABLE OF CONTENTS Section Description Page OT NLINE PAYROLL REPORTING...3 ONLINE PAYROLL REPORTING HELP...4
Quick Reference Card for Timestamp Hourly View Employees
 Time & Attendance Quick Reference Card for Timestamp Hourly View Employees Navigator Version 7.0 The following instructions describe a typical Navigator configuration. The names and location of widgets
/ 1. Online Banking User Guide SouthStateBank.com / (800)
") / 1 Online Banking User Guide SouthStateBank.com / (800) 277-2175 01242018 Welcome Thank you for using South State s Online Banking. Whether you are a first time user or an existing user, this guide will
/ 1 Online Banking User Guide SouthStateBank.com / (800) 277-2175 01242018 Welcome Thank you for using South State s Online Banking. Whether you are a first time user or an existing user, this guide will
PLEXUS PAY PORTAL YOUR HOW-TO GUIDE
 PLEXUS PAY PORTAL YOUR HOW-TO GUIDE - 1 - Table of Contents Activate Account Activating Your Pay Portal Account 3 Navigating your Plexus Pay Portal 8 Managing your funds 17 Activating your Prepaid Card
Applicant Tracking & Onboarding. Payroll. Time & Attendance. IOIPay ESS 2.0 Administrators' Guide. Human Resources. Employee Self-Service
 Applicant Tracking & Onboarding Payroll IOIPay ESS 2.0 Administrators' Guide Time & Attendance Human Resources Employee Self-Service Next Steps 1. Visit www.ioipay.com 2. Click on the Employer Login tab
Meritain Connect User Manual. for Employees. 1 Meritain Connect User Guide for Employees
 Meritain Connect User Manual for Employees 1 Meritain Connect User Guide for Employees Contents Introduction... 4 Accessing Meritain Connect... 5 Logging In... 5 Forgot Password... 6 Registration Process...
ecashiering Table Of Contents
 ecashiering Table Of Contents Overview... 2 Logging in to ecashiering... 2 ecashiering Tab... 3 Payment Management... 3 Digital Delivery Account Managment... 7 Patient Pay Online Tab... 8 Account Summary...
WELCOME TO OUR MARKETCONNECT WEBSITE
 WELCOME TO OUR MARKETCONNECT WEBSITE We recognize that easy, efficient, online access to investment accounts is a growing priority for our clients. We are continuously improving our online platform and
HR Employee Resources On-Line
 HR Employee Resources On-Line Table of Contents General Information...4 Computer Requirements... 4 Helpful Hints...4 Module 1: Introduction to H.E.R.O... 5 Overview/Objectives... 6 Topic 1: Log on/out
Business Online Banking User s Guide
 Business Online Banking User s Guide Published By FIRST NATIONAL BANK ALASKA This User s Guide is designed solely to assist First National Bank Alaska customers in understanding the various functions and
Employee / Per-Capita. Self-Service Portal Instructions
 Grand Traverse Band of Ottawa and Chippewa Government Employee / Per-Capita These instructions are for Employees and Tribal members to activate and access the electronic portal for benefits, open enrollment,
Show Instructions. For Festivals. Version 1.2
 For Festivals Version 1.2 Table of Contents Page 03 03 Section Add Shows Create a New Show, Enter Show Details 04-05 04 05 Add Artists Create a New Artist Enter Artist Details 06 06 Editing Edit Show,
Employee Services Portal Administrator Guide
 Employee Services Portal Administrator Guide Contents Edit employee access & password... 3 Using the portal to provide electronic W-2s... 5 Setup the portal... 5 Reset the portal for a new tax year...
ENTERPRISE SUBSCRIBER GUIDE
 ENTERPRISE SUBSCRIBER GUIDE Enterprise Subscriber Guide 880 Montclair Road Suite 400 Birmingham, AL 353 www. TABLE OF CONTENTS Table of Contents Introduction...6 Logging In...6 Navigation Bar, Sub-Menu
Palisades School District PowerSchool Parent Portal Guide
 Palisades School District PowerSchool Parent Portal Guide Get Started To get started, you must create a parent account in the PowerSchool Parent Portal. Create a Parent Account Use this procedure to create
PayrollSE Year End Checklist
 Classification - Public PayrollSE 2014-15 Year End Checklist Introduction Welcome to the PayrollSE Year End Checklist. This document is designed to guide you through the Year End process, although not
Online Banking User Guide
 TABLE OF CONTENTS TABLE OF CONTENTS... 1 INTRODUCTION... 4 QUICK REFERENCE... 4 LOG ON... 4 SECURITY PROFILE... 4 LOG ON... 5 ENTER YOUR USER ID... 5 REVIEW SECURE IMAGE & PHRASE, ENTER PASSWORD... 6 FIRST