MERCHANT MANUAL. Direct Connect Copyright 2016, All Rights Reserved.
|
|
|
- Joy McBride
- 5 years ago
- Views:
Transcription
1 MERCHANT MANUAL Direct Connect Copyright 2016, All Rights Reserved
2 Table of Contents Overview... 5 The Gateway... 6 Logon as a Merchant... 7 Adding a New User Finding and Editing Users Creating Transactions Credit Card Credit Card Sale Credit Card Level Credit Card PreAuth Credit Card Return Credit Card ForceAuth Debit Card Debit Card Sale Debit Card Return Check Check Sale Check Auth Check Void Gift Card Gift Card Redeem Gift Card Reload Gift Card Refund Gift Card Activate Gift Card Deactivate Gift Card Inquire Batches and Settlement Current Batch Batches Batch Exceptions
3 End of Day Transaction Reports Summary Transaction Reports for Cards Transaction Reports for Checks Void Transactions Refund Transactions Repeat Sale Transactions Capture PreAuth Transactions Recurring Billing Add and Edit a Customer Add and Edit a Payment Item Add and Edit a Contract View Customers View Contracts Billing Report Contract Expiration Card Expiration Card Safe Add a Card Add a Customer View Safe Tools Batch Upload Receipt Templates Custom Fields Hosted Page Emulator API documentation Fraud Control Settings Held for Review Log Preferences, , and Logout
4 Changing User Password Setting Security Sending to Merchant Support System Logout
5 Overview By using the Gateway, the administrator users can manage their accounts with little more than a few keystrokes and mouse clicks. Through an intuitive graphical user interface, an administrator can set up new accounts and modify or delete existing ones. In turn, merchants can upload POS transactions from their terminals and capture images of signed sales drafts. As a result, merchants no longer have to hold copies of these transactions for retrieval requests. Instead, the images are housed on the web and available to the merchant by using a web browser. Additionally, merchants also have access to manage accounts at the user level within their merchant accounts*. This versatility thus not only supports a wide level of account management, but also reduces the need for administrator involvement in routine and simple adjustments to the merchant account. In addition, the Gateway provides tools to customize logos and contact information, which locate on the Gateway web pages viewable to every user. In this way, while maintaining a professional business presentation, an administrator can conveniently provide merchants with vital contact information. This documentation targets individuals who will monitor the Gateway system on a regular basis. Some knowledge of basic system administrative principles is a plus. For an administrator, although prior experience with system administration is not required, it will help facilitating installation and maintenance of the payment server. *Managing user accounts is dependent on the merchant s assigned security permissions. 5
6 The Gateway What to expect and what to do when beginning to use the Gateway for payment processing. In this introductory chapter, you will learn the basics on how to use the Gateway for payment processing. The topics covered include the payment server s logon process, graphical user interface (GUI), and user account management. To begin using the Gateway, you must first logon to the system. 1. Open your internet browser 2. Type the Uniform Resource Locator (URL) for the payment server login page in the Address field ( domain>/paygate/login.aspx). Refer to your Welcome Letter if you are unsure of the correct URL and the login page for the Gateway should open (shown below) 3. Input your username in the Username field 4. Input your password in the Password field 5. Click Log In (the Click here if you forgot your password option sends the password for whichever users are configured with your address) Note If this is your first time logging on to the payment server, you will be required to change your password. 6

7 Logon as a Merchant After you logon to the system as a merchant, a menu bar will appear on the screen (as shown below). It contains a list of options: Virtual Terminals, Recurring Billing, Current Batch, End of Day, Batches, Transaction Reports, Manage Users, Card Safe, Tools, Fraud Control, Preferences, , and Logout. A History bar will appear under the logo near the top of the page which keeps a running history of pages you ve visited for ease of navigation. All reports displayed by the gateway can be exported to CSV by clicking the link in the upper right portion of the report. The Manage Users feature is discussed in this chapter. discussed in the following chapters. All other features will be 7
8 Virtual Terminals Credit Process Sale, PreAuth, or ForceAuth transactions on credit card Debit Process Sale or Return transactions on debit card Checks Process Sale or Void transactions on checks Gift Cards Process Redeem, Reload, Refund, Activate, Deactivate, or Inquire transactions on gift card (Note: A gift card must be activated to be used) Recurring Billing Add Customer Add a new customer for recurring billing View Customer Displays established recurring billing customers View Contracts Displays established contracts for customers Billing Report Displays transactions processed through recurring billing Contract Expiration View contracts that have expired or are close to expiration Card Expiration View stored credit cards that have expired or are close to expiration Current Batch Summary Displays a summary list on transactions in the current batch Credit/Debit/EBT/Checks Displays the transaction details in the current batch Host Batch Info Displays a batch summary form the processor host 8
9 End of Day Credit/Debit/EBT/Checks Displays the current batch summary and allow you to submit the batch Batches Credit/Debit/EBT/Checks Displays the transaction details of closed batches Batch Exceptions View any transactions that failed to settle Transaction Reports Summary Displays a summary list on all transactions categorized by the payment type Credit/Debit/EBT/Gift Cards/Check Displays the transaction details, including receipt and/or check images if applied Lookup Receipt View the receipt for a transaction using the reference number (PNRef) Manage Users Add Add a new user account Find/Edit Find, edit or delete user account Card Safe Add a Card Adds and stores a credit card Add a Customer Add and store customer information View Safe View the stored customer and credit card information 9
10 Tools Batch Upload Uploads a batch of transactions in a Tab Delimited or PC Charge DAT file Receipt Templates Add any custom text to the bottom of receipts Custom Fields Create/Manage any custom fields that will appear on the virtual terminals and all transaction reports Hosted Page Create/Manage the hosted page for the merchant Emulator Create/Manage shopping cart emulators for the merchant API Documentation The online API documentation Fraud Control Settings Manage the fraud settings for the merchant including IP/Hourly/Daily velocity, IP/Country restrictions, AVS/CVV options, and Amount restrictions Held for Review View any transactions held for review based on the Fraud Control settings Log View the log for Fraud Control Preferences Password Change the user password Security Set security for functions performed at the user level 10

11 Sales Send to the Gateway sales team Support Send to the Gateway support team Logout Exit the Gateway Adding a New User The Manage Users section is used to add, find, edit, or delete user accounts. Adding a new user: 1. Click on the Manage Users menu 2. Click on the Add User link to add a new user and the following screen will appear 11
12 Without your specifying a user name in the User Name field, the gateway will generate a user name for you The Security Level box should be defined correctly to give the user access to only what the user needs to complete his/her task (Also, see Setting Security in Chapter 6) 3. Enter the new user s information into the User Information form 4. Checking the API User option will only enable this user to communicate with the gateway via API. API users will not be able to login to the gateway directly. 5. The Limit IP option enables you to restrict access for this user to a single IP Address 6. The Limit Country option enables you to restrict access for this user to a certain country 7. Click on the Save User button to save the user Finding and Editing Users The Find/Edit function lets you manage the user account, such as, search a user account, modify the previously entered user information, delete an existing user, activate or inactivate a user account, etc. 1. Click on the Manage Users menu. 2. Click on the Find/Edit link and the following screen will appear. 3. If you know the value (full or partial) of the user that you are searching for, enter the value in the appropriate column header to narrow the search. 4. Fill out other fields that you know in order to narrow down the selection. Notice without entering any information, the filters form will return all user 12

13 accounts. To narrow the returned list of records, continue to enter more search criteria. 5. To view the user details, delete the user from the system, reset the password, or the user, simply click on the Username. The following screen will appear. The following describes the function of each link in the above figure. Click this link to send the user an . Your default mail application will appear, enabling you to send the . Reset Password Click this link to reset the user password. generate a new user password. Password Click this link to the user their password. Log In as this User Click this link to log in as this user. Delete User Click this link to delete this user. Note: The payment server will automatically You cannot delete a primary user. A primary user is created when a merchant is first generated. 13

14 Make User Active or Inactive Click this link to make this user inactive or active. 6. To edit the user details, click on the icon or the Edit User link and the following screen will appear: 7. Edit the fields as necessary; click Save User to save the changes. 14
15 Creating Transactions How to use virtual terminals Virtual Terminals allow you to process various transactions on credit card, debit card, check, and gift card. The transaction types include Sale, PreAuth (pre-authorization), ForceAuth (post-authorization), Void, Return, etc. This chapter describes how to process each type of transaction, grouped by the payment methods: Credit Card, Debit Card, Check, and Gift Card. In general, when filling out the transaction forms (illustrated as screenshots in this chapter), be aware that the industry type of your merchant account, such as retail or e- Commerce, has different requirements on certain fields to be populated or not. For example, some payment processors do not require an address for a retail transaction, but require for an e-commerce one. Consult your service provider if you are unsure of these requirements. To process retail transactions, you will need various devices, such as card reader, PIN pad, and check reader. Note: The only PIN pad supported by the Virtual Terminal is the Verifone PinPad 1000se. Credit Card The Virtual Terminal facilitates Return transactions on credit card. There is also the option to Void and Return transactions through Find Transactions. This to ensure a void or return transaction is only made on an existing transaction, which further help reduce fraud. Credit Card Sale 1. Click on the Virtual Terminals menu 2. Click on the Credit link 3. Click on the Sale tab (shown below) 15


16 4. Enter the credit card information into the Credit Card Sale form 5. Note the last field on the form is Test. This is a custom field. See the Custom Field section for more information 6. Click Process and a receipt similar to the one below will open Credit Card Sale Receipt 16
17 7. Notice the two options in the figures above: Print Receipt and Receipt 8. Click on Print Receipt to print the transaction receipt 9. Enter the address in the space provided and click Receipt 10. To process another Credit Sale, select Click here to process another transaction Credit Card Level-3 Credit card processing methods fit into three levels: Level 1, Level 2, and Level-3. Each level is defined by how much information is needed to complete a payment, with Level 1 requiring the least for payment authorization and Level-3 requiring more information. A characteristic of the MasterCard and Visa credit card interchange structure for purchases using a corporate card or a purchasing card is that these transactions allow additional information to be appended to the transaction by the seller before the item works its way through the interchange system from the acquirer to the issuer. Level-3 processing provides more detailed information about the transaction to be conveyed back to the buying organization via the issuing bank. The most significant reason for supplying this information, at least from the merchant perspective, is that the interchange fees borne by the merchant as part of the transaction fees they pay, is significantly reduced. In addition, a special interchange category called Large Ticket Interchange, (LTI) requires Level-3 processing. This applies to the really large transactions that are prevalent in the B2B and B2G arenas. Level-3 payments require the most data out of the three processing levels. For comparison, Level-2 payments require information such as: Transaction amount Customer code Sales tax Level-3 payments require all the data for Level 2 payments, but also more detailed information, such as: 17

18 Quantity Item ID or SKU Item description Unit price Extended price Unit of measure (each) Commodity code Line discount Credit Card Level-3 Sale: 1. Click on the Virtual Terminals menu 2. Click on the Credit link 3. Click on the Sale tab 18
19 4. Click on Level 3 Data and the following window will appear. Complete the required information. 5. Follow the same steps defined for Credit Card Sales. Credit Card PreAuth PreAuth is the process of authorizing and reserving the funds for the transaction ensuring the card is valid, and the cardholder has sufficient open-to-buy funds to cover the purchase amount and reserving the funds for completion. 1. Click on the Virtual Terminals folder 2. Click on the Credit link 3. Click on the PreAuth tab (shown below) 19


20 4. Enter the credit card information into the form 5. Click Process and a receipt similar to the one below will open 20

21 7. Notice the two options in the figures above: Print Receipt and Receipt 8. Click on Print Receipt to print the transaction receipt 9. Enter the address in the space provided and click Receipt 10. To process another Credit PreAuth, select Click here to do another Pre Auth Credit Card Return A Credit Card Return is a return transaction in which a previous Credit Card Sale is to be returned / voided. 1. Click on the Virtual Terminals folder 2. Click on the Credit link 3. Click on the Return tab (shown below) You may then process a return just as you would a sale. For more information about this setting, contact your administrator or reseller. Also, to void a transaction that has not yet been processed (i.e. the batch has not yet been settled), continue to Transaction Reports via step 4 below. 21
 6.")
22 4. Read the information and click Transaction Reports (shown below) Note: The date is defaulted to today s date. 5. Enter the appropriate information. (No information needs to be entered onto this page, by clicking the Submit button, you will view all transactions today) 6. Click Submit and a list of transactions similar to the sample screen below will appear 7. A list of transactions will appear, click on the transaction Ref # you wish to Void 22
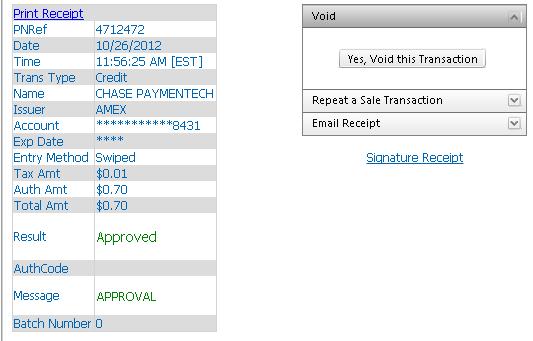
 9.")

23 8. Click Yes, Void this Transaction (Note: from this screen, you can also repeat a sale transaction using the same payment information and the receipt) 9. Click OK and similar screen to the following void response example will appear Credit Card ForceAuth ForceAuth is a sale transaction for which a merchant received a voice authorization. A ForceAuth is done so that the previously authorized transaction can be settled and the merchant can receive funds. 1. Click on the Virtual Terminals folder 2. Click on the Credit link 23


24 3. Click on the ForceAuth tab (shown below) 4. Enter the customer s credit card information into the form 5. Click Process and a receipt similar to the one below will open 24

25 7. Notice the two options in the figures above: Print Receipt and Receipt 8. Click on Print Receipt to print the transaction receipt 9. Enter the address in the space provided and click Receipt 10. To process another Credit ForceAuth, select Click here to do another Force Auth Debit Card Virtual Terminals allow you to process Sale and Return (void) transactions on debit card. To process debit card transactions, you need to first connect both PIN (Personal Identification Number) pad and card reader with your computer. Refer to Setting up Input Devices in Chapter 9 for details. If this is the first time your Internet browser s attempting to access the debit page, you ll be prompted to download an installer from the Gateway, which will enable you to access the serial device required for debit transactions. Debit Card Sale 1. Click on the Virtual Terminals folder 2. Click on the Debit link and a screen will appear similar to the example shown below 3. The virtual terminal supports any keyboard emulation card reader and the 25
 6.")
26 Verifone PinPad 1000se device. Swipe the debit card through the card reader. The Card Number and Expiration Date fields will automatically populate after swiping the card 4. Enter the appropriate transaction information in the form 5. Click Process (the Clear button lets you clear the form without processing the transaction) 6. The PIN pad connected to your computer will prompt for a PIN. Input the number and click the Enter key on your PIN pad and a receipt will appear similar to the example below Debit Card Return 1. To perform a return on a debit card transaction, refer to the refund option in the Transaction Reports section Check This section describes Sale, Pre Auth and Void check transactions. Check Sale 1. Click on the Virtual Terminals menu 2. Click on the Checks link 3. Click on the Sale tab (shown below) 26


27 4. Enter the check information into the form 5. Click Process and a receipt will appear similar to the example below Check Auth 1. Click on the Virtual Terminals menu 2. Click on the Checks link 3. Click on the Pre Auth tab (shown below) 27
 7.")

28 Check Void Voiding a transaction is the reversal of a current transaction that has been authorized but not settled. Settled transactions require processing of RETURN (a.k.a., REFUND, CREDIT) in order to be reversed. 4. Click on the Virtual Terminals menu 5. Click on the Checks link 6. Click on the Void tab (shown below) 7. In the Original PNRef field, enter the PNRef number you received from the corresponding check transaction on which you are performing this void. You can locate the PNRef by performing a search through Transactions Report. 8. Click Process and a receipt similar to the example below will appear Gift Card Through Virtual Terminals, you can process Redeem (Sale), Reload, and Refund transactions on a gift card. You can also Activate, Deactivate, or Inquire a gift card. Note: A gift card must be activated before use. 28
 4. Enter the gift card information 5.")

29 Gift Card Redeem 1. Click on the Virtual Terminals menu 2. Click on the Gift Cards link 3. Click on the Redeem tab (shown below) 4. Enter the gift card information 5. Click Redeem and a receipt similar to the example below will appear Gift Card Reload 1. Click on the Virtual Terminals menu 2. Click on the Gift Cards link 3. Click on the Reload tab (shown below) 29

30 4. Enter the gift card information 5. Click Reload and a receipt similar to the example below will appear Gift Card Refund 1. Click on the Virtual Terminals menu 2. Click on the Gift Cards Link 3. Click on the Refund tab (shown below) 30
31 4. Enter the gift card information 5. Click Refund and a receipt similar to the example below will appear Gift Card Activate 1. Click on the Virtual Terminals menu 2. Click on the Gift Cards Link 3. Click on the Activate tab (shown below) 4. Enter the gift card information 5. Click Activate and a receipt similar to the example below will appear 31


32 Gift Card Deactivate 1. Click on the Virtual Terminals menu 2. Click on the Gift Cards Link 3. Click on the Deactivate tab (shown below) 4. Enter the gift card information 5. Click Deactivate and a receipt similar to the example below will appear 32


33 Gift Card Inquire 1. Click on the Virtual Terminals menu 2. Click on the Gift Cards Link 3. Click on the Inquire tab (shown below) 4. Enter the gift card information 5. Click Inquire and a receipt similar to the example below will appear 33
34 Batches and Settlement How to create and settle batches In this chapter, we will discuss the payment server s batch and settlement features, mainly, Current Batch, End of day, and Batches. These features are there for merchants with terminal-based payment processors. Terminal-based processors require merchants to store the authorized transactions on the terminal until the merchant captures and submits them for settlement. Remember that if you have payment options that are host-based, you will not see these features for those payment types. Contact our Support team to define if your payments are host-based. A batch is a collection of transactions. Usually a merchant has one batch per day or per shift. Batch has two types: open batch and closed batch. An open batch, or current batch, is a batch that has not yet been settled. On the contrary, a closed batch is a batch that has already been settled. To submit/settle the transactions in the current batch, the End of Day function comes into place. These doesn t apply to host-based solutions. If you are using a host-based solution get in touch with our Support team. Current Batch Current Batch consists of two parts, transaction summary and transaction details, which are grouped by the payment method. The summary provides an overview of transactions in the current batch. The transaction details enable you to further explore and perform more tasks on each transaction. The current batch summary lists transactions by payment types, the total number and amount of both deposit and return transactions, and the net amount and quantity of all transactions. 1. Click on the Current Batch menu 2. Click on the Summary link and a list will appear similar to the example shown 34


35 below 3. To view the credit card details, click on the Credit link. To view the debit card details, click on the Debit link. To view the EBT details, click on the EBT link and a list will appear similar to the example shown below 4. Click on the transaction s Ref # link to further display the detail of the transaction 5. Notice if you see to the left of the link, it means a receipt with signatures is captured for this transaction. To view the receipt, click on the Ref # and a screen will appear similar to the example shown below 35
36 36

37 Batches Batches contain transactions that are already settled. Similar to Current Batch, the batches are grouped by payment types: Credit, Debit, and EBT. 1. Click on the Batches menu 2. To view the credit card details, click on the Credit link. To view the debit card details, click on the Debit link. To view the EBT details, click on the EBT link. To view all batches on the same screen, click the CC/DBT/EBT link and a screen will appear similar to the example shown below 3. For date selection, refer to an identical figure in Transaction Summary in Chapter 4 4. The available Batch States are Closed, Suspended, Submitted, and All. Definitions are described below a. Closed All batches that settled successfully b. Suspended All batches that were submitted for settlement, but did not 37
38 settle successfully c. Submitted All batches that have been submitted but have neither settled or failed (this applies to ACH batches only as credit/debit batches will either settle or fail instantly) d. All All batches 5. Click Submit and a screen will appear similar to the example shown below 6. To view the batch summary, click on the Summary link and a screen will appear similar to the example shown below Note: The summary displays the batch s total number and amount of both deposit and return transactions, grouped by payment types. 7. To view the batch details, click on the Detail link and a screen will appear similar to the example shown below Note: The above figure is identical to the one in Find Credit/Debit/EBT/Gift Transaction in Chapter 4, in which it is described in detail. 8. Click on the transaction s Ref # link to view further details of the transaction (shown below) 38
. Because this transaction is already settled, you cannot do void, but refund.")
39 Note: You can perform three more tasks on this individual credit card transaction: Void, Repeat Sale, and Receipt (This option is only available for merchants who have it selected. To enable this option, contact your Reseller). Because this transaction is already settled, you cannot do void, but refund. Batch Exceptions This report will show a detailed list of transactions that failed settlement. This can be useful in verifying which transactions have been deposited and which have not. 1. Click the Batches menu 2. Click the Batch Exceptions link and a screen will appear similar to the example shown below 39

40 Note: Merchants can t take actions on Rollback Batch. Get in touch with our Support Team. End of Day The End of Day settlement is the process through which transactions with authorization codes are submitted to the payment processor for transfer of funds. This procedure is usually conducted at the end of the business day. After the settlement, the transactions in Current Batch are moved into Batches. 1. Click on the End of Day menu 2. To settle the credit card transactions, click on the Credit link 3. To settle the debit card transactions, click on the Debit link 4. To settle the EBT transactions, click on the EBT link 5. To settle all transactions together, click on the CC/DBT/EBT link 40


41 6. Click Close Batch and a screen will appear similar to the example shown below 7. The text Your batch has been queued for settlement. appears. Settlements will run every quarter-hour, I.E. 1:00, 1:15, 1:30, etc. Note: You can only have one batch queued for settlement at a time. 8. To view the batch queued for settlement, click the Pending Settlement link. A screen will appear similar to the example shown below. 41

42 9. To stop the batch from settling prior to the quarter-hour, click the Cancel link 10. Click OK 42

43 Transaction Reports How to view transactions and receipts Transaction Reports display transactions that are processed through the Gateway. Inside the folder, transactions are grouped by payment types: credit, debit, gift, EBT and check. They can also be image-attached, such as check image and signature image. Furthermore, you can process post-auth, repeat sale, return/refund, and void through Find Transactions, based on the transactions you can locate in Transaction Reports. Summary The Summary inside Transaction Reports provides an overview of all transactions processed within a chosen date range. 1. To view Transaction Summary, click on the Transaction Reports menu 2. Click on the Summary link 43

44 3. Select a pre-defined date range from the Date Range drop-down list. Or, modify Start Date and End Date. Or, use the <<, <, >, or >> link in the month bar to switch the month, and click on any date link in the calendar for a particular date. 4. You can also have the report show the transactions based on the user that entered the transactions, the Register associated with the transactions, or the Batch Number associated with the transactions 5. Click Submit to have the report reflect any date changes or specific field queries Transaction Reports for Cards Card transactions include credit card, debit card, gift card, and EBT card transactions. Since they all have similar transaction fields, we will discuss one card type, credit card, in detail. 1. Click on the Transaction Reports menu 2. To view the credit card details, click on the Credit link. To view the debit card details, click on the Debit link. To view gift card transactions, click on the Gift Cards link. To view the EBT details, click on the EBT link 44

45 3. Refer to Step 3, date range selection, in Summary earlier in this chapter for specifying a date range Note: For the rest of the filter fields, you don t need to fill them all. Instead, just the ones you know, because the less information you provide, the more matches you will receive. The following table illustrates 3 filter fields that each has a drop-down list. 4. Choose a Transaction Type from the drop-down list 5. Choose an option to Exclude Void transactions or not (by default, this box is checked) 6. Choose a card Payment Type from the drop-down list 7. Choose a Status from the drop-down list 8. After entering all necessary information, click on the Submit button (the Reset button clears the form) and a screen will appear similar to the example shown below The following gives you a quick overview of each column in the example screen above. You can enter information in these fields to change the results of the report at any time, just click Refresh in the upper right corner of the report after making changes. Ref # A unique reference number that the system assigns to each transaction for an easy retrieval Customer ID A unique number that the merchant assigns to identify a customer Invoice The optional invoice number that is associated with the transaction Date 45
46 The date and time the transaction was processed Payment Type The transaction s payment type (Examples are: Visa, MasterCard, Visa, Amex, etc.) Acct # The partially masked card number Name on Card The customer s name Trans Type The transaction type (Examples are: Sale, Authorization, ForceCapture, Repeat Sale, and Credit) Response Message The response for the transaction (Examples are: Approved, Declined) Approval Code The approval or error code of the transaction Auth Amt The dollar amount of an approval or authorization request Total Amount The transaction amount that is captured by the host Tip Amount The amount of any adjustment made to the transaction (only for merchants with Tip enabled) User The user name or terminal that processed the transaction Register The register number on which the transaction is performed Transaction Status The status of the transaction. Examples are: Open Transaction has yet to be settled Settled Transaction has settled RolledBack Transaction failed to settle InProcess Transaction is in the process of settlement FraudHold Transaction was held due to Fraud settings Ineligible Transaction cannot be settled 46

47 9. If you want to change the number of transactions listed per screen page, change the Page size located at the bottom left corner of the report. By default, the screen shows up to 25 transactions per page. 10. You will have the option to export the transaction list in multiple formats by clicking Print/Export Reports. You can also export the transaction list in CSV in one step just by clicking the ESP Logo on the upper right corner of the report. 11. To further explore the detail of a transaction, click on the transaction s Ref# link Note: There are four kinds of task box(s) you may see, Void, Refund, Capture and Repeat Sale, located on the right of the card transaction detail. You may also see the option to the receipt. The following table shows a list of task box(s) matching transaction types: 47
48 Card Type Transaction Type Settlement Task Box(es) PreAuth N/A Cature, Repeat Sale Unsettled Void, Repeat Sale Sale, Force Capture Settled Refund, Repeat Sale Unsettled Void, Repeat Sale Credit Settled Repeat Sale Credit Card Unsettled Void Settled Repeat Sale Unsettled Void Gift Card Sale Settled Refund 12. In the transaction list, if you see (the image icon) to the left of the transaction s Ref# link, which means a signature is captured for this transaction. Click on the reference number, then click the Signature Receipt link and a screen will appear similar to the example shown below 48
 3.")
49 Transaction Reports for Checks The process of searching for a check transaction is identical to that for a card transaction, except that the searching filters are slightly different. 1. Click on the Transaction Reports menu 2. Click on the Check link (shown below) 3. For date selections, refer to Step 3 under Summary earlier in the chapter Note: For the filter fields, you only need to fill out the ones you know, because the less information you provide, the more matches you will receive. The following table illustrates 2 filter fields that each has a drop-down list. 4. Choose a Transaction Type from the drop-down menu 5. Choose a Status from the drop-down menu 49
50 6. Click Submit (the Reset button clears the form) and a screen will appear similar to the example shown below 7. Please refer to Step 9 through Step 11 in Transaction Reports for Cards in Chapter 4 for these three features The following gives you an overview of each column as shown in the example screen above. Ref # A unique reference number that the system assigns to each transaction for an easy retrieval Customer ID A unique number that the merchant assigns to identify a customer Invoice ID The optional invoice number that is associated with the transaction Date The date and time the transaction was processed Result The response for the transaction. Examples are: Approved, Declined Payment Type The transaction s payment type (Examples are: ECHECK, VERIFY) Acct # The last 4 digits of the checking account number Transit # The financial institution s transit (bank routing) number for the check Check # The check number Name The customer s name shown on the check Type The type of transaction processed. Examples are: Sale, Credit 50

51 Amt The dollar amount of the check transaction User The user name or terminal that processed the transaction Register The register number on which the transaction is performed 8. To view the detail of a check transaction, click on its Ref# link 9. In the transaction list, if you see (the image icon) to the left of the transaction s Ref# link, which means a check image is captured for this transaction. Click the Ref #, then click the Image Receipt link 51


52 Void Transactions Through Transaction Reports, you can perform a void on unsettled credit card, gift card and check transactions: 1. To void a transaction, click Yes, Void this Transaction and a screen will appear similar to the example shown below 52
 2.")
53 Refund Transactions Similar to void transactions, through Transaction Reports, you can perform a refund on the settled credit card, and gift card transactions: 1. To adjust the refund amount, edit the amount field (a valid refund amount is less than or equal to the original transaction amount) 2. Click on Refund Account and a screen will appear similar to the example shown below 53
54 Repeat Sale Transactions Through Transaction Reports, you can perform a repeat sale on existing credit card and check transactions. For credit card repeat sale, you are actually processing a brand new sale transaction. Through Transaction Reports, you can perform repeat sale on any existing Sale, PreAuth, ForceCapture (PostAuth or ForceAuth), and Return/Credit credit card transaction. To process a repeat sale, first find the target transaction through the steps described earlier in this chapter. Then click on the transaction s Ref# link. A repeat sale task box will appear (shown below). 1. To change the amount of the repeat sale, edit the amount field 2. By checking the Force Duplicate box, you can process a duplicate transaction. A duplicate transaction is an attempted transaction identical to the one already made on the same day, with the same credit card number, expiration date, and total amount 3. Click on Yes, Charge Account and a screen will appear similar to the example 54


55 shown below Capture PreAuth Transactions The procedure of capturing a PreAuth credit card transaction is also called PostAuth. It is the completion of a PreAuth transaction. To do so, first locate the transaction through the steps described earlier in this chapter. Then click on the transaction s Ref# link. A Capture task box will appear to the right of the transaction detail. 55

56 1. To change the capturing amount, edit the amount field 2. Click Yes, Capture Amount and a screen similar to the example below will appear 56

57 Recurring Billing How to configure transactions for recurring billing The Recurring Billing functions allow merchants to bill customers on a recurring basis. Each day, a batch process runs automatically and processes all the recurring transactions scheduled for that day. This chapter describes how to set up a customer s recurring billing, including: add a recurring billing customer, add a payment method for the billing, and configure the recurring billing contract. Add and Edit a Customer 1. Click on the Recurring Billing menu 2. Click on the Add Customer link and a screen will appear similar to the example shown below Note: In the new customer information form, the Customer ID field is for your own reference. Typically, you should make this field same as the customer identifier in your CRM (Customer Relationship Management) or billing system. 57
58 The required fields in the form are: Customer ID, plus one of these three fields: First Name, Last Name, or Company. 3. Enter all the information necessary to identify a customer for recurring billing; then click Add Customer Note: The recurring billing customer profile screen appears after you add a new recurring billing customer. It includes three sections: Primary Contact, Payment Methods, and Contracts. Each section has a link in the header that allows you to edit or add information associated with that section. You can also reach this screen by selecting View Customers in the Recurring Billing folder, which we will discuss later in this chapter. 4. To edit the customer primary contact information, click on the Edit Customer link in the Primary Contract section header 5. The customer contact information form will appear. Edit the fields accordingly 6. Click Update Customer. This will take you back to Customer Profile Screen Add and Edit a Payment Item You can add two types of payment method for a recurring billing customer: Credit Card and ACH (E-Check). 1. From the recurring billing customer profile screen, click on the Add Payment 58


59 Method link in the Payment Info section header 2. Select either Credit Card or ACH and a screen will appear similar to the examples shown below 59

60 3. Fill out the credit card or ACH information 4. You have two options to charge the customer on this payment item: either charge later or charge now. If you select Later Use Only, click Save Payment Info. This will take you back to the recurring billing customer profile screen. If you select Charge Now, follow the steps below 60


61 5. Insert an amount in the Amount field 6. Click Charge & Save Payment Info and a receipt will appear similar to the examples shown below 61


62 7. To go back to the recurring billing customer profile screen, click the View Customer link above the receipt and a screen will appear similar to the example shown below 8. To view the stored payment methods, click the Payment Methods tab 9. To edit the payment item, click on edit 62

63 10. Edit the payment information and click Update Payment Item. This will take you back to the recurring billing customer profile screen Note: Once a payment method is properly populated, you will have the option to charge and/or refund the customer s payment account. 11. To charge to an established payment item account, input an amount in the Charge Amount box, and click on the Charge link 63


64 12. To refund an established payment item account, click the Refund link. This will take you to the Return tab in the virtual terminal. Refer to the Credit Card Return section of Chapter 2 for further information 64

65 Add and Edit a Contract A recurring billing contract contains billing information, such as when, how much, and how often to charge a customer. Prior to adding a contract, you need to have at least one payment item available for billing the customer. 1. Click on the Add Contract link in the header of the recurring billing customer profile screen and a screen will appear similar to the example shown below 65
66 The following describes each input field in the Contracts Info form Contract ID (Required) A unique number or word identifying the contract Contract Name (Optional) The name of a contract. You can also use this field to specify a contract type, such as Gold, Silver, or Bronze Start Date (Required) The first date the contract to be executed. Notice the start date cannot be on the same day that you enter the contract. This is because the payment server s recurring batch process may have already run for the day End Date (Optional) The date that the contract to be terminated. If the contract is ongoing, leave this field blank Subtotal (Required) The amount before tax to be charged to the customer each time the contract gets executed Tax (Optional) The tax amount for the payment Total A Read Only field, which is automatically populated by adding Subtotal and Tax; This is the total amount that will be charged every time the contract gets executed Status (Required) By default, a contract is set to Active when created. Once a contract or customer expires, the status will be automatically set to Inactive. A contract with Inactive status will not be executed Payment Item (Which Account should be Billed for this Contract) (Required) Select a payment item for the contract to execute on Contract Frequency (Execute this Contract) (Required) Select how often the contract gets executed Retry Processing Payment (Required) If a contract is executed, but for some reason, the transaction is declined, this field will tell the payment server how many times to re-process the transaction. A contract will only be executed once per day. Any transactions that fail will not be 66
67 attempted again until the following day. By selecting 0, the contract will not execute again until the next scheduled charge date and will only charge the regular amount of the contract. In other words, when this field is set to 0, and a transaction fails, the recurring billing system will not try to recover the funds that was failed to obtain previously Approval (Required) Choose to receive a confirmation every time the contract s payment is approved Declined (Required) Choose to receive a confirmation every time the contract s payment is declined Note: The following are two reminders when processing transactions through recurring billing. If a transaction is declined and you have selected 10 retries (the maximum amount of times you can retry) in the Retry Processing Payment field, the payment server will keep trying to process the transaction until it is either approved or retried 10 times. This will not affect the next bill date. For example, you have a contract setup to charge $15 to a credit card on the first day of every month; if on 5/1/2018 the transaction is declined, but it is finally approved on 5/6/2018, the next bill date will still be 6/1/2018 A contract can only have one transaction pending at any given time. For example, you have a contract set up to process daily. If the credit card gets declined today and you requested to have it retry several times, the contract will not execute at its regular time tomorrow. When the recurring billing system of the Gateway runs tomorrow, it will see this contract is flagged as declined and will try to reprocess the declined transaction. Therefore, the new charge for tomorrow will not be queued. It is recommended that daily contracts have retries set to 0 and that you request to have a decline confirmation sent. This way, you can take the necessary steps to resolve declined payments without missing any further payments 2. Input the contract information into the Contract Info form 67


68 3. Click Add Contract. This will take you back to the recurring billing customer profile screen. To view the contract, click the Contract tab 4. To edit a contract, click on its Contract ID link 5. The Contract Info form will appear again for you to edit 6. Click Update Contract afterwards. This will take you back to the recurring billing customer profile screen 7. To view the payment history on this contract, click on the Payment History link and a screen will appear similar to the example shown below View Customers The View Customers link inside the Recurring Billing menu enables you to search for a customer under certain filters. 1. Click on the Recurring Billing menu 2. Click on the View Customers link 68
69 3. This displays all customers. You can search for customers by entering any information in the column headers 4. To view the customer information, click on the Customer ID link. This will take you to the recurring billing customers profile screen View Contracts The View Contracts link enables you to search for a contract under certain filters. 1. Click on the Recurring Billing folder 2. Click on the View Contracts link and a screen will appear similar to the example shown below 3. This displays all contracts. You can search for customers by entering any information in the column headers 4. To view the contract s owner, click on the Customer ID link. This will take you to the recurring billing customer profile screen 5. To view the payment history on this contract, click on the Payment History link 6. To view the detail of a contract, click on the Contract ID link. This will take you to the Contract Info form Billing Report The Billing Report link enables you to view all the approved transactions in line with their corresponding contracts. In the report, transactions processed automatically through recurring billing will be listed. Other transactions made under Recurring Billing will not appear, including charging on either a payment item when it s newly created, or a payment item inside the Payment Info section. You can locate those transactions through Find Transactions instead. 1. Click on the Recurring Billing menu 69

70 2. Click on the Billing Report link and a screen will appear similar to the example shown below 3. This displays the billing history for all contracts. You can search for transactions by entering any information in the column headers 4. To view the contract for a particular transaction, click on the Contract ID link 5. To view the details of a transaction, click on the transaction s Ref # link Contract Expiration This report is used to view recurring contracts that are near expiration or have expired. 1. Click on the Recurring Billing menu 2. Click on the Contract Expiration link and a screen will appear similar to the example shown below 3. By default, this report displays contracts that are going to expire in the next 7 days. By clicking the drop down menu, you can expand this search by 14 or 30 days 4. To view contracts that have already expired, click the Already Expired tab and a screen will appear similar to the example shown below 5. This will display all recurring contracts that have expired 70

71 Card Expiration This report is used to view stored credit cards that are near expiration or have expired. 1. Click on the Recurring Billing menu 2. Click on the Card Expiration link and a screen will appear similar to the example shown below 3. By default, this report displays cards that are going to expire in the next 7 days. By clicking the drop down menu, you can expand this search by 14 or 30 days 4. To view cards that have already expired, click the Already Expired tab and a screen will appear similar to the example shown below 6. This will display all stored cards that have expired 71

72 Card Safe How to store customer and card information outside of Recurring Billing In this chapter, we will discuss how to add, manage, and delete stored customer and card information using the Card Safe. This option is made available by the Reseller. Add a Card This will allow you to securely store a customer s card information 1. Click the Card Safe menu 2. Click the Add a Card link and a screen appears similar to the example shown below (Note: There must be an existing stored customer to save the card information) 72
73 3. Select the customer from the Select a Customer drop down list 4. Select the card type from the Card Type drop down list 5. Enter the card number in the Card Number field (do not use spaces or dashes when entering the card number 6. There are 2 options for Token Mode a. Default Returns a returns a CCInfoKey for the card data b. CardFormat Returns a randomly generated number in the format of a credit card number matching the card type of the actual card 7. Enter the card s expiration date in the Expiration Date field (use the MMYY format, so 02/12 becomes 0212) 8. Enter the name as it appears on the card in the Name On Card field 9. Enter the billing address for the card in the Address field 10. Enter the billing city for the card in the City field 11. Enter the billing zip code for the card in the Zip field 12. To perform a $.01 authorization on the card (this will verify the card is active), click the Perform $.01 Auth button. The result of the authorization will display next to the button 13. To save the card information, click the Save button 14. If at any time you need to update or remove the card information, you can use the features in the View Safe screen Add a Customer This will allow you to securely store customer information 1. Click the Card Safe menu 2. Click the Add a Customer link and a screen appears similar to the example shown below 73


74 3. Enter the customer s name in the Customer Name/Description field 4. Enter the merchant defined customer ID in the Customer ID field 5. Enter the first name of the customer in the First Name field 6. Enter the last name of the customer in the Last Name field 7. Enter the customer s title in the Title field 8. Enter the customer s department in the Department field To enter the contact information for the customer, click the Contact tab 74
75 1. Enter the customer s address in the field 2. Enter the customer s daytime phone number in the Daytime Phone field 3. Enter the customer s evening phone number in the Evening Phone field 4. Enter the customer s fax number in the Fax field 5. Enter the customer s mobile phone number in the Mobile field 6. Enter the customer s shipping address information in the Shipping Address fields. If the billing address is the same as the shipping address, check the Shipping and Billing Address are the same check box. Otherwise, enter the customer s billing address information in the Billing Address fields 7. Click the Save button to save the customer s information. This will take you to the View Safe screen View Safe This shows you a report of all the stored customer and card information. This includes information entered in the Recurring Billing section. 1. Click the Card Safe menu 2. Click the View Safe link and a screen appears similar to the example shown below 3. This report will display all stored customers for the merchant, including ones entered through the recurring billing section 4. To search for a specific customer, fill out any information in the fields below the column names 5. To view/edit customer information, click the Customer Key link associated with the customer. A screen will appear similar to the one shown below 75

76 6. To view any stored cards for the customer, click the Cards tab. A screen will appear similar to the one shown below 7. To charge the stored card, click the Charge link. You will be redirected to the virtual terminal with the stored card information prepopulated 8. To add card information for this customer, click the Add a Card button. This will take you to the Add a Card section 76

77 Tools How to configure tools for the gateway In this chapter, we will discuss the various tools available in the payment gateway. Access to these tools is given by the Reseller, so you may not see all of them listed in your gateway. Batch Upload Batch Upload Functionality (PC Charge and Text Formats) There is a feature to allow a merchant to do a manual batch upload through the web interface. This may be desired if the merchant s POS application is not easily able to integrate directly with the Payment Server. In such a case, the application can output transactions to a flat file, which can be uploaded to the Payment Server. To access Batch Upload within the Payment Server go to: Tools Batch Upload When you click on this option, the following page will open: Note that the File Format option defaults to Tab Delimited, but also has an option for PC Charge dat File. Often, a merchant s application will be outputting a simple Tab Delimited text file (see below for details), but a merchant using PC Charge will need to import a file in PC Charge s dat format; both formats are available. Notice the text at the top of the page: Once a batch file has been uploaded, please note that the changes in reports will not be reflected immediately because the server processes batch files every hour on the hour. In order to carry out the upload, the merchant will: 77
78 1. Navigate to the Batch Upload page 2. Select the appropriate File Format option: Tab Delimited or PC Charge dat File 3. Browse to the file to be selected 4. Click Upload The format for PC Charge files (.dat) is automatically created by that program. If you will be uploading batches from PC Charge, you will not need to modify the format of those files. However, if you wish to create Tab Delimited text files that can be uploaded by the Batch Upload function, your files will need to contain the following fields: Field Number Field Name Description Required 1 Transaction Type SALE, REPEATSALE, AUTH, RETURN, FORCE Y 2 Account Num Account Number Y 3 Exp Date Expiration Date Y 4 Amount Total Amount Y 5 Invoice Num Invoice Number N 6 Zip Zip Code N 7 Street Street of Billing Address N 8 Name On Card Card Holder s Name As On Card N 9 PO Num Purchase Order Number N 10 Tax Amount Tax Amount N 11 City City of Billing Address N 12 State State N 13 Auth Code Authorization Code N 14 PNRef Unique Reference Number N 15 Card Type Ex: Visa, MasterCard, etc. N Below is an example of a Tab Delimited text file. Each line is a separate transaction. 78

79 Note: Make sure the file is Tab Delimited meaning that there needs to be one tab space between each field. Once you have uploaded a batch file, an executable called OfflineBatch.exe will complete the job. The executable scans for ready batch files and then processes the transactions found within, readying them for settlement. This is an automatic process once enabled. HOWEVER it MUST be set as a scheduled task to run every hour, otherwise OfflineBatch.exe will not run and the uploaded transactions will never actually be processed (or settled). Receipt Templates This will allow you to enter custom text that will appear at the bottom of all receipts generated by the Virtual Terminal. 1. Click the Tools menu 2. Click Receipt Templates and a screen will appear similar to the example shown below 79
80 3. Enter any text you wish to appear at the bottom of the receipts generated by the Virtual Terminal 4. Click Save to save the text Custom Fields This tool enables you to create any customized fields that will display on the Virtual Terminal and all transaction reporting. 1. Click the Tools menu 2. Click the Custom Fields link and a screen will appear similar to the example shown below 3. This report will show all custom fields that currently exist 4. To create a new Custom Field, click the Add new field link in the header bar above the column names 5. The following field descriptions are listed below FieldName This is used as a key to programmatically access custom fields, internally and through the custom fields web service Numeric? This restricts the custom field to either accept alphanumeric characters or only numeric characters Decimal Places This represents the number of decimal places you want allowed in the custom field Max Length This is the maximum number of characters you want to allow in the custom field RegEx This is where you would define any regular expressions that can be accepted in the custom field (Examples are:!@#$%^&*) 80
81 Required? This is where you would select if you want the custom field to be required or not Description This is where you would define the description of the custom field Min Value This is where you would set a minimum value if the custom field is numeric Max Value This is where you would set a maximum value if the custom field is numeric Display on Receipt Choosing this option displays the custom field on the receipts generated by the Virtual Terminal Error Message This is where you would define an error message that would appear if the field was required and was not filled in 6. After entering in the desired parameters, save the custom field by clicking Insert (At any time, you can cancel the creation of the custom field by clicking Cancel) 7. To edit an existing custom field, click the Edit link. This will bring you to the same screen shown when creating a Custom Field 8. To Delete an existing custom field, click the Delete link Hosted Page This tool allows you to create and manage the hosted page for the merchant. 1. Click the Tools menu 2. Click the Hosted Page link and a screen appears similar to the example shown below 81
82 3. The different tabs are described below. At any time, you can save any changes by click the Save Settings button a. Options 82
83 Page Title This is where you would define the title of the hosted page Page is active This is where you would determine if the page is active or inactive. The page must be active to be displayed Restrict referring host This indicates whether or not the hosted page will be limited by IP address 83
84 Allowed host This is where you would define the IP address that will be accessing the hosted page. Note: if the Restrict referring host option is checking and no IP address is defined in the Allowed host field, the hosted page will not be accessible from any external page Pay Notification This indicates whether or not you would like notifications of payments collected on your hosted page sent to members of your staff. This is necessary if utilizing the Hosted Receipt Support retail card swipe This is where you would choose if you wanted the hosted page to accept swiped transactions Support Customer and Payment Tokenization This where you would choose if you wanted to support tokenization of customer and payment information entered on the Hosted Payment page. Tokenized information will be stored in the card safe. b. Fields 84

85 Customer specifies amount Enabling this allows the customer to determine the amount Submit button URL This is where you would define the URL that the submit button on the page points to Use POST for Submit The default behavior when you submit a transaction on the hosted page is to process the transaction, then send the response to the submit button URL using HTTP Get. 85
86 Enabling this option sends the response to the submit button URL using HTTP Post Use Hosted Receipt This is where you would determine if you would like the response values displayed on our Hosted Receipt page Error URL This is where you would define the URL the page goes to should an unexpected error occur Continue URL This is where you would define the URL the page goes to once the continue button is clicked on the hosted receipt page Field Visibility This is you would select what fields you want displayed on the hosted page. For custom fields, you have 2 additional options o Read Only Enabling this displays the field, but the customer will not be able to enter any information in the field o Visible to Customer This is where you would determine if the field displays for the customer. If this option is enabled, information in the custom field will still be passed with the transaction, but will be invisible to the customer Show donation amounts? This gives you the option to show donation amounts on the hosted page. If you enable this option, enter donation amounts in the Amount options field Amount options This is where you would define the donation amounts available to the customer. To add an amount, enter the amount in the Amount options field, then click the Add Option button c. Appearance 86

87 Font Color This is where you would select the color of the font displayed on the hosted page. There are 4 different ways to select the color o Web Palette Simply choose the color you would like o RGB Sliders You can either enter the hexadecimal character of a specific color or slide the Red, Green, or Blue arrows until you find the color you want o HSB You can either enter the hexadecimal character of a specific color or select the color you want o HSV You can either enter the hexadecimal character of a specific color or select the color you want Page Background Color This is where you would select the color of the background of the page. Refer to the color choosing methods described in the Font Color section 87
88 Panel Background Color This is where you would select the color of the background for the panels on the page. Refer to the color choosing methods described in the Font Color section Font This is where you would select the style of font that is displayed on the page Font Size This is where you would determine the size of the font displayed on the page Header Background Color This is where you would determine the color of the background of the page header. Refer to the color choosing methods described in the Font Color section Header Font This is where you would select the style of font that is displayed in the page header Header Font Size This is where you would determine the size of the font that is displayed in the page header Header Font Color This is where you would select the color of the font that is displayed in the page header. Refer to the color choosing methods described in the Font Color section Order Panel Width Here you can determine the number of pixels or percentage of the page size for the Order Panel Width. The default selection is Pixels, but to select a percentage, choose Percent from the drop down list Custom Field Panel Width Here you can determine the number of pixels or percentage of the page size for the Custom Fields Panel Width. The default selection is Pixels, but to select a percentage, choose Percent from the drop down list Address Panel Width Here you can determine the number of pixels or percentage of the page size for the Address Panel Width. The default selection is Pixels, but to select a percentage, choose Percent from the drop down list Pay Panel Width Here you can determine the number of pixels or percentage of the page size for the Pay Panel Width. The default selection is Pixels, but to select a percentage, choose Percent from the drop down list 88

89 Result Panel Width Here you can determine the number of pixels or percentage of the page size for the Result Panel Width. The default selection is Pixels, but to select a percentage, choose Percent from the drop down list Panel Width = Header Width This button configures all panel widths to be equal to the page header width Control Skin There are 20 control skins to choose from each with their own color schemes. Default is automatically selected, but to select a different one, choose from the drop down list Page Banner Here you can upload an image saved on your computer that will display at the top of the page. To select an image, click the Select button to open a separate window on your computer. In that window, find the image file you want to upload and click Open. Hide Banner This option hides any chosen banner on the page, making the image invisible to the customer Preview Clicking this will open a pop up window that will display the page as it was the last time the settings were saved. To view any changes you make, you must first save the settings by clicking the Save Settings button d. Security Hosted Page Credentials The Generate button will create new credentials used to access the hosted page. Every time new credentials are created, the URL used to access the hosted page will change, meaning the URL used to access the hosted page prior to creation of new credentials will become invalid 89


90 e. Button Amount This enables you to create HTML code for a button for a fixed amount that would display on the page. Enter the amount in DDDD.CC format and click the Generate HTML button. The HTML code is displayed in the box under the Generate HTML button f. Panels Text Visibility 90
91 o Order Header Checking this displays the Order Header on the page o Custom Fields Header Checking this displays the Custom Fields Header on the page o Address Header Checking this displays the Address Header on the page o Pay Header Checking this displays the Pay Header on the page o Result Header Checking this displays the Result Header on the page Customize Text o Order Header Checking this enables you to customize the text displayed in the Order Header o Custom Fields Header Checking this enables you to customize the text displayed in the Custom Fields Header o Address Header Checking this enables you to customize the text displayed in the Address Header o Pay Header Checking this enables you to customize the text displayed in the Pay Header o Result Header Checking this enables you to customize the text displayed in the Result Header g. Receipt 91

92 This displays a text editor for you to customize any text you want displayed on the built-in receipt/confirmation form. Click the Save Settings button to save any changes h. Page Text 92

93 This is where you would customize the labels and links that are displayed on the page i. Receipt 93

94 This is where you can customize the receipt that is ed to the customer j. Disclosures 94

95 This is where you can customize the notifications and disclosures that are displayed prior to submitting a payment Emulator This tool configures the gateway to communicate to various shopping carts. 1. Click the Tools menu 2. Click the Emulator link and a screen appears similar to the example shown below 95
 Determine the method the shopping cart")

96 3. This will display all emulators that currently exist 4. To add a new emulator, click the Add New button in the upper left corner of the report 5. The Global Settings must be defined and saved prior to accessing the Field Mapping tab Global Settings o Method (Required) Determine the method the shopping cart will use to communicate to the gateway, either a HTTP Get or HTTP Post o Description (Required) Enter the name you wish to call this emulator o Source IP Define an specific IP address that you will be accessing the emulator from o Hash Value Enter a hash value that matches the hash value entered in the shopping cart configuration Field Mapping 96

97 o This is where you would define and map fields from the shopping cart to the emulator o You can select a Template of existing field mappings for a shopping cart from the drop down list. Once a template has been selected, click the Load button. 97
, click the Advanced link")
98 o These fields can be edited at any time by clicking the Edit link o To add any additional field mappings, click the Add field mapping link o To see advanced field mapping settings (Order Position and Field Formula), click the Advanced link 98
99 Field Name x_login x_tran_key x_type x_amount o To delete any field mappings, click the Delete link o To save the field mappings, click the Save button at the bottom of the screen The table below contains the minimum fields required for submitting credit card payments (these fields are already mapped for the emulator templates): Description Value: Merchant s unique API Login ID. Format: 20-characters maximum. Notes: API Login ID that the merchant obtained from the Merchant Interface. Must be stored securely. The API Login ID and Transaction Key together provide access to the payment gateway. Value: Merchant s unique Transaction Key. Format: 16-character maximum. Notes: Transaction Key that the merchant obtained from the Merchant Interface must be stored securely. The API Login ID and Value: Type of credit card transaction. Format: AUTH_CAPTURE (default), AUTH_ONLY, CAPTURE_ONLY, CREDIT, PRIOR_AUTH_CAPTURE, VOID Notes: If the value submitted does not match a supported value, the transaction is rejected. If this field is not submitted or the value is blank, the payment gateway processes the transaction as AUTH_CAPTURE. Value: Amount of the transaction. Format: 15 digit-maximum, with a decimal point (no dollar symbol). For example, Notes: This is the total amount and must include tax, shipping, and any other charges 99
100 x_card_num Value: Customer s credit card number Format: 13 to 16 digits without spaces. When x_type=credit, only the last four digits are required. Notes: It is sensitive cardholder information and must be stored securely and in accordance with the Payment Card Industry (PCI) Data Security Standard. x_exp_date Value: Customer s credit card expiration date Format; MMYY Notes: It is sensitive cardholder information and must be stored securely and in accordance with the Payment Card Industry (PCI) Data Security Standard. x_trans_id Value: Payment-gateway-assigned transaction ID of an original transaction Notes: Required only for CREDIT, PRIOR_AUTH_CAPTURE, and VOID transactions. Do not include this field if you are providing the x_split_ tender_id field. x_split_tender_id alue: Payment-gateway-assigned ID that links the current authorization request to the original authorization request. Format: Numeric Notes: This value applies only to partial authorization transactions and is returned in the reply message from the original authorization request. x_auth_code Value: Authorization code of an original transaction not authorized on the payment gateway Format: 6 characters x_relay_response Value: FALSE Format: FALSE, F, NO, N Notes: SIM applications use relay response. Set this field to false if you are 100
101 using AIM. 6. Further documentation for the emulator can be found in the API documentation under Gateway Emulator Documentation The table below contains optional fields for submitting credit card payments (these fields will need to be mapped within the emulator and added to any template or existing emulator): x_invoice_num Optional Value: The merchant-assigned invoice number for the transaction. Format: 20-character maximum (no symbols). Notes: The invoice number must be created dynamically on the merchant server or provided per transaction. The payment gateway does not perform this function. x_method Optional Value: The payment method. Format: CC or ECHECK Notes: The method of payment for the transaction, CC (credit card) or ECHECK (electronic check). If this field is not submitted or is blank, the value defaults to CC. x_description Optional Value: The transaction description. Format: 255-character maximum (no symbols). Notes: The description must be created dynamically on the merchant server or provided per transaction. The payment gateway does not perform this function. x_first_name Optional Value: The first name associated with the customer s billing address Format: 101
102 50-character maximum (no symbols) x_last_name Optional Value: The last name associated with the customer s billing address Format: 50-character maximum (no symbols) x_company Optional Value: The company associated with the customer s billing address Format: 50-character maximum (no symbols) x_address Optional Value: The customer s billing address Format: 60-character maximum (no symbols) Required if the merchant would like to use the Address Verification Service security feature. x_city Optional Value: The city of the customer s billing address Format: 40-character maximum (no symbols) x_state Optional Value: The state of the customer s billing address Format: 40-character maximum (no symbols) or a valid 2- character state code x_zip Optional Value: The ZIP code of the customer s billing address Format: 20- character maximum (no symbols) Required if the merchant would like to use the Address Verification Service security feature. x_country Optional Value: The country of the customer s billing address Format: 60- character maximum (no symbols) x_phone Optional Value: The phone number associated with the customer s billing address Format: 25-digit maximum (no letters). For example, (123) x_fax Optional Value: The fax number associated 102
103 x_ x_cust_id x_ship_to_first_name x_ship_to_last_name x_ship_to_company with the customer s billing address Format: 25-digit maximum (no letters). For example, (123) Optional Value: The customer s valid address Format: 255-character maximum. For example, janedoe@customer.com Notes: The address to which the customer s copy of the receipt is sent when the Receipts option is configured in the Merchant Interface. The is sent to the customer only if the address format is valid. Optional Value: The merchant assigned customer ID Format: 20-character maximum (no symbols) Notes: The unique identifier that represents the customer associated with the transaction. The customer ID must be created dynamically on the merchant server or provided per transaction. The payment gateway does not perform this function. Optional Value: The first name associated with the customer s shipping address Format: 50-character maximum (no symbols) Optional Value: The last name associated with the customer s shipping address Format: 50-character maximum (no symbols) Optional Value: The company associated with the customer s shipping address Format: 50-character maximum (no symbols) 103
104 x_ship_to_address Optional Value: The customer s shipping address Format: 60-character maximum (no symbols) x_ship_to_city Optional Value: The city of the customer s shipping address Format: 40-character maximum (no symbols) x_ship_to_state Optional Value: The state of the customer s shipping address Format: 40-character maximum (no symbols) or a valid twocharacter state code x_ship_to_zip Optional Value: The ZIP code of the customer s shipping address Format: 20- character maximum (no symbols) x_ship_to_country Optional Value: The country of the customer s shipping address Format: 60- character maximum (no symbols) x_tax This optional field can contain either the valid tax amount or delimited tax information. When submitting delimited tax information, you must delimit values with a bracketed pipe in the order shown below. The total amount of the transaction in x_amount must include this amount. The delimited tax information elements are: tax item name tax description tax amount: the dollar sign ($) is not allowed within delimited information. The total amount of the transaction in x_amount must include this amount. x_freight This optional field can contain either the valid duty amount or delimited duty information. When submitting delimited duty information, you must delimit values 104
105 with a pipe. The total amount of the transaction in the x_amount field must include this amount. The delimited duty information elements are: tax item name < > tax description < > tax amount: the dollar sign ($) is not allowed within delimited information. The total amount of the transaction in the x_amount field must include this amount. x_duty This optional field can contain either the valid duty amount or delimited duty information. When submitting delimited duty information, you must delimit values with a pipe, as shown in the example below. The total amount of the transaction in the x_amount field must include this amount. The delimited duty information elements are: duty item name < > freight description < > freight amount: the dollar sign ($) is not allowed within delimited information. The total amount of the transaction in the x_amount field must include this amount. x_tax_exempt This optional field can contain the tax exempt status of the order. The values of this field can include: TRUE, FALSE, T, F, YES, NO, Y, N, 1, 0. x_po_num This optional field can contain the merchant-assigned purchase order 105
106 number, up to 25 characters, no symbols. The purchase order number must be created dynamically on the merchant server or provided per transaction. The payment gateway does not perform this function. The following table lists the fields returned in the response from the payment gateway in the order that they are listed in the response: Response Code Response Subcode Response Reason Code Response Reason Text Authorization Code AVS Response Value: The overall status of the transaction Format: 1 = Approved 2 = Declined 3 = Error 4 = Held for review Value: A code used by the payment gateway for internal transaction tracking Value: A code that represents more details about the result of the transaction. Format: Numeric Value: A brief description of the result that corresponds with the response reason code Format: Text Value: The authorization or approval code Format: 6 characters Value: The Address Verification Service (AVS) response code Format: A = Address (Street) matches, ZIP does not B = Address information not provided for AVS check E = AVS error G = Non-U.S. Card Issuing Bank 106
107 MD5 Hash Card Code Response N = No Match on Address (Street) or ZIP P = AVS not applicable for this transaction R = Retry System unavailable or timed out S = Service not supported by issuer U = Address information is unavailable W = Nine digit ZIP matches, Address (Street) does not X = Address (Street) and nine digit ZIP match Y = Address (Street) and five digit ZIP match Z = Five digit ZIP matches, Address (Street) does not Value: The payment gateway-generated MD5 hash value that can be used to authenticate the transaction response. Value: The card code verification (CCV) response code Cardholder Authentication Verification Response Format: M = Match N = No Match P = Not Processed S = Should have been present U = Issuer unable to process request Value: The cardholder authentication verification response code Format: Blank or not present = CAVV not 107
108 validated 0 CAVV not validated because erroneous data was submitted 1 CAVV failed validation 2 CAVV passed validation 3 CAVV validation could not be performed; issuer attempt incomplete 4 CAVV validation could not be performed; issuer system error 5 Reserved for future use 6 Reserved for future use 7 CAVV attempt failed validation issuer available (U.S.- issued card/non-u.s acquirer) 8 CAVV attempt passed validation issuer available (U.S.- issued card/non-u.s. acquirer) 9 CAVV attempt failed validation issuer unavailable (U.S.-issued card/non-u.s. acquirer) A CAVV attempt passed validation issuer unavailable (U.S.-issued card/non-u.s. acquirer) B CAVV passed validation, information only, no liability shift Account Number Value: Last 4 digits of the card provided Format: Alphanumeric (XXXX6835) Notes: This field is returned with all transactions Card Type Value: Visa, MasterCard, American Express, Discover, Diners Club, JCB 108
109 Split Tender ID Requested Amount Balance On Card Format: Text Value: The value that links the current authorization request to the original authorization request. This value is returned in the reply message from the original authorization request Format: Alphanumeric Notes: Split Tender ID is returned only in the reply message for the first transaction that receives a partial authorization. Value: Amount requested in the original authorization Format: Numeric Notes: Requested amount is present if the current transaction is for a prepaid card or if a x_split_tender_id element was sent in. Value: Balance on the debit card or prepaid card Format: Numeric Notes: Can be a positive or negative number. Balance On Card has a value only if the current transaction is for a prepaid card. API documentation This displays the online API documentation 1. Click the Tools menu 2. Click API documentation and a screen appears similar to the example shown below 109

110 Fraud Control Preventing Fraud 110

111 This chapter discusses settings to further restrict fraud attempts on your gateway. Settings This is where will set all the fraud control options. 1. Click the Fraud Control menu 2. Click the Settings link and a screen appears similar to the example shown below 3. The different tabs are described below. At any time, you can save any changes by clicking Save all filters a. Daily Velocity 111

112 To enable this filter, check the Enable this filter check box Enter the maximum number of transactions you want processed through your gateway in the Transaction count field When the maximum number of transactions is reached, the following options will be applied to any further transactions 1. Audit The transactions will be logged, but will process normally 2. Authorize, but hold for review This will authorize the transactions, but will not settle the transactions until they are reviewed 3. Decline this will decline all transactions 4. Send an if this filter is triggered This will send an to the address configured for the Merchant- Primary user for all transactions that are flagged by this filter b. Card Verification This is where you would select the AVS and CV restrictions for the gateway 112


113 By default, all these options are checked. It is recommended you contact your Reseller prior to making any changes for an explanation of these settings c. IP Filtering To enable this filter, check the Enable this filter check box By default, all IP addresses and countries are allowed 113

114 1. To restrict any IP addresses, enter the IP address in the IP Address fields 2. Click the Add button and the IP address will appear in the Blocked IP Addresses box 3. By selecting any countries under the Allowed Countries menu, you will enable the gateway to only accept traffic from the country selected When a transaction is sent from a restricted IP address or country, the following options will be applied 1. Audit The transactions will be logged, but will process normally 2. Authorize, but hold for review This will authorize the transactions, but will not settle the transactions until they are reviewed 3. Decline this will decline all transactions 4. Send an if this filter is triggered This will send an to the address configured for the Merchant- Primary user for all transactions that are flagged by this filter d. Amount To enable this filter, check the Enable this filter check box 114
115 1. To set a lower limit, enter an amount in the Lower Limit field 2. To set a upper limit, enter an amount in the Upper Limit field When a transaction is sent for an amount outside of the defined range, the following options will be applied 1. Audit The transactions will be logged, but will process normally 2. Authorize, but hold for review This will authorize the transactions, but will not settle the transactions until they are reviewed 3. Decline this will decline all transactions 4. Send an if this filter is triggered This will send an to the address configured for the Merchant- Primary user for all transactions that are flagged by this filter e. Hourly Velocity To enable this filter, check the Enable this filter check box 115

116 1. To set an hourly maximum number of transactions allowed through the gateway, enter the number of transactions in the Transaction count field When the number of transactions per hour is reached, the following options will be applied to any further transactions 1. Audit The transactions will be logged, but will process normally 2. Authorize, but hold for review This will authorize the transactions, but will not settle the transactions until they are reviewed 3. Decline this will decline all transactions 4. Send an if this filter is triggered This will send an to the address configured for the Merchant- Primary user for all transactions that are flagged by this filter f. Transaction IP Velocity 116
117 To enable this filter, check the Enable this filter check box 1. To set a maximum number of transactions allowed per IP address, enter the number of transactions in the Allow _ transactions per IP per hour field 2. To exclude any IP addresses, enter the IP address in the Excluded IP Addresses field, the click the Add button When the maximum number of transactions per IP address is reached, the following options will be applied to any further transactions 1. Audit The transactions will be logged, but will process normally 2. Authorize, but hold for review This will authorize the transactions, but will not settle the transactions until they are reviewed 3. Decline this will decline all transactions 4. Send an if this filter is triggered This will send an to the address configured for the Merchant- Primary user for all transactions that are flagged by this filter Held for Review This report shows all transactions that were held due to the Authorize, but hold for review option selected for the fraud control filters. 1. Click the Fraud Control menu 2. Click the Held for Review link and a screen appears similar to the example shown below The following gives you a quick overview of each column in the example screen above. You can enter information in these fields to change the results of the report at any time, just click Refresh in the upper right corner of the report after making changes. 117
118 PNRef The reference number assigned to the transaction by the gateway Date/Time The date/time of the transaction Pay Type The payment type of the transaction (Examples are: Visa, MasterCard, AMEX) Trx Type The transaction type of the transaction (Examples are: Auth, Sale, RepeatSale) IP The IP address used to send the transaction to the gateway Rule The fraud control restriction that flagged the transaction User The username used to process the transaction Detail A detailed description of the reason the transaction was flagged Log This provides a log for all transactions that are caught by the fraud control filters 1. Click the Fraud Control menu 2. Click the Log link and a screen appears similar to the example shown below The following gives you a quick overview of each column in the example screen above. You can enter information in these fields to change the results of the report at any time, just click Refresh in the upper right corner of the report after making changes. Rule Type 118
119 The fraud control restriction that flagged the transaction Action The action performed on the transaction based on the filter settings IP The IP address used to send the transaction to the gateway Send If an was sent because the filter was triggered (Will either be True or False) Message A detailed description of the reason the transaction was flagged PNRef The reference number assigned to the transaction by the gateway 119

120 Preferences, , and Logout How to change personal settings and get additional support This chapter discusses the functions of Preferences: change the user password and modify security levels to grant a user specific access to certain functions. Furthermore, we include information on the remaining features in the menu bar: send s to your payment solution service provider, and log out of the Gateway. Changing User Password 1. Click on the Preferences menu 2. Click on the Password link and a screen will appear similar to the example shown below 3. Input the current password in the Old Password field 4. Input your new password in the New Password field 120
 Setting Security The Security preference is to set security for functions performed at the merchant user level.")
121 5. Confirm your new password by inputting it into the Enter New Password Again field 6. Click on the Change Password button (the Reset button clears the contents in the fields) Setting Security The Security preference is to set security for functions performed at the merchant user level. The user security level is assigned when each new user account is created. A merchant user will be able to access each function if his/her security level is greater than or equal to the number defined in this preference. 1. Click on the Preferences menu 2. Click on the Security link and a screen will appear similar to the example shown below 121
MERCHANT MANUAL. Direct Connect Merchant Services LLC Copyright 2016, All Rights Reserved Merchant Manual v 1.
 MERCHANT MANUAL Direct Connect Merchant Services LLC www.directconnectps.com Copyright 2016, All Rights Reserved Merchant Manual 2016.10.06 v 1.doc Table of Contents Overview... 5 The Gateway... 6 Logon
Sterling Virtual Terminal. User Guide
 Sterling Virtual Terminal User Guide Version 3.1.00 August 2015 Chapter 1: Getting started Table of Contents USER GUIDE... 1 CHAPTER 1: GETTING STARTED... 5 SYSTEM REQUIREMENTS... 5 STERLING VIRTUAL TERMINAL
DIRECT CONNECT GATEWAY
 DIRECT CONNECT GATEWAY RESELLER USER MANUAL Copyright 2016, All Rights Reserved. This document is protected by copyright and other protective laws. Direct Connect Merchant Services, LLC. Is a registered
GLOBAL TRANSPORT VT & BATCH SOLUTION
 GLOBAL TRANSPORT VT & BATCH SOLUTION USER GUIDE VERSION 17.2 NOVEMBER Global Payments Inc. 10 Glenlake Parkway, North Tower Atlanta, GA 30328-3447 COPYRIGHT 2007- GLOBAL PAYMENTS INC. ALL RIGHTS RESERVED.
User s Guide. (Virtual Terminal Edition)
") User s Guide (Virtual Terminal Edition) Table of Contents Home Page... 4 Receivables Summary... 4 Past 30 Day Payment Summary... 4 Last 10 Customer Transactions... 4 View Payment Information... 4 Customers
User s Guide (Virtual Terminal Edition) Table of Contents Home Page... 4 Receivables Summary... 4 Past 30 Day Payment Summary... 4 Last 10 Customer Transactions... 4 View Payment Information... 4 Customers
ROAMpay TM. X4 User's Guide
 ROAMpay TM X4 User's Guide Last Modified: 06/14/2013 Contents 1 Activating ROAMpay X4 2 Using the System 2 Login 2 First-time Login 2 Default Settings 3 Retrieving Your Password 3 Online Sales 4 Saved
PayTrace Virtual Terminal
 PayTrace Virtual Terminal Training Aid August 2011 Let s get started by learning about your needs All merchants using PayTrace will be processing transactions. The real question is how will you be processing
Getting Started with Transaction Express. Transaction Express User Guide
 Getting Started with Transaction Express Transaction Express User Guide Table of Contents Transaction Express User Guide... 5 Section 1 Getting Started... 5 Welcome Email... 5 Merchant List... 5 Navigation...
Portico VT. User Guide FOR HEARTLAND MERCHANT USERS APRIL 2015 V2.8
 Portico VT User Guide FOR HEARTLAND MERCHANT USERS APRIL 2015 V2.8 Notice THE INFORMATION CONTAINED HEREIN IS PROVIDED TO RECIPIENT "AS IS" WITHOUT WARRANTY OF ANY KIND, EXPRESS OR IMPLIED, INCLUDING BUT
USER S GUIDE Last Modified: 04/08/2013 1
 USER S GUIDE Last Modified: 04/08/2013 1 Contents 1 Welcome 1 Activating ROAMpay X4 2 Using the System 2 Login 2 First-time Login 2 Default Settings 3 Retrieving Your Password 3 Online Sales 4 Saved Item
Getting Started With Transaction Express
 Getting Started With Transaction Express Table of Contents Product Overview... 8 Welcome Email... 8 Merchant List... 8 Navigation... 9 Left Navigation Sections... 10 Password Security... 11 Change... 12
Virtual Terminal User Guide
 With the Clearent Virtual Terminal, merchants can accept credit card payments using the web browser on a computer, tablet, or mobile device. In this guide you will find step-by-step instructions for using
U s e r s g U i d e 1
 User s guide 1 Contents 2 Welcome 3 User Service Activation 4 Introduction 4 Purpose 5 Key Features 6 Activation 8 Using the System 8 Login 9 Credit Sale 10 For Swipe Capable Devices 10 For Manual Entry
First Data Global Gateway SM Virtual Terminal User Manual
 First Data Global Gateway SM Virtual Terminal User Manual Version 1.0 2015 First Data Corporation. All Rights Reserved. All trademarks, service marks, and trade names referenced in this material are the
Sage Mobile Payments User's Guide
 Sage Mobile Payments User's Guide Last Modified: 8/4/2014 Contents 1 Activating Sage Mobile Payments 2 Using the System 2 Login 2 Multi user Login 2 First-time Login 3 Default Settings 3 Retrieving Your
USER HELP. Copyright Information Copyright 2016 Global Payments Inc. All rights reserved worldwide.
 MERCHANT SALES: 800-637-8268 New Merchant Accounts PARTNER PROGRAMS: 800-637-8268 New and existing partnerships CUSTOMER CARE: 800-338-6614 Existing merchant account support Statements and deposits Changes
To login to the Virtual Terminal, click on the link in your Welcome to PPI , enter your user ID and password and click OK.
 Welcome to the PPI PayMover Virtual Terminal Training. The Virtual Terminal allows you to process real-time credit card transactions without a standalone hardware terminal. You are able to process credit
PAYware Mobile User Guide
 Version 1.002 PAYware Mobile User Guide - 1 - Copyright 2010. VeriFone, Inc. All rights reserved. Notice Copyright March 2010, VeriFone Inc. All rights reserved. VeriFone, the VeriFone logo, PAYware, PAYware
User Guide: VirtualMerchant
 User Guide: VirtualMerchant Two Concourse Parkway, Suite 800, Atlanta, GA 30328 Elavon, Incorporated 2012. All Rights Reserved Copyright Copyright 2012 Elavon, Incorporated. All rights reserved. No part
User Guide. mpos Readers RP350x & RP457c Mobile Payment Acceptance User Guide for Android
 mpos Readers RP350x & RP457c Mobile Payment Acceptance User Guide for Android Disclosure Statements Confidential Notice The information contained herein is the property of Total System Services, Inc. (TSYS
Virtual Terminal. Velocity Virtual Terminal
 Virtual Terminal Velocity Virtual Terminal VT account setup Accessing your VT account https://portal.nabcommerce.com Password Reset From the login page click Forgot password Enter your user name If the
PayTrace API Responses
 PayTrace API Responses Updated July 2011 The PayTrace API will always return a response when it receives a request. The response will either contain one or more Error messages or a Response value with
Online Banking Procedures
 Table of Contents Online Banking Procedures... 2 1.1 Sign into Online Banking- No Token...2 1.2 Sign into Online Banking- Token...3 1.3 Change Account Nickname...5 Stop Payments... 7 1.4 New Stop Payments...7
Virtual Terminal Plus, A Vantiv Payment Application
 Virtual Terminal Plus, A Vantiv Payment Application Application User Guide for Merchants Edition: 2.2 Updated: Friday, February 17, 2017 Information contained within this guide is subject to change without
User Guide. Accept EFTPOS, Visa and Mastercard payments on the go with Kiwibank QuickPay.
 User Guide Accept EFTPOS, Visa and Mastercard payments on the go with Kiwibank QuickPay. Kiwibank QuickPay terms and conditions apply. Kiwibank QuickPay is only available for business banking purposes.
Merchant Portal User Guide
 Merchant Portal User Guide TABLE OF CONTENTS Accessing the Click Merchant Portal... 3 Virtual Terminal... 4 Single Entry (Merchant Enters Card Details)... 5 Payment Using Collected Card Details... 5 Payment
First Data Global Gateway Virtual Terminal User Guide. Version 2.4
 First Data Global Gateway Virtual Terminal User Guide Version 2.4 July 15, 2010 Table of Contents 1 Introduction 6 1.1 First Data Global Gateway Virtual Terminal Overview 6 1.1.1 Processing Transactions
Account Management. Pilot Support Guide
 Account Management Pilot Support Guide Public Use Doc no: PR-PUB-0012 Version 1.0 June 22, 2017 Copyright notice Copyright 2017 Cayan LLC. All rights reserved. No part of this publication may be reproduced,
//index. Chapter Content Page Part One: Bluefin Support. Part Two: Logging In Part Three: Integration Part Four: Processing. Part Five: Reporting
 MANUAL 1 //index Chapter Content Page Part One: Bluefin Support Part Two: Logging In Part Three: Integration Part Four: Processing Part Five: Reporting Part Six: Settings Part Seven: Receipts Part Eight:
FirstView. Merchant User Guide. Version 1.0. FirstView Merchant User Guide
 FirstView Merchant User Guide Version 1.0 Document Control Document ID Version Author/Editor Date Original Draft 1.0 Dan Gill 7/26/2018 Copyright 2018 First American Payment Systems, L.P. All rights reserved.
User Guide. Accept EFTPOS, Visa and Mastercard payments on the go with Kiwibank QuickPay.
 User Guide Accept EFTPOS, Visa and Mastercard payments on the go with Kiwibank QuickPay. Kiwibank QuickPay terms and conditions apply. Kiwibank QuickPay is only available for business banking purposes.
BluePay QuickBooks Online Plugin User Guide
 BluePay QuickBooks Online Plugin User Guide This documentation contains a step-by-step guide on installing the plugin and also how to utilize all of the plugin s features. You will need to first contact
epnplugin v Financial Software Payments Module for QuickBooks Sales Receipts
 epnplugin v3.1.58 Financial Software Payments Module for QuickBooks Sales Receipts eprocessing Network LLC 7/2/2012 epnplugin 3 Sales Receipts Table of Contents OVERVIEW... 3 REQUIREMENTS & PREPARATIONS...
ANZ EGATE MERCHANT ADMINISTRATION QUICK REFERENCE GUIDE
 ANZ EGATE MERCHANT ADMINISTRATION QUICK REFERENCE GUIDE PURPOSE The purpose of this Quick Reference Guide is to provide the user with a quick reference to using the ANZ egate Merchant Administration. COPYRIGHT
Using the Telstra T-Suite Management Console. Customer Administrator s Reference Manual
 Using the Telstra T-Suite Management Console Customer Administrator s Reference Manual June 2011 Registering With TMC Notice Pivot Path is a registered trademark of Jamcracker, Inc. Registered trademark
Virtual Terminal User Guide Version (Australia IPG)
") Virtual Terminal User Guide Version 2017-3 (Australia IPG) Gateway 1 Contents This table of contents has been amended to exclude sections not applicable to Australia. The original content is still available
Virtual Terminal User Guide Version 2017-3 (Australia IPG) Gateway 1 Contents This table of contents has been amended to exclude sections not applicable to Australia. The original content is still available
Account Management. Pilot Support Guide
 Account Management Pilot Support Guide Public Use Doc no: PR-PUB-0013 Version 1.0 June 22, 2017 Copyright notice Copyright 2017 Cayan LLC. All rights reserved. No part of this publication may be reproduced,
Forte Mobile Application
 Forte Mobile Application User Guide v3.1.2 Updated 5.25.2017 Revision History Forte Mobile Application: User Guide v3.1.2 Version Date Changes 3.1.1 4/6/2016 New Format. Added Merchant Settings Admin Password.
Virtual Terminal Plus A Vantiv Payment Application
 Virtual Terminal Plus A Vantiv Payment Application Application User Guide for Merchants Edition: 3.1 Updated: Friday, October 20, 2017 Information contained within this guide is subject to change without
What s New Guide Merchants
 Page 2 of 23 Table of Contents PURPOSE... 3 NEW MERCHANT INTERFACE... 3 Home Page... 3 New Navigation... 4 Tools...7 Reports... 8 Search... 9 Account... 10 Settings... 11 Merchant Profile... 12 Billing
Registering a Card and Creating an Account on
 Installing MyCardRules The MyCardRules App is available for both iphones and Android phones. To install MyCardRules: 1. Search for the app in the App Store or on Google Play. 2. Follow the instructions
1 Virtual Terminal Quick Reference Guide. Virtual Terminal Quick Reference Guide. Getting Started
 1 Virtual Terminal Quick Reference Guide Virtual Terminal Quick Reference Guide Getting Started 2 Virtual Terminal Quick Reference Guide What you need Internet enabled laptop or computer Virtual Terminal
ecashiering Table Of Contents
 ecashiering Table Of Contents Overview... 2 Logging in to ecashiering... 2 ecashiering Tab... 3 Payment Management... 3 Digital Delivery Account Managment... 7 Patient Pay Online Tab... 8 Account Summary...
SmartPay Express User Guide
 SmartPay Express User Guide Table of Contents INTRODUCTION... 4 SmartPay Express Overview... 4 System Requirements... 5 Trusted Sites... 5 Available Resources... 7 Additional Resources... 7 LOGGING IN...
QuickBooks Plugin Documentation
 QuickBooks Plugin Documentation UPDATED MAY 21, 2014 AGMS.COM 15707 Coit Rd Suite C210 Dallas, TX 75248 P) 866-951-AGMS F) 214-491-4401 INDEX Module Installation... 4 Step 1... 5 Step 2... 6 Step 3...
Vantiv ecommerce for Magento 1 User Guide. Version 1.0.7
 Vantiv ecommerce for Magento 1 User Guide Version 1.0.7 Vantiv ecommerce for Magento 1... 1 User Guide... 1 1. Project... 3 2. Onboarding... 3 3. Installation... 3 4. Configuration... 5 5. Nuances for
Accounts Receivable. Billing Functions. Establishing House Accounts
 18 The billing functionality in FTD Mercury allows you to set up an automated billing system, complete with aging cycles, finance charges, and statements for your customers. You can bill your customers
RMS Payment Bridge User s and Setup Guide Version 2.0
 RMS Payment Bridge User s and Setup Guide Version 2.0 RMS Payment Bridge - User s and Setup Guide v2.0 1 of 53 Table of Contents RMS Payment Bridge... 3 User s Guide... 3 Debit Cards... 4 Debit Cards:
Payment Solutions MyCardRules. MyCardRules Mobile App. User Guide. Release 3.1
 Payment Solutions November 27, 2017 Installing MyCardRules... 2 Registering a Card and Creating an Account on MyCardRules... 2 Logging In to MyCardRules... 2 Registering a Card... 3 Creating an Account...
First Data Global Gateway Virtual Terminal User Guide. Version v9.0
 First Data Global Gateway Virtual Terminal User Guide Version v9.0 March 2015 Revision History DOCUMENT: First Data Global Gateway Virtual Terminal User Guide The following table lists the additions, updates/modifications,
SANTANDER TREASURY LINK USER GUIDE
 SANTANDER TREASURY LINK USER GUIDE Welcome to Santander Treasury Link Santander Treasury Link is a secure Web application that allows you to manage accounts, payments, transfers, reports, and users. This
Blackbaud Merchant Services Web Portal Guide
 Blackbaud Merchant Services Web Portal Guide 10/09/2017 Blackbaud Merchant Services 4.0 Blackbaud Merchant Services Web Portal Guide US 2016 Blackbaud, Inc. This publication, or any part thereof, may not
DSWR User Guide. In effect from January 29 th,, BCLDB Direct Sales Web Reporting User Guide Page 1
 DSWR User Guide In effect from January 29 th,, 2017 BCLDB Direct Sales Web Reporting User Guide Page 1 Contents Introduction... 4 Before You Get Started... 4 Registering for the DSWR Application... 5 Log-in...
Personal account manual A ME
 Personal account manual A.005.34.01-01.ME 05.07.2018 Table of Contents 1. Logging in... 4 2. Main page... 6 3. Orders monitor... 6 3.1. Orders search... 7 3.2. Search results... 8 3.3. Saving data to file...
NAB EFTPOS USER GUIDE. for Countertop
 NAB EFTPOS USER GUIDE for Countertop & Mobile Terminals About your NAB EFTPOS Terminal NAB EFTPOS Mobile NAB EFTPOS Countertop 2 Table of Contents Getting to know your NAB EFTPOS VeriFone terminal...5
Administrator Guide. Regions itreasury. Administrator Guide
 Administrator Guide Regions itreasury Administrator Guide Revised 082011 itreasury Administrator Guide Welcome to Regions itreasury. This Guide contains information about all administrative duties associated
BBVA Compass Spend Net Payables
 User Guide BBVA Compass Spend Net Payables User Guide Vault Services Table of Contents Introduction 2 Technical Requirements 2 Getting started 3 Sign In 3 General Navigation 4 Upload/Create Payment 5
EMS e-terminal. User guide e-terminal. Version: Apollo Building Herikerbergweg CN Amsterdam The Netherlands
 Apollo Building Herikerbergweg 25 1101 CN Amsterdam The Netherlands E techsupport@emspay.eu T +31 088 TECHSUPPORT EMS e-terminal User guide e-terminal Version: 2017-2 User guide e-terminal Version 2017-2
What s New Guide Merchants
 Page 2 of 30 Table of Contents PURPOSE...4 MULTIPLE USER ACCOUNTS FEATURE...4 User Roles... 5 User Administration... 6 User Profile... 7 Changes to the Merchant Interface... 8 FAQs... 9 What is the pricing
- 1 - Revision Date: 7/27/09
 Deposit Checks QuickBooks Module Documentation... - 2 - Installation... - 2 - Initial Setup... - 5 - Granting Permission... - 5 - Setting Up the Gateway Credentials... - 7 - Processing Transactions...
Broad POS & PAX S80 Updated: 8/25/2016. PAX S80 Manual - 1
 Broad POS & PAX S80 Updated: 8/25/2016 PAX S80 Manual - 1 PAX S80 Manual - 2 Main Overview 1. Go to https://secure.broadpos.com/index.jsp 2. Login using ID & PW ID: PPSCS PW: Card123456789 3. After login,
Credit Card Processing Overview
 Credit Card Processing Overview Managers are provided access and login information for their Clear Commerce site upon site set-up. If you do not know your Clear Commerce URL, login, or password, please
User Guide Mobile Point-of-Sale (mpos), Version 2.0
, Version 2.0") User Guide Mobile Point-of-Sale (mpos), Version 2.0 Contents Overview... 1 Features... 1 Getting Started... 2 Login... 3 First Time Login/Password Reset... 3 Setting Security Questions... 4 Password Expiring...
User Guide Mobile Point-of-Sale (mpos), Version 2.0 Contents Overview... 1 Features... 1 Getting Started... 2 Login... 3 First Time Login/Password Reset... 3 Setting Security Questions... 4 Password Expiring...
Mobile Application User Guide
 Mobile Application User Guide SwipeSimple ios version 3.0 1 Contents 3 Part 1: Getting Started 3 Downloading the app 4 Signing in 5 Familiarizing yourself with the interface 19 Part 5: Items 19 Sorting
Merchant e-solutions Payment Acceptance User Guide for Magento (M1)
") Merchant e-solutions Payment Acceptance User Guide for Magento (M1) Step-by-step guidance for setup and use of the Payment Acceptance extension for Magento 1 Table of Contents Key Contacts... 3 Extension
Merchant e-solutions Payment Acceptance User Guide for Magento (M1) Step-by-step guidance for setup and use of the Payment Acceptance extension for Magento 1 Table of Contents Key Contacts... 3 Extension
Personal account manual A ME
 Personal account manual A.005.34.01-01.ME 08.04.2019 Table of Contents 1. Logging in... 4 2. Main page... 6 3. Orders monitor... 6 3.1. Orders search... 7 3.2. Search results... 9 3.3. Saving data to file...
Check for Expired Credit Cards 2 Setup Products / Subscription 2 Setup Shipping Templates 2
 Wine Direct 4.1 Wine Club Fulfillment Quick Steps Wine Club Preparation Page Check for Expired Credit Cards 2 Setup Products / Subscription 2 Setup Shipping Templates 2 Fulfillment Processing Verify Wine
PayKings iprocess Setup Guide for Android Devices
 PayKings iprocess Setup Guide for Android Devices Contents: iprocess account setup 2 Installing iprocess on your Android device 3 Configuring the iprocess app 8 Attaching the iprocess card reader 10 Processing
CyberSource Global Payment Management for Magento 2
 CyberSource Global Payment Management for Magento 2 User s Guide Version 2.0.3 January 2018 January 2018 CyberSource Global Payment Management for Magento 2.x 1 Contents Recent Changes... 5 1. Introduction:...
P2P Instructions. 4. Select Person to Person
 P2P Instructions 1. To utilize P2P, you need to first be enrolled in digital banking. Sign up at www.ucbankmn.com or enroll directly through our mobile app. (To learn more about digital banking see https://www.ucbankmn.com/eservices/online-banking.)
CONVERGE MOBILE User Guide - ios
 How to take payments with the Converge Mobile app? CONVERGE MOBILE User Guide - ios Version 2.0 CONTACT Two Concourse Parkway, Suite 800 Atlanta, GA 30328 DOWNLOAD APP Store Google Play 2017 Elavon Inc.
Vantiv ecommerce for Magento 2
 Vantiv ecommerce for Magento 2 User Guide Version 1.0.0 June 2017 Table of Content 1. Onboarding...3 2. Installation...3 3. Configuration...5 4. Nuances for each MOP...22 5. Checkout...23 6. Stored Payment
Payment Gateway.
 Payment Gateway vterminal Allows you to manually key in Sale, Check (if setup), Credit, Void, AuthOnly, Post Auth transactions and Gift Cards (if setup). vterminal Retail Swipe With the Retail Swipe feature,
Users Guide for InstantAccept POS
 Users Guide for InstantAccept POS How to make a sale: Go in to Make a Sale on your QuickBooks POS. Select your item. Choose what type of payment you are taking. If you are using a card reader, click swipe
Wells Fargo Merchant Services. Wells Fargo Mobile Merchant User Guide for Apple ipad Version 3.2
 Wells Fargo Merchant Services Wells Fargo Mobile Merchant User Guide for Apple ipad Version 3.2 Table of Contents Overview...3 Key Features...3 Download Wells Fargo...4 Mobile Merchant...4 Demo Mode...4
CyberSource Global Payment Management
 CyberSource Global Payment Management Magento 2.x Implementation Guide Version 1.1.0 August 2017 Extract Use this guide to install and configure the CyberSource extension for Magento 2.x. Contents Recent
University of North Carolina User Guide
 University of North Carolina User Guide June 2006 The software described in this document is furnished under a license agreement. The software may be used or copied only in accordance with the terms of
epnplugin v Financial Software Payments Module for QuickBooks Process Payment Guide
 epnplugin v3.1.69 Financial Software Payments Module for QuickBooks Process Payment Guide eprocessing Network LLC 7/1/2016 epnplugin 3 User Reference Guide Table of Contents OVERVIEW... 4 REQUIREMENTS
Process a Refund. Bank Cards. MasterCard Visa American Express Discover
 WEB TUTORIALS Process a Refund Bank Cards MasterCard Visa American Express Discover THE AVFUEL HUB To begin, select Refund from the Transactions menu in the top navigation bar or the Transactions button
Professional Editions Setup Guide
 Professional Editions Setup Guide FOR TAX YEAR 2017 V 1 1 Table of Contents Click on any title to navigate directly to that section. Download and Install Download Installation File from Practice Manager
ProcessNow Terminal User Guide
 ProcessNow Terminal User Guide Table of Contents Product Overview ProcessNow Terminal... 3 Initial Setup Welcome Emails... 3 ProcessNow Initial Setup Instructions... 4 Initial Setup - USB - 8006L1 Card
INBUSINESS BANKING SYSTEM
 Introducing your new INBUSINESS BANKING SYSTEM Companion Guide to Business Banking Video Tutorials Updated 0.09.8 WELCOME TO THE INBUSINESS SYSTEM The InBusiness System will help you efficiently and securely
Sponsor User s Guide
 Sponsor User s Guide Contents Chapter 1: Getting Started Overview 2 Logging on and off 6 Time Clock/Attendance 6 Online Account Management 8 Changing passwords and Sign-in/out codes 2 Changing your password
Envision Credit Card Processing
 A Guide for Processing Transactions with Envision's Credit Card Module I Table of Contents Part I Credit Card Processing Setup 1 Part II Credit Card Processing 2 1 Entering Tips... 3 2 Processing the Credit
CARDSPOT USER GUIDE
 2017 2017 EML Payments Europe Limited. All rights reserved 8330 Ward Parkway, 4th Floor / Kansas City, MO 64114 / 800.755.5001 / www.emlpayments.com WELCOME TO CARDSPOT A Card Activation System Built to
Overview. Business Online Banking BASIC OVERVIEW PAGE 1
 Overview Business Online Banking BASIC OVERVIEW PAGE 1 Basic Overview Business Online Banking Main navigation: My Accounts, Move Money, and Additional Services. Admins have full access to all accounts
Cardholder & Program Administrator
 Access Online Transaction Management User Guide Cardholder & Program Administrator Version 2.9 Contents Introduction...3 Transaction Management Variables by Organization... 3 Procedures in This Guide...
CONVERGE MOBILE User Guide - Android
 How to take payments with the Converge Mobile app? CONVERGE MOBILE User Guide - Android Version 2.0 CONTACT Two Concourse Parkway, Suite 800 Atlanta, GA 30328 DOWNLOAD Google Play APP Store 2017 Elavon
Enterprise Payment Solutions. Remote Deposit Capture. Remote Deposit Capture User Manual
 Enterprise Payment Solutions Remote Deposit Capture 1999-2014 Jack Henry & Associates, Inc. All rights reserved. Information in this document is subject to change without notice. Printed in the United
Virtual Terminal User Guide Version (Australia IPG)
") Virtual Terminal User Guide Version 2017-5 (Australia IPG) Gateway 1 Contents This table of contents has been amended to exclude sections not applicable to Australia. The original content is still available
Virtual Terminal User Guide Version 2017-5 (Australia IPG) Gateway 1 Contents This table of contents has been amended to exclude sections not applicable to Australia. The original content is still available
GUIDE TO SILVER BACK OFFICE FOR NCR SILVER PRO RESTAURANT
 GUIDE TO SILVER BACK OFFICE FOR NCR SILVER PRO RESTAURANT CONTENTS INTRODUCTION... 7 LOGGING INTO SILVER BACK OFFICE... 8 MY STORE... 9 ACTIVITY SUMMARY... 9 SALES DASHBOARD... 10 CUSTOMER DASHBOARD...
RAM QUICK REFERENCE GUIDE. Lloyds Bank Cardnet Online Management Information System
 RAM QUICK REFERENCE GUIDE Lloyds Bank Cardnet Online Management Information System Contents 1. Logging In 1 2. Searching for Merchant Numbers 2 3. Merchant Profile Details 3 4. Transaction Activity 4 4.1
Basic & Pro Resellers
 Getting Started Guide Basic & Pro Resellers Getting Started Guide Page 1 Getting Started Guide: Basic & Pro Resellers Version 2.2 (1.6.2012) Copyright 2012 All rights reserved. Distribution of this work
E-Bill & Collect User Guide June 2016
 E-Bill & Collect User Guide June 2016 Table of Contents Page Introduction Simple Web Manual Payments Enter Payment Details Verify Payment Details Payment Confirmed Authenticated & SSO Payments Lookup Account
BroadPOS Building a Merchant Terminal Profile: Omaha
 BroadPOS Building a Merchant Terminal Profile: Omaha Accessing BroadPOS To access your BroadPOS Terminal Maintenance Account on the web: Navigate to https://secure.broadpos.com Input your User Name (not
MySagePay USER GUIDE
 MySagePay USER GUIDE Contents 1.0 Welcome to MySagePay 3 1.1 Logging into MySagePay 3 1.2 What you will see 4 2.0 Settings 5 2.1 My Account 5 2.2 Settings 6 2.3 AVS/CV2 7 2.4 3D Secure 8 2.5 Restrictions
Retail Application. Quick Reference Guide. Ingenico Telium United States
 Retail Application Quick Reference Guide Ingenico Telium United States Color Key Required Merchant Input on Point of Sale Required Customer Input on Internal or External PIN-pad Optional Merchant Input
USER S GUIDE O C T O B E R 2 9,
 PAYWARE MOBILE USER S GUIDE F O R I O S O C T O B E R 2 9, 2 0 1 2 Notice VeriFone, the VeriFone logo, MX Solutions, PAYware, PAYware PC, PAYware SIM, PAYware Transact, PAYware Mobile, PAYware Connect,
Requisitioner Training Manual
 Requisitioner Training Manual Larry McWilliams Procurement Department lmcwilli@kent.edu Revised December 2018 0 Introduction The purpose of this training guide is to familiarize the user with FlashCart,
Merchant e-solutions Payment Acceptance User Guide for Magento version 2.x ( M2 )
") Merchant e-solutions Payment Acceptance User Guide for Magento version 2.x ( M2 ) Step-by-step guidance for setup and use of the Payment Acceptance extension for Magento 1 Table of Contents Key Contacts...
Merchant e-solutions Payment Acceptance User Guide for Magento version 2.x ( M2 ) Step-by-step guidance for setup and use of the Payment Acceptance extension for Magento 1 Table of Contents Key Contacts...