ParaChat v9.12 Hosted Documentation - PDF
|
|
|
- Jared Shaw
- 6 years ago
- Views:
Transcription
1 ParaChat v9.12 Hosted Documentation - PDF
2
3 Table of Contents Service Administration Pages... 1 Logging Into Your Service Administration Pages... 1 Logging Into Your Service Administration Pages... 3 Site Settings... 5 Site Administration - Main... 5 Site Tab > Site Settings > Home... 5 Home... 7 Site Administration - Site-Wide Limits... 9 Site Tab > Site Settings > Site-Wide Limits... 9 Site Administration - Site-Wide Settings Site Tab > Site Settings > Site-Wide Settings Site Administration - Main Security Site Tab > Security Settings > Main Security Allow Chat Access from Specified Web Addresses Only - Professional & Above Allow Chat Access from Specified Web Addresses Only - Standard Only Boot Page for an Expelled User Site Administration - Site Transcripts Site Tab > Site Settings > Site Transcripts Site Administration - In-Room Text Messages Site Tab > Branding & Text Settings > In-Room Text Messages Site Administration - Create A New Room Site Tab > Room Creation > Create A New Room Database Options User Administration - Integrated Member Database User Settings >>> Integrated Member Database Users Administration - Integrated Member Database Users & Databases Settings > Integrated Member Database Users Administration - Code for Integrated Database Users & Databases Settings > Code for Integrated Database Registration Process Example Auto Log-in & Load - Use Your Existing Database Users Administration - External Database Connection Users & Databases Settings > External Database Connection Users Administration - Member Profile URL Users & Databases Settings > Member Profile URL Customize Global Room Settings Site Administration - Image Branding Site Tab > Branding & Text Settings > Image Branding Site Administration - Text Banner Site Tab > Branding & Text Settings > Text Panel Site Administration - Manual Customization Site Tab > Site Settings > Manual Customization Site Administration - Site Counter Site Tab > Counter & Who's Chatting > Site User Counter Site User Counter Code Defined Room Settings Rooms Administration - View / Edit / Delete Room(s) Rooms Settings > View / Edit / Delete Room(s) Site Administration - Create A New Room Site Tab > Room Creation > Create A New Room Rooms Administration - View / Edit / Delete Room(s) Rooms Settings > View / Edit / Delete Room(s) Rooms Administration - Home iii
4 ParaChat v9.12 Hosted Documentation - PDF Rooms Tab > Rooms Settings > Home Rooms Administration - Transcripts Rooms Tab > Transcript Settings > Transcripts Rooms Administration - Moderation Rooms Tab > Rooms Settings > Moderation Rooms Administration - Recent Room History Rooms Tab > Transcript Settings > Room History Rooms Administration - Auto Login Rooms Tab > Display Room Codes > Auto Login Customize Room Settings Rooms Administration - User Interface Colors Rooms Tab > Rooms Settings > User Interface Colors Rooms Administration - Manual Customization Rooms Tab > Rooms Settings > Manual Customization Room Administration - Room Counter Rooms Tab > Display Room Codes > Room User Counter Code Room User Counter Code Defined User Settings Users Administration - Add A New User Users & Databases Tab > Add A New User Creating A User On The Chat Server Users Administration - Edit A User Users & Databases Tab > Local Users > Edit A User Users Administration - Add A New User Users & Databases Tab > Add A New User Creating A User On The Chat Server Users Administration - List All Users Users & Databases Tab > Local Users > List All Users Add Site Admin Add Room Admin GUI Admin Console GUI Admin Console GUI Admin Tabs News Rooms Users Messages Cruise Moderation Site Super Log Help Customization How To Customize Your Chat Room How To Customize Your Chat Room Chat Applet Code Chat Applet Defined Customize Chat Room Colors Branding Banner & Text Banners Customize Chat Room Buttons Customize Chat Room Labels Customize Chat Room Messages Customize Chat Room Menus Customize Mouse-Over Tips Chat Options iv
5 Table of Contents Customize Right-Click Menus Room Roaming Remove Options Add or Remove Menu Items Add or Remove Buttons Lists for Sounds, Icons, Etc Customize Avatars, Emoticons and Sounds Customize Avatars Customize Emoticons Customize Sounds Customize Alert Sounds Customize Status Messages Customize Fonts Avatars Allow Avatars Remove Avatar Option Customize Avatars Transcripts Site Administration - Site Transcripts Site Tab > Site Settings > Site Transcripts Rooms Administration - Recent Room History Rooms Tab > Transcript Settings > Room History Transcript Settings Turn On Transcripts View Transcripts Database Options User Administration - Integrated Member Database User Settings >>> Integrated Member Database Users Administration - Integrated Member Database Users & Databases Settings > Integrated Member Database Users Administration - Code for Integrated Database Users & Databases Settings > Code for Integrated Database Registration Process Example Auto Log-in & Load - Use Your Existing Database Users Administration - External Database Connection Users & Databases Settings > External Database Connection Moderated Events Moderated Events Moderated Events Types of Users Creating a Moderated Event Creating a Moderated Event Creating a Moderated Event Room Administrator Task Summary Moderator Task Summary Speaker Task Summary After a Moderated Event Anatomy of Moderation Open Moderation Site & Room Counter Code Room Administration - Room Counter Rooms Tab > Display Room Codes > Room User Counter Code Room User Counter Code Defined Site Administration - Site Counter Site Tab > Counter & Who's Chatting > Site User Counter Site User Counter Code Defined v
6 ParaChat v9.12 Hosted Documentation - PDF Index vi
7 Service Administration Pages Logging Into Your Service Administration Pages The link to the chat administration pages is found within your original order confirmation . If you did not save your , or if you did not bookmark the web page URL, log into your room and type #webadmin. This will display the URL to your Service Administration pages. You can also log into your chat room and launch the GUI Admin Console. To launch the GUI Admin Console, log into your chat room using your Site or Room Admin user name and password, and select Admin Console in the Action menu item and click on the Help tab. Service Levels That Support This Option: Basic Standard Professional Enterprise Event Reseller Click on the Admin Area button for access to your Service Administration pages. Your web-based administration page will load in a new web browser window. Enter the Site Admin Name, Password and Site ID issued to you during your registration process. This information is located on your order confirmation . 1
8 ParaChat v9.12 Hosted Documentation - PDF 2
9 Service Administration Pages Logging Into Your Service Administration Pages The link to the chat administration pages is found within your original order confirmation . If you did not save your , or if you did not bookmark the web page URL, log into your room and type #webadmin. This will display the URL to your Service Administration pages. You can also log into your chat room and launch the GUI Admin Console. To launch the GUI Admin Console, log into your chat room using your Site or Room Admin user name and password, and select Admin Console in the Action menu item and click on the Help tab. Service Levels That Support This Option: Basic Standard Professional Enterprise Event Reseller Click on the Admin Area button for access to your Service Administration pages. Your web-based administration page will load in a new web browser window. Enter the Site Admin Name, Password and Site ID issued to you during your registration process. This information is located on your order confirmation . 3

10 ParaChat v9.12 Hosted Documentation - PDF 4
11 Service Administration Pages Site Settings Site Administration - Main Service Levels That Support This Option: Basic Standard Professional Enterprise Event Reseller Site Tab > Site Settings > Home 5

12 ParaChat v9.12 Hosted Documentation - PDF 6
13 Service Administration Pages Home Site ID The number is issued to you during your order process. This number is static and cannot be altered. Site Status Notification of the status of your account. Service Level This is your type of service licensed, Professional, Standard, etc. Account Address The address used during your order process. You Are Logged In As The user that is currently logged into the Service Administration Pages. Maximum User Connections The number of concurrent users you have licensed. Voice & Video Chat Option Whether or not you have licensed the Voice and or Video. Maximum Voice/Video Connections The number of concurrent Voice/Video users you have licensed. Secure Encrypted Chat Whether or not you have licensed the Secure Encrypted module. Event Moderation Whether or not your licensed service allows the Moderated Events. Mobile Device Access (WAP) Whether or not your licensed service allows WAP access. Mobile Device Access (App-Based) Whether or not your licensed service allows App-Based access (iphone, Blackberry, etc.) Rooms in Site This is a list of Rooms belonging to this Site and can only be modified by adding and deleting rooms. URL Enforcement What your allowed URL enforcement level is set to. Allowed Web Addresses What your allowed web addresses are set to. Server Type Internal ParaChat Server Type. 7
14 ParaChat v9.12 Hosted Documentation - PDF 8

15 Service Administration Pages Site Administration - Site-Wide Limits Service Levels That Support This Option: Basic Standard Professional Enterprise Event Reseller Site Tab > Site Settings > Site-Wide Limits 9
16 ParaChat v9.12 Hosted Documentation - PDF Inactive User Time-out Set the time for a non-active user to be timed-out. When a user is timed-out, they will be disconnected from the chat room. Set Per-Room User Limit Enable this feature if you would like to change the default number of users allowed in the chat rooms within your site. Number Of Users Per Room Set the number of users you would like to set as the default users per room. Allow Overflow Rooms You can create overflow rooms if you limit the number of users per room. You must have Default Number Of Users Per Room set to have overflow room function. Require Valid User Name and Password Enabled: this option will only allowed registered users into rooms within your Site. Disabled: this option allows all users into your Site. Message for Non-Members This message will be displayed to users who do not have a registered user name and password. 10
17 Service Administration Pages Site Administration - Site-Wide Settings Service Levels That Support This Option: Basic Standard Professional Enterprise Event Reseller Site Tab > Site Settings > Site-Wide Settings 11

18 ParaChat v9.12 Hosted Documentation - PDF Language of User Interface Select the default user interface language for your rooms. Room Roaming Enabled: this is the default setting and users are allowed to roam from room to room. 12
19 Service Administration Pages Disabled: this will prohibit users from seeing any other rooms and will prohibit user created rooms. Allow Private Messaging Enabled: this is the default setting and users are allowed to send private messages. Disabled: this will prohibit users from sending private messages to one another. Allow Cross-Room Private Messaging Enabled: this is the default setting and users are allowed to send private messages from room to room. Disabled: this will prohibit users from sending private messages to one another from room to room. Allow User Created Rooms Enabled: this is the default setting and users are allowed to create user created rooms. Disabled: this will prohibit users from being able to create user created rooms. Allow Avatars Please see this detailed information. Display Avatars by Default Enabled: display avatars by default Disabled: this is the default setting, do not display avatars by default. Allow Room Audio Enabled: this is the default setting and users are allowed to submit sounds into the room. Disabled: this will prohibit users from being able to submit sounds into the room. Allow Mobile Device Interface Enabled: this is the default setting and users are allowed to use the mobile interface Disabled: this will prohibit users from being able to use the mobile interface 13

20 ParaChat v9.12 Hosted Documentation - PDF 14

21 Service Administration Pages Site Administration - Main Security Service Levels That Support This Option: Basic Standard Professional Enterprise Event Reseller Site Tab > Security Settings > Main Security Allow Chat Access from Specified Web Addresses Only - Professional & Above Allowed Web Addresses Our unique URL enforcement system allows you to limit the way applet code for a particular room can be distributed onto other web pages on the Internet. By indicating the exact URL(s) where you wish your room HTML applet code to run, you may limit people from taking the code from your HTML page and running your chat room on their own web page without your permission. List all URLs or domains where you wish to run your applet code in this field. You can place a comma and a space between allowed URLs so that each URL is active in the chat window. HINT: It is important to note that users sometimes access domains without the www suffix before your domain name. Therefore, if your chat page is you may also wish to include - without the www suffix - as an allowed URL. It is best to use the complete URL structure here, so be certain to include the as well. It is also important to note that if you designate an allowed URL as for 15
22 ParaChat v9.12 Hosted Documentation - PDF example, the server will permit the chat room to run on any web page within that domain, and not just on a specific page within that domain. Enforcement Level Your chat service will enforce the URLs you provide for your Site by either: allow - allows all user connections regardless of URL warn - warns users that the chat room is running on a web page that is not allowed deny - warns users that the chat room is running on a web page that is not allowed and does not allow a connection to the chat room Users will be able to connect and enter a room with the URL enforcement set to both allow and warn. However, a user will not be able to enter a room if the URL enforcement is set to deny and the room is not placed on the correct URL. Here is a list of error messages that a user will see if the URL of the room does not match the Allowed Web Address(es) settings: Allow no error message will be displayed Warn Warning. This room has not been configured to operate on this web page. To access this ParaChat room, please visit: After the user receives this message they will stay in the room and will be able to chat. Deny Access Denied. This room has not been configured to operate on this web page. To access this ParaChat room, please visit: After the user receives this message they will be disconnected and kicked out of the chat room. Allow Chat Access from Specified Web Addresses Only - Standard Only Service Levels That Support This Option: Basic Standard Professional Enterprise Event Reseller 16

23 Service Administration Pages Allowed Web Addresses ParaChat Standard permits user connections from a single domain. Standard customers may edit their allowed web address in the r;update Allowed Web Address field by inputting their web address prefix, domain name, extension, plus an optional user directory, in the fields provided. To operate your ParaChat service on more than one domain, please upgrade to ParaChat Professional. Enforcement Level Standard is set to the following by default: deny - warns users that the chat room is running on a web page that is not allowed and does not allow a connection to the chat room Users will be able to connect and enter a room with the URL enforcement set to both allow and warn. However, a user will not be able to enter a room if the URL enforcement is set to deny and the room is not placed on the correct URL. Here is the error messages that a user will see if the URL of the room does not match the Allowed Web Address settings: Deny Access Denied. This room has not been configured to operate on this web page. To access this ParaChat room, please visit: After the user receives this message they will be disconnected and kicked out of the chat room. 17

24 ParaChat v9.12 Hosted Documentation - PDF Boot Page for an Expelled User Service Levels That Support This Option: Basic Standard Professional Enterprise Event Reseller Enable Expel Page Enabled: expelled users will be sent to a page you define under Page to Show to an Expelled User. Disabled: expelled users will only be disconnected from the chat room. Page to Show to an Expelled User Enter a web page URL for users to be taken to after they are expelled from the chat room. 18
25 Service Administration Pages Site Administration - Site Transcripts Service Levels That Support This Option: Basic Standard Professional Enterprise Event Reseller Site Tab > Site Settings > Site Transcripts 1. Transcript Settings 2. Turn on Transcripts 3. View Transcripts 4. Recent Room History - (Room Setting) 19

26 ParaChat v9.12 Hosted Documentation - PDF Site Administration - In-Room Text Messages Service Levels That Support This Option: Basic Standard Professional Enterprise Event Reseller Site Tab > Branding & Text Settings > In-Room Text Messages In-Room Text Message Display Text Message Enabled: turns on the text ad message Disabled: turns off the text ad message Text Message This message will be displayed in the chat room at a set interval set under "Display Interval". You can include a URL if you wish. HTML commands cannot be used. Display Interval Set the refresh time from the pull down menu. HINT: This message is only sent when the room is active. If the room remains inactive no text is sent to the room. 20
27 Service Administration Pages Site Administration - Create A New Room Service Levels That Support This Option: Basic Standard Professional Enterprise Event Reseller Site Tab > Room Creation > Create A New Room To create a new chat room enter the new chat room name under Create a New Room in Site <your site name here> and then customize your new room. 21
28 ParaChat v9.12 Hosted Documentation - PDF Database Options User Administration - Integrated Member Database Service Levels That Support This Option: Basic Standard Professional Enterprise Event Reseller You can administer your site using the site administration explanations below: Log in to the Web-base Administration Pages and select the Site Settings tab. User Settings >>> Integrated Member Database Select from the list below for more information on each Database Option Integrated Member Database (beginner knowledge) Code of Integrated Member Database Registration Process Example Use Your Existing Database (intermediate knowledge) External Database Connection (Standard knowledge) Member Profile URL (Standard knowledge) 22
29 Service Administration Pages Users Administration - Integrated Member Database Service Levels That Support This Option: Basic Standard Professional Enterprise Event Reseller Users & Databases Settings > Integrated Member Database View Member Info Click the member name to display their member name, real name, last login date, registration date, address, and access status. 23
30 ParaChat v9.12 Hosted Documentation - PDF Suspend Click the member name to suspend the user's access to your room(s) using this member name. Unsuspend Click the member name to unsuspend the user's access from your chat room(s). Delete Click the member name to permanently delete the user name from your list of active members. 24
31 Service Administration Pages To require all users who access your chat service to have a member name registered in this fashion, you must configure your Site to Allow Registered Users Only. To do so, return to your main Site Settings >> Site-Wide Limits page and enable Require Valid User Name and Password. 25
32 ParaChat v9.12 Hosted Documentation - PDF Users Administration - Code for Integrated Database Service Levels That Support This Option: Basic Standard Professional Enterprise Event Reseller Users & Databases Settings > Code for Integrated Database The link code generation tool contains registration linking HTML code that is relevant to your Site only. Customize the linking code to your options. Highlight and copy the code from the pop-up window, and then paste it into the HTML source code of any web page on your site. URL Of Branding Image Add your own branding image to your registration page. Replace with the URL of an image on your site. Exact URL Of Your Chat Room To direct your registered members back to your chat room using the "ENTER THE CHAT ROOM NOW" link on the member registration page, you must customize this field. Text For Link Customize this field to replace the default setting of "Register Name / Update Password" link label. Language Selection Select the language you would like the registration form to display. 26
33 Service Administration Pages Attention: If you make incorrect entries into these fields your linking code will not work correctly. Sample Pop-up Window Customize Member Database Application Default Language The Integrated Member Database Application uses a registration system in English by default. You may easily customize the default language used by the registration system by making a minor edit to the Member Registration Linking Code: Sample Default Member Registration Linking Code - English <a href=" testing123&cserver=ac&cimg= &curl= target="_new">register Name / Update Password</a> To customize the default language, change the directory name highlighted in RED above to your desired language as listed below: Sample Member Registration Linking Code Customized To Spanish <a href=" testing123&cserver=ac&cimg= &curl= target="_new">register Name / Update Password</a> Current Language Support English = en Spanish = es 27
34 ParaChat v9.12 Hosted Documentation - PDF German = de If you are interested in providing a translation of the Integrated Member Database Application to a language not listed above, please contact support@parachat.com and/or complete these forms. We will be offering additional language support in a subsequent release of our software, or as translations are provided. Directing Registered Members Back to Your Chat Room To direct your registered members back to your chat room using the "ENTER THE CHAT ROOM NOW" link on the member registration page, you must make the following edit to your Member Registration Linking Code: Replace (denoted in red below) with the EXACT web page URL where you have implemented your chat room: <a href=" testing123&cserver=ac&cimg= &curl= target="_new">register Name / Update Password</a> For example, if you have implemented your chat room on then your edited Linking Code would appear as: <a href=" testing123&cserver=ac&cimg= &curl= target="_new">register Name / Update Password</a> 28
35 Service Administration Pages Registration Process Example Service Levels That Support This Option: Basic Standard Professional Enterprise Event Reseller Users who click the link will go to the a member registration page. Each user must input their desired member name, their real name, and their address. An activation will be sent to the address that is supplied. Each user must click the link within the to validate their request and activate their member name. 29
36 ParaChat v9.12 Hosted Documentation - PDF Once the validation process has been completed, each user will receive a subsequent that confirms their successful registration. The registration confirmation contains the member name they selected, and a password that has been assigned to them. A user may change their password by using the "Log-in to change settings" option on the main registration page. Please note that the system will update changed passwords every 5 minutes. 30
37 Service Administration Pages 31
38 ParaChat v9.12 Hosted Documentation - PDF Auto Log-in & Load - Use Your Existing Database Service Levels That Support This Option: Basic Standard Professional Enterprise Event Reseller Auto Log-in of your Web site's registered users into your chat room is accomplished by passing a user name variable from your database, session cookie, or through the URL, and placing it into the chat applet HTML. Through some minor customization to the chat applet HTML, the user will be logged directly into the chat room without requiring a secondary log-in through the chat client's login panel. For example, if you place your chat room in a members-only area of your web site, and you require users to authenticate themselves to gain access to the member area, their user name can be passed into the chat room to automatically log them in with their registered user name. User authentication remains a function of your web-server, and not of the chat client or server. Your chat service already includes the Auto Log-in feature. Required Parameters There are 2 mandatory parameters to add to your chat applet HTML to utilize the Auto Log-in feature. The parameters are: <param name="ctrl.autologin" value="true"> <param name="net.user" value="<user name variable>"> The Ctrl.AutoLogin parameter tells the chat room to permit a user to be automatically logged in to the chat room without displaying the log-in panel. The Net.User parameter value is where you need to pass the authenticated user name variable. For example, if a user is logged into your site with user name "Mike", then the correct format for the Net.User parameter value after the user name has been passed would be: <param name="net.user" value="mike"> Optional Parameters There are 2 optional parameters that can be added to the chat applet HTML, which can be utilized with the Auto Log-in feature. The parameters are: <param name="net.userpass" value="<user's password>"> <param name="net.cookie" value="<cookie password, etc.>"> The Net.UserPass parameter is used only to pass a user's password to the chat server for authentication by the chat server, and not by your database. This parameter should only be used if a user profile exists on both the chat server as well as in your own database, and the password in 32
39 Service Administration Pages your database matches the user's password on the chat server. There is no requirement to populate the Net.UserPass value with a user's password from your database. HINT: If the admin user name and password that you supplied is also in your database, you would need to pass this user name and password into the chat applet HTML so you can access the chat room's administrative functions. The chat server requires a valid administrator user name and password to be supplied in order to gain access to the administrative features. 33
40 ParaChat v9.12 Hosted Documentation - PDF Users Administration - External Database Connection Service Levels That Support This Option: Basic Standard Professional Enterprise Event Reseller Users & Databases Settings > External Database Connection For more information on this option please read this information or visit this forum article. 34

41 Service Administration Pages Users Administration - Member Profile URL Service Levels That Support This Option: Basic Standard Professional Enterprise Event Reseller Users & Databases Settings > Member Profile URL If you would like to add the ability for users to have their profile URL displayed when a user selects to view their profile from within the chat room, you can add the static URL information in the Prefix of Member Profile URL. This profile URL will be some type of database driven system that runs on your site. Please see your webmaster for more information on this. The information required for the Prefix of Member Profile URL is a static URL followed by the variable user name. Example Static URL linked to a database on your site: Variable user name: mike The profile URL that would be displayed in the chat room would be: 35

42 ParaChat v9.12 Hosted Documentation - PDF Customize Global Room Settings Site Administration - Image Branding Service Levels That Support This Option: Basic Standard Professional Enterprise Event Reseller Site Tab > Branding & Text Settings > Image Branding You can update the images and click-through locations for your image panels using the Service Administration Pages for the upper or lower branding panels. By default these image branding panels are disabled. Display Branding Image Enabled - branding image area will display your branding image Disabled - branding image area is removed Show Branding Image on Log-in Panel Branding Image Position Enabled - the branding image will be displayed on the log-in page Disabled - the branding image will only be displayed when a user has fully logged into a room Top of Room Bottom of Room 36


43 Service Administration Pages Upload An Image To upload an image click on the Browse button and navigate to the image you wish to upload to your chat site. Due to advances in our server programming, there is no set limit to the dimensional size of the image. However, please keep the size of the image file under 20k. Keeping the image file small helps your users load the chat room faster. Delete An Image Select an image you wish to delete and click the Delete Image button. Set Image To Display & Click-thru URL After you have uploaded your image(s) select the image you would like to display under Select an Image to Display pull-down menu. Then enter the URL that you would like to have displayed under Set Click-thru URL for Selected Image. 37

44 ParaChat v9.12 Hosted Documentation - PDF Site Administration - Text Banner Service Levels That Support This Option: Basic Standard Professional Enterprise Event Reseller Site Tab > Branding & Text Settings > Text Panel You can add text to the bottom of each chat room when you customize the settings. Using this page you can turn this option on & off, make the text animated or static, etc. You have 1-4 different text message options. 38

45 Service Administration Pages 39
46 ParaChat v9.12 Hosted Documentation - PDF Site Administration - Manual Customization Service Levels That Support This Option: Basic Standard Professional Enterprise Event Reseller Site Tab > Site Settings > Manual Customization Site Manual Customizations will be reflected in all the rooms within your site. Making changes to your rooms using the Site Manual Customization option is a very simple process. In the Parameter Name field you can add the parameter that you wish to define. For example, to find the parameter for removing the Bold button from the chat interface you would review the Customization pages in this documentation and discover the parameter value that you need to add is Add.Bold. The default value for Add.Bold = true, the bold button is displayed by default. Add or Remove Bold Button Parameter Name: Add.Bold Parameter Permitted Value: true or false Service Levels That Support This Customization: Basic Standard Professional Enterprise Event 40
 false = button is removed Parameter Permitted Values have a few different types of values.")

47 Service Administration Pages HTML Configuration: <param name="add.bold" value="false"> true = button is displayed (default) false = button is removed Parameter Permitted Values have a few different types of values. true or false on or off text numbers color To remove the Bold button you would simply add the following information and click on the Add button. Parameter Name: Add.Bold Parameter Value: false See the example below After you have added this parameter you can verify this setting by reviewing saved parameters under Current Customization Parameters for Your Site. To remove any parameter from the Current Customization Parameters for Your Site list, simply enter the parameter into Delete a Existing Customization Parameter and click Delete. After adding multiple customization options, you might see a list similar to the one below. 41

48 ParaChat v9.12 Hosted Documentation - PDF 42
49 Service Administration Pages Site Administration - Site Counter Service Levels That Support This Option: Basic Standard Professional Enterprise Event Reseller Site Tab > Counter & Who's Chatting > Site User Counter Drive traffic to your chat rooms from throughout your web site! The User Counter is a Java-based counter that informs your web site visitors of how many users are currently chatting in all your rooms. Through the addition of a few lines of HTML to web pages throughout your site, the number of users in your chat rooms are conveniently displayed on any web page. Use the customization tool to configure the size, color, and font of your Site User Counter, then click the "Show Me My User Counter Code" to generate your HTML. Copy the HTML from the window that displays, and paste it into the HTML source code of the web pages on your site where you wish to display this information. Select the customization options you wish and click on the Show Me My User Counter Code Button. Your customized code will be displayed in a pop-up window similar to the one below. 43
50 ParaChat v9.12 Hosted Documentation - PDF Copy the code from the pop-up window and place it into your web page. Site User Counter Code Defined <!-- Begin Counter Code --> <applet codebase=" archive=counter.jar code="count.chatcounter.class" width=20 height=18> <param name="query.site" value="community"> <param name="ui.bg" value="ffffff"> <param name="ui.fg" value="000000"> <param name="ui.fontsize" value="10"> <param name="ui.fontname" value="helvetica"> Sorry, your browser is not Java enabled, please visit <a href=" java support pages</a> </applet> <!-- End Counter Code --> query.site = Your site ID for your chat site ui.bg = Background color of the who's chatting list ui.fg = Font color ui.fontsize = Font size ui.fontname = Font that the user list will use 44
51 Service Administration Pages 45
52 ParaChat v9.12 Hosted Documentation - PDF Room Settings Rooms Administration - View / Edit / Delete Room(s) Service Levels That Support This Option: Basic Standard Professional Enterprise Event Reseller Rooms Settings > View / Edit / Delete Room(s) Click on a room to edit or delete. 46

53 Service Administration Pages Site Administration - Create A New Room Service Levels That Support This Option: Basic Standard Professional Enterprise Event Reseller Site Tab > Room Creation > Create A New Room To create a new chat room enter the new chat room name under Create a New Room in Site <your site name here> and then customize your new room. 47
 Service Levels That Support This Option: Basic")
54 ParaChat v9.12 Hosted Documentation - PDF Rooms Administration - View / Edit / Delete Room(s) Service Levels That Support This Option: Basic Standard Professional Enterprise Event Reseller Rooms Settings > View / Edit / Delete Room(s) Click on a room to edit or delete. 48
55 Service Administration Pages Rooms Administration - Home Service Levels That Support This Option: Basic Standard Professional Enterprise Event Reseller Rooms Tab > Rooms Settings > Home 49

56 ParaChat v9.12 Hosted Documentation - PDF Site ID The number is issued to you during your order process. This number is static and cannot be altered. Room Name The name of the room you are making customization options to. Default Greeting Any message or greeting will display as the default message when a user logs into a room. Admin User Name(s) Enter the user name(s) of the Room Admin user(s). You may enter multiple names here separated only by a comma. There is no need to place a comma and a space between Admin user names, just a comma. If you leave this field blank, you will not be able to log back into your Service Administration Pages. 50
57 Service Administration Pages HINT: Room Admin user names must be password protected. If you list a user name(s) in this field, it is suggested that you have created a user on the chat server. If a user profile is not create for a user name, any person who logs into the chat room using that admin name will have admin privileges in the room. Open / Close Room Open: this option allows the room to remain open Close: this option will close your room. Closed Room Message The message displayed to a user trying to access a closed room. Set A Room Password Enabled: a password will be required to enter the room. Disabled: no password is required to enter the room. Room Password Password to be used to enter room. Password Failed Message Message received if a user tries to log into the room and does not have a valid password. Enable Transcript for Room Enabled: turn transcripts on. Disabled: turn transcripts off. 51

58 ParaChat v9.12 Hosted Documentation - PDF Rooms Administration - Transcripts Service Levels That Support This Option: Basic Standard Professional Enterprise Event Reseller Rooms Tab > Transcript Settings > Transcripts Transcripts will be stored for up to 30 days. After 30 days your transcripts will be purged from the system. Please enable Daily Transcripts so you don't lose any of your important information. Under View Transcripts select the transcript you would like to view. When you click on this link you will see the transcripts page launch in a new window pop up window. For more information on transcripts, please visit the transcripts pages. 52
59 Service Administration Pages Rooms Administration - Moderation Service Levels That Support This Option: Basic Standard Professional Enterprise Event Reseller Rooms Tab > Rooms Settings > Moderation Please also visit our Moderated Events Documentation Pages. 53

60 ParaChat v9.12 Hosted Documentation - PDF Moderators Speakers Assign a moderator name in this field. Make sure you have created a user name and password for this user. Moderation State Enabled - branding image area will display your branding image Disabled - branding image area is removed Turning on moderation must be done through the GUI admin console. Show User Names During Event 54
61 Service Administration Pages This gives you the option to only display Room Admins, Site Admins, Moderators and Speakers in the user list. All other standard users will not be displayed during a moderated event. This is very helpful during large moderated events. Open Moderation (Public Chat is Allowed During Moderation please see the Open Moderation information page Private Chat During Moderation Enabled - user will be allowed to private message one another Disabled - private messaging is not available Color Customization for Moderation Assign colors to the different options above. More information on these parameters. 55
62 ParaChat v9.12 Hosted Documentation - PDF Rooms Administration - Recent Room History Service Levels That Support This Option: Basic Standard Professional Enterprise Event Reseller Rooms Tab > Transcript Settings > Room History Recent Room History Settings Your chat service includes the ability to generate and display Recent Room History in your Chat Room. When this feature is turned on, all chat text within the main chat window is written to a live transcript. When a user enters into the chat room they have the opportunity to view what they might have missed prior to entering the room. These live transcripts are available to room users for up to 1000 stored messages and/or 7 days. These settings can be configured or turn off. The Recent Room History information is dynamic by nature and is NOT stored on the server in the transcript area. 56
63 Service Administration Pages While a user is in the room, they can select Recent Room History under the Action menu. 57
64 ParaChat v9.12 Hosted Documentation - PDF A Java pop-up window will be displayed with messages that the user missed while they were not in the room. Enable / Disable Recent Room History Parameter Name: Enable.Mn.Play Parameter Permitted Value: true or false Service Levels That Support This Customization: Basic Standard Professional Enterprise Event Reseller HTML Configuration: <param name="enable.mn.play" value="true"> More Information: true = allow recent room history (default) false = disable recent room history and gray out the option in the Action menu 58

65 Service Administration Pages Rooms Administration - Auto Login Service Levels That Support This Option: Basic Standard Professional Enterprise Event Reseller Rooms Tab > Display Room Codes > Auto Login You can copy and paste your room code from this window into your web-page. 59
66 ParaChat v9.12 Hosted Documentation - PDF Customize Room Settings Rooms Administration - User Interface Colors Service Levels That Support This Option: Basic Standard Professional Enterprise Event Reseller Rooms Tab > Rooms Settings > User Interface Colors 60

67 Service Administration Pages This page offers you the ability to customize the Skin Color of your chat room as well as the Text Color on the Chat Room user interface. Please do not include a # in the color code. 61
68 ParaChat v9.12 Hosted Documentation - PDF Rooms Administration - Manual Customization Service Levels That Support This Option: Basic Standard Professional Enterprise Event Reseller Rooms Tab > Rooms Settings > Manual Customization Room Manual Customizations will only be reflected in all the room you are making the changes to. Making changes to your room using the Room Manual Customization option is a very simple process. In the Parameter Name field you can add the parameter that you wish to define. For example, to find the parameter for removing the Bold button from the chat interface you would review the Customization pages in this documentation and discover the parameter value that you need to add is Add.Bold. The default value for Add.Bold = true, the bold button is displayed by default. Add or Remove Bold Button Parameter Name: Add.Bold Parameter Permitted Value: true or false Service Levels That Support This Customization: Basic Standard Professional Enterprise Event Reseller 62
 false = button is removed Parameter Permitted Values have a few different types of values.")

69 Service Administration Pages HTML Configuration: <param name="add.bold" value="false"> true = button is displayed (default) false = button is removed Parameter Permitted Values have a few different types of values. true/false text numbers To remove the Bold button you would simply add the following information and click on the Add button. Parameter Name: Add.Bold Parameter Value: false See the example below After you have added this parameter you can verify this setting by reviewing saved parameters under Current Customization Parameters for Your Room <your room name here>. To remove any parameter from the Current Customization Parameters for Your Room <your room name here> list, simply enter the parameter into Delete a Existing Customization Parameter and click Delete. 63

70 ParaChat v9.12 Hosted Documentation - PDF After adding multiple customization options, you might see a list similar to the one below. 64
71 Service Administration Pages Room Administration - Room Counter Service Levels That Support This Option: Basic Standard Professional Enterprise Event Reseller Rooms Tab > Display Room Codes > Room User Counter Code Drive traffic to your chat rooms from throughout your web site! The User Counter is a Java-based counter that informs your web site visitors of how many users are currently chatting there. Through the addition of a few lines of HTML to web pages throughout your site, the number of users in your chat rooms are conveniently displayed on any web page. Use the customization tool to configure the size, color, and font of your Room User Counter, then click the "Show Me My User Counter Code" to generate your HTML. Copy the HTML from the window that displays, and paste it into the HTML source code of the web pages on your site where you wish to display this information. Select the customization options you wish and click on the Show Me My User Counter Code Button. Your customized code will be displayed in a pop-up window similar to the one below. 65
72 ParaChat v9.12 Hosted Documentation - PDF Copy the code from the pop-up window and place it into your web page. Room User Counter Code Defined <!-- Begin Counter Code --> <applet codebase=" archive=counter.jar code="count.chatcounter.class" width=20 height=18> <param name="query.site" value="community"> <param name="query.room" value="lobby"> <param name="ui.bg" value="ffffff"> <param name="ui.fg" value="000000"> <param name="ui.fontsize" value="10"> <param name="ui.fontname" value="helvetica"> Sorry, your browser is not Java enabled, please visit <a href=" java support pages</a> </applet> <!-- End Counter Code --> query.site = Your site ID for your chat site query.room = Your room name 66
73 Service Administration Pages ui.bg = Background color of the who's chatting list ui.fg = Font color ui.fontsize = Font size ui.fontname = Font that the user list will use 67
74 ParaChat v9.12 Hosted Documentation - PDF User Settings Users Administration - Add A New User Service Levels That Support This Option: Basic Standard Professional Enterprise Event Reseller Users & Databases Tab > Add A New User Your chat solution offers 3 levels of users - Site Administrators, Room Administrators and Standard Users. By default, when your service is initially established, the administrator name and password provided during the order process is automatically configured as a Site Administrator. A Site Administrator has the following privileges: Create Additional Site Administrators Create Additional Room Administrators Administrative privileges in all admin created chat rooms Administrative privileges in all user created rooms (dynamic rooms) Full Access to Service Administration Pages Full Access to GUI Admin Console (GUI options are dependant on ParaChat service subscribed to) Optional Settings: Invisible Log-in Admin Avatar Show My User Name on Top of User List A Room Administrator has the following privileges: Administrative privileges only in the room they are assigned to as room administrator No Access to Service Administration Pages Full Access to GUI Admin Console from within the room they are assigned to (GUI options are dependant on ParaChat service subscribed to) Optional Settings: Invisible Log-in Admin Avatar Show My User Name on Top of User List A Operator has the following privileges: Administrative privileges in all admin created chat rooms No Access to Service Administration Pages Defined Access to GUI Admin Console Optional Settings: Invisible Log-in 68
75 Service Administration Pages Admin Avatar Show My User Name on Top of User List A Standard User has no administrative privileges and will have to enter their password protected user name and password when entering the chat room. Creating standard users will bypass any of the Internal Member Database users. If you only have a few standard users to create, please follow these steps. However, if you would like users to be able to sign up for a standard user name and password on their own, please implement code on your site for the Internal Member Database A Site administrator may create additional Site & Room administrators or standard users by following these steps: Creating A User On The Chat Server Step 1. Log in to the Web-base Administration Pages by entering the registered Site Admin Name, Password and Site ID that you provided during the placement of your order and that can be found in your Order Confirmation , and click the Sign In button. Step 2. Click on the Users tab. Step 3. Click Add User button. 69
76 ParaChat v9.12 Hosted Documentation - PDF Step 4. To create a new user add a New User Name, Password, Confirm Password and press Save. If you entered valid information you will receive confirmation page. Click continue. Step 5. After you create a new user you will be able to modify the following information: Address address of the user (not required) Invisible Log-in (admin users only) When admin users log into a room they will be invisible to other users. Site and/or Room admins can make these changes in the GUI admin console. Invisible admin users will be able to see one another. When an admin is in invisible mode their user name will be in italics. Use Admin Avatar (admin users only) 70
77 Service Administration Pages When avatars are enabled the Site and/or Room admins will have a admin only avatar. Show My User Name on Top of User List (admin users only) This feature will place all Site and/or Room admins on top of the user list. Step 8. The user that you just created is only a standard user. They have no admin rights and can only log into the chat room with the password set. If you would like them to be a Site or Room Admin there are additional steps that need to be taken. Please select below for more information. Add this user as a Site Admin Add this user as a Room Admin 71
78 ParaChat v9.12 Hosted Documentation - PDF Users Administration - Edit A User Service Levels That Support This Option: Basic Standard Professional Enterprise Event Reseller Users & Databases Tab > Local Users > Edit A User Your chat solution offers 3 levels of users - Site Administrators, Room Administrators and Standard Users. By default, when your service is initially established, the administrator name and password provided during the order process is automatically configured as a Site Administrator. Only Site Administrators have the ability to change any user passwords for any user created on the chat server.. Only standard users can change their passwords if you have implemented the Internal Member Database option. If you decide to change any of the passwords for non internal member database users, follow these simple steps. Step 1. Log in to the Web-base Administration Pages by entering the registered Site Admin Name, Password and Site ID that you provided during the placement of your order and that can be found in your Order Confirmation , and click the Sign In button. Step 2. You will arrive at the Main Log-in page. Step 3. Click on the Users Settings tab. 72

79 Service Administration Pages Step 4. Click List All Users. Step 5. Select the user you would like to modify and click Edit. 73
80 ParaChat v9.12 Hosted Documentation - PDF Step 6. You will be able to modify the following information for the user name: Password You will need to also enter the same password in the Confirm Password field. Address address of the user (not required) Invisible Log-in (admin users only) When admin users log into a room they will be invisible to other users. Site and/or Room admins can make these changes in the GUI admin console. Invisible admin users will be able to see one another. When an admin is in invisible mode their user name will be in italics. Use Admin Avatar (admin users only) When avatars are enabled the Site and/or Room admins will have a admin only avatar. Show My User Name on Top of User List (admin users only) This feature will place all Site and/or Room admins on top of the user list. 74
81 Service Administration Pages Users Administration - Add A New User Service Levels That Support This Option: Basic Standard Professional Enterprise Event Reseller Users & Databases Tab > Add A New User Your chat solution offers 3 levels of users - Site Administrators, Room Administrators and Standard Users. By default, when your service is initially established, the administrator name and password provided during the order process is automatically configured as a Site Administrator. A Site Administrator has the following privileges: Create Additional Site Administrators Create Additional Room Administrators Administrative privileges in all admin created chat rooms Administrative privileges in all user created rooms (dynamic rooms) Full Access to Service Administration Pages Full Access to GUI Admin Console (GUI options are dependant on ParaChat service subscribed to) Optional Settings: Invisible Log-in Admin Avatar Show My User Name on Top of User List A Room Administrator has the following privileges: Administrative privileges only in the room they are assigned to as room administrator No Access to Service Administration Pages Full Access to GUI Admin Console from within the room they are assigned to (GUI options are dependant on ParaChat service subscribed to) Optional Settings: Invisible Log-in Admin Avatar Show My User Name on Top of User List A Operator has the following privileges: Administrative privileges in all admin created chat rooms No Access to Service Administration Pages Defined Access to GUI Admin Console Optional Settings: Invisible Log-in Admin Avatar Show My User Name on Top of User List 75

82 ParaChat v9.12 Hosted Documentation - PDF A Standard User has no administrative privileges and will have to enter their password protected user name and password when entering the chat room. Creating standard users will bypass any of the Internal Member Database users. If you only have a few standard users to create, please follow these steps. However, if you would like users to be able to sign up for a standard user name and password on their own, please implement code on your site for the Internal Member Database A Site administrator may create additional Site & Room administrators or standard users by following these steps: Creating A User On The Chat Server Step 1. Log in to the Web-base Administration Pages by entering the registered Site Admin Name, Password and Site ID that you provided during the placement of your order and that can be found in your Order Confirmation , and click the Sign In button. Step 2. Click on the Users tab. Step 3. Click Add User button. 76


83 Service Administration Pages Step 4. To create a new user add a New User Name, Password, Confirm Password and press Save. If you entered valid information you will receive confirmation page. Click continue. Step 5. After you create a new user you will be able to modify the following information: Address address of the user (not required) Invisible Log-in (admin users only) When admin users log into a room they will be invisible to other users. Site and/or Room admins can make these changes in the GUI admin console. Invisible admin users will be able to see one another. When an admin is in invisible mode their user name will be in italics. Use Admin Avatar (admin users only) 77
84 ParaChat v9.12 Hosted Documentation - PDF When avatars are enabled the Site and/or Room admins will have a admin only avatar. Show My User Name on Top of User List (admin users only) This feature will place all Site and/or Room admins on top of the user list. Step 8. The user that you just created is only a standard user. They have no admin rights and can only log into the chat room with the password set. If you would like them to be a Site or Room Admin there are additional steps that need to be taken. Please select below for more information. Add this user as a Site Admin Add this user as a Room Admin 78
85 Service Administration Pages Users Administration - List All Users Service Levels That Support This Option: Basic Standard Professional Enterprise Event Reseller Users & Databases Tab > Local Users > List All Users 79

86 ParaChat v9.12 Hosted Documentation - PDF Add Site Admin Service Levels That Support This Option: Basic Standard Professional Enterprise Event Reseller A Site Administrator has the ability to easily create additional Site and Room administrators, has administrative privileges in all chat rooms that are part of a Site, and has full access to web-based Site, Room and User administration pages. The default user name chat-admin cannot be deleted. Once a password protected user has been created, you can add that user as a Site Administrator by following these steps: Step 1. Log into the Web-based Administration Pages and select the Users tab. Step 2. Create a new user name that is password-protected, or select a user name that has already been created. Step 3. Enter the user names of the Site Admin users. You may enter multiple names separated only by a comma. There is no need to place a comma and a space between Admin user names, just a comma. HINT: If you leave this field blank, you will not be able to log back into your web-based admin pages. HINT: Site Admin user names must be password protected. If you list a user name(s) in this field, it is suggested that you have a User Profile for each user created. If a user profile is not create for a user name, any person who logs into the chat room using that admin name will have admin privileges in the room. Step 4. Click Submit. The new user you have added will have full administrative powers in all your chat rooms within this site. 80
 in which they have been granted administrative privileges by a Site administrator, and has no web-based access, but does have access to the GUI Admin Console.")
87 Service Administration Pages Add Room Admin Service Levels That Support This Option: Basic Standard Professional Enterprise Event Reseller A Room administrator has administrative privileges in only the room(s) in which they have been granted administrative privileges by a Site administrator, and has no web-based access, but does have access to the GUI Admin Console. Once a password protected user has been created, you can add that user as a Room Administrator by following these steps: Step 1. Log in to the Web-base Administration Pages and select the Room Settings tab. Step 2. Create a new user name that is password protected, or select a user name that has already been created. Step 3. Select the room you wish to add a new Room Admin. Enter the user name(s) of the Room Admin user(s). You may enter multiple names here separated only by a comma. There is no need to place a comma and a space between Admin user names, just a comma. HINT: Room Admin user names must be password protected. If you list a user name(s) in this field, it is suggested that you have a User Profile for each user created. If a user profile is not create for a user name, any person who logs into the chat room using that admin name will have admin privileges in the room. Step 4. Click Save. The new user you have added will have full administrative powers in the chat room you have added them as a Room Admin. 81
88

89 GUI Admin Console GUI Admin Console The Chat Room Administration Console offers an easy graphic user interface (GUI) to all room and site administrators. The GUI Admin Console is a tabbed interface based on functionality. Click on the tab links below to discover more information on each tab. Sample GUI Admin Console. Most features found in the GUI Admin Console can also be found as Text Admin Commands. Service Levels That Support This Option: Basic Standard Professional Enterprise Event Reseller Starting the Room Administration Console In order to use the administrative features in your GUI Admin Console you must have Sun Java and above installed on your computer. To check your installed version of Java - verify here. Log into the room using the site or room administration user name and password. As part of your log-in messages you will see one of the following messages if you have logged in correctly: You are a site admin You are a room admin You are a operator As you enter the chat room using either a super, site or room admin user name and password, you will receive a pop-up window similar to this one: You can click Yes to open the GUI Admin Console. If you click No you can easily open the Admin Console using the Action pull-down menu and select Admin Console. Only admin users will have this option available. 83


90 ParaChat v9.12 Hosted Documentation - PDF Any changes made in the GUI Admin Console will show a confirmation at the bottom of the page. Changes will also be logged in the Log History area for that session. 84
91 GUI Admin Console GUI Admin Tabs About Rooms Users Messages Cruise Moderation Site Log 85

92 ParaChat v9.12 Hosted Documentation - PDF Help Sample GUI Admin Console 86
93 GUI Admin Console News Service Levels That Support This Option: Basic Standard Professional Enterprise Event Reseller Main The latest news & information about the chat service may be reviewed under the Main sub-tab. 87
94 ParaChat v9.12 Hosted Documentation - PDF 88
95 GUI Admin Console Rooms Service Levels That Support This Option: Basic Standard Professional Enterprise Event Reseller Status Current configuration information about your Site ID, and the chat room into which the admin is currently logged in, may be reviewed under the Status sub-tab. 89

96 ParaChat v9.12 Hosted Documentation - PDF Basic Room Greeting Set the room greeting for the chat room. The room greeting is displayed to each user when they log into the chat room.. The web-based Service Administration Pages may also be used to set a Room Greeting. Open Room Click the Open Room button to re-open a closed room. Chat rooms are open by default. 90
97 GUI Admin Console The web-based Service Administration Pages may also be used to Open & Close rooms. Close Room To close a room, enter a message that users will see when they visit a closed room, then click the Close Room button. When a room is closed, new users are unable to log into the room. However, any existing users will remain in the room. Site-level, room-level and operator-level administrators have sufficient permissions to access closed rooms. To expel all users from a room that is going to be closed, check the Also Empty Room check box before clicking the Close Room button. The web-based Service Administration Pages may also be used to Open & Close the room. Room Password Set a room password to restrict access to the chat room only to users who know the room password. Input a password into the field, and click Set to passwordprotect the chat room. Click the Remove button to remove the room password, and return the room to being accessible without a password. The web-based Service Administration Pages may also be used to set and remove a Room Password. 91

98 ParaChat v9.12 Hosted Documentation - PDF Service Levels That Support This Option: Basic Standard Professional Enterprise Event Reseller Transcript 92
99 GUI Admin Console Auto Transcript Logging To generate chat transcripts automatically, click the On button to start continuous logging. A single log file, called log, will continually append until automatic transcript generation is manually stopped by clicking the Off button. The administrator does not need to remain logged in for automatic transcript generation to continue. The web-based Service Administration Pages may also be used to manage Automatic Transcript Generation, and to retrieve the transcripts that have been generated. Recent Room History Recent Room History displays the chat text that has transpired from either 1000 lines of text or 7 days, whichever is greater. To purge this historical text, click on Clear. 93

100 ParaChat v9.12 Hosted Documentation - PDF Service Levels That Support This Option: Basic Standard Professional Enterprise Event Reseller 94
101 GUI Admin Console Filter Profanity Filter Turning the Profanity Filter On will replace words in the chat window that exist in the default profanity filter list (and/or the custom profanity filter list) with %%%% when the words are distributed to other users by the chat server. Enabling this feature from the GUI Admin Console enables this feature only for the room into which the admin user is logged in, and will override any Site-level setting. Turn the Profanity Filter Off to prevent words from being filtered by the chat server. The web-based Service Administration Pages may also be used to enable the Profanity Filter for all rooms under a Site ID. Shout Filter Turn the Shout Filter On to replace all capital letters in a user's chat message with lower case letters when they are distributed to other users by the chat server. Enabling this feature from the GUI Admin Console enables this feature only for the room into which the admin user is logged in, and will override any Site-level setting. Turn the Shout Filter Off to allow chat messages that consist of all capital letters to appear in the chat window. The web-based Service Administration Pages may also be used to enable the Shout Filter for all rooms under a Site ID. 95

102 ParaChat v9.12 Hosted Documentation - PDF 96
103 GUI Admin Console Users Service Levels That Support This Option: Basic Standard Professional Enterprise Event Reseller Expel/Ban/Gag Expel (and Ban) Highlight a user name in the Users in Room list. Click the Expel button to eject the highlighted user from the chat room. Check the Also ban the IP and Also ban the entire C class IP range check boxes, then click the Expel button, to ban the user at the time of expulsion. If the IP address is banned, it can be un-banned by 1) removing the IP address from the banned IP list in your web-based Service Administration Pages, or 2) from the Un-Ban sub-tab (see below). Service Levels That Support This Option: Basic Standard Professional Enterprise Event Reseller Gag Use the Gag feature to "silence" a user, which is to prevent a user's chat text from displaying in the chat window during a session. A gagged user's chat text is still displayed to them in their chat window. However, they are not aware that their chat text is being blocked from displaying to other users in the chat room. Ban User Name Ban a user name to prevent it from being used to log into the chat room by highlighting the user name in the Users in Room list, and clicking the Ban User Name button. Cookie Gag Set a cookie to permanently Gag a specific user. Highlight a user name in the Users in Room list, and click the Cookie Gag button to set the cookie. Use the pulldown menu next to the button to set the expiration date for the cookie. Cookie Ban 97

104 ParaChat v9.12 Hosted Documentation - PDF Set a cookie to permanently Ban a specific user. Highlight a user name in the Users in Room list, and click the Cookie Ban button to set the cookie. Use the pulldown menu next to the button to set the expiration date for the cookie. Users in Room Click the Refresh button to update the User List within that tab. Highlight a user name in the list, and click the User Info button to display information about that user's session in a pop-up window, such as IP address, session duration, etc. 98

105 GUI Admin Console Service Levels That Support This Option: Basic Standard Professional Enterprise Event Reseller Un-Ban To un-ban an IP address is to remove an IP address from the banned IP list. To unban an IP address, input the exact IP address into the text input field, then click the Unban IP button. To un-ban a user name is to remove a user name from the banned user name list. To unban a user name, input the exact user name into the text input field, then click the Unban User button. 99
106 ParaChat v9.12 Hosted Documentation - PDF 100

107 GUI Admin Console Service Levels That Support This Option: Basic Standard Professional Enterprise Event Reseller Admin Settings Invisible Log-in 101
108 ParaChat v9.12 Hosted Documentation - PDF An admin user name will not appear in the chat room's User List when an admin user turns the Invisible Log-in on by clicking the On button. An admin user retains all admin access and functionality when invisible. Site and room admin users are able to see invisible admin users, whose user names will display in italic to denote invisibility. Click the Off button to turn off Invisible Log-in. The web-based Service Administration Pages may also be used to enable Invisible Log-in. Admin User Avatar Click the On button to always display the default Admin Avatar, or custom admin avatar, next to the admin name in the chat room's User List. Click the Off button to no longer display the Admin Avatar next to the admin user name. The web-based Service Administration Pages may also be used to enable Admin Avatar. Stay On Top of User List Click the On button to always display an admin user name at the top of the chat room's User List. Click the Off button to display an admin user name in alphabetical order in the chat room's User List. The web-based Service Administration Pages may also be used to enable Stay On Top of User List. 102
109 GUI Admin Console 103
110 ParaChat v9.12 Hosted Documentation - PDF Messages Service Levels That Support This Option: Basic Standard Professional Enterprise Event Reseller Messages Send a message to a single user via a private chat window, or send a message to all users in the chat room. This is especially useful for sending routine or common messages, which can be saved to the chat server for future reference. Either enter a message in the text box, or select the message from the Stored Messages list. To send the message to a single user, highlight the user's name in the User Names list, select To the highlighted user, and press the Send button. To send the message to all users in the room, select To the entire room and press the Send button. To add a new message to the Stored Messages list to save it for future use, click Add then Save to Server. To retrieve the list of Stored Messages, click Load from Server. To remove a message from the Stored Messages list, highlight the message under Stored Messages, and click the Delete button. 104

111 GUI Admin Console 105
112 ParaChat v9.12 Hosted Documentation - PDF Cruise Service Levels That Support This Option: Basic Standard Professional Enterprise Event Reseller Cruise Cruise is used to cause a specific URL to open in a new browser window for a single user, or for all users in the chat room. This is especially useful for sending routine or common URLs, which can be saved to the chat server for future reference. Either enter a URL in the text box, or select the URL from your pre-defined list. To send the URL to a single user, highlight the user's name in the User Names list, select To the highlighted user, and press the Send button. To send the message to all users in the room, select To the entire room and press the Send button. To add a new URL to the Stored URL Links and save it for future use, click Add then Save to Server. To retrieve the list of Stored URLs, click the Load from Server button. To remove a message from the Stored URL Links, highlight the link under Stored URL Links, and click the Delete button. 106

113 GUI Admin Console 107
114 ParaChat v9.12 Hosted Documentation - PDF Moderation Service Levels That Support This Option: Basic Standard Professional Enterprise Event Reseller Set room moderation features On/Off Set the room to moderated mode or remove the room from moderated mode. Moderator Select a user, or enter a user name. Click the Add button to add it to the allowed moderators list, or the Delete button to remove it from the allowed moderators list. For a current list of moderators, click on the Show Moderators button. The list of current speakers will display under the Refresh button. Adding Moderators is also available in the Service Administration Pages. Speaker Select a user, or enter a user name. Click the Add button to add it to the allowed moderators list, or the Delete button to remove it from the allowed moderators list. For a current list of speakers, click on the Show Speakers button. The list of current speakers will display under the Refresh button. Adding speakers is also available in the Service Administration Pages. 108

115 GUI Admin Console 109
116 ParaChat v9.12 Hosted Documentation - PDF Site Service Levels That Support This Option: Basic Standard Professional Enterprise Event Reseller Message >>> Broadcast Type a message into the text input field, and click the Send button to broadcast the message to all users in all rooms under a Site ID. Message >>> Kick Out All Users Type a message into the text input field, and click the Empty button to expel all users from all rooms under a Site ID, and display the message in each user's chat window. 110

117 GUI Admin Console 111
118 ParaChat v9.12 Hosted Documentation - PDF Super Service Levels That Support This Option: Basic Standard Professional Enterprise Event Reseller User Expel/Ban Either enter the user name or click on User Info to get the highlighted user name from the chat window. Check on options Also ban the IP and Also ban the entire C class IP range and then click on Expel button to expel or ban the user. If you ban the IP address, you will need to remove the IP address from the banned IP list in your web-based Service Administration pages to allow the user back into your rooms. Gag Allows you to have a user stay in the room, but none of their chat text is displayed in the room. Their text is displayed on their screen so they think that they are still annoying the room. However, they are not aware that their text is being blocked in the room and usually give up and leave without knowing that they have been gagged. Ban Room Name Add the room name to the banned room name list. 112

119 GUI Admin Console Message Broadcast a message to all users on the chat server. 113
120 ParaChat v9.12 Hosted Documentation - PDF 114
121 GUI Admin Console Log Service Levels That Support This Option: Basic Standard Professional Enterprise Event Reseller Log History Any changes that transpire during an admin session using the GUI Admin Console will be reflected in the Log History tab. Click the Clear button to clear the activity history, or click the Pop button to display the activity in a pop-up window from which the admin user may copy the text. 115

122 ParaChat v9.12 Hosted Documentation - PDF 116
123 GUI Admin Console Help Service Levels That Support This Option: Basic Standard Professional Enterprise Event Reseller Help The Help tab contains links to the Documentation and the Service Administration Pages. About The About tab displays copyright and version information about the chat software. Also display are the operating system and Java version used by the admin user's computer. 117
124 ParaChat v9.12 Hosted Documentation - PDF 118

125 GUI Admin Console 119
126
127 Customization How To Customize Your Chat Room How To Customize Your Chat Room By default your chat room works as soon as you paste your code onto your web page. To make customizations to your room there are 3 different ways to make these settings. 1. Site Manual Customization Site Wide Customizations will be reflected in all the rooms within your site and will over write any server default settings. 2. Room Manual Customization Room Manual Customizations will only be reflected in the room you are making the changes to. This setting will over ride any server default and Site Manual Customizations. 3. HTML Applet Code Customization HTML Applet Code Customizations will only be reflected in the room you are making the changes to. These settings will over ride any server default, Site Manual Customizations & Room Manual Customizations. This option will allow you to have the same room on 2 different pages with a completely different look and feel. 121
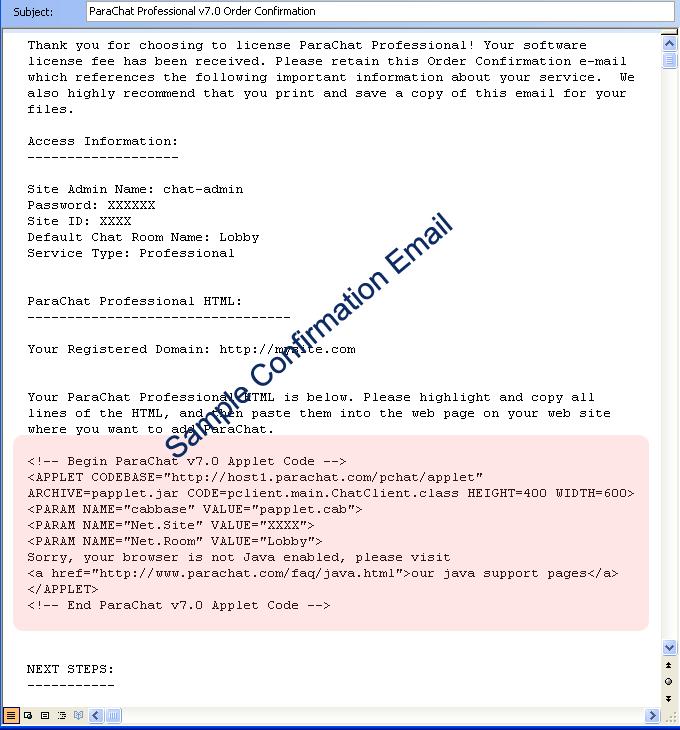
128 ParaChat v9.12 Hosted Documentation - PDF Chat Applet Code How to add HTML parameters to your applet code. The following is an example on how to add HTML applet code to your current chat room. If you wanted to change the background color to FF0000 (red) you would add the following HTML to your chat applet code. However, it is much easier to add customization options using the Room Manual Customization or Site Manual Customization page in your Service Administration Pages. <!-- Begin Chat Applet Code --> <applet codebase= archive=papplet.jar code=pclient.main.chatclient.class HEIGHT=400 WIDTH=600> <param name="net.room" value="lobby"> <param name="net.site" value="592bej"> <param name="col.mainfg" value="ff0000"> If you see this message you do not have a Java enabled browser. Visit <a href=" ParaChat Support</a> for more information on how to upgrade your browser! </applet> <!-- End Chat Applet Code --> Below is an example of the that was sent out to you after you placed your hosted chat room order. If you have deleted or lost your original you can get a copy of your room code from your Service Administration Pages. 122
129 Customization 123
130 ParaChat v9.12 Hosted Documentation - PDF Chat Applet Defined There are some key HTML parameters that must be included with your applet code. If you change these settings from what you registered, your room will not work correctly. As in all HTML parameters, capitalization counts! Below you will see a description of each value. codebase = The URL of where you download the chat code. height = Setting for the height of the chat room on your web page. width = Setting for the width of the chat room on your web page. archive = ParaChat Java class files code = ParaChat Java class files Net.Room = Name of your registered chat room. Net.Site = The name of your Site issued to you when you signed up for your service. This is only changeable when you are running your own chat server, on your hardware. Do not modify this setting or your room will not function. <!-- Begin Chat Applet Code --> <applet codebase= archive=papplet.jar code=pclient.main.chatclient.class HEIGHT=400 WIDTH=600> <param name="net.room" value="lobby"> <param name="net.site" value="00000"> If you see this message you do not have a Java enabled browser. Visit <a href=" ParaChat Support</a> for more information on how to upgrade your browser! </applet> <!-- End Chat Applet Code --> 124
131 Customization Customize Chat Room Colors Service Levels That Support This Customization: Basic Standard Professional Enterprise Event Reseller 1. Foreground Color Of Chat Room - text color 2. Background Color Of Chat Room - skin color 3. Background Color Of Show Users List 4. Background Color Of Show Rooms List 5. Background Color Of Text Input Field 6. Foreground Color Of Text Input Field 7. Background Color Of Main Chat Area 8. Text Color In the Main Chat Area 9. Color Of System Message In The Main Chat Window 10. Color Of URL Links In The Main Chat Room 11. Color Of Text In User List Of The Main Window 12. Color Of Logged In User In User List And Room Name In Room List 13. Color Of Admin User in User List 14. Color Of User Count In Main Chat Area 125
132 ParaChat v9.12 Hosted Documentation - PDF Branding Banner & Text Banners Service Levels That Support This Customization: Basic Standard Professional Enterprise Event Reseller The Branding Banner and Text Banners customizations can be made via your Service Administration Pages at a Site level. If you would like to customize each individual chat room you can use the options below. 1. Display Text Ads At Bottom Of Chat Room 2. Display Text Ads At Bottom Of Chat Room On The Log-in Page 3. Display Branding Banner In The Chat Room 4. Display Branding Banner In The Chat Room Log-in Page 5. Display Branding Banner In The Top Branding Banner Area 6. Define The Width Of the Branding Banner Area 7. Define The Height Of the Branding Banner Area 8. Define The Image Displayed In The Branding Banner Area 9. Define The Image Click-through Associated With Branding Banner 126
133 Customization Customize Chat Room Buttons Service Levels That Support This Customization: Basic Standard Professional Enterprise Event Reseller 1. Text For Test Button On Sound Selection Pop-up 2. Text For Send Button On Sound Selection Pop-up 3. Text For Ok Button 4. Text For Cancel Button 5. Text For Send Button 6. Text For Ask Button Displayed During A Moderated Event 7. Text For Rooms Button 8. Text For Users Button 9. Text For Connect Button On The Log-in Panel 10. Text For Download Button In Recent Room History Window 11. Text For Get Java Button Text In Prompt For Getting Latest Java 12. Text For Enter Without Password In The User Password Prompt 13. Text For "Start" in Ping Under Troubleshooting 14. Text For "Stop" in Ping Under Troubleshooting 15. Text For "Regular Connection" in Connectivity Under Troubleshooting 16. Text For "Alternative" in Connectivity Under Troubleshooting 17. Text For "Secure" in Connectivity Under Troubleshooting 127
134 ParaChat v9.12 Hosted Documentation - PDF Customize Chat Room Labels Service Levels That Support This Customization: Basic Standard Professional Enterprise Event Reseller 1. Text For User Name: On Log-in Panel 2. Text For Password: On Log-in Panel 3. Text For User Info: On Log-in Panel 4. Text For Room Password On Log-in Panel 5. Text For Show Busy Check Box On User Status Pop-up Window 6. Text For To: Field Of A Private Chat Window 7. Text For Room Field Of A Private Chat Window 8. Text For From Field Of A Private Chat Window 9. Text For is typing Field From Main Chat Room Notification 10. Text For Chat Title In Various Pop-up Windows 11. Text In Reconnect Pop-up Window Above The List 12. Text In Reconnect Pop-up Window Before Cancel Button 13. Text For Room: On Log-in Panel 14. Text For Accept On Private Chat Message Prompt For Approval 15. Text For Reject and Ignore This User On Private Chat Message Prompt For Approval 16. Text For Cancel On Private Chat Message Prompt For Approval 128
135 Customization Customize Chat Room Messages Service Levels That Support This Customization: Basic Standard Professional Enterprise Event Reseller 1. Message appears in a pop-up prompt when a user selects to log off 2. Message appears in main chat area after log-off was confirmed 3. Message appears in main chat area when user wants to connect but the user is already connected to the chat server 4. Message appears in main chat area when a user is not connected to the chat server 5. Message appears in a pop-up prompt when a user name password is required 6. Message appears in a pop-up prompt when a room password is required 7. Message appears in the main chat room when a user joins the room 8. Message appears in the main chat room when a user exits the room 9. Message appears in the main chat room when a Super Admin user enters 10. Message appears in the main chat room when a Site Admin enters 11. Message appears in the main chat room when a Room Admin enters 12. Message appears in the blank area when the main chat room pops up 13. Message appears in the main chat room allowing user to reconnect to chat room 14. Message appears in a pop-up prompt when a user selects to clear all text 15. Message appears in a pop-up prompt when a user has an older version of Java 16. Message appears in the main chat window when a user submits a sound 17. Message appears in the main chat window when user is disconnected for an unexplained reason 129
136 ParaChat v9.12 Hosted Documentation - PDF 18. Message appears in the main chat window when the default TCP connection does not go through - typically due to fire wall between the user and the chat server 19. Message appears in the main chat window when the default TCP connection does not go through and HTTP tunneling is used as an alternative connection protocol 20. Message appears in the main chat window when the user is prohibited from connecting to the chat server - typically due to firewall blocking all access 21. Message appears in the main chat window when user is connecting to chat server 22. Message appears in the main chat window notifying user what room they have entered 23. Message appears in the roaming window when a user is not found 24. Message appears in the recent room history window 25. Message appears when a regular use is not allowed to initiate private chat 26. Message appears for public notification in a popup window 27. Message appears for private notification in a popup window 28. Message appears in the text entry area - "Start typing here" 130
137 Customization Customize Chat Room Menus Service Levels That Support This Customization: Basic Standard Professional Enterprise Event Reseller 1. Text That Appears For Action Menu Item 2. Text That Appears For Recent Room History 3. Text That Appears For My Avatar 4. Text That Appears For Clear Text 5. Text That Appears For Connect 6. Text That Appears For Quit 7. Text That Appears For Admin Console 8. Text That Appears For Moderation Console 1. Text That Appears For Options Menu Item 2. Text That Appears For Tree View 3. Text That Appears For Timestamp 4. Text That Appears For Display Smiley Faces 5. Text That Appears For Room Audio 6. Text That Appears For Block All Private Messages 7. Text That Appears For Auto Reconnect 8. Text That Appears For Sound On Enter 9. Text That Appears For On Under Sound Enter On 10. Text That Appears For Sound On Exit Under 11. Text That Appears For On Under Sound Exit On 12. Text That Appears For Sound on New Text 13. Text That Appears For On Under Sound on New Text 14. Text That Appears For Notify Public Messages 15. Text That Appears For Notify Private Messages 16. Text That Appears For Approve All Private Chat 17. Text That Appears For Show Join/Leave 18. Text That Appears For Show Avatars 131
138 ParaChat v9.12 Hosted Documentation - PDF 19. Text That Appears For Show Background Image 20. Text That Appears For Double Space 21. Text That Appears For Insert Separator 22. Text That Appears For Font Size 23. Text That Appears For My User Font 24. Text That Appears For Window Background Color 25. Text That Appears For Page Admin 1. Text That Appears For Roam Menu Item 2. Text That Appears For Room List 3. Text That Appears For Create Room 4. Text That Appears For User Search 1. Text That Appears For AV Menu Items 2. Text That Appears For Voice Chat Menu Item (voice only) 3. Text That Appears For AV 4. Text That Appears For Start My Voice Chat Broadcast (voice only) 5. Text That Appears For Start My Voice/Video Chat Broadcast 6. Text That Appears For Show Requests to Hear My Broadcast (voice only) 7. Text That Appears For Show Requests to Show My Broadcast 8. Text That Appears For Show My Voice Chat Icon (voice only) 9. Text That Appears For Show My Voice/Video Icon 1. Text That Appears For Help Menu Item 2. Text That Appears For Chat Help 3. Text That Appears For About 4. The Support URL That Users Are Taken To When They Select Chat Help Under The Help Menu Item 5. Add or Remove The Troubleshooting Menu Item 1. Text That Appears For Mobile Menu Item 2. Text That Appears For Mobile 3. Text That Appears For Mobile Interface 1. Text That Appears For Security Menu Item 2. Text That Appears For Security Info 132
139 Customization 1. Private Chat Window Menu Items 2. Text That Appears On The Private Chat Window Ignore This User 3. Text That Appears On The Private Chat Window Beep On New Text 1. The Download Java URL That Users Are Taken To When They Select Download latest Java 133
140 ParaChat v9.12 Hosted Documentation - PDF Customize Mouse-Over Tips Service Levels That Support This Customization: Basic Standard Professional Enterprise Event Reseller 1. Mouse-Over Tip For Bold Button 2. Mouse-Over Tip For Italic Button 3. Mouse-Over Tip For Smile Button 4. Mouse-Over Tip For Color Button 5. Mouse-Over Tip For Sound Button 6. Mouse-Over Tip For Status Button 7. Mouse-Over Tip For Float Button 8. Mouse-Over Tip For Help Button 9. Mouse-Over Tip For Log-out Button 10. Mouse-Over Tip For Log-in Button 11. Mouse-Over Tip For User Count Label 12. Mouse-Over Tip For AV Button (voice only) In Private Message Window 13. Mouse-Over Tip For AV Button (voice/video) In Private Message Window 14. Mouse-Over Tip For AV Button (voice only) In Main Chat Window 15. Mouse-Over Tip For AV Button (voice/video) In Main Chat Window 16. Mouse-Over Tip For Roam On User/Rooms List 134
141 Customization 17. Mouse-Over Tip For Search User On User/Rooms List 135
142 ParaChat v9.12 Hosted Documentation - PDF Chat Options Service Levels That Support This Customization: Basic Standard Professional Enterprise Event Reseller 1. Turn Click-able Text In Chat Room On/Off 2. Lobby Feature - Show Room List Instead Of User List When Logging Into Room 3. Set The Help Click-thru URL 4. The Download Java URL That Users Are Taken To When They Select "Download latest Java" 5. Join Leave Message - Setting The Default 6. Font Size - Setting The Default 7. Whether to pop-up Recent Room History after user logs into the chat room 8. Whether to add Rooms Tab to roam pop-up window 9. Whether to add Create Tab to roam pop-up window 10. Whether to add Users Tab to roam pop-up window 11. Tree View - Empty Rooms Are Deleted Only If They Are Dynamic Rooms 12. Tree View - Position (Angled, None & Horizontal) 13. User Password Field From Within The Log-in Panel 14. User Info Field From Within The Log-in Panel 15. Room Password Field From Within The Log-in Panel 16. Space Characters In User Name On Log-in Panel Will Be Replaced With Underscore 17. User List Default Height 18. Where To Display The User / Rooms List (left or right) 19. Maximum Number Of Characters To Display In The Main Chat Area & Private Windows 20. Use Pop-up Mode After Log-in 21. Define A New Language File For A Chat Room 22. Use Browser Cookie For User Data 23. Show Right Click Menu On Text Components for Copy/Paste 24. Show Copy (besides Select All) On Right Click Of Main Chat & Private Chat Window 25. Add Button for Enter Without Password in User Password Prompt 26. Auto Scroll Text Of Main Chat & Private Chat 136
143 Customization 27. Enable Timestamp For All Messages 28. Customize Language For Room(s) 29. Disallow Users From Initiating Private Chat 30. Disable Right Click On A User Name 31. Disable Copy Text From Main Chat And Private Chat 32. Set Bold Button Initial State 33. Color Of Other Users Before Chat Message In Main Chat Area 34. Color Of User (self) Before Chat Message In Main Chat Area 35. Whether To Show The HTTP Tunneling Message In The Main Chat Area 36. Height Of The Text Input Field In The Main Chat Room 37. Font Size In The User List & Rooms List 38. Auto Reconnect State 39. Auto Reconnect Frequency 40. Text Entered and Displayed Right to Left (Arabic, Hebrew etc. Languages) 41. Select A Room To Join 42. Notification If You Have Public Messages 43. Notification If You Have Private Messages 44. Prompt For Admin Console Between Rooms 45. Whether To Show "Start Typing Here" Text 46. Whether To Enforce Max Number Of Characters For Text Input 47. Whether To Show Connectivity Tab 48. Whether To Put Sliding Horizontal Bar Between Main Chat & Input Field 49. Maximum Number Of Characters Allowed To Be Typed In The Main Text Entry Field 50. Guest log-in option. User Name Created Automatically and Logged Into The Room 51. Whether To Put AV Menu Under Action As A Sub-menu 52. Set Default Of "approve all private chat" 53. Set Default Of "block all private chat" Under Options 54. Whether To Use Non-Transparent Images For Buttons 55. Whether To Show WAP Tab In Mobile Pop-up Window 56. Whether To Show iphone Tab In Mobile Pop-up Window 57. Whether To Show A Border For Main Chat Area For Java Preview Window Only 58. Whether To Show A Logo Image On WAP Pages (mobile device only) 137
144 ParaChat v9.12 Hosted Documentation - PDF Customize Right-Click Menus Service Levels That Support This Customization: Basic Standard Professional Enterprise Event Reseller 1. Right-Click Private Chat Pop-up Menu Item In User List 2. Right-Click See Profile Pop-up Menu Item In User List 3. Right-Click Ignore Pop-up Menu Item In User List 4. Right-Click Unignore Pop-up Menu Item In User List 5. Right-Click Available Pop-up Menu Item In Online Status Messages 6. Right-Click New Status Message Pop-up Menu Item In Online Status Messages 7. Right-Click Join Room Pop-up Menu Item In Room List 8. Right-Click Refresh Room List 9. Right-Click Copy Select Text 10. Right-Click Select All Select Text 11. Right-Click Cut Select Text 12. Right-Click Paste Select Text 138
145 Customization Room Roaming Service Levels That Support This Customization: Basic Standard Professional Enterprise Event Reseller 1. Text On Rooms Roaming Tab 2. Text On Creation Roaming Tab 3. Text On Users Roaming Tab 4. Text On Roam Window For Click refresh to update room list 5. Text On Roam Window For Find User 6. Text On Roam Window For Rooms 7. Text On Roam Window For User Names 8. Text On Roam Window For Create a New Chat Room 9. Text On Roam Window For Add a Password 10. Text On Roam Window For Search Result 11. Text On Roam Window For Refresh Button 12. Text On Roam Window For Join Button 13. Text On Roam Window For Chat Button 14. Text On Roam Window For Create Button 15. Text On Roam Window For Find Button 16. Whether Room Roaming Is Enabled 139
146 ParaChat v9.12 Hosted Documentation - PDF Remove Options Add or Remove Menu Items Service Levels That Support This Customization: Basic Standard Professional Enterprise Event Reseller 1. Add or Remove Action Top Menu Item 2. Add or Remove Recent Room History From The Action Menu Item 3. Add or Remove Avatar From The Action Menu Item 4. Add or Remove Options Top Menu Item 5. Add or Remove Timestamp From The Options Menu Item 6. Add or Remove Room Audio From The Options Menu Item 7. Add or Remove Block All Private Messages From The Options Menu Item 8. Add or Remove Sound On Enter From The Options Menu Item 9. Add or Remove Sound On Exit From The Options Menu Item 10. Add or Remove Sound On New Text From The Options Menu Item 11. Add or Remove Show Join/Leave From The Options Menu Item 12. Add or Remove Page Admin From The Options Menu Item 13. Add or Remove Roam Top Menu Item 14. Add or Remove Room List From The Roam Menu Item 15. Add or Remove Create Room From The Roam Menu Item 16. Add or Remove User Search From The Roam Menu Item 17. Add or Remove All AV (Voice & Video) Related Buttons and Menus 18. Add or Remove AV (Voice & Video) Menu 19. Add or Remove Help Top Menu Item 140
147 Customization 20. Add or Remove Chat Help From The Help Menu Item 21. Add or Remove About From The Help Menu Item 22. Add or Remove The Right Click Option To View User Profiles 23. Add or Remove Troubleshooting Text 24. Add or Remove The Notify Public Message option 25. Add or Remove The Mobile Top Menu Item 26. Add or Remove The Mobile Interface Item 27. Add or Remove Approve All Private Chat Menu Item 141
148 ParaChat v9.12 Hosted Documentation - PDF Add or Remove Buttons Service Levels That Support This Customization: Basic Standard Professional Enterprise Event Reseller 1. Add or Remove Bold Button 2. Add or Remove Italic Button 3. Add or Remove Smile Button 4. Add or Remove Color Button 5. Add or Remove Sound Button 6. Add or Remove Status Button 7. Add or Remove Float Button 8. Add or Remove Help Button 9. Add or Remove Voice Button 10. Add or Remove Video Button 11. Add or Remove Log-in / Log-out Button 12. Add or Remove User Count Label 13. Add or Remove Voice Button From The Private Message Window 14. Add or Remove Video Button From The Private Message Window 15. Add or Remove Ignore and Unignore On User List 16. Add or Remove Room Plus Sign 142
149 Customization 17. Add or Remove Magnifying Glass 143
150 ParaChat v9.12 Hosted Documentation - PDF Lists for Sounds, Icons, Etc. Customize Avatars, Emoticons and Sounds Service Levels That Support This Customization: Basic Standard Professional Enterprise Event Reseller You can easily customize your settings for Avatars, Emoticons and Sounds. 1. Customize Avatars List 2. Customize Emoticons List 3. Customize Sounds List 4. Customize Alert Sounds List 5. Customize Status List 6. Customize Fonts List 144
151 Customization Customize Avatars Service Levels That Support This Customization: Basic Standard Professional Enterprise Event Reseller If you would like to customize the list of Avatar for your rooms you can simply add a parameter to tell the chat server which avatars to display in your rooms. By default all avatars will be available in your rooms when you have enabled avatars for your users. To remove the Avatar option completely, disable this feature in your Service Administration Pages. If you wish to limit which avatars are displayed complete the following steps. Step 1. Determine which avatars you would like included in your avatar list. Below is a list of avatars and avatar names. Avatar Avatar Name Avatar Avatar Name admin.gif (admin user only) default.png default2.png elf1.png elf2.png punk1.png punk2.png alien1.png alien2.png av21.png av22.png av23.png av24.png av27.png av28.png av29.png av32.png 145
152 ParaChat v9.12 Hosted Documentation - PDF av33.png av34.png av30.png av31.png av1.png av2.png av3.png av4.png av5.png av6.png av7.png av8.png av25.png av26.png av9.png av10.png av11.png av12.png av13.png av14.png av15.png av16.png av17.png av18.png av19.png av20.png cat.png dog.png penguin.png pig.png Step 2. Log into your Service Administration Area and navigate to Site Settings >> Manual Customization. 146
153 Customization Step 3. Step 4. In the Parameter Name field enter Cf.Avatar In the Parameter Value field add the names of the Avatars (from the list in Step 1) you would like to display in your chat rooms. Separate the file names with a comma and no space. Click Add. Only the listed Avatar names will appear as an option for your users. Review the settings you just saved under the Current Customization Parameters for Your Site list. 147
154 ParaChat v9.12 Hosted Documentation - PDF Step 5. When your users try to select a new Avatar they will see a list similar to the one below. 148
155 Customization Customize Avatars List Parameter Name: Cf.Avatar Parameter Permitted Value: Any installed Avatar Service Levels That Support This Customization: Basic Standard Professional Enterprise Event Reseller HTML Configuration: <param name="cf.avatar" value="<see list above>"> Info: The only avatar that will display will be the avatars listed with this parameter setting. For the entire list please see below: 149
156 ParaChat v9.12 Hosted Documentation - PDF Cf.Avatar=elf1.png,elf2.png,punk1.png,punk2.png,alien1.png,alien2.png,av21.png,av22.png, av23.png,av24.png,av27.png,av28.png,av29.png,av32.png,av33.png,av34.png,av30.png,av31.png, av1.png,av2.png,av3.png,av4.png,av5.png,av6.png,av7.png,av8.png,av25.png,av26.png,av9.png, av10.png,av11.png,av12.png,av13.png,av14.png,av15.png,av16.png,av17.png,av18.png,av19.png, av20.png,cat.png,dog.png,penguin.png,pig.png,default.png,default2.png Use Site Level Avatar Image Files Parameter Name: Ctrl.Site.Avat Parameter Permitted Value: true or false Service Levels That Support This Customization: Basic Standard Professional Enterprise Event Reseller HTML Configuration: <param name="ctrl.site.avat" value="false"> 150
157 Customization Customize Emoticons Service Levels That Support This Customization: Basic Standard Professional Enterprise Event Reseller If you would like to customize the list of emoticons for your rooms you can simply add a parameter to tell the chat server which emoticons to display in your rooms. By default all emoticons will be available in your rooms. If you wish to limit which avatars are displayed follow the following steps. Step 1. Determine which emoticons you would like included or remove in your emoticons list. Below is a list of emoticons and emoticons names. Emoticons Emoticon Name Emoticons Emoticon Name angry asprin beer biggrin biglips blink blush closedeyes coffee cool coolsmile dry excl eye frown glare happy huh laugh lips mad mellow ninja ohmy punk rolleyes rose sad sadeyes sleep 151
158 ParaChat v9.12 Hosted Documentation - PDF smile surprise thumbdown tongue wacko wink smoke teeth thumbup unsure wine wub yawn Step 2. Log into your Service Administration Area and navigate to Site Settings >> Manual Customization. Step 3. Step 4. To Add a emoticon: In the Parameter Name field enter Cf.AddSmiley To Remove a emoticon: In the Parameter Name field enter Cf.DelSmiley In the Parameter Value field add the names of the emoticon (from the list in Step 1) you would like to modify in your chat rooms. Separate the emoticon name(s) with a comma and no space. Click Add. Review the settings you just saved under the Current Customization Parameters for Your Site list. 152

159 Customization Step 5. When your users try to select from their emoticon list they will see a list similar to the one below. Customize Emoticons - Add Parameter Name: Cf.AddSmiley Parameter Permitted Value: Any installed emoticon Service Levels That Support This Customization: Basic Standard Professional Enterprise Event Reseller HTML Configuration: <param name="cf.addsmiley" value="<see list above>"> Java Lite Support Customize Emoticons - Remove Parameter Name: Cf.DelSmiley Parameter Permitted Value: Any installed emoticon Service Levels That Support This Customization: Basic Standard Professional Enterprise Event Reseller HTML Configuration: <param name="cf.delsmiley" value="<see list above>"> Java Lite Support 153
160 ParaChat v9.12 Hosted Documentation - PDF Use Site Level Emoticons Image Files Parameter Name: Ctrl.Site.Smile Parameter Permitted Value: true or false Service Levels That Support This Customization: Basic Standard Professional Enterprise Event Reseller HTML Configuration: <param name="ctrl.site.smile" value="false"> 154
161 Customization Customize Sounds Service Levels That Support This Customization: Basic Standard Professional Enterprise Event Reseller If you would like to customize the list of sounds for your rooms you can simply add a parameter to tell the chat server which sounds to display in your rooms. By default all sounds will be available in your rooms. To remove the sounds option completely, disable this feature in your Service Administration Pages. If you wish to limit which sounds are displayed complete the following steps. Step 1. Determine which sounds you would like included in your sounds list. Below is a list of sounds and sound names. ambulance applause arrow-flying arrow artillery atchu1 atchu2 baboon babygiggle bark barks bear-grizzly bear beep bite boing bomb bong boo-hiss boo break-dishes bubble bubbles burp1 burp2 busy camel cannon car-break car-door car-horn1 car-horn2 car-horn3 car-horn4 car-horn5 car-horn6 car-horn7 car-start car-start2 cat chainsaw chimp chicken chirp chomp clap clink close computer cougar cough cow cowbell crash cry cuckoo dialtone do-it dog-drink dogwhine dog_drinking dolphin door-close1 door-close2 door-open doorbell doorcreak drain electric elephant explode fastbusy flush flyby gasp gate giggle-baby giggle-kid giggle-man electricguitar gigglewoman gong guinea-pig gun-fight hehe hog home-run howl ice infant 155

162 ParaChat v9.12 Hosted Documentation - PDF ip jackhammer keyboard kids-yeah kiss kitten knife knock landing laugh-jolly laugh laughing lion machine-gun march meow monkey oil-can open-bottle pig plane police1 police2 polizia pop punch1 punch2 punch3 punch4 puppy quack reload-rack reload return ring1 ring2 ring3 rooster scratch scream-echo scream screech sealion shotgun silencer slap slurp small-bell snore snore2 soda-ice soda1 soda2 space-alien space-music speed splash splat squeak-toy start-your sword1 sword2 teehee telephone thunder tic-toc1 tic-toc2 tincan tone toot touchtone.0 touchtone.1 touchtone.2 touchtone.3 touchtone.4 touchtone.5 touchtone.6 touchtone.7 touchtone.8 touchtone.9 touchtone.# touchtone.* train truck-start tuner waahh monitorbeep waterrunning waterdrop wave whistle wolf wookie yawn yeehaw yell1 yell2 zip Step 2. Log into your Service Administration Area and navigate to Site Settings >> Customize Global Room Settings >> Manual Customization. Step
 you would like to display in your chat")

163 Customization Step 4. In the Parameter Name field enter Cf.Sounds In the Parameter Value field add the names of the sounds (from the list in Step 1) you would like to display in your chat rooms. Separate the file names with a comma and no space. Click Add. Only the listed sound names will appear as an option for your users. Review the settings you just saved under the Current Customization Parameters for Your Site list. Step 5. When your users try to select a new sound they will see a list similar to the one below. 157
164 ParaChat v9.12 Hosted Documentation - PDF Customize Sounds List Parameter Name: Cf.Sounds Parameter Permitted Value: Any installed sounds Service Levels That Support This Customization: Basic Standard Professional Enterprise Event Reseller HTML Configuration: <param name="cf.sounds" value="<see list above>"> Info: The only sounds that will display will be the sounds listed with this parameter setting. Java Lite Support Use Site Level Sound Files Parameter Name: Ctrl.Site.Snd Parameter Permitted Value: true or false Service Levels That Support This Customization: Basic Standard Professional Enterprise Event Reseller HTML Configuration: <param name="ctrl.site.snd" value="false"> 158
165 Customization Customize Alert Sounds Service Levels That Support This Customization: Basic Standard Professional Enterprise Event Reseller If you would like to customize the list of alert sounds for your rooms you can simply add a parameter to tell the chat server which alert sounds to display in your rooms. By default a smaller list of sounds will be available in your rooms. If you wish to customize which alert sounds are displayed complete the following steps. Step 1. Determine which sounds you would like included in your alert sounds list. Below is a list of sounds and sound names. ambulance applause arrow-flying arrow artillery atchu1 atchu2 baboon babygiggle bark barks bear-grizzly bear beep bite boing bomb bong boo-hiss boo break-dishes bubble bubbles burp1 burp2 busy camel cannon car-break car-door car-horn1 car-horn2 car-horn3 car-horn4 car-horn5 car-horn6 car-horn7 car-start car-start2 cat chainsaw chimp chicken chirp chomp clap clink close computer cougar cough cow cowbell crash cry cuckoo dialtone do-it dog-drink dogwhine dog_drinking dolphin door-close1 door-close2 door-open doorbell doorcreak drain electric elephant explode fastbusy flush flyby gasp gate giggle-baby giggle-kid giggle-man electricguitar gigglewoman gong guinea-pig gun-fight hehe hog home-run howl ice infant ip jackhammer keyboard kids-yeah kiss kitten 159

166 ParaChat v9.12 Hosted Documentation - PDF knife knock landing laugh-jolly laugh laughing lion machine-gun march meow monkey oil-can open-bottle pig plane police1 police2 polizia pop punch1 punch2 punch3 punch4 puppy quack reload-rack reload return ring1 ring2 ring3 rooster scratch scream-echo scream screech sealion shotgun silencer slap slurp small-bell snore snore2 soda-ice soda1 soda2 space-alien space-music speed splash splat squeak-toy start-your sword1 sword2 teehee telephone thunder tic-toc1 tic-toc2 tincan tone toot touchtone.0 touchtone.1 touchtone.2 touchtone.3 touchtone.4 touchtone.5 touchtone.6 touchtone.7 touchtone.8 touchtone.9 touchtone.# touchtone.* train truck-start tuner waahh monitorbeep waterrunning waterdrop wave whistle wolf wookie yawn yeehaw yell1 yell2 zip Step 2. Log into your Service Administration Area and navigate to Site Settings >> Manual Customization. Step 3. In the Parameter Name field enter Cf.Alert 160
167 Customization Step 4. In the Parameter Value field add the names of the sounds (from the list in Step 1) you would like to display in your chat rooms. Separate the file names with a comma and no space. Click Add. Only the listed sound names will appear as an option for your users. Review the settings you just saved under the Current Customization Parameters for Your Site list. Step 5. When your users try to select a new sound they will see a list similar to the one below. 161

168 ParaChat v9.12 Hosted Documentation - PDF Customize Alert Sounds List Parameter Name: Cf.Alert Parameter Permitted Value: Any installed sounds Service Levels That Support This Customization: Basic Standard Professional Enterprise Event Reseller HTML Configuration: <param name="cf.alert" value="<see list above>"> Info: The only sounds that will display will be the alert sounds listed with this parameter setting. Java Lite Support 162
169 Customization Customize Status Messages Service Levels That Support This Customization: Basic Standard Professional Enterprise Event Reseller If you would like to customize the list of alert sounds for your rooms you can simply add a parameter to tell the chat server which alert sounds to display in your rooms. By default a smaller list of sounds will be available in your rooms. If you wish to customize which alert sounds are displayed complete the following steps. Step 1. Determine which status messages you would like included in your status messages list. Below is a list of standard messages. You can include any messages you would like. Busy Stepped Out Be Right Back Not At My Desk On the Phone Step 2. Log into your Service Administration Area and navigate to Site Settings >> Manual Customization. Step

170 ParaChat v9.12 Hosted Documentation - PDF Step 4. In the Parameter Name field enter Cf.Status In the Parameter Value field add the names of the status message you would like to display in your chat rooms. Separate the file names with a comma and a space. Click Add. Only the listed sound names will appear as an option for your users. Review the settings you just saved under the Current Customization Parameters for Your Site list. Step 5. When your users try to select a new status message they will see a list similar to the one below. Customize Status Messages List Parameter Name: Cf.Status Parameter Permitted Value: Any messages Service Levels That Support This Customization: Basic Standard Professional Enterprise Event Reseller 164
171 Customization HTML Configuration: <param name="cf.status" value="any messages separated with a comma and a space"> Info: The only status messages that will display will be the status messages listed with this parameter setting. 165

172 ParaChat v9.12 Hosted Documentation - PDF Customize Fonts Service Levels That Support This Customization: Basic Standard Professional Enterprise Event Reseller If you would like to customize the list of fonts for your rooms you can simply add a parameter to tell the chat server which alert sounds to display in your rooms. By default a smaller list of sounds will be available in your rooms. If you wish to customize which alert sounds are displayed complete the following steps. Step 1. Determine which status messages you would like included in your status messages list. Below is a list of standard messages. You can include any messages you would like. Dialog TimesRoman Courier Helvetica Step 2. Log into your Service Administration Area and navigate to Site Settings >> Manual Customization. Step
 you would like to display in your chat rooms. Separate the file names with a comma and no space.")

173 Customization Step 4. In the Parameter Name field enter Cf.Fonts In the Parameter Value field add the names of the fonts (from the list in Step 1) you would like to display in your chat rooms. Separate the file names with a comma and no space. Click Add. Only the listed sound names will appear as an option for your users. Review the settings you just saved under the Current Customization Parameters for Your Site list. Step 5. When your users try to select a new status message they will see a list similar to the one below. Customize Status Messages List Parameter Name: Cf.Fonts Parameter Permitted Value: Any installed font Service Levels That Support This Customization: Basic Standard Professional Enterprise Event Reseller 167
174 ParaChat v9.12 Hosted Documentation - PDF HTML Configuration: <param name="cf.fonts" value="any installed font from list above"> Info: The only fonts that will display will be the fonts listed with this parameter setting. 168
175 Avatars Allow Avatars Service Levels That Support This Customization: Basic Standard Professional Enterprise Event Reseller By default avatars will be allowed for your users when they log into the chat room, but not displayed by default. Users do have the ability to turn avatars on via the Options menu after then log into the chat room. To display avatars by default complete the following steps. Step 1. Log into your Service Administration Area and navigate to Site Settings > Site- Wide Settings. 169
176 ParaChat v9.12 Hosted Documentation - PDF Step 2. Navigate to Avatars >> Display Avatars by Default and select Enabled (this can be seen in red above). Display Avatars by Default Enabled - will allow users to see the My Avatar selection under the Options menu and have the Show Avatars selected under the Options menu. (see example below) 170
177 Avatars Disabled - will allow users to see the My Avatar selection under the Options menu and allow users to see the Show Avatars un-selected under the Options menu. (see example below) 171
178 ParaChat v9.12 Hosted Documentation - PDF Enable / Disable Avatars Parameter Name: Val.Avatar Parameter Permitted Value: true or false Service Levels That Support This Customization: Basic Enterprise 172
179 Avatars Standard Professional Event HTML Configuration: <param name="val.avatar" value="false"> 173
180 ParaChat v9.12 Hosted Documentation - PDF Remove Avatar Option Service Levels That Support This Customization: Basic Standard Professional Enterprise Event Reseller By default avatars will be allowed for your users when they log into the chat room, but not displayed by default. Users do have the ability to turn avatars on via the Options menu after then log into the chat room. To remove the Avatar option completely, complete the following steps. Step 1. Log into your Service Administration Area and navigate to Site Settings >> Global. 174

181 Avatars Step 2. Navigate to Avatars >> Allow Avatars and select Disabled (this can be seen in red above). Allow Avatars Enabled - will allow users to see the My Avatar selection under the Options menu and allow users to see the Show Avatars selection under the Options menu. (see example below) 175
182 ParaChat v9.12 Hosted Documentation - PDF Disabled - will remove the My Avatar selection under the Options menu and remove the Show Avatars under the Options menu (see example below) 176


183 Avatars Remove Avatar Option Parameter Name: Op.Avatar Parameter Permitted Value: true or false Service Levels That Support This Customization: Basic Enterprise 177
184 ParaChat v9.12 Hosted Documentation - PDF Standard Professional Event HTML Configuration: <param name="op.avatar" value="false"> More Information: true = show avatars in the user list false = disable avatars for users and remove the menu item "My Avatar" (default) 178
185 Avatars Customize Avatars Service Levels That Support This Customization: Basic Standard Professional Enterprise Event Reseller If you would like to customize the list of Avatar for your rooms you can simply add a parameter to tell the chat server which avatars to display in your rooms. By default all avatars will be available in your rooms when you have enabled avatars for your users. To remove the Avatar option completely, disable this feature in your Service Administration Pages. If you wish to limit which avatars are displayed complete the following steps. Step 1. Determine which avatars you would like included in your avatar list. Below is a list of avatars and avatar names. Avatar Avatar Name Avatar Avatar Name admin.gif (admin user only) default.png default2.png elf1.png elf2.png punk1.png punk2.png alien1.png alien2.png av21.png av22.png av23.png av24.png av27.png av28.png av29.png av32.png 179
186 ParaChat v9.12 Hosted Documentation - PDF av33.png av34.png av30.png av31.png av1.png av2.png av3.png av4.png av5.png av6.png av7.png av8.png av25.png av26.png av9.png av10.png av11.png av12.png av13.png av14.png av15.png av16.png av17.png av18.png av19.png av20.png cat.png dog.png penguin.png pig.png Step 2. Log into your Service Administration Area and navigate to Site Settings >> Manual Customization. 180
187 Avatars Step 3. Step 4. In the Parameter Name field enter Cf.Avatar In the Parameter Value field add the names of the Avatars (from the list in Step 1) you would like to display in your chat rooms. Separate the file names with a comma and no space. Click Add. Only the listed Avatar names will appear as an option for your users. Review the settings you just saved under the Current Customization Parameters for Your Site list. 181

188 ParaChat v9.12 Hosted Documentation - PDF Step 5. When your users try to select a new Avatar they will see a list similar to the one below. 182

189 Avatars Customize Avatars List Parameter Name: Cf.Avatar Parameter Permitted Value: Any installed Avatar Service Levels That Support This Customization: Basic Standard Professional Enterprise Event Reseller HTML Configuration: <param name="cf.avatar" value="<see list above>"> Info: The only avatar that will display will be the avatars listed with this parameter setting. For the entire list please see below: 183
190 ParaChat v9.12 Hosted Documentation - PDF Cf.Avatar=elf1.png,elf2.png,punk1.png,punk2.png,alien1.png,alien2.png,av21.png,av22.png, av23.png,av24.png,av27.png,av28.png,av29.png,av32.png,av33.png,av34.png,av30.png,av31.png, av1.png,av2.png,av3.png,av4.png,av5.png,av6.png,av7.png,av8.png,av25.png,av26.png,av9.png, av10.png,av11.png,av12.png,av13.png,av14.png,av15.png,av16.png,av17.png,av18.png,av19.png, av20.png,cat.png,dog.png,penguin.png,pig.png,default.png,default2.png Use Site Level Avatar Image Files Parameter Name: Ctrl.Site.Avat Parameter Permitted Value: true or false Service Levels That Support This Customization: Basic Standard Professional Enterprise Event Reseller HTML Configuration: <param name="ctrl.site.avat" value="false"> 184
191 Transcripts Site Administration - Site Transcripts Service Levels That Support This Option: Basic Standard Professional Enterprise Event Reseller Site Tab > Site Settings > Site Transcripts 1. Transcript Settings 2. Turn on Transcripts 3. View Transcripts 4. Recent Room History - (Room Setting) 185
192 ParaChat v9.12 Hosted Documentation - PDF Rooms Administration - Recent Room History Service Levels That Support This Option: Basic Standard Professional Enterprise Event Reseller Rooms Tab > Transcript Settings > Room History Recent Room History Settings Your chat service includes the ability to generate and display Recent Room History in your Chat Room. When this feature is turned on, all chat text within the main chat window is written to a live transcript. When a user enters into the chat room they have the opportunity to view what they might have missed prior to entering the room. These live transcripts are available to room users for up to 1000 stored messages and/or 7 days. These settings can be configured or turn off. The Recent Room History information is dynamic by nature and is NOT stored on the server in the transcript area. 186


193 Transcripts While a user is in the room, they can select Recent Room History under the Action menu. 187

194 ParaChat v9.12 Hosted Documentation - PDF A Java pop-up window will be displayed with messages that the user missed while they were not in the room. Enable / Disable Recent Room History Parameter Name: Enable.Mn.Play Parameter Permitted Value: true or false Service Levels That Support This Customization: Basic Standard Professional Enterprise Event Reseller HTML Configuration: <param name="enable.mn.play" value="true"> More Information: true = allow recent room history (default) false = disable recent room history and gray out the option in the Action menu 188
195 Transcripts Transcript Settings Service Levels That Support This Option: Basic Standard Professional Enterprise Event Reseller By default transcripts are disabled for each room. Make sure to turn on transcripts for each room you wish to have transcripts written for. Transcript Settings are set globally for all your rooms under your site settings. To modify your transcript settings Log into your Service Administration Pages and navigate to Site Settings >> Site Transcripts. 189

196 ParaChat v9.12 Hosted Documentation - PDF Transcripts will be stored for up to 30 days. After 30 days your transcripts will be purged from the system. Please enable Daily Transcripts so you don't lose any of your important information. User-Created (Dynamic) Room Transcript Settings Enable Transcripts For Dynamic Rooms 190
197 Transcripts To automatically generate chat transcripts for user created room, set this option to Enabled. When this feature is turned on, all chat text within the main chat window is written to a transcript file on the chat server for ALL user created rooms. Global Transcript Settings Enabled: logging of user-created rooms is turned on Disabled: logging of user-created rooms is turned off Transcripts will be stored for up to 30 days. After 30 days your transcripts will be purged from the system. Please enable Daily Transcripts so you don't lose any of your important information. Log Private Messages: To log messages that are sent in Private Chat windows to the chat transcript log file, set this option to Enabled. Private chat messages will appear in chronological order along with messages posted to the main chat window. Timestamp Messages: Display IP: Enabled: logging of private messages is turned on Disabled: logging of private messages is turned off If you would like a timestamp to accompany each chat message in the chat transcript, set this option to Enabled. It is important to note that the timestamp that appears in the chat window uses the local clock on each user's computer, where the timestamp that appears in the chat transcript log file uses the clock on the chat server itself. As such, you will find that the timestamp that appears in the chat transcript is Pacific time (GMT minus 8 hours). Enabled: time-stamp is turned on Disabled: time-stamp is turned off To log the IP address of the user who has sent the message, set this option to Enabled. This information can be reviewed later to see if you wish to ban their IP address or to discover more information on the user Display Join/Leave Enabled: logging of the user's IP address is turned on Disabled: logging of the user's IP address is turned off Enable or disable the "<user name> has joined..." and "<user name> has left..." messages from displaying within chat transcript log files. Enabled: join/leave messages will display in the chat transcript log file Disabled: join/leave messages will not display in the chat transcript log file Daily Transcripts: To your daily transcripts, set this option to Enabled. 191
198 ParaChat v9.12 Hosted Documentation - PDF Address(es) of Transcript Recipient(s): If you set Daily Transcripts to Enabled, you must include at least one address to send the transcripts to. To send to multiple addresses, enter each address separated only with a comma. Transcripts have a maximum size of 500k before they roll over and a new transcript is created. This is due to some mail gateway limitations and downloading transcript speeds. Transcripts are sent out multiple times during the day if Daily Transcripts is enabled. When a transcript reaches 500k the transcript is put into que to be ed out. If you have a very busy room you could receive ed transcripts multiple times a day. If you do enable transcripts, please remember to set do_not_reply@parachat.com as allowed in your spam settings. Transcripts will be stored for up to 30 days. After 30 days your transcripts will be purged from the system. Please enable Daily Transcripts so you don't lose any of your important information. Transcript List for Site <Your Site Name Here> You will find a list of your admin created and dynamic room transcripts in this list. Admin created rooms will link back to each individual room transcript lists. 192
199 Transcripts Turn On Transcripts Service Levels That Support This Option: Basic Standard Professional Enterprise Event Reseller Your chat service includes the ability to automatically generate chat transcripts. When this feature is turned on, all chat text within the main chat window is written to a transcript file on the chat server. The default name of the transcript file is auto-generated and corresponds to the current date and time. Naming Example: log _ = Wed Sep 21 23:16:06 PDT 2005 The transcript file will continuously append as content is posted to the main chat window until the file reaches 500k in size. When the transcript file reaches its 500k limit, it will automatically rotate, and be assigned a name that corresponds to the current date and time. A new transcript file will begin to build automatically thereafter. There are 2 ways to turn on transcript for a room. 1. Log into your Service Administration Area and navigate to Room Settings >> Home. 193

200 ParaChat v9.12 Hosted Documentation - PDF Scroll down to Room Transcript. Under Enable Transcripts for Room and select Enabled. 2. While you are logged in your chat room open the GUI Admin Console. Within the GUI Admin Console navigate to Rooms >> Transcript. To enable transcripts for this room select On <Turn on automatic transcript logging>. 194
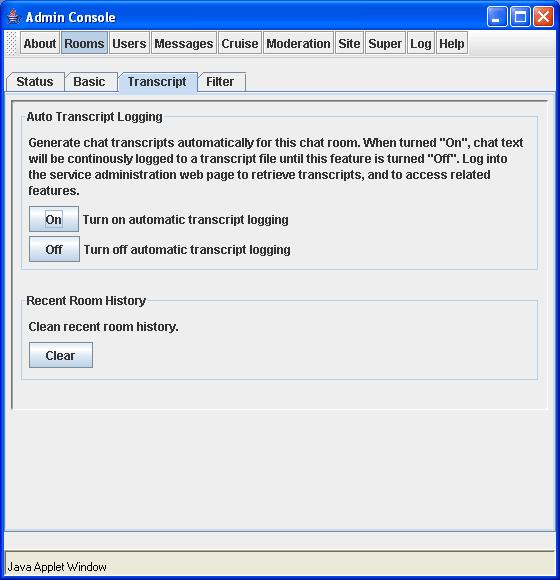
201 Transcripts 195

202 ParaChat v9.12 Hosted Documentation - PDF View Transcripts Service Levels That Support This Option: Basic Standard Professional Enterprise Event Reseller By default transcripts are disabled for each room. Make sure to turn on transcripts for each room you wish to have transcripts written for. To view your transcripts Log into your Service Administration Pages and navigate to the room you wish to visit settings for Room Settings >> Room Transcripts. Under View Transcript select the transcript you would like to view. When you click on this link you will see the transcripts page launch in a new window pop up window. Transcripts will be stored for up to 30 days. After 30 days your transcripts will be purged from the system. Please enable Daily Transcripts so you don't lose any of your important information. Transcripts have a maximum size of 800k before they roll over and a new transcript is created. This is due to some mail gateway limitations and downloading transcript speeds. Transcripts are sent out multiple times during the day if Daily Transcripts is enabled. When a transcript reaches 800k the transcript is put into que to be ed out. If you have a very busy room you could receive ed transcripts multiple times a day. 196
203 Database Options User Administration - Integrated Member Database Service Levels That Support This Option: Basic Standard Professional Enterprise Event Reseller You can administer your site using the site administration explanations below: Log in to the Web-base Administration Pages and select the Site Settings tab. User Settings >>> Integrated Member Database Select from the list below for more information on each Database Option Integrated Member Database (beginner knowledge) Code of Integrated Member Database Registration Process Example Use Your Existing Database (intermediate knowledge) External Database Connection (Standard knowledge) Member Profile URL (Standard knowledge) 197

204 ParaChat v9.12 Hosted Documentation - PDF Users Administration - Integrated Member Database Service Levels That Support This Option: Basic Standard Professional Enterprise Event Reseller Users & Databases Settings > Integrated Member Database View Member Info Click the member name to display their member name, real name, last login date, registration date, address, and access status. 198
 using")


205 Database Options Suspend Click the member name to suspend the user's access to your room(s) using this member name. Unsuspend Click the member name to unsuspend the user's access from your chat room(s). Delete Click the member name to permanently delete the user name from your list of active members. 199
206 ParaChat v9.12 Hosted Documentation - PDF To require all users who access your chat service to have a member name registered in this fashion, you must configure your Site to Allow Registered Users Only. To do so, return to your main Site Settings >> Site-Wide Limits page and enable Require Valid User Name and Password. 200

207 Database Options Users Administration - Code for Integrated Database Service Levels That Support This Option: Basic Standard Professional Enterprise Event Reseller Users & Databases Settings > Code for Integrated Database The link code generation tool contains registration linking HTML code that is relevant to your Site only. Customize the linking code to your options. Highlight and copy the code from the pop-up window, and then paste it into the HTML source code of any web page on your site. URL Of Branding Image Add your own branding image to your registration page. Replace with the URL of an image on your site. Exact URL Of Your Chat Room To direct your registered members back to your chat room using the "ENTER THE CHAT ROOM NOW" link on the member registration page, you must customize this field. Text For Link Customize this field to replace the default setting of "Register Name / Update Password" link label. Language Selection Select the language you would like the registration form to display. 201

208 ParaChat v9.12 Hosted Documentation - PDF Attention: If you make incorrect entries into these fields your linking code will not work correctly. Sample Pop-up Window Customize Member Database Application Default Language The Integrated Member Database Application uses a registration system in English by default. You may easily customize the default language used by the registration system by making a minor edit to the Member Registration Linking Code: Sample Default Member Registration Linking Code - English <a href=" testing123&cserver=ac&cimg= &curl= target="_new">register Name / Update Password</a> To customize the default language, change the directory name highlighted in RED above to your desired language as listed below: Sample Member Registration Linking Code Customized To Spanish <a href=" testing123&cserver=ac&cimg= &curl= target="_new">register Name / Update Password</a> Current Language Support English = en Spanish = es 202
209 Database Options German = de If you are interested in providing a translation of the Integrated Member Database Application to a language not listed above, please contact support@parachat.com and/or complete these forms. We will be offering additional language support in a subsequent release of our software, or as translations are provided. Directing Registered Members Back to Your Chat Room To direct your registered members back to your chat room using the "ENTER THE CHAT ROOM NOW" link on the member registration page, you must make the following edit to your Member Registration Linking Code: Replace (denoted in red below) with the EXACT web page URL where you have implemented your chat room: <a href=" testing123&cserver=ac&cimg= &curl= target="_new">register Name / Update Password</a> For example, if you have implemented your chat room on then your edited Linking Code would appear as: <a href=" testing123&cserver=ac&cimg= &curl= target="_new">register Name / Update Password</a> 203

210 ParaChat v9.12 Hosted Documentation - PDF Registration Process Example Service Levels That Support This Option: Basic Standard Professional Enterprise Event Reseller Users who click the link will go to the a member registration page. Each user must input their desired member name, their real name, and their address. An activation will be sent to the address that is supplied. Each user must click the link within the to validate their request and activate their member name. 204

211 Database Options Once the validation process has been completed, each user will receive a subsequent that confirms their successful registration. The registration confirmation contains the member name they selected, and a password that has been assigned to them. A user may change their password by using the "Log-in to change settings" option on the main registration page. Please note that the system will update changed passwords every 5 minutes. 205

212 ParaChat v9.12 Hosted Documentation - PDF 206
213 Database Options Auto Log-in & Load - Use Your Existing Database Service Levels That Support This Option: Basic Standard Professional Enterprise Event Reseller Auto Log-in of your Web site's registered users into your chat room is accomplished by passing a user name variable from your database, session cookie, or through the URL, and placing it into the chat applet HTML. Through some minor customization to the chat applet HTML, the user will be logged directly into the chat room without requiring a secondary log-in through the chat client's login panel. For example, if you place your chat room in a members-only area of your web site, and you require users to authenticate themselves to gain access to the member area, their user name can be passed into the chat room to automatically log them in with their registered user name. User authentication remains a function of your web-server, and not of the chat client or server. Your chat service already includes the Auto Log-in feature. Required Parameters There are 2 mandatory parameters to add to your chat applet HTML to utilize the Auto Log-in feature. The parameters are: <param name="ctrl.autologin" value="true"> <param name="net.user" value="<user name variable>"> The Ctrl.AutoLogin parameter tells the chat room to permit a user to be automatically logged in to the chat room without displaying the log-in panel. The Net.User parameter value is where you need to pass the authenticated user name variable. For example, if a user is logged into your site with user name "Mike", then the correct format for the Net.User parameter value after the user name has been passed would be: <param name="net.user" value="mike"> Optional Parameters There are 2 optional parameters that can be added to the chat applet HTML, which can be utilized with the Auto Log-in feature. The parameters are: <param name="net.userpass" value="<user's password>"> <param name="net.cookie" value="<cookie password, etc.>"> The Net.UserPass parameter is used only to pass a user's password to the chat server for authentication by the chat server, and not by your database. This parameter should only be used if a user profile exists on both the chat server as well as in your own database, and the password in 207
214 ParaChat v9.12 Hosted Documentation - PDF your database matches the user's password on the chat server. There is no requirement to populate the Net.UserPass value with a user's password from your database. HINT: If the admin user name and password that you supplied is also in your database, you would need to pass this user name and password into the chat applet HTML so you can access the chat room's administrative functions. The chat server requires a valid administrator user name and password to be supplied in order to gain access to the administrative features. 208

215 Database Options Users Administration - External Database Connection Service Levels That Support This Option: Basic Standard Professional Enterprise Event Reseller Users & Databases Settings > External Database Connection For more information on this option please read this information or visit this forum article. 209
216
217 Moderated Events Moderated Events Your hosted chat solution is equipped with a moderated event feature that is used to hold organized and structured events online, and in real time. Your hosted chat solution includes moderated event feature to be easy to set up, easy to use, feature-rich, and intuitive for end-users, moderators, speakers and room administrators alike. Below you will find a guide to setting up, conducting, and completing a moderated event. Service Levels That Support This Option: Basic Standard Professional Enterprise Event Reseller There are 2 moderation modes into which a chat room may be configured: Moderated Chat When the moderated event mode is enabled, the main chat window becomes "read only". User submissions are filtered to a designated moderator for review. The moderator may reply to the question, or forward it to a designated speaker for reply. When the reply is posted, the original question appears along with the moderator or speaker's reply in the main chat window for all users to read. Open Moderation This is a unique mode where the features of open chat are coupled with the features of moderated chat. When invoked, the chat interface has 2 chat text input fields. The top chat text input field is used for submissions to the main chat window. The bottom chat text input field is used for submissions to a moderator. Open moderation allows users to chat freely in the main chat room, as well as to submit questions to a moderator or speaker who, in turn, submit an answer to the submitted questions. Questions and answers display together in the main chat window as you find with moderated chat mode. How It Works When you place your Chat Room into a moderated mode, users may no longer submit their chat text directly to the main chat window. Private chatting is automatically disabled as well. Chat text is submitted to a Moderator for screening and editing, then forwarded on to a Speaker. The Speaker will answer the screened question, and submit both the original question and the corresponding answer together to the main chat window for all users to read. Standard Users will then see their name and question appear in the main chat window, along with the Speaker's name and the answer to their question. When the moderated event is over, moderated mode may be turned off on-the-fly to return the room to an open chat setting. A transcript of the event can be retrieved for posting or distribution. Transcripts are always enabled for moderated events and cannot be disabled. This is to insure a transcript is created for your event. 211
218 ParaChat v9.12 Hosted Documentation - PDF Moderators Speakers Assign a moderator name in this field. Make sure you have created a user name and password for this user. Enabled - branding image area will display your branding image Disabled - branding image area is removed Open Moderation (Public Chat is Allowed During Moderation please see the Open Moderation information page Private Chat During Moderation Enabled - user will be allowed to private message one another Disabled - private messaging is not available 212
219 Moderated Events Color Customizations for Moderation Assign colors to the different options above. More information on these parameters. 213
220 ParaChat v9.12 Hosted Documentation - PDF Moderated Events Your hosted chat solution is equipped with a moderated event feature that is used to hold organized and structured events online, and in real time. Your hosted chat solution includes moderated event feature to be easy to set up, easy to use, feature-rich, and intuitive for end-users, moderators, speakers and room administrators alike. Below you will find a guide to setting up, conducting, and completing a moderated event. Service Levels That Support This Option: Basic Standard Professional Enterprise Event Reseller There are 2 moderation modes into which a chat room may be configured: Moderated Chat When the moderated event mode is enabled, the main chat window becomes "read only". User submissions are filtered to a designated moderator for review. The moderator may reply to the question, or forward it to a designated speaker for reply. When the reply is posted, the original question appears along with the moderator or speaker's reply in the main chat window for all users to read. Open Moderation This is a unique mode where the features of open chat are coupled with the features of moderated chat. When invoked, the chat interface has 2 chat text input fields. The top chat text input field is used for submissions to the main chat window. The bottom chat text input field is used for submissions to a moderator. Open moderation allows users to chat freely in the main chat room, as well as to submit questions to a moderator or speaker who, in turn, submit an answer to the submitted questions. Questions and answers display together in the main chat window as you find with moderated chat mode. How It Works When you place your Chat Room into a moderated mode, users may no longer submit their chat text directly to the main chat window. Private chatting is automatically disabled as well. Chat text is submitted to a Moderator for screening and editing, then forwarded on to a Speaker. The Speaker will answer the screened question, and submit both the original question and the corresponding answer together to the main chat window for all users to read. Standard Users will then see their name and question appear in the main chat window, along with the Speaker's name and the answer to their question. When the moderated event is over, moderated mode may be turned off on-the-fly to return the room to an open chat setting. A transcript of the event can be retrieved for posting or distribution. Transcripts are always enabled for moderated events and cannot be disabled. This is to insure a transcript is created for your event. 214
221 Moderated Events Moderators Speakers Assign a moderator name in this field. Make sure you have created a user name and password for this user. Enabled - branding image area will display your branding image Disabled - branding image area is removed Open Moderation (Public Chat is Allowed During Moderation please see the Open Moderation information page Private Chat During Moderation Enabled - user will be allowed to private message one another Disabled - private messaging is not available 215

222 ParaChat v9.12 Hosted Documentation - PDF Color Customizations for Moderation Assign colors to the different options above. More information on these parameters. 216
223 Moderated Events Types of Users The moderated event feature includes 4 types of users. Each type of user has different attributes and responsibilities during a moderated event, and has access to different features. Below is a summary of these attributes: 1. Standard User: A user who attends a moderated event. The Standard User accesses a chat room using a nickname of their choice. When a chat room is placed in moderated mode, text submitted by a user is automatically forwarded to a Moderator for review prior to being answered by a Speaker. A user will see their submitted question in their chat window, and receive a confirmation that their question has been submitted. 2. Room Administrator: A user who has access to the administrative controls of the chat room. The room administrator accesses a chat room using a designated admin user name and password. They are responsible for setting up the Moderator(s) and Speaker(s) for the event using the GUI Admin Console, for placing the room into moderation mode, and for turning on the transcript feature if desired. The Room Administrator also has the ability to ban or expel unwanted or obnoxious users from the chat room, to change the room greeting, invoke the profanity filter, and a variety of other important functions. 3. Moderator: A user is designated as an event moderator by the Room Administrator. The Moderator accesses a chat room using the user name assigned to them by the Room Administrator. To password-protect a user name that has been allocated to a Moderator, please see the User Administration instructions. Questions posed by Standard Users are automatically sent to the Moderation Console for review, editing, deleting, answering, or forwarding on to the Speaker. Although the Moderation Console will automatically display in a separate window apart from the ParaChat room when a question is submitted by a Standard User, the Moderator may also launch the window by selecting Moderation Console under the Action pull-down menu. In a small-scale moderated event, the Moderator can also function as the Speaker. In this case, there is no need to set up both a unique Moderator name and Speaker name. Simply handle both Moderator and Speaker functions exclusively as a Moderator. You cannot assign the same user name as a Moderator and Speaker. 4. Speaker: A user is designated as an event Speaker by the Room Administrator. The Speaker accesses a chat room using the user name assigned to them by the Room Administrator. To password-protect a user name that has been allocated to a Speaker, please see the User Administration instructions. A speaker will receive questions that have been screened and forwarded by the Moderator into their Moderation Console. Once a screened question is received by a Speaker, the Speaker has the choice of also editing the question prior to answering it, and submitting it to the entire chat room. Although the Moderation Console will automatically display in a separate window apart from the chat room when a question is submitted by a Moderator, the Speaker may also launch the window by selecting Moderation Console under the Action pull-down menu. 217
224 ParaChat v9.12 Hosted Documentation - PDF Creating a Moderated Event Creating a Moderated Event Below is a list of tips for ensuring a successful moderated event. 1. Generate a Transcript: The transcript feature allows you to record your moderated event. Transcripts are turn on by default for ALL moderated events and cannot be disabled. The chat text submitted to the main chat window during the event is written to and retained on the chat server. When your moderated event has ended, simply retrieve the transcript and post it on your web site, or distribute it by Password-Protect User Names: To prevent unauthorized use of Moderator or Speaker names, you may wish to passwordprotect the user names that you have allocated to Moderators, Speakers, or other VIPs. For information on password-protecting user names, please see the User Administration instructions. 3. Take Questions in Advance: 4. Practice: Prevent lulls in your moderated event by accepting questions in advance of your event. In this fashion, the moderator will have a list of pre-screened questions from which to select in case users do not submit enough questions, or relevant questions, to maintain a consistent flow. If you promote a moderated event on your web site, provide a link so that users may submit questions early. We have made every effort to offer an intuitive moderated event feature. We suggest conducting a trial moderated event so that you may become comfortable with the features, and also have the opportunity to request technical support in advance of your event. Practice makes perfect! Moderating An Event To conduct a moderated event, the Room Administrator, Moderator(s), and Speaker(s) should be familiar with the Moderation Console, and take the steps outlined below. The Moderation Console: The Moderation Console is used by the Moderator(s) and Speaker(s) to screen and answer questions submitted by Standard Users. It provides the ideal interface to manage questions. The Moderation Console may be launched by the Room Administrator, Moderator(s), or Speaker(s) by selecting Moderation Console from the Action pull-down menu. The Moderation Console will launch in a separate window from the chat room. 218
225 Moderated Events The following options and actions are available to manage user questions, each of which corresponds to a button at the base of the Moderation Console. Highlight a question by clicking on it with your left mouse button. You may take the following actions with each highlighted question by clicking on the appropriate button, each of which is described below: Fetch Previous Next Answer Edit Forward Forward To Post Gag Delete Forward To All When you want to see more questions from the server, click on the "Fetch" button to download recently submitted questions. Go to the previous set of previously "Fetched" questions. By default 10 questions are displayed per screen. Go to the Next set of previously "Fetched" questions. By default 10 questions are displayed per screen. After a message is received into your moderation console, click on "Answer" to answer the question. After a message is submitted you can edit the question before it is forwarded to a speaker or submitted to the room. After you receive and edit a message you can forward a message on to a set of speakers in a round-robin fashion. After you receive and edit a message you can forward to a particular (selected) speaker. If you wish to broadcast a message to everyone in the room you can use the "Post" feature. When you encounter a user that is annoying and continues to submit too many questions, gag gives you the ability to block questions submitted by the user. Click on a selected question and click on the delete button to remove it from the list. Forward to all speakers at once 219
226 ParaChat v9.12 Hosted Documentation - PDF Creating a Moderated Event Below is a list of tips for ensuring a successful moderated event. 1. Generate a Transcript: The transcript feature allows you to record your moderated event. Transcripts are turn on by default for ALL moderated events and cannot be disabled. The chat text submitted to the main chat window during the event is written to and retained on the chat server. When your moderated event has ended, simply retrieve the transcript and post it on your web site, or distribute it by Password-Protect User Names: To prevent unauthorized use of Moderator or Speaker names, you may wish to passwordprotect the user names that you have allocated to Moderators, Speakers, or other VIPs. For information on password-protecting user names, please see the User Administration instructions. 3. Take Questions in Advance: 4. Practice: Prevent lulls in your moderated event by accepting questions in advance of your event. In this fashion, the moderator will have a list of pre-screened questions from which to select in case users do not submit enough questions, or relevant questions, to maintain a consistent flow. If you promote a moderated event on your web site, provide a link so that users may submit questions early. We have made every effort to offer an intuitive moderated event feature. We suggest conducting a trial moderated event so that you may become comfortable with the features, and also have the opportunity to request technical support in advance of your event. Practice makes perfect! Moderating An Event To conduct a moderated event, the Room Administrator, Moderator(s), and Speaker(s) should be familiar with the Moderation Console, and take the steps outlined below. The Moderation Console: The Moderation Console is used by the Moderator(s) and Speaker(s) to screen and answer questions submitted by Standard Users. It provides the ideal interface to manage questions. The Moderation Console may be launched by the Room Administrator, Moderator(s), or Speaker(s) by selecting Moderation Console from the Action pull-down menu. The Moderation Console will launch in a separate window from the chat room. The following options and actions are available to manage user questions, each of which corresponds to a button at the base of the Moderation Console. Highlight a question by clicking on it with your left mouse button. You may take the following actions with each highlighted question by clicking on the appropriate button, each of which is described below: 220
227 Moderated Events Fetch Previous Next Answer Edit Forward Forward To Post Gag Delete Forward To All When you want to see more questions from the server, click on the "Fetch" button to download recently submitted questions. Go to the previous set of previously "Fetched" questions. By default 10 questions are displayed per screen. Go to the Next set of previously "Fetched" questions. By default 10 questions are displayed per screen. After a message is received into your moderation console, click on "Answer" to answer the question. After a message is submitted you can edit the question before it is forwarded to a speaker or submitted to the room. After you receive and edit a message you can forward a message on to a set of speakers in a round-robin fashion. After you receive and edit a message you can forward to a particular (selected) speaker. If you wish to broadcast a message to everyone in the room you can use the "Post" feature. When you encounter a user that is annoying and continues to submit too many questions, gag gives you the ability to block questions submitted by the user. Click on a selected question and click on the delete button to remove it from the list. Forward to all speakers at once 221
228 ParaChat v9.12 Hosted Documentation - PDF Room Administrator Task Summary 1. Set a Welcome Message (optional): Before the event begins, set a relevant greeting or topic of discussion that users will see when they first log into the room. In the Admin Console, Configure tab >>> Topic tab >>> enter a topic and press the "Set" button. 2. Transcripts Are On By Default: No need to start transcripts, they are on by default and cannot be turned off for a Moderated Event. 3. Set up Moderator(s): Add the user name(s) that will be used by the Moderator(s). In the Admin Console, Moderation tab >>> Moderator tab >>> enter a Moderator user name and press the Add button. 222
229 Moderated Events To review a list of current Moderator names, press the Show Moderators button. A list of current moderators will be displayed below the Refresh button. Please see image below. To remove unwanted Moderator names, enter the user name and press the Delete button. 223
230 ParaChat v9.12 Hosted Documentation - PDF In a small-scale moderated event, the Moderator can also function as the Speaker. In this case, there is no need to set up both a unique Moderator name and Speaker name. Simply handle both Moderator and Speaker functions exclusively as a Moderator. You can also set up Moderators in the Service Administration Pages. Please note that a Moderator name must not be used as a Speaker name too. 4. Set up Speaker(s): Add the user name(s) that will be used by the Speaker(s). In the Admin Console, Moderation tab >>> Moderator tab >>> enter a Speaker user name and press the Add button. To review a list of current Speaker names, press the Show Speaker button. A list of current speakers will be displayed below the Refresh button. Please see image below. To remove unwanted Speaker names, enter the user name and press the Delete button. 224

231 Moderated Events In a small-scale moderated event, the Moderator can also function as the Speaker. In this case, there is no need to set up both a unique Moderator name and Speaker name. Simply handle both Moderator and Speaker functions exclusively as a Moderator. You can also set up Speakers in the Service Administration Pages. Please note that a Moderator name must not be used as a Speaker name too. 5. Turn on Moderation mode: Change the room mode from open chat to moderated chat. In the Admin Console, Moderation tab >>> Moderation tab >>> click the On button. Turn this on when you are ready to start your moderated event. 225
232 ParaChat v9.12 Hosted Documentation - PDF 226
233 Moderated Events Moderator Task Summary 1. Log into the ParaChat Room: Enter the chat room using the Moderator user name (and password if applicable) that has been provided by the Room Administrator. 2. Launch Moderation Console: Although the Moderation Console will automatically display in a separate window apart from the chat room when a question is submitted by a user, the Moderator may also launch the window launch the window by selecting Moderation Console under the Action pull-down menu. 3. Receive and Screen Questions: When a question is submitted by a user, it will appear in the Moderation Console. Each question is numbered for easy reference. Use the button controls to edit or delete functions to screen a highlighted question. 4. Forward to Speaker: Once a question has been screened, use the button controls to forward the highlighted question to the Speaker. Multiple Moderators & Speakers Large-scale moderated events may require multiple moderators, as well as multiple speakers. The Event Moderation feature accommodates this requirement by allowing you to assign one or more Moderator and/or one or more Speakers. 227
234 ParaChat v9.12 Hosted Documentation - PDF Speaker Task Summary 1. Log into the Chat Room: Enter the chat room using the Speaker user name (and password if applicable) that has been provided by the Room Administrator. 2. Launch Moderation Console: Although the Moderation Console will automatically display in a separate window apart from the chat room when a question is submitted by a user, the Moderator may also launch the window launch the window by selecting Moderation Console under the Action pull-down menu. 3. Receive Screened Questions: When a question is received from the Moderator, it will appear in the Moderation Console. Each question is numbered for easy reference. As a Speaker, the option to further edit or delete a question is available. 4. Answer and Submit Questions: Use the Answer button to reply to a highlighted question. Press the "OK" button when the question has been answered, and the question will be posted to the main chat window with the accompanying answer. Multiple Moderators & Speakers Large-scale moderated events may require multiple moderators, as well as multiple speakers. The Event Moderation feature accommodates this requirement by allowing you to assign one or more Moderator and/or one or more Speakers. 228
235 Moderated Events After a Moderated Event Turn Off Moderation: In the Admin Console, Moderation tab >>> click the Off button. The room will automatically revert to an open chat, where users may freely submit chat text directly to the main chat window. This will also clear all user submitted questions. Retrieve the Transcript: The transcript can be retrieved by logging into the Service Administration Pages to retrieve the transcript just created or wait until they are ed out, if you have that option enabled. Questions Are Cleared: When the Moderator(s) and Speaker(s) close their Moderation Consoles and disconnect from the room, the list of questions contained within the Moderation Console are NOT cleared. A record of the questions that have been answered, and posted to the main chat window, are found in the transcript if one was generated. The only way to clear the questions retained by the chat server is to turn off Moderation. 229

236 ParaChat v9.12 Hosted Documentation - PDF Anatomy of Moderation Moderation Console for moderator & speaker Moderation Console for moderator & speaker 230

237 Moderated Events Moderation Console - Forward Question 231

238 ParaChat v9.12 Hosted Documentation - PDF Moderation Console - Answer Question 232

239 Moderated Events A moderator or speaker can submit a question with the answer to the chat room during a Moderated Event. Moderation Console - Edit question Edit questions before or after the question is sent to the Speaker. Moderation Console - Post to room option 233


240 ParaChat v9.12 Hosted Documentation - PDF You can Post announcements into the chat room at any time using the Post option. Moderation Console - Action Menu Moderation Console - Options Menu 234
241 Moderated Events Moderation Console - Help Menu 235
242 ParaChat v9.12 Hosted Documentation - PDF 236

243 Moderated Events Open Moderation This is a unique mode where the features of open chat are coupled with the features of moderated chat. When invoked, the chat interface has 2 chat text input fields. The bottom chat text input field is used for submissions to the main chat window. The top chat text input field is used for submissions to a moderator. Open moderation allows users to chat freely in the main chat room, as well as to submit questions to a moderator or speaker who, in turn, submit an answer to the submitted questions. Questions and answers display together in the main chat window as you find with moderated chat mode. Configuring Your Chat Room For Open Moderation Configuring your chat room for open moderation is easily accomplished by turning the feature On for your room using the web-based server administration pages. Step 1. Log into your Server Administration Page and navigate to the room settings area for the room you wish to enable this feature. 237

244 ParaChat v9.12 Hosted Documentation - PDF Step 2. Under Public Chat and Private Chat During Moderation select On. Step 3. Click the Save button. Step 4. Log into your chat room as the room administrator, and turn the moderation feature On. The moderation feature is turned on from the GUI Admin Console. The bottom chat text input field is used for submissions to the main chat window, as you find in Open Chat mode. The top chat text input field is used for submissions to a moderator, as you find in Moderated Chat mode. 238

245 Site & Room Counter Code Room Administration - Room Counter Service Levels That Support This Option: Basic Standard Professional Enterprise Event Reseller Rooms Tab > Display Room Codes > Room User Counter Code Drive traffic to your chat rooms from throughout your web site! The User Counter is a Java-based counter that informs your web site visitors of how many users are currently chatting there. Through the addition of a few lines of HTML to web pages throughout your site, the number of users in your chat rooms are conveniently displayed on any web page. Use the customization tool to configure the size, color, and font of your Room User Counter, then click the "Show Me My User Counter Code" to generate your HTML. Copy the HTML from the window that displays, and paste it into the HTML source code of the web pages on your site where you wish to display this information. 239

246 ParaChat v9.12 Hosted Documentation - PDF Select the customization options you wish and click on the Show Me My User Counter Code Button. Your customized code will be displayed in a pop-up window similar to the one below. Copy the code from the pop-up window and place it into your web page. Room User Counter Code Defined <!-- Begin Counter Code --> <applet codebase=" archive=counter.jar code="count.chatcounter.class" width=20 height=18> <param name="query.site" value="community"> <param name="query.room" value="lobby"> <param name="ui.bg" value="ffffff"> <param name="ui.fg" value="000000"> <param name="ui.fontsize" value="10"> <param name="ui.fontname" value="helvetica"> Sorry, your browser is not Java enabled, please visit <a href=" java support pages</a> </applet> <!-- End Counter Code --> query.site = Your site ID for your chat site 240
247 Site & Room Counter Code query.room = Your room name ui.bg = Background color of the who's chatting list ui.fg = Font color ui.fontsize = Font size ui.fontname = Font that the user list will use 241

248 ParaChat v9.12 Hosted Documentation - PDF Site Administration - Site Counter Service Levels That Support This Option: Basic Standard Professional Enterprise Event Reseller Site Tab > Counter & Who's Chatting > Site User Counter Drive traffic to your chat rooms from throughout your web site! The User Counter is a Java-based counter that informs your web site visitors of how many users are currently chatting in all your rooms. Through the addition of a few lines of HTML to web pages throughout your site, the number of users in your chat rooms are conveniently displayed on any web page. Use the customization tool to configure the size, color, and font of your Site User Counter, then click the "Show Me My User Counter Code" to generate your HTML. Copy the HTML from the window that displays, and paste it into the HTML source code of the web pages on your site where you wish to display this information. Select the customization options you wish and click on the Show Me My User Counter Code Button. Your customized code will be displayed in a pop-up window similar to the one below. 242

249 Site & Room Counter Code Copy the code from the pop-up window and place it into your web page. Site User Counter Code Defined <!-- Begin Counter Code --> <applet codebase=" archive=counter.jar code="count.chatcounter.class" width=20 height=18> <param name="query.site" value="community"> <param name="ui.bg" value="ffffff"> <param name="ui.fg" value="000000"> <param name="ui.fontsize" value="10"> <param name="ui.fontname" value="helvetica"> Sorry, your browser is not Java enabled, please visit <a href=" java support pages</a> </applet> <!-- End Counter Code --> query.site = Your site ID for your chat site ui.bg = Background color of the who's chatting list ui.fg = Font color ui.fontsize = Font size ui.fontname = Font that the user list will use 243
Editing the Home Page
 Editing the Home Page Logging on to Your Web site 1. Go to https://extension.usu.edu/admin/ 2. Enter your Login and Password. 3. Click Submit. If you do not have a login and password you can request one
Streaming Presentation Manager User Guide
 Streaming Presentation Manager User Guide This user guide is intended to be used in conjunction with Slides, Audio with Slides Streaming or Video with Slides Streaming. First we will review the product
Legal Notes. Regarding Trademarks KYOCERA MITA Corporation
 Legal Notes Unauthorized reproduction of all or part of this guide is prohibited. The information in this guide is subject to change without notice. We cannot be held liable for any problems arising from
VII. Corente Services SSL Client
 VII. Corente Services SSL Client Corente Release 9.1 Manual 9.1.1 Copyright 2014, Oracle and/or its affiliates. All rights reserved. Table of Contents Preface... 5 I. Introduction... 6 Chapter 1. Requirements...
KYOCERA Net Admin User Guide
 KYOCERA Net Admin User Guide Legal Notes Unauthorized reproduction of all or part of this guide is prohibited. The information in this guide is subject to change without notice. We cannot be held liable
Android Rep Console
 Android Rep Console 2.2.10 2003-2018 BeyondTrust, Inc. All Rights Reserved. BEYONDTRUST, its logo, and JUMP are trademarks of BeyondTrust, Inc. Other trademarks are the property of their respective owners.
Snap-Ins Chat. Salesforce, Winter
 Salesforce, Winter 18 @salesforcedocs Last updated: December 1, 2017 Copyright 2000 2017 salesforce.com, inc. All rights reserved. Salesforce is a registered trademark of salesforce.com, inc., as are other
File Cabinet Manager
 Tool Box File Cabinet Manager Java File Cabinet Manager Password Protection Website Statistics Image Tool Image Tool - Resize Image Tool - Crop Image Tool - Transparent Form Processor Manager Form Processor
Understanding Admin Access and RBAC Policies on ISE
 Understanding Admin Access and RBAC Policies on ISE Contents Introduction Prerequisites Requirements Components Used Configure Authentication Settings Configure Admin Groups Configure Admin Users Configure
Jive Forums. Administrators Guide
 Jive Forums Administrators Guide Copyright 2006 All rights reserved. - ii - Table of Contents Table of Contents... iii 1.0 About this Document... 10 1.1 Who Should Use this Guide?...10 1.2 Document Conventions...11
VIEWER LICENSE GUIDE FOR SERVICEPOINT 5X
 ADVANCED REPORTING TOOL (ART 3X) VIEWER LICENSE GUIDE FOR SERVICEPOINT 5X 2012 Bowman Systems L.L.C. All Rights Reserved. This document and the information contained herein are the property of Bowman Systems
Wimba Classroom Version 6.1 Room Administrator Guide
 Wimba Classroom Version 6.1 Room Administrator Guide Wimba Classroom 6.1 Room Administrator Guide 1 Administration Tools 2 Room Management 3 Creating a New Room (RoomCreators Only) 3 Setting up a Room
AUGUST CommPortal GUIDE
 AUGUST 2018 CommPortal GUIDE 2 AirePBX CommPortal Guide Table of Contents 1 Introduction...4 1.1 About This Manual...4 2 CommPortal Overview...5 2.1 Interface overview...5 2.2 Browser and Operating System
RightNow eservice Center 5.5 New Administrator s Survival Guide
 RightNow eservice Center 5.5 New Administrator s Survival Guide Table of Contents You may click on each line below to go to that section of this document. OVERVIEW...3 HELPFUL RESOURCES...4 GAINING FAMILIARITY
Wimba Classroom. Version 5.2. Room Administrator Guide
 Wimba Classroom Version 5.2 Room Administrator Guide Wimba Classroom 5.2 Room Administrator Guide 1 Administration Tools 2 Room Management 3 Creating a New Room (RoomCreators Only) 3 Setting up a Room
08/10/2018. Istanbul Now Platform User Interface
 08/10/2018 Contents Contents...5 UI16... 9 Comparison of UI16 and UI15 styles... 11 Activate UI16... 15 Switch between UI16 and UI15...15 UI16 application navigator... 16 System settings for the user
Administering Jive Mobile Apps for ios and Android
 Administering Jive Mobile Apps for ios and Android TOC 2 Contents Administering Jive Mobile Apps...3 Configuring Jive for Android and ios...3 Custom App Wrapping for ios...3 Authentication with Mobile
Agent and Agent Browser. Updated Friday, January 26, Autotask Corporation
 Agent and Agent Browser Updated Friday, January 26, 2018 2018 Autotask Corporation Table of Contents Table of Contents 2 The AEM Agent and Agent Browser 3 AEM Agent 5 Privacy Mode 9 Agent Browser 11 Agent
AT&T IP Flexible Reach Department Administrator Guide
 AT&T IP Flexible Reach Department Administrator Guide 1 Contents Get Started... 5 Log In... 6 What a Department Administrator Can Do... 8 About Premier... 11 Use Premier... 12 Use the AT&T IP Flexible
EMPLOYER USER GUIDE PLEASE NOTE
 EMPLOYER USER GUIDE Getting Started... Error! Bookmark not defined. Request Log-In Permission... 3 Log In... 4 My Control Panel... 5 Post a New Job... Error! Bookmark not defined. Review Employee Applications...
Joomla User Guide Ver 3
 LiveHelp Server Joomla User Guide Ver 3 Introduction The process of configuration and implementation of the LiveHelp server is divided into four stages, which are detailed below. The approximate time of
CLIQ Web Manager. User Manual. The global leader in door opening solutions V 6.1
 CLIQ Web Manager User Manual V 6.1 The global leader in door opening solutions Program version: 6.1 Document number: ST-003478 Date published: 2016-03-31 Language: en-gb Table of contents 1 Overview...9
CONTENTS PAGE. Top Tip: Hold down the Ctrl key on your keyboard and using your mouse click on the heading below to be taken to the page
 USER GUIDE CONTENTS PAGE Top Tip: Hold down the Ctrl key on your keyboard and using your mouse click on the heading below to be taken to the page Part 1) How to create a new account...2 Part 2) How to
User Guide. Version
 User Guide Version 0.19 2-11-2008 StormPro Max User Guide Page 1 of 69 5/10/2008 Table of Contents 1. Overview... 4 1.1 Definition of StormPro Max Terms... 4 2. Accessing StormPro Max... 5 3. Navigating
Last Updated On: 10/11/2016
 LEADALERT USER GUIDE Last Updated On: 10/11/2016 Intellectual Property Disclaimer All title, ownership rights and intellectual property rights herein and any copies thereof including but not limited to
Configure Guest Access
 Cisco ISE Guest Services, page 1 Guest and Sponsor Accounts, page 2 Guest Portals, page 18 Sponsor Portals, page 34 Monitor Guest and Sponsor Activity, page 46 Guest Access Web Authentication Options,
leveraging your Microsoft Calendar Browser for SharePoint Administrator Manual
 CONTENT Calendar Browser for SharePoint Administrator manual 1 INTRODUCTION... 3 2 REQUIREMENTS... 3 3 CALENDAR BROWSER FEATURES... 4 3.1 BOOK... 4 3.1.1 Order Supplies... 4 3.2 PROJECTS... 5 3.3 DESCRIPTIONS...
The TELUS Business Connect Mobile solution. Admin guide
 The TELUS Business Connect Mobile solution Admin guide Table of contents. Part Getting started 4 Introduction 5 Admin homepage 5 Main functions 5 Admin Portal 5 My Extension 6 Do Not Disturb 7 RingOut
Snap-Ins Chat. Salesforce, Summer
 Snap-Ins Chat Salesforce, Summer 17 @salesforcedocs Last updated: August 17, 2017 Copyright 2000 2017 salesforce.com, inc. All rights reserved. Salesforce is a registered trademark of salesforce.com, inc.,
PMI User Training 2016 JUNE
 PMI User Training 2016 JUNE Launching the system To access the system, please use the details provided to you. Your unique ELP username and password Access Details Navigate your internet browser to https://pmi.siyandza-elp.com
NetExtender for SSL-VPN
 NetExtender for SSL-VPN Document Scope This document describes how to plan, design, implement, and manage the NetExtender feature in a SonicWALL SSL-VPN Environment. This document contains the following
QUICK START GUIDE. How Do I Get Started? Step #1 - Your Account Setup Wizard. Step #2 - Meet Your Back Office Homepage
 QUICK START GUIDE Here is a tool that will help you generate prospects and follow up with them using your web browser. Your Lead Capture system has Personal Sites, Contact Management, Sales Tools and a
Lucid Key Server. Help Documentation.
 Lucid Key Server Help Documentation www.lucidcentral.org Help for the Lucid Key Server Welcome to the Lucid Key Server, one member of the Lucid family of products. For more information on other Lucid and
Editor Guide. There are three ways to create, edit and delete an article within SOCS. They are Central Services, SOCS Wiki s and Easy Edit.
 Editor Guide There are three ways to create, edit and delete an article within SOCS. They are Central Services, SOCS Wiki s and Easy Edit. Central Services Select Editor from left-hand side navigation
QQWebAgent and QQMarketing Dashboard Quick Start Guide
 QQWebAgent and QQMarketing Dashboard Quick Start Guide Contents Implementing QQWebAgent on Your Web Site... 3 What You Need to Do... 3 Instructions for Web Designers, Webmasters or Web Hosting Provider...
Administering Workspace ONE in VMware Identity Manager Services with AirWatch. VMware AirWatch 9.1.1
 Administering Workspace ONE in VMware Identity Manager Services with AirWatch VMware AirWatch 9.1.1 You can find the most up-to-date technical documentation on the VMware website at: https://docs.vmware.com/
Blackboard Collaborate Ultra 2018 UT DALLAS USER MANUAL
 Blackboard Collaborate Ultra 208 UT DALLAS USER MANUAL UT Dallas elearning ELEARNING@UTDALLAS.EDU SPRING 208 Table of Contents Introduction... 3 Browser Support... 3 Blackboard Collaborate Ultra inside
ipass Open Mobile 3.0.x for Android Quick Start Guide
 ipass Open Mobile 3.0.x for Android Quick Start Guide V E R S I O N 1. 0, O C T O B E R 2 0 1 4 Corporate Headquarters ipass Inc. 3800 Bridge Parkway Redwood Shores, CA 94065 USA www.ipass.com +1 650-232-4100
LPAC Agent CONSOLE Agent Guide. Version 2.0
 LPAC Agent CONSOLE Agent Guide Version 2.0 Table of Contents Contents LOGGING IN... 3 SETTINGS... 4 General tab... 4 Chat tab... 5 Sounds tab... 6 Language tab... 7 AGENT CONSOLE OVERVIEW... 8 Visitor
VMware AirWatch Google Sync Integration Guide Securing Your Infrastructure
 VMware AirWatch Google Sync Integration Guide Securing Your Email Infrastructure AirWatch v9.2 Have documentation feedback? Submit a Documentation Feedback support ticket using the Support Wizard on support.air-watch.com.
Configure Guest Access
 Cisco ISE Guest Services, on page 1 Guest and Sponsor Accounts, on page 2 Guest Portals, on page 13 Sponsor Portals, on page 25 Monitor Guest and Sponsor Activity, on page 35 Guest Access Web Authentication
Setting Up Resources in VMware Identity Manager (SaaS) Modified 15 SEP 2017 VMware Identity Manager
 Modified 15 SEP 2017 VMware Identity Manager") Setting Up Resources in VMware Identity Manager (SaaS) Modified 15 SEP 2017 VMware Identity Manager Setting Up Resources in VMware Identity Manager (SaaS) You can find the most up-to-date technical documentation
Setting Up Resources in VMware Identity Manager (SaaS) Modified 15 SEP 2017 VMware Identity Manager Setting Up Resources in VMware Identity Manager (SaaS) You can find the most up-to-date technical documentation
Administrator Manual. Last Updated: 15 March 2012 Manual Version:
 Administrator Manual Last Updated: 15 March 2012 Manual Version: 1.6 http://www.helpdeskpilot.com Copyright Information Under the copyright laws, this manual may not be copied, in whole or in part. Your
CenturyLink Business Communicator for Desktop
 CenturyLink Business Communicator for Desktop User Guide Release 2.0 Document Version 4 BusinessCommunicator_Guide_0517_v4 1 CenturyLink Business Communicator Guide Table of Contents 1 About CenturyLink
Remote Support 19.1 Web Rep Console
 Remote Support 19.1 Web Rep Console 2003-2019 BeyondTrust Corporation. All Rights Reserved. BEYONDTRUST, its logo, and JUMP are trademarks of BeyondTrust Corporation. Other trademarks are the property
Administrator Manual. Last Updated: 15 March 2012 Manual Version:
 Administrator Manual Last Updated: 15 March 2012 Manual Version: 1.6 http://www.happyfox.com Copyright Information Under the copyright laws, this manual may not be copied, in whole or in part. Your rights
MANAGEMENT AND CONFIGURATION MANUAL
 MANAGEMENT AND CONFIGURATION MANUAL Table of Contents Overview... 3 SYSTEM REQUIREMENTS... 3 The Administration Console... 3 CHAT DASHBOARD... 4 COMPANY CONFIGS... 4 MANAGE LEARNING... 7 MANAGE TABS...
Configuring the CSS for Device Management
 CHAPTER 2 Configuring the CSS for Device Management Before you can use the WebNS Device Management user interface software, you need to perform the tasks described in the following sections: WebNS Device
Case Management System
 Case Management System Investigator/non-Administrator Instructions Your Lighthouse Services Case Management System (CMS) has been set up and is ready for your use. It is a powerful tool to oversee and
Wimba Pronto. Version 2.0. User Guide
 Wimba Pronto Version 2.0 User Guide Wimba Pronto 2.0 User Guide Welcome to Wimba Pronto 1 What's New in Wimba Pronto 2.0 2 Getting Started 3 Wimba Pronto System Requirements 3 Creating a New Wimba Pronto
Users Guide. Kerio Technologies
 Users Guide Kerio Technologies C 1997-2006 Kerio Technologies. All rights reserved. Release Date: June 8, 2006 This guide provides detailed description on Kerio WebSTAR 5, version 5.4. Any additional modifications
Telephony Toolbar Enterprise. User Guide
 Telephony Toolbar Enterprise User Guide Release 4.4 October 2009 Table of Contents 1 Summary of Changes... 7 1.1 Changes for this Release... 7 2 About This Guide... 8 2.1 Open Telephony Toolbar-Corporate...
Sophos Mobile as a Service
 startup guide Product Version: 8 Contents About this guide... 1 What are the key steps?... 2 Change your password... 3 Change your login name... 4 Activate Mobile Advanced licenses...5 Check your licenses...6
Introduction to 9.0. Introduction to 9.0. Getting Started Guide. Powering collaborative online communities.
 Introduction to 9.0 Introduction to 9.0 Getting Started Guide Powering collaborative online communities. TABLE OF CONTENTS About FirstClass...3 Connecting to your FirstClass server...3 FirstClass window
smartdata.gen2 Corporate Cardholder Guide February 2014
 smartdata.gen2 Corporate Cardholder Guide February 2014 Table of Contents Chapter 1 Getting Started... 1-i Introduction... 1-1 Browser Requirements... 1-1 Security... 1-2 Selecting a Language Preference...
NETSPOKE CONFERENCING. User Guide
 NETSPOKE CONFERENCING User Guide Updated version September 2007 2007 Premiere Global Services, Inc. All Rights Reserved CONTENT WHAT IS NETSPOKE?... 4 GETTING STARTED... 5 ACCESSING NETSPOKE (VIA CONFERENCING
Working with Wikispaces
 Working with Wikispaces Create an Account 1. Go to http://www.wikispaces.com/ 2. Click in the Get Started box on the top right of the page. 3. Enter a username. Your username will be visible to the students.
Avalanche Remote Control User Guide. Version 4.1
 Avalanche Remote Control User Guide Version 4.1 ii Copyright 2012 by Wavelink Corporation. All rights reserved. Wavelink Corporation 10808 South River Front Parkway, Suite 200 South Jordan, Utah 84095
Practice Labs User Guide
 Practice Labs User Guide This page is intentionally blank Contents Introduction... 3 Overview... 3 Accessing Practice Labs... 3 The Practice Labs Interface... 4 Minimum Browser Requirements... 5 The Content
ViMP 2.1. Administration Guide. Author: ViMP GmbH
 ViMP 2.1 Administration Guide Author: ViMP GmbH Chapter: Table of Contents Table of Contents ViMP Administration Panel... 5 Enter the Administration panel... 5 Filter Options... 6 Modules... 7 Media...
Enforced Client Policy & Reporting Server (EPRS) 2.3. Administration Guide
 2.3. Administration Guide") Enforced Client Policy & Reporting Server (EPRS) 2.3 Copyright 2016 Dell Inc. All rights reserved. This product is protected by U.S. and international copyright and intellectual property laws. Dell, the
Enforced Client Policy & Reporting Server (EPRS) 2.3 Copyright 2016 Dell Inc. All rights reserved. This product is protected by U.S. and international copyright and intellectual property laws. Dell, the
Overview NOTE: Listing Overview. User Profile. Language Selection. Asset(s) View. Asset(s) Details. Editing Mode
 View. Asset(s) Details. Editing Mode") Overview Listing Overview User Profile Language Selection Asset(s) View Asset(s) Details Editing Mode NOTE: Some functions may not be available to all users depending on permissions granted. Some of the
Overview Listing Overview User Profile Language Selection Asset(s) View Asset(s) Details Editing Mode NOTE: Some functions may not be available to all users depending on permissions granted. Some of the
SPONTANIA PRO 3.3 ADMINISTRATOR MANUAL
 SPONTANIA PRO 3.3 ADMINISTRATOR MANUAL ClearOne Spain S.L. Plaza España nº3, 7ª planta 50.004 Zaragoza Spain Telephone +34 976 302 524 FAX +34 976 211 873 Web www.clearone.com SPONTANIA PRO ADMINISTRATOR
Configure Guest Access
 Cisco ISE Guest Services, page 1 Guest and Sponsor Accounts, page 2 Guest Portals, page 15 Sponsor Portals, page 30 Monitor Guest and Sponsor Activity, page 42 Guest Access Web Authentication Options,
Manage Administrators and Admin Access Policies
 Manage Administrators and Admin Access Policies Role-Based Access Control, on page 1 Cisco ISE Administrators, on page 1 Cisco ISE Administrator Groups, on page 3 Administrative Access to Cisco ISE, on
Wimba Classroom. Version 5.3. System Administrator Guide
 Wimba Classroom Version 5.3 System Administrator Guide Wimba Classroom 5.3 System Administrator Guide 1 Administration Tools 2 Room Administration 3 Server Login Styles 4 Selecting a Server Login Style
Administrative Training Mura CMS Version 5.6
 Administrative Training Mura CMS Version 5.6 Published: March 9, 2012 Table of Contents Mura CMS Overview! 6 Dashboard!... 6 Site Manager!... 6 Drafts!... 6 Components!... 6 Categories!... 6 Content Collections:
Parallels Pro Control Panel
 Parallels Pro Control Panel Legal and Copyright Notice ISBN: N/A Parallels 660 SW 39 th Street Suite 205 Renton, Washington 98057 USA Phone: +1 (425) 282 6400 Fax: +1 (425) 282 6444 Copyright 2007 Ensim
MeetingPlaza Version 8.0
 MeetingPlaza Version 8.0 Reference manual for Chairperson or Administrator, Lecturer (For License Package) NTT-IT Corporation July, 2016 MeetingPlaza is a registered trademark of NTT-IT Corporation. The
Welcome to our Moodle site! What is Moodle?
 Welcome to our Moodle site! We are excited to introduce the use of this online e-learning platform in our "Get SMART FAST" Training Program! We believe the use of this virtual classroom and training format
eshop Installation and Data Setup Guide for Microsoft Dynamics 365 Business Central
 eshop Installation and Data Setup Guide for Microsoft Dynamics 365 Business Central Table of Contents Installation Guide... 3 eshop Account Registration in Dynamics 365 Business Central:... 3 eshop Setup
Remote Support Web Rep Console
 Remote Support Web Rep Console 2017 Bomgar Corporation. All rights reserved worldwide. BOMGAR and the BOMGAR logo are trademarks of Bomgar Corporation; other trademarks shown are the property of their
epals SchoolBlog Teacher s Guide
 epals SchoolBlog Teacher s Guide DOCUMENT VERSION 2.0 JUNE 2007 Copyright 2007 epals, Inc. All rights reserved. epals, epals SchoolBlog,and the epals SchoolBlog logo are trademarks or registered trademarks
Test Delivery System. Test Administrator User Guide LOUISIANA ELPS and ELPT. Published July 6, Updated October 12, 2018
 LOUISIANA ELPS and ELPT Test Delivery System Test Administrator User Guide 2018-2019 Published July 6, 2018 Updated October 12, 2018 Prepared by the American Institutes for Research Descriptions of the
ipass Open Mobile 3.1.x for Android Quick Start Guide
 ipass Open Mobile 3.1.x for Android Quick Start Guide V E R S I O N 1. 0, J A N U A R Y 2 0 1 5 Corporate Headquarters ipass Inc. 3800 Bridge Parkway Redwood Shores, CA 94065 USA www.ipass.com +1 650-232-4100
WebSphere Application Server V7: Administration Consoles and Commands
 Chapter 5 of WebSphere Application Server V7 Administration and Configuration Guide, SG24-7615 WebSphere Application Server V7: Administration Consoles and Commands WebSphere application server properties
GLOBALMEET USER GUIDE
 GLOBALMEET USER GUIDE Release 3.8.1 July 2016 TABLE OF CONTENTS GlobalMeet Overview 4 Get the GlobalMeet Desktop Tools 5 Download and Install GlobalMeet 5 System Requirements 5 Getting Started 6 Sign in
BrainCert Enterprise LMS. Learning Management System (LMS) documentation Administrator Guide Version 3.0
 documentation Administrator Guide Version 3.0") BrainCert Enterprise LMS Learning Management System (LMS) documentation Administrator Guide Version 3.0 1 P a g e Table of Contents... 3... 3... 4... 4... 5... 5... 6... 6... 8... 8... 9... 9... 10...
BrainCert Enterprise LMS Learning Management System (LMS) documentation Administrator Guide Version 3.0 1 P a g e Table of Contents... 3... 3... 4... 4... 5... 5... 6... 6... 8... 8... 9... 9... 10...
User s Manual for uknowva
 User s Manual for uknowva Prepared by: Convergence IT Services Pvt. Ltd. Description uknowva is extensible Enterprise Collaboration Software that offers a private and secure platform for members of an
NotifyMDM Device Application User Guide Installation and Configuration for Android
 NotifyMDM Device Application User Guide Installation and Configuration for Android NotifyMDM for Android, Version 3.x NotifyMDM for Android 1 Table of Contents NotifyMDM for Android 3 Installation Instructions
Running Effective Meetings
 Running Effective Meetings www.clickmeeting.com In this guide... You ll learn how organize your online meeting space, set up camera and voice, share your presentation and manage attendees. Contents Launch
Major League Baseball Club Accreditation System
 Functional Specifications User Guide System Administrator Major League Baseball Club Accreditation System Club Accreditation User Guide System Administrator - v1.4 Page 1 Date Versio n Revision History
User Guide. Administration Portal. Release 6.7. For Customer Administrators
 User Guide Administration Portal Release 6.7 For Customer Administrators Published: 10/22/2014 Table of Contents Table of Contents Introduction... 1 Contents of this Guide... 1 Intended Audience... 1 Version
Vovici Enterprise System Administration Guide
 know more. go far. Vovici Enterprise System Administration Guide Version 4.0 January 2009 45365 Vintage Park Plaza, Suite 250, Dulles, VA 20166 t: + 1 703 481 9326 f: + 1 703 783 0069 e: sales@vovici.com
ipass Open Mobile Quick Start Guide for Android
 ipass Open Mobile 3.2.1 Quick Start Guide for Android VERSION 1.0, SEPTEMBER 2015 Corporate Headquarters ipass Inc. 3800 Bridge Parkway Redwood Shores, CA 94065 USA www.ipass.com +1 650-232-4100 +1 650-232-0227
Wimba Classroom Version 6.1 System Administrator Guide
 Wimba Classroom Version 6.1 System Administrator Guide Wimba Classroom 6.1 System Administrator Guide 1 Administration Tools 2 Room Administration 3 Server Login Styles 3 Selecting a Server Login Style
Using WebBoard at UIS
 Using WebBoard at UIS Accessing your WebBoard Course...3 Logging in to WebBoard...3 Understanding the WebBoard Environment...4 The Menubar...5 The Conferences Menu...5 Conferences...5 Topics...6 Messages
CommandCenter Secure Gateway User Guide Release 5.2
 CommandCenter Secure Gateway User Guide Release 5.2 Copyright 2011 Raritan, Inc. CC-0U-v5.2-E July 2011 255-80-3100-00 This document contains proprietary information that is protected by copyright. All
Microsoft Windows SharePoint Services
 Microsoft Windows SharePoint Services SITE ADMIN USER TRAINING 1 Introduction What is Microsoft Windows SharePoint Services? Windows SharePoint Services (referred to generically as SharePoint) is a tool
 Trend Micro Incorporated reserves the right to make changes to this document and to the product described herein without notice. Before installing and using the product, please review the readme files,
WebEx Meeting Participant Guide
 WebEx Meeting Participant Guide Signing On to a WebEx Meeting 1 Attending a WebEx Meeting 3 WebEx Meeting Tabs 4 WebEx Meeting Audio Information 6 Streaming Audio 6 Phone Audio 8 WebEx Meeting Panels 10
iservice USER GUIDE January 2016
 iservice USER GUIDE January 2016 TABLE OF CONTENTS Access iservice...3 Site Navigation...4 User Management...5 Create a New User...5 Edit, Clone, Reset Passwords, & Disable Users...5 Re-Enable an Inactive
Blackboard Student Quick Reference Guide
 Blackboard Student Quick Reference Guide Welcome to Blackboard, UTT s E-Learning System! This Quick Reference Guide is designed to help get you started using Blackboard Release 9.1.120113.0. Page 1 of
ENTERPRISE SUBSCRIBER GUIDE
 ENTERPRISE SUBSCRIBER GUIDE Enterprise Subscriber Guide 880 Montclair Road Suite 400 Birmingham, AL 353 www. TABLE OF CONTENTS Table of Contents Introduction...6 Logging In...6 Navigation Bar, Sub-Menu
Expedient User Manual Getting Started
 Volume 1 Expedient User Manual Getting Started Gavin Millman & Associates Pty Ltd 281 Buckley Street Essendon VIC 3040 Phone 03 9331 3944 Web www.expedientsoftware.com.au Table of Contents Logging In...
Learn about the latest offerings in Adobe Connect. This article summarizes the new features and enhancements.
 Adobe Connect 9.7 Release Notes Learn about the latest offerings in Adobe Connect. This article summarizes the new features and enhancements. Adobe Connect is a web conferencing solution for web meetings,
Start Here. Accessing Cisco Show and Share. Prerequisites CHAPTER
 CHAPTER 1 Revised: May 31, 2011 Accessing Cisco Show and Share, page 1-1 Cisco Show and Share Quick Start, page 1-4 Sign In to Cisco Show and Share, page 1-20 Set Your Personal Preferences, page 1-22 Accessing
Account Management Settings section. Service Request Settings section
 WebEx Site Configuration Audit Log The following settings are included in the CSV export of changes to the Configuration > Common Site Settings > Options page of WebEx Site Administration. Account Management
Privileged Access Management Android Access Console 2.2.2
 Privileged Access Management Android Access Console 2.2.2 2015 Bomgar Corporation. All rights reserved worldwide. BOMGAR and the BOMGAR logo are trademarks of Bomgar Corporation; other trademarks shown
User Guide. Administration Portal. For Customer Administrators
 User Guide Administration Portal For Customer Administrators Table of Contents Table of Contents Introduction... 1 Contents of this Guide... 1 Intended Audience... 1 Version Information... 1 What s New