WEB PAY EMPLOYEE GUIDE
|
|
|
- Charles Smith
- 6 years ago
- Views:
Transcription


1 Revised 4/14/2017 WEB PAY EMPLOYEE GUIDE Client Resource
2
3 TABLE OF CONTENTS WEB PAY... 2 SELF SERVICE PORTAL... 9 HOME EMPLOYEES PAYROLL NOTIFICATIONS GLOSSARY

4 WEB PAY Use Web Pay self service and social collaboration to manage information and network with coworkers. Users may not have access to all of the options described in this guide. Each company determines which options are available and each user's security group determines the display of information. In order to maintain confidentiality, employees must contact their Company Administrator with questions. Paylocity is not authorized to speak directly with employees. Click the Paylocity logo in the middle of the header to return to the default home page. Access messages in the header section of the screen. The bell indicates there are no messages. When there are messages, the red box displays the number of messages. Click Help to view help text for each screen. Use the self service portal or the menus across the top of the application to navigate through Web Pay. Select Self Service Portal from the Applications menu. Select Home to access the self service portal. Select Directory to view all employees. Select Impressions to view impression badges received by employees. Select Teams to view the company s team structure. Select Log Out from the Account Profile to log out of the application. Multiple Pages of Information When there are multiple pages of information, use the page numbers and arrow keys to view all available information. Click the back arrow with an adjacent vertical line to access the first page. Click the multiple back arrows with an adjacent vertical line to access the prior set of pages. Click the back arrow to access the prior page. Click a page number to select a specific page. Click the forward arrow to access the next page. Click the multiple forward arrows with an adjacent vertical line to access the next set of pages. Click the forward arrow with an adjacent vertical line to access the last page. 2
5 MESSAGE CENTER View or delete messages. Click the Received link to view the message details. Check the box adjacent to the message and click Delete to delete the message. Click the link to view additional details. Click Print to print the message. Click Keep As Unread to keep the message marked as an unread message. Click Return to return to the previous screen. 3

6 MESSAGES View messages. Click View all Messages to access the Message Center. EVENT NOTIFICATION When an Administrator launches an Event, the selected employee will receive a notification about the Event for completion. Click the Please access the event here link to display the Event. 1. Fill out the required information within the Event. 2. Click Submit. 4

7 SIDEBAR MENU Use the sidebar menu to access help or download mobile applications. Select Security to learn more about how Paylocity protects information. 5
8 CHANGING INFORMATION Users may be able to edit certain fields in Web Pay. All fields with a green icon adjacent to the field name or a green title are required and must be populated in order to save information in a screen. Many of the changes made by employees are pending changes that will not take effect until a Company Administrator approves them. Pending addition Pending change Pending deletion Saving Information When finished entering information, use one of the save options to save the information. Save the updated information and remain on the current screen. Save the updated information and open a new screen to add additional information. Save the updated information and return to the previous screen. Save the updated information and close the current screen Discard the changes and return to the previous screen. Return to the previous screen. 6


9 A warning will appear when navigating away from a screen where changes have been made but not saved. SORTING List pages display information in columns that can be sorted. There will be a triangle adjacent to the column heading by which the system is sorting the information. The triangle will show the direction of the current sort. To change the sorting of displayed information, click the applicable column heading. 7
10 8

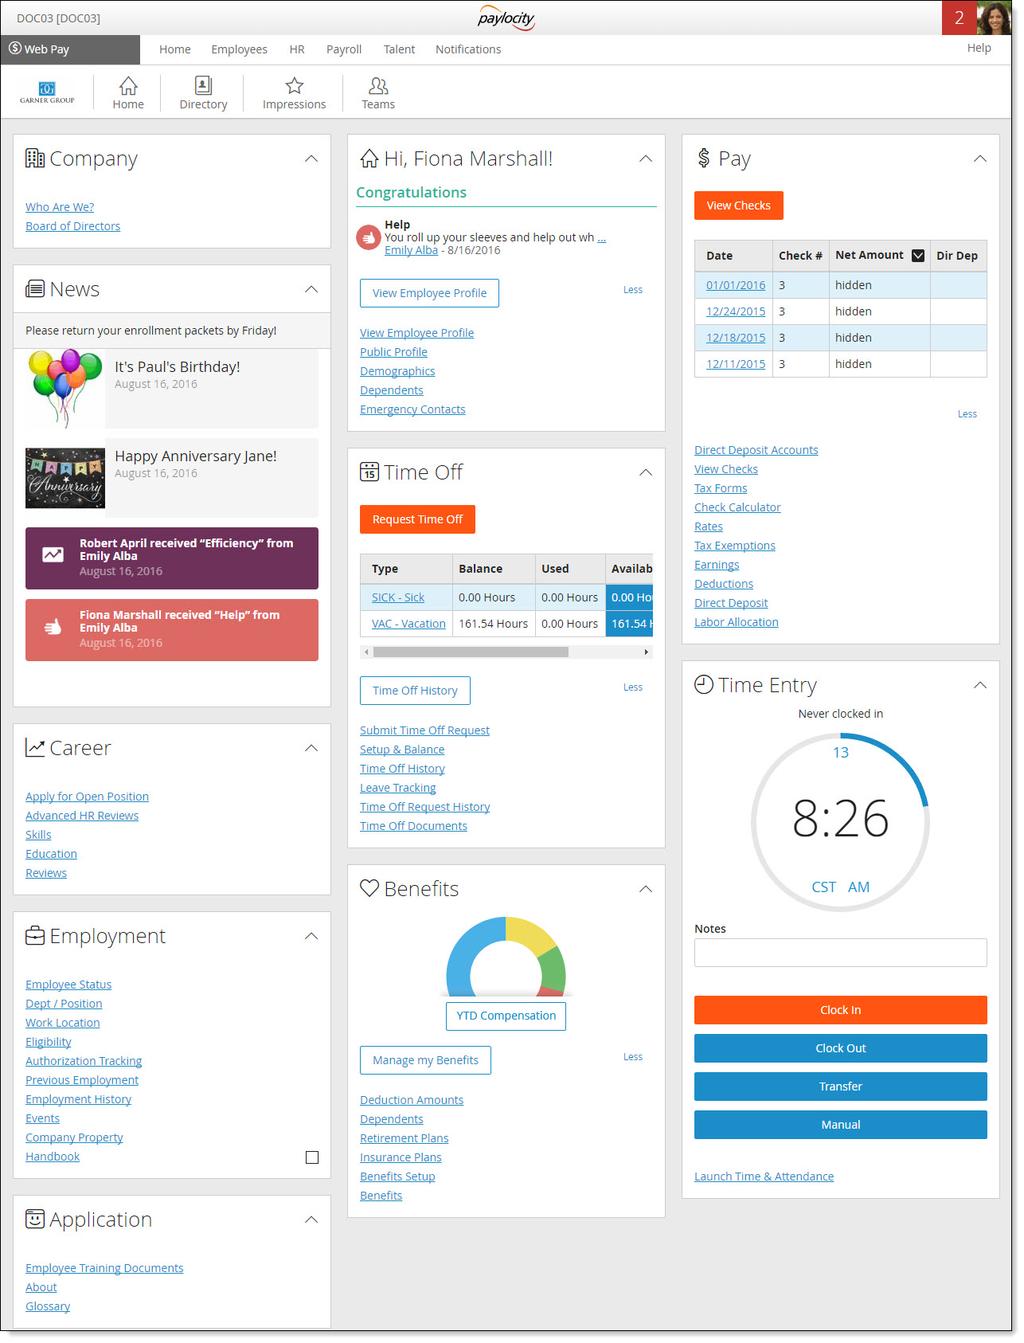
11 SEARCH FILTERS Search options are available to expand or limit the amount of information displayed. Select or enter the required criteria in one or more fields. Click the Search button to display all information that matches the required criteria. Verify the results in the display section. To save the search results for future use, enter a name for the search in the Save Search field and click the Save icon. Once the search has been saved, users can select the saved search from the Select Saved Search drop down. To delete the saved search, select the saved search from the drop down and click the Delete icon. Click Show All to display all information. SELF SERVICE PORTAL SELF SERVICE PORTAL Self service portal information is organized into tablet-friendly cards. Each company may configure their own display and access. Click the icon to expand or collapse the card. Click Less to hide information in the card. Click More to display all information. Use the self service portal to manage Web Pay information. Click the boxes or the links to access associated Web Pay screens. 9
12 10

13 APPLY FOR AN OPEN POSITION Apply for an open position in the company. Click the X in the top-right corner of your screen to close this screen and return to the self service portal. 1. Select the Open Position from the Open Position drop down. 2. Click Save and Close to save the open position application and return to the main screen. COMPANY NEWS ITEMS View all company news items. Click the Publish Date link to view the details. DIRECT DEPOSIT ACCOUNT Add, edit, or delete direct deposit account information. Click the X in the top-right corner of your screen to close this screen and return to the self service portal. 1. To add a new direct deposit account, select Add New Direct Deposit Account from the drop down. 2. Select the applicable Account Type (Checking, Savings, or Pay Card) from the drop down. 3. Enter the nine digit ABA Transit Routing Number without dashes or spaces. 4. Enter the Account Number without spaces or symbols (17 character limit). 5. Enter the Name on Account (30 character limit). 6. If this is the main account, Save the updated information to deposit the entire paycheck to this main account. If this is an additional account, check the Additional Deposit Account box. 7. Select the Amount Type from the drop down to indicate whether the numeric value in the Amount field should be a Flat dollar amount, Percent, or Net Minus. Selecting Net Minus will issue a live check for the dollar amount entered into the Amount field with the balance being deposited into the corresponding bank account. 8. Enter the Amount based on the Amount Type. 11
14 9. Save the updated information. The specified amount will be deposited in each additional account listed and the net check will be deposited into the main account. To change the order in which money is deposited into an additional deposit account, select the radio button adjacent to the applicable account Routing Number and click the blue up or down arrow to move the account. Important Notes Employees can have an unlimited number of Direct Deposit accounts. When adding an "Additional Account", note that if you have the percentage amount as 100% being deposited no additional money will be deposited in any more Additional Accounts. EDIT EMPLOYEE PROFILE Click the image to upload a new profile image. Select Use Default Image to return to the default image. Click Preview to preview the profile. Click View to view the profile that appears when users click Profile. Click the applicable icon to link a LinkedIn, Facebook, Google+, or Twitter profile to the employee profile. Click Upload Resume to upload a resume. Enter personal information in the About Me field. Click the spell check icon to check the spelling. Enter information in the Schools/Education search field to select an education option or enter education information in the field and click Add to add the education information to the employee profile. Make a selection from the Class Of drop down and enter additional information in the comments field. Users may edit, save, or delete education information by clicking the applicable icon. 12
15 Enter information in the Skills/Expertise search field to select a skill or expertise or enter skills or expertise information in the field and click Add to add the information to the employee profile. Click the X to delete information. Check the box adjacent to those Interests that apply. Click the applicable section icon to add interests from the selected section. Click Save Profile Changes to save the updated information. Important Notes When users add a new education option to their employee profile, the option will be available to every user in the company. When users add a new skill or expertise to their employee profile, the option will be available to every user in the company. 13

16 HIDE OR DISPLAY THE NET AMOUNT Click the Net Amount icon to hide or display the Net Amount in the Compensation section of the self service portal. NEWS ITEM View the company news item. Click the X in the top-right corner of your screen to close this screen and return to the previous screen. Use the arrows adjacent to the drop down to navigate from one news item to the next or select a specific news item from the drop down. Click the search icon located below the X to view a summary list of news items. 14
17 PERSONAL INFORMATION Click Personal Information to add or edit personal information from three available tabs: Details 1. Enter your First Name, Last Name, and Middle Name. 2. Enter your preferred Title and select an applicable Suffix. 3. Enter a Preferred First Name and Prior Last Name. 4. In the Personal section, enter your Social Security Number, Marital Status, Birth Date, possible Disability, Ethnicity, and Sex. 5. To continue, click Save. 15
18 Contact 1. Enter applicable Phone and To edit an Address, click the Edit icon ( ). 3. From the Emergency Contact area, you are able to: a. Click the + Add Contact link to add an Emergency Contact. b. Click the contact's Name to edit an existing Emergency Contact. 4. Click Save when done editing. 16
19 17
20 Social 1. Update your Personal Image. 2. Enter information in the About Me section. 3. Click Save when done editing. 4. Click Connect to connect your Employee Profile with your social media accounts. SUBMIT TIME OFF REQUESTS Submit time off requests. Click the X in the top-right corner of your screen to close this screen and return to the self service portal. 1. Select a Request Type from the drop down. 2. Enter additional information in the Employee Comments field. 3. Select the Single Day or Multiple Days radio button. 4. Select or enter the Start Date. 5. Select or enter the End Date. 6. Enter the Hours Per Day. 7. Enter the applicable Start Time. 8. Click Save and Close to submit the time off request. 18

21 For additional detail, click Discard changes and go to the Time Off Request History to access the Time Off Requests screen. Important Notes The ability to submit time off requests from the Self Service Portal will not be available to employees that are assigned to a Web Time policy; those employees will need to submit time off through Web Time. UPLOAD NEW PROFILE IMAGE 1. Click Upload New Profile Image. 2. Click Select to find the image. 3. Select the image and click Open to upload the image. 19


22 UPLOAD RESUME 1. Click Upload Resume to find the document. 2. Select the resume and click Open to upload the document. Click My Resume to display the resume. Click the red X to delete the resume. 20
23 VIEW CHECKS Under the $ Pay heading, you can select to View Checks. From there you have the option to view Checks and Tax Forms. 21
24 22

25 VIEW PROFILE View the employee profile. Click the link to send an to the employee. Click Add Impression to award an impression badge for the employee. Click View Team to view the employee's team. Click My Resume to view the employee's resume. 23


26 WEB TIME Select Web Time from the Applications menu or select Launch Time & Attendance in the Time Entry section of the self service portal. Clock in and out from the self service portal. To return to Web Pay, select Web Pay from the Applications menu. 24

27 YEAR TO DATE COMPENSATION View year to date compensation. Click the X in the top-right corner of your screen to close this screen and return to the self service portal. 1. Select the Year from the drop down. 2. Check the Include Employer Paid Taxes box to display employer paid taxes in the chart. 3. Click the Run icon to display the information. Important Notes The YTD Compensation Chart will display up to 12 sections of information including employer paid taxes. The largest earnings and/or deductions will display first. Additional earnings and deductions will be combined into a total section that appears as Other. The YTD Compensation Chart pulls data from payroll history based on check date. It does not project or annualize values based on insurance plan or recurring deduction/earning setup. 25

28 HOME ABOUT View product information and system requirements. Click the Verify your system setup button to confirm all system requirements are present and accurate to run the application. A green check will appear next to each option that meets the requirements. Adobe Reader is required to view and print pay stubs, reports, and other documents. Click the applicable link in this screen to download Adobe Reader. Users may be required to click the applicable link to download and run the installation program to enable Offsite Printing. COPYRIGHT View copyright information. 26

29 DIRECTORY View employee contact information. Use the Quick Search area to view specific employees. Click the Employee's Name to view the employee's profile. Click Award to submit an impression badge for the employee. 27

30 IMPRESSIONS View employee impression badges. Use the search filters to view specific employees. Depending on the company's configuration, supervisor approval of the impression badge may be required before the impression badge appears in this screen. Click Award Impression to award an impression badge for a fellow employee. Click All Impressions to view a list of all impressions awarded. Click Profile to view the employee's profile. Click Team to view the employee's team. Click Impression to award an impression badge to the employee. 28
31 AWARD AN IMPRESSION Submit an impression badge to recognize a fellow employee for a job well done. Depending on the company's configuration, supervisor approval of the impression badge may be required. 1. Select the Impression Type from the available list. The selected badge displays a default title and comments. 2. Type the name(s) of the recipient(s) in the Recipient(s) field. 3. Choose whether the Impression will be Visible to Everyone. 4. Customize the comment information in the Comments field. 5. Once complete, Send the impression. 29

32 Search Filter Options Search for employees in Web Pay self service and social collaboration. Enter the employee's name in the Search field to find a specific employee. Enter information in the Search field to find specific employees who match the search criteria. Selected search criteria may appear at the top of the screen. Click the X to remove selected criteria. 30


33 Click the filter icon to use multiple search criteria. Enter the applicable criteria in each search field and click Search. Click Reset to clear the specified search criteria. GLOSSARY View payroll terms and calculations to assist with questions about paychecks. This screen cannot be edited. 31
 and minus (-) signs. Click View Team to display direct reports.")
34 TEAMS View employee teams. The company team structure appears based on information entered in the Supervisor field. Click the Top Level icon to move up one level. Zoom in and out with the plus (+) and minus (-) signs. Click View Team to display direct reports. Hover the mouse over an employee s name to display additional details. 32
35 PREFERENCES View or edit personal preferences. Users may be required to enter their password when saving changes. 1. Enter the User Name. 2. To change the password, check the Change Password box. 3. Enter the Current Password. 4. Enter the New Password and enter the new password a second time in the Confirm New Password field. 5. Select the Default Home Page at login. 6. Check the box(es) within the Notifications Preferences area to choose where you want to have notifications sent; multiple selections can be made. 7. Select the number of rows that appear on a page in the Paging Size field. 8. Select a login challenge question from the Question 1, Question 2, and Question 3 drop downs. Enter the answer to the respective login challenge question in the Answer 1, Answer 2, and Answer 3 fields. 9. Select an image from the Select Security Image drop down. This image will appear on the login screen once the Company Id and Username are entered. 10. Enter a personal Security Phrase. This phrase will appear on the login screen once the Company Id and Username are entered. 11. Save the updated information. Important Notes Notifications are always sent to the Message Center. Users who establish challenge questions must select three unique questions and enter three answers. They may not select only one or two questions and they may not select a question more than once. 33


36 TRAINING DOCUMENTS Access online training documents and videos. HELP Clicking Help at the top right of the screen will open a help text pop-up screen. This screen provides assistance to navigate through various screens, fields and pages. 34
37 EMPLOYEES EMPLOYEE INFO PERSONAL DEMOGRAPHICS Add or edit general employee information. 1. Enter the Last Name (40 character limit), First Name (40 character limit), and Middle Name (20 character limit). 2. Enter a Salutation (10 character limit). 3. Select a Suffix from the drop down. 4. Enter a Nickname (20 character limit) and/or Prior Last Name (40 character limit). 5. Enter the Address, Phone, and information. 6. Select the Gender from the drop down. 7. Select the Ethnicity from the drop down. 8. Select the Marital Status from the drop down. 9. Check the Smoker box, if applicable. 10. Enter information in the Disability field (30 character limit). 11. Enter information in the Veteran field (30 character limit). 12. Save the updated information. Important Notes Employees are not able to add or edit their own Social Security Number (SSN) or Birth Date information. Employees must contact the Company Administrator to make these changes. 35
38 IN THE ADDRESS SECTION 1. Enter the address in the Address 1 field (30 to 50 character limit) and applicable address information in the Address 2 field (30 to 50 character limit). 2. Enter the City (30 character limit), select the State from the drop down, and enter the Zip Code. 3. Select a Country from the drop down. 4. Enter the County. 5. Enter the applicable Additional Address (100 character limit). 6. Select the Additional Address Type from the drop down. 7. Select the Additional Address Country from the drop down. 8. Enter the Home Phone number and Mobile Phone number. 9. Enter the address (40 character limit). Important Notes It may be necessary to enter the plus (+) sign before the phone number in order to save the phone number. The character limit for address fields may vary depending on the selected screen. DEPENDENTS Click the Add button to add a new dependent. Click the Last Name link to display or modify the dependent details. Check the box adjacent to the Last Name and click the Delete button to delete the dependent. 1. Enter the Last Name (40 character limit), First Name (40 character limit), and Middle Name (20 character limit). 2. Select the Relationship from the drop down. 3. Select the Gender from the drop down. 4. Select or enter the Birth Date. 5. Enter the Social Security number in the SSN field. 6. If the dependent is an emergency contact, check the Emergency Contact box and select the Primary Phone from the drop down. 7. Enter additional information the Notes field. 8. Enter the applicable Address, Phone, and information. 9. Check the Full Time Student box, if applicable. 36
39 10. Once you Save the information, the Coverage Dates section will display. 1. Click Add to add coverage information to the dependent. 2. Enter or select the Coverage Begin date. 3. Enter or select the Coverage End date (if applicable). 4. Click Save. 37
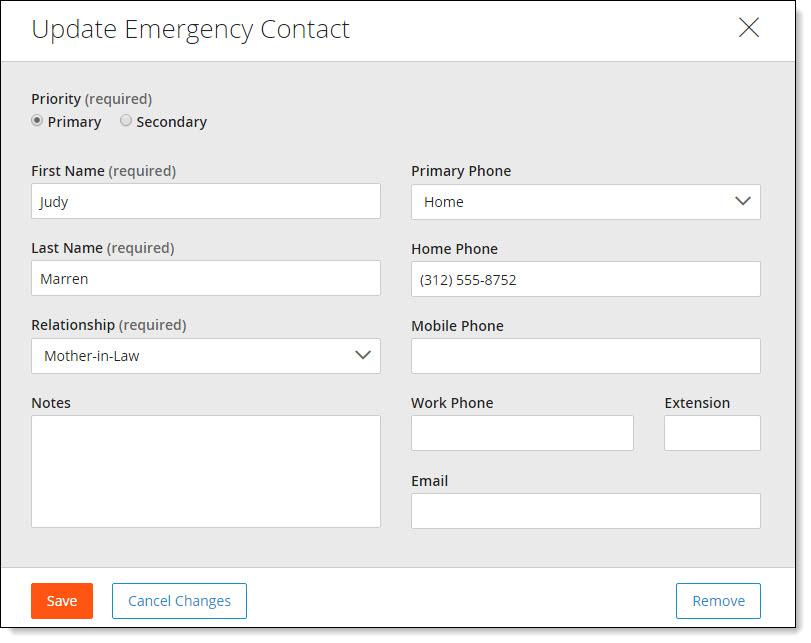
40 EMERGENCY CONTACTS Click the Add button to add a new emergency contact. Click the Last Name link to display or modify the emergency contact details. Check the box adjacent to the Last Name and click the Delete button to delete the dependent. 1. Select the Priority. 2. Enter the Last Name and First Name. 3. Select the Relationship from the drop down. 4. Select the Primary Phone from the drop down. 5. Enter the Address, Phone, and information. 6. Enter additional information in the Notes field (100 character limit). 7. Save the updated information. 38
41 WORK EMPLOYEE STATUS View employee status information. DEPT & POSITION View supervisor, reviewer, position, home department cost center, pay settings, and union information. 39
42 LOCATION View work site information. Important Notes Temporary password resets are ed to the work address entered in the field. Employees can have notifications sent to this work address in addition to having them sent to the Message Center. ELIGIBILITY View information regarding eligibility for work. 40
43 AUTHORIZATION TRACKING View work authorization status. Click the Date link to display the details. Click the Cancel button to return to the main screen. STATUTORY 41

44 PAYROLL SETUP RATES View pay rates or salary amounts. The display includes rate history and information on additional rates. TAXES View or edit tax information. Click the Tax Code link to display or modify the details. 1. Select a Filing Status from the drop down. 2. Enter the number of exemptions in the Exemption 1 field and the applicable number of exemptions in the Exemption 2 field (if applicable). 3. Select the applicable Amount Type if different from the Default Amount. 4. Enter an Amount. This field is enabled when a dollar Amount Type is selected from the drop down. 5. Enter a Percentage as a whole number not as a decimal (e.g., 10% should be entered as instead of 0.10). This field is enabled when a percentage Amount Type is selected from the drop down. 6. For State Taxes, enter the Percentage Allocation for the state selected. 7. Designate the SUI from the drop down. 8. Save the updated information. 42

45 AMOUNT TYPES Additional Flat: Add an additional flat dollar amount to what the employee should have withheld. Additional Flat plus Additional Percentage: Add an additional flat dollar amount and a percentage of taxable wages to what the employee should have withheld. Additional Percentage: Add a percentage of taxable wages to what the employee should have withheld. Blocked: No tax amount should be taken but the employee's wages are still reflected as taxable. Flat Dollar Amount: Withhold only the amount entered within the Amount field. Flat Dollar Amount plus Fixed Percentage: Withhold the amount entered within the Amount field and the percentage of taxable wages entered within the Percentage field. Flat Percentage: Withhold only the percentage of taxable wages entered within the Percentage field. 43

46 EARNINGS View regularly scheduled recurring earnings. Click the Code link to display its details. Click the Cancel button to return to the main screen. 44
47 DEDUCTIONS View regularly scheduled recurring deductions. Click the Deduction Code link to display its details. Click the Cancel button to return to the main screen. Important Notes Users may be able to edit deductions in the self service portal. Changes made by employees will not take effect until a Company Administrator approves them. 45
 from the drop down. 3.")
48 DIRECT DEPOSIT Add, edit, or delete direct deposit account information. Click the X in the top-right corner of your screen to close this screen and return to the self service portal. 1. To add a new direct deposit account, select Add New Direct Deposit Account from the drop down. 2. Select the applicable Account Type (Checking, Savings, or Pay Card) from the drop down. 3. Enter the nine digit ABA Transit Routing Number without dashes or spaces. 4. Enter the Account Number without spaces or symbols (17 character limit). 5. Enter the Name on Account (30 character limit). 6. If this is the main account, Save the updated information to deposit the entire paycheck to this main account. If this is an additional account, check the Additional Deposit Account box. 7. Select the Amount Type from the drop down to indicate whether the numeric value in the Amount field should be a Flat dollar amount, Percent, or Net Minus. Selecting Net Minus will issue a live check for the dollar amount entered into the Amount field with the balance being deposited into the corresponding bank account. 8. Enter the Amount based on the Amount Type. 9. Save the updated information. The specified amount will be deposited in each additional account listed and the net check will be deposited into the main account. To change the order in which money is deposited into an additional deposit account, select the radio button adjacent to the applicable account Routing Number and click the blue up or down arrow to move the account. 46

49 Important Notes The system will not allow an incorrect Routing Number to be saved. Selecting Net Minus will issue a live check for the dollar amount entered into the Amount field with the balance being deposited into the corresponding bank account. LABOR ALLOCATION View specific distribution of wages. PAY CURRENT CHECKS View current check information. Users are able to print a pay stub by clicking the Download Printable Version button on the bottom of this screen. To view a paycheck or direct deposit voucher issued prior to the current check, click the Check Date drop down and select the applicable check date to display the check or voucher. The Employee section, which displays the Employee Id and Department, can be expanded or collapsed by clicking the double arrows. The Check or Voucher #, Delivery Location, Check Date, Period Begin and End Dates, Gross Earnings, Gross YTD, Net Earnings, and Net YTD are displayed in the Check section. Depending on the company's configuration, the bottom sections of the screen will display applicable details about Direct Deposits, Earnings, Deductions, Benefits, Taxes, and Time Off. 47
50 48
51 CHECK HISTORY Search for checks in a specific date range. Select a Date Range From and Date Range To, populating the checks to display. Click the Submit button to display the results. To summarize only certain checks in the specified date range, check the box adjacent to the applicable checks in the Results section. Click the Calculate Summary button to display the sum totals of the selected checks in the Summary and Detailed Pay Information sections. Click the Print Summary Report button to print a copy of the Check History Summary Report. 49
52 TAX FORMS View and print W2s, 1099s, and 1095-Cs that have been processed by Paylocity. Click the Tax Year link to view or print a copy of the tax form. Close the PDF file to return to the main screen. 50
53 51
54 TIME OFF BALANCES View time off information. Click the Type link to display the details. Click the Cancel button to return to the main screen. 52
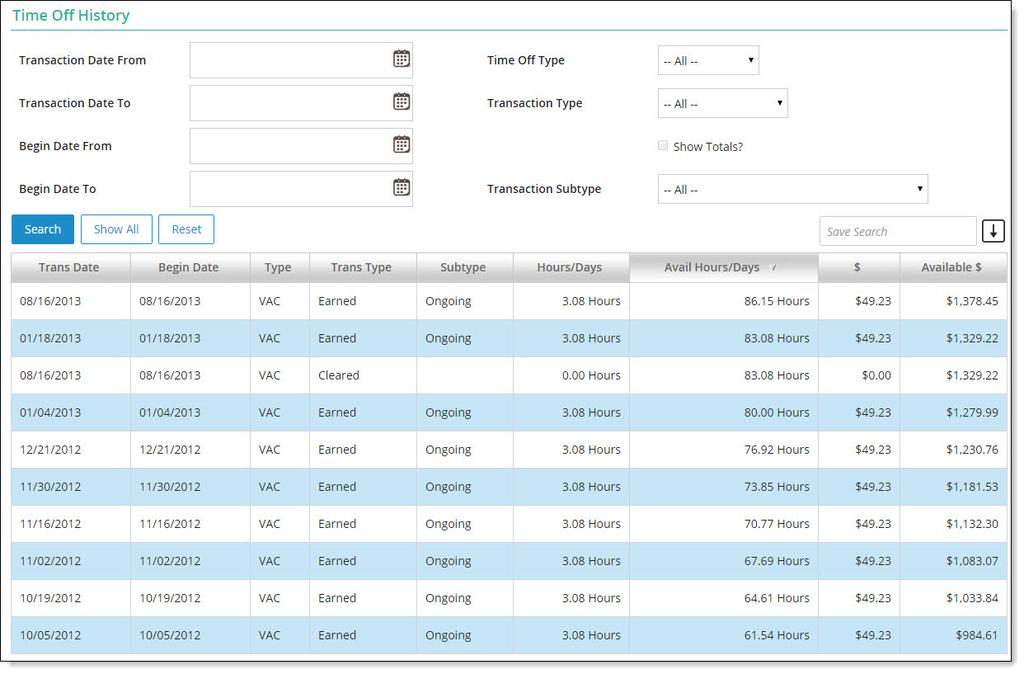
55 HISTORY View time off benefits earned and used per payroll and any manual adjustments made in Web Pay. Users can search for time off based on selected date ranges and/or types and display totals. 53
56 HUMAN RESOURCES PERSONAL DEMOGRAPHICS Add or edit general employee information. 1. Enter the Last Name (40 character limit), First Name (40 character limit), and Middle Name (20 character limit). 2. Enter a Salutation (10 character limit). 3. Select a Suffix from the drop down. 4. Enter a Nickname (20 character limit) and/or Prior Last Name (40 character limit). 5. Enter the Address, Phone, and information. 6. Select the Gender from the drop down. 7. Select the Ethnicity from the drop down. 8. Select the Marital Status from the drop down. 9. Check the Smoker box, if applicable. 10. Enter information in the Disability field (30 character limit). 11. Enter information in the Veteran field (30 character limit). 12. Save the updated information. Important Notes Employees are not able to add or edit their own Social Security Number (SSN) or Birth Date information. Employees must contact the Company Administrator to make these changes. 54
57 DEPENDENTS Click the Add button to add a new dependent. Click the Last Name link to display or modify the dependent details. Check the box adjacent to the Last Name and click the Delete button to delete the dependent. 1. Enter the Last Name (40 character limit), First Name (40 character limit), and Middle Name (20 character limit). 2. Select the Relationship from the drop down. 3. Select the Gender from the drop down. 4. Select or enter the Birth Date. 5. Enter the Social Security number in the SSN field. 6. If the dependent is an emergency contact, check the Emergency Contact box and select the Primary Phone from the drop down. 7. Enter additional information the Notes field. 8. Enter the applicable Address, Phone, and information. 9. Check the Full Time Student box, if applicable. 55
58 10. Once you Save the information, the Coverage Dates section will display. a. Click Add to add coverage information to the dependent. b. Enter or select the Coverage Begin date. c. Enter or select the Coverage End date (if applicable). d. Click Save. 56
59 EMERGENCY CONTACTS Click the Add button to add a new emergency contact. Click the Last Name link to display or modify the emergency contact details. Check the box adjacent to the Last Name and click the Delete button to delete the dependent. 1. Select the Priority. 2. Enter the Last Name and First Name. 3. Select the Relationship from the drop down. 4. Select the Primary Phone from the drop down. 5. Enter the Address, Phone, and information. 6. Enter additional information in the Notes field (100 character limit). 7. Save the updated information. 57
60 WORK EMPLOYEE STATUS View employee status information. DEPT & POSITION View supervisor, reviewer, position, home department cost center, pay settings, and union information. 58
61 LOCATION View work site information. Important Notes Temporary password resets are ed to the work address entered in the field. Employees can have notifications sent to this work address in addition to having them sent to the Message Center. ELIGIBILITY View information regarding eligibility for work. 59
62 AUTHORIZATION TRACKING View work authorization status. Click the Date link to display the details. Click the Cancel button to return to the main screen. STATUTORY 60
63 EMPLOYMENT RATES View pay rates or salary amounts. The display includes rate history and information on additional rates. PREVIOUS EMPLOYERS View employment history prior to being employed by the company. Click the Employer Name link to display the details. Click the Cancel button to return to the main screen. 61
64 EMPLOYMENT HISTORY The Employment History screen is a single page view of the employee s compensation and position history while employed by the company. Changes to the employee work information such as a job change, performance appraisal, new rate, or employment status change are automatically added to Employment History overnight. Click the Effective Date link to display the details. 62
65 Click the Cancel button to return to the main screen. EVENTS View events, awards, or disciplinary actions. Click the Code link to display its details. 63
66 Click the Cancel button to return to the main screen. COMPANY PROPERTY View the company property that has been issued. PAY CURRENT CHECKS View current check information. Users are able to print a pay stub by clicking the Download Printable Version button on the bottom of this screen. To view a paycheck or direct deposit voucher issued prior to the current check, click the Check Date drop down and select the applicable check date to display the check or voucher. The Employee section, which displays the Employee Id and Department, can be expanded or collapsed by clicking the double arrows. The Check or Voucher #, Delivery Location, Check Date, Period Begin and End Dates, Gross Earnings, Gross YTD, Net Earnings, and Net YTD are displayed in the Check section. Depending on the company's configuration, the bottom sections of the screen will display applicable details about Direct Deposits, Earnings, Deductions, Benefits, Taxes, and Time Off. 64
67 65
68 CHECK HISTORY Search for checks in a specific date range. Select a Date Range From and Date Range To, populating the checks to display. Click the Submit button to display the results. To summarize only certain checks in the specified date range, check the box adjacent to the applicable checks in the Results section. Click the Calculate Summary button to display the sum totals of the selected checks in the Summary and Detailed Pay Information sections. Click the Print Summary Report button to print a copy of the Check History Summary Report. TAX FORMS View and print W2s, 1099s, and 1095-Cs that have been processed by Paylocity. Click the Tax Year link to view or print a copy of the tax form. Close the PDF file to return to the main screen. 66
69 67
70 BENEFITS RETIREMENT PLANS View retirement plan information. Click the Deduction link to display the details. Click the Match Details & Allocations button to display the established match rules for the current Plan Click the Return button to return to the main screen. 68
71 INSURANCE PLANS View insurance plan information. Click the View link to access the plan web site. Click the Description link to display the details. Click the View link to access the plan web site. Click the Cancel button to return to the main screen. 69
72 70
73 CLASSES View setup values used for employee benefits integration and insurance plan settings. Click the Effective Date to view the selected benefit. Click the Cancel button to return to the main screen. 71
74 PERFORMANCE ADVANCED HR REVIEWS View performance reviews. Click the Review Date link to display its details. Click the Cancel button to return to the main screen. 72
75 TRAINING SKILLS View skill information. Click the Skill link to display the details. Click the Cancel button to return to the main screen. 73
76 EDUCATION View education information which may include classes taken while employed by the company and tuition reimbursement information. Click the School link to display the details. Click the Cancel button to return to the main screen. 74
77 TIME OFF BALANCES View time off information. Click the Type link to display the details. Click the Cancel button to return to the main screen. 75
78 HISTORY View time off benefits earned and used per payroll and any manual adjustments made in Web Pay. Users can search for time off based on selected date ranges and/or types and display totals. LEAVE TRACKING View information about leaves such as Family and Medical Leave Act (FMLA), disability leave, or military leave. Click the Start Date link to display the details. Click the Tracking Type link to display the details. 76
79 Click the Cancel button to return to the main screen. 77
80 TIME OFF REQUESTS Submit time off requests. User may also submit time off requests in the self service portal. Once a request is approved or declined, the employee receives a message in the Message Center and the new status appears in this screen. Click the Add button to add a time off request. Click the Start Date link to display or modify the details. Check the box adjacent to the Start Date and click the Delete button to cancel the request. 1. Select a Request Type from the drop down. 2. Check the FMLA Related box if the time off request is related to FMLA leave. 3. Enter additional information in the Employee Comments field. 4. Select the Single Day or Multiple Days radio button. 5. Select or enter the Start Date. 6. Select or enter the End Date. 7. Enter the Hours Per Day. 8. Enter the applicable Start Time and End Time. 9. Click the Add Request Date(s)>> button. 78
81 10. Verify all information. 11. Click the Submit Request button. Important Notes Time off accruals and self service must be implemented in order to use the Time Off Requests feature. 79
82 CURRENT CHECKS View current check information. Users are able to print a pay stub by clicking the Download Printable Version button on the bottom of this screen. To view a paycheck or direct deposit voucher issued prior to the current check, click the Check Date drop down and select the applicable check date to display the check or voucher. The Employee section, which displays the Employee Id and Department, can be expanded or collapsed by clicking the double arrows. The Check or Voucher #, Delivery Location, Check Date, Period Begin and End Dates, Gross Earnings, Gross YTD, Net Earnings, and Net YTD are displayed in the Check section. Depending on the company's configuration, the bottom sections of the screen will display applicable details about Direct Deposits, Earnings, Deductions, Benefits, Taxes, and Time Off. 80
83 81

84 EVENTS MY EVENTS View and complete assigned events. Use the filter field to expand or limit the display of information. Select the View Event icon to view or complete the event. Select the Download PDF icon to review the completed event. Complete all fields and click Submit to submit the completed event. 82
85 Employee I-9 Verification Add the applicable demographic and I-9 information. Enter the First Name (40 character limit), optional Middle Name (20 character limit), and Last Name (40 character limit). Enter the Address, Phone, and information. Select or enter the Birth Date. Valid format is MM/DD/CCYY. Enter the U.S. Social Security Number. Select the applicable Status. Certain selections may enable other fields such as Expiry Date, Document Type, Document Number, Type of Visa, or Country of Issuance. Complete the applicable fields associated with the selected Status. Provide the applicable Documentation. Select the document type and then upload the document. 1. Documents in List A establish both identity and employment authorization. 2. Documents in List B establish identity. 3. Documents in List C establish employment authorization. Sign the form. Click Send Request to save the updated information. 83
86 84
87 HR PERSONAL DEMOGRAPHICS Add or edit general employee information. 1. Enter the Last Name (40 character limit), First Name (40 character limit), and Middle Name (20 character limit). 2. Enter a Salutation (10 character limit). 3. Select a Suffix from the drop down. 4. Enter a Nickname (20 character limit) and/or Prior Last Name (40 character limit). 5. Enter the Address, Phone, and information. 6. Select the Gender from the drop down. 7. Select the Ethnicity from the drop down. 8. Select the Marital Status from the drop down. 9. Check the Smoker box, if applicable. 10. Enter information in the Disability field (30 character limit). 11. Enter information in the Veteran field (30 character limit). 12. Save the updated information. Important Notes Employees are not able to add or edit their own Social Security Number (SSN) or Birth Date information. Employees must contact the Company Administrator to make these changes. 85

88 DEPENDENTS Click the Add button to add a new dependent. Click the Last Name link to display or modify the dependent details. Check the box adjacent to the Last Name and click the Delete button to delete the dependent. 1. Enter the Last Name (40 character limit), First Name (40 character limit), and Middle Name (20 character limit). 2. Select the Relationship from the drop down. 3. Select the Gender from the drop down. 4. Select or enter the Birth Date. 5. Enter the Social Security number in the SSN field. 6. If the dependent is an emergency contact, check the Emergency Contact box and select the Primary Phone from the drop down. 7. Enter additional information the Notes field. 8. Enter the applicable Address, Phone, and information. 9. Check the Full Time Student box, if applicable. 86
.")
89 10. Once you Save the information, the Coverage Dates section will display. a. Click Add to add coverage information to the dependent. b. Enter or select the Coverage Begin date. c. Enter or select the Coverage End date (if applicable). d. Click Save. 87

90 EMERGENCY CONTACTS Click the Add button to add a new emergency contact. Click the Last Name link to display or modify the emergency contact details. Check the box adjacent to the Last Name and click the Delete button to delete the dependent. 1. Select the Priority. 2. Enter the Last Name and First Name. 3. Select the Relationship from the drop down. 4. Select the Primary Phone from the drop down. 5. Enter the Address, Phone, and information. 6. Enter additional information in the Notes field (100 character limit). 7. Save the updated information. 88

91 WORK EMPLOYEE STATUS View employee status information. DEPT & POSITION View supervisor, reviewer, position, home department cost center, pay settings, and union information. 89
92 WORK LOCATION View work site information. Important Notes Temporary password resets are ed to the work address entered in the field. Employees can have notifications sent to this work address in addition to having them sent to the Message Center. ELIGIBILITY View information regarding eligibility for work. 90
93 AUTHORIZATION TRACKING View work authorization status. Click the Date link to display the details. Click the Cancel button to return to the main screen. STATUTORY EMPLOYMENT RATES View pay rates or salary amounts. The display includes rate history and information on additional rates 91
94 PREVIOUS EMPLOYERS View employment history prior to being employed by the company. Click the Employer Name link to display the details. Click the Cancel button to return to the main screen. 92

95 EMPLOYMENT HISTORY The Employment History screen is a single page view of the employee s compensation and position history while employed by the company. Changes to the employee work information such as a job change, performance appraisal, new rate, or employment status change are automatically added to Employment History overnight. Click the Effective Date link to display the details. Click the Cancel button to return to the main screen. 93

96 EVENTS View events, awards, or disciplinary actions. Click the Code link to display its details. Click the Cancel button to return to the main screen. COMPANY PROPERTY View the company property that has been issued. PAY CURRENT CHECKS View current check information. Users are able to print a pay stub by clicking the Download Printable Version button on the bottom of this screen. 94

97 To view a paycheck or direct deposit voucher issued prior to the current check, click the Check Date drop down and select the applicable check date to display the check or voucher. The Employee section, which displays the Employee Id and Department, can be expanded or collapsed by clicking the double arrows. The Check or Voucher #, Delivery Location, Check Date, Period Begin and End Dates, Gross Earnings, Gross YTD, Net Earnings, and Net YTD are displayed in the Check section. Depending on the company's configuration, the bottom sections of the screen will display applicable details about Direct Deposits, Earnings, Deductions, Benefits, Taxes, and Time Off. 95
98 CHECK HISTORY Search for checks in a specific date range. Select a Date Range From and Date Range To, populating the checks to display. Click the Submit button to display the results. To summarize only certain checks in the specified date range, check the box adjacent to the applicable checks in the Results section. Click the Calculate Summary button to display the sum totals of the selected checks in the Summary and Detailed Pay Information sections. Click the Print Summary Report button to print a copy of the Check History Summary Report. 96

99 TAX FORMS View and print W2s, 1099s, and 1095-Cs that have been processed by Paylocity. Click the Tax Year link to view or print a copy of the tax form. Close the PDF file to return to the main screen. 97
100 BENEFITS RETIREMENT PLANS View retirement plan information. Click the Deduction link to display the details. Click the Match Details & Allocations button to display the established match rules for the current Plan Click the Return button to return to the main screen. 98
101 INSURANCE PLANS View insurance plan information. Click the View link to access the plan web site. Click the Description link to display the details. Click the View link to access the plan web site. Click the Cancel button to return to the main screen. 99
102 CLASSES View setup values used for employee benefits integration and insurance plan settings. Click the Effective Date to view the selected benefit. Click the Cancel button to return to the main screen. PERFORMANCE ADVANCED HR REVIEWS View performance reviews. Click the Review Date link to display its details. Click the Cancel button to return to the main screen. 100
103 TRAINING SKILLS View skill information. Click the Skill link to display the details. Click the Cancel button to return to the main screen. 101
104 EDUCATION View education information which may include classes taken while employed by the company and tuition reimbursement information. Click the School link to display the details. Click the Cancel button to return to the main screen. 102

105 TIME OFF BALANCE View time off information. Click the Type link to display the details. Click the Cancel button to return to the main screen. 103
, disability leave, or military leave. Click the Start Date link to display the details.")
106 HISTORY View time off benefits earned and used per payroll and any manual adjustments made in Web Pay. Users can search for time off based on selected date ranges and/or types and display totals. LEAVE TRACKING View information about leaves such as Family and Medical Leave Act (FMLA), disability leave, or military leave. Click the Start Date link to display the details. Click the Tracking Type link to display the details. 104
107 Click the Cancel button to return to the main screen. 105

108 TIME OFF REQUESTS Submit time off requests. User may also submit time off requests in the self service portal. Once a request is approved or declined, the employee receives a message in the Message Center and the new status appears in this screen. Click the Add button to add a time off request. Click the Start Date link to display or modify the details. Check the box adjacent to the Start Date and click the Delete button to cancel the request. 1. Select a Request Type from the drop down. 2. Check the FMLA Related box if the time off request is related to FMLA leave. 3. Enter additional information in the Employee Comments field. 4. Select the Single Day or Multiple Days radio button. 5. Select or enter the Start Date. 6. Select or enter the End Date. 7. Enter the Hours Per Day. 8. Enter the applicable Start Time and End Time. 9. Click the Add Request Date(s)>> button. 106
109 10. Verify all information. 11. Click the Submit Request button. Important Notes Time off accruals and self service must be implemented in order to use the Time Off Requests feature. 107
110 PAYROLL CHECK CALCULATOR SETUP Test possible payroll changes such as increasing the 401k contribution. View what the outcome of the check will be based on the changes made. Users are not able to save this test check. 1. Select Test Mode to test possible payroll changes 2. Select Standard, Use Supplemental Tax Rate, or Block All Income Tax Withholding from the Taxation drop down. 3. Clear the Block Recurring Earnings box to allow all recurring earnings. Use the Check Calculator Earnings screen to allow or block individual earnings. 4. Clear the Block Recurring Deductions box to allow all recurring deductions. Use the Check Calculator Deductions screen to allow or block individual deductions. 5. Select Gross to Net to calculate a check based on the employee s gross pay. Check the applicable box if the employee is to receive the base Salary amount or Default Hours amount. If the employee is to receive hours other than default hours, paid with a different rate of pay, or a dollar amount other than the regular salary, click Earnings. 6. Check the Allow Negative Net box to prevent the Check Calculator from dropping deductions and taxes until net pay reaches zero or greater. Check the Adjustment - No Tax amount calc box to prevent the Check Calculator from calculating tax amounts when adjusting taxable wages. 7. Select Net to Gross to calculate a check based on a specific net pay amount. Enter the applicable Net Pay amount and select the Default Earnings Code for the gross pay. 8. Select Fringe Benefit "Gross-Up" to calculate a taxable fringe benefit when no other wages are being paid to the employee and the company will be paying the employee's portion of FICA. Enter the taxable Fringe Amount, select the Fringe Earnings Code, and select the Tax Offset Earnings Code. Important Notes The default Standard Taxation option calculates the check based on the employee s Federal and State Filing Status and Exemptions. Use Supplemental Tax Rate uses the IRS bonus taxation guidelines. Block All Income Tax Withholding blocks all established Federal and State taxes. Wages will be reported as taxable but no withholding will take place. This will not adjust the Social Security or Medicare taxes in any way. 108

111 EARNINGS Configure the earning codes. When the Block Recurring Earnings box is checked in the Check Calculator Setup screen, all recurring earnings will have a check in the Block column. The Line Items section will display recurring earnings established in the Earnings screen. Fields and Line Items in this screen may be enabled based on the setup. Check or clear the Block box adjacent to the Earning Code to individually block or unblock a recurring earning. To enter additional earnings for this check, select the applicable earning from the Earning Code drop down. Enter the applicable Hours or Amount. Select the applicable Calc Code from the drop down. Select the applicable Rate Code from the drop down. Enter the applicable Rate. Click the Delete link in the Action column to delete the Deduction. Click the Edit link in the Detail column to access the Earning Detail screen to enter additional information for an earning not available through the main Earnings screen. Users may be able to tie the earnings to a Shift, Job, and/or Workers Comp Code as well as enter a Begin Date and End Date. Users may also able to allocate wages between Cost Centers. 109

112 DEDUCTIONS Configure the deduction codes. When the Block Recurring Deductions box is checked in the Check Calculator Setup screen, all recurring deductions will have a check in the Block column. The Line Items section will display recurring deductions established in the Deductions screen. Fields and Line Items in this screen may be enabled based on the setup. Enter the Deduction Multiplier. The amounts listed in the Line Items section will be multiplied by the factor listed in this field. Check or clear the Block box adjacent to the Deduction Code to individually block or unblock a recurring deduction. To enter additional deductions for this check, select the applicable deduction from the Deduction Code drop down. Enter the applicable Rate/Amount. Select the applicable Calc Code from the drop down. Click the Delete link in the Action column to delete the Deduction. TAXES Adjust the tax withholding taken on the check. Fields and Line Items in this screen may be enabled based on the setup. Select the Taxation and Tax Frequency from the respective drop downs to adjust the amounts withheld from this check. Check or clear the Block box adjacent to the Tax Code to individually block or unblock the tax code. To enter additional tax codes, select the applicable Tax Code from the drop down. If applicable, change the employee's Filing Status and Exemptions for this check only. Use the Amount Type drop down and the Amount and/or Percentage fields to designate a different amount and/or percentage to withhold for this check. Use the Reciprocity drop down and the Primary check box to designate how the state withholding should occur for this check. Click the Delete link in the Action column to delete the Tax Code. 110


113 PREVIEW/SUMMARY View the Gross, Net, Earnings, Deductions, and Taxes of the check. Click the Print Test Earnings Statement button at the bottom of the screen to generate a printable report that displays the possible changes to the paycheck. Close this screen to return to the main screen. 111
114 112

115 NOTIFICATIONS MESSAGE CENTER View or delete messages. Click the Received link to view the message details. Check the box adjacent to the message and click Delete to delete the message. Click the link to view additional details. Click Print to print the message. Click Keep As Unread to keep the message marked as an unread message. Click Return to return to the previous screen. 113
PARTNER PORTAL TOOLKIT
 Revised 7/26/2018 PARTNER PORTAL TOOLKIT Financial Advisors WWW.PAYLOCITY.COM TABLE OF CONTENTS Partner Portal Toolkit... 3 User Accounts... 4 Partner Portal... 5 Select Company or Set... 6 Recent Hires...
isolved Employee Self-Service User s Guide
 isolved Table of Contents OVERVIEW... 2 EMPLOYEE SELF-SERVICE INITIAL EMAIL... 2 EMPLOYEE SELF-SERVICE INITIAL SIGN-ON... 3 FIRST TIME LOG-IN... 5 PAY HISTORY...7 W2/ACA/1099 FORMS...8 EMPLOYEE MESSAGES...
LOGING INTO EVOPAY. Login to evopay for Current Employees. 1. Go to https://paydata.evolutionpayroll.com/ess#/login
 PayData s evopay - Employee Self Serve is a web-based portal which allows employees to access their payroll information via the internet. Employees have the ability to view and print payroll vouchers and
PeopleSoft 9.2 Employee Self Service User Guide
 Employee Self Service User Guide 3280 Progress Drive, Suite 100 Orlando, Florida 32826-0140 Phone: (407) 823-2771 Table of Contents Welcome to Employee Self Service... 1 Who Do I Call For Help?... 1 How
Payentry ESS Employee User Guide
 Payentry ESS Employee User Guide Welcome to the latest version of Payentry ESS! In this document, you ll learn how to: Navigate Payentry ESS Use the Pay History Screen Use the Employee Screen o Manage
RIAS PHASE III - PeopleSoft HCM/Payroll. Employee Self Service
 RIAS PHASE III - PeopleSoft HCM/Payroll Employee Self Service Contents 2 Employee Self Service...3 Personal Information Summary...4 Home/Mailing Addresses...6 Add an Address... 7 Phone Numbers...8 Delete
Greenshades Employee Portal. Overview and Guidelines for Use
 Greenshades Employee Portal Overview and Guidelines for Use Table of Contents Contents Login and Navigation... 3 Logging in to GreenEmployee.com... 3 Your first visit to GreenEmployee.com... 4 Your GreenEmployee.com
Payentry ESS Admin User Guide
 Payentry ESS Admin User Guide Welcome to the latest version of Payentry ESS! In this document, you ll learn how to: Sentric Payentry ESS Portal Using Payentry ESS as an Administrator o Employee Self Service
Manual Imports Copyright 2017 Paylocity. All Rights Reserved
 Manual Imports Paylocity Web Link is an easy and convenient way to update information for multiple employees with a single import. Standard and custom sample files are available in the Web Link Help screen
Community Services Group Employee Portal
 Community Services Group Employee Portal https://csgonline.greenemployee.com/ Logging in to GreenEmployee.com Please use the above link to take you directly to a sign-in page or on the Insider you can
DarwiNet Employee Level
 DarwiNet Employee Level Table Of Contents Welcome to the Help area for your online payroll system... 1 Logging In... 3 Login... 3 Forgot Password... 3 Employee Welcome Screen... 5 Personal... 7 Personal...
Contacts. Viewing Payroll and Compensation Data
 Contents Contacts... 1 Viewing a Paycheck... 1 Enrolling in Direct Deposit 9.2... 2 Maintaining Direct Deposit Information 9.2... 6 Updating W-4 Information (Federal Tax Withholdings)... 15 Updating M-4
NYS Payroll Online Self Service. November 2017
 NYS Payroll Online Self Service November 2017 1 NYS Payroll Online Phases Current Phase: View Paycheck View Direct Deposit Account(s) Update Pay Statement Option Update Tax Withholding View W-2 Update
A360 HR/Payroll System
 A360 HR/Payroll System Employee Self Service (ESS) January 2018 Notes: 1 2 Account Activation Last full week of January, 2018 Current users of a360 Financial Management will use existing a360 account.
Employee Online Overview.
 Employee Online Overview https://employeeonline.puyallup.k12.wa.us Employee Online Homepage You will find the site map running down the left side of Employee Online, as shown below: Message Board The Welcome
ADP VANTAGE USER MANUAL FOR EMPLOYEES
 ADP VANTAGE USER MANUAL FOR EMPLOYEES This section of the manual will focus on EMPLOYEE user related instructions and functionality. This includes registering for ADP Vantage, viewing and editing personal
Welcome to e-people 4. What is e-people? 4. Accessing e-people 4. AHS Accounts 4
 User Guide Table of contents Welcome to e-people 4 What is e-people? 4 Accessing e-people 4 AHS Email Accounts 4 How to Access Your AHS Email Account Externally 4 AHS Outlook Web Access Log Off 5 How to
Common Tasks Within Your ATC Healthcare Services Vibe Portal Login
 Common Tasks Within Your ATC Healthcare Services Vibe Portal Login Within this document you will find easy How To, step by step instructions for many of the tasks you can perform within the Vibe portal.
Printing the Study Guide
 Ceridian Self Service Version 2.4 Printing the Study Guide If you are using a version of Adobe Reader that is prior to 6.0, Ceridian recommends clearing the Shrink oversized pages to paper size check box
ivisions Employee Guide Portal Employee User Guide Town of Needham Terry Wolfson Created: 1/27/2014 Updated: 10/5/2016
 ivisions Employee Guide Portal Employee User Guide Town of Needham Terry Wolfson Created: 1/27/2014 Updated: 10/5/2016 Contents What is ivisions?... 2 Registering to ivisions Portal... 3 Logging into the
BLYTHEVILLE EMPLOYEE ACCESS CENTER GUIDE
 BLYTHEVILLE EMPLOYEE ACCESS CENTER GUIDE Table of Contents Section 1 Page 2 About the Employee Access Center (EAC) Section 2 Logging into EAC Page 3 Section 3 Employee Tasks Page 5 -Demographic Information
PeopleSoft Employee Self-Service (ESS)
") PeopleSoft Employee Self-Service (ESS) Version 1.2 Updated May 28, 2015 Contents Overview... 1 Logging In to ESS... 2 Changing Your Password... 3 Setting Up I Forgot My Password VERY IMPORTANT!... 4 Resetting
PeopleSoft Employee Self-Service (ESS) Version 1.2 Updated May 28, 2015 Contents Overview... 1 Logging In to ESS... 2 Changing Your Password... 3 Setting Up I Forgot My Password VERY IMPORTANT!... 4 Resetting
PeopleSoft 9.2 Self-Service Employee Information (SSEI)
") PeopleSoft 9.2 Self-Service Employee Information (SSEI) User Guide 450 E. South Street Orlando, Florida, 32801-2816 Phone: (407) 836 5661 Revised: 01/2018 1 Table of Contents Welcome to Self-Service Employee
PeopleSoft 9.2 Self-Service Employee Information (SSEI) User Guide 450 E. South Street Orlando, Florida, 32801-2816 Phone: (407) 836 5661 Revised: 01/2018 1 Table of Contents Welcome to Self-Service Employee
ADDUS Homecare - MyADP Employee Self-Service User Guide
 ADDUS Homecare - MyADP Employee Self-Service User Guide Table of Contents To navigate to a specific topic, click on the title in the table of contents. Registration for Myadp/Navigation... 3 W-4 Changes...
Employee Self Service
 MUNIS Employee Self Service Munis Employee Self Service Administration User Guide Version 9.3 Employee Self Service (ESS) gives current employees the ability to monitor, maintain or estimate some of their
Employee Self Service
 Paycor s HR application offers a variety of ways for employees to view and change their personal information such as address, phone number, and emergency contacts as well as viewing employment related
Welcome to the Clackamas County team!!!
 Welcome to the Clackamas County team!!! Starting a new position is an exciting time and we want to help you get acquainted with your new employer, Clackamas County. The Onboarding and Employee Self Service
Welcome to Employee Self- Service! From the District home page, click the Employees link. Next, click Employee Self- Service.
 Welcome to Employee Self- Service! From the District home page, click the Employees link. Next, click Employee Self- Service. Log in to Employee Self Service. You must type district\user name in order
INSTRUCTIONS FOR ACCESSING WIUP ON THE WEB
 INSTRUCTIONS FOR ACCESSING WIUP ON THE WEB University Information Management Systems (UIMS) Help Desk: 298-2104 Administrative Services (Jan Carlson) 298-1800 To access WIUP on the Web, follow the instructions
ADDUS Homecare - MyADP Employee Self-Service User Guide
 ADDUS Homecare - MyADP Employee Self-Service User Guide Table of Contents To navigate to a specific topic, click on the title in the table of contents. Registration for Myadp/Navigation... 3 W-4 Changes...
Using Employee Self. v11.1. Service (ESS) Comprehensive User Guide
 Comprehensive User Guide") Using Employee Self v11.1 Service (ESS) Comprehensive User Guide Table of Contents Table of Contents... 2 Employee Self Service Overview... 4 Features and Information... 4 Logging into Employee Self Service...
Using Employee Self v11.1 Service (ESS) Comprehensive User Guide Table of Contents Table of Contents... 2 Employee Self Service Overview... 4 Features and Information... 4 Logging into Employee Self Service...
OneUSG Connect. Hire a New Employee. Hire a New Employee HR_JA002
 Description This process describes the steps necessary to a new employee into a Position. Conditions A Position has been created in HCM Source Documents Hire Documentation Identify Verification Documentation
Oracle Human Capital Management
 Participant s Guide Oracle Human Capital Management Employee Self-Service (About Me - Personal Information) In Association with: How To Use This Guide This guide provides step-by-step instructions for
County of DuPage. Link to Employee Access Portal. Instruction Manual
 County of DuPage Link to Employee Access Portal Instruction Manual Table of Contents Introduction... 3 How to Access the LEAP Site... 3 Login... 3 Returning to the LEAP Home Page... 5 Personal Information
HR Employee Resources On-Line
 HR Employee Resources On-Line Table of Contents General Information...4 Computer Requirements... 4 Helpful Hints...4 Module 1: Introduction to H.E.R.O... 5 Overview/Objectives... 6 Topic 1: Log on/out
Employee Self Service (ESS) Version
 Version") (ESS) Version 2.04.0.0 Employees can access from any computer view their elected withholding, earnings summary, check history, leave balances and leave history. request changes to their demographics, direct
(ESS) Version 2.04.0.0 Employees can access from any computer view their elected withholding, earnings summary, check history, leave balances and leave history. request changes to their demographics, direct
SUNY PAYROLL SELF-SERVICE INSTRUCTIONS
 SUNY PAYROLL SELF-SERVICE INSTRUCTIONS Step Purpose Action Screenshots 1 Log on to the Payroll Self Service Using Firefox or Chrome, begin at www.buffalo.edu/hr. *We recommend using Firefox or Chrome as
NYS Payroll Online Self Service. July 2016
 NYS Payroll Online Self Service July 2016 1 NYS Payroll Online Phases Current Phase: View Paycheck View Direct Deposit Account(s) Update Pay Statement Option Update Tax Withholding View W-2 Update Email
USER GUIDE Employee Self-Service (ESS)
") USER GUIDE Employee Self-Service (ESS) For Delaware North Associates Delaware North Companies, Rev. 1/7/13 Welcome to the PeopleManager Employee Self-Service (ESS) User Guide. This guide is designed to
USER GUIDE Employee Self-Service (ESS) For Delaware North Associates Delaware North Companies, Rev. 1/7/13 Welcome to the PeopleManager Employee Self-Service (ESS) User Guide. This guide is designed to
Employee Space Guide. Contents
 Employee Space Guide Contents Sign In To Employee Space... 2 My Reviews... 4 My Development... 4 My Profile... 5 Find A Coworker... 15 Opportunities... 16 On Line Paystub... 17 Direct Deposit... 18 W4...
GREENSHADES & AVIONTÉ
 GREENSHADES & AVIONTÉ Setup and Filing with Greenshades Created 9/17/2014 1270 Eagan Industrial Road, Suite 150 Eagan, MN 55121 877.428.4668 www.avionte.com Greenshades & Avionté Table of Contents Greenshades
WEB TIME SUPERVISOR GUIDE
 Revised 02/23/2018 WEB TIME SUPERVISOR GUIDE CLIENT RESOURCE PAYLOCITY.COM TABLE OF CONTENTS Web Time... 3 Home... 15 Employees... 28 Reports... 130 Web Kiosk Setup... 132 Glossary... 156 Index... 158
Raymore Peculiar KeyNet Employee Portal
 Raymore Peculiar KeyNet Employee Portal STEP 1 Login to Website http://rpkeynet.raypec.k12.mo.us/keynet/keydefault.asp or http://www.raypec.k12.mo.us click on Departments; click on Human Resources; click
Web Access User Guide for Employees
 Web Access User Guide for Employees 11/1/12 TABLE OF CONTENTS FUNCTIONS PAGE # Logging In 1 Forgot Username/Password 1 Changing Your Password 1 Logging Out 1 What is Available To You? 1 My Pay Statements
3E Online Analytics Help Guide
 Document Revision History Date Version Change Reference November 16, 2009 AA Original version Table of Contents 1.0 Introduction... 1 2.0 Payroll Menus... 2 3.0 Filtering and Sorting... 3 4.0 Column Selection...
NORTH KANSAS CITY SCHOOLS. A Northland Tradition. Employee Online User s Guide
 NORTH KANSAS CITY SCHOOLS A Northland Tradition Employee Online User s Guide Table of Contents Introduction... 1 Accessing Employee Online... 1 Access from the District Network... 1 Access through the
Employee Access. Fiscal Contact Information Phone: , Web:
 Fiscal Contact Information Phone: 509-456-2718, Email: fiscal@esd101.net Web: http://www.esd101.net/newisc June 2012 TERMS OF USE The information contained herein is licensed, trade-secret and proprietary
CITY OF ERIE EMPLOYEE ACCESS CENTER
 CITY OF ERIE EMPLOYEE ACCESS CENTER EMPLOYEE USER MANUAL Version 1.1 May 20, 2010 C:\convert\EAC User Manual Ver 1.1.doc Page 1 of 12 Login Screen Welcome to the Employee Access Center (also known as EAC).
***First-Time User***
 INSTRUCTIONS FOR ACCESSING THE WIU MAINFRAME ON CAMPUS ***First-Time User*** University Technology Support Center: 298-2704 Administrative Information Management Systems (AIMS): 298-1944 Human Resources
2. Click on the Secure User Login and enter in the login and password provided by your employer.
 PayData s evopay - Employee Self Serve is a web-based portal which allows employees to access their payroll information via the internet. Employees have the ability to view and print payroll vouchers and
EDUCATION PORTAL INFORMATION CENTER (EPIC) FAO USER MANUAL. Version 1.2
 FAO USER MANUAL. Version 1.2") EDUCATION PORTAL INFORMATION CENTER (EPIC) FAO USER MANUAL Version 1.2 Table of Contents INTRODUCTION... - 3 - GENERAL SCREEN DESIGN AND NAVIGATION... - 3 - LOGIN... - 3 - FORGOT USERNAME OR PASSWORD...
EDUCATION PORTAL INFORMATION CENTER (EPIC) FAO USER MANUAL Version 1.2 Table of Contents INTRODUCTION... - 3 - GENERAL SCREEN DESIGN AND NAVIGATION... - 3 - LOGIN... - 3 - FORGOT USERNAME OR PASSWORD...
Burbank School District 111
 Page 1 of 12 user sign on page. Burbank School District 111 This page is used to sign onto the EIS (). Enter your user name, tab to password and enter your password. Click on the Click to Continue button
Union Public Schools Employee Self Service (ESS)
") Union Public Schools Employee Self Service (ESS) Employee Self Service (ESS) is the Munis Self Service (MSS) application created specifically for Union Public Schools employees. ESS provides access to
Union Public Schools Employee Self Service (ESS) Employee Self Service (ESS) is the Munis Self Service (MSS) application created specifically for Union Public Schools employees. ESS provides access to
ONBOARDING. HUMAN Workday RESOURCE MANAGEMENT ONBOARDING EMPLOYEE AS SELF. Personal Information Change Action Item
 1. Log into Workday using your LSU username and password. First time screen information will appear. Click Let s Get Started! button to proceed. 2. Click on the cloud icon on the right hand side of the
Mecklenburg County Public Schools. Employee Self Serve Manual: For Employee Use
 Mecklenburg County Public Schools Employee Self Serve Manual: For Employee Use TABLE OF CONTENTS What is Employee Self Serve?... 2 URL... 2 Login... 2 My Profile... 3 Verifying your Email Address... 3
Specialized Data Systems, Inc. Web Financial Office 2017 W2 Processing Instructions Specialized Data Systems, Inc Revised Last: 12/12/17
 Specialized Data Systems, Inc. Web Financial Office 2017 W2 Processing Instructions Specialized Data Systems, Inc. 2017 Revised Last: 12/12/17 Table of Contents WELCOME... 3 W2 Processing for 2017 Instructions...
EMPLOYEE ACCESS. Updated 04/12/12 1 of 13
 If you are not a current Skyward user, you will have to email Cindy Crace (ccrace@gcs.k12.in.us) or Sandy Cook (sacook@gcs.k12.in.us) to obtain your Login and Password. If you are a current Skyward user,
IT User Guide: Viewing/Changing Personal Information In PeopleSoft HR
 IT User Guide: Viewing/Changing Personal Information In PeopleSoft HR January, 2016 TABLE OF CONTENTS Overview... 2 Accessing the System... 2 Viewing/Updating Personal Information... 4 Updating Address
How to Use ADP Self Service
 How to Use ADP Self Service The Employee Self Service system allows employees to access their pay statements, W-2 s and personal information on-line, 24 hours a day, 7 days a week. To access ESS, you must
Employee Self Service (ESS) Version
 Version") Employee Self Service (ESS) Version 2.12.0 Employee Self Service Employees can access from any computer. view their elected withholding, earnings summary, check history, company documents and leave history.
Employee Self Service (ESS) Version 2.12.0 Employee Self Service Employees can access from any computer. view their elected withholding, earnings summary, check history, company documents and leave history.
Welcome to DECIBEL. Welcome to DECIBEL (An Intranet Application), your Online Resource Centre.
, your Online Resource Centre.") Welcome to DECIBEL Welcome to DECIBEL (An Intranet Application), your Online Resource Centre. Through DECIBEL, we ve provided you with lots of useful information, available with just a few clicks of a
Welcome to DECIBEL Welcome to DECIBEL (An Intranet Application), your Online Resource Centre. Through DECIBEL, we ve provided you with lots of useful information, available with just a few clicks of a
CAMPUS PORTAL QUICK REFERENCE GUIDE: STUDENT PORTAL
 CAMPUS PORTAL QUICK REFERENCE GUIDE: STUDENT PORTAL 1 CONTENTS How to Set Up Your Portal Web Account... 3 How to Personalize Your Homepage... 4 How to View Holds Applied to Your Portal Account... 4 How
My Self Service/Payroll version
 Table of Contents Accessing Employee Self Service.1 Payroll and Compensation Direct Deposit..3 Add an Account.4 Edit/Delete an Account.5 W-4 Tax Information 7 View Paystub.. 10 W-2 Information.11 Year
Tip: If you need to rest all web logos, instead click on the button to "Reset All to Default."
 Self-service information is based on general system setup, employee information, and employee-specific payroll information. Settings are available to update site configuration options, public site content,
User s Guide. (Virtual Terminal Edition)
") User s Guide (Virtual Terminal Edition) Table of Contents Home Page... 4 Receivables Summary... 4 Past 30 Day Payment Summary... 4 Last 10 Customer Transactions... 4 View Payment Information... 4 Customers
User s Guide (Virtual Terminal Edition) Table of Contents Home Page... 4 Receivables Summary... 4 Past 30 Day Payment Summary... 4 Last 10 Customer Transactions... 4 View Payment Information... 4 Customers
Get the most from your Health Savings Account. Your guide to your HSA and online account access
 Get the most from your Health Savings Account Your guide to your HSA and online account access 1 Health Savings Account Investments Contents Getting started... 2 Accessing the BBPadmin Online Portal...
GRADUATE STUDENT EMPLOYEE SELF SERVICE GUIDE
 GRADUATE STUDENT EMPLOYEE SELF SERVICE GUIDE CONTENTS Click any topic below to go directly to that page. HOW TO USE SELF SERVICE 1.1 How to Access, Log In and Navigate Employee Self Service BENEFITS 2.1
Online Services for Employers User Guide. Mayo Clinic Health Solutions
 Online Services for Employers User Guide Mayo Clinic Health Solutions Table of Contents 1.0 Registering and Signing In... 1 Registration... 1 User Definitions... 1 Signing In... 1 2.0 Enrollment... 3 3.0
Employer Self Service (ESS) User Quick Guide
 User Quick Guide") Employer Self Service (ESS) User Quick Guide i Table of Contents Getting Started 6 Accessing the Employer Self Service (ESS) Portal 6 Maintaining Account Settings 7 Switching Employers within Session 7
Employer Self Service (ESS) User Quick Guide i Table of Contents Getting Started 6 Accessing the Employer Self Service (ESS) Portal 6 Maintaining Account Settings 7 Switching Employers within Session 7
MyESS Help Table of Contents
 Table of Contents MyESS Background Page 2 Logging into MyESS Page 3 Navigation Tips Page 4 Overview Page Page 5 Information Homepages Page 6 MyESS Navigation Tips Page 7 Changing Information through MyESS
RAPIDS 2.0 SPONSOR S USER GUIDE
 RAPIDS 2.0 SPONSOR S USER GUIDE JUNE 19, 2017 DEPARTMENT OF LABOR OFFICE OF APPRENTICESHIP (OA) EMPLOYMENT AND TRAINING (ETA) BUSINESS PROCESS MANAGEMENT SYSTEM (BPMS) PLATFORM 1 P a g e Revision History
Employee Portal-External Guide
 Employee Portal-External Guide Accesing the employee portal 1) Open your internet 2) Type the following in your address bar: https://my.doculivery.com/external/systems3000-branchb This will bring you to
Payroll 2018 W-2 Instructions
 Payroll 2018 W-2 Instructions Included in this document are the instructions and processes for balancing and submitting your 2018 W-2 tax information. Step 1 941 Balancing Step 2 Balancing State Withholding
NOVAtime 5000 Employee Web Services
 NOVAtime 5000 Employee Web Services Table of Contents Logging In... 2 Accessing Employee Web Services... 3 Using the Dashboard... 3 Viewing Your Timesheet... 4 4.1 Timesheet Summary... 5 Viewing Accrual
MERS Employer Portal. Reporting for Defined Benefit User Guide. Presented by MERS Finance & Education Departments
 MERS Employer Portal Reporting for Defined Benefit User Guide Presented by MERS Finance & Education Departments 1 MUNICIPAL EMPLOYEES RETIREMENT SYSTEM 1134 Municipal Way, Lansing, MI 48917 800.767.2308
Online Banking User Guide
 Online Banking User Guide If you need assistance, please call 315.477.2200 or 800.462.5000 M-F 7:30am - 6:00pm Sat 9:00am - 1:00pm empowerfcu.com 315.477.2200 800.462.5000 Table of Contents Online Banking
PNC BENEFIT PLUS: HEALTH SAVINGS ACCOUNT EMPLOYER GUIDE. Welcome to the PNC BeneFit Plus Employer Portal!
 PNC BENEFIT PLUS: HEALTH SAVINGS ACCOUNT EMPLOYER GUIDE Welcome to the PNC BeneFit Plus Employer Portal! The Employer Portal is a powerful, easy-to-use self-service solution that gives you the tools to
Time and Attendance Self Service - Hourly Training Guide University of Massachusetts Boston Human Resources Department
 2017-2018 Time and Attendance Self Service - Hourly Training Guide University of Massachusetts Boston Human Resources Department Revised: September 2017 Table of Contents HR Direct Self Service Login Login
EMPLOYEE REFERENCE WORKDAY EMPLOYEE QUICK GUIDE
 This guide provides navigation help and basic steps for the following Workday topics: Basic Navigation Getting Started Inbox Personal Information Talent Management Time Off Benefits Payroll Medtronic is
ORACLE ESS INSTRUCTIONS Oracle Employee Self Service (ESS) is accessible via the Landry s Employee Portal from anywhere with an internet access.
 is accessible via the Landry s Employee Portal from anywhere with an internet access.") ORACLE ESS INSTRUCTIONS Oracle Employee Self Service (ESS) is accessible via the Landry s Employee Portal from anywhere with an internet access. Step 1. To log in via the Landry s Employee Portal, go to
ORACLE ESS INSTRUCTIONS Oracle Employee Self Service (ESS) is accessible via the Landry s Employee Portal from anywhere with an internet access. Step 1. To log in via the Landry s Employee Portal, go to
People Employee Self Service Reference Guide. August 2017 Version 3.0
 People Employee Self Service Reference Guide August 2017 Version 3.0 What s in this Guide? Section Page Logging on to People 4 Requesting a Password 6 Changing Your Password 8 Changing Your Forgotten Password
Under Biographical Details you can:
 To update an employee s personal information you will look under HRWeb>General Update>Personal Data. Search for the employee using the name, national ID (SSN), or the 7-digit HR/Payroll system employee
Employee Self Service. Getting Started Guide
 Employee Self Service Getting Started Guide https://ess.sccoe.org About Employee Self Service (ESS) Employee Self Service is a secure website where CUSD employees can view their personnel data. This site
ALL MEMBERS AND PAYEES
 Table of Contents Click a link to walk through a specific procedure. ALL MEMBERS AND PAYEES 1 GETTING STARTED How do I register? How do I log on? How do I update security questions? How do I retrieve/reset
Compensation Workbench
 Compensation Workbench Contents Logging into Compensation Workbench... 3 Compensation Allocations Page... 4 Viewing Job History... 5 Viewing Employee Details... 6 Viewing Compensation History... 7 Entering
Employee User Guide What Employees Need to Know About Using the Burnham & Flower Wealthcare
 Employee User Guide What Employees Need to Know About Using the Burnham & Flower Wealthcare Table of Contents Getting started...2 My accounts...3 My expenses...13 Communications...15 Enrollment...17 Resources...21
Release Miscellaneous Updates and Installation Instructions
 GEORGIA DEPARTMENT OF EDUCATION OFFICE OF THE STATE SUPERINTENDENT OF SCHOOLS TWIN TOWERS EAST ATLANTA, GA 30034-5001 TELEPHONE: (800) 869-1011 FAX: (404) 651-5006 http://www.gadoe.org/ MEMORANDUM TO:
WebCenter Employee User Guide
 Help Documents WebCenter Employee User Guide As an Employee of Contract Professionals you will be issued a username and password which will enable you to access your employment records via the internet.
401(k) Export Utility PR-1063
 Export Utility PR-1063") 401(k) Export Utility PR-1063 Overview This Extended Solution to the Payroll module adds a utility to create an ASCII export file for a 401(k) Plan containing employee Payroll information (see Specific
401(k) Export Utility PR-1063 Overview This Extended Solution to the Payroll module adds a utility to create an ASCII export file for a 401(k) Plan containing employee Payroll information (see Specific
JOB AID: SINGLE STREAMLINED APPLICATION
 Your destination for affordable, quality health care, including Medi-Cal October 7, 2015 The Covered California Single Streamlined Application (SSA) supports all online applications, whether processed
Employee Self
 Employee Self Service @ Employee Self Service (ESS) is an enhancement to the central HR/Payroll system that will allow you to view your personal and payroll data and easily make changes. It s a convenient,
Business Online Banking User Guide
 Business Online Banking User Guide Table of Contents Contents Overview... 2 Logging In... 2 Additional Login Information... 5 Home/Dashboard... 6 Top Line Tool Bar... 6 Bulletins... 7 Dashboard... 8 Accounts...
Vendor Inquiry and Reports Munis Version 11.2
 Objective This document gives you step by step instructions for using the Vendor Inquiry/Reports program to query the vendor master table for information regarding a specific vendor(s) and how to produce
Best Net Basics Revised 11/22/2017
 Revised 11/22/2017 REGISTER YOUR BEST NET ACCOUNT San Bernardino City Unified School District employees use the County s Best Net Employee Self Service site for Pay Stub viewing and/or printing. Best Net
Under Biographical Details you can:
 To update an employee s personal information you will look under Emory HR Web>General Update>Personal Data. Search for the employee using the name, national ID (SSN), or the 7-digit HR/Payroll system employee
Doculivery. Procedures Checklist 10/26/16
 1 Doculivery Year-End Procedures Checklist 10/26/16 Table of Contents Preparing for Doculivery Year-End Procedures... 1 Create Opt In/Out File from Doculivery W-2/Tax Form Site... 3 Set Up Employees in
W-2 Printing & E-Filing
 Vision Municipal Solutions W-2 Printing & E-Filing How-To Guide P a g e 2 Contents Introduction... 4 What is the goal of this walkthrough?... 4 Substitute W-2 Copy A... 5 Create a new W-2 Run... 5 Modifying
DOLLAR GENERAL CAREER SITE CANDIDATE ONLINE APPLICATION REFERENCE GUIDE
 DOLLAR GENERAL CAREER SITE CANDIDATE ONLINE APPLICATION REFERENCE GUIDE In June 2016, Dollar General launched a new online application system. This Reference Guide is for the new system and includes the
Key-Payroll. User Meeting November 2017 Presented by: Jane Lyons and Joy Watson
 Key-Payroll User Meeting November 2017 Presented by: Jane Lyons and Joy Watson I Key Payroll Help Table of Contents Foreword 0 Part I 2017 Enhancements 2 1 Enhancements... 2 Part II Special Features 11