Leadership Training Manual
|
|
|
- Brianna Harrington
- 6 years ago
- Views:
Transcription

1 Leadership Training Manual
2 Table of Contents 2 Welcome 3 CCB Overview 4 Groups & Process Queues Introduction 5 Adding People to a Group by Name 8 Adding People to a Group by Search 15 Inviting People to a Group by Name 20 Removing People from a Group from the Group Page 22 Adding Assistant Group Leaders 24 Viewing an Event 29 Creating an Event 39 Inviting People to Events 46 Recurring Events 48 Managing the Guest List 51 Recording Attendance 58 Recording Attendance from Reminder 62 Creating a Message 66 Creating Needs 70 Assigning Needs 73 Informing of Needs 76 Uploading Group Files 79 Reports 81 Creating Department Notes (Coaches/Directors) 1
3 Welcome To The Calvary Online Community (CCB) Here at Calvary Church, we use an online software called Church Community Builder (CCB) that is designed to help us engage, empower, and encourage. It offers an extensive system for tracking members and guests, plus online tools to build community and make it easy to connect into the life of your church. Leaders have the tools they need to manage their ministries, and people are able to interact, find ways to serve, and communicate within their small groups. People stay at a church when they find how they fit and where they belong. The Calvary Online Community contains relationship-building tools to connect people with ministry and with each other to help them become fully integrated into the church. At the core of CCB is connection and communication. It s focused on people, not data! Before we look at any piece of technology, we must remember the why behind it. Software and technology is a tool to serve the why. Again, the purpose of this tool is connection and communication. Let s watch a brief video to introduce CCB. Click here for video. Encouraging, Equipping, Empowering Together we can connect and communicate the light of God s news! To access the Calvary Online Community, visit calvarywyncote.com/ccb. *A mobile login can be found at calvarywyncote.ccbchurch.com that will allow you to access the site in a simplified directory format. 2
4 Overview Here s a quick overview of what CCB is all about: Communicate with staff and others Grow closer to other members by sharing information through profiles View photos of groups and families Share up-to-date contact information Online giving, event registration/payment and download giving statements Group communication and management Calendar and event management Group need management Serve positions - search, view, sign-up Volunteer scheduling Room and Resource management - do you need the church van, a projector, sound system, or a specific room? Attendance tracking and kids check-in Staff/Leadership processes - provides structured system to any process Upload files, create forms And more As we look at all that CCB can do, we encourage you to think of ways that it can be tailored to your area of ministry. Let s take a look at the basic user walkthrough. All of the help documents we will look at today can be found in CCB under help which is found by clicking the icon at the top right corner. You may contact our church office at: office@calvarywyncote.com or or Pastor Alex at alex@calvarywyncote.com for additional help. 3
5 Groups Groups are the backbone of our online community. Events, volunteer opportunities, message boards, and most s all start through groups. The contents of this training manual will focus primarily on the functions of a group in CCB. Events & Needs Video - click here Leading Your Group Video - click here Let s look at groups more in-depth: Add/Remove Participants Events Attendance Messages Needs Positons & Scheduling Files Reports Coaches (leaders of groups) The following pages will cover step-by-step processes for these areas. Process Queues One other area we want to make you aware of is process queues. A Process is a way to track people through a series of steps (Queues) in your Church Community Builder software. The intent is to make sure that no step is missed along the way. Let s look at how a process would help us in visitor follow-up. Visitor Follow-Up Video - click here 4
6 Adding People to a Group by Name Required Privileges One of the following is required: Group Leader (Main or Assistant) in groups that have enabled this Group Leader privilege Director in groups that have enabled this Group Leader privilege Coach in groups that have enabled this Group Leader privilege Department Admin (for groups in their Department) Full Group admin Overview Depending on where you begin (group homepage, Group Participants list, or Edit Group Participants), click Add people, Add or invite new group participants, or Add or invite new people on the right side of the screen under Actions. OR OR On the next page you will have up to three choices on how you would like to add people to the group. Select People by name. 5

7 The Use cross reference option will only appear if you have set up a cross-referenced saved search in the group. When you click this option, a new window will appear. Make sure the radio button is set to Add directly. Enter the name of the first person you want to add. Hit enter on your keyboard or click the name to add them to your list. Do the same for each additional person you are adding to the group. This search tool works just like searching for people by name on the People tab. Once you've entered all the people you want to add, click Add Now and you'll receive a confirmation that they've been added to the group. 6

8 7
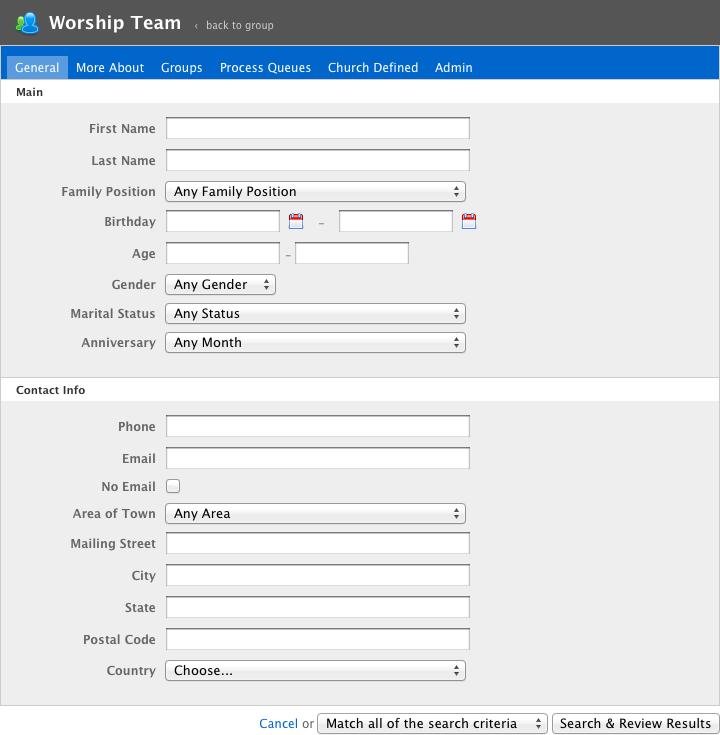
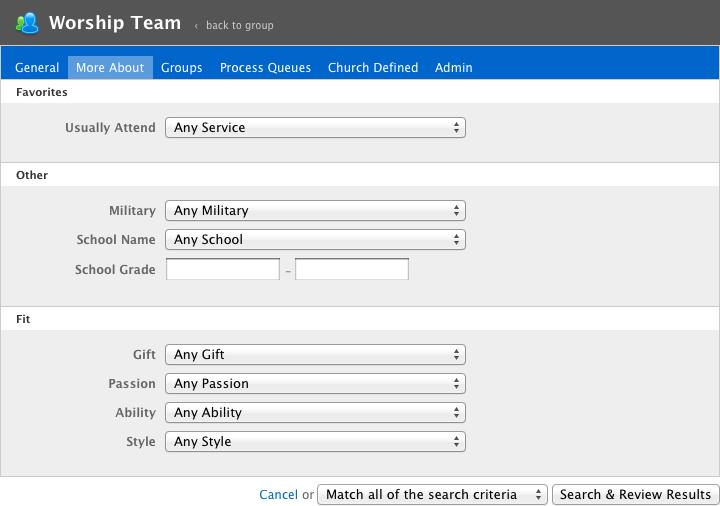
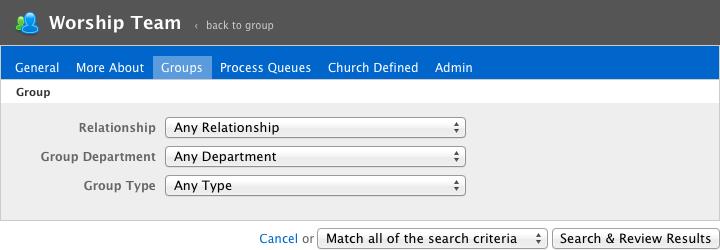
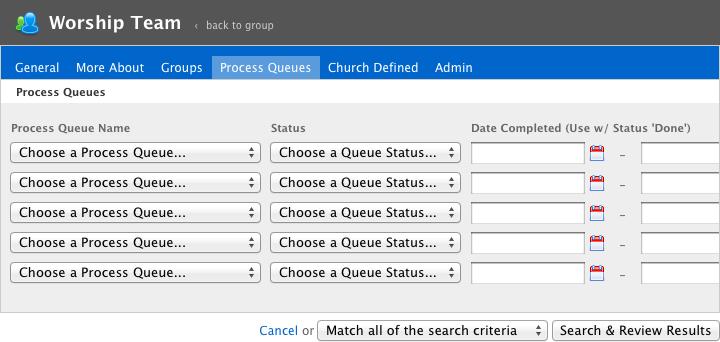
9 Adding People to a Group by Search Required Privileges One of the following is required: Group Leader (Main or Assistant) in groups that have enabled this Group Leader privilege Director in groups that have enabled this Group Leader privilege Coach in groups that have enabled this Group Leader privilege Department Admin (for groups in their Department) Full Group admin Overview Depending on where you begin (group homepage, Group Participants list, or Edit Group Participants), click Add people, Add or invite new group participants, or Add or invite new people on the right side of the screen under Actions. OR OR On the next page you will have up to three choices on how you would like to add people to the group. Select People by search. 8

10 The Use cross reference option will only appear if you have set up a cross-referenced saved search in the Group. When you click this option, a new window will appear. Make sure the radio button is set to Add directly, then click Choose Search Criteria. You will be taken to a search tool that allows you to search through various aspects of people's profiles, along with information about their involvement in other areas of the system. 9
11 10
12 11
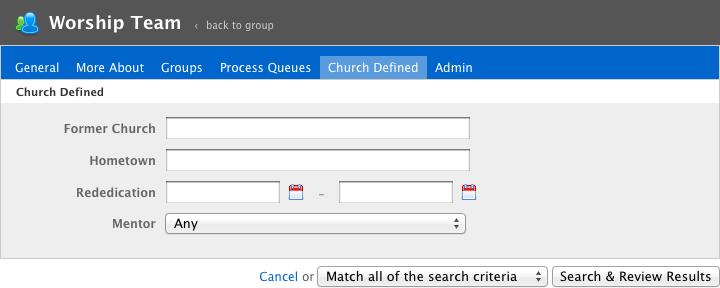
13 12

14 You can choose to find people that match any of the criteria you enter or require that they match all of the criteria by toggling through the two options in the pulldown. Once you have the search set the way you want it, click Search & Review Results. You will see the people who match the search you created, with options to add the entire list or specific individuals within it. 13


15 If you choose to add by selecting specific people individually, you will receive a confirmation of the additions and will be able to select more individuals to add. You can also edit the search criteria or start over. If you choose to add all of the people returned in the search, you will need to confirm that this is what you want to do. Then you will be taken back to the Group Participants page. 14
 Full Group admin")

16 Inviting People to a Group by Name Required Privileges One of the following is required: Group Leader (Main or Assistant) in groups that have enabled this Group Leader privilege Director in groups that have enabled this Group Leader privilege Coach in groups that have enabled this Group Leader privilege Department Admin (for groups in their Department) Full Group admin Overview Depending on where you begin (group homepage, Group Participants list, or Edit Group Participants), click Add people, Add or invite new group participants, or Add or invite new people on the right side of the screen under Actions. OR OR On the next page you will have up to three choices on how you would like to invite people to the group. Select People by name. 15


17 People by name When you click this option, a new window will appear. Make sure the radio button is set to Invite and enter the name of the first person you want to add. Hit enter on your keyboard or click the name to add them to your list. Do the same for each additional person you are inviting to the group. This search tool works just like searching for people by name on the People tab. Once you've entered all the people you want to invite, you can enter custom text that will appear in the invitation . 16

18 Click Send Now and you'll receive a confirmation that they've been invited to the group. If they do not have an address in their profile, no will be sent, but they will still be 'approved' to join the group. The confirmation text will alert you of anyone who could not be sent an . 17


19 Once you have sent the invitations, the individuals will receive an with a link to join the group. If you have accidentally invited the wrong person to join a group, an was still sent. However, you can change their invited status. Here's how to remove the invitation: If you're starting from the Group overview page, click Add people on the right side of the screen, under Actions. Next click Edit the participants list on the right side of the screen. 18
 of the person(s) you want to un-invite, click the")

20 Now click the Open Invitations tab. Check the box(es) of the person(s) you want to un-invite, click the If checked, set group status to... pulldown menu, and select Remove from group. Click OK next to the pulldown menu. The person has now been successfully un-invited. 19
21 Removing People from a Group from the Group Page To remove people from a group, go to the Group overview page and click the number of group participants or view*. Click Edit the group participants list in the Actions menu on the right. Check the box next to the names of those you will be removing, then choose Remove from group from the If checked, set group status to... pulldown options and click OK**. 20
22 *People can be removed from any group except the Entire Church Group and, if your site has more than one campus, the 'All Members of Campus' groups. **Everyone except the Main Leader can be removed from the group. To remove the person designated as Main Leader, you will first need to change the Main Leader from the Edit group participants page. When someone is removed from a group, the following records are retained: attendance history (under Involvement on their profile); messages or comments left, needs taken, scheduling assignments connected, or files uploaded (visible within the group); and group and position history (under History on the profile, Deluxe only). 21


23 Adding Assistant Group Leaders To add an Assistant Group Leader, go to the Group overview page and click the number of group participants or view. Click Edit the group participants list in the Actions menu on the right. Check the box next to the names of those you will be making Assistant Leaders, then choose Assistant Leader from the If checked, set group status to... pulldown options and click OK. 22

24 The person must already be a member of the group. 23

25 Viewing an Event You have the ability to view events you've been invited to, events hosted by groups you're in, events on the church-wide calendar, and events in Open to All Groups. After logging in, you can directly view an event by looking in the Upcoming area and clicking on its name or a need by clicking the name of the need item. You can also access the monthly view by clicking on the mini-calendar next to the Upcoming section or the Calendar tab. On My Calendar... On the My Calendar view, you'll find events you have been invited to or registered for, events being hosted by groups you're in, and needs or volunteer opportunities you have accepted or been assigned. On the church-wide calendar (or campus-wide, if applicable for your church), you'll find events hosted by groups which have chosen to share their events with the entire church, regardless of whether or not you are a member. Typing into the Live Search box in the upper right will dynamically filter though the events that show on the calendar. 24


26 Click on the name of the event you would like to view. If you're coming from the calendar, clicking the event name will pull up an information pop-up, and you will need to click 'view event details'. Details 25

27 The Details section is visible to anyone who can access the event. It will show the date and time of the event, the location, the Event Organizer and contact phone number, the group hosting the event, the description, an expandable section for Upcoming occurrences. The Upcoming occurrences... dates are clickable and will take you to that specific event occurrence. There is also an RSVP or Register button if you have not signed up for the event yet. Rooms & Resources Tab This tab is only included for events marked as needing rooms or resources (Standard and Deluxe versions). It's visible to leaders, Department Admins, and event admins, and contains the Rooms & Resources requested, the estimated attendance, setup and cleanup times, and general setup notes. 26
.")
28 Guest List Tab This tab is visible to Basic Users, but may show 'guest list hidden' depending on how the event was set up. Leaders will always see the list of names. If people are connected to the event in any way, it will show them by status (yes, no, maybe, not responded, or requesting). Attendance Tab The Attendance tab is visible to the Event Organizer, the group's leaders, Department Admins, and event admins. It contains the settings for if the event will have attendance taken. These include the Attendance Grouping, attendee limit, reminder , and if the event is an Attendance Only event. This is also where the event summary will be found after attendance is taken (Deluxe only). Check-In Tab 27
29 This tab is visible to leaders, Department Admins, and event admins. It will show the settings available for the event in relation to Check-In. These include the Attendance Grouping, the attendee limit, the room name, and the child/adult ratio (room name and child/adult ratio are Deluxe only; the tab as a whole is visible with Standard or Deluxe). Attendance Grouping is the only setting required for the event to be available for Check-In. Publish Tab This tab allows a leader to request publication to the church-wide/campus-wide and/or public calendars. It is also only visible to leaders, Department Admins, and event admins. The tab will show whom the event is visible to on the group calendar and provide the file download for an external calendar. 28


30 Creating an Event Creating an Event As a main Group Leader, Coach, Director, Department Admin, or Assistant Leader, you may add an Event from a number of different places in Church Community Builder. The quickest way to add an event is from the homepage (the first page you see when logging in), but you may also add the event from your Group's home page or most any event calendar. Click +Create a New Event to start creating the new event from the homepage or New Event from the Group home page. Hover over a calendar day and click Add Event at the top to begin from the calendar. 29


31 When you've clicked the first button to create an event, you'll be presented with a pop-up asking if the event will require Rooms & Resources or not. Be aware that, after initial setup, this setting can only be changed by a Full Event Admin. 30

32 Rooms & Resources Needed Choosing 'Rooms & Resources needed' will bring up the following options. Name: This is the event name that will show on calendars, invitations, etc. Description: This will appear on the Event overview page, in an Event Invitation, and in the Event pop-out from the monthly view of a calendar. It will also show up on the approval page and both setup/resource reports. Group: If you did not create the event directly from a group page, you will have to choose the group to host the event here. Event Time: This is the actual time of the event; it does not include setup or cleanup time. 31
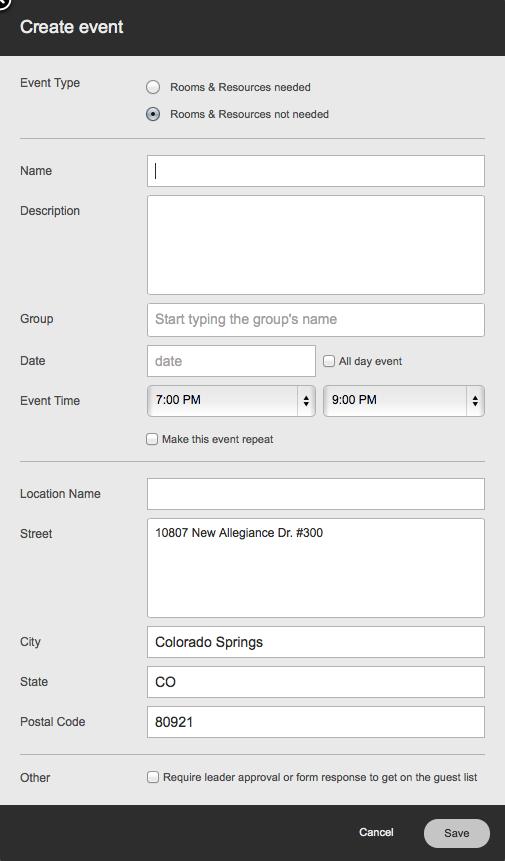
33 Setup/Cleanup: Setup and cleanup times are entered in minutes and are used to determine resource conflicts. This option is only available for at-the-church events. Make this event repeat: By checking this box, you open up another set of options: How often?: In the first pull-down, you can set the event to repeat daily, weekly, monthly by date, or monthly by day. The following pull-downs will let you further refine your choice (e.g., every other week, every three months on the 15th, on the second Sunday of every month, etc.). Ends: If your repeating event has a set end date, enter it here. If it's expected to continue indefinitely, leave the field blank. Use an address other than _: The system will automatically input the campus's location for these events. That is the location that will automatically be included in the calendar feed and event download. If the event will take place somewhere else, check this box to enter address information and overwrite the default. The last option on this initial setup page is whether or not to require leader approval or a form response to get on the guest list to this event. If this box is not checked, the event will be open to all. The button to join the guest list will display RSVP if no form is connected to the event, or Register if there is. If the box is checked, an will be sent to the event organizer when a person requests to attend if a form is not connected, and the button will always read Register. Click Save to view the event and change any other settings as needed. Rooms & Resources Not Needed Choosing 'Rooms & Resources not needed' will bring up the following options on the event creation popup: 32
34 33

35 Name: This is the event name that will show on calendars, invitations, etc. Description: This will appear on the Event overview page, in an Event Invitation, and in the Event pop-out from the monthly view of a calendar. It will also show up on the approval page and both setup/resource reports. Group: If you did not create the event directly from a group page, you will have to choose the group to host the event here. Event Time: This is the time guests will be shown. It doesn't involve any setting up or cleaning up the organizer or other volunteers may need to do. Make this event repeat: By checking this box, you open up another set of options: How often?: In the first pull-down, you can set the event to repeat daily, weekly, monthly by date, or monthly by day. The following pull-downs will let you further refine your choice (e.g., every other week, every three months on the 15th, on the second Sunday of every month, etc.). Ends: If your repeating event has a set end date, enter it here. If it's expected to continue indefinitely, leave the field blank. Next are the Location settings. If they are all filled in, a 'View Map' link will be displayed in the event page. The last option on this initial setup page is whether or not to require leader approval or a form response to get on the guest list to this event. If this box is not checked, the event will be open to all. The button to join the guest list will display RSVP if no form is connected to the event, or Register if there is. If the box is checked, an will be sent to the event organizer if a form is not connected, and the button will always read Register. Click Save to view the event and change any other settings as needed. Additional Options After clicking Save, an event set to need Rooms & Resources will show this screen: 34

36 These events require administrative approval before guests can be invited. You can also request the event be published on the church-wide or public calendars via the Publish tab; this also requires approval. Once you've requested publication, you'll get an when your request is approved or declined. An event designated not to need rooms an will show this screen instead: 35

37 Let's look at the tabs. The Rooms & Resources tab is only available for events designated at setup to require Rooms & Resources, and can only be used by group Main and Assistant Leaders, Coaches, Directors, Department Admins, and Full Event Admins. It will allow you to request resources and, after requesting, see the approval status of those resources. If the group is not set up to allow leaders to request resources, this tab will remain visible, but the requesting button will not appear. 36

38 You can manage your guest list, send invitations, print name badges, and more from the Guest List tab. This will be immediately enabled for events that don't need Rooms & Resources, and will be enabled upon event approval for events that do. Learn how to invite people to events or register for an event next. Note that the 'Invite people' link will disappear once the event date is past. You can set attendance settings for reporting or check-in purposes. Here is where you can choose the appropriate Attendance Grouping, indicate any attendee limit, enable reminder s to record attendance, or hide the event from view as an attendance-only event. If you set up your event for attendance, someone will need to record attendance after the event has taken place. Events requiring Rooms & Resources events can be set up with child/adult ratios and room names for 37

39 check-in; events without can only be set up with the appropriate Attendance Grouping (via the Attendance tab). Here, choose the appropriate Attendance Grouping, set the room limit, name the room, and set the child/adult ratio. See the Room Management section of the Check-In: Basic Overview article, the Event Setup section of Preparing to Use Check-In, and the Check-In: Room Management article for more information. Both events with and without Rooms & Resources can request publication to various calendars in your church. If you have the correct permissions, you can add events yourself. If not, your request must be approved by an administrator. Your last option is to change the Event Organizer and contact phone number. Click 'change ' next to the current Event Organizer's name to pull up the pop-up. Change the organizer by clicking the X by the current organizer's name and entering the name of the person you wish to put in charge. If you would like to set a contact phone number, check the box marked 'Do not use this person s phone number for the event contact phone' and enter the appropriate phone number in the box that appears. If the box is not checked, the Event Organizer's contact phone number will be used. 38
 Overview First, select the event from Upcoming on the homepage, from a calendar, or from a group.")
40 Inviting People to Events Privileges Required Event Organizer (can invite to any assigned event) Group Leader, Coach, Director (can invite to any Event in the assigned Groups) Event admin (can invite to any Event in the assigned Campus) Overview First, select the event from Upcoming on the homepage, from a calendar, or from a group. Once you are on an event's detail page, select 'invite people' from the Guest List Actions drop-down in the Guest List tab. This link will only be accessible if the event date is 'today' or in the future; otherwise, it will read 'add people' instead, and will allow you to add people directly but not invite them. You will then be presented with the options to invite the leaders or entire membership of any group you have access to, people by name, or people by search. If the event you are inviting people to is a recurring event, these invitations will invite recipients to every occurrence of the event. 39


41 If you would like to invite people to only one of the occurrences, you will need to convert that occurrence to a single event. To do that, go to the event detail page for the occurrence date you wish to change and click Convert this occurrence to a single event under the Actions menu. Click Confirm in the pop-up, and then when you go to send invitations from this event, the invitations will be for this one date only. Keep in mind that if you have already invited people to the repeating event, you will need to resend invitations; invitees are not automatically moved into the single occurrence. Inviting People by Group 40

42 If you choose People by group, you'll have the option to invite or directly add leadership or all members of any group you have access to. Below that, you can write a custom message to go in the invitation. Inviting People by Name If you have specific people you want to invite, choose People by name. Start typing a name until you see the person in the list, and then select their name. You can continue searching for and adding people to the list until you have all the people you need to invite included. Add a custom message to the invitation if needed and click Send Now. 41

43 Inviting People by Search The final way to find people to invite is by using search criteria. After clicking People by search, make sure the option is Invite and then click Choose Search Criteria. Select the criteria you wish to use. Keep in mind, this option searches the entire database rather than just the group itself. After the search results are returned, you may select a specific set of people from the list by clicking the boxes next to the names or select all X'. 42

44 Changing Invitation Settings There are a few invitation settings that can be adjusted for an event. To get to these settings, go to the Guest List tab and select Invitation Settings from the Guest List Actions menu. 43

45 You can determine whether to allow guests to see who else is coming or RSVP for more than just themselves, as well as set a limit on the number of people who can attend and be notified via when someone RSVPs for the event. Additionally, you can change the headers shown on the event s ed invitation if desired. Resending Invitations Once you have sent invitations to an event, the people invited will be able to access the invitation page so long as they have access to the that was sent. In addition, if they have a login to your Church Community Builder site, they will be able to either respond to or change their response to an event that either a) they have been invited to or b) is hosted by a group to which they belong. Should you wish to resend an invitation , you will need to go back to Invite People and choose People by Search. Choose 'Invite' rather than 'Add Directly', and for your search criteria, go to the This Event tab and choose the status of 'Open Invitation'. You will then be presented with a screen where you can choose from the people who have not yet responded to your event invitation and send them another. You can also re-send 44
46 invitations to people who who have already responded, or responded a specific way, or everyone you originally invited just adjust your Planned Status choice under This Event. 45

47 Recurring Events Setting Recurrence Pattern When creating a recurring event, check the box that says Make this event repeat in order to enable the recurrence options for this event. You will see two or three options: How often?, When/On the and the, and Ends. Each choice will provide you with different selections, allowing you to set up nearly any recurrence combination. Each recurring event can be set up to occur indefinitely (no end date) or to end on a specific date. Daily: Allows you to set up events that occur daily or every other day. Weekly: Allows you to set up an event event that takes place weekly or every two, three, or four weeks. Additionally you can choose one or more days during the week when the event occurs. For example, if you have an event that takes place on Tuesdays and Thursdays every other week you would choose Weekly, Every 2 weeks and check the Tuesday and Thursday boxes. Monthly (by date): Allows you to set up an event that takes place on the same date each month, every other month or once a quarter. Monthly (by day): Allows you to set up an event that takes place each month, every other month or every quarter on the same day for example, a visitors' lunch on the 2nd Sunday. Additionally you may set up events that happen twice in a month (e.g., the 2nd and 4th Thursdays). Deleting an Occurrence If the event will not be taking place on one or more scheduled days, you may delete these occurrences. Navigate to the event date you want to delete, and choose Delete this occurrence from the Actions menu. 46


48 Repeat for each date you wish to delete. Editing a Single Occurrence If you need to edit the date, time, or resources for one or more occurrences, but not for the entire series, you can convert those dates to single events and edit them independently of the event series. To do this, navigate to the event and click Convert this occurrence to a single event from the Actions menu on the right.. Repeat for each date you wish to convert to a single event. Then you can select Edit this event from the Actions menu on each single event and edit them independently of the main recurring event. 47
49 Managing the Guest List Privileges Required Event Organizer (allows you to manage the guest list for the Events you are assigned to) Group Leader (allows you to manage the guest list for any Event in your Group) Event admin (allows you to manage the guest list for any Event in your assigned Campus) Department Admin (allows you to manage the guest list for any Event in any of the Groups in your Department) Overview As an Event Organizer, you will have the responsibility of keeping track of who has registered for the Events you host. The Guests area of the Event is one place where you can manage your guest list. In addition, if there is a form within your site being used for registration purposes, you may also need to know how to match a form submission to a profile. Please click here for instructions on matching form responses to profiles. In this article we will focus on the tools within the Event itself. You can view and edit guest information the Guest List tab on the Event Detail page. The information in this area allows you to quickly look through the different responses: Yes, Maybe, No, Not Responded, and Requesting. 25 names will be shown to begin, but more names will be made visible as you scroll through the list. If the guest list is not visible to the attendees, non-leaders will see Guest list hidden on this tab. Leaders will still see the people and be able to interact with them. 48

50 From here, you can run reports or make adjustments to the guest list, including approving those requesting to attend the event if applicable. Select the appropriate status (i.e., Yes, Maybe, No, Not responded, or Requesting) to view the names of the people connected. You will see the number of people connected to that status in parentheses. Check the appropriate people and use the If checked, set event status to... or If checked, set count to... pulldowns. Then click OK to change the status or count. You can change both at the same time. You may also access PDF or Excel reports that include whichever status type you like, including all statuses, along with the contact information for those individuals. Click the name of the report to access the one you wish to run. 49

51 Access to reports is restricted to Group Leaders and Event admins. 50
52 Recording Attendance Required Privileges Event Organizer Group Leader (Main or Assistant) Coach Director Event admins (Limited or Full) Department Admin Event Organizers can record attendance from any Event they organize, Group Leaders can record attendance for events in any Group they lead, and Event admins can record attendance for any Event in the system. Overview There are three different ways to access and post attendance in Church Community Builder: going directly to the Event, starting from the Group, and starting from the Attendance Grouping. We will look at each below. From a Specific Event All roles can use this option to record attendance. It requires that an Event be created before you can post attendance. Access the Event detail page (click the name and then view event details from a calendar or the name from an upcoming list). Go to the Attendance tab and click 'Record attendance' under Attendance Actions. Because an Attendance Grouping is necessary to take attendance, if the Event was not set up correctly, you will be prompted to select an Attendance Grouping for the event. Choose from the options available in the pulldown menu, click Save, and then click Record Attendance again. If the group was not set up correctly, 51


53 you will be prompted to contact someone with Group Admin privileges to make adjustments to the group. Click here to learn more about setting up a Group to take attendance. Now that you have the attendance posting screen open, you can begin posting attendance. You will be able to do one or more of the following: mark current Group members or Event registrants as having attended, enter a headcount (for total attendance or just people not yet in the database), or search the site for those not yet in the Group or registered for the Event. Using the search box allows you to find both those currently on the list and those not in the Group. If your Group is over 1000 members, only people with a status of 'yes/attending' for the event will be displayed automatically. For other names, you will need to search via the search box. 52

54 Individuals marked as attended via the search will be added to the event attendance, but will not be added to the group. With the Deluxe version of Church Community Builder, you also have the option to include notes about the Event in the Event Summary section below the list of names and the information to leadership (Main Leader, Assistant Leaders, Coach, and Director) or to the entire group (including leadership). 53

55 Click Save at the bottom of the page to apply your selections. From the Group This method is available to Group Leaders and Event admins and works best if no Event has been created on the Group. An Attendance Only event will automatically be created, visible on the Admin All Events calendar, and the Attendance Grouping will be used for the name of the Event. If there is already an Event on the calendar that matches all of the settings chosen, the attendance will be applied to the existing Event instead of a new Event. Click on the name of the Group for which you want to take attendance. This takes you to that Group's detail page. Click Record attendance from the Actions area on the right. 54


56 Any event with an occurrence within the last nine days (including today) will be displayed to choose from. If there are no events within the last nine days, a link to create a new event will be shown instead. Choose the event and click Record attendance; then follow the steps above. For an Entire Attendance Grouping This last option is available only to Event administrators and allows them to record attendance for multiple Groups at the same time. When using this option, a new Attendance Only event will be created on the All Events calendar if there is not a corresponding Event already on the calendar. Click More > Attendance Entry to begin. Make your selections and click Record Attendance at the bottom of the page. The first Group without attendance already recorded will appear along with all members of the group. All groups attached to the Attendance Grouping being used will appear in the Summary section on the right. 55

57 If your Group is over 1000 members, only people with a status of 'yes/attending' for the event will be displayed automatically. For other names, you will need to search via the search box. Record attendance using the steps in the first section of this article. When you have finished recording the Group members, non Group members, and visitors, click Save and Do Next to apply your selections and move to the next Group in the list. Continue this process to record attendance for each Group in the chosen Attendance Grouping (the Groups included in the summary are those associated with the Attendance Grouping selected). You may use the Did not meet check box if the Group did not meet. Record Attendance Using a Barcode Roster In addition to manually entering attendance into the site, you may use a barcode scanner and roster to help expedite the process. Each Group has a barcode roster available that converts the individual ID number into a barcode. This roster can be printed from the Reports tab on a group's calendar page. Once the roster has been printed, use the same instructions above to record attendance but scanning the barcode of an attendee from the report instead of typing the name in the search box. Continue scanning until all individuals have been marked as attended. 56

58 Note: Printing the barcode roster from the Entire Church Group will provide you an alphabetized list of barcodes for your entire database. 57

59 Recording Attendance from Reminder Privileges Required Event Organizer Group Leader (Main or Assistant) Overview Attendance reminders, when enabled, will send up to three s to the Event Organizer and Group Leaders, beginning the day after the event if attendance has not already been recorded. To record attendance, click the button in the . If you didn't meet, you can select Did Not Meet right from the to record that. The attendance recording interface accessible through is mobile friendly for attendance recording on your phone or tablet on the go. 58
60 You will land on an attendance entry page, allowing you to mark the attendance of any group member or person on the RSVP list. You can also enter the number of other visitors who attended. If you are on a mobile phone, the attendance marking screen and the visitors count screen will be separate. You cannot record attendance from an reminder for an event with over 100 attendees without logging in. 59
61 The next page will allow you to enter notes. 60
62 Once you have submitted the attendance, you will see a summary page with information about the Event. The link in the will remain active for two weeks and will allow you to return to the summary page should you wish to do so. As with the initial submission of attendance, you will be prompted to log in to make any changes to the information. 61
63 Creating a Message One of the following is required: Group Leader (Main, Assistant, Coach, or Director) Group member (controlled by the group's settings) Message privileges Overview Messages are a combination of and discussion board posts created within a Group. These messages will be sent via to group members whose communication settings allow and may be posted to the Group's Messages area, depending on the settings chosen when creating the message. Additionally, if the Group's membership type is set as Open to All, anyone with a login to Church Community Builder will be able to view them. Membership in a Group is required to comment on messages. To send a new message, you can click on Send a Message/New Message in any one of three locations: Under the Messages tab on the Group overview page Under the Actions menu on the Group overview page Under the Actions menu after clicking View all messages from the Messages tab. OR 62
. Subject: This will show on the message list page and be used as the subject of the email.")
64 OR After clicking on the Send a Message link, complete the message form: Send to: You may choose to send the message to all members of a Group or just the leaders (if the Group is administrative, this will be locked to leaders). Subject: This will show on the message list page and be used as the subject of the . Message: This will show on the All Messages page and be used as the content. Use the formatting tools at the top to customize the message. 63


65 If necessary, add up to three attachments. These will be included in the as a link and uploaded to the Group's file library. You may also decide whether the person must log in to the site to access the file by checking the box at the bottom. Finally, if you are a Group Leader, you can adjust the message options (default for group members is all 64
.")
66 boxes unchecked): Expose my and allow responses directly to me: Exposes the address of the sender and allows recipients to reply directly to the sender via . Without this checked, group members may only be allowed to post comments to the message, which are visible to all members (or just leaders depending on the Send to option selected). Just send an (Don't store history or allow discussion): Sends the message as an only, does not post a message to the message board. If this is chosen, it is recommended the top box is checked as well, or else no reply can be sent. Don't allow people to discuss or comment on this message: Use this setting when you wish to have the message available in the site (so new members could read it, for example), but do not wish comments to be posted to the message. You can use this setting along with the first one to save the message for future members to read, but require responses to be sent to you. In list views, keeps message at the top: This setting ignores the date of the message or comments and keeps it at the top of the list no matter how old it is. Use this setting when posting group guidelines, for example. After filling out the form, click Send to complete the creation process and send the message. 65
67 Creating Needs Needs are connected to groups, and they are added by going to a specific group. A Need may be created by a Group Leader or group member (if the group settings allow). An individual with Need privileges may create and track Needs in any group. On the group homepage, click on the Needs tab. The Needs are displayed at the bottom of the screen. There are two ways to create a need from here: starting from scratch by clicking on New Need, or by duplicating an exiting need. Clicking New Need will start you with a blank need form; to duplicate, click the name of the need you want to recreate. From a need's detail page, select Edit this need and then Duplicate this need. This will create a new need with the title of the original plus *COPY* at the end. The description, Need Coordinator, location information, and all requested items will be copied over, while the requested items' dates and assignees will be wiped clean. 66

68 From here on, we'll be explaining the process of creating a need from scratch. Begin by clicking New Need in the Needs tab of the group's homepage. The Create a New Need page will open. 67

69 First enter the details of the Need. The Need Name must be entered or the page will not save. You may choose a Coordinator for the Need from the pulldown listing. The listing includes all basic members in a group. Limited Access Users may not coordinate a need, but can be assigned a needed item. Location information is optional. If you enter the address information, a map link will be shown for the Need. Now it's time to enter the items you want included in the Need. Each item must have a date. The red X lets you delete an item. 68

70 When you've entered your items, be sure to save. You will have an option if you need more lines at the bottom. Once you click Save, the need will be ready for you to inform individuals of or assign. To see the Needs you coordinate, go to More > Needs and click Needs I'm Coordinating. There is also a link for Past Coordination for Needs with prior dates. 69
71 Assigning Needs Once a Need is created, you can assign an individual to an item. Go to the group homepage and click the Needs tab. Click on View all needs, and then the Need name. Click the link under Actions: The needed items will be listed. A red box is shown to the left of items which have not been assigned or taken. 70


72 Click the link Click here to assign for the item you want to assign. A search box will display to search for an individual to assign the item. Any individual in the database may be selected; it is not limited to the members of the group. Once you select the individual, click Assign. The individual assigned now displays in the Taken by field and the I'll take it checkbox is checked. The red box has been replaced by a check mark in a green circle. 71


73 notification is automatically sent to the person assigned the item. You will see confirmation that the individual was notified. If you do not see the confirmation, the person does not have an address, so no notification could be sent. The individual is still assigned to the item. To remove the assignment, click Assign / Un-Assign items and uncheck the I'll take it box. The individual un-assigned will automatically be notified if they have an address. You will see a confirmation that the individual was informed about the change in item assignment. If you do not see the confirmation, the person does not have an address and could not be notified. 72

74 Informing of Needs Once a Need has been created, the Need Coordinator can inform any of the group members about the Need so that they can choose to take one of the needed items. Go to the group homepage and click on Needs. Click View all needs, and then the name of the Need. Open the Need and click the Inform people button. An message box will open. Type your message and send the to all the group members in the group where the Need was created. (The number of members in the group is shown.) 73


75 Or you can search for specific people from the group to inform about the Need. Begin typing a name in the search box and click the name or hit enter to add to the list. Continue adding people until you have included everyone you wish to inform. 74
76 The group members you have chosen to inform will receive an with a link to the Need and the message you typed (if applicable). You will see a confirmation message. 75

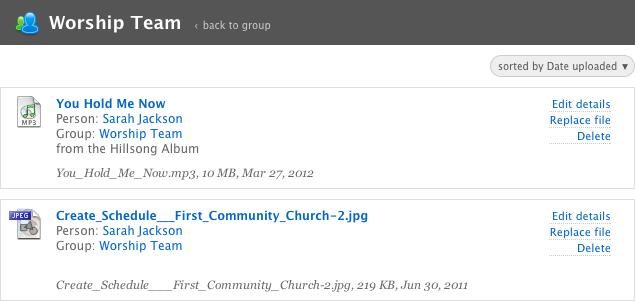
77 Uploading Group Files Uploading You can upload a file to a Group if you have File privileges, if you are a Group Leader or Assistant Leader, or as a group member if the group settings allow. To upload files from the Group overview page, select the Files tab and click New File. You can also upload a file after clicking on View all files by selecting Upload a file in the Actions menu on the right side of that screen. In the modal window that pops up, click Choose File to select a file from your computer. Add an optional Label and/or Description for your file. Then click Save to finish uploading. 76

78 There are just a few restrictions you should be aware of: File names (including the extension) are limited to 64 characters Files must be uploaded one at a time File size is limited to 10 MB Files can also be uploaded as attachments to a group message. In that case, the file size limit is 5 MB. You can keep an eye on your upload progress by looking at the status bar of your web browser. When your file has finished uploading, you will receive a confirmation message on the group files page. 77
79 78

80 Where Are My Reports? When looking for reports, remember that the Reports drop-down menu is contextualized to the page you are currently viewing. As an example, let's look at three different pages within a group. On a Group Overview page... The reports available in the pulldown menu are geared toward people specifically, the people participating in that group. On a Group Calendar page... The reports available in the pulldown menu are geared toward events and attendance, specifically related to that group. 79

81 On an Event Overview page... The reports available in the pulldown menu are geared toward the event in question. 80

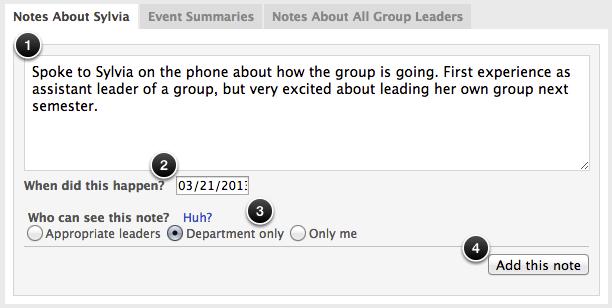
82 Creating Department Notes Directors and Coaches can add notes about any Group Leader in their Department. Directors can also add notes about any Coach in their Department. You can change the terminology in each Department if Director and Coach aren't the titles your church uses. Adding Notes as a Director Click Groups. The list of Departments with Groups you direct will be on the right side of the screen. Click the name of the Department the Group belongs to. To add a note about a Coach, click the name of the Coach on the right, then click Notes about [the Coach]. To add a note about a Group Leader, click the name of the person who is coaching the Group Leader, then [the Coach]'s Group Leaders, then the name of the Group Leader. 81
, add the date")
, select who can")
83 Type the note in the box provided (1), add the date the meeting or event took place (2), select who can see 82

84 the note (3), and click Add this note (4). Adding Notes as a Coach To add a note about a Group Leader, first click Groups, then the name of the Group Leader from the My Group Leaders list on the right. Type the note in the box provided (1), add the date the meeting or event took place (2), select who can see the note (3), and click Add this note (4). 83
85 84
Managing Groups Using InFellowship. A guide for Small Group Leaders
 Managing Groups Using InFellowship A guide for Small Group Leaders 2 3 Managing Groups Using InFellowship Table of Contents MyLifePoint your InFellowship account...4 InFellowship Groups - Your Dashboard...5
Your profile contains your contact information. This is what other members will use when they want to get in touch.
 Update contact information Your profile contains your contact information. This is what other members will use when they want to get in touch. 1. Log into your site. 2. Click your name in the upper-right
Coastal Connections. Student Leader User Guide
 Coastal Connections Last updated October 2011 0 Table of Contents Getting Started... 2 Managing Your Organization s Site... 3 Managing Your Organization s Interests... 5 Managing Your Organization s Roster...
CollegiateLink Student Leader User Guide
 CollegiateLink 2011 Last updated February 2011 0 Table of Contents Getting Started... 2 Managing Your Organization s Site... 3 Managing Your Organization s Interests... 5 Managing Your Organization s Roster...
Life After Microsoft Outlook
 Life After Microsoft Outlook Welcome to Google Calendar Now that you've switched from Microsoft Outlook to Google Apps, here are some tips on beginning to use Google Calendar to manage your day. What's
Basic User Walkthrough
 Basic User Walkthrough Basic User Walkthrough Table of Contents Accessing the Online Community 3 Your Personal Home Page 4 Viewing & Updating Your Profile 6 1. Contact Info 6 2. Profile Tabs 6 3. Actions
CareCarma. It Starts With Family
 CareCarma It Starts With Family 3. INTRODUCTION 3. How can CareCarma Help You? 3. CareCarma Home Page 4. CareCarma CareCircle 4. CareCarma CareCircle Tools 5. Work on Different Plattforms 6. GETTING STARTED
Austin Community College Google Apps Calendars Step-by-Step Guide
 The topics that will be covered in this workshop: Access (p.2) Calendar Settings (p.2) o General Tab (p.2) o Calendar Tab (p.3) Change Calendar Color (p.3) Calendar Notifications (p.4) Sharing (p.4) o
What is MyCCCov? Table of Contents
 What is MyCCCov? MyCCCov (our personalized Church Community Builder/CCB ) provides a private, safe and personal place for you to stay connected at CCCov. Here s a snapshot of how MyCCCov will benefit you:
Blue Jeans for Canvas User Guide
 Blue Jeans for Canvas User Guide OVERVIEW The Blue Jeans for Canvas Integration supports the ability to schedule, join and view recordings of previously scheduled meetings from within the Canvas account.
EagleSync 101 Powered by OrgSync
 EagleSync 101 Powered by OrgSync Today, we ll be covering.. Getting Started Portal Overview Managing your Portal Updating your Existing Student Organization Inviting People & Managing your Roster Starting
CollegiateLink Student Leader User Guide
 CollegiateLink 2010 Last updated August 2010 0 Table of Contents Getting Started... 2 Managing Your Organization s Site... 3 Managing Your Organization s Interests... 5 Managing Your Organization s Roster...
EMS Walk. Browse Events: Events in University Housing Space
 EMS Walk This guide explains the various components of University Housing s Event Management System (EMS) and provides step-by-step instructions for new users. EMS Web App Home Page (formerly Virtual EMS)
Workshop Scheduler Admin Manual
 Workshop Scheduler Admin Manual This application and the documentation were developed by the Center for Academic Excelence group of Appalachian State University. Copyright 2016. All rights reserved. rev
Webmail Plus Tutorial
 Webmail Plus Tutorial Created by: Welby Seely, TAC Co-Chair Webmail Plus Calendar The Webmail Plus calendar is an important tool to help you manage your time, audit time sheets, and verify the database.
Outlook 2007 Web Access User Guide
 Outlook 2007 Web Access User Guide Table of Contents Page i TABLE OF CONTENTS OUTLOOK 2007 MAIL... 1 Launch Outlook Web Access... 1 Screen Elements... 2 Inbox... 3 Read Mail... 3 Delete a Message... 3
Guide to My DCC WHAT IS MY DCC? LOGGING IN YOUR PERSONAL HOMEPAGE
 Guide to My DCC WHAT IS MY DCC? Welcome to My DCC! My DCC is the online community of Door Creek Church. It provides an easy and effective way to communicate and connect with groups, staff and others who
OCC Church App Using the Church App
 OCC Church App Using the Church App You can download the app onto your mobile device from the App Store or Google Play. Once the app has completed downloading, open the app. 1. Enter the authentication
Contents Office 365 Groups in Outlook 2016 on the web... 3 What are groups?... 3 Tips for getting the most out of Office 365 Groups...
 Contents Office 365 Groups in Outlook 2016 on the web... 3 What are groups?... 3 Tips for getting the most out of Office 365 Groups... 3 Create a Group in Web Outlook... 4 Group limits... 6 Group privacy...
EMS WEB APP User Guide
 EMS WEB APP User Guide V44.1 Last Updated: August 14, 2018 EMS Software emssoftware.com/help 800.440.3994 2018 EMS Software, LLC. All Rights Reserved. Table of Contents CHAPTER 1: EMS Web App User Guide
Outlook Web Access Exchange Server
 Outlook Web Access Exchange Server Version 2.0 Information Technology Services 2008 Table of Contents I. INTRODUCTION... 1 II. GETTING STARTED... 1 A. Logging In and Existing Outlook Web Access... 1 B.
Lesson 4: Using the Calendar
 Microsoft Office Specialist 2013 Series Microsoft Outlook 2013 Certification Guide Lesson 4: Using the Calendar Lesson Objectives In this lesson, you will explore the features of the Calendar module and
25Live. Training Manual. 25Live
 25Live Training Manual 25Live 25live@mail.montclair.edu 25Live Table of Contents Contents 25Live Training 25Live Training Manual Manual OVERVIEW The 25Live Dashboard 25Live Home Calendar 25Live Availability
Zoom User Manual. developed. Gary P. Davis. and. David J. Ayersman. for. Students and Employees of New River Community and Technical College
 Zoom User Manual developed by Gary P. Davis and David J. Ayersman for Students and Employees of Zoom manual.docx Page 1 of 35 Last Updated: August 13, 2018 PREFACE AND OVERVIEW For the fall 2018 term,
coconut calendar user guide Page 1 of 46
 coconut calendar user guide Page 1 of 46 coconut calendar user guide CONTENTS Coconut Calendar User guide overview 4 Staff view Dashboard 5 The Dashboard 5 Staff view Schedule 6 Access your schedule 6
INFORMATION TECHNOLOGIES & SERVICES
 Welcome to Weill Cornell Events Weill Cornell Events is a public event system for Weill Cornell faculty, staff and students. It can be used to create events, attend events, invite people to events and
Ohio State. VolunteerMatch LINE GOES RIGHT HERE. Volunteer s Guide. Office of Volunteer Relations
 HEADER Ohio State COPY LINE GOES RIGHT VolunteerMatch HERE Volunteer s Guide Office of Volunteer Relations volunteer@osu.edu 1-800-762-5646 Updated September 15, 2015 Contents Volunteer Experience: Logging
SCOUT SUSPENSE TRACKER Version 10.0
 SCOUT SUSPENSE TRACKER Version 10.0 USER S MANUAL For Civilian Personnel Management Service (CPMS) HPC-COM LLC Help Desk 800-795-1902 Updated: February 2011 Table of Contents SCOUT Suspense Tracker V10.0
Group Leader Quickstart Guide. Original photo by Trey Ratcliff
 Group Leader Quickstart Guide Original photo by Trey Ratcliff In This Guide Group Setup Create a Group Profile Post Types and Restrictions Group Tags Ideal Group Size Group Nickname Default Invitation
Student Leader and Advisor User Guide shockersync.wichita.edu Updated November 2018
 Student Leader and Advisor User Guide shockersync.wichita.edu Updated November 2018 For more specific questions, please contact student.orgs@wichita.edu or call us at 316.978.3022 Getting Started Each
The Soccer Box Coaches & Managers
 The Soccer Box Coaches & Managers Quick Start - Building Your Team STEP 1 Register your team STEP 2 Receive Invitation for Bonzi Team Add your players to send invitation link for the team. STEP 3 Your
User Manual. For JH CONNECT. Jesus House Intranet Application. Version
 User Manual For JH CONNECT Jesus House Intranet Application Version 1.1 24-05-2010 Table of Contents 1 Overview... 5 1.1 What Is JH Connect... 5 2 Starting Up... 6 2.1 Editing your existing Jesus House
Outlook Skills Tutor. Open Outlook
 Outlook Skills Tutor Lakewood School District Open Outlook Working with the Inbox Receiving new email Sorting your Inbox Reading email Using the Reading Pane Sending, replying to, and forwarding messages
MESA Database User Guide
 MESA Database User Guide Table of Contents Introduction... 5 Login Screen... 5 Dashboard... 6 My Profile... 7 School Management... 8 Search for a School... 8 Add a School to Your Center... 8 Remove a School
Google Calendar. View: Toggle the calendar view between day, week, month and more All day events: Events and tasks set for all day
 12 Google Calendar 1 2 11 6 5 4 3 10 9 8 7 Event status Not replied to Accepted Tentative Declined Reminder(s) set for the event One or more individuals invited to the event Private event Recurring or
ClockIt-Online User Guide
 ClockIt-Online User guide V5.4 Page 1 Content Purpose...4 Terminology...4 Logging in...5 Dashboard...6 Navigation...6 My account...8 Company duty roster...9 Open shifts...11 Prerequisite...11 Applying
OLLI Online. Users Guide
 OLLI Online Users Guide Version 1 / December 3, 2014 Table of Contents LOGIN... 3 EDIT MEMBER SETTINGS... 4 Settings Overview... 4 Community Profile... 4 Member Info... 5 Photo... 6 Notifications... 7
SMS Reminder Settings Setting Up Reminders in Demographics Custom Text Reminders... 38
 Table of Contents Activating Patient Portal... 1 Patient Portal... 3 Premium Patient Portal Admin Function... 3 Set Up... 3 How to Make Changes to the Portal Landing Page... 5 Premium Patient Portal Features...
Outlook 2010 Calendar
 Outlook 2010 Calendar Table of Contents The Calendar... 4 The Week View... 5 Day View... 6 Month View... 7 Schedule View... 8 Scheduling Appointments... 9 Appointments... 10 Meetings... 10 Creating Appointments/Meetings...
HGC SUPERHUB HOSTED EXCHANGE
 HGC SUPERHUB HOSTED EXCHANGE EMAIL OUTLOOK WEB APP (OWA) 2010 USER GUIDE V2013.6 HGC Superhub Hosted Email OWA User Guide @ 2014 HGC. All right reserved. Table of Contents 1. Get Started... 4 1.1 Log into
How-To Guide Outlook 2010 Client (Installed)
") How-To Guide Outlook 2010 Client (Installed) Feature: Outlook 2010 Calendar Document Version: April 19, 2011 Contents HOW DO I GET TO THE CALENDAR IN OUTLOOK?... 2 HOW DO I OPEN OR VIEW A BUILDING (OR
How-To Guide Outlook 2010 Client (Installed) Feature: Outlook 2010 Calendar Document Version: April 19, 2011 Contents HOW DO I GET TO THE CALENDAR IN OUTLOOK?... 2 HOW DO I OPEN OR VIEW A BUILDING (OR
Microsoft Lync 2013 Quick-Start Guide. ThinkTel Communications Professional Services Last Updated: June 18, 2013
 Microsoft Lync 2013 Quick-Start Guide ThinkTel Communications Professional Services Last Updated: June 18, 2013 Instant Messaging & Presence Accept an IM request Click anywhere on the picture display area
Sharing the Calendar
 Sharing the Calendar The new feature allows you to Share your calendar. To enable this feature, select the Calendar icon on the lower left side of your screen also known as the Navigation Pane. Then Click
SwatCal. Swarthmore College s integrated mail and calendar system
 SwatCal Swarthmore College s integrated mail and calendar system [SWATCAL] Learn how to use Swarthmore College s integrated email and calendar system. Import/export your meeting maker calendar, create
Microsoft Outlook Basics
 Microsoft Outlook 2010 Basics 2 Microsoft Outlook 2010 Microsoft Outlook 2010 3 Table of Contents Getting Started with Microsoft Outlook 2010... 7 Starting Microsoft Outlook... 7 Outlook 2010 Interface...
Page 3. News Alerts StreamLink Software. All rights reserved.
 Member User Guide 2016 StreamLink Software. All rights reserved. No part of this publication may be reproduced, transmitted, transcribed, stored in a retrieval system, or translated into any language,
STUDENT CLUBS ORGSYNC MANUAL
 STUDENT CLUBS ORGSYNC MANUAL 2016 STUDENT CLUBS ORGSYNC MANUAL 2016 1 CONTENTS Orgsync video tutorial links 3 How to set up your student club 4 How to make changes to your student club profile 4 How to
District 5910 Website Quick Start Manual Let s Roll Rotarians!
 District 5910 Website Quick Start Manual Let s Roll Rotarians! All Rotarians in District 5910 have access to the Members Section of the District Website THE BASICS After logging on to the system, members
Ohio State. VolunteerMatch LINE GOES RIGHT HERE. Subhead copy line goes right here Microsite Administrator s Guide. Updated July 23, 2015
 HEADER Ohio State COPY LINE GOES RIGHT VolunteerMatch HERE Subhead copy line goes right here Microsite Administrator s Guide Lorem ipsum dolor sit amet, consectetuer adipiscing elit. Nam cursus. Morbi
Hamilton Holmes Outlook Training
 Hamilton Holmes Outlook Training Navigation Pane Mail: Contains mail related folders like inbox and sent items folder. Use the Favorites section at the top of the pane for easy access to frequently used
2013 edition (version 1.1)
") 2013 edition (version 1.1) Contents 1 Introduction... 3 2 Signing in to your Office 365 account... 3 2.1 Acceptable Use Policy and Terms of Use... 4 3 Setting your profile and options... 4 3.1 Settings:
2013 edition (version 1.1) Contents 1 Introduction... 3 2 Signing in to your Office 365 account... 3 2.1 Acceptable Use Policy and Terms of Use... 4 3 Setting your profile and options... 4 3.1 Settings:
EVERY NATION OUTLOOK WEB ACCESS (OWA) USER S GUIDE
 USER S GUIDE") EVERY NATION OUTLOOK WEB ACCESS (OWA) USER S GUIDE Exchange 2003 Version Revised September 2005 TABLE OF CONTENTS WHAT S NEW IN OWA 2003?...2 General...2 Inbox and Message Composition...2 Tasks...2 INTRODUCTION
EVERY NATION OUTLOOK WEB ACCESS (OWA) USER S GUIDE Exchange 2003 Version Revised September 2005 TABLE OF CONTENTS WHAT S NEW IN OWA 2003?...2 General...2 Inbox and Message Composition...2 Tasks...2 INTRODUCTION
Wimba Pronto. Version 2.0. User Guide
 Wimba Pronto Version 2.0 User Guide Wimba Pronto 2.0 User Guide Welcome to Wimba Pronto 1 What's New in Wimba Pronto 2.0 2 Getting Started 3 Wimba Pronto System Requirements 3 Creating a New Wimba Pronto
Administrator Quick Guide
 1 Administrator Quick Guide Login Screen The first page employees will see when visiting their training site is the login screen. This is where employees must enter their username and password to access
N C MPASS. Getting Started. Version 6.8
 N C MPASS Getting Started Version 6.8 Ontario Telemedicine Network (OTN) All rights reserved. Last update: May 24, 2018 This document is the property of OTN. No part of this document may be reproduced
How to Request an Event using Ad Astra
 How to Request an Event using Ad Astra Navigate to the Astra guest portal (best used in Mozilla Firefox or Google Chrome) (https://asapp02.aaiscloud.com/une_schedule/portal/guestportal.aspx) *If your page
Outlook Web Access (OWA) PTHS District 209
 PTHS District 209") Outlook Web Access (OWA) PTHS District 209 Table of Contents Welcome to Outlook Web Access (OWA)... 1 To Access Your Proviso E-mail:... 1 If You Use Windows 95 or 98 or 2000 at Home... 2 About the Navigation
Outlook Web Access (OWA) PTHS District 209 Table of Contents Welcome to Outlook Web Access (OWA)... 1 To Access Your Proviso E-mail:... 1 If You Use Windows 95 or 98 or 2000 at Home... 2 About the Navigation
Confluence User Training Guide
 Confluence User Training Guide Below is a short overview of wikis and Confluence and a basic user training guide for completing common tasks in Confluence. This document outlines the basic features that
Events Creating an Event
 Events Creating an Event Events Creating an Event Objective: To learn how to create an event & understand the different configuration settings that are needed to build out event content & enable online
Yammer. Getting Started. What Tool Do I Use?
 1 Yammer Getting Started In an effort to have fewer passwords, your IT team is making your log-in to Yammer much easier. You will simply have to perform a couple of steps to set this up, only once. After
Scheduling WebEx Meetings with Microsoft Outlook
 Scheduling WebEx Meetings with Microsoft Outlook About WebEx Integration to Outlook, page 1 Scheduling a WebEx Meeting from Microsoft Outlook, page 2 Starting a Scheduled Meeting from Microsoft Outlook,
Solar Eclipse Scheduler. Release 9.0
 Solar Eclipse Scheduler Release 9.0 Disclaimer This document is for informational purposes only and is subject to change without notice. This document and its contents, including the viewpoints, dates
OpenSpace provides some important benefits to you. These include:
 Cengage Education A member of Open Colleges Welcome to OpenSpace OpenSpace is our virtual campus. It is our online space for students, tutors and staff to interact. It provides you with a secure, interactive
9 Scheduling Appointments, Meetings, and Events
 9 Scheduling Appointments, Meetings, and Events This chapter explains how to: Create an appointment, meeting or event Use QuickAdd to quickly create an appointment Create recurring appointments or meetings
CDM+ CDM+ Attendance. Attendance Preferences 10 Entering Attendance for a Service or Event 10. Entering Attendance for a Class 12
 CDM+ Attendance Setting up Class Lists 2 Setting up Group Lists (Pro version only) 3 Detail Tracking 3 Assign Individuals to Classes 4 Taking Attendance 6 Attendance Worksheet By Date 7 Sample Attendance
ASTRA USER GUIDE. 1. Introducing Astra Schedule. 2. Understanding the Data in Astra Schedule. Notes:
 ASTRA USER GUIDE 1. Introducing Astra Schedule Astra Schedule is the application used by Academic Space Scheduling & Utilization to schedule rooms for classes and by academic colleges, schools, and departments
Scheduling Meetings. Tips for Scheduling Secure Cisco Unified MeetingPlace Meetings
 Scheduling Meetings Release: 7.0 Revision Date: December 9, 2009 1:30 pm Tips for Scheduling Secure Cisco Unified MeetingPlace Meetings, page 1 How to Schedule a Web Meeting, page 2 How to Schedule a Video
STUDENT USER GUIDE FOR
 STUDENT USER GUIDE FOR Contents Registering on Handshake... p. 2 Adjusting Public/Private settings...p. 3 Setting Notification Preferences p. 4 Uploading Documents. p. 4 Editing Documents... p. 5 Searching
Basic User. Walk Through Guide
 Basic User Walk Through Guide This quick tutorial will help you get started exploring the many features of our new church web-based online community. You will be able to interact with others, get details
Dugan's Travels. Agent Website. User Guide
 Dugan's Travels Agent Website User Guide Lundy Innovations Ken Lundy, Sr. v1.2 1 v1.6 Table of Content Website Overview.................................................................... 3 Home Page -
Rutgers. A How-To Guide for Instructors
 Moodle @ Rutgers A How-To Guide for Instructors 7/30/2012 Prepared by the Department of Instructional Technology & elearning Solutions (ITeS) CA/NJDS, Room B725 Page 2 Table of Contents Required Software...
Calendar: Scheduling, invitations, attachments, and printing
 Does your Calendar look different than what s shown here? To fix this, switch to the new look! Calendar: Scheduling, invitations, attachments, and printing Your calendar view Sign in to Google Calendar.
Overview & General Navigation
 User Guide Contents Overview & General Navigation... 3 Application Terminology... 3 Groups... 3 Text Formatting Menu Bar... 3 Logging into the Application... 3 Dashboard... 4 My Profile... 5 Administrator
Table of Contents Navigation-Provider Card Page 3 Making Connections Page 8 Messaging Outside of Patient Context
 QuickStart Guides 1 Table of Contents Navigation-Provider Card Page 3 Making Connections Page 8 Messaging Outside of Patient Context Page 11 Manage Personal Account Settings Page 13 Sending a Referral
AN INTRODUCTION TO OUTLOOK WEB ACCESS (OWA)
") INFORMATION TECHNOLOGY SERVICES AN INTRODUCTION TO OUTLOOK WEB ACCESS (OWA) The Prince William County School Division does not discriminate in employment or in its educational programs and activities against
INFORMATION TECHNOLOGY SERVICES AN INTRODUCTION TO OUTLOOK WEB ACCESS (OWA) The Prince William County School Division does not discriminate in employment or in its educational programs and activities against
Calendar: Scheduling, invitations, and printing
 Calendar: Scheduling, invitations, and printing Your Calendar View Sign in to your Bates Google Calendar Account (http://calendar.bates.edu). You'll see your calendar weekly view. To change your calendar
How To: Advisor Resource
 How To: Advisor Resource This how to will help you as an Advisor use OrgSync. Remember, if you ever have any questions on OrgSync contact Student Life at stulife@mst.edu The Role of an Advisor in OrgSync
InSite User Guide. InSite User Guide. InSite User Guide
 InSite User Guide InSite User Guide InSite is a website from which you can access and research legislative information. Your jurisdiction uses a software application called Legistar to help manage the
Scheduling WebEx Meetings with Microsoft Outlook
 Scheduling WebEx Meetings with Microsoft Outlook About WebEx Integration to Outlook, on page 1 Scheduling a WebEx Meeting from Microsoft Outlook, on page 2 Starting a Scheduled Meeting from Microsoft Outlook,
OUTLOOK WEB ACCESS (OWA) USER S GUIDE. Exchange 2003 Version - OWA Guide
 USER S GUIDE. Exchange 2003 Version - OWA Guide") OUTLOOK WEB ACCESS (OWA) USER S GUIDE Exchange 2003 Version - OWA Guide TABLE OF CONTENTS WHAT S NEW IN OWA 2003?...2 General...2 Inbox and Message Composition...2 Tasks...2 INTRODUCTION TO OWA...3 Web-Based
OUTLOOK WEB ACCESS (OWA) USER S GUIDE Exchange 2003 Version - OWA Guide TABLE OF CONTENTS WHAT S NEW IN OWA 2003?...2 General...2 Inbox and Message Composition...2 Tasks...2 INTRODUCTION TO OWA...3 Web-Based
For Volunteers An Elvanto Guide
 For Volunteers An Elvanto Guide www.elvanto.com Volunteers are what keep churches running! This guide is for volunteers who use Elvanto. If you re in charge of volunteers, why not check out our Volunteer
Scheduling WebEx Meetings with Microsoft Outlook
 Scheduling WebEx Meetings with Microsoft Outlook About WebEx Integration to Outlook, page 1 Scheduling a WebEx Meeting from Microsoft Outlook, page 2 Starting a Scheduled Meeting from Microsoft Outlook,
AT&T Conferencing Add-in for Microsoft Outlook
 AT&T Conferencing Add-in for Microsoft Outlook 2016 AT&T Intellectual Property. All rights reserved. AT&T, the AT&T logo and all other AT&T marks contained herein are trademarks of AT&T Intellectual Property
OUTLOOK HOW DO I? 2013
 OUTLOOK HOW DO I? Click on a Link to take you to that Section OUTLOOK - GENERAL... 2 GENERAL How Do I Navigate the 2010 Outlook Screen?... 2 GENERAL: How Do I Change the Reading Pane View?... 7 GENERAL:
How to Add and Remove Permissions to Your Page
 How to Add and Remove Permissions to Your Page Introduction: User Privileges This chart displays the different PEPFAR SharePoint user roles and permissions. Review this chart to understand what ability
Overview & Training Materials
 Overview & Training Materials Introduction SimplifyIT s Intranet Portal and Enterprise Management Solutions including a help desk, knowledge base, training management, vendor management and more is designed
Outlook 2016 for Mac: Basics
 Outlook 2016 for Mac: Basics FINAL 2015. All Rights Reserved. California State University, Bakersfield June 24, 2015 REVISION CONTROL Document Title: Author: File Reference: O2016 Outlook Mac Basics Staff
eclubhouse CLUB OFFICIAL USER GUIDE
 eclubhouse CLUB OFFICIAL USER GUIDE eclub Club Users Guide 11/2013 Table of Contents eclubhouse... 1 CLUB OFFICIAL USER GUIDE... 1 LOGGING IN... 3 RESETTING PASSWORD & UNLOCKING ACCOUNT... 4 ADMINISTRATION...
Bengal Success Portal
 Bengal Success Portal Adviser Guide Welcome to the Bengal Success Portal! The Bengal Success Portal gives you a convenient way to keep track of your students and ensure timely intervention with instructors,
ClientNet Admin Guide. Boundary Defense for
 ClientNet Admin Guide Boundary Defense for Email DOCUMENT REVISION DATE: Feb 2012 ClientNet Admin Guide / Table of Contents Page 2 of 36 Table of Contents OVERVIEW... 3 1 INTRODUCTION... 3 1.1. AUDIENCE
Scheduling WebEx Meetings with Microsoft Outlook
 Scheduling WebEx Meetings with Microsoft Outlook About WebEx Integration to Outlook, page 1 Scheduling a WebEx Meeting from Microsoft Outlook, page 2 Starting a Scheduled Meeting from Microsoft Outlook,
Findmyshift - Getting started with Findmyshift
 Findmyshift - Getting started with Findmyshift Managers Creating your first roster Adding staff to your team Inviting your staff to log in Choosing your settings Entering shifts Publishing shifts Handling
25Live: How to Submit a Request
 25Live: How to Submit a Request Need help? If you can t remember your passcode, contact the UTS Help Desk at 303-871-4700 to have your passcode reset or reset it yourself through Forgot Passcode link on
Collegiate Link FAQ for Club and Student Organization Leaders
 Collegiate Link FAQ for Club and Student Organization Leaders What is Collegiate Link? Collegiate Link (CL) is a database that chronicles student organization profiles, membership rosters, and events,
Setting Up an Event Using Surveys
 2016 Contents 1. INTRODUCTION... 3 2. CONFIRMATION EMAIL... 3 3. MANAGE CONTACTS... 4 4. REGISTRATION FORM... 5 5. ADD ACTIONS... 14 6. SENDING YOUR INVITATION CAMPAIGN... 17 7. REMINDER TO REGISTER...
SCHOOLOGY OVERVIEW Getting Started
 SCHOOLOGY OVERVIEW Getting Started Publication: September 18, 2017 Table of Contents INTRODUCTION... 2 GETTING STARTED... 2 HOMEPAGE... 2 RECENT ACTIVITY... 2 GRADES AND ATTENDANCE... 3 CALENDAR... 3 Create
Key Features: Learning Objectives: Table of Contents:
 Key Features: Skype for Business is a communications platform available on Windows, Mac, and mobile devices. Skype for Business is designed to allow user interaction between colleagues and external contacts.
TrainingFinder Real-time Affiliate Integrated Network (TRAIN) Administrator Handbook. Version 3.2 (3/26/08) Public Health Foundation
 Administrator Handbook. Version 3.2 (3/26/08) Public Health Foundation") TrainingFinder Real-time Affiliate Integrated Network (TRAIN) Administrator Handbook Version 3.2 (3/26/08) Public Health Foundation Table of Contents About This Handbook 5 TRAIN Administrative Basics 6
TrainingFinder Real-time Affiliate Integrated Network (TRAIN) Administrator Handbook Version 3.2 (3/26/08) Public Health Foundation Table of Contents About This Handbook 5 TRAIN Administrative Basics 6
Connecting nonprofits with volunteers is what we ve done for more than 55 years.
 Connecting nonprofits with volunteers is what we ve done for more than 55 years. We connect young and old, diverse cultures and religions, and people of all economic levels to build a stronger, more vibrant
Calendar Basics Outlook 2016 for Windows
 Calendar Basics Outlook 2016 for Windows Texas Christian University Information Technology Table of Contents Navigate the Calendar... 1 Create and Edit New Calendar Items... 2 New Appointment... 2 Add