CIM GOLDTeller. Created August FPS GOLD. All rights reserved.
|
|
|
- Gavin Carter
- 6 years ago
- Views:
Transcription

1 CIM GOLDTeller Created August 2017
2 2 CIM GOLDTeller Table of Contents CIM GOLDTeller Overview... 8 Administrative Screens... 9 File Functions Operator Information CIM GOLDTeller Screen Details Security System Company Options Screen Rules for Valid Passwords Institution Name Employee Number Length Days to Force Employee Password Change Minutes Without Activity to Close Terminal Minimum Length of Password (5-40) Customer Service Security Force Alpha-Numeric Passwords Force Special Characters in Passwords User Defined Fields field group User Defined Field Type User Defined Field Length User Defined Field Description Security Reports Screen History tab Changes to Display field group CIM GOLD Employee Security CIM GOLD Profile Security Customer Service Cross Reference EFT GOLD Options Employee Details Employee Password Reset Employee Field Level Security System Security... 40
3 Contents 3 Options Profile Field Level Security Teller Details Terminal Violation Reset Selection Criteria field group Start Date End Date Start Time End Time Changed by Employee# History List View Access tab Employees Tellers CIM GOLD Profiles System Profiles Search Include field group Details Teller Information CIM GOLD System Field Level Profile Assignments All Assigned Profiles Report on Effective Security Exclude Inactive/Terminated Employees Access List View Securables tab CIM GOLD System Field Level Include field group Employees Profiles Effective Security
4 4 CIM GOLDTeller Profile Assignments Exclude Inactive/Terminated Employees Securables List View Employee/Profile Listing tab Include field group Employees Profiles Sort By Reset Passwords Screen Rules for Valid Passwords Search Selection List Reset Violations Screen Number Name User Name Enhanced User Name Location Security Screen Employees Tellers CIM GOLD Profiles System Profiles Display Effective Security Search Security list view Employee tab Teller Screen Teller Detail field group Web Teller Opers.dat File Options field group Current Totals, Last Signoff, and Previous Totals tabs Limitations Tab Online Limits field group Give Warning if Net Cash Exceeds Opers.dat File Offline Limits field group... 79
5 Contents 5 Override Required for Correction Opers.dat File Print Totals field group CIM GOLD Profile tab System Profile tab CIM GOLD tab System tab System Security Details Field Level tab Subscribe to Mini-Applications Screen Screens List View Description Cost per Month per User Terminated Employee Deletion Screen Display Search Selection List Software, Server, and Files Administrator Options Account Signatures Form/Font Configuration Menu Design PC Branch Settings PC Institution Settings Settings Page One tab Settings Page Two tab CTR & Cash Dispenser Defaults Institution Options (Inquiry Only) Print Form Design Profile Speed Key Assignments System Configuration System Field Dictionary Transaction Design View/Modify Droplists MICR Check Printing Creating MICR Checks for Use in CIM GOLDTeller Create MICR Line
6 6 CIM GOLDTeller Creating MICR Check Ranges Set Option to Print MICR Checks Running Transactions for MICR Checks Printer Remote Override How to Use Keystrokes Log On Log Off Run a Transaction Mass Loan Payments (600/50/0) Retirement Distribution (1230) Automatically Close Cards When Closing Deposit Account Use Receipts Functions Clear CIS Search Information Go Back to Interrupted Transaction Interrupt a Transaction Item List Print Output Display Repeat Last Transaction Repeat Last Transaction and Fields Reprint Receipt Reverse Last Transaction Administrator Options Operator Functions Print Functions Teller Total Functions Check Writer Currency Transaction Report Journal/Forwarding Non Customer Transaction Log Notice of Delayed Availability OFAC Calculator Display GOLDTeller32 CIM Version
7 Contents 7 Display GOLDTeller 32 CIM What's New Display Keyboard Shortcuts Test Override PC Calculate Check Digit Options CIS Search (F9) Multiple Transactions (F10) Client Services FPS GOLD Teller Capture User's Guide Introduction Images and Storage Purchase Required Components Item Types and Virtual Tickets Processing Transactions Transaction Process Overview Teller Capture Transaction Example Viewing Images Viewing Scanned Images from the Journal Log Viewing Scanned Images from Deposit Account History Viewing Scanned Images from Loan Account History Cancellations/Corrections/Errors OnUs Check Clearing Transmission of x9.37 Files Teller Capture Totals Screen X9.37 Research Screen Report Type Options Search Fields Search Results list view View and Print Images Form Samples

8 8 CIM GOLDTeller Overview CIM GOLDTeller Overview CIM GOLDTeller is a convenient tool that allows tellers to quickly access customer data and run transactions on their accounts. It works seamlessly with CIM GOLD, allowing the teller to view other screens and information, and then quickly return to GOLDTeller. GOLDTeller is a robust system that can be set up according to each teller's needs. The information in this document will explain the various setup options and requirements of GOLDTeller, as well as explain how to perform many functions within GOLDTeller.
9 CIM GOLDTeller Overview 9 Administrative Screens Teller System > Administrative in the CIM GOLD tree view Administrators can manage institution-wide tasks using the two screens located on the CIM GOLD tree view: File Functions such as file backup, restoration, copy, and deletion Operator Information such as teller override authority, monetary limits, speed keys, PC monetary totals, and print options
. See the example below.")
10 10 CIM GOLDTeller Overview File Functions Teller System > Administrative > File Functions in the CIM GOLD tree view You can easily back up, copy, delete, and restore data files using File Functions (found on the CIM GOLD tree view under Teller System > Administrative > File Functions). See the example below. Back Up Data Files This function allows you to easily back up institution GOLDTeller files. FPS GOLD recommends backing up these files every week. This function does require security. A user with appropriate security can back up files and will also receive reminder messages to prompt them to do so. If working in a server environment, all other users must be logged off GOLDTeller for a backup to occur. The newly backed-up file will be placed at the same path location as the current file. Reference the file directories to identify this location. The file names will follow this format: GOLDTLLR.001 OPERS.001 PLATFORM.001 Restore Data Files This function provides a tool to quickly identify and restore a backup file. Upon selecting <Restore Data Files>, a prompt will be shown asking if you want to restore GOLDTLLR, OPERS, and/or PLATFORM backup files. Depending on the file(s) chosen, a dialog box will be shown displaying the backup or copied files. You can then select/highlight a specific file to be restored. Click <Restore> to load the selected file. Copy Data Files This function assists in creating a copy of the GOLDTeller.DAT, OPERS.DAT, or Platform.ISM files. A prompt will be shown asking if you want to make a copy of each one of these files. If <YES> is selected, a copy of that file is created and placed at the same path location where the original file is located. File names will follow this format: GOLDTLLR.CPY OPERS.CPY PLATFORM.CPY Delete Old Data Files This function provides a utility to quickly identify and delete old data files. Upon selecting <Delete old data files> a prompt will be shown asking if you want to delete GOLDTLLR, OPERS, and/or PLATFORM backup files. Depending on the file(s) chosen, a dialog box will be shown displaying the backup or copied files. You can then
11 CIM GOLDTeller Overview 11 select/highlight specific files for deletion. Once all the files you want have been highlighted, click <Delete> to remove those files. A "Delete All" selection is also available to conveniently delete all backup or copied files.

12 12 CIM GOLDTeller Overview Operator Information Teller System > Administrative > Operator Information in the CIM GOLD tree view You can easily view and change teller setup information using the Operator Information screen. See the example below. Operator Information contains data pertinent to individual tellers. Operator information is used to verify that the teller is valid. Operator information indicates the override level assigned to each teller, teller transaction limits, whether a teller can receive and process a remote override, and other teller-specific options. Teller PC Status: Shows the current status of the highlighted user. There are three possible statuses: o Signed On o Signed Off Temporarily o Signed Off Permanently Note: This is the where a user, with appropriate security and while logged on to the same Opers.dat file, may log off another CIM GOLDTeller user by selecting "Signed Off Permanently" or "Signed Off Temporarily." Override Authority: The use of Remote Override allows a teller performing a transaction, requiring an override above their own specified level, to send that transaction electronically to another employee signed on CIMGOLD for a remote override. Use the Override Authority drop-down list to select the appropriate override level for the user.
13 CIM GOLDTeller Overview 13 Override Required for Correction: Select, from the drop-down list, the override required for the user to perform correction transactions. Remote Override Priority: An officer needing override authority must have a value of 1 in this field. Automatically Fill Account List on Account Entry: When entering the account number on a transaction all accounts for, the IRS owner on the account entered will be shown automatically in the account list, if this box is marked. Next Day Mode: Field shows as checked if the user logged on with an effective date in the future. Always Show Logon Information Dialog: If this field is checked, the Logon Information prompt to always be shown. This prompt allows a cash drawer amount to be entered, if other than zero, and to mark for Next Day Processing as needed. It is recommended that when tellers are regularly signing-on under a Next Day Processing on the teller sign-on environment, that this box be marked; otherwise, it is recommended that the setting remain unchecked. Transaction condition #52, Teller Signing on With a Future Date, must be allowed. Skip File Backup Date Message: Check this box if you want to prevent this message from displaying when tellers sign on: "Bad Date Error Getting the Last Backup Date." This message displays when someone signs on to GOLDTeller or clicks <Back Up Data Files> on the Teller System > Administrative > File Functions screen. Monetary Limits: o Offline: Teller monetary limits while in offline mode. o Host Online: Teller monetary limits while communicating with the host (online). The T, S, or O next to these amounts is the override level required for the limits. <Update Host Limits for All Opers> Click this button to update the host limits for all operators who are using this opers.dat file.

14 14 CIM GOLDTeller Overview CIM GOLDTeller Screen Details Main GOLDTeller Menu Bar At the top of the main CIM GOLDTeller screen are menus. See the following sections for more information concerning each of these menus: Functions Speed Keys Options CIS Search Multiple Transactions Log Off The Teller Screen Below the menus is the main CIM GOLDTeller screen. This screen can be divided into four quadrants, as shown below: 1. The first quadrant displays the teller name and number at the top, followed by a list of all the transactions available to the teller. To change which transactions are displayed here, use the Functions > Administrator Options > Menu Design screen.
15 CIM GOLDTeller Overview 15 The transactions are divided into their categories, and then categories within categories, such as: 1. Deposits 2. Retirement Deposits 0. Normal Contribution (1220/0/0) Transactions end with their respective transaction code on the end (such as 1220/0/0 in the example above). Click the transaction you want to run in this list, and the transaction will be displayed in the third quadrant. C 2. TIP: In the field to the right of the teller name, you can type the transaction you want to run by typing the number/letter in front of each category. For example, if you wanted to run the Loan Payment transaction, you would type "100" for 1: Loans, 0: Loan Payments, 0: Loan Pmt (600/0/0). Note: These numbers are based on each teller menu, so they may not be the same. The second quadrant displays information concerning the customer that has been selected. To select a customer, use the CIS Search function (press <F9). To clear out any information in this field group and run a transaction for a different customer, press <Shift> + <F9> or select "Clear CIS Search Information" from the Functions menu. When you click an account listed below the name information, that account will be automatically filled in the third quadrant (Transaction Display) in the Account Number field of the transaction selected from the menu. 3. This quadrant displays the transaction that was selected in quadrant 1. When all information is correctly entered on the transaction, click <Send> and the results of the transaction will be displayed in quadrant 4. Also see the Running Transactions topic. 4. This quadrant is also known as the Output Display. This quadrant displays the results of any transaction run in quadrant 3. You can print this information by pressing <Ctrl> + P, and then selecting how you want to print the information, as shown below: The paths for these printers are entered on the Printer Defaults tab on the System Configuration screen.

16 16 CIM GOLDTeller Overview Right-Click Menu Right-click on an account in the list to open a menu that gives you quick access to account-related features. These features are explained below the following example. Menu Item What It Does Goto Account Information Takes you to the Account Information screen for the selected account. Goto Account History Takes you to the History screen for the selected account. Show Account Opens a list of names linked to the selected account. Names Print Customer Label Displays the mailing address linked to the selected account in the Output Display below the account list. Click Ctrl+P to print the label. Refresh Balances If you have run transactions on any of the accounts in the list, click here to display the current balances on those accounts.
17 CIM GOLDTeller Overview View Signatures Opens File Services Plus so you can view signature captures. Upload and Link Signatures Opens File Services Plus so you can save and link signature captures. Edit Opens an editing menu so you can edit or copy information in the list. Printing Opens a printing menu, including printer settings, preview, and setup. Export Opens a menu so you can export information to Report Manager or to a text file. Auto Resize Opens a menu so you can resize the account list. Find Opens a dialog box so you can search for information in the account list. 17

18 18 Before you can begin using CIM GOLDTeller, you must first download GOLDTeller for CIM GOLD and then set up certain files and functions in GOLDTeller according to your needs. Software and licenses are required for each computer using GOLDTeller. CIM GOLD and GOLDTeller for CIM GOLD must be purchased for every teller. You must download CIM GOLD before downloading CIM GOLDTeller. To download CIM GOLDTeller: Go to FPS GOLD's secure site: If you do not have a user ID or password to log onto the secure site, contact your FPS GOLD banking consultant. 1. Click the Software Download link on the left side of the welcome page of the secure site, as shown below: Click the GOLDTeller for CIM GOLD / GOLDTeller Platform link. A message is displayed at the bottom of the browser window asking you if you want to run or save PFWGOLDTellerCIMPlatform.exe from secure.fps-gold.com. Click <Run>. You may receive a message stating that this download is from an untrusted site. Click <Yes> on that message. Complete the steps to finish downloading CIM GOLDTeller.
19 19 When the download is complete, you can log onto CIM GOLD, and then complete the rest of the setup process, as described in the following sections: Security Software Server Files Printer System Configuration - Files Operator.dat File Speed Keys Remote Override GOLDTllr.dat File PC Branch PC Institution Settings System Field Dictionary View/Modify Forms Transaction Design Menu Design Back-up Files Options Menu

20 20 Security System Before you can use CIM GOLD, security must be set up for each employee who will use CIM GOLD. Security for CIM GOLD is set up in the CIM GOLD application under Security in the left tree view, as shown below. See any of the following topics for more information concerning the screens under Security: Company security options Reports Reset Passwords Reset Violations Subscribe to Mini-Applications Terminated Employee Deletion
21 21 The following list shows the order in which security must be set up within CIM GOLD so that security will work properly for your institution and employees. NOTE FPS GOLD must add security for your institution s Security Administrator before employee security setups can begin. 1. Subscribe to Mini-Applications - Before security setup, your institution must subscribe to all applications and screens your institution will use. 2. Company Options - The fields on this screen define your institution name, length of employee numbers and passwords, days to force security code (password) changes, and minutes of inactivity to timeout CIM GOLD and other FPS GOLD products. Company Options are found on the CIM GOLD Security > Company Options screen Contains setup fields for employee, profile, teller security, CIM GOLD screens, and field-level security. If your institution chooses to use profiles, they must be set up before setting up individual employees. Also see the FPS GOLD Employee Profiles section in the Security Management manual for security information specifically for FPS GOLD employees.
22 22 Company Options Screen Security > Company Options Overview of Security Before using CIM GOLD and other FPS GOLD product applications, security must be set up for your institution and its employees. The CIM GOLD Security screens are used to set up the following: Company security options Security for employees and tellers Security for CIM GOLD screens Security for system screens such as GOLDTeller and GOLDView CIM GOLD Field Level Security. The following specifies the order in which security must be set up within CIM GOLD so that security will work properly for your institution and employees. 1. Subscribe to Mini-Applications - Your institution must subscribe to all applications and screens your institution will have access to before you can set up security. 2. Company Options - The options on this screen let you define your institution name, length of employee numbers and passwords, days to force security code (password) changes, and minutes of inactivity to time out CIM GOLD and other FPS GOLD products. Company Options are found on the CIM GOLD Security > Company Options screen Contains setup fields for employee, profile, teller security, CIM GOLD screens, system screens, and Field Level Security. If your institution chooses to use profiles, they must be set up before setting up individual employees. Some of the features available in the CIM GOLD Security system are listed below. You can create profile groups to set up employees with similar security clearance. For example, all tellers could be set up with the same security access. You can set up multiple profiles per employee. You can specify a length of time after which password changes are forced. Users can select their own security codes (passwords). You can grant users one of three levels of security: File Maintenance, Inquiry, and None (no access). You can set the length of time an FPS GOLD program can remain inactive before automatically locking the program and requiring a password to be entered. You can grant specified FPS GOLD customer service personnel with defined levels of security access. You can delete security for terminated employees. You can delete unused profiles. Reports for changes made to the Security System are FPSDR218, Security Change Report, and Online Report. Setting Up Company Options To set up your company's security options, complete the following steps. 1. Enter your Institution name in the Institution Name field.
23 23 2. In the Employee Number Length field, enter a number between 4 to 10. (For example, if you enter 8 here, all employee numbers must be eight digits long.) 3. In the Days to Force Employee Password Change field, enter a number between 15 and 99 (or 9999, never expires) to define the default number of days between forced password changes for your institution. The recommendation is to force a password change at least every 90 days. This company default can be overridden during individual employee setup. Password changes are forced after the specified length of time. This feature protects your institution from fraudulent use of a security code for any extended period. Should a security code be violated, the user could immediately create a new security code. If the violation goes undetected, the violated code is only usable until the Days to Force Employee Password Change days are reached. 4. In the Minutes Without Activity to Close Terminal field, enter the number of minutes for your institution s default that will trigger a timeout for users. A minimum of 5 and maximum of 60 minutes must be entered; the system will not accept a number outside that range. This company default can be overridden during individual employee setup. The first time a user attempts to enter anything on an FPS GOLD program after the timeout value has expired, a timeout window will be displayed and the user must enter their username and password in order to continue. This feature, also called an "inactivity logoff" increases security by locking FPS GOLD programs that are not in "active" use. 5. In the Minimum Length of Password (security code) field, enter the minimum password (security code) length for your institution s default, a minimum of 5 and maximum of 40. If a number outside this range is entered, the following error message will appear: "PASSWORD value must be from 5 to 8." If employees attempt to set passwords (security codes) with fewer characters than the minimum you specify in this field, they will receive the following error: "PASSWORD IS NOT LONG ENOUGH OR INVALID SPACES IN PASSWORD." 6. If left blank, the Customer Service Security field will allow all FPS GOLD support personnel access to your institution files. A check mark will turn on the customer service security option, and you are given the option to select the security access granted for FPS customer service personnel. You must select the FPS GOLD support personnel from the Customer Service list; only those selected will be able to access and support your institution. 7. If you check the Force Alpha-Numeric Passwords field, all employees must use both letters and numbers in their passwords (security codes). If the field is left blank, employees can enter any variation of letters and/or numbers they want without restrictions. 8. When the Force Special Characters in Passwords field is checked, all employees will be required to have at least one special character in their passwords (security code). If the field is left blank, special characters will not be required in passwords. For usernames and passwords, all printable characters and embedded spaces are now allowed. (See the table below.) Usernames are not case sensitive. Passwords are case sensitive. Leading and trailing spaces will be ignored. Characters Allowed in Passwords and Usernames
24 24 Alphanumeric characters Special characters 9. abcdefghijklmnopqrstuvwxyz ABCDEFGHIJKLMNOPQRSTUVWXYZ =,. / \!@ #$% ^& * ()_+ < >?: {} [ ] ; User Defined Fields are designated fields tied to each employee s security setup that can be used for any purpose within an institution. For example, an institution could set up a field to show the title of the employee, date of hire, birth date, etc. 10. For each User Defined Field implemented, enter the Data Type (Numeric or Alpha-Numeric), field Length, and Field Description. Each user-defined field set up at an institution will show on the Employee setup tab. WARNING: Once the User Defined Fields are set up, they cannot be removed or changed. The reset password function is located in CIM GOLD Security > Reset Password. When an employee cannot remember their password, the security administrator can reset the password to the employee's user name.the employee would then log in using their user name as a password. The employee will then be prompted to provide a new password. If a user has violated a terminal by entering the password incorrectly three times and can't remember the password, first reset the violated terminal, and then reset the employee password. FPS GOLD recommends that only a limited number of employees be given the ability to reset passwords. To reset a password, click on the employee's name in the list and click <Reset Password>, then click <Yes> on the Verify Action dialog. Only one employee can be reset at a time. Once the password has been reset, an employee has 12 hours to sign on using their user name as the password. At then next logon, the employee will be required to set a new password.
25 25 Setting Passwords For new employees, the password (security code) for their first sign-on will be the same as their assigned user name, and they will be forced to change them. The password they choose will be ruled based on the setup password fields in the Company Options menu. The password will automatically expire after the designated time selected to force an employee password change at your institution. On the day the password is forced to change, the employee will log on to the system as usual and enter their current password. The program will then generate a Password Change dialog that will prompt the employee to enter a new password (twice). A passwords can only be changed after the correct current code has been entered. The system keeps track of the last five passwords for each user name. You cannot reuse a previously used password until at least five new passwords have been used. On the sixth password change, you are able to reuse the first password that was used. If, at any time, you want to change your password, log on as you normally would. Enter your User Name, current Security Code (password), mark the Change Security Code (password) box, and click <OK>. The recommendation is for an employee to change their security code if they suspect that their password has been compromised.
26 26 The system will display a Password Change dialog asking you for the new password (security code). When changing a password, the system requires the user to enter the new code twice. This is to verify that the user entered the new password correctly. See Also: Rules for Valid Passwords
27 27 Rules for Valid Passwords For usernames and passwords, all printable characters and embedded spaces are allowed. (See the table below.) Usernames are not case sensitive. Passwords are case sensitive. Leading and trailing spaces will be ignored. Characters Allowed in Passwords and Usernames Alphanumeric characters abcdefghijklmnopqrstuvwxyz ABCDEFGHIJKLMNOPQRSTUVWXYZ Special characters -=,. / \!@ #$% ^& * ()_+ < >?: {} [ ] ; Types of Passwords Not Allowed The following table lists the kinds of passwords that are not valid. Based on the settings on the Company Options screen, users will have to follow these rules when creating passwords. Password Length A Password Is Not Valid If... Any length The new password is the same as the current password or any of the last 4 previous passwords (regardless of case). The institution setting Force Special Characters in Passwords is checked and the new password doesn t contain a special character. The institution setting Force Alpha-Numeric Passwords is checked and the new password doesn t contain at least one number and one letter. The new password is shorter than the value in the institution setting Minimum Length of Password. The new password is empty. The new password has ascending or descending sequences (sequences are found by splitting the password with a blank space). For example, "12 cba" is not valid, but "12 abc" is. More than 8 characters The new password contains the username (regardless of case). The new password has a sequence of 5 or more consecutive ascending or descending characters. For example, LONGabcdePASSWORD and LONG54321PASSWORD are not valid, but LONGabcdPASSWORD is valid. The new password has 4 or more consecutive identical characters. For example, long 1111 password is not valid. 8 characters or less The password is fewer than 5 characters. There are 3 or more characters that are the same as the last non-blank character. For example, is not valid. There are 4 or more characters that are the same as the first non-blank character. For example " " is not valid Characters 1-4 are the same as 5-8, or 2-4 are the same as 5-7, or 3-5 are the same as 6-8, or 1-3 are the same as 4-6. For example abcdabcd is not valid. There are more than 3 blank characters in the password. See "Characters Allowed in Passwords" above.
28 28 Institution Name Enter your Institution name in the this field.
29 29 Employee Number Length Enter a length specification in the Employee Number Length field; the length can range from a minimum of four to a maximum of 10 digits.
30 30 Days to Force Employee Password Change Enter a number between 15 and 99 that defines the number of days between forced password changes for your institution. Password changes are forced after the specified length of time. This feature protects your institution from fraudulent use of a security code for any extended period. Should a security code be violated, the user could immediately assign himself/herself a new security code. If the violation goes undetected, the violated code is only usable until the Days to Force Employee Password Change days are reached.
31 31 Minutes Without Activity to Close Terminal Enter the number of minutes for your institution s default that will trigger a timeout for users. A minimum of 5 and maximum of 60 minutes must be entered; the system will not accept a number outside that range. The default is 20 minutes. The first time a user attempts to enter anything on an FPS GOLD program after the timeout value has expired, a timeout window will be displayed and the user must enter their username and password in order to continue. This feature, also called an "inactivity logoff," increases security by locking FPS GOLD programs that are not in "active" use. Should a user need more or less time before timeout occurs, the security officer can override the default and enter any length of time up to 546 minutes on the Employee Definition screen.
32 32 Minimum Length of Password (5-40) Enter the minimum password (security code) length for your institution s default, a minimum of 5 and maximum of 40. If employees attempt to set passwords (security codes) with fewer characters than the minimum you specify in this field, they will receive the following error: "PASSWORD IS NOT LONG ENOUGH OR INVALID SPACES IN PASSWORD." User-Selected Security Code On the day security codes are forced to change, employees will log on to the system as normal and enter their old security codes. The computer will then ask them to enter a new security code (twice). Security codes can be changed only after the correct current security code has been entered. The system keeps track of the last six security codes for each user name. You cannot re-use a previously used security code until at least six new security codes have been used. On the seventh time, you are able to re-use the old security code. If at any time you want to change your security number, log on as you normally would. Enter all of the information you normally would as you sign on, except click the Change Security Code box. The system will display a dialog asking you for the new security code. When changing a security code, the system requires the user to enter the code twice. The reason for this is to verify that the user did in fact enter the number he or she wanted. One typo could cause a lot of confusion. See Also: Rules for Valid Passwords
33 33 Customer Service Security If left blank, FPS GOLD will be allowed support personnel access to your institution files. A check mark will turn on the Customer Service Security option, and you will need to select the security access you want to grant for specific FPS customer service personnel on the Customer Service tab. Only those selected will be able to access your files. FPS GOLD Only: NCC Security personnel can add an FPS employee to the list with proper authorization.
34 34 Force Alpha-Numeric Passwords If you check this box, all employees must use both letters and numbers in their passwords (security codes). If the field is left blank, employees can enter any combination of letters and numbers without restrictions. User-Selected Security Code On the day security codes are forced to change, employees will log on to the system as normal and enter their old security codes. The computer will then ask them to enter a new security code (twice). Security codes can be changed only after the correct current security code has been entered. The system keeps track of the last six security codes for each user name. You cannot re-use a previously used security code until at least six new security codes have been used. On the seventh time, you are able to re-use the old security code. If at any time you want to change your security number, log on as you normally would. Enter all of the information you normally would as you sign on, except click the Change Security Code box. The system will display a dialog asking you for the new security code. When changing a security code, the system requires the user to enter the code twice. The reason for this is to verify that the user did in fact enter the number he or she wanted. One typo could cause a lot of confusion. See Also: Rules for Valid Passwords
35 35 Force Special Characters in Passwords When this field is checked, all employees will be required to have at least one special character in their passwords (security code). If the field is left blank, special characters will not be required in passwords. User-Selected Security Code On the day security codes are forced to change, employees will log on to the system as normal and enter their old security codes. The computer will then ask them to enter a new security code (twice). Security codes can be changed only after the correct current security code has been entered. The system keeps track of the last six security codes for each user name. You cannot re-use a previously used security code until at least six new security codes have been used. On the seventh time, you are able to re-use the old security code. If at any time you want to change your security number, log on as you normally would. Enter all of the information you normally would as you sign on, except click the Change Security Code box. The system will display a dialog asking you for the new security code. When changing a security code, the system requires the user to enter the code twice. The reason for this is to verify that the user did in fact enter the number he or she wanted. One typo could cause a lot of confusion. See Also: Rules for Valid Passwords
36 36 User Defined Fields field group User Defined Fields are designated fields tied to each employee s security setup that can be used for any purpose within an institution. For example, an institution could set up a field to show the title of the employee, date of hire, birthdates, etc. For each User Defined Field implemented, enter the Data Type (Numeric or Alpha-Numeric), field Length, and Field Description. Each User Defined field set up at an institution will show on the Employee setup tab. WARNING: Once the user-defined fields are set up, they cannot be removed or changed. See the following topics: User Defined Field Type 1-5 User Defined Field Length 1-5 User Defined Field Description 1-5 User Defined Field Type 1-5 User-defined fields are designated fields tied to each employee s security setup that can be used for any purpose within an institution. For example, an institution could set up a field to show the title of the employee, date of hire, birthdates, etc. For each User-defined field implemented, enter the Data Type (Numeric or Alpha-Numeric), field Length, and Field Description. Each User Defined field set up at an institution will show on the Employee setup tab. WARNING: Once the User Defined Fields are set up, they cannot be removed or changed. User Defined Field Length 1-5 User-defined fields are designated fields tied to each employee s security setup that can be used for any purpose within an institution. For example, an institution could set up a field to show the title of the employee, date of hire, birthdates, etc. For each User-defined field implemented, enter the Data Type (Numeric or Alpha-Numeric), field Length, and Field Description. Each User Defined field set up at an institution will show on the Employee setup tab. WARNING: Once the User Defined Fields are set up, they cannot be removed or changed. User Defined Field Description 1-5 User-defined fields are designated fields tied to each employee s security setup that can be used for any purpose within an institution. For example, an institution could set up a field to show the title of the employee, date of hire, birthdates, etc. For each User-defined field implemented, enter the Data Type (Numeric or Alpha-Numeric), field Length, and Field Description. Each User Defined field set up at an institution will show on the Employee setup tab. WARNING: Once the User Defined Fields are set up, they cannot be removed or changed.
37 37
38 38 Security Reports Screen Security reports allow you to view and print reports for security setup and changes made for CIM GOLD screen access (including GOLDView, GOLDTeller, etc.), employee and teller information, and field-level security. Note: All security changes for CIM GOLD and System screens are available on this screen. Changes made to GOLDTrak PC security are not included. Afterhours reports FPSDR218 and the System Security Change Report should both be used for archive and audit purposes. Tabs Selection criteria are specific for each tab, based on the function of the screen. The tabs are briefly explained below. The History tab is used to report and print changes made to CIM GOLD Security using CIM GOLD. You can limit searches to profiles, to employee and teller details, or to other criteria. The Access tab allows you to select any employees, profiles, or tellers and display or print the access that has been granted in CIM GOLD Security. You can also refine your search to include only some or all of the access for employee details, CIM GOLD, System, teller details, and field-level security. If multiple profiles are assigned, the "effective" security will be determined. The Securables tab allows you to select any applications, Systems, or screens and display or print the employees and profiles that have been granted security for them in CIM GOLD Security. The report can also display employees and CIM GOLD profiles that are restricted by field-level security. If multiple profiles are assigned, the "effective" security will be determined. The Employee/Profile Listing tab allows you to include employees and profiles and to generate and print a detail report of employee/profile setup information (Employee Numbers, Employee or Profile Type, Status, User Name, Timeout, and Password Expiration). The report will also show which employees are sharing CIM GOLD or System profiles. You can sort the information by Full Name, System Profile, Employee/Profile Number, Password Expiration, Status, Timeout, Employee/Profile Type, and User/Profile Name.
39 39 History tab The History tab is used to report and print changes made to CIM GOLD Security using CIM GOLD. You can limit searches to profiles, to employee and teller details, or to other criteria. The search results will be shown on the screen. You can view the report by clicking the <Print Preview > button; click <Print> to print the report. 1. Click on one or more checkboxes in the Changes to Display field group. Note: Searching with multiple criteria will take a little more time. 2. To view changes for a specific date range, enter or select the Start Date and End Date. 3. Enter the Start Time and End Time to view changes for a specific time frame. 4. Enter an employee number in the Changed by Employee# field to view specific changes made by a user. 5. Click <Search> to perform the selected search. Buttons <Clear> Click this button to clear the screen and start over with a new search. The search results and all sections will be removed from the screen, and the date and time will be changed back to the pre-selected date and times for today. <Search> Click this button after you have made all the selections necessary for your search. <Print Preview> Click this button after the search has been performed to see a preview of the report that can be printed. The details for both the Key and Data fields will be shown on the report. Right click in the print preview to use the Find, Increase Zoom, and Decrease Zoom. You can also use <Ctrl>+<F> to find data within the print preview. <Print> Click this button after the search has been performed to print the results of your search on a report. The details for both the Key and Data fields will be shown on the report. To view prior to printing, click <Print Preview>. Note: Afterhours reports FPSDR218 and the System Security Change Report both need to be used to audit changes to security. FPSDR218 shows all changes to CIM GOLD Profiles and Employee Security changes to CIM GOLD screens. System Security shows all changes to Company Options, System Profiles, and Employee Security changes to System screens. Changes to Display field group Use these fields to define a search for changes made to security access. CIM GOLD Employee Security Check this box if you want to find history items that show changes made to CIM GOLD Employee security.
40 40 CIM GOLD Profile Security Check this box if you want to find history items that show changes made to CIM GOLD Profile security. Customer Service Cross Reference Check this box to require FPS GOLD employees to be added to your institution's security. Once this is set, you must indicate which profile you want your FPS GOLD support staff to be tied to. All FPS GOLD employees who are required to help you with your files must be set up in the list on the Customer Service tab. Check the box and save changes. The Customer Service tab will be added to your screen. EFT GOLD Options Check this field to view changes made to EFT GOLD settings. This will show the EFT GOLD security operator limits and EFT GOLD options. All past history is available according to your history limits. Employee Details Check this box if you want to display employee details. Employee Password Reset Check this box if you want to find Employee Password Reset history items. Employee Field Level Security Check this box if you want to find history items that show changes made to Employee Field Level security. System Security Check this box if you want to find history items that show changes made to System security. System security consists of all other FPS PC products, including GOLDTeller, GOLDView, etc. Options Changes made to employee and Profile options will be shown when you check this box.
41 41 Profile Field Level Security Check this box if you want to find history items that show changes made to Profile Field Level security. Teller Details Check this box if you want to display teller details. Terminal Violation Reset Check this box if you want to find Terminal Violation Reset history items. Selection Criteria field group Use these fields to limit your search to certain dates and times, or to the employee who made changes. Start Date Enter the start date to search for a file maintenance change, addition, or drop in the selected record. End Date Enter the end date to search for a file maintenance change, addition, or drop in the selected record. Start Time Enter the start time to search for a file maintenance change, addition, or drop in the selected record. End Time Enter the end time to search for a file maintenance change, addition, or drop in the selected record. Changed by Employee# If you know it, enter the employee number of the employee who made the change, addition, or drop you want to find in the selected record.
42 42 History List View This list view displays the results of the search criteria you entered above. The following explains the information under each column. Change Category: This field indicates the type of record that was changed, added or dropped. The results for the search are based on the selections made in the Changes to Display field group Date and Time: This field indicates the date and time a file maintenance change, addition, or drop occurred on the selected record. Action: This field indicates that the record was updated, added or dropped. For records where data is changed you will see "Add" for new records, "Update" for changes, and "Drop" for deleted records. Changed By: This field indicates the name and employee number that made the add, change or drop to the record. Key Fields: This field indicates how many items are in the change. If you click on the arrow you can view who or what record the changes were made to. When you print the report, these items will automatically print. Data Fields: This field indicates how many items are in the change. If you click on the arrow you can view the changes that were made. The old and new data is reported on the list. When you print the report, these items will automatically print.
43 43 Access tab The Access tab allows you to select employees, profiles, or tellers and view or print the access that has been granted to them in CIM GOLD Security. You can also limit your search to only include some or all of the access for employee details, CIM GOLD, System, teller details, and field-level security. If multiple profiles are assigned, the "effective" security will be determined. To select certain employees from the list, click on the names while holding the <Ctrl> key down. When you have made your search selection, click on <Run Report>. The results will be shown on the right side of the screen. Right click in the print preview to use the Find, Increase zoom and decrease zoom. You can also use <Ctrl>+<F> keys to find data within the print preview. You can print the results by clicking on the <Print> button. The Search field under the CIM GOLD Profiles heading is used to enter a portion of the user name for a quick search. Use this feature to find a specific user name, teller name or profile name. When you click on a different radio button in the Include group box, the search criteria is removed. The Include categories can be used to limit your report, or you can select any combination of the choices to create one report with all data. Employees Select this option to display employees in the list view below. Tellers Select this option to show tellers in the list view below. CIM GOLD Profiles Select this option to show CIM GOLD Profiles in the list view below. System Profiles Select this option to show System Profiles in the list view below. System security consists of all other FPS PC products, including GOLDTeller, GOLDView, etc. Search Enter a portion of the employee's user name for a quick search. Use this feature to find a specific user name, teller name or profile name based on the radio button selection. Include field group The Include categories can be used to limit your report, or you can select any combination of the choices to create one report with all data.
44 44 Details Check or uncheck this box to show or hide the employee information details such as name, profiles status and user defined fields. The setup for this type of security is handled on the screen on the Employee tab. To select certain employees from the list, click on the names while holding the <Ctrl> key down. Teller Information Check or uncheck this box to show or hide the details for your tellers. The setup for this type of security is handled on the screen on the Teller tab. Only employees who will be processing monetary transactions to accounts need to be set up as tellers. Information such as name, employee number, transaction limits, and over ride authority will be shown. To select several employees from the list, click on the names while holding the <Ctrl> key down. CIM GOLD Check or uncheck this box to show or hide the CIM GOLD screens that employees have security to. The System also indicates whether employees are tied to profiles. The setup for this type of security is handled on the screen on the CIM GOLD tab and can be done by specific employee or profile. To select certain employees from the list, click on the names while holding the <Ctrl> key down. System Check or uncheck this box to show or hide the System screens that employees have security rights to. The System also indicates whether employees are tied to profiles. The setup for this type of security is handled on the screen on the System tab and can be done by specific employee or profile. To select several employees from the list, click on the names while holding the <Ctrl> key down. System security consists of all other FPS PC products, including GOLDTeller, GOLDView, etc. Field Level Check or uncheck this box to show or hide the fields that employees have security to. The setup for this type of security is handled on the screen on the CIM GOLD tab and can be done by specific employee or profile. To select certain employees from the list, click on the names while holding the <Ctrl> key down. Profile Assignments Check this box to run a report for profile security and add the employees names and numbers to the report to show who is tied to specific profiles. When running a report on an employee, you will be able to report the profiles that are tied to employees.
45 45 All Assigned Profiles When this field is checked, the employee s individual security will print as well as the security for each profile assigned to the employee. This field works only when printing Effective Security for an employee and is used in conjunction with the CIM GOLD and System fields in the Include field group. If either the CIM GOLD and/or the System field is selected, the All Assigned Profiles field will print the profile s security settings for either CIM GOLD and/or System, depending on what is selected. This new field saves the user from having to run another report with the CIM GOLD Profiles or the System Profiles radio button field selected and then having to match the profiles with the employees. The report will show the Effective security of the employee followed by the Individual Security and Profiles security, in that order. Report on Effective Security Check this box if you want the report to determine what the effective security is for your selection. If this box is not checked, only individual security will be reported. Exclude Inactive/Terminated Employees When this box is checked, no Inactive or Terminated employees will be shown on the report. Access List View To select certain employees from the list, click on the names while holding the <Ctrl> key down. When you have made your search selection, click on <Run Report>. The results will be shown on the right side of the screen.
46 46 Securables tab The Securables tab allows you to select an application, System, or screen and view or print which employees or profiles have been granted security to them in CIM GOLD Security. The report also displays employees and CIM GOLD profiles that are restricted by Select either CIM GOLD, System, or Field Level Security to start your search, then select Employees and/or Profiles. Based on the application you select, the screens in the list will change. Checkmark the screens you want to include on the report. To expand the list view, click on the + sign. To select all screens in the expanded list, click on the box next to the main tree item. If multiple profiles are assigned, the "effective" security will be determined. When you have made your search selection, click <Run Report>. The results will be shown on the right side of the screen. The report can show the employees and/or profiles that have security to the selected screens. The report also shows whether they have INQ (inquiry) or F/M (file maintenance) rights to the screen. Right-click in the print preview to use the Find, Increase Zoom, and Decrease Zoom. You can also use <Ctrl>+<F> keys to find data within the print preview. You can print the results by clicking <Print>. CIM GOLD Check this box to show the CIM GOLD screens that employees have security to. It also shows indicates if employees are tied to profiles. The setup for this type of security is handled on the setup screen on the CIM GOLD tab and can be done by specific employee or profile. To select certain employees from the list, click on the names while holding the <Ctrl> key down. System Select this option to show the System screens that employees have security to. It also shows indicates if employees are tied to profiles. The setup for this type of security is handled on the setup screen on the System tab and can be done by specific employee or profile. To select certain employees from the list, click on the names while holding the <Ctrl> key down. Note: If you are using CIM GOLD, many of the System screens are now obsolete, but are still on the list. You may want to remove the security for your employees for the obsolete screens so that the report is much shorter and will be more concise to audit. In the future, when all clients are using CIM GOLD, the obsolete screens will be removed from the list. Field Level Select this option to show the fields that employees have security to. The setup for this type of security is handled on the screen on the Field Level tab and can be done by specific employee or profile. To select certain employees from the list, click on the names while holding the <Ctrl> key down. Include field group Use these fields to display employees, profiles, or both in the report.
47 47 Employees Check this box to display employees who have access to certain screens and also to display those who are restricted by field-level security. You can select both Employees and Profiles. Profiles Check this box to display profiles that have access to certain screens and also to display profiles restricted by field-level security. You can select both Employees and Profiles. If you check this box, both the profile and profile assignments will be shown. Effective Security Check this box to report the Effective Security for the selected criteria. When checked, effective security will be reported. When not checked, only individual security will be reported. Profile Assignments This box is automatically checked when you click on Profiles. Your report will show profiles and which employees are assigned to each profile. Exclude Inactive/Terminated Employees When this box is checked, no Inactive or Terminated employees will be shown on the report.
48 48 Securables List View To select certain employees from the list, click on the names while holding the <Ctrl> key down. When you have made your search selection, click on <Run Report>. The results will be shown on the right side of the screen.
49 49 Employee/Profile Listing tab The fields on this tab allow you to include employees and/or profiles and view or print a detail report of employee and profile setup information (Employee Numbers, Employee or Profile Type, Status, User Name, Timeout, and Password Expiration). The report will also show which employees are sharing CIM GOLD profiles. You can sort the information by Full Name, System Profile, Employee/Profile Number, Password Expiration, Name, Status, Timeout, Employee/Profile Type, and User/Profile Name. Include field group The Include categories can be used to limit your report to Employees or Profiles, but both can be selected. Employees Check this box to display employees who have access to certain screens and also to display those who are restricted by field-level security. You can select both Employees and Profiles. Profiles Check this box to display employees who have access to certain screens and also to display those who are restricted by field-level security. You can select both Employees and Profiles. Sort By Select from the drop-down list to sort the report by that field. The options are defined below. All sorts will be ordered first by the selection and then by full name. Regardless of sort order, the report will show the number, type, name, full name, status, CIM GOLD profile, System profile, timeout, and password expiration for each employee listed. Sort Options CIM GOLD Profile: All the employees in the list will be ordered by CIM GOLD Profile and then by full name. Full Name: All the employees in the list will be ordered by the employee full name and/or System Profile Description. System Profile: All the employees in the list will be ordered by the shared System Profile Name. Blanks (which mean not sharing a System Profile Name) sort to the top, followed by those employees sharing a System Profile Name. Number: All the employees in the list will be ordered by Employee/System Profile Name. Password Expiration: All the employees in the list will be ordered by Password Expiration days, from least to greatest. Status: All the employees in the list will be ordered alphabetically by Status first and then by Full Name and/or Profile Description.
50 50 Timeout: All the employees in the list will be ordered by Timeout values, from least to greatest. Type: All the items in the list will be ordered by employee or profile type, with employees first. User/Profile Name: All the employees in the list will be ordered by the employees' user names and then by full name.

51 51 Reset Passwords Screen Security > Reset Passwords The Reset Passwords screen is located in CIM GOLD Security > Reset Password. When an employee cannot remember a password, the security administrator can reset the password to the employee's Enhanced User name. The employee would then log in using their user name, in all lower case, as a password. The employee will then be prompted to provide a new password. If a user has violated their security by entering the password incorrectly three times and can't remember the password, first reset the restricted employee, and then reset the employee password. FPS GOLD recommends that only a limited number of employees be given the ability to reset passwords. To reset a password, click on the employee's name in the list and click <Reset Password>, then click <Yes> on the Verify Action dialog. Only one employee can be reset at a time. Once the password has been reset, an employee has 12 hours to sign on using their Enhanced Username in lower case as the password. At the next logon, the employee will be required to set a new password. Note: FPS GOLD cannot reset passwords for your employees. An employee at your institution must handle this function. FPS GOLD Only: Editor users do not have security to this function. Setting Passwords
52 52 For a new employee, the password (security code) for the first sign-on will be the same as the assigned Enhanced Username in lower case, and the employee will be forced to change it. The Security > Company Options screen controls rules for setting up new passwords (see the Rules for Valid Passwords). The password will automatically expire after the designated time selected to force an employee password change. On the day the password is forced to change, the employee will log on to the system as usual and enter their current password. The program will then generate a Password Change dialog that will prompt the employee to enter a new password (twice). A password can be changed only after the correct current password has been entered. If at any time you want to change your password, log on as you normally would. Enter your User Name, current Security Code (password), mark the Change Security Code (password) box, and click <OK>. The system will display a Password Change dialog asking you for the new password (security code). When changing a password, the system requires the user to enter the new code twice. This is to verify that the user entered the new password correctly. See the rules for valid passwords. See also: Security System
53 53 Rules for Valid Passwords For usernames and passwords, all printable characters and embedded spaces are allowed. (See the table below.) Usernames are not case sensitive. Passwords are case sensitive. Leading and trailing spaces will be ignored. Characters Allowed in Passwords and Usernames Alphanumeric characters abcdefghijklmnopqrstuvwxyz ABCDEFGHIJKLMNOPQRSTUVWXYZ Special characters -=,. / \!@ #$% ^& * ()_+ < >?: {} [ ] ; Types of Passwords Not Allowed The following table lists the kinds of passwords that are not valid. Based on the settings on the Company Options screen, users will have to follow these rules when creating passwords. Password Length A Password Is Not Valid If... Any length The new password is the same as the current password or any of the last 4 previous passwords (regardless of case). The institution setting Force Special Characters in Passwords is checked and the new password doesn t contain a special character. The institution setting Force Alpha-Numeric Passwords is checked and the new password doesn t contain at least one number and one letter. The new password is shorter than the value in the institution setting Minimum Length of Password. The new password is empty. The new password has ascending or descending sequences (sequences are found by splitting the password with a blank space). For example, "123 cba" is not valid, but "123abc" is. More than 8 characters The new password contains the username (regardless of case). The new password has a sequence of 5 or more consecutive ascending or descending characters. For example, LONGabcdePASSWORD and LONG54321PASSWORD are not valid, but LONGabcdPASSWORD is valid. The new password has 4 or more consecutive identical characters. For example, long 1111 password is not valid. 8 characters or less The password is fewer than 5 characters. There are 3 or more characters that are the same as the last non-blank character. For example, is not valid. There are 4 or more characters that are the same as the first non-blank character. For example " " is not valid Characters 1-4 are the same as 5-8, or 2-4 are the same as 5-7, or 3-5 are the same as 6-8, or 1-3 are the same as 4-6. For example abcdabcd is not valid. There are more than 3 blank characters in the password. See "Characters Allowed in Passwords" above.
54 54 Search To find a username quickly in the list below, begin typing the name in this field.
55 55 Selection List This field displays a list of employees whose passwords you can change. To change a password, select a name in this list and click <Reset Employee Password>. Click <Yes> on the Verify Action dialog box.

56 56 Reset Violations Screen Security > Reset Violations The Reset Violations screen is located in CIM GOLD Security > Reset Violations. Use this screen to reset a password if one of the following occurs: the user has entered an incorrect password three consecutive times while attempting to log in; the user has been inactive for 90 days or more. A user cannot sign on to any FPS GOLD product until the violation has been cleared. FPS GOLD recommends that only a limited number of employees be given security to reset violated terminals. Note: FPS GOLD cannot reset security violations for your employees. An employee at your institution must reset them. If there are no security violations when you open the Reset Violations screen, you will see the message There are no violations to display in a red box at the top of the screen. See the following example. FPS GOLD Only: Editor users do not have security to this function. Reset Violations Screen w ithout a Violation If there are security violations, they will be listed on the screen. See the following example.

57 57 Reset Violations Screen w ith a Violation To clear a violation: 1. Highlight the name in list. 2. Click the <Reset> button on the bottom of the screen. The reset will clear the violation, and the user can attempt to log in again with their current password. Note: Resetting violations does not change the password to the user name. A password is only reset to the user name by resetting the password on the Employee screen in Security or on the Reset Passwords screen. Use this method if a user forgets his or her password. The Security > Company Options screen contains a field called Minutes Without Activity to Close Terminal. Each institution can set this field for any given employee to a number of minutes. When that amount of time has passed without any activity, the system automatically logs the employee off the terminal. That employee must then sign on to the system again following the normal procedure.
58 58 Number This field displays the teller number for the user who caused the violation. For instructions on how to use this screen, see the overview topic.
59 59 Name This field displays the name of the employee with the security violation.
60 60 User Name This field displays the user name of the user who caused the violation. This field is used on CIM GOLD screens and afterhours reports. For instructions on how to use this screen, see the overview topic.
61 61 Enhanced User Name This field displays the long user name (if your institution has entered this data) for the employee with the violation. Note: This name is only used in security. The User Name field is used on CIM GOLD screens and afterhours reports.
62 62 Location This field displays the PC VTAM location for the user with the violation. For instructions on how to use this screen, see the overview topic.
63 63 Security Screen Before you can use CIM GOLD, each employee who will use CIM GOLD must have security to the screens or specific fields they will use. Note: FPS GOLD must add security for your institution s Security Administrator before employee security setups can begin. Overview of CIM GOLD Security Security for CIM GOLD is set up on several CIM GOLD screens. The following list shows the order in which security must be set up within CIM GOLD so that security will work properly for your institution and employees. 1. Subscribe to Mini-Applications - Before security setup, your institution must subscribe to all applications and screens your institution will use. 2. Company Options - The fields on this screen define your institution name, length of employee numbers and passwords, days to force security code (password) changes, and minutes of inactivity to timeout CIM GOLD and other FPS GOLD products. Company Options are found on the CIM GOLD Security > Company Options screen. 3. Institution defaults for CIM GOLD Customer Index Bubble, CIM GOLDTeller (for Menu and Speed Keys), and Document Imaging (for Firebird Signatures). 4. Security > - Contains setup fields for employee, profile, teller security, CIM GOLD screens, and field-level security. If your institution chooses to use profiles, they must be set up before setting up individual employees. What Is a Security Profile? On the CIM GOLD Profile tab and System Profile tab, you can set up security profiles. Profiles save time and ensure that security settings are the same for all employees with the same duties (such as all tellers or all loan officers). A profile is set up one time and then linked to all employees that require the same security access. For example, the security access for all tellers could be set up under the profile name Teller. The Teller profile would then be linked to each employee who requires access to the security given under the Teller profile. Profiles save time because you set up security only once for a group of employees that would require the same security clearance. Also, if a security change is needed for a group of employees that share the same profile, you can change the security one time on the profile, rather than changing each individual employee s security. Note: FPS GOLD client services representatives have inquiry-access only to institution security. We cannot release password violations or reset passwords for your institution at any time. An employee at your institution must handle these types of security issues. Using the Security Screen Use the Security screen to assign screen-level or field-level security to individual employees and tellers. You can also create security profiles for groups (such as the loan department) and then assign individual employees to those groups. All individuals assigned to the same group profile will then have the same security settings.
64 64 Note: This section gives overviews and how-to information on using Security. For help on an individual field on the Security screen, click in the field and press the <F1> key on your keyboard. This section describes how to set up: Company Security options, Security for Employees and Tellers, Security for CIM GOLD screens, Security for System screens, and CIM GOLD Field Level Security.
65 65 Employees Click on this button to view existing Employees in the list below. You can also click on this button to add or edit security for employees. For more information on setting up security for employees, see the Employee tab help.
66 66 Tellers Click on this button to view existing Tellers in the list below. You can also click on this button to add or edit security for tellers. For more information on setting up security for tellers, see the Teller tab help.
67 67 CIM GOLD Profiles Click on this field to view existing CIM GOLD profiles in the list below. You can also click on this field to add or edit CIM GOLD profiles. For more information on setting up CIM GOLD profiles, see the CIM GOLD Profile tab help.
68 68 System Profiles Click on this button to view existing System profiles in the list below. You can also click on this button to add or edit System profiles. Multiple profiles can be attached to an individual. If settings for specific screen access are different (such as some inquiry and some maintenance), file maintenance access will be effective for the employee. The highest setting will be used. For more information on setting up System profiles, see the System Profile tab help.
69 69 Display Effective Security Check this box to report the effective security for the selected criteria. When checked, effective security will be reported. When not checked, only individual security will be reported.
70 70 Search Type the first letter or letters (up to 8) of a User Name or Enhanced User Name to quickly find it in the Security list view below. Use this feature to find a specific user name, teller name, or profile name.
71 71 Security list view This list displays the names of employees, tellers, or profiles set up at your institution. Click on the appropriate radio button above the list to view items of that type.

72 72 Employee tab Use the fields on the Employee tab of the Security > screen to set up employee security. Note: As a general security procedure, FPS GOLD cannot reset passwords or security violations for your employees. Setting Up an Employee To set up security for an employee, create a new employee. You can also copy security to a new employee or from an one existing employee to another. To create a new employee: 1. On the Security screen, select Employees and click <New>. 2. In the "Create a new Employee" dialog, type a new Employee Number, User Name, Enhanced User Name, and Full Name. The fields on the dialog are explained in the table below. Note: After you click <OK>, you cannot change the Employee Number for this employee. You can only delete this employee and start over. To do this, change the employee Status to "Terminated" and delete the employee using the Terminated Employee Deletion screen.

73 Field Name Number of Characters Purpose identify the employee within the organization 73 Editable? Employee Number variable established on the Company Options screen User Name maximum of eight shown on reports and alphanumeric characters screens Yes, if Display Effective Security is not checked Enhanced User Name up to 40 characters Yes used to log on to FPS GOLD products No. See the Note above. 3. Click <OK>. 4. On the Employees tab, enter the remaining data. The Status drop-down list will show the default Active status. Select another status if necessary. 4. Timeout Minutes are defaulted from the Company Options screen. If the length of time is not appropriate for the new employee, you can enter 5 to 60 minutes. 5. Password Expiration is defaulted from the Company Options screen. If an employee needs more or fewer days between password (security code) changes, enter a number between 15 and 99 here. You can also enter 9999 for a password that never expires. 6. Soft Token Key is a two-step authentication that can be used in EFT GOLD for wires for added security. If your institution has selected Require SoftToken Authentication on the EFT GOLD Wire Options screen, enter the appropriate information in this field. For more information on using this feature, see the EFT GOLD User's Guide in DocsOnWeb. 7. If this employee will use a System Profile, select the appropriate profile(s) from the list below by checking the box in the Member? column. 8. If this employee will use a CIM GOLD Profile, select the appropriate profile(s) from the list below by checking the box in the Member? column. Note: CIM GOLD and System Profiles must be set up before you can use the profile name on an employee security setup. 9. Enter the appropriate information in the User Defined fields that your organization may have set up on the Company Options screen. 10. Click <Save Changes>.
74 74 If the employee being set up is also a teller, continue to the Teller tab. If the employee is not a teller and is not using CIM GOLD or System Profiles, go to the CIM GOLD and System tabs to set the appropriate security. <Reset Password> This button should only be used when employees forget their passwords. Clicking this button gives employees 12 hours to use their user name as their password before the system will force them to create a new password. Giving employees security to the Reset Password mini-application allows them to reset passwords but does not allow them to change any security. The temporary password will be the same as the Enhanced User Name in lower case. For example, John Doe s user name is JOHND. He would enter JOHND in the User Name field and also as the password. When he clicks <OK>, a Security Code Update window will display. To save the new code, John Doe would then enter a new password in the Enter New Password and Re-enter New Password fields and click <OK>. If a password is changed using this method, the password will remain valid until the next Password Expiration interval is reached or the employee forces a password change when logging in to CIM GOLD. To copy employee security to a new employee: If the Display Effective Security box has a checkmark, click on it to remove it. Select the employee in the list, then click <Copy to New> to copy the security settings from the selected employee to a new employee. All the security, including profiles, will be copied to the new employee. (This does not copy Teller information.) Make any adjustments to the new employee's individual security as needed. Click <Save Changes>. To copy security from one existing employee to another: If the Display Effective Security box has a checkmark, click on it to remove it. Select the employee that you will copy from in the list, then click <Copy to Existing>. The "Select Existing Employee to Copy to" dialog box opens.
 Make any adjustments to the new employee's individual security as needed. Click <Save Changes>. Note: <Copy to Existing> is only for copying employee security.")
75 In the dialog box, select the employee you want to copy to. All the security, including profiles, will be replaced for the employee you are copying to. (This does not copy Teller information.) Make any adjustments to the new employee's individual security as needed. Click <Save Changes>. Note: <Copy to Existing> is only for copying employee security. Deleting an Employee You can't use the <Delete> button on this screen to remove an employee from the system. This prevents you from accidentally deleting an employee. To delete an employee: Select Terminated from the Status drop-down list. Open the Security > Terminated Employee Deletion screen and delete them from the system. See Also: CIM GOLD Profile tab System Profile tab CIM GOLD tab

76 76 Teller Screen The Teller setup screen is found in two locations in CIM GOLD: under Deposits > Definitions and under Security > (on the Teller tab). This screen is used to set up employees who will be performing teller transactions for your customers. Only tellers who are set up on this screen will be able to sign on to GOLDTeller. Employees who will not process monetary transactions do not need to be set up on this screen. The screen displays information and options about the tellers who are set up for your institution. You must have file maintenance security to the Deposit Definitions > Teller Information screen to add new tellers and make changes to these records. You also need to have security to the Security > menu item. To change only limits and teller cash drawers, give file maintenance security on the Deposits > Definitions > Teller Information screen and no security to the Security screens. Branch personnel will not be able to add new tellers but can update some data. You cannot change a teller s data if the teller is currently signed on to the GOLDTeller System, but you can view the day's current information. Three days of totals are stored continuously for each teller: current day, last signoff, and previous totals. They may be useful when researching teller total issues. An employee number record must also be created for this teller in CIM GOLD Security. Setting Up a Teller 1. On the Security screen, select Tellers. 2. Click on the Teller tab.
77 77 3. Click <New>. 4. Enter the Teller Number and Employee Number. Although not required, FPS GOLD recommends that these numbers be the same. 5. Enter the full name of the employee in the Name field, a maximum of 45 alphanumeric characters. 6. Enter the Office number where the teller will mainly process transactions. If the teller will be working from more than one office, select the Other Office Signon option. 7. Mark ATM Teller if the teller being set up is for your ATM. 8. Mark Web Teller if the teller being set up is a teller for GOLDPhone and Internet transactions. 9. Enter the User Name the teller will sign on with. Note This field is only enabled if you are using CIM GOLDTeller and point to the same.dat file. If you are not, you must edit the fields on the Teller within GOLDTeller for your DB4 server(s) Opers.dat File. 10. Select the Override Authority (Teller, Supervisor or Officer) this teller should have. Note This field is only enabled if you are using CIM GOLDTeller and point to the same.dat file. If you are not, you must edit the fields on the Teller within GOLDTeller for your DB4 server(s) Opers.dat File. 11. If the teller will be performing remote overrides for other tellers, select the Remote Override Priority (1-5). This is the order that this teller will be notified as overrides are needed, 1 being first. Note This field is only enabled if you are using CIM GOLDTeller and point to the same.dat file. If you are not, you must edit the fields on the Teller within GOLDTeller for your DB4 server(s) Opers.dat File. 12. Go to the Limitations tab to set online and offline limits and to set Override requirements. 13. Enter the Online Limits for Cash, Check and Journal In and Out limits. The defaults are 999,999, If the default is used, no overrides will be required. These limitations are used on each individual deposit account transaction. They are also used for the Supervisor and Officer on overrides. 14. Select the appropriate override level for the online Cash, Check and Journal limits. 15. Enter the Offline Limits for Cash, Check and Journal In and Out limits. The default is 999,999, If the default is used, no overrides will be required. These limitations are used on each individual deposit account transaction. They are also used for the Supervisor and Officer on overrides.
78 78 Note This field is only enabled if you are using CIM GOLDTeller and point to the same.dat file. If you are not, you must edit the fields on the Teller within GOLDTeller for your DB4 server(s) Opers.dat File. 16. Select the necessary Override Required for Correction Opers.dat File. Note This field is only enabled if you are using CIM GOLDTeller and point to the same.dat file. If you are not, you must edit the fields on the Teller within GOLDTeller for your DB4 server(s) Opers.dat File. 17. Click <Save Changes>. If this employee is tied to CIM GOLD and System profiles, you have completed the security setup. Teller Detail field group This field group provides details about the teller, such as Teller Number and Name. For details on any field, click in the field and press <F1>. Web Teller This box needs to be checked for all Web Tellers (numbers 5611, 5621, 5711, and 5721). You cannot use these teller numbers for another teller. Opers.dat File Options field group The fields contained in this field group are only enabled if you are using CIM GOLD and you are pointing to the same.dat file. Current Totals, Last Signoff, and Previous Totals tabs Current Totals are displayed only if the teller is currently signed on. Last Signoff totals are the totals as of the last time the teller signed on. When a teller signs on for a new day, these totals are moved to the third set of totals, and then reset to zero. They are updated at the first release or signoff. Previous Totals are the totals from the last signoff of the day prior to the effective date of the Last Signoff. Limitations Tab The fields on this tab allow you to set limits for a teller. The fields in this group can be maintained by branch personnel using the Teller Information screen in Deposits > Definitions.
79 79 The limits and overrides listed in this field group are used when individual teller transactions are processed online. Limits can be set up for the ins and outs of cash, check, and journal, along with the corresponding override, if the limit is reached. These fields default to $ when you set up a new teller record. This essentially means that tellers will not meet their limits and will not have to override any transaction. To set a valid limit, enter the dollar amount for each type of funding based on the teller selected. The fields in this group can be maintained by branch personnel using the Teller Information screen in Deposits > Definitions. The following table explains the fields in this group. Field Description Cash In Enter the amount of cash in the teller is able to process in one transaction without an override. Enter the appropriate override level in the Override Required field. The default amount is $999,999, If this field is blank, no limit is available. Cash Out Enter the amount of cash out the teller is able to process in one transaction without an override. Enter the appropriate override level in the Override Required field. The default amount is $999,999, If this field is blank, no limit is available. Override Required In this field, select the override level required to override the cash in and cash out limits for this teller for both online and offline transactions. This field will accept Teller, Supervisor, or Officer. This is a required field. Check In Enter the amount of check in the teller is able to process in one transaction without an override. Enter the appropriate override level in the Override Required field. The default amount is $999,999, If this field is blank, no limit is available. Check Out Enter the amount of check out the teller is able to process in one transaction without an override. Enter the appropriate override level in the Override Required field. The default amount is $999,999, If this field is blank, no limit is available. Override Required In this field, select the override level required to override the cash in and cash out limits for this teller for both online and offline transactions. This field will accept Teller, Supervisor, or Officer. This is a required field. Journal In Enter the amount of journal in the teller is able to process in one transaction without an override. Enter the appropriate override level in the Override Required field. The default amount is $999,999, If this field is blank, no limit is available. Journal Out Enter the amount of journal out the teller is able to process in one transaction without an override. Enter the appropriate override level in the Override Required field. The default amount is $999,999, If this field is blank, no limit is available. Override Required In this field, select the override level required to override the journal in and journal out limits for this teller for both online and offline transactions. This field will accept Teller, Supervisor, or Officer. This is a required field. Use this field to alert this teller when their cash drawer amount exceeds the amount entered in this field. When the teller gets this alert, they should sell some of their cash down to the limit your institution advises. The limits listed in this field group are used when individual teller transactions are processed offline and are only enabled if you are using CIM GOLD GOLDTeller and using the same DB4 server; if you are not you must edit the fields on the Teller within GOLDTeller. Limits can be set up for the ins and outs of cash, check, and journal, along with the corresponding override, if the limit is reached. These fields default to $
80 80 when you set up a new teller record. This essentially means that tellers will not meet their limits and will not have to override any transaction. To set a valid limit, enter in the dollar amount for each of the types of funding based on the teller selected. The following table explains the fields in this group. Field Description Cash In Enter the amount of cash in the teller is able to process in one transaction offline without an override. If this field is blank, no limit is available. Cash Out Enter the amount of cash out the teller is able to process in one transaction offline without an override. If this field is blank, no limit is available. Override Required In this field, select the override level required to override the cash in and cash out limits for this teller for both online and offline transactions. This field will accept Teller, Supervisor, or Officer. This is a required field. Check In Enter the amount of check in the teller is able to process in one transaction offline without an override. The default amount is $999,999, Check Out Enter the amount of check out the teller is able to process in one transaction offline without an override. If this field is blank, no limit is available. Override Required In this field, select the override level required to override the cash in and cash out limits for this teller for both online and offline transactions. This field will accept Teller, Supervisor, or Officer. This is a required field. Journal In Enter the amount of journal in the teller is able to process in one transaction offline without an override. If this field is blank, no limit is available. Journal Out Enter the amount of journal out the teller is able to process in one transaction offline without an override. If this field is blank, no limit is available. Override Required The level of security given to a teller for transaction correction overrides can be Teller, Supervisor, or Officer. This field is only enabled if you are using CIM GOLD GOLDTeller; if you are not, you must edit the fields on the Teller within GOLDTeller. Override Required for Correction Opers.dat File The level of security given to a teller for transaction correction overrides can be Teller, Supervisor, or Officer. This field is only enabled if you are using CIM GOLD GOLDTeller and using the same DB4 server; if you are not, you must edit the fields on the Teller within GOLDTeller. Print Totals field group The fields in this group allow you to print teller totals for tellers you select. The From Teller and To Teller fields allow you to select a range of teller numbers that will be printed on the list. It will print the from-to range inclusively. If you enter only a From Teller number, only that number will be used in the report. If you enter only a To Teller number, the system will use all teller numbers from the beginning of the file up to and including the To Teller number for the report. Since there are three sets of teller totals available on this screen, click one of the radio buttons to print that set. Once you have selected the parameters for the printout and the destination, click <Print> to print the list of tellers.
81 81


82 82 CIM GOLD Profile tab Use the fields on this tab to set up CIM GOLD profiles. Any CIM GOLD profiles that already exist on the system will be shown in the list view. For information on how profiles work and why they are useful, see "What Is a Security Profile?" in the Security Screen overview section. Creating a CIM GOLD Profile You can copy from an existing profile or create a new one. To create a CIM GOLD profile: 1. On the Security screen, select CIM GOLD Profiles and click <New>. 2. In the "Create a CIM GOLD Profile" dialog, type a new Profile Name and click <OK>. CIM GOLD Profile names can have up to 12 characters. 3. The new Profile Name will be added to the bottom of the profile list with the default Active Status. The new profile name will also be added to the CIM GOLD Profile Membership list on the Employee setup tab and can be selected for employees that will be tied to a profile. 4. On the CIM GOLD tab, select all applications and screens the profile will need to use, then click <Save Changes>. The Search field allows you to enter data to find the security setting. If found in the main heading list, the main heading is highlighted. See the example below. 5. If you use field-level security restrictions, go to the Field Level tab, select restrictions for the profile, then click <Save Changes>.
83 83 Copying a CIM GOLD Profile To copy a profile: Select a CIM GOLD profile from the list. Click <Copy> to copy the security settings from an existing CIM GOLD profile to a new one. Make any necessary adjustments to the new profile. Click <Save Changes>. Deleting a CIM GOLD Profile To delete a profile: 1. Make sure the profile is not attached to any employees. Otherwise, you will get an error message that tells you employees are assigned to it. 2. Select the CIM GOLD profile and click <Delete>. See Also: Employee tab System Profile tab CIM GOLD tab

84 84 System Profile tab Use the fields on this tab to set up security for all FPS GOLD products not listed on the CIM GOLD tab. For information on how profiles work and why they are useful, see "What Is a Security Profile?" in the Security Screen overview section. Creating a System Profile You can copy from an existing profile or create a new one. To create a System profile: 1. On the Security screen, select System Profiles, then click <New>. 2. In the Create a new Profile dialog box, type a new Profile Number and Profile Name. FPS GOLD recommends that you designate an employee number range to use for System profile numbers, such as The name assigned to the profile will be listed in the System Profile drop-down list on the Employee setup tab and can be selected for employees that will be tied to a profile. A System profile name can have up to eight characters. It cannot be the same as any other profile or username. The Description can be up to 40 characters long and can be used to further define the profile. When you have finished entering information, click <OK>.

85 85 The new profile will be shown in the profile list with the default Active Status. 3. On the System tab, select all functions the profile will need to use, then click <Save Changes>. After profiles have been set up, create individual employee security on the Employee tab, and tie each employee setup to the appropriate profiles. Copying a System Profile To copy a profile: Select a System profile from the list. Click <Copy> to copy the security settings from an existing System profile to a new one. Make any necessary adjustments to the new profile. Click <Save Changes>. Deleting a System Profile To delete a profile: 1. Make sure the profile is not attached to an employees. Otherwise, you will get an error message that tells you employees are assigned to it. 2. Open the Security > Terminated Employee Deletion screen and delete the profile. See Also: Employee tab CIM GOLD Profile tab CIM GOLD tab

86 86 CIM GOLD tab Use the fields on the CIM GOLD tab of the Security > screen to set up CIM GOLD security for your employees. Some CIM GOLD applications also require some security settings on the System tab. CIM GOLD security is used for the screens; System security is used for functions within the screens and for financial applications. Setting Up CIM GOLD Security Before any employee can access CIM GOLD, security clearance must be set up for that employee. CIM GOLD security can be set up on individual employees and/or on CIM GOLD Profiles. The profiles can be tied to employees who require the same security clearance to perform their job duties. If multiple profiles are tied to an employee, Effective Security can be viewed. To set up CIM GOLD access for an employee or profile: 1. On the Security screen, select Employees or CIM GOLD Profiles. 2. Select the CIM GOLD tab. 3. In the Security list view, select the employee or CIM GOLD Profile for which security is being set up or changed. 4. Select Inquire or Maintain on each item listed below the applications to which the employee or CIM GOLD Profile should have access. If no access is allowed, select None. 5. When you have finished making selections, click <Save Changes>. See Also: Employee tab
87 87 CIM GOLD Profile tab System Profile tab
88 88 System tab Use the fields on the System tab on the Security > screen to set up security for all other FPS GOLD products not listed on the CIM GOLD tab for your employees. Some CIM GOLD applications also require some security settings on the System tab. CIM GOLD security is used for the screens; System security is used for functions within the screens and for financial applications. Setting Up System Security The System tab is used to set up security for employees and profiles that need to have access to all other FPS GOLD programs that are not listed on the CIM GOLD tab. The System tab will be disabled if you have not selected Employees or System Profiles. Some of the applications listed on the System security tab are obsolete and have been programmed to be used in CIM GOLD or other PC Products, such as GOLD ExceptionManager and CIM GOLD Teller Platform. However, you must select the Maintain radio button for the FPS PC Applications function on the System tab to grant access to CIM GOLD. There are also other functions in PC Applications which can control access to CIS, employee and officer names, as well as other PC applications. Applications and functions are listed in alphabetic order. Set each option for access for each employee or profile. To set up System security, complete the following steps: 1. On the Security > screen, select either the Employees or System Profiles radio button, and then select the employee or profile you want to set up in the list view on the left-side of the screen. 2. Select the System tab, as shown below.

89 89 3. Select Inquire or Maintain on each item listed below applications to which the employee or profile should have access. If no access is allowed, select None. 4. When you have finished making selections, click <Save Changes>. For a list of all security options on this tab and a short description, see System Security Details. See Also: Employee tab CIM GOLD Profile tab System Profile tab System Security Details The following tables list all possible security options on the System tab of the Security > screen. Only specific security personnel at your institution can set up these screens for employees. These options affect which applications employees have access to, as well as other features and functions within applications. Account Merchant List Accounting Report Writer Accounts Payable Accounts Receivable
90 90 Additional Loan Security Allow Customer Support Access Alter Terminal for Payroll Commercial Loan Menu (This is now obsolete.) Core CIA Tool Program Core File Synchronization Customer Information File Deposit System Electronic Teller Journal Event Letter Parameters Financial Options Fixed Assets Fps-Change Terminal Options General Ledger System GOLD ExceptionManager GOLD Services GOLDPhone Processing GOLDTeller Security GOLDView Loan System Materials Management Payroll Management Payroll Management Reports PC Applications Report Warehouse Menu Security Management Utility Programs Web Security Accounting Report Writer - Application 50 Bit # Function Name 01 Run Reports 02 Set Up Reports 03 Dictionary Function
91 91 Accounts Payable - Application 7 Bit # Function Name Function 15 **DROP 6,10 17 **DROP Function 36 Ach Invoice Verification Ach Pmt Threshold Verification Capital Approval 06 Cash Planning 18 Category Codes 61 Change Client Number Check Reconciliation Check Register Contract File 38 Control Statement Register Dist. Screen Formats 9/10 10 Distribution Profile 5/6 31 Emp. Code in Responsibility 04 Flag Invoices for Payment 22 Inventory Product 23 Inventory Product Spcl Changes 08 Invoice Payee 24 Item Profiles 28 Location Profiles 29 Multiple File Changes 1-6 / Only Post To Term Table Office 30, Post Recurring Payments Print Checks 20 Print Control Statements , 12, Print Reports 26 Print Requests 1-5 / 2-5, Recurring Payments 13/14 01 Report Formats Report Writer 63
92 92 Accounts Payable - Application 7 20 Responsibility File 1-3 / Restrict Detail Fields 18, Run Report Writer Reports 63-1, Screen Formats 63 Set Up Report Writer Reports 63-2, 63-3, 63-4, Ship To Locations 1-1 / Transaction Processing 29/30 32 Vendor Alternate Payee 2-4, Vendor File 1-4 / 2-4, 17/18 35 Vendor Master Ach Sreen 17/18, <F2> 11 Void Checks Void Control Statements 40 Accounts Receivable Bit # Function Name 14 Account Number Change 6 Delete Open Item Pmt/adjs 2 General Account, hist, cif, repea 12 Inventory 5 Invoices 13 Ledger Options 1 Options, msg, resp, tran Desc, act 11 Processing for General Ledger 8 Report Cycle or Cycle End Proc 7 Report Options 9 Report Printing 10 Function Report Writer 3 Transaction Posting 4 Transaction Search/modify

93 93 Alter Terminal for Payroll - Application 30 Bit # 01 Function Name Function Access Commercial Loan Menu The Commercial Loan Menu is now obsolete. Customer Information File Customer Information File has been replaced by CIS and Customer Relationship Management in CIM GOLD. To set up security for these screens, use the CIM GOLD tab. See the following example. Deposit Document Prep System - Application 4

94 94 Deposit System - Application 4 Security setup for the Deposit System is now located on the CIM GOLD tab. See the following example. Electronic Teller Journal - Application 27 Bit # 01 Function Name Function Access Event Letter Parameters 01 Access The Event Letter Parameters menu is now obsolete. Financial Options - Application 18 Bit # Function Name Function 16 Account Number Structure 05 Accounts Payable 06 Accounts Receivable 13/14 01 Company Name/Accounting Prds 3/4 Financial Options Financial Routing Info Rec 04 Inventory
95 95 Financial Options - Application Payroll Options 03 Requisition/Purchase Order 15/16 Fixed Assets - Application 33 Bit # Function Name Functions 01 Access to Program Gives access to the Fixed Assets system (Application 33) in GOLDVision. 02 Allow Drop Distribution Profile Depreciation Distribution (function 10). If this option is set to Maintain, users have the security clearance to drop (delete) depreciation distributions from the system. Also see section 2.4.1, Distribution Profile screen, in the Fixed Assets manual for more information. For information on setting up GOLDVision security, see the Allow Access to GOLDVision Screens section in the CIM GOLD User's Guide. 03 Allow Zero Purchase Price Asset Financial Data screen (function 22). If this option is set to Maintain, users can enter zero (0) or nothing in the Purchase Price field. If this option is set to None, users must enter an amount in the Purchase Price field on the Asset Financial Data screen (function 22). 04 Change Client Number To access clients other than 0 (zero) in the Fixed Assets system, the Maintain radio button must be selected for this option. This is mainly for GOLDPoint Systems use only. 05 Distribution Profiles (F8) 63 Report Writer Report 63-2, 63-3, 63-4, Report Writer Run Report 63-1, To Do in Future 40 To Do in the Future Fps-Change Terminal Options - Application 24 Bit # Function Name Functions 01 Access to Program General Ledger System - Application 1 Bit # Function Name Functions
96 96 General Ledger System - Application 1 01 Company Options Definitions 1/2 02 Custom Report Definitions 41/42 03 Accoutnt File Maintenance 53/54, 57/58 04 Trans Dsply/Corr/Drop/Xfer 11/12 05 Trans F-M/Delete/Xfer/Clsd Grp Transaction Entry 8 07 Transaction Entry Past/Future 8 08 Print Standard Reports 19/20, Print Custom Reports 24, 28, 32, 32-1, 32-2, Print Custom Reports Outofbal 24, 28, Close Balances to Next Year Post From Other Applications Account Budget F/M 53/54, 57/58 14 Employee Report Security 81/82 15 Budget Rec Disp/Del/Prep/Spred 72, 76, 83/84 16 Account Number Structure 5/6 17 Transaction Deletion Sub-Account Titles 17/18, 21/22, 25/26, 29/30, 33/34 19 Organizational Chart Custom Report Line Detail Define Group of Reports 55/56 22 Statement Pre-requisites 59/60 23 Enter Client Number Custom Report Messages 69/70 25 Calculate Avg Daily Balance Account Defaults 79/80 27 Copy a Control Group Distribution Profile, Branch Allocation Table 87/88, 91/92 29 Allow Acct Drop with Bal/Trans 54, Allow G/L Sweeps 95/96, Reserved
97 97 GOLD Services - Application 8 Bit # Function Name Function 01 G/L Autopost IRS Information Returns 400, 401/402; also used for IRS GOLD security 03 IRS Print All Returns (INQ) 403; also used for IRS GOLD security 04 IRS Create Returns (F/M) 404; also used for IRS GOLD security 05 IRS Delete All Returns (INQ) 405; also used for IRS GOLD security 06 Online ACH Posting Check Recon Detail/Summary 3/4, then 61/62, 65/66 08 Check Recon Print Reports 63, Check Recon Mass Deletes 3/4, then Check Recon Void Checks 3/4, then Check Recon Transmission Hist 3/4, then Bank table Inquiry 9 13 Bond Redemption 6 14 Online ATM Journal Store/Forward Display/Print 200, then Holiday Scheduling (Loan Past Due Notices) 700, then 751/ Field Level Security (Loans - APR screen) 19/20 18 Loan Additional Fields Services 800, then Deposit Event 35/36 20 Calculate Date or Days ATM Comparative Totals Deposit Audit Confirmation 31/32 23 Loan Audit Confirmation 33/34 24 System Printing 37/38 25 WWW ACH Batch Queue 39/40 26 WWW ACH Security 41/42 27 Privacy Options 43/44 28 Comp Track Hist Summary (INQ) 100, then Compt Track History Detail 100, then 103/ Comp Track Pay 100, then 105/106
98 98 GOLD Services - Application 8 31 Comp Track Branch 100, then 107/ Comp Track Teller 100, then 109/ Comp Track Default 100, then 111/ Comp Track Calculation (INQ) 100, then 113 GOLDPhone Processing - Application 35 Bit # Function Name Function 01 Access GOLDTeller Security - Application 60 Bit # Function Name Function 01 Operator File Operator Information 02 System Configuration System Configuration 03 Not Used 04 Check Imaging 05 Forms Design View/Modify Forms and Droplists 06 Transaction Design Transaction Design/PC Institution Options 07 Transaction Selection Design Transaction Selection Design 08 Print Configuration Form/Font Configuration 09 Clear/Synchronize Totals Clear PC Totals/Synchronize PC Totals With Host Totals 10 System Fields Dictionary System Field Dictionary 11 Signature Capture Signature Capture and Display 12 Jrnl Search on Other Opers Journal/Forward on Other Operators 13 Upload/Download Data File Upload File to Host/Download File to Host 14 Allow Changing Institutions Change Institutions 15 GOLDTeller Platform Platform Session 16 Database Backup/Restore Backup Data Files/Restore Data Files/Delete Data Files 33 Platform 34 Platform Options 35 Platform File Directories 36 Platform Delete/Merge Sessions
99 99 GOLDTeller Security - Application Platform Sales Tracking GOLDView - Application 62 Bit # Function Name Function 01 Access to Loan Reports 02 Access to Deposit Reports 03 Access to General Ledger Rpts 04 Access to Teller Reports 05 Access to Payroll Reports 06 Access to GOLDView Reports Loan System - Application 3 Bit # Function Name Function 01 Loan Classification /Pmt Fields 1/2 02 Loan Indiv Fields (Payment Methods 1, 2, 3) 13/14 03 Loan History (F/M - Skip) 3, 7, 17, Loan Tax and Statistical Field 21/22 05 Initialize a New Loan 25/26 06 Loan Pattern s 69/70 07 Reserve/Subsidy/Late Fields; Interest on Negative Reserves 5/6; 43, then 5/6 08 Loan Miscellaneous Fields 9/10 09 Reserve Disbursements 49/50 10 Loan Payoff Calculation Loan Amortization Schedule Reserve Disbursements Reports Investor Master/Group Records 47/48, 51/52 14 Reserve Analysis 63, then 65/66, 69/70, 71/72, or Copy Investor Group Loan Collection Information 30, then 1/2
100 100 Loan System - Application 3 17 Coll Inst Opts/ Coll # s 30, then 3/4 or 8 18 Loan Collection History 30, then 5 or Collection Fields 29/30 20 Collection Inst Opts/ Coll # s 30, then 9/10 or 11/12 21 Variable Screen /Inq 73/74, 77/78 22 Individualized Fields (PM 7) 13/14 23 Individualized Fields (PM 5) 13/14 24 GNMA Online Investor Report Release Loan Servicing Loan Investor Fields 37/38 27 LIP and Budget Fields 41/42, Other Miscellaneous Fields 45/46 29 Sell Loan to Investor Life/Disability/Add-on Insurance Loan Pool Members/Remittance 83/84, 87/88 32 FHA Risk Based Premiums 89/90 33 Credit Life Premium Tables 91/92 34 Coll Seller Recs/History 93/94, Loan Coupon Printing LIP Account Summary/History Summary/Multiple Borrower 57, then 1; 57, then 3; 43, then 1 37 LIP Disbursement 57, then 5/6 38 LIP Disbursement Processing 57, then 8 39 LIP Payee History 57, then 9 40 LIP Inspector Report/Que/Updt 57, then 13 or 15/16 or 17/18 41 Copy LIP Budgets 57, then LIP Budget 57, then Payee Records 53/54, then 1/2 44 Payee History 53/54, then 3/4 45 Payee List 53/54, then Unamortized Yields (Deferred Fees) 9/10, then <Deferred Fields> 47 Credit Life & Additional Flds 85/86 48 LIP Voucher Ranges 57, then 25/26 or 27
101 101 Loan System - Application 3 49 Loan Assumptions Access to Employee Accounts (Also refer to 64 - Access to Employee Accounts, in the Loan System 2 (Application 48) section below.) Based on hold codes 69 (Officer/Director Loan) and 70 (Employee Loan), all main loan functions. 51 User Defined Fields 71/72 52 Fastrak Field Mapping Screen 75/76 53 Analysis Options Screen 63, then 73/74 54 Loan Foreclosure Information 30, then 19/20 55 Loan Bankruptcy Information 30, then 23/24 56 GOLDPhone PIN 85/86 (field) 57 Current and Prior YTD 27/28 58 Property/Lienholder Menu 80 (menu) 59 Variable Queue 30, then 22 or 25/26 or 27/28 60 Variable Queue Processing 30, then 15 or 17 or Loan Rate Table 43, then 13/14 62 Capitalization and Variances 23/24 63 Payment Schedule 39/40 64 Lending Inventory 13/14 Materials Management - Application 34 Bit # Function Name Function 01 **DROP Function 02 Requisitions 03 Purchase Orders 04 Receiving 05 Inventory Reports 06 Post Order Requests 07 Order Request F/M 08 Process Pick Lst/Replenish Alt 09 Screen/Report Formats 10 Take Inventory 11 Adjust Inventory
102 Batch Print Requests 13 Approval 14 Receive w/o Purchase Order 17 **DROP Function 18 Category Codes 19 Ship to Locations 20 Responsibility File 21 Vendor File 22 Inventory Product 23 Inventory Product Spcl Changes 24 Item Profiles 25 Screen Formats 26 Print Requests 27 Contract File 28 Location Profiles 29 Mulitple File Changes 30 Capital Approval 31 Emp. Code in Responsibility 32 Vendor Alternate Payee 33 Recalculate Unit Price 61 Change Client Number 63 Set Up Report Writer Reports 64 Run Report Writer Reports Payroll Management - Application 11 Bit # Function Name Function 01 Report Formats Print Reports / Emp. Payroll History Emp. Earnings/Deductions 21/22, 25/26 05 Emp. Profile 06 Emp. Evaluation 07 Report Writer
103 103 Payroll Management - Application Emp. Benefits 33/34 09 Payroll Posting - F/M 8, 15/16 10 Payroll Adjustments Co Emp Pay Change/F1 - Emp Mstr 13<F1>/14<F1>, Print Payroll Checks Check Reconciliation Void Checks 44, Employee Master 13/14, 13<F1>/14<F1>, 13<F2>/14<F2>, 13<F7>/14<F7>, 13<F10>/14<F10> 16 Dept Employee Changes Payroll Cycles 1-1/ Company Earnings 1-2/ Company Deductions 1-3/ Tax Tables 1-4/ Company Benefits 1-5/ Project Codes 1-6/ Job Cost Codes 1-7/ Position Control File 1-8/ Job Description File 1-9/ Pay Grade File 1-10/ Job Status File 1-11/ Company User Fields 1-12/ Employee Number Change 1-13/ Position Control Budget Info 1-14/2-14, 2-8<F1> 33 Daily F/M Employee Master and Labels , Employee Pay Information , , , , , , , , , , Emp. Not Posted and Balancing , Distribution Position Control and Budget , Time Cards Posting Errors
104 104 Payroll Management - Application Batch Reports 42 FTE Report Alternate Posting 1-15/ Monthly Tax Liability 49 Employee Pay Amounts 13<F1>/14<F1> 50 Employee User Field 1 41/42 51 Employee User Field 2 41/42 52 Employee User Field 3 41/42 53 Employee User Field 4 41/42 54 Employee User Field 5 41/42 55 Post Rate Changes 20, Change Client Number Report Writer Report Report Writer Run Report 63.1, 63.7 PC Applications - Application 57 Bit # Function Name 01 Access to PC Applications Function WinTerm, GOLDTeller, GOLDPrint, GOLDView, G/L GOLD, GOLDVision, GOLDWriter, GOLD ExceptionManager, GOLDAcquire, CRM GOLD, IRS GOLD 02 CRM GOLD Access to Employees and CRM GOLD Officers 03 Imaging Create Database GOLDDocument Imaging 04 Imaging Open Database GOLDDocument Imaging 05 Imaging Access Database Fields GOLDDocument Imaging 06 Imaging Import Images GOLDDocument Imaging 07 Imaging Modify Image Info GOLDDocument Imaging 08 Imaging Delete Images GOLDDocument Imaging 09 Imaging Options GOLDDocument Imaging 10 Imaging Print GOLDDocument Imaging 11 GOLDWriter Access GOLDWriter 12 Imaging Create Group GOLDDocument Imaging
105 105 PC Applications - Application Imaging Create Subgroup GOLDDocument Imaging 14 Imaging Change Group GOLDDocument Imaging 15 Imaging Change Subgroup GOLDDocument Imaging 16 Imaging Export Images GOLDDocument Imaging 17 Imaging Properties GOLDDocument Imaging 18 CheckWriter List Checks CheckWriter 19 CheckWriter Change/Add Checks CheckWriter 20 CheckWriter Print Checks CheckWriter 21 CheckWriter List Docs CheckWriter 22 CheckWriter Change/Add Docs CheckWriter 23 EIS/DSR Executive Reports 24 CIM Security CIM GOLD 25 CIM User-defined Help Section CIM GOLD 26 CIM Subscription CIM GOLD 27 CIM Can See Employee Deposit Accounts CIM GOLD 29 EFT GOLD Access EFT GOLD 30 EFT GOLD Submit Wires EFT GOLD 31 EFT GOLD Approve Wires EFT GOLD 32 EFT GOLD Change Options EFT GOLD 33 CIM Can See Employee Loan Accounts CIM GOLD 34 GOLDAcquire Access GOLDAcquire 35 GOLDAcquire Upload GOLDAcquire 36 EFT GOLD View Inbound Wires EFT GOLD 37 EFT GOLD View Outbound Wires EFT GOLD 38 CIM Can See Employee Deposit History CIM GOLD 39 CIM Can See Employee Loan History CIM GOLD 40 Allow Gateway to Alter Terminal GOLDGateway Report Warehouse Menu - Application 53 Bit # Function Name Functions
106 106 Report Warehouse Menu - Application Warehouse Directory 1/2 02 Report/Line/Index Selection 31/32, 33/34, 35/36 03 Print Position Selection 37/38 04 Warehouse Options 39/40 Security Management - Application 19 Bit # Function Name Function 01 Administrative Functions 02 Reset Security Violation (F9) <F9> 03 Print Requests (2, 3, 4) <F9>, then 2, 3, or 4 04 Appl. Programmer Functions 05 Reset Security Code <F11> Reset Emp. Password Utility Programs - Application 10 Bit # Function Name Function 01 Access to Utility Programs 02 Message Application 4 03 Calculate Check Digits 5 04 General Ledger Check Digits 1 05 Teller Activity Teller Emulator Check Printing Check Reconciliation 25/26 13 Bulletin Board 7/8 14 Check Digits Report 9 15 Online ACH Posting PC File Transfer Utility 48
107 107 Field Level tab The Field Level tab on the Security > screen is used to set up restricted file maintenance to specific data fields for employees. In order to use this feature, employees must first be set up with CIM GOLD application and screen security using the CIM GOLD tab before any field-level security can be tied to them. If an employee is tied to a CIM GOLD profile, the profile name is used to set up restricted access in Field Level Security. If multiple profiles with different field-level security are tied to an employee, all the secured fields from all profiles will be restricted for the employee. If the Field Level Security feature is not going to be used by your institution, no work is required with this screen. When Maintain access is given to applications and screens, all the fields are file maintainable until they have been restricted individually or on a profile setup using this screen. Note: Field Level Security is for CIM GOLD applications and does not correspond with any other PC product. The Field Level Security screen is organized into two sections. The Restricted Fields list view shows all the fields that are restricted for the employee or profile selected. The All Fields list view is used to restrict the specific fields for an employee or profile based on Record Type. The Record Type dictates what fields are available for the specified type. For example, CSPI is for CIS Customer Profile. The records are the same as the records used in GOLDWriter and system history. For a list of record types and descriptions, see the Master Records section in the help file. If your institution uses field-level security for employees and CIM GOLD profiles, use the following instructions for setup and changes. For details on how to use any of the fields on this tab, click in the field and press <F1>. Setting Up Field-level Security To set up or change field-level security for employees and profiles, complete the following steps. 1. Select Employees or CIM GOLD Profiles on the left side of the screen. 2. Select the appropriate employee or profile from the list. 3. Click on the Field Level tab. 4. Select the Record Type from the drop-down list; all fields in the selected record will be shown. 5. Click on the Restrict box next to the field to restrict access and add it to the list of Restricted Fields. 6. Click <Save Changes> after restrictions are made for each Record Type. If any fields need to be unrestricted, select them on the Restricted Fields list (use the <Ctrl> button on your keyboard to select multiple fields). Then click <Clear Selected Restrictions> and <Save Changes>.
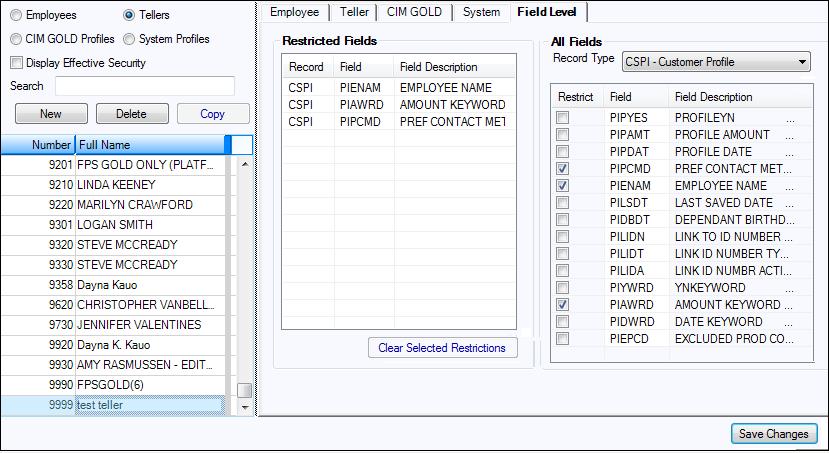
108 108
109 109 Subscribe to Mini-Applications Screen Security > Subscribe to Mini-Applications The Subscribe to Mini-Applications screen allows you to designate which applications and screens your institution will have access to in CIM GOLD. If a screen is not subscribed to, it will not be listed on the CIM GOLD Subscribe to Mini-Applications screen to give security access to. You must have proper security to access this screen. The screens are listed in alphabetical order, which is the same way they appear in the CIM GOLD navigation tree. Please be aware that some applications and screens may have a billable fee for their use. You can see which screens are billable by clicking on a screen listed on the Subscribe to Mini-Applications screen; the price for using that screen will appear in the Cost per Month per User field at the bottom of the screen. The Description field will provide a short description of the application or screen selected. Most screens can be unsubscribed to if you uncheck the box next to the screen. When unsubscribing to a screen, all security given to employees and CIM GOLD Profiles for that screen will be deleted. Use caution when unsubscribing to a screen; if a screen is unsubscribed to in error, all employees and CIM GOLD Profiles will need to be set up for security to the screen again. If a screen is required and cannot be unsubscribed to, you will get an error if you uncheck the box. Note: Employees already signed on to the system can view a newly subscribed screen by deleting their cache. If they wait until the following day, they will be able to view the screen on their first sign on. The list view displays all screens available to your institution. To subscribe to any screen, check the box next to it. The Description field gives a short description of the highlighted screen. The Cost per Month per User field shows the cost, if any, of the highlighted screen each month for each person using it. After selecting all the screens you want to subscribe to, click <Save Changes>. Note: Your institution must subscribe to a screen before that screen will appear in Security or in the CIM GOLD navigation tree for any user. As new screens are added to the list, they are advertised in a release notification. Unsubscribing To unsubscribe from a screen, remove the check in its box by clicking on it. If you unsubscribe to any screen, you will see a warning when you click <Save Changes>: "Warning! You are unsubscribing to at least one miniapplication. This action will remove all security to these mini-applications for every person and every profile! Do you REALLY want to continue?" Click <Yes> to continue or <No> to cancel and return to the screen. See also: Security System
110 110 Screens List View This list view displays all screens available to your institution. To subscribe to any screen, check the box next to it. After selecting all the screens you want to subscribe to, click <Save Changes>.
111 111 Description This field gives a short description of the highlighted screen.
112 112 Cost per Month per User This field shows the cost, if any, of the highlighted screen each month for each person using it.
113 113 Terminated Employee Deletion Screen Security > Terminated Employee Deletion This screen is used to delete terminated employees and obsolete System Profiles and must be given very limited security. CIM GOLD profiles can be deleted on the screen once they are inactive. Warning: All employee CIM GOLD screen access and employee details will be removed when an employee is deleted using this function. This is a final action and cannot be undone. Only employees with Terminated status will be shown on this screen. To delete terminated employees, complete the following steps Select one or more employees to delete. You can select several employees by holding down the <Ctrl> key. After selecting all the employees you want to delete, click <Delete Terminated Employee>. Verify deletion by clicking <Yes> on the Confirm Delete dialog. If the employee is tied to profiles, the employee will be removed from the profile; the profile is not affected. If the employee is also a teller, the teller record and opers.dat information are also deleted. Deleted employees will be shown on the Security > Reports > History screen. See also: Security System
114 114 Display Select Employees to delete terminated employees from the system. Select System Profiles to delete profiles that are not tied to any users. Only profiles that are orphaned will be shown in the list.
115 115 Search To find a username quickly in the list below, begin typing the name in this field.
116 116 Selection List This field displays a list of employees whose passwords you can change. To delete an employee, select a name in this list and click <Delete Terminated Employee>.
117 117 Software, Server, and Files Software and licenses must be purchased for every teller who uses CIM GOLDTeller. However, you only need to download CIM GOLD because CIM GOLDTeller is part of CIM GOLD. The current versions of software are located on the FPS GOLD secure website under Software Download ( You will need a user name and security code to access the secure website. In order for GOLDTeller to work, first set up the following: A DB4Server (recommended). FPS GOLD helps you install a DB4Server at each of your branches at your institution. Or, you may need only one DB4 Server for your entire institution. Note: FPS GOLD highly recommends you have a DB4Server set up at each branch. Typically, the DB4Server resides on a separate PC. The main purpose of a DB4Server is to share customized files with work station PCs. This keeps the files on work stations current and consistent. When using a DB4Server, CIM GOLDTeller will be loaded as a client on each workstation. FPS GOLD recommends that the DB4Server be a separate server machine that is not used as a functioning GOLDTeller PC; however, it can be an active machine that is also being used to run GOLDTeller. If the server resides on an active GOLDTeller PC, that PC will be the "lead" machine, and it will need to be turned on during working hours. A document that details how to set up a PC as a DB4Server is available from FPS GOLD. For more information, contact FPS GOLD. Create the following files that should reside on the shared teller server (DB4Server): o GOLDTtllr.dat file (or the dat file): A customized file for receipts, passbooks, checks, screens, codes, balance sheets, and options; o Opers.dat file (or the opers file): A customized file for teller setup and speed keys; o TnnnnDyymmdd.jlg file: A file for journal files. Set up your file directories so that individual GOLDTeller machines point to these shared files on the DB4Server using the steps below. To connect your CIM GOLDTeller to the DB4Server: 1. Open CIM GOLD and click on Teller System > GOLDTeller > Functions > Administrator Options > System Configuration:


118 118 On each GOLDTeller m achine, enter the path to the shared files on the server. 2. Enter the DB4 server name in the Opers.dat File, Goldtllr.dat File, and Journal Files fields, as well as the path where that server name is found. This is the server name given to you by GOLDPoint Systems. It is usually DB4. You should regularly save and back up the GOLDTllr.dat file and the Opers.dat file. See File Functions for information on how to back up these files.
119 119 Administrator Options CIM GOLDTeller Functions menu > Administrator Options The functions under Administrator Options require special security. These options are for administrators to set up menus, transactions, options, and other important conditions needed for employees to use GOLDTeller. See the following links for more information on each of these functions: Account Signatures Form/Font Configuration Menu Design PC Branch Settings PC Institution Settings Print Form Design Profile Speed Key Assignments System Configuration System Field Dictionary Transaction Design View/Modify Droplists MICR Check Form Designer MICR Next Check Number


120 120 Account Signatures CIM GOLDTeller Functions menu > Administrator Options > Account Signatures CIM GOLDTeller offers Capture Account Signatures, which assists in quickly and easily linking customer signatures and/or images to accounts. When the signatures are linked, you can set up specific transactions to show these images while the teller is processing the transactions. Capture Account Signatures uses CIM GOLD GOLDDocument Imaging in capturing and displaying these images. Please refer to the CIM GOLDTeller document, section CIM GOLD GOLDDocument Imaging Instructions, for step-by-step setup information. Capture Signatures To capture account signatures: 1. Select Functions > Administrator Options > Account Signatures > Capture Signatures. The following dialog box displays: 2. Enter the account number, marking the appropriate account type, and click <Get>. Note: Confirm that the account number entered is the desired account. This function does not verify that the account is an existing account on the system. As a result, you may link an image to a non-existent account. 3. Choose the source, by clicking the hypertext, from which the signature will be captured. From Clipboard: Signature was captured and is currently saved to the Microsoft Office Clipboard. From File: Signature was captured and saved on a PC or network folder. From Scanner: Signature will be scanned and captured via scanning equipment. 4. Enter the Description and Image Type in the Image Data Input Form and click <OK>. Note: A recommended description entry is Last Name, First Name Middle Name (as seen above). Following this format will allow users to later easily search signatures by name (description), rather than account number, if desired. The Image Type should remain as "Signature." The signature image will then be displayed by the Image View function box. 5. Click the Crop Image icon to cleanup and resize the signature image.

121 121 From the Crop Image display, use the Cropping Rectangle to position and resize the signature image. 6. Click and drag a corner of the cropping rectangle to reposition it. Do the same on the opposite corner. The right-hand view shows how the signature image will appear. 7. Press <OK> once the signature image is displayed as desired. The Image View will now show the newly cropped image as well. 8. To save the image, click the <Save> icon ; then click the Close Icon box indicating that the image was saved successfully., which will then display a dialog Find Signatures Use Find Account Signatures to manage existing signature images. Signature images may be viewed, printed, copied, or deleted using the Account Images dialog box.

122 122 To search by account: 1. Enter the Branch and Account number and click <Find Matching Images>. All images linked to that account will be displayed. To search by description: 1. Enter the description and click <Find Matching Images>, which will display all signatures with that description. Note: As was previously mentioned, a recommended entry format is Last Name, First Name Middle Name, such as "Doe, John Q." To search by Tax ID: 1. Enter the Tax ID number and click <Find Matching Images>, which will retrieve all signatures linked to the Tax ID number. Note: The Tax ID number search references only IRS Owner numbers and their accounts. To search by Last Name and/or First Name : 1. Enter the name and click <Find Matching Images>, which will retrieve signatures linked to a matching name. Note: The name searches only reference IRS Owner names and their accounts. From the search results box, highlight the desired imaged. This will activate the <View>, <Print>, <Copy>, and <Delete Image> buttons. Display Signature Signatures and driver's licenses can be shown on specific transactions as tellers process them. You can make the signature image appear upon entering the account number in the teller transaction. To set up this signature display:

123 Select Functions > Administrator Options > Transaction Design. 2. Select the transaction you want to customize. 3. Click <Options>, Display Signature.
124 124 Form/Font Configuration CIM GOLDTeller Functions menu > Administrator Options > Form/Font Configuration This function allows the changing of fonts that are used on certain forms. Generally, FPS GOLD sets up the forms and fonts.

125 125 Menu Design GOLDTeller Functions menu > Administrator Options > Menu Design Menu Design allows you to customize the Transaction menu tree. You can customize the following menu types: 1. Default All tellers use the same menu. This menu may also be customized. 2. Individual Each teller may have his or her own menu assignment. 3. Profile A security group can be customized for tellers assigned to a specified profile. The hierarchy of menus used is Individual Menu, Profile Menu, and then Default Menu. Before making changes, determine the type and name of the menu to create or edit. Default Menu - This is the menu displayed and selected when first accessing this option. The Default Menu is generally used if only one menu is used per institution. All tellers initially default to this menu. Profile Menu - This option enables a menu to be set up that multiple tellers could share. This allows a menu to be customized to fit a particular job description, and then each teller under that description will share it. To select this menu, click the radio button <Profile Menu>. From the drop-down list, select the profile name, which will now allow for menu setup or maintenance. Note: A profile must first be set up in CIM GOLD Security before the profile may be selected and assigned to a teller. Individual Menu This menu enables individual tellers to have a customized GOLDTeller menu. To select this menu, click the radio button Individual Menu and then select the desired user from the drop-down list. Note: An individual teller must first be setup with security before he or she may be selected and assigned an individual teller menu. <Copy Current Menu> Use this option to quickly copy an existing menu to another individual or profile. The default menu may also be selected and updated. To copy a menu: Select the menu you want to copy in the Menu Design list view on the left of the screen. Click <Copy Current Menu>. The following dialog box displays:

126 Click the radio button next to the type of menu (Profile, Individual, or Default) you want to copy the menu to, then click <Copy>. For the copy to take effect, click <Save Current Menu>. To delete a menu: Select the menu you want to delete in the Menu Design list view on the right of the screen. Click <Delete Current Menu> to remove all menu records for the selected menu. A confirmation dialog box will display. Click <Yes> to delete the menu. Adding Categories and Transactions You can add categories and transactions to a menu. See the illustration below. Category Levels 1st Level Category Cashiers Checks etc. is an example of a 1st Level Category. 2nd Level Category No Account is an example of a 2nd Level Category. To add a 1st or 2nd Level Category: Highlight the position in the menu where the new category name will be added. The new category will be inserted after the highlighted menu category. Type a label for the new category in the 1st Level Category text box or in the 2nd Level Category text box. Click <Add>, which will show the new category name in green and its menu position. Click <Save Current Menu> to keep this new category name.

127 127 GOLDTeller Functions m enu > Adm inistrator Options > Menu Design Screen To add a transaction: Highlight the position in the menu where the transaction needs to be placed. The new transaction will be inserted after the highlighted menu transaction. In the Available Transactions List, highlight the transaction, then click <Add Transaction>. The proposed addition will now appear in the menu in green. Click <Save Current Menu> to keep the new transaction. Note: A category or transaction can be repositioned within the menu by dragging and dropping it. An item that has been moved displays in red. Changes made to individual transactions are handled in Transaction Design. Deleting or Renaming a Category or Transaction To delete a category or transaction from the menu: You can delete a category or transaction from the menu. You can rename a category but not a transaction. 1. Right-click on the item, which will open a new menu. Click "Delete Menu Item" or "Rename Menu Item."
128 Click <Save Current Menu> to keep your changes. Creating a New Menu After creating a new individual or profile in Security, the user may now select that desired profile or Individual from the appropriate drop-down list. Upon selecting the desired name or profile, if no existing menu is found, the institution default will be used as a beginning template. Transactions may now be added or removed as needed. Available Menus List This list at the bottom right of the screen displays a complete record of all existing menus currently found on the GOLDTllr.dat file being used by the PC. Highlight any listed user to see the related menu.

129 129 PC Branch Settings GOLDTeller Functions menu > Administrator Options > PC Branch Settings The PC Branch Settings dialog box allows for individual branch setups to be used on the Currency Transaction Report, on the Delayed Availability Report, and on receipt printing. See the example below. GOLDTeller Functions m enu > Adm inistrator Options > PC Branch Settings If you use the Currency Transaction Report from GOLDTeller, this is customizable by branch and, consequently, prints this information in the Financial Institution section of the form. If the applicable branch (GOLDTeller knows which branch the teller is signed on to) is not set up, the institution information under PC Institution Settings is used. Note: Security for this screen is controlled under Security > > System tab > GOLDTeller Security > PC Branch Settings. You must have appropriate security in order to update PC branch information. FPS GOLD must make changes to your receipt format to use this data on receipts.
130 130 Use the Office Information screen (GOLDServices > Office Information in the CIM GOLD tree view) to set up office information. You can then bring these settings over into the PC Branch Settings by clicking <Update from Host> on the PC Branch Settings dialog. The following information explains fields on the PC Branch Settings dialog box: Disable Update If the box is checked in the "Disable Update" column, branch information will not be updated upon clicking <Update from Host>. Title This is the title of the employee at your bank who is responsible for your bank's CTR forms. Examples of a title would be Bank Manager or Vice President. Preparer Employee responsible for all your CTR forms. Contact Employee responsible for questions concerning your bank CTR forms. Drop To drop a branch from the branch list, highlight the branch and click <Drop>.
131 131 PC Institution Settings CIM GOLDTeller Functions menu > Administrator Options > PC Institution Settings Use the PC Institution Settings to set up specific ways your institution wants to use CIM GOLDTeller. Only those employees with proper security can access this screen. To access PC Institution Settings, select Functions menu > Administrator > PC Institution Settings. The following is an example of this screen: See the following sections for more information concerning each the fields on the tabs on this screen: Settings Page One tab Settings Page Two tab CTR & Cash Dispenser Defaults tab
132 132 Institution Options (Inquiry Only) tab

133 133 Settings Page One tab CIM GOLDTeller Functions menu > Administrator Options > PC Institution Settings See the following example of the Settings Page One tab on the PC Institution Settings screen in CIM GOLDTeller, followed by field descriptions. Field Description Institution Name in Heading Enter the name of your institution the way you want it to be displayed in CIM GOLDTeller. The name of the institution is displayed in the upper-right corner of the menu bar, to the right of the Log Off function. See the example below.

 is checked.")
134 134 Field Description Logon/Logoff field group Use As Of Date on Logon This option is for tellers who process transactions for the next business day. Some institutions stop processing transactions for the current day after 3 p.m. However, they do process transactions with an As-of Date for the next day after 3 p.m. This is called next-day processing or PM Mode. When processing transactions in PM Mode, you will see "PM Mode" at the top of the transaction list, as shown below: When tellers initially log on to CIM GOLDTeller, a Logon Information box is displayed, as shown below. If the teller checks the Next Day Processing box on this dialog box, the As-of Date becomes file maintainable, but only if this option (Use As Of Date on Logon) is checked. If this option is not checked, then that date cannot be changed.


135 Field 135 Description If the Next Day Processing box is checked, you must enter a future date in the Asof Date field. The date you enter in the As-of Date will be the default As-of Date on all transactions. However, once processing a transaction, you can change that date. Disable Allow Cash Drawer To Be Automatically Filled In If this option is selected, the cash drawer is not automatically filled in by the system when logging off for the day. The teller must manually enter their cash amount. Disable Download Transactions At Logon This option is not operational. Disable Allow Next Day Processing If this option is selected, tellers will not be able to process transactions in next-day processing mode (also known as PM Mode). The Next Day Processing box on the Logon Information dialog box will be disabled, as shown below. For more information on PM Mode, see the Use As Of Date on Logon option above. Default To Do A Final Logoff At Logoff Select this option if you want a final logoff to be the default when logging off. If this option is not selected, a temporary logoff will be the default. For more information about logging off CIM GOLDTeller, see the Log Off section.

136 136 Field Description Default To Use An Adding Machine At Final Logoff If this option is selected, the Cash Drawer screen that is shown when performing a final log off functions similarly to an adding machine, where you can use your numbers pad on the keyboard to enter exact amounts. For example, if this option is not set, and you enter "1" in the 100's field, the system knows that the one means 1 hundred dollar bill, and adds up the number as "100" in the total. If this option is on, you would need to enter "100.00" and the system would total it as " " If you enter "1," the system assumes ".01" and gives you an error provider, as shown below: Disable "Don't Clear Currency Fields" At Final Logoff When this option is selected, tellers will be forced to enter cash amounts on the Cash Drawer - Counter screen at final sign-off. The Don't Clear Currency Fields box will be grayed out on the dialog box that appears when logging off, as shown below. This option is not used for temporary releases. This option was added to avoid any potential problems from forced balancing of cash. If this option is not selected, tellers have the option of not clearing out any of the currency fields on the Cash Drawer - Counter screen by selecting the Don't Clear Currency Fields checkbox. Write Log On/Off. Subtotal Transaction to Journal Gives institutions the option of writing the Sign On/Off and the Subtotal transactions (tran code 1005) to the GOLDTeller Journal Log (<Ctrl> + J). This information may help with questions when balancing. Disable Check For This determines if GOLDTeller will check to verify if the host is back online. Online When Host Is
137 Field 137 Description Down Show Dialog Before And After Each Online Check This determines if a dialog will display when going offline and online with the host. Teller Trans Timeout Value (Seconds) This determines the time (in seconds) before GOLDTeller will try to communicate with the host before completing the transaction offline. Totals/Journals field group Default To Print Teller Journals At Final Logoff This determines if a default option will be set up to print teller totals for the teller at final logoff. Default To Print Teller Totals At Final Logoff This determines if a default option will be set up to print teller totals for the teller at final logoff. Default To Print Balance Sheet At Final Logoff This determines if a default option will be set up to print a balance sheet for the teller at final logoff. Disable Synchronize PC Teller Totals At Logon This determines if the PC teller totals will be synchronized with the host teller totals at logon. Disable Synchronize Totals At Final Logoff This determines if the PC teller totals will be synchronized with the host teller totals at logoff. Synchronize After Each Transaction This will synchronize totals after each transaction. FPS GOLD recommends that you only set this on the retirement distribution, transaction Disable Synchronize Totals After Forwarding This determines if PC teller totals will be synchronized after journal forwarding has been completed. Be Able to Stop Synchronize After Forwarding This allows the teller to stop synchronizing totals after journal forwarding is completed. Use Alternate Journal Printer This allows you to print a journal report to a printer different than the one designated for documents. A dialog will appear that will allow you to select another printer. Default Axiohm/Nexus Printer to Journal Roll Check this checkbox field if you want the journal roll to print to the default (Axiohm or Nexus printer).
138 138 Field Description Totaling Fields Misc 1-3 These are the field names for the miscellaneous fields on the balance sheet. These fields can be used for unfit currency, Susan B. Anthony dollars, or other currency. Number of Day to Keep Journals This indicates the number of days to keep journal files. These records can be kept from 1 to 99 days. Transaction Field Defaults field group These fields enable you to determine defaults that can be used in GOLDTeller on all transactions of the type selected. If you want to use these defaults for individual transactions, set them up through the Transaction Design function. There are five fields here. The first field, Don't Use These as Defaults, tells the system to not use the following four fields. The following four fields are used to default transaction fields to checkmark (yes). They are Default Penalty to Yes, Default Passbook to Yes, Default Correction to Yes, and Default Overdraft to Yes. For example, when transactions that have a penalty option are accessed, the penalty box will automatically be checked if Default Penalty to Yes is checked on this screen. Other Field Defaults These fields work the same as the Transaction Field Defaults. Other Fields are fields that mean something different depending on the transaction accessed. F-Keys field group If you check these fields, the function of the F-keys on your keyboard change as indicated in the field labels. <Date/Time Transactions Last Updated from Host> Button Click this button to view the date and time that the.dat file you are pointing to was last updated with transaction changes from FPS GOLD. When any changes are made to existing transactions, such as adding a new field or adding a new transaction, they need to be downloaded to your.dat file. This downloading is an automated process. There may be times when you need to override this date to get prior transaction changes downloaded. When this is necessary, press <Ctrl> + <Shift> and click this button to override the date signoff. When you sign back on, the transactions that are downloaded will be shown on your screen.

139 139 Settings Page Two tab CIM GOLDTeller Functions menu > Administrator Options > PC Institution Settings See the following example of the Settings Page Two tab on the PC Institution Settings screen in CIM GOLDTeller, followed by field descriptions. Field Description Check Writer Fields Disable Check Writer on Functions Menu This checkbox can disable Check Writer from the Functions menu. When checked, Check Writer will only automatically appear when the Check Out field is entered on a transaction. Disable Cancel and other fields of Check Writer When this field is checkmarked, the ability to cancel Check Writer will be disabled when Check Writer is called after the completion of a Check Out transaction. The <Cancel> button, <Exc> key, and clock icon will all be
140 140 disabled. Tellers will be forced to click <OK> in order for Check Writer to complete the transaction. Disable Automatically Bring Up Check Writer This determines if Check Writer will automatically come up after a transaction is completed. Disable Fill Check Writer with CIS If this option is checked, Check Writer will not pull CIS information. You will have to fill in the fields manually. Disable Skip Choice Dialog If Default Check Form Exists This determines if a choice dialog will be shown for check types. Update Check Reconciliation Record on Host Check this field to update the payee name on checks in Check Reconciliation. Use MICR Check Writer Feature (Online Only) This determines whether you will be able to use MICR Check Printing, which means you use blank check stock for teller-created checks. The use of MICR checks in CIM GOLDTeller is only available in online mode. MICR check printing will be disabled in offline mode and will revert to offline check printing, so you will need to keep preprinted forms on site in case of communication disruption. Only Allow MICR Checks To Be Generated If this option is checked, you will only be able to create MICR checks. When you are offline, no checks can be created. Customer Labels Fields Left Label X and Y Right Label X and Y This is the setup for envelopes. Two different setups are available. There are four boxes providing the X and Y label coordinates to indicate where to start the print. Default Print Customer Label To Loan Account This will set the default to always print an envelope for a loan account for the Print Envelope function. Default Print Customer Label To Right This will set the default to always print an address on the right-hand side of the envelope for the Print Envelope function. Passbooks Fields Disable Skip Choice This determines if a choice dialog will appear if the passbook form exists. Dialog If Default Passbook Form Exists Number of Passbook Lines This determines the number of lines available for passbooks. When a passbook transaction is run and the teller enters the number of the line on which to begin the printing in the passbook, the system validates that there are sufficient lines in the passbook so that the printing will not exceed the length of the passbook. If an invalid number is entered, an error message will be displayed which states, "Passbook Line Number Must Be Between 1 and X." "X" equals the value entered in this field (the total number of passbook lines). Allow Passbook Line Number Entry When Turning Page Allows a passbook line number to be entered when turning to a new page in the passbook. GOLDTrak PC Fields Check for GOLDTrak PC Checks to be printed This option causes the system to check the GOLDTrak PC program for any checks that needed to be printed before closing GOLDTeller. The checks can be printed from Check Writer.
141 Allow Officer Override 141 This option allows you to require an officer override before GOLDTrak PC checks can be written from Check Writer in the GOLDTeller program. Allow Supervisor Override This option allows you to require a supervisor override before GOLDTrak PC checks can be written from Check Writer in the GOLDTeller program. Allow Teller Override This option allows you to require a teller override before GOLDTrak PC checks can be written from Check Writer in the GOLDTeller program. Make Informational Only This option makes Check Writer informational only when printing GOLDTrak PC checks from GOLDTeller. Overrides/Chat Fields Disable Use Overrides on Host Security Functions This determines if overrides are used on functions dealing with host security. Some examples of this are Transaction Selection Design, Transaction Design, System Configuration, and Operator Information. This option does not apply to overrides coming from the host on hold codes or transaction conditions. Disable Save Last Used Teller And Computer Name For Remote Override This field is now obsolete. Ignore Overrides for Dollar Check this box if you do not want to look at dollar limits on overrides Limits Remote Override Timeout This is the timeout value allowed while doing a remote override before the override will fail. Signatures Use IExplorer for Signature Display This checkbox allows your institution to get signatures for GOLDTeller transactions from a third party by entering the path for them in the field below. Max Signature Size Enter the maximum signature size based on your third-party vendor's electronic signature size. Miscellaneous Fields Include Date on Output Print This will display the date at the top of the Output Display screen when something is printed to it. Skip Auto Showing Customer Status on Entry View If this field is checked, the customer's status will not automatically display. Force Calculate Withholding Button on 1230 Transaction If this field is checked, the teller cannot proceed with a retirement distribution before they see if there is any withholding for the customer. Use Print Driver When "Use Printer Codes" is Checked (Graphics) This determines if printer codes will be used if Use Printer Codes is checked. Use the Whole Printer Name (don't strip off <on???>) This option allows you to use the whole printer name when printing. Snap to Form Design Grid Check this box to turn on grid lines on a form design screen Snap to Transaction Design Grid Check this box to turn on grid lines on a transaction design screen
142 142 Snap to Transaction Design Grid Width Enter the width of the transaction design grid. Snap to Transaction Design Height Enter the height of the transaction design grid. Copies of the Bond Redemption Report Enter the number of copies of the Bond Redemption Report should be created. If a number is not entered, only one copy will print. To get two copies, enter "1" in this field.
143 143 CTR & Cash Dispenser Defaults CIM GOLDTeller Functions menu > Administrator Options > PC Institution Settings The fields under the Currency Transaction Report Insitution Defaults are used to set up default information for the Currency Transaction Report. In each of the fields, enter the appropriate data. The Print Offset X, Y and Print Preview Offset X, Y fields are used to facilitate the proper printing of the Currency Transaction Report. In order to use this feature, institution option CTRO must be set.
144 144 Institution Options (Inquiry Only) CIM GOLDTeller Functions menu > Administrator Options > PC Institution Settings The fields on this tab display various options set for your institution; you cannot change these settings. If you need more information about these fields, please contact your FPS GOLD banking consultant.
145 145 Print Form Design CIM GOLDTeller Functions menu > Administrator Options > Print Form Design This function allows for the definition of forms (such as balance sheet, journal report, checks, and teller totals) to be created or modified. Due to the distinctive and complex layout of forms and their setups, FPS GOLD makes these kinds of changes for your institution.

146 146 Profile Speed Key Assignments CIM GOLDTeller Functions menu > Administrator Options > Profile Speed Keys Assignments Quickly and easily assign speed keys to a CIM GOLD profile. Select a profile from the Profile Name drop-down list. Locate the transaction and [right-click] over it. Select <Assign Speed Key>, and the screen is shown. Enter the letter associated with the desired speed key and click <OK>. Click <Save> to keep your changes. Delete Speed Key To delete an existing speed key assignment: 1. Place the corresponding letter in the Delete Speed Key field at the bottom of the screen. 2. Click <Delete Speed Key>. The speed key will be removed when you click <Save>. Copy Speed Keys Existing speed keys setups, for both profiles and individual users, can be quickly copied to a selected profile. To copy a speed key: 1. From either the profile or individual drop-down list, select the speed key setup you want to copy. 2. Click <Copy Speed Keys from Profile/Operator>.
147 147 System Configuration CIM GOLDTeller Functions menu > Administrator Options > System Configuration System Configuration displays the paths where data files are stored. The files can be on a network or an individual PC. The operator, GOLDTeller, and journal data file configurations are found here. Operator Data File (Opers.dat) Individual operator or teller information is stored in this file. GOLDTeller Data File (Goldtllr.dat) Your institution s customized GOLDTeller information is stored in this file. It is referred to as the GOLDTeller.dat file. FPS GOLD keeps a copy of this file at the Provo facility. Journal Data Files Journal information is stored in this file. Storing journal files on a network is beneficial because it allows you to move from PC to PC within the network without losing your PC totals. Printer Defaults Determine and indicate here the printer to be used by the user s Display, Document, Passbook, Receipt, Check, Envelope, or Alternate Journal Print Destinations. Miscellaneous Selections are available for mass loan payments, disable options, and other default preferences. Please note that selections made on the miscellaneous tab affect just that current computer.

148 148 System Field Dictionary CIM GOLDTeller Functions menu > Administrator Options > System Field Dictionary The System Field Dictionary is used to create fields to be utilized for drop boxes on transactions. The value entered on the field can be used to populate a field on the system. Once the field is created, it is available to be used in View/Modify Drop Lists. An example of a helpful drop list is for retirement distributions. The IRS code for the distribution type (i.e., death, normal or premature) is selected from the drop box and populates the distribution field on the system. You can limit the distribution codes to the distribution types your institution supports in the View/Modify Drop Lists function. To begin, select from the Function menu Administrator Options/System Field Dictionary. To add a new field: 1. Click <New>. 2. In the Field Name field, enter the new field to be created. Note: If more than one field will be grouped for a drop box, type the same first few characters for each field name. This way, they will be grouped together in the list box and easily accessed when selecting them for the drop-down list.
149 Leave the ID or Length field blank. The system will automatically fill it in with the length of the field name. Change this only if you want to shorten the field name. 4. Enter the description in the Constant Data field. This description will display in the drop-down list. The dropdown list can show only approximately 20 characters. 5. In the Short Data field, enter the value to be sent to the system to populate a host field. 6. Click <Save> to save the field into the list box. Note: The fields in the list box show in alphabetical and case order. To copy a field to create a new field: Highlight the field in the list box to be copied. Click <Copy>. The New Field box will appear populated with the information for the copied field. The only field needed is the Field Name; enter the new field name. Click <Save>. To edit an existing field: Highlight the field in the list box to be edited. Click <Edit>. Edit the information. Click <Save>. To delete an existing field: 1. Highlight the field, from the list box, to be deleted. 2. Click <Delete>. Note: The field will be deleted from the drop-down list as well.
150 150 Transaction Design CIM GOLDTeller Functions menu > Administrator Options > Transaction Design Transaction Design (GOLDTllr.dat) allows customized maintenance on individual transactions. This can be used to rename the transaction, rename a field on the transaction, or set options on the transaction. Note: For all new transactions added by FPS GOLD, you must use this function to adjust the data on the screen based on how you format your transactions. In Transaction Design, the Available Transactions List is the complete list of transactions found in CIM GOLDTeller. Maintenance done to a transaction through this utility will affect the menu(s) that transaction is tied to. Refer to Menu Design to review menu setups. Transactions are composed of a transaction number: transaction number / modifier / sequence. All FPS GOLD default transactions have a 0 (zero) sequence number. Transactions can be copied to create a new transaction. A new transaction will have a new sequence number assigned to it. A copied transaction allows certain fields to be individualized without changing its main functionality.

151 151 A transaction can be quickly located by using the scroll bar to the right of the Available Transactions List box. If you know the transaction s code or part of the transaction description, enter the transaction number in the field "Code" or enter part of the transaction description in the "Description" field, to quickly find the desired transaction. Highlight the desired transaction, which will populate the transaction detail and transaction grid on the right. Make any necessary changes and click <Save>. Only new transactions, which have been copied and saved, may be deleted from the Available Transaction List. When you want to delete such a transaction, highlight and click <Delete>. You may also [right-click] the transaction, which will enable a screen that allows you to select "Delete Selected Transaction". To Copy an Existing Transaction, Creating a New Transaction: Highlight the existing transaction from the Available Transaction List. Click <Save New> The new transaction will now be found in the complete Available Transactions List. Make any adjustments to this new transaction. Follow the Field Change process in making these changes. Click <Save> when finished.

152 152 To use this newly copied/created transaction, you will need to add it to a menu. Refer to the Menu Design section on how to add the transaction to a menu. Field Change 1. Highlight the transaction to be changed on the left. This will display the transaction grid and detail to the right. 2. If properties on an individual field need to be changed, [right-click] inside of that field; a new GOLDTeller Transaction Field Properties screen will be shown. Field Name: Rename field or enter new field name. PC Hide Field: Hide field on transaction Default Field to Yes: If applicable, this will allow an option to be defaulted to "On" or "Yes". Example: Penalty, Passbook, or Overdraft.

153 153 Field Type: Allows you to change the type of data that is entered. Edit (data is entered) Checkbox (marked "On" or "Off") or Drop List (data selected may only come from drop list). Select the drop list to be used from the given selection. Description Position: Change where the name of the field is displayed on the transaction. Copy to Field: Based on the transaction, certain values can be copied into another field. Note: The remaining fields are display only. Transaction Entry Options To make transaction level changes, click <Options> from the Transaction Design screen. The Transaction Entry Options screen is a combination of inquiry fields and maintainable fields. Use this screen to require an override along with the appropriate override level, or mark "Display Signature" to prompt the transaction to display any captured signatures linked to the selected account. If you need to make changes to this screen, it is best that you speak with your FPS GOLD Banking Consultant before you make them.

154 154 View/Modify Droplists Functions menu > Administrator Options > View/Modify Droplists Use a drop list to provide a quick list of available options for a specific field within a transaction. The drop list helps to assure accuracy and controls what content may be entered into that field. A drop list can be added to most fields found on transactions. Once a drop list has been placed on a field, the user must choose from that range of options. Drop List Names (Section A): Lists all current drop lists available and allows users to create or delete drop lists. Create a New List - Enter the name of the new drop list in the field above the [Add List] button. Click <Add List>. Modify an Existing List - Highlight the drop list in box A; make necessary changes in box B Delete an Existing List - Highlight the drop list in box A; click <Delete List(s)> Drop List Entries (Section B): Highlight the drop list name in Section A, which will populate the drop list detail in Section B. In Section B, fields can be added to the drop list from Section C. Fields found in Section C are defined in the System Field Dictionary. From Section C, select the field to be moved to Section B. The field in Section C can be highlighted and then click <Add Entry> in Section B. Rather than click <Add Entry>, you may also double-click the field in Section C, which will move the field over to Section B. Use the up/down arrows in Section B to arrange the desired order of the fields within the drop list. Once all desired fields have been placed in Section B, click <Save>. An entry is easily removed by highlighting it and clicking <Delete Entry(s)>. Dictionary Entries (Section C): Use the [Search Box] at the top of Section C to quickly locate a desired field. As you enter information into the search box field, the search is narrowed to match that which is
155 155 being typed in the box. Once again, fields found here in Section C are created, modified, or deleted from the System Field Dictionary.
156 156 MICR Check Printing CIM GOLDTeller Functions menu > Administrator Options > MICR Check Form Designer Blank checks can be set up in CIM GOLDTeller to print MICR (magnetic ink character recognition) checks. The use of MICR checks in CIM GOLDTeller is only available in online mode. MICR check printing will be disabled in offline mode and will revert to offline check printing. When using MICR checks, tellers should not enter a check number on any check-out transactions, including those run using Multiple Transaction mode. The system will determine the next check number to be used based on your institution s setup. We recommend that you delete the check-out number on all transactions and create new offline transactions to be used with preprinted checks in the event that you cannot communicate with FPS GOLD. Note: This currently works for all Check Out transactions. You must create check formats for all types of checks you intend to use on blank check stock. To set up this feature for your institution, you must have security setup for each user on the Security > screen, System tab, then expand the GOLDTeller Security node and select the Maintain radio button for Forms Design. by FPS GOLD is not required for this feature to work for your institution. You must have the blank check stock needed for each type of check you want to use, and you must have a check printer available for tellers using CIM GOLDTeller. To use MICR checks, complete the following: Create MICR checks using the MICR Check Form Designer Create check ranges for MICR checks for each branch Turn on the PC Institution option indicating that MICR checks can be used Running transactions with the MICR check printing function

157 157 Creating MICR Checks for Use in CIM GOLDTeller CIM GOLDTeller Functions menu > Administrator Options > MICR Check Form Designer In order to print MICR checks from CIM GOLDTeller, you must use the MICR Check Form Design to create how you want the MICR checks to look and print. This function is similar to other check formatting programs within CIM GOLD (Deposits Check Printing, Loans Check Printing, Accounts Payable Check Printing). To design a new MICR check: 1. Click Functions > Administrator Options > MICR Check Form Designer in CIM GOLDTeller to open the MICR Check Form Design screen. See the following example: CIM GOLDTeller > Functions m enu > Adm inistrator Options > MICR Check Form Designer 2. Click <New Format> to design a check from scratch.

158 Or click <Copy Format> if you want to copy an already-saved format, make changes to it, and save it with a new format number. The fields in the Format Settings field group are now editable, as shown below The Format field is prefilled with a system-entered format number. Enter a number you want to assign to this check format in the Sub Format field. Enter a description for that format in the Description field (such as bank checks, subsidiary checks, cashier's checks). Enter the Width and Height for this check format. You can find the information for the width and height on the outside of the box your checks come in. For easier field alignment in the format area, an image of one of your checks can be placed in the background. You can scan and save one of your existing checks as an image in.jpg,.png,.bmp, or other image format. Click the browse button under Image Path (displayed below to facilitate check design) and find where you saved the check image. Note: The image is only for formatting purposes. This image will not appear on printed checks. The Current GoldTeller Check Printer field displays the default printer where the checks will be printed. If you want to change this printer, you will need to change your Windows default printer. For more information on how to change your default printer, see the <F1> help from your Windows desktop and search for "change default printer." Note: You must use a laser printer to print MICR encoded checks, because MICR encoding must be printed with a special magnetic ink only available for laser printers. (This is a legal requirement of the Check 21 Act.) Select the fields you want on the check grid by dragging and dropping the fields listed in the Available Print Field Labels box into the grid view, as shown below. Place the field where you want it to print on the check.

159 Once the field is placed on the check grid, you can manually drag on the sides and top of the field box to increase or decrease the size of the field. Or you can right-click the field box and manually enter the size of the box in the Width and Height fields on the Sizeable Label Properties, as shown in the following example.

160 To delete a field on the check grid that you no longer want, click it and then press the <Delete> key on your keyboard. Or right-click on the field box, and check the Remove this label from the form box on the Sizeable Label Properties box. C TIP: For graphical fields, such as a check logo image (WKIMAG) or a signature, you select where the system pulls the graphic by right-clicking the graphic field on the grid. This causes the Sizeable Label Properties box to be displayed, as shown below. Notice that the Path for logo image field is available (this field only appears for graphic fields). Click the browse icon and find the location of the graphic you want to use. Click <OK> and then <Print Preview> to see how the graphic looks on your checks. You can increase/decrease the size of the graphic box.

161 Continue adding fields to the check grid in the places you want those fields to print on the actual check. Note: You can add custom messages or labels by using the User defined text box, and then dragging and dropping that information into the grid, as shown below. This can be done multiple times to add any data you want to the check.

 was selected.")
162 When all fields have been added and the check looks correct, click <Save Format>. The <Create MICR> button is enabled when you click <Save Format>. 14. Click <Create MICR>, enter the MICR number that will print on the bottom of the check, then click <Save Format> again. For more information on this feature, see Create MICR Line. 15. Click <Page Settings> and select the page size for check printing. You can select either Letter (8.5 x 11") or Legal (8.5 x 14"). 16. Click <Print Preview> or <Print Test> to see what your check format will look like. In the example below, the field Display Grid Lines (1" bold) was selected. Now you can set up a check range to use this format and run transactions for these MICR checks.
163 163 See Also: Create MICR Line Creating MICR Check Ranges Set Option to Print MICR Checks Running Transactions for MICR Checks Create MICR Line Every check needs a MICR line, which is the line used to uniquely identify the bank and account number where the check comes from. MICR checks require special fonts to be downloaded to your PC, as well as special printers. Government regulations require that MICR fonts meet ANSI and ABA (X ) banking standards. If you do not currently have this font loaded on your PC, you will not be able to print MICR checks. For more information on how to download this font, contact your FPS GOLD banking consultant. The following is an example of where MICR lines are found on checks: To include the MICR line on a check format: 1. Click <Create MICR> on the MICR Check Form Design screen. The Create MICR Line dialog box is displayed, as shown below.

164 Enter the routing number used for your bank in the R/T Number field. Enter the Account Number you use to print checks for your bank. 4. Click the browse icon and select the MICR font you use to print checks. If a MICR font is not listed as one of the font choices, you need to add it by downloading it to your Windows font folder. Contact your FPS GOLD banking consultant if you need help finding a good font to use. Note: You can modify the font size as well, if needed. If you want to create a custom MICR line, click the Custom MICR Line box and then enter the number you want to use for the MICR line in the field below the Custom MICR Line checkbox. If you want the next available check number to come before the routing and account numbers, check the Check Number First box. The Sample MICR Line displays how this affects the MICR line. If the checks you are using have a different number of digits for the Check Number besides 4, enter that number in the Number of Digits field. Click <OK>. The MICR line will be displayed on the check grid of the MICR Check Form Design screen. Drag and drop the MICR line to where you want it to be on your checks

165 165 Creating MICR Check Ranges CIM GOLDTeller Functions menu > Administrator Options > MICR Check Form Designer In order to use CIM GOLDTeller MICR checks, you must set up check ranges for each type of check you designed on the MICR Check Form Design screen. One check type can have several different check ranges, if desired. Check ranges are set up by selecting Functions > Administrator Options > MICR Next Check Number in CIM GOLDTeller. See the following example of this screen: CIM GOLDTeller > Functions > Adm inistrative Options > MICR Next Check Num ber To set up check ranges: 1. Access the MICR Next Check Number screen (CIM GOLDTeller > Functions > Administrative Options > MICR Next Check Number, as shown above. 2. Click <Create New Check Range>. The New Range screen is displayed, as shown below. 3. Select the check format you want to set up a range of check numbers for in the list view box at the top of this screen. This list is populated when check formats are set up on the MICR Check Format Design screen. The Check Type and Check Sub-Type fields will reflect the check format you selected. 4. Enter the office number used for this check range. Each office can have a unique check range for the same type of check. Note: To make the check number range universal for all offices, use office zero (0). 5. Enter the initial check number to want to start with in the Check Number field. If this number is not included in the range of checks you enter in the Start and End Check Range fields, you will receive an error message that states this starting number must be within the range. 6. Enter the starting check number for this range in the Start Check Range field. 7. Enter the ending check number for this range in the End Check Range field. If this value is exceeded during the check printing process, CIM GOLDTeller will stop and require administrative actions to continue. 8. Click <OK>. The check range you set up will be displayed in the list view on the Get Next Check Number Admin screen. Locking/Unlocking a Check Number Range You can lock a check number or range of numbers to prevent it from being used for MICR checks until another administrator unlocks the check number or range.
166 166 To lock a check number range: 1. Select the check number range you want to lock in the list view. 2. Click <Lock Selected Check Item>. A locked check range is indicated by a red color in the list view, as shown in the example above. To unlock a check number: 1. Select the check number or range you need to unlock. 2. Click <Unlock Selected Check Item>. Increment and Unlock Checks You can also increment and unlock a check number. This should generally only be done if an error has occurred that requires a check number to be advanced and unlocked. This is an automated process that happens during check printing in CIM GOLDTeller. To increment and unlock checks: 1. Select the check range you want to increment and unlock from the list view. 2. Click the <Increment & Unlock Selected Check Item>. If a check error has occurred and a check sequence has been advanced by mistake, you can reverse (subtract) the check number and unlock the check number. To reverse and unlock a check number: 1. Select the check number or range you need to reverse and unlock from the list view. 2. Click <Reverse & Unlock Selected Check Item>. WARNING: Reversing and unlocking a check number should be done as a last resort to fix an error because it may cause an error in Check Reconciliation. Every effort has been made to perform this process during CIM GOLDTeller check printing if an error has occurred. Resetting a Check Number or Check Range Sometimes when preparing to print a MICR check in CIM GOLDTeller, the teller requests the next available check number, and that check number exceeds the bounds (the check range). In this case, check printing will be halted until it is fixed. The Reset Check Number and Range dialog allows you to reset a check number or range so that normal MICR check printing can proceed. To reset a check number: 1. From the Get Next Check Number Admin screen, select the check range you want to renumber in the list view. 2. Click <Reset Selected Check# and/or Range(s)>. The Reset Check Number and Range screen is displayed, as shown below.

167 Enter the new check number or the range of check numbers in the designated fields, then click <OK>. Note: If you are only resetting the check number, it is not necessary to adjust the check ranges. Deleting a Check Range You can delete a check number range, if necessary. WARNING: You cannot reverse the deletion. You should never delete active MICR check ranges. To delete a check number range: 1. Click on the Functions menu > Administrative Options > MICR Next Check Number. 2. In the Get Next Check Number Admin dialog box, select the range you want to delete. 3. Click <Delete Selected Check Range>. Or right-click and select <Delete Selected Check Range> from the pop-up menu. Refresh the Grid Click <Refresh Grid> to re-read and refresh all the current MICR check number setups.
 box to use MICR checks with Check Writer.")
168 168 Set Option to Print MICR Checks CIM GOLDTeller Functions menu > Administrator Options > PC Institution Settings, Settings Page Two In order to print MICR checks, you select an option on the PC Institution Settings screen, as shown below. Check the Use MICR Check Writer Feature (Online only) box to use MICR checks with Check Writer. If you also check the Only Allow MICR Checks to be Generated box, you will not be able to create any checks if you are offline. See Also: MICR Check Printing
. 2. Enter the parameters for the transaction, and then click <Send>.")

169 169 Running Transactions for MICR Checks With the MICR option turned on, your check format set up, and check number or ranges verified, you are ready to run transactions and print MICR checks. 1. In CIM GOLDTeller, process a transaction that requires a Check Out, such as the one shown below using Withdrawal (tran code 1130). 2. Enter the parameters for the transaction, and then click <Send>. Important Note: Do not enter the Check Out Number. If a check number is entered, the system assumes that a pre-printed check is being requested, and the MICR check printing will be bypassed. When this field is left blank, the system assumes you are processing a MICR check. If you know you will always be using MICR checks, you can remove all the Check Out Number fields from transactions (using the Transaction Design function). However, you need to consider what your procedures will be in the event of being offline when running transactions. After you click <Send>, the Select Form dialog box is displayed, as shown below.

170 Select the check format you want to use from the drop-down list, then click <OK>. Remember: Check formats are set up on the MICR Check Form Design. The formats set up on that screen are the ones displayed in this drop-down list. Click <OK> and Check Writer is displayed, as shown below. Notice that the Check Number field is not file maintainable. All other fields are open for file maintenance. 5. Complete the Check Writer details, then click <OK>. The check is printed as designated. A record of the check is sent to Check Reconciliation.
171 171 Printer CIM GOLDTeller Functions menu > Administrator Options > System Configuration > Printer Defaults tab This section explains how to set up your printers in CIM GOLDTeller as well as various features of the printing options. Printer Destinations in GOLDTeller (Operator Mode) Seven different types of documents are defined in GOLDTeller. They are Display, Document, Passbook, Receipt, Check, Envelopes, and Alternate Journal Print Destination. It is necessary to set up printer destinations for the seven types before you print from GOLDTeller. To set up printer destinations in GOLDTeller: 1. On the Functions menu, select Administrator Options > System Configuration > Printer Defaults tab. See the example below.

172 In the Destination field for the document type you want to set up, click the down arrow and select the Windows Printer driver you want to use from the drop-down list. Select Use Printer Codes if the document type requires additional setup information. If you do not need additional setup information, go to step 6. In the Printer Type field, click the down arrow and select the GOLDTeller printer you need to use from the drop-down list. If a Lexmark printer has been selected in the Printer field, enter a number (1 4), if required, or use the up and down arrows in the Light field to designate a number. The light number indicates which print job will be printed next. Repeat this process for the remaining six document types. Set the printer destination to "Display" for all document types not used. Click <Save> and then <Close>. Note: The Display document type should have its destination set to "Display." This will allow you to view other document types before actually printing them.
173 173

174 174 Remote Override Security > in the CIM GOLD tree view Remote Override allows a teller to send a transaction electronically to another employee for the override. To set up remote override security for system profiles: Click Security > in the CIM GOLD tree view. Select the System Profiles radio button, then click on the System tab. Select the a Profile Name in the list view on the left. On the System tab, click on the triangle at the left of FPS PC Applications. Select one of the radio buttons next to the "Chat/remote" option: N (No Access) I (Remote Override Access Only) F (Chat and Remote Override Access). Setting Up Teller Override Authority You can set up override authority for a teller when you add the teller to system so that the teller can accept a remote override from another teller. If an employee can receive and approve a remote override and does not use GOLDTeller, see the setup instructions in the CIM GOLDTeller document, page 15, for help in setting up the user. They must be signed on to CIM GOLD to be able to do overrides. To set up remote override authority for tellers: Click Security > in the CIM GOLD tree view. Select the Tellers radio button, then click on the Teller tab. Select the teller in the list view on the left.


175 On the Teller tab, enter "1" in the Remote Override Priority field. If the field is 0, no remote override will be sent to this teller. Click on the drop-down arrow for the Override Authority field and select the appropriate authority level. Security > Screen, Teller Tab Disabling Remote Overrides Sometimes a user who is set up to override transactions may want to suppress or stop overrides from coming to them. This is important when an officer goes to lunch or leaves their desk and won t be available. To disable remote overrides: 1. Click on Options in the main CIM GOLD menu bar at the top of the screen. 2. Select User Preferences. 3. Mark Disable Remote Override to deactivate overrides.

 and have the necessary override level.")

176 176 Requesting a Remote Override Upon sending a transaction that requires an override, a prompt will appear indicating that an override is required. If the user does not have the override level necessary to do the override, they can click <Remote Override>, which will provide a list of users who are available (signed into CIM GOLD) and have the necessary override level. Highlight the user in the list and click <OK>. The teller sending the transaction and requesting the override will see the following prompt: The user receiving the override request will see this prompt: The user then has a choice to look at the transaction and then enter their credentials to override it, or to ignore it. The prompts alert the users that they have 30 seconds before the override will time out.
177 177
178 178 How to... How to... The following sections give step-by-step instructions for common procedures using CIM GOLDTeller. Use Keystrokes Log On Log Off Run a Transaction
179 How to Use Keystrokes You can use keyboard shortcuts to perform some functions in CIM GOLDTeller. The following is a list of FPS GOLD keystrokes that are standard in CIM GOLDTeller. Keystroke Keystroke <Esc> Closes the active window (same as Cancel). <F1> Opens online help window. <F2> through <F7> Accesses (user-defined) speed key for a transaction. <F8> Reverses last transaction (displays last transaction with correction mode activated). <F9> Displays the Selection for Transaction Entry menu. <F10> Starts a customer session. <F11> Displays the Item List. <Shift> + <F12> Repeats last transaction with previous data (displays last transaction with data from previous transaction in the fields). See Also: Profile Speed Key Assignments
180 180 How to... Log On When CIM GOLDTeller is opened, a logon prompt dialog box opens. You must log on before you can do anything else. When you log on for the first time each day, you will need to enter your user name, security code (same code used for administrative mode so that you are logged onto the administrative mode at the same time), a cash drawer amount, and a foreign cash drawer amount, if applicable. When you log on after a temporary logoff, you will only need to enter your user name and security code. The Logon dialog also provides the ability to change your security code or the as of logon date. In addition, you can change the mode that you are working in to next day processing or offline mode, if needed. As of Date The As Of Date field on the Logon screen is accessible if your institution uses next day processing. Or you can use this option on all transactions for a given day. For example, if your institution is open on Saturdays for business, but you do not process on Saturdays, you can use this option to perform transactions on Saturday with Monday as the processing date. Next Day Processing The Next Day Processing option allows you to log on after a daily "cutoff time" or to work on Saturday with Monday processing. If you use this option, you will need an As of Date (greater than today's date). Transactions will be run offline, so you will need to forward all items the next day that you log on live. Logging on in Offline Mode The Logon In Offline Mode option allows you to log on to GOLDTeller and work within the program, but you will not be able to communicate with the host or have access to host-based functions (administrative sessions). See Also: Log Off
181 How to Log Off To log off of CIM GOLDTeller, click the <Log Off> button at the top right of the screen: The following dialog box displays: Select one of the available options, then Press <Enter> or click <OK>. The options are explained below. Note: These options are available only if they have been set in PC Institution Settings. Temporary Release: If you are leaving your workstation for an extended period of time, such as lunch, and are returning the same day, use this option to log off temporarily. Don't Clear Currency Fields: When this option is selected, tellers must enter cash amounts on the Cash Drawer - Counter screen at final sign-off. The Don't Clear Currency Fields box will be grayed out on the dialog box that appears when logging off, as shown below. This option is not used for temporary releases. This option was added to avoid any potential problems from forced balancing of cash. If this option is not selected, tellers have the option of not clearing out any of the currency fields on the Cash Drawer - Counter screen by selecting the Don't Clear Currency Fields checkbox. Use An Adding Machine: If this option is selected, the Cash Drawer screen that is shown when performing a final logoff functions similarly to an adding machine, so you can use your numbers pad on the keyboard to enter exact amounts. For example, if this option is not set, and you enter "1" in the 100's field, the system knows that the one means 1 hundred dollar bill, and adds up the number as "100" in the total. If this option is on, you would need to enter "100.00," and the system would total it as " " If you enter "1," the system assumes ".01" and displays an error, as shown below:
182 182 How to... See Also: Log On Teller Totals

183 How to Run a Transaction Transactions in CIM GOLDTeller vary depending on your institution options and on what kind of information is needed to run the transaction. The layout of the screen can also vary because your institution can design the screen. This section gives the steps for running a simple Cash Deposit transaction as an example of how to run a transaction. Before you run a transaction, select the customer's name by pressing <F9> or clicking on <CIS Search> on your toolbar. Select the customer name, which will populate the list of accounts for the customer and facilitate the processing of transactions. You can also just enter the account number on the transaction instead of doing a search. To run a Cash Deposit transaction: The numbers on the screen example below correspond to the following steps. 1. Select a transaction in the transactions list. 2. Double-click on the account you want to run the transaction on. 3. Enter the customer's identification number in the Soc Sec#/Federal ID field. If the customer is the IRS owner on the account, you not have to enter this data. TIP: You can copy and paste the number from the customer information section in the middle of the screen. 4. Enter the total amount of the transaction in the Tran Amount field. 5. Enter the Cash In amount. C Note: You can also enter a brief description of the transaction in the New Description field and check Passbook or Correction if they apply to the transaction. 6. When you have finished entering information, click <Send>. The receipt displays under the account information section in the middle of the screen.

184 184 How to... Note: On transactions 1450 (Card Payment) and 1460 (Card Advance), card numbers are masked in compliance with Payment Card Industry Data Security Standards. For more information, see FPS GOLD PCI Compliance. See Also: Currency Transaction Report Appendix D - Transaction Code Information in DocsOnWeb Multiple Transactions (F10)

185 How to Mass Loan Payments (600/50/0) Use the Mass Loan Payments screen to quickly process many transactions for many different accounts. This function is especially useful if your institution has one employee or a small number of employees responsible for entering loan payments on accounts. For example, if you receive many loan payment checks each day in the mail, an employee can use this screen to enter that information for each account. The Mass Loan Payments function allows you to perform loan payment transactions 600 (and 2600) and 690 and payments with principal decreases. With Mass Loan Payments, you can perform multiple loan payment transactions of the following types: Regular Payment Bulk Activity Payment Regular Payment with Additional Principal Spread Payment Spread Payment with Reserve Mail-in Payment Walk-in Payment Processing Mass Loan Payments You can add payments for multiple accounts at one time. However, you can only process one type of payment at a time. Once you select one of seven Payment Transaction types listed above, you must send all of the transactions of that type before you can select another type. To perform mass loan payment transactions: 1. Select "Mass Loan Payments (600/50/0)" from the Loans menu in CIM GOLDTeller: Note: If Mass Loan Payments does not appear in your transaction list, someone with security access will need to add it. See > Administrator Options > Menu Design for information on how to set up your transaction list. The Mass Loan Payments screen opens:

186 How to... In the Payment Transaction field group, select the type of transaction you want to run. If you are entering many transactions, group the transactions by type. For example, if you have a pile of loan payments that are from walk-in payments, mail-in payments, and regular payments, you would group the mail-in payments together and process those; then group the walk-in payments and process those; and then group the regular payments and process those. Hint: Select the transaction type first. If you enter account information first, and then change the transaction type, the system will ask you if you want to clear all transactions. You will either have to process the transactions with the transaction type that was already selected, or you will lose all the information you entered and be forced to enter it again using the transaction type you need. 3. Enter an account number in the Account Number field. 4. Enter the payment amount in the Tran Amount field. 5. Click on Check, Journal, or Cash to specify the method of payment. 6. If the payment is being made by check, enter the check number in the Check-In Number field. 7. Enter information specific to the transaction type you selected in Step 2: If this is a spread payment (tran code 690), enter the principal amount in the Principal field and the interest amount in the Interest field.

187 How to If this is a spread payment (tran code 690) and you need an extra field to enter another amount, such as escrow, click the Spread Payment With Reserve radio button. The Reserve1 field will appear below the Principal field. Enter the extra amount in Reserve1, if necessary. If this is a Regular Payment with Additional Principal Field transaction, enter the amount of the additional principal in the Additional Principal field. This field does not appear on the screen until you select the Regular Payment with Additional Principal Field radio button. Similarly, if you are running a Spread Payment or Spread Payment with Reserve Field transaction, enter the appropriate payment information in the Principal, Interest, and Reserve 1 fields. 8. Click <Add Tran>. Hint: If using the number keypad to quickly enter account information, press the <+> key. The information, including a running total in green, will be displayed on the right-hand side of the screen. The columns in the list view change according to the type of transaction. Note: If this is a spread payment (tran code 690) and the amounts do not add up when you click the <Add Tran> button, a message will display stating that the amounts do not add up. You must fix the amounts before you continue. The system will do a pre-test of a regular payment with additional principal before processing the transaction to be sure that both the payments and the principal decrease will work. If an override is needed, both the payment (tran code 600) and the principal decrease (tran code 510 field credit) will be rejected. 9. Enter any other payments of the same type that you need to enter. Note: After you click <Add Tran>, you cannot change the Payment Transaction type until you click <Send>. 10. Click <Send>. All the loan payments that can be processed without an override will be sent to the host and processed. When the transaction is finished, the screen will display accepted and rejected loan payments. If a payment is rejected, the reason displays in the Status column. See the following section for information on handling rejected transactions.
188 188 How to... You can pprint a report of the transactions by clicking either <Print Bank Report> or <Print Tran Report>. 11. When you have completed processing a group of accounts and want to begin processing another group, click <Clear All Trans>. A warning dialog box opens. If you click <Yes>, the screen will become blank and return to default settings. Handling Rejected Transactions Loan payments that require a teller or supervisor override will reject. You can either click <Remove Tran> to delete a rejected payment or process an override. WARNING: Checking one of the override checkboxes will post all pending transactions in the list view with the override; you can't select one at a time and send them individually. To process an override: 1. Click the TOV checkbox for teller override or SOV checkbox for supervisor override. 2. Click <Retry Rejects> and then <Send>. The Override Required dialog box opens. 3. Enter the necessary information. Note: If you know beforehand that certain items will require an override, it would be faster to process those items together in a separate batch (for instance, payments that have been sent from the collection department). You can print a report of all rejected items by clicking <Print Report>. Loan Payment Notes When posting a payment on a loan that is two or more payments past due for this tran code, the system requires a teller override (TOV). For contract collections, late charges included in the regular payment are shown in the seller history as a separate item. If a correction transaction is processed on the same day and for the same amount as the 600 transaction regular payment, both transactions are cancelled. Otherwise, the correction will show on the Afterhours Processing Exceptions Listing (FPSRP013). When posting a payment on a payment method 5 loan that is higher or lower than the actual amount, the system will require a TOV and display one of the following messages: "TOV AMT TOO LOW -- PMT IS $XXX.XX" or "TOV AMT TOO HIGH -- PMT IS $XXX.XX." For payment methods 0, 1, 2, and 7, when posting a payment on a loan that has received a partial payment, the system requires a teller override (TOV). When making a reversal of a payment tran (600), if one or more 500s and/or 510s were posted after the payment was posted, all the 500s and 510s must be reversed prior to the reversal tran (608). If one or more 500s and/or 510s were posted and you only want to reverse one particular transaction (and not the payment), you don't have to reverse all of the transactions posted after that transaction,just that transaction itself. Options: The following institution options are available when posting loan transactions: OPT 8 BSOV: Allows you to bypass the supervisor override when posting payments for payment method 6 where the borrower pays more than the scheduled amount (if the loan has not been sold to an investor). OPT Y CFEE: Requires a TOV when posting a payment if miscellaneous fees are due on the loan. (This option is available for all payment methods.) OPT Y BTOV: Stops the requirement for a TOV when posting a loan payment for an amount greater than the payment amount. This was created for processing mass payments; however, it also works with regular loan payments. (This option is only available with payment method 5 loans.)
189 How to OP01 BKPM: Bankruptcy (Hold Code 4 and 5): o Allows a principal decrease (tran code 510/518) o Allows a principal increase (tran code 500/508) o Allows a pay-off (tran code 580) o Allows a loan payment (incl. auto payments) (tran code 600/608) o Allows a "teller spread" payment (tran code 690/698) o Allows payment of late charges (tran code 550/558) o Allows waiving of late charges (tran code 570/578) o Allows VSI Add (tran code 870/878) o Allows VSI Cancel (tran code 890/898) o Allows assessing of misc. fees (tran code 660/668) o Allows a payment of misc. fees (tran code 850/858) o Allows waiving of miscellaneous fees (tran code 670/678) o Allows a partial payment (tran code 510/508 to field 33) o Allows an automatic payment OP01 PIWD: Allows interest to be paid only in full-day increments for payment method 6 loans. If this option is set, when a payment is posted (600 transaction code only), interest will only be paid in full-day increments. For example, if the per diem is $5.50, only multiples of $5.50 would be paid to interest ($5.50, $11.00, $16.50, etc.), up to the full amount of interest owed. Any remaining amount will be applied to principal. If the amount paid is less than the per diem, no interest will be paid. The result of this option will be a more accurate Date Last Paid To. Example: Given: Principal balance: $3, Loan rate: % Interest base: 365 Per diem: $3.14 Interest for 30 days: $97.34 P/I constant: $ A payment of $ divided by the per diem of $3.14 will be 31. The per diem multiplied by 31 is $ The remainder of the payment ($2.66) will be applied to the principal. OP02 APCO: Charge-Offs (Hold Code 2): o Allows a loan payment (including auto payments) (tran code 600/608) o Allows a "teller spread" payment (tran code 690/698) o Allows payment of late charges (tran code 550/558) o Allows waiving of late charges (tran code 570/578) o Allows VSI Add (tran code 870/878) o Allows VSI Cancel (tran code 890/898) o Allows assessing of misc. fees (tran code 660/668) o Allows a payment of miscellaneous fees (tran code 850/858) o Allows waiving of miscellaneous fees (tran code 670/678) o Allows an automatic payment OP03 ACCO Charge-Offs: (Hold Code 2): o Allows a principal decrease (tran code 510/518) o Allows a principal increase (tran code 500/508) o Allows a pay-off (tran code 580) OP03 PM07: Allows you to bypass the supervisor override when posting payments for payment methods 0 and 7 where the borrower pays more than the scheduled amount (if the loan has not been sold to an investor).
 When you process a Retirement Distribution (transaction code 1230), the withholding amount displays on the GOLDTeller screen so you can use it to balance the")
190 How to Retirement Distribution (1230) When you process a Retirement Distribution (transaction code 1230), the withholding amount displays on the GOLDTeller screen so you can use it to balance the transaction. Example: A customer wants to withdraw $ from their retirement account. To process this transaction: 1. Enter the Transaction Amount on the transaction, then click <Calculate Withholding>. The following dialog box is shown after the withholding is calculated using the settings on the account. 2. Ask how much the customer wants. In this example, there are two options: the withholding can be computed on the $ withdrawal amount, to give the customer $ ; the customer can receive the net of the withholding, which is $ As you can see, the withholding amount is different based on the Amount to Customer. 3. Select the appropriate amount in the dialog box. The Tran Amount field and the new field Calculated Withholding are prefilled. 4. Tellers should enter the amount to the customer from the dialog box above in the Cash, Check, or Journal Out fields to make the transaction balance. See the following example.

191 How to Note: We recommend that tellers click the <Calculate Withholding> button on the transaction for every distribution. You can require tellers to click it before they can proceed with the transaction. To do this, check the Force Calculate Withholding Button on 1230 Transaction field (GOLDTeller Functions menu > Administrative Options > PC Institution Settings > Settings Page Two, Miscellaneous field group). See the following example.

192 192 How to...
193 How to Automatically Close Cards When Closing Deposit Account When a deposit account is closed, the system will find and close all cards to which that account is linked, if there are no other open accounts tied to the card. If there are cards that cannot be closed, the transaction will be canceled, and you will need to handle them manually.
194 194 How to... Use Receipts CIM GOLDTeller allows you to receipts to customers rather than printing paper receipts. You must be using the new address record in order to use this feature. Institution Option P0E0 (Use New Addresses) must be set. To use the new address record, a conversion must be processed on your CIS file. Contact your Account Manager for more information. Once this conversion is completed, you can set an additional Institution Option to begin using the receipts feature at your bank. CIM GOLD version 15.1 or higher must be installed. Note: A printer must be selected in your GOLDTeller Receipt Printer configurations. receipts will not work if you print to your display. Institution Option (EMRT- Receipts) must be set to allow tellers the option to receipts to your customers. Second receipts will still be printed as they currently are. A check box, Receipt?, will be shown on the bottom of each teller transaction that requires an account number. An option to automatically check this field on all transactions is found in PC Institution Settings Page Two. Address Rules The addresses of the SSN entered on the transaction or the addresses of the Account IRS Owner will be presented to the teller in a drop-down list. After a conversation with the client, the teller must select one of the addresses from the list. o addresses cannot be entered during the transactions. Only addresses on file can be used. o If there are no addresses on file for the customer, a message displays. The transaction continues, and regular receipts will be printed. o If the teller is set up to display receipt information, no addresses will be presented. Sender Information Alert #209 will be used for the receipt transaction . Your institution can design how you want the receipt to look. Your institution can use the transaction data below in the message: o Account Number o Transaction Amount o Cash/Check/Journal Amounts o Date and Time o Journal Record Number o Teller Number o Address o Transaction Type: Deposit Withdrawal Transfer Payment Etc. The ed receipt will follow the format of the Alert Systems Template. Your institution can customize the following sections: o subject line; o header info; o other customized advertisement type information.
195 How to Journal Information All receipt information will still be saved in the Journal Record. You can reprint receipts from the Journal File, but you cannot resend s from the journal. Sample The following is an example of a typical receipt: There has been activity to your account <accountnumber> <transactiontype> Record Teller Date Time <recnum> <teller> <MM/DD/CCYY> <HH:MM:SS> Transaction Amount <tranamount> Cash In <cashin> Cash Out <cashout> Check In <checkin> Check Out <checkout> Journal In <journalin> Journal Out <journalout>
196 196 Functions Functions CIM GOLDTeller Functions menu Each of the functions listed under the Functions menu in CIM GOLDTeller is described in the following sections. Clear CIS Search Information Go Back to Interrupted Transaction Interrupt a Transaction Item List Print Output Display Repeat Last Transaction Repeat Last Transaction and Fields Reprint Receipt Reverse Last Transaction Administrator Options Operator Functions Print Functions Teller Total Functions Check Writer Currency Transaction Report Journal/Forwarding Notice of Delayed Availability OFAC Calculator Display GOLDTeller32 CIM Version Display GOLDTeller 32 CIM What's New Display Keyboard Shortcuts Test Override PC Calculate Check Digit

197 Functions 197 Clear CIS Search Information CIM GOLDTeller Functions menu > Clear CIS Search Information Select this option to clear the fields in the Personal Information field group, as shown below. This clears any CIS search that was entered, and you can search and select another customer for whom you'd like to run a transaction, as explained in the CIS Search topic.
198 198 Functions Go Back to Interrupted Transaction CIM GOLDTeller Functions menu > Go Back to Interrupted Transaction Select this option from the Functions menu and the system bring up an interrupted transaction just as you last left it. This function only works if you have already interrupted a transaction, as explained below.

199 Functions 199 Interrupt a Transaction CIM GOLDTeller Functions menu > Interrupt a Transaction You may have occasions when you need to interrupt a transaction and do something else before returning back to the transaction to complete the process. If you select the Interrupt a Transaction function (or press <Ctrl> + I) while a transaction is displayed, the system will freeze the transaction you are working on, thereby allowing you to access a different transaction in CIM GOLDTeller or access a different screen in CIM GOLD. To indicate that a transaction has been interrupted, a yellow-highlighted "I" will be displayed at the top of the transaction list in GOLDTeller, as shown below. To return to the transaction, press <Ctrl> + B (or select "Go Back to Interrupted Transaction" from the Functions menu).

200 200 Functions Item List CIM GOLDTeller Functions menu > Item List Select the Item List function (or press <F11>) to bring up an easy-to-enter ledger that tracks and totals monetary denominations or journal entries deposited with a transaction. It is required on the Multiple Transaction mode. If you use MICR checks, the Checks Out Nbr field is not on the screen. See the example below. If your institution requires a description on check transactions , enter the description in the New Description field. (A description is required if your bank uses Institution Option BDSC, Require Description on Check Transactions.) See Also: Creating MICR Checks for Use in CIM GOLDTeller Run a Transaction
, or right-click the Output Display and select \"Print.")
201 Functions 201 Print Output Display CIM GOLDTeller Functions menu > Print Output Display If you want to print the transaction information that is displayed in the Output Display box after a transaction has been run, select "Print Output Display" from the Functions menu (<Ctrl> + P), or right-click the Output Display and select "Print." The Print Output Display dialog box is displayed, allowing you to select how you want to print the information: to a Windows printer, document printer, a receipt printer, or more, as shown below: The paths for these printers are entered on the Printer Defaults tab on the System Configuration screen.
202 202 Functions Repeat Last Transaction CIM GOLDTeller Functions menu > Repeat Last Transaction Select this option or press <F12> to perform the last transaction that was last run. All fields will be blank on the transaction. See Running Transactions for more information. C TIP: Pressing <F12> again will place the data entered in the first field on the previous transaction in this transaction s first field. Each time <F12> is pressed; the next field will be filled with the data entered in the previous transaction. This is similar to the Repeat Last Transaction and Fields function (see below).
203 Functions 203 Repeat Last Transaction and Fields CIM GOLDTeller Functions menu > Repeat Last Transaction and Fields Repeat Last Transaction and Fields (<Shift> + <F12>) causes the previous transaction to be shown with the fields populated with the previous transaction s data.
204 204 Functions Reprint Receipt CIM GOLDTeller Functions menu > Reprint Receipt After a transaction has been processed, before another transaction is performed, a copy of the receipt can easily be reprinted by pressing <Ctrl> + R. To reprint a receipt for a transaction performed prior to the last transaction, use Journal Forwarding to identify the desired transaction.
205 Functions 205 Reverse Last Transaction CIM GOLDTeller Functions menu > Reverse Last Transaction Reverse Last Transaction (<F8>) causes the last transaction performed to appear with the Correction field checked (or not checked, if correcting a correction).
206 206 Functions Administrator Options CIM GOLDTeller Functions menu > Administrator Options The functions under Administrator Options require special security. These options are for administrators to set up menus, transactions, options, and other important conditions needed for employees to use GOLDTeller. See the following links for more information on each of these functions: Account Signatures Form/Font Configuration Menu Design PC Branch Settings PC Institution Settings Print Form Design Profile Speed Key Assignments System Configuration System Field Dictionary Transaction Design View/Modify Droplists MICR Check Form Designer MICR Next Check Number
207 Functions 207 Operator Functions CIM GOLDTeller Functions menu > Operator Functions Click List Operators to open a list of all the employees who can use CIM GOLDTeller. Click Operator Information to open the Operator Information dialog.


208 208 Functions Print Functions CIM GOLDTeller Functions menu > Print Functions Use these functions to set up print defaults. Print Check Endorsement Enables a user to print a check endorsement for your institution. This function can be repeated for multiple checks. Print Custom Label Provides an interface for a user to quickly enter and print custom label information. Print Envelope Prints envelope labels for loan and deposit accounts. Print Non-Transaction Receipt Enables a user to easily and quickly print a non-transaction receipt.

209 Functions 209
210 210 Functions Teller Total Functions CIM GOLDTeller Functions menu > Teller Total Functions At the end of a day, teller totals are taken. This can only be done when a final release is performed. To print or view teller totals: 1. To log off of CIM GOLDTeller, click the <Log Off> button at the top right of the screen: The following dialog box displays: 2. Deselect Temporary Release. 3. Select Use An Adding Machine. 4. Click <OK>. The Adding Machine screen displays:

211 Functions Click <OK> on this screen. The Balance Sheet screen displays:

212 212 Functions 6. Select Print Teller Totals. 7. Click <OK>. The teller totals will print. See Also: Log Off

. 6. Click <OK>. The check will print.")
213 Functions 213 Check Writer CIM GOLDTeller Functions menu > Check Writer This function allows you to print checks on the check destination printer without creating a transaction. 1. Select "Check Writer" from the Functions menu. The Select Form dialog will display. 2. Click the down arrow and select a check form from the drop-down list. 3. Click <OK>. The Check Writer dialog will display. 4. Fill in the appropriate information for the check type. This information will be transferred to the actual check. 5. Click <OK>. The check will print to the check destination. If the check destination is a printer, the Ready to Print Check dialog will display (if option is turned on). 6. Click <OK>. The check will print. Note: FPS GOLD suggests that this function be secured and only used when a reprint of a check is required. No audit trail is created for this function, and no corresponding transaction is processed.
214 214 Functions Currency Transaction Report CIM GOLDTeller Functions menu > Currency Transaction Report The Currency Transaction Report totals all currency transactions made during the day for each Social Security number. It must be filed by your institution online using the BSA website or through Verafin. All accounts that have the same IRS owner Social Security number will be combined. Once you fill out the information on this screen, you can click <Print Preview> to view the information in its finished form. This screen will also be enabled automatically if the customer is over limit when transactions are processed. To open the Currency Transaction Report screen, select "Currency Transaction Report" from the CIM GOLDTeller Functions menu. See the examples below. Part I Teller System > GOLDTeller > Functions > Currency Transaction Report The following notes apply to Part 1: If no Social Security Number is entered on the transaction, Box 2a will be marked.

215 Functions 215 If multiple accounts have been posted to, Box 3 will be marked. There is no limit to the number of names on this form. The system populates Box 18 with the first contact phone number found in this order: home, cell, work. The Alien Registration field for Item 20 is the same as the Non-Citizen ID. If the state entered in the Issuing State field for Box 20 is in the United States, then the Country field will be populated automatically. Account numbers are repeated for both Box 21 and Box 22 when deposits and withdrawals have been processed for the same SSN. Up to 30 accounts can be printed on the form. Part II Currency Transaction Report, Part II The following notes apply to Part II: Box 23 is the Transaction Date. Box 24 is not populated by FPS GOLD.

216 216 Functions Boxes 25a, 27a, and the Total Cash In and Total Cash Out are populated by FPS GOLD. Boxes 25a e and 27a e (highlighted in the example above) are file maintainable. You can move the cash amounts to the appropriate category. FPS GOLD has not programmed for all transaction codes. 26 and 28 are based on the teller transaction for foreign cash. You can add an unlimited number of accounts to other names on the report. Part III Currency Transaction Report, Part III The following notes apply to Part III: Items (out of order on the form) are populated from PC institution settings. Items 40 and 41 are populated from branch settings. Adding Additional Names to the Form

217 Functions 217 You can add additional names to the form using the account entered on line 20. A button in the top right corner of the screen, <Account Name Search>, will be enabled when an account number is entered on the form. (See the example below.) If you add additional Cash In and Cash Out amounts on lines 21 and 22, you will need to manually add them to Part II of the form. Fields b, c, d, and e are open for file maintenance for lines 25 and 27. To use this feature, complete the following steps: 1. In line 20, enter the account number to be used. Note: Once an account has been entered, it cannot be changed. If it is left blank and cash in or out is entered, you cannot add an account. 2. Select the proper name sequence in the Name Seq field at the top right corner of the screen. 3. Click <Account Name Search> to get the list of names linked to the account entered in Step Double-click the appropriate name on the Names Linked to Account dialog. All the current CIS information will be automatically populated on the form for the name sequence selected. Currency Transaction Report Account Nam e Search Requirements Banks and other financial institutions are required to file a Currency Transaction Report for each transaction involving more than $10,000 in cash. The IRS requires all Currency Transaction Reports to be filed with them within 15 days of receipt. However, some persons and entities are exempt from this rule, such as the following: another bank in the United States;
218 218 Functions any federal, state or local government (including the District of Columbia, U.S. territories and possessions, and various tribal government authorities); any listed corporation whose stock is traded on the New York Stock Exchange or the American Stock Exchange (Excluding stock listed on the Emerging Company Marketplace of the American Stock Exchange); any listed corporation whose stock is designated as a Nasdaq National Market Security listed on the Nasdaq Stock Market (excluding stock issued under the separate Nasdaq Small-Cap Issue heading); or any consolidated subsidiary of a listed corporation that files combined federal income tax returns. Please review your institution s requirements for creating and sending a Currency Transaction Report. Note: Foreign cash in and cash out are not captured for this report. For more information concerning the Currency Transaction Report, visit the IRS website. Institution option (NCTR, New CTR Form) must be set to use this form. The cumulative total of cash transactions throughout the day should be logged by the Social Security number of the person conducting the transaction at the teller window. If your tellers do not enter the SSN for the person, the IRS owner on the account will be logged as the one doing business. We suggest you review your policy and procedures to make sure you are in compliance. You may need to add the SSN field to your teller transactions in order to use it. The following 33 transactions currently have this field on them: 1120, 1130, 1190, 1400, 1400, 1400, 1400, 1410, 1410, 1410, 1420, 1420, 1420, 1430, 1430, 1430, 1430, 1440, 1440, 1440, 1450, 1450, 1460, 1460, 1480, 1480, 1490, 1490, 1490, 1490, 1490, 1800, DEP Deposit WDR Withdrawal CLS Close CCN Check Cash No Hold CCO Cash Check On-Us CCH Cash Check-Hold OTC Hold On-Us MON Money Order AMO Account Money Ordr MOF Money Order F/M TCK Travelers Check ATC Acct Travelers Chk TCF Travelers Chk F/M ECK Exchange Checks AEC Acct Exchange Chks ECF Exchange Check F/M ECK Exchange Checks/2 CCK Cashiers Check ACC Account Cashrs Chk CCF Cashiers Check F/M CCP Credit Card Pay CPC Credt Crd Pay-Acct CCA Credit Card Adv. CAC Credt Card Adv-Acct BND Bond Cashing BND Bond Redemption XCT Exchange To U.S. XCF Exchange Fm U.S. XWD Exchange Withdrawal XDP Exchange Deposit XFC Xchg Frgn To Frgn GLD G/L Debit
 was created to allow your institution to set the CTR form limit.")
219 Functions , GLC, G/L Credit Note: On transactions 1450 (Card Payment) and 1460 (Card Advance), card numbers are masked in compliance with Payment Card Industry Data Security Standards. For more information, see FPS GOLD PCI Compliance. Institution option (CTRA, CTR Amount) was created to allow your institution to set the CTR form limit. Previously, the limit was cash amounts over $10,000.00, but you can now set it at a lower limit if you want to gather customer information for the form before the required $10, limit. If you want to set these two options for your institution, please submit a work order. The data fields that are required on the form are populated automatically from the CIS file based on the SSN. If no SSN is entered on an account transaction, the IRS owner information will be used. The physical address tied to the customer will be used; if one is not available, the address information on the form will be left blank. We will add addresses, phones, and other data to the form when it is available. Some of the fields present on the form are not available on transactions or on our system, so they have been disabled. The following example of the PC Institution Settings dialog, CTR & Cash Dispenser Defaults tab shows the new fields highlighted. PC Institution Settings Dialog, CTR & Cash Dispenser Defaults Tab (Functions > Adm inistrator Options > PC Institution Settings) The fields highlighted on the screen above need to be filled out to pre-populate the bank information on page three of the CTR form. Note: Tellers can minimize this screen if they need to access another transaction before finishing the document.

220 220 Functions The CTR form enters branch information using the PC Branch Settings dialog. The name of the office and the phone number are used on the CTR in fields 40 and 41. See the following example. PC Branch Settings Dialog Box

221 Functions 221 Journal/Forwarding CIM GOLDTeller Functions menu > Journal / Forwarding Journal Files Each transaction that has been processed through the CIM GOLD, GOLDTeller system is tracked and recorded through PC files called Journal Files. Journal files are located either on the DB4Server or on the individual PC where those transactions were performed. System Configuration controls where the journal files will be placed through the following marked path: Journal files can be available for any number of days your institution can store. Each institution can choose to extend these days by changing the setting in PC Institution Settings. The journal files are named using an individual teller s number and the date transactions were performed. To access GOLDTeller, Journal Files, select Functions from the Tool Bar. From the Functions drop-down menu, select Journal / Forwarding or use fast keys Ctrl + J. This will open the Journal Log dialog box. My Today s Transactions: The Journal Log will allow the current user to view a summary of his or her transactions for the day by selecting <My Today s Transactions>. This selection is a standard predefined selection. You can set up a variety of selections based on what your tellers need for balancing throughout the day. Print Report: Facilitates the printing of any selection of Journal Report to a specified printer Print Preview: Generates an online preview of the selected journal report Print Check In Detail: Check this box to print the F11 item list checks on the report selected.


222 222 Functions Print New Description: Check this box to print the transaction description entered by the teller at the time of the transaction. Forward All: Forwards all transactions, performed in an offline status, to the host. Edit Selections Selecting "Edit Selections" opens the Journal Scan Information dialog box. This box allows the user to alter/vary from the default selection options. The default settings, which "My Today s Transactions" uses, include all online and offline transactions done during the current day. If you want to set up additional Journal Selections, type a new name in the Selection Name field, update the needed selection parameters, and click <OK>. This will save this new selection as a future choice option. The example below shows a selection being created to include only transactions done offline.


223 Functions 223 Journal Log The Journal Log dialog box lists all transactions that fall within specified parameters.
224 224 Functions In most cases, you will select "My Today s Transactions." Once those transactions have been listed, you can then highlight a specific transaction. To view the transaction detail, you can also right-click on the transaction, which will open a pop-up menu. This pop-up menu allows the user to do the following tasks: Correct Transaction: Populates original transaction detail with the offsetting "Correction" box automatically marked or unmarked, depending on whether the original transaction was a correction itself. Forward Transaction: If the highlighted transaction was done in an offline setting, this option will forward only this transaction to the host. Other offline transactions will not be forwarded. Selecting "Forward All" in the Journal Log will forward all offline transactions. Repeat Transaction: Original transaction detail is populated into the transaction detail screen for immediate use. Show Cash Counter: This option allows you to view a screen where the teller's cash has been entered. This data will stay in the record until it is cleared out. Show Item List: If an item list was used for the highlighted transaction, this option will display those entries as they were originally entered.

225 Functions 225 Non Customer Transaction Log The names on this log are used to screen non-customer transactions against your institution's FinCEN 314a file. This log is a way for you to keep track of transactions performed for individuals that do not include an account and get them screened as required. An example of this kind of transaction is cashing a check for a non-bank customer without using an account number. Other examples include money order purchases, cashier's checks, and so forth. The screen pre-fills some of the information from the last transaction the teller ran. The columns on the screen are as follows: Date: This is the date of the transaction to add to the log. Time: This is the time of the transaction to add to the log. Tran Code: This is the transaction code. Tran Mod: This is the transaction modifier. Description: This is the description of the transaction. Tran Amount: This is the total amount of the transaction. Teller: This is the number of the teller who performed the transaction. Payor Name: This is the name of the person from whom you received checks or cash for the transaction. Payee Name: This is the name of the person to whom checks or cash was paid by the transaction. If you do not access this screen after the transaction, you can manually enter all the data for the transaction. The FinCEN List The FinCEN list follows slightly different rules. This list is only made available to banks. The bank receives a 314a request, usually every two weeks, but possibly more or less than that. They have 14 days to report the results of the search. The search should only occur once for a specific FinCEN list. The search must include a search of accounts on file for up to 12 months, and of transactions that are not linked to an account for the last 6 months. The FinCEN list is not guaranteed to be nationwide and may be regional. Therefore, banks may not all receive the same list. Accordingly, we will have each bank upload its own FinCEN list, and we will process it when we receive it. Each bank will search its own list. A screen is available in CIM GOLD to enable you to upload your bank's FinCEN314a list. Found under Miscellaneous/FinCEN 314a. Once you download the file, you can process a screening against your noncustomer list and CIS. These files will be screened each time they are loaded.
226 226 Functions There is a GOLDTeller function available to facilitate the entries of 314a transactions for non-customer transactions. Institutions may use the FinCEN list to assess risk before opening accounts, but are not required to do so. For our purposes, new account OFAC searches will not search the FinCEN list. Requirements for Record Retention Banks must keep the following information about each FinCEN list to verify that they are in compliance with FinCEN reporting: date of the request; tracking numbers within the request; date the request was searched. If positive matches, also keep the following information: the date matches were reported; the accounts and transactions that were identified in the match process. This information must be kept for five years.
227 Functions 227 Notice of Delayed Availability CIM GOLDTeller Functions menu > Notice of Delayed Availability This function allows the manual printing of the Availability Form. The notice informs the customer that the check(s) deposited will not be available until a certain time designated by your institution. The notices can be printed for various reasons, including: Accounts that have been overdrawn excessively Checks deposited in one day exceed $5000 Check is deposited into a new account An emergency, such as failure of computer equipment, has occurred.

228 228 Functions Transactions with Uncollected Funds Holds will automatically cause the Notice of Delayed Availability dialog box to be shown. The dialog box will be shown after the deposit transaction has been processed and receipts have been printed. All fields on the notice, except the Account Number and Date, can be file maintained. The TO: box is filled with the standard mailing label information used for statements and forms. The FROM: box is filled with the PC institution Option information for the CTR Form. The Amount and Day fields are filled using your intuition s uncollected funds rules.
229 Functions 229 The following options apply to the Notice of Delayed Availability: Institution option NHEX: Prints only the Exception/Extended section of the notice Institution option PNDA: Prints both the case-by-case and Exception/Extended sections of the notice. Institution option NHEX and PNDA: Prints the notice only for transactions run with Exception/Extended uncollected funds.
230 230 Functions OFAC CIM GOLDTeller Functions menu > OFAC The Office of Foreign Assets Control publishes a list of individuals and companies owned or controlled by, or acting for or on behalf of, targeted countries. It also lists individuals, groups, and entities, such as terrorists and narcotics traffickers. Customer name information can be quickly weighed against this list for possible matches. Access the OFAC application by selecting OFAC from the Functions menu or by pressing <Ctrl> and <O> simultaneously.

231 Functions 231 Calculator CIM GOLDTeller Functions menu > Calculator Calculations can be performed by selecting "Calculator" from the Functions menu. Calculations can be typed, using the keyboard or numeric keypad, or performed with the mouse through point-and-click commands.
232 232 Functions Display GOLDTeller32 CIM Version CIM GOLDTeller Functions menu > Display GOLDTeller32 CIM Version Select "Display GOLDTeller32CIM Version" to quickly view and identify the version currently installed on your machine.
233 Functions 233 Display GOLDTeller 32 CIM What's New CIM GOLDTeller Functions menu > Display GOLDTeller 32 CIM What's New Select "Display GOLDTeller32CIM Whats New" to quickly view the latest changes to CIM GOLDTeller.

234 234 Functions Display Keyboard Shortcuts CIM GOLDTeller Functions menu > Display Keyboard Shortcuts A list of common keyboard short cuts can be quickly referenced by selecting this function or by pressing <Shift> and <K> simultaneously. This list of common shortcuts can also be printed, by pressing <Print> on the Display Keyboard Shortcuts dialog box, for convenience.
235 Functions 235 Test Override CIM GOLDTeller Functions menu > Test Override This function allows you to check the override function.

236 236 Functions PC Calculate Check Digit CIM GOLDTeller Functions menu > PC Calculate Check Digit The check digit of an account number can be quickly calculated by selecting "PC Calculate Check Digit" from the Function menu.

237 Options 237 Options CIM GOLDTeller Options menu The items on the CIM GOLDTeller Options menu allow you to set up defaults for transactions and printing. Enable Ready to Print Dialog: A function in GOLDTeller brings up a dialog box every time something is printed from GOLDTeller. The dialog states "Ready to Print Display." The item will not be printed until you click <OK> on this dialog. This gives you time to make the necessary preparations for printing, if needed. Display All Print: Displays all documents that are sent to the printer in the Output Display. Automatically Fill Account List: When you enter the account number on a transaction, all accounts for the IRS owner will be shown automatically in the account list. Multiple Transaction Balancing Display: The Balancing Display dialog box will automatically be displayed when <Send> is clicked for a transaction. Skip Receipt Print on Forwarding: If you select this option, a receipt will not automatically print when you complete a transaction.

238 238 CIS Search (F9) CIS Search (F9) CIM GOLDTeller CIS Search menu Click on the CIS Search menu heading at the top of CIM GOLDTeller to open the Customer Search dialog box and quickly find a customer. You can search by a number of categories. See the example below Type enough information in the Search field to narrow the search sufficiently. Select the search category from the drop-down list. Click <OK>.
239 Multiple Transactions (F10) 239 Multiple Transactions (F10) CIM GOLDTeller Multiple Transactions menu Use Multiple Transactions when you will be processing more than one transaction for a customer with one funding type, such as a check. Example: a deposit to a savings account and a loan payment. If your institution uses MICR checks, this function is not allowed for Check Out transactions when you are offline. You do not enter check numbers in the Check Out fields at any time when using MICR checks. Running Multiple Transactions To run multiple transactions: 1. Select Multiple Transactions from the CIM GOLDTeller tool bar or press <F10>. See the example below. Note: If the Multiple Transactions option is not activated at the top of your tool bar, you must submit a work order and have FPS GOLD turn on the option (MTRN) before it will be made available Select the customer's name by pressing <F9> or clicking on <CIS Search> on your toolbar. Selecting the customer name will populate the list of accounts for the customer and facilitate the processing of transactions. Under Total Amounts F11 For Item List, input any Cash In or Out totals, as well as Checks. Press <F11> if you want to open the Item List and enter detailed input amounts. See the example below.
.")
240 Multiple Transactions (F10) The total transaction amount is now seen (in the example above, Use 1,132.33). After you enter the Cash In/Out and Checks In information, use the Transaction Menu to select the transaction to allocate the monies (such as Use 1,132.33). Note: You need to add any necessary hold amounts for the check items deposited before you begin processing individual transactions. Enter any Local Hold or Unspecified amounts in the designated fields. In the example below, a loan payment transaction (600 / 0 / 0) was selected, and the account number and payment amount were entered.

241 Multiple Transactions (F10) Once the loan payment transaction information has been entered, click <Add>. This will put the loan payment transaction below in the transaction queue. Also, the amount to be allocated has been reduced by the loan payment, leaving $65.84 to be used. 8. Select the next transaction from the transaction menu on the left of the screen. 9. Enter the transaction information and click <Add>. If any funds are left to be allocated, the amount will be shown as Use If the transactions total more than the amount the customer gave you, it will be shown as Get When all transactions balance, the <Send> button will become active. 10. To process the transactions, click <Send>. If the option "Multiple Transaction Balancing Display" is checked (under the Options menu at the top of the screen), the Balancing Display will automatically be displayed when <Send> is clicked. 11. Click <OK> again to process the transactions.


242 242 Multiple Transactions (F10) Notes on Using the Multiple Transaction Balancing Display Each individual transaction submitted that involves an override will require the override information to be entered, so you may have to enter this information multiple times. An individual receipt will print for each transaction that was added during the Multiple Transaction process. If it is determined that a correction needs to be made, a correction must be processed for each individual transaction. The Multiple transaction cannot be used. Journal Forwarding: A transaction number is assigned to each transaction in the list and will include an additional sequence number for each of the individual transactions. In the example below, notice that transaction #4 has three individual transactions listed as 4.1, 4.2, and 4.3. To delete a transaction that has been added to the transaction list: Hover your cursor over the transaction and [right-click] to display a new menu. Click <Delete Transaction> to remove the transaction.
243 Multiple Transactions (F10) 243 See Also: Run a Transaction
244 244 Client Services Client Services When you encounter problems using CIM GOLDTeller, your institution's liaison should contact your institution's Client Services representative. Before contacting FPS GOLD, have the following information ready: Your computer VTAM identification number. Your institution number. Your location. A description of the error or problem. A description of what you were doing when the error/problem occurred. Your teller number and/or account number. Client Services Hours Client Services is available Monday through Friday, from 6:00 a.m. to 6:00 p.m. (MT).
245 FPS GOLD Teller Capture User's Guide 245 FPS GOLD Teller Capture User's Guide FPS GOLD partners with Jaguar Software for our Teller Capture scanning product. The Jaguar software is used for imaging documents and checks, as teller transactions are processed through CIM GOLDTeller. Image files in the X.937 format are created and stored on a server at FPS GOLD. The information in this document will explain the various setup options and requirements of FPS GOLD Teller Capture, as well as how to use it.
246 246 FPS GOLD Teller Capture User's Guide Introduction The following list gives an overview of how FPS GOLD Teller Capture works. Each teller requires a check/document scanner for the PC at their window. Deposit slips, withdrawal slips, and loan coupons can be used for transactions to autofill the account number, personal information for the IRS owner, and the account list. Customization for documents used should be completed and tested before going live on Teller Capture. See the Form Samples at the end of this user's guide for sample documents. If you choose to not scan deposit slips, withdrawal slips, or loan coupons, the account number will need to be manually entered before you begin transactions. When monetary amounts are entered in the Cash In, Cash Out, Check Out, Journal In, and Journal Out fields, virtual documents will be created. Each Transaction must be in balance before proceeding to the next. Optional scanner endorsement printing can be done at the time of the transaction. Virtual endorsements are required. Procedures need to be in place to balance Checks In for your tellers, branches, and the institution before you consider your bank balanced each day. FPS GOLD will separate your transit checks from your on-us items. Transit checks will be forwarded to the Federal Reserve Bank (FRB) or your correspondent processor. See the following sections for more information.
247 FPS GOLD Teller Capture User's Guide 247 Images and Storage Images for transactions that are processed using Teller Capture will automatically be attached to the history on deposit and loan accounts. All documents, checks, tickets, and journal tickets are viewable for each transaction processed from the GOLDTeller Journal. Optionally, deposit and withdrawal slip images can be shown on your customer statements, in addition to check images.
248 248 FPS GOLD Teller Capture User's Guide Purchase Contact your FPS GOLD Client Services Account Manager to obtain a price quote for the FPS GOLD Teller Capture product. After you have purchased the licenses for Teller Capture, your organization s deposit and withdrawal slips and loan payment coupons will need to be customized by FPS GOLD to be used with the Jaguar scanning software.
249 FPS GOLD Teller Capture User's Guide 249 Required Components Before Teller Capture can be turned on for your organization, options and machines must be properly updated as follows: The newest account number conversion program (Institution Option NRCV) must be in place for your institution. Institution Option S937 (Sierra X9.37 Check Processing) must be turned on. Each teller who will be processing transactions using Teller Capture will need to be on CIM GOLD software version 16.2 or higher. To print deposit slips on statements, Institution Option DPSI (Show Deposit Slip Images) must be set. To print withdrawal slips on statements, Institution Option WDLS (Show Withdrawal Slip Images) must be set. Each teller machine that will be used for scanning must have a check/document scanner attached. We recommend the Panini Vision Next scanner, which can process 180 documents per minute. Other scanners may be used but need to be tested to verify compatibility. Please work with FPS GOLD to ensure scanner compatibility before you purchase them. Scanners with Ranger Universal Scan software will work. If you will be scanning documents on transactions, you must check "Use Teller Capture" in User Preferences (CIM GOLD > Options menu > User Preferences, General tab). See the example below. If you need to view items in Teller Capture but you have no scanner, you must check "No Scanner" in User Preferences (CIM GOLD > Options menu > User Preferences, General tab). See the example below. Options Menu > User Preferences > General Tab Subscribe to the X9.37 Research screen and the Teller Capture Totals screen.
250 250 FPS GOLD Teller Capture User's Guide Item Types and Virtual Tickets Each item scanned is required to have a specific Item Type in order to process correctly. Some transactions will designate the Item Type based on the transaction being run. If you are scanning documents (deposit, withdrawal or loan slips, tickets for cash in/out or journal in/out), each type of document must be customized so the scanner can pick up the correct Item Types to fill in when transactions are processed. The list below is how Teller Capture identifies the Item Types. (This field is in the check detail record 25 in position 80.) Item Types 0 Deposited Check 5 Cash Out 1 On-us check (killed/cashed) 6 Check Out (MO CC BC TC) 2 Deposit 7 Journal In 3 Withdrawal 8 Journal Out 4 Cash In 9 Loan Coupon Tellers will fill in all fields on the Item List (F11), and virtual tickets will be created as necessary based on transaction type and fields populated. See the example below of a Journal In virtual ticket. FPS GOLD Teller Capture - Journal In Virtual Ticket
251 FPS GOLD Teller Capture User's Guide 251 Processing Transactions The following sections explain how to process transactions using Teller Capture. Transaction Process Overview Teller Capture Transaction Example
252 252 FPS GOLD Teller Capture User's Guide Transaction Process Overview To begin the scanning process: 1. Select the appropriate transaction from the CIM GOLD Teller transaction menu. If a deposit or withdrawal slip or loan coupon is used, the account number will be populated on the transaction from the item type scanned. The full account number needs to be written on the tickets, including all leading zeros. If documents are not used, the account number will need to be manually entered on the transaction. 2. Place the transaction items in the scanner and select <Scan Items (Alt+I)>. The Jaguar Teller Capture screen will be shown as items are scanned. If there are read errors with an item scanned, any fields that need repair will be highlighted in yellow after the scan is completed. To repair read errors: 1. Input the correct information as indicated. 2. Click <Update>. 3. Click <Scan> to continue with the transaction. After all items are scanned and necessary repairs are made, the transaction will be populated with information based on the type of documents scanned. If additional fields need to be populated, manual entry is required. To process the transaction: 1. Click <Send>. The items scanned will be attached to the transaction on the Teller Journal and on the history of the account.
 Selected 2. The deposit slip and checks are loaded in the scanner.")
. 4.")
253 FPS GOLD Teller Capture User's Guide 253 Teller Capture Transaction Example The following example shows a Deposit transaction that has a deposit slip, checks in, cash out, and a journal in. 1. The Deposit transaction 1120/0/0 is selected from the transaction menu. CIM GOLDTeller - Deposit Transaction (1120/0/0) Selected 2. The deposit slip and checks are loaded in the scanner. Panini Teller Capture Scanner with Transaction Items Loaded 3. The items are scanned by clicking <Scan Items>(Alt+I) on the CIM GOLDTeller Screen. The Teller Capture screen is shown as the documents are being scanned. If any read errors occur, the documents that had read errors will be indicated (See a. in the example below). 4. The document is selected to fix the errors. The example below indicates that the account number was not read.

254 254 FPS GOLD Teller Capture User's Guide Teller Capture Screen - 1 of 3 Item s Scanned, Show ing Account Num ber Error The second and third items scanned have no errors, as shown in the following two examples.

255 FPS GOLD Teller Capture User's Guide 255 Teller Capture Screen - 2 of 3 Item s Scanned

256 256 FPS GOLD Teller Capture User's Guide Teller Capture Screen - 3 of 3 Item s Scanned, Ready to Com plete 5. When the scan is completed, <Stop> is clicked. The first item scanned is highlighted. The items in the list are in the order they were scanned and will remain in this order. Each item can be verified by selecting the item from the Item Listing. If any of the data was read incorrectly, it can be repaired by changing the field and clicking <Update> to save changes. Note: The total of Debits and Credits does not match in this example. This is because there is a Cash Out and a Journal In transfer on the deposit slip. These amounts will be entered on the Item List (F11) for the transaction. 6. When the images are verified and correct, <Complete> is clicked. The GOLDTeller Item List (F11) screen will be enabled. The scanned checks are populated in the Checks In column. Here the Checks Out, Cash In/Out, and Journal In/Out fields are manually entered as applicable for the transaction.


257 FPS GOLD Teller Capture User's Guide 257 CIM GOLDTeller > Item List (F11) Note: In this example, there are Checks In, Cash Out, and Journal In. These amounts need to balance to the deposit slip total. After this transaction, a Journal Out will need to be processed to keep the journals in balance for the teller. 7. <OK> is clicked to continue with the transaction. Based on the account number scanned and on the <F11> input, the account number and the monetary fields will be automatically populated on the transaction. CIM GOLDTeller - Deposit Transaction (1120/0/0), Ready to Send
258 258 FPS GOLD Teller Capture User's Guide 8. Enter any other data necessary, such as the Journal Reference number or Uncollected Funds Holds (UCF). 9. Click <Send> to process the transaction.
259 FPS GOLD Teller Capture User's Guide 259 Viewing Images Once a transaction is processed, the items scanned for the transaction can be viewed in the Journal File and on the history of the account. NOTE If you will be scanning documents on transactions, you must check "Use Teller Capture" in User Preferences (CIM GOLD > Options menu > User Preferences, General tab). If you need to view items in Teller Capture but you have no scanner, you must check "No Scanner" in User Preferences (CIM GOLD > Options menu > User Preferences, General tab). See the example below. Options > User Preferences > Use Teller Capture Option IMPORTANT If the Use Teller Capture box is not checked, scanned items cannot be viewed until the day after the transaction was processed. The day transactions are processed, the images are only stored and viewed through the Teller Capture Web server. The next day, the images are viewed using the FPS GOLD X9.37 server. If you want to view images but do not scan items, click the No Scanner box, too.
260 260 FPS GOLD Teller Capture User's Guide
). 2. Right-click on the transaction. The right-click menu opens, as shown below.")
261 FPS GOLD Teller Capture User's Guide 261 Viewing Scanned Images from the Journal Log To view scanned images from the Journal Log: 1. Op the Journal File in GOLDTeller (Functions > Journal Forwarding (Ctrl + J)). 2. Right-click on the transaction. The right-click menu opens, as shown below. CIM GOLDTeller > Functions > Journal Forw arding (Ctrl + J) 3. Select Show Scanned Items. 4. View the scanned items for the transaction. NOTE If you will be scanning documents on transactions, you must check "Use Teller Capture" in User Preferences (CIM GOLD > Options menu > User Preferences, General tab). If you need to view items in Teller Capture but you have no scanner, you must check "No Scanner" in User Preferences (CIM GOLD > Options menu > User Preferences, General tab).
 of the transaction.")
262 262 FPS GOLD Teller Capture User's Guide Viewing Scanned Images from Deposit Account History To view scanned images from Deposit Account History: 1. Go to the account history screen in CIM GOLD Deposits. CIM GOLD > Deposits > Account Inform ation > History 2. Access the history for the date(s) of the transaction. Note: The Scanned column shows a Y when there have been items scanned for a transaction. 3. Double-click on the transaction to view the History Detail screen.

263 FPS GOLD Teller Capture User's Guide 263 CIM GOLD > Deposits > Account Inform ation > History, History Detail 4. To view the images, click <Show Scanned Items>. 5. All images scanned and virtual tickets will be listed for the transaction in the order that they were scanned. Click on each item to see the image.


264 264 FPS GOLD Teller Capture User's Guide Teller Capture Item Sum m ary Screen, Deposit Slip Teller Capture Item Sum m ary Screen, Check In


265 FPS GOLD Teller Capture User's Guide 265 Teller Capture Item Sum m ary Screen, Check In Teller Capture Item Sum m ary Screen, Virtual Cash Out Ticket
266 266 FPS GOLD Teller Capture User's Guide Teller Capture Item Sum m ary Screen, Virtual Journal In Ticket


267 FPS GOLD Teller Capture User's Guide 267 Viewing Scanned Images from Loan Account History To view scanned images from Loan Account History: 1. Go to the account history screen in CIM GOLD Loans. 2. Access the history for the date(s) of the transaction. CIM GOLD > Loans > History, Detailed History tab 3. Double-click on the transaction to view the History Detail. CIM GOLD > Loans > Account Inform ation > History, Detailed History tab

268 268 FPS GOLD Teller Capture User's Guide 4. To view the images, click <Show Scanned Items>. 5. All scanned items and virtual tickets will be listed for the transaction in the order that they were scanned. Click on each item to see the image. Teller Capture Item Sum m ary Screen, Loan Coupon


269 FPS GOLD Teller Capture User's Guide 269 Teller Capture Item Sum m ary Screen, Transit Check Teller Capture Item Sum m ary Screen, Virtual Cash Out Ticket
270 270 FPS GOLD Teller Capture User's Guide

271 FPS GOLD Teller Capture User's Guide 271 Cancellations/Corrections/Errors When a transaction is processed with scanned items and it is corrected, the scanned items are deleted from the database. This means that the items must be rescanned using the appropriate transaction. If a transaction is canceled on the GOLDTeller screen after its items were scanned, the scanned items will be deleted from the database. Handling Errors You can correct scanning errors and delete duplicate scans after scanning has completed. To correct scanning errors: 1. If an error was made during the scan process or on the F11 screen, return to the scan by clicking <Yes> from the dialog shown below. 2. If the error is on the F11 screen, click <No>, then click F11. To return to the scan for any reason before the transaction is processed: 1. Click <Re-Open Scan> (see the example below).


272 FPS GOLD Teller Capture User's Guide Fix the errors on the scan. Click <Complete>. Validate the F11 again. Click <OK>. Click <Send> to send the transaction. To cancel a scan: 1. Click <Cancel>on the F11 screen. The Scan Canceled warning will display (see below). 2. Click <Yes> to cancel the scan. Items scanned will be cleared from the database and will need to be rescanned. OR Click <No> to keep the F11 screen open. Handling Duplicates A Confirmation dialog box will display if duplicate items are scanned (see below).

273 FPS GOLD Teller Capture User's Guide 273 To remove duplicate scans: 1. Click <Yes> to remove the duplicates. OR Click <No> to keep the duplicates and send both in the x9.37.
 for the same reject reasons as checks posting from FRB. The 1130.")
274 274 FPS GOLD Teller Capture User's Guide OnUs Check Clearing On-us checks from internal teller transactions are given a Transaction Code (tran code) of when they are processed from x9.37 files sent to FPS GOLD from your organization. Tran code on-us items will be sent to GOLD ExceptionManager (GEM) for the same reject reasons as checks posting from FRB. The checks can be handled through GEM by either posting the item to the account or by returning the item and processing a charge back to the account the check was credited to. When a return option is selected in GEM for an on-us item, the Create Charge Back dialog box displays (see below). The Teller Capture system does not produce an Image Replacement Document (IRD); therefore, the original check deposited will need to be pulled and sent with the charge back notice for collection. Create Charge Back Message When Item s Are Returned in GEM
275 FPS GOLD Teller Capture User's Guide 275 Transmission of x9.37 Files The transmission of x9.37 files will be customized for each organization. After FPS GOLD receives the daily file, it will be separated by transit items and on-us items. Transit items will be sent out to FRB or the correspondent processor, and on-us items will be processed.

276 276 FPS GOLD Teller Capture User's Guide Teller Capture Totals Screen Your institution must first subscribe to this screen and give security to the appropriate staff. The Teller Capture Totals screen is found in the CIM GOLD menu under Teller System. See the following example. Teller Capture Totals Screen The report is a totals-only report that shows the totals for transit, on-us, and cashed checks for the bank for each day. You must access this screen every day to get the totals calculated and saved for each day. Totals are calculated at the time the screen is accessed. You can view today s totals throughout the day, and the totals will be updated each time. Today s totals are bolded. You can right-click in the screen to print the data. This report is used to balance your daily file to the work the tellers have processed. The amounts on this report are gathered on the teller capture server before they are sent for the split-off of transit checks and the on-us checks are posted. The amounts should be verified with the alert you receive after the file is uploaded for posting at the end of the day. Once the file has been posted, use the X9.37 Research screen (found in the CIM GOLD menu under Miscellaneous) for any other research you may need to do. This research screen can also be used for research on your inclearing items.
277 FPS GOLD Teller Capture User's Guide 277 X9.37 Research Screen For complete information on the Teller Capture system, see the Teller Capture User's Guide. Your institution must first subscribe to this screen and give security to the appropriate staff. This screen is located under Miscellaneous in the CIM GOLD tree view. The X9.37 Research screen is used to balance, research, and audit the work that is processed using Teller Capture and for branch capture X9.37 files. The X9.37 files are stored on your Sierra server and are accessible through this screen. There is a set procedure for your bank to get them uploaded to our central X9.37 file for processing. For Teller Capture, all documents and checks that are scanned by your tellers are viewable in various ways by selecting the desired format from the Report Type drop-down list There is one report that can be used to look at the X9.37 files we process for your bank when you are using branch capture. Results of your searches can be viewed and/or printed individually or in groups. When you select a new Report Type, the screen will be cleared for your new search parameters. To find and view specific scanned items: 1. Click on the arrow at the right of the Report Type field and select an option. For information on the Report Type options, see the table below. 2. Enter information in the search fields at the top of the screen. For information on the search fields, see the table below. 3. View and print the results in the list view.
278 278 FPS GOLD Teller Capture User's Guide Report Type Options The Report Type choices are explained in the table below. X9.37 This report is used for banks that use either teller or branch capture. It shows all the X9.37 items we received for your bank. This includes deposit slips, withdrawal slips, and loan coupons if you include them in your scans. A date range can be used on this search, in addition to all the other search parameters on the screen. Teller Capture All Items This is a teller capture search only and is used to view all the items that were scanned on a specific date. No other search criteria are available for this selection. The original search will be shown in teller number order, scan ID and in the order the tickets were scanned. In addition, there will be a color grid indicating the start and end of each transaction. If you sort any of the columns, the color indications will stay with the line item and will not be with each piece of the transaction. To go back to view the full transaction, click <search> again. Teller Capture All Checks This is a teller capture search only and is used to view all the check items that were scanned on a specific day. No other search criteria are available for this selection. This search includes both on-us and transit checks but does not include cashed on-us checks. The total for this selection is shown in the list view at the bottom of the screen. Teller Capture OnUs Items This is a teller capture search only and is used to view all the on-us checks for a specific day. This does not include on-us checks cashed. No other search criteria are available for this selection. The total for this selection is shown in the list view at the bottom of the screen. Teller Capture Transit Items This is a teller capture search only and is used to view all the transit checks for a specific day. No other search criteria are available for this selection. The total for this selection is shown in the list view at the bottom of the screen. Teller Capture All Checks Totals Only This is a teller capture search only and is used to view all the teller capture check totals for a specific day. No other search criteria are available for this selection. The totals shown on the screen are for on-us and transit items. This selection can be used to balance your check totals for the day.
279 FPS GOLD Teller Capture User's Guide 279 Search Fields The Search Criteria fields at the top of the screen are explained in the table below. Start Date Enter the date you want to use for your search. You must select a Report type from the list above. This field must be used on all report type searches. End Date Enter the end date you want to use if you are processing the X9.37 report type for multiple days. This field will be disabled if the report type cannot be processed for multiple days. Amount Enter the beginning and ending amount(s) for the item(s) you want to search for. These fields will be disabled if the report type cannot be searched by the amount. Check Number Enter the beginning and ending check number for the item(s) you want to search for. These fields will be disabled if the report type cannot be searched by check number. Account Number Enter the beginning and ending office and account number(s) for the item(s) you want to search for. These fields will be disabled if the report type cannot be searched by account number. Trace Number Enter the beginning and ending trace number(s) for the item(s) you want to search for. These fields will be disabled if the report type cannot be searched by the trace number. Routing Number Enter the routing transit number you want to search for. These fields will be disabled if the report type cannot be search by the routing number. Teller Capture Scan ID Enter the scan ID for the selected search criteria. Using this search allows you to review all the items for specified transaction. <Search> Click this button when you have completed the entry of the report and the search data. <Clear> Click this button to clear the data and all the search parameters to enter a new search.
280 280 FPS GOLD Teller Capture User's Guide Search Results list view The columns in the list view are explained in the table below. Account Number This is the account number for each item in the selection. This field is blank for Transit Checks. Date This is the date for each item in the selection. Multiple selection Report types will show multiple dates in this column. Check Number This is the check number for the items in the selection. Items that do not carry a check number such as deposit and cash item types will be blank. If the scan did not correctly read the check number, this field could also be blank. Amount This is the amount for the items in the selection. Payer Bank Routing This is the routing transit for the item in the list. For on-us times this will be your bank s routing transit number. It will be shown on all on-us checks and other on us tickets such as deposit and cash item types. Teller: This is the teller number that processed the teller capture transaction. When the teller number is not available based on the Report Type, this field will be blank. Item Type This is the item type that was sent though in the teller capture transaction. If you send us item types in your X9.37 for deposit and withdrawal slips this field will be populated with that information. (This field is in the check detail record 25 in position = Deposit 3 = Withdrawal) Trace/Scan ID This is the number that gets tied to the transactions in the list. It will be the identification number of the teller transaction when using teller capture, and will be the trace number for X9.37 files. TOTAL If a total is available for the Report Type selected, it will be shown in a grid at the bottom of the screen.
281 FPS GOLD Teller Capture User's Guide 281 View and Print Images To view one image: 1. Double click on the item in the list. You can zoom, rotate and print the item. Note: this function does not print substitute (IRD) checks. To view multiple images: 1. Right-click on the first item in the list that you would like to view. 2. Click on "Show Item Images" in the dialog that opens. 3. Click the right arrow to move down through the list, and click the left arrow to move up. You can also zoom, rotate, and print each item one at a time. Note: This function does not print substitute (IRD) checks. The dialog below opens.

282 282 FPS GOLD Teller Capture User's Guide To print multiple images: 1. Select the items from the list that you want to print images for. 2. Click on "Print Selected Image Items." This dialog below opens.

283 FPS GOLD Teller Capture User's Guide Select the items you want to print, then click <Print>. Note: This does not print substitute (IRD) checks.
REACH Remote Deposit Capture
 REACH Remote Deposit Capture Company Administration CONTENTS Introduction to REACH... 1 Overview of Roles... 1 Session Timeouts and Maintenance... 1 User Login... 2 Login via Online Cash Management...
Chapter 2: Clients, charts of accounts, and bank accounts
 Chapter 2: Clients, charts of accounts, and bank accounts Most operations in BankLink Practice are client specific. These include all work on coding transactions, reporting, and maintaining chart of accounts
RONA e-billing User Guide
 RONA e-billing Contractor Self-Service Portal User Guide RONA e-billing User Guide 2015-03-10 Table of Contents Welcome to RONA e-billing What is RONA e-billing?... i RONA e-billing system requirements...
USER GUIDE Time and Attendance User Administration Human Capital Management Suite
 USER GUIDE Time and Attendance User Administration Human Capital Management Suite Ormed Information Systems Ltd. Version 1.2 (January 2015) What s Inside What s Inside...1 Introduction...2 Procedures...3
CLIQ Web Manager. User Manual. The global leader in door opening solutions V 6.1
 CLIQ Web Manager User Manual V 6.1 The global leader in door opening solutions Program version: 6.1 Document number: ST-003478 Date published: 2016-03-31 Language: en-gb Table of contents 1 Overview...9
AndroPay Admin Center Getting Started
 USER MANUAL AndroPay Admin Center Getting Started Introduction: The Customer Administration Center, or Admin Center, is your central site for all things AndroPay. Through the Admin Center, you can upload
RPM Upgrade Changes in Previous Versions. Client Information
 RPM Upgrade Changes in Previous Versions Version 5.0.8 Client Information Basic new audit events Client Phone Change and Client Cell Phone will be logged when a client s phone or cell phone is changed.
Heritage Bank Correspondent Lockbox. Lockbox. User Guide
 Heritage Bank Correspondent Lockbox Lockbox User Guide Contents Accessing Lockbox... 1 Messages... 2 Moving messages... 4 Batch messages... 5 Message administration... 6 Creating a message... 6 Recalling
SETUP GUIDE Human Capital Management Suite
 SETUP GUIDE Human Capital Management Suite Ormed Information Systems Ltd. Version 1.1 (August 2013) What s Inside What s Inside...1 About this Document...2 Where should I look?...2 Ormed Software Basics...3
The PeopleSoft Financials System
 The PeopleSoft Financials System 2 Introduction...................... 14 Signing In and Out.................... 14 Signing In to the System.............. 14 Signing Out................... 17 Navigation
ORACLE RDC ONSITE RESEARCH COORDINATOR TRAINING
 ORACLE RDC ONSITE RESEARCH COORDINATOR TRAINING TRAINING REQUIREMENTS RDC system training is designed and conducted for access to OnSite. Additional RDC training will be provided on a per study basis by
Isi Net User Manual for Bank customers
 1 Table of Contents 1 Introduction and overview... 4 1.1 Isi Net User Types... 4 1.2 Accessing the Isi Net service... 5 1.2.1 User Login... 5 1.2.2 User Logout... 7 1.3 User Interface... 7 1.3.1 Menus...
R A D I O N I C S. READYKEY K6100 Readykey for Windows. User Guide. Logging In. Logging Out. If an ID device has been issued:
 R A D I O N I C S READYKEY K6100 Readykey for Windows User Guide Logging In If an ID device has been issued: 1. Use your ID device with the desktop administration or Central Network Controller (CNC) reader,
User Guide. Created: Tuesday, August 06, OCI ChequeWriter System
 User Guide Created: Tuesday, August 06, 2013 Copyright OC Innovations Pte Ltd. All rights reserved. http://www.ocisystem.com/ The information contained in this document is subject to change without notice.
Calendar & Buttons Dashboard Menu Features My Profile My Favorites Watch List Adding a New Request...
 remitview User Guide 1 TABLE OF CONTENTS INTRODUCTION... 3 Calendar & Buttons... 3 GETTING STARTED.... 5 Dashboard.... 7 Menu Features... 8 PROFILE.... 10 My Profile... 10 My Favorites... 12 Watch List...
DocumentDirect for the Internet. User s Guide
 DocumentDirect for the Internet User s Guide Copyright 2008-2015 UMB Financial Corporation. (External) Version 3.0 07012015 FINAL July 2015 UMB Reg. U.S. Pat. & Tm. Off. Table of Contents iii Contents
Expedient User Manual Getting Started
 Volume 1 Expedient User Manual Getting Started Gavin Millman & Associates Pty Ltd 281 Buckley Street Essendon VIC 3040 Phone 03 9331 3944 Web www.expedientsoftware.com.au Table of Contents Logging In...
TREENO ELECTRONIC DOCUMENT MANAGEMENT. Administration Guide
 TREENO ELECTRONIC DOCUMENT MANAGEMENT Administration Guide February 2012 Contents Introduction... 8 About This Guide... 9 About Treeno... 9 Managing Security... 10 Treeno Security Overview... 10 Administrator
The TxEIS How To Guide Series. Business. How to: CLOSE END OF FISCAL YEAR. Developed by the TEXAS COMPUTER COOPERATIVE
 The TxEIS How To Guide Series Business How to: CLOSE END OF FISCAL YEAR Developed by the TEXAS COMPUTER COOPERATIVE Copyright 2016 by Texas Computer Cooperative All rights reserved 1314 Hines Avenue San
Electronic Receipts. Printing, Saving and Retrieving Electronic Receipts INTRODUCTION CONTENTS
 Electronic Receipts Printing, Saving and Retrieving Electronic Receipts INTRODUCTION CU*Answers is pleased to introduce its first-ever integrated electronic receipt system. This booklet describes the CU*BASE
MFS Wires III DSI Impact Integration. Escrow. User Guide. Last edited: Fidelity National Financial
 MFS Integration Escrow User Guide Last edited: 06.25.2013 2013 Fidelity National Financial Table of Contents Logging On 3 Logging Off 3 Timing Out 4 Understanding System Maintenance 4 Contacting Support
ALL MEMBERS AND PAYEES
 Table of Contents Click a link to walk through a specific procedure. ALL MEMBERS AND PAYEES 1 GETTING STARTED How do I register? How do I log on? How do I update security questions? How do I retrieve/reset
It is recommended that you configure Internet Explorer to see the MLS as a trusted site.
 Tips for New Users Welcome to Rapattoni MLS! You now have access to the most advanced Internet-based multiple listing system on the market, with many exciting tools and features that will help you provide
Disassembly of the CertiflexDimension software is also expressly prohibited.
 All content included in CertiflexDimension programs, manuals and materials generated by the programs are the property of The Versatile Group Inc. (TVG) and are protected by United States and International
ORACLE RDC ONSITE RESEARCH COORDINATOR TRAINING
 ORACLE RDC ONSITE RESEARCH COORDINATOR TRAINING TRAINING REQUIREMENTS RDC system training is designed and conducted for access to OnSite. Additional RDC training will be provided on a per study basis by
WEB TIME SUPERVISOR GUIDE
 Revised 02/23/2018 WEB TIME SUPERVISOR GUIDE CLIENT RESOURCE PAYLOCITY.COM TABLE OF CONTENTS Web Time... 3 Home... 15 Employees... 28 Reports... 130 Web Kiosk Setup... 132 Glossary... 156 Index... 158
JUNE 2018 Version 1.0. CU*ANSWERS Risk Assessment for It s Me 247. Online Banking
 JUNE 2018 Version 1.0 CU*ANSWERS Risk Assessment for It s Me 247 Online Banking CONTENTS INTRODUCTION... 3 FEATURES... 3 QUICK REFERENCE... 4 RISK ASSESSMENT TOOLS... 5 PIB TOOLS... 8 ABNORMAL ACTIVITY...
The terms Offline Interface and Standalone Mode mean the same thing a separate program to handle simple circulation tasks while the network is down.
 Chapter 10 - Standalone Mode The terms Offline Interface and Standalone Mode mean the same thing a separate program to handle simple circulation tasks while the network is down. Several features are available
Web-Banking for corporate clients User manual
 User manual BIFIT Service (version 3.9.1) Content Preface... 3 Getting started with the AWP Web-Banking... 4 Requirements for the system... 4 AWP Web-Banking login page... 4 Multi-factor authentication...
BE Share. Microsoft Office SharePoint Server 2010 Basic Training Guide
 BE Share Microsoft Office SharePoint Server 2010 Basic Training Guide Site Contributor Table of Contents Table of Contents Connecting From Home... 2 Introduction to BE Share Sites... 3 Navigating SharePoint
Treasury Management User Guide. Online Banking
 Treasury Management User Guide Online Banking Released August 2018 Treasury Management... 4 Logging in to Treasury Management...5 Helpful Hints...10 User Menu... 12 Profile and Preferences... 12 Notification
Accounts Payable MODULE USER S GUIDE
 Accounts Payable MODULE USER S GUIDE INTEGRATED SOFTWARE SERIES Accounts Payable MODULE USER S GUIDE Version 3.1 Copyright 2005 2009, Interactive Financial Solutions, Inc. All Rights Reserved. Integrated
Rabo Supplier Finance User Manual - Suppliers -
 Rabo Supplier Finance User Manual - Suppliers - Page 2 of 33 Table of Contents 1 About This Document... 3 1.1 Objectives of This Document... 3 1.2 Inside This Document... 3 2 Rabo Supplier Finance platform...
STX & ios Devices. Setting up and using STX iphone, ipad, ipod touch
 STX & ios Devices Setting up and using STX iphone, ipad, ipod touch STX for ios provides more flexibility and efficiency for you and your staff. With all the most often used features of STX desktop built-in,
Table of Contents. Overview of the TEA Login Application Features Roles in Obtaining Application Access Approval Process...
 TEAL Help Table of Contents Overview of the TEA Login Application... 7 Features... 7 Roles in Obtaining Application Access... 7 Approval Process... 8 Processing an Application Request... 9 The Process
Supplier Quick Reference and How To Guide
 and How To Guide For Help or Support support@primerevenue.com Toll Free USA & Canada: 1 800 557 8047 Toll Free Europe: 00800 7746 3000 Toll Free Asia: 001 800 7746 3000 Toll Free Australia: 1 800 217 718
Part 1: Understanding Windows XP Basics
 542362 Ch01.qxd 9/18/03 9:54 PM Page 1 Part 1: Understanding Windows XP Basics 1: Starting Up and Logging In 2: Logging Off and Shutting Down 3: Activating Windows 4: Enabling Fast Switching between Users
Working with Mailbox Manager
 Working with Mailbox Manager A user guide for Mailbox Manager supporting the Message Storage Server component of the Avaya S3400 Message Server Mailbox Manager Version 5.0 February 2003 Copyright 2003
Area Access Manager User Guide
 Area Access Manager User Guide Area Access Manager User Guide Table of Contents Chapter 1: Introduction...9 Conventions Used in this Documentation... 9 Getting Started... 10 Licensing Requirements...
2016 Autosoft, Inc. All rights reserved.
 Copyright 2016 Autosoft, Inc. All rights reserved. The information in this document is subject to change without notice. No part of this document may be reproduced, stored in a retrieval system, or transmitted
NetDMR National Installation. Regulatory Authority User Guide
 NetDMR National Installation Regulatory Authority User Guide Table of Contents Chapter 1. Introduction...1 1.1. Structure of this Guide...1 1.1.1. Organization...1 1.1.2. User Guide Notation and Conventions...1
OUTLOOK WEB ACCESS UOW USER GUIDE INDEX
 OUTLOOK WEB ACCESS UOW USER GUIDE INDEX ACCESSING MAIL... 2 SETTING UP... 2 OPTIONS... 3 VIEWING... 4 ARRANGE MESSAGES... 4 CREATING/SENDING A NEW MESSAGE... 5 REPLYING TO MESSAGES... 5 FORWARDING MESSAGES...
2.1 Logging on to FieldManager Software
 2 Getting Started The main window displays all statewide contracts. Please note that you have access to ALL contracts and functionality is based on permission level. These contracts are imported into FieldManager
AccountsIQ Tips and Tricks. Updated 20/10/2008. Purpose. 1. List and describe what heading and text will be containing in each of the Tip s and tricks
 AccountsIQ Tips and Tricks Updated 20/10/2008 Purpose 1. List and describe what heading and text will be containing in each of the Tip s and tricks 2. Outline what FAQ s will be released on the System
Getting Started with the IntelleView POS Operator Software
 Getting Started with the IntelleView POS Operator Software Operator's Guide for Software Version 1.2 About this Guide This operator's guide explains how to start using your IntelleView POS Operator software.
User Guide V6.1g / 48730B
 READYKEY User Guide Readykey for Windows Software 17231 V6.1g / 48730B UL Listings Trademarks UL 294 - Access Control System Units Microsoft, Windows, Windows NT are either registered trademarks or trademarks
Working with VIEW Datamatic All rights reserved.
 Working with VIEW Datamatic cannot accept any responsibility, financial or otherwise, for any consequences arising out of the use of this material. The information contained herein is subject to change.
Juris Year-End Checklist 2011
 Juris Year-End Checklist 2011 Page1 Checklist for 2011 The only year-end processing required in Juris is Firm Accounting and Disbursements. This Firm Accounting Close Accounting Year function does the
Getting Started with Solar Eclipse. Release 8.6.5
 Getting Started with Solar Eclipse Release 8.6.5 Legal Notices 2009 Activant Solutions Inc. All rights reserved. Unauthorized reproduction is a violation of applicable laws. Activant and the Activant logo
Service Minder Plus Features/Helpful Hints
 Service Minder Plus Features/Helpful Hints This manual covers helpful hints and use of features. Note: These items will be addressed during the training sessions. This document is meant to be used as an
Representative Payee Manager User Guide
 Representative Payee Manager User Guide Version 5.0.9 Copyright 1997-2018 Complete Computer Solutions, Inc. Table of Contents Contents... 1 System Navigation... 2 Ribbon Menu... 5 Logon to the System...
i-power DMS - Document Management System Last Revised: 8/25/17 Version: 1.0
 i-power DMS - Document Management System Last Revised: 8/25/17 Version: 1.0 EPL, Inc. 22 Inverness Parkway Suite 400 Birmingham, Alabama 35242 (205) 408-5300 / 1-800-243-4EPL (4375) www.eplinc.com Property
Transactions: Transaction List
 Transactions Transactions: Transaction List Purpose The Transaction List allows you to view transactions for selected dates; create new transactions; open, edit or delete existing transactions; open client
PowerSchool Student and Parent Portal User Guide. https://powerschool.gpcsd.ca/public
 PowerSchool Student and Parent Portal User Guide https://powerschool.gpcsd.ca/public Released June 2017 Document Owner: Documentation Services This edition applies to Release 11.x of the PowerSchool software
Outlook 2010 One. Wednesday, August 7, 9-11 am. Agenda:
 Page 1 Outlook 2010 One Wednesday, August 7, 9-11 am Agenda: Outlook Search Options Working with Attachments Creating a Signature Marking a Message as Read Flag an item for Follow-Up Reply, Reply All &
MYOB Exo PC Clock. User Guide
 MYOB Exo PC Clock User Guide 2018.01 Table of Contents Introduction to MYOB Exo PC Clock... 1 Installation & Setup... 2 Server-based... 2 Standalone... 3 Using Exo PC Clock... 4 Clocking Times... 5 Updating
Administration. Training Guide. Infinite Visions Enterprise Edition phone toll free fax
 Administration Training Guide Infinite Visions Enterprise Edition 406.252.4357 phone 1.800.247.1161 toll free 406.252.7705 fax www.csavisions.com Copyright 2005 2011 Windsor Management Group, LLC Revised:
Solar Eclipse Trackers, Logs, and Queues. Release 9.0.4
 Solar Eclipse Trackers, Logs, and Queues Release 9.0.4 i Table Of Contents Disclaimer This document is for informational purposes only and is subject to change without notice. This document and its contents,
Microsoft Dynamics GP is a robust accounting package that can meet
 In This Chapter Chapter 1 What Microsoft Dynamics GP Does Best Familiarizing yourself with the Microsoft Dynamics GP window Understanding Dynamics GP terms Knowing how Dynamics GP keeps your CPA happy
ecashiering Table Of Contents
 ecashiering Table Of Contents Overview... 2 Logging in to ecashiering... 2 ecashiering Tab... 3 Payment Management... 3 Digital Delivery Account Managment... 7 Patient Pay Online Tab... 8 Account Summary...
End-of-Year and Rollover Preparation Guide
 End-of-Year and Rollover Preparation Guide School Year 2014-2015 The information in this document is subject to change without notice and does not represent a commitment on the part of Horizon. The software
AgentWorks Administrator and Manager User Guide - Release 12.5
 AgentWorks Administrator and Manager User Guide - Release 12.5 March 21, 2013 2012 MoneyGram InternationalAll rights reserved. Table of Contents Registration Overview... 2 1. Initial Log In AgentWorks
Salesforce Classic Guide for iphone
 Salesforce Classic Guide for iphone Version 35.0, Winter 16 @salesforcedocs Last updated: October 27, 2015 Copyright 2000 2015 salesforce.com, inc. All rights reserved. Salesforce is a registered trademark
vbound User Guide vbound User Guide Version Revised: 10/10/2017
 vbound User Guide Version 4.1.1 Revised: 10/10/2017 Copyright 2014-2017 FFL Solutions Inc. Page 1 of 87 Table of Contents Using vbound...5 Starting vbound... 5 Bound Book List... 6 vbound Ribbon Menu...
Pathway Net User s Guide
 Pathway Net User s Guide TABLE OF CONTENTS 3. Logging onto Pathway Net 4. Changing Passwords 5. Transaction View 7. Viewing Transaction Detail 8. Reallocating Transactions 9. Splitting Transactions 11.
Welcome to Client Access Web!
 Welcome to Client Access Web! Introduction W elcome to the Express Collections Client Access Portal. This portal has been crafted so that you, our valued client, can have convenient and secure access to
TheFinancialEdge. Configuration Guide for Cash Receipts
 TheFinancialEdge Configuration Guide for Cash Receipts 102711 2011 Blackbaud, Inc. This publication, or any part thereof, may not be reproduced or transmitted in any form or by any means, electronic, or
Basics FLEETMATE. Getting Started The Main Window Using Your Mouse Window Controls and Buttons Data Entry Filtering Data
 Basics Getting Started The Main Window Using Your Mouse Window Controls and Buttons Data Entry Filtering Data Copyright SCB Consulting, LLC. All rights reserved. www.fleetmate.com Getting Started Welcome
USER MANUAL. > analyze. reduce. recover
 USER MANUAL > analyze > reduce > recover Table of Contents COPY AUDIT... 1 OVERVIEW... 1 IMPORTANT NOTES FOR PRINT AUDIT 4 CUSTOMERS... 1 COMMUNICATOR TECHNICAL NOTES... 2 COPY AUDIT SOFTWARE... 2 INSTALLING
Business Online User Guide July 2017
 Business Online User Guide July 2017 Business Online Account Holder 1 Introduction.. 1 Types of Activity 1 Log In 2 Multifactor Authentication. 2 MFA Device Print Security 2 MFA Enrollment 3 Registered
nfax 5.0 OceanFax User s Guide
 nfax 5.0 OceanFax User s Guide 1 Table of Contents 1. FAXVIEW GUIDE... 1 1.1 FaxView Login and Exit... 1 1.1.1 FaxView Client Login... 1 1.1.2 WebFax Client... 2 1.1.3 FaxView Exit... 3 2.2 FaxView Over
ACCESS ONLINE USER GUIDE
 ACCESS ONLINE USER GUIDE PREPARED BY: SUPPLIER PAYMENT SERVICES FINANCIAL SERVICES ACCESS ONLINE USER GUIDE GETTING STARTED LOGGING IN:... 2 FORGOT YOUR PASSWORD?... 4 LOGGING OUT... 6 MY PERSONAL INFORMATION
SURVEYOR/400. Users Guide. Copyright , LINOMA SOFTWARE LINOMA SOFTWARE is a division of LINOMA GROUP, Inc.
 SURVEYOR/400 Users Guide Copyright 1996-2013, LINOMA SOFTWARE LINOMA SOFTWARE is a division of LINOMA GROUP, Inc. Surveyor/400 version: 4.0.0 Publication date: August 7 th, 2013 Table of Contents SURVEYOR/400
HOME ASSESSMENT VALIDATION AND ENTRY SYSTEM (JHAVEN) USER GUIDE
 USER GUIDE") HOME ASSESSMENT VALIDATION AND ENTRY SYSTEM (JHAVEN) USER GUIDE In support of Software Version 1.4.0 (January 2019) Page 1 of 64 TABLE OF CONTENTS TABLE OF CONTENTS... 2 INTRODUCTION... 6 INSTALLATION...
HOME ASSESSMENT VALIDATION AND ENTRY SYSTEM (JHAVEN) USER GUIDE In support of Software Version 1.4.0 (January 2019) Page 1 of 64 TABLE OF CONTENTS TABLE OF CONTENTS... 2 INTRODUCTION... 6 INSTALLATION...
CoreFirst Bank & Trust
 CoreFirst Bank & Trust New Commercial Internet Banking Frequently Asked Questions ACCOUNT OVERVIEW 1. Q: Why are some of my account numbers highlighted and marked with an asterisk A: Highlighted account
Clearspan Web Interface Getting Started Guide
 Clearspan Web Interface Getting Started Guide RELEASE 22 March 2018 NOTICE The information contained in this document is believed to be accurate in all respects but is not warranted by Mitel Networks Corporation
Administrator Manual
 Administrator Manual CURA Technical Support Email: cura_support@mindscope.com Phone: 1.888.322.2362 x 55 Administrator Manual Page 1 Table of Contents The Setup Module... 3 Skills... 3 Adding or Modifying
Release Personnel Module Guide
 Release 2.10 Personnel Module Guide November 2016 SATEON Release 3.0 Personnel Module Guide Issue 0.1, released November 2016 Disclaimer Copyright 2016, Grosvenor Technology. All rights reserved. SATEON
Remote Deposit. User Guide. Copyright 2008 v3.2 The remote capture software is powered by Wausau Financial Systems, Inc.
 Remote Deposit User Guide Copyright 2008 v3.2 The remote capture software is powered by Wausau Financial Systems, Inc. Table of Contents Remote Deposit User Guide The Remote Deposit Application...2 Using
Version 6.0. User and Reference Manual
 Version 6.0 User and Reference Manual FundVision 6.0 All rights reserved. No parts of this work may be reproduced in any form or by any means - graphic, electronic, or mechanical, including photocopying,
CitiDirect Online Banking
 CitiDirect Online Banking Reports and Inquiry Guide February 2009 3 Contents Overview 2 Report vs. Inquiry 3 Additional Resources 3 Online Help 3 CitiDirect Customer Support 3 Setting Preferences for Reports
ATB Online Business General User. User Guide
 ATB Online Business General User User Guide Contents Welcome to ATB Online Business 4 How to use this guide 5 Roles and entitlements in ATB Online Business 5 Administrator role 5 User roles 5 Limits 6
Donations Table of Contents
 Donations Table of Contents Donations Table of Contents 1 About Donations 3 Default Settings (Donations) 6 Reports, Labels, and Statements 8 Donations Log Report (and Donations Batch Report) 8 Deposit
User Documentation. Administrator Manual.
 User Documentation Administrator Manual Proposal Software 1140 US Highway 287, Suite 400-102 Broomfield, CO 80020 USA Tel: 203.604.6597 www.proposalsoftware.com Table of Contents Open the WebPro Viewer...
Logging In to the Program
 Introduction to FLEX DMS F&I Introduction to FLEX DMS F&I Welcome to Autosoft FLEX DMS F&I, a Web-based program that fully integrates with the Autosoft FLEX Dealership Management System (DMS). The program
Client-Account Receivable
 Nexsure Training Manual - Accounting Client-Account Receivable In This Chapter Client Accounts Receivable Entity Definition Receive Payments from Clients Relating to Policies Allocation of Payment Leave
Accounts Receivable WalkThrough
 PRACTICE CS Accounts Receivable WalkThrough Version 2014.x.x TL 30465 9/8/16 Copyright Information Text copyright 2004-2016 by Thomson Reuters. All rights reserved. Video display images copyright 2004-2016
Juris Year-End Checklist
 Juris Year-End Checklist 1 Table of Contents Before You Begin... 3 Year-End Closing for Firm Accounting... 3 Find and Post Unposted Batches... 3 Ensure You Don t Have Open Pre-Bills Dated the Year Being
DSS User Guide. End User Guide. - i -
 DSS User Guide End User Guide - i - DSS User Guide Table of Contents End User Guide... 1 Table of Contents... 2 Part 1: Getting Started... 1 How to Log in to the Web Portal... 1 How to Manage Account Settings...
GLP Administrator. AcqKnowledge GLP
 GLP Administrator AcqKnowledge GLP Introduction When AcqKnowledge is used with the GLP System installed, each user is assigned permissions for the program that indicate what operations that user is and
Enhancements Guide. Applied Business Services, Inc. 900 Wind River Lane Suite 102 Gaithersburg, MD General Phone: (800)
") Enhancements Guide Applied Business Services, Inc. 900 Wind River Lane Suite 102 Gaithersburg, MD 20878 General Phone: (800) 451-7447 Support Telephone: (800) 451-7447 Ext. 2 Support Email: support@clientaccess.com
Enhancements Guide Applied Business Services, Inc. 900 Wind River Lane Suite 102 Gaithersburg, MD 20878 General Phone: (800) 451-7447 Support Telephone: (800) 451-7447 Ext. 2 Support Email: support@clientaccess.com
SECTION 5 USING STUDENT
 SECTION 5 USING STUDENT EMAIL 5. USING STUDENT EMAIL On enrolling at the University all students automatically have an email account created. Account creation depends on a student successfully enrolling
Document Imaging User Guide
 Release 4.9 IMAGING TECHNOLOGY GROUP Document Imaging Systems Document Imaging User Guide IMAGING TECHNOLOGY GROUP IMIGIT tm Document Imaging User Guide Release 4.91 March 2007 Imaging Technology Group
smartdata.gen2 Corporate Cardholder Guide February 2014
 smartdata.gen2 Corporate Cardholder Guide February 2014 Table of Contents Chapter 1 Getting Started... 1-i Introduction... 1-1 Browser Requirements... 1-1 Security... 1-2 Selecting a Language Preference...
Administering isupport
 Administering isupport Tracking and Monitoring isupport Usage Agents perform tasks in the background that are an integral part of isupport functionality. See Enabling and Scheduling Agents on page 2 for
FAMCare Connect Admin Guide
 2011-2012 FAMCare Connect Admin Guide 2011-2012 The FAMCare Connect Administrator Guide will help a FAMCare administrator setup and configure the system. Contents How to Define Security Needs... 3 Security
Working with VIEW. Page 1
 Working with VIEW Datamatic cannot accept any responsibility, financial or otherwise, for any consequences arising out of the use of this material. The information contained herein is subject to change.
onecard Smart Data OnLine Getting Started Guide for Program Administrators
 Smart Data OnLine Getting Started Guide for Program Administrators Table of contents Introduction 3 Login 4 Company site configuration 6 Set-up Tasks 7 Creating a reporting structure 9 Cost allocation
EVERY NATION OUTLOOK WEB ACCESS (OWA) USER S GUIDE
 USER S GUIDE") EVERY NATION OUTLOOK WEB ACCESS (OWA) USER S GUIDE Exchange 2003 Version Revised September 2005 TABLE OF CONTENTS WHAT S NEW IN OWA 2003?...2 General...2 Inbox and Message Composition...2 Tasks...2 INTRODUCTION
EVERY NATION OUTLOOK WEB ACCESS (OWA) USER S GUIDE Exchange 2003 Version Revised September 2005 TABLE OF CONTENTS WHAT S NEW IN OWA 2003?...2 General...2 Inbox and Message Composition...2 Tasks...2 INTRODUCTION
Auto-Signature Add-On Product. Spectrum
 Auto-Signature Add-On Product Spectrum Information in this document is subject to change without notice and does not represent a commitment on the part of Dexter + Chaney. The software described in this