ADVANTAGE Financial System User Guide County Manager David Hankerson
|
|
|
- Marlene Heath
- 6 years ago
- Views:
Transcription

1 ADVANTAGE Financial System User Guide September 2015
2 ADVANTAGE Financial System User Guide County Manager David Hankerson 2
3 *This page is fully linked. Please click the page you wish to view. Table of Contents Navigation... 5 Introduction... 6 Accessing Advantage... 6 To save advantage as your favorite:... 8 To create an icon on your desktop:... 9 Log in to Advantage Navigating Advantage Action Buttons Menu Panel To add a page or a document to your favorites list: To change your password: Workspaces Navigating through Workspaces Jump To.16 Document Catalog Document Catalog Mode Expand All/Collapse All Arrows Pick List and Calendar Tools Drop Down Arrows Search Results Search Using the Document Catalog Wildcards Documents Document Phases Document Versions Document Function Document IDs Document Layout Copy and Paste within a document Approving Documents Using Worklist Track Work in Progress 34 Modifying Document..36 Error Messages Inquiry Tables...39 Vendor Tables..42 Search for a Vendor Search for a Vendor by address Locate a Vendor s phone number or address Log Out
4 Budget Transfer Budget (TB) Procurement Requisition (RQS) Free Form Vendors for a Requisition Requisition Cancellation...81 Department Purchase Order (PD).82 Department Purchase Order Cancellation Delivery Order (DO) Delivery Order Cancellation Receiver (RC) Receiver Cancellation Stock Room Requisition (SRQ) Cash Receipts Cash Receipt (CR) Vendor Refund Over/Short Miscellaneous Document List Copy Document Check to see if a GAX1 has been paid Common Error Messages Has a PO created from my RQS? Is a receiver entered against my purchase order? Procurement Type Codes Has a buyer been assigned to my RQS? I created a document today and I can t remember the number. How do I find it? Research Tables Vendor Invoice Registry Paid Check Check Reconciliation Vendor Transaction History Lifecycle Document Search Lifecylce Inquiry Recalculate Accounting Lines Purchasing and Payment Information Glossary
5 Navigation 5

6 Introduction Welcome to Advantage Financial! The Advantage Financial system is used by Cobb County to record and monitor all financial activity. Advantage Financial is a web based system. You do not have to have internet to access the system. You do need to have the county intranet. To use Advantage Financial you must have a valid user ID and password. If you do not have one, your department head must request one for you. To do this, they can send an to the System Administration division of the Finance Department. System Administration consists of: Roxane Rush roxane.rush@cobbcounty.org Felicia Wright felicia.wright@cobbcounty.org Accessing Advantage 1. From icobb, under Department Resources, click on Finance & Economic Development. NOTE: Advantage Financial only works in Internet Explorer. If you are using Google Chrome to reach icobb, you will need to copy the link and paste it into an Internet Explorer window to use it. 6


7 2. Click on the AMS NAVIGATION link under the heading QUICK LINKS. 3. Right click on the AMS FINANCIAL link under the heading QUICK LINKS and select Copy Link Address. You can then paste the link into an Internet Explorer window. It is recommended that you save Advantage as one of your favorites, or create an icon on your desktop for Advantage. This will save you steps in accessing Advantage. It will also allow you to access the system if icobb is unavailable. 7


8 To save advantage as your favorite: 1. From the Log in page, click Favorites. 2. Click Add to Favorites. 8


9 3. Enter a name, or let it default. Click Add or OK. A link will then be placed in your favorites list. To create an icon on your desktop: 1. From the login page, right click on your mouse button. 2. Select Create Shortcut. 3. Click Yes when this message appears. The AMS Financial link will be placed on your desktop. 9


10 Log in to Advantage 1. Type your User ID in the designated field. 2. Type your Password in the designated field. 3. Either press enter or click Login. The user name and password are both case sensitive. If you make a mistake, an error message will appear on the page. You can click the Reset button to clear the user name and password fields and try again. Navigating Advantage The Advantage home page consists of the following areas: Action Buttons Jump To Workspaces Work Area Menu Panel Workspaces Jump To Action Buttons Logout Work Area Menu Panel 10

11 Action Buttons Action Buttons Include: Home: Returns you to the home page from any page in Advantage. Personalize: Only specialty users will use this link to receive specialized workspaces. Accessibility: Opens a new browser window with information about features in Advantage. App Help: Opens a new browser window with online help About: Information about Advantage Financial software Red Button: Logout, ends your Advantage session. Menu Panel The menu panel is the left of the screen. The menu panel changes when you are in a workspace, or in a document. Menu Panel From the home page, the menu panel consists of: Message Center: Contains the worklist. Worklist-displays work assigned to you according to the approval rules established in Advantage. 11
 documents History: History lists all pages and documents opened during the current session of Advantage.")

12 Search: Contains the Document Catalog Document Catalog-a listing of all documents. The document catalog is used to search for a document or create documents. Contract Catalog-allows a limited search of Master Agreement (MA) documents History: History lists all pages and documents opened during the current session of Advantage. The pages are listed with the most recent page at the top. The history list needs to be refreshed (collapsed and then re-expanded) to display any pages opened since the last refresh of the list. Favorites: Allows you to quickly access commonly used pages. To add a page or a document to your favorites list: 1. Open the page or document. 2. Right click on the mouse. 3. Select Add to Favorites. 4. Enter the name of the favorite and then click OK. 12


13 The page will then appear in your favorites list. Administration: Allows you to change your password. To change your password: 1. Click on Administration 2. Click Change Password 3. Type in your old password. 4. Type in a new password. 5. Retype the new password. 6. Click on Change User Password. A message will appear that the password has successfully changed. 13
14 About passwords: Passwords in Advantage do not expire. Change your password as often as you would like. Passwords must be 2-16 characters. Passwords are case sensitive. Passwords can be any combination of numbers, symbols, or letters. Workspaces The system has 5 standard workspaces. The workspaces contain links to various tables and documents. Some links are listed in several workspaces. For example a link to the Vendor/Customer table can be found in the Information Search, Ordering and Receiving and Quick Links workspaces. Information Search: This workspace allows authorized users to search for data in various tables. Ordering and Receiving: With authorization all purchasing documents can be created here. There are also links to various search tables. Cash Receipts: Authorized users can create Cash Receipt (CR) documents. Transfer Budgets: Authorized users can create Transfer Budget (TB) documents from this workspace. Quick Links: Contains links to various tables and documents. 14

15 Navigating through Workspaces Workspaces are designed so you will be able to look up any information relevant to the task you are performing without having to leave the workspace. For example, if you are creating a PD, you will be able to look up the vendor, your budget, and commodities without having to leave the Ordering and Receiving workspace. There are several ways to navigate within the workspaces. Menu Panel: Each workspace has different options listed on the menu panel. Once inside a workspace you can click on links in the menu panel to get to another component of the workspace. Close: Clicking Close will take you completely out of your workspace and back to the home page. Clicking Close will take you to the Home Page Use the menu panel to navigate through workspaces 15


16 Jump To The Jump To link appears throughout the system whether you are at the home page, in a document or in a table. The Jump To allows you to enter in a page code for a page, link to that page, and then click the back link to return to where you were. For example, if you are in a document and you want to check your budget, you can enter the page code for the budget table in the Page Code box and you will be taken to the budget table. After you are done viewing the budget table, click on the back link on that table, and you will be taken back to where you were in your document. To use the page linking feature: If you are in your document, enter the page code for the expense budget summary table in the Jump To box. Then click Go. This will take you to the budget table, where you can search for your expense budget. 16

17 When you are ready to return to your document click on the Back link listed on the page. Some common page codes that you might use to link are listed below. Page Code VCUST COMM ESUM29L2 BQ29LV2 BQ29LV1 VIR PDCHK CHREC VTH LFDOCSCH LINQ Page Name Vendor Search Commodity Code Search Expense Budget Summary Expense Budget Appropriation Budget Vendor Invoice Registry Paid Check Check Reconciliation Vendor Transaction History Lifecycle Document Search Lifecycle Inquiry 17
 Document Catalog Mode B) Expand All/Collapse All arrows C) Search Criteria D) Pick List E) Calendar F) Drop down arrows G) Search Results Document Catalog Mode: The document catalog has two modes.")
18 Document Catalog The document catalog is used to search for a document or to create a document. There are seven important elements in the document catalog that are highlighted. A) Document Catalog Mode B) Expand All/Collapse All arrows C) Search Criteria D) Pick List E) Calendar F) Drop down arrows G) Search Results Document Catalog Mode: The document catalog has two modes. The search mode and the create mode. Create Mode-Click Create to create a new document. (When the document catalog is in the Create mode, a link will be listed at the top to switch to Search mode). Search Mode-Click Search to search for a document. (When the document catalog is in search mode a link is listed at the top to switch to Create mode) Create Mode Search Mode 18

19 Expand All/Collapse All Arrows These arrows appear often in Advantage Financial and allow you to expand all of the fields listed on a page, or collapse all of the fields. Search Criteria: The search criteria are grouped into three sections. Search criteria can be entered in each of these fields. Entering multiple search options creates a more restrictive search. Advantage will look for documents that meet all search criteria entered. Document Identifier o Code-Document Code (PD, DO, etc) o Dept-Department number of the document o Unit-Unit code entered when the document was created o ID-ID number of the document. User Information o Create User ID-The user ID of the person who created the document o Create date-the date the document was created. Document State o Search by the Function, Status, or Phase of a document. Search criteria fields 19


20 Pick List and Calendar Tools The Pick list and Calendar tools appear often in Advantage Financial. Both tools help you in selecting values for the search criteria. Pick List: Clicking the pick list will display a table with all available options for the field. You can either select one of the options by clicking select, or you can return to the previous page by clicking cancel. Calendar: Clicking the calendar will open up a pop up box that contains a calendar. The calendar has arrows to allow you to scroll to future and previous months and years. Clicking a date on the calendar will populate the create date field with the date you have selected. 20


21 Drop Down Arrows Drop down arrows appear often in Advantage Financial in tables and documents. Clicking on the arrow will display all selections available for the field. Search Results The results of the document catalog search are displayed in the grid at the bottom of the page. All documents that match the search criteria are displayed. The results section for the document catalog displays up to ten documents. If there are more than ten documents that match the search criteria, the Next and Last movement links will be underlined. 21

22 The movement links are located below the results section. The movement links are: First: Takes you to the first window of the results section Prev: Takes you to the previous window of the results section Next: Takes you to the next window of the results section Last: Takes you to the last window of the results section Search Using the Document Catalog To find a specific document or group of documents, search criteria will have to be entered on the Document Catalog. To search using the Document Catalog, complete the following actions: 1. Click on Search from the menu panel 2. Click on Document Catalog 3. Enter search criteria in the search fields 4. Do one of the following a) Click on Browse, or b) Press Enter Your search results will appear in the results section. To open a document listed in the grid: Click the document ID link (underlined), OR Select the check box next to the document and click the Open link. Direct Document Link Action Links 22

23 Wildcards Wildcards are characters that will assist you in searching on any table in Advantage Financial. The most commonly used wildcard is an Asterisk (*). The asterisk allows you to perform a search when all of the criteria is not known. The placement of the asterisk is very important when searching. For example, if you are searching for a document, and you do not know the entire document number but know it ends in 12. Type *12 in the ID on the document catalog. The results section shows all documents that end in


24 The asterisk may be included in the middle of your search criteria. For example, if you are searching for a document that begins with and ends in 17, you can include the wildcard in the middle of your search criteria. The asterisk may also appear at the end of your search criteria. For example, if you are searching for a document that begins with 3100, you would enter 3100* on the document catalog. 24
25 There are other wild cards that you can use when entering your search criteria to help you locate the desired information. They are listed below: Wildcard Description Uses and Example > Greater than sign Use to search for information greater than a specific item. For example, if you wanted to view documents created after August 1, 2014, type >8/1/2014 in Create Date on the Document Catalog. >= Greater than or equal to sign Use to search for information greater than or equal to a specific item. For example, if you wanted to view documents created on or after August 1, 2014, type >=8/1/2014 in Create Date on the Document Catalog < Less than sign Use to search for information less than a specific item. For example, if you wanted to view documents created before August 1, 2014, type <8/1/2014 in Create Date on the Document Catalog <= Less than or equal to sign Use to search for information less than or equal to a specific item. For example, if you wanted to view documents created on or before August 1, 2014, type <=8/1/2014 in Create Date on the Document Catalog, Comma Use to search for more than one item. For example if you wanted to view PD s and DO s type PD,DO in Document Code on the Document Catalog Documents Document Phases Draft: A document always begins in the draft phase. In the draft phase, a document causes no updates. When a draft document is submitted, if there are any errors, the error messages will be displayed and the document will stay in the draft phase. In order to proceed to the next phase, the errors must be corrected, and the document re-submitted. Pending: If a document requires additional approvals, it changes from draft, to pending phase upon submission. The document will stay in pending phase until all necessary approvals are completed. 25
: After a document is in the final phase, it may be necessary to modify the final document to change or add information.")
26 Final: The document will reach final phase if no (more) approvals are required on the document. The document is then considered complete. Historical (Final): After a document is in the final phase, it may be necessary to modify the final document to change or add information. When this happens, the final version of the document changes to a historical phase to make way for the latest version. Document Versions After a document reaches the final phase, the document can still be modified or cancelled. When the document is modified or cancelled, a new version of the document is created to allow the original document to remain, while the subsequent document progresses to the final phase. Version numbers begin at one for new documents, and increase by one each time a new version of the same document is created. All versions of the document appear in the document catalog. Document Function The document function indicates your intention for creating the document. The functions are: New: Indicates that the document does not already exist in Advantage Financial. The intention is to create a new document and not to modify an existing document. Modification: Indicates that your intention is to change the information on a previously final document. Cancellation: Indicates that you intend to cancel (reverse entries) a previously final document. 26

27 Document IDs Each document has a unique identification number. The document ID appears in the document catalog and at the top of the screen when a document is opened. Document Code Department Code Unique ID Version Function Phase Document Layout All documents have a header section and detail line components. The menu panel of a document displays the available document components. When a document is first opened, the header component is displayed by default. On the document menu panel, the component you are in is highlighted in yellow. To display the contents of specific components, click the component name on the left. The contents will display in the white space to the right under different tabs. Click on List View to view the contents in a list instead of under Tabs. Document Components 27

28 When you click a component all of the lines contained in that component of the document appear at the top of your screen in the line summary. The detail information for the highlighted line will appear in the line detail section. Line Summary Line Detail Copy and Paste within a document When you are creating a document with many lines, you can copy one of those lines, and paste it into the document. Then you only need to change parts of the line that are different. Use the trash can icon to remove lines from a document. Use the copy icon to copy a line. Then paste it by clicking Insert copied line. 28

29 Approving Documents Using Worklist When a document is submitted successfully and goes to Pending phase, the document is routed through worklist to be approved. Documents that go to Final phase will need no further approvals. Depending on your level of security, you may or may not be authorized to approve documents. If you are not authorized to approve a document, you will not use the worklist. The following steps illustrate how to approve documents using worklist. 1. Click on Message Center 2. Click on Worklist Click Message Center Click Worklist 29


30 The Worklist displays your personal worklist, and any group worklist that you may belong to. Your personal Worklist is your name. Click the down arrow to view any other worklist that you may belong to. When a document is approved it will be directed to the group worklist first. When approving a document, you must first take the document from the group worklist, taking the document will move it into your personal worklist. Follow these steps to approve a document through worklist. 1. Click the drop down arrow, next to your name. Click the dropdown arrow next to your name. This will display any group worklist that you may belong to 2. Select a group worklist. Selecting a group worklist will display all documents in that worklist pending approval. This will display all documents in the group worklist that are pending approval. 30


31 3. Select the document you want to approve by clicking the selection box. A check mark will appear. 4. Click on Take Task Select the document by clicking on the selection box After a document has been selected, click on Take Task. Once you have clicked on Take Task, the document will be removed from the group worklist and placed in your personal worklist. Note: It is possible that more than one user will have access to a group worklist. 5. Click the drop down arrow, and select your name. You will see that the document is now in your personal worklist. After you have taken the task select your personal worklist. The document will now be in your personal worklist. Click on the document link to open the document and review. 6. Click on the Document Link. This will open the document. 7. Review the document. 31


32 8. Approve or Reject the document a. Scroll to the bottom of the document b. Click Approve or Reject All After reviewing your document, click here to Approve. Click here to Reject All 32
33 Approving a document will either take the document to final status, or place it in another Worklist for further approvals. Each department head determines the levels of approvals for their department. Rejecting a document will take it out of the worklist, and places the document in Draft status on the Document Catalog. The document can be edited, and then re-submitted for approval. If the document remains in pending phase after it is rejected, the person or people who previously approved it will have to unapprove it to return it to the draft status, or reject all. Reject All: The reject all action is used to reject all levels of approval on a pending document, even if the document has been approved. Applying this action will change the document from Pending to Draft status. The Reject All action can be applied from inside the document or from the worklist. To perform the reject all action, complete the following steps: From the work list, open the document. On the Workflow Menu select Reject All. 33

34 Track Work in Progress All documents have an option to Track Work in Progress. Selecting this option on a document that is pending will display all the approval levels the document must go through in order to become final. Selecting this option on a Final document will display all the approvals the document needed to become final. To Track Work in Progress, you must open the document. Once the document in question is opened complete the following steps. 1. Click on Workflow. 2. Select Track Work in Progress Click on Workflow and then Track Work in Progress. 34

35 The Track Work in Progress screen appears. Below is a listing of the fields listed on this page with a description of each field. Click Back to be returned to your document The Approval Rule ID section displays the ID of the approval path the document will follow. The Seq No section displays the sequence in which the document will be approved. The Approval Level section displays the approval level needed to approve the document. The Assignment Date displays the date the document was assigned for that level of approval. The Initial Assignee Name displays the name of the group the document is at to be approved. The Approval Status displays if the document is approved or still pending. The Approval User Name displays the name of the person who applied the approval. If you click on the View Log link, the Track Work in Progress Log will appear. This displays the date and time the approval took place, as well as the user who approved the document. Clicking on the View Visual link, the approval path information will appear in a visual flowchart. If you click on Back, you will be returned back to your document 35

36 Modifying Documents When a document reaches the final phase, it is possible to make certain changes to the final document. To modify a document there cannot be any documents referencing the document. For example, if a PD needs to be modified, and there is a RC against the PD, the RC would need to be cancelled before the modification can be completed. There are certain things you cannot do on a modification document. Some examples of these are: Change the vendor code Delete a commodity or accounting line Distribute Accounting lines Because modifications to documents can vary greatly, if you have any specific questions about modifying a document, contact the Purchasing Department. To modify a document: 1. Locate the original document using the document catalog. 2. Open the original document. 3. Click Edit at the bottom of the document. This will create a modification version of the final document. The document s gray fields will become white, indicating that you are in edit mode. 36

37 Modification creating a second version of the document 4. Make all necessary changes. 5. Validate and Submit the document. The modification document will then go through the same approval processes as the original document. Error Messages When editing any of the documents, error messages may appear. Depending on the type of message returned, the action chosen (Save, Validate, Submit) may or may not be successful. The document below has 3 error messages. Click on View All link to view error messages. 37

 it will take you to the component of the document where the error is. Some (not all) errors will be highlighted in the document.")
38 When you click on view all, a drop down screen will display all the errors. You can scroll down if you need to. This section will show details for all messages. Scroll bar Severity: Tells you the severity of your error. For example if the severity is Error, the document will not submit until the errors are corrected. The Information and Warning messages will not prevent the document from submitting. Component: Tells which part of the document the error is in. Line Number: If you click on the link (underlined portion) it will take you to the component of the document where the error is. Some (not all) errors will be highlighted in the document. Description: Click on the folder icon under Description for more information about the error. 38


39 Inquiry Tables There are several inquiry tables in Advantage Financial that you can access to view information. All of the inquiry tables have the same layout. Below is an example of an inquiry table. Grid Grid Detail Grid: displays a list of: All records in the table OR All records returned after the search function is used. To move through the grid, use the First, Prev, Next and Last movement links. Grid Detail: displays the detail of the selected record (highlighted in orange) in the grid. These fields are gray indicating that they are display only. You cannot change the information in these tables. Search: 1. Click Search. 39

40 This will open a search window for the table you are on. 2. Enter search criteria in the desired fields. 3. Either Click OK, or press Enter on your keyboard. 40
41 Commodities with hammer in the name will be displayed. Helpful Hints: Remember to use wild cards in your search criteria. If no results return, or if you want to start another search, just click on the Search link again. Some examples of inquiry tables are: Commodity Fund Department Unit Sub Unit 41
 or they can fill out a vendor application form and return it to the Finance Department.")
42 Vendor Table The vendor table contains all companies registered as vendors with Cobb County. Vendors can register online using Vendor Self Service (VSS) or they can fill out a vendor application form and return it to the Finance Department. The vendor table is listed in the following workspaces in Advantage Financial: Information Search Ordering and Receiving Quick Links The vendor table has the same layout as other inquiry tables in Advantage Financial; however it is a little bit different. Because the table contains so much information, the table has several components to it, just like a document. Vendor Components The detail for the vendor selected (highlighted in orange) will appear in the detail section and in the various components of the vendor table. Only vendors with a Vendor Active Status of Active will be displayed and are available to be used. 42


43 Search for a Vendor 1. Click Search on the Vendor Table. 2. Enter search criteria in the search box. 3. Click OK or press enter. All vendors matching the search criteria will be displayed. 43


44 When entering search criteria to locate a vendor, start by searching in the Legal Name field. For example: If you are searching for the vendor number for Red the Uniform Tailor, enter *uniform* in the Legal Name field, and then press enter. The vendor information for all vendors that have uniform in their name will return in the results. 44


45 If no results are returned when you search by Legal Name, click Search again and search by putting information in the Alias/DBA field. For Example: You are searching for the vendor number for Paulding Trophy. You have tried to search for the vendor number using the legal name field and no results are returned. Click Search again, remove Paulding Trophy from the legal name field and type it in the Alias/DBA field. Click OK, or hit enter. The vendor information is then returned. 45


46 Search for a Vendor by address Locating a vendor in Advantage Financial can be tough because of all of the different ways vendors can be listed. Searching for a vendor by their address is one additional way to find a vendor in the system. 1. From the Vendor/Customer table, scroll to the bottom and click on Master Addresses. 2. Click on Search. 3. Enter the address, or a portion of the address in the Street 1 field. Remember to use wildcards! Then click OK


47 5. Any vendors that have that address will appear at the top of the table. Find the address you are looking for and highlight it, then click Vendor/Customer Detail to verify it is the correct vendor. Locate a Vendor s phone number or address 1. Search for the vendor using the search function. 2. Once located, highlight the active vendor. 3. Click on the Address section on the menu panel Highlight vendor you are looking for, then click on the Address component 47


48 All of the available addresses will be listed. The address highlighted will have the detail listed on the detail section of the screen. The phone number is also listed in the address component for each vendor. To return to the Vendor Table, click on Vendor/Customer on the menu panel. Click Vendor Customer to return 48


49 Log Out It is important that when you are finished working in the system, that you logout properly. To logout perform the following task. 1. Click the red icon at the top right of the screen. You will receive a message stating Logout Successful. 49
50 Budget 50


51 Transfer Budget (TB) 1. Click Transfer Budgets. Click Transfer Budgets 2. Click Transfer Your Budget. 3. Click on Click here to create a TB. Click on this link to create a TB 4. Click Create. Click Create 51

. 9.")
52 5. Enter Department and Unit. 6. In ID enter your unit again. 7. Click Auto Numbering. 8. Click Create. Enter your unit Enter your department Enter your unit again here. Click Auto Numbering Click Create This will take you to the Header of the TB document. Justification for the budget transfer must be attached to the header of the document. It is recommended that you write your NOTE or justification for the budget transfer after creating the TB so you will have the transaction ID# to put in your file, preferably at the top. A Word file may be best suited to justify the budget transfer, however other files can be used for the same purpose (i.e., Excel, Agenda Items, etc.). 9. Click on File at the bottom, then choose Attachments. Click on File, Attachments 52


53 10. Click Upload. Click Upload 11. Click Browse. Click Browse A Choose File window will open for you to search for your file. It is recommended that you create a file for your budget transfer attachments to help locate notes. 12. Highlight the document you wish to attach. 13. Double click the document or click Open. 53

54 Highlight the document to be attached Click Open 14. In Description enter a short description of your attachment. 15. Select Standard for the Attachment Type. Make sure Standard is selected as the Attachment Type Enter a Brief Description 54

55 16. Click Upload. Click Upload To attach another file follow steps Click Return to Document. This will take you back to the Header of your TB. Click Return to Document 55

56 18. Click Expense Budget component. 19. Click Insert New Line. Click Expense Budget Click Insert New Line 56


57 20. In Action select Modify. 21. Scroll Down and click Save. When the document has saved, information will infer into the document. Select Modify Click Save 22. In Dollar Amount enter the budget amount to be transferred. 23. In Increase/Decrease, click on the drop down menu and click on Decrease. 24. Enter Fund, Department, Appropriation Unit, Unit, and Object. 25. Click Save Enter Fund Enter Dollar Amount Enter Department Increase or Decrease Enter Unit Enter Appropriation Unit Enter Object Click Save 57

58 26. Click on the Copy Icon. 27. Click on Insert Copied Line. Click on the Copy Icon Click Insert Copied Line This will create a duplicate line directly below the line you copied from. This will prevent you from having to re-enter every field. 58

59 28. Highlight the second line, select the correct information for Dollar Amount, Increase/Decrease, Fund, Department, Appropriation, Unit, and Object. 29. Scroll down and click Save. 30. Repeat steps 26 through 29 for any additional transfer lines that need to be entered. For Example, change object and appropriation unit For Example, Change Increase/Decrease Click Save 59


60 31. Click Smart Budget Rollup. Click Smart Budget Rollup 32. Click on Appropriation Budget component and verify rollup. Click Appropriation Budget Verify the appropriation rollup 60
61 33. Click Validate. Click Validate If your document does not validate successfully follow the below steps: 1. Correct the errors on the Expense Budget lines. 2. Once corrected, click on Appropriation Budget. 3. Highlight the appropriation line affected by any edits entered, and delete the line, by clicking on the scissors icon. 4. Click on Expense Budget. 5. Click on Smart Budget Rollup. 6. Click Validate. 7. Repeat steps 1 through 7 until your document is validated successfully. 61

62 34. Click Submit. This message will appear when your document is submitted successfully 62
63 Procurement 63


64 Requisition (RQS) 1. Click on Ordering and Receiving. Click Ordering and Receiving 2. Click on Request Goods & Services. 3. Click on Click here to access a RQS. Click on this link to create a RQS 4. Click Create Click Create 64


65 5. Enter your Department, Unit, and check Auto Numbering. 6. Click Create. Enter your department Enter your unit Click Auto Numbering Click Create 7. Enter Procurement Type or select a procurement type using the pick list. Enter Procurement Type ID 65

 10.")
66 8. Scroll down and click on Contact. Click Contact 9. Enter Requester ID, using the pick list. OR If the Requester is not on the pick list, enter the following information: Name Phone Number (Optional) 10. Click Save. Enter Requester ID Click Save 66

67 Contact Information will infer after you click save. 11. Click on Default Shipping/Billing. Click Default Shipping /Billing 67
 on Free on Board. 14. Enter Delivery Date or click on the calendar to specify date. 15. Specify Delivery Type. 16. Click Save.")
68 The Shipping and Billing locations will default from your user ID. Verify that your shipping location is correct; you can use the pick list to change shipping location if necessary. 12. Enter Shipping Method, or select one using the pick list. 13. Enter (5) on Free on Board. 14. Enter Delivery Date or click on the calendar to specify date. 15. Specify Delivery Type. 16. Click Save. Note: The majority of all deliveries will be Standard Ground and the majority of all Shipping Methods will be Vendor Delivery (5). Enter Shipping Method Enter Free on Board Enter Delivery Date Click Save Select Delivery Type 68
69 17. Click on Commodity component. 18. Click Insert New Line. Click Commodity Component Click Insert New Line 69
70 19. Enter Commodity, or select a commodity using the pick list. 20. Specify Line Type (Item or Service). For line type Service see note below. 21. Enter Quantity. 22. Enter unit of measure in Unit. If you are not sure of the abbreviation use the pick list to select a unit of measure. 23. Enter Unit Price. 24. Enter Extended Description. Important Note: A detailed description of the item you are requesting is required. 25. Click Save. Enter Commodity Enter Line Type Enter Quantity Enter Extended Description Enter Unit of Measure Enter Unit Price Click Save Repeat steps for each additional commodity you are requesting. 70
71 To enter a Service line type, follow these steps instead of steps 20-25: a. Select Line Type Service. b. Enter Contract Amount. c. Enter Service From and Service to Date. d. Enter Extended Description. e. Click Save. f. Remove shipping details from any service commodities after clicking Ship/Bill To (Step #36). NOTE: A freight line or shipping charge is considered a Service line type. Be sure to follow steps a-f when adding a freight line. For Service type commodities follow steps A-F instead of
. 29.")

72 26. Click Accounting Distribution. 27. Click Insert New Line. Click Accounting Distribution Click Insert New Line 28. Enter Accounting Template (Sub Unit). 29. Enter Distribution %. The percentage will always be 100% when you have the same Unit number for different lines. You may want to build your own accounting lines if you have more than one Unit to charge your document to. Enter Accounting Template Click Fund Accounting Enter Distribution % 72
73 30. Click Fund Accounting. 31. Enter Object Code if all commodities are going to be charged to one object code. If multiple object codes are to be used, skip step 31, and follow step Click Save. Enter an object code Click Save 73

74 33. Click Distribute Accounting Lines. Click Distribute Accounting Lines This will create an accounting line for each commodity entered. If you are charging all commodity lines to the same object code, skip step 34, and continue with step If you are charging commodity lines to different object codes, click Fund Accounting and enter an Object code for each line. Click Fund Accounting Enter an object code for each line if using multiple object codes 74

75 35. Click on the Commodity Component. Click Related Actions and Ship/Bill From Header. NOTE: Remove shipping details from any service line type commodities Click Commodity Component 75
76 Adding a vendor is not required for a requisition. If you wish to add a vendor to the requisition complete the following steps. 1. Click on Vendor component. 2. Click Insert New Line. 3. Enter Vendor Customer, or select a vendor using the pick list. 4. Click Save. The vendor information will infer. If needed the vendor contact information can be changed, but the fields can not be blank. Note: Only select a vendor with an active status of 2 Click Vendor Component Enter Vendor Customer Insert New Line 76
77 36. Click Validate. Click Validate 77

78 37. When the document validates successfully, click Submit. Click Submit This message will appear when your document is submitted successfully. This message will appear when your document is submitted successfully. 78
79 Free Form Vendors for a Requisition The Free Form Vendor on the Requisition is an optional section which allows you to suggest vendors Purchasing can obtain quotes from. You are able to enter vendors who are not current, active Cobb County vendors. To enter a suggested vendor on the Requisition, click on Insert New Line. Insert New Line 79
80 Enter the vendor name, principal contact, telephone number, address, and choose Correspondence Type . You can add additional information in the Comments box. There is no place for a vendor number on this screen. If the vendor you are suggesting is a current Cobb County vendor, please enter their vendor number in the Comments box. Vendor Name Principal Contact Telephone Comments Correspondence Type: choose 80
81 Requisition Cancellation You are not authorized to cancel a requisition. If you try to perform a requisition cancellation you will receive the following error message. If you need a requisition cancelled, contact the Purchasing Department. 81


82 Department Purchase Order (PD) 1. Click Ordering and Receiving. 2. Click on Department Purchase Orders. 3. Click on Click here to access a PD. Click Ordering and Receiving Click on this link to create a PD 4. Click Create at top of page. Click Create 82


83 5. Enter your Department, Unit and enter your PD number in ID. 6. Click on Create. Enter your Unit Enter your Department number Enter your PD number here Click Create 7. Enter 3 in Procurement type ID. Enter 3 in Procurement Type ID 83

 10. Click Save.")
84 8. Click on Requestor Issue Buyer. Click Requestor Issue Buyer 9. Enter Requester ID using the pick list. OR If the Requester is not on the pick list, enter the following information: Name Phone Number (Optional) 10. Click Save. If you used the pick list the name, and phone will default at this time. Enter Requester ID Click Save 84

85 13. Click on Default Shipping/Billing Click Default Shipping/Billing 85
86 14. Enter Shipping Location Code, or select from pick list. 15. Enter 001 in Billing Location. 16. Enter Shipping Method, or select from pick list. Note: Most PD s will be Customer Pick Up (11). Some will be Vendor Delivery (5). 17. Enter (5) in Free on Board 18. Enter Delivery Date or use Calendar to specify date. 19. Specify Delivery Type. Note: The majority of all deliveries will be Standard Ground, or Customer Pick Up. 20. Click Save. Enter Shipping Location Enter Billing Location Enter Shipping Method Enter Free on Board Enter Delivery Date Select Delivery Type After Shipping/Billing information is entered, click Save 86
87 21. Click on Commodity component. 22. Click Insert New Line Click Commodity Component Click Insert New Line 87
88 23. Enter Commodity number, or select a commodity using the pick list. Be sure the commodity you select has an active status of True. 24. Specify Line Type (Item or Service). For line type Service see note below. 25. Enter Quantity. 26. Enter unit of measure in Unit, or select a unit of measure using the pick list. 27. Enter a unit price in Unit Price. 28. Enter a description in Extended Description. 29. Click Save. 30. Repeat steps 22 through 29 for each additional commodity. Enter Commodity Number Enter Quantity Enter Line Type Enter a description in Extended Description. Enter Unit of measure Enter Unit Price 88
89 To enter a Service line type, follow these steps instead of steps 25-29: a. Select Line Type Service. b. Enter Contract Amount. c. Enter Service From and Service To Date. d. Enter Extended Description if required. e. Click Save. f. Remove shipping details from any service commodities after clicking Ship/Bill To (Step #40). NOTE: A freight line or shipping charge is considered a Service line type. Be sure to follow steps a-f when adding a freight line. For Service type commodities follow steps A-F instead of steps

90 31. Click on Accounting Distribution component. 32. Click Insert New Line. Click Accounting Distribution Component Click Insert New Line 33. Enter Distribution %. The percentage will always be 100% when you have the same Unit number for different lines. You may want to build your own accounting lines if you have more than one Unit to charge your document to. 34. Enter Accounting Template (Sub Unit). Enter Distribution % Enter Accounting Template 90

91 35. Click Fund Accounting. 36. Enter Object Code if all commodities are going to be charged to one object code. If multiple object codes are to be used, skip step Click Save. Click Fund Accounting Enter Object Code Click Save 91

92 38. Click on Distribute Accounting Lines. Click Distribute Accounting Lines This will create an accounting line for each commodity entered. If you are charging all commodity lines to the same object code skip steps If you are charging commodity lines to different object codes, click on Accounting Component. 40. Click Fund Accounting and enter an Object Code for each line. Click Fund Accounting Click on Accounting Component Enter an object code for each line if using multiple object codes 92

93 41. Click on Vendor component. 42. Enter vendor number in Vendor Customer, or select a vendor using the pick list Note: Only select a vendor with an active status of Click Save. The vendor information will infer. Once inferred the vendor contact information may be changed, but the fields must not be left blank. Click Vendor Component Enter Vendor number or use pick list to choose vendor. Click Save after Vendor information is entered 93
94 44. Click the Commodity Component. Click Related Actions and choose Ship/Bill From Header Click Commodity Component NOTE: Remove shipping details from any service line type commodities. 94
95 45. Click Validate. Click Validate 95

96 46. When the document validates successfully, click Submit. Click Submit This message will appear when your document is submitted successfully. This message will appear when your document is submitted successfully 96

97 Department Purchase Order Cancellation A PD can only be cancelled if there are no documents referencing it. If there is a RC or an IN against the PD, they must be cancelled before the PD can be cancelled. If there is a payment made on the PD, the PD cannot be cancelled. 1. Click on Ordering and Receiving. Click Ordering and Receiving 2. Click on Department Purchase Orders. 3. Click on Click here to access a PD. Click here to access a PD 97

 Click on the selection box,")
98 4. Search for the PD you want to cancel by entering search criteria in the fields. 5. Click Browse. Click Browse after search criteria has been entered Enter search criteria in any of these fields 6. Open the document by performing one of the following actions: a) Click on the selection box, on the left, then click Open. b) Click on the document Link. Click Open Select the document 98


99 7. Click on Discard and click OK or Cancel on the message. Click on Discard 99

100 A cancellation draft will appear. The document is now a cancellation draft 8. Click Validate. Click Validate 100
101 9. When the document validates successfully, click Submit. Click Submit 101
102 This message will appear when your document is submitted successfully The cancellation document will then be routed through the same approvals as the original document. Entries will not be reversed until the cancellation is in Final Phase. 102

103 Delivery Order (DO) 1. Click on Ordering and Receiving. Click Ordering and Receiving 2. Click on Delivery Orders. 3. Click on Click here to create a new DO. Click on this link to create a DO 4. A search can be performed in two ways or a combination. Enter in a word or phrase in Search For. The Search For looks in the following locations at the same time: Commodity Code, Commodity Description, Commodity Line Description, and the Master Agreement (Source). Use the percentage sign (%) as your wildcard in the Search For. Enter the Vendor Customer ID in Vendor. Use the asterisk (*) as your wildcard in the Vendor. 103


104 5. Click Search. Enter word, phrase, number in Search For Click Search Enter Vendor Customer ID if needed 104

105 6. Select the items you wish to order by entering a Quantity or SC Amount (Service Contract) next to the desired lines. Click on Add to Cart. Enter quantity or SC Amount beside items ordering Click Add to Cart. 105
.")
106 7. If ordering more items, click on the Next Link and repeat Step 7. Make sure you click Add to Cart after each page you choose items from. If you want to review your Shopping Cart before checking out, click on Edit Shopping Cart (otherwise click Proceed to Checkout). It is not necessary or required to use Edit Shopping Cart before checking out to create a DO. Click Edit Shopping Cart if needed 106


107 On the Edit Shopping Cart page, you have the option to make changes to quantities and delete lines. You can also add more lines by clicking Continue Shopping. From this page you can enter your Shipping Location, Accounting Template and Delivery Date and Proceed to Checkout if finished. Delete lines or change quantity Enter Shipping Location, Accounting Template, and Delivery Date Proceed to Checkout when finished or Continue Shopping 8. If you have completed your order and do not wish to edit your shopping cart, click Proceed to Checkout. Items selected in cart. Click Proceed to Checkout when done 107

 15.")
108 9. Enter the Department or choose from the picklist. 10. Make sure Auto Numbering is selected. 11. Enter Shipping Location code, or select from pick list. 12. Enter 001 in Billing Location. 13. Enter Accounting Template 14. Enter Delivery Date or use Calendar to specify date. Be sure to enter a date in the future to allow time for the document to route for approvals. (If you enter the current date, by the time the document reaches the final approver, it will most-likely be in the past and the document will automatically be rejected.) 15. Click Checkout. Shipping Location Department Auto Numbering Accounting Template Billing Location Delivery Date Click Checkout when done When this message pops up, click OK. 108

109 This will bring up the Header component of your DO document. 16. Click on Requestor Issue Buyer. Click on Requestor Issue Buyer 109
110 17. Enter Requester ID, using the pick list. OR If the Requester is not on the pick list, enter the following information: Name Phone Number (Optional) Click Save and the requestor information will populate. Enter Requester ID Click Save 110

111 18. Click on Default Shipping/Billing Default Shipping/Billing 111

112 19. Review the Default Shipping/Billing to be sure it is complete. AMS requires these fields to be completed on the Commodity Section, but it does not generate an error if it is missing on the Header. It is the information entered on the Header of the document, however, that prints on the Delivery Order. Therefore, the user must be sure the Shipping/Billing fields are completed on the Header to avoid having the DO rejected for correction. 20. Enter Shipping Location code, or select from pick list. 21. Enter 001 in Billing Location. 22. Enter 5 in Shipping Method. 23. Enter 5 in Free on Board. 24. Enter Delivery Date or use Calendar to specify date. 25. Specify Delivery Type. Enter shipping information in Default Shipping/Billing section. 112

113 Note: The majority of all deliveries will be Standard Ground. 26. Click on the Commodity component. Commodities will infer from selected lines on the Deliver Order Search. 27. Verify Quantity and Unit on each commodity line. Note: Unit price and Commodity Description will infer from the Master Agreement. If unit price pulls forward $0.00, enter the price in List Price, and enter a description in Extended Description. 28. For additional information enter a description in Extended Description. Verify Quantity and Unit Click Commodity Component Enter a description Enter list price for commodities that bring forward $0.00 in unit price 113
.")
114 29. Click Accounting Distribution component. 30. Click Insert New Line. Click Accounting Distribution Click Insert New Line. 31. Enter Distribution %. The percentage will always be 100% when you are charging all the commodity lines to the same sub unit. 32. Enter Accounting Template (Sub Unit). Enter Distribution % Enter Accounting Template 114
115 33. Click Fund Accounting. 34. Enter Object Code if all commodities are going to be charged to one object code. If multiple object codes are to be used, skip step Click Save. 36. Click Distribute Accounting. Click Fund Accounting Enter an Object Code Click Distribute Accounting 115

116 This will create an accounting line for each commodity entered. If you are charging all commodity lines to the same object code, skip steps and continue with step If you are charging commodity lines to different object codes, click Accounting Component. 38. Click Fund Accounting and enter an Object Code for each line. Click Fund Accounting Click Accounting Component Enter an object code for each line if using multiple object codes 116
117 39. Click Ship/Bill From Header to distribute shipping information to commodity lines. Click Ship/Bill From Header 117

118 Vendor Information will default from the Master Agreement. To view vendor information click Vendor component. Note: Vendor information should not be changed. 40. Click on Validate. Click Validate 118


119 41. After your document validates successfully, click on Submit. Click Submit This message will appear when your document is submitted successfully 119

120 Delivery Order Cancellation A DO can only be cancelled if there are no documents referencing it. If there is a RC or an IN against the DO, they must be cancelled before the DO can be cancelled. If there is a payment made on the DO, the DO cannot be cancelled. 1. Click on Ordering and Receiving. Click Ordering and Receiving 2. Click on Delivery Orders. 3. Click on Click here to access an existing DO. Click here to access an existing DO 120
 Click on the selection box, on the left, then")

121 4. Search for the DO you want to cancel by entering search criteria in the fields. 5. Click Browse. 6. Open the document by performing one of the following actions: a) Click on the selection box, on the left, then click Open. b) Click on the document Link. Click Browse after search criteria has been entered Enter search criteria in any of these fields Open the document 7. Click on Discard. Chose OK or Cancel on the message. Click Discard 121

122 A cancellation draft will appear. The document is now a cancellation draft. 122


123 8. Click Validate. Once document validates successfully, it can be submitted. 9. Click Submit. Click Validate, then Submit This message will appear when your document is Submitted Successfully. This message will appear when your document is submitted successfully The cancellation document will then be routed through the same approvals as the original document. Then entries will not be reversed until the cancellation is in Final Phase. 123
124 Receiver (RC) 1. Click on Ordering and Receiving. Click Ordering and Receiving 2. Click on Receive Goods & Services. 3. Click on Click here to create a new RC. Click on this link to Create a new RC 124

125 4. Search for a document to receive by one or a combination of the following: Document Code: Enter a specific document code in document code field. Department: Enter your department in Department. Doc ID: Enter your document ID Vendor: Enter the vendor number used in the document. Commodity: Enter the commodity code used in the document. Shipping Code Location: Enter your shipping code. Issuer Code: Enter your user ID in this field 5. Click Browse 6. Highlight the document you need to receive. 7. Click on Select lines to Receive. Click Browse after search criteria is entered. Enter search criteria in these fields Highlight document and click select lines to receive 125
 Click Receive All Unselected Lines.")

126 8. Do one of the following: a) Individually select the lines you want to receive b) Click Receive All Lines. This will select all of the lines. c) Click Receive All Unselected Lines. This will receive only those lines that you have not selected. Use this option if there are only a few lines that you did not receive. Note: Only select the lines you have received. Select the line(s) you want to receive or Click one of the boxes above Click Receive 9. Click Receive. This will bring up the Header component of your RC document. 126
127 10. Click Commodity component. 11. Specify quantity received in Received Qty. 12. Specify Ship Indicator as partial or final. Click Commodity component Specify Shipment Indicator as Partial or Final Enter Quantity received For line type service, enter an amount in Received SC amount Enter a Condition here if needed Note: If the shipment is a partial or an over shipment you are required to specify a condition in the Condition field. Repeat steps 11 through 12 for each commodity line received. For a line type of service, do not enter a received quantity. Enter an amount in Received SC amount. 127
128 13. Click Validate. Click Validate 128
129 14. When document validates successfully, click Submit. Click Submit 129
130 This message will appear when your document is submitted successfully 130

131 Receiver Cancellation 1. Click on Ordering and Receiving. Click Ordering and Receiving 2. Click on Receive Goods & Services. 3. Click on Click here to access an existing RC. Click on this link to access an existing RC 131

 Click on the selection box, on")
132 4. Search for the receiver you want to cancel by entering search criteria in the fields. 5. Click Browse. Click Browse after search criteria has been entered Enter search criteria in any of these fields 6. Open the document by performing one of the following actions: c) Click on the selection box, on the left, then click Open. d) Click on the document Link. Select the document Click Open 132
133 7. Click on Discard. Chose OK or Cancel on the message. Click on Discard 133


134 A cancellation draft will appear. The document is now a cancellation draft 8. Click Validate. Click Validate 134
135 9. Once document validates successfully, click Submit. Click Submit 135

136 This message will appear when your document is submitted successfully The cancellation document will then be routed through the same approvals as the original document. Then entries will not be reversed until the cancellation is in Final Phase. 136
.")
137 Stock Room Requisition (SRQ) 1. Click Ordering and Receiving. Click Ordering & Receiving 2. Click on Request Goods and Services. 3. Click on Click here to access a SRQ (Inventory). Click on this link for a SRQ 137


138 4. Click Create at top of page. Click on Create 5. Enter your Department, Unit and check Auto Numbering. 6. Click on Create. Enter your Department Enter your Unit Click Create Check Auto Numbering 138

139 7. Enter Warehouse Code or use pick list to select a warehouse. 8. Enter Requesting Unit or use pick list to select a unit. 9. Enter Issuer ID or use pick list to select an Issuer ID. If the issuer ID is not in the pick list, enter their name and phone number. 10. Click Save at bottom of the screen. Enter Requesting Unit Enter Warehouse Click Save Enter Issuer ID 139


140 11. Click Delivery Information. Your shipping location will default. Verify that your shipping location is correct, you can use pick list to change shipping location if necessary. 12. Enter Delivery Date, or use the pick list to select a date. Click Delivery Information Enter a Delivery Date 13. Click on the Commodity component. 14. Click Insert New Line. Click Commodity component Click Insert New Line 140
141 15. Enter Stock Item number or use pick list if you do not know stock item number. 16. Enter Requested Quantity. 17. Click Save. Enter Stock Item Number Enter Requested Quantity Click Save 141
. 21. Enter Distribution %. The percentage will always be 100% when you have the same Unit number for different lines.")
142 To add additional stock item lines repeat steps Click on Accounting Distribution component. 19. Click on Insert New Line. Click Accounting Distribution component Click Insert New Line 20. Enter Accounting Template (Sub Unit). 21. Enter Distribution %. The percentage will always be 100% when you have the same Unit number for different lines. You may want to build your own accounting lines if you have more than one Unit to charge your document to. Enter Accounting Template Enter Distribution % 142
143 22. Click Fund Accounting. 23. Enter Object Code if all commodities are going to be charged to one object code. If multiple object codes are to be used, skip step Click Save. Enter an object code Click Fund Accounting Click Save 143
144 25. Click on Distribute Accounting. Click Distribute Accounting This will create an accounting line for each commodity entered. If you are charging all commodity lines to the same object code, skip steps 26-27, and continue with step

145 26. If you are charging commodity lines to different object codes, click the Accounting Component. 27. Click Fund Accounting and enter an Object Code for each line. Click Fund Accounting Click Accounting Component Enter an object code for each line if using multiple object codes 28. Click on Validate. Click Validate 145
146 29. Once document validates successfully you can submit the document. Click Submit. Click Submit 146
147 This message will appear when your document is submitted successfully 147
148 Cash Receipts 148


149 Cash Receipt (CR) 1. Click Cash Receipts. Click Cash Receipts 2. Click Cash Receipts. 3. Click on Click here to access a CR. Click on this link for CR 149


150 4. Click Create. Click Create 5. Enter your Department. 6. Enter your Unit. 7. Enter Deposit Slip Number in ID. 8. Click Create. Enter your Unit number Enter your Department Enter your deposit ticket number Click Create 150


151 9. Enter the accounting Period, for example October would be 1 and March would be Enter your Bank Account Code in Bank Account, or select yours from the pick list. 11. Enter the Bank Deposit Date. Enter the period, for example Oct = 1, Mar = 6 Enter your bank account code Enter the bank deposit date 12. Click Vendor component. 13. Click Insert New Line. Click Vendor Component 2 Click Insert New Line 151
152 14. Enter Line Amount. 15. Click Save. Click Save Enter Line Amount 152

153 16. Click Accounting component. 17. Click Insert New Line. Click Accounting Component Click Insert New Line 153
154 18. Enter Event Type and Line Type. 19. Enter Accounting Template (sub unit). 20. Enter a description in Line Description. 21. Enter Line Amount. Enter Accounting Template (sub unit) Enter Event Type Enter Line Description Enter Line Amount 154
155 22. Click on Fund Accounting. 23. Enter Revenue Source. 24. Click Save. Click Fund Accounting Enter Revenue Source Click Save To add additional revenue lines repeat steps If your CR is complete, skip the following steps, and go to step 25 and
156 Vendor Refund If you have a Vendor Refund follow the steps listed below. 1. Click on Vendor component. 2. Click Insert New Line. Click Vendor Component Click Insert New Line 156
157 3. Enter Vendor Customer number, or select a vendor using the pick list. 4. Enter Line Amount. Enter Vendor Customer Number Enter Line Amount 157
158 Click Accounting Component. 5. Click Insert New Line. Click Accounting Component Click Insert New Line 158

159 6. Enter Event Type AR32 and Line Type A when you must use an object code. 7. Enter Accounting Template (sub unit). 8. Enter a description in Line Description. 9. Enter Line Amount. Enter Event Type AR32 and Line Type A Enter Accounting Template (sub unit) Enter Line Amount Enter Line Description 159

160 10. Click Fund Accounting. 11. Enter Object Code. 12. Click Save. Click Fund Accounting Enter Object Code Click Save If your CR is complete, skip the following steps, and go to step 25 and

161 Over/Short If you have an Over/Short follow the steps listed below. 1. Click Vendor component. 2. Click Insert New Line. Click Vendor Component Click Insert New Line 161


162 3. Enter Line Amount. 4. Click Save. Enter Line Amount Click Save 5. Click Accounting component. 6. Click Insert New Line. Click Accounting Component Click Insert New Line 162

 Enter Line Description Enter Line Amount 11.")
163 7. Enter Event Type AR32 and Line Type A when you use an object code. 8. Enter Accounting Template (sub unit). 9. Enter a description in Line Description. 10. Enter Line Amount. Enter a negative sign - before the number if you have a shortage. Enter Event Type AR32 and Line Type A Enter Accounting Template (sub unit) Enter Line Description Enter Line Amount 11. Click Fund Accounting. 12. Enter Object Code. 13. Click Save. Click Fund Accounting Enter Object code Click Save 163


164 Follow steps 25 and 26 to complete your document. 25. Click Validate. Click Validate 26. When the document validates successfully, click Submit. Click Submit 164
165 This message will appear when your document is submitted successfully 165
166 Miscellaneous 166
167 Document List Documents Code Name Description Who Uses CR Cash Receipt Used to record all monies received Department DO Delivery Order Used to order goods which are part of an annual contract between Cobb County and particular vendors. References an MA Department PD Department Purchase Order Used by departments to obtain "quick" purchases. May not exceed $ PDL Library PD Used by only Library and Law Library. For purchase of books only. Can be any amount. PDR Risk Management PD Used by only Fleet Management. Can be any amount. RC Receiver Used by departments to show that goods/supplies have been received or services rendered are completed. May be partial or final. RQS Requisition Used to request goods or services. Purchasing receives the RQS electronically and bids out to vendors. Department Department Department Department Department SRQ Stock Requisition Used to order items which are stock items Department in County warehouses. TB Transfer Budget Used to move monies to desired accounts Department AD Automated Disbursement A document that creates the check. The check number is located within the AD. Accounts Payable DC Disbursement Reclassification Allows reclassification of money disbursed on checks, EPYs and EFTs for cancellations. Accounts Payable EFT Electronic Funds Transfer An electronic payment. Accounts Payable EPY EPayables An electronic payment, instant payment for Accounts Payable the vendor. GAE General Accounting Encumbrance Used to encumber funds to buy externally. Used frequently with grants and projects Accounts Payable GAX General Accounting Expense Used to enter Direct Payment Voucher documents. 2 way match Accounts Payable GAX1 GAX with Approvals Used to pay for services Department GAXRE Recurring GAX A GAX document that can be set to recur as needed. Used mostly for utility payments IN Invoice Used to record vendor's invoices that reference purchase orders MD Manual Disbursement Checks that are issued immediately, not in the normal disbursement cycle. Accounts Payable Accounts Payable Accounts Payable 167
168 Code Name Description Who Uses PJ PJ PRC Program Budget Maintenance Program Budget Maintenance Agenda Item Payment Request-Manually Entered Used to establish or modify program budgets Used to establish or modify program budgets based on Agenda Items Used to manually create a 3 way match (invoice-purchase order-receiver), or used to close an encumbrance PRM Payment Request-Matching Computer generated matching document. The system creates a PRM document when a Receiver, Purchase Order and Invoice match VCC Vendor Customer Creation Document used to create new vendors. VCC can be created in AMS or in VSS VCM Vendor Customer Modification Document used to modify existing vendors. VCM can be created in AMS or in VSS APEB Expense Budget Used to create and amend expense budgets for budget structure 80 (grants) BGEX Expense Budget Used to create and amend expense budgets BGRV Revenue Budget Used to create and amend revenue budgets FA Fixed Asset Acquisition Used to record information about establishing newly acquired fixed assets FC Fixed Asset Cancellation Used to cancel a wrongly entered fixed asset FD Fixed Asset Disposition Used to record the disposition of existing assets FE FI Fixed Asset Depreciation Expense Fixed Asset Increase/Decrease Used to manually record the depreciation of an existing asset. Used to record changes to the actual cost of existing assets. FM Fixed Asset Modification Allows you to record descriptive (nonaccounting) changes or adjustments to existing assets FT Fixed Asset Transfer Allows you to record the transfer of assets from one location or Responsibility Center to another JV Journal Voucher Used to post or correct accounting activity that cannot be accomplished through any other document. PREXP Payroll Expenditure Created by the PAM process to accrue expenditures associated with the payroll PRLIA Payroll Liability Created by the PAM process to record liabilities associated with the payroll PRLID Payroll Internal Created by the PAM process to post internal purchase/sale, reimbursement, or operational transfer activity to satisfy the liabilities Accounts Payable Accounts Payable Accounts Payable Accounts Payable AP/Purchasing AP/Purchasing Budget Budget Budget General Accounting General Accounting General Accounting General Accounting General Accounting General Accounting General Accounting General Accounting General Accounting General Accounting General Accounting 168
169 Code Name Description Who Uses PRLNP Payroll Net Pay Created by the PAM process to report the payout of the net pay liabilities established by the PRLIA documents RE Receivable Used to enter a transaction to record money owed as a result of goods or services provided, overpayment to a vendor, or anticipated receipt of unearned revenue CI Stock Issue Confirmation Document that recognizes that requisitioned items were removed from inventory and released to the requestor. IA Inventory Adjustment Used to adjust quantities or unit values of on-hand items due to a change in on-hand quantity or unit cost. OC Over the Counter Stock Issue Used only by Parks and DOT, used to order and confirm stock items. PI Pick and Issue Prints pick tickets based on SRQ documents and generates associated CI documents. SN Stock Return Used to return items previously confirmed back to the warehouse MA Master Agreement Sets prices, terms, and conditions, by which you can purchase itemized goods or services from a vendor at a negotiated price. DO's reference an MA PO Purchase Order An award document that is a contractual agreement between Cobb County and a vendor to provide goods or services at prearranged prices and delivery dates. A purchase order can reference Requisitions General Accounting General Accounting Inventory Inventory Inventory Inventory Inventory Purchasing Purchasing 169

170 Copy Document The Copy Document feature allows you to create a new document from an existing document with the same document code. Once the source document has been copied into the new document, you have the ability to change the information as needed for the new document. To copy a document, complete the following steps: 1. Select the document to be copied from. 2. Click Copy. First select document Click Copy after document has been selected 170


171 The Source Document section displays information about the document you are going to copy. The Target Document section displays information about the new document you are creating. 3. Fill in Target Document information. Such as Document Department Code, Document Unit Code, and Document ID. Check Auto Numbering if necessary. 4. Click Copy Document. Click Copy Document Fill in Target Document Information. 171

172 The target document has been created. The information in the document will match exactly to the document that was copied. 5. Change the information in the document as necessary. 6. Validate and Submit the document. 172


173 Check to see if a GAX1 has been paid 1. Click on Search. 2. Click Document Catalog. Click Search, and then click Document Catalog 3. Enter GAX1 in Code. The GAX1 document is used by departments to enter payments to vendors. 4. Enter GAX1 document number. 5. Click Browse or press Enter. Enter GAX1 document number in ID. Enter GAX in Code 173


174 If no results are returned, try searching again by using wildcards before and after the GAX1 number. If no results are returned again, contact Accounts Payable for a status of the GAX1. 6. Open the GAX1 document by clicking on the document link, or selecting the check box and clicking Open. 7. Once inside the document, click on the drop down arrow at the top and choose Document References. Click Document Reference The Document Reference Query screen will appear. 8. Click Forward Reference. Click Forward Reference 174


175 If an AD, MD, EFT or EPY document appears, a check or electronic payment has been created for the GAX1. If nothing appears, a payment has not been created. The AD, MD, EFT or EPY document is not the check number. The GAX1 document has an AD listed as a forward reference, meaning that a check has been created for this GAX1. Click on the AD document link 9. Click on the link to the AD, MD, EFT or EPY document. The check number or payment reference number and check amount are listed in the header of the document. 10. Click Close to exit out of the document. The check number and amount are listed here. 175

176 Common Error Messages Error Message: Delivery Date cannot be less than the Record Date of the Document. Explanation: The Delivery Date must be changed before the document will validate. Resolution: 1. On the Header section of your document click on Default Shipping/Billing. 2. Change the Delivery Date to a date Greater than today s date. 3. Click on the Related Actions button in your document and choose Ship/Bill To Lines link. How to avoid this error message: 1. Make sure you click on the Ship/Bill To Lines link. 2. If you add or change any commodities, click on the Ship/Bill To Lines link again. 176
177 Error Message: At least one accounting line is required for this commodity line. Explanation: One or more commodity lines do not have an accounting line. Resolution: 1. If you used Accounting Distribution, go back to the Accounting Distribution section, and click on the Distribute Accounting link. 2. If you did not use Accounting Distribution, highlight the commodity line with the error and then click the Accounting Component. Click Insert New Line, then enter the accounting template, amount and object code. How to avoid this error message: 1. Make sure to click on the Distribute Accounting link after you add a new commodity, or change information on a commodity. 177
178 Error Message: Appr Unit is required and Budget Line not found for Fund/Department/AU within OC Expense Budget. Explanation: You do not have a budget line established for the unit and object combination you are trying to use. NOTE: On purchasing documents you will never have to manually enter your appropriation unit. Resolution: 1. Contact the Budget Department and have them add the budget line so you can spend out of it. OR 2. Charge the item to another unit/object combination. OR 3. You have an incorrect grouping of elements in a budget line (such as the wrong fund). How to avoid this error message: 1. Check your budget table before entering your document to ensure that you will not receive the error. 2. Only enter the accounting template and object code. ALL other information will infer upon validation. 178
179 Error Message: Vendor is required per options on Event Type/Document Control. Explanation: You do not have a vendor for your document, or you have selected a vendor that is not active. Resolution: 1. Verify that you have a vendor number listed in the document. 2. If you do have a vendor listed, the vendor is inactive. The vendor could be inactive for two reasons. 1) The vendor is a new vendor and we are waiting to receive appropriate forms, or 2) The vendor s information changed requiring them to have a new number. Open the Vendor Table and look up the vendor. If the vendor is inactive due to a new vendor number, the new vendor number will be listed in the Location Name field of the vendor. If there is not a new number listed, contact Accounts Payable for the new number or a status of the vendor. How to avoid this error message: Check the status of the vendor before using the vendor on a document. 179


180 Has a PO created from my RQS? 1. Open the RQS in the document catalog. Once the RQS is opened, click on the drop down arrow at the top and click on Document References. Click Document Reference 2. Click Forward Reference. Click forward reference 180


181 If a PO has been created the PO number will be listed. The PO number will be underlined and you can click on the PO to open the document. This is what the screen would look like if a PO has been created. If a PO has not been created the screen would look like this. Click Back to return to the RQS document. If a PO has not been created and you feel it should, contact the Purchasing Department. 181


182 Is a receiver entered against my purchase order? There are several ways to see if a RC has been entered against a purchase order. One of the easiest ways to find out is using the Document Reference link. 1. Search for the purchasing document in the Document Catalog and open it. Once it is opened, click on the drop down arrow at the top and click on Document References. Click here 2. Click Forward Reference and if there is an RC entered for the purchasing document it will be displayed. (This will also display IN or PRM documents that have been created against this purchase order. These documents are underlined, so you can click any document listed and open it to get more detailed information.) Receiver Forward reference 182

183 3. Click on the RC document link to view the receiver. Click on the Commodity component to view what and how much of the purchasing document has been received. When determining if a receiver has been done, compare the Received Quantity with the Ordered Quantity. If the Received Quantity is less than the Ordered Quantity then a RC can be done. Compare the Received SC Amount and the Ordered SC Amount in the same manner. Also check the Shipment Indicator. If it is Final, it means that a final RC has been done, and no other receivers are necessary. 183


184 Another way to check on a receiver is to view the commodity lines of the purchase order. All purchase orders have a Matching tab in the Commodity component, with receiver and invoice information. Open your document from the document catalog. Click on the Commodity component. Highlight the specific commodity you want to check. Click on the commodity component Go to the Matching tab. The first column in the matching tab displays invoice information. If an invoice has been entered, the Quantity, Contract, and Amount fields will be populated. If the invoice has been finalized, the Final flag will be checked. The second column in the matching tab displays Receiver information. If a receiver has been entered, the Quantity, or Contract field will be populated. If the receiver has been finalized, the Final flag will be checked. 184
185 The third column in the matching tab is the paid column. When the fields in this column are populated, it does not necessarily mean that the vendor has been paid. This field is populated when the document is ready to be paid. When looking at the matching tab, you will have to look at each commodity line in the purchase order separately. To view another commodity, highlight another commodity and scroll down to the matching section. Matching is good to use when you are looking at a specific commodity line, or a document with few commodity lines. 185
186 Procurement Type Codes When entering a procurement document, it is necessary to enter a procurement type in the header. It is important that you enter the appropriate procurement type for the item(s) you are purchasing. This information will help the Purchasing Department procure the items in a timely fashion. Purchasing also uses this information to track and report various purchases. Below is a listing of the most commonly used Procurement Type Codes. If you do not know which code to use on a document or have a question about one in AMS (not on this list), contact the Purchasing Department. Procurement Name Description Type 2 Delivery Order Use on all DO documents (orders made from an established Master Agreement) 3 Departmental Use on all PD documents Purchase Order (PD) 4 Purchase Order < $50,000 Purchase of goods or one time services in amounts less than $50,000 that must be processed by the Purchasing Department 5 Service Contract Maintenance or service contracts (renewed < $50,000 6 Sole Source < $50,000 8 Purchase Order $50,000 or > 9 Service Contract $50,000 or > 10 Sole Source $50,000 or > 13 State Contract/Cooperative Purchasing Agreement annually) in amounts less than $50,000 Sole Source Purchase in amounts of less than $50,000 made upon department recommendation requiring Department Head, Purchasing Director and County Manager approval Purchase of goods or one time services in amounts of $50,000 or more that must be processed by the Purchasing Department Maintenance or service contracts (renewed annually) in amounts of $50,000 or more Sole Source Purchase in amounts of $50,000 or more made upon department recommendation requiring Department Head, Purchasing Director and County Manager approval Purchase of goods or services utilizing a state contract or another cooperative purchasing agreement where competitive bidding has already occurred 186
187 Has a buyer been assigned to my RQS? 1. Open the RQS from the document catalog. 2. Once the RQS is opened, click the Contact section. If a buyer is assigned to the RQS, the buyers information will be listed. This RQS has a buyer: This RQS does not have a buyer: 187

188 I created a document today and I can t remember the number. How do I find it? 1. Go to the document catalog. 2. Enter your user ID, and today s date in the search criteria. 3. Hit Enter or click browse. This will pull up all documents that you have created today. If you have created a lot of documents and want to narrow down your search, enter additional search criteria, and then hit enter or click browse. For example, if you are searching for all documents you created today that are in draft phase, enter your user ID, create date, and select draft in Phase, and then hit enter or click browse. A listing of all documents you created today in draft phase will be listed. 188

189 Research Tables There are several tables all users have access to that allow to research payments or documents. The tables are in the Information Search Workspace under the Research Payments tab. The research tables are: Vendor Invoice Registry Paid Check Check Reconciliation Vendor Transaction History Lifecycle Document Search Lifecycle Inquiry 189

.")
190 Vendor Invoice Registry This page displays a list of each vendor invoice recorded in the financial system. You can search by vendor number to see a listing of all of the invoices that are listed for a particular vendor, or you can search by invoice number. To search by a vendor, enter the vendor number in Vendor Code and then click Browse. This will have a listing of all the invoices processed for the vendor code listed. To search by a Vendor Invoice Number, enter the invoice number in the Vendor Invoice Number. Remember to exclude leading zeros, and leave out special characters (ex. dashes). Then click browse. A listing of all the invoice numbers that match the entry will be listed, regardless of vendor. 190

191 Paid Check The Paid Check table allows you to view checks that have cleared the bank. If you know the check number, you can search by the check number, and see the date the check cleared the bank. If a check is listed on the Paid Check table, it has cleared the bank. Each month the bank sends us a file of checks that have cleared the bank. A process called Check Reconciliation is run that takes all the checks that have cleared the bank, and lists them with the cleared date on the Paid Check table. If a check is NOT listed on the Paid Check table, it is possible that it has still cleared the bank, due to a timing issue since the file is sent once a month. This check cleared the bank on this date. 191


192 Check Reconciliation The Check Reconciliation page has a listing for each disbursement document that has not cleared the bank. Each record contains data such as check number, amount, and status. When the Check Reconciliation process is run each month, it moves the checks that have cleared the bank off of this page and onto the Paid Check table. If a check is listed on this page, it is possible that it has cleared the bank due to a timing issue of when the process is run. To search for a check number, click Search, then enter the check number in Check/EFT, then click OK. If the check has not been moved by the Check Reconciliation process, the check will be listed on the Check Reconciliation Page. 192

193 Vendor Transaction History The Vendor Transaction History page allows you to search for specific information related to vendor transactions. You will also be able to transition to other pages for more information related to the vendor or payment that you are searching for. Query Section Results Section About the Query Section: The Vendor Code must be populated in the query section You can only search for a single vendor code at a time You cannot use a wildcard in the vendor code field All other fields allow the use of a wildcard. Multiple values can be entered in fields by separating the values with a comma If the Sub Unit is entered, the Unit is required When querying on Vendor Invoice Number, the only Document Types searched are: PR, ABS, AD, MD, DC, EFT, EPY 193

194 About the Results Section After you have entered your search criteria and clicked on Browse, the search results are displayed in the grid of the Results section. Use the First, Previous, Next and Last links to go through the data Initially records are sorted by Record Date You can sort by other columns, by clicking on the column names that are underlined. Certain documents will not contain all data in the results section of the page. For example, Purchase Order documents will not have Check Number or Bank Account Code. Only the latest final version of a document is displayed All documents and referenced documents contain a link to open the latest version of the document and view the document details. When you click Close on the document, you are taken back to where you were in the VTH page. Calculate Total There is a link on the Vendor Transaction History Table that allows you to calculate the total of the results. 194
195 When the Calculate Total link is clicked, the line amounts of all of the result records are summed and displayed in the Result Total field. **AD and MD documents that are cancelled are NOT included in the calculation. 195

196 Page Transitions The Vendor Transaction History page contains transitions to other pages in AMS. Each page that you transition to contains a Back link. When you click on the Back link, you are taken back to where you were when you left the Vendor Transaction History Page. You are only authorized to access the Vendor Invoice Registry, Check Reconciliation, Paid Checks, and Lifecycle Inquiry Links. 196

197 Lifecycle Document Search This page allows you to search for a document and then link to the Lifecycle Inquiry page to view the complete chain of documents associated with it on a single page. You must enter a document code. You can use wildcards in searching for your document. After entering your search criteria, click Browse. The search results will be displayed in the results section. Select the desired record in the grid, and then click the Lifecycle Inquiry link. Highlight the desired document and then click on Lifecycle Inquiry. 197

198 Lifecycle Inquiry This page allows you to view the complete chain of documents associated with a selected search document. This page only works for documents that have a phase of Final or Historical Final. This page can be accessed directly from the Information Search workspace, or you can link to this page from the Lifecycle Document Search page. The Lifecycle Inquiry page does NOT allow you to use wildcards to search for a document. You must know the exact number of the document, or search for it first on the Lifecycle Document Search page and then link over to this page. It is recommended that you find your document on the Lifecycle Document Search and then link over to the Lifecycle Inquiry Page. Once you have located the document you wish to inquire on The Forward or Backward search buttons can be clicked to initiate a search. The Backward search button allows you to view all documents that reference the search document and were created on the same date or before the date of the search document. The Forward button allows you to view all documents that reference the search document and were created on the same date or after the search document. 198


199 Click the Forward link and all documents that reference this document will appear in the grid. Click the Backward link and all documents that reference this document will appear in the grid. 199


200 If you would like to download the results into Excel, click the Download to Excel link. This will bring up a pop up box. Click Open. The results will then be in an Excel format. 200


201 The Document Filter section allows you to limit the values displayed in grid section for your search. You may just search for a specific document code or you can define the From and To Dates of the documents. For example, if you want to filter on AD documents, enter AD in Document Code, then click Forward. Only the AD documents related to the document queried on will be returned. You can click on the Document ID link to transition to a document listed in the search results grid. For example, if you would like to look inside this AD document, click on the document ID link. 201

202 The document will pull up. When you are done viewing the document, click Close at the bottom of the document. This will take you back to the Lifecycle Inquiry table. 202

203 Recalculate Accounting Lines In the Commodity section of all procurement documents there is a link called Recalculate Accounting Line Amount. This link is helpful when a quantity is changed after the Distribute Accounting Lines has been done, or on a modification document. This PD was entered and the quantity was entered as 2 incorrectly. The Quantity should have been 1. On the Commodity section, change the quantity to 1, and then click Related Actions and choose Recalculate Accounting Line Amount. This will automatically update the line amount on the Commodity section, and it will update the line amount on the accounting section. 203
204 This also works on a modification document. If a quantity needs to be changed on a commodity line of a modification document, change the quantity on the commodity section and then click the Recalculate Accounting Line Amount link. Clicking on this link will update the line amount on the commodity section and on the accounting section as well. The Line Amount on the Commodity line and Accounting line have both updated when Recalculate Accounting Lines is used. NOTE: The Recalculate Accounting Line Amount also works when a unit price needs to be changed. 204
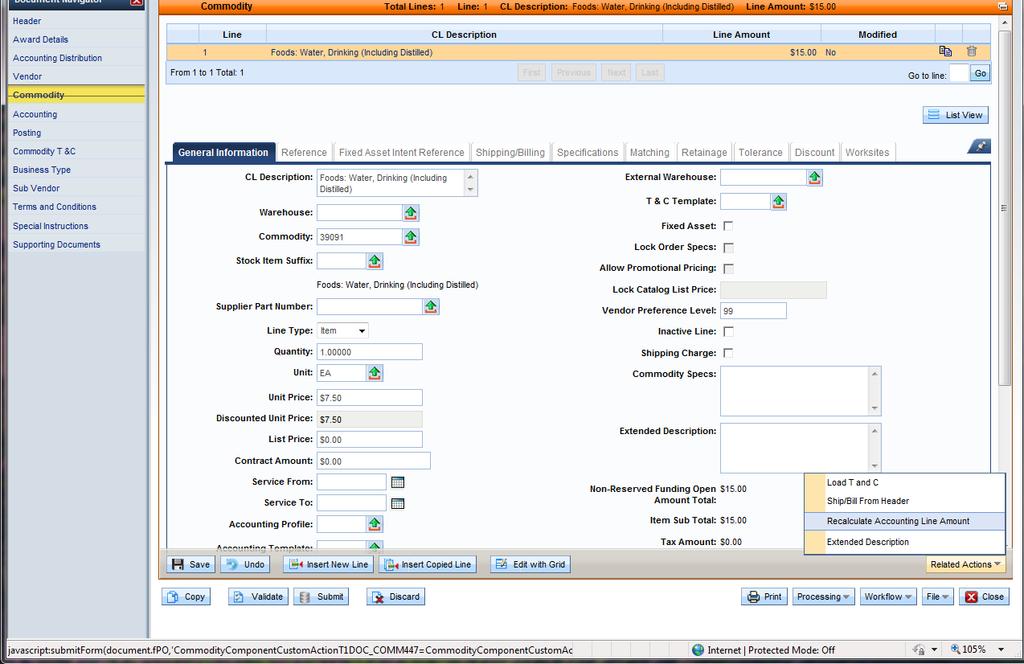
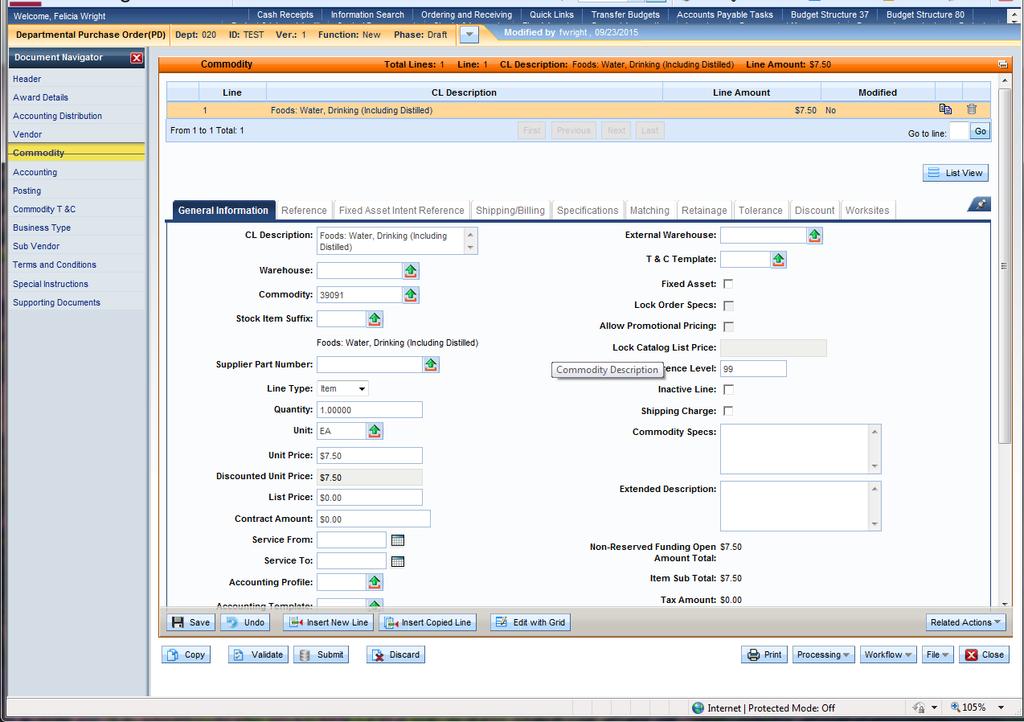
205 205
Checkout Western Marketplace
 Checkout Western Marketplace Checkout Screen Layout 1 2 1. Icon area Icon availability will change depending upon the status of the order. Archive - Places order in Archives (recommend do not use) Trash
Online Requesting and Receiving. Training Manual
 Online Requesting and Receiving Training Manual 1 Table of Contents Introduction 3 Logging In.3 Creating a Profile...3 Modifying a Ship to Address...3 FOAPAL and Commodity Codes 3 Code Favorites...3 Understanding
Requisitioner Training Manual
 Requisitioner Training Manual Larry McWilliams Procurement Department lmcwilli@kent.edu Revised December 2018 0 Introduction The purpose of this training guide is to familiarize the user with FlashCart,
SAP Shopping Cart for Custodians
 BUSINESS & PRODUCTIVITY TECHNOLOGY & INFORMATION SYSTEMS SERVICES DIVISION USER SUPPORT SERVICES: EMPLOYEE BUSINESS TRAINING SAP Shopping Cart for Custodians Revised: October 2010 TABLE OF CONTENTS OVERVIEW...
Entering a Purchase Order (Formerly DPO) - DO NOT USE SAFARI
 - DO NOT USE SAFARI") Entering a Purchase Order (Formerly DPO) - DO NOT USE SAFARI Select the Finance Tab at the top right of the screen. Select Purchase Orders from menu list on the left side of page. Select or to start a
Entering a Purchase Order (Formerly DPO) - DO NOT USE SAFARI Select the Finance Tab at the top right of the screen. Select Purchase Orders from menu list on the left side of page. Select or to start a
Signing on to Smartstream
 Signing on to Smartstream To access Smartstream: Open the Internet Explorer homepage. Click on Staff Applications Under Staff Applications, scroll to the "Smartstream" option. Click on that option. 1 Signing
Falcon s Purch Guide REQUESTORS AND SHOPPERS. 1 Revised 7/16/18
 Falcon s Purch Guide REQUESTORS AND SHOPPERS 1 Table of Contents General Shopping & Requisitions... 3 Punchout, Hosted Catalogs and Non-catalog Items... 3 Splitting Between Multiple Budgets... 4 Foundation
FOUR SEASONS MARKETPLACE BUYER TRAINING
 FOUR SEASONS MARKETPLACE BUYER TRAINING Table Of Contents 1. INTRODUCTION... 2 2. LOGIN SCREEN... 3 3. FRONT PAGE... 5 3.1 LOGO PANEL... 6 3.2. SEARCH PANEL... 9 3.3 FRONT PAGE TABS... 10 3.4 CATALOGS
Using McKesson Specialty Care Solutions US Oncology Order Center
 Using Specialty Care Solutions US Oncology Order The, mscs.mckesson.com, is an online destination that provides easy access to everything you need to manage your purchasing relationship with Specialty
buylu Purchasing Manual Published by: Finance Infrastructure February 2019 buylu Manual v
 buylu Purchasing Manual Published by: Finance Infrastructure February 2019 buylu Manual v06.07-18 1 Table of Contents I. Overview of buylu Process... 6 II. Creating and Managing Your User Profile... 6
buylu Purchasing Manual Published by: Finance Infrastructure April 2018 buylu Manual v
 buylu Purchasing Manual Published by: Finance Infrastructure April 2018 buylu Manual v05.02-18 1 Table of Contents I. Overview of buylu Process... 6 II. Creating and Managing Your User Profile... 6 III.
Banner-Requestor_Approver Training Manual
 BANNER NAVIGATION Welcome to Banner! This is a brief overview of basic navigation required to utilize the Self Service system. Accessing Banner SSB (Self Service) 1. Open a session of Internet Explorer
User s Guide. (Virtual Terminal Edition)
") User s Guide (Virtual Terminal Edition) Table of Contents Home Page... 4 Receivables Summary... 4 Past 30 Day Payment Summary... 4 Last 10 Customer Transactions... 4 View Payment Information... 4 Customers
User s Guide (Virtual Terminal Edition) Table of Contents Home Page... 4 Receivables Summary... 4 Past 30 Day Payment Summary... 4 Last 10 Customer Transactions... 4 View Payment Information... 4 Customers
Version Number 14.3 Updated 1/26/2015
 Purchasing South Dakota Board of Regents Human Resources/Finance Information Systems Version Number 14.3 Updated 1/26/2015 Page 1 Table of Contents Welcome 3 Overview 3 Intended Audience 3 Documentation
The PeopleSoft Financials System
 The PeopleSoft Financials System 2 Introduction...................... 14 Signing In and Out.................... 14 Signing In to the System.............. 14 Signing Out................... 17 Navigation
User Guide Create isupplier Supplier Charges
 CALIFORNIA RESOURCES CORPORATION AND ITS AFFILIATES (COLLECTIVELY, CRC) OVERVIEW This User Guide aims to describe how to electronically submit supplier charges (field tickets and/or invoices) against a
Cart & Assign. 6. Enter an optional Note to the Assignee and click the Assign button.
 Revised 11/18/13 Cart & Assign Modify The Shopping Cart You may Unassign the shopping cart only until the Requester has submitted it. 1. Click the Shop icon, hover over My Carts And Orders, and click View
University of North Carolina User Guide
 University of North Carolina User Guide June 2006 The software described in this document is furnished under a license agreement. The software may be used or copied only in accordance with the terms of
CUBuyplusR. Browser s Guide
 CUBuyplusR Browser s Guide This guide will review how to search for products and add them to your cart. In addition, the procedure for generating a purchase request will be outlined as well as tracking
LAWSON PORTAL 9.0 REQUISITION CENTER (RQC): SHOPPING
: SHOPPING") LAWSON PORTAL 9.0 REQUISITION CENTER (RQC): SHOPPING CONTENTS: I. Logging In Page. 3 to 8 II. Profile Page. 9 to 11 A. Basic & Detail: Page. 9 to 10 B. Header Comments: Page. 11 to 12 III. Find / Shop
LAWSON PORTAL 9.0 REQUISITION CENTER (RQC): SHOPPING CONTENTS: I. Logging In Page. 3 to 8 II. Profile Page. 9 to 11 A. Basic & Detail: Page. 9 to 10 B. Header Comments: Page. 11 to 12 III. Find / Shop
i. Shipping Address 6
 USER GUIDE USER GUIDE Table of Contents I. Accessing the System II. System Functions 4 a. User Rolls 4 b. Profile Setup 6 i. Shipping Address 6 ii. Billing Address 9 iii. E-Mail Preferences iv. Funding
Version Number: 1.0 Date: 8/31/2011
 Purchasing South Dakota Board of Regents Human Resources/Finance Information Systems Version Number: 1.0 Date: 8/31/2011 Page 1 Table of Contents Purchasing Introduction 2 Overview, Intended Audience,
03 TCHR WEB REQ (Purchasing) Page 1
 Page 1") Secretary Purchase Request Instructions (This is required for all School Specialty orders) Web Access: 1. Go to the District Portal 2. Click on the ISD Apps icon then click on the My Benefits icon 3. Mouse
Secretary Purchase Request Instructions (This is required for all School Specialty orders) Web Access: 1. Go to the District Portal 2. Click on the ISD Apps icon then click on the My Benefits icon 3. Mouse
Banner 9 Training Guide
 South Dakota Board of Regents Student Information System/Financial Aid Human Resources/Finance Information System Banner 9 Training Guide Date 9/26/2018 This training assumes that the user has completed
BUYWAYS Shopping Created on 9/26/2014 4:22:00 PM
 Created on 9/26/2014 4:22:00 PM Table of Contents... 1 Fundamentals... 1 Understanding the BuyWays Process... 1 Understanding BuyWays Roles... 3 Understanding BuyWays Terminology... 5 Understanding BuyWays
UNIVERSITY OF NEW MEXICO FIN PU-101 Purchasing Processes for Departments Lab. Participant Guide
 0 UNIVERSITY OF NEW MEXICO FIN PU-101 Purchasing Processes for Departments Lab Participant Guide Version 3.0 11/02/2010 Table of Contents Confidentiality and Sensitive Information 2 Course Pre-requisites
TABLE OF CONTENTS. WELCOME TO mycsa... LOGGING IN... FORGOT PASSWORD... FIRST TIME REGISTRATION... ACCESS TYPE... GETTING STARTED...
 USER GUIDE TABLE OF CONTENTS WELCOME TO mycsa... LOGGING IN... FORGOT PASSWORD... FIRST TIME REGISTRATION... ACCESS TYPE... GETTING STARTED... SETTING PREFERENCES... CONTACT US... DASHBOARD... MANAGING
VALO Commerce. Beam Suntory User Guide
 VALO Commerce Beam Suntory User Guide Beam Suntory User Guide Access Your VALO Commerce Site through CONNECT Navigate to https://intlconnect.beamsuntory.com and click on the InnerWorkings tile to access
Mustang Market Requisitioner Guide
 Mustang Market Requisitioner Guide Western Financial Services Contents Overview... 4 Introduction... 4 Objectives of this guide... 4 How to use this guide... 4 Where to go for additional support... 4 Mustang
Quick Reference Sheet Non-Catalog Orders
 Quick Reference Sheet Non-Catalog Orders Logging In Log on to My Western. There is a link under Technology Tools (My Western) and there is a link on the Gateway to eprocurement website under Business Services.
Business Plus Stores September 2014
 Business Plus Stores September 2014 Stores - Sections Section Function Description 1 1 st & Last Bulleted Shortcuts enter/delete warehouse requisition print requisition copy, if desired search previous
SCT BANNER SYSTEM. In order to log into the system you will need a MSU Banner ID, User password and access to the Internet.
 SCT BANNER SYSTEM BANNER INTRODUCTION: Banner is a suite of products that is replacing what we know as the SCT Plus system. These products access a common database so that information can be shared across
Seller & Seller Administrator Manual
 Seller & Seller Administrator Manual BuySpeed Online 8.2 1 BSO Seller Manual Copyright 2009 Periscope Holdings, Inc. All rights reserved. Information in this document is subject to change without notice.
Requester Quick Reference
 Accessing BearBuy 1. Log into MyAccess and select the BearBuy link. a. By default, you will be directed to the Shopping Homepage, unless you set your homepage to a different BearBuy page. b. If you are
People. Processes. Integrating Globally.
 People. Processes. Integrating Globally. Course: isupplier for Suppliers Table of Contents Table of Contents Course Introduction...4 L1: Vendor Registration... 6 Register for isupplier using SteelTrack
Welcome to the Goddess Purchasing Portal!
 Goddess Purchasing Portal Quick Reference Guide Welcome to the Goddess Purchasing Portal! URL http://www.goddessproductsinc.com/arkansas.html Login Password Your State of Arkansas Email Address Welcome1
Welcome to Shopfront. Your distributor will supply your user name, password, and the website address for your login page.
 User Guide Table of Contents Login... 3 Choose a Location... 4 Home Page... 5 Header Bar... 6 My Catalog... 6 Menu Bar... 7 My Profile... 8 Contact Us... 9 Change Location... 10 Shopping Lists... 11 Quick
NYRA /Puridiom User Manual
 The New York Racing Association, Inc. NYRA /Puridiom User Manual CHRIMS, Inc. 3/15/2013 Revision 1.1 1. Introduction...4 About This Manual...4 Log in Procedure...5 The Navigation Bar...6 User Navigation
Requisition Entry Guide. Direct questions to Procurement & Contract Services, x5134
 Requisition Entry Guide Direct questions to Procurement & Contract Services, x5134 Requisition Entry Guide Refer to Log into PeopleSoft Financials guide for login instructions. Once logged in, click on
Contents Introduction Terminology Login Home Page Features Catalog Order Non-Catalog Order...
 User Guide Contents Contents... 1 Introduction... 2 Terminology... 2 Login... 3 Home Page Features... 4 Catalog Order... 5 Non-Catalog Order... 18 Approval Routing... 34 View Order Status... 34 Delete
Scholastic Oracle Cloud Supplier Portal User Guide
 Scholastic Oracle Cloud Supplier Portal User Guide Table of Contents Introduction to the Supplier Portal... 3 What is the Supplier Portal?... 3 Navigating the Supplier portal... 3 Logging in... 3 Homepage
Creating a Requisition
 BANNER XE 9 (Application Manager) Navigation Information Banner Menu Banner Search After logging into Banner XE this screen will be displayed. Clicking the Banner Menu button under Banner will bring up
How to Order a Four Panel Brochure through Print Services. Go to the Print Services Web Page and select the Online Store link.
 How to Order a Four Panel Brochure through Print Services Go to the Print Services Web Page and select the Online Store link. 1 Enter your Username and Password on the Print Services Online Ordering home
Coupa Requester User Guide
 Coupa Requester User Guide To be used by R1 Users, Approvers and Corporate Personnel April 2017 Coupa User Guide Legend Please note that the following icons are used throughout this document to assist
Table of Contents. Buyer Functions Buyer Responsibilities: Create and submit orders for approval and manage personal profile and preferences.
 Table of Contents Buyer Functions Buyer Responsibilities: Create and submit orders for approval and manage personal profile and preferences. Web site Login Page # Login Process 3 Reset Password 4 Authorize
TXSMARTBUY ONLINE ORDERING SYSTEM
 TEXAS COMPTROLLER OF PUBLIC ACCOUNTS TXSMARTBUY ONLINE ORDERING SYSTEM USER GUIDE May 2015 1 Page TxSmartBuy.com User Guide Table of Contents WHO CAN USE THIS SYSTEM?... 4 SYSTEM REQUIREMENTS AND BROWSER
Banner Procurement Training
 Banner Procurement Training Requisitions Self Service 7.1 Finance Module Release Date: January 1, 2007 1 Table of Contents Special Notes on Self Service Requisitions..3 Entering a Requisition..4 Adding
User Guide. Avery Dennison Web Ordering Solution for Steinmart
 User Guide Avery Dennison Web Ordering Solution for Steinmart March 2012 Copyright 2012 A very Dennison The information in this document is subject to change without notice and should not be construed
JOB AID FOR EMARKET REQUESTERS THIS JOB AID IS FOR THOSE INDIVIDUALS THAT HAVE THE FSU_PO_REQUESTER ROLE IN OMNI ONLY.
 JOB AID FOR EMARKET REQUESTERS THIS JOB AID IS FOR THOSE INDIVIDUALS THAT HAVE THE FSU_PO_REQUESTER ROLE IN OMNI ONLY. IF YOU DO NOT CREATE REQUISITIONS IN OMNI, THEN YOU WILL USE THE JOB AID TITLED EMARKET
Munis Self Service Vendor Self Service
 Munis Self Service Vendor Self Service User Guide Version 10.5 For more information, visit www.tylertech.com. TABLE OF CONTENTS Vendor Self Service Overview... 3 Vendor Self Service Users... 3 Vendor Registration...
Once you click on the Enterprise Icon found on your desktop you will be asked for your password. This Default Code Is
 Once you click on the Enterprise Icon found on your desktop you will be asked for your password. This Default Code Is You should now see the main screen which is called the main screen or menu screen.
WEBSITE TRAINING GUIDE MY OFFICE PRODUCTS. Office Supplies & Business Print
 WEBSITE TRAINING GUIDE MY OFFICE PRODUCTS Office Supplies & Business Print Table of Contents Log In... 2 Updating My User Information... 4 Creating Favorites List... 6 Viewing Saved Carts... 9 Creating
BANNER REQUISITION USER GUIDE
 NORTHWEST FLORIDA STATE COLLEGE BANNER REQUISITION USER GUIDE 2 Table of Contents: Chapter 1 Forms used for Banner Requisitions. 3 Chapter 2 Navigating and creating a new Requisition... 4 Requestor/ Delivery
ACH Payments. User Guide
 ACH Payments User Guide Table of Contents Overview... 2 Supported SEC Codes... 2 Create Batch... 2 Creating a Free Form Batch... 3 Creating a Batch from a Template... 14 Manage Batch Templates... 21 Transaction
MMP QUICK REFERENCE Table of Content
 MMP QUICK REFERENCE Table of Content Glossary.. 2 Accessing MMP... 3 Personalize Your Shopping Profile.. 4 Quick Steps for Creating Shopping Carts & Adding Products Creating and Renaming a Cart.. 4 Adding
OM Marketplace. October, 2017
 OM Marketplace October, 2017 1 CONTENTS Contents Page # OM Marketplace Basics 3 About OM Marketplace 4 Login 5 User Preferences 8 Order Management 17 Place An Order 18 Quick Key 27 Upload Order 29 View
Scholastic Oracle Cloud Supplier Portal User Guide
 Scholastic Oracle Cloud Supplier Portal User Guide Table of Contents Introduction to the Supplier Portal... 3 What is the Supplier Portal?... 3 Navigating the Supplier portal... 3 Logging in... 3 Homepage
Alamo Ag Customer Service Interface Guide
 Alamo Ag Customer Service Interface Guide - Rev 12/2014 2 Contents Logging On...4 Request Access 5 Opening Screen.6 What s New Screen.8 Edit Profile.10 E-Parts Look-up.12 Navigation Tree.14 Product Line/Printable
Training Manual. Ameren Services
 CCTM Ameren Supplier Training Manual Ameren Services We make a sincere effort to ensure the accuracy of the material described herein; however, Ameren Services makes no warranty, expressed or implied,
Invoice QuickStart Guide
 Invoice QuickStart Guide Table of Contents Working with Payment Requests Manually Creating a Payment Request from an Existing Vendor Creating a Recurring Payment Request Adding Distributions to a Payment
Overview of HoundMart eprocurement Module and Benefits
 Contents Overview of HoundMart eprocurement Module and Benefits... 1 Purpose of this Guide... 1 Access HoundMart Application... 2 HoundMart Home Page Overview... 3 Shop using Hosted Catalog... 4 Notification
New BoundTree.com User Guide Fall Version 6
 New BoundTree.com User Guide Fall 2016 Version 6 Table of Contents Overview Navigating the Home Page Creating an Account Logging into an Existing Account Forgot Your Password? Reviewing Your Account Editing
Mustang Market Approver Guide
 Mustang Market Approver Guide Western Financial Services Contents Overview... 3 Introduction... 3 Objectives of this guide... 3 How to use this guide... 3 Where to go for additional support... 3 Mustang
Supplier Portal. Instruction Manual
 This manual provides information necessary to become a registered Supplier with the Hillsborough County Aviation Authority Procurement Department. Supplier Portal Instruction Manual 0 Introduction to Supplier
Quick Reference Guide Welcome to the SUNY TierOne Diversity Site
 Quick Reference Guide Welcome to the SUNY TierOne Diversity Site HOMEPAGE CONTRACT Select Contract from your location dropdown to shop SUNY Pre-approved items. NON-CONTRACT Select NonContract from your
HOW TO INPUT A BID ADVERTISEMENT ON SIGMA
 HOW TO INPUT A BID ADVERTISEMENT ON SIGMA Table of Contents Access SIGMA... 2 Create an RFP / Bid... 3 Complete the RFP information... 4 Header... 4 General Information Tab... 4 Contact Tab... 4 Add an
BUYWAYS Requisitioning Created on 9/26/2014 4:18:00 PM
 Created on 9/26/2014 4:18:00 PM Table of Contents... 1 Requisitioner Basics... 1 Creating Your Own Cart... 1 Creating Your Own Cart (Phoenix)... 4 Finding and Viewing an Assigned Cart... 9 Finding and
Contents GENERAL OVERVIEW 3. User Profile and Permissions... 3 Regional Manager... 3 Manager... 3 User... 4 Security... 4
 SYNERGY USER GUIDE Contents GENERAL OVERVIEW 3 User Profile and Permissions... 3 Regional Manager... 3 Manager... 3 User... 4 Security... 4 Budgets... 4 Spending Limits... 5 PO Hold Review... 5 Regional
New Finance Officer & Staff Training
 New Finance Officer & Staff Training Overview MUNIS includes many programs and tools to allow for the management of the District financials. As newer finance officers and staff, you are charged with understanding,
Financial Information System (FIS) Web Client End User Training
 Web Client End User Training") FIS - JD Edwards EnterpriseOne Common Foundations Workshop Financial Information System (FIS) Web Client End User Training 1 Logging On 1. Open Internet Explorer 2. Go to www.uwindsor.ca/fis 3. Save web
FIS - JD Edwards EnterpriseOne Common Foundations Workshop Financial Information System (FIS) Web Client End User Training 1 Logging On 1. Open Internet Explorer 2. Go to www.uwindsor.ca/fis 3. Save web
REPSPARK USER GUIDE 1
 REPSPARK USER GUIDE 1 TABLE OF CONTENTS INTRODUCTION 3 CREATING A LOGIN Creating a Username and Password 4 Reset Password 5 GETTING STARTED Editing Profile Information 4 PRODUCTS Product Availability 6
How to Enter a Contract
 Module: Contract Management Topic: CM Contract Processing CM Contract Entry Munis Version 11.1 Objective How to Enter a Contract This document describes the steps taken to enter a basic contract in the
Revision Control Date By Action Pages 12/13/2011 Jonathan Hale 9.0 Process -----
 Procurement Business Process Guide Process: Create a New Express Purchase Order (EPO) Module: Purchasing High Level Description Process Module Document Type Create a New Express Purchase Order Purchasing
Quick Reference Sheet Non-Catalog Orders
 Quick Reference Sheet Non-Catalog Orders Logging In Log on to My Western. There is a link under Technology Tools (My Western) and there is a link on the Gateway to eprocurement website under Business Services.
Create Service Contract
 Create Service Contract This guide will cover: The process of creating service contracts with suppliers. This process replaces the Office of General Counsel Checklist (specifically the Overview tab). However,
Logging Into ipart Enter the Store ID
 Logging Into ipart Enter the Store ID Using your computers web browser, navigate to the ipart homepage URL: https://ipart.amador.ca which will look similar to the image above. Enter the Store ID requested
Browser s Guide Contents
 Browser s Guide Contents Browser s Guide... 1 Browser Role... 2 Logging In... 2 Contact Information... 2 My Account Settings... 2 Key Concepts... 3 Searching... 3 Supplier Searching... 3 Product Searching...
RSA WebCRD Getting Started
 RSA WebCRD Getting Started User Guide Getting Started With WebCRD Document Version: V9.2.2-1 Software Version: WebCRD V9.2.2 April 2013 2001-2013 Rochester Software Associates, Inc. All Rights Reserved.
Requisition REQS Electronic Document Guide
 REQS Electronic Document Guide Page 1 of 57 (REQS) Electronic Document Table of Contents Document Overview... 4 Path to Get to A... 5 REQS Document Layout... 5 The DOCUMENT HEADER displays:... 5 Doc Nbr
EGGERS ONLINE. Customer User Guide - Quoting
 EGGERS ONLINE Customer User Guide - Quoting URL: www.eggersindustriesonline.com or www.eggersindustries.com (Customers / Eggers Online) You are strongly encouraged to change your initial password see 'CHANGING
Design Gallery User Guide
 Design Gallery User Guide Table of Contents Placing an Order... 3 For Stock and Print on Demand Items... 4 For Customizable Items... 5 Advanced Location Search in Shopping... 7 Your Shopping Cart... 8
SAP Shopping & Budget Basics
 BUSINESS & PRODUCTIVITY TECHNOLOGY & INFORMATION SYSTEMS SERVICES DIVISION USER SUPPORT SERVICES: EMPLOYEE BUSINESS TRAINING SAP Shopping & Budget Basics Revised: November 2010 TABLE OF CONTENTS OVERVIEW...
School Specialty New Release Manual
 School Specialty New Release Manual Version 11.1 Table of Contents: Registration Entering Orders Search Options Search by Catalog Number Search by Keyword Digital Catalogs Upload File Add to Shopping List
ADERP ISUPPLIER PORTAL USER MANUAL VERSION 1.2
 ADERP ISUPPLIER PORTAL USER MANUAL VERSION 1.2 Document Control Change Record 4 Date Author Version Change Reference 12-Dec-2016 DOF 1.0 08-Feb-2017 DOF 1.1 Updated with new URL links 23-Mar-2017 DOF 1.2
TRAINING GUIDE - REGISTERED SUPPLIER GUIDE Lamprell Energy Limited Procurement and Supply Chain. Version: 1.0
 TRAINING GUIDE - REGISTERED SUPPLIER GUIDE Lamprell Energy Limited Procurement and Supply Chain Version: 1.0 Table of Contents Introduction... 3 Login... 3 Login Assistance... 3 Homepage... 4 Sourcing...
How to Create a Dell Punchout in PeopleSoft. A Quick Reference Guide for Dell Punchout Procurement February 2016
 A Quick Reference Guide for Dell Punchout Procurement February 2016 Table of Contents What are the Advantages of using Dell Punchout Page 2 How to Create a Dell Punchout in Creating an equote Pages 3-10
USER GUIDE for Simon Malls On-Line Resource Center. SimonResourceCenter.com
 USER GUIDE for Simon Malls On-Line Resource Center SimonResourceCenter.com Welcome to the Online Resource Center for printing and fulfillment. You have access to this site 24 hours a day, 7 days a week.
CREATING A REQUISITION
 UPDATES 7/13/2016 Removed FOAPAL references to FOAP Page 7: Updated REQUESTOR/DELIVERY INFORMATION section 14. ATTENTION TO Page 12: Updated VENDOR INFORMATION section 2. ADDRESS TYPE Page 14: Updated
Quick Reference Guide
 [Type text] North Carolina A&T State University Quick Reference Guide 08/20/2012 VERSION 5 NorthNN TABLE OF CONTENTS I. Navigation Information...4 A. Navigation Tabs 4 1. Home/Shop 4 2. Favorites 4 3.
WELCOME TO FIS BANNER. Navigation & Document Query
 WELCOME TO FIS BANNER Navigation & Document Query FIS Banner WebSite Help FIS Launch Page FIS System Guide FIS Banner Manual Purchasing FIS Training http://fis.ucsc.edu http://financial.ucsc.edu/pages/systems_fisguide.aspx
PeopleSoft Financials 9.2 Upgrade Candyse Edwards Health eshop Administrator. How to Create a Health eshop Requisition
 PeopleSoft Financials 9.2 Upgrade Candyse Edwards Health eshop Administrator How to Create a Health eshop Requisition Upon logging into PeopleSoft, click on the Navigation/Compass Symbol and then Navigator.
Navigating BearBuy Quick Reference
 1. UC BearBuy Logo 2. User Information 8. Quick Menu 4. Action Items 6. Cart Summary 9. Navigation Menu 10. Shop at the Top 3. My Bookmarks 5. Notifications 7. Quick Search 11. BearBuy News 12. Punch outs
Supplier Reference Guide (QRG) Table of Contents
 Table of Contents") Supplier Onboarding Supplier Reference Guide (QRG) Table of Contents Supplier Checklist... 2 New Supplier Onboarding Steps... 3 Introduction... 4 Registration... 6 Certification... 16 Acceptance... 35
Supplier Onboarding Supplier Reference Guide (QRG) Table of Contents Supplier Checklist... 2 New Supplier Onboarding Steps... 3 Introduction... 4 Registration... 6 Certification... 16 Acceptance... 35
SAP ONLINE PAYMENT USER GUIDE
 SAP ONLINE PAYMENT USER GUIDE JHM SAP Training www.hopkinsmedicine.org/sap saptraining@jhmi.edu June 5, 2013 CONTENTS Contents... 2 Accessing The Online Payment Request (AP Electronic Check Request) -
Xifin Client Portal User s Guide Version 1.0. January 2018
 Xifin Client Portal User s Guide Version 1.0 January 2018 Table of Contents Getting Started... 3 Contacting Allina Health Laboratory Billing... 3 Xifin Client Portal Information... 3 Logging in to Xifin
FINANCE MANAGER. Bidding Manual Finance Manager.
 FINANCE MANAGER Bidding Manual 2009 Finance Manager Table of Contents Start Page... 5 Setup Which Files Should Be Completed First?... 7 Item Categories... 8 Unit of Measure... 11 Buildings... 13 Requestors...
CATERING REQUISITIONER REFERENCE GUIDE
 CATERING REQUISITIONER REFERENCE GUIDE In order to automate the processing of invoices and payments for catered events, all catered events must have a purchase requisition and a receiving created. Note
For EWay.com users. EWay Navigation. Accessing EWay. Logging in to EWay. Forgot Password or User ID. EWay Online Catalog Navagation B
 Reference reference guide. Accessing EWay 1. Launch your Web Browser. 2. Click in the Address fi eld. 3. Type www.eway.com. 4. Press the Enter key. Logging in to EWay 1. Enter your User ID in the fi eld
ISUPPLIER PORTAL USER MANUAL ADERP VERSION 1.0
 ISUPPLIER PORTAL USER MANUAL ADERP VERSION 1.0 Contents Contents... i Oracle isupplier Portal Overview...1 Recommended Browsers and Settings...2 Advanced Settings...2 Turn-off pop-up blocker or Allow pop-up
Navigation Reference Guide
 FISCAL AFFAIRS FINANCIAL MANAGEMENT SYSTEM (FMS) Navigation Reference Guide June 2004 Table of Contents Introduction to Financial Management System... ii Navigation Reference Guide... ii Overview...ii