WebSMS 5.0. User Guide. June 2011
|
|
|
- Carol King
- 6 years ago
- Views:
Transcription
1 WebSMS 5.0 User Guide June 2011
2 Revision History Version Date Version History 3.0 Apr, Document Released 3.1 Jun, Updated some screen shots 4.0 Aug, Added the following features to system 1. Phone book 1.1 Enabled contact sharing in between parent account and child account 1.2 Enabled contact copy in between own contact groups 2. Allowed user to select contacts from contact groups for simple sms broadcast. 3. Enabled immediate campaign broadcast 4. Introduced birthday greeting to contacts in contact groups 5.0 Jun, Added the following features to system 1. Survey 2. Show filtered numbers in group send page, campaign page and survey page Confidential and Proprietary Page 2 / 80
3 Table of Contents Revision History... 2 Abbreviations... 4 Introduction... 5 Overview Login and Logout Registration Broadcast Send SMS Send SMS (Advance) View Scheduler SMS Template Campaign Campaign Broadcast Birthday Broadcast Inbox Survey Phone Book Manage Group Manage Contact Manage Blacklist Reporting Credit Flow Report Outbox Online Purchase History Delivery Report Survey Summary Report Survey Details Report Administration Manager User Manage Sender ID Manage Campaign keyword Profile Confidential and Proprietary Page 3 / 80
4 Abbreviations DCS DLR DN MO MT SMS URL Sender ID (Sender) Masking Data Coding Scheme Delivery Report/Delivery Receipt Delivery Notification (same as DLR) Mobile Originated SMS Mobile Terminated SMS Short Message Service Uniform Resource Locator Sender ID is the masking which is given to the sms. For Example is the Sender ID is set as Test, then the users would receive an sms coming from Test titled as Test. Same as Sender ID Confidential and Proprietary Page 4 / 80
5 Introduction WebSMS 5.0 User Guide This document is intended to be used by system s end users who will be using the web-based sms portal to send and receive SMS. Generally, there are three ways to send SMS : 1. Send SMS to one or more numbers 2. Send immediate SMS to a contact group 3. Send scheduled SMS to a contact group Overview This document covers overview of features and elements available in WebSMS portal and detail steps required to broadcast SMS via the portal. Confidential and Proprietary Page 5 / 80
 Launch Internet Explorer and browse to the login URL for WebSMS b) Login using the given login name and")
6 1.0 Login and Logout To Login 1. Follow the following steps to login to websms portal a) Launch Internet Explorer and browse to the login URL for WebSMS b) Login using the given login name and password. Note : User is strongly recommended to use Microsoft Internet Explorer for Websms portal. Confidential and Proprietary Page 6 / 80
7 To Logout 1. User may click at the Logout link at the top right corner of the web page to logout. As an alternative, user may also click at the Logout link at the button of the left menu to logout from websms portal. Confidential and Proprietary Page 7 / 80


8 2.0 Registration Confidential and Proprietary Page 8 / 80

9 1. Click at the registration button from the login page. 2. Key in the particulars. (* required = username, password, confirm password, name, mobile number, , word verification). 3. Press Back button to go back to module management page. 4. Press Next button to proceed to the next step which is the confirmation page. 5. Users are required to check all the details listed before confirm the registration. 6. Tick the check box to agree the Term and Conditions. (* required) 7. Press Back button to go back to new user registration payment page. 8. Press Cancel to cancel the whole registration processes 9. Press Confirm button to confirm the registration process. (Store all the information that key in from these few registration page into system) 10. Upon confirmation; the following acknowledge screen will be shown on screen. Confidential and Proprietary Page 9 / 80

10 Confidential and Proprietary Page 10 / 80


11 3.0 Broadcast Send SMS To send SMS to one or more numbers 1. To send SMS to one or more numbers, access via the Broadcast Tab -> Send SMS link or the 1 st page after login. 2. Insert the mobile number. 3. Choose sender ID from list. 4. Select the language (English/Other language). 5. Insert the Message. 6. Press Send button to send out the message. 7. Press Reset button to reset mobile number, sender ID, language and message. Confidential and Proprietary Page 11 / 80

12 To select recipient numbers from existing contact groups WebSMS 5.0 User Guide 1. To send SMS to one or more recipient numbers from existing contact groups; click at < Select from contact groups > link beside the mobile number list box. The following contact selection pop-up page will be shown on screen. 2. Enter one of following details in order to search for the required contact(s) 1. The name of the contact group. 2. The name of the contact. 3. The complete or partial phone number of the contact. Confidential and Proprietary Page 12 / 80

13 The result of the search will be display below the search section 3. Tick to select the phone numbers to be added to the broadcast list. 4. Click at Save list to copy the number to the recipient list. 5. You may continue to search and add contacts into the recipient list. Once all the selection are done, click at Close to close this pop-up page. Confidential and Proprietary Page 13 / 80
")

14 3.0.2 Send SMS (Advance) Confidential and Proprietary Page 14 / 80
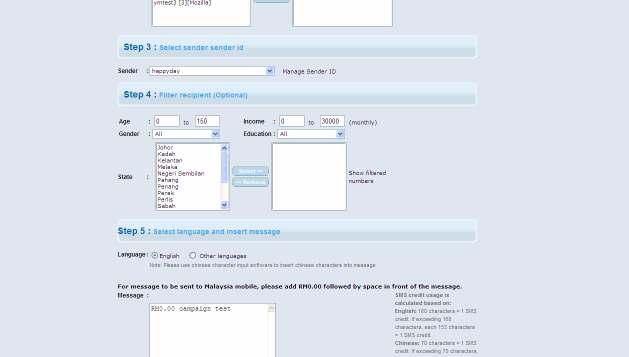
15 To send Immediate SMS to a contact group 1. To send immediate SMS to a contact group, access via the Broadcast Tab -> Send SMS (Advance) SMS link. 2. Select user group(s) from list. 3. Choose sender ID from list. 4. Select filter criterion for the selected contact group to further shortlist the broadcast for contacts within the contact group which matches the selected criterions. You may click at Show filtered numbers to get the matching mobile number after filtration. 5. Select the language (English/ Other Language). 6. Insert the Message. 7. You may also use personalize message; to do that simply select from personalized message list and press the insert button. 8. Select immediate (Default). 9. Press Reset button to reset user group, sender ID, language, broadcast type and message. 10. Press Send button to send out the message. 11. After press send, user will be directed to message outbox. From outbox, user will be able to know the status of the broadcast Confidential and Proprietary Page 15 / 80

16 Confidential and Proprietary Page 16 / 80
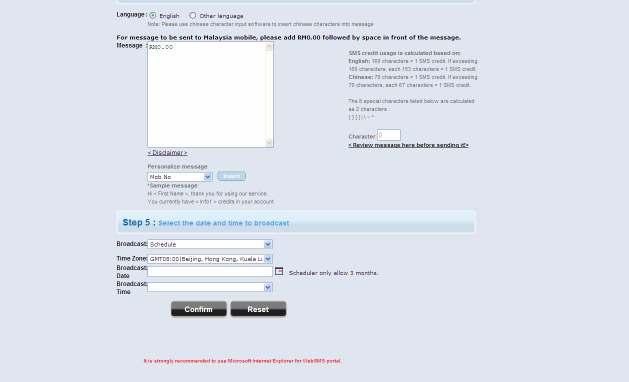
17 To send Scheduled SMS to a contact group 1. To send scheduled SMS to a contact group, access via the Broadcast Tab - > Send SMS (Advance) link. 2. Select user group(s) from list. 3. Choose sender ID from list. 4. Select filter criterion for the selected contact group to further shortlist the broadcast for contacts within the contact group which matches the selected criterions. 5. Select the language (English/ Other Language). 6. Insert the Message. 7. You may also use personalize message; to do that simply select from personalized message list and press the insert button. 8. Select schedule. 9. User will need to select the date/time and the time zone of the intended broadcast. 10.Press Reset button to reset user group, sender ID, language, broadcast type and message. 11.Press Send button to schedule the future message broadcast. 12.After press send, the details of the broadcast will be saved and it will be listed under View Scheduler link. To add a new contact group 1. User may follow the Add New Group link beside group selection box. Alternatively, user may access the same page via the Broadcast Tab -> Manage Sender ID link. To add a new sender ID 1. User may follow the Manage Sender ID link beside sender selection box. 2. Alternatively, user may access the same page via the Broadcast Tab -> Manage Sender ID link. Confidential and Proprietary Page 17 / 80

18 3.0.3 View Scheduler To view scheduled job details 1. Access the View Scheduler page via the Broadcast Tab -> View Scheduler link. 2. The details of the scheduler job that has been sent. 3. The details of the future scheduler job that will be send out. To update or delete scheduled job 1. Point to and press the row of Future Scheduler job that you want to update. 2. A pop up window as shown below will appear. Confidential and Proprietary Page 18 / 80
 Change the Message. f) Re-choose desired broadcast date. g) Re-choose desired broadcast time. 4. Press Update to update the scheduler job. 5. Press Delete to delete the scheduler job. 6.")
19 3. User may made the following changes to the scheduled broadcast a) Change user group from list. b) Change sender ID from list. c) Change filter criterion. d) Change the language (English/ Chinese). e) Change the Message. f) Re-choose desired broadcast date. g) Re-choose desired broadcast time. 4. Press Update to update the scheduler job. 5. Press Delete to delete the scheduler job. 6. Press Cancel to close the pop up window without making any changes. Confidential and Proprietary Page 19 / 80

20 3.0.4 SMS Template To Manage SMS template 1. To manage SMS Template, access the main SMS template page via Broadcast Tab -> SMS Template Link. 2. To search for a SMS Template that has been stored; enter the template title into the text box beside the Search button and click at the Search button. 3. To View or Update the SMS Template that has been stored; click at hexagon icon (under the action column). 4. To delete the existing SMS Template; click at the X icon (under the action column). 5. Click at the Add button to add a new SMS Template. 6. To send SMS to one or more numbers or to a contact group from a SMS Template that has been stored; choose the required send type under the send type column. Confidential and Proprietary Page 20 / 80

21 Add SMS template 1. After press the Add button, a new Add Template form will appear. 2. Select the language (English/ Chinese). 3. Give the new SMS Template a Title. 4. Insert the new SMS Template message. 5. Press Add to confirm the adding. 6. Press Reset to reset all the above fields. 7. Press Cancel to cancel the adding. Confidential and Proprietary Page 21 / 80
22 Update or View SMS template 1. After press the View/ Update icon, a View/ Update Template form will appear. 2. Change the language (English/Chinese). 3. Change SMS Template a Title. 4. Change SMS Template message. 5. Press Update to confirm the updating. 6. Press Reset to reset all the above fields. 7. Press Cancel to cancel the update. Confidential and Proprietary Page 22 / 80
23 4.0 Campaign Campaign Broadcast Campaign is a 2-way SMS implemented through keyword. User will organize a campaign by defining the date and time of the broadcast; keyword; possible responses for the campaign; target contact group and content for the campaign. Once campaign is configured; system will broadcast the campaign message to the target recipient group. Recipient will response to campaign and system will parse the response and produce the response statistics for the campaign owner. The statistics can be obtained from the campaign s main page by clicking at the figure under the response column. Below is a sample screen for the statistics page. Confidential and Proprietary Page 23 / 80
24 Example of campaign/poll Campaign details : a. Campaign name : Dining Poll b. Date and time of the broadcast : :00:00 c. Campaign end time: :00:00 d. Campaign keyword : Tenjin e. Possible response options for campaign : 1, 2, 3 f. Target contact group : UserGroup1 g. Sender ID : Tenjin h. Contact group filter criterion : (default all) i. SMS content and it s language : How would you rate your experience dining at Tenjin? i. Disappointed ii. Satisfactory iii. Excellent j. Standard reply message : Thank you for your feedback, we appreciate your feedback and we hope to see you again soon. k. Reply message for invalid response : Sorry, you response is invalid. Please response with one of the following response. 1. Disappointed 2. Satisfactory 3. Excellent l. Expired message. The campaign has expired; thank you for your message. Campaign result : Response Summary : Responded: 10(50%) Not responded:10(50%) Response Result : Option 1 : [0-0%] Option 2 : [5 50%] Option 3 : [5 50%] Confidential and Proprietary Page 24 / 80

. 5.")
25 To manage Campaign 1. To manage Campaign, access via Campaign & Birthday Tab -> Campaign Broadcast Link. 2. To search for a Campaign; enter the Campaign into the text box beside the Search button and click at the Search button. 3. To add a campaign; click at the Add Campaign button. 4. To View or Update the Campaign that has been stored; click at hexagon icon (under the action column). 5. To delete the existing Campaign; click at the X icon (under the action column). Confidential and Proprietary Page 25 / 80
26 Confidential and Proprietary Page 26 / 80
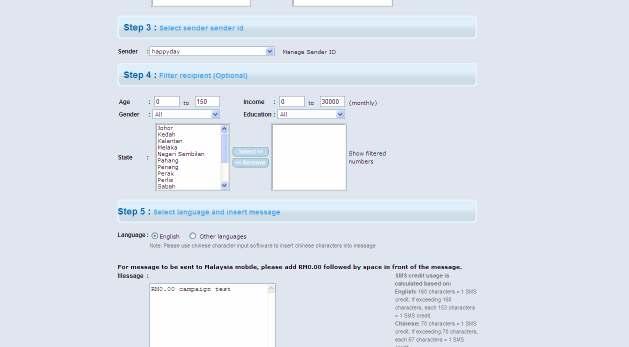
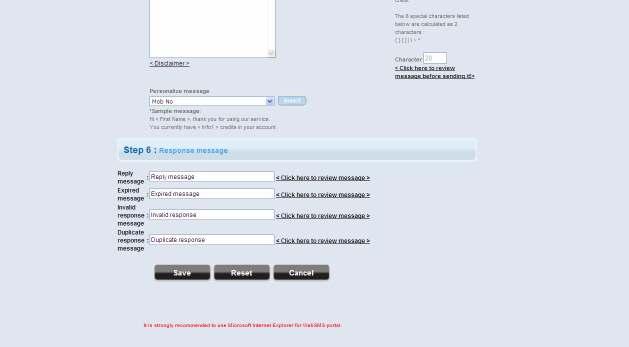
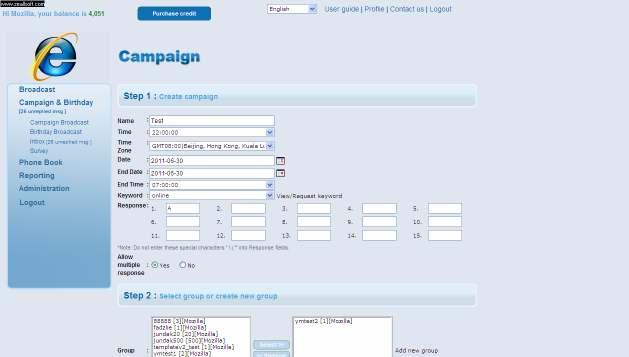
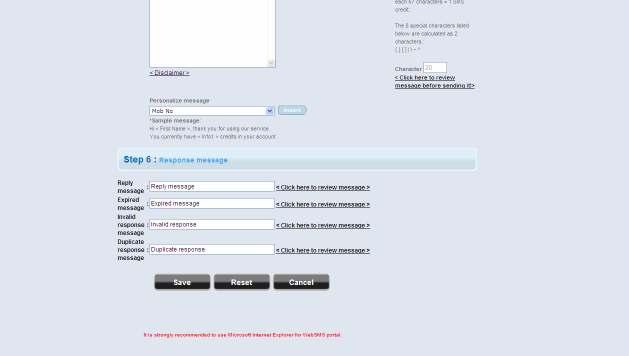
27 To create a immediate campaign 1. To create a immediate campaign, access via the Campaign & Birthday Tab -> Campaign Broadcast Link. 2. Enter Campaign name. 3. Select Immediate as the campaign time. 4. Choose the campaign s end date and end time. 5. Select the keyword to match for response. 6. Enter possible responses for the campaign. 7. Configure allow multiple response flag; set it to true to allow recipient to response more than once to the question. 8. Select user group(s) from list. 9. Choose sender ID from list. 10.Select filter criterion for the selected contact group to further shortlist the broadcast for contacts within the contact group which matches the selected criterions. You may click at Show filtered numbers to get the matching mobile number after filtration. 11.Select the language (English/ Other Language). 12.Insert the Message. 13.If want to use personalize message, select from list and press the insert button. 14.Configure reply text, expired text, invalid response and duplicate MO response. 15.Press Reset button to reset user group, sender ID, language, broadcast type and message. 16.Press Save button to schedule the campaign. 17.After press Save, the details of the broadcast will be saved and it will be listed in Campaign s main page. Confidential and Proprietary Page 27 / 80
28 Confidential and Proprietary Page 28 / 80
29 To schedule a campaign 1. To schedule a new campaign, access via the Broadcast Tab -> Campaign link. 2. Enter Campaign name. 3. User will need to select the date/time and the time zone of the intended broadcast time which is also campaign start date and time. 4. Set the campaign end date and end time. 5. Select the keyword to match for response. 6. Enter possible responses for the campaign. 7. Configure allow multiple response flag; set it to true to allow recipient to response more than once to the question. 8. Select user group(s) from list. 9. Choose sender ID from list. 10.Select filter criterion for the selected contact group to further shortlist the broadcast for contacts within the contact group which matches the selected criterions. You may click at Show filtered numbers to get the matching mobile number after filtration. 11.Select the language (English/ Other Language). 12.Insert the Message. 13.If want to use personalize message, select from list and press the insert button. 14.Configure reply text, expired text, invalid response and duplicate MO response. 15.Press Reset button to reset user group, sender ID, language, broadcast type and message. 16.Press Save button to schedule the campaign. 17.After press Save, the details of the broadcast will be saved and it will be listed in campaign s main page. Confidential and Proprietary Page 29 / 80


30 To update a campaign 1. Click at the Edit icon on the manage campaign main page. Confidential and Proprietary Page 30 / 80
31 2. User may made the following changes to the scheduled campaign a) Change the campaign name b) Change time zone c) Re-choose desired broadcast date / campaign start date. d) Re-choose desired broadcast time / campaign start time. e) Change campaign end date and time. f) Reconfigure allow multiple response flag; set it to true to allow recipient to response more than once to the question. g) Change user group from list. h) Change sender ID from list. i) Change filter criterion. j) Change the language (English/ Chinese). k) Change the Message. l) Change reply message, invalid response message, expired message and duplicate MO message. 3. Press Update to update the campaign. 4. Press Cancel to quit this page without making any changes. Confidential and Proprietary Page 31 / 80

32 4.0.2 Birthday Broadcast User will be able to configure customized birthday greeting for contact(s) in their contact group(s). Before they are able to send birthday greeting to any contacts; the birthday greeting feature must be activated for the contact and it s contact group. To view Inbox, go to Campaign & Birthday Tab -> Inbox Link. Confidential and Proprietary Page 32 / 80


33 To configure birthday broadcast/greeting 1. To configure birthday broadcast/greeting, access via the Campaign & Birthday Tab -> Birthday Broadcast link. 2. Choose sender ID from list. 3. Select the language (English/Other language). 4. Insert the Message. 5. You may also use personalize message; to do that simply select from personalized message list and press the insert button. 6. Press Update button to save the message. 7. Press Reset button to reset sender ID, language and message. Confidential and Proprietary Page 33 / 80

34 4.0.3 Inbox Inbox consists of replies to campaign and any incoming MO from mobile subscriber to system s user. To view Inbox, go to Campaign & Birthday Tab -> Inbox Link. Confidential and Proprietary Page 34 / 80
. 4. Insert the Message. 5. Press Send button to reply to the message.")
35 To reply to Inbox 1. To reply to Inbox, click at hexagon icon (under the action column). The above page will be displayed on screen. 2. Choose sender ID from list. 3. Select the language (English/Other language). 4. Insert the Message. 5. Press Send button to reply to the message. Confidential and Proprietary Page 35 / 80

36 To view reply to inbox summary 1. To view the history of reply to Inbox, click at second icon (under the action column). The above page will be displayed on screen. 2. From this report, you will able to see the date and time of the reply, the replied message and the status of the reply. Confidential and Proprietary Page 36 / 80
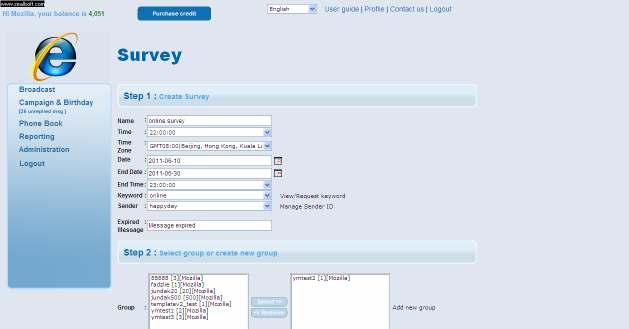
37 4.0.4 Survey Survey module allows user to organize a multiple questions survey. User will be able to compile a list of questions for the survey with configurable reply text for each answer submitted back to the system via 2- way SMS. Same as the implementation of campaign, response from recipients are mapped to survey by matching keyword assigned for survey. User will organize a survey by defining the date and time of the broadcast; keyword; target contact group and all the questions for the survey (which can be configured according to user s response). Once survey is configured; system will broadcast the first survey message to the target recipient group. Recipients will response to survey and system will parse the response and produce the response statistics for the survey owner. The statistics can be obtained from the survey summary report page under Reporting section. Note : At any time, one keyword can only be assigned to a campaign or survey. e.g. : If user organized a survey with keyword travel from 1 st of June 2011 to 31 st of June 2011; then travel keyword cannot be use in other campaign or survey during the month of June Confidential and Proprietary Page 37 / 80
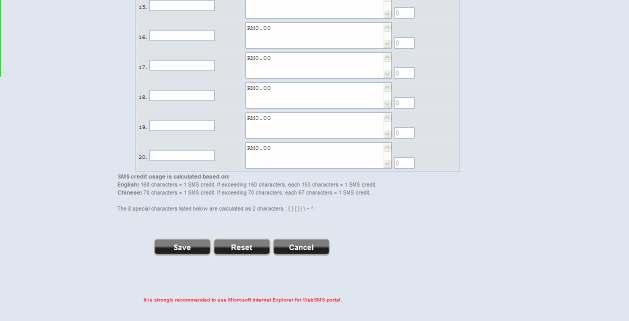
38 Example of Survey Survey details : m. Survey name : Online Purchase Survey n. Date and time of the broadcast : :00:00 o. Survey end time: :00:00 p. Survey keyword : online q. Target contact group : UserGroup1 r. Sender ID : online s. Contact group filter criterion : (default all) t. Survey s language and questions: 1. Do you shop online? Response with y or n. (main question) If recipient s answer is y then go to no. 2; if recipient s answer is y then go to no. 3; otherwise go to no How frequent do you shop online? a. Once a week b. Once a month c. Once a year d. others If recipient s answer is either a, b, or c go to no. 5; if recipient s answer d go to no. 6; Otherwise go to no Thank you for participating in online shopping survey. 4. Incorrect response. Please response with y or n? 5. How much do you spent for a typical transaction? a. 100 to 500 b. 500 to 1,000 c. 1,000 to 2,000 d. 2,000 to 5,000 e. more than 5,000 if recipient s responded; go to Thank you for participating in online shopping survey. 7. Invalid response. Please re-select your shopping frequency. a. Once a week b. Once a month c. Once every few months d. Once a year e. others 8. Thank you very much for participating in online shopping survey. Confidential and Proprietary Page 38 / 80
39 Below are the entries in Response History and Question corresponds to the survey. Response history is form by adding recipient s response to the question. e.g. online_y : this is the reply to recipient s response where they responded with y online_y_a : this is the reply to recipient s response where after responded with y followed by a Kindly take note that (keyword)_xcd is the general error message reply to recipient when no matching response history are find. No Response History Message 1 Online Do you shop online? Response with y or n. 2 online_y How frequent do you shop online? a. Once a week b. Once a month c. Once a year d. others 3 online_n Thank you for participating in online shopping survey. 4 online_err Incorrect response. Please response with Y or N? 5 Online_y_a How much do you spent for a typical transaction? a. 100 to 500 b. 500 to 1,000 c. 1,000 to 2,000 d. 2,000 to 5,000 e. more than 5,000 Online_y_b How much do you spent for a typical transaction? a. 100 to 500 b. 500 to 1,000 c. 1,000 to 2,000 d. 2,000 to 5,000 e. more than 5,000 Online_y_c Thank you for participating in online shopping survey. Online_y_d Thank you for participating in online shopping survey. Online_y_err Invalid response. Please re-select your shopping frequency. a. Once a week b. Once a month c. Once every few months d. Once a year e. others Online_y_a_err Thank you very much for participating in online shopping survey! Online_xcd Sorry, invalid response Confidential and Proprietary Page 39 / 80

40 To manage Survey 1. To manage Survey, access via Campaign & Birthday Tab -> Survey Link. 2. To search for a Survey; enter the Survey into the text box beside the Search button and click at the Search button. 3. To add a Survey; click at the Add Survey button. 4. To View or Update the Survey that has been stored; click at hexagon icon (under the action column). 5. To delete the existing Survey; click at the X icon (under the action column). 6. Please refer to Survey Summary Report under Reporting section for survey s statistic which includes the delivery statistics, response statistics and the breakdown of the response. 7. For details of recipient s response; please refer to Survey Details Report under Reporting section. This report shows the mobile number of the recipient who response to the survey, date and time of their response and their response history. Confidential and Proprietary Page 40 / 80

41 Confidential and Proprietary Page 41 / 80
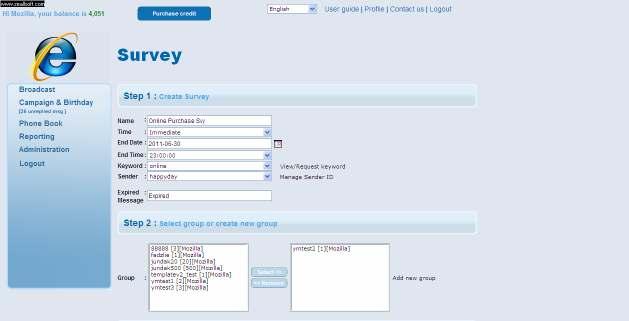
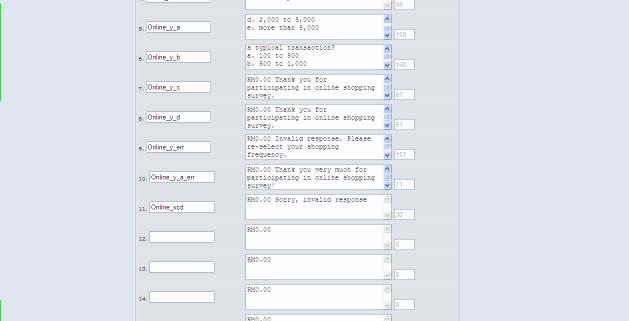
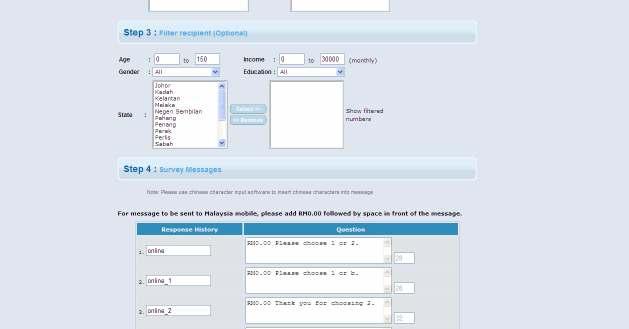
42 To create a immediate survey 1. To create a immediate survey, access via the Campaign & Birthday Tab - > Survey Link 2. Enter Survey name. 3. Select Immediate as the survey time. 4. Select End Date and End Time for the survey. 5. Select the keyword to match for response. 6. Choose sender ID from list. 7. Configure expired message. 8. Select user group(s) from list. 9. Select filter criterion for the selected contact group to further shortlist the broadcast for contacts within the contact group which matches the selected criterions. You may click at Show filtered numbers to get the matching mobile number after filtration. 10.Configure the Response history and message. Below is an example of survey entry based on the survey example described in previous section. Response History Message Online Do you shop online? Response with y or n. online_y How frequent do you shop online? a. Once a week b. Once a month c. Once a year d. others online_n Thank you for participating in online shopping survey. online_err Incorrect response. Please response with Y or N? Online_y_a How much do you spent for a typical transaction? a. 100 to 500 b. 500 to 1,000 c. 1,000 to 2,000 d. 2,000 to 5,000 e. more than 5,000 Online_y_b How much do you spent for a typical transaction? a. 100 to 500 b. 500 to 1,000 c. 1,000 to 2,000 d. 2,000 to 5,000 e. more than 5,000 Online_y_c Thank you for participating in online shopping survey. Online_y_d Thank you for participating in online shopping survey. Online_y_err Invalid response. Please re-select your shopping frequency. a. Once a week b. Once a month c. Once every few months d. Once a year e. others Online_y_a_err Thank you very much for participating in online shopping survey! Online_xcd Sorry, invalid response Confidential and Proprietary Page 42 / 80
43 11.Press Reset button to reset the entries. 12.Press Save button to schedule the survey. 13.After press Save, the details of the survey will be saved and it will be listed in Survey s main page. Confidential and Proprietary Page 43 / 80
44 Confidential and Proprietary Page 44 / 80
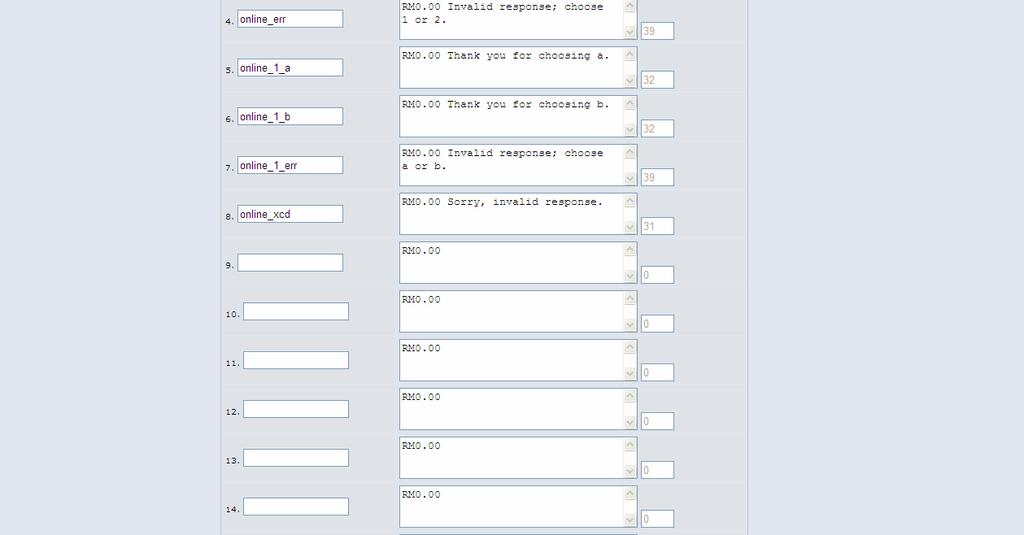
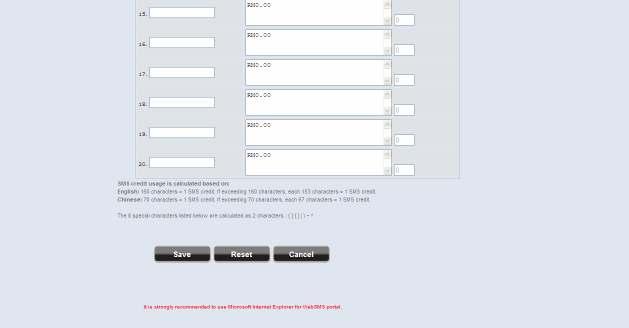
45 To schedule a survey 1. To create a immediate survey, access via the Campaign & Birthday Tab - > Survey Link 2. Enter Survey name. 3. Select the start time of the survey. 4. Choose the desired time zone. 5. Select End Date and End Time for the survey. 6. Select the keyword to match for response. 7. Choose sender ID from list. 8. Configure expired message. 9. Select user group(s) from list. 10.Select filter criterion for the selected contact group to further shortlist the broadcast for contacts within the contact group which matches the selected criterions. You may click at Show filtered numbers to get the matching mobile number after filtration. 11.Configure the Response history and message. Below is an example of survey entry. Response History Message Online RM0.00 Please choose 1 or 2. online_1 RM0.00 Please choose 1 or b. online_2 RM0.00 Thank you for choosing 2. online_err RM0.00 Invalid response; choose 1 or 2. online_1_a RM0.00 Thank you for choosing a. online_1_b RM0.00 Thank you for choosing b. online_1_err RM0.00 Invalid response; choose a or b. online_xcd RM0.00 Sorry, invalid response. 12.Press Reset button to reset the entries. 13.Press Save button to schedule the survey. 14.After press Save, the details of the survey will be saved and it will be listed in Survey s main page. Confidential and Proprietary Page 45 / 80


46 To update a survey 1. Click at the Edit icon on the manage survey main page. Confidential and Proprietary Page 46 / 80
47 2. User may made the following changes to the scheduled survey a) Change the survey name b) Change time zone c) Re-choose desired broadcast date / survey start date. d) Re-choose desired broadcast time / survey start time. e) Change survey end date and end time. f) Change keyword. g) Change sender ID (choose from list). h) Reconfigure expired message. i) Change user group from list. j) Change filter criterion. k) Reconfigured Response history and message. 3. Press Update to update the survey. 4. Press Cancel to quit this page without making any changes. Confidential and Proprietary Page 47 / 80

. 5.")
48 5.0 Phone Book Manage Group To Manage Contact Group 1. To manage Contact Group, access via Phone Book Tab -> Manage Group Link. 2. To search for a Contact Group; enter the Contact Group into the text box beside the Search button and click at the Search button. 3. To Update the Contact Group; click at hexagon icon (under the action column). 4. To configure the contact sharing options for the Contact Group; click at hourly glass icon (under the action column). 5. To activate birthday greeting for a group; click at the hexagon icon under the birthday broadcast activation column. Confidential and Proprietary Page 48 / 80

49 6. To delete the existing Contact Group; click at the X icon (under the action column). 7. To download the existing Contact Group; click at the download icon (under the action column). 8. Click at the Add Group button to add a new Contact Group. To add a empty contact group 1. Click at the Add Group button; the above page will be displayed on screen. 2. Click at Create Group Name link. 3. Enter the group name and click at the Add button. 4. New contact group will be created and user will be directed to the main contact group page. Confidential and Proprietary Page 49 / 80

50 To import a contact group 1. Click at the Add Group button; the above page will be displayed on screen. 2. Click at Import File link. 3. Select the file to be inserted. 4. New contact group will be created and the contacts will be inserted. User will be directed to the main contact group page after that. Confidential and Proprietary Page 50 / 80
51 Contact sharing 1. Parent will be able to share their contacts with their sub users so that their sub user will also be able to broadcast to their contact group. 2. There are 2 types of contact sharing a. Share the contact with your direct sub user or child account only. b. Share the contact with all levels of sub users (which include your child account s sub accounts) 3. The owner of the contacts of the parent will be able to set a limit for the maximum of message to be broadcast to the shared contacts. There are 4 types of sending limit of contact sharing a. Daily (e.g. 3 times in a day) b. Weekly (e.g. 5 times in a week) c. Monthly (eg : 10 times in a month) d. No limit 4. As an incentive for the parent for sharing the contacts, parent will be able to set a charging multiplier for the shared contacts. The sms credit charged to the sub user will be the normal credit times the charging multiplier. e.g : The cost of sending a message which is shorter than 160 characters to a Singapore is 1 SMS credit. If we send it to a Singapore number which exists in our own contact list then we ll be charged 1 SMS credit for the message. If we send it to a Singapore number which is under our parent s shared list and the charging multiplier is 2; then we ll be charged at 2 SMS credit for the message. Confidential and Proprietary Page 51 / 80

52 To configure share options for a contact group 1. Click at the share button (hourly glass) from phone book s main page; the above page will be displayed on screen. 2. Select from the available share options. a. Do not share b. Share with direct sub users only c. Share with all sub users 3. Select share limit from the share limit drop down list a. No Limit. b. Daily c. Weekly d. Monthly 4. Enter the share frequency. 5. Enter the multiplier for charging. 6. Click at Submit to save the settings. Confidential and Proprietary Page 52 / 80
. 4. Key in the name (* optional). 5. Select a status (* optional). 6. Press Search button to perform the searching. 7. Press Reset to clean all the above fields.")
53 5.0.2 Manage Contact To search contact for a contact group 1. To search contact in a group, access via Phone Book Tab -> Manage Contact Link. 2. Select a user group name. 3. Key in the phone number (* optional). 4. Key in the name (* optional). 5. Select a status (* optional). 6. Press Search button to perform the searching. 7. Press Reset to clean all the above fields. 8. The result of the searching will appear. Confidential and Proprietary Page 53 / 80
54 To manage contact for a contact group 1. To manage Contact, access via Phone Book Tab -> Manage Contact Link. 2. To search for a Contact; enter the Contact into the text box beside the Search button and click at the Search button. 3. To activate birthday greeting for a contact; click at the hexagon icon under the birthday broadcast activation. 4. To Update the Contact; click at hexagon icon (under the action column). 5. To delete the existing Contact; click at the X icon (under the action column). 6. Click at the Add Contact button to add a new Contact. Confidential and Proprietary Page 54 / 80


55 To add a new contact 1. Click at the Add Contact button; the above page will be displayed on screen. 2. Select the group for the new contact and click at the Add button 3. Enter the phone number and other relevant details for the new contact and click at the Add button. 4. New contact will be created and user will be directed to the main contact page. Confidential and Proprietary Page 55 / 80

56 To update a contact 1. Click at the Update Contact icon from contact main page; the above page will be displayed on screen. 2. Update the phone number and other relevant details for the selected contact and click at the Update button. 3. Contact details will be updated and user will be directed to the main contact page. 4. To delete the contact; click at the Delete button at the bottom of the page. 5. Click at Cancel button to exit the page without making any changes. Confidential and Proprietary Page 56 / 80
. 3. Search for the required contact by entering the following fields under the search section. a.")
57 To copy contact(s) from other contact groups 1. Click at the Copy Contact icon from contact main page; the above page will be displayed on screen. 2. Choose the destination contact group (the selected contact will be inserted into this group). 3. Search for the required contact by entering the following fields under the search section. a. Source contact group b. Name of contact c. Phone number of the contact Confidential and Proprietary Page 57 / 80

58 When search returns a list of matching contacts; the matching contacts will be display below the search section. Below is a sample screen for the search result. 4. Tick to select the phone numbers to be added to the destination contact group. 5. Click at Add to list to copy the number to the destination contact group. 6. After the Add to list button is clicked; the new contact will be added into the destination contact group. 7. You may continue to search and add contacts into the destination contact group. Once all the selections are done, click at Close to close this popup page. Confidential and Proprietary Page 58 / 80
59 5.0.3 Manage Blacklist Users may be able to manage their own blacklist in WebSMS system. Basically, there are 2 types of blacklist in the system. 1. Account level blacklist 2. Keyword based blacklist For any number which has been blacklisted under account level; user will not be able to send to this number from send sms pages, campaign pages and reply to sms page. For numbers which has been blacklisted as keyword based blacklist numbers; user will not be able to send to this number from campaign broadcast if the keyword for the broadcast matches the blacklisted keyword and the phone number is in the recipient list. To create a account level blacklist number; simply enter the phone number and leave the keyword as select a keyword (do not select any keyword). To create a keyword based blacklist number; enter the phone number and select the required keyword. Note : User will be able to review the blacklisted numbers from the Blacklisted column in outbox report after a broadcast. Confidential and Proprietary Page 59 / 80

60 To Manage Blacklist 1. To manage your personal blacklist, access the main blacklist page via Tab Phone book -> Manage Blacklist Link. 2. To search for a combination of phone number and keyword that has been blacklisted; enter the phone number into the text box and select the keyword to search for beside the Search button then click at the Search button. 3. To View or Update the blacklisted number or keyword that has been stored; click at hexagon icon (under the action column). 4. To delete the existing blacklisted number or keyword; click at the X icon (under the action column). 5. Click at the Add button to add a new blacklisted number or keyword. Confidential and Proprietary Page 60 / 80
 for the blacklisted number. 4. Press Insert to confirm the adding.")
61 Add Blacklist 1. After press the Add button, a new Add Template form will appear. 2. Enter the phone number to be blacklisted. 3. Select the keyword (optional) for the blacklisted number. 4. Press Insert to confirm the adding. Confidential and Proprietary Page 61 / 80
 for the blacklisted number. 4. Press Update to confirm the updating.")
62 Update or View Blacklist 1. After press the View/ Update icon, a View/ Update Template form will appear. 2. Update the phone number to be blacklisted. 3. Update the keyword (optional) for the blacklisted number. 4. Press Update to confirm the updating. Confidential and Proprietary Page 62 / 80

63 6.0 Reporting Credit Flow Report Credit Flow Report shows the credit flow or changes for each broadcast and transferred made through the system. 1. To view Credit Flow Report, access via Reporting Tab -> Credit Flow Report Link. 2. Select a User ID. 3. Select the Date From. 4. Select the Date To. 5. Press Submit button to generate the report. 6. Credit Flow Report will appear after generated. Confidential and Proprietary Page 63 / 80


64 6.0.2 Outbox Outbox Report shows the broadcast statistics and status of each broadcast made from the system. 1. To view Outbox, access via Reporting Tab -> Outbox Link. Confidential and Proprietary Page 64 / 80
65 2. Select a User ID. 3. Select the Date From. 4. Select the Date To. 5. Press Submit button to generate the report. 6. Outbox Report will appear after generated. Confidential and Proprietary Page 65 / 80
 of particular group of sending. 3.")
66 To view outbox details 1. To view outbox details that shown the phone number, press the pending/ Failed/ Success hyperlink. 2. A new pop up window will appear, this is the phone number list of particular status (pending/ failed/ success) of particular group of sending. 3. Can change the status to view the phone number list of other status (pending/ failed/ success). 4. Press Close button to close the pop up window. Confidential and Proprietary Page 66 / 80
. 3.")
67 6.0.3 Online Purchase History Online Purchase History shows the online payment transaction performed by the user. 1. To view Online Purchase History, access via Reporting Tab -> Online Purchase History Link. 2. Select a report mode (by Date or by month). 3. If date report mode is selected; select the Date From and Date To. 4. If month report mode is selected; select the required month 5. Press Submit button to generate the report. 6. The Purchase report will appear after generated. Confidential and Proprietary Page 67 / 80

68 6.0.4 Delivery Report Delivery Report shows the delivery status of each MT broadcasted from the system. 1. To view Broadcast Report, access via Reporting Tab -> Delivery Report Link. 2. Select a User ID. 3. Select a User Group 4. Select the Date From. 5. Select the Date To. 6. Press Submit button to generate the report. 7. Delivery Report will appear after generated. Confidential and Proprietary Page 68 / 80

69 6.0.5 Survey Summary Report Survey Summary Report shows the delivery statistic, response statistic and response breakdown for a survey. 1. To view Survey Summary Report, access via Reporting Tab -> Survey Summary Report Link. 2. Select a Survey Name. 3. Press Submit button to generate the report. 4. Survey Summary Report will appear after generated. 5. Description of fields in report 1. Survey name is the name of the survey. 2. Group is the contact group that we have broadcasted to. 3. Response history is an id link to a response level and it is form by adding recipient s response to the question. e.g. online_y : this is the reply to recipient s response where they responded with y online_y_a : this is the reply to recipient s response where after responded with y followed by a Confidential and Proprietary Page 69 / 80
70 4. Question is the reply text for a particular response history level. 5. Delivery statistic shows the total number MT delivered for a particular response history level. 6. Response statistic shows the response statistic in the following format Total response from recipients vs total recipient who never response vs Total message sent 7. Response breakdown break down the response from the recipients according to the possible response expected from recipients. e.g. 1(2/4), 2(1/4), err (2/4) Indicated that there is 2 recipients response with 1, 1 recipient response with 2 and 2 recipient response with invalid response. Confidential and Proprietary Page 70 / 80

71 6.0.5 Survey Details Report Survey Details Report shows the incoming response for a survey. 1. To view Survey Details Report, access via Reporting Tab -> Survey details Report Link. 2. Select a Survey Name. 3. Press Submit button to generate the report. 4. Survey Summary Report will appear after generated. 5. Description of fields in report 1. Survey name is the name of the survey. 2. Date/time is date and time of the response 3. Mobile number is the mobile number of the recipient who response to the survey 4. Response history is an id link to a response level and it is form by adding recipient s response to the question. e.g. online_y : this is the reply to recipient s response where they responded with y online_y_a : this is the reply to recipient s response where after responded with y followed by a Confidential and Proprietary Page 71 / 80
. 4.")
72 7.0 Administration Manager User To manage (sub) user 1. To manage user, access via Administration Tab -> Manage User Link. 2. To search for a user; enter the contact into the text box beside the Search button and click at the Search button. 3. To Update the user; click at hexagon icon (under the action column). 4. To view the profile of an existing user; click at the magnifier icon (under the action column). 5. To delete the existing user; click at the X icon (under the action column). 6. Click at the Add button to add a new user. Confidential and Proprietary Page 72 / 80
 3.")

73 To add user 1. Click at the Add button on the manage user main page; the above page will be displayed on screen. 2. Enter the details of the new user (* indicated compulsory field) 3. Click at the Back button to quit without making any changes. 4. Click at the Reset button to reset all the information entered. 5. Click at the Next button to proceed to next step. The credit assignment and sender id assignment page will be displayed on screen. Confidential and Proprietary Page 73 / 80


74 6. Enter the credit to be allocated to the new user and check the sender ID to be assigned to the user. 7. Click at the Next button to proceed to next step. Module assignment page will be displayed on screen. 8. Click at Save button to save the setting of the new user. Click at OK at the pop up window to complete the setup. Confidential and Proprietary Page 74 / 80

75 Confidential and Proprietary Page 75 / 80


76 To update user s details 1. Click at the Update icon on the manage user main page; the above page will be displayed on screen. 2. To reset the password for the sub user; enter the new password and click at the Reset button to update his/her password. 3. To change the total number of sub user allowed for the sub user; change the figure to the required number and click at the Update button beside the item. 4. To change the status of the sub user; select the required status and click at Update button beside the item. 5. To transfer credit from main user s account to the sub user s account; enter the amount to be transferred and click at the Transfer button beside the item. 6. To change the total number of sender ID allowed; change the figure to the required number and click at the Update button beside the item. 7. Check/uncheck the sender id to set the sender id to be assigned for the sub user. 8. To save the sender ID setting; click at the sender ID to save the setting. 9. User will be redirected to the manage user main page. Confidential and Proprietary Page 76 / 80

77 To view sub user s profile 1. Click at the magnifier icon on the manage user main page; the above page will be displayed on screen. 2. Click at the cancel button to go back to the manage user main page. Confidential and Proprietary Page 77 / 80

. 5.")
78 7.0.2 Manage Sender ID To manage Sender ID 1. To manage Sender ID, access via Administration Tab -> Manage Sender ID Link. 2. To search for a Sender ID; enter the Sender ID into the text box beside the Search button and click at the Search button. 3. To Update the Sender ID; click at hexagon icon (under the action column). 4. To delete the existing Sender ID; click at the X icon (under the action column). 5. Click at the Add button to add a new Sender ID. Confidential and Proprietary Page 78 / 80

79 7.0.3 Manage Campaign keyword To manage Campaign Keyword 8. To manage Campaign Keyword, access via Administration Tab -> Campaign Keyword Link. 9. To search for a Campaign Keyword; enter the Campaign Keyword into the text box beside the Search button and click at the Search button. 10.To request for a Campaign Keyword; enter the Campaign Keyword into the text box beside the Request button and click at the Request button. Confidential and Proprietary Page 79 / 80


80 8.0 Profile To update profile 1. Press the Profile Tab. 2. Insert/ Change the Company Name. 3. Insert/ Change the Company Address. 4. Insert/ Change the City. 5. Insert/ Change the State. 6. Insert/ Change the Postcode. 7. Insert/ Change the Country by select from the list. 8. Insert/ Change the Office phone number. 9. Insert/ Change the Fax number. 10.Insert/ Change the Name. (Required) 11.Insert/ Change the Mobile phone number. (Required) 12.Insert/ Change the Address. (Required) 13.Insert/ Change the Position. 14.Insert/ Change the business type by select from the list. 15.Press Cancel button to cancel the profile updating without any changes. 16.Press Update to confirm the profile updating. Confidential and Proprietary Page 80 / 80
Ariba Network Configuration Guide
 Ariba Network Configuration Guide Content Account Configuration Basic Profile Email Notifications Electronic Order Routing Electronic Invoice Routing Remittances Test Account Creation Managing Roles and
Get Qualified User Manual
 MALTA ENTERPRISE Get Qualified User Manual Student Guide Contents 1. Logon... 3 2. Registration... 3 3. Profile... 3 Ongoing Applications... 3 Editing your profile... 4 Profile... 4 Account... 4 Password...
Health Messenger User Guide
 Health Messenger User Guide V 2.6 3/09/2018 USER GUIDE TABLE OF CONTENTS 1.0 GENERAL INFORMATION 1.1 System Overview 1.2 Support 1.3 Uploading Export Files 1.4 Minimum System Requirements 2.0 GETTING STARTED
PLEXUS PAY PORTAL YOUR HOW-TO GUIDE
 PLEXUS PAY PORTAL YOUR HOW-TO GUIDE - 1 - Table of Contents Activate Account Activating Your Pay Portal Account 3 Navigating your Plexus Pay Portal 8 Managing your funds 17 Activating your Prepaid Card
Isi Net User Manual for Bank customers
 1 Table of Contents 1 Introduction and overview... 4 1.1 Isi Net User Types... 4 1.2 Accessing the Isi Net service... 5 1.2.1 User Login... 5 1.2.2 User Logout... 7 1.3 User Interface... 7 1.3.1 Menus...
Welcome to Shopfront. Your distributor will supply your user name, password, and the website address for your login page.
 User Guide Table of Contents Login... 3 Choose a Location... 4 Home Page... 5 Header Bar... 6 My Catalog... 6 Menu Bar... 7 My Profile... 8 Contact Us... 9 Change Location... 10 Shopping Lists... 11 Quick
For other details about the campaign including Frequently Asked Questions, please visit
 EMPLOYEE CAMPAIGN PLEDGE FORM HELP GUIDE I have an @ledcor.com email address This guide will help you register and login to the Ledcor Cares Employee Campaign pledge form and walk you through the easy
Reports Message History Message Summary Message Segment Summary Credit History. Profile Sign out Online Help
 Bulk SMS Login Screen Home Navigation Bar Address Book Groups Adding new groups Deleting selected groups Uploading to your group list Downloading from your group list Members Adding new Members Deleting
Sendroid Ultimate. User Manual
 Sendroid Ultimate User Manual System Overview Sendroid Ultimate is an ultimate bulk SMS portal software and SMS reseller system designed for bulk SMS service providers, SMS resellers and bulk SMS marketers.
Ariba Network Configuration Guide
 Ariba Network Configuration Guide Content Account configuration Basic Profile Email Notifications Electronic Order Routing Electronic Invoice Routing Remittances Accelerated payments Test Account creation
Sappi Ariba Network. Summit Guided Session: Account Configuration
 Sappi Ariba Network Summit Guided Session: Account Configuration 1 Manage invitation letter + 2 Landing Page Sappi 2 1 1 Open the Invitation Letter that you received at your email address from ordersender-prod@ansmtp.ariba.com
CheckNet Users Manual
 CheckNet Users Manual Table of Contents Chapter 1: Logging In Logging In... 3 Forgot Password... 4 Remembering Password Using Hint... 4 Forgot Password Using E-Mail... 4 Initial Log In - Updating User
Xifin Client Portal User s Guide Version 1.0. January 2018
 Xifin Client Portal User s Guide Version 1.0 January 2018 Table of Contents Getting Started... 3 Contacting Allina Health Laboratory Billing... 3 Xifin Client Portal Information... 3 Logging in to Xifin
Admin/User Manual SoftPal.com.ng
 Admin/User Manual SoftPal.com.ng 2 THIS MANUAL IS DIVIDED INTO THREE PARTS: 1. THE MEMBER CONTROL PANEL 2. THE ADMIN CONROL PANEL 3. THE CONTENT MANAGEMENT PANEL THE MEMBER CONTROL PANEL is visible to
BBVA Compass Spend Net Payables
 User Guide BBVA Compass Spend Net Payables User Guide Vault Services Table of Contents Introduction 2 Technical Requirements 2 Getting started 3 Sign In 3 General Navigation 4 Upload/Create Payment 5
AT&T Business Messaging Account Management
 Account Management Administrator User Guide July 2016 1 Copyright 2016 AT&T Intellectual Property. All rights reserved. AT&T, the AT&T logo and all other AT&T marks contained herein are trademarks of AT&T
USER GUIDE. June 2012 VERSION 1.0. Supplier Portal. Kimberly-Clark. E-sourcing
 USER GUIDE June 2012 VERSION 1.0 Supplier Portal Kimberly-Clark E-sourcing Copyright 2005, Kimberly-Clark Worldwide, Inc. All rights reserved. This document and its associated training materials are proprietary
Welcome to Client Access Web!
 Welcome to Client Access Web! Introduction W elcome to the Express Collections Client Access Portal. This portal has been crafted so that you, our valued client, can have convenient and secure access to
With Online Fax, you can send and receive faxes, view queued/archived faxes, add contacts from the following North American locations:
 AT&T Online Fax allows you to send and receive faxes in email format, access your faxes from virtually any device with internet without the need for a dedicated fax line. AT&T Intellectual Property. All
Ariba Network Configuration Guide
 Ariba Network Configuration Guide Content 1. Account Configuration I. Account Access II. Company Profile III. Email Notifications IV. Electronic Order Routing V. Electronic Invoice Routing VI. Remittances
Active Messenger User Guide
 Active Messenger User Guide 0 2 8 Active Messenger User Guide Index 1. Login 2 1.1 Login to Vibe Active SMS 2 2. Set Up Your User Profile 3 2.1 Profile 3 2.2 Fill in the Invoice Contact details 4 2.3 Settings
Ariba Network Configuration Guide
 Ariba Network Configuration Guide Content 1. Account Configuration I. Account Access II. Company Profile III. Email Notifications IV. Electronic Order Routing V. Electronic Invoice Routing VI. Remittances
My MessageMedia User Guide
 My MessageMedia User Guide Copyright and Trademark Statement 2011 MessageMedia All rights reserved. Apart from any use permitted under the Copyright Act 1968, no part of this publication may be reproduced,
User Manual RouteSms SmsPlus Desktop. Version 1.0
 User Manual RouteSms SmsPlus Desktop Version 1.0 1. Content : 1 INTRODUCTION...... 3 2 LOGIN... 4 3 WELCOME PAGE...... 5 4 SEND SMS...... 6 4.1 SINGLE SMS:... 6 4.2 BULK SMS:... 7 4.3 PERSONALIZED BULK
PCCW mobile SMS Web Access 2.0 User Guide
 PCCW mobile SMS Web Access 2.0 User Guide Version 2.1.2 11 March 2011 Version: 2.1.2 Table of Content 1 Introduction... 4 2 General... 5 2.1 Getting started... 5 2.2 Login/Logout... 5 2.3 Switch between
A Guide for Customer Accounts
 A Guide for Customer Accounts Introduction This document contains set up and configuration guides for ODDS Customer Accounts. This manual helps to assist customers with the setup of their ODDS account,
SIAM R3.0 USER GUIDE
 SIAM R3.0 USER GUIDE Document Reference: 8295 September 2016 Revision: 3 Version Date Author Changes Number 1 Mar 2015 John Lindsay 2 Jun Sam Unsuspending a SIM card description updated. 2016 Smith 3 Sep
New BoundTree.com User Guide Fall Version 6
 New BoundTree.com User Guide Fall 2016 Version 6 Table of Contents Overview Navigating the Home Page Creating an Account Logging into an Existing Account Forgot Your Password? Reviewing Your Account Editing
FAXLAN CLIENT v3.0 USER GUIDE
 FAXLAN CLIENT v3.0 USER GUIDE Draft Version 1.2 May 15 th, 2003 2 TABLE OF CONTENTS 1. FAXLAN CLIENT OVERVIEW... 3 1.1 FAXLAN CLIENT V3.0 FEATURES... 3 1.2 FAXLAN CLIENT V3.0 SYSTEM REQUIREMENTS... 3 2.
Contents Overview... 3 Steps to run an Excel Add-In Setup:... 4 Add-Ins LOGIN SEND SMS Send Text or Flash Sms... 1
 User Manual IND-BulkSms Excel Add-In Version 1.0 Contents 1 2 3 4 5 6 7 Overview... 3 Steps to run an Excel Add-In Setup:... 4 Add-Ins... 11 LOGIN... 12 SEND SMS... 13 5.1 Send Text or Flash Sms... 13
Using the Telstra T-Suite Management Console. Customer Administrator s Reference Manual
 Using the Telstra T-Suite Management Console Customer Administrator s Reference Manual June 2011 Registering With TMC Notice Pivot Path is a registered trademark of Jamcracker, Inc. Registered trademark
1. What is the web address to the mail portal and what does the Sign in page look like?
 Welcome to the Certified Mail Portal, below will be detailed instructions to many of the frequently asked questions you may have about this portal. The questions will start simple and become more complex
FLP Merchant Website. User Guide. Version 0.14
 FLP Merchant Website User Guide Version 0.14 Revision History Responsible Revision Date Version Vitalii Vysotskyi Created the initial version of the user guide 2017-11-28 0.1 Vitalii Vysotskyi Small updates
School Mail System. - Access through Outlook Web Access. User Guide FOR. Education Bureau (EDB)
") School Mail System - Access through Outlook Web Access User Guide FOR Education Bureau (EDB) Version: 1.1 February 2008 The Government of the Hong Kong Special Administrative Region The contents of this
School Mail System - Access through Outlook Web Access User Guide FOR Education Bureau (EDB) Version: 1.1 February 2008 The Government of the Hong Kong Special Administrative Region The contents of this
esd Portal: Parent View User Guide v
 esd Portal: Parent View User Guide v. 5.9.0 Copyright 2002-2018 eschooldata, LLC All rights reserved. TABLE OF CONTENTS Overview... 3 Parent Portal Login Page... 3 Online Registration...4 Parent Portal
Admin/User Manual. om
 1 Admin/User Manual www.smslauncher.c om 2 THIS MANUAL IS DEVIDED INTO THREE PARTS: 1. THE MEMBER CONTROL PANEL 2. THE ADMIN CONROL PANEL 3. THE CONTENT MANAGEMENT PANEL THE MEMBER CONTROL PANEL is visible
FAQ Frequently Asked Questions
 Supplier Portal Fehrer Group FAQ Frequently Asked Questions F.S. Fehrer Automotive GmbH & Co KG Heinrich Fehrer Straße 1-3 97456 Kitzingen Version of 13.05.16 Page 1 of 10 Content 1 GENERAL QUESTIONS...
EFM Community 3.1 Portal Administration Guide
 EFM Community 3.1 Portal Administration Guide WHITE PAPER For technical support please call: 1-800-787-8755 Or visit: Hwww.Vovici.comH Please contact Vovici technical support if you believe any of the
Send-only SMS user guide
 Send-only SMS user guide Send-only SMS communications sometimes called SMS blasts are used to send information to recipients with no requirement to receive any return information. See the 2-way SMS user
Contents. e-blast User Guide Oct
 Contents Contents... 1 Set Up... 2 Ordering a new site... 2 Configuration & Installation... 2 Overview... 3 Features... 3 Getting Started... 4 Home Screen... 5 Icon Usage... 6 Navigation Side Bar... 6
Ariba Network. T-Mobile Configuration Guide
 Ariba Network T-Mobile Configuration Guide Content Account configuration Basic Profile Email Notifications Electronic Order Routing Electronic Invoice Routing Remittances Accelerated payments Test Account
Instructions for SAP CCtr. How to use SAP Contact Center phone system
 Instructions for SAP CCtr How to use SAP Contact Center phone system How to start the program 1. Open Internet Explorer browser. Type http://[sap Contact Center Website].ipcallcenters.eu into the address
InterCallTXT TextOnline User Guide
 InterCallTXT TextOnline User Guide 1. Messages www.intercalleurope.com Information Hotline 0871 7000 170 +44 (0)1452 546742 conferencing@intercalleurope.com Reservations 0870 043 4167 +44 (0)1452 553456
Daman isupplier Portal User Guide. Procurement
 Procurement Table of Content 1. Introduction... 4 Benefits associated with using isupplier include:... 4 2. System Requirements... 4 2.1 Recommended Operating System:... 4 2.2 Browser Requirements:...
Agilent Partner Central
 User Guide for Partners 6/1/2010 For External Partners/US_Canada Version Author: Betsy Savarese/Trish Kohrt/Tamie LeBar/CEG Version: 1.0 Partner Central Training for Partners June 7 th through June 11
E-POST OFFICE USER SUPPORT
 E-POST OFFICE USER SUPPORT Issued November 2017 1 E-Post Office CONTENTS 1 Service description 3 2 Registration 4 3 E-Post Office in the portal 5 3.1 Home 5 3.2 E-letter 5 3.2.1 Archive folder structure
MANAGING ACTIVITIES...
 Sales Center Guide GETTING STARTED... 2 LOGGING INTO LASSO... 2 FINDING YOUR WAY AROUND... 3 CONTACTING SUPPORT... 3 ACCESSING THE SALES CENTER... 3 SALES CENTER TIPS... 5 SEARCHING FOR A REGISTRANT...
BeAware Corporate Edition Admin Console. User Manual. BeAware Corporate Edition Admin Console Version 7.1. Ascentive LLC.
 User Manual BeAware Corporate Edition Admin Console Version 7.1 Ascentive LLC User Manual 1 Copyright Notice Copyright 2008 Ascentive LLC All Rights Reserved This document is protected by copyright law
Reseller Web Site Instructions Manual
 Reseller Web Site Instructions Manual CONTENTS 1. WHY USE OUR RESELLER WEB SITE TO SELL SMS? GENERAL INFORMATION ON OUR RESELLER WEB SITE.... 4 2. HOW CAN I HAVE MY OWN RESELLER WEB SITE? DETAILS WE NEED
NextGen Patient Portal. User Guide.
 2.4.3 NextGen Patient Portal User Guide www.nextgen.com Copyright 2014-2017 QSI Management, LLC. All Rights Reserved. The registered trademarks listed at http://www.qsii.com/legal_notices.shtml are the
eformat Parent Portal User Guide Electronic Free or Reduced Meal Application Tracking
 eformat Parent Portal User Guide Electronic Free or Reduced Meal Application Tracking NOTE: You must enter your student s Student ID, first name, and last name exactly as it is recorded in the Student
CommzGate Cloud SMS User Guide
 CommzGate Cloud SMS User Guide 2014 Welcome! This User Guide takes a visual approach to introducing you to the features found on the CommzGate Cloud SMS Web Portal. Each major part of the User Interface
CONTACTNOW ADVANCED SMS USER MANUAL. Contents. 1 Login 1. 2 Account Settings 1. 3 Online Payments 1. 4 Maintain Groups 2. 5 Import Numbers 2
 CONTACTNOW ADVANCED SMS USER MANUAL Contents 1 Login 1 2 Account Settings 1 3 Online Payments 1 4 Maintain Groups 2 5 Import Numbers 2 Insert Single Number 2 Bulk Import (preparing your file) 3 Save Your
QUICK START GUIDE 8x8 Residential Service. 8x8 Residential Service Quick Start Guide
 QUICK START GUIDE Quick Start Guide Version 1.0, October 2011 Contents Login Procedure...3 Home...4 Phone and Fax Lines...4 Edit Phone and Fax Lines... 4 Number Transfer... 6 Billing...12 Statements...
This document contains information that will help you to create and send graphically-rich and compelling HTML s through the Create Wizard.
 This document contains information that will help you to create and send graphically-rich and compelling HTML emails through the Create Email Wizard. or warranty by AT&T and is subject to change. 1 Contents
BeetleEye Application User Documentation
 BeetleEye Application User Documentation BeetleEye User Documentation 1 Table of Contents Welcome to the BeetleEye Application... 6 Overview... 6 Navigation... 6 Access BeetleEye... 6 Update account information...
Team Leidos Supplier User Guide
 Team Leidos Supplier User Guide Contents 1 Purpose:... 3 2 Guidance:... 3 2.1 View OJEU Contract Notice...3 2.1.1 Obtain OJEU Contract Notice Number...3 2.1.2 Obtain LSL esourcing Tender Reference Number...4
BluOcean Technology Pte Ltd. All Rights Reserved.
 BluOcean User Guide Copyright@2010 BluOcean Technology Pte Ltd. All Rights Reserved. Document version: UG.100305 The product described in this document is distributed under licenses restricting its use,
I-SUPPLIER MODULE. isupplier Module
 I-SUPPLIER MODULE isupplier Module Authored by: Kiran Katti Version: 1.1 Date: 06-January-2015 Table of Contents Terms Used in the User Manual:... 2 Introduction to isupplier... 4 Requirements/Software
Supplier Portal Guide
 Supplier Portal Guide Contents New Supplier Registration... 2 Introduction... 2 Registration and Login to the Supplier Portal... 2 Need Assistance... 2 Register on the Supplier Portal... 3 Terms and Conditions...
User Manual. [Outlook Web App 2013] Central Information Systems Division
![User Manual. [Outlook Web App 2013] Central Information Systems Division](/thumbs/88/115898574.jpg "User Manual. [Outlook Web App 2013] Central Information Systems Division") [Outlook Web App 2013] Central Information Systems Division Table of Contents 1. To Login... 4 2. To Logout... 5 3. Change Password... 5 4. Email Messaging... 6 4.1 Create a New Mail... 6 4.2 To Save Mail
[Outlook Web App 2013] Central Information Systems Division Table of Contents 1. To Login... 4 2. To Logout... 5 3. Change Password... 5 4. Email Messaging... 6 4.1 Create a New Mail... 6 4.2 To Save Mail
Connect for Android. Sender App. August 28, 2012 Ver 5.3 AWest. 1 P age
 Connect for Android Sender App August 28, 2012 Ver 5.3 AWest 1 P age Blackboard Connect for Android... 3 System Requirements... 3 Installation and Setup... 3 Logging into the Android App... 4 Navigating
Recipient USER GUIDE
 Recipient USER GUIDE General Information What is smartmail? smartmail is smartview s proprietary email encryption system used to protect your personal and transaction related information. What is smartportal?
esd Portal: Parent View User Guide v
 esd Portal: Parent View User Guide v. 5.0.0 Copyright 2002-2016 eschooldata, LLC All rights reserved. TABLE OF CONTENTS Overview... 3 Parent Portal Registration... 3 Logging In... 5 Getting Help... 7 Navigating
How to Guide. How to create mobile surveys. and forms START
 06 and forms How to Guide How to create mobile surveys START sales@textlocal.com 01244 752299 www.textlocal.com 06 and forms How to Guide How to create mobile surveys START sales@textlocal.com 01244 752299
Web Portal User Guide
 Web Portal User Guide Version (1.0) June 2012 Page 1 TABLE OF CONTENTS 1 Introduction... 1 2 User Guide - Key Functions... 2 2.1 Sending Messages... 3 2.1.1 To Simply Send a Message... 3 2.2 Using the
Tenant Portal Guide PURPOSE. Page 1. The purpose of this document is to review the features associated with the Tenant Portal.
 Tenant Portal Guide Page 1 PURPOSE The purpose of this document is to review the features associated with the Tenant Portal. Page 2 Table of Contents Tenant Portal... 3 Logging into the Tenant Portal...
Desktop App User Guide
 BlackBerry AtHoc Networked Crisis Communication Desktop App User Guide Microsoft Windows and Apple macos Platforms Release 7.0.0.2, July 2017 Copyright 2017 BlackBerry Limited. All Rights Reserved. This
Keep It Easy Software Cloud User Manual
 Keep It Easy Software Cloud User Manual 2015 Keep It Easy Software 1 CONTENTS How to Login... 5 Functions... 5 System Preferences... 6 General... 7 Receipt Categories... 9 Expense Categories... 10 Service
Websense Secure Messaging User Help
 Websense Secure Messaging User Help Welcome to Websense Secure Messaging, a tool that provides a secure portal for the transmission and viewing of sensitive, personal data in email. Use the portal to view
How to Navigate the AHIP Medicare Course. Subject Page #
 How to Navigate the AHIP Medicare Course Table of Contents Subject Page # Introduction 2 AHIP Registration Process 3 AHIP Login Process 8 Course Parts 14 Final Exam 17 Certificate and Transmit Score to
E-POST OFFICE USER SUPPORT
 E-POST OFFICE USER SUPPORT Issued November 2018 CONTENTS 1 Service description 3 2 Registration 4 3 E-Post Office in the portal 5 3.1 Archive (homepage) 5 3.2 E-letter 5 3.2.1 Archive folder structure
PowerSchool User Guide For Parents
 PowerSchool User Guide For Parents https://powerschool.gpcsd.ca/public Table of Contents Understanding Power School Parent Portal... 2 Introduction... 2 Let s Get Started... 2 Creating Your PowerSchool
PC-FAX.com Web Customer Center
 PC-FAX.com Web Customer Center Web Customer Center is a communication center right in your browser. You can use it anywhere you are. If you are registered by Fax.de, you have received a customer number
ACT Test Accessibility and Accommodations System (TAA) User Guide
 User Guide") ACT Test Accessibility and Accommodations System (TAA) User Guide www.act.org ACT Test Accessibility and Accommodations System (TAA) User Guide Table of Contents Overview... 2 Introduction to the Test
ACT Test Accessibility and Accommodations System (TAA) User Guide www.act.org ACT Test Accessibility and Accommodations System (TAA) User Guide Table of Contents Overview... 2 Introduction to the Test
BM Solutions Mortgage Portal. Document upload - Case tracking - Secure messaging Mobile technology. User Guide 15 January 2018 V3.
 BM Solutions Mortgage Portal Document upload - Case tracking - Secure messaging Mobile technology User Guide 15 January 2018 V3.0 KEY BENEFITS Moving forward together with secure online document upload
Outlook Web Access Exchange Server
 Outlook Web Access Exchange Server Version 2.0 Information Technology Services 2008 Table of Contents I. INTRODUCTION... 1 II. GETTING STARTED... 1 A. Logging In and Existing Outlook Web Access... 1 B.
2. Type in User Name and Password [Password is case-sensitive]. 7. Type in any Additional Comments. 8. Click the Review Tab to review your order.
![2. Type in User Name and Password [Password is case-sensitive]. 7. Type in any Additional Comments. 8. Click the Review Tab to review your order.](/thumbs/72/67555501.jpg "2. Type in User Name and Password [Password is case-sensitive]. 7. Type in any Additional Comments. 8. Click the Review Tab to review your order.") Log In 1. Open your Internet web browser and type in the following address: https://www.marshfieldlabs.org/reference 2. Type in User Name and Password [Password is case-sensitive]. 3. Click Log In. NOTE:
Log In 1. Open your Internet web browser and type in the following address: https://www.marshfieldlabs.org/reference 2. Type in User Name and Password [Password is case-sensitive]. 3. Click Log In. NOTE:
Flex Supplier Portal How to use Flex Supplier Portal
 Flex Supplier Portal How to use Flex Supplier Portal TABLE OF CONTENT TABLE OF CONTENT... 2 Introduction... 4 How to access Flex Portal... 5 OKTA account registration... 5 How to login OKTA (After registration)...
International SOS e-learning Training Hub User Guide
 International SOS e-learning Training Hub User Guide WELCOME TO THE INTERNATIONAL SOS TRAINING HUB.... 2 STEP 1. ACCESSING THE INTERNATIONAL SOS TRAINING HUB... 2 STEP 2. LOGGING INTO INTERNATIONAL SOS
2 Career Agency 4.2 User Guide
 This document was produced by Voloper Creations Inc. 2000 2009 Voloper Creations Inc. All Rights Reserved Brands or product names are trademarks or registered trademarks of their respective holders. The
Online CDC service. HowTo guide for applicants
 Online CDC service HowTo guide for applicants Disclaimer While every reasonable effort has been made to ensure that this document is correct at the time of printing, the State of NSW, its agents and employees,
Online Registration Management Guide
 Online Registration Management Guide For Extension Registration Managers Penn State College of Agricultural Sciences, Online Registration Management System 10/27/2014 This document is intended to provide
Center for Science Outreach Public View
 Vanderbilt University Center for Science Outreach Public View Destiny One Page 1 Contents Create a Student Profile/Account... 3 Browse for a Course... 5 Register for a Course and Checkout... 7 Page 2 Create
Quick Answers. You may create any Sender ID for the transactional route, provided the Sender ID should be of 6 alpha characters only.
 Quick Answers Text SMS How to choose Bulk SMS sender ID? You may create any Sender ID for the transactional route, provided the Sender ID should be of 6 alpha characters only. What is an Opt-Out SMS? How
Kean University. System Guide. cougar.kean.edu. Your window to the world
 Kean University E-Mail System Guide cougar.kean.edu www.kean.edu Your window to the world USING KEAN UNIVERSITY E-MAIL SYSTEM (COUGAR) This document is divided into three sections: Messenger Express Basics:
SMS4Act! User Guide. Revision 3.22 Date: 18 April 2018
 SMS4Act! User Guide Revision 3.22 Date: 18 April 2018 support@sms4act.com www.sms4act.com SMS4Act! User Guide Contents What is SMS4Act!?... 3 SMS4Act! Features... 3 Who is MessageMedia?... 3 How to Install
Making online easy. Cube Reviews User Guide
 Making online easy Cube Reviews User Guide Introduction page Funnel How to Link Your Review Sites page How to Customise Funnel Content page How to Customise Funnel Set-Up page 7 Widgets page 8 Invites
NETBANK USER GUIDE v
 LOG IN TO THE NETBANK Log in with Internet Access Code 1. Type in your Customer ID in the Customer ID field. (Your Customer ID is an eight digit unique numerical code sent to you in the Welcome Letter
Excel-SMS Enotified. Excel-SMS Help Manual
 Enotified Help Manual 7/7/2012 Contents 1. What is the excel-sms User Guide?... 2 2. Getting Started with excel-sms... 2 3. About the excel-sms Interface... 3 4. How to Send an SMS... 4 4.1 Sending One
The Platform ecommerce Functionality
 The Platform ecommerce Functionality EXTERNAL ADMINISTRATOR GUIDE 2 ECOMMERCE FUNCTIONALITY (EXTERNAL ADMINISTRATOR GUIDE) Contents Log on to The Platform 4 Search for a Training Course 6 Checking Training
Concur Expense QuickStart Guide. Concur Technologies Version 1.8
 Concur Expense QuickStart Guide Concur Technologies Version 1.8 September 7, 2017 2004 2017 Concur. All rights reserved. 1 Document Revision History Date Description Version Author 08/22/2014 Concur Expense
Electronic Timesheet Overview for Providers *This optional service is available June 5, 2017
 Electronic Timesheet Overview for Providers *This optional service is available June 5, 2017 Note: All case and provider information contained in this document is entirely fictitious and any resemblance
Oracle isupplier. Supplier User Guide
 Supplier User Guide Table of Contents isupplier Application, Help and Support... 3 Registration... 3 For Help... 3 Overview... 4 User Registration... 5 Login to isupplier... 7 isupplier and Sourcing Responsibility
Warrick County School Corp.
 Warrick County School Corp. Ou Microsoft Outlook Web Access Guide Getting StartedStyarted Go to the Warrick County School Corp. Home Page (www.warrick.k12.in.us) and click the Web Mail link. Logging In
P.E.O. STAR Scholarship Online Recommendation Instructions
 P.E.O. STAR Scholarship Online Recommendation Instructions The P.E.O. STAR Scholarship Recommendation Form for the chapter is available from September 1 through November 1. Starting September 1: As a chapter
elocalise Mobile Introduction
 elocalise Mobile Introduction Hi and a big thank you for choosing elocalise for your mobile marketing! We sincerely hope you get a lot out of using this tool as we believe that it can potentially change
NEOMIN Webmail Instructions
 NEOMIN Webmail Instructions Lisa Collins Created: Nov 10 th, 2009 Revised: Jan 25 th, 2010 1 Table of Contents Logging In 3 Viewing your Inbox/Emails 4-5 Printing & Deleting Emails 5 Replying & Forwarding
Meritain Connect User Manual. for Employees. 1 Meritain Connect User Guide for Employees
 Meritain Connect User Manual for Employees 1 Meritain Connect User Guide for Employees Contents Introduction... 4 Accessing Meritain Connect... 5 Logging In... 5 Forgot Password... 6 Registration Process...
AvePoint Online Services for Partners 2
 AvePoint Online Services for Partners 2 User Guide Service Pack 1 Issued June 2017 Table of Contents What s New in this Guide...4 About...5 Submitting Documentation Feedback to AvePoint...6 Browser Support