SalesGrow CRM. Grow your Sales & Business An Essential CRM Solution delivery quickly and affordably
|
|
|
- Gyles Ford
- 6 years ago
- Views:
Transcription

1 SalesGrow CRM Grow your Sales & Business An Essential CRM Solution delivery quickly and affordably 1
2 Contents 1. Overview 2. Getting Started 2.1 Account Setup Personal Settings Company Details Users Profiles Roles Fiscal Year Business Hours 2.2 Product Customization Page Layout Organization Page Details Show or Hide Tabs Create Fields Create List View 2.3 Common Operations Import Export Search Records Mass Actions 3. Sales Force Automation 3.1 Leads Create Leads Associate Leads Convert Leads Approve Leads Standard Fields 3.2 Accounts Create Accounts Associate Accounts 2
3 3.2.3 Member Accounts Standard Fields 3.3 Opportunities Create Potential Associate Potential Big Deal Alert Standard Fields 3.4 Contacts Create Contacts Associate Contacts Approve Contacts Standard Fields 3.5 Forecasting Forecast Based on Role Hierarchy Forecast Based on Territory Hierarchy Set Fiscal year 3.6 Activities Tasks Events Calls 4. Marketing Automation 4.1 Campaigns Create Campaigns Associate Campaigns Add Campaigns to Leads/Contacts Standard Fields 4.2 Web Forms Set up Web Forms Auto Response Rules Unsubscription Form 4.3 Mass Send Mass s Schedule Mass s 3
4 5. Account Settings 5.1 Personal Settings Change Language Use Signature Update Personal Information Themes 5.2 Organization Settings Change Company Details Personalize Logo Set Currency Set up Fiscal Year 6. Security Management 6.1 Manage Users Add Users Re-Invite Users Activate/Deactivate Users Delete Users Accounts 6.2 Manage Profiles Create Profiles Control Permissions Associate Users 6.3 Manage Roles Create Roles Assign Roles 6.4 Territory Management Create Territories Assign Territories Decision Guide 6.5 Manage Groups Share Records Assign Groups 6.6 Data Sharing Rules Manage Data Sharing 4
5 6.6.2 Creating Data Sharing Rules 7. Customization 7.1 Home Tab Customization Add Components Change to Customizable Mode 7.2 Tab Settings Organize Tabs Rename Tabs Custom Tabs Group Tabs 7.3 Page-Level Customization Customize Page Layout Organize Page Details Related Lists Search Layout Manage List View Add Photo Address Duplication Check 7.4 Field-Level Customization Standard Fields Custom Fields Special Fields 7.5 Templates Templates Inventory Templates 8. Data Administration 8.1 Reports & Dashboards Reports Dashboards 8.2 Recycle Bin 9. Automation 9.1 Workflow Management Workflow Rules 5
6 9.1.2 Workflow Alerts Workflow Tasks Workflow Field Updates Scenario Webhooks 9.2 Website Integration Web Forms Auto Response Rules Unsubscribe Form 10. Customer Support 10.1 Cases Create Cases Associate Cases Approve Cases Standard Fields 10.2 Solutions Create Solutions Associate Solutions Standard Fields 11. Inventory Management 11.1 Products Create Products Associate Products Customize Tax Rates Generate PO Standard Fields 11.2 Price Books Create Price Books Associate Price Books Set Discount Standard Fields 11.3 Vendors Create Vendors 6
7 Associate Vendors Standard Fields 11.4 Quotes Create Quotes Associate Quotes Convert Quotes Standard Fields 11.5 Sales Orders Create Sales Orders Associate Sales Orders Standard Fields 11.6 Purchase Orders Create Purchase Orders Associate Purchase Orders Standard Fields 11.7 Invoices Create Invoices Associate Invoices Standard Fields 7
8 1. Overview SalesGrow CRM is an On-demand Customer Relationship Management (CRM) software for managing your customer relations in a better way. SalesGrow CRM software helps streamline your organizationwide sales, marketing, customer support, and inventory management functions in a single system. Understanding SalesGrow CRM Get an insight into the basics and know your SalesGrow CRM better. Getting Started Get started the easy way with some initial setup and customizations. What's New? Find what's the latest in SalesGrow CRM and explore the new features and improvements. Sales Force Automation Track leads, prospects and close more deals in less time. Keep customer data organized for upselling & cross-selling opportunities. Marketing Automation Effectively plan marketing activities, send mass s and improve the quality of lead generation processes using web forms. Inventory Management Track the procurement and sale of goods or services and manage the pre-sales and postsales activities in a single application. Customer Support Enable a better integration between Sales & Customer Support processes in a single system. Reports & Dashboards Generate various reports and use dashboards to visualize comparisons, patterns, and trends in sales, and marketing. Activities Organize and keep track of all the tasks, events, and calls. Also, set reminders and create recurring activities. Document Library Manage and easily share all your business related documents in the Documents tab within SalesGrow CRM. SalesGrow CRM for Mobile Get instant access to your CRM data anywhere, anytime, from your iphone, ipad and Android phones. 8
9 Personal Settings Define your personal settings such as language, date & time, signature, name format, currency, etc., as per your requirements. Organization Settings Add your company details, including set up fiscal year, business hours and personalize your company logo. Users & Permissions Define the security levels in your account by creating the roles, profiles, and groups for the users. Customization Apply page-level and field-level customizations, change tab settings and other company related details in your account. Automation Automate sales, marketing and support processes by creating workflow rules, alerts & tasks plus record assignment rules. Templates Create templates, inventory templates and mail merge templates of your own. Website Integration Publish web forms online and set up auto response rules to send s for the records generated via web forms. Data Administration Import your data into SalesGrow CRM, keep track of the import details and also export your data anytime. Apps & Addons Select from a wide range of addons and plug-ins that help you manage your business effectively. Billing & Payments Manage all your subscription and billing details; upgrade or downgrade your account anytime. 2. Getting Started Here, you will be introduced to a number of useful functions and concepts that will help you start working with your CRM account. It will provide you with information required to complete the most essential tasks needed to get started and get the most of your SalesGrow CRM experience. 2.1 Account Setup Start setting up your SalesGrow CRM account by adding your company details and personal information. Then you can create roles and profiles according to your organization's requirements and add users. 9
10 2.1.1 Personal Settings First, personalize your CRM account by changing language and time zone. Also, add your personalized signature to be used for business s sent via SalesGrow CRM Company Details Add your company details such as the company name for all your business communication, country locale, time zone and also the company logo. Note that the image file size should not exceed 20 KB and for best results, use an image with 190 (width) by 65 (height) pixel dimensions Users Add users to your CRM account and assign them roles and profiles. Note that only after you add a user in your account, will you be able to add new profiles and roles. For the first user that you 10

11 add, the system defined role (CEO, Manager) and profile (Administrator, Standard) can be assigned Profiles Create profiles that define the access permissions to the various CRM modules and features Roles Also, set up the organization-wide hierarchy by creating Roles and assigning it to users Fiscal Year Set up the fiscal year for your company which is used for accounting purposes and preparing financial statements. The fiscal year may not be the same as the calendar year. Select the fiscal start month, then the fiscal quarters are automatically rolled up. 11
12 2.1.6 Business Hours Various teams in your organization may work at different business hours and work in shifts based in different time zones. Define your business hours that will be helpful in assigning cases to individuals using the case escalations rules. 2.2 Product Customization Next, customize your account based on your industry standards and business requirements. You can begin by customizing fields, page layouts, themes, tabs and list views Page Layout Customize the Record Details page layout. You can add required fields or hide the unwanted fields, reorder the fields, create delete sections, mark fields as mandatory and change to 1 column or 2 column layout. 12


13 2.2.2 Organization Page Details Change the order of the Related Lists such as the Attachments, Open Activities, Closed Activities, etc., for records in each module. Show or hide some of the related lists as per the organization's business requirements Show or Hide Tabs Organize tabs in such a way that only the relevant tabs are visible for use and the unwanted tabs are hidden. You can also rename the tabs based on your business domain. 13


14 2.2.4 Create Fields Add custom fields of various types such as text, lookup, pick list, currency, autonumber, check box, etc. Formula fields can be created to populate dynamically calculated data based on the values returned from other standard or custom fields Create List View Create custom list views to filter records based on a given criteria. This will help you sort out the required records quickly and perform all the necessary operations on the records. 14


15 2.3 Common Operations Take a quick glance into some of the common operations such as importing, exporting, navigating and searching records in SalesGrow CRM Import Import records in your CRM account from external sources, if you already have the data. You can either import records assigned to you or import records that are assigned to other users by using the Import My Organization Records option Export Export data in CSV format from individual CRM modules in your CRM account. You can either manually export the records or request a data backup. 15

16 2.3.3 Search Records Save time by using the search feature to locate specific information or specific records without having to go through the entire list of records. There are three search options: Search records Alphabetically, by Information or by Criteria Mass Actions Perform mass operations such as the mass update, mass transfer, mass delete, mass etc. for easy and quick management of records. 3. Sales Force Automation SalesGrow CRM provides your sales force, executives, and management with sophisticated sales management functions such as: lead generation & qualification, sales pipeline analysis, sales stage & probability analysis, competitor analysis, real-time sales forecasting and other useful metrics. These functions give your business an opportunity to completely focus on customer life-cycle (lead generation - acquisition - conversion - retention - loyalty), thus increasing sales revenue. SalesGrow CRM has sales force automation modules such as: Leads, Accounts, Contacts, Potentials, and Sales Forecasting. You can accurately track all business opportunities and close more deals in less time. In addition, you can identify bottlenecks in the sales processes, well in advance and effectively utilize existing customer data for future cross-selling and up-selling opportunities. 3.1 Leads Leads are raw details about individuals or representatives of organizations collected from trade shows, seminars, advertisements and other marketing campaigns. 16
17 3.1.1 Create Leads In SalesGrow CRM, you can create leads by: Entering data in the lead details form: You can manually fill in the Lead details gathered from various external sources, e.g. trade shows, exhibitions, colleagues, business cards, etc. Importing leads from external sources: You can gather data through various sources, e.g. purchasing a leads' database, leads from different business units, etc. and import the CSV and XLS files into SalesGrow CRM. Capturing leads from website: You can create web forms and allow website visitors to submit their contact details or questions directly through forms. These details submitted in the website are captured directly in the Leads module. Note Some of the standard fields may not be visible or editable depending on your organization's business process. In case you want to add or modify fields or would like to know more details on the usage of fields, please contact your System Administrator. Create Leads Individually You can create leads manually by entering the details in the lead page. For instance: While traveling you met a person who showed some interest in your product or service. You exchanged business cards and assured them you would contact him or her again with more details about the product/service. The next day, you create a lead manually with the available details and contact the person. In such cases, it is easy to manually enter in the available details and create a lead record instantly. You can create leads individually by using the following: Filling in the details in the lead creation form. Cloning the lead with a few changes in the existing record. Note By default, the person who creates the lead owns it. To change owner, click the Change link in the Lead Owner field from the Lead Details page and select another user. To create leads individually 1. In the Leads module, click New Lead. 2. In the Create Lead page, enter the lead details. 3. Click Save. To clone leads 17
18 1. In the Leads tab, click a particular lead that is to be cloned. 2. In the Lead Details page, click Clone. 3. In the Clone Lead page, modify the required details. 4. Click Save. Qualify Leads After collecting the lead details in your CRM account, the next stage is lead qualification. With further negotiations or follow up, the lead can be qualified into a business opportunity. In this stage the focus is on evaluating leads based on their interest and readiness to be promoted to sales. Following are some of the methods for leads qualification: Phone Call: A direct and quick follow up method after the lead generation to initiate further discussion on the sales process. Direct Mail: A traditional approach of delivering materials such as advertising circulars, brochures, catalogs and other commercial materials through postal mail. Send communications to enhance business relationships if the addresses are captured during the lead generation process. This enables a quicker method to send specific or mass mailings to qualifying leads. 18
19 Meeting: A one-to-one personal meeting or a scheduled online meeting provides a good approach for further development towards the next stage. Documents: The process of exchanging documents to understand the prospective business, enabling clarity of expectation and understanding to provide business solutions. Notes: Notes in the form of remarks or comments included during the follow up sessions that act as a record of the previous follow ups during the qualifying stage Associate Lead Associate Leads with Other Records As qualification of leads is the focus, associating various records with the leads is the next step. You may need to associate leads with other records, until the lead reaches a certain stage where it can be converted to Potential as per your organization's sales process. In the Lead Details page, you can associate the following: Open Activities: To add tasks and events (meetings and calls). Closed Activities: To archive the closed activities. Attachments & Notes: To attach documents and notes. Mails: To send messages to the selected lead. Campaigns: To associate many campaigns to a single lead. Social Interactions - To view the Twitter and Facebook interactions associated to the lead and send messages, like posts, retweet, etc Converting Lead Convert Leads to Other Sales Records When there is a chance of further negotiations with a lead, it can be converted into an account, contact, and potential. In short, once the lead status has reached a certain stage, it can be qualified as a potential. On conversion, all the lead details are transferred in creating an account, contact, and potential. You can map the lead fields with those of the account, contact and potential so that the 19
20 details are transferred to the appropriate fields. Note Once a lead is converted into a potential, lead status will be changed to Converted in Leads Home page. You can view the list of converted leads by selecting the Converted Leads list view. When a lead is converted, it cannot be reverted to a lead. An account will be created on lead conversion if the Company Name detail is available for the lead. Availability Profile Permission Required: Users with the Convert Leads permission in profile can access this feature. While converting a lead to a potential first a new account and contact are created with the relevant lead data, and then a new potential is created. The following table provides description 20
21 of the various fields converted to an account, contact, and potential during lead conversion. In case of custom fields, you can map them too. Lead Field Salutation First Name Last Name Company Designation Lead Source Industry Annual Revenue Assigned To Phone Mobile Fax Skype ID Web site Lead Status Rating No of Employees Opt Out Street City State Postal Code Country Custom Fields Converted To Contact: Salutation Contact Name Contact Name Account: Name Contact: Title Potential: Lead Source Contact: Lead Source Account: Industry Account: Annual Revenue Account, Contact, Potential: Assigned To Account: Phone Contact: Phone Contact: Mobile Account: Fax Contact: Fax Contact: Contact: Skype ID Account: Web site User should specify the Potential Stage while converting the lead. Potential: Rating Account: No. of Employees Contact: Opt Out Account: Street Contact: Street Account: City Contact: City Account: State Contact: State Account: Postal Code Contact: Postal Code Account: Country Contact: Country Users can map their own custom field. To convert leads to other sales records 1. Click the Leads tab. 2. In the Leads Home page, select the lead to be converted. 21

22 3. In the Lead Details page, click Convert. Note 4. In the Lead Conversion page, choose the appropriate account/contact option. The options to create an account/contact or add to the existing account/contact will be available based different use cases. 5. Select Create a new Potential for this Account/Contact check box if you want a potential upon lead conversion. All the mandatory fields for the Potentials module will be listed. o Specify the Potential Name. By default, the Company Name will be populated as the potential name. o Specify the Potential Closing Date or select the date from the calendar displayed. o Select the Potential Stage from the drop-down list. o Select the Contact Role from the drop-down list. o o o 6. Click Convert. Enter the Amount. Choose the Campaign Source from the lookup. Note that only the campaigns associated to the lead will be listed. You can associate one campaign which qualified the lead. This details for this campaign source will be available in the potential. Select the Owner of the record. This option will be available only if a new record is created. All the mandatory fields available for the Potentials module will be listed during lead conversion. When the Address Duplication Check is enabled, you will not be able to convert a lead, if the following conditions are true. o Lead is assigned to a User A and User B tries to convert it. o User B is a subordinate to User A in the organization's hierarchy. o There are duplicated available for the record. 22
23 Scenarios - Convert Leads Here is an example that will help you understand the different scenarios. Let us take for example a lead with the following details: Lead Name - Charles Stone Company Name - WTM. Address WTM@gmail.com Various scenarios Lead Name: Available Company: Available Address: Available If Account/Contact already exists in CRM Use Case 1 If the address matches with an existing contact then: 1. Add to existing contact 2. Create a new contact o On selecting this option an account will also be created. If Account/Contact does not exists in CRM A new account and a new contact will be created. Use Case 2: If there is no contact with the matching address, the system will search for accounts with a matching company name. If the company name matches an existing account, then: 1. Add to existing account 2. Create a new account o On selecting this option a contact will also be created. Use Case 3: If Case 2 is not satisfied and there is no account with the matching company name, the system will search for contacts with a matching lead name. If the lead name matches an existing contact, then: 1. Add to existing contact 2. Create a new contact o On selecting this option an account will also be created. 23
24 Lead Name: Available Company: Not Available Address: Not Available Lead Name: Available Company: Available Address: Not Available Lead Name: Available Company: Not Available Address: Available Options: 1. Add to existing contact The existing details in the contact will not be changed/overwritten. 2. Create a new contact Options: 1. Add to existing account o If the lead name matches with an existing contact in CRM, then you will have the option to add to the existing contact or create one. o If the lead name does not match with any existing contact in CRM, then a contact will be created and associated to the account. 2. Create a new account o A contact will be created and associated to the account. Options: 1. Add to existing contact o If the address matches with an existing contact in CRM, then you will have the option to add it to that existing contact. o If there is no contact with the matching address, the system will search for contacts with a matching lead name. If it matches with any existing contact in CRM, then you will have the option to add it to that existing contact. 2. Create a new contact o A contact will be created and associated to the account. A new contact will be created A new account and a new contact will be created. The contact will be associated to the account. A new contact will be created 24

25 Map Custom Fields When a lead is converted into an account, contact and potential, field values of a lead are transferred to the mapped account, contact, and potential fields. Only when the fields are accurately mapped with those of the corresponding modules, will data be transferred properly. By default, the standard fields are mapped with the corresponding fields of the other modules (Accounts, Contacts, and Potentials). With the lead conversion mapping tool, you can easily map other fields that you create. Please note that you need to map a field with a similar type of field only. For example, a Text field should be mapped only with a Text field, a Picklist field with a similar type of Picklist field. To map lead fields with other modules 1. Click Setup > Customization > Fields > Leads > Map Fields. 2. In the Map Fields for Leads Conversion page, the fields are listed under Lead Fields column. 3. Map the lead fields to the corresponding fields of Accounts, Contacts and Potentials. 4. Click Save. Close Leads Without Converting Based on your business requirements, you may want to close the leads instead of converting them. In such a case, you can do the following: 1. Add a custom value (Closed) for the Lead Status field. 25
26 2. Change the Lead Status to Closed. 3. Create a List View to filter all the leads that are closed. By default, some industry standard pick list values are available in the Lead Status field. You can modify the pick list values as per your organization's business process and replace the existing value with new value. To add a pick list value 1. Log in to SalesGrow CRM with Administrator privileges. 2. Click Setup > Customization > Field. 3. Select Leads module from the drop-down list and click the Edit link for the Lead Status pick list field. 4. In the Edit Pick List page, click Add New Values. 5. In the Add New Value box, specify Closed. 6. Click Add. 7. Click Save Approving Records The import feature and Web forms have an option to enable manual approval of records. When this option is enabled, records imported or gathered through web forms are not added directly to the modules. They need to be approved first for other users to access the records. Records can be approved for the Leads, Contacts, Cases or any other Custom module's records. 26
27 Availability feature. Profile Permission Required: Users with the Approve Records permission can access this To approve records 1. Click the Leads Tab. 2. In the [Module] Home page, under [Module] Tools section, click the Approve [Module] link. 3. In the [Module] Approval page, select the records for approval. 4. Click Approve Standard Fields Standard Fields in Leads Following are the list of SalesGrow defined standard fields available in the Leads module: Field Name Description Data type Maximum Limit Lead Owner Select the SalesGrow CRM user to whom the Lookup - Lead is assigned. Salutation Select the salutation from the drop-down Pick list - list. First Name Specify the first name of the lead. Text box Alphanumeric(40) Title Specify the job position of the lead Text box Alphanumeric(100) Last Name* Specify the last name of the lead. This field is Text box Alphanumeric(80) a mandatory. Company* Specify the name of the company where the Text box Alphanumeric(100) lead is working. This field is a mandatory. Lead Source Select the source of the lead, that is, from Pick list - where the lead is generated. Industry Select the industry to which the lead Pick list - belongs. Annual Specify the annual revenue of the company Currency Decimal (16) Revenue where the lead is working. Phone Specify the phone number of the lead. Text box Alphanumeric(30) Mobile Specify the mobile number of the lead. Text box Alphanumeric(30) 27
28 Fax Specify the fax number of the lead. Text box Alphanumeric(30) Specify the address of the lead. Alphanumeric and Special characters(100) Secondary Specify another address of the lead. Alphanumeric and Skype ID Specify the Skype ID of the lead. Currently skype ID can be in the range of 6 to 32 characters. Text box Special characters(100) Alphanumeric(50) Web site Specify the Web site of the lead. URL Alphanumeric(120) Lead Status Select the status of the lead from the dropdown Pick list - list. Rating Select the rating of the lead from the dropdown Pick list - list. No. of Specify the number of employees in lead's Numeric Integer (16) Employees company. Optout Check box - Select the check-box to remove leads from your mailing list so that they will not receive any s from your SalesGrow CRM account Created By Displays name of the user created the Lead Date/Time - first time. Modified By Displays name of the user modified the Lead. Date/Time Street Specify the street address of the lead. Text box Alphanumeric(250) City Specify the name of the city where the lead Text box Alphanumeric(30) lives. State Specify the name of the state where the lead Text box Alphanumeric(30) lives. Zip Code Specify the postal code of the lead's address. Numeric Alphanumeric(30) Country Specify the name of the lead's country. Text box Alphanumeric(30) Description Specify any other details about the lead. Text area (long text) characters 3.2 Accounts Leads are raw details about individuals or representatives of organizations collected from trade shows, seminars, advertisements and other marketing campaigns Create Accounts Accounts are companies or departments with which you plan or have business dealings. In SalesGrow CRM, you can create accounts by: Entering data in the account details form: You can manually fill in the Account details gathered from various external sources. Importing leads from external source: You can gather data through various sources and import the CSV and XLS files into SalesGrow CRM. 28
29 Converting lead to account: On lead conversion, contacts, accounts and potentials can be created. Note Some of the standard fields may not be visible or editable depending on your organization's business process. In case you want to add or modify fields or would like to know more details on the usage of fields, please contact your System Administrator Create Accounts Individually You can create accounts individually by: Filling in the details on the account creation form. Cloning the accounts with a few changes in the existing account details. Availability enabled. Profile Permission Required: Access to the Accounts Tab with the Create permission To create accounts individually 1. In the Accounts module, click New Account. 2. In the Create Account page, enter the account details. 3. Click Save. To clone accounts 1. In the Accounts tab, click a particular account that is to be cloned. 2. In the Account Details page, click Clone. 3. In the Clone Account page, modify the required details. 4. Click Save Associate Accounts 29
30 Associate Account with Other Records You can create a 360 degree view of the account to display all the associated details, such as contacts, potentials, trouble tickets, activities, attachments, and notes in a single view. In the Account Details page, you can update the following: Potentials: To add potentials. Contacts: To add contacts. Open Activities: To add tasks and events (meetings and calls). Closed Activities: To display the closed activities. Products: To add products. Quotes: To add quotes. Sales Orders: To add sales orders. Invoices: To add invoices. Attachments & Notes: To attach documents and notes. Member Accounts: To add other divisions or subsidiaries to the parent account. Cases: To create cases Member Accounts Add Member Accounts Member Accounts are secondary accounts added to an existing parent account. This allows having separate accounts with different divisions within a parent company and provides a full view of the individual accounts as well as the consolidated accounts within the parent account. To add member accounts 1. In the Account Details page, the existing member account details, if any, are displayed. o Click Account Name, Phone, Website, Account Type, Industry, or Annual Revenue links to sort the display order of the records. o Click the relevant Edit or Del link to modify or delete the member account respectively. 2. Click New. 3. Enter the member account details. 4. Click Save Standard Fields Standard Fields in Accounts Following are the list of SalesGrow defined standard fields available in the Accounts module: Field Name Description Data type Maximum Limit Account Name Specify the company Text box Alphanumeric(100) 30
31 name. This field is mandatory. Account Owner Select the name of the user to whom the account is assigned. Website Specify the URL of the company's Web site. Ticker Symbol Specify the ticker symbol of the Company. Parent Account Select the parent company name from the Change pop-up dialog. Employees Specify the number of employees in account's company. Ownership Specify the type of ownership of the company. Industry Select the type of industry from the drop-down list. Account Type Select the type of account from the dropdown list. Account Number Specify the reference number for account. Up to 40 characters are allowed in this field. Account Site Specify the name of the account s location, for example, Headquarters or London. Up to 80 characters are allowed in this field. Phone Specify phone number of the account. Fax Specify fax number of the account. Specify the official E- mail address of the account. Rating Specify the rating of the account. Look up - URL Text box Lookup Numeric Picklist Pick list - Pick list - Numeric Text box Text box Text box Pick list - Alphanumeric(30) Alphanumeric(30) Integers(10) Number Alphanumeric(30) Alphanumeric(30) Alphanumeric(30) Alphanumeric and Special characters(100) 31
32 SIC Code Created By Modified By Annual Revenue Billing Address Street City State Code Country Specify the Standard Industrial Classification code of the account. Displays name of the user created the Account first time. Displays name of the user modified the Account. Specify the annual revenue of the account. Specify the billing address of the account to send the quotes, invoices, and other agreements. Text box Date/Time - Date/Time Numeric Street - Text box City - Text box State - Text box Code - Text box Country- Text box Integers(10) Integers(10) Alphanumeric(250) Alphanumeric(30) Alphanumeric(30) Alphanumeric(30) Alphanumeric(30) Shipping Address Street City State Code Country Specify the shipping address of the account to deliver the shipment. Street - Text box City - Text box State - Text box Code - Text box Country - Text box Alphanumeric(250) Alphanumeric(30) Alphanumeric(30) Alphanumeric(30) Alphanumeric(30) Description Specify any other details about the account. Text area (long text) characters 3.3 Contacts Contacts are people in an organization with whom you communicate in pursuit of a business opportunity Create Contacts 32
33 In SalesGrow CRM, you can create contacts by: Entering data in the contact details form: You can manually fill in the Contact details gathered from various external sources. Importing contacts from external source: You can gather data through various sources, e.g. purchasing contacts database, contacts from different business units, etc. and import the CSV and XLS files into SalesGrow CRM. Capturing contacts from website: You can create web forms and allow website visitors to submit their contact details or questions directly through forms. These details submitted in the website are captured directly into the Contacts module. Converting lead to contact: On lead conversion, contacts, accounts and potentials can be created. Synchronizing Microsoft Outlook contacts: You can synchronize the contacts in Microsoft Outlook with the contacts in SalesGrow CRM. Note Some of the standard fields may not be visible or editable depending on your organization business process. In case you want to add or modify fields or would like to know more details on the usage of fields, please contact your System Administrator. Create Contact Individually You can create contacts individually by: Filling in the details in the contact creation form. Cloning the contacts with a few changes in the existing contact details. To create contacts individually Note 1. In the Contacts module, click New Contact. 2. In the Create Contact page, enter the contact details 3. Click Save. By default, the person who creates the contact owns it. To change owner, click the Change link in the Contact Owner field from the Contact Details page and select another user. While selecting the Account from the Lookup field's pop window, there is also an option to create an Account. You can use this option to quickly create an account by providing some mandatory information. You have two options: o Click Save. The record will be saved and it will be listed with the other accounts. You can select it to associate to the contact that you were creating. 33
34 o Click Save & Associate to save the new record and also associate it to the contact that you were creating. To clone contacts 1. In the Contacts tab, click a particular contact that you want to be cloned. 2. In the Contact Details page, click Clone. 3. In the Clone Contact page, modify the required details. 4. Click Save Associate Contacts Associate Contact with other Records You can create a 360-degree view of the contact to display all the associated details, such as potentials, trouble tickets, open activities, history of the completed activities, attachments, and notes. In the Contact Details page, you can update the following: Member Accounts: To add other divisions or subsidiaries to the parent account Open Activities: To add tasks and events Closed Activities: To display all the closed tasks and events Cases: To create cases for the contact Products: To add products for the contact Attachments: To attach documents and notes Notes: To attach notes to the contact. Potentials: To add potentials to the account Contacts: To add contacts to the account Sales Orders: To add sales orders to the account Invoices: To add invoices to the account Quotes: To add quotes Campaigns: To associate many campaigns to a single contact Social Interactions - To view the Twitter and Facebook interactions associated to the contact and send messages, like posts, retweet, etc Approve Contacts Approving Records The import feature and Web forms have an option to enable manual approval of records. When this option is enabled, records imported or gathered through web forms are not added directly to the modules. They need to be approved first for other users to access the records. Records can be approved for the Leads, Contacts, Cases or any other Custom module's records. 34
35 Availability feature. Profile Permission Required: Users with the Approve Records permission can access this To approve records 1. Click the Leads Tab. 2. In the [Module] Home page, under [Module] Tools section, click the Approve [Module] link. 3. In the [Module] Approval page, select the records for approval. 4. Click Approve Standard Fields Standard Fields in Contacts Following are the list of SalesGrow defined standard fields available in the Contacts module: Field Name Description Data type Maximum Limit Contact Owner Select the SalesGrow Lookup - CRM user to whom the account is assigned. Salutation Select the Salutation of Pick list the contact, such as Mr., Ms, Mrs., or others. First Name Specify the first name Text box Alphanumeric(40) of the contact. Last Name* Specify the last name of Text box Alphanumeric(40) the contact. This field is mandatory. Account Name Select the account Lookup - related to the contact. Vendor Name Select the vendor Lookup - related to the contact Campaign Source Select the Campaign Lookup - related to the contact Lead Source Select the source from Pick list - 35
36 which the contact is created. Title Specify the job position Text box Alphanumeric(50) of the contact. Department Specify the department Text box Alphanumeric(30) of the contact. Date of Birth Specify the birthday of Date - the contact to send greetings for a better relationship. Reports To Select the person to Text area 255 characters whom the contact reports Created By Displays name of the Date/Time - user created the contact first time. Modified By Displays name of the Date/Time user modified the contact Opt Out Select the check-box to Check box - remove contacts from your mailing list so that they will not receive any s from your SalesGrow CRM account Skype Id Specify the Skype ID of Text box Alphanumeric(50) the contact. Currently skype ID can be in the range of 6 to 32 characters. Phone Specify the office phone Text box Alphanumeric(50) number of the contact. Mobile Specify the mobile Text box Alphanumeric(50) number of the contact. Home Phone Specify the home phone Text box Alphanumeric(50) number of the contact. Other Phone Specify the other phone Text box Alphanumeric(50) number of the contact (if any). Fax Specify the Fax number Text box Alphanumeric(50) of the contact. Specify the primary Alphanumeric(100) address of the contact. Secondary Specify another Alphanumeric(100) 36
37 Assistant Asst Phone Mailing Address Street City State Zip Country address of the contact. Specify the name of the contact s assistant. Specify the phone number of the contact's assistant. Specify the primary address of the contact. Text box Street - Text box City - Text box State - Text box Code - Text box Country- Text box Alphanumeric(100) Alphanumeric(250) Alphanumeric(30) Alphanumeric(30) Alphanumeric(30) Alphanumeric(30) Other Address Street City State Zip Country Specify the other address of the contact (if any). Street - Text box City - Text box State - Text box Code - Text box Country - Text box Alphanumeric(250) Alphanumeric(30) Alphanumeric(30) Alphanumeric(30) Alphanumeric(30) Description Specify any other details about contact. Text area (long text) characters 3.4 Opportunities Potentials are business deals with companies or people that generate real revenue for your organization Create Potential In SalesGrow CRM, you can create potentials by: Entering data in the potential details form: You can manually fill in the Potential details gathered from various external sources. Importing potentials from external sources: You can gather data through various sources and import the CSV and XLS files into SalesGrow CRM. 37
38 Converting lead to potential: On lead conversion, contacts, accounts and potentials can be created. Note Some of the standard fields may not be visible or editable depending on your organization business process and field-level security settings. In case you want to add or modify fields or would like to know more details on the usage of fields, please contact your System Administrator. Create Potentials Individually You can create potentials individually by: Filling in the details in the potential creation form. Cloning the potential with a few changes from the existing potential details To create potentials individually Note 1. In the Potentials module, click New Potential. 2. In the Create Potential page, enter the potential details. 3. Click Save. While selecting the Account or Contacts from the Lookup field's pop-up window, there is also an option to create an Account or Contact. You can use this option to quickly create an account or contact by providing some mandatory information. You have two options: o Click Save. The record will be saved and it will be listed with the other accounts or contacts. You can select it to associate to the potential that you were creating. o Click Save & Associate to save the new record and also associate it to the potential that you were creating. To clone potentials 1. In the Potentials tab, click a particular potential that is to be cloned. 2. In the Potential Details page, click Clone. 3. In the Clone Potential page, modify the required details. 4. Click Save. Associate Potentials with Other Records You can create a 360-degrees view of the potential to display all the associated details, such as open activities, history of the completed activities, contacts, products, sales stage history, attachments, and notes. 38
39 In the Potential Details page, you can update the following: Sales Stage History: To view the history of the sales stage Competitors: To associate competitors Attachments: To attach documents Notes: To add notes Open Activities: To create tasks and events Closed Activities: To display the completed tasks and events Products: To add products Quotes: To create quote for the potentials Sales Orders: To create sales orders for the potential Contact Roles : To select contacts associated s: To send s to the primary contact of potential Cases: To create cases Associate Potential Associate Competitors with Potential Most companies prefer to purchase products after analyzing different vendors. If you are working within a highly competitive market, where your competitors are directly competing with you in being awarded the deal, it is always better to know their strengths and weaknesses well in advance so that you can propose your offering in a better way. This feature enables you to add the competitor's strengths and weaknesses. To associate competitors with potential 1. Click the Potentials tab. 2. In the Potentials Home page, select the required potential. 3. In the Potential Details page, the competitor details, if any, are displayed. o Click Competitor Name, Website, Strengths, or Weaknesses links to sort the display order of the records. o Click the relevant Edit or Del link to modify or delete the record respectively. 4. Click New and do the following: o Enter the Competitor Name. o Enter the competitor's Website. o Enter the Strengths and Weaknesses in the respective text boxes. 5. Click Save. Map Contact Roles While prospecting, you may need to contact different people (contacts) to finalize the sales deal. It is always better to know the contact's role in your prospecting organization, so that you always have the correct discussion with the right person. For example, explaining about product price and discounts is always better with the Financial Manager, whereas explaining product features is better with the 39
40 Product Manager. This kind of approach helps you to negotiate with the prospecting organization in a better way and minimize the sales lead-time. To map contact roles 1. Click the Potentials tab. 2. In the Potentials Home page, select the required potential. 3. In the Potential Details page, the contact details, if any, are displayed. o Click Contact Name, Phone, , or Role Name links to sort the display order of the records. o Click the relevant Del link to delete the record. 4. Click Add Contact Role. 5. In the Contact Roles Mapping page, for each contact select the role from the Contact Role dropdown list. 6. Select the check box(es) of the contacts that you want to add. 7. Click Save. Customize Contact Roles While prospecting, there is a need to contact different people (contacts) to close the sales deal. Contact Roles helps in knowing the role of the contact in the prospecting organization and then having the correct discussion with the right person. For instance, explaining details about the product price and discounts is always better with the Financial Manager where as product features should be discussed with the Product Manager. By default, some of the contact roles such as, Decision Maker, Product Management, Purchasing and other roles are available. However, the contact roles can be customized according to specific business processes. Availability Profile Permission Required: Users with the Field-level Access permission in profile can access this feature. To customize contact roles values 1. Log in to SalesGrow CRM with Administrator privileges. 2. Click Setup > Customization > Fields > Potentials > Contact Roles. 3. In the Edit Contact Roles page, do the following: 40


41 o Click Add Role or Delete Role links, if needed. o Modify the existing roles from the Contact Role text box. 4. Click Save after updating the contact roles. To add contact roles in potentials 1. Click the Potentials tab. 2. In the Potentials Home page, select the required potential. 3. In the Potential Details page under Contact Roles section, the list of contacts associated with potential are displayed. Click Add Contact Roles link. 4. In the Contact Roles Mapping page, for each contact select the role from the Contact Role dropdown list. 5. Click Save after associating roles to all the contacts Big Deal Alert Set up Big Deal Alert You can use the Big-deal Alert to notify your management or colleagues about a chance of being awarded a big deal that you would like to share with them. Sometimes, executive board members may be interested in knowing all of the Big-deal information well in advance. You can send the Big-deal alert 41
42 as an notification to all the SalesGrow CRM users or to the selected users and colleagues not registered as SalesGrow CRM users. By default, there is a Big Deal Alert in SalesGrow CRM that you can modify and use. To configure big deal alert 1. Click Setup > Automation > Workflow Rules. 2. In the Workflow Rules page, select Potentials from the List of Rules drop-down list. 3. Click Big Deal Rule from the list of rules. 4. In the Rule Details page, the default criteria is " Amount >= 1000 and the probability = 100 ". 5. Click Edit to modify the Rule Details. 6. Under Actions > Instant Actions the Related Alerts, Tasks and Field Updates are listed. You can change them as per your requirements. 7. Click Save. Configure Sales Stage Picklist To add or modify pick list value 1. Click Setup > Customization > Fields > Potentials. 2. From the list of potential fields, click the Edit link corresponding to the Stage field. 3. Modify the existing details, and then click Save Standard Fields Standard Fields in Opportunities Following are the list of SalesGrow defined standard fields available in the Opportunities module: Field Name Description Data type Maximum Limit Potential Select the name of the user to whom the Lookup Owner potential is assigned. Potential Specify name of the potential. This field is Text box Alphanumeric(120) Name* mandatory. Account Select name of the account to which potential Lookup - Name* has to be created. This field is mandatory. Type Select the type of potential (New Business or Pick list - Existing Business) from the drop-down list. Lead Source Select the lead source from the drop-down list Pick list - Campaign Select the campaign related to the contact. Lookup - Source Contact Name Select the contact related to the Potential. Lookup Amount Specify the amount that can be expected after Currency 42
43 closing the potential. Closing Date* Specify or select the expected close date. This Date format - field is mandatory. Next Step Specify the next step of the sales process. Text box Alphanumeric(100) Stage* Select the sales stage from the drop-down list. Pick list - This field is mandatory. Probability Specify the probability of closing an potential. Number Expected Calculated based on the Amount and potential Currency Revenue Stage that you specify Created By Displays name of the user created the potential Date/Time - first time. Modified By Displays name of the user modified the Date/Time potential Description Specify any other details about potential. Text area (long text) characters 3.5 Forecasting Forecasts are factual insight for fine-tuning the sales process in your organization Forecast Based on Role Hierarchy Roles provide access permissions for the records in SalesGrow CRM. Based on the role hierarchy, records are accessible by users. A role hierarchy has multiple roles and sub roles. In SalesGrow CRM, you create a forecast target for the top most role in the hierarchy, i.e. for the organization. Forecasts targets are then set for the other roles in the hierarchy and the users in those roles. Users with administrator profile can create forecasts. Role managers can set targets for their roles, sub roles and the users in these roles. As each user can have only one role, you can have only one forecast target set for the user. Configure the Organization's Forecast Settings At first, a user with the administrator profile has to configure the organization's forecast settings in the SalesGrow CRM account. The settings include: Target Period of Forecast (Monthly or Quarterly). The start month of the Financial year. Field values based on which forecast targets are set. Make sure that you have created the fields based on your business requirements. You can create forecast for a specific quarter/month only once. You can however modify the existing forecast details. 43
44 Create Forecasts Based on Role Hierarchy In SalesGrow CRM, forecast is created for the top most role in the hierarchy, i.e. for the organization. Forecasts targets are then set for the other roles in the hierarchy and the users in those roles. Each role can have only one forecast for every quarter/month. A manager can be assigned to each role, failing which the parent role's manager owns the role. Each user can have only one forecast target set for every quarter/month. Only Role Managers and users with administrator profile can create forecasts. A role's manager can set targets for the users in the role. Users cannot set target for themselves. Role managers can set targets for themselves. If the role manager's superior changes the target, the role manager cannot change it. If a role does not have a manager, the manager of the superior role in the hierarchy can set targets for the users in the sub roles. You can create forecast reports based on roles To create forecast for a quarter/month 1. Go to the Forecasts module. 2. Click on the Create Forecast icon. The Create Forecast icon will not be available while creating forecast for the first time. 3. Select the month/quarter and the year from the drop-down lists. Forecast will be created for the selected quarter/month. 4. Specify the sales Target for the month/quarter. 5. Specify the Target for Sub Roles (the next level sub roles). You can specify the overall target for the role and also the target for the role manager. Targets for others users in these roles and sub roles can be set once you create this forecast. 44
45 6. Specify the target for each User. Only the users in the top most role of the hierarchy will be listed. To set targets for user in other roles, you need to drill down to each level in the role hierarchy. See Also View Forecasts 7. Click Save. Set Targets for Sub Roles and its Users You can drill down to each sub role and set targets for the sub roles, its managers and users. To set target for sub roles 1. In the Forecast module, select the Month/Quarter and Year from the respective drop-down list to see the forecasts details. 2. Click on the Role/User links to drill down to the next level of forecast targets. 3. Specify the sales Target for the roles, role managers or users. 4. Click Save. View Forecasts Forecast Terminologies Target - Sales target that is set. You can set targets for roles, sub roles, role managers and users. Achieved - It is the closed potential amount for each role and its sub roles. Pipeline Potential - Expected amount of the potentials in pipeline for the month/quarter. Target Achieved in % - Percentage of target that is achieved. Shortage in % - Percentage of the target amount that is not in pipeline for the month/quarter. Target Mismatch - When there is a mismatch in the total target amount and the sum of individual targets for the sub roles and its users. Star Performers - Roles and users who have achieved the target and exceeded the target Compute Options There are two options to compute the Target Amount, Achieved Amount, Pipeline Potential, Target Achieved in Percentage, Shortage in Percentage and Target Mismatch when you view the forecast for a month/quarter. Compute - Calculates the forecast numbers for the role level that you are currently viewing. Compute All - Calculates the forecast numbers for all role and sub roles. 45
46 Drill Down Through the Forecast Based on your role, you will be able to view the forecast details and drill down through the forecast targets of other levels in the role hierarchy. The CEO (top most role in the hierarchy) will be able to access all forecast targets set for other sub roles and its users. Whereas, Sales Executives may only be able to access their individual targets and the target set for their role. Achieved - Click to view the closed-won potentials that contributed in achieving the target. Pipeline Potential - Click to view the potentials in pipeline for the month/quarter. Roles - Click to drill down to the next level in the role hierarchy and view the targets set for the role. You can set targets based on your access permissions. Users -Click to drill down to the next level and view the targets set for the user. You can set targets based on your access permissions. Say there is Territory A and its Sub Territory B. If the role manager of terriotry A sets the target for the users in territory B, then the role manager for territory B cannot modify them Forecast Based on Territory Hierarchy By default, forecasts in SalesGrow CRM are based on role hierarchy. However, if you enable territory management forecasts will be based on territory hierarchy. Territory Management in SalesGrow CRM is a system by which customer accounts are grouped based on a defined set of criteria. This makes for easy sharing of customer accounts among sales teams of your company. Users with administrator profile can create forecasts. Territory managers can set targets for their territories, sub territories and the users within. A user can have different targets set for each territory he belongs unlike forecasts in role hierarchy which allows only one target per role. Availability Permission Required: Available only if Territory Management feature is enabled. 46
47 Configure the Organization's Forecast Settings At first, a user with administrator profile has to configure the organization's forecast settings in the SalesGrow CRM account. The settings include: Target Period of Forecast (Monthly or Quarterly). The start month of the Financial year. Field values based on which forecast targets are set. Make sure that you have created the fields based on your business requirements. Note You can create a forecast for a specific quarter/month only once. You can however modify the existing forecast details. Create Forecasts Based on Territory Hierarchy When you enable Territories, you can create forecasts based on the territory hierarchy of your organization. Note that once enabled, all the existing forecast will be deleted. Each territory can have only one forecast for every quarter/month. A manager can be assigned to each territory, failing which the parent territory's manager owns the territory. Each user can have multiple forecast targets, one for each territory that the user belongs. Only Territory Managers and users with an administrator profile can create forecasts. Users cannot set target for themselves. Territory managers can set targets for themselves. If the territory manager's superior changes the target, the territory manager cannot change it. If there are three territory hierarchy levels, with a territory manager only for the first level, the manager will be able to: o Set forecast targets for the first and second levels while creating forecast for a month/quarter. o Set forecast targets for the third level once the forecast is created The territory manager needs to drill down to the third level to set targets for the users. If a territory does not have a manager, the manager of the superior role in the hierarchy can set targets for the users in the sub territories. You can create forecast reports based on territories. To create forecast for a quarter/month 1. Go to the Forecasts module. 2. Click on the Create Forecast icon. The Create Forecast icon will not be available while creating forecast for the first time. 47
48 3. Select the Territory from the drop-down list. 4. Select the month/quarter and the year from the drop-down lists. Forecast will be created for the selected quarter/month. 5. Specify the sales Target for the month/quarter. 6. Specify the Target for Sub Territories (the next level sub territories). You can specify the overall target for the territory and also the target for the territory manager. Targets for others users in these territories and sub territories can be set once you create this forecast. 7. Specify the target for each User. Only the users in the top most territory of the hierarchy will be listed. To set targets for user in other territories, you need to drill down to each level in the territory hierarchy. 8. Click Save. Set Targets for Sub Territory and its Users You can drill down to each sub territory and set targets for the sub territories, its managers and users. To set target for sub territories 1. In the Forecast module, select the Month/Quarter and Year from the respective drop-down list to see the forecasts details. 48

49 2. Click on the Sub Territory/User links to drill down to the next level of forecast targets. 3. Click the Edit link for the section that you want to modify. You can edit the targets for territories, territory managers or users based on your access privileges. 4. Click Save. 49
50 View Forecasts Forecast Terminologies Target - Sales target that is set. You can set targets for territories, sub territories, territory managers and users. Achieved - It is the closed potential amount for each territory and its sub territories. It also includes the potentials owned by users who are not part of the territory. Pipeline Potential - Expected amount of the potentials in pipeline for the month/quarter. It also includes the potentials owned by users who are not part of the territory. Target Achieved in % - Percentage of target that is achieved. Shortage in % - Percentage of the target amount that is not in pipeline for the month/quarter. Target Mismatch - When there is a mismatch in the total target amount and the sum of individual targets for the sub territories and its users. Star Performers - Roles and users who have achieved the target and exceeded the target. Target not set - This will be visible next to the forecast target of the role, its manager or users in a role, when the target is not set. 50
51 Manager icon - The territory manager will be indicated with an icon (refer to the image above). Compute Options There are two options to compute the Target Amount, Achieved Amount, Pipeline Potential, Target Achieved in Percentage, Shortage in Percentage and Target Mismatch when you view the forecast for a month/quarter. Compute - Calculates the forecast numbers for the territory level that you are currently viewing. Compute All - Calculates the forecast numbers for all territories and sub territories. 51
52 Drill Down Through the Forecast Based on the territories that you are part of, you will be able to view the forecast details and drill down through the forecast targets of other levels in the territory hierarchy. For instance, in WTM Inc., users in the WTM Sales territory (top most territory in the hierarchy) will be able to access all forecast targets set for other sub territories and its users. Whereas, users in a sub territory may only be able to access their individual targets and the target set for their territory. Achieved - Click to view the closed-won potentials that contributed in achieving the target. Pipeline Potential - Click to view the potentials in pipeline for the month/quarter. Territory- Click to drill down to the next level in the territory hierarchy and view the targets set for the territory. Users -Click to drill down to the next level and view the targets set for the user Set Fiscal Year Set up Fiscal Year The first settings to configure when creating a forecast for the first time, is the Fiscal Year. Depending on your organization's financial cycle, you can specify the month the financial year begins. To set up Fiscal Year 1. Click Setup > Organization Settings > Fiscal Year. 2. In the Fiscal Year page, select the Fiscal Start Month from the drop down list. 52
53 3. Choose Start Month or End Month. Note 4. Click Save. By default, fiscal year is configured as January to December. Let's say your fiscal year starts in April 2013 and ends in March If you choose to name the fiscal year based on the start month, the year name will be displayed as 2013 (in reports and other mentions) and if you choose to name the fiscal year based on the end month, the year name will be displayed as Create Forecasts Forecasts are created to help every individual in the sales team, who has opportunities assigned to them and their managers. Note By default, the person who creates the forecast owns it. Forecasts can be created for each quarter of the Fiscal Year. You can create forecasts for a specific quarter only once. However, you can modify the existing forecast details. You cannot customize the fields in the forecast module. To create forecasts 1. In the Forecast module, click New Forecast. 2. In the Create Forecast page, select the Year and Quarter from the respective drop-down lists. 3. Click Next. 4. In the Forecast Details section, specify the following details: o Enter the target Quota for each month. The target quota is the same value entered in the Amount field in the Potentials module. o Specify the Committed Amount and Best Case Amount for each month's target quota. 5. Click Save. 53

54 Associate Forecasts with Other Records Once the forecast is created, you can add potentials to each month. When the deal is closed it will automatically appear under forecast history. All the potentials created will show under each individual sales person's monthly forecast list for follow-up. In the Forecast Details page, the details displayed are: List of Potentials for each month: Displays the list of potentials, the associated accounts and the corresponding forecast details for the month. You can also add new potentials to the month. Forecast History: Displays the over-all details of the forecast with aggregate Quota, Closed Amount, Committed Amount and Best Case Amount details. Switch to New Forecast Here is what is new in the New Forecasts Create Forecasts based on role hierarchy or territory hierarchy. Track the performance of individual roles/territories in the hierarchy. Track the performance of each user in the role/territory. Choose between the monthly or quarterly forecast options. Set targets for sub roles and its users in the hierarchy, once the forecast is created.. Choose your forecast target from any numeric field in the Potentials module. In the old forecasts, it is based on the Amount field. Set sales targets for all the users in your role if you are the role manager. Set individual targets for role managers and the other users in the role, apart from an overall sales target for the role. Navigate easily to access the required data. Use the Compute option to calculate the status of forecast for any given month/quarter. It calculates the target achieved, potentials in pipeline, shortage in the pipeline, etc. Get notified when there is a mismatch in the target forecasted. For example, the role's target amount is USD and the targets for the sub roles are USD 5000 and USD In this case, you will be notified at once of the mismatch of USD 1000 in the target. Identify the Star Performers in your team with the Star indicators. 54
55 Keep abreast of shortages in the pipeline. Know what percentage of the target amount is not in the pipeline for a given month/quarter. Be assured that the sales targets for a given role will be maintained for reference even when a user is moved from one role to another. On Enabling the New Forecast Best Case and Committed Amount will not be available. Instead you will have other parameters to calculate, such as, target amount, achieved amount, pipeline potential, target achieved in percentage, etc. The existing forecasts will be removed. You will not be able to access the forecasts for the previous months. Forecast History (a history of changes made to forecasts) will not be maintained. 3.6 Activities Tasks Create Tasks Activities play an important role in daily business operations. Activities can be either time bound calendar events, such as meetings, seminars, appointments, etc., or status bound tasks, such as send status report to manager, send to customer, etc. In SalesGrow CRM, most of the records have activities as a related list for a better 360 degree view. You can associate activities with modules, such as leads, accounts, contacts, potentials, campaigns, etc. Under the Activities Module, you can store information related to Tasks, Events, and Calls. A task is a specific piece of work required to be done within a given time frame. They are listed in the SalesGrow CRM's Home page of the user, Activities home page and in other related records. 55
56 Availability Profile Permission Required: Access to the Activities Tab that includes View, Create, Edit and Delete permissions. To create tasks Note 1. In the Activities module, click New Task. You can also create a task from within a record by clicking the New Task link in the Open Activities related list. 2. In the Create Task page, specify the task details. 3. Click Save. Tasks will be closed, only when the Status of the task is updated as Completed. The status, Completed, is a system defined field. An alternate custom field with the same label will not close the task automatically Events Create Events An event is an activity that happens at a given place and time. They are listed in the SalesGrow CRM's Home page of the user, Activities home page, Calendar and in other related records. Availability Profile Permission Required: Access to the Activities Tab that includes View, Create, Edit and Delete permissions. 56
57 To create events 1. In the Activities module, click New Events. 2. In the New Event popup, specify the event details. 3. Click Save. To create events from Calendar Note 1. Click the Calendar icon and select the Day, Week or Month view. 2. In the Calendar, click the Create link or click on a time slot in the calendar. 3. In the New Event popup, specify the event details. 4. Click Save. Events are automatically closed at the specified end date and time. There is no status update for events Calls The Log a Call functionality helps you to register the inbound calls (received from leads and customers) and outbound calls (dialed to leads and customers) with call details such as call duration, date and time of calls, notes, etc. Users who frequently make calls or receive calls in an organization can make use of this functionality in SalesGrow CRM. For instance, this is of great help to the Customer Support Executives who often receive calls from their customers. By recording call logs, they can identify the time spent on each call and keep track of the average time spent in calls on a monthly basis. On the other hand, the Sales and Marketing Executives can keep track of all the calls they make to their prospects. The call details can be further used to generate reports on billing details, average time spent on calls, number of calls per day, etc. Availability Profile Permission Required: Access to the Activities Tab that includes View, Create, Edit and Delete permissions. 57
58 Benefits Helps identify typical questions asked by users Keep track of all the customer calls for future reference. Log a Call Using the Log a Call feature in SalesGrow CRM you can capture the completed and current call details. To log a current call Note 1. In the Activities module, click New Call. You can also add call details from within a record by clicking the Log a Call link in the Open Activities related list. 2. In the Log a Call page, specify the details of the call. You cannot add custom fields in the Log a Call page. However, you can customize the existing fields using page layout customization. 3. In the Time Details section, click Current Call. By default, Current Call is selected. 4. Click Start. The call timer indicates the duration of the current call. 5. Click Stop when the call is completed. The Call Start Time and Call Duration are automatically updated. 6. Click Save to save the current call. 7. Click Save & Create Follow-up Task to save and create a follow-up task. The Related To field will be available only if you are calling a Contact. The user who logs a call is the Call Owner and you cannot change the owner of the call. Only users with permission to edit the call record can modify it. The details of the call will be available in the Activities tab. To log a completed call or schedule a call 1. In the Activities module, click New Call. You can also add call details from within a record by clicking the Log a Call link in the Open Activities related list. 2. In the Log a Call page, specify the details of the call. 3. In the Time Details section, select Completed Call/Schedule Call. On selecting Schedule Call, you will ahve the option to assign the call to a user. 4. Enter the Call Duration of the call in minutes and seconds. 5. Click Save, or click Save & Create Follow-up Task to save and create a follow-up task. Save & Create Follow-up Task option is not available while scheduling a call. 58
59 Note The Related To field will be available only if you are calling a Contact. The details of the call will be available in the Activities tab. You can mark the Call Duration and Call Start Time fields as non-mandatory. Associate calls with CRM records To associate calls with CRM records 1. Click the Leads or Contacts tab. 2. Select the record for which you want to log a call. 3. In the [Record] Details page, the existing call details, if any, are displayed. o Click Subject, Activity Type, Status, Due Date or Owner Name links to sort the display order of the records. o Click the Edit or Del link to modify or delete the call details respectively. 4. Click the Log a Call link. 5. In the Log a Call page, enter the call related details. 6. Click Save, or click Save & Create Follow-up Task to save and create a follow-up task. 4. Marketing Automation As part of the marketing automation, SalesGrow CRM provides Campaign management, marketing, and Web Forms (to generate leads, contacts, and cases) which are useful for integrating your organization's sales and marketing activities. With the SalesGrow CRM campaign management features, you can effectively plan marketing expenditures and improve the quality of lead generation process. In addition, campaign management integrated with leads and opportunities modules helps your organization in measuring the campaign performance and effectiveness. 4.1 Campaigns Plan, execute and monitor the performance of your marketing activities Create Campaigns Create Campaigns In SalesGrow CRM, you can create campaigns by: Entering data in the campaign details form: You can manually fill in the campaign details gathered from various external sources. Note 59
60 Some of the standard fields listed below may not be visible or editable depending on your organization's business process. In case you want to add or modify fields, please contact your System Administrator for more details on the usage of other fields. Create Campaigns Individually You can create campaigns individually by using the following: Filling in the details in the campaign creation form. Cloning the campaign with a few changes in the existing record. Note By default, the person who creates the campaign owns it. To change owner, click the Change link in the Campaign Owner field from the Campaign Details page and select another user. To create campaigns individually 1. In the Campaigns module, click New Campaign. 2. In the Create Campaign page, enter the campaign details. 3. Click Save. To clone campaigns 1. In the Campaigns tab, click a particular campaign that is to be cloned. 2. In the Campaign Details page, click Clone. 3. In the Clone Campaign page, modify the required details. 4. Click Save Associate Campaigns Associate Campaign with Other Records After creating campaigns, you may need to associate campaigns with other records, such as tasks, events, attachments, leads, contacts, and potentials. In the Campaign Details page, you can associate the following: Open Activities: To add tasks and events. Closed Activities: To display the closed tasks and events. Potentials: To display the potentials converted through a campaign. Attachments: To attach documents to the campaign. Leads: To display the leads generated through a campaign. Contacts: To display the contacts generated through a campaign. 60
61 Associate Leads/Contacts to the Campaign There are many types of campaigns that can be organized. For example, Trade Shows, Direct Mailer, Telemarketing, Print or Online Ads etc. The prime focus of campaigns is to acquire information from leads who have an interest in what you offer. Many leads maybe associated to a single campaign as you may have included some existing leads to take part in a particular campaign. In such cases, it is necessary that you keep track of all the leads as a result of the campaign. Using the Campaigns module, you can store all the necessary details in a well organized manner, for future reference. Add New Leads/Contacts to the Campaign To associate new leads 1. In the Campaign Details page, the existing lead details, if any, are displayed. o Click the column headings to sort the display order of the records. o Click the relevant Edit link to modify the campaign member status of the lead. 2. Click the New link. 3. In the New Lead page, specify the lead details. 4. Click Save. To associate new contacts 1. In the Campaign Details page, the existing contact details, if any, are displayed. o Click the column headings to sort the display order of the records. o Click the relevant Edit link to modify the campaign member status of the contact. 2. Click the New link. 3. In the New Contact page, specify the contact details. 4. Click Save. Associate Existing Leads/Contacts To associate existing leads or contacts to the campaign 1. In the Campaign Details page, the associated lead or contact details, if any, are displayed. 2. Click Associate Existing Leads/Contact. 3. In the Add Existing Leads/Contacts page, specify the criteria to search the required records. 4. Click Search. 5. Under Matching Leads/Contacts, select the check box(es) of the records that you want to associate to the campaign. 6. Select the Campaign Member Status from the Status drop-down list. 7. Click Add to Campaign. The selected records will be associated to the campaign. 61
62 Import Leads or Contacts You can import a list of leads into SalesGrow CRM and directly associate them to the campaign. Note that while importing, the first campaign member status will be applied to all the leads or contacts. You can later change the campaign member status whenever needed. If the import file is in XLS, XLSX or VCF format, you can import a maximum of 1500 records/batch. Records more than 1500 can be imported in CSV format. To import leads or contacts 1. In the Campaign Details page, the associated lead or contact details, if any, are displayed under Leads/Contacts related lists. 2. Click Import. 3. In the Import Leads page, specify the import details. The Imported leads/contacts will be associated to the campaign. Mass Update Campaign Member Status The campaign member status defines the status of the leads or contacts who are part of the campaign. Note that the Status of a Lead is different from the Campaign Member Status. To update campaign member status 1. In the Campaign Details page, the associated lead or contact details, if any, are displayed. 2. Click Mass Update Member Status. 3. In the Mass Update Campaign Member Status page, select any of the following to get the list of records that you want to update: 1. All Records - Select this option and click Fetch to list all the records. 2. Manual Criteria - Select this option, provide search criteria and click Search to list records based on the criteria. 4. Under Matching Leads/Contacts, select the check box(es) of the records. 5. Select the Campaign Member Status from the Status drop-down list. 6. Click Update Member Status. The selected records will be updated with the status that you specify Add Campaigns to Leads/Contacts Add Campaigns to the Leads/Contacts To add campaigns to leads or contacts 1. Click the Leads/Contacts tab. 2. In the Leads/Contact Details page, the existing campaign details, if any, are displayed. o Click the column headings to sort the display order of the records. 62
63 o Click the relevant Edit or Remove link to change the member status field or remove the campaign association from the record respectively. 3. Click Add Campaigns. 4. In the Add Campaigns to Lead/Contact page, do the following: o o Choose the campaign member Status from the drop-down list. Select the check box(es) of the campaigns that you want to associate to the lead or contact. 5. Click Add to Lead/Contact. Customize Campaign Member Status Each member associate to a campaign needs a campaign member status. For example, for a Trade Show campaign, the leads or contacts associated to it may have their status as Invited, Attended, Not Attended etc. To customize campaign member status 1. Click Setup > Customization > Fields > Campaigns > Campaign Member Status 2. In the Customize Campaign Member Status page, all the status values will be listed. You can do the following: 3. Add Member Status - Click the Add Status link and enter the value along with its display Order. (Note that you have a maximum of 20 member status values. 4. Delete Member Status - Select the check box(es) of the values and click the Delete Status link to delete the value(s). 5. Click Save Standard Fields Standard Fields in Campaigns Following are the list of SalesGrow defined standard fields available in the Campaigns module: Field Name Description Data type Maximum Limit Campaign Select the name of the user to whom the campaign Pick list - Owner is assigned. Campaign Specify the name of the campaign. Text box Alphanumeric(40) Name* Type Select the type of the campaign. Pick List - Status Select the status of the campaign. Pick List - Start Date Specify the date on which the campaign starts. Date - format End Date Specify the date on which the campaign ends. Date - format Expected Revenue Specify the revenue expected after launching the campaign. Currency - 63
64 Actual Cost Specify the actual amount spent on the campaign. Currency - Budgeted Cost Specify the planned amount to be spent on the Currency - campaign. Expected Specify the campaign turnout percentage. Number Response Num sent Specify the number of leads/contacts to whom the Text box Integers campaign details has been sent. Created By Displays name of the user created the campaign Date/Time - first time. Modified By Displays name of the user modified the campaign Date/Time Description Specify additional details about the campaign. Text area characters 4.2 Web Forms Build web forms to capture leads, contacts and cases online Set up Web Forms Creating a web form involves three steps Building the form - Drag and drop fields to build a form and format it easily with the WYSIWYG editor. Specifying the form details - Add details such as form name, landing page URL (where the visitor needs to be redirected after the form is submitted) record assignment rule, notification details, etc. Generating the code for the form - Embed the form using various code formats. Codes for some third-part sites (WordPress, Google Sites, Facebook, and Joomla) are readily available. You can build web forms to generate records for the Leads, Contacts, Cases and any other Custom modules. While building a web form, the following elements are available in the form: Option Add Fields Set fields' font and form layout Insert Captcha Upload Files in the form Description Drag and drop the fields that are required in the form. By default, some of the fields are already added when you build a new form. Use the WYSIWYG editor to change the font style and size, background color, alignment of the fields, etc. in the form. Captcha is used for security in feedback forms, website registration, comments from visitors, etc. Add captcha for the SalesGrow CRM system to prevent unauthorized automated spamming programs from filling the web form. This option is available only in the Paid Editions. With this option capture files through your web-to-lead/contact/case forms, such as screenshots of an issue, quote requests, photo of individuals, etc. The size of the file should be within 20 MB. If the file size exceeds the limit, the form will not be submitted and the record will not be added in SalesGrow CRM. This option is available 64
65 Mark fields as mandatory Mark fields as hidden Add help link for a field Change button name Specify location URL of the form Specify landing page URL Select record assignment rule Specify notification options Embed form code only in the Paid Editions. Collect important information such as name, address, mobile number, etc. from the visitors who fill up the web form by marking fields as mandatory. Add a hidden field and its value in the form. These hidden values are submitted along with the web form but are hidden to the visitors who fill the form. A field you provide may require data to be filled in a specific format. For example, the date format may need to be specified in DD-MM-YYYY. For such requirements, you can use the option to add a tip or hint to help the visitor who fills the form. The name of the call to action button can be Save, Submit, or another other name. You can easily change the name as per your requirements. The Location URL is the web page URL where you plan to host the web form. Specifying the URL helps prevent spam and allows only forms submitted through the particular domain to be captured as valid information. This is the URL of the web page to which the visitor needs to be redirected once the web form is submitted. Records generated through the web forms can be automatically assigned to the users in CRM with the help of Assignment Rules. Set notifications that needs to be sent to the record owners and also the visitors who submit the forms. templates or autoresponse rules can be used to send notification s. Embed the web form's code in your web page. The code is available in three different formats - HTML source code, Embed code and iframe code. Generating Web Forms To generate web forms for Leads, Contacts, and Cases 1. Click Setup > Website Integration > Web Forms. 2. In the Web Forms page, choose the Module from the drop-down list. The existing web forms for the selected module will be listed. 3. Click Create Web Form. 4. In the web form builder, do the following: o Build a form Drag and drop the fields that you need in the web form. Insert captcha. Add the option to upload files. Mark fields as mandatory. Make fields hidden in the form. Provide hint or help links for fields. Set font and layout of the form. Change button names. o Specify form details and other options Add form details such as, form name, landing page URL, form location URL. Set record assignment rule. Set notification options 65
66 o Copy web form code and embed options Get code to embed in your site and other third-party sites. The code is available in three different formats - HTML source code, Embed code and iframe code. Step 1: Build a Form Drag & drop fields in the WYSIWYG editor, which also provides various other options to build a form. Add Fields Drag & drop the fields you need in the form and change the font style and size, background color, alignment of the fields, etc. To add fields and set font and layout of the form 1. Under the Fields List tab, click on a field and drag & drop it in the form builder. 2. Make changes to the font, background color, field label alignment and form width. Note By default, some of the fields are already added in the form. o For Leads and Contacts - Last Name, and Phone fields. o For Cases - Status, Subject and Description fields. 66
67 You cannot remove the following fields from the form, as they are mandatory for a record. o For Leads and Contacts - Last Name field. o For Cases - Subject field. To have custom fields, you need to first create them in the particular module. When you add the Account Name field in the web form for Contacts and contact details are submitted, an account will automatically be created in SalesGrow CRM. If an account with the same name already exists in your CRM account, an account will not be created when the form details are submitted. An Account will be created, even if certain mandatory field details are not provided. Later, when the account is edited, you need to provide the other mandatory details before saving the record. Upload Files Capture files through your web-to-lead/contact/case forms, such as screenshots of an issue, quote requests, photo of individuals, etc. The size of the file should be within 20 MB. If the file size exceeds the limit, the form will not be submitted and the record will not be added in SalesGrow CRM. This option is available only in the Paid Editions. To add the option to upload files 1. Click the Advanced Tools tab. 2. Drag & drop the File Upload field. Note that the visitor can upload a file not more than 20 MB. You can use the help link option in the Field Settings to provide this hint. 67
68 Mark Fields as Mandatory Collect important information such as name, address, mobile number, etc. from the visitors who fill up the web form by marking fields as mandatory. To mark fields as mandatory 1. Move your mouse pointer to the field that you want to mark as mandatory. 2. Click on the Settings icon. 3. In the Field Properties pop-up, select the Mark as required field checkbox. 4. Click Done. Mark Fields as Hidden Add a hidden field and its value in the form. These hidden values are submitted along with the web form but are hidden to the visitors who fill the form. For example, if you have hosted the same form in various web pages, the hidden field will help you identify which record is generated form a web form hosted in a specific web page. To make fields hidden in the form 1. Move your mouse pointer to the field that you want to hide in the form. 2. Click on the Settings icon. 3. In the Field Properties pop-up, select the Mark as hidden field checkbox. 4. Specify the value for the field and click Done. 68
69 Provide Help Link A field you provide may require data to be filled in a specific format. For example, the date format may need to be specified in DD-MM-YYYY. For such requirements, you can use the option to add a tip or hint to help the visitor who fills the form. To provide hint or help links for fields 1. Move your mouse pointer to the field for which you want to provide hint or help link. 2. Click on the Settings icon. 3. In the Field Properties pop-up, select the Include help link checkbox. 4. Choose one of the following: o o 5. Click Done. Link & Text - Specify a text for the link and provide the link URL. Link Only - Specify the help/hint text. For example, the date field can have - MM-DD- YYYY 69
70 Change Button Name By default, there are two call to action buttons - Submit and Reset. You can rename these buttons as per your requirements. To change button names 1. Move your mouse pointer to the field that you want to rename in the form. 2. Click on the Settings icon. 3. In the Field Properties pop-up, modify the field name. The name of the field will be changed only in the form. 4. Click Done 70
71 Remove Field from the Form Easily remove unwanted fields from the web form and add them whenever required. To remove a field from the form 1. Move your mouse pointer to the field that you want to remove from the form. 2. Click on the Delete icon. Preview the Web Form Take a look at the web form before publishing it in your web site. To preview the form 1. In the form builder, click on the Preview link. A preview of the form will be available. 71
72 Step 2: Specify Form Details 1. Enter a Form Name (Example: Feedback, Contact Us, etc.). 2. Specify a Landing page URL. The visitor who submits the form will be redirected to the URL specified here. It should start with " or The length of Return URL should not exceed 255 characters. (Example: 3. Specify a Form Location URL. This should be the webpage where the web form will be hosted. It should start with " or (Example: If you plan to host the web form in multiple websites or you are not sure where the web form will be hosted, enter * in this field. This prevents spam and allows only forms submitted through 72
73 the particular domain to be captured as valid information. 4. Choose one of the following options to Assign Owner to the records that are submitted via web form. o Choose a User - Select from the drop-down list. All the records generated through the form will be assigned to the selected user. 5. Create or Choose [Module] Assignment rule to assign ownership - Select an existing assignment rule or create a new one. Based on the rule, records will be assigned to the users. With assignment rules you can implement the Round Robin method to assign records to the users. 6. Click Save. Step 3: Use Web Form Code to Embed The code for the web form is available in 3 formats: Source Code, code to Embed, iframe code. The code is also readily available for some third-party sites - WordPress, Facebook, Google Sites and Joomla. Please note that the Script and iframe code is available only in the Paid Editions. Note 1. Click on SalesGrow Sites, WordPress, Facebook, Google Sites, or Joomla to get the respective code. 2. Copy the code and paste it in the website where you want the web form. 3. Click Done. In order to avoid spam, the generated Web Form (HTML file) must be published in an active web server (Apache, Microsoft, IIS, etc.). The web form will not work if you submit the form values from your desktop. When the HTML code is generated for the web form, certain entities are hidden by default. If you remove those hidden entities, the web form will not work. Here is the code snippet that should not be removed from your web form code: 73
74 <input type="hidden" name="xnqsjsdp" value="" /> <input type="hidden" name="xmiwtld" value="" /> <input type="hidden" name="actiontype" value="" / Auto Response Rules The Auto Response rule feature enables you to send automated s when leads, contacts, cases or records for the custom modules are generated through web forms. When a lead is generated through web forms, you may want to send appropriate s to the leads with different types of requests. In such cases, you can create an auto response rule with specific rule criteria. When the condition is satisfied, the corresponding is sent. You can create numerous auto response rules but only one auto response rule can be active at a time. Note When the details gathered through the web form does not satisfy the Auto Response Rule criteria, then the template (acknowledgment ) selected while creating the web form will be sent. Availability this feature. Profile Permission Required: Users with the permission to create web forms can access Create Auto Response Rule To create auto response rules for web forms 1. Click Setup > Website Integration > Auto Response Rules. 2. In the Auto Response Rules page, select the module from the drop-down list. 3. Click Create Rule. You will be able to create the auto response rule for the selected module. 4. In the Create Auto Response Rules for Web to [Module] page, do the following: 74
75 o Enter the Rule Name. o Select the check box to activate the rule. 5. Click Save. Note Once the rule is created, you need to define the criteria (i.e. create rule entries) based on which the template will be sent to the visitor who submits the web form. Create Auto Response Rule Entry To create auto response rule entry 1. Click Setup > Website Integration > Auto Response Rules. 2. In the Auto Response Rules page, click on the rule for which you want to create the rule entry. 3. In the Auto Response Rules for Web to [Module] page, click Create Rule Entry. 4. In the Rule Entry page, do the following: o Specify the Rule Criteria. 75
76 Note o Choose an Template from the drop down list. If you do not have templates created for the module, you can click on the Create an Template link. 5. Click Save. When the details gathered through the web form does not satisfy the Auto Response Rule criteria, then the template selected while creating the web form will be sent Unsubscription Form Setting up an Unsubscribe Form This feature helps you to generate the HTML code for the Unsubscribe Form. You can use the Form to provide an Unsubscribe option for the recipients. The process to set up the form consists of three parts. Availability Profile Permission Required: Users with the Unsubscribe Form permission in profile can access this feature. Part 1 - To generate an unsubscribe Form 1. Click Setup > Website Integration > Unsubscription Form. 2. In the Unsubscription Form page, do the following: o Enter your website address in the Return URL field. o Click Generate HTML. 3. Copy and paste the generated HTML code into HTML editor and save it as an HTML file. 4. Click Finish. Part 2 - To publish the unsubscribe Form When you want to publish the unsubscribe form in a web page and provide a link to the web page from an Create a web page in your website and paste the generated HTML code in the page. 76
77 2. Get the URL for the web page that you created in your website. Part 3 - To add unsubscribe link in the template 1. Click Setup > Templates > Template. 2. In the Templates page, click the Edit link corresponding to the template you want to provide the Unsubscribe option. 3. Click Edit. 4. In the Footer section, type your desired content. Example: "Click here to unsubscribe". 5. Select the View HTML source check box and provide a link to the page where the unsubscribe form is published. Example: Click <a href=" to unsubscribe. 6. Click Save. Part 4 - To use unsubscribe option Note 1. Click the Unsubscribe link in an message. 2. Enter the address and click Unsubscribe. 3. The opt out option for the Lead and/or Contact will be automatically selected. s will not be sent to the Leads or Contacts, if the Opt Out check box is selected. If the user enters a Secondary Address, then also the opt out option will also be selected. The HTML code cannot be embedded directly in your template. You need to save the generated code as an HTML file and use the link in the template. 4.3 Mass Send mass s to your leads and contacts use autoresponders to follow up with customers Send Mass s Send Mass s In SalesGrow CRM, you can send mass s to customers manually, by creating a new mailing list or by using an existing list. You can select the list of recipients in two ways: Instant Filter (creating New Custom View) Existing Custom View Note The Mass feature is available only in the Leads and Contacts modules. You need to create templates before sending mass s. 77
78 Bounced notifications for mass s are not tracked in SalesGrow CRM. However, if the user has configured SalesGrow Mail Addon, notifications about bounced s can be tracked only for individual s (but not mass s). The notifications are sent to the user's primary address that has been configured. Availability Profile Permission Required: Users with the Mass Leads/Contacts permission in profile can access this feature. To send mass s 1. Click the [Module] tab. Module refers to Leads, Accounts, Contacts, etc. tabs. 2. In the [Module] Home page, click [Module] Tools > Mass [Module ]. 3. In the Mass page, by default, the system displays the Template tab. 4. Under the Template tab, do the following: o Select the Template from the list. Note, that you cannot edit the content here. o Click the New Template link to create a template. 5. Under the Select Records tab, do the following: o o 6. Click Send. Click Custom View Criteria, and then Select Custom View from the list, or Click Manual Criteria, to search and select the required records manually. The system will display only those records that contain an address. While sending mass s to contacts, you can also specify the criteria based on the fields in the Accounts module Schedule Mass s Schedule Mass This feature allows you to schedule bulk s to be sent to selected leads or contacts. For example, you want to send an to customers at 10 AM PST, but you have an important meeting at that time. You can schedule the to be sent at that specific time by using the Mass Scheduler, even in your absence. 78
79 Availability Profile Permission Required: Users with the Mass Leads/Contacts permission in profile can access this feature. Note For a given scheduled time only three mass processes are possible. To schedule mass s 1. Click the Leads or Contacts tab. 2. In the Home page, under Leads/Contacts Tools, click Schedule Mass Click New Mass Mail Schedule. 4. In the New Mass Mail Scheduler page, do the following: o Enter the Mass Mail Scheduler Name. o Select the Custom View from the list. o Select the Template from the list. o Select the Active check box. o Only when you select the Active check box, will the scheduled s be delivered. Enter the Start Date and Time to schedule the s. Enter the date in MM/DD/YYYY format, or select the date from the calendar displayed. Select the hours and minutes from the respective lists. 5. Click Save. The system displays the View Mass Mail Schedule page. 6. Click Edit or Delete, as required. 7. Click Go Back. The created Scheduler is displayed under Mass Mail Schedulers. 5. Account Settings The CRM account settings consists of Personal and Organizational Settings. Before you start working with your account, you need to set up the personal settings such as defining a country locale, language, time zone, date format, etc. Users in an organization work from different locations, across different time zones and geography. They can set up their personal preferences in SalesGrow CRM. If you have set up an organization's account, you can setup fiscal year, business hours etc. for your organization. 79
80 5.1 Personal Settings Personalize your CRM account by setting up your country locale, time zone, language and personal details Change Language Change Locale Information Based on the country locale, you can mention the language for your account. Also, choose between 12 hr time format and 24 hr time format in the CRM account. The date format is automatically updated with the country locale that you select. The following international date formats are supported: dd-mm-yyyy mm-dd-yyyy yyyy-mm-dd To change language, country locale, time format and time zone. 1. Click Setup > Personal Settings > Account Information. 2. In the Account Information page, click Edit for the Locale Information section. 3. Choose the value from the corresponding drop-down lists. 4. Click Save. Change Name Format By default, the name format is set as <Salutation> <First Name> <Last Name>. However, you can change the name format as per naming conventions used in your country. 80

81 Example: In the USA the name format is generally <Salutation> <First Name> <Last Name> whereas in Japan the format is <Last Name> <First Name> <Salutation> To change name format 1. Click Setup > Personal Settings > Name Format. 2. In the Name Format page, drag and drop the Salutation, First Name and Last Name to change the order. 3. Click Save Use Signature While sending s to your customers, you can embed a signature automatically in the body of the message. Signatures can be customized as per your requirement. To use the signature feature 1. Click Setup > Personal Settings > Account Information. 2. In the Account Information page, click Edit for the Signature section 3. Specify the signature in the HTML editor. To use the signature in s, you need to enable the Add User Signature check box in the template. 4. Click Save. Add Logo in your Signature You can also add a logo in your signature by providing the image source in the HTML code. To add logo in your signature 1. Click Setup > Personal Settings > Account Information. 2. In the Account Information page, click Edit for the Signature section 3. In the editor pop-up box, click to select an image and insert. 4. Click Save. 81
82 5.1.3 Update Personal Information You can change your personal details such as name, phone number, website, date of birth, address, language, time format, time zone, etc. To change personal details 1. Click Setup > Personal Settings > Account Information. 2. In the Account information page, click Edit for the corresponding section. 3. Modify the personal details as required. (Refer to the table below) 4. Click Save. List of Standard Fields Field Name Description Data Type First Name Specify the first name of the user. Text box Last Name* Specify the last name of the user. This field is a mandatory field. Text box Alias Specify the other name of the user. Text box Specify the login name of the SalesGrow CRM user. This is a mandatory Text box Address* Active Role* field. Specify the status of the user. By default the status is active. If required the System Administrator can deactivate the user, so that user cannot access the SlaesGrow CRM system. Select the role (for example, Administrator, Standard User, and others). This is a mandatory field. Only if you have the Administrator profile, you can change this value. Check box Pick list * Display the primary ID of the user. This field can be updated in SalesGrow Accounts. Website Specify the website URL of the user. URL Phone Specify the official phone number of the user. Pick list Mobile Specify the mobile phone number of the user. Text box, integer value Fax Specify the FAX number of the user. Text box Date of Select the date of birth of the user from the mm/dd/yyyy drop-down list Date box Birth Street Specify the primary address of the SalesGrow CRM user. Text box City Specify the name of the city where the user lives. Text box State Specify the name of the state where the user lives. Text box Zip Specify the postal code of the user's address. Text box, integer value Country Specify the name of the user's country. Text box Language* Select the language. This field is a mandatory field. Pick list Country Select the country locale to specify your date format. This field is a Pick list 82
83 Locale* Time Zone* mandatory field. Select the time zone in which you are working. This field is a mandatory field. Pick list Themes SalesGrow CRM Themes give individual users the option to customize the colors and layout of their CRM account. The following options are available: Change the color of tabs and their fonts. Change the background color. Swap between Fixed and Fluid screen layout. Please note that this customization is User specific, i.e. a theme changed by one user will not be reflected in another user's CRM accounts. To change theme 1. Click Setup > Personal Settings > Theme. 2. In the Themes page, do the following: o Under Tab Bar, select Default or Custom. o Choose color for the Normal Tab and the Normal Tab Fonts. o Choose color for the Selected Tab and the Selected Tab Fonts. 83

84 o Under Background, choose Default, Gray or White. 3. Click Save. 5.2 Organization Settings Specify company details, your organization's business hours, fiscal year and currencies. There are certain organization specific details, which help differentiate one organization from the other. SalesGrow CRM recommends Users with Administrator's privilege to customize these company specific details so that all users under an organization-specific account will have these common features Change Company Details To change company details 1. Log in to SalesGrow CRM with Administrator privileges. 2. Click Setup > Organization Settings > Company Details. 3. In the Company Details page, click Edit. 4. Make the necessary changes to the details. 5. Click Save Personalize Logo In order to give a personalized look to your account, SalesGrow CRM allows organizations to change the default logo to your company logo. The customized company logo will appear for all the users within the account. The image file size should not exceed 20 KB. For best results, the logo dimension should be 190 (width) by 65 (height) pixels. The logo file format should be.jpg /.png /.gif. To personalize logo 1. Log in to SalesGrow CRM with Administrator privileges. 2. Click Setup > Organization Settings > Company Details. 3. In the Company Details page, click Edit. 4. Under Company Logo section, browse and select the logo. 5. Click Save. 84
 with Administrator privilege can change the currency settings depending on the organization's requirement.")

85 5.2.3 Set Currency Currency settings are an organization specific feature. By default, the currency is set to US dollars ($). However, user(s) with Administrator privilege can change the currency settings depending on the organization's requirement. Based on the country locale you choose, the currency value will be updated for Quotes, Invoices, Campaigns and other billing related fields. To select currency 1. Log in to SalesGrow CRM with Administrator privileges. 2. Click Setup > Organization Settings > Company Details. 3. In the Company Details page, click Edit. 4. Under Locale Information section, select the country from the Currency Locale list. 5. Click Save. Set Organization Time Zone You can define a common time zone for your organization's SalesGrow CRM account. For Workflow Rules, a day will be calculated based on this time zone. To set the organization's time zone 1. Log in to SalesGrow CRM with Administrator privileges. 2. Click Setup > Organization Settings > Company Details. 3. In the Company Details page, click Edit. 4. Under Locale Information section, select the Time Zone from the drop-down list. 5. Click Save. 85
86 Assign Super Administrator The Super Administrator is the single point of contact for all communications regarding the transactions and bills from SalesGrow CRM. The organization's administrator has the privilege to change the super administrator as per the company's requirements. To select super administrator Note 1. Log in to SalesGrow CRM with Administrator privileges. 2. Click Setup > Organization Settings > Company Details. 3. In the Company Details page, click Edit. 4. Under Company Details section, select the Super Admin from the list. 5. Click Save. Only the active users with the default Administrator profile in SalesGrow CRM can be selected as the Super Administrator in an organization Set up Fiscal Year The fiscal year setting helps organizations to configure their fiscal cycle based on the selected start month. Once the fiscal start month is selected, fiscal quarters are automatically rolled up. By default, SalesGrow CRM's fiscal start month is set to January. You can specify the fiscal year name based on the start or the end month. For example, let's say your fiscal year starts in April 2010 and ends in March If you choose the fiscal year to be based on the start month, the year name will be displayed as 2010 (wherever applicable). If you choose the fiscal year to be based on the end month, the year name will be displayed as To set up fiscal year 1. Log in to SalesGrow CRM with Administrator privileges. 2. Click Setup > Organization Settings > Fiscal Year. 86

87 3. In the Fiscal Year page, select the Fiscal Start Month from the drop-down list. Note 4. Choose Start Month or End Month to specify if the fiscal year name should be based on the start or the end month. 5. Click Submit. The above instructions are followed to set the fiscal year for the first time. If you have already set the fiscal year but wish to update it now, the above mentioned instructions will not be applicable. To update the fiscal year after it has been set up, do the following: o Select the Forecasts module 87
88 o Click View Settings > Edit o o In the Forecast Settings Page, update the values as required. Click Save. 6. Security Management Managing the complexities of security administration is one of the growing concerns in any enterprise, especially those open to e-commerce and those with large networks. In such demanding times, the availability of Security Management is considered predominant affecting all sectors of an enterprise. The foundation of any security management is a model with role-based access control, enabling all the required functionality and authentication for a security system. SalesGrow CRM provides a set of security features that defines permission to the data as well as the features of SalesGrow CRM. Administrators control these security options in the organization's account. The role-based security ensures that data is accessible to users based on the organization's hierarchy. Profiles, on the other hand, ensure that users have permission to only the relevant 88
89 features in CRM - various modules, data administration tools. There is also Groups that allow you to extend the data-level access to other users with similar job profile. 6.1 Manage Users Manage all the users in your SalesGrow CRM account, deactivate users who are no longer part of the company account Add Users In the Free Edition, you can add upto 10 users. In the other Editions, the number of users that you can add is based on the user licenses purchased. 89
90 Availability Profile Permission Required: Users with the Manage Users permission in profile can access this feature. To add users 1. Log in to SalesGrow CRM with Administrator privileges. Users with Manage Users permission in the profile can also access this feature to add users. 2. Click Setup > Users & Permissions > Users. 3. In the Users page, click Add New User. 4. In the Add New User page, enter the following details: o First Name & Last Name - It is mandatory to enter the Last Name. 90

91 o o o - Enter the user's valid address that is not already used to create a SalesGrow CRM account. An invitation will be sent to this address. Role- Choose the role of the user in your organization. Profile - Choose a profile that defines the access rights in SalesGrow CRM account for the user. You can add other details like phone numbers, address, photo, fax, website, date of birth, language, etc. after adding the user. 5. Click Save. The system sends an invitation to the user's address. Only when the user accepts the invitation, will the status of the user change to Confirmed. Modify Users When you add a user, you will be specifying only the Name, address, Role and Profile details. You can add the other details of the user, such as, phone numbers, address, photo, fax, website, date of birth, language, etc. later whenever needed. To modify a user's details 1. Click Setup > Users & Permissions > Users. 2. In Users page, click on the user from the list to modify the user details or add more information. 3. In User's Details page, click Edit for the corresponding section in which you want to modify the user's details. You can provide the following details: o Phone, Mobile, Website, Fax & Date of Birth - Enter these details of the user. o o Address Information - Enter the full address details. Language - Select a language and it will be set as the language for the user's SalesGrow CRM account. 91

92 o Country Locale- Select your country from the list. o Time Format - Choose 12 hour or 24 hour time format. o Time Zone - The time zone that you select here will be the time set in your SalesGrow CRM account. 4. Click Save Re-Invite Users When the users do not accept the invitation sent by the Administrator within 7 days, the Administrator can resend the invitation to the user. Users who have not accepted the invitation to join the organization's CRM account will be listed under Unconfirmed Users. You can send an invite again only to the unconfirmed users. If the user is deactivated, you need to activate them. To re-invite a user 1. Log in to SalesGrow CRM with Administrator privileges. 2. Click Setup > Users & Permissions > Users. 3. In the Users page, point your mouse to the user and click the Settings icon. Click Re-invite. Alternatively, you can also go to the Unconfirmed Users view and select the user to re-invite. An invitation will be sent to the user's address. 92
93 6.1.3 Activate/Deactivate Users Sometimes in your organization, the users' hierarchical status may change or they may move to different business units. In such cases, you might have to deactivate those users after transferring ownership of the records to other users. Note that deactivating a user is different from deleting a user. When you deactivate a user: The user will no longer be able to access the CRM account. No one will be able to log into the service using the deactivated ID. You are free to use the same user license to add another user. The user license is not canceled. You will be billed for the number of user licenses that you had bought. The user will be listed under Deactivated Users. If you decide to activate the user again, you can re-invite the deactivated user. To deactivate a user 1. Log in to the SalesGrow CRM with Administrator privileges. 2. Click Setup > Users & Permissions > Users. 3. In the Users page, select the Active Users view. Point your mouse to the user you wish to deactivate and click the Settings icon. Click Deactivate. The user will be deactivated and a system generated will be sent to the corresponding user. 93
94 To activate a user 1. Log in to the SalesGrow CRM with Administrator privileges. 2. Click Setup Users & Permissions > Users. 3. In the Users page, select the Inactive Users view. 4. Move your mouse pointer to the user that you want to activate and click the Settings icon. Click Activate. The user will be activated and a system generated will be sent to the corresponding user. 94
95 Note Only active users are counted towards user licenses Delete Users Accounts You can also close your SalesGrow account, if you do not want to use any of the SalesGrow services. Important Note: On closing your account, you will not be able to access our SalesGrow Services. Before closing, please ensure that you have exported all your data from the SalesGrow CRM system and also from the other SalesGrow services. Once you close your account, all of your data within SalesGrow services will be deleted immediately and cannot be restored in future. 6.2 Manage Profiles Create profiles that define the access permissions for the users. Set module-level and feature-level permissions for different profiles Create Profiles While creating a profile, first you have to associate the existing profile to the new profile and later you can change the modules and field-level access control. The table below provides information on the default profiles and the additional profiles for the different Editions. 95
96 Cloning a Profile A profile has the following categories of permissions: Module level: Enable or disable the access to modules (tabs). Record-level: Enable or disable permissions to View, Create, Edit, and Delete records. Feature-level: Enable or disable permission to access features, such as Import, Export, Mass Mail, Mass Update, Mass Transfer etc, to the users associated to the profiles. Field-level: Enable or disable permission to access the fields in a record. In addition you can restrict the access to edit the fields. To create a new profile 1. Click Setup > Users & Permissions > Profiles. 2. In the Profiles page, click Create Profile. 3. In the New Profile page, do the following: o Enter the Profile Name. Note o Select an existing profile from the Clone Profile fields. The new profile will be cloned. Later you can modify the access control for the new profile. o Enter the Profile Description. 4. Click Save. Once you have cloned the profile, you can make the changes to the various permissions. You can create profiles only if you have more than one user in your SalesGrow CRM account Control Permissions After creating a profile, you must control the access to the modules (Leads, Accounts, Contacts, Potentials, Cases, Solutions, Products, Price Books, Tasks, Events, Forecasts, Vendors, Purchase Orders, 96
97 Sales Orders, Invoices and also Notes and Attachments), import/export, tools, report access, system administration, and general permissions for the profile. Users with System Administrator privileges can manage these permissions. General permissions: Tab Visibility: Permission to allow or restrict access to the modules (tabs) View: Permission to view the records in module Create: Permission to create the record in module Edit: Permission to modify the record in module Delete: Permission to delete the records in module List of Permissions Sections Description 97
98 Module-level Permissions To enable/disable the following permissions to the various modules (Leads, Accounts, Contacts, Cases, and others) and the records in them. Tab Visible View Create Edit Delete Tab Group Permissions Reports & Dashboards Permissions Import Permissions Export Permission Tool Permissions Admin Permissions General Permissions To provide access to the tab groups. Users will be able to access the tabs within the tab groups based on the Module-level Permissions. Permissions to manage the reports and dashboards in SalesGrow CRM and also to schedule reports. Various permissions required to import records from each module that are owned by you and organization-wide users. Various permissions required to export records from each module. Permissions required to use various features under Module Tools such as the Mass Transfer, Mass Delete, Mass , Change Owner etc. Permissions to access the features such as Roles, Profiles, Users, Groups, SalesGrow CRM Customization etc. Other general permissions to access the variety of featured in SalesGrow CRM, such as Convert Leads, Manage Subscription, Manage Workflow, Manage Custom Views, etc. To control permissions Note 1. Click Setup > Users & Permissions > Profiles. 2. In the Profiles page, click the Edit link corresponding to the profile that you want to modify. 3. In the Profile Information page, specify the access permissions for the following: o Module-level Permissions o Tab Group Permissions o Reports & Dashboards Permissions o Import Permissions o Export Permissions o Tool Permissions o Admin Permissions o Apps Permissions o General Permission 4. Click Save. You cannot edit the default profiles, Administrator and Standard. These are provided only for your reference. It is strongly recommended to define your own profiles based on the existing default profiles. 98

99 6.2.3 Associate Users You can associate the profile with the users so that they can access CRM modules and fields that are assigned to them. Users with System Administrator privileges can associate a profile with users. To associate users with a profile 1. Click Setup > Users & Permissions > Users. 2. In the Users page, click the <User Name>. 3. In the User Details page, click Edit. 4. In the User Details page, select the Profile from the pick list. 5. Click Save. Deleting Profiles When organizing your SalesGrow CRM account, you may delete some of the unwanted profiles after assigning the users to the other profiles. Before deleting a particular profile, Users associated to that profile must be transferred to other existing profiles. You can delete all the profiles except "System Administrator" and "Standard User" profiles. To delete a profile 1. Click Setup > Users & Permissions > Profiles. 2. In the Profiles page, click the Del link for the specific profile. 3. In the Delete Profile page, transfer the existing users to the new profile. 4. Click Transfer & Delete. The profile will be permanently deleted. 6.3 Manage Roles Create roles for the users in your account such as CEO, Sales Manager, Marketing Manager etc. 99
100 6.3.1 Create Roles By default, the CEO and Manager roles are enabled for your SalesGrow CRM paid account. In addition, you can create different types of roles for users based on their position in your organization hierarchy and the type of your SalesGrow CRM Edition. Note A user with an Administrator profile will have access to all the data irrespective of the role assigned to the user. To create new roles 1. Click Setup > Users & Permissions > Roles. 2. In the Roles page, click New Role. 3. In the New Role page, do the following: o Enter the Role Name. Do not add a role with the same name. o Select the immediate superior's role from the Reports To lookup. If you do not select the superior's role, the new role will be created under the CEO role. o Select the Share Data with Peers check box if you would like to enable access rights to peers. o Specify the Description for the role. 4. Click Save. Note You can create roles only if you have more than one user in your SalesGrow CRM account. 100
101 6.3.2 Assign Roles After creating roles, you can assign them to the users in your organization. A user with an Administrator profile will have access to all the data irrespective of the role assigned to the user. To assign roles to the users 1. Click Setup > Users & Permissions > Users. 2. In the Users page, click the <User Name>. 3. In the User Details page, click Edit. 4. Select the specific Role from the lookup box. 5. Click Save. Edit Roles You can modify the user roles as per changes in your organizational hierarchy. As part of the modification of the roles, you can perform the following: Rename the role Change the Superior Role Change the setting for sharing data with Peers While changing the role names, all the data sharing rules will be updated automatically. So you don't need to calculate the data sharing rules or update the user details. 101
102 Note A user with an Administrator profile will have access to all the data irrespective of the role assigned to the user To edit a Role 1. Click Setup > Users & Permissions > Roles. 2. In the Roles List, click the Role name. 3. In the Role Details page, click Edit. 4. In the Edit Role page, update the new properties for the role. 5. Click Save. Delete Roles You cannot delete the existing roles without transferring the users to a new role. To delete a Role 1. Click Setup > Users & Permissions > Roles. 2. In the Roles page, click the Role name. 3. In the Role Details page, click Delete. 4. In the Delete Role page, click on an existing Role to transfer the child-roles to the selected role. 5. Click Transfer & Delete. Now the role and child-roles are transferred to the new role and a different organization hierarchy is created. 6.4 Territory Management Segment customer accounts based on account characterists such as, products or services, expected revenue, zip code/region, or industry, rather than record ownership Create Territories 102
103 Understanding Territory Management Using Territory Management, you can segment accounts, contacts and potentials into territories. You can build a territory hierarchy by creating territories and sub territories. You can define criteria for each of these territories and based on the criteria, records will be assigned to the territories. Based on the territory criteria, when a record is created or modified, territories are automatically assigned to the records. A record will not be assigned to a sub territory unless it meets the criteria of the parent territory. An account or contact can be assigned to a maximum of ten territories. Whereas, a potential can be assigned to only one territory. Each territory can have a manager who can: o Create forecasts for the users in the territory. o Provide permissions for the users in the territory. Territory managers will always have the Read and Write permissions for their territories. Territories are automatically assigned for the records. If required, the territory managers can manually assign records to their territories and sub territories. Also, users with administrator profile can assign territories to records. Multiple forecasts can be created for a user. Users cannot create forecast for themselves. Only the manager can create it for the users. You can disable territory management based on your business needs. If you enable the feature again, the territory structure will remain unchanged. Permissions to Access Records in a Territory With Territory Management, the following criteria determines who can access the records in a territory. The module-level permissions in profiles. The permissions set for users in a territory. Users can edit records in their territory only if: The user has the profile permission to edit records of the module. The territory to which the record belongs provides Read-Write-Delete permissions to its users. The user is the manager of the territory to which the record belongs. Note Users will have full access to the records they own. Child records will have the same permissions as that of the parent record. Users with the Administrator profile will have full access to all the records. Various Roles and Responsibilities Role Responsibility 103
104 Administrators Activate/Deactivate territory management. Create territories. Add/Remove users in a territory. Manually assign territories to records, if required. Territory Managers Create sub territories for their territories. Add/Remove users in the territory. Set up forecast targets for their territories. Manually change the territory for accounts, contacts and potentials. Territory Members (Read-only Permission) Territory Members (Read-write Permission) View accounts, contacts, and potentials View sales forecast of the territory Create or modify accounts, contacts and potentials View sales forecast of the territory Owner of CRM Records Can perform all functions as per the profile-level permissions. Enable Territory Management Before you enable Territory Management for your organization's account, please make sure that you have read our Decision Guide for Territory Management. While enabling this feature, you have two options: Build territory hierarchy from scratch - Using this option, you can create territory hierarchy from scratch. 104
 will be transferred as territory managers. You may later have to change the territory hierarchy as per you business needs.")
105 Extend your territory hierarchy from role hierarchy - Using this option, you can replicate the hierarchy from Roles to Territories. All the users in a role will be added as user in the territory. The role managers (in the new role hierarchy) will be transferred as territory managers. You may later have to change the territory hierarchy as per you business needs. It is important to note that you can either build territory hierarchy from scratch or extend your role hierarchy to territory hierarchy. Once the option is chosen, you cannot go back to the other option. Once territory management is enabled: All the accounts, contacts and potentials will have an additional field, Territories. 105

106 In the Accounts, Contacts, Potentials home page, a drop-down will be available with the territories that you create. 106
107 You will have the option to create forecasts based on territory hierarchy. Users belonging to multiple territories can have multiple forecast targets set for each territory. To enable territory management 1. Click Setup > Territory Management > Territories. 2. Click Get Started. You will have the following options to create a territory hierarchy. o Extend from Role Hierarchy - Click to replicate the hierarchy from roles to territories. o Start from Scratch - Click to create territory hierarchy from scratch. Enable Potential Rule for Territories Creating a territory requires you to specify criteria based on which territories are assigned to accounts. With Potential Rule enabled, you can specify criteria based on which territories are assigned to potentials. Once you enable the Potentials Rule, whenever you create a territory or edit an existing one, the option to add Potential Rule will be available. You can disable the Potential Rule any time. On disabling, the potentials will be automatically reassigned to the territories based on the associated account's territory. When you enable again, potentials will be automatically assigned to territories based on the Potential Rules. 107
108 To enable or disable potential rule 1. Click Setup > Territory Management > Territories. 2. Click the View Settings link. 3. In the Territory Settings popup, click the Enable/Disable link. Create Territories Users with the Administrator profile can create territories. Territory managers also have the default privilege to create sub territories for their territories. To create a territory 1. Click Setup > Territory Management > Territories. 2. Click New Territory. 3. In the Create Territory page, specify the following: o Specify a Name for the territory. o Choose a Territory Manager from the drop-down list. 108
109 o Choose a Parent Territory from the lookup. o o o o Search and add Users and allot Permissions. These users will have access to the records assigned to this territory. All the users can have the same permission for the records, either Read Only or Read/Write/Delete. Under Account Rule, specify criteria for accounts. Based on this rule criteria, territories will be assigned to accounts in SalesGrow CRM. Under Potential Rule, specify criteria for potentials. This options will be available only if it is enabled under Settings. Based on this rule criteria, territories will be assigned to potentials in SalesGrow CRM. 109
110 o Enter Description. 4. Click Create. Create Sub Territories Under each territory, you can create sub territories. In case a sub territory does not have a manager, the parent territory's manager administers the sub territories. To create a sub territory 1. Click Setup > Territory Management > Territories. 110
111 2. In the Territory Hierarchy page, move your mouse pointer to a territory and click on the Create Child Territory icon. 3. In the Create Territory page, specify details. Refer to the steps in Create Territory. Delete Territories When you delete a territory: You lose the territory details forever. You will be prompted to transfer the sub territories to another parent territory in the hierarchy. The forecast created for the current and previous quarters/months will remain. To delete a territory 1. Click Setup > Territory Management > Territories. 111
112 2. In the Territory Hierarchy page, move your mouse pointer to a territory and click on the Delete icon. Manage Forecasts When you enable territory management, you can configure the organization's forecast settings and begin creating forecasts every quarter/month. To configure organization's forecast settings (after enabling territory management) 1. In the Forecast module, click Get Started. 2. In the Forecast Settings page, select the Target Period as Monthly or Quarterly. 3. Choose the Fiscal Start Month from the drop-down list. 4. Select Start Month or End Month. Based on your selection, the year will be displayed in the forecasts. For example, your fiscal year is from April to March. You select the End Month option for the financial year The year in the forecast will be mentioned as Select the Target Field, and click Save. You will be asked to confirm the settings after which you can start creating forecasts for users. Disable Territory Management You can disable territory management. On disabling this feature the following will not be accessible: The information related to territories in the Accounts, Contacts and Potentials modules. 112
113 The existing forecasts based on territory hierarchy. It will be deleted permanently. You will be able to create forecasts based on role hierarchy. To disable territory management 1. Click Setup > Territory Management > Territories. 2. Click Disable Territory Management Assign Territories How are Territories Assigned? Automatically Territories are automatically assigned to accounts, contacts and potentials when they are created or modified. When a record meets the criteria of a territory, only then is it validated for its sub territories. If a record does not meet the criteria, it will be validated for the next territory of the same level in the hierarchy. When a record satisfies the criteria of a territory, it will be assigned to that territory and SalesGrow CRM will further move on to check if the record meets the criteria of the other territories and sub territories in the hierarchy. 113
114 For example, take the following territory hierarchy: Manually In the example: o If the record meets the criteria for North America and also for its sub territory, Central then the record will have Central territory assigned to it. Please note that both the territories, North America and Central, will not be assigned to the records. o If the record meets the criteria for Zillum, but does not satisfy the criteria for other territories in the hierarchy, then only Zillum will be assigned to the record. Territory managers can manually assign records to their territories and sub territories. Users with Administrator profile can also manually assign territories to records. 114
115 Territories that are manually added can only be removed manually. Automatically assigned territories cannot be removed manually. Territory Assignment for Accounts Here are some scenarios: Scenarios Record meets the criteria of a single territory. Record meets the criteria of multiple territories. Record does not meet the criteria of a parent territory but meets the criteria of its sub territory. Record does not satisfy the criteria of any territory. What will happen? The record will be assigned to the territory. The record is assigned to all those territories. Neither the parent territory nor the sub territory will be assigned to the record. No territory will be assigned to the record. A maximum of ten territories can be assigned to an account. Here are some use cases and the consequence Territory Assignment for Contacts Here are some scenarios: Scenarios An account is not associated to the What will happen? Territory will not be assigned to the contact. 115
116 contact. The account associated to the contact does not have a territory. The account associated to the contact has a single territory. The account associated to the contact has multiple territories. Territory will not be assigned to the contact. The account's territory will be assigned to the contact. Territories will be assigned based on the following criteria for: 1. The contact owner is part of any one territory of the account. 2. The contact owner is the territory manager of any one territory of the account. 3. The contact creator is part of any one territory of the account. 4. The contact creator is the territory manager of any one territory of the account. A maximum of ten territories can be assigned to a contact of which only one territory can be automatically assigned based on the account associated to the contact. For more details, refer to the Assignment of Accounts table. With the above use cases, if the system does not determine a single territory then territory will not be assigned to the contact. Territory Assignment for Potentials (Opportunities) Territories are assigned to potentials based on Potential Rules. For various territories and sub territories you may have created potential rules. Two factors are taken into consideration in determining the potential rule that will be applied to a potential record. They are: Contact associated to the Potential - If the contact associated to the potential has a territory assigned to it, CRM will check for Potential Rules in that territory. If there are sub territories, The system will check the first level territories for Potential Rule. If none exists, it will skip to the second level and check. The system will not check further if no Potential Rule is available in the second level as well. When the Potential Rules exists in the first level territory in the hierarchy, but the record does not satisfy the criteria, then the system will not check the second level. Account associated to the Potential - If the contact associated to the potential does not have a territory assigned to it, CRM will check for the Account associated to the potential and check the account's territory for Potential Rules. If there are sub territories, This method will also be followed when: 116
117 A potential does not satisfy the criteria of the territories with Potential Rules. With the previous method, if more than one territory matches the potential. A potential does not meet the criteria in the Potential Rule of the first level of hierarchy. The first as well as the second level of territory in the hierarchy does not have a potential rule. Also, territories will be reassigned to potentials, if the associated account or contact is modified. Here are some business scenarios: Scenarios - Contacts An account or contact is not associated to the potential. The contact associated to the potential has a single territory. The contact associated to the potential has multiple territories. What will happen? Territory will not be assigned to the potential. The contact's territory will be assigned to the potential. Territories will be assigned based on the following criteria for: 1. The potential owner is part of any one territory of the contact. 2. The potential owner is the territory manager of any one territory of the contact. 3. The potential creator is part of any one territory of the contact. 4. The potential creator is the territory manager of any one territory of the contact. Scenarios - Accounts The account associated to the potential has a single territory. The account associated to the potential has multiple territories. What will happen? The account's territory will be assigned to the potential. Territories will be assigned based on the following criteria for: 1. The potential owner is part of any one territory of the account. 2. The potential owner is the territory manager of any one territory of the account. 3. The potential creator is part of any one territory of the account. 4. The potential creator is the territory manager of any one territory of the account. 117
118 Note Only one territory can be assigned to a potential. With the above use cases, if the system does not determine a single territory then territory will not be assigned to the potential. Also, note that if a territory is manually assigned to a record, the territories will not be assigned automatically based on the use cases mentioned above. Territory Reassignment When Records Are Modified For accounts, the associated child records are contacts and potential. When an account is modified and falls into another territory, the associated contact and potential may also be reassigned to a different territory. The following table will provide details on the various use cases when the parent record is modified. Here are some business scenarios: Parent records that are modified A record that was part of two or more territories is now reassigned to a new territory. A record that was assigned to only one territory is now assigned to additional territories. A record that was assigned to only one territory is now reassigned to new territories. A record that was assigned to more than one territory is now assigned to additional territories. A record that was assigned to more than one territory is now reassigned to new territories. What will happen to the associated records? Records will be reassigned to the new single territory. Records will remain assigned to the parent record's territory. It will not be assigned to the new additional territories. Records will not be assigned to the new territories. The associated records will not be part of any territory. Records will remain assigned to the parent record's territories. It will not be assigned to the new additional territories. Records will not be assigned to the new territories. The associated records will not be part of any territory. Run Rules to Assign Territories Automatically When the territory's assignment rules are run, records that meet the rule criteria in the territory will automatically be assigned to the territory. Initially, when you go to Setup > Territory Management > Assign Territories in your SalesGrow CRM account, you need to run the rules for the existing accounts. Based on the account's territories, the associated contacts and potentials will also be assigned to territories. If you enable Potential Rules, you can run rules for potentials as well. You can look up records and assign them to territories using one of the three options listed below: By Territory - Records from the selected territories will be listed. You can select the records and assign them to territories. By Custom View - When you have the records sorted using list views, it is easier to view and assign them to the appropriate territories. 118

119 Apply my own criteria - When both the options above do not serve the purpose, you can always define a set of criteria to filter records. This option, allows you to modify the set of criteria using the Change Pattern option. To search records and assign to territories 1. Click Setup > Territory Management > Assign Territories. 2. Choose Accounts or Potentials from the drop-down. 3. Choose one of the following from the drop-down: o Territory - Select the territory and sub-territories from the drop-down list. o Custom View - Select the list view from the drop-down list. o My own criteria - Specify a set of criteria to filter records. Note 4. Review the matching results that are listed and click Run Rules. Records will be assigned to various territories based on the territory rules. You will receive a confirmation when the process of assigning territories is complete. Territories that are manually added can only be removed manually. Automatically assigned territories cannot be removed manually Decision Guide Introduction Territory Management is a system by which customer accounts are grouped based on a defined set of criteria. This makes for easy sharing of customer accounts among sales teams in your company. In SalesGrow CRM, the territory management feature lets you: Create territories and specify criteria that defines a territory. Build a territory hierarchy in addition to the role hierarchy in your account. Access predefined reports on territories, such as, Star performers across territories, Overall Sales Cycle Duration among territories, Revenue By Territories, etc. Create custom reports on territories. Set multiple forecast targets for users belonging to multiple territories. 119
120 Territory management need not be a requirement for every organization. You need to decide on the usage of territories for your organization's sales structure and data-sharing model. This document will guide you and help you decide if Territory Management is required for your company. Role vs Territory Let us first take a look at the advantages that territory management has to provide, when compared to roles. Role Hierarchy Record ownership is with one owner. Record is accessible to: Territory Hierarchy Record ownership is with one owner. Record is accessible to: Owner of the record Users who are superior to the record owner in the role hierarchy Users who have access granted based on the data sharing rules. Owner of the record Users who are superior to the record owner in the role hierarchy Other users in the record's territory Users in the territories that are superior to record's territory. Segment customer accounts based on the record ownership. User can be assigned to only one role. User can have a single forecast target only. Segment customer accounts based on the account characteristics. User can be assigned to multiple territories. Users can have multiple forecasts targets, one for each territory that they belong. Here is a business scenario to explain better! 120

121 Let us assume that the sales force in WTM Inc. comprises of six teams across the United States - North Central, North East, North West, South Central, South East and South West. In this sales structure, You do not want the sales team from any specific region to access the records of another region. There may be a few important prospects that you want to share with the senior sales reps from two different teams, in two regions. It may become a complicated process to achieve this using roles and data sharing rules alone. On the other hand, with territories based on a defined set of criteria, you can extend the SalesGrow CRM datasharing model in your SalesGrow CRM account and easily share records with various users in different teams. This will ensure that the teams are focused towards a goal to achieve the sales target set under the different times zones. 121
122 Before You Move to Territory Hierarchy Before you plan to set up Territory Management in your SalesGrow CRM account, consider the following topics that will help you determine if Territory Management is suited to your organization. Sales Structure and Sharing Needs - A CRM data sharing structure, which requires individuals belonging to multiple territories to access multiple customer accounts. Forecasting - Forecasts based on territory hierarchy. The need to set forecasts targets for each territory a users belongs. Administration - Territories can be managed as individual units to reduce the burden on the administrators. Sales Structure and Sharing Needs How is your data shared with other users? It is crucial to analyze if the role-based hierarchy, data sharing rules, groups and assignment rules provide the best options to share accounts as per your sale structure. Your organization may have the need to share records based on the products or services, revenue, zip code/region, or industry, and not based on the record ownership. For such a complex and collaborative sharing model, you need territories that ensure effective grouping of customer accounts and sharing records with different sales teams. Does the sales structure in your organization require you to share customer accounts with many people from different teams? Take this as an example: You have a ground sales representative who makes calls to the prospect and arranges for a meeting. You also have a field sales representative to visit the prospect for a demo of the product. How do you share accounts with both these sales reps? An organization's sales structure may either be linear or a complex matrix, where data sharing is one to many. Territory Management will be right for your organization, if Your company's sharing needs depend more on account's characteristics rather than the individual ownership of the records. Your organization has a matrix sales structure, which requires individuals belonging to multiple territories to access multiple customer accounts. 122

123 Forecasting When you switch to Territory Management in SalesGrow CRM, forecasts will also change to suit the territory requirements. When a user is part of multiple territories you may need to set different sales targets for the user, as you will have different targets set for each territory. Having a single forecast target for the user will not work then. By splitting your monthly/quarterly targets based on the territories and the customer accounts in them, you will have a clear picture of the sales forecast and the target to be achieved. Administration Does your administrator find it complicated to manage the numerous sharing rules that have to be monitored when there are changes in the sales structure? When there is a complex data sharing architecture, some of the challenges that you have to be aware of are: Providing similar data access to multiple users, managing those permissions individually or on a role level for users, creating multiple sharing rules, maintaining huge data volume and monitoring frequent movement of sales reps to different sales groups. Territories, on the other hand, are easier to manage. For example: Your sales structure is demarcated based on region. A sales executive who takes care of customer enquires that come from China is a star performer in your team. You decide to give this sales rep additional responsibility, to handle customers from Japan. In this example, territory management gives you the flexibility to add the user in China and 123

124 Japan sales territory to where the sales executive can access the customer records from both the countries. When complex data sharing rules and role hierarchy do not meet the requirements, territories are a much easier option to maintain as individual units that will also reduce the burden on the administrators. Visualizing your organization's sales structure in a territorial hierarchy can help decide if Territory Management is the option for you. Reasons to Use Territory Management! Do you need to avoid uneven distribution of the customer accounts to enhance focused sales and team responsibilities? Your sales reps may either have too much work or too little work. This could potentially lead to wasted resources and lost revenue. The workload needs to be properly distributed to give your existing customers and prospects the attention that they need. Say your customer account segmentation range from small businesses to large corporations and the opportunities are handled by the sales people based on the deal size. In such a structure, use territories to divide your sales team and assign prospects by business size to gain flexibility over data visibility and sharing. 124

125 One group of sales reps can handle deals with maximum 50 licenses, another group can be assigned to deals with 50 plus licenses. In case of dynamic sales teams, having territories also facilitates easy movement of sales reps, as they may need to switch between territories. Does your organization's business and data sharing model depend more on account's characteristics (geographical divisions, customer account's size, multiple products lines, industry, etc.) and less on the individual ownership? Using territorial hierarchy is a big advantage as territories provide more flexibility over data visibility and sharing. Let's say you sell furniture for schools in different districts. Each sales group takes care of sales in their respective school districts. Within each district there are numerous schools (pre schools, high schools, college) that would like to buy furniture. Depending on the district and the quantity of order placed, you assign the deal to your sales reps. Here, it's the account's characteristic of the account that decides the overall sales structure. Using the territories here, will benefit you. It will provide focus and simplify the process of record sharing among individuals of different teams. Are your customers spread across various geographical locations? If so, do you want to reduce travel time and expenses for your sales team? Creating territories based on geographical locations of the market, and strategically placing sales reps within their native country s sales territory can be of great advantage for the business. This reduces the 125

126 time on travel as business opportunities are centered in one demarcated area. Also, this will help your sales team overcome the cultural and language barriers that different territories have. Does your business structure provide cross-selling opportunities? If so, do you need a flexible data sharing system that helps cross-selling to promote both customer retention and revenue growth? With a business that deals in software for HR management, financing, staffing, and project management you may have a sales group focused on each of these products. When a prospect is interested in two of these products, how do you share the customer account with individuals from different teams who are involved in the sales cycle! Having a territorial hierarchy based on the product lines and granting access to sales reps from multiple teams is an efficient way to manage this scenario. It helps in collaborative cross selling for your business. Would you look for industry expertise in your sale reps, if your company deals with multiple product lines and verticals? Sales reps need a thorough product/service knowledge and expertise that help boost sales. In travel business, if you are in charge of a Caribbean cruise, you have to be familiar with the tour packages, the pricing, itinerary, ship information, its special features, excursions and so on. Create a territory that includes customer accounts interested in the Caribbean cruise. Belonging to this territory that gives you enough experience and opportunities to develop your proficiency and negotiating skills is definitely good for sales. Your Decision Make sure you choose the right data-sharing model for the smooth running of your business. If you would like to find out how Territory Management will suit your business needs, you can also refer to the online help for more details on how it works. To conclude use territory management if you: 126
127 Have a complex sales structure with the need to often change users to different sales teams/territories. Need to segment customer accounts based on the account characteristics rather than the record ownership. Want an easy to maintain process for the administrators to manage sharing of data among multiple users of different teams. Require multiple forecasts targets for users belonging to different sales territories. 6.5 Manage Groups Create groups to manage a common set of records with a group of members. Create Groups You can create different types of user groups and share the common records among groups. To create groups 1. Click Setup > Users & Permissions > Groups. 2. In the Groups page, click Create Group. 3. In the New Group page, do the following: 127
128 o In the Group Details section, specify the Group Name and Description for the group. o In the Group Source section, select the group members. You can select users, roles, roles & subordinates, and different groups as members of the new group. 128
129 4. Click Save Share Records In SalesGrow CRM, records are always owned by the user. However, access rights to the records can be extended to other users by grouping a set of users and setting up sharing rules for each module. After setting up the sharing rules, group members can access records in CRM modules as per their permission in their profile. For example, if "User A" doesn't have access to the Potentials module, he/she cannot access the Potentials by setting up data sharing with groups. The owner has all rights on the records Records cannot be owned by groups. However, records can be shared with other users by groups and setting up data sharing rules 129

130 A User must have profile-level permission to access the records To apply the record sharing, you must recalculate after setting up the sharing rules To share data with groups 1. Click Setup > Users & Permissions > Data sharing Rules. 2. In the Data Sharing Rules page, setup sharing rules for each module. 3. Click Save Assign Users After creating a new group, you can associate members with the group. As mentioned above, group members can be users, roles, roles & subordinates or other groups. After assigning group members you can share the CRM data among users by applying data sharing rules. Note You can assign users to multiple groups and they can access data as per the permissions in the profile and sharing rules. To associate users to a group 1. Click Setup > Users & Permissions > Groups. 2. In the Groups page, select the group to which you want to assign users. 3. In the Group Details page, click Edit. 4. Under Group Sources, select the users. You can select users, roles, roles & subordinates, and different groups as members of the new group. 5. Click Save. Edit Groups After creating groups, you can update the group name and group members as your requirements grow. 130
131 To edit groups 1. Click Setup > Users & Permissions > Groups. 2. In the Groups List page, you can see the list of Groups you have added. 3. In the Public Groups List page, click on Edit. 4. In the Edit Group page, do the following: o In the Group Details section, specify the group name and comments for the group in Group Name and Description fields respectively. o In the Group Source section, select the group members. You can change the users, roles, roles & subordinates, and different groups as members of the new group. 5. Click Save. Delete Groups Periodically you may consider cleaning up the unwanted groups using the delete function. While deleting, all the data sharing rules will be calculated automatically, updating the changes, so you won't need to recalculate them. To delete Groups 1. Click Setup > Users & Permissions > Groups. 2. In the Groups page, the list of group names will be available. 3. Click the Del link to remove any Group from this list. 6.6 Data Sharing Rules Define rules that help you to share data with peers, management, and subordinates Manage Data Sharing By default, access rights to CRM records is set as private so that the record owner and his/her manager can oversee the CRM data. However, using the Data Sharing Rules, you can extend the access rights to users belonging to other roles and groups. Once the data sharing rules are configured, users associated to other roles and groups can gain additional access to the records that belong to other users. Key Features By default all the modules have a Private option. If the Organization-wide permission is set as Public Read/Write/Delete, everyone can access and update all the users data. Role Hierarchy and Sharing Rules will not be applied in this case. If the Organization-wide permission is set as Read Only, everyone can only view the other users' records. In this case other users cannot modify the owner's records. If the Organizational permission is set as Private, Role Hierarchy and Sharing Rules can be applied. 131
132 You cannot restrict the accessibility set in Organization's default permissions by writing the Sharing Rules. You can only extend the additional data visibility In the Import History, records that belong to you and your sub-ordinates (if any) will always be shown. All the Attachments, Notes, s and Competitors belonging to a record are accessible, if you are able to view that record. Forecasts will always be private. Managing Default Data Sharing Process You can provide the following types of access levels to user in SalesGrow CRM modules: Private: Only the record owner and his/her superior can view the record. Public Read only: Users can view others' records but cannot modify and delete the records. Public Read/Write/Delete: Other users can view, modify and delete the records. Availability this feature. Profile Permission Required: Users with the Manage Data Sharing permission can access Note By default, access rights to CRM records is set as private so that the record owner and his/her manager can oversee the CRM data. The organization-level data sharing model is not yet implemented for Notes, Reports, Dashboards, and modules. To manage default permissions 1. Click Setup > Users & Permissions > Data Sharing Settings. 2. In the Data Sharing Settings page, click Edit All Default Permissions. 3. In the Edit Default Organization Permissions page, update the following Access Privilege for modules: o Private o Public Read Only 132

133 o Public Read/Write/Delete 4. Click Save after updating access privileges for all the modules Creating Data Sharing Rules This feature helps you to create rules to provide access or restrict users from viewing your data in various modules. Availability this feature. Profile Permission Required: Users with the Manage Data Sharing permission can access 133

134 To create data sharing rules 1. Click Setup > Users & Permissions > Data Sharing Settings. 2. In the Data Sharing Settings page, click New Sharing Rule for the corresponding module. 3. In the New Sharing Rule page, do the following: o Specify from whom the records are shared. o Specify to whom the records are shared. o Choose the Access Type from the drop-down list. o Select the Superiors Allowed check box to allow data sharing to the superiors. 4. Click Create Sharing Rule. 7. Customization Customizing is the most powerful way of achieving a successful organization-specific Customer Relationship Management system. One of the key elements of SalesGrow CRM is its capacity to allow customization and the flexibility to do so. Based on the organization's requirements, users with Administrative privileges can implement SalesGrow CRM customization. You can customize a lot of elements like the tabs (modules), the page layouts, sections in a page, fields, etc. The changes include renaming, reordering items and even hiding tabs and fields that are not required. 134

135 7.1 Home Tab Customization Personalize your Home tab by adding components and rearranging them Add Components In the Home tab, you can add up to 5 components. Each component will list data from the various others modules like the Leads, Potentials, Activities, Dashboards etc. To add components 1. In the Home tab, click (Customizable option icon). 135


136 2. In the Home tab, click (Add Component icon). 3. In the Add Component pop-up window, do the following: o Select a Module from the drop-down list. o Specify a Component Name. o Select a Column Layout. You can either have a one column or a two column layout. o Select the Custom View whose data you want to view in the Home tab. o Click Save. Note 4. Click the navigation arrows to view more records. Only 5 records will be listed per page. In the Classic View, you cannot customize the components. The number of records per page can be selected by the user. Based on the SalesGrow CRM Edition, users can select the records per page. Customize Column Headings in Components In the Customizable view, the components that you add in the Home tab can be list views or data in the form of pipelines, pie charts or bar graphs, etc. For the List View components you can easily add, delete and reorder the columns. You need to make the changes for the list view and the same will be applied to the related components in the Home tab also. 136
![To customize column headings 1. Click the [Module] tab. (For eg. Leads, Contacts, Accounts, etc.) 2. In the [Module] Home page, select the list view that you want to edit. 3. Click the Edit link. 4.](/docs-images/80/80447117/images/137-1.jpg "In the Edit View page, select and move the fields to the Available Columns list box.")
137 To customize column headings 1. Click the [Module] tab. (For eg. Leads, Contacts, Accounts, etc.) 2. In the [Module] Home page, select the list view that you want to edit. 3. Click the Edit link. 4. In the Edit View page, select and move the fields to the Available Columns list box. After selecting the columns you can change the order of the columns or remove unnecessary columns from the Selected Columns list box. 5. Click Save. The changes will be applied to the related components in the Home tab Change to Customizable Mode Under the Home tab, you can either set the Classic mode or the Customizable mode where you add up to 5 components and rearrange them to suit your needs. To change to Classic or Customizable Mode 1. In the Home tab, click the Customizable option icon. The Customizable View of the Home tab will be available. You can add components and rearrange them. 7.2 Tab Settings Customize the tabs by renaming them, hide unwanted tabs and create web tabs of your own. 137
138 7.2.1 Organize Tabs The option to organize tabs allows organizations to display only the relevant number of modules and hide the unwanted ones. For instance, an educational organization using SlaesGrow CRM might not require the Quotes or Invoices, so these modules can be hidden. You can also change the order of the modules by moving them up or down on the list. Availability Profile Permission Required: Users with the Administrator profile can access this feature. To organize tabs 1. Log in to SalesGrow CRM with administrative privileges. 2. Click Setup > Customization > Modules. 3. In the List of Modules page, click Manage Modules. 4. Use the horizontal arrows to move the tabs from the Unselected Tabs list to the Selected Tabs list and vice versa. 5. Click Save. 138
139 Note The Home tab cannot be hidden. Irrespective of the profiles, hidden modules are not displayed to any user Rename Tabs The SalesGrow CRM system provides an option to rename the tab names according to industry-specific terminologies. For instance, the Leads tab can be renamed to Candidates in an educational institute. Users with Administrator privileges can change the tab names. These changes are reflected in all the standard pages of the user interface except for custom reports and dashboards. Availability Profile Permission Required: Users with the Administrator profile can access this feature. The table below displays the industry specific tab names comparing them to the standard SalesGrow CRM tabs: salegrow CRM Ad Agency IT Firm School Leads Leads Leads Candidates Accounts Clients Accounts Parents Contacts Advertisers Contacts Students Products Media Type Services Courses To rename tabs 1. Log in to SalesGrow CRM with administrative privileges. 2. Click Setup > Customization > Modules. 3. Move the mouse pointer to the module that you want to rename. 139
![4. Click on the Setting icon, and then click Edit [Module]. 5. Enter the singular and plural forms of the module's name in the respective text boxes. 6. Select the profile(s).](/docs-images/80/80447117/images/140-1.jpg "Users in the selected profiles will have access to the module. 7. Click Save. Note New tab names will not be reflected on the Page Layout, Reports, and Dashboards modules.")
140 4. Click on the Setting icon, and then click Edit [Module]. 5. Enter the singular and plural forms of the module's name in the respective text boxes. 6. Select the profile(s). Users in the selected profiles will have access to the module. 7. Click Save. Note New tab names will not be reflected on the Page Layout, Reports, and Dashboards modules. Standard names are always displayed. All the fields' names will also change according to the new name. For example, if you change the "Account" tab to "Client", the "Account Name" field will be changed to "Client Name". If you change a tab name to plural form with the suffix "-ies", the singular form will be suffixed with "y". For example, if you change "Potentials" to "Opportunities", in all the places the singular form of "Potential" is changed to "Opportunity". 140
141 While changing the tab name you can add singular and plural names for the tab, eg: Leads vs. Lead Custom Tabs SalesGrow CRM offers more than 10 standard modules for Sales, Marketing, Customer Support and Inventory management. These modules have predefined business logic, including page layout, reports, and workflow automation, which cannot be completely modified to accommodate your other business processes. Every business has a set of requirements that may not fit into these standard modules. You may require modules that are unique to your organization; that would cater to the needs of your organization, store data that is relevant to your business process and most importantly, be linked with the other standard modules in your account. For example, a real-estate company using SalesGrow CRM would like to track not only leads, contacts and prospects but would also want to tightly link with properties, buildings, etc. Without these modules, customer life-cycle management is incomplete. To address these unique business requirements, you can create your own modules. With the Custom Modules functionality in SalesGrow CRM, you can develop new modules using built-in tools that need no programming skills. These custom modules can seamlessly integrate with core CRM modules and need not be stand-alone modules. What more, you can: Add fields and modify the page layout as per your needs. Use roles and profiles to define access controls for the custom modules and its fields. Import data to the custom modules with ease. Take a backup of your data, anytime. Send mass s to the records in the custom module. Use macros to execute a set of actions. Create workflow rules to automate your business process. Build module relationship by linking custom module records with standard module records. Availability Permission Required: Users with Administrator profile can create custom modules. 141

142 Add Custom Modules Only users with administrator profile have the permission to create modules in your organization's SalesGrow CRM account. To add custom modules 1. Log in to SalesGrow CRM with Administrator's privileges. 2. Click Setup > Customization > Modules. 3. Click Create Module. 4. Enter the singular and plural form of the module name in the respective text boxes. 5. Select the profile(s). Users in the selected profiles will have access to the custom module. 6. Click Create. On creating the module, Record Name, Record Owner, and Secondary fields will be automatically added. You can further create fields for the custom module and customize the page layout. An Example For Real Estate Business Here is an example of a cusotm module added in a Real Estate account. In the subsequent sections, you'll learn how to use other administrator functions. 142
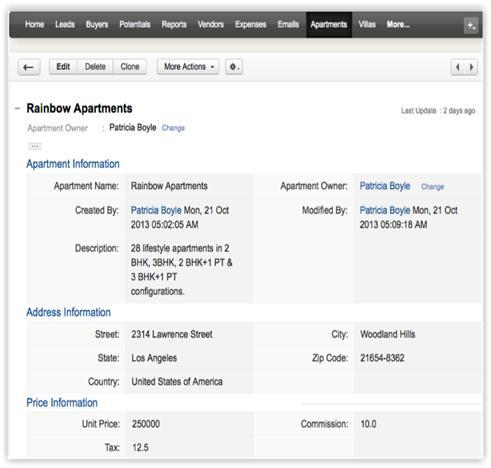
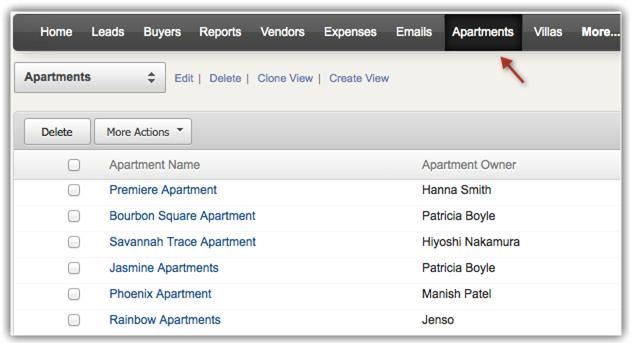
143 143

144 Edit Custom Modules To edit custom modules 1. Click Setup > Customization >Modules. 2. Move the mouse pointer to a module and click on the Settings icon. Options to Edit 'Module', Page Layout, Field Level permissions and Delete will be listed. 3. Click the Edit 'Module' link to edit the module name, and the profile permissions for it. 4. Click the Page Layout link to edit page layout of the module. 5. Click the Field Level permissions link to control the access of fields in the module. Note 1. To edit the field label of the [Module] Name, click Edit aganist the field label. 2. In the Edit Custom Field section, enter the new label. 3. Click Save. Except for the [Module] Name, no other primary field in a custom module is customizable. Link Custom Modules With Other Modules By linking a custom module with a standard or another custom module, you can build module relationship and connect data easily. This is very useful in creating a variety of reports based on the data in your custom module. This cross module linking can be done using Lookup Fields. Similarly, you can also link standard modules with custom modules but creating a lookup field in the standard module. 144
145 To create lookup field in custom module and link it to another module 1. Log in to SalesGrow CRM with Administrator privileges. 2. Click Setup > Customization > Field. 3. Select the custom module from the drop-down list and click New Custom Field. 4. In New Custom Field page, select Lookup from the Field Type list. 5. In the Field Details section, do the following: 6. Enter a name for the lookup field in the Label text box. (Eg. Interested Buyers) 7. Select the Section Name from the drop-down list where the field should be displayed. (Eg. Apartment Information) 8. Select a module from the Lookup Type drop-down. The custom field wil poulate data from the module selected here. (Eg. Buyers. The lookup field will list all the records from the Buyers module.) 145
146 9. Enter the Related List Label. (Eg. Interested Apartments) A related list will be created for the records in the Buyers module. 10. Click Save. Delete Custom Modules When there is a need to delete a custom modules make sure that it is not linked to another module. Once you delete the custom module, you can't restore data from it. Before deleting make sure you have checked the following: You have taken a back up of your data using the Export feature. The module is not liked with any other custom or standard modules. Workflow rules that are configured for the custom module are deleted. Alternatively, you can hide the custom module for all the users in the organization's CRM account or only to specific profiles. To delete custom modules 1. Click Setup > Customization > Modules. 2. Move the mouse pointer to a module that you want to delete and click on the Settings icon. 3. In the menu, Delete link. Make sure to read the instructions in the pop-up box and then click Yes, Delete now to delete the module Group Tabs The different departments in your organization may use different modules (tabs) in SalesGrow CRM. Tab groups let you organize the tabs available in your SalesGrow CRM account. You can group the Sales, Marketing, Support and Inventory related tabs and share the tab groups with users of the corresponding profiles in CRM. For instance, the Sales group may use only the Leads, Contacts, Accounts, Potentials, Reports and Dashboards tabs. So you can create a Sales Tabs group and provide accessibility only to the Sales profile. Please note that the users will be able to access the tabs in a Tab Group based on the Module-level Permissions in their profile. Availability Profile Permission Required: Users with the Administrator profile can create tab groups. 146
147 To create tab groups Note 1. Click Setup > Customization > Tab Groups. 2. In the Tab Groups section, click Create Tab Group. 3. In the Create Tab Group page, do the following: o Enter a Group Name. o Select the tabs from the Available List. o Move the tabs to the Selected List. 4. Click Save. You can create a maximum of 10 tab groups with any number of tabs in each group. For a given profile, only the tabs in the tab group will be accessible. The users will be able to access the tabs in a group based on the Module-level Permissions in their profile. 7.3 Page-Level Customization Customize page layouts & columns available in the related list items and create custom views to filter records Customize Page Layout Page-level customization is one of the important functions that allow CRM administrators to define the organization-specific requirements within each module. Ideally, this should be completed before rolling out the CRM system for the organization. Customize Page Layout Customizing the page layout allows you to do the following: Add required fields or hide the unwanted fields Reorder the fields Mark fields as mandatory Create and delete sections Change to one column or two column layout 147

148 Availability Profile Permission Required: Users with the Customize SalesGrow CRM permission can access this feature. Add Required Fields or Hide Unwanted Fields By default all the standard fields are displayed in each module page layout. The customs fields that you create will also be displayed. You can hide some of the standard fields, add new custom fields to the pages and move fields from one section to other section. You can also drag and drop the fields to reorder them. To show or hide fields 1. Log in to SalesGrow CRM with Administrator privileges. 2. Click Setup > Customization > Layouts. 3. In the Edit Page Layout page, drag and drop the Field Labels to/from the List of Removed Fields to hide or show fields. 148

149 Note 4. Click Save. You cannot add other fields to the Product Details section of the Inventory modules (Quotes, Purchase Orders, Sales Orders and Invoices). If you remove the Probability field from the Potentials module, you will not be able to Edit a Potential's Stage in the Business Card view from the Record's Details Page. This is because Potential Stage is defined by its Probability. For example, you have defined the stage "Negotiation" by a Probability of "10%". If you remove the Probabilty field altogether from Potentials, the Stage has no definition and therefore is no longer editable from the Business Card view. In order to be able to edit the Stage from the Business Card view, make sure that the Probability field is included back in the Potential Information section. Mark Fields as Mandatory You can make certain fields mandatory in SalesGrow CRM as per your requirements. Note that the Locked Fields and certain Standard Fields, cannot be removed or changed from mandatory. For example, Last Name and Lead Owner in Leads; Potential Owner, Potential Name, Stage, and Closing Date in Potentials. To mark a field as mandatory 1. Log in to SalesGrow CRM with Administrator privileges. 2. Click Setup > Customization > Layouts. 3. In the Edit Page Layout page, move the mouse pointer over the field and select the check box. Clear the check box to change the field from mandatory. 149


150 4. Click Save. Add or Modify Sections Sections help in combining certain type of fields within a particular topic. By default, there are some sections available in each module. You can add, modify or delete these sections based on your organization's requirements. To add a section 1. Log in to SalesGrow CRM with Administrator privileges. 2. Click Setup > Customization > Layouts. 3. In the Edit Page Layout page, click Create Section. 4. In the Create Section dialog box, add Name for the new section, select the Column Layout, and click OK. 5. Click Save. 150

151 To modify a section 1. Log in to SalesGrow CRM with Administrator privileges. 2. Click Setup > Customization > Layouts. 3. In the Edit Page Layout page, click Edit icon. Note 4. Edit the Name and Column Layout details, if required, and click OK. 5. Click Save. The tab order is set to Left-Right on selecting "Two-Column" in the Column Layout. Click (Delete icon) to delete the section. Product Details section of the Inventory modules (Quotes, Purchase Orders, Sales Orders and Invoices) has only single-column layout support. You do not have the Two-Column Layout support for this section. 151
152 7.3.2 Organize Page Details The option to Organize Page details, is available in each module and helps to change the order of the related list views. Additionally, you can show or hide some of the related lists as per your organization's requirement using this feature. To organize page details 1. Log in to SalesGrow CRM with Administrator privileges. 2. Click a [Module] tab. 3. Select a record from the list view. 4. In the [Record] Details page, click (Settings icon) and then click Organize [Module] Details. 152
153 5. In the Organize [Module] Details page, choose the options from the Unselected List. 6. Move the selected options to the Selected List. 7. Change the order of the Related List as per your requirement. 8. Click Save Related Lists The Related Lists are the records that are associated to the parent record. For example, an Account has Contacts, Potentials, Notes, Open Activities, etc., associated to it. These associated records are the Related Lists. Customizing the related list view allows you to re-order or modify the columns in the list view. Availability Profile Permission Required: Users with the Customize SalesGrow CRM permission can access this feature. To customize related lists 153

154 1. Log in to SalesGrow CRM with Administrator privileges. 2. Click Setup > Customization > Related List. 3. In the Related List Columns page, select the module from the Modules List. 4. Select the options from the Available Columns that you want to be displayed in the Related List. 5. Move the selected options to the Selected Columns list. 6. Click Save. Note Company defined mandatory fields cannot be removed from the Related List columns. You can create custom fields for a module, and the same will be listed under the Available Columns Search Layout The Search Layout helps you customize the field values that you want to view in search results. For example, when you search leads by name, you may want to view the values from the , phone, lead 154
155 type and lead source fields. You can select just these in the Search Layout. A maximum of 6 fields can be selected. Availability Profile Permission Required: Users with the Administrator profile can access this feature. To customize search layout 1. Log in to SalesGrow CRM with Administrator privileges. 2. Click Setup > Customization > Search Layout. 3. In the Search Layout page, select the module from the Modules List and click Edit. 4. In the Fields List section, select the check box(es) of the fields that you want to view in the Search Results' page. 5. Click Save. 155
156 Set up Default List View This option enables customizing the default view for the modules depending on an individual user s choice. Once the default view is customized, the new chosen view becomes the default view displayed whenever the module is accessed. For instance, the default view for the Leads module could be All Open Leads. To customize view settings 1. Click Setup > Customization > Custom View Settings. 2. In the Custom View Settings page, select the Module from the drop-down list. 3. Select the List View from the drop-down list. 4. Click Save Manage List View A List View is grouping of records based on a defined set of criteria. List Views are beneficial for displaying customer specific data according to your business requirements. For example, you may be interested in following-up on the leads created during the last week or review overdue tasks or you may want to filter out big deals. The best way to handle these scenarios is to filter the records using the list views. You can also use the List Views for changing record owners, deleting records in bulk and sending mass s. SalesGrow CRM provides a set of Standard list views that are ready to be used by all the users in your organization. In addition, you can also create list views and share with colleagues in your organization. Standard List Views: You can modify the standard views and sort the order of the columns in the list. You cannot delete these list views. Custom List Views: You can create, modify and delete the custom views and you can also sort the order of the columns in the list. List views are categorized under Created By Me and Shared With Me. You can also mark list views that you often use as Favorites and those will be listed first in the List View drop-down. Just click the Star next to a list view and it will available under Favorites. 156

157 Standard List Views In the <Module> Home page, you can select the required list view from the View drop-down list. You can only rearrange the order of the columns or add more columns to the standard view modes. Some of the standard list views are: All Records, My Records, Recently Create Records, Recently Modified Records, Recently Viewed Records, etc. Create Custom List Views You can create custom list views in SalesGrow CRM by defining criteria as per your requirement. The custom views created by the user will be listed under the Created By Me in the drop down list. Availability feature. Permission Required: Users with the Manage Custom Views permission can access this To create custom views 1. Click the [Module] Tab.( For e.g. Leads, Contacts, Accounts, etc.) 2. In the [Module] Home page, move your mouse pointer to the list view's drop-down. 3. Click the Create View link. 4. In the New View page, do the following: o Enter the custom View Name. 157
158 o Select the Mark as Favorite, if required. The custom list views marked as favorite will be listed first in the list view drop-down. o o Select the columns to be displayed in the View mode. Choose the option as to who can see this view. 158


159 o Specify Criteria to filter the records. 5. Click Save. Specifying List View Criteria In the Specify Criteria section you can specify the criteria based on which records will be filters and under this list view. The following table lists the criteria options for certain types of fields: Field Type String fields like: Criteria Options First Name Mobile Website Industry Title Created By Skype ID Phone Salutation Company State Numeric fields like: Age My Percentage Age in Days My Currency My Decimal 159


160 Date & DateTime fields like: Created Time Modified Time My Date My Date Time Boolean fields like: Opt Out Add to QuickBooks Active My Date Time Note You can add up to 25 criteria. Specify the numbers without commas. For example, specify 15,000 as If you select the None option, custom view will not be created. Age in Days option is a very useful for the Date and DateTime fields. It can be used to filter records such as, leads that were created within the last 15 days, potentials that were closed in the past 10 days, or users whose subscription was renewed in the lats 5 days. Selecting List View Columns In the Choose Columns section, select the columns to be displayed in the List View from the Available Columns list box. After selecting the columns you can change the order of the columns or remove unnecessary columns from the Selected Columns list box. 160
161 Note It is better to select less than 10 columns to avoid horizontal scrolling in List View. Setting up Permissions to the List View In the Accessibility Details section, define the user's accessibility to view the custom lists. The following options are available: All users are allowed to view this custom view. Show this custom view only to me. Allow the following users to view this custom view. Edit Criteria Patterns Criteria Pattern Editor in the custom list views help you to define the advanced filters using simple logic like and / or. Availability this option. Profile Permission Required: Users who have the access to the Custom List view can use Note You can specify a maximum of 25 criteria for a list view. To edit criteria patterns 1. Click Module tab. 2. Select a List View from the drop-down list. 3. In Edit View page, review your existing criteria and click the Change Pattern link. 4. In Pattern Editor box, modify filters and click the Save link. 5. Save the modified custom view. Example: You would like to filter out the leads registered for a Webinar or Trade Show from California or Texas, and whose Industry is IT. 161
")
162 Lead Source contains "Webinar or Trade Show" and State is "California or Texas" and Industry is "IT" You can create this criteria easily using the Criteria option given below: The criteria pattern will be automatically set as: Since the criteria pattern does not match the requirement, you can edit it as: You can use the following characters in the Criteria Pattern Editor: Round brackets: ( ) and / or operators Criteria Row Number Important Notes When the Change Pattern box is open, you cannot add or delete a criteria row under the Specify Criteria section. The operator precedence will not be taken into account if you do not specify brackets. For example, if you specify the criteria as 1 or 2 and 3, it will be considered as ((1 or 2) and 3) You can change the and or or of the criteria rows and it will be updated in the Editor below. You can change the and or or condition in the pattern and it will be updated in the rows above. If you specify 1 and 2 and save it, on editing the view the pattern will be shown as (1 and 2). For (1 and 2) or 3 the pattern will be shown as ( (1 and 2) or 3 ) If you add more rows in the editor and delete one by one there will be additional brackets displayed in the pattern. For example if there are 5 rows added and you delete the 4th row, it will be shown as ( ( ( ( 1 and 2 ) or 3) )or 4 ) and if the 3rd row is deleted again it will be shown as ( ( ( ( 1 and 2 ) ) ) or 3 ). If the first row is deleted then it will be shown as ( ( ( ( 1 ) ) ) or 2 ). 162
163 However, upon saving the criteria, it will become ( 1 or 2 ). ( ( ( 1 and 2 ) and 3 ) ) will appear if the last criteria is deleted. Make sure that you do not use the following as they are invalid: (), (and), (or) If the brackets do not match it will be treated as invalid. You will get an error message, if the number of rows and the numbers given in the pattern do not match and also, if there are any missed numbers in the pattern specified. Save and Cancel buttons on the custom view will be hidden while editing the criteria pattern. In case the final brackets are missing, there will be a difference in the Criteria Patterns Editor and its view mode. Your Criteria Pattern in Editor Your Criteria Pattern in View Mode ( 1 and 2 ) or ( 3 and 4 ) (( 1 and 2 ) or ( 3 and 4 )) 1 and 2 and 3 and 4 (1 and 2 and 3 and 4 ) ( 1 or 2 ) and ( 3 or 4 ) ( ( 1 or 2 ) and ( 3 or 4 ) ) Use Last Activity Time in Criteria Apart from editing a record, there are various other activities associated with records. For example, adding a note, closing a task, sending s etc. The last updated time of such activities is captured in each record as Last Update: Time (only in the Leads, Accounts, Contacts and Potentials modules). The information in this field can be used in the List View criteria, to filter out records that had no activity for a specific period of time or those records that had recent activities. Note This option is supported only for the Leads, Accounts, Contacts and Potentials modules. The Last Activity Time under list view criteria and the Last Update time in the Record Details page are the same. You can use this criteria only for the custom list views. Availability this option. Profile Permission Required: Users who have the access to the Custom List view can use The activities and updates that will be recorded as Last Activity time: o o Editing fields in a record Adding & updating activities, i.e. Tasks, Events, Calls 163
164 o o o o o o o Sending s to leads and contacts Adding & editing notes Adding potentials & contacts under an account Changing the owner of the record Adding and deleting a record (This does not include deleting a record associated to the parent record.) Closing a task (This does not apply for events as they are automatically moved under Closed Activities after the End DateTime.) Deleting and restoring the records (individually or in bulk). The activities and updates that will NOT be recorded as Last Activity time: Mass operations like Mass Update, Mass Transfer etc. (Except for Mass Delete option.) Editing contacts or potentials under an account will not be listed under the Account Deleting related lists under a record. To use the Last Activity Time in criteria 1. Click the Leads, Accounts, Contacts or Potentials module. 2. Select a List View from the drop-down list and click the Edit link. You can specify criteria only for the custom list views. 3. In Edit View page, under Specify Criteria select the Last Activity Time from the drop-down list. 4. Specify the criteria conditions. 5. Click Save. Clone Custom List View The custom views that you create can be duplicated and a similar list view can be created. Please note that the default views cannot be cloned or deleted. To clone custom list views 1. Click the [Module] Tab.( For e.g.. Leads, Contacts, Accounts, etc.) 2. In the [Module] Home page, select the list view that you want to duplicate. 3. Click the Clone View link. 4. In the Clone View page, do the following: o Enter the custom View Name. o Select the columns to be displayed in the View mode. o Choose the option as to who can see this view. o Select the Specify Criteria check box and specify the criteria. 164
165 5. Click Save. Edit Standard List View You can edit the standard list views that are by default provided in SalesGrow CRM to add or remove the columns in the list view. Please note that you cannot edit the criteria or rename these pre-defined list views. To edit standard list views 1. Click the [Module] Tab. (For e.g. Leads, Contacts, Accounts, etc.) 2. In the [Module] Home page, select the list view that you want to edit. 3. Click the Edit link. 4. In the Edit View page, select and move the fields to the Available Columns list box. After selecting the columns you can change the order of the columns or remove unnecessary columns from the Selected Columns list box. 5. Click Save. Sort Records in List View Records in the list view can be sorted in ascending or descending order. To sort records 1. Click the [Module] Tab. (For e.g. Leads, Contacts, Accounts, etc.) 2. In the [Module] Home page, select the list view that you want to see. 165

![Please note that the pre-defined list views cannot be deleted. To delete custom list views 1. Click the [Module] Tab.](/docs-images/80/80447117/images/166-1.jpg "(For e.g. Leads, Contacts, Accounts, etc.) 2.")
166 3. Click on the column heading and then select Ascending or Descending option to sort the records. Delete Custom List View The custom views that you create can be deleted if required. Please note that the pre-defined list views cannot be deleted. To delete custom list views 1. Click the [Module] Tab. (For e.g. Leads, Contacts, Accounts, etc.) 2. In the [Module] Home page, select the list view that you want to delete. 3. Click the Delete link Add Photo 166
![You can add a photo of your contacts and leads in your SalesGrow CRM account. You can delete the photos whenever required. To add a photo 1. Click the [Module] tab. 2.](/docs-images/80/80447117/images/167-1.jpg "From the list of records, select a record for which you want to add a photo. 3. In the Record Details page, click on the photo. 4.")
167 You can add a photo of your contacts and leads in your SalesGrow CRM account. You can delete the photos whenever required. To add a photo 1. Click the [Module] tab. 2. From the list of records, select a record for which you want to add a photo. 3. In the Record Details page, click on the photo. 4. Browse and select the images from your desktop, and click Upload. 167

168 The photo will be added to the record Address Duplication Check When you have hundreds and thousands of business contacts, every time you add a new contact to your growing business, it is not very easy to check for duplicates. SalesGrow CRM provides you with an option to check if a lead or contact already exists in your CRM account by using address, which is a unique value. While adding a record, if the address matches with a record in CRM you will be notified. This will avoid creating duplicates. The administrator or a user with the Customize SalesGrow CRM profile permission needs to enables this option to check for address duplication. Once it is enabled, you will be able to avoid adding duplicate records in your Leads and Contacts modules while creating records, collecting leads/contacts using web forms, importing, etc. Note You can avoid duplicates only for the field in the Leads and Contacts Module. Duplication check will not be performed for the Secondary field and the fields created by you. Availability Permission Required: All the users can use this feature once it is enabled. 168

169 Enable Duplication Check Users with the Customize SalesGrow CRM permission in profile can enable this feature. All the Administrators will receive an notification, when this feature is enabled or disabled. Please note that you need to enable it separately for the Leads and Contacts module. Once it is enabled, all the users can use it and they will be notified while adding a lead or a contact whose address already exists in CRM. To enable the feature 1. Click Setup > Customization > Layout. 2. In the Edit Page Layout page, select the Leads/Contacts module. You need to enable it separately for the Leads and Contacts module. 3. Select the Do not allow duplicates in field check box. 4. Click Save. You can disable this feature by clearing the Do not allow duplicates in field check box. 7.4 Field-Level Customization Create custom fields, formula fields and hide unwanted fields Standard Fields Standard Modules & Fields You can use API to integrate with the following standard modules: 169
170 Leads Accounts Contacts Potentials Campaigns Forecasts Cases Solutions Products Price Books Quotes Events Invoices Vendors Purchase Order Tasks Calls The following tables give the list of supported fields in the SalesGrow CRM Modules along with their description. Leads Field Name Description Data type Maximum Limit Lead Owner Select the SalesGrow CRM user to whom the Lookup - Lead is assigned. Salutation Select the salutation from the drop-down Pick list - list. First Name Specify the first name of the lead. Text box Alphanumeric(40) Title Specify the job position of the lead Text box Alphanumeric(100) Last Name* Specify the last name of the lead. This field is Text box Alphanumeric(80) a mandatory. Company* Specify the name of the company where the Text box Alphanumeric(100) lead is working. This field is a mandatory. Lead Source Select the source of the lead, that is, from Pick list - where the lead is generated. Industry Select the industry to which the lead Pick list - belongs. Annual Specify the annual revenue of the company Currency Decimal (16) Revenue where the lead is working. Phone Specify the phone number of the lead. Text box Alphanumeric(30) Mobile Specify the mobile number of the lead. Text box Alphanumeric(30) Fax Specify the fax number of the lead. Text box Alphanumeric(30) Specify the address of the lead. Alphanumeric and Special characters(100) Secondary Specify another address of the lead. Alphanumeric and Special characters(100) Skype ID Specify the Skype ID of the lead. Currently Text box Alphanumeric(50) skype ID can be in the range of 6 to 32 characters. Web site Specify the Web site of the lead. URL Alphanumeric(120) Lead Status Select the status of the lead from the dropdown Pick list - list. Rating Select the rating of the lead from the dropdown Pick list - list. No. of Specify the number of employees in lead's Numeric Integer (16) Employees company. Opt- Select the check-box to remove leads from Check box - 170
171 out your mailing list so that they will not receive any s from your SalesGrow CRM account Campaign Select the campaign related to the Lead Lookup Source Created By Displays name of the user created the Lead Date/Time - first time. Modified By Displays name of the user modified the Lead. Date/Time Street Specify the street address of the lead. Text box Alphanumeric(250) City Specify the name of the city where the lead Text box Alphanumeric(30) lives. State Specify the name of the state where the lead Text box Alphanumeric(30) lives. Zip Code Specify the postal code of the lead's address. Numeric Alphanumeric(30) Country Specify the name of the lead's country. Text box Alphanumeric(30) Description Specify any other details about the lead. Text area (long text) characters Accounts Field Name Description Data type Maximum Limit Account Name * Specify the company Text box Alphanumeric(100) name. This field is mandatory. Account Owner Select the name of the Look up - user to whom the account is assigned. Website Specify the URL of the URL Alphanumeric(30) company's Web site. Ticker Symbol Specify the ticker Text box Alphanumeric(30) symbol of the Company. Parent Account Select the parent Lookup company name from the Change pop-up dialog. Employees Specify the number of Numeric Integers(10) employees in account's company. Ownership Specify the type of Picklist ownership of the company. Industry Select the type of Pick list - industry from the drop-down list. Account Type Select the type of account from the drop- Pick list - 171
172 down list. Account Number Specify the reference number for account. Up to 40 characters are allowed in this field. Account Site Specify the name of the account s location, for example, Headquarters or London. Up to 80 characters are allowed in this field. Phone Specify phone number of the account. Fax Specify fax number of the account. Specify the official E- mail address of the account. Rating Specify the rating of the account. SIC Code Specify the Standard Industrial Classification code of the account. Created By Displays name of the user created the Account first time. Modified By Displays name of the user modified the Account. Annual Revenue Specify the annual revenue of the account. Billing Address Specify the billing address of the account Street to send the quotes, City invoices, and other State agreements. Code Country Numeric Text box Text box Text box Pick list - Text box Date/Time - Date/Time Numeric Street - Text box City - Text box State - Text box Code - Text box Country- Text box Number Alphanumeric(30) Alphanumeric(30) Alphanumeric(30) Alphanumeric and Special characters(100) Integers(10) Integers(10) Alphanumeric(250) Alphanumeric(30) Alphanumeric(30) Alphanumeric(30) Alphanumeric(30) Shipping Address Specify the shipping address of the account Street - Text box Alphanumeric(250) Alphanumeric(30) 172
173 Street City State Code Country to deliver the shipment. City - Text box State - Text box Code - Text box Country - Text box Alphanumeric(30) Alphanumeric(30) Alphanumeric(30) Description Specify any other details about the account. Text area (long text) characters Contacts Field Name Description Data type Maximum Limit Contact Owner Select the SalesGrow Lookup - CRM user to whom the account is assigned. Salutation Select the Salutation of Pick list the contact, such as Mr., Ms, Mrs., or others. First Name Specify the first name Text box Alphanumeric(40) of the contact. Last Name* Specify the last name of Text box Alphanumeric(40) the contact. This field is mandatory. Account Name Select the account Lookup - related to the contact. Vendor Name Select the vendor Lookup - relatedd to the contact Campaign Source Select the Campaign Lookup - related to the contact Lead Source Select the source from Pick list - which the contact is created. Title Specify the job position Text box Alphanumeric(50) of the contact. Department Specify the department Text box Alphanumeric(30) of the contact. Date of Birth Specify the birthday of Date - the contact to send greetings for a better relationship. Reports To Select the person to whom the contact Text area 255 characters 173
174 Created By Modified By Opt Out Skype Id Phone Mobile Home Phone Other Phone Fax Secondary Assistant Asst Phone Mailing Address Street City State Zip reports Displays name of the user created the contact first time. Displays name of the user modified the contact Select the check-box to remove contacts from your mailing list so that they will not receive any s from your SalesGrow CRM account Specify the Skype ID of the contact. Currently skype ID can be in the range of 6 to 32 characters. Specify the office phone number of the contact. Specify the mobile number of the contact. Specify the home phone number of the contact. Specify the other phone number of the contact (if any). Specify the Fax number of the contact. Specify the primary address of the contact. Specify another address of the contact. Specify the name of the contact s assistant. Specify the phone number of the contact's assistant. Specify the primary address of the contact. Date/Time - Date/Time Check box - Text box Text box Text box Text box Text box Text box Text box Street - Text box City - Text box State - Text box Alphanumeric(50) Alphanumeric(50) Alphanumeric(50) Alphanumeric(50) Alphanumeric(50) Alphanumeric(50) Alphanumeric(100) Alphanumeric(100) Alphanumeric(100) Alphanumeric(250) Alphanumeric(30) Alphanumeric(30) Alphanumeric(30) Alphanumeric(30) 174
175 Country Code - Text box Country- Text box Other Address Street City State Zip Country Specify the other address of the contact (if any). Street - Text box City - Text box State - Text box Code - Text box Country - Text box Alphanumeric(250) Alphanumeric(30) Alphanumeric(30) Alphanumeric(30) Alphanumeric(30) Description Specify any other details about contact. Text area (long text) characters Potentials Field Name Description Data type Maximum Limit Potential Select the name of the user to whom the Lookup Owner potential is assigned. Potential Specify name of the potential. This field is Text box Alphanumeric(120) Name* mandatory. Account Select name of the account to which potential Lookup - Name* has to be created. This field is mandatory. Type Select the type of potential (New Business or Pick list - Existing Business) from the drop-down list. Lead Source Select the lead source from the drop-down list Pick list - Campaign Select the campaign related to the contact. Lookup - Source Contact Name Select the contact related to the Potential. Lookup Amount Specify the amount that can be expected after Currency closing the potential. Closing Date* Specify or select the expected close date. This Date format - field is mandatory. Next Step Specify the next step of the sales process. Text box Alphanumeric(100) Stage* Select the sales stage from the drop-down list. Pick list - This field is mandatory. Probability Specify the probability of closing an potential. Number Expected Calculated based on the Amount and potential Currency Revenue Stage that you specify Created By Displays name of the user created the potential Date/Time - first time. Modified By Displays name of the user modified the Date/Time 175
176 potential Description Specify any other details about potential. Text area (long text) characters Campaigns Field Name Description Data type Maximum Limit Campaign Select the name of the user to whom the campaign Pick list - Owner is assigned. Campaign Specify the name of the campaign. Text box Alphanumeric(40) Name* Type Select the type of the campaign. Check box - Status Select the status of the campaign. Pick List - Start Date Specify the date on which the campaign starts. Date - format End Date Specify the date on which the campaign ends. Date - format Expected Specify the revenue expected after launching the Currency - Revenue campaign. Actual Cost Specify the actual amount spent on the campaign. Currency - Budgeted Cost Specify the planned amount to be spent on the Currency - campaign. Expected Specify the campaign turnout percentage. Number Response Num sent Specify the number of leads/contacts to whom the Text box Integers campaign details has been sent. Created By Displays name of the user created the campaign Date/Time - first time. Modified By Displays name of the user modified the campaign Date/Time Description Specify additional details about the campaign. Text area characters Forecasts Field Name Description Data type Maximum Limit Year* Select the fiscal year from the drop-down list. Pick list - Quarter* Select the quarter of the fiscal year. Pick list - Month Display the month of the selected quarter. Month Quota Specify the quota for the month. Currency - Closed Display the amount from the closed won potentials. Currency - Committed Specify the total amount a sales person confident of Currency - Amount Best Case Amount closing during forecast period. Specify the amount a sales person might be closing. This amount can be either more or less than Commit Amount. Currency - Pipeline Displays the amount in the sales pipeline. Currency - Owned By Displays the owner of the forecast. Lookup - Created By Displays the person created the forecast first time. Date/Time - 176
177 Last Modified By Displays the person modified the forecast. format Date/Time format - Cases Field Name Description Data Maximum Limit type Case Display the case ID after creating a case. Number 16 digit Number Product Select the product name related to the case. Lookup - Name Case Owner Select the name of the user to whom the case is Lookup - assigned. Subject* Specify the title of the Case. This field is mandatory. Text box Alphanumeric(255) Priority Select the priority of the Case from the drop-down Pick list - list. Status* Select the status of the Case from the drop-down Pick list - list. Reported By Displays the name of the contact. - - Related To Select the name of the contact who submitted the Lookup - Case. Type Select the type of problem. It can be a general Pick list - question, feature request, or real issue in your product/service. Case Origin* Select the source from which the case has been Pick list - generated. You can select , Phone, or Website. If you select , you must specify the ID of the customer. Specify the ID of the contact. Alphanumeric and Special characters Account Select the account related to the case Lookup Name Potential Select the Potential related to the case Lookup Name Phone Specify the phone number of the customer Text box Alphanumeric(50) Case Reason Specify the reason for the case Pick list - Description Specify complete details about the case. Text characters Area Internal Specify follow-up notes about case. Text 3000 characters Comments Area Solution Specify the solution provided Text characters Add Comment specify the follow-up notes about the solution Area Text Area characters 177
178 Solutions Field Name Description Data type Maximum Limit Solution Display the case ID after creating a solution Number 16 digit Number Solution Specify the subject of the solution.this field Text box Alphanumeric(255) Title* is mandatory Solution Select the name of the user to whom the Pick list - Owner solution is assigned. Product Select the name of the product to which the Lookup - Name solution has to be associated. Question* Select the priority of the solution from the Text box, Alphanumeric(255) drop-down list.this field is mandatory Alphanumeric Answer* Specify solution details.this field is Text Area - mandatory Status Specify the status of the solution. Pick list - Created By Displays the person created the solution first Date/Time format time. Last Modified Displays the person modified the solution Date/Time format By Description Specify any other details about solution. Text box characters Comments Specify additional comments about the solution. Text box characters Products Field Name Description Data type Maximum Limit Product Name* Specify the name of the product. This field is Text box Alphanumeric(50) mandatory. Product Owner Select the name of the user to whom the Pick list product is assigned. Product Code Specify the product identification. Text box Alphanumeric(40) Product Active Specify the status of the product. Check box - Vendor Name Specify the name of the vendor. Lookup Product Category Select the category of the product. Pick list Sales Start Date Specify the date on which the product sales Date starts Sales End Date Specify the date on which the product sales Date ends Created By Displays the person created the product first time. Date/Time format Modified By Displays the person modified the product Date/Time format Commission Rate Specify the commission rate for selling the product. Numeric Decimal 178
179 Manufacturer Select the name of the product Pick list - manufacturer. Unit Price Specify the unit price of the product. Currency Taxable Specify whether the product is a taxable Check-box product Product Category Select the category of the product. Pick list - Support Start Select the date on which the product Date - Date support starts. Support Expiry Select the date on which the product Date - Date support ends. Usage Unit Displays the unit price of the product. Text box Alphanumeric Qty Ordered Specify the number of units. Text box Integers Qty in Stock Displays the stock quantity Text box Integers Reorder Level Specify the Reorder value Text box Integers Handler Select the SalesGrow CRM user who is Lookup handling the product Qty in Demand Displays the demand quantity Text box Integers Description Specify any other details about product. Text area (long text) characters Price Books Field Name Description Data type Maximum Limit Price book Owner Select the name of the user to Lookup - whom the price book is assigned. Price book Name* Specify the name of the Price Text box Alphanumeric(50) Book. This field is mandatory. Active Select the Active check box to Check box - set the status of the Price Book as active. Pricing Model Select the model of the price Pick list - book Created By Displays the person created the Date/Time format Price book first time. Modified By Displays the person modified Date/Time format the Price book. Description Specify any other details about Price Book. Text area (long text) 32000characters Pricing details Specify the Pricing details From Range - Text box Decimal (20) From Range To Range - Text To Range box Discount Discount - Percent 179
180 Quotes Field Name Description Data type Maximum Limit Quote Owner Select the name of the Lookup - user to whom the quote is assigned. Subject* Specify the name of the Text box Alphanumeric(50) quote. This field is mandatory. Potential Name Specify the potential Text box Alphanumeric(40) name for which the quote has to be created. Quote Stage Specify the status of Check box - the quote. Valid Till Specify the date till the Date - quote is valid after sending to the prospective customer. Contact Name Specify the contact to Lookup - which the quote has to be created. Account Name Specify the account to Lookup which the quote has to be created. Carrier Select the name of the Pick list - carrier manufacturer. Shipping Select the category of Text box Alphanumeric(50) the quote. Inventory Manager Specify the person Text box Alphanumeric(50) responsible for shipping the shipment to the account or contact. Account Name* Specify the account Lookup name to which the quote has to be created. This field is mandatory Created By Displays the person Date/Time format created the Price book first time. Modified By Displays the person modified the Price book. Date/Time format Billing Address Specify the primary Street - Text Alphanumeric(250) address of the contact. box Alphanumeric(30) Street City - Text Alphanumeric(30) 180
181 City State Zip Country box State - Text box Code - Text box Country- Text box Alphanumeric(30) Alphanumeric(30) Shipping Address Street City State Zip Country Specify the shipping address of the contact (if any). Street - Text box City - Text box State - Text box Code - Text box Country - Text box Alphanumeric(250) Alphanumeric(30) Alphanumeric(30) Alphanumeric(30) Alphanumeric(30) Product Name * Quantity in Stock Quantity* Unit Price* List Price* Total Terms & Conditions Description Select the product name.this field is mandatory Displays the stock quantity. Specify the quantity for which the sales order has to be generated. This field is mandatory Displays the unit price of the product. Select the product list price from Price Book or specify the product price. This field is mandatory Displays the amount of the selected products. Specify the terms and conditions that are associated with quote. Specify any other details about quote. Lookup - Numeric Integers Numeric Integers Currency Lookup and Numeric Integers Text box Alphanumeric Text area Text area characters Sales Orders Field Name Description Data type Maximum Limit Sales Order Owner Select the name of the Lookup 181
182 user to whom the sales order is assigned. SO Number Display the Sales order Number 16 digit ID after creating a case. Subject* Specify the name of the Text box Alphanumeric(50) sales order. This field is mandatory. Potential Name Select the potential for Lookup - which the sales order has to be generated. Customer No Specify the customer Text box Alphanumeric(50) identification number (if any) Purchase Order Select the reference Text box - purchase order. Quote Name Select the reference Lookup - quote. Contact Name Select the contact for Lookup - which the sales order has to be generated. Due Date Select the date Date - Carrier Select the carrier s Pick list - name that ships the products from your warehouse to customer site. Pending Text box Alphanumeric(50) Status Specify the status of Pick list - the sales order. Sales Commission Specify the commission Numeric float to the sales person upon closing the deal. Excise Duty Specify the excise duty Text Box Numeric for the shipment Account Name* Specify the account Lookup - name to which the sales order has to be created.this field is mandatory Assigned To Select the user's name Select option - to whom the sales order handling duty is assigned. Created By Displays name of the user created the Sales order first time. Date/Time 182
183 Modified By Billing Address Street City State Zip Country Displays name of the user modified the Sales order Specify the primary address of the contact. Date/Time Street - Text box City - Text box State - Text box Code - Text box Country- Text box Alphanumeric(250) Alphanumeric(30) Alphanumeric(30) Alphanumeric(30) Alphanumeric(30) Shipping Address Street City State Zip Country Specify the shipping address of the contact (if any). Street - Text box City - Text box State - Text box Code - Text box Country - Text box Alphanumeric(250) Alphanumeric(30) Alphanumeric(30) Alphanumeric(30) Alphanumeric(30) Product Name * Quantity in Stock Quantity* Unit Price* List Price* Tax Adjustments Select the product name.this field is mandatory Displays the stock quantity. Specify the quantity for which the sales order has to be generated. This field is mandatory Displays the unit price of the product. Select the product list price from Price Book or specify the product price. This field is mandatory Specify the tax component of the products Specify if there are any adjustments, such as Lookup - Numeric Integers Numeric Integers Currency Lookup and Numeric Integers Currency - Currency - 183
184 Total Terms & Conditions Description discounts, or extra charges etc. Displays the amount of the selected line item. Specify the terms and conditions that are associated with sales order. Specify any other details about sales order. Currency - Text area (long text) Text area (long text) characters Invoices Field Name Description Data type Maximum Limit Invoice Owner Select the name of the Lookup user to whom the invoice is assigned. Invoice Number Display the case ID Numeric 16 digit after creating a solution Subject* Specify the name of the Text box Alphanumeric(50) invoice. This field is mandatory. Sales Order Select the reference Lookup - Sales order (if any). Purchase Order Select the reference Text Box Purchase order. Customer No Specify the customer Text box Alphanumeric(50) identification number (if any). Excise Duty Specify the excise duty Text box Numeric for the shipment Invoice Date Specify the date on Date - which the invoice is created. Due Date Specify the invoice due Date - date as per your payment terms. Sales Commission Specify the commission Currency Float to the sales person upon closing the deal. Account Name * Specify the account Lookup - name to which the invoice has to be created. This field is mandatory Contact Name Specify the contacts Lookup 184
185 Status Assigned To Created By Modified By Billing Address Street City State Zip Country name to which the invoice has to be created. Specify the status of the invoice. Select the user's name to whom the invoice handling duty is assigned.this field is mandatory Displays the person created the Price book first time. Displays the person modified the Price book. Specify the primary address of the contact. Check box - Lookup - Date/Time format Date/Time format Street - Text box City - Text box State - Text box Code - Text box Country- Text box Alphanumeric(250) Alphanumeric(30) Alphanumeric(30) Alphanumeric(30) Alphanumeric(30) Shipping Address Street City State Zip Country Specify the shipping address of the contact (if any). Street - Text box City - Text box State - Text box Code - Text box Country - Text box Alphanumeric(250) Alphanumeric(30) Alphanumeric(30) Alphanumeric(30) Alphanumeric(30) Product Name * Quantity in Stock Quantity* Select the product name.this field is mandatory Displays the stock quantity. Specify the quantity for which the sales order has to be generated. Lookup - Numeric Integers Numeric Integers 185
186 Unit Price* List Price* Total Terms & Conditions Description This field is mandatory Displays the unit price of the product. Select the product list price from Price Book or specify the product price. This field is mandatory Displays the amount of the selected products. Specify the terms and conditions that are associated with invoice. Specify any other details about invoice. Currency Lookup and Numeric Integers Currency - Text area Text area characters Vendors Field Name Description Data type Maximum Limit Vendor Owner Select the name of Lookup the user to whom the Vendor details is assigned. Vendor Name* Specify the name of Text box Alphanumeric(50) the vendor. This field is mandatory Phone Specify the phone Text box Alphanumeric(40) number of the vendor Specify the ID of the vendor Alphanumeric and Special characters(100) Website Specify the Web site URL of the vendor URL Alphanumeric and Special characters(50) GL Account Select the general Pick List - ledger account Category Specify the category Text box Alphanumeric(40) of the vendor Created By Displays the person Date/Time format created the Price book first time. Modified By Displays the person modified the Price book. Date/Time format Vendor Address Specify the address Street - Text Alphanumeric(250) of the vendor box Alphanumeric(30) Street City - Text box Alphanumeric(30) City State - Text Alphanumeric(30) 186
187 State Postal Code Country box Code - Text box Country- Text box Alphanumeric(30) Description Specify any other details about vendor Text area (long text) characters Purchase Order Field Name Description Data type Maximum Limit Purchase Order Select the name of the Lookup Owner user to whom the purchase order is assigned. PO Number Display the Sales order Number 16 digit ID after creating a case. Subject* Specify the name of the Text box Alphanumeric(50) purchase order. This field is mandatory. Vendor Name* Specify the name of the Text box Alphanumeric(20) vendor. Requisition No Specify the number in Text box Alphanumeric(20) which the purchase order is requested Tracking Number Specify the number to Text box track the purchase order Contact Name Specify the contacts Lookup name to which the invoice has to be created. Carrier Select the carrier s name that ships the products from your warehouse to customer Pick list - Purchase Order Date site. Specify the date on which purchase order is created. Date - Due Date Select the due date. Date - Excise Duty Specify the excise duty Text box for the shipment Sales Commission Specify the commission to the sales person upon closing the deal. Currency Float 187
188 Status Assigned To Created By Modified By Billing Address Street City State Zip Country Specify the status of the purchase order. Select the SalesGrow CRM user name to whom the purchase order handling duty is assigned. This field is mandatory Displays the person created the Price book first time. Displays the person modified the Price book. Specify the primary address of the contact. Check box - Select option - Date/Time format Date/Time format Street - Text box City - Text box State - Text box Code - Text box Country- Text box Alphanumeric(250) Alphanumeric(30) Alphanumeric(30) Alphanumeric(30) Alphanumeric(30) Shipping Address Street City State Zip Country Specify the shipping address of the contact (if any). Street - Text box City - Text box State - Text box Code - Text box Country - Text box Alphanumeric(250) Alphanumeric(30) Alphanumeric(30) Alphanumeric(30) Alphanumeric(30) Product Name * Select the product Lookup - name.this field is mandatory Quantity in Stock Displays the stock Numeric Integers quantity. Quantity* Specify the quantity for Numeric Integers which the sales order has to be generated. This field is mandatory Unit Price* Displays the unit price Currency 188
189 List Price* Total Terms & Conditions Description of the product. Select the product list price from Price Book or specify the product price. This field is mandatory Displays the amount of the selected products. Specify the terms and conditions that are associated with purchase order. Specify any other details about purchase order. Lookup and Numeric Text area (long text) Text area (long text) Integers characters Tasks Field Name Description Data type Maximum Limit Task Owner Select the name of the user to whom the Lookup task is assigned. Subject* Specify the name of the task. This field is Text box Alphanumeric(50) mandatory. Due Date Specify the due date for the task Date Contacts/Leads Select the related contact or lead Lookup Accounts Select any other record related to the task Lookup - Status Specify the status of the task Pick List - Priority Select the due date. Date - Send Notification Select the check box to send notification Check box to the task owner Remind At Select the check box to set reminder for the Check box task Recurring Activity Select the check box to mark it as a Check box - recurring activity Description Specify the details about the task Text area (long text) characters Events Field Name Description Data type Maximum Limit Event Owner Select the name of the user to whom the Lookup event is assigned. Subject* Specify the name of the event. This field is Text box Alphanumeric(50) mandatory. Start Date Time* Specify the date and time when the event will be started. This field is mandatory. Date and Time End Date Time * Specify the date and time when the event will be over. This field is mandatory. Date and Time 189
190 Venue Enter the venue for the event Text Contacts/Leads Select the related contact or lead Lookup Accounts Select any other record related to the event Lookup - Send Notification Select the check box to send notification Check box to the event owner Remind At Select the check box to set reminder for the Check box event Recurring Activity Select the check box to mark it as a recurring Check box - activity Description Specify the details about the event Text area (long text) characters Calls Field Name Description Data type Maximum Limit Subject* Specify the subject of the call. This field is Text box Alphanumeric(50) mandatory. Call Type* Choose whether the call is inbound or outbound Call Purpose Select the purpose of the call Pick List Call From/To Choose Contact or Lead - Related To Select the record to which the call is related to Pick List - Call Details Select whether it is a Current call or Completed - call Call Start Automatically displays the call start data and Pick List Time time Call Duration Specify the duration of the call Integer Description Specify the details about the task Text area (long characters text) Billable Select the check box if the call is considered for Check box billing Call Result Enter the call result Text Custom Fields For almost all of the fields that you create, you need to specify the following: Label: Specify a name for the field. Section Name: Choose a section under which the field should be listed. Whenever required, you can change the placement of the field in any other section. Other specifications required for each type of field: Field Type Text Integer Decimal Other Details Length: Maximum 255 characters are allowed. Length: Maximum 9 digits are allowed. Length: Maximum 16 digits (including decimal places) are allowed. 190
191 Percent Label: Specify the field name Currency Length: Maximum 16 digits are allowed. Rounding Option: Specify the rounding option Decimal Places: Specify the number of decimal places Precision: Specify the rounding precision Date Format: YYYY/MM/DD Note:Date format will be changed according to user's time zone settings. Date & Format: YYYY/MM/DD HH:MM Note:Date format will be changed according to user's Time time zone settings. Specify a valid address Phone Specify a valid phone number Pick list Pick List Values: Specify the pick list values Multi-select Pick List Values: Specify the pick list values Pick list URL - Text Area Specify the Character limit: Small is 2000 characters, Large is characters. Text Area Large will not be available while adding criteria in any feature. Both Text Area Large and Small cannot be used for sorting records in ascending or descending order. Check box - Auto Prefix: Specify the prefix of the auto-number sequence Starting Number: Specify the Number starting number of the sequence Suffix: Specify the suffix of the auto-number sequence Existing Records: Select the check-box to apply auto-number to existing records. Lookup Lookup Type: Select the module for which you like to establish relationship Related List Label: It is the name you give to the entity that will be created under the record's details. Long Integer Custom Field Limits For example, Attachments, Contact Roles etc. Maximum 18 characters are allowed There is a limit to the total number of fields that you can create in you account and also a limit to the type of fields that you create. This varies based on your SalesGrow CRM Edition. Add Custom Fields In each module, you can add custom fields to capture important data specific to your business requirements by specifying some field-related information. Availability Profile Permission Required: Users with the Field-level Access permission in profile can access this feature. 191

192 To add custom fields 1. Log in to SalesGrow CRM with Administrator's privileges. 2. Click Setup > Customization > Fields. 3. Select the module from the drop-down list and click New Custom Field. 4. In the New Custom Field page, do the following: 192
193 o In the Select Field Type section, select the field type. o In Provide Field Details section, specify the field details. (Refer to the table above) 5. Click Save. Note The Also create for Accounts, Contacts, Potentials option will be available only while creating fields for Leads. The Also create for Sales Orders, Invoices option will be available only while creating fields for Quotes. Once the field is created, you cannot change the 'data type' of the field. For example, an Integer (digits) field cannot be changed into a Currency field. You can edit the custom fields to change the length of the following types of fields. - Currency, Text, Number (Integer), Decimal, Phone, Long Integer and URL. You cannot add custom fields in the Log a Call page. However, you can customize the existing fields using page layout customization. 193

194 Edit Custom Fields To edit custom fields 1. Click Setup > Customization > Fields. Module refers to the Leads, Accounts, Contacts, etc. tabs. 2. Select the module from the drop-down list. All the existing fields in the selected module will be listed. 3. Click the Edit link for the corresponding field that you want to edit. Delete Custom Fields The fields that you have created can be deleted, in case you do not need them. Please note that standard fields cannot be deleted and when you delete a custom field, the associated data will also be deleted from SalesGrow CRM. If you do not want to delete the field, you can also hide it so that it is not used by users. To delete custom fields 1. Click Setup > Customization > Fields. Module refers to the Leads, Accounts, Contacts, etc. tabs. 2. Select the module from the drop-down list. All the existing fields in the selected module will be listed. 3. Click the Delete link for the corresponding field that you want to delete. 4. Make sure to read the instructions in the pop-up box and then click Yes, Delete now to delete the field. Create Currency Fields The currency field allows you to define the decimal and the precision settings based on your selected currency locale. There are four rounding options available for a currency field in SalesGrow CRM: 194
195 To create currency custom fields 1. Log in to SalesGrow CRM with Administrator privileges. 2. Click Setup > Customization > Fields. Module refers to the Leads, Accounts, Contacts, etc. tabs. 3. Select the module from the drop-down list and click New Custom Field. 4. In [Module] New Custom Field page, select Currency from the Field Type list. 5. In the Field Details section, do the following: o Enter a name in the Label field. o Select the Section Name from the drop-down list where the field should be displayed. o In the Length field, type the desired length of the total number of digits. o Select the Rounding option from the drop-down list. o In the Decimal Places, type the number of decimal places you require. 6. Click Save. 195

196 Add Pick List Values By default, some of the industry standard pick list values are available in each module. You can modify the pick list values as per your organization's business process and replace the existing value with new values so that the records are associated correctly. To add or modify pick list values 1. Log in to SalesGrow CRM with Administrator privileges. 2. Click Setup > Customization > Field. Module refers to the Leads, Accounts, Contacts, etc. tabs. 3. Select the module from the drop-down list and click the Edit link for the corresponding pick list field. 4. In the Edit Pick List page, you can do the following: o Click Add New Values. o o Select the check box to use first value as default value. Click Sort values alphabetically, not in the order entered. Note o Click to delete the value. 5. Click Save. 196

197 When you edit the value(s), it will not be automatically updated in the records where it is used. You need to individually select the records and update the pick list field. When you delete a pick list value, records that have the field value associated to it will not be deleted. To replace pick list values 1. Log in to SalesGrow CRM with Administrator privileges. 2. Click Setup > Customization > Field. Module refers to the Leads, Accounts, Contacts, etc. tabs. 3. Select the module from the drop-down list and click the Replace link for the corresponding pick list field. 4. In the Find and Replace pick list page, do the following: o Select an existing value that needs to be replaced. o Enter a value that is to be replaced with another value. Note 5. Click Save. When you replace the value(s), it will be automatically updated in the records where it is used. You need not individually select the records and update the pick list field. Add Multi-Select Pick List Values This option enables selecting multiple values while creating or editing record. For instance, your organization may be offering different services and some of your customers may be interested in multiple services. In this case you can use the multi-select pick list value instead of single pick list value while creating a potential. Periodically, you can modify the pick list values as per your organization's business process. To add multi-select pick list values 1. Log in to SalesGrow CRM with Administrator privileges. 197
198 2. Click Setup > Customization > Field. Module refers to the Leads, Accounts, Contacts, etc. tabs. 3. Select the module from the drop-down list and click New Custom Field. 4. In the [Module] New Custom Field page, select Multi-select Pick List from the field type list. 5. In the Field Details section, do the following: o Enter a name in the Label field. o Select the Section Name from the drop down list where the field should be displayed. o Specify the pick list values. o Select the check box to use first value as default value. 6. Click Save. Note When you delete a pick list value, records that have the field value associated to it will not be deleted. 198
199 Create Lookup Field The lookup field helps in establishing relationship between different modules (linking two different modules: Accounts with Contacts) or establishing parent-child relationship with a module. Note that lookup fields cannot be created for Tasks and Events. Examples of Parent-Child Relationship: 1. Parent Account - Member Accounts (Doing business with Head Quarter Company and multiple divisions within the company) 2. Contact - Member Contacts 3. Case - Sub Case 4. Potential - Part Payment 5. Product - Part Products 6. Solution - Related Solutions Availability Profile Permission Required: Users with the Field-level Access permission in profile can access this feature. To create lookup field 1. Log in to SalesGrow CRM with Administrator privileges. 2. Click Setup > Customization > Field. Module refers to the Leads, Accounts, Contacts, etc. tabs. 3. Select the module from the drop-down list and click New Custom Field. 4. In [Module] New Custom Field page, select Lookup from the Field Type list. 5. In the Field Details section, do the following: 199
200 o Enter a name for the lookup field in the Label text box. (Eg. Interested Products. This field will be available while creating a lead.) o Select the Section Name from the drop-down list where the field should be displayed. (Eg. Lead Information) o Select a module from the Lookup Type drop-down. In the field, data from the module selected here, will be listed. (Eg. Products. The lookup field will list all the products) o Enter the Related List Label. (Eg. Interested Leads. A related list will be created for the records in the Products module.) 6. Click Save. Create Auto Number Field The auto number type custom field helps classifying the records by unique numbers. Once the auto number field is added to the CRM module, the number is added sequentially to the new records. This can be used to update the existing records also. For instance, Invoice Number, Quote Number and Sales Order. 200
201 Availability Profile Permission Required: Users with the Field-level Access permission in profile can access this feature. To create auto number fields 1. Log in to SalesGrow CRM with Administrator privileges. 2. Click Setup > Customization > Fields. Module refers to the Leads, Accounts, Contacts, etc. tabs. 3. Select the module from the drop-down list and click New Custom Field. 4. In [Module] New Custom Field page, select Auto Number from the Field Type list. 5. In the Field Details section, do the following: 201
202 o Enter a name in the Label field. o Select the Section Name from the drop-down list where the field should be displayed. o Select the Lookup Type i.e. the data that should be listed in the lookup. o Enter the Prefix, Starting Number and the Suffix for the auto number value. 6. Click Save. Map Dependency Fields There are certain fields whose values depend on another field's value. For example, the values in the State field will depend on the country that you select from the Country field. Similarly, the values for the Sub-Department field will depend on the Department field that you select. You can define this parentchild relationship in two drop down fields. To map field dependencies 1. Click Setup > Customization > Fields. Module refers to the Leads, Accounts, Contacts, etc. tabs. 2. Select the module from the drop-down list and click Map Dependency Fields. 202

203 3. In the Map Dependency Fields page, click New. o Select the Parent Field from the drop-down list. o Select the Child Field from the drop-down list. o Click Next. o Select the values for each parent field value. o For example, if the parent field is Country, then, select the States for the selected country. o Click the Previous or Next links, if required, to map the all the Parent field values to the Child field values. 4. Click Save Special Fields Customize Tax Rates The Tax Rate field allows defining different types of tax rates for the products you sell to your customers. Once the tax rates are added, you can select the tax type and rate while creating a quote, order, or invoice for the customers. For instance, Sales Tax = 10.5 %; VAT = 1%; etc. Availability feature. Profile Permission Required: Users with the Field-level Access permission can access this To add Tax Rates 1. Log in to SalesGrow CRM with Administrator privileges. 203

204 2. Click Setup > Customization > Fields > Products > Customize Tax Rate. 3. In the Customize Tax Rates page, click Add Tax. 4. Specify the type of tax and tax rate in Tax Label and Tax Value fields respectively. 5. Click Save. To use Tax Rates 1. Click the Invoice tab. 2. In the Invoice Home page, click New Invoice. 3. In the New Invoice page, specify the customer and product details. 204

205 4. In the Product Details section, click Tax (after sub totaling the line items). 5. In the Group Tax box, select the default tax rates or specify the new rates. 6. Click Save. Map Stage-Probability values Defining the criteria for Sales Stage is important to identify the performance of an organization-wide Sales pipeline. Stage probability can be determined based on two important factors - Forecast Type and Forecast Category. These two values are useful in describing the stage of a potential. In the Stage-Probability mapping page you can perform the following operations: Create different types of Sales stages according to your organization-wide Sales process. Associate Probability values to the Sales stages. Associate Forecast types (Open, Closed-won, or Closed-lost) to Sales stages. Associate Forecast categories (Pipeline, Closed, Omitted, Best Case, Committed) Note For a better sales pipeline analysis assign different probabilities to sales stage values. For each stage assign probability in the range of 0 to 100. You may consider using probability value as 100 when the deal is closed-won and 0 for deal closed-lost. To map stage and probability values 1. Log in to SalesGrow CRM with Administrator privileges. 205
 and the corresponding Probability of closing the sales deal o Delete sales Stage")

206 2. Click Setup > Customization > Fields > Potentials > Stage-Probability Mapping. 3. In the Stage-Probability Mapping page, do the following: o Add the sales Stage (s) and the corresponding Probability of closing the sales deal o Delete sales Stage (s) and assign the existing Probability to another Sales Stage value Note o To modify the existing Sales Stages, use the Replace option. 4. Click Save. For a better sales pipeline analysis assign different probabilities to sales stage values. For each stage assign probability in the range of 0 to 100. You may consider using probability value as 100 when the deal is closed-won and 0 when the deal is closed-lost. 206
207 7.5 Templates Create customized templates, inventory templates and mail merge templates Templates Create Templates You can create templates for sending s to the customers (leads and contacts), and SalesGrow CRM users within your organization. To create an template Note 1. Click Setup > Templates > Template. 2. In the Templates page, click New Template. 3. In the New Template page, select the Record Type from the drop-down list. 4. Enter the Template Name. 5. Select the Template Folder from the Store Under drop-down list. 6. For the template, add the From, Subject etc. details. (refer to the table below) 7. In the Template Body section, create the message body by incorporating the fields from various modules: o Select the required fields from the Available Merge fields drop-down list. o Select the relevant field name based on the category (User, Organization, or Specific o Module). Copy the field (for example, $contacts_firstname) from the Copy Merge Field value and paste it in the body of the template. You can also provide merge fields for the Subject of the template. 8. Footer: As per the CAN SPAM Act, provide an Unsubscribe form (Opt-out) link for users to remove their ID from your mass mailing list. 9. Click Preview to view your Click Save. You can create a template with characters. You can give a link to your video in your template. You cannot embed the video in the template itself. If you are creating an template for sending s to leads, do not merge the contactrelated fields and vice versa. If you try to merge both fields, you will experience errors while creating the template. Templates are Record specific. It is created for a specific record type. For example, you can create a template for leads or contacts. When you send s to leads, only the templates created for lead records will be available. 207
208 List of Standard Fields Field Name Description Data Type Record Type Displays the record type for the template Text box Template Name Specify the name of the template. - Store Under Select one of the available folders. Dropdown From Specify the sender ID to receive reply s. Dropdown Reply To Specify the ID to which you want to receive the replies from your Text box recipient. Subject Specify the subject to be displayed while sending to recipients. Text box Add User Select the check box to add user signature Check box Signature Attachment Attach file with the (max file size: 3 MB) - Sample Template Dear $leads_salutation $leads_firstname $leads_lastname, Thank you for your interest in SalesGrow CRM. We welcome your suggestions and comments in improving the product further. Sincerely, <$User_Name> Output Dear Mr. Larry King, Thank you for your interest in SalesGrow CRM. We welcome your suggestions and comments in improving the product further. Sincerely, SalesGrow CRM Team Create Newsletter templates 1. First, create a Newsletter in Adobe Dreamweaver or any other HTML Editor and upload all images/css used in the newsletter template to your Website. 2. In SalesGrow CRM, click Setup > Templates > Template. 3. In the Template editor, click the Edit HTML icon 208
209 4. In the Code View mode, paste your Newsletter HTML code and click Insert. 5. Click Save. Clone Templates You can clone the existing template and make the necessary changes to create a new template. To clone an existing template 1. Click Setup > Templates > Template. 2. In the Templates page, click on the template that you want to clone. 3. In the View Template page, click Clone. 4. In the Clone Template page, modify the details and make changes to the template. 5. Click Save. Modify Templates You can modify the existing template by changing the required fields. To modify template 1. Click Setup > Templates > Template. 2. In the Templates page, click the Edit link corresponding to the template. 3. In the Edit Template page, modify the template details. 4. Click Save. Delete Templates Occasionally, you may need to remove some of the unnecessary templates from the SalesGrow CRM system for a better user experience. You may consider removing templates that are not useful for future reference. Please note that you cannot delete the templates if it's being used in auto responders, etc. To delete template 1. Click Setup > Templates > Template. 209


210 2. In the Templates page, click the Del link corresponding to the template. Manage Template Folders You can store all the templates in easy to access folders, which can be shared with other users. To create template folder 1. Click Setup > Templates > Template. 2. In the Templates page, click New Template Folder. 3. In the Folder Details do the following: o Enter the Folder Name. o o Specify additional information about the folder in the Description text box. Under Accessibility Details select one of the following options: All Users are allowed to view this Template Folder: Select if you would like to enable the folder access for all the users. 210
211 4. Click Save. Show this Template Folder only to me: Select if you would like to enable the folder access only to you. Allow the following users to view this Template Folder: Select the users or user roles that can access the folder Inventory Templates You can create Inventory templates for sending customized quotes, sales orders, invoices, and purchase orders to customers and your suppliers. Inventory Modules You can select the following primary modules and create templates by linking with other secondary modules: Quotes: Quotes, Products, Users, Organization, Accounts, Contacts, and Potentials. Purchase Orders: Purchase Orders, Products, Users, Organization, Vendors, and Contacts. Sales Orders: Sales Orders, Products, Users, Organization, Accounts, Contacts, and Potentials. Invoices: Invoices, Products, Users, Organization, Accounts, Contacts, and Potentials. 211
212 Special Instructions In the Inventory Template, "Product Name" is a mandatory field. If you are not adding this field products will not be listed. Ensure that tags for line items are present within <tbody id="lineitem"> and </tbody> tags. Use the ${companylogo} tag for embedding your Company Logo in a template. In addition to Inventory modules, you can merge fields from Users, Organization, Accounts, Vendors, Contacts, and Potentials modules in the template. A default template will be used in Print Preview, Export to PDF and Send Mail functions of Quotes, Orders, and Invoices. Inventory Template Tags While creating a template, you can use various tags from Users, Organization, Accounts, Contacts, Potentials, Vendors, Quotes, Sales Orders, Invoices, and Purchase Orders modules. List of Standard Fields Field Tag Description Data Type Name First ${User.First Specify the first name of the user. Text box Name Name} Last Name ${User.Last.Name} Specify the last name of the user. This field is a Text box mandatory field. ${User. } Specify the official ID of the user. This is a URL mandatory field. Phone ${User.Phone} Specify the official phone number of the user. Pick list Mobile ${Mobile} Specify the mobile phone number of the user. Text box, integer value Fax ${User.Fax} Specify the FAX number of the user. Text box Street ${User.Street} Specify the primary address of the SalesGrow Text box CRM user. City ${User.City} Specify the name of the city where the user lives. Text box State ${User.State} Specify the name of the state where the user Text box lives. Zip ${User.Zip Code} Specify the postal code of the user's address. Text box, integer value Country ${User.Country} Specify the name of the user's country. Text box List of Organization-Related Tags Field Name Tag Description Data Type Name ${Organization.Organization Specify your company name. Text box Name} Phone ${Organization.Phone} Specify the official phone number of your Text box company. Mobile ${Organization.Mobile} Specify the mobile number of your Text box 212
213 company. Fax ${Organization.Fax} Specify the FAX number of your company. Text box Website ${Organization.Website} Specify your company Website URL. URL URL Street ${Organization.Street} Specify the primary address of your Text box company. City ${Organization.City} Specify the city in which your company is Text box located. State ${Organization.State} Specify the state in which your company is Text box located. Postal Code ${Organization.Zip Code} Specify the postal code of your company Text box address. Country ${Organization.Country} Specify the name of the country in which Text box your company headquarters is located. Company Logo ${companylogo} Upload your company logo, which can be used as header in your quotes, orders, and invoices similar to letterhead. Maximum Browse Image Description ${Organization.Organization Description} Customize Inventory Template To customize an inventory template allowed size 188 x 80 px. Specify your company information. Text Area 1. Click Setup > Templates > Inventory Templates. 2. In the Inventory Templates home page, click New Template. 3. In the Select Template Module page, select the module from the Record Type drop-down list. 4. In the New Templatepage, do the following: o Specify the Name of the template. o Select Folder from the drop-down list. o Select Set as Default check box, if required. o Create the Template by incorporating the fields from modules. In the Template Bodyfield, specify the following: 213
214 Select the type of field from the Field Type pick list. You can select fields related to the module. Select the required fields from the Available Merge fields drop-down list. Copy the fields (for example, ${Quotes.Account Name}) from the Select Field drop-down list. Copy the field value displayed in Copy Merge Field value text box and paste in Template Body text area. Note: You can create a template with less than characters. If the template contains more than characters, extra characters will be truncated. 5. Click Save. Delete Templates Occasionally, you may need to remove some of the unnecessary inventory templates from the SalesGrow CRM system for a better user experience. You may consider removing inventory templates that are not useful for future reference. To delete an inventory template 1. Click Setup > Templates > Inventory Templates. 2. In the Inventory Templates page, delete the required template by clicking the Del link. Manage Template Folders You can store all of the inventory templates in easy to access folders, which can be shared with other users. To create an inventory template folder 1. Click Setup > Templates > Inventory Templates. 2. In the Inventory Templates page, click New Template Folder. 3. In the Folder Details do the following: o Enter the Folder Name. o Specify additional information about folder in the Description text box. 214
215 o Under Accessibility Details select one of the following options: All Users are allowed to view this Template Folder: Select if you would like to enable the folder access for all the users. Show this Template Folder only to me: Select if you would like to enable the folder access only to you. Allow the following users to view this Template Folder: Select the users or user roles that can access the folder. 4. Click Save. 215
216 8. Data Administration The purpose of the SalesGrow CRM data administration tools are to guide the CRM Administrator in creating, verifying and ensuring data integrity by maintaining relationships and implementing access controls throughout the databases. Based on the organization's requirement, user(s) with Administrator privilege can set up the CRM data administration. The specific operational procedures within SalesGrow CRM's data administration are explained below. 8.1 Reports & Dashboards Create reports and pictorial representation of your custom report data, for a real-time snapshot of your organization's key metrics Reports SalesGrow CRM reports are the detailed and informative list of records. Each report provides access to important data required for various purposes. In SalesGrow CRM, standard reports are provided in various modules, which can be either used as it is or customized further as per your business requirements. Availability this feature. Profile Permission Required: Users with the Reports & Dashboard permissions can access SalesGrow CRM provides more than 40 different standard reports for the users' benefit. These reports are distributed across different modules in SalesGrow CRM. You can use the standard reports or customize them as per your business requirements. Please note that we do not provide reports for Price Books. List of Some of the Standard Reports Report Name Account and Contact Reports Contact Mailing List Key Accounts Description List of contact address details. Accounts that give you more sales revenue. 216
217 Accounts by Industry Potential Reports Pipeline by Stage Potentials Closing by this Month Sales Person's Performance Report Lost Potentials Potentials by Type Open Potentials Pipeline by Probability Sales By Lead Source This Month Sales Today's Sales Stage Vs Potential Type Report Lead Reports Leads By Source Leads By Status Today's Leads Leads by Ownership Converted Leads Leads by Industry Activity Reports Tasks and Events Report Today's Calls Campaign Reports Campaigns Revenue Report Campaign Leads Case & Solution Reports Popular Solutions Cases By Origin Cases By Status Cases By Priority Cases By Comments Sales Forecast Reports Quarterly Forecast Summary Forecast History Report Product Reports Products by Category Products by Support Termination date Products by Cases Vendor Reports Amount by Vendors Vendors Vs Purchases Accounts from various industries. Potentials by their stage. Potentials that are closing during the current month. Potentials gained by each sales person. Potentials that are lost. Potentials by their type. Potentials that are pending. Pipeline of the potentials by their probability. Sales from various lead sources. Sales that has happen during current month. Sales that has happen today. Sales vs potentials report Leads from various sources. Leads and their status. Leads that are created today. Leads and the corresponding owners. Leads that are converted into Account / Potential / Contact. Leads from various vertical industries. List of all the tasks and events. List of current day's inbound and outbound calls. Revenue generated from the campaign. Leads that are generated through the campaign. Number of comments for solutions. Cases based upon their origin. Cases based upon their status. Cases based upon their priorities. Cases with the number of comments count. Quarterly forecasts that includes committed amounts, bestcase amounts, and pipeline by quarter. Life cycle of the forecast. Products based upon their category. Products list whose support discontinued during the current month. Products and with the list of cases associated with the products. Vendors based on the amount Vendors based on the purchases made from the vendors. 217
218 Quote Reports Quotes by Accounts Quotes by Stage Sales Order Reports Sales Orders by Accounts Sales Orders by Status Sales Orders by Owner Purchase Order Reports Contacts Vs Purchases Purchase Orders by Status Invoice Reports Invoices by Accounts Invoices by Status Sales Metrix Reports Lead Conversion across Industries Lead Conversion across Owners Lead Conversion across Sources Lead Conversion Count across Owners Overall Sales Duration across Lead Sources Overall Sales Duration across Potential Type Sales Cycle Duration across Lead Sources Sales Cycle Duration across Owners Sales Cycle Duration across Potential Type Territory Reports (only if you enable territory management feature) Overall Sales Cycle Duration among territories Performance by Sales Persons across territories Pipeline Potentials among Territories - Matrix Revenue By Territories - Last 6 Months Revenue By Territories - Summary Revenue Channels among Territories Sales Cycle Duration across Territories Star performers across territories Quotes based on accounts. Quotes based on their stages. Sales orders based on accounts. Sales orders based on their status. Sales orders based on their owners. Contacts based on purchases. Purchase orders based on their status. Invoices based on their accounts. Invoices based on their status. Average number of days taken for the Lead to be converted from various industries for the past 6 months Average number of days taken by owners to convert the Lead for the past 6 months Average number of days taken for the Lead to be converted from various sources in the past 6 months Total number of Lead converted by various owners for the past 6 months Average number of days taken for the Lead to win as Potential from various Lead sources Average number of days taken for the Lead to win as Potential of different type Average number of days taken for the Potential from various lead sources to win Average number of days taken by the owner to win their Potential Average number of days taken for the Potential of different types to win Overall Sales Cycle Duration among territories - summary Performance by Sales Persons across territories Potentials in pipeline based on territories matrix report. Revenue by territories for the past 6 months. Summary of Revenue by territories for dashboard. Revenue Channels among Territories - Summary Report. Time take for the potentials to close acorss various territories Sales persons who achieved their targets 218
219 Target Achieved among territories Target achieved among territories for this FY. These do not include sub territories targets Dashboards Dashboard is a pictorial representation of your custom reports, which gives a real-time snapshot of your organization's key metrics. Using dashboards, you can easily visualize the patterns and trends in sales, marketing, support, and inventory related data. For example, you can glance at the products that are selling fast over a period of time, compare the current quarter sales with previous quarter sales, or compare the actual sales to the projected sales. In SalesGrow CRM, the dashboard comprises of different types of two-dimensional and threedimensional charts (components). The various types of charts are bar, pie, line, table, or funnel. The unique feature in SalesGrow CRM is the Funnel chart, which can be used to visualize the various stages in sales pipeline. Availability Profile Permission Required: Access to the Dashboard Tab and Manage Reports & Dashboards permission. 8.2 Recycle Bin The Recyle Bin stores all the records and files that are deleted from the SalesGrow CRM account. The records in the recycle bin will be available for 60 days after which it will be permanently deleted from your CRM account. Notes The records in the Recycle Bin will be available based on the Role hierarchy and your permission to view the records. Restore Records Records in the recycle bin are listed based on the the Role hierarchy and your permission to view the records. You can restore the records in a single click. To restore records from Recycle Bin 219
220 1. Click Setup > Data Administration > Recycle Bin. 2. In the Recycle Bin, select the check boxes of the records that you want to restore. 3. Click Restore. Delete Records from Recycle Bin Records in the recycle bin will be available for 60 days after which it will be permanently deleted from your CRM account. Users with Administrator profile can select the records and delete them permanently from SalesGrow CRM. To delete records from Recycle Bin 1. Click Setup > Data Administration > Recycle Bin. 2. In the Recycle Bin, select the check boxes of the records that you want to permanently delete. 3. Click Delete. 9. Automation In business, there are numerous everyday activities and processes that need to be done and when automated will save time and effort. For example, a sales manager may be required to assign the leads to various sales reps based on certain criteria. Also, you may need to send pre-sales and post sales follow up s to customers at scheduled intervals. SalesGrow CRM gives you the option to automate workflow procedures and set up automatic replies, alerts, and notifications in advance. You can create workflow rules and associate workflow alerts, tasks and field updates with them. Additionally, you can set up case escalation rules and also assignment rules for leads, contacts and cases generated via web forms. 9.1 Workflow Management Automate your sales, marketing and business processes and standardize working methods Workflow Rules Workflow Rules in SalesGrow CRM, are a set of actions (alerts, tasks and field updates) that are executed when certain specified conditions are met. These rules automate the process of sending alerts, assigning tasks and updating certain fields of a record when a rule is triggered. A workflow rule consists of the following elements: Basic Details - Specify details on the record type for which the rule applies, rule name, description, and option to activate the rule. Rule Trigger- Specify when the rule should be triggered for a record and based on what. There are two options: 220
221 o Execute based on a record's action - Rules can be triggered when records are created, edited, created/edited, deleted or a specific fields are updated. o Execute based on a date field's value - For all the records matching the rule criteria, rule will be triggered either monthly or yearly based on the value of the date field that is selected. Rule Criteria - List out the criteria to filter out records that meet the criteria. Workflow rule is triggered to these records. Instant Actions - Add alerts, tasks, field updates, webhooks and custom functions that will be triggered immediately when the rule is executed. Time Based Actions - Add alerts, tasks, field updates, webhooks and custom functions that will be scheduled and triggered based on a specified time. Availability Profile Permission Required: Users with Manage Workflow permission in profile can access this feature. Create Workflow Rules The steps to create a workflow rule are divided into 4 parts. Part 1 - Specify the basic details of the rule 1. Click Setup > Automation > Workflow > Rules. 2. In the Workflow Rules page, click Create Rule. 3. In the New Rule page, do the following: o o Select the Module to which the rule applies from the drop-down list. Enter the Rule Name. Click the Lock/Unlock icon to next to the rule name. Only Administrators can lock/unlock a workflow rule. This option is available so that others user are not able to edit or delete the rule. If required others can clone the workflow rule. In the Lock Rule pop up, specify the reason to lock the rule and click Yes, Lock. 221
222 o Select the Status check box if you want the rule to be active. o Enter the Description for the workflow rule. 4. Click Next. Part 2 - Select rule trigger option There are two options based on which the rule will be triggered for a record that matched the rule criteria. One of these options need to be selected when you create a workflow rule and you cannot change it later by editing the rule. The two options from the Execute based on drop-down list are: A Record Action - Rules can be triggered when records are created, edited, created/edited, deleted or a specific fields are updated. A Date Field's Value -For all the records matching the rule criteria, rule will be triggered either monthly or yearly based on the value of the date field that is selected. This option is available only in the Enterprise Edition. Execute Based on Record Action When new leads are created in SalesGrow CRM you may want to automatically send an or a series of s at set intervals. You may also want to create tasks for these new leads. Also, sometimes when specific fields are updated, you may want to trigger a workflow. This execution option lets you specify an action based on which workflow rules will be triggered. 1. Select one of the following: o Create: Executes the rule when records are created. o Edit: Executes the rule when existing record are modified. o Create or Edit: Executes the rule when records are created or existing records are modified. 222
.")
223 o o Field Update: Executes the rule when the values of the specified fields are modified in a record. Delete: Executes the rule when certain records are deleted. Only Workflow Alerts and Webhooks and be associated for such a rule. The action includes: Deleting a record from the Details Page. Deleting from the List View (One by one or in bulk). Using the Mass Delete feature. Deleting from a record's Related List. For example, deleting a contact under an Account. 223

224 When you select the Field Update option, do the following: o Choose the field name from the drop-down lists. o Choose one of the following: Execute the rule when all the selected fields are updated. Execute the rule when any selected field is updated. Click Next. Execute Based on Date Field's Value You may want to get an reminder a week before a deal's expected closing date, or may want to send an to the customers reminding them of the monthly rentals or subscription renewals. In these cases, it is not necessary that the records should be created or edited for the rule to get triggered. It is plainly based on the value in the date fields. This execution option lets you pick a date field from a record and allows you to define the day for the rule to be triggered. Please note, with this option, a maximum of 3000 records will be triggered every hour. If there are more than 3000 records, the remaining records will be executed in the next hour. Please note, this option is available only in the Enterprise Edition. 1. Choose a Date field from the drop-down list. All the date fields in the module for which the rule is being created will be listed. 2. Choose On, Before or After from the drop-down list to set the Date of Execution. The rule can be set to trigger a maximum of 90 days Before or After the Date field specified. 3. Specify the time of execution in hours and minutes. In case of DateTime fields, there is an option to trigger the rule based on the time in the field 224
225 value. Note 4. Select the Execution cycle as Once, Every Month or Every Year. 5. Click Next. A locked rule cannot be edited by other users. If required, they can clone the rule to create another. The actions such as, alerts, field updates, tasks, etc. associated to a locked rule is also locked and cannot be edited or deleted by users. For a rule to be triggered using the Field Update option, both the rule criteria and the execution criteria must be true. If your SalesGrow CRM account is downgraded or the subscription expired, the workflow rules will be disabled. If you renew the subscription, you will need to manually enable the rules. When the Delete option is selected as the execution criteria, a workflow rule will not be triggered if records are deleted from the Recycle Bin. You can configure and associate only workflow alerts and webhooks to a workflow rule with the execution criteria as Delete. Workflow Rules will be triggered when records are modified using Mass Update, Macros and when ownership of records are changed. Rules are also triggered when tasks are created through Macro. 225
226 Part 3 - Set the rule criteria 1. In the Rule Criteria section, specify the rule criteria details. 2. Click Add Criteria to add multiple criteria. 3. Click Next. Edit Criteria Patterns Criteria Pattern Editor in the custom list view helps you to develop the advanced filters using simple logical operators like and / or. Availability Profile Permission Required: Users with the Manage Workflow permission in profile can access this feature. Note You can specify a maximum of 25 criteria for a list view. To edit criteria patterns Click Setup > Automation > Workflow > Rules. In the Workflow Rules page, click on a workflow rule. In the Edit Rule page, review your existing criteria and click the Change Pattern link. In Pattern Editor box, modify filters and click the Save link. Save the modified custom view. Example: You would like to trigger a workflow rule for all the potentials whose Type is New Business, Stage is Need Analysis or Qualification, and Amount is above $ Type is New Business; Stage is Need Analysis or Qualification; and Amount > $
 and / or operators Criteria Row Number Important Notes When the Change Pattern box is being used to")
227 You can create this criteria easily using the Criteria option given below: The criteria pattern will be automatically set as: Since the criteria pattern does not match the requirement, you can edit it as: You can use the following characters in the Criteria Pattern Editor: Round brackets: ( ) and / or operators Criteria Row Number Important Notes When the Change Pattern box is being used to edit, you cannot add or delete a criteria row under the Specify Criteria section. The operator precedence will not be taken into account if you do not specify brackets. For example, if you specify the criteria as 1 or 2 and 3, it will be considered as ((1 or 2) and 3) You can change the and or or of the criteria rows and it will be updated in the Editor below. You can change the and or or condition in the pattern and it will be updated in the rows above. If you specify 1 and 2 and save it, on editing the view the pattern will be shown as (1 and 2). For (1 and 2) or 3 the pattern will be shown as ( (1 and 2) or 3 ) If you add more rows in the editor and delete one by one there will be additional brackets displayed in the pattern. For example if there are 4 rows added and you delete the 3rd row, the criteria pattern will be as ( ( ( ( 1 and 2 ) ) ) or 3 ). If the first row is deleted then it will be shown as ( ( ( ( 1 ) ) ) or 2 ). However, on saving the criteria, it will change as ( 1 or 2 ). Make sure that you do not use the following as they are invalid: (), (and), (or). If the brackets do not match it will be treated as invalid. There will an error message, if the number of rows and the numbers given in the pattern do not match and also, if there are any numbers missed in the pattern. 227
228 In case the final brackets are missing, there will be a difference in the Criteria Patterns Editor and its view mode. Your Criteria Pattern in Editor Your Criteria Pattern in View Mode ( 1 and 2 ) or ( 3 and 4 ) (( 1 and 2 ) or ( 3 and 4 )) 1 and 2 and 3 and 4 (1 and 2 and 3 and 4 ) ( 1 or 2 ) and ( 3 or 4 ) ( ( 1 or 2 ) and ( 3 or 4 ) ) Part 4 - Associate instant and/or time based actions 1. In the Actions section, do the following: Note that you cannot save a rule without creating either an instant or a time based action. o Create Instant Action by associating alerts, tasks, field updates, webhooks or custom functions. o Create Time Based Actions and associate alerts, tasks, field updates, webhooks or custom functions. o A maximum of 5 time based actions can be created. 2. Click Save. Associate Actions to Rules Workflow rules are meaningful only if an alert, task, field update, webhook or custom function is associated to the rule. They are grouped under Actions that can either be Instant Actions or Time Based Actions. These actions once created, can be associated with many rules. Note For each action, you can associate a maximum of 5 alerts, 5 tasks, and 3 field updates. You can associate up to 6 (1 Instant Action and 5 Time-Based Actions) custom functions per workflow rule. Similarly, you can associate up to 6 (1 Instant Action and 5 Time-Based Actions) webhooks per workflow rule. A maximum of 5 Time Based Actions (that includes alerts, tasks, field updates, webhooks and custom functions) can be created for a rule. If your SalesGrow CRM account is downgraded or the subscription expired, the workflow rules will be disabled. If you renew the subscription, you will need to manually enable the rules. Create Instant Actions Instant action includes alerts, tasks, field updates, webhooks and custom functions that are triggered immediately when the rule is executed. There are two options to associate these actions. Create alerts, tasks, field updates, webhooks or custom functions and associate them to the rule. Select existing alerts, tasks, field updates, webhooks or custom functions to associate to the rule. 228
229 To create an instant action If you are creating a workflow rule, directly go to step 4 1. Click Setup > Automation > Workflow > Rules. 2. In the Workflow Rules page, click on the rule for which you want to create an action. 3. Click Edit to modify the rule settings. 4. Under Instant Actions section, do the following to associate alerts, tasks, field updates, webhooks or custom functions to the rule: o In the corresponding section, click (the Add icon) and specify the details to create a record and associate it to the rule. Note o In the corresponding section, click (the Associate icon) and select an existing record and associate it to the rule. 5. Click Save. For a workflow rule, all the actions (alerts, tasks, field updates, webhooks and custom functions) will not be listed. If the rule is for Leads, only the actions created for Leads will be available for association. Only one set of instant action can be created with alerts, tasks, etc. associated to it. You can associate a maximum of 5 alerts, 5 tasks, 3 field updates, 1 custom function and 1 webhook to the instant action. If your SalesGrow CRM account is downgraded or the subscription expired, the workflow rules will be disabled. If you renew the subscription, you will need to manually enable the rules. Create Time Based Actions Time Based actions include alerts, tasks, field updates, webhooks and custom functions that are triggered on a specified time after the rule is executed. You can schedule the actions to be triggered based on the Rule Trigger Date, record Created Time, record Modified Time as well as other time or date fields in the module. You can see the list of scheduled actions for individual records under "Upcoming Actions". 229

230 There are two options to associate these actions. Create alerts, tasks, field updates, webhooks or custom functions and associate them to the rule. Select existing alerts, tasks, field updates, webhooks or custom functions to associate to the rule. Availability Profile Permission Required: Users with the Manage Workflow permission in profile can access this feature. To create time based actions If you are creating a workflow rule, directly go to step 4 1. Click Setup > Automation > Workflow > Rules. 2. In the Workflow Rules page, click on the rule for which you want to create an action. 3. Click Edit to modify the rule settings. 4. Under the Actions section, click Add a Time Based Action. 5. Enter a Name for the time based action. 6. Specify the Execution Time, i.e. when the associated actions should be triggered. 230
, specify")
 will not be listed.")
231 7. Click Save. 8. Under Time Based Action section, do the following to associate alerts, tasks, field updates, webhooks or custom functions to the rule: o In the corresponding section, click (the Add icon), specify the details to create a record and associate it to the rule. o In the corresponding section, click (the Associate icon), select an existing record and associate it to the rule. 9. Click Save. Note For a workflow rule, all the actions (alerts, tasks, field updates, webhooks and custom functions) will not be listed. If the rule is for Leads, only the actions created for Leads will be available for association. You can create a maximum of 5 time based actions for a workflow rule. Each Time Based Action can have a maximum of 5 alerts, 5 tasks, 3 field updates, 5 custom functions and 5 webhooks.. If the Opt Out option is enabled, s will not be sent to the customers. 231
232 For the Workflow Management feature, the Organization's Time Zone will be considered for calculating a day. In the absence of the time zone being defined, the Super Administrator's Time Zone will be considered. Time Based Actions are not minute based. There can be a delay of few minutes for the time based actions to be triggered. When alerts reach the limit for the day, any remaining s to be sent the same day will not be sent. If the Execution Time that is calculated is a time in the past, then the action will be triggered immediately. There can be a delay of few minutes for the time based actions to be triggered. The scheduled actions for a records will be listed under Upcoming Actions in the Records Details Page. Instances when the Time Based actions will be rescheduled: 1. The Execution Criteria for the Rule is either Edit or Create or Edit. When the rule criteria is satisfied for a record, the instant actions are triggered and time based actions are scheduled for the record. If a user edits the record and the rule criteria is not fulfilled, then the time based actions scheduled earlier will be deleted. If the record is edited again and the criteria is satisfied, then the time based actions will be rescheduled. 2. For Time Based Actions, the Execution Time can also be based on the custom Date & Time field. When a rule criteria is satisfied for a record, the instant actions are triggered and time based actions are scheduled for the record. If a user edits the record to change the value of the date & time field, the time based actions will be rescheduled as per the new date & time value. Instances when the Time Based actions will not be rescheduled or deleted: 1. The Execution Criteria for the Rule is either Edit or Create or Edit. When the rule criteria is satisfied for a record, the instant actions are triggered and time based actions are scheduled for the record. If a user edits the record but the rule criteria is not fulfilled, then the time based actions will not be scheduled again. 2. When a lead is converted, all the time based actions that are scheduled for the record will be deleted. 3. When the Enterprise Edition is downgraded to the Free Edition, all the time based actions that are scheduled for the record will be deleted. 4. When records are deleted, all the time based actions scheduled to the record will also be deleted. If the deleted records are restored, the time based actions will not be rescheduled. Use List View & Summary View There are two views for workflow rules that are created - the List View and the Summary View. The Summary View is available only for the workflow rules and not for the alerts, tasks and field updates. This view lists out the Criteria and Field Updates associated to the rules that will help you get a clear picture of all the rules and where they are used to avoid any confusion. 232

233 Note You need to select a module to check the summary view. This view is not available when you select the "All Modules" option. In the List View you can reorder the rules to change the sequence in which the rules need to be executed. The Reorder option will be available only after you select a module from the dropdown list. To reorder the workflow rules 1. Click Setup > Automation > Workflow > Rules. 2. In the Workflow Rules page, select a module from the drop-down list. Make sure you have selected the List View and not the Summary View. 3. Click Reorder Rules. 4. Drag and drop the rules on the order that you want. To use summary view 1. Click Setup > Automation > Workflow > Rules. 2. In the Workflow Rules page, select a module from the drop-down list. 3. Click Summary View icon. All the rules for the selected module will be listed along with the Criteria and the associated Field Updates. You can click the Show More link to see the other items associated to the rule. 233

234 Delete Workflow Rules Workflow rules can be deactivated when not in use. You can also delete the unwanted workflow rules. Note When you delete a workflow rule, all the time based actions scheduled for the records will also be deleted. To delete workflow rules 1. Click Setup > Automation > Workflow > Rules. 2. In the Workflow Rules page, click the Delete icon for the corresponding rule. 234

235 9.1.2 Workflow Alert Workflow alert comprises of an template, which is used to send notification to all the specified recipients. This notification is sent to the recipients when the associated workflow rule is triggered. You can associate maximum 5 workflow alerts to a rule. Availability Profile Permission Required: Users with the Manage Workflow permission in profile can access this feature. To create workflow alert 1. Click Setup > Automation > Workflow > Alerts 2. In the Workflow Alerts page, click Configure Alert. 3. In the New Alert page, under Alert Details section, do the following: o Enter a Name for the alert. o o o Choose a Module from the drop-down list. Choose the template for the alert from the drop-down list. Only templates created for the selected record type (module) will be listed in the drop-down field. Click the Create Templates link to create a template. 4. In the New Alert page, under Recipient Details section, choose the recipients: o Persons Associated to the Record - Depending on the type of record, you will have the option to select and Secondary field, Record Owner, Record Creator and the Record Owner's Manager. o Groups, Roles, Roles and Subordinates, and Users. 5. Specify the address of the Additional Recipients. Use comma to separate more than one address. You can add maximum 10 addresses. 6. Click Save. An based alert is created, which can be associated to the workflow rules. 235
236 9.1.3 Workflow Tasks Workflow Tasks are assigned to the users when the associated workflow rules are triggered. A workflow task can be associated to a workflow rule, when you want to create a task and assign it to a user, upon triggering the rule. Availability this feature. Profile Permission Required: Users with Manage Workflow profile permission can access To create a workflow task 1. Click Setup > Automation > Workflow > Tasks. 2. In the Workflow Tasks page, click Create Task. 3. In the New Task page, do the following: o o Select the Module from the drop-down list. Enter a Subject for the task. Insert merge fields to create dynamic task subjects. 236
237 o o o o Specify the Due Date to complete the task. Select the Status of the task from the drop-down list. Select the task Priority from the drop-down list. Select the user from the Assigned To lookup list to assign the task. o o Select the Notify Assignee check box to notify the task owner via about the task. Select the Remind Assignee check box to send reminder to the task owner. Alert through - A reminder will be sent to the task owner at the specified time. 237
238 Note Alert through Pop-up - A pop-up reminder will be initiated to the task owner at the specified time. o Enter the task Description. 4. Click Save. A new workflow task is created, which can be associated to workflow rules. Workflow tasks cannot be created for records that does not support tasks in SalesGrow CRM, such as Solution, Forecasts etc. Workflow tasks cannot be associated to a workflow rule if the Execution Criteria selected for a rule is 'Delete'. If the Assigned To field is not specified, the system will automatically assign the Task to the record's owner. If you select a workflow task while importing records (such as leads, accounts, contacts), Notify Assignee option (though selected for the particular workflow task) will not be applicable. If the owner of the task is inactive or unconfirmed, then the task will be automatically assigned to the owner of the record to which the task is added. In case the record's owner is also an inactive or unconfirmed user, then the task will be assigned to the Super Administrator Workflow Field Updates The Field Update option helps you to automatically update certain field values in the records, when the associated workflow rule is triggered. Availability Profile Permission Required : Users with the Administrator profile can access this feature. To create field updates 1. Click Setup > Automation > Workflow > Field Updates. 2. In the Workflow Field Updates page, click Configure Field Update. 3. In the New Workflow Field Update page, do the following: o o Enter a Name for the field update. Select the Module from the drop-down list. You can also update the field values of the related parent records associated to the record selected for workflow rule. For example: While creating workflow rules for 238

239 Contacts, you will be able to update the fields of the parent Account records too. o o o Select the field from the Update drop-down list that needs to be updated. Specify the value for the field that you want updated. Click Save. Note Workflow Field Updates cannot be associated to a workflow rule if the Execution Criteria selected for a rule is 'Delete'. You can associate a maximum of 3 field updates to each action (Instant and Time Based Actions). You can update the Record Owner field too using this feature. You can also use this feature to update a Text field and DateTime field with no value so that the field is left blank. Using workflow field updates, the owner of the record can be changed. If the user to be assigned is inactive or unconfirmed, the workflow field update will not be executed. From within a workflow rule, you can also create Workflow Field Updates to update parent record's fields. Record Type Contacts Potentials Cases Solutions Products Quotes Sales Order Purchase Orders Invoices Parent Records That You Can Update Accounts, Vendors Accounts, Campaigns, Contacts Products, Accounts, Potentials, Contacts Products Vendors Contacts, Accounts, Potentials Contacts, Accounts, Potentials, Quotes Contacts, Vendors Accounts, Sales Orders, Contacts Scenario for Field Update Scenario: While creating leads you want to update the following field values based on some criteria. Lead Status as Contact Immediately The criteria is, if the lead status is Not Contacted and the address of the lead does not contain yahoo, gmail, or hotmail, then the following fields should be updated: 239


240 Procedure: First, you need to create Workflow Field Updates as given below: 1. Click Setup > Automation > Workflow > Field Update. 2. In the Workflow Field Update page, click Configure Field Update. 3. In the New Field Update page, enter a Name for the update. 4. Select the Module for which the field update applies. 5. Specify the Update as Lead Status = Contact Immediately. 6. Click Save. Once the field updates are created, you need to create a workflow rule with the following: o Module - Leads o Execute On - Create o Rule Criteria - Lead Status is Not Contacted and doesn't contain yahoo, gmail, hotmail. o Instant Action - Workflow Field Update (select the two field updates that you created) 240
241 Now, when you create a lead with an address other than yahoo, gmail, hotmail, the Lead Type and Lead Status field values automatically get updated for the record Workflow Scenarios Following are some of the examples of workflow rules. Workflow Rules with Instant Actions Scenario - Assign leads to selected users when it is a high value deal. Record Type - Leads Execute On Create or Edit Rule Criteria Amount is 10,00,000 Instant Actions A Task and Field Update Create a field update that updates the Lead Owner field value to a particular user. Also, create a task for the new record owner. Time Based - Actions Scenario - Notify management when a big deal is lost. Record Type - Potentials Execute On Rule Criteria Instant Actions Time Based Actions Edit Stage is Closed Lost An Alert Create an template for potentials that includes the potential details and the reason for losing the deal. - Scenario - Assign demo requests that are generated from web forms to Sales Reps. You can assign the demos to the reps based on the type of product or the number of licenses needed. 241
242 Record Type - Leads Execute On Rule Criteria Instant Actions Time Based Actions Create Region is EST A Field Update Create a field update that updates the Lead Owner field value to a particular user. Also, create a task for new lead owner. - Scenario - Set the Response Time when a case is created based on the type of customer. Record Type - Cases Execute On Create Rule Criteria Customer Type is Platinum Instant Actions A Field Update Create a field update that sets the Response Time to a particular value. Time Based Actions - Scenario - Assign a task to contact and qualify the lead within a specified due date. Record Type - Leads Execute On Rule Criteria Instant Actions Time Based Actions Create Lead Status is Not Contacted A Task Create a task that defines the due date by which the lead should be contacted and qualified. You can calculate the due date based on any date field in the module. - Scenario - Notify the record owner and management when a lead status changes to 'Qualify'. Record Type - Leads Execute On Rule Criteria Instant Actions Time Based Actions Create or Edit Lead Status is Qualify A Task and Alert Create a task to convert the lead. Also, create an template to notify the record owner and management about the lead status
243 Workflow Rules with Time Bases Actions Scenario - Notify users if the potential's closing date is tomorrow and if it is a high value opportunity. Record Type - Potentials Execute On Create or Edit Rule Criteria Amount >= 10,00,000 Instant - Actions Time Based Execution Time - 5 Day(s) Before Closing Date Actions An Alert and Task Create an alert to notify the management and the potential owner about the closing date. Also, create a task for the record owner to follow-up with the potential. Scenario - Assign task to the invoice owner if the invoice payment due date is nearing Record Type - Invoices Execute On Create Rule Criteria - Instant - Actions Time Based Execution Time - 3 Day(s) Before Due Date Actions An Alert and Task Create an that needs to be sent to the invoice record owner as a reminder to collect payments within the due date. Also, create a task to collect the payments. Scenario - Send an to users who are evaluating your product, asking them for their feedback. Record Type - Leads Execute On Rule Criteria Instant Actions Time Based Actions Create or Edit Lead Status is Product Evaluation An Alert Create an that provides information on your product and lists out the help resources. Execution Time - 7 Day(s) After Evaluation Start Date An Alert and Task Create an template to be sent to the customers, highlighting some important features in your product. Execution Time - 14 Day(s) After Evaluation Start Date An Alert and Task Create an template to be sent to the customers, asking them their feedback 243
244 on your product and informing them of the evaluation period coming to an end. Also, you can assign a task for the record owner to personally call and see if the lead is interested to purchase Webhooks Webhooks facilitates communication with third-party applications by sending instant web notifications every time an event occurs in SalesGrow CRM. With Webhooks, you can configure HTTP URLs and associate them in workflow rules to automate the entire notification process. For general information about Webhooks. Scenarios After closing a potential in SalesGrow CRM, you can push the customer information to Accounting software and automatically generate an Invoice for the Customer. You can generate an estimate in your Accounting software as soon as the opportunity stage is changed from Prospecting to Price Quote. Availability this feature. Profile Permission Required: Users with the Manage Workflow permissions in can access List of Fields in Webhook Field Name Description Data Maximum Limit Type Name Specify name of the webhook. Text Alphanumeric(50) Description Add a description for the webhook. Text 200 characters URL to Notify Specify the REST API URL of the third-party application. URL 200 characters Method Select type of API method - POST or GET. By default, Radio - system selects POST method. Button Module Choose one of the SalesGrow CRM modules. Picklist - Supported Modules: CRM primary module, such as leads, accounts, contacts, potentials, etc. 244
245 Events and Tasks Append Entity Parameters Note: You can not set up webhooks for Call Logs and Notes modules. Specify the Parameter Name and corresponding Parameter Value. This is the request parameters sent while triggering the webhook notification to third-party application. String 3000 characters Supported Modules: CRM primary modules User Organization Append Custom Parameters Preview URL Specify the CRM Parameter Name and corresponding Value for the webhook. This is also the request parameters sent while triggering the webhook. The name and the value are as configured. This key/value pair is mainly used to send the Auth tokens, security tokens, etc. Preview the complete webhook URL to be notified to the third-party application. String - Text Read-only Set Up Webhooks Setting up Webhooks includes the following three steps: Create a webhook. Associate webhook to a workflow rule. Test webhook integration. To create a webhook 1. Click Setup > Automation > Workflow > Webhooks. 2. In the Webhooks page, click the Configure Webhook. 3. In the Configure Webhook page, specify all necessary parameters. 4. Click Save. 245
246 246

247 To associate webhook to a workflow rule 1. Click Setup > Automation > Workflow Rules. 2. In the Workflow Rules page, click the Create a Workflow Rule. 3. In the Workflow Rule page, specify workflow rule parameters. 4. Under Workflow Actions, select the webhooks to be triggered. 5. Click Save. To test the webhook integration 1. Add test data in CRM according to your workflow rule criteria. 2. In your application check for the data received from SalesGrow CRM via webhook notification. 3. If there is an error or data mismatch, modify your webhook settings in SalesGrow CRM. 4. Continue this test until you obtain the required data from SalesGrow CRM to your Application. Important Notes You can associate up to 6 (1 Instant Action and 5 Time-Based Actions) webhooks per workflow rule. You can transfer data for a maximum of 10 CRM fields from SalesGrow CRM to third-party applications using webhook. You cannot retrieve data from other Apps to SalesGrow CRM using webhooks. You must update the API ticket regularly according to limits in third-party applications. 247
248 You will not receive any notification, if the Webhook integration stopped functioning due to any issue in a third-party API. If there is any failure in the process, Webhook will send a notification first, SalesGrow CRM system will send a second notification after 15 min. Thereafter, the system will not send any Webhook notifications for that particular workflow trigger. If you exceed the maximum count per day, the system will not send remaining Webhook notifications to third-party applications and will notify the failure to Administrator. In the URL to Notify field, if you want to specify a port number, please note that only 80 or 443 port numbers are supported. SalesGrow CRM will the send the data in following standard format for Date and Date Time fields to third-party applications: o Date: yyyy-mm-dd o Date Time: yyyy-mm-dd hh:mm 9.2 Website Integration Use web forms, auto response rules and unsubscribe forms to gather data online and build a multi-channel communication to improve business Web Forms Web forms simplify the process of capturing visitors or users information from your website into your CRM system. They are designed to automate the importing of data from websites into SalesGrow CRM. Non-technical users find it easy to design and publish their own web forms. Web forms are supported for Leads, Contacts, Cases and any other Custom Modules that you have in your account. Before setting up the web form, complete the following check-list: Create a default template to send automated replies to website visitors upon submission of their details. Create an Assignment rule if you wish to assign the incoming records to specific users or based on round robin method. By default, all incoming records are assigned to the Administrator. Configure the Web form further, to suit your requirements. Customize the fields to be added in the web form. Test the entire workflow of Web form, before publishing in the Website. Availability feature. Profile Permission Required: Users with the Web-to-[Module] permission can access this 248
249 Web forms can be used to: Capture data (visitors' information) Communicate with website visitors Conduct surveys Respond to user questions Generate online sales Receive online feedback Creating a web form involves three steps Building the form - Drag and drop fields to build a form and format it easily with the WYSIWYG editor. Specifying the form details - Add details such as form name, landing page URL (where the visitor needs to be redirected after the form is submitted) record assignment rule, notification details, etc. Generating the code for the form - Embed the form using various code formats. Codes for some third-part sites (WordPress, Google Sites, Facebook, and Joomla) are readily available. You can build web forms to generate records for the Leads, Contacts, Cases and any other Custom modules. While building a web form, the following elements are available in the form: Option Add Fields Set fields' font and form layout Insert Captcha Upload Files in the form Mark fields as mandatory Mark fields as hidden Add help link for a field Description Drag and drop the fields that are required in the form. By default, some of the fields are already added when you build a new form. Use the WYSIWYG editor to change the font style and size, background color, alignment of the fields, etc. in the form. Captcha is used for security in feedback forms, website registration, comments from visitors, etc. Add captcha for the SalesGrow CRM system to prevent unauthorized automated spamming programs from filling the web form. This option is available only in the Paid Editions. With this option capture files through your web-to-lead/contact/case forms, such as screenshots of an issue, quote requests, photo of individuals, etc. The size of the file should be within 20 MB. If the file size exceeds the limit, the form will not be submitted and the record will not be added in SalesGrow CRM. This option is available only in the Paid Editions. Collect important information such as name, address, mobile number, etc. from the visitors who fill up the web form by marking fields as mandatory. Add a hidden field and its value in the form. These hidden values are submitted along with the web form but are hidden to the visitors who fill the form. A field you provide may require data to be filled in a specific format. For example, the date format may need to be specified in DD-MM-YYYY. For such requirements, you 249
250 Change button name Specify location URL of the form Specify landing page URL Select record assignment rule Specify notification options Embed form code can use the option to add a tip or hint to help the visitor who fills the form. The name of the call to action button can be Save, Submit, or another other name. You can easily change the name as per your requirements. The Location URL is the web page URL where you plan to host the web form. Specifying the URL helps prevent spam and allows only forms submitted through the particular domain to be captured as valid information. This is the URL of the web page to which the visitor needs to be redirected once the web form is submitted. Records generated through the web forms can be automatically assigned to the users in CRM with the help of Assignment Rules. Set notifications that needs to be sent to the record owners and also the visitors who submit the forms. templates or autoresponse rules can be used to send notification s. Embed the web form's code in your web page. The code is available in three different formats - HTML source code, Embed code and iframe code. Generating Web Forms To generate web forms for Leads, Contacts, and Cases 1. Click Setup > Website Integration > Web Forms. 2. In the Web Forms page, choose the Module from the drop-down list. The existing web forms for the selected module will be listed. 3. Click Create Web Form. 4. In the web form builder, do the following: o Build a form Drag and drop the fields that you need in the web form. Insert captcha. Add the option to upload files. Mark fields as mandatory. Make fields hidden in the form. Provide hint or help links for fields. Set font and layout of the form. Change button names. o Specify form details and other options Add form details such as, form name, landing page URL, form location URL. Set record assignment rule. Set notification options o Copy web form code and embed options Get code to embed in your site and other third-party sites. The code is available in three different formats - HTML source code, Embed code and iframe code. 250
251 Step 1: Build a Form Drag & drop fields in the WYSIWYG editor, which also provides various other options to build a form. Add Fields Drag & drop the fields you need in the form and change the font style and size, background color, alignment of the fields, etc. To add fields and set font and layout of the form 1. Under the Fields List tab, click on a field and drag & drop it in the form builder. 2. Make changes to the font, background color, field label alignment and form width. Note By default, some of the fields are already added in the form. o For Leads and Contacts - Last Name, and Phone fields. o For Cases - Status, Subject and Description fields. You cannot remove the following fields from the form, as they are mandatory for a record. o For Leads and Contacts - Last Name field. o For Cases - Subject field. To have custom fields, you need to first create them in the particular module. When you add the Account Name field in the web form for Contacts and contact details are submitted, an account will automatically be created in SalesGrow CRM. If an account with the same name already exists in your CRM account, an account will not be created when the form details are submitted. 251

252 An Account will be created, even if certain mandatory field details are not provided. Later, when the account is edited, you need to provide the other mandatory details before saving the record. Upload Files Capture files through your web-to-lead/contact/case forms, such as screenshots of an issue, quote requests, photo of individuals, etc. The size of the file should be within 20 MB. If the file size exceeds the limit, the form will not be submitted and the record will not be added in SalesGrow CRM. This option is available only in the Paid Editions. To add the option to upload files 1. Click the Advanced Tools tab. 2. Drag & drop the File Upload field. Note that the visitor can upload a file not more than 20 MB. You can use the help link option in the Field Settings to provide this hint. Mark Fields as Mandatory Collect important information such as name, address, mobile number, etc. from the visitors who fill up the web form by marking fields as mandatory. 252
253 To mark fields as mandatory 1. Move your mouse pointer to the field that you want to mark as mandatory. 2. Click on the Settings icon. 3. In the Field Properties pop-up, select the Mark as required field checkbox. 4. Click Done. Mark Fields as Hidden Add a hidden field and its value in the form. These hidden values are submitted along with the web form but are hidden to the visitors who fill the form. For example, if you have hosted the same form in various web pages, the hidden field will help you identify which record is generated form a web form hosted in a specific web page. To make fields hidden in the form 1. Move your mouse pointer to the field that you want to hide in the form. 2. Click on the Settings icon. 3. In the Field Properties pop-up, select the Mark as hidden field checkbox. 4. Specify the value for the field and click Done. 253
254 Provide Help Link A field you provide may require data to be filled in a specific format. For example, the date format may need to be specified in DD-MM-YYYY. For such requirements, you can use the option to add a tip or hint to help the visitor who fills the form. To provide hint or help links for fields 1. Move your mouse pointer to the field for which you want to provide hint or help link. 2. Click on the Settings icon. 3. In the Field Properties pop-up, select the Include help link checkbox. 4. Choose one of the following: o o 5. Click Done. Link & Text - Specify a text for the link and provide the link URL. Link Only - Specify the help/hint text. For example, the date field can have - MM-DD- YYYY 254
255 Change Button Name By default, there are two call to action buttons - Submit and Reset. You can rename these buttons as per your requirements. To change button names 1. Move your mouse pointer to the field that you want to rename in the form. 2. Click on the Settings icon. 3. In the Field Properties pop-up, modify the field name. The name of the field will be changed only in the form. 4. Click Done 255
256 Remove Field from the Form Easily remove unwanted fields from the web form and add them whenever required. To remove a field from the form 1. Move your mouse pointer to the field that you want to remove from the form. 2. Click on the Delete icon. Preview the Web Form Take a look at the web form before publishing it in your web site. To preview the form 1. In the form builder, click on the Preview link. A preview of the form will be available. 256
257 Step 2: Specify Form Details 1. Enter a Form Name (Example: Feedback, Contact Us, etc.). 2. Specify a Landing page URL. The visitor who submits the form will be redirected to the URL specified here. It should start with " or The length of Return URL should not exceed 255 characters. (Example: 3. Specify a Form Location URL. This should be the webpage where the web form will be hosted. It should start with " or (Example: If you plan to host the web form in multiple websites or you are not sure where the web form will be hosted, enter * in this field. This prevents spam and allows only forms submitted through 257
258 the particular domain to be captured as valid information. Note 4. Choose one of the following options to Assign Owner to the records that are submitted via web form. o Choose a User - Select from the drop-down list. All the records generated through the form will be assigned to the selected user. o Create or Choose [Module] Assignment rule to assign ownership - Select an existing assignment rule or create a new one. Based on the rule, records will be assigned to the users. With assignment rules you can implement the Round Robin method to assign records to the users. 5. Enable Notify [Record] Owner, if required and select an template that will be sent to the record owner. 6. Enable Acknowledge Visitor if you want to send an to the person who submitted the web form. o 7. Click Save. Using Autoresponse Rule - Use one of the existing auto response rules. Based on the details gathered using the web form, autoresponse rules can be triggered to send specific s. When details gathered through the web form does not satisfy the Auto Response Rule criteria, then the template selected in the second option will be sent as an acknowledgment . The Request Approval option will help you validate the generated records manually, and then add them to the corresponding module in SalesGrow CRM. If this option is not selected, all the records generated through the web form are added directly to the corresponding modules. If the domain name in the Location URL does not match with the URL where the web form is hosted, then the information will not be captured. Alternatively, you can enter [*] in the landing URL field to capture from other / multiple domains. 258
259 Step 3: Use Web Form Code to Embed The code for the web form is available in 3 formats: Source Code, code to Embed, iframe code. The code is also readily available for some third-party sites - WordPress, Facebook, Google Sites and Joomla. Please note that the Script and iframe code is available only in the Paid Editions. Note 1. Click on SalesGrow Sites, WordPress, Facebook, Google Sites, or Joomla to get the respective code. 2. Copy the code and paste it in the website where you want the web form. 3. Click Done. In order to avoid spam, the generated Web Form (HTML file) must be published in an active web server (Apache, Microsoft, IIS, etc.). The web form will not work if you submit the form values from your desktop. When the HTML code is generated for the web form, certain entities are hidden by default. If you remove those hidden entities, the web form will not work. Here is the code snippet that should not be removed from your web form code: <input type="hidden" name="xnqsjsdp" value="" /> <input type="hidden" name="xmiwtld" value="" /> <input type="hidden" name="actiontype" value="" / Auto Response Rules The Auto Response rule feature enables you to send automated s when leads, contacts, cases or records for the custom modules are generated through web forms. When a lead is generated through web forms, you may want to send appropriate s to the leads with different types of requests. In such cases, you can create an auto response rule with specific rule criteria. When the condition is satisfied, the corresponding is sent. You can create numerous auto response rules but only one auto response rule can be active at a time. Note When the details gathered through the web form does not satisfy the Auto Response Rule criteria, then the template (acknowledgment ) selected while creating the web form will be sent. 259
260 Availability this feature. Profile Permission Required: Users with the permission to create web forms can access Create Auto Response Rule To create auto response rules for web forms 1. Click Setup > Website Integration > Auto Response Rules. 2. In the Auto Response Rules page, select the module from the drop-down list. 3. Click Create Rule. You will be able to create the auto response rule for the selected module. 4. In the Create Auto Response Rules for Web to [Module] page, do the following: o Enter the Rule Name. o Select the check box to activate the rule. 5. Click Save. Note Once the rule is created, you need to define the criteria (i.e. create rule entries) based on which the template will be sent to the visitor who submits the web form. Create Auto Response Rule Entry To create auto response rule entry 1. Click Setup > Website Integration > Auto Response Rules. 2. In the Auto Response Rules page, click on the rule for which you want to create the rule entry. 260
![3. In the Auto Response Rules for Web to [Module] page, click Create Rule Entry. Note 4. In the Rule Entry page, do the following: o Specify the Rule Criteria.](/docs-images/80/80447117/images/261-0.jpg "o Choose an Email Template from the drop down list. If you do not have email templates created for the module, you can click on the Create an Email Template link. 5. Click Save.")
261 3. In the Auto Response Rules for Web to [Module] page, click Create Rule Entry. Note 4. In the Rule Entry page, do the following: o Specify the Rule Criteria. o Choose an Template from the drop down list. If you do not have templates created for the module, you can click on the Create an Template link. 5. Click Save. When the details gathered through the web form does not satisfy the Auto Response Rule criteria, then the template selected while creating the web form will be sent Unsubscribe Form This feature helps you to generate the HTML code for the Unsubscribe Form. You can use the Form to provide an Unsubscribe option for the recipients. The process to set up the form consists of three parts. Availability Profile Permission Required: Users with the Unsubscribe Form permission in profile can access this feature. 261
262 Part 1 - To generate an unsubscribe Form 1. Click Setup > Website Integration > Unsubscription Form. 2. In the Unsubscription Form page, do the following: o Enter your website address in the Return URL field. o Click Generate HTML. 3. Copy and paste the generated HTML code into HTML editor and save it as an HTML file. 4. Click Finish. Part 2 - To publish the unsubscribe Form When you want to publish the unsubscribe form in a web page and provide a link to the web page from an Create a web page in your website and paste the generated HTML code in the page. 2. Get the URL for the web page that you created in your website. Part 3 - To add unsubscribe link in the template 1. Click Setup > Templates > Template. 2. In the Templates page, click the Edit link corresponding to the template you want to provide the Unsubscribe option. 3. Click Edit. 4. In the Footer section, type your desired content. Example: "Click here to unsubscribe". 5. Select the View HTML source check box and provide a link to the page where the unsubscribe form is published. Example: Click <a href=" to unsubscribe. 6. Click Save. Part 4 - To use unsubscribe option Note 1. Click the Unsubscribe link in an message. 2. Enter the address and click Unsubscribe. 3. The opt out option for the Lead and/or Contact will be automatically selected. s will not be sent to the Leads or Contacts, if the Opt Out check box is selected. If the user enters a Secondary Address, then also the opt out option will also be selected. The HTML code cannot be embedded directly in your template. You need to save the generated code as an HTML file and use the link in the template. 262
263 10. Customer Support SalesGrow CRM provides the Customer Support & Service management (Help Desk) features, such as Cases (Trouble tickets), Solutions (Knowledge base), Case Routing & Escalation through Workflow rules, and easy to deploy Web-to-Case forms for capturing customer-specific cases through Websites. In addition, you can also synchronize customer-specific messages as Cases from Microsoft Outlook mail client to the Cases module in SalesGrow CRM. The Cases and Solutions functionality can be used to streamline organization-wide Customer Support processes by integrating Sales & Customer Support in a single system. Integration between Sales and Post-sales support management helps organizations in resolving the customer reported cases in the least possible time, enhancing customer satisfaction and allowing for more cross-selling and up-selling opportunities in future Cases Cases refer to the feedback received from the customers on various issues pertaining to the use of products or services Create Cases In SalesGrow CRM, you can create cases by: Entering data in the case details form: You can manually fill in the Case details gathered from various external sources. Importing cases from external source: You can gather data through various sources and import the CSV and XLS files into SalesGrow CRM. Capturing cases from website: You can create web forms and allow website visitors to submit their case details or questions directly through forms. These details submitted in the website are captured directly into the Cases module. Note Some of the standard fields may not be visible or editable depending on your organization's business process. In case you want to add or modify fields, please contact your System Administrator for more details on the usage of other fields. Create Cases Individually You can create cases individually by using the following: Filling in the details in the case creation form. Cloning the case with a few changes in the existing record. 263
264 Notes By default, the person who creates the case owns it. To change owner, click the Change link in the Case Owner field from the Case Details page and select another user. To create cases 1. In the Cases module, click New Case. 2. In the Create Case page, enter the case details. 3. Click Save. To clone cases 1. Click the Cases tab, click a particular case that you want to be cloned. 2. In the Case Details page, click Clone. 3. In the Clone Case page, modify the required case details. 4. Click Save Associate Cases You can create a 360-degree view of the Case to display all the associated details, such as potentials, cases, open activities, history of the completed activities, attachments, and notes. In the Campaign Details page, you can associate the following records: To associate cases with other records Open Activities: To add tasks and events Closed Activities: To display all the closed tasks and events Attachments: To attach documents Notes: To add notes Approve Cases The import feature and Web forms have an option to enable manual approval of records. When this option is enabled, records imported or gathered through web forms are not added directly to the modules. They need to be approved first for other users to access the records. Records can be approved for the Leads, Contacts, Cases or any other Custom module's records. 264
265 Availability feature. Profile Permission Required: Users with the Approve Records permission can access this To approve records 1. Click the Leads Tab. 2. In the [Module] Home page, under [Module] Tools section, click the Approve [Module] link. 3. In the [Module] Approval page, select the records for approval. 4. Click Approve Standard Fields Following are the list of SalesGrow defined standard fields available in the Cases module: Field Name Description Data Maximum Limit type Case Display the case ID after creating a case. Number 16 digit Number Product Select the product name related to the case. Lookup - Name Case Owner Select the name of the user to whom the case is Lookup - assigned. Subject* Specify the title of the Case. This field is mandatory. Text box Alphanumeric(255) Priority Select the priority of the Case from the drop-down Pick list - list. Status* Select the status of the Case from the drop-down Pick list - list. Reported By Displays the name of the contact. - - Related To Select the name of the contact who submitted the Lookup - Case. Type Select the type of problem. It can be a general Pick list - question, feature request, or real issue in your product/service. Case Origin* Select the source from which the case has been generated. You can select , Phone, or Website. If you select , you must specify the ID of Pick list - 265
266 the customer. Specify the ID of the contact. Alphanumeric and Special characters Account Select the account related to the case Lookup Name Potential Select the Potential related to the case Lookup Name Phone Specify the phone number of the customer Text box Alphanumeric(50) Case Reason Specify the reason for the case Pick list - Description Specify complete details about the case. Text characters Area Internal Specify follow-up notes about case. Text 3000 characters Comments Area Solution Specify the solution provided Text characters Add Comment 10.2 Solutions specify the follow-up notes about the solution Area Text Area characters Solutions refer to the resources within the organization that enables solving repetitive problems encountered by customers Create Solutions In SalesGrow CRM, you can create solutions by: Entering data in the solution details form: You can manually fill in the Solution details gathered from various external sources. Importing solutions from external source: You can gather data through various sources and import the CSV and XLS format files into SalesGrow CRM. Note Some of the standard fields may not be visible or editable depending on your organization's business process. In case you want to add or modify fields, please contact your System Administrator for more details on the usage of other fields. Create Solutions Individually You can create solutions individually by using the following: Filling in the details in the solution creation form. Cloning the solution with few changes in the existing record. 266
267 Note By default, the person who creates the solution owns it. To change owner, click the Change link in the Solution Owner field from the Solution Details page and select another user. To create solutions individually 1. In the Solutions module, click New Solution. 2. In the Solutions Home page, enter the solution details. (Refer to the table below) 3. Click Save. To clone solutions 1. Click the Solutions tab, click a particular solution that you want to be cloned. 2. In the Solution Details page, click Clone. 3. In the Clone Solution page, modify the required solution details. (Refer to the table below) 4. Click Save. List of Standard Fields Field Name Description Data Type Solution Title* Specify the subject of the solution. Text box, Alphanumeric (255) Solution Select the SalesGrow CRM user's name to which the Pick list Owner solution is assigned. Status Select the status from the list Pick list Product Select the name of the product to which the solution has to Lookup Name be associated. Question* Specify the Question. Text box Answer* Specify solution details. Text box Note You can add comments only in the edit mode. The Add Comment field will not be available while creating the solution Associate Solutions Attach Documents to the Solution You can attach additional documents to the solution. To attach documents This feature allows you to attach documents, spreadsheets and presentations to the solution. 267
268 Standard Fields Following are the list of SalesGrow defined standard fields available in the Solutions module: Field Name Description Data type Maximum Limit Solution Display the case ID after creating a solution Number 16 digit Number Solution Specify the subject of the solution. This field Text box Alphanumeric(255) Title* is mandatory Solution Select the name of the user to whom the Pick list - Owner solution is assigned. Product Select the name of the product to which the Lookup - Name solution has to be associated. Question* Select the priority of the solution from the Text box, Alphanumeric(255) drop-down list. This field is mandatory Alphanumeric Answer* Specify solution details. This field is Text Area - mandatory Status Specify the status of the solution. Pick list - Created By Displays the person created the solution first Date/Time format time. Last Modified Displays the person modified the solution Date/Time format By Description Specify any other details about solution. Text box characters Comments Specify additional comments about the solution. Text box characters 11. Inventory Management SalesGrow CRM extends beyond the traditional CRM functions and supports complete sales cycle management by integrating Inventory Management features. These include Products, Price Books, Vendors, Sales Orders, Quotes, and Invoices, along with the Sales related modules, such as Leads, Accounts & Contacts, and Opportunities. With the SalesGrow CRM Inventory Management features you can achieve seamless integration between pre-sales and post-sales accounting activities in a single application. In addition, you can also procure goods or services from the selected list of vendor Products Products refer to the goods or services sold or procured by any organization Create Products In SalesGrow CRM, you can create products by: 268
269 Entering data in the product details form: You can manually fill in the Product details gathered from various external sources. Note Some of the standard fields may not be visible or editable depending on your organization business process. In case you want to add or modify fields, please contact your System Administrator for more details on the usage of other fields. Create Products Individually You can create individual products by: Filling in the details in the product creation form. Cloning the products with a few changes in the existing product details. To understand the SalesGrow defined standard fields in the Products module. To create products individually 1. In the Products module, click New Product. 2. In the Create Product page, enter the product information. o Under Product Information, select the Product Active check box if you want the newly created product to be active. By default, the check box is selected. 3. Click Save. To clone products 1. In the Products tab, click a particular product that you want to be cloned. 2. In the Product Details page, click Clone. 3. In the Clone Product page, modify the required details. 4. Click Save Associate Products You can create a 360-degree view of the product to display all the associated details, such as products, trouble tickets, open activities, history of the completed activities, attachments, and notes. In the Product Details page, you can update the following: Price Books: To add different list prices to the product. Open Activities: To add tasks and events to product. Closed Activities: To display the closed tasks and events to product. Cases: To add cases to the product. 269
270 Solutions: To add solutions to the product. Attachments: To attach documents to the product. Leads: To add leads to the product Contacts: To add contacts to the product Potentials: To add potentials to the product Accounts: To add accounts to the product Generate PO In a typical business scenario, there is a lag between the time at which the stock is ordered and the time at which the stock is received. To handle this case, we have a Reorder Level for the products. Reorder level of the product is the point at which a new order is to be placed for the supply of products. The reorder level is set so that products are purchased before the company runs out of stock to sell. It is always set as a number higher than zero, based on the time taken to receive the goods. In SalesGrow CRM, you can set the reorder level for each product and generate the purchase order for the products below the reorder level. To generate PO for records below reorder level 1. Click the Products module. 2. In the Products Home page, click Product Tools > Generate PO for Record below Reorder Level. 3. In the Generate PO for Record below Reorder Level page, select the Vendor from the drop-down list. Note that only the vendors whose products are below the reorder level will be displayed here. The products below the reorder level will be listed on selecting the vendor. 4. Select the check box(es) of the products for which you need to generate the purchase orders. 5. Click Generate Purchase Order. You will be directed to the Create Purchase Order page. Update a Product's Multiple List Prices A product may have multiple list prices that need to be updated often. You can edit them at any time. To update list prices 1. Login to your account and choose Products. 2. Select the product for which you wish to update the list prices. 270

271 3. In the Price Books Related List, click the Edit All link. 4. In the Edit List Prices section, enter the new prices manually. 5. Click Save List Prices. Understand Stock Information Auto-Updates The details of product quantity in the Stock Information section are updated automatically with reference to the sales order and purchase order and invoice. Following is the logic behind the automatic updates. Quantity in Stock Quantity in stock changes with respect to Invoice & Purchase Order Quantity in stock increases when a purchase order is delivered. Quantity in stock decreases when an already delivered purchase order is cancelled. Quantity in stock decreases with an invoice creation (this includes when a quote or sales order is converted to an invoice). Quantity in stock increases with an invoice cancellation. Quantity in Demand: Quantity in demand increases when a sales order is created. 271

272 Quantity in demand decreases when a sales order is delivered or cancelled. Quantity in demand also decreases when a sales order is converted to an invoice. The status of the sales order thus converted automatically changed to "delivered". Quantity Ordered: Quantity ordered increases when a purchase order is created. Quantity ordered decreases when a purchases order is delivered or cancelled. Example: Following is an example that shows you how the quantity values vary at different stages for a given scenario. You run a furniture business. You have 10 arm chairs in stock. Your have no sales order or purchase order. In that case, your quantity in stock would be 10, while your quantity in demand and quantity ordered would be 0. You receive a sales order (created) for 4 chairs. Now, the quantity in demand increases. The stock information would be: You create a purchase order for 5 chairs. This will result in an increase in the quantity ordered. You deliver your the sales order for 4 chairs and create an invoice for the same. Here, your quantity in stock and quantity in demand decrease accordingly. 272

 Product Active Specify the status of the product. Check box - Vendor Name Specify the name of the vendor. Lookup Product Category Select the category of the product.")
273 Your purchase order for 5 chairs has been delivered and your stock fills up again. The stock flow is thus automated as you update sales order, purchase order and invoice details Standard Fields Following are the list of SalesGrow defined standard fields available in the Products module: Field Name Description Data type Maximum Limit Product Name* Specify the name of the product. This field is Text box Alphanumeric(50) mandatory. Product Owner Select the name of the user to whom the Pick list product is assigned. Product Code Specify the product identification. Text box Alphanumeric(40) Product Active Specify the status of the product. Check box - Vendor Name Specify the name of the vendor. Lookup Product Category Select the category of the product. Pick list Sales Start Date Specify the date on which the product sales Date starts Sales End Date Specify the date on which the product sales Date ends Created By Displays the person created the product first time. Date/Time format Modified By Displays the person modified the product Date/Time format Commission Rate Specify the commission rate for selling the product. Numeric Decimal 273
274 Manufacturer Select the name of the product Pick list - manufacturer. Unit Price Specify the unit price of the product. Currency Taxable Specify whether the product is a taxable Check-box product Product Category Select the category of the product. Pick list - Support Start Select the date on which the product Date - Date support starts. Support Expiry Select the date on which the product Date - Date support ends. Usage Unit Displays the unit price of the product. Text box Alphanumeric Qty Ordered Specify the number of units. Text box Integers Qty in Stock Displays the stock quantity Text box Integers Reorder Level Specify the Reorder value Text box Integers Handler Select the SalesGrow CRM user who is Lookup handling the product Qty in Demand Displays the demand quantity Text box Integers Description Specify any other details about product. Text area (long text) characters 11.2 Price Books Price Books refer to the agreed price for selling a product to a customer. Based on the agreed terms, the prices can even vary for different customers Create Price Books In SalesGrow CRM, you can create price books by: Entering data in the price book details form: You can manually fill in the Price Book details. Importing price books from external sources: You can gather data through various sources and import CSV and XLS files into SalesGrow CRM. Note Some of the standard fields may not be visible or editable depending on your organization's business process. In case you want to add or modify fields, please contact your System Administrator for more details on the usage of other fields. Create Price Books Individually You can create price books individually by: Filling in the details in the price book creation form. 274
275 Cloning the price book with a few changes in the existing price book details. To create price books individually Note 1. In the Price Books module, click New Price Book. 2. In the Create Price Book page, enter the price information. 3. Click Save. By default, the person who creates the price book owns it. To change owner, click the Change link in the Price Book Owner field and select another user. To clone price books 1. In the Price Books module, click a particular record that you want to be cloned. 2. In the Price Books Details page, click Clone. 3. In the Clone Price Books page, modify the required details. 4. Click Save Associate Price Book You can create a 360-degree view of the price book to display all the associated details. In the Price Book Details page, you can update the following details: Products: To add products. Attachments: To attach documents. Update List Prices of Multiple Products You may have one Price Book that applies for more than one product. If you wish to update the list prices of products under one price book, you can update them either manually or by using the Import List Price option. To update list price manually 1. Click the Price Books module. 2. Select the desired price book. 275


276 3. In the Products related List, click the Edit All link. 4. In the Edit List Prices section, enter the new prices manually. 5. Click Save List Prices. To use the Import option, 1. Click the Price Books module. 2. Select the price book for which you wish to update the list prices. 3. In the Products related List, click the Import List Price link. 276
277 4. In the Import Products wizard, select the file with the new list prices. The file formats accepted are XLS, XLSX, CSV and VCF. 5. Select a value for Find Products by, either Product Name or Product ID. 6. Map the fields and click Import. The Import Summary appears. The list prices are updated in the Price Books. These products will also be associated with the appropriate Price Books in the Products Related List as well Set Discounts While creating price book information, you have an option to choose your Pricing Model based on your business requirement. You can choose from the following options: 277
278 No discount Flat Discount Differential Discount To define the pricing model with no discount 1. In the Price Books module, click New Price Book. 2. In the Create Price Book page, enter a Price Book Name. 3. Select Pricing Model from the drop down list. By default, the Pricing Model displayed is None. 4. Click Save. To define the pricing model with Flat or Differential discount 1. In the Price Books module, click New Price Book. 2. In the Create Price Book page, enter a Price Book Name. 3. Select Flat/Differential discount from the drop down list. 4. In the Pricing Details section, enter the From Range, To Range and Discount (%). 5. Click Add to enter more slots of pricing details and discounts. 6. Click Save Standard Fields Following are the list of SalesGrow defined standard fields available in the Price Books module: Field Name Description Data type Maximum Limit Price book Owner Select the name of the user to Lookup - whom the price book is assigned. Price book Name* Specify the name of the Price Text box Alphanumeric(50) Book. This field is mandatory. Active Select the Active check box to Check box - set the status of the Price Book as active. Pricing Model Select the model of the price Pick list - book - Flat or differential Created By Displays the person created the Date/Time format Price book first time. Modified By Displays the person modified Date/Time format the Price book. Description Specify any other details about Price Book. Text area (long text) 32000characters Pricing details Specify the Pricing details From Range - Text box Decimal (20) From Range To Range - Text To Range box 278
279 Discount Discount - Percent 11.3 Vendors Vendors are the companies, individuals or contractors from whom your organization procures products and/or services Create Vendors In SalesGrow CRM, you can create vendors by: Entering data in the vendor details form: You can manually fill in the Vendor details in the form. Importing vendors from external sources: You can gather data through various sources and import the CSV and XLS files into SalesGrow CRM. Note Some of the standard fields may not be visible or editable depending on your organization's business process. In case you want to add or modify fields, please contact your System Administrator for more details on the usage of other fields. Create Vendors Individually You can create vendors individually by: Filling in the details in the vendor creation form. Cloning the vendor with a few changes in the existing vendor details. To create vendors individually 1. In the Vendors module, click New Vendor. 2. In the Create Vendor page, enter the vendor details. 3. Click Save. To clone vendors 1. In the Vendors tab, click a particular vendor that you want to be cloned. 2. In the Vendor Details page, click Clone. 3. In the Clone Vendor page, modify the required details. 4. Click Save. 279
280 Associate Vendors You can create a 360-degree view of the vendor to display all the associated details, such as products, activities, contacts, and purchase orders. Products: To add products purchased from vendor. Purchase Orders: To create purchase orders for getting products from the vendors. Open Activities: To add new tasks and events. Closed Activities: To track closed tasks and events. Attachments: To add files to the vendor record. Contacts: To add contacts related to vendors Standard Fields Following are the list of SalesGrow defined standard fields available in the Vendors module: Field Name Description Data type Maximum Limit Vendor Owner Select the name of Lookup the user to whom the Vendor details is assigned. Vendor Name* Specify the name of Text box Alphanumeric(50) the vendor. This field is mandatory Phone Specify the phone Text box Alphanumeric(40) number of the vendor Specify the ID of the vendor Alphanumeric and Special characters(100) Website Specify the Web site URL of the vendor URL Alphanumeric and Special characters(50) GL Account Select the general Pick List - ledger account Category Specify the category Text box Alphanumeric(40) of the vendor Created By Displays the person Date/Time format created the Price book first time. Modified By Displays the person modified the Price book. Date/Time format Vendor Address Specify the address Street - Text Alphanumeric(250) of the vendor box Alphanumeric(30) Street City - Text box Alphanumeric(30) City State - Text Alphanumeric(30) State box 280
281 Postal Code Country Code - Text box Country- Text box Alphanumeric(30) Description Specify any other details about vendor Text area (long text) characters 11.4 Quotes Quotes are legal agreements between a customer and a vendor to deliver the requested product within the specified time at the agreed upon price Create Quotes In SalesGrow CRM, you can store quote details by manually entering the data in the quote details form. Note Some of the standard fields may not be visible or editable depending on your organization business process. In case you want to add or modify fields, please contact your System Administrator for more details on the usage of other fields. Create Quotes Individually To create quotes 1. In the Quotes module, click New Quote. 2. In the Create Quotes page, enter the quotes details. 281
282 3. Under the Product Details section, click Add Line Items. 4. In the Choose Products popup, type in at least one character of the Product Name or Product Code to search for the desired product and choose it from the drop-down. The only way to add products is by choosing them from the drop-down. You cannot add them otherwise. Also, the search results are affected by words seperated by a space. For example, typing "P" will bring up "i pad", provided the product name is stored as "i pad" (as two words). If it is stored as "ipad", typing "p" will not bring up the product. To bring this up, you must type "i. To know more about a product listed in the drop-down, point your mouse to the Info icon next to the product. 5. Enter the desired quantity for the chosen product. For more info on the stock quantity of the chosen product, point the mouse to the Info icon next to quantity text box. 6. Add more product lines as required by clicking the Add another line link. Note that you can add up to 100 line items in a quote. 282
283 7. Once you have added all product lines, click Add Products to add them to the quote. All the details required for the chosen line item (including taxes, price book discounts and product description for the chosen product) will be populated automatically. If you have more than one item, simply drag and drop line items to reorder the product lines.to view the Product Quantity and Unit price, point your mouse to the Product Name/Product Code. To view Total after Discount, point your mouse to Discount. 283
284 If you wish to add the list price from an associated price book, click on the Price Book Look Up icon to browse and select the desired price book. 8. To edit the details of a line item, click on the Edit icon that appears when you point your mouse to a value such as tax or discount. Editing a value changes any related values automatically. To view the Discount and Range details for the associated price book, point your mouse to the Discount 284
285 value and click on the Info icon that appears. Note 9. Click Save. The Product Details section is not customizable. If you wish to add any other details in the section such as Billing info, that is not possible. To clone quotes 1. In the Quotes tab, click a particular quote that you want to be cloned. 2. In the Quote Details page, click Clone. 3. In the Clone Quotes page, modify the required details. 4. Click Save Associate Quotes You can create a 360-degree view of the quote to display all the associated details, such as sales orders, open activities, and history of the completed activities. Sales Orders: To display sales orders associated with quotes. Open Activities: To add tasks and events related to quotes. Closed Activities: To display the completed activities. Attachments: To attach documents. s: To view messages. 285
286 Convert Quotes Convert Quotes to Sales Order/Invoice To convert quotes to a sales order or invoice Note 1. Click the Quotes tab. 2. In the Quotes Home page, select the required quote. 3. In the Quote Details page, click Convert, and then select Sales Order / Invoice. The Sales Order/Invoice Details page will be displayed. In case you have custom fields in your quote, you must map it with the corresponding custom fields in the sales order/invoice. The mapping must be done before you convert the quote. To map custom fields of the Quotes module 1. Click Setup > Customization > Fields. 2. Select the Quotes module from the Module list. 3. Click Map Custom Field. 4. In the Map Fields for Quotes Conversion page, map the Quotes custom fields to the corresponding fields in Sales Order/Invoice. 286
287 5. Click Save. Now the Quotes custom fields are mapped with their corresponding fields in Sales Order/Invoice. The values will be converted accordingly on Quotes conversion Standard Fields Following are the list of SalesGrow defined standard fields available in the Quotes module: Field Name Description Data type Maximum Limit Quote Owner Select the name of the Lookup - user to whom the quote is assigned. Subject* Specify the name of the Text box Alphanumeric(50) quote. This field is mandatory. Potential Name Specify the potential Text box Alphanumeric(40) name for which the quote has to be created. Quote Stage Specify the status of Check box - the quote. Valid Till Specify the date till the quote is valid after sending to the prospective customer. Date - 287
288 Contact Name Account Name Carrier Shipping Inventory Manager Account Name* Created By Modified By Billing Address Street City State Zip Country Specify the contact to which the quote has to be created. Specify the account to which the quote has to be created. Select the name of the carrier manufacturer. Select the category of the quote. Specify the person responsible for shipping the shipment to the account or contact. Specify the account name to which the quote has to be created. This field is mandatory Displays the person created the Price book first time. Displays the person modified the Price book. Specify the primary address of the contact. Lookup - Lookup Pick list - Text box Text box Lookup Date/Time format Date/Time format Street - Text box City - Text box State - Text box Code - Text box Country- Text box Alphanumeric(50) Alphanumeric(50) Alphanumeric(250) Alphanumeric(30) Alphanumeric(30) Alphanumeric(30) Alphanumeric(30) Shipping Address Street City State Zip Country Specify the shipping address of the contact (if any). Street - Text box City - Text box State - Text box Code - Text box Country - Alphanumeric(250) Alphanumeric(30) Alphanumeric(30) Alphanumeric(30) Alphanumeric(30) 288
289 Product Name * Quantity in Stock Quantity* Unit Price* List Price* Total Terms & Conditions Description 11.5 Sales Orders Select the product name.this field is mandatory Displays the stock quantity. Specify the quantity for which the sales order has to be generated. This field is mandatory Displays the unit price of the product. Select the product list price from Price Book or specify the product price. This field is mandatory Displays the amount of the selected products. Specify the terms and conditions that are associated with quote. Specify any other details about quote. Text box Lookup - Numeric Integers Numeric Integers Currency Lookup and Numeric Integers Text box Alphanumeric Text area Text area characters Sales Orders are confirmation of sales, generated after the customer sends a purchase order based on your quotes Create Sales In SalesGrow CRM, you can store sales order details by entering data in the sales order details form. Note Some of the standard fields may not be visible or editable depending on your organization business process. In case you want to add or modify fields, please contact your System Administrator for more details on the usage of other fields. Create Sales Orders Individually To create sales orders 289
290 1. In the Sales Orders module, click New Sales Order 2. In the Create Sales Orders page, enter the sales order details. 3. Under the Product Details section, click Add Line Items. 4. In the Choose Products popup, type in at least one character of the Product Name or Product Code to search for the desired product and choose it from the drop-down. The only way to add products is by choosing them from the drop-down. You cannot add them otherwise. Also, the search results are affected by words seperated by a space. For example, typing "P" will bring up "i pad", provided the product name is stored as "i pad" (as two words). If it is stored as "ipad", typing "p" will not bring up the product. To bring this up, you must type "i. To know more about a product listed in the drop-down, point your mouse to the Info icon next to the product. 5. Enter the desired quantity for the chosen product. For more info on the stock quantity of the chosen product, point the mouse to the Info icon next 290
291 to quantity text box. 6. Add more product lines as required by clicking the Add another line link. Note that you can add up to 100 line items in a sales order. 7. Once you have added all product lines, click Add Products to add them to the sales order. All the details required for the chosen line item (including taxes, price book discounts and product description for the chosen product) will be populated automatically. Simply drag and drop line items if you wish to reorder the product lines.to view the Product Quantity and Unit price, point your mouse to the Product Name/Product Code. To view Total after Discount, point your mouse to Discount. 291
292 If you wish to add the list price from an associated price book, click on the Price Book Look Up icon to browse and select the desired price book. 8. To edit the details of a line item, click on the Edit icon that appears when you point your mouse to a value such as tax or discount. Editing a value changes any related values automatically. 292
293 To view the Discount and Range details for the associated price book, point your mouse to the Discount value and click on the Info icon that appears. Note 9. Click Save. The Product Details section is not customizable. If you wish to add any other details in the section such as Billing info, that is not possible. To clone sales orders 1. In the Sales Orders tab, click a particular sales order that you want to be cloned. 2. In the Sale Order Details page, click Clone. 3. In the Clone Sale Orders page, modify the required details. 4. Click Save. 293
294 Associate Sales Orders You can associate a sales order with other records such as, activities, attachments and notes. Invoices: To create invoices from the sales order. Open Activities: To add tasks related to sales order. Closed Activities: To display the closed activities. Attachments: To add files and notes to sales order. s: To view messages. Convert Sales Order to Invoice To convert sales order to invoice Note 1. Click the Sales Orders tab. 2. In the Sales Orders Home page, select the required sales order. 3. In the Sales Order Details page, click Convert, and then select Invoice. The Invoice Details page will be displayed. In case you have custom fields in your Sales Order, you must map it with the corresponding custom fields in the invoice. The mapping must be done before you convert the sales order. To map custom fields of the Sales Orders module 1. Click Setup > Customization > Fields. 2. Select the Sales Orders module from the Module list. 3. Click Map Custom Field. 294
295 4. In the Map Fields for Sales Orders Conversion page, map the Sales Order custom fields to the corresponding fields in Invoice. Note that the same page is displayed for Quotes conversion as well. 295
296 5. Click Save. Now the Sales Order custom fields are mapped with their corresponding fields in Invoice. The values will be converted accordingly on Sales Order conversion Standard Fields Following are the list of SalesGrow defined standard fields available in the Sales Orders module: Field Name Description Data type Maximum Limit Sales Order Owner Select the name of the Lookup user to whom the sales order is assigned. SO Number Display the Sales order Number 16 digit ID after creating a case. Subject* Specify the name of the Text box Alphanumeric(50) sales order. This field is mandatory. Potential Name Select the potential for Lookup - which the sales order has to be generated. Customer No Specify the customer Text box Alphanumeric(50) identification number (if any) Purchase Order Select the reference Text box - purchase order. Quote Name Select the reference Lookup - quote. Contact Name Select the contact for Lookup - which the sales order has to be generated. Due Date Select the date Date - Carrier Select the carrier s Pick list - name that ships the products from your warehouse to customer site. Pending Text box Alphanumeric(50) Status Specify the status of Pick list - the sales order. Sales Commission Specify the commission Numeric float to the sales person upon closing the deal. Excise Duty Specify the excise duty Text Box Numeric for the shipment Account Name* Specify the account name to which the Lookup - 296
297 Assigned To Created By Modified By Billing Address Street City State Zip Country sales order has to be created.this field is mandatory Select the user's name to whom the sales order handling duty is assigned. Displays name of the user created the Sales order first time. Displays name of the user modified the Sales order Specify the primary address of the contact. Select option - Date/Time Date/Time Street - Text box City - Text box State - Text box Code - Text box Country- Text box Alphanumeric(250) Alphanumeric(30) Alphanumeric(30) Alphanumeric(30) Alphanumeric(30) Shipping Address Street City State Zip Country Specify the shipping address of the contact (if any). Street - Text box City - Text box State - Text box Code - Text box Country - Text box Alphanumeric(250) Alphanumeric(30) Alphanumeric(30) Alphanumeric(30) Alphanumeric(30) Product Name * Quantity in Stock Quantity* Unit Price* Select the product name.this field is mandatory Displays the stock quantity. Specify the quantity for which the sales order has to be generated. This field is mandatory Displays the unit price of the product. Lookup - Numeric Integers Numeric Integers Currency 297
298 List Price* Tax Adjustments Total Terms & Conditions Description Select the product list price from Price Book or specify the product price. This field is mandatory Specify the tax component of the products Specify if there are any adjustments, such as discounts, or extra charges etc. Displays the amount of the selected line item. Specify the terms and conditions that are associated with sales order. Specify any other details about sales order. Lookup and Numeric Integers Currency - Currency - Currency - Text area (long text) Text area (long text) characters 11.6 Purchase Orders Purchase Orders are a legally bound order-placement document for procuring products or services from vendors Create Purchase Orders In the SalesGrow CRM system, you can store purchase order details by entering data into the Purchase Order form. Note Some of the standard fields may not be visible or editable depending on your organization business process. In case you want to add or modify fields, please contact your System Administrator for more details on the usage of other fields. To create purchase orders 1. In the Purchase Orders module, click New Purchase Order. 2. In the Create Purchase Order page, enter the relevant details. 3. Under the Product Details section, click Add Line Items. 298
299 4. In the Choose Products popup, type in at least one character of the Product Name or Product Code to search for the desired product and choose it from the drop-down. The only way to add products is by choosing them from the drop-down. You cannot add them otherwise. Also, the search results are affected by words seperated by a space. For example, typing "P" will bring up "i pad", provided the product name is stored as "i pad" (as two words). If it is stored as "ipad", typing "p" will not bring up the product. To bring this up, you must type "i. To know more about a product listed in the drop-down, point your mouse to the Info icon next to the product. 5. Enter the desired quantity for the chosen product. For more info on the stock quantity of the chosen product, point the mouse to the Info icon next to quantity text box. 299
300 6. Add more product lines as required by clicking the Add another line link. Note that you can add up to 100 line items in a purchase order. 7. Once you have added all product lines, click Add Products to add them to the purchase order. All the details required for the chosen line item (including taxes, price book discounts and product description for the chosen product) will be populated automatically. Simply drag and drop line items if you wish to reorder the product lines. To view the Product Quantity and Unit price, point your mouse to the Product Name/Product Code. To view Total after Discount, point your mouse to Discount. 300
301 If you wish to add the list price from an associated price book, click on the Price Book Look Up icon to browse and select the desired price book. 8. To edit the details of a line item, click on the Edit icon that appears when you point your mouse to a value such as tax or discount. Editing a value changes any related values automatically. 301
302 9. To view the Discount and Range details for the associated price book, point your mouse to the Discount value and click on the Info icon that appears. 10. Click Save. Note The Product Details section is not customizable. If you wish to add any other details in the section such as Billing info, that is not possible Associate Purchase Orders By default, you can associate a purchase order with other records such as, activities, attachments, and notes. In the Purchase Order Details page, you can update the following: o o o Activities: To add tasks related to purchase orders Attachments: To attach files to purchase orders s: To view s Standard Fields Following are the list of SalesGrow defined standard fields available in the Purchase Orders module: Field Name Description Data type Maximum Limit Purchase Order Select the name of the Lookup Owner user to whom the purchase order is assigned. PO Number Display the Sales order Number 16 digit 302
303 ID after creating a case. Subject* Specify the name of the Text box Alphanumeric(50) purchase order. This field is mandatory. Vendor Name* Specify the name of the Text box Alphanumeric(20) vendor. Requisition No Specify the number in Text box Alphanumeric(20) which the purchase order is requested Tracking Number Specify the number to Text box track the purchase order Contact Name Specify the contacts Lookup name to which the invoice has to be created. Carrier Select the carrier s Pick list - name that ships the products from your warehouse to customer site. Purchase Order Specify the date on Date - Date which purchase order is created. Due Date Select the due date. Date - Excise Duty Specify the excise duty Text box for the shipment Sales Commission Specify the commission Currency Float to the sales person upon closing the deal. Status Specify the status of Check box - the purchase order. Assigned To Select the SalesGrow Select option - CRM user name to whom the purchase order handling duty is assigned. This field is mandatory Created By Displays the person Date/Time format created the Price book first time. Modified By Displays the person modified the Price book. Date/Time format Billing Address Specify the primary Street - Text Alphanumeric(250) address of the contact. box Alphanumeric(30) 303
304 Street City State Zip Country City - Text box State - Text box Code - Text box Country- Text box Alphanumeric(30) Alphanumeric(30) Alphanumeric(30) Shipping Address Street City State Zip Country Specify the shipping address of the contact (if any). Street - Text box City - Text box State - Text box Code - Text box Country - Text box Alphanumeric(250) Alphanumeric(30) Alphanumeric(30) Alphanumeric(30) Alphanumeric(30) Product Name * Quantity in Stock Quantity* Unit Price* List Price* Total Terms & Conditions Description Select the product name.this field is mandatory Displays the stock quantity. Specify the quantity for which the sales order has to be generated. This field is mandatory Displays the unit price of the product. Select the product list price from Price Book or specify the product price. This field is mandatory Displays the amount of the selected products. Specify the terms and conditions that are associated with purchase order. Specify any other details about purchase order. Lookup - Numeric Integers Numeric Integers Currency Lookup and Numeric Integers Text area (long text) Text area (long text) characters 304
305 11.7 Invoices Invoices are bills issued by the vendor to the customers along with the goods or services with the purpose of receiving payment Create Invoices In SalesGrow CRM, you can create invoices by entering data in the Invoice details form. Note Some of the standard fields may not be visible or editable depending on your organization business process. In case you want to add or modify fields, please contact your System Administrator for more details on the usage of other fields. Create Invoice Individually You can create invoices individually by: Filling in the details in the invoice creation form. Cloning the invoices with a few changes in the existing invoice details. To create invoices individually 1. In the Invoices module, click New Invoice. 2. In the Create Invoices page, enter the invoice details. 3. Under the Product Details section, click Add Line Items 4. In the Choose Products popup, type in at least one character of the Product Name or Product Code to search for the desired product and choose it from the drop-down. The only way to add products is by choosing them from the drop-down. You cannot add them otherwise. Also, the 305
306 search results are affected by words seperated by a space. For example, typing "P" will bring up "i pad", provided the product name is stored as "i pad" (as two words). If it is stored as "ipad", typing "p" will not bring up the product. To bring this up, you must type "i. To know more about a product listed in the drop-down, point your mouse to the Info icon next to the product. 5. Enter the desired quantity for the chosen product. For more info on the stock quantity of the chosen product, point the mouse to the Info icon next to quantity text box. 6. Add more product lines as required by clicking the Add another line link. Note that you can add up to 100 line items in an invoice. 7. Once you have added all product lines, click Add Products to add them to the invoice. All the details required for the chosen line item (including taxes, price book discounts and product description for the chosen product) will be populated automatically. 306
307 Simply drag and drop line items if you wish to reorder the product lines.to view the Product Quantity and Unit price, point your mouse to the Product Name/Product Code. To view Total after Discount, point your mouse to Discount. 307
308 If you wish to add the list price from an associated price book, click on the Price Book Look Up icon to browse and select the desired price book. 8. To edit the details of a line item, click on the Edit icon that appears when you point your mouse to a value such as tax or discount. Editing a value changes any related values automatically. To view the Discount and Range details for the associated price book, point your mouse to the 308

309 Discount value and click on the Info icon that appears. Note 9. Click Save. The Product Details section is not customizable. If you wish to add any other details in the section such as Billing info, that is not possible. To clone invoices 1. In the Invoices tab, click a particular invoice that you want to be cloned. 2. In the Invoice Details page, click Clone. 3. In the Clone Invoice page, modify the required details. 4. Click Save Associate Invoices You can associate an invoice with the other records such as, activities, attachments and notes. Open Activities: To add tasks and events related to invoices. Closed Activities: To display the completed activities. Attachments: To attach documents. s: To view messages Standard Fields Following are the list of SalesGrow defined standard fields available in the Invoices module: Field Name Description Data type Maximum Limit 309
310 Invoice Owner Subject Sales Order Purchase Order Customer No. Excise Duty Invoice Date Due Date Sales Commission Account Name Contact Name Status Created By Modified By Billing Address Select the name of the user to whom the invoice is assigned. Specify the name of the invoice. This field is mandatory. Select the reference Sales order (if any). Select the reference Purchase order. Specify the customer identification number (if any). Specify the excise duty for the shipment Specify the date on which the invoice is created. Specify the invoice due date as per your payment terms. Specify the commission to the sales person upon closing the deal. Specify the account name to which the invoice has to be created. This field is mandatory Specify the contacts name to which the invoice has to be created. Specify the status of the invoice. Displays the person who created the Invoice. Displays the person who modified the Invoice. Specify the primary address of the Lookup Text box Lookup - Text Box Text box Text box Date - Date - Currency Lookup - Lookup Check box - Date/Time format Date/Time format Street - Text box Alphanumeric(50) Alphanumeric(50) Numeric Float Alphanumeric(250) Alphanumeric(30) 310
311 Street City State Zip Country contact. City - Text box State - Text box Code - Text box Country- Text box Alphanumeric(30) Alphanumeric(30) Alphanumeric(30) Shipping Address Street City State Zip Country Specify the shipping address of the contact (if any). Street - Text box City - Text box State - Text box Code - Text box Country - Text box Alphanumeric(250) Alphanumeric(30) Alphanumeric(30) Alphanumeric(30) Alphanumeric(30) Product Name Quantity in Stock Quantity Unit Price List Price Total Terms & Conditions Select the product name.this field is mandatory Displays the stock quantity. Specify the quantity for which the sales order has to be generated. This field is mandatory Displays the unit price of the product. Select the product list price from Price Book or specify the product price. This field is mandatory Displays the amount of the selected products. Specify the terms and conditions that Lookup - Numeric Numeric Currency Lookup and Numeric Currency - Text area Integers Integers Integers 311
312 Description are associated with invoice. Specify any other details about invoice. Text area characters 312

313 WTM IT LIMITED H-216, 2nd Floor, Tower no.4, International InfoTech Park, Vashi, Navi Mumbai, Maharashtra, India, Pin Toll Free India International Website: CRM page: 313
Customer Relationship Management Software Version 1.0. Administrator Guide Guide Version ITarian 1255 Broad Street Clifton, NJ 07013
 Customer Relationship Management Software Version 1.0 Administrator Guide Guide Version 1.0.111218 ITarian 1255 Broad Street Clifton, NJ 07013 Table of Contents 1. Introduction to CRM...5 1.1.Open the
The QuickStudy Guide for Zoho CRM
 The QuickStudy Guide for Zoho CRM Susan Clark Cornerstone Solutions Inc. Houston The QuickStudy Guide for Zoho CRM Using Zoho Everyday How Did Quick Get Included in the Book Name? Using This QuickStudy
Customer Relationship Management Software Version 1.0
 Customer Relationship Management Software Version 1.0 Administrator Guide Guide Version 1.0.111218 Comodo Security Solutions 1255 Broad Street Clifton, NJ 07013 Table of Contents 1. Introduction to CRM...5
The Zoho CRM QuickStudy Guide
 The Zoho CRM QuickStudy Guide Using Zoho Everyday 13 How Did Quick Get Included in the Book Name?... 15 Understanding Why... 15 Using This QuickStudy Guide Hey, Don t Skip This... 15 What is CRM?... 16
Comodo Customer Relationship Management Software Version 1.0
 Comodo Customer Relationship Management Software Version 1.0 Administrator Guide Guide Version 1.0.082417 Comodo Security Solutions 1255 Broad Street Clifton, NJ 07013 Table of Contents 1. Introduction
Maximizer CRM. Customer Service Maximizer CRM 2017 VERSION COMPARISON FOR WEB ACCESS (EMEA) Maximizer CRM 2016/R2.
 Maximizer CRM 2016/R2.") VERSION COMPARISON FOR WEB ACCESS (EMEA) Sales Support multiple sales processes Track opportunity stage age Track overall opportunity age Monitor progress by comparing stage age with target age Opportunity
VERSION COMPARISON FOR WEB ACCESS (EMEA) Sales Support multiple sales processes Track opportunity stage age Track overall opportunity age Monitor progress by comparing stage age with target age Opportunity
The New Act! Premium Know Your Customers. Propel Productivity. Make Insightful Decisions.
 The New Act! Premium Know Your Customers. Propel Productivity. Make Insightful Decisions. Sage ACT! 2013 A multitude of product innovations, feature enhancements, and businesscritical services have been
Set Up and Maintain Sales Tools
 Set Up and Maintain Sales Tools Salesforce, Spring 16 @salesforcedocs Last updated: February 18, 2016 Copyright 2000 2016 salesforce.com, inc. All rights reserved. Salesforce is a registered trademark
10.0. Construction Management Software CRM
 10.0 Construction Management Software CRM ComputerEase Version 10.0 Copyright 2013 ComputerEase Software, Inc. All rights reserved. 5/30/2014 ComputerEase Software, Inc. 6460 Harrison Ave., Suite 200 Cincinnati,
Feature Comparison Worksheet: Core Features of the System
 Feature Comparison Worksheet: Core Features of the System General Features Virtually unlimited ability to customize and set-up User Defined Fields in all areas of the product to be used for profiling Contacts,
Product Documentation SAP Business ByDesign February Marketing
 Product Documentation PUBLIC Marketing Table Of Contents 1 Marketing.... 5 2... 6 3 Business Background... 8 3.1 Target Groups and Campaign Management... 8 3.2 Lead Processing... 13 3.3 Opportunity Processing...
ADD/EDIT VENDOR. 1. To add a new vendor to the system from within the Accounts Payable module, navigate to: Accounts Payable Vendors.
 ADD/EDIT VENDOR 1. To add a new vendor to the system from within the Accounts Payable module, navigate to: Accounts Payable Vendors. Vendors can also be added from within the Purchasing module. Regardless
Salesforce Lead Management Implementation Guide
 Salesforce Lead Management Implementation Guide Salesforce, Winter 16 @salesforcedocs Last updated: October 1, 2015 Copyright 2000 2015 salesforce.com, inc. All rights reserved. Salesforce is a registered
VEDATRAK CRM 3.0. User Guide
 VEDATRAK CRM 3.0 User Guide 2 (C) 2006-2012 SUI SOLUTIONS Ltd. All rights reserved. 3 Contents Overview...9 System Requirements...12 Installation Notes...13 Vedatrak Basics...14 User Roles...14 System
IBM TRIRIGA Version Procurement Management User Guide
 IBM TRIRIGA Version 10.3 Procurement Management User Guide Note Before using this information and the product it supports, read the information in Notices on page 192. Second edition, June 2013. This edition
XRMS Open Source. User Manual v March 2006
 XRMS Open Source User Manual v 1.99 28 March 2006 Copyright Information Copyright 2005-2006 XRMS Development Team. Some rights reserved. Licensed under the GNU Free Documentation License [http://www.gnu.org//copyleft/fdl.html].
W W W. M A X I M I Z E R. C O M
 W W W. M A X I M I Z E R. C O M Notice of Copyright Published by Maximizer Software Inc. Copyright 2018 All rights reserved Registered Trademarks and Proprietary Names Product names mentioned in this document
SugarCRM Jumpstart Project Team Training. Technology Advisors, Inc.
 SugarCRM Jumpstart Project Team Training Technology Advisors, Inc. Goal Provide Project Team with necessary background to understand standard SugarCRM functionality in order to make informed decisions
Sappi Ariba Network. Summit Guided Session: Account Configuration
 Sappi Ariba Network Summit Guided Session: Account Configuration 1 Manage invitation letter + 2 Landing Page Sappi 2 1 1 Open the Invitation Letter that you received at your email address from ordersender-prod@ansmtp.ariba.com
Bpm online sales. Team Package User Guide
 Bpm online sales Team Package User Guide User guide Contents 1. Bpm online sales overview... 6 2. Bpm online interface... 8 2.1. Bpm'online interface overview... 9 2.2. Bpm online home page... 12 2.3.
ONCONTACT MARKETING AND CAMPAIGN USER GUIDE V10
 ONCONTACT MARKETING AND CAMPAIGN USER GUIDE V10 Contents Marketing Dashboard... 2 Marketing Dashboard Badges... 2 Marketing Dashboard Panels... 3 Campaign Record... 3 Field Descriptions... 4 Opportunities
Salesforce Lead Management Implementation Guide
 Salesforce Lead Management Implementation Guide Salesforce, Winter 18 @salesforcedocs Last updated: November 7, 2017 Copyright 2000 2017 salesforce.com, inc. All rights reserved. Salesforce is a registered
Data Import Guide DBA Software Inc.
 Contents 3 Table of Contents 1 Introduction 4 2 Data Import Instructions 5 3 Data Import - Customers 10 4 Data Import - Customer Contacts 16 5 Data Import - Delivery Addresses 19 6 Data Import - Suppliers
Installation Guide. LexisNexis Prospect Portfolio v2.1 For Salesforce CRM. Contents
 LexisNexis Prospect Portfolio v2.1 For Salesforce CRM Installation Guide Contents Install LexisNexis Prospect Portfolio v2.1 2 Upgrade to LexisNexis Prospect Portfolio v2.1 from a previous version 5 Create
Customer Relationship Management Software
 Customer Relationship Management Software User Manual Admin Version 1.3 2 Second CRM Getting Started 2013 Table of Content BASIC ADMINISTRATION... 4 MAINTAIN USERS... 4 USERS CONFIGURATION... 5 Create
Luxor CRM 2.0. Getting Started Guide
 Luxor CRM 2.0 Getting Started Guide This Guide is Copyright 2009 Luxor Corporation. All Rights Reserved. Luxor CRM 2.0 is a registered trademark of the Luxor Corporation. Microsoft Outlook and Microsoft
BeetleEye Application User Documentation
 BeetleEye Application User Documentation BeetleEye User Documentation 1 Table of Contents Welcome to the BeetleEye Application... 6 Overview... 6 Navigation... 6 Access BeetleEye... 6 Update account information...
LexisNexis Dossier Suite User Guide
 LexisNexis Dossier Suite User Guide LexisNexis Dossier Suite Overview Gain deeper insights into the players and dynamics of your marketplace using comprehensive company, executive and industry information.
Smart Software to help you Gain & Retain Customers
 Smart Software to help you Gain & Retain Customers Zoho CRM Plus helps you engage with the right prospects, sell smarter and retain more customers, while measuring and improving all customer-facing activities
Ariba Network Configuration Guide
 Ariba Network Configuration Guide Content Account Configuration Basic Profile Email Notifications Electronic Order Routing Electronic Invoice Routing Remittances Test Account Creation Managing Roles and
CRM Insights. User s Guide
 CRM Insights User s Guide Copyright This document is provided "as-is". Information and views expressed in this document, including URL and other Internet Web site references, may change without notice.
Salesforce Enterprise Edition Upgrade Guide
 Salesforce Enterprise Edition Upgrade Guide Salesforce, Spring 16 @salesforcedocs Last updated: February 11, 2016 Copyright 2000 2016 salesforce.com, inc. All rights reserved. Salesforce is a registered
sforce Web Services Enterprise API sforce Object Query Language sforce Custom Objects... 40
 Release Notes Winter 04 Major Announcements Dashboards... 2 Workflow Automation... 8 Advanced Page Layout Wizard... 12 Dynamic Page Layouts and Field-Level Security... 14 Team-Based Account Management...
USER MANUAL. TapCRM TABLE OF CONTENTS. Version: 1.4
 USER MANUAL TABLE OF CONTENTS Introduction... 1 Benefits of TapCRM... 1 Prerequisites... 1 Installation & Configuration... 2 TapCRM Plug-in Installation... 2 Front Side Instructions... 9 Contact Us...
12/05/2017. Customer Service Management
 12/05/2017 Contents...3 Get started with... 3 Activate Customer Service... 5 Set up associated entities... 6 Set up communication channels... 16 Track and analyze Customer Service case data... 40 Create
ACT! by Sage. Premium for Web 2007 (9.0) User s Guide
 User s Guide") ACT! by Sage Premium for Web 2007 (9.0) User s Guide ACT! by Sage Premium for Web 2007 (9.0) User s Guide Copyright Notice and Trademark 2006 Sage Software SB, Inc. All Rights Reserved. The Sage Software
ACT! by Sage Premium for Web 2007 (9.0) User s Guide ACT! by Sage Premium for Web 2007 (9.0) User s Guide Copyright Notice and Trademark 2006 Sage Software SB, Inc. All Rights Reserved. The Sage Software
Welcome to the Vale Vendor Portal Guide
 Welcome to the Vale Vendor Portal Guide 1. Introductory 1.1 How to access? 1.2 Presenting the Portal 2. Onboarding Process 3. Negotiate Module 4. Purchase Module 5. Payment Module 1. Introductory Main
First Data Global Gateway SM Virtual Terminal User Manual
 First Data Global Gateway SM Virtual Terminal User Manual Version 1.0 2015 First Data Corporation. All Rights Reserved. All trademarks, service marks, and trade names referenced in this material are the
Vendor Inquiry and Reports Munis Version 11.2
 Objective This document gives you step by step instructions for using the Vendor Inquiry/Reports program to query the vendor master table for information regarding a specific vendor(s) and how to produce
Autodesk Global Event Platform
 Autodesk Global Event Platform User Manual Updated: January 8 th 2013 Created by: Onemedia Contents Accessing the tool... 3 Accessing the tool Autodesk Partners... 3 Accessing the tool Autodesk Logging
RESPONSIVE SOLUTIONS, INC. CUSTOMER+ ADMIN MANUAL
 RESPONSIVE SOLUTIONS, INC. ADMIN MANUAL Version 5.5 2011 3 USER MANAGEMENT: Administration > User Management User Management is where you will add, edit, activate and deactivate users, as well as import
ACT! 2012 Pro & Premium Upgrade Guide from ACT! 2008
 ACT! 2012 Pro & Premium Upgrade Guide from ACT! 2008 Latest ACT! updates at a glance: WORKS WITH: ACT! 2012 ACT! 2008 Compatible with Windows 7 (32 & 64 bit editions) Works with Microsoft Office 2010 Supports
1z0-412.oracle. ORACLE 1z Oracle Eloqua and Oracle Content Marketing Cloud Service 2013 Implementation Essentials
 1z0-412.oracle Number: 1z0-412 Passing Score: 800 Time Limit: 120 min File Version: 5.0 ORACLE 1z0-412 Oracle Eloqua and Oracle Content Marketing Cloud Service 2013 Implementation Essentials Version 5.0
Know Your Customer. c360 Microsoft Dynamics CRM 4.0 Product Catalog
 c360 Microsoft Dynamics CRM 4.0 Product Catalog Know Your Customer c360 products extend the functionality and industry focus of Microsoft Dynamics CRM c360 Core Productivity Pack Explorer (CRM Search Engine)
NetSuite: Built for the Distribution Industry
 Winning Big in Supply Chain Sales: Winning Sales Strategies for Wholesale & Distribution Companies Serving You Today: Sean Rollings Senior Director Product & Industries Marketing Curt Leo Wholesale/Distribution
MYOB Exo CRM. User Guide
 MYOB Exo CRM User Guide 2018.1 Table of Contents Outlook Integration... 1 Quick Add Widgets... 2 Licensing... 2 Available Functions... 5 Contacts in Exo Business CRM... 6 Contacts Master... 7 Contacts
Creating and Editing Budgets
 EXO Business CRM User Guide 4. Select the levels to create budgets at by ticking the required boxes in the Budget Model section. It is only necessary to tick one box for each column - ticking the box for
Sage ERP Accpac Online 5.5
 Sage ERP Accpac Online 5.5 Integration Resource Guide for Sage ERP Accpac And Sage CRM (Updated: July 11, 2010) Thank you for choosing Sage ERP Accpac Online. This Resource Guide will provide important
Luxor CRM Administrator s Guide
 Luxor CRM Administrator s Guide Atum Corporation 2003 version 0.1 September 3, 2003 416-410-8444 ext 114 Luxor CRM product support: 1-877-893-3266 ext 114 416-410-8999 luxorsupport@atum.com TABLE OF CONTENTS
MANAGING ACTIVITIES...
 Sales Center Guide GETTING STARTED... 2 LOGGING INTO LASSO... 2 FINDING YOUR WAY AROUND... 3 CONTACTING SUPPORT... 3 ACCESSING THE SALES CENTER... 3 SALES CENTER TIPS... 5 SEARCHING FOR A REGISTRANT...
Administrator Manual
 Administrator Manual CURA Technical Support Email: cura_support@mindscope.com Phone: 1.888.322.2362 x 55 Administrator Manual Page 1 Table of Contents The Setup Module... 3 Skills... 3 Adding or Modifying
Comodo One. Quote Manager Administrator Guide Guide Version Software Version 3.26
 rat Comodo One Software Version 3.26 Quote Manager Administrator Guide Guide Version 3.26.110818 Comodo Security Solutions 1255 Broad Street Clifton, NJ 07013 Table of Contents 1 Introduction to Quote
Copyright Basware Corporation. All rights reserved.. Vendor Portal Admin Guide Basware P2P 17.3
 Copyright 1999-2017 Basware Corporation. All rights reserved.. Vendor Portal Admin Guide Basware P2P 17.3 1 Overview of Vendor Portal Setup Basware P2P s vendor portal allows vendors to retrieve easily
SALESFORCE CERTIFIED ADMINISTRATOR
 Certification Exam Guide SALESFORCE CERTIFIED ADMINISTRATOR Spring 18 2018 Salesforce.com, inc. All rights reserved. S ALESFORCE CERTIFIED ADMINISTRATOR CONTENTS About the Salesforce Certified Administrator
SALESFORCE CERTIFIED ADMINISTRATOR
 Certification Exam Guide SALESFORCE CERTIFIED ADMINISTRATOR Winter 18 2017 Salesforce.com, inc. All rights reserved. S ALESFORCE CERTIFIED ADMINISTRATOR CONTENTS About the Salesforce Certified Administrator
Siebel Project and Resource Management Administration Guide. Siebel Innovation Pack 2013 Version 8.1/8.2 September 2013
 Siebel Project and Resource Management Administration Guide Siebel Innovation Pack 2013 Version 8.1/ September 2013 Copyright 2005, 2013 Oracle and/or its affiliates. All rights reserved. This software
IBM Leads Version 9 Release 1 October 25, User Guide
 IBM Leads Version 9 Release 1 October 25, 2013 User Guide Note Before using this information and the product it supports, read the information in Notices on page 35. This edition applies to version 9,
Learning Series. Volume 8: Service Design and Business Processes
 Learning Series Volume 8: Service Design and Business Processes NOTICES ServicePRO Learning Series Edition November 2014 HelpSTAR and ServicePRO are registered trademarks of Help Desk Technology International
Siebel Marketing User Guide. Version 7.8, Rev. A August 2006
 Siebel Marketing User Guide Version 7.8, Rev. A August 2006 Copyright 2006, Oracle. All rights reserved. The Programs (which include both the software and documentation) contain proprietary information;
Ariba Network Configuration Guide
 Ariba Network Configuration Guide Content 1. Account Configuration I. Account Access II. Company Profile III. Email Notifications IV. Electronic Order Routing V. Electronic Invoice Routing VI. Remittances
Ariba Network Configuration Guide
 Ariba Network Configuration Guide Content 1. Account Configuration I. Account Access II. Company Profile III. Email Notifications IV. Electronic Order Routing V. Electronic Invoice Routing VI. Remittances
Enhance Your Sales Cloud Implementation
 Enhance Your Sales Cloud Implementation Salesforce, Winter 18 @salesforcedocs Last updated: November 2, 2017 Copyright 2000 2017 salesforce.com, inc. All rights reserved. Salesforce is a registered trademark
CRM Overview Opportunities, Sales and Marketing Tools
 CRM Overview Opportunities, Sales and Marketing Tools Presented by: Jennifer Bankos Objectives Set up the system to use Opportunity Maintenance Enter and track leads through Opportunity Maintenance Set
About the Tutorial. Audience. Prerequisites. Copyright & Disclaimer. Salesforce
 i About the Tutorial Salesforce is a leading CRM (Customer Relationship Management) software which is served form cloud. It has more than 800 applications to support various features like generating new
Welcome to the Investor Experience
 Welcome to the Investor Experience Welcome to the Black Diamond Investor Experience, a platform that allows advisors to customize how they present information to their clients. This document provides important
WHAT S NEW GUIDE 2019
 WHAT S NEW GUIDE 2019 #GrowWithConfidence DATA SHEET NOTICE OF COPYRIGHT Published by Maximizer Software Inc. Copyright 2019 All rights reserved Registered Trademarks and Proprietary Names Product names
Sourcing Buyer User Guide
 Sourcing Buyer User Guide Version 6.4 August 2011 Copyright 2002-2011 Ion Wave Technologies, Inc. Springfield, Missouri Welcome to Enterprise Sourcing! This manual is intended to provide buyers an instructional
People. Processes. Integrating Globally.
 People. Processes. Integrating Globally. Course: isupplier for Suppliers Table of Contents Table of Contents Course Introduction...4 L1: Vendor Registration... 6 Register for isupplier using SteelTrack
Administrator Guide. November 2010
 Administrator Guide November 2010 AppShore Inc. Administrator Guide Table of Contents Overview...2 Logging into AppShore...2 How to upgrade a subscription...3 How to close your AppShore account...4 Roles...5
PlanWell Enterprise. By clicking on [Find a PlanWell Location Near You], you will be able to search by zip code, state or country.
![PlanWell Enterprise. By clicking on [Find a PlanWell Location Near You], you will be able to search by zip code, state or country.](/thumbs/71/65854054.jpg "PlanWell Enterprise. By clicking on [Find a PlanWell Location Near You], you will be able to search by zip code, state or country.") PlanWell Enterprise The PlanWell service is simple to use, and its ecommerce functions are likely to be familiar. You don t need any special tools or software to use it; just a current Microsoft Internet
PlanWell Enterprise The PlanWell service is simple to use, and its ecommerce functions are likely to be familiar. You don t need any special tools or software to use it; just a current Microsoft Internet
User Guide Part 2: More Details. March 2014
 User Guide Part 2: More Details March 2014 Table of Contents Introduction... 3 More Details... 4 The Home Page... 4 Workflows... 5 Starting a Workflow... 5 Policy Life Cycle Workflows... 6 Start Review
Connecting Software. CB Mobile CRM - iphone. User Manual
 CB Mobile CRM - iphone User Manual Summary This document describes the ios app Mobile CRM, its functionality and features available. The document is intended for end users as user manual to provide knowledge
MARKETO CHECKLIST. All users are setup within Marketo with the appropriate roles and permissions.
 Setup Users & Roles All users are setup within Marketo with the appropriate roles and permissions. Smart Campaign Settings Limit set to abort smart campaigns if number of qualified leads exceeds this limit
Ariba Network. T-Mobile Configuration Guide
 Ariba Network T-Mobile Configuration Guide Content Account configuration Basic Profile Email Notifications Electronic Order Routing Electronic Invoice Routing Remittances Accelerated payments Test Account
Act! v18 is the only edition that is fully designed, tested and supported for Microsoft Windows 10 and Microsoft Office 2016.
 Numerous Act! innovations, feature enhancements, and business critical services have been introduced in recent updates. Check out what you could be doing with the latest Act! software to propel your sales
CRM On Demand Oracle CRM On Demand Connected Mobile Sales Administration Guide
 CRM On Demand Oracle CRM On Demand Connected Mobile Sales Administration Guide For Oracle CRM On Demand Release 32 June 2016 Copyright 2005, 2016 Oracle. All rights reserved. This software and related
Export out report results in multiple formats like PDF, Excel, Print, , etc.
 Edition Comparison DOCSVAULT Docsvault is full of features that can help small businesses and large enterprises go paperless. The feature matrix below displays Docsvault s abilities for its Enterprise
Salesforce Limits. Salesforce, Spring
 Salesforce Limits Salesforce, Spring 16 @salesforcedocs Last updated: April 28, 2016 Copyright 2000 2016 salesforce.com, inc. All rights reserved. Salesforce is a registered trademark of salesforce.com,
Sage 300. Sage CRM 2018 Integration Upgrade Guide. October 2017
 Sage 300 Sage CRM 2018 Integration Upgrade Guide October 2017 This is a publication of Sage Software, Inc. 2017 The Sage Group plc or its licensors. All rights reserved. Sage, Sage logos, and Sage product
Record Clone User Guide
 IOTAP s Record Clone add-on for Microsoft Dynamics CRM allows users to create copy of records for not only System & Standard entities but also Custom and their related entities. Record Clone Version: 3.1
EXO BUSINESS CRM. User Guide EXO BUSINESS M YO B ENT ERPRI S E S O L U T I O N S
 EXO BUSINESS CRM User Guide EXO BUSINESS M YO B ENT ERPRI S E S O L U T I O N S Important Notices This material is copyright. It is intended only for MYOB Enterprise Solutions Business Partners and their
Dynamics 365 for Customer Service - User's Guide
 Dynamics 365 for Customer Service - User's Guide 1 2 Contents Dynamics 365 for Customer Service - User's Guide...9 Improve customer service with better automation and tracking...9 Create queue and route
Accounts Receivable Customer
 Accounts Receivable Customer Contents Overview... 1 Document Layout... 2 General Information Tab... 3 Corporate Information Tab... 3 Contact Information Tab... 4 Addresses Tab... 4 Overview The Customer
Seller & Seller Administrator Manual
 Seller & Seller Administrator Manual BuySpeed Online 8.2 1 BSO Seller Manual Copyright 2009 Periscope Holdings, Inc. All rights reserved. Information in this document is subject to change without notice.
Microsoft Dynamics CRM 2011 Customization and Configuration
 Microsoft Dynamics CRM 2011 Customization and Configuration Number: MB2-866 Passing Score: 800 Time Limit: 120 min File Version: 1.0 http://www.gratisexam.com/ Microsoft EXAM MB2-866 Microsoft Dynamics
InFOREMAX RMA Management System 7.0 User s Guide
 InFOREMAX RMA Management System 7.0 User s Guide Welcome to the InFOREMAX RMA Management System Integrate a powerful e-business environment today InFOREMAX-based solutions enable your electronic business
Hoover s Optimizer User s Guide
 Hoover s Optimizer User s Guide 1 Feedback? optimizeronline@hoovers.com Contents USER GUIDE... 4 PREPARE YOUR FILE... 4 Hoover s Optimizer Input File Layout:... 4 Order of Fields:... 5 File Format Limitations:...
Administrator Guide. Position Manager 11 Effective 4/9/2018
 Administrator Guide Position Manager 11 Effective 4/9/2018 Contents System Administration 4 Career Site 6 Acknowledgement Text 6 Career Site Settings: Acknowledgement Text Detail 6 Adding an Acknowledgement
SALESFORCE CERTIFIED SALES CLOUD CONSULTANT
 Certification Exam Guide SALESFORCE CERTIFIED SALES CLOUD CONSULTANT Summer 18 2018 Salesforce.com, inc. All rights reserved. S ALESFORCE CERTIFIED SALES CLOUD CONSULTANT CONTENTS About the Salesforce
Salesforce Limits. Salesforce, Winter
 Salesforce Limits Salesforce, Winter 18 @salesforcedocs Last updated: December 6, 2017 Copyright 2000 2017 salesforce.com, inc. All rights reserved. Salesforce is a registered trademark of salesforce.com,
INSIGHTS, POWERED BY INSIDEVIEW
 INSIGHTS, POWERED BY INSIDEVIEW Installation Guide Product Version 4.2 OCTOBER, 2017 Table of Contents Chapter 1: Introduction to Insights, powered by InsideView...3 What s New in this Release?... 4 Chapter
Standard System Documentation
 Standard System Documentation SD-6Dec2017 CONTENTS 1. Standard Knowledgebase Guide.......................................... 4 1.1 Overview.......................................................... 5 1.2
SalonVision Configuration Guide
 SalonVision Configuration Guide A Guide For SalonVision Live Data Integration I SalonVision Online Booking Configurations Table of Contents Part I Introduction 1 Part II Envision Setup 2 1 Setup Program
s + Zoho CRM. for Your Business. Customer Relationship Management.
 Emails + Zoho CRM for Your Business Customer Relationship Management Email 2 Contents The Basics The Email + CRM Solution Built-in Option to Send Emails Zoho Mail Add-on BCC Dropbox Plug-in for Microsoft
12/05/2017. Customer Service Management
 12/05/2017 Contents Contents...5 Customer Service case management... 5 Activate...6 Additional plugins for... 8 for Orders... 11 integration with Field Service Management...13 Integration with Financial
User Manual. ARK for SharePoint-2007
 User Manual ARK for SharePoint-2007 Table of Contents 1 About ARKSP (Admin Report Kit for SharePoint) 1 1.1 About ARKSP 1 1.2 Who can use ARKSP? 1 1.3 System Requirements 2 1.4 How to activate the software?
Adobe Sign for Microsoft Dynamics
 for Microsoft Dynamics User Guide (v6) Last Updated: September 1, 2017 2017 Adobe Systems Incorporated. All rights reserved Table of Contents Overview... 3 Gaining Access to Adobe Sign... 3 Sending for
MRPEasy features. MRPEasy is a powerful yet simple manufacturing software especially built for effective manufacturing control.
 MRPEasy features MRPEasy is a powerful yet simple manufacturing software especially built for effective manufacturing control. The solution is an online service, extremely easy to use, effortless to maintain,
The Auction Manager Owner s Manual. A quick guide to the tools and features available in BiddingforGood s Auction Manager.
 The Auction Manager Owner s Manual A quick guide to the tools and features available in BiddingforGood s Auction Manager. When you log in to Auction Manager, this is what you ll see: This is the main toolbar.
SuiteSocial. July 18, 2016 Version 2016 Release 1
 July 18, 2016 Version 2016 Release 1 General Notices Sample Code NetSuite Inc. may provide sample code in SuiteAnswers, the Help Center, User Guides, or elsewhere through help links. All such sample code