April Communication Manager User s Guide
|
|
|
- Kathlyn Ray
- 5 years ago
- Views:
Transcription
1 April 2012 Communication Manager User s Guide
2 Table of Contents Overview... 4 Navigating ecentral... 5 WebSync Wizard... 8 WebSync Setup... 8 Login Setup... 9 Schedule WebSync... 9 WebSync Options... 9 Correspondence Setup Correspondence Types Select Correspondence ecentral Appointment Status Practice Management Appointment Status Edit Correspondence Finishing the Wizard Account Settings Practice Setup Change Password and Postcard Campaigns Editing templates Text messaging setup Setting up custom text messages Patient Surveys Patient Surveys Setup Previewing Surveys Reports Patient Satisfaction Scores Patient Response Summary Responses Correspondence Manager... 40
3 Search Printing an messages report Text Messages Text Message Search Printing a text messages report Postcards Searching for postcards Printing a postcard messages report Viewing the Text Message Opt Out Report Viewing the Text Messages Received Patient Newsletter Referral Manager Setting Up referrals in ecentral Setting Up Referrals in DXWeb Professional Referrals Sent Referral search Viewing Sent Patient Referral Information Professional Referrals Received Referral search Viewing Received Patient Referral Information Patient Referrals Received Edit Referral Professional contact list Personal Contact List Practice Statistics Patient Settings... 71


4 Overview The ecentral Communication Manager contains a variety of useful main features: Automating , Text message, and Postcard correspondence for patient s appointments and recall. Automating Surveys following patient appointments Sending Newsletters to patients Managing Professional and Patient referrals Logging in to ecentral The login page is the first page you encounter when you try to access ecentral at ecentral.ident.com. To log in to ecentral, enter your Username and Password in the appropriate fields and click Login. If you have forgotten your ecentral login password, type in your Username and click the Forgot your password? link to have your password ed to you. Tip: For your convenience, the bottom of the Login page includes links to learn more about ecentral, to view any of the video product demonstrations of ecentral, and to sign-up for ecentral. After you log in to ecentral, the account name of your account is displayed in the upper-right corner of the page. (By default, you are taken to the Home page once you log in)

5 Navigating ecentral Navigating in ecentral is easy: To access the Home page, Appointments Manager, Communications Manager, Insurance Manager, and Web site Manager, move your mouse over the appropriate tab, and select the area you wish to access. You can click any of the navigation links in the upper-right corner of the page: What s New - Opens the National Information Services Web Site in a new browser window, from which you can explore the new features of ecentral My Website Opens your practice s Web site in a new browser window. My Opens the Ident login page, from which you can access your Ident account. Help Provides access to the ecentral Help files. Logout Logs you out of your ecentral account (you are returned to the Login page). You must enter your username and password to log back in to the site. You can click the Did You Know? Read More link to view a list of helpful ecentral tips. In the How do I section, you can click any of the topics to open a Help file regarding that task. You can also click the More Tips link to open the ecentral Help files.


6 In the Dashboard section, you can view ecentral statistics for your practice. Click the left and right arrows to navigate between messages, insurance claims, patient referrals, patient satisfaction, post cards, provider referrals, and text messages. Click the View Full Dashboard link to open the Dashboard so that you can see all the statistics at once. The Dashboard is also accessible from the Home tab menu and Home page. The Resources section provides links to several information resources: Billing Summary To view your billing statements for ecentral services. Downloads To get ecentral updates Education To open the Dental Resource Center Website in a new browser window.

7 Finance To set up payment plans and leasing options for patients. If you have a merchant account, your account information is listed. If you do not have a merchant account, you can sign up for one. Supplies To open the Henry Schein website in a new browser window. You can click the Feedback tab on the left side of the page to go to the feedback forum and submit an idea to improve ecentral or to report a software bug. You can click any of the links at the bottom of the page: Customer Support To contact an ecentral support representative by phone or . Feedback To submit an idea or report a bug. Privacy Policy To view ecentral s policies to protect your privacy. Terms & Conditions To view the terms of use for ecentral.
8 WebSync Wizard Before you can use ecentral, you must set up the WebSync and other preferences. Note: WebSync is accessed from your practice management software (such as DENTRIX or EasyDental) via the software s toolbar (such as the DXWeb Toolbar or EasyWeb Toolbar). For more information, refer to the documentation for your practice management software. The WebSync Wizard helps you set up the following options, so you can transfer information back and forth between your practice management software and your ecentral Web Site: WebSync Setup Correspondence Setup Patient Upload Setup Questionnaire Upload Setup Patient Financing Setup Insurance Eligibility Setup Insurance Claim Tracking Setup Through this manual, we will be focusing on the Communication Manager features, which use the WebSync Setup and Correspondence Setup. If you want to set up each WebSync option in the wizard, click Next to continue to the next step and proceed through the wizard. If at any time you need to return to a previous step, click Back to return to the previous step in the Wizard. If you want to set up a specific feature of the WebSync without going through all the steps in the Wizard, click the feature in the navigation list to go directly to that setup step. Please note that you must complete the wizard once in its entirety before you can jump to individual steps. Important: You must go to the Finish step of the wizard and click Finish to save any changes you make before you exit the wizard. If you need to exit the wizard before you click Finish, click Cancel. If you cancel and leave the wizard without clicking Finish, all your changes will be lost. WebSync Setup Running WebSync synchronizes the information in your practice management software (such as DENTRIX or EasyDental) with the information in your ecentral Web site. For the Communication Manager, the WebSync allows you to send the correspondence you have requested to your patients. To access and use WebSync Click the Settings icon on your practice management software s toolbar, and select WebSync Wizard.

9 The WebSync Wizard appears. You can customize the information you would like to sync in the WebSync setup. You can also customize the frequency of the reminders that are generated about the WebSync. This document will discuss WebSync Setup, Settings, and the WebSync itself. Login Setup In the Login Setup group box, enter the User ID and Password you received when you registered your ecentral account. If you have not registered for an ecentral account, you can click Register. You do not need to register if you already have an ecentral account. If you forgot your password, click Forgot Password. An with the password will be sent to the address associated with the user account that is entered. Schedule WebSync You can run the WebSync automatically in the Schedule WebSync dialog. If you want the WebSync to run automatically at a specific time, mark Once Daily at and select a time. If you do not want the WebSync to run automatically, mark Do not run WebSync Automatically. WebSync Options In the WebSync options group box, check the box next to the options you would like to include during the WebSync:
10 Correspondence Upload Patient Upload Questionnaire Upload Referral Upload Insurance Eligibility Upload Insurance Claim Tracking Upload Download Patient Information Changes Download Appointment Status Updates DXWeb Toolbar Updates If you want to include all the options in the WebSync, select All. For the Communication Manager, the Correspondence Upload is responsible for uploading , text message, and postcard reminders for ecentral. The Patient Upload would be used if you wish to upload patients who have given web consent so that they can be sent newsletters through ecentral. Download Appointment Status Updates is responsible for downloading confirmations, such as when patients confirm their appointment by . Note: If you have esync 3.1 or greater installed in your practice, a plugin can be installed set up to download , text, and postcard confirmations in real-time. If this is set up already, Download Appointment Status Updates can be disabled. Correspondence Setup Sending correspondence to your patients keeps them informed about their scheduled appointments and continuing care deadlines. Correspondence helps you reduce the number of missed appointments in your office and keeps your patients informed about their treatment needs. You can send Appointment reminders and Continuing Care reminders to your patients via letters, postcards, messages, or text messages. These correspondences must be set up in the DXWeb Toolbar and your ecentral Web site before they can be sent. To access and set up Correspondence in the WebSync 1. Click the Settings icon on your practice management software s toolbar, and select WebSync Wizard. The WebSync Wizard appears. 2. Click Correspondence to display the Correspondence Setup dialog box. Correspondence Types Place a check mark in the box next to the correspondence type(s) you want to send to your patients. You can select one, two, or all options. Note: It is recommended that you do not select any correspondence types until you have set up the correspondences and are ready to start sending them. Enables to be sent to those patients with an address set up in the Family File or Patient Setup Text Message Enables text messages to be sent to patients with a cell phone listed in the Mobile or Other fields in the Family File
11 Postcard Enables postcards to be printed and sent to patients with an address set up in the Family File Enabling any of these options indicates that you agree to the Pricing and Terms of Use. Click Pricing and Terms of Use link to view those terms and conditions. Select Correspondence In the Select Correspondence group box, select the correspondence you want to send. By default, ten correspondence templates are available: Appointment Reminder, 30 days before appointment Appointment Reminder, 14 days before appointment Appointment Reminder, 1 day before appointment Continuing Care Reminder, 30 days before appointment Continuing Care Reminder, 14 days before appointment Continuing Care Reminder, 1 day before appointment Continuing Care Due, 30 days before due date Continuing Care Due, 14 days before due date Continuing Care Due, 1 days past due Continuing Care Due, 90 days past due If you want to send a correspondence that is not on the list, click New. If you want to change the settings of one of the default or any other existing correspondences, select one and click Edit. Clicking either of these buttons will open the Edit Correspondence dialog box (See Edit Correspondence ). ecentral Appointment Status In the ecentral Appointment Status group box, select the status(es) of appointments you want to upload to the Appointments page of your ecentral account. The status(es) of appointments correspond to the statuses that are available in the appointment list in your pracitce management software. Two weeks of appointments in your practice management software's appointment module will be uploaded to the ecentral Appointment Manager every time the WebSync runs, but the appointments that have the status(es) you specify in the ecentral Appointment Status group box will be marked as confirmed appointments in the ecentral Appointment Manager. Practice Management Appointment Status In the Practice Management Appointment Status group box, select the status you want to display in the patient s appointment of your practice management system when patients confirm their appointment by , and/or when you confirm appointments from the Appointment Manager in ecentral. Edit Correspondence The Edit Correspondence dialog box is accessed when you click Edit from the Correspondence Setup dialog box (See Correspondence Setup ).

12 Correspondence Name Enter the Correspondence Name you want to use for the correspondence you are creating/editing. Reminder Range Use Reminder Range to specify when you would like the reminder to be sent, and to specify what type of reminder. To specify when reminders are sent In the Reminder Range section, select Appointment or Continuing Care Due Date, depending on whether you want reminders sent prior to an appointment or relative to a continuing care due date. The range you select will be the range that is used to determine which patients receive this correspondence. If you select Appointment 1. In the days before appointment box, specify the number of days before the appointment you want to send the correspondence. 2. In the CC Attached box, select whether you would like to require that Continuing Care be attached to the appointment.
13 If you select Only With, correspondence will be sent to only those appointments that are attached to the continuing care types specified. If you select Only Without, correspondence will be sent to only those appointments that do not have any continuing care types attached. If you select All, correspondence will be sent to all appointments in the date range, whether or not the appointments have continuing care attached. 3. Select the Template you want to use for this correspondence. The Templates listed are the templates you have set up on your ecentral account. Click View/Edit Template to go to your ecentral account to view or modify these templates (this will be covered later in this guide in more detail). If you select Continuing Care Due Date 1. In the days before/after box, specify the number of days before or after the due date you want to send the correspondence. 2. In the Due Date box, select whether you want to send the correspondence before or after the due date. 3. Select the Template you want to use for this correspondence. The Templates listed are the templates you have set up on your ecentral account. Click View/Edit Template to go to your ecentral account to view or modify these templates. Select Continuing Care Type Note: If you marked Appointment in the Reminder Range, you will only be able to select Continuing Care Types if you choose Only With from the CC Attached? list. Select the Continuing Care Type(s) you want to include in this correspondence. Correspondence will be sent to only the selected continuing care type(s). The selectable continuing care types that are available are set up through your practice management software s Continuing Care/Recall Setup. To select all of these types, select the All option. Select Provider Select the Provider(s) you would like to include in this correspondence. You can choose to include patient providers based on their primary provider or their appointment provider. Correspondence will be sent to only the highlighted Provider(s). To select all of these types, check the All check box. Select Billing Type(s) Select the Billing Type(s) you want to include. Only patients with the selected billing type(s) will be included. Select All to include all billing types. The billing types that are available are the billing types that you have set up in the Practice Definitions of the Office Manager/Reports module.
14 Select Age To send correspondence to only those patients who are under/over a specified age 1. Select Include Patients According to Age. 2. Select Under or Over, then in the Under/Over box, specify an age limit to use for your correspondence. Finishing the Wizard After setting up your desired reminders, select Finish on the left side of the WebSync Wizard, or keep continuing through the Wizard by pressing Next, and when at the Finish page, press the Finish button to save any changes you made while using the Websync Wizard. Note: Pressing Cancel will lose any changes you have made in the WebSync Wizard.

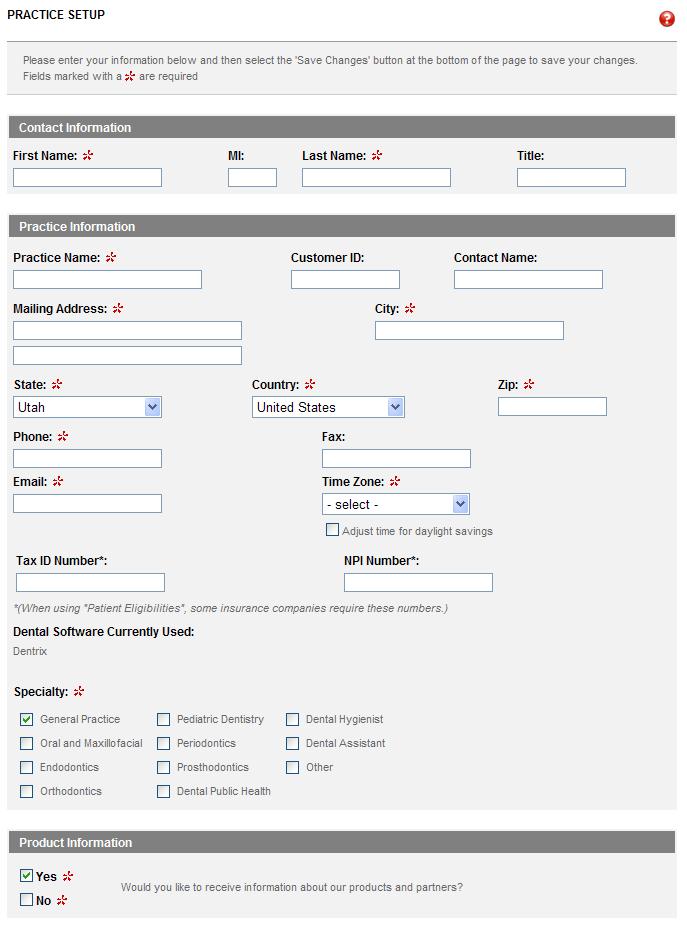
15 Account Settings It is important to set up your account before you start using ecentral. To configure account settings From the Home tab menu, click Account Settings to display the ecentral preferences on the left side of the navigation panel: Under ecentral Preferences, you have the following options: Practice Setup Select Packages Payment Method Change Password Launch Dashboard Practice Setup The practice setup page displays the contact information, practice information, and product information you have specified for your ecentral account. It is important to enter this information and ensure that it is correct because it is the information that is used when you send correspondence and referrals and it is the information that is used to represent your practice in the professional contact list. To configure your practice setup From the Home tab menu, click Account Settings to display the ecentral preferences on the left side of the navigation panel. The Practice Setup page appears. If you are under Account Settings but in a different section, and wish to navigate back to Practice Setup, select Practice Setup on the navigation panel to the left.
16
17 Contact Information This is where you enter the main owner contact name information for the ecentral product. It will not be displayed to patients. First Name - Enter the account subscriber's first name. MI - Enter the account subscriber's middle initial. Last Name - Enter the account subscriber's last name. Title - Enter the account subscriber's title. Practice Information Practice Name - Enter the name of the practice. This name will be displayed on the practice template Web site when creating it for the first time, and also will be used as your practice name displayed to patients when using and/or Web site surveys. Customer ID - Enter the practice customer ID number. Contact Name - Enter the contact name. This may be the owner of the ecentral product, or the contact who manages ecentral. It will not be displayed to patients. Mailing Address - Enter the practice mailing address. This information will appear on the practice template Web site when creating it for the first time. City - Enter the practice city. This information will appear on the practice template Web site when creating it for the first time. State - Enter the practice state. This information will appear on the practice template Web site when creating it for the first time. Country - Enter the practice country. Zip - Enter the practice ZIP code. This information will appear on the practice template Web site when creating it for the first time. Phone - Enter the practice phone number. This information will appear on the practice template Web site when creating it for the first time, and will also be displayed in , Text message, and Postcard correspondence reminders for patients as your main contact number. Fax - Enter the practice fax number. This information will be displayed in correspondence reminders for the patient as your main contact number. - Enter the address to which you want correspondence to be sent. This address will appear as the reply to address for patient communication and in correspondence reminders.
. NPI Number - Enter the NPI number.")
18 Time Zone - Select the office time zone. This information will be used for the text messaging feature in the Communication Manager. Tax ID Number - Enter the practice tax ID number. Insurance companies require this number to check for patient eligibility (Insurance Manager only). NPI Number - Enter the NPI number. Some insurance companies require this number to check for patient eligibility (Insurance Manager only). Specialty - Check the office specialty. Product Information Yes - Check yes if you want to receive information about our products and partners. No - Check no if you don't want to receive information about our products and partners. When you are finished making changes to the practice information, you may save it by pressing the Save button that appears at the bottom of this section. It will notify you if the settings were saved successfully. Change Password You should change your ecentral login password periodically to keep your information safe. You can manage your login name and passwords for ecentral from the Change Password window. To change your password 1. From the Home tab menu on the ecentral Web page, click Account Settings to display the ecentral preferences on the left side of the navigation panel. 2. Click change password to display the Change Password window. 3. In the Old Password field, type your current password. 4. In the New Password field, type your new password.
19 5. In the Confirm New Password field, type your password again. 6. Click Update Password to update your password. Important Notes: When changing your password, you will also want to make sure to update the new password in the WebSync Wizard software, and also in the newer esync software (if installed), so that they will synchronize properly to your ecentral account. Also, this will change the password for the Dentrix Mobile and Kiosk login.

20 and Postcard Campaigns Using ecentral, you can set up automated and postcard campaigns to remind patients of upcoming appointments and continuing care. (In ecentral, you can select templates that specify what the and postcard reminders will look like when you send them to your patients.) Because there are several types of correspondence that patients need to receive, you can use different and postcard templates for each type of correspondence. After you select your and postcard templates in ecentral, in the WebSync Wizard you can specify which templates patients will receive for their reminders (See Correspondence Setup and Edit Correspondence ). Note: The & Postcards Setup campaign in ecentral works in conjunction with the Correspondence Setup section of the DXWeb WebSync Wizard. To select a template for a specific correspondence type in ecentral 1. From the ecentral Communications tab menu, click /postcard campaigns to display the & Postcard Campaigns page. 2. Select the correspondence type that you would like to see: All All types of campaigns display in the list. (This is the default option.) Appointment Reminders Only the Appointment Reminder campaigns display in the list. Continuing Care Due Only the Continuing Care Due campaigns display in the list.

21 Continuing Care Reminders Only the Continuing Care Reminder campaigns display in the list. Note: These correspondence types are the same as the correspondence types that you select in the Websync Wizard s Correspondence Setup section. Important: If a green check mark ( ) and the word (Enabled) appear next to a delivery option, this means that this delivery option was selected and will be sent out as part of the campaign. If a red x icon ( ) and the text (Disabled - Click Edit to modify) appear next to a delivery option, this means that this delivery option was not selected and will not be sent out as part of the campaign. If a yellow warning sign ( ) appears next to a delivery method, this means that this option was disabled in the WebSync Wizard in Correspondence Setup. Notes: If you later enable a delivery method in the WebSync Wizard, the option returns to its previous state in and Postcards Campaigns: either Enabled or Disabled. If you turn off a delivery method in the WebSync Wizard, it turns the selected delivery method off for every campaign that is configured to use it. When you turn an option on or off in the WebSync Wizard, to see the new settings in ecentral you may need to refresh the page in ecentral by pressing CTRL+F5 and clicking Retry. 3. Click Edit next to the campaign you want to change to display the Editing dialog box. 4. Select the delivery method for this campaign: - Only will be sent for this campaign.
22 Postcards - Only postcards will be sent for this campaign. Both - Both and postcards will be sent for this campaign. None - Select this option to suspend the campaign for now; no or postcards will be sent. Notes: Depending on your selection, the or postcards step may be eliminated from the subsequent configuration pages. Make sure you click the Pricing and Terms of Use link and read this information before proceeding with a postcard campaign. 5. If you select Both as the delivery method, the Postcards for Confirmed Appointments area becomes enabled. Click Yes to send postcards when appointments have been confirmed by . Click No to not send postcards when appointments have been confirmed by . Important Tip: Keep in mind that it may take up to 7 days for a postcard to be delivered to the patient. ecentral will not schedule and send Postcards reminders that are uploaded by the WebSync any closer than 10 days before the patient s appointments. 6. Click Next. The Template page appears with all templates in the General category displayed. 7. In the Category list, select a template category: General Holiday Pediatric People Seasons All (Non Custom) - Includes all templates from all categories. My Custom - Includes templates that you have modified and saved. For information on how to create custom templates, see Editing Templates. 8. Scroll through the template list and select the template you want to use. Your selected template displays in the Selected Template area. Tip: You can click Enlarge to display an enlarged version of the template. Click Close when finished.

23 9. Click Next to display the Review /Postcard Selection page (or the Postcard page if that option is enabled). The page is divided in half to show you your selections for both and postcards. A green check mark ( ) or red x icon ( ) are used to indicate whether the delivery option is currently enabled or disabled. 10. Click Save. Your changes are saved, and the wizard closes and returns to the & Postcard Campaigns page.

24 Editing templates You can edit an template and save your changes to use with an campaign without affecting the original template. To edit an template 1. From the ecentral Communications tab menu, click edit templates to display the Edit Templates page. 2. In the Category list, select a template category: General Holiday Pediatric

25 People Seasons All (Non Custom) - Includes all templates from all categories. My Custom - Includes templates that you have modified and saved. 3. Scroll through the template list and select the template you want to use. Your selected template displays in the Selected Template area. 4. Click Edit to display the Correspondence Types dialog box. 5. Select the campaign type that you would like to see: Appointment Reminder - Only the Appointment Reminder type displays in the editor. Continuing Care Due - Only the Continuing Care Due type displays in the editor. Continuing Care Reminders - Only the Continuing Care Reminder type displays in the editor. 6. Click Next. 7. Use the Edit Correspondence editor to make any changes you want to the template. Tip: For help on using the toolbar and other editing tools, click the Help corner. icon in the upper-right 8. Click the Save icon on the toolbar.
26 9. The Template Name field defaults to the correspondence type and the template name. You can either use this default name or type a new template name, and then click Save. Note: The other two fields cannot be edited here. The Template Category is set to Custom because you are defining a custom template. The Correspondence Type was selected previously and is displayed here as part of the summary.
27 Text messaging setup In addition to and postcard reminders, you can send text message reminders to your patients with cell phones. Note: Before you can send text message reminders to your patients: It is recommended that patient s have a cell phone number entered in the Mobile or Other field in your practice management software, such as DENTRIX Family File. It will try the Mobile field first if a number is listed, then the Other field if the Mobile is blank. If there is no number listed in the Mobile or Other fields, it will try to schedule a text to the number in the Home field, and if that field is empty, last of all it will use the Work field number. You must enable text messaging in the WebSync Wizard. You must agree to the Terms of Use. To read the Terms of Use, click the Terms of Use link. If you are using esync, you can set up appointment status updates so that when patients confirm their appointment by responding to your text message, the appointment status is automatically updated in your practice management software. Note: If patients don t want to receive text message reminders, they can opt out with a text message reply, and ecentral will not send them text message reminders. ecentral lets you view a Text Message Opt Out Report so that you can see which patients have opted out of automated text message reminders. Tip: Using the Appointment Manager, you can view correspondence details, such as if a text message was sent or is waiting to be delivered, if a patient as confirmed his or her appointment, or if a patient has opted out from text message reminders. To set up a text message reminder in ecentral 1. On the Communications tab menu, click text message campaigns to display the Text Message Campaigns page.
28 If a green check mark ( ) and the word (Enabled) appear next to a text message campaign, this means that this text message will be sent as part of the campaign. If a red x icon ( ) and the text (Disabled - Click Edit to modify) appear next to a text message campaign, this means that this text message will not be sent as part of the campaign. To enable a text message campaign, click Edit and select Enable this text message. If text messages are disabled in the WebSync Wizard in Correspondence Setup, all of the campaigns appear in light gray and have the disabled icon ( ) next to them. Notes: If you later enable this option in the WebSync Wizard, the option returns to its previous state in Text Message Campaigns (either Enabled or Disabled) for each campaign. If you turn off text messages in the WebSync Wizard, it turns all text messages off for every campaign When you turn an option on or off in the WebSync Wizard, to see the new settings in ecentral you need to refresh the page in ecentral by pressing F5. 2. Click Add (or Edit) to display the dialog box where you can add new text message campaigns or edit existing ones.
29 3. Make sure Enable this text message is selected (to make this text message active), then use the following options to set up your text messaging: Allow patient to confirm appointment from text message reminder - When this option is selected, text messages will include instructions for the patient to confirm the appointment. Send text message reminder when appointment is already confirmed - When this option is selected, text message reminders will be sent to patients who have already confirmed the appointment previously. Send text message reminder before appointment - Specify how long before the appointment you want to send the text message. Enter a number and then select either Days or Hours. You can enter up to 13 days or up to 23 hours before an appointment. Tip: Enter a zero (0) for the message to deliver exactly at the actual appointment date and time. Under Select a message to send, click a filter to display only Template text messages (predefined in the software), Custom text messages (that you have created) or All text messages. All is selected by default. Select the text message format that you want to use for the campaign 4. When finished, click Next. The Reviewing: Text Message page shows you the format for your final text message before it is sent.
30 Tip: You can click Test if you want to test the text message by sending it to the cell phone number you provide. After typing a cell phone number, click Send. 4. Click Save. Important Notes about ecentral Text Messaging: These text messages will be delivered to the patients from the number Patients have the capability of opting out by texting STOP (not case sensitive) to their text message or to that number after receiving a text from ecentral. If a patient does so, they will receive another text that will confirm that they are opted out, and that they can opt back in by texting RESUME (not case sensitive) to that number, which they can do so at any time. The patient will no longer receive any text messages unless they opt back in. Patients will receive a mandatory one-time text notification the first time they are scheduled a text by ecentral that will notify them that they are set up for text message reminders from your office and allow them to opt out by texting STOP. It will also notify them that message and data rates may apply, meaning that they are only charged for the text based on their cellular service plan; there are no additional charges to the patient from ecentral for receiving a text.

31 Setting up custom text messages In addition to the pre-defined text message templates that are ready for you to set up and use, you can also define custom text messages. 1. On the Communications tab menu, click add/edit text message to display the Add/Edit Text Message page. 2. Click Add. The Creating Text Message page appears.
32 3. In the Message field, type the text of your message (up to 120 characters). 4. If you want to insert merge fields in your text message, place your cursor where you want to add the merge field, click Add Merge Fields, and choose from the following: <Provider Name> <Provider Phone> <Patient Name> <Appt Date> <Appt Time> Note: When text messages are sent, merge fields are automatically replaced with the specific data from your practice management software. For example, if you include the <Patient Name> merge field, the system will automatically replace <Patient Name> with the patient's name when the message is sent. Merge fields do count towards the total 120 characters you can include in your message. For example, the <Provider Phone> merge field adds 12 characters, the <Patient Name> merge field adds 10 characters, the <Appt Date> merge field adds 10 characters, and the <Appt Time> merge field adds 8 characters. 5. When finished, click Save to save the custom text message and return to the Add/Edit Text Message page. To make this new message an active campaign, you will need to select it in the Text Message Campaigns page.
33 6. On the Communications tab menu, click text message campaigns to display the Text Message Campaigns page. Tip: You can also click the text message campaign link after typing the text message to go directly to the Text Message Campaigns page. 7. Click Add (or Edit) to display the dialog box where you can add new text message campaigns or edit existing ones. 8. Make sure Enable this text message is selected (to make this text message active), then use the following options to set up your text messaging: Allow patient to confirm appointment from text message reminder - When this option is selected, text messages will include instructions for the patient to confirm the appointment. Note: The additional instructions do not reduce the number of characters you can include in your custom text message; you can still include up to 120 characters, not counting the confirmation instructions. Send text message reminder when appointment is already confirmed - When this option is selected, text message reminders will be sent to patients who have already confirmed the appointment previously. Send text message reminder before appointment - Specify how long before the appointment you want to send the text message. Enter a number and then select either Days or Hours. You can enter up to 13 days or up to 23 hours before an appointment.
, Custom text messages (that you have created) or All text messages.")
34 Tip: Enter a zero (0) for the actual appointment date and time. Under Select a message to send, click a filter to display only Template text messages (pre-defined in the software), Custom text messages (that you have created) or All text messages. All is selected by default. Select the text message format you want to use for the campaign. 9. When finished, click Next. The Reviewing: Text Message page shows you the format for your final text message before it is sent. Tip: You can click Test if you want to test the text message by sending it to the cell phone number you provide. After typing a cell phone number, click Send. 10. Click Save.
35 Patient Surveys Patient surveys help you discover the needs of your patients. With a few simple clicks in the Patient Surveys page of the Communication Manager, you can create an entire survey that will give you valuable insight into your patient s experience at your office. You can post patient surveys on your practice Web site, and you can automatically send surveys via up to a week after an appointment. There are three parts to the Patient Surveys page: Setup - Allows you to select which questions you want to include on your survey form, and allows you to select delivery options. Reports - Allows you to view statistics about the surveys that your patients have completed. Responses - Allows you to view the responses on each survey that your patients have completed. Patient Surveys Setup The Patient Surveys Setup page allows you to select the content of the patient surveys you want to deliver to your patients. It also allows you to set up delivery options for your patient surveys. The Patient Survey Setup is divided into three sections: Patient Satisfaction Surveys, Survey Questions, and Delivery and Completion Events. To set up patient surveys 1. From the Communications tab menu, click patient survey. 2. Click Setup. 3. If you want to an Appointment Survey to all patients with an address after their scheduled appointment, select that check box. Note: If you choose to have survey s sent to patients after their appointments, no more than one survey will be sent in a 30-day period, even if the patient has multiple appointments during those 30 days.
36 2. In the Survey Questions section, select the Survey Questions you want to include in the survey. (Clear the checkbox to remove the question from the survey.) You cannot add additional questions to the survey. Tip: You can make all of your surveys anonymous by clearing the Name, Phone Number, and Address fields so that patients do not have the option to enter that information. 3. In the Delivery and Completion section, select the number of days after an appointment you want to surveys to patients. In the text box, enter the message you want patients to see when they complete the survey on your practice Web site. If you want to have an message sent to you when a survey is completed, select Send me an when a survey has been completed... and enter the address where you want the message to be sent.

37 4. When you have set up the survey the way you want it, click Save to save your changes. If you exit the Setup without clicking Save, your changes will be lost. Previewing Surveys You can preview a survey to see how the questions are formatted by clicking the Preview Survey link on the right side of the Survey Questions. Note: If you include or exclude questions from the survey, you must first click Save if you want to view those changes using Preview Survey. Reports In the Patient Surveys Reports page, you can view statistics about the surveys that have been completed by your patients. You can also view the satisfaction scores for the last month, six months, and year. And, you can see response totals for each question in your survey. The Patient Surveys Reports are divided into two sections: Patient Satisfaction Scores and Patient Response Summary. These are described below:
38 Patient Satisfaction Scores The Patient Satisfaction Scores section includes Survey Statistics and Satisfaction Scores. Survey Statistics: The survey statistics that are listed include: Total Surveys from , Total Surveys from Web site, Completed Surveys, Partial Surveys, and Unanswered Surveys. These statistics are based on all of the patient surveys that have been completed by or ed to patients. Satisfaction Scores: The Satisfaction Scores show the number of surveys that received a Great, Good, Okay, Fair, or Poor rating. These scores are shown for the total number of surveys, the surveys submitted in the past month, the surveys submitted in the past six months, and the surveys submitted in the past year, so you can see how the survey scores for your office are progressing or regressing. Patient Response Summary The Patient Response Summary lists each of the questions on the surveys and the total number of responses that received each rating and the rate of responses that receive each rating. To display the patient satisfaction scores and patient response summary From the Communications tab menu, click patient survey. Responses The Patient Surveys Responses lists each survey that has been completed by patients along with the date the survey was completed, the name of the patient who completed the survey (if the patient entered a name), the status of the survey (Complete or Incomplete), the source of the survey (such as Web or ), and the score of the responses on the survey. To display survey responses 1. From the Communications tab menu, click patient survey. 2. Click Responses. 3. By default, the information in the Patient Survey Responses is listed for the previous month. To change the date range: a. Click Filter by Date. b. In the date fields, enter a start and end date for the responses you want to view. c. Click Submit. The survey responses are displayed.

39 To open a new window that displays the actual completed survey with responses In the Details column, click View.
40 Correspondence Manager Using ecentral, sending patient appointment and continuing care reminders is easy and completely automated. After you have sent correspondence to your patients, a record of the correspondence is added to the Correspondence Manager. To access the Correspondence Manager from the Communication Manager page From the Communications tab menu, click correspondence reports. The Correspondence Manager tracks: correspondence Text message correspondence Postcard correspondence To view the details of a certain type of correspondence, click the desired link on the Correspondence Manager page. When you send correspondence to your patients, a record of the message is added to the section of the Correspondence Manager. To display correspondence in the Correspondence Manager From the Communications tab menu, click correspondence reports. The Correspondence Manager appears with Messages selected by default. Note: The list of messages displayed are those that were sent prior to upcoming appointments and due dates that are scheduled between the specified search dates. Only messages that are associated with an appointment or due date that falls between those search dates are displayed in the list. See Search below for more information.
41 Each record in the list contains the uploaded date, delivery date, patient name, continuing care due date, appointment time, type of correspondence that was sent, and the status of the . You can sort your messages by any of the categories listed. Click the name of the category to sort the list of messages. You can also resend or delete from this list by selecting or clearing the checkbox next to the message and clicking Resend or Delete . Search To search for a specific message, click Search. The Message Search dialog box appears. In the dialog box, enter the Appointments/Continuing Care Due date to search by and click Submit. All messages that were sent regarding Appointments or Continuing Care within the specified date range will be listed on the Messages page. You may also search by Uploaded Date, by selecting the option. This will allow you to display all s uploaded by the WebSync in the specified date range.
42 Printing an messages report You can print the messages you have sent through ecentral. To print the Messages Report 1. Click the Printable Version button. A new window opens that displays the Messages Report. 2. Click the Print button to print the Messages Report. Text Messages When you send text message correspondence to your patients, a record of the message is added to the Text Messages page of the Correspondence Manager. To display text message correspondence in the Correspondence Manager 1. From the Communications tab menu, click correspondence reports. The Correspondence Manager appears. 2. Click Text Messages. Note: The list of text messages displayed are those that were sent (or are still scheduled to send) prior to upcoming appointments that are scheduled between the specified search dates. Only text messages that are associated with an appointment that falls between those search dates are displayed in the list. See Text Message Search below for more information.

43 This record contains the uploaded date, patient name, delivery time, appointment time, and the status of the text message. You can sort your text messages by any of the categories listed. Click the name of the category to sort the list of text messages. You can also cancel text messages from this list by selecting or clearing the checkbox next to the text messages and clicking Cancel Selected. Note: You cannot cancel a text message if it has already been delivered. Text Message Search To search for a specific message, click Text Message Search. The Text Message Search dialog box appears.
44 In the dialog box, to search by appointment date, select Appointment Date, enter the range of appointment dates to search by, and click Submit. All messages that were sent regarding Appointments within the specified date range will be listed on the Text Messages page. You may also search by Uploaded Date, by selecting the option. This will allow you to display all text messages uploaded by the WebSync in the specified date range. Printing a text messages report You can print the text messages you have sent through ecentral. To print the Text Messages Report 1. Click the Printable Version icon on the right side of the screen. 2. Click Print. Postcards When you send postcard correspondence to your patients, a record of the message is added to the Postcards section of the Correspondence Manager. To display postcard message correspondence in the Correspondence Manager 1. From the Communications tab menu, click correspondence reports. The Correspondence Manager appears. 2. Click Postcards. Note: The list of postcards displayed are those that were scheduled or sent prior to upcoming appointments that are scheduled between the specified search dates. Only post cards that are associated with an appointment or continuing care due date that falls between those search dates are displayed in the list. See Searching for Post Cards below for more information.

45 This record contains the upload date, mailed date, patient name, appointment date, continuing care due date, type of correspondence that was sent, and the status of the Postcard. You can sort your postcards by any of the categories listed. Click the name of the category to sort the list of postcards. Searching for postcards Using Correspondence Manager, you can search for a specific postcard. To search for a specific postcard 1. Cick Postcard Search. The Postcard Search dialog box appears.
46 2. In the Date Range fields, specify a start date and end date to use for the search. 3. Click Submit. All postcards that were sent regarding Appointments or Continuing Care within the specified date range are listed on the Postcards page. You may also search by Uploaded Date, by selecting the option. This will allow you to display all postcards uploaded by the WebSync in the specified date range. Printing a postcard messages report You can print the list of the postcard messages you have sent through ecentral. To print the Text Messages Report 1. Click the Printable Version icon on the right side of the screen. 2. Click Print. Viewing the Text Message Opt Out Report If patients don't want to receive text message reminders, they can opt out, and ecentral will not send them text message reminders. ecentral lets you view a Text Message Opt Out Report so you can see which patients have opted out of automated text message reminders. The report shows the opt-out date, the patient's name, the appointment date and time, and the patient's phone number. The Correspondence Manager page appears.

47 1. Click Text Message Opt-Out. The Text Message Opt-Out page appears.

48 Tip: To sort the list by any column, click one of the column headers. Note: The top of the report includes the instructions for a patient to opt-in so they can receive text message reminders. Viewing the Text Messages Received This report shows non-confirmation text message replies received from a patient. 1. In the Communication Manager, click Text Messages Received. The Text Messages Received page appears.
49 2. If you would like to be sent an at your office contact address whenever a patient replies via text message, enable the option Send notifications to practice when a patient replies with a non-confirmation text message. The message the patient replied with will be displayed on that message that is received. You may also view the patient s messages that they have replied with on this report, and also view the patient s appointment information that their text message was sent for.
50 Patient Newsletter One of the best ways to inform your patients about the events in your office and in the field of dentistry is through a newsletter. ecentral gives you the option to send an electronic newsletter to your patients, saving you money on paper and postage. Types of newsletters You can send the following types of newsletters: A text-only newsletter - A text-only newsletter will not require your customers to open an attached file; you also won't need to worry about whether your customers have the software needed to view your attachment (such as Adobe Acrobat to view PDF files). However, text-only newsletters are simply text. There is no design, graphics, or layout to add visual interest or aid readability. A newsletter that you create and publish using some other layout and design program - You can create a traditional newsletter using a software program such as Microsoft Word, Microsoft Publisher, or Adobe InDesign, then publish the newsletter to a file that your customers can open and read. If you use this method, you should make sure you publish your newsletter in a common file format (such as RTF, PDF, DOC) that your customers will be able to read and open using software they have on their computer or can download for free. Both - You can also send both types of newsletters, by attaching the newsletter file, and also including the actual newsletter text in the body of the message. To prepare an e-newsletter 1. From the Communications tab menu, click send newsletter. The Patient Newsletter page appears.
51 2. In the Subject field, type the subject for the newsletter message. 3. In the Newsletter Text field, type the newsletter text, or the message that will introduce your attached newsletter file. 4. If you want a copy of the newsletter sent to your practice's address (configured in the Practice Setup page), select Send Newsletter to Practice. 5. To add the newsletter you've created as an attachment, next to the Add File Attachment field click Browse, browse to the newsletter file, and then click Open. If you decide to remove the attachment, delete the file name and path from the Add File Attachment field. Sending the e-newsletter When your newsletter is ready to send, you need to decide who to send it to. Note: Only families who have been marked with a Web Consent Date (for the Guarantor/Head of Household) and have afterwards been uploaded by the WebSync s Patient Upload are available to receive the newsletter. For more information on how to assign a Web Consent Date for a family, see Patient Settings. To send the e-newsletter 1. Click one of the following buttons to specify who you want to send the newsletter to:

52 All Patients - This option sends the newsletter to the addresses for all family patients uploaded with Web Consent All Guarantors - This option sends the newsletter to only the addresses of the guarantors uploaded with Web Consent. Select Patients - Using this option, you can select the patients you want to receive the newsletter using the fields shown here: Clicking Select Patients allows you to search for patients by name. This can take time if you have a long list of patients, so you may want to narrow your name search by selecting Guarantors Only to include only guarantors in your search list. You can also enter a Date Uploaded range to narrow the search to patients whose information was uploaded to your ecentral Web site within the specified date range. (If you want to disregard the upload date, select Ignore Upload Date.) If you want to narrow the search to a range of names (sorted alphabetically by last name, then first name), in the From and To fields, specify the name range, as shown in the example above. 2. Once you have entered the filters by which you want to search, click Submit Search. The search results will be displayed in the Search Results list.

53 3. Using the checkboxes next to the patient names, select the patients you want to receive a newsletter. or Click Select All to select all patients in the list. Notes: If a duplicate address is selected, only one will be sent to that address. Newsletters are sent as Blind Carbon Copy so that the recipients of the newsletter do not see the addresses of other recipients. 4. Once you have selected the patients to whom you would like to send the newsletter, click Send Newsletter. A message will appear letting you know that the newsletter has been sent successfully.
54 Referral Manager You can use ecentral to send electronic referrals to other dental professionals and collect referrals patients send to your practice. Once you have sent referrals, you can track the professional referrals sent, professional referrals received, and patient referrals received. You can also edit the that will be sent to referred patients. In the Referral Manager, you can also view your professional contact list (the list of all other dental professionals who use ecentral) and set up a personal contact list of dental professionals with whom you work frequently. In order to send referrals, you must set up the provider(s) to whom you will be sending referrals in your practice management software, your ecentral Web site, and the DXWeb or EasyWeb Toolbar. Setting Up referrals in ecentral Before you can send electronic referrals to other providers, you must make sure the provider to whom you want to send a referral has an ident.com account. You can search to see if a provider has an ident.com account using the Professional Contact list in the ecentral Referral Manager. To set up referrals in the Referral Manager 1. From the Communications tab menu, click professional contact list. The Professional Contact List page appears. 2. You can search by specific information by clicking Search Professional Contacts, then using the Last Name, First Name, Specialty, State/Province, City, and Zip Code fields. Enter the information you want to search by and click Search to bring up a list of providers who match the search criteria. Click the first letter of the provider's last name to populate a list of all providers by last name. If the provider is on the list, they have an ident.com account and you can upload referrals for them. If you cannot find the provider on the list, they do not have an ident.com account and must at least sign up for a free ecentral.ident.com account before you can upload patient referrals to them. Note: The Contact List displays the specialty, provider name, and user name of each provider. Take note of the user name of the providers you are searching for, as you will need this user name later in the referral setup process. 3. If the provider is one with whom you will be working and sending referrals more than once, add them to your personal contact list. To add a provider to your personal contact list, find them in the Professional Contact List. When you have found the provider on that list, click Add to add them to the Personal Contact List.

55 Note: The Personal Contact List contains only those providers you have added to it, so it is easier to search through when you are trying to locate a specific provider's information. Setting Up Referrals in DXWeb You must set up referral providers in the Referral Setup section of the DXWeb toolbar before you can upload referrals to that provider. To set up Referrals in DXWeb 1. In the DXWeb Toolbar, click Settings > Referral Setup. The Select Referred To dialog box appears. 2. You can either select the provider's name in the list or search for the desired provider by entering the first few letters of the provider's last name in the Enter Name field and clicking the search button. When you have selected the desired provider, click OK. The Referral Settings dialog box appears, and the contact information (Name, Address, Phone, Fax, and address) of the referral provider you have selected appears in the Referral Source group box.

56 3. Verify that the information is correct. If you need to change any of the provider's contact information, open the Office Manager and click Maintenance > Reference > Referral Maintenance, select the provider, and click Edit to edit the provider's contact information. 4. Enter the user name you found in the Professional Contact List of the ecentral Web site. If you do not have the user name, open the ecentral Web site, click the Referral Center tab, click the Professional Contact List link, search for the desired provider, and copy the provider's Referral Number from the Referral Number column into the User Name field of the Referral Settings dialog box. 5. Select the address to use when sending referral notifications to the provider. You can use the provider's Primary Address that was set up in the Office Manager, or you can select a Secondary Address to use instead of the primary address. If you don't want to send notifications of referrals, clear the Send Notifications box. Once you have set up referrals in the DXWeb toolbar, in the Patient Chart, when editing one or more Treatment Plans for a patient, under the Related Referral field you can select the Referred to doctor that was set up in the DXWeb toolbar to mark that procedure for referral, and then set up the Referral Upload to send referrals during the WebSync, or the Referral Upload Override to send a few referrals at a time without running the WebSync. You may also send referrals manually in the Patient Chart by selecting the patient, and selecting File Send Referral Via Web, which also allows you to attach images to be sent with the referral (only supported with Dexis and Dentrix Image integrated software). Note: In order to send a patient as a referral, the patient needs to give Web Consent. See Setting up Patient Account Access.

57 Professional Referrals Sent Using Referral Manager, you can view the referrals that have been sent from your office. To view the referrals that have been sent from your office 1. From the Communications tab menu, click referrals. 2. Under Professional Referrals, click Sent. You can view the total number of referrals sent from your office, search for a specific referral, delete referrals, or send correspondence to doctors to whom you are sending referrals. The total number of referrals sent from your office is shown at the top of the Referrals sent frame. The total number of referrals that have been viewed is shown beneath the total number of referrals sent. Referral search You can search for specific referrals that have been sent from your office.
58 To do a referral search 1. From the Referrals Sent page, click Search Referrals Sent. 2. Enter the search criteria you want to use in the following fields: Referred By - The last and first name of the person who sent the referral, such as Smith, Mike. Specialties - Select one of the dental specialties from the list. Referral Number - The referral number of the person who sent the referral, such as Ref Patient Name - The last and first name of the patient who was referred, such as Smith, Mike. Start Date - Enter a start date by typing a date or clicking the calendar button to open the calendar and select a date. End Date - Enter an end date by typing a date or clicking the calendar button to open the calendar and select a date. 3. Click Submit. Viewing Sent Patient Referral Information To view the information that is part of the referral, simply click on the name of the patient. It will display various details, such as general patient information, procedures, and even images if any were sent with the referral. Printing the Referrals Sent Report You can print the referrals you have sent. To print the Referrals Sent report 1. Click the Printable Version icon on the right side of the screen. A new window opens that displays the Referrals Sent Report. 2. Click Print.

59 Professional Referrals Received Using Referral Manager, you can view the referrals that have been sent from your office. To view the referrals that have been received by your office 1. From the Communications tab menu, click referrals. 2. Under Professional Referrals, click Received. In this window, you can search for and view referrals that have been sent to your office from other professionals. The total number of referrals received by your office is shown at the top of the Referrals Sent frame. The total number of referrals that have been viewed is shown beneath the total number of referrals received. Referral search You can search for specific referrals that have been received by your office. To do a referral search 1. From the Professional Referrals Received page, click Search Referrals Received. 2. Enter the search criteria you want to use in the following fields:
60 Referral Number - The First Name and Last Name of the person who sent the referral, such as Ref Contact Name - The First Name and Last Name of the referral contact (if different). Start Date - Enter a start date by typing a date or clicking the calendar button to open the calendar and select a date. End Date - Enter an end date by typing a date or clicking the calendar button to open the calendar and select a date. 4. Click Submit. Viewing Received Patient Referral Information To view the information that is part of the referral, simply click on the name of the patient. It will display various details, such as general patient information, procedures, and even images if any were sent with the referral. Print Referrals Received Report You can print the referrals you have received. To print the Referrals Received Report 1. Click the Printable Version icon on the right side of the screen. A new window opens that displays the Referrals Received Report. 2. Click Print.

61 Patient Referrals Received Using Referral Manager, you can view the patient referrals that have been received by your office. The ability for patients to refer their friends thru ecentral is a feature associated with the ecentral Template Website, or if requested, for websites customized through ecentral services. If this feature is enabled in the Website Manager, each time a patient completes a Satisfaction Survey they will be taken to the ecentral template website where they can refer their friends. To view the patient referrals that have been received by your office 1. From the Communications tab menu, click referrals. 2. Under Patient Referrals, click Received. In this window, you can search for and view patient referrals that have been received by your office. The total number of referrals received by your office is shown at the top of the Patient Referrals Received frame. The total number of referrals that have been viewed is shown beneath the total number of referrals received. Referral search You can search for specific referrals that have been received by your office. To do a referral search
62 1. From the Professional Referrals Received page, click Search Referrals Received. 2. Enter the search criteria you want to use in the following fields: Referred By - The First Name and Last Name of the person who sent the referral, such as Smith, Mike. Contact Name - The First Name and Last Name of the referral contact (if different). Start Date - Enter a start date by typing a date or clicking the calendar button to open the calendar and select a date. End Date - Enter an end date by typing a date or clicking the calendar button to open the calendar and select a date. 3. Click Submit. Print Referrals Received Report You can print the referrals you have received. To print the Referrals Received Report 1. Click the Printable Version icon on the right side of the screen. A new window opens that displays the Referrals Received Report. 2. Click Print. Disabling the Patient Referral Feature If you wish to disable the Patient Referral feature 1. From the Web Site tab menu, click manage my site. 2. Select Practice Info & Web site Settings. 3. Select No to the Allow patients to refer friends from your site? option. 4. Click Finish.

63 Edit Referral One of the best ways to build your practice is through patient referrals. You can help make this easy by creating a custom template for patients to use. Whenever a patient refers a friend through the ecentral template website, the template that is selected and activated will be delivered to the friend s address, which will display your office contact information, and invite the friend to your practice. The template may also be customized. To customize a patient referral template: 1. From the Communications tab menu, click referrals. 2. Under Referral , click Edit. Several templates are displayed in the Patient Referral Library.
64 3. Select a template to be used for your patient referral page. 4. To customize the template, click Edit Template. The Edit Referral window appears. Use the tools in the window to customize the text and graphics. When you have made changes, click the Preview tab to preview the template as it will appear when delivered by . When you have finished making changes to the template, click the Save icon to save your changes. 5. When you click Make Active, a red border is placed around the selected template and the template is displayed to the right of the Patient Referral Library. Note: If you do not like the changes you have made or you would like to start over, click Reset Template. Receive Notification You stay informed about the health of your practice by being notified each time a new patient is referred to your office. To have an sent to you each time a new patient referral is sent 1. From the Web Site tab menu, click manage my site. 2. Select Practice Info & Web site Settings. 3. Select the me each time a patient is referred check box next to the Allow patients to refer friends from your site? option. 4. If you would like the notification to be sent to an address other than your default practice address (specified in Practice Setup), in the field, type the address to which you would like the referral notifications to be sent to. 5. Click Finish.
65 Professional contact list To help you stay connected to other professionals in your field, ecentral provides you with a Professional Contact List. This list contains other professional offices with an ident.com account. You can use this list to find new professionals to work with. You can find these professionals by searching or by viewing a list by letter. To use the professional contact list 1. From the Communications tab menu, click professional contact list. 2. Click one of the letters to display a list of all providers for that letter. or Click Search Professional Contacts and use any of the criteria provided to search for a specific contact. Viewing professional contacts Using the Professional Contact List, you can view information about professional contacts, contact them via , find their referral numbers to set up ecentral Professional Referrals, and add providers from the Professional Contact List to your Personal Contact List. To view information about a contact 1. Click the name of the contact. 2. When you finish viewing the contact information, click Close. To contact a provider in the Professional Contact List 1. In the Professional Contact List, click Contact next to the contact to whom you want to send an message. 2. In the Subject box, type the subject of the message. 3. In the Message box, type the text of the message. 4. If you want to include your practice's phone number, select Include a from office phone number. 5. Click Submit. To add providers from the Professional Contact List to the Personal Contact List In the Professional Contact List, click Add next to the contact you want to add to your Personal Contact List.
66 Notes: Once a provider has been added to your personal contact list, you can view that provider s information in either the Professional Contact List or your Personal Contact List. If a contact already exists in your Personal Contact List, when you try to add the contact, a message appears that states "The contact is already in your personal contact list." Personal Contact List To help you keep track of other professionals with ident.com accounts, you may add providers from the Professional Contact List to your Personal Contact List. This list will only display providers that you have added. You can also view your contacts by searching or by viewing a list by letter. To use the personal contact list 1. From the Communications tab menu, click personal contact list. You should now be able to view all of your personal contacts. If you wish to narrow down the list of providers further, you may click one of the letters to display a list of all providers for that letter, or click Search Personal Contacts and use any of the criteria provided to search for a specific contact. Viewing personal contacts Using the Personal Contact List, you can view information about personal contacts, contact them via , find their referral numbers to set up ecentral Professional Referrals, and remove providers from your Personal Contact List. To view information about a contact 1. Click the name of the contact. 2. When you finish viewing the contact information, click Close. To contact someone in the Personal Contact List 1. In the Personal Contact List, click Contact next to the person to whom you want to send an message. 2. In the Subject box, type the subject of the message. 3. In the Message box, type the text of the message. 4. If you want to include your practice's phone number, select Include a from office phone number. 5. Click Submit.
67 To remove providers from your Personal Contact List In the Personal Contact List, click Remove next to the contact you want to remove from your Personal Contact List. Notes: Once a provider has been added to your personal contact list, you can view that provider s information in either the Professional Contact List or your Personal Contact List. If a contact already exists in your Personal Contact List, when you try to add the contact, a message appears that states "The contact is already in your personal contact list.
68 Practice Statistics ecentral makes it easy to view certain correspondence statistics, including the statistics about patient survey satisfaction scores, appointment correspondence, text message appointment correspondence, postcard appointment correspondence, patient referrals, and provider referrals. By default, the survey statistics reflect cumulative totals (except the satisfaction scores, which are shown for the past month, past six months, and past year). To display correspondence statistics From the Communications tab menu, click practice statistics. The Practice Statistics page appears.
69 Search by Date Range You can narrow the scope of the Appointment Correspondence and Electronic Referrals practice statistics by clicking Statistics Search and specifying a narrower date range in the dialog box that appears. When you click Submit, the statistics will be recalculated to reflect the statistics for the specified date range.
70
71 Patient Settings The Patient Setup/Settings area of the toolbar allows you to limit and specify what reminders a patient will receive, and is also where you assign Web Consent dates. This is also the area to change settings for a patient s login account for the Website Manager. To set up patient preferences and Web Consent in the Toolbar 1. On the toolbar of your practice management software (such as DENTRIX or EasyDental), click Settings, and then click Patient Setup. 2. If you do not have a patient selected, the Select Patient dialog box appears; select a patient to continue. If you have a patient selected, the Patient Settings dialog box appears.

72 3. In order for a patient to have their information posted to a Web site, to be able to have ecentral newsletters delivered to, or to send the patient s information as a referral to another office using ecentral s Professional Referrals, the patient must sign a Web Consent form. In the Web Consent Date box, enter the date of consent, or click Insert Today's Date if the patient consented today. NOTE: for patient login accounts and newsletters, if using Dentrix G4 Productivity Pack 7 or later, the Web Consent date needs to be entered for the Guarantor of the family. 4. DENTRIX and EasyDental have a consent form letter on the server in the Letter Template Path specified in the Preferences dialog box. To find this letter: a. Open the Office Manager. b. From the Maintenance menu, point to Practice Setup, and click Preferences.
DXWeb Webenabled Version 4.0 Supplement
 DXWeb Webenabled Version 4.0 1 DXWeb Webenabled Version 4.0 Supplement To be used with the DENTRIX 9.0 User s Guide 727 E. Utah Valley Drive, Suite 500 American Fork, UT 84003 Tel. (801) 763-9300 Fax (801)
Dentrix Learning Edition. Installation Instructions
 Dentrix Learning Edition Installation Instructions 2 TIPS FOR A SUCCESSFUL INSTALLATION These steps have been prepared to help minimize or eliminate any issues when installing the Dentrix Learning Edition.
SMARTPROS LTD. PROFESSIONAL EDUCATION CENTER USER S GUIDE BANKING EDITION
 - 1 - SMARTPROS LTD. PROFESSIONAL EDUCATION CENTER USER S GUIDE BANKING EDITION Document version 1.0 - Banking Updated April 20, 2006 SmartPros Banking by SmartPros Ltd. Support: admin@smartpros.com (914)
BeetleEye Application User Documentation
 BeetleEye Application User Documentation BeetleEye User Documentation 1 Table of Contents Welcome to the BeetleEye Application... 6 Overview... 6 Navigation... 6 Access BeetleEye... 6 Update account information...
Easy Dental Release Guide
 Easy Dental 12.1 Release Guide www.easydental.com 1-800-824-6375 PUBLICATION DATE October 2018 COPYRIGHT 1987 2018 Henry Schein One. All rights reserved. No part of this publication may be reproduced,
Meritain Connect User Manual. for Employees. 1 Meritain Connect User Guide for Employees
 Meritain Connect User Manual for Employees 1 Meritain Connect User Guide for Employees Contents Introduction... 4 Accessing Meritain Connect... 5 Logging In... 5 Forgot Password... 6 Registration Process...
AN INTRODUCTION TO OUTLOOK WEB ACCESS (OWA)
") INFORMATION TECHNOLOGY SERVICES AN INTRODUCTION TO OUTLOOK WEB ACCESS (OWA) The Prince William County School Division does not discriminate in employment or in its educational programs and activities against
INFORMATION TECHNOLOGY SERVICES AN INTRODUCTION TO OUTLOOK WEB ACCESS (OWA) The Prince William County School Division does not discriminate in employment or in its educational programs and activities against
Patient Portal User Guide The Patient s Guide to Using the Portal
 2014 Patient Portal User Guide The Patient s Guide to Using the Portal Table of Contents: What is the Patient Portal?...3 Enrolling in the Patient Portal.......... 4-19 A. Enrollment Option #1: First-Time
Keep It Easy Software Cloud User Manual
 Keep It Easy Software Cloud User Manual 2015 Keep It Easy Software 1 CONTENTS How to Login... 5 Functions... 5 System Preferences... 6 General... 7 Receipt Categories... 9 Expense Categories... 10 Service
[Type text] DLC Client Manager Welcome Manual
![[Type text] DLC Client Manager Welcome Manual](/thumbs/87/96515013.jpg "[Type text] DLC Client Manager Welcome Manual") [Type text] DLC Client Manager Welcome Manual Table of Contents Getting Started Prepping Your Data in Expert... 3 Logging In... 4 Synching with Expert... 5 Getting Started with Client Manager... 6 Working
[Type text] DLC Client Manager Welcome Manual Table of Contents Getting Started Prepping Your Data in Expert... 3 Logging In... 4 Synching with Expert... 5 Getting Started with Client Manager... 6 Working
Session 1 Navigation & Administration
 Session 1 Navigation & Administration Agenda Launching ACPM from AC AC/ACPM Integration Basic Navigation Tips in ACPM Administration Overview ACPM Help Launching ACPM from AC Amazing Charts Practice Management
Dashboard User Guide For assistance, please call
 Dashboard User Guide For assistance, please call 1-866-399-8647. With these instructions, you will: PAGE 1. Login to the Clarity site, Configure 911, and Change your Password... 2 2. Set up Mobile Connect
Standard Hotline: Dashboard User Guide For assistance, please call ext. 102.
 Standard Hotline: Dashboard User Guide For assistance, please call 1-800-453-2251 ext. 102. With these instructions, you will: PAGE 1. Login to the VoiceConnect site and Change your Password... 2 2. Set
NQF ONLINE MEASURE SUBMISSION FORM USERS GUIDE
 NQF ONLINE MEASURE SUBMISSION FORM USERS GUIDE VERSION 1.1 Guide Version 1.0 01/11 TABLE OF CONTENTS PART 1: TECHNICAL SUPPORT FOR SUBMISSION FORM TABLE OF CONTENTS... CREATING AN INDIVIDUAL ACCOUNT...
User s Guide. (Virtual Terminal Edition)
") User s Guide (Virtual Terminal Edition) Table of Contents Home Page... 4 Receivables Summary... 4 Past 30 Day Payment Summary... 4 Last 10 Customer Transactions... 4 View Payment Information... 4 Customers
User s Guide (Virtual Terminal Edition) Table of Contents Home Page... 4 Receivables Summary... 4 Past 30 Day Payment Summary... 4 Last 10 Customer Transactions... 4 View Payment Information... 4 Customers
Odyssey File & Serve. Review Queue User Guide Release 3.11
 Odyssey File & Serve Review Queue User Guide Release 3.11 OFS-FS 200 3375 v.1 June 2015 COPYRIGHT AND CONFIDENTIALITY Copyright 2015 Tyler Technologies, Inc. All rights reserved. All documentation, source
Frooition Implementation guide
 Frooition Implementation guide Version: 2.0 Updated: 14/12/2016 Contents Account Setup: 1. Software Checklist 2. Accessing the Frooition Software 3. Completing your Account Profile 4. Updating your Frooition
Provider Secure Portal User Manual
 Provider Secure Portal User Manual Copyright 2011 Centene Corporation. All rights reserved. Operational Training 2 August 2011 Table of Contents Provider Secure Portal... 5 Registration... 6 Provider -
Luxor CRM 2.0. Getting Started Guide
 Luxor CRM 2.0 Getting Started Guide This Guide is Copyright 2009 Luxor Corporation. All Rights Reserved. Luxor CRM 2.0 is a registered trademark of the Luxor Corporation. Microsoft Outlook and Microsoft
Business Online Banking User Guide
 Business Online Banking User Guide Table of Contents Contents Overview... 2 Logging In... 2 Additional Login Information... 5 Home/Dashboard... 6 Top Line Tool Bar... 6 Bulletins... 7 Dashboard... 8 Accounts...
4/27/2018 Blackbaud Internet Solutions 4.5 US 2015 Blackbaud, Inc. This publication, or any part thereof, may not be reproduced or transmitted
 Email Guide 4/27/2018 Blackbaud Internet Solutions 4.5 Email US 2015 Blackbaud, Inc. This publication, or any part thereof, may not be reproduced or transmitted in any form or by any means, electronic,
EFM Community 3.1 Portal Administration Guide
 EFM Community 3.1 Portal Administration Guide WHITE PAPER For technical support please call: 1-800-787-8755 Or visit: Hwww.Vovici.comH Please contact Vovici technical support if you believe any of the
Colorado Access Provider Portal Guide
 Colorado Access Provider Portal Guide coaccess.com 1 CONTENTS INTRODUCTION... 3 SYSTEM REQUIREMENTS... 3 NEW PROVIDER REGISTRATION... 4 Provider Information... 4 New Provider Registration... 4 New Registration...
TAS User Guide. 12 January Version 1.0
 TAS User Guide 12 January 2012 Version 1.0 Disclaimer This user guide is for information purposes and might not exactly match the functionality and display of the TAS Registration system and the TLD Application
WCB Online User Guide for Workers
 WCB Online User Guide for Workers WCB Online User Guide for WORKERS A Nova Scotians safe and secure from workplace injury Table of Contents WCB Online 1 Create an Account Profile 1 WCB Online Navigation
Parent. Portal. User. Manual
 EDUCATIONAL SERVICES Parent Portal User Manual Version 3.0 GENESIS STUDENT INFORMATION SYSTEM PARENT PORTAL Introduction 3 Logging In & Logging Out 4 Student Summary Dashboard The Dashboard Selecting a
2013 EDITION. V-Camp Student. Guide. INTERACTIVE GUIDE Use the buttons shown below to navigate throughout this interactive PDF BACK
 V-Camp Student Guide INTERACTIVE GUIDE Use the buttons shown below to navigate throughout this interactive PDF BACK 03 EDITION V-Camp Student Guide Table of Contents Unit : Table of Contents...iii How
Parent Student Portal User Guide. Version 3.1,
 Parent Student Portal User Guide Version 3.1, 3.21.14 Version 3.1, 3.21.14 Table of Contents 4 The Login Page Students Authorized Users Password Reset 5 The PSP Display Icons Header Side Navigation Panel
View Payments. User Guide. Online Merchant Services
 View Payments User Guide Online Merchant Services Copyright Statement Copyright 2010-2011 by American Express Company. All rights reserved. No part of this document may be reproduced in any form or by
Horizon BCBSNJ Broker Portal
 Horizon BCBSNJ Broker Portal User Guide VERSION 0.1 November 1, 2013 Contents 1 Introduction... 15 1.1 Overview... 15 1.2 Purpose... 15 1.3 Intended Audience... 15 1.4 Conventions Followed... 15 1.5 Structure
Patient Portal: Policies and Procedures & User Reference Guide Patient Portal Version 5.8.1
 Patient Portal: Policies and Procedures & User Reference Guide Patient Portal Version 5.8.1 1 Welcome to the Patient Portal We would like to welcome you to the Patient Portal. The Patient Portal is a secure
ACT Test Accessibility and Accommodations System (TAA) User Guide
 User Guide") ACT Test Accessibility and Accommodations System (TAA) User Guide www.act.org ACT Test Accessibility and Accommodations System (TAA) User Guide Table of Contents Overview... 2 Introduction to the Test
ACT Test Accessibility and Accommodations System (TAA) User Guide www.act.org ACT Test Accessibility and Accommodations System (TAA) User Guide Table of Contents Overview... 2 Introduction to the Test
Benefit Tracker. User Manual
 Benefit Tracker User Manual 2017 www.modahealth.com Revised 10/20/2017 Table of Contents Introduction Page 3 Benefit Tracker Overview Page 3 Security and Password Protection Page 3 Passwords Page 4 Getting
Drake Hosted User Guide
 Drake Hosted User Guide Last Revision Date: 1/2/2017 Support.DrakeSoftware.com (828) 524-8020 Drake Hosted User Guide Copyright The Drake Hosted User Guide, Drake Tax Software, and any other related materials
User Manual Appointment System
 User Manual Appointment System Page 1 of 17 1.0 TABLE OF CONTENTS TABLE OF CONTENTS... 2 System Overview... 3 Menu Options... 3 Application Access... 3 Patient Registration... 6 Schedule Appointment...
How to Navigate the AHIP Medicare Course
 How to Navigate the AHIP Medicare Course This document is for reference only. It is a guide provided to help answer any questions you may have about the AHIP site and its coursework. It is provided as
Salesforce Classic Guide for iphone
 Salesforce Classic Guide for iphone Version 35.0, Winter 16 @salesforcedocs Last updated: October 27, 2015 Copyright 2000 2015 salesforce.com, inc. All rights reserved. Salesforce is a registered trademark
5 Steps to Success with RevenueWell 1/6
 5 Steps to Success with RevenueWell 1/6 Step 1: Finish Set Up Now that you re up and running, please make sure to visit the Settings tab and review the below settings areas to keep your practice looking
Campus Community Guide October 2012
 Campus Community Guide October 2012 This document is intended for restricted use only. Infinite Campus asserts that this document contains proprietary information that would give our competitors undue
How to Navigate the AHIP Medicare Course. Subject Page #
 How to Navigate the AHIP Medicare Course Table of Contents Subject Page # Introduction 2 AHIP Registration Process 3 AHIP Login Process 8 Course Parts 14 Final Exam 17 Certificate and Transmit Score to
Ge#ng Started Guide New Users and Starter Edi/on
 Ge#ng Started Guide New Users and Starter Edi/on Goal Thank you for taking the time to use Viewpath as your project management solution. Our goal in providing this guide is to help streamline the process
LimeSurvey manual. Version; Authors: Carl DEVOS, Laurence Kohn. Page 1 of 48
 LimeSurvey manual Version; 2015-07-17 Authors: Carl DEVOS, Laurence Kohn Page 1 of 48 Contents Introduction...3 Login in LimeSurvey...4 From the creation of a survey to the analyses...5 1. Create a survey...6
Salesforce Classic Mobile Guide for iphone
 Salesforce Classic Mobile Guide for iphone Version 41.0, Winter 18 @salesforcedocs Last updated: November 30, 2017 Copyright 2000 2017 salesforce.com, inc. All rights reserved. Salesforce is a registered
Trustedchoice.com Agency Profile User Manual
 Trustedchoice.com Agency Profile User Manual User Manual Page 1 1. Getting started 1.1 Accessing the website Step Action 1 Open the internet browser on your computer. 2 Type http://www.projectcapmarketing.com
USER MANUAL. Calendar 365 TABLE OF CONTENTS. Version: 4.0
 USER MANUAL TABLE OF CONTENTS Introduction... 1 Benefits of Calendar 365... 1 Pre-requisites... 2 Installation... 2 Installation Steps... 2 Configuration Steps... 5 Calendar Management... 19 Calendar Activities...
ipcr Web Training Manual
 ipcr Web Training Manual Technical support: (800) 464-1740 Technical support email address: support@ipcrems.com [1] Table of Contents Accessing ipcr Web... 4 ipcr Web Sign In... 5 Persistent ipcr Web Features...
Introduction to Release 5.1 HTML5
 it just makes sense Summary We are thrilled to introduce you to the newest release of Cloud9, Release 5.1 HTML5! This document is designed to get you up and running without a pause in your daily routine.
User Guide. Chapter 6. Teacher Pages
 User Guide Chapter 6 s Table of Contents Introduction... 5 Tips for s... 6 Pitfalls... 7 Key Information... 8 I. How to add a... 8 II. How to Edit... 10 SharpSchool s WYSIWYG Editor... 11 Publish a...
PatientXpress. User Manual. Copyright HRDSQ, LLC
 PatientXpress User Manual Table of Contents 1. PatientXpress Layout...3 2. Birthday...4 3. Appointment Confirmation...6 4. Feedback...9 5. Contact......11 6. Setup.....16 7. Recalls.......19 8. Call Logs......21
ipad ereader User s Guide
 ipad ereader User s Guide MAY 2014 Table of Contents General information... 1 About Professional ebook... 1 About this Guide... 1 How does the Professional ebook System work?... 1 Where can I learn more
AlwaysAssist User Guide Vision Care Provider Portal Page 0
 AlwaysAssist User Guide Vision Care Provider Portal Page 0 AlwaysAssist User Guide Vision Care Provider Portal Table of Contents Entering the Site... 2 Provider Login... 2 Password Change... 3 Password
Provider Portal Administration Guide
 Provider Portal Administration Guide Revision Date: 7/22/2011 Table of Contents Table of Contents Introduction... 3 User Accounts Overview... 3 Tier Structure... 3 Security Roles... 4 Guide Conventions...
mycoresource.com Member User Guide
 mycoresource.com Member User Guide January 2017 i Table of Contents Portal Overview... 1 Create Account - Member... 2 Sign In... 8 Forgot Password or Username... 10 Home Page... 13 View My Expenses...
NextGen Patient Portal. User Guide.
 2.4.3 NextGen Patient Portal User Guide www.nextgen.com Copyright 2014-2017 QSI Management, LLC. All Rights Reserved. The registered trademarks listed at http://www.qsii.com/legal_notices.shtml are the
WCB Online A User Guide for Tiered Service Providers
 WCB Online User Guide for Tiered Service Providers WCB Online A User Guide for Tiered Service Providers A Nova Scotians safe and secure from workplace injury Table of Contents WCB Online 1 Profile Creation
Fulbright Distinguished Awards in Teaching Program Partner Organization Application Manual. Institute of International Education
 Fulbright Distinguished Awards in Teaching Program Partner Organization Application Manual Institute of International Education 2015-2016 Contents International Application...3 Overview...3 Login for Applicants...3
Contents.
 Firstbeat New Lifestyle Assessment User manual June 2016 1 Contents 1. System requirements... 3 2. Getting started... 4 2.1. Logging in... 4 2.2. Home page functions... 5 2.3. Firstbeat Uploader plugin
I. ATTORNEY ADMINISTRATION OVERVIEW...3. HELP CENTER...4 Documents Web Tutorials Online Seminar Technical Support INVITE A CLIENT TO MYCASEINFO...
 I. ATTORNEY ADMINISTRATION OVERVIEW...3 II. III. IV. HELP CENTER...4 Documents Web Tutorials Online Seminar Technical Support INVITE A CLIENT TO MYCASEINFO...7-8 CLIENT MANAGEMENT Sorting and Viewing Clients...8-9
Great Start to Quality STARS Quality Improvement Consultants User Manual STARS - Systematic Tiered Assessment and Rating Solution
 STARS Quality Improvement Consultants User Manual STARS - Systematic Tiered Assessment and Rating Solution Table of Contents 1 Great Start to Quality... 4 1.1 Welcome... 4 1.2 Introduction to the Great
It is recommended that you configure Internet Explorer to see the MLS as a trusted site.
 Tips for New Users Welcome to Rapattoni MLS! You now have access to the most advanced Internet-based multiple listing system on the market, with many exciting tools and features that will help you provide
Event Scheduling System 4.0 User Guide
 This document was produced by Voloper Creations Inc. 2000 2009 Voloper Creations Inc. All Rights Reserved Brands or product names are trademarks or registered trademarks of their respective holders. The
CLIENT DASHBOARD. With Cloud Communication Solution (C.C.S).
.") CLIENT DASHBOARD. CLIENT DASHBOARD Content CCS Presentation... 3 SMS... 3 Channels... 3 Requirement... 3 1.1 To read before connect... 4 1.2 Glossary of symbols... 5 1.3 CONNECTION... 6 1.3.1 Choice of
CLIENT DASHBOARD. CLIENT DASHBOARD Content CCS Presentation... 3 SMS... 3 Channels... 3 Requirement... 3 1.1 To read before connect... 4 1.2 Glossary of symbols... 5 1.3 CONNECTION... 6 1.3.1 Choice of
Test Information and Distribution Engine
 SC-Alt Test Information and Distribution Engine User Guide 2018 2019 Published January 14, 2019 Prepared by the American Institutes for Research Descriptions of the operation of the Test Information Distribution
Table of Contents RURO, Inc. All Rights Reserved
 Table of Contents ABOUT THIS GUIDE... 7 Purpose of this Guide...7 ACCESSING THE SYSTEM AS A CLIENT PORTAL USER... 7 Navigating the Client Portal...7 Creating and Submitting a New Requisition...8 Accepting
Open House Guide User Manual
 Open House Guide User Manual About this Service The Desert Sun offers a self-serve online ad placement platform for Realtors and home sellers to advertise open house listings. For Realtors, the system
MyCaseInfo Attorney User's Guide. A Best Case Bankruptcy Add-on Tool
 MyCaseInfo Attorney User's Guide A Best Case Bankruptcy Add-on Tool 2 Table of Contents I. ATTORNEY ADMINISTRATION OVERVIEW... 4 II. HELP CENTER... 5 Documents Web Tutorials Online Seminar Technical Support
Molina Agent User Guide
 Molina Agent User Guide REGISTERING and LOGGING IN Welcome to Sentinel Elite! Sentinel is accessible at www.sentinelelite.com. If you are new to Sentinel please register as a new agent. Once selected,
Create a free website in four steps
 LET S PUT OUR CITIES ON THE MAP Create a free website in four steps Step #1: Create an account Sign in to Google and StartLogic to create your free website.* Visit www.gybo.com/business U nder the section
Home Office Pro User Guide
 Home Office Pro User Guide Table of Contents HOME OFFICE PRO GETTING STARTED GUIDE MEMBERS EDITION... 3 SECTION I: THE GETTING STARTED CHECK LIST... 4 SECTION II: BUILD MY CONTACT LIST... 4 SECTION III:
How to Navigate the AHIP Medicare Course
 How to Navigate the AHIP Medicare Course This document is for reference only. It is a guide provided to help answer any questions you may have about the AHIP site and its coursework. It is provided as
People. Processes. Integrating Globally.
 People. Processes. Integrating Globally. Course: isupplier for Suppliers Table of Contents Table of Contents Course Introduction...4 L1: Vendor Registration... 6 Register for isupplier using SteelTrack
MillinPro+ USER GUIDE. A Complete Web-Based Platform for Managing Medical Bills and Insurance Claims
 MillinPro+ A Complete Web-Based Platform for Managing Medical Bills and Insurance Claims MILLIN ASSOCIATES, LLC USER GUIDE 2010-2012 Copyrights Reserved Millin Associates, LLC Document Change History Version
Administrator Manual
 Administrator Manual CURA Technical Support Email: cura_support@mindscope.com Phone: 1.888.322.2362 x 55 Administrator Manual Page 1 Table of Contents The Setup Module... 3 Skills... 3 Adding or Modifying
SECTION 5 USING STUDENT
 SECTION 5 USING STUDENT EMAIL 5. USING STUDENT EMAIL On enrolling at the University all students automatically have an email account created. Account creation depends on a student successfully enrolling
Logging In & Logging Out
 Logging In & Logging Out Logging In Logging into Genesis is very simple: 1. Go to the Web Access URL supplied with your district welcome packet. 2. Enter your Email Address in the Username field 3. Enter
Contents INDEX...83
 Email Guide 012511 Blackbaud NetCommunity 2011 Blackbaud, Inc. This publication, or any part thereof, may not be reproduced or transmitted in any form or by any means, electronic, or mechanical, including
OpenSpace provides some important benefits to you. These include:
 Cengage Education A member of Open Colleges Welcome to OpenSpace OpenSpace is our virtual campus. It is our online space for students, tutors and staff to interact. It provides you with a secure, interactive
KANSAS CITY LIFE GROUP BENEFITS DASHBOARD MANUAL
 KANSAS CITY LIFE GROUP BENEFITS DASHBOARD MANUAL What can you do with dashboards? Locate Value Added Services information Find a form View and pay bill View bill data View payment history Terminate members
RONA e-billing User Guide
 RONA e-billing Contractor Self-Service Portal User Guide RONA e-billing User Guide 2015-03-10 Table of Contents Welcome to RONA e-billing What is RONA e-billing?... i RONA e-billing system requirements...
Cresskill Public Schools Genesis Parent Portal User Guide
 Cresskill Public Schools Genesis Parent Portal User Guide Introduction The Genesis Parent/Student Portal tool is a safe, secure way to view your child s school record for the current school year. If your
What is New in MyChart? My Medical Record Health Preferences Settings Appointments and Visits Visits Schedule an Appointment Update Information
 What is New in MyChart? On August 26th, we will be upgrading and changing the look and feel to our MyChart patient portal site. We would like to make you aware of a few differences that you will see, when
Behavior Health Consumer Portal User Guide
 Behavior Health Consumer Portal User Guide Updated: 11-20-2016 Contents Introduction to the Consumer Portal... 3 Portal Navigation... 4 My Chart... 7 Portal setup and customization... 9 Widgets on your
Aerial iexchange Users Guide
 Aerial iexchange Users Guide 2014.1 How to Run the Util\\\ \user Disclaimer How to reach us Copyright Information contained in this document is subject to change without notice and does not present a commitment
InCommand. User s Guide
 InCommand User s Guide March 28, 2014 Table of Contents Introduction...7 Requirements...8 General Terms...9 General Concepts... 10 How to login to InCommand... 11 1. Management... 13 1.1 Summary... 13
ARUP Connect. ARUPLab.com
 ARUPLab.com User Manual January 2018 Table of Contents ARUP Connect Introduction... 1 Menu Options... 2 Visual Notifications... 3 Log In... 4 Log Out... 4 Feedback... 5 Help... 6 My Account Management...
Quick Reference Card for Timestamp Hourly View Employees
 Time & Attendance Quick Reference Card for Timestamp Hourly View Employees Navigator Version 7.0 The following instructions describe a typical Navigator configuration. The names and location of widgets
Parent Portal. User Manual
 Parent Portal User Manual GENESIS STUDENT INFORMATION SYSTEM PARENT PORTAL Introduction 3 Logging In & Logging Out 4 Student Summary Dashboard The Dashboard Selecting a Student Attendance Daily Attendance
ISUPPLIER PORTAL USER MANUAL ADERP VERSION 1.0
 ISUPPLIER PORTAL USER MANUAL ADERP VERSION 1.0 Contents Contents... i Oracle isupplier Portal Overview...1 Recommended Browsers and Settings...2 Advanced Settings...2 Turn-off pop-up blocker or Allow pop-up
Navigating Your Profile
 Part 1: Profile Login Navigating Your Profile 1. Start at the Greater Kansas City Community Foundation s home page, www.growyourgiving.org. Select Nonprofit Search. 2. This is the Nonprofit Search home
ADERP ISUPPLIER PORTAL USER MANUAL VERSION 1.2
 ADERP ISUPPLIER PORTAL USER MANUAL VERSION 1.2 Document Control Change Record 4 Date Author Version Change Reference 12-Dec-2016 DOF 1.0 08-Feb-2017 DOF 1.1 Updated with new URL links 23-Mar-2017 DOF 1.2
CJA evoucher. Attorney User Manual Release 5.2 October 2018
 CJA evoucher Attorney User Manual Release 5. October 08 CJA evoucher for Attorneys i Contents Nota Bene: Edit before using!... Introduction... Panel Management... Voucher & Authorization Request Submission...
LimeSurvey. You must have at least one group in each survey, even if you do not wish to divide the survey into multiple groups.
 LimeSurvey Basic Survey Elements A survey has three integral elements, each of which must exist: 1) A survey name 2) At least one group 3) At least one question Survey Name The survey name provides the
SupraWEB Guide for Agents. SupraWEB. Login for Real Estate Agents
 SupraWEB Guide for Agents SupraWEB Login for Real Estate Agents Table of Contents Overview...1 Login to SupraWEB...1 SupraWEB Home Page...1 Home Page Quick Links... 2 Menu Bar... 2 Update Code...3 Identify
Welcome to e-people 4. What is e-people? 4. Accessing e-people 4. AHS Accounts 4
 User Guide Table of contents Welcome to e-people 4 What is e-people? 4 Accessing e-people 4 AHS Email Accounts 4 How to Access Your AHS Email Account Externally 4 AHS Outlook Web Access Log Off 5 How to
SureClose Product Line
 SureClose Product Line Release Notes 3.7 June 21, 2013 SureClose 3.7 Release Notes June 2013 1 Table of Contents Overview... 4 Post-Installation Considerations... 4 Features and Functionality... 6 New
Customer Maintenance
 7 FTD Mercury makes maintaining customers easy. If you use house accounts for your customers, after setting up these accounts, the customer billing process is automated (using the Accounts Receivable Billing
KANSAS CITY LIFE GROUP BENEFITS DASHBOARD MANUAL
 KANSAS CITY LIFE GROUP BENEFITS DASHBOARD MANUAL What can you do with dashboards? Locate Value Added Services information Find a form View and pay bill View payment history Terminate members View and export
A Step-by-Step Guide to Survey Success
 A Step-by-Step Guide to Survey Success Table of Contents Why VerticalResponse?... 3 Quickstart Guide... 4 Step 1: Setup Your Account... 4 Step 2: Create Your Survey... 6 Step 3. Access Your Dashboard and
Blackboard 5 Level One Student Manual
 Blackboard 5 Level One Student Manual Blackboard, Inc. 1899 L Street NW 5 th Floor Washington DC 20036 Copyright 2000 by Blackboard Inc. All rights reserved. No part of the contents of this manual may
Top Marketer 8i User Guide
 Top Marketer 8i User Guide Top Producer Systems Phone Number: 1-800-830-8300 Email: tmsupport@topproducer.com Web Site: www.topproducer.com Document v TMK 3.0.2 Trademarks Information in this document