Chimpegration for The Raiser s Edge
|
|
|
- Brooke Matthews
- 5 years ago
- Views:
Transcription
1 Chimpegration for The Raiser s Edge Overview... 3 Chimpegration Versions... 3 Chimpegration Basic... 3 Chimpegration Professional... 3 The Raiser s Edge Versions... 3 Installation... 3 Set up... 4 Activation... 5 Settings... 6 Day to Day Usage... 8 Export... 8 Manage Campaign Results General Tab Record Matching Tab Process Tab Schedule Tab Loading and Saving Settings Import from MailChimp List tab Mapping Groups Settings Run Review Process the synch Synchronise The Raiser s Edge and MailChimp development@zeidman.info UK: US: (646)
2 1. List tab Mapping Groups Settings Business Settings Spouse Settings Run Review Process the synch Synchronise Relationships between The Raiser s Edge and MailChimp Removing Constituents from a Mailing List Automation Export Batch Reports List Management Chimpegration View (available to self-hosted users only) Chimpegration Scheduler (available to self-hosted users only) Chimpegration Settings Security Settings Lists (for Pro users only) Campaigns Campaign Activity (for Pro users only) Duplicate s (for Pro users only) Export Manage Campaign results Synch Profiles for Multiple Mailchimp Accounts (Pro users only) Resources Page 2
3 Overview Chimpegration for The Raiser s Edge integrates MailChimp with The Raiser s Edge. There are two versions of the application; Chimpegration Basic and Chimpegration Professional. In this guide all areas that are for Pro users only are highlighted with this background colour. Chimpegration Versions Chimpegration Basic Chimpegration Basic allows you to export records directly from RE into MailChimp for use in mass marketing and gives you the ability to bring your campaign results back into RE, including bounces and unsubscribes. Chimpegration Professional Chimpegration Professional in addition to the functionality of Chimpegration Basic, allows you to synchronise MailChimp and The Raiser s Edge to ensure data is as up to date and clean as possible, as well as view constituent mailing information from MailChimp directly from RE and remove subscribers from list who no longer appear in a query. The Raiser s Edge Versions In the release of RE 7.94 onwards some functionality and appearance of the application differs. This means that depending on which RE version you are running Chimpegration is applied differently which is clearly marked on the documentation. Installation For self-hosted/on premise users only. (If you are hosted by Blackbaud you should find Chimepgration in your plug-ins area ready for set-up). When you download Chimpegration from Zeidman Development and unzip the compressed file, there are three applications to be installed: Zeidman Development Universal Server Installer installed on the server and only run once in order to set up the server. This should be run by the administrator. Chimpegration client Installed wherever The Raiser s Edge is installed and the user sends bulk s. Chimpegration View installed wherever users need to view a constituent s MailChimp activity directly from the constituent record (Professional version only) Page 3
4 In general the installation is straightforward. In each case run the setup.exe file and follow the wizard. Please ensure that The Raiser s Edge and any other programmes are closed before starting your installation. FOR A NEW INSTALLATION ALWAYS START WITH THE SERVER INSTALL. FOR UPGRADES, UNLESS YOU ARE MOVING DATABASES, THERE IS NO NEED TO RUN THE SERVER INSTALL. Please download instruction for the Zeidman Development Universal Server Installer from our website: Set up The first time you use Chimpegration you will need to authenticate it with MailChimp before you can start using it. Firstly go to plug-ins and open Chimpegration. you will see the screen below (a different main menu is shown for versions under 4): Page 4

5 Activation You need to first click on Activate Application. This will prompt you to enter your ZeidZone username and password. If you don t already have an account you can create one here Page 5

6 Activation will register your copy of Chimpegration with Zeidman Development. The process sends your organisation name and Raiser s Edge serial number to our secure servers. This generates a registration code that is unique to your installation. Settings In order for Chimpegration to talk to MailChimp it needs to know your API key. Click on Settings and enter your MailChimp API key. To get your API key click on Where do I get my API Key from? link, this will take you directly to your MailChimp account settings (you will need to login to MailChimp), copy your API key and paste it here. Click ok. Page 6


7 For self-hosted/on premise users: The first time that you process a campaign or synchronise with MailChimp you may be prompted for the connection details that you created in the server setup as shown below: Page 7
8 Enter the SQL server credentials that you set up on the server in order to continue. Note that in order to use Chimpegration View (Professional version only) these settings need to have been entered previously). Note that you can also set these values by pressing the ZD logo on the main Chimpegration menu to bring up the About box. Under the advanced menu select Setup SQL Credentials to bring up the above screen. You are now ready to start using Chimpegration. Day to Day Usage Export Available for both Basic and Pro users. Additional features available to Pro users are highlighted. 1. Create list in MailChimp 2. Create query or export of users to go into list 3. Add to MailChimp groups 4. For Pro Users only - Working with relationships records 5. Choose how to update list 6. Map RE fields to MailChimp merge fields 7. Process 1. Create list in MailChimp To export data from RE into MailChimp you must first create a list in MailChimp, create any merge fields you want to export to and ensure they are in the correct format. 2. Create query or export of users to go into list Go into the plug-in and select Export list to MailChimp. Then in RE you can create a query or export of users who you wish to export to MailChimp, be Page 8
9 sure to include any fields you wish to use in the mailing in the output criteria. These fields will map to your MailChimp list s merge variables. You will need to ensure there are no blank address fields in your query, the best way to do this is to use the preferred address field in the output. 3. Add to MailChimp Groups You can also set up groups in MailChimp into which you can add your list of users. Groups in MailChimp are used to segment your constituents so that you are able to send them different campaigns. These may correspond to how you use constituent codes or attributes. Select your MailChimp list and any groups the exported users should be added to. Some people may have more than one value in a group e.g. Interests: Golf and Tennis, if you are adding new values to existing groups select Add to any existing groups. You may have a group where only one value is allowed, e.g. current donor?: yes/no, if you are updating these groups select: Replace existing groups with these. 4. For Pro Users only - Working with relationships records Pro users can export both constituent and non-constituent records into a list, you must set-up a merge field distinguishing between these types of records in MailChimp in advance and map the type to that field. You should also use the import ID in the ID merge field for relationships records. If your list contains relationships you will need to select whether to add these records to MailChimp as constituents or relationships. Page 9

10 5. Choose how to update list Page 10

11 You can choose whether to only add new s or add new addresses and update existing records. The first option will not update the values of constituents already in MailChimp. Page 11
12 Pro users can also choose how to handle constituents who share an address. The first option will select the constituent data containing the attribute specified in your settings. If none of the duplicate records contain this attribute an exception will be raised and the constituents will be written to the control report and not exported as part of the list. The second option will simply choose one of those records to export at random. This might be preferable for generic mailing lists where no personalisation is used. This is the only option for those using Chimpegration Basic. 6. Map RE fields to MailChimp merge fields Next you need to map the output fields from your query or export to the fields in MailChimp. You can set up any number of merge fields in MailChimp before your import to accommodate your RE fields. You must include an address or the export will not run as this is required by MailChimp. For Pro users it is necessary to map the constituent ID in order to use the synchronisation module, it will also offer you much better accuracy of matching when managing campaign results. Page 12

13 You can save mapping files you use regularly and load them here to save you time. Page 13
14 7. Process Once all your fields are mapped click on Run Now. You will now be able to see your constituents in your MailChimp list and them as usual. Manage Campaign Results Once you have run an campaign from MailChimp you can update records in RE based on the outcome of the mailing. The manage campaign section contains four areas: 1. General 2. Record Matching 3. Process 4. Scheduler Page 14
15 Page 15
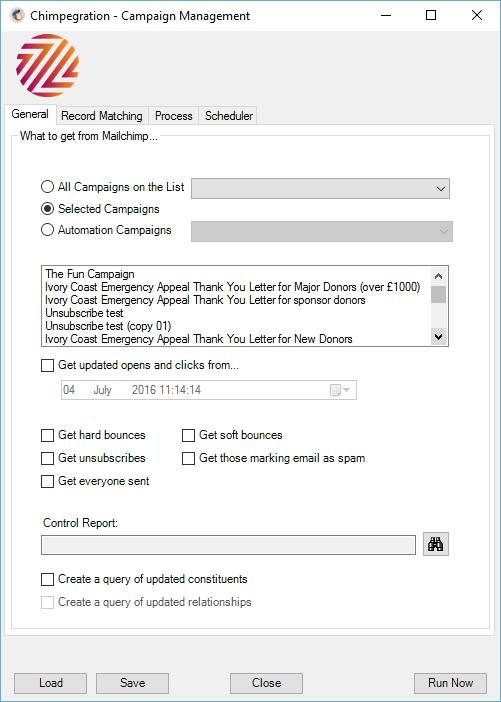
16 1. General Tab Select Campaign to Process All users Users of the Basic version are only able to select a single campaign at a time to process using the Selected Campaigns button. Select the campaign you wish to manage from the list. Pro Users Pro users may select to either pull all the campaigns in a list using the All Campaigns on the List button and selecting the list from the dropdown or may select an automation campaign (see Automation Campaigns later in this guide) You may optionally select when to pull changes from. This is useful for automation campaigns so that you need not retrieve the changes for every single update but can adjust the date. It is also useful for regular campaigns where you know that there have been clicks and opens since you last ran the campaign. By selecting a date you will only retrieve clicks and opens since that date and will update any actions that have already been added with the new clicks and opens. Due to a MailChimp API limitation, if you select a date, you will not be able to retrieve soft bounces or those marking the as spam. Select the type of s to process. Choose from; Hard Bounces Soft Bounces Unsubscribes Those marking as spam Everyone Sent. Everyone Sent will give you a list of all those people who actually received your , so everyone on that list excluding the hard and soft bounces. Create a control report for any errors in the process, you can also choose to create a query of updated records. Page 16
17 Ignore previously processed errors. Where the campaign management process has run previously but failed it is possible to carry on from where you left off. There are a number of reason why the process may have failed but this is most commonly occurs with large volumes are data on the Blackbaud hosted environment. Automation Campaigns (Professional) If you are running an automation campaign then you are given the option to retrieve all the addresses from the beginning of the campaign or by selecting a date, you are able to retrieve those from that date. This is shown below. Note that the text on the date from check box and the retrieve all check box changes when the campaign is an automation campaign. Page 17

18 2. Record Matching Tab Basic Users If you have the Basic version users will be matched on address and processed against all records by default Page 18
19 Professional Edition Choose how to identify your constituents in RE, you can either match on address or Cons ID. If matching on ID make sure you match to the same field you exported the ConsID to. If matching on address you need to decide how to deal with constituents who share an address. The first option will add the process only to the record identified as primary (as per your settings) or you can process against all records using that address. This might be useful for unsubscribes, bounces etc. Page 19

20 Note that the text in the image above will vary depending on the duplication criteria you have set up in settings. Page 20
21 3. Process Tab All users You can now choose how the records should be processed, you can choose one or more of the following: Change the type Mark the as do not contact Delete the address Globally add an action (Pro users can also choose to add opens and clicks to the action attributes these must be defined in advance in the settings menu), constituent attribute, solicit code or appeal to the constituent record. Globally add a relationship attribute (if you are processing relationship records) Some of these actions will be more relevant to the processing of s. For example for bounced s you may want to delete the address or change the type to Inactive . Whereas if you select to process all s that were sent, you may wish to add an action or an appeal to those constituents. Functionality for RE 7.93 and below vs 7.94 and above Page 21

22 Once you have run the process you can repeat it as many times as you need to, performing different actions for different processes. Page 22

23 The above image relates to RE 7.94 where the change to if this type is already in use field has been removed. You can also see that it is possible to set an as inactive, whereas in RE 7.93 this function isn t available. Page 23
 are shown.")
24 From v4.0 it is now possible to have different processes for different selected campaigns. For example, you may want to add one attribute for one campaign but a different one for another campaign. The functionality is shown for 7.94 and above. By default the All campaigns (or All workflow s ) are shown. You are able to select individual campaigns or s as shown below: Adding Attributes On pressing the attribute button you will be given the option of adding an attribute template that will be added to Raiser s Edge. This is shown below. There are two views: When the attribute is only allowed once on the constituent record, and a match to an existing attribute is found, it is only possible to update the attribute or otherwise ignore the changes. Page 24

25 When multiple attributes of the same type are allowed for the selected category then there are three options if the attribute is found according to the match settings; 1. Ignore whether or not there is an existing match and add a new attribute anyway 2. Only add a new attribute if no match is found, otherwise update the found attribute with the new values. 3. If a match is found then leave it and do not update the values. Otherwise add a new attribute. Page 25

26 In either case you are given the option to match on the attribute category as well as optionally one or more of attribute description, date or comment. Adding Appeals Appeals are added in exactly the same way as attribute with the exception that there is no such concept of an appeal that cannot appear more than once on the appeal tab. The add box is shown below with the definitions of each option the same as for attributes. Page 26

27 Adding Consent From version 7.96 patch 8 of Raiser s Edge you are also able to add consent records. This can be used for any scenario but perhaps most commonly when a constituent unsubcribes from your list you may want to add a corresponding opt out in RE as shown below. Page 27


28 The dropdowns beneath the consent and privacy boxes allow you to save previously used values so that they can be retrieved more easily. Select the option you need to insert a previously saved value, update a previously saved value with the current value, add a new value or delete a previous value as shown below Page 28
29 As consent records cannot be removed or updated once added you are able to determine whether or not a similar consent record already exists and if so whether nor not to add this one. This is based on the selected checkboxes at the bottom of the screen. 4. Schedule Tab The schedule tab offers settings that are particular useful when scheduling the campaign management process. Note that they will still function even if the process is not being scheduled and this is a way of overwriting the previously saved template dates rather than needing to update the values. The settings allow you to specify that instead of using the dates that have been set up, the application should use the current date. This is useful so that when running a scheduled update, you do not need to update the dates each time you run it. These settings are only enabled if you have selected to process the respective area. Page 29

30 5. Loading and Saving Settings Page 30
31 It is possible to save the campaign management settings to a file which can then be loaded again whenever you want to run the same process. This reduces the setup time considerably. Import from MailChimp New to version 4.0, this allows you to import new and existing data from MailChimp into Raiser s Edge. If you are familiar with the synchronisation module then import work in a similar way but in only one direction. 1. List selection 2. Mapping synch fields 3. Working with groups 4. Settings 5. Run/processing options 6. Review 7. Process the synch 8. Summary report 1. List tab When you first choose to import from MailChimp you will need to select a MailChimp list to work with. You can choose to only import a segment of your list, this can be useful if you have a very large list and only want to bring over changes to certain records, or if your segmentation relates to groups or relationships. Finally you are able to create queries based on the constituents that have been created, updated or existing constituent that you have chosen to skip. Page 31

32 2. Mapping Map across the fields which should be imported. Note that not all fields in The Raiser s Edge can be imported into in a meaningful way so these have been removed from the fields available. You are also able to specify whether or not a blank value should overwrite a populated value. By default the blank will not overwrite the populated value but it may be that this is required in which case you can set this on a field by field basis. Note that the line will still appear in the review screen showing a blank but that it will not actually overwrite the populated value. Page 32
33 3. Groups It is possible to import MailChimp groups to Raiser s Edge attributes, solicit codes or constituent codes. Until the action to take has been set up, it will be displayed as the entry below i.e. the group will not be synchronised. Page 33
34 By pressing the edit button you are given a number of options as to how you synchronise the group with The Raiser s Edge. Page 34
35 In each case it is the value selected in the MailChimp group that is imported onto The Raiser s Edge. Ignore this will not synchronise between the two platforms. Constituent Codes The MailChimp value corresponds to a constituent code which will be populated in RE. Page 35
36 Solicit codes - The MailChimp value corresponds to a solicit code which will be populated in RE. A Single Attribute A MailChimp value will create an attribute with this category. If multiple MailChimp group values are selected a new attribute will be added but with the same category and differing values. If the MailChimp group is set up as a radio button or a single dropdown then the list of attributes will be those that are marked as Allow Only 1 per Record in RE. If the MailChimp group is set up as checkboxes then the list of attributes will be those that are not marked as Allow Only 1 per Record. If the MailChimp group is set up as hidden from the sign up page then both types of attributes will be listed. Multiple Attributes A MailChimp value will create an attribute with the same category name as the group value. You specify the description which should be valid for the type of attribute category being used. If a value is to be removed from RE because it no longer exists on MailChimp, you are given the option to remove it, or in some cases, add a date value to indicate when that group membership ended or in the case of the multiple attribute categories you can give it a specific value as shown in the screenshot above. 4. Settings To ensure the data being imported into RE has your business rules applied to it you can use the following settings: Page 36
 Either way the result will be added to the control report")
37 Code Tables If data has been added to MailChimp that does not currently exist in RE you can choose to Ignore that particular field Ignore the entire record Attempt to add the code to the code table (assuming you have the correct permissions) Either way the result will be added to the control report Page 37
38 Addresses (7.94 and above) In version 7.94 and above it is possible to mark addresses as primary. These settings give you the option to decide whether an incoming address should be marked as primary or not. In version 7.94 and above it is possible to have more than one of the same type. These settings allow you to decide whether an incoming address should be added to the list of existing s or if it should overwrite and address with the same type. Page 38

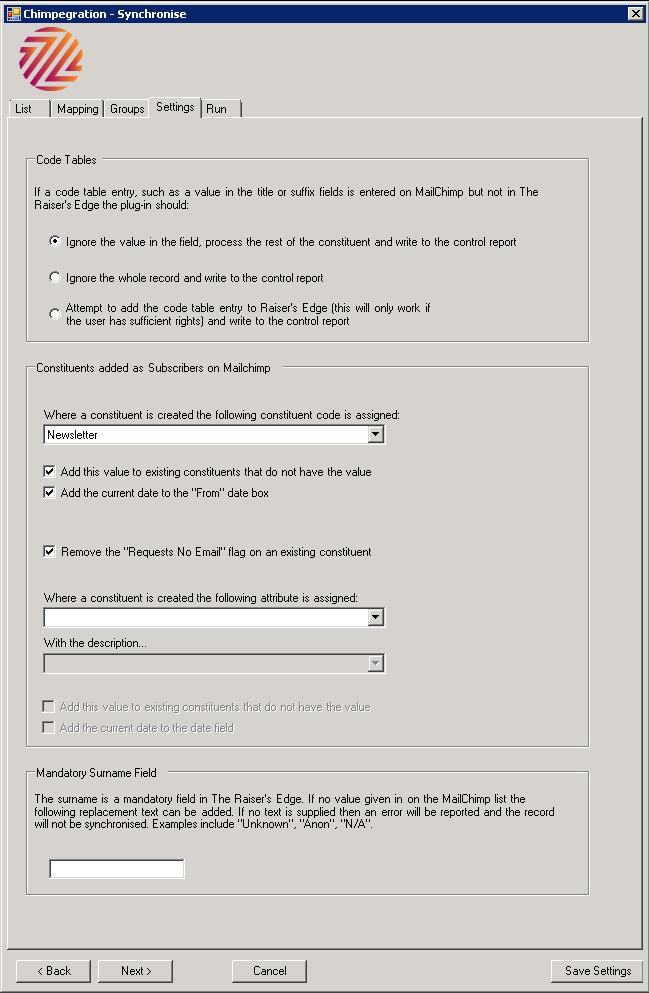
39 Constituents added as Subscribers When adding new users to RE from MailChimp you may wish to add a constituent code to the record, you can choose which one here. You can also choose to add that code to existing constituents that do not already have the code and add a start date too. You are also able to add a constituent attribute to MailChimp users. This can be any type attribute type and the description box will adjust accordingly. Page 39
40 Finally, by selecting the removal of the Request no flag on the constituent bio 1 tab, any record coming from MailChimp will have this flag unset. Mandatory Last Name Field To ensure the import runs smoothly you can choose standard text to add to the last name field on the constituent record. User-defined Mandatory Fields If you have any user-defined manual fields these will appear as separate boxes beneath this one and you can select default text to fill those areas too. The example below shows that this organisation s Raiser s Edge have made the primary addressee and primary salutation fields mandatory. Chimpegration must be supplied with a default value in order that a new record can be saved. Page 40

41 5. Run Page 41

42 Here you can select when the import should run from. If it has never previously been run (as shown above) all changes will be imported. If it has previously been run then this option will show the date of the last import. You can also choose to import records from a set date too. Processing the Synchronisation Once you are happy with the settings press the Run Now button to proceed. This will retrieve all the records that have been added to or updated on MailChimp and will display the records for review. Page 42

43 6. Review The review screen shows the records as specified in your set up (as above). You can choose to process using the action to take specified on the screen, choose to process in a different way or skip and update later. Examples There are a number of different permutations of review records. You may be told that there is an error in importing the data in which case the error will be shown (and also sent to the control report). In the example below the record is not on Raiser s Edge and will be imported as a new record there. Page 43

44 It is possible to adjust the action to take so that if you are not happy with a proposed change you can set the whole record so that it will not be imported or you can skip individual field changes by setting the action to take to None. The group import grid will show below the main import grid. It will show you which groups it is importing into Raiser s Edge, it will also explain how the import will work as there may be more than one area affected. 7. Process the synch Once you are happy with all the records; click process all, you will see a summary screen of the import. Your control report will contain the details of this import and show any records skipped and the reasons why. The following modules are available for Chimpegration Professional users only Synchronise The Raiser s Edge and MailChimp This allows for a full two way synchronisation between RE and MailChimp, pushing data both ways to ensure you have no data silos or out-of-date information. 1. List selection 2. Mapping synch fields 3. Working with groups 4. Settings 5. Run/processing options 6. Review Page 44
45 7. Process the synch 8. Summary report 1. List tab When you first choose to synchronise The Raiser s Edge and MailChimp you will need to select a MailChimp list to work with. Choose the query to synchronise the list with and create a control report for any errors. The query should include all the constituents that should be synchronised between the two systems. If the constituent is not in the query then changes in The Raiser s Edge will not be transferred to MailChimp. Anybody who signs up on MailChimp will be brought over to The Raiser s Edge. However if they then to do not fulfil the query criteria they will not be included in subsequent synchronisations. To ensure that they are included add a common denominator to the query such as a constituent code that they will be given. You can also choose to only synchronise a segment of your list, this can be useful if you have a very large list and only want to bring over changes to certain records, or if your segmentation relates to groups or relationships. Finally you are able to create queries based on the constituents that have been created, updated or existing constituent that you have chosen to skip. Page 45

46 2. Mapping Map across the fields which should be synchronised, as you did in the export. Note that not all fields in The Raiser s Edge can be synchronised in a meaningful way so these have been removed from the fields available. You are also able to specify whether or not a blank value should overwrite a populated value. By default the blank will not overwrite the populated value but it may be that this is required in which case you can set this on a field by field basis. Note that the line will still appear in the review screen showing a blank but that it will not actually overwrite the populated value. Page 46

47 3. Groups It is possible to synchronise MailChimp groups to Raiser s Edge attributes, solicit codes or constituent codes. Until an action has been set up all group actions will show as the last entry below i.e. the group will not be synchronised. Page 47

48 By pressing the edit button you are given a number of options as to how you synchronise the group with The Raiser s Edge. Page 48

49 In each case it is the value selected in the MailChimp group that is synchronised with The Raiser s Edge. Ignore this will not synchronise between the two platforms. Constituent Codes The MailChimp value corresponds to a constituent code which will be populated in RE or vice versa. Solicit codes - The MailChimp value corresponds to a solicit code which will be populated in RE or vice versa. Page 49
50 A Single Attribute A MailChimp value will create an attribute with this category. If multiple MailChimp group values are selected a new attribute will be added but with the same category and differing values. If the MailChimp group is set up as a radio button or a single dropdown then the list of attributes will be those that are marked as Allow Only 1 per Record in RE. If the MailChimp group is set up as checkboxes then the list of attributes will be those that are not marked as Allow Only 1 per Record. If the MailChimp group is set up as hidden from the sign up page then both types of attributes will be listed. Multiple Attributes A MailChimp value will create an attribute with the same category name as the group value. You specify the description which should be valid for the type of attribute category being used. Consent Records From RE 7.96 patch 8 it is now possible to synchronise consent records and solicit codes (as the outcome of the consent records) with MailChimp. This is explained fully in this article 1 If a value is to be removed from RE because it no longer exists on MailChimp, you are given the option to remove it, or in some cases, add a date value to indicate when that group membership ended or in the case of the multiple attribute categories you can give it a specific value as shown in the screenshot above. 4. Settings To ensure the data being synched back into RE has your business rules applied to it you can use the following settings: 7.93 and below: 1 Page 50
51 Page 51

52 7.94 and above Page 52
 Either way the result will be added to the control report")
53 Code Tables If data has been added to MailChimp that does not currently exist in RE you can choose to Ignore that particular field Ignore the entire record Attempt to add the code to the code table (assuming you have the correct permissions) Either way the result will be added to the control report Page 53

54 Addresses (7.94 and above) In version 7.94 and above it is possible to mark addresses as primary. These settings give you the option to decide whether an incoming address should be marked as primary or not. In version 7.94 and above it is possible to have more than one of the same type. These settings allow you to decide whether an incoming address should be added to the list of existing s or if it should overwrite and address with the same type. Page 54
55 Constituent s added as Subscribers When adding new users to RE from MailChimp you may wish to add a constituent code to the record, you can choose which one here. You can also choose to add that code to existing constituents that do not already have the code and add a start date too. We have enabled you add a constituent attribute to MailChimp users. This can be any type attribute type and the description box will adjust accordingly. Finally, by selecting the removal of the Request no flag on the constituent bio 1 tab, any record coming from MailChimp will have this flag unset. Mandatory Last Name Field To ensure the synchronisation runs smoothly you can choose standard text to add to the last name field on the constituent record. If you have any user-defined manual fields these will appear as separate boxes beneath this one and you can select default text to fill those areas too. Page 55

56 Address Back Up Settings Here you can choose to back up the existing RE preferred address when you add a new one from MailChimp. Select which address lines to back up and the address type. You can also choose to remove the send mail flag for the backed up address. This way you ll never lose a previous address. The way this works changed from version 4.4. Previously the backup would simply retain the address and remove its preferred status. It would create a new blank address to populate. From 4.4 the backup makes a copy of the address. One copy would remain as the preferred address and the other saved as an alternate. Any incoming field values Page 56

57 would then overwrite the preferred copy. See this article for more information: 5. Business Settings If you have any business fields mapped then this tab will appear. Page 57
58 Business Creation You can decide whether or not business relationships are created with a nonconstituent relationship to the organisation or whether Chimpegration attempts to look up the organisation in your system. If it does not find a constituent with the same organisation name it will create a non-constituent relationship instead. Business Relationships and Reciprocal Relationship values You can decide how the relationship and reciprocal relationship values are set up. Mandatory Organization Name To ensure the synchronisation runs smoothly you can choose standard text to add to the organization name field on the constituent record. If you have not mapped a merge variable to organization name but have mapped other business fields then this value is required in order to create a new organization relationship record in The Raiser s Edge Mandatory fields (not shown) If there are any user defined mandatory organisation relationship fields (including mandatory address fields) then these will be prompted for at the bottom of this tab. Page 58

59 6. Spouse Settings Spouse Relationships and Reciprocal Relationship values You can decide how the relationship and reciprocal relationship values are set up. These are based on the gender. If you have consistently set the gender for constituents and their spouses then you are able to set a value for dependant on the Page 59
60 gender. If constituents have been set consistently but not their spouse relationships Chimpegration will assume the relationship has the opposite gender. You are of course able to set gender neutral relationship types such as Spouse or Partner. Mandatory Spouse Last Name To ensure the synchronisation runs smoothly you can choose standard text to add to the spouse last name field on the constituent record. If you have not mapped a merge variable to spouse last name but have mapped other spouse fields then this value is required in order to create a new individual relationship record in The Raiser s Edge Mandatory fields (not shown) If there are any user defined mandatory individual relationship fields (including mandatory address fields) then these will be prompted for at the bottom of this tab. Page 60
 all changes will be synchronised.")
61 7. Run Date to synchronise data from Here you can select when the synchronisation should run from. If it has never previously been run (as shown above) all changes will be synchronised. If it has previously been run then this option will show the date of the last synchronisation. You can also choose to synchronise records from a set date too. Page 61
62 You can choose which data you want to review and how conflicts will be handled. Ordinarily you will want to review all records, unless you have a very large list which you are happy to go into RE, excepting conflicts. Before you process the records you can choose to save your settings for the next time you run your synchronisation. Processing the Synchronisation Once you are happy with the settings press the Run Now button to proceed. This will retrieve all the records that have been added to or updated on MailChimp. It will do the same for The Raiser s Edge. It will then display the records for review. 8. Review The review screen shows the records as specified in your set up (as above). You can choose to process using the action to take specified on the screen, choose to process in a different way or skip and update later. Examples Where there is an error in the processing the specific record (as shown in the figure below) you will be forced to skip that record. The explanation is shown in the top right box and will be added to the control report. To add your own notes to the record (which are saved in the control report) enter them in the box beneath. In other cases you will be able to decide which direction the synchronisation will flow. If the record is new to The Raiser s Edge it will always go to MailChimp (unless you decide to skip it) and vice versa. Note that the constituent ID for new records will always go to MailChimp. If you do not want a specific field level change to take place then set the action to take to None. You can change the direction of information flow at an individual field level either way using the dropdown in the centre. Page 62

63 In the example above the record does not exist on the Raiser s Edge and consequently all fields will be pushed to MailChimp. By default any fields more recently updated on one side will go over to the other. In some cases this is fine. In other areas we may not want to accept the defaults. Where a record has been changed both on MailChimp and on The Raiser s Edge it will be shown as in conflict. Before proceeding you will need to decide how to transfer the data (or set this up in the rules on the Run tab of the previous settings screen) The group synch will show you which groups it is synching and in which direction, it will also explain how the synch will work as there may be more than one area affected. Page 63

64 9. Process the synch Once you are happy with all the records; click process all, you will see a summary screen of the synch. Your control report will contain the details of this synch and show any records skipped and the reasons why. Synchronise Relationships between The Raiser s Edge and MailChimp This process is almost identical to the synch process listed above, but when selecting the list only those configured for use with relationships are shown. There are a few other differences to the regular synchronisation: Remember to map the relationship ImportID to the ID field. Only non-constituent relationships are synchronised. If the import id points to a constituent relationship it will not be synchronised and instead you should use the regular synchronisation. No new records will be added to The Raiser s Edge. This should be done in the regular synchronisation. The reason for this is that there is no way of Chimpegration knowing which constituent record the new relationship record should be associated with. Removing Constituents from a Mailing List Select Remove Subscribers from the main menu, select the MailChimp list (and if this list contains relationships choose between constituent or relationship records) from which you wish to remove subscribers, map the ConsID to the appropriate Page 64
65 merge field. IMPORTANT NOTE: if you map this incorrectly Chimpegration will attempt to delete all records, please check this carefully before proceeding. If you choose to match on please select the type from the list on the left and move to the right. You can select more than one. You can also choose to check only the preferred address for addresses. Choose the query to use. This query should contain the constituents you want to keep on the MailChimp list. If they are not in the query then they will be removed. Select whether to delete (remove from list, you can re-add this person at any time) or unsubscribe (only the constituent will be able to re-add themselves to this list, manually) the users. Finally it is also possible to remove subscribers from a group on the list or from individual group items on that list. Note that by comparison removing from a group will take a lot longer to process than removing from the list as a whole Finally if you can select that if subscribers are not in The Raiser s Edge they should not be removed. This may be the case for newly subscribed individuals who have yet to be brought over to RE. Page 65

66 Click delete to start processing. The application will let you know how many constituents will be removed from the list. Page 66


67 Click Show Details to see exactly who is going to be removed. You are also able to remove them from this list of those to be removed by unchecking the box next to their address. Click yes and your constituents have now been removed. Page 67

68 Automation Export Automation Export is new for version 4.0 of Chimpegration. MailChimp automations allow you to set up rules that trigger an automation workflow for an individual subscriber. The workflow can send a number of s and vary those s depending on the user interaction. Normally a subscriber would need to fulfil the criteria that you set up in MailChimp but with Automation Export you are able to push a subscriber or query of subscribers into a workflow whether or not they fulfil the MailChimp criteria. Page 68
69 On the Automation Export screen select an automation workflow followed by an within that workflow. You may want to select the first in the workflow but you can also select subsequent s too. Select a query of constituents to export. Chimpegration will attempt to push the address to the workflow it finds based on the priority order that you give. When you press the run now button the process will export the constituents to the workflow. The control report will appear in the reports area of Chimpegration. Note The constituents should already be a subscriber on your MailChimp list otherwise they cannot join a workflow. If necessary export new subscribers to MailChimp first using the regular export functionality. Batch Reports With version 3 of the MailChimp API a new method was introduced to send large data sets to MailChimp. This affects the export and the remove subscribers modules. Instead of sending the data and waiting for a response to see determine any errors, MailChimp now sends the response asynchronously, i.e. the list of errors are sent at some point after the event. In theory what this means is that the actual processing can be quicker allowing you to get on with other things. Chimpegration needs to tie together any errors that were made before the records were sent to MailChimp and errors from MailChimp. From version 4.0 the control reports for export, remove records and export to automation are stored in the Reports area of Chimpegration. These are available for 7 days but can be saved locally as previously Not only will you see the status of the most recent run, you will also see the last 7 days worth of reports too. As shown below: Page 69

70 If you select a row you are then able to save the data to an output file. By ticking the Open file automatically on saving tickbox the file will open up in Excel after saving. List Management List management enables you to perform simple tasks connected directly to a list. You are able to add a consent when someone subscribes or when someone unsubscribes from a list. You are also able to capture their MailChimp star rating and store it as an attribute on their constituent record. The module is relatively simple. Page 70

71 Select the MailChimp list to retrieve data from Select the merge field that stores the constituent id. Records are looked up by constituent id unless there is no value. In this case they are looked by address. Select a control report for any errors. Next you should select one of three processes. For subscribes and unsubscribes you can add a consent record For the star ratings you can add an attribute. The consent date is given the date of the subscribe or unsubscribe. Page 71

72 Chimpegration View (available to self-hosted users only) Chimpegration View allows you to view a constituents MailChimp data directly from the Raiser s Edge constituent record. You can see their details, mailings sent and any actions taken on those mailings, such as opening the or clicking a link. From the constituent record go to the macro button and select View.On.MailChimp This constituent has two addresses and this will be reflected in the Chimpegration View. The activity for the constituent is dependent on their address and the list that they are on. Page 72
73 Note: if you have users sharing addresses on RE Chimpegration View will show activity for that address which may not be for this constituent depending on your settings for primary address holder. Chimpegration Scheduler (available to self-hosted users only) The Chimpegration Scheduler module allows users to run the Campaign Management module according to schedule. Page 73

74 Unfortunately this module is not available to organisations using Chimpegration on the Blackbaud Hosting environment. The module is a paid for addition to Chimpegration Professional. Please see the Chimpegration Schedule user guide available from our website for more information. Chimpegration Settings Security Settings Here you can choose to lock down certain areas of functionality for non-supervisor users. Just check the radio boxes next to the appropriate area to restrict access. Page 74
75 Lists (for Pro users only) This allows you to select a list which contains both constituent and non-constituent relationships and map the merge field that records the type of record it is. In order to be able to synchronise both constituents and non-constituent relationships Chimpegration needs to know what type of record each subscriber in MailChimp is. You will need to set up a merge field in the list which designates this value. The merge field should be a dropdown merge field with a choice of two values e.g. constituents and relationships. This is shown below: In the example above we see the Record Type field has two options of Constituent and Relationship. In our list settings below we have selected our MailChimp list Relationships, we have ticked that it contains both constituents and relationships, that we are using the Record Type merge field to determine whether the subscriber is a constituent or a relationship and we have selected which options represent which record type. Page 75

76 Note that as with the regular synchronisation the ID field is still used to store the ID of both record types but for relationships it will be the import ID rather than the constituent id. Campaigns In order to keep your dropdown list in the Manage Campaigns section clean you can archive processed campaigns here by simply selecting them and moving them into the Archived Campaigns box using the arrow buttons. If you need to process a campaign after archiving just move it back into active campaigns and it will now appear in the dropdown menu again. Note that this only affects Chimpegration and does not impact on MailChimp itself. You can also change the order in which campaigns appear in Chimpegration. This makes it much easier to find a campaign in Campaign Management. Page 76

77 Campaign Activity (for Pro users only) Here you can select the action attributes you wish to use to track information on opens and clicks, this involves prior set-up on RE in the attributes actions text area of the Config. In order to be able to update campaign actions rather than just create a new one, you should specify an attribute to store the MailChimp campaign id. Page 77
 Whilst MailChimp does not allow multiple records to share an email address you may have numerous contacts in RE who do share an email address, perhaps a family")
78 You are also able to store the campaign name as a notepad2. In this case you will need to supply the notepad type. Duplicate s (for Pro users only) Whilst MailChimp does not allow multiple records to share an address you may have numerous contacts in RE who do share an address, perhaps a family address or organisational main address. This contact will then be used for all 2 This is the only location on the action that shows on the main constituent action grid as well as being free text within the action. This is far from an idea solution but it does make it very clear as to which MailChimp campaign the action refers to especially when a constituent has multiple campaigns on their record. Page 78

79 Chimpegration action where both contacts appear. This is a default setting and it will work differently depending on the area you are processing and some areas contain overwrites for this in the processing. RE7.93 and below Page 79

80 RE7.94 and above As there is no requirement in RE for address to be unique but there is such a requirement in MailChimp these settings allow you to determine which constituent should be regarded as the main contact person for a specific . In all versions you can specify a constituent attribute or a constituent code. In 7.93 and below you can specify an address attribute. In 7.94 and above you can specify the constituent where the address is marked as primary. These can settings can be overwritten in the respective modules of Chimpegration. The following describes how they are used in these modules. Page 80
81 Export If two constituents with the same address appear in the query for export Chimpegration will select the one containing the attribute specified here. You can overwrite this in the export section for certain lists if you prefer. Manage Campaign results Here you have the option to process the records as per the defaults set above or to process against all records. However if you select to use Cons ID to identify matches this will ignore these settings. Synch Here the ConsID is used to identify constituents by default. However for new users signing up (who may already be in the database) it will use the address and the criteria above to try and match the constituent. Profiles for Multiple Mailchimp Accounts (Pro users only) Profiles allow one instance of Raiser s Edge to be used by multiple groups of MailChimp users. Most obviously this would be to allow one instance of RE to be used by more than one MailChimp account but it could also be used by two groups using the same instance of RE and the same MailChimp account but have different setting requirements. Access the manage profile area from the Z logo about box as shown below Page 81

82 When you bring this up for the first time there will be a default profile but you are able to add new profiles to the application as shown below. As long as a profile has not been assigned to a user it is also possible to change the name of the profile so that if you do not want to use default you are able to change it. Page 82


83 The second tab allows you to assign one or more profiles to a user. You do not need to restrict the profiles by user. In which case all users will have access to all profiles. Page 83

84 From the dropdowns select the profile name and the user to assign to that profile. There should be at least one user assigned to each profile but multiple can be assigned too. On starting up Chimpegration, if the profiles are not restricted or if a user has access to more than one profile then they will need to select from the dropdown shown below: If you have not enabled profiles or a user only has access to one profile then they will simply connect directly to that profile and bypass the above screen. If a user has access to multiple profiles and has selected one of them, in Chimpegration they will see a label showing them which they are currently working with. Page 84

85 Each profile has unique settings so that they can be configured differently to the others if need be. Page 85
Audit Trail for The Raiser s Edge
 ATP 2.10.6 Audit Trail for The Raiser s Edge development@zeidman.info www.zeidman.info UK: 020 3637 0080 US: (646) 570 1131 Contents Overview... 3 Versions... 3 Audit Trail Free... 3 Audit Trail Basic...
Importacular for The Raiser s Edge
 Importacular for The Raiser s Edge development@zeidman.info www.zeidman.info UK: 020 3637 0080 US: (646) 570 1131 Table of Contents Overview... 4 Installation for Self-Hosted Users (on premise)... 4 Hosted
Validatrix for The Raiser s Edge
 Validatrix for The Raiser s Edge development@zeidman www.zeidman.i UK: 020 3637 0080 Contents Overview... 3 Installation... 3 Day to Day Usage... 3 Overview... 5 Criterion... 6 Dependencies... 9 Realtime
Mass Merge Utility User Guide. March, 2016
 March, 2016 Table of Contents Overview... 2 Purpose... 3 Usage... 4 Items to Note... 4 Decisions to Make Before Starting... 4 Running the Merge Process... 5 Deleting Child Constituent Records... 14 Frequently
New Features and Enhancements
 chapter 1 New Features and Enhancements Constituent Records.................................................................. 2 Duplicate Constituent Management Tool.................................................
The Raiser's Edge and Luminate Online Integration Guide
 The Raiser's Edge and Online Integration Guide 042312 2013 Blackbaud, Inc. This publication, or any part thereof, may not be reproduced or transmitted in any form or by any means, electronic, or mechanical,
Act! Link for Accounting User Guide
 Act! Link for Accounting User Guide Contents Act! Link for Accounting Introduction Page 3 Compatibility Page 4 Automatically Linking Companies Page 5 Automatically Linking Contacts Page 7 Using the Link
System Administrator s Handbook
 System Administrator s Handbook www.lamplightdb.co.uk Contents The role of system administrators p.4 Database operators adding, setting permissions and deleting p.5 Lockouts and factor authentication
RE-LO Integration Guide
 RE-LO Integration Guide 05/06/2016 Edge 4.5 RE-LO Integration US 2015 Blackbaud, Inc. This publication, or any part thereof, may not be reproduced or transmitted in any form or by any means, electronic,
Eloqua Integration User Guide. Cvent, Inc 1765 Greensboro Station Place McLean, VA
 Eloqua Integration User Guide 2017 Cvent, Inc 1765 Greensboro Station Place McLean, VA 22102 www.cvent.com Contents Eloqua Integration User Guide... 3 Enabling Eloqua Integration in Your Account... 4 Helpful
FastStats Integration
 Guide Improving results together 1 Contents Introduction... 2 How a campaign is conducted... 3-5 Configuring the integration with PureResponse... 4-17 Using Cascade with the PureResponse platform... 17-10
The Connector. Version 1.2 Microsoft Project to Atlassian JIRA Connectivity. User Manual
 The Connector Version 1.2 Microsoft Project to Atlassian JIRA Connectivity User Manual Ecliptic Technologies, Inc. Copyright 2008 www.the-connector.com Page 1 of 86 Copyright and Disclaimer All rights
Search for a Constituent Record - All users should go in through the CSM not core RE
 Raisers Edge Search for a Constituent Record - All users should go in through the CSM not core RE Always assume the constituent is already on the database so start by completing a search for their record
W W W. M A X I M I Z E R. C O M
 W W W. M A X I M I Z E R. C O M Notice of Copyright Published by Maximizer Software Inc. Copyright 2018 All rights reserved Registered Trademarks and Proprietary Names Product names mentioned in this document
Act! Link for Accounting Administrator Guide
 Act! Link for Accounting Administrator Guide Contents Act! Link for Accounting Introduction Page 3 Compatibility Page 5 Server Preparation Page 6 Act! Link for Accounting Program Installation Page 22 Registration
Set & Forget Marketing
 Set & Forget Marketing POS Sites User Guide A Product Of Table of Contents Introduction... 1 Before you Begin.... 2 1. Decide on the look and feel of your Marketing E-mails... 2 2. Getting your Logo in
Inxmail Professional 4.4 in five steps (test accounts)
") How-to Inxmail Professional 4.4 in five steps (test accounts) Use this document as an introduction to help get you started with Inxmail Professional. The five steps presented here take you through the
How-to Inxmail Professional 4.4 in five steps (test accounts) Use this document as an introduction to help get you started with Inxmail Professional. The five steps presented here take you through the
The Raiser s Edge & Microsoft Office Integration Guide
 The Raiser s Edge & Microsoft Office Integration Guide 020912 2012 Blackbaud, Inc. This publication, or any part thereof, may not be reproduced or transmitted in any form or by any means, electronic, or
Batch and Import Guide
 Batch and Import Guide 06/13/2017 Blackbaud Altru 4.96 Batch and Import US 2017 Blackbaud, Inc. This publication, or any part thereof, may not be reproduced or transmitted in any form or by any means,
Contents. Raiser's Edge Integration. Overview of Raiser s Edge Integration 2
 Raiser's Edge Integration Last Updated: 08/05/2016 for ResearchPoint 4.91 Contents Overview of Raiser s Edge Integration 2 Set Up Integration 2 ResearchPoint Search of Raiser's Edge Records 7 Raiser's
Getting to Know Your Raiser s Edge Data
 Getting to Know Your Raiser s Edge Data This document guides you through a series of simple but informative downloads from your Raiser s Edge system. The tables detailed in these reports form the heart
GiftWorks Import Guide Page 2
 Import Guide Introduction... 2 GiftWorks Import Services... 3 Import Sources... 4 Preparing for Import... 9 Importing and Matching to Existing Donors... 11 Handling Receipting of Imported Donations...
Version 1.4 Paribus Discovery for Microsoft Dynamics CRM User Guide
 Version 1.4 Paribus Discovery for Microsoft Dynamics CRM User Guide Document Version 1.3 Release Date: September 2011 QGate Software Limited D2 Fareham Heights, Standard Way, Fareham Hampshire, PO16 8XT
Microsoft Access Database How to Import/Link Data
 Microsoft Access Database How to Import/Link Data Firstly, I would like to thank you for your interest in this Access database ebook guide; a useful reference guide on how to import/link data into an Access
Blackbaud s Mailwise Service Append
 Blackbaud s Mailwise Service E-Mail Append Thank you for sending your data to the Blackbaud s Mailwise Service for screening and choosing the E-Mail Append service. This Help Guide outlines the steps to
The Raiser's Edge Sphere Connector Guide
 The Raiser's Edge Sphere Connector Guide 8/13/2013 Sphere 9.4.3 The Raiser's Edge Sphere Connector US 2013 Blackbaud, Inc. This publication, or any part thereof, may not be reproduced or transmitted in
Quick Start Guide AUTODOC HSE
 AUTODOC HSE Quick Start Guide Table of Contents Step 1: What do you want to do?... 4 AutoDoc HSE s core functions... 5 Choose your outcome... 5 What next?... 6 Step 2: Installing AutoDoc HSE... 7 Before
Get to know Inxmail Professional 4.4 in five easy steps
 How-to Get to know Inxmail Professional 4.4 in five easy steps Use this document as an introduction to help get you started with Inxmail Professional. The five steps presented here take you through the
Table of Contents RE:S EARCH C HAPTER 1 O VERVIEW C HAPTER 2 C HANGES IN THE RAISER S EDGE. Brief Summary of Changes...2 Electronic Interface...
 RE:S EARCH Table of Contents C HAPTER 1 O VERVIEW Brief Summary of Changes...2 Electronic Interface...2 C HAPTER 2 C HANGES IN THE RAISER S EDGE Configuration...4 Security Tab...4 Tables Tab...4 Constituent
4/27/2018 Blackbaud Internet Solutions 4.5 US 2015 Blackbaud, Inc. This publication, or any part thereof, may not be reproduced or transmitted
 Email Guide 4/27/2018 Blackbaud Internet Solutions 4.5 Email US 2015 Blackbaud, Inc. This publication, or any part thereof, may not be reproduced or transmitted in any form or by any means, electronic,
Edition 3.2. Tripolis Solutions Dialogue Manual version 3.2 2
 Edition 3.2 Tripolis Solutions Dialogue Manual version 3.2 2 Table of Content DIALOGUE SETUP... 7 Introduction... 8 Process flow... 9 USER SETTINGS... 10 Language, Name and Email address settings... 10
04/23/2012 ResearchPoint 2.91 Prospects US
 Prospects Guide 04/23/2012 ResearchPoint 2.91 Prospects US 2011 Blackbaud, Inc. This publication, or any part thereof, may not be reproduced or transmitted in any form or by any means, electronic, or mechanical,
Broker ASSESS administrator s guide
 Broker ASSESS administrator s guide This guide focuses on administrative tasks. Please consult the Broker ASSESS user s guide for a broad explanation of the following, which will not be covered within
5 Steps to Processing Marketing Efforts via
 5 Steps to Processing Marketing Efforts via Email Create the Email Message Create the Package (Insert the Email) Create the Marketing Effort (If you haven't already done so) Add the Effort Settings & Segment
QSalesData User Guide
 QSalesData User Guide Updated: 11/10/11 Installing the QSalesData Software... 2 Licensing the QSalesData Product... 3 Build QSalesData fields in ACT Step 2 of Install Checklist... 4 Adding the QB Data
Simply Accounting Intelligence Tips and Tricks Booklet Vol. 1
 Simply Accounting Intelligence Tips and Tricks Booklet Vol. 1 1 Contents Accessing the SAI reports... 3 Copying, Pasting and Renaming Reports... 4 Creating and linking a report... 6 Auto e-mailing reports...
10/31/2016 Spark US 2016 Blackbaud, Inc. This publication, or any part thereof, may not be reproduced or transmitted in any form or by any
 Email Guide 10/31/2016 Spark Email US 2016 Blackbaud, Inc. This publication, or any part thereof, may not be reproduced or transmitted in any form or by any means, electronic, or mechanical, including
Text Messaging Guide
 Text Messaging Guide 031208 2008 Blackbaud, Inc. This publication, or any part thereof, may not be reproduced or transmitted in any form or by any means, electronic, or mechanical, including photocopying,
Blackbaud Direct Marketing New Features Guide
 Blackbaud Direct Marketing New Features Guide 05/09/2018 Blackbaud Direct Marketing 5.0 Blackbaud Direct Marketing New Features US 2018 Blackbaud, Inc. This publication, or any part thereof, may not be
STEP-BY-STEP HOW TO GUIDE
 STEP-BY-STEP HOW TO GUIDE for Kensington Register & Retrieve For HP Locks www.hplockregistration.kensington.com www.hplockregistration.kensington.com i ii Contents A. Create an Administrator Account.......................................
Installation & Configuration Guide Enterprise/Unlimited Edition
 Installation & Configuration Guide Enterprise/Unlimited Edition Version 2.3 Updated January 2014 Table of Contents Getting Started... 3 Introduction... 3 Requirements... 3 Support... 4 Recommended Browsers...
[Type text] DLC Client Manager Welcome Manual
![[Type text] DLC Client Manager Welcome Manual](/thumbs/87/96515013.jpg "[Type text] DLC Client Manager Welcome Manual") [Type text] DLC Client Manager Welcome Manual Table of Contents Getting Started Prepping Your Data in Expert... 3 Logging In... 4 Synching with Expert... 5 Getting Started with Client Manager... 6 Working
[Type text] DLC Client Manager Welcome Manual Table of Contents Getting Started Prepping Your Data in Expert... 3 Logging In... 4 Synching with Expert... 5 Getting Started with Client Manager... 6 Working
Manual. The Salvation Army Southern Territorial Headquarters 2015 InterChange University
 Email Manual The Salvation Army Southern Territorial Headquarters 2015 InterChange University 52 Table of Contents 5: Email... 4 An Overview of the Email Process... 5 Important Points to Remember... 6
MAS 90/200 Intelligence Tips and Tricks Booklet Vol. 1
 MAS 90/200 Intelligence Tips and Tricks Booklet Vol. 1 1 Contents Accessing the Sage MAS Intelligence Reports... 3 Copying, Pasting and Renaming Reports... 4 To create a new report from an existing report...
The Raiser s Edge & Microsoft Office Integration Guide
 The Raiser s Edge & Microsoft Office Integration Guide 041211 2011 Blackbaud, Inc. This publication, or any part thereof, may not be reproduced or transmitted in any form or by any means, electronic, or
InsightUnlimited Upgrades Best Practices. July 2014
 InsightUnlimited Upgrades Best Practices July 2014 InsightUnlimited Version: 2012.2 and above Document Version: 1.1 Last Updated: July 29, 2014 Table of Contents Introduction... 4 Overview... 4 Audience...
Blackbaud NetCommunity 7.1 SP3 New Features Guide
 Blackbaud NetCommunity 7.1 SP3 New Features Guide 2/20/2018 Blackbaud NetCommunity 7.1 SP3 New Features US 2017 Blackbaud, Inc. This publication, or any part thereof, may not be reproduced or transmitted
Nintex Reporting 2008 Help
 Nintex Reporting 2008 Help Last updated: Thursday, 24 December 2009 1 Using Nintex Reporting 2008 1.1 Chart Viewer Web Part 1.2 Importing and Exporting Reports 1.3 Import Nintex report page 1.4 Item Level
Smart Connection User Guide
 User Guide Issue 1.4 May 2010 0/59 CONTENTS 1. Introduction and Overview...3 1.1 Profiles and Privileges in... 3 1.2 Interactions with Oberthur s Personalisation Systems... 3 Transmission / Input File
The Full Campaign Manager gives you the ability to target your client bank by creating your own sales and marketing campaigns.
 Introduction The Full Campaign Manager gives you the ability to target your client bank by creating your own sales and marketing campaigns. You can run queries on all of your clients to a broad or specific
WELCOME TO IRECRUIT. Contents: Step 1: How to Register.3. Step 2: Search for Jobs Step 3: Apply for a Job..23
 WELCOME TO IRECRUIT irecruit is our online job search and application system. Use irecruit to search and apply for advertised UTS jobs. You can also use irecruit to set up job alerts tailored to your job
Data Health Center Guide
 Data Health Center Guide 081117 2017 Blackbaud, Inc. This publication, or any part thereof, may not be reproduced or transmitted in any form or by any means, electronic, or mechanical, including photocopy-ing,
Imagine. Create. Discover. User Manual. TopLine Results Corporation
 Imagine. Create. Discover. User Manual TopLine Results Corporation 2008-2009 Created: Tuesday, March 17, 2009 Table of Contents 1 Welcome 1 Features 2 2 Installation 4 System Requirements 5 Obtaining Installation
Contents. Batch & Import Guide. Batch Overview 2. Import 157. Batch and Import: The Big Picture 2 Batch Configuration 11 Batch Entry 131
 Batch & Import Guide Last Updated: 08/10/2016 for ResearchPoint 4.91 Contents Batch Overview 2 Batch and Import: The Big Picture 2 Batch Configuration 11 Batch Entry 131 Import 157 Configure Import File
2/21/2018 Blackbaud NetCommunity 7.1 Parts US 2017 Blackbaud, Inc. This publication, or any part thereof, may not be reproduced or transmitted in any
 Parts Guide 2/21/2018 Blackbaud NetCommunity 7.1 Parts US 2017 Blackbaud, Inc. This publication, or any part thereof, may not be reproduced or transmitted in any form or by any means, electronic, or mechanical,
Salesforce Integration User Guide. Cvent, Inc 1765 Greensboro Station Place McLean, VA
 Salesforce Integration User Guide 2017 Cvent, Inc 1765 Greensboro Station Place McLean, VA 22102 www.cvent.com Contents Salesforce Integration User Guide... 3 Setting Up Your Account... 4 Helpful Hints...
USER GUIDE. PowerSurvey CRM 2013/2015
 USER GUIDE PowerSurvey CRM 2013/2015 Contents Overview Creating PowerSurveys Survey Fields Add an Image to the Banner Area Preview Adding Questions to a Survey Question Types Add a Survey Question through
Administration Guide
 Administration Guide 04/11/2018 Blackbaud Altru 4.96 Administration US 2017 Blackbaud, Inc. This publication, or any part thereof, may not be reproduced or transmitted in any form or by any means, electronic,
How to Use the Job Merge Wizard
 How to Use the Job Merge Wizard Print Audit 5 includes a tool called the Job Merge Wizard. This tool is intended for companies that have multiple locations and want to consolidate the data for reporting
Installing Switched-On Schoolhouse 2007
 1 Installation & Setup Installing Switched-On Schoolhouse 2007 Switched-On Schoolhouse 2007 (SOS) is easy to install on your computer because most of the installation components install themselves. Before
USING ODBC COMPLIANT SOFTWARE MINTRAC PLUS CONTENTS:
 CONTENTS: Summary... 2 Microsoft Excel... 2 Creating a New Spreadsheet With ODBC Data... 2 Editing a Query in Microsoft Excel... 9 Quattro Pro... 12 Creating a New Spreadsheet with ODBC Data... 13 Editing
LIMS QUICK START GUIDE. A Multi Step Guide to Assist in the Construction of a LIMS Database. Rev 1.22
 LIMS QUICK START GUIDE A Multi Step Guide to Assist in the Construction of a LIMS Database Rev 1.22 Contents Contents...1 Overview - Creating a LIMS Database...2 1.0 Folders...3 2.0 Data Fields...3 2.1
Release Notes V9.5 (inc V9.4) Release Notes. Phone: Fax:
 Release Notes. Phone: Fax:") Release Notes V9.5 (inc V9.4) 2016 Release Notes Phone: 01981 590410 Fax: 01981 590411 E-mail: information@praceng.com RELEASE NOTES These Release Notes give you information regarding changes, modifications
Release Notes V9.5 (inc V9.4) 2016 Release Notes Phone: 01981 590410 Fax: 01981 590411 E-mail: information@praceng.com RELEASE NOTES These Release Notes give you information regarding changes, modifications
Maximizer CRM. Customer Service Maximizer CRM 2017 VERSION COMPARISON FOR WEB ACCESS (EMEA) Maximizer CRM 2016/R2.
 Maximizer CRM 2016/R2.") VERSION COMPARISON FOR WEB ACCESS (EMEA) Sales Support multiple sales processes Track opportunity stage age Track overall opportunity age Monitor progress by comparing stage age with target age Opportunity
VERSION COMPARISON FOR WEB ACCESS (EMEA) Sales Support multiple sales processes Track opportunity stage age Track overall opportunity age Monitor progress by comparing stage age with target age Opportunity
EXO BUSINESS CRM. User Guide EXO BUSINESS M YO B ENT ERPRI S E S O L U T I O N S
 EXO BUSINESS CRM User Guide EXO BUSINESS M YO B ENT ERPRI S E S O L U T I O N S Important Notices This material is copyright. It is intended only for MYOB Enterprise Solutions Business Partners and their
Marketer's Guide. User guide for marketing analysts and business users
 Marketer's Guide Rev: 2014-06-11 Marketer's Guide User guide for marketing analysts and business users Table of Contents Chapter 1 Introduction... 4 Chapter 2 Quick Start Guide... 5 2.1 Accessing the Email
The Connector Version 2.0 Microsoft Project to Atlassian JIRA Connectivity
 The Connector Version 2.0 Microsoft Project to Atlassian JIRA Connectivity User Manual Ecliptic Technologies, Inc. Copyright 2011 Page 1 of 99 What is The Connector? The Connector is a Microsoft Project
MYOB Exo CRM. User Guide
 MYOB Exo CRM User Guide 2018.1 Table of Contents Outlook Integration... 1 Quick Add Widgets... 2 Licensing... 2 Available Functions... 5 Contacts in Exo Business CRM... 6 Contacts Master... 7 Contacts
Oracle Eloqua and Salesforce
 http://docs.oracle.com Oracle Eloqua and Salesforce Integration Guide 2018 Oracle Corporation. All rights reserved 07-Jun-2018 Contents 1 Integrating Oracle Eloqua with Salesforce 4 2 Overview of data
Marketo Integration User Guide. Cvent, Inc 1765 Greensboro Station Place McLean, VA
 Marketo Integration User Guide 2017 Cvent, Inc 1765 Greensboro Station Place McLean, VA 22102 www.cvent.com Contents Marketo Integration User Guide... 3 Enabling Marketo Integration for Your Account...
The Raiser's Edge and everydayhero Integration Guide
 The Raiser's Edge and everydayhero Integration Guide 12/16/2016 The Raiser's Edge & Everyday Hero Integration US 2016 Blackbaud, Inc. This publication, or any part thereof, may not be reproduced or transmitted
VETtrak Data Insights User Guide. for VETtrak version
 VETtrak Data Insights User Guide for VETtrak version 4.4.8.2 Contents Data Insights User Guide... 2 What are Data Insights?... 2 Why is it called Data Insights?... 2 Why did we create this new feature?...
USER GUIDE. PowerMailChimp CRM 2013
 USER GUIDE PowerMailChimp CRM 2013 Contents About PowerMailChimp Navigating PowerMailChimp in CRM 2013 Dynamics CRM Marketing Lists and MailChimp Groups Existing CRM Marketing Lists Creating a new CRM
Step 1: Run an Enrolment Report for the user account you want to archive
 Overview Occasionally, there are times where you must merge two user accounts. This is usually when someone has created two accounts due to a name change, or an alternative email address. This guide will
An Integrated Solution for Nonprofits
 An Integrated Solution for Nonprofits 100411 2011 Blackbaud, Inc. This publication, or any part thereof, may not be reproduced or transmitted in any form or by any means, electronic, or mechanical, including
Administrator s Guide
 Administrator s Guide 1995 2011 Open Systems Holdings Corp. All rights reserved. No part of this manual may be reproduced by any means without the written permission of Open Systems, Inc. OPEN SYSTEMS
Content Author's Reference and Cookbook
 Sitecore CMS 7.2 Content Author's Reference and Cookbook Rev. 140225 Sitecore CMS 7.2 Content Author's Reference and Cookbook A Conceptual Overview and Practical Guide to Using Sitecore Table of Contents
Sostenuto 4.1 title page. System Management User s Guide
 Sostenuto 4.1 title page System Management User s Guide Date: November 2013 All rights reserved. No part of this document may be reproduced or transmitted in any form or by any means, or stored in any
DocAve for Salesforce 2.1
 DocAve for Salesforce 2.1 This document is intended for anyone wishing to familiarize themselves with the user interface and basic functionality of AvePoint s DocAve for Salesforce tool. System Requirements
Blackbaud, Inc. This publication, or any part thereof, may not be reproduced or transmitted in any form or by any means, electronic, or
 7.93 Update Guide 092513 2013 Blackbaud, Inc. This publication, or any part thereof, may not be reproduced or transmitted in any form or by any means, electronic, or mechanical, including photocopying,
This document contains information that will help you to create and send graphically-rich and compelling HTML s through the Create Wizard.
 This document contains information that will help you to create and send graphically-rich and compelling HTML emails through the Create Email Wizard. or warranty by AT&T and is subject to change. 1 Contents
RELEASE NOTES: FEBRUARY 23, 2016
 RELEASE NOTES: 2.16.01 FEBRUARY 23, 2016 Highlights from this release Report Criteria Favourites Change Name on WO/LOT/INV with blend Save report criteria so you can run it the same way next time. Read
Welcome To Account Manager 2.0
 Account Manager 2.0 Manage Unlimited FileMaker Servers, Databases, Privileges, and Users Effortlessly! The ultimate tool for FileMaker Database Administrators. Welcome To Account Manager 2.0 What Is Account
Trusted Advisor User Guide. inty CASCADE v 2.9.0
 Trusted Advisor User Guide inty CASCADE v 2.9.0 Table of Contents 1. Overview... 2 2. Logging in to inty CASCADE... 2 2.1 Forgotten Password... 4 2.2 Password Complexity... 5 3. Home Page... 7 4. Navigation...
FormsNet3 sm Recipient Module Training Guide
 FormsNet3 sm Recipient Module Training Guide FormsNet3 sm More than 95% of data collected by the CIBMTR is submitted electronically via FormsNet3 sm, a comprehensive electronic data submission system containing
SUPPLIER GUIDE PROCONTRACT THE TENDER PROCESS WITHIN FOR
 SUPPLIER GUIDE FOR THE TENDER PROCESS WITHIN PROCONTRACT Contents Viewing the Exercise Details/Documents... 3 The Questionnaire/Tender/Quote Documents... 9 Discussions... 11 Question and Answer Facility...
User Guide NHER Plan Assessor 6
 User Guide NHER Plan Assessor 6 This User guide gives step by step instructions on how to use the new features in Plan Assessor 6 Welcome to Plan Assessor 6... 2 Database List... 2 Filtering... 2 Project
GDPR Consent Using MailChimp
 a GDPR Consent Using MailChimp How to work with MailChimp to manage your GDPR consent processes Prepared by Bryony Cole (Product Manager) Conscious Solutions Limited Royal London Buildings 42-46 Baldwin
Accountant Office Managing Clients
 Accountant Office Managing Clients Participant Guide Version 1.0 2008 MYOB Technology Pty Ltd Disclaimer MYOB has made every attempt to ensure the accuracy, relevance and completeness of this material
Startel Soft Switch Configuration
 Startel Soft Switch Configuration User s Guide While every attempt is made to ensure both accuracy and completeness of information included in this document, errors can occur, and updates or improvements
An Integrated Solution for Nonprofits
 An Integrated Solution for Nonprofits 072104 2004 Blackbaud, Inc. This publication, or any part thereof, may not be reproduced or transmitted in any form or by any means, electronic, or mechanical, including
icontact for Salesforce Installation Guide
 icontact for Salesforce Installation Guide For Salesforce Enterprise and Unlimited Editions Lightning Experience Version 2.3.4 Last updated October 2016 1 WARNING DO NOT SKIP ANY PART OF THIS GUIDE. EVERY
The Raiser's Edge and everydayhero Integration Guide
 The Raiser's Edge and everydayhero Integration Guide 01/22/2015 The Raiser's Edge 7.93 Raiser's Edge & everydayhero Integration UK 2014 Blackbaud, Inc. This publication, or any part thereof, may not be
Compliance Desktop Technology Platform Admin User Guide
 Compliance Desktop Technology Platform Admin User Guide Table of Contents 1. Logging into ComplianceDesktop... 4 1.1 ComplianceDesktop Landing Page... 4 1.2 Requesting a New Password... 4 1.3 Requesting
Tips and Tricks Alchemex for MYOB Account Right
 Tips and Tricks Alchemex for MYOB Account Right Table of Contents Auto e-mailing reports... 1 Automatically Running Macros... 4 Creating new Macros from Excel... 4 Compact Metadata Functionality... 6 Copying,
PayrollSE Year End Checklist
 Classification - Restricted PayrollSE 2016-17 Year End Checklist Introduction Welcome to the PayrollSE Year End Checklist. This document is designed to guide you through the Year End process, although
Jobtrain Basics Client Guide. January 2019
 Jobtrain Basics Client Guide January 2019 Jobtrain basics - client guide This guide is designed to help users with the most basic processes within Jobtrain including adding jobs, basic candidate management
CONFIGURING YOUR CONNECTOR CONFIGURING YOUR CONNECTOR MICROSOFT DYNAMICS
 CONFIGURING YOUR CONNECTOR MICROSOFT DYNAMICS 1 Contents Instructions... 3 Step 1: Syncing Credentials... 4 Step 2: Web Services and Org Info... 4 Step 3: Sync Dates... 5 Step 4: Syncing Preferences...
External Data Connector for SharePoint
 External Data Connector for SharePoint Last Updated: July 2017 Copyright 2014-2017 Vyapin Software Systems Private Limited. All rights reserved. This document is being furnished by Vyapin Software Systems
All of your registration data can be exported into either a.csv or spreadsheet file.
 How to Guide to Setting up Registrations with TryBooking Overview This document is a guide for setting up any type of an event where you need your patrons to complete a series of questions at the time