A Guide to Understand, Install and Use Pie Register WordPress Registration Plugin
|
|
|
- Judith Stone
- 5 years ago
- Views:
Transcription
1 A Guide to Understand, Install and Use Pie Register WordPress Registration Plugin 1 P a g e
2 Contents 1. Introduction Who is it for? Community v/s PRO Version Which version is right for me Let s get started! Get the Plugin Install and Activate Update the License Key Install Add-ons Pie Register Features Registration Forms Create Registration Forms Edit, Delete, Preview Forms Verify & Moderate Registrations Setup User Registration Verification Setup Address Change Verification Invitation Only Registrations Enable Invitation Codes Notifications with Custom Templates Use Custom Templates CAPTCHA Support Add CAPTCHA to a Form Setup recaptcha Setup CAPTCHA in Login Form Setup CAPTCHA in Forgot Password Form Shortcodes Access Shortcodes from Manage Forms Access Shortcodes from Help Basic Shortcodes Data Import/Export Start Import/Export Data P a g e
3 Download Basic User Data Payment Integration Setup Payment Gateway Setup PayPal Standard Conditional Logic (Pie Register PRO) Enable Conditional Logic Built-in Form Templates (Pie Register PRO) Block Users (Pie Register PRO) Block users by Username Block users by IP Address Block Users by Address Settings Default Pages Settings Role Based Redirect Configure UX Settings Custom Logo and Tooltip Disable CSS and jquery Auto login after registration Pie Register Theme Miscellaneous Override Settings Advanced Login Security (Pie Register PRO) Setup recaptcha Settings Setup User Registration Verification Setup Address Change Verification Restrict Search Engines and Bots Timed Registration Form Submissions Restrict WordPress Widget visibility Help Documentation Registration Form Shortcodes License Key Activation and Deactivation (PRO) Version, Environment, Error Log and Debug Information P a g e
4 5.14. Support Support Forums FAQ Section How to Videos and Tutorials Support Tickets PRO Version Pie Register Add-ons Marketing Setup MailChimp Profile Search Setup Profile Search Customize Profile Search Settings Social Login General Settings Login via Facebook Login via Twitter Login via Google Login via Yahoo Login via LinkedIn Login via WordPress Two-way Login (Twilio) via SMS Texting Setup Twilio Two-way Login Pie Register Shortcuts Auto Login Users (Pie Register PRO) Replacement Keys Add Form Button Menu Visibility Control Logout URL Creation Social Login Shortcode Page Visibility Restriction Rate the plugin on wp.org End of Document P a g e
5 1. Introduction Pie Register is a quick and easy to use WordPress registration plugin to convert your Wordpress website into a membership based site. The plugin has a host of useful features, like drag and drop registration forms, invitation only registration, templates, data import & export and integration with payment gateway and more. It also comes with robust add-ons to help with profile searches, marketing, social login, two-way login, etc. With Pie Register you can quickly create a registration forms to let visitors register to your website and pay for priority content and services via PayPal. It also allows you to block certain users based on preset criteria and have CAPTCHA/reCAPTCHA on the forms to make sure the site is not being spammed by bots. Pie Register has hundreds of thousands of downloads and thousands of active installations at any given time so there is an active community of users who use and support the plugin. It comes in two versions, community and professional. The community version is free, has limited features and is supported by the plugin community and developers via the forums; the professional version has more advance features and comes with ticket based support with the development team. 5 P a g e
6 2. Who is it for? As stated, Pie Register is a Wordpress registration plugin, which means it s used to turn Wordpress websites and blogs into a place where users register to access the content being offered. The user data can be used for analytical purposes; it s a window into who the users are and where they come from. The data can be used to market your product and services in an effective way using the integrated tools. User data collected through the registration system can used to create effective marketing campaigns. The integrated role based page access makes sure that users can access only the allowed pages. Unwanted users can be blocked by username, and IP address adding an extra layer of security to the website. Through the integrated payment gateway, businesses can get paid for the content they offer thus offering a possible revenue stream. 6 P a g e
7 3. Community v/s PRO Version Pie Register is available in two versions; one is the community version which is free. This version has limited features and can be used to create a single registration form. Following are the features in the community version: Create a single Registration form by dragging/dropping fields. Verify and moderate Member Registrations. Invitation-only registration by using Invitation Codes. Add Captcha to Registration Forms. Custom Templates for Membership Notifications. PayPal Integration to charge Membership Fee. Custom Profile Pages. Short Codes and Widgets. Export/Import User Data. Separate Paid Add-ons The PRO version comes with all the features in the community version, plus these additional features: Unlimited Registration Forms. Use Math Captcha, HoneyPot, No Captcha, ReCaptcha and timed submission. Social login using Facebook and Twitter. Build Marketing Campaigns using MailChimp. Auto Login after registration and two-way login using SMS. Use Conditional logic to build advanced registration flows. Set up Rules for Role Based Redirection to land users on different pages based on user role. Block unwanted users by username, and IP address. Built-in form templates and import/export users and settings. Search User Profiles. Restrict widgets: Set visibility of widgets for specific user roles and non-logged in users. Premium support for 6 months Which version is right for me If your website needs a basic registration form without the bells and whistles, the community version can do the job for you. In case of multiple websites and advance form needs and security, the PRO version is the way to go. 7 P a g e
8 Do check out Pie Register on Facebook and Twitter for occasional discounts on offer! 4. Let s get started! Once you ve decided to turn your Wordpress website into a membership only site and have chosen Pie Register to do the job, here s how to get started Get the Plugin Go to to get the version of the plugin you want. Alternatively, the community version of the plugin can be download from If you re buying the PRO version or paid add-ons, select the products to add to the cart. Go through the Check out and Payment process to complete your purchase. Once you have successfully completed the purchase, an will be sent with order and license details. 8 P a g e
9 4.2. Install and Activate Once you have the plugin package, you can begin the install and activation process. Login to the Wordpress website/blog s admin panel. Go to dashboard. Click on Plugins > Add New > Upload Plugin. Locate and Install Plugin. Once it is installed, click on Activate. Plugin will show up in the list of plugins. 9 P a g e

10 4.3. Update the License Key If you purchased the PRO version, you will have to install the license keys. Get the license keys by logging into your store account using the credentials you used to create the account at the time of purchase. Once you have the keys, In the Wordpress admin panel, click on Pie Register Go to Help > Settings. Add License key and the address used at the time of purchase. Click Activate. The Plugin will be upgraded to the PRO Version and additional features will show up in the menu. 10 P a g e
11 4.4. Install Add-ons To install and activate add-ons simply repeat the instructions under Install and Activate! for each addon. The plugin along with the add-ons is now installed and activated on the website/blog, it is now time to start creating your first registration form! 11 P a g e
12 5. Pie Register Features Pie Register offers features that are easy to configure and use. In this section we will cover steps for features available in Community and PRO versions Registration Forms Pie Register allows you to create registration forms by simply dragging and dropping fields onto the registration forms. The community version allows a single registration form while the PRO version offers unlimited number of forms Create Registration Forms For creating a registration form, here s what you need to do. Login to your blog/site and go to your dashboard. In the dashboard s menu, click on Pie Register > Manage Forms. Click on Add New to create a new form, this will open the Form Editor. Add new fields from Default Fields, Standard Fields, or Advanced Fields tabs located on the top right corner of the editor. Customize fields & buttons by clicking on edit icon. Fill the details in the Form Editor. Click on Save Settings to save the form Edit, Delete, Preview Forms Here is how you can edit/delete/preview forms. Login to your blog / site and go to the dashboard. In the dashboard s menu, click on Pie Register > Manage Forms. In the registration form table click Edit under the registration form you want to edit. To delete a form click Delete below the form s name. To preview a form click Preview below the form s name. 12 P a g e

13 5.2. Verify & Moderate Registrations With Pie Register, administrator can optionally approve and moderate user registration requests before users can login. Unverified users get deleted automatically after a predefined grace period. This feature will prevent your website from being crowded with fake user registrations Setup User Registration Verification Follow the steps below to set up user registration verification. Login to your blog / site and go to your dashboard. In the dashboard s menu, click on Pie Register > Settings > Security. Scroll down to User Verification section. From New User Verification drop down menu select Admin Approval, Verify Address, or Admin Approval AND Verify Address [Pro] to setup registration verification. Set Grace Period (number of days after which unverified users will be deleted automatically) Setup Address Change Verification You can also setup address change verification from the Verify Address Section. 13 P a g e

14 To enable address change verification select 1-Step: Verify New Address. For better authentication select 2-Step: Authenticate request by sending an to old address + verify new address. To disable address change verification select OFF. You can also check the list of unverified users. Login to your blog / site and go to your dashboard. In the dashboard s menu, click on Users > Unverified Users. From here you can verify users, resend pending payment , resend verification , or delete unverified users Invitation Only Registrations Have an exclusive site? Pie Register offers an Invitation Only Registration feature. Once enabled, users can only register when you send them an invitation code. This will protect your privacy and prevent unwanted registrations. You can easily set multiple codes and invite codes can also help you keep track of your users with the help of Invitation Tracking Dashboard Widget. 14 P a g e
15 Enable Invitation Codes Enable the invitation codes to send to your users. Login to your blog / site and go to your dashboard. In the dashboard s menu, click on Pie Register > Invitation Codes. Check Enable Invitation Codes check box to enable invitation only registration. Click Save Settings button. In the Insert Codes section write down invitation codes, no special character allowed and enter one code on each line. Click Add Code button. In the Usage section add number of times a code can be used to register. From the Code table you can see the added codes, you can now delete, activate, or deactivate them. 15 P a g e

16 Notifications with Custom Templates With Pie Register you can create custom templates to use with user communications. These templates can be used to send out customized messages to the website users Use Custom Templates Here is how you can use custom templates. Login to your blog / site and go to your dashboard. In the dashboard s menu, click on Pie Register > Notifications. From here you can select Admin Notification tab or User Notification tab to design admins or users templates respectively. Edit the text fields according to your requirement. Use replacement keys to add admins or users form data to the templates. Modify the template using the text editor. Click Save Changes button to save the notification template. 16 P a g e
17 5.5. CAPTCHA Support It is easy to use Pie Register to prevent spamming and block bots by using CAPTCHA/reCAPTCHA Add CAPTCHA to a Form Following are the steps to add CAPTCHA to a form. Login to your blog / site and go to your dashboard. In the dashboard s menu, click on Pie Register > Manage Forms. To Add CAPTCHA to a new form click Add New, to add to an existing form click Edit below the form s name. From the Advanced Field tab located on the top right corner add Re-Captcha. Pie Register s community version has Math CAPTCHA too and PRO version includes advance CAPTCHA option, i.e. Honeypot. Click Save Settings to save the form. 17 P a g e

18 Setup recaptcha To setup recaptcha, here is what you need to do. Login to your blog / site and go to your dashboard. In the dashboard s menu, click on Pie Register > Settings > Security. In recaptcha Settings section select Yes to enable CAPTCHA on Forgot Password Form. Next you will need to register your site for recaptcha, to do this go to and click Get recaptcha. Now login with your Google account or create a new Google account. Next register your site by providing a descriptive label and domain name. Check Get alerts about this site. (Optional) Click on Register. Once you are registered you will receive your Site Key and your Secret Key. Copy both keys and paste them in ReCAPTCHA Settings section. Click Save Changes Setup CAPTCHA in Login Form PRO version of Pie Register lets you setup CAPTCHA in Login Form. To setup CAPTCHA in Login Form, follow the steps below. Login to your blog / site and go to your dashboard. In the dashboard s menu, click on Pie Register > Settings > Security. To enable CAPTCHA in Login Form select Yes or select a number to enable CAPTCHA after a certain number of login attempts in Login Form section. Add CAPTCHA label. Select CAPTCHA type either Math CAPTCHA or No CAPTCHA recaptcha. Next check Lockout User feature. Select minutes to lockout user for after selected number of invalid login attempts. 18 P a g e
19 Setup CAPTCHA in Forgot Password Form PRO version of Pie Register lets you setup CAPTCHA in Forgot Password Form. To setup CAPTCHA in Forgot Password Form, follow the steps below. Login to your blog / site and go to your dashboard. In the dashboard s menu, click on Pie Register > Settings > Security. In Forgot Password Form section select Yes to enable CAPTCHA on Forgot Password Form. Next check Lockout User feature. Select minutes to lockout user for after selected number of invalid login attempts Shortcodes Pie Register comes with WordPress Shortcodes which speeds up the integration of registration forms. You can setup the registration process quickly by using the Shortcodes provided with each registration form. 19 P a g e

20 Access Shortcodes from Manage Forms Following are the steps to use registration form Shortcodes. Login to your blog / site and go to your dashboard. In the dashboard s menu, click on Pie Register > Manage Forms. The Shortcodes are located in the Registration forms table under Shortcode column. 20 P a g e
21 Access Shortcodes from Help Registration form Shortcodes can also be accessed from Dashboard > Pie Register > Help > Shortcodes. With the use of these shortcodes, you can embed Pie-Register forms into your Custom Pages, Posts and Widgets Basic Shortcodes Here are some basic form shortcodes that you can embed: For login form use: [pie_register_login] For Registration form use: [pie_register_form] For forgot password form use: [pie_register_forgot_password] For profile page use: [pie_register_profile] 21 P a g e
22 5.7. Data Import/Export The Data Import/Export feature allows you to duplicate or move your existing WordPress user or configuration data. Using the built in facility lets you export data with Custom Fields and you can either import this data to another website or keep it as a backup. The Import/Export features also gives you the flexibility to export all or specific fields with a particular Date range in both CSV format and a json file, the latter is for PRO Version only Start Import/Export Data Here are the steps for Import/Export Data. Login to your blog / site and go to your dashboard. In dashboard s menu, click on Pie Register > Import/Export. From here you can Import/Export All Settings, Templates, Invitation Codes, or All Users Data with Custom Fields. 22 P a g e
23 Download Basic User Data You can download basic user data field from the User Entries section. Select basic fields of users data to Export from Select Fields section. You can select date range from Select User Registration Date Range section. Click Download CSV File to download the exported data in CSV format. You can also import user data in CSV format. From the Import section you can import user data in CSV format. Select file to import. Check Update Existing Users if you want to update the user data and click Import. 23 P a g e

24 5.8. Payment Integration Pie Register offers payment integration with PayPal. With payment gateways like PayPal you can charge your WordPress website users. Currently, the plugin allows PayPal Standard integration; future release will add more payment gateways, including stripe and authorize.net Setup Payment Gateway For setting up the Payment Gateway, follow the steps below. Login to your blog / site and go to your dashboard. In the dashboard s menu, click on Pie Register > Payment Gateways. From the General Settings tab you can setup Payment Success, Payment Failed, Reactivate Account, and Already Active Account messages Setup PayPal Standard Setting up PayPal Standard will require your PayPal Hosted Button ID. From the PayPal Standard tab you can setup the PayPal Standard payment gateway. Check Enable PayPal Standard. Enter PayPal Hosted Button ID. Select PayPal Mode; Sandbox or Live. Click Save Changes to finish setting up PayPal Standard. 24 P a g e

25 5.9. Conditional Logic (Pie Register PRO) With Pie Register, you can customize the registration process to suit your needs by using Conditional Logic. This feature allows you to show or hide fields and forms based on user input. You can build advanced registration flows and get better control of your registration process using Conditional Logic Enable Conditional Logic Here is how you can enable conditional logic. Login to your blog / site and go to your dashboard. In the dashboard s menu, click on Pie Register > Manage Forms. To add conditional logic to a new form click Add New, to add to an existing form click Edit below the form s name. Click the edit icon on the form or any form field that you want to add conditional logic to. Set Enable Conditional Logic to Yes. Define condition according to requirements and then click Save Settings. 25 P a g e

26 5.10. Built-in Form Templates (Pie Register PRO) Pie Register PRO comes with built-in form templates that can be modified using the Form Editor. These templates can be used for quickly putting together commonly used forms you can get up and running fast. You can also modify existing templates to suit your needs. The templates come with a few default fields, and additional fields can be added and customized within no time. For a complete guide on how to use built-in form templates refer to section P a g e
27 5.11. Block Users (Pie Register PRO) With the Pie Register PRO version, you can block IP addresses automatically based on security settings Block users by Username You can block users by username from accessing your blog or website. Login to your blog / site and go to your dashboard. In the dashboard s menu, click on Pie Register > Block Users. To block users by their Username click on the Block Users by Username tab. Check Do not allow users listed below to login to my site. In the Usernames section, add the usernames of users you want to block from your site (one username on each line). Click Save Changes. 27 P a g e
28 Block users by IP Address You can also block certain IP Address from accessing your blog or website. In the dashboard s menu, click on Pie Register > Block Users. To block IP Addresses click on the Block Users by IP Address tab. Check Do not allow access to my site from IP addresses listed below. In the IP Addresses section, add the IP Address you want to block from your site (one IP Address on each line) and click Save Changes. 28 P a g e

29 Block Users by Address You can even block users by addresses from accessing your blog or website. Login to your blog / site and go to your dashboard. In the dashboard s menu, click on Pie Register > Block Users. To block users by their addresses click on the Block Users by Address tab. Check Do not allow access to my site for users using address listed below. In the Addresses section, add the addresses of users you want to block from your site (one addresses on each line). Click Save Changes. 29 P a g e

30 5.12. Settings You can configure Pie Register settings from the settings page. To configure Pie Register s settings: Login to your blog / site and go to your dashboard. In the dashboard s menu, click on Pie Register > Settings Default Pages Settings Following are the steps for configuring page settings. From the Pages tab, you can configure setting for pages. From the All Users sub tab, you can set Login Page, Registration Page, Forgot Password Page, Profile Page, After Login Page, and After Logout Page. 30 P a g e

31 Role Based Redirect In the dashboard s menu, click on Pie Register > Settings and select the Pages tab. From the Role Based Redirect sub tab, you can set redirect based on user roles Configure UX Settings You can configure UX settings to make it a more user friendly experience for the website users. In the dashboard s menu, click on Pie Register > Settings and select the UX tab. From the UX tab, you can configure the UX elements of your website. From the Basic sub tab, you can check to enable Show tips and hints on form editor tool. From the Login Form section, you can edit Username Label, Username Placeholder, Password Label, and Password Placeholder. From the Forgot Password Form section, you can edit Username Label, Username Placeholder. 31 P a g e

32 Custom Logo and Tooltip In the dashboard s menu, click on Pie Register > Settings and select the UX tab. From the Custom Logo section, you can specify a custom logo URL, Upload a custom logo, enter logo Tooltip Text, and enter logo Link URL. 32 P a g e

33 Disable CSS and jquery In the dashboard s menu, click on Pie Register > Settings and select the UX tab. You can disable Pie Register s custom CSS generation if your theme is conflicting with Pie Register s CSS. You can also disable Pie Register s jquery UI for enhancements, however disabling it may limit Pie Register s functionality. Click Save Settings once you are done configuring Auto login after registration In the dashboard s menu, click on Pie Register > Settings and select the UX tab. From the Advanced sub tab, you can check to enable Auto login users after registration. 33 P a g e

34 Pie Register Theme In the dashboard s menu, click on Pie Register > Settings and select the UX tab. From Pie-Register Theme section, you can select them for the plugin Miscellaneous Override Settings In the dashboard s menu, click on Pie Register > Settings and select the Overrides tab. From Overrides sub tab, you can configure a few settings to override existing ones. 34 P a g e
35 Advanced Login Security (Pie Register PRO) Pie Register PRO provides advanced security which lets you display CAPTCHA based on the number of unsuccessful login attempts. Login to your blog / site and go to your dashboard. In the dashboard s menu, click on Pie Register > Settings > Security. To enable CAPTCHA in Login Form, select Yes or select a number to enable CAPTCHA after a certain number of login attempts in Login Form section. Add CAPTCHA label. Select CAPTCHA type either Math CAPTCHA or No CAPTCHA recaptcha. Next select minutes to lockout user for after selected number of invalid login attempts. You can also setup CAPTCHA in Forgot Password Form. Login to your blog / site and go to your dashboard. In the dashboard s menu, click on Pie Register > Settings > Security. In Forgot Password Form section select Yes to enable CAPTCHA on Forgot Password Form. 35 P a g e
36 Setup recaptcha Settings See section Setup User Registration Verification See section Setup Address Change Verification See section Restrict Search Engines and Bots To restrict Search Engines and Bots: Login to your blog / site and go to your dashboard. In the dashboard s menu, click on Pie Register > Settings > Security. In Basic sub tab, scroll down to Restrict for Search Engine(s)/Bot section. Check to enable Restrict search engines and bots from crawling pages. In User Agents to reject enter agents to restrict access. (One in each line) Enter Text to send bots when blocking access. Click Save Changes. 36 P a g e
37 Timed Registration Form Submissions You can reject auto registration forms based the time it took to fill them out. This is added safeguard against bot activity. Login to your blog / site and go to your dashboard. In the dashboard s menu, click on Pie Register > Settings > Security. In Advanced sub tab, check Time form submission, and enter time in seconds. Click Save Settings. 37 P a g e


38 Restrict WordPress Widget visibility To restrict widgets based on user s login status or the user s role: Login to your blog / site and go to your dashboard. In the dashboard s menu, click on Pie Register > Settings > Security. In Advanced sub tab, Restrict and customize widgets from the Restrict Widget section. Click Save Settings. 38 P a g e

39 5.13. Help The help page of Pie Register contains Documentation, Shortcodes, License, and Version details. To go to the Help page: Login to your blog / site and go to your dashboard. In the dashboard s menu, click on Pie Register > Help. Or simply visit and look under Resources or Support Documentation From the Documentation section you can access tutorials, guides, FAQs, Forums, etc. 39 P a g e
40 Registration Form Shortcodes Registration form Shortcodes can also be viewed from Dashboard > Pie Register > Help > Shortcodes. 40 P a g e

41 License Key Activation and Deactivation (PRO) Dashboard > Pie Register > Help > License. From the License tab you can activate and/or deactivate the plugin, and add-ons. You must activate the license keys before all the features of the plugin or add-on are available. Important Note: If you intend to use the product license key on a different website, you must Deactivate it on the current site before uninstalling the plugin. This ensures that the license key is freed up for re-use. If you forget to do this the key will be not be available. 41 P a g e
42 Version, Environment, Error Log and Debug Information From the Dashboard > Pie Register > Help > Version tab you can view version and debug information of the Pie Register Plugin, WordPress and Server Configuration details. Product support may request this information while servicing a support ticket. 42 P a g e
43 5.14. Support With thousands of active installs, Pie Register provides robust open source community support on the Pie Register Forum. Additionally, we offer a complete guide along with simple and easy to follow How-to videos. Pie Register PRO users can get ticket based support directly from the Pie Register Support and Development team by using the Support Tickets system. Visit Support Forums To go to Pie Register Support Forums: Go to From the top menu click on Support > Forums FAQ Section To go to Pie Register FAQ section: Go to From the top menu click on Support > FAQ How to Videos and Tutorials To view Pie Register Tutorials & How to Videos: Go to From the top menu click on Resources > Video Tutorials Support Tickets PRO Version To open a Support Ticket for Pie Register Pro: 43 P a g e

44 Go to From the top menu click on Support > Submit a Ticket. Click Login button located in the top right corner of the page. Enter your username/ address and password to login and submit your support ticket. 6. Pie Register Add-ons Pie Register comes with add-ons that can be used to create Marketing Campaigns, Search Profiles and use Social Login on your website. For marketing, currently we are integrated with MailChimp. Aweber integration is on the way Marketing Pie Register s Marketing Add-on provides integration with MailChimp to facilitate marketing and drip campaigns. With MailChimp you can send communication to your user base with ease and simplicity. 44 P a g e

45 Setup MailChimp Here is how you can setup MailChimp integration. Login to your blog / site and go to your dashboard. In the dashboard s menu, click on Pie Register > Bulk . Click on MailChimp tab. Check Enable MailChimp Subscription. Select Auto Add Subscriber to Yes or No depending on your preference. Fill in Auto Add Mailing List name and MailChimp API key. To import existing user to MailChimp, add list name in Import Existing Users to MailChimp section. Click Save Settings. 45 P a g e
46 6.2. Profile Search With the Profile Search Add-On, administrators can let users search and display user data. User information displayed in search results can be limited based on the admin s choice. Admin will need to use profile search shortcode on page content to ensure that it shows up on the frontend (for more details on shortcodes, please see section 5.6.) Setup Profile Search Searching a profile is very simple. Login to your blog / site and go to your dashboard. In the dashboard s menu, click on Pie Register > Profile Search. Select a form that you want to search. Select fields to search on. Design profile display page using the Profile Display Editor. Click Save Changes. 46 P a g e
47 Customize Profile Search Settings You can also customize Profile Search Settings. Customize search settings from the Profile Search Settings section. Select where to display search results. Select which users to allow Profile Search. Set whether to exclude data from search results Social Login With Pie Register Social Login, you can allow users to signup/sign in via their Facebook, Twitter, Google, LinkedIn, Yahoo and WordPress accounts. Admin needs to use Social Login shortcode on page content to ensure that it shows on the frontend (for more details on shortcodes, please see section 5.6.) General Settings Setting up social login general setting is the first stage. Login to your blog / site and go to your dashboard. In the dashboard s menu, click on Pie Register > Social Login. Click on General Settings tab, select icon style, and click Save Changes. 47 P a g e


48 Login via Facebook Here is how you can setup login via Facebook. Click on Pie Register > Social Login. Click on Facebook tab. Check Enable Facebook. Sign in to your Facebook Developer Account, follow the steps given in the link located in the Steps section to create App ID and App Secret. Once you have App ID and App Secret, enter it in the fields. Click Save Changes. 48 P a g e

49 Login via Twitter Here is how you can setup login via Twitter. Click on Pie Register > Social Login. Click on Twitter tab. Check Enable Twitter. Follow steps given in the link located in the Steps section to get Consumer Key and Consumer Secret. Once you have Consumer Key and Consumer Secret, enter it in the fields. Click Save Changes Login via Google Here is how you can setup login via Google. Click on Pie Register > Social Login. Click on Google tab. Check Enable Google Plus. Follow steps given in the link located in the Steps section to get Client ID and Client Secret. Once you have Client ID and Client Secret, enter it in the fields. 49 P a g e

50 Click Save Changes Login via Yahoo Here is how you can setup login via Yahoo. Click on Pie Register > Social Login. Click on Yahoo tab. Check Enable Yahoo. Click Save Changes. 50 P a g e

51 Login via LinkedIn Here is how you can setup login via LinkedIn. Click on Pie Register > Social Login. Click on LinkedIn tab. Check Enable LinkedIn. Follow steps given in the link located in the Steps section to get App Key and App Secret. Once you have App Key and App Secret, enter it in the fields. Click Save Changes Login via WordPress Here is how you can setup login via WordPress. Click on Pie Register > Social Login. Click on WordPress tab. Check Enable WordPress. Follow steps given in the link located in the Steps section to get Client ID and Client Secret. Once you have Client ID and Client Secret, enter it in the fields. Click Save Changes. 51 P a g e
52 6.4. Two-way Login (Twilio) via SMS Texting Pie Register provides Two-way Login feature with the Two-way Login (SMS) add-on. It provides an additional layer of login security by Twilio integration, which means you can use SMS to verify the user registration process Setup Twilio Two-way Login Here is how you can set it up. Login to your blog / site and go to your dashboard. In the dashboard s menu, click on Pie Register > Twilio (SMS). Go to Twilio Settings > General Settings section > Enable Twilio. In Account Settings section, add Twilio Phone Number, Twilio Account SID, and Twilio AUTH Token. In User Settings section, check Two Way Login. Enter Pin Expire Time in minutes. If you want a notification when a user registers, check Notify Admin. Enter Admin Mobile Number to receive registration notifications on. 52 P a g e
53 7. Pie Register Shortcuts Following are some Pie Register shortcuts to save time and effort Auto Login Users (Pie Register PRO) Pie Register allows you to auto login users that are registered on your website. To enable this option, go to your WordPress Dashboard then in the Menu click on Pie Register > Settings 53 P a g e

54 > UX from there you can enable the option to auto login registered users by checking the checkbox and clicking Save Settings Replacement Keys This plugin offers replacement keys that allow usage of user information like registration form fields in templates. To use replacement keys, go to your WordPress Dashboard. From the menu click on Pie Register > Notifications. From here, you can set notification s for both Users and Admin. To use add replacement keys to the templates, go to the drop down Replacement Keys and select the preferred information. 54 P a g e

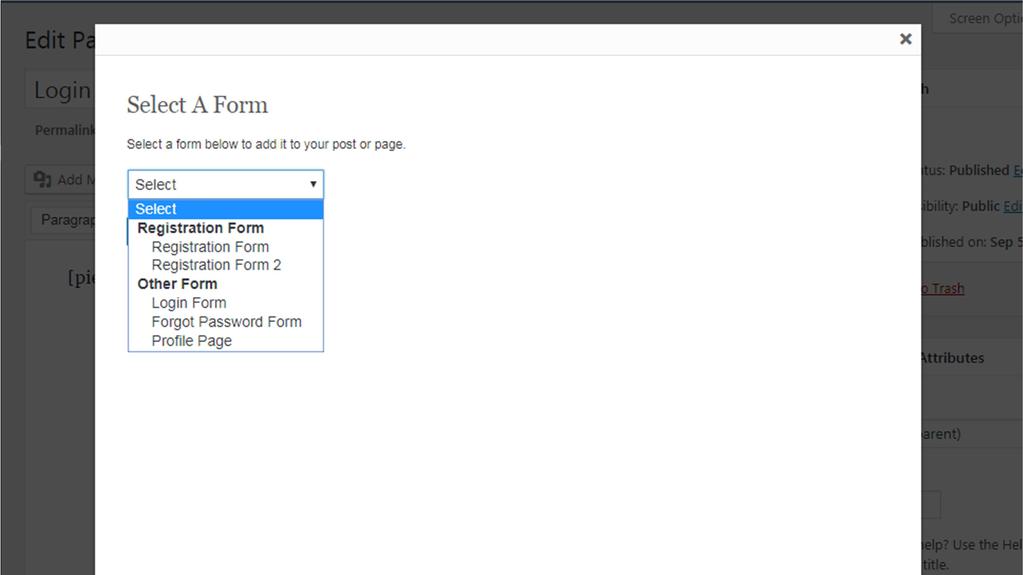
55 Add Form Button Pie Register plugin simplifies the process of adding forms to pages & posts by using an Add Form button. The button is located beside the Add Media button in the Post/Page Editor. To Add Forms to a page or a post, simply click the Add Form button when editing. A window with dropdown menu will open from where you can select & add the available forms. 55 P a g e

56 56 P a g e

57 7.4. Menu Visibility Control With Pie Register, Admin can control the visibility of menu items according to users. Menu Visibility can be set by roles & sessions of users. To control menu visibility, go to your WordPress Dashboard then from menu click on Appearance > Menus. From here you can select any menu and set the visibility of each menu item from the Visibility Status drop down menu located in Menu Structure. Following are the available options of Visibility Status: Default. Show to Logged in Users. Show to Non-Logged in Users. Show Only Administrator. Show Only Editor. Show Only Author. Show Only Contributor. Show Only Subscriber. 57 P a g e

58 7.5. Logout URL Creation To create a Logout URL simply add:?piereg_logout_url=true to your site URL. Example: Social Login Shortcode Social Login Shortcode allow easy integration of the social login feature. Once the Social Login feature is set up, use the shortcode [pie_register_social_login] on any page to integrate social login buttons. To see how to setup Social Login visit the Social Login section 6.3. in Features > Add-Ons. 58 P a g e
59 7.7. Page Visibility Restriction With Pie Register, Admin can control page and post visibility restrictions and by roles & sessions of users. To control Page Visibility Restriction, edit the page or post you want to restrict, it will be located below the text editor section. From there, you can restricts visibility, set restriction type, and add a redirect URL or a redirect page. 59 P a g e

60 8. Rate the plugin on wp.org If you liked the plugin we hope you rate us on WP.ORG. 60 P a g e
61 9. End of Document We hope this guide helps you in using Pie Register to its fullest potential. The development team continues to work on the plugin to add new and useful features. We would love to hear your thoughts on what should be added next to Pie Register or any other suggestions to improve the plugin. Feel free to drop us a message on our Facebook page or tweet at us anytime. You can also leave us your feedback here and also rate us on WP.ORG. Thank you for your continued support! Pie Register WordPress Plugin is a product of Genetech Solutions, a software development company that provides web and mobile solutions to its clients worldwide. For more details on Genetech s services, visit 61 P a g e
Membership Mastery. Easily Create Your Own Membership Site Using WishList and Wordpress EXCLUSIVE CONTENT. by: Aidan Booth & Steve Clayton
 Membership Mastery Easily Create Your Own Membership Site Using WishList and Wordpress EXCLUSIVE CONTENT by: Aidan Booth & Steve Clayton WHY MEMBERSHIP SITES? 3 OPTIMIZEPRESS WORDPRESS THEME 3 INSTALLING
JSN UniForm User Manual. Introduction. A simple contact form created by JSN UniForm. JSN UniForm is a Joomla form extension which helps you create
 JSN UniForm User Manual Introduction A simple contact form created by JSN UniForm JSN UniForm is a Joomla form extension which helps you create forms quickly and easily - from normal forms to complex forms.
Getting Started Guide. Prepared by-fatbit Technologies
 Getting Started Guide Prepared by-fatbit Technologies 1 Contents 1. Manage Settings... 3 1.1. General... 4 1.2. Local... 6 1.3. SEO... 7 1.4. Option... 8 1.5. Live Chat... 19 1.6. Third Part API s... 20
BrainCert Enterprise LMS. Learning Management System (LMS) documentation Administrator Guide Version 3.0
 documentation Administrator Guide Version 3.0") BrainCert Enterprise LMS Learning Management System (LMS) documentation Administrator Guide Version 3.0 1 P a g e Table of Contents... 3... 3... 4... 4... 5... 5... 6... 6... 8... 8... 9... 9... 10...
BrainCert Enterprise LMS Learning Management System (LMS) documentation Administrator Guide Version 3.0 1 P a g e Table of Contents... 3... 3... 4... 4... 5... 5... 6... 6... 8... 8... 9... 9... 10...
Easy Website Creation Using WordPress. Welcome and thank you to our Sponsors
 Easy Website Creation Using WordPress Welcome and thank you to our Sponsors Easy Website Creation Using WordPress Every Business Needs a Website! Presented by: Todd Schafer Designer & WordPress Developer
General Settings General Settings Settings
 Contents General Settings... 3 Payment Methods... 31 Currency Management... 35 Sales Tax... 37 Commission Settings... 40 Affiliate Commission Settings... 43 Email Templates Management... 46 Subscription
How To Set Up The Genius Store Builder Theme Step--By--Step Guide For Building Your First Profitable Affiliate Store
 How To Set Up The Genius Store Builder Theme Step--By--Step Guide For Building Your First Profitable Affiliate Store Thank you for purchasing the InstaGenus plugin. You have received our bonus Genius Store
Affiliate Guide. Version Jan 2017
 Website: http://magehit.com Contact: sale@magehit.com Affiliate Guide Version 4.0.5 - Jan 2017 Configuration Go to System >> Configurations >> MageHit >> Affiliate Pro (or Affiliate Pro >> Configuration)
Wishlist Greeting Registration Manual
 Wishlist Greeting Registration Manual Table of Contacts Use the quick navigation links below to navigate through the manual: Introduction to Wishlist Greeting Registration Complete Activation Process Summary
USER MANUAL. SalesPort Salesforce Customer Portal for WordPress (Lightning Mode) TABLE OF CONTENTS. Version: 3.1.0
 TABLE OF CONTENTS. Version: 3.1.0") USER MANUAL TABLE OF CONTENTS Introduction...1 Benefits of Customer Portal...1 Prerequisites...1 Installation...2 Salesforce App Installation... 2 Salesforce Lightning... 2 WordPress Manual Plug-in installation...
USER MANUAL TABLE OF CONTENTS Introduction...1 Benefits of Customer Portal...1 Prerequisites...1 Installation...2 Salesforce App Installation... 2 Salesforce Lightning... 2 WordPress Manual Plug-in installation...
Introduction. Please Note! Webguidesetup.com
 Introduction Welcome to my WordPress guide. Using this guide you will learn how to find a web hoster, download WordPress, create a database and install WordPress as a content management system. You'll
Entrepreneur Theme Documentation
 Entrepreneur Theme Documentation Installation Plugins Updates (optional) Front Page Setup Front Page Editing Front Page: Site Title, Tagline and Logo Front Page: Website Colors Front Page: Sections Section
PaperWeight s User Manual (Admin Area)
") PaperWeight s User Manual (Admin Area) Prepared by: FATbit Technologies Copyright 2004 2014 FATbit Technologies. All Rights Reserved. The information contained in this document represents the current views,
PaperWeight s User Manual (Admin Area) Prepared by: FATbit Technologies Copyright 2004 2014 FATbit Technologies. All Rights Reserved. The information contained in this document represents the current views,
Making online easy. Cube Reviews User Guide
 Making online easy Cube Reviews User Guide Introduction page Funnel How to Link Your Review Sites page How to Customise Funnel Content page How to Customise Funnel Set-Up page 7 Widgets page 8 Invites
SOCIAL LOGIN FOR MAGENTO 2 USER GUIDE
 1 User Guide Social Login for Magento 2 Extension SOCIAL LOGIN FOR MAGENTO 2 USER GUIDE BSSCOMMERCE 1 2 User Guide Social Login for Magento 2 Extension Contents 1. Social Login for Magento 2 Extension
Getting Started with the Aloha Community Template for Salesforce Identity
 Getting Started with the Aloha Community Template for Salesforce Identity Salesforce, Winter 18 @salesforcedocs Last updated: November 30, 2017 Copyright 2000 2017 salesforce.com, inc. All rights reserved.
COUPONPAQ ADMIN USER GUIDE
 COUPONPAQ ADMIN USER GUIDE -2- Overview THANK YOU FOR CHOOSING COUPONPAQ SOFTWARE COUPONPAQ platform is the No 1 feature packed coupon distribution software on the market. It creates an effective incentive
 1 Daniel Web-Builders and Marketing cc MLM WEB DESIGN Multi Level Marketing Or call: +2776 384 7379 / 081 549 9250 We offer 04 different MLM website programs (Level 1) to increase SALES The price includes:
Hotel Booking Plugin for WordPress Documentation
 Hotel Booking Plugin for WordPress Documentation Updated on November 17, 2017 Overview Quick Start Guide Installation Add Seasons Add Services Add Accommodation Types Add Amenities Add Categories Add Rates
Newsletter Popup v3.x Configuration for Magento 2
 Newsletter Popup v3.x Configuration for Magento 2 From Plumrocket Documentation Contents 1. Configuring Newsletter Popup 3.x Extension for Magento 2 2. Managing Newsletter Popups 3. Managing Newsletter
BeetleEye Application User Documentation
 BeetleEye Application User Documentation BeetleEye User Documentation 1 Table of Contents Welcome to the BeetleEye Application... 6 Overview... 6 Navigation... 6 Access BeetleEye... 6 Update account information...
Sendroid Ultimate. User Manual
 Sendroid Ultimate User Manual System Overview Sendroid Ultimate is an ultimate bulk SMS portal software and SMS reseller system designed for bulk SMS service providers, SMS resellers and bulk SMS marketers.
Technical Support. Web site. 24online Support Contact. ( a) Technical support (Corporate Office):
 Technical support (Corporate Office):") Technical Support Please feel free to contact us for any of your query, comments, or requests concerning the software you purchased, your registration status, or similar issues to Customer Care/Service
Technical Support Please feel free to contact us for any of your query, comments, or requests concerning the software you purchased, your registration status, or similar issues to Customer Care/Service
EFM Community 3.1 Portal Administration Guide
 EFM Community 3.1 Portal Administration Guide WHITE PAPER For technical support please call: 1-800-787-8755 Or visit: Hwww.Vovici.comH Please contact Vovici technical support if you believe any of the
SOCIAL LOGIN FOR MAGENTO 2
 1 User Guide Social Login for Magento 2 SOCIAL LOGIN FOR MAGENTO 2 USER GUIDE BSS COMMERCE 1 2 User Guide Social Login for Magento 2 Contents 1. Social Login for Magento 2 Extension Overview... 3 2. How
Top 10 WordPress Plugins.
 Top 10 WordPress Plugins Thank you for downloading this ebook. I wrote this guide to help others learn which plugins are the best to install to use with WordPress. This ebook is a guide, and the purpose
WEBSITE INSTRUCTIONS. Table of Contents
 WEBSITE INSTRUCTIONS Table of Contents 1. How to edit your website 2. Kigo Plugin 2.1. Initial Setup 2.2. Data sync 2.3. General 2.4. Property & Search Settings 2.5. Slideshow 2.6. Take me live 2.7. Advanced
Startup Guide. Version 2.3.7
 Startup Guide Version 2.3.7 Installation and initial setup Your welcome email included a link to download the ORBTR plugin. Save the software to your hard drive and log into the admin panel of your WordPress
USER MANUAL. TapCRM TABLE OF CONTENTS. Version: 1.4
 USER MANUAL TABLE OF CONTENTS Introduction... 1 Benefits of TapCRM... 1 Prerequisites... 1 Installation & Configuration... 2 TapCRM Plug-in Installation... 2 Front Side Instructions... 9 Contact Us...
DOCUMENTATION OLAM WORDPRESS THEME
 DOCUMENTATION OLAM WORDPRESS THEME INDEX Theme installation 2 Setting up website 3 Sidebars & widgets 5 Working with EDD 8 Working with Unyson 8 Content Elements 9 Media elements 9 Olam elements 10 Creating
Wishlist 1-Click Registration Manual
 Wishlist 1-Click Registration Manual Table of Contents Use the quick navigation links below to navigate through the manual: Introduction to Wishlist 1-Click Registration Complete Activation Process Summary
Administrator Manual. Last Updated: 15 March 2012 Manual Version:
 Administrator Manual Last Updated: 15 March 2012 Manual Version: 1.6 http://www.helpdeskpilot.com Copyright Information Under the copyright laws, this manual may not be copied, in whole or in part. Your
Contents 1. How can I import my users from another platform? How can I Create Membership Levels and Subscription Packs?
 Contents 1. How can I import my users from another platform?... 2 2. How can I Create Membership Levels and Subscription Packs?... 5 3. Where is My Registration Page and How does the Registration Process
WEBSITE INSTRUCTIONS
 Table of Contents WEBSITE INSTRUCTIONS 1. How to edit your website 2. Kigo Plugin 2.1. Initial Setup 2.2. Data sync 2.3. General 2.4. Property & Search Settings 2.5. Slideshow 2.6. Take me live 2.7. Advanced
Jobmonster Document. by NooTheme
 Jobmonster Document by NooTheme Jobmonster Document GENERAL... 6 Jobmonster Instruction... 6 WordPress Information... 6 Download Theme Package... 6 Requirement For Jobmonster... 7 INSTALLATION... 7 Install
Table of content. Creating signup form Associating automation tools to signup form Signup form reports...42
 A User Guide Signup forms are the most popular tools for building a subscriber database. They let your website visitors become subscribers by entering basic details such as name and email address. The
DSS User Guide. End User Guide. - i -
 DSS User Guide End User Guide - i - DSS User Guide Table of Contents End User Guide... 1 Table of Contents... 2 Part 1: Getting Started... 1 How to Log in to the Web Portal... 1 How to Manage Account Settings...
TRACKABLE BULK MAIL SOLUTION ADDITIONAL FEATURE
 TRACKABLE BULK MAIL SOLUTION ADDITIONAL FEATURE TABLE OF CONTENTS Table of Contents... 1 Document Revision History... 3 Introduction... 4 Purpose... 4 Scope... 4 User Rights... 5 Overall Description...
USER MANUAL. SuiteCRM Customer Portal for Joomla TABLE OF CONTENTS. Version: 2.0
 USER MANUAL TABLE OF CONTENTS Introduction... 1 Benefits of Customer Portal... 1 Prerequisites... 1 Installation... 2 SuiteCRM Plug-in Installation... 2 Joomla Manual Plug-in installation... 3 Plug-in
Getting started guide for Administrators
 Getting started guide for Administrators Table of Contents Introduction... 3 Creating the school portal... 5 Navigating the platform... 6 Help Center... 12 Profile... 14 Configuring features... 16 Customizing
Administrator Manual. Last Updated: 15 March 2012 Manual Version:
 Administrator Manual Last Updated: 15 March 2012 Manual Version: 1.6 http://www.happyfox.com Copyright Information Under the copyright laws, this manual may not be copied, in whole or in part. Your rights
FB Image Contest. Users Manual
 FB Image Contest Users Manual Table of contents Description.. 3 Step by step installation... 5 The administration interface.. 10 Creating a new contest... 13 Creating a Facebook Application.. 19 Adding
System powered by FATbit Technologies
 Manual for GROUPON Script: bitfat Deals USER MANUAL FOR GROUPON: bitfatdeals SYSTEM System powered by FATbit Technologies Table of contents 1. Introduction. 3 of 98 2. Front End System Interface. 4 of
WORDPRESS 101 A PRIMER JOHN WIEGAND
 WORDPRESS 101 A PRIMER JOHN WIEGAND CONTENTS Starters... 2 Users... 2 Settings... 3 Media... 6 Pages... 7 Posts... 7 Comments... 7 Design... 8 Themes... 8 Menus... 9 Posts... 11 Plugins... 11 To find a
Blue Form Builder extension for Magento 2
 Blue Form Builder extension for Magento 2 User Guide Version 1.0 Table of Contents I) Introduction......5 II) General Configurations....6 1) General Settings.....7 2) ReCaptcha... 8 III) Manage Forms......
WordPress Maintenance For Beginners
 WordPress Maintenance For Beginners Content Pages, posts, users, links, widgets, menus, comments, products, etc. Media Images, documents, videos, music, etc. Plugins Function, features, and facilities.
Quick Start Guide #1 Getting Started & Basic Setup WishList Products
 1 Table of Contents A. Pre-Setup... 4 1) Secure a domain name:...4 2) Secure a hosting account:...4 3) Setup DNS accordingly:...4 B. Installation... 4 1) Download/Install WordPress to recently secured
Custom Contact Forms Magento 2 Extension
 Custom Contact Forms Magento 2 Extension User Manual This is the user manual of Magento 2 Custom Contact Forms v100.0.0 and was last updated on 29-06-2017. To see what this extension can do, go to the
A Guide to Using WordPress + RAVEN5. v 1.4 Updated May 25, 2018
 + v 1.4 Updated May 25, 2018 Table of Contents 1. Introduction...................................................................................3 2. Logging In.....................................................................................4
BrainCert HTML5 Virtual Classroom
 BrainCert HTML5 Virtual Classroom WordPress plugin documentation Version 1.5 1 TABLE OF CONTENTS 1.0 Installation... 4 2.0 Virtual Classroom Configuration... 5 BrainCert API Key... 6 BrainCert Base URL...
WordPress.com: Creating Your First Site
 MNC Nonprofit Technology and Communications Conference April 10 2014 WordPress.com: Creating Your First Site Presented by Peter Fleck, President, PF Hyper LLC pfhyper@gmail.com Gary Leatherman, Creative
Marketing & Back Office Management
 Marketing & Back Office Management Menu Management Add, Edit, Delete Menu Gallery Management Add, Edit, Delete Images Banner Management Update the banner image/background image in web ordering Online Data
Smart Bulk SMS & Voice SMS Marketing Script with 2-Way Messaging. Quick-Start Manual
 Mobiketa Smart Bulk SMS & Voice SMS Marketing Script with 2-Way Messaging Quick-Start Manual Overview Mobiketa Is a full-featured Bulk SMS and Voice SMS marketing script that gives you control over your
administrative control
 administrative control Powerful membership management features Administrative Control Powerful membership management features Member Management Create and manage member types Approve members via email
USER MANUAL. DynamicsPort - Dynamics CRM Customer Portal for Drupal TABLE OF CONTENTS. Version: 1.0
 USER MANUAL TABLE OF CONTENTS Introduction... 1 Benefits of Customer Portal... 1 Prerequisites... 1 Installation & Configuration... 2 Dynamics CRM Plug-in Installation... 2 Drupal Manual Plug-in installation...
ESSR European Space Software Repository
 ESSR European Space Software Repository Software User Manual T/ +4 031 424814 F/ +4 0314242816 E/ hello@innobyte.com W/ www.innobyte.com A/ Bl. Regiei, nr.6b, etaj 4-5, Sector 6, București, 060204, România
Admin Center. Getting Started Guide
 Admin Center Getting Started Guide Useful Links Create an Account Help Center Admin Center Agent Workspace Supervisor Dashboard Reporting Customer Support Chat with us Tweet us: @Bold360 Submit a ticket
Chat Connect Pro Setup Guide
 Chat Connect Pro Setup Guide Wordpress plugin data manager Live Streaming / Video Production Data Feed Plugin Setup Setup Process: Step 1 Purchase Plugin Step 2 Install plugin by uploading plugin inside
USER MANUAL. DynamicsPort - Dynamics CRM Customer Portal for Drupal TABLE OF CONTENTS. Version: 1.1
 USER MANUAL TABLE OF CONTENTS Introduction... 1 Benefits of Customer Portal... 1 Prerequisites... 1 Installation & Configuration... 2 Dynamics CRM Plug-in Installation... 2 Drupal Manual Plug-in installation...
USER MANUAL. Dynamics CRM Customer Portal for WordPress TABLE OF CONTENTS. Version: 1.2.1
 USER MANUAL TABLE OF CONTENTS Introduction... 1 Benefits of Customer Portal... 1 Prerequisites... 1 Installation... 2 Dynamics CRM Plug-in Installation... 2 WordPress Manual Plug-in installation... 5 Plug-in
How to Use Your EV Connect Account
 How to Use Your EV Connect Account Accessing the EV Connect Network To access the EV Connect network, point your web browser to http://network.evconnect.com. This brings you to the account login page.
Documentation for the new Self Admin
 Documentation for the new Self Admin The following documentation describes the structure of the new Self Admin site along with the purpose of each site section. The improvements that have been made to
USER MANUAL. SuitePort - SuiteCRM Customer Portal for WordPress TABLE OF CONTENTS. Version: 2.5.0
 USER MANUAL TABLE OF CONTENTS Introduction... 1 Benefits of Customer Portal... 1 Prerequisites... 1 Installation... 2 SuiteCRM Plug-in Installation... 2 WordPress Manual Plug-in installation... 3 Plug-in
Social Viral Video Training Manual
 2 Welcome! We have created a detailed guide on setting up and using Social Viral Video. Please go through it and let us know if you get stuck at anything. The app creation process is relatively long, but
Opaali Portal Quick guide
 Opaali Portal Quick guide Company information Telia Finland Oyj Teollisuuskatu 15, 00510 HELSINKI, FI Registered office: Helsinki Business ID 1475607-9, VAT No. FI14756079 1 (40) Page 2 (40) Copyright
About the Tutorial. Audience. Prerequisites. Copyright & Disclaimer. WordPress
 About the Tutorial WordPress is an open source Content Management System (CMS), which allows the users to build dynamic websites and blog. WordPress is the most popular blogging system on the web and allows
A User Guide. Besides, this Getting Started guide, you ll find the Zoho Campaigns User Guide and many other additional resources at zoho.com.
 A User Guide Welcome to Zoho Campaigns! This guide will help you create and send your first email campaign. In addition to sending an email campaign, you ll learn how to create your first mailing list,
USER MANUAL. DynamicsPort - Dynamics CRM Customer Portal for DotNetNuke TABLE OF CONTENTS. Version: 1.2.1
 USER MANUAL TABLE OF CONTENTS Introduction... 1 Benefits of Customer Portal... 1 Prerequisites... 1 Installation & Configuration... 2 Dynamics CRM Plug-in Installation... 2 DotNetNuke Manual Plug-in Installation...
DonorDrive Fundraising Guide: Getting Started with Online Fundraising
 DonorDrive Fundraising Guide: Getting Started with Online Fundraising We here at DonorDrive created this guide to help you navigate your Fundraiser Portal. Your DonorDrive Fundraiser Portal will help you
Primary Source Verification. How to Apply
 Primary Source Verification Oman Society of Engineers (OSE) - Sultanate of Oman How to Apply A Step By Step Guide for Completing Your Application If you are applying as an individual applicant, click here
SPECIFICATIONS Insert Client Name
 ESSENTIAL LMS BRANDING SPECIFICATIONS Insert Client Name Creation Date: June 23, 2011 Last Updated: July 11, 2017 Version: 16.5 Page 1 Contents Branding Elements... 3 Theme Management... 3 Header Images...
KNOWLEDGE MANAGEMENT (SHAREPOINT ADD-IN)
") KNOWLEDGE MANAGEMENT (SHAREPOINT ADD-IN) Enterprise version Updated: May 2018 Version 1.0.0.2 Copyright Beyond Intranet 2017. All Rights Reserved i Notice Beyond Technologies LLC. This is a controlled
KNOWLEDGE MANAGEMENT (SHAREPOINT ADD-IN) Enterprise version Updated: May 2018 Version 1.0.0.2 Copyright Beyond Intranet 2017. All Rights Reserved i Notice Beyond Technologies LLC. This is a controlled
USER MANUAL. DynamicsPort - Dynamics CRM Customer Portal for Drupal TABLE OF CONTENTS. Version: 1.2
 USER MANUAL TABLE OF CONTENTS Introduction... 1 Benefits of Customer Portal... 1 Prerequisites... 1 Installation & Configuration... 2 Dynamics CRM Plug-in Installation... 2 Drupal Manual Plug-in installation...
Lead Rocket Training Manual
 Lead Rocket Training Manual Discover the Most Incredible Bonus Gift Ever! Just go to http://undergroundmarketers.com/bonus This guide is devised into 3 parts the first section details how to install, activate
Crypterio Theme Documentation
 Crypterio Theme Documentation Also available Online manual and Video tutorials. 2001 2018 Stylemix LLC Table of Contents Getting Started... 1 Introduction... 1 System Requirements... 2 Installing the Theme...
USER MANUAL. DynamicsPort - Dynamics CRM Customer Portal for WordPress TABLE OF CONTENTS. Version: 1.2.1
 USER MANUAL TABLE OF CONTENTS Introduction... 1 Benefits of Customer Portal... 1 Prerequisites... 1 Installation... 2 Dynamics CRM Plug-in Installation... 2 WordPress Manual Plug-in installation... 5 Plug-in
Documentation of Woocommerce Login / Sign up Premium. Installation of Woocommerce Login / Sign up Premium
 Documentation of Woocommerce Login / Sign up Premium Installation of Woocommerce Login / Sign up Premium Installation Install Word Press from http://codex.wordpress.org/installing_wordpress. Upload via
USER GUIDE. Version 2.0. Reflex Online Cash Management
 TM USER GUIDE Version 2.0 Reflex Online Cash Management Table of Contents USER GUIDE VERSION 2.0 Table of Contents... 2 1. Introduction... 4 1.1 What is Reflex?... 4 1.2 How do I access Reflex?... 4 1.3
Sync User Guide. Powered by Axient Anchor
 Sync Powered by Axient Anchor TABLE OF CONTENTS End... Error! Bookmark not defined. Last Revised: Wednesday, October 10, 2018... Error! Bookmark not defined. Table of Contents... 2 Getting Started... 7
Case Management System
 Case Management System Administrator Instructions Your Lighthouse Services Case Management System (CMS) has been set up and is ready for your use. It is a powerful tool to oversee and manage all your Lighthouse
Anchor User Guide. Presented by: Last Revised: August 07, 2017
 Anchor User Guide Presented by: Last Revised: August 07, 2017 TABLE OF CONTENTS GETTING STARTED... 1 How to Log In to the Web Portal... 1 How to Manage Account Settings... 2 How to Configure Two-Step Authentication...
SAP Jam Communities What's New 1808 THE BEST RUN. PUBLIC Document Version: August
 PUBLIC Document Version: August 2018 2018-10-26 2018 SAP SE or an SAP affiliate company. All rights reserved. THE BEST RUN Content 1 Release Highlights....3 1.1 Anonymous access to public communities....4
Table of Contents 1. ABOUT THE GIS PANGEA SYSTEM 5 2. HOME DASHBOARD OVERVIEW MANAGER DASHBOARD OVERVIEW 66
 Table of Contents 1. ABOUT THE GIS PANGEA SYSTEM 5 PANGEA SYSTEM REQUIREMENTS 5 PANGEA MOBILE COMPATIBILITY 6 LOGGING IN TO PANGEA 6 MANAGING USER ACCOUNT SECURITY AND DELEGATE INFORMATION 13 ABOUT SESSION
Case Management System
 Case Management System Investigator/non-Administrator Instructions Your Lighthouse Services Case Management System (CMS) has been set up and is ready for your use. It is a powerful tool to oversee and
BOLT eportfolio Student Guide
 BOLT eportfolio Student Guide Contents BOLT EPORTFOLIO STUDENT GUIDE... I BOLT EPORTFOLIO BASICS... 3 BOLT eportfolio user interface overview... 3 Dashboard... 3 My Items Page... 4 Explore Page... 5 Sharing
Mobile Login extension User Manual
 extension User Manual Magento 2 allows your customers convenience and security of login through mobile number and OTP. Table of Content 1. Extension Installation Guide 2. Configuration 3. API Settings
Reviewer Plugin. Ultimate Reviews & User Ratings. Version Author: Michele Ivani Reviewer Plugin v. 3.6.
 Reviewer Plugin Ultimate Reviews & User Ratings Version 3.6.0 Author: Michele Ivani Twitter: @Michele_Ivani Reviewer Plugin v. 3.6.0 1 di 15 Index # Getting started 3 Install the plugin 3 Installation
In This Guide. More Help Elsewhere. Quick Start Guide WRTG 101 with Professor Hoskins edspace.american.edu
 Quick Start Guide WRTG 101 with Professor Hoskins edspace.american.edu In This Guide Log In 2 Change Password 2 Change Display Name and Set Profile 3 Orientation to Dashboard and Toolbar 4 Setting Your
OxyClassifieds Handbook
 OxyClassifieds Handbook OxyClassifieds Team Email: office@oxyclassifieds.com Web: http://www.oxyclassifieds.com OxyClassifieds Handbook by OxyClassifieds Team Copyright 2006-2011 www.oxyclassifieds.com
Secure Access Manager User Guide September 2017
 Secure Access Manager User Guide September 2017 1 1 INTRODUCTION... 3 1.1 SUMMARY... 3 2 BASIC FUNCTIONS... 3 2.1 LOGIN TO YOUR SAM ACCOUNT... 3 2.1.1 How to Activate your Account... 3 2.1.2 How to Login
USER MANUAL. DynamicsPort - Dynamics CRM Customer Portal for WordPress TABLE OF CONTENTS. Version: 1.1
 USER MANUAL TABLE OF CONTENTS Introduction... 1 Benefits of Customer Portal... 1 Prerequisites... 1 Installation... 2 Dynamics CRM Plug-in Installation... 2 WordPress Manual Plug-in installation... 5 Plug-in
1. Beginning (Important)
") Appointway Wordpress" Documentation by InkThemes Get Your Site Ready in Just 1 Click Thank you for purchasing our theme. If you have any questions that are beyond the scope of this help file, please feel
Appointway Wordpress" Documentation by InkThemes Get Your Site Ready in Just 1 Click Thank you for purchasing our theme. If you have any questions that are beyond the scope of this help file, please feel
edirectory Change log
 edirectory 11.2.00 Change log Arca Solutions 7138 Little River Turnpike #1825 Annandale, VA 22003 www.arcasolutions.com 1. What s new 1. Sponsors can now add a video to their classifieds ads 2. Sponsors
WordPress Maintenance For Beginners
 WordPress Maintenance For Beginners Content Pages, posts, users, links, widgets, menus, comments, products, etc. Media Images, documents, videos, music, etc. Plugins Function, features, and facilities.
User s Guide to MiParque.org
 User s Guide to MiParque.org Columbia College IAM Team 2012 12/9/2012 TABLE OF CONTENTS 1. Logging In / Dashboard 2. Appearance 3. Plugins 4. Users 5. Tools 6. Settings 7. MiIdea (Disqus) 8. Pages 9. Polls
Vantiv ecommerce for Magento 1 User Guide. Version 1.0.7
 Vantiv ecommerce for Magento 1 User Guide Version 1.0.7 Vantiv ecommerce for Magento 1... 1 User Guide... 1 1. Project... 3 2. Onboarding... 3 3. Installation... 3 4. Configuration... 5 5. Nuances for
JSN UniForm Configuration Manual Introduction
 JSN UniForm Configuration Manual Introduction JSN UniForm is a Joomla! Form extension which helps you create forms quickly and easily - from normal to complex. Moreover, you can efficiently manage all
USER MANUAL. DynamicsPort - Dynamics CRM Customer Portal for Joomla TABLE OF CONTENTS. Version: 1.0
 USER MANUAL TABLE OF CONTENTS Introduction... 1 Benefits of Customer Portal... 1 Prerequisites... 1 Installation & Configuration... 2 Dynamics CRM Plug-in Installation... 2 Joomla Manual Plug-in installation...
If you are not registered as Developer yet, you need to click blue button Register.
 Facebook 1. Login to your Facebook account. 2. Go to the Developers page: https://developers.facebook.com/ If you are not registered as Developer yet, you need to click blue button Register. FAQ: Question:
USER MANUAL. DynamicsPort - Dynamics CRM Customer Portal for Joomla TABLE OF CONTENTS. Version: 1.2
 USER MANUAL TABLE OF CONTENTS Introduction... 1 Benefits of Customer Portal... 1 Prerequisites... 1 Installation & Configuration... 2 Dynamics CRM Plug-in Installation... 2 Joomla Manual Plug-in installation...