User s Guide. (Virtual Terminal Edition)
|
|
|
- Alaina Thomas
- 5 years ago
- Views:
Transcription


1 User s Guide (Virtual Terminal Edition)
2 Table of Contents Home Page... 4 Receivables Summary... 4 Past 30 Day Payment Summary... 4 Last 10 Customer Transactions... 4 View Payment Information... 4 Customers Page... 5 Customers... 5 Access customer profile... 5 New Invoice Button... 6 Filter Options... 7 Export Button... 7 Import Button... 8 Import a customer file:... 8 New Button... 9 Customer Profile Delete Customer Actions Section View Customer Information Current Statements Current Invoices Transaction History Payment Plans Credit History Saved Accounts Virtual Terminal Page...14 Billing Page...15 Invoices Tab Recurring Invoices Bulk Payment Entry Invoice Filter Options Invoice details Access customer details Action items Export Button Import Button New Button (Invoice) Statements Tab Filter Options Export Button New Button (Statement) Reports Page...23 Transactions Payment Gateway Log Accounts Receivable User History Profile Changes Report: Customer Account Activity Report
3 Table of Contents Settings Page Merchant Information Login Settings Level 2 Defaults Level 3 Defaults Invoice Settings Payment Settings Reminder Settings Customization Settings Customer Settings Enrollment Settings Settings Editing s Using Custom Fields in Customer Welcome Settings Customer Login Information Settings Customer Login Information Username Settings Invoice Settings Statement Settings Payment Confirmation Settings. 46 AutoPay Declined Settings Non-Sufficient Funds (NSF) Settings Refund Settings Payment Reminder Settings AutoPay Reminder Settings Credit Card Expiration Reminder Settings

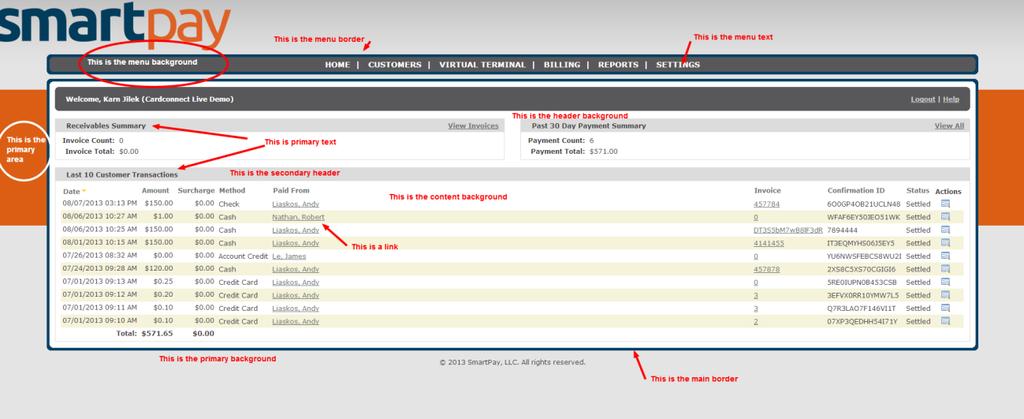
shows your total receivables by invoice count and total dollars.")
4 Welcome to SmartPay! Home Page This document will help you navigate the system and make the most of the functionality available to you in SmartPay. This document is also available in SmartPay, simply by selecting the help button from any screen. This button is located on the far right of the Welcome line. (Next to logout.) Home Page When you login to SmartPay, you will immediately see the Home screen, which shows a summary of your current receivables, a summary of payments received in the past 30 days and a listing of the last 10 customer payments received. Receivables Summary This section (A)shows your total receivables by invoice count and total dollars. To view individual invoices, click on the View Invoices link in the upper right hand corner of this section. Past 30 Day Payment Summary This section (B)shows the total payments made in the last 30 days by payment count and total dollars. To view individual payments, click on the View All link in the upper right hand corner of this section. Last 10 Customer Transactions Your last 10 customer transactions are listed here. To sort this list, simply click on the header for the column you would like to sort. Click the header a second time to reverse the sort order. To see details on a particular customer, click on the customer s name in the Paid From column. (C) To see details of a particular invoice, click on the invoice number in the Invoice column. (D) View Payment Information To view payment information for a particular customer, click on the View Payment icon in the Actions column. (E) This is the icon: 4

5 Customers Page Customers Page The customer section allows you to manage your customers in SmartPay. From this page, you can add a new customer, edit existing customers, filter, sort, import and export customer information and create a new invoice. Customers To sort any column, click the word in the column header. To reverse your sort, click again. Access customer profile To access a specific customer, click on their name (A) or click on the appropriate icon in the Actions column. (B) Action icons: Edit customer information. This brings you to the customer s profile page. Create new invoice. This brings up the create a new invoice screen and automatically pre-fills the customer information for you. Send customer their login. Clicking this icon will send an to the customer informing them of their login information. Text for this is defined in Account Settings, Settings, Customer Login Information template. Access Virtual Terminal Remove this customer. This removes the customer from the SmartPay system. You will be asked to confirm the removal before it will be done. 5
6 Customers Page New Invoice Button At the top left of the customer listing, right below the Customers heading, there is a button titled New invoice. This function allows you to create a new invoice for any current customer. When you click on the new invoice button, the Add New Invoice window appears (see graphic). Fill in the relevant information and select save for a one-time invoice or recurring for a recurring invoice. The information you need to add a new invoice includes: Customer (billed to). If you don t know the number you can look it up by selecting the Search button. Initial Date (invoice date). You can enter a date, click on the calendar to select a date, or click on current date to insert today s date. Date Due. You can enter a date, click on the calendar to select a date, or click on current date to insert today s date. Amount Due. The amount the customer owes. Discount. Click the checkbox if you offer an early payment discount. When you click this box, additional options will appear, allowing you to select your discount terms. (Percentage or dollar amount as well as days before due.) Invoice Number. Your invoice number. This must be a unique number, as duplicates are not allowed. Custom pdf. If you choose to attach an invoice to the , this is where you would select that file. Description. A description of the invoice for the customer. Line Items. This is where you add line item details to an invoice. When you click Add Line Item, a new line will appear asking for dollar amount and description. Select the Save icon for a one-time charge or the Recurring icon for a recurring charge. Select Cancel to discard your changes. 6
7 Customers Page Filter Options This option is directly under the New Invoice button and is where you filter the current list of customers that are displayed or that will be exported when you click the export button. You can filter by: First Name Last Name Business Name Customer ID Address Zip Code State Phone Number The filter will return all customers whose criteria starts with the information entered. Once you have selected your filter options, click on Search to bring up your results. (Note that the Rows Per Page field allows you to choose to see 50, 100 or 200 customers at a time.) In the filter options window, you will also see the following buttons: Search Updates the customer list using the current filters. Remove all filters Removes all filters you have selected and displays the system default customer list. Load default filters Loads the filter set you have saved as your default, if you have saved one. Save as default Saves the current filters as your default filters. Every time you go into this function, the initial list displayed will be defined by this filter. Export Button This allows you to export the current customer list to a CSV file that you can save locally. The list of customers is generated using the current filter set. (See above for more information on filters.) All pages of the currently filtered customer list will be exported. 7

8 Customers Page Import Button This allows you to import a list of customers into SmartPay from a CSV file. When you select import, the window below will appear. Note that you must open SmartPay in Internet Explorer or Firefox to use this functionality. Import a customer file: Choose your file type. Options include comma delimited, tab delimited or custom delimiter. (A delimiter is the character used to separate data columns.) Delimiter. If you choose custom delimiter, you will need to enter the appropriate character in this box. Select or unselect First row is column headers as appropriate. If this box is checked, the import utility will use the very first data row as the column headers. If your file does not have column headers, make sure this box is unchecked. Select Choose File and find the appropriate file. This is where you select the file that you wish to upload. Please limit the size of your file to 5 MB. (Make sure file name appears to the right of the Choose file button after you have made your selection.) Click Next. The system will upload your file, bringing you to a preview screen where you can map the columns. This is where you match the columns of your file to the fields in the system. If the First row is column headers check box was selected, the system will attempt to automatically determine these mappings for you based upon the name of the column. If there is a column that does not match up with a system field or that you simply want to exclude, you can select the Skip Column option for that column. Once you have finished mapping the columns, click the import button to import the customers. When you click the import button, the entire file will first be validated to make sure that all of the records in the file meet the requirements for required fields and don t have duplicated values for fields that don t allow duplicates. If there are any validation errors, they will be displayed so you can fix them. The file will not be imported until all the errors are fixed. 8
9 Customers Page New Button This is where you create a new customer in SmartPay. When you click on New, the Add New Customer window will appear. The required information for a new customer is marked with a red asterisk(*). Unique customer ID must be specified. If you enter a customer ID that is already in use, you will be asked to change it before you can save the new customer. Tax ID (Social Security Number) is an optional field. Customer s first and last name (Customer s Middle Name is optional.) Business Name that the customer works for. There is a checkbox where you can choose to send (or not send) a welcome to the customer. If this box is checked, then a welcome will be sent. Text for this is defined in Account Settings, Settings, Customer Welcome Settings. Please make sure you have setup your Welcome prior to checking this box for any new customers. A primary address. Up to two additional addresses. Please note that if you specify additional addresses, all s sent from the system to the primary address will be carbon copied (cc) to the additional addresses. Primary and Billing addresses. Phone numbers Daytime, evening, cell and fax as appropriate. A username and password. o o Usernames must be between 3 and 50 characters, contain only alpha-numeric, period (.), hyphen (-), underscore (_) or at sign (@) characters. They cannot start or end with a period, hyphen character. Passwords must be at least 7 characters in length and contain both alpha and numeric characters. Passwords must be changed every 90 days. A user s current password cannot be the same as any of the last four passwords. Users will be locked out of the system after 6 failed login attempts. Once a user is locked out, they will remain locked out until a merchant administrator unlocks them. If you do not want to assign a password, click the Generate button to have the system create a password that meets all the criteria. Note that the password will be masked, so you must have and address for the customer. An will be sent to them with their new password. Click the save button to keep your changes or the Cancel button to discard your changes. 9

 Delete Customer Removes the customer from the database.")
10 Customers Page Customer Profile You access the customer profile by either clicking on the customer s name or clicking the Edit Customer Information action icon under the Actions column. This section allows you to view, modify and control all of the information, invoices, statements, payments, refunds and saved accounts for that customer. The customer profile page is divided into several sections to help organize the information and make it easy to view. All sections can be expanded and collapsed by clicking on the black arrow to the left of the section heading. (See image below.) Delete Customer Removes the customer from the database. (See image above.) Customers cannot be deleted if they have any invoices with a balance due. (Action will not appear if it cannot be used.) To delete the customer you are on, click Delete Customer. Do not delete a customer until all pending payments have been settled. Actions Section This section has links to perform many of the common actions to manage the customer. Virtual Terminal. To access this section, click on Virtual Terminal. When you do this, the Virtual Terminal function will open, allowing you to verify, capture, or process a payment for your customer without the need to create an invoice record. This function also allows you to issue refunds/credits to customers. For more information, please see the Virtual Terminal section in this users guide. 10
11 Customers Page Create a new invoice. To access this section, click on Create New Invoice. When you do this, the Add New Invoice window will appear. It will be pre-populated with the customer s name. You will need to add/edit the following: Customer (billed to). This is pre-populated when you select Add New Invoice from a customer record. Initial Date (invoice date). You can enter a date, click on the calendar to select a date, or click on current date to insert today s date. Date Due. You can enter a date, click on the calendar to select a date, or click on current date to insert today s date. Amount Due. The amount the customer owes. Discount. Click the checkbox if you offer an early payment discount. When you click this box, additional options will appear, allowing you to select your discount terms. (Percentage or dollar amount as well as days before due.) Invoice Number. Your invoice number. This field does not allow duplicates. Custom pdf. If you choose to attach an invoice to the , this is where you would select that file. Description. A description of the invoice for the customer. Line Items. This is where you add line item details to an invoice. When you click Add Line Item, a new line will appear asking for dollar amount and description. Select the Save icon for a one-time charge or the Recurring icon for a recurring charge or Cancel to discard your changes. Pay Invoices allows you to enter a payment for the customer using one of the customer s saved accounts or by entering a new account. Create Payment Plan allows you to create a payment plan for the customer. Enter a manual payment allows you to enter a manual payment for an invoice if the customer mailed you their payment or did not make the payment using the payment interface system. Create new statement allows you to create a new statement that summarizes one or more invoices. The customer must have invoices with a current balance for you to create a statement for them. Send login information sends an to the customer to remind them of their username and password to login to your portal. The sent to the customer uses the Customer Login Information template. Send welcome sends an to the customer informing them of this portal and how they can login to use it. The sent to the customer uses the Customer Welcome template, as defined in Account Settings. Reset password resets the customer s password. It assigns a temporary password and s that information to the customer. The customer will be required to change their password again the first time they login after having their password reset. The that is sent to the customer uses the Customer Login Information template. 11
12 Customers Page Edit AutoPay. This is where you enable or disable AutoPay. When you click on this function, it will bring up the AutoPay Settings window where you click the appropriate option. Unlock Login. If a customer is locked out of their account due to too many failed login attempts, you will need to unlock them before they can login. To do this: Go to Customers. Click on the appropriate customer. Click on Unlock login. Note that nothing will happen indicating the unlock was successful, but it did happen. If a customer continues to have trouble logging in, have them clear their cookies and/or cache in their browser. View Customer Information This is where you view and edit customer information such as their name, address, mailing address, phone number and username. For security purposes, you cannot view or edit their password. Usernames must be between 3 and 50 characters, contain only alpha-numeric, period (.), hyphen (-), underscore (_), or at sign (@) characters. They cannot start or end with a period, hyphen character. Current Statements This is where you can view a list of the customer s current statements. The list can be sorted by clicking on a column header. The actions column of the listing table also provides you with the ability to view, edit, and delete statements. Current Invoices This is where you can view a list of the customer s active invoices. The list can be sorted by clicking on a column header. The actions column also provides you with the ability to view, edit, , pay and delete invoices. Invoice status options include: Active indicates that the invoice still has a current balance due. Paid indicates the invoice has been paid in full. Archived indicates that the invoice is either paid in full or is no longer valid. Within this section, you can or Delete invoices. To do this: 1. Check the box next to the invoice(s) you want to view or delete 2. Go to the with checked: drop down list and select the appropriate action 3. Click Go. Also within this section you can view the customer s invoice history. Simply click View History next to Current Invoices. The system will take you to the Invoice History window where you can look at individual invoices or export the data. 12
13 Customers Page Transaction History This section shows a list of all the transactions on the customer s account. The list defaults to sorting by most recent first. You can sort the list by any column, simply by clicking on a column header. The actions column provides you with the ability to view a transaction, view a receipt or access Virtual Terminal. To reverse a payment, click on the Virtual Terminal icon. Reverse Payment icon. The system will bring you to the Virtual Terminal window where you can reverse the payment. Payment Plans This section shows a list of any payment plans the customer has set up with you. Credit History This section shows a list of any refunds you have issued to the customer. The list can be sorted by clicking on a column header. Saved Accounts This section is where you view, add, edit and delete the customer s saved accounts. Only credit cards and bank accounts may be retained as a saved account. To add a new credit card or bank account, click the appropriate link on the right hand side. A window will pop up where you can add the required information. You will notice two questions at the top of this window: Default Account? Check this box if you want this to be the default account the system uses for payment. Not visible to customer? This is for customers who allow payment plans and should only be checked if you do NOT want the customer to have access to edit or delete the account. To delete a saved account, click on the trash icon under Actions. 13
14 Virtual Terminal Page Virtual Terminal Page The Virtual Terminal Page is where you can process payments and refunds, authorize and verify credit card accounts without first creating an invoice. On the Virtual Terminal screen (below), you will see three sections: Payment Type, Customer Information, Payment Information and Line Item Detail. These functions are described below. Payment Type is where you select the type of transaction you wish to process. Your options include: o Charge a credit card. Using this function, you can process a payment (Authorize and Capture), authorize only, or verify a credit card. o Refund a credit card. This is where you issue refunds. o Charge a bank account. This is where you process ACH transactions. o Refund a bank account. This is where you issue ACH refunds. Customer Information is where you enter an existing customer or add a new customer. You must enter all customer information in order to perform any virtual terminal functions. Payment Information is where you enter the amount of the payment, the purchase order number (if any), the invoice number (if any) and select tax exempt, if appropriate. New Cred/Debit Card is where you are able to add a new credit or debit card. Here you can choose to save the card information, set it as the default card, and if it is visible to the customer. Line Item Detail is where you enter details of the transaction, if you so choose. o If you click on Add Line Item, the fields under Line Item Detail become editable. You can enter any of the following information: Item #/SKU Description Units (unit of measure) Quantity Unit Price Discount (note that this is only a dollar amount.) Tax Commodity o If you enter too many lines or want to delete the line item detail, click delete on the far right side of the row you want to delete. o When you are done entering all of your details, click the submit button to process your transaction. The system will send a confirmation to the customer and you will see a transaction confirmation appear on your screen. 14

15 Billing Page Billing Page The Billing page is where you manage your invoices and statements in SmartPay. In this section you will find details on outstanding invoices as well as the functionality to add new or recurring invoices, enter bulk payments, sort, filter, export and import. Click on the appropriate option to select it. Click here to sort. Invoices Tab The default view is the Invoices tab (above) where it lists the first few active SmartPay invoices. To sort any column, click on the title in the column header. To perform a reverse sort, simply click again. To view a particular invoice or customer, click on that invoice or customer. You may also choose any of the following action icons to perform the activities identified. View Invoice Edit Invoice invoice Enter a manual payment Delete invoice On the Invoices tab, at the top left of the customer listing, you will see links for Recurring Invoices and Bulk Payment Entry. Below these buttons, you will find Filter Options and a With Checked option. See below for more details. 15
16 Billing Page Recurring Invoices This function allows you to turn a new invoice into a recurring invoice. Any values that you have already entered will be copied to the new recurring invoice form that is displayed after clicking the button. To create a new recurring invoice, click on the Recurring Invoices, then the New button on the right hand side. The Add New Recurring Invoices window will appear. You will need to complete the following: Enter the customer or search for the appropriate customer by clicking on the Search button. Select a name for your template. Enter the amount of the invoice. Enter the frequency that you would like the invoice to occur. This can be o Daily enter the number of days between invoices. o Weekly enter the number of weeks between invoices and the day you would like it generated. o Monthly enter either the day or week on which you want the invoice generated each month. o Yearly Enter the month and day on which you want the invoice generated each year. Enter the start date. Select the appropriate option for duration. (How long you want the recurrence to happen.) Options include: o Forever o End after X occurrences o Stop after a specific date Enter a Description for the invoice. Select the appropriate notification options. Text for these s is defined in Account Settings, Settings, Payment Reminder Settings and Invoice . Click on Save to keep your changes or Cancel to discard your changes. 16

17 Billing Page Bulk Payment Entry If you have multiple manual payments that need to be entered into the system, you can do that with bulk payment entry. This feature allows you to enter manual payments from up to 25 customers at a time. At the top of the page, select the payment method either cash or check. (A) Below the payment method, there is a checkbox to automatically fill in the customer s outstanding balance, should you choose to select it. (B) This function accesses customer records by either their Customer ID or address. (C) Choose the appropriate option in the dropdown box next to Unique Customer Identifier. Once you have entered all of your customers (or filled the page), click on one of the save options at the bottom of the page. Save and Review Saves the payment entries and takes you to a review page that you can print for your records. Save and Continue Entry Saves the payment entries, then clears out the customer and payment information on the screen to allow you to continue entering manual payments. This is useful if you have more than 25 payment entries to make. If there are errors in your payment entries, the system will display the errors after you click either of the save options. If there are any errors, no payment entries will be saved until they are corrected. 17
18 Billing Page Invoice Filter Options This option is directly under the Recurring Invoices and Bulk Payment Entry functions and is where you filter the current list of customers that are displayed or that will be exported when you click the export button. You can filter by: Customer ID Name Business Name Invoice Number Invoice Status (Active, Paid,Archived) Status (Any, Sent, Not Sent) Due Date Range Invoice Date Range Invoice Amount Range The filter will return all customers whose criteria starts with the information entered. Once you have selected your filer options, click on Search to bring up your results. (Note that the Rows Per Page field allows you to choose to see 50, 100 or 200 customers at a time.) In this window, you will also see the following buttons: Search Updates the customer list using the current filters. Remove all filters Removes all filters you have selected and displays the system default customer list. Load default filters Loads the filter set you have saved as your default. If you have not saved a custom set as your default filter set, the system default filter set is loaded. Save as default Saves the current filters as your default filters. Every time you go into this function, the initial list displayed will be defined by this filter. Invoice details To access details of a specific invoice, click on that invoice number. This will open a new window with invoice details and a Pay Now option, allowing you to process a payment on that invoice. If you select Pay Now, the Make a Payment window will appear, allowing you to enter required payment details. 18
19 Billing Page Access customer details To access specific customer details, click on the customer s name. This will bring up the customer window with all associated functionality that you find in the customers section. Action items The following functions are available under Actions: Export Button View Invoice Edit Invoice invoice Enter a manual payment Delete invoice This allows you to export the current customer list to a CSV file that you can save locally. The list of customers is generated using the current filter set. (See prior section for more information on filters.) All pages of the currently filtered customer list will be exported. 19
20 Billing Page Import Button This function allows you to import a list of customers into SmartPay from a CSV file. When you select import, the Import Customers window will appear. Note that you must open SmartPay in Internet Explorer or Firefox to use this functionality. To import a file: Choose your file type. Options include comma delimited, tab delimited or custom delimiter. (A delimiter is the character used to separate data columns.) Delimiter. If you choose custom delimiter, you will need to enter the appropriate character in this box. Select or unselect First row is column headers as appropriate. If this box is checked, the import utility will use the very first data row as the column headers. If your file does not have column headers, make sure this box is unchecked. Select Choose File and find the appropriate file. This is where you select the file that you wish to upload. Please limit the size of your file to 5 MB. (Make sure file name appears to the right of the Choose file button after you have made your selection.) Click Next. The system will upload your file, bringing you to a preview screen where you can map the columns. This is where you match the columns of your file to the fields in the system. If the First row is column headers check box was selected, the system will attempt to automatically determine these mappings for you based upon the name of the column. If there is a column that does not match up with a system field or that you simply want to exclude, you can select the Skip Column option for that column. Once you have finished mapping the columns, click the import button to import the customers. When you click the import button, the entire file will first be validated to make sure that all of the records in the file meet the requirements for required fields and don t have duplicated values for fields that don t allow duplicates. If there are any validation errors, they will be displayed so you can fix them. The file will not be imported until all the errors are fixed. New Button (Invoice) To create a new invoice in SmartPay, click the New button in the upper right corner of the invoice listing page. This will bring up the Add New Invoice window. The information you need to add a new invoice includes: Customer (billed to). If you don t know the number you can look it up by selecting the Search button. Initial Date (invoice date). You can enter a date, click on the calendar to select a date, or click on current date to insert today s date. Date Due. You can enter a date, click on the calendar to select a date, or click on current date to insert today s date. Amount Due. The amount the customer owes. Discount. Click the checkbox if you offer an early payment discount. When you click this box, additional options will appear, allowing you to select your discount terms. (Percentage or dollar amount as well as days before due.) 20
21 Billing Page Invoice Number. Your invoice number. Duplicate invoice numbers are not allowed. Custom pdf. If you choose to attach an invoice to the , this is where you would select that file. Description. A description of the invoice for the customer. Line Items. This is where you add line item details to an invoice. When you click Add Line Item, a new line will appear asking for dollar amount and description. Select the Save icon for a one-time charge or the Recurring icon for a recurring charge. Select Cancel to discard your changes. Statements Tab The statements interface allows you to manage your statements in SmartPay. A statement is defined as a snapshot of one or more invoices grouped together at a given point in time. On this page you can filter for specific statements using the options listed below. Filter Options You can filter by any of the criteria listed under Filter Options (see graphic below): Customer ID: Filters the statement list by the customer ID. Name Business Name Statement Number Date Range Min/Max Amount Enter whichever criteria you want to filter for and select the Search button. Remove All Filters This option removes all filters and displays the system default statement list. Load Default Filters This option loads the filter set you have saved as your default. Save As Default This option saves the current filter as your default. 21
22 Billing Page Export Button This button allows you to export the current statement list to a CSV file that you can save locally on your computer. The list of statements is generated using the current filter set. To change the exported file, simply change your filter set. New Button (Statement) This button in the upper right corner of the statements page allows you to create a new statement in SmartPay. To create a new statement: Click the New button. The system will bring up the Add New Statement window. The required information for a new statement is o Customer (billed to field) o At least one invoice o Statement number o Creation date Click Search and enter the relevant criteria to find the correct customer. Select the customer, then click Next. The system will bring up all open invoices for that customer. Click on the box to the left of the invoice number to select each invoice you want to include on the statement. To select all invoices, click on the selection box to the left of Invoice in the header bar. Enter a statement number. Enter the date you want on the statement. Enter a description. (Optional) Click Save. This creates a statement for this customer. 22

23 Reports Page Reports Page This section allows you to view various reports about your customers, invoices and payments. Transactions This report shows all of the transactions that have been processed and the status of those transactions. Click on Transactions to access the report. You can sort, filter and export. In addition, you can the report. The report defaults to show the most recent payments. In the status column on the far right, you will find the status of each payment. (See below) Options include: Auth Only - This is an authorization only, no funds change hands. Captured This transaction has been captured and is currently pending settlement. The status will be updated to Accepted once the transaction has settled. Settled This transaction has been settled. Rejected This transaction has been rejected. Voided This transaction was voided prior to settlement. Export: This button, to the right of Transactions, will export all transactions returned by your default settings to a CSV file. If you do not have default filter settings saved, then the system default filter settings are used. o change the exported file, filter your records to reflect the criteria you want, then click Export. 23
24 Reports Page Filter Options: When you click on Transactions, you will see the list of recent transactions processed. You can filter this list by clicking on Filter Options at the top of the page. This brings you the window below to enter criteria by which to filter. Below the filters is the reports table. You can sort the report by clicking on one of the column headings. Clicking the column header a second time will toggle the sort direction of the column. Clicking on a customer name will bring you to the profile page for the customer that made the payment. Clicking on an invoice number will bring you to the invoice the payment was made to. 24
25 Reports Page Report Once you have filtered the statements to the set you want to report on, you can the report. To do this, click on Report (see red arrow above). The Scheduled Report window will pop up. Within this window, you will need to enter the following criteria: Name The person you are sending the report to. Period The time period for which you want to generate the report. Options include: All Current day, week, month, quarter or year Previous day, week, month, quarter or year To The address(es) to send the report to. This is a comma delimited list of addresses. If sending to multiple people, addresses must be separated by commas. If no addresses are specified the report will be sent to the address specified in your merchant account settings. Description Message to include in the . Repeats This specifies how often this report should be generated and when. Options include: Never (for a one time report) Daily Weekly Monthly Yearly Within the box below repeats, specify the schedule. This can be set up to process after a certain number of days, on specific days, dates, weeks, months or after a set number of occurrences. If you do not want a report to run more than once, select the box next to Delete the scheduled report if it is not scheduled to run again. Click Save to implement your schedule. 25
26 Reports Page Payment Gateway Log This report shows the log of all transactions that have been submitted through the CardConnect gateway. This is where you can see if a transaction was approved or denied and, if there is an error code, what the code is. These messages come straight from CardConnect, so they are technical, but you can find the detail you need using the example below. Error code cross references are included in this User s Guide. To access the report, click on Payment Gateway Log. The report defaults to only failed transactions for the last 30 days. To change the list of items you see, click on Filter Options and modify the criteria. To view the error message, click on the View link in the Response column on the far right. That will bring up the View Payment Gateway Log Response. CardConnect gateway information looks like this: You can read the entire error by scrolling to the right inside the error message box. Accounts Receivable This report shows all of the invoices that have not yet been paid. You can sort and export this list. Sort the list by clicking on one of the column headings. Clicking the column header a second time toggles the sort direction of that column. Clicking on a customer name will bring you to the profile page for the customer that the invoice is associated with. Clicking on an invoice number shows you the invoice details. As with Payments, you can export this report by clicking on the Export as CSV button or by clicking on Accounts Receivable, then on Export. Export as CSV: This button, to the right of Payments, will export all payments returned by your default settings to a CSV file. If you do not have default filter settings saved, then the system default filter settings are used. To change the exported file, filter your records to reflect the criteria you want, then click Export. 26
27 Reports Page User History The two reports in this section show information about customer and user history. Both of these reports can be exported as a CSV, just like payments and accounts receivable. Profile Changes Report: This report shows a list of all the changes that have been made to the customer s profile. When you click on this report, the Profile Changes report will appear with filter options available. (See graphic for filter options.) Once you have selected all the options you want to filter for, click on the Search button. The system will display your results below the filter box. You also have these options available in this function: Remove All Filters: This option removes all filters and displays the system default statement list. Load Default Filters: This option loads the filter set you have saved as your default. Save As Default: This option saves the current filter as your default. After creating this report, you can it to whomever you choose by selecting the Report button. You can also export this report by clicking on the Export option below the Profile Changes header. 27
28 Reports Page Customer Account Activity Report This report shows a list of all the activities performed by or for your customers. You can sort, filter, export and this report. When you click this Customer Account Activity Report, the report detail window will appear with all filter options available. (See graphic for filter options.) Once you have selected all the options you want to filter for, click on the Search button. The system will display your results below the filter box. You also have these options available in this function: Remove All Filters: This option removes all filters and displays the system default statement list. Load Default Filters: This option loads the filter set you have saved as your default. Save As Default: This option saves the current filter as your default. After creating this report, you can it to whomever you choose by selecting the Report button. You can also export this report by clicking on the Export option below the Customer Account Activity header. 28
. Click the black arrow (B) to expand or collapse the desired section.")
29 Settings Page Settings Page This page is where you control your SmartPay account information and settings. All sections can be expanded and collapsed. You can expand or collapse all sections by clicking either the Expand All or Collapse All button at the top (A). Click the black arrow (B) to expand or collapse the desired section. Below is a list of sections and their contents. Merchant Information This section is where you enter your business name, address, phone number(s), fax number, address and website. To edit this section, click on the Edit button. When your changes are complete, make sure to click Save to keep or Cancel to discard your changes. Login Settings This section is where you change your login information and display name, as well as add new users. To change a user s login information or display name, click on the Edit this user icon under the Actions column. A window will pop up allowing you to edit the user s name, address, user name and password. This is also where you are able to unlock or lock, a merchant user. To do this, click the lock icon on the same row of their name. If you are troubleshooting an issue with a particular user within your system, you can impersonate that user by clicking on the impersonate icon. This allows you to function as that user without knowing their password. New User To add a new user, click on the New User button. A window will pop up allowing you to enter the user s name, address, user name and password. Note that whatever password you select will have to be changed the first time this user logs into the system. This is also where you will designate whether this person is an administrator. 29


30 Settings Page Level 2 Defaults In order for our transactions to qualify for lower Level 2 pricing, certain criteria must be met. This is where you set up the required information so send to your payment gateway to receive the level 2 processing rate for your transactions. Level 3 Defaults In order for our transactions to qualify for lower Level 3 pricing, certain criteria must be met. This is where you set up the required information so send to your payment gateway to receive the level 3 processing rate for your transactions. Your credit card processor can provide you with further details on Level 2 and Level 3 processing. Invoice Settings This is where you are able to create custom settings for your invoices by clicking the New Custom Field (show in red in the image blow). In the window that pops up, fill out the required information, as described below. Name: Enter the title for your custom field. Type: Select from the available options which include: Single Line Text Multiple Line Text Single Select Drop Down Multiple Line Drop Down Checkbox List Number Date Time Date/Time Phone Number If you select an option that requires a list, the Values box will appear. Click on Add Value to add values to your list. (Single select drop down, multiple line drop down, checkbox list) Visible to Customer: Do you want the customer (SmartPay user) to see this custom field or not? Click the Save button. 30
31 Settings Page Payment Settings This section is where you adjust your payment related settings. To make changes, click on the Edit button. Once you are done making changes, click the Save button to keep or click Cancel button to discard your changes. There are several functions within this section: General Allow Partial Payments: Allows the customer to make partial payments on invoices. If this is not checked, the customer must always pay the full amount of the invoice. Allow Negative Invoices: If this option is selected, the system will be allowed to refund more than the amount a customer paid resulting in a negative balance. Auto Send NSF Notifications: If checked, when you mark a payment as NSF (non-sufficient funds), the Send Notification to Customer check box will always be checked by default. Payment Terms: Allows you to set how the default due date of invoices are calculated when creating a new invoice. The following payment terms are available: None The due date will be the date the invoice was created. Due on Receipt the due date will be the date the invoice was created. Net 15 The due date will be 15 days after the invoice date. Net 30 The due date will be 30 days after the invoice date. Net 60 The due date will be 60 days after the invoice date. 31
32 Settings Page Starting Invoice Number: If this setting has a value, then when you create a new invoice, the invoice number will be automatically calculated based on the next available number, starting with the number in this setting. If no number is set, then you will always have to type in the invoice number manually. Duplicate invoice numbers are not allowed. Maximum Payment Amount: This is the maximum payment the system will allow for this customer. (i.e. If you do not want a customer to pay more than $X at any one time, you would set that maximum here.) If you do not want to set a maximum, leave it at $0. Days Allowed Past Due Date: The number of days the customer can set their AutoPay to generate payment after the due date. (i.e. Due date is the 10 th, if set to 5, the customer can set AutoPay to generate payment on the 15 th.) Credit Cards Allow Credit Card Payments: This option will only appear if your merchant account is set up to allow credit card transactions. If this option is checked, customers will be able to add credit cards as saved accounts and make payments to you using credit cards. The following credit cards are accepted: Visa MasterCard Discover American Express Allow Credit Card Swipers: This function enables the use of credit card swiper hardware to read credit card information directly into the site s form fields. Credit Card Surcharge Type: This is the type of surcharge applied to ALL credit card charges. Options are Flat Fee or Percent of Transaction. To disable surcharges, select None. Credit Card Surcharge Amount: This is the amount that is added to each transaction as a surcharge. Credit Card Surcharge Text: This is the text that prints on the invoice when you charge a surcharge. It defaults to Surcharge Fee unless you specify something else. E-Checks Allow E-Check Payments: This option will only appear if your merchant account is set up to allow ACH/E-Check transactions. If this option is checked, customers will be able to add bank accounts as saved accounts and make payments to you using their bank accounts. E-Check Convenience Fee Type: This is the type of convenience fee applied to ALL E-Check charges. Options are Flat Fee or Percent of Transaction. To disable surcharges, select None. E-Check Convenience Fee Amount: This is the amount that is added to each transaction as a convenience fee. E-Check Convenience Fee Text: This is the text that prints on the invoice when you charge a convenience fee. It defaults to Convenience Fee unless you specify something else. 32 Note that if you have not previously charged Surcharges or Convenience Fees, you will want to change your payment confirmation message to include the fee in that message.
33 Settings Page Templates Note that for the three functions below, you must be in Internet Explorer or Firefox. Invoice Display Template: If you have created a template for your invoices, this is where you would select that file. Click on Choose File to make the selection and upload your template. Payment Receipt Template: If you have created a template for your payment receipts, this is where you would select that file. Click on Choose File to make the selection and upload your template. Invoice Line Items Template: If you have created a template for your invoice line items, this is where you would select that file. Click on Choose File to make the selection and upload your template. Once you have made your selections and uploaded the appropriate files, click the Save button to keep your settings. Custom Fields This is where you create custom fields for payments. Functionality is the same as custom fields in invoice settings. Reminder Settings This section is where you customize the way reminder s are sent to your customers. text is set in the Setting section within Account Settings. Settings in this section apply to all customers. Invoice Reminder: This function allows you to configure whether or not invoice due date reminders will be sent out to your customers. If this setting is enabled, you choose the number of days before the due date that the reminder will be sent. The following reminders will only show up if functions are enabled in merchant setup. AutoPay Reminder: This function allows you to configure whether or not invoices that will be paid with AutoPay will be sent a reminder letting them know of the upcoming payment. If this setting is enabled, you choose the number of days before the payment is made that the reminder is sent. Card Expiration Reminder: This function only appears if your merchant account is set up to allow credit card transactions. It allows you to configure whether or not notifications are sent to customers when a credit card they have saved in the system is about to expire. If this setting is enabled, you choose the number of days before the credit card expires that the reminder is sent. 33
34 Settings Page Customization Settings This section is where you customize the look and feel of SmartPay to reflect your company. To make changes, click on the Edit button. Once you are done making changes, click on the Save button to keep or click Cancel to discard your changes. Note that any changes made to settings will not appear on your screen until you logout of SmartPay and log back in. Customizable settings in this section include: Messages and Text Welcome Message This is the message displayed when a customer goes to your custom URL to login. Login Message This is the message displayed when a user logs in to SmartPay. Login User Name Text This defaults to Username: If you prefer to call your users something else, you can edit the text here. Login Password Text This defaults to Password: If you refer to passwords by another term, you can edit it here. Payment Message This is the message displayed when a customer makes a payment. AutoPay Message This is the message displayed when a customer sets up AutoPay. Tab Names If you prefer not to use the terms Invoice, Customer or Statement, you can edit the singular and plural versions of these terms here. Changes made her are reflected throughout the system. (i.e. Invoice may be called mortgage.) Note that you will need to logout of the system and log back in before your changes will be visible. 34
35 Settings Page Colors and Styles This is where you are able to customize SmartPay to reflect your brand and colors. Font Family you can customize the fonts used throughout the system by selecting a font family here. Options include: Georgia Palatino Linotype Times New Roman Arial Arial Black Comic Sans MS Impact Lucida Sans Unicode Tahoma Trebuchet MS Verdana Courier New Lucida Console Colors you can customize the colors used in various sections by entering the hex code for each color. If you know the RGB code, you can convert that to a hex code by going to: The features listed below indicate what color the text will be when you hover over that option with your mouse: Menu Hover Link Hover Table Row Mouse Hover Graphics on the following page identify the various sections of the SmartPay site so you can match them to the color options in Settings. 35

36 Settings Page 36
37 Settings Page Customer Settings This section is where you determine what information a customer can or cannot change themselves. If you mark a field as editable, the customer is able to change the information. When you lock a field, the customer cannot change the information. Fields that can be locked include: Name Business Name Primary Secondary Tertiary (third ) Daytime Phone Number Evening Phone Number Cell Phone Number Fax Number Primary Address Billing Address User Name Password Custom Fields Custom fields contain information that you require for your customers. To add a New Custom Field, click on the New Custom Field on the right. A popup window will appear. Enter the name of your custom field and click Save. 37
38 Settings Page Enrollment Settings If you choose to allow your customers to enroll in SmartPay on your website, this is where you would set it up. In order to enable this functionality, you will need to have a custom URL. Once enrollment is enabled, the customer will need to access SmartPay directly from your URL to reach the self-enrollment functionality. Enroll Link Text: The text on the button the customer will click to enroll. Messages and Text Enroll Form Header Text: The header that your customer will see at the top of the enrollment form. Enroll Form Message: The message your customers will see at the top of the enrollment form. Enroll Thank You Header: This is the header of the page your customer sees after completing the enrollment form. Enroll Thank You Message: The message on the page your customer sees after completing the enrollment form. Fields This is where you select required fields that customers will need to complete during selfenrollment. You can select any or all of these fields. The SmartPay system has preselected User Name, Password and Primary , as these are mandatory. Customer Enrollment s s that are sent to customers will enroll themselves in SmartPay are edited in this screen, not in the Settings tab. The s available to customize include: Customer Enrollment Verification sent to the customer to verify enrollment. They will need to click on the link in the to complete the enrollment process. Customer Enrollment Complete sent to the customer to confirm that enrollment is complete and they may begin using SmartPay. 38
39 Settings Page Settings This is where you set up the messages that SmartPay automatically sends to your customers. The s are sent as plain text and each message can be customized to fit your needs. Messages in the system include: Customer Welcome sent when you set up a new customer in SmartPay Customer Send Login Information Sent when a customer requests their login information through Forgot your password? or when you send them their login information from this system. Customer Send Login User Name Information sent when a customer requests their username through the Forgot your username? function in the system Invoice Sent when you create an invoice for a customer. Statement Sent when you generate a statement for a customer. Payment Confirmation Sent when a customer makes a payment. Autopay Declined Sent to the customer and merchant when a payment on an AutoPay account is declined. NSF Sent to the customer and merchant when a payment is marked NSF in the system. Refund Sent when you issue a refund or reverse a payment. Payment Reminder Sent to alert the customer when a payment is due. The number of days in advance that it is sent is specified by your selection in Reminder Settings. AutoPay Reminder Sent to alert the customer prior to an AutoPay payment being processed. Credit Card Expiration Reminder Sent to inform a customer when their credit card is about to expire. The number of days in advance that it is sent is specified by your selection in Reminder Settings. 39

40 Settings Page Editing s To customize a message, uncheck the box next to Use Default Template below the title of the message you want to edit. There are certain pieces of information that can be customized and automatically replaced with the appropriate information by using tokens. Tokens are a type of place holder that will be populated with the customer information they are named for. For example, an sent to customer John Doe will have the tokens [CUSTOMER_FIRST_NAME] [CUSTOMER_LAST_NAME] but will be populated with John Doe when the message is sent. Each template supports a different set of tokens. To see which tokens are available for a particular template, refer to the lists on the following pages. NOTE: Tokens are case sensitive, so you must type them exactly as they appear. Also, fields that have no content will not appear on the . Using Custom Fields in Note that if you have created custom fields and you would like to use that information in an , you will need to use the appropriate token in the text of your message. Each time a custom field is created, an associated token is automatically created. (See below.) To identify the token, go to the appropriate custom field setup in Settings. 40
Sterling Virtual Terminal. User Guide
 Sterling Virtual Terminal User Guide Version 3.1.00 August 2015 Chapter 1: Getting started Table of Contents USER GUIDE... 1 CHAPTER 1: GETTING STARTED... 5 SYSTEM REQUIREMENTS... 5 STERLING VIRTUAL TERMINAL
BBVA Compass Spend Net Payables
 User Guide BBVA Compass Spend Net Payables User Guide Vault Services Table of Contents Introduction 2 Technical Requirements 2 Getting started 3 Sign In 3 General Navigation 4 Upload/Create Payment 5
E-Bill & Collect User Guide June 2016
 E-Bill & Collect User Guide June 2016 Table of Contents Page Introduction Simple Web Manual Payments Enter Payment Details Verify Payment Details Payment Confirmed Authenticated & SSO Payments Lookup Account
SmartPay Express User Guide
 SmartPay Express User Guide Table of Contents INTRODUCTION... 4 SmartPay Express Overview... 4 System Requirements... 5 Trusted Sites... 5 Available Resources... 7 Additional Resources... 7 LOGGING IN...
OmniView Users Guide Version 3.1.0
 OmniView Users Guide Version 3.1.0 2012 - Profitec, Inc. CONTENTS OmniView v3.1 User Guide WELCOME TO YOUR ONLINE PAYMENT AND PRESENTMENT PORTAL... 1 GETTING STARTED... 1 LOGIN SCREEN... 1 USING YOUR
Treasury Management User Guide. Online Banking
 Treasury Management User Guide Online Banking Released August 2018 Treasury Management... 4 Logging in to Treasury Management...5 Helpful Hints...10 User Menu... 12 Profile and Preferences... 12 Notification
ROAMpay TM. X4 User's Guide
 ROAMpay TM X4 User's Guide Last Modified: 06/14/2013 Contents 1 Activating ROAMpay X4 2 Using the System 2 Login 2 First-time Login 2 Default Settings 3 Retrieving Your Password 3 Online Sales 4 Saved
Business Online Banking User Guide
 Business Online Banking User Guide Table of Contents Contents Overview... 2 Logging In... 2 Additional Login Information... 5 Home/Dashboard... 6 Top Line Tool Bar... 6 Bulletins... 7 Dashboard... 8 Accounts...
BUSINESS BANKING ONLINE. Deskside User Guide
 BUSINESS BANKING ONLINE Deskside User Guide INTRODUCTION TO BUSINESS BANKING ONLINE Business Banking Online (BBOL) offers our business customers both large and small the tools and features needed to manage
Merchant Portal User Guide
 Merchant Portal User Guide TABLE OF CONTENTS Accessing the Click Merchant Portal... 3 Virtual Terminal... 4 Single Entry (Merchant Enters Card Details)... 5 Payment Using Collected Card Details... 5 Payment
Getting Started with Transaction Express. Transaction Express User Guide
 Getting Started with Transaction Express Transaction Express User Guide Table of Contents Transaction Express User Guide... 5 Section 1 Getting Started... 5 Welcome Email... 5 Merchant List... 5 Navigation...
GLOBAL TRANSPORT VT & BATCH SOLUTION
 GLOBAL TRANSPORT VT & BATCH SOLUTION USER GUIDE VERSION 17.2 NOVEMBER Global Payments Inc. 10 Glenlake Parkway, North Tower Atlanta, GA 30328-3447 COPYRIGHT 2007- GLOBAL PAYMENTS INC. ALL RIGHTS RESERVED.
User Guide. Customer Self Service (CSS) Web Application Progress Software Corporation. All rights reserved.
 Web Application Progress Software Corporation. All rights reserved.") User Guide Customer Self Service (CSS) Web Application 1993-2017 Progress Software Corporation. Version 2.1 March 2017 Table of Contents Welcome... 3 Accessing the Customer Self Service (CSS) Web Application...
User Guide Customer Self Service (CSS) Web Application 1993-2017 Progress Software Corporation. Version 2.1 March 2017 Table of Contents Welcome... 3 Accessing the Customer Self Service (CSS) Web Application...
USER S GUIDE Last Modified: 04/08/2013 1
 USER S GUIDE Last Modified: 04/08/2013 1 Contents 1 Welcome 1 Activating ROAMpay X4 2 Using the System 2 Login 2 First-time Login 2 Default Settings 3 Retrieving Your Password 3 Online Sales 4 Saved Item
HealthyCT Online Member Bill Pay. User Guide For Enrollment and Online Payments
 HealthyCT Online Member Bill Pay User Guide For Enrollment and Online Payments Revised April 2016 Table of Contents I. Enrollment Process: Setting up Member Bill Pay... Page 2 II. Setting Up Your Payments...
FirstNet for Business
 Page 1" First State Community Bank FirstNet for Business End-User Guide Page 2" Table of Contents" Logging In... 3% Changing Your Password... 4% Cash User Login Screen... 4% Navigation... 7% Account Listing
Process a Refund. Bank Cards. MasterCard Visa American Express Discover
 WEB TUTORIALS Process a Refund Bank Cards MasterCard Visa American Express Discover THE AVFUEL HUB To begin, select Refund from the Transactions menu in the top navigation bar or the Transactions button
MERCHANT MANUAL. Direct Connect Merchant Services LLC Copyright 2016, All Rights Reserved Merchant Manual v 1.
 MERCHANT MANUAL Direct Connect Merchant Services LLC www.directconnectps.com Copyright 2016, All Rights Reserved Merchant Manual 2016.10.06 v 1.doc Table of Contents Overview... 5 The Gateway... 6 Logon
Account Management. Pilot Support Guide
 Account Management Pilot Support Guide Public Use Doc no: PR-PUB-0012 Version 1.0 June 22, 2017 Copyright notice Copyright 2017 Cayan LLC. All rights reserved. No part of this publication may be reproduced,
U s e r s g U i d e 1
 User s guide 1 Contents 2 Welcome 3 User Service Activation 4 Introduction 4 Purpose 5 Key Features 6 Activation 8 Using the System 8 Login 9 Credit Sale 10 For Swipe Capable Devices 10 For Manual Entry
First Data Global Gateway SM Virtual Terminal User Manual
 First Data Global Gateway SM Virtual Terminal User Manual Version 1.0 2015 First Data Corporation. All Rights Reserved. All trademarks, service marks, and trade names referenced in this material are the
E-Bill Express User Manual
 E-Bill Express User Manual Table of Contents Enroll in E-Bill Express... 2 Add a Payment Method... 8 ACH (Bank Account)... 9 Credit / Debit Card... 10 Update or Delete a Payment Method... 11 Update...
MERCHANT MANUAL. Direct Connect Copyright 2016, All Rights Reserved.
 MERCHANT MANUAL Direct Connect Copyright 2016, All Rights Reserved www.directconnectps.com Table of Contents Overview... 5 The Gateway... 6 Logon as a Merchant... 7 Adding a New User... 11 Finding and
Sage Mobile Payments User's Guide
 Sage Mobile Payments User's Guide Last Modified: 8/4/2014 Contents 1 Activating Sage Mobile Payments 2 Using the System 2 Login 2 Multi user Login 2 First-time Login 3 Default Settings 3 Retrieving Your
Udio Systems. Front Desk
 Udio Systems Front Desk Table of Contents 1. Tour of Udio... 5 2. Login... 6 2.1 First Time User... 6 2.2 Login to Udio... 6 2.3 Changing your Password... 6 3. The Dashboard... 7 3.1 People Search... 7
Business Online Banking
 First State Community Bank Business Online Banking End User Guide Table of Contents Logging In... 3 Navigation... 5 Account Activity Options... 7 Transactions... 8 Transfers... 9 Stop Payments...10 Statements...12
Virtual Terminal User Guide
 With the Clearent Virtual Terminal, merchants can accept credit card payments using the web browser on a computer, tablet, or mobile device. In this guide you will find step-by-step instructions for using
Payments & Transfers User Guide
 Payments & Transfers User Guide Table of Contents Payee Maintenance...1 ACH Payments...4. Batch Creation...4 Creating a Manual Batch...4 Transaction Import...6 Templates & Recurring Payments... 7 Wire
Getting Started With Transaction Express
 Getting Started With Transaction Express Table of Contents Product Overview... 8 Welcome Email... 8 Merchant List... 8 Navigation... 9 Left Navigation Sections... 10 Password Security... 11 Change... 12
Account Management. Pilot Support Guide
 Account Management Pilot Support Guide Public Use Doc no: PR-PUB-0013 Version 1.0 June 22, 2017 Copyright notice Copyright 2017 Cayan LLC. All rights reserved. No part of this publication may be reproduced,
FirstView. Merchant User Guide. Version 1.0. FirstView Merchant User Guide
 FirstView Merchant User Guide Version 1.0 Document Control Document ID Version Author/Editor Date Original Draft 1.0 Dan Gill 7/26/2018 Copyright 2018 First American Payment Systems, L.P. All rights reserved.
ecashiering Table Of Contents
 ecashiering Table Of Contents Overview... 2 Logging in to ecashiering... 2 ecashiering Tab... 3 Payment Management... 3 Digital Delivery Account Managment... 7 Patient Pay Online Tab... 8 Account Summary...
ATB Online Business General User. User Guide
 ATB Online Business General User User Guide Contents Welcome to ATB Online Business 4 How to use this guide 5 Roles and entitlements in ATB Online Business 5 Administrator role 5 User roles 5 Limits 6
Sponsor User s Guide
 Sponsor User s Guide Contents Chapter 1: Getting Started Overview 2 Logging on and off 6 Time Clock/Attendance 6 Online Account Management 8 Changing passwords and Sign-in/out codes 2 Changing your password
Invoice Ninja Documentation
 Invoice Ninja Documentation Release 4.0.1 Hillel Coren Dec 25, 2017 Basic Features 1 Introduction 3 2 Clients 9 3 Invoices 15 4 Payments 21 5 Recurring Invoices 25 6 Credits 29 7 Quotes 33 8 Tasks 39
USER HELP. Copyright Information Copyright 2016 Global Payments Inc. All rights reserved worldwide.
 MERCHANT SALES: 800-637-8268 New Merchant Accounts PARTNER PROGRAMS: 800-637-8268 New and existing partnerships CUSTOMER CARE: 800-338-6614 Existing merchant account support Statements and deposits Changes
Virtual Terminal Plus, A Vantiv Payment Application
 Virtual Terminal Plus, A Vantiv Payment Application Application User Guide for Merchants Edition: 2.2 Updated: Friday, February 17, 2017 Information contained within this guide is subject to change without
INBUSINESS BANKING SYSTEM
 Introducing your new INBUSINESS BANKING SYSTEM Companion Guide to Business Banking Video Tutorials Updated 0.09.8 WELCOME TO THE INBUSINESS SYSTEM The InBusiness System will help you efficiently and securely
DSWR User Guide. In effect from January 29 th,, BCLDB Direct Sales Web Reporting User Guide Page 1
 DSWR User Guide In effect from January 29 th,, 2017 BCLDB Direct Sales Web Reporting User Guide Page 1 Contents Introduction... 4 Before You Get Started... 4 Registering for the DSWR Application... 5 Log-in...
CyberSource Business Center
 CyberSource Business Center CS3-609-06-16-09 Copyright 2009 Harris Connect, LLC. all rights reserved. Reproduction in any form without the express written consent of Harris Connect, LLC. is strictly prohibited
InBusiness Banking System Companion Guide to Business Banking Video Tutorials
 Banking System Companion Guide to Business Banking Video Tutorials Great Things Happen! Updated 05.5.6 Welcome to the InBusiness System The InBusiness System will help you efficiently and securely manage
First State Bank of Blakely, Inc. Cash Manager. User Guide
 First State Bank of Blakely, Inc. Cash Manager User Guide Table of Contents Logging In... 1 Changing Your Password... 2 Cash User Login Screen... 3 Cash Management User Single Sign On... 4 Navigation...
Positive Pay User Guide. Positive Pay User Guide - 1 -
 - 1 - Table of Contents Positive Pay Overview... 3 User Login... 3 Transaction Processing- Submitting Issued Check File... 4 Transaction Processing Add New Issued Check... 5 Transaction Processing - Exception
ONLINE BANKING MANUAL FOR BUSINESS MASTER USERS
 ONLINE BANKING MANUAL FOR BUSINESS MASTER USERS Business Administration Authorizations Payees Roles Users All Users Guy Somebody Payroll Mr. Business John Doe Accounting USERNAME Allbusine Mr. Business
O N L I N E B A N K I N G C A S H M A N A G E M E N T End-User Guide
 ONLINE BANKING CASH MANAGEMENT End-User Guide TABLE OF CONTENTS LogIn Process...1 Company Login... 1 Cash User Login... 3 Cash Management User Single Sign On... 4 Navigation...5 Account Listing Page...6
V2 Premiums and Fulfillment
 V2 Premiums and Fulfillment Table of Contents Table of Contents... 2 Create Catalog Items... 3 Create Packages... 8 Create Shippers... 11 Create Inventory Purchases... 11 Create Ask Ladders... 15 Attach
Client-Account Receivable
 Nexsure Training Manual - Accounting Client-Account Receivable In This Chapter Client Accounts Receivable Entity Definition Receive Payments from Clients Relating to Policies Allocation of Payment Leave
QuickBooks Plugin Documentation
 QuickBooks Plugin Documentation UPDATED MAY 21, 2014 AGMS.COM 15707 Coit Rd Suite C210 Dallas, TX 75248 P) 866-951-AGMS F) 214-491-4401 INDEX Module Installation... 4 Step 1... 5 Step 2... 6 Step 3...
Online Store. General Store Front User Guide
 Online Store General Store Front User Guide March 2018 Version 2.3 shop.bunzl.com.au 1 Table of Contents TABLE OF CONTENTS... 2 1 INTRODUCTION... 4 2 USER ROLES AND PERMISSIONS WITHIN ONLINE STORE... 5
WELCOME to Qantas Group isupplier
 WELCOME to Qantas Group isupplier A manual for suppliers Welcome to our isupplier help manual. You re receiving this manual as you are one of our preferred suppliers with access to the isupplier Portal.
ezbusiness Card Management 7/1/2015
 ezbusiness Card Management 7/1/2015 Table of Contents Logging In........ 3 Out-of-Band Processing.... 5 Navigation.....5 Viewing Pages. 5 Sorting Lists.5 Accessing Online Help...6 Menu Options and Navigation...6
Table of Contents. Buyer Functions Buyer Responsibilities: Create and submit orders for approval and manage personal profile and preferences.
 Table of Contents Buyer Functions Buyer Responsibilities: Create and submit orders for approval and manage personal profile and preferences. Web site Login Page # Login Process 3 Reset Password 4 Authorize
PayTrace Virtual Terminal
 PayTrace Virtual Terminal Training Aid August 2011 Let s get started by learning about your needs All merchants using PayTrace will be processing transactions. The real question is how will you be processing
Online Banking Guide Commercial Banking Business Banking Government Banking
 Online Banking Guide Commercial Banking Business Banking Government Banking Effective April 16, 2013 1 Login Users may login directly from www.unibank.com Select Online Banking. Enter your existing login
ADD/EDIT VENDOR. 1. To add a new vendor to the system from within the Accounts Payable module, navigate to: Accounts Payable Vendors.
 ADD/EDIT VENDOR 1. To add a new vendor to the system from within the Accounts Payable module, navigate to: Accounts Payable Vendors. Vendors can also be added from within the Purchasing module. Regardless
Splitit USA Inc. User Guide for Merchants
 Splitit USA Inc. User Guide for Merchants Page 1 www.splitit.com COPYRIGHT 2015 Splitit USA Inc. ALL RIGHTS RESERVED RELEASE October 2015 Disclaimer: SPLITIT USA INC. OR ITS SUPPLIERS MAY DISCONTINUE OR
POSITIVE PAY U S E R G U I D E
 POSITIVE PAY U S E R G U I D E Positive Pay User Guide Getting Started... 3 Administration... 3 Company Administration... 3 Manage Users... 3 Communication... 4 Manage Alerts... 5 Positive Pay Check...
University of North Carolina User Guide
 University of North Carolina User Guide June 2006 The software described in this document is furnished under a license agreement. The software may be used or copied only in accordance with the terms of
Portico VT. User Guide FOR HEARTLAND MERCHANT USERS APRIL 2015 V2.8
 Portico VT User Guide FOR HEARTLAND MERCHANT USERS APRIL 2015 V2.8 Notice THE INFORMATION CONTAINED HEREIN IS PROVIDED TO RECIPIENT "AS IS" WITHOUT WARRANTY OF ANY KIND, EXPRESS OR IMPLIED, INCLUDING BUT
ACH Payments. User Guide
 ACH Payments User Guide Table of Contents Overview... 2 Supported SEC Codes... 2 Create Batch... 2 Creating a Free Form Batch... 3 Creating a Batch from a Template... 14 Manage Batch Templates... 21 Transaction
SANTANDER TREASURY LINK USER GUIDE
 SANTANDER TREASURY LINK USER GUIDE Welcome to Santander Treasury Link Santander Treasury Link is a secure Web application that allows you to manage accounts, payments, transfers, reports, and users. This
SmartPay Business. An Introduction to SmartPay Business for Merchants
 SmartPay Business An Introduction to SmartPay Business for Merchants Contents Introduction to SmartPay Business... 1 Navigational Features... 2 Top Menu Bar... 2 Left Main Menu... 3 Collapsing/Expanding
CashLink Quick Reference Guide
 CashLink Quick Reference Guide Navigating your Account Summary Page After you log in, you will see the Account Summary Page screen. This screen gives you access to all other functions and displays important
RONA e-billing User Guide
 RONA e-billing Contractor Self-Service Portal User Guide RONA e-billing User Guide 2015-03-10 Table of Contents Welcome to RONA e-billing What is RONA e-billing?... i RONA e-billing system requirements...
Welcome to the Online Payment Center for MFA Oil Company
 Welcome to the Online Payment Center for MFA Oil Company To Enroll your MFA Oil Company account, select the Enroll Now button. Once you click on Enroll Now, you will be directed to the Terms and Conditions
How Do I Use the Patient Payment Manager (PPM) for Automated Payments?
 for Automated Payments?") How Do I Use the Patient Payment Manager (PPM) for Automated Payments? The PPM is an automated payment system that is tied to your merchant account with BancTek. Once you receive your merchant account
How Do I Use the Patient Payment Manager (PPM) for Automated Payments? The PPM is an automated payment system that is tied to your merchant account with BancTek. Once you receive your merchant account
JHA Payment Solutions ipay Solutions. Business Bill Pay. Funds Verification CSL Client Reference Guide. September 2018
 JHA Payment Solutions ... 1 Enrollment Process... 2 Home Page... 3 Message Center... 4 Attention Required... 4 Shortcut Method... 4 Scheduled... 4 History... 4 Since You Last Logged In... 4 Payees Tab...
EZ Parent Center Directions Parent Sign Up and Purchase Preordering
 EZ Parent Center Directions Parent Sign Up and Purchase Preordering Parents should contact your school (or caterer) when any type of support is needed. You can use the following link https://www.ezparentcenter.com/site/ezparentcenter_contact.aspx
Virtual Terminal Plus A Vantiv Payment Application
 Virtual Terminal Plus A Vantiv Payment Application Application User Guide for Merchants Edition: 3.1 Updated: Friday, October 20, 2017 Information contained within this guide is subject to change without
core user guide business gateway TABLE OF CONTENTS BANKING > WEALTH > INSURANCE
 business gateway core user guide TABLE OF CONTENTS Getting Started... 2 Administration Approval... 8 Logging In... 2 Administration Report... 8 Electronic Report Delivery (ERD)... 17 Security Key... 2
How to Use Your EV Connect Account
 How to Use Your EV Connect Account Accessing the EV Connect Network To access the EV Connect network, point your web browser to http://network.evconnect.com. This brings you to the account login page.
Reports. Commonalities Among All Reports. Remote Deposit Capture Report Handbook. Reports are generated in Central Time (CT).
.") Reports Commonalities Among All Reports Reports are generated in Central Time (CT). Print is an option available for all reports. Exporting reports into a Microsoft Office Excel spreadsheet, a tab-delimited
Reports Commonalities Among All Reports Reports are generated in Central Time (CT). Print is an option available for all reports. Exporting reports into a Microsoft Office Excel spreadsheet, a tab-delimited
User Guide. General Navigation
 User Guide General Navigation Table of Contents INTRODUCTION 2 TECHNICAL REQUIREMENTS 3 Screen Display for Laptop 3 Screen Display for Desktop PC 3 NAVIGATION 4 Contact Us 4 Log Out 4 Menu > Sub Menu Display
Quick Reference Cardholder
 The Commercial Card Expense Reporting (CCER) service Quick Reference Cardholder Accessing the Commercial Card Expense Reporting (CCER) service 1. Sign on to the Commercial Electronic Office (CEO ) portal
Easthampton Savings Bank Online Business Banking User Guide
 Easthampton Savings Bank Online Business Banking User Guide Page 1 of 100 Table of Contents SECURITY...6 PASSWORD TAB FUNCTIONALITY...6 SECURE DELIVERY TAB FUNCTIONALITY...9 CHALLENGE CODE TAB FUNCTIONALITY...10
Cardholder & Program Administrator
 Access Online Transaction Management User Guide Cardholder & Program Administrator Version 2.9 Contents Introduction...3 Transaction Management Variables by Organization... 3 Procedures in This Guide...
Accessing ACH payments
 We are in the process of making some very exciting enhancements to your online banking to help you run your business better, every day. In the near future you will be migrated from the current (KBO) platform
CASH MANAGEMENT User Guide
 CASH MANAGEMENT User Guide Login Process... 4 Logging On for the First Time... 4 Company Administrator Activities... 8 Creating New Cash Users... 8 Resetting Cash User Password... 12 Modifying Cash User
//index. Chapter Content Page Part One: Bluefin Support. Part Two: Logging In Part Three: Integration Part Four: Processing. Part Five: Reporting
 MANUAL 1 //index Chapter Content Page Part One: Bluefin Support Part Two: Logging In Part Three: Integration Part Four: Processing Part Five: Reporting Part Six: Settings Part Seven: Receipts Part Eight:
Online Banking User Guide
 Online Banking User Guide If you need assistance, please call 315.477.2200 or 800.462.5000 M-F 7:30am - 6:00pm Sat 9:00am - 1:00pm empowerfcu.com 315.477.2200 800.462.5000 Table of Contents Online Banking
Business Portals Guide
 Business Portals Guide The ZipLine (NPCA) Business Portals are three web sites that allow a merchant to launch a payment card program to local businesses. The businesses can save on each transaction by
Rabo Supplier Finance User Manual - Suppliers -
 Rabo Supplier Finance User Manual - Suppliers - Page 2 of 33 Table of Contents 1 About This Document... 3 1.1 Objectives of This Document... 3 1.2 Inside This Document... 3 2 Rabo Supplier Finance platform...
Create a New Sale. Bank Cards. MasterCard Visa American Express Discover
 WEB TUTORIALS Create a New Sale Bank Cards MasterCard Visa American Express Discover THE AVFUEL HUB To begin, select Sale from the Transactions menu in the top navigation bar or the Transactions button
User Guide #PeopleFirst
 ADVANCED BUSINESS ONLINE BANKING User Guide #PeopleFirst TABLE OF CONTENTS LOGIN Login Instructions 3 ACCOUNT BALANCES AND TRANSACTION DETAILS Balance Snapshot 4 Important Account Balances 4 Recent Transactions
Employer Self Service (ESS) User Quick Guide
 User Quick Guide") Employer Self Service (ESS) User Quick Guide i Table of Contents Getting Started 6 Accessing the Employer Self Service (ESS) Portal 6 Maintaining Account Settings 7 Switching Employers within Session 7
Employer Self Service (ESS) User Quick Guide i Table of Contents Getting Started 6 Accessing the Employer Self Service (ESS) Portal 6 Maintaining Account Settings 7 Switching Employers within Session 7
Contents. Table of. TO REGISTER OR SIGN IN, GO TO REGISTRATION
 Table of Contents Registration... 1 My Account Information... 2 Other Payment Options... 2 One-Time Payment (Fee-Based)*... 3 AutoPay Fixed Amount (Fee-Based)*... 3 My Accounts... 4 Make Payment (Fee-Based)*...
Quick Reference Cardholder
 The Commercial Card Expense Reporting (CCER) service Quick Reference Cardholder Accessing the Commercial Card Expense Reporting (CCER) Service 1. Sign on to the Commercial Electronic Office (CEO ) portal
Administrator Quick Guide
 1 Administrator Quick Guide Login Screen The first page employees will see when visiting their training site is the login screen. This is where employees must enter their username and password to access
User Guide Regions Association Image Lockbox Online
 User Guide Regions Association Image Lockbox Online 2012 Regions Bank. Regions Lockbox Services subject to product terms and conditions. Rev. 111312 Association Image Lockbox User Guide Association Image
Business ebanking User Guide
 Business ebanking User Guide If you have any questions, please contact Business ebanking Support at 1-800-593-4345 Contents About Business Online Banking... 3 System Requirements/Considerations... 4 Password
Merchant Dashboard User Guide
 Merchant Dashboard User Guide February 10, 2015 Contents Dashboard... 3 Transactions... 5 Items... 7 Users... 9 Reports... 10 Account Settings... 11 2 Dashboard On the Dashboard page, you can get summaries
1 Virtual Terminal Quick Reference Guide. Virtual Terminal Quick Reference Guide. Getting Started
 1 Virtual Terminal Quick Reference Guide Virtual Terminal Quick Reference Guide Getting Started 2 Virtual Terminal Quick Reference Guide What you need Internet enabled laptop or computer Virtual Terminal
Personal account manual A ME
 Personal account manual A.005.34.01-01.ME 05.07.2018 Table of Contents 1. Logging in... 4 2. Main page... 6 3. Orders monitor... 6 3.1. Orders search... 7 3.2. Search results... 8 3.3. Saving data to file...
Sappi Ariba Network. Summit Guided Session: Account Configuration
 Sappi Ariba Network Summit Guided Session: Account Configuration 1 Manage invitation letter + 2 Landing Page Sappi 2 1 1 Open the Invitation Letter that you received at your email address from ordersender-prod@ansmtp.ariba.com
Making members shine, one smile at a time TM. Consumer Pay Online (CPOL) Portal Training. CPOLT
 Portal Training. CPOLT") Consumer Pay Online (CPOL) Portal Training CPOLT20171204 1 Consumer Pay Online (CPOL) Portal Tutorial Contents CPOL Landing Page... 3 CPOL Enrollment... 4 Step 1... 5 Step 2... 6 Step 3... 7 Username or
Consumer Pay Online (CPOL) Portal Training CPOLT20171204 1 Consumer Pay Online (CPOL) Portal Tutorial Contents CPOL Landing Page... 3 CPOL Enrollment... 4 Step 1... 5 Step 2... 6 Step 3... 7 Username or
Online Banking Quick Reference Guide
 Online Banking Quick Reference Guide Sign-On to Online Banking On the initial Sign-On page, sign on to online banking as follows: 1. Type your ID in the SIGN ON ID field. Note: If you cannot remember your
View Payments. User Guide. Online Merchant Services
 View Payments User Guide Online Merchant Services Copyright Statement Copyright 2010-2011 by American Express Company. All rights reserved. No part of this document may be reproduced in any form or by
Scholastic Oracle Cloud Supplier Portal User Guide
 Scholastic Oracle Cloud Supplier Portal User Guide Table of Contents Introduction to the Supplier Portal... 3 What is the Supplier Portal?... 3 Navigating the Supplier portal... 3 Logging in... 3 Homepage
Vendor Portal User Guide
 Vendor Portal User Guide Version 1.3.208 Taulia Inc. 420 Taylor Street, 4 th Floor San Francisco, CA 94102 Phone +1 (415) 376 8280 Fax +1 (415) 639 6439 Taulia GmbH Bundesallee 171 10715 Berlin, Germany
FORUM Business Online Banking
 FORUM Business Online Banking FORUM Business Online Banking has a new look but still offers the same level of service and security. Complete privacy, controlled through encryption and passwords, ensures