User Guide Netaxept Administration Module. Version 1.50
|
|
|
- Martina Adams
- 5 years ago
- Views:
Transcription

1 User Guide Netaxept Administration Module Version 1.50
2 This document describes the various functions of Netaxept Administration Module (Netaxept Admin). The latest version of the document is available at: Please contact Netaxept customer support for your country for any issues concerning the Netaxept product: For any settlement or acquiring related issues, please contact your particular acquirer. 1 LOGIN User ID codes Login Choosing a trading site 5 2 TRANSACTIONS Payment transaction list Advanced transaction search Details History Financial operations Recurring Callbacks Anti-fraud analysis (Threatmetrix) 17 3 REPORTS 19 4 OPTIONS Merchant Terminal Image A payment terminal optimized for web pages A payment terminal optimized for mobile devices Issuer fees Payment update Users Transactions filter My profile Agreement Report Callback Help 44 5 HELP & TOOLS Messages Tools Link payment Call centre System updates Test transactions Contact us 49 6 SYSTEM STATUS 50 2/50
3 1 Login 1.1 User ID codes Nets will provide a username and a password to log in to Netaxept Admin for the contact person named in the Netaxept agreement. The contact person has all access rights in Netaxept Admin. Besides the contact person, there are the following user levels in Netaxept Admin. User level Administrator User Read only Notification Description Created and maintained by the contact person or another administrator. The "Administrator" has all rights in Netaxept Admin. Nets recommends to create at least one "Administrator" level user acting as a substitute/deputy for the contact person when he/she is absent. Created and maintained by the contact person or the administrator. The "User" has rights to monitor and process transactions but doesn't have access to user management page to create or maintain users. Created and maintained by the contact person or the administrator. The "Read only" can only review data in Netaxept Admin. Created and maintained by the contact person or the administrator. The "Notification" will receive Netaxept related notifications by and/or SMS, but is not able to log in to Netaxept Admin at all. Until further notice, the functionality for sending notifications is not available. Each person must have their own personal username and login password; group user ID codes are not allowed. All user ID codes should be kept safe. A login password must be at least 7 characters long and contain both numbers and alphabetical characters. A new password cannot be any of the four previously used passwords. If you fail to login five times, your user account will be locked. If the user account is locked, you need to contact your contact person or the "Administrator" level user who is able to open the user account in "Users" page in Netaxept Admin. If the person, whose user account is not locked yet, loses or forgets their login password, they can order a new password by using "Forgot password" functionality available in Netaxept Admin login 3/50
4 page. To be able to use the functionality, the person's address and mobile phone number need to be registered in Netaxept Admin. Nets maintains only the user ID codes given to the contact person. In other words, if the contact person locks his/her user account or fails to order a new login password by using "Forgot password" functionality, they can contact Netaxept customer support for their country. Lower level users need to be created and maintained by the contact person and "Administrator" level users. Nets cannot make these changes on behalf of the merchant. 1.2 Login Netaxept Admin is available in English, Norwegian, Danish, Swedish and Finnish. The default language is English. You can change the language by clicking on the flags in the top left corner of the page. You can log in to Netaxept Admin at: Test: Production: When you log in to Netaxept Admin for the first time, you will be required to change your password. After changing your password, register your name, address and mobile phone number to "My contact information" section or check that already filled information is correct. The information needs to be filled so that you can use "Forgot password" functionality available in Netaxept Admin login page for ordering a new password if needed. Field name Name Phone number Description The user's first and last name. The user's address. Using group s are not allowed. The user's mobile phone number. The phone number should start with two zeroes "00" or "+" and include the country code. E.g where "00358" is the country code for Finland with leading zeroes and " " the actual number. 4/50
5 The view following login will vary depending on the service package selected in the Netaxept agreement and the user level used for login. If Nets has added notifications in Netaxept Admin, you'll see them first after login and can continue to other pages by clicking tabs on the top of the page. 1.3 Choosing a trading site After logging in, you will see the trading sites (i.e. merchants) for which you have access rights. Select the trading site you want and click. If you only have access rights to one trading site, you will be transferred directly to the transaction page of that trading site after logging in. 5/50
6 2 Transactions In the "Transactions" section you will see all transactions carried out at your trading site, and you can further process them within the limitations of the user rights granted to your user ID codes. Netaxept will automatically create settlement batches for the merchant's daily captured and credited card transactions and pass them on to the particular acquirer for further processing. The acquirer will settle the card transactions to the merchant within the settlement period agreed in the agreement between these parties and in accordance with the current price list. Contrary to card payments, captured and credited direct bank payments are paid by bank transfer almost real-time between the buyer and merchant. In your company's bank statement you will see card payments settled as settlement batches and direct bank payments as individual transactions. 2.1 Payment transaction list On this page, you will see all successful and failed transactions carried out at your trading site. 6/50
7 From the drop down list in the top left you can select the transactions you want to see in the payment transaction list, e.g. by selecting all successful or failed payments or all authorized transactions only. As a default, the list shows all successful transactions, with the most recent transactions at the top. Field name Issuer Date Order number Amount Description Payment method used for the transaction. Date and time of the transaction. The column will always show the registered date of transaction regardless of whether or not the transaction has already been processed further, e.g. captured, credited or annulled. A transaction identifier defined by the merchant. Nets recommends to generate each transaction a unique order number but if wanted the same order number can be used several times. A transaction amount + a possible payment fee. The column will always show the registered transaction amount regardless of whether or not the transaction has already been processed further, e.g. captured, credited or annulled. The following icons provide further details on the transaction. The last operation done to the transaction has failed The transaction is marked for review on the basis of the risk rating carried out by the Threat Metrix analysis or the transaction is only registered The data have been stored for recurring transactions A recurring transaction, i.e. either a recurring payment or an easy payment There is a colour-coded bar next to each transaction indicating the status of the transaction in question. The transaction has been registered The transaction has been authorized (doesn't include account verifications) The transaction has been captured The transaction has been credited The authorization has been annulled Account verification has been made to the transaction By clicking on a colour-coded bar you can process a transaction further, i.e. capture or credit a transaction. The bars will function according to the processing mode selected for the transaction from the icons at the top right of the payment transaction list or on the "Options" => "Payment update" page. Direct mode with confirmation: Ask for a confirmation message before processing transactions Mark mode: Tag transactions to be processed Direct mode: Process transactions immediately 7/50
8 By clicking on a transaction anywhere other than the colour-coded bar you will be transferred to a page where you will see more detailed information about the transaction selected. 2.2 Advanced transaction search When clicking on the "Advanced" text or button, a separate search section will open where you can search for transactions using various search criteria. The search is used in conjunction with a drop-down menu. For example, if you know that a transaction has been credited, select "Credited transactions" from the drop down list and define the search using these search criteria. 8/50
9 The transactions matching your search criteria will be displayed on the same page below the search section. If you wish, you can export your search results directly to Excel by clicking on the "Export to Excel" button. Field name Number of rows Merchants Description Number of transactions in the payment transaction list. Trading sites linked to the trading site in question. The trading site 9/50
10 Date Capture date Transaction id Transaction reference Batch Currency Amount Card number Pan hash Authorization id Order number Order description Customer first name Customer last name Customer Customer phone Customer IP Customer number marked as the main trading site can search for transactions either at all trading sites or by targeting a certain trading site. Date and time when the transaction was registered. Date and time when the transaction was captured. A transaction identifier which identifies the transaction and is generated for the transaction either by the merchant or Netaxept. The merchant must not have an existing, corresponding transaction ID in Netaxept. A reference number allocated to the transaction by the merchant. The reference number will be returned to the merchant with the settlement. If the acquirer chosen by the merchant supports the return of the transaction-specific reference number, the transaction reference will be returned to the merchant with the settlement and can be seen in Netaxept Admin. The transaction reference can be seen also in the merchant's bank statement when direct bank payments are in question. A sequential number allocated by Netaxept for each settlement batch. The numbering of settlement batches per trading site begins at 1, with the maximum being 999. Thereafter, the numbering will start from the beginning again. A currency code for the transaction amount. If several currencies are used at your trading site and you do a search with a certain amount, you must also complete the "Currency" field. An authorized transaction amount + a possible payment fee. If you wish to search for a certain amount, type the same amount in the "Min" and "Max" fields. If a value was only inserted in the "Min" or the "Max" field, the search will bring up all transactions whose minimum / maximum amount is up to the amount indicated. Either the first 6 or the last 4 digits of the number of the payment card used for the transaction. A character string used to link a recurring transaction (an easy payment or a recurring payment) to the original transaction. An ID given to an authorized transaction by the issuer. A transaction identifier defined by the merchant. Nets recommends to generate each transaction a unique order number but if wanted the same order number can be used several times. Searching partial order numbers are not supported. Free-format data content determined by the merchant and displayed to the buyer on the payment terminal. The buyer's first name sent by the merchant with the transaction. The buyer's last name sent by the merchant with the transaction. The buyer's address sent by the merchant with the transaction. The buyer's telephone number sent by the merchant with the transaction. The buyer's browser connection IP address. The buyer's ID defined by the merchant. Customer number identifies the buyer or a customer group. The same customer number can be 10/50
11 All Issuers used several times. Payment method used for the transaction. 2.3 Details All payment methods used at your trading site are listed on this page. Uncheck the payment methods that you wish to exclude from the search. You can also mark or unmark all the payment methods in one click by using "All Issuers" checkbox. On this page, you will see further details of the transaction that you have selected. Field name Issuer Interface mode Description Payment method used for the transaction. A method / channel used by the merchant to receive transaction data from the buyer: web shop with Netaxept payment terminal web shop with merchant s own payment terminal mail and telephone order 11/50
12 Status Transaction id Authorization id Transaction reference Order number Order description Amount By clicking on a colour-coded bar you can process a transaction further. If the transaction has been authorized, it will change to captured after the click. The status of a captured transaction will change to credited after the click. A transaction identifier which identifies the transaction and is generated for the transaction either by the merchant or Netaxept. The merchant must not have an existing, corresponding transaction ID in Netaxept. An ID given to an authorized transaction by the issuer. A reference number allocated to the transaction by the merchant. The reference number will be returned to the merchant with the settlement. If the acquirer chosen by the merchant supports the return of the transaction-specific reference number, the transaction reference will be returned to the merchant with the settlement and can be seen in Netaxept Admin. The transaction reference can be seen also in the merchant's bank statement when direct bank payments are in question. A transaction identifier defined by the merchant. Nets recommends to generate each transaction a unique order number but if wanted the same order number can be used several times. Free-format data content determined by the merchant and displayed to the buyer on the payment terminal. The original, registered amount of a transaction. VAT (included) Fee Rounding amount Captured Credited Customer name Customer Customer phone Customer IP Customer number Terminal visited Terminal redirected Masked PAN VAT included in the original amount. An additional charge determined for the transaction by the merchant. The fee will be added to the original amount. Rounding amount defined by the merchant for the transaction. The captured amount. The credited amount. The buyer's name sent by the merchant with the transaction. The buyer's address sent by the merchant with the transaction. The buyer's telephone number sent by the merchant with the transaction. The buyer's browser connection IP address. The buyer's ID defined by the merchant. Customer number identifies the buyer or a customer group. The same customer number can be used several times. Date and time when the buyer has visited in the payment terminal. Date and time when the buyer has been redirected from the payment terminal to the URL specified by the merchant. The first 6 or the last 4 digits of the number of the payment card used for the transaction. Card expiry date The validity period of a payment card in the format yymm (y = year, m = month). Issuer country Authenticated with Country where the payment card used for the transaction was issued. An exclamation point with pink background indicates if the country of customer's IP address does not match the country of card issuer. A protocol used for the authentication of the payment card. 12/50
13 ECI The Verified by Visa or MasterCard SecureCode authentication result: 05 (Visa) or 02 (MasterCard) = Cardholder authenticated 06 (Visa) or 01 (MasterCard) = Cardholder authentication attempted, but the payment card was not registered for the authentication service 07 (Visa) or 00 (MasterCard) = The merchant was not registered for the authentication service 2.4 History On this page, you will see history data for the transaction that you have selected. Field name Date Operation Description Date and time when the operation mentioned in the "Operation" column was done to the transaction. An operation done to the transaction: Verification: Checking a card account status with a zero amount in order to ensure that the card account is valid. Order registration: The data required for the transaction are stored in Netaxept. A registered transaction must be authorized within 24 hours of the registering. Auth: A cash provision is made for the buyer's account for the agreed amount. Sale: A cash provision is made for the buyer's account for the agreed amount and the account is captured for the same amount. Capture: The buyer's account is captured for the authorized amount. The amount to be captured may be, at maximum, the authorized amount. Credit: The amount captured is returned to the buyer's 13/50
14 Batch Description Amount Callback account. The amount to be credited may be, at maximum, the captured amount. An opposite operation to capturing. Annul: The cash provision made for the buyer's account has been cancelled. An opposite operation to authorization. A sequential number allocated by Netaxept for each settlement batch. The numbering of settlement batches per trading site begins at 1, with the maximum being 999. Thereafter, the numbering will start from the beginning again. Free-format data content determined by the merchant and displayed to the merchant in Netaxept Admin. The field shows also an IP address and/or a username that has been used for the transaction. The transaction amount during the operation mentioned in the "Operation" column. Indicates the status of the callback enquiry. 2.5 Financial operations On this page, you can perform further actions for the transaction that you have selected. Capture: "Capture" debits the buyer's account. By default the total authorised amount is shown in the "Amount" field. If you want to capture only part of the authorized amount, enter the amount how much you want to capture in the "Amount" field. Annul: "Annul" is an opposite operation to authorization and it cancels the cash provision made for the buyer's account. The cancellation of authorization is always applied to the whole amount. Part of the authorized amount cannot be cancelled. Credit: "Credit" is an opposite operation to capturing and it returns the captured amount to the buyer's account. By default the total captured amount is shown in the "Amount" field. If you want to credit only part of the captured amount, enter the amount how much you want to credit in the "Amount" field. 14/50
15 Field name Amount Description Description The amount to be annulled / captured / credited in the specified currency. Use a comma as a separator, e.g. 1,20 = 1 euro and 20 cents. Free-format data content determined by the merchant and displayed to the merchant in Netaxept Admin. The field shows also an IP address and/or a username that has been used for the transaction. 15/50
16 Transaction reference A reference number allocated to the transaction by the merchant. The reference number will be returned to the merchant with the settlement. 2.6 Recurring If the acquirer chosen by the merchant supports the return of the transaction-specific reference number, the transaction reference will be returned to the merchant with the settlement and can be seen in Netaxept Admin. The transaction reference can be seen also in the merchant's bank statement when direct bank payments are in question. On this page, you will see the earlier recurring transactions related to the transaction that you have selected, as well as the relevant details. The page will only be displayed when the transaction is marked as a recurring transaction. Easy payment: The buyer pays with one click for any purchases made after the initial purchase. Recurring payment: The merchant captures the payment card in accordance with the agreement between the merchant and the buyer, without the buyer re-entering payment card information during a purchase. Field name Frequency Expire date (subscription) Card expire date Issuer Description Indicates how often recurring payments are made. Only displayed for recurring payments. The last date on which the agreement between the merchant and the buyer is valid. Only displayed for recurring payments. The last date on which the buyer's payment card is valid. Payment method used for the transaction. 16/50
17 Date Order number Amount Date and time of the transaction. A transaction identifier defined by the merchant. Nets recommends to generate each transaction a unique order number but if wanted the same order number can be used several times. The amount of a recurring transaction + a possible payment fee. 2.7 Callbacks On this page, you will see the status changes of the transaction that you have selected. The page will only be displayed when the merchant enables the callback functionality on the "Options" => "Callback" page. The callback provides the merchant with information about when the status of the transaction changed to authorized, captured, credited or annulled. The callback is useful for example when information about the real status of a transaction remains unclear due to an interruption in data communications during payment. Field name Date Operation Callback status Description Date and time when the status enquiry was made. Transaction status, e.g. authorized, captured or credited. Indicates the status of the enquiry. 2.8 Anti-fraud analysis (Threatmetrix) On this page, you will see the results of the risk rating done by Threatmetrix for the transaction that you have selected. The page will only be displayed when the merchant activates the functionality in question by contacting Netaxept customer support for his country. Threatmetrix screens all transactions real time and rates them on a fraud scale based on the configured thresholds. Based on the risk assessment transactions are either passed or rejected automatically, or set for review where the merchant needs to approve the transaction before it can be processed further. 17/50
18 Field name Policy score Reasons Status Approved by Antifraud analysis results Description The value set for a transaction on the basis of risk rating done by Threatmetrix. Risk score in written form. The status set for a transaction by risk rating: Pass: The transaction has been accepted and is ready for further processing. Review: The merchant needs to approve the transaction before further processing. Reject: The transaction has been rejected for risk management reasons and its further processing is not possible. The username which accepted the transaction for further processing. A more detailed analysis of the results from the anti-fraud analysis and values used as a basis for risk rating. 18/50
19 3 Reports In the "Reports" section, you can search and view various charts and reports on the transactions carried out at your trading site. The reporting section will only be displayed when the merchant selects the "Advanced" or "Call Centre" service package in the Netaxept agreement. Batch: Displays the settlement batch data of your trading site for the last seven days. You can retrieve later batch data or data for a certain period (up to a maximum 7-day period) using the search feature. You can also automatically receive daily settlement batch data via in Excel format by activating the functionality in question on the "Options" => "Report" page. Turnover: Displays the daily and monthly turnover of your trading site by currency. 19/50
20 Time of purchase: Displays the transaction times of your trading site. Transactions: Displays the volumes of successful transactions of your trading site by day, week and month. 20/50
21 Transactions amount: Displays the maximum, minimum and average amounts of your trading site as well as the most frequently occurring amount by currency. 21/50
22 Passed and rejected transactions: Displays all successful and failed transactions of your trading site as percentages and numbers. 22/50

23 4 Options In the "Options" section you can edit the settings related to your trading site. 4.1 Merchant On this page, you can select the trading site whose view you wish to see on Netaxept Admin. The page will only be displayed when you have access to several trading sites which are linked together by Netaxept customer support. 4.2 Terminal On the sub-pages of this page, you can customize the payment terminal to be displayed as you wish on the Internet and on mobile platforms. If you so wish, you may also use the ready-to-use payment terminal template offered by Netaxept. The pages are only necessary for a merchant involved in e-commerce where the buyer is directed to enter the payment method details on the payment terminal site. The ready-to-use terminal as a single page mode Terminal on a mobile device 23/50


24 The customized terminal as a two page mode Image On this page, you can upload and store the images, e.g. your company logo, that you wish to see displayed on the payment terminal. The image file format should be jpg, gif or png. The maximum file size is 480x95 pixels and 100 KB. The uploaded image will be displayed on the payment terminal after it has been activated in Netaxept Admin. You can verify the image quality using the preview feature. The text on the payment terminal displayed in the preview is only an example, not the final payment terminal to be displayed to the buyer. 24/50

25 4.2.2 A payment terminal optimized for web pages On this page, you can create new payment terminal templates optimized for web pages and edit any existing templates. Activate the template by clicking the "Activate" link. This will ensure that the template in question is used for transaction, unless the "TerminalDesign" parameter is set separately for a transaction in the technical integration. By clicking the "Configure CSS" button you can make CSS style based style definitions for the template. 25/50

26 If you have several trading sites, you can share your terminal template with your other trading sites by clicking the "Share" button. After that the same terminal template is available for all our trading sites without the need to copy the template code separately to each trading site. Only one template can be shared at a time. In other trading sites the template sharing is shown as follows. 26/50
27 Field name Description Name Merchant Web Design - outside the Netaxept terminal The unique name for the template. You should refer to the template name in the technical integration if you wish to use different templates for different transactions. 27/50
28 Background Image-url HTML Add images Design - within the Netaxept terminal Text colour Background Image-url Border / frame Images Advanced Meta tag The background colour of the area surrounding the payment terminal. The background colour can be replaced with an image. The image displayed outside of the payment terminal. The URL address of the image should start with https. The general style cannot be changed, but you can add your own style tags to the template. The tags should be contained within curly brackets and end with a space and a slash, for example {netaxept:terminal /}. Netaxept will tidy the HTML field content during saving. By clicking the button you can select a payment terminal image previously added on the "Image" tab. The text colour of the area inside the payment terminal. The background colour of the area inside the payment terminal. The background colour can be replaced with an image. The image displayed inside the payment terminal. The URL address of the image should start with https. The line surrounding the payment terminal. Logos are displayed in either white or colour on the payment terminal. Alternatively, the Nets and Netaxept logos can be displayed as white and all other logos as colored. Keywords that provide information about your site. Keywords are not visible on the site, but they are used by search engines to find your site efficiently. <meta name="testpage" content="keyword1, keyword2"> A payment terminal optimized for mobile devices On this page, you can create new payment terminal templates optimized for mobile devices and edit any existing templates. Activate the template by clicking the "Activate" link. This will ensure that the template in question is used for transaction, unless the "TerminalDesign" parameter is set separately for a transaction in the technical integration. By clicking the "Manage device templates" button you can define which template is to be used for each mobile device type. 28/50
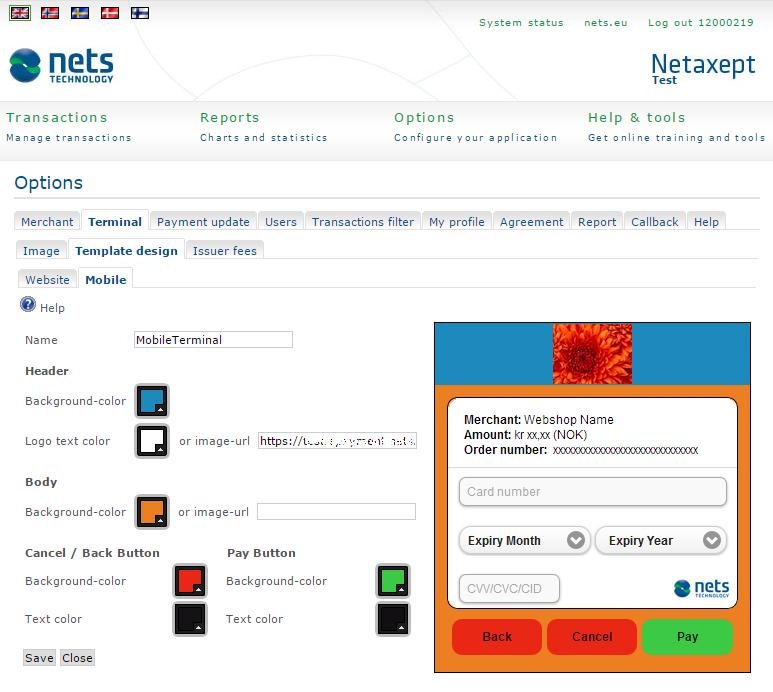
29 29/50
30 Field name Name Header Background colour Logo text colour Image-url Body Background colour Image-url Cancel / Back / Pay buttons Background colour Text colour Issuer fees Description The unique name for the template. You should refer to the template name in the technical integration if you wish to use different templates for different transactions. The background colour of the payment terminal header. The text colour used in the payment terminal header. The text can also be replaced with an image. The image displayed on the payment terminal header. The URL address of the image should start with https. The background colour of the payment terminal body. The background colour can be replaced with an image. The image displayed on the payment terminal body. The URL address of the image should start with https. Button background colours. Button text colours. On this page, you can define fixed amount and percentage-based payment fees for various transactions. You can also define the terms on which any transactions not meeting these terms will be rejected. If several rules apply for the same payment method then the transaction will only be rejected if any one of the rules rejects it. The fee will be calculated based on one rule according to priority: BIN-based rules take priority over "payment method" -based rules. Branded payment methods (Dankort, LIC, Coop, Bring) take priority over generic ones (Visa, MasterCard). Rule with maximum effective fee (before rounding) takes priority over the lower-fee rules. "Apply fee (%) according to captured amount" checkbox applies to fee set in percentages on card payments. When doing partial captures on transactions with fee, you can control if the fee should be fully drawn on the first capture or if you want to have the fee applied proportionally to how much of the full transaction you have captured. Normal behaviour is to capture the full fee for the transaction on the first partial capture. 30/50
31 Field name Currencies Card type Card country Min amount Max amount Fee amount Fee % Description The currency in which you wish to display a new fee. The card type (debit/credit) for which a fee is defined. Transactions performed with a debit card will be captured to the buyer's bank account a credit card will be captured to the buyer's credit card account The country issuing the payment cards for which the fee is added. The lowest amount for which Netaxept begins to add a fee for transactions. No fee is added to transactions below the minimum amount. Optional information. The highest amount for which Netaxept adds a fee for transactions. No fee is added to transactions above the maximum amount. Optional information. A fixed fee amount in your selected currency which is independent of the total amount of the transaction. Enter either a fee amount or a fee %. Only positive fee values are accepted. The percentage of the fee you have selected from the total amount of 31/50
32 Payment method BIN Name Filter Fee rounding Total amount rounding the transaction. Enter either a fee amount or a percentage for the fee. Only positive fee values are accepted. The payment method for which a fee is added. If no suitable option can be found in the payment methods, select "Custom card", fill in the first 6 digits of the card number and enter a descriptive name for the payment method. Enter the 6 digits at the beginning of the card numbers for which you wish to define a fee. Only necessary if you have selected "Custom card" as the payment method. Enter a descriptive name for the payment method for which you wish to define a fee. This name will be displayed in the fee list on the buyer's payment terminal. Only necessary if you have selected "Custom card" as the payment method. You can either allow or reject the payment transactions that meet the terms you have defined. You can specify that a fee related to a transaction will be automatically rounded off: Whole closest: To the nearest integer Tenth closest: To the nearest tenth Whole down: Down to the nearest integer Tenth down: Down to the nearest tenth Whole up: Up to the nearest integer Tenth up: Up to the nearest tenth You can specify that the final transaction amount after fees etc. will be automatically rounded off: Whole closest: To the nearest integer Tenth closest: To the nearest tenth Whole down: Down to the nearest integer Tenth down: Down to the nearest tenth Whole up: Up to the nearest integer Tenth up: Up to the nearest tenth 4.3 Payment update On this page, you can select the most suitable processing method for transactions in Netaxept Admin. 32/50
33 In the list on the "Transactions" page, there is a colour-coded bar next to each transaction indicating the status of the transaction in question. Clicking on a bar will enable you to process a transaction further, i.e. capture or credit a transaction. The bars will function according to the processing mode selected for the transaction on this page. Mark mode: Tag transactions to be processed When clicking on the colour-coded bar of a transaction, the transaction in question will be added to a separate transaction list for later processing. This list can be found on the "Marked transactions" page, which can be displayed by clicking on the "Process marked transactions" link. The link appears after the first transaction has been added to the list. On this page, you can process marked transactions or delete a tag from one or more transactions. Direct mode: Process transactions immediately When clicking on the colour-coded bar of a transaction, the transaction in question will be captured or credited immediately without a confirmation notification. Only use this processing mode after careful consideration. Direct mode with confirmation: Ask for a confirmation message before processing transactions When clicking on the colour-coded bar of a transaction, Netaxept will ask for confirmation from the user, e.g. "Are you sure you want to credit this order?". The user must respond positively to this question before the operation in question is used for this transaction. This is the default setting. 4.4 Users On this page, you can add, edit and delete users, and change their passwords. This page will only be displayed to contact person and "Administrator" level users. 33/50
34 You can add new users by clicking the "Add user" button. Fill in the user's contact details and choose the proper user level for the user. It is important that contact details are added so that if needed, the user can order a new login password by using "Forgot password" functionality available in Netaxept Admin login page. Link the user to at least one trading site by choosing the right trading site from the "Merchant" list. If you wish to link the user to several trading sites, press "CTRL" button when selecting multiple trading sites. If the user is not linked to any trading site, they are not able to log in to Netaxept Admin at all. If you want that the user receives notifications related to Netaxept, mark the check box "Receive notifications". Until further notice, the functionality for sending notifications is not available. However, you can already mark this check box so that everything is then ready when we activate the functionality. Finally, save the user by clicking the "Add user" button. After saving the user, you will see the user's username and password at the top of the page. Username and password are not sent automatically to the new user by or SMS, instead the contact person or "Administrator" level user is responsible for sending this information safely to the user. 34/50


35 Field name Username User rights Description An ID created by Netaxept which identifies the user and cannot be changed. The user will need their username when logging on to Netaxept Admin. Users are divided into different groups: Administrator: All rights, including user management User: Processing and management of transactions Read only: Limited to "Read only" rights Notification: Receives Netaxept related notifications by and/or SMS, but is not able to log in to Netaxept Admin at all. Note! To be able to receive notifications, "Receive notifications" check box needs to be marked for the user. Until further notice, 35/50
36 the functionality for sending notifications is not available. However, you can already create users with this user level so that everything is then ready when we activate the functionality. Last activity date Notify Information Merchants Tools This division enables the creation of different user levels for different users and results in a different interface view. Date and time when the user last logged in to Netaxept Admin. Indicates whether the user receives Netaxept related notifications. You can choose this by marking "Receive notifications" check box for the user. User's contact details: Full name: The user's first and last name The user's address. Using group s are not allowed. Phone number: The user's mobile phone number. The phone number should start with two zeroes "00" or "+" and include the country code. E.g where "00358" is the country code for Finland with leading zeroes and " " the actual number. Remember to register the user's address and mobile phone number so that the user can use "Forgot password" functionality available in Netaxept Admin login page for ordering a new password. The trading sites the user has the right to log in to. If you wish, you can delete the user's link to a trading site so that the user cannot log in to that trading site's view. Tools for editing users: Edit: The edit function allows you to change the user's information and password, and link the user to the one or several trading sites. The password you changed is a singleuse password that Netaxept Admin requires to change when the user logs in to Netaxept next time. Before closing the "Edit" window, remember to save your changes. Delete: The delete function allows you to delete the user completely from Netaxept Admin. When clicking the button, you will see a confirmation box asking that are you sure you want to delete this user. The deleted user cannot be activated again. Unlock: The unlock function allows you to open the user account that is locked. When you unlock the user account, user's password remains the same. If the user doesn't remember their password, you can generate them a new password by clicking "Edit" and then "Click to generate a new password" button. You can also ask the user to order them a new password by using "Forgot password" functionality available in Netaxept Admin login page. To be able to use the functionality, the user's address and mobile phone number need to be registered in Netaxept Admin. 4.5 Transactions filter On this page, you can define misuse prevention settings which will help you to reduce risks at your trading site. 36/50
37 Activity filter: Limit transactions on the basis of a maximum amount or number You can set a maximum sum value or a maximum number of transactions, indicating transactions that will be accepted within a certain time period with a certain payment card or from a certain IP address. Country filter: Limit transactions on the basis of card issuing countries You can limit transactions based on the country where the payment card used for the transactions was issued. First select all continents and countries, and then delete from the list the countries issuing cards you do not wish to approve for payments. As a default, payment cards issued by any country are accepted. Card type filter: Limit transactions on the basis of card type Until further notice, this functionality is in pilot use and only available to separately agreed customers. 37/50
38 You can prevent transactions done by credit cards so that debit cards can still be used for payment at your trading site, but credit cards will not be accepted. Transactions performed with a debit card will be captured to the buyer's bank account a credit card will be captured to the buyer's credit card account IP address check for Netaxept Admin and API Until further notice, this functionality is in pilot use and only available to separately agreed customers. You can activate a second security layer either for Netaxept Admin logins and/or API calls. If "API call IP range check" is enabled, there will be a check each time the API is being requested as your merchant and will only let through the calls from the IP addresses and/or IP ranges specified by you. If "Admin IP range check" is enabled, there will be a second check after the user has signed in, and will only let the user from the entered IP addresses and/or IP ranges to log in to Netaxept Admin. In the textbox field enter either a valid (IPV4) IP address or IP range, or both. Separate several specific addresses by comma. IP range should be entered so that the lower IP is on the left side of the dash and the higher one is on the right side. When specifying the IP addresses, make sure your external IP address is within range. Example of the valid IP address: Example of the valid IP range: Example of the mixed IP range and the single IP address: , Anti-fraud configuration (Threatmetrix) Threatmetrix screens all transactions real time and rates them on a fraud scale based on the configured thresholds. Based on the risk assessment transactions are either passed or rejected automatically, or set for review where the merchant needs to approve the transaction before it can be processed further. The default risk policy and thresholds will be suitable for most merchants. In this section you can set your own thresholds for the transactions if necessary. Please note that the thresholds you set may result in the rejection of transactions or you may be required to review and approve them manually before further processing. This section will be shown only when the functionality in question is activated for the merchant by Nets. 38/50
39 Field name Use custom risk rating Enable review classification Reject Review Pass Description If this check box is marked, thresholds set by the merchant will be used instead of default thresholds set by Nets. Note! The thresholds you set may result in the rejection of transactions or you may be required to review and approve them manually before further processing. We recommend you to use default thresholds unless there is a specific reason to customize thresholds yourself. When using default thresholds, "Use custom risk rating" check box must be unchecked. If this check box is marked, besides passing and rejecting transactions, review status will be used in customized thresholds. Transactions that are marked as review need to be approved by the merchant before they can be processed further. Note! If you use review status, some transactions need to be approved separately before further processing. If transaction is only registered, it needs to be approved during 24 hours so that authorization is still accepted. We recommend you to uncheck "Enable review classification" check box unless there is a specific reason to manually review transactions before accepting them. Transactions that trigger a risk value which is between these thresholds will be automatically rejected for risk management reasons and its further processing is not possible. Transactions that trigger a risk value which is between these thresholds will be set for review where you need to approve the transaction before it can be processed further. Transactions that trigger a risk value which is between these thresholds will be automatically accepted and is ready for further processing. 4.6 My profile On this page, you can view your contact details and change your own login password that you use when logging in to Netaxept Admin. It is important to have contact details added and up-to-date so that if needed, you can order a new login password by using "Forgot password" functionality available in Netaxept Admin login page. Each user must have their own personal username and password; group user ID codes are not allowed. All user ID codes should be kept safe. A user password must be at least 7 characters long and contain both numbers and alphabetical characters. A new password cannot be any of the four previously used passwords. 39/50
40 Field name Old password New password Verify new password Name Phone number Description Your current personal password that you used to log in to Netaxept Admin. Your new personal password for Netaxept Admin. A password must be at least 7 characters long and contain both numbers and alphabetical characters. A new password cannot be any of the four previously used passwords. Re-enter the new password. The user's first and last name. The user's address. Using group s are not allowed. The user's mobile phone number. The phone number should start with two zeroes "00" or "+" and include the country code. E.g where "00358" is the country code for Finland with leading zeroes and " " the actual number. 4.7 Agreement On this page, you can enable a new payment method and edit existing payment methods. You cannot manage card payment settings on this page. Each payment method you want to enable requires that an agreement is entered into with the acquirer. You will receive service ID codes for enabling the payment method after the agreement is processed, and you should enter these IDs on this page. The merchant is responsible for ensuring that all information entered is correct. 40/50
41 Field name Agreements Issuer Currency Valid from - Valid until Description The payment method for which an agreement is made. The payment method for which an agreement is made. The currency in which you wish to make an agreement on the payment method. The validity period of the agreement. Not required for all payment methods. 4.8 Report On this page, you can activate the functionality for receiving a daily settlement batch report via . If you wish to enter several addresses, they should be separated by a semicolon: xxx@xx.com ; yyy@xx.com Previously the page contained a section for receiving Netaxept notifications. This section is now removed and the corresponding functionality is moved to "Users" page. If you had added addresses and/or mobile phone numbers to this section, Nets has created you one or several "Notification" user(s) and added these addresses and mobile phone numbers under them. 41/50
42 4.9 Callback On this page, you can define settings for the callback functionality. The callback functionality provides the merchant with information about when the status of the transaction changed to authorized, captured, credited or annulled. The callback is useful for example when information about the real status of a transaction remains unclear due to an interruption in data communications during payment. 42/50
43 Field name Transaction timeout Callback URL Callback username and password Automatically recheck offline transactions Description A time limit up to which Netaxept will ask about status changes from the acquirer. In addition, the service will automatically ask about status changes 24 hours after the time limit. A merchant-defined URL address to which Netaxept sends information about any changes to a transaction status. The URL address should start with https. Netaxept will retry to send the callback within timeout value until the merchant's server responds with "HTTP 200". When Netaxept sends a callback to the configured callback URL the transaction ID is appended in the request. To get more details on the transaction, a Query call is necessary. Only to be entered if the merchant-defined URL address is protected by a username and password. Otherwise, these fields should be left empty. Cases where Netaxept responds with error code 91 "Offline" can be configured to have Netaxept retry the transaction and send a callback update when the transaction is authorized from the issuer. 43/50
44 4.10 Help On this page, you can enable or disable page-specific instructions. Page-specific instructions can be found behind the icon on nearly every page of Netaxept Admin. You will find the same instructions but in more detail in this document. 44/50
45 5 Help & tools In the "Help & tools" section you can make transactions via link payment and mail and telephone order sales, view Netaxept related notifications and generate test transactions. 5.1 Messages On this page, you can see Netaxept related notifications. The same notification will be shown also after login to Netaxept Admin. 5.2 Tools Link payment On this page, you can make a transaction via a link payment. The page will only be displayed when the merchant selects "Start"or "Advanced" service package in the Netaxept agreement. For a link payment, the merchant creates a link in Netaxept Admin and sends it to the buyer, e.g. by . When the buyer clicks this link, the browser will transfer them to the payment terminal where they can enter the payment information. On the payment terminal, the buyer will see the information that the merchant provided when creating the link. Before creating a link check that transaction timeout is disabled for your trading site in "Options" section => "Callback" tab. If transaction timeout functionality is in use, the link doesn't work and payment cannot be processed after the timeout value has exceeded. 45/50
46 Field name Amount Order number Order description Transaction recon reference Description The amount to be authorized or authorized and captured in the specified currency. Use a comma as a separator, e.g. 1,20 = 1 euro and 20 cents. A transaction identifier defined by the merchant. Nets recommends to generate each transaction a unique order number but if wanted the same order number can be used several times. Order number can contain numbers and alphabetical characters but no special characters, Scandinavian letters or empty spaces. Free-format data content determined by the merchant and displayed to the buyer on the payment terminal. A reference number allocated to the transaction by the merchant. The reference number will be returned to the merchant with the settlement. If the acquirer chosen by the merchant supports the return of the transaction-specific reference number, the transaction reference will be returned to the merchant with the settlement and can be seen in Netaxept Admin. The transaction reference can be seen also in the merchant's bank 46/50
47 Language Auth / Sale Customer number Customer first name Customer last name Customer address Customer postcode Customer town Customer country Customer Customer phone statement when direct bank payments are in question. Defines the language in which the buyer will see the payment terminal. The operation to be used for the transaction: Auth: A cash provision is made for the buyer's account for the agreed amount. Sale A cash provision is made for the buyer's account for the agreed amount and the account is captured for the same amount. The buyer's ID defined by the merchant. Customer number identifies the buyer or a customer group. The same customer number can be used several times. Buyer's first name. Mandatory only in Paytrail direct bank payments. Buyer's last name. Mandatory only in Paytrail direct bank payments. Buyer's address. Mandatory only in Paytrail direct bank payments. Buyer's postal code. Mandatory only in Paytrail direct bank payments. Buyer's city. Mandatory only in Paytrail direct bank payments. Buyer's country. Mandatory only in Paytrail direct bank payments. Buyer's address. Mandatory only in Paytrail direct bank payments. Buyer's telephone number Call centre On this page, you can either authorize or authorize and capture new telephone and mail order transactions. Transactions coming through the web shop cannot be processed on this page. The page will only be displayed when the merchant selects "Call Centre" or "Advanced" service package in the Netaxept agreement. However, please note that in "Advanced" service package call centre functionality is additional paid service that is activated separately by Nets. If the "Advanced" merchant tries to make call centre transaction without activating the service in question, they will see an error message "Callcenter not allowed, please contact Nets support" on top of the page after clicking "Register" button. 47/50
48 Field name Amount Transaction recon reference Order number Description The amount to be authorized or authorized and captured in the specified currency. Use a comma as a separator, e.g. 1,20 = 1 euro and 20 cents. A reference number allocated to the transaction by the merchant. The reference number will be returned to the merchant with the settlement. If the acquirer chosen by the merchant supports the return of the transaction-specific reference number, the transaction reference will be returned to the merchant with the settlement and can be seen in Netaxept Admin. The transaction reference can be seen also in the merchant's bank statement when direct bank payments are in question. A transaction identifier defined by the merchant. Nets recommends to generate each transaction a unique order number but if wanted the same order number can be used several times. Order number can contain numbers and alphabetical characters but no 48/50
49 Order description Customer number Customer Customer phone Credit card number Expiry date Security code Auth / Sale special characters, Scandinavian letters or empty spaces. Free-format data content determined by the merchant and displayed to the merchant in Netaxept Admin. The buyer's ID defined by the merchant. Customer number identifies the buyer or a customer group. The same customer number can be used several times. Buyer's address that will be used for information purposes only. Nets doesn't use it for sending messages or receipt information to the buyer. Optional information. Buyer's telephone number that will be used for information purposes only. Nets doesn't use it for sending messages or receipt information to the buyer. Optional information. The number of the payment card used in the transaction. If this is a credit/debit card and the buyer wishes to make a debit payment, the card number is on the back of the Visa Debit card or Debit MasterCard. The month and year of validity of the payment card. Depending on the payment card, its security code (CVV2/CVC2/CID) can be found either on the front or back of the card. Visa and MasterCard display their CVV2/CVC2 as three separate numbers in connection with the signature panel. If you use a credit/debit card and you wish to make a debit payment, you can find the CVV2/CVC2 after the Visa Debit or Debit MasterCard card number on the back of the card. American Express payment cards display their CID on the front of the card as a four-digit number. Diners Club payment cards display the three-digit card verification value in connection with the signature panel after the card number. The operation to be used for the transaction: Auth: A cash provision is made for the buyer's account for the agreed amount. Sale: A cash provision is made for the buyer's account for the agreed amount and the account is captured for the same amount. 5.3 System updates On this page, you will see information about planned service breaks in Netaxept. Until further notice, this functionality is in pilot use and issues or changes might happen. 5.4 Test transactions On this page, you can generate Visa and MasterCard test transactions. Generated transactions are only authorized and not captured yet. 5.5 Contact us On this page, you will find contact details to Netaxept customer support for your country. 49/50

50 6 System status On this page, you can see service issues and incidents affecting the availability and the performance of Netaxept services and functionalities either directly or through third party systems. Until further notice, this functionality is in pilot use and issues or changes might happen. 50/50
User Guide Netaxept Administration Module
 User Guide Netaxept Administration Module Version 1.50 This document describes the various functions of Netaxept Administration Module (Netaxept Admin). The latest version of the document is available
User s Guide. (Virtual Terminal Edition)
") User s Guide (Virtual Terminal Edition) Table of Contents Home Page... 4 Receivables Summary... 4 Past 30 Day Payment Summary... 4 Last 10 Customer Transactions... 4 View Payment Information... 4 Customers
User s Guide (Virtual Terminal Edition) Table of Contents Home Page... 4 Receivables Summary... 4 Past 30 Day Payment Summary... 4 Last 10 Customer Transactions... 4 View Payment Information... 4 Customers
Corporate Gateway. Mail and Telephone Order Payment Service (Hosted Call Centre) Guide
 Guide") Corporate Gateway Mail and Telephone Order Payment Service (Hosted Call Centre) Guide V4.2 April 2017 Mail and Telephone Order Payment Service (Hosted Call Centre) Guide > Contents Contents 1 Introduction
Corporate Gateway Mail and Telephone Order Payment Service (Hosted Call Centre) Guide V4.2 April 2017 Mail and Telephone Order Payment Service (Hosted Call Centre) Guide > Contents Contents 1 Introduction
Sterling Virtual Terminal. User Guide
 Sterling Virtual Terminal User Guide Version 3.1.00 August 2015 Chapter 1: Getting started Table of Contents USER GUIDE... 1 CHAPTER 1: GETTING STARTED... 5 SYSTEM REQUIREMENTS... 5 STERLING VIRTUAL TERMINAL
Merchant Administration User Guide
 Merchant Administration User Guide For MasterCard Payment Gateway Version 6.8 09 March 2017 Notices Following are policies pertaining to proprietary rights and trademarks. Proprietary Rights The information
Getting Started with Transaction Express. Transaction Express User Guide
 Getting Started with Transaction Express Transaction Express User Guide Table of Contents Transaction Express User Guide... 5 Section 1 Getting Started... 5 Welcome Email... 5 Merchant List... 5 Navigation...
MySagePay User Guide
 MySagePay User Guide Table of Contents 1.0 Welcome to MySagePay 3 1.1 Logging into MySagePay 3 1.2 What you will see 4 2.0 Settings 5 2.1 My Account 5 2.2 Settings 6 2.3 AVS/CV2 7 2.4 3D Secure 8 2.5 Restrictions
Virtual Terminal User Guide Version (Australia IPG)
") Virtual Terminal User Guide Version 2017-3 (Australia IPG) Gateway 1 Contents This table of contents has been amended to exclude sections not applicable to Australia. The original content is still available
Virtual Terminal User Guide Version 2017-3 (Australia IPG) Gateway 1 Contents This table of contents has been amended to exclude sections not applicable to Australia. The original content is still available
EMS e-terminal. User guide e-terminal. Version: Apollo Building Herikerbergweg CN Amsterdam The Netherlands
 Apollo Building Herikerbergweg 25 1101 CN Amsterdam The Netherlands E techsupport@emspay.eu T +31 088 TECHSUPPORT EMS e-terminal User guide e-terminal Version: 2017-2 User guide e-terminal Version 2017-2
First Data Global Gateway SM Virtual Terminal User Manual
 First Data Global Gateway SM Virtual Terminal User Manual Version 1.0 2015 First Data Corporation. All Rights Reserved. All trademarks, service marks, and trade names referenced in this material are the
Business Online Banking User Guide
 Business Online Banking User Guide Table of Contents Contents Overview... 2 Logging In... 2 Additional Login Information... 5 Home/Dashboard... 6 Top Line Tool Bar... 6 Bulletins... 7 Dashboard... 8 Accounts...
Direct Debit Overview Payments Clarification of Terms Features Rejections Contact Methods & Filters...
 Table of Contents Direct Debit Overview... 2 Payments... 4 Clarification of Terms... 4 Features... 6 Rejections... 8 Contact Methods & Filters... 8 Contact Status... 9 Printing Letters... 9 Viewing the
BBVA Compass Spend Net Payables
 User Guide BBVA Compass Spend Net Payables User Guide Vault Services Table of Contents Introduction 2 Technical Requirements 2 Getting started 3 Sign In 3 General Navigation 4 Upload/Create Payment 5
First Data Gateway. Virtual Terminal User Guide. Version 2.5
 First Data Gateway Virtual Terminal User Guide Version 2.5 First Data is a trading name of First Data Europe Limited, a private limited company incorporated in England (company number 02012925) with a
Personal account manual A ME
 Personal account manual A.005.34.01-01.ME 08.04.2019 Table of Contents 1. Logging in... 4 2. Main page... 6 3. Orders monitor... 6 3.1. Orders search... 7 3.2. Search results... 9 3.3. Saving data to file...
USER GUIDE FOR SUPPLIERS. OpusCapita Business Network
 USER GUIDE FOR SUPPLIERS OpusCapita Business Network Contents 1. Introduction... 3 2. Finalizing registration and changing your password... 4 2.1 Finalize your registration... 4 2.2 Change your forgotten
RAM QUICK REFERENCE GUIDE. Lloyds Bank Cardnet Online Management Information System
 RAM QUICK REFERENCE GUIDE Lloyds Bank Cardnet Online Management Information System Contents 1. Logging In 1 2. Searching for Merchant Numbers 2 3. Merchant Profile Details 3 4. Transaction Activity 4 4.1
MyST User Guide Published: 23 April 2018
 This document outlines how to use MyST, our transaction management tool. Here you will find a breakdown of the various functions available and instructions on how to use them. Published: 23 April 2018
Personal account manual A ME
 Personal account manual A.005.34.01-01.ME 05.07.2018 Table of Contents 1. Logging in... 4 2. Main page... 6 3. Orders monitor... 6 3.1. Orders search... 7 3.2. Search results... 8 3.3. Saving data to file...
MyST User Guide 3.1. Published: 23 July 2018
 This document outlines how to use MyST, our transaction management tool. Here you will find a breakdown of the various functions available and instructions on how to use them. Published: 23 July 2018 3.1
PayTrace Virtual Terminal
 PayTrace Virtual Terminal Training Aid August 2011 Let s get started by learning about your needs All merchants using PayTrace will be processing transactions. The real question is how will you be processing
MySagePay USER GUIDE
 MySagePay USER GUIDE Contents 1.0 Welcome to MySagePay 3 1.1 Logging into MySagePay 3 1.2 What you will see 4 2.0 Settings 5 2.1 My Account 5 2.2 Settings 6 2.3 AVS/CV2 7 2.4 3D Secure 8 2.5 Restrictions
First Data Gateway. Virtual Terminal User Guide. Version 2.4
 First Data Gateway Virtual Terminal User Guide Version 2.4 First Data is a trading name of First Data Europe Limited, a private limited company incorporated in England (company number 02012925) with a
ROAMpay TM. X4 User's Guide
 ROAMpay TM X4 User's Guide Last Modified: 06/14/2013 Contents 1 Activating ROAMpay X4 2 Using the System 2 Login 2 First-time Login 2 Default Settings 3 Retrieving Your Password 3 Online Sales 4 Saved
Subscriptions and Payment Pages Version 2
 Version 2 Published: 26 April 2018 2.1.21 (c) Table of Contents 1 Introduction... 3 1.1 About Subscriptions... 3 1.2 Process Overview... 3 1.3 Pre-requisites... 3 2 Processing a Subscription through Payment
Access Online. Navigation Basics. User Guide. Version 2.2 Cardholder and Program Administrator
 Access Online Navigation Basics User Guide Version 2.2 Cardholder and Program Administrator Contents Introduction... 1 Access Online Overview... 2 How We Gather and Manage Transaction Data in Access Online...
Quick Reference Guide: SafeShop 3 Web Store. User Manual
 : SafeShop 3 Web Store User Manual TABLE OF CONTENTS REGISTRATION.2 SAFESHOP WEBSTORE. 5 1. FIND MY TRANSACTION:.5 2. STAGED ORDERS:.6 3. MANAGE ORDERS: 7 4. MANAGE SALES...9 5. MANAGE CREDIT/CHARGEBACK
Vantiv ecommerce for Magento 2
 Vantiv ecommerce for Magento 2 User Guide Version 1.0.0 June 2017 Table of Content 1. Onboarding...3 2. Installation...3 3. Configuration...5 4. Nuances for each MOP...22 5. Checkout...23 6. Stored Payment
WELCOME TO RESELLER CENTRE MANUAL... 3 RESELLER PANEL... 4 HOW TO START... 4
 Table of Contents WELCOME TO RESELLER CENTRE MANUAL... 3 RESELLER PANEL... 4 HOW TO START... 4 Dashboard... 4 Filter... 4 Table of content... 5 Trend... 5 Export dashboard data... 6 Bar chart & graphs...
2017 Barclaycard. e-terminal (Virtual terminal)
") e-terminal (Virtual terminal) Table of contents 1. Introduction 2. Submit a new payment 2.1 Credit cards 3. Transaction feedback 3.1 On-screen 3.1.1 Credit-cards 3.2 Back office 3.3 E-mail 4. Advanced
e-terminal (Virtual terminal) Table of contents 1. Introduction 2. Submit a new payment 2.1 Credit cards 3. Transaction feedback 3.1 On-screen 3.1.1 Credit-cards 3.2 Back office 3.3 E-mail 4. Advanced
HANDEPAY DASHBOARD USER GUIDE HANDEPAY DASHBOARD USER GUIDE. Version:
 HANDEPAY DASHBOARD Version: 1.5-1 - Welcome to the Handepay Dashboard user guide. In this guide we will look at the different sections of the Dashboard and explain what each section does. The different
Access ACS. Administrator s User Guide
 Access ACS Administrator s User Guide Copyright Copyright 2009 ACS Technologies Group, Inc. All rights reserved. Reproduction of any part of this publication by mechanical or electronic means, including
SitelokTM. Stripe Plugin V1.5
 SitelokTM Stripe Plugin V1.5 Sitelok Stripe Plugin Manual Copyright 2015-2018 Vibralogix. All rights reserved. This document is provided by Vibralogix for informational purposes only to licensed users
Account Management. Pilot Support Guide
 Account Management Pilot Support Guide Public Use Doc no: PR-PUB-0012 Version 1.0 June 22, 2017 Copyright notice Copyright 2017 Cayan LLC. All rights reserved. No part of this publication may be reproduced,
Treasury Management User Guide. Online Banking
 Treasury Management User Guide Online Banking Released August 2018 Treasury Management... 4 Logging in to Treasury Management...5 Helpful Hints...10 User Menu... 12 Profile and Preferences... 12 Notification
ONLINE TRADE SERVICES USER GUIDE
 ONLINE TRADE SERVICES USER GUIDE Contents 1 Welcome 4 2 Using Online Trade Services for the first time 5 3 System Features (Service Administrator) 11 3.1 Overview 11 3.2 Change profile 11 3.3 Jurisdiction
Quick Start Guide Access Online. Maintenance. July 2017 To configure the application before usage and all necessary settings in clear steps.
 Quick Start Guide Access Online Maintenance July 2017 To configure the application before usage and all necessary settings in clear steps. General To use the payment and/or reporting module of Access Online
Merchant Portal User Guide
 Merchant Portal User Guide TABLE OF CONTENTS Accessing the Click Merchant Portal... 3 Virtual Terminal... 4 Single Entry (Merchant Enters Card Details)... 5 Payment Using Collected Card Details... 5 Payment
Supplier Quick Reference and How To Guide
 and How To Guide For Help or Support support@primerevenue.com Toll Free USA & Canada: 1 800 557 8047 Toll Free Europe: 00800 7746 3000 Toll Free Asia: 001 800 7746 3000 Toll Free Australia: 1 800 217 718
MERCHANT MANUAL. Direct Connect Copyright 2016, All Rights Reserved.
 MERCHANT MANUAL Direct Connect Copyright 2016, All Rights Reserved www.directconnectps.com Table of Contents Overview... 5 The Gateway... 6 Logon as a Merchant... 7 Adding a New User... 11 Finding and
PLEXUS PAY PORTAL YOUR HOW-TO GUIDE
 PLEXUS PAY PORTAL YOUR HOW-TO GUIDE - 1 - Table of Contents Activate Account Activating Your Pay Portal Account 3 Navigating your Plexus Pay Portal 8 Managing your funds 17 Activating your Prepaid Card
ACCESS ONLINE USER GUIDE
 ACCESS ONLINE USER GUIDE PREPARED BY: SUPPLIER PAYMENT SERVICES FINANCIAL SERVICES ACCESS ONLINE USER GUIDE GETTING STARTED LOGGING IN:... 2 FORGOT YOUR PASSWORD?... 4 LOGGING OUT... 6 MY PERSONAL INFORMATION
Virtual Terminal User Guide
 Virtual Terminal User Guide Version 2018-1(IPG) 2018 First Data Corporation. All Rights Reserved. All trademarks, service marks and trade names referenced in this material are the property of their respective
FirstView. Merchant User Guide. Version 1.0. FirstView Merchant User Guide
 FirstView Merchant User Guide Version 1.0 Document Control Document ID Version Author/Editor Date Original Draft 1.0 Dan Gill 7/26/2018 Copyright 2018 First American Payment Systems, L.P. All rights reserved.
2013 Eon Technologies. 24 Banking Business U S E R G U I D E
 24 Banking Business U S E R G U I D E CONFIDENTIALITY STATEMENT All materials on this document are protected as the copyrights, trademarks and/ or other intellectual properties owned by BCR Chisinau S.A.,
LINKS MODULAR SOLUTIONS PAY.LINK MANUAL
 LINKS MODULAR SOLUTIONS PAY.LINK MANUAL Links Modular Solutions Pty Ltd July 2009 Table of Contents Welcome to pay.link... 5 Overview... 6 Payments... 7 Clarification of Terms... 8 Run Status... 8 Transaction
Virtual Terminal User Guide Version (Australia IPG)
") Virtual Terminal User Guide Version 2017-5 (Australia IPG) Gateway 1 Contents This table of contents has been amended to exclude sections not applicable to Australia. The original content is still available
Virtual Terminal User Guide Version 2017-5 (Australia IPG) Gateway 1 Contents This table of contents has been amended to exclude sections not applicable to Australia. The original content is still available
CyberSource Business Center
 CyberSource Business Center CS3-609-06-16-09 Copyright 2009 Harris Connect, LLC. all rights reserved. Reproduction in any form without the express written consent of Harris Connect, LLC. is strictly prohibited
NAB EFTPOS USER GUIDE. for Countertop
 NAB EFTPOS USER GUIDE for Countertop & Mobile Terminals About your NAB EFTPOS Terminal NAB EFTPOS Mobile NAB EFTPOS Countertop 2 Table of Contents Getting to know your NAB EFTPOS VeriFone terminal...5
MERCHANT MANUAL. Direct Connect Merchant Services LLC Copyright 2016, All Rights Reserved Merchant Manual v 1.
 MERCHANT MANUAL Direct Connect Merchant Services LLC www.directconnectps.com Copyright 2016, All Rights Reserved Merchant Manual 2016.10.06 v 1.doc Table of Contents Overview... 5 The Gateway... 6 Logon
Is your website secure? Yes. When the browser opens a secured website, https can be seen in the URL instead of just http.
 Patient FAQ Placing Orders Is your website secure? Yes. When the browser opens a secured website, https can be seen in the URL instead of just http. How do I place an order? 1. Select your brand from the
User Guide. Customer Self Service (CSS) Web Application Progress Software Corporation. All rights reserved.
 Web Application Progress Software Corporation. All rights reserved.") User Guide Customer Self Service (CSS) Web Application 1993-2017 Progress Software Corporation. Version 2.1 March 2017 Table of Contents Welcome... 3 Accessing the Customer Self Service (CSS) Web Application...
User Guide Customer Self Service (CSS) Web Application 1993-2017 Progress Software Corporation. Version 2.1 March 2017 Table of Contents Welcome... 3 Accessing the Customer Self Service (CSS) Web Application...
Vantiv ecommerce for Magento 1 User Guide. Version 1.0.7
 Vantiv ecommerce for Magento 1 User Guide Version 1.0.7 Vantiv ecommerce for Magento 1... 1 User Guide... 1 1. Project... 3 2. Onboarding... 3 3. Installation... 3 4. Configuration... 5 5. Nuances for
Admin/User Manual SoftPal.com.ng
 Admin/User Manual SoftPal.com.ng 2 THIS MANUAL IS DIVIDED INTO THREE PARTS: 1. THE MEMBER CONTROL PANEL 2. THE ADMIN CONROL PANEL 3. THE CONTENT MANAGEMENT PANEL THE MEMBER CONTROL PANEL is visible to
Sage Mobile Payments User's Guide
 Sage Mobile Payments User's Guide Last Modified: 8/4/2014 Contents 1 Activating Sage Mobile Payments 2 Using the System 2 Login 2 Multi user Login 2 First-time Login 3 Default Settings 3 Retrieving Your
Account Management. Pilot Support Guide
 Account Management Pilot Support Guide Public Use Doc no: PR-PUB-0013 Version 1.0 June 22, 2017 Copyright notice Copyright 2017 Cayan LLC. All rights reserved. No part of this publication may be reproduced,
Authorize.Net Magento 2.x Payment Module
 Authorize.Net Magento 2.x Payment Module User Guide Revision 1.0.1 September 17, 2018 Sep 17 2018 Authorize.Net Global Payment Management for Magento 2.x 1 Contents Document History... 4 1. Introduction...
iveri Lite BackOffice User Guide
 iveri Lite BackOffice User Guide Table of Contents 1New...4 2OVERVIEW...5 3INITIAL ADMINISTRATOR SET-UP AND CONFIGURATION...6 4NEW USER SET-UP AND CONFIGURATION...10 5INDIVIDUAL FUNCTIONS WITHIN IVERI
Opaali Portal Quick guide
 Opaali Portal Quick guide Company information Telia Finland Oyj Teollisuuskatu 15, 00510 HELSINKI, FI Registered office: Helsinki Business ID 1475607-9, VAT No. FI14756079 1 (40) Page 2 (40) Copyright
User Guide: VirtualMerchant
 User Guide: VirtualMerchant Two Concourse Parkway, Suite 800, Atlanta, GA 30328 Elavon, Incorporated 2012. All Rights Reserved Copyright Copyright 2012 Elavon, Incorporated. All rights reserved. No part
User Manual. Getting Started..2. Understanding the Home Screen...2. Creating an Event...3. Registration 6. Managing an Existing Event.
 User Manual Getting Started..2 Understanding the Home Screen...2 Creating an Event....3 Registration 6 Managing an Existing Event.10 Using the Publication Manager 12 Policies.12 Where to Go for Help.13
Visa Payments Control
 Visa Payments Control Getting Started Guide Effective: June 2017 2017 Visa. All Rights Reserved. Notices and Disclaimers This document is protected by copyright restricting its use, copying, distribution,
USER S GUIDE Last Modified: 04/08/2013 1
 USER S GUIDE Last Modified: 04/08/2013 1 Contents 1 Welcome 1 Activating ROAMpay X4 2 Using the System 2 Login 2 First-time Login 2 Default Settings 3 Retrieving Your Password 3 Online Sales 4 Saved Item
CyberSource Global Payment Management
 CyberSource Global Payment Management Magento 2.x Implementation Guide Version 1.1.0 August 2017 Extract Use this guide to install and configure the CyberSource extension for Magento 2.x. Contents Recent
My MessageMedia User Guide
 My MessageMedia User Guide Copyright and Trademark Statement 2011 MessageMedia All rights reserved. Apart from any use permitted under the Copyright Act 1968, no part of this publication may be reproduced,
Table of Contents Installing Integrated Payments Manager Pre-Check Links Integrated Payments Manager Setup... 3
 Table of Contents Table of Contents... 1 Installing Integrated Payments Manager... 3 Pre-Check... 3 Links Integrated Payments Manager Setup... 3 Using Integrated Payments Manager... 9 It is comprised of
View Payments. User Guide. Online Merchant Services
 View Payments User Guide Online Merchant Services Copyright Statement Copyright 2010-2011 by American Express Company. All rights reserved. No part of this document may be reproduced in any form or by
SmartPay Express User Guide
 SmartPay Express User Guide Table of Contents INTRODUCTION... 4 SmartPay Express Overview... 4 System Requirements... 5 Trusted Sites... 5 Available Resources... 7 Additional Resources... 7 LOGGING IN...
onecard Smart Data OnLine Getting Started Guide for Program Administrators
 Smart Data OnLine Getting Started Guide for Program Administrators Table of contents Introduction 3 Login 4 Company site configuration 6 Set-up Tasks 7 Creating a reporting structure 9 Cost allocation
Virtual Terminal User Guide
 With the Clearent Virtual Terminal, merchants can accept credit card payments using the web browser on a computer, tablet, or mobile device. In this guide you will find step-by-step instructions for using
Copyright 2017 Ingenico epayments. e-terminal (Virtual terminal)
") e-terminal (Virtual terminal) Table of contents 1. Introduction 2. Submit a new payment 2.1 Credit cards 2.2 Direct Debits 3. Transaction feedback 3.1 On-screen 3.1.1 Credit-cards 3.1.2 Direct Debits AT
e-terminal (Virtual terminal) Table of contents 1. Introduction 2. Submit a new payment 2.1 Credit cards 2.2 Direct Debits 3. Transaction feedback 3.1 On-screen 3.1.1 Credit-cards 3.1.2 Direct Debits AT
ANZ EGATE MERCHANT ADMINISTRATION QUICK REFERENCE GUIDE
 ANZ EGATE MERCHANT ADMINISTRATION QUICK REFERENCE GUIDE PURPOSE The purpose of this Quick Reference Guide is to provide the user with a quick reference to using the ANZ egate Merchant Administration. COPYRIGHT
Documentation for the new Self Admin
 Documentation for the new Self Admin The following documentation describes the structure of the new Self Admin site along with the purpose of each site section. The improvements that have been made to
USER GUIDE REPORTING <ACQ + GW IMAGE HERE> VERSION 1.0
 REPORTING VERSION 1.0 TABLE OF CONTENTS 1. BATCHED TRANSACTIONS 3 1. BATCH OVERVIEW 3 1. Fraud 5 2. DCC (Dynamic Currency Conversion) 6 3. History 7 1.2 VIEWING RELATED TRANSACTIONS
Solibri Solution Center Guide for Account Administrators
 Guide for Account Administrators Copyright 2016 Solibri, Inc. Content... 1 1 Terminology... 2 2 Accessing the... 4 2.1 Account Registration... 4 2.1.1 New Customer... 4 2.1.2 Existing Customer with Known
imerchantconnect Quick Reference
 imerchantconnect Quick Reference Your secure, easy-to-use, always available, online resource for account information. Introduction imerchantconnect is Elavon s all-inclusive FREE online reporting and statement
Blackbaud Merchant Services Web Portal Guide
 Blackbaud Merchant Services Web Portal Guide 10/09/2017 Blackbaud Merchant Services 4.0 Blackbaud Merchant Services Web Portal Guide US 2016 Blackbaud, Inc. This publication, or any part thereof, may not
Introduction. Automatic gate opening no more swiping
 Introduction This user guide is intended for companies and drivers to use the functionality available in the TAMS System Manage your entire Auckland Airport access account via the internet! One simple
OneCard Smart Data OnLine Getting Started Guide for Program Administrators. Help for what matters
 Smart Data OnLine Getting Started Guide for Program Administrators Help for what matters Table of contents Introduction 3 Login 4 Company site configuration 6 Set-up Tasks 7 Creating a reporting structure
Getting Around QuickBooks Online
 QuickBooks Online Student Guide Chapter 2 Getting Around QuickBooks Online Chapter 2 Chapter 2 Now that you ve finished your company setup in QuickBooks Online, you re ready to get started. It s a good
Trusted Advisor User Guide. inty CASCADE v 2.9.0
 Trusted Advisor User Guide inty CASCADE v 2.9.0 Table of Contents 1. Overview... 2 2. Logging in to inty CASCADE... 2 2.1 Forgotten Password... 4 2.2 Password Complexity... 5 3. Home Page... 7 4. Navigation...
Mobile Banking App Guide (ios and Android Apps) Mobile Banking App Guide (ios and Android)
 Mobile Banking App Guide (ios and Android)") Mobile Banking App Guide (ios and Android) Page 1 A safe and efficient way of accessing your People s Choice Credit Union accounts, paying bills Contents. 1. Mobile Banking using the People s Choice iphone
Mobile Banking App Guide (ios and Android) Page 1 A safe and efficient way of accessing your People s Choice Credit Union accounts, paying bills Contents. 1. Mobile Banking using the People s Choice iphone
Payment Technique and Process
 Payment Technique and Process The McAfee Consumer website provides a complete billing & payment process for individual customers (Home & Home Office service). The website payment is process easy and informing.
Software: Netscape Navigator (v or higher) or Internet Explorer (v. 5.5 or higher), set at 800 x 600 screen resolution (minimum)
 or Internet Explorer (v. 5.5 or higher), set at 800 x 600 screen resolution (minimum)") TEXAS TECH UNIVERSITY HEALTH SCIENCES CENTER PURCHASING CARD USER S MANUAL PATHWAY NET SYSTEM Pathway Net is the software application that automates the TTUHSC Purchasing Card reconciliation process. This
TEXAS TECH UNIVERSITY HEALTH SCIENCES CENTER PURCHASING CARD USER S MANUAL PATHWAY NET SYSTEM Pathway Net is the software application that automates the TTUHSC Purchasing Card reconciliation process. This
Getting Started With Transaction Express
 Getting Started With Transaction Express Table of Contents Product Overview... 8 Welcome Email... 8 Merchant List... 8 Navigation... 9 Left Navigation Sections... 10 Password Security... 11 Change... 12
FREQUENTLY ASKED QUESTIONS
 FREQUENTLY ASKED QUESTIONS 1. What is the YES BANK MasterCard SecureCode? The MasterCard SecureCode is a service offered by YES BANK in partnership with MasterCard. This authentication is basically a password
Quick Guide UOB TRANSACTION BANKING
 UOB TRANSACTION BANKING Table of Contents Welcome to UOB Business Internet Banking Plus (BIBPlus) 2 Things to note before you get started 2 1 BIBPlus Login 3 1.1 First Time Login 3 1.2 Activate User/Password
Bidvest Bank Personal Internet Banking User Manual
 Bidvest Bank Personal Internet Banking User Manual October 2016 Contents 1. INTRODUCTION... 4 1.1 Applying for Internet Banking... 4 2. MAINTAIN YOUR USERNAME, PASSWORD AND PIN... 5 2.1 Forgotten username...
SecureBill. Integration Guide. Version: 1.2
 Version: 1.2 Date: 28/02/2017 Author: SecurePay Document Control Document Version History Date Version Author Changes 05/01/2016 1.0 SecurePay - Initial document creation. 04/04/2016 1.1 SecurePay - Added
1 Virtual Terminal Quick Reference Guide. Virtual Terminal Quick Reference Guide. Getting Started
 1 Virtual Terminal Quick Reference Guide Virtual Terminal Quick Reference Guide Getting Started 2 Virtual Terminal Quick Reference Guide What you need Internet enabled laptop or computer Virtual Terminal
How do I purchase a membership for Third Age Learning - York Region?
 1. Go to our website www.talyr.ca 2. Once there, press the Join Us tab at the top of the page (see example page below). 3. Now that you are on the Join Us page, select which membership level you wish to
VIRTUAL TERMINAL GUIDE
 VIRTUAL TERMINAL GUIDE Version 1.4 Jan 2017 1 TABLE OF CONTENTS ABOUT THIS GUIDE... 2 INTRODUCTION... 3 ACCESSING THE VIRTUAL TERMINAL... 4 SUBMITTING A PAYMENT... 5 VIEWING YOUR TRANSACTIONS... 7 Virtual
USER GUIDE. Version 2.0. Reflex Online Cash Management
 TM USER GUIDE Version 2.0 Reflex Online Cash Management Table of Contents USER GUIDE VERSION 2.0 Table of Contents... 2 1. Introduction... 4 1.1 What is Reflex?... 4 1.2 How do I access Reflex?... 4 1.3
AvePoint Online Services 2
 2 User Guide Service Pack 7 Issued August 2017 Table of Contents What s New in this Guide...6 About...7 Versions: Commercial and U.S. Government Public Sector...7 Submitting Documentation Feedback to AvePoint...8
Getting Started with. InSpiredByYou.com COPYRIGHT STUDIOPLUS SOFTWARE, LLC ALL RIGHTS RESERVED
 Getting Started with InSpiredByYou.com COPYRIGHT 1998-2013 STUDIOPLUS SOFTWARE, LLC ALL RIGHTS RESERVED i Getting Started with InSpiredByYou Table of Contents Setting Up InSpiredByYou... 3 Set Up an InSpiredByYou
Using the Telstra T-Suite Management Console. Customer Administrator s Reference Manual
 Using the Telstra T-Suite Management Console Customer Administrator s Reference Manual June 2011 Registering With TMC Notice Pivot Path is a registered trademark of Jamcracker, Inc. Registered trademark
ATB Online Business General User. User Guide
 ATB Online Business General User User Guide Contents Welcome to ATB Online Business 4 How to use this guide 5 Roles and entitlements in ATB Online Business 5 Administrator role 5 User roles 5 Limits 6
Nayax DCS First Steps Manual
 Nayax DCS First Steps Manual DOCUMENT CONTROL Version Author 1.0 David Korodi 1.1 Alex Vaserman Date 20.05.16 23.05.16 Description Initial Release. Minor Corrections and design Objective The purpose of
User Guide. Accept EFTPOS, Visa and Mastercard payments on the go with Kiwibank QuickPay.
 User Guide Accept EFTPOS, Visa and Mastercard payments on the go with Kiwibank QuickPay. Kiwibank QuickPay terms and conditions apply. Kiwibank QuickPay is only available for business banking purposes.
PayWay. MTS File Format Specification
 PayWay MTS File Format Specification Version 1.1 4 Feb 2016 Document History Date Version 27 Sep 2010 1.0 Initial Version 4 Feb 2016 1.1 Added TEST as valid value for Merchant Id Page 2 Table of Contents