Adobe Photoshop Sh S.K. Sublania and Sh. Naresh Chand
|
|
|
- Rolf Malone
- 5 years ago
- Views:
Transcription

1 Adobe Photoshop Sh S.K. Sublania and Sh. Naresh Chand Photoshop is the software for image processing. With this you can manipulate your pictures, either scanned or otherwise inserted to a great extant. You can use photoshop to create pictures and art works with text and other graphics. Work Area The Photoshop work area is arranged to help you focus on creating and editing images. Photoshop Work Area 1. Menu bar 2. Options bar 3. Go to Bridge 4. Palette well 5. Toolbox 6. Palettes Work Area Components Menu bar contains menus organized by tasks. For example, the Layers menu contains commands for working with layers. In Photoshop, you can customize the menu bar by showing, hiding, or adding color to menu items. Options bar provides options for using a tool. Toolbox contains tools for creating and editing images. Active image area displays the active open file. The window containing an open file is also called the document window.

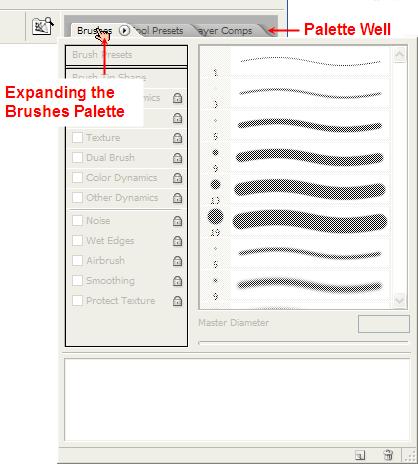
2 Palette well helps you organize the palettes in your work area. Palettes help you monitor and modify images. You can customize the palette locations in the workspace. In Photoshop, you can also show, hide, or add color to items in palette menus. In Photoshop, you can change the font size of the text in the options bar, palettes, and tool tips. Palette Well The Photoshop options bars include a palette well that helps you organize and manage palettes. The palette well stores, or docks, palettes that you use frequently, so that you don t have to keep them open on the work area. The palette well is available only when the screen resolution is greater than 800 pixels x 600 pixels (a setting of at least 1024 x 768 is recommended). Click a palette s tab to use the palette in the palette well. The palette remains open until you click outside it or click the palette s tab again.

3 Tools and Toolbox The first time you start the application, the toolbox appears at the left side of the screen. You can move the toolbox by dragging its title bar. You can also show or hide the toolbox by choosing Window > Tools. Some tools in the toolbox have options that appear in the context-sensitive tool options bar. These include the tools that let you use type, select, paint, draw, sample, edit, move, annotate, and view images. Other tools in the toolbox allow you to change foreground/background colors, go to Adobe Online, work in different modes, and jump between Photoshop and ImageReady applications. You can expand some tools to show hidden tools beneath them. A small triangle at the lower right of the tool icon signals the presence of hidden tools. You can view information about any tool by positioning the pointer over it. The name of the tool appears in a tool tip below the pointer. Some tool tips contain links leading to additional information about the tool. To use a tool Do one of the following:

4 Click a tool in the toolbox. If there is a small triangle at a tool s lower right corner, hold down the mouse button to view the hidden tools. Then click the tool you want to select. Press the tool s keyboard shortcut. The keyboard shortcut is displayed in its tool tip. For example, you can select the Move tool by pressing the V key. Using the Selecting Tool A. Toolbox B. Active tool C. Hidden tools D. Tool name E. Tool shortcut F. Hidden tool triangle Using the Navigator Palette You use the Navigator palette to quickly change the view of your artwork using a thumbnail display. The colored box in the Navigator (called the proxy view area) corresponds to the currently viewable area in the window. Do one or more of the following: To display the Navigator palette, select Window > Navigator. To change the magnification, type a value in the text box, click the Zoom Out or Zoom In button, or drag the zoom slider. To move the view of an image, drag the proxy view area in the image thumbnail. You can also click the image thumbnail to designate the viewable area. To change the color of the proxy view area, select Palette Options from the palette menu. Select a preset color from the Color pop up menu, or double-click the color box to choose a custom color.

5 Navigator Palette A. Palette menu button B. Thumbnail display of artwork C. Proxy preview area D. Zoom text box E. Zoom Out button F. Zoom slider G. Zoom In button Rulers Rulers help you position images or elements precisely. When visible, rulers appear along the top and left side of the active window. Markers in the ruler display the pointer s position when you move it. Changing the ruler origin (the (0, 0) mark on the top and left rulers) lets you measure from a specific point on the image. The ruler origin also determines the grid s point of origin. To show or hide rulers, choose View > Rulers. Using Marquee Tool The marquee tools let you select rectangles, ellipses, rounded rectangles (ImageReady), and pixel rows and columns. By default, a selection border is dragged from its corner. Select a marquee tool Rectangular Marquee makes a rectangular selection. Rounded Rectangle Marquee (ImageReady) selects a rounded rectangle, such as a web page button.
6 Elliptical Marquee makes an elliptical selection. Single Row or Single Column Marquee defines the border as a 1-pixel-wide row or column. Specify one of the selection options in the options bar. Selection Options A. New B. Add To C. Subtract From D. Intersect With Specify a feathering setting in the options bar. Turn anti-aliasing on or off for the Rounded Rectangle Marquee tool or the Elliptical Marquee tool. For the Rectangle Marquee tool, the Rounded Rectangle Marquee tool, or the Elliptical Marquee tool, choose a style in the options bar: Normal determines marquee proportions by dragging. Fixed Aspect Ratio Sets a height-to-width ratio. Enter values (decimal values are valid in Photoshop) for the aspect ratio. For example, to draw a marquee twice as wide as it is high, enter 2 for the width and 1 for the height. Fixed Size specifies set values for the marquee s height and width. Enter pixel values in whole numbers. Keep in mind that the number of pixels needed to create a 1-inch selection depends on the resolution of the image. For aligning your selection to guides, a grid, slices, or document bounds, do one of the following to snap your selection: Choose View > Snap, or choose View > Snap To and choose a command from the submenu. The marquee selection can snap to a document boundary. This is controlled in the Snap To submenu. Do one of the following to make a selection: With the Rectangle Marquee tool, the Rounded Rectangle Marquee tool, or the Elliptical Marquee tool, drag over the area you want to select. Hold down Shift as you drag to constrain the marquee to a square or circle (release the mouse button before Shift to keep the shape constrained). To drag a marquee from its center, hold down Alt (Windows) or Option (Mac OS) after you begin dragging. Dragging a marquee from the corner of an image (left), and from the center of an image (right) With the Single Row or Single Column Marquee tool, click near the area you want to select, and then drag the marquee to the exact location. If no marquee is visible, increase the magnification of your image view.
7 To reposition a rectangle, rounded rectangle, or elliptical marquee, first drag to create the border, keeping the mouse button depressed. Then hold down the spacebar and continue to drag. Release the spacebar, but keep the mouse button depressed, if you need to continue adjusting the selection border. Using the Lasso Tool The Lasso tool is useful for drawing freeform segments of a selection border. Select the Lasso tool, and select options. See To set options for the Lasso, Polygonal Lasso, and Magnetic Lasso tools. Drag to draw a freehand selection border. To draw a straight-edged selection border, hold down Alt (Windows) or Option (Mac OS), and click where segments should begin and end. You can switch between drawing freehand and straight-edged segments. To erase recently drawn segments, hold down the Delete key until you ve erased the fastening points for the desired segment. To close the selection border, release the mouse without holding down Alt. Using the Magic Wand Tool The Magic Wand tool lets you select a consistently colored area (for example, a red flower) without having to trace its outline. You specify the color range, or tolerance, for the Magic Wand tool s selection. You cannot use the Magic Wand tool on an image in Bitmap mode or on 32-bits-perchannel images. Select the Magic Wand tool. Specify one of the selection options in the options bar. The Magic Wand tool s pointer changes depending on which option is selected. Selection Options A. New B. Add To C. Subtract From D. Intersect With In the options bar, specify any of the following: Tolerance Determines the similarity or difference of the pixels selected. Enter a value in pixels, ranging from 0 to 255. A low value selects the few colors very similar to the pixel you click. A higher value selects a broader range of colors. Anti-aliased Defines a smooth edge. Contiguous Selects only adjacent areas using the same colors. Otherwise, all pixels in the entire image using the same colors are selected.


8 Sample All Layers Selects colors using data from all the visible layers. Otherwise, the Magic Wand tool selects colors from the active layer only. In the image, click the color you want to select. If Contiguous is selected, all adjacent pixels within the tolerance range are selected. Otherwise, all pixels in the tolerance range are selected. Layers Layers allow you to work on one element of an image without disturbing the others. Think of layers as sheets of acetate stacked one on top of the other. You can see through transparent areas of a layer to the layers below. You can change the composition of an image by changing the order and attributes of layers. In addition, special features such as adjustment layers, fill layers, and layer styles let you create sophisticated effects. Transparent areas on a layer let you see through to the layers below. All the above three layers seen together will be as below.


9 A new image in Photoshop has a single layer. The number of additional layers, layer effects, and layer sets you can add to an image is limited only by your computer s memory. Layer groups help you organize and manage layers. You can use groups to arrange your layers in a logical order and to reduce clutter in the Layers palette. You can nest groups within other groups. You can also use groups to apply attributes and masks to multiple layers simultaneously. Layers Palette The Layers palette lists all layers, groups, and layer effects in an image. You can use the Layers palette to show and hide layers, create new layers, and work with groups of layers. You can access additional commands and options in the Layers palette menu. Photoshop Layers Palette A. Layers palette menu B. Group C. Layer D. Expand/Collapse Layer effects E. Layer effect F. Layer thumbnail
10 To display the Layers palette, choose Window > Layers. To use the Layers palette menu, click the triangle in the upper right corner of the palette. It contains commands for working with layers. To change the size of layer thumbnails, choose Palette Options from the Layers palette menu, and select a thumbnail size. To change thumbnail contents, choose Palette Options from the Layers palette menu and select Entire Document to display the contents of the entire document. Select Layer Bounds to restrict the thumbnail to the object s pixels on the layer. Select the Show Group Thumbnails box to show a composite image of the group rather than the group icon. Turn off thumbnails to improve performance and save monitor space. To expand and collapse groups (and layer sets in ImageReady), click the triangle to the left of a group folder. See To view layers and groups within a group. Shapes and Paths Vector shapes are lines and curves that you draw using the shape or pen tools. Vector shapes are resolution-independent they maintain crisp edges when resized, printed to a PostScript printer, saved in a PDF file, or imported into a vector-based graphics application. Paths are outlines that you can turn into selections, or fill and stroke with color. The outline of a shape is a path. You can easily change the shape of a path by editing its anchor points. You can draw shapes in ImageReady, but you can t work directly with paths. When you work with the shape tools in Photoshop, you can draw in three different modes. You choose a mode by selecting an icon in the options bar when you have a shape or pen tool selected. Shape Layers Creates a shape on a separate layer. You can use either the shape tools or the pen tools to create shape layers. Because they are easily moved, resized, aligned, and distributed, shape layers are ideal for making graphics for web pages. In Photoshop, you can choose to draw multiple shapes on a layer. A shape layer consists of a fill layer that defines the shape color and a linked vector mask that defines the shape outline. The outline of a shape is a path, which appears in the Paths palette. Paths Draws a work path on the current layer that you can then use to make a selection, create a vector mask, or fill and stroke with color to create raster graphics (much as you would using a painting tool). A work path is temporary unless you save it. Paths appear in the Paths palette. Fill Pixels Paints directly on a layer much as a painting tool does. When you work in this mode, you are not creating vector graphics. You work with the shapes you paint just as you do with any raster image. The Pen tools don't work in this mode.
11 Using the Brush Tool or Pencil Tool The Brush tool and the Pencil tool paint the current foreground color on an image. The Brush tool creates soft strokes of color. The Pencil tool creates hard-edged lines. Choose a foreground color. (See To choose colors in the toolbox.) Select the Brush tool or Pencil tool. Set tool options in the options bar: Choose a brush from the Brush Presets picker, and set brush options. (See To select a preset brush.) Choose a blending mode from the Mode menu. (See List of blending modes.) Specify an opacity by dragging the Opacity slider. Opacity specifies the amount of paint coverage applied by each stroke. For the Brush tool, specify a flow rate by dragging the Flow slider. Flow specifies how quickly paint is applied. Press a number key to set a tool s opacity in multiples of 10% (pressing 1 sets to 10%; pressing 0 sets to 100%). Use Shift and number key to set Flow. Click the Airbrush button to use the brush as an airbrush. For the Pencil tool, select Auto Erase to paint the background color over areas containing the foreground color. (See To use the Auto Erase option with the Pencil tool.) Do one or more of the following: Drag in the image to paint. To draw a straight line, click a starting point in the image. Then hold down Shift, and click an ending point. When using the Brush tool as an airbrush, hold down the mouse button without dragging to build up color. Brushes Palette The Brushes palette lets you select preset brushes and design custom brushes. The brush you select determines many characteristics of the resulting stroke. Photoshop provides a variety of preset brushes to fill a wide range of uses. In Photoshop, you can also create custom brushes using the Brushes. Palette Brushes palette with Brush Tip Shape options displayed A. Locked B. Unlocked C. Selected brush tip D. Brush settings E. Brush stroke preview F. pop-up menu G. Brush tip shapes (available when Brush Tip Shape option is selected) H. Brush options.
12
2 Working with Selections
 2 Working with Selections Learning how to select areas of an image is of primary importance you must first select what you want to affect. Once you ve made a selection, only the area within the selection
Photoshop Basics A quick introduction to the basic tools in Photoshop
 Photoshop Basics A quick introduction to the basic tools in Photoshop Photoshop logo courtesy Adobe Systems Inc. By Dr. Anthony R. Curtis Mass Communication Department University of North Carolina at Pembroke
Graphic Design & Digital Photography. Photoshop Basics: Working With Selection.
 1 Graphic Design & Digital Photography Photoshop Basics: Working With Selection. What You ll Learn: Make specific areas of an image active using selection tools, reposition a selection marquee, move and
4 Working with Selections
 4 Working with Selections Learning how to select areas of an image is of primary importance you must first select what you want to affect. Once you ve made a selection, only the area within the selection
Keyboard Shortcuts. Command Windows Macintosh
 S00ILCS5.qxp 3/19/2010 1:11 AM Page 477 Keyboard Shortcuts k Adobe Illustrator CS5 If a command on a menu includes a keyboard reference, known as a keyboard shortcut, to the right of the command name,
PhotoShop Selection Tools
 PhotoShop Selection Tools In Photoshop, as in many similar photo software applications, there are basic sets of selection tools the marquee, lasso, and magic wand tools. Additionally, you can use the move
Shortcut Keys for Adobe Photoshop (Educational Support)
") Shortcut Keys for Adobe Photoshop (Educational Support) http:// SHORTCUT KEYS - I Adobe Photoshop Tools V Move M Marquee tools L Lasso tools W Quick Selection, Magic Wand C Crop and Slice Tools I Eyedropper,
Shortcut Keys for Adobe Photoshop (Educational Support) http:// SHORTCUT KEYS - I Adobe Photoshop Tools V Move M Marquee tools L Lasso tools W Quick Selection, Magic Wand C Crop and Slice Tools I Eyedropper,
USING THE PHOTOSHOP TOOLBOX
 IN THIS CHAPTER USING THE PHOTOSHOP TOOLBOX Using the Options Bar 44 Using the Selection Tools 45 Using the Crop and Slice Tools 46 Using the Retouching Tools 46 Using the Painting Tools 49 Using the Drawing
3 WORKING WITH SELECTIONS
 3 WORKING WITH SELECTIONS Lesson overview In this lesson, you ll learn how to do the following: Make specific areas of an image active using selection tools. Reposition a selection marquee. Move and duplicate
Photoshop Creative Cloud (CC)
") Photoshop Creative Cloud (CC) Photoshop is an image editing and design software. Photoshop can be used to add special effects to an image, correct color and image flaws, and even remove parts of an image
Photoshop Creative Cloud (CC) Photoshop is an image editing and design software. Photoshop can be used to add special effects to an image, correct color and image flaws, and even remove parts of an image
How to create shapes. Drawing basic shapes. Adobe Photoshop Elements 8 guide
 How to create shapes With the shape tools in Adobe Photoshop Elements, you can draw perfect geometric shapes, regardless of your artistic ability or illustration experience. The first step to drawing shapes
ITEC185. Introduction to Digital Media
 ITEC185 Introduction to Digital Media ADOBE ILLUSTRATOR CC 2015 What is Adobe Illustrator? Adobe Illustrator is a program used by both artists and graphic designers to create vector images. These images
ADOBE PHOTOSHOP BOOK SAHALSOFTWARE. Frist Editing. Contents
 ADOBE PHOTOSHOP BOOK SAHALSOFTWARE Frist Editing Contents Lesson 01: Introduction of Adobe Photoshop Lesson 02: How to Open Photoshop Lesson 03: Environment Lesson 04: Tools in Adobe Photoshop Lesson 05:
3 WOrkinG WiTH SElECTiOnS lesson overview
 3 Working with Selections Lesson overview In this lesson, you ll learn how to do the following: Make specific areas of an image active using selection tools. Reposition a selection marquee. Move and duplicate
ILLUSTRATOR TUTORIAL-1 workshop handout
 Why is Illustrator a powerful tool? ILLUSTRATOR TUTORIAL-1 workshop handout Computer graphics fall into two main categories, bitmap graphics and vector graphics. Adobe Illustrator is a vector based software
Overview of Adobe Fireworks
 Adobe Fireworks Overview of Adobe Fireworks In this guide, you ll learn how to do the following: Work with the Adobe Fireworks workspace: tools, Document windows, menus, and panels. Customize the workspace.
ADOBE PHOTOSHOP Using Masks for Illustration Effects
 ADOBE PHOTOSHOP Using Masks for Illustration Effects PS PREVIEW OVERVIEW In this exercise, you ll see a more illustrative use of Photoshop. You ll combine existing photos with digital art created from
Adobe photoshop Using Masks for Illustration Effects
 Adobe photoshop Using Masks for Illustration Effects PS Preview Overview In this exercise you ll see a more illustrative use of Photoshop. You ll combine existing photos with digital art created from scratch
Adobe Photoshop CS2 Reference Guide For Windows
 This program is located: Adobe Photoshop CS2 Reference Guide For Windows Start > All Programs > Photo Editing and Scanning >Adobe Photoshop CS2 General Keyboarding Tips: TAB Show/Hide Toolbox and Palettes
WORK AREA. Lesson overview
 1 GETTING TO KNOW THE WORK AREA Lesson overview In this lesson, you ll explore the workspace and learn how to do the following: Open an Adobe Illustrator CS6 file. Adjust the user interface brightness.
Adobe Illustrator CS Design Professional GETTING STARTED WITH ILLUSTRATOR
 Adobe Illustrator CS Design Professional GETTING STARTED WITH ILLUSTRATOR Chapter Lessons Create a new document Explore the Illustrator window Create basic shapes Apply fill and stroke colors to objects
Photoshop / Editing paths
 Photoshop / Editing paths Path segments, components, and points Select a path Adjust path segments Add or delete anchor points Convert between smooth points and corner points Adjust path components Path
Using Masks for Illustration Effects
 These instructions were written for Photoshop CS4 but things should work the same or similarly in most recent versions Photoshop. 1. To download the files you ll use in this exercise please visit: http:///goodies.html
INSTRUCTORS: A. SANPHAWAT JATUPATWARANGKUL A. NATTAPOL SUPHAWONG A. THEEPRAKORN LUNTHOMRATTANA COMPUTER AIDED DESIGN I AUTOCAD AND ILLUSTRATOR CS
 INSTRUCTORS: A. SANPHAWAT JATUPATWARANGKUL A. NATTAPOL SUPHAWONG A. THEEPRAKORN LUNTHOMRATTANA COMPUTER AIDED DESIGN I AUTOCAD AND ILLUSTRATOR CS BITMAP IMAGES VS VECTOR GRAPHICS WORKING WITH BITMAP IMAGES
Making Selections. Photoshop Chapter C
 Making Selections Photoshop Chapter C Compositing Combining images from different sources To do this, user must know how to select parts of the varying images Selecting Methods Freeform tools Create own
Drawing shapes and lines
 Fine F Fi i Handmade H d d Ch Chocolates l Hours Mon Sat 10am 6pm In this demonstration of Adobe Illustrator CS6, you will be introduced to new and exciting application features, like gradients on a stroke
Adobe InDesign CS6 Tutorial
 Adobe InDesign CS6 Tutorial Adobe InDesign CS6 is a page-layout software that takes print publishing and page design beyond current boundaries. InDesign is a desktop publishing program that incorporates
A QUICK TOUR OF ADOBE ILLUSTRATOR CC (2018 RELEASE)
") A QUICK TOUR OF ADOBE ILLUSTRATOR CC (2018 RELEASE) Lesson overview In this interactive demonstration of Adobe Illustrator CC (2018 release), you ll get an overview of the main features of the application.
A QUICK TOUR OF ADOBE ILLUSTRATOR CC (2018 RELEASE) Lesson overview In this interactive demonstration of Adobe Illustrator CC (2018 release), you ll get an overview of the main features of the application.
Interface. 2. Interface Photoshop CS/ImageReady CS for the Web H O T
 2. Interface Photoshop CS/ImageReady CS for the Web H O T 2. Interface The Welcome Screen Interface Overview Using the Toolbox Using Palettes Using the Options Bar Creating a Tool Preset Resetting Tools
L E S S O N 2 Background
 Flight, Naperville Central High School, Naperville, Ill. No hard hat needed in the InDesign work area Once you learn the concepts of good page design, and you learn how to use InDesign, you are limited
Objective Utilize appropriate tools and methods to produce digital graphics.
 INSTRUCTIONAL NOTES There are many similarities between Photoshop and Illustrator. We have attempted to place tools and commands in the context of where they are most effective or used most often. This
Adobe Photoshop CS3 - Shortcuts, Tips & Tricks!
 Adobe Photoshop CS3 - Shortcuts, Tips & Tricks! In Photoshop CS3, many of the shortcuts for the application menus, palette menus and tools can be customized using the Keyboard Shortcuts Editor. Although
Adobe Illustrator CC 2018 Tutorial
 Adobe Illustrator CC 2018 Tutorial GETTING STARTED Adobe Illustrator CC is an illustration program that can be used for print, multimedia and online graphics. Whether you plan to design or illustrate multimedia
EDITING SHAPES. Lesson overview
 3 CREATING AND EDITING SHAPES Lesson overview In this lesson, you ll learn how to do the following: Create a document with multiple artboards. Use tools and commands to create basic shapes. Work with drawing
Education and Training CUFMEM14A. Exercise 2. Create, Manipulate and Incorporate 2D Graphics
 Education and Training CUFMEM14A Exercise 2 Create, Manipulate and Incorporate 2D Graphics Menu Exercise 2 Exercise 2a: Scarecrow Exercise - Painting and Drawing Tools... 3 Exercise 2b: Scarecrow Exercise
9 Using Appearance Attributes, Styles, and Effects
 9 Using Appearance Attributes, Styles, and Effects You can alter the look of an object without changing its structure using appearance attributes fills, strokes, effects, transparency, blending modes,
Layer Styles. Learning Objectives. Introduction
 5 Text, Shapes, and Layer Styles Learning Objectives After completing this chapter, you will be able to: Explain the differences between vector and bitmap graphics. Enter and edit text using the type tools.
Drawing tool gallery 2 06/06/07 09:21:26. Illustrator provides the following drawing tools: The Add Anchor Point tool (+) adds anchor points to paths.
 adds anchor points to paths.") pport/adobe/adobehelpdata/cache/illustrator/12.0/en_us/htmłpage/ws714a382cdf7d304e7e07d0100196cbc5f-6266.html Drawing tool gallery Drawing tool gallery Illustrator provides the following drawing tools:
pport/adobe/adobehelpdata/cache/illustrator/12.0/en_us/htmłpage/ws714a382cdf7d304e7e07d0100196cbc5f-6266.html Drawing tool gallery Drawing tool gallery Illustrator provides the following drawing tools:
4 TRANSFORMING OBJECTS
 4 TRANSFORMING OBJECTS Lesson overview In this lesson, you ll learn how to do the following: Add, edit, rename, and reorder artboards in an existing document. Navigate artboards. Select individual objects,
Overview of Adobe InDesign
 Overview of Adobe InDesign In this guide, you ll learn how to do the following: Work with the InDesign workspace, tools, document windows, pasteboard, panels, and layers. Customize the workspace. Change
Paint/Draw Tools. Foreground color. Free-form select. Select. Eraser/Color Eraser. Fill Color. Color Picker. Magnify. Pencil. Brush.
 Paint/Draw Tools There are two types of draw programs. Bitmap (Paint) Uses pixels mapped to a grid More suitable for photo-realistic images Not easily scalable loses sharpness if resized File sizes are
The process of making a selection is fundamental to all Photoshop
 102640 ch15.1.qxp 3/10/07 11:23 AM Page 303 Making Selections The process of making a selection is fundamental to all Photoshop documents. A selection isolates an area of an image so that you can apply
SNOWFLAKES PHOTO BORDER - PHOTOSHOP CS6 / CC
 Photo Effects: Snowflakes Photo Border (Photoshop CS6 / CC) SNOWFLAKES PHOTO BORDER - PHOTOSHOP CS6 / CC In this Photoshop tutorial, we ll learn how to create a simple and fun snowflakes photo border,
Photoshop Introduction to The Shape Tool nigelbuckner This handout is an introduction to get you started using the Shape tool.
 Photoshop Introduction to The Shape Tool nigelbuckner 2008 This handout is an introduction to get you started using the Shape tool. What is a shape in Photoshop? The Shape tool makes it possible to draw
Overview of Adobe Fireworks CS6
 Overview of Adobe Fireworks CS6 Lesson topics: Work with the Adobe Fireworks CS6 workspace: tools, Document windows, menus, and panels. Customize the workspace. Change the magnification of a document.
Using Selection Tools and Layers
 Using Selection Tools and Layers A version of the melon head. Yours does not need to look just like this. Start by opening the Lesson 02 Start file provided. Select File>Save As and rename file adding
Chapter 1. Getting to Know Illustrator
 Chapter 1 Getting to Know Illustrator Exploring the Illustrator Workspace The arrangement of windows and panels that you see on your monitor is called the workspace. The Illustrator workspace features
Think of layers as a stack of transparencies. Layers can be changed independently of other layers by clicking on its name in the layers palette.
 Layer Techniques Think of layers as a stack of transparencies. Layers can be changed independently of other layers by clicking on its name in the layers palette. Reviewing the Layers Palette: A: Show/Hide
Overview of Adobe InDesign CS5 workspace
 Overview of Adobe InDesign CS5 workspace In this guide, you ll learn how to do the following: Work with the InDesign workspace, tools, document windows, pasteboard, panels, and layers. Customize the workspace.
SETTINGS AND WORKSPACE
 ADOBE ILLUSTRATOR Adobe Illustrator is a program used to create vector illustrations / graphics (.ai/.eps/.svg). These graphics will then be used for logos, banners, infographics, flyers... in print and
Step 1: Create A New Photoshop Document
 Snowflakes Photo Border In this Photoshop tutorial, we ll learn how to create a simple snowflakes photo border, which can be a fun finishing touch for photos of family and friends during the holidays,
Illustrator syllabus and overview
 Illustrator syllabus and overview Adobe Illustrator CS6 is a sophisticated vector drawing tools. You can create distinctive designs with precise shape-building tools, fluid and painterly brushes, and advanced
Adding Objects Creating Shapes Adding. Text Printing and Exporting Getting Started Creating a. Creating Shapes Adding Text Printing and Exporting
 Getting Started Creating a Workspace Pages, Masters and Guides Adding Objects Creating Shapes Adding Text Printing and Exporting Getting Started Creating a Workspace Pages, Masters and Guides Adding Objects
Introduction to Photoshop. Training Documentation
 Introduction to Photoshop Training Documentation 1 Introduction to Photoshop... 3 What is Photoshop?... 3 Tool Palate... 3 Gradient: Allows transition between two or more chosen colors... 4 Other Terms:...
The Photoshop Workspace
 Adobe Photoshop: Chapter 2: The Photoshop Workspace When you first open or start Photoshop the work area is made up of a set of default or standard Tools, Palettes and menus. Photoshop s Tools are contained
Page Number Mouse Menu
 Adobe Photoshop CS5 Quick Reference Summary Adobe Photoshop CS5 Quick Reference Summary Number Mouse Adjustment Layer PS 187 Clip to Layer button on Adjustments Layer New Adjustment Layer Background Eraser
Paint Tutorial (Project #14a)
") Paint Tutorial (Project #14a) In order to learn all there is to know about this drawing program, go through the Microsoft Tutorial (below). (Do not save this to your folder.) Practice using the different
Paint Tutorial (Project #14a) In order to learn all there is to know about this drawing program, go through the Microsoft Tutorial (below). (Do not save this to your folder.) Practice using the different
HAPPY HOLIDAYS PHOTO BORDER
 HAPPY HOLIDAYS PHOTO BORDER In this Photoshop tutorial, we ll learn how to create a simple and fun Happy Holidays winter photo border! Photoshop ships with some great snowflake shapes that we can use in
Adobe Fireworks is an incredible application with specific solutions to
 Chapter 1: Introducing Fireworks CS4 In This Chapter Understanding when you should use Fireworks Discovering the workspace Finding out about the tools Looking into the views Using the basic selection tools
Pen Tool, Fill Layers, Color Range, Levels Adjustments, Magic Wand tool, and shadowing techniques
 Creating a superhero using the pen tool Topics covered: Pen Tool, Fill Layers, Color Range, Levels Adjustments, Magic Wand tool, and shadowing techniques Getting Started 1. Reset your work environment
Keys for selecting tools
 Keys for selecting tools Use these shortcuts in the Tools panel. In most cases, you can momentarily switch tools by holding down the keyboard shortcut for the tool. Selection tool V V Rotation tool W W
Adobe Flash CS4 Part 1: Introduction to Flash
 CALIFORNIA STATE UNIVERSITY, LOS ANGELES INFORMATION TECHNOLOGY SERVICES Adobe Flash CS4 Part 1: Introduction to Flash Fall 2010, Version 1.0 Table of Contents Introduction...3 Downloading the Data Files...3
Interface. 2. Interface Illustrator CS H O T
 2. Interface Illustrator CS H O T 2. Interface The Welcome Screen The Illustrator Workspace The Toolbox Keyboard Shortcuts Palette Control Setting Preferences no exercise files Illustrator CS H O T Illustrator
Adobe Photoshop CS2/CS3: introduction
 Adobe Photoshop CS2/CS3: introduction Lessons Lesson 1: Overview of Adobe Photoshop CS2/CS3 After you learn about the Photoshop workspace, you'll learn to create a new image, select it, and make an example
Interface Overview. Menu Bar. Control Palette. Toolbox. Palettes. Document Window. Status Bar
 Lesson overview: This module covers basic elements of the Illustrator work area. Learn how to open and close plaettes, choose tools, and learn the funtions of each tool. Learn how to reset your workspace
If you have been using CorelDRAW, you may have turned off this opening screen. If so, skip to step 5.
 Opening CorelDRAW If you have been using CorelDRAW, you may have turned off this opening screen. If so, skip to step 5. 1. When CorelDRAW is loaded, a new section is created on the Start Menu. To open
creating files and saving for web
 creating files and saving for web the template files assume a default image size of 300 x 300 pixels images intended for the web should be produced in rgb mode name your images in a logical format, so
Adobe InDesign CS6 Tutorial
 Adobe InDesign CS6 Tutorial Adobe InDesign CS6 is a page-layout software that takes print publishing and page design beyond current boundaries. InDesign is a desktop publishing program that incorporates
Illustrator 1 Object Creation and Modification Tools
 Illustrator 1 Object Creation and Modification Tools Pen Tool Creates a precision shape using points and curve handles. Shape Tools Creates geometric solids. Selection Tool Selects objects and groups.
In this exercise you will be creating the graphics for the index page of a Website for children about reptiles.
 LESSON 2: CREATING AND MANIPULATING IMAGES OBJECTIVES By the end of this lesson, you will be able to: create and import graphics use the text tool attach text to a path create shapes create curved and
Working With Images: Intermediate Photoshop
 Working With Images: Intermediate Photoshop Viewing Information in the Layers Palette 1. Choose File > Open and open the Start.psd file in the Lesson01 folder located in the PS_Workshop folder on the desktop.
Paint Brush. Pencil. Eraser. Marker. Airbrush. Neon. Bucket. Blend. Blur. Sharpen. Rubber Stamp. Smudge. Dodge. Burn. Sponge. Transparency.
 Canvas Tools Canvas Tools Selection tools Painting Line Rectangle Oval Selection Lasso selection Direct edit lasso selection Direct group selection Direct edit selection Hyperlink pointer Rectangle Rounded
Adobe Web Project. Illustrator. Curriculum Guide
 Adobe Web Project Illustrator Curriculum Guide ILLUSTRATOR OVERVIEW Contents Illustrator Lesson 1: Beginning Successfully Tools Palettes Artwork Windows Lesson 2: Working in Illustrator Artwork Drawing
Do Now # 1 Label the Photoshop Interface.
 Class Warmup AVTECH Do Now # 1 Label the Photoshop Interface. The Menu Bar The Options Panel The Canvas The Navigator Panel The History Panel Button The Workspace Button The Tool Bar The Layers Panel The
Creating Vector Shapes Week 2 Assignment 1. Illustrator Defaults
 Illustrator Defaults Before we begin, we are going to make sure that all of us are using the same settings within our application. For this class, we will always want to make sure that our application
Using Adobe Photoshop
 Using Adobe Photoshop 2 In this section we ll look at some essential things you need to know in order to use Photoshop effectively. First of all, we ll take a look at customising Photoshop s settings and
ADOBE ILLUSTRATOR CS3
 ADOBE ILLUSTRATOR CS3 Chapter 2 Creating Text and Gradients Chapter 2 1 Creating type Create and Format Text Create text anywhere Select the Type Tool Click the artboard and start typing or click and drag
14. Using Illustrator CC with Other Adobe Applications
 14. Using Illustrator CC with Other Adobe Applications Lesson overview In this lesson, you ll learn how to do the following: Place linked and embedded graphics in an Illustrator file. Place multiple images
Using Adobe Photoshop
 Using Adobe Photoshop 2 In this section we ll look at some essential things you need to know in order to use Photoshop effectively. First of all, we ll take a look at customising Photoshop s settings and
Create ruler guides. Create a ruler guide
 Create ruler guides Ruler guides are different from grids in that they can be positioned freely on a page or on a pasteboard. You can create two kinds of ruler guides: page guides, which appear only on
Photoshop Fundamentals
 Lesson 3 Photoshop Fundamentals Photoshop Fundamentals How to Navigate your Document Zooming in and out To zoom in and out on your Photoshop document, hold down the Command key (Ctrl on Win) and press
Adobe Illustrator CS5 Part 2: Vector Graphic Effects
 CALIFORNIA STATE UNIVERSITY, LOS ANGELES INFORMATION TECHNOLOGY SERVICES Adobe Illustrator CS5 Part 2: Vector Graphic Effects Summer 2011, Version 1.0 Table of Contents Introduction...2 Downloading the
2. If a window pops up that asks if you want to customize your color settings, click No.
 Practice Activity: Adobe Photoshop 7.0 ATTENTION! Before doing this practice activity you must have all of the following materials saved to your USB: runningshoe.gif basketballshoe.gif soccershoe.gif baseballshoe.gif
Learning to use the drawing tools
 Create a blank slide This module was developed for Office 2000 and 2001, but although there are cosmetic changes in the appearance of some of the tools, the basic functionality is the same in Powerpoint
Paint Brush. Airbrush Kinked. Pencil Basic. Eraser Polygon. Bucket. Blend. Wand. Marquee. Row Selection Polygon. Column Selection. Oval.
 Canvas X Tools Canvas X Tools Selection tools Painting Line Selection Paint Brush Line Lasso selection Airbrush Kinked Direct edit lasso selection Neon Smooth Kinked Direct group selection Pencil Basic
Adobe Indesign for Beginner - Session Structure
 Adobe Indesign for Beginner - Session Structure Hour 01 Introduction to Indesign Indesign Workspace Hide / show palettes Dock / float palettes Group / ungroup palettes Stack / unstack palettes Save / load
2 SELECTING AND ALIGNING
 2 SELECTING AND ALIGNING Lesson overview In this lesson, you ll learn how to do the following: Differentiate between the various selection tools and employ different selection techniques. Recognize Smart
tool brush pen rectangle tool J Direct Selection Shift + E Shift+K Group Selection H Magic Wand Z Lasso X Pen Shift+W D Add Anchor Point Shift+R
 delete lasso blend free transform rotate text magic wand mesh eye drop reflect pen tab direct selection gradient scale hand column graph live paint bucket ellipse enter caps lock return zoom scissors selection
PASS4TEST. IT Certification Guaranteed, The Easy Way! We offer free update service for one year
 PASS4TEST IT Certification Guaranteed, The Easy Way! \ http://www.pass4test.com We offer free update service for one year Exam : 9A0-088 Title : Adobe IIIustrator CS4 Exam Vendors : Adobe Version : DEMO
USO RESTRITO. AppleWorks 6. Quick Reference
 Page 2 (3,1) AppleWorks 6 Quick Reference F O R M A C O S 4:13 PM Page 1 (1,1) AppleWorks Help General keyboard shortcuts Step-by-step instructions and many more keyboard shortcuts are in AppleWorks Help.
Layers (Just the Basics) By Jerry Koons
 By Jerry Koons") and their applications are always a topic of concern and confusion, especially to those that are new to the Photoshop and Elements programs. will become one of your best tools after you understand their
and their applications are always a topic of concern and confusion, especially to those that are new to the Photoshop and Elements programs. will become one of your best tools after you understand their
Chapter 1 Introduction to Photoshop CS3 1. Exploring the New Interface Opening an Existing File... 24
 CONTENTS Chapter 1 Introduction to Photoshop CS3 1 Exploring the New Interface... 4 Title Bar...4 Menu Bar...5 Options Bar...5 Document Window...6 The Toolbox...7 All New Tabbed Palettes...18 Opening an
CSC 101L Summer 2010 Lab #7 Photoshop I Familiarization. Objectives of this lab:
 CSC 101L Summer 2010 Lab #7 Photoshop I Familiarization Your Name: WFU e-mail address: Objectives of this lab: Lab Questions: There are short-answer questions embedded in the instructions and at the end.
9 ADVANCED LAYERING. Lesson overview
 9 ADVANCED LAYERING Lesson overview In this lesson, you ll learn how to do the following: Import a layer from another file. Clip a layer. Create and edit an adjustment layer. Use Vanishing Point 3D effects
When dragging out a marquee: Shift toggles the corner selection
 VECTORSCRIBE DYNAMIC CORNERS When dragging out a marquee: Esc cancels the marquee When dragging out a marquee: Shift toggles the corner selection When dragging out a marquee: Option+Alt adds corners to
Quick Guide for Photoshop CC Basics April 2016 Training:
 Photoshop CC Basics Creating a New File 1. Click File > New 2. Keep Default Photoshop Size selected in the Preset drop-down list. 3. Click OK. Showing Rulers 1. On the Menu bar, click View. 2. Click Rulers.
12 APPLYING EFFECTS. Lesson overview
 12 APPLYING EFFECTS Lesson overview In this lesson, you ll learn how to do the following: Use various effects like Pathfinder, Distort & Transform, Offset Path, and Drop Shadow effects. Use Warp effects
Custom Shapes As Text Frames In Photoshop
 Custom Shapes As Text Frames In Photoshop I used a background for this activity. Save it and open in Photoshop: Select Photoshop's Custom Shape Tool from the Tools panel. In the custom shapes options panel
Illustrator Domains 1-4: Getting to Know Your Workspace. Dreamweaver Domain 3
 Illustrator Domains 1-4: Getting to Know Your Workspace 1 Lesson 1: Getting to Know the Work Area Toolbar Fly-out menus for hidden tools Panels Can be opened, closed, docked, or hide all (Tab) Like your
Adobe Flash Course Syllabus
 Adobe Flash Course Syllabus A Quick Flash Demo Introducing the Flash Interface Adding Elements to the Stage Duplicating Library Items Introducing Keyframes, the Transform Tool & Tweening Creating Animations