Compli. Digital Done Right. Owner s Manual. Universal Player/Transport
|
|
|
- Stephanie Kennedy
- 5 years ago
- Views:
Transcription
1 C O R P O R A T I O N Compli Universal Player/Transport Owner s Manual Digital Done Right
2 TABLE OF CONTENTS Table of Contents Page 1 General Information: General Info. & Safety Precautions Page 2-5 Before You Start: Features, Disc Compatibility Page 6-8 Front Panel: Controls and Functions Page 9 Rear Panel: Controls and Connections Page 10 Remote Control/: Description and Functions Page Getting Started: On-screen s, Setup Navigator Page Playing Discs Page FAQ: Frequently Asked Questions Page Disc Navigator: Introduction and Use Page Playing Discs: Scanning, Using the Multi Dial Page 24 Slow Motion, Frame Advance, Looping Page Repeat and Random Play Page Programming Page Disc Search Page 32 Switching Subtitles/DVD/Video Page 33 Switching DVD-RW/CD/MP3 Audio Channels Page 34 ing Disc Information Page 35 Audio Settings: Audio DRC, Virtual Surround Page Set Speaker Distance Page 38 Video Settings: Video Adjust Page Menu: Using Settings, Page Video Out, and Settings Page 43-47, Parental Lock, Setting Country Code Page Bonus Group, Auto Disc Menu Page 50 Group Playback, DVD, SACD Playback Page 51 CD Playback, Audio output Mode Page 52 Speaker Installation, Distance Page Additional Information: Care of the Player and Discs Page Screen Sizes and Disc Formats Page 57 Audio Output Setting Variations Page 58 and Country Code List - Selecting Page Glossary Page Troubleshooting Page Specifications Page 66 Appendix: RS-232 Protocol and Control Details Page Warranty: Terms and Conditions Page 73
3 CONGRATULATIONS You have just acquired the finest DVD Player/transport available for the playback of digitally encoded source material for both audio and video formats. IMPORTANT Save all packaging in a dry place away from fire hazards. Your Theta transport is a precision electronic instrument and should be properly packaged any time shipment is made. In the unlikely event that you have to return your unit to the factory for service, or if you send it to us for updating, the original packaging will best protect the unit from shipping damage or delay. In order to achieve the fullest flexibility and enjoyment from your transport, we at Theta recommend that you read this manual in full before connecting the unit to your audio/video system. WARNING United Stated law prohibits disposition of these commodities to Libya, Laos, North Korea, Cambodia or Cuba unless otherwise authorized by the United States. NOTE: This equipment has been tested and found to comply with the limits for a Class B digital device, pursuant to Part 15 of the FCC rules and CE. These limits are designed to provide reasonable protection against harmful interference in a residential installation. This equipment generates, uses and can radiate radio frequency energy and, if not installed and used in accordance with the instructions, may cause harmful interference to radio communications. However, there is no guarantee that interference will not occur in a particular installation. If this equipment does cause harmful interference to radio and television reception, which can be determined by turning the equipment off and on, the user is encouraged to try to correct the interference by one or more of the following measures: * Reorient or relocate the receiving antenna. * Increase the separation between equipment and receiver. * Connect the receiver into an outlet on a different circuit from the transport. IMPORTANT NOTICE I. Due to the computer-based circuitry used in Theta products, it is imperative that the player be connected to a ground via its three-wire AC power cord. It is important that the AC power outlet, which the transport is plugged into, is actually grounded. Failure to do so will severely compromise the performance, reliability and safety of use of the transport. II. It is also important to prevent contact with static electricity when connecting other components and cables to the transport. When connecting cables, simply place one hand on top of the player and then grasp the metal barrel of the cable with the other hand and plug (unplug) the cable into (from) the appropriate jack on the transport. III. At times a snapping sound may occur or the player may lockup and fail to operate. This is NOT A MALFUNCTION of the unit. This is normally caused by exposure to static electricity and can be cured by turning off the power amplifier(s) and then turning the player off and then on with the rear mounted power switch. IV. Ventilation is an important issue when placing the transport in a system. Make certain that the transport is in a well-ventilated area or rack unit. V. Please take note, that some power line conditioners defeat the AC power ground on their outlets. If the intention is to plug the player into a line conditioner, check with your dealer to make certain that the particular conditioner that is intended for use DOES NOT DEFEAT THE AC GROUND on its AC outlets. VI. DO NOT remove the cover from the player, as there are no user serviceable components inside. Refer servicing and updating to qualified service personnel only. Acknowledgments Dolby, AC-3, Pro Logic and the double-d symbol are trademarks of Dolby Laboratories Licensing Corporation. DTS and the DTS symbol are trademarks of Digital Theater Systems. DCDi is a registered trademark of Faroudja Laboratories, Inc Theta Digital Corp./T.D.C. All rights reserved Glen Buckley/ Frank Culmone
4 IMPORTANT The lightning flash with arrowhead symbol, within an equilateral triangle, is intended to alert the user to the presence of uninsulated dangerous voltage within the product's enclosure that may be of sufficient magnitude to constitute a risk of electric shock to persons. IMPORTANT SAFETY INSTRUCTIONS READ INSTRUCTIONS All the safety and operating instructions should be read before the product is operated. RETAIN INSTRUCTIONS The safety and operating instructions should be retained for future reference. HEED WARNINGS All warnings on the product and in the operating instructions should be adhered to. FOLLOW INSTRUCTIONS All operating and use instructions should be followed. CLEANING Unplug this product from the wall outlet before cleaning. The product should be cleaned only with a polishing cloth or a soft dry cloth. Never clean with furniture wax, benzine, insecticides or other volatile liquids since they may corrode the cabinet. ATTACHMENTS Do not use attachments not recommended by the product manufacturer as they may cause hazards. WATER AND MOISTURE Do not use this product near water for example, near a bathtub, wash bowl, kitchen sink, or laundry tub; in a wet basement; or near a swimming pool; and the like. ACCESSORIES Do not place this product on an unstable cart, stand, tripod, bracket, or table. The product may fall, causing serious injury to a child or adult, and serious damage to the product. Use only with a cart, stand, tripod, bracket, or table recommended by the manufacturer, or sold with the product. Any mounting of the product should follow the manufacturer s instructions, and should use a mounting accessory recommended by the manufacturer. CART A product and cart combination should be moved with care. Quick stops, excessive force, and uneven surfaces may cause the product and cart combination to overturn. CAUTION RISK OF ELECTRIC SHOCK DO NOT OPEN CAUTION: TO PREVENT THE RISK OF ELECTRIC SHOCK, DO NOT REMOVE COVER (OR BACK). NO USER-SERVICEABLE PARTS INSIDE. REFER SERVICING TO QUALIFIED SERVICE PERSONNEL. The exclamation point within an equilateral triangle is intended to alert the user to the presence of important operating and maintenance (servicing) instructions in the literature accompanying the appliance. H002_ VENTILATION Slots and openings in the cabinet are provided for ventilation and to ensure reliable operation of the product and to protect it from overheating, and these openings must not be blocked or covered. The openings should never be blocked by placing the product on a bed, sofa, rug, or other similar surface. This product should not be placed in a built-in installation such as a bookcase or rack unless proper ventilation is provided or the manufacturer s instructions have been adhered to. POWER SOURCES This product should be operated only from the type of power source indicated on the marking label. If you are not sure of the type of power supply to your home, consult your product dealer or local power company. LOCATION The appliance should be installed in a stable location. NONUSE PERIODS The power cord of the appliance should be unplugged from the outlet when left unused for a long period of time. GROUNDING OR POLARIZATION If this product is equipped with a polarized alternating current line plug (a plug having one blade wider than the other), it will fit into the outlet only one way. This is a safety feature. If you are unable to insert the plug fully into the outlet, try reversing the plug. If the plug should still fail to fit, contact your electrician to replace your obsolete outlet. Do not defeat the safety purpose of the polarized plug. If this product is equipped with a three-wire grounding type plug, a plug having a third (grounding) pin, it will only fit into a grounding type power outlet. This is a safety feature. If you are unable to insert the plug into the outlet, contact your electrician to replace your obsolete outlet. Do not defeat the safety purpose of the grounding type plug.
5 POWER-CORD PROTECTION Power-supply cords should be routed so that they are not likely to be walked on or pinched by items placed upon or against them, paying particular attention to cords at plugs, convenience receptacles, and the point where they exit from the product. OUTDOOR ANTENNA GROUNDING If an outside antenna or cable system is connected to the product, be sure the antenna or cable system is grounded so as to provide some protection against voltage surges and built-up static charges. Article 810 of the National Electrical Code, ANSI/NFPA 70, provides information with regard to proper grounding of the mast and supporting structure, grounding of the lead-in wire to an antenna discharge unit, size of grounding conductors, location of antenna-discharge unit, connection to grounding electrodes, and requirements for the grounding electrode. See Figure A. LIGHTNING For added protection for this product during a lightning storm, or when it is left unattended and unused for long periods of time, unplug it from the wall outlet and disconnect the antenna or cable system. This will prevent damage to the product due to lightning and power-line surges. POWER LINES An outside antenna system should not be located in the vicinity of overhead power lines or other electric light or power circuits, or where it can fall into such power lines or circuits. When installing an outside antenna system, extreme care should be taken to keep from touching such power lines or circuits as contact with them might be fatal. OVERLOADING Do not overload wall outlets, extension cords, or integral convenience receptacles as this can result in a risk of fire or electric shock. OBJECT AND LIQUID ENTRY Never push objects of any kind into this product through openings as they may touch dangerous voltage points or short-out parts that could result in a fire or electric shock. Never spill liquid of any kind on the product. SERVICING Do not attempt to service this product yourself as opening or removing covers may expose you to dangerous voltage or other hazards. Refer all servicing to qualified service personnel. WARNING: TO PREVENT FIRE OR SHOCK HAZARD, DO NOT EXPOSE THIS APPLIANCE TO RAIN OR MOISTURE. H001_ DAMAGE REQUIRING SERVICE Unplug this product from the wall outlet and refer servicing to qualified service personnel under the following conditions: When the power-supply cord or plug is damaged. If liquid has been spilled, or objects have fallen into the product. If the product has been exposed to rain or water. If the product does not operate normally by following the operating instructions. Adjust only those controls that are covered by the operating instructions as an improper adjustment of other controls may result in damage and will often require extensive work by a qualified technician to restore the product to its normal operation. If the product has been dropped or damaged in any way. When the product exhibits a distinct change in performance this indicates a need for service. REPLACEMENT PARTS When replacement parts are required, be sure the service technician has used replacement parts specified by the manufacturer or have the same characteristics as the original part. Unauthorized substitutions may result in fire, electric shock, or other hazards. SAFETY CHECK Upon completion of any service or repairs to this product, ask the service technician to perform safety checks to determine that the product is in proper operating condition. WALL OR CEILING MOUNTING The product should not be mounted to a wall or ceiling. HEAT The product should be situated away from heat sources such as radiators, heat registers, stoves, or other products (including amplifiers) that produce heat. GROUND CLAMP ELECTRIC SERVICE EQUIPMENT Fig. A ANTENNA LEAD IN WIRE ANTENNA DISCHARGE UNIT (NEC SECTION ) GROUNDING CONDUCTORS (NEC SECTION ) GROUND CLAMPS POWER SERVICE GROUNDING ELECTRODE SYSTEM (NEC ART 250, PART H) NEC NATIONAL ELECTRICAL CODE [For U.S. model] IMPORTANT NOTICE The serial number for this equipment is located on the rear panel. Please write this serial number on your enclosed warranty card and keep it in a secure area. This is for your security. H006A_
6 ADDITIONAL SAFTEY REQUIREMENTS Please carefully read each item of the operating instructions and safety precautions before using this product. Use extra care to follow the warnings written on the product itself and/or in the operating instructions. Keep the operating instructions and safety precautions for future reference. Caution: to reduce the risk of electrical shock, do not remove any of the cover panels. No user-serviceable parts inside. Refer all servicing to qualified service personnel only. To prevent fire or shock hazard, do not allow liquids to spill or objects to fall into any openings of the product. This unit is supplied with a 3 pin grounded AC plug. Always insert the ac plug into a grounded outlet. Do not remove the ground pin or disable the ground for any purpose. Before making any connections to the unit, first turn off the power and then disconnect the ac power cord. When installing the unit in your system, make certain to allow a minimum of 1½ inches of ventilation on each side of the unit. Also allow at least 2½ inches of ventilation space above the unit. Improper ventilation of the unit may cause overheating, which may damage the unit and it to fail. Place the unit on a solid surface only. i.e. not on carpet, etc. Do not place the unit near heat sources such as direct sunlight, stoves, heat registers, radiators or other heat producing equipment. To prevent damage to the digital or analog output circuitry, be certain not to short the output signal pin(s) to ground. sure that your output cables do not have any internal shorts before connecting them. IMPORTANT NOTICE Due to the computer-based circuitry used in this product, it is imperative that the player be connected to a ground via its three-wire AC power cord. It is important that the AC power outlet, which the unit is plugged into, is actually grounded. Failure to do so will severely compromise the performance, reliability and safety of use of the unit. It is also important to prevent contact with static electricity when connecting other components and cables to the unit. When connecting cables, simply place one hand on top of the player and then grasp the metal barrel of the cable with the other hand and plug (unplug) the cable into (from) the appropriate jack on the unit. At times a snapping sound may occur or the unit may lockup and fail to operate. This is NOT A MALFUNCTION of the unit. This is normally caused by exposure to static electricity and can be cured by turning off the power amplifier(s) and then turning the unit off and then on with the rear mounted power switch. Ventilation is an important issue when placing the unit in a system. Make certain that the unit is in a wellventilated area or rack unit. Please take note, that some power line conditioners defeat the AC power ground on their outlets. If the intention is to plug the unit into a line conditioner, check with your dealer to make certain that the particular conditioner that is intended for use DOES NOT DEFEAT THE AC GROUND on its AC outlets. DO NOT remove the cover from the player, as there are no user serviceable components inside. Refer servicing and updating to qualified service personnel only.
7 R 01 Before You Start Features DVD-Audio and SACD compatible Experience the super high-quality audio performance of DVD-Audio and Super Audio CD (SACD). The on-board 24-bit/192kHz DAC means that this player is fully compatible with high sampling-rate discs, capable of delivering exceptional sound quality in terms of dynamic range, low-level resolution and high-frequency detail. Built-in Dolby* 1 Digital and DTS* 2 decoding with multichannel outputs Logos: 1 This player features multichannel analog outputs for connection to an AV amplifier to give you stunning surround sound from Dolby Digital, DTS and multichannel DVD- Audio discs. TruSurround* 3 and Virtual Dolby Digital Logo: TruSurround/Virtual Dolby Digital creates a realistic surround-sound effect from any Dolby Digital source using just two speakers. Super Fine Focus digital filter This improves the quality of the video output by reducing video noise and increasing the horizonatal resolution to 540 lines. MP3 compatibility This player is compatible with CD-R, CD-RW and CD-ROM discs that contain MP3 audio tracks (see pages 10-11). Graphical on-screen displays Setting up and using your DVD player is made very easy using the graphical onscreen displays. *1 Manufactured under license from Dolby Laboratories. Dolby and the double-d symbol are trademarks of Dolby Laboratories. *2 DTS and DTS Digital Surround are registered trademarks of Digital Theater Systems, Inc. *3 TruSurround and the symbol are trademarks of SRS Labs, Inc. TruSurround technology is incorporated under license from SRS Labs, Inc. PureCinema progressive scan When connected to a progressive scancompatible TV or monitor using the component video outputs, you can enjoy extremely stable, flicker free images, with the same frame refresh rate as the original movie (see page 50). 8

8 01 Before You Start Disc / Content Format Playback Compatibility General Disc Compatibility This player was designed and engineered to be compatible with software containing one or more of the following logos. DVD-Audio DVD-Video DVD-R DVD-RW Audio CD Video CD CD-R CD-RW Super Audio CD Other formats, including but not limited to the following, are not playable in this player: Photo CD / DVD-RAM / DVD-ROM / CD-ROM (except those that contain MP3 files formatted as specified in the Compressed Audio Compatibility section) DVD-R/RW and CD-R/RW discs (Audio CDs and Video CDs) recorded using a DVD Recorder, CD Recorder or Personal Computer may not be playable on this machine. This may be caused by a number of possibilities, including but not limited to: the type of disc used; the type of recording; or damage, dirt or condensation on either the disc or the player s pick-up lens. Special note about particular formats or software follows below: CD-R/RW Compatibility This unit will play CD-R and CD-RW discs recorded in CD Audio, Video CD, or MP3 audio formatting. However, any other content may cause the disc not to play, or create noise/distortion in the output. This unit cannot record CD-R or CD-RW discs. Un-finalized CD-R/RW discs recorded in CD Audio can be played, but not all Table of Contents (playing time, etc..) will be displayed. DVD-R/RW Compatibility This unit will play DVD-R/RW discs that were recorded using the DVD Video format. This unit will play DVD-RW discs that were recorded using the Video Recording format. This unit cannot record DVD-R/RW discs. Un-finalized DVD-R/RW discs cannot be played in this player. Compressed Audio Compatibility This unit will play compressed audio files formatted in the MPEG-1 Audio Layer 3 format (MP3) with a 44.1 or 48kHz fixed bit rate. Incompatible files will not play and UNPLAYABLE will be displayed on the unit. Variable Bit-Rate (VBR) files are playable, but playing time may not be shown correctly. The CD-ROM used to compile your MP3 files must be ISO 9660 Level 2 compliant. CD physical format: Mode1, Mode2 XA Form1. This player only plays tracks that are named with the file extension.mp3 or.mp3. 10
9 Before You Start This player is compatible with multisession discs, but only plays sessions that are closed. Use CD-R or CD-RW media for recording your MP3 files. This player can recognize a maximum of 250 folders or 250 tracks. Discs containing more than 250 folders or 250 tracks will play, but only the first 250 folders / tracks. Folder and track names (excluding the.mp3 extension) are displayed. There are many different recording bitrates available to encode your MP3 files. This unit was designed to be compatible with all of them. Audio encoded at 128Kbps should sound close to regular CD Audio quality. This player will play lower bit-rate MP3 tracks, but please note that the sound quality becomes noticeably worse at lower bit-rates. PC Created Disc Compatibility If you record a disc using a Personal Computer, even if it is recorded in a compatible format as listed above, there will be cases in which the disc may not be playable in this machine due to the setting of the application software used to create the disc. In these particular incidences, check with the software publisher for more detailed information. DVD-R/RW and CD-R/RW software disc boxes also have additional compatibility information. Titles, chapters, Groups and tracks DVD-Video discs are generally divided into one or more titles. Titles may be further subdivided into chapters. Title 1 Title 2 Title 3 DVD-Audio discs are divided into one or more groups that can each contain a number of tracks. Group 1 Group 2 Group 3 Track 1 Track 2 Track 3 Track 1 Track 1 Track 2 CDs, SACDs and Video CD are divided into tracks. Track 1 Track 2 Track 3 Track 4 Track 5 Track 6 CD-ROMs containing MP3 files are divided into folders and tracks. Folders may also contain further subfolders. mp3 mp3 Folder A Folder B Folder C mp3 Track 1 Track 2 Track 3 Track 1 Track 1 Track 2 DVD-Video regions All DVD-Video discs carry a region mark on the case somewhere that indicates which region(s) of the world the disc is compatible with. Your DVD player also has a region mark, which you can find on the rear panel. Discs from incompatible regions will not play in this player. Discs marked ALL will play in any player. The diagram below shows the various DVD regions of the world mp3 5 5 mp mp3 Chapter 1 Chapter 2 Chapter 3 Chapter 1 Chapter 1 Chapter
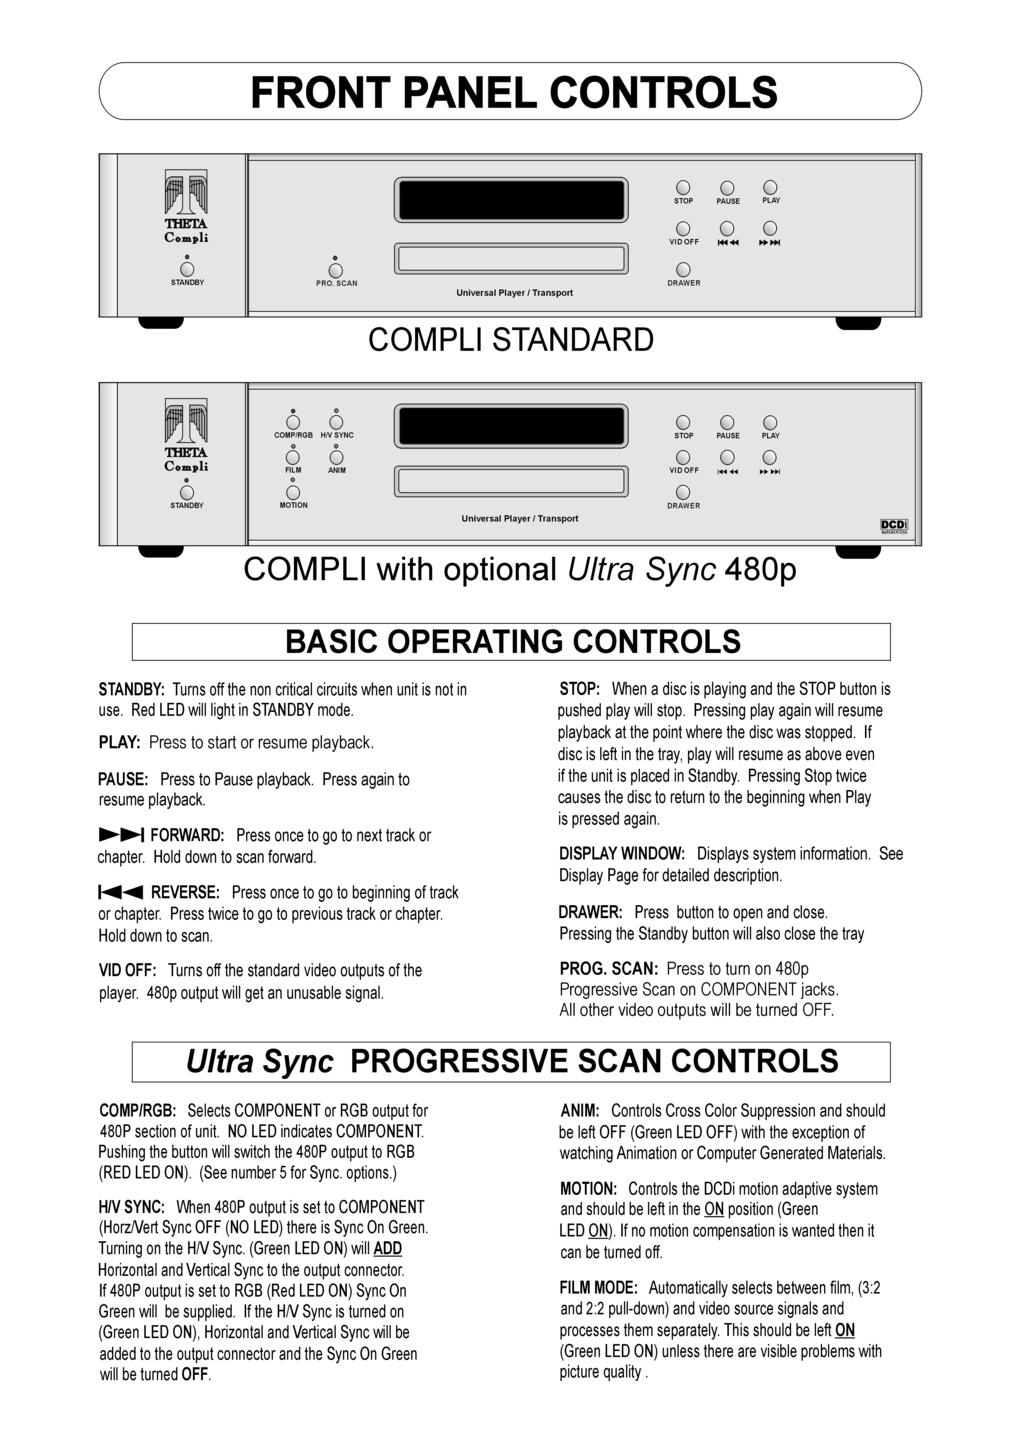
10
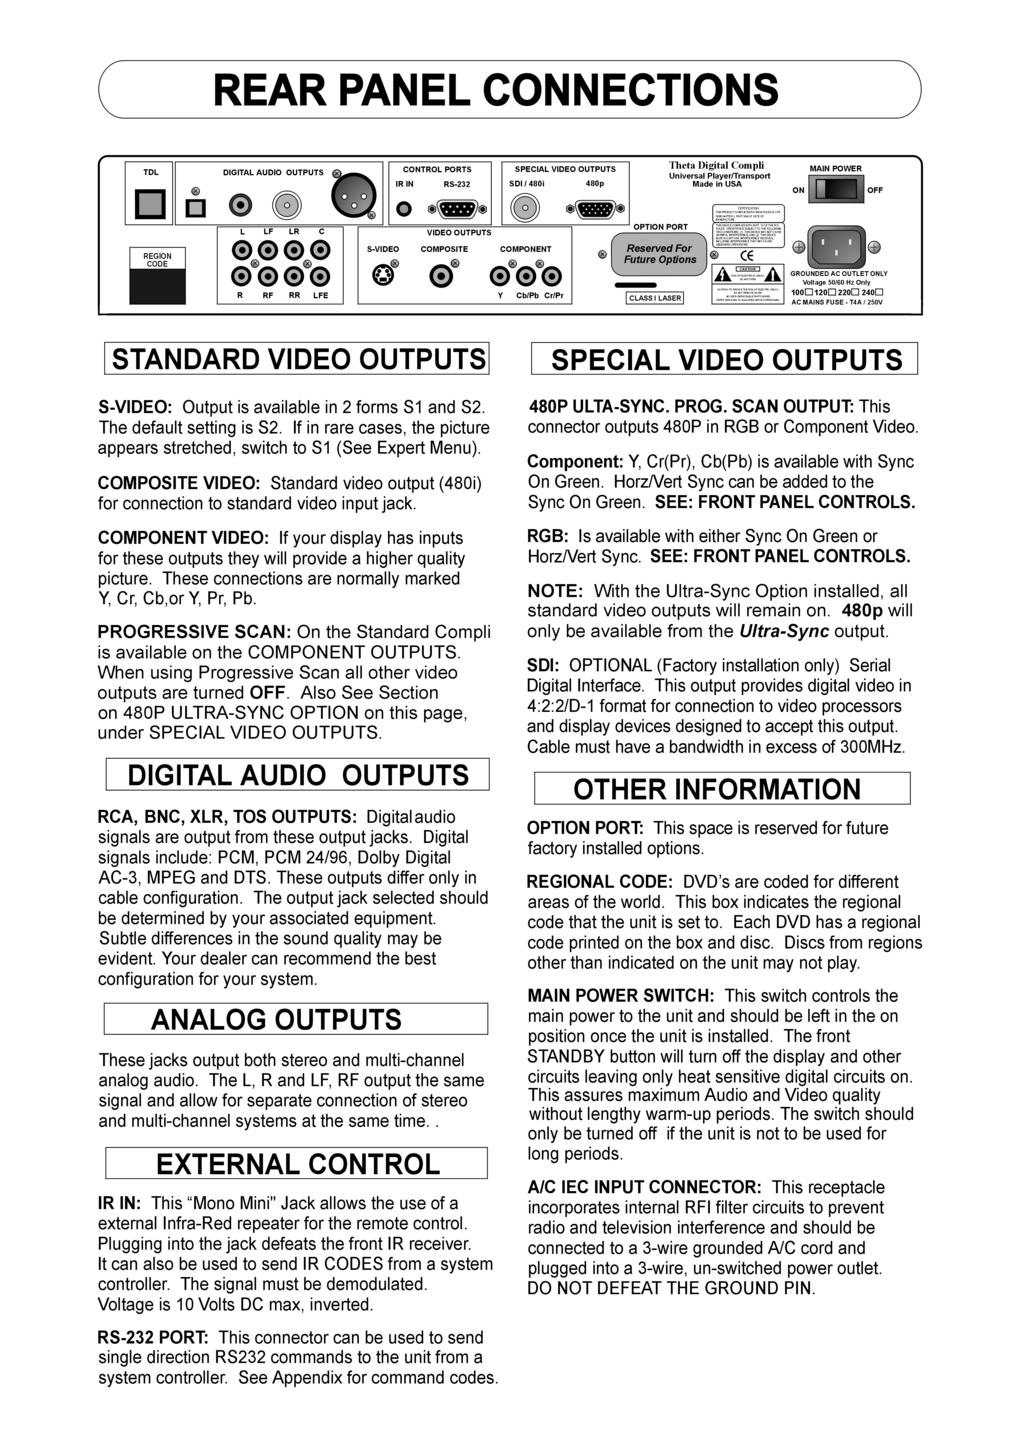
11
12 03 Controls and s CH Lights when analog 5.1 channel output is selected. 2 V-PART Lights when playing a video part of a DVD disc 3 PRGSVE Used on Compli Standard Only See Front Panel Controls - Page 9 4 Lights during multi-angle scenes on a DVD disc. 5 GUI (Graphical User Interface) Lights when a menu is displayed on-screen 6 GRP Indicates that the character display is showing a DVD-Audio group number 7 TITLE Indicates that the character display is showing a DVD-Video title number 8 Lights when 2V/TruSurround is active. 9 TRK Indicates that the character display is showing a track number 10 CHP Indicates that the character display is showing a DVD chapter number 11 REMAIN Lights when the character display is showing the time or number of tracks/titles/chapters remaining 12 Character display 13 8 Lights when a disc is paused 14 3 Lights when a disc is playing 15 2D Lights when a Dolby Digital soundtrack is playing 16 DTS Lights when a DTS soundtrack is playing 20
13 Controls and s 03 Remote control Buttons 6 thru 9 and 20 thu 22 glow slightly in the dark for ease of use OPEN / 1 14 CLOSE DISPLAY AUDIO SUBTITLE ANGLE SETUP RETURN MENU MULTI SPEED + ENTER 1 (STANDBY/ON) Press to switch the player on or into standby 2 DISPLAY Press to display information about the disc playing (page 46) 3 AUDIO Press to select the audio channel or language. 4 SETUP Press to display (or exit) the on-screen display E/ TOP MENU VIDEO ADJUST DIMMER JOG MODE V.ADJ FL JOG 7 3 PLAY MODE SURROUND CLEAR 12 8 E/ VOLUME CHANNEL C ENTER E 0 TV CONTROL + FUNC + TV ENTER & Joystick Use to navigate on-screen displays and menus. Press ENTER to select an option or execute a command 6 (RETURN) Press to return to a previous menu screen 7 V.ADJ (VIDEO ADJUST ) Press to display the Video Adjust menu. 8 7 Press to stop the disc (you can resume playback by pressing 3 (play)) 9 3 Press to start or resume playback 10 4 Press to jump to the start of the previous / next chapter / track 11 PLAY MODE Press to display the Play Mode menu. (You can also get to the Play Mode menu by pressing SETUP and selecting Play Mode) 12 Number buttons 13 MENU Press to display a DVD disc menu, or the Disc Navigator if a DVD-RW, CD, Video CD or MP3 disc is loaded 14 0 OPEN/CLOSE Press to open or close the disc tray 15 ANGLE Press to change the camera angle during DVD multi-angle scene playback. 16 SUBTITLE Press to select a subtitle display. 17 TOP MENU Press to display the top menu of a DVD disc 21
14 03 Controls and s MULTI DIAL Use for scanning and slow motion control. 19 Jog indcator Lights when multi dial is in jog mode. 20 JOG (JOG MODE) Press to put switch jog mode on/off. When on, use the MULTI DIAL to advance or reverse frames. 21 FL (DIMMER) Press to change the display brightness 22 8 Press to pause playback; press again to restart 23 1 and /e / and E/ Use for reverse / forward slow motion playback, frame reverse / advance and reverse / forward scanning. 24 SURROUND Press to activate/switch off 2V/TruSurround. 25 CLEAR Press to clear a numeric entry 26 ENTER Press to select an option or execute a command 27 TV CONTROL buttons VOLUME Use to adjust the volume CHANNEL Use to select TV channel FUNC Press FUNC to select the TV for remote control operation 28 TV Press TV to turn the TV s power on or put in to standby Setting up the Remote Control to TV This most be set to use buttons 27 and Input the Manufacturer code. While holiding down the CLEAR button, input the two digit code from the table next page that corresponds to the make of your TV. For example, If you have a Pioneer TV, press and hold CLEAR, then press 0, 0 on the remote control. 2. Confirm that the TV is responding to the programmed code. On the remote, press the TV button. If the TV swithches on (or into standby if it was on previously), then you have the correct code. If nothing happens when you press the TV button, start again from step 1 using a different code. Some manufacturers have several codes. Try each one until you find the one that works. Preset code list 00, PIONEER1 01, RCA1 02, SHARP3 03, ZENITH1 04, SONY 05, TOSHIBA1 06, HITACHI1 07, PHILIPS 08, PANASONIC1 09, MITSUBISHI 10, GOLDSTAR1 11, GE1 12, MAGNAVOX1 13, JVC1 14, SANYO2 15, RCA2 16, RCA3 17, RCA4 18, RCA5 19, SHARP1 20, ZENITH12 21, SANYO1 22, PANASONIC2 23, GOLDSTAR2 24, HITACHI2 25, HITACHI3 26, TOSHIBA2 27, SHARP2 28, GE2 29, MAGNAVOX2 30, TOSHIBA3 31, HITACHI4 32, JVC2 33, FUJITSU 34, PIONEER2 35, GRANDIENTE
15 Getting Started 04 Using the on-screen displays For ease of use, this player makes extensive use of graphical on-screen displays (OSDs). You should get used to the way these work as you ll need to use them when setting up the player, using some of the playback features, such as program play, and when making more advanced settings for audio and video. All the screens are navigated in basically the same way, using the cursor buttons to change the highlighted item and pressing ENTER to select it. Throughout this manual, Select means use the Joystick to highlight an item onscreen, then press ENTER. DISPLAY AUDIO SUBTITLE ANGLE SETUP TOP MENU MENU MULTI SPEED + ENTER Information at the bottom of every OSD screen explains the currently selected menu item and shows which buttons can be used for that screen. Setting up with the Setup Navigator Using the Setup Navigator you can make a number of other initial settings for this player. We recommend using the Setup Navigator, especially if you connected this player to an AV receiver for playing surround sound. To answer some of the questions about digital audio formats you may need to look at the instructions that came with your AV receiver. 1 If a disc is playing, press 7 (stop). Also turn on your TV and make sure that it is set to the correct video input. 2 Press SETUP. The on-screen display (OSD) appears. RETURN VIDEO ADJUST DIMMER JOG MODE V.ADJ FL JOG 7 3 E/ 8 E/ Audio Settings Video Adjust 4 1 PLAY MODE SURROUND Play Mode Disc Navigator Button SETUP (Joystick) What it does /exit the on-screen display Changes the highlighted menu item 3 Select Setup Navigator. Setup Navigator ENTER Selects the highlighted menu item (both ENTER buttons work in exactly the same way) Audio Settings Play Mode Video Adjust Disc Navigator (RETURN) Returns to the previous menu without saving changes Setup Navigator 25
16 04 Getting Started 4 Select a DVD language. Some DVD discs feature on-screen menus, soundtracks and subtitles in several languages. Set your preferred language here. 7 Did you connect a digital output to your AV receiver? Select Connected or Not Connected. Setup Navigator Setup Navigator Settings Audio Out Settings Speaker Settings AV Receiver Func. DVD glish French German Italian Spanish Dutch Other Settings Audio Out Settings Speaker Settings AV Receiver Func. AV Receiver 5.1ch Audio Out Connected Not Connected Note that the language you choose here may not be available on all discs. If you want to select a language other than those listed, select Other. See Selecting languages using the language code list for details. 5 Did you connect this player to an AV receiver? Setup Navigator Settings Audio Out Settings Speaker Settings AV Receiver Func. AV Receiver Connected Not Connected If you selected Not Connected in both steps 6 and 7, that completes the setup. Press ENTER to leave the Setup Navigator. If you selected Connected in step 6, then answer the following questions about the speakers in your system, otherwise jump to step Do you have a center speaker connected to your AV receiver? Select Connected or Not Connected. Setup Navigator If you selected Not Connected here, that completes the setup. Press ENTER to leave the Setup Navigator. Settings Audio Out Settings Speaker Settings AV Receiver Func. Center Speaker Connected Not Connected 6 Did you connect the 5.1 channel analog audio outputs to your AV receiver? Select Connected or Not Connected. 9 Do you have surround speakers connected to your AV receiver? Select Connected or Not Connected. Setup Navigator Setup Navigator Settings Audio Out Settings Speaker Settings AV Receiver Func. AV Receiver 5.1ch Audio Out Connected Not Connected Settings Audio Out Settings Speaker Settings AV Receiver Func. Center Speaker Surround Connected Not Connected 26
17 Getting Started Do you have a sub-woofer connected to your AV receiver? Select Connected or Not Connected. Setup Navigator 13 Is your AV receiver compatible with 96kHz Linear PCM audio? Select Compatible, Not Compatible or Don t Know. Settings Audio Out Settings Speaker Settings AV Receiver Func. Center Speaker Surround Sub-woofer Connected Not Connected Setup Navigator Settings Audio Out Settings Speaker Settings AV Receiver Func. Dolby Digital DTS 96kHz Linear PCM Compatible Not Compatible Don't Know If you selected Not Connected in step 7, that completes the setup. Press ENTER to leave the Setup Navigator. Questions 11 through 14 are concerned with the digital decoding capabilities of your AV receiver. 14 Is your AV receiver MPEG compatible? Select Compatible, Not Compatible or Don t Know. 11 Is your AV receiver Dolby Digital compatible? Select Compatible, Not Compatible or Don t Know. Setup Navigator Settings Audio Out Settings Speaker Settings AV Receiver Func. Dolby Digital DTS 96kHz Linear PCM MPEG Compatible Not Compatible Don't Know Setup Navigator Settings Audio Out Settings Speaker Settings AV Receiver Func. Dolby Digital Compatible Not Compatible Don't Know 15 Press ENTER to complete the setup, or press SETUP to quit the Setup Navigator without making any changes. 12 Is your AV receiver DTS compatible? Select Compatible, Not Compatible or Don t Know. Setup Navigator Setup Navigator Settings Audio Out Settings Speaker Settings AV Receiver Func. Dolby Digital Compatible DTS Not Compatible Settings complete 96kHz Linear PCM Unknown Press ENTER to exit MPEG ENTER Settings Audio Out Settings Speaker Settings AV Receiver Func. Dolby Digital DTS Compatible Not Compatible Don't Know Congratulations, setup is complete! 27
18 04 Getting Started Playing discs The basic playback controls for playing DVD, CD, SACD, Video CD and MP3 discs are covered here. Further functions are detailed in the next chapter. Throughout this manual, the term DVD means DVD-Video, DVD-Audio and DVD-R/RW. If a function is specific to a particular kind of DVD disc, it is specified. 1 If the player isn t already on, press STANDBY/ON to switch it on. If you re playing a DVD or Video CD, also turn on your TV and make sure that it is set to the correct video input. 2 Press 0 OPEN/CLOSE to open the disc tray. 3 Load a disc. Load a disc with the label side facing up, using the disc tray guide to align the disc. Never load more than one disc at a time. OPEN / CLOSE DISPLAY AUDIO SUBTITLE ANGLE SETUP TOP MENU MENU MULTI SPEED + ENTER VIDEO ADJUST DIMMER JOG MODE V.ADJ FL JOG 7 3 E/ 8 E/ 4 1 PLAY MODE SURROUND CLEAR C ENTER E TV CONTROL + + FUNC VOLUME CHANNEL TV 4 Press 3 (play) to start playback. If you re playing a DVD or Video CD, a menu may appear. If you re playing an MP3 disc, it may take a few seconds before playback starts, depending on the complexity of the file structure on the disc. Basic playback controls The table below shows the basic controls on the remote for playing discs. The folllowing chapter covers more playback features in more detail. 28
19 Î OPEN/CLOSE 0 Getting Started 04 Button What it does 3 Starts playback. DVD and Video CD: if the display shows RESUME, playback starts from the resume point. 8 Pauses a disc that s playing, or restarts a paused disc. 7 Stops playback. DVD and Video CD: shows RESUME. Press 7 (stop) again to cancel the resume function (The resume function is also cancelled when you eject the disc tray.). 1 Press to start fast reverse scanning. Press 3 (play) to resume normal playback. Press to start fast forward scanning. Press 3 (play) to resume normal playback. 4 Skips to the start of the current track or chapter, then to previous tracks/chapters. Skips to the next track or chapter. Numbers Use to enter a title/group/track number. Press ENTER to select (or wait a few seconds). If the disc is stopped, playback starts from the selected title/group (for DVD) or track number (for CD/SACD/Video CD/MP3). If the disc is playing, playback jumps to the start of the selected chapter or track (within the current group for DVD-Audio). Front panel controls The 3 (play), 7 (stop), and 8 (pause) buttons on the front panel work in exactly the same way as their remote control equivalents. The combined scan/skip buttons on the front panel (4 1 and ) work slightly differently from the remote buttons Press and hold for fast scan; press for track/ chapter skip. You may find with some DVD discs that some playback controls don t work in certain parts of the disc. This is not a malfunction. DVD disc menus Many DVD-Video and DVD-Audio discs contain menus from which you can select what you want to watch or listen to. They may give access to additional features, such as subtitle and audio language selection, or special features such as slideshows. See the disc packaging for details. Sometimes menus are displayed automatically when you start playback; others only appear when you press MENU or TOP MENU. 3 PLAY 3 29
20 04 Getting Started Some DVD-Audio discs feature a bonus group. To access this group you have to input a password, which you can find on the disc s packaging. SETUP TOP MENU MENU MULTI SPEED + Video CD PBC menus Some Video CDs have menus from which you can choose what you want to watch. These are called PBC (Playback control) menus. You can play a PBC Video CD/Super VCD without having to navigate the PBC menu by starting playback using a number button or track skip button ( ) to select a track, rather than the 3 (play) button. ENTER SETUP TOP MENU MENU MULTI SPEED + VIDEO RETURN ADJUST DIMMER JOG MODE V.ADJ FL JOG E/ 4 1 E/ ENTER PLAY MODE SURROUND CLEAR C ENTER VIDEO RETURN ADJUST DIMMER JOG MODE V.ADJ FL JOG E E/ 8 E/ TV CONTROL 4 1 Button TOP MENU MENU (Joystick) ENTER (RETURN) What it does s the top menu of a disc this varies with the disc. s a disc menu this varies with the disc and may be the same as the top menu. Moves the cursor around the screen. Selects the current menu option. Returns to the previously displayed menu screen. On some DVD-Audio discs featuring browsable pictures, press to display the browser screen. Button (RETURN) Numbers PLAY MODE SURROUND TV CONTROL CLEAR C ENTER E What it does s the PBC menu. 0 Use to enter a numbered menu option. Press ENTER to select (or wait a few seconds). 4 s the previous menu page (if there is one). s the next menu page (if there is one). 30 Numbers Highlights a numbered menu option (some discs only). Press ENTER to select (or wait a few seconds).
21 Getting Started 04 After I load a DVD disc, it ejects automatically after a few seconds! Most likely, the disc is the wrong region for your player. The region number should be printed on the disc; check it against the region number of the player (which you can find on the rear panel). If the region number is OK, it may be that the disc is damaged or dirty. Clean the disc and look for signs of damage. Check also that the disc is aligned properly in the disc tray and that it s loaded label-side up. Why won t the disc I loaded play? First check that you loaded the disc the right way up (label side up), and that it s clean and not damaged. If a disc loaded correctly won t play, it s probably an incompatible format or disc type, such as DVD-ROM. There s no picture! Check the front panel and make sure that the VIDEO OFF indicator isn t lit. If it is, press the VIDEO OFF button to switch the video output back on. Also make sure that if your TV isn t compatible with progressive scan video, that the PROGRESSIVE indicator isn t lit. If it is, press the PROGRESSIVE button to switch the video output back to interlace. See also page 18. I have a widescreen TV so why are there black bars at the top and bottom of the screen when I play some discs? Some movie formats are such that even when played on a widescreen TV, black bars are necessary at the top and bottom of the screen. This is not a malfunction. I have a standard (4:3) TV and set the player to show widescreen DVDs in pan & scan format, so why do I still get black bars top and bottom with some discs? Some discs override the display preferences of the player, so even if you have 4:3 (Pan & Scan) selected, those discs will still be shown in letterbox format. This is not a malfunction. My AV receiver is definitely compatible with 96/88.2kHz Linear PCM audio, but it doesn t seem to work with this player. What s wrong? For digital copy-protection purposes, some 96/88.2kHz DVD discs only output digital audio downsampled to 48/44.1kHz. This is not a malfunction. To fully take advantage of the high sampling rate audio, connect the analog audio outputs to your amplifier/receiver. Why can t I hear SACD audio through the digital outputs? SACD audio is only available through the analog outputs. This is not a malfunction. Some DVD-Audio discs too only output audio through the analog outputs. 31
22 04 Getting Started Is it better to listen to DVD-Audio discs through the analog outputs? Some DVD-Audio discs do not output anything through the digital outputs, and multichannel discs are downmixed to stereo for the digital output. In addition, high sampling rate DVD-Audio discs (higher than 96kHz) automatically downsample audio output from the digital outputs. Using the multichannel analog audio outputs for DVD-Audio have none of these limitations. My DVD-Audio disc starts playing, but then suddenly stops! The disc may have been illegally copied. My CD with MP3 tracks won t play! Also make sure that the tracks are encoded in MPEG1 audio layer 3 format. Some MP3 tracks don t show up. Where are they? Filenames that don t end with the extension.mp3 won t be recognized by this player. Also, if there are more than 250 folders or tracks on the disc, only the first 250 are recognized. 32
23 Playing Discs 05 Introduction Most of the features described in this chapter make use of on-screen displays. For an explanation of how to navigate these see - Using the on-screen displays. Many of the functions covered in this chapter apply to DVD and SACD discs, Video CDs, CDs and MP3 discs, although the exact operation of some varies slightly with the kind of disc loaded. Some DVD discs restrict the use of some functions (random or repeat, for example). This is not a malfunction. When playing Video CDs, some of the functions are not available during PBC playback. If you want to use them, start the disc playing using a number button to select a track. Using the Disc Navigator to browse the contents of a disc Use the Disc Navigator to browse through the contents of a disc to find the part you want to play. You can use the Disc Navigator when a disc is playing or stopped. 1 Press SETUP and select Disc Navigator from the on-screen display. Alternatively, if a DVD-RW, CD, Video CD or MP3 disc is loaded, you can press MENU, which takes you straight to the Disc Navigator screen. Audio Settings Play Mode Setup Navigator Video Adjust Disc Navigator 2 Select what you want to play. Depending on the type of disc you have loaded, the Disc Navigator looks slightly different. For DVD-Video discs select a title, or a chapter within a title. Disc Navigator Title(1-03) DVD Title 01 Title 02 Title 03 Chapter(1-036) Chapter 001 Chapter 002 Chapter 003 Chapter 004 Chapter 005 Chapter 006 Chapter 007 Chapter 008 It s not possible to use the Disc Navigator when playing a Video CD/Super VCD in PBC mode, or when a DVD disc menu is displayed. For DVD-Audio discs select a group, or a track within a group. Disc Navigator Group(1-03) DVD-Audio Group 01 Group 02 Group 03 Track(1-14) Track 01 Track 02 Track 03 Track 04 Track 05 Track 06 Track 07 Track 08 33
24 05 Playing Discs For SACD discs select a track within the current playback area. 2ch Area Disc Navigator Track(1-009) Track 001 Track 002 Track 003 Track 004 Track 005 Track 006 Track 007 Track 008 Total Time For a VR mode DVD-RW disc select beween the Playlist and Original areas of the disc, or a title. Move the joystick right to preview the title. It s not possible to switch between Original and Playlist during playback. Not all DVD-RW discs have a Playlist. DVD-RW Original Play List Disc Navigator Title(1-03) 01. 3/31 FIRST LEAGUE 02. 4/28 SECOND LEAGUE 03. 4/29 FINAL ROUND For MP3 discs select a folder, or a track within a folder. (Note that if a folder or track name contains accented or non-roman characters, they may show up with generic names F_033, T_035, etc.). MP3 Disc Navigator Folder(1-017) 001. ACP 002. Nth Degree 003. Pfeuti 004. Live 005. Glitch music 006. CodHead 007. Thermo 008. Missing Man Track(1-010) 001. Gravity deluxe 002. Tesla's patent 003. Border dispute 004. Delayed by rain 005. Accident incident 006. Pigeon post 007. Outernational 008. Vacuum tube Playback starts after you press ENTER. The Disc Navigator is not available unless there is a disc loaded. Another way to find a particular place on a disc is to use one of the search modes. See Searching a disc. For CDs and Video CDs select a track. Disc Navigator CD Track(1-13) Track 01 Track 02 Track 03 Track 04 Track 05 Track 06 Track 07 Track 08 Total Time
25 Playing Discs 05 Scanning discs You can fast-scan discs forward or backward at various different speeds using the remote. 1 During playback, press 1 or to start scanning. 2 Press repeatedly to increase the scanning speed. MP3s can only be scanned at one speed. The scanning speed is shown on-screen. 3 To resume normal playback, press 3 (play). Sound can be heard while scanning SACDs, audio CDs, and MP3 discs. There is no sound while scanning DVD- Videos and Video CDs, and no subtitles while scanning DVD-Video. Depending on the disc, normal playback may automatically resume when a new chapter is reached on a DVD-Video disc. Using the Multi Dial You can use the Multi Dial to control fast and slow motion scanning and frame advance of DVD-Video, DVD-R/RW and Video CDs. When scanning, no audio is output, even when the scanning speed is 1/1 (normal playback speed). To start scanning playback at 1/16 speed, turn the MULTI DIAL (clockwise for forward; anticlockwise for reverse) during playback. Turn the MULTI DIAL in the same direction to increase the scan speed the speed is indicated at the top left of the screen. Turn in the opposite direction to slow the scan speed/reverse direction. To start high-speed scanning, turn the MULTI DIAL quickly (clockwise for forward; anticlockwise for reverse) during playback. Change the speed/direction in the same way as above. To resume normal playback, press 3. To start manual scanning, press JOG (JOG MODE), then use the MULTI DIAL to advance frames in either direction. To switch off jog mode, press JOG (JOG MODE) again. The picture remains paused until you restart playback. To resume normal playback, press 3. You can scan Video CDs in the same way as DVD-Video discs (see above). However, reverse slow-motion scanning is not possible, and there are just two fast scanning speeds. 35
26 05 Playing Discs Playing in slow motion You can play DVD-Videos, DVD-R/RW and Video CDs at four different forward slow motion speeds, and DVD-Videos, DVD-R/RW also at two reverse speeds. 1 During playback, press 8 (pause). 2 Press and hold /e or E/ until slow motion playback starts. The slow motion speed is shown onscreen. There is no sound during slow motion playback. 3 Press repeatedly to change the slow motion speed. The slow motion speed is displayed onscreen. 4 To resume normal playback, press 3 (play). You can t use slow motion playback with some titles on some DVDs. Video CD only supports forward slow motion playback. The picture quality during slow motion playback is not as good as during normal playback. Depending on the disc, normal playback may automatically resume when a new chapter is reached. For DVD-Audio discs featuring browsable pictures, press /e/e/ to view the previous/next picture. Frame advance/frame reverse You can advance or back up DVD-Video or DVD-RW discs frame-by-frame. With Video CDs, you can only use frame advance. 1 During playback, press 8 (pause). 2 Press /e or E/ to reverse or advance a frame at a time. 3 To resume normal playback, press 3 (play). The picture quality when using frame reverse is not as good as frame advance. Depending on the disc, normal playback may automatically resume when a new chapter is reached. When changing direction of a DVD- Video disc, the picture may move in an unexpected way. This is not a malfunction. For DVD-Audio discs featuring browsable pictures, press /e/e/ to view the previous/next picture. 36
27 Playing Discs 05 Looping a section of a disc The A-B Repeat function allows you to specify two points (A and B) within a track (DVD-Audio, CD and Video CD) or title (DVD- Video and DVD-RW) that form a loop which is played over and over. 3 Press ENTER on B(d Point) to set the loop end point. Play Mode A-B Repeat Repeat Random Program Search Mode A(Start Point) B(d Point) Off A-B Repeat is not available with SACDs, MP3s, Super VCDs, Video CD in PBC mode, or while a DVD disc menu is being displayed. 1 During playback, press PLAY MODE and select A-B Repeat from the list of functions on the left. After pressing ENTER, playback jumps back to the start point and plays the loop. 4 To resume normal playback, press CLEAR or select Off from the menu. Play Mode A-B Repeat Repeat Random Program Search Mode A(Start Point) B(d Point) Off 2 Press ENTER on A(Start Point) to set the loop start point. Play Mode A-B Repeat Repeat Random Program Search Mode A(Start Point) B(d Point) Off 37
28 05 Playing Discs Using repeat play There are various repeat play options, depending on the kind of disc loaded. It s also possible to use repeat play together with program play to repeat the tracks/chapters in the program list (see Creating a program list. Repeat play is not available with Video CDs/Super VCD in PBC mode, or while a DVD disc menu is being displayed. 1 During playback, press PLAY MODE and select Repeat from the list of functions on the left. Play Mode DVD-Video and DVD-RW discs Title Repeat Chapter Repeat Repeat Off DVD-Audio discs Group Repeat Track Repeat Repeat Off SACD, CD and Video CD discs Disc Repeat Track Repeat Repeat Off MP3 discs Disc Repeat Folder Repeat Track Repeat Repeat Off A-B Repeat Repeat Random Program Search Mode Title Repeat Chapter Repeat Repeat Off 2 Select a repeat play option. The repeat play options available depend on the type of disc loaded. The screen below appears when a DVD-Video disc is loaded. If you ve made a program list, the Program Repeat option also appears as a repeat option. To stop the disc and cancel repeat play, press 7 (stop). You can also cancel repeat play without stopping playback by pressing CLEAR. The disc will play to the end, then stop. Play Mode A-B Repeat Repeat Random Program Search Mode Title Repeat Chapter Repeat Repeat Off You can t use repeat and random play at the same time. If you switch camera angle during repeat play, repeat play is canceled. 38
29 Playing Discs 05 Using random play Use the random play function to play titles or chapters (DVD-Video ), groups or tracks (DVD-Audio), or tracks (CD, Video CD and MP3 discs) in a random order. You can set the random play option when a disc is playing or stopped. You can t use random play with SACDs, DVD-RWs, Video CDs/Super VCDs playing in PBC mode, or while a DVD disc menu is being displayed. 1 Press PLAY MODE and select Random from the list of functions on the left. Play Mode A-B Repeat Repeat Random Program Search Mode Random Title Random Chapter Random Off 2 Select a random play option. The random play options available depend on the type of disc loaded. The screen below appears when a DVD-Video disc is loaded. DVD-Video discs Random Title Random Chapter Random Off DVD-Audio discs Random Group Random Track Random Off MP3, CD and Video CD discs On Off To stop the disc and cancel random playback, press 7 (stop). You can also cancel random playback without stopping the disc by presssing CLEAR. The disc will play to the end, then stop. During random play, the 4 and buttons function a little differently to normal: 4 returns to the beginning of the current track/chapter. You can't go back further than this. selects another track/chapter at random from those remaining. You can't use random play together with program or repeat play. Play Mode A-B Repeat Repeat Random Program Search Mode Random Title Random Chapter Random Off 39
30 05 Playing Discs Creating a program list This feature lets you program the play order of titles/group/chapters/folders/tracks on a disc. Program play is not available with DVD- RWs, Video CDs/Super VCDs playing in PBC mode, or while a DVD disc menu is being displayed. 1 Press PLAY MODE and select Program from the list of functions on the left. 3 Select a title, chapter, group, folder or track for the current step in the program list. For a DVD-Video disc, you can add a whole title, or a chapter within a title to the program list. To add a title, select the title. Program Program Step Title(1-03) Title 01 Title 02 Title 03 Chapter(1-036) Chapter 001 Chapter 002 Chapter 003 Chapter 004 Chapter 005 Chapter 006 Chapter 007 Chapter 008 Play Mode A-B Repeat Repeat Random Program Search Mode Create/Edit Playback Start Playback Stop Program Delete Program Memory Off To add a chapter, first highlight the title, then move the cursor right and select a chapter from the list. Program 2 Select Create/Edit from the list of program options. Play Mode Program Step Title(1-03) Title 01 Title 02 Title 03 Chapter(1-036) Chapter 001 Chapter 002 Chapter 003 Chapter 004 Chapter 005 Chapter 006 Chapter 007 Chapter 008 A-B Repeat Repeat Random Program Search Mode Create/Edit Playback Start Playback Stop Program Delete Program Memory Off For a DVD-Audio disc, you can add a whole group, or a track within a group to the program list. To add a group, select the group. The Program edit screen that appears depends on the kind of disc loaded. On the left side is the program list, then to the right is a list of titles (if a DVD-Video disc is loaded), groups (for DVD-Audio), tracks (for SACDs, CDs and Video CDs/Super VCD), or folder names (for MP3 discs). On the far right is a list of chapters (for DVD-Video) or tracks (for DVD-Audio and MP3). Program Program Step Group(1-03) Group 01 Group 02 Group 03 Track(1-14) Track 01 Track 02 Track 03 Track 04 Track 05 Track 06 Track 07 Track 08 40
31 Playing Discs 05 To add a track, first highlight the group, then move the cursor right and select a track from the list. To add a track, first find the folder, then move the cursor right and select a track name from the list. Program Program Program Step Group(1-03) Group 01 Group 02 Group 03 Track(1-14) Track 01 Track 02 Track 03 Track 04 Track 05 Track 06 Track 07 Track 08 Program Step Folder(1-006) 001. ACP 002. Nth Degree 003. Pfeuti 004. Live 006. CodHead Track(1-010) 001. Gravity deluxe 002. Tesla's patent 003. Border dispute 004. Delayed by rain 005. Accident incident 006. Pigeon post 007. Outernational 008. Vacuum tube For SACD, CD or Video CD/Super VCD, select a track to add to the program list. (The screen below shows a CD loaded.) Program Program Step Track(1-12) Track 01 Track 02 Track 03 Track 04 Track 05 Track 06 Track 07 Track 08 Total Time 0.00 For an MP3 disc, you can add a whole folder, or a track within a folder to the program list. To add a folder, select the folder. After pressing ENTER to select the title/ group/chapter/folder/track, the step number automatically moves down one. 4 Repeat step 3 to build up a program list. A program list can contain up to 24 titles/ chapters/groups/folders/tracks. 5 To play the program list, press 3 (play). Program play remains active until you turn off program play (see below), erase the program list (see below), eject the disc or switch off the player. Program Program Step Folder(1-006) 001. ACP 002. Nth Degree 003. Pfeuti 004. Live 005. Glitch music 006. CodHead Track(1-010) 001. Gravity deluxe 002. Tesla's patent 003. Border dispute 004. Delayed by rain 005. Accident incident 006. Pigeon post 007. Outernational 008. Vacuum tube To exit the program edit screen without starting playback, press PLAY MODE or SETUP. (Don t press RETURN your program list will be lost.) During program play, press to skip to the next program step. Press CLEAR during playback (though not if the program list OSD is displayed) to switch off program play. Press while stopped to erase the program list. 41
32 05 Playing Discs Editing a program list After creating a program list, you can add, delete and change steps. 1 Press PLAY MODE and select Program from the list of functions on the left. 2 Select Create/Edit from the list of program options. 3 To clear a step, highlight the step number and press CLEAR. 4 To insert a step in the middle of the program list, highlight the step where you want the new step to appear, then select a title/group/chapter/folder/track to add. After pressing ENTER, the new step is inserted into the list. 5 To add a step to the end of the program list, highlight the next free step then select a title/group/chapter/folder/ track to add. To exit the program edit screen without starting playback, press PLAY MODE or SETUP. If you want to exit the program edit screen without saving the changes you made, press RETURN. Other functions available from the program menu As well as creating and editing a program list, you can start and stop program play, erase the program list, and memorize a DVD program list from the Program menu. 1 Press PLAY MODE and select Program from the list of functions on the left. Play Mode A-B Repeat Repeat Random Program Search Mode Create/Edit Playback Start Playback Stop Program Delete Program Memory Off 2 Select a program play function. Create/Edit See Creating a program list. Playback Start Starts playback of the program list Playback Stop Turns off program play, but does not erase the program list Program Delete Erases the program list and turns off program play Program Memory (DVD-Video only) Select On to save the program list for the disc loaded. (Select Off to cancel the program memory for the disc loaded) 42 After saving a program list using the Program Memory feature, whenever you load that disc, the program list is automatically recalled and program play switched on. You can save program lists for up to 24 discs. After that, the oldest one is replaced with the new one saved.
33 Playing Discs 05 Searching a disc Using the search mode function from the Play Mode menu you can quickly jump to a particular part of the disc that you re watching or listening to. 1 Press PLAY MODE and select Search Mode from the list of functions on the left. The search options that appear depend on the kind of disc loaded. The screen below shows the DVD-Video search options. Play Mode A-B Repeat Repeat Random Program Search Mode Title Search Chapter Search Time Search 4 Press ENTER to start playback. You can only use time search with DVD- Video and Video CD discs. The disc must be playing in order to use time search. Search functions are not available with Video CDs/Super VCD in PBC mode (start non-pbc playback by stopping playback, then pressing, then 3 (play)). You can often select what you want to watch from a DVD disc menu. 2 Select a search mode. 3 Use the number buttons to enter a title, group, chapter, page, folder or track number, or a time. Play Mode A-B Repeat Repeat Random Program Search Mode Title Search Chapter Search Time Search Input Chapter For a time search, enter the number of minutes and seconds into the currently playing title (DVD-Video/DVD-RW) or track (Video CD) you want playback to resume from. For example, press 4, 5, 0, 0 to have playback start from 45 minutes into the disc. For 1 hour, 20 minutes and 30 seconds, press 8, 0, 3, 0. Some DVD-Audio discs feature pages of browsable pictures. ter the page number you want. 43
34 05 Playing Discs Switching subtitles Some DVD-Video discs have subtitles in one or more languages; the disc box will usually tell you which subtitle languages are available. You can switch subtitle language during playback. 1 Press SUBTITLE repeatedly to select a subtitle option. Switching DVD-Video audio language When playing a DVD-Video disc recorded with dialog in two or more languages, you can switch audio language during playback. 1 Press AUDIO repeatedly to select an audio language option. Subtitle 1 glish Audio 2 French Dolby Digital 3/2.1CH While the above display is showing, you can also use the joystick (up/down) and ENTER to select a subtitle language from a drop-down menu. With some discs, while the above display is showing, you can also use the joystick (up/down) and ENTER to select an audio language from a drop-down menu. Subtitle 1 glish Audio 2 French Dolby Digital 3/2.1CH Off 1. glish 2. French 3. German 4. Italian 1. glish 2. French 3. German 4. Italian Dolby Digital 3/2.1CH Dolby Digital 3/2.1CH Dolby Digital 2CH Dolby Digital 2CH 1/ 1 1/ 1 Some discs only allow you to change subtitle language from the disc menu. Press TOP MENU to access. To set subtitle preferences, see Subtitle. Some discs only allow you to change audio language from the disc menu. Press TOP MENU to access. To set audio language preferences, see Audio. 44
35 Playing Discs 05 Switching DVD-RW audio channel When playing a DVD-RW disc recorded with dual-mono audio, you can switch between the main, sub, and mixed channels during playback. 1 Press AUDIO repeatedly to select an audio channel option. Audio 1L Dolby Digital 1+1CH Switching DVD-Audio audio channel Depending on the disc, you may be able to switch channels when playing DVD-Audio discs see the disc box for details. 1 Press AUDIO repeatly to select an audio channel option. Audio 1 Digital Out Converted Linear PCM 192kHz24bit 2CH When you change the audio channel, playback restarts from the beginning of the current track. Switching CD/MP3/Video CD audio channel You can switch between stereo, just the left channel or just the right channel of a CD/ MP3/Video CD/Super VCD. (To change the audio channel of a CD it must be playing.) Some Super VCDs have two soundtracks. With these discs you can switch between the two soundtracks as well as individual channels in each. 1 Press AUDIO repeatly to select an audio channel option. Audio Stereo Switching camera angles Some DVD-Video discs feature scenes shot from two or more angles check the disc box for details. When a multi-angle scene is playing, a icon appears on screen to let you know that other angles are available (this can be switched off if you prefer). During playback press ANGLE to switch angle. Some discs only allow you to change audio channel from the disc menu. Press TOP MENU to access. To set audio language preferences, see Audio. 45
36 05 Playing Discs ing disc information Various track, chapter and title information, as well as the video transmission rate for DVD discs, can be displayed on-screen. 1 During playback, press DISPLAY to show/switch the information displayed. Keep pressing DISPLAY to change the displayed information. DVD-Video displays SACD displays Play 3 SACD Current / Total Elapsed Remain Total Track 1/ (During multichannel playback only) Play 3 SACD Current / Total Elapsed Remain Total Track 1/ /2.1CH Audio Play 3 SACD Elapsed Remain Total Disc Play 3 DVD Current / Total Elapsed Remain Total Title 1/ glish 1 glish 1 Audio Dolby Digital 3/2.1CH Subtitle Angle Play 3 Current / Total Chapter 2/36 DVD Elapsed 0.06 Remain 1.40 Total 1.46 # Tr. Rate : 6.0Mbps The # mark displayed with some DVD-Video discs means that the video is playing at 24 frames/second, progressive. CD and Video CD displays Play 3 VCD Elapsed Remain Total Disc Play 3 VCD Current / Total Elapsed Remain Total Track 2/ (During PBC playback only) Play 3 VCD Pause 8 Current / Total DVD Elapsed Remain Total MP3 disc displays Chapter 2/36 Tr. Rate : Mbps Play 3 MP3 When the disc is paused, the display also shows the frame number. Current / Total Elapsed Track 1/ Track Name Outernational Remain Total Play 3 MP3 Current / Total DVD-Audio displays Folder Folder Name 2/7 ACP Play 3 DVD-Audio Current / Total Elapsed Remain Total Track 1/ Linear PCM Audio 192kHz 24bit 2/0CH Subtitle Angle Play 3 DVD -Audio Current / Total Elapsed Remain Total Group 1/ Tr. Rate : 9.5Mbps DVD-RW displays You can see disc information (number of titles/chapters, groups, tracks, folders and so on) from the Disc Navigator screen. See Using the Disc Navigator to browse the contents of a disc. Play 3 DVD-RW Original Current / Total Elapsed Remain Title 1/ Audio Dolby Digital 2/0CH Subtitle Total Play 3 DVD-RW Original Current / Total Chapter 1/1 Tr. Rate 4.3Mbps
37 The Audio Settings Menu 06 Audio DRC Default setting: Off When watching Dolby Digital DVDs at low volume, it s easy to lose the quieter sounds completely including some of the dialog. Switching Audio DRC (Dynamic Range Control) to On can help by bringing up the quieter sounds, while controlling loud peaks. How much of a difference you hear depends on the material you re listening to. If the material doesn t have wide variations in volume, you may not notice much change. Audio DRC is only effective with Dolby Digital audio sources. Audio DRC is only effective through the digital output when Digital Out is set to On, and Dolby Digital Out is set to Dolby Digital > PCM. The effect of Audio DRC depends on your speakers and AV receiver settings. 1 Press SETUP and select Audio Settings from the on-screen display. Audio Settings Video Adjust Play Mode Disc Navigator Setup Navigator 2 Highlight Audio DRC, then use the Joystick (left/right) to change to On or Off, as required. Audio Settings 1/ 2 Audio DRC Virtual Surround Channel Level Off Off Fix 3 Press ENTER to make the setting and exit the Audio Settings screen. 47
38 06 The Audio Settings Menu Virtual Surround Default setting: Off Switch on Virtual surround to enjoy surround sound effects from just two speakers. When you play a Dolby Digital soundtrack, Virtual Dolby Digital, which uses TruSurround technology from SRS, produces a deep, realistic 3D soundspace from a pair of stereo speakers. 2 Highlight TruSurround, then use the Joystick (left/right) to change to 2V/ TruSurround or Off, as required. Audio Settings 1/ 2 Audio DRC Virtual Surround Channel Level Off Off Fix 3 Press ENTER to make the setting and exit the Audio Settings screen. You can also use the SURROUND button on the remote control to switch Virtual Surround on (2V/ TruSurround)/Off. 1 Press SETUP and select Audio Settings from the on-screen display. Audio Settings Play Mode Video Adjust Disc Navigator Setup Navigator Virtual Surround does not work with CD, MP3, DVD-Audio or SACD discs, or 96kHz Linear PCM soundtracks. The Virtual Surround effect is output only through the analog AUDIO OUT jacks. Make sure that Audio Output Mode is set to 2 Channel. How good the surround effect is varies with the disc. 48
39 06 The Audio Settings Menu Audio Settings 3/3 Speaker Distance L Speaker Distance C Speaker Distance R Speaker Distance LS Speaker Distance RS Speaker Distance SW 10.0 ft ft ft ft ft ft. Use the joystick (up/down) to select a speaker. Use the joystick (left/right) to adjust the distance from your listening position to that speaker. Front left/right (L/R) speakers can be set from 1.0 ft. to 30 ft. in 0.5 ft. increments. Center speaker (C) and subwoofer (SW) can be set from 6.5 ft. to +6.5 ft. relative to the front left/right speakers Surround left/right (LS/RS) speakers can be set from 20 ft. to +6.5 ft. relative to the front left/right speakers. When you adjust the front left (L) or front right (R) speaker, all the other speaker distances are adjusted relative to that speaker. 6 Press ENTER to make the settings and exit the audio settings screen. The speaker distance settings have no effect on SACD playback. 50 You can t adjust the channel level for any speakers that are set to Off in the Speaker Installation menu screen (page 64). The Fix setting is equivalent to setting all the channel levels to +6 db. Therefore, the Variable setting will usually sound quieter than the Fix setting.
40 The Video Settings Menu 07 Video Adjust Default setting: Standard From the Video Adjust screen you can select the standard video presentation or define presets of your own. 1 Press SETUP and select Video Adjust from the on-screen display. You can also access these settings by pressing V.ADJ (VIDEO ADJUST). 1 Select one of the Memory presets (see above). 2 Move the joystick down to select Detailed Settings then press ENTER. Video Adjust I.Memory1 Detailed Settings 3 Adjust the picture quality settings. Interlace Memory 1 (I. Memory 1) Audio Settings Play Mode Video Adjust Disc Navigator Setup Navigator Recall Settings Fine Focus Contrast Sharpness Chroma Level Hue min soft min green I.Memory1 On max fine max red 2 Use the joystick (left/right) to select a preset. Video Adjust Standard Standard Normal I. Memory1 2 / P. Memory1 2 Use for making your own interlaced / progressive presets (see below) 3 Press ENTER to make the setting and exit the Video Adjust screen. Depending on the disc and the TV/ monitor, you may not see the effect clearly. Creating your own interlace output presets These presets are available when the video output is set to interlace. (Use the front panel PROGRESSIVE button to switch between interlace and progressive video output. Use the joystick (up/down) to select a setting. Use the joystick (left/right) to adjust the current setting. Press DISPLAY to switch between full and single view. You can change the preset number from the Recall Settings menu item. You can adjust any or all of the following picture quality settings: Fine Focus Switch On to reveal greater detail (high resolution) in the picture. Contrast Adjusts the contrast between light and dark elements in the picture. Sharpness Adjusts the sharpness of the mid-frequency (less detailed) elements in the picture. (This setting is only effective when Fine Focus is On.) Chroma Level Adjusts how saturated colours appear. Hue Adjusts the overall colour balance between red and green. (This is only effective onv S-Video and COMPOSTE VIDEO OUTPUTS. 51
41 07 The Video Settings Menu 4 Press ENTER to save the preset and exit the Video Adjust screen. Creating your own progressive output presets. These presets are available when the video output is set to progressive. (Use the front panel PROGRESSIVE button to switch between interlace and progressive video output. 1 Select one of the Memory presets (see above). 2 Move the joystick down to select Detailed Settings then press ENTER. Video Adjust P. Memory1 Detailed Settings 3 Ajust the picture quality settings. Progressive Memory 1 (P. Memory 1) Recall Settings PureCinema Sharpness Contrast Brughtness Chroma Level Hue soft soft off min green P.Memory1 Auto fine fine max max red Use the joystick (up/down) to select a setting. Use the joystick (left/right) to adjust the current setting. Press DISPLAY to switch between full and single view. You can change the preset number from the Recall Settings menu item. You can adjust any or all of the following picture quality settings: PureCinema When watching DVD movies, PureCinema optimizes the picture quality. The default setting is Auto, but if the picture appears unnatural, then set to On or Off, as appropriate. Sharpness Adjusts the sharpness of the mid-frequency (less detailed) elements in the picture. Contrast Adjusts the contrast between light and dark elements in the picture. Brightness Adjusts the overall brightness of the picture. Chroma Level Adjusts how saturated colours appear. Hue Adjusts the overall colour balance between red and green. 3 Press ENTER to save the preset and exit the Video Adjust screen. Video on a DVD discs may be either video material (originally shot on video) or film material (originally shot on film). Video material has a frame rate of 30 frames/sec.(ntsc), compared with 24 frames/sec. for film. This player converts film material to 60 frames/sec. (in progressive scan mode). PureCinema adjusts the picture so that it matches more closely the picture quality of a cinema screen. You can see whether video on a DVD disc is film or video material by displaying the video transmission rate. If a hash mark (#) appears next to the transmission rate display, it is film is film. 52
42 The Menu 08 Using the menu The menu is where you can set preferences for language, audio and video output, and so on. If a menu option is grayed out it means that it cannot be changed at the current time. This is usually because a disc is playing. Stop the disc, then change the setting. 1 Press SETUP and select from the on-screen display. Digital Out Dolby Digital Out DTS Out Linear PCM Out MPEG Out On Off If at any time you need to switch off the digital audio output, set this to Off, otherwise leave it On. Audio Settings Play Mode Video Adjust Disc Navigator Setup Navigator You can t switch on/off the optical and coaxial outputs individually. There is no digital output when playing SACDs and some DVD-Audio discs regardless of this setting. 2 Select the setup category from the list on the left, then select an item from the menu list to the right. 3 Make the setting you want. settings Digital Out Default setting: On You only need to make this setting if you connected this system to an AV receiver (or other component) using one of the digital outputs. Dolby Digital Out Default setting: Dolby Digital You only need to make this setting if you connected this system to an AV receiver (or other component) using one of the digital outputs. Digital Out Dolby Digital Out DTS Out Linear PCM Out MPEG Out Dolby Digital Dolby Digital > PCM If your AV receiver (or other connected component) is Dolby Digital compatible, set to Dolby Digital, otherwise set to Dolby Digital > PCM. 53
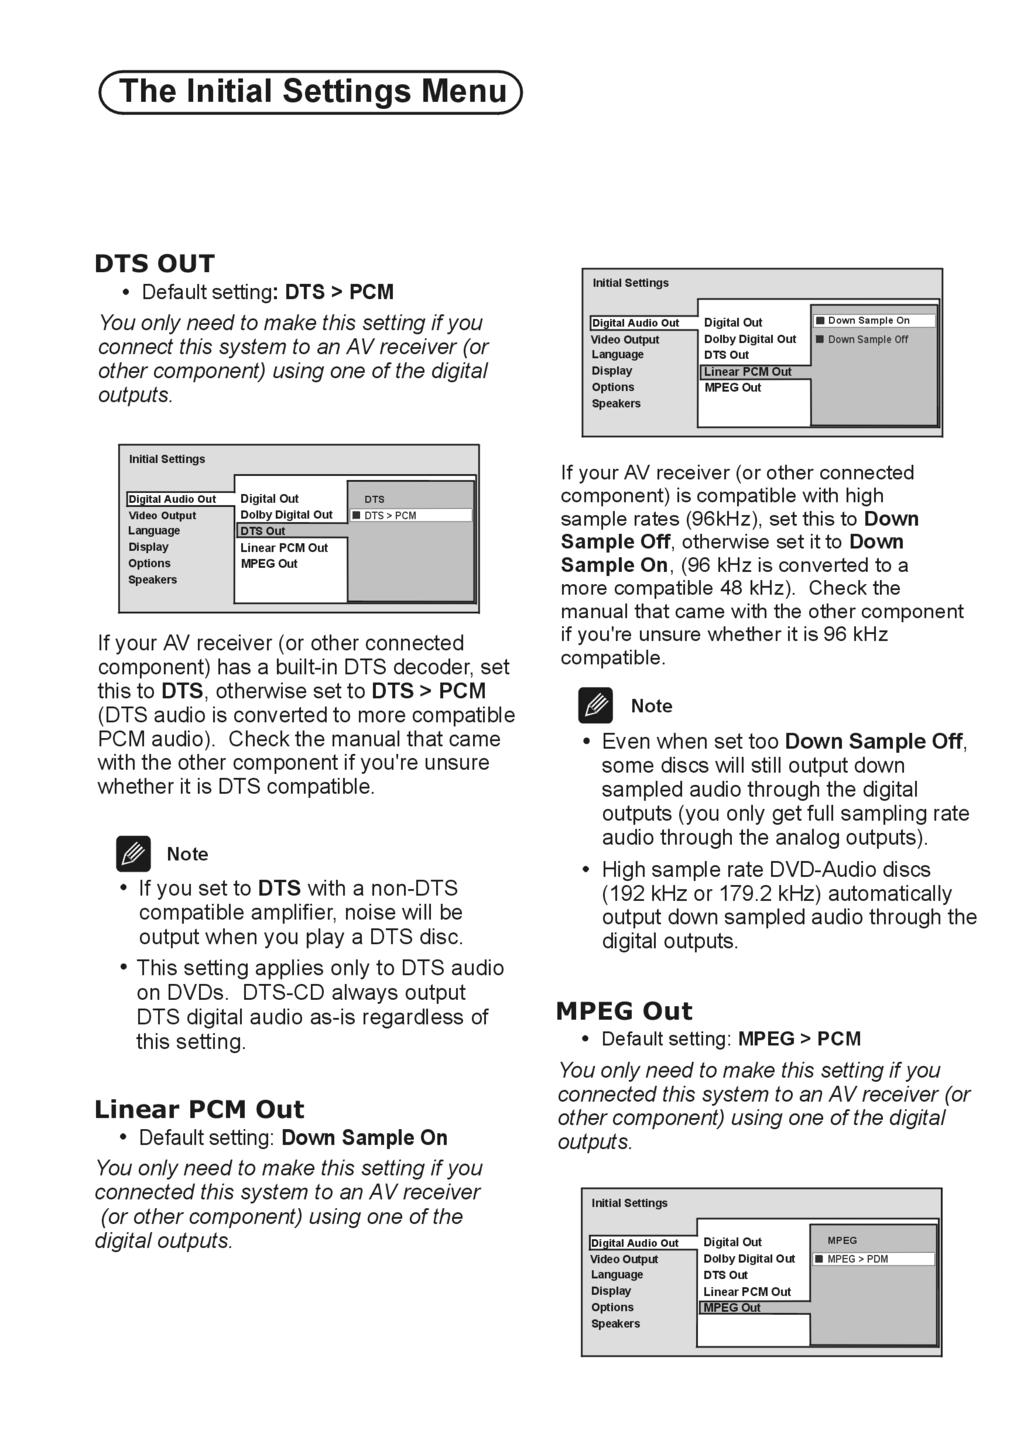
43
YST-SW20 SUBWOOFER SYSTEM OWNER S MANUAL. Active Servo Technology
 CAUTION SUBWOOFER SYSTEM Active Servo RISK OF ELECTRIC SHOCK DO NOT OPEN CAUTION: TO REDUCE THE RISK OF ELECTRIC SHOCK DO NOT REMOVE COVER (OR BACK). NO USER-SERVICEABLE PARTS SIDE. REFER SERVICG TO QUALIFIED
VOICE-ACTIVATED INTERCOM SYSTEM
 VOICE-ACTIVATED INTERCOM SYSTEM Owner s Manual For Wireless Intercom Model WHI-4CUPG EXPLANATION OF GRAPHIC WARNING SYMBOLS This symbol is intended to alert the user to the presence of un-insulated dangerous
SUBWOOFER SYSTEM YST-MSW10
 ACTIVE SERVO PROCESSING SUBWOOFER SYSTEM YST-MSW10 Active Servo SUBWOOFER SYSTEM YST-MSW10 Active Servo HIGH CUT HIGH LOW OWNER S MANUAL MANUAL DE INSTRUCCIONES CAUTION RISK OF ELECTRIC SHOCK DO NPT OPEN
LTC 5121, LTC 5141 Series 2- and 4-Position Economical Sequential Switcher
 LTC 5121, LTC 5141 Series 2- and 4-Position Economical Sequential Switcher Eng Installation Instructions F D E NL I Philips Communication & Security Systems Eng Installation Instructions...1.1 F Manuel
CANTEEN 6000 Portable Battery Pack NAP-30. Instruction Manual Please read carefully before use and keep for future reference.
 CANTEEN 6000 Portable Battery Pack NAP-30 Instruction Manual Please read carefully before use and keep for future reference. Thank You We know you have many choices when it comes to technology; thank you
9 Digital Photo Frame NF-900. Instruction Manual Please read carefully before use and keep for future reference.
 9 Digital Photo Frame NF-900 Instruction Manual Please read carefully before use and keep for future reference. Table of Contents Thank You... 3 In the Box... 3 At a Glance... 4 Buttons (Rear)...4 Connections...
IMPORTANT SAFETY INSTRUCTIONS Please read this owner s guide
 Model no: CD418JN IMPORTANT SAFETY INSTRUCTIONS Please read this owner s guide Please take the time to follow the instructions in this owner s guide carefully. It will help you set up and operate your
7-Port Fast Charging Station NAP Instruction Manual Please read carefully before use and keep for future reference.
 7-Port Fast Charging Station NAP-7000 Instruction Manual Please read carefully before use and keep for future reference. Thank You We know you have many choices when it comes to technology; thank you for
Instruction Manual. 5.1 Channel Cinema System with Remote Wirless and Glossy MODEL:LS 250
 Instruction Manual 5.1 Channel Cinema System with Remote Wirless and Glossy MODEL:LS 250 Wireless-Rear Speaker Read this manual carefully to get the excellent acoustics from this unit. SAFETY INFORMATION
PCM60A 100W MAX P.A. AMPLIFIER.
 PCM60A 100W MAX P.A. AMPLIFIER www.pyleaudio.com IMPORTANT SAFETY INSTRUCTIONS 1. Read Instructions All the safety and operating instructions should be read before the appliance is operated. 2. Retain
RTT98 VINTAGE TURNTABLE
 RTT98 VINTAGE TURNTABLE WARNING: TO PREVENT FIRE OR SHOCK HAZARD, DO NOT EXPOSE THIS APPLIANCE TO RAIN OR MOISTURE. DO NOT REMOVE COVER. PILOT LAMPS SOLDERED IN PLACE. NO USER SERVICEABLE PARTS INSIDE.
Monochrome Camera. Features. User manual
 Monochrome Camera LTC0330/11 LTC0330/21 LTC0350/11 LTC0350/21 LTC0330/51 LTC0330/61 LTC0350/51 LTC0350/61 Features To obtain the best results from your new camera, read these instructions carefully before
INSTRUCTION MANUAL DISTRIBUTION UNIT. Please read this manual thoroughly before use, and keep it handy for future reference.
 INSTRUCTION MANUAL DISTRIBUTION UNIT Please read this manual thoroughly before use, and keep it handy for future reference. ISSUE 1 May 2006 LIMITATION OF LIABILITY THE INFORMATION IN THIS PUBLICATION
Bluetooth Headphone FCC ID:OR8-T1
 Bluetooth Headphone T1 FCC ID:OR8-T1 Important Safety Instructions 1 Caution: To reduce the risk of electric shock, do not dismantle the product and do not expose the apparatus to rain or moisture. No
Digital Color Cameras
 Digital Color Cameras Eng LTC 0240 LTC 0242 LTC 0243 Philips Communication & Security Systems IMPORTANT SAFEGUARDS 1. Read Instructions - All the safety and operating instructions should be read before
IMPORTANT SAFETY INSTRUCTIONS
 SAFETY INSTRUCTIONS WARNING: TO PREVENT FIRE OR SHOCK HAZARD, DO NOT EXPOSE THIS APPLIANCE TO RAIN OR MOISTURE. IMPORTANT SAFETY INSTRUCTIONS 1. Read instructions - All the safety and operating instructions
BLUETOOTH CLOCK RADIO
 BLUETOOTH CLOCK RADIO SCR1989BT OPERATING INSTRUCTIONS Please read and follow this instruction manual carefully before using the unit and retain it for future reference SYLVANIA is a registered trademark
Monochrome Cameras LTC 0140 LTC 0142 LTC Eng. Philips Communication & Security Systems
 Monochrome Cameras Eng LTC 0140 LTC 0142 LTC 0143 Philips Communication & Security Systems IMPORTANT SAFEGUARDS 1. Read Instructions - All the safety and operating instructions should be read before the
VPS Series. User Guide 11/16
 VPS Series User Guide 11/16 ELECTRICAL SAFETY PRECAUTIONS The lightning flash with arrowhead symbol, within an equilateral triangle, is intended to alert the user to the presence of uninsulated "dangerous
Portable HD Video Dash Cam NCV Instruction Manual Please read carefully before use and keep for future reference.
 Portable HD Video Dash Cam NCV-6001 Instruction Manual Please read carefully before use and keep for future reference. Thank You We know you have many choices when it comes to technology; thank you for
PORTABLE HOME SECURITY VIDEO CAMERA
 PORTABLE HOME SECURITY VIDEO CAMERA Instruction Manual English Version1.0 MODEL: SG6227 www.lorexcctv.com Copyright 2007 Lorex Technology Inc. CAUTION RISK OF ELECTRIC SHOCK. DO NOT OPEN.! CAUTION: TO
Please Read First. CAUTION: Please read these important safety instructions carefully
 Please Read First The lightning flash with arrowhead, within an equilateral triangle, is intended to alert the user to the presence of uninsulated dangerous voltage within the product s enclosure that
2.4 GHz WIRELESS B&W VIDEO SECURITY SYSTEM MODEL WL5230
 2.4 GHz WIRELESS B&W VIDEO SECURITY SYSTEM MODEL WL5230 FOR MORE INFORMATION WWW.STRATEGICVISTA.COM Before operating the system, please read this manual thoroughly and retain it for future reference!!!
Video Surveillance System with 2 Indoor/Outdoor Night Vision Cameras
 Video Surveillance System with 2 Indoor/Outdoor Night Vision Cameras Instruction Manual English Version 1.0 MODEL: SHS-2S www.lorexcctv.com Copyright 2006 LOREX Technology Inc. Thank you for purchasing
ACTIVE LOUDSPEAKER. Model: DJSP1216LBT
 ACTIVE LOUDSPEAKER Model: DJSP1216LBT PLEASE READ THIS USER MANUAL COMPLETELY BEFORE OPERATING THIS UNIT AND RETAIN THIS BOOKLET FOR FUTURE REFERENCE. WARNINGS To reduce the risk of fire or electric shock,
Beyond Your Expectations Within Your Reach UDP-1. Universal Disc Player. McCORMACK AUDIO CORPORTATION OF VIRGINIA
 Beyond Your Expectations Within Your Reach UDP-1 Universal Disc Player McCORMACK AUDIO CORPORTATION OF VIRGINIA INTRODUCTION Thank you for purchasing the UDP-1 Universal Disc Player. This player is manufactured
CR6S Stereo Micro Crush
 1 THANK YOU! Thank you for choosing Orange. You are now a member of the Legendary British Guitar Amplifier owners club! Since 1968 when the company was founded, Orange has been a pioneering force in the
CD RADIO CLOCK MODEL NRC-175
 CD RADIO CLOCK MODEL NRC-175 PLEASE READ THIS USER MANUAL COMPLETELY BEFORE OPERATING THIS UNIT AND RETAIN THIS BOOKLET FOR FUTURE REFERENCE. LASER SAFETY: This unit employs a laser. Only qualified service
Bluetooth Portable Speaker Slate MODEL:CAB PLEASE READ CAREFULLY BEFORE OPERATING THIS EQUIPMENT
 Bluetooth Portable Speaker Slate MODEL:CAB-31653 PLEASE READ CAREFULLY BEFORE OPERATING THIS EQUIPMENT Important Safety Instructions CAUTION RISK OF ELECTRIC SHOCK DO NOT OPEN CAUTION: TO REDUCE THE ELECTRIC
CD/Radio Portable Player
 GV-PS713 CD/Radio Portable Player I N S T R U C T I O N MANU A L WARNING TO PREVENT FIRE OR SHOCK HAZARD DO NOT EXPOSE THIS APPLIANCE TO RAIN OR MOISTURE. CAUTION RISK OF ELECTRIC SHOCK DO NOT OPEN WARNING
SLIM SOUND BAR OWNER S MANUAL. Please read this manual carefully before operating your set and retain it for future reference.
 ENGLISH OWNER S MANUAL SLIM SOUND BAR Please read this manual carefully before operating your set and retain it for future reference. NB2338A www.lg.com NB2338A-N0.EVENT.304..indd 203-05-07 3:0:05 2 Safety
MultiPlex 15 Touch Screen. User s Manual
 MultiPlex 5 Touch Screen User s Manual Preface Precautions. READ INSTRUCTIONS: All the safety and operating instructions should be read before the LCD monitor is operated.. RETAIN INSTRUCTIONS: The safety
DSS Console and DSS Console for Attendant for Digital Super Hybrid Systems. Reference Guide ANSWER RELEASE
 ANSWER RELEASE PSQX1526ZA 98.8.5 7:32 PM Page 1 DSS Console and DSS Console for Attendant for Digital Super Hybrid Systems Reference Guide Model KX-T7440/KX-T7441 8 16 24 32 40 48 7 15 23 31 39 47 6 14
Instruction Manual Please read carefully before use and keep for future reference.
 Portable Bluetooth Speaker with Colored Lights NAS-3096 Instruction Manual Please read carefully before use and keep for future reference. Important Safety Information CAUTION RISK OF ELECTRIC SHOCK DO
Sound Bar System OWNER S MANUAL. Please read this manual carefully before operating your set and retain it for future reference.
 OWNER S MANUAL Sound Bar System Please read this manual carefully before operating your set and retain it for future reference. NB2020A www.lg.com NB2020A-N0.DUSALLK.indd 1 2012-08-13 2:47:21 2 Getting
DVD Player DV-354. Operating Instructions
 DVD Player DV-354 Operating Instructions IMPORTANT The lightning flash with arrowhead symbol, within an equilateral triangle, is intended to alert the user to the presence of uninsulated dangerous voltage
QIT600F1 USER'S GUIDE
 QIT600F1 USER'S GUIDE 1 IMPORTANT SAFEGUARDS Warnings: 1. Read all of these instructions. Save these instructions for later use, please. 2. Unplug this monitor from the wall outlet before cleaning. Do
Kogan Bluetooth Karaoke System with Dual Microphones KAKAR2MICA
 Kogan Bluetooth Karaoke System with Dual Microphones KAKAR2MICA K TABLE OF CONTENTS SAFETY & WARNINGS...1 IMPORTANT SAFETY INSTRUCTIONS...1 AC CONNECTION...2 LOCATION OF CONTROLS...3 ASSEMBLY AND CONNECTIONS...4
MP-C582 INSTRUCTION MANUAL. Micro-Clip MP3 Player. Please read this manual carefully before operation
 MP-C582 Micro-Clip MP3 Player INSTRUCTION MANUAL Please read this manual carefully before operation PRECAUTIONS The lightning flash with arrowhead symbol within an equilateral triangle is intended to alert
Multi Player with GPS User Manual MMP-401
 Multi Player with GPS User Manual MMP-401 Thank you for purchasing this HITACHI product. To obtain the best performance and safety, please read this manual carefully. Please keep this manual for future
The OontZ XL Guide. TheOontZ.com. The Powerful Portable Wireless Bluetooth Speaker. Visit our Website:
 The Guide The Powerful Portable Wireless Bluetooth Speaker Visit our Website: To contact our OontZ Support Team To view the whole family of OontZ Speakers For getting started guides for different types
IMPORTANT SAFETY INSTRUCTIONS
 SAFETY INSTRUCTIONS WARNING: TO PREVENT FIRE OR SHOCK HAZARD, DO NOT EXPOSE THIS APPLIANCE TO RAIN OR MOISTURE. IMPORTANT SAFETY INSTRUCTIONS 1. Read instructions - All the safety and operating instructions
MP3/ CD/ Radio/Bluetooth Porta ble Pl a ye r With Remote Control
 GV-PS913 MP3/ CD/ Radio/Bluetooth Porta ble Pl a ye r With Remote Control R I N S T R U C T I O N MANU A L WARNING TO PREVENT FIRE OR SHOCK HAZARD DO NOT EXPOSE THIS APPLIANCE TO RAIN OR MOISTURE. CAUTION
CS-MP125 INSTRUCTION MANUAL. Dual Alarm Clock Radio with Universal Dock for ipod. Please read this manual carefully before operation.
 CS-MP125 Dual Alarm Clock Radio with Universal Dock for ipod INSTRUCTION MANUAL Please read this manual carefully before operation. Precautions For Customer Use: Enter below the serial number that is located
RIO R22 & R44. Quick Start Guide for all variants
 RIO R22 & R44 Quick Start Guide for all variants Important Safety Information 1. READ THESE INSTRUCTIONS All the safety and operating instructions should be read before the product is operated. 2. KEEP
Model: PTTC4U. Multifunction Turntable With MP3 Recording, USB-to-PC, Cassette Playback
 Model: PTTC4U Multifunction Turntable With MP3 Recording, USB-to-PC, Cassette Playback Read instructions carefully before use and store in a safe place for future reference. IMPORTANT SAFETY INSTRUCTIONS
The Outlaw s Guide: Transformative Engineering HDS-42AVR 4k/HDR HDMI Splitter. Integrating the HDS-42AVR with the Model 975
 Transformative Engineering HDS-42AVR 4k/HDR HDMI Splitter The Outlaw s Guide: Integrating the HDS-42AVR with the Model 975 RS232 GND RX TX IR-IN USB INPUT SELECT A B 3 4 1 2 OUTPUT INPUT POWER HDS-42AVR
Qi Wireless & USB Charger with Bluetooth Speaker NAP-52. Instruction Manual Please read carefully before use and keep for future reference.
 Qi Wireless & USB Charger with Bluetooth Speaker NAP-52 Instruction Manual Please read carefully before use and keep for future reference. Thank You We know you have many choices when it comes to technology;
CR1701A. ijuke. Instruction Manual. extras. albums MUTE VOL + VOL -
 CR1701A ijuke Instruction Manual MUTE VOL + albums VOL - extras www.crosleyradio.com IMPORTANT SAFETY INSTRUCTION PLEASE READ CAREFULLY ALL THE FOLLOWING IMPORTANT SAFEGUARDS THAT ARE APPLICABLE TO YOUR
IMPORTANT SAFETY INSTRUCTIONS
 IMPORTANT SAFETY INSTRUCTIONS CAUTION: TO REDUCE THE RISK OF ELECTRIC SHOCK, DO NOT REMOVE COVER (OR BACK). NO USER-SERVICEABLE PARTS INSIDE. REFER SERVICING TO QUALIFIED SERVICE PERSONNEL. CAUTION: THIS
ESV4 Quick Installation Guide
 ESV4 Quick Installation Guide 4CH Network Video Recorder with Local Display Version 1.0.0 2 ESV4 Quick Installation Guide Table of Contents Preliminary... 3 System Overview... 8 Front View... 8 Rear View...
A CH Power Amplifier
 A-965 7-CH Power Amplifier Introduction READ THIS BEFORE OPERATING YOUR UNIT CAUTION WARNING : TO REDUCE THE RISK OF ELECTRIC SHOCK, DO NOT REMOVE COVER (OR BACK). NO USER-SERVICEABLE PARTS INSIDE. REFER
CR73-3 / CR703. Instruction Manual DISC SKIP+ F.SKIP B.SKIP REPEAT OPEN/ AM FM DOW UP DISC 1 DISC 2 EARPHONE DISC 3 CD PHONO TAPE RADIO
 F.SKIP DOW UP CR73-3 / CR703 Instruction Manual DISC SKIP+ PLAY/ PAUSE STOP B.SKIP REPEAT CD PHONO TAPE RADIO OPEN/ CLOSE VOLUME AM FM POWER ON OFF TUNING DISC 1 DISC 2 DISC 3 EARPHONE 910-261000-002 WARRANTY
DVD-209 DVD-419 PRECAUTIONS
 PRECAUTIONS The lightning flash with arrowhead symbol within an equilateral triangle is intended to alert the user to the presence of uninsulated dangerous voltage within the product s enclosure that may
IS208B INSTRUCTION MANUAL
 IS208B INSTRUCTION MANUAL Contents Warnings & Precautions... 3 Important Safety Instructions... 4 In the Box & Features... 5 Powering the Unit... 6 Docking an ipod... 7 Playing an ipod... 8 Setting the
HARD DRIVE EXPANSION BAY DESIGNED FOR THE DIGIMERGE BLADE
 HARD DRIVE EXPANSION BAY DESIGNED FOR THE DIGIMERGE BLADE INSTRUCTION MANUAL English Version 1.0 VBAY3HD Right For Business Copyright 2009 Digimerge Technology Inc. www.digimerge.com Thank you for purchasing
Plug-in wireless speaker
 JBL Soundfly BT Plug-in wireless speaker Quick Setup Guide Welcome Thank you for purchasing the JBL Soundfly BT plug-in wireless speaker. Soundfly BT will fill your room with sound from your portable Bluetooth-enabled
WELCOME SAFETY INSTRUCTIONS
 IMPORTANT ANNOUNCEMENT FOR A HIGH PERFORMANCE OF THE QUALITY AND USEFUL LIFE OF THE SOUND, WE RECOMMEND NOT TO TOUCH THE MEMBRANES OF THE SPEAKERS, DUE TO THE RISK OF CRUSHING AND DEFORMATION. THE WARRANTY
USER MANUAL GOLDMUND EIDOS REFERENCE UNIVERSAL PLAYER
 USER MANUAL GOLDMUND EIDOS REFERENCE UNIVERSAL PLAYER Table of Contents 1. FEATURES AND COMPATIBILITY...5 2. UNPACKING...5 3. POWER SUPPLY VOLTAGE SELECTION...6 4. CHOICE OF PLAYER LOCATION...6 5. POWER
E100 User Guide. Built-in DAB+, FM & Bluetooth Hi-Fi sound system SE0120 SE0150
 E100 User Guide Built-in DAB+, FM & Bluetooth Hi-Fi sound system SE0120 SE0150 1.0 Important Safety Instructions CAUTION: To reduce the risk of electric shock, do not remove the cover. No user-serviceable
Blonde On Blonde OWNER S MANUAL SWR SCOTTSDALE, AZ USA
 Blonde On Blonde OWNER S MANUAL SWR SCOTTSDALE, AZ USA IMPORTANT SAFETY INSTRUCTIONS CAUTION: TO REDUCE RISK OF ELECTRIC SHOCK, DO NOT REMOVE THE COVER OR BACK. NO USER-SERVICEABLE PARTS INSIDE. PLEASE
15" LCB Television FLM-1514,FLM-1514B,FLM-153B,FLM Your LCD TV may look slightly different from the one pictured above.
 15" LCB Television FLM-1514,FLM-1514B,FLM-153B,FLM-1517 Your LCD TV may look slightly different from the one pictured above. 20061004 Table Of Contents Important Safety Instructions... 1 Product Features
KC218S INSTRUCTION MANUAL
 KC218S INSTRUCTION MANUAL Contents Warnings & Precautions... 2 Important Safety Instructions... 3 In the Box & Features... 4 Mounting the Unit & Powering the Unit... 5 Setting the Clock & Kitchen Timer...
Owner s Instruction Manual
 Owner s Instruction Manual Advanced Healthcare Telephone Model 5150 Contents IMPORTANT SAFETY INSTRUCTIONS...3 BOX CONTENTS...4 FEATURES...4 ON/OFF SWITCH...4 DIAL BUTTONS...4 RECEIVER VOLUME CONTROL...4
Network Camera. Quick Guide DC-B1203X. Powered by
 Network Camera Quick Guide DC-B1203X Powered by Safety Precautions English WARNING RISK OF ELECTRIC SHOCK DO NOT OPEN WARNING: TO REDUCE THE RISK OF ELECTRIC SHOCK, DO NOT REMOVE COVER (OR BACK). NO USER-SERVICEABLE
C ookie User Manual BC
 Cookie User Manual BC Cookie Please follow the instruction in this guide to enjoy the best sound. Cookie User Manual Hold "O" button to power on and off Press "O" button to play/pause music (for compatible
Universal Docking Station with RF. Wireless Speakers for ipod
 Universal Docking Station with RF Wireless Speakers for ipod USER MANUAL JiSS-585 (ipod Not Included) PLEASE READ THIS USER MANUAL COMPLETELY BEFORE OPERATING THIS UNIT AND RETAIN THIS BOOKLET FOR FUTURE
 POWER + - + + - INPUT 2010 INNOVAGE LLC All Rights Reserved. Project Name: ProjectorS35_IM Designer/Studio: INNOVAGE Revision: SET UP AND INSTALLATION RCA cables generally cannot be connected to a TV (unless
Lightshow Box with Speaker
 pg.1 Lightshow Box with Speaker ORCHESTRA of LIGHTS 1-2 6 4 8 6 Pre-programmed Christmas Songs Dance of the Sugar Plum Fairy Deck The Halls Gemmy Christmas Medley Jingle Bells Religious Medley The Gemmy
LED Lamp with Wireless Charging NA Instruction Manual Please read carefully before use and keep for future reference.
 LED Lamp with Wireless Charging NA-1000 Instruction Manual Please read carefully before use and keep for future reference. Thank You We know you have many choices when it comes to technology; thank you
DVD Player DV-656A DV-655A. DV-655A only. Operating Instructions
 DVD Player DV-656A DV-655A DV-655A only Operating Instructions IMPORTANT The lightning flash with arrowhead symbol, within an equilateral triangle, is intended to alert the user to the presence of uninsulated
CANARY AUDIO. Vacuum Tube Compact Disc Player CD-100 OWNER S MANUAL. Handcrafted in California MADE IN USA
 CANARY AUDIO Vacuum Tube Compact Disc Player Handcrafted in California CD-100 OWNER S MANUAL MADE IN USA Dear Customer: Please allow us to take this opportunity to thank you for purchasing this CANARY
OWNER S INSTRUCTION MANUAL
 OWNER S INSTRUCTION MANUAL CALLER ID TYPE II MULTI-FEATURE TELEPHONE MODEL 2730 1 IMPORTANT SAFETY INSTRUCTIONS Always follow basic safety precautions when using your telephone equipment to reduce the
CD Boombox with Bluetooth NPB-270. Instruction Manual Please read carefully before use and keep for future reference.
 CD Boombox with Bluetooth NPB-270 Instruction Manual Please read carefully before use and keep for future reference. Table of Contents Thank You... 3 In the Box... 3 Before You Start... 4 At a Glance...
QAA14AV013 Instruction Manual
 QAA14AV013 Instruction Manual Contents Important Safety Instructions...2 Safety... 2 Warning... 2 Identifying the Parts...4 Main Unit:... 4 Remote Control... 4 Install remote control batteries...5 Connections...5
888385_01 Install.book Page 1 Wednesday, November 11, :45 PM. SMDR6 Installation Guide
 888385_01 Install.book Page 1 Wednesday, November 11, 1998 2:45 PM SMDR6 Installation Guide 888385_01 Install.book Page 2 Wednesday, November 11, 1998 2:45 PM 888385_01 Install.book Page i Wednesday, November
CR1702A LIMITED MANUFACTURERS WARRANTY. ijuke Premier. Instruction Manual.
 LIMITED MANUFACTURERS WARRANTY Crosley Radio, Inc. warrants the product to be free from defects in material and workmanship under normal use for a period of one year from the original date of purchase.
MODEL: CH196B/R. 3-Speed Stereo Turntable With Built-in Speakers
 MODEL: CH196B/R 3-Speed Stereo Turntable With Built-in Speakers WARNINGS To reduce the risk of fire or electric shock, do not expose this appliance to rain or moisture. To reduce the risk of electric shock,
1. Introduction Features Checking List Installation Install the Pedestal Connect Your Monitor to Computer...
 E27M5G 27 " W User Manual M Series L E D B A C K L I G H T M o n i to r Content F.C.C STATEMENT IMPORTANT SAFEGUARDS 1. Introduction 6 1.1 Features...6 1.2 Checking List...6 2. Installation 7 2.1 Install
User`s Guide SBAR-51. Sound Bar and Docking Station
 User`s Guide SBAR-51 Sound Bar and Docking Station Please read the following instructions carefully before connecting, operating or adjusting this product. Please keep this manual in a convenient place
Table of Contents. Federal Communications Commission (FCC) Statement...2
 Statement...2") Contents Table of Contents Federal Communications Commission (FCC) Statement...2 Important Safety Instructions...3 Chapter 1 Introduction Features...6 Package Contents...7 Front View and Controls...8 Installing
Contents Table of Contents Federal Communications Commission (FCC) Statement...2 Important Safety Instructions...3 Chapter 1 Introduction Features...6 Package Contents...7 Front View and Controls...8 Installing
Instruction Manual. Portable Stereo Media Player. Never-Ending Learning Innovation
 Instruction Manual Portable Stereo Media Player Never-Ending Learning Innovation 80 Little Falls Road, Fairfield, NJ 07004 1-800-631-0868 www.hamiltonbuhl.com Contents Warnings and Precautions...3 Important
OWNER S MANUAL CD-2 V 1.3
 OWNER S MANUAL CD-2 V 1.3 2 TABLE OF CONTENTS WARNINGS... 3 ACCESSORIES... 4 REMOTE CONTROL... 5 FRONT PANEL... 6 REAR PANEL... 7 MENU SYSTEM... 8 NOTES OF IMPORTANCE... 10 CONNECTORS... 11 TECHNICAL SPECIFICATIONS...
THANK YOU! Crush PiX 20L. Thank you for choosing Orange. You are now a member of the Legendary British Guitar Amplifier owners club!
 1 THANK YOU! Thank you for choosing Orange. You are now a member of the Legendary British Guitar Amplifier owners club! Since 168 when the company was founded, Orange has been a pioneering force in the
BS 181 SINGLE CHANNEL POWER SUPPLY USER MANUAL
 BS 181 SINGLE CHANNEL POWER SUPPLY USER MANUAL August 2016 This product is designed and manufactured by: ASL Intercom B.V. Zonnebaan 42 3542 EG Utrecht The Netherlands Phone: +31 (0)30 2411901 Fax: +31
P75 Dual Source Power Amplifier Installation Manual
 P75 Dual Source Power Amplifier Installation Manual SAFETY INSTRUCTIONS CAUTION: TO REDUCE THE RISK OF ELECTRIC SHOCK, DO NOT REMOVE THE COVER. NO USER- SERVICEABLE PARTS INSIDE. REFER SERVICING TO QUALIFIED
SOUNDSTICKS WIRELESS. Setup Guide. Downloaded from
 SOUNDSTICKS WIRELESS Setup Guide English Japanese Simplified Chinese 2 SOUNDSTICKS WIRELESS 1. Read these instructions. 2. Keep these instructions. 3. Heed all warnings. 4. Follow all instructions. 5.
User s Guide. Digital Whole Home Audio Distribution System. Includes 8 audio source inputs and 8 amplified audio zones
 User s Guide Digital Whole Home Audio Distribution System FEATURES Includes 8 audio source inputs and 8 amplified audio zones Hi-Fi2 SYSTEM Optional Hi-Fi2 Expansion Kit adds 8 more zones (16 total) Super
OWNER S MANUAL. Additional Camera Unit AC-CAM-210 Compatible with AC210 Baby Video Monitor TABLE OF CONTENTS
 OWNER S MANUAL Additional Camera Unit AC-CAM-210 Compatible with AC210 Baby Video Monitor TABLE OF CONTENTS WARNINGS...2 SETUP REQUIREMENTS... 3 Setting up the Camera... 4 Limited warranty...7 Technical
AVC7505 OWNER S MANUAL
 RECORDABLE MP3+G PROF. KARAOKE PLAYER W/HDMI & VGA OUTPUTS AVC7505 OWNER S MANUAL PLAY/PAUSE ACC7505-01 Safety Instructions Package Contents FRONT PANEL REAR PANEL REMOTE CONTROL USB & SD CARD A/V Connection
2 Series II COM PANION M ULTIM EDIA SPEAKERS. Owner s Guide. Guia del usuario. Notice d utilisation
 COM PANION M ULTIM EDIA SPEAKERS 2 Series II Owner s Guide Guia del usuario Notice d utilisation Français English SAFETY INFORMATION Please read this owner s guide Please take the time to follow the instructions
Marshall Lynx LCD Universal Monitors
 Marshall Lynx LCD Universal Monitors User Manual Marshall Industrial Video/Security Div. For more information, contact Marshall Electronics, Industrial Video & Security (800) 800-6608 www.mars-cam.com
DUAL CHARGER WIRELESS SPEAKER SYSTEM WITH RECHARGEABLE "Li-Ion" BATTERY
 DUAL CHARGER WIRELESS SPEAKER SYSTEM WITH RECHARGEABLE "Li-Ion" BATTERY User s Guide CR13 Smart Device not included. Wireless Speaker System with Bluetooth Technology for "Hands Free" Answering Dual Charger
ESV16. Quick Installation Guide. 16CH Network Video Recorder with Local Display. Version 1.0.0
 ESV16 Quick Installation Guide 16CH Network Video Recorder with Local Display Version 1.0.0 2 ESV16 Quick Installation Guide Table of Contents Preliminary... 3 System Overview... 8 Front View... 8 Rear
WIRELESS BLUETOOTH BOOMBOX
 G-BOOM WIRELESS BLUETOOTH BOOMBOX Wireless Bluetooth Rugged Construction Rechargeable Battery USB Device Charging G-650 Welcome to G-PROJECT Thanks for purchasing G-BOOM and joining G-Project. With just
BS 287 DUAL CHANNEL POWER SUPPLY. User Manual. January 2017 V1.0
 BS 287 DUAL CHANNEL POWER SUPPLY User Manual January 2017 V1.0 Table of contents 1.0 SAFETY INSTRUCTIONS... 3 2.0 GENERAL DESCRIPTION PS 289... 4 3.0 MECHANICAL INSTALLATION... 5 4.0 MAINS POWER & SAFETY
Important Safety Instructions...2 Safety...2 Warning...3. Identifying the Parts...4 Main Unit...4 Remote Control...5
 Contents Important Safety Instructions...2 Safety...2 Warning...3 Identifying the Parts...4 Main Unit...4 Remote Control...5 Preparations...5 Prepare the Remote Control...5 Replace the Remote Control Battery...6
GOLDMUND EIDOS 18 / 18D DVD PLAYER
 GOLDMUND EIDOS 18 / 18D DVD PLAYER GOLDMUND EIDOS 18 / 18D DVD PLAYER USER MANUAL WARNING! This high quality DVD player possess technical features which are necessary for an accurate tracking of the today's
Personal MiniDisc System
 3-866-600-11(1) Personal MiniDisc System Operating Instructions Owner's Record The model number and the serial number are located on the right side. Record the serial number in the space provided below.
CONTENTS IMPORTANT SAFETY INSTRUCTIONS.. 3 PRECAUTIONS.. 4 BEFORE USE.. 5 TURNTABLE PARTS. 5 LISTENING TO A RECORD. 5
 1 CONTENTS IMPORTANT SAFETY INSTRUCTIONS.. 3 PRECAUTIONS.. 4 BEFORE USE.. 5 TURNTABLE PARTS. 5 LISTENING TO A RECORD. 5 HOW to REPLACE the TURNTABLE STYLUS (NEEDLE)... 6 RECORD YOUR VINYL to PC using WINDOWS