Table of Contents HOL-SDC-1409
|
|
|
- Edwin Howard
- 6 years ago
- Views:
Transcription
1 Table of Contents Lab Overview - - vsphere Big Data Extensions... 2 Lab Guidance... 3 Verify Hadoop Clusters are Running... 5 Module 1 - Hadoop POC In Under an Hour (45 Min)... 9 Module Overview Manage Hadoop Pooled Resources Create A Basic Hadoop Cluster via Web Client Create a Hadoop Cluster with the Serengeti CLI Add Data and Run a MapReduce Job Scale out a Hadoop Cluster via the Web Client Scale Out a Hadoop Cluster via the Serengeti CLI Module 2 - Fast And Easy Deployment Of Hadoop Clusters (15 Min) Module Overview Configure and Deploy Hadoop Clusters Resize Hadoop Cluster after Creation Export Configuration and Create Customized Cluster Module 3 - Compute Only and No Distro Clusters on Shared HDFS (15 Min)...85 Module Overview Create a Compute Only Cluster Module 4 - Highly Available Hadoop (15 Min) Module Overview How To Create Hadoop Cluster With HA Enabled Module 5 - Fast And Easy Deployment of HBase Cluster (15 Min) Module Overview Configure and Deploy HBase Clusters Manage Hadoop Pooled Resources Module 6 - Elastic Scaling of Hadoop Clusters (45 Min) Module Overview Manage Existing Tier1 and Tier2 Clusters Manual Hadoop Elasticity Automatic Hadoop Elasticity Schedule Fixed Elastic Scaling Page 1
2 Lab Overview - HOL- SDC vsphere Big Data Extensions Page 2
3 Lab Guidance The Apache Hadoop software library is a framework that allows for the distributed processing of large data sets across clusters of computers, designed to scale up from single servers to thousands of machines, each offering local compute and storage resources. Hadoop is being used by enterprises across verticals for Big Data analytics to help make better business decisions based on large data sets. VMware enables you to easily and efficiently deploy and use Hadoop on your existing virtual infrastructure through vsphere Big Data Extensions (BDE). BDE makes Hadoop virtualization-aware, improves performance in virtual environments and enables deployment of Highly Available (HA) Hadoop clusters in minutes. vsphere BDE automates deployment of a Hadoop cluster, and thus provides better Hadoop manageability and usability. In this lab, you will execute 15 minute "lightning labs" to configure and deploy Hadoop and HBase clusters on local storage in minutes. You will also create compute-only clusters that allow the use of shared storage across multiple Map Reduce clusters, providing multi-tenancy and enabling easy scaling in or scaling out of compute resources. You will also add vsphere High Availability (HA) to improve resiliency of your Hadoop clusters. There is a full length lab to simulate a complete Hadoop Proof Of Concept (POC). In the POC module, you will configure and deploy your cluster, add data to HDFS and run Map Reduce jobs against your deployed cluster. In the final module, you will configure manual and automatic scaling of your Hadoop clusters. You will use resource pools with differing priorities, and run Map Reduce jobs to see how vsphere will scale in or out cluster nodes based on your priorities and the resource demands placed on the system. You will also see how to schedule fixed elasticity, which allows you to vary the amount of compute resources depending upon the day/time. Note: Some of the lab modules contain lengthy command lines that must be typed into the PuTTY session. To ease this process, there is a README.txt on the desktop. You can copy the relevant commands and paste them into Putty using this file if you don't want to type them manually. The modules and timing are as follows: Hadoop POC In Under an Hour:45 min Add resources Create cluster Hadoop/Hbase Put data into HDFS Execute MR/HBase Jobs Page 3
4 Fast and Easy Deployment of Hadoop Cluster: 15 min. Create and resize standard Hadoop Clusters with multiple Distros and config Modify Hadoop configuration after creation (e.g. change scheduler from FIFO to Fair) Manage resources (Add/delete Network, Resource Pools, Datastores) Create Compute-only and No-Distro clusters on shared HDFS: 15 min. Deploy with HVE to enable locality Show node placement policy controls in Serengeti Create Cluster with No Hadoop Distribution installed. Highly Available Hadoop: 15 min. Deploy master nodes on shared storage with HA enabled. Kill the NameNode process and see the node automatically restart. Create HBase Cluster: 15 min. Create and Resize Hbase Cluster Manage resources (Add/delete Network, Resource Pools, Datastores) Simulate Elasticity POC: 45 min. Manage Tier 1 and Tier 2 Clusters Execute MR jobs on both clusters Show Manual Elasticity Show Automated Elasticity Show Scheduled Elasticity Lab Captains: Michael West, Matthew Portnoy, David Morse Page 4
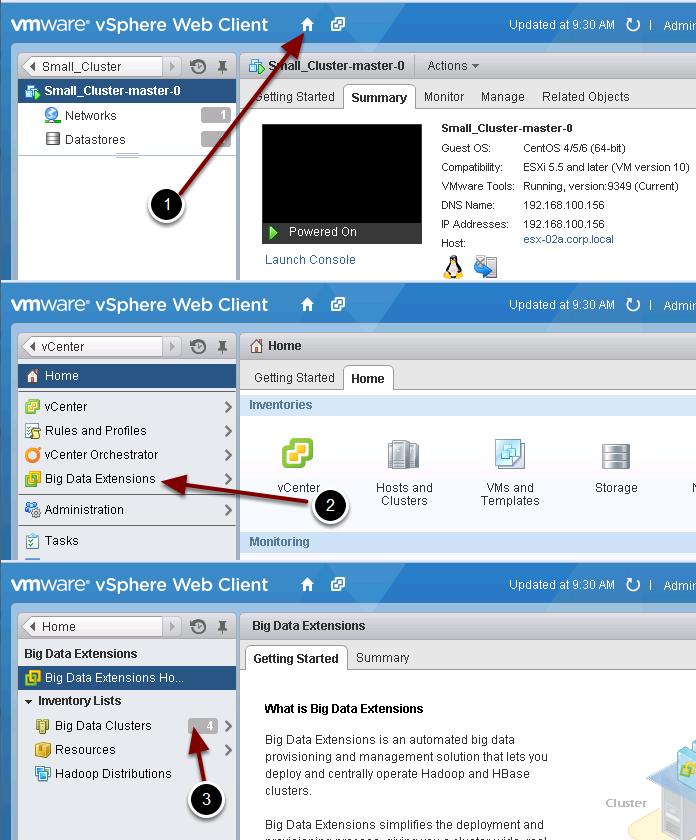
5 Verify Hadoop Clusters are Running As part of the deployment of your lab, the four Hadoop clusters that were created for you should have automatically started. However, you should perform the steps below prior to starting each module to verify the clusters are running. Use Putty to SSH to management-server 1. Double-click the PuTTY icon on the desktop. 2. Click the SerengetiCLI session. 3. Click Open. Page 5
 Connects to the local management server (connect --host localhost:8443) Enters the")
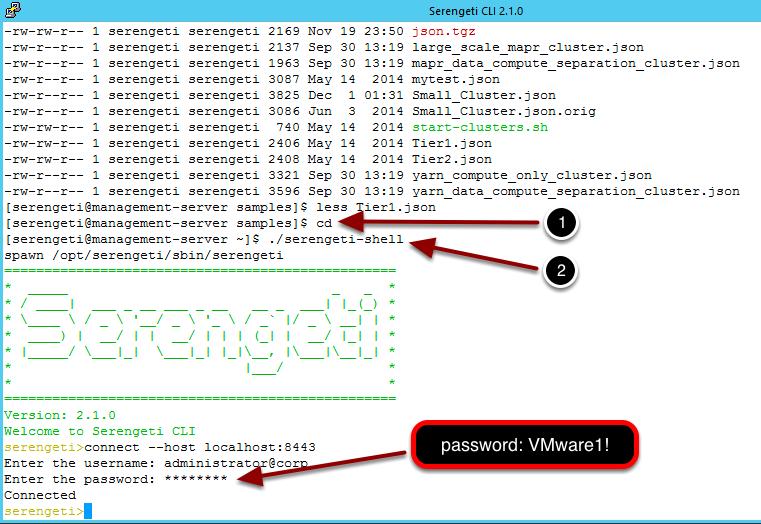
6 Connect to the Serengeti CLI Type./serengeti-shell to automatically login to the Serengeti CLI (NOTE: you can type./ser and hit TAB to auto-complete the command). This script automates the following tasks: Launches the serengeti shell (located at /opt/serengeti/sbin/serengeti) Connects to the local management server (connect --host localhost:8443) Enters the username Enters the password (VMware1!) You should then see "Connected" followed by the "serengeti>" prompt, as shown above. Listing Hadoop Cluster Details 1. To see your clusters type cluster list (note: the up arrow will let you cycle through the command history) 2. Small_cluster, Tier1 and Tier2 clusters must have a STATUS of RUNNING. If the status is STOPPED or ERROR, you will need to start the cluster (see the next step for instructions). 3. Hbase_Cluster only needs to be running if you are going to do the Hbase Deployment Module Page 6
7 4. Note: Clusters take several minutes to start, so you don't want to start a cluster you are not going to use. Page 7
8 Start a Hadoop Cluster NOTE: This step is only necessary if any clusters are in the STOPPED or ERROR state, as listed in the previous step. If they're all RUNNING, don't try to start them. 1) Type cluster start --name "cluster name". Replace "cluster name" with the name of the cluster that needs to be started. You do not need to wait for the clusters to start, since the first few steps in each module do not depend on the clusters running. Feel free to continue, and check back on the status of the start command. Page 8
9 Module 1 - Hadoop POC In Under an Hour (45 Min) Page 9
10 Module Overview Hadoop clusters typically require specialized expertise and dedicated hardware infrastructure to deploy. In this module, we will explore the benefits of running Hadoop on VMware vsphere. By virtualizing Hadoop clusters, you are able to deploy multiple VMs per host, which allows you to separate data from compute. By doing this, you can seamlessly scale the compute layer within your Hadoop cluster, while keeping the data separate. Other benefits of running Hadoop on vsphere include: Run multiple compute workloads on the same physical hardware, optimizing resource utilization Eliminate the need for dedicated hardware to run Hadoop workloads Inherit better reliability and flexibility due to High Availability (HA), vmotion, and DRS features of the vsphere platform In this module, we will simulate a rapid proof of concept using vsphere Big Data Extensions. We will explore the following key concepts: Mapping vsphere resources to Big Data Extensions resources for consumption by Hadoop Quickly create multiple types of Hadoop clusters Load data and run MapReduce jobs Run a Pig script via the Serengeti CLI Simple scale-out of Hadoop compute node on vsphere NOTE: If you have not already done so, please ensure all the clusters are running by following the instructions in the initial section of this lab. Let's get started! Page 10
11 Manage Hadoop Pooled Resources Hadoop makes excellent use of the system resources that are made available to it. In an environment with shared physical resources that have been virtualized, it is important to appropriately assign the resources that can be used by your Hadoop clusters. vsphere allows you to dedicate specific CPU, RAM, storage and networking resources to your Hadoop clusters. In this module, you will use the vsphere Big Data Extensions Plugin to add network and storage resources to the Hadoop clusters. Login to vsphere Web Client Open Firefox and login to the vsphere Web Client by checking the Use Windows session authentication checkbox, and clicking the Login button. In case this fails, you can uncheck the box and specify a username of CORP\Administrator with a password of VMware1! (Note:! is part of the password) Page 11

12 Explore the vsphere Environment In the vsphere Web Client, click the Hosts and Clusters icon as shown above. Page 12

13 Hosts and Clusters View First, take a look at the resource pools that are configured in this vsphere environment. The vsphere Big Data Extensions will leverage these resource pools to ensure our Hadoop clusters have the resources they need, while also ensuring resources are not overcommitted, which could negatively impact other applications. Page 13
 configured, and there are also local VMFS volumes (Local-ds-esx-0na) for each of the three ESXi hosts.")
14 Storage View Next, click on the Storage and Networking icons to get a sense of the data stores and networks that are configured in this environment. Notice that there is one NFS datastore (ds-site-a-nfs01) configured, and there are also local VMFS volumes (Local-ds-esx-0na) for each of the three ESXi hosts. In the next steps, we'll configure our Hadoop clusters to use both shared and local storage, a key benefit of using the vsphere Big Data Extensions. Page 14
15 Navigate to Big Data Extensions Plugin To get to the Big Data Extensions plugin, first click the Home icon, then choose Big Data Extensions from the sidebar menu. Page 15
16 Explore BDE Plugin First, let's take a look at the Hadoop clusters that are already configured in this environment. Click on the Big Data Clusters item in the sidebar menu, as shown above. Page 16

17 View Big Data Clusters Notice that there are four Hadoop clusters configured in this vsphere environment. The columnar view on the right indicates each cluster's name, status, which Hadoop distribution is running, the resource pool it belongs to, and the list of nodes. As we saw in the last lesson, resource pools are how we manage how Hadoop consumes the underlying physical resources. This is an important differentiator versus using dedicated physical hardware for Hadoop, where the resources may be wasted when Hadoop jobs are not running. vsphere allows you to run a mix of workloads, while also guaranteeing resources based upon business needs. Page 17


18 View Cluster Actions 1. Click on All Actions, and note all the actions that can be taken on a cluster from within the vsphere Web Client. We will investigate these further in a future lesson. 2. Return to the main BDE menu by clicking the back button indicated above. Click Resources Click the Resources item under Inventory lists, as highlighted above. Page 18
19 Map vcenter Resources to BDE Inventory Items This screen is where we map vsphere datastores into constructs that the Big Data Extensions will allocate to Hadoop clusters. Notice that a couple of mappings are already made. (Note: Depending on the lab environment, there may be no datastores available to be shown. Refer to the illustration above instead.) The Big Data Extensions can consume both shared and local storage, depending upon the specific need. In this screen, we can see that there is a dslocal (local datastore) item, that maps to the local storage on each of the 3 ESX hosts in our datacenter. There is also a dsshared datastore item, that is mapped to the ds-site-a-nfs01 NFS vsphere datastore. Checkboxes allow multiple datastores to be easily managed and consumed by our Hadoop clusters. 1. Click the Add icon (plus sign) as shown above to view the Add Datastore dialog. You can enter in an arbitrary name, specify if the datastore will be local or shared, and check which datastores will be used. 2. Since we already have all the mappings we need, click Cancel to close this dialog. 3. Click the Home icon to return to the vsphere Web Client home page. Page 19

20 Create A Basic Hadoop Cluster via Web Client In this lesson, we will create a Hadoop cluster via the vsphere Web Client. Navigate to Big Data Extensions Plugin Click on Big Data Extensions in the side bar. Page 20


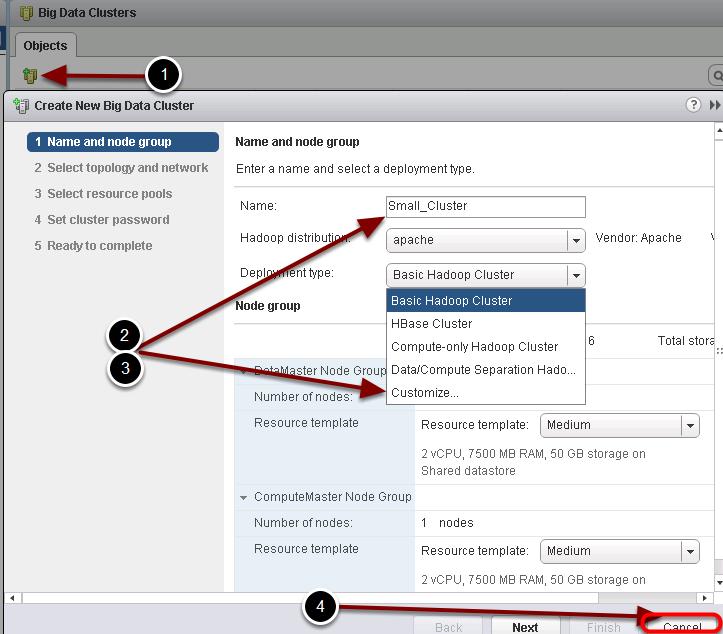
21 Simulate Creating a Basic Hadoop Cluster A basic Hadoop cluster mimics the standard deployment you'd see with physical Hadoop clusters, in that the Datanode and Tasktrackers reside within a single machine. In other lessons, you will see that it can be advantageous to separate these services into their own VMs. Click Big Data Clusters under Inventory Lists. Click the New Cluster button Click on the New Big Data Cluster icon, as indicated above. Page 21

22 Specify Cluster Details 1. Enter Basic_Hadoop as the name of the new cluster. 2. Select Default as the Application Manager choice. 3. Select apache as the Hadoop distribution. Cloudera CDH4, MapR, and Pivotal Hadoop distributions are also supported. Click Next to continue. Page 22
23 Set Deployment Type Select Basic Hadoop Cluster as the deployment type. This mimics a traditional physical Hadoop deployment. Here is a description of the deployment types available: Basic Hadoop Cluster: For simple Hadoop deployments for proof of concept projects and other small-scale data processing tasks. HBase Cluster: HBase clusters can contain JobTracker or Tasktracker nodes to run HBase MapReduce jobs. Data-Compute Separation Hadoop Cluster: Allows you to separate the data and compute nodes, which allow control of where nodes are placed on your ESXi hosts. Also facilitates elastic scaling of compute nodes as shown later in this lab. Compute-only Hadoop Cluster: For running MapReduce jobs; they read data from external HDFS clusters, and don't store data. Customized Cluster: Allows creation of clusters using the same configuration file as previously created clusters. You can also edit the file to further customize the cluster configuration. Page 23

24 Select the Custom Template Each distinct Hadoop node configuration is called a Node Group. The Node Groups you will see depends on the Deployment Type selected in the previous step. Node Groups allow for deployment of similar types of nodes, and share common attributes such as vcpu, RAM, and datastore. In the image above, you are going to deploy 1 DataMaster node (which runs the NameNode service), 1 ComputeMaster node (which runs the JobTracker service), and 3 Worker nodes (which contain the DataNode and TaskTracker services). Under the DataMaster Node Group, choose Customize... in the Resource template dropdown list. NOTE: You can also use the command-line interface or Customize... to define any Node Group you want. Customize the Template Change the defaults to these values, as shown above: 1. vcpu number: 1 2. Memory size: 3748 MB 3. Storage size: 10 GB 4. Datastore type: Shared (NOTE: this is customizable for each Node Group, so you could choose to have your Worker nodes use Local storage, but put the DataMaster/NameNode and/or ComputeMaster/Jobtracker on Shared storage. This allows the use of vsphere HA or FT to improve the availability of those nodes, while still ensuring data locality for compute nodes) Page 24

25 5. Click OK to continue. Page 25
. 2.")
26 Specify the Resources for the Cluster 1. Choose the Customize... option for each Node Group, and size each Node Groups' resources as shown in the previous step, except for the Worker Nodes (keep them as Local storage and 50 GB). 2. Set the Number of nodes for each Node Group to Once you've ensured your choices match the ones shown in the screenshot above, click Next to continue. Page 26

27 Network and Resource Pool Leave the Hadoop topology and Network settings at their default values. Click Next to continue. Select Resource Pool Check the Small Hadoop Clusters resource pool as shown above, and click Next to continue. Page 27
28 Set Cluster Password Choose an administrative password for the Big Data Cluster. The password and confirmation password must match. Type VMware14 as the password. Choose Next to continue. Page 28
29 Cancel Creation Review the settings for the Big Data cluster; they should look similar to the screenshot above. NOTE!!! Due to resource and time constraints for the lab, DO NOT CLICK FINISH! Click Cancel, as creating a cluster is too resource and time intensive for the HOL environment. Click Cancel to cancel the deployment. Watch the video below to see a deployment of a Hadoop cluster. Page 29
30 Video Page 30
31 Create a Hadoop Cluster with the Serengeti CLI In the last lesson, we used the vsphere Web Client to walk through creating a new Hadoop cluster. We will now run through the same process using the Serengeti CLI. The CLI allows you to have finer-grained control over cluster creation, including the ability to specify what roles run on which nodes in the cluster. Use Putty to SSH to management-server 1. Double-click the PuTTY icon on the desktop. 2. Click the SerengetiCLI session. 3. Click Open. Page 31
32 Connect to the Serengeti CLI Type./serengeti-shell to automatically login to the Serengeti CLI (NOTE: you can type./ser and hit TAB to auto-complete the command). This script automates the following tasks: Launches the serengeti shell (located at /opt/serengeti/sbin/serengeti) Connects to the local management server (connect --host localhost:8443) Enters the username Enters the password (VMware1!) You should then see "Connected" followed by the "serengeti>" prompt, as shown above. Explore the Serengeti CLI Try out the following commands in the CLI to get an idea of how the environment is configured: cluster list - lists all the Hadoop clusters and some of their configuration resourcepool list - lists vsphere resource pools datastore list - lists the Serengeti datastores network list - lists the network mappings Page 32
33 help - shows a list of all available commands within this shell Create a Hadoop Cluster via the CLI Now we will walk through how to create a Hadoop cluster via the CLI. This process is similar to using the vsphere Web Client, but there are more options available. Page 33

34 View Specfile Hadoop cluster configurations are defined by JSON specification files. Let's take a look inside one of these spec files. 1. If you're in the Serengeti shell, type exit to get back to a Linux bash prompt 2. Change to the right directory: cd /opt/serengeti/samples/ 3. Type less compute_only_cluster.json to look at a sample specification file. 4. Scroll through the file using the arrow keys, and press q to quit when you're done. Using a json file via the CLI allows more control over the configuration of the cluster, including role placement across nodes in the cluster. Create the Cluster - Video This video shows the process to create a compute-only cluster using an existing HDFS filesystem. We won't actually create another cluster in this lab due to time constraints, but here is the command to use in the CLI along with the json file: Page 34
35 cluster create --name SharedHDFSTest --specfile /opt/serengeti/samples/compute_ Page 35
36 Add Data and Run a MapReduce Job In this section we will: Use the HDFS Put command from the CLI to add files to the Hadoop Filesystem Run a Map Reduce job in an existing Hadoop Cluster Run a Pig script in an existing Hadoop Cluster From the vsphere Web Client, use the Hadoop management pages to view job status and the results file Use Putty to SSH to management-server 1. Double-click the PuTTY icon on the desktop. 2. Click the SerengetiCLI session. 3. Click Open. Page 36
37 Connect to the Serengeti CLI Type./serengeti-shell to automatically login to the Serengeti CLI (NOTE: you can type./ser and hit TAB to auto-complete the command). This script automates the following tasks: Launches the serengeti shell (located at /opt/serengeti/sbin/serengeti) Connects to the local management server (connect --host localhost:8443) Enters the username Enters the password (VMware1!) You should then see "Connected" followed by the "serengeti>" prompt, as shown above. Page 37
38 Select the Small_Cluster as our target To choose the Small_Cluster as the target we will be working with, enter the following command into the CLI: cluster target --name Small_Cluster Page 38
 Execute fs ls /tmp 2) You should not see /tmp/input and /tmp/output directories. If you do, continue to step 3, otherwise skip to the next section, Put Data Into HDFS.")
39 Verify that input and output directories do not exist. The Wordcount MapReduce job requires that the directories for output files do not already exist. 1) Execute fs ls /tmp 2) You should not see /tmp/input and /tmp/output directories. If you do, continue to step 3, otherwise skip to the next section, Put Data Into HDFS. 3) Type exit to leave the Serengeti CLI 4) Type ssh ) Type hadoop fs -rmr /tmp/input 6) Type hadoop fs -rmr /tmp/output 7) Type exit 8) Type./serengeti-shell to return to the Serengeti CLI 9) Enter cluster target --name Small_Cluster and continue to next part of the lab. Page 39
40 Put data into HDFS As a simple example of a MapReduce job, we will do a word count on the Charles Dickens book Nicholas Nickleby. We first need to upload a text version of the document into the HDFS filesystem: fs put --from /home/serengeti/nicholasnickleby.txt --to /tmp/input/serengetites Page 40

41 Open the MapReduce Status Page Back in the vsphere Web Client, open the MapReduce status page: 1. Right-click on the Small_Cluster cluster 2. Select Open MapReduce Status Page from the context menu. Once this page opens, you can return to the Serengeti CLI window. We will come back to this status page after we execute the MapReduce job. Run MapReduce To run our MapReduce job, enter the following command in the CLI: mr jar --jarfile /opt/serengeti/cli/lib/hadoop-examples jar --mainclass o This command executes the WordCount MapReduce job that is included in the hadoop-examples jar file that comes with Serengeti. This class reads the input from Page 41
 in the browser address bar.")
42 the /tmp/input directory, executes the MR job, and stores the results in the /tmp/ output directory. View Map Reduce Status Page Go back to your web browser, and scroll down to view the Map Reduce results. Click the Refresh icon (highlighted above) in the browser address bar. Scroll down and look at the running and completed jobs section. The job we submitted does not take long to run, so it may already be completed by the time you view the page. Once the job completes (you may have to refresh the page a couple of times), click on the hyperlinked Jobid to view some details about the job. View MR Job Details Feel free to explore this page and look at the statistics for the job we submitted. Page 42
43 When we executed the MapReduce job to do a word count on the Serengeti user guide, here is what happened, at a simplified level: 1. Map Step: The master node takes the input data, divides it into smaller units of work, and distributes these to the worker nodes, which further subdivide them. In the WordCount example, each line in the file is broken into words, and the map function outputs key/value pairs containing the word and the number of occurrences in that line. 2. Reduce Step: The master node collects back all the results from the worker nodes, sums the values for each word (key) and outputs a single key/value with the word and sum. Page 43

44 Sort the Results Using Pig The default results file output by the MapReduce job is sorted alphabetically by word. To make our results file easier to understand, we will run a simple pig script to sort the file by number of occurrences of each word in ascending order. Back in the Serengeti CLI window, type the following command: pig script /home/serengeti/sort.pig Once the command completes as pictured above, move on to the next step. Page 44

45 Open HDFS Status Page Back in the vsphere Client, make sure you are on the Big Data Clusters page. Right-click on the Small_Cluster and choose the "Open HDFS Status Page" option. Page 45

46 Browse HDFS Filesystem Click the "Browse the filesystem" link as shown in the screenshot above. Page 46


47 Navigate HDFS Filesystem We need to navigate to the directory /tmp/output/wordcount-sorted. You can simply type this directory in to the "Goto:" field and click on the go button, or manually click on the directories until you reach that folder. View the Sorted Results Now that we are in the right directory, simply click the "part-r-0000" link to view the results that we sorted with the Pig script. Page 47
48 Scroll through the wordcount-sorted file To view the complete file, you will need to click the "View Next chunk" link near the top of the page. The word count results are sorted by the number of occurrences of each word, in ascending order. If you scroll to the bottom of the last chunk, you will see the most common words, such as "the", as shown above. Page 48
49 Scale out a Hadoop Cluster via the Web Client This lesson will show you how to scale out a Hadoop cluster via the vsphere Web Client. The next lesson will walk through the same procedure using the CLI interface. The ability to easily scale your Hadoop clusters up and down is a key benefit of running Hadoop on vsphere. It is very difficult and costly to achieve the same results on dedicated physical hardware. Navigate to Big Data Extensions Plugin 1. If you are not already in the Big Data Extensions plugin, navigate back to it by clicking the Home icon. 2. Select Big Data Extensions from the sidebar menu as shown above. Page 49
50 Click Big Data Clusters Click Big Data Clusters in the sidebar menu. Page 50

51 Scale Out the Small_Cluster 1. Right-click on Small_Cluster 2. Choose 'Scale Out...' Page 51

52 Increase Worker Instances If we wanted to double the number of compute nodes (workers), we would change the Instance number to 2. Upon execution of this task, Big Data Extensions would clone a new worker node, and automatically add it to the Small_Cluster Hadoop cluster. NOTE!! Due to time and resource constraints, please don't scale the cluster out at this time. Click Cancel. Video of the Resize Process This video shows you the resize process in action. Page 52
53 Scale Out a Hadoop Cluster via the Serengeti CLI In this lesson, we will scale out a Hadoop cluster using the Serengeti CLI. Use Putty to SSH to management-server 1. Double-click the PuTTY icon on the desktop. 2. Click the SerengetiCLI session. 3. Click Open. Page 53
54 Connect to the Serengeti CLI Type./serengeti-shell to automatically login to the Serengeti CLI (NOTE: you can type./ser and hit TAB to auto-complete the command). This script automates the following tasks: Launches the serengeti shell (located at /opt/serengeti/sbin/serengeti) Connects to the local management server (connect --host localhost:8443) Enters the username Enters the password (VMware1!) You should then see "Connected" followed by the "serengeti>" prompt, as shown above. Page 54
55 Listing Hadoop Cluster Details To see your clusters, type cluster list. command history. Note that up arrow will let you see your Notice that we currently have 3 workers in the Tier1 cluster. In the next step, we will see how to expand this. Page 55

56 View Cluster Resize Syntax First, let's look at the help for the cluster resize command. Type help cluster resize and press ENTER. Take a look at the keywords for the command. Enter the Resize Command As you can see from the help information, the command syntax we'd use to scale out the Tier1 cluster to 5 worker nodes is: cluster resize --name Tier1 --nodegroup worker --instancenum 5 Note!! Due to HOL constraints, do not actually run this command, as it is resource intensive and time-consuming. Page 56
57 Module 2 - Fast And Easy Deployment Of Hadoop Clusters (15 Min) Page 57
58 Module Overview Hadoop clusters typically require specialized expertise and dedicated hardware infrastructure to deploy. In this module you will see how easy it is to configure your Hadoop cluster nodes, size the virtual machines - including CPU, Memory and Storage - and deploy into your existing vsphere environment. As resource demands change over time - or throughout the day - you can resize the Hadoop cluster to accommodate these changes. Lastly, once a cluster is configured, you will see how to export that configuration, and use it to create or update other Hadoop clusters. Note: You MUST run the "Verify Hadoop Clusters Are Running" step under the Lab Overview section prior to doing this module. Page 58
59 Configure and Deploy Hadoop Clusters In this module, you will deploy an Apache Hadoop cluster using the vsphere Web Client and the vsphere Big Data Extensions. Login to vsphere Web Client Open Firefox and login to the vsphere Web Client by checking the Use Windows session authentication checkbox, and clicking the Login button. In case this fails, you can uncheck the box and specify a username of CORP\Administrator with a password of VMware1! (Note:! is part of the password) Page 59

60 Navigate to Hosts and Clusters Click on Hosts and Clusters Page 60

61 Create a Resource Pool Resource Pools allow you to limit the amount of CPU and Memory that can be consumed by your Hadoop cluster, but as you will see in Module 6, they also are the mechanism for establishing the priority of one cluster over another in the case of resource contention. Right-click on the cluster named Cluster Site A, and select 'New Resource Pool...'. Page 61

62 Configure Resource Pool Name the resource pool MyResourcePool. Leave all settings at the defaults and click OK. Page 62


63 Return to the Home Page Click the Home icon at the top to return to the home page. Navigate to Big Data Extensions Plugin This is a vcenter Plugin providing specific capability to configure, deploy, and manage your Big Data environment. Click on the "Big Data Extensions" tab Select Big Data Clusters Four Hadoop clusters have been created for this lab. If any cluster that you need has not started, or if it has an error status, please follow the directions in the Verify Hadoop Page 63

64 Clusters are Running step under the Lab Overview section prior to doing this module. Click on Big Data Clusters in the sidebar. Create a Hadoop Cluster Click Create New Hadoop Cluster. Page 64

65 Select Cluster Name and Hadoop Distribution You will choose your preferred Hadoop Distribution. Supported distros include Cloudera, Mapr, HortonWorks, and PivotablHD. We will use the open source Apache distribution in this module. There are several deployment types for your clusters. You can mimic the typical physical Hadoop deployment with the Basic Hadoop Cluster. This type will separate the Namenode and Jobtracker into their own Virtual Machines, however each Tasktracker and Datanodes combination will be in a single Virtual Machine. You also have the option of separating the Compute (Tasktracker) from the Datanode using the Data/Compute Separation Hadoop option. This facilitates the elastic scaling of Compute you can see in Module 6. For this Module, enter or select the following options: Name : BasicHadoop Application Manager: Default Hadoop distribution: Apache Click Next to continue. Select the Deployment Type Select the Basic Hadoop Cluster for the Deployment Type if it is not already selected. Page 65

66 Select the custom template Each distinct Hadoop Node configuration is called a Node Group. You will see specific Node Groups based on the Deployment Type you selected, but you can also use the Command Line Interface to define any type of Node Group you want. In this section, you are sizing the virtual machine CPU, RAM, and Data storage for each Node Group. You will also define the number of a specific node group to deploy. In the image above, you are going to deploy 3 Worker Nodes, containing a TaskTracker and DataNode, 1 ComputeMaster (Jobtracker), and 1 DataMaster (NameNode). Click the Resource template button, and select Customize. Customize the Template Note that you can select Shared or Local storage. Typically, Hadoop has been deployed with local storage to provide the data locality that is central to its performance. You can see that each Node Group can be configured with its own Datastore type. This means that, for instance, your DataNodes can run on Local storage, while you have the Jobtracker and Namenodes on Shared storage. This allows the use of vsphere HA or FT to improve the availability of those nodes while still ensuring data locality. Page 66

67 Change the default to : vcpu number : 1 Memory size : 3748 Storage Size : 10 Datastore type : Shared Click OK. Page 67
 Set the number of nodes for each worker to 1. Click Next to continue.")
68 Select Resources for the Cluster Make sure to select the Customize option and size each Node Group resources as in the previous step. (Note: The Worker Node group will require a Storage size of 20GB.) Set the number of nodes for each worker to 1. Click Next to continue. Page 68

69 Topology and Network Leave the default settings (which may be slightly different than shown above). Click the Next button to continue. Select the proper Resource Pool Select the resource pool, MyResourcePool, that you created in a earlier step. Click Next. Page 69

70 Set Cluster Password Set a custom administrative password for the nodes. Use the password 'VMware1$'. Select Next to continue. Page 70

71 Cancel Creation Review the deployment settings. NOTE!!! Due to resource and time constraints for the lab, DO NOT CLICK FINISH! Click Cancel, as creating a cluster is too resource and time intensive for the HOL environment. Depending on the size of the cluster, it takes anywhere from 6 to 20 minutes to deploy and be running. ClickCancel to cancel the deployment. Watch the video below to see a deployment of a Hadoop cluster. Page 71
72 Video Page 72

73 Resize Hadoop Cluster after Creation As resource demands change over time - or throughout the day - you can resize the Hadoop cluster to accommodate these changes. In this module, you will use the vsphere Big Data Extensions Plugin to resize an existing cluster. Navigate to Big Data Extensions Plugin Click on the "Big Data Extensions" tab Page 73

74 Select Big Data Clusters Click on the Big Data clusters tab. Page 74

75 Select the Cluster You may choose any of the Running clusters for the Resize process. Because of resource and timing constraints in the lab environment, we will not actually complete the creation of additional nodes. Right click the cluster from the Center Panel list of Clusters. Page 75

76 Select Scale Out Scaling out in our environment is to create an additional node for the Node Group you select. vsphere will automatically provision the Virtual Machine, install and configure the appropriate Hadoop components for your selected NodeGroup, and startup the services. Select Scale Out. Page 76

77 Select the Node Group to resize Select node group, you want to resize. Select the new number of instances. Note!! Due to the time it takes to make configuration changes and resource constraints in the lab environment, we will not be doing any changes to the cluster. Click Cancel. Watch the video below to see the scale out of a cluster. Video Page 77
78 Export Configuration and Create Customized Cluster Once a Hadoop cluster is configured, you will be able export that configuration and use it to create or update the configuration of other Hadoop clusters. In this module, you will export a running configuration, and deploy a customized cluster from that configuration. Use Putty to SSH to management-server 1. Double-click the PuTTY icon on the desktop. 2. Click the SerengetiCLI session. 3. Click Open. Page 78
79 Connect to the Serengeti CLI Type./serengeti-shell to automatically login to the Serengeti CLI (NOTE: you can type./ser and hit TAB to auto-complete the command). This script automates the following tasks: Launches the serengeti shell (located at /opt/serengeti/sbin/serengeti) Connects to the local management server (connect --host localhost:8443) Enters the username Enters the password (VMware1!) You should then see "Connected" followed by the "serengeti>" prompt, as shown above. Page 79
80 List Small_Cluster Information Locate the running cluster, by typing cluster list --name Small_Cluster Page 80
81 Export Small_Cluster Configuration To change the cluster's configuration, we must first export it to a configuration file. Type : cluster export --name Small_Cluster --specfile /home/serengeti/small_cluster.js Configuration File The cluster configuration file is stored as a json file. To see its contents exit serengeti by typing: quit Then type: more /home/serengeti/small_cluster.json A spacebar will advance the page. 'q' will quit the more command. You can edit it with your favorite text editor, and when you are done, just save it. Notice that the configuration includes definition of the Node groups and specific Hadoop configurations. Due to time constraints for the lab, we will not be editing the file. A sample of the file is provided below. Page 81
82 { "nodegroups" : [ { "name" : "master", "roles" : [ "hadoop_namenode", "hadoop_jobtracker" ], "instancenum" : 1, "storage" : { "type" : "shared", "sizegb" : 5 }, "cpunum" : 1, "memcapacitymb" : 3748, "swapratio" : 0.1, "rpnames" : [ "Small Hadoop Clusters" ], "haflag" : "on", "configuration" : { } }, { { "name" : "worker", "roles" : [ "hadoop_datanode", "hadoop_tasktracker" ], "instancenum" : 2, "storage" : { "type" : "shared", "sizegb" : 5 }, "cpunum" : 1, "memcapacitymb" : 3748, "swapratio" : 0.1, "rpnames" : [ "Small Hadoop Clusters" ], "haflag" : "off", "configuration" : { }, "name" : "client", "roles" : [ Page 82
83 "hadoop_client", "pig", "hive", "hive_server" ], "instancenum" : 1, "storage" : { "type" : "shared", "sizegb" : 5 }, "cpunum" : 1, "memcapacitymb" : 3748, "swapratio" : 0.1, "rpnames" : [ "Small Hadoop Clusters" ], "haflag" : "off", "configuration" : { } } ], "configuration" : { } "hadoop" : { "core-site.xml" : { }, "hdfs-site.xml" : { }, "mapred-site.xml" : { }, "hadoop-env.sh" : { }, "log4j.properties" : { }, "fair-scheduler.xml" : { }, "capacity-scheduler.xml" : { }, "mapred-queue-acls.xml" : { } } }, "networknames" : [ ] Page 83
84 Deploying the Custom Cluster If you did edit the file, for example changing the number of vcpus in the worker node from 1 to 2, you could then deploy the customized cluster by typing: cluster create --name Small_Cluster_2cpu --specfile /home/serengeti/small_clust after reconnecting to the serengeti CLI. NOTE!! Creating a cluster is too time and resource intensive for the HOL environment. Do not enter this command. Video Due to time and resource constraints in our lab environment we will not execute the command, but have created a video showing the above command. Page 84
85 Module 3 - Compute Only and No Distro Clusters on Shared HDFS (15 Min) Page 85
86 Module Overview Hadoop clusters typically require specialized expertise and dedicated hardware infrastructure to deploy. In the previous module you deployed a Basic Hadoop cluster that separated the Namenode and Jobtracker into their own Virtual Machines, kept each Tasktracker and Datanodes combination in a single Virtual Machine. In this module you will see how easy it is to not only separate your Jobtracker and Namenode, but also to put Tasktrackers and Datanodes into their own VMs as well. This separation of Compute and Data is the key element of the Elastic Scaling that is demonstrated in Module 6 of this lab. Specifically, you will create a Compute Only Cluster that deploys JobTracker, Namenode and Tasktracker nodes, but does not create new Datanodes. Instead, you will point to an existing Hadoop File System (HDFS) that was previously created. The value in this is many organizations have isolated Hadoop clusters today that make use of some of the same data. You can now easily spin up a cluster and point it to existing data in HDFS instead of copying it into a new filesystem. Note: If you have not done so in a previous module, You MUST run "Verify Hadoop Clusters Have Started" step under the lab overview section prior to doing this module. Page 86
87 Create a Compute Only Cluster You will deploy a Hadoop compute only cluster, that uses an external HDFS filesystem, and HVE Hadoop Virtualization Extensions (HVE) are changes VMware has submitted to the opensource Apache community to make Hadoop run better on virtualized infrastructure. HVE refines Hadoop's replica placement, task scheduling, and balancer policies. Hadoop clusters implemented on virtualized infrastructure have full awareness of the topology on which they are running. Thus, the reliability and performance of these clusters are enhanced. For more information about HVE, you can refer to the publicly available white paper entitled "Hadoop Virtualization Extensions on VMware vsphere 5". Page 87
88 Use Putty to SSH to management-server 1. Double-click the PuTTY icon on the desktop. 2. Click the SerengetiCLI session. 3. Click Open. Connect to the Serengeti CLI Type./serengeti-shell to automatically login to the Serengeti CLI (NOTE: you can type./ser and hit TAB to auto-complete the command). This script automates the following tasks: Launches the serengeti shell (located at /opt/serengeti/sbin/serengeti) Connects to the local management server (connect --host localhost:8443) Enters the username Page 88
89 Enters the password (VMware1!) You should then see "Connected" followed by the "serengeti>" prompt, as shown above. Page 89

90 Hadoop Rack topology Hadoop makes placement and execution decisions based on datacenter topology. Administrators provide their datacenter topology via a topology file. It specifies, for instance, the racks in the datacenter and the servers on each rack. In a virtual environment we have introduced the concept of a nodegroup to represent servers (that are actually VMs) that are running on a specific esxi host. You can make Hadoop topology aware by uploading your topology file through the Big Data Extensions CLI. We are showing you a very simple example that only defines the Racks and physical hosts. To do this, upload the file topology.txt by typing : topology upload --filename /opt/serengeti/conf/rack_topology.txt A warning appears regarding overwriting the existing configuration. Answer 'Y' to continue. The content of the file is : rack1: esx-01a.corp.local, esx-02a.corp.local, esx-03a.corp.local List Topology Verify that the topology has been uploaded, by typing : topology list And see that rack1 consists of the 3 ESX hosts in your cluster. Page 90
91 Configuring a Compute Only Hadoop Cluster As we saw in a Modules 1 and 2, Hadoop Clusters can be created directly through the vsphere Big Data Extensions plugin. They can also be created through the CLI using a json specfile. The specfile contains the cluster configuration and points to the external Hadoop Filesystem using the externalhdfs tag. This tag points to the Namenode of an existing Hadoop cluster. This enables the new cluster to use the already existing HDFS filesystem, while deploying Master and compute resources. { externalhdfs: hdfs:// :8020, distro:pivotalhd, nodegroups:[ { name: master, roles: [ hadoop_jobtracker ], instancenum: 1, storage:{ type: SHARED, sizegb:1 }, cpunum: 1, memcapacitymb: 1024, haflag: off, rpnames: [ Tier2RP ] }, { name: worker, roles: [ hadoop_tasktracker ], instancenum: 1, cpunum: 1, memcapacitymb: 1024, storage: { type: LOCAL, sizegb: 1 }, rpnames: [ Tier2RP // change this to the resource pool added via Serengeti CLI Page 91
92 ] }, { name: client, roles: [ hadoop_client ], instancenum: 1, cpunum: 1, memcapacitymb: 1024, storage: { type: SHARED, sizegb: 1 }, rpnames: [ Tier2RP ] } ], configuration: { hadoop: { core-site.xml: { // check for all settings at // io.file.buffer.size: 4096 }, hdfs-site.xml: { // check for all settings at // HADOOP_CLASSPATH:, // JAVA_HOME:, // PATH: }, log4j.properties: { // hadoop.root.logger: INFO,RFA, // log4j.appender.rfa.maxbackupindex: 10, // log4j.appender.rfa.maxfilesize: 100MB, // hadoop.security.logger: DEBUG,DRFA } } } }mapred-site.xml: { // check for all settings at hadoop-env.sh: { // HADOOP_HEAPSIZE:, // HADOOP_NAMENODE_OPTS:, // HADOOP_DATANODE_OPTS:, Page 92

93 // HADOOP_SECONDARYNAMENODE_OPTS:, // HADOOP_JOBTRACKER_OPTS:, // HADOOP_TASKTRACKER_OPTS:, // HADOOP_CLASSPATH:, // JAVA_HOME:, // PATH: }, log4j.properties: { // hadoop.root.logger: INFO,RFA, // log4j.appender.rfa.maxbackupindex: 10, // log4j.appender.rfa.maxfilesize: 100MB, // hadoop.security.logger: DEBUG,DRFA } } } } Deploy a Hadoop Cluster With the PivotalHD Distribution From the Big Data Extensions CLI or vcenter Plugin you can deploy the Compute Only Cluster with PivotalHD as the Distro and take advantage of HVE to provide virtual topology awareness. For this exercise, we are going to use the CLI. Below is an example of the command used to deploy an alternate distro to Apache. In this example, the file Pivotal.txt would specify the PivotalHD distro to be used. We will not actually execute this command in the lab because the PivotalHD distro has not been installed in the Serengeti server. Type : cluster create --name Pivotal --topology HVE --distro PivotalHD --specfile /opt Note!! Due to time and resource constraints in our lab environment, do not execute the command. Depending on the size of the cluster, it can take from 6 to 20 minutes be be deployed. The video below shows the deployment of a Compute Only Hadoop Cluster. Page 93
94 Video Page 94
95 Module 4 - Highly Available Hadoop (15 Min) Page 95
96 Module Overview This is a single 15-minute lab. vsphere provides a well-known capability to automatically restart VMs when a physical infrastructure failure occurs. If an ESXi host fails, vsphere HA will automatically restart the failed VM on another host in your vsphere cluster. vsphere Big Data Extensions add to this capability by monitoring specific Hadoop nodes and restarting them when those processes fail. In this lab we will take a running Hadoop cluster, kill the Namenode process and see that vsphere will detect that process failure and automatically restart the node. Note: Please check the clusters are running by following the steps at 'Verify Hadoop Clusters Have Started' under the Lab Overview at the beginning of this lab. Page 96

97 How To Create Hadoop Cluster With HA Enabled Let's start by getting comfortable with the Big Data Extensions vcenter plugin and see how to create a Hadoop cluster with HA enabled Login to vsphere Web Client Open Firefox and login to the vsphere Web Client by checking the Use Windows session authentication checkbox, and clicking the Login button. In case this fails, you can uncheck the box and specify a username of CORP\Administrator with a password of VMware1! (Note:! is part of the password) Page 97

98 Navigate to Big Data Extensions Plugin To get to the Big Data Extensions plugin, first click the Home icon, then choose Big Data Extensions from the sidebar menu. Page 98
99 Explore BDE Plugin First, let's take a look at the Hadoop clusters that are already configured in this environment. Click on the Big Data Clusters item in the sidebar menu, as shown above. Page 99

100 Hadoop and Hbase Clusters are already Running Notice that 4 Hadoop clusters have previously been created for you. We will be working with the Small_Cluster in this module. 1. Click on the Small_Cluster to drill into the details. Hadoop Cluster Nodes Are Virtual Machines Notice that this Hadoop cluster is made up of multiple virtual machines. The Node Group defines the Hadoop Roles that have been enabled on those VMs and ultimately the Hadoop processes that are running. As a reminder, the Namenode keeps the directory tree of the Hadoop file system (HDFS) and tracks where across the filesystem data is stored. The Namenode does not actually store the data but if it is Page 100

101 down, the data is unavailable. In this Hadoop cluster, the data is stored in the Worker Node VMs. The Small_Cluster_master-0 VM contains the Hadoop Namenode process. 1. Click on the Small_Cluster-master-0 VM to show the details pane, then click on Small_Cluster-master-0 in the bottom Node Detail pane to drill into the VM details. Page 101

102 Virtual Machine High Availability Enabled Now that you are looking at Virtual Machine details for the Namenode VM, you can see if it is protected by HA. Hover the mouse over the icon highlighted above to see protection level. Next we will see how this cluster was created. Page 102
103 How Small_Cluster was Created Click on the Home Icon, then Big Data Extensions and finally Big Data Clusters. On this page you will see all of the Clusters previously created and how to create new clusters. Page 103
104 Page 104
105 Create Cluster Wizard In previous modules, you have seen details on the many cluster creations options available in the Big Data Extensions wizard. In this module, you will see that we created the Small_Cluster using a pre-defined json file that describes the cluster we want to create. Click on the green Plus sign to start the Create Cluster Wizard. We will then give the cluster a name and select Customize from the deployment type droplist. Customize allows you to select a json file from your desktop to use as the basis for your cluster. Note!! We will not create a cluster from here, but will view the json from your desktop. Click Cancel Page 105
106 Page 106
107 View the JSON script From your Windows Desktop: 1. Double-click on the Lab Files folder 2. Double-click the Small_Cluster.json file. Cluster definitions are done using JSON files. These are specfiles that define the nodes that make up your Hadoop clusters, including types of nodes, what Hadoop roles will be configured in each node, how many to deploy, resources allocated to each node, HA/FT on or off, node placement on hosts, and even affinity between types of nodes. (The modules on creating Hadoop clusters go into more detail on this). Page 107

108 Small_Cluster is Defined by Small_Cluster.json File The cluster we looked at with the vsphere Web Client was named small_cluster. small_cluster.jsonis the file that was used to define that cluster.notice the NodeGroup with the name = Master. The Master NodeGroup contains two roles;jobtracker and Namenode. These roles map directly to Chef Recipes that are used to orchestrate the provisioning of the VMs. Also notice that HA is set to ON for the Master NodeGroup and is set to OFF for the worker NodeGroup. When we create the cluster through the Page 108
109 command line, we simply reference this specfile in the cluster create command. We have already done that for you in this lab. Kill the Namenode Process and Verify HA Restart Now we are going to kill the Namenode process and see what happens. Page 109
110 Connect to the Namenode VM From the Windows Desktop perform the following steps: 1. Double-click the PuTTY icon 2. Select the Namenode session 3. Click the Open button, which will automatically log you in as the serengeti user. Find the NameNode Process 1. Type the command below into the shell: pgrep -f proc_namenode Page 110
 Kill the namenode process by typing in the following command: sudo pkill -f proc_namenode 2) Verify the process is terminated by running the")

111 This command lists the processes running on the system with the string proc_namenode. You should see a process ID (as shown above), which we will kill in the next step. Kill the Namenode Process 1) Kill the namenode process by typing in the following command: sudo pkill -f proc_namenode 2) Verify the process is terminated by running the pgrep command again (you should be able to arrow up twice to get back to this command): pgrep -f proc_namenode You should no longer get a PID returned, as shown above. We have simulated a failure of the Namenode service by killing it; this has a large impact, as the Hadoop cluster can no longer access data stored in the HDFS filesystem. Page 111

112 Watch the Restart of the Namenode We will navigate to the Console screen of the Namenode VM. Go back to the vsphere Web Client using Firefox. 1. Click on the Home icon or tab 2. Click on the Hosts and Clusters icon Page 112

113 Find the Namenode VM and Launch the Console 1. Expand the Small Hadoop Clusters Resource Pool 2. Expand the vsphere Big Data Extensions Server pool 3. Expand the master Resource Pool. 4. Click on Small_Cluster-master Click Launch Console. Notice that the VM is restarting. It should take about 2 minutes to restart. Page 113

114 Verify that the Namenode has Restarted Page 114

115 Verify New Namenode Process Issue the pgrep command again (you should be able to arrow up to avoid some keystrokes): pgrep -f proc_namenode Note we see the process ID again, which means the Namenode process is running again in our VM. vsphere HA identified the failure of the Namenode process, and initiated an automatic restart to reduce the potential downtime for this Hadoop cluster. Page 115

116 View/Acknowledge vsphere HA reset alarm 1. Click the Alarm icon in the Alarms pane in the lower right-hand corner (as shown above). Review the Alarm Details, which indicates vsphere HA reset the VM shortly after we killed the namenode process. 2. Click the Acknowledge button to indicate we've reviewed this alarm. Page 116
117 Module 5 - Fast And Easy Deployment of HBase Cluster (15 Min) Page 117
118 Module Overview Hadoop clusters typically require specialized expertise and dedicated hardware infrastructure to deploy. In this module you will see how easy it is to go beyond Hadoop deployment to configure your HBase cluster nodes, size the virtual machines - including CPU, Memory and Storage - and deploy into your existing vsphere environment. Note: If you have not done so in a previous module, you MUST run "Verify Hadoop Clusters are Running" step under the lab overview section prior to doing this module. Page 118
119 Configure and Deploy HBase Clusters In this module, you will see how to configure and deploy an HBase cluster using the vsphere Big Data Extensions Plugin. Navigate to Hosts and Clusters From the vsphere Web Client, Click on Hosts and Clusters Create Resource Pool If you already created a resource pool in a previous module, skip down to step "Return to Homepage". Resource Pools allow you to limit the amount of CPU and Memory that can be consumed by your clusters, but as you will see in Module 6, also are the Page 119

120 mechanism for establishing the priority of one cluster over another in the case of resource contention. Right click on the cluster names Cluster site A, and select New Resource pool Page 120


121 Configure Resource Pool Name the cluster MyHadoopCluster. Leave all settings at the default level and click ok. Return to Homepage Click the home button at the top to return to the homepage. Page 121
122 Navigate to Big Data Extensions Plugin This is a vcenter Plugin providing specific capability to config, deploy and manage your Big Data environment. Click on the "Big Data Extensions" tab Page 122

123 Select Hadoop Clusters Click on Big Data Clusters. Four Hadoop clusters have been created for this lab. If any cluster that you need has not started or has an error status, follow the directions in "Verify Hadoop Clusters are Running" step under the lab overview section prior to doing this module. Click Create a New Big Data Cluster. Cluster Name and Distribution You will choose your preferred Hadoop Distribution. Supported distros include Cloudera, Mapr, HortonWorks, and PivotalHD. We will use the opensource Apache distribution in this module. There are several deployment types for your clusters. You can mimic the typical physical Hadoop deployment with the Basic Hadoop Cluster. This type will separate the Namenode and Jobtracker into their own Virtual Machines, however each Page 123
 from the Datanode using the Data/Compute Separation Hadoop option.")
124 Tasktracker and Datanodes combination will be in a single Virtual Machine. You also have the option of separating the Compute (Tasktracker) from the Datanode using the Data/Compute Separation Hadoop option. This facilitates the elastic scaling of Compute you can see in Module 6. For this Module You will be deploying an Hbase cluster. Select the following options: Name: Hbase Application Manager: Default Hadoop Distribution: apache Click Next to continue. Set Deployment Type Set the Deployment type to Basic HBase Cluster. Page 124

125 Select the Custom Template Each distinct Hadoop Node configuration is called a Node Group. You will see specific Node Groups based on the Deployment Type you selected, but you can also use the Command Line Interface to define any type of Node Group you want. In this section, you are sizing the virtual machine CPU, RAM and Data storage for each NodeGroup. You will also define the number of a specific nodegroup to deploy. Per the image above, you are going to deploy 3 Worker Nodes, containing a TaskTracker and DataNode, 1 ComputeMaster (Jobtracker) and 1 DataMaster (NameNode). Click the Resource template button, and select Customize... Customize the Template Note that you can select Shared or Local storage. Typically, Hadoop has been deployed with local storage to provide the data locality that is central to its performance. You can see that each NodeGroup can be configured with its own Datastore type. This means that, for instance, your DataNodes can run on Local storage, while you have the Page 125

126 Jobtracker and Namenodes on Shared storage. This allows the use of vsphere HA or FT to improve the availability of those nodes while still ensuring data locality. Change the default to : vcpu number: 1 Memory size :3748 Storage Size : 20 Datastore type : Shared Click OK. Page 126

127 Select the Resources for the rest of the HBase Cluster Make sure to select the Customize option and size each NodeGroup's resources as in the previous step. Set the number of nodes, for each worker and client Nodegroup. Click Next to continue. Network and Hadoop Topology Leave the Hadoop Topology as RACK_AS_RACK. Leave the network asdefaultnetwork. Click Next to continue. Page 127

128 Select the Proper Resource Pool Select the resource pool, MyHadoopCluster, that you created in a earlier step. Click Next to continue. Set Cluster Password Select the Set password radio button. Enter the password 'VMware1$' in both text boxes. Click Next to continue. Cancel Cluster Creation Depending on the size of the cluster, it takes anywhere from 6 to 20 minutes to deploy and be running. Page 128

129 Note!! Due to resource and time constraints for the lab, we will not actually create the cluster. Click Cancel. Watch the video below, to see a deployment of an Hbase cluster. Video Page 129

130 Manage Hadoop Pooled Resources Hadoop makes excellent use of the system resources that are made available to it. In an environment with shared physical resources that have been virtualized, it is important to appropriately assign the resources that can be used by your Hadoop clusters. vsphere allows you to specifically make available CPU, RAM, Storage and Virtual Networks to your Hadoop clusters. In this module, you will use the vsphere Big Data Extensions Plugin to add network and storage resources to the Hadoop Clusters. Navigate to Big Data Extensions Plugin Click on Home and then Hosts and Clusters. Page 130
131 Navigate to Big Data Extensions Plugin This is a vcenter Plugin providing specific capability to config, deploy and manage your Big Data environment. Click on the "Big Data Extensions" tab Page 131

132 Select Resources Click on the Resources tab. Page 132


133 Find Your Datastores This process is not creating new datastores. It is simply allowing the administrator to determine which datastores can be used when creating Hadoop clusters within BDE. vsphere will then create virtual disks across those datastores during cluster creation. Select the Datastores tab. Add Datastore Click on the plus sign in the upper left corner to open the add datastore window. Add Datastore Details Fill out the information for the datastores you want to add. The Name you specify can be used in SpecFiles to refer to this set of datastores. Name : Test datastores Select all of the datastores that begin with the name Local Select if the datastores are shared or local storage. Page 133


134 Select Cancel because we have already added the datastores into your environment. Networks You are able to easily segment network traffic for specific clusters by adding multiple networks and using them in the cluster create specfiles. Select the tab Networks Page 134

135 Add Network Click on the plus sign in the upper left corner to open the add networks window. Page 135

136 Network Information Fill out the information for your selected network. Name : This will be the name you refer to when creating your cluster specfiles Port group name : Then name of the port group, where the network is attached. Use DHCP to automatically obtain IP addresses Select cancel, to exit the guide. Page 136
137 Module 6 - Elastic Scaling of Hadoop Clusters (45 Min) Page 137
138 Module Overview vsphere Big Data Extensions add to the resource monitoring and sharing capabilities of vsphere. In this module, you will: Configure manual and automatic scaling of your Hadoop clusters Use resource pools with differing priorities, and run MapReduce jobs to see how vsphere can scale in or out cluster nodes based on those priorities and resource demands placed on the system This will be accomplished in several stages: 1. Introduction to the vcenter extensions that provide the new Big Data functionality, and show you how to monitor resource consumption of your clusters. 2. Manually scale (resize) clusters, including creating new cluster nodes to support increased resource demands. 3. Execute a MapReduce job called Pi on two separate clusters with different priorities. This will demonstrate how vsphere can automatically respond to resource contention by powering down lower priority cluster nodes. 4. Schedule elasticity by specifying the time that vsphere should power on additional cluster nodes. Elastic Hadoop Video Page 138

139 If you are running short of time and do not want to complete the Elastic Hadoop Lab, we have included this video to show it in action. Ensure Tier1 and Tier2 clusters are Running Note: You MUST run the "Verify Hadoop Clusters Have Started" step under the lab overview section prior to doing this module. Using the vsphere Web Client, click Home, Big Data Extensions, Big Data Clusters to view your list of clusters. The Tier1 and Tier2 clusters must have a Status of Running (as highlighted above). Page 139
140 Manage Existing Tier1 and Tier2 Clusters We will get familiar with the clusters pre-created for this lab and use the Hadoop administrative views. We will also see the CPU performance views that will be used in the later part of the module. Page 140

141 Accessing the Big Data Extensions in vcenter Open Firefox from your desktop, which should access the vsphere Web Client login page. Check Use Windows session authentication, and click Login. If this fails, uncheck the box and enter CORP\Administrator as the user name and VMware1! as the password. We will now look at the Big Data Extensions functionality in vcenter. Page 141

142 Navigate to Big Data Extensions Logging in should bring you to the Home page, as shown above; if not, click the Home icon at the top of the screen. In the Inventories panel, click on the Big Data Extensions icon, as shown above. Page 142

143 Working with Clusters Click on Big Data Clusters under the Inventory Lists on the left-hand side. This will show a list of the pre-built, pre-deployed clusters. Page 143

144 Manually Scale Out Tier1 Cluster Those of you that administer traditional vsphere hosts are undoubtedly familiar with how to scale a VM's resources up or down. With Big Data Extensions, not only can we add resources to individual Hadoop nodes, but we can add brand-new nodes to existing clusters, or power down nodes that may not be needed for current workloads. Let's add nodes to (scale out) the Tier1 cluster: 1. Right-click on the Tier1 cluster in the Objects list 2. Select the Scale Out... action Page 144
, so you would increase this to 4 or more. NOTE!")
145 Choose The Number of Instances to Deploy The first parameter is the Node group (which is the Hadoop role, e.g. worker or data) that you want to scale out. Next, you specify how many total instances of that node you want; this value defaults to how many are currently deployed (3 in this example), so you would increase this to 4 or more. NOTE!! Since resources are limited in this lab environment, we won't actually scale out this cluster, so click the Cancel button. View Hadoop File System (HDFS) Details Deployed Hadoop Clusters contain administrative pages that are available via your web browser. You can access those pages directly from vcenter. Let's view the Hadoop File System (HDFS) information for Tier1: 1) Right-click on the Tier1 cluster 2) Choose Open HDFS Status Page Page 145

146 The status page will then open in a new tab in the browser, as shown below. Page 146
147 Sample HDFS Status Page Feel free to click on some of the links on this page; you can browse the node's file system and view its log files, among other things. Page 147

148 View MapReduce Status Page As mentioned earlier, deployed Hadoop clusters contain status web pages that can be viewed directly from vcenter. Let's view MapReduce information for the Tier1 cluster: 1. Right-click on the Tier1 cluster 2. Click on Open MapReduce Status Page Your browser will open up the MapReduce status page in a new browser tab, as shown below. Page 148
149 Sample MapReduce Status Page You can click on the number of nodes (3 in this example) to see details of the Active Task Trackers in this cluster. Page 149

150 Select Cluster to View Performance You can close the Status Page tab to return to the vsphere Web Client. You should be back at the list of clusters, as shown above; if not, open Firefox, login with Windows credentials, then click Big Data Extensions, then Big Data Clusters. From the list of Big Data Clusters, left-click on the Tier1 cluster as shown above, which will show a list of Node Groups/Virtual Machines in the cluster (as shown below). Page 150
 VMs available for the workload and prioritization defined for the clusters.")
151 Select a Worker VM from the Tier1 Cluster In our clusters, the Data VM contains the Data Node Role for Hadoop, while the Worker VMs contain the Tasktracker Role and are responsible for executing the tasks that make up a Job. Our goal is to make sure that we have the right number of Worker (Tasktracker) VMs available for the workload and prioritization defined for the clusters. In this section, we'll monitor the performance of a single worker node from each of our two clusters. 1. Left-click on the Tier1-worker-0 VM in the Tier1 cluster. 2. The bottom pane is now populated with the details of this VM. Click its name (Tier1-worker-0) as shown above to view the VM's properties. Monitor the Worker VM's Performance Navigate to the Advanced CPU Performance tab for the Tier1-worker-0 VM: 1. Click on the Monitor Tab 2. Click on the Performance Tab 3. Click on the Advanced Tab 4. Click the rewind icon to expand the view of the chart. Page 151

152 Familiarize yourself with this chart; feel free to switch to other subsystems by changing the View dropdown to Memory, Disk, etc. Later in this module, we will configure a specific Chart View to monitor the load on the VM. Page 152
153 Manual Hadoop Elasticity In this section, we will use the Serengeti CLI to learn how to deploy clusters into specific Resource Pools. We will also see how to directly access Hadoop clusters to Scale in (power down) nodes and to Resize (add new nodes) using the command line. Page 153

154 Logging into the Serengeti Management Server console Much of the management of Big Data Clusters can be done through the vsphere GUI, as other modules in this lab have shown. Here, we will look at how this can also be done from the command line. From the Windows Desktop perform the following steps: 1. Double-click the PuTTY icon on the desktop 2. Click the SerengetiCLI session 3. Click the Open button Page 154
155 Serengeti SSH prompt You should now see a Linux SSH window, as shown above, as this lab has been configured for passwordless SSH login. In case this does not work, the user name is serengeti and the password is VMware1! Now that we're at the console, let's look at the JSON specification files that can be used to create and configure clusters. Page 155

156 Cluster Configuration using JSON Files Clusters are defined using Serengeti JSON files, which are cluster specification files that define the nodes which make up your Hadoop clusters. Let's look at list of these on the Serengeti management server: 1. From the PuTTY shell prompt, change the directory to where the JSON files are: cd /opt/serengeti/samples 2. List the files in this directory: ls -l 3. The cluster we've been using in the the vsphere Web Client is named Tier1. Let's look at the specification file used to create that cluster by typing less Tier1.json These specification files can be customized to your requirements, allowing specification of: Hadoop role of each node Number of nodes Number of CPUs Virtual machine RAM and disk size Affinity between types of nodes The modules on creating Hadoop clusters go into more detail on this. For now, let's look at Tier1.json, which was the specification file used to create the Tier1 cluster running in this lab. Page 156

157 Tier1 Cluster Specification File (Tier1.json) Notice the first nodegroup is named master. This contains two roles: namenode and jobtracker. These roles map directly to Chef Recipes that are used to orchestrate the provisioning of the VMs. Also notice that HA is set to on for the Master NodeGroup. To create this cluster from the command line, we simply reference this specfile in the cluster create command, which we've already done for this lab. Finally, notice that we have specified the Resource Pool that this cluster will be deployed into (Tier1 Hadoop Clusters). This is important for cluster prioritization, as you will see later in the module. Enter 'q' to quit the Tier1.json listing. Page 157
158 Connect to Management Server using Serengeti CLI To open the Serengeti console, you need have a PuTTY session connected as described above. 1. Change to the Serengeti home directory (cd) 2. Type./seregenti-shell as shown above (or type the first few letters and press Tab to auto-complete) This should automatically connect you to the Serengeti server with the correct user name and password. If you have issues, or want to do it manually, the commands this script executes are shown below: 1. Type serengeti to open the Serengeti CLI 2. Connect to the Serengeti Management Server by typing connect --host localhost: Username is administrator@corp 4. Password is VMware1! Once you see the string "Connected", and the "serengeti>" CLI prompt appears, you can start interacting directly with your Hadoop clusters. The CLI has a help command which displays a list of available Serengeti commands and syntax. To get help for a specific command, append the name of the command to the help command, e.g. help cluster create. Similar to a Linux shell, you can also enter a partial command and press Tab to automatically complete it. Page 158
159 Page 159
160 Listing Hadoop Clusters This shell is similar to a Linux bash shell, in that you can use the arrow keys to look through the command history. Since we have several clusters, you may need to use the vertical scrollbar to see all of your clusters. 1. Type cluster list to see a list of clusters (as shown above). 2. Note that AUTO ELASTIC is Disabled for both Tier1 and Tier2 clusters, which means elastic scaling is disabled. In other words, the number of instances is fixed: each cluster has 1 master node, 1 data node, and 3 worker nodes. This means if you want to power on or off a node in a Hadoop cluster, you must do so manually. We will enable auto elasticity later in this lab. Listing Hadoop Cluster Detail cluster list --name Tier1 --detail Page 160
161 1. Copy and paste the above command to the CLI. 2. Note that this gives us details of the Tier1 cluster, down to the VM (node) level. All three Tier1 worker nodes should list a STATUS of Service Ready. This means the VMs are powered on, and the Hadoop services are running. Manually Set Number of Compute Cluster Nodes To change the number of worker nodes running in your cluster, you need only execute a single cluster CLI command. Try the command below to reduce the number of compute nodes in the Tier1 cluster from 3 to 2: Page 161
162 cluster setparam --name Tier1 --elasticitymode MANUAL --targetcomputenodenum 2 As the screenshot above shows, Serengeti will reduce the number of compute nodes by powering off one of the worker VMs. Executing this command may take a couple of minutes. Once you have scaled down the cluster, scale it back up to its original size: cluster setparam --name Tier1 --elasticitymode MANUAL --targetcomputenodenum 3 After a few minutes, you'll see the VM that was just powered off come back up, and all three VMs will show "Service Ready". This same operation can be performed through the vsphere Web Client using the Big Data Extensions plugin, shown earlier in this lab, by right-clicking on the Tier1 cluster and choosing Scale Out. Scale Up/Down Cluster Resources As we just observed, the number of compute nodes can be easily changed on the fly. The CPU and memory resources of each node can also be adjusted ("scaled") up or down; let's see how. 1. Go to the vsphere Web Client, and from the Home screen/tab, click Big Data Extensions, Big Data Clusters. 2. Right-click on the Tier1 cluster. Page 162


163 3. Choose "Scale Up/Down..." from the Actions menu. Scale Up/Down vcpu/memory 1. You should now see a dialog box like the one above. This is where we could increase/decrease the amount of vcpus or memory each node has. 2. Note!! Click Cancel, since the default values of 1 vcpu and 3748 MB are acceptable. Page 163

164 Automatic Hadoop Elasticity We will execute MapReduce jobs on both our Tier1 and Tier2 clusters and see how vsphere responds to the consumption of CPU from multiple clusters with different priority levels. vsphere also supports scaling clusters in or out based on memory contention, however we will focus on CPU contention in this lab. NOTE: The resources available to this lab are highly dependent upon the number of labs being deployed in the HOL environment. Your results may be different than those shown in the screenshots below. Start MapReduce Job on Tier2 Cluster 1. From the Windows desktop, double-click the PuTTY icon. 2. Click on Tier2-master-0 3. Click on Load 4. Click on Open. You should not be prompted for a password, but if you are, type password Page 164

165 List the MapReduce Scripts 1. Type cd /usr/lib/hadoop This moves you to the hadoop directory that contains our scripts. 2. Type ls -al run* to see the Python scripts that call MapReduce Java apps. We are going to use the runpi.py script Page 165
166 Run Pi MapReduce on Tier2 1. Type python runpi.py This will start a Pi calculation MapReduce job that will saturate the CPU usage on the worker VMs of your Tier2 cluster. This script executes a MapReduce job that is a heavy CPU process that will use 100% of the available resources in the worker (Tasktracker) VMs in our cluster. NOTE: It is possible that your results could be significantly different based on the total resource usage in the HOL environment. Page 166
167 Check Tier2 CPU Usage through Web Client 1. Open Firefox and log into the vsphere Web Client; click the Home icon at the top of the screen 2. In the Inventories panel, click on the Big Data Extensions icon Page 167

168 View Your Cluster List 1. Click on Big Data Clusters in the Inventory Lists panel This will show a list of the 4 Hadoop clusters that have already been deployed in this lab environment. Select the Tier2 Cluster 1) Click on the Tier2 cluster from the list. Page 168

169 Select Tier2-worker-0 VM In our clusters, the Data VM contains the Data Node Role for Hadoop. The Worker VMs contain the Tasktracker Role, and are responsible for executing the tasks that make up a Job. Our goal is to make sure that we have the right number of Worker (Tasktracker) VMs available for the workload and prioritization defined for the clusters. Here we are going to monitor the performance of a single worker node from each of our two clusters. 1. Click on the Tier2-worker-0 node from the Tier2 cluster. 2. On the bottom pane, click the Tier2-worker-0 VM. Page 169

170 Navigate to Advanced CPU Monitoring Navigate to the Advanced CPU Performance tab for the Tier2-worker-0 VM: 1. Click on Monitor Tab 2. Click on Performance Tab 3. Click on Advanced Tab 4. Click on the rewind arrows to expand the chart view. Page 170

171 Create Custom Chart for Tier2-worker-0 VM You are going to create a custom chart that contains CPU Usage and CPU Ready Time. You will save this as a chart called "Elasticity Test". 1. Click on Chart Options (as shown above) Page 171

172 Select the Performance Metrics for Your Custom Chart 1. For Target Object, unselect 0 and select Tier2-worker-0 2. Check the Ready and Usage counters; select Usage in MHz and any others 3. Click Save Options As... and type Elasticity Testing as the name. Create "Elasticity Testing" View For Tier2-worker-0 VM 1. Now that our chart options have been saved, click Ok to close this window. This chart now lets us see Tier2-worker-0's CPU Ready and CPU Usage time in a single pane. A quick note on interpreting these numbers: data is accumulated in 20 second intervals. You are looking at the average CPU utilization % over that interval. Ready time is a measure of the amount of time that a vcpu is ready to run, but has not yet been scheduled on a physical CPU. This number should be less than 10% per vcpu. The collection interval is 20 seconds (or 20,000 Milliseconds). We are running with 1 vcpu per VM, so Ready time above 2,000 Milliseconds potentially indicates resource contention, so powering down a Hadoop node VM may be necessary to optimize cluster performance. Page 172

173 NOTE: Because of the nature of our HOL environment, there can be spikes in Ready time that are unrelated to the workload within your individual labs. This means that VMs will tend to power on or off more often than in other physical infrastructure. It is also possible that you will not see any VMs power down. If you do not see results in two to three minutes, move on in the lab because the Ready time did not exceed the threshold needed to invoke the power off. You can see the expected behavior in the video at the beginning of this Module. Page 173
. Page 174")
174 View Elasticity Testing Chart 1) Ensure that Elasticity Testing is selected from the Chart View dropdown list (it should already be selected). Page 174

175 Tier2-worker-0 Resource Consumption Notice that we are using 100% of the one vcpu that is assigned to this VM. The Ready Time number should be relatively low; however, as mentioned above, this lab environment may show Ready Time spikes due to the extreme over-allocation of resources to support thousands of VMs with limited physical hardware. Start MapReduce Job on Tier1 Cluster Now we want to repeat our previous process and start the same MapReduce Job on our Tier1 cluster. Page 175

176 1. From the Windows desktop, double-click on the PuTTY icon 2. Click on Tier1JobtrackerNode 3. Click on Load 4. Click on Open. It should automatically login; if not, the password is password Page 176

177 Show the MapReduce Script 1. Type cd /usr/lib/hadoop This moves you to the hadoop directory, which contains our script 2. Type ls -al run* to see the Python scripts that call MapReduce Java apps. As on Tier2, we are going to use the runpi.py script. Page 177
 VMs in our cluster.")
178 Run Pi MapReduce on Tier1 1. Type python runpi.py and press Enter This will start the Pi calculation MapReduce job that will saturate the CPU usage on the Tier1 worker cluster VMs. This script executes a MapReduce job that is a heavy CPU process that will use 100% of the available resources in the worker (Tasktracker) VMs in our cluster. NOTE: Because of the nature of our lab environment, it is possible that you will not see 100% CPU. You can see the expected result in the video at the beginning of the module. Page 178
 Click on the Tier1")
179 Check Tier1 CPU Usage Through the Web Client If you have not left the Performance Chart page we used to view Tier2 CPU, then click twice on the Navigation Drop List to get back to your cluster list. You can also navigate directly there from the Drop list, or by taking the path we used previously: Home -> Big Data Extensions -> Big Data Clusters Select the Tier1 Cluster 1) Click on the Tier1 cluster. Page 179
 VMs available for the workload and prioritization defined for the clusters.")
180 Select Tier1-worker-0 VM In our clusters, the Data VM contain the Data Node Role for Hadoop. The Worker VMs contain the Tasktracker Role and are responsible for executing the tasks that make up a Job. Our goal is to make sure that we have the right number of Worker (Tasktracker) VMs available for the workload and prioritization defined for the clusters. Here we are going to monitor the performance of a single worker node from each of our two clusters 1. Click on the Tier1-worker-0 VM in the Tier1 cluster. 2. Click on the Tier1-worker-0 VM in the bottom pane (Node Detail). Page 180

181 Create "Elasticity Testing" View For Tier1 Worker-0 VM 1. Click Chart Options 2. For Target Object, deselect 0 and select Tier1-worker-0 3. Check only the Ready and Usage counters 4. Click Save Options As and name it Elasticity Testing Page 181

182 Tier1-worker-0 VM Resource Consumption You should see CPU for this VM at 100% Usage as expected. You also should be seeing some increase in Ready Time. NOTE: As previously mentioned, due to the nature of our lab environment, you may not see 100% CPU usage. To see the expected behavior, you can view the video at the beginning of the module. Tiered Service Levels - Set Resource Pool Priorities We now want to show how to increase the priority of the Tier1 Hadoop cluster. We will do so by setting the CPU shares in the Tier1 Clusters Resource Pool to HIGH. Note that the shares were already set to HIGH for you. Page 182
183 1) Click on the Home Icon or Home Tab 2) Click on Hosts and Clusters Page 183

184 Raise the Priority on Your Tier1 Resource Pool Raising the priority of a Resource Pool that contains a Hadoop Cluster means that the cluster will get a higher share of resources than Clusters that are created in lower priority Resource Pools. 1. Expand the Inventory List on the left-hand side of the screen and click on Tier1 Hadoop Clusters Resource Pool 2. Click on the Manage tab on the middle panel of the screen Notice that the CPU Shares is already set to High, but this is where you can change this setting. Page 184

185 Edit Tier1 Clusters Resource Pool CPU Shares 1. Click on Edit 2. Note Shares are set to High, but can be lowered to Low, Normal, or Custom 3. Click on Cancel to close this dialog. Page 185
186 Edit Tier1 Cluster Resource Settings Because of the nuances of our Hands-on Lab environment, we are going to arbitrarily limit the amount of CPU available to non Tier1 VMs by setting a CPU reservation on the Tier1 Hadoop Clusters resource pool. This is not something you need to do in your own environment to enable elastic scaling. 1. Right-click on the Tier1 Hadoop Clusters Resource Pool 2. Go to All vcenter Actions flyout, and choose Edit Resource Settings... Page 186

187 Set a CPU Reservation on Tier1 Cluster Because of the nuances of our Hands-on Lab environment, we are going to arbitrarily limit the amount of CPU available to non Tier1 VMs by setting a CPU reservation on the Tier1 Hadoop Clusters resource pool. This is not something you need to do in your own environment to enable elastic scaling. 1. Set a CPU reservation for 4144 MHz and click OK As you view the performance charts later in the lab, you may want to come back here and adjust this value. Increasing it will starve the Tier2 clusters, resulting in increases in CPU Ready time for its VMs. Verify Tier1 and Tier2 Nodes are Powered On We now want to ensure all of the nodes within the Tier1 and Tier2 clusters are on. Within Firefox (vsphere Web Client): 1) Click on the Home Icon or Home Tab Page 187
188 2) Click on Hosts and Clusters Page 188

189 Verify Tier1 Worker Node VMs are Powered on 1. Ensure you've selected the Tier1 Hadoop Cluster 2. Click Related Objects 3. Click Virtual Machines Verify that all Tier1 worker nodes are Powered On. They should be, unless you powered them off in a previous lab. Page 189
190 Verify Tier2 Worker Nodes are Powered On 1. Click on Tier2 Hadoop Clusters Resource Pool 2. Click on Related Objects 3. Click on Virtual Machines Verify that all Tier2 worker nodes are Powered On. They should be unless you powered them off in a previous lab. Page 190
191 Change Elasticity Mode to Auto 1. Open Firefox and log into the vsphere Web Client; click the Home icon at the top of the screen 2. In the Inventories panel, click on the Big Data Extensions icon Page 191

192 View Your Cluster List 1. Click on Big Data Clusters in the Inventory Lists panel This will show a list of the 4 Hadoop clusters that have already been deployed in this lab environment, including their Elasticity Mode (shown below) Note Elasticity Mode of Running Clusters As highlighted above, the list of Big Data Clusters has a column for Elasticity Mode; the clusters should be in either a Manual or "N/A" state. Note that Compute (tasktrackers) and Data (Datanodes) move run in separate VMs in order for Auto Elasticity to be enabled. If they are running in the same VM, you will see an N/A status Page 192
193 Enable Auto Elasticity for Tier1 and Tier2 Clusters 1. In the cluster list, right-click the Tier1 cluster 2. Select Set Elasticity Mode... from the drop-down list. 3. Click the Auto radio button to set automatic elasticity. 4. Click OK to confirm automatic elasticity. The Tier1 cluster will now be set to automatic elasticity. Repeat the above steps for the Tier2 cluster. Because the runpi jobs are consuming host CPU, these commands may take a couple of minutes to complete. FYI: Auto Elasticity can also be set through the Serengeti CLI; the below commands are the CLI equivalents of what we just did in the GUI: cluster setparam --name Tier2 --elasticitymode auto cluster setparam --name Tier2 --elasticitymode auto Page 193
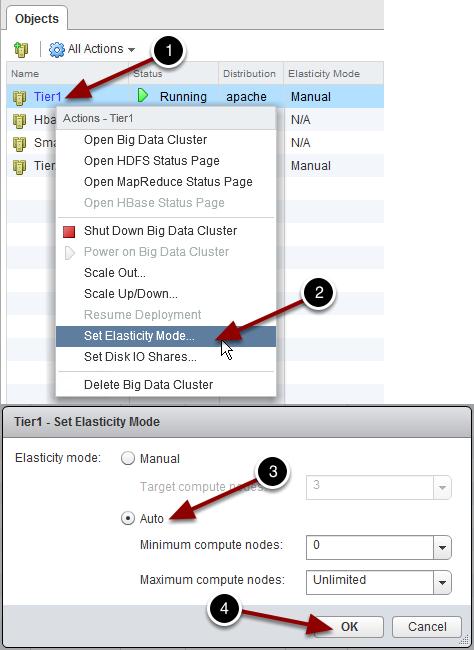
194 Page 194

195 Monitor Power Off/On Tasks Now let's see what vsphere does with the nodes in Automatic Elasticity mode. 1. On the right side of the screen, you will see the Recent Tasks Panel. Click on All 2. Click on More Tasks. Note: It may take a few minutes for vsphere to determine that a node needs to be powered off. Page 195

196 VMs Powering On/Off In a couple of minutes you should see VMs in your Tier1 and Tier2 Clusters begin to power down, as shown above. NOTE: You should click the refresh button on this page to view the updated tasks more quickly. If you do not see this occur in a couple of minutes, please view the video at the beginning of the module for the expected result. Sometimes the Ready time threshold for powering down is not met and the VMs may not power off. Page 196

197 Monitoring CPU Performance Metrics Let's navigate back to our Custom Performance Views to see what is happening with CPU Usage and Ready time. 1. Click on the Home icon at the top of the screen. 2. In the Inventories panel, click on the Big Data Extensions icon. Page 197

 Click on Tier1")
198 View Your Cluster List 1. Click on Hadoop Clusters in the Inventory Lists panel Select Your Tier1 Cluster 1) Click on Tier1 cluster. Page 198

199 Select the Tier1-worker-0 VM in the Tier1 Cluster 1) Click on the Tier1-worker-0 VM in the Tier1 cluster on the top list and bottom pane. Monitor Ready Time Reduction 1. Click on Monitor 2. Click on Performance 3. Click on the Chart Options View dropdown list and select"elasticity Testing". This will give you your CPU Usage and Ready View Page 199

200 You should see some reduction in the Ready time spikes based on a reduction in the CPU consumption across the cluster. Note: this will be dependent upon the infrastructure anomalies described earlier in the module. Page 200

201 Schedule Fixed Elastic Scaling You can enable fixed, elastic scaling according to a preconfigured schedule. Scheduled fixed, elastic scaling provides more control than variable, elastic scaling while still improving efficiency, allowing explicit changes in the number of active compute nodes during periods of predictable usage. For example, in an office with typical workday hours, there is likely a reduced load on a VMware View resource pool after the office staff goes home. Those resources could be consumed as compute nodes overnight and then made available to office workers in the morning. Go to the Hosts and Clusters View We now want to ensure all of the nodes within the Tier1 cluster are on. Within Firefox (vsphere Web Client): 1) Click on the Home Icon or Home Tab 2) Click on Hosts and Clusters Verify Tier1 Worker Node VMs are Powered on 1. Ensure you've selected the Tier1 Hadoop Cluster 2. Click Related Objects Page 201
202 3. Click Virtual Machines Verify that all Tier1 worker nodes are Powered On. They should be, unless you powered them off in a previous lab. Page 202
203 Logging into the Serengeti Management Server console Much of the management of Big Data Clusters can be done through the vsphere GUI, as other modules in this lab have shown. Here, we will look at how this can also be done from the command line. From the Windows Desktop perform the following steps: 1. Double-click the PuTTY icon on the desktop 2. Click the SerengetiCLI session 3. Click the Open button Page 203
204 Serengeti SSH prompt You should now see a Linux SSH window, as shown above, as this lab has been configured for passwordless SSH login. In case this does not work, the user name is serengeti and the password is VMware1! Now that we're at the console, let's look at the script that is used to set the number of active TaskTracker compute nodes. Run set_compute_node_num.sh script 1. From the Serengeti Linux shell, type set_compute_node_num.sh (TIP: you can type "set_" and hit TAB to auto-complete) 2. Note the parameters this script takes: the name of the cluster (e.g. --name Tier1), and the number of compute nodes we want (e.g. --computenodenum 1). Page 204
, which")
205 Reduce number of Tier1 compute nodes to 2 1. Let's reduce the number of Tier1 compute nodes from 3 (the default) to 2 by running this command from the Linux shell: set_compute_node_num.sh --name Tier1 --computenodenum 2 You should see output similar to the screen shot above; note that Auto Elasticity was enabled with the same number of minimum and maximum compute nodes (2), which is why we term it fixed elastic scaling. Confirm the reduction via the vsphere Web Client 1. Switch back to the vsphere Web Client and click the Refresh icon (shown above) 2. Note that the number of worker VMs has changed from 3 to 2. Page 205
: set_compute_node_num.")
206 Increase number of Tier1 compute nodes back to 3 1. Let's increase the number of Tier1 compute nodes back to 3 by running this command from the Linux shell (you can use the up arrow, and just change the 2 to 3): set_compute_node_num.sh --name Tier1 --computenodenum 3 You should see output similar to the screen shot above; note that Auto Elasticity is still enabled, with the same number of minimum and maximum compute nodes (3). Confirm the increase via the vsphere Web Client 1. Switch back to the vsphere Web Client and click the Refresh icon (shown above) 2. Note that the number of worker VMs is back to 3. Page 206
VMware vsphere Big Data Extensions Command-Line Interface Guide
 VMware vsphere Big Data Extensions Command-Line Interface Guide vsphere Big Data Extensions 1.0 This document supports the version of each product listed and supports all subsequent versions until the
VMware vsphere Big Data Extensions Command-Line Interface Guide
 VMware vsphere Big Data Extensions Command-Line Interface Guide vsphere Big Data Extensions 1.1 This document supports the version of each product listed and supports all subsequent versions until the
VMware vsphere Big Data Extensions Command-Line Interface Guide
 VMware vsphere Big Data Extensions Command-Line Interface Guide vsphere Big Data Extensions 2.0 This document supports the version of each product listed and supports all subsequent versions until the
Beta. VMware vsphere Big Data Extensions Administrator's and User's Guide. vsphere Big Data Extensions 1.0 EN
 VMware vsphere Big Data Extensions Administrator's and User's Guide vsphere Big Data Extensions 1.0 This document supports the version of each product listed and supports all subsequent versions until
VMware vsphere Big Data Extensions Command-Line Interface Guide
 VMware vsphere Big Data Extensions Command-Line Interface Guide vsphere Big Data Extensions 2.1 This document supports the version of each product listed and supports all subsequent versions until the
VMware vsphere Big Data Extensions Administrator's and User's Guide
 VMware vsphere Big Data Extensions Administrator's and User's Guide vsphere Big Data Extensions 1.1 This document supports the version of each product listed and supports all subsequent versions until
Table of Contents HOL-PRT-1467
 Table of Contents Lab Overview - - Virtual Volumes with Dell EqualLogic... 2 Lab Guidance... 3 Pre-flight Instructions... 5 Module 1 - Working with Dell EqualLogic and VVOLs (60 Mins)... 11 Creating a
Deploy Big Data Extensions on vsphere Standard Edition
 Deploy Big Data Extensions on vsphere Standard Edition You can deploy Big Data Extensions 2.1.1 Fling on VMware vsphere Standard Edition for the purpose of experimentation and proof-of-concept projects
Hadoop Virtualization Extensions on VMware vsphere 5 T E C H N I C A L W H I T E P A P E R
 Hadoop Virtualization Extensions on VMware vsphere 5 T E C H N I C A L W H I T E P A P E R Table of Contents Introduction... 3 Topology Awareness in Hadoop... 3 Virtual Hadoop... 4 HVE Solution... 5 Architecture...
Table of Contents HOL-HBD-1301
 Table of Contents Lab Overview... 2 - vcloud Hybrid Service Jump Start for vsphere Admins...3 Module 1 - vcloud Hybrid Service: Architecture and Consumption Principles...5 vcloud Hybrid Service... 6 vcloud
Table of Contents HOL-SDC-1412
 Table of Contents Lab Overview... 2 - IT Outcomes Data Center Virtualization and Standardization... 3 Module 1 - Lab Overview (15 Min)... 5 Physical Topology... 6 Application Topology... 8 Access the 3-Tier
NexentaStor VVOL
 NexentaStor 5.1.1 VVOL Admin Guide Date: January, 2018 Software Version: NexentaStor 5.1.1 VVOL Part Number: 3000-VVOL-5.1.1-000065-A Table of Contents Preface... 3 Intended Audience 3 References 3 Document
Horizon Console Administration. 13 DEC 2018 VMware Horizon 7 7.7
 Horizon Console Administration 13 DEC 2018 VMware Horizon 7 7.7 You can find the most up-to-date technical documentation on the VMware website at: https://docs.vmware.com/ If you have comments about this
HOL09-Entry Level VMAX: Provisioning, FAST VP, TF VP Snap, and VMware Integration
 HOL09-Entry Level VMAX: Provisioning, FAST VP, TF VP Snap, and VMware Integration HOL09-Entry Level VMAX: Provisioning, FAST VP, TF VP Snap, and VMware Integration 1 VMAX 10K "Hands On Lab" Exercises 1.1
Virtual Appliance User s Guide
 Cast Iron Integration Appliance Virtual Appliance User s Guide Version 4.5 July 2009 Cast Iron Virtual Appliance User s Guide Version 4.5 July 2009 Copyright 2009 Cast Iron Systems. All rights reserved.
VMware vfabric Data Director 2.5 EVALUATION GUIDE
 VMware vfabric Data Director 2.5 EVALUATION GUIDE Introduction... 2 Pre- requisites for completing the basic and advanced scenarios... 3 Basic Scenarios... 4 Install Data Director using Express Install...
VMware vsphere Big Data Extensions Administrator's and User's Guide
 VMware vsphere Big Data Extensions Administrator's and User's Guide vsphere Big Data Extensions 2.3.2 This document supports the version of each product listed and supports all subsequent versions until
Table of Contents HOL-SDC-1422
 Table of Contents - VMware Development Tools and SDKs... 2 Lab Overview... 3 Module 1 - Developer Center, Workbench IS, and the vsphere Management SDK (30 min)... 4 Introduction... 5 Using Workbench IS
Table of Contents HOL-1701-CHG-5
 Table of Contents Lab Overview: vrealize Operations Application Monitoring: Challenge Lab... 2 Lab Overview... 3 Lab Guidance... 5 Module 1 - Configuring a Custom Application (15 minutes)... 10 Introduction...
Dell Storage vsphere Web Client Plugin. Version 4.0 Administrator s Guide
 Dell Storage vsphere Web Client Plugin Version 4.0 Administrator s Guide Notes, Cautions, and Warnings NOTE: A NOTE indicates important information that helps you make better use of your computer. CAUTION:
Reset the Admin Password with the ExtraHop Rescue CD
 Reset the Admin Password with the ExtraHop Rescue CD Published: 2018-01-19 This guide explains how to reset the administration password on physical and virtual ExtraHop appliances with the ExtraHop Rescue
VMware Infrastructure Planner
 Thanks for participating in a assessment! Table of Contents 1. Release Notes for vsan Assessment v. 2.0.168.0... 2 2. About vsan Assessment... 34 3. Install and configure the virtual appliance... 45 2.1
VMware Horizon View 5.2 Reviewer s Guide REVIEWER S GUIDE
 VMware Horizon View 5.2 Reviewer s Guide REVIEWER S GUIDE Table of Contents Introduction... 5 What Is VMware Horizon View?... 5 Simplify.... 5 Manage and Secure.... 5 Empower... 5 Architecture and Components
VMware vsphere 5.5: Install, Configure, Manage Lab Addendum. Lab 21: VMware vsphere Distributed Resource Scheduler
 VMware vsphere 5.5: Install, Configure, Manage Lab Addendum Lab 21: VMware vsphere Distributed Resource Scheduler Document Version: 2014-06-02 Copyright Network Development Group, Inc. www.netdevgroup.com
Getting Started with ESX Server 3i Installable Update 2 and later for ESX Server 3i version 3.5 Installable and VirtualCenter 2.5
 Getting Started with ESX Server 3i Installable Update 2 and later for ESX Server 3i version 3.5 Installable and VirtualCenter 2.5 Getting Started with ESX Server 3i Installable Revision: 20090313 Item:
Table of Contents HOL-1710-SDC-6
 Table of Contents Lab Overview - - What's New: vsphere with Operations Management.. 2 Lab Guidance... 3 Module 1 - What's New in vsphere (90 minutes)... 9 vcenter Server Appliance (VSCA)... 10 vcenter
VMware View Upgrade Guide
 View 4.0 View Manager 4.0 View Composer 2.0 This document supports the version of each product listed and supports all subsequent versions until the document is replaced by a new edition. To check for
REVISED 1 AUGUST REVIEWER'S GUIDE FOR VMWARE APP VOLUMES VMware App Volumes and later
 REVISED 1 AUGUST 2018 REVIEWER'S GUIDE FOR VMWARE APP VOLUMES VMware App Volumes 2.13.1 and later Table of Contents Introduction Audience What You Will Learn Navigating This Document for App Volumes Use
VMware AirWatch: Directory and Certificate Authority
 Table of Contents Lab Overview - HOL-1857-06-UEM - VMware AirWatch: Directory and Certificate Authority Integration... 2 Lab Guidance... 3 Module 1 - Advanced AirWatch Configuration, AD Integration/Certificates
vcloud Director Administrator's Guide
 vcloud Director 5.5 This document supports the version of each product listed and supports all subsequent versions until the document is replaced by a new edition. To check for more recent editions of
REVISED 1 AUGUST QUICK-START TUTORIAL FOR VMWARE APP VOLUMES VMware App Volumes and later
 REVISED 1 AUGUST 2018 QUICK-START TUTORIAL FOR VMWARE APP VOLUMES VMware App Volumes 2.13.1 and later Table of Contents Introduction Audience What You Will Learn Navigating This Document for App Volumes
Hands-on Lab Manual. Introduction. Dell Storage Hands-on Lab Instructions. Estimated Completion Time: 30 minutes. Audience. What we will be doing
 Dell Storage Hands-on Lab Instructions Dell SC Series CITV Integration with VMware VASA Estimated Completion Time: 30 minutes Introduction Audience The audience for this document is technical professionals
Dell SC Series Integration with VMware VVols
 Dell SC Series Integration with VMware VVols Dell Storage Hands-on Lab Estimated completion time: 30 minutes Audience The audience for this document includes technical professionals who wish to learn about
vcloud Director Administrator's Guide vcloud Director 8.10
 vcloud Director Administrator's Guide vcloud Director 8.10 You can find the most up-to-date technical documentation on the VMware website at: https://docs.vmware.com/ If you have comments about this documentation,
Using the VMware vcenter Orchestrator Client. vrealize Orchestrator 5.5.1
 Using the VMware vcenter Orchestrator Client vrealize Orchestrator 5.5.1 You can find the most up-to-date technical documentation on the VMware website at: https://docs.vmware.com/ If you have comments
VMware vsphere 5.5: Install, Configure, Manage Lab Addendum. Lab 3: Configuring VMware ESXi
 VMware vsphere 5.5: Install, Configure, Manage Lab Addendum Lab 3: Configuring VMware ESXi Document Version: 2014-07-08 Copyright Network Development Group, Inc. www.netdevgroup.com NETLAB Academy Edition,
Table of Contents. VMware AirWatch: Technology Partner Integration
 Table of Contents Lab Overview - HOL-1857-08-UEM - Workspace ONE UEM - Technology Partner Integration... 2 Lab Guidance... 3 Module 1 - F5 Integration with Workspace ONE UEM (30 min)... 9 Introduction...
Processing Big Data with Hadoop in Azure HDInsight
 Processing Big Data with Hadoop in Azure HDInsight Lab 1 - Getting Started with HDInsight Overview In this lab, you will provision an HDInsight cluster. You will then run a sample MapReduce job on the
Getting Started with ESX Server 3i Embedded ESX Server 3i version 3.5 Embedded and VirtualCenter 2.5
 Getting Started with ESX Server 3i Embedded ESX Server 3i version 3.5 Embedded and VirtualCenter 2.5 Title: Getting Started with ESX Server 3i Embedded Revision: 20071022 Item: VMW-ENG-Q407-430 You can
1) Use either Chrome of Firefox to access the VMware vsphere web Client. https://vweb.bristolcc.edu. FireFox
 Use either Chrome of Firefox to access the VMware vsphere web Client. https://vweb.bristolcc.edu. FireFox") CIS 231 Windows 7 Install Lab #2 1) Use either Chrome of Firefox to access the VMware vsphere web Client. https://vweb.bristolcc.edu CHROME At the your connection is not private message, click Advanced
CIS 231 Windows 7 Install Lab #2 1) Use either Chrome of Firefox to access the VMware vsphere web Client. https://vweb.bristolcc.edu CHROME At the your connection is not private message, click Advanced
Preparing Virtual Machines for Cisco APIC-EM
 Preparing a VMware System for Cisco APIC-EM Deployment, page 1 Virtual Machine Configuration Recommendations, page 1 Configuring Resource Pools Using vsphere Web Client, page 4 Configuring a Virtual Machine
Preparing Virtual Machines for Cisco APIC-EM
 Preparing a VMware System for Cisco APIC-EM Deployment, on page 1 Virtual Machine Configuration Recommendations, on page 1 Configuring Resource Pools Using vsphere Web Client, on page 4 Configuring a Virtual
Setting Up Cisco Prime LMS for High Availability, Live Migration, and Storage VMotion Using VMware
 CHAPTER 5 Setting Up Cisco Prime LMS for High Availability, Live Migration, and Storage VMotion Using VMware This chapter explains setting up LMS for High Availability (HA), Live migration, and, Storage
Installation of Cisco Business Edition 6000H/M
 Installation Overview, page 1 Installation Task Flow of Cisco Business Edition 6000H/M, page 2 Installation Overview This chapter describes the tasks that you must perform to install software on your Business
Table of Contents HOL-1757-MBL-6
 Table of Contents Lab Overview - - VMware AirWatch: Technology Partner Integration... 2 Lab Guidance... 3 Module 1 - F5 Integration with AirWatch (30 min)... 8 Getting Started... 9 F5 BigIP Configuration...
VMware vsphere: Install, Configure, and Manage v6.5 Pod. Installation and Configuration Guide
 VMware vsphere: Install, Configure, and Manage v6.5 Pod Installation and Configuration Guide Document Version: 2017-12-27 Installation of VMware vsphere: ICM v6.5 virtual pods as described in this guide
Deploying the Cisco Tetration Analytics Virtual
 Deploying the Cisco Tetration Analytics Virtual Appliance in the VMware ESXi Environment About, on page 1 Prerequisites for Deploying the Cisco Tetration Analytics Virtual Appliance in the VMware ESXi
Quick Deployment Step-by-step instructions to deploy Oracle Big Data Lite Virtual Machine
 Quick Deployment Step-by-step instructions to deploy Oracle Big Data Lite Virtual Machine Version 4.11 Last Updated: 1/10/2018 Please note: This appliance is for testing and educational purposes only;
RecoverPoint for Virtual Machines
 RecoverPoint for Virtual Machines Basic Configuration Installation Guide P/N 302-004-369 Rev 01 Version 5.1.1 RecoverPoint for Virtual Machines Version 5.1.1 Basic Configuration Installation Guide Copyright
Dell Storage Compellent Integration Tools for VMware
 Dell Storage Compellent Integration Tools for VMware Version 4.0 Administrator s Guide Notes, Cautions, and Warnings NOTE: A NOTE indicates important information that helps you make better use of your
Connectra Virtual Appliance Evaluation Guide
 Connectra Virtual Appliance Evaluation Guide This document is intended for users who are new to Check Point products and would like to evaluate and review Connectra Virtual Appliance. We recommend reading
CIS 231 Windows 7 Install Lab #2
 CIS 231 Windows 7 Install Lab #2 1) To avoid certain problems later in the lab, use Chrome as your browser: open this url: https://vweb.bristolcc.edu 2) Here again, to avoid certain problems later in the
Xton Access Manager GETTING STARTED GUIDE
 Xton Access Manager GETTING STARTED GUIDE XTON TECHNOLOGIES, LLC PHILADELPHIA Copyright 2017. Xton Technologies LLC. Contents Introduction... 2 Technical Support... 2 What is Xton Access Manager?... 3
Version 2.3 User Guide
 V Mware vcloud Usage Meter Version 2.3 User Guide 2012 VMware, Inc. All rights reserved. This product is protected by U.S. and international copyright and intellectual property laws. This product is covered
The audience for this document is technical professionals who wish to learn more about using the Dell Compellent VMware vsphere Client Plug-in.
 Dell Storage Hands-on Lab Instructions Storage provisioning using the Dell Compellent vsphere Web Plug-in Estimated Completion Time: 30 Minutes Introduction Audience The audience for this document is technical
Basic Configuration Installation Guide
 RecoverPoint for VMs 5.1 Basic Configuration Installation Guide P/N 302-003-975 REV 1 July 4, 2017 This document contains information on these topics: Revision History... 2 Overview... 3 Reference architecture...
Archiware Pure Quick Start Guide
 Archiware Pure Quick Start Guide Content 1 System Requirements... 3 1.1 Hardware Requirements... 3 1.2 Supported Hypervisors... 3 1.3 Deployment Requirements... 3 2 Deploying the Virtual Appliance... 4
Cisco Virtual Application Container Services 2.0 Lab v1
 Cisco Virtual Application Container Services 2.0 Lab v1 Last Updated: 02-SEP-2015 About This Solution Cisco Virtual Application Container Services (VACS) enables simplified deployment of Secure Application
Table of Contents HOL-SDC-1635
 Table of Contents Lab Overview - - vrealize Log Insight... 2 Lab Guidance... 3 Module 1 - Log Management with vrealize Log Insight - (45 Minutes)... 7 Overview of vrealize Log Insight... 8 Video Overview
VMware vfabric Data Director Installation Guide
 VMware vfabric Data Director Installation Guide vfabric Data Director 1.0.1 This document supports the version of each product listed and supports all subsequent versions until the document is replaced
VMware AirWatch - Workspace ONE, Single Sign-on and VMware Identity Manager
 VMware AirWatch - Workspace ONE, Single Sign-on and VMware Identity Table of Contents Lab Overview - HOL-1857-03-UEM - Workspace ONE UEM with App & Access Management... 2 Lab Guidance... 3 Module 1 - Workspace
NetBackup 7.6 Replication Director A Hands On Experience
 NetBackup 7.6 Replication Director A Hands On Experience Description Through this hands on lab you can test drive Replication Director and experience for yourself this easy to use, powerful feature. Once
How to Deploy vcenter on the HX Data Platform
 First Published: 2016-07-11 Last Modified: 2019-01-08 vcenter on HyperFlex Cisco HX Data Platform deployment, including installation and cluster configuration and management, requires a vcenter server
Sandbox Setup Guide for HDP 2.2 and VMware
 Waterline Data Inventory Sandbox Setup Guide for HDP 2.2 and VMware Product Version 2.0 Document Version 10.15.2015 2014-2015 Waterline Data, Inc. All rights reserved. All other trademarks are the property
IT Systems Integration
 IT Systems Integration vsphere Update Manager 6.0 Patch and Upgrade Management Guide. Prepared By IT Systems Version History Version Date Notes 1.0 01/13/17 Initial Release 1 Introduction VMware Update
Dell EMC Ready Architectures for VDI
 Dell EMC Ready Architectures for VDI Designs for VMware Horizon 7 on Dell EMC XC Family September 2018 H17387 Deployment Guide Abstract This deployment guide provides instructions for deploying VMware
Getting Started with ESXi Embedded
 ESXi 4.0 Embedded vcenter Server 4.0 This document supports the version of each product listed and supports all subsequent versions until the document is replaced by a new edition. To check for more recent
Basic Configuration Installation Guide
 EMC RecoverPoint for VMs 5.0 Basic Configuration Installation Guide P/N 302-003-534 REV 01 December 7, 2016 This document contains information on these topics: Revision History... 2 Overview... 3 Reference
VMware vcenter AppSpeed Installation and Upgrade Guide AppSpeed 1.2
 VMware vcenter AppSpeed Installation and Upgrade Guide AppSpeed 1.2 This document supports the version of each product listed and supports all subsequent versions until the document is replaced by a new
Table of Contents HOL-SDC-1415
 Table of Contents Lab Overview - - IT Outcomes Security Controls Native to Infrastructure. 2 Lab Guidance... 3 Module 1 - Policy-Based Compliance... 5 Introduction... 6 Manage vcenter Server Virtual Machines...
Installing and Upgrading Cisco Network Registrar Virtual Appliance
 CHAPTER 3 Installing and Upgrading Cisco Network Registrar Virtual Appliance The Cisco Network Registrar virtual appliance includes all the functionality available in a version of Cisco Network Registrar
UDP Director Virtual Edition
 UDP Director Virtual Edition (also known as FlowReplicator VE) Installation and Configuration Guide (for StealthWatch System v6.7.0) Installation and Configuration Guide: UDP Director VE v6.7.0 2015 Lancope,
Cisco Modeling Labs OVA Installation
 Prepare for an OVA File Installation, page 1 Download the Cisco Modeling Labs OVA File, page 2 Configure Security and Network Settings, page 2 Deploy the Cisco Modeling Labs OVA, page 12 Edit the Virtual
FireFox. CIS 231 Windows 10 Install Lab # 3. 1) Use either Chrome of Firefox to access the VMware vsphere web Client.
 Use either Chrome of Firefox to access the VMware vsphere web Client.") CIS 231 Windows 10 Install Lab # 3 1) Use either Chrome of Firefox to access the VMware vsphere web Client. https://vweb.bristolcc.edu CHROME At the your connection is not private message, click Advanced
CIS 231 Windows 10 Install Lab # 3 1) Use either Chrome of Firefox to access the VMware vsphere web Client. https://vweb.bristolcc.edu CHROME At the your connection is not private message, click Advanced
VMware vcloud Director Evaluator s Guide TECHNICAL WHITE PAPER
 VMware vcloud Director Evaluator s Guide TECHNICAL WHITE PAPER Table of Contents 1. Getting Started.... 4 1.1 About This Guide... 4 1.2 Intended Audience.... 4 1.3 Help and Support During the Evaluation....
VMware vsphere Optimize and Scale [v5.5] Custom Lab 12 Diagnosing CPU performance issues Copyright 2014 Global Knowledge Network Training Ltd.
![VMware vsphere Optimize and Scale [v5.5] Custom Lab 12 Diagnosing CPU performance issues Copyright 2014 Global Knowledge Network Training Ltd.](/thumbs/80/80957084.jpg "VMware vsphere Optimize and Scale [v5.5] Custom Lab 12 Diagnosing CPU performance issues Copyright 2014 Global Knowledge Network Training Ltd.") VMware vsphere Optimize and Scale [v5.5] Custom Lab 12 Diagnosing CPU performance issues Copyright 2014 Global Knowledge Network Training Ltd. Lab 12 Diagnosing CPU performance issues Objective: Use a
VMware vsphere Optimize and Scale [v5.5] Custom Lab 12 Diagnosing CPU performance issues Copyright 2014 Global Knowledge Network Training Ltd. Lab 12 Diagnosing CPU performance issues Objective: Use a
Cloud Computing II. Exercises
 Cloud Computing II Exercises Exercise 1 Creating a Private Cloud Overview In this exercise, you will install and configure a private cloud using OpenStack. This will be accomplished using a singlenode
UDP Director Virtual Edition Installation and Configuration Guide (for Stealthwatch System v6.9.0)
") UDP Director Virtual Edition Installation and Configuration Guide (for Stealthwatch System v6.9.0) Installation and Configuration Guide: UDP Director VE v6.9.0 2016 Cisco Systems, Inc. All rights reserved.
UDP Director Virtual Edition Installation and Configuration Guide (for Stealthwatch System v6.9.0) Installation and Configuration Guide: UDP Director VE v6.9.0 2016 Cisco Systems, Inc. All rights reserved.
Virtual Storage Console, VASA Provider, and Storage Replication Adapter for VMware vsphere
 Virtual Storage Console, VASA Provider, and Storage Replication Adapter for VMware vsphere Workflow Guide for 7.2 release July 2018 215-13170_B0 doccomments@netapp.com Table of Contents 3 Contents Deciding
Oracle Enterprise Manager 11g Ops Center 2.5 Hands-on Lab
 Oracle Enterprise Manager 11g Ops Center 2.5 Hands-on Lab Introduction to Enterprise Manager 11g Oracle Enterprise Manager 11g is the centerpiece of Oracle's integrated IT management strategy, which rejects
ITCorporation HOW DO I INSTALL A FRESH INSTANCE OF ANALYZER? DESCRIPTION RESOLUTION. Knowledge Database KNOWLEDGE DATABASE
 KNOWLEDGE DATABASE HOW DO I INSTALL A FRESH INSTANCE OF ANALYZER? 3. Click on GMS/Analyzer - Virtual Appliance or GMS/Analyzer - Virtual Appliance 950GB under GMS - Virtual Appliance. Note: It is not recommended
Configuring High Availability for VMware vcenter in RMS All-In-One Setup
 Configuring High Availability for VMware vcenter in RMS All-In-One Setup This chapter describes the process of configuring high availability for the VMware vcenter in an RMS All-In-One setup. It provides
TECHNICAL WHITE PAPER AUGUST 2017 REVIEWER S GUIDE FOR VIEW IN VMWARE HORIZON 7: INSTALLATION AND CONFIGURATION. VMware Horizon 7 version 7.
 TECHNICAL WHITE PAPER AUGUST 2017 REVIEWER S GUIDE FOR VIEW IN VMWARE HORIZON 7: INSTALLATION AND CONFIGURATION VMware Horizon 7 version 7.x Table of Contents Introduction.... 3 JMP Next-Generation Desktop
Data Protection Guide
 SnapCenter Software 4.0 Data Protection Guide For VMs and Datastores using the SnapCenter Plug-in for VMware vsphere March 2018 215-12931_C0 doccomments@netapp.com Table of Contents 3 Contents Deciding
Virtualization with VMware ESX and VirtualCenter SMB to Enterprise
 Virtualization with VMware ESX and VirtualCenter SMB to Enterprise This class is an intense, four-day introduction to virtualization using VMware s immensely popular Virtual Infrastructure suite including
Getting Started with Pentaho and Cloudera QuickStart VM
 Getting Started with Pentaho and Cloudera QuickStart VM This page intentionally left blank. Contents Overview... 1 Before You Begin... 1 Prerequisites... 1 Use Case: Development Sandbox for Pentaho and
Configure RSPAN with VMware
 Configure RSPAN with VMware Published: 2018-04-19 The Remote Switched Port Analyzer (RSPAN) enables you to monitor traffic on one switch through a device on another switch and then send the monitored traffic
VMware vfabric Data Director Installation Guide
 VMware vfabric Data Director Installation Guide vfabric Data Director 2.5 This document supports the version of each product listed and supports all subsequent versions until the document is replaced by
CIS 231 Windows 10 Install Lab # 3
 CIS 231 Windows 10 Install Lab # 3 1) To avoid certain problems later in the lab, use Chrome as your browser: open this url: https://vweb.bristolcc.edu 2) Here again, to avoid certain problems later in
vsphere Datacenter Administration Guide
 vsphere Datacenter Administration Guide ESX 4.1 ESXi 4.1 vcenter Server 4.1 This document supports the version of each product listed and supports all subsequent versions until the document is replaced
Table of Contents HOL-1730-USE-2
 Table of Contents Lab Overview - - Cloud Native Apps With Photon Platform...2 Lab Guidance... 3 Module 1 - What is Photon Platform (15 minutes)... 9 Introduction... 10 What is Photon Platform - How Is
Agent and Agent Browser. Updated Friday, January 26, Autotask Corporation
 Agent and Agent Browser Updated Friday, January 26, 2018 2018 Autotask Corporation Table of Contents Table of Contents 2 The AEM Agent and Agent Browser 3 AEM Agent 5 Privacy Mode 9 Agent Browser 11 Agent
Deploy the ExtraHop Discover Appliance with VMware
 Deploy the ExtraHop Discover Appliance with VMware Published: 2018-07-17 The ExtraHop virtual appliance can help you to monitor the performance of your applications across internal networks, the public
Developing and Deploying vsphere Solutions, vservices, and ESX Agents
 Developing and Deploying vsphere Solutions, vservices, and ESX Agents vsphere 5.0 This document supports the version of each product listed and supports all subsequent versions until the document is replaced
Using the Horizon vrealize Orchestrator Plug-In
 Using the Horizon vrealize Orchestrator Plug-In VMware Horizon 6 version 6.2.3, VMware Horizon 7 versions 7.0.3 and later Modified on 4 JAN 2018 VMware Horizon 7 7.4 You can find the most up-to-date technical
Platform Compatibility... 1 Known Issues... 1 Resolved Issues... 2 Deploying the SRA Virtual Appliance... 3 Related Technical Documentation...
 Secure Remote Access SonicWALL SRA 5.0.0.3 Contents Platform Compatibility... 1 Known Issues... 1 Resolved Issues... 2 Deploying the SRA Virtual Appliance... 3 Related Technical Documentation... 17 Platform
Exam4Tests. Latest exam questions & answers help you to pass IT exam test easily
 Exam4Tests http://www.exam4tests.com Latest exam questions & answers help you to pass IT exam test easily Exam : VCP510PSE Title : VMware Certified Professional 5 - Data Center Virtualization PSE Vendor
Contents. Limitations. Prerequisites. Configuration
 Welcome to your Netmail Secure trial The trial version of Netmail Secure allows you to evaluate Netmail Secure from within your own corporate domain. Included is a sample mail feed that is automatically
Developing and Deploying vsphere Solutions, vservices, and ESX Agents
 Developing and Deploying vsphere Solutions, vservices, and ESX Agents vsphere 6.0 This document supports the version of each product listed and supports all subsequent versions until the document is replaced
Getting Started with VMware View View 3.1
 Technical Note Getting Started with VMware View View 3.1 This guide provides an overview of how to install View Manager components and provision virtual desktops. Additional View Manager documentation