Administration Manual
|
|
|
- Nathan Chandler
- 6 years ago
- Views:
Transcription
1 Administration Manual SAP J2EE Engine 6.20
2 Contents About This Manual...12 Target Audience and Prerequisites...12 Structure...12 Documentation Conventions...14 Further Reading...14 Administration Tools...15 Overview...16 Visual Administrator...17 Logging on to SAP J2EE Engine Visual Administrator Utilities...18 Shell Console Administrator...24 Property Files Administration...25 Config Tool...26 Config Tool Overview...26 Configuring SAP J2EE Engine 6.20 Managers and Services...26 Adding Nodes to SAP J2EE Engine 6.20 Cluster...28 Removing Nodes from SAP J2EE Engine 6.20 Cluster...30 SAP J2EE Engine 6.20 as an NT/2000 Service or a Unix Daemon...31 Configuring Cluster Elements with Identical Names in Different Clusters as Separate NT Services...35 SAP J2EE Engine 6.20 in Remote Debug Mode...36 Console Config Tool...38 Overview...38 of Console Config Tool Functions...38 Deployment Tools...43 LogViewer Tool...44 Introduction /453
3 Viewing Logs...45 Configuration...46 Appclear Tool...61 DBTool...62 DBTool Overview...62 DBTOOL.XML...62 Library Tool...68 RMIC Tool...70 GUI RMIC Tool...70 Console RMIC Tool...71 ShutDown Tool...72 User Tool...74 User Tool Overview...74 XML Structure for User Tool...74 Analyze Tool...76 Analyze Tool Overview...76 Administration of SAP J2EE Engine 6.20 Cluster...78 Overview...79 Cluster Management with the Visual Administrator Tool...79 Cluster Management with the Console Administrator Tool...80 Planning the Architecture of a Cluster...81 SAP J2EE Engine Cluster Introduction...81 Adding Nodes to SAP J2EE Engine 6.20 Cluster...87 Creating Cluster Nodes...87 Configuring the Additional Nodes...88 Managing the Load Balancing System...97 Configuring the Load Balancing Power of the Machines Within the Cluster...97 Configuring a Cluster When Multiple LAN Adapters are Available (Windows) /453
4 Procedure...99 Administration of SAP J2EE Engine 6.20 Stand-Alone Version Overview Stand-Alone Server Services and Managers Stand-Alone Server Administration and Application Deployment Configuration Tasks Overview Configuration of Additional Libraries System-Lib Lib Additional-Lib How to Set up SAP J2EE Engine 6.20 Web Server Setting Ports Setting Various Virtual Hosts on One Server Caching Mime Types Log Files Setting Security Constraints Using the Log System and Monitoring Log System Monitoring Managing Security Architecture Integration Login to SAP J2EE Engine Features Tasks Login Users and Groups Managing SSL Connections /453
5 Remote Administration Using Telnet Overview How to Connect and Work Using Telnet Connecting Internet Information Server to SAP J2EE Engine Running Apache Web Server with SAP J2EE Engine Configuring Apache Web Server Setting up SAP J2EE Engine 6.20 for Application Tracing Setting SAP J2EE Engine Tracing Mode Traced Components Setting up SAP J2EE Engine 6.20 for Remote Debugging Configuring an Application Node as a Debug Node Initiate Debugging Session Configuration of Debug Nodes via the Config Tool Managers Administration Reference Classloader Manager Visual Administrator Cluster Manager Visual Administrator Critical Information and Troubleshooting Tips Connections Manipulator Visual Administrator Critical Information and Troubleshooting Tips IpVerification Manager Visual Administrator Critical Information and Troubleshooting Tips Lock Manager Visual Administrator Log Manager Visual Administrator Memory Manager /453
6 Policy Manager Visual Administrator Pool Manager Visual Administrator Ports Manager Visual Administrator R3Startup Manager Visual Administrator Service Manager Visual Administrator Swap Manager Visual Administrator Critical Information and Troubleshooting Tips SystemThread Manager Visual Administrator Thread Manager Visual Administrator Critical Information and Troubleshooting Tips Timeout Manager Visual Administrator Critical Information and Troubleshooting Tips Services Administration Reference Admin Service Visual Administrator Critical Information and Troubleshooting Tips Appclient Service Visual Administrator Console Administrator DBMS Service Visual Administrator /453
7 Console Administrator Critical Information and Troubleshooting Tips DBPool Service Visual Administrator Console Administrator Critical Information and Troubleshooting Tips Deploy Service Visual Administrator Console Administrator EISConnector Service Visual Administrator EJB Service Visual Administrator EJB20 Service Visual Administrator Console Administrator File Service Visual Administrator HTTP Service Visual Administrator Console Administrator Critical Information and Troubleshooting Tips HTTP Heartbeat Service Integration Visual Administrator HTTP Tunneling Service Visual Administrator IIOP Service Visual Administrator JavaMail Service /453
8 Visual Administrator JMS Service Visual Administrator Console Administrator Critical Information and Troubleshooting Tips Keystore Service Visual Administrator Console Administrator Critical Information and Troubleshooting Tips Log Viewer Service Log Service Visual Administrator Console Administrator Monitor Service Visual Administrator Console Administrator Naming Service Visual Administrator Console Administrator P4 Service Visual Administrator Pinger Service Visual Administrator R3Startup Service Visual Administrator RFC Engine Service Visual Administrator Runtime Info Service Visual Administrator Security Service /453
9 Visual Administrator Console Administrator Critical Information and Troubleshooting Tips Servlet_jsp Service Visual Administrator Console Administrator Property Files Critical Information and Troubleshooting Tips Shell Service Visual Administrator SSL Service Visual Administrator Critical Information and Troubleshooting Tips Telnet Service Visual Administrator Console Administrator Transaction Service Visual Administrator Shell Commands Reference Administration Shell Language Conventions Help Adding a Group of Commands System Variables Dispatcher ADMIN DEBUG KEYSTORE LOG MONITOR /453
10 R3STARTUP SSL SYSTEM Application Nodes and State Controller ADMIN APPCLIENT DBMS DBPOOL DEPLOY EISCONNECTOR EJB HTTP JMS KEYSTORE LOG LOGIN MONITOR NAMING INTEGRATION POLICY RESOURCE SERVLET_JSP SYSTEM USERS Shell Language The Backus-Naur MetaLanguage Property Files Reference Overview General Properties Dispatcher Node /453
11 Application Node and State Controller Module Properties Dispatcher Node Application Node and State Controller /453
12 About This Manual This Administration Manual is a guide for the initial and runtime configuration of SAP J2EE Engine It introduces application server administration tools and provides comprehensive information and troubleshooting tips on specific points of SAP J2EE Engine 6.20 administration. Target Audience and Prerequisites Structure The Administration Manual is addressed to system administrators whose task is the initial configuration and further maintenance of SAP J2EE Engine 6.20 System. This section must also be considered by administrators and developers who perform deployment tasks and runtime administration of the system. This manual assumes that you are familiar with the following topics: The Internet and the World Wide Web Java programming language J2EE specification The contents of this manual is organized into several subsections, as described below: Administration Tools This section introduces the tools provided for administration of SAP J2EE Engine It provides detailed description of the Visual Administrator tool, Console Administrator tool, Config Tool, and Property Files. Administration of SAP J2EE Engine 6.20 Cluster This section presents an overview of fundamental clustering concepts implemented in SAP J2EE Engine It also describes the general requirements for cluster configuration, how to add nodes to the cluster, and how to administer it with the tools provided. 12/453
13 Administration of SAP J2EE Engine 6.20 Stand-Alone Version This section provides an overview of SAP J2EE Engine 6.20 Stand-Alone Version concepts, and guidelines for its administration. Configuration Tasks This section provides information on typical administration tasks. Managers Administration Reference This section gives administrators information about general and SAP J2EE Engine 6.20 managers-specific properties, critical information, and troubleshooting tips. The section on managers-specific properties describes how to set the properties specified with the Visual Administrator tool, with the Console Administrator tool, and from the property files, as well as important issues from the administration of each manager. Services Administration Reference This section gives system administrators information about general and SAP J2EE Engine 6.20 services-specific properties, critical information, and troubleshooting tips. The section on services-specific properties describes how to set the properties specified with the Visual Administrator tool, with the Console Administrator tool, and from the property files, as well as important issues from the administration of each service module. Shell Commands Reference This section contains a full description of all SAP J2EE Engine 6.20 Shell language commands, their syntax, properties, and example usage. Property Files Reference This section contains information about the content of SAP J2EE Engine 6.20 property files. Index This is an index of the keywords used in the Administration Manual in alphabetical order. 13/453
14 Documentation Conventions The following font styles are used in SAP J2EE Engine 6.20 documentation to denote specific text expressions, words, and so on: Further Reading Italic style Used for file and directory names, system paths, and so on File and directory paths are given in Windows format (with backslashes separating directory names). For Unix versions, the directory paths are the same, except that slashes are used instead of backslashes to separate directories. Example: java.exe,../cluster/dispatcher/managers/framework.properties Monospaced font This font denotes Java source code or contents of any other specific file. Examples: Service_0_Name=cluster\dispatcher Service_0_RootDir=C:\SAP_J2EEngine6.20_SP2\cluster\dispatcher Service_0_JavaPath=C:\jdk\1.3\bin For information on SAP J2EE Engine 6.20 functions, refer to the following documents: Getting Started Development Manual Deployment Manual The official specifications on J2EE can be found at the following URL: 14/453
15 Chapter 1 Administration Tools Overview Visual Administrator Shell Console Administration Property Files Administration Config Tool Console Config Tool Deployment Tools Log Viewer Tool Appclear Tool DBTool Library Tool RMIC Tool ShutDown Tool User Tool Analyze Tool 15/453
16 Overview The job of an administrator covers several tasks: Configuration the setting up of the system, both initial and runtime Initial administration of services and managers Managing security Runtime administration and control of services and managers Deployment of applications and additional libraries Managing the log system SAP J2EE Engine 6.20 provides three basic tools for administration Visual Administrator, Console Administrator, and Config Tool (both Visual and Console). SAP J2EE Engine 6.20 modules can be also configured by setting properties in the corresponding Property Files. In addition, DBTool, Library Tool, RMIC Tool, Shutdown Tool, and User Tool provide specific functions for the runtime administration of particular modules. Note: SAP J2EE Engine 6.20 tools run on all platforms supported by SAP Web Application Server. 16/453
17 Visual Administrator The SAP J2EE Engine 6.20 Visual Administrator is a graphical user interface (GUI) that enables the administration of the whole cluster, of the cluster nodes, and all modules running on them. The Visual Administrator is written in the Java programming language and can be run in any environment where a Java Virtual Machine is available. It enables remote monitoring and management of the cluster, and for each cluster element, and enables the system administrator to monitor all managers and services working on each node in a single GUI. The current limitation, in terms of size, for a cluster which can be administered with the Visual Administrator is eight nodes. When you have more, use the Telnet as an alternative. The Visual Administrator includes functions for: Obtaining general information about a service or manager (for example, its name, group, and so on) Administering and changing the properties either specific or common for each service or manager Runtime administration and control Deployment of applications on all cluster elements Log viewing Logging on to SAP J2EE Engine 6.20 To connect to SAP J2EE Engine 6.20, the following parameters must be specified in the Login dialog box: User Name a valid user name (case insensitive) must be specified. The default value is Administrator. Password a user password. The default value is (empty string). Host host name or IP address. The default value is localhost. Port server port for connection (RMI). The default value is Connect connects the user to the server. The server must be started before trying to connect to it. Cancel cancels the operation and closes the dialog box. Transport layers the available modes are o No layer the connection is done using RMI/P4 protocol. This is the default mode. o HTTP Tunneling this enables communication through proxies and firewalls. If HTTP Tunneling is used, Proxy Host and Port must be 17/453
18 o specified using the Settings option. The default Proxy Port is SSL SSL protocol provides privacy and reliability of communication between applications over the Internet using cryptographic security. The default port is When Visual Administrator is started for the first time, the fields of the Login dialog box contain the default values. Each time Visual Administrator is started, the last-known values for User Name, Host, and Port are displayed. Visual Administrator Utilities Visual Administrator utilities enable you to obtain general information about services and managers, setting the properties, runtime control, and log viewing. General Utilities Main Menu and Toolbar The main menu provides the following options: Connect o Login connects the user to the server. The same operation can be performed by choosing (Login) on the toolbar. o Logout disconnects the user from the server. The same operation can be performed by choosing (Logout) on the toolbar. o Exit closes the SAP J2EE Engine 6.20 Visual Administrator. The same operation can be performed by choosing (Exit) on the toolbar. View o Tab View shows the cluster elements, managers and services in three tabs. The Tab View mode can be chosen by selecting (Tab View) on the toolbar. o Cluster View shows the cluster elements with their managers and services. The Cluster View mode can be chosen by selecting (Cluster View) on the toolbar. o Element View shows all Managers and Services. The Element View mode can be chosen by selecting (Element View) on the toolbar. 18/453
19 o Expand expands the tree in the selected tab. The same operation can be performed by choosing (Expand tree) on the toolbar. o Collapse collapses the tree in the selected tab. The same operation can be performed by choosing (Collapse tree) on the toolbar. Tools This menu contains a single command Properties. The following properties can be set o Ping Time (ms) the ping time in milliseconds. This is the interval at which Visual Administrator checks if the connection with SAP J2EE Engine 6.20 is still alive. The default value is o Status msg history the number of messages in the Status bar. The default value is 20. o Statistics pooling interval (ms) the interval at which the refresh of diagrams and statistics is made, in milliseconds. The default value is o LogViewer Ping Time (ms) the Log Viewer ping time in milliseconds. The default value is o HTML Browser the browser used to visualize the help topics o Look and Feels displays the installed look-and-feel and the one in use. The Look and Feel of the GUI can be changed by selecting one of the available modes: Metal, CDE/Motif, or Windows. A new Look and Feel can be added by specifying its name and class that extends the standard javax.swing.lookandfeel. The default mode is Metal. The properties can also be set by choosing (Properties) on the toolbar. Help o Help Topic opens a help topic using the HTML Browser specified in the Tools Properties menu. The same operation can be performed by choosing (Help) on the toolbar. o About opens a window with information about SAP J2EE Engine The same operation can be performed using the Shift + F1 key combination. The toolbar provides additional options for administration of cluster nodes: Shuts down the selected cluster node The toolbar enables you to start or stop SAP J2EE Engine 6.20 modules: Starts the server or dispatcher part of a service (or both) 19/453
20 Stops the server or dispatcher part of a service (or both) The toolbar provides the following options for saving or resetting SAP J2EE Engine 6.20 modules properties: Saves the properties that were changed in the Properties or in the Control Descriptor tab Resets the properties from the last change Status Bar The Status bar provides information about system events. Provides detailed information about system events Module Information The Control Descriptor tab provides the following subtabs with information about each service. General This tab provides general information about the SAP J2EE Engine 6.20 services. The tab contains the following fields: Service Name the service name cannot be changed Display Name sets a name defined by the user Service Group refers to services visual representation only Server Frame Class Name and Dispatcher Frame Class Name the main service classes. If the service is an application, the Server Frame Class Name must be specified. If it is a session service, the Server Frame Class Name and the Dispatcher Frame Class Name must be specified. Startup Mode provides three available options o STARTUP_ALWAYS the service is started always when the server is started o STARTUP_AUTOMATIC the service is started when another service invokes it o STARTUP_ MANUAL the service is started manually Note 1: All core services must be in STARTUP_ALWAYS mode. 20/453
21 Note 2: All transport services (HTTP, IIOP, P4) must be in either STARTUP_ALWAYS or STARTUP_MANUAL mode. Properties The Properties tab provides information about cluster services properties. The usage of the Properties tab is described in Setting the Properties section below. Distribute Service Version displays the version of the service according to the Java Package Versioning Specification Provider Name displays the name of the service provider Service Directory specifies the work directory of the current service Protocol Remote Support for Service describes the list of support protocols for the service with the Support and Service Name Service References describes the list of service references of the service to other services and libraries Additional The Additional tab provides basic information about each service. You can change the Running Service Icon, Stopped Service Icon, and Suspended Service Icon fields, or set their default values. for <service_name> a brief descriptive text about the service and its purpose, where <service_name> is the name of the service Setting Properties Properties The Properties tab contains the cluster modules properties that can be modified. These properties are specific for each service and are used to start the service. Each property has Key and Value according to java.util.properties. Control Descriptor The subtab Properties of the Control Descriptor tab provides information about the service properties: 21/453
22 Properties Editor Class Name the name of the editor class that enables the editing of the service properties. If the service has its own properties, you must provide an editor for them. Runtime Class Name the name of the class that contains information about the visual part of the service Deployment Class Name the class that controls the deployment. It implements a specific interface with methods, which are invoked before or after deploying or undeploying a service. This class is used only for the deployment of services whose implementations differ from the standards described in the corresponding specifications. Debug mode properties - if the Enable Debug Mode indicator is set, the Server Frame Class and the Dispatcher Frame Class are started to enable displaying of debug information from the service. These classes are specific for each service. Note: For detailed information about the service properties, refer to the Services Administration Reference and Managers Administration Reference sections in this manual. Runtime Control The Runtime tab provides options to modify certain service properties at runtime. The toolbar provides additional options for each Runtime tab, which are described when the corresponding service Runtime tab is considered. Note: Service-specific Runtime tabs are described in the corresponding Services Administration Reference sections in this manual. Log Viewing All significant events that occur on cluster nodes are written to log files that correspond to each module. A list of these events is displayed in the Log Viewer tab. You can view the following types of log messages: Emergency system is unusable Alert immediate action must be taken Critical critical conditions Error error conditions 22/453
23 Warning warning conditions Notice normal but significant events for the system Info information Trace events that occur during application methods execution Debug debug-level messages All shows all existing events Log messages can be displayed in ascending or descending order by type, date and time, caller (the specific service), user, client IP, and cluster. By choosing (Save log messages) on the toolbar, all displayed log messages in the table are saved. By choosing (Reset log messages) on the toolbar, all displayed log messages in the table are deleted and pointers are nullified. By choosing (Next log) on the toolbar, the next log of the selected type in the table is displayed and the log message content is shown. By choosing (Next log messages) on the toolbar, the next X log messages are added in the table, where X is the number specified in the CountField. By choosing (Auto on) on the toolbar, the next X log messages are added in the table in the defined period automatically. By choosing (Auto off) on the toolbar, the Auto on option is turned off. 23/453
24 Shell Console Administrator SAP J2EE Engine 6.20 Console Administrator is an alternative to the Visual Administrator tool. Unlike the Visual Administrator, it is not a GUI and the runtime control and administration is done using specific commands in the Shell language. The commands are entered on the command line in the console where the cluster node is running. This tool enables monitoring on the processes started on the different elements of the cluster and provides the opportunity for prompt and adequate reaction whenever problems occur. Console Administrator enables remote administration through telnet clients, or applets that simulate telnet client, as well as continuous deployment of applications and additional libraries. SAP J2EE Engine 6.20 Shell Language commands are described in detail in the Shell Commands Reference section in this document. 24/453
25 Property Files Administration Property files contain the configuration logic of SAP J2EE Engine Application server GUI administration tools Visual Administrator and Config Tool read the properties from these files to visualize them. If some modifications are made, they are stored in the corresponding property files. Properties can also be configured by editing the property files. For a list of SAP J2EE Engine 6.20 property files, refer to the Property Files Reference section in this document. All properties separated by modules are described in the Managers Administration Reference and Services Administration Reference sections in this manual. 25/453
26 Config Tool Config Tool Overview This tool provides an easy way to add, remove, and configure SAP J2EE Engine 6.20 cluster elements. In addition, you can set and use SAP J2EE Engine 6.20 in background mode as a Windows NT/2000 Service or a Daemon on Unix-like platforms. Config Tool can be used without a running SAP J2EE Engine The only requirement is to have the J2EE Engine installed on the local machine. Note: If you are running the Config Tool with JDK build 10 or lower and you are using an Intel processor with enabled Hyper Threading mode, then you may have difficulties with visualizing some parts of the Config Tool GUI correctly. To avoid these problems, disable the Hyper Threading mode. For more information, see SAPNote Note: Config Tool is XML-based, which enables third-party visualizations to be developed or integrated as part of a more complicated configuration system. For more information, refer to the Development Manual. Configuring SAP J2EE Engine 6.20 Managers and Services Application Node Configuration SAP J2EE Engine 6.20 Config Tool enables the modification of service or manager module properties. The current J2EE Engine configuration is detected automatically and displayed immediately after running the tool. 26/453

27 Cluster Installation Mode To load another configuration, you must specify the directory where SAP J2EE Engine 6.20 has been installed by choosing the File Scan command, or on the toolbar. A tree structure is displayed in the left-hand tab of the window. The main section of the tree is the SAP J2EE Engine 6.20 cluster. If the installation type is alone (for standalone version of SAP J2EE Engine 6.20), the alone ( ) configuration is displayed. By default, the J2EE Engine consists of one dispatcher, one application node, and one state controller. There are two subsections for each cluster node managers ( ) and services ( ). They contain a list of managers ( ) and services ( ) running on the cluster nodes. When a module is selected, its properties are displayed in the right-hand tab of the Config Tool frame. Modifying Configuration Properties When a particular service or manager is selected, its properties are displayed with their keys and values in the right-hand tab of the window. 27/453

28 Changing Module Properties To modify a property, first select it. Its key and value are shown in the corresponding text fields at the bottom of the pane, and can be modified. To add a new property, type its key and value and select Add to append it to the list of available properties. To remove one, select it and delete it by choosing Remove. Note: For information on SAP J2EE Engine 6.20 module properties, refer to the Managers Administration Reference and Services Administration Reference sections in this manual. Exporting and Applying Configuration To apply the changes, select File Apply, or on the toolbar. You can also save the configuration in an XML file by choosing File Export properties to XML, or on the toolbar. Adding Nodes to SAP J2EE Engine 6.20 Cluster The Config Tool enables you to add dispatcher and application nodes to the SAP J2EE Engine 6.20 Cluster. This option is available only for cluster installation mode. 28/453
29 Adding Cluster Nodes A new node can be added using the New menu. To specify the type of the cluster node to be added, select either New Dispatcher or New Server ( or on the toolbar respectively). A dialog box appears. Choose a name for the new cluster element from a list of available options. If you are creating an application node, then the data from the existing application node is copied to the new application node. You can clear this data by selecting the Clear all application data option, which starts the AppClear Tool. It is recommended to clear the application data. If the new cluster node is added successfully, the Config Tool window displays the updates. The new cluster node is displayed along with the managers and services running on it. Their properties can be modified as described in the Managers Administration Reference and Services Administration Reference sections in this manual. Note: You cannot add a state controller using the Config Tool. If you want to create a state controller, then use the upgrade procedure. For more information, see Upgrading SAP J2EE Engine 6.20 in the Installation and Upgrade Manual. Note: When you add nodes to an existing cluster, which is already configured to work with the startup framework, make sure you also configure the new node to use the startup framework, as you have already configured the other 29/453

30 nodes in the cluster. Otherwise, the life cycle of the new node will not be managed by the startup framework. New Cluster Node has been Added Successfully Removing Nodes from SAP J2EE Engine 6.20 Cluster The Config Tool enables you to remove nodes from the SAP J2EE Engine This option is available for cluster installation mode. It is possible to remove a dispatcher node only if there is more than one dispatcher in the cluster. Also, you cannot remove the initial application node created from the installation, it is used when creating a new application node for copying the existing application data. Note: Do not remove the state controllers. To remove an application node, select it from the cluster tree from the lefthand side of the frame and choose on the toolbar. 30/453

31 Removing Cluster Nodes SAP J2EE Engine 6.20 as an NT/2000 Service or a Unix Daemon Running a Cluster Node in Background Mode SAP J2EE Engine 6.20 can be run as a Windows NT/2000 Service or a Daemon on Unix-like platforms. The task of this service is to run SAP J2EE Engine 6.20 in background mode, thus increasing security and providing for optional reboot on startup. The J2EE Engine can be run either as a cluster or as a stand-alone version. When the cluster version is chosen, each cluster node is set to run separately in background mode. In this case, it is important that at least one dispatcher node is set to run in background mode; otherwise, the SAP J2EE Engine 6.20 system cannot function properly. When SAP J2EE Engine 6.20 is set to run in background mode, it can be accessed using Telnet. The console output is available in the corresponding log files. To set a cluster node to run as an NT/2000 Service or a Unix Daemon, the following steps must be performed: 31/453

32 Step 1. Select the NT Service tab of the frame and set the Enable NT Service indicator. Setting a Node to Run in Background Mode Java Path must be specified. This is the path to the Java home directory. Shutdown port must be specified. The cluster element listens to this port for a request to shut down. Make sure that the specified port is not already in use. Shutdown timeout has a default value but it can be modified. When the service stops its process, there is a timeout period (in milliseconds), after which the cluster element is shut down. Java parameters for starting cluster elements as a NT service. You can configure them using this field. 32/453
33 Step 2. To apply the changes, choose File Apply or on the toolbar. The settings are saved to service.ini file in the configtool subdirectory of SAP J2EE Engine 6.20 installation directory. This file has the following format: Service_0_MainClass=com.inqmy.boot.Start ServiceCount=1 Service_0_RootDir=C:\SAP_J2EEngine6.20\cluster\server Service_0_Timeout=10000 Service_0_JavaPath=C:\jdk1.3.1_09\ Service_0_Name=cluster\server Service_0_Port=5561 Service_0_Parameters= Service_0_JavaParameters=-Dmemory.manager=64M -Xmx64M -classpath ".;.\system-lib\boot.jar;.\system-lib\jaas.jar;" - Djava.security.policy=.\java.policy - Dorg.omg.CORBA.ORBClass=com.inqmy.system.ORBProxy - Dorg.omg.CORBA.ORBSingletonClass=com.inqmy.system.ORBSingletonProx y - Djavax.rmi.CORBA.PortableRemoteObjectClass=com.inqmy.system.Portab leremoteobjectproxy A detailed description of each field is provided below: ServiceCount the number of SAP J2EE Engine 6.20 nodes to be started in background mode. Indices of these nodes are in the range [0, ServiceCount-1]. Service_0_Name a mnemonic name of this element Service_0_RootDir the directory where the specified cluster element is installed Service_0_JavaPath contains the classpath to JDK directory Service_0_JavaParameters contains additional parameters to be passed to JVM Service_0_MainClass the main class to run Service_0_Parameters main class input parameters, if needed. In this case, no parameters are specified Service_0_Port port to be used when shutting this element down. When the operating system sends a signal for shutdown, the program sends a specially generated random key to this port. The key is generated when this element is started and the same key is used at shutdown for verification. The program waits until specified timeout passes. After the timeout, if the element is still running, it is forced to shut down. Service_0_Timeout this timeout is used when the element is shut down. It specifies the time (in milliseconds) after which the element is stopped by the system if it has failed to shut down. 33/453
34 Step 3. Start SAP J2EE Engine 6.20 in background mode according to the operating system on which SAP J2EE Engine 6.20 system runs. Windows NT/2000 Start Service.exe, which is in the configtool subdirectory of SAP J2EE Engine 6.20 installation directory. To add the SAP J2EE Engine 6.20 node to the Windows services, start service.exe as follows: Service.exe install the service(s) is (are) registered as NT/2000 Service(s). For each specified cluster node, a separate service is generated. All services have startup mode automatic. To start the service(s), open the Control Panel Services folder. Find the service in the list of available services (for example: SAP J2EE Server 1, SAP J2EE Dispatcher 1, SAP J2EE Server 2, and so on). Select it, and choose Start on the right-hand side. No Startup Parameters are needed for the service to run. The system starts the particular SAP J2EE Engine 6.20 node in background mode. It can be used and administered as usual. The only difference is that the server does not run in a console window. Note: Service.exe cannot be run within a 4NT DOS console. Start the service in another DOS console window. Unix-Like Platforms Open a console in the directory where Config Tool is installed. To start SAP J2EE Engine 6.20 as a Unix Daemon, enter: unixdaemon start This command starts the SAP J2EE Engine 6.20 system in background mode. It uses service.ini file to obtain the parameters of the cluster nodes. Note: The following points should be considered when running the J2EE Engine as an NT Service or Unix Daemon: 1. When Config Tool is started, the Java parameters field is loaded from the cmdline.properties file, located in the directory of the corresponding cluster element. 34/453
35 2. When the NT Service ( Daemon for Unix) indicator is set, the Apply command modifies the service.ini file, as described above. 3. When the NT Service ( Daemon for Unix) indicator is not set, the Apply command erases the information for this cluster element in the service.ini file. 4. Config Tool modifies only service.ini. To specify some new properties permanently, you must modify the corresponding cmdline.properties. Removing SAP J2EE Engine 6.20 in Background Mode To remove all SAP J2EE Engine 6.20 nodes running in background mode on Windows NT/2000 platform, start service.exe in a DOS console (but not in 4NT ) as follows: Service.exe remove To stop SAP J2EE Engine 6.20 running as a daemon on Unix-like platforms, use the following option: unixdaemon stop Even after you have removed or stopped SAP J2EE Engine service or daemon on Windows or Unix-like platform respectively, you can still run them in background mode following the steps described in the previous section. To disable the option for running a SAP J2EE Engine 6.20 node in background mode, complete the following steps: Select the relevant SAP J2EE Engine node in the left-hand pane of the Config Tool; Deselect the Enable check-box in the right-hand pane; Choose Apply on the toolbar. Configuring Cluster Elements with Identical Names in Different Clusters as Separate NT Services If various clusters reside on a single machine simultaneously, cluster elements with identical names running in different clusters can be set as separate NT services as follows: 35/453

36 1. In the service.ini file of the corresponding cluster, locate the Service_i_Name element, where i specifies the number of the service, which name has to be modified. 2. Change the name on the right side of the expression as you wish. 3. Install the service as described above. Note 1: If this procedure is not accomplished, only one of the cluster elements is run as an NT service. Note 2: The execution of these steps must take place between Step 2 and Step 3 of J2EE Engine 6.20 as an NT/2000 Service or a Unix Daemon section. SAP J2EE Engine 6.20 in Remote Debug Mode The Config Tool enables you to run the J2EE Engine in remote debug mode. This task can be performed on state controllers and application nodes of SAP J2EE Engine 6.20 Cluster. To run the cluster node in remote debug mode, complete the following steps: Step 1. Select an application node, choose the Debug tab, and set the Enabled indicator. Setting the Server Node in Debug Mode 36/453
37 To run the cluster element in remote debug mode, you must set additional parameters to the Virtual Machine. One of them is the debug port that enables debugger clients connections. Therefore, the next step is: Step 2. In the Debug port field type a number corresponding to the port that you want to set for debugger client connections. This port is opened by the Virtual Machine and must not be among the ports that SAP J2EE Engine uses. The cluster element remote debug performance is paused until a remote debugger client connects to the system. This client must be JPDA compatible. 37/453
38 Console Config Tool Overview The Console Config Tool handles SAP J2EE Engine 6.20 configuration, adding new nodes to the cluster, and running the J2EE Engine in background mode as a Windows NT/2000 Service, or a Daemon on Unix-like platforms. Console Config Tool has the same functions as the GUI Config Tool. There are several ways to run the Console Config Tool: Run Tools -> Console Config Tool from the SAP J2EE Engine 6.20 program folder. Doubleclick the consoleconfig script file in configtool directory of the installed SAP J2EE Engine Open a console window in the directory where the consoleconfig script file is located, enter consoleconfig on the command line, and choose Enter. Note: Config Tool is XML-based, which enables third-party visualizations to be developed or integrated as part of a more complicated configuration system. For more information, refer to the Development Manual. of Console Config Tool Functions The Console Config Tool functions for the cluster type of configuration are explained below. The stand-alone configuration procedure is similar. Step 1: Main Menu This step lists the available cluster elements and the Console Config Tool general options. <1> displays the available dispatcher nodes <2> displays the available application nodes <3> displays the available state controller or backup state controller <4> saves the configuration in an XML file <5> saves the changes <6> scans the directory where SAP J2EE Engine 6.20 has been installed 38/453
39 <7> adds a new dispatcher node (the maximum number of dispatcher nodes is 60) <8> adds a new application node (the maximum number of server nodes is 60) <9> removes a dispatcher <10> removes an application node <0> exits the Console Config Tool The next step depends on the choice in step 1. To modify the properties of dispatcher services and managers, select <1>. Step 2: Dispatcher Node Configuration This step enables you to modify dispatcher services and managers properties. <1> lists all services <2> lists all managers <3> sets the cluster element to run as a Windows NT/2000 Service, or a Daemon on Unix-like platforms; if the cluster element is already enabled to run in background mode, at this step you can disable this option <4> displays the Main Menu (step 1) <0> exits the Console Config Tool If <1> is the selected option, continue as follows: Step 2.1: Services Properties This step displays a numbered list of SAP J2EE Engine 6.20 services. To choose a service, enter the corresponding number. The last option from the list returns to the previous step. Each service has the following configuration menu: <1> lists all service properties <2> enables you to add a new property by specifying its name and value <3> displays a numbered list of all properties and enables you to delete properties <4> displays a numbered list of all properties and enables you to change their values <5> enables you to change the startup type of the service. By default, the type is set to always but can be changed as follows o <1> always starts the service 39/453
40 o <2> starts the service automatically that is, the first time the service is requested, it starts o <3> the service is started manually that is, the service must be started by the system administrator o <4> returns to the previous step <6> saves the changes made in the previous choices <7> lists the used ports o <1> lists the used TCP ports o <2> lists the used UDP ports o <3> returns to the previous menu o <0> exits the Console Config Tool <8> returns to the previous menu <0> exits the Console Config Tool Note: After each modification, a confirmation question is displayed with two options: Y for yes and N for no. If <2> is the choice in Step 2, continue as follows: Step 2.2: Managers Properties This step displays a numbered list of SAP J2EE Engine 6.20 managers. To choose a manager, enter the corresponding number. The last option from the list returns to the previous step. The managers configuration menu does not differ from the services configuration menu. For detailed information on the configuration menu, refer to Step 2.1. If the choice in Step 2 is <3> (that is, you want to enable the cluster element to run in background mode), continue as follows: Step 2.3: Cluster Element as a Windows NT/2000 Service or a Daemon on Unix-Like Platforms This step enables you to set the cluster element (dispatcher) as a Windows NT/2000 Service, or a Daemon on Unix-like platforms. The default settings are displayed: Port on which the cluster element listens for requests the default value is Make sure the specified port is not already in use. Timeout specifies the timeout period (in milliseconds) before the cluster element is shut down if the service stops its process. The default value is /453
41 Main class specifies the main class to run. The default is com.inqmy.boot.start. Root directory the directory where the cluster element has been installed. Default is <SAPj2eeEngine_install_dir>/cluster/dispatcher Java executable path the path to the Java home directory. The default is C:\jdk\1.3.1_09\bin\java. Parameters main class input parameters, if required. In this case, no parameters are specified. Java parameters for starting cluster elements as an NT service The cluster element default settings described above can be modified using the following options: <1> sets port value <2> sets timeout <3> sets main class <4> sets root directory <5> sets Java executable path <6> sets main class parameters <7> sets Java parameters <8> sets the cluster element to be a Windows NT/2000 Service <9> confirms the current cluster element status and returns to the previous step <0> exits the Console Config Tool Note: For detailed information about setting SAP J2EE Engine 6.20 cluster elements as a Windows NT/2000 Services or a Daemon on Unix-like platforms, refer to Confil Tool SAP J2EE Engine 6.20 as a Windows NT/2000 Service or Unix Daemon the section in this manual. If <2> is the choice in Step 1, continue as follows: Step 3: Application Node Configuration This step enables you to modify the properties of the services and managers running on the application nodes of the SAP J2EE Engine 6.20 cluster. <1> lists all services <2> lists all managers <3> enables debug mode <4> sets the cluster element to run as a Windows NT/2000 Service, or a Daemon on Unix-like platforms; if the cluster element is already 41/453
42 enabled to run in background mode, at this step you can disable this option <5> displays the Main Menu (step 1) <0> exits the Console Config Tool If <1> is the selected option, continue as follows: Step 3.1: Services Properties This step displays a numbered list of SAP J2EE Engine 6.20 services. It is the same as for dispatcher nodes therefore, refer to Step 2.1. If <2> is the choice in Step 3, continue as follows: Step 3.2: Managers Properties This step displays a numbered list of SAP J2EE Engine 6.20 managers. It is the same as for dispatcher nodes therefore, refer to Step 2.2. If <3> is the selected option, continue as follows: Step 3.3: Enable Debug Mode This step enables you to run the J2EE Engine in remote debug mode. This task can be performed on application nodes and state controllers of SAP J2EE Engine 6.20 Cluster. To run the cluster element in remote debug mode, set a debug port that enables debugger clients connections. It is opened by the Virtual Machine and must not be among the ports that SAP J2EE Engine uses. Step 3.4: Cluster Element as a Windows NT/2000 Service or a Daemon on Unix-Like Platforms This step enables you to set application node, state controller, and backup state controller as a Windows NT/2000 Service, or a Daemon on Unix-like platforms. It is the same as for dispatcher nodes therefore, refer to Step 2.3. Step 4: State Controller Configuration The state controller configuration is the same as the configuration for application nodes. Refer to the corresponding section. 42/453
43 Deployment Tools All tools that carry out deployment-related tasks on SAP J2EE Engine 6.20 are located in <SAPj2eeEngine_install_dir>/deploying. These are tools for RMI classes compilation, J2EE components generation, application assembling, and actual application deployment on different cluster nodes. For information on how to deploy J2EE applications, how to use the different deployment tools, and view some sample deployment scenarios, refer to the Deployment Manual. 43/453
44 LogViewer Tool Introduction This guide discusses features and navigation for the Log Viewer application. Purpose The J2EE Engine listens to logging activity and makes every log file available as it is created. The user can open log files and if possible, the data will be parsed such that columns of data can be accessed. The most recent log messages are displayed first. It is possible to open and view many log files at one time. You can view logs side-by-side, search each column, or merge the logs based on time stamps in each record. The Log Viewer: Displays application and system logs Gives insight into system problems, helps debugging and improve performance by providing insights into the inner workings. Tries to display the information in a useful form (it understands the information in a log) Brings logs together from the J2EE Engine and related systems in one place Searches logs Merges logs that have some kind of compatible sequence information across application nodes Allows to control the amount of log data created (by controlling the severity threshold on Logs) Context Monitoring Running a query across many logs while searching for 'Error' on the Severity column is an easy way to keep track of problems. The Log Viewer also can generate template files for the CCMS agent. Alerts will then be generated in the CCMS. 44/453

45 Problem Diagnostics The messages in log files provide hints to the cause of problematic application behavior. Performance Tuning The SAT logs show execution times for user transactions. The SQL trace provides details on the database interactions through the OpenSQL interface. Prerequisites for Running the Log Viewer You must have Java runtime 1.3 or greater installed Log Viewer client is a Swing application. The Log Viewer Service on the SAP J2EE Engine is required. It is assumed that the Log Viewer is installed and configured properly on your system, according to the Installation and Configuration Guide Log Viewer listed under Related Documentation, below. Viewing Logs When a log is displayed in the Log Viewer window, as shown in the figure above, the section most recent in time is initially displayed. You have the following controls to view the log: You can move up and down the log using the up and down arrows, or using the scroll bar. 45/453
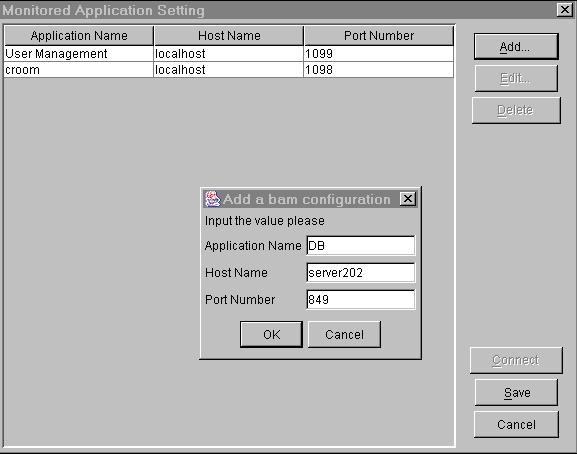
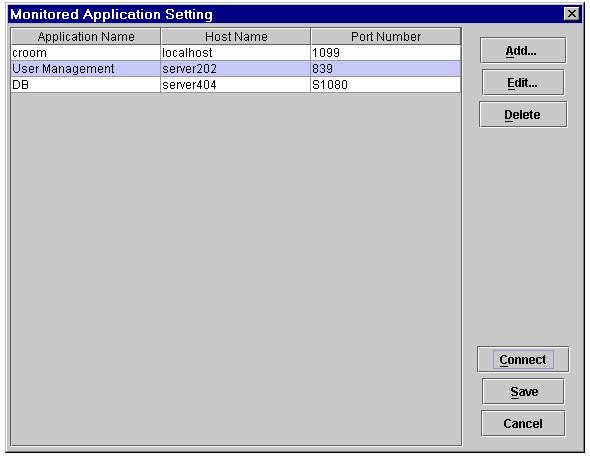
46 Use the Refresh Selected Log File icon to show the most current part of the log. You can also view the most recent part of the log (the top) using the CONTROL-HOME keys. You can view the oldest part of the log (the bottom) using the CONTROL-END keys. The buttons on the column tops, shown below, allow you to sort the log lines presented by the column headings. Configuration Add a Monitored Application 1. To add a new monitored application in the Log Viewer, select Tools Config from the menu. 2. On the Monitored Application Setting window, click Add. 3. Enter the following: a. Application Name this is descriptive title only, and should help the user to remember the application being monitored. b. Host Name an IP address pointing to the host c. Port Number -- the standard service port for the P4 RMI service d. Click OK. 4. Click Connect to test the connection to the J2EE Engine, before you save the configuration. 5. Click Save to save your configuration and connect to the J2EE Engine. The monitored application name will be refreshed on the side menu navigation tree. 46/453
47 47/453
48 To test the connection to verify that it works, do the following: 1. Click Connect. 2. If connection does not work, possible reasons are: a. Wrong port. To determine the correct port, see the Configuring the Remote Configuration Socketport section. b. Wrong host name. Either the host J2EE Engine is not running, or the IP address is not correct. Verify the IP address. Try pinging the host to see if it is working. To edit the application settings, do the following: 1. Select the application name. 2. Click Edit. 3. Change the settings as required. 4. Click Save. To remove a monitored application, click Delete. Generation of the CCMS Monitoring Template Computing Center Management System (CCMS) is an application running on an SAP R/3 system that monitors the state and quality of SAP execution, both within the R/3 System, and in external servers. CCMS receives information from CCMS Agent applications running within the R/3 system and on external servers. This section describes the format and creation of CCMS Agent Template files (templates) used by CCMS Agents within servers external to R/3. These templates define to the CCMS Agent what log files to monitor, where they are located in the directory structure, and what log output patterns to look for. A CCMS Agent Template is created whenever the Log Viewer receives notification that a new log has been created. The contents of a template file are created, according to the values specified in a Properties file. 48/453
49 Flow As illustrated in the figure below, the Log Viewer receives a New Log command (from a J2EE application, for example) to initiate the creation of the CCMS Agent Template file. J2EE Application Creates New Log New Log Command log 2 Add to log list New log listener 3 Create CCMS Agent template 1 6 Agent Template contains pattern CCMS Agent 7 Read Template Monitor log for patterns 8 4 Update the log file template index 5 Index 9 Notify CCMS of finds RFC Log Viewer CCMS R/3 The sequence of events is shown by the numbers in the figure above. The Log Viewer gets the location of the log in the file system, and adds the log file to the list of log files to be monitored by the Log Viewer (log list). The Log Viewer then reads the Log Viewer Properties file to determine the text pattern to search for, and in what color CCMS is to display each such line found. Log Viewer then creates the template file, inserting the log file path name, the search pattern, and the color value. The Log Viewer then stores the template file in the template output directory, as specified in the Properties file. When the CCMS Agent finds a new template, it gets the template, corresponding to the new log, from the template output directory. The CCMS Agent begins monitoring the log for text patterns specified in the template. When the agent finds one of the specified text patterns, it notifies CCMS on the R/3 system via an RFC. 49/453
50 of the Log Viewer Properties File The Log Viewer Properties file is an unformatted text file that specifies configurable properties of the Log Viewer. It can be created and edited with any text editor. The file name is of the form: log_timestamplogmon.iniwhere the file name is composed of two parts: a unique log time stamp prefix, log_timestamp Example: the required end characters, logmon.ini, that indicate this is a log initialization file. Example: logmon.ini The Properties file is stored in the installation directory of the SAP J2EE Engine Typically in location c:\sapj2ee6.20\cluster\server\services\logviewer An example of the Properties is shown in the Example Properties File section. The description of the purpose and format of each property follows. Output_directory This output_directory property specifies where in the directory structure the template files are stored. It has the format: output_directory = directory file path where directory file path stored. defines the location where the template files are Example for MS Windows-based system: output_directory = C:\\usr\\sap\\PRFCLOG\\logmon Note: Note that double backslashes (\\) are required as directory separators, because the backslash has special meaning in Microsoft Windows. The first backslash serves as the escape character and indicates that the following backslash is actually part of the text string that identifies the directory. 50/453
51 Example for Unix-based system: output_directory = /usr/sap/prfclog/logmon Flag for Generating the CCMS Template File This property gives you the option no to create a CCMS Template file. It has the format: FlagForGeneratingCCMSTemplate = binary digit where binary digit is: 0, to specify that no template file is to be created 1, to specify that the template file is to be created, as specified by properties below. Example: FlagForGeneratingCCMSTemplate = 1 Search Patterns and CCMS Display Color This property defines the text string pattern that CCMS is to search for, the log type, and the color in which the corresponding line in the log is to be displayed. It has the format: TypeOfFormatter_Pattern = Color Value The TypeOfFormatter_Pattern property is composed of two parts, separated by the underscore (_) character: The TypeOfFormatter part specifies the type of log to monitored, and can have one of the following values: Specify SAPJLog for the List Format log type. Specify ASCIILog for the ASCII logs log type. Specify SATLog for the SATTraces log type. 51/453
52 The Pattern part specifies the text string pattern to be searched for. Examples are: Error Warning Information The Color Value property can have one of three values: GREEN YELLOW RED Putting the two parts together is illustrated in the following examples: SAPJLog_Fatal = RED, indicating a List Format log is to be searched for text Fatal and will be displayed on the CCMS monitor screen with color red. ASCIILog_Warning = YELLOW, indicating an ASCII log is to be searched for text Warning and will be displayed on the CCMS monitor screen with color yellow. ASCIILog_Debug = GREEN, indicating an ASCII log is to be searched for text Debug and will be displayed on the CCMS monitor screen with color green. SATLog_Warning = YELLOW, indicating an SATTraces log is to be searched for text Warning and will be displayed on the CCMS monitor screen with color yellow. Example Properties File logviewer 6.20 ##specify the configuration directory that holds properties file for logviewer ## (mainly 'LogViewerLogging.properties' & 'startuplogging.properties') ##default: no value/commented, and the directory is \sapmarkets\properties ##Note that you'll have to use double backslashes for Windows systems ##(e.g.: c:\\sapmarkets\\properties). #cfg.path= MBeanServerName=RemoteMBeanServer socketport=3011 # The above part is not relevant to the CCMS Agent template generation. # This rest of this file defines the properties needed for creating the CCMSAgent Template. 52/453
53 # The property output_directory defines the location where the template files should be put. The following directory must already exist & LV has write permission. Diff formats for diff Oss # The directory is where the CCMS agent is going to look for the templates # example for windows based system output_directory = C:\\usr\\sap\\PRFCLOG\\logmon #example for unix based system #output_directory = /usr/sap/prfclog/logmon # FlagForGeneratingCCMSTemplate: If 0, Do not generate template file; If 1, Generate the ccmstemplate files. FlagForGeneratingCCMSTemplate = 1 # The following properties defines the Pattern to search for and the value for. # The format is TypeOfFormatter_Pattern = Value. # So if a pattern to be searched was "Error" in the ListFormatFiles # and the display color was Pink, then the definition is: # SAPJLOG_Error = Pink # For List format log type = SAPJLog # patterni = Fatal, for example in first one SAPJLog_Fatal = RED SAPJLog_Error = RED SAPJLog_Warning = YELLOW SAPJLog_Debug = GREEN SAPJLog_Info = GREEN # For Ascii logs log type = ASCIILog ASCIILog_Fatal = RED ASCIILog_Error = RED ASCIILog_Warning = YELLOW ASCIILog_Debug = GREEN ASCIILog_Info = GREEN # For SATTraces. log type = SATLog SATLog_Fatal = RED SATLog_Error = RED SATLog_Warning = YELLOW SATLog_Debug = GREEN SATLog_Info = GREEN of the CCMS Agent Template File This file is created by the Log Viewer and stored in the template output directory, output_directory, as specified in the Log Viewer Properties file. The contents are created, based on the example properties specified in the Log Viewer Properties file, as described in the previous section. The following is an example of a template, based on the previous properties file. 53/453
54 Example of a CCMS Agent Template File LOGFILE_TEMPLATE FILENAME=LogFile0.log DIRECTORY=C:\Documents and Settings\i803727\properties\CombinedLogMergeLogrecordCounterTest2 PATTERN_0=ERROR VALUE_0=Pink PATTERN_1=Warning VALUE_1=Yellow PATTERN_2=Info VALUE_2=White PATTERN_3=FATAL VALUE_3=Red PATTERN_4=Debug VALUE_4=Blue. Configuring the Remote Configuration Socketport This is the same port as defined for the P4 Service for RMI. It is usually 3011, but can change. To determine its value, look in the P4 properties file. The properties file can be found at the following location: C:\usr\sap\epb3\j2ee\j2ee_00\cluster\dispatcher\services\p4\properties The following is an example P4 properties file with the port emphasized. #p4 #Fri May 16 09:51:52 PDT 2003 alltransports=httptunneling\:ssl\: ssl=50006 port=50004 httptunneling=50005 Attribute Setting Log files attributes include the formatter used and the log level. Only the log level an be set through the log viewer user interface. The attribute settings just change the log level on the log, not the location. Procedure 1. Select (highlight) the log file for which you want to set the attribute settings. Right click on the log file name and select Attribute Setting (alternatively click Tools Attribute Setting.. from the top menu). 54/453

55 2. On the Attribute Setting window, select Severity. The possible values appear under the values column. Select the severity value (Log Level) that you wan to display in the Log Viewer. The severity is an attribute that can be set for the SAP Java Logging framework. To adjust the logging level, the logging framework will only write those log records whose severity is higher than the severity level you set. 55/453
 will not appear under the column Severity in the log.")
56 Note: If you select the value Error then all the values below Error (implies increasing severity) will be visible in the log file updates. All log records with severity settings above Error (lesser severity levels) will not appear under the column Severity in the log. The settings are applied as new log records are written by the application running on the J2EE Engine. This does not impact the display of records written before the setting was changed. Docking / Undocking the Application Log You can view the log file within the Log Viewer application window (dock) or as a separate window (undock). This may be helpful for the case where you want to compare two or more log files simultaneously in separate windows. 56/453
 log messages that contain the search string.")
57 Procedure 1. Right click on the log file tab in the Log Viewer window, and select Undock<file_name>. This action launches a new log file window. 2. To dock the file, click on the dock icon. Search Strings Searches for the first (and next) log messages that contain the search string. The messages of each row in the log can be searched for a regular expression substring (like the Unix grep tool). You can perform search on the rows as well as the columns: 57/453

58 Procedure 1. Right click anywhere on the row or the column (not on the column header). The highlighted text indicates the name of the column. Select GREP to search strings. 2. On the dialog window, enter the search string as the input value and click Ok. The search results appear in the split window. Inside the search result window, when you double click on one row, the upper log file window will automatically scroll to the particular position and highlight the line you have clicked in the log file. 3. The search results appear in the split window. Inside the search result window, when you double click on one row, the upper log file window will automatically scroll to the particular position and highlight the line you have clicked in the log file. Note: All search strings are case sensitive. 58/453

59 Show / Hide Columns You can show or hide columns in the Log Viewer. Right click on the column header and select / deselect the column name which you want to show / hide. It is also possible to move columns. Drag and drop them at the new position. 59/453
. Dock.")
60 Icons Icons Meanings Configure LogViewer Client. Set the attributes of the selected log file (if it is controlled by the logging.jar service). Dock. Toggle displaying the search results pane. Get the latest logs from the J2EE Engine. 60/453
61 Appclear Tool Appclear Tool removes applications deployed previously on the application node. Appclear Tool execution is performed using the appclear script file, located in <SAPj2eeEngine_install_dir>/cluster/server or <SAPj2eeEngine_install_dir>/alone directory. An additional txt file must be given as a parameter to the script file to specify the deployed applications to be removed. This file must be named appclear.txt and must be located in the same directory as the corresponding script. The syntax of appclear.txt file is as follows: delete=[directory_path] skip=[directory_path] If a directory path is specified in the delete command, all files and subdirectories are deleted. The skip command line shows the path to a directory that is not to be deleted. More then one directory can be added at the skip command line and all paths are separated by semicolon (;). Note 1: appclear script file is executed without any parameters. It reads from appclear.txt and removes the selected directories. Make sure that appclear.txt file is present in the directory where the appclear script is located. Note 2: The skip command cannot be omitted. It must exist in the row straight after delete. If all directories must be deleted, the syntax of skip is: skip= (that is, without any parameters). Note 3: It is recommended that Appclear Tool be used in critical situations only, since it clears all data that has been stored in the DBMS Service /work directory. This includes users and groups that are not created by default during the installation process that is, the initial state of the J2EE Engine is recovered, except the default password for user Guest (default password is guest but after executing appclear script file the password for this user is empty string ). You can modify the appclear.txt file to prevent deletion of all data. However, when SAP J2EE Engine 6.20 is functioning properly, it is recommended you use the REMOVEAPP command from the DEPLOY Shell command group to remove an application. 61/453
62 DBTool DBTool Overview DBTool provides an easy and reliable way to create and manipulate pools. This process is fully automatic and is performed using an XML file. A pool represents a set of stored connections to a database. A pooled connection is a logical connection, which actually represents a wrapper over a physical one. Therefore, when a user terminates a connection to the database, the connection is returned to the pool and can be reused by another user. In this way, greater efficiency is achieved by avoiding the process of recreating connections. SAP J2EE Engine DBPool Service supports both JDBC 1.x and JDBC 2.0 compliant drivers. Therefore, different properties must be specified when using either type of drivers. In both cases, however, you can name the pool, and specify aliases for it. The pool can also limit the number of connections to a predefined maximum value. For JDBC 1.x drivers the database is identified using a JDBC URL. The JDBC URL consists of three parts: a protocol identifier (always JDBC), a driver identifier (for example, ODBC, IDB, Oracle, and so on), and a database identifier (the format is driver specific). As an example, jdbc:odbc:demo is the JDBC URL for a database named demo accessed using the JDBC-ODBC bridge driver. The JDBC 2.0 drivers require specific properties for example, application node name and port number. For these drivers you must also specify the classnames of the XADataSource object factory and of the XADataSource object used when connection is established. To create the pool, run dbtool script file, located in <SAPj2eeEngine_install_dir>/tools directory. DBTOOL.XML The dbtool.xml file is passed as a parameter to the dbtool script file. Its tags are defined in the following DTD: <!DOCTYPE db-tool [ <!ELEMENT db-tool (login-info, jdbc-driver*, database-pool*, database-initialization*)> <!ELEMENT login-info (host, port, user-name, user-password)> <!ELEMENT host (#PCDATA)> 62/453
63 <!ELEMENT port (#PCDATA)> <!ELEMENT user-name (#PCDATA)> <!ELEMENT user-password (#PCDATA)> <!ELEMENT jdbc-driver (classname, jar-file+)> <!ELEMENT classname (#PCDATA)> <!ELEMENT jar-file (#PCDATA)> <!ELEMENT database-pool (poolname, alias*, jdbc-driver-classname, jdbc-url, db-user, db-password, init-connections?, defaultconnections?, max-connections?, isolation-level?)> <!ELEMENT poolname (#PCDATA)> <!ELEMENT alias (#PCDATA)> <!ELEMENT jdbc-driver-classname (#PCDATA)> <!ELEMENT jdbc-url (#PCDATA)> <!ELEMENT db-user (#PCDATA)> <!ELEMENT db-password (#PCDATA)> <!ELEMENT init-connections (#PCDATA)> <!ELEMENT default-connections (#PCDATA)> <!ELEMENT max-connections (#PCDATA)> <!ELEMENT isolation-level (#PCDATA)> <!ELEMENT database-pool-jdbc-2.0 (poolname, alias*, objectfactory, xads-class-name, init-connections?, default-connections?, max-connections?, isolation-level?, properties?)> <!ELEMENT object-factory (#PCDATA)> <!ELEMENT xads-class-name (#PCDATA)> <!ELEMENT properties (property+)> <!ELEMENT property (property-name, property-value)> <!ELEMENT property-name (#PCDATA)> <!ELEMENT property-value (#PCDATA)> <!ELEMENT database-initialization (poolname, sql-statement*)> <!ELEMENT sql-statement (#PCDATA)> <!ATTLIST sql-statement ignore-error CDATA #IMPLIED> ]> The elements of the DTD are described as follows: <!-- The db-tool element is the root element for this DTD. It contains the information that is necessary to create a pool of database connections using the DBTool. --> <!ELEMENT db-tool (login-info, jdbc-driver*, database-pool*, database-initialization*)> <!-- The login-info element contains the information used for the user login to SAP J2EE Engine. This includes host, port, and security information a username, and a valid password. --> 63/453
64 <!ELEMENT login-info (host, port, user-name, user-password)> <!-- The host element defines the host, to which the user connects. --> <!ELEMENT host (#PCDATA)> <!-- The port element defines the port through which the user connects to SAP J2EE Engine. --> <!ELEMENT port (#PCDATA)> <!-- The user-name element specifies a valid user name to log on to SAP J2EE Engine. --> <!ELEMENT user-name (#PCDATA)> <!-- The user-password element specifies a valid password for the relevant user to log on to SAP J2EE Engine. --> <!ELEMENT user-password (#PCDATA)> <!-- The jdbc-driver element contains data about the JDBC driver that is used for obtaining DataSource objects and respectively, connections to the database. --> <!ELEMENT jdbc-driver (classname, jar-file+)> <!-- The classname element specifies the classname of the driver for example, oracle.jdbc.driver.oracledriver. --> <!ELEMENT classname (#PCDATA)> <!-- The jar-file element specifies the archive file of the relevant JDBC driver. When you enter the path to the driver, be aware that the syntax is operating system-specific. --> <!ELEMENT jar-file (#PCDATA)> <!-- The database-pool element contains the data that is necessary to register a pool when JDBC 1.x-compliant driver is used. You do not need to include this element, when you use a JDBC 2.0 driver. --> <!ELEMENT database-pool (poolname, alias*, jdbc-driver-classname, jdbc-url, db-user, db-password, init-connections?, defaultconnections?, max-connections?, isolation-level?)> <!-- 64/453
65 The poolname element specifies a name for the database pool used when it is looked up. --> <!ELEMENT poolname (#PCDATA)> <!-- The alias element defines an alternative name of a registered pool; thus multiple applications can look up a single pool can be looked up by a different name. --> <!ELEMENT alias (#PCDATA)> <!-- The jdbc-driver-classname element defines the implementation class of the JDBC driver. --> <!ELEMENT jdbc-driver-classname (#PCDATA)> <!-- The jdbc-url element defines URL of the database. The format is database-specific. The URL of a database should contain the following elements: the protocol identifier; the name of the database; the name of the machine where the connection with the database is established; port listening for connections. Some databases for example, Oracle, also require name of the service. --> <!ELEMENT jdbc-url (#PCDATA)> <!-- The db-user element specifies user name in the database. --> <!ELEMENT db-user (#PCDATA)> <!-- The db-password element specifies user password in the database. --> <!ELEMENT db-password (#PCDATA)> <!-- The init-connections element defines the number of the connections obtained from the driver, when the pool is created. --> <!ELEMENT init-connections (#PCDATA)> <!-- The default-connections element defines the number of default connections to the database. If, for example, default-connections value is set to 10 and the number of free and used connections exceeds 10 then all free connections are closed till the number reaches > <!ELEMENT default-connections (#PCDATA)> <!-- 65/453
66 The max-connections element defines the maximum number of connections, which can be obtained from the driver --> <!ELEMENT max-connections (#PCDATA)> <! The isolation-level element defines the transaction isolation level that is used for the connection, as follows: NONE sets default isolation. This is the isolation level of the connection returned by the driver. RUC sets TRANSACTION_READ_UNCOMMITED isolation level RC sets TRANSACTION_READ_COMMITED isolation level RR sets TRANSACTION_REPEATABLE_READ isolation level S sets TRANSACTION_SERIALIZABLE isolation level --> <!ELEMENT isolation-level (#PCDATA)> <!-- The database-pool-jdbc-2.0 element contains the data that is necessary to register a pool when JDBC 2.0-compliant driver is used. You do not need to include this element, when you use a JDBC 1.x driver. --> <!ELEMENT database-pool-jdbc-2.0 (poolname, alias*, objectfactory, xads-class-name, init-connections?, default-connections?, max-connections?, isolation-level?, properties?)> <!-- The object-factory element specifies XADataSource object factory for example, com.merant.sequelink.jdbcx.datasource.sequelinkdatasourcefactory. --> <!ELEMENT object-factory (#PCDATA)> <!-- The xads-class-name element specifies the name of the XADataSource object class for example, com.merant.sequelink.jdbcx.datasource.sequelinkdatasource. --> <!ELEMENT xads-class-name (#PCDATA)> <!-- The properties element contains additional driver-specific properties. This element is optional. --> <!ELEMENT properties (property+)> <!-- The property element describes a particular driver-specific property with its name and value. --> <!ELEMENT property (property-name, property-value)> <!-- 66/453
67 The property-name element specifies the name of a particular driver-specific property. --> <!ELEMENT property-name (#PCDATA)> <!-- The property-value element specifies the value of the relevant driver-specific property. --> <!ELEMENT property-value (#PCDATA)> <!-- The database-initialization element contains data for database initialization and enables you to perform database operations using a particular database pool. The pool is specified by name. --> <!ELEMENT database-initialization (poolname, sql-statement*)> <!-- The sql-statement element contains the SQL statement for the database initialization. It specifies the operation that is to be performed on the database. --> <!ELEMENT sql-statement (#PCDATA)> <!-- This tag defines an attribute ignore-error for the sqlstatement, which takes a value of CDATA type (String) and is not required. The attribute takes either true or false value. If it is set to false, and the system throws an SQLException, the execution of the SQL statement(s) within the databaseinitialization tag is stopped. The same is the result when the ignore-error attribute is not set at all. If it is set to true, the execution of the SQL statements continues even after an SQLException is thrown. --> <!ATTLIST sql-statement ignore-error CDATA #IMPLIED> Note: You can find an evample of an XML file used by DBTool in <SAPj2eeEngine_install_dir>/tools directory. The filename is dbtool.xml. 67/453
68 Library Tool Library Tool has two functions to validate the library.txt file on a particular cluster element, and to include the entries of library.txt on one of the cluster elements into the corresponding file on another. To validate a library.txt file, use: libtool validate s <cluster_directory_name> This option verifies the JAR files in the corresponding application node directory. All JAR files in each entry line in library.txt are compared with the existing JAR files in the additional-lib directory of the application node. If the comparison fails, an error message is displayed. To compare two library.txt files on different application nodes and include the source entries into the destination file, use: libtool include s <source_directory> -d <destination_directory> [-r] This option is useful when you have configured the library.txt on one application node and want to configure the other application nodes in the same way. All entry lines that are missing in the destination library.txt are added, so that the destination file has all the information that is in the source. This command includes the additional entries in the reference.txt file as well. The parameter r performs a special function. If the source file and the destination file contain equal library names and r is specified оn the command line, the destination s library entry is updated with the one in the source file. Otherwise, the duplicated libraries remain unchanged. Note: All needed JAR files must be copied manually from the source to the destination additional-lib directory. For more detailed information about the structure of library.txt, see Configuration Tasks Configuration of Additional Libraries. Note 1: Use Library Tool only when the J2EE Engine is not running. 68/453
69 Note 2: We recommend that you use this tool only in the stand-alone version of the J2EE Engine. If you want to use it on the cluster version, first you have to stop all cluster elements. Then run Library tool on the state controller. After that, start the other cluster elements. Their library references are synchronized to the ones on the state controller. Note 3: To modify library references at runtime, use CHANGELIB and CHANGEREF Shell commands from the DEPLOY group instead. For information about these commands, see Shell Commands Reference. 69/453
70 RMIC Tool RMIC Tool generates stubs and ties (skeletons) to be used in the remote client-server communication. The tool enables you to manage the process by choosing various options in both GUI and console (non-gui) environment. The names of the generated files follow a convention, according which the files generated with RMI/P4 support are named as follows: <classname>_stub <classname>p4_skel For the files generated to support IIOP, the names are as follows: _<classname>_stub _<classname>_tie GUI RMIC Tool You can start the GUI RMIC Tool by executing the RMIC script file (located in <SAPj2eeEngine_install_dir>/deploying directory) without parameters. The usage and options of the RMI improved compiler dialog box are described below: Destination Directory the directory where the files for remote communication are generated. The path is absolute, according to the corresponding operating system. The default value is the current directory. Class Name the fully qualified Java name of the remote class Additional classpath directories or JAR files to be added to the classpath; with this option, you do not need to set in advance the path to the package in the system classpath. Different options are provided for the specifics of the generating process: RMI_P4 Support generates stubs and skeletons that enable you to use the remote object using the RMI/P4 protocol Use RMI_P4 Security related to the RMI/P4 option above. If the indicator is set, the generated skeleton encapsulates additional security features. Each time a particular remote method is requested by a client, the security logic implemented in the skeleton verifies whether 70/453
71 the corresponding user is authorized with access to the remote method. If not, an exception is thrown. RMI_IIOP Support generation of stubs and ties is performed using the IIOP protocol Additional Stubs related to the RMI/IIOP option above. If a remote class implements more than one remote interface, separate stubs for all implemented interfaces are generated. By default (if the indicator is not set), a common stub is generated for all implemented interfaces. Keep java generated files if you set this indicator, the generated.java files of the stubs and the skeletons are not deleted after the.class files have been produced Console RMIC Tool You can start the RMIC script file with parameters in console environment. The available options are as follows: -d after this parameter, specify the destination directory where the generated stubs and skeletons are saved. The path is absolute, according to the corresponding operating system. The default value is the current directory. -classpath adds the specified directories and JAR files to the classpath -nrmi_p4 if you specify this parameter, the generated stubs and skeletons do not support the RMI/P4 protocol -nsecurity related to nrmi_p4 option; if you choose this parameter, the generated skeleton does not include additional security features. By default, security features are included in the generated files. -iiop with this option specified the files are generated with IIOP support -additional related to iiop option; if you use this option, RMIC Tool generates separate stubs for all remote interfaces that are implemented by the remote class. By default, a single stub for all interfaces is created. -nkeep if you use this option, the generated.java files are deleted, after the.class files are produced. By default, the.java files are stored as well. Note: Specify the fully qualified Java name of the remote class after the options that you have chosen to use. 71/453
72 ShutDown Tool ShutDown Tool performs local or remote shutdown on a specified cluster element. The process is executed using a shutdown script file, included in the <SAPj2eeEngine_install_dir>/tools/ directory. The syntax of the parameters is as follows: Where: shutdown u p h <host:port> -ids -u is the username of the user the default value is Administrator -p is the password of the user the default value is -h:port specifies the host and the port of the cluster element the default value is localhost:3011 -ids specifies the ID for every cluster element the default value is 0 The number of parameters can vary from one to nine. Any parameters above this range are not processed. The command identifiers (-u, -p, -h, -ids) are also included in the number of parameters. For example, the total number of parameters in the following command is five: shutdown -ids h localhost:3011 Two different approaches must be taken into consideration to count the parameters correctly if the ids identifier is available in the command line: When separated by comma, the cluster elements IDs are considered as a single command parameter. For example, shutdown -ids 5001,4001 the actual number of parameters in this example is two (not three). When separated by spaces, every ID is counted as a single parameter. For example, shutdown -ids the actual number of parameters in this example is four. More information about the Shutdown tool can be obtained using: shutdown.bat shutdown.bat shutdown.bat shutdown.bat help info info help 72/453
73 All parameters after the filename are optional. For example, if shutdown is typed in the command line on its own, all cluster elements on the local machine are shut down. 73/453
74 User Tool User Tool Overview User Tool enables you to add user groups authorized to server resources. For example, DBTool cannot start creating pools without available groups, so the system administrator must first create the user groups. This task is performed in the following steps: Generate a usertool.xml file with a specified structure Run the usertool script file, which uses the configured XML The usertool script file is located in <SAPj2eeEngine_install_dir>/tools directory. XML Structure for User Tool This XML file is organized hierarchically, and requires the following structure: <user-tool> <!-- exactly 1 <login-info> must be specified --> <!-- the tag <port> is optional --> <login-info> <host>localhost</host> <port>3011</port> <user-name>administrator</user-name> <user-password /> </login-info> <!-- (0..n) <group> must be specified --> <!-- at least 1 <parent-group> must be specified per <group> -> <!-- if group already exists, the parents are added --> <group> <name>financial</name> <parent-group>manager</parent-group> </group> <group> <name>manager</name> <parent-group>root</parent-group> </group> </user-tool> 74/453
75 The <login-info> tag defines the login properties of the new user group with their values: <host> localhost <port> (optional) 3011 <user_name> Administrator <user_password> an empty value The <group> tag defines the new group name and its parent group: <name> specifies the name of the group <parent-group> specifies the name of the parent group. In this example, the group named financial is included as a child group of the manager parent group. 75/453
76 Analyze Tool Analyze Tool Overview Use this tool to locally or remotely gather information about the SAP J2EE Engine without interfering the system resources, but viewing their copy instead. This toll can be started using the script file analyze in the <SAPj2eeEngine_install_dir>/tools/analyze/ directory. The Analyze Tool can be used in two ways: Offline - in this case the tool collects all the system properties, the file structure of the installation directory, the output of some operational system dependant commands and files like logs, go scripts, service and manager properties, service.ini, etc. Online - tries to connect to all known SAP J2EE ports and stores the responses. If the tool succeeds to connect using Telnet port, it will try to log on to SAP J2EE Engine. Then executes many shell commands for each cluster element and tries to start Offline Analyze from the shell for each new host it goes. If it does not succeed on a host, it executes some Operational System dependant commands on the host. The following options are available: -v starts the verbose mode. Otherwise, the console of the tool is silent. -j <J2EE_HOME> SAP J2EE Engine directory to be analyzed. If it is specified, the tool scans first offline and then tries online scan. -h <remote_host> host name for online analysis. If <J2EE_HOME> and <remote_host> are specified the tool scans them both (SAP J2EE Engine and the remote host), but all the data is collected in one.zip file, that is <analyze.zip> -u <user> administrators user name needed for the Telnet analysis. Default name is Administrator. -p <password> user password. The default is an empty string. -z <analyze.zip> The analysis result.zip file. The default value is./analyze.zip. -telnet <port> the port number for Telnet analysis. -http <port> the port number for the HTTP scan. -port <port> the port number for the raw scan. 76/453
77 Note: You can specify several ports by simply repeating the parameter. For example, -telnet 23 -telnet Example on starting an offline analyze: java com.inqmy.tools.analyze.analyze -v -j C:\SAP_J2EEngine6.20 Example on starting an online analyze: java com.inqmy.tools.analyze.analyze -v -h localhost 77/453
78 Chapter 2 Administration of SAP J2EE Engine 6.20 Cluster Overview Planning the Architecture of a Cluster Adding Nodes to SAP J2EE Engine 6.20 Cluster Managing the Load-Balancing System Configuring a Cluster When Multiple LAN Adapters are Available (Windows) 78/453
79 Overview A SAP J2EE Engine 6.20 cluster is a group of independent connected nodes managed as a single system for higher availability and reliability, easier manageability and greater scalability. Clustering minimizes response time to client requests and provides scalability by adding more nodes to an existing system, thereby minimizing the risk of system disruption. Clustering results in improved manageability because the system administrator can manage the cluster remotely from a central location. The cluster appears to the administrator as containing no nodes, but as a single system. The SAP J2EE Engine 6.20 cluster solution includes centralized management of the state of the cluster nodes, centralized persistent data storage, centralized runtime state management, dynamic cluster load balancing, failover recovery, data replication. To obtain best performance, it is very important to consider the requirements for cluster configuration, and the expected workload, and to choose the most appropriate cluster scenario and the optimal configuration for the system. Cluster Management with the Visual Administrator Tool The Visual Administrator tool enables you to manage the different nodes in a SAP J2EE Engine 6.20 cluster and configure the modules running on them. The tool provides the following modes for viewing the cluster nodes, and the modules running on them: Tab View three tabs are displayed in the left-hand pane of the Visual Administrator. Cluster tab displays the running state controller, backup state controller, application nodes, and dispatcher nodes in the cluster. It provides information about the port, host, ID, type, and name of each node. Managers displays a list of all managers running in the cluster. Services displays a list of all services running in the cluster. 79/453
80 Cluster View provides a tree view in which the main elements are the cluster nodes. The managers and services running on each cluster node can be displayed by expanding the tree. Element View displays a tree of all managers and services running in the cluster. When expanded, the tree also shows the nodes on which each module runs. You can modify the administrable properties of the modules in each of the options for cluster viewing. Note: For detailed information about SAP J2EE Engine 6.20 services and managers, refer to the Services Administration Reference and Managers Administration Reference sections in this document. Cluster Management with the Console Administrator Tool The SAP J2EE Engine 6.20 Console Administrator tool enables you to administer cluster nodes. Unlike Visual Administrator, it is not a GUI and the administration is done using Shell language commands. Commands can be input in the node command line, or can be used for remote administration using a telnet client. When using a telnet client, the system administrator must first run a state controller, a dispatcher and an application node. The administrator can then connect to the cluster (that is, to the dispatcher node) and to configure all other nodes in the cluster remotely. The Console Administrator commands are divided into groups, containing commands with different functions. Two of them System Commands and Admin Commands refer to SAP J2EE Engine 6.20 cluster administration. Note: For detailed information about the Shell Language commands, refer to the Shell Commands Reference section in this document. 80/453
81 Planning the Architecture of a Cluster SAP J2EE Engine Cluster Introduction The SAP J2EE Engine 6.20 cluster must consist of: one state controller, which: o serves as a single, central, persistent data storage o manages the state of the cluster o holds global information about the cluster and the participating nodes cluster-wide locks, configurations, and so on o does not process user requests the applications deployed on the cluster are first started on the state controller (to be initialized), and then are started on the application nodes. After the synchronization within the cluster, the applications are stopped on the state controller. one back-up state controller (optional), which: o in case of state controller failure, replaces the state controller and takes responsibility of the whole cluster. Thus, the back-up state controller becomes the state controller. When the original state controller is again up and running, it becomes the back-up state controller. o is recommended to be installed on a different physical machine, as this prevents from cluster failures in case of hardware problems dispatcher nodes, which dispatch the user requests between the application nodes application nodes, which process user requests. 81/453

82 The SAP J2EE Engine 6.20 Cluster Architecture All cluster nodes are connected and communicate with each other. There are a number of requirements that must be met to configure a SAP J2EE Engine 6.20 cluster. The minimum cluster configuration consists of one state controller, one dispatcher node, and one application node. (This is also the default cluster installation.) The cluster cannot exist without a state controller. 82/453
83 All machines on which the cluster nodes are started must be on the same Local Area Network (LAN). The IP addresses of the hosts can be either static or dynamic. All identical services on SAP J2EE Engine 6.20 nodes must be of the same version. Typically, all identical services on the nodes in the cluster must be configured the same in relation to external resources. Why Working in a Cluster? The configuration of the SAP J2EE Engine 6.20 cluster must be planned considering the following basic points: Deployed and running applications the number of application nodes must change relatively to the load which the cluster is supposed to handle. The leading criterion is the total consumption of calculating and other system resources for all applications to be accessed by clients. Number of concurrent users the number of dispatcher nodes (also the number of cluster machines) must increase proportionally if there is a significant growth in the number of client requests. Stability of the system one state controller in the cluster can identify a single point of failure. Adding a back-up state controller ensures that when the state controller fails, the cluster will stay stable and the application nodes will continue to process requests. Mechanisms for Automatic Restarts in Case of Cluster Node Failures The 6.20 cluster architecture is designed so as if a cluster node fails, it automatically restarts. This guarantees the stability of the whole system and ensures that the deployed applications will continue to function correctly regardless of cluster node failures. The behavior of the cluster in case of failures is as follows: If an application node fails, it automatically restarts If the state controller fails and there is no back-up state controller, all nodes in the cluster automatically restart. If the state controller fails and there is a back-up state controller installed, the cluster continues to function correctly. The backup state controller becomes the state controller. The original state controller 83/453
84 automatically restarts and joins the cluster as a back-up state controller. If the backup state controller fails, it automatically restarts. As the state controller is still running, the cluster will still function correctly. If the dispatcher node fails, it automatically restarts. Note: These mechanisms work when you use the cyclic scripts to start the cluster nodes, when you use the startup framework, and when you are in an ABAP environment. If you use the standard go scripts to start the nodes, these mechanisms for automatic restart of the cluster nodes will not be available. Cluster Startup For Enterprise Portal customers, we recommend that after you install the SAP J2EE Engine, you install the startup framework and use it to start the SAP J2EE Engine. The startup framework provides centralized management of the cluster nodes and monitors their life cycle. In case of cluster node failure, the framework automatically restarts the corresponding node. Start the J2EE Engine as described in the Installing and Configuring the 6.40 Startup Framework to Use with SAP J2EE Engine 6.20 guide provided with the J2EE Engine 6.20 installation package (see <SAPj2eeEngine_install_dir>/docs/startup.pdf). The first node to start is the state controller. After that, the dispatcher and the application nodes start and connect to the state controller. The existence or successful start of the backup state controller is not critical for successful start of the whole cluster. The other options to start the cluster are: By using the go_loop scripts these are cyclic scripts designed so as if a cluster node fails, the script automatically restarts and the node is again up and running. If in ABAP environment (that is, the the r3environment property of the R3Startup Manager running on the dispatcher node is set to yes.), the ABAP dispatcher starts the whole cluster. In case of failures, the cluster nodes are automatically restarted. By using the standard go scripts in case of cluster node failure, you must manually restart the corresponding node; there is no automatic restart in this case. 84/453
85 Startup in ABAP Environment This startup sequence is present if the r3environment property of the R3Startup Manager running on the dispatcher node is set to yes or if the startup mode of the R3Startup Service is set to always. The cluster startup sequence is as follows: 1. The ABAP dispatcher starts the SAP J2EE Engine dispatcher node. The dispatcher node R3Startup Manager is started, but the dispatcher itself is not started since it needs a state controller to connect to. 2. The dispatcher s R3Startup Manager starts the state controller and the application nodes. The application nodes cannot start until the state controller is up and running. 3. The Cluster Manager of the dispatcher node detects the running state controller and starts the dispatcher. The dispatcher connects to the state controller. 4. The Cluster Managers of each application node detect the running state controller and start the corresponding application node. The nodes connect to the state controller. After a certain timeout (specified in the RestartTimeout property in the dispatcher node s R3Startup Manager), the dispatcher checks whether all application nodes have successfully started and, if they have not, terminates the corresponding process and restarts the node. The number of attempts allowed to restart the failed application node is specified in the MaxRestarts property in the R3Startup Manager. The automatic restart mechanisms in the ABAP environment are as follows: If an application node fails, the R3Startup Manager running on the dispatcher node detects this and restarts the node. To ensure that the failed application node has closed and released all used resources, the dispatcher waits for a timeout (specified in the SleepBeforeRestart property in the R3Startup Service) before triggering the application node restart. If the state controller fails and there is no back-up state controller, all other nodes in the cluster (including the dispatcher) fail too. The ABAP 85/453
86 dispatcher detects that there is no SAP J2EE Engine dispatcher running and restarts it. Then the dispatcher node restarts the other nodes in the cluster as described in the startup procedure above. If the state controller fails and there is a back-up state controller installed, the cluster nodes connect to the back-up state controller and the cluster continues to function correctly. The state controller automatically restarts and joins the cluster as a back-up state controller. If the backup state controller fails, the R3Startup Manager running on the dispatcher node detects this and restarts it. If the dispatcher node fails, the ABAP dispatcher detects this and restarts the J2EE Engine dispatcher. Cluster Size Restrictions The maximum number of nodes participating in one and the same J2EE Engine 6.20 cluster must be no more than 15. The current limitation, in terms of size, for a cluster which can be administered with the Visual Administrator is eight nodes. When you have more, use the Telnet as an alternative. 86/453
87 Adding Nodes to SAP J2EE Engine 6.20 Cluster The typical SAP J2EE Engine 6.20 Cluster installation provides a state controller, a dispatcher, and an application node. Additional cluster nodes can be added by using the SAP J2EE Engine 6.20 Config Tool. Adding nodes typically increases performance and scalability. To add a node to the cluster, you must first create the node, and then run and connect it to the cluster. Cluster nodes are created locally that is, the system administrator cannot create nodes on a remote machine. To add a cluster node on a particular machine, SAP J2EE Engine 6.20 ( Cluster type) must be installed on this machine. The Creating Cluster Nodes section explains how to add cluster nodes. When a new node is created, it must be configured properly to run within the existing cluster. The configuration of the newly created cluster nodes is explained in the Configuring Additional Nodes section below. Creating Cluster Nodes The SAP J2EE Engine 6.20 Config Tool enables you to add application and dispatcher nodes to the cluster. After the new node has been added successfully, it can also be configured using the Config Tool. Note: For detailed information on how to add cluster nodes using the Config Tool, refer to the Config Tool section in this manual. To add nodes, which will run on a different physical machine, use the installation procedure. Installing a Backup State Controller During a dialog instance installation, select the Create Backup Controller option and specify the host and port for the state controller. The installation procedure will then automatically configure the correct ClusterHosts property values for the cluster nodes you are installing. 87/453
88 Note: Use the Config Tool to manually specify the host and port of the backup state controller in the ClusterHosts property of all cluster nodes already installed since this will not be configured automatically. Adding Cluster Nodes to an Existing Cluster Box To add additional nodes to an existing cluster box, use the Config Tool. It automatically configures the values of all necessary properties (ClusterHosts and ClusterElementType). Adding a Dialog Instance to the Cluster A dialog instance is a box in the cluster (a physical machine with all dispatcher and application nodes running on it) that does not contain a state controller and connects to a central instance (a box that contains a state controller). To add to the cluster a dialog instance without a backup state controller, use the standard installation procedure but do not install a state controller or a backup state controller. During the installation, specify the hosts and the ports of the state controller and the backup state controller in the cluster. The installation procedure will then automatically configure the correct ClusterHosts property values for the cluster nodes you are installing. Configuring the Additional Nodes General Configurations When a new node is created, it can be run and connected to the SAP J2EE Engine 6.20 cluster. When joining nodes to a cluster the system administrator must take into consideration the ports used on the machine where the new node is to run. All communication services on cluster nodes have a default port property that must be changed if the particular port is already in use on the particular machine. It is essential that the ports specified for HTTP Service, P4 Service, JMS Service, and Telnet Service are not already in use by another cluster node running on the corresponding machine. The values of the OpenPort and JoinPort properties must not be duplicated for cluster nodes running on a single machine. When a newly generated application node connects to the cluster, a database replication process starts. If the database is too large, the timeout period may be exceeded and the corresponding application node will fail to connect. To 88/453
89 overcome this problem, increase the value of the CoreLoadTimeout property in the Service Manager. In addition, when configuring the cluster, the system administrator may choose to restrict the access to one or more of its nodes from certain machines (specified either by hostnames or IP addresses). This is achieved by configuring the IPVerification Manager appropriately. To ensure correct communication and operation within the cluster, the following properties must be configured in the Cluster Manager of each cluster node: ClusterHosts specifies the set of hosts and ports to which the corresponding node tries to connect to join the cluster. See the Creating Cluster Nodes section above to determine when the system sets the value of this property automatically, and when you have to configure it manually. ClusterElementType determines the type of cluster node; possible values: StateController, BackupStateController, Dispatcher, ApplicationNode. This property is automatically set by the system, when you create the corresponding node. RepeatToConnect true if the node will wait for a state controller to start a new cluster, false if the node itself will create the cluster. This property is deprecated use the ClusterElementType property instead. DependentElement false if the node is a state controller or a backup state controller, true for dispatcher or application nodes. This property is deprecated use the ClusterElementType property instead. If the settings for the ClusterHosts and ClusterElementType properties of a cluster node are not correct, this node will not be able to start and join the cluster. Thus, if the cluster is configured to have more than one state controller, only one of these nodes will be started. If two backup state controllers are configured, but no state controller, the cluster will not be started. If you do not specify the ClusterElementType property, the values of the RepeatToConnect and DependentElement properties are used to determine the cluster node type. Otherwise, the values of the RepeatToConnect and DependentElement properties are ignored. These properties are used only when upgrading an existing cluster. In the case of a new installation, the properties are not used. 89/453
90 The SuspendedElement property in the Service Manager must be true for the state controller and the backup state controller, and false for the application nodes. This property is also configured by default when you install the cluster nodes. This results in the following valid configurations in the Cluster Manager and in the Service Manager: State Controller ClusterHosts ClusterElementType RepeatToConnect DependentElement SuspendedElement <back-up state controller host>:<back-up state controller join port> StateController false false true Backup State Controller (Optional) ClusterHosts ClusterElementType RepeatToConnect DependentElement SuspendedElement <state controller host>:<state controller join port> BackupStateController true false true Dispatcher Nodes ClusterHosts <state controller host>:<state controller join port> <back-up state controller host>:<back-up state controller join port> ClusterElementType Dispatcher RepeatToConnect true DependentElement true SuspendedElement false Application Nodes ClusterHosts <state controller host>:<state controller join port> <back-up state controller host>:<back-up state controller join port> ClusterElementType ApplicationNode RepeatToConnect true DependentElement true SuspendedElement false 90/453
91 Configuring a Dispatcher Node to Distribute Requests Only to the Local Application Nodes Set the LocalLoadBalancing property in the Service Manager of the dispatcher nodes in the cluster must be set to true. This property enforces the dispatcher to distribute requests only to the application nodes, situated on the same physical machine. Adding Nodes to a Cluster Which Uses the Startup Framework When you add nodes to an existing cluster, which is already configured to work with the startup framework, make sure you also configure the new node to use the startup framework, as you have already configured the other nodes in the cluster. Otherwise, the life cycle of the new node will not be managed by the startup framework. Tuning the Cluster Nodes to Detect Network Disconnection Ping Requests and Timeouts All cluster nodes on regular intervals send ping requests in turn to all other nodes in the cluster. The period which determines the time between two consecutive ping requests is specified in the PingInterval property in the Cluster Manager. The dispatcher and application nodes do not expect a reply from the pinged cluster node. The state controller and the backup state controller expect a reply. The period in which the corresponding node expects the reply is specified in the PingReplyTimeout property. If the state controller or the backup state controller has not received a reply for three consecutive ping requests, the state controller assumes that the non-responding node is blocked or has failed and removes it from the cluster. The state controller also notifies the other cluster nodes to exclude the failed node from the cluster. The default value for the PingInterval property is 1000ms. The default value for the PingReplyTimeout property is 60000ms. If the value of the PingInterval property is set to 0, the ping algorithm for the current cluster node is disabled, that is it does not send regular ping requests to the other cluster nodes. 91/453
92 If the value of the PingReplyTimeout property is set to 0, the state controller or the back-up state controller does not expect replies. The PingReplyTimeout property on dispatcher and application nodes is not functional. Detecting Network Failures by IP Address To enable the algorithm for detecting network failures by IP address, specify the IP address to which the current cluster node is bound in the ClusterElementIPAddress property of the Cluster Manager. This property defines to which IP address the current cluster element is bound. The cluster node registers in the cluster with this IP address. The node uses this IP address to send ping requests to itself; thus, if this does not succeed, the cluster node detects a network failure and restarts itself. If after the restart, the node is still unable to ping itself over the IP address, it again restarts itself. This process continues until the network is restored and the node succeeds to ping itself. The LAN adapter of this IP address must be visible for the other machines in the cluster. This property is optional, if it is not specified, the algorithm for detecting network disconnection is disabled. By default the property is not specified. We recommend that you use this property only if you have a static IP address. Detecting Failures Within the Cluster The SAP J2EE Engine cluster architecture includes several watchdogs, which detect inactivity and failures of cluster nodes in the cluster and shut down or restart (depending on the startup mechanism you use) the stuck or hanged nodes. You can also configure a timeout for these triggered shutdowns or restarts, to ensure that the corresponding node has released all used resources. Managers Timeout This watchdog monitors the startup of the managers on the corresponding node. If the managers before the Service Manager have not started before the specified timeout has elapsed, the node automatically restarts. Use this timeout when you have a large cluster, consisting of a lot of nodes. It will ensure that there are no stuck nodes in the cluster. 92/453
93 By default this watchdog mechanism is disabled. To use it, configure the KernelTimeout property in the Service Manager of the corresponding node. The value of this property is in seconds. This is the timeout after which if the managers have not started, the node restarts automatically. Core Services Timeout This watchdog monitors the startup of the core services on the corresponding node. If the core services have not started before the specified timeout has elapsed, the node automatically restarts. By default the core services timeout is set to 30 seconds. To change this, change the value of the CoreLoadTimeout property in the Service Manager of the corresponding node. Additional Services Timeout This watchdog monitors the startup of the additional services on the corresponding node. If the additional services have not started before the specified timeout has elapsed, the node automatically restarts. By default the additional services timeout is set to 40 seconds. To change this, change the value of the AdditionalLoadTimeout property in the Service Manager of the corresponding node. Thread Manager Inactivity Detection This watchdog monitors the activity of the threads in the corresponding node. If the watchdog does not detect thread activity for the period specified in the InactivityTimeout property in the Thread Manager, it assumes that the node is stuck and stops it. The value of this property is in minutes. By default, the Thread Manager inactivity detection is disabled, that is the property is missing. To enable this mechanism, add this property and specify its value. HTTP Heartbeat The HTTP Heartbeat Service running on the dispatcher nodes can be used to check the availability of the application nodes in the cluster, whether they are up and running, and able to process HTTP requests. This service sends HTTP requests to all application nodes in the cluster to check whether they will send the expected response for a specified period. 93/453
94 When the HTTP Heartbeat Service is started, it enumerates the application nodes and starts sending requests to them. The CYCLE_TIMEOUT property specifies how often the service will send these requests. If the response is not returned during the specified time interval or if it is returned but is not the expected response, after the timeout specified in the HTTP_SOCKET_TIMEOUT property elapses, the socket to that application node will be closed and the HTTP Heartbeat Service will shut down or restart the application node (depending on the startup mechanism you use). The value of the CYCLE_TIMEOUT property must be equal to or larger than the value of the HTTP_SOCKET_TIMEOUT property to ensure that the next request will be sent after the socket timeout has elapsed. The HTTP Heartbeat Service can also be used to check the correct work of an application deployed on the J2EE Engine, that is, you can send a request to the application and after the successful completing of the request (which might for example test partly or the whole functionality of the application), the application will send a confirmation response to the HTTP Heartbeat Service. If the response is not correct, the service will shut down or restart the application node (depending on the startup mechanism you use). The HTTP Heartbeat Service also checks whether the application is in stopped mode, and if so, the application node is neither shut down, nor restarted, although the service has not received the correct response. Note: By default, this service is stopped and has to be started manually. To use it you have to configure its properties according to your J2EE Engine installation and application specifics; just starting the service manually without specifying the properties will lead to an error message and the service will fail to start. For more information about the HTTP Heartbeat Service and its properties, see Services Administration Reference -> HTTP Heartbeat Service in this manual. Shutdown and Restart Timeout To ensure that cluster node to be shut down (restarted) has closed and released all resources, which it holds, before the shutdown (restart), the system waits a certain timeout before shutting down (restarting) the corresponding node. This timeout is specified in the HaltTimeout property in the Service Manager of the corresponding node. 94/453
95 To perform a critical shut down, use the ForceShutdown property of the Service Manager. If set to true, the system performs a critical shutdown, that is, does not stop the applications and the application nodes before the shutdown. By default the value of this property is set to false (that is, before shutdown, the system stops the deployed applications). Not Started Cluster Nodes (R3Startup Manager) The R3Startup Manager running on dispatcher nodes starts the state controller, the backup state controller, and the application nodes. After a certain timeout, the R3Startup Manager checks whether all cluster nodes, which it has started are up and running. This timeout is specified in the RestartTimeout property in the dispatcher s R3Startup Manager. The default value of the RestartTimeout property is calculated by the following formula: 900 x <the number of cluster nodes, which the manager starts> The value is in seconds. Example: If you have a cluster consisting of 1 dispatcher, 1 state controller, and 2 application nodes, the value of the RestartTimeout property will be 900 x (1 state controller + 2 application nodes) = 900 x 3 = 2700 seconds If the value of the RestartTimeout property is set to 0, this mechanism is disabled, that is, the R3Startup Manager does not detect failed to start nodes and does not restart them. If the R3Startup Manager detects a cluster node, which is not running, the manager kills its process and restarts the node. The maximum number of restarts of a cluster node is specified in the MaxRestarts property. The default value is 5 restarts, that is after 6 startup failures, the R3Startup Manager shuts down the corresponding node. Restart Timeout in Case of Application Node Failure (R3Startup Manager) When in R/3 environment the R3Sstartup Service has detected an application node failure, the R3Startup Manager restarts the corresponding node. However, to ensure that the application node has closed and released all resources, which it holds, before the restart, the manager waits a certain 95/453
96 timeout before restarting the application node. This timeout is specified in the SleepBeforeRestart property in the R3Startup Service. The default value of this property is 5 seconds. Note: For more information on configuring Cluster Manager, Service Manager, R3Startup Manager, and IPVerification Manager, see the Managers Administration Reference section in this manual. 96/453
97 Managing the Load Balancing System The SAP J2EE Engine 6.20 load balancing system distributes client requests to appropriate cluster nodes within the cluster. When a client application requests an application node resource (a particular service), the load balancing system chooses the most appropriate application node (which has that particular service running on it.) This applies only for the communication services that run on both dispatcher and application nodes. These services use the functions provided by a specially designed interface, named LoadBalance context, and direct the client requests accordingly. The load balancing system chooses the application nodes that must process client requests randomly. However, machines in the cluster have a certain load balancing power defined (as described below) and this power is relative to the power of all cluster elements. That is, the average count of requests that an application node receives is determined by the proportion of the load balancing power it has, relative to the load balancing power of the whole cluster. Configuring the Load Balancing Power of the Machines Within the Cluster The machines within the cluster may work at different speeds, have a different number of elements running on them, and different amount of physical memory, and so on. Therefore, you can estimate the power of a machine (relative to other cluster elements), so that the load-balancing algorithm can determine the appropriate cluster element to process a client request. The number of application and dispatcher cluster elements running on a particular machine must also be considered when calculating the relative power. These calculations are performed by the system administrator and are independent of the SAP J2EE Engine 6.20 system. Once the relative power of the machines is estimated, the dispatcher nodes check this property and select the most appropriate application node to process the client request. To define the relative power of a machine, start SAP J2EE Engine 6.20 Visual Administrator. Make sure that you are in Cluster view mode (that is, on the toolbar is selected). Choose Cluster Application node Managers ServiceManager from the left-hand pane of SAP J2EE 97/453
98 Engine 6.20 Visual Administrator. Choose the Properties tab from the righthand pane. Select the LoadBalancingPower property and change its value in the Value field at the bottom of the right-hand pane. The value range of this property is an integer from 1 to 100. The default value is 50. Choose Add. To put the changes into effect, choose (Save Properties) on the toolbar and restart the Service Manager. 98/453
99 Configuring a Cluster When Multiple LAN Adapters are Available (Windows) Procedure This section provides a solution how the IP of the physical LAN adapter to prevail against the IPs of the other installed adapters. When J2EE Engine works in a cluster, each machine is connected to the cluster network using its physical LAN adapter. Therefore, it is obligatory for each machine in the cluster this adapter to be placed on a first place, as when calling the local host the system returns the adapter that is defined first. 1. On your Windows system, choose Start -> Settings -> Control Panel -> Network and Dial-up Connections. 2. From the Windows toolbar menus, choose Advanced -> Advanced Settings. The Advance Settings dialog appears. 3. In the Connections pane, select your physical LAN adapter and move it to the top of the list. 4. Choose OK. You then have to restart the J2EE Engine instance running on this machine. Note: If after the change of the LAN adapter settings, there are still problems in connecting the machine to the cluster, you may need to restart the whole cluster. 99/453
100 Chapter 3 Administration of SAP J2EE Engine 6.20 Stand-Alone Version Stand-Alone Server Overview Stand-Alone Server Services and Managers Stand-Alone Server Administration and Application Deployment 100/453
101 Overview SAP J2EE Engine 6.20 Stand-alone version consists of a server and a dispatcher running in one Java Virtual Machine. It encapsulates all the functions of the SAP J2EE Engine 6.20 cluster. The difference between the two is that the Stand-alone Server cannot process as many requests as the cluster, which typically contains a number of application and dispatcher nodes. Therefore, the response time to a large number of requests increases, and scalability is reduced. However, Stand-alone Server is a very good solution for a smaller number of requests, since it provides optimizations for better performance, and the communication between the server and dispatcher parts of the Stand-alone Server is not based on sockets. 101/453
102 Stand-Alone Server Services and Managers The Stand-alone Server consists of all services and managers in the cluster version, including a Cluster Manager responsible for the communication between the virtual server and dispatcher nodes. In contrast to the cluster version, the stand-alone version contains two Service Managers in one virtual machine one for the dispatcher part and one for the server part. The Service Manager for the dispatcher part takes care of starting and stopping services that run on a dispatcher node in the cluster solution that is, communication services. The Service Manager for the server part manages services that run on application nodes in the cluster solution. Both Service Managers have an additional property, StandAlone, which denotes that they are running in stand-alone mode. Note: For detailed information about Services and Managers administration, refer to the Services Administration Reference and Managers Administration Reference sections in this document. 102/453
103 Stand-Alone Server Administration and Application Deployment SAP J2EE Engine 6.20 Stand-Alone Server has similar functions as those provided by the cluster solution. You can use three administration tools to perform admnistration task on it Visual Administrator, Console Administrator, and Property Files. Using the Visual Administrator tool, SAP J2EE Engine 6.20 Stand-Alone Server is relatively easier to administer than the cluster solution because it consists of a single application node. The administration steps are identical as those for the SAP J2EE Engine 6.20 Cluster. They are described later in the Services Administration Reference chapter of this manual. All Console Administrator-specific commands of the cluster solution are also available for Stand-alone Server administration. Only the lss and lsm commands have different behaviour. They list altogether the services or managers that are running in the Virtual Machine. That is, they are not divided by services and managers running on the application node and those running on dispatcher node of the Stand-alone Server. When you deploy an application, you must perform the same steps as with the cluster solution. There is no difference in deployment procedures between them. 103/453
104 Chapter 4 Configuration Tasks Overview Configuration of Additional Libraries How to Set up SAP J2EE Engine 6.20 Web Server Using the Log System and Monitoring Managing Security Remote Administration Using Telnet Connecting Internet Information Server with SAP J2EE Engine 6.20 Running Apache Web Server with SAP J2EE Engine 6.20 Setting up SAP J2EE Engine 6.20 for Application Tracing and Remote Debugging 104/453
105 Overview This section explains how to perform tasks concerning general administration of SAP J2EE Engine Tasks described in this section may refer to information in other parts of the manual or other SAP J2EE Engine 6.20 documents. Featured tasks are: Configuration of Additional Libraries How to Set up SAP J2EE Engine 6.20 Web Server Using Log System and Monitoring Managing Security Configuring a Firewall Remote Administration Using Telnet Connecting Internet Information Server with SAP J2EE Engine 6.20 Running Apache Web Server with SAP J2EE Engine 6.20 Setting up SAP J2EE Engine 6.20 for Application Tracing and Remote Debugging 105/453
106 Configuration of Additional Libraries System-Lib Lib SAP J2EE Engine 6.20 functions both basic and additional are provided by a set of services and libraries. The libraries are separated into three groups, and the JAR files are located in three subdirectories of SAP J2EE Engine 6.20 cluster nodes installation directories: system-lib, lib, and additional-lib. This task describes the specific functions each group provides, and explains how to add JAR files to each group (if required). Additional libraries required to run a certain application can be added at deploy time using SAP J2EE Engine 6.20 Deploy Tool. For further information, refer to the Deployment Manual. This directory contains JAR files that are used by the system for unification of system functions when different versions of Java Development Kit (JDK) are used. You are not supposed to add any JAR files to the ones available in this directory. The JAR files in this directory refer to SAP J2EE Engine 6.20 kernel functions that is, they represent system core modules. When a new JAR is added, the system classloader detects it and loads its classes at startup. You do not have to set any references to this JAR. The corresponding cluster node has to be restarted to load the classes in the additional JAR. Additional-Lib All libraries that are to be used from more than one application must be put into this directory, and then references must be set to them. Note: If a certain library is to be used by just one application, it is recommended you put its JAR directly into the application EAR for deployment. This way, no references need be set. 106/453
107 This directory contains JAR files that provide SAP J2EE Engine 6.20 additional functions. You can add JAR files and set references to them. To activate the changes, you can restart only the services that have references to the new module(s) that is, it is not necessary to restart the whole system or the cluster node. The libraries from the additional-lib directory are described in library.txt file, which is located in /managers/ directory. When a library is added to the directory, the library.txt file is updated with the new entry. The libraries that are included by default in the additional-lib directory are used by SAP J2EE Engine services and are vital for the proper functioning of the application server. These standard libraries and the references between them are defined in default-library.txt, located in../server/managers/settings directory. The libraries are loaded at server startup and are used by both core and additional services. Note 1: It is recommended that you avoid editing default-library.txt. If editing proves to be necessary (for example, when different libraries should be used for various OS), the file must be edited manually on each cluster node, which may lead to inconsistency. Furthermore, the files that are listed in defaultlibrary.txt must only be changed using the tools provided for upgrading and patching of the versions. Note 2: default-library.txt is not available in older J2EE Engine versions. To run a server component from an older version within a cluster in which default-library.txt is available, copy the file in the../server/managers/settings directory of the server element from the older version. The references from services to libraries are defined in the provider.xml of the relevant service. The reference.txt file in../server/managers directory describes references from deployed applications and resource adapters to services or libraries. Note: We recommend that you avoid editing library.txt, reference.txt and provider.xml files manually, but use the tools provided with J2EE Engine. The options for editing these files are described in the subsequent sections. Adding a New JAR to the Set of Libraries A new JAR is added to the set of libraries by copying it into the additional-lib folder, or its subfolders. You must then modify the library.txt file placed in the corresponding managers directory. A new library line has to be added to the 107/453
108 text file to indicate that a new JAR is added to additional-lib directory. A new reference line must then be added, if this library has a reference link to another one. The syntax of this file is as follows: library jsse jsse.jar reference jsse jnet This example illustrates the adding of jsse.jar, named jsse, which has a single reference to jnet library. Jnet must be also defined in library.txt: library jnet jnet.jar JAR names must be specified as a relative path from the additional-lib folder. A reference between jsee and jnet now means that jsee.jar uses classes from jnet.jar. Multiple libraries can be organized under one name. For example: library majorlib lib1.jar;lib2.jar; libn.jar This avoids having to set references among all libraries. In the example above, majorlib is loaded with a single classloader, which provides for their usage as a common entity for example, each of the libraries can use classes from any other library. Note: Supported separator is semi-colon (;). Except for JAR files, directories with classes can also be set as a library. The absolute path to the directory must be specified using! before the path denoting it is a directory. For example: library classes!c:\myclasses Console Administrator New libraries can be added to the additional-lib directory using the CHANGELIB command from the DEPLOY command group. For details on its parameter and usage, refer to Shell Commands Reference section in this manual. Note: You can specify a subdirectory of additional-lib and locate the libraries you deploy there. This might be necessary, for example, to avoid collisions when you have deployed various applications that use different versions of a particular library. If you specify a non-existing directory, it is created automatically. You can change the name of the JAR files. 108/453
109 Deploy Tool To add libraries, you can also use Deploy Tool provided with SAP J2EE Engine For more information, refer to the Deployment Manual. Setting References from Service to Services or Libraries You can set references from a service to another service, or from a service to a library. When an extra service or library is installed on SAP J2EE Engine 6.20, you can set a reference to it. This task can be performed either using the Visual Administrator tool or provider.xml file of the corresponding service. Note that a reference to a service or a library must be set explicitly for each service that is, a service or library cannot be referenced by another service unless it is specified in the provider.xml file of this service. Visual Administrator Reference to a service or library can be set by choosing the Control Descriptor Distribute tab of the corresponding service in Visual Administrator. The Service References pane enables you to add, remove, and edit references. Add displays a dialog box in which you must specify Reference Name, Type and Strength. If a reference to a library is set, the Reference Name must exist in library.txt file. Two reference types are available: Service and Library. The strength of a reference can be either weak or hard. A Weak reference implies that, when starting a service, it is not obligatory that services that are referenced by it must be started. The referenced services must be available on the server, but not necessarily started. When stopping a service with weak reference to other ones, services that it refers to might not be stopped. Remove removes a selected reference from the list of available references Edit enables you to modify the name, type and strength of a selected reference Provider.xml File You can set a reference to a service or library using the provider.xml file of each service. You must add the following field to the list of available references: 109/453
110 <reference type="referencetype" strength="referencestrength"> ReferenceName </reference> The ReferenceType can be service or library. The value of the ReferenceStrength element can be weak or hard. Note: If a reference to other resources (services and libraries) is added in Servlets_jsp Service, the classpath to the specified JAR must be added in the ServletCompilerClassPath property. It is used to find external resources that are used by JSPs at compilation time. After changing the classpath, Servlet_jsp Service must be restarted. Adding a Reference from a Deployed Application to a Service or Library If an application deployed on SAP J2EE Engine 6.20 uses resources from outside the application EAR, it must set references to them to work properly. Resources can be either SAP J2EE Engine 6.20 services or additional libraries (JAR files that are not included inside the application). Referring to a JAR, instead of including it inside the application, has several advantages: The same JAR can be used from more than one application at the same time, which saves classloading system resources. To modify a JAR, there is no need to redeploy the application. The logic of interaction between the application and the external classes remains the same. To add a reference to a service or JAR file that to be used by an application deployed on SAP J2EE Engine 6.20, you must modify the reference.txt file, located in the <SAPj2eeEngine_install_dir>cluster/server/managers directory. The structure of reference.txt is simple. Consider the following example: reference petstore library:ejb reference petstore service:ejb reference petstore service:security reference petstore service:servlet_jsp To add another reference, just add a new line to the text file, specifying the type of reference (service or library), and the name of the service or library. Each service must match exactly the name of the corresponding service in the server namespace. Each library must be already specified in library.txt. The name of the application must be specified, as deployed in the server 110/453
111 namespace (for example, petstore). All names are case sensitive. If an application uses an XML file, a reference must be added to the inqmyxml.jar file, or to another available XML parser. Console Administrator This task can be also performed using the CHANGEREF command from the DEPLOY Shell commands group. For details on its parameters and usage, refer to the Shell Commands Reference section of this manual. Deploy Tool To add or modify references to libraries, you can also use Deploy Tool provided with SAP J2EE Engine For more information, refer to the Deployment Manual. 111/453
112 How to Set up SAP J2EE Engine 6.20 Web Server SAP J2EE Engine 6.20 can be used as a fully functional Web server. This is implemented in HTTP Service. This service can receive requests over the HTTP protocol from clients and respond to them by sending back the HTML files that correspond to the requested URL. It is a session service that is, it is installed on both dispatcher and application nodes to process more client requests. HTTP Service is developed in accordance with HTTP 1.1 specification (RFC 2068). SAP J2EE Engine 6.20 Web server supports high-volume Web sites consisting of static contents such as HTML and image files, and also Servlets and JavaServer Pages (JSP). To serve dynamic Web applications, SAP J2EE Engine 6.20 provides a Servlet_jsp Service that works as a container for Web applications Servlets. This service includes a JSP engine for processing JSP files. To perform these functions, Servlet_jsp Service fully implements Java TM Servlets 2.3 and JavaServer Pages TM 1.2 Specifications. Note: Although you can use the Web server as your basic server, you are not forced to do so. Other configurations work together with your own Web server and the contents therein, including plugins provided with SAP J2EE Engine However, it is worthwhile to compare all possibilities for performance reasons. Setting Ports HTTP Port By default, the SAP J2EE Engine 6.20 Web server listens for HTTP requests on port 80. The system administrator can define another port value. If the new port value is already in use by another service, an error occurs. When the new port is set, the HTTP Service must be restarted. To change the HTTP port, choose Dispatcher Services HTTP from the Cluster tree in the left-hand pane of Visual Administrator. Choose the Properties tab from the right-hand pane. Specify the HTTP port in the Port field. To save the changes, choose (Save). You are then prompted to restart the HTTP Service. Choose Yes from the dialog box. 112/453
113 For the default port execute: When a new port is specified, execute: SSL Port To provide privacy between two communicating applications (a client and a server) SAP J2EE Engine 6.20 Web server uses the Secure Sockets Layer (SSL) Protocol. This protocol is designed to authenticate the server, and optionally the client. The advantage of SSL is that it is independent of the application protocol used. A higher level application protocol (for example, HTTP, FTP, TELNET, and so on) lies transparently on top of the SSL Protocol. The SSL Protocol can negotiate an encryption algorithm and session key as well as authenticate a server before the application protocol transmits or receives its first byte of data. All application protocol data is transmitted encrypted, ensuring privacy. To change the SAP J2EE Engine 6.20 Web Server SSL port, choose the Dispatcher Services HTTP node from the Cluster tree in the left-hand pane of Visual Administrator. Choose the Properties tab from the right-hand pane. Specify the SSL port in the SSL Port field. To save the changes, choose (Save Properties) on the toolbar. You are then prompted to restart the HTTP Service. Choose Yes from the dialog box. Note: To enable SSL communication, copy the iaik_jsse.jar, iaik_ssl.jar, iaik_jce.jar packages into the following directories:../admin/lib/,../alone/additional-lib/,../cluster/dispatcher/additional-lib/,../cluster/all dispatchers/additional-lib/,../cluster/server/additional-lib/, and../cluster/all servers/additional-lib/, or at a location specified in the CLASSPATH system variable. The IAIK packages either can be obtained from the SAP J2EE Engine provider or can be downloaded at Start Keystore and SSL Services on both dispatcher and application nodes. Keystore Service must be started first. Setting Various Virtual Hosts on One Server Virtual hosting enables you to define host names to which servers or clusters respond. When you use virtual hosting, you use Domain Name System (DNS) to specify one or more host names that map to the SAP J2EE Engine 6.20 IP 113/453
114 address, and you specify the Web Applications that are served by the virtual host. Step 1 Accessing the HTTP Service To access your virtual host configuration properties choose Server Services HTTP from the Cluster tree in the left-hand pane of Visual Administrator. Choose Runtime from the right-hand pane. The default host is SAP J2EE Engine 6.20 Documentation Start Page. It is accessed by executing in your Web browser. To modify the default host, or to set SAP J2EE Engine 6.20 to respond to other virtual hosts, specify the Host Name, Root Directory, Start Page, or the Aliases (or both Start Page and Aliases). Step 2 Choosing the Host Name To set a new host name, choose Runtime from the right-hand pane. Enter the name in the Host name field. You must also modify the hosts file in your operating system source directory (for example, C:\WINNT\system32\drivers\etc for WindowsNT). The server responds to the specified host name when executing HTTP requests. Step 3 Setting Your Root Directory Enter the path to your Web application root directory in the Root Directory field. The path can be either absolute or relative (from the <SAPj2eeEngine_install_dir>/cluster/server directory). Note: Specifying the root directory in SAP J2EE Engine 6.20 Visual Administrator does not create this directory automatically. When you complete Step 3, choose Add in the Hosts pane. To modify the properties of a virtual host, choose Set in the Hosts pane. Restart the HTTP Service. Completing Steps 1, 2, and 3 is enough to run your Web application. Completing Step 4 is necessary if your Start Page does not meet the file name and format requirements specified by the Infer Names pane in the Properties General tab. 114/453
115 Caching Step 4 Start Page Choose Runtime from the right-hand pane. Specify the path to your Web application start page in the Start Page field. The path can be relative (from the specified root directory) or absolute. Choose Set in the Hosts pane. Restart the HTTP Service. Setting this property is optional. It is required only if the Web application start page name or type (or both) differs from the file types specified in the Infer Names pane in the Properties General tab, or the start page is not located in the specified root directory. When starting the Web application, the server searches for the files defined in the Infer Names pane in their order of appearance. Therefore, the order of these files is important and can be changed by using the options on the righthand side to best suit your application. Step 5 Setting Aliases The use of aliases in SAP J2EE Engine 6.20 HTTP Service enables one object to be named using different names. You can set a leaf entry to point to another object in the namespace. Called an alias entry, it contains the name of the object to which it is pointing. When you look up an object by using the alias, the alias is dereferenced so that what is returned is the object pointed to by the alias name. To set aliases, choose the Server Services HTTP node from the Cluster tree in the left-hand pane of Visual Administrator. Choose Runtime from the right-hand pane. Enter the name of the new alias in the Alias field. Point the path to the object s file or directory (or both) in the Path field. Choose Add to add the new alias. To access the object, execute in your Web browser. Note: When deploying Web applications on SAP J2EE Engine 6.20, they appear automatically as aliases to the default host. To set a deployed application to be available on other virtual host, add it as an alias to your virtual host. Cache is the program s local store for response messages and the subsystem that controls its message storage, retrieval, and deletion. A cache stores 115/453
116 Mime Types cacheable responses to reduce the response time and network bandwidth consumption for future, equivalent requests. Any client or server may include a cache, although a server cannot use a cache while it is acting as a tunnel. SAP J2EE Engine 6.20 HTTP Service provides options for administration of HTTP cache. The icon in the HTTP Service Runtime tab clears the HTTP cache in a runtime mode. In the Properties General tab, there are three more options to administer the HTTP cache: Use Cache if this indicator is set, the cache is available for use Max File Length for Cache manages the maximum length of the files written to cache Cache Size controls the number of entries in cache The Multipurpose Internet Mail Extensions (MIME) type specifies the data format. Some of the most common types of preformatted data used in SAP J2EE Engine 6.20 HTTP Service are: text data, page description language documents, image data, and autosense print data. This section describes each of these data types, lists their corresponding MIME types, and explains how to add additional MIME types or to modify the current ones using the SAP J2EE Engine 6.20 Visual Administrator. Text Data Typically, preformatted text data is provided in a character-oriented representation class, such as a character array, String, or Reader, or in a byte-oriented representation class, such as a byte array, input stream, or URL. Plain text and HTML are two common forms of preformatted text data. These MIME-type strings can be used to represent the format of the data when constructing a DocFlavor (i.e. print data format): text/plain plain text in the default character set US-ASCII text/plain;charset=xxx plain text in character set xxx text/html HyperText Markup Languge in the default character set (US-ASCII) text/html;charset=xxx HyperText Markup Languge in the character set xxx 116/453
117 Page Language Documents Typically, preformatted page description language (PDL) documents are provided in a byte-oriented representation class, such as byte array, InputStream, or URL. These MIME type strings can be used to represent the format of the data when constructing a DocFlavor: application/pdf Portable Document Format document application/postscript PostScript TM document application/vnd.hp-pcl Printer Control Language document Image Data Preformatted image data is provided in a byte-oriented representation class: byte array, InputStream, or URL. You can use these MIME type strings to represent the format of the data when constructing a DocFlavor: image/gif Graphics Interchange Format image image/jpeg Joint Photographic Experts Group image image/png Portable Network Graphics image Autosense Print Data Preformatted autosense print data enables the printer to decide how to interpret the print data. Typically, this type of data is provided in a byteoriented representation class. The following MIME type string can be used to represent the format of the data when constructing a DocFlavor: application/octet-stream How to Add and Modify MIME Types To add new MIME types, or to modify current ones, choose Server Services HTTP node from the Cluster tree in the left-hand pane of Visual Administrator. From the right-hand pane, choose Properties MIME Types. A list of file extensions and their MIME types appears. The SAP J2EE Engine 6.20 HTTP Service uses these file extensions by default. Adding a New MIME Type Enter the name of the file extension you want to add in the Extension field. Enter the MIME type that corresponds to this extension in the MIME Type field. Choose Add to add the new MIME type. To save the changes, choose 117/453
118 Log Files (Save Properties). The HTTP Service restarts to enable the changes to take effect. Modifying the Current MIME Types Select a file extension and its MIME type from the list of file extensions and MIME types in Properties MIME Types. Modify the MIME type properties in the MIME Type field. Choose Add to set the new MIME type properties for this file extension. To save the changes, choose (Save Properties). The HTTP Service restarts to enable the changes to take effect. Note: If you modify the file extension in the Extension field, SAP J2EE Engine 6.20 Visual Administrator creates a new file extension with the same MIME type properties. Dispatcher Node The SAP J2EE Engine 6.20 HTTP Service log system is separated between the application node and the dispatcher. HTTP Service on dispatcher node creates log messages in the <SAPj2eeEngine_install_dir>/cluster/dispatcher/services/log/work directory. These log files contain information about opening and closing HTTP and HTTPS sockets, about errors occurring when opening new sockets, and about changing HTTP and SSL port values. To view the dispatcher log messages, choose Server Services HTTP from the Cluster tree in the left-hand pane of Visual Administrator. Choose Log Viewer from the right-hand pane. All significant events that occur on the dispatcher node are written to log files that correspond to each module. Select the Log type dropdown menu on the toolbar to view all log messages. Application Node HTTP Service on application node creates log messages by default in the <SAPj2eeEngine_install_dir>/cluster/server/services/http/log directory. These log files record all significant events that have occurred on the HTTP Service. Choose Server Services HTTP from the Cluster tree in the left-hand pane of Visual Administrator. Choose Properties General from the right-hand pane. You can change the log format, the file name, and the directory of the HTTP Service log files in this tab. 118/453
119 The current state of HTTP Service can be stored in common log format (CLF) and restored in case of a crash. Set the Log in Common Log Format indicator to start logging in CLF. You can use the LogFile (CLF) property to modify the file name and the directory where the CLF files are stored. It is active only if the Log in Common Log Format indicator is set. By default, the path to the common log file is../services/http/log/http.log. Enter the file name or the directory (or both) where you want to store your CLF files in the LogFile (CLF) field. To save the changes, choose (Save Properties). The HTTP Service restarts to enable the changes to take effect. To view the application node log files, choose Log Viewer. All significant events that occur on the application node are written to log files that correspond to each module. Select the Log type dropdown menu on the toolbar to view all log messages. Choose (Save Properties) to save the log messages in *.log format. A dialog box appears. You can select the name and the directory where you want to save your log messages. Choose OK to finish the saving process. Setting Security Constraints You can set security constraints for HTTP methods. This associates security roles to one or more of these methods and restricts access to certain resources. This task is performed at application assembling phase. Constraints are set for a particular application that is to be deployed on SAP J2EE Engine. Logically, they apply for that application only! Therefore, you have the opportunity to set different security constraints for different web applications. Certain modifications are performed over web.xml descriptor of the corresponding application to set the constraints. They are presented by an example of setting such a constraint for HTTP PUT method for a default application named $SAP_J2EE_Engine_default. Note: The web.xml descriptor of an application that is deployed on SAP J2EE Engine is located in a subdirectory of the work directory of the Servlets_jsp Service. The web.xml descriptor of the $SAP_J2EE_Engine_default application is the following: <web-app> <display-name>default</display-name> 119/453
120 <welcome-file-list> <welcome-file>index.jsp</welcome-file> </welcome-file-list> <resource-ref> <description>description</description> <res-ref-name>mail/mailsession</res-ref-name> <res-type>javax.mail.session</res-type> <res-auth>container</res-auth> </resource-ref> <security-constraint> <web-resource-collection> <web-resource-name>protected Area</web-resource-name> <http-method>put</http-method> <url-pattern>/*</url-pattern> </web-resource-collection> <auth-constraint> <role-name>*</role-name> </auth-constraint> <user-data-constraint> <transport-guarantee /> </user-data-constraint> </security-constraint> <login-config> <auth-method>basic</auth-method> <realm-name /> </login-config> <security-role> <description /> <role-name>$sap_j2ee_engine_default_put_role</role-name> <user-name>administrator</user-name> </security-role> </web-app> Note: The tags are not explained in this document. You can find a thorough description of each of them in the Java Servlet Specification, version 2.3. As a result, the role $SAP_J2EE_Engine_default_put_role is created, which allows only the Administrator user to perform PUT requests to the $SAP_J2EE_Engine_default application. 120/453
121 Using the Log System and Monitoring Log System Monitoring the server activity is a critical point in the administration process. SAP J2EE Engine 6.20 provides a log system to record the server activity and a monitoring system to report important data from specified server components in real time. To detect server problems in time, and to take immediate steps, check the log and the monitoring systems regularly. This ensures stable server performance. Log Files The SAP J2EE Engine 6.20 log system provides a useful way to manage the server activity. The system records the events that have occurred on the cluster elements in log files, so the system administrator can monitor the system performance, detect problems, and find the source of a fault. SAP J2EE Engine 6.20 provides log files for monitoring the cluster elements console output. The information printed on the command line is provided to <SAPj2eeEngine_install_dir>/cluster/server or dispatcher/managers/console_logs directory and stored in two separate txt files. One of the files logs the output data about loading and starting of the managers and services (for example, Loading: LogManager...). The name of the file includes the date and time of its creation and output for marking the information that has been logged (for example, 2001_11_12_at_15_59_3_output.log). The other file logs exceptions and errors that occurred during the running process of the cluster elements. The name of the file contains the date and time of its creation and error for marking the information that has been logged (for example, 2001_11_12_at_15_59_3_error.log). This log system can be managed using console_logs.properties file located in <SAPj2eeEngine_install_dir>/cluster/server/managers or <SAPj2eeEngine_install_dir>/cluster/dispatcher/managers/ directory. It contains three properties with the following keys and values: LogConsoleStreams this property has a boolean value that indicates if console output is logged. By default, it is set to YES. 121/453
122 LogDir specifies the directory where the log files are stored. By default, it is /managers/console_logs. DaysToKeepLogs specifies how long (in days) to store the log files. The default value is 7. Logging console output helps the system administrator to monitor the cluster elements running process if the specific node is set as an NT Service, or no console is provided (such as in an SAP Web Application Server). The log system consists of Log Manager and Log Service for each dispatcher and application node. The Log Manager creates a directory for each manager, where it stores all data associated with the particular manager in plain text format. These directories are created in the <SAPj2eeEngine_install_dir>/cluster/dispatcher or server/managers/log directory. The Log Service stores all data associated with the services in plain text format in the <SAPj2eeEngine_install_dir>/cluster/dispatcher or server/services/log/work directory. To modify these settings, use the Log Manager and Log Service Properties tab. Note: The HTTP Service running on application nodes stores its log messages in the <SAPj2eeEngine_install_dir>/cluster/server/services/http/log directory by default. The HTTP Service log files are described in detail in How to Set up SAP J2EE Engine 6.20 Web Server section in this document. The log system recognizes the following types of events: EMERGENCY (log level 0) System is unusable ALERT (log level 1) Immediate action must be taken CRITICAL (log level 2) Critical conditions ERROR (log level 3) Error conditions WARNING (log level 4) Warning conditions NOTICE (log level 5) Normal but significant events for the system INFO (log level 6) Information TRACE (log level 7) Events that occur as a result of application methods execution DEBUG (log level 8) Debug-level messages, And accordingly creates nine log file types with the same names. The file names can be changed from each Log Manager or Log Service Properties tab. 122/453
123 Archiving Log Messages At certain times, or in reaching a particular size, the log files are archived and stored in another directory. The default directory where the archived log files are stored is named logbackup. This directory is available anywhere log files are stored. To change the name of this directory, make sure that you are in Cluster view mode (make sure that on the toolbar is selected). Select Cluster Server or Dispatcher Managers or Services Log from the left-hand pane of SAP J2EE Engine 6.20 Visual Administrator. Choose Properties from the right-hand pane. Select the ZipDirectory property and change its value in the Value field at the bottom of the right-hand pane. Choose Add. To enable the changes to take effect, choose (Save Properties) on the toolbar and restart the corresponding Log Manager or Service. The log files are added to the archive when they reach the length specified in the MaxFileLength property. To change its value, select the property and change its value in the Value field at the bottom of the right-hand pane. Choose Add. To enable the changes to take effect, choose (Save Properties) on the toolbar and restart the corresponding Log Manager or Service. The maximum period between two consecutive log files archiving operations is specified by the MaxDelayTime property. Log Viewer Tab The Log Viewer tab in SAP J2EE Engine 6.20 Visual Administrator displays the messages stored in the log files for a selected service, manager, cluster node or the whole cluster. The log messages can be displayed in ascending or descending order by type, by date and time, caller, user, client IP, and cluster ID. 123/453

124 Visual Administrator Cluster Log Viewer Tab Monitoring SAP J2EE Engine monitoring system consists of a Monitor Server and Monitor Service. The Monitor Service establishes a connection between the Monitor Server and the system. The Monitor Server, working on a separate Virtual Machine, collects data from cluster elements, and reports the information and statistics about the cluster nodes and their components to Visual Administrator, SAP s Computing Center Management System (CCMS) agent, a File System (in.xls and.html format files), and its own Monitor Server GUI tool. The monitor server has its own shell environment, from which it can be configured dynamically. 124/453

125 Monitoring System Structure The expected overhead when the monitoring system in turned on is different, depending on the way the data is reported. The most light weight is achieved when reporting to SAP s CCMS or to File System. The overhead if the Monitor Server is working on a separate physical machine (apart from any of the cluster elements) is about 5-8 %, measured if the reporting interval is set to 10 seconds (every 10 seconds the Monitor Server requests the available data from all cluster elements). If this interval is larger, practically the overhead will be insignificant. Most heavy, but of course most convenient way to view the monitored data is the Visual Administrator reporting. The overhead in this situation comes not from the monitoring system itself, but from the fact that a Visual Administrator is attached to the system (attaching a Visual Administrator to a cluster has some overhead, which can be measured on every separate cluster configuration for precise figures). However, this does not diminish the usefulness of the Visual Administrator monitoring option, because it is very useful for initial tuning and obtaining general information about the resource consumption of a running application. The overhead of the Visual Administrator is overcome when using the Monitor Server GUI tool. It provides the same functionality and monitor data view as 125/453
Administration Manual
 Administration Manual SAP J2EE Engine 6.20 Contents About This Manual... 10 Target Audience and Prerequisites... 10 Structure... 10 Documentation Conventions... 11 Further Reading... 11 Administration
Extended Search Administration
 IBM Lotus Extended Search Extended Search Administration Version 4 Release 0.1 SC27-1404-02 IBM Lotus Extended Search Extended Search Administration Version 4 Release 0.1 SC27-1404-02 Note! Before using
Oracle WebLogic Server
 Oracle WebLogic Server Creating WebLogic Domains Using the Configuration Wizard 10g Release 3 (10.1.3) August 2008 Oracle WebLogic Server Creating WebLogic Domains Using the Configuration Wizard, 10g Release
Overview. Borland VisiBroker 7.0
 Overview Borland VisiBroker 7.0 Borland Software Corporation 20450 Stevens Creek Blvd., Suite 800 Cupertino, CA 95014 USA www.borland.com Refer to the file deploy.html for a complete list of files that
Application Servers - Installing SAP Web Application Server
 Proven Practice Application Servers - Installing SAP Web Application Server Product(s): IBM Cognos 8.3, SAP Web Application Server Area of Interest: Infrastructure DOC ID: AS02 Version 8.3.0.0 Installing
Chapter 2 WEBLOGIC SERVER DOMAINS. SYS-ED/ Computer Education Techniques, Inc.
 Chapter 2 WEBLOGIC SERVER DOMAINS SYS-ED/ Computer Education Techniques, Inc. Objectives You will learn: Domain - concept and implementation. Content of a domain. Common domain types. Production versus
Cisco Unified Serviceability
 Cisco Unified Serviceability Introduction, page 1 Installation, page 5 Introduction This document uses the following abbreviations to identify administration differences for these Cisco products: Unified
OpenText Web Experience Management
 OpenText Web Experience Management Administration Guide This document outlines the procedures required to properly configure a Web Experience Management environment. OpenText Web Experience Management
Wavelink Avalanche Site Edition Java Console User Guide. Version 5.3
 Wavelink Avalanche Site Edition Java Console User Guide Version 5.3 Revised 04/05/2012 ii Copyright 2012 by Wavelink Corporation. All rights reserved. Wavelink Corporation 10808 South River Front Parkway,
Oracle Fusion Middleware
 Oracle Fusion Middleware Administering Web Services 12c (12.1.2) E28131-01 June 2013 Documentation for developers and administrators that describes how to administer Web services. Oracle Fusion Middleware
Getting Started with Prime Network
 CHAPTER 1 These topics provide some basic steps for getting started with Prime Network, such as how to set up the system and the basic parts of the Prime Network Administration GUI client. Basic Steps
Using the VMware vcenter Orchestrator Client. vrealize Orchestrator 5.5.1
 Using the VMware vcenter Orchestrator Client vrealize Orchestrator 5.5.1 You can find the most up-to-date technical documentation on the VMware website at: https://docs.vmware.com/ If you have comments
Using the VMware vrealize Orchestrator Client
 Using the VMware vrealize Orchestrator Client vrealize Orchestrator 7.0 This document supports the version of each product listed and supports all subsequent versions until the document is replaced by
CHAPTER. Introduction
 CHAPTER 1 Cisco Unified Communications Manager (formerly Cisco Unified CallManager) serves as the software-based call-processing component of the Cisco Unified Communications family of products. A wide
Perceptive Nolij Web. Administrator Guide. Version: 6.8.x
 Perceptive Nolij Web Administrator Guide Version: 6.8.x Written by: Product Knowledge, R&D Date: June 2018 Copyright 2014-2018 Hyland Software, Inc. and its affiliates.. Table of Contents Introduction...
Oracle Fusion Middleware
 Oracle Fusion Middleware Creating Domains Using the Configuration Wizard 11g Release 1 (10.3.4) E14140-04 January 2011 This document describes how to use the Configuration Wizard to create, update, and
ExpressCluster X SingleServerSafe 3.2 for Windows. Operation Guide. 2/19/2014 1st Edition
 ExpressCluster X SingleServerSafe 3.2 for Windows Operation Guide 2/19/2014 1st Edition Revision History Edition Revised Date Description First 2/19/2014 New manual Copyright NEC Corporation 2014. All
24x7 Scheduler Web-based Management Console User's Guide Version 5.3
 24x7 Scheduler Web-based Management Console User's Guide Version 5.3 Copyright SoftTree Technologies, Inc. 1998-2014 All rights reserved Table of Contents Table of Contents ABOUT THIS GUIDE... 4 CONVENTIONS
EXPRESSCLUSTER X SingleServerSafe 3.3 for Windows. Operation Guide. 10/03/2016 4th Edition
 EXPRESSCLUSTER X SingleServerSafe 3.3 for Windows Operation Guide 10/03/2016 4th Edition Revision History Edition Revised Date Description 1st 02/09/2015 New manual 2nd 04/20/2015 Corresponds to the internal
GSS Administration and Troubleshooting
 CHAPTER 9 GSS Administration and Troubleshooting This chapter covers the procedures necessary to properly manage and maintain your GSSM and GSS devices, including login security, software upgrades, GSSM
BEAWebLogic Server. Node Manager Administrator s Guide
 BEAWebLogic Server Node Manager Administrator s Guide Version 10.0 Revised: March 30, 2007 Contents 1. Introduction and Roadmap Document Scope and Audience.............................................
Contents at a Glance. vii
 Contents at a Glance 1 Installing WebLogic Server and Using the Management Tools... 1 2 Administering WebLogic Server Instances... 47 3 Creating and Configuring WebLogic Server Domains... 101 4 Configuring
Wavelink Avalanche Mobility Center Java Console User Guide. Version 5.2
 Wavelink Avalanche Mobility Center Java Console User Guide Version 5.2 Revised 27/09/2011 ii Copyright 2011 by Wavelink Corporation. All rights reserved. Wavelink Corporation 10808 South River Front Parkway,
IBM Security Identity Governance and Intelligence. SAP HANA Database Adapter Installation and Configuration Guide IBM
 IBM Security Identity Governance and Intelligence SAP HANA Database Adapter Installation and Configuration Guide IBM IBM Security Identity Governance and Intelligence SAP HANA Database Adapter Installation
Vidyo Server for WebRTC. Administrator Guide
 Vidyo Server for WebRTC Administrator Guide Product Version 3.2 Document Version A April, 2016 TABLE OF CONTENTS Overview... 1 Understanding the Configuration Procedure... 1 1. Using Vidyo Server for WebRTC
BEAWebLogic Server. Using the WebLogic Diagnostic Framework Console Extension
 BEAWebLogic Server Using the WebLogic Diagnostic Framework Console Extension Version 10.0 Revised: March 30, 2007 Contents 1. Introduction and Roadmap What Is the WebLogic Diagnostic Framework Console
American Dynamics RAID Storage System iscsi Software User s Manual
 American Dynamics RAID Storage System iscsi Software User s Manual Release v2.0 April 2006 # /tmp/hello Hello, World! 3 + 4 = 7 How to Contact American Dynamics American Dynamics (800) 507-6268 or (561)
Creating Domain Templates Using the Domain Template Builder 11g Release 1 (10.3.6)
") [1]Oracle Fusion Middleware Creating Domain Templates Using the Domain Template Builder 11g Release 1 (10.3.6) E14139-06 April 2015 This document describes how to use the Domain Template Builder to create
[1]Oracle Fusion Middleware Creating Domain Templates Using the Domain Template Builder 11g Release 1 (10.3.6) E14139-06 April 2015 This document describes how to use the Domain Template Builder to create
WhatsConfigured for WhatsUp Gold 2016 User Guide
 WhatsConfigured for WhatsUp Gold 2016 User Guide Contents Welcome to WhatsConfigured 1 What is WhatsConfigured? 1 Finding more information and updates 1 Sending feedback 2 Deploying WhatsConfigured 3 STEP
JDMS - A Java Based Alternative to Motif DMS Windows Susanna Wallenberger, Janice Replogle, SAS Institute Inc., Cary NC
 JDMS - A Java Based Alternative to Motif DMS Windows Susanna Wallenberger, Janice Replogle, SAS Institute Inc., Cary NC ABSTRACT JDMS harnesses the power of a SAS using Java technologies. JDMS is a Java
Agent and Agent Browser. Updated Friday, January 26, Autotask Corporation
 Agent and Agent Browser Updated Friday, January 26, 2018 2018 Autotask Corporation Table of Contents Table of Contents 2 The AEM Agent and Agent Browser 3 AEM Agent 5 Privacy Mode 9 Agent Browser 11 Agent
User Manual. Admin Report Kit for IIS 7 (ARKIIS)
") User Manual Admin Report Kit for IIS 7 (ARKIIS) Table of Contents 1 Admin Report Kit for IIS 7... 1 1.1 About ARKIIS... 1 1.2 Who can Use ARKIIS?... 1 1.3 System requirements... 2 1.4 Technical Support...
User Manual Admin Report Kit for IIS 7 (ARKIIS) Table of Contents 1 Admin Report Kit for IIS 7... 1 1.1 About ARKIIS... 1 1.2 Who can Use ARKIIS?... 1 1.3 System requirements... 2 1.4 Technical Support...
BEAWebLogic Server. Introduction to BEA WebLogic Server and BEA WebLogic Express
 BEAWebLogic Server Introduction to BEA WebLogic Server and BEA WebLogic Express Version 10.0 Revised: March, 2007 Contents 1. Introduction to BEA WebLogic Server and BEA WebLogic Express The WebLogic
Supplement H.1: JBuilder X Tutorial. For Introduction to Java Programming, 5E By Y. Daniel Liang
 Supplement H.1: JBuilder X Tutorial For Introduction to Java Programming, 5E By Y. Daniel Liang This supplement covers the following topics: Getting Started with JBuilder Creating a Project Creating, Compiling,
Supplement II.B(1): JBuilder X Tutorial. For Introduction to Java Programming By Y. Daniel Liang
: JBuilder X Tutorial. For Introduction to Java Programming By Y. Daniel Liang") Supplement II.B(1): JBuilder X Tutorial For Introduction to Java Programming By Y. Daniel Liang This supplement covers the following topics: Getting Started with JBuilder Creating a Project Creating, Compiling,
Supplement II.B(1): JBuilder X Tutorial For Introduction to Java Programming By Y. Daniel Liang This supplement covers the following topics: Getting Started with JBuilder Creating a Project Creating, Compiling,
SAP BusinessObjects Profitability and Cost Management Upgrade Guide
 PUBLIC SAP BusinessObjects Profitability and Cost Management Document Version: 10.0 2019-04-09 SAP BusinessObjects Profitability and Cost Management Upgrade Guide 2019 SAP SE or an SAP affiliate company.
Server Configuration and Customization Guide Operations Center 5.5
 Server Configuration and Customization Guide Operations Center 5.5 November 18, 2014 www.netiq.com/documentation Legal Notices THIS DOCUMENT AND THE SOFTWARE DESCRIBED IN THIS DOCUMENT ARE FURNISHED UNDER
Getting Started with CMS
 CHAPTER 3 This chapter contains these sections that describe the Cluster Management Suite (CMS) on the Catalyst 3750 switch: Understanding CMS section on page 3-1 Configuring CMS section on page 3-8 Displaying
KYOCERA Net Admin User Guide
 KYOCERA Net Admin User Guide Legal Notes Unauthorized reproduction of all or part of this guide is prohibited. The information in this guide is subject to change without notice. We cannot be held liable
Manage and Generate Reports
 Report Manager, page 1 Generate Reports, page 3 Trust Self-Signed Certificate for Live Data Reports, page 4 Report Viewer, page 4 Save an Existing Stock Report, page 7 Import Reports, page 7 Export Reports,
Managing GSS Devices from the GUI
 CHAPTER 1 This chapter describes how to configure and manage your Global Site Selector Manager (GSSM) and Global Site Selector (GSS) devices from the primary GSSM graphical user interface. It includes
BEAWebLogic RFID. Edge Server. Using the Administration Console
 BEAWebLogic RFID Edge Server Using the Administration Console Version 2.1 Revised: June 29, 2006 Contents 1. Introduction and Roadmap Document Scope and Audience.............................................
Cisco Unified Customer Voice Portal
 Unified CVP, page 1 Operations Console, page 3 Error Handling, page 14 Control Center Operation, page 15 Device Pools, page 42 Import Operations Console Configuration, page 46 Export Operations Console
EXPRESSCLUSTER X SingleServerSafe 3.3 for Windows. Installation Guide. 01/29/2016 3rd Edition
 EXPRESSCLUSTER X SingleServerSafe 3.3 for Windows Installation Guide 01/29/2016 3rd Edition Revision History Edition Revised Date Description 1st 02/09/2015 New manual 2nd 04/20/2015 Corresponds to the
EMC Ionix Network Configuration Manager Version 4.1.1
 EMC Ionix Network Configuration Manager Version 4.1.1 RSA Token Service Installation Guide 300-013-088 REVA01 EMC Corporation Corporate Headquarters: Hopkinton, MA 01748-9103 1-508-435-1000 www.emc.com
WA2031 WebSphere Application Server 8.0 Administration on Windows. Student Labs. Web Age Solutions Inc. Copyright 2012 Web Age Solutions Inc.
 WA2031 WebSphere Application Server 8.0 Administration on Windows Student Labs Web Age Solutions Inc. Copyright 2012 Web Age Solutions Inc. 1 Table of Contents Directory Paths Used in Labs...3 Lab Notes...4
Installing and Configuring the 6.40 Startup Framework to Use with
 Installing and Configuring the 6.40 Startup Framework to Use with SAP J2EE Engine 6.20 Last update: 23.09.2004 SAP J2EE Engine 6.20 Contents Overview...3 Additional Resources...4 Procedure on UNIX...5
Avalanche Remote Control User Guide. Version 4.1
 Avalanche Remote Control User Guide Version 4.1 ii Copyright 2012 by Wavelink Corporation. All rights reserved. Wavelink Corporation 10808 South River Front Parkway, Suite 200 South Jordan, Utah 84095
bs^ir^qfkd=obcib`qflk= prfqb=clo=u
 bs^ir^qfkd=obcib`qflk= prfqb=clo=u cçê=u=táåççïë=póëíéãë cçê=lééåsjp=eçëíë cçê=f_j=eçëíë 14.1 bî~äì~íáåö=oéñäéåíáçå=u This guide provides a quick overview of features in Reflection X. This evaluation guide
NetExtender for SSL-VPN
 NetExtender for SSL-VPN Document Scope This document describes how to plan, design, implement, and manage the NetExtender feature in a SonicWALL SSL-VPN Environment. This document contains the following
CLIQ Web Manager. User Manual. The global leader in door opening solutions V 6.1
 CLIQ Web Manager User Manual V 6.1 The global leader in door opening solutions Program version: 6.1 Document number: ST-003478 Date published: 2016-03-31 Language: en-gb Table of contents 1 Overview...9
Overview of Cisco UCS Manager GUI
 Overview of Cisco UCS Manager GUI This chapter includes the following sections: Overview of Cisco UCS Manager GUI, page 1 Logging in to Cisco UCS Manager GUI through HTTPS, page 6 Logging in to Cisco UCS
EventSentry Quickstart Guide
 Contents I Part I About This Guide 2 Part II Overview 3 Part III Installing EventSentry 6 1 Installation with... Setup 7 2 Management Application... 8 3 Configuration... 9 4 Remote Update... 12 5 Heartbeat
VII. Corente Services SSL Client
 VII. Corente Services SSL Client Corente Release 9.1 Manual 9.1.1 Copyright 2014, Oracle and/or its affiliates. All rights reserved. Table of Contents Preface... 5 I. Introduction... 6 Chapter 1. Requirements...
IFS TOUCH APPS SERVER INSTALLATION GUIDE
 IFS TOUCH APPS SERVER INSTALLATION GUIDE ABSTRACT IFS Touch Apps Server is an On Premise version of the IFS Touch Apps Cloud. The On Premise version doesn t need a separate installation of the IFS Cloud
Installing and Configuring vcloud Connector
 Installing and Configuring vcloud Connector vcloud Connector 2.6.0 This document supports the version of each product listed and supports all subsequent versions until the document is replaced by a new
Version Monitoring Agent User s Guide SC
 Tivoli IBM Tivoli Advanced Catalog Management for z/os Version 02.01.00 Monitoring Agent User s Guide SC23-7974-00 Tivoli IBM Tivoli Advanced Catalog Management for z/os Version 02.01.00 Monitoring Agent
Central Administration Console Installation and User's Guide
 IBM Tivoli Storage Manager FastBack for Workstations Version 7.1.1 Central Administration Console Installation and User's Guide SC27-2808-04 IBM Tivoli Storage Manager FastBack for Workstations Version
Sage ebusiness Manager Installation Guide. September 2016
 Sage 100 2017 ebusiness Manager Installation Guide September 2016 2016 The Sage Group plc or its licensors. All rights reserved. Sage, Sage logos, and Sage product and service names mentioned herein are
Hypertext Transfer Protocol Over Secure Sockets Layer (HTTPS)
") Hypertext Transfer Protocol Over Secure Sockets Layer (HTTPS) This chapter provides information about Hypertext Transfer Protocol over Secure Sockets Layer. HTTPS, page 1 HTTPS for Cisco Unified IP Phone
Hypertext Transfer Protocol Over Secure Sockets Layer (HTTPS) This chapter provides information about Hypertext Transfer Protocol over Secure Sockets Layer. HTTPS, page 1 HTTPS for Cisco Unified IP Phone
Installing on WebLogic Server
 155 Chapter 11 Installing on WebLogic Server This chapter provides instructions for performing a new installation of TIBCO Collaborative Information Manager on WebLogic Application Server in a non-clustered
Sage 100 ERP. ebusiness Manager Installation Guide. This version of the software has been retired
 Sage 100 ERP ebusiness Manager Installation Guide This version of the software has been retired 2012 Sage Software, Inc. All rights reserved. Sage, the Sage logos, and the Sage product and service names
EMC Documentum Composer
 EMC Documentum Composer Version 6.0 SP1.5 User Guide P/N 300 005 253 A02 EMC Corporation Corporate Headquarters: Hopkinton, MA 01748 9103 1 508 435 1000 www.emc.com Copyright 2008 EMC Corporation. All
Version 11 Release 0 May 31, IBM Contact Optimization Installation Guide IBM
 Version 11 Release 0 May 31, 2018 IBM Contact Optimization Installation Guide IBM Note Before using this information and the product it supports, read the information in Notices on page 39. This edition
Creating WebLogic Domains Using the Configuration Wizard 12c (12.1.3)
") [1]Oracle Fusion Middleware Creating WebLogic 12.1.3 Domains Using the Configuration Wizard 12c (12.1.3) E41890-02 August 2015 This document describes how to use the Configuration Wizard to create, update,
[1]Oracle Fusion Middleware Creating WebLogic 12.1.3 Domains Using the Configuration Wizard 12c (12.1.3) E41890-02 August 2015 This document describes how to use the Configuration Wizard to create, update,
Central Administration Console Installation and User's Guide
 IBM Tivoli Storage Manager FastBack for Workstations Version 7.1 Central Administration Console Installation and User's Guide SC27-2808-03 IBM Tivoli Storage Manager FastBack for Workstations Version
Contents Prerequisites... 5 Installing Contract Management Web Services... 11
 Installing and Configuring Contract Management Web Services July 2014 Contents Prerequisites... 5 Base Contract Management Installation... 5 Java Runtime Environment Requirements... 5 Contract Management
PRODUCT MANUAL. idashboards Reports Admin Manual. Version 9.1
 PRODUCT MANUAL idashboards Reports Admin Manual Version 9.1 idashboards Reports Admin Manual Version 9.1 No part of the computer software or this document may be reproduced or transmitted in any form or
Hypertext Transfer Protocol over Secure Sockets Layer (HTTPS)
") Hypertext Transfer Protocol over Secure Sockets Layer (HTTPS) This chapter provides information about Hypertext Transfer Protocol over Secure Sockets Layer. HTTPS, page 1 HTTPS for Cisco Unified IP Phone
Hypertext Transfer Protocol over Secure Sockets Layer (HTTPS) This chapter provides information about Hypertext Transfer Protocol over Secure Sockets Layer. HTTPS, page 1 HTTPS for Cisco Unified IP Phone
Policy Manager for IBM WebSphere DataPower 7.2: Configuration Guide
 Policy Manager for IBM WebSphere DataPower 7.2: Configuration Guide Policy Manager for IBM WebSphere DataPower Configuration Guide SOAPMDP_Config_7.2.0 Copyright Copyright 2015 SOA Software, Inc. All rights
APAR PO06620 Installation Instructions
 IBM Corporation APAR PO06620 Installation Instructions IBM Counter Fraud Management 1.5.0.5 IBM Counter Fraud Development 3-31-2017 Table of Contents 1 Fix readme... 1 2 Abstract... 1 3 Contents... 1 4
Session 8. Reading and Reference. en.wikipedia.org/wiki/list_of_http_headers. en.wikipedia.org/wiki/http_status_codes
 Session 8 Deployment Descriptor 1 Reading Reading and Reference en.wikipedia.org/wiki/http Reference http headers en.wikipedia.org/wiki/list_of_http_headers http status codes en.wikipedia.org/wiki/_status_codes
Using ANM With Virtual Data Centers
 APPENDIXB Date: 3/8/10 This appendix describes how to integrate ANM with VMware vcenter Server, which is a third-party product for creating and managing virtual data centers. Using VMware vsphere Client,
Upgrading an ObserveIT One-Click Installation
 Upgrading an ObserveIT One-Click Installation This document was written for ObserveIT Enterprise version 7.6.1. This document uses screenshots and procedures written for Windows Server 2012 R2 and SQL
Management User s Guide. Version 6.2, December 2004
 Management User s Guide Version 6.2, December 2004 IONA, IONA Technologies, the IONA logo, Orbix, Orbix/E, Orbacus, Artix, Orchestrator, Mobile Orchestrator, Enterprise Integrator, Adaptive Runtime Technology,
EXPRESSCLUSTER X SingleServerSafe 3.3 for Windows. Installation Guide. 10/02/2017 6th Edition
 EXPRESSCLUSTER X SingleServerSafe 3.3 for Windows Installation Guide 10/02/2017 6th Edition Revision History Edition Revised Date Description 1st 02/09/2015 New manual 2nd 04/20/2015 Corresponds to the
Configuring SAP Targets and Runtime Users
 CHAPTER 4 Before you can create or run processes in your SAP environment, you must create the targets on which the processes will run. Targets are used to define specific environments where activities,
MultiSite Manager. User Guide
 MultiSite Manager User Guide Contents 1. Getting Started... 2 Opening the MultiSite Manager... 2 Navigating MultiSite Manager... 2 2. The All Sites tab... 3 All Sites... 3 Reports... 4 Licenses... 5 3.
Configuring Security Features on an External AAA Server
 CHAPTER 3 Configuring Security Features on an External AAA Server The authentication, authorization, and accounting (AAA) feature verifies the identity of, grants access to, and tracks the actions of users
ArcGIS Enterprise: Advanced Topics in Administration. Thomas Edghill & Moginraj Mohandas
 ArcGIS Enterprise: Advanced Topics in Administration Thomas Edghill & Moginraj Mohandas Outline Overview: Base ArcGIS Enterprise Deployment - Key Components - Administrator Endpoints Advanced Workflows:
Using the SSM Administration Console
 CHAPTER 6 Your user role controls whether you can access the SSM Administration Console. The following information is included in this section: SSM Administration Console Overview, page 6-1 Launching the
vcenter CapacityIQ Installation Guide
 vcenter CapacityIQ 1.0 This document supports the version of each product listed and supports all subsequent versions until the document is replaced by a new edition. To check for more recent editions
Upgrading from TrafficShield 3.2.X to Application Security Module 9.2.3
 Upgrading from TrafficShield 3.2.X to Application Security Module 9.2.3 Introduction Preparing the 3.2.X system for the upgrade Installing the BIG-IP version 9.2.3 software Licensing the software using
Practice Labs User Guide
 Practice Labs User Guide This page is intentionally blank Contents Introduction... 3 Overview... 3 Accessing Practice Labs... 3 The Practice Labs Interface... 4 Minimum Browser Requirements... 5 The Content
Oracle Communications Billing and Revenue Management
 Oracle Communications Billing and Revenue Management Pipeline Configuration Center Installation and System Administration Guide Release 7.4 E25364-02 October 2012 Oracle Communications Billing and Revenue
SecureTransport Version September Web Client User Guide
 SecureTransport Version 5.3.1 15 September 2017 Web Client User Guide Copyright 2016 Axway All rights reserved. This documentation describes the following Axway software: Axway SecureTransport 5.3.1 No
Attunity Connect and BEA WebLogic (Version 8.1)
") Attunity Connect and BEA WebLogic (Version 8.1) Attunity Connect and BEA WebLogic (Version 8.1) 2006 by Attunity Ltd. Due to a policy of continuous development, Attunity Ltd. reserves the right to alter,
Attunity Connect and BEA WebLogic (Version 8.1) Attunity Connect and BEA WebLogic (Version 8.1) 2006 by Attunity Ltd. Due to a policy of continuous development, Attunity Ltd. reserves the right to alter,
WebSphere Application Server V7: Administration Consoles and Commands
 Chapter 5 of WebSphere Application Server V7 Administration and Configuration Guide, SG24-7615 WebSphere Application Server V7: Administration Consoles and Commands WebSphere application server properties
Using Hypertext Transfer Protocol over Secure Sockets Layer (HTTPS)
") CHAPTER 2 Using Hypertext Transfer Protocol over Secure Sockets Layer (HTTPS) This chapter contains information on the following topics: HTTPS Overview, page 2-1 HTTPS for Cisco Unified IP Phone Services,
CHAPTER 2 Using Hypertext Transfer Protocol over Secure Sockets Layer (HTTPS) This chapter contains information on the following topics: HTTPS Overview, page 2-1 HTTPS for Cisco Unified IP Phone Services,
Deploying Citrix MetaFrame with the FirePass Controller
 Deployment Guide Deploying Citrix Presentation Server (MetaFrame) with the FirePass Controller Deploying Citrix MetaFrame with the FirePass Controller Welcome to the F5 FirePass controller Deployment Guide
KVM Console. KVM Console
 , page 1 Virtual, page 2 KVM Direct Access, page 5 Starting the from a Server, page 6 Starting the from a Service Profile, page 6 Starting the from the Cisco UCS KVM Direct Web Page, page 7 Starting the
FUSION REGISTRY COMMUNITY EDITION SETUP GUIDE VERSION 9. Setup Guide. This guide explains how to install and configure the Fusion Registry.
 FUSION REGISTRY COMMUNITY EDITION VERSION 9 Setup Guide This guide explains how to install and configure the Fusion Registry. FUSION REGISTRY COMMUNITY EDITION SETUP GUIDE Fusion Registry: 9.2.x Document
Managing External Identity Sources
 CHAPTER 5 The Cisco Identity Services Engine (Cisco ISE) integrates with external identity sources to validate credentials in user authentication functions, and to retrieve group information and other
SC-T35/SC-T45/SC-T46/SC-T47 ViewSonic Device Manager User Guide
 SC-T35/SC-T45/SC-T46/SC-T47 ViewSonic Device Manager User Guide Copyright and Trademark Statements 2014 ViewSonic Computer Corp. All rights reserved. This document contains proprietary information that
Course: JBoss Training: JBoss AS 7 and JBoss EAP 6 Administration and Clustering Training
 Course: JBoss Training: JBoss AS 7 and JBoss EAP 6 Administration and Clustering Training Course Length: Duration; 4 days Course Code: WA 2060 This training course covers both the unsupported open source
ASA Clientless SSL VPN (WebVPN) Troubleshooting Tech Note
 Troubleshooting Tech Note") ASA Clientless SSL VPN (WebVPN) Troubleshooting Tech Note Document ID: 104298 Contents Introduction Prerequisites Requirements Components Used Conventions Troubleshooting ASA Version 7.1/7.2 Clientless
ASA Clientless SSL VPN (WebVPN) Troubleshooting Tech Note Document ID: 104298 Contents Introduction Prerequisites Requirements Components Used Conventions Troubleshooting ASA Version 7.1/7.2 Clientless
VMware vcenter Log Insight Administration Guide
 VMware vcenter Log Insight Administration Guide vcenter Log Insight 2.0 This document supports the version of each product listed and supports all subsequent versions until the document is replaced by
Parallels Remote Application Server
 Parallels Remote Application Server Parallels Client for Mac User's Guide v16 Parallels International GmbH Vordergasse 59 8200 Schaffhausen Switzerland Tel: + 41 52 672 20 30 www.parallels.com Copyright
Real-Time Monitoring Configuration
 CHAPTER 7 This chapter contains the following information for configuring the Cisco Unified Presence Server Real-Time Monitoring Tool (RTMT). Some options that are available in the current version of the
ExpressCluster X SingleServerSafe 3.2 for Windows. Installation Guide. 2/19/2014 1st Edition
 ExpressCluster X SingleServerSafe 3.2 for Windows Installation Guide 2/19/2014 1st Edition Revision History Edition Revised Date Description First 2/19/2014 New manual Copyright NEC Corporation 2014. All