Table of Contents 1.1. Introduction. Legal Notice 1.2. Preface 1.3. Project Info 1.4. Messaging Concepts Architecture 1.7.
|
|
|
- Bartholomew Allen
- 6 years ago
- Views:
Transcription
1 Table of Contents Introduction Legal Notice Preface Project Info Messaging Concepts Architecture Using the Server Address Model Using JMS Using Core Using AMQP Mapping JMS Concepts to the Core API The Client Classpath Examples Routing Messages With Wild Cards Understanding the Apache ActiveMQ Artemis Wildcard Syntax Filter Expressions Persistence Configuring Transports Configuration Reload Detecting Dead Connections Detecting Slow Consumers Avoiding Network Isolation Resource Manager Configuration Flow Control Guarantees of sends and commits Message Redelivery and Undelivered Messages
2 Message Expiry Large Messages Paging Queue Attributes Scheduled Messages Last-Value Queues Message Grouping Extra Acknowledge Modes Management Security Broker Plugins Resource Limits The JMS Bridge Client Reconnection and Session Reattachment Diverting and Splitting Message Flows Core Bridges Duplicate Message Detection Clusters High Availability and Failover Graceful Server Shutdown Libaio Native Libraries Thread management Logging REST Interface Embedding Apache ActiveMQ Artemis Apache Karaf Spring Integration CDI Integration Intercepting Operations Protocols and Interoperability
3 Tools Maven Plugin Unit Testing Troubleshooting and Performance Tuning Configuration Reference Updating Artemis

4 Introduction Apache ActiveMQ Artemis User Manual The User manual is an in depth manual on all aspects of Apache ActiveMQ Artemis 4
5 Legal Notice Legal Notice Licensed to the Apache Software Foundation (ASF) under one or more contributor license agreements. See the NOTICE file distributed with this work for additional information regarding copyright ownership. The ASF licenses this file to You under the Apache License, Version 2.0 (the "License"); you may not use this file except in compliance with the License. You may obtain a copy of the License at Unless required by applicable law or agreed to in writing, software distributed under the License is distributed on an "AS IS" BASIS, WITHOUT WARRANTIES OR CONDITIONS OF ANY KIND, either express or implied. See the License for the specific language governing permissions and limitations under the License. 5
6 Preface Preface What is Apache ActiveMQ Artemis? Apache ActiveMQ Artemis is an open source project to build a multi-protocol, embeddable, very high performance, clustered, asynchronous messaging system. Apache ActiveMQ Artemis is an example of Message Oriented Middleware (MoM). For a description of MoMs and other messaging concepts please see the Messaging Concepts. Why use Apache ActiveMQ Artemis? Here are just a few of the reasons: 100% open source software. Apache ActiveMQ Artemis is licensed using the Apache Software License v 2.0 to minimise barriers to adoption. Apache ActiveMQ Artemis is designed with usability in mind. Written in Java. Runs on any platform with a Java 8+ runtime, that's everything from Windows desktops to IBM mainframes. Amazing performance. Our ground-breaking high performance journal provides persistent messaging performance at rates normally seen for non-persistent messaging, our non-persistent messaging performance rocks the boat too. Full feature set. All the features you'd expect in any serious messaging system, and others you won't find anywhere else. Elegant, clean-cut design with minimal third party dependencies. Run ActiveMQ Artemis stand-alone, run it in integrated in your favourite JEE application server, or run it embedded inside your own product. It's up to you. Seamless high availability. We provide a HA solution with automatic client failover so you can guarantee zero message loss or duplication in event of server failure. Hugely flexible clustering. Create clusters of servers that know how to load balance messages. Link geographically distributed clusters over unreliable connections to form a global network. Configure routing of messages in a highly flexible way. 6
7 Project Info Project Information The official Apache ActiveMQ Artemis project page is Software Download The software can be download from the Download page: Project Information If you have any user questions please use our user forum If you have development related questions, please use our developer forum Pop in and chat to us in our IRC channel Apache ActiveMQ Artemis Git repository is All release tags are available from And many thanks to all our contributors, both old and new who helped create Apache ActiveMQ Artemis. 7
8 Messaging Concepts Messaging Concepts Apache ActiveMQ Artemis is an asynchronous messaging system, an example of Message Oriented Middleware, we'll just call them messaging systems in the remainder of this book. We'll first present a brief overview of what kind of things messaging systems do, where they're useful and the kind of concepts you'll hear about in the messaging world. If you're already familiar with what a messaging system is and what it's capable of, then you can skip this chapter. Messaging Concepts Messaging systems allow you to loosely couple heterogeneous systems together, whilst typically providing reliability, transactions and many other features. Unlike systems based on a Remote Procedure Call (RPC) pattern, messaging systems primarily use an asynchronous message passing pattern with no tight relationship between requests and responses. Most messaging systems also support a requestresponse mode but this is not a primary feature of messaging systems. Designing systems to be asynchronous from end-to-end allows you to really take advantage of your hardware resources, minimizing the amount of threads blocking on IO operations, and to use your network bandwidth to its full capacity. With an RPC approach you have to wait for a response for each request you make so are limited by the network round trip time, or latency of your network. With an asynchronous system you can pipeline flows of messages in different directions, so are limited by the network bandwidth not the latency. This typically allows you to create much higher performance applications. Messaging systems decouple the senders of messages from the consumers of messages. The senders and consumers of messages are completely independent and know nothing of each other. This allows you to create flexible, loosely coupled systems. Often, large enterprises use a messaging system to implement a message bus which loosely couples heterogeneous systems together. Message buses often form the core of an Enterprise Service Bus. (ESB). Using a message bus to de-couple disparate systems 8
9 Messaging Concepts can allow the system to grow and adapt more easily. It also allows more flexibility to add new systems or retire old ones since they don't have brittle dependencies on each other. Messaging styles Messaging systems normally support two main styles of asynchronous messaging: message queue messaging (also known as point-to-point messaging) and publish subscribe messaging. We'll summarise them briefly here: The Message Queue Pattern With this type of messaging you send a message to a queue. The message is then typically persisted to provide a guarantee of delivery, then some time later the messaging system delivers the message to a consumer. The consumer then processes the message and when it is done, it acknowledges the message. Once the message is acknowledged it disappears from the queue and is not available to be delivered again. If the system crashes before the messaging server receives an acknowledgement from the consumer, then on recovery, the message will be available to be delivered to a consumer again. With point-to-point messaging, there can be many consumers on the queue but a particular message will only ever be consumed by a maximum of one of them. Senders (also known as producers) to the queue are completely decoupled from receivers (also known as consumers) of the queue - they do not know of each other's existence. A classic example of point to point messaging would be an order queue in a company's book ordering system. Each order is represented as a message which is sent to the order queue. Let's imagine there are many front end ordering systems which send orders to the order queue. When a message arrives on the queue it is persisted - this ensures that if the server crashes the order is not lost. Let's also imagine there are many consumers on the order queue - each representing an instance of an order processing component - these can be on different physical machines but consuming from the same queue. The messaging system delivers each message to one and only one of the ordering processing components. Different messages can be processed by different order processors, but a single order is only processed by one order processor - this ensures orders aren't processed twice. 9
10 Messaging Concepts As an order processor receives a message, it fulfills the order, sends order information to the warehouse system and then updates the order database with the order details. Once it's done that it acknowledges the message to tell the server that the order has been processed and can be forgotten about. Often the send to the warehouse system, update in database and acknowledgement will be completed in a single transaction to ensure ACID properties. The Publish-Subscribe Pattern With publish-subscribe messaging many senders can send messages to an entity on the server, often called a topic (e.g. in the JMS world). There can be many subscriptions on a topic, a subscription is just another word for a consumer of a topic. Each subscription receives a copy of each message sent to the topic. This differs from the message queue pattern where each message is only consumed by a single consumer. Subscriptions can optionally be durable which means they retain a copy of each message sent to the topic until the subscriber consumes them - even if the server crashes or is restarted in between. Non-durable subscriptions only last a maximum of the lifetime of the connection that created them. An example of publish-subscribe messaging would be a news feed. As news articles are created by different editors around the world they are sent to a news feed topic. There are many subscribers around the world who are interested in receiving news items - each one creates a subscription and the messaging system ensures that a copy of each news message is delivered to each subscription. Delivery guarantees A key feature of most messaging systems is reliable messaging. With reliable messaging the server gives a guarantee that the message will be delivered once and only once to each consumer of a queue or each durable subscription of a topic, even in the event of system failure. This is crucial for many businesses; e.g. you don't want your orders fulfilled more than once or any of your orders to be lost. In other cases you may not care about a once and only once delivery guarantee and are happy to cope with duplicate deliveries or lost messages - an example of this might be transient stock price updates - which are quickly superseded by the next update on the 10
11 Messaging Concepts same stock. The messaging system allows you to configure which delivery guarantees you require. Transactions Messaging systems typically support the sending and acknowledgement of multiple messages in a single local transaction. Apache ActiveMQ Artemis also supports the sending and acknowledgement of message as part of a large global transaction - using the Java mapping of XA: JTA. Durability Messages are either durable or non durable. Durable messages will be persisted in permanent storage and will survive server failure or restart. Non durable messages will not survive server failure or restart. Examples of durable messages might be orders or trades, where they cannot be lost. An example of a non durable message might be a stock price update which is transitory and doesn't need to survive a restart. Messaging APIs and protocols How do client applications interact with messaging systems in order to send and consume messages? Several messaging systems provide their own proprietary APIs with which the client communicates with the messaging system. There are also some standard ways of operating with messaging systems and some emerging standards in this space. Let's take a brief look at these: Java Message Service (JMS) JMS is part of Oracle's JEE specification. It's a Java API that encapsulates both message queue and publish-subscribe messaging patterns. JMS is a lowest common denominator specification - i.e. it was created to encapsulate common functionality of the already existing messaging systems that were available at the time of its creation. 11
12 Messaging Concepts JMS is a very popular API and is implemented by most messaging systems. JMS is only available to clients running Java. JMS does not define a standard wire format - it only defines a programmatic API so JMS clients and servers from different vendors cannot directly interoperate since each will use the vendor's own internal wire protocol. Apache ActiveMQ Artemis provides a fully compliant JMS 1.1 and JMS 2.0 API. System specific APIs Many systems provide their own programmatic API for which to interact with the messaging system. The advantage of this it allows the full set of system functionality to be exposed to the client application. API's like JMS are not normally rich enough to expose all the extra features that most messaging systems provide. Apache ActiveMQ Artemis provides its own core client API for clients to use if they wish to have access to functionality over and above that accessible via the JMS API. RESTful API REST approaches to messaging are showing a lot interest recently. It seems plausible that API standards for cloud computing may converge on a REST style set of interfaces and consequently a REST messaging approach is a very strong contender for becoming the de-facto method for messaging interoperability. With a REST approach messaging resources are manipulated as resources defined by a URI and typically using a simple set of operations on those resources, e.g. PUT, POST, GET etc. REST approaches to messaging often use HTTP as their underlying protocol. The advantage of a REST approach with HTTP is in its simplicity and the fact the internet is already tuned to deal with HTTP optimally. Please see Rest Interface for using Apache ActiveMQ Artemis's RESTful interface. AMQP AMQP is a specification for interoperable messaging. It also defines a wire format, so any AMQP client can work with any messaging system that supports AMQP. AMQP clients are available in many different programming languages. 12
13 Messaging Concepts Apache ActiveMQ Artemis implements the AMQP 1.0 specification. Any client that supports the 1.0 specification will be able to interact with Apache ActiveMQ Artemis. MQTT MQTT is a lightweight connectivity protocol. It is designed to run in environments where device and networks are constrained. Out of the box Apache ActiveMQ Artemis supports version MQTT Any client supporting this version of the protocol will work against Apache ActiveMQ Artemis. STOMP Stomp is a very simple text protocol for interoperating with messaging systems. It defines a wire format, so theoretically any Stomp client can work with any messaging system that supports Stomp. Stomp clients are available in many different programming languages. Please see Stomp for using STOMP with Apache ActiveMQ Artemis. OPENWIRE ActiveMQ 5.x defines it's own wire Protocol "OPENWIRE". In order to support ActiveMQ 5.x clients, Apache ActiveMQ Artemis supports OPENWIRE. Any ActiveMQ 5.12.x or higher can be used with Apache ActiveMQ Artemis. High Availability High Availability (HA) means that the system should remain operational after failure of one or more of the servers. The degree of support for HA varies between various messaging systems. Apache ActiveMQ Artemis provides automatic failover where your sessions are automatically reconnected to the backup server on event of live server failure. For more information on HA, please see High Availability and Failover. Clusters 13
14 Messaging Concepts Many messaging systems allow you to create groups of messaging servers called clusters. Clusters allow the load of sending and consuming messages to be spread over many servers. This allows your system to scale horizontally by adding new servers to the cluster. Degrees of support for clusters varies between messaging systems, with some systems having fairly basic clusters with the cluster members being hardly aware of each other. Apache ActiveMQ Artemis provides very configurable state-of-the-art clustering model where messages can be intelligently load balanced between the servers in the cluster, according to the number of consumers on each node, and whether they are ready for messages. Apache ActiveMQ Artemis also has the ability to automatically redistribute messages between nodes of a cluster to prevent starvation on any particular node. For full details on clustering, please see Clusters. Bridges and routing Some messaging systems allow isolated clusters or single nodes to be bridged together, typically over unreliable connections like a wide area network (WAN), or the internet. A bridge normally consumes from a queue on one server and forwards messages to another queue on a different server. Bridges cope with unreliable connections, automatically reconnecting when the connections becomes available again. Apache ActiveMQ Artemis bridges can be configured with filter expressions to only forward certain messages, and transformation can also be hooked in. Apache ActiveMQ Artemis also allows routing between queues to be configured in server side configuration. This allows complex routing networks to be set up forwarding or copying messages from one destination to another, forming a global network of interconnected brokers. For more information please see Core Bridges and Diverting and Splitting Message Flows. 14
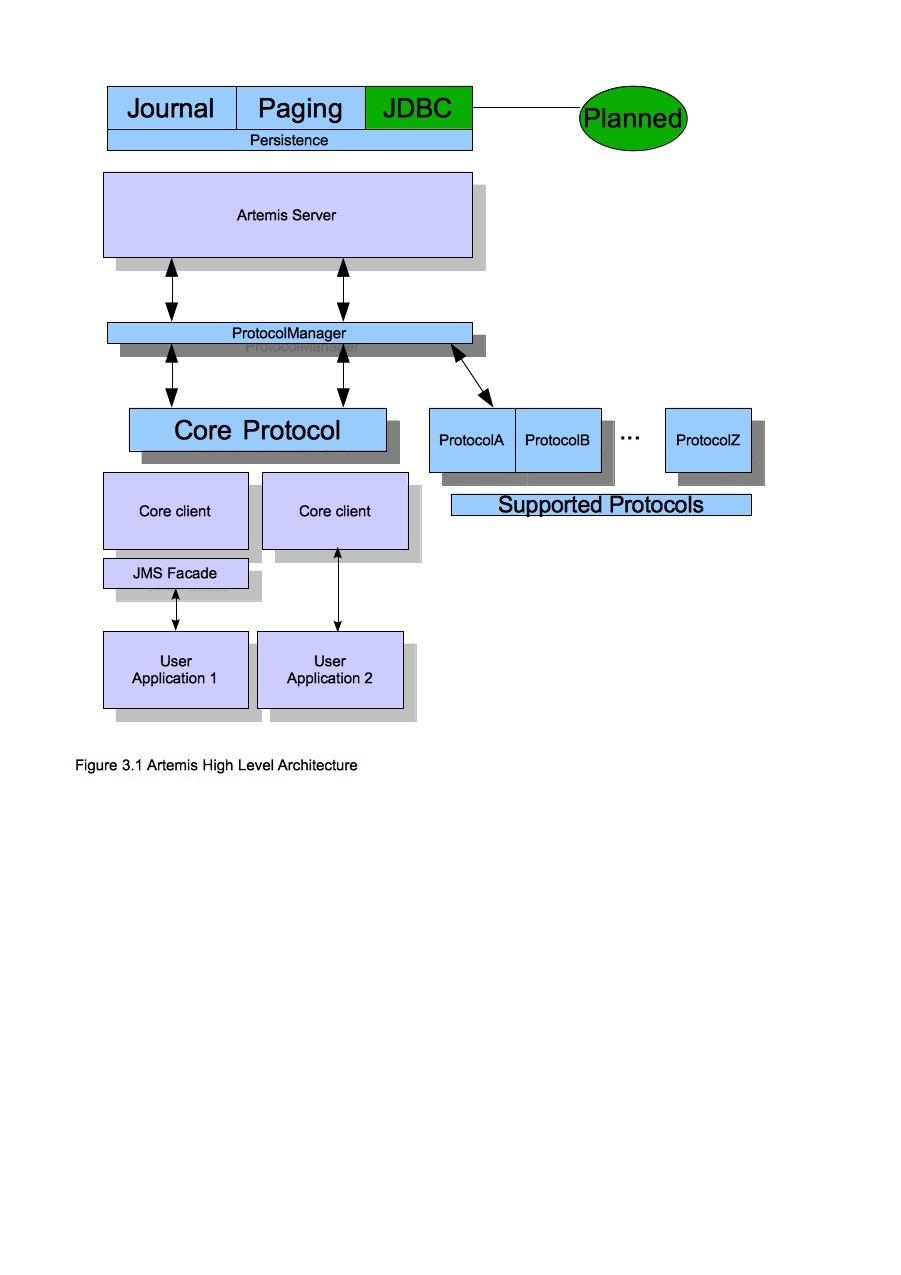
15 Architecture Architecture In this section we will give an overview of the Apache ActiveMQ Artemis high level architecture. Core Architecture Apache ActiveMQ Artemis core is designed simply as set of Plain Old Java Objects (POJOs) - we hope you like its clean-cut design. Each Apache ActiveMQ Artemis server has its own ultra high performance persistent journal, which it uses for message and other persistence. Using a high performance journal allows outrageous persistence message performance, something not achievable when using a relational database for persistence. Apache ActiveMQ Artemis clients, potentially on different physical machines interact with the Apache ActiveMQ Artemis server. Apache ActiveMQ Artemis currently provides two APIs for messaging at the client side: 1. Core client API. This is a simple intuitive Java API that is aligned with the Artemis internal Core. Allowing more control of broker objects, like for example, direct creation of addresses and queues. The Core API also offers a full set of messaging functionality without some of the complexities of JMS. 2. JMS client API. The standard JMS API is available at the client side. Apache ActiveMQ Artemis also provides different protocol implementations on the server so you can use respective clients for these protocols: 1. AMQP 2. OpenWire 3. MQTT 4. STOMP 5. HornetQ (for use with HornetQ clients). 6. CORE (Artemis CORE protocol) JMS semantics are implemented by a JMS facade layer on the client side. 15
16 Architecture The Apache ActiveMQ Artemis server does not speak JMS and in fact does not know anything about JMS, it is a protocol agnostic messaging server designed to be used with multiple different protocols. When a user uses the JMS API on the client side, all JMS interactions are translated into operations on the Apache ActiveMQ Artemis core client API before being transferred over the wire using the Apache ActiveMQ Artemis wire format. The server always just deals with core API interactions. A schematic illustrating this relationship is shown in figure 3.1 below: 16
17 Architecture 17
18 Architecture Figure 3.1 shows two user applications interacting with an Apache ActiveMQ Artemis server. User Application 1 is using the JMS API, while User Application 2 is using the core client API directly. You can see from the diagram that the JMS API is implemented by a thin facade layer on the client side. Apache ActiveMQ Artemis stand-alone server The standard stand-alone messaging server configuration comprises a core messaging server and a number of protocol managers that provide support for the various protocol mentioned earlier. Protocol managers are plugable if you The role of the JMS Service is to deploy any JMS Queue, Topic and ConnectionFactory instances from any server side JMS configuration. It also provides a simple management API for creating and destroying Queues and Topics which can be accessed via JMX or the connection. It is a separate service to the ActiveMQ Artemis core server, since the core server is JMS agnostic. If you don't want to deploy any JMS Queue or Topic via server side XML configuration and don't require a JMS management API on the server side then you can disable this service. The stand-alone server configuration uses Airline for bootstrapping the Broker. The stand-alone server architecture is shown in figure 3.3 below: 18

19 Architecture For more information on server configuration files see Server Configuration 19
20 Architecture Apache ActiveMQ Artemis embedded in your own application Apache ActiveMQ Artemis core is designed as a set of simple POJOs so if you have an application that requires messaging functionality internally but you don't want to expose that as an Apache ActiveMQ Artemis server you can directly instantiate and embed Apache ActiveMQ Artemis servers in your own application. For more information on embedding Apache ActiveMQ Artemis, see Embedding Apache ActiveMQ Artemis. Apache ActiveMQ Artemis integrated with a Java EE application server Apache ActiveMQ Artemis provides its own fully functional Java Connector Architecture (JCA) adaptor which enables it to be integrated easily into any Java EE compliant application server or servlet engine. Java EE application servers provide Message Driven Beans (MDBs), which are a special type of Enterprise Java Beans (EJBs) that can process messages from sources such as JMS systems or mail systems. Probably the most common use of an MDB is to consume messages from a JMS messaging system. According to the Java EE specification, a Java EE application server uses a JCA adapter to integrate with a JMS messaging system so it can consume messages for MDBs. However, the JCA adapter is not only used by the Java EE application server for consuming messages via MDBs, it is also used when sending message to the JMS messaging system e.g. from inside an EJB or servlet. When integrating with a JMS messaging system from inside a Java EE application server it is always recommended that this is done via a JCA adaptor. In fact, communicating with a JMS messaging system directly, without using JCA would be illegal according to the Java EE specification. 20
21 Architecture The application server's JCA service provides extra functionality such as connection pooling and automatic transaction enlistment, which are desirable when using messaging, say, from inside an EJB. It is possible to talk to a JMS messaging system directly from an EJB, MDB or servlet without going through a JCA adapter, but this is not recommended since you will not be able to take advantage of the JCA features, such as caching of JMS sessions, which can result in poor performance. Figure 3.2 below shows a Java EE application server integrating with a Apache ActiveMQ Artemis server via the Apache ActiveMQ Artemis JCA adaptor. Note that all communication between EJB sessions or entity beans and Message Driven beans go through the adaptor and not directly to Apache ActiveMQ Artemis. The large arrow with the prohibited sign shows an EJB session bean talking directly to the Apache ActiveMQ Artemis server. This is not recommended as you'll most likely end up creating a new connection and session every time you want to interact from the EJB, which is an anti-pattern. 21
22 Architecture 22
23 Architecture 23
24 Using the Server Using the Server This chapter will familiarise you with how to use the Apache ActiveMQ Artemis server. We'll show where it is, how to start and stop it, and we'll describe the directory layout and what all the files are and what they do. For the remainder of this chapter when we talk about the Apache ActiveMQ Artemis server we mean the Apache ActiveMQ Artemis standalone server, in its default configuration with a JMS Service enabled. This document will refer to the full path of the directory where the ActiveMQ distribution has been extracted to as ${ARTEMIS_HOME} directory. Installation After downloading the distribution, the following highlights some important folders on the distribution: bin web user-manual api examples core javaee jms lib schema bin -- binaries and scripts needed to run ActiveMQ Artemis. web -- The folder where the web context is loaded when ActiveMQ Artemis runs. user-manual -- The user manual is placed under the web folder. api -- The api documentation is placed under the web folder 24
25 Using the Server examples -- JMS and Java EE examples. Please refer to the 'running examples' chapter for details on how to run them. lib -- jars and libraries needed to run ActiveMQ Artemis licenses -- licenses for ActiveMQ Artemis schemas -- XML Schemas used to validate ActiveMQ Artemis configuration files Creating a Broker Instance A broker instance is the directory containing all the configuration and runtime data, such as logs and data files, associated with a broker process. It is recommended that you do not create the instance directory under ${ARTEMIS_HOME}. This separation is encouraged so that you can more easily upgrade when the next version of ActiveMQ Artemis is released. On Unix systems, it is a common convention to store this kind of runtime data under the /var/lib directory. For example, to create an instance at '/var/lib/mybroker', run the following commands in your command line shell: cd /var/lib ${ARTEMIS_HOME}/bin/artemis create mybroker A broker instance directory will contain the following sub directories: bin : holds execution scripts associated with this instance. etc : hold the instance configuration files data : holds the data files used for storing persistent messages log : holds rotating log files tmp : holds temporary files that are safe to delete between broker runs At this point you may want to adjust the default configuration located in the etc directory. Options There are several options you can use when creating an instance. For a full list of updated properties always use: 25
26 Using the Server $./artemis help create NAME artemis create - creates a new broker instance SYNOPSIS artemis create [--addresses <addresses>] [--aio] [--allow-anonymous] [--autocreate] [--blocking] [--cluster-password <clusterpassword>] [--cluster-user <clusteruser>] [--clustered] [--data <data>] [--default-port <defaultport>] [--disable-persistence] [--encoding <encoding>] [--failover-on-shutdown] [--force] [--global-max-size <globalmaxsize>] [--home <home>] [--host <host> ] [--http-host <httphost>] [--http-port <httpport>] [--java-options <javaoptions>] [--mapped] [--max-hops <maxhops>] [--message-load-balancing <messageloadbalancing>] [--name <name>] [--nio] [--no-amqp-acceptor] [--no-autocreate] [--no-autotune] [--no-fsync] [--no-hornetq-acceptor] [--no-mqtt-acceptor] [--no-stomp-acceptor] [--no-web] [--paging] [--password <password> ] [--ping <ping>] [--port-offset <portoffset>] [--queues <queues>] [--replicated] [--require-login] [--role <role>] [--shared-store] [--silent] [--slave] [--ssl-key <sslkey>] [--ssl-key-password <sslkeypassword>] [--ssl-trust <ssltrust>] [--ssl-trust-password <ssltrustpassword>] [--use-client-auth] [--user <user>] [--verbose] [--] <directory> OPTIONS --addresses <addresses> Comma separated list of addresses --aio Sets the journal as asyncio. --allow-anonymous Enables anonymous configuration on security, opposite of --require-login (Default: input) --autocreate Auto create addresses. (default: true) --blocking Block producers when address becomes full, opposite of --paging (Default: false) --cluster-password <clusterpassword> The cluster password to use for clustering. (Default: input) --cluster-user <clusteruser> The cluster user to use for clustering. (Default: input) --clustered 26
27 Using the Server Enable clustering --data <data> Directory where ActiveMQ Data is used. Paths are relative to artemis.instance --default-port <defaultport> The port number to use for the main 'artemis' acceptor (Default: 61616) --disable-persistence Disable message persistence to the journal --encoding <encoding> The encoding that text files should use --failover-on-shutdown Valid for shared store: will shutdown trigger a failover? (Default: false) --force Overwrite configuration at destination directory --global-max-size <globalmaxsize> Maximum amount of memory which message data may consume (Default: Undefined, half of the system's memory) --home <home> Directory where ActiveMQ Artemis is installed --host <host> The host name of the broker (Default: or input if clustered) --http-host <httphost> The host name to use for embedded web server (Default: localhost) --http-port <httpport> The port number to use for embedded web server (Default: 8161) --java-options <javaoptions> Extra java options to be passed to the profile --mapped Sets the journal as mapped. --max-hops <maxhops> Number of hops on the cluster configuration --message-load-balancing <messageloadbalancing> Load balancing policy on cluster. [ON_DEMAND (default) STRICT OFF] 27
28 Using the Server --name <name> The name of the broker (Default: same as host) --nio Sets the journal as nio. --no-amqp-acceptor Disable the AMQP specific acceptor. --no-autocreate Disable Auto create addresses. --no-autotune Disable auto tuning on the journal. --no-fsync Disable usage of fdatasync (channel.force(false) from java nio) on the journal --no-hornetq-acceptor Disable the HornetQ specific acceptor. --no-mqtt-acceptor Disable the MQTT specific acceptor. --no-stomp-acceptor Disable the STOMP specific acceptor. --no-web Remove the web-server definition from bootstrap.xml --paging Page messages to disk when address becomes full, opposite of --blocking (Default: true) --password <password> The user's password (Default: input) --ping <ping> A comma separated string to be passed on to the broker config as network-check-list. The broker will shutdown when all these addresses are unreachable. --port-offset <portoffset> Off sets the ports of every acceptor --queues <queues> Comma separated list of queues. --replicated Enable broker replication 28
29 Using the Server --require-login This will configure security to require user / password, opposite of --allow-anonymous --role <role> The name for the role created (Default: amq) --shared-store Enable broker shared store --silent It will disable all the inputs, and it would make a best guess for any required input --slave Valid for shared store or replication: this is a slave server? --ssl-key <sslkey> The key store path for embedded web server --ssl-key-password <sslkeypassword> The key store password --ssl-trust <ssltrust> The trust store path in case of client authentication --ssl-trust-password <ssltrustpassword> The trust store password --use-client-auth If the embedded server requires client authentication --user <user> The username (Default: input) --verbose Adds more information on the execution -- This option can be used to separate command-line options from the list of argument, (useful when arguments might be mistaken for command-line options <directory> The instance directory to hold the broker's configuration and data. Path must be writable. Some of these properties may be mandatory in certain configurations and the system may ask you for additional input. 29
30 Using the Server./artemis create /usr/server Creating ActiveMQ Artemis instance at: /user/server --user: is a mandatory property! Please provide the default username: admin --password: is mandatory with this configuration: Please provide the default password: --allow-anonymous --require-login: is a mandatory property! Allow anonymous access?, valid values are Y,N,True,False y Auto tuning journal... done! Your system can make 0.34 writes per millisecond, your journal-buffer-ti meout will be You can now start the broker by executing: "/user/server/bin/artemis" run Or you can run the broker in the background using: "/user/server/bin/artemis-service" start Starting and Stopping a Broker Instance Assuming you created the broker instance under /var/lib/mybroker all you need to do start running the broker instance is execute: /var/lib/mybroker/bin/artemis run Now that the broker is running, you can optionally run some of the included examples to verify the the broker is running properly. To stop the Apache ActiveMQ Artemis instance you will use the same artemis script, but with the stop argument. Example: /var/lib/mybroker/bin/artemis stop Please note that Apache ActiveMQ Artemis requires a Java 7 or later runtime to run. 30
31 Using the Server By default the etc/bootstrap.xml configuration is used. The configuration can be changed e.g. by running./artemis run -- xml:path/to/bootstrap.xml or another config of your choosing. Environment variables are used to provide ease of changing ports, hosts and data directories used and can be found in etc/artemis.profile on linux and etc\artemis.profile.cmd on Windows. Server JVM settings The run scripts set some JVM settings for tuning the garbage collection policy and heap size. We recommend using a parallel garbage collection algorithm to smooth out latency and minimise large GC pauses. By default Apache ActiveMQ Artemis runs in a maximum of 1GiB of RAM. To increase the memory settings change the -Xms and -Xmx memory settings as you would for any Java program. If you wish to add any more JVM arguments or tune the existing ones, the run scripts are the place to do it. Pre-configured Options The distribution contains several standard configuration sets for running: Non clustered stand-alone. Clustered stand-alone Replicated stand-alone Shared-store stand-alone You can of course create your own configuration and specify any configuration when running the run script. Library Path 31
32 Using the Server If you're using the Asynchronous IO Journal on Linux, you need to specify java.library.path as a property on your Java options. This is done automatically in the scripts. If you don't specify java.library.path at your Java options then the JVM will use the environment variable LD_LIBRARY_PATH. You will need to make sure libaio is installed on Linux. For more information refer to the libaio chapter at Runtime Dependencies System properties Apache ActiveMQ Artemis can take a system property on the command line for configuring logging. For more information on configuring logging, please see the section on Logging. Configuration files The configuration file used to bootstrap the server (e.g. bootstrap.xml by default) references the specific broker configuration files. broker.xml. This is the main ActiveMQ configuration file. All the parameters in this file are described here It is also possible to use system property substitution in all the configuration files. by replacing a value with the name of a system property. Here is an example of this with a connector configuration: <connector name="netty">tcp://${activemq.remoting.netty.host:localhost}:${activemq.remoting.netty.port:61616}</connector> Here you can see we have replaced 2 values with system properties activemq.remoting.netty.host and activemq.remoting.netty.port. These values will be replaced by the value found in the system property if there is one, if not they default back to localhost or respectively. It is also possible to not supply a default. i.e. ${activemq.remoting.netty.host}, however the system property must be supplied in that case. 32
33 Using the Server Bootstrap File The stand-alone server is basically a set of POJOs which are instantiated by Airline commands. The bootstrap file is very simple. Let's take a look at an example: <broker xmlns=" <file:core configuration="${activemq.home}/config/stand-alone/non-clustered/bro ker.xml"></core> <basic-security/> </broker> core - Instantiates a core server using the configuration file from the configuration attribute. This is the main broker POJO necessary to do all the real messaging work. In addition all JMS objects such as: Queues, Topics and ConnectionFactory instances are configured here. The main configuration file. The configuration for the Apache ActiveMQ Artemis core server is contained in broker.xml. This is what the FileConfiguration bean uses to configure the messaging server. There are many attributes which you can configure Apache ActiveMQ Artemis. In most cases the defaults will do fine, in fact every attribute can be defaulted which means a file with a single empty configuration element is a valid configuration file. The different configuration will be explained throughout the manual or you can refer to the configuration reference here. Windows Server On windows you will have the option to run ActiveMQ Artemis as a service. Just use the following command to install it: 33
34 Using the Server $./artemis-service.exe install The create process should give you a hint of the available commands available for the artemis-service.exe 34
35 Address Model Apache ActiveMQ Artemis Addressing and Queues Apache ActiveMQ Artemis has a unique addressing model that is both powerful and flexible and that offers great performance. The addressing model comprises three main concepts: addresses, queues and routing types. An address represents a messaging endpoint. Within the configuration, a typical address is given a unique name, 0 or more queues, and a routing type. A queue is associated with an address. There can be multiple queues per address. Once an incoming message is matched to an address, the message will be sent on to one or more of its queues, depending on the routing type configured. Queues can be configured to be automatically created and deleted. A routing type determines how messages are sent to the queues associated with an address. A Apache ActiveMQ Artemis address can be configured with two different routing types. Table 1. Routing Types If you want your messages routed to A single queue within the matching address, in a point-topoint manner. Every queue within the matching address, in a publishsubscribe manner. Use this routing type Anycast Multicast Note: It is possible to define more than one routing type per address, but this typically results in an anti-pattern and is therefore not recommended. If an address does use both routing types, however, and the client does not show a preference for either one, the broker typically defaults to the anycast routing type. The one exception is when the client uses the MQTT protocol. In that case, the default routing type is multicast. Basic Address Configuration 35

36 Address Model The following examples show how to configure basic point to point and publish subscribe addresses. Point-to-Point Messaging Point-to-point messaging is a common scenario in which a message sent by a producer has only one consumer. AMQP and JMS message producers and consumers can make use of point-to-point messaging queues, for example. Define an anycast routing type for an address so that its queues receive messages in a point-to-point manner. When a message is received on an address using anycast, Apache ActiveMQ Artemis locates the queue associated with the address and routes the message to it. When consumers request to consume from the address, the broker locates the relevant queue and associates this queue with the appropriate consumers. If multiple consumers are connected to the same queue, messages are distributed amongst each consumer equally, providing the consumers are equally able to handle them. Figure 1. Point to Point Messaging Configuring an Address to Use the Anycast Routing Type Open the file /etc/broker.xml for editing. Add an address configuration element and its associated queue if they do not exist already. Note For normal Point to Point semantics, the queue name MUST match the address name. 36

37 Address Model <configuration...> <core...>... <address name="orders"> <anycast> <queue name="orders"/> </anycast> </address> </core> </configuration> Publish-Subscribe Messaging In a publish-subscribe scenario, messages are sent to every consumer subscribed to an address. JMS topics and MQTT subscriptions are two examples of publish-subscribe messaging. To configure an address with publish-subscribe semantics, create an address with the multicast routing tyoe. Figure 2. Publish-Subscribe Configuring an Address to Use the Multicast Routing Type Open the file /etc/broker.xml for editing. Add an address configuration element with multicast routing type. 37
38 Address Model <configuration...> <core...>... <address name="pubsub.foo"> <multicast/> </address> </core> </configuration> When clients connect to an address with the multicast element, a subscription queue for the client will be automatically created for the client. It is also possible to pre-configure subscription queues and connect to them directly using the queue's Fully Qualified Queue names. Add one more queue elements to the address and wrap the multicast element around them. This step is typically not needed since the broker will automatically create a queue for each subscription requested by a client. <configuration...> <core...>... <address name="pubsub.foo"> <multicast> <queue name="client123.pubsub.foo"/> <queue name="client456.pubsub.foo"/> </multicast> </address> </core> </configration> Figure 3. Point-to-Point with Two Queues Point-to-Point Address multiple Queues It is actually possible to define more than one queue on an address with an anycast routing type. When messages are received on such an address, they are firstly distributed evenly across all the defined queues. Using Fully Qualified Queue names., clients are able to select the queue that they d like to subscribe to. Should more than one consumer connect direct to a single queue, Apache ActiveMQ Artemis will take care of distributing messages between them, as in the example above. 38

39 Address Model Figure 3. Point-to-Point with Two Queues Note: This is how Apache ActiveMQ Artemis handles load balancing of queues across multiple nodes in a cluster. Configuring a Point-to-Point Address with Two Queues Open the file /etc/broker.xml for editing. Add an address configuration with Anycast routing type element and its associated queues. <configuration...> <core...>... <address name="address.foo"> <anycast> <queue name="q1"/> <queue name="q2"/> </anycast> </address> </core> </configuration> Point-to-Point and Publish-Subscribe Addresses It is possible to define an address with both point-to-point and publish-subscribe semantics enabled. While not typically recommend, this can be useful when you want, for example, a JMS Queue say orders and a JMS Topic named orders. The different routing types make the addresses appear to be distinct. Using an example of JMS Clients, the messages sent by a JMS queue producer will be routed using the anycast routing type. Messages sent by a JMS topic producer will use the multicast routing type. In addition when a JMS topic consumer attaches it will be 39


40 Address Model attached to it s own subscription queue. JMS queue consumer will be attached to the anycast queue. Figure 4. [Point-to-Point and Publish-Subscribe Note: The behavior in this scenario is dependent on the protocol being used. For JMS there is a clear distinction between topic and queue producers and consumers, which make the logic straight forward. Other protocols like AMQP do not make this distinction. A message being sent via AMQP will be routed by both anycast and multicast and consumers will default to anycast. For more information, please check the behavior of each protocol in the sections on protocols. The XML snippet below is an example of what the configuration for an address using both anycast and multicast would look like in /etc/broker.xml. routing types. Note that subscription queues are typically created on demand, so there is no need to list specific queue elements inside the multicast routing type. <configuration...> <core...>... <address name="foo.orders"> <anycast> <queue name="orders"/> </anycast> <multicast/> </address> </core> </configuration> How to filter messages 40
41 Address Model Apache ActiveMQ Artemis supports the ability to filter messages using Apache Artemis Filter Expressions. Filters can be applied in two places, on a queue and on a consumer. Queue Filter When a filter is applied to a queue, messages are filter before they sent to the queue. To add a queue filter use the filter element when configuring a queue. Open up the broker.xml and add an address with a queue, using the filter element to configure a filter on this queue. <address name="filter"> <queue name="filter"> <filter string="color='red'"/> </queue> </address> The filter defined above ensures that only messages with an attribute "color='red'" is sent to this queue. Consumer Filters Consumer filters are applied after messages have reached a queue and are defined using the appropriate client APIs. The follow JMS example shows how to consumer filters work. 1. Define an address with a single queue, with no filter applied. <address name="filter"> <queue name="filter"> </queue> </address> 41
42 Address Model... // Send some messages for (int i = 0; i < 3; i ++) { TextMessage redmessage = sendersession.createtextmessage("red"); redmessage.setstringproperty("color", "red"); producer.send(redmessage) } TextMessage greenmessage = sendersession.createtextmessage("green"); greenmessage.setstringproperty("color", "green"); producer.send(greenmessage) At this point the queue would have 6 messages: red,green,red,green,red,green MessageConsumer redconsumer = redsession.createconsumer(queue, "color='red'"); The redconsumer has a filter that only matches "red" messages. The redconsumer will receive 3 messages. red, red, red The resulting queue would now be green, green, green Creating and Deleting Addresses and Queues Automatically You can configure Apache ActiveMQ Artemis to automatically create addresses and queues, and then delete them when they are no longer in use. This saves you from having to preconfigure each address and queue before a client can connect to it. Automatic creation and deletion is configured on a per address basis and is controlled by following: 42
43 Address Model Parameter autocreateaddresses autodeleteaddresses defaultaddressroutingtype Description When set to true, the broker will create the address requested by the client if it does not exist already. The default is true. When set to true, the broker will be delete any auto-created adddress once all of it s queues have been deleted. The default is true The routing type to use if the client does not specify one. Possible values are MULTICAST and ANYCAST. See earlier in this chapter for more information about routing types. The default value is MULTICAST. Configuring an Address to be Automatically Created Edit the file /etc/broker.xml and add the auto-create-addresses element to the addresssetting you want the broker to automatically create. (Optional) Add the address-setting if it does not exits. Use the match parameter and the The Apache ActiveMQ Artemis Wildcard Syntax to match more than one specific address. Set auto-create-addresses to true (Optional) Assign MULTICAST or ANYCAST as the default routing type for the address. The example below configures an address-setting to be automatically created by the broker. The default routing type to be used if not specified by the client is MULTICAST. Note that wildcard syntax is used. Any address starting with /news/politics/ will be automatically created by the broker. <configuration...> <core...>... <address-settings> <address-setting match="/news/politics/#"> <auto-create-addresses>true</auto-create-addresses> <default-address-routing-type>multicast</default-address-routing-type> </address-setting> </address-settings>... </core> </configuration> 43
44 Address Model Configuring an Address to be Automatically Deleted Edit the file /etc/broker.xml and add the auto-delete-addresses element to the addresssetting you want the broker to automatically create. (Optional) Add the address-setting if it does not exits. Use the match parameter and the The Apache ActiveMQ Artemis Wildcard Syntax to match more than one specific address. Set auto-delete-addresses to true The example below configures an address-setting to be automatically deleted by the broker. Note that wildcard syntax is used. Any address request by the client that starts with /news/politics/ is configured to be automatically deleted by the broker. <configuration...> <core...>... <address-settings> <address-setting match="/news/politics/#"> <auto-create-addresses>true</auto-create-addresses> <default-address-routing-type>multicast</default-address-routing-type> </address-setting> </address-settings>... </core> </configuration> Fully Qualified Queue Names Internally the broker maps a client s request for an address to specific queues. The broker decides on behalf of the client which queues to send messages to or from which queue to receive messages. However, more advanced use cases might require that the client specify a queue directly. In these situations the client and use a fully qualified queue name, by specifying both the address name and the queue name, separated by a ::. Currently Artemis supports fully qualified queue names on Core, AMQP, JMS, OpenWire, MQTT and Stomp protocols for receiving messages only. Specifying a Fully Qualified Queue Name 44
45 Address Model In this example, the address foo is configured with two queues q1, q2 as shown in the configuration below. <configuration...> <core...>... <addresses> <address name="foo"> <anycast> <queue name="q1" /> <queue name="q2" /> </anycast> </address> </addresses> </core> </configuration> In the client code, use both the address name and the queue name when requesting a connection from the broker. Remember to use two colons, ::, to separate the names, as in the example Java code below. String FQQN = "foo::q1"; Queue q1 session.createqueue(fqqn); MessageConsumer consumer = session.createconsumer(q1); Configuring a Prefix to Connect to a Specific Routing Type Normally, if a Apache ActiveMQ Artemis receivs a message sent to a particular address, that has both anycast and multicast routing types enable, Apache ActiveMQ Artemis will route a copy of the message to one of the anycast queues and to all of the multicast queues. However, clients can specify a special prefix when connecting to an address to specify whether to connect using anycast or multicast. The prefixes are custom values that are designated using the anycastprefix and multicastprefix parameters within the URL of an acceptor. Configuring an Anycast Prefix 45
46 Address Model In /etc/broker.xml, add the anycastprefix to the URL of the desired acceptor. In the example below, the acceptor is configured to use anycast:// for the anycastprefix. Client code can specify anycast://foo/ if the client needs to send a message to only one of the anycast queues. <configuration...> <core...>... <acceptors> <acceptor name="artemis">tcp:// :61616?protocols=amqp;anycastprefix =anycast://</acceptor> </acceptors>... </core> </configuration> Configuring a Multicast Prefix In /etc/broker.xml, add the anycastprefix to the URL of the desired acceptor. In the example below, the acceptor is configured to use multicast:// for the multicastprefix. Client code can specify multicast://foo/ if the client needs the message sent to only the multicast queues of the address. <configuration...> <core...>... <acceptors> <acceptor name="artemis">tcp:// :61616?protocols=amqp;multicastpref ix=multicast://</acceptor> </acceptors>... </core> </configuration> Advanced Address Configuration Pre-configuring subscription queue semantics In most cases it s not necessary to pre-create subscription queues. The relevant protocol managers take care of creating subscription queues when clients request to subscribe to an address. The type of subscription queue created, depends on what properties the 46
47 Address Model client request. E.g. durable, non-shared, shared etc... Protocol managers uses special queue names to identify which queues below to which consumers and users need not worry about the details. However, there are scenarios where a user may want to use broker side configuration to pre-configure a subscription. And later connect to that queue directly using a Fully Qualified Queue name.. The examples below show how to use broker side configuration to pre-configure a queue with publish subscribe behavior for shared, non-shared, durable and non-durable subscription behavior. Configuring a shared durable subscription queue with up to 10 concurrent consumers The default behavior for queues is to not limit the number connected queue consumers. The max-consumers paramter of the queue element can be used to limit the number of connected consumers allowed at any one time. Open the file /etc/broker.xml for editing. <configuration...> <core...>... <address name="durable.foo"> <multicast> <!-- pre-configured shared durable subscription queue --> <queue name="q1" max-consumers="10"> <durable>true</durable> </queue> </multicast> </address> </core> </configuration> Configuring a non-shared durable subscription The broker can be configured to prevent more than one consumer from connecting to a queue at any one time. The subscriptions to queues configured this way are therefore "non-shared". To do this simply set the max-consumers parameter to "1" 47
48 Address Model <configuration...> <core...>... <address name="durable.foo"> <multicast> <!-- pre-configured non shared durable subscription queue --> <queue name="q1" max-consumers="1"> <durable>true</durable> </queue> </multicast> </address> </core> </configuration> Pre-configuring a queue as a non-durable subscription queue Non-durable subscriptions are again usually managed by the relevant protocol manager, by creating and deleting temporary queues. If a user requires to pre-create a queue that behaves like a non-durable subscription queue the purge-on-no-consumers flag can be enabled on the queue. When purgeon-no-consumers is set to true. The queue will not start receiving messages until a consumer is attached. When the last consumer is detached from the queue. The queue is purged (it's messages are removed) and will not receive any more messages until a new consumer is attached. Open the file /etc/broker.xml for editing. <configuration...> <core...>... <address name="non.shared.durable.foo"> <multicast> <queue name="orders1" purge-on-no-consumers="true"/> </multicast> </address> </core> </configuration> Additional Information: Protocol Managers, Address 48
49 Address Model A protocol manager maps protocol specific concepts down to the Apache ActiveMQ Artemis core model of addresses, queues and routing types. For example, when a client sends a MQTT subscription packet with the addresses /house/room1/lights /house/room2/lights The MQTT protocol manager understands that the two addresses require multicast semantics. The protocol manager will therefore first look to ensure that multicast is enabled for both addresses. If not, it will attempt to dynamically create them. If successful, the protocol manager will then create special subscription queues with special names, for each subscription requested by the client. The special name allows the protocol manager to quickly identify the required client subscription queues should the client disconnect and reconnect at a later date. If the subscription is temporary the protocol manager will delete the queue once the client disconnects. When a client requests to subscribe to a point to point address. The protocol manager will look up the queue associated with the point to point address. This queue should have the same name as the addresss. Note: If the queue is auto created, it will be auto deleted once there are no consumers and no messages in it. For more information on auto create see the next section Configuring Addresses and Queues via Address Settings Configuring Addresses and Queues via Address Settings There are some attributes that are defined against an address wildcard rather than a specific address/queue. Here an example of an address-setting entry that would be found in the broker.xml file. 49
50 Address Model <address-settings> <address-setting match="order.foo"> <dead-letter-address>dla</dead-letter-address> <max-delivery-attempts>3</max-delivery-attempts> <redelivery-delay>5000</redelivery-delay> <expiry-address>expiryqueue</expiry-address> <last-value-queue>true</last-value-queue> <max-size-bytes>100000</max-size-bytes> <page-size-bytes>20000</page-size-bytes> <redistribution-delay>0</redistribution-delay> <send-to-dla-on-no-route>true</send-to-dla-on-no-route> <address-full-policy>page</address-full-policy> <slow-consumer-threshold>-1</slow-consumer-threshold> <slow-consumer-policy>notify</slow-consumer-policy> <slow-consumer-check-period>5</slow-consumer-check-period> </address-setting> </address-settings> The idea with address settings, is you can provide a block of settings which will be applied against any addresses that match the string in the match attribute. In the above example the settings would only be applied to the address "order.foo" address but you can also use wildcards to apply settings. See: The chapter on the wild card syntax. For example, if you used the match string jms.queue.# the settings would be applied to all addresses which start with jms.queue. which would be all JMS queues. The meaning of the specific settings are explained fully throughout the user manual, however here is a brief description with a link to the appropriate chapter if available. max-delivery-attempts defines how many time a cancelled message can be redelivered before sending to the dead-letter-address. A full explanation can be found here. redelivery-delay defines how long to wait before attempting redelivery of a cancelled message. see here. expiry-address defines where to send a message that has expired. see here. expiry-delay defines the expiration time that will be used for messages which are using the default expiration time (i.e. 0). For example, if expiry-delay is set to "10" and a message which is using the default expiration time (i.e. 0) arrives then its expiration time of "0" will be changed to "10." However, if a message which is using an expiration time of "20" arrives then its expiration time will remain unchanged. Setting expiry-delay to "-1" will disable this feature. The default is "-1". last-value-queue defines whether a queue only uses last values or not. see here. 50
51 Address Model max-size-bytes and page-size-bytes are used to set paging on an address. This is explained here. redistribution-delay defines how long to wait when the last consumer is closed on a queue before redistributing any messages. see here. send-to-dla-on-no-route. If a message is sent to an address, but the server does not route it to any queues, for example, there might be no queues bound to that address, or none of the queues have filters that match, then normally that message would be discarded. However if this parameter is set to true for that address, if the message is not routed to any queues it will instead be sent to the dead letter address (DLA) for that address, if it exists. address-full-policy. This attribute can have one of the following values: PAGE, DROP, FAIL or BLOCK and determines what happens when an address where max-size-bytes is specified becomes full. The default value is PAGE. If the value is PAGE then further messages will be paged to disk. If the value is DROP then further messages will be silently dropped. If the value is FAIL then further messages will be dropped and an exception will be thrown on the client-side. If the value is BLOCK then client message producers will block when they try and send further messages. See the following chapters for more info Flow Control, Paging. slow-consumer-threshold. The minimum rate of message consumption allowed before a consumer is considered "slow." Measured in messages-per-second. Default is -1 (i.e. disabled); any other valid value must be greater than 0. slow-consumer-policy. What should happen when a slow consumer is detected. KILL will kill the consumer's connection (which will obviously impact any other client threads using that same connection). NOTIFY will send a CONSUMER_SLOW management notification which an application could receive and take action with. See slow consumers for more details on this notification. slow-consumer-check-period. How often to check for slow consumers on a particular queue. Measured in seconds. Default is 5. See slow consumers for more information about slow consumer detection. auto-create-jms-queues. Whether or not the broker should automatically create a JMS queue when a JMS message is sent to a queue whose name fits the address match (remember, a JMS queue is just a core queue which has the same address and queue 51
52 Address Model name) or a JMS consumer tries to connect to a queue whose name fits the address match. Queues which are auto-created are durable, non-temporary, and non-transient. Default is true. This is DEPRECATED. See auto-create-queues. auto-delete-jms-queues. Whether or not the broker should automatically delete autocreated JMS queues when they have both 0 consumers and 0 messages. Default is true. This is DEPRECATED. See auto-delete-queues. auto-create-jms-topics. Whether or not the broker should automatically create a JMS topic when a JMS message is sent to a topic whose name fits the address match (remember, a JMS topic is just a core address which has one or more core queues mapped to it) or a JMS consumer tries to subscribe to a topic whose name fits the address match. Default is true. This is DEPRECATED. See auto-create-addresses. auto-delete-jms-topics. Whether or not the broker should automatically delete autocreated JMS topics once the last subscription on the topic has been closed. Default is true. This is DEPRECATED. See auto-delete-addresses. auto-create-queues. Whether or not the broker should automatically create a queue when a message is sent or a consumer tries to connect to a queue whose name fits the address match. Queues which are auto-created are durable, non-temporary, and nontransient. Default is true. auto-delete-queues. Whether or not the broker should automatically delete auto-created queues when they have both 0 consumers and 0 messages. Default is true. auto-create-addresses. Whether or not the broker should automatically create an address when a message is sent to or a consumer tries to consume from a queue which is mapped to an address whose name fits the address match. Default is true. auto-delete-addresses. Whether or not the broker should automatically delete autocreated addresses once the address no longer has any queues. Default is true. 52
53 Using JMS Using JMS Although Apache ActiveMQ Artemis provides a JMS agnostic messaging API, many users will be more comfortable using JMS. JMS is a very popular API standard for messaging, and most messaging systems provide a JMS API. If you are completely new to JMS we suggest you follow the Oracle JMS tutorial - a full JMS tutorial is out of scope for this guide. Apache ActiveMQ Artemis also ships with a wide range of examples, many of which demonstrate JMS API usage. A good place to start would be to play around with the simple JMS Queue and Topic example, but we also provide examples for many other parts of the JMS API. A full description of the examples is available in Examples. In this section we'll go through the main steps in configuring the server for JMS and creating a simple JMS program. We'll also show how to configure and use JNDI, and also how to use JMS with Apache ActiveMQ Artemis without using any JNDI. A simple ordering system For this chapter we're going to use a very simple ordering system as our example. It is a somewhat contrived example because of its extreme simplicity, but it serves to demonstrate the very basics of setting up and using JMS. We will have a single JMS Queue called OrderQueue, and we will have a single MessageProducer sending an order message to the queue and a single MessageConsumer consuming the order message from the queue. The queue will be a durable queue, i.e. it will survive a server restart or crash. We also want to pre-deploy the queue, i.e. specify the queue in the server configuration so it is created automatically without us having to explicitly create it from the client. JNDI Configuration 53
54 Using JMS The JMS specification establishes the convention that administered objects (i.e. JMS queue, topic and connection factory instances) are made available via the JNDI API. Brokers are free to implement JNDI as they see fit assuming the implementation fits the API. Apache ActiveMQ Artemis does not have a JNDI server. Rather, it uses a clientside JNDI implementation that relies on special properties set in the environment to construct the appropriate JMS objects. In other words, no objects are stored in JNDI on the Apache ActiveMQ Artemis server, instead they are simply instantiated on the client based on the provided configuration. Let's look at the different kinds of administered objects and how to configure them. Note The following configuration properties are strictly required when Apache ActiveMQ Artemis is running in stand-alone mode. When Apache ActiveMQ Artemis is integrated to an application server (e.g. Wildfly) the application server itself will almost certainly provide a JNDI client with its own properties. ConnectionFactory JNDI A JMS connection factory is used by the client to make connections to the server. It knows the location of the server it is connecting to, as well as many other configuration parameters. Here's a simple example of the JNDI context environment for a client looking up a connection factory to access an embedded instance of Apache ActiveMQ Artemis: java.naming.factory.initial=org.apache.activemq.artemis.jndi.activemqinitialcontex tfactory connectionfactory.invmconnectionfactory=vm://0 In this instance we have created a connection factory that is bound to invmconnectionfactory, any entry with prefix connectionfactory. will create a connection factory. In certain situations there could be multiple server instances running within a particular JVM. In that situation each server would typically have an InVM acceptor with a unique server-id. A client using JMS and JNDI can account for this by specifying a connction factory for each server, like so: 54
55 Using JMS java.naming.factory.initial=org.apache.activemq.artemis.jndi.activemqinitialcontex tfactory connectionfactory.invmconnectionfactory0=vm://0 connectionfactory.invmconnectionfactory1=vm://1 connectionfactory.invmconnectionfactory2=vm://2 Here is a list of all the supported URL schemes: vm tcp udp jgroups Most clients won't be connecting to an embedded broker. Clients will most commonly connect across a network a remote broker. Here's a simple example of a client configuring a connection factory to connect to a remote broker running on myhost:5445: java.naming.factory.initial=org.apache.activemq.artemis.jndi.activemqinitialcontex tfactory connectionfactory.connectionfactory=tcp://myhost:5445 In the example above the client is using the tcp scheme for the provider URL. A client may also specify multiple comma-delimited host:port combinations in the URL (e.g. (tcp://remote-host1:5445,remote-host2:5445) ). Whether there is one or many host:port combinations in the URL they are treated as the initial connector(s) for the underlying connection. The udp scheme is also supported which should use a host:port combination that matches the group-address and group-port from the corresponding broadcast-group configured on the ActiveMQ Artemis server(s). Each scheme has a specific set of properties which can be set using the traditional URL query string format (e.g. scheme://host:port?key1=value1&key2=value2 ) to customize the underlying transport mechanism. For example, if a client wanted to connect to a remote server using TCP and SSL it would create a connection factory like so, tcp://remotehost:5445?ssl-enabled=true. All the properties available for the tcp scheme are described in the documentation regarding the Netty transport. 55
56 Using JMS Note if you are using the tcp scheme and multiple addresses then a query can be applied to all the url's or just to an individual connector, so where you have (tcp://remote-host1:5445?httpenabled=true,remote-host2:5445?httpenabled=true)? clientid=1234 then the httpenabled property is only set on the individual connectors where as the clientid is set on the actual connection factory. Any connector specific properties set on the whole URI will be applied to all the connectors. The udp scheme supports 4 properties: localaddress - If you are running with multiple network interfaces on the same machine, you may want to specify that the discovery group listens only only a specific interface. To do this you can specify the interface address with this parameter. localport - If you want to specify a local port to which the datagram socket is bound you can specify it here. Normally you would just use the default value of -1 which signifies that an anonymous port should be used. This parameter is always specified in conjunction with localaddress. refreshtimeout - This is the period the discovery group waits after receiving the last broadcast from a particular server before removing that servers connector pair entry from its list. You would normally set this to a value significantly higher than the broadcast-period on the broadcast group otherwise servers might intermittently disappear from the list even though they are still broadcasting due to slight differences in timing. This parameter is optional, the default value is milliseconds (10 seconds). discoveryinitialwaittimeout - If the connection factory is used immediately after creation then it may not have had enough time to received broadcasts from all the nodes in the cluster. On first usage, the connection factory will make sure it waits this long since creation before creating the first connection. The default value for this parameter is milliseconds. Lastly, the jgroups scheme is supported which provides an alternative to the udp scheme for server discovery. The URL pattern is either jgroups://channelname? file=jgroups-xml-conf-filename where jgroups-xml-conf-filename refers to an XML file on the classpath that contains the JGroups configuration or it can be jgroups://channelname?properties=some-jgroups-properties. In both instance the channelname is the name given to the jgroups channel created. 56
57 Using JMS The refreshtimeout and discoveryinitialwaittimeout properties are supported just like with udp. The default type for the default connection factory is of type javax.jms.connectionfactory. This can be changed by setting the type like so java.naming.factory.initial=org.apache.activemq.artemis.jndi.activemqinitialcontex tfactory java.naming.provider.url=tcp://localhost:5445?type=cf In this example it is still set to the default, below shows a list of types that can be set. Configuration for Connection Factory Types type CF (default) XA_CF QUEUE_CF QUEUE_XA_CF TOPIC_CF TOPIC_XA_CF interface javax.jms.connectionfactory javax.jms.xaconnectionfactory javax.jms.queueconnectionfactory javax.jms.xaqueueconnectionfactory javax.jms.topicconnectionfactory javax.jms.xatopicconnectionfactory Destination JNDI JMS destinations are also typically looked up via JNDI. As with connection factories, destinations can be configured using special properties in the JNDI context environment. The property name should follow the pattern: queue.<jndi-binding> or topic.<jndibinding>. The property value should be the name of the queue hosted by the Apache ActiveMQ Artemis server. For example, if the server had a JMS queue configured like so: <queue name="orderqueue"/> And if the client wanted to bind this queue to "queues/orderqueue" then the JNDI properties would be configured like so: 57
58 Using JMS java.naming.factory.initial=org.apache.activemq.artemis.jndi.activemqinitialcontex tfactory java.naming.provider.url=tcp://myhost:5445 queue.queues/orderqueue=orderqueue It is also possible to look-up JMS destinations which haven't been configured explicitly in the JNDI context environment. This is possible using dynamicqueues/ or dynamictopics/ in the look-up string. For example, if the client wanted to look-up the aforementioned "OrderQueue" it could do so simply by using the string "dynamicqueues/orderqueue". Note, the text that follows dynamicqueues/ or dynamictopics/ must correspond exactly to the name of the destination on the server. The code Here's the code for the example: First we'll create a JNDI initial context from which to lookup our JMS objects. If the above properties are set in jndi.properties and it is on the classpath then any new, empty InitialContext will be initialized using those properties: 58
59 Using JMS InitialContext ic = new InitialContext(); //Now we'll look up the connection factory from which we can create //connections to myhost:5445: ConnectionFactory cf = (ConnectionFactory)ic.lookup("ConnectionFactory"); //And look up the Queue: Queue orderqueue = (Queue)ic.lookup("queues/OrderQueue"); //Next we create a JMS connection using the connection factory: Connection connection = cf.createconnection(); //And we create a non transacted JMS Session, with AUTO\_ACKNOWLEDGE //acknowledge mode: Session session = connection.createsession(false, Session.AUTO_ACKNOWLEDGE); //We create a MessageProducer that will send orders to the queue: MessageProducer producer = session.createproducer(orderqueue); //And we create a MessageConsumer which will consume orders from the //queue: MessageConsumer consumer = session.createconsumer(orderqueue); //We make sure we start the connection, or delivery won't occur on it: connection.start(); //We create a simple TextMessage and send it: TextMessage message = session.createtextmessage("this is an order"); producer.send(message); //And we consume the message: TextMessage receivedmessage = (TextMessage)consumer.receive(); System.out.println("Got order: " + receivedmessage.gettext()); It is as simple as that. For a wide range of working JMS examples please see the examples directory in the distribution. 59
60 Using JMS Warning Please note that JMS connections, sessions, producers and consumers are designed to be re-used. It is an anti-pattern to create new connections, sessions, producers and consumers for each message you produce or consume. If you do this, your application will perform very poorly. This is discussed further in the section on performance tuning Performance Tuning. Directly instantiating JMS Resources without using JNDI Although it is a very common JMS usage pattern to lookup JMS Administered Objects (that's JMS Queue, Topic and ConnectionFactory instances) from JNDI, in some cases you just think "Why do I need JNDI? Why can't I just instantiate these objects directly?" With Apache ActiveMQ Artemis you can do exactly that. Apache ActiveMQ Artemis supports the direct instantiation of JMS Queue, Topic and ConnectionFactory instances, so you don't have to use JNDI at all. For a full working example of direct instantiation please look at the "Instantiate JMS Objects Directly" example under the JMS section of the examples. See the Examples section for more info. Here's our simple example, rewritten to not use JNDI at all: We create the JMS ConnectionFactory object via the ActiveMQJMSClient Utility class, note we need to provide connection parameters and specify which transport we are using, for more information on connectors please see Configuring the Transport. 60
61 Using JMS TransportConfiguration transportconfiguration = new TransportConfiguration(NettyCo nnectorfactory.class.getname()); ConnectionFactory cf = ActiveMQJMSClient.createConnectionFactoryWithoutHA(JMSFacto rytype.cf,transportconfiguration); //We also create the JMS Queue object via the ActiveMQJMSClient Utility //class: Queue orderqueue = ActiveMQJMSClient.createQueue("OrderQueue"); //Next we create a JMS connection using the connection factory: Connection connection = cf.createconnection(); //And we create a non transacted JMS Session, with AUTO\_ACKNOWLEDGE //acknowledge mode: Session session = connection.createsession(false, Session.AUTO_ACKNOWLEDGE); //We create a MessageProducer that will send orders to the queue: MessageProducer producer = session.createproducer(orderqueue); //And we create a MessageConsumer which will consume orders from the //queue: MessageConsumer consumer = session.createconsumer(orderqueue); //We make sure we start the connection, or delivery won't occur on it: connection.start(); //We create a simple TextMessage and send it: TextMessage message = session.createtextmessage("this is an order"); producer.send(message); //And we consume the message: TextMessage receivedmessage = (TextMessage)consumer.receive(); System.out.println("Got order: " + receivedmessage.gettext()); Setting The Client ID This represents the client id for a JMS client and is needed for creating durable subscriptions. It is possible to configure this on the connection factory and can be set via the clientid element. Any connection created by this connection factory will have this 61
62 Using JMS set as its client id. Setting The Batch Size for DUPS_OK When the JMS acknowledge mode is set to DUPS_OK it is possible to configure the consumer so that it sends acknowledgements in batches rather that one at a time, saving valuable bandwidth. This can be configured via the connection factory via the dupsokbatchsize element and is set in bytes. The default is 1024 * 1024 bytes = 1 MiB. Setting The Transaction Batch Size When receiving messages in a transaction it is possible to configure the consumer to send acknowledgements in batches rather than individually saving valuable bandwidth. This can be configured on the connection factory via the transactionbatchsize element and is set in bytes. The default is 1024 *
63 Using Core Using Core Apache ActiveMQ Artemis core is a completely JMS-agnostic messaging system with its own API. We call this the core API. If you don't want to use JMS or other protocols you can use the core API directly. The core API provides all the functionality of JMS but without much of the complexity. It also provides features that are not available using JMS. Core Messaging Concepts Some of the core messaging concepts are similar to JMS concepts, but core messaging concepts differ in some ways. In general the core messaging API is simpler than the JMS API, since we remove distinctions between queues, topics and subscriptions. We'll discuss each of the major core messaging concepts in turn, but to see the API in detail, please consult the Javadoc. Message A message is the unit of data which is sent between clients and servers. A message has a body which is a buffer containing convenient methods for reading and writing data into it. A message has a set of properties which are key-value pairs. Each property key is a string and property values can be of type integer, long, short, byte, byte[], String, double, float or boolean. A message has an address it is being sent to. When the message arrives on the server it is routed to any queues that are bound to the address - if the queues are bound with any filter, the message will only be routed to that queue if the filter matches. An address may have many queues bound to it or even none. There may also be entities other than queues, like diverts bound to addresses. Messages can be either durable or non durable. Durable messages in a durable queue will survive a server crash or restart. Non durable messages will never survive a server crash or restart. 63
64 Using Core Messages can be specified with a priority value between 0 and 9. 0 represents the lowest priority and 9 represents the highest. Apache ActiveMQ Artemis will attempt to deliver higher priority messages before lower priority ones. Messages can be specified with an optional expiry time. Apache ActiveMQ Artemis will not deliver messages after its expiry time has been exceeded. Messages also have an optional timestamp which represents the time the message was sent. Apache ActiveMQ Artemis also supports the sending/consuming of very large messages much larger than can fit in available RAM at any one time. Address A server maintains a mapping between an address and a set of queues. Zero or more queues can be bound to a single address. Each queue can be bound with an optional message filter. When a message is routed, it is routed to the set of queues bound to the message's address. If any of the queues are bound with a filter expression, then the message will only be routed to the subset of bound queues which match that filter expression. Other entities, such as diverts can also be bound to an address and messages will also be routed there. Note In core, there is no concept of a Topic, Topic is a JMS only term. Instead, in core, we just deal with addresses and queues. For example, a JMS topic would be implemented by a single address to which many queues are bound. Each queue represents a subscription of the topic. A JMS Queue would be implemented as a single address to which one queue is bound - that queue represents the JMS queue. Queue Queues can be durable, meaning the messages they contain survive a server crash or restart, as long as the messages in them are durable. Non durable queues do not survive a server restart or crash even if the messages they contain are durable. 64
65 Using Core Queues can also be temporary, meaning they are automatically deleted when the client connection is closed, if they are not explicitly deleted before that. Queues can be bound with an optional filter expression. If a filter expression is supplied then the server will only route messages that match that filter expression to any queues bound to the address. Many queues can be bound to a single address. A particular queue is only bound to a maximum of one address. ServerLocator Clients use ServerLocator instances to create ClientSessionFactory instances. ServerLocator instances are used to locate servers and create connections to them. In JMS terms think of a ServerLocator in the same way you would a JMS Connection Factory. ServerLocator instances are created using the ActiveMQClient factory class. ClientSessionFactory Clients use ClientSessionFactory instances to create ClientSession instances. ClientSessionFactory instances are basically the connection to a server In JMS terms think of them as JMS Connections. ClientSessionFactory instances are created using the ServerLocator class. ClientSession A client uses a ClientSession for consuming and producing messages and for grouping them in transactions. ClientSession instances can support both transactional and non transactional semantics and also provide an XAResource interface so messaging operations can be performed as part of a JTA transaction. ClientSession instances group ClientConsumers and ClientProducers. ClientSession instances can be registered with an optional SendAcknowledgementHandler. This allows your client code to be notified asynchronously when sent messages have successfully reached the server. This unique Apache ActiveMQ Artemis feature, allows you to have full guarantees that sent messages have reached the server without having 65
66 Using Core to block on each message sent until a response is received. Blocking on each messages sent is costly since it requires a network round trip for each message sent. By not blocking and receiving send acknowledgements asynchronously you can create true end to end asynchronous systems which is not possible using the standard JMS API. For more information on this advanced feature please see the section Guarantees of sends and commits. ClientConsumer Clients use ClientConsumer instances to consume messages from a queue. Core Messaging supports both synchronous and asynchronous message consumption semantics. ClientConsumer instances can be configured with an optional filter expression and will only consume messages which match that expression. ClientProducer Clients create ClientProducer instances on ClientSession instances so they can send messages. ClientProducer instances can specify an address to which all sent messages are routed, or they can have no specified address, and the address is specified at send time for the message. Warning Please note that ClientSession, ClientProducer and ClientConsumer instances are designed to be re-used. It's an anti-pattern to create new ClientSession, ClientProducer and ClientConsumer instances for each message you produce or consume. If you do this, your application will perform very poorly. This is discussed further in the section on performance tuning Performance Tuning. A simple example of using Core Here's a very simple program using the core messaging API to send and receive a message. Logically it's comprised of two sections: firstly setting up the producer to write a message to an addresss, and secondly, creating a queue for the consumer, creating the consumer and starting it. 66
67 Using Core ServerLocator locator = ActiveMQClient.createServerLocatorWithoutHA(new TransportC onfiguration( InVMConnectorFactory.class.getName())); // In this simple example, we just use one session for both producing and receiving ClientSessionFactory factory = locator.createclientsessionfactory(); ClientSession session = factory.createsession(); // A producer is associated with an address... ClientProducer producer = session.createproducer("example"); ClientMessage message = session.createmessage(true); message.getbodybuffer().writestring("hello"); // We need a queue attached to the address... session.createqueue("example", "example", true); // And a consumer attached to the queue... ClientConsumer consumer = session.createconsumer("example"); // Once we have a queue, we can send the message... producer.send(message); // We need to start the session before we can -receive- messages... session.start(); ClientMessage msgreceived = consumer.receive(); System.out.println("message = " + msgreceived.getbodybuffer().readstring()); session.close(); 67
68 Using AMQP Using AMQP Apache ActiveMQ Artemis is also a pure AMQP 1.0 broker, with a high performant and feature complete protocol manager for AMQP. You can use any AMQP 1.0 compatible clients. A short list includes: qpid clients at the qpid project.net Clients Javascript NodeJS Java Script RHEA... and many others. Message Conversions The broker will not perform any message conversion to any other protocols when sending AMQP and receiving AMQP. However if you intend your message to be received on a AMQP JMS Client, you must follow the JMS Mapping convention: JMS Mapping Conventions If you send a body type that is not recognized by this specification the conversion between AMQP and any other protocol will make it a Binary Message. So, make sure you follow these conventions if you intend to cross protocols or languages. Especially on the message body. Example We have a few examples as part of the Artemis distribution:.net:./examples/protocols/amqp/dotnet 68
69 Using AMQP ProtonCPP./examples/protocols/amqp/proton-cpp Ruby./examples/protocols/amqp/proton-ruby Java (Using the qpid JMS Client)./examples/protocols/amqp/queue 69
70 Mapping JMS Concepts to the Core API Mapping JMS Concepts to the Core API This chapter describes how JMS destinations are mapped to Apache ActiveMQ Artemis addresses. Apache ActiveMQ Artemis core is JMS-agnostic. It does not have any concept of a JMS topic. A JMS topic is implemented in core as an address with name=(the topic name) and with a MULTICAST routing type with zero or more queues bound to it. Each queue bound to that address represents a topic subscription. Likewise, a JMS queue is implemented as an address with name=(the JMS queue name) with an ANYCAST routing type assocatied with it. Note. That whilst it is possible to configure a JMS topic and queue with the same name, it is not a recommended configuration for use with cross protocol. 70
71 The Client Classpath The Client Classpath Apache ActiveMQ Artemis requires several jars on the Client Classpath depending on whether the client uses Apache ActiveMQ Artemis Core API, JMS, and JNDI. Warning All the jars mentioned here can be found in the lib directory of the Apache ActiveMQ Artemis distribution. Be sure you only use the jars from the correct version of the release, you must not mix and match versions of jars from different Apache ActiveMQ Artemis versions. Mixing and matching different jar versions may cause subtle errors and failures to occur. Apache ActiveMQ Artemis Core Client If you are using just a pure Apache ActiveMQ Artemis Core client (i.e. no JMS) then you need activemq-core-client.jar, activemq-commons.jar, and netty.jar on your client classpath. JMS Client If you are using JMS on the client side, then you will also need to include activemq-jmsclient.jar and geronimo-jms_2.0_spec.jar. Note geronimo-jms_2.0_spec.jar just contains Java EE API interface classes needed for the javax.jms.* classes. If you already have a jar with these interface classes on your classpath, you will not need it. 71
72 Examples Examples The Apache ActiveMQ Artemis distribution comes with over 90 run out-of-the-box examples demonstrating many of the features. The examples are available in both the binary and source distribution under the examples directory. Examples are split by the following source tree: features - Examples containing broker specific features. ha - examples showing failover and reconnection capabilities. clustered - examples showing load balancing and distribution capabilities. perf - examples allowing you to run a few performance tests on the server sub-modules - examples of integrated external modules. protocols - Protocol specific examples openwire mqtt stomp amqp A set of Java EE examples are also provided which need WildFly installed to be able to run. Running the Examples To run any example, simply cd into the appropriate example directory and type mvn verify or mvn install (For details please read the readme.html in each example directory). You can use the profile -Pexamples to run multiple examples under any example tree. For each server, you will have a created server under./target/server0 (some examples use more than one server). You have the option to prevent the example from starting the server (e.g. if you want to start the server manually) by simply specifying the -PnoServer profile, e.g.: # running an example without running the server mvn verify -PnoServer 72
73 Examples Also under./target there will be a script repeating the commands to create each server. Here is the create-server0.sh generated by the Queue example. This is useful to see exactly what command(s) are required to configure the server(s). # These are the commands used to create server0 /myinstalldirectory/apache-artemis-1.1.0/bin/artemis create --allow-anonymous --si lent --force --no-web --user guest --password guest --role guest --port-offset 0 - -data./data --allow-anonymous --no-autotune --verbose /myinstalldirectory/apacheartemis-1.1.0/examples/features/standard/queue/target/server0 Several examples use UDP clustering which may not work in your environment by default. On linux the command would be: route add -net netmask dev lo This command should be run as root. This will redirect any traffic directed to to the loopback interface. On Mac OS X, the command is slightly different: sudo route add netmask All the examples use the Maven plugin, which can be useful for running your test servers as well. This is the common output when running an example. On this case taken from the Queue example: [INFO] Scanning for projects... [INFO] [INFO] [INFO] Building ActiveMQ Artemis JMS Queue Example [INFO] [INFO] [INFO] --- maven-enforcer-plugin:1.4:enforce queue --- [INFO] [INFO] --- maven-remote-resources-plugin:1.5:process queue --- [INFO] [INFO] --- maven-resources-plugin:2.6:resources queue --- [INFO] Using 'UTF-8' encoding to copy filtered resources. [INFO] Copying 1 resource [INFO] Copying 3 resources [INFO] [INFO] --- maven-compiler-plugin:3.1:compile queue --- [INFO] Changes detected - recompiling the module! [INFO] Compiling 1 source file to /work/apache-artemis-1.1.0/examples/features/sta 73
74 Examples ndard/queue/target/classes [INFO] [INFO] --- maven-checkstyle-plugin:2.16:check queue --- [INFO] [INFO] --- apache-rat-plugin:0.11:check queue --- [INFO] RAT will not execute since it is configured to be skipped via system proper ty 'rat.skip'. [INFO] [INFO] --- maven-resources-plugin:2.6:testresources queu e --- [INFO] Using 'UTF-8' encoding to copy filtered resources. [INFO] skip non existing resourcedirectory /work/apache-artemis-1.1.0/examples/fea tures/standard/queue/src/test/resources [INFO] Copying 3 resources [INFO] [INFO] --- maven-compiler-plugin:3.1:testcompile queue --- [INFO] No sources to compile [INFO] [INFO] --- maven-surefire-plugin:2.18.1:test queue --- [INFO] [INFO] --- maven-jar-plugin:2.4:jar queue --- [INFO] Building jar: /work/apache-artemis-1.1.0/examples/features/standard/queue/t arget/queue jar [INFO] [INFO] --- maven-site-plugin:3.3:attach-descriptor queue --- [INFO] [INFO] >>> maven-source-plugin:2.2.1:jar (attach-sources) > que ue >>> [INFO] [INFO] --- maven-enforcer-plugin:1.4:enforce queue --- [INFO] [INFO] <<< maven-source-plugin:2.2.1:jar (attach-sources) < que ue <<< [INFO] [INFO] --- maven-source-plugin:2.2.1:jar queue --- [INFO] Building jar: /work/apache-artemis-1.1.0/examples/features/standard/queue/t arget/queue sources.jar [INFO] [INFO] >>> maven-source-plugin:2.2.1:jar (default) > queue >>> [INFO] [INFO] --- maven-enforcer-plugin:1.4:enforce queue --- [INFO] [INFO] <<< maven-source-plugin:2.2.1:jar (default) < queue <<< [INFO] [INFO] --- maven-source-plugin:2.2.1:jar queue --- [INFO] [INFO] --- artemis-maven-plugin:1.1.0:create queue --- [INFO] Local id: local url: file:///users/apacheuser/.m2/repository/ layout: default snapshots: [enabled => true, update => always] releases: [enabled => true, update => always] 74
75 Examples [INFO] Entries.size 2 [INFO]... key=project = MavenProject: /work/apache-artemis-1.1.0/examples/features/standard/queue/pom.xml [INFO]... key=plugindescriptor = Component Descriptor: role: 'org.apache.maven.pl ugin.mojo', implementation: 'org.apache.activemq.artemis.maven.artemiscliplugin', role hint: 'org.apache.activemq:artemis-maven-plugin:1.1.0:cli' role: 'org.apache.maven.plugin.mojo', implementation: 'org.apache.activemq.artemis.maven.artemiscreateplugin', role hint: 'org.apache.activemq:artemis-maven-plugin: 1.1.0:create' role: 'org.apache.maven.plugin.mojo', implementation: 'org.apache.activemq.artemis.maven.artemisclientplugin', role hint: 'org.apache.activemq:artemis-maven-plugin: 1.1.0:runClient' --- Executing org.apache.activemq.artemis.cli.commands.create create --allow-anonymous --silent --force --no-web --user guest --password guest --role guest --port-offse t 0 --data./data --allow-anonymous --no-autotune --verbose /work/apache-artemis-1.1.0/examples/features/standard/queue/target/server0 Home::/work/apache-artemis-1.1.0/examples/features/standard/queue/../../../.., Ins tance::. Creating ActiveMQ Artemis instance at: /work/apache-artemis-1.1.0/examples/feature s/standard/queue/target/server0 You can now start the broker by executing: "/work/apache-artemis-1.1.0/examples/features/standard/queue/target/server0/bin /artemis" run Or you can run the broker in the background using: "/work/apache-artemis-1.1.0/examples/features/standard/queue/target/server0/bin /artemis-service" start [INFO] ########################################################################### ######################## [INFO] create-server0.sh created with commands to reproduce server0 [INFO] under /work/apache-artemis-1.1.0/examples/features/standard/queue/target [INFO] ########################################################################### ######################## [INFO] [INFO] --- artemis-maven-plugin:1.1.0:cli queue --- [INFO] awaiting server to start [INFO] awaiting server to start server-out: _ server-out: / \ (_) server-out: / _ \ _ \ / _ \ \/ / / server-out: / \ \/ _/ / \/ \ \ server-out: /_/ \_\ \ \ _ _ _ / / server-out: Apache ActiveMQ Artemis server-out: server-out: server-out:17:30:25,091 INFO [org.apache.activemq.artemis.integration.bootstrap] 75
76 Examples AMQ101000: Starting ActiveMQ Artemis Server server-out:17:30:25,120 INFO [org.apache.activemq.artemis.core.server] AMQ221000: live Message Broker is starting with configuration Broker Configuration (clustere d=false,journaldirectory=./data/journal,bindingsdirectory=./data/bindings,largemes sagesdirectory=./data/large-messages,pagingdirectory=./data/paging) server-out:17:30:25,152 INFO [org.apache.activemq.artemis.core.server] AMQ221013: Using NIO Journal server-out:17:30:25,195 INFO [org.apache.activemq.artemis.core.server] AMQ221043: Protocol module found: [artemis-server]. Adding protocol support for: CORE server-out:17:30:25,199 INFO [org.apache.activemq.artemis.core.server] AMQ221043: Protocol module found: [artemis-amqp-protocol]. Adding protocol support for: AMQP server-out:17:30:25,209 INFO [org.apache.activemq.artemis.core.server] AMQ221043: Protocol module found: [artemis-hornetq-protocol]. Adding protocol support for: H ORNETQ server-out:17:30:25,211 INFO [org.apache.activemq.artemis.core.server] AMQ221043: Protocol module found: [artemis-mqtt-protocol]. Adding protocol support for: MQTT server-out:17:30:25,214 INFO [org.apache.activemq.artemis.core.server] AMQ221043: Protocol module found: [artemis-openwire-protocol]. Adding protocol support for: OPENWIRE server-out:17:30:25,335 INFO [org.apache.activemq.artemis.core.server] AMQ221043: Protocol module found: [artemis-stomp-protocol]. Adding protocol support for: STO MP [INFO] awaiting server to start server-out:17:30:25,781 INFO [org.apache.activemq.artemis.core.server] AMQ221003: trying to deploy queue jms.queue.dlq server-out:17:30:25,835 INFO [org.apache.activemq.artemis.core.server] AMQ221003: trying to deploy queue jms.queue.expiryqueue server-out:17:30:25,933 INFO [org.apache.activemq.artemis.core.server] AMQ221020: Started Acceptor at :61616 for protocols [CORE,MQTT,AMQP,HORNETQ,STOMP,OPE NWIRE] server-out:17:30:25,936 INFO [org.apache.activemq.artemis.core.server] AMQ221020: Started Acceptor at :5445 for protocols [HORNETQ,STOMP] server-out:17:30:25,939 INFO [org.apache.activemq.artemis.core.server] AMQ221020: Started Acceptor at :5672 for protocols [AMQP] server-out:17:30:25,944 INFO [org.apache.activemq.artemis.core.server] AMQ221020: Started Acceptor at :1883 for protocols [MQTT] server-out:17:30:25,948 INFO [org.apache.activemq.artemis.core.server] AMQ221020: Started Acceptor at :61613 for protocols [STOMP] server-out:17:30:25,949 INFO [org.apache.activemq.artemis.core.server] AMQ221007: Server is now live server-out:17:30:25,949 INFO [org.apache.activemq.artemis.core.server] AMQ221001: Apache ActiveMQ Artemis Message Broker version [nodeid=a855176b-50f0-11e5-9 37e-2fe9bb000966] [INFO] Server started [INFO] [INFO] --- artemis-maven-plugin:1.1.0:runclient queue --- Sent message: This is a text message Received message: This is a text message [INFO] [INFO] --- artemis-maven-plugin:1.1.0:cli queue --- server-out:17:30:27,476 INFO [org.apache.activemq.artemis.core.server] AMQ221002: Apache ActiveMQ Artemis Message Broker version SNA 76
77 Examples [INFO] [INFO] BUILD SUCCESS [INFO] [INFO] Total time: s [INFO] Finished at: T17:30:27-04:00 [INFO] Final Memory: 42M/508M [INFO] List This includes a preview list of a few examples that we distribute with Artemis. Please refer to the distribution for a more accurate list. Applet This example shows you how to send and receive JMS messages from an Applet. Application-Layer Failover Apache ActiveMQ Artemis also supports Application-Layer failover, useful in the case that replication is not enabled on the server side. With Application-Layer failover, it's up to the application to register a JMS ExceptionListener with Apache ActiveMQ Artemis which will be called by Apache ActiveMQ Artemis in the event that connection failure is detected. The code in the ExceptionListener then recreates the JMS connection, session, etc on another node and the application can continue. Application-layer failover is an alternative approach to High Availability (HA). Applicationlayer failover differs from automatic failover in that some client side coding is required in order to implement this. Also, with Application-layer failover, since the old session object dies and a new one is created, any uncommitted work in the old session will be lost, and any unacknowledged messages might be redelivered. Core Bridge Example 77
78 Examples The bridge example demonstrates a core bridge deployed on one server, which consumes messages from a local queue and forwards them to an address on a second server. Core bridges are used to create message flows between any two Apache ActiveMQ Artemis servers which are remotely separated. Core bridges are resilient and will cope with temporary connection failure allowing them to be an ideal choice for forwarding over unreliable connections, e.g. a WAN. Browser The browser example shows you how to use a JMS QueueBrowser with Apache ActiveMQ Artemis. Queues are a standard part of JMS, please consult the JMS 2.0 specification for full details. A QueueBrowser is used to look at messages on the queue without removing them. It can scan the entire content of a queue or only messages matching a message selector. Client Kickoff The client-kickoff example shows how to terminate client connections given an IP address using the JMX management API. Client side failover listener The client-side-failoverlistener example shows how to register a listener to monitor failover events Client-Side Load-Balancing The client-side-load-balancing example demonstrates how sessions created from a single JMS Connection can be created to different nodes of the cluster. In other words it demonstrates how Apache ActiveMQ Artemis does client-side load-balancing of sessions across the cluster. 78
79 Examples Clustered Durable Subscription This example demonstrates a clustered JMS durable subscription Clustered Grouping This is similar to the message grouping example except that it demonstrates it working over a cluster. Messages sent to different nodes with the same group id will be sent to the same node and the same consumer. Clustered Queue The clustered-queue example demonstrates a JMS queue deployed on two different nodes. The two nodes are configured to form a cluster. We then create a consumer for the queue on each node, and we create a producer on only one of the nodes. We then send some messages via the producer, and we verify that both consumers receive the sent messages in a round-robin fashion. Clustering with JGroups The clustered-jgroups example demonstrates how to form a two node cluster using JGroups as its underlying topology discovery technique, rather than the default UDP broadcasting. We then create a consumer for the queue on each node, and we create a producer on only one of the nodes. We then send some messages via the producer, and we verify that both consumers receive the sent messages in a round-robin fashion. Clustered Standalone The clustered-standalone example demonstrates how to configure and starts 3 cluster nodes on the same machine to form a cluster. A subscriber for a JMS topic is created on each node, and we create a producer on only one of the nodes. We then send some messages via the producer, and we verify that the 3 subscribers receive all the sent messages. 79
80 Examples Clustered Static Discovery This example demonstrates how to configure a cluster using a list of connectors rather than UDP for discovery Clustered Static Cluster One Way This example demonstrates how to set up a cluster where cluster connections are one way, i.e. server A -> Server B -> Server C Clustered Topic The clustered-topic example demonstrates a JMS topic deployed on two different nodes. The two nodes are configured to form a cluster. We then create a subscriber on the topic on each node, and we create a producer on only one of the nodes. We then send some messages via the producer, and we verify that both subscribers receive all the sent messages. Message Consumer Rate Limiting With Apache ActiveMQ Artemis you can specify a maximum consume rate at which a JMS MessageConsumer will consume messages. This can be specified when creating or deploying the connection factory. If this value is specified then Apache ActiveMQ Artemis will ensure that messages are never consumed at a rate higher than the specified rate. This is a form of consumer throttling. Dead Letter The dead-letter example shows you how to define and deal with dead letter messages. Messages can be delivered unsuccessfully (e.g. if the transacted session used to consume them is rolled back). 80
81 Examples Such a message goes back to the JMS destination ready to be redelivered. However, this means it is possible for a message to be delivered again and again without any success and remain in the destination, clogging the system. To prevent this, messaging systems define dead letter messages: after a specified unsuccessful delivery attempts, the message is removed from the destination and put instead in a dead letter destination where they can be consumed for further investigation. Delayed Redelivery The delayed-redelivery example demonstrates how Apache ActiveMQ Artemis can be configured to provide a delayed redelivery in the case a message needs to be redelivered. Delaying redelivery can often be useful in the case that clients regularly fail or roll-back. Without a delayed redelivery, the system can get into a "thrashing" state, with delivery being attempted, the client rolling back, and delivery being re-attempted in quick succession, using up valuable CPU and network resources. Divert Apache ActiveMQ Artemis diverts allow messages to be transparently "diverted" or copied from one address to another with just some simple configuration defined on the server side. Durable Subscription The durable-subscription example shows you how to use a durable subscription with Apache ActiveMQ Artemis. Durable subscriptions are a standard part of JMS, please consult the JMS 1.1 specification for full details. Unlike non-durable subscriptions, the key function of durable subscriptions is that the messages contained in them persist longer than the lifetime of the subscriber - i.e. they will accumulate messages sent to the topic even if there is no active subscriber on them. They will also survive server restarts or crashes. Note that for the messages to be persisted, the messages sent to them must be marked as durable messages. 81
82 Examples Embedded The embedded example shows how to embed JMS within your own code using POJO instantiation and no config files. Embedded Simple The embedded example shows how to embed JMS within your own code using regular Apache ActiveMQ Artemis XML files. Message Expiration The expiry example shows you how to define and deal with message expiration. Messages can be retained in the messaging system for a limited period of time before being removed. JMS specification states that clients should not receive messages that have been expired (but it does not guarantee this will not happen). Apache ActiveMQ Artemis can assign an expiry address to a given queue so that when messages are expired, they are removed from the queue and sent to the expiry address. These "expired" messages can later be consumed from the expiry address for further inspection. Apache ActiveMQ Artemis Resource Adapter example This examples shows how to build the activemq resource adapters a rar for deployment in other Application Server's HTTP Transport The http-transport example shows you how to configure Apache ActiveMQ Artemis to use the HTTP protocol as its transport layer. Instantiate JMS Objects Directly 82
83 Examples Usually, JMS Objects such as ConnectionFactory, Queue and Topic instances are looked up from JNDI before being used by the client code. This objects are called "administered objects" in JMS terminology. However, in some cases a JNDI server may not be available or desired. To come to the rescue Apache ActiveMQ Artemis also supports the direct instantiation of these administered objects on the client side so you don't have to use JNDI for JMS. Interceptor Apache ActiveMQ Artemis allows an application to use an interceptor to hook into the messaging system. Interceptors allow you to handle various message events in Apache ActiveMQ Artemis. JAAS The jaas example shows you how to configure Apache ActiveMQ Artemis to use JAAS for security. Apache ActiveMQ Artemis can leverage JAAS to delegate user authentication and authorization to existing security infrastructure. JMS Auto Closable The jms-auto-closeable example shows how JMS resources, such as connections, sessions and consumers, in JMS 2 can be automatically closed on error. JMS Completion Listener The jms-completion-listener example shows how to send a message asynchronously to Apache ActiveMQ Artemis and use a CompletionListener to be notified of the Broker receiving it. JMS Bridge The jms-bridge example shows how to setup a bridge between two standalone Apache ActiveMQ Artemis servers. 83
84 Examples JMS Context The jms-context example shows how to send and receive a message to a JMS Queue using Apache ActiveMQ Artemis by using a JMS Context. A JMSContext is part of JMS 2.0 and combines the JMS Connection and Session Objects into a simple Interface. JMS Shared Consumer The jms-shared-consumer example shows you how can use shared consumers to share a subscription on a topic. In JMS 1.1 this was not allowed and so caused a scalability issue. In JMS 2 this restriction has been lifted so you can share the load across different threads and connections. JMX Management The jmx example shows how to manage Apache ActiveMQ Artemis using JMX. Large Message The large-message example shows you how to send and receive very large messages with Apache ActiveMQ Artemis. Apache ActiveMQ Artemis supports the sending and receiving of huge messages, much larger than can fit in available RAM on the client or server. Effectively the only limit to message size is the amount of disk space you have on the server. Large messages are persisted on the server so they can survive a server restart. In other words Apache ActiveMQ Artemis doesn't just do a simple socket stream from the sender to the consumer. Last-Value Queue The last-value-queue example shows you how to define and deal with last-value queues. Last-value queues are special queues which discard any messages when a newer message with the same value for a well-defined last-value property is put in the 84
85 Examples queue. In other words, a last-value queue only retains the last value. A typical example for last-value queue is for stock prices, where you are only interested by the latest price for a particular stock. Management The management example shows how to manage Apache ActiveMQ Artemis using JMS Messages to invoke management operations on the server. Management Notification The management-notification example shows how to receive management notifications from Apache ActiveMQ Artemis using JMS messages. Apache ActiveMQ Artemis servers emit management notifications when events of interest occur (consumers are created or closed, addresses are created or deleted, security authentication fails, etc.). Message Counter The message-counters example shows you how to use message counters to obtain message information for a JMS queue. Message Group The message-group example shows you how to configure and use message groups with Apache ActiveMQ Artemis. Message groups allow you to pin messages so they are only consumed by a single consumer. Message groups are sets of messages that has the following characteristics: Messages in a message group share the same group id, i.e. they have same JMSXGroupID string property values The consumer that receives the first message of a group will receive all the messages that belongs to the group Message Group 85
86 Examples The message-group2 example shows you how to configure and use message groups with Apache ActiveMQ Artemis via a connection factory. Message Priority Message Priority can be used to influence the delivery order for messages. It can be retrieved by the message's standard header field 'JMSPriority' as defined in JMS specification version 1.1. The value is of type integer, ranging from 0 (the lowest) to 9 (the highest). When messages are being delivered, their priorities will effect their order of delivery. Messages of higher priorities will likely be delivered before those of lower priorities. Messages of equal priorities are delivered in the natural order of their arrival at their destinations. Please consult the JMS 1.1 specification for full details. Multiple Failover This example demonstrates how to set up a live server with multiple backups Multiple Failover Failback This example demonstrates how to set up a live server with multiple backups but forcing failover back to the original live server No Consumer Buffering By default, Apache ActiveMQ Artemis consumers buffer messages from the server in a client side buffer before you actually receive them on the client side. This improves performance since otherwise every time you called receive() or had processed the last message in a MessageListener onmessage() method, the Apache ActiveMQ Artemis client would have to go the server to request the next message, which would then get sent to the client side, if one was available. 86
87 Examples This would involve a network round trip for every message and reduce performance. Therefore, by default, Apache ActiveMQ Artemis pre-fetches messages into a buffer on each consumer. In some case buffering is not desirable, and Apache ActiveMQ Artemis allows it to be switched off. This example demonstrates that. Non-Transaction Failover With Server Data Replication The non-transaction-failover example demonstrates two servers coupled as a livebackup pair for high availability (HA), and a client using a non-transacted JMS session failing over from live to backup when the live server is crashed. Apache ActiveMQ Artemis implements failover of client connections between live and backup servers. This is implemented by the replication of state between live and backup nodes. When replication is configured and a live node crashes, the client connections can carry and continue to send and consume messages. When non-transacted sessions are used, once and only once message delivery is not guaranteed and it is possible that some messages will be lost or delivered twice. OpenWire The Openwire example shows how to configure an Apache ActiveMQ Artemis server to communicate with an Apache ActiveMQ Artemis JMS client that uses open-wire protocol. You will find the queue example for open wire, and the chat example. Paging The paging example shows how Apache ActiveMQ Artemis can support huge queues even when the server is running in limited RAM. It does this by transparently paging messages to disk, and depaging them when they are required. Pre-Acknowledge 87
88 Examples Standard JMS supports three acknowledgement modes: AUTO_ACKNOWLEDGE, CLIENT_ACKNOWLEDGE, and DUPS_OK_ACKNOWLEDGE. For a full description on these modes please consult the JMS specification, or any JMS tutorial. All of these standard modes involve sending acknowledgements from the client to the server. However in some cases, you really don't mind losing messages in event of failure, so it would make sense to acknowledge the message on the server before delivering it to the client. This example demonstrates how Apache ActiveMQ Artemis allows this with an extra acknowledgement mode. Message Producer Rate Limiting The producer-rte-limit example demonstrates how, with Apache ActiveMQ Artemis, you can specify a maximum send rate at which a JMS message producer will send messages. Queue A simple example demonstrating a JMS queue. Message Redistribution The queue-message-redistribution example demonstrates message redistribution between queues with the same name deployed in different nodes of a cluster. Queue Requestor A simple example demonstrating a JMS queue requestor. Queue with Message Selector The queue-selector example shows you how to selectively consume messages using message selectors with queue consumers. 88
89 Examples Reattach Node example The Reattach Node example shows how a client can try to reconnect to the same server instead of failing the connection immediately and notifying any user ExceptionListener objects. Apache ActiveMQ Artemis can be configured to automatically retry the connection, and reattach to the server when it becomes available again across the network. Replicated Failback example An example showing how failback works when using replication, In this example a live server will replicate all its Journal to a backup server as it updates it. When the live server crashes the backup takes over from the live server and the client reconnects and carries on from where it left off. Replicated Failback static example An example showing how failback works when using replication, but this time with static connectors Replicated multiple failover example An example showing how to configure multiple backups when using replication Replicated Failover transaction example An example showing how failover works with a transaction when using replication Request-Reply example A simple example showing the JMS request-response pattern. Scheduled Message 89
90 Examples The scheduled-message example shows you how to send a scheduled message to a JMS Queue with Apache ActiveMQ Artemis. Scheduled messages won't get delivered until a specified time in the future. Security The security example shows you how configure and use role based queue security with Apache ActiveMQ Artemis. Send Acknowledgements The send-acknowledgements example shows you how to use Apache ActiveMQ Artemis's advanced asynchronous send acknowledgements feature to obtain acknowledgement from the server that sends have been received and processed in a separate stream to the sent messages. Spring Integration This example shows how to use embedded JMS using Apache ActiveMQ Artemis's Spring integration. SSL Transport The ssl-enabled shows you how to configure SSL with Apache ActiveMQ Artemis to send and receive message. Static Message Selector The static-selector example shows you how to configure an Apache ActiveMQ Artemis core queue with static message selectors (filters). Static Message Selector Using JMS 90
91 Examples The static-selector-jms example shows you how to configure an Apache ActiveMQ Artemis queue with static message selectors (filters) using JMS. Stomp The stomp example shows you how to configure an Apache ActiveMQ Artemis server to send and receive Stomp messages. Stomp1.1 The stomp example shows you how to configure an Apache ActiveMQ Artemis server to send and receive Stomp messages via a Stomp 1.1 connection. Stomp1.2 The stomp example shows you how to configure an Apache ActiveMQ Artemis server to send and receive Stomp messages via a Stomp 1.2 connection. Stomp Over Web Sockets The stomp-websockets example shows you how to configure an Apache ActiveMQ Artemis server to send and receive Stomp messages directly from Web browsers (provided they support Web Sockets). Symmetric Cluster The symmetric-cluster example demonstrates a symmetric cluster set-up with Apache ActiveMQ Artemis. Apache ActiveMQ Artemis has extremely flexible clustering which allows you to set-up servers in many different topologies. The most common topology that you'll perhaps be familiar with if you are used to application server clustering is a symmetric cluster. 91
92 Examples With a symmetric cluster, the cluster is homogeneous, i.e. each node is configured the same as every other node, and every node is connected to every other node in the cluster. Temporary Queue A simple example demonstrating how to use a JMS temporary queue. Topic A simple example demonstrating a JMS topic. Topic Hierarchy Apache ActiveMQ Artemis supports topic hierarchies. With a topic hierarchy you can register a subscriber with a wild-card and that subscriber will receive any messages sent to an address that matches the wild card. Topic Selector 1 The topic-selector-example1 example shows you how to send message to a JMS Topic, and subscribe them using selectors with Apache ActiveMQ Artemis. Topic Selector 2 The topic-selector-example2 example shows you how to selectively consume messages using message selectors with topic consumers. Transaction Failover The transaction-failover example demonstrates two servers coupled as a live-backup pair for high availability (HA), and a client using a transacted JMS session failing over from live to backup when the live server is crashed. 92
93 Examples Apache ActiveMQ Artemis implements failover of client connections between live and backup servers. This is implemented by the sharing of a journal between the servers. When a live node crashes, the client connections can carry and continue to send and consume messages. When transacted sessions are used, once and only once message delivery is guaranteed. Failover Without Transactions The stop-server-failover example demonstrates failover of the JMS connection from one node to another when the live server crashes using a JMS non-transacted session. Transactional Session The transactional example shows you how to use a transactional Session with Apache ActiveMQ Artemis. XA Heuristic The xa-heuristic example shows you how to make an XA heuristic decision through Apache ActiveMQ Artemis Management Interface. A heuristic decision is a unilateral decision to commit or rollback an XA transaction branch after it has been prepared. XA Receive The xa-receive example shows you how message receiving behaves in an XA transaction in Apache ActiveMQ Artemis. XA Send The xa-send example shows you how message sending behaves in an XA transaction in Apache ActiveMQ Artemis. 93
94 Routing Messages With Wild Cards Routing Messages With Wild Cards Apache ActiveMQ Artemis allows the routing of messages via wildcard addresses. If a queue is created with an address of say queue.news.# then it will receive any messages sent to addresses that match this, for instance queue.news.europe or queue.news.usa or queue.news.usa.sport. If you create a consumer on this queue, this allows a consumer to consume messages which are sent to a hierarchy of addresses. Note In JMS terminology this allows "topic hierarchies" to be created. This functionality is enabled by default. To turn it off add the following to the broker.xml configuration. <wildcard-addresses> <enabled>false</enabled> </wildcard-addresses> For more information on the wild card syntax and how to configure it, take a look at wildcard syntax chapter, also see the topic hierarchy example in the examples. 94
95 Understanding the Apache ActiveMQ Artemis Wildcard Syntax Understanding the Apache ActiveMQ Artemis Wildcard Syntax Apache ActiveMQ Artemis uses a specific syntax for representing wildcards in security settings, address settings and when creating consumers. The syntax is similar to that used by AMQP. An Apache ActiveMQ Artemis wildcard expression contains words delimited by the character '. ' (full stop). The special characters ' # ' and ' * ' also have special meaning and can take the place of a word. The character ' # ' means 'match any sequence of zero or more words'. The character ' * ' means 'match a single word'. So the wildcard 'news.europe.#' would match 'news.europe', 'news.europe.sport', 'news.europe.politics', and 'news.europe.politics.regional' but would not match 'news.usa', 'news.usa.sport' nor 'entertainment'. The wildcard 'news.*' would match 'news.europe', but not 'news.europe.sport'. The wildcard 'news.*.sport' would match 'news.europe.sport' and also 'news.usa.sport', but not 'news.europe.politics'. Configuring Wildcard syntax It's possible to further configure the syntax of the wildcard addresses using the broker configuration. For that, the <wildcard-addresses> configuration tag is used. <wildcard-addresses> <enabled>true</enabled> <delimiter>.</delimiter> <any-words>#</any-words> <single-word>*</single-word> </wildcard-addresses> The example above shows the default configuration. 95
96 Understanding the Apache ActiveMQ Artemis Wildcard Syntax 96
97 Filter Expressions Filter Expressions Apache ActiveMQ Artemis provides a powerful filter language based on a subset of the SQL 92 expression syntax. It is the same as the syntax used for JMS selectors, but the predefined identifiers are different. For documentation on JMS selector syntax please the JMS javadoc for javax.jms.message. Filter expressions are used in several places in Apache ActiveMQ Artemis Predefined Queues. When pre-defining a queue, in broker.xml in either the core or jms configuration a filter expression can be defined for a queue. Only messages that match the filter expression will enter the queue. Core bridges can be defined with an optional filter expression, only matching messages will be bridged (see Core Bridges). Diverts can be defined with an optional filter expression, only matching messages will be diverted (see Diverts). Filter are also used programmatically when creating consumers, queues and in several places as described in management. There are some differences between JMS selector expressions and Apache ActiveMQ Artemis core filter expressions. Whereas JMS selector expressions operate on a JMS message, Apache ActiveMQ Artemis core filter expressions operate on a core message. The following identifiers can be used in a core filter expressions to refer to attributes of the core message in an expression: AMQPriority. To refer to the priority of a message. Message priorities are integers with valid values from is the lowest priority and 9 is the highest. E.g. AMQPriority = 3 AND animal = 'aardvark' AMQExpiration. To refer to the expiration time of a message. The value is a long integer. AMQDurable. To refer to whether a message is durable or not. The value is a string with valid values: DURABLE or NON_DURABLE. 97
98 Filter Expressions AMQTimestamp. The timestamp of when the message was created. The value is a long integer. AMQSize. The size of a message in bytes. The value is an integer. Any other identifiers used in core filter expressions will be assumed to be properties of the message. The JMS spec states that a String property should not get converted to a numeric when used in a selector. So for example, if a message has the age property set to String 21 then the following selector should not match it: age > 18. Since Apache ActiveMQ Artemis supports STOMP clients which can only send messages with string properties, that restriction is a bit limiting. Therefore, if you want your filter expressions to autoconvert String properties the the appropriate number type, just prefix it with convert_string_expressions:. If you changed the filter expression in the previous example to be convert_string_expressions:age > 18, then it would match the aforementioned message. The JMS spec also states that property identifiers (and therefore the identifiers which are valid for use in a filter expression) are an, "unlimited-length sequence of letters and digits, the first of which must be a letter. A letter is any character for which the method Character.isJavaLetter returns true. This includes _ and $. A letter or digit is any character for which the method Character.isJavaLetterOrDigit returns true." This constraint means that hyphens (i.e. - ) cannot be used. However, this constraint can be overcome by using the hyphenated_props: prefix. For example, if a message had the foo-bar property set to 0 then the filter expression hyphenated_props:foo-bar = 0 would match it. 98
99 Persistence Persistence In this chapter we will describe how persistence works with Apache ActiveMQ Artemis and how to configure it. Apache ActiveMQ Artemis ships with two persistence options. The Apache ActiveMQ Artemis File journal which is highly optimized for the messaging use case and gives great performance, and also Apache Artemis JDBC Store, which uses JDBC to connect to a database of your choice. The JDBC Store is still under development, but it is possible to use it's journal features, (essentially everything except for paging and large messages). Apache ActiveMQ Artemis File Journal (Default) An Apache ActiveMQ Artemis file journal is an append only journal. It consists of a set of files on disk. Each file is pre-created to a fixed size and initially filled with padding. As operations are performed on the server, e.g. add message, update message, delete message, records are appended to the journal. When one journal file is full we move to the next one. Because records are only appended, i.e. added to the end of the journal we minimise disk head movement, i.e. we minimise random access operations which is typically the slowest operation on a disk. Making the file size configurable means that an optimal size can be chosen, i.e. making each file fit on a disk cylinder. Modern disk topologies are complex and we are not in control over which cylinder(s) the file is mapped onto so this is not an exact science. But by minimising the number of disk cylinders the file is using, we can minimise the amount of disk head movement, since an entire disk cylinder is accessible simply by the disk rotating - the head does not have to move. As delete records are added to the journal, Apache ActiveMQ Artemis has a sophisticated file garbage collection algorithm which can determine if a particular journal file is needed any more - i.e. has all its data been deleted in the same or other files. If so, the file can be reclaimed and re-used. 99
100 Persistence Apache ActiveMQ Artemis also has a compaction algorithm which removes dead space from the journal and compresses up the data so it takes up less files on disk. The journal also fully supports transactional operation if required, supporting both local and XA transactions. The majority of the journal is written in Java, however we abstract out the interaction with the actual file system to allow different pluggable implementations. Apache ActiveMQ Artemis ships with two implementations: Java NIO. The first implementation uses standard Java NIO to interface with the file system. This provides extremely good performance and runs on any platform where there's a Java 6+ runtime. Linux Asynchronous IO The second implementation uses a thin native code wrapper to talk to the Linux asynchronous IO library (AIO). With AIO, Apache ActiveMQ Artemis will be called back when the data has made it to disk, allowing us to avoid explicit syncs altogether and simply send back confirmation of completion when AIO informs us that the data has been persisted. Using AIO will typically provide even better performance than using Java NIO. The AIO journal is only available when running Linux kernel 2.6 or later and after having installed libaio (if it's not already installed). For instructions on how to install libaio please see Installing AIO section. Also, please note that AIO will only work with the following file systems: ext2, ext3, ext4, jfs, xfs. With other file systems, e.g. NFS it may appear to work, but it will fall back to a slower synchronous behaviour. Don't put the journal on a NFS share! For more information on libaio please see lib AIO. libaio is part of the kernel project. Memory mapped. The third implementation uses a file-backed READ_WRITE memory mapping against the OS page cache to interface with the file system. 100
101 Persistence This provides extremely good performance (especially under strictly process failure durability requirements), almost zero copy (actually is the kernel page cache) and zero garbage (from the Java HEAP perspective) operations and runs on any platform where there's a Java 4+ runtime. Under power failure durability requirements it will perform at least on par with the NIO journal with the only exception of Linux OS with kernel less or equals 2.6, in which the msync) implementation necessary to ensure durable writes was different (and slower) from the fsync) used is case of NIO journal. It benefits by the configuration of OS huge pages#huge_pages), in particular when is used a big number of journal files and sizing them as multiple of the OS page size in bytes. The standard Apache ActiveMQ Artemis core server uses two instances of the journal: Bindings journal. This journal is used to store bindings related data. That includes the set of queues that are deployed on the server and their attributes. It also stores data such as id sequence counters. The bindings journal is always a NIO journal as it is typically low throughput compared to the message journal. The files on this journal are prefixed as activemq-bindings. Each file has a bindings extension. File size is , and it is located at the bindings folder. JMS journal. This journal instance stores all JMS related data, This is basically any JMS Queues, Topics and Connection Factories and any JNDI bindings for these resources. Any JMS Resources created via the management API will be persisted to this journal. Any resources configured via configuration files will not. The JMS Journal will only be created if JMS is being used. The files on this journal are prefixed as activemq-jms. Each file has a jms extension. File size is , and it is located at the bindings folder. Message journal. This journal instance stores all message related data, including the message themselves and also duplicate-id caches. 101
102 Persistence By default Apache ActiveMQ Artemis will try and use an AIO journal. If AIO is not available, e.g. the platform is not Linux with the correct kernel version or AIO has not been installed then it will automatically fall back to using Java NIO which is available on any Java platform. The files on this journal are prefixed as activemq-data. Each file has a amq extension. File size is by the default (configurable), and it is located at the journal folder. For large messages, Apache ActiveMQ Artemis persists them outside the message journal. This is discussed in Large Messages. Apache ActiveMQ Artemis can also be configured to page messages to disk in low memory situations. This is discussed in Paging. If no persistence is required at all, Apache ActiveMQ Artemis can also be configured not to persist any data at all to storage as discussed in the Configuring the broker for Zero Persistence section. Configuring the bindings journal The bindings journal is configured using the following attributes in broker.xml bindings-directory This is the directory in which the bindings journal lives. The default value is data/bindings. create-bindings-dir If this is set to true then the bindings directory will be automatically created at the location specified in bindings-directory if it does not already exist. The default value is true Configuring the jms journal The jms config shares its configuration with the bindings journal. Configuring the message journal The message journal is configured using the following attributes in broker.xml journal-directory 102
103 Persistence This is the directory in which the message journal lives. The default value is data/journal. For the best performance, we recommend the journal is located on its own physical volume in order to minimise disk head movement. If the journal is on a volume which is shared with other processes which might be writing other files (e.g. bindings journal, database, or transaction coordinator) then the disk head may well be moving rapidly between these files as it writes them, thus drastically reducing performance. When the message journal is stored on a SAN we recommend each journal instance that is stored on the SAN is given its own LUN (logical unit). create-journal-dir If this is set to true then the journal directory will be automatically created at the location specified in journal-directory if it does not already exist. The default value is true journal-type Valid values are NIO, ASYNCIO or MAPPED. Choosing NIO chooses the Java NIO journal. Choosing ASYNCIO chooses the Linux asynchronous IO journal. If you choose ASYNCIO but are not running Linux or you do not have libaio installed then Apache ActiveMQ Artemis will detect this and automatically fall back to using NIO. Choosing MAPPED chooses the Java Memory Mapped journal. journal-sync-transactional If this is set to true then Apache ActiveMQ Artemis will make sure all transaction data is flushed to disk on transaction boundaries (commit, prepare and rollback). The default value is true. journal-sync-non-transactional If this is set to true then Apache ActiveMQ Artemis will make sure non transactional message data (sends and acknowledgements) are flushed to disk each time. The default value for this is true. journal-file-size 103
104 Persistence The size of each journal file in bytes. The default value for this is bytes (10MiB). journal-min-files The minimum number of files the journal will maintain. When Apache ActiveMQ Artemis starts and there is no initial message data, Apache ActiveMQ Artemis will pre-create journal-min-files number of files. Creating journal files and filling them with padding is a fairly expensive operation and we want to minimise doing this at run-time as files get filled. By pre-creating files, as one is filled the journal can immediately resume with the next one without pausing to create it. Depending on how much data you expect your queues to contain at steady state you should tune this number of files to match that total amount of data. journal-pool-files The system will create as many files as needed however when reclaiming files it will shrink back to the journal-pool-files. The default to this parameter is -1, meaning it will never delete files on the journal once created. Notice that the system can't grow infinitely as you are still required to use paging for destinations that can grow indefinitely. Notice: in case you get too many files you can use compacting. journal-max-io Write requests are queued up before being submitted to the system for execution. This parameter controls the maximum number of write requests that can be in the IO queue at any one time. If the queue becomes full then writes will block until space is freed up. When using NIO, this value should always be equal to 1 When using AIO, the default should be 500. The system maintains different defaults for this parameter depending on whether it's NIO or AIO (default for NIO is 1, default for AIO is 500) 104
105 Persistence There is a limit and the total max AIO can't be higher than what is configured at the OS level (/proc/sys/fs/aio-max-nr) usually at journal-buffer-timeout Instead of flushing on every write that requires a flush, we maintain an internal buffer, and flush the entire buffer either when it is full, or when a timeout expires, whichever is sooner. This is used for both NIO and AIO and allows the system to scale better with many concurrent writes that require flushing. This parameter controls the timeout at which the buffer will be flushed if it hasn't filled already. AIO can typically cope with a higher flush rate than NIO, so the system maintains different defaults for both NIO and AIO (default for NIO is nanoseconds times per second, default for AIO is nanoseconds - ie times per second). Note By increasing the timeout, you may be able to increase system throughput at the expense of latency, the default parameters are chosen to give a reasonable balance between throughput and latency. journal-buffer-size The size of the timed buffer on AIO. The default value is 490KiB. journal-compact-min-files The minimal number of files before we can consider compacting the journal. The compacting algorithm won't start until you have at least journal-compact-min-files Setting this to 0 will disable the feature to compact completely. This could be dangerous though as the journal could grow indefinitely. Use it wisely! The default for this parameter is `10` journal-compact-percentage The threshold to start compacting. When less than this percentage is considered live data, we start compacting. Note also that compacting won't kick in until you have at least journal-compact-min-files data files on the journal The default for this parameter is
106 Persistence journal-datasync (default: true) This will disable the use of fdatasync on journal writes. When enabled it ensures full power failure durability, otherwise process failure durability on journal writes (OS guaranteed). This is particular effective for NIO and MAPPED journals, which rely on fsync/msync to force write changes to disk. An important note on disabling journal-datasync. Any modern OS guarantees that on process failures (i.e. crash) all the uncommitted changes to the page cache will be flushed to the file system, maintaining coherence between subsequent operations against the same pages and ensuring that no data will be lost. The predictability of the timing of such flushes, in case of a disabled journal-datasync, depends on the OS configuration, but without compromising (or relaxing) the process failure durability semantics as described above. Rely on the OS page cache sacrifice the power failure protection, while increasing the effectiveness of the journal operations, capable of exploiting the read caching and write combining features provided by the OS's kernel page cache subsystem. An important note on disabling disk write cache. 106
107 Persistence Warning Most disks contain hardware write caches. A write cache can increase the apparent performance of the disk because writes just go into the cache and are then lazily written to the disk later. This happens irrespective of whether you have executed a fsync() from the operating system or correctly synced data from inside a Java program! By default many systems ship with disk write cache enabled. This means that even after syncing from the operating system there is no guarantee the data has actually made it to disk, so if a failure occurs, critical data can be lost. Some more expensive disks have non volatile or battery backed write caches which won't necessarily lose data on event of failure, but you need to test them! If your disk does not have an expensive non volatile or battery backed cache and it's not part of some kind of redundant array (e.g. RAID), and you value your data integrity you need to make sure disk write cache is disabled. Be aware that disabling disk write cache can give you a nasty shock performance wise. If you've been used to using disks with write cache enabled in their default setting, unaware that your data integrity could be compromised, then disabling it will give you an idea of how fast your disk can perform when acting really reliably. On Linux you can inspect and/or change your disk's write cache settings using the tools hdparm (for IDE disks) or sdparm or sginfo (for SDSI/SATA disks) On Windows you can check / change the setting by right clicking on the disk and clicking properties. Installing AIO The Java NIO journal gives great performance, but If you are running Apache ActiveMQ Artemis using Linux Kernel 2.6 or later, we highly recommend you use the AIO journal for the very best persistence performance. It's not possible to use the AIO journal under other operating systems or earlier versions of the Linux kernel. If you are running Linux kernel 2.6 or later and don't already have libaio installed, you can easily install it using the following steps: Using yum, (e.g. on Fedora or Red Hat Enterprise Linux): 107
108 Persistence yum install libaio Using aptitude, (e.g. on Ubuntu or Debian system): apt-get install libaio Apache ActiveMQ Artemis JDBC Persistence WARNING: The Apache ActiveMQ Artemis JDBC persistence store is under development and is included for evaluation purposes. The Apache ActiveMQ Artemis JDBC persistence layer offers the ability to store broker state (Messages, Addresses and other application state) using a database. N.B. Address full policy Paging (See: The section on Paging) is currently not supported with the JDBC persistence layer. Using the ActiveMQ Artemis File Journal is the recommended configuration as it offers higher levels of performance and is more mature. The JDBC persistence layer is targeted to those users who must use a database e.g. due to internal company policy. ActiveMQ Artemis currently has support for a limited number of database vendors (older versions may work but mileage may vary): 1. PostgreSQL 9.4.x 2. MySQL 5.7.x 3. Apache Derby The JDBC store uses a JDBC connection to store messages and bindings data in records in database tables. The data stored in the database tables is encoded using Apache ActiveMQ Artemis internal encodings. Configuring JDBC Persistence To configure Apache ActiveMQ Artemis to use a database for persisting messages and bindings data you must do two things. 1. Add the appropriate JDBC driver libraries to the Artemis runtime. You can do this by dropping the relevant jars in the lib folder of the ActiveMQ Artemis distribution. 108
109 Persistence 2. Create a store element in your broker.xml config file under the <core> element. For example: <store> <database-store> <jdbc-connection-url>jdbc:derby:data/derby/database-store;create=true</ jdbc-connection-url> <bindings-table-name>bindings_table</bindings-table-name> <message-table-name>message_table</message-table-name> <page-store-table-name>message_table</page-store-table-name> <large-message-table-name>large_messages_table</large-message-table-na me> <jdbc-driver-class-name>org.apache.derby.jdbc.embeddeddriver</jdbc-dri ver-class-name> </database-store> </store> jdbc-connection-url The full JDBC connection URL for your database server. The connection url should include all configuration parameters and database name. Note: When configuring the server using the XML configuration files please ensure to escape any illegal chars; "&" for example, is typical in JDBC connection url and should be escaped to "&". bindings-table-name The name of the table in which bindings data will be persisted for the ActiveMQ Artemis server. Specifying table names allows users to share single database amongst multiple servers, without interference. message-table-name The name of the table in which bindings data will be persisted for the ActiveMQ Artemis server. Specifying table names allows users to share single database amongst multiple servers, without interference. large-message-table-name The name of the table in which messages and related data will be persisted for the ActiveMQ Artemis server. Specifying table names allows users to share single database amongst multiple servers, without interference. page-store-table-name 109
110 Persistence The name of the table to house the page store directory information. Note that each address will have it's own page table which will use this name appended with a unique id of up to 20 characters. jdbc-driver-class-name The fully qualified class name of the desired database Driver. jdbc-network-timeout The JDBC network connection timeout in milliseconds. The default value is milliseconds (ie 20 seconds). Note that some DBMS (e.g. Oracle, 30 chars) have restrictions on the size of table names, this should be taken into consideration when configuring table names for the Artemis database store, pay particular attention to the page store table name, which can be appended with a unique ID of up to 20 characters. (for Oracle this would mean configuring a page-store-table-name of max size of 10 chars). Configuring Apache ActiveMQ Artemis for Zero Persistence In some situations, zero persistence is sometimes required for a messaging system. Configuring Apache ActiveMQ Artemis to perform zero persistence is straightforward. Simply set the parameter persistence-enabled in broker.xml to false. Please note that if you set this parameter to false, then zero persistence will occur. That means no bindings data, message data, large message data, duplicate id caches or paging data will be persisted. 110
111 Configuring Transports Configuring the Transport In this chapter we'll describe the concepts required for understanding Apache ActiveMQ Artemis transports and where and how they're configured. Understanding Acceptors One of the most important concepts in Apache ActiveMQ Artemis transports is the acceptor. Let's dive straight in and take a look at an acceptor defined in xml in the configuration file broker.xml. <acceptors> <acceptor name="netty">tcp://localhost:61617</acceptor> </acceptors> Acceptors are always defined inside an acceptors element. There can be one or more acceptors defined in the acceptors element. There's no upper limit to the number of acceptors per server. Each acceptor defines a way in which connections can be made to the Apache ActiveMQ Artemis server. In the above example we're defining an acceptor that uses Netty to listen for connections at port The acceptor element contains a URI that defines the kind of Acceptor to create along with its configuration. The schema part of the URI defines the Acceptor type which can either be tcp or vm which is Netty or an In VM Acceptor respectively. For Netty the host and the port of the URI define what host and port the Acceptor will bind to. For In VM the Authority part of the URI defines a unique server id. The acceptor can also be configured with a set of key, value pairs used to configure the specific transport, the set of valid key-value pairs depends on the specific transport be used and are passed straight through to the underlying transport. These are set on the URI as part of the query, like so: <acceptor name="netty">tcp://localhost:61617?sslenabled=true&keystorepath=/path</a cceptor> 111
112 Configuring Transports Understanding Connectors Whereas acceptors are used on the server to define how we accept connections, connectors are used by a client to define how it connects to a server. Let's look at a connector defined in our broker.xml file: <connectors> <connector name="netty">tcp://localhost:61617</connector> </connectors> Connectors can be defined inside a connectors element. There can be one or more connectors defined in the connectors element. There's no upper limit to the number of connectors per server. You make ask yourself, if connectors are used by the client to make connections then why are they defined on the server? There are a couple of reasons for this: Sometimes the server acts as a client itself when it connects to another server, for example when one server is bridged to another, or when a server takes part in a cluster. In this cases the server needs to know how to connect to other servers. That's defined by connectors. If you're using JMS and you're using JNDI on the client to look up your JMS connection factory instances then when creating the ActiveMQConnectionFactory it needs to know what server that connection factory will create connections to. That's defined by the java.naming.provider.url element in the JNDI context environment, e.g. jndi.properties. Behind the scenes, the ActiveMQInitialContextFactory uses the java.naming.provider.url to construct the transport. Here's a simple example: java.naming.factory.initial=org.apache.activemq.artemis.jndi.activemqinitialco ntextfactory connectionfactory.myconnectionfactory=tcp://myhost:61616 Configuring the transport directly from the client side. 112
113 Configuring Transports How do we configure a core ClientSessionFactory with the information that it needs to connect with a server? Connectors are also used indirectly when directly configuring a core ClientSessionFactory to directly talk to a server. Although in this case there's no need to define such a connector in the server side configuration, instead we just create the parameters and tell the ClientSessionFactory which connector factory to use. Here's an example of creating a ClientSessionFactory which will connect directly to the acceptor we defined earlier in this chapter, it uses the standard Netty TCP transport and will try and connect on port to localhost (default): Map<String, Object> connectionparams = new HashMap<String, Object>(); connectionparams.put(org.apache.activemq.artemis.core.remoting.impl.netty.transpor tconstants.port_prop_name, 61617); TransportConfiguration transportconfiguration = new TransportConfiguration( "org.apache.activemq.artemis.core.remoting.impl.netty.nettyconnectorfactory", connectionparams); ServerLocator locator = ActiveMQClient.createServerLocatorWithoutHA(transportConfi guration); ClientSessionFactory sessionfactory = locator.createclientsessionfactory(); ClientSession session = sessionfactory.createsession(...); etc Similarly, if you're using JMS, you can configure the JMS connection factory directly on the client side: 113
114 Configuring Transports Map<String, Object> connectionparams = new HashMap<String, Object>(); connectionparams.put(org.apache.activemq.artemis.core.remoting.impl.netty.transpor tconstants.port_prop_name, 61617); TransportConfiguration transportconfiguration = new TransportConfiguration( "org.apache.activemq.artemis.core.remoting.impl.netty.nettyconnectorfactory", connectionparams); ConnectionFactory connectionfactory = ActiveMQJMSClient.createConnectionFactoryWit houtha(jmsfactorytype.cf, transportconfiguration); Connection jmsconnection = connectionfactory.createconnection(); etc Configuring the Netty transport Out of the box, Apache ActiveMQ Artemis currently uses Netty, a high performance low level network library. Our Netty transport can be configured in several different ways; to use straightforward TCP sockets, SSL, or to tunnel over HTTP or HTTPS.. We believe this caters for the vast majority of transport requirements. Single Port Support Apache ActiveMQ Artemis supports using a single port for all protocols, Apache ActiveMQ Artemis will automatically detect which protocol is being used CORE, AMQP, STOMP or OPENWIRE and use the appropriate Apache ActiveMQ Artemis handler. It will also detect whether protocols such as HTTP or Web Sockets are being used and also use the appropriate decoders It is possible to limit which protocols are supported by using the protocols parameter on the Acceptor like so: <connector name="netty">tcp://localhost:61617?protocols=core,amqp</connector> 114
115 Configuring Transports Configuring Netty TCP Netty TCP is a simple unencrypted TCP sockets based transport. Netty TCP can be configured to use old blocking Java IO or non blocking Java NIO. We recommend you use the Java NIO on the server side for better scalability with many concurrent connections. However using Java old IO can sometimes give you better latency than NIO when you're not so worried about supporting many thousands of concurrent connections. If you're running connections across an untrusted network please bear in mind this transport is unencrypted. You may want to look at the SSL or HTTPS configurations. With the Netty TCP transport all connections are initiated from the client side. I.e. the server does not initiate any connections to the client. This works well with firewall policies that typically only allow connections to be initiated in one direction. All the valid Netty transport keys are defined in the class org.apache.activemq.artemis.core.remoting.impl.netty.transportconstants. Most parameters can be used either with acceptors or connectors, some only work with acceptors. The following parameters can be used to configure Netty for simple TCP: Note The host and port parameters are only used in the core API, in XML configuration these are set in the URI host and port. host. This specifies the host name or IP address to connect to (when configuring a connector) or to listen on (when configuring an acceptor). The default value for this property is localhost. When configuring acceptors, multiple hosts or IP addresses can be specified by separating them with commas. It is also possible to specify to accept connection from all the host's network interfaces. It's not valid to specify multiple addresses when specifying the host for a connector; a connector makes a connection to one specific address. Note Don't forget to specify a host name or IP address! If you want your server able to accept connections from other nodes you must specify a hostname or IP address at which the acceptor will bind and listen for incoming connections. The default is localhost which of course is not accessible from remote nodes! 115
116 Configuring Transports port. This specified the port to connect to (when configuring a connector) or to listen on (when configuring an acceptor). The default value for this property is tcpnodelay. If this is true then Nagle's algorithm will be disabled. This is a Java (client) socket option. The default value for this property is true. tcpsendbuffersize. This parameter determines the size of the TCP send buffer in bytes. The default value for this property is bytes (32KiB). TCP buffer sizes should be tuned according to the bandwidth and latency of your network. Here's a good link that explains the theory behind this. In summary TCP send/receive buffer sizes should be calculated as: buffer_size = bandwidth * RTT. Where bandwidth is in bytes per second and network round trip time (RTT) is in seconds. RTT can be easily measured using the ping utility. For fast networks you may want to increase the buffer sizes from the defaults. tcpreceivebuffersize. This parameter determines the size of the TCP receive buffer in bytes. The default value for this property is bytes (32KiB). writebufferlowwatermark. This parameter determines the low water mark of the Netty write buffer. Once the number of bytes queued in the write buffer exceeded the high water mark and then dropped down below this value, Netty's channel will start to be writable again. The default value for this property is bytes (32KiB). writebufferhighwatermark. This parameter determines the high water mark of the Netty write buffer. If the number of bytes queued in the write buffer exceeds this value, Netty's channel will start to be not writable. The default value for this property is bytes (128KiB). batchdelay. Before writing packets to the transport, Apache ActiveMQ Artemis can be configured to batch up writes for a maximum of batchdelay milliseconds. This can increase overall throughput for very small messages. It does so at the expense of an increase in average latency for message transfer. The default value for this property is 0 ms. 116
117 Configuring Transports directdeliver. When a message arrives on the server and is delivered to waiting consumers, by default, the delivery is done on the same thread as that on which the message arrived. This gives good latency in environments with relatively small messages and a small number of consumers, but at the cost of overall throughput and scalability - especially on multi-core machines. If you want the lowest latency and a possible reduction in throughput then you can use the default value for directdeliver (i.e. true ). If you are willing to take some small extra hit on latency but want the highest throughput set directdeliver to false. nioremotingthreads. When configured to use NIO, Apache ActiveMQ Artemis will, by default, use a number of threads equal to three times the number of cores (or hyper-threads) as reported by Runtime.getRuntime().availableProcessors() for processing incoming packets. If you want to override this value, you can set the number of threads by specifying this parameter. The default value for this parameter is -1 which means use the value from Runtime.getRuntime().availableProcessors() * 3. localaddress. When configured a Netty Connector it is possible to specify which local address the client will use when connecting to the remote address. This is typically used in the Application Server or when running Embedded to control which address is used for outbound connections. If the local-address is not set then the connector will use any local address available localport. When configured a Netty Connector it is possible to specify which local port the client will use when connecting to the remote address. This is typically used in the Application Server or when running Embedded to control which port is used for outbound connections. If the local-port default is used, which is 0, then the connector will let the system pick up an ephemeral port. valid ports are 0 to connectionsallowed. This is only valid for acceptors. It limits the number of connections which the acceptor will allow. When this limit is reached a DEBUG level message is issued to the log, and the connection is refused. The type of client in use will determine what happens when the connection is refused. In the case of a core client, it will result in a org.apache.activemq.artemis.api.core.activemqconnectiontimedoutexception. Configuring Netty SSL 117
118 Configuring Transports Netty SSL is similar to the Netty TCP transport but it provides additional security by encrypting TCP connections using the Secure Sockets Layer SSL Please see the examples for a full working example of using Netty SSL. Netty SSL uses all the same properties as Netty TCP but adds the following additional properties: sslenabled Must be true to enable SSL. Default is false. keystorepath When used on an acceptor this is the path to the SSL key store on the server which holds the server's certificates (whether self-signed or signed by an authority). When used on a connector this is the path to the client-side SSL key store which holds the client certificates. This is only relevant for a connector if you are using 2- way SSL (i.e. mutual authentication). Although this value is configured on the server, it is downloaded and used by the client. If the client needs to use a different path from that set on the server then it can override the server-side setting by either using the customary "javax.net.ssl.keystore" system property or the ActiveMQspecific "org.apache.activemq.ssl.keystore" system property. The ActiveMQ-specific system property is useful if another component on client is already making use of the standard, Java system property. keystorepassword When used on an acceptor this is the password for the server-side keystore. When used on a connector this is the password for the client-side keystore. This is only relevant for a connector if you are using 2-way SSL (i.e. mutual authentication). Although this value can be configured on the server, it is downloaded and used by the client. If the client needs to use a different password from that set on the server then it can override the server-side setting by either using the customary "javax.net.ssl.keystorepassword" system property or the ActiveMQ-specific "org.apache.activemq.ssl.keystorepassword" system property. The ActiveMQ-specific system property is useful if another component on client is already making use of the standard, Java system property. truststorepath 118
119 Configuring Transports When used on an acceptor this is the path to the server-side SSL key store that holds the keys of all the clients that the server trusts. This is only relevant for an acceptor if you are using 2-way SSL (i.e. mutual authentication). When used on a connector this is the path to the client-side SSL key store which holds the public keys of all the servers that the client trusts. Although this value can be configured on the server, it is downloaded and used by the client. If the client needs to use a different path from that set on the server then it can override the server-side setting by either using the customary "javax.net.ssl.truststore" system property or the ActiveMQ-specific "org.apache.activemq.ssl.truststore" system property. The ActiveMQ-specific system property is useful if another component on client is already making use of the standard, Java system property. truststorepassword When used on an acceptor this is the password for the server-side trust store. This is only relevant for an acceptor if you are using 2-way SSL (i.e. mutual authentication). When used on a connector this is the password for the client-side truststore. Although this value can be configured on the server, it is downloaded and used by the client. If the client needs to use a different password from that set on the server then it can override the server-side setting by either using the customary "javax.net.ssl.truststorepassword" system property or the ActiveMQ-specific "org.apache.activemq.ssl.truststorepassword" system property. The ActiveMQspecific system property is useful if another component on client is already making use of the standard, Java system property. enabledciphersuites Whether used on an acceptor or connector this is a comma separated list of cipher suites used for SSL communication. The default value is null which means the JVM's default will be used. enabledprotocols Whether used on an acceptor or connector this is a comma separated list of protocols used for SSL communication. The default value is null which means the JVM's default will be used. needclientauth 119
120 Configuring Transports This property is only for an acceptor. It tells a client connecting to this acceptor that 2-way SSL is required. Valid values are true or false. Default is false. verifyhost When used on an acceptor the CN of the connecting client's SSL certificate will be compared to its hostname to verify they match. This is useful only for 2-way SSL. When used on a connector the CN of the server's SSL certificate will be compared to its hostname to verify they match. This is useful for both 1-way and 2- way SSL. Valid values are true or false. Default is false. usedefaultsslcontext Only valid on a connector. Allows the connector to use the "default" SSL context (via SSLContext.getDefault() ) which can be set programmatically by the client (via SSLContext.setDefault(SSLContext) ). If set to true all other SSL related parameters except for sslenabled are ignored. Valid values are true or false. Default is false. Configuring Netty HTTP Netty HTTP tunnels packets over the HTTP protocol. It can be useful in scenarios where firewalls only allow HTTP traffic to pass. Please see the examples for a full working example of using Netty HTTP. Netty HTTP uses the same properties as Netty TCP but adds the following additional properties: httpenabled. This is now no longer needed as of version 2.4. With single port support Apache ActiveMQ Artemis will now automatically detect if http is being used and configure itself. httpclientidletime. How long a client can be idle before sending an empty http request to keep the connection alive httpclientidlescanperiod. How often, in milliseconds, to scan for idle clients httpresponsetime. How long the server can wait before sending an empty http response to keep the connection alive 120
121 Configuring Transports httpserverscanperiod. How often, in milliseconds, to scan for clients needing responses httprequiressessionid. If true the client will wait after the first call to receive a session id. Used the http connector is connecting to servlet acceptor (not recommended) 121
122 Configuration Reload Configuration Reload The system will perform a periodic check on the configuration files, configured by configuration-file-refresh-period, with the default at 5000, in milliseconds. Once the configuration file is changed (broker.xml) the following modules will be reloaded automatically: Address Settings Security Settings Diverts Addresses & queues Notice: Address & queues won't be removed upon reload, given the risk of losing messages. You may execute explicit CLI or Management operations to remove destinations. 122
123 Detecting Dead Connections Detecting Dead Connections In this section we will discuss connection time-to-live (TTL) and explain how Apache ActiveMQ Artemis deals with crashed clients and clients which have exited without cleanly closing their resources. Cleaning up Dead Connection Resources on the Server Before an Apache ActiveMQ Artemis client application exits it is considered good practice that it should close its resources in a controlled manner, using a finally block. Here's an example of a well behaved core client application closing its session and session factory in a finally block: 123
124 Detecting Dead Connections ServerLocator locator = null; ClientSessionFactory sf = null; ClientSession session = null; try { locator = ActiveMQClient.createServerLocatorWithoutHA(..); sf = locator.createclientsessionfactory();; session = sf.createsession(...);... do some stuff with the session... } finally { if (session!= null) { session.close(); } if (sf!= null) { sf.close(); } } if(locator!= null) { locator.close(); } And here's an example of a well behaved JMS client application: 124
125 Detecting Dead Connections Connection jmsconnection = null; try { ConnectionFactory jmsconnectionfactory = ActiveMQJMSClient.createConnectionFact orywithoutha(...); jmsconnection = jmsconnectionfactory.createconnection();... do some stuff with the connection... } finally { if (connection!= null) { connection.close(); } } Or with using auto-closeable feature from Java, which can save a few lines of code: try ( ActiveMQConnectionFactory jmsconnectionfactory = new ActiveMQConnectionFactor y(); Connection jmsconnection = jmsconnectionfactory.createconnection()) {... do some stuff with the connection... } Unfortunately users don't always write well behaved applications, and sometimes clients just crash so they don't have a chance to clean up their resources! If this occurs then it can leave server side resources, like sessions, hanging on the server. If these were not removed they would cause a resource leak on the server and over time this result in the server running out of memory or other resources. We have to balance the requirement for cleaning up dead client resources with the fact that sometimes the network between the client and the server can fail and then come back, allowing the client to reconnect. Apache ActiveMQ Artemis supports client reconnection, so we don't want to clean up "dead" server side resources too soon or this will prevent any client from reconnecting, as it won't be able to find its old sessions on the server. 125
126 Detecting Dead Connections Apache ActiveMQ Artemis makes all of this configurable. For each ClientSessionFactory we define a connection TTL. Basically, the TTL determines how long the server will keep a connection alive in the absence of any data arriving from the client. The client will automatically send "ping" packets periodically to prevent the server from closing it down. If the server doesn't receive any packets on a connection for the connection TTL time, then it will automatically close all the sessions on the server that relate to that connection. If you're using JMS, the connection TTL is defined by the ConnectionTTL attribute on a ActiveMQConnectionFactory instance, or if you're deploying JMS connection factory instances direct into JNDI on the server side, you can specify it in the xml config, using the parameter connectionttl. The default value for connection ttl on an "unreliable" connection (e.g. a Netty connection) is ms, i.e. 1 minute. The default value for connection ttl on a "reliable" connection (e.g. an in-vm connection) is -1. A value of -1 for ConnectionTTL means the server will never time out the connection on the server side. If you do not wish clients to be able to specify their own connection TTL, you can override all values used by a global value set on the server side. This can be done by specifying the connection-ttl-override attribute in the server side configuration. The default value for connection-ttl-override is -1 which means "do not override" (i.e. let clients use their own values). The logic to check connections for TTL violations runs periodically on the broker. By default, the checks are done every 2,000 milliseconds. However, this can be changed if necessary by using the connection-ttl-check-interval attribute. Closing core sessions or JMS connections that you have failed to close As previously discussed, it's important that all core client sessions and JMS connections are always closed explicitly in a finally block when you are finished using them. If you fail to do so, Apache ActiveMQ Artemis will detect this at garbage collection time, and log a warning similar to the following in the logs (If you are using JMS the warning will involve a JMS connection not a client session): 126
127 Detecting Dead Connections [Finalizer] 20:14:43,244 WARNING [org.apache.activemq.artemis.core.client.impl.del egatingsession] I'm closing a ClientSession you left open. Please make sure you c lose all ClientSessions explicitly before let ting them go out of scope! [Finalizer] 20:14:43,244 WARNING [org.apache.activemq.artemis.core.client.impl.del egatingsession] The session you didn't close was created here: java.lang.exception at org.apache.activemq.artemis.core.client.impl.delegatingsession.<init>(delega tingsession.java:83) at org.acme.yourproject.yourclass (YourClass.java:666) Apache ActiveMQ Artemis will then close the connection / client session for you. Note that the log will also tell you the exact line of your user code where you created the JMS connection / client session that you later did not close. This will enable you to pinpoint the error in your code and correct it appropriately. Detecting failure from the client side. In the previous section we discussed how the client sends pings to the server and how "dead" connection resources are cleaned up by the server. There's also another reason for pinging, and that's for the client to be able to detect that the server or network has failed. As long as the client is receiving data from the server it will consider the connection to be still alive. If the client does not receive any packets for a configurable number of milliseconds then it will consider the connection failed and will either initiate failover, or call any FailureListener instances (or ExceptionListener instances if you are using JMS) depending on how it has been configured. This is controlled by the clientfailurecheckperiod attribute which can be set a number of ways: If you're using the core API then you can invoke org.apache.activemq.artemis.api.core.client.serverlocator.setclientfailurecheckpe riod(long) If you're using JMS then you can invoke org.apache.activemq.artemis.jms.client.activemqconnectionfactory.setclientfailure CheckPeriod(long) on your javax.jms.connectionfactory. 127
128 Detecting Dead Connections However, the simplest way is to just set the clientfailurecheckperiod on the URL your client is using to connect, e.g. tcp://localhost:61616? clientfailurecheckperiod= The default value for client failure check period on an "unreliable" connection (e.g. a Netty connection) is ms, i.e. 30 seconds. The default value for client failure check period on a "reliable" connection (e.g. an in-vm connection) is -1. A value of -1 means the client will never fail the connection on the client side if no data is received from the server. Typically this is much lower than connection TTL to allow clients to reconnect in case of transitory failure. Configuring Asynchronous Connection Execution Most packets received on the server side are executed on the remoting thread. These packets represent short-running operations and are always executed on the remoting thread for performance reasons. However, by default some kinds of packets are executed using a thread from a thread pool so that the remoting thread is not tied up for too long. Please note that processing operations asynchronously on another thread adds a little more latency. These packets are: org.apache.activemq.artemis.core.protocol.core.impl.wireformat.rollbackmessage org.apache.activemq.artemis.core.protocol.core.impl.wireformat.sessionclosemessage org.apache.activemq.artemis.core.protocol.core.impl.wireformat.sessioncommitmessa ge org.apache.activemq.artemis.core.protocol.core.impl.wireformat.sessionxacommitmes sage org.apache.activemq.artemis.core.protocol.core.impl.wireformat.sessionxaprepareme ssage org.apache.activemq.artemis.core.protocol.core.impl.wireformat.sessionxarollbackm essage To disable asynchronous connection execution, set the parameter async-connectionexecution-enabled in broker.xml to false (default value is true ). 128
129 Detecting Dead Connections 129
130 Detecting Slow Consumers Detecting Slow Consumers In this section we will discuss how Apache ActiveMQ Artemis can be configured to deal with slow consumers. A slow consumer with a server-side queue (e.g. JMS topic subscriber) can pose a significant problem for broker performance. If messages build up in the consumer's server-side queue then memory will begin filling up and the broker may enter paging mode which would impact performance negatively. However, criteria can be set so that consumers which don't acknowledge messages quickly enough can potentially be disconnected from the broker which in the case of a non-durable JMS subscriber would allow the broker to remove the subscription and all of its messages freeing up valuable server resources. Configuration required for detecting slow consumers By default the server will not detect slow consumers. If slow consumer detection is desired then see queue attributes chapter for more details. The calculation to determine whether or not a consumer is slow only inspects the number of messages a particular consumer has acknowledged. It doesn't take into account whether or not flow control has been enabled on the consumer, whether or not the consumer is streaming a large message, etc. Keep this in mind when configuring slow consumer detection. Please note that slow consumer checks are performed using the scheduled thread pool and that each queue on the broker with slow consumer detection enabled will cause a new entry in the internal java.util.concurrent.scheduledthreadpoolexecutor instance. If there are a high number of queues and the slow-consumer-check-period is relatively low then there may be delays in executing some of the checks. However, this will not impact the accuracy of the calculations used by the detection algorithm. See thread pooling for more details about this pool. 130
131 Avoiding Network Isolation Network Isolation (Split Brain) It is possible that if a replicated live or backup server becomes isolated in a network that failover will occur and you will end up with 2 live servers serving messages in a cluster, this we call split brain. There are different configurations you can choose from that will help mitigate this problem Quorum Voting Quorum voting is used by both the live and the backup to decide what to do if a replication connection is disconnected. Basically the server will request each live server in the cluster to vote as to whether it thinks the server it is replicating to or from is still alive. This being the case the minimum number of live/backup pairs needed is 3. If less than 3 pairs are used then the only option is to use a Network Pinger which is explained later in this chapter or choose how you want each server to react which the following details: Backup Voting By default if a replica loses its replication connection to the live broker it makes a decision as to whether to start or not with a quorum vote. This of course requires that there be at least 3 pairs of live/backup nodes in the cluster. For a 3 node cluster it will start if it gets 2 votes back saying that its live server is no longer available, for 4 nodes this would be 3 votes and so on. It's also possible to statically set the quorum size that should be used fotr the case where the cluster size is known up front, this is done on the Replica Policy like so: <ha-policy> <replication> <slave> <quorum-size>2</quorum-size> </slave> </replication> </ha-policy> 131
132 Avoiding Network Isolation In this example the quorum size is set to 2 so if you were using a single pair and the backup lost connectivity it would never start. Live Voting By default, if the live server loses its replication connection then it will just carry on and wait for a backup to reconnect and start replicating again. In the event of a possible split brain scenario this may mean that the live stays live even though the backup has been activated. It is possible to configure the live server to vote for a quorum if this happens, in this way if the live server doesn't not receive a majority vote then it will shutdown. This is done by setting the vote-on-replication-failure to true. <ha-policy> <replication> <master> <vote-on-replication-failure>true</vote-on-replication-failure> <quorum-size>2</quorum-size> </master> </replication> </ha-policy> As in the backup policy it is also possible to statically configure the quorum size. Pinging the network You may configure one more addresses on the broker.xml that are part of your network topology, that will be pinged through the life cycle of the server. The server will stop itself until the network is back on such case. If you execute the create command passing a -ping argument, you will create a default xml that is ready to be used with network checks:./artemis create /mydir/myserver --ping This XML part will be added to your broker.xml: 132
133 Avoiding Network Isolation <!-- You can specify the NIC you want to use to verify if the network <network-check-nic>thenickname</network-check-nic> --> <!-- Use this to use an HTTP server to validate the network <network-check-url-list> --> <network-check-period>10000</network-check-period> <network-check-timeout>1000</network-check-timeout> <!-- this is a comma separated list, no spaces, just DNS or IPs it should accept IPV6 Warning: Make sure you understand your network topology as this is meant to che ck if your network is up. Using IPs that could eventually disappear or be partially visible may defeat the purpose. You can use a list of multiple IPs, any successful ping will make the server OK to continue running --> <network-check-list> </network-check-list> <!-- use this to customize the ping used for ipv4 addresses --> <network-check-ping-command>ping -c 1 -t %d %s</network-check-ping-command> <!-- use this to customize the ping used for ipv addresses --> <network-check-ping6-command>ping6 -c 1 %2$s</network-check-ping6-command> Once you lose connectivity towards on the given example, you will see see this output at the server: 133
134 Avoiding Network Isolation 09:49:24,562 WARN [org.apache.activemq.artemis.core.server.networkhealthcheck] Pi ng Address / wasn't reacheable 09:49:36,577 INFO [org.apache.activemq.artemis.core.server.networkhealthcheck] Ne twork is unhealthy, stopping service ActiveMQServerImpl::serverUUID=04fd5dd8-b18c- 11e6-9efe-6a ad0 09:49:36,625 INFO [org.apache.activemq.artemis.core.server] AMQ221002: Apache Act ivemq Artemis Message Broker version [04fd5dd8-b18c-11e6-9efe-6a ad0] stopped, uptime seconds 09:50:00,653 WARN [org.apache.activemq.artemis.core.server.networkhealthcheck] pi ng: sendto: No route to host 09:50:10,656 WARN [org.apache.activemq.artemis.core.server.networkhealthcheck] Ho st is down: java.net.connectexception: Host is down at java.net.inet6addressimpl.isreachable0(native Method) [rt.jar:1.8.0_73] at java.net.inet6addressimpl.isreachable(inet6addressimpl.java:77) [rt.jar:1.8.0_73] at java.net.inetaddress.isreachable(inetaddress.java:502) [rt.jar:1.8.0_73] at org.apache.activemq.artemis.core.server.networkhealthcheck.check(networkhea lthcheck.java:295) [artemis-commons snapshot.jar:1.6.0-snapshot] at org.apache.activemq.artemis.core.server.networkhealthcheck.check(networkhea lthcheck.java:276) [artemis-commons snapshot.jar:1.6.0-snapshot] at org.apache.activemq.artemis.core.server.networkhealthcheck.run(networkhealt hcheck.java:244) [artemis-commons snapshot.jar:1.6.0-snapshot] at org.apache.activemq.artemis.core.server.activemqscheduledcomponent$2.run(ac tivemqscheduledcomponent.java:189) [artemis-commons snapshot.jar:1.6.0-snaps HOT] at org.apache.activemq.artemis.core.server.activemqscheduledcomponent$3.run(ac tivemqscheduledcomponent.java:199) [artemis-commons snapshot.jar:1.6.0-snaps HOT] at java.util.concurrent.executors$runnableadapter.call(executors.java:511) [rt.jar:1.8.0_73] at java.util.concurrent.futuretask.runandreset(futuretask.java:308) [rt.jar:1. 8.0_73] at java.util.concurrent.scheduledthreadpoolexecutor$scheduledfuturetask.access $301(ScheduledThreadPoolExecutor.java:180) [rt.jar:1.8.0_73] at java.util.concurrent.scheduledthreadpoolexecutor$scheduledfuturetask.run(sc heduledthreadpoolexecutor.java:294) [rt.jar:1.8.0_73] at java.util.concurrent.threadpoolexecutor.runworker(threadpoolexecutor.java:1 142) [rt.jar:1.8.0_73] at java.util.concurrent.threadpoolexecutor$worker.run(threadpoolexecutor.java: 617) [rt.jar:1.8.0_73] at java.lang.thread.run(thread.java:745) [rt.jar:1.8.0_73] Once you re establish your network connections towards the configured check list: 134
135 Avoiding Network Isolation 09:53:23,461 INFO [org.apache.activemq.artemis.core.server.networkhealthcheck] Ne twork is healthy, starting service ActiveMQServerImpl:: 09:53:23,462 INFO [org.apache.activemq.artemis.core.server] AMQ221000: live Messa ge Broker is starting with configuration Broker Configuration (clustered=false,jou rnaldirectory=./data/journal,bindingsdirectory=./data/bindings,largemessagesdirect ory=./data/large-messages,pagingdirectory=./data/paging) 09:53:23,462 INFO [org.apache.activemq.artemis.core.server] AMQ221013: Using NIO Journal 09:53:23,462 INFO [org.apache.activemq.artemis.core.server] AMQ221043: Protocol m odule found: [artemis-server]. Adding protocol support for: CORE 09:53:23,463 INFO [org.apache.activemq.artemis.core.server] AMQ221043: Protocol m odule found: [artemis-amqp-protocol]. Adding protocol support for: AMQP 09:53:23,463 INFO [org.apache.activemq.artemis.core.server] AMQ221043: Protocol m odule found: [artemis-hornetq-protocol]. Adding protocol support for: HORNETQ 09:53:23,463 INFO [org.apache.activemq.artemis.core.server] AMQ221043: Protocol m odule found: [artemis-mqtt-protocol]. Adding protocol support for: MQTT 09:53:23,464 INFO [org.apache.activemq.artemis.core.server] AMQ221043: Protocol m odule found: [artemis-openwire-protocol]. Adding protocol support for: OPENWIRE 09:53:23,464 INFO [org.apache.activemq.artemis.core.server] AMQ221043: Protocol m odule found: [artemis-stomp-protocol]. Adding protocol support for: STOMP 09:53:23,541 INFO [org.apache.activemq.artemis.core.server] AMQ221003: Deploying queue jms.queue.dlq 09:53:23,541 INFO [org.apache.activemq.artemis.core.server] AMQ221003: Deploying queue jms.queue.expiryqueue 09:53:23,549 INFO [org.apache.activemq.artemis.core.server] AMQ221020: Started Ac ceptor at :61616 for protocols [CORE,MQTT,AMQP,STOMP,HORNETQ,OPENWIRE] 09:53:23,550 INFO [org.apache.activemq.artemis.core.server] AMQ221020: Started Ac ceptor at :5445 for protocols [HORNETQ,STOMP] 09:53:23,554 INFO [org.apache.activemq.artemis.core.server] AMQ221020: Started Ac ceptor at :5672 for protocols [AMQP] 09:53:23,555 INFO [org.apache.activemq.artemis.core.server] AMQ221020: Started Ac ceptor at :1883 for protocols [MQTT] 09:53:23,556 INFO [org.apache.activemq.artemis.core.server] AMQ221020: Started Ac ceptor at :61613 for protocols [STOMP] 09:53:23,556 INFO [org.apache.activemq.artemis.core.server] AMQ221007: Server is now live 09:53:23,556 INFO [org.apache.activemq.artemis.core.server] AMQ221001: Apache Act ivemq Artemis Message Broker version [ , nodeid=04fd5dd8-b18c-11e6-9ef e-6a ad0] Warning Make sure you understand your network topology as this is meant to validate your network. Using IPs that could eventually disappear or be partially visible may defeat the purpose. You can use a list of multiple IPs. Any successful ping will make the server OK to continue running 135
136 Avoiding Network Isolation 136
137 Resource Manager Configuration Resource Manager Configuration Apache ActiveMQ Artemis has its own Resource Manager for handling the lifespan of JTA transactions. When a transaction is started the resource manager is notified and keeps a record of the transaction and its current state. It is possible in some cases for a transaction to be started but then forgotten about. Maybe the client died and never came back. If this happens then the transaction will just sit there indefinitely. To cope with this Apache ActiveMQ Artemis can, if configured, scan for old transactions and rollback any it finds. The default for this is milliseconds (5 minutes), i.e. any transactions older than 5 minutes are removed. This timeout can be changed by editing the transaction-timeout property in broker.xml (value must be in milliseconds). The property transaction-timeout-scan-period configures how often, in milliseconds, to scan for old transactions. Please note that Apache ActiveMQ Artemis will not unilaterally rollback any XA transactions in a prepared state - this must be heuristically rolled back via the management API if you are sure they will never be resolved by the transaction manager. 137
138 Flow Control Flow Control Flow control is used to limit the flow of data between a client and server, or a server and another server in order to prevent the client or server being overwhelmed with data. Consumer Flow Control This controls the flow of data between the server and the client as the client consumes messages. For performance reasons clients normally buffer messages before delivering to the consumer via the receive() method or asynchronously via a message listener. If the consumer cannot process messages as fast as they are being delivered and stored in the internal buffer, then you could end up with a situation where messages would keep building up possibly causing out of memory on the client if they cannot be processed in time. Window-Based Flow Control By default, Apache ActiveMQ Artemis consumers buffer messages from the server in a client side buffer before the client consumes them. This improves performance: otherwise every time the client consumes a message, Apache ActiveMQ Artemis would have to go the server to request the next message. In turn, this message would then get sent to the client side, if one was available. A network round trip would be involved for every message and considerably reduce performance. To prevent this, Apache ActiveMQ Artemis pre-fetches messages into a buffer on each consumer. The total maximum size of messages (in bytes) that will be buffered on each consumer is determined by the consumerwindowsize parameter. By default, the consumerwindowsize is set to 1 MiB (1024 * 1024 bytes). The value can be: -1 for an unbounded buffer 0 to not buffer any messages. 138
139 Flow Control >0 for a buffer with the given maximum size in bytes. Setting the consumer window size can considerably improve performance depending on the messaging use case. As an example, let's consider the two extremes: Fast consumers Fast consumers can process messages as fast as they consume them (or even faster) To allow fast consumers, set the consumerwindowsize to -1. This will allow unbounded message buffering on the client side. Use this setting with caution: it can overflow the client memory if the consumer is not able to process messages as fast as it receives them. Slow consumers Slow consumers takes significant time to process each message and it is desirable to prevent buffering messages on the client side so that they can be delivered to another consumer instead. Consider a situation where a queue has 2 consumers; 1 of which is very slow. Messages are delivered in a round robin fashion to both consumers, the fast consumer processes all of its messages very quickly until its buffer is empty. At this point there are still messages awaiting to be processed in the buffer of the slow consumer thus preventing them being processed by the fast consumer. The fast consumer is therefore sitting idle when it could be processing the other messages. To allow slow consumers, set the consumerwindowsize to 0 (for no buffer at all). This will prevent the slow consumer from buffering any messages on the client side. Messages will remain on the server side ready to be consumed by other consumers. Setting this to 0 can give deterministic distribution between multiple consumers on a queue. Most of the consumers cannot be clearly identified as fast or slow consumers but are inbetween. In that case, setting the value of consumerwindowsize to optimize performance depends on the messaging use case and requires benchmarks to find the optimal value, but a value of 1MiB is fine in most cases. Using Core API 139
140 Flow Control If Apache ActiveMQ Artemis Core API is used, the consumer window size is specified by ServerLocator.setConsumerWindowSize() method and some of the ClientSession.createConsumer() methods. Using JMS If JNDI is used on the client to instantiate and look up the connection factory the consumer window size is configured in the JNDI context environment, e.g. jndi.properties. Here's a simple example using the "ConnectionFactory" connection factory which is available in the context by default: java.naming.factory.initial=org.apache.activemq.artemis.jndi.activemqinitialcontex tfactory connectionfactory.myconnectionfactory=tcp://localhost:61616?consumerwindowsize=0 If the connection factory is directly instantiated, the consumer window size is specified by ActiveMQConnectionFactory.setConsumerWindowSize() method. Please see the examples for an example which shows how to configure Apache ActiveMQ Artemis to prevent consumer buffering when dealing with slow consumers. Rate limited flow control It is also possible to control the rate at which a consumer can consume messages. This is a form of throttling and can be used to make sure that a consumer never consumes messages at a rate faster than the rate specified. The rate must be a positive integer to enable this functionality and is the maximum desired message consumption rate specified in units of messages per second. Setting this to -1 disables rate limited flow control. The default value is -1. Please see the examples chapter for a working example of limiting consumer rate. Using Core API If the Apache ActiveMQ Artemis core API is being used the rate can be set via the ServerLocator.setConsumerMaxRate(int consumermaxrate) method or alternatively via some of the ClientSession.createConsumer() methods. 140
141 Flow Control Using JMS If JNDI is used to instantiate and look up the connection factory, the max rate can be configured in the JNDI context environment, e.g. jndi.properties. Here's a simple example using the "ConnectionFactory" connection factory which is available in the context by default: java.naming.factory.initial=org.apache.activemq.artemis.jndi.activemqinitialcontex tfactory java.naming.provider.url=tcp://localhost:61616?consumermaxrate=10 If the connection factory is directly instantiated, the max rate size can be set via the ActiveMQConnectionFactory.setConsumerMaxRate(int consumermaxrate) method. Note Rate limited flow control can be used in conjunction with window based flow control. Rate limited flow control only effects how many messages a client can consume in a second and not how many messages are in its buffer. So if you had a slow rate limit and a high window based limit the clients internal buffer would soon fill up with messages. Please see the examples chapter for an example which shows how to configure ActiveMQ Artemis to prevent consumer buffering when dealing with slow consumers. Producer flow control Apache ActiveMQ Artemis also can limit the amount of data sent from a client to a server to prevent the server being overwhelmed. Window based flow control In a similar way to consumer window based flow control, Apache ActiveMQ Artemis producers, by default, can only send messages to an address as long as they have sufficient credits to do so. The amount of credits required to send a message is given by the size of the message. As producers run low on credits they request more from the server, when the server sends them more credits they can send more messages. The amount of credits a producer requests in one go is known as the window size. 141
142 Flow Control The window size therefore determines the amount of bytes that can be in-flight at any one time before more need to be requested - this prevents the remoting connection from getting overloaded. Using Core API If the Apache ActiveMQ Artemis core API is being used, window size can be set via the ServerLocator.setProducerWindowSize(int producerwindowsize) method. Using JMS If JNDI is used to instantiate and look up the connection factory, the producer window size can be configured in the JNDI context environment, e.g. jndi.properties. Here's a simple example using the "ConnectionFactory" connection factory which is available in the context by default: java.naming.factory.initial=org.apache.activemq.artemis.jndi.activemqinitialcontex tfactory connectionfactory.myconnectionfactory=tcp://localhost:61616?producerwindowsize=10 If the connection factory is directly instantiated, the producer window size can be set via the ActiveMQConnectionFactory.setProducerWindowSize(int producerwindowsize) method. Blocking producer window based flow control using CORE protocol When using the CORE protocol (used by both the Artemis Core Client and Artemis JMS Client) the server will always aim give the same number of credits as have been requested. However, it is also possible to set a maximum size on any address, and the server will never send more credits to any one producer than what is available according to the address's upper memory limit. Although a single producer will be issued more credits than available (at the time of issue) it is possible that more than 1 producer be associated with the same address and so it is theoretically possible that more credits are allocated across total producers than what is available. It is therefore possible to go over the address limit by approximately: '''total number of producers on address * producer window size''' 142
143 Flow Control For example, if I have a JMS queue called "myqueue", I could set the maximum memory size to 10MiB, and the the server will control the number of credits sent to any producers which are sending any messages to myqueue such that the total messages in the queue never exceeds 10MiB. When the address gets full, producers will block on the client side until more space frees up on the address, i.e. until messages are consumed from the queue thus freeing up space for more messages to be sent. We call this blocking producer flow control, and it's an efficient way to prevent the server running out of memory due to producers sending more messages than can be handled at any time. It is an alternative approach to paging, which does not block producers but instead pages messages to storage. To configure an address with a maximum size and tell the server that you want to block producers for this address if it becomes full, you need to define an AddressSettings (Configuring Queues Via Address Settings) block for the address and specify max-sizebytes and address-full-policy The address block applies to all queues registered to that address. I.e. the total memory for all queues bound to that address will not exceed max-size-bytes. In the case of JMS topics this means the total memory of all subscriptions in the topic won't exceed maxsize-bytes. Here's an example: <address-settings> <address-setting match="jms.queue.examplequeue"> <max-size-bytes>100000</max-size-bytes> <address-full-policy>block</address-full-policy> </address-setting> </address-settings> The above example would set the max size of the JMS queue "examplequeue" to be bytes and would block any producers sending to that address to prevent that max size being exceeded. Note the policy must be set to BLOCK to enable blocking producer flow control. 143
144 Flow Control Note Note that in the default configuration all addresses are set to block producers after 10 MiB of message data is in the address. This means you cannot send more than 10MiB of message data to an address without it being consumed before the producers will be blocked. If you do not want this behaviour increase the maxsize-bytes parameter or change the address full message policy. Note Producer credits are allocated from the broker to the client. Flow control credit checking (i.e. checking a producer has enough credit) is done on the client side only. It is possible for the broker to over allocate credits, like in the multiple producer scenario outlined above. It is also possible for a misbehaving client to ignore the flow control credits issued by the broker and continue sending with out sufficient credit. Blocking producer window based flow control using AMQP Apache ActiveMQ Artemis ships with out of the box with 2 protocols that support flow control. Artemis CORE protocol and AMQP. Both protocols implement flow control slightly differently and therefore address full BLOCK policy behaves slightly different for clients that use each protocol respectively. As explained earlier in this chapter the CORE protocol uses a producer window size flow control system. Where credits (representing bytes) are allocated to producers, if a producer wants to send a message it should wait until it has enough byte credits available for it to send. AMQP flow control credits are not representative of bytes but instead represent the number of messages a producer is permitted to send (regardless of the message size). BLOCK for AMQP works mostly in the same way as the producer window size mechanism above. Artemis will issue 100 credits to a client at a time and refresh them when the clients credits reaches 30. The broker will stop issuing credits once an address is full. However, since AMQP credits represent whole messages and not bytes, it would be possible in some scenarios for an AMQP client to significantly exceed an address upper bound should the broker continue accepting messages until the clients credits are exhausted. For this reason there is an additional parameter available on address settings that specifies an upper bound on an address size in bytes. Once this upper bound is reach Artemis will start rejecting AMQP messages. This limit is the max-size- 144
145 Flow Control bytes-reject-threshold and is by default set to -1 (or no limit). This is additional parameter allows a kind of soft and hard limit, in normal circumstances the broker will utilize the max-size-bytes parameter using using flow control to put back pressure on the client, but will protect the broker by rejecting messages once the address size is reached. Rate limited flow control Apache ActiveMQ Artemis also allows the rate a producer can emit message to be limited, in units of messages per second. By specifying such a rate, Apache ActiveMQ Artemis will ensure that producer never produces messages at a rate higher than that specified. The rate must be a positive integer to enable this functionality and is the maximum desired message consumption rate specified in units of messages per second. Setting this to -1 disables rate limited flow control. The default value is -1. Please see the examples chapter for a working example of limiting producer rate. Using Core API If the Apache ActiveMQ Artemis core API is being used the rate can be set via the ServerLocator.setProducerMaxRate(int producermaxrate) method or alternatively via some of the ClientSession.createProducer() methods. Using JMS If JNDI is used to instantiate and look up the connection factory, the max rate size can be configured in the JNDI context environment, e.g. jndi.properties. Here's a simple example using the "ConnectionFactory" connection factory which is available in the context by default: java.naming.factory.initial=org.apache.activemq.artemis.jndi.activemqinitialcontex tfactory connectionfactory.myconnectionfactory=tcp://localhost:61616?producermaxrate=10 If the connection factory is directly instantiated, the max rate size can be set via the ActiveMQConnectionFactory.setProducerMaxRate(int producermaxrate) method. 145
146 Flow Control 146
147 Guarantees of sends and commits Guarantees of sends and commits Guarantees of Transaction Completion When committing or rolling back a transaction with Apache ActiveMQ Artemis, the request to commit or rollback is sent to the server, and the call will block on the client side until a response has been received from the server that the commit or rollback was executed. When the commit or rollback is received on the server, it will be committed to the journal, and depending on the value of the parameter journal-sync-transactional the server will ensure that the commit or rollback is durably persisted to storage before sending the response back to the client. If this parameter has the value false then commit or rollback may not actually get persisted to storage until some time after the response has been sent to the client. In event of server failure this may mean the commit or rollback never gets persisted to storage. The default value of this parameter is true so the client can be sure all transaction commits or rollbacks have been persisted to storage by the time the call to commit or rollback returns. Setting this parameter to false can improve performance at the expense of some loss of transaction durability. This parameter is set in broker.xml Guarantees of Non Transactional Message Sends If you are sending messages to a server using a non transacted session, Apache ActiveMQ Artemis can be configured to block the call to send until the message has definitely reached the server, and a response has been sent back to the client. This can be configured individually for durable and non-durable messages, and is determined by the following two parameters: BlockOnDurableSend. If this is set to true then all calls to send for durable messages on non transacted sessions will block until the message has reached the server, and a response has been sent back. The default value is true. 147
148 Guarantees of sends and commits BlockOnNonDurableSend. If this is set to true then all calls to send for non-durable messages on non transacted sessions will block until the message has reached the server, and a response has been sent back. The default value is false. Setting block on sends to true can reduce performance since each send requires a network round trip before the next send can be performed. This means the performance of sending messages will be limited by the network round trip time (RTT) of your network, rather than the bandwidth of your network. For better performance we recommend either batching many messages sends together in a transaction since with a transactional session, only the commit / rollback blocks not every send, or, using Apache ActiveMQ Artemis's advanced asynchronous send acknowledgements feature described in Asynchronous Send Acknowledgements. If you are using JMS and JNDI then using the elements blockondurablesend and blockonnondurablesend. If you're using JMS but not using JNDI then you can set these values directly on the ActiveMQConnectionFactory instance using the appropriate setter methods. If you're using core you can set these values directly on the ClientSessionFactory instance using the appropriate setter methods. When the server receives a message sent from a non transactional session, and that message is durable and the message is routed to at least one durable queue, then the server will persist the message in permanent storage. If the journal parameter journalsync-non-transactional is set to true the server will not send a response back to the client until the message has been persisted and the server has a guarantee that the data has been persisted to disk. The default value for this parameter is true. Guarantees of Non Transactional Acknowledgements If you are acknowledging the delivery of a message at the client side using a non transacted session, Apache ActiveMQ Artemis can be configured to block the call to acknowledge until the acknowledge has definitely reached the server, and a response has been sent back to the client. This is configured with the parameter BlockOnAcknowledge. If this is set to true then all calls to acknowledge on non transacted sessions will block until the acknowledge has reached the server, and a response has been sent back. You might want to set this to true if you want to implement a strict at most once delivery policy. The default value is false 148
149 Guarantees of sends and commits Asynchronous Send Acknowledgements If you are using a non transacted session but want a guarantee that every message sent to the server has reached it, then, as discussed in Guarantees of Non Transactional Message Sends, you can configure Apache ActiveMQ Artemis to block the call to send until the server has received the message, persisted it and sent back a response. This works well but has a severe performance penalty - each call to send needs to block for at least the time of a network round trip (RTT) - the performance of sending is thus limited by the latency of the network, not limited by the network bandwidth. Let's do a little bit of maths to see how severe that is. We'll consider a standard 1Gib ethernet network with a network round trip between the server and the client of 0.25 ms. With a RTT of 0.25 ms, the client can send at most 1000/ 0.25 = 4000 messages per second if it blocks on each message send. If each message is < 1500 bytes and a standard 1500 bytes MTU (Maximum Transmission Unit) size is used on the network, then a 1GiB network has a theoretical upper limit of (1024 * 1024 * 1024 / 8) / 1500 = messages per second if messages are sent without blocking! These figures aren't an exact science but you can clearly see that being limited by network RTT can have serious effect on performance. To remedy this, Apache ActiveMQ Artemis provides an advanced new feature called asynchronous send acknowledgements. With this feature, Apache ActiveMQ Artemis can be configured to send messages without blocking in one direction and asynchronously getting acknowledgement from the server that the messages were received in a separate stream. By de-coupling the send from the acknowledgement of the send, the system is not limited by the network RTT, but is limited by the network bandwidth. Consequently better throughput can be achieved than is possible using a blocking approach, while at the same time having absolute guarantees that messages have successfully reached the server. The window size for send acknowledgements is determined by the confirmation-windowsize parameter on the connection factory or client session factory. Please see Client Reconnection and Session Reattachment for more info on this. Asynchronous Send Acknowledgements 149
150 Guarantees of sends and commits To use the feature using the core API, you implement the interface org.apache.activemq.artemis.api.core.client.sendacknowledgementhandler and set a handler instance on your ClientSession. Then, you just send messages as normal using your ClientSession, and as messages reach the server, the server will send back an acknowledgement of the send asynchronously, and some time later you are informed at the client side by Apache ActiveMQ Artemis calling your handler's sendacknowledged(clientmessage message) method, passing in a reference to the message that was sent. To enable asynchronous send acknowledgements you must make sure confirmationwindowsize is set to a positive integer value, e.g. 10MiB Please see the examples chapter for a full working example. 150
151 Message Redelivery and Undelivered Messages Message Redelivery and Undelivered Messages Messages can be delivered unsuccessfully (e.g. if the transacted session used to consume them is rolled back). Such a message goes back to its queue ready to be redelivered. However, this means it is possible for a message to be delivered again and again without success thus remaining in the queue indefinitely, clogging the system. There are 2 ways to deal with these undelivered messages: Delayed redelivery. It is possible to delay messages redelivery. This gives the client some time to recover from any transient failures and to prevent overloading its network or CPU resources. Dead Letter Address. It is also possible to configure a dead letter address so that after a specified number of unsuccessful deliveries, messages are removed from their queue and sent to the dead letter address. These messages will not be delivered again from this queue. Both options can be combined for maximum flexibility. Delayed Redelivery Delaying redelivery can often be useful in cases where clients regularly fail or rollback. Without a delayed redelivery, the system can get into a "thrashing" state, with delivery being attempted, the client rolling back, and delivery being re-attempted ad infinitum in quick succession, consuming valuable CPU and network resources. Configuring Delayed Redelivery Delayed redelivery is defined in the address-setting configuration: 151
152 Message Redelivery and Undelivered Messages <!-- delay redelivery of messages for 5s --> <address-setting match="jms.queue.examplequeue"> <!-- default is > <redelivery-delay-multiplier>1.5</redelivery-delay-multiplier> <!-- default is 0 (no delay) --> <redelivery-delay>5000</redelivery-delay> <!-- default is redelivery-delay * 10 --> <max-redelivery-delay>50000</max-redelivery-delay> </address-setting> If a redelivery-delay is specified, Apache ActiveMQ Artemis will wait this delay before redelivering the messages. By default, there is no redelivery delay ( redelivery-delay is set to 0). Other subsequent messages will be delivery regularly, only the cancelled message will be sent asynchronously back to the queue after the delay. You can specify a multiplier (the redelivery-delay-multiplier ) that will take effect on top of the redelivery-delay. Each time a message is redelivered the delay period will be equal to the previous delay redelivery-delay-multiplier. A max-redelivery-delay can be set to prevent the delay from becoming too large. The max-redelivery-delay is defaulted to redelivery-delay \ 10. Example: - redelivery-delay=5000, redelivery-delay-multiplier=2, max-redelivery-delay= Delivery Attempt 1. (Unsuccessful) 2. Wait Delay Period: Delivery Attempt 2. (Unsuccessful) 4. Wait Delay Period: // (5000 * 2) < max-delay-period. Use Delivery Attempt 3: (Unsuccessful) 6. Wait Delay Period: // (10000 * 2) > max-delay-period: Use max-delay-delivery Address wildcards can be used to configure redelivery delay for a set of addresses (see Understanding the Wildcard Syntax), so you don't have to specify redelivery delay individually for each address. Example 152
153 Message Redelivery and Undelivered Messages See the examples chapter for an example which shows how delayed redelivery is configured and used with JMS. Dead Letter Addresses To prevent a client infinitely receiving the same undelivered message (regardless of what is causing the unsuccessful deliveries), messaging systems define dead letter addresses: after a specified unsuccessful delivery attempts, the message is removed from its queue and sent to a dead letter address. Any such messages can then be diverted to queue(s) where they can later be perused by the system administrator for action to be taken. Apache ActiveMQ Artemis's addresses can be assigned a dead letter address. Once the messages have been unsuccessfully delivered for a given number of attempts, they are removed from their queue and sent to the relevant dead letter address. These dead letter messages can later be consumed from the dead letter address for further inspection. Configuring Dead Letter Addresses Dead letter address is defined in the address-setting configuration: <!-- undelivered messages in examplequeue will be sent to the dead letter address deadletterqueue after 3 unsuccessful delivery attempts --> <address-setting match="jms.queue.examplequeue"> <dead-letter-address>jms.queue.deadletterqueue</dead-letter-address> <max-delivery-attempts>3</max-delivery-attempts> </address-setting> If a dead-letter-address is not specified, messages will removed after max-deliveryattempts unsuccessful attempts. By default, messages are redelivered 10 times at the maximum. Set max-deliveryattempts to -1 for infinite redeliveries. A dead letter address can be set globally for a set of matching addresses and you can set max-delivery-attempts to -1 for a specific address setting to allow infinite redeliveries only for this address. 153
154 Message Redelivery and Undelivered Messages Address wildcards can be used to configure dead letter settings for a set of addresses (see Understanding the Wildcard Syntax). Dead Letter Properties Dead letter messages which are consumed from a dead letter address have the following properties: _AMQ_ORIG_ADDRESS a String property containing the original address of the dead letter message _AMQ_ORIG_QUEUE a String property containing the original queue of the dead letter message Example See: Dead Letter section of the Examples for an example that shows how dead letter is configured and used with JMS. Delivery Count Persistence In normal use, Apache ActiveMQ Artemis does not update delivery count persistently until a message is rolled back (i.e. the delivery count is not updated before the message is delivered to the consumer). In most messaging use cases, the messages are consumed, acknowledged and forgotten as soon as they are consumed. In these cases, updating the delivery count persistently before delivering the message would add an extra persistent step for each message delivered, implying a significant performance penalty. However, if the delivery count is not updated persistently before the message delivery happens, in the event of a server crash, messages might have been delivered but that will not have been reflected in the delivery count. During the recovery phase, the server will not have knowledge of that and will deliver the message with redelivered set to false while it should be true. As this behavior breaks strict JMS semantics, Apache ActiveMQ Artemis allows to persist delivery count before message delivery but this feature is disabled by default due to performance implications. 154
155 Message Redelivery and Undelivered Messages To enable it, set persist-delivery-count-before-delivery to true in broker.xml : <persist-delivery-count-before-delivery>true</persist-delivery-count-before-delive ry> 155
156 Message Expiry Message Expiry Messages can be set with an optional time to live when sending them. Apache ActiveMQ Artemis will not deliver a message to a consumer after it's time to live has been exceeded. If the message hasn't been delivered by the time that time to live is reached the server can discard it. Apache ActiveMQ Artemis's addresses can be assigned a expiry address so that, when messages are expired, they are removed from the queue and sent to the expiry address. Many different queues can be bound to an expiry address. These expired messages can later be consumed for further inspection. Message Expiry Using Apache ActiveMQ Artemis Core API, you can set an expiration time directly on the message: // message will expire in 5000ms from now message.setexpiration(system.currenttimemillis() ); JMS MessageProducer allows to set a TimeToLive for the messages it sent: // messages sent by this producer will be retained for 5s (5000ms) before expirati on producer.settimetolive(5000); Expired messages which are consumed from an expiry address have the following properties: _AMQ_ORIG_ADDRESS a String property containing the original address of the expired message _AMQ_ORIG_QUEUE a String property containing the original queue of the expired message _AMQ_ACTUAL_EXPIRY 156
157 Message Expiry a Long property containing the actual expiration time of the expired message Configuring Expiry Addresses Expiry address are defined in the address-setting configuration: <!-- expired messages in examplequeue will be sent to the expiry address expiryque ue --> <address-setting match="jms.queue.examplequeue"> <expiry-address>jms.queue.expiryqueue</expiry-address> </address-setting> If messages are expired and no expiry address is specified, messages are simply removed from the queue and dropped. Address wildcards can be used to configure expiry address for a set of addresses (see Understanding the Wildcard Syntax). Configuring The Expiry Reaper Thread A reaper thread will periodically inspect the queues to check if messages have expired. The reaper thread can be configured with the following properties in broker.xml message-expiry-scan-period How often the queues will be scanned to detect expired messages (in milliseconds, default is 30000ms, set to -1 to disable the reaper thread) message-expiry-thread-priority The reaper thread priority (it must be between 1 and 10, 10 being the highest priority, default is 3) Example See the examples.md chapter for an example which shows how message expiry is configured and used with JMS. 157
158 Large Messages Large Messages Apache ActiveMQ Artemis supports sending and receiving of huge messages, even when the client and server are running with limited memory. The only realistic limit to the size of a message that can be sent or consumed is the amount of disk space you have available. We have tested sending and consuming messages up to 8 GiB in size with a client and server running in just 50MiB of RAM! To send a large message, the user can set an InputStream on a message body, and when that message is sent, Apache ActiveMQ Artemis will read the InputStream. A FileInputStream could be used for example to send a huge message from a huge file on disk. As the InputStream is read the data is sent to the server as a stream of fragments. The server persists these fragments to disk as it receives them and when the time comes to deliver them to a consumer they are read back of the disk, also in fragments and sent down the wire. When the consumer receives a large message it initially receives just the message with an empty body, it can then set an OutputStream on the message to stream the huge message body to a file on disk or elsewhere. At no time is the entire message body stored fully in memory, either on the client or the server. Configuring the server Large messages are stored on a disk directory on the server side, as configured on the main configuration file. The configuration property large-messages-directory specifies where large messages are stored. For JDBC persistence the large-message-table should be configured. <configuration xmlns="urn:activemq" xmlns:xsi=" xsi:schemalocation="urn:activemq /schema/artemis-server.xsd">... <large-messages-directory>/data/large-messages</large-messages-directory>... </configuration 158
159 Large Messages By default the large message directory is data/largemessages and large-message-table is configured as "LARGE_MESSAGE_TABLE". For the best performance we recommend using file store with large messages directory stored on a different physical volume to the message journal or paging directory. Configuring Parameters Any message larger than a certain size is considered a large message. Large messages will be split up and sent in fragments. This is determined by the parameter minlargemessagesize Note Apache ActiveMQ Artemis messages are encoded using 2 bytes per character so if the message data is filled with ASCII characters (which are 1 byte) the size of the resulting Apache ActiveMQ Artemis message would roughly double. This is important when calculating the size of a "large" message as it may appear to be less than the minlargemessagesize before it is sent, but it then turns into a "large" message once it is encoded. The default value is 100KiB. Using Core API If the Apache ActiveMQ Artemis Core API is used, the minimal large message size is specified by ServerLocator.setMinLargeMessageSize. ServerLocator locator = ActiveMQClient.createServerLocatorWithoutHA(new TransportC onfiguration(nettyconnectorfactory.class.getname())) locator.setminlargemessagesize(25 * 1024); ClientSessionFactory factory = ActiveMQClient.createClientSessionFactory(); Configuring the transport directly from the client side will provide more information on how to instantiate the session factory. Using JMS 159
160 Large Messages If JNDI is used to instantiate and look up the connection factory, the minimum large message size is configured in the JNDI context environment, e.g. jndi.properties. Here's a simple example using the "ConnectionFactory" connection factory which is available in the context by default: java.naming.factory.initial=org.apache.activemq.artemis.jndi.activemqinitialcontex tfactory connectionfactory.myconnectionfactory=tcp://localhost:61616?minlargemessagesize= If the connection factory is being instantiated directly, the minimum large message size is specified by ActiveMQConnectionFactory.setMinLargeMessageSize. Compressed Large Messages You can choose to send large messages in compressed form using compress-largemessages attributes. compresslargemessages If you specify the boolean property compresslargemessages on the server locator or ConnectionFactory as true, The system will use the ZIP algorithm to compress the message body as the message is transferred to the server's side. Notice that there's no special treatment at the server's side, all the compressing and uncompressing is done at the client. If the compressed size of a large message is below minlargemessagesize, it is sent to server as regular messages. This means that the message won't be written into the server's large-message data directory, thus reducing the disk I/O. # If JNDI is used to instantiate and look up the connection factory, large message compression can be configured in the JNDI context environment, e.g. jndi.properties. Here's a simple example using the "ConnectionFactory" connection factory which is available in the context by default: 160
161 Large Messages java.naming.factory.initial=org.apache.activemq.artemis.jndi.activemqinitialcontex tfactory connectionfactory.myconnectionfactory=tcp://localhost:61616?compresslargemessages= true Streaming large messages Apache ActiveMQ Artemis supports setting the body of messages using input and output streams ( java.lang.io ) These streams are then used directly for sending (input streams) and receiving (output streams) messages. When receiving messages there are 2 ways to deal with the output stream; you may choose to block while the output stream is recovered using the method ClientMessage.saveOutputStream or alternatively using the method ClientMessage.setOutputstream which will asynchronously write the message to the stream. If you choose the latter the consumer must be kept alive until the message has been fully received. You can use any kind of stream you like. The most common use case is to send files stored in your disk, but you could also send things like JDBC Blobs, SocketInputStream, things you recovered from HTTPRequests etc. Anything as long as it implements java.io.inputstream for sending messages or java.io.outputstream for receiving them. Streaming over Core API The following table shows a list of methods available at ClientMessage which are also available through JMS by the use of object properties. 161
162 Large Messages Name Description JMS Equivalent setbodyinputstream(inputstream) setoutputstream(outputstream) saveoutputstream(outputstream) Set the InputStream used to read a message body when sending it. Set the OutputStream that will receive the body of a message. This method does not block. Save the body of the message to the `OutputStream`. It will block until the entire content is transferred to the `OutputStream`. JMS_AMQ_InputStream JMS_AMQ_OutputStream JMS_AMQ_SaveStream : org.apache.activemq.artemis.api.core.client.clientmessage API To set the output stream when receiving a core message: ClientMessage msg = consumer.receive(...); // This will block here until the stream was transferred msg.saveoutputstream(someoutputstream); ClientMessage msg2 = consumer.receive(...); // This will not wait the transfer to finish msg2.setoutputstream(someotheroutputstream); Set the input stream when sending a core message: ClientMessage msg = session.createmessage(); msg.setinputstream(datainputstream); 162
163 Large Messages Notice also that for messages with more than 2GiB the getbodysize() will return invalid values since this is an integer (which is also exposed to the JMS API). On those cases you can use the message property _AMQ_LARGE_SIZE. Streaming over JMS When using JMS, Apache ActiveMQ Artemis maps the streaming methods on the core API (see ClientMessage API table above) by setting object properties. You can use the method Message.setObjectProperty to set the input and output streams. The InputStream can be defined through the JMS Object Property JMS_AMQ_InputStream on messages being sent: BytesMessage message = session.createbytesmessage(); FileInputStream fileinputstream = new FileInputStream(fileInput); BufferedInputStream bufferedinput = new BufferedInputStream(fileInputStream); message.setobjectproperty("jms_amq_inputstream", bufferedinput); someproducer.send(message); The OutputStream can be set through the JMS Object Property JMS_AMQ_SaveStream on messages being received in a blocking way. BytesMessage messagereceived = (BytesMessage)messageConsumer.receive(120000); File outputfile = new File("huge_message_received.dat"); FileOutputStream fileoutputstream = new FileOutputStream(outputFile); BufferedOutputStream bufferedoutput = new BufferedOutputStream(fileOutputStream); // This will block until the entire content is saved on disk messagereceived.setobjectproperty("jms_amq_savestream", bufferedoutput); Setting the OutputStream could also be done in a non blocking way using the property JMS_AMQ_OutputStream. // This won't wait the stream to finish. You need to keep the consumer active. messagereceived.setobjectproperty("jms_amq_outputstream", bufferedoutput); 163
164 Large Messages Note When using JMS, Streaming large messages are only supported on StreamMessage and BytesMessage. Streaming Alternative If you choose not to use the InputStream or OutputStream capability of Apache ActiveMQ Artemis You could still access the data directly in an alternative fashion. On the Core API just get the bytes of the body as you normally would. ClientMessage msg = consumer.receive(); byte[] bytes = new byte[1024]; for (int i = 0 ; i < msg.getbodysize(); i += bytes.length) { msg.getbody().readbytes(bytes); // Whatever you want to do with the bytes } If using JMS API, BytesMessage and StreamMessage also supports it transparently. BytesMessage rm = (BytesMessage)cons.receive(10000); byte data[] = new byte[1024]; for (int i = 0; i < rm.getbodylength(); i += 1024) { int numberofbytes = rm.readbytes(data); // Do whatever you want with the data } Large message example Please see the examples chapter for an example which shows how large message is configured and used with JMS. 164
165 Paging Paging Apache ActiveMQ Artemis transparently supports huge queues containing millions of messages while the server is running with limited memory. In such a situation it's not possible to store all of the queues in memory at any one time, so Apache ActiveMQ Artemis transparently pages messages into and out of memory as they are needed, thus allowing massive queues with a low memory footprint. Apache ActiveMQ Artemis will start paging messages to disk, when the size of all messages in memory for an address exceeds a configured maximum size. The default configuration from Artemis has destinations with paging. Page Files Messages are stored per address on the file system. Each address has an individual folder where messages are stored in multiple files (page files). Each file will contain messages up to a max configured size ( page-size-bytes ). The system will navigate on the files as needed, and it will remove the page file as soon as all the messages are acknowledged up to that point. Browsers will read through the page-cursor system. Consumers with selectors will also navigate through the page-files and it will ignore messages that don't match the criteria. Warning: When you have a queue, and consumers filtering the queue with a very restrictive selector you may get into a situation where you won't be able to read more data from paging until you consume messages from the queue. Example: in one consumer you make a selector as 'color="red"' but you only have one color red 1 millions messages after blue, you won't be able to consume red until you consume blue ones. This is different to browsing as we will "browse" the entire queue looking for messages and while we "depage" messages while feeding the queue. 165
166 Paging Configuration You can configure the location of the paging folder Global paging parameters are specified on the main configuration file ( broker.xml ). <configuration xmlns="urn:activemq" xmlns:xsi=" xsi:schemalocation="urn:activemq /schema/artemis-server.xsd">... <paging-directory>/somewhere/paging-directory</paging-directory>... Property Name Description Default paging-directory Where page files are stored. Apache ActiveMQ Artemis will create one folder for each address being paged under this configured location. data/paging : Paging Configuration Parameters Paging Mode As soon as messages delivered to an address exceed the configured size, that address alone goes into page mode. Note Paging is done individually per address. If you configure a max-size-bytes for an address, that means each matching address will have a maximum size that you specified. It DOES NOT mean that the total overall size of all matching addresses is limited to max-size-bytes. Configuration Configuration is done at the address settings, done at the main configuration file ( broker.xml ). 166
167 Paging <address-settings> <address-setting match="jms.someaddress"> <max-size-bytes> </max-size-bytes> <page-size-bytes> </page-size-bytes> <address-full-policy>page</address-full-policy> </address-setting> </address-settings> This is the list of available parameters on the address settings. Property Name `maxsizebytes` `pagesizebytes` `addressfullpolicy` `pagemaxcachesize` Description What's the max memory the address could have before entering on page mode. The size of each page file used on the paging system This must be set to PAGE for paging to enable. If the value is PAGE then further messages will be paged to disk. If the value is DROP then further messages will be silently dropped. If the value is FAIL then the messages will be dropped and the client message producers will receive an exception. If the value is BLOCK then client message producers will block when they try and send further messages. The system will keep up to `page-max-cache-size` page files in memory to optimize IO during paging navigation. Default -1 (disabled) 10MiB (10 \* 1024 \* 1024 bytes) PAGE 5 Global Max Size Beyond the max-size-bytes on the address you can also set the global-max-size on the main configuration. If you set max-size-bytes = -1 on paging the global-max-size can still be used. When you have more messages than what is configured global-max-size any new produced message will make that destination to go through its paging policy. 167
168 Paging global-max-size is calculated as half of the max memory available to the Java Virtual Machine, unless specified on the broker.xml configuration. Dropping messages Instead of paging messages when the max size is reached, an address can also be configured to just drop messages when the address is full. To do this just set the address-full-policy to DROP in the address settings Dropping messages and throwing an exception to producers Instead of paging messages when the max size is reached, an address can also be configured to drop messages and also throw an exception on the client-side when the address is full. To do this just set the address-full-policy to FAIL in the address settings Blocking producers Instead of paging messages when the max size is reached, an address can also be configured to block producers from sending further messages when the address is full, thus preventing the memory being exhausted on the server. When memory is freed up on the server, producers will automatically unblock and be able to continue sending. To do this just set the address-full-policy to BLOCK in the address settings In the default configuration, all addresses are configured to block producers after 10 MiB of data are in the address. Caution with Addresses with Multiple Multicast Queues 168
169 Paging When a message is routed to an address that has multiple multicast queues bound to it, e.g. a JMS subscription in a Topic, there is only 1 copy of the message in memory. Each queue only deals with a reference to this. Because of this the memory is only freed up once all queues referencing the message have delivered it. If you have a single lazy subscription, the entire address will suffer IO performance hit as all the queues will have messages being sent through an extra storage on the paging system. For example: An address has 10 multicast queues One of the queues does not deliver its messages (maybe because of a slow consumer). Messages continually arrive at the address and paging is started. The other 9 queues are empty even though messages have been sent. In this example all the other 9 queues will be consuming messages from the page system. This may cause performance issues if this is an undesirable state. Max Disk Usage The System will perform scans on the disk to determine if the disk is beyond a configured limit. These are configured through 'max-disk-usage' in percentage. Once that limit is reached any message will be blocked. (unless the protocol doesn't support flow control on which case there will be an exception thrown and the connection for those clients dropped). Example See the examples chapter for an example which shows how to use paging with Apache ActiveMQ Artemis. 169
170 Queue Attributes Address and Queue Attributes and Settings 170
171 Scheduled Messages Scheduled Messages Scheduled messages differ from normal messages in that they won't be delivered until a specified time in the future, at the earliest. To do this, a special property is set on the message before sending it. Scheduled Delivery Property The property name used to identify a scheduled message is "_AMQ_SCHED_DELIVERY" (or the constant Message.HDR_SCHEDULED_DELIVERY_TIME ). The specified value must be a positive long corresponding to the time the message must be delivered (in milliseconds). An example of sending a scheduled message using the JMS API is as follows. TextMessage message = session.createtextmessage("this is a scheduled message messa ge which will be delivered in 5 sec."); message.setlongproperty("_amq_sched_delivery", System.currentTimeMillis() ); producer.send(message);... // message will not be received immediately but 5 seconds later TextMessage messagereceived = (TextMessage) consumer.receive(); Scheduled messages can also be sent using the core API, by setting the same property on the core message before sending. Example See the examples chapter for an example which shows how scheduled messages can be used with JMS. 171
172 Last-Value Queues Last-Value Queues Last-Value queues are special queues which discard any messages when a newer message with the same value for a well-defined Last-Value property is put in the queue. In other words, a Last-Value queue only retains the last value. A typical example for Last-Value queue is for stock prices, where you are only interested by the latest value for a particular stock. Configuring Last-Value Queues Last-value queues are defined in the address-setting configuration: <address-setting match="jms.queue.lastvaluequeue"> <last-value-queue>true</last-value-queue> </address-setting> By default, last-value-queue is false. Address wildcards can be used to configure Last- Value queues for a set of addresses (see here). Using Last-Value Property The property name used to identify the last value is "_AMQ_LVQ_NAME" (or the constant Message.HDR_LAST_VALUE_NAME from the Core API). For example, if two messages with the same value for the Last-Value property are sent to a Last-Value queue, only the latest message will be kept in the queue: 172
173 Last-Value Queues // send 1st message with Last-Value property set to STOCK_NAME TextMessage message = session.createtextmessage("1st message with Last-Value prope rty set"); message.setstringproperty("_amq_lvq_name", "STOCK_NAME"); producer.send(message); // send 2nd message with Last-Value property set to STOCK_NAME message = session.createtextmessage("2nd message with Last-Value property set"); message.setstringproperty("_amq_lvq_name", "STOCK_NAME"); producer.send(message);... // only the 2nd message will be received: it is the latest with // the Last-Value property set TextMessage messagereceived = (TextMessage)messageConsumer.receive(5000); System.out.format("Received message: %s\n", messagereceived.gettext()); Example See the examples chapter for an example which shows how last value queues are configured and used with JMS. 173
174 Message Grouping Message Grouping Message groups are sets of messages that have the following characteristics: Messages in a message group share the same group id, i.e. they have same group identifier property ( JMSXGroupID for JMS, _AMQ_GROUP_ID for Apache ActiveMQ Artemis Core API). Messages in a message group are always consumed by the same consumer, even if there are many consumers on a queue. They pin all messages with the same group id to the same consumer. If that consumer closes another consumer is chosen and will receive all messages with the same group id. Message groups are useful when you want all messages for a certain value of the property to be processed serially by the same consumer. An example might be orders for a certain stock. You may want orders for any particular stock to be processed serially by the same consumer. To do this you can create a pool of consumers (perhaps one for each stock, but less will work too), then set the stock name as the value of the _AMQ_GROUP_ID property. This will ensure that all messages for a particular stock will always be processed by the same consumer. Note Grouped messages can impact the concurrent processing of non-grouped messages due to the underlying FIFO semantics of a queue. For example, if there is a chunk of 100 grouped messages at the head of a queue followed by 1,000 non-grouped messages then all the grouped messages will need to be sent to the appropriate client (which is consuming those grouped messages serially) before any of the non-grouped messages can be consumed. The functional impact in this scenario is a temporary suspension of concurrent message processing while all the grouped messages are processed. This can be a performance bottleneck so keep it in mind when determining the size of your message groups, and consider whether or not you should isolate your grouped messages from your non-grouped messages. Using Core API 174
175 Message Grouping The property name used to identify the message group is "_AMQ_GROUP_ID" (or the constant MessageImpl.HDR_GROUP_ID ). Alternatively, you can set autogroup to true on the SessionFactory which will pick a random unique id. Using JMS The property name used to identify the message group is JMSXGroupID. // send 2 messages in the same group to ensure the same // consumer will receive both Message message =... message.setstringproperty("jmsxgroupid", "Group-0"); producer.send(message); message =... message.setstringproperty("jmsxgroupid", "Group-0"); producer.send(message); Alternatively, you can set autogroup to true on the ActiveMQConnectonFactory which will pick a random unique id. This can also be set in the JNDI context environment, e.g. jndi.properties. Here's a simple example using the "ConnectionFactory" connection factory which is available in the context by default java.naming.factory.initial=org.apache.activemq.artemis.jndi.activemqinitialcontex tfactory connectionfactory.myconnectionfactory=tcp://localhost:61616?autogroup=true Alternatively you can set the group id via the connection factory. All messages sent with producers created via this connection factory will set the JMSXGroupID to the specified value on all messages sent. This can also be set in the JNDI context environment, e.g. jndi.properties. Here's a simple example using the "ConnectionFactory" connection factory which is available in the context by default: java.naming.factory.initial=org.apache.activemq.artemis.jndi.activemqinitialcontex tfactory connectionfactory.myconnectionfactory=tcp://localhost:61616?roupid=group-0 Example 175
176 Message Grouping See the [examples](examples.md} chapter for an example which shows how message groups are configured and used with JMS and via a connection factory. Clustered Grouping Using message groups in a cluster is a bit more complex. This is because messages with a particular group id can arrive on any node so each node needs to know about which group id's are bound to which consumer on which node. The consumer handling messages for a particular group id may be on a different node of the cluster, so each node needs to know this information so it can route the message correctly to the node which has that consumer. To solve this there is the notion of a grouping handler. Each node will have its own grouping handler and when a messages is sent with a group id assigned, the handlers will decide between them which route the message should take. There are 2 types of handlers; Local and Remote. Each cluster should choose 1 node to have a local grouping handler and all the other nodes should have remote handlers- it's the local handler that actually makes the decision as to what route should be used, all the other remote handlers converse with this. Here is a sample config for both types of handler, this should be configured in the broker.xml file. <grouping-handler name="my-grouping-handler"> <type>local</type> <address>jms</address> <timeout>5000</timeout> </grouping-handler> <grouping-handler name="my-grouping-handler"> <type>remote</type> <address>jms</address> <timeout>5000</timeout> </grouping-handler> The address attribute refers to a cluster connection and the address it uses, refer to the clustering section on how to configure clusters. The timeout attribute referees to how long to wait for a decision to be made, an exception will be thrown during the send if this timeout is reached, this ensures that strict ordering is kept. 176
177 Message Grouping The decision as to where a message should be routed to is initially proposed by the node that receives the message. The node will pick a suitable route as per the normal clustered routing conditions, i.e. round robin available queues, use a local queue first and choose a queue that has a consumer. If the proposal is accepted by the grouping handlers the node will route messages to this queue from that point on, if rejected an alternative route will be offered and the node will again route to that queue indefinitely. All other nodes will also route to the queue chosen at proposal time. Once the message arrives at the queue then normal single server message group semantics take over and the message is pinned to a consumer on that queue. You may have noticed that there is a single point of failure with the single local handler. If this node crashes then no decisions will be able to be made. Any messages sent will be not be delivered and an exception thrown. To avoid this happening Local Handlers can be replicated on another backup node. Simple create your back up node and configure it with the same Local handler. Clustered Grouping Best Practices Some best practices should be followed when using clustered grouping: 1. Make sure your consumers are distributed evenly across the different nodes if possible. This is only an issue if you are creating and closing consumers regularly. Since messages are always routed to the same queue once pinned, removing a consumer from this queue may leave it with no consumers meaning the queue will just keep receiving the messages. Avoid closing consumers or make sure that you always have plenty of consumers, i.e., if you have 3 nodes have 3 consumers. 2. Use durable queues if possible. If queues are removed once a group is bound to it, then it is possible that other nodes may still try to route messages to it. This can be avoided by making sure that the queue is deleted by the session that is sending the messages. This means that when the next message is sent it is sent to the node where the queue was deleted meaning a new proposal can successfully take place. Alternatively you could just start using a different group id. 3. Always make sure that the node that has the Local Grouping Handler is replicated. These means that on failover grouping will still occur. 4. In case you are using group-timeouts, the remote node should have a smaller group-timeout with at least half of the value on the main coordinator. This is because this will determine how often the last-time-use value should be updated 177
178 Message Grouping with a round trip for a request to the group between the nodes. Clustered Grouping Example See the examples chapter for an example of how to configure message groups with a ActiveMQ Artemis Cluster. 178
179 Extra Acknowledge Modes Extra Acknowledge Modes JMS specifies 3 acknowledgement modes: AUTO_ACKNOWLEDGE CLIENT_ACKNOWLEDGE DUPS_OK_ACKNOWLEDGE Apache ActiveMQ Artemis supports two additional modes: PRE_ACKNOWLEDGE and INDIVIDUAL_ACKNOWLEDGE In some cases you can afford to lose messages in event of failure, so it would make sense to acknowledge the message on the server before delivering it to the client. This extra mode is supported by Apache ActiveMQ Artemis and will call it preacknowledge mode. The disadvantage of acknowledging on the server before delivery is that the message will be lost if the system crashes after acknowledging the message on the server but before it is delivered to the client. In that case, the message is lost and will not be recovered when the system restart. Depending on your messaging case, preacknowledgement mode can avoid extra network traffic and CPU at the cost of coping with message loss. An example of a use case for pre-acknowledgement is for stock price update messages. With these messages it might be reasonable to lose a message in event of crash, since the next price update message will arrive soon, overriding the previous price. Note Please note, that if you use pre-acknowledge mode, then you will lose transactional semantics for messages being consumed, since clearly they are being acknowledged first on the server, not when you commit the transaction. This may be stating the obvious but we like to be clear on these things to avoid confusion! Using PRE_ACKNOWLEDGE 179
180 Extra Acknowledge Modes This can be configured in a client's JNDI context environment, e.g. jndi.properties, like this: java.naming.factory.initial=org.apache.activemq.artemis.jndi.activemqinitialcontex tfactory connection.connectionfactory=tcp://localhost:61616?preacknowledge=true Alternatively, to use pre-acknowledgement mode using the JMS API, create a JMS Session with the ActiveMQSession.PRE_ACKNOWLEDGE constant. // messages will be acknowledge on the server *before* being delivered to the clie nt Session session = connection.createsession(false, ActiveMQJMSConstants.PRE_ACKNOWL EDGE); Or you can set pre-acknowledge directly on the ActiveMQConnectionFactory instance using the setter method. To use pre-acknowledgement mode using the core API you can set it directly on the ClientSessionFactory instance using the setter method. Individual Acknowledge A valid use-case for individual acknowledgement would be when you need to have your own scheduling and you don't know when your message processing will be finished. You should prefer having one consumer per thread worker but this is not possible in some circumstances depending on how complex is your processing. For that you can use the individual Acknowledgement. You basically setup Individual ACK by creating a session with the acknowledge mode with ActiveMQJMSConstants.INDIVIDUAL_ACKNOWLEDGE. Individual ACK inherits all the semantics from Client Acknowledge, with the exception the message is individually acked. Note Please note, that to avoid confusion on MDB processing, Individual ACKNOWLEDGE is not supported through MDBs (or the inbound resource adapter). this is because you have to finish the process of your message inside the MDB. 180
181 Extra Acknowledge Modes Example See the examples chapter for an example which shows how to use preacknowledgement mode with JMS. 181
182 Management Management Apache ActiveMQ Artemis has an extensive management API that allows a user to modify a server configuration, create new resources (e.g. addresses and queues), inspect these resources (e.g. how many messages are currently held in a queue) and interact with it (e.g. to remove messages from a queue). All the operations allows a client to manage Apache ActiveMQ Artemis. It also allows clients to subscribe to management notifications. There are 3 ways to manage Apache ActiveMQ Artemis: Using JMX -- JMX is the standard way to manage Java applications Using the core API -- management operations are sent to Apache ActiveMQ Artemis server using core messages Using the JMS API -- management operations are sent to Apache ActiveMQ Artemis server using JMS messages Although there are 3 different ways to manage Apache ActiveMQ Artemis each API supports the same functionality. If it is possible to manage a resource using JMX it is also possible to achieve the same result using Core. This choice depends on your requirements, your application settings and your environment to decide which way suits you best. In version 2 of Apache ActiveMQ Artemis the syntax used for MBean Object names has changed significantly due to changes in the addressing scheme. See the documentation for each individual resource for details on the new sytanx. The Management API Regardless of the way you invoke management operations, the management API is the same. For each managed resource, there exists a Java interface describing what can be invoked for this type of resource. Apache ActiveMQ Artemis exposes its managed resources in the org.apache.activemq.artemis.api.core.management package 182
183 Management The way to invoke a management operations depends whether JMX, core messages, or JMS messages are used. Note A few management operations requires a filter parameter to chose which messages are involved by the operation. Passing null or an empty string means that the management operation will be performed on all messages. Apache ActiveMQ Artemis Management API Apache ActiveMQ Artemis defines a core management API to manage core resources. For full details of the API please consult the javadoc. In summary: Apache ActiveMQ Artemis Server Management Listing, creating, deploying and destroying queues A list of deployed core queues can be retrieved using the getqueuenames() method. Core queues can be created or destroyed using the management operations createqueue() or deployqueue() or destroyqueue() )on the ActiveMQServerControl (with the ObjectName org.apache.activemq.artemis:broker=" <brokername>" or the resource name broker ) createqueue will fail if the queue already exists while deployqueue will do nothing. Pausing and resuming Queues The QueueControl can pause and resume the underlying queue. When a queue is paused, it will receive messages but will not deliver them. When it's resumed, it'll begin delivering the queued messages, if any. Listing and closing remote connections Client's remote addresses can be retrieved using listremoteaddresses(). It is also possible to close the connections associated with a remote address using the closeconnectionsforaddress() method. Alternatively, connection IDs can be listed using listconnectionids() and all the sessions for a given connection ID can be listed using listsessions(). Transaction heuristic operations 183
184 Management In case of a server crash, when the server restarts, it it possible that some transaction requires manual intervention. The listpreparedtransactions() method lists the transactions which are in the prepared states (the transactions are represented as opaque Base64 Strings.) To commit or rollback a given prepared transaction, the commitpreparedtransaction() or rollbackpreparedtransaction() method can be used to resolve heuristic transactions. Heuristically completed transactions can be listed using the listheuristiccommittedtransactions() and listheuristicrolledbacktransactions methods. Enabling and resetting Message counters Message counters can be enabled or disabled using the enablemessagecounters() or disablemessagecounters() method. To reset message counters, it is possible to invoke resetallmessagecounters() and resetallmessagecounterhistories() methods. Retrieving the server configuration and attributes The ActiveMQServerControl exposes Apache ActiveMQ Artemis server configuration through all its attributes (e.g. getversion() method to retrieve the server's version, etc.) Listing, creating and destroying Core bridges and diverts A list of deployed core bridges (resp. diverts) can be retrieved using the getbridgenames() (resp. getdivertnames() ) method. Core bridges (resp. diverts) can be created or destroyed using the management operations createbridge() and destroybridge() (resp. createdivert() and destroydivert() ) on the ActiveMQServerControl (with the ObjectName org.apache.activemq.artemis:broker="<brokername>" or the resource name broker ). It is possible to stop the server and force failover to occur with any currently attached clients. to do this use the forcefailover() on the ActiveMQServerControl (with the ObjectName org.apache.activemq.artemis:broker="<brokername>" or the resource name broker ) Note Since this method actually stops the server you will probably receive some sort of error depending on which management service you use to call it. 184
185 Management Address Management Core addresses can be managed using the AddressControl class (with the ObjectName org.apache.activemq.artemis:broker="<brokername>",component=addresses,address=" <addressname>" or the resource name address.<addressname> ). Modifying roles and permissions for an address You can add or remove roles associated to a queue using the addrole() or removerole() methods. You can list all the roles associated to the queue with the getroles() method Queue Management The bulk of the core management API deals with core queues. The QueueControl class defines the Core queue management operations (with the ObjectName org.apache.activemq.artemis:broker="<brokername>",component=addresses,address=" <addressname>",subcomponent=queues,routing-type="<routingtype>",queue="<queuename>" or the resource name queue.<queuename> ). Most of the management operations on queues take either a single message ID (e.g. to remove a single message) or a filter (e.g. to expire all messages with a given property.) Expiring, sending to a dead letter address and moving messages Messages can be expired from a queue by using the expiremessages() method. If an expiry address is defined, messages will be sent to it, otherwise they are discarded. The queue's expiry address can be set with the setexpiryaddress() method. Messages can also be sent to a dead letter address with the sendmessagestodeadletteraddress() method. It returns the number of messages which are sent to the dead letter address. If a dead letter address is not defined, message are removed from the queue and discarded. The queue's dead letter address can be set with the setdeadletteraddress() method. Messages can also be moved from a queue to another queue by using the movemessages() method. Listing and removing messages Messages can be listed from a queue by using the listmessages() method which returns an array of Map, one Map for each message. 185
186 Management Messages can also be removed from the queue by using the removemessages() method which returns a boolean for the single message ID variant or the number of removed messages for the filter variant. The removemessages() method takes a filter argument to remove only filtered messages. Setting the filter to an empty string will in effect remove all messages. Counting messages The number of messages in a queue is returned by the getmessagecount() method. Alternatively, the countmessages() will return the number of messages in the queue which match a given filter Changing message priority The message priority can be changed by using the changemessagespriority() method which returns a boolean for the single message ID variant or the number of updated messages for the filter variant. Message counters Message counters can be listed for a queue with the listmessagecounter() and listmessagecounterhistory() methods (see Message Counters section). The message counters can also be reset for a single queue using the resetmessagecounter() method. Retrieving the queue attributes The QueueControl exposes queue settings through its attributes (e.g. getfilter() to retrieve the queue's filter if it was created with one, isdurable() to know whether the queue is durable or not, etc.) Pausing and resuming Queues The QueueControl can pause and resume the underlying queue. When a queue is paused, it will receive messages but will not deliver them. When it's resume, it'll begin delivering the queued messages, if any. Other Resources Management Apache ActiveMQ Artemis allows to start and stop its remote resources (acceptors, diverts, bridges, etc.) so that a server can be taken off line for a given period of time without stopping it completely (e.g. if other management operations must be performed such as resolving heuristic transactions). These resources are: 186
187 Management Acceptors They can be started or stopped using the start() or. stop() method on the AcceptorControl class (with the ObjectName org.apache.activemq.artemis:broker=" <brokername>",component=acceptor,name="<acceptorname>" or the resource name acceptor.<acceptorname> ). The acceptors parameters can be retrieved using the AcceptorControl attributes (see Understanding Acceptors) Diverts They can be started or stopped using the start() or stop() method on the DivertControl class (with the ObjectName org.apache.activemq.artemis:broker=" <brokername>",component=addresses,address=" <addressname>",subcomponent=diverts,divert="<divertname>" or the resource name divert.<divertname> ). Diverts parameters can be retrieved using the DivertControl attributes (see Diverting and Splitting Message Flows)) Bridges They can be started or stopped using the start() (resp. stop() ) method on the BridgeControl class (with the ObjectName org.apache.activemq.artemis:broker=" <brokername>",component=bridges,name="<bridgename>" or the resource name bridge. <the bridge name> ). Bridges parameters can be retrieved using the BridgeControl attributes (see Core bridges) Broadcast groups They can be started or stopped using the start() or stop() method on the BroadcastGroupControl class (with the ObjectName org.apache.activemq.artemis:broker="<brokername>",component=broadcastgroups,name="<broadcastgroupname>" or the resource name broadcastgroup.<the broadcast group name> ). Broadcast groups parameters can be retrieved using the BroadcastGroupControl attributes (see Clusters) Cluster connections They can be started or stopped using the start() or stop() method on the ClusterConnectionControl class (with the ObjectName org.apache.activemq.artemis:broker="<brokername>",component=clusterconnections,name="<clusterconnectionname>" or the resource name clusterconnection.<the cluster connection name> ). Cluster connections parameters can be retrieved using the ClusterConnectionControl attributes (see Clusters) 187
188 Management Using Management Via JMX Apache ActiveMQ Artemis can be managed using JMX. The management API is exposed by Apache ActiveMQ Artemis using MBeans interfaces. Apache ActiveMQ Artemis registers its resources with the domain org.apache.activemq.artemis. For example, the ObjectName to manage the anycast queue examplequeue on the address exampleaddress is: org.apache.activemq.artemis:broker=<brokername>,component=addresses,address="examp leaddress",subcomponent=queues,routing-type="anycast",queue="examplequeue" and the MBean is: org.apache.activemq.artemis.api.core.management.queuecontrol The MBean's ObjectName are built using the helper class org.apache.activemq.artemis.api.core.management.objectnamebuilder. You can also use jconsole to find the ObjectName of the MBeans you want to manage. Managing Apache ActiveMQ Artemis using JMX is identical to management of any Java Applications using JMX. It can be done by reflection or by creating proxies of the MBeans. Configuring JMX By default, JMX is enabled to manage Apache ActiveMQ Artemis. It can be disabled by setting jmx-management-enabled to false in broker.xml : <!-- false to disable JMX management for Apache ActiveMQ Artemis --> <jmx-management-enabled>false</jmx-management-enabled> If JMX is enabled, Apache ActiveMQ Artemis can be managed locally using jconsole. Note Remote connections to JMX are not enabled by default for security reasons. Please refer to Java Management guide to configure the server for remote management (system properties must be set in artemis.profile ). 188
189 Management By default, Apache ActiveMQ Artemis server uses the JMX domain "org.apache.activemq.artemis". To manage several Apache ActiveMQ Artemis servers from the same MBeanServer, the JMX domain can be configured for each individual Apache ActiveMQ Artemis server by setting jmx-domain in broker.xml : <!-- use a specific JMX domain for ActiveMQ Artemis MBeans --> <jmx-domain>my.org.apache.activemq</jmx-domain> MBeanServer configuration When Apache ActiveMQ Artemis is run in standalone, it uses the Java Virtual Machine's Platform MBeanServer to register its MBeans. By default Jolokia is also deployed to allow access to the mbean server via rest. Example See the chapters chapter for an example which shows how to use a remote connection to JMX and MBean proxies to manage Apache ActiveMQ Artemis. Exposing JMX using Jolokia The default Broker configuration ships with the Jolokia http agent deployed as a Web Application. Jolokia is a remote JMX over HTTP bridge that exposed mbeans, for a full guids as to how to use refer to Jolokia Documentation, however a simple example to query the broker's version would be to use a browser and go to the URL This would give you back something like the following: {"request":{"mbean":"org.apache.activemq.artemis:broker=\" \"","attribute":" Version","type":"read"},"value":"2.0.0-SNAPSHOT","timestamp": ,"status":2 00} Using Management Via Apache ActiveMQ Artemis API The management API in ActiveMQ Artemis is called by sending Core Client messages to a special address, the management address. 189
190 Management Management messages are regular Core Client messages with well-known properties that the server needs to understand to interact with the management API: The name of the managed resource The name of the management operation The parameters of the management operation When such a management message is sent to the management address, Apache ActiveMQ Artemis server will handle it, extract the information, invoke the operation on the managed resources and send a management reply to the management message's reply-to address (specified by ClientMessageImpl.REPLYTO_HEADER_NAME ). A ClientConsumer can be used to consume the management reply and retrieve the result of the operation (if any) stored in the reply's body. For portability, results are returned as a JSON String rather than Java Serialization (the org.apache.activemq.artemis.api.core.management.managementhelper can be used to convert the JSON string to Java objects). These steps can be simplified to make it easier to invoke management operations using Core messages: 1. Create a ClientRequestor to send messages to the management address and receive replies 2. Create a ClientMessage 3. Use the helper class org.apache.activemq.artemis.api.core.management.managementhelper to fill the message with the management properties 4. Send the message using the ClientRequestor 5. Use the helper class org.apache.activemq.artemis.api.core.management.managementhelper to retrieve the operation result from the management reply For example, to find out the number of messages in the core queue examplequeue : 190
191 Management ClientSession session =... ClientRequestor requestor = new ClientRequestor(session, "activemq.management"); ClientMessage message = session.createmessage(false); ManagementHelper.putAttribute(message, "queue.examplequeue", "messagecount"); session.start(); ClientMessage reply = requestor.request(m); int count = (Integer) ManagementHelper.getResult(reply); System.out.println("There are " + count + " messages in examplequeue"); Management operation name and parameters must conform to the Java interfaces defined in the management packages. Names of the resources are built using the helper class org.apache.activemq.artemis.api.core.management.resourcenames and are straightforward (e.g. queue.examplequeue for the Core Queue examplequeue. Configuring Management The management address to send management messages is configured in broker.xml : <management-address>activemq.management</management-address> By default, the address is activemq.management. The management address requires a special user permission manage to be able to receive and handle management messages. This is also configured in broker.xml: <!-- users with the admin role will be allowed to manage --> <!-- Apache ActiveMQ Artemis using management messages --> <security-setting match="activemq.management"> <permission type="manage" roles="admin" /> </security-setting> Example See the examples chapter for an example which shows how to use JMS messages to manage the Apache ActiveMQ Artemis server. Management Notifications 191
192 Management Apache ActiveMQ Artemis emits notifications to inform listeners of potentially interesting events (creation of new resources, security violation, etc.). These notifications can be received by 3 different ways: JMX notifications Core messages JMS messages JMX Notifications If JMX is enabled (see Configuring JMX section), JMX notifications can be received by subscribing to org.apache.activemq.artemis:type=broker,brokername=<broker name>,module=core,servicetype=server for notifications on resources. Core Messages Notifications Apache ActiveMQ Artemis defines a special management notification address. Core queues can be bound to this address so that clients will receive management notifications as Core messages A Core client which wants to receive management notifications must create a core queue bound to the management notification address. It can then receive the notifications from its queue. Notifications messages are regular core messages with additional properties corresponding to the notification (its type, when it occurred, the resources which were concerned, etc.). Since notifications are regular core messages, it is possible to use message selectors to filter out notifications and receives only a subset of all the notifications emitted by the server. Configuring The Core Management Notification Address The management notification address to receive management notifications is configured in broker.xml : <management-notification-address>activemq.notifications</management-notification-a ddress> 192
193 Management By default, the address is activemq.notifications. JMS Messages Notifications Apache ActiveMQ Artemis's notifications can also be received using JMS messages. It is similar to receiving notifications using Core API: Topic notificationstopic = ActiveMQJMSClient.createTopic("notificationsTopic"); Session session =... MessageConsumer notificationconsumer = session.createconsumer(notificationstopic); notificationconsumer.setmessagelistener(new MessageListener() { public void onmessage(message notif) { System.out.println(" "); System.out.println("Received notification:"); try { Enumeration propertynames = notif.getpropertynames(); while (propertynames.hasmoreelements()) { String propertyname = (String)propertyNames.nextElement(); System.out.format(" %s: %s\n", propertyname, notif.getobjectproperty( propertyname)); } } catch (JMSException e) { } System.out.println(" "); } }); Example See the examples chapter for an example which shows how to use a JMS MessageListener to receive management notifications from ActiveMQ Artemis server. Notification Types and Headers Below is a list of all the different kinds of notifications as well as which headers are on the messages. Every notification has a _AMQ_NotifType (value noted in parentheses) and _AMQ_NotifTimestamp header. The timestamp is the un-formatted result of a call to 193
194 Management java.lang.system.currenttimemillis(). BINDING_ADDED (0) _AMQ_Binding_Type, _AMQ_Address, _AMQ_ClusterName, _AMQ_RoutingName, _AMQ_Binding_ID, _AMQ_Distance, _AMQ_FilterString BINDING_REMOVED (1) _AMQ_Address, _AMQ_ClusterName, _AMQ_RoutingName, _AMQ_Binding_ID, _AMQ_Distance, _AMQ_FilterString CONSUMER_CREATED (2) _AMQ_Address, _AMQ_ClusterName, _AMQ_RoutingName, _AMQ_Distance, _AMQ_ConsumerCount, _AMQ_User, _AMQ_RemoteAddress, _AMQ_SessionName, _AMQ_FilterString CONSUMER_CLOSED (3) _AMQ_Address, _AMQ_ClusterName, _AMQ_RoutingName, _AMQ_Distance, _AMQ_ConsumerCount, _AMQ_User, _AMQ_RemoteAddress, _AMQ_SessionName, _AMQ_FilterString SECURITY_AUTHENTICATION_VIOLATION (6) _AMQ_User SECURITY_PERMISSION_VIOLATION (7) _AMQ_Address, _AMQ_CheckType, _AMQ_User DISCOVERY_GROUP_STARTED (8) name DISCOVERY_GROUP_STOPPED (9) name BROADCAST_GROUP_STARTED (10) name BROADCAST_GROUP_STOPPED (11) name BRIDGE_STARTED (12) name 194
195 Management BRIDGE_STOPPED (13) name CLUSTER_CONNECTION_STARTED (14) name CLUSTER_CONNECTION_STOPPED (15) name ACCEPTOR_STARTED (16) factory, id ACCEPTOR_STOPPED (17) factory, id PROPOSAL (18) _JBM_ProposalGroupId, _JBM_ProposalValue, _AMQ_Binding_Type, _AMQ_Address, _AMQ_Distance PROPOSAL_RESPONSE (19) _JBM_ProposalGroupId, _JBM_ProposalValue, _JBM_ProposalAltValue, _AMQ_Binding_Type, _AMQ_Address, _AMQ_Distance CONSUMER_SLOW (21) _AMQ_Address, _AMQ_ConsumerCount, _AMQ_RemoteAddress, _AMQ_ConnectionName, _AMQ_ConsumerName, _AMQ_SessionName Message Counters Message counters can be used to obtain information on queues over time as Apache ActiveMQ Artemis keeps a history on queue metrics. They can be used to show trends on queues. For example, using the management API, it would be possible to query the number of messages in a queue at regular interval. However, this would not be enough to know if the queue is used: the number of messages can remain constant because nobody is sending or receiving messages from 195
196 Management the queue or because there are as many messages sent to the queue than messages consumed from it. The number of messages in the queue remains the same in both cases but its use is widely different. Message counters gives additional information about the queues: count The total number of messages added to the queue since the server was started countdelta the number of messages added to the queue since the last message counter update messagecount The current number of messages in the queue messagecountdelta The overall number of messages added/removed from the queue since the last message counter update. For example, if messagecountdelta is equal to -10 this means that overall 10 messages have been removed from the queue (e.g. 2 messages were added and 12 were removed) lastaddtimestamp The timestamp of the last time a message was added to the queue udpatetimestamp The timestamp of the last message counter update These attributes can be used to determine other meaningful data as well. For example, to know specifically how many messages were consumed from the queue since the last update simply subtract the messagecountdelta from countdelta. Configuring Message Counters By default, message counters are disabled as it might have a small negative effect on memory. To enable message counters, you can set it to true in broker.xml : 196
197 Management <message-counter-enabled>true</message-counter-enabled> Message counters keeps a history of the queue metrics (10 days by default) and samples all the queues at regular interval (10 seconds by default). If message counters are enabled, these values should be configured to suit your messaging use case in broker.xml : <!-- keep history for a week --> <message-counter-max-day-history>7</message-counter-max-day-history> <!-- sample the queues every minute (60000ms) --> <message-counter-sample-period>60000</message-counter-sample-period> Message counters can be retrieved using the Management API. For example, to retrieve message counters on a queue using JMX: // retrieve a connection to Apache ActiveMQ Artemis's MBeanServer MBeanServerConnection mbsc =... QueueControlMBean queuecontrol = (QueueControl)MBeanServerInvocationHandler.newPro xyinstance(mbsc, on, QueueControl.class, false); // message counters are retrieved as a JSON String String counters = queuecontrol.listmessagecounter(); // use the MessageCounterInfo helper class to manipulate message counters more eas ily MessageCounterInfo messagecounter = MessageCounterInfo.fromJSON(counters); System.out.format("%s message(s) in the queue (since last sample: %s)\n", messagecounter.getmessagecount(), messagecounter.getmessagecountdelta()); Example See the examples chapter for an example which shows how to use message counters to retrieve information on a JMS Queue. 197
198 Security Security This chapter describes how security works with Apache ActiveMQ Artemis and how you can configure it. To disable security completely simply set the security-enabled property to false in the broker.xml file. For performance reasons security is cached and invalidated every so long. To change this period set the property security-invalidation-interval, which is in milliseconds. The default is ms. To assist in security auditing the populate-validated-user option exists. If this is true then the server will add the name of the validated user to the message using the key _AMQ_VALIDATED_USER. For JMS and Stomp clients this is mapped to the key JMSXUserID. For users authenticated based on their SSL certificate this name is the name to which their certificate's DN maps. If security-enabled is false and populatevalidated-user is true then the server will simply use whatever user name (if any) the client provides. This option is false by default. Role based security for addresses Apache ActiveMQ Artemis contains a flexible role-based security model for applying security to queues, based on their addresses. As explained in Using Core, Apache ActiveMQ Artemis core consists mainly of sets of queues bound to addresses. A message is sent to an address and the server looks up the set of queues that are bound to that address, the server then routes the message to those set of queues. Apache ActiveMQ Artemis allows sets of permissions to be defined against the queues based on their address. An exact match on the address can be used or a wildcard match can be used using the wildcard characters ' # ' and ' * '. Eight different permissions can be given to the set of queues which match the address. Those permissions are: createdurablequeue. This permission allows the user to create a durable queue under matching addresses. 198
199 Security deletedurablequeue. This permission allows the user to delete a durable queue under matching addresses. createnondurablequeue. This permission allows the user to create a non-durable queue under matching addresses. deletenondurablequeue. This permission allows the user to delete a non-durable queue under matching addresses. send. This permission allows the user to send a message to matching addresses. consume. This permission allows the user to consume a message from a queue bound to matching addresses. browse. This permission allows the user to browse a queue bound to the matching address. manage. This permission allows the user to invoke management operations by sending management messages to the management address. For each permission, a list of roles who are granted that permission is specified. If the user has any of those roles, he/she will be granted that permission for that set of addresses. Let's take a simple example, here's a security block from broker.xml file: <security-setting match="globalqueues.europe.#"> <permission type="createdurablequeue" roles="admin"/> <permission type="deletedurablequeue" roles="admin"/> <permission type="createnondurablequeue" roles="admin, guest, europe-users"/> <permission type="deletenondurablequeue" roles="admin, guest, europe-users"/> <permission type="send" roles="admin, europe-users"/> <permission type="consume" roles="admin, europe-users"/> </security-setting> The ' # ' character signifies "any sequence of words". Words are delimited by the '. ' character. For a full description of the wildcard syntax please see Understanding the Wildcard Syntax. The above security block applies to any address that starts with the string "globalqueues.europe.": Only users who have the admin role can create or delete durable queues bound to an address that starts with the string "globalqueues.europe." Any users with the roles admin, guest, or europe-users can create or delete temporary queues bound to an address that starts with the string "globalqueues.europe." 199
200 Security Any users with the roles admin or europe-users can send messages to these addresses or consume messages from queues bound to an address that starts with the string "globalqueues.europe." The mapping between a user and what roles they have is handled by the security manager. Apache ActiveMQ Artemis ships with a user manager that reads user credentials from a file on disk, and can also plug into JAAS or JBoss Application Server security. For more information on configuring the security manager, please see 'Changing the Security Manager'. There can be zero or more security-setting elements in each xml file. Where more than one match applies to a set of addresses the more specific match takes precedence. Let's look at an example of that, here's another security-setting block: <security-setting match="globalqueues.europe.orders.#"> <permission type="send" roles="europe-users"/> <permission type="consume" roles="europe-users"/> </security-setting> In this security-setting block the match 'globalqueues.europe.orders.#' is more specific than the previous match 'globalqueues.europe.#'. So any addresses which match 'globalqueues.europe.orders.#' will take their security settings only from the latter security-setting block. Note that settings are not inherited from the former block. All the settings will be taken from the more specific matching block, so for the address 'globalqueues.europe.orders.plastics' the only permissions that exist are send and consume for the role europe-users. The permissions createdurablequeue, deletedurablequeue, createnondurablequeue, deletenondurablequeue are not inherited from the other security-setting block. By not inheriting permissions, it allows you to effectively deny permissions in more specific security-setting blocks by simply not specifying them. Otherwise it would not be possible to deny permissions in sub-groups of addresses. Security Setting Plugin 200
201 Security Aside from configuring sets of permissions via XML these permissions can alternatively be configured via a plugin which implements org.apache.activemq.artemis.core.server.securitysettingplugin e.g.: <security-settings> <security-setting-plugin class-name="org.apache.activemq.artemis.core.server.im pl.legacyldapsecuritysettingplugin"> <setting name="initialcontextfactory" value="com.sun.jndi.ldap.ldapctxfactor y"/> <setting name="connectionurl" value="ldap://localhost:1024"/> <setting name="connectionusername" value="uid=admin,ou=system"/> <setting name="connectionpassword" value="secret"/> <setting name="connectionprotocol" value="s"/> <setting name="authentication" value="simple"/> </security-setting-plugin> </security-settings> Most of this configuration is specific to the plugin implementation. However, there are two configuration details that will be specified for every implementation: class-name. This attribute of security-setting-plugin indicates the name of the class which implements org.apache.activemq.artemis.core.server.securitysettingplugin. setting. Each of these elements represents a name/value pair that will be passed to the implementation for configuration purposes. See the JavaDoc on org.apache.activemq.artemis.core.server.securitysettingplugin for further details about the interface and what each method is expected to do. Available plugins LegacyLDAPSecuritySettingPlugin This plugin will read the security information that was previously handled by LDAPAuthorizationMap and the cachedldapauthorizationmap in Apache ActiveMQ 5.x and turn it into Artemis security settings where possible. The security implementations of ActiveMQ 5.x and Artemis don't match perfectly so some translation must occur to achieve near equivalent functionality. Here is an example of the plugin's configuration: 201
202 Security <security-setting-plugin class-name="org.apache.activemq.artemis.core.server.impl. LegacyLDAPSecuritySettingPlugin"> <setting name="initialcontextfactory" value="com.sun.jndi.ldap.ldapctxfactory"/ > <setting name="connectionurl" value="ldap://localhost:1024"/> <setting name="connectionusername" value="uid=admin,ou=system"/> <setting name="connectionpassword" value="secret"/> <setting name="connectionprotocol" value="s"/> <setting name="authentication" value="simple"/> </security-setting-plugin> class-name. The implementation is org.apache.activemq.artemis.core.server.impl.legacyldapsecuritysettingplugin. initialcontextfactory. The initial context factory used to connect to LDAP. It must always be set to com.sun.jndi.ldap.ldapctxfactory (i.e. the default value). connectionurl. Specifies the location of the directory server using an ldap URL, ldap://host:port. You can optionally qualify this URL, by adding a forward slash, /, followed by the DN of a particular node in the directory tree. For example, ldap://ldapserver:10389/ou=system. The default is ldap://localhost:1024. connectionusername. The DN of the user that opens the connection to the directory server. For example, uid=admin,ou=system. Directory servers generally require clients to present username/password credentials in order to open a connection. connectionpassword. The password that matches the DN from connectionusername. In the directory server, in the DIT, the password is normally stored as a userpassword attribute in the corresponding directory entry. connectionprotocol. Currently the only supported value is a blank string. In future, this option will allow you to select the Secure Socket Layer (SSL) for the connection to the directory server. Note: this option must be set explicitly to an empty string, because it has no default value. authentication. Specifies the authentication method used when binding to the LDAP server. Can take either of the values, simple (username and password, the default value) or none (anonymous). Note: Simple Authentication and Security Layer (SASL) authentication is currently not supported. destinationbase. Specifies the DN of the node whose children provide the permissions for all destinations. In this case the DN is a literal value (that is, no string substitution is performed on the property value). For example, a typical value 202
203 Security of this property is ou=destinations,o=activemq,ou=system (i.e. the default value). filter. Specifies an LDAP search filter, which is used when looking up the permissions for any kind of destination. The search filter attempts to match one of the children or descendants of the queue or topic node. The default value is (cn=*). roleattribute. Specifies an attribute of the node matched by filter, whose value is the DN of a role. Default value is uniquemember. adminpermissionvalue. Specifies a value that matches the admin permission. The default value is admin. readpermissionvalue. Specifies a value that matches the read permission. The default value is read. writepermissionvalue. Specifies a value that matches the write permission. The default value is write. enablelistener. Whether or not to enable a listener that will automatically receive updates made in the LDAP server and update the broker's authorization configuration in real-time. The default value is true. The name of the queue or topic defined in LDAP will serve as the "match" for the security-setting, the permission value will be mapped from the ActiveMQ 5.x type to the Artemis type, and the role will be mapped as-is. It's worth noting that since the name of queue or topic coming from LDAP will server as the "match" for the security-setting the security-setting may not be applied as expected to JMS destinations since Artemis always prefixes JMS destinations with "jms.queue." or "jms.topic." as necessary. ActiveMQ 5.x only has 3 permission types - read, write, and admin. These permission types are described on their website. However, as described previously, ActiveMQ Artemis has 7 permission types - createdurablequeue, deletedurablequeue, createnondurablequeue, deletenondurablequeue, send, consume, browse, and manage. Here's how the old types are mapped to the new types: read - consume, browse write - send admin - createdurablequeue, deletedurablequeue, createnondurablequeue, deletenondurablequeue As mentioned, there are a few places where a translation was performed to achieve some equivalence.: 203
204 Security This mapping doesn't include the Artemis manage permission type since there is no type analogous for that in ActiveMQ 5.x. The admin permission in ActiveMQ 5.x relates to whether or not the broker will auto-create a destination if it doesn't exist and the user sends a message to it. Artemis automatically allows the automatic creation of a destination if the user has permission to send message to it. Therefore, the plugin will map the admin permission to the 4 aforementioned permissions in Artemis. Secure Sockets Layer (SSL) Transport When messaging clients are connected to servers, or servers are connected to other servers (e.g. via bridges) over an untrusted network then Apache ActiveMQ Artemis allows that traffic to be encrypted using the Secure Sockets Layer (SSL) transport. For more information on configuring the SSL transport, please see Configuring the Transport. User credentials Apache ActiveMQ Artemis ships with two security manager implementations: The legacy, deprecated ActiveMQSecurityManager that reads user credentials, i.e. user names, passwords and role information from properties files on the classpath called artemis-users.properties and artemis-roles.properties. The flexible, pluggable ActiveMQJAASSecurityManager which supports any standard JAAS login module. Artemis ships with several login modules which will be discussed further down. This is the default security manager. JAAS Security Manager When using JAAS much of the configuration depends on which login module is used. However, there are a few commonalities for every case. The first place to look is in bootstrap.xml. Here is an example using the PropertiesLogin JAAS login module which reads user, password, and role information from properties files: <jaas-security domain="propertieslogin"/> 204
205 Security No matter what login module you're using, you'll need to specify it here in bootstrap.xml. The domain attribute here refers to the relevant login module entry in login.config. For example: PropertiesLogin { org.apache.activemq.artemis.spi.core.security.jaas.propertiesloginmodule requi red debug=true org.apache.activemq.jaas.properties.user="artemis-users.properties" org.apache.activemq.jaas.properties.role="artemis-roles.properties"; }; The login.config file is a standard JAAS configuration file. You can read more about this file on Oracle's website. In short, the file defines: an alias for an entry (e.g. PropertiesLogin ) the implementation class for the login module (e.g. org.apache.activemq.artemis.spi.core.security.jaas.propertiesloginmodule ) a flag which indicates whether the success of the login module is required, requisite, sufficient, or optional (see more details on these flags in the JavaDoc a list of configuration options specific to the login module implementation By default, the location and name of login.config is specified on the Artemis command-line which is set by etc/artemis.profile on linux and etc\artemis.profile.cmd on Windows. Dual Authentication The JAAS Security Manager also supports another configuration parameter - certificate-domain. This is useful when you want to authenticate clients connecting with SSL connections based on their SSL certificates (e.g. using the CertificateLoginModule discussed below) but you still want to authenticate clients connecting with non-ssl connections with, e.g., username and password. Here's an example of what would go in bootstrap.xml : <jaas-security domain="propertieslogin" certificate-domain="certlogin"/> And here's the corresponding login.config : 205
206 Security PropertiesLogin { org.apache.activemq.artemis.spi.core.security.jaas.propertiesloginmodule requir ed debug=false org.apache.activemq.jaas.properties.user="artemis-users.properties" org.apache.activemq.jaas.properties.role="artemis-roles.properties"; }; CertLogin { org.apache.activemq.artemis.spi.core.security.jaas.textfilecertificateloginmodu le required debug=true org.apache.activemq.jaas.textfiledn.user="cert-users.properties" org.apache.activemq.jaas.textfiledn.role="cert-roles.properties"; }; When the broker is configured this way then any client connecting with SSL and a client certificate will be authenticated using CertLogin and any client connecting without SSL will be authenticated using PropertiesLogin. JAAS Login Modules GuestLoginModule Allows users without credentials (and, depending on how it is configured, possibly also users with invalid credentials) to access the broker. Normally, the guest login module is chained with another login module, such as a properties login module. It is implemented by org.apache.activemq.artemis.spi.core.security.jaas.guestloginmodule. org.apache.activemq.jaas.guest.user - the user name to assign; default is "guest" org.apache.activemq.jaas.guest.role - the role name to assign; default is "guests" credentialsinvalidate - boolean flag; if true, reject login requests that include a password (i.e. guest login succeeds only when the user does not provide a password); default is false debug - boolean flag; if true, enable debugging; this is used only for testing or debugging; normally, it should be set to false, or omitted; default is false There are two basic use cases for the guest login module, as follows: Guests with no credentials or invalid credentials. Guests with no credentials only. 206
207 Security The following snippet shows how to configure a JAAS login entry for the use case where users with no credentials or invalid credentials are logged in as guests. In this example, the guest login module is used in combination with the properties login module. activemq-domain { org.apache.activemq.artemis.spi.core.security.jaas.propertiesloginmodule suffici ent debug=true org.apache.activemq.jaas.properties.user="artemis-users.properties" org.apache.activemq.jaas.properties.role="artemis-roles.properties"; org.apache.activemq.artemis.spi.core.security.jaas.guestloginmodule sufficient debug=true org.apache.activemq.jaas.guest.user="anyone" org.apache.activemq.jaas.guest.role="restricted"; }; Depending on the user login data, authentication proceeds as follows: User logs in with a valid password the properties login module successfully authenticates the user and returns immediately. The guest login module is not invoked. User logs in with an invalid password the properties login module fails to authenticate the user, and authentication proceeds to the guest login module. The guest login module successfully authenticates the user and returns the guest principal. User logs in with a blank password the properties login module fails to authenticate the user, and authentication proceeds to the guest login module. The guest login module successfully authenticates the user and returns the guest principal. The following snipped shows how to configure a JAAS login entry for the use case where only those users with no credentials are logged in as guests. To support this use case, you must set the credentialsinvalidate option to true in the configuration of the guest login module. You should also note that, compared with the preceding example, the order of the login modules is reversed and the flag attached to the properties login module is changed to requisite. 207
208 Security activemq-guest-when-no-creds-only-domain { org.apache.activemq.artemis.spi.core.security.jaas.guestloginmodule sufficient debug=true credentialsinvalidate=true org.apache.activemq.jaas.guest.user="guest" org.apache.activemq.jaas.guest.role="guests"; org.apache.activemq.artemis.spi.core.security.jaas.propertiesloginmodule requi site debug=true org.apache.activemq.jaas.properties.user="artemis-users.properties" org.apache.activemq.jaas.properties.role="artemis-roles.properties"; }; Depending on the user login data, authentication proceeds as follows: User logs in with a valid password the guest login module fails to authenticate the user (because the user has presented a password while the credentialsinvalidate option is enabled) and authentication proceeds to the properties login module. The properties login module successfully authenticates the user and returns. User logs in with an invalid password the guest login module fails to authenticate the user and authentication proceeds to the properties login module. The properties login module also fails to authenticate the user. The nett result is authentication failure. User logs in with a blank password the guest login module successfully authenticates the user and returns immediately. The properties login module is not invoked. PropertiesLoginModule The JAAS properties login module provides a simple store of authentication data, where the relevant user data is stored in a pair of flat files. This is convenient for demonstrations and testing, but for an enterprise system, the integration with LDAP is preferable. It is implemented by org.apache.activemq.artemis.spi.core.security.jaas.propertiesloginmodule. org.apache.activemq.jaas.properties.user - the path to the file which contains user and password properties org.apache.activemq.jaas.properties.role - the path to the file which contains user and role properties 208
209 Security reload - boolean flag; whether or not to reload the properties files when a modification occurs; default is false debug - boolean flag; if true, enable debugging; this is used only for testing or debugging; normally, it should be set to false, or omitted; default is false In the context of the properties login module, the artemis-users.properties file consists of a list of properties of the form, UserName=Password. For example, to define the users system, user, and guest, you could create a file like the following: system=manager user=password guest=password The artemis-roles.properties file consists of a list of properties of the form, Role=UserList, where UserList is a comma-separated list of users. For example, to define the roles admins, users, and guests, you could create a file like the following: admins=system users=system,user guests=guest LDAPLoginModule The LDAP login module enables you to perform authentication and authorization by checking the incoming credentials against user data stored in a central X.500 directory server. For systems that already have an X.500 directory server in place, this means that you can rapidly integrate ActiveMQ Artemis with the existing security database and user accounts can be managed using the X.500 system. It is implemented by org.apache.activemq.artemis.spi.core.security.jaas.ldaploginmodule. initialcontextfactory - must always be set to com.sun.jndi.ldap.ldapctxfactory connectionurl - specify the location of the directory server using an ldap URL, ldap://host:port. You can optionally qualify this URL, by adding a forward slash, /, followed by the DN of a particular node in the directory tree. For example, ldap://ldapserver:10389/ou=system. authentication - specifies the authentication method used when binding to the LDAP server. Can take either of the values, simple (username and password) or none (anonymous). 209
210 Security connectionusername - the DN of the user that opens the connection to the directory server. For example, uid=admin,ou=system. Directory servers generally require clients to present username/password credentials in order to open a connection. connectionpassword - the password that matches the DN from connectionusername. In the directory server, in the DIT, the password is normally stored as a userpassword attribute in the corresponding directory entry. connectionprotocol - currently, the only supported value is a blank string. In future, this option will allow you to select the Secure Socket Layer (SSL) for the connection to the directory server. This option must be set explicitly to an empty string, because it has no default value. userbase - selects a particular subtree of the DIT to search for user entries. The subtree is specified by a DN, which specifes the base node of the subtree. For example, by setting this option to ou=user,ou=activemq,ou=system, the search for user entries is restricted to the subtree beneath the ou=user,ou=activemq,ou=system node. usersearchmatching - specifies an LDAP search filter, which is applied to the subtree selected by userbase. Before passing to the LDAP search operation, the string value you provide here is subjected to string substitution, as implemented by the java.text.messageformat class. Essentially, this means that the special string, {0}, is substituted by the username, as extracted from the incoming client credentials. After substitution, the string is interpreted as an LDAP search filter, where the LDAP search filter syntax is defined by the IETF standard, RFC A short introduction to the search filter syntax is available from Oracle's JNDI tutorial, Search Filters. For example, if this option is set to (uid={0}) and the received username is jdoe, the search filter becomes (uid=jdoe) after string substitution. If the resulting search filter is applied to the subtree selected by the user base, ou=user,ou=activemq,ou=system, it would match the entry, uid=jdoe,ou=user,ou=activemq,ou=system (and possibly more deeply nested entries, depending on the specified search depth see the usersearchsubtree option). usersearchsubtree - specify the search depth for user entries, relative to the node specified by userbase. This option is a boolean. false indicates it will try to match one of the child entries of the userbase node (maps to 210
211 Security javax.naming.directory.searchcontrols.onelevel_scope ). true indicates it will try to match any entry belonging to the subtree of the userbase node (maps to javax.naming.directory.searchcontrols.subtree_scope ). userrolename - specifies the name of the multi-valued attribute of the user entry that contains a list of role names for the user (where the role names are interpreted as group names by the broker's authorization plug-in). If you omit this option, no role names are extracted from the user entry. rolebase - if you want to store role data directly in the directory server, you can use a combination of role options ( rolebase, rolesearchmatching, rolesearchsubtree, and rolename ) as an alternative to (or in addition to) specifying the userrolename option. This option selects a particular subtree of the DIT to search for role/group entries. The subtree is specified by a DN, which specifes the base node of the subtree. For example, by setting this option to ou=group,ou=activemq,ou=system, the search for role/group entries is restricted to the subtree beneath the ou=group,ou=activemq,ou=system node. rolename - specifies the attribute type of the role entry that contains the name of the role/group (e.g. C, O, OU, etc.). If you omit this option, the role search feature is effectively disabled. rolesearchmatching - specifies an LDAP search filter, which is applied to the subtree selected by rolebase. This works in a similar manner to the usersearchmatching option, except that it supports two substitution strings, as follows: {0} - substitutes the full DN of the matched user entry (that is, the result of the user search). For example, for the user, jdoe, the substituted string could be uid=jdoe,ou=user,ou=activemq,ou=system. {1} - substitutes the received username. For example, jdoe. For example, if this option is set to (member=uid={1}) and the received username is jdoe, the search filter becomes (member=uid=jdoe) after string substitution (assuming ApacheDS search filter syntax). If the resulting search filter is applied to the subtree selected by the role base, ou=group,ou=activemq,ou=system, it matches all role entries that have a member attribute equal to uid=jdoe (the value of a member attribute is a DN). This option must always be set, even if role searching is disabled, because it has no default value. 211
212 Security If you use OpenLDAP, the syntax of the search filter is (member:=uid=jdoe). rolesearchsubtree - specify the search depth for role entries, relative to the node specified by rolebase. This option can take boolean values, as follows: false (default) - try to match one of the child entries of the rolebase node (maps to javax.naming.directory.searchcontrols.onelevel_scope ). true try to match any entry belonging to the subtree of the rolebase node (maps to javax.naming.directory.searchcontrols.subtree_scope ). debug - boolean flag; if true, enable debugging; this is used only for testing or debugging; normally, it should be set to false, or omitted; default is false Add user entries under the node specified by the userbase option. When creating a new user entry in the directory, choose an object class that supports the userpassword attribute (for example, the person or inetorgperson object classes are typically suitable). After creating the user entry, add the userpassword attribute, to hold the user's password. If you want to store role data in dedicated role entries (where each node represents a particular role), create a role entry as follows. Create a new child of the rolebase node, where the objectclass of the child is groupofnames. Set the cn (or whatever attribute type is specified by rolename ) of the new child node equal to the name of the role/group. Define a member attribute for each member of the role/group, setting the member value to the DN of the corresponding user (where the DN is specified either fully, uid=jdoe,ou=user,ou=activemq,ou=system, or partially, uid=jdoe ). If you want to add roles to user entries, you would need to customize the directory schema, by adding a suitable attribute type to the user entry's object class. The chosen attribute type must be capable of handling multiple values. CertificateLoginModule The JAAS certificate authentication login module must be used in combination with SSL and the clients must be configured with their own certificate. In this scenario, authentication is actually performed during the SSL/TLS handshake, not directly by the JAAS certificate authentication plug-in. The role of the plug-in is as follows: To further constrain the set of acceptable users, because only the user DNs explicitly listed in the relevant properties file are eligible to be authenticated. 212
213 Security To associate a list of groups with the received user identity, facilitating integration with the authorization feature. To require the presence of an incoming certificate (by default, the SSL/TLS layer is configured to treat the presence of a client certificate as optional). The JAAS certificate login module stores a collection of certificate DNs in a pair of flat files. The files associate a username and a list of group IDs with each DN. The certificate login module is implemented by the following class: org.apache.activemq.artemis.spi.core.security.jaas.textfilecertificateloginmodule The following CertLogin login entry shows how to configure certificate login module in the login.config file: CertLogin { org.apache.activemq.artemis.spi.core.security.jaas.textfilecertificateloginmod ule debug=true org.apache.activemq.jaas.textfiledn.user="users.properties" org.apache.activemq.jaas.textfiledn.role="roles.properties"; }; In the preceding example, the JAAS realm is configured to use a single org.apache.activemq.artemis.spi.core.security.jaas.textfilecertificateloginmodule login module. The options supported by this login module are as follows: debug - boolean flag; if true, enable debugging; this is used only for testing or debugging; normally, it should be set to false, or omitted; default is false org.apache.activemq.jaas.textfiledn.user - specifies the location of the user properties file (relative to the directory containing the login configuration file). org.apache.activemq.jaas.textfiledn.role - specifies the location of the role properties file (relative to the directory containing the login configuration file). reload - boolean flag; whether or not to reload the properties files when a modification occurs; default is false In the context of the certificate login module, the users.properties file consists of a list of properties of the form, UserName=StringifiedSubjectDN. For example, to define the users, system, user, and guest, you could create a file like the following: 213
214 Security system=cn=system,o=progress,c=us user=cn=humble user,o=progress,c=us guest=cn=anon,o=progress,c=de Each username is mapped to a subject DN, encoded as a string (where the string encoding is specified by RFC 2253). For example, the system username is mapped to the CN=system,O=Progress,C=US subject DN. When performing authentication, the plug-in extracts the subject DN from the received certificate, converts it to the standard string format, and compares it with the subject DNs in the users.properties file by testing for string equality. Consequently, you must be careful to ensure that the subject DNs appearing in the users.properties file are an exact match for the subject DNs extracted from the user certificates. Note: Technically, there is some residual ambiguity in the DN string format. For example, the domaincomponent attribute could be represented in a string either as the string, DC, or as the OID, Normally, you do not need to worry about this ambiguity. But it could potentially be a problem, if you changed the underlying implementation of the Java security layer. The easiest way to obtain the subject DNs from the user certificates is by invoking the keytool utility to print the certificate contents. To print the contents of a certificate in a keystore, perform the following steps: 1. Export the certificate from the keystore file into a temporary file. For example, to export the certificate with alias broker-localhost from the broker.ks keystore file, enter the following command: keytool -export -file broker.export -alias broker-localhost -keystore broker.ks - storepass password After running this command, the exported certificate is in the file, broker.export. 2. Print out the contents of the exported certificate. For example, to print out the contents of broker.export, enter the following command: keytool -printcert -file broker.export Which should produce output similar to that shown here: Owner: CN=localhost, OU=broker, O=Unknown, L=Unknown, ST=Unknown, C=Unknown Issuer: CN=localhost, OU=broker, O=Unknown, L=Unknown, ST=Unknown, C=Unknown Serial number: 4537c82e Valid from: Thu Oct
215 Security 19:47:10 BST 2006 until: Wed Jan 17 18:47:10 GMT 2007 Certificate fingerprints: MD5: 3F:6C:0C:89:A8:80:29:CC:F5:2D:DA:5C:D7:3F:AB:37 SHA1: F0:79:0D:04:38:5A:46:CE:86:E1:8A:20:1F:7B:AB:3A:46:E4:34:5C The string following Owner: gives the subject DN. The format used to enter the subject DN depends on your platform. The Owner: string above could be represented as either CN=localhost,\ OU=broker,\ O=Unknown,\ L=Unknown,\ ST=Unknown,\ C=Unknown or CN=localhost,OU=broker,O=Unknown,L=Unknown,ST=Unknown,C=Unknown. The roles.properties file consists of a list of properties of the form, Role=UserList, where UserList is a comma-separated list of users. For example, to define the roles admins, users, and guests, you could create a file like the following: admins=system users=system,user guests=guest The simplest way to make the login configuration available to JAAS is to add the directory containing the file, login.config, to your CLASSPATH. Changing the username/password for clustering In order for cluster connections to work correctly, each node in the cluster must make connections to the other nodes. The username/password they use for this should always be changed from the installation default to prevent a security risk. Please see Management for instructions on how to do this. Securing the console Artemis comes with a web console that allows user to browse Artemis documentation via an embedded server. By default the web access is plain HTTP. It is configured in bootstrap.xml : 215
216 Security <web bind=" path="web"> </web> <app url="jolokia" war="jolokia-war war"/> Alternatively you can edit the above configuration to enable secure access using HTTPS protocol. e.g.: <web bind=" path="web" keystorepath="${artemis.instance}/etc/keystore.jks" keystorepassword="password"> <app url="jolokia" war="jolokia-war war"/> </web> As shown in the example, to enable https the first thing to do is config the bind to be an https url. In addition, You will have to configure a few extra properties desribed as below. keystorepath - The path of the key store file. keystorepassword - The key store's password. clientauth - The boolean flag indicates whether or not client authentication is required. Default is false. truststorepath - The path of the trust store file. This is needed only if clientauth is true. truststorepassword - The trust store's password. Controlling JMS ObjectMessage deserialization Artemis provides a simple class filtering mechanism with which a user can specify which packages are to be trusted and which are not. Objects whose classes are from trusted packages can be deserialized without problem, whereas those from 'not trusted' packages will be denied deserialization. Artemis keeps a black list to keep track of packages that are not trusted and a white list for trusted packages. By default both lists are empty, meaning any serializable object is allowed to be deserialized. If an object whose class matches one of the 216
217 Security packages in black list, it is not allowed to be deserialized. If it matches one in the white list the object can be deserialized. If a package appears in both black list and white list, the one in black list takes precedence. If a class neither matches with black list nor with the white list, the class deserialization will be denied unless the white list is empty (meaning the user doesn't specify the white list at all). A class is considered as a 'match' if its full name exactly matches one of the entries in the list. its package matches one of the entries in the list or is a sub-package of one of the entries. For example, if a class full name is "org.apache.pkg1.class1", some matching entries could be: org.apache.pkg1.class1 - exact match. org.apache.pkg1 - exact package match. org.apache -- sub package match. A * means 'match-all' in a black or white list. Specifying black list and white list via Connection Factories To specify the white and black lists one can append properties deserializationblacklist and deserializationwhitelist respectively to a Connection Factory's url string. For example: ActiveMQConnectionFactory factory = new ActiveMQConnectionFactory("vm://0?deseria lizationblacklist=org.apache.pkg1,org.some.pkg2"); The above statement creates a factory that has a black list contains two forbidden packages, "org.apache.pkg1" and "org.some.pkg2", separated by a comma. You can also set the values via ActiveMQConnectionFactory's API: public void setdeserializationblacklist(string blacklist); public void setdeserializationwhitelist(string whitelist); Again the parameters are comma separated list of package/class names. 217
218 Security Specifying black list and white list via system properties There are two system properties available for specifying black list and white list: org.apache.activemq.artemis.jms.deserialization.whitelist - comma separated list of entries for the white list. org.apache.activemq.artemis.jms.deserialization.blacklist - comma separated list of entries for the black list. Once defined, all JMS object message deserialization in the VM is subject to checks against the two lists. However if you create a ConnectionFactory and set a new set of black/white lists on it, the new values will override the system properties. Specifying black list and white list for resource adapters Message beans using a JMS resource adapter to receive messages can also control their object deserialization via properly configuring relevant properties for their resource adapters. There are two properties that you can configure with connection factories in a resource adapter: deserializationblacklist - comma separated values for black list deserializationwhitelist - comma separated values for white list These properties, once specified, are eventually set on the corresponding internal factories. Specifying black list and white list for REST interface Apache Artemis REST interface (Rest) allows interactions between jms client and rest clients. It uses JMS ObjectMessage to wrap the actual user data between the 2 types of clients and deserialization is needed during this process. If you want to control the deserialization for REST, you need to set the black/white lists for it separately as Apache Artemis REST Interface is deployed as a web application. You need to put the black/white lists in its web.xml, as context parameters, as follows 218
219 Security <web-app> <context-param> <param-name>org.apache.activemq.artemis.jms.deserialization.whitelist</par am-name> <param-value>some.allowed.class</param-value> </context-param> <context-param> <param-name>org.apache.activemq.artemis.jms.deserialization.blacklist</par am-name> <param-value>some.forbidden.class</param-value> </context-param>... </web-app> The param-value for each list is a comma separated string value representing the list. 219
220 Broker Plugins Apache ActiveMQ Artemis Plugin Support Apache ActiveMQ Artemis is designed to allow extra functionality to be added by creating a plugin. Multiple plugins can be registered at the same time and they will be chained together and executed in the order they are registered. (i.e. the first plugin registered is always executed first). Creating a plugin is very simple. It requires implementing the ActiveMQServerPlugin interface, making sure the plugin is on the classpath, and registering it with the broker. Only the methods that you want to add behavior for need to be implemented as all of the interface methods are default methods. Adding the plugin to the classpath The proper place to add your jar would be under $ARTEMIS_INSTANCE/lib. If you are using an embed system than you will need the jar under the regular classpath of your embedded application. Registering a Plugin To register a plugin with by XML you need to add the broker-plugins element at the broker.xml. <configuration...> <broker-plugins> <broker-plugin class-name="some.plugin.userplugin" /> </broker-plugins> </configuration> Registering a Plugin Programmatically 220
221 Broker Plugins For registering a plugin programmatically you need to call the registerbrokerplugin() method and pass in a new instance of your plugin. In the example below assuming your plugin is called UserPlugin, registering it looks like the following:... Configuration config = new ConfigurationImpl();... config.registerbrokerplugin(new UserPlugin()); 221
222 Resource Limits Resource Limits Sometimes it's helpful to set particular limits on what certain users can do beyond the normal security settings related to authorization and authentication. For example, limiting how many connections a user can create or how many queues a user can create. This chapter will explain how to configure such limits. Configuring Limits Via Resource Limit Settings Here is an example of the XML used to set resource limits: <resource-limit-settings> <resource-limit-setting match="myuser"> <max-connections>5</max-connections> <max-queues>3</max-queues> </resource-limit-setting> </resource-limit-settings> Unlike the match from address-setting, this match does not use any wild-card syntax. It's a simple 1:1 mapping of the limits to a user. max-connections defines how many connections the matched user can make to the broker. The default is -1 which means there is no limit. max-queues defines how many queues the matched user can create. The default is -1 which means there is no limit. 222
223 The JMS Bridge The JMS Bridge Apache ActiveMQ Artemis includes a fully functional JMS message bridge. The function of the bridge is to consume messages from a source queue or topic, and send them to a target queue or topic, typically on a different server. Notice: The JMS Bridge is not intended as a replacement for transformation and more expert systems such as Camel. The JMS Bridge may be useful for fast transfers as this chapter covers, but keep in mind that more complex scenarios requiring transformations will require you to use a more advanced transformation system that will play on use cases that will go beyond Apache ActiveMQ Artemis. The source and target servers do not have to be in the same cluster which makes bridging suitable for reliably sending messages from one cluster to another, for instance across a WAN, and where the connection may be unreliable. A bridge can be deployed as a standalone application, with Apache ActiveMQ Artemis standalone server or inside a JBoss AS instance. The source and the target can be located in the same virtual machine or another one. The bridge can also be used to bridge messages from other non Apache ActiveMQ Artemis JMS servers, as long as they are JMS 1.1 compliant. Note Do not confuse a JMS bridge with a core bridge. A JMS bridge can be used to bridge any two JMS 1.1 compliant JMS providers and uses the JMS API. A core bridge (described in Core Bridges) is used to bridge any two Apache ActiveMQ Artemis instances and uses the core API. Always use a core bridge if you can in preference to a JMS bridge. The core bridge will typically provide better performance than a JMS bridge. Also the core bridge can provide once and only once delivery guarantees without using XA. The bridge has built-in resilience to failure so if the source or target server connection is lost, e.g. due to network failure, the bridge will retry connecting to the source and/or target until they come back online. When it comes back online it will resume operation as normal. 223
224 The JMS Bridge The bridge can be configured with an optional JMS selector, so it will only consume messages matching that JMS selector It can be configured to consume from a queue or a topic. When it consumes from a topic it can be configured to consume using a non durable or durable subscription Typically, the bridge is deployed by the JBoss Micro Container via a beans configuration file. This would typically be deployed inside the JBoss Application Server and the following example shows an example of a beans file that bridges 2 destinations which are actually on the same server. The JMS Bridge is a simple POJO so can be deployed with most frameworks, simply instantiate the org.apache.activemq.artemis.api.jms.bridge.impl.jmsbridgeimpl class and set the appropriate parameters. JMS Bridge Parameters The main bean deployed is the JMSBridge bean. The bean is configurable by the parameters passed to its constructor. Note To let a parameter be unspecified (for example, if the authentication is anonymous or no message selector is provided), use <null /> for the unspecified parameter value. Source Connection Factory Factory This injects the SourceCFF bean (also defined in the beans file). This bean is used to create the source ConnectionFactory Target Connection Factory Factory This injects the TargetCFF bean (also defined in the beans file). This bean is used to create the target ConnectionFactory Source Destination Factory Factory This injects the SourceDestinationFactory bean (also defined in the beans file). This bean is used to create the source Destination Target Destination Factory Factory 224
225 The JMS Bridge This injects the TargetDestinationFactory bean (also defined in the beans file). This bean is used to create the target Destination Source User Name this parameter is the username for creating the source connection Source Password this parameter is the parameter for creating the source connection Target User Name this parameter is the username for creating the target connection Target Password this parameter is the password for creating the target connection Selector This represents a JMS selector expression used for consuming messages from the source destination. Only messages that match the selector expression will be bridged from the source to the target destination The selector expression must follow the JMS selector syntax Failure Retry Interval This represents the amount of time in ms to wait between trying to recreate connections to the source or target servers when the bridge has detected they have failed Max Retries This represents the number of times to attempt to recreate connections to the source or target servers when the bridge has detected they have failed. The bridge will give up after trying this number of times. -1 represents 'try forever' Quality Of Service This parameter represents the desired quality of service mode Possible values are: AT_MOST_ONCE DUPLICATES_OK 225
226 The JMS Bridge ONCE_AND_ONLY_ONCE See Quality Of Service section for a explanation of these modes. Max Batch Size This represents the maximum number of messages to consume from the source destination before sending them in a batch to the target destination. Its value must >= 1 Max Batch Time This represents the maximum number of milliseconds to wait before sending a batch to target, even if the number of messages consumed has not reached MaxBatchSize. Its value must be -1 to represent 'wait forever', or >= 1 to specify an actual time Subscription Name If the source destination represents a topic, and you want to consume from the topic using a durable subscription then this parameter represents the durable subscription name Client ID If the source destination represents a topic, and you want to consume from the topic using a durable subscription then this attribute represents the the JMS client ID to use when creating/looking up the durable subscription Add MessageID In Header If true, then the original message's message ID will be appended in the message sent to the destination in the header ACTIVEMQ_BRIDGE_MSG_ID_LIST. If the message is bridged more than once, each message ID will be appended. This enables a distributed request-response pattern to be used Note when you receive the message you can send back a response using the correlation id of the first message id, so when the original sender gets it back it will be able to correlate it. MBean Server 226
227 The JMS Bridge To manage the JMS Bridge using JMX, set the MBeanServer where the JMS Bridge MBean must be registered (e.g. the JVM Platform MBeanServer or JBoss AS MBeanServer) ObjectName If you set the MBeanServer, you also need to set the ObjectName used to register the JMS Bridge MBean (must be unique) The "transactionmanager" property points to a JTA transaction manager implementation and should be set if you need to use the 'ONCE_AND_ONCE_ONLY' Quality of Service. Apache ActiveMQ Artemis doesn't ship with such an implementation, but if you are running within an Application Server you can inject the Transaction Manager that is shipped. Source and Target Connection Factories The source and target connection factory factories are used to create the connection factory used to create the connection for the source or target server. The configuration example above uses the default implementation provided by Apache ActiveMQ Artemis that looks up the connection factory using JNDI. For other Application Servers or JMS providers a new implementation may have to be provided. This can easily be done by implementing the interface org.apache.activemq.artemis.jms.bridge.connectionfactoryfactory. Source and Target Destination Factories Again, similarly, these are used to create or lookup up the destinations. In the configuration example above, we have used the default provided by Apache ActiveMQ Artemis that looks up the destination using JNDI. A new implementation can be provided by implementing org.apache.activemq.artemis.jms.bridge.destinationfactory interface. Quality Of Service The quality of service modes used by the bridge are described here in more detail. 227
228 The JMS Bridge AT_MOST_ONCE With this QoS mode messages will reach the destination from the source at most once. The messages are consumed from the source and acknowledged before sending to the destination. Therefore there is a possibility that if failure occurs between removing them from the source and them arriving at the destination they could be lost. Hence delivery will occur at most once. This mode is available for both durable and non-durable messages. DUPLICATES_OK With this QoS mode, the messages are consumed from the source and then acknowledged after they have been successfully sent to the destination. Therefore there is a possibility that if failure occurs after sending to the destination but before acknowledging them, they could be sent again when the system recovers. I.e. the destination might receive duplicates after a failure. This mode is available for both durable and non-durable messages. ONCE_AND_ONLY_ONCE This QoS mode ensures messages will reach the destination from the source once and only once. (Sometimes this mode is known as "exactly once"). If both the source and the destination are on the same Apache ActiveMQ Artemis server instance then this can be achieved by sending and acknowledging the messages in the same local transaction. If the source and destination are on different servers this is achieved by enlisting the sending and consuming sessions in a JTA transaction. The JTA transaction is controlled by a JTA Transaction Manager which will need to be set via the settransactionmanager method on the Bridge. This mode is only available for durable messages. 228
229 The JMS Bridge Note For a specific application it may possible to provide once and only once semantics without using the ONCE_AND_ONLY_ONCE QoS level. This can be done by using the DUPLICATES_OK mode and then checking for duplicates at the destination and discarding them. Some JMS servers provide automatic duplicate message detection functionality, or this may be possible to implement on the application level by maintaining a cache of received message ids on disk and comparing received messages to them. The cache would only be valid for a certain period of time so this approach is not as watertight as using ONCE_AND_ONLY_ONCE but may be a good choice depending on your specific application. Time outs and the JMS bridge There is a possibility that the target or source server will not be available at some point in time. If this occurs then the bridge will try Max Retries to reconnect every Failure Retry Interval milliseconds as specified in the JMS Bridge definition. However since a third party JNDI is used, in this case the JBoss naming server, it is possible for the JNDI lookup to hang if the network were to disappear during the JNDI lookup. To stop this from occurring the JNDI definition can be configured to time out if this occurs. To do this set the jnp.timeout and the jnp.sotimeout on the Initial Context definition. The first sets the connection timeout for the initial connection and the second the read timeout for the socket. Note Once the initial JNDI connection has succeeded all calls are made using RMI. If you want to control the timeouts for the RMI connections then this can be done via system properties. JBoss uses Sun's RMI and the properties can be found here. The default connection timeout is 10 seconds and the default read timeout is 18 seconds. If you implement your own factories for looking up JMS resources then you will have to bear in mind timeout issues. Examples 229
230 The JMS Bridge Please see the examples chapter which shows how to configure and use a JMS Bridge with JBoss AS to send messages to the source destination and consume them from the target destination and how to configure and use a JMS Bridge between two standalone Apache ActiveMQ Artemis servers. 230
231 Client Reconnection and Session Reattachment Client Reconnection and Session Reattachment Apache ActiveMQ Artemis clients can be configured to automatically reconnect or reattach to the server in the event that a failure is detected in the connection between the client and the server. 100% Transparent session re-attachment If the failure was due to some transient failure such as a temporary network failure, and the target server was not restarted, then the sessions will still be existent on the server, assuming the client hasn't been disconnected for more than connection-ttl Detecting Dead Connections In this scenario, Apache ActiveMQ Artemis will automatically re-attach the client sessions to the server sessions when the connection reconnects. This is done 100% transparently and the client can continue exactly as if nothing had happened. The way this works is as follows: As Apache ActiveMQ Artemis clients send commands to their servers they store each sent command in an in-memory buffer. In the case that connection failure occurs and the client subsequently reattaches to the same server, as part of the reattachment protocol the server informs the client during reattachment with the id of the last command it successfully received from that client. If the client has sent more commands than were received before failover it can replay any sent commands from its buffer so that the client and server can reconcile their states.ac The size of this buffer is configured by the ConfirmationWindowSize parameter, when the server has received ConfirmationWindowSize bytes of commands and processed them it will send back a command confirmation to the client, and the client can then free up space in the buffer. If you are using JMS and you're using the JMS service on the server to load your JMS connection factory instances into JNDI then this parameter can be configured in the jms configuration using the element confirmationwindowsize a. If you're using JMS but not 231
232 Client Reconnection and Session Reattachment using JNDI then you can set these values directly on the ActiveMQConnectionFactory instance using the appropriate setter method. If you're using the core API you can set these values directly on the ServerLocator instance using the appropriate setter method. The window is specified in bytes. Setting this parameter to -1 disables any buffering and prevents any re-attachment from occurring, forcing reconnect instead. The default value for this parameter is -1. (Which means by default no auto re-attachment will occur) Session reconnection Alternatively, the server might have actually been restarted after crashing or being stopped. In this case any sessions will no longer be existent on the server and it won't be possible to 100% transparently re-attach to them. In this case, Apache ActiveMQ Artemis will automatically reconnect the connection and recreate any sessions and consumers on the server corresponding to the sessions and consumers on the client. This process is exactly the same as what happens during failover onto a backup server. Client reconnection is also used internally by components such as core bridges to allow them to reconnect to their target servers. Please see the section on failover Automatic Client Failover to get a full understanding of how transacted and non-transacted sessions are reconnected during failover/reconnect and what you need to do to maintain once and only oncedelivery guarantees. Configuring reconnection/reattachment attributes Client reconnection is configured using the following parameters: retryinterval. This optional parameter determines the period in milliseconds between subsequent reconnection attempts, if the connection to the target server has failed. The default value is 2000 milliseconds. 232
233 Client Reconnection and Session Reattachment retryintervalmultiplier. This optional parameter determines determines a multiplier to apply to the time since the last retry to compute the time to the next retry. This allows you to implement an exponential backoff between retry attempts. Let's take an example: If we set retryinterval to 1000 ms and we set retryintervalmultiplier to 2.0, then, if the first reconnect attempt fails, we will wait 1000 ms then 2000 ms then 4000 ms between subsequent reconnection attempts. The default value is 1.0 meaning each reconnect attempt is spaced at equal intervals. maxretryinterval. This optional parameter determines the maximum retry interval that will be used. When setting retryintervalmultiplier it would otherwise be possible that subsequent retries exponentially increase to ridiculously large values. By setting this parameter you can set an upper limit on that value. The default value is 2000 milliseconds. reconnectattempts. This optional parameter determines the total number of reconnect attempts to make before giving up and shutting down. A value of -1 signifies an unlimited number of attempts. The default value is 0. If you're using JMS and you're using JNDI on the client to look up your JMS connection factory instances then you can specify these parameters in the JNDI context environment in, e.g. jndi.properties : java.naming.factory.initial = ActiveMQInitialContextFactory connection.connectionfactory=tcp://localhost:61616?retryinterval=1000&retryinterva lmultiplier=1.5&maxretryinterval=60000&reconnectattempts=1000 If you're using JMS, but instantiating your JMS connection factory directly, you can specify the parameters using the appropriate setter methods on the ActiveMQConnectionFactory immediately after creating it. If you're using the core API and instantiating the ServerLocator instance directly you can also specify the parameters using the appropriate setter methods on the ServerLocator immediately after creating it. 233
234 Client Reconnection and Session Reattachment If your client does manage to reconnect but the session is no longer available on the server, for instance if the server has been restarted or it has timed out, then the client won't be able to re-attach, and any ExceptionListener or FailureListener instances registered on the connection or session will be called. ExceptionListeners and SessionFailureListeners Please note, that when a client reconnects or re-attaches, any registered JMS ExceptionListener or core API SessionFailureListener will be called. 234
235 Diverting and Splitting Message Flows Diverting and Splitting Message Flows Apache ActiveMQ Artemis allows you to configure objects called diverts with some simple server configuration. Diverts allow you to transparently divert messages routed to one address to some other address, without making any changes to any client application logic. Diverts can be exclusive, meaning that the message is diverted to the new address, and does not go to the old address at all, or they can be non-exclusive which means the message continues to go the old address, and a copy of it is also sent to the new address. Non-exclusive diverts can therefore be used for splitting message flows, e.g. there may be a requirement to monitor every order sent to an order queue. Diverts can also be configured to have an optional message filter. If specified then only messages that match the filter will be diverted. When an address has both exclusive and non-exclusive diverts configured, the exclusive ones are processed first. If any of the exclusive diverts diverted the message, the nonexclusive ones are not processed. Diverts can also be configured to apply a Transformer. If specified, all diverted messages will have the opportunity of being transformed by the Transformer. When an address has multiple diverts configured, all of them receive the same, original message. This means that the results of a transformer on a message are not directly available for other diverts or their filters on the same address. A divert will only divert a message to an address on the same server, however, if you want to divert to an address on a different server, a common pattern would be to divert to a local store-and-forward queue, then set up a bridge which consumes from that queue and forwards to an address on a different server. Diverts are therefore a very sophisticated concept, which when combined with bridges can be used to create interesting and complex routings. The set of diverts on a server can be thought of as a type of routing table for messages. Combining diverts with bridges allows you to create a distributed network of reliable routing connections between multiple geographically distributed servers, creating your global messaging mesh. 235
236 Diverting and Splitting Message Flows Diverts are defined as xml in the broker.xml file. There can be zero or more diverts in the file. Please see the examples for a full working example showing you how to configure and use diverts. Let's take a look at some divert examples: Exclusive Divert Let's take a look at an exclusive divert. An exclusive divert diverts all matching messages that are routed to the old address to the new address. Matching messages do not get routed to the old address. Here's some example xml configuration for an exclusive divert, it's taken from the divert example: <divert name="prices-divert"> <address>jms.topic.priceupdates</address> <forwarding-address>jms.queue.priceforwarding</forwarding-address> <filter string="office='new York'"/> <transformer-class-name> org.apache.activemq.artemis.jms.example.addforwardingtimetransformer </transformer-class-name> <exclusive>true</exclusive> </divert> We define a divert called ' prices-divert ' that will divert any messages sent to the address ' jms.topic.priceupdates ' (this corresponds to any messages sent to a JMS Topic called ' priceupdates ') to another local address ' jms.queue.priceforwarding ' (this corresponds to a local JMS queue called ' priceforwarding ' We also specify a message filter string so only messages with the message property office with value New York will get diverted, all other messages will continue to be routed to the normal address. The filter string is optional, if not specified then all messages will be considered matched. In this example a transformer class is specified. Again this is optional, and if specified the transformer will be executed for each matching message. This allows you to change the messages body or properties before it is diverted. In this example the transformer simply adds a header that records the time the divert happened. 236
237 Diverting and Splitting Message Flows This example is actually diverting messages to a local store and forward queue, which is configured with a bridge which forwards the message to an address on another ActiveMQ Artemis server. Please see the example for more details. Non-exclusive Divert Now we'll take a look at a non-exclusive divert. Non exclusive diverts are the same as exclusive diverts, but they only forward a copy of the message to the new address. The original message continues to the old address You can therefore think of non-exclusive diverts as splitting a message flow. Non exclusive diverts can be configured in the same way as exclusive diverts with an optional filter and transformer, here's an example non-exclusive divert, again from the divert example: <divert name="order-divert"> <address>jms.queue.orders</address> <forwarding-address>jms.topic.spytopic</forwarding-address> <exclusive>false</exclusive> </divert> The above divert example takes a copy of every message sent to the address ' jms.queue.orders ' (Which corresponds to a JMS Queue called ' orders ') and sends it to a local address called ' jms.topic.spytopic ' (which corresponds to a JMS Topic called ' SpyTopic '). 237
238 Core Bridges Core Bridges The function of a bridge is to consume messages from a source queue, and forward them to a target address, typically on a different Apache ActiveMQ Artemis server. The source and target servers do not have to be in the same cluster which makes bridging suitable for reliably sending messages from one cluster to another, for instance across a WAN, or internet and where the connection may be unreliable. The bridge has built in resilience to failure so if the target server connection is lost, e.g. due to network failure, the bridge will retry connecting to the target until it comes back online. When it comes back online it will resume operation as normal. In summary, bridges are a way to reliably connect two separate Apache ActiveMQ Artemis servers together. With a core bridge both source and target servers must be Apache ActiveMQ Artemis servers. Bridges can be configured to provide once and only once delivery guarantees even in the event of the failure of the source or the target server. They do this by using duplicate detection (described in Duplicate Detection). Note Although they have similar function, don't confuse core bridges with JMS bridges! Core bridges are for linking an Apache ActiveMQ Artemis node with another Apache ActiveMQ Artemis node and do not use the JMS API. A JMS Bridge is used for linking any two JMS 1.1 compliant JMS providers. So, a JMS Bridge could be used for bridging to or from different JMS compliant messaging system. It's always preferable to use a core bridge if you can. Core bridges use duplicate detection to provide once and only once guarantees. To provide the same guarantee using a JMS bridge you would have to use XA which has a higher overhead and is more complex to configure. Configuring Bridges Bridges are configured in broker.xml. Let's kick off with an example (this is actually from the bridge example): 238
239 Core Bridges <bridge name="my-bridge"> <queue-name>jms.queue.sausage-factory</queue-name> <forwarding-address>jms.queue.mincing-machine</forwarding-address> <filter string="name='aardvark'"/> <transformer-class-name> org.apache.activemq.artemis.jms.example.hatcolourchangetransformer </transformer-class-name> <retry-interval>1000</retry-interval> <ha>true</ha> <retry-interval-multiplier>1.0</retry-interval-multiplier> <initial-connect-attempts>-1</initial-connect-attempts> <reconnect-attempts>-1</reconnect-attempts> <failover-on-server-shutdown>false</failover-on-server-shutdown> <use-duplicate-detection>true</use-duplicate-detection> <confirmation-window-size> </confirmation-window-size> <user>foouser</user> <password>foopassword</password> <static-connectors> <connector-ref>remote-connector</connector-ref> </static-connectors> <!-- alternative to static-connectors <discovery-group-ref discovery-group-name="bridge-discovery-group"/> --> </bridge> In the above example we have shown all the parameters its possible to configure for a bridge. In practice you might use many of the defaults so it won't be necessary to specify them all explicitly. Let's take a look at all the parameters in turn: name attribute. All bridges must have a unique name in the server. queue-name. This is the unique name of the local queue that the bridge consumes from, it's a mandatory parameter. The queue must already exist by the time the bridge is instantiated at start-up. Note If you're using JMS then normally the JMS configuration activemq-jms.xml is loaded after the core configuration file broker.xml is loaded. If your bridge is consuming from a JMS queue then you'll need to make sure the JMS queue is also deployed as a core queue in the core configuration. Take a look at the bridge example for an example of how this is done. 239
240 Core Bridges forwarding-address. This is the address on the target server that the message will be forwarded to. If a forwarding address is not specified, then the original address of the message will be retained. filter-string. An optional filter string can be supplied. If specified then only messages which match the filter expression specified in the filter string will be forwarded. The filter string follows the ActiveMQ Artemis filter expression syntax described in Filter Expressions. transformer-class-name. An optional transformer-class-name can be specified. This is the name of a user-defined class which implements the org.apache.activemq.artemis.core.server.cluster.transformer interface. If this is specified then the transformer's transform() method will be invoked with the message before it is forwarded. This gives you the opportunity to transform the message's header or body before forwarding it. ha. This optional parameter determines whether or not this bridge should support high availability. True means it will connect to any available server in a cluster and support failover. The default value is false. retry-interval. This optional parameter determines the period in milliseconds between subsequent reconnection attempts, if the connection to the target server has failed. The default value is 2000 milliseconds. retry-interval-multiplier. This optional parameter determines determines a multiplier to apply to the time since the last retry to compute the time to the next retry. This allows you to implement an exponential backoff between retry attempts. Let's take an example: If we set retry-interval to 1000 ms and we set retry-interval-multiplier to 2.0, then, if the first reconnect attempt fails, we will wait 1000 ms then 2000 ms then 4000 ms between subsequent reconnection attempts. The default value is 1.0 meaning each reconnect attempt is spaced at equal intervals. initial-connect-attempts. This optional parameter determines the total number of initial connect attempts the bridge will make before giving up and shutting down. A value of -1 signifies an unlimited number of attempts. The default value is
241 Core Bridges reconnect-attempts. This optional parameter determines the total number of reconnect attempts the bridge will make before giving up and shutting down. A value of -1 signifies an unlimited number of attempts. The default value is -1. failover-on-server-shutdown. This optional parameter determines whether the bridge will attempt to failover onto a backup server (if specified) when the target server is cleanly shutdown rather than crashed. The bridge connector can specify both a live and a backup server, if it specifies a backup server and this parameter is set to true then if the target server is cleanly shutdown the bridge connection will attempt to failover onto its backup. If the bridge connector has no backup server configured then this parameter has no effect. Sometimes you want a bridge configured with a live and a backup target server, but you don't want to failover to the backup if the live server is simply taken down temporarily for maintenance, this is when this parameter comes in handy. The default value for this parameter is false. use-duplicate-detection. This optional parameter determines whether the bridge will automatically insert a duplicate id property into each message that it forwards. Doing so, allows the target server to perform duplicate detection on messages it receives from the source server. If the connection fails or server crashes, then, when the bridge resumes it will resend unacknowledged messages. This might result in duplicate messages being sent to the target server. By enabling duplicate detection allows these duplicates to be screened out and ignored. This allows the bridge to provide a once and only once delivery guarantee without using heavyweight methods such as XA (see Duplicate Detection for more information). The default value for this parameter is true. confirmation-window-size. This optional parameter determines the confirmationwindow-size to use for the connection used to forward messages to the target node. This attribute is described in section Reconnection and Session Reattachment 241
242 Core Bridges Warning When using the bridge to forward messages to an address which uses the BLOCK address-full-policy from a queue which has a max-size-bytes set it's important that confirmation-window-size is less than or equal to maxsize-bytes to prevent the flow of messages from ceasing. producer-window-size. This optional parameter determines the producer flow control through the bridge. You usually leave this off unless you are dealing with huge large messages. Default=-1 (disabled) user. This optional parameter determines the user name to use when creating the bridge connection to the remote server. If it is not specified the default cluster user specified by cluster-user in broker.xml will be used. password. This optional parameter determines the password to use when creating the bridge connection to the remote server. If it is not specified the default cluster password specified by cluster-password in broker.xml will be used. static-connectors or discovery-group-ref. Pick either of these options to connect the bridge to the target server. The static-connectors is a list of connector-ref elements pointing to connector elements defined elsewhere. A connector encapsulates knowledge of what transport to use (TCP, SSL, HTTP etc) as well as the server connection parameters (host, port etc). For more information about what connectors are and how to configure them, please see Configuring the Transport. The discovery-group-ref element has one attribute - discovery-group-name. This attribute points to a discovery-group defined elsewhere. For more information about what discovery-groups are and how to configure them, please see Discovery Groups. 242
243 Duplicate Message Detection Duplicate Message Detection Apache ActiveMQ Artemis includes powerful automatic duplicate message detection, filtering out duplicate messages without you having to code your own fiddly duplicate detection logic at the application level. This chapter will explain what duplicate detection is, how Apache ActiveMQ Artemis uses it and how and where to configure it. When sending messages from a client to a server, or indeed from a server to another server, if the target server or connection fails sometime after sending the message, but before the sender receives a response that the send (or commit) was processed successfully then the sender cannot know for sure if the message was sent successfully to the address. If the target server or connection failed after the send was received and processed but before the response was sent back then the message will have been sent to the address successfully, but if the target server or connection failed before the send was received and finished processing then it will not have been sent to the address successfully. From the senders point of view it's not possible to distinguish these two cases. When the server recovers this leaves the client in a difficult situation. It knows the target server failed, but it does not know if the last message reached its destination ok. If it decides to resend the last message, then that could result in a duplicate message being sent to the address. If each message was an order or a trade then this could result in the order being fulfilled twice or the trade being double booked. This is clearly not a desirable situation. Sending the message(s) in a transaction does not help out either. If the server or connection fails while the transaction commit is being processed it is also indeterminate whether the transaction was successfully committed or not! To solve these issues Apache ActiveMQ Artemis provides automatic duplicate messages detection for messages sent to addresses. Using Duplicate Detection for Message Sending 243
244 Duplicate Message Detection Enabling duplicate message detection for sent messages is simple: you just need to set a special property on the message to a unique value. You can create the value however you like, as long as it is unique. When the target server receives the message it will check if that property is set, if it is, then it will check in its in memory cache if it has already received a message with that value of the header. If it has received a message with the same value before then it will ignore the message. Note Using duplicate detection to move messages between nodes can give you the same once and only once delivery guarantees as if you were using an XA transaction to consume messages from source and send them to the target, but with less overhead and much easier configuration than using XA. If you're sending messages in a transaction then you don't have to set the property for every message you send in that transaction, you only need to set it once in the transaction. If the server detects a duplicate message for any message in the transaction, then it will ignore the entire transaction. The name of the property that you set is given by the value of org.apache.activemq.artemis.api.core.message.hdr_duplicate_detection_id, which is _AMQ_DUPL_ID The value of the property can be of type byte[] or SimpleString if you're using the core API. If you're using JMS it must be a String, and its value should be unique. An easy way of generating a unique id is by generating a UUID. Here's an example of setting the property using the core API:... ClientMessage message = session.createmessage(true); SimpleString myuniqueid = "This is my unique id"; // Could use a UUID for this message.setstringproperty(hdr_duplicate_detection_id, myuniqueid); And here's an example using the JMS API: 244
245 Duplicate Message Detection... Message jmsmessage = session.createmessage(); String myuniqueid = "This is my unique id"; // Could use a UUID for this message.setstringproperty(hdr_duplicate_detection_id.tostring(), myuniqueid);... Configuring the Duplicate ID Cache The server maintains caches of received values of the org.apache.activemq.artemis.core.message.impl.hdr_duplicate_detection_id property sent to each address. Each address has its own distinct cache. The cache is a circular fixed size cache. If the cache has a maximum size of n elements, then the n + 1 th id stored will overwrite the 0 th element in the cache. The maximum size of the cache is configured by the parameter id-cache-size in broker.xml, the default value is 2000 elements. The caches can also be configured to persist to disk or not. This is configured by the parameter persist-id-cache, also in broker.xml. If this is set to true then each id will be persisted to permanent storage as they are received. The default value for this parameter is true. Note When choosing a size of the duplicate id cache be sure to set it to a larger enough size so if you resend messages all the previously sent ones are in the cache not having been overwritten. Duplicate Detection and Bridges Core bridges can be configured to automatically add a unique duplicate id value (if there isn't already one in the message) before forwarding the message to it's target. This ensures that if the target server crashes or the connection is interrupted and the bridge resends the message, then if it has already been received by the target server, it will be ignored. 245
246 Duplicate Message Detection To configure a core bridge to add the duplicate id header, simply set the use-duplicatedetection to true when configuring a bridge in broker.xml. The default value for this parameter is true. For more information on core bridges and how to configure them, please see Core Bridges. Duplicate Detection and Cluster Connections Cluster connections internally use core bridges to move messages reliable between nodes of the cluster. Consequently they can also be configured to insert the duplicate id header for each message they move using their internal bridges. To configure a cluster connection to add the duplicate id header, simply set the useduplicate-detection to true when configuring a cluster connection in broker.xml. The default value for this parameter is true. For more information on cluster connections and how to configure them, please see Clusters. 246
247 Clusters Clusters Clusters Overview Apache ActiveMQ Artemis clusters allow groups of Apache ActiveMQ Artemis servers to be grouped together in order to share message processing load. Each active node in the cluster is an active Apache ActiveMQ Artemis server which manages its own messages and handles its own connections. The cluster is formed by each node declaring cluster connections to other nodes in the core configuration file broker.xml. When a node forms a cluster connection to another node, internally it creates a core bridge (as described in Core Bridges) connection between it and the other node, this is done transparently behind the scenes - you don't have to declare an explicit bridge for each node. These cluster connections allow messages to flow between the nodes of the cluster to balance load. Nodes can be connected together to form a cluster in many different topologies, we will discuss a couple of the more common topologies later in this chapter. We'll also discuss client side load balancing, where we can balance client connections across the nodes of the cluster, and we'll consider message redistribution where Apache ActiveMQ Artemis will redistribute messages between nodes to avoid starvation. Another important part of clustering is server discovery where servers can broadcast their connection details so clients or other servers can connect to them with the minimum of configuration. Warning Once a cluster node has been configured it is common to simply copy that configuration to other nodes to produce a symmetric cluster. However, care must be taken when copying the Apache ActiveMQ Artemis files. Do not copy the Apache ActiveMQ Artemis data (i.e. the bindings, journal, and largemessages directories) from one node to another. When a node is started for the first time and initializes its journal files it also persists a special identifier to the journal directory. This id must be unique among nodes in the cluster or the cluster will not form properly. 247
248 Clusters Server discovery Server discovery is a mechanism by which servers can propagate their connection details to: Messaging clients. A messaging client wants to be able to connect to the servers of the cluster without having specific knowledge of which servers in the cluster are up at any one time. Other servers. Servers in a cluster want to be able to create cluster connections to each other without having prior knowledge of all the other servers in the cluster. This information, let's call it the Cluster Topology, is actually sent around normal Apache ActiveMQ Artemis connections to clients and to other servers over cluster connections. This being the case we need a way of establishing the initial first connection. This can be done using dynamic discovery techniques like UDP and JGroups, or by providing a list of initial connectors. Dynamic Discovery Server discovery uses UDP multicast or JGroups to broadcast server connection settings. Broadcast Groups A broadcast group is the means by which a server broadcasts connectors over the network. A connector defines a way in which a client (or other server) can make connections to the server. For more information on what a connector is, please see Configuring the Transport. The broadcast group takes a set of connector pairs, each connector pair contains connection settings for a live and backup server (if one exists) and broadcasts them on the network. Depending on which broadcasting technique you configure the cluster, it uses either UDP or JGroups to broadcast connector pairs information. Broadcast groups are defined in the server configuration file broker.xml. There can be many broadcast groups per Apache ActiveMQ Artemis server. All broadcast groups must be defined in a broadcast-groups element. Let's take a look at an example broadcast group from broker.xml that defines a UDP broadcast group: 248
249 Clusters <broadcast-groups> <broadcast-group name="my-broadcast-group"> <local-bind-address> </local-bind-address> <local-bind-port>5432</local-bind-port> <group-address> </group-address> <group-port>9876</group-port> <broadcast-period>2000</broadcast-period> <connector-ref>netty-connector</connector-ref> </broadcast-group> </broadcast-groups> Some of the broadcast group parameters are optional and you'll normally use the defaults, but we specify them all in the above example for clarity. Let's discuss each one in turn: name attribute. Each broadcast group in the server must have a unique name. local-bind-address. This is the local bind address that the datagram socket is bound to. If you have multiple network interfaces on your server, you would specify which one you wish to use for broadcasts by setting this property. If this property is not specified then the socket will be bound to the wildcard address, an IP address chosen by the kernel. This is a UDP specific attribute. local-bind-port. If you want to specify a local port to which the datagram socket is bound you can specify it here. Normally you would just use the default value of -1 which signifies that an anonymous port should be used. This parameter is always specified in conjunction with local-bind-address. This is a UDP specific attribute. group-address. This is the multicast address to which the data will be broadcast. It is a class D IP address in the range to , inclusive. The address is reserved and is not available for use. This parameter is mandatory. This is a UDP specific attribute. group-port. This is the UDP port number used for broadcasting. This parameter is mandatory. This is a UDP specific attribute. broadcast-period. This is the period in milliseconds between consecutive broadcasts. This parameter is optional, the default value is 2000 milliseconds. connector-ref. This specifies the connector and optional backup connector that will be broadcasted (see Configuring the Transport for more information on connectors). Here is another example broadcast group that defines a JGroups broadcast group: 249
250 Clusters <broadcast-groups> <broadcast-group name="my-broadcast-group"> <jgroups-file>test-jgroups-file_ping.xml</jgroups-file> <jgroups-channel>activemq_broadcast_channel</jgroups-channel> <broadcast-period>2000</broadcast-period> <connector-ref connector-name="netty-connector"/> </broadcast-group> </broadcast-groups> To be able to use JGroups to broadcast, one must specify two attributes, i.e. jgroupsfile and jgroups-channel, as discussed in details as following: jgroups-file attribute. This is the name of JGroups configuration file. It will be used to initialize JGroups channels. Make sure the file is in the java resource path so that Apache ActiveMQ Artemis can load it. jgroups-channel attribute. The name that JGroups channels connect to for broadcasting. Note The JGroups attributes ( jgroups-file and jgroups-channel ) and UDP specific attributes described above are exclusive of each other. Only one set can be specified in a broadcast group configuration. Don't mix them! The following is an example of a JGroups file <config xmlns="urn:org:jgroups" xmlns:xsi=" xsi:schemalocation="urn:org:jgroups sd"> <TCP loopback="true" recv_buf_size=" " send_buf_size="640000" discard_incompatible_packets="true" max_bundle_size="64000" max_bundle_timeout="30" enable_bundling="true" use_send_queues="false" sock_conn_timeout="300" thread_pool.enabled="true" thread_pool.min_threads="1" thread_pool.max_threads="10" thread_pool.keep_alive_time="5000" thread_pool.queue_enabled="false" thread_pool.queue_max_size="100" 250
251 Clusters thread_pool.rejection_policy="run" oob_thread_pool.enabled="true" oob_thread_pool.min_threads="1" oob_thread_pool.max_threads="8" oob_thread_pool.keep_alive_time="5000" oob_thread_pool.queue_enabled="false" oob_thread_pool.queue_max_size="100" oob_thread_pool.rejection_policy="run"/> <FILE_PING location="../file.ping.dir"/> <MERGE2 max_interval="30000" min_interval="10000"/> <FD_SOCK/> <FD timeout="10000" max_tries="5" /> <VERIFY_SUSPECT timeout="1500" /> <BARRIER /> <pbcast.nakack use_mcast_xmit="false" retransmit_timeout="300,600,1200,2400,4800" discard_delivered_msgs="true"/> <UNICAST timeout="300,600,1200" /> <pbcast.stable stability_delay="1000" desired_avg_gossip="50000" max_bytes="400000"/> <pbcast.gms print_local_addr="true" join_timeout="3000" view_bundling="true"/> <FC max_credits=" " min_threshold="0.10"/> <FRAG2 frag_size="60000" /> <pbcast.state_transfer/> <pbcast.flush timeout="0"/> </config> As it shows, the file content defines a jgroups protocol stacks. If you want Apache ActiveMQ Artemis to use this stacks for channel creation, you have to make sure the value of jgroups-file in your broadcast-group/discovery-group configuration to be the name of this jgroups configuration file. For example if the above stacks configuration is stored in a file named "jgroups-stacks.xml" then your jgroups-file should be like <jgroups-file>jgroups-stacks.xml</jgroups-file> Discovery Groups While the broadcast group defines how connector information is broadcasted from a server, a discovery group defines how connector information is received from a broadcast endpoint (a UDP multicast address or JGroup channel). 251
252 Clusters A discovery group maintains a list of connector pairs - one for each broadcast by a different server. As it receives broadcasts on the broadcast endpoint from a particular server it updates its entry in the list for that server. If it has not received a broadcast from a particular server for a length of time it will remove that server's entry from its list. Discovery groups are used in two places in Apache ActiveMQ Artemis: By cluster connections so they know how to obtain an initial connection to download the topology By messaging clients so they know how to obtain an initial connection to download the topology Although a discovery group will always accept broadcasts, its current list of available live and backup servers is only ever used when an initial connection is made, from then server discovery is done over the normal Apache ActiveMQ Artemis connections. Note Each discovery group must be configured with broadcast endpoint (UDP or JGroups) that matches its broadcast group counterpart. For example, if broadcast is configured using UDP, the discovery group must also use UDP, and the same multicast address. Defining Discovery Groups on the Server For cluster connections, discovery groups are defined in the server side configuration file broker.xml. All discovery groups must be defined inside a discovery-groups element. There can be many discovery groups defined by Apache ActiveMQ Artemis server. Let's look at an example: <discovery-groups> <discovery-group name="my-discovery-group"> <local-bind-address> </local-bind-address> <group-address> </group-address> <group-port>9876</group-port> <refresh-timeout>10000</refresh-timeout> </discovery-group> </discovery-groups> We'll consider each parameter of the discovery group: 252
253 Clusters name attribute. Each discovery group must have a unique name per server. local-bind-address. If you are running with multiple network interfaces on the same machine, you may want to specify that the discovery group listens only only a specific interface. To do this you can specify the interface address with this parameter. This parameter is optional. This is a UDP specific attribute. group-address. This is the multicast IP address of the group to listen on. It should match the group-address in the broadcast group that you wish to listen from. This parameter is mandatory. This is a UDP specific attribute. group-port. This is the UDP port of the multicast group. It should match the groupport in the broadcast group that you wish to listen from. This parameter is mandatory. This is a UDP specific attribute. refresh-timeout. This is the period the discovery group waits after receiving the last broadcast from a particular server before removing that servers connector pair entry from its list. You would normally set this to a value significantly higher than the broadcast-period on the broadcast group otherwise servers might intermittently disappear from the list even though they are still broadcasting due to slight differences in timing. This parameter is optional, the default value is milliseconds (10 seconds). Here is another example that defines a JGroups discovery group: <discovery-groups> <discovery-group name="my-broadcast-group"> <jgroups-file>test-jgroups-file_ping.xml</jgroups-file> <jgroups-channel>activemq_broadcast_channel</jgroups-channel> <refresh-timeout>10000</refresh-timeout> </discovery-group> </discovery-groups> To receive broadcast from JGroups channels, one must specify two attributes, jgroupsfile and jgroups-channel, as discussed in details as following: jgroups-file attribute. This is the name of JGroups configuration file. It will be used to initialize JGroups channels. Make sure the file is in the java resource path so that Apache ActiveMQ Artemis can load it. jgroups-channel attribute. The name that JGroups channels connect to for receiving broadcasts. 253
254 Clusters Note The JGroups attributes ( jgroups-file and jgroups-channel ) and UDP specific attributes described above are exclusive of each other. Only one set can be specified in a discovery group configuration. Don't mix them! Discovery Groups on the Client Side Let's discuss how to configure an Apache ActiveMQ Artemis client to use discovery to discover a list of servers to which it can connect. The way to do this differs depending on whether you're using JMS or the core API. Configuring client discovery using JMS If you're using JMS and you're using JNDI on the client to look up your JMS connection factory instances then you can specify these parameters in the JNDI context environment. e.g. in jndi.properties. Simply ensure the host:port combination matches the group-address and group-port from the corresponding broadcast-group on the server. Let's take a look at an example: java.naming.factory.initial = ActiveMQInitialContextFactory connectionfactory.myconnectionfactory=udp:// :9876 The element discovery-group-ref specifies the name of a discovery group defined in broker.xml. When this connection factory is downloaded from JNDI by a client application and JMS connections are created from it, those connections will be load-balanced across the list of servers that the discovery group maintains by listening on the multicast address specified in the discovery group configuration. If you're using JMS, but you're not using JNDI to lookup a connection factory - you're instantiating the JMS connection factory directly then you can specify the discovery group parameters directly when creating the JMS connection factory. Here's an example: 254
255 Clusters final String groupaddress = " "; final int groupport = 9876; ConnectionFactory jmsconnectionfactory = ActiveMQJMSClient.createConnectionFactory(new DiscoveryGroupConfiguration(groupAdd ress, groupport, new UDPBroadcastGroupConfiguration(groupAddress, groupport, null, -1)), JMSFactoryType.CF); Connection jmsconnection1 = jmsconnectionfactory.createconnection(); Connection jmsconnection2 = jmsconnectionfactory.createconnection(); The refresh-timeout can be set directly on the DiscoveryGroupConfiguration by using the setter method setdiscoveryrefreshtimeout() if you want to change the default value. There is also a further parameter settable on the DiscoveryGroupConfiguration using the setter method setdiscoveryinitialwaittimeout(). If the connection factory is used immediately after creation then it may not have had enough time to received broadcasts from all the nodes in the cluster. On first usage, the connection factory will make sure it waits this long since creation before creating the first connection. The default value for this parameter is milliseconds. Configuring client discovery using Core If you're using the core API to directly instantiate ClientSessionFactory instances, then you can specify the discovery group parameters directly when creating the session factory. Here's an example: final String groupaddress = " "; final int groupport = 9876; ServerLocator factory = ActiveMQClient.createServerLocatorWithHA(new DiscoveryGrou pconfiguration(groupaddress, groupport, new UDPBroadcastGroupConfiguration(groupAddress, groupp ort, null, -1)))); ClientSessionFactory factory = locator.createsessionfactory(); ClientSession session1 = factory.createsession(); ClientSession session2 = factory.createsession(); The refresh-timeout can be set directly on the DiscoveryGroupConfiguration by using the setter method setdiscoveryrefreshtimeout() if you want to change the default value. 255
256 Clusters There is also a further parameter settable on the DiscoveryGroupConfiguration using the setter method setdiscoveryinitialwaittimeout(). If the session factory is used immediately after creation then it may not have had enough time to received broadcasts from all the nodes in the cluster. On first usage, the session factory will make sure it waits this long since creation before creating the first session. The default value for this parameter is milliseconds. Discovery using static Connectors Sometimes it may be impossible to use UDP on the network you are using. In this case its possible to configure a connection with an initial list if possible servers. This could be just one server that you know will always be available or a list of servers where at least one will be available. This doesn't mean that you have to know where all your servers are going to be hosted, you can configure these servers to use the reliable servers to connect to. Once they are connected there connection details will be propagated via the server it connects to Configuring a Cluster Connection For cluster connections there is no extra configuration needed, you just need to make sure that any connectors are defined in the usual manner, (see Configuring the Transport for more information on connectors). These are then referenced by the cluster connection configuration. Configuring a Client Connection A static list of possible servers can also be used by a normal client. Configuring client discovery using JMS If you're using JMS and you're using JNDI on the client to look up your JMS connection factory instances then you can specify these parameters in the JNDI context environment in, e.g. jndi.properties : java.naming.factory.initial=org.apache.activemq.artemis.jndi.activemqinitialcontex tfactory connectionfactory.myconnectionfactory=(tcp://myhost:61616,tcp://myhost2:61616) 256
257 Clusters The connectionfactory.myconnectionfactory contains a list of servers to use for the connection factory. When this connection factory used client application and JMS connections are created from it, those connections will be load-balanced across the list of servers defined within the brackets (). The brackets are expanded so the same query cab be appended after the last bracket for ease. If you're using JMS, but you're not using JNDI to lookup a connection factory - you're instantiating the JMS connection factory directly then you can specify the connector list directly when creating the JMS connection factory. Here's an example: HashMap<String, Object> map = new HashMap<String, Object>(); map.put("host", "myhost"); map.put("port", "61616"); TransportConfiguration server1 = new TransportConfiguration(NettyConnectorFactory. class.getname(), map); HashMap<String, Object> map2 = new HashMap<String, Object>(); map2.put("host", "myhost2"); map2.put("port", "61617"); TransportConfiguration server2 = new TransportConfiguration(NettyConnectorFactory. class.getname(), map2); ActiveMQConnectionFactory cf = ActiveMQJMSClient.createConnectionFactoryWithHA(JMS FactoryType.CF, server1, server2); Configuring client discovery using Core If you are using the core API then the same can be done as follows: HashMap<String, Object> map = new HashMap<String, Object>(); map.put("host", "myhost"); map.put("port", "61616"); TransportConfiguration server1 = new TransportConfiguration(NettyConnectorFactory. class.getname(), map); HashMap<String, Object> map2 = new HashMap<String, Object>(); map2.put("host", "myhost2"); map2.put("port", "61617"); TransportConfiguration server2 = new TransportConfiguration(NettyConnectorFactory. class.getname(), map2); ServerLocator locator = ActiveMQClient.createServerLocatorWithHA(server1, server2) ; ClientSessionFactory factory = locator.createsessionfactory(); ClientSession session = factory.createsession(); Server-Side Message Load Balancing 257
258 Clusters If cluster connections are defined between nodes of a cluster, then Apache ActiveMQ Artemis will load balance messages arriving at a particular node from a client. Let's take a simple example of a cluster of four nodes A, B, C, and D arranged in a symmetric cluster (described in Symmetrical Clusters section). We have a queue called OrderQueue deployed on each node of the cluster. We have client Ca connected to node A, sending orders to the server. We have also have order processor clients Pa, Pb, Pc, and Pd connected to each of the nodes A, B, C, D. If no cluster connection was defined on node A, then as order messages arrive on node A they will all end up in the OrderQueue on node A, so will only get consumed by the order processor client attached to node A, Pa. If we define a cluster connection on node A, then as ordered messages arrive on node A instead of all of them going into the local OrderQueue instance, they are distributed in a round-robin fashion between all the nodes of the cluster. The messages are forwarded from the receiving node to other nodes of the cluster. This is all done on the server side, the client maintains a single connection to node A. For example, messages arriving on node A might be distributed in the following order between the nodes: B, D, C, A, B, D, C, A, B, D. The exact order depends on the order the nodes started up, but the algorithm used is round robin. Apache ActiveMQ Artemis cluster connections can be configured to always blindly load balance messages in a round robin fashion irrespective of whether there are any matching consumers on other nodes, but they can be a bit cleverer than that and also be configured to only distribute to other nodes if they have matching consumers. We'll look at both these cases in turn with some examples, but first we'll discuss configuring cluster connections in general. Configuring Cluster Connections Cluster connections group servers into clusters so that messages can be load balanced between the nodes of the cluster. Let's take a look at a typical cluster connection. Cluster connections are always defined in broker.xml inside a cluster-connection element. There can be zero or more cluster connections defined per Apache ActiveMQ Artemis server. 258
259 Clusters <cluster-connections> <cluster-connection name="my-cluster"> <address>jms</address> <connector-ref>netty-connector</connector-ref> <check-period>1000</check-period> <connection-ttl>5000</connection-ttl> <min-large-message-size>50000</min-large-message-size> <call-timeout>5000</call-timeout> <retry-interval>500</retry-interval> <retry-interval-multiplier>1.0</retry-interval-multiplier> <max-retry-interval>5000</max-retry-interval> <initial-connect-attempts>-1</initial-connect-attempts> <reconnect-attempts>-1</reconnect-attempts> <use-duplicate-detection>true</use-duplicate-detection> <message-load-balancing>on_demand</message-load-balancing> <max-hops>1</max-hops> <confirmation-window-size>32000</confirmation-window-size> <call-failover-timeout>30000</call-failover-timeout> <notification-interval>1000</notification-interval> <notification-attempts>2</notification-attempts> <discovery-group-ref discovery-group-name="my-discovery-group"/> </cluster-connection> </cluster-connections> In the above cluster connection all parameters have been explicitly specified. The following shows all the available configuration options address Each cluster connection only applies to addresses that match the specified address field. An address is matched on the cluster connection when it begins with the string specified in this field. The address field on a cluster connection also supports comma separated lists and an exclude syntax '!'. To prevent an address from being matched on this cluster connection, prepend a cluster connection address string with '!'. In the case shown above the cluster connection will load balance messages sent to addresses that start with jms. This cluster connection, will, in effect apply to all JMS queues and topics since they map to core queues that start with the substring "jms". The address can be any value and you can have many cluster connections with different values of address, simultaneously balancing messages for those addresses, potentially to different clusters of servers. By having multiple cluster connections on different addresses a single Apache ActiveMQ Artemis Server can effectively take part in multiple clusters simultaneously. 259
260 Clusters Be careful not to have multiple cluster connections with overlapping values of address, e.g. "europe" and "europe.news" since this could result in the same messages being distributed between more than one cluster connection, possibly resulting in duplicate deliveries. Examples: 'jms.eu' matches all addresses starting with 'jms.eu' '!jms.eu' matches all address except for those starting with 'jms.eu' 'jms.eu.uk,jms.eu.de' matches all addresses starting with either 'jms.eu.uk' or 'jms.eu.de' 'jms.eu,!jms.eu.uk' matches all addresses starting with 'jms.eu' but not those starting with 'jms.eu.uk' Notes: Address exclusion will always takes precedence over address inclusion. Address matching on cluster connections does not support wild-card matching. This parameter is mandatory. connector-ref. This is the connector which will be sent to other nodes in the cluster so they have the correct cluster topology. This parameter is mandatory. check-period. The period (in milliseconds) used to check if the cluster connection has failed to receive pings from another server. Default is connection-ttl. This is how long a cluster connection should stay alive if it stops receiving messages from a specific node in the cluster. Default is min-large-message-size. If the message size (in bytes) is larger than this value then it will be split into multiple segments when sent over the network to other cluster members. Default is call-timeout. When a packet is sent via a cluster connection and is a blocking call, i.e. for acknowledgements, this is how long it will wait (in milliseconds) for the reply before throwing an exception. Default is retry-interval. We mentioned before that, internally, cluster connections cause bridges to be created between the nodes of the cluster. If the cluster connection is created and the target node has not been started, or say, is being rebooted, then the cluster connections from other nodes will retry connecting to the target until it comes back up, in the same way as a bridge does. 260
261 Clusters This parameter determines the interval in milliseconds between retry attempts. It has the same meaning as the retry-interval on a bridge (as described in Core Bridges). This parameter is optional and its default value is 500 milliseconds. retry-interval-multiplier. This is a multiplier used to increase the retryinterval after each reconnect attempt, default is 1. max-retry-interval. The maximum delay (in milliseconds) for retries. Default is initial-connect-attempts. The number of times the system will try to connect a node in the cluster initially. If the max-retry is achieved this node will be considered permanently down and the system will not route messages to this node. Default is -1 (infinite retries). reconnect-attempts. The number of times the system will try to reconnect to a node in the cluster. If the max-retry is achieved this node will be considered permanently down and the system will stop routing messages to this node. Default is -1 (infinite retries). use-duplicate-detection. Internally cluster connections use bridges to link the nodes, and bridges can be configured to add a duplicate id property in each message that is forwarded. If the target node of the bridge crashes and then recovers, messages might be resent from the source node. By enabling duplicate detection any duplicate messages will be filtered out and ignored on receipt at the target node. This parameter has the same meaning as use-duplicate-detection on a bridge. For more information on duplicate detection, please see Duplicate Detection. Default is true. message-load-balancing. This parameter determines if/how messages will be distributed between other nodes of the cluster. It can be one of three values - OFF, STRICT, or ON_DEMAND (default). This parameter replaces the deprecated forwardwhen-no-consumers parameter. If this is set to OFF then messages will never be forwarded to another node in the cluster 261
262 Clusters If this is set to STRICT then each incoming message will be round robin'd even though the same queues on the other nodes of the cluster may have no consumers at all, or they may have consumers that have non matching message filters (selectors). Note that Apache ActiveMQ Artemis will not forward messages to other nodes if there are no queues of the same name on the other nodes, even if this parameter is set to STRICT. Using STRICT is like setting the legacy forward-whenno-consumers parameter to true. If this is set to ON_DEMAND then Apache ActiveMQ Artemis will only forward messages to other nodes of the cluster if the address to which they are being forwarded has queues which have consumers, and if those consumers have message filters (selectors) at least one of those selectors must match the message. Using ON_DEMAND is like setting the legacy forward-when-no-consumers parameter to false. Default is ON_DEMAND. max-hops. When a cluster connection decides the set of nodes to which it might load balance a message, those nodes do not have to be directly connected to it via a cluster connection. Apache ActiveMQ Artemis can be configured to also load balance messages to nodes which might be connected to it only indirectly with other Apache ActiveMQ Artemis servers as intermediates in a chain. This allows Apache ActiveMQ Artemis to be configured in more complex topologies and still provide message load balancing. We'll discuss this more later in this chapter. The default value for this parameter is 1, which means messages are only load balanced to other Apache ActiveMQ Artemis serves which are directly connected to this server. This parameter is optional. confirmation-window-size. The size (in bytes) of the window used for sending confirmations from the server connected to. So once the server has received confirmation-window-size bytes it notifies its client, default is A value of -1 means no window. producer-window-size. The size for producer flow control over cluster connection. it's by default disabled through the cluster connection bridge but you may want to set a value if you are using really large messages in cluster. A value of -1 means no window. 262
263 Clusters call-failover-timeout. Similar to call-timeout but used when a call is made during a failover attempt. Default is -1 (no timeout). notification-interval. How often (in milliseconds) the cluster connection should broadcast itself when attaching to the cluster. Default is notification-attempts. How many times the cluster connection should broadcast itself when connecting to the cluster. Default is 2. discovery-group-ref. This parameter determines which discovery group is used to obtain the list of other servers in the cluster that this cluster connection will make connections to. Alternatively if you would like your cluster connections to use a static list of servers for discovery then you can do it like this. <cluster-connection name="my-cluster">... <static-connectors> <connector-ref>server0-connector</connector-ref> <connector-ref>server1-connector</connector-ref> </static-connectors> </cluster-connection> Here we have defined 2 servers that we know for sure will that at least one will be available. There may be many more servers in the cluster but these will; be discovered via one of these connectors once an initial connection has been made. Cluster User Credentials When creating connections between nodes of a cluster to form a cluster connection, Apache ActiveMQ Artemis uses a cluster user and cluster password which is defined in broker.xml : <cluster-user>activemq.cluster.admin.user</cluster-user> <cluster-password>change ME!!</cluster-password> 263
264 Clusters Warning It is imperative that these values are changed from their default, or remote clients will be able to make connections to the server using the default values. If they are not changed from the default, Apache ActiveMQ Artemis will detect this and pester you with a warning on every start-up. Client-Side Load balancing With Apache ActiveMQ Artemis client-side load balancing, subsequent sessions created using a single session factory can be connected to different nodes of the cluster. This allows sessions to spread smoothly across the nodes of a cluster and not be "clumped" on any particular node. The load balancing policy to be used by the client factory is configurable. Apache ActiveMQ Artemis provides four out-of-the-box load balancing policies, and you can also implement your own and use that. The out-of-the-box policies are Round Robin. With this policy the first node is chosen randomly then each subsequent node is chosen sequentially in the same order. For example nodes might be chosen in the order B, C, D, A, B, C, D, A, B or D, A, B, C, D, A, B, C, D or C, D, A, B, C, D, A, B, C. Use org.apache.activemq.artemis.api.core.client.loadbalance.roundrobinconnectionloadb alancingpolicy as the <connection-load-balancing-policy-class-name>. Random. With this policy each node is chosen randomly. Use org.apache.activemq.artemis.api.core.client.loadbalance.randomconnectionloadbalan cingpolicy as the <connection-load-balancing-policy-class-name>. Random Sticky. With this policy the first node is chosen randomly and then re-used for subsequent connections. Use org.apache.activemq.artemis.api.core.client.loadbalance.randomstickyconnectionloa dbalancingpolicy as the <connection-load-balancing-policy-class-name>. 264
265 Clusters First Element. With this policy the "first" (i.e. 0th) node is always returned. Use org.apache.activemq.artemis.api.core.client.loadbalance.firstelementconnectionloa dbalancingpolicy as the <connection-load-balancing-policy-class-name>. You can also implement your own policy by implementing the interface org.apache.activemq.artemis.api.core.client.loadbalance.connectionloadbalancingpolicy Specifying which load balancing policy to use differs whether you are using JMS or the core API. If you don't specify a policy then the default will be used which is org.apache.activemq.artemis.api.core.client.loadbalance.roundrobinconnectionloadbalanc ingpolicy. If you're using JMS and you're using JNDI on the client to look up your JMS connection factory instances then you can specify these parameters in the JNDI context environment in, e.g. jndi.properties, to specify the load balancing policy directly: java.naming.factory.initial=org.apache.activemq.artemis.jndi.activemqinitialcontex tfactory connection.myconnectionfactory=tcp://localhost:61616?loadbalancingpolicyclassname= org.apache.activemq.artemis.api.core.client.loadbalance.randomconnectionloadbalanc ingpolicy The above example would instantiate a JMS connection factory that uses the random connection load balancing policy. If you're using JMS but you're instantiating your connection factory directly on the client side then you can set the load balancing policy using the setter on the ActiveMQConnectionFactory before using it: ConnectionFactory jmsconnectionfactory = ActiveMQJMSClient.createConnectionFactory (...); jmsconnectionfactory.setloadbalancingpolicyclassname("com.acme.myloadbalancingpoli cy"); If you're using the core API, you can set the load balancing policy directly on the ServerLocator instance you are using: ServerLocator locator = ActiveMQClient.createServerLocatorWithHA(server1, server2) ; locator.setloadbalancingpolicyclassname("com.acme.myloadbalancingpolicy"); 265
266 Clusters The set of servers over which the factory load balances can be determined in one of two ways: Specifying servers explicitly Using discovery. Specifying Members of a Cluster Explicitly Sometimes you want to explicitly define a cluster more explicitly, that is control which server connect to each other in the cluster. This is typically used to form non symmetrical clusters such as chain cluster or ring clusters. This can only be done using a static list of connectors and is configured as follows: <cluster-connection name="my-cluster"> <address>jms</address> <connector-ref>netty-connector</connector-ref> <retry-interval>500</retry-interval> <use-duplicate-detection>true</use-duplicate-detection> <message-load-balancing>strict</message-load-balancing> <max-hops>1</max-hops> <static-connectors allow-direct-connections-only="true"> <connector-ref>server1-connector</connector-ref> </static-connectors> </cluster-connection> In this example we have set the attribute allow-direct-connections-only which means that the only server that this server can create a cluster connection to is server1- connector. This means you can explicitly create any cluster topology you want. Message Redistribution Another important part of clustering is message redistribution. Earlier we learned how server side message load balancing round robins messages across the cluster. If message-load-balancing is OFF or ON_DEMAND then messages won't be forwarded to nodes which don't have matching consumers. This is great and ensures that messages aren't moved to a queue which has no consumers to consume them. However, there is a situation it doesn't solve: What happens if the consumers on a queue close after the messages have been sent to the node? If there are no consumers on the queue the message won't get consumed and we have a starvation situation. 266
267 Clusters This is where message redistribution comes in. With message redistribution Apache ActiveMQ Artemis can be configured to automatically redistribute messages from queues which have no consumers back to other nodes in the cluster which do have matching consumers. To enable this functionality message-load-balancing must be ON_DEMAND. Message redistribution can be configured to kick in immediately after the last consumer on a queue is closed, or to wait a configurable delay after the last consumer on a queue is closed before redistributing. By default message redistribution is disabled. Message redistribution can be configured on a per address basis, by specifying the redistribution delay in the address settings, for more information on configuring address settings, please see Queue Attributes. Here's an address settings snippet from broker.xml showing how message redistribution is enabled for a set of queues: <address-settings> <address-setting match="jms.#"> <redistribution-delay>0</redistribution-delay> </address-setting> </address-settings> The above address-settings block would set a redistribution-delay of 0 for any queue which is bound to an address that starts with "jms.". All JMS queues and topic subscriptions are bound to addresses that start with "jms.", so the above would enable instant (no delay) redistribution for all JMS queues and topic subscriptions. The attribute match can be an exact match or it can be a string that conforms to the Apache ActiveMQ Artemis wildcard syntax (described in Wildcard Syntax). The element redistribution-delay defines the delay in milliseconds after the last consumer is closed on a queue before redistributing messages from that queue to other nodes of the cluster which do have matching consumers. A delay of zero means the messages will be immediately redistributed. A value of -1 signifies that messages will never be redistributed. The default value is -1. It often makes sense to introduce a delay before redistributing as it's a common case that a consumer closes but another one quickly is created on the same queue, in such a case you probably don't want to redistribute immediately since the new consumer will arrive shortly. 267
268 Clusters Cluster topologies Apache ActiveMQ Artemis clusters can be connected together in many different topologies, let's consider the two most common ones here Symmetric cluster A symmetric cluster is probably the most common cluster topology. With a symmetric cluster every node in the cluster is connected to every other node in the cluster. In other words every node in the cluster is no more than one hop away from every other node. To form a symmetric cluster every node in the cluster defines a cluster connection with the attribute max-hops set to 1. Typically the cluster connection will use server discovery in order to know what other servers in the cluster it should connect to, although it is possible to explicitly define each target server too in the cluster connection if, for example, UDP is not available on your network. With a symmetric cluster each node knows about all the queues that exist on all the other nodes and what consumers they have. With this knowledge it can determine how to load balance and redistribute messages around the nodes. Don't forget this warning when creating a symmetric cluster. Chain cluster With a chain cluster, each node in the cluster is not connected to every node in the cluster directly, instead the nodes form a chain with a node on each end of the chain and all other nodes just connecting to the previous and next nodes in the chain. An example of this would be a three node chain consisting of nodes A, B and C. Node A is hosted in one network and has many producer clients connected to it sending order messages. Due to corporate policy, the order consumer clients need to be hosted in a different network, and that network is only accessible via a third network. In this setup node B acts as a mediator with no producers or consumers on it. Any messages arriving on node A will be forwarded to node B, which will in turn forward them to node C where they can get consumed. Node A does not need to directly connect to C, but all the nodes can still act as a part of the cluster. 268
269 Clusters To set up a cluster in this way, node A would define a cluster connection that connects to node B, and node B would define a cluster connection that connects to node C. In this case we only want cluster connections in one direction since we're only moving messages from node A->B->C and never from C->B->A. For this topology we would set max-hops to 2. With a value of 2 the knowledge of what queues and consumers that exist on node C would be propagated from node C to node B to node A. Node A would then know to distribute messages to node B when they arrive, even though node B has no consumers itself, it would know that a further hop away is node C which does have consumers. Scaling Down Apache ActiveMQ Artemis supports scaling down a cluster with no message loss (even for non-durable messages). This is especially useful in certain environments (e.g. the cloud) where the size of a cluster may change relatively frequently. When scaling up a cluster (i.e. adding nodes) there is no risk of message loss, but when scaling down a cluster (i.e. removing nodes) the messages on those nodes would be lost unless the broker sent them to another node in the cluster. Apache ActiveMQ Artemis can be configured to do just that. The simplest way to enable this behavior is to set scale-down to true. If the server is clustered and scale-down is true then when the server is shutdown gracefully (i.e. stopped without crashing) it will find another node in the cluster and send all of its messages (both durable and non-durable) to that node. The messages are processed in order and go to the back of the respective queues on the other node (just as if the messages were sent from an external client for the first time). If more control over where the messages go is required then specify scale-down-groupname. Messages will only be sent to another node in the cluster that uses the same scale-down-group-name as the server being shutdown. Warning If cluster nodes are grouped together with different scale-down-group-name values beware. If all the nodes in a single group are shut down then the messages from that node/group will be lost. If the server is using multiple cluster-connection then use scale-down-clustername to identify the name of the cluster-connection which should be used for scaling down. 269
270 Clusters 270
271 High Availability and Failover High Availability and Failover We define high availability as the ability for the system to continue functioning after failure of one or more of the servers. A part of high availability is failover which we define as the ability for client connections to migrate from one server to another in event of server failure so client applications can continue to operate. Live - Backup Groups Apache ActiveMQ Artemis allows servers to be linked together as live - backup groups where each live server can have 1 or more backup servers. A backup server is owned by only one live server. Backup servers are not operational until failover occurs, however 1 chosen backup, which will be in passive mode, announces its status and waits to take over the live servers work Before failover, only the live server is serving the Apache ActiveMQ Artemis clients while the backup servers remain passive or awaiting to become a backup server. When a live server crashes or is brought down in the correct mode, the backup server currently in passive mode will become live and another backup server will become passive. If a live server restarts after a failover then it will have priority and be the next server to become live when the current live server goes down, if the current live server is configured to allow automatic failback then it will detect the live server coming back up and automatically stop. HA Policies Apache ActiveMQ Artemis supports two different strategies for backing up a server shared store and replication. Which is configured via the ha-policy configuration element. <ha-policy> <replication/> </ha-policy> or 271
272 High Availability and Failover <ha-policy> <shared-store/> </ha-policy> As well as these 2 strategies there is also a 3rd called live-only. This of course means there will be no Backup Strategy and is the default if none is provided, however this is used to configure scale-down which we will cover in a later chapter. Note The ha-policy configurations replaces any current HA configuration in the root of the broker.xml configuration. All old configuration is now deprecated although best efforts will be made to honour it if configured this way. Note Only persistent message data will survive failover. Any non persistent message data will not be available after failover. The ha-policy type configures which strategy a cluster should use to provide the backing up of a servers data. Within this configuration element is configured how a server should behave within the cluster, either as a master (live), slave (backup) or colocated (both live and backup). This would look something like: <ha-policy> <replication> <master/> </replication> </ha-policy> or <ha-policy> <shared-store/> <slave/> </shared-store/> </ha-policy> or 272
273 High Availability and Failover <ha-policy> <replication> <colocated/> </replication> </ha-policy> Data Replication When using replication, the live and the backup servers do not share the same data directories, all data synchronization is done over the network. Therefore all (persistent) data received by the live server will be duplicated to the backup. Notice that upon start-up the backup server will first need to synchronize all existing data from the live server before becoming capable of replacing the live server should it fail. So unlike when using shared storage, a replicating backup will not be a fully operational backup right after start-up, but only after it finishes synchronizing the data with its live server. The time it will take for this to happen will depend on the amount of data to be synchronized and the connection speed. Note In general, synchronization occurs in parallel with current network traffic so this won't cause any blocking on current clients. However, there is a critical moment at the end of this process where the replicating server must complete the synchronization and ensure the replica acknowledges this completion. This exchange between the replicating server and replica will block any journal related operations. The maximum length of time that this exchange will block is controlled by the initial-replication-sync-timeout configuration element. Replication will create a copy of the data at the backup. One issue to be aware of is: in case of a successful fail-over, the backup's data will be newer than the one at the live's storage. If you configure your live server to perform a failback to live server when restarted, it will synchronize its data with the backup's. If both servers are shutdown, the administrator will have to determine which one has the latest data. The replicating live and backup pair must be part of a cluster. The Cluster Connection also defines how backup servers will find the remote live servers to pair with. Refer to Clusters for details on how this is done, and how to configure a cluster connection. Notice that: 273
274 High Availability and Failover Both live and backup servers must be part of the same cluster. Notice that even a simple live/backup replicating pair will require a cluster configuration. Their cluster user and password must match. Within a cluster, there are two ways that a backup server will locate a live server to replicate from, these are: specifying a node group. You can specify a group of live servers that a backup server can connect to. This is done by configuring group-name in either the master or the slave element of the broker.xml. A Backup server will only connect to a live server that shares the same node group name connecting to any live. This will be the behaviour if group-name is not configured allowing a backup server to connect to any live server Note A group-name example: suppose you have 5 live servers and 6 backup servers: live1, live2, live3 : with group-name=fish live4, live5 : with group-name=bird backup1, backup2, backup3, backup4 : with group-name=fish backup5, backup6 : with group-name=bird After joining the cluster the backups with group-name=fish will search for live servers with group-name=fish to pair with. Since there is one backup too many, the fish will remain with one spare backup. The 2 backups with group-name=bird ( backup5 and backup6 ) will pair with live servers live4 and live5. The backup will search for any live server that it is configured to connect to. It then tries to replicate with each live server in turn until it finds a live server that has no current backup configured. If no live server is available it will wait until the cluster topology changes and repeats the process. 274
275 High Availability and Failover Note This is an important distinction from a shared-store backup, if a backup starts and does not find a live server, the server will just activate and start to serve client requests. In the replication case, the backup just keeps waiting for a live server to pair with. Note that in replication the backup server does not know whether any data it might have is up to date, so it really cannot decide to activate automatically. To activate a replicating backup server using the data it has, the administrator must change its configuration to make it a live server by changing slave to master. Much like in the shared-store case, when the live server stops or crashes, its replicating backup will become active and take over its duties. Specifically, the backup will become active when it loses connection to its live server. This can be problematic because this can also happen because of a temporary network problem. In order to address this issue, the backup will try to determine whether it still can connect to the other servers in the cluster. If it can connect to more than half the servers, it will become active, if more than half the servers also disappeared with the live, the backup will wait and try reconnecting with the live. This avoids a split brain situation. Configuration To configure the live and backup servers to be a replicating pair, configure the live server in ' broker.xml to have: <ha-policy> <replication> <master/> </replication> </ha-policy>. <cluster-connections> <cluster-connection name="my-cluster">... </cluster-connection> </cluster-connections> The backup server must be similarly configured but as a slave 275
276 High Availability and Failover <ha-policy> <replication> <slave/> </replication> </ha-policy> All Replication Configuration The following table lists all the ha-policy configuration elements for HA strategy Replication for master : Name `check-forliveserver` `clustername` `groupname` `initialreplicationsynctimeout` Description Whether to check the cluster for a (live) server using our own server ID when starting up. This option is only necessary for performing 'fail-back' on replicating servers. Name of the cluster configuration to use for replication. This setting is only necessary if you configure multiple cluster connections. If configured then the connector configuration of the cluster configuration with this name will be used when connecting to the cluster to discover if a live server is already running, see `checkfor-live-server`. If unset then the default cluster connections configuration is used (the first one configured). If set, backup servers will only pair with live servers with matching group-name. The amount of time the replicating server will wait at the completion of the initial replication process for the replica to acknowledge it has received all the necessary data. The default is 30,000 milliseconds. Note: during this interval any journal related operations will be blocked. The following table lists all the ha-policy configuration elements for HA strategy Replication for slave : 276
277 High Availability and Failover Name `clustername` `groupname` `maxsavedreplicatedjournalssize` `allowfailback` `initialreplicationsynctimeout` Description Name of the cluster configuration to use for replication. This setting is only necessary if you configure multiple cluster connections. If configured then the connector configuration of the cluster configuration with this name will be used when connecting to the cluster to discover if a live server is already running, see `checkfor-live-server`. If unset then the default cluster connections configuration is used (the first one configured) If set, backup servers will only pair with live servers with matching group-name This specifies how many times a replicated backup server can restart after moving its files on start. Once there are this number of backup journal files the server will stop permanently after if fails back. Whether a server will automatically stop when a another places a request to take over its place. The use case is when the backup has failed over After failover and the slave has become live, this is set on the new live server. It represents the amount of time the replicating server will wait at the completion of the initial replication process for the replica to acknowledge it has received all the necessary data. The default is 30,000 milliseconds. Note: during this interval any journal related operations will be blocked. Shared Store When using a shared store, both live and backup servers share the same entire data directory using a shared file system. This means the paging directory, journal directory, large messages and binding journal. When failover occurs and a backup server takes over, it will load the persistent storage from the shared file system and clients can connect to it. This style of high availability differs from data replication in that it requires a shared file system which is accessible by both the live and backup nodes. Typically this will be some kind of high performance Storage Area Network (SAN). We do not recommend you use Network Attached Storage (NAS), e.g. NFS mounts to store any shared journal (NFS is slow). 277

278 High Availability and Failover The advantage of shared-store high availability is that no replication occurs between the live and backup nodes, this means it does not suffer any performance penalties due to the overhead of replication during normal operation. The disadvantage of shared store replication is that it requires a shared file system, and when the backup server activates it needs to load the journal from the shared store which can take some time depending on the amount of data in the store. If you require the highest performance during normal operation, have access to a fast SAN and live with a slightly slower failover (depending on amount of data). Configuration To configure the live and backup servers to share their store, configure id via the hapolicy configuration in broker.xml : <ha-policy> <shared-store> <master/> </shared-store> </ha-policy>. <cluster-connections> <cluster-connection name="my-cluster">... </cluster-connection> </cluster-connections> The backup server must also be configured as a backup. 278
279 High Availability and Failover <ha-policy> <shared-store> <slave/> </shared-store> </ha-policy> In order for live - backup groups to operate properly with a shared store, both servers must have configured the location of journal directory to point to the same shared location (as explained in Configuring the message journal) Note todo write something about GFS Also each node, live and backups, will need to have a cluster connection defined even if not part of a cluster. The Cluster Connection info defines how backup servers announce there presence to its live server or any other nodes in the cluster. Refer to Clusters for details on how this is done. Failing Back to live Server After a live server has failed and a backup taken has taken over its duties, you may want to restart the live server and have clients fail back. In case of "shared disk", simply restart the original live server and kill the new live server by can do this by killing the process itself. Alternatively you can set allow-fail-back to true on the slave config which will force the backup that has become live to automatically stop. This configuration would look like: <ha-policy> <shared-store> <slave> <allow-failback>true</allow-failback> </slave> </shared-store> </ha-policy> In replication HA mode you need to set an extra property check-for-live-server to true in the master configuration. If set to true, during start-up a live server will first search the cluster for another server using its nodeid. If it finds one, it will contact this server and try to "fail-back". Since this is a remote replication scenario, the "starting live" will have to synchronize its data with the server running with its ID, once they are in 279
280 High Availability and Failover sync, it will request the other server (which it assumes it is a back that has assumed its duties) to shutdown for it to take over. This is necessary because otherwise the live server has no means to know whether there was a fail-over or not, and if there was if the server that took its duties is still running or not. To configure this option at your broker.xml configuration file as follows: <ha-policy> <replication> <master> <check-for-live-server>true</check-for-live-server> <master> </replication> </ha-policy> Warning Be aware that if you restart a live server while after failover has occurred then check-for-live-server must be set to true. If not the live server will restart and server the same messages that the backup has already handled causing duplicates. It is also possible, in the case of shared store, to cause failover to occur on normal server shutdown, to enable this set the following property to true in the ha-policy configuration on either the master or slave like so: <ha-policy> <shared-store> <master> <failover-on-shutdown>true</failover-on-shutdown> </master> </shared-store> </ha-policy> By default this is set to false, if by some chance you have set this to false but still want to stop the server normally and cause failover then you can do this by using the management API as explained at Management You can also force the running live server to shutdown when the old live server comes back up allowing the original live server to take over automatically by setting the following property in the broker.xml configuration file as follows: 280
281 High Availability and Failover <ha-policy> <shared-store> <slave> <allow-failback>true</allow-failback> </slave> </shared-store> </ha-policy> All Shared Store Configuration The following table lists all the ha-policy configuration elements for HA strategy shared store for master : Name Description If set to true then when this server is stopped normally the backup will become live assuming failover. If false then the backup server will remain passive. Note that if false you want failover to occur the you can use the the management API as explained at [Management](management.md) If set to true then server startup will wait until it is activated. If set to false then server startup will be done in the background. Default is true. The following table lists all the ha-policy configuration elements for HA strategy Shared Store for slave : Name `failoveron-servershutdown` `wait-foractivation` `failoveron-servershutdown` `allowfailback` Description In the case of a backup that has become live. then when set to true then when this server is stopped normally the backup will become liveassuming failover. If false then the backup server will remain passive. Note that if false you want failover to occur the you can use the the management API as explained at [Management] (management.md) Whether a server will automatically stop when a another places a request to take over its place. The use case is when the backup has failed over. Colocated Backup Servers 281

282 High Availability and Failover It is also possible when running standalone to colocate backup servers in the same JVM as another live server. Live Servers can be configured to request another live server in the cluster to start a backup server in the same JVM either using shared store or replication. The new backup server will inherit its configuration from the live server creating it apart from its name, which will be set to colocated_backup_n where n is the number of backups the server has created, and any directories and its Connectors and Acceptors which are discussed later on in this chapter. A live server can also be configured to allow requests from backups and also how many backups a live server can start. this way you can evenly distribute backups around the cluster. This is configured via the ha-policy element in the broker.xml file like so: <ha-policy> <replication> <colocated> <request-backup>true</request-backup> <max-backups>1</max-backups> <backup-request-retries>-1</backup-request-retries> <backup-request-retry-interval>5000</backup-request-retry-interval> <master/> <slave/> </colocated> <replication> </ha-policy> the above example is configured to use replication, in this case the master and slave configurations must match those for normal replication as in the previous chapter. shared-store is also supported 282
283 High Availability and Failover Configuring Connectors and Acceptors If the HA Policy is colocated then connectors and acceptors will be inherited from the live server creating it and offset depending on the setting of backup-port-offset configuration element. If this is set to say 100 (which is the default) and a connector is using port then this will be set to 5545 for the first server created, 5645 for the second and so on. Note for INVM connectors and Acceptors the id will have colocated_backup_n appended, where n is the backup server number. Remote Connectors It may be that some of the Connectors configured are for external servers and hence should be excluded from the offset. for instance a Connector used by the cluster connection to do quorum voting for a replicated backup server, these can be omitted from being offset by adding them to the ha-policy configuration like so: <ha-policy> <replication> <colocated> <excludes> <connector-ref>remote-connector</connector-ref> </excludes>... </ha-policy> Configuring Directories Directories for the Journal, Large messages and Paging will be set according to what the HA strategy is. If shared store the the requesting server will notify the target server of which directories to use. If replication is configured then directories will be inherited from the creating server but have the new backups name appended. The following table lists all the ha-policy configuration elements for colocated policy: 283
284 High Availability and Failover Name `request-backup` `max-backups` `backup-requestretries` `backup-requestretry-interval` `backup-portoffset` Description If true then the server will request a backup on another node How many times the live server will try to request a backup, -1 means for ever. How long to wait for retries between attempts to request a backup server. How many backups a live server can create The offset to use for the Connectors and Acceptors when creating a new backup server. Scaling Down An alternative to using Live/Backup groups is to configure scaledown. when configured for scale down a server can copy all its messages and transaction state to another live server. The advantage of this is that you dont need full backups to provide some form of HA, however there are disadvantages with this approach the first being that it only deals with a server being stopped and not a server crash. The caveat here is if you configure a backup to scale down. Another disadvantage is that it is possible to lose message ordering. This happens in the following scenario, say you have 2 live servers and messages are distributed evenly between the servers from a single producer, if one of the servers scales down then the messages sent back to the other server will be in the queue after the ones already there, so server 1 could have messages 1,3,5,7,9 and server 2 would have 2,4,6,8,10, if server 2 scales down the order in server 1 would be 1,3,5,7,9,2,4,6,8,

285 High Availability and Failover The configuration for a live server to scale down would be something like: <ha-policy> <live-only> <scale-down> <connectors> <connector-ref>server1-connector</connector-ref> </connectors> </scale-down> </live-only> </ha-policy> In this instance the server is configured to use a specific connector to scale down, if a connector is not specified then the first INVM connector is chosen, this is to make scale down fromm a backup server easy to configure. It is also possible to use discovery to scale down, this would look like: <ha-policy> <live-only> <scale-down> <discovery-group-ref discovery-group-name="my-discovery-group"/> </scale-down> </live-only> </ha-policy> Scale Down with groups It is also possible to configure servers to only scale down to servers that belong in the same group. This is done by configuring the group like so: 285
53. Spring Integration 54. CDI Integration 55. Intercepting Operations 56. Protocols and Interoperability 57. Tools 58. Maven Plugin 59.
 Table of Contents 1. Introduction 2. Legal Notice 3. Preface 4. Project Info 5. Messaging Concepts 6. Architecture 7. Using the Server 8. Address Model 9. Using JMS 10. Using Core 11. Using AMQP 12. Mapping
Table of Contents 1.1. Introduction. Legal Notice 1.2. Preface 1.3. Project Info 1.4. Versions Messaging Concepts 1.7. Architecture 1.
 Table of Contents Introduction Legal Notice Preface Project Info Versions Messaging Concepts Architecture Using the Server Upgrading Address Model Using JMS Using Core Using AMQP Mapping JMS Concepts to
53. Interoperability 54. Tools 55. Performance Tuning 56. Configuration Reference
 Table of Contents 1. Introduction 2. Legal Notice 3. Preface 4. Project Info 5. Running the Server 6. Messaging Concepts 7. Architecture 8. Using the Server 9. Using JMS 10. Using Core 11. Mapping JMS
Table of Contents 1.1. Introduction. Legal Notice 1.2. Preface 1.3. Project Info 1.4. Messaging Concepts Architecture 1.7.
 Table of Contents Introduction Legal Notice Preface Project Info Messaging Concepts Architecture Using the Server Using JMS Using Core Mapping JMS Concepts to the Core API The Client Classpath Examples
Table of Contents. ActiveMQ Artemis Documentation
 Table of Contents 1. Introduction 2. Legal Notice 3. Preface 4. Project Info 5. Messaging Concepts 6. Architecture 7. Using the Server 8. Using JMS 9. Using Core 10. Mapping JMS Concepts to the Core API
HornetQ 2.0 User Manual. Putting the buzz in messaging
 HornetQ 2.0 User Manual Putting the buzz in messaging Table of Contents 1. Legal Notice...1 2. Preface...2 3. Project Information...3 3.1. Software Download...3 3.2. Project Information...3 4. Messaging
HornetQ User Manual Putting the buzz in messaging
 HornetQ User Manual Putting the buzz in messaging by Clebert Suconic (Red Hat, Inc.), Andy Taylor (Red Hat, Inc.), Tim Fox (Red Hat, Inc.), Jeff Mesnil (Red Hat, Inc.), Howard Gao (Red Hat, Inc.), Francisco
HornetQ 2.1 User Manual. Putting the buzz in messaging
 HornetQ 2.1 User Manual Putting the buzz in messaging Table of Contents 1. Legal Notice... 1 2. Preface... 2 3. Project Information... 3 3.1. Software Download... 3 3.2. Project Information... 3 4. Messaging
HornetQ User Manual Putting the buzz in messaging
 HornetQ User Manual Putting the buzz in messaging by Clebert Suconic (Red Hat, Inc.), Andy Taylor (Red Hat, Inc.), Tim Fox, Jeff Mesnil, and Howard Gao (Red Hat, Inc.) 1. Legal Notice... 1 2. Preface...
Red Hat JBoss AMQ 7.1
 Red Hat JBoss AMQ 7.1 Using AMQ Broker For Use with AMQ Broker 7.1 Last Updated: 2018-03-02 Red Hat JBoss AMQ 7.1 Using AMQ Broker For Use with AMQ Broker 7.1 Legal Notice Copyright 2018 Red Hat, Inc.
HornetQ Project. Much more than faster. Andrea Leoncini Senior Solution Architect Red Hat, Inc. 6 th of October 2011
 HornetQ Project Much more than faster Andrea Leoncini Senior Solution Architect Red Hat, Inc. 6 th of October 2011 Something about SOA SOA!= SOAP 2 3 Technicals notes Some stats HornetQ sets a record breaking
Red Hat JBoss AMQ 7.0
 Red Hat JBoss AMQ 7.0 Using AMQ Broker For Use with AMQ Broker 7.0 Last Updated: 2017-12-14 Red Hat JBoss AMQ 7.0 Using AMQ Broker For Use with AMQ Broker 7.0 Legal Notice Copyright 2017 Red Hat, Inc.
Real World Messaging With Apache ActiveMQ. Bruce Snyder 7 Nov 2008 New Orleans, Louisiana
 Real World Messaging With Apache ActiveMQ Bruce Snyder bsnyder@apache.org 7 Nov 2008 New Orleans, Louisiana Do You Use JMS? 2 Agenda Common questions ActiveMQ features 3 What is ActiveMQ? Message-oriented
Purplefinder Enterprise Platform Messagng with ActiveMQ. Peter Potts 13 th October 2010
 Purplefinder Enterprise Platform Messagng with ActiveMQ Peter Potts 13 th October 2010 Resources Manning Book: ActiveMQ in Action Apache Documentation & download: http://activemq.apache.org/ 8 example
MOM MESSAGE ORIENTED MIDDLEWARE OVERVIEW OF MESSAGE ORIENTED MIDDLEWARE TECHNOLOGIES AND CONCEPTS. MOM Message Oriented Middleware
 MOM MESSAGE ORIENTED MOM Message Oriented Middleware MIDDLEWARE OVERVIEW OF MESSAGE ORIENTED MIDDLEWARE TECHNOLOGIES AND CONCEPTS Peter R. Egli 1/25 Contents 1. Synchronous versus asynchronous interaction
Distributed Systems. Messaging and JMS Distributed Systems 1. Master of Information System Management
 Distributed Systems Messaging and JMS 1 Example scenario Scenario: Store inventory is low This impacts multiple departments Inventory Sends a message to the factory when the inventory level for a product
Red Hat AMQ 7.2 Configuring AMQ Broker
 Red Hat AMQ 7.2 Configuring AMQ Broker For Use with AMQ Broker 7.2 Last Updated: 2018-12-17 Red Hat AMQ 7.2 Configuring AMQ Broker For Use with AMQ Broker 7.2 Legal Notice Copyright 2018 Red Hat, Inc.
Inside WebSphere Application Server
 Inside WebSphere Application Server The anatomy of WebSphere Application Server is quite detailed so, for now, let's briefly outline some of the more important parts. The following diagram shows the basic
<Insert Picture Here> WebLogic JMS Messaging Infrastructure WebLogic Server 11gR1 Labs
 WebLogic JMS Messaging Infrastructure WebLogic Server 11gR1 Labs Messaging Basics Built-in Best-of-Breed Messaging (JMS) Engine Years of hardening. Strong performance.
Course: JBoss Training: JBoss AS 7 and JBoss EAP 6 Administration and Clustering Training
 Course: JBoss Training: JBoss AS 7 and JBoss EAP 6 Administration and Clustering Training Course Length: Duration; 4 days Course Code: WA 2060 This training course covers both the unsupported open source
Data Management in Application Servers. Dean Jacobs BEA Systems
 Data Management in Application Servers Dean Jacobs BEA Systems Outline Clustered Application Servers Adding Web Services Java 2 Enterprise Edition (J2EE) The Application Server platform for Java Java Servlets
Oracle WebLogic Server
 Oracle WebLogic Server Creating WebLogic Domains Using the Configuration Wizard 10g Release 3 (10.1.3) August 2008 Oracle WebLogic Server Creating WebLogic Domains Using the Configuration Wizard, 10g Release
JBOSS AS 7 AND JBOSS EAP 6 ADMINISTRATION AND CLUSTERING (4 Days)
") www.peaklearningllc.com JBOSS AS 7 AND JBOSS EAP 6 ADMINISTRATION AND CLUSTERING (4 Days) This training course covers both the unsupported open source JBoss Application Server and the supported platform
www.peaklearningllc.com JBOSS AS 7 AND JBOSS EAP 6 ADMINISTRATION AND CLUSTERING (4 Days) This training course covers both the unsupported open source JBoss Application Server and the supported platform
Red Hat JBoss Enterprise Application Platform 7.0
 Red Hat JBoss Enterprise Application Platform 7.0 Configuring Messaging For Use with Red Hat JBoss Enterprise Application Platform 7.0 Last Updated: 2017-09-28 Red Hat JBoss Enterprise Application Platform
Java Enterprise Edition
 Java Enterprise Edition The Big Problem Enterprise Architecture: Critical, large-scale systems Performance Millions of requests per day Concurrency Thousands of users Transactions Large amounts of data
Red Hat AMQ 7.2 Introducing Red Hat AMQ 7
 Red Hat AMQ 7.2 Introducing Red Hat AMQ 7 Overview of Features and Components Last Updated: 2018-07-16 Red Hat AMQ 7.2 Introducing Red Hat AMQ 7 Overview of Features and Components Legal Notice Copyright
EJB ENTERPRISE JAVA BEANS INTRODUCTION TO ENTERPRISE JAVA BEANS, JAVA'S SERVER SIDE COMPONENT TECHNOLOGY. EJB Enterprise Java
 EJB Enterprise Java EJB Beans ENTERPRISE JAVA BEANS INTRODUCTION TO ENTERPRISE JAVA BEANS, JAVA'S SERVER SIDE COMPONENT TECHNOLOGY Peter R. Egli 1/23 Contents 1. What is a bean? 2. Why EJB? 3. Evolution
Notes. Submit homework on Blackboard The first homework deadline is the end of Sunday, Feb 11 th. Final slides have 'Spring 2018' in chapter title
 Notes Ask course content questions on Slack (is651-spring-2018.slack.com) Contact me by email to add you to Slack Make sure you checked Additional Links at homework page before you ask In-class discussion
Red Hat JBoss Enterprise Application Platform 7.1
 Red Hat JBoss Enterprise Application Platform 7.1 Configuring Messaging For Use with Red Hat JBoss Enterprise Application Platform 7.1 Last Updated: 2018-07-11 Red Hat JBoss Enterprise Application Platform
Diplomado Certificación
 Diplomado Certificación Duración: 250 horas. Horario: Sabatino de 8:00 a 15:00 horas. Incluye: 1. Curso presencial de 250 horas. 2.- Material oficial de Oracle University (e-kit s) de los siguientes cursos:
Oracle Fusion Middleware
 Oracle Fusion Middleware Configuring and Managing JMS for Oracle WebLogic Server 11g Release 1 (10.3.4) E13738-04 January 2011 This document is a resource for system administrators who configure, manage,
Oracle Fusion Middleware
 Oracle Fusion Middleware Configuring and Managing JMS for Oracle WebLogic Server 11g Release 1 (10.3.1) E13738-01 May 2009 This document is a resource for system administrators who configure, manage, and
Introduction to WebSphere Platform Messaging (WPM)
") Introduction to WebSphere Platform Messaging (WPM) Unit Objectives After completing this unit, you should be able to discuss: Overview of WebSphere Messaging system Service Integration Bus Architecture
Introduction to WebSphere Platform Messaging (WPM) Unit Objectives After completing this unit, you should be able to discuss: Overview of WebSphere Messaging system Service Integration Bus Architecture
SHORT NOTES / INTEGRATION AND MESSAGING
 SHORT NOTES / INTEGRATION AND MESSAGING 1. INTEGRATION and MESSAGING is related to HOW to SEND data to and receive from ANOTHER SYSTEM or APPLICATION 2. A WEB SERVICE is a piece of software designed to
Introduction to WebSphere Platform Messaging (WPM)
") Introduction to WebSphere Platform Messaging (WPM) Unit Objectives This unit will discuss: WAS 5 and Messaging Overview of New WebSphere Messaging System Service Integration Bus Architecture and Components
Introduction to WebSphere Platform Messaging (WPM) Unit Objectives This unit will discuss: WAS 5 and Messaging Overview of New WebSphere Messaging System Service Integration Bus Architecture and Components
C-JDBC Tutorial A quick start
 C-JDBC Tutorial A quick start Authors: Nicolas Modrzyk (Nicolas.Modrzyk@inrialpes.fr) Emmanuel Cecchet (Emmanuel.Cecchet@inrialpes.fr) Version Date 0.4 04/11/05 Table of Contents Introduction...3 Getting
Red Hat JBoss A-MQ 7.0- Beta Using A-MQ Broker
 Red Hat JBoss A-MQ 7.0- Beta Using A-MQ Broker For use with A-MQ Broker 7.0 Red Hat Customer Content Services Red Hat JBoss A-MQ 7.0-Beta Using A-MQ Broker For use with A-MQ Broker 7.0 Legal Notice Copyright
Exam Name: IBM Certified System Administrator - WebSphere Application Server Network Deployment V7.0
 Vendor: IBM Exam Code: 000-377 Exam Name: IBM Certified System Administrator - WebSphere Application Server Network Deployment V7.0 Version: Demo QUESTION 1 An administrator would like to use the Centralized
Java EE Architecture, Part Two. Java EE architecture, part two 1
 Java EE Architecture, Part Two Java EE architecture, part two 1 Content Requirements on the Business layer Framework Independent Patterns Transactions Frameworks for the Business layer Java EE architecture,
Amazon MQ. Developer Guide
 Amazon MQ Developer Guide Amazon MQ: Developer Guide Copyright 2017 Amazon Web Services, Inc. and/or its affiliates. All rights reserved. Amazon's trademarks and trade dress may not be used in connection
<Insert Picture Here> QCon: London 2009 Data Grid Design Patterns
 QCon: London 2009 Data Grid Design Patterns Brian Oliver Global Solutions Architect brian.oliver@oracle.com Oracle Coherence Oracle Fusion Middleware Product Management Agenda Traditional
Open Message Queue mq.dev.java.net. Alexis Moussine-Pouchkine GlassFish Evangelist
 Open Message Queue mq.dev.java.net Alexis Moussine-Pouchkine GlassFish Evangelist 1 Open Message Queue mq.dev.java.net Member of GlassFish project community Community version of Sun Java System Message
IBM Software Group. IBM WebSphere MQ V7.0. Introduction and Technical Overview. An IBM Proof of Technology IBM Corporation
 IBM Software Group IBM WebSphere MQ V7.0 Introduction and Technical Overview An IBM Proof of Technology 2008 IBM Corporation Unit Agenda Why is Messaging Important to the Enterprise? What is WebSphere
Introduction to JMS & Apache ActiveMQ
 Introduction to JMS & Apache ActiveMQ The web meeting will begin shortly Dial-in Information: Participant Code: 90448865 US Toll free: (1) 877 375 2160 US Toll: (1) 973 935 2036 United Kingdom: 08082348621
X100 ARCHITECTURE REFERENCES:
 UNION SYSTEMS GLOBAL This guide is designed to provide you with an highlevel overview of some of the key points of the Oracle Fusion Middleware Forms Services architecture, a component of the Oracle Fusion
Ultra Messaging Queing Edition (Version ) Guide to Queuing
 Guide to Queuing") Ultra Messaging Queing Edition (Version 6.10.1) Guide to Queuing 2005-2017 Contents 1 Introduction 5 1.1 UMQ Overview.............................................. 5 1.2 Architecture...............................................
Ultra Messaging Queing Edition (Version 6.10.1) Guide to Queuing 2005-2017 Contents 1 Introduction 5 1.1 UMQ Overview.............................................. 5 1.2 Architecture...............................................
Reliable asynchronous web-services with Apache CXF
 Reliable asynchronous web-services with Apache CXF Florent Benoit, BULL/OW2 [ @florentbenoit ] Guy Vachet, France Telecom [guy.vachet@orange-ftgroup.com] New CXF transport allowing reliable Web Services
Administering JMS Resources for Oracle WebLogic Server c (12.1.3)
") [1]Oracle Fusion Middleware Administering JMS Resources for Oracle WebLogic Server 12.1.3 12c (12.1.3) E41859-05 November 2016 This document is a resource for WebLogic Server 12.1.3 system administrators
[1]Oracle Fusion Middleware Administering JMS Resources for Oracle WebLogic Server 12.1.3 12c (12.1.3) E41859-05 November 2016 This document is a resource for WebLogic Server 12.1.3 system administrators
Red Hat AMQ 7.1 Deploying AMQ Broker on OpenShift Container Platform
 Red Hat AMQ 7.1 Deploying AMQ Broker on OpenShift Container Platform For Use with AMQ Broker 7.1 Last Updated: 2018-06-14 Red Hat AMQ 7.1 Deploying AMQ Broker on OpenShift Container Platform For Use with
Oracle Fusion Middleware
 Oracle Fusion Middleware Programming JMS for Oracle WebLogic Server 11g Release 1 (10.3.1) E13727-01 May 2009 This document is a resource for software developers who want to develop and configure applications
Oracle Fusion Middleware
 Oracle Fusion Middleware Deployment Guide for Oracle Service Bus 11g Release 1 (11.1.1.5.0) E15022-03 April 2011 Oracle Fusion Middleware Deployment Guide for Oracle Service Bus, 11g Release 1 (11.1.1.5.0)
Administration Manual
 Administration Manual SAP J2EE Engine 6.20 Contents About This Manual... 10 Target Audience and Prerequisites... 10 Structure... 10 Documentation Conventions... 11 Further Reading... 11 Administration
Developing JMS Applications for Oracle WebLogic Server c (12.1.3)
") [1]Oracle Fusion Middleware Developing JMS Applications for Oracle WebLogic Server 12.1.3 12c (12.1.3) E41857-02 August 2015 This document is a resource for software developers who want to develop and
[1]Oracle Fusion Middleware Developing JMS Applications for Oracle WebLogic Server 12.1.3 12c (12.1.3) E41857-02 August 2015 This document is a resource for software developers who want to develop and
Oracle Fusion Middleware
 Oracle Fusion Middleware Administering Web Services 12c (12.1.2) E28131-01 June 2013 Documentation for developers and administrators that describes how to administer Web services. Oracle Fusion Middleware
(9A05803) WEB SERVICES (ELECTIVE - III)
 WEB SERVICES (ELECTIVE - III)") 1 UNIT III (9A05803) WEB SERVICES (ELECTIVE - III) Web services Architecture: web services architecture and its characteristics, core building blocks of web services, standards and technologies available
1 UNIT III (9A05803) WEB SERVICES (ELECTIVE - III) Web services Architecture: web services architecture and its characteristics, core building blocks of web services, standards and technologies available
WebSphere Application Server, Version 5. What s New?
 WebSphere Application Server, Version 5 What s New? 1 WebSphere Application Server, V5 represents a continuation of the evolution to a single, integrated, cost effective, Web services-enabled, J2EE server
Fast Track to EJB 3.0 and the JPA Using JBoss
 Fast Track to EJB 3.0 and the JPA Using JBoss The Enterprise JavaBeans 3.0 specification is a deep overhaul of the EJB specification that is intended to improve the EJB architecture by reducing its complexity
Transformation-free Data Pipelines by combining the Power of Apache Kafka and the Flexibility of the ESB's
 Building Agile and Resilient Schema Transformations using Apache Kafka and ESB's Transformation-free Data Pipelines by combining the Power of Apache Kafka and the Flexibility of the ESB's Ricardo Ferreira
Oracle Fusion Middleware
 Oracle Fusion Middleware Configuring and Managing the Messaging Bridge for Oracle WebLogic Server 11g Release 1 (10.3.1) E13741-01 May 2009 This document explains how to configure and manage a WebLogic
Introduction to Messaging using JMS
 Introduction to Messaging using JMS Evan Mamas emamas@ca.ibm.com IBM Toronto Lab Outline Basic Concepts API Architecture API Programming Model Advanced features Integration with J2EE Simple applications
Configuring the Oracle Network Environment. Copyright 2009, Oracle. All rights reserved.
 Configuring the Oracle Network Environment Objectives After completing this lesson, you should be able to: Use Enterprise Manager to: Create additional listeners Create Oracle Net Service aliases Configure
BEAAquaLogic. Service Bus. MQ Transport User Guide
 BEAAquaLogic Service Bus MQ Transport User Guide Version: 3.0 Revised: February 2008 Contents Introduction to the MQ Transport Messaging Patterns......................................................
Developing Applications with Java EE 6 on WebLogic Server 12c
 Developing Applications with Java EE 6 on WebLogic Server 12c Duration: 5 Days What you will learn The Developing Applications with Java EE 6 on WebLogic Server 12c course teaches you the skills you need
Oracle Fusion Middleware
 Oracle Fusion Middleware Creating Domains Using the Configuration Wizard 11g Release 1 (10.3.4) E14140-04 January 2011 This document describes how to use the Configuration Wizard to create, update, and
JBoss Messaging 2.0 Quickstart Guide. Setting the Standard for High Performance Messaging
 JBoss Messaging 2.0 Quickstart Guide Setting the Standard for High Performance Messaging Table of Contents 1. About JBoss Messaging...1 2. Getting Started...2 3. Download...3 3.1. Software Download...3
Chapter 2 WEBLOGIC SERVER DOMAINS. SYS-ED/ Computer Education Techniques, Inc.
 Chapter 2 WEBLOGIC SERVER DOMAINS SYS-ED/ Computer Education Techniques, Inc. Objectives You will learn: Domain - concept and implementation. Content of a domain. Common domain types. Production versus
FUSION REGISTRY COMMUNITY EDITION SETUP GUIDE VERSION 9. Setup Guide. This guide explains how to install and configure the Fusion Registry.
 FUSION REGISTRY COMMUNITY EDITION VERSION 9 Setup Guide This guide explains how to install and configure the Fusion Registry. FUSION REGISTRY COMMUNITY EDITION SETUP GUIDE Fusion Registry: 9.2.x Document
Red Hat Decision Manager 7.0
 Red Hat Decision Manager 7.0 Installing and configuring Decision Server on IBM WebSphere Application Server For Red Hat Decision Manager 7.0 Last Updated: 2018-04-14 Red Hat Decision Manager 7.0 Installing
RED HAT JBOSS FUSE. A lightweight, flexible integration platform
 RED HAT JBOSS FUSE A lightweight, flexible integration platform TECHNOLOGY OVERVIEW We knew that our previous integration hub simply wouldn t allow us to meet our goals. With Red Hat JBoss Fuse, we re
Vision of J2EE. Why J2EE? Need for. J2EE Suite. J2EE Based Distributed Application Architecture Overview. Umair Javed 1
 Umair Javed 2004 J2EE Based Distributed Application Architecture Overview Lecture - 2 Distributed Software Systems Development Why J2EE? Vision of J2EE An open standard Umbrella for anything Java-related
IBM Operational Decision Manager Version 8 Release 5. Configuring Operational Decision Manager on WebLogic
 IBM Operational Decision Manager Version 8 Release 5 Configuring Operational Decision Manager on WebLogic Note Before using this information and the product it supports, read the information in Notices
Enterprise Integration Patterns: Designing, Building, and Deploying Messaging Solutions
 Enterprise Integration Patterns: Designing, Building, and Deploying Messaging Solutions Chapter 1: Solving Integration Problems Using Patterns 2 Introduction The Need for Integration Integration Challenges
BEAAquaLogic. Service Bus. Native MQ Transport User Guide
 BEAAquaLogic Service Bus Native MQ Transport User Guide Version: 2.6 RP1 Revised: November 2007 Contents Introduction to the Native MQ Transport Advantages of Using the Native MQ Transport................................
presentation DAD Distributed Applications Development Cristian Toma
 Lecture 12 S4 - Core Distributed Middleware Programming in JEE Distributed Development of Business Logic Layer presentation DAD Distributed Applications Development Cristian Toma D.I.C.E/D.E.I.C Department
MTAT Enterprise System Integration. Lecture 2: Middleware & Web Services
 MTAT.03.229 Enterprise System Integration Lecture 2: Middleware & Web Services Luciano García-Bañuelos Slides by Prof. M. Dumas Overall view 2 Enterprise Java 2 Entity classes (Data layer) 3 Enterprise
Sun Java System Application Server 8.1: Administration & Deployment
 Sun Java System Application Server 8.1: Administration & Deployment Student Guide - Volume I IAS-4444 Rev A D62040GC10 Edition 1.0 D63846 Copyright 2006, 2009, Oracle and/or its affiliates. All rights
Web Application Development Using JEE, Enterprise JavaBeans and JPA
 Web Application Development Using JEE, Enterprise Java and JPA Duration: 5 days Price: $2795 *California residents and government employees call for pricing. Discounts: We offer multiple discount options.
Building the Enterprise
 Building the Enterprise The Tools of Java Enterprise Edition 2003-2007 DevelopIntelligence LLC Presentation Topics In this presentation, we will discuss: Overview of Java EE Java EE Platform Java EE Development
GlassFish v2.1 & Enterprise Manager. Alexis Moussine-Pouchkine Sun Microsystems
 GlassFish v2.1 & Enterprise Manager Alexis Moussine-Pouchkine Sun Microsystems 1 Some vocabulary Cluster a group a homogenous GlassFish instances administered as a whole Load-Balancing a strategy and implementation
Nirvana A Technical Introduction
 Nirvana A Technical Introduction Cyril PODER, ingénieur avant-vente June 18, 2013 2 Agenda Product Overview Client Delivery Modes Realm Features Management and Administration Clustering & HA Scalability
Describe the concepts and some practical applications of messaging. Describe the concepts and basic structure of JMS.
 Overview Describe the concepts and some practical applications of messaging. Describe the concepts and basic structure of JMS. Write simple JMS messaging code using the publish and subscribe and point-to-point
Oracle - Developing Applications for the Java EE 7 Platform Ed 1 (Training On Demand)
") Oracle - Developing Applications for the Java EE 7 Platform Ed 1 (Training On Demand) Code: URL: D101074GC10 View Online The Developing Applications for the Java EE 7 Platform training teaches you how
Oracle - Developing Applications for the Java EE 7 Platform Ed 1 (Training On Demand) Code: URL: D101074GC10 View Online The Developing Applications for the Java EE 7 Platform training teaches you how
SOA-14: Continuous Integration in SOA Projects Andreas Gies
 Service Mix 4 Topologies Principal Architect http://www.fusesource.com http://open-source-adventures.blogspot.com About the Author Principal Architect PROGRESS - Open Source Center of Competence Degree
Oracle Service Bus. 10g Release 3 (10.3) October 2008
 October 2008") Oracle Service Bus Tutorials 10g Release 3 (10.3) October 2008 Oracle Service Bus Tutorials, 10g Release 3 (10.3) Copyright 2007, 2008, Oracle and/or its affiliates. All rights reserved. This software
Oracle Service Bus Tutorials 10g Release 3 (10.3) October 2008 Oracle Service Bus Tutorials, 10g Release 3 (10.3) Copyright 2007, 2008, Oracle and/or its affiliates. All rights reserved. This software
Red Hat Process Automation Manager 7.0 Planning a Red Hat Process Automation Manager installation
 Red Hat Process Automation Manager 7.0 Planning a Red Hat Process Automation Manager installation Last Updated: 2018-08-31 Red Hat Process Automation Manager 7.0 Planning a Red Hat Process Automation
Services Oriented Architecture and the Enterprise Services Bus
 IBM Software Group Services Oriented Architecture and the Enterprise Services Bus The next step to an on demand business Geoff Hambrick Distinguished Engineer, ISSW Enablement Team ghambric@us.ibm.com
ActiveSpaces Transactions. Quick Start Guide. Software Release Published May 25, 2015
 ActiveSpaces Transactions Quick Start Guide Software Release 2.5.0 Published May 25, 2015 Important Information SOME TIBCO SOFTWARE EMBEDS OR BUNDLES OTHER TIBCO SOFTWARE. USE OF SUCH EMBEDDED OR BUNDLED
juddi Developer Guide
 juddi 3.0 - Developer Guide Developer Guide ASF-JUDDI-DEVGUIDE-16/04/09 Contents Table of Contents Contents... 2 About This Guide... 3 What This Guide Contains... 3 Audience... 3 Prerequisites... 3 Organization...
Oracle WebLogic Server 12c on AWS. December 2018
 Oracle WebLogic Server 12c on AWS December 2018 2018, Amazon Web Services, Inc. or its affiliates. All rights reserved. Notices This document is provided for informational purposes only. It represents
J2EE Interview Questions
 1) What is J2EE? J2EE Interview Questions J2EE is an environment for developing and deploying enterprise applications. The J2EE platform consists of a set of services, application programming interfaces
Administration Manual
 Administration Manual SAP J2EE Engine 6.20 Contents About This Manual...12 Target Audience and Prerequisites...12 Structure...12 Documentation Conventions...14 Further Reading...14 Administration Tools...15
Oracle Fusion Middleware
 Oracle Fusion Middleware Installation Planning Guide 11g Release 1 (11.1.1.7.0) B32474-16 June 2013 Oracle Fusion Middleware Installation Planning Guide, 11g Release 1 (11.1.1.7.0) B32474-16 Copyright
COPYRIGHTED MATERIAL. Getting Started with Geronimo. Where to Find Geronimo
 Getting Started with Geronimo The goal of this chapter is to get Geronimo up and running for your own system in the shortest possible time. The basic system requirements, on both Unix and Windows systems
Scaling DreamFactory
 Scaling DreamFactory This white paper is designed to provide information to enterprise customers about how to scale a DreamFactory Instance. The sections below talk about horizontal, vertical, and cloud
Gateway Property File Creation Oracle Banking Payments Release [May] [2018]
![Gateway Property File Creation Oracle Banking Payments Release [May] [2018]](/thumbs/96/129017233.jpg "Gateway Property File Creation Oracle Banking Payments Release [May] [2018]") Gateway Property File Creation Oracle Banking Payments Release 14.1.0.0.0 [May] [2018] ORACLE FINANCIAL SERVICES Table of Contents 1. CREATING PROPERTY FILE FOR GATEWAY APPLICATIONS... 1-1 1.1 INTRODUCTION...
Gateway Property File Creation Oracle Banking Payments Release 14.1.0.0.0 [May] [2018] ORACLE FINANCIAL SERVICES Table of Contents 1. CREATING PROPERTY FILE FOR GATEWAY APPLICATIONS... 1-1 1.1 INTRODUCTION...
Data Acquisition. The reference Big Data stack
 Università degli Studi di Roma Tor Vergata Dipartimento di Ingegneria Civile e Ingegneria Informatica Data Acquisition Corso di Sistemi e Architetture per Big Data A.A. 2016/17 Valeria Cardellini The reference
Building loosely coupled and scalable systems using Event-Driven Architecture. Jonas Bonér Patrik Nordwall Andreas Källberg
 Building loosely coupled and scalable systems using Event-Driven Architecture Jonas Bonér Patrik Nordwall Andreas Källberg Why is EDA Important for Scalability? What building blocks does EDA consists of?
Web Application Development Using JEE, Enterprise JavaBeans and JPA
 Web Application Development Using JEE, Enterprise Java and JPA Duration: 35 hours Price: $750 Delivery Option: Attend training via an on-demand, self-paced platform paired with personal instructor facilitation.
Java EE 7: Back-End Server Application Development
 Oracle University Contact Us: Local: 0845 777 7 711 Intl: +44 845 777 7 711 Java EE 7: Back-End Server Application Development Duration: 5 Days What you will learn The Java EE 7: Back-End Server Application
In the most general sense, a server is a program that provides information
 d524720 Ch01.qxd 5/20/03 8:37 AM Page 9 Chapter 1 Introducing Application Servers In This Chapter Understanding the role of application servers Meeting the J2EE family of technologies Outlining the major