Pega Agile Studio USER GUIDE 7.4
|
|
|
- Ami Garrett
- 5 years ago
- Views:
Transcription

1 Pega Agile Studio USER GUIDE 7.4
2 2018 Pegasystems Inc., Cambridge, MA All rights reserved. Trademarks For Pegasystems Inc. trademarks and registered trademarks, all rights reserved. All other trademarks or service marks are property of their respective holders. For information about the third-party software that is delivered with the product, refer to the third-party license file on your installation media that is specific to your release. Notices This publication describes and/or represents products and services of Pegasystems Inc. It may contain trade secrets and proprietary information that are protected by various federal, state, and international laws, and distributed under licenses restricting their use, copying, modification, distribution, or transmittal in any form without prior written authorization of Pegasystems Inc. This publication is current as of the date of publication only. Changes to the publication may be made from time to time at the discretion of Pegasystems Inc. This publication remains the property of Pegasystems Inc. and must be returned to it upon request. This publication does not imply any commitment to offer or deliver the products or services described herein. This publication may include references to Pegasystems Inc. product features that have not been licensed by you or your company. If you have questions about whether a particular capability is included in your installation, please consult your Pegasystems Inc. services consultant. Although Pegasystems Inc. strives for accuracy in its publications, any publication may contain inaccuracies or typographical errors, as well as technical inaccuracies. Pegasystems Inc. shall not be liable for technical or editorial errors or omissions contained herein. Pegasystems Inc. may make improvements and/or changes to the publication at any time without notice. Any references in this publication to non-pegasystems websites are provided for convenience only and do not serve as an endorsement of these websites. The materials at these websites are not part of the material for Pegasystems products, and use of those websites is at your own risk. Information concerning non-pegasystems products was obtained from the suppliers of those products, their publications, or other publicly available sources. Address questions about non-pegasystems products to the suppliers of those products. This publication may contain examples used in daily business operations that include the names of people, companies, products, and other third-party publications. Such examples are fictitious and any similarity to the names or other data used by an actual business enterprise or individual is coincidental. This document is the property of: Pegasystems Inc. One Rogers Street Cambridge, MA USA Phone: Fax: (617) DOCUMENT: Pega Agile Studio User Guide SOFTWARE VERSION: 7.4 PUBLISHED: Monday, May 14, 2018 Feedback If you have suggestions or comments for how we can improve our materials, send an to AppDocBug@pega.com.
3 CONTENTS Introduction 1 What's new in Pega Agile Studio? 1 User basics 3 What's on your portal 3 The header 4 Your current application 4 Project Management menu 5 Operator menu 6 Help menu 7 The left navigation 7 Search tool 7 Create menu 7 The work area 9 The Dashboard 12 My products, My releases, and My epics 12 Reports 13 Agile Workbench 14 Configuring your dashboard 16 Updating your operator profile 18 Setting your preferences 20 Changing your password 22 Switching applications 23 Using the Search tool 24 Searching for project work 24 Filtering results 25 Assigning project work 26 Assigning work 26 Managing resource preferences 27 Module 2: Products and releases 29 Working with products and releases 29 Pega Agile Studio User Guide 3
4 Adding and updating products 31 Adding a product 31 Updating a product 33 Retiring or withdrawing products 33 Retiring a product 34 Withdrawing a product 34 Adding and updating releases 35 Adding a release 35 Updating a release 35 Managing settings for a release 36 Restricting a release 37 Unrestricting a release 37 Retiring and withdrawing releases 37 Retiring a release 38 Withdrawing a release 38 Module 3: Goals and epics 39 Working with goals 39 Adding goals 41 Adding goals from a product or release Goals tab 41 Adding goals from a product entry screen 41 Maintaining and viewing goals 42 Viewing your followed goals 42 Viewing all open goals 42 Viewing product goals 43 Viewing release goals 43 Updating goals 45 Removing links to releases 45 Resolving goals 46 Reporting goal progress 47 Working with epics 47 Adding epics 49 Method 1. Selecting the Add Epic Action on a Goal or Release menu 49 Pega Agile Studio User Guide 4
5 Method 2. Selecting the Add Epic row action 49 Method 3. From the Create menu 49 Adding user stories to epics 50 Adding a user story from a list of epics 51 Adding user stories from an epic display 51 Adding stories using a template 52 Bulk processing user stories for epics 53 Maintaining and viewing epics 54 Viewing epics 54 Viewing dependencies for epics 56 Updating epics 57 Removing the link to a goal 57 Bulk processing epics 58 Resolving epics 58 Reporting on epics 58 Module 4: Project basics 60 Adding and removing yourself as a follower 60 Followers 61 Adding and removing yourself as a follower 61 Unfollow items from My Followed Items 61 Adding and editing dependencies 62 Viewing dependencies 62 Adding and editing a dependency 63 Tagging work 63 Tagging an item 64 Finding tags 64 Using the Tags tab 66 Reporting on Tags 66 Collaboration using PegaPulse 66 Tracking effort 68 Entering effort 68 Reporting on effort 71 Pega Agile Studio User Guide 5
6 Managing workbaskets 71 Adding workbaskets 72 Setting default workbaskets for releases 72 Viewing workbaskets 73 Viewing the contents of a workbasket 74 Bulk process workbasket items 74 Module 5: Scrum projects 77 Working with scrum teams 77 Adding a scrum team 78 When the project is created 79 Adding resources and assigning roles 80 Option 1: Add new resources 81 Option 2: Change resource roles 82 Option 3: Remove a resource 82 Editing your team and tracking project status 82 Updating the team details 83 Editing the definition of ready 83 Editing the definition of done 83 Override average velocity 84 Editing the Team Task List 84 Resolving and reopening scrum projects 85 Resolving a project 85 Completing a project 86 Withdrawing a project 86 Reopening a resolved project 86 Module 6: Sprints 88 Working with sprints 88 Sprint planning 89 Withdrawing a sprint 90 Team resource availability 90 Viewing the team's suggested velocity 92 How suggested velocity is calculated 92 Pega Agile Studio User Guide 6
7 Selecting stories 93 Planning tasks 95 Add common tasks to all stories 95 Add tasks to an individual story 97 Using the Scrum Board 99 What's on the Scrum Board? 100 Processing items on the Scrum Board 101 Changing statuses from the Scrum Board 103 Moving to New Status 103 Moving to Open Status 103 Moving to Blocked Status 103 Moving to Pending-Verification Status 104 Moving to Complete Status 104 Completing user stories from the Scrum Board 104 Selecting the Approve Option 104 Selecting the Send for Verification Option 105 Selecting the Reject Option 105 Selecting the Withdraw Option 106 Generating sprint documents 106 Documenting a sprint 107 Closing a sprint 107 Closing a sprint 108 Accepting an individual story 108 Accepting all open stories 109 Rejecting a story 109 Moving individual bugs and issues to the backlog 110 Moving all bugs and issues to the backlog 111 Module 7: Backlogs 112 Working with backlogs 112 Adding a backlog 114 Adding a backlog 114 Importing user stories from an Excel spreadsheet 114 Pega Agile Studio User Guide 7
8 Manually adding user stories to a backlog 116 Option 1: Enter it directly from the Backlog tab 116 Option 2: Enter it from the Create menu 118 Option 3 - Select the Import Stories from Excel action from the backlog 119 Importing user stories from an Application Profile 120 Importing stories from an Application Profile 120 Viewing teams associated with a backlog 122 Managing bugs and issues in backlogs 123 Module 8: Grooming backlogs 125 Grooming your backlog 125 Monitoring the status of user stories 126 Updating a status 126 Ranking user stories in a backlog 127 Method 1: Drag and Drop (Best Practice) 127 Method 2: Use the Quick Edit action 128 Method 3: Use the Edit menu 128 Bulk processing backlog stories 128 Bulk processing bugs and issues 130 Reporting on backlogs 132 Module 9: Bugs and issues 134 Working with bugs and issues 134 The Bugs & Issues tab 136 Adding bugs 137 Adding bugs from the Create menu 137 Triaging new bugs 139 Option 1: Approve and assign bug 139 Option 2: Resolve 140 Option 3: Request more info 141 Fixing bugs 142 Option 1: Fix bug 142 Option 2: Defer bug 143 Option 3: Request more info 144 Pega Agile Studio User Guide 8
9 Option 4: Resolve bug 145 Verifying bugs 147 Reopening bugs 148 Spin-off related work 149 Monitoring bug fixes 149 Tracking Development Activity 150 Monitoring progress, status, and resolution 151 Adding issues 152 Adding issues from the Create menu 152 Fixing issues 154 Option 1: Complete issue 154 Option 2: Resolve issue 154 Option 3: Defer issue 155 Module 10: Feedback items 157 Working with feedback items 157 Creating feedback items in Pega Agile Studio 158 Creating a feedback item 158 When the item is created 159 Viewing feedback items 159 Processing feedback items 160 Displaying feedback items 160 Processing feedback items 160 Module 11: Tracking Development Activity 164 Monitoring development activity in Pega Agile Studio 164 Viewing development activity from Pega Agile Studio 165 Viewing and recording your development work 165 Module 12: Reporting 167 Working with project reports 167 Using embedded reports 168 Using burndown charts 169 Reading your burndown chart 170 Calculating burndown data 171 Pega Agile Studio User Guide 9
10 Best practices for burndown data 171 Sprint burndowns 171 Release burndowns 171 Updating burndown chart trendlines 172 Creating custom reports 174 Creating a new report category 175 Copying or editing an existing report 176 Creating a new report 176 Tips for creating Pega Agile Studio reports 177 Pega Agile Studio reporting associations & joins 179 Using the Report Browser 181 Finding frequently requested report information 183 Pega Agile Studio User Guide 10
11 Introduction This guide is designed to help users of the Pega Agile Studio become familiar with basic and commonly used features that support the creation and management of Scrum projects in your organization. See What's New in Pega Agile Studio for a list of features and enhancements implemented in this version of the framework. For system administrators, see the Agile Studio 7.4 Implementation Guide for detailed instructions about how to perform post installation setup and configuration tasks that should be completed before users begin working in the application. The guide is divided into modules. Each module is structured around a number of topics that range from conceptual overviews and lists of features to detailed step by step instructions and visual examples explaining the recommended approach to creating and managing a scrum project and its related work. Module Describes... 1: Commonly used general features and functions and how to access them 2: Products and releases How to add and maintain products and releases 3. Goals and epics How to add and maintain goals and epics 4. Project basics Commonly used project features and functions and how to access them 5. Scrum projects How to add, maintain, and resolve projects 6. Sprints How to plan, add, and manage sprints including how to use the sprint planning wizard and scrum board 7. Backlogs How to create and manage backlogs 8. Grooming backlogs Best practices and processing functions that support backlog grooming 9. Bugs and issues How to add and manage bugs and issues in projects and backlogs 10. Feedback items How to enter and triage feedback items 11. Tracking development How to monitor and record activity performed in a development system by a project resource 12: Reporting Reporting options and how they can be used Glossary Collection of <Product Short Name> terminology descriptions What's new in Pega Agile Studio? The following improvements and enhancements are included in this release of Pega Agile Studio.
12 Provide application feedback via Pega s new Smart Feedback tool Smart Feedback enables Pega Platform 7.3 application users to send product feedback to a connected Pega Agile Studio system. In addition to entering textual feedback, users can take screen and video captures, and attach other files to their feedback. Note that the screen and video capture functionality is only available using Chrome. Along with these items, a file including important system information is attached by default. Include selected user story attachments in sprint documentation Users can now optionally include select user story attachments in sprint documentation. By default, all user story attachments uploaded by a user will be included in sprint documentation. This new functionality allows users to more easily share additional user story context with project stakeholders.
13 User basics Topics covered: What's on your portal Updating your operator profile Setting your preferences Changing your password Switching applications Using the Search tool Assigning project work Managing resource preferences What's on your portal Users: All Your portal is composed of three sections that provide access to the project management tools and functions that you need to create and manage projects and perform project work. The header The left navigation The work area The menus, tools, and project options that appear on your portal are set based on your project role.

14 The header The header contains menus and gadgets that provide you with quick access to the Project Management, Operator, and Help menus. Your current application This field displays the name of the application you are currently working in. If you have access to multiple applications, you can display and work in another application using the Switch To option on your Operator menu. In the example shown above, click on the application name (i.e., Pega Agile Studio) to display the Project Management menu options: View and Tool.

15 Project Management menu This menu allows you to navigate the two project menus Tools and View which display the processing and viewing options that your security settings allow you to perform. The options that appear are based on your project role. Tools menu Options on the Tools menu are typically restricted to use by project managers and scrum masters to perform administrative functions that maintain project resources, and also to identify development and testing environments that are typically connected to Pega Agile Studio. View menu Options on the View menu display lists of project items that have already been entered. From a list, you can select them for further review and processing.


16 Operator menu The options on the Operator menu allow you to switch applications, update your profile, change your password, edit your user preferences and log off.
17 Help menu This menu links you directly to the Pega Discovery Network (PDN) where you can display the Pega Agile Studio User Guide and information about what version of Pega Agile Studio you are using. You can also browse for other knowledge articles and Pega Platform publications from there. The left navigation The left navigation area contains all of the pre-built dashboard pages, the search menu, the create menu, and recent cases. Search tool This tool supports the entry of text strings and project item IDs to search for, locate, and display project work, tags, or Pulse posts. To use it, type a character or text contained in the item that you are searching for. Create menu Options on the Create menu create new project items. Certain case types can also be created within the context of other case types.

18 When in focus, your work, reports, lists, etc. display in the work area. You can toggle between various work using your RECENT list located in the Navigation panel. Click Close in the header of an item to close that item.

19 The work area The work area is the area located directly under the portal header where you display and perform project work. It is organized into two areas Navigation Panel on the left and Content display on the right. Anytime you select a menu option or display an assignment or unit of work, the Content area is populated with the selected item or landing page. This area displays with or without tabs based on settings in your user preferences.

20 When work is displayed, an item has visible links to its parent items in the Related area to the right of the item display. Clicking a link to a related item opens that item.
21

22 The Dashboard The Dashboard view is the default view you see when you log in to Pega Agile Studio. This view allows you to access the following gadgets from the work area, and each user can configure this to meet their needs. You can display the following gadgets on your dashboard by default. To do so, select them from the gadget list in your operator preferences. My Work displays the list of the backlogs you are linked to as a resource or a follower. Pulse displays the recent pulse messages for the cases that you are linked to as a resource or a follower. You can add or remove items from these lists by adding or removing yourself as a follower. To filter the content of a list, click the Filter icon to the right of a column header. This allows you to easily search the list for specific items. Use the search field above each list to search for items in the list by name. My products, My releases, and My epics These gadgets display a list of products, releases, and epics that you are linked to as a party or a follower. Gadgets that appear in the Navigation pane cannot be configured through the Dashboard preferences as

23 default gadgets. However, clicking one of them displays that list on the dashboard where you can filter its content in the same way. Reports Click Reports in the Navigation panel to display the Report Browser on the dashboard. The browser displays a number of report categories on the right side of the screen, and also displays the reports that you have recently run in the center of the screen. Click a Report Category to see the reports for that category. Click a report title to view that report. For more details about reporting in Pega Agile Studio, see Working with project reports. Click the question mark icon to display detailed information about how to use features and options in the Report Browser and access tutorial videos. Browser Options include: The Search reports field allows you to enter text strings to find and run existing reports. Results are displayed in a list in the center of the screen.
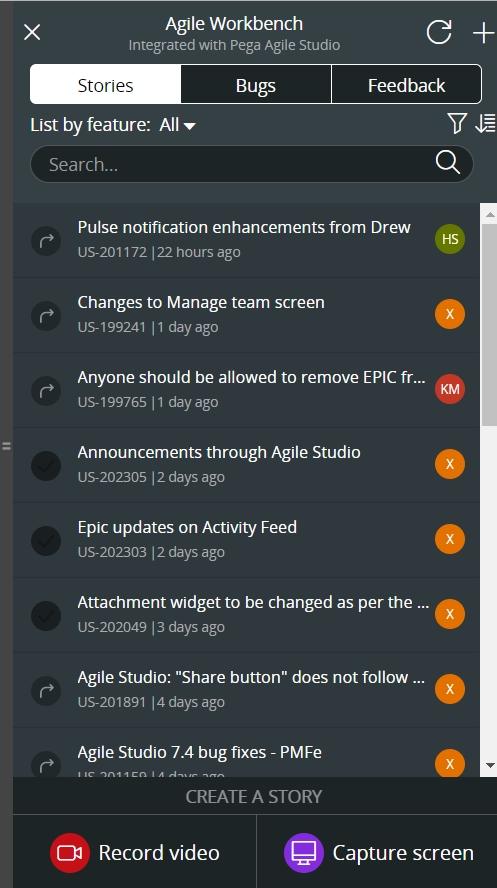
24 Add category allows you to create a new public or private reporting category. Add report launches the report writer tool and allows you to create reports. This option requires you to set up a Reporting Ruleset before you can create categories and reports. Reports can be listed under Private and/or Public Categories. PRIVATE CATEGORIES lists the private categories you can access. PUBLIC CATEGORIES lists reports that are provided with Pega Agile Studio as well as reports for use by users who have access to Pega Agile Studio. Agile Workbench This feature was introduced in Agile Studio 7.3 and higher. Agile Workbench helps users to capture real-time feedback in terms of Feedback, User Stories, and Bugs in the application. To access Agile Workbench, in the left navigation menu, click the pushpin icon. The collapsible Agile Workbench appears. You can create User Stories, Bugs, and Feedback items using Agile Workbench. For more information, see Agile Workbench.
25

26 Configuring your dashboard Click the gear icon in the top right corner to configure your own dashboard. This allows you to choose which gadgets can be placed on the dashboard as well as change the layout to maximize the space to meet your needs. Click Switch Template to customize the look of the dashboard, allowing you to place widgets side by side in various different formats.

27 Click Add Widget to add widgets to your dashboard from a pre-set menu.
28 You can also add widgets directly onto the dashboard when in edit mode. You can also drag and drop widgets to your desired location once they are placed on the dashboard (all within the edit dashboard view). Updating your operator profile Users: All From the Operator menu, you can change your name, phone, and information and upload a new profile image. The profile data that is entered here is also the data that appears when your ID is displayed in the Team list of a project, sprint/task group, or user story. If the Single Sign-on feature is enabled in your system, the edit fields display in read-only mode and you will not be able to update your profile. 1. On the portal header, click your name and select the Profile option. This screen displays in a pop-up window.

29 2. Click Edit Profile to display the profile fields you can update. The data defaults from your operator record. 3. You can update your Name, Position, Phone, , and Chat ID. 4. You can also browse for and select a new image for your profile. Click Upload Image to upload it to the file. A pop-up window displays when the upload is complete. Click OK. If you already display an image and want to remove it, click Delete Image. 5. Click Save. Changes are saved to your operator record and your new image displays.
30 Setting your preferences Users: All Operator preferences allow you to select your preferred item defaults, the default view for your dashboard display, and to specify settings for when and how you want to receive notifications.
31 1. On the portal header, click your name and select the Preferences option. Your ID and Name appear at the top of the display. This information defaults from your operator profile. In the DEFAULTS FOR NEW WORK section, use the fields to enter starting text and press the down arrow on your keyboard to display a list of values. Then, select the ID of the Backlog, Release, and Team
32 you want used as default values when you enter work from the Create menu. When a Backlog or Release is selected, the Product field displays and is populated with the product associated with the backlog or release. Select the Automatically follow all bug items that I create check box to add yourself as a follower of any bugs that you created. These bugs display in your list. Regardless of your preference setting, you can always manually elect to follow or unfollow an item. When you request a report from the Report Browser on your portal, the Default values can become the report's default criteria and filter options when the report is displayed. In the & NOTIFICATION SETTINGS section, indicate which notifications you want to receive. When a check box is selected, the selected action sends you an using the address that appears in your operator profile. The Enable Case Types (Pulse Notifications) section lets you choose which case types you follow to send you notifications when pulse comments are posted for them. 2. Click Save. Your changes take effect immediately. Changing your password Users: All You can change your password from the Operator menu located on the right side of your portal header. 1. On the portal header, click your name and select the Profile option. A pop-up window displays your operator profile.

33 2. Click Change Password. 3. Enter your current password in the Current Password field. 4. Enter your new password in the New Password field. 5. Enter the same password again into the Confirm Password field. 6. Click OK to activate your new password. The new password takes effect the next time you log on. Switching applications Users: All If your organization has another application on the same instance as Pega Agile Studio, and you have security to access and work in both applications, you can toggle between the two applications. 1. On the portal header, click your name and select the Switch To option to display a list of the other applications you can access. 2. Select the application you want to move to from the list appended to the menu. Your desktop refreshes and the selected application becomes your current application.
34 Using the Search tool Users: All The Search tool located on your project portal provides you with a flexible way to find and display project work. You can search on any string or item ID. Search performs a contains query. For example, if you enter Self Service, the search finds all work objects containing a string with Self Service, such as Customer Self Service or Self Service transactions. You can search for work items where a particular user is a party in the work item. For example, if you search for the Operator ID User1, the search returns all work objects that were assigned to, created by, or resolved by that user. You can also search for tags and Pulse posts. Matches display as links at the top of the search results. Select a tag to open the Tag Deck or a post to display the related item containing the post. When you sign on, the initial query searches for all work items (open or resolved) of all types that were updated at any time. If your search string does not produce the desired results on the initial search, change one or more filters and repeat the search. The project item opens automatically if you are searching with an item ID and the search finds an exact match. Searching for project work 1. In the Search tool, enter a text string, item ID, or Operator ID that relates to the work you are searching for. 2. Press the enter key or click the Search icon to search and display the results. Results are displayed as a list of items sorted by work type and other filters that you select with the search text highlighted in red.

35 The item opens a tab and displays automatically when you search with an item ID and search finds an exact match. 3. Otherwise, click on a row to open that item. Filtering results After the initial search is complete, results can be filtered by work type, work object, work status, and time. When you log on, the search defaults to these standard search criteria. Once you filter the display, the same criteria is used for subsequent searches until you change it or log out. The Case filter lets you specify which case type you are searching for, such as Backlog, Product, or User story. The Include filter lets you specify whether to include work items or attachments, or both. The Show filter lets you specify all work, work that is resolved, or work entered and worked on by you. The Last Updated filter lets you filter by item update time frames.

36 Assigning project work Users: All Project work can be assigned to a workbasket, team member, or yourself. Pega Agile Studio uses a standard set of assignment fields in entry and action forms for you to route an open work item. Where applicable to the type of project item you are processing, assignment fields display when you: Create a new unit of work Select the Reassign action Select the Edit action Perform bulk processing Assigning work Select the option from the selection list for the type of work assignment you want to make. If you select Workbasket, press the down arrow on your keyboard or type starting text in the empty field to display the list of available workbaskets. Select a workbasket. If you leave the field blank and the item is linked to a release version, the item is routed to a default workbasket specified in the item's product release.

37 If you select Resource, press the down arrow on your keyboard or type starting text in the empty field to display the list of available project resources. Select a resource. If you select Me, the item is assigned to you. Managing resource preferences Users: Senior Project Manager, Project Manager Project Resources are operators assigned to work for one or more projects. This can include developers, testers, and stakeholders, as well as the administrative members of a team. The Maintain Resource Preferences action allows you to search for resources in Pega Agile Studio and then update their operator preferences. This tool is helpful when you want to set common values for team members that default when they enter and update project assignments. Maintaining project resources is typically a management function. The sample SRProjectManager and Project Manager operators are configured with this privilege. 1. From the Project Management menu, select the Tools > Maintain Resource Preferences option to display a screen where you can view a list of resources, and then filter and sort the list to locate specific resources. 2. Click the column header to sort the list. 3. Click the down arrow in a column header to filter the column.
38 4. Click the Update Preferences button to display a resource's preferences. From here you can update their preferences in the exact same way that you would update your own user s.
39 Module 2: Products and releases Topics covered: Working with products and releases Adding and updating products Retiring and withdrawing products Adding and updating releases Retiring and withdrawing releases Working with products and releases Users: Senior Project Manager, Project Manager Products define the deliverables you implement in your applications to meet your organizational and market needs. A product provides overall visibility into its different releases and backlogs while a release of the product tracks activity for the different versions of a product. As part of your product planning process, you can plan one or more releases for a product and one or more goals for each release. Products and releases have separate lifecycles. You can update them, retire them when they are no longer active, and withdraw them if not used. You can create products from the Create menu in the portal header. You can create releases by selecting Add Release from the Actions menu of a Product. When created, products are identified by a PRD- prefix and releases by a RLS- prefix. You can view lists of Products and Releases from the Project Management menu View option. You can view a list of products and releases that you are following by clicking the My Products or My Releases option in the left panel.

40 Maintaining products and releases is configured as a management function. You must have the operator privilege to display menu options that create, update, retire, and withdraw products and releases. The sample SRProjectManager operator is configured with this privilege. For more information, see the Agile Studio 7.4 Implementation Guide. This diagram provides an example of the relationship between a product, its backlog(s), and its releases in a Scrum project. Each release is associated with one or more goals. The organization has a Customer Self Service for the Web product that is divided into four separate implementations - each defined as a release with a different version number and aligned with goals that define the implementation milestones expected to be completed in the release. Release 1.1 implements the ability to handle statement requests and address changes.
41 Release 1.2 implements integration with systems, online payments and disputes. Release 1.3 implements the self-service portal. Release 1.4 implements the mobile application and live chat capability. The Self Service backlog stores the backlog of user stories for the product, each of which can be associated with one of the product's releases. Adding and updating products User: Senior Project Manager When you add a product, it automatically creates and associates a release and a backlog with the product. Adding a product 1. From the Create menu, select Product to display the entry screen. 2. Enter a product Name. 3. Select a product Category to associate it with an implementation type. Application indicates that the product is associated with a full featured application. Component indicates that the product is a reusable component that can be used in an application or framework. Framework indicates that the product is associated with a framework. This value is captured for reporting purposes. It does not drive any functionality or processing. 4. Enter a product Description. 5. In the INITIAL RELEASE section, enter the initial release Name and a Version. 6. In the PRODUCT GOALS section, click the Plus icon to add and associate one or more goals with the product. Enter the Goal and Description.
42 7. Click Create to create and display the product. From the product display, select the Releases, Backlogs, and Goal tabs to view and access actions to update these components.
43 Updating a product When you update a product, you can update or add product details. 1. Display the product. o Click My Products in the navigation pane. Alternatively, from the Project Management menu select View > Products, and then choose the Product ID from the product list. The list displays open and retired products. It does not include withdrawn products. o Alternatively, click a Product ID link on a tab or form. 2. Click Edit. 3. Update the Name, Product Type, and Description fields. 4. Select the Enable Owner-Based Security on Features check box to allow only product owners to add or modify features for the product. 5. Click Submit. Retiring or withdrawing products User: Senior Project Manager You can choose to retire or withdraw a product if that product is no longer linked to an open backlog, goal, or release. Retiring a product sunsets a previously active product that is no longer needed. Withdrawing a product allows you to delete a product added in error or entered but never used. When a product is retired or withdrawn, it remains in the database. This allows you to use the Search field gadget to search for and optionally reopen it. Withdrawn products, however, are not displayed in the Product list accessed from the Project Management > View > Products menu option.
44 Retiring a product When you retire a product, the product status changes to Resolved-Retired but it will remain on the product list where you can select it and open it. 1. Display the product. 2. From the Actions list, select Retire Product. If the product is associated with an open backlog, release, or goal, it cannot be retired. The message Unable to resolve product due to open items appears. Click Show Open Items to display a list of the open items in a separate window where you can select them, review their content, and resolve them. Then, select Retire Product again to continue. 3. Enter the Reason for retiring the product. 4. Click Submit. Withdrawing a product When you withdraw a product, the product status changes to Retired-Withdrawn and it no longer appears on the product list. 1. Display the product. 2. From the Actions list, select Withdraw Product. If the product is associated with an open backlog, release, or goal, it cannot be withdrawn. The message Unable to resolve product due to open items appears. Click Show Open Items to display a list of the open items in a separate window where you can select them, review their content, and resolve them. Then, select Withdraw Product again to continue. 3. Enter the Reason you are withdrawing the product. 4. Click Submit.
45 Adding and updating releases Users: Senior Project Manager, Project Manager When you add a product, its initial release is created at the same time. You can augment that release with additional releases as you schedule and build more implementations of the product. Adding a release 1. Display the product to which you are adding the release. 2. From the Actions menu, select Create New Release. 3. Enter a Version and Release Name. The release name can be the same as a previously entered release but with a different version. Versions can be any alphabetical or numerical combination you choose. Example: 2.2, phase2 4. Enter a release Description. 5. Click the to select and enter the Planned Development Start and Planned Development End and the Generally Available/Released dates of the release. The start and end dates define the duration of the release burndown chart. The end date also determines in which month the release will display on the Product s Release Roadmap. 6. Click Save to create the release and assign it a unique RLS- ID. Updating a release When you update a release, you can choose whether you want to update the details or manage your settings. Updating the release is also the process you use to flag a release when it is complete and ready for general availability. You do that by updating its status and entering an availability date. 1. Display the Release.
46 Select it from My Releases in the navigation pane. Alternatively, from the Project Management menu select View > Releases and choose from the list of open and retired releases. Select a Release ID from the list. Alternatively, click the Release ID link on a tab or form. 2. Select Edit. 3. At the top of the screen, you can update the Version, Release Name and Description fields. 4. Enter Planned Development Start and Planned Development End dates. The start and end dates define the duration of the release burndown chart. The end date also determines in which month the release will display on the Product s Release Roadmap. 5. Select a Status. If the release is complete, select the Open-Available status to indicate that the release is generally available (GA). 6. Click Submit. Managing settings for a release You can set routing, approvals, and verification for a release. 1. Select a release from My Releases in the navigation pane. Alternatively, from the Project Management menu select View > Releases, and then choose from the list of open and retired releases. Select a Release ID from the list. Alternatively, click the Release ID link on a tab or form. 2. From the Actions list, select Manage Settings. 3. In the DEFAULT ROUTING section, select the default workbaskets for items that are associated with the release. 4. In the APPROVALS AND VERIFICATIONS section, indicate whether approval or verification is required for an item. 5. Click Submit.
47 Restricting a release When you click Restrict Release, you will be added as the Release Manager of that particular release. Only users assigned the Release Manager role are allowed to edit the release. Users assigned the Release Manager role can associate goals and epics to a release. Users assigned with different roles are not able to add or remove epics and goals to the restricted release. To restrict a release, complete the following steps: 1. On the release Work item, click Action > Restrict release. The following message appears: Are you sure to mark this release as "Restricted"? If so, only release managers can make any changes to this release. Also you can add others as Release Manager with same access rights." 2. Click Submit. Unrestricting a release Users assigned the Release Manager role can unrestrict the release. To unrestrict a release, complete the following steps: 1. On the release Work item, click Action > Restrict release. The following message appears: Are you sure to remove all the restrictions for this release? Anyone can make changes to this release if you do so." 2. Click Submit. Retiring and withdrawing releases User: Senior Project Manager You can choose to retire or withdraw a release. Retiring a release sunsets a previously active release that is no longer needed. Withdrawing a release allows you to delete a release added in error or entered but never used.
48 When a release is retired or withdrawn it remains in the database. This allows you to use the Search field gadget to search for and optionally reopen it. Withdrawn releases, however, are not displayed in the Release list accessed from the Project Management > View > Releases menu option. Retiring a release A release can be retired or withdrawn only when it has no open items such as bugs, stories, goals, or epics. When you retire a release, the release status changes to Resolved-Retired. It stays on the release list and can be included in reports. 1. Display the release. 2. From the Actions list, select Retire Product. 3. Enter the Resolution Notes to detail why you are retiring the release. 4. Click Submit. Withdrawing a release When you withdraw a release, the release status changes to Retired-Withdrawn. It is no longer visible on the list of available releases or available for reporting. 1. Display the release. 2. From the Actions list, select Withdraw Release. 3. Enter the Resolution Notes to detail why you are withdrawing the release. 4. Click Submit.
49 Module 3: Goals and epics Topics covered: Working with goals Adding goals Maintaining and viewing goals Working with epics Adding epics Adding user stories to epics Maintaining and viewing epics Working with goals Users: Senior Project Manager, Project Manager, Scrum Master, Product Owner Goals describe in business language what you are trying to achieve in a project to satisfy a business solution or solve a business problem. An example of a business goal is: Increase revenue by 15% by end of fourth quarter Decrease customer processing time by 20% by end of year Ensure at least 90% of quotes are processed in under 2 minutes A good business goal describes: What you want to change and how it changes A unit of measurement and targeted measure for the change Optionally, a target date for the goal to be met
50 In Pega Agile Studio, goals are associated with a single product and can link to one or more of that product's releases. Usually captured before the start of a Release, goals can be entered and updated throughout the lifecycle of the Product. Identified by their GOAL- prefix, goals have the following characteristics: They are ranked in order when associated with a Release They can link to one or more Epics Encouraging teams to associate work with Goals and Epics provides your project managers with the tools to assess how much work should be allocated towards a goal before a project begins. Goal setting also allows you to track team progress towards each goal throughout a release. This gives you the ability to adjust time
51 frames where necessary, and it highlights whether teams are working on items within the parameters of a goal - ensuring that there are no surprises at the end of a release if goals are not met. Adding goals User: Senior Project Manager Adding and maintaining goals is configured as a management function. You must have the operator security required to display menu options that create, update, and resolve goals. The sample SRProjectManager operator is configured with this security. You can add goals in several ways. Adding goals from a product or release Goals tab 1. From the Actions menu of a product or release, select Create New Goal. This displays a separate window that allows you to enter the goal information. 2. Enter a Name for the goal. 3. If you have the information, you can enter it into the Description, Business Value and Risks/Limitations fields. 4. Click Save. Adding goals from a product entry screen You can quickly add goals without limited details at the same time you create a product by entering the goals in the Product Goals section of the product entry screen. 1. Click the Plus sign to add a row and enter the goal. 2. Enter the GOAL and DESCRIPTION. 3. When the product is created, the goal ID is assigned.

52 Maintaining and viewing goals User: Senior Project Manager Goals have a lifecycle that is reflected by the goal status. They can have a status of Pending-Details, Pending- Resources, Open-InProgress, or Resolved. When they are resolved, they can be flagged as Resolved-Completed, Resolved-Retired, or Resolved- Withdrawn. Adding and maintaining goals is configured as a management function. You must have the operator security required to display menu options that create, update, and resolve goals. The sample SRProjectManager operator is configured with this security. This topic describes the most common actions you can use to view and maintain your goals. Viewing your followed goals You can view a list of the goals you are following by clicking My Goals from the left panel. Click a Goal from the list to display that goal. Viewing all open goals You can view a list of open goals or those goals associated with a product or a release across products. From the Project Management menu, select View > Goals. This displays a list of open goals across products. You can filter the list by GOAL, GOAL ID, PRODUCT and OWNER by clicking the down arrow to the right of a column header. You also can sort the display by clicking anywhere in a column header.


53 Viewing product goals From a product display, select the Goals tab to display the goals in a tree grid. Expand the nodes on the tree to view epics linked to each product goal, and then expand the epics to view the user stories that are linked to the epic. The Release column displays information about goal or epic associations to releases. Click a goal name to open the goal. Viewing release goals From a release, select the Goals tab to display the goals.

54 The list is sorted in the order the goals are ranked when you add them to the release. The rank is visible from the Edit menu or Update Goal Associations action of a release where you can use drag and drop to reset their rank. The Release field displays information about goal or epic associations to releases. Expand the goals to view epics linked to each goal and then expand the epics to view the user stories that are linked to the epic.

55 Click a goal name to open the goal. Updating goals You can update a goal to add detail or add an epic. 1. Select Edit. 2. Add or update your detail. 3. Click Submit. Removing links to releases You can add and remove a link to a release but you cannot remove a link to a product. There are two ways to remove the association between a release and a goal.
56 From a release 1. From a release display, select Update Goal Associations. 2. To add a goal to the release, click the Plus sign icon. Use the empty field to enter the Goal Name/ID or press the down arrow on your keyboard to select it. 3. To remove a goal, click the Trash icon. 4. Click Submit. From a goal 1. From a goal display, select Edit. 2. Click the "X" icon next to a release to remove a release association. 3. Click Submit. Resolving goals You can resolve a goal at any time during the lifecycle of a Product or Release if it has no open Epics. 1. From a goal display, select the Resolve action. 2. Select a resolution Status. o Complete - indicates that the goal was accomplished, sets the goal status to Resolved-Completed, and removes it from the list of open goals. The goal remains visible in the goals list of its associated product and releases. o o Retire - indicates that the goal is no longer is use, sets the goal status to Resolved-Retired, and removes it from the list of open goals. The goal remains visible in the goals list of its associated products and releases. Withdraw - indicates that the goal should be deleted, sets the goal status to Resolved-Withdrawn, removes it from the list of open goals, and deletes its product and release associations. 3. Enter the Reason you are resolving the goal. 4. Click Submit.
57 Reporting goal progress There are several displays where you can access reports related to goals. The Progress section of the Dashboard tab of releases contains a bar chart of Story count by Goal and Story Status. This chart provides insight into how you are progressing on defining and completing stories for the goals in your release. The Dashboard tab of a goal has reports specific to the goal. These reports show you Story Count by Epic & Status, Story Points by Project Team and Status, and User Stories associated with a tag by release and status. Working with epics Users: All It is a common practice to keep user stories small so the team is able to complete the implementation of a story in a single sprint. However, it is also common to organize stories that cannot fit into a single sprint but are related to the overall project and its releases into larger categories called epics. Think of epics as very large user stories or collections of user stories organized by a name. The epic represents a significant amount of work that is too large for a single story. They are broken down into smaller, manageable units of work that can be completed in single sprints or across multiple sprints. Pega Agile Studio includes an optional Epic field on user stories that allows you to flag and track these collections by a name. For example, user stories like these are candidates for epics because of the number of components and the order in which those components are developed: o Customizable End User Desktop As an end user, I want to be able to customize my desktop so I can get my work completed more efficiently based on my work patterns. o Visual Task Management As an end user, I want to manipulate my tasks from a screen so I get a complete view of my work o Guided Application Entry As an end user, I want the system to guide me through the application process so I can minimize training.

58 Epics are associated with a single product and can be optionally associated with a release. Epics can also be linked to one of that product's goals as well as associated with one or more user stories in sprints and backlogs. When thinking about features to include in a product or release, product owners may find it helpful to begin at a high level with epics and then break down those epics into more detailed stories. Epics can be entered and updated throughout the lifecycle of a product or release. Unlike goals, they can be added and maintained by all users. They are identified by their EPIC- prefix. Epics have a life cycle defined by the following stages:
59 Idea used to indicate that the epic is new and hasn t been targeted for a release yet. Plan the epic has been prioritized Design the business case is being defined, and the estimated cost and timeframe are being determined Schedule time frame is defined; initial stories are being written and the team(s) are being identified. Build teams are actively sprinting on stories in the epic Release Readiness all stories for the epic are complete. Documentation is complete and the epic s features are ready for rollout. Adding epics Users: All You can add epics using one of three methods. All methods display a full epic entry screen in a separate window. Entry details are described under Method 3. Method 1. Selecting the Add Epic Action on a Goal or Release menu 1. Open the release or goal. 2. On a release, select Add Epic from the Actions list. On a goal, click Add Epic on the Epics tab. 3. Enter the epic details in the window. 4. Click Save. Method 2. Selecting the Add Epic row action You can select the Add Epic action from the row actions when you click the Gear icon on the grid of the Goals tab of products and releases, and on the Epics tab of a goal. Method 3. From the Create menu This option displays the full range of detail fields and values that can be entered for an epic. It also allows you
60 to associate the epic with a product and, optionally, a release and goal linked to the product. 1. Select the Plus sign next to the search bar, and then click Epic. 2. Associate the epic with a Product. Use the fields to enter starting text or press the down arrow on your keyboard to select it. This field defaults to the default product listed in your operator preferences. Optionally, you can associate the epic with a Goal that is also associated with the product you select. You can also associate the epic with a Release. 3. Enter a Name for the epic. 4. Select the Current Stage. This defaults to Idea for new epics. 5. Enter a Priority value. The priority orders the epic in the epics list on the Epics tab of releases, the Epics tab of goals, and the Goals tab of products and releases. 6. Optionally, in the Affinity Sizing section, enter Estimated Story Points or Estimated Sprints. These fields are meant to be used in Affinity Sizing to record a rough guess of the size of the epic before the full story details are defined. This value is not automatically calculated once stories are sized, but it can be used as an historical view of the originally estimated size of the epic. The estimated story points for an epic are also used in the Epic Scheduler view. 7. Click Create. Adding user stories to epics Users: All You can add user stories to a backlog that is linked to a product associated with an epic. You can add the stories from an epic display or you can opt to download and use a preconfigured Excel template if you have more than two or three stories to add. This is the same process you use to add user stories to a backlog, but this process automatically links each story to the epic when the stories are created.
61 Adding a user story from a list of epics 1. From the Epics tab of a goal, click the Gear icon from an epic row. 2. Then, select the Add User Story action to display the full entry screen in a separate window. 3. Enter the story data. 4. Click Save to create and add the story. Adding user stories from an epic display 1. Open an epic. 2. From the Stories tab, click Add. Select the Import Stories from Excel action to add a story and display an entry screen in a separate window. 3. Use the auto complete box to enter starting text and search for and select a Backlog. The list is filtered to display only those backlogs linked to the product associated with the epic. 4. Enter a starting rank that indicates where you want these stories inserted into the backlog. If you leave the field blank, the stories are added to the top of the backlog. 5. For each user story you want to add, click the Plus sign icon to add a row to the grid at the bottom of the screen. 6. Enter a user story title in the NAME field. You also can add DESCRIPTION, and STORY POINTS columns. 7. Add the ACCEPTANCE CRITERIA. If you want to enter multiple criteria for a user story, separate them in the field with a line break using Alt > Enter. 8. Continue to add user stories by inserting additional rows in the grid. 9. Click Save to create the stories. The stories are added to the backlog with a status of New and a link to the epic. From here you can open

62 them to complete their detail and reset their rank. Adding stories using a template You can use a preconfigured template to add a large number of user stories and then import them into a backlog. This also allows you to copy and paste common values and text into the stories and their acceptance criteria. This feature adds new stories. It does not allow you to export existing stories to edit them and re-import them. 1. From the Stories tab of an epic display, click Add and select the Import Stories from Excel action. 2. Use the auto complete box to enter starting text to search for, and then select a Backlog. The list is filtered to display only those backlogs linked to the product associated with the epic. 3. Click Download Template to open the Excel user story spreadsheet template from a pop up window. A file name is assigned to it. In order to make the file easy to save and locate, the file name includes the backlog ID as a prefix. Do not add or remove columns from this spreadsheet. 4. For each user story you want to add, enter a user story title in the Name field. You also can enter value in
63 the Description and Story Points columns of the spreadsheet, and select a value from the list to populate the Assign to Workbasket column. If the Assign to Workbasket column is left blank, the story will be assigned to the default workbasket. Add Acceptance Criteria. If you want to enter multiple criteria for a user story, separate them in the cell with a line break by typing Alt+Enter. 5. Save the file locally. 6. Click Import to browse for and select the file. 7. Click Upload to load the file and populate the screen with the user stories. 8. Review and edit the stories. Click the Trash icon to delete a story if do not want to add it to the backlog. 9. Enter the Starting Rank to position the stories in the list when you add them to the backlog. 10. Click the Plus sign icon to add more stories to the grid of imported stories. 11. Click Save to accept and create the user stories. The stories are added starting with the rank indicated on the Add User Stories display, with a status of Pending-Details. From here you can open them to complete their detail. Bulk processing user stories for epics You can also bulk process the stories in an epic. 1. Display the epic, and then select the Stories tab. 2. Click the Gear icon and then select Bulk Process. 3. In the window, select the stories you want to process, select the action you want to perform, and then enter the required data. 4. Click Process Work.
64 Maintaining and viewing epics Users: All Epics have a life cycle defined by the following stages: Idea used to indicate that the epic is new and hasn t been targeted for a release yet. Plan the epic has been prioritized Design the business case is being defined, and the estimated cost and timeframe are being determined Schedule time frame is defined; initial stories are being written and the team(s) are being identified. Build teams are actively sprinting on stories in the epic Release Readiness all stories for the epic are complete. Documentation is complete and the epic s features are ready for rollout. When they are Resolved, they are flagged as Resolved-Completed or Resolved-Withdrawn. This topic describes the most common actions you can use to view and maintain your epics. Viewing epics You can view a list of the epics that you are following by clicking My Epics in the Navigation pane. Clicking an epic from the list displays that epic.

65 You can view a list that includes epics either from the Goals tab of products and releases or from the Epics tab of a goal. From this display, you can sort and filter the list using the column headers. Double-click an epic to display the details. Also, you can view a list of open epics and filter them by epic, ID, status, goal, and product. From the Project Management menu, select View > Epics. You can filter the list by clicking the down arrow to the right of any column header. You also can sort the display by clicking anywhere in a column header.

66 Viewing dependencies for epics To see how an epic is dependent on other epics, user stories, and bugs, and to edit those dependencies, click the dependencies icon on the Epics tab of a release goal. You can view the dependencies for an epic from the right side of the epic display screen. To add and remove dependencies, select the Edit Dependencies action from the epic.
67 Updating epics Epics can be updated by selecting Edit. 1. From this display, you can update any of the fields except the Product value that was set when the epic was created. If you change the goal to one that is linked to a different product, the epic's product is updated to reflect the current product of the selected goal. 2. Click Submit. Removing the link to a goal You can remove the link between an epic and a goal but you cannot remove a link between the epic and a product. 1. Select Edit. 2. Delete the value in the Goal field. 3. Click Submit.
68 Bulk processing epics You can bulk process the epics in a goal. 1. Display the goal, and then select the Epics tab. 2. Click the Gear icon and then select Bulk Process Epics. 3. Select the epics that you want to process, select the action you want to perform, and then enter the required data. 4. Click Process Work. Resolving epics You can resolve an epic at any time during the life cycle of a Product if it is no longer linked to an open user story. 1. From an epic display, select the Resolve action. 2. Select a resolution Status. o Complete - indicates that the epic has been completed, sets the epic status to Resolved-Completed, and removes it from the list of open epics. If it is linked to a goal, it remains visible in both the Epics tab of the goal and the Goals tab of its associated product. o Withdraw - indicates the epic should be deleted, sets the status to Resolved-Withdrawn, removes it from the list of open epics, and deletes its goal and product associations. You cannot withdraw an epic if it is associated with an open or resolved-completed user stories. 3. Enter the Reason you are resolving the epic. 4. Click Submit. Reporting on epics There are a number or reports designed to help you track the progress of epics. The Dashboard tab of a product has a report that displays a prioritized list of open epics for the product. There is also a pie chart that displays the open epics by goal for the product.
69 The Epics tab of the Progress section located on the Dashboard tab of a release shows the overall status of the stories in the epics associated with the release. The Dashboard tab on a goal includes a number of reports that group information by epic.
70 Module 4: Project basics Topics covered: Adding and removing yourself as a project follower Adding and editing dependencies Tagging work Tracking effort Managing workbaskets Adding and removing yourself as a follower Users: All You can easily choose to follow or not follow a case in Pega Agile Studio. When you follow an item, it displays in the MY FOLLOWED ITEMS list on your Dashboard. Following specific items such as Releases, Products, and Goals displays them in that specific area of your portal -- for example, My Releases.
71 Followers When you choose to follow an item, you are added as a follower of the item. You can view all followers of an item by clicking View All on the team display of the item. When you add yourself as a follower on an item, it appears in the MY FOLLOWED ITEMS section on your Dashboard. Choosing not to follow an item deletes the item from the MY FOLLOWED ITEMS section of your Dashboard and removes you from the stakeholder list as a Follower party of the item. Adding and removing yourself as a follower 1. From the header of any item, click Follow to add yourself as a follower. If you are already following a case, the button displays as Unfollow. 2. Click Unfollow to remove yourself as a follower. It is removed from your Followed Items list. Unfollow items from My Followed Items You can remove yourself as a follower of individual and multiple items from the My Followed Items list. Individual item click Unfollow on a row in the list Multiple items click Bulk Unfollow to display a check list of your followed items. From this list you have two processing options. Unfollow All Resolved Items removes you as a follower of resolved items on your list Unfollow Selected Items removes you as a follower of items you checked on the list
72 Adding and editing dependencies Users: All Dependencies help you identify and manage the order of completion or the scheduling of epics, user stories, tasks and bugs in your release. Item dependencies can span multiple project teams, and an item can have multiple dependencies. Viewing dependencies The dependency indicator is displayed in the final column of a tree or grid that displays epics, user stories, bugs, or tasks. When the indicator shows a count to its right the item has dependencies. When it is grayed, no dependencies are defined for that item. Clicking the indicator - whether black or gray - allows you to add, edit and remove dependencies. Dependencies can be viewed from the Related section of epics, user stories, bugs, and tasks. Dependency display From this gadget you can:
73 See if the dependent items are required before or after the current item View basic information about the dependent item such as its status, story points, associated backlog and project, and backlog rank Click the dependency Name or ID to open it and display its full detail Adding and editing a dependency You can add, edit, or remove dependencies. When you add a dependency, you can select whether the item is required before or after another user story, epic, bug, or task. 1. Select Edit Dependencies from the action menu or click a dependency icon in a tree or grid that displays a Dependency column. 2. In the Add New Dependency section, select the Item Type of the dependent item. 3. Enter starting text in the auto complete box and press your down key to find and select the dependent item. The item can be an epic, user story, task or bug. 4. Select whether the dependency item is required before or is required after this current item. 5. Click Add to add the dependency to the display. To add another dependency, select another item and click Add again. 6. Click the Trash icon to remove a dependency. 7. Click Save. The item is flagged with a "link" icon count to indicate it has a dependency. Tagging work Users: All You can tag items in Pega Agile Studio. A tag is a text value that you can associate with one or more items. You can select from a list of available tags or create new tags. You can search, access and report on tagged items.
74 You can use tags to group or categorize open or resolved items in any way you like, even across projects and products. For example, you could create a tag called customer_satisfaction to tag bugs that were found by or are impacting your customers. A tag can contain up to 64 characters and cannot contain spaces. Duplicate tag names on a single item are not permitted. The Tag icon displays a count of tags associated with the item and provides a way to view and edit those tags. Tagging an item 1. Display the item. Click the Tag icon or select the Manage Tags action from the Actions Menu to display the Manage Tags dialog box. You can also click the icon from a list of items. 2. Enter a tag using one of the following ways. Enter starting text in the auto complete box and press your down arrow key to find and select an existing tag. Enter text for a new tag. A tag can contain up to 64 characters and cannot contain spaces. Duplicate tag names are not permitted. 3. Click Add Tag. The tag appears in the ASSOCIATED TAGS list. To remove a tag from a work item, click the "X" in the row of the tag you want to remove. 4. Click Close to close the window. Finding tags You can search for tags using the Search tool in the Left Navigation. Matching tags display above the case results.
75 Click a Matching Tags result to open the Tags tab.
76 Using the Tags tab To access the Tags tab, select a tag in the Search results. For the selected tag, the Tags tab displays the following: Cases - A list of cases that have been tagged with your selected tag Posts- A list of pulse posts that have been tagged with your selected tag Reporting on Tags In addition to viewing tags from the Tags tab, Pega Agile Studio includes reports that provide information about how your project items are tagged. Items for Tag launched from the Report Browser Project Summary category User Stories for Tag by Release and Status launched from the Report Browser Scrum category or the Reports section of a Backlog Dashboard tab Bugs by Tag and Status launched from the Reports section of the Dashboard tab on Backlogs and Projects Collaboration using PegaPulse Users: All PegaPulse is a social activity stream that is available on Pega Agile Studio items that facilitates conversation and collaboration among resources, product owners, and other stakeholders.

77 It allows you to have and view conversations about particular user stories, bugs and any other item type within Pega Agile Studio instead of these conversations getting lost in s and other communication types. The Pulse feed allows you to post a message in the context of a case. Other users can then reply to that post or create a new top level post. You can also post files or links to the Pulse feed. Files attached to Pulse will also be attached to the item. You can see a count of Pulse posts associated with that item from many of the lists in Pega Agile Studio. This can be very useful while grooming stories or reviewing open bugs. Pulse entries are visible on: the Pulse tab of products and backlogs the Details tab of goals, epics, user stories, bugs, issues, tasks, feedback, and task groups
78 You can search for pulse posts using the Search tool at the top of the portal. At the top of the search results it displays Social/Pulse: n posts found as a link you can click to see the details. Tracking effort Users: All You can track the effort spent on bug items, tasks, and issues. The total effort is calculated for parent items so they can then be viewed and reported on to get a clear picture of how much effort remains and how much effort has been completed in each area. Entering effort Effort can be entered at various stages of the life cycle of a bug, task or issue. They can be entered from: Bug, issue, and task pop-ups from the scrum board Edit menu on bugs, tasks, and issues Resolution actions on bugs, tasks, and issues Check in, Save As, and New dialogs in your Pega Platform development environment when it is enabled with a communication link to Pega Agile Studio There are several different effort fields available in Pega Agile Studio. The value can be set in decimal fractions of an hour such as.5, 1.5, 1.25, 1.75, etc.
79 Planned Effort entered when you initially estimate the effort for a bug, task, or issue used to determine the default initial value for Remaining Effort Remaining Effort the hours remaining to complete this work initially set from Planned Effort if that field has a value should be manually updated - this value is not auto-calculated based on any value set to zero on resolution of a bug, task, or issue Hours Spent indicates the Hours spent on the item by an individual resource; can be used throughout the life of an item - typically entered at the end/start of each day to update the time spent on the item that day

80 more than one resource can enter hours spent towards an item is added to previous Total Hours Spent to calculate new total actual effort not directly related to Planned Effort or Remaining Effort Total Hours Spent the total hours spent tracked and/or entered against the item thus far; this is summed from the additional hours entered by each user. cannot be manually entered or edited calculated after input of Hours Spent sum of current all Hours Spent for all resources working the item
81 Total Estimated Effort sum of Remaining Effort and Total Hours Spent automatically calculated by system and cannot be edited by users Reporting on effort There are a number of reports that are designed to report on the effort spent on your release and project. the Report Browser Productivity/Throughput category contains many reports on efforts the Burndown Charts on the Dashboard tab of releases, projects, and sprints show the effort for items trended over time Managing workbaskets Users: All Workbaskets are routing destinations that hold project work that is not currently assigned to a project resource. Pega Agile Studio is configured with four workbaskets that represent four automatic routing categories for work associated with a product release. These workbaskets are also default selection values when you select workbasket as the routing option for project work, and when you use the Assign To action to process individual and bulk process items.
82 When a release is created, these preconfigured workbaskets are the default values for the routing categories of work described in the following table. Workbasket Name Routing Category Routes ProjectMgmtDefault Default/Active open, active, and in-process items ProjectMgmtApprovals Approval/Inbox new user stories, task groups, tasks, and bugs that require approval after entry ProjectMgmtVerif Verification completed user stories, task groups, tasks, and bugs that require verification before resolution ProjectMgmtdDefer Deferrals items that have been flagged for deferral Operators with system administrator privileges can add workbaskets. Those with privileges to add and update releases can specify the default routing for a release. All users can view the content of a workbasket. Adding workbaskets 1. Log in to Pega Agile Studio as an operator with access to the Designer Studio. Select Designer Studio > Org & Security > Tools > Workbaskets to display a list of available workbaskets. 2. Select one of the ProjectMgmt workbaskets to copy and save it to a new name or click Actions and select the +Create > Organization > Workbaskets option. 3. To display help for the workbasket entry fields, click Actions > Get Help. Setting default workbaskets for releases The default workbaskets for a release can be set by selecting Actions > Manage Settings option on the release display. To change a workbasket, click the down arrow next to a routing category to display a list of workbaskets and select a new value.

83 Viewing workbaskets Operators can view the items routed to a workbasket and display them for further processing. Items can be routed to workbaskets in several ways. Automatic default routing is associated with a release for Scrum bug and task approval or verification or any Pega BPM item when entered, approved, verified, or deferred. Assignment fields display depending on the type of project item when you: Create a new unit of work Select the Reassign action Select Edit Perform bulk processing Depending on your security level, you can view the content of a workbasket and process individual items or bulk process them.
84 Viewing the contents of a workbasket This process can be performed by all users and allows you to select a workbasket, view its contents, and select individual items for processing. 1. From the Project Management menu, select View > Resources & Workbaskets. 2. Select the Workbaskets tab. 3. Use the field auto complete box to enter starting text to find and select a workbasket. A list of items in that workbasket displays. 4. Select an item to process it. Bulk process workbasket items This process allows you to either transfer items from a workbasket or bulk process items in a workbasket. 1. From the Project Management menu, select View > Resources & Workbaskets. 2. Click Bulk Process. 3. Choose your filter criteria. By default, the display is filtered to show all items regardless of status assigned to you. You can change the filter values or delete a criteria row. You can also add new criteria by clicking the Plus sign icon.
85 4. Click Filter Work to apply the criteria and update the display with the items matching the filter criteria. 5. Select the items you want to process. 6. Select an action from the Select Action menu. The available actions are dependent on the item types you select. This table lists the available actions by item type. Item Type Project Sprint User Story Task Bug Available Actions Reassign Reassign Reassign Move Item, Reassign Reassign, Resolve Bug
86 Item Type Issue Feedback Epic Goal Task Group (Smart BPM only) Template (Smart BPM only) Backlog Available Actions Reassign, Resolve Issue Triage, Reject Reassign Reassign Reassign Retire Template, Return to Build Mode Reassign
87 Module 5: Scrum projects Topics covered: Working with scrum teams Adding a scrum team Adding resources and assigning roles Editing your team and tracking project status Resolving and reopening scrum projects Working with scrum teams Users: All Pega Agile Studio supports the structure and principles of the Scrum methodology in a way that allows you to create, manage, and report on your scrum projects from start to finish. Scrum projects are a composition of multiple building blocks - teams, sprints, user stories, tasks, bugs, and issues. The best practice is to create one project per scrum team. In Pega Agile Studio the terms project and project teams can be used interchangeably. This allows you to quickly view the velocity history for a team by simply viewing the project's sprints.
88 Adding a scrum team Users: Senior Project Manager, Project Manager This is a management function. The sample SRProjectManager and Project Manager operators are configured with this privilege.
89 1. From the +Create menu, select Team to enter project details. The best practice is to create one project per scrum team. 2. Enter a Name for the team. 3. Enter a Mission that describes the purpose of the team. 4. Optionally enter the team's Location. This field can hold any value you choose such as a country, a city, or a room number. 5. Enter the team's Default Backlog ID. This value helps streamline sprint planning and provides a view from the backlog of teams that pull work from that backlog. The team can still pull stories, bugs, and issues from a different backlog. 6. Select the team's default Sprint Length. This is used when you create new sprints to set the sprint start and end date. 7. Check the Auto Rebaseline Sprint Planned Efforts/Points box if you want the planned efforts/points to automatically reset the baseline when new stories are added mid-sprint. Leaving this box unchecked leaves the planned sprint values unchanged if the total number of story points in the sprint changes mid-sprint. 8. Optionally, enter the team's Initial Velocity (i.e., the number of story points the team can complete in a sprint). If the team is already established and knows their velocity, it can be entered here. This will be used to suggest a velocity during sprint planning for the project s first sprint. 9. Use the calendar icon to select the Start and End dates. The End date can be reset after the project has been created. 10. Click Create to create the project and display it. When the project is created A unique ID prefixed with PROJ- is assigned with a status of Open. You are added to the Project as a follower. This is visible by clicking View All on the Team tab. It is added to your My Teams list.

90 Adding resources and assigning roles Users: Senior Project Manager, Project Manager After you add a project, you can add project Resources and assign them roles in the project. A project's resources and their role assignments are visible in the Team list. Creating a team, by adding resources and role assignments, is a recommended best practice as you add sprints, party data will automatically default into the sprint. The Update Team action from the Team list allows you to add and remove project resources. It also allows you to assign or update the project role of a resource. Resources are members of your Scrum team who will work on stories. When you start a sprint for a project, all members of the project s team with a role of Resource, Scrum Master, or Product Owner will be added to the sprint team. Sprint resources appear on the first screen of Sprint Planning. This is typically a management function. The sample SRProjectManager and Project Manager operators are configured with this privilege. 1. Display the project. From the Team list on the right side of the display click Update Team.

91 This action displays the list of users currently associated with the team. From this display you can perform a number of options to add and update the Team list. You can add new resources to the team. You can also update the role or percent allocation associated with resources or remove them from the list. Any or all of these options can be performed before you click Save to process all of your additions and updates. Option 1: Add new resources 1. To add a specific resource, use the auto complete box to find a resource by name or ID and select it. Enter text or press the down arrow key to display a list of available values. 2. Click the down arrow next to the Role entry field to display a list of project roles. Select a role. If the selected role is Resource, you can optionally enter a percentage % Allocation. Use the percentage to indicate the portion of work time the resource works on this team. This feature is useful in planning when you have resources who work on a team less than 100% of the time. If the allocation is left blank, the resource's time is interpreted at 100%.
92 Option 2: Change resource roles 1. To change the project role assigned to a resource, click Edit on the row for the resource you want to change. The resource's Role and % Allocation fields display for edit. 2. Click the down arrow next to the Role field to display a list of project roles. Select a role. If the selected role is Resource, you can optionally enter a percentage allocation. Use this field to indicate the portion of the resource's time this resource works on this team. 3. Click the green check mark icon to process the update. 4. Click Save. Option 3: Remove a resource 1. To remove a resource, select the row for the resource and click the Trash icon. 2. Click Save. Editing your team and tracking project status Users: Senior Project Manager, Project Manager Throughout the life cycle of your team, various actions can be taken to update team settings and track the team's status. You can: Update the team details Edit the definition of ready Edit the definition of done Edit the team task list Track the team status
93 Updating the team details 1. Display the team. Select Edit. 2. Update the fields. 3. Click Submit. Editing the definition of ready Teams can create a definition of ready. This is used to list the criteria used to measure if their stories are in a state that is ready to be pulled into a sprint. It is visible from the Team's Details tab. The definition typically lists the things that must be done for each story during grooming in order for a story is considered ready. For example, criterion could be: Performance criteria has been identified OR UI Designs/Mockups are attached where appropriate. To set the definition of ready: 1. Display the project. From the Actions menu, select Update Definition of Ready. 2. Click the Plus sign icon to add a new row and enter a new item to the definition. 3. Click the Trash icon to remove a row from the list. 4. Click Submit. Editing the definition of done Teams can create a definition of done. The definition is used to list the criteria used to measure if their stories are done. It is visible from the Team's Details tab. The definition typically lists the things that must be done for each story in a sprint in order for that story to be considered truly done. For example, one criterion could be: Test scripts are updated and regression tests passed. To edit the definition of done: 1. Display the project. From the Actions menu, select Update Definition of Done. 2. Click the Plus signicon to add a new row and enter a new item to the definition.
94 3. Click the Trash icon to remove a row from the list. 4. Click Submit. Override average velocity A team s average velocity is displayed in the team header. This value is calculated as the average velocity from the team s 3 most recent sprints. In the circumstance where the calculated average doesn t line up with how the team is actually performing, the product owner or scrum master can use the Override Average Velocity action on the team to temporarily update this value. Once the next sprint is completed, the override will be replaced by the calculated average velocity from the last 3 sprints. To override the average velocity: 1. Display the project. From the Actions menu, select Override Average Velocity. The screen shows the team s current average velocity. 2. Enter a new velocity value to override the current value. 3. Click Submit. The team s header is updated to reflect the new velocity, and a history note is added to the team indicating that the user overrode the velocity. Editing the Team Task List Teams can create a list of default tasks that can be used to task out stories in their sprints. This list can contain common tasks that teams perform on most user stories in each sprint. For example, these tasks could be Update Automated Tests, Conduct Code Review, OR Update Release Notes with Story Details. During sprint planning or in an in-progress sprint, the team task list can be added to one or more stories. To edit the team task list: 1. Display the project. From the Actions menu, select Define Task List. 2. Click the Plus sign icon to add a new row and enter a new item to the task list. a. Enter a PRIORITY. This is the order the tasks will show up in a resource's worklist and a story's task list. The higher priority tasks appear at the top of these lists.
95 b. Enter a NAME for the task and optionally a DESCRIPTION. c. Enter the PLANNED HOURS. This is the time the task would typically take. d. Select the task TYPE. All details can be changed once the tasks are added to a story in a sprint. 3. You can also import a list of tasks from an Excel template by clicking Download Template and Import. 4. Click the Trash icon to remove a row from the list. 5. Click Submit. Resolving and reopening scrum projects Users: Senior Project Manager, Project Manager You can resolve an open scrum project after all project work is complete or if a project is being abandoned. You can reopen a resolved project as needed. These are typically management functions. The sample SRProjectManager and Project Manager operators are configured with these privileges. Resolving a project You can resolve an open scrum project by choosing one of two options. 1. You can Complete a project when all of the work associated with the project, including sprints, user stories, tasks, bugs, and issues, is finished and marked complete. Completed projects appear at the end of the project list displayed by the View > Projects option of the Project Management menu. They are also included in the My Teams area of your dashboard when you are listed as a project resource or stakeholder. 2. You can withdraw it and remove it from the project list even if it does not have associated child items. This option is typically used to remove projects that are mistakenly entered.
96 When a project is resolved it remains in the database. This allows you to use the search bar to search for and display them. You also can reopen them. Completing a project 1. From the Actions list of the project, select Complete. If the project has open items, it cannot be completed. The message Unable to complete project since it has open items displays. Click Show Open Items to display a list of the open items in a separate window. From here you can review open items and process them. When the items are resolved, select Complete again. 2. In the Resolution Notes text box, enter your resolution comments and details. This information will be visible in the Pulse feed for the project. Optionally enter values for the actual start and end date. 3. Click Submit. The project status is set to Resolved-Completed. Withdrawing a project 1. From the Actions list of a project display, select Withdraw Project. You cannot withdraw a project if it has sprints, bugs, or issues. In that case, an error message indicating that there are one or more child items open displays and you are unable to submit the action. 2. In the Reason for Withdrawing project text box, enter the reason you are withdrawing the project. This information will be visible in the Pulse feed for the project. 3. Click Submit. The project status is set to Resolved-Withdrawn. Reopening a resolved project You can also reopen a project that has been completed or withdrawn. When you reopen it, you can immediately begin adding, assigning, and managing additional project work to what has already been completed.
97 1. Use the search bar to enter the project name or its ID to search for a resolved project. or Select View > Projects from the Project Management menu and select the project from the list. Resolved projects appear at the end of the list. 2. Select the project to open it. 3. From the Actions list, select Reopen. 4. Click Submit.
98 Module 6: Sprints Topics covered: Working with sprints Sprint planning Using the Scrum Board Changing the work status from the Scrum Board Completing user stories from the Scrum Board Generating sprint documents Closing a sprint Working with sprints Users: All Pega Agile Studio contains tools and actions that are designed to support the tracking and management of sprints - the scrum concept where teams do their planning, development and review of activity within a predefined time box. Using these capabilities enables your team to: measure and predict sprint velocity improve quality by setting aside time for planning with easy to use tools and reports reduce risk by conducting frequent reviews with stakeholders drive product value by placing focus on the highest priority user stories You can view the currently active sprint for your teams in the My Teams view on the Dashboard.
99 Sprint planning Users: All The Sprint Planning tool guides you through the initial setup of a sprint - reviewing resource availability, selecting user stories from backlogs and creating tasks for those stories. It also helps you calculate sprint velocity based on resources that are available before you add stories to the sprint. The Sprint Planning Wizard is not supported in Pega Agile Studio. However, if you have a previous version of Pega Agile Studio and have existing sprints that were created but have not yet completed the sprint planning process, those sprints will use the old Pega Agile Studio Sprint Planning Wizard to complete planning. Sprints created starting with Pega Agile Studio use the new sprint planning process documented in the following topics. To access Sprint Planning use one of the following options: On the Sprints tab of a Project, click Plan Sprint on a sprint row. From the My Teams display on the Dashboard, click Plan Sprint for one of the sprints in the list. From a sprint that is in Pending-Planning status, click Plan Sprint. Sprint Planning is easy to use and most effective when you have identified your team resources and groomed your backlog so that you can pull in user stories that are fully qualified, ranked, sized, updated with acceptance criteria and in an Open-Ready status before you start your planning. Sprint Planning allows you to: Set the team's Resource Availability by selecting the project resources that perform sprint tasks and sets their availability. View the team's Definition of Done. View the team's previous sprint velocity and the suggested velocity for the current sprint. View the list of epics that the product owner had targeted to be worked on this sprint.
100 Select stories to pull in user stories from one or more backlogs. Perform Task Planning to create the initial tasks for the user stories. If you decide to exit Sprint Planning before you are finished, you can click Save and the sprint remains in Pending-Planning status. When you are ready, you can select the sprint from the Sprints tab of the project to resume planning from the point you exited. You will be unable to process work in the sprint until you finish sprint planning. When you do, the sprint is set to a Pending-Start status the user stories are pulled into the sprint the resources are added to the Team of the sprint you can continue to add tasks, bugs, and issues at the story and sprint level once you are ready to kick off your spring, you can click Start Sprint. Withdrawing a sprint During planning, if you decide that you do not want to create the sprint, you can withdraw it. From the sprint you want to withdraw, click the Actions list and select Withdraw. The sprint status is set to Withdrawn, and any stories that had been selected during sprint planning are moved back into the backlog in an Open-Ready status. Team resource availability Users: All This section, located on the right side of the Sprint Planning display, allows you to enter the availability for your team's resources during the sprint.

101 The resources you select are listed in the Team tab of the sprint when you complete planning. 1. When the planning screen loads, the operators listed on the Team tab of the project with a Role value of Resource default into the table as a starting resource list. 2. Click the Get Current Team link to refresh the sprint resource list with the current list of resources from the project team. 3. Click the Update Team link to add or remove a resource. Use the auto complete box to find and select resources. Enter the number of days the resource will be available for the sprint. Click the Trash icon to remove a resource from the list if that resource is not available to work on this sprint. Then, click Add to add the resources to the list for the sprint team. 4. Click OK to close the Update Team window. 5. The Days field displays for each resource. This defaults to the number of days in the sprint if the resource is
102 100% allocated to the team or defaults a reduced number of days if the resource is available for a smaller percentage of time. In the field, enter the number of days the resource is available to work on the sprint. If the resource is available but not for the length of time that has defaulted into the display, you can adjust the number of days for that resource. This value is added to the total number of days for all resources which is used to help calculate the suggested velocity. Once you complete the Sprint Planning step, you cannot modify the Days field for a resource. This value is intended to indicate the planned days for the resources as of the start of the sprint. When the sprint is resolved you can enter the actual days for each resource. Viewing the team's suggested velocity Users: All The Sprint Planning screen displays the suggested velocity that has been calculated for the sprint. Designed as a sprint planning tool it is used to help the team set a realistic planned story point goal based on available resources for the sprint. It is meant to be used as a reference point and guideline that does not require you to select or limit stories based on that velocity. If the suggested velocity is calculated at 50 but you only include 34 story points in the sprint, that sprint will have a planned sprint velocity of 34, not 50. How suggested velocity is calculated Suggested velocity is calculated using values from the most recently resolved sprints, if available, in combination with the total team days available from the Team resource availability section. The value changes when resources are added and removed or you change the number of days available on the Team Schedule.
103 If you have previously completed sprints, the team's average velocity and total actual person days available from the most recently resolved sprint in combination with the total team days available from the Team Availability for this sprint are used to calculate the suggested velocity. The formula is AverageVelocity/LastSprintTotalDays*NewSprintTotalTeamDays. Example: If 42 total days available for a sprint are multiplied by a value of.5 points per day for the previous sprint, a suggested velocity of 21 is calculated for the sprint. 42/5=21. If you do not have previously completed sprints, another formula is used to calculate the suggested velocity for the initial estimate. This formula is set in a Decision tree called DetermineVelocityForFirstSprint that can be customized by your system administrator if you want to calculate projected velocity for a project s initial sprint differently. The default calculation is Suggested Velocity = Total Team Days in Current Sprint *.6/1 where.6 is the ideal working day, in which the resource works on sprint work for 60% of each day. 1 represents the number of days it takes an average team to complete 1 story point. Given that your organization and teams may differ on how big 1 story point is, this formula is intended to provide a working example. It can be customized for your implementation by creating your version of the decision tree in your Pega Agile Studio custom Ruleset. Selecting stories Users: All The Available Stories and Selected Stories section allows you to quickly select and add user stories to the sprint from one or more backlogs. From a best practice standpoint, you should only add user stories that are groomed and in an Open-Ready status. By default, you will see all Open-Ready stories assigned to the team from the team's default backlog. The stories you select in this step are not moved to the sprint until you have finished sprint planning by clicking Save and Continue. 1. Use the auto complete box to find and select a backlog. This field defaults to the Default Backlog of the Project. If you want to open the selected backlog, click the Search icon next to this field.

104 2. When a backlog is selected, a list of top ranked stories in the backlog with an Open-Ready status displays. 3. You can toggle the For my team check box to show stories that have been associated with the project team in the backlog or to show all stories. By default, all stories assigned to the team are shown but if you want to see all Open-Ready stories, clear the box. 4. To sort the story list, click a column header. 5. To add a story to the sprint, click the Plus sign icon next to the story. This places it in the SELECTED STORIES list at the bottom of the screen and adds its story points to the Total Points for Selected Stories value. 6. Click Create User Story to add a new user story and append it to the SELECTED STORIES list. 7. If you want to add stories from another backlog, select the backlog and repeat the process to add those items to those you have already selected. 8. To remove stories from the SELECTED STORIES list, click the Minus sign icon on the row of the story you want to remove. This moves the story back to its original backlog and subtracts its story points from the Total Points for Selected Stories value. 9. When you have finished adding stories, click Save & Continue to start the sprint. The sprint status changes to Pending-Start and the selected stories are now visible in the Stories tab of the sprint. 10. Click Start Sprint to start the sprint. This action:
105 Changes the status of the sprint and all stories in the sprint to Open-InProgress Starts the burndown tracker for the sprint Initializes the scrum board. Planning tasks Users: All When a sprint is in a Pending-Start or Open-InProgress status, you can add tasks to the open stories in the sprint. A common set of tasks can be added to all stories or tasks can be added individually to stories. You can add the task detail and update the target hours from the sprint's story list or the scrum board once the story is in an Open-InProgress status. A recommended and best practice is to task out your user stories during sprint planning. In this way the team can agree on the work required to meet the acceptance criteria and definition of done for each story. It is also a good practice to try to estimate the effort for each task so that an hours burndown chart can be used to track how work is progressing. There are two ways to add tasks from the Stories tab of a sprint: Add a set of common tasks to all stories Add a set of tasks to an individual story Add common tasks to all stories This action allows you to import tasks from your team's task list using a Microsoft Excel template or enter a set of tasks into a grid. When you click Submit, all tasks are added to the open stories in the sprint. You can create a default task list for your project team and import it into your sprint's stories to quickly task out the common work across stories. You also can enter basic user story data into an Excel spreadsheet template and import it to quickly add tasks. This method is helpful when you have a standard set of tasks that your team or organization uses on all stories, such as Create Test Script or User Documentation. 1. Open the Sprint. 2. Click Add and select Add Tasks to Stories.

106 3. If you have already defined a task list for the team, Pull in Team's Task List appears on the screen. Click to populate the screen with tasks from the task list. 4. You also can click Download Template to open the Excel task spreadsheet template. A file name is assigned to it prefixed with the sprint ID to make it easy to save and locate. You cannot add or remove columns from this spreadsheet. 5. For each task you want to add, enter a task name in the Name field and a Priority value. You also can add a Description and Target Effort (in hours). You can select a value from the list to populate the task Type field. 6. Save the file locally. 7. Click Import to browse for and select the file. 8. Click Upload to load the file and populate the screen with the tasks. 9. Review and edit the tasks. Click the Trash icon to delete a task if do not want to add it to the stories.

107 10. Click the Plus sign icon to add more tasks to the grid of imported tasks. 11. Click Save to accept and create the tasks. The tasks are added to all of the open stories in the sprint with a status of New. You can expand a story row in the list to view its associated tasks. Add tasks to an individual story 1. Open the sprint. 2. Click the Gear icon on the row of the story you want to add the task to and select the Add Tasks to Story action to display the Add Tasks to Story entry screen. 3. Expand the User Story Details to view the story description and acceptance criteria. 4. If you have already defined a task list for the team, Pull in Team's Task Listappears on the screen. Click to populate the screen with tasks from the task list. 5. You also can click Download Template to open the Excel task spreadsheet template. A file name is assigned to it prefixed with the sprint ID to make it easy to save and locate.
. You can select a value from the list to populate the task Type field. 7. Save the file locally. 8.")
108 You cannot add or remove columns from this spreadsheet. 6. For each task you want to add, enter a task name in the Name field and a Priority value. You also can add a Description and Target Effort (in hours). You can select a value from the list to populate the task Type field. 7. Save the file locally. 8. Click Import to browse for and select the file. 9. Click Upload to load the file and populate the screen with tasks. 10. Review and edit the tasks. Click the Trash icon to delete a task if you do not want to add it to the stories. 11. Click the Plus sign icon to add more tasks to the grid of imported tasks. 12. Click Save to accept and create the tasks. The tasks are added to the story in the sprint with a status of New. You can expand the story row in the list to view its associated tasks.
109 Using the Scrum Board Users: All The Scrum Board displays the content of the sprint in an easy to use visual grid format that allows your team to view, discuss and interactively update the status of tasks, bugs, and issues in the sprint. It also helps geographically distributed teams stay on the same page and have informative daily standups and sprint reviews. Using the Scrum Board Enforces best practices for monitoring and managing the development effort Allows team members and other stakeholders to see at a glance the progress the team has made in a sprint Monitors story points and remaining hours at the sprint and story level Allows team members to action and move items on the board at the time of discussion Allows you to drag and drop tasks to update their status Allows you to add new bugs and tasks to the Scrum Board mid-sprint Interactively updates the board when sprint items are processed outside of the board The Scrum Board is created when you click Start Sprint to move the sprint to an Open-InProgress status. The Scrum Board button appears on the Stories tab of the sprint. Click to open it in a separate window.

110 What's on the Scrum Board? The following example illustrates the Scrum Board as it is initially displayed after you complete sprint planning. It is structured as grid where: Rows represent a user story in the sprint or a collection of sprint bugs or sprint issues included in the sprint but not targeted to be completed as part of a user story Columns represent work statuses and track the progress of the tasks, bugs, and issues in the sprint Column 1 is the anchor column for the user story, sprint bugs and sprint issues. It displays the story points and remaining hours associated with the tasks and bugs. Columns 2-6 track the status of items which are in one of the following statuses.

111 New - added to the sprint but not yet worked Blocked - unable to work the item because of another factor; for example: a dependency, system availability Open - item is currently being worked Pending Verification - item requires verification before completion Complete - work is resolved Processing items on the Scrum Board You can add and process the items in the sprint without leaving the Scrum Board display. Tasks, bugs, and issues are represented on the Scrum Board by actionable shapes. Each shape displays basic information about the item - ID, Name, Workbasket, or Operator, the item it is assigned to and its remaining effort. When any of the values are too long to display, they are truncated but the full value can be viewed in the shape's tool tip when you hover over it.

112 Use drag and drop to move them from one column to another to change its status. Items in the complete column display a red check mark if their status is Resolved-Completed. Items, such as tasks, bugs, and issues, that have been rejected display without a check mark. Right-click a user story shape in the anchor column of the display to perform any of these actions. Open - opens the item in its own tab of the work area Add Task - adds another task with full detail to the story in a pop-up window; a task shape is added a column in the story row based on status; updates the story points and remaining hours Add Bug - adds a bug item to the user story row; also available from the Bugs shape to add a bug to that row Add Issue - adds an issue to the user story row; also available from the Issues shape to add an issue to that row Add Note - adds comments and notes about the item that is stored in the item's Pulse feed Mark as Blocked - marks the story as blocked from making progress Resolve - allows you to complete a user story by selecting options to approve, reject, withdraw or send it story for verification Withdraw - resolves the story with a Resolved-Withdrawn status and removes it from the sprint and/or backlog
113 Double-click any item to view its details in a pop-up window. If the item is not resolved, you can update its details and/or reassign it to another resource or workbasket. Right-click a task, bug, or issue to select and perform one of these actions: Open - opens the item in its own tab in your work area Withdraw - withdraws the item and removes it from the scrum board Add Note - adds comments/notes to the item and stores them in the item s Pulse feed Click the Refresh icon to refresh the board with any updates you or others make to items in the sprint. Changing statuses from the Scrum Board Users: All You can quickly change the status of a task, bug, or issue by dragging and dropping it on the scrum board. Moving to New Status Dropping a bug, task, or issue in the New column sets the status on that item to New. Moving to Open Status When you drop a task, bug, or issue in the Open column, a window displays that allows you to select who the item should be assigned to. This defaults to the current user. Optionally, you can enter some instructional notes. Notes display in the Pulse feed for the item. The status of the item is set to Open. Moving to Blocked Status When you drop a task, bug, or issue in the Blocked column, a window displays that prompts you to enter a note indicating why the item is blocked and optionally allows you to add a dependency to track which item is blocking it. Notes entered on this screen are displayed in the Pulse feed for the blocked item. The item's status is set to Pending-Blocked to indicate that the team is currently blocked from making progress on this item.
114 Moving to Pending-Verification Status When you drop a task, bug, or issue in the Pending-Verification column, a window displays that allows you to enter a Note and to enter the actual resource Hours Spent. When moving bugs to this column, it is required that you enter a Note and that the total Hours Spent is greater than zero. Any notes entered on this action will show on the Pulse feed for the item. The status of the item is set to Pending-Verification. Moving to Complete Status When you drop a task, bug, or issue in the Complete column a window displays that allows you to enter a Note and to enter actual resource Hours Spent. When moving bugs to this column, it is required that you enter a Note and that the total Hours Spent is greater than zero. Any notes entered on this action will show on the Pulse feed for the item. The status of the item is set to Resolved-Completed. Completing user stories from the Scrum Board Users: All When you are working in a sprint, you can complete the user stories from the Scrum Board. 1. Double-click the story shape in the first column to review and edit details for the story before completing it. 2. Right-click the shape to select the Resolve action. 3. A window displays a drop down with the four options you can select to complete the user story. If there are unresolved bugs associated with the story you cannot Approve or Withdraw the story. The action automatically resolves the items for you when you click OK. The best practice is to resolve the tasks, bugs, and issues as the work is completed so that your sprint burndown charts reflect the actual pace of work completion. 4. Select your story resolution action. Selecting the Approve Option This option sets the status of the user story and its open items to Resolved-Completed and moves any open items to the Complete column of the Scrum Board. The remaining points value of the story is reset to 0.
115 1. Select Approve. 2. Optionally, associate the story with a release, epic, or feature. 3. Optionally, enter text in the Note box. This text displays in the Pulse feed of the user story. 4. Click Submit. Selecting the Send for Verification Option This option sets the status of the user story and its open items to Pending-Verification and moves any open items into the Verification column of the scrum board. The story to indicate that story is pending verification. icon appears in the top right corner of a user 1. Select Send for Verification. 2. Optionally, associate the story with a release, epic, or feature. 3. Optionally, enter text in the Note box. This text displays on the Pulse feed of the user story. 4. Click Save. Selecting the Reject Option This option sets the status of the user story and its open items to Resolved-Rejected. On the scrum board, all tasks, bugs, and issues for the story are moved to the Complete column. the story points and remaining hours are reset to zero a copy of the story is created in the backlog copies of any open tasks are moved to the new story open bugs or issues are moved to the new story dependencies, pulse notes and followers are moved to the new story 1. Select Reject User Story. 2. Select the Reason to Reject.
116 3. Modify the Backlog for the copied story defaults to the original story backlog. 4. Select the Backlog Rank for the copied story defaults to the original rank. 5. Optionally, specify a Release to associate with the new story. 6. Optionally, enter text in the Note box. This text displays in the Pulse feed of the user story. 7. Click Save. Selecting the Withdraw Option This option sets the status of the user story and its open items to Resolved-Withdrawn and removes any open items for that story from the Scrum Board. The remaining hours value of the story is reset to 0. The story and its items are no longer displayed on the Scrum Board when it is refreshed. 1. Select Withdraw. 2. Optionally, enter text in the Note box. This text displays in the Pulse feed of the user story. 3. Click Save. Generating sprint documents Users: All There are two documents that can be generated for sprints to aid in the distribution of sprint details to stakeholders who may not regularly log into Pega Agile Studio. These documents are: Sprint Stories Document A document containing story cards for each story in your sprint. Each story card contains information about the story such as: story name, description, size, rank, acceptance criteria, epic, and status. Sprint Status Report Includes a summary of statistics for the sprint, lists of stories, bugs and issues in the sprint, details on all stories in the sprint, a list of upcoming stories for the team in their backlog, and the team s definition of done. Users can optionally include select user story attachments in sprint documentation. By default, all user story attachments uploaded by a user will be included in sprint documentation. This functionality allows users to more easily share additional user story context with project stakeholders.

117 Documenting a sprint 1. Open the sprint. 2. Use the Gear icon to select one of the Document actions above the story list. 3. Microsoft Word opens and the content for the document is generated. Save the generated document locally and edit as needed. Closing a sprint Users: All The sprint resolution screen is ideal for use during a sprint review meeting to help the team and product owner walk through the stories in the sprint to determine if each story is accepted or rejected. You can close a sprint when it has been processed through all the steps of Sprint Planning. You cannot resolve a sprint from the Scrum Board. During sprint resolution you can: Enter the team's actual days worked. Review the team's definition of done. Review stories from the sprint to accept or reject them. Review open bugs and move them to the backlog. At any time during sprint resolution you can click Save to save all of your progress so far and close the screen to return to sprint resolution at the point where you left off at a later time.
118 Closing a sprint 1. Click Close Sprint from the sprint list on the project display or the Stories tab of a sprint. 2. Update the Actual days worked for resources assigned to the sprint to more accurately reflect the difference between the planned work time and the actual time spent. The total actual days for the team is also used to help determine the suggested velocity while planning the next sprint. The team section lists each resource on the team and displays their name and team role their planned days as entered during spring planning their total hours spent from the hours spent as entered on bugs, tasks, and issues during the sprint 3. Click the down arrow to expand and view the team's Definition of Done. If the team has not defined a Definition of Done, they can do so from their Project Team. 4. Review the stories in the sprint and action them. The resolution screen lists the stories in the sprint. For each story you can see its Name, ID, Status, Size, Epic, and other details. Click a story name to open it and display full detail. Expand a row to view the tasks and bugs associated with the story. If the story is not resolved, you can use the Accept and Reject buttons to action it. Accepting an individual story If the product owner determines that a story meets the acceptance criteria and the Definition of Done, the team can mark the story as accepted: 1. Click Accept in the story row to display the acceptance screen that includes a summary of actual resource hours spent implementing the story a total of all hours spent on tasks, bugs, and issues. Stories with open bugs cannot be accepted. In order to accept a story with open bug, all bugs within that story must be either resolved or moved out of the story. Click More unresolved items in the OPEN BUGS & ISSUES section of the screen to move them. 2. Select the Release in which the team delivered the story.
119 3. Optionally, enter text in the Notes box. Text entered here is displayed in the Pulse feed of the user story. 4. Click Save to: o Resolve the open tasks associated with the story. o o Set the status of the story to Resolved-Completed. Add the story's points to the actual velocity for the sprint and show the story as burned down in the burndown chart. Accepting all open stories If the team and product owner determine all of the open stories in the sprint can be accepted, they can use the Accept All Open Stories action to quickly resolve them. To accept the stories from the sprint resolution screen: 1. Click Accept All Open Stories above the user stories list to display a list of the open stories in the sprint. For each story, you review a count of open bugs and enter an associated release. Stories with open bugs cannot be accepted and no action occurs on the story. In order to accept a story with open bug, all bugs within that story must be either resolved or moved out of the story. Click Move unresolved items in the OPEN BUGS & ISSUES section of the screen to move them. 2. Click Save to: o Resolve the tasks of open stories that have no open bugs. o o Set the status of stories to Resolved-Completed. Add the stories points to the actual velocity for the sprint and show the stories as burned down on the burndown chart. Rejecting a story If the team and product owner determine that a story should be rejected, you can opt to reject that story from the resolution screen. To reject a story: 1. Click Reject on the story row. 2. Select a Reason to Reject the story. 3. Select the Backlog to move the story to and its Backlog Rank. Both default to the original story value.
120 4. Optionally, select a target Release and enter a Note. Note text is displayed in the Pulse feed of the story. 5. Click Save to: o Set the story status to Resolved-Rejected. o o o Copy the story to the selected backlog, rank, and release. Copy the open tasks, bugs and remaining hours to the new story. Completed hours Hours Spent for tasks are not copied. Story points are not transferred. Copy the Pulse posts, attachments, tags, followers, and dependencies to the new story. 6. Review the sprint's open bugs and issues. The best practice is to determine how to handle outstanding technical debt and bugs at the end of the sprint. The OPEN BUGS & ISSUES section of the resolution screen lists the unresolved bugs and issues that are directly associated with the sprint or user stories in the sprint. Click a bug or issue to view its detail and to take additional actions to resolve the item. If you determine that the item cannot be resolved, you can opt to move them to a backlog individually or using a bulk process. Moving individual bugs and issues to the backlog 1. Click Move to Backlog on the bug you want to move. 2. Select the Backlog you want to move the item to. It defaults to the existing backlog. 3. Update the Priority.
121 4. If you want the item to remain associated with the team, check the Bugs should remain associated with this project team box. Leaving it unchecked moves the item to the backlog without a project association. 5. Optionally, enter a Note with more details about the progress of the item and why it is being moved out of the sprint. The text display on the Pulse feed of the item. 6. Click Save to remove the item from the sprint and place it in the backlog with no change in status. Moving all bugs and issues to the backlog 1. Click Move unresolved items above the list. 2. Select the Backlog you want to move the items to. 3. If you want to the item to remain associated with the team, check the Bugs should remain associated with this project team box. Leaving it unchecked moves the items to the backlog without a project association. 4. Optionally, enter a Note with more details about the progress of the item and why it is being moved out of the sprint. The text displays in the Pulse feed of the item. 5. Click Save to remove the items from the sprint and place them in the backlog with no change in status or priority. 6. Once all open stories have been accepted or rejected and there are no open bugs or issues remaining in the sprint, the Close Sprint button displays at the bottom of the screen. Click Close Sprint to resolve the sprint, set its status to Resolved-Completed and include its velocity in the team's average velocity.
122 Module 7: Backlogs Topics covered: Working with backlogs Adding a backlog Importing user stories from an excel spreadsheet Manually adding user stories to a backlog Importing user stories from an application profile Viewing teams associated with a backlog Managing bugs and issues using backlogs Working with backlogs Users: All Backlogs are populated with user stories that are reviewed, evaluated, and groomed to be pulled into a sprint. Bugs and issues can also be added to a backlog pending action in a sprint. Backlogs are linked to a product as shown in this diagram.

123 A starting backlog is automatically created when you add a product. A product usually contains at least one backlog to prioritize work but can contain additional backlogs depending on the size and complexity of the product implementations. For example: a backlog can be created just to hold bug items related to the product or enhancement requests outside of the scope of a product release. User stories in a backlog can be moved from one backlog to another and from one project to another. Backlogs contain user stories, bugs, and issues. User stories in backlogs can also include tasks after full detailed stories are added to a sprint. Backlogs maintain links to the items that are pulled into sprints and eventually resolved. These links allow you track the epic, release, project and sprint associated with the item and its resolution status. Backlogs are assigned a unique identifier prefixed by BL-.
124 Adding a backlog Users: Senior Project Manager, Project Manager, Scrum Master You can add as many backlogs as you need to support your product implementations. When the product was added, it created the starting backlog. Adding a backlog 1. From the Create menu, select New > Backlog. 2. Select the Product associated with this backlog. 3. Enter a Name for the backlog and a Description. 4. Click Create. The backlog now appears in the Backlogs tab of the product. You are added as a Follower and the backlog displays in the My Backlogs section of your Dashboard. At this point, the backlog is empty. Importing user stories from an Excel spreadsheet Users: Senior Project Manager, Project Manager, Scrum Master You can enter basic user story data into an Excel spreadsheet template and import it to quickly add user stories to a backlog. This import method is helpful when you have a large number of user stories you want to add but with a minimum amount of detail. This feature adds new stories. It does not allow you to export existing stories to edit them and re-import them. 1. Open the backlog. 2. Click Add and select Import Stories from Excel.
125 3. Click Download Template to open the Excel user story spreadsheet template. A file name is assigned to it, prefixed with the backlog ID, to make it easy to save and locate. You cannot add or remove columns from this spreadsheet. 4. For each user story you want to add, enter a user story title into the Name field. You also can add a Description and Story Points, and select a value from the list to populate the Assign to Workbasket field. If you leave workbasket blank, the story will get assigned to the default workbasket. You can add acceptance criteria in the Acceptance Criteria column. To add multiple acceptance criteria to a single story, Alt+Enter to add a line break between each acceptance criteria in the cell. 5. Save the file locally. 6. Click Import to browse for and select the file. 7. Click Upload to load the file and populate the screen with the user stories. 8. Enter a value in the Start From Rank field to indicate the starting rank for the items that you are importing from this file. Items will be inserted in the backlog at the starting rank you specify here. If stories with this rank already exist in the backlog, they are moved down in the list and re-ranked. For example, if you set Starting From Rank at 11 and you add 20 stories to a backlog that already contains 30 stories, the new stories are added, starting at number 10. Items are pushed to the end of the list and their rank is re-set. If you leave the Start From Rank field blank, the stories are added to the top of the backlog. 9. Review and edit the stories. Click the Trash icon to delete a story if do not want to add it to the backlog. Click the Plus sign icon to add more stories to the grid of imported stories. 10. Click Submit to accept and create the user stories.
126 The stories are added to the backlog, starting at the indicated rank, with a status of Pending-Details. From here you can open them to complete their detail and set their rank. Manually adding user stories to a backlog Users: All In addition to importing user stories from an application profile or an Excel spreadsheet, you can manually add user stories directly to a backlog one by one. These options are recommended when you only have a few stories to add to a backlog or when you want to insert a user story during sprint planning or backlog grooming. Option 1: Enter it directly from the Backlog tab 1. From the Stories tab, click Add and select the Add New Story action. A separate entry window appears. Alternatively, you also can click the Gear icon at the end of an item row and select the Add User Story action.
127 2. Enter the user story, click Save to add the story and close the window. When you add the story from the Gear icon >Add User Story action, it inserts the new story into a row below the row you selected on the tree grid. The story's Rank is set to the next value in the list. In this example: the row selected was the story ranked 12, the new story Rank value defaults to 13 and is inserted below the selected story.
128 Option 2: Enter it from the Create menu 1. From the Create menu, select User Story to display the user story entry screen. 2. Enter your story detail and use the Backlog auto complete control to find and select the backlog where you want to add the user story. Once you select a backlog, the Rank field displays. 3. Click Create to create the story and close the window.

129 This option inserts the story in the list based on the Rank value you enter in the field. The default value of the Rank field is the rank of the first open user story in the backlog. If you clear the field, the rank is set to be the first open user story in the backlog. Option 3 - Select the Import Stories from Excel action from the backlog 1. From the backlog Stories tab, click Add and select Import Stories from Excel. A table of basic entry fields displays that is similar to the format used to import user stories in bulk from an Excel spreadsheet. 2. Click the Plus sign icon to add a row to the list and enter story detail. 3. Continue to add user stories. Click the Trash icon if you want to delete a story from the table. 4. Click Submit to create the user stories and add them to the backlog.
130 Importing user stories from an Application Profile Users: All You can import specifications from an Application Profile into a backlog to add user stories or epics. When you use this feature: Specifications are added as user stories. If the use case has a Word document attachment, it is attached to the user story. The specification name is mapped to the user story name The specification description is mapped to the user story description Requirements are listed as acceptance criteria Application Profiles can be created on PRPC development systems that are version 6.3 or earlier. If you have conducted your DCO sessions using Pega 7, you will not have an Application Profile to import into Pega Agile Studio. Application profiles that are in a Resolved-Completed status and have been packaged as a zip file using package option in the Application Profiler can be uploaded into Pega Agile Studio to add user stories. On the import screen described below, click Import AP to browse for and upload the profile. When uploaded, it appears in the Application Profile selection list. Importing stories from an Application Profile 1. Open the backlog. 2. From the Stories tab, click Add and select Import Stories from AP to launch a new window.

131 3. If the Application Profile has not been uploaded to Pega Agile Studio, click Import Profile to browse for and upload the profile. 4. Choose the Application Profile you want to import. 5. In the Import starting at rank field, enter the starting rank for the items you are importing from this file.
132 For example: You if you set the rank at 11 and you add 20 stories when there are 30 stories already in the backlog, the import process adds the stories starting at number 10. Items are pushed to the end of the list and their rank reset. 6. Click Select to populate the window with the specifications from the profile you selected. The checkboxes in the Import? column default to checked. If you do not want to include a specification in the import, clear the box. Select All selects all boxes. Clear All clears all checkboxes. 7. Choose whether you want to create a User Story or an Epic for the specification. 8. Click Submit to start the import and create a user story or epics for each specification you selected. After importing user stories, the lower ranked user stories in the backlog may appear lower on the backlog. Use filtering or scroll down to see the range of user stories that you are interested in viewing. Viewing teams associated with a backlog Users: All You can associate default backlogs with teams. This has several benefits that can streamline sprint planning for teams, allowing a view into the backlog so teams can pull work directly from the backlog. The Team tab of a backlog display lists the BACKLOG OWNERS as well as any team that has listed the backlog as their default backlog. Backlog owners are the product and development managers associated with the backlog. You can add users with these roles to the backlog by clicking Update Team on the Team tab. Project teams that have listed the backlog as their default backlog display in the RELATED TEAMS section. This list displays the team name, the number of resources on the team, the team's average velocity and the scrum master. To associate a project team with a backlog: 1. Open the Project Team. 2. From the Actions list, select Edit. 3. Use the auto complete box to find and select the Default Backlog.
133 Managing bugs and issues in backlogs Users: All Pega Agile Studio helps you solve the question of where to store and how to manage bugs and issues that are reported during development cycles. Backlog displays have a separate Bugs & Issues tab to allow you to organize, store, and manage bugs and issues that are reported and associated with your projects, releases, sprints, and user stories separately from the user stories that are stored on the Backlog tab. The display defaults to only the open items although both open and resolved items are associated with the backlog. From this tab you can: Filter and sort the list using column headers. Click the Gear icon and select Bulk Process Bugs or Bulk Process Issues to perform bulk processing actions on multiple items in the list.
134 Click Show resolved bugs/issues to toggle the display to the full list of open and resolved bugs and issues in the backlog. Search for bugs and issues by their ID or Name using the search field above the list. Click the Gear icon and select Export to Microsoft Excel to export the bugs to an Excel spreadsheet. Click Add to add new bugs and issues to the list by selecting Add Bug, Add Issues, or Import Bugs from Excel. Click the Gear icon at the end of an item row to take quick actions on that item. Process individual bugs and issues by clicking their name to display the item and then clicking Actions to select a processing action.
135 Module 8: Grooming backlogs Topics covered: Grooming your backlog Monitoring the status of user stories Ranking user stories in a backlog Bulk processing backlog stories Bulk processing bugs and issues Reporting on backlogs Grooming your backlog Users: All Pega Agile Studio provides tools and actions designed specifically to support backlog grooming in preparation for pulling items into a sprint. Backlog grooming is the process of managing the details, status and rank of user stories. It requires ongoing action and attention from the project team. As a team, it is important to define a working agreement to determine how well groomed your backlog should be. With Pega Agile Studio, you can coordinate the points of your agreement with the use of available tools and actions to reach your desired outcome. When thinking about grooming practices for your backlogs, consider the following: How much detail should be available in a user story before it is put into an Open-Ready status? Based on the team's velocity, how many weeks or months of sized stories should be available in the backlog? What does a user story look like? You can create a baseline 1-point user story that can be used as a model to create and size user stories.
136 What are the valid values for story points for a user story? What is the largest sized user story that can be pulled into a sprint? How does the team s definition of done effect their story sizing? Monitoring the status of user stories Users: All You can assign different statuses to user stories as you monitor and groom a backlog. This enables you to quickly see where a story stands in relation to its readiness for a sprint. Statuses also allow you to filter items in the backlog and group them for bulk processing. The following statuses are listed in the typical order in which stories are likely to progress from the time they are entered until the time they are pulled into a sprint or returned to the backlog New - this is the default value a story when added as a new story to a backlog Pending-Details - indicates the story does not have enough detail at this time to size it and pull it into a sprint Pending-Sizing - indicates a story that has enough detail to size the story; requires entry of the story description and acceptance criteria Pending-Blocked - indicates a story cannot be pulled into a sprint because it is dependent on some type of criteria to complete the work such as technical setup or system dependency Open-Ready - indicates that the story is sized and ready to be pulled into a sprint; requires entry of the story description, story points and acceptance criteria Pending-Resizing - indicates the previous sizing was either preliminary or did not reflect the correct level of detail and effort required to complete the story and needs to be re-evaluated Updating a status You can update individual stories using the Quick Edit action from the Stories tab of a backlog.
137 1. Click the Gear icon at the end of a story row and select Quick Edit. 2. Select the new Status. 3. Click Save to close the window. Ranking user stories in a backlog Users: All As part of the grooming process, product owners typically maintain the order of user stories in the backlog. You can rank stories to indicate the order in which user stories should be completed by the team. The rank of a user story is set by its numbered position in the backlog list. You can reset the rank using one of two methods. Method 1: Drag and Drop (Best Practice) This method is useful when you just want to re-rank and prioritize stories without displaying and updating the details. 1. Display the backlog. 2. Filter the display to see the items you want to rank. 3. On the Stories tab, find the row of the item you want to rank. Click to the left of the row to display the insertion icon. It indicates the current rank of the item. 4. Drag it to its new position in the list and drop it. A --- line appears to guide you to the row where you want to drop the item to set its rank. 5. Continue to drop and drag other items. 6. Click the Refresh icon to reset the numbering of the items. When an item is re-ranked using drag and drop, its new rank will be one number higher than the item it is dropped under. For example, if an item ranked 7 was dragged and dropped... the story would be ranked 6.
138 Method 2: Use the Quick Edit action This method is useful when you have a very large backlog and want to move a few stories that are not visible on the current display, are at the bottom of the backlog list, or you just want to reset the rank of one or two stories. 1. From the Stories tab, click the Gear icon and select the Quick Edit action at the end of the story row you want to update. 2. Update the Rank value. 3. Click Save. 4. Click the Refresh icon to reset the numbering of the items. Method 3: Use the Edit menu This method is useful when you are looking at an individual story and want to reset its rank. 1. Open the story. 2. From the main harness, select Edit. 3. Update the Backlog Rank value. 4. Click Submit. Bulk processing backlog stories Users: All You can bulk process stories in a backlog to save your team the processing time that is used to perform routine redundant updates and assignments one by one. This process is useful when you want to perform tasks like moving stories from one release to another. 1. From the Stories tab, click the Gear icon and select Bulk Process to display a list of the open backlog stories in a separate window.

139 2. Check the box next to each story you want to bulk process for a single action. 3. Select the action you want to perform on those stories. Depending on the action you choose, other entry and selection fields display. Add Note add note text and indicate whether that information should be included in a release note Add Tags add one or more tags ReAssign assign the story to a project resource or workbasket Update Backlog change the backlog value Update Epic change the epic value Update Project change the project value Update Release change the release value Update Sprint update the story status

140 Update Status add or change a sprint ID Withdraw Item withdraw the story 4. Click Process Work to start processing the selected items. When processing completes, a check mark is placed next to each item that was processed. 5. You can continue to select items and actions to perform additional processing on items in the list. Bulk processing bugs and issues Users: All You can bulk process bugs and issues in a backlog to save your team the processing time that is used to perform routine redundant updates and assignments one by one. 1. Open the backlog, select the Bugs & Issues tab. Click the Gear icon and select either the Bulk Process Bugs or Bulk Process Issues action. 2. Check the box next to each bug or issue that you want to bulk process for a single action. 3. Select the action you want to perform on the selected items. Depending on the action you choose, other entry and selection fields display.
141 Add Note add note text and indicate whether that information should be included in a release note Add Tag add one or more tags Move Item move the bug or issue to another backlog or to a sprint; change the release, project, and epic association ReAssign assign to a project resource or workbasket Update Backlog change the backlog value Update Priority change the priority of the item Update Project change the project value Update Release change the release value Update Sprint change the sprint value Update User Story change the user story value Update Status change the status of the item Withdraw Item withdraw the item 4. Click Process Work to start processing the selected items. When processing completes, a check mark is placed next to each item that was processed. 5. You can continue to select items and actions to perform additional processing on items in the list.
142 Reporting on backlogs Users: All You can generate and review reports on backlog items from several locations. The backlog Dashboard tab displays a number of reports that are useful when determining how much work is ready in your backlog and other backlog metrics.

143 The Scrum category of the Report Browser.
144 Module 9: Bugs and issues Topics are: Working with bugs and issues Adding bugs Triaging new bugs Fixing bugs Verifying bugs Reopening bugs Spin-off related work Monitoring bug fixes Adding issues Fixing issues Working with bugs and issues Users: All Bugs and issues are captured and processed as units of work linked to a project or backlog. Bugs are assigned a BUG- prefix; issues are assigned an ISSUE- prefix.

145 A bug is defined as a technical defect reported against a project, backlog, sprint, or user story. An issue is an impediment or non-technical problem that arises during the project. Bugs and issues are listed on the Bugs & Issues tab of projects, backlogs, sprints, and user stories. They must be resolved before a project or sprint can be completed.

146 The Bugs & Issues tab From this tab you can: Click the name in the row to open a bug or issue and select additional processing actions. Sort and filter the columns. To sort, click the column header. The up arrow icon displays. To reverse the sort order, click the icon again. To filter the column, click the down arrow and specify the filter. Filtered columns are indicated by the icon. To clear the filter, select the icon and then click Clear Filter. Click the Gear icon and select Bulk Process Bugs or Bulk Process Issues to perform bulk processing actions on multiple items in the list. Click Show resolved bugs/issues to toggle the display to the full list of open and resolved bugs and issues in the backlog. Search for bugs and issues by their ID or Name using the search field above the list. Click the Gear icon and select Export to Microsoft Excel to export the bugs to an Excel spreadsheet. Click Add to add new bugs and issues to the list by selecting Add Bug, Add Issues or Import Bugs from Excel.
147 Click the Gear icon at the end of an item row to take quick actions on that item. Process individual bugs and issues by clicking their name to display the item and then clicking Actions to select a processing action. Click the Refresh icon to update the content of the list. Adding bugs Users: All You can add bug items by doing one of the following: Select the Bug Item option from the Create menu. Right-click the Sprint Bugs or User Story shapes in the Scrum Board and select Add Bug. Select the Add Bug action from the Bugs & Issues tab. Select the Import Bugs from Excel action from the Add button on the Bugs & Issues tab. This is a quick entry option that allows you to create multiple bug items at once with minimal detail. Using this option, you can import bugs from Microsoft Excel. Spinning a Feedback item into a bug during the feedback triage process Bugs can also be sent to Pega Agile Studio from the Test Management Framework or other external applications using a SOAP Service. For more information, see the Agile Studio 7.4 Implementation Guide. Adding bugs from the Create menu 1. From the Create menu, select Bug Item. 2. Associate the bug with a backlog. Enter other parent associations as needed. If you have entered default values for these fields in your operator preferences, the fields are populated with those values. Otherwise, use the auto complete box to enter starting text. Use the down arrow to display a list of the most recently created items of that type, limited by the associations you have already entered in these fields. Then, select a value.
148 3. Enter a Name for the bug. Name it with a short phrase that summarizes the problem. For example: Java script error on item entry 4. Enter a longer Description of the problem and the Steps to Reproduce it. Be as specific and thorough as possible. In both of these fields, you can format the text, as well as insert images. Routing, Priority, and Effort Fields 5. In the Planned Effort field, enter the number of hours that you estimate it will take to fix this bug. 6. Select an Assign To option to indicate who to assign the bug to after entry. Workbasket is the default selection. Workbasket displays a list of workbaskets. Select a Workbasket. if you leave this blank, the bug is routed to the default workbasket defined for the product release. Resource displays a list of resources. Select a Resource. Me routes it to your worklist. 7. From the Reported By list, indicate who reported the bug.
149 8. Select a Type from the list to categorize the bug. 9. Assign it a Priority and select its Severity. The priority value defaults to 10 and can be a number from 1-100, with 100 being items with the highest priority. It is intended to indicate the product team's priority for the bug. Severity defaults to Sev-2 High. It is intended to indicate the severity/impact of the bug from an end user perspective. 10. Optionally, enter testing information in the TESTING DETAILS fields. 11. Click Create to create the bug item and assign it an ID prefixed with BUG-. The bug advances to the Triage step. If your preference is set to automatically follow bugs that you add, you are added as a Follower of the bug. Triaging new bugs Users: All When a bug is added with a status of New, you can review (triage) the bug and determine how it should be handled by selecting one of three processing options. Option 1: Approve and assign bug This action approves the bug for development and assigns it to a resource or workbasket. The resource who triages the bug can also enter a Release to target the fix and associate the bug with a project team. You can expand the Additional Details section to view or edit the Description and Steps to Reproduce. If the triage resource enters notes in the Instructions field, those notes display in the Pulse feed of the bug. When submitted, the status is changed to Open.
150 Option 2: Resolve If the bug is something that you do not want to fix, this action records the resolution Reason and resolves it with a Status of Resolved- appended with one of these values that you can select. If you select a resolution status of No Action, Rejected, Withdraw or Cannot Recreate the bug is resolved with that status. Notes entered in the Reason field are displayed in the Pulse feed for the bug.
151 If you select a status of Duplicate or Enhancement, you are requested to enter additional information. Resolving a bug as a duplicate If you select a resolution status of Duplicate, you are prompted to enter the duplicate item's ID in the Duplication Bug field. When you click Submit: The status changes to Resolved-Duplicate. Notes entered in the Reason field are display in the Pulse feed of the bug. The duplicate bug ID displays on the Details tab of the bug. A note is added to the duplicate to indicate that the bug was triaged as its duplicate. Followers, tags, and dependencies are copied to the duplicate. Resolving a bug as an enhancement If you select a resolution status of Enhancement, you are prompted to associate the enhancement with an existing epic or user story or you can opt to create a new epic or user story. When you click Submit: The status changes to Resolved-Enhancement. Notes entered in the Reason field are displayed in the Pulse feed of the bug. The related epic or story ID displays on the Details tab of the bug. Followers, tags, and dependencies are copied to the related story or epic. Option 3: Request more info If the bug does not have enough information to make a decision about the next action, this action requests more information from the resource who entered it. It sends the bug back to the resource with a Pulse post detailing what is needed and sets the status to Pending-Info. When the party provides more information, the bug defaults back to the triage action when displayed again. Enter a Note detailing the information you need to make a decision.
152 Fixing bugs Users: All After a bug is approved and assigned in the triage process, it defaults to a Fix Bug stage in which development resources can review the bug and determine the best way to fix it, selecting one of four processing options. Option 1: Fix bug Use this action after you have fixed the bug and are ready to mark it as complete.
153 Select the Release where the bug was fixed. If you enter text in the Completion Note field, it will be displayed on the Pulse feed of the item. In the Hours Spent field, enter the amount of time you spent working on the bug. If another resource spent time on it, you can also enter their time spent. Click Submit. The current operator is set as the Completed By Operator value and is displayed in the People section. If verification is required for the bug based on settings in the release after the action is submitted, the bug advances to a verification step with a status of Pending-Verification. If verification is not required, the bug s status changes to Resolved-Completed. Option 2: Defer bug This action lets you defer the bug to a backlog or release and enter a Reason for Deferral. It sets the status to Pending-Deferred and displays it on the Bugs & Issues of the backlog you select.
154 Option 3: Request more info If the bug does not have enough information to make a decision about the next action, this action requests more information from the resource who entered it. It sends the bug back to the resource with a Pulse post detailing what is needed and sets the status to Pending-Info. When the party provides more information, the bug defaults back to the triage action when displayed again. Enter a Note detailing the information you need to make a decision.

155 Option 4: Resolve bug If the bug is something that you do not want to fix, this action records the resolution Reason and resolves it with a Status of Resolved- appended with one of these values that you can select.
156 If you select a resolution status of No Action, Rejected, Withdraw or Cannot Recreate the bug is resolved with that status. Notes entered in the Reason field are displayed in the Pulse feed for the bug. If you select a status of Duplicate or Enhancement, you are requested to enter additional information. Resolving a bug as a duplicate If you select a resolution status of Duplicate, you are prompted to enter the duplicate item's ID in the Duplication Bug field. When you click Submit: The status changes to Resolved-Duplicate. Notes entered in the Reason field are display in the Pulse feed of the bug. The duplicate bug ID displays on the Details tab of the bug. A note is added to the duplicate to indicate that the bug was triaged as its duplicate. Followers, tags, and dependencies are copied to the duplicate.
157 Resolving a bug as an enhancement If you select a resolution status of Enhancement, you are prompted to associate the enhancement with an existing epic or user story or you can opt to create a new epic or user story. When you click Submit: The status changes to Resolved-Enhancement. Notes entered in the Reason field are displayed in the Pulse feed of the bug. The related epic or story ID displays on the Details tab of the bug. Followers, tags, and dependencies are copied to the related story or epic. Verifying bugs Users: All After a bug has been marked fixed, if its release requires bug verification, the item moves to the verification stages with a status of Pending-Verification. From this stage you can either Verify or Defer the bug. When you select the Verify Bug action, you can select one of three Verification Action options: 1. Return to previous owner returns the bug to the person who marked it fixed because the verification fails. The bug's status is reset to Open. When a bug fails verification, the number of times it has failed
158 displays in the Details tab. 2. Send to a different user allows you to select a different resources to return the bug to because the verification fails. The bug's status is reset to Open. When a bug fails verification, the number of times it has failed displays in the Details tab. 3. Approve approves the fix. The status is set to Resolved-Completed. The current operator is added as the Verified By party on the People display. Reopening bugs Users: All When a bug is in a Resolved status, it can be reopened by selecting Reopen. 1. If the bug is in a resolved user story, sprint, or project team, you must select a Backlog to move the bug into. This value defaults to the backlog currently associated with the bug. 2. Enter a Reopen Note. This note is display in the Pulse feed of the item. 3. Click Save. The bug is removed from any resolved parent items and associated with the selected backlog. The status is set to New and moved to the triage stage.
159 Spin-off related work Users: All When investigating a bug item, you may determine that there is work that is required for another team to complete before the bug can be resolved. To efficiently create and track this work, you can use the Spin-Off Related Work action. 1. Select the Spin-Off Related Work option from the Actions list. 2. Select the Request Type and the item type you want to Create As either a bug or user story. You can create the new item as a bug, epic, issue, task, or user story. 3. Select a Backlog for the new item. This should be the backlog in which the item will be prioritized. 4. Enter the DETAILS FOR NEW CASE. Name and Description are required for bugs and user stories. Optionally, select a resource from your team as the Contact in the event there are questions from the recipient of the new item. Optionally, enter a Note to explain your request. The note is display one the Pulse feed of the spun-off item. 5. Click Save to create the item and associate it with the selected backlog. It is linked to the bug as a dependency. Monitoring bug fixes Users: All You can track the development activity for bug fixes that have been assigned to project resources and monitor their progress, status and resolution.
160 Tracking Development Activity When your development application is enabled with a communication link between the application and Pega Agile Studio, the details of updates made to rules in the application by the resource to fix a bug are sent to Pega Agile Studio and displayed on the Related Updates tab of the bug display. For more information on communication links, see the Agile Studio 7.4 Implementation Guide. For each rule change made in your development system that is associated with a bug fix, a row displays. Each row includes the following information: the date and time the rule was modified, the Action (Save As, Check In, New rule), the Rule Type, Rule Name, Ruleset, and the Resource who made the change. Expanding a row displays the:
161 Rule key Development notes associated with the update Monitoring progress, status, and resolution A number of reports are available that you can run and/or view to track the progress, status, and resolution of bugs. The reports are located in the following locations: The Defect Management and Rule Updates report categories of the Report Browser

162 The Quality section of the Dashboard tab of backlogs, project teams, goals, and sprints Adding issues Users: All You can add issues by doing one of the following: Select the Issue option from the Create menu Select the Add Issue action from Bugs & Issues tab or the Sprint Issues or User Story shapes on the Scrum Board Adding issues from the Create menu 1. From the Create menu, select Issue.
163 2. Associate the issue with a Project and/or a Backlog. If you have entered default values for these fields in your operator preferences, these fields are populated with those values. Otherwise, use the to enter starting text and press the down arrow to list the most recently created items of that type, limited by the associations you have already added. Then, select a value. When you select a Backlog you can also select a sprint and/or a user story. 3. Enter a Name. Name it with a short phrase that summarizes the issue. For example: Training resource scheduling 4. Enter a longer Description of the issue. Be as specific and thorough as possible. 6. Assign it a Priority and select its Severity. The priority value defaults to 10 and can be a number from 1-100, with 100 being the highest priority. It is meant to indicate the product/team's priority for the issue. Severity defaults to Sev-2 High. It is meant to indicate the severity/impact from the end user perspective. 7. Optionally enter the Planned Effort. This is the estimated time you think it will take to resolve the issue. 8. Select a Type to categorize the issue. 9. Select an Assign To option to indicate who to assign the issue to after entry. Workbasket is the default selection. Workbasket displays a list of workbaskets. Select a workbasket. If you leave this blank, the bug is routed to the default workbasket for the product release. Resource displays a list of resources. Select a resource. Me routes it to your worklist. 10. Click Create.
164 Fixing issues Users: All When an issue is added, it defaults to a Fix Issue action where you can the review the issue and complete it, resolve it, or defer it. Option 1: Complete issue This action records completion Notes and resolves the issue with a status of Resolved-Completed. If you enter text in the Notes field, it will be displayed on the Pulse feed of the item. In the Hours Spent field, enter the amount of time you spent working on the issue since the last time you tracked your effort. If another resource also spent time working on the issue, you can also track their time here. Option 2: Resolve issue This action records the resolution Reason and resolves it with a Resolution Status of Resolved- appended with one of these values that you can select: Duplicate, Withdrawn, or Rejected.
165 Option 3: Defer issue This action lets you defer it to a backlog or project and enter a Reason for Deferral. It sets the status to Pending-Deferred and displays it to the Bugs & Issues tab of the backlog or project you select.
166
167 Module 10: Feedback items Topics covered: Working with feedback items Creating feedback items in Agile Studio Viewing feedback items Processing feedback items Working with feedback items Users: All Feedback items provide an easy way to enter and submit questions, potential bugs, issues, enhancement requests, and areas of concern about an application or product. When entered, the items route to a workbasket where they can be triaged and evaluated for inclusion in a project or backlog as a user story, bug, or issue. Feedback items are identified by their FDBK- prefix. They can be created in three ways. From the Create menu on your portal, select the Feedback option. From the Add Feedback button on a Product s Feedback tab. On Pega Platform versions 7.2 and lower, click the pushpin icon when it is visible on your portal in a development system or application that is connected to Pega Agile Studio and has the Direct Feedback function enabled. For more information, see the Agile Studio 7.4 Implementation Guide. On Pega Platform versions and higher, select Send us feedback from the operator menu on your portal in a development system or application that is connected to Pega Agile Studio and has the Smart Feedback component installed.
168 Creating feedback items in Pega Agile Studio Users: All This entry option creates a feedback item directly in Pega Agile Studio where it is triaged and assigned to a project or the backlog for a product/release as a user story, task group, bug or issue. It also can also be rejected and resolved. This is a useful option when your development system is not connected to Pega Agile Studio or you do not have access to the development system but want to provide feedback. Creating a feedback item 1. Do one of the following: From the Create menu, select Feedback to display the entry screen. From a product s Feedback tab, click Add Feedback. 2. Enter the following information: Title Backlog Use the drop-down menu to select a Product. This field defaults to the Product selected in your operator preferences. Optionally, select a Feature if your feedback is about a specific product feature. Enter a brief descriptor in the Feedback field. In the Description field, enter text that describes in detail the scenario or problem. Select the Category that best describes the application area related to this feedback. This value appears on the feedback report. In the Requested By field, select the party that best describes who is providing the feedback. 3. Click Create.

169 When the item is created It is routed to a workbasket for triage. The name of the person who created the item is added to the PEOPLE section of the item. The person who created the item is added as a Follower of the item. This means that the feedback item displays on their MY FOLLOWED ITEMS list. The item is displayed on the Feedback tab of the product. Viewing feedback items Users: All Feedback can be a powerful tool to use in Acceptance Testing or to gather input from your product s user base. A product's Feedback Voting View shows a user-friendly list of feedback items that users can vote on to indicate which items they would like to see implemented. For product managers, the feedback list will display in a list format on their product. For other users, the feedback list will display in an interactive voting view format. Toggle between these two views using the controls above the list. To filter the feedback list by tag, click the tag icon. To vote for a feedback item, click the Like link next to the feedback item. To remove your vote, click the Unlike link. You can see the total number of votes an item has on each row.
170 Processing feedback items Users: Senior Project Manager, Project Manager, Scrum Master, Product Owner Feedback item processing allows you to review, update, and spin it off as a user story, task group, bug, or issue in a project or backlog. You also can reject it. You can review and update items individually or use bulk processing to process multiple items using the same routing criteria. Displaying feedback items You can view a list of feedback items on the Feedback tab of a product. From this view, you can filter and sort the items in the list and also take action on the items. Processing feedback items When you process a feedback item individually or use the bulk process, you can select one of these actions. Triage to process the item and spin it off as another item type Resolve to resolve the item without further action Quick Edit to update information about the feedback item that displays in the product's feedback list Edit to update basic item information such as name, description, category, and product - not available for bulk processing Reassign to move the feedback item to a different resource or workbasket Like to indicate that this is a suggestion that you would be interested in seeing implemented. Triage Action This action allows you to process a feedback item and spin it off as another item type.
171 1. Select the item type you want to create from the feedback item. 2. When you select an item type, the lower portion of the action displays additional fields. Which fields display are dependent on the type of item you selected and filtered by the associations the type can have with a backlog, release, project, sprint and/or user story. Use the auto complete boxto select from the values. The values are also filtered based on the relationships that are allowed between those associations. 3. Edit the Name for New Case if you want the name of the spun-off item to be different than what is displayed. 4. If you are spinning off a bug or issue, enter a Priority. 5. Optionally, enter a note. The note is added to the feedback item and copies to the spun-off item. 6. Click Submit. The item is resolved with a status of Resolved-Spunoff and removed from the open list of feedback items. The feedback item records the ID of the spinoff item in its DETAILS section. Click the item ID to display it.
172 An is sent to the followers of the feedback item informing them that it has been resolved. The spun-off item: Displays as a link the DETAILS section of the feedback item Displays a link to the feedback item that it was spunoff from it its own DETAILS section Lists the same followers as the feedback item Has the attachments and notes from the feedback item. Resolve Action This action allows you to resolve the item without any further action and prevents any further evaluation of the feedback item. Use this action when the feedback is a basic question or an administrative issue that can be handled without the entry of a bug, user story or other item type. 1. Select the resolution Status and enter the Reason you are resolving the item. The reason is displayed as a post in the feedback's PULSE section.

173 2. If you select a status of Duplicate, enter the ID of the user story, epic, bug, or feedback item that is the duplicate of the item. 3. Click Submit. The item is resolved with a status of Resolved-xxxx, where xxxx is the status you selected, and is removed from the open list of feedback items. If the item was resolved as a duplicate, any followers from the item are added as followers to the duplicate item. An is sent to the followers of the feedback item informing them that it has been Resolved. Quick Edit Action This action allows you to edit fields on the feedback item that display in the product's feedback list. 1. From the product's feedback list, select Quick Edit from the row action icon of the item. 2. Modify the Name, Category, Requested By,or Status values. 3. Click Save. Update Details Action This action allows you to associate the feedback item with a product or change the details of the feedback item. 1. Modify the Product, Feedback name, Description, Priority, Status, Category or Requested By values. 2. Click Submit.
174 Module 11: Tracking Development Activity Topics covered: Monitoring development activity in Pega Agile Studio Recording your development effort Monitoring development activity in Pega Agile Studio Users: All You can track developer activity and effort for tasks, bugs, issues and user stories assigned to resource when a communication link is set up between Pega Agile Studio and the system where the actual development occurs. For more information on communication links, see the Agile Studio 7.4 Implementation Guide. Every time a resource works on or completes a task, issues, user story or bug fix: the detail is recorded and displayed in the Related Updates tab of that item if the bug, issue, or user story is in a sprint or epic, the changes are displayed in the Related Updates tab of the sprint or epic A line is added to the item's history, indicating a rule/code change was associated with the item If the task, issue, or bug is resolved: it is removed from the list of assigned work and resolved in Pega Agile Studio if the Task Complete box is checked on the Check-in form in the development system it is included in reports for resolved work The development tracking feature supports tracking both Pega Platform rule and code changes made in an external repository such as Eclipse. To track code changes made to an external, non-pega repository you will
175 need to configure a call to the Add Development Info Soap Service. For more information, see the Agile Studio 7.4 Implementation Guide. Viewing development activity from Pega Agile Studio You can view or track development activity in Pega Agile Studio from item displays and reports. Development updates are visible on the Related Updates tab of the tasks, user stories, and bugs when updates are received from the development system. They are also rolled up to epics and sprints if they are associated with the item. For each rule change in your development system that is associated with a task, user story, or bug, a row displays. Each row includes the following information: the date and time the rule was modified, the action (Save As, Check In, New Rule), the rule type, rule name, Ruleset, and the resource who made the change. Expanding a row shows you the following: Rule name and key Development notes associated with the update The Rule Updates category of reports located on your Report Browser lists three reports that display different views of the rule update data - Rule Updates by Project and Resource, Rule Updates by Resource and Project, and User Story Work by RuleSet. Viewing and recording your development work Users: All You can view work assigned to you in Pega Agile Studio from your development environment through features that are enabled when a communication link is established between the two systems. You can also record your development effort. When you create a New rule or perform a Save As or Check In of a rule related to the development work you perform to complete a task or bug, the pop-up window for the rule includes a Project Management section where you can record your work effort, associate it with the work, and flag it as complete. How you view and record your development work depends on whether your development environment is built on Pega 7.3 or an earlier version of the Pega Platform. See Tracing development changes to work
176 items for the steps to manage Agile Studio work and record your development work in Designer Studio. If your development environment is on a previous version of Pega, see Working with Development Systems on Previous Pega Platform Releases on the Agile Studio product page for the steps to follow.
177 Module 12: Reporting Topics covered: Working with reports Using embedded reports Using burndown charts Updating burndown chart trendlines Creating custom reports Using the report browser Frequently requested reporting information Working with project reports Users: All You can easily access project reports from product, release, goal, backlog, project team, or sprint displays or generate reports using the Report Browser. Embedded Reports Access these reports from product, release, goal, backlog, project, or sprint displays Report Browser Display your report options and a list of reports available using the Pega Platform Report Browser
178 Using embedded reports Users: All Pega Agile Studio embeds a variety of reports on the Dashboard tab in product, release, goal, backlog, project team, or sprint displays. When you display one of these item types, you can select the Dashboard tab to view reports and other key information about the item. Use these reports to view information about completed and remaining work for the item, effort totals, quality and bugs, and overall work progress. Chart Actions are available for many of the charts. These actions allow you to view the data for the chart and drill down to additional detail. You can also use these actions to view a larger version of the chart in a separate window or export it to a PDF.
179 Using burndown charts Users: All A burndown chart shows you the remaining and completing work trended over time. In Pega Agile Studio there are Story Point and Effort (hours) burndown charts. There are also Bug Trending charts to show the number of open bugs trended over time. These charts show data points for each day. You can use them to help determine how well your team is trending to complete the release, project, or sprint on time. Burndown charts display on the Dashboard tab of Releases, Scrum Projects, Pega BPM project and sprints. The following table summarizes the available charts by item.
180 Item Story Point Burndown Effort Burndown Bug Trending Release Yes Yes Yes Scrum Project Yes Yes Yes Pega BPM Project No Yes Yes Sprint Yes Yes Yes Reading your burndown chart Optimal Planned (red line): This line shows the optimal burndown rate of story points or hours over the duration of the sprint, project, or release. The starting point of this line on the Y (vertical) axis shows the starting points/hours on the start date of the sprint, project, or release. You can reset the starting point using the Update Trendlines action. The end point of this line should hit the horizontal axis on the end date of the sprint, project, or release. The Optimal planned line should always be a straight line that trends downwards to zero. It should remain consistent throughout the duration of your sprint, project, or release, unless you use the Update Trendlines action. Actual Remaining (blue line): This line shows the daily remaining points or efforts from the start of the sprint through the current day. Ideally, if your work is on track, this line should track closely with the Optimal line. Click either of these lines in the key located below the chart to hide or show the selected line.
181 Calculating burndown data The data used by the burndown chart is written out nightly by a background processing agent. The first data point on the chart is written out on the night of the start date. The current day s data points are calculated on demand to show the real-time data for the last point on the Actual Points Remaining, Total Points Completed, and Total Points Planned lines. Best practices for burndown data Sprint burndowns 1. Move sized stories with an Open-Ready status into your sprint on the first day. Sprint Planning helps you determine the best targeted story points for your team to undertake in their sprint. Pulling sized stories in on the first day of the sprint gives your burndown lines an accurate starting point. 2. Encourage your team to move each story to a Pending-Verification or Resolved-Completed status as they complete the work for the story. Doing this as the work is resolved versus waiting until after the sprint review will give you a better picture of how quickly the team completed stories in the sprint. If all stories are pushed to Pending-Verification or Resolved-Completed at the end of the sprint, all of the story points will not show as burnt down until the final day of the sprint. Release burndowns 1. At the start of a release, mark all stories in the backlog planned for that release with the release ID. This ensures that they are counted in the burndown chart for the release. You can mark stories with the release ID individually or mark multiple stories simultaneously using the Update Release action, available from Bulk Processing a backlog.
182 2. Try to size as many stories for the release as soon as possible so that you have a good starting point to burn down from and get an accurate picture of how much work is truly remaining for your release. 3. Associate all bugs that you have targeted to be fixed in a release with the release ID. This ensures that the bugs display on the Release s Bug Trending report. This will give you a good picture of the trending of bugs in your release over time. Updating burndown chart trendlines Users: Senior Project Manager, Project Manager, Scrum Master Trendlines on Effort Burndown and Story Points Burndown charts provide a visual representation of release, project or sprint progress over time and act as a guide to how well work is actually going to plan based on your planned effort and story point estimates.
183 Burndown charts are visible on the Dashboard tab of a Project, Sprint, Task Group, or Release. When the tabs appear on a Scrum project, an Hours tab displays the Effort Burndown and a Story Points tab displays the Story Points Burndown. Only an Hours tab displays for Pega BPM projects. At the time a release, project, or sprint/task group is started, the existing effort hours and/or story point estimates are used to determine the starting point of the optimal trendline represented on the vertical axis of the burndown chart. The red line is the trendline. As work progresses, you may decide that you want to reset the baseline values for the trendline of a project, release or sprint due to changes in plan estimates. The Update Trendline action allows you to reset the reporting baseline values for planned hours and story points for sprints story points for scrum project teams (Scrum project teams do not show a trendline on the Effort Hours burndown.) planned hours for releases Updating these values does not affect the total hours displayed in the EFFORTS section of the project or sprint/task group Details tab.
184 1. From the Dashboard tab of a release, project, or sprint, click Update Trendlines. This displays the current number of optimal planned hours and/or story points that are set for the release, project, or sprint. You can change the values to reset the starting point of the optimal trendline. 2. Enter a new value(s) in the Update To field(s). 3. Click Save. The trendline is updated to reflect the new value when you redisplay the burndown chart. Creating custom reports Users: All In order to create custom reports, you must have a reporting ruleset listed in your access group. Your system administrator can add this ruleset to your access group. For more information, see the Agile Studio 7.4 Implementation Guide. For reporting information and tutorials, access the PDN.
185 Creating a new report category 1. Click Reports on the left navigation panel to display the Report Browser. 2. Click Add Category. 3. Enter the Category Name, Category Description, and a Category Type. A Public category and the reports it contains is visible to all Pega Agile Studio users. A Private category and its reports is visible only to the person who created the category. The new categories are displayed in one of the Categories sections on the right side of the Report Browser.

186 Copying or editing an existing report 1. To copy a report, click the Gear icon to the right of a report in the list on the right side of the Report Browser and select Copy. 2. Enter the new name for your report in the Report Title. Specify a Public or Private Category Type, and select the Report Category. 3. To edit a report, open a report from the Report Browser and click Edit Report to the right of the report. Note that this option may not be available for all reports. Creating a new report 1. Click Add Report on the top of the Report Browser. The Create New Report dialog displays.
187 2. Select the CaseType. This table lists the case types that you may find useful when creating custom reports. Case Type Work Items Included Example of Fields Available Project Management All Pega Agile Studio work types Item ID, label, description, remaining effort, etc. Assignments Workbasket Assignments All work item assignments (workbasket & operator) Workbasket assignments (excludes work assigned to operators) Assigned to operator/workbasket ID, assignment age etc. Workbasket ID, assignment age etc. Operators Operator instances Operator ID, operator name, operator telephone #, , access group etc. 3. Select a Report Type: List displays a list of fields for the results Summary or Chart group the results to get totals and other counts and create a chart based on those results Click the question mark icon in the Report Browser for more information. Tips for creating Pega Agile Studio reports Scrum items contain their parent information in various ID and Key properties. These values can be used as part of report criteria (for example, to get a list of all bugs in RLS-123) or as part of the result set (for example, for all bugs, display the associated project ID). Parent Item Type ID Property Key Property Item Types that may have this Data Populated Product.ProductID.ProductInsKey Releases, Goals, Epics, Backlogs, User Stories, Bugs, Tasks, Issues, Feedback Release.ProductVersionID.ProductVersionInsKey Goals, Epics, User Stories, Bugs, Tasks, Issues Goal.GoalID.GoalInsKey Epics, User Stories, Bugs, Tasks, Issues
, Bugs, Tasks, Issues User Story.UserStoryID.UserStoryInsKey Bugs, Tasks, Issues Project.ProjectID.")
188 Parent Item Type ID Property Key Property Item Types that may have this Data Populated Epic.EpicID.EpicInsKey User Stories, Bugs, Tasks, Backlog.BacklogID.BacklogInsKey User Stories, Projects (Scrum Issues only), Bugs, Tasks, Issues User Story.UserStoryID.UserStoryInsKey Bugs, Tasks, Issues Project.ProjectID.ProjectInsKey Sprints, User Stories, Bugs, Tasks, Issues Sprint.SprintID.SprintInsKey User Stories, Bugs, Tasks, Issues The following diagram shows the relationships among items.
Agile Studio USER GUIDE 7.3
 Agile Studio USER GUIDE 7.3 2017 Pegasystems Inc., Cambridge, MA All rights reserved. Trademarks For Pegasystems Inc. trademarks and registered trademarks, all rights reserved. All other trademarks or
Agile Studio WORKING WITH DEVELOPMENT SYSTEMS ON PREVIOUS PEGA PLATFORM RELEASES 7.3
 Agile Studio WORKING WITH DEVELOPMENT SYSTEMS ON PREVIOUS PEGA PLATFORM RELEASES 7.3 2017 Pegasystems Inc., Cambridge, MA All rights reserved. Trademarks For Pegasystems Inc. trademarks and registered
Project Management Framework
 Project Management Framework Release Notes Version 7.1.1 Framework Overview The Project Management Framework (PMF) is a powerful Project Management application designed for the management of Scrum projects.
Agile Studio IMPLEMENTATION GUIDE 7.3.1
 Agile Studio IMPLEMENTATION GUIDE 7.3.1 2017 Pegasystems Inc., Cambridge, MA All rights reserved. Trademarks For Pegasystems Inc. trademarks and registered trademarks, all rights reserved. All other trademarks
Pega Agile Studio. Upgrade Guide 7.4
 Pega Agile Studio Upgrade Guide 7.4 2018 Pegasystems Inc., Cambridge, MA. All rights reserved. Trademarks For Pegasystems Inc. trademarks and registered trademarks, all rights reserved. All other trademarks
Pega Field Marketing USER GUIDE 7.4
 Pega Field Marketing USER GUIDE 7.4 2018 Pegasystems Inc., Cambridge, MA All rights reserved. Trademarks For Pegasystems Inc. trademarks and registered trademarks, all rights reserved. All other trademarks
Pega Digital Software Delivery
 Pega Digital Software Delivery USER GUIDE 1.00 [Type here] 2018 Pegasystems Inc., Cambridge, MA All rights reserved. Trademarks For Pegasystems Inc. trademarks and registered trademarks, all rights reserved.
Pega Foundation for Healthcare
 Pega Foundation for Healthcare COMMON CODES SOLUTION BUSINESS CASE USE CASE GUIDE 7.31 2017 Pegasystems Inc., Cambridge, MA All rights reserved. Trademarks For Pegasystems Inc. trademarks and registered
Pega Foundation for Healthcare
 Pega Foundation for Healthcare COMMON CODES SOLUTION BUSINESS CASE USE CASE GUIDE 7.4 2018 Pegasystems Inc., Cambridge, MA All rights reserved. Trademarks For Pegasystems Inc. trademarks and registered
Pega Underwriting for Insurance
 OPERATIONS Pega Underwriting for Insurance Implementation Planning Workbook 7.4 2018 Pegasystems Inc., Cambridge, MA All rights reserved. Trademarks For Pegasystems Inc. trademarks and registered trademarks,
Managing the Burn Down Agent
 Managing the Burn Down Agent Agile Studio 7.3.1 December 2017 Introduction Agile Studio 7.3.1 has several burn down charts that teams and managers can use to view the overall progress of a sprint, team,
Pega Underwriting for Insurance
 PEGA OPERATIONS Pega Underwriting for Insurance IMPLEMENTATION GUIDE 7.31 2017 Pegasystems Inc., Cambridge, MA All rights reserved. Trademarks For Pegasystems Inc. trademarks and registered trademarks,
Decision Manager Help. Version 7.1.7
 Version 7.1.7 This document describes products and services of Pegasystems Inc. It may contain trade secrets and proprietary information. The document and product are protected by copyright and distributed
Pega Customer Service for Healthcare and Pega Sales Automation for Healthcare
 Pega Customer Service for Healthcare and Pega Sales Automation for Healthcare INSTALLATION GUIDE Pega Customer Relationship Management for Healthcare 7.31 2017 Pegasystems Inc., Cambridge, MA All rights
Pega Customer Service for Healthcare and Pega Sales Automation for Healthcare
 Pega Customer Service for Healthcare and Pega Sales Automation for Healthcare UPGRADE GUIDE Pega Customer Relationship Management for Healthcare 7.31 2017 Pegasystems Inc., Cambridge, MA All rights reserved.
Integrating Agile Studio with Other Applications
 Integrating Agile Studio with Other Applications Agile Studio 7.3.1 December 2017 Introduction Agile Studio is integrated with Pega Platform 7.3.1 to allow teams to change their application s records in
Pega Product Composer for Healthcare
 Pega Product Composer for Healthcare IMPLEMENTATION GUIDE 7.31 2017 Pegasystems Inc., Cambridge, MA All rights reserved. Trademarks For Pegasystems Inc. trademarks and registered trademarks, all rights
Project Management Framework
 Project Management Framework 7.1.2 UPGRADE GUIDE Copyright 2015 Pegasystems Inc., Cambridge, MA All rights reserved. This document describes products and services of Pegasystems Inc. It may contain trade
Pega Knowledge. User Guide 7.4
 Pega Knowledge User Guide 7.4 2018 Pegasystems Inc., Cambridge, MA All rights reserved. Trademarks For Pegasystems Inc. trademarks and registered trademarks, all rights reserved. All other trademarks or
User Guide. PegaSurvey 7.2.1
 User Guide PegaSurvey 7.2.1 Copyright Copyright 2016 Pegasystems Inc. All rights reserved. Trademarks For Pegasystems Inc. trademarks and registered trademarks, all rights reserved. Other brand or product
Capturing Interaction History
 Capturing Interaction History Pega Marketing for Financial Services 7.31 November 2017 Introduction This document contains information about how Pega Marketing for Financial Services 7.31 captures Interaction
7.21 IMPLEMENTATION GUIDE
 Pega Customer Service 7.21 IMPLEMENTATION GUIDE Copyright 2016 Pegasystems Inc., Cambridge, MA All rights reserved. Trademarks For Pegasystems Inc. trademarks and registered trademarks, all rights reserved.
VCR REST Connectivity
 VCR REST Connectivity Pega Smart Dispute for Issuers 7.21 December 2017 Introduction This document explains how Pega Smart Dispute for Issuers connects to VCR using REST connectors. VCR supports POST method
MARKETING. Pega Marketing. Installation Guide 7.4
 MARKETING Pega Marketing Installation Guide 7.4 2018 Pegasystems Inc., Cambridge, MA All rights reserved. Trademarks For Pegasystems Inc. trademarks and registered trademarks, all rights reserved. All
Healthcare Common Codes Solution
 Healthcare Common Codes Solution Version 3.2 SP1 Business Use Case Guide Copyright 2013 Pegasystems Inc., Cambridge, MA All rights reserved. This document describes products and services of Pegasystems
Administration Guide. Release
 Administration Guide Release 13.3.00 This Documentation, which includes embedded help systems and electronically distributed materials, (hereinafter referred to as the Documentation ) is for your informational
System Architect Essentials I. EXERCISE GUIDE (v. 7.1)
") System Architect Essentials I EXERCISE GUIDE (v. 7.1) Copyright 2015 Pegasystems Inc., Cambridge, MA All rights reserved. This document describes products and services of Pegasystems Inc. It may contain
System Architect Essentials I EXERCISE GUIDE (v. 7.1) Copyright 2015 Pegasystems Inc., Cambridge, MA All rights reserved. This document describes products and services of Pegasystems Inc. It may contain
ServiceNow - Agile in ServiceNow
 ServiceNow - Agile in ServiceNow The ServiceNow Agile Development application is an iterative and incremental process for software development environments. Agile Development application is enhanced with
Pega Knowledge PRODUCT OVERVIEW 7.31
 Pega Knowledge PRODUCT OVERVIEW 7.31 2017 Pegasystems Inc., Cambridge, MA All rights reserved. Trademarks For Pegasystems Inc. trademarks and registered trademarks, all rights reserved. All other trademarks
Pega Knowledge Management
 Pega Knowledge Management 7.1 USER GUIDE Copyright 2014 Pegasystems Inc., Cambridge, MA All rights reserved. This document describes products and services of Pegasystems Inc. It may contain trade secrets
VCR Batch Queue Processing
 VCR Batch Queue Processing Smart Dispute for Issuers 7.21 February 2017 Introduction Visa claims resolution (VCR) provides various queues for members to download and process cases or transactions. The
Decision Strategy Manager
 Decision Strategy Manager DMSample - Retention Predictive Model Version 7.1.8 2015 by Pegasystems Inc. All rights reserved This document describes products and services of Pegasystems Inc. It may contain
Pega Co-Browse. Installation Guide 7.4
 Pega Co-Browse Installation Guide 7.4 2018 Pegasystems Inc., Cambridge, MA All rights reserved. Trademarks For Pegasystems Inc. trademarks and registered trademarks, all rights reserved. All other trademarks
Managing the Burn Down Agent
 Managing the Burn Down Agent Project Management Framework 7.1.2 May 2015 Introduction The Project Management Framework has several burn down charts that can be used by teams and managers to view the overall
Technical Note. Customer Process Manager. 7.1 Release 2. CPM Next Best Action Adapter
 Technical Note Customer Process Manager 7.1 Release 2 CPM Next Best Action Adapter Copyright 2014 Pegasystems Inc., Cambridge, MA All rights reserved. This document describes products and services of Pegasystems
Product Designer for Financial Services
 Product Designer for Financial Services IMPLEMENTATION GUIDE 7.22 Copyright 2017 Pegasystems Inc., Cambridge, MA All rights reserved. Trademarks For Pegasystems Inc. trademarks and registered trademarks,
PRPC Personal Edition Installation Guide 6.3 SP1
 PRPC Personal Edition Installation Guide 6.3 SP1 Copyright 2012 Pegasystems Inc., Cambridge, MA All rights reserved. This document describes products and services of Pegasystems Inc. It may contain trade
you choose and by the roles the users are allowed to fulfill within the system. Finances Enter the monthly savings and costs for the project.
 Oracle Instantis EnterpriseTrack Quick Reference Guide for Release 8.5 Create a Proposal From the Top Navigation Bar, click Create Proposals/Charters. Enter all the required fields and click Save to save
Use Guide STANDARD JIRA-CLIENT ESTNDAR. Version 3.0. Standard JIRA Client Use Guide
 Use Guide STANDARD JIRA-CLIENT ESTNDAR Version 3.0 Standard JIRA Client Use Guide Madrid, December, 2017 1 INTRODUCTION 3 2 JIRA CLIENT SOLUTIONS 4 3 INSTALLATION AND REQUIREMENTS 5 4 ACCESS 5 4.1 Request
Task Management User Guide
 Task Management User Guide Version 18 April 2018 Contents About This Guide... 5 Tasks Overview... 5 Create a Project for Task Management... 5 Project Templates Overview... 5 Add a Project Template...
Certified Senior System Architect
 White Paper Certified Senior System Architect EXAM BLUEPRINT Copyright 2017 Pegasystems Inc., Cambridge, MA All rights reserved. This document describes products and services of Pegasystems Inc. It may
X12 Message Processing
 X12 Message Processing Pega Foundation for Healthcare 7.31 July 2017 Overview The Accredited Standards Committee (ASC) X12 message is used to transfer data across and between industries. Pega Foundation
Pega Knowledge. Implementation Guide
 Implementation Guide 2018 Pegasystems Inc., Cambridge, MA All rights reserved. Trademarks For Pegasystems Inc. trademarks and registered trademarks, all rights reserved. All other trademarks or service
EXAM BLUEPRINT Certified CPM Architect
 EXAM BLUEPRINT Certified CPM Architect White Paper Copyright 2011 Pegasystems Inc., Cambridge, MA All rights reserved. This document describes products and services of Pegasystems Inc. It may contain trade
Pega Foundation for Financial Services
 Pega Foundation for Financial Services ACCOUNTING GUIDE 7.32 2017 Pegasystems Inc., Cambridge, MA All rights reserved. Trademarks For Pegasystems Inc. trademarks and registered trademarks, all rights reserved.
VIEWER LICENSE GUIDE FOR SERVICEPOINT 5X
 ADVANCED REPORTING TOOL (ART 3X) VIEWER LICENSE GUIDE FOR SERVICEPOINT 5X 2012 Bowman Systems L.L.C. All Rights Reserved. This document and the information contained herein are the property of Bowman Systems
[ Getting Started with Analyzer, Interactive Reports, and Dashboards ] ]
![[ Getting Started with Analyzer, Interactive Reports, and Dashboards ] ]](/thumbs/88/117545107.jpg "[ Getting Started with Analyzer, Interactive Reports, and Dashboards ] ]") Version 5.3 [ Getting Started with Analyzer, Interactive Reports, and Dashboards ] ] https://help.pentaho.com/draft_content/version_5.3 1/30 Copyright Page This document supports Pentaho Business Analytics
Version 5.3 [ Getting Started with Analyzer, Interactive Reports, and Dashboards ] ] https://help.pentaho.com/draft_content/version_5.3 1/30 Copyright Page This document supports Pentaho Business Analytics
Pega Chat. Installation Guide 7.4
 Pega Chat Installation Guide 7.4 2018 Pegasystems Inc., Cambridge, MA All rights reserved. Trademarks For Pegasystems Inc. trademarks and registered trademarks, all rights reserved. All other trademarks
PEGA MARKETING. Pega Marketing IMPLEMENTATION GUIDE 7.31
 PEGA MARKETING Pega Marketing IMPLEMENTATION GUIDE 7.31 2017 Pegasystems Inc., Cambridge, MA All rights reserved. Trademarks For Pegasystems Inc. trademarks and registered trademarks, all rights reserved.
EXAM BLUEPRINT PRPC Certified Reporting Specialist v6.2
 White Paper EXAM BLUEPRINT PRPC Certified Reporting Specialist v6.2 Copyright 2011 Pegasystems Inc., Cambridge, MA All rights reserved. This document describes products and services of Pegasystems Inc.
Project and Portfolio Management Center
 Project and Portfolio Management Center Software Version: 9.42 Getting Started Go to HELP CENTER ONLINE http://admhelp.microfocus.com/ppm/ Document Release Date: September 2017 Software Release Date: September
EXAM BLUEPRINT PRPC Certified Senior System Architect v 6.2
 White Paper EXAM BLUEPRINT PRPC Certified Senior System Architect v 6.2 Copyright 2011 Pegasystems Inc., Cambridge, MA All rights reserved. This document describes products and services of Pegasystems
ASTRA USER GUIDE. 1. Introducing Astra Schedule. 2. Understanding the Data in Astra Schedule. Notes:
 ASTRA USER GUIDE 1. Introducing Astra Schedule Astra Schedule is the application used by Academic Space Scheduling & Utilization to schedule rooms for classes and by academic colleges, schools, and departments
Inside JIRA scheme, everything can be configured, and it consists of. This section will guide you through JIRA Issue and it's types.
 JIRA Tutorial What is JIRA? JIRA is a tool developed by Australian Company Atlassian. It is used for bug tracking, issue tracking, and project management. The name "JIRA" is actually inherited from the
Technical Note. PegaCHAT 6.2 SP3. Installing and Configuring OpenFire
 Technical Note PegaCHAT 6.2 SP3 Installing and Configuring OpenFire Copyright 2011 Pegasystems Inc., Cambridge, MA All rights reserved. This document describes products and services of Pegasystems Inc.
HarePoint HelpDesk for SharePoint. User Guide
 HarePoint HelpDesk for SharePoint For SharePoint Server 2016, SharePoint Server 2013, SharePoint Foundation 2013, SharePoint Server 2010, SharePoint Foundation 2010 User Guide Product version: 16.2.0.0
Technical Note. Using the Net Promoter Framework 7.1
 Technical Note Using the Net Promoter Framework 7.1 Copyright 2014 Pegasystems Inc., Cambridge, MA All rights reserved. This document describes products and services of Pegasystems Inc. It may contain
ADP Vantage HCM: Navigation for Time Managers
 ADP Vantage HCM: General Navigation 2 Login Page 2 Basic User Interface 3 Privacy, Legal, Feedback, Copyright 3 Preferences, Support, Logout 4 Menus and Activity Options 8 Messages, Calendar, My Profile
Printable Help. The complete text of the MLS Online Help
 Printable Help The complete text of the MLS Online Help Updated June 12, 2017 Table of Contents Table of Contents 2 Accessing the MLS 11 Access Edge MLS from a Mobile Device 11 Log On or Off the MLS 11
COMMUNITIES USER MANUAL. Satori Team
 COMMUNITIES USER MANUAL Satori Team Table of Contents Communities... 2 1. Introduction... 4 2. Roles and privileges.... 5 3. Process flow.... 6 4. Description... 8 a) Community page.... 9 b) Creating community
Blackbaud Direct Marketing New Features Guide
 Blackbaud Direct Marketing New Features Guide 05/09/2018 Blackbaud Direct Marketing 5.0 Blackbaud Direct Marketing New Features US 2018 Blackbaud, Inc. This publication, or any part thereof, may not be
Business Intelligence Exchange (BIX)
") Business Intelligence Exchange (BIX) Release Notes Version 2.3 And Version 2.3 SP1 February, 2012 Framework Overview The Business Intelligence Exchange (BIX) extracts information from a PRPC database into
Business Intelligence Exchange (BIX) Release Notes Version 2.3 And Version 2.3 SP1 February, 2012 Framework Overview The Business Intelligence Exchange (BIX) extracts information from a PRPC database into
EXAM BLUEPRINT PRPC Certified System Architect
 EXAM BLUEPRINT PRPC Certified System Architect White Paper Copyright 2011 Pegasystems Inc., Cambridge, MA All rights reserved. This document describes products and services of Pegasystems Inc. It may contain
HPE Project and Portfolio Management Center
 HPE Project and Portfolio Management Center Software Version: 9.41 Getting Started Go to HELP CENTER ONLINE http://ppm-help.saas.hpe.com Document Release Date: March 2017 Software Release Date: March 2017
SpiraTest Quick Start Guide Inflectra Corporation
 SpiraTest Quick Start Guide Inflectra Corporation Date: January 28, 2018 Contents Introduction 2 1. Logging In and Selecting a Project 3 2. Define the Requirements 5 3. Create the Release and Iteration
KeyNavigator Book Transfer
 Created (10/2018) KeyNavigator Book Transfer User Guide Table of Contents 1. Introduction to Book Transfer... 3 Overview... 3 Features... 3 Navigation... 3 Transfer Processing Timing... 4 2. User-Level
SAFe Reports Last Update: Thursday, July 23, 2015
 SAFe Reports Last Update: Thursday, July 23, 2015 This document describes the set of reports provided by Jazz Reporting Service (JRS) aligned with SAFe (Scaled Agile Framework) metrics. Some of these reports
Oracle. Engagement Cloud Using Service Request Management. Release 12
 Oracle Engagement Cloud Release 12 Oracle Engagement Cloud Part Number E73284-05 Copyright 2011-2017, Oracle and/or its affiliates. All rights reserved. Author: Joseph Kolb This software and related documentation
CollabNet TeamForge 5.3 Evaluator s Guide
 CollabNet TeamForge 5.3 Evaluator s Guide Thank you for evaluating CollabNet TeamForge 5.3. This Evaluator s Guide will help you experience the key features of CollabNet TeamForge by walking you through
QuickStart Training Guide: The Accounting Review Role
 Accounting Review Role Final Approval of Expense Reports If you are an Accountant who is using ExpensAble Corporate to make final approval of employees expense reports, this information is for you. This
Expense: Process Reports
 Expense: Process Reports User Guide for Standard Edition Applies to these SAP Concur solutions: Expense Professional/Premium edition Standard edition Travel Professional/Premium edition Standard edition
SmartView. User Guide - Analysis. Version 2.0
 SmartView User Guide - Analysis Version 2.0 Table of Contents Page i Table of Contents Table Of Contents I Introduction 1 Dashboard Layouts 2 Dashboard Mode 2 Story Mode 3 Dashboard Controls 4 Dashboards
Oracle. Service Cloud Knowledge Advanced User Guide
 Oracle Service Cloud Release November 2016 Oracle Service Cloud Part Number: E80589-02 Copyright 2015, 2016, Oracle and/or its affiliates. All rights reserved Authors: The Knowledge Information Development
Treasury Management User Guide. Online Banking
 Treasury Management User Guide Online Banking Released August 2018 Treasury Management... 4 Logging in to Treasury Management...5 Helpful Hints...10 User Menu... 12 Profile and Preferences... 12 Notification
Agile Implementation The Anaplan Way Dashboard Input Guides
 Agile Implementation The Anaplan Way Dashboard Input Guides Last Updated: December 06 Setup. Fill out project details in the Project Information section. **The start and end dates impact the filter throughout,
PegaRULES Process Commander. Certified Senior System Architect. Exam Blueprint
 PegaRULES Process Commander Certified Senior System Architect Exam Blueprint Copyright 2009 Pegasystems Inc., Cambridge, MA All rights reserved. This document describes products and services of Pegasystems
DevPlan User Guide. Table of Content. DevPlan User Guide. Author: TechExcel co.ltd
 DevPlan User Guide Author: TechExcel co.ltd Table of Content DevPlan User Guide Chapter 1- Project Mangement with DevPlan 1 Understanding TechExcel DevPlan 2 Product Design and Knowledge Management 3 Planning
Customize Your Application
 Customize Your Application Pega Customer Service 7.4 April 2018 Core features for initial implementation (approximately 8-10 weeks) Stated durations are estimates, and assume that installation tasks are
Healthcare FHIR API TECHNICAL SPECIFICATION 7.4
 Healthcare FHIR API TECHNICAL SPECIFICATION 7.4 2018 Pegasystems Inc., Cambridge, MA All rights reserved. Trademarks For Pegasystems Inc. trademarks and registered trademarks, all rights reserved. All
Trace Analysis Step-by-Step Guide
 CONTENTS Contents... 1 Overview... 2 Key Takeaways... 2 Trace Analysis UI... 3 Folder Explorer... 4 Traceability section... 5 Mini Toolbar... 6 State Property Legend... 6 Work Item Type Legend... 6 Relation
Oracle. Field Service Cloud Configuring and Using Reports 18B
 Oracle Field Service Cloud 18B Part Number: E94743-02 Copyright 2018, Oracle and/or its affiliates. All rights reserved Authors: The Field Service Cloud Information Development Team This software and related
Modern Requirements4TFS 2018 Release Notes
 Modern Requirements4TFS 2018 Release Notes Modern Requirements 3/7/2018 Table of Contents 1. INTRODUCTION... 3 2. SYSTEM REQUIREMENTS... 3 3. APPLICATION SETUP... 3 GENERAL... 4 1. FEATURES... 4 2. ENHANCEMENT...
Use Guide STANDARD JIRA CLIENT. (Practical Case)
") Use Guide STANDARD JIRA CLIENT (Practical Case) Version 3.0 Madrid, July 2018 1 OBJECTIVE 4 2 BASIC STANDARD SOLUTION 4 2.1 User Profiles 4 2.2 Types of issue 2.2.1 Functional Support 2.2.2 Corrective
Use Guide STANDARD JIRA CLIENT (Practical Case) Version 3.0 Madrid, July 2018 1 OBJECTIVE 4 2 BASIC STANDARD SOLUTION 4 2.1 User Profiles 4 2.2 Types of issue 2.2.1 Functional Support 2.2.2 Corrective
Sage Getting Started Guide. September 2017
 Sage 100 2018 Getting Started Guide September 2017 2017 The Sage Group plc or its licensors. All rights reserved. Sage, Sage logos, and Sage product and service names mentioned herein are the trademarks
ES CONTENT MANAGEMENT - EVER TEAM
 ES CONTENT MANAGEMENT - EVER TEAM USER GUIDE Document Title Author ES Content Management - User Guide EVER TEAM Date 20/09/2010 Validated by EVER TEAM Date 20/09/2010 Version 9.4.0.0 Status Final TABLE
Welcome to the Investor Experience
 Welcome to the Investor Experience Welcome to the Black Diamond Investor Experience, a platform that allows advisors to customize how they present information to their clients. This document provides important
Managing the Burn Down Agent
 Managing the Burn Down Agent Agile Studio 7.4 May 2018 Introduction Agile Studio 7.4 has several burn down charts that teams and managers can use to view the overall progress of a sprint, team, or release.
CCRS Quick Start Guide for Program Administrators. September Bank Handlowy w Warszawie S.A.
 CCRS Quick Start Guide for Program Administrators September 2017 www.citihandlowy.pl Bank Handlowy w Warszawie S.A. CitiManager Quick Start Guide for Program Administrators Table of Contents Table of Contents
DASHBOARD PERFORMANCE INDICATOR DATABASE SYSTEM (PIDS) USER MANUAL LIBERIA STRATEGIC ANALYSIS TABLE OF CONTETABLE OF CONT. Version 1.
 USER MANUAL LIBERIA STRATEGIC ANALYSIS TABLE OF CONTETABLE OF CONT. Version 1.") UNITED STATES AGENCY FOR INTERNATIONAL DEVELOPMENT TABLE OF CONTETABLE OF CONT PERFORMANCE INDICATOR DATABASE SYSTEM (PIDS) LIBERIA STRATEGIC ANALYSIS DASHBOARD USER MANUAL Version 1.0 PERFORMANCE INDICATOR
UNITED STATES AGENCY FOR INTERNATIONAL DEVELOPMENT TABLE OF CONTETABLE OF CONT PERFORMANCE INDICATOR DATABASE SYSTEM (PIDS) LIBERIA STRATEGIC ANALYSIS DASHBOARD USER MANUAL Version 1.0 PERFORMANCE INDICATOR
Guide to User Interface 4.3
 Datatel Colleague Guide to User Interface 4.3 Release 18 June 24, 2011 For corrections and clarifications to this manual, see AnswerNet page 1926.37. Guide to User Interface 4.3 All Rights Reserved The
Widgets for SAP BusinessObjects Business Intelligence Platform User Guide SAP BusinessObjects Business Intelligence platform 4.1 Support Package 2
 Widgets for SAP BusinessObjects Business Intelligence Platform User Guide SAP BusinessObjects Business Intelligence platform 4.1 Support Package 2 Copyright 2013 SAP AG or an SAP affiliate company. All
Certified Pega Customer Service Business Architect
 White Paper Certified Pega Customer Service Business Architect EXAM BLUEPRINT Copyright 2015 Pegasystems Inc., Cambridge, MA All rights reserved. This document describes products and services of Pegasystems
Hands-On Lab. Agile Planning and Portfolio Management with Team Foundation Server Lab version: Last updated: 11/25/2013
 Hands-On Lab Agile Planning and Portfolio Management with Team Foundation Server 2013 Lab version: 12.0.21005.1 Last updated: 11/25/2013 CONTENTS OVERVIEW... 3 EXERCISE 1: AGILE PROJECT MANAGEMENT... 4
Personalizing CA Clarity PPM User Guide. Release
 Personalizing CA Clarity PPM User Guide Release 13.2.00 This Documentation, which includes embedded help systems and electronically distributed materials, (hereinafter referred to as the Documentation
Oracle. SCM Cloud Using Innovation Management. Release 13 (update 18B)
") Oracle SCM Cloud Release 13 (update 18B) Release 13 (update 18B) Part Number E94283-01 Copyright 2011-2018, Oracle and/or its affiliates. All rights reserved. Authors: Ann E. Gilbert, Landis Gwynn This
Oracle SCM Cloud Release 13 (update 18B) Release 13 (update 18B) Part Number E94283-01 Copyright 2011-2018, Oracle and/or its affiliates. All rights reserved. Authors: Ann E. Gilbert, Landis Gwynn This
Assignment Statuses An assignment can have any one of the following statuses. Depending on how the assignment is made,
 Assignments Assignments The topics in this section provide information about Assignments. To begin managing Assignments on the Assignments console: 1. On the Navigation bar, click Assignments 2. The Assignments
Talend Open Studio for MDM Web User Interface. User Guide 5.6.2
 Talend Open Studio for MDM Web User Interface User Guide 5.6.2 Talend Open Studio for MDM Web User Interface Adapted for v5.6.2. Supersedes previous releases. Publication date: May 12, 2015 Copyleft This
EXERCISE SYSTEM GUIDE (v. 7.13)
") EXERCISE SYSTEM GUIDE (v. 7.13) Copyright 2016 Pegasystems Inc., Cambridge, MA All rights reserved. This document describes products and services of Pegasystems Inc. It may contain trade secrets and proprietary
EXERCISE SYSTEM GUIDE (v. 7.13) Copyright 2016 Pegasystems Inc., Cambridge, MA All rights reserved. This document describes products and services of Pegasystems Inc. It may contain trade secrets and proprietary
TREENO ELECTRONIC DOCUMENT MANAGEMENT
 TREENO ELECTRONIC DOCUMENT MANAGEMENT User Guide February 2012 Contents Introduction... 5 About This Guide... 5 About Treeno... 6 Navigating Treeno EDM... 7 Logging in to Treeno EDM... 7 Changing Your
User Guide. Kronodoc Kronodoc Oy. Intelligent methods for process improvement and project execution
 User Guide Kronodoc 3.0 Intelligent methods for process improvement and project execution 2003 Kronodoc Oy 2 Table of Contents 1 User Guide 5 2 Information Structure in Kronodoc 6 3 Entering and Exiting