Movavi Screen Capture Pro 10 for Mac
|
|
|
- Laura Matilda Rodgers
- 5 years ago
- Views:
Transcription

1 Movavi Screen Capture Pro 10 for Mac Don't know where to start? Read these tutorials: Recording screen Recording online video Recording video from players Capture any fragment of your screen or the full desktop. Record video from online video websites such as YouTube or Vimeo. Record any video in your player. Recording Skype calls Recording only audio Need more help? Record Skype calls with sound from both ends. Record any sound from a device or music on your computer. Write to us at support@movavi.com Or click here to open live chat.
2 Table of Contents Activating Screen Capture Pro...3 Activating without Internet access...4 Getting an activation key...6 Trial limitations...7 Recording video from screen...8 Recording online video...11 Recording with webcam...13 Recording video from players...16 Recording Skype calls...18 Making an animated GIF...21 Record audio only...23 Launcher...25 Quick capture shortcuts...27 Setting up a screen recording...29 Capture area...31 Sound...33 Webcam...35 Mouse cursor effects...36 Recording keystrokes...38 Scheduling...39 Time limit...41 Starting the recording...42 Permissions...43 Editing captured files...44 Opening the editor...45 Opening previous recordings...46 Cutting recordings...47 Changing the format...49 Advanced settings...51 Uploading videos to YouTube...53 Uploading videos to Google Drive...56 Uploading to Movavi Cloud...59 Taking screenshots...61 Full screen screenshots...63 Screenshots during recording...64 Taking webpage screenshots...65 Uploading to Google Drive...66 Editing screenshots...70 Opening screenshots...73 Resizing images...74 Cropping images...76 Using the Brush...77 Adding arrows...78 Adding lines...79 Adding frames...80 Highlighting objects...81 Adding text...82 Saving edited screenshots...83 Screen Capture Pro preferences...84 General preferences...85 File preferences...87 Keyboard shortcuts...88 Video preferences...89 Webcam preferences...90 Effects...91 Adding a logo...92 Sharing preferences...93 Help and support...94 Installing Movavi Sound Grabber...95 Uninstalling Movavi Sound Grabber...96 System requirements...97 Supported formats...98 Codec activation...99 How to collect logs

3 Activating Screen Capture Pro Step 1: Click the button below to buy an activation key. After the purchase is completed, the key will be delivered to you via . Step 2: On the launcher window, click the Activate button. Step 3: Enter your activation key and click Activate. 3

4 Activating without Internet access If your computer is not connected to the Internet, you can activate Movavi Screen Capture Pro via . Step 1: Click the button below to buy an activation key. After the purchase is completed, the key will be delivered to you via . Step 2: On the launcher window, click the Activate button. Step 3: Enter your activation key and select the Activate offline option. Then, click Activate. Step 4: In the next window, click Copy and transfer this information to a computer or device with an Internet connection. 4


5 Step 5: When you have access to the Internet, paste the information you copied into a new and send it to reg@movavi.com. You should receive a reply within an hour. Copy the registration key from the reply and transfer it to the computer with Movavi Screen Capture Pro. Step 6: Return to the window with offline activation. If you've closed the window, repeat steps 1-3 and enter the same activation key you used before. Then, paste the registration key into the box and click Activate. 5
6 Getting an activation key To activate Movavi Screen Capture Pro, you will need an activation key. You can buy an activation key from our official website or from any of our partners, and it will be delivered to you via On the Movavi Screen Capture Pro launcher, click the cogwheel button and choose Buy Activation Key from the menu, or use the button below. 2. On the purchase page, click the Buy Now button next to the type of license that you need. If you're a home user, choose the Personal License. If you're planning to use Movavi Screen Capture Pro for work, business, or government organizations, choose the Business License. 3. Fill in your billing information and enter a valid address. IMPORTANT! We will send the activation key to this address, so please make sure it is entered correctly. 4. After you've completed your payment and your request has been processed, you will receive a confirmation from support@movavi.com with your activation key. If you haven't received your activation key: Check the Spam folder of your mailbox Contact support 6
7 Trial limitations When you first start your copy of Movavi Screen Capture Pro, it will be running in LIMITED TRIAL MODE until you activate the program. You can use all the features, but the following restrictions will apply: TRIAL VERSION FULL VERSION Lifetime license Movavi Screen Capture Pro will stop working after 14 days A watermark with the words ' trial version' will be added to all exported videos Capture time is limited to 2 minutes per video No annoying watermarks Add your own logo to your recorded videos Unlimited capture time Free updates Discounts on other Movavi products and upgrades 7


8 Recording video from screen How to make a screencast with Movavi Screen Capture Pro This tutorial will show you how to record and save a video from what's happening on your screen. Step 1: Set up the capture area 1. On the Movavi Screen Capture Pro launcher, click Record region. 2. Select the part of the screen that you want to record: Click and drag on the screen to select the capture area. To record a window or a window panel, hover your mouse pointer over it and click once a frame appears around it. To record the full screen, click on any empty space. Learn more: Capture area Step 2: Set up the sound Recording system audio 1. Click the System Audio button to enable recording sounds and audio playing on your computer. 2. Use the slider on the left to set the necessary recording volume. Recording from a microphone 1. Make sure that a microphone is connected to your computer. 2. Click the Microphone button to enable recording sounds from external devices. 3. Click the arrow above the Microphone button and select the device you want to use for recording. Step 3: Start recording When you're ready to begin, click the REC button. You will be given a 3-second countdown before the recording begins. Use these keyboard shortcuts to control the recording process: - pause the recording 8
9 - take a snapshot of the capture area - end capture and save the recording Tip: these are the default hotkeys. You can change them in the Keyboard Shortcuts section of the preferences. When you're ready to finish your recording, click Stop on the recording panel or use the keyboard shortcut. Step 4: Edit the recording (optional) When you finish recording, the capture editing window will open. Your video is ready and saved in MKV format, but you can preview it, edit, or save it in a different format. Cutting the recording To cut out a fragment: 1. Place the position marker to the beginning of the unwanted fragment and click the scissors icon. 2. Move the position marker to the end of the fragment and click the scissors button again. 3. Move the position marker to the center of the fragment to select it and click the trash can button. Saving the edited recording To save the trimmed version, or to change the format of your recording: 1. Click the Save As button. The output options will open. 2. Choose a name and location for saving the video. 3. Click one of the squares at the top to choose a format for saving your video. 4. Click Save to start processing your recording. 9
10 Frequently asked questions: I get a codec activation message when I try to start recording When you first start using Movavi Screen Capture Pro, you need to activate the codecs you are using. Simply click Activate in the message box to start using these codecs and continue with your capture. This process is free of charge and does not collect any personal information. 10
11 Recording online video How to download videos from YouTube, Vimeo, and other websites Step 1: Select capture area 1. On the Movavi Screen Capture Pro launcher, click Record region. 2. The screen will dim and a magnifying glass will appear. For high-quality videos, we recommend recording in full screen mode. To select the entire screen, click on any empty area of the desktop. For low-quality videos, draw the capture area on top of the web player. Learn more: Capture area Step 2: Enable system sound The recording panel will appear. Here, you can set up the sound and other options. 1. Click the System Audio button to enable sound recording. 2. Use the slider to the left to set the necessary system audio volume. Step 3: Record the video 1. To ensure the best recording quality, set the online video player to the highest quality and wait for the video to load. 2. Click the REC button to begin recording. 3. You will be given a 3-second countdown before recording starts. Use this time to enable full screen mode and click Play to start the video. 4. When the video ends, use the keyboard shortcut to finish recording, or click Stop on the recording panel. Step 4: Cut and convert the video (optional) Your video is now ready. When you end the recording, you can play the finished video, cut out unwanted parts, or save it in a different format. Trimming the video If you've recorded extra bits at the beginning or at the end of the video: 1. Place the position marker to where you want to cut the video. 2. Click the scissors button to cut at the selected time. 3. Select the fragment you've cut and click the trash can icon to delete it. 11
12 Saving the edited video After you finish capture, your recording is already saved in MKV format. If you've cut the video or want to change the format, you will need to save a copy of the video. 1. Click the Save As button in the editing window. The output options will appear. 2. Name your file and click the button in the Save to box to choose where to save the video. 3. Choose the format for saving the new video. If you can't find the format you want, click the arrows need. 4. Click Save to begin processing your recording. to search for the format that you 12

13 Step 1: Select capture area Recording with webcam 1. In the Movavi Screen Capture Pro launcher, click Record region. 2. With the crosshair, select the part of the screen that you want to record. After that, the screen recording panel will appear. Learn more: Capture area Step 2: Set up the webcam 1. Connect the web-camera to your computer and wait until the system installs the necessary drivers. 2. Click the cogwheel icon on top of the Webcam button. The webcam preferences will open. 3. Under Use this webcam, choose the webcam device that you want to use and cherk that its preview appears on the right. 4. Set up the video options for this webcam: Click the Settings button to set up your webcam's options such as brightness, contrast, and exposure. Note: webcam settings are different for each model. Choose the resolution that you would like to use. The higher the resolution, the higher the webcam video quality will be. However, if the webcam video is small, you may not need a very large resolution. For the best quality, use the highest frame rate that your webcam can provide for the best quality. If your webcam is mostly static or if you want a smaller file size, you may want to use a lower frame rate. 5. Set up the size and position for your webcam: Use the Video size slider to set the size of the webcam picture relative to the entire video. Choose one of the Position options to place your webcam picture inside the frame. 6. Click OK to save the webcam preferences. 13


14 Now that you've set up the webcam, the next time you want to use it, simply click the Webcam button once to enable webcam recording. Step 3: Set up sound Next, choose the audio sources that you want to hear on your recording: System sounds To record music and other sounds playing on your computer, click the System Audio button. The button appears green when enabled. Microphone You can record audio from your webcam's built-in microphone, or use an external microphone for better sound quality: 1. Click the Microphone button to enable recording audio from a microphone. 2. Click the arrow above and choose the microphone you want to use from the list. Step 4: Record your video When you're ready to begin, click REC to start recording. The recording panel will be minimized during recording. To finish the recording, press or click Stop on the recording panel. Step 5: Edit and save When the recording is finished, it will open in the capture editor, where you can play or trim the result. 14

15 To cut or trim the video, use the scissors and trash can buttons on the toolbar. If you've trimmed the file or if you want to save your recording in a different format, click Save As. 15
16 Recording video from players Before you start: Note the quality and resolution of your video. For best video quality, it is recommended that you record the video as close to its real resolution as possible. If the video is larger than your screen, maximize the player window and record the full screen. If the video is smaller than your screen, set the player settings to display the actual size. In this case, stretching the video to the full screen will decrease the quality. Step 1: Choose the capture area 1. On the Movavi Screen Capture Pro launcher window, click Record region. 2. Your cursor will turn into a crosshair. Use it to select the part of the screen that you want to record: If you're going to record in windowed mode, click the video inside the player to select just the video without the player window. If you're going to record a large video in full screen mode, click on an empty area of your desktop to select the entire screen. Learn more: Capture area Step 2: Set up the sound After you've selected the capture area, the recording panel will appear. Use the panel to set up the recording options. 1. To enable recording sounds from the player, click the speaker button under System Audio. The button will appear green when enabled. 2. Use the slider to the left of the speaker button to set the volume of the player's recording. 3. To make sure that other sounds don't interfere with your recording, check that the Microphone button is disabled (black), and close other windows or browser tabs that might play sounds during your recording. Step 3: Record video When you're ready, click the REC button on the recording panel and start playback in the player. The recording panel will hide Tip: You can trim the beginning later, so don't worry if you start playback after recording has begun. To end the recording, press or click Stop on the recording panel. Step 4: Edit and convert (optional) 16
17 Your recording is ready and saved in MKV format, and you can view the result in the capture editor. Now, you can trim the video or convert it to a different format. 1. To trim the video from the beginning or from the end, move the position marker to where you want to trim the video and click the scissors button to cut off the fragment. Then, select the unwanted fragment and click the trash can button to delete the fragment. 2. Click the Save As button to open output options. 3. Under File name, enter a name for the new video. Then, click the button under Save to and choose where you want to save the video. 4. Select the format you want to save the recording in. If you don't see the format you want to use, click the arrows format that you need. to search for the 5. Click Save to start processing the new file. 17
18 Recording Skype calls When you record audio or video calls using Skype, FaceTime or a similar program, it is important that you record both ends of the conversation. To do that, you will need to record input from your microphone or webcam, as well as the audio from your speakers. Follow the steps below to record Skype calls with audio. Step 1: Select capture area 1. Launch the Skype application and make sure it is on screen. 2. On the Movavi Screen Capture Pro launcher, click Record region. 3. Your cursor will turn into a crosshair. Draw a rectangle inside the Skype window where your call video will be. Learn more: Capture area Step 2: Set up the sound Once the capture area is selected, the recording panel will appear. Here, you can choose which sound sources can be heard on your recording. 1. Click the speaker button under System Audio to enable recording sounds on your computer, including the call from the other end. The button appears green when enabled. 2. Click the Microphone button to enable recording from a microphone. If you have more than one microphone, click Microphone and choose the one you want to use for the recording. 3. Use the sliders to the left of each button to set the necessary volume levels for the call and for your microphone. Tip: if you're recording a video call, you do not need to enable webcam recording in Movavi Screen Capture Pro, because Skype is already recording your webcam. Step 3: Record your call 1. Start your call in the Skype window. 2. Click REC on the Movavi Screen Capture Pro panel to begin recording. 18
19 3. When you finish your call, press or click the Stop button on the recording panel to finish recording. The capture editor will appear, where you can play the finished video, cut the recording, or save it in a different format. Step 4: Edit and convert (optional) If your recording started before the call, you can trim off the extra bits using the scissors and trash can buttons. 1. Place the position marker to where you want the video to start and click the scissors button. 2. Select the unwanted fragment and click the trash can button to delete it. 3. Now that you've cut the video, you need to save the trimmed copy. To do that, click the Save As button. 4. The export options will open in a new window. There, select the format you want to use, name the file and choose where you want to save it, and click Save to start processing the video. Tip: If you want to save just the audio of the call without the video, go to the Audio tab and select MP3. 19
20 20

21 Making an animated GIF To create a GIF, all you need to do is record an action or video on the screen and then save the animation in the GIF format. Step 1: Select capture area 1. Click Record region on the launcher window. Your cursor will turn into a crosshair. 2. Draw a rectangle with your mouse to select the area that you want to record. If you need to adjust the capture area, drag its edges to change the size and drag the circle in the center to change its position. Step 2: Record the action Once everything is ready, click the orange REC button to begin recording your GIF. When you've finished your recording, press need, you can trim the recording later. or click Stop on the control panel. Don't worry if you accidentally record more than you Step 3: Trim and save your GIF After capture is complete, you will see your recording in the capture editor window. Trimming the GIF (optional) If you've recorded extra bits, you can cut them off: 1. Place the position marker to where you want to cut the video. 2. Click the scissors button to make a cut. 3. Select the fragment you want to remove and click the trash can button. 21


22 Saving the GIF 1. Click the Save As button to open output options. 2. Click the GIF square at the top to choose GIF as the output format. 3. Name your GIF file and choose where you want to store it. 4. Click Save to start turning the recording into an animated GIF. Fun fact! The creators of this format intended it to be pronounced as 'jif', but it is now more common to pronounce it with a hard 'g', so both pronunciations are accepted. 22
23 Record audio only Recording music or voice with Movavi Screen Capture Pro Besides screen activity, you can just as easily record online music, radio, podcasts, and voice input as standalone audio files. Step 1: Open the recording panel In the launcher window, click Record region and click anywhere on the screen to open the recording panel. Tip: If you want to record with video, draw the capture area over the part of the screen that you want to record. Step 2: Set up the audio On the recording panel, choose which audio sources you want to record from: Recording system sounds To record music, online videos, and any other sounds playing on your computer, click the System Audio button. off on Recording microphone audio To record sound from a microphone or any other recording device connected to your computer, click the Microphone button. If you have more than one recording device, click the arrow above the button and select the device you want to record from. off on Volume levels Use the sliders to the left of the System Audio and Microphone buttons to adjust the volume of each source. Step 3: Record the audio Click REC when you're ready to begin recording. 23
24 To end the recording, press or click Stop on the recording panel. Step 4: Save audio file When the recording is finished, the capture editor window will appear, where you can play the audio you've recorded. 1. Click Save As to open the exporting options. 2. To save just the audio from your recording, go to the Audio tab and select one of the audio formats available. If you aren't sure which format to choose, click the MP3 button at the top as it's the most popular format for audio files. 3. Click Save to turn your recording into an audio file. 24

25 Launcher How to use the Movavi Screen Capture Pro launcher When you start Movavi Screen Capture Pro, you will see the launcher window. You can use it to start capturing your screen or open the editor to edit previous recordings or screenshots. Using the mini-widget If you use Movavi Screen Capture Pro frequently, you can switch to the compact widget. Click Switch to compact mode on the launcher, and the compact widget will hide to the menu bar. Click the Movavi Screen Capture Pro icon full launcher, click the button on the mini-widget. to show or hide the widget. To return to the Or click the cogwheel icon and choose Switch to Launcher Window. Quick capture shortcuts Capture shortcuts allow you to start capture instantly with pre-defined settings. Then, click the shortcut you like, and immediately start capturing your screen. Hint: if you are using the mini-widget, click Quick capture shortcuts to open the list of shortcuts. Learn more about quick capture shortcuts 25
26 26


27 Quick capture shortcuts With quick capture shortcuts, you can start recording immediately, so you don't miss a thing. To use the shortcuts: 1. In the launcher window, the shortcuts are right at hand. If you are using the mini-widget, click Quick capture shortcuts. 2. Click the shortcut you want to use. Video Repeat last recording immediately start a recording with the same settings that you used last time. Quick full screen recording immediately start a full screen recording. Quick region recording record a specific area of the screen. Screenshots Repeat last screenshot take a screenshot of the same area of the screen as the previous screenshot. Full screen screenshot take a screenshot of the entire screen and open the folder containing the screenshots. Webpage screenshot take a long screenshot of a webpage. For screenshots, you can choose what to do with new images: open in screenshot editor, show in folder, or copy to clipboard. 3. If you're recording a region, you'll need to select the capture area before the recording can begin. To do that, draw the capture area with your mouse or click inside the window you want to record. 27

28 The recording will then start immediately with the default settings. 28


29 Setting up a screen recording To start preparing for a screen recording, click Record region on the launcher window: Capture area Once you click on the Record region button, a crosshair will appear around your cursor. Use the crosshair to select which part of the screen you want to record. Once you've selected the capture area, it will appear as an orange rectangle on your screen. Learn more: Capture area Recording panel The recording panel appears after you've selected the capture area. You can use it to set up your recording. Sound You can record sound from two different sources on your video: from your speakers, or from an external device, such as a microphone. Click the speaker button to record system audio, Click the microphone button to record from a microphone. Learn more: Sound Webcam You can simultaneously record your webcam footage that will show up in the corner of the video. Connect the camera and click the Webcam button on the recording panel. Learn more: Webcam 29

30 Cursor recording If you're making an instructional video, you can highlight the cursor and its clicks to help your viewers keep track of your mouse. You can change the appearance of your cursor in the Effects section of the Preferences. Learn more: Mouse cursor effects Keystroke recording If you're showing keyboard actions such as hotkeys on your video, you can enable keystroke recording, and the keys you press will automatically appear at the bottom of the video. You can enable keystroke recording in the Effects section of the Preferences. Learn more: Recording keystrokes Starting the recording To start recording right away, click the REC button on the recording panel. You can pause and end capture using the buttons on the recording panel: Learn more: Starting the recording 30

31 Capture area The orange frame defines which part of your screen will be visible in your screen recording. Selecting the capture area Step 1: Click the Record region button on the launcher window. * If you're using the mini-launcher, click the camera button on the left. Or click the Select Capture Area button on the recording panel. Tip: The first time you use this button, you may see a message asking for permission to use your accessibility options. Click Open System Preferences on the message and enable Movavi Screen Capture Pro under Accessibility in Security & Privacy. Learn more: Permissions Step 2: Your cursor will turn into a crosshair. Use it to select the part of the screen that you want to record. To record a window or a window panel, hold your mouse pointer over the window you want to record and click when a frame appears around it. Tip: if you select a window, the capture area will follow whenever you move the window. To record the entire screen, click on an empty part of the desktop, or To record a part of the screen, click and drag diagonally to draw the area where you want it to appear. Setting an exact size After you've opened the recording panel, you can choose a preset size from the Capture Area section, or enter an exact size into the boxes: 31


32 To set the capture area to full screen, open the preset list and choose DISPLAY from the list. Editing the capture area To change the capture area size, drag the edge of the capture area with your mouse. To move the capture area, drag the square in its center. 32


33 Sound You can record sound from two separate sources: system audio and microphone audio. You can enable sound recording on the recording panel. System audio System audio is the sound that you can hear from your speakers. It includes music, video sound, alerts, and all other sounds. 1. To enable recording system audio, click the speaker icon on the recording panel. 2. Use the slider to the left of the speaker button to change the system audio volume. Microphone audio To record from a microphone or any other external recording device: 1. Connect the microphone to the computer. Make sure that it is recognized by the system and working correctly. 2. Click the microphone icon on the recording panel to enable microphone recording. 3. If you have more than one recording device connected, click the arrow use. next to Microphone and choose which microphone you want to 4. Use the slider to the left of the microphone button to change the volume. When enabled, the sound icons appear green. off on 33
34 Troubleshooting The system audio source cannot be found If you see a message when trying to enable system audio: 1. Open System Preferences and click on Sound. 2. In Sound preferences, switch to the Output tab. 3. On the Output tab, select Internal Speakers or a different audio device instead of Movavi Sound Grabber. See also: Recording only audio Recording Skype calls 34


35 Webcam You can record webcam video simultaneously with a screencast. The webcam video will appear in the corner of the main video. Enable the webcam To enable webcam recording, click the webcam icon on the recording panel: Webcam options If this is your first time recording with a webcam, you may want to set up how the webcam looks on your video. To open the webcam options, click the cogwheel icon on the webcam button. Or open the Settings menu, choose Preferences, and then switch to the the Webcam tab. If you have more than one camera, choose the one you want to use under "Use this webcam". Webcam properties Click the Settings button to open your webcam's built-in properties. These can be different for each manufacturer, but usually you can set up the brightness, white balance, exposure, and other color options. Resolution The resolution affects the quality of the output video. If the video is very small, you can choose a lower resolution without a noticeable decrease in quality. Frame rate Frame rate is the number of shots the camera takes each second. Higher frame rates will make the movements look smoother and work best for videos with a lot of motion. If the picture is mostly static, you can decrease frame rate to save disk space. The standard frame rate is frames per second. Video size Use the video size slider to change the size of the webcam video relative to the main video. Position You can place your webcam footage in any of the four corners of the main video. Choose where to place the webcam video under position. See also: Webcam preferences 35
36 Mouse cursor effects Using mouse effects, you can use the mouse as a pointer and show your viewers where to click. Step 1: Open the mouse cursor options 1. Click the Settings menu and choose Preferences. 2. In the Preferences window, switch to the Effects tab. Learn more: Effects options Step 2: Enable the cursor Select Show cursor on recording. This will make the cursor visible on recordings. To make the cursor invisible, disable this option. Step 3: Highlight cursor actions (optional) To make the cursor visible even better, you can highlight it or enable a special effect for clicks. Highlight cursor A semi-transparent circle will appear around the cursor, making it easier to track. 1. Select the Highlight cursor option. 2. (optional) The default highlight is yellow. To change the highlight color, click the square on the right and pick the new color. 3. (optional) Use the Size slider to make the highlight smaller or larger. The cursor itself will remain the standard size. Hover your mouse over the square on the right to preview the highlight. 36
 Click the left square to set the color for the left mouse button. 3. (optional) Click the right square to set the color for the right mouse button.")
37 Highlight clicks Concentric circles will appear for every click, color-coded for two mouse buttons. 1. Select the Highlight clicks option. 2. (optional) Click the left square to set the color for the left mouse button. 3. (optional) Click the right square to set the color for the right mouse button. Mouse click sound A clicking sound will play whenever you click the mouse. 1. Enable the Mouse click sound option. 2. (optional) The default clicking sound has already been selected for you. If you want to use your own sound, open the drop-down box and choose Add sound. Then, open the sound file that you want to use. You can use WAV, MP3, AIFF, and AU files. 37

38 Recording keystrokes If you're making a tutorial that uses keyboard shortcuts, it's helpful to display them on screen for your viewers. Enable keystroke recording to show the keys you pressed at the bottom of the video. 1. Open the Settings menu. 2. Choose Preferences. 3. In the Preferences window, switch to the Effects tab. 4. To enable keystroke recording, select one of the options: Keyboard shortcuts only only key combinations such as C or Esc will show up on screen. Letters and keys that do not cause an action will not be displayed. All keystrokes each key you press will appear on screen, including letters and numbers. To turn off keystroke recording, open the Effects preferences once again and select Do not capture keystrokes. Tips: Avoid entering any passwords or other sensitive information while you're recording a video with keystroke recording: if you share the video, your viewers will be able to see each character you type. 38
 Before scheduling the recording: 1.")

39 Scheduling Any recording can be scheduled for a later time. You can use this to automate your recordings or capture late-night webinars. Step 1: Set up your recording Scheduled recordings will start with the currently selected options (system sound, webcam, etc.) Before scheduling the recording: 1. (optional) Default capture area for scheduled recordings is full screen, so if you want to change it, click the Select Capture Area button on the recording panel and select the part of the screen you want to see on your scheduled recording. 2. To enable system sound recording, click the speaker button on the recording panel and make sure it is enabled and highlighted green. Learn more: Capture area Sound Webcam Step 2: Schedule recording 1. On the recording panel, click the alarm clock button to open capture time settings. 2. Select Schedule recording and click the Add Task button. 4. A task template will appear. Fill in the details for the task: Title - the name of your recording Date and time - the moment recording should start Duration - how long the recording should last (e.g if you want to record an hour long webinar, set this at 01:00:00) Capture area - by default, the program will record full screen. However, if you'd like to avoid recording extra parts of the screen, you can select Current area. Be careful: the program will capture the area selected on screen at the moment your recording starts! After capture - you can set your computer to automatically sleep or shut down when the recording is over. 39

40 5. Click Create to add the task to your recording schedule. Step 3: Enable launching at startup (optional) The screen recorder needs to be running at the scheduled start time to begin the recording. If you've scheduled the recording for a later date, enable the program to start with your computer so that you don't miss the recording. To do that, open the General section of the Preferences, click More and enable the Launch application at startup option. Finally, click OK in the Preferences window to save the changes. After the recording is finished, the recording file will be stored in *.mkv format in the output folder with your other screen recordings. Please note that if you haven't yet activated the program, the maximum capture time is two minutes for each video. To learn more about activating Movavi Screen Capture Pro, see the Activating Software section. If you are starting a lengthy recording, make sure that you have enough free disk space for saving the temporary recording files. 40
41 Time limit When you record a long webinar or online video, you can limit the recording to a specific time and it will stop automatically once the time is up. This way, you don't have to wait around for the video to end. Step 1: Set a time limit 1. On the recording panel, click the alarm clock button to open capture time settings. 2. Select the Set time limit for recording option. 3. Set Duration by entering the time limit as hours:minutes:seconds. 4. Click OK to enable the time limit. Note: the limit will work on all your next recordings in the current session only, until you restart the program. Step 2: Start the recording Click the REC button on the recording panel to begin recording. After the specified time is up, the recording will end automatically. 41
 On the menu bar, click the Movavi Screen Capture Pro icon and choose Start Recording.")

42 To begin recording: Starting the recording To begin recording, do any of the following: Click the REC button on the control panel. Use the start recording keyboard shortcut ( by default) On the menu bar, click the Movavi Screen Capture Pro icon and choose Start Recording. You will be given a 3-second countdown before recording begins. The recording panel will change during capture: On the left, you can see information about the recording: Duration the time recorded so far Recorded the recording size on disk Left on Disk how much free disk space you have left In the middle, you can see which sound sources are being recorded and preview the webcam: Webcam off/on System audio recording off/on Microphone audio recording off/on To pause recording: To pause recording, do any of the following: Click the Pause button on the recording panel. Click the Pause button on the orange panel at the top of the capture frame: Use the pause capture keyboard shortcut ( by default) On the menu bar, click the Movavi Screen Capture Pro icon and choose Pause. When you're ready to resume the recording, the Resume button will be in the same location as the Pause button. To stop recording: When you're ready to finish the recording, do any of the following: Click the Stop button on the control panel. Click the Stop button on the orange panel at the top of the capture frame: Use the stop recording keyboard shortcut ( by default) On the menu bar, click the Movavi Screen Capture Pro icon and choose Stop Recording. The recording will end and the player window will open, where you can view and edit the video. To cancel the recording: If you want to terminate the recording without saving the video and delete the recording file, click Cancel on the recording panel. Troubleshooting: Capture doesn't start immediately By default, you will see a three-second countdown after you press the REC button and before the recording begins. You can use this time to prepare for recording. If you want the recording to start immediately, open the Preferences and enable the 'Disable countdown' option. 42


43 Permissions Movavi Screen Capture Pro uses your system's accessibility features for keystroke recording and selecting window panes. To use these features, you will need to enable them in your System Preferences on first use. On Mac OS X 10.9 and higher: 1. Open System Preferences. 2. Click Security & Privacy. 3. Switch to the Privacy tab. 4. Click the Accessibility section on the left. 5. At the bottom of the window, click the lock icon and enter your password when prompted to enable changing the preferences. 6. Select the box next to Movavi Screen Capture Pro. This will allow it to use accessibility features for capture. On Mac OS X 10.7 and 10.8: 1. Open System Preferences. 2. Click Accessibility. 3. Check the 'Enable access for assistive devices' box. 43

44 Editing captured files When you end a recording, the player window will open, where you can view the finished video, save videos to a different format, and edit videos and screenshots. Here's what you can do: Cut recordings trim videos from the beginning or the end, cut out fragments. Change recording format save the video in a different video format, as an audio file, or even as an animated GIF. Publish online upload the video straight to YouTube or Google Drive. View previous recordings all your earlier recordings and screenshots in one place on the history panel. 44

45 Opening the editor To open the capture editor, click Edit files on the launcher: Or click Edit captured files if you are using the mini-widget. Also, the capture editor will open after you finish recording a video. 45


46 Opening previous recordings After you've finished a recording, it will open in the capture editor, where you can view and cut the file. If you want to edit the recording later, you can open a recording file using any of the following: Recent recordings At the bottom of the capture editor, you can see a carousel of your previous recordings and screenshots. If you can't see the thumbnails, click the Recent button in the bottom left to show the panel. Tip: If you've changed the recording folder in File preferences, the Recent panel will only show recordings in the new folder. Open a file Open the Media Files menu and choose Open Recording File. Then, find the file in the Explorer dialog box and click Open. Storage location The default locations for saving output files are: "/Movies/Movavi Screen Capture Pro/" for video recordings "/Movies/Movavi Screen Capture Pro/Screenshots" for screenshots To change where the files are stored: 1. Open the Settings menu and choose Preferences. 2. In the Preferences window, switch to the Files tab. 3. To change the video storage folder, click the ellipsis button next to Save output videos to and choose a new folder. To change the screenshot storage folder, click the ellipsis button 4. Click OK to accept the changes. next to Save screenshots to and choose a new folder. 46


47 Cutting recordings This guide will show you how to cut out parts from video recordings using the built-in capture editor. Before you start: Open the capture editor window, Open the recording you want to edit in the capture editor. Step 1: Cut fragments 1. Move the position marker to where you want to cut the video. 2. Click the scissors button. A cut marker will appear at the current position. Repeat these two steps to cut at the beginning and and at the end of each fragment you want to delete. Precise positioning For more precise positioning, click on the cut marker on the seek bar and do any of the following: Click the previous frame and next frame buttons to move the cut marker by exactly one frame, Click the arrows next to the time to move the marker by a small interval. With the cut marker selected, use the arrow keys to move it left or right by 100 milliseconds. Manually enter the necessary time. Step 2: Delete fragments 1. On the seek bar, click a fragment to select it. The selected fragment appears as a darker shade. 2. To delete the selected fragment, click the trash can button. A dotted line will appear on the seek bar where a fragment has been deleted: 47

48 How to undo cutting To cancel a cutting action, click Undo at the top of the window or press. To repeat a cancelled action, click Redo. Step 3: Save the edited video If you've cut the video, you need to save it to apply the changes. 1. Click Save As. The window with saving options will appear. 2. At the top of the window, choose where to save the file and enter a file name. 3. Choose a format for the video. If you don't know which format to choose, leave MP4 selected. It will save faster and at no quality loss. 4. Click Save to start processing the video. This may take a while for longer videos. 48


49 Changing the format New recordings are created in the MKV format which is supported by most players. This guide will show you how to save your video recordings in a different format. You can also convert your video recordings to audio by saving them as an audio format, or convert them to a mobile-friendly format for watching on devices. Before you start: 1. Open the capture editor. 2. Find the recording that you want to change. Step 1: Open the output options Click Save As to open the output options. Step 2: Name and location Enter a name for your new file under File name. If you want to store the recording somewhere other than the default folder, click the ellipsis button next to Save to and choose a different folder. Step 3: Choose a new format Select a format you want to use. The formats are organized into three groups: Video - MP4, WebM, GIF, AVI, MKV, MOV, WMV, FLV, M2TS, OGV, SWF Audio - MP3, WAV, AAC, FLAC, OGG, WMA Devices - iphone, ipad, Android, Samsung Galaxy S6 S7, NEXUS, PlayStation Use the arrows to search for the format that you need. 49
50 Step 4: Save the file Finally, click Save to convert your recording to the selected format. This may take a while for large videos. 50


51 Advanced settings There are some extra settings you can use to customize your recorded files before saving. To open the settings, click Advanced in the saving window. Resolution The frame size or resolution determines the videos width and height in pixels. Open the Resolution list to select from the most common resolutions. Ideally, the frame size should not exceed the resolution of the recorded video, but match it instead. Smaller resolutions allow you to make the output video smaller and thus save your disk space, however, this will sacrifice some video quality due to downscaling. Framing Choosing a resize method can help you manage how your video is resized to fit inside the frame size you've set. There are three resizing options available: Letterbox the video will be resized to fit inside the frame entirely. This method allows you to keep the whole video inside the frame without distortions, but may place black bars around the video. Stretch the video is fit entirely inside the frame and then stretched on one axis in such a way as to fill the entire frame without leaving black bars. This allows you to cover the entire frame, however, the objects in the video may appear horizontally or vertically distorted. Crop the video will be resized to be slightly larger than the frame, cropping the parts that do not fit inside it. This allows to cover the entire area of the frame without distorting any of the objects inside the video or without leaving black bars, however, this may not suit some clips where important objects are near the edge of the frame. FPS The number of frames per second is the number of shots that a camera takes each second to make a video. Most cameras shoot video at around 24 frames per second. However, some cameras can shoot high-speed video that you can use to make slow motion clips. If you plan on using high-speed videos, choose the FPS that matches the video. If you're using regular videos, leave the default FPS. Sample rate 51
52 The sample rate affects the quality of digital sound, and defines the maximum frequencies that an audio stream can contain. The default sample rate is set to Hz, which exceeds the maximum frequencies of human hearing and is used to record Audio CDs and most music tracks. Channels Stereo sound contains two channels and has the capacity to convey the relative location of sound sources, which makes it best for recording music; mono sound has only one channel and produces sound without differentiating left and right channels. Stereo is the generally preferred number of channels, however, some mobile devices record sound only in mono mode. 52

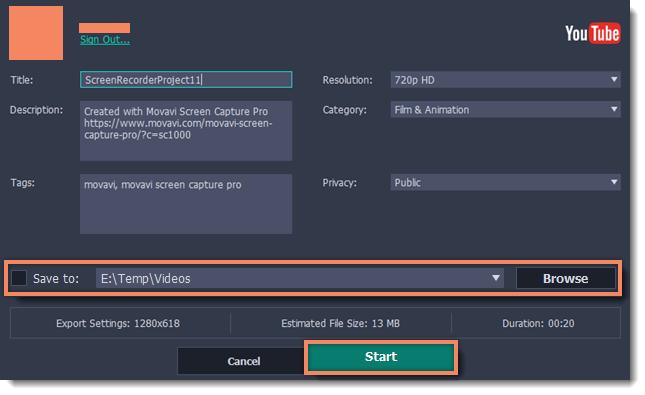
53 Uploading videos to YouTube Once your video is ready, you can share it to YouTube! Step 1: Open the Export window Click the Share button next to Save As and select YouTube. Step 2: Sign in to your account 1. Click Sign In. The authentication page will open in your browser. 2. Sign in to your account and click Allow to let Movavi Screen Capture Pro upload videos. Step 3: Choose a resolution In the export window, open the Resolution list and choose a resolution that suits your video. For best results, choose a resolution that is equal to or less than the height of your video. For example, if your video is 1280x720, choose the 720p resolution. This resolution will be the highest available quality available for your video. Lower resolutions will be generated automatically by the website. 53


54 Step 4: Fill in the details 1. Fill in the title and description for your video. 2. Add some tags to help users find videos by relevant topics. Separate tags with commas. 3. Choose a category to help viewers find relevant content. 4. Open the Privacy box and choose who you want to see the video: Private only you can see the video. Unlisted the video will not appear for other people unless you give them the link. Public anyone can access the video. Step 5: Save and upload the video 1. Before uploading, you can save the video to disk to keep all the editing and settings. To do that, enable the where the video file is stored, click Browse and select a folder. Save to box. To change Hint: by default, the option is disabled. Remember: the original recording is automatically saved in the MKV format in your output folder. 2. Check the length and size of the video. YouTube allows users to upload videos up to 15 minutes. To upload longer videos, you need to verify your account. YouTube help increasing your upload limit 3. Click Start to begin saving and uploading the video. 54
55 55

: Select your Google Drive folder After you've signed in, the program will load your Google Drive folder list.")
56 Uploading videos to Google Drive You can use Google Drive to store your videos or share them with others. Step 1: Open the Export window 1. Click the Share button next to Save As. 2. Select Google Drive. Step 2: Sign in to your account 1. Click Sign In. The authentication page will open in your browser. 2. Sign in to your account and click Allow to let Movavi Screen Capture Pro upload videos. Step 3 (optional): Select your Google Drive folder After you've signed in, the program will load your Google Drive folder list. You can share files to specific folders if you like. Select one of them in the list. 56
57 Step 4 (optional): Choose a format By default, MP4 is suggested. You can change the format and upload files in various formats, including GIF, MP3, and other. Learn more: Changing the format Step 5: Fill in the details 1. Fill in the title for your video. 2. Choose who you want to see the video under Privacy: Only me only you can see the video. Get shareable link the video will not appear for other people unless you give them the link. Step 6: Save and upload the video 1. Before uploading, you can save the video to disk to keep all the editing and settings. To do that, enable the where the video file is stored, click the ellipsis button Save to box. To change and select a folder. Hint: by default, the option is disabled. Remember: the original recording is automatically saved in the MKV format in your output folder. 2. Click Start to begin saving and uploading the video. 57
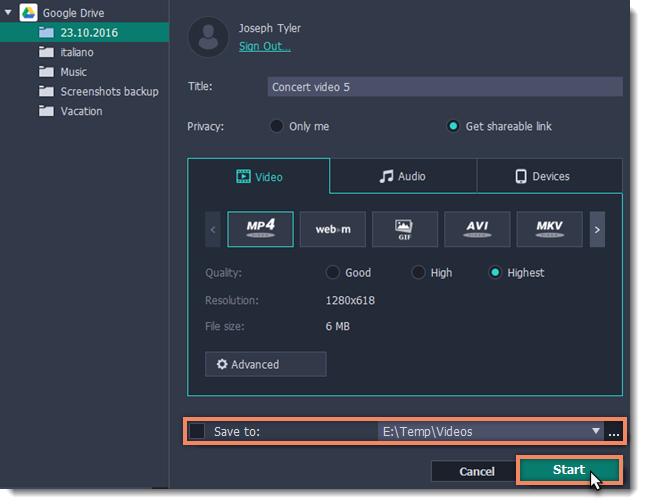
58 58


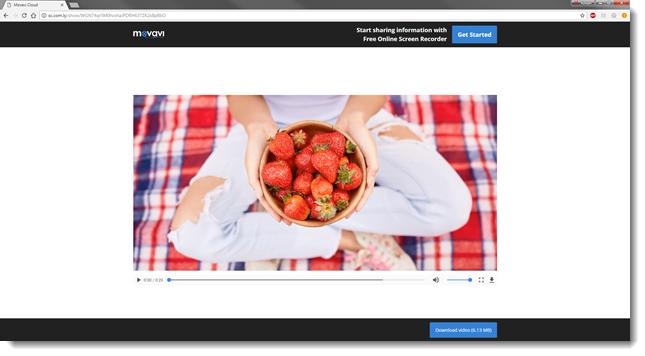
59 Uploading to Movavi Cloud If you only need to quickly share a file, you can use Movavi Cloud. It will give you a shareable link in just one click! 1. In the editor window, click the Share button and select Movavi Cloud. The upload will start immediately. 2. Share! The link will be copied to clipboard automatically, but you can also use the copy button or click View in Browser to open the file in your default browser. In the browser, you can play the video or download it. The file will be accessible by the link, so if you feel you might need to send it to someone else some other time, make sure to know where to find it (e.g. in a message you've first attached it to). 59
60 60
61 Taking screenshots Capturing screenshots with Movavi Screen Capture Pro Step 1: On the Take a screenshot tab in the Movavi Screen Capture Pro launcher, click Region screenshot. Step 2: Your cursor will turn into a crosshair. Select the part of the screen that you want to capture: To capture a window or a window frame, hold your mouse pointer over the window and click after a frame appears around it. To capture a part of the screen, hold the left mouse button and drag diagonally to draw a rectangle. To capture the entire screen, click on any empty area of your desktop. Step 3 (optional): A frame will appear over the selected area. You can now edit your screenshot: Select a tool you want to add to your screenshot: Line drag to draw a shape. Click Tool Properties, Arrow, Tapered Arrow or Frame. Hold the left mouse button and to change the color and width of your shape. Drag by the green arrow circle or the white circles on the edges to resize the element; rotate by dragging the green circle left or right: If you need to move the capture area, click the Drag-area mode button. 61


62 Step 4: Choose what you want to do with your screenshot: Click the Copy button to copy the image to clipboard without saving the screenshot to a file. Click the Save button to save the image file and open its containing folder. Click the Share Click More button to share the image to Movavi Cloud. if you want to save the image file and open it for editing or share it to Google Drive. Where are the screenshots stored? By default, the screenshots are stored in the "/Movies/Movavi Screen Capture Pro/Screenshots" folder of your user. You can change where the files are saved in the Files section of the Preferences. To open the screenshot's location, click the folder icon on its thumbnail at the bottom of the editor window. Learn more: Editing screenshots 62


63 Using the launcher: Full screen screenshots 1. Go to the Take a screenshot tab. 2. Click Full screen screenshot in the list of screenshot shortcuts. Using the mini-widget: Step 1: Click Quick capture shortcuts. Step 2: In the list of quick capture shortcuts, click Full screen screenshot. The screenshot will be saved instantly. 63


64 Screenshots during recording While recording a video, you can take a screenshot using any of the following: Press Hint: This is the default keyboard shortcut for taking a screenshot. You can change it in the Keyboard Shortcuts section of the Preferences. Click the camera button on the capture frame: Click the Movavi Screen Capture Pro icon on the menu bar and choose Save a screenshot. 64


65 Taking webpage screenshots This guide will help you capture long webpages in a single screenshot. Using the launcher window: Step 1: Go to the Take a screenshot tab. Step 2: Under 'Screenshot shortcuts', click Webpage screenshot. Step 3: Click inside the webpage you want to capture. The program will start scrolling the page automatically. Capturing the screenshot will take a few seconds. Using the compact mode launcher: Step 1: Open the compact mode launcher. Step 2: Click Quick capture shortcuts. Step 3: Switch to the screenshot tab at the bottom of the list. Step 4: Choose Webpage screenshot from the list. Step 5: Click inside the webpage you want to capture. Capturing the screenshot will take a few seconds. See also: Editing screenshots Quick capture shortcuts 65

66 Step 1: Take a screenshot Uploading to Google Drive 1. On the Take a screenshot tab in the Movavi Screen Capture Pro launcher, click Region screenshot. Your cursor will turn into a crosshair. Select the part of the screen that you want to capture: To capture a window or a window frame, hold your mouse pointer over the window and click after a frame appears around it. To capture a part of the screen, hold the left mouse button and drag diagonally to draw a rectangle. To capture the entire screen, click on any empty area of your desktop. 2. A frame will appear over the selected area. Click the More button and select Google Drive. 66


67 Step 2: Sign in to your account 1. Click Sign In. The authentication page will open in your browser. 2. Sign in to your account and click Allow to let Movavi Screen Capture Pro upload files. Step 3 (optional): Select your Google Drive folder After you've signed in, the program will load your Google Drive folder list. You can share files to specific folders if you like. Select one of them in the list. 67


68 Step 4 (optional): Choose a format By default, all screenshots are in PNG format. You can change the format to BMP or JPG. 1. Open the Format list in the export window. 2. Select a format you want to save your image in. Step 5: Fill in the details 1. Fill in the title for your screenshot. 2. Choose who you want to see the screenshot under Privacy: Only me only you can see the screenshot. Get shareable link the screenshot will not appear for other people unless you give them the link. Step 6: Save and upload the screenshot 1. Before uploading, you can save the screenshot as a file on your computer. To do that, enable the image file is stored, click the ellipsis button Save to box. To change where the and select a folder. 68

69 2. Click Start to begin saving and uploading the screenshot. 69
70 Editing screenshots How to annotate screenshots with Movavi Screen Capture Pro Step 1: Open the screenshot editor 1. On the Movavi Screen Capture Pro launcher, click Edit files to open the screenshot editor window. Hint: Or click the Save and edit button when taking a screenshot to make it open in the editor straight away. 2. On the Recent panel at the bottom, click the screenshot that you want to edit. How to take screenshots Step 2: Crop the screenshot 1. At the top of the screenshot editor window, click Crop to open the cropping tool. 2. A frame will appear around the image. Select the part of the image that you want to keep: Drag the frame's borders to resize the frame, and drag by the center of the frame to move it. If you need a specific size, enter it into the width and height boxes on the right. If you need to lock the frame's proportions, click the lock icon to the right of the size boxes. 3. Click Apply to cut off the selected parts. Step 3: Add shapes 1. At the top of the window, choose a shape tool that you want to use: Arrows, Lines, Frames, or Highlighter. 2. On the right, choose the style that you want to use: tapered or straight arrows, rectangle or ellipsis, etc. Here, you can also choose the color, width, and outline for the shape. 3. Click the Add Arrow / Add Line / Add Frame / Add Highlight button to place the selected shape on the image. 70


71 4. On the image, move the shape with your mouse to place it where you want: Drag the arrow circle on the shape to change its size. To remove a shape, select the shape and click the button or press the Delete key. To rotate frames and highlights, drag the green circle at the top left or right. Step 4: Add text 1. At the top of the window, click the Text button to open the text tool. 2. Click Add Text on the right to create a text box on the image. 3. Double-click the text box and enter your text. 4. On the right, choose the font, style, size, and color of the text. Switch to the Background tab to choose the color of the background. 5. To move the text box, drag it with your mouse. To rotate or resize the text, drag the arrow circle or use the Text rotation slider on the right. To remove a text box, select it and click the button or press the Delete key. Step 5: Save the image When you're done editing the image, click Save As to save the finished screenshot. 71

72 If you are using the trial version, you will not be able to save edited screenshots. To remove the trial limitations, buy an activation key and use it to activate the program. 72

73 Opening screenshots You can open screenshots and other images for editing in the built-in screenshot editor window. To open the editor, click Edit files in the launcher window. Also, the editor will open after taking screenshots with the Region screenshot button and after every video recording. After the screenshot editor window opens, you can choose which screenshot you want to edit: If you've taken the screenshot recently, it should appear on the Recent panel at the bottom. Click the screenshot to start editing it. 73


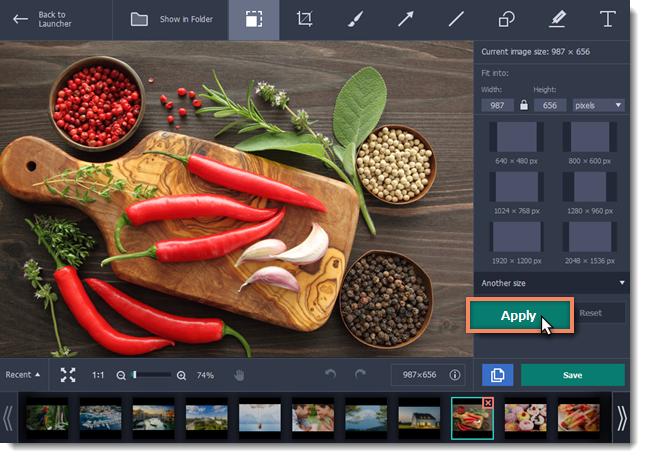
74 Resizing images Step 1: Open the Resize tab How to make images smaller with Movavi Screen Capture Pro Click the Resize button at the top of the window to open resizing options. Step 2: Enter the new dimensions Enter the new width and height in pixels. If you need different units, open the list on the right and choose percent, centimeters, or inches. Or you can choose one of the size presets below. If you don't see the necessary size, click Another size to open the full list of sizes in pixels, percent, centimeters, or inches. By default, the image will maintain its original proportions after resizing. If you need to change the proportions, click the lock icon. Step 3: Resize the image Click Apply to set the new size. 74
75 75

76 Cropping images Step 1: At the top of the window, click the Crop button to open the cropping tool. Step 2: A frame will appear around the image. Select the part of the image that you want to keep using any of the following: Drag the edges of the frame, Click and drag to draw a new frame, Use one of the presets on the right to set the frame size, Or enter the exact width and height into the boxes. Locking the aspect ratio To prevent the frame proportions from changing, click the lock icon. If you've selected a preset, you will need to deselect it in order to change the frame proportions. Inverting proportions To invert the width and height, click the arrow icon between the width and height boxes: Step 3: Click Apply to cut the image. 76


77 Using the Brush Step 1: At the top of the screenshot editor window, click the Brush button. Step 2: On the right-hand panel, set the brush size and softness, choose a color and set its opacity. Step 3: Draw whatever you like! Simply hold your mouse button and move the brush around your image. Be creative! The changes will be applied immediately. 77


78 Adding arrows Step 1: At the top of the screenshot editor window, click the Arrows button. Step 2: On the right, choose the style of the arrow: Choose an arrow shape. The Basic group contains straight arrows, and the Tapered group contains arrows that are wider towards the head. Under the shape styles, set the color, width, and outline for the arrow. You can also change these after you've added the arrow. Step 3: Click Add Arrow to place the arrow onto the image. Step 4: Move and resize the arrow on the image: Drag by the green arrow circle to resize and rotate the arrow. Drag by the arrow shape to move it. To delete the arrow, click the green circle with the cross. 78
79 Adding lines Step 1: At the top of the screenshot editor window, click the Lines button. Step 2: On the right, choose the style of the line. Step 3: Click Add Line to place the line onto the image. Step 4: Move and resize the line on the image: Drag by the green arrow circle Drag the line itself to move it. to resize and rotate the line. To delete the line, click the green circle with the cross. 79


80 Adding frames Step 1: At the top of the screenshot editor window, click the Frames button. Step 2: On the right, choose the frame shape. Step 3: Click Add Frame to place the frame onto the image. Step 4: Move and resize the frame on the image: Drag by the green arrow circle or the white circles on the edges to resize the frame. Drag the edge of the frame to move it. To rotate the frame, drag the green circle left or right: To delete the frame, click the green circle with the cross. 80


81 Highlighting objects Step 1: At the top of the screenshot editor window, click the Highlighter button. Step 2: On the right, click Add Highlight to create a highlight rectangle on the image. Step 3: Set the color and opacity of the selected highlight using the options on the right. Step 4: Move and resize the highlight on the image: Drag by the green arrow circle or the white circles on the edges to resize the highlight. Drag the edge of the highlight rectangle to move it. To rotate the highlight, drag the green circle left or right: To delete the highlight, click the green circle with the cross. 81

82 Adding text Step 1: At the top of the window, click the Text button to open the text tool. Step 2: Click Add Text to create a text box on the image. Step 3: Double-click inside the text box and enter the new text. Hint: to enter multiple lines, press Enter at the end of a line or use a new text box for each line. Step 4: On the right, choose the font, style, size, and color of the text. Switch to the Background tab to choose the color of the background. Step 5: Drag the text box to the necessary place on the image. To resize or rotate the text, drag by the green arrow icon: To remove a text box, click the green X button: 82

83 Saving edited screenshots After you've taken a screenshot, it is already saved to your computer. However, if you've made any changes to the image, you will need to save the file. To save the image, click Save As in the bottom right-hand corner of the screenshot editor. Trial restrictions If you're using a trial version of Movavi Screen Capture Pro, you will not be able to save edited screenshots. To remove these limitations, buy an activation key and use it to activate the program. 83
84 Screen Capture Pro preferences To open the program settings for Movavi Screen Capture Pro: 1. Open the Settings menu or click the cogwheel button in the launcher window. 2. Choose Preferences. The preferences window will open. The preferences are organized into relevant categories: General, Files, Keyboard Shortcuts, Video, Webcam, Effects, Logo and Sharing. 84

85 General preferences The General tab allows you to change the basic behavior of the program. The settings are organized into two groups for your convenience. Basic settings Disable countdown Every time before the recording starts, you will see a 3-second countdown. This gives you time to prepare for your recording. Select this option to turn the countdown off and start recording immediately. Show capture control panel during recording The capture control panel will appear on top of the capture frame while recording a video. You can use it to pause or stop capture, take a snapshot, or see how much space the recording has taken up. If you are recording a full screen video, the panel will not be visible. Disable frame blinking during capture In case the blinking irritates you, check this box. The frame will stay still during recording. Allow window panes selection To record only the main window panes (no frames, menus or browser tabs), Movavi Screen Capture Pro needs access to your screen. Enable sound notifications The program will notify you when a screenshot has been taken, a file export is finished, or if an error occurs. Other settings 85

86 Launch application at startup With this option enabled, Movavi Screen Capture Pro will start when you log in and run in the background. This way you will always be ready to capture your screen. Save extended logs for troubleshooting In case you experience trouble using the program and contact our support team, they might ask you to collect logs. The logs contain the program's actions for some period of time, as well as important error reports and descriptions. Extended logs give the most amount of information which may be essential to solving your problem. How to collect logs Automatically check for updates The program will notify you if a new version is available. Minor updates are absolutely free (for example, from v.1.3 to v.1.4). For major updates users with purchased Movavi Screen Capture Pro license will get a considerable discount. Download updates in the background The program will automatically download an update if available and ask you to install the new version afterwards. I give consent to send anonymous usage stats to Movavi Enabling this box will allow Movavi Screen Capture Pro to send us anonymous data about how you use the program. This data does not contain any personally identifiable information and is only used for improving our software. You can find more information about how we use the statistics on our Movavi Improvement Program page. 86

87 File preferences In the Filessection of the preferences, you can change where your captured files are stored. To change a folder location, click the icon with the dots and select a new folder: Save output videos to... This is where all your video recordings are saved. Delete original recording after saving If you save the recording in a different format, or trim the file, the original will be deleted. Save screenshots to... This is where all your new screenshots are saved. You can also find your recent screenshots in the editor window. Default screenshot format Here you can change the format for all new screenshots. You can also change the format for a single screenshot by using the Save As button in the editor window to save a copy with a different format. 87

88 Keyboard shortcuts On the Keyboard Shortcuts section, you can set your own shortcuts. To change one of the shortcuts: 1. Click inside the box with the shortcut you want to change. The box will become blank. 2. Simultaneously press on keyboard the keys you want to use as a shortcut to the selected action. The box will now display your custom shortcut. 3. Click OK to apply the changes. To reset all the keyboard shortcuts to their original state, click the Reset to Default button. If there's a keyboard shortcut you want to use in other software while Movavi Screen Capture Pro is running, check the shortcuts box. Disable keyboard If you forget a shortcut, you can always look it up here in the keyboard shortcut settings. 88

89 Video preferences On the Video tab, you can choose how the videos are recorded and saved, change the preferred audio quality, including the sample rate, number of channels, and bits per second. Frame rate The frame rate defines how many frames will be captured each second and affects the smoothness of motion in the video. A lower frame rate will result in smaller output size, however, the video may not turn out as smooth. The recommended frame rate is frames per second. Output frame size Usually, your desktop is recorded at full size. This option allows you to reduce the original video quality to 1/2 or 1/4 of the original. The video file will have lower quality, but take up less disk space. This can also improve performance while recording on slower computers. Scale down Retina video recordings Enabling this option will reduce video file size, but may also result in text and graphics appearing less crisp. Disable this option if video quality is a concern. Sample rate The first number is the audio sample rate, measured in Kilohertz (khz). This is the number of digital samples taken each second to record sound. Higher sample rate usually means higher quality khz is the recommended sample rate, which corresponds to the human hearing range. Channels Mono uses only one audio channel, which saves some disk space. Stereo uses two audio channels, which allows distinguishing the direction a sound is coming from and usually sounds more natural. Bit depth Screen Capture Pro will record audio at 16 bits, which is the standard bit depth for most audio recordings. This means that every sample contains 16 bits of information to encode sound. Enable SuperSpeed conversion This option will make saving videos faster if you use the same output video codec. For example, if you cut the video without changing the format. Formats that work with SuperSpeed are marked with these icons: some files, try disabling this option. or in the list. If you're having problems with saving 89
90 Webcam preferences The Webcam section of the preferences allows you to set up your webcam for recording it on top of the main video. Enabling the webcam 1. Connect the camera to your computer and wait until your system installs the necessary drivers. 2. In the Webcam preferences section, select the camera you want to use from the 'Use this webcam' box. If the camera does not appear in the list, try manually installing the driver that came with your camera. You can use the preview square on the right to check that the camera is working properly. Webcam properties Clicking the Settings button will open the camera's properties. These properties are different for each manufacturer, but generally you can use them to calibrate the brightness, contrast, and exposure of your camera. Resolution The resolution affects the quality of the output video. If the video is very small, you can choose a lower resolution without a noticeable decrease in quality. Frame rate Frame rate is the number of shots the camera takes each second. Higher frame rates will make the movements look smoother and work best for videos with a lot of motion. If the picture is mostly static, you can decrease frame rate to save disk space. The standard frame rate is frames per second. Video size Use the video size slider to set the size of the webcam overlay relative to the main video. Position Use one of the position options to choose where your webcam overlay will be placed on the original video. 90
91 Effects In the Effects section of the preferences, you can set up the visibility of your mouse and keystrokes. Cursor options Select Show cursor on recording to make the cursor visible to your viewers. Highlight cursor This option will add a bright circle around the mouse cursor to make it more visible. 1. Select the Highlight cursor option. 2. Click the square on the right to choose the highlight color. Use the Alpha channel box to change its opacity. 3. Use the size slider to change the size of the highlight circle. Hint: hover your mouse over the preview square on the right to see how it will look on the recording. Highlight clicks This option will flash a circle around the cursor for every click. You can set two different colors for the left and right mouse buttons. 1. Enable the Highlight clicks option. 2. Click the left square to set the color for the left mouse button. 3. Click the right square to set the color for the right mouse button. Mouse click sound A clicking sound will be played every time you click the mouse to draw attention to your actions. 1. Enable the Mouse click sound option. The default mouse click sound will be used. 2. (optional) If you have a file with a different sound effect you want to use, open the box under 'Mouse click sound' and choose Add sound. Then, open the audio file with the sound effect. You can use WAV, MP3, AIFF, and AU files. Keystroke recording options Keyboard shortcuts only only functional keys and key combinations (for example, C) will appear on the video. All keystrokes all key presses, including letters of the alphabet, will appear on the video. Hint: avoid entering passwords when this option is enabled if you don't want everyone to see your password. 91

92 Adding a logo On this tab, you can set up adding your own logo to your recorded videos. Add a corporate logo Enable this checkbox to show your logo on your videos. To add a logo, click the icon with the dots and select an image: Logo size on video This shows how big your logo will be relative to your video. By default, the logo takes up 20% of the shorter side in your recorded video resolution (e.g. if your video is 500x200 pixels, the logo will be 40px in height). You can set this option from 10 to 30 percent. Position Use one of the position options to choose where your logo will be placed on the original video. Note that adding your own image is not available in trial mode. Activate the program to use this option. 92
93 Sharing preferences The Sharing tab allows you to manage your YouTube and Google Drive accounts used to upload files to. To sign in to your account: 1. Click Sign In. The authentication page will open in your browser. 2. Sign in to your account and click Allow to let Movavi Screen Capture Pro upload files. 93

94 Help and support Didn't find what you were looking for? Need help with a problem? Have a suggestion? Contact our support team and we'll help you right away. How to reach us By scpro@movavi.com Fill out a support form We guarantee a response within 3 business days! If you ran into a problem, please describe it in as much detail as possible; any screenshots, log files, or information about your system will allow us to help you faster. Frequently asked questions Why is "Trial Version" written on my videos? The watermark is only placed on videos in the trial version. Buy an activation key and use it to activate the program. After that, you can convert files without the watermark. Removing trial restrictions Why do I have to activate codecs? Some video and audio codecs are patented by other organizations and need to be activated. Activation is free of charge and you will only need to do this once for each patented codec. You may encounter the activation messages when starting capture or opening captured files. When you activate the codec, the program sends your consent to our server. If you don't want to see these messages, select Activate other codecs without asking, and future codecs will be activated automatically. Codec activation 94


95 Installing Movavi Sound Grabber Movavi Sound Grabber is a free extension that enables you to capture system sounds on your Mac. It acts as a virtual audio input device and sends the sound from music, videos, and system alerts that you would normally hear through your speakers to the input channel so that it may be recorded by screen capturing software. By default, Movavi Sound Grabber is installed automatically together with Movavi Screen Capture Pro. However, if you have trouble capturing sound from certain devices (e.g. wireless Bluetooth headphones), have uninstalled Movavi Sound Grabber or it is missing from your system, you will need to reinstall it in order to capture system sounds. 1. Uninstall Movavi Sound Grabber that had been installed automatically. Note that after deinstalling you might need to reboot your Mac. Learn more: Uninstalling Movavi Sound Grabber 2. In Movavi Screen Capture Pro, go to the Help menu and click About to check your program version. This will determine the package you need to download. Click the blue button below for version 5.4 and above: For other versions OR for version 5.4 with troublesome sound capture on devices, click the green button: 3. Once the download has finished, open the.dmg package you've downloaded. 4. Double-click the package icon to launch the install assistant. Then, follow the on-screen instructions to install the software just like you would install any other program. 4. Restart Movavi Screen Capture Pro if it was running during installation. That's it! You can now easily record system audio using Movavi Screen Capture Pro! 95


96 Uninstalling Movavi Sound Grabber Since Movavi Sound Grabber is a virtual device and does not show up under Applications in Finder, you need to use an Uninstall file to remove Sound Grabber from your system. 1. Launch Movavi Sound Grabber Uninstaller in your Applications list, or click the link below to download the uninstaller. Movavi Sound Grabber Uninstaller.zip MB 2. Make sure that Movavi Screen Capture Pro is closed and launch the downloaded file. If you see a security warning, click Open. 3. You will see the following confirmation dialogue. Click Yes to continue and enter your user password to confirm uninstallation of Movavi Sound Grabber. Movavi Sound Grabber will then be removed from your system. If you need to re-install Movavi Sound Grabber for capturing system sounds, please see the Installing Movavi Sound Grabber section. 96
Movavi Screen Recorder 5 for Mac
 Movavi Screen Recorder 5 for Mac Don't know where to start? Read these tutorials: Recording screen Recording online video Recording video from players Capture any fragment of your screen or the full desktop.
Movavi Screen Recorder 10 for Mac
 Movavi Screen Recorder 10 for Mac Don't know where to start? Read these tutorials: Recording screen Recording online video Recording video from players Capture any fragment of your screen or the full desktop.
Movavi Screen Capture Pro 10
 Movavi Screen Capture Pro 10 Don't know where to start? Read these tutorials: Recording screen Recording online video Recording video from players Capture any fragment of your screen or the full desktop.
Movavi Video Editor 15 Business
 Movavi Video Editor 15 Business Don't know where to start? Read these tutorials: How to remove trial restrictions Save your video without a watermark and use the program after 14 days. Make a video in
Gecata by Movavi 5. Recording desktop. Recording with webcam Capture videos of the games you play. Record video of your full desktop.
 Gecata by Movavi 5 Don't know where to start? Read these tutorials: Recording gameplay Recording desktop Recording with webcam Capture videos of the games you play. Record video of your full desktop. Add
Movavi Split Movie for Mac User manual
 Movavi Split Movie for Mac User manual Table of Contents Quick start guide...2 Activating Split Movie...4 Getting an activation key...5 Activating without Internet...5 Opening files...8 Playback...9 Cutting
GOM Cam User Guide. Please visit our website (cam.gomlab.com) regularly to check out our. latest update.
 regularly to check out our. latest update.") GOM Cam User Guide Please visit our website (cam.gomlab.com) regularly to check out our latest update. From screen recording to webcam video and gameplay recording GOM Cam allows you to record anything
GOM Cam User Guide Please visit our website (cam.gomlab.com) regularly to check out our latest update. From screen recording to webcam video and gameplay recording GOM Cam allows you to record anything
Movavi Video Converter Premium 18
 Movavi Video Converter Premium 18 Don't know where to start? Read these tutorials: Converting videos Converting for devices Converting audio Change the video format Watch videos on your Play any audio
Movavi Video Converter 18
 Movavi Video Converter 18 Don't know where to start? Converting videos Change the video format Read these tutorials: Converting for devices Watch videos on your phone or tablet More questions? Converting
Movavi Video Editor 15
 Movavi Video Editor 15 Don't know where to start? Read these tutorials: How to remove trial restrictions Save your video without a watermark and use the program after 7 days. Make a Quick Video Have your
litecam HD GUIDE For litecam HD Version 5.0 Contents
 1 litecam HD GUIDE For litecam HD Version 5.0 Contents 2 TABLE OF CONTENTS SYSTEM REQUIREMENTS 4 LITECAM HD INSTALLATION GUIDE 5 litecam HD installation Procedure... 5 - Installation... 5 - Activation...
Camtasia Studio 5.0 PART I. The Basics
 Camtasia Studio 5.0 Techsmith s Camtasia Studio software is a video screenshot creation utility that makes it easy to create video tutorials of an on screen action. This handout is designed to get you
USER GUIDE. For litecam HD Version 4.8. November 5 th, 2013.
 1 USER GUIDE For litecam HD Version 4.8 November 5 th, 2013. 2 Contents TABLE OF CONTENTS SYSTEM REQUIREMENTS 4 GUIDE TIP 5 LITECAM HD INSTALLATION GUIDE 9 litecam HD installation Procedure... 9 - Installation...
Movavi PDF Editor User Guide. Quick start guide Opening files Editing documents Saving files
 Movavi PDF Editor User Guide Quick start guide Opening files Editing documents Saving files Table of Contents Quick start guide...2 Removing trial restrictions...3 Getting an activation key...4 Activating
Movavi Video Editor 14 Plus
 Movavi Video Editor 14 Plus Don't know where to start? Read these tutorials: How to remove trial restrictions Make a video in easy mode Make a video in full-feature mode Save your video without a watermark
The Start menu (overview)
") The Start menu (overview) The Start menu is the main gateway to your computer's programs, folders, and settings. It's called a menu because it provides a list of choices, just as a restaurant menu does.
The Start menu (overview) The Start menu is the main gateway to your computer's programs, folders, and settings. It's called a menu because it provides a list of choices, just as a restaurant menu does.
CyberLink. Screen Recorder 4. User's Guide
 CyberLink Screen Recorder 4 User's Guide Copyright and Disclaimer All rights reserved. To the extent allowed by law, Screen Recorder IS PROVIDED AS IS, WITHOUT WARRANTY OF ANY KIND, EITHER EXPRESS OR IMPLIED,
Bridgit Conferencing Software User s Guide. Version 3.0
 Bridgit Conferencing Software User s Guide Version 3.0 ii Table Of Contents Introducing Bridgit Conferencing Software... 1 System Requirements... 1 Getting Bridgit Conferencing Software... 2 The Bridgit
PediGait IP. Users Manual
 PediGait IP Users Manual April 2012 Table of Contents Clients Tab... 2 Open a Client file... 2 Delete Client file(s)... 2 Edit a Client... 3 Add a new client... 3 Add Comments to client files... 4 Profiles
Camtasia... 3 What is Camtasia and how do I download it?... 4 How do I record a video in Camtasia?... 6 How do I edit video and audio in
 CAMTASIA Table of Contents... 3 What is and how do I download it?... 4 How do I record a video in?... 6 How do I edit video and audio in?...14 How do I apply effects in?...19 How do I use a Green Screen
Microsoft PowerPoint 2013 Beginning
 Microsoft PowerPoint 2013 Beginning PowerPoint Presentations on the Web... 2 Starting PowerPoint... 2 Opening a Presentation... 2 File Tab... 3 Quick Access Toolbar... 3 The Ribbon... 4 Keyboard Shortcuts...
Microsoft PowerPoint 2010 Beginning
 Microsoft PowerPoint 2010 Beginning PowerPoint Presentations on the Web... 2 Starting PowerPoint... 2 Opening a Presentation... 2 File Tab... 3 Quick Access Toolbar... 3 The Ribbon... 4 Keyboard Shortcuts...
Transcribing and Coding Audio and Video Files
 Transcribing and Coding Audio and Video Files Contents TRANSCRIBING AND CODING AUDIO AND VIDEO FILES... 1 GENERAL INFORMATION ABOUT THE ANALYSIS OF AUDIO AND VIDEO FILES... 1 THE MEDIA PLAYER TOOLBAR...
IN THIS CLASS WE ARE GOING TO LEARN THE BASIC FEATURES OF WINDOWS 8.1 WITH HANDS ON TRAINING THE CLASS WILL RUN ON THE SPEED OF THE AVERAGE STUDENT
 1 IN THIS CLASS WE ARE GOING TO LEARN THE BASIC FEATURES OF WINDOWS 8.1 WITH HANDS ON TRAINING EACH CLASS WILL RUN APPROXIMATELY 40 MINUTES WE WILL PICK UP WHERE WE LEFT OFF AT THE NEXT CLASS THE CLASS
Panopto. End-User Guide
 Panopto End-User Guide Table of Contents INTRODUCTION... 3 PROVISIONING A COURSE... 3 LOGGING IN... 7 NAVIGATION... 8 PREPARING TO RECORD... 9 CREATING A SIMPLE RECORDING (AUDIO AND VIDEO ONLY)... 10 CREATING
Screencast.com. Getting the Most from Your Screencast.com Account. July TechSmith Corporation. All rights reserved.
 Screencast.com Getting the Most from Your Screencast.com Account July 2009 2009 TechSmith Corporation. All rights reserved. Contents Contents...2 First Things First: Get Organized...3 Get Familiar with
Microsoft PowerPoint 2007 Beginning
 Microsoft PowerPoint 2007 Beginning Educational Technology Center PowerPoint Presentations on the Web... 2 Starting PowerPoint... 2 Opening a Presentation... 2 Microsoft Office Button... 3 Quick Access
Libraries. Multi-Touch. Aero Peek. Sema Foundation 10 Classes 2 nd Exam Review ICT Department 5/22/ Lesson - 15
 10 Classes 2 nd Exam Review Lesson - 15 Introduction Windows 7, previous version of the latest version (Windows 8.1) of Microsoft Windows, was produced for use on personal computers, including home and
imovie 08 Basics USF College of Education Laptop Initiative EDU 252, Website:
 imovie 08 Basics USF College of Education Laptop Initiative EDU 252, Email: laptoplounge@coedu.usf.edu Website: http://fcit.usf.edu/laptop/ imovie 08 is a completely redesigned version of the video editing
ACDSee Video Studio User Guide. Contents
 Contents Welcome to ACDSee Video Studio 2 Creating, Saving, and Sharing Projects 3 Adding and Removing Media 4 Organizing, Adjusting, and Displaying Media 7 Timeline Tracks 7 Copying and Pasting Properties
Camtasia Studio 7 User Guide
 Camtasia Studio 7 User Guide TechSmith & Camtasia Studio: TechSmith Corporation released popular desktop recording tools like Snagit, Jing, and Camtasia. TechSmith also launched Screencast.com, a screencast
TABLE OF CONTENTS. 7 Chat Files Attendees Questions Settings... 18
 INSTRUCTOR MANUAL TABLE OF CONTENTS Table of Contents... 1 1 Overview... 2 2 Prerequisites... 2 3 Starting the Session... 2 4 Session Menu... 4 4.1 Extending duration... 4 4.2 Lobby Announcement... 5 4.3
GETTING STARTED TABLE OF CONTENTS
 imovie 11 Tutorial GETTING STARTED imovie 11 is consumer-level digital video editing software for Macintosh. You can use imovie 11 to edit the footage you film with digital video cameras and HD video cameras.
Creating a Recording in Canvas Embedding a Recording in Canvas To embed a recording into a discussion
 Table of Contents What is Kaltura... 3 Things to Remember... 3 My Media... 3 To access My Media... 3 Upload Media... 4 To perform a media upload... 4 Viewing Videos... 6 Add New List Options... 6 Media
The Fundamentals. Document Basics
 3 The Fundamentals Opening a Program... 3 Similarities in All Programs... 3 It's On Now What?...4 Making things easier to see.. 4 Adjusting Text Size.....4 My Computer. 4 Control Panel... 5 Accessibility
Dimo MKV Video Converter for Mac is Mac MKV Converter to help you convert MKV files to MOV, WMV, MP4, MKV, etc. for editing,
 Introduce o Brief Introduction Convert o Convert MKV video Burn o Create ISO GIF o Make GIF Download o Download online movies Play o Play MKV Video Edit o Cut MKV video length by trimming o Get MKV video
BBFlashBack Training for Library Staff
 BBFlashBack Training for Library Staff Learning outcomes: By the end of the course you will be able to: record a screencast insert/import text, images, audio & video edit text, audio & video files produce
Desktop Client USER GUIDE. Version 2. Strategic Vision, Inc.
 Desktop Client USER GUIDE Version 2 Strategic Vision, Inc. Table of Contents Welcome Desktop Client Interface................... Audio and Webcam Settings................. Tool Overview........................
Introduction to Microsoft PowerPoint 2000
 Introduction to Microsoft PowerPoint 2000 TABLE OF CONTENTS Accessing PowerPoint 2000... 3 Starting a Presentation... 3 About the Editing Screen in Normal Screen View... 4 About Menu Displays in PowerPoint
Useful Google Apps for Teaching and Learning
 Useful Google Apps for Teaching and Learning Centre for Development of Teaching and Learning (CDTL) National University of Singapore email: edtech@groups.nus.edu.sg Table of Contents About the Workshop...
WebEx Network Recording Player User Guide
 WebEx Network Recording Player User Guide for Advanced Recording Format (.arf) files Version 2.3 Copyright 1997-2009 Cisco Systems, Inc. and/or its affiliated entities. All rights reserved. WEBEX, CISCO,
Editing Videos. Overview. 1. Open the Editor
 Editing Videos Overview The Panopto editor allows for easy web-based editing from any modern browser. You can perform quick, non-destructive edits to any video on the Panopto platform and deliver exactly
OFFICIAL USER MANUAL 1
 OFFICIAL USER MANUAL 1 Contents: Getting Started with Musician Video Maker 3 Launching And Activating Musician Video Maker 3 Beta Tester Users 5 Start Mode And Demo Mode 6 Importing Your Video Footage
CAPTURE. USER GUIDE v1
 CAPTURE USER GUIDE v1 INTRODUCTION About The Logitech Capture app makes creating content with your webcam as easy as lights, camera, Capture. Start recording high-quality videos the second you plug in
Movavi Video Converter 14. User guide
 Movavi Video Converter 14 User guide Table of Contents Movavi Video Converter 14... 3 Overview... 4 System Requirements... 5 Supported Formats... 6 Program Settings... 7 Hardware Acceleration... 11 Activating
icms Pro USER S Manual Ver 1.4
 icms Pro USER S Manual Ver 1.4 Contents Panes... 7 How Can User Rights Affect Your Use of icms Pro SW?... 10 Minimum System Requirements... 11 Installing the icms Pro SW... 12 Download icms Pro from icatchinc
MagicInfo VideoWall Author
 MagicInfo VideoWall Author MagicInfo VideoWall Author User Guide MagicInfo VideoWall Author is a program designed to construct a VideoWall layout and create VideoWall content by adding various elements
Movavi Mac Cleaner. Download PDF. Not sure where to begin? Read the Quick Start Guide!
 Movavi Mac Cleaner Download PDF Not sure where to begin? Read the Quick Start Guide! Table of Contents Cleaning Your Mac...3 System Requirements...4 Installation...5 Trial and Activation...7 Getting an
Share Content. Share Content
 , page 1 Quick reference tasks: share content, page 2 Share a file, page 4 Share an application, page 11 About sharing a remote computer, page 14 Take a Poll, page 17 Transfer and Download Files During
Parallels Toolbox User's Guide
 Parallels Toolbox User's Guide Parallels International GmbH Vordergasse 59 8200 Schaffhausen Switzerland Tel: + 41 52 672 20 30 www.parallels.com Copyright 1999-2018 Parallels International GmbH. All rights
Movavi Screen Capture Studio. User's Manual
 Movavi Screen Capture Studio User's Manual Table of Contents Movavi Screen Capture Studio...4 Overview... 5 System Requirements... 6 Movavi Screen Capture... 7 Main Features...8 Supported Video Formats...
Using PowerPoint to Create an Interactive Multimedia Portfolio Ben Johnson
 Using PowerPoint to Create an Interactive Multimedia Portfolio Ben Johnson www.psd.k12.co.us/staff/benj Getting Started 1. Launch PowerPoint from the start button. Select the Design Template radio button.
Version 2.0. Campus 2.0 Student s Guide
 Campus 2.0 Student s Guide Version 2.0 Campus 2.0 Student s Guide Error! No text of specified style in document. i Important Notice Copyright 2008 Tegrity, Inc. Disclaimer 2008 Tegrity, Inc. all rights
EASI MP-X Series. User Manual EASI MPR. Workstation. MPR Workstation user manual, , rev003
 EASI MP-X Series User Manual EASI MPR Workstation MPR Workstation user manual, 59300234, rev003 Contents MPR Workstation Introduction...1 General...1 Software version...1 Structure of the Network...1 Workstation
HOW TO Use Microsoft Expression Encoder
 HOW TO Use Microsoft Expression Encoder Microsoft Expression Encoder is a free tool for converting video files such as MPG, MP4, and AVI files to Windows Media Video (WMV) format for use in AdQue. It can
Dimo FLV Video Converter for Mac is an all-in-one Mac FLV conversion software. It can help convert FLV files to almost all video and
 Introduce o Brief Introduction Convert o Convert FLV video Burn o Create ISO GIF o Make GIF Download o Download online movies Play o Play FLV Video Edit o Cut FLV video length by trimming o Get FLV video
Avigilon Control Center Web Client User Guide
 Avigilon Control Center Web Client User Guide Version: 4.12 Standard PDF-WEBCLIENT-S-E-Rev2 Copyright 2013 Avigilon. All rights reserved. The information presented is subject to change without notice.
Contents. Launching Word
 Using Microsoft Office 2007 Introduction to Word Handout INFORMATION TECHNOLOGY SERVICES California State University, Los Angeles Version 1.0 Winter 2009 Contents Launching Word 2007... 3 Working with
Microcontroller Compatible Audio File Conversion
 Microcontroller Compatible Audio File Conversion Created by Mike Barela Last updated on 2018-06-07 09:10:45 PM UTC Guide Contents Guide Contents Convert Sound Files in Audacity Audacity Download Audacity
A Reference guide to Using the Collaborate tool in your LMS (Mac Users)
") A Reference guide to Using the Collaborate tool in your LMS (Mac Users) Your LMS includes a synchronous (real-time) tool for online communication within your subject or community. The Collaborate tool
A Reference guide to Using the Collaborate tool in your LMS (Mac Users) Your LMS includes a synchronous (real-time) tool for online communication within your subject or community. The Collaborate tool
Getting Started. Microsoft QUICK Source 7
 Microsoft QUICK Windows Source 7 Getting Started The Windows 7 Desktop u v w x u Icon links to a program, file, or folder that is stored on the desktop. v Shortcut Icon links to a program, file, or folder
Avigilon Control Center Standard Web Client User Guide. Version 5.6
 Avigilon Control Center Standard Web Client User Guide Version 5.6 2006-2015, Avigilon Corporation. All rights reserved. Unless expressly granted in writing, no license is granted with respect to any copyright,
Introduction to Kaltura
 Introduction to Kaltura The Kaltura media content management system allows users to record, stream, and manage multimedia files. This industry-leading enterprise system offers many robust tools. This guide
ECHO Personal Capture
 1 ECHO Personal Capture Introduction to Lecture Capture Lecture capture technology allows instructors to create audio/video recordings of classroom lectures or presentations. With lecture capture, instructors
icms Pro USER s MANUAL Ver 1.0
 icms Pro USER s MANUAL Ver 1.0 Contents Target Audience for this Document... 5 Copyright, Trademarks and Important Information... 5 Copyright... 5 Disclaimer... 5 Introduction... 6 Tabs... 6 Panes... 7
LionMail. for Administrative Assistants
 LionMail for Administrative Assistants If you directly manage email on behalf of others or just send and receive dozens (or hundreds!) of messages a day in your role as an administrative assistant, this
Tech Day Camtasia. What is Camtasia Studio?
 Tech Day 2008 Camtasia What is Camtasia Studio? Camtasia Studio is a video-based screen capturing software program. It is analogous to using a video camera to record your screen. However, unlike using
How To Capture Screen Shots
 What Is FastStone Capture? FastStone Capture is a program that can be used to capture screen images that you want to place in a document, a brochure, an e-mail message, a slide show and for lots of other
2. Download and open the app. Android requests permission to use the external device each time. Check "Use by default for this USB Device".
 The ShurePlus MOTIV app provides instant recording for your Android device. Adjust your microphone settings and record uncompressed audio. Then share your files via text, email, Google Drive, and more.
Teaching with Primary Sources
 Teaching with Primary Sources Joining Educators and Students with Library of Congress Resources Creating a Presentation with PowerPoint 2007 Benefits of using PowerPoint in lectures: PowerPoint encourages
If you have many MXF files from Canon/Sony/Panasonic camcorders and want to convert them to video files that you can play on your
 Introduce o Brief Introduction Convert o Convert MXF video Burn o Create ISO GIF o Make GIF Download o Download online movies Edit o Cut MXF video length by trimming o Get MXF video size by cropping o
CyberLink. U Webinar. User's Guide
 CyberLink U Webinar User's Guide Copyright and Disclaimer All rights reserved. To the extent allowed by law, U Webinar IS PROVIDED AS IS, WITHOUT WARRANTY OF ANY KIND, EITHER EXPRESS OR IMPLIED, INCLUDING
Application of Skills: Microsoft PowerPoint 2013 Tutorial
 Application of Skills: Microsoft PowerPoint 2013 Tutorial Throughout this tutorial, you will progress through a series of steps to create a presentation about yourself. You will continue to add to this
Podcasting With GarageBand 09
 Podcasting With GarageBand 09 Starting a GarageBand Podcast Project Types of Podcasts You can create several different types of podcasts in GarageBand: Audio podcasts include audio with narration, dialogue,
Microsoft Office 2007
 Microsoft Office 2007 Adding Slide Transitions Transition Sound Transitions Transition Speed Apply to All A slide transition is the way one slide changes to the next in Slide Show view. Animations Tab:
User Guide. FTR Reporter For more information, visit
 FTR Reporter 5.7.1 For more information, visit www.fortherecord.com TABLE OF CONTENTS INTRODUCTION... 5 Overview... 5 About This Document... 5 GETTING STARTED... 6 Installation... 6 Starting Reporter...
Opening the Program. Movie Maker II 1
 1 Opening the Program To open the Movie Maker II application, use the Start Programs Movie Maker combination from the desktop. Alternatively, you can create a shortcut on the desktop. After executing this
How To Capture Screen Shots
 What Is FastStone Capture? FastStone Capture is a program that can be used to capture screen images that you want to place in a document, a brochure, an e-mail message, a slide show and for lots of other
Windows Movie Maker / Microsoft Photo Story Digital Video
 Windows Movie Maker / Microsoft Photo Story Digital Video http://intranet/technology/index.html TRC HELP DESK X5092 April 2006 Photo Story and Movie Maker Microsoft Photo Story 3 allows you to create fantastic
Parallels Toolbox for Windows User's Guide
 Parallels Toolbox for Windows User's Guide Parallels International GmbH Vordergasse 59 8200 Schaffhausen Switzerland Tel: + 41 52 672 20 30 www.parallels.com Copyright 1999-2018 Parallels International
liquivid Video Improve v2.x Installation Instructions for Windows, macos, Adobe Lightroom Manual
 liquivid Video Improve v2.x Installation Instructions for Windows, macos, Adobe Lightroom Manual Installation Instructions for Windows... 3 Required Hardware & Software... 3 Installation... 3 File Saving
UICapture Training Macintosh. Macintosh Panopto Recorder: Login
 UICapture Training Macintosh Before You Begin 1. (For individuals working on their own) If you do not have Panopto installed on your Mac, download and install it from the ITS Software Downloads page or
 S4B Split Movie Soft4Boost Help S4B Split Movie www.sorentioapps.com Sorentio Systems, Ltd. All rights reserved Contact Us If you have any comments, suggestions or questions regarding S4B Split Movie or
Microsoft Word 2010 Tutorial
 1 Microsoft Word 2010 Tutorial Microsoft Word 2010 is a word-processing program, designed to help you create professional-quality documents. With the finest documentformatting tools, Word helps you organize
WebEx Recording Editor. User Guide
 WebEx Recording Editor User Guide 042310 Copyright 1997 2010 Cisco and/or its affiliates. All rights reserved. WEBEX, CISCO, Cisco WebEx, the CISCO logo, and the Cisco WebEx logo are trademarks or registered
User Guide. FTR Player For more information visit
 FTR Player 5.7.1 TABLE OF CONTENTS INTRODUCTION... 4 Overview... 4 About This Document... 4 GETTING STARTED... 6 Installation... 6 Starting FTR Player... 6 To start Player in Windows 7 or Windows 10 6
User Manual Any company, product or service names found in this document may be the trademarks or registered trademarks of their respective companies.
 User Manual Any company, product or service names found in this document may be the trademarks or registered trademarks of their respective companies. Action! Gameplay and screen recorder Thank you for
PowerPoint 2016 Advanced for Windows
 1 PowerPoint 2016 Advanced for Windows PowerPoint 2016 Advanced for Windows Training Objective To learn advanced features of PowerPoint 2016 in order to create more elaborate presentations. What you can
TECHSMITH RELAY Santa Ana College Distance Education, Cesar Chavez Building Room A-101, (714) ,
 ,") TECHSMITH RELAY Santa Ana College Distance Education, Cesar Chavez Building Room A-101, (714) 564-6725, DistEd@sac.edu Techsmith Relay is a simple video creation program that allows users to record video
TECHSMITH RELAY Santa Ana College Distance Education, Cesar Chavez Building Room A-101, (714) 564-6725, DistEd@sac.edu Techsmith Relay is a simple video creation program that allows users to record video
Creators Basic Guide to Using UICapture (Windows)
") Creators Basic Guide to Using UICapture (Windows) All of the University of Iowa General Assignment Classrooms (GAC) are equipped with the recording software known as Panopto Recorder on Windows and Mac.
Creators Basic Guide to Using UICapture (Windows) All of the University of Iowa General Assignment Classrooms (GAC) are equipped with the recording software known as Panopto Recorder on Windows and Mac.
Handout Objectives: a. b. c. d. 3. a. b. c. d. e a. b. 6. a. b. c. d. Overview:
 Computer Basics I Handout Objectives: 1. Control program windows and menus. 2. Graphical user interface (GUI) a. Desktop b. Manage Windows c. Recycle Bin d. Creating a New Folder 3. Control Panel. a. Appearance
How to Make a Movie in imovie How to Make a Movie Trailer in imovie How to Color Correct a Movie in imovie
 How to Make a Movie in imovie How to Make a Movie Trailer in imovie How to Color Correct a Movie in imovie 1. Make sure you are using the Mac. Make a Movie in imovie 2. If your files are on an external
ipims USER s MANUAL (ORION IP Device Total Management SW) Ver 1.2 by sj
 Ver 1.2 by sj") ipims USER s MANUAL (ORION IP Device Total Management SW) Ver 1.2 by sj Contents Contents... 2 Target Audience for this Document... 5 Minimum System Requirements... 5 Introduction... 6 Tabs... 6 Panes...
ipims USER s MANUAL (ORION IP Device Total Management SW) Ver 1.2 by sj Contents Contents... 2 Target Audience for this Document... 5 Minimum System Requirements... 5 Introduction... 6 Tabs... 6 Panes...
PowerPoint Intermediate 2010
 PowerPoint Intermediate 2010 I. Creating a Slide Master A. Using the design feature of PowerPoint essentially sets up similar formatting for all of your slides within a presentation. However, there are
Session 7 MS Word. Graphics. Inserting Clipart, and Graphics Modify graphics Position graphics
 Session 7 MS Word Graphics Inserting Clipart, and Graphics Modify graphics Position graphics Table of Contents Session 7 Working with Graphics... 1 The Toolbar... 1 Drawing Toolbar... 1 Picture Toolbar...
Creating a short stop motion animation with Adobe Photoshop CC. Open Adobe Photoshop CC. A note about embedding
 Creating a short stop motion animation with Adobe Photoshop CC Open Adobe Photoshop CC A note about embedding Photoshop CC never embeds video or sound into your document. Instead, it links to the original
Articulate Engage 2013 Tutorial
 How to Access Engage 1. By Launching Engage Directly o You can open Engage directly from the desktop by clicking on the green Engage Icon, which is shown in the top right corner of this manual. 2. By Launching
A GET YOU GOING GUIDE
 A GET YOU GOING GUIDE To Your copy here Audio Notetaker 4.0 April 2015 1 Learning Support Getting Started with Audio Notetaker Audio Notetaker is highly recommended for those of you who use a Digital Voice
Using Flash Animation Basics
 Using Flash Contents Using Flash... 1 Animation Basics... 1 Exercise 1. Creating a Symbol... 2 Exercise 2. Working with Layers... 4 Exercise 3. Using the Timeline... 6 Exercise 4. Previewing an animation...
Blackboard Collaborate Ultra 2018 UT DALLAS USER MANUAL
 Blackboard Collaborate Ultra 208 UT DALLAS USER MANUAL UT Dallas elearning ELEARNING@UTDALLAS.EDU SPRING 208 Table of Contents Introduction... 3 Browser Support... 3 Blackboard Collaborate Ultra inside