RoboRemo User Manual v1.9.1
|
|
|
- Alexia Sherman
- 5 years ago
- Views:
Transcription


1 RoboRemo User Manual v1.9.1
2 Table of Contents General Description...3 Bluetooth / WiFi / Ethernet / USB modules...4 Available interface items...6 Building the interface...8 Common edit s...9 Button edit s...9 Local actions...10 Slider edit s...11 Led edit s...12 Led examples...12 Level indicator edit s...13 Text log edit s...13 Accelerometer edit s...14 Text field edit s...14 Plot edit s...15 Image edit s...16 Touchpad edit s...17 Kbd connector edit s...18 Kbd connector examples...18 Heartbeat sender edit s...19 Touch stopper edit s...19 Vibrator edit s...19 Menu s...20 RFCOMM settings...21 Interface menu s...21 New features and fixed bugs
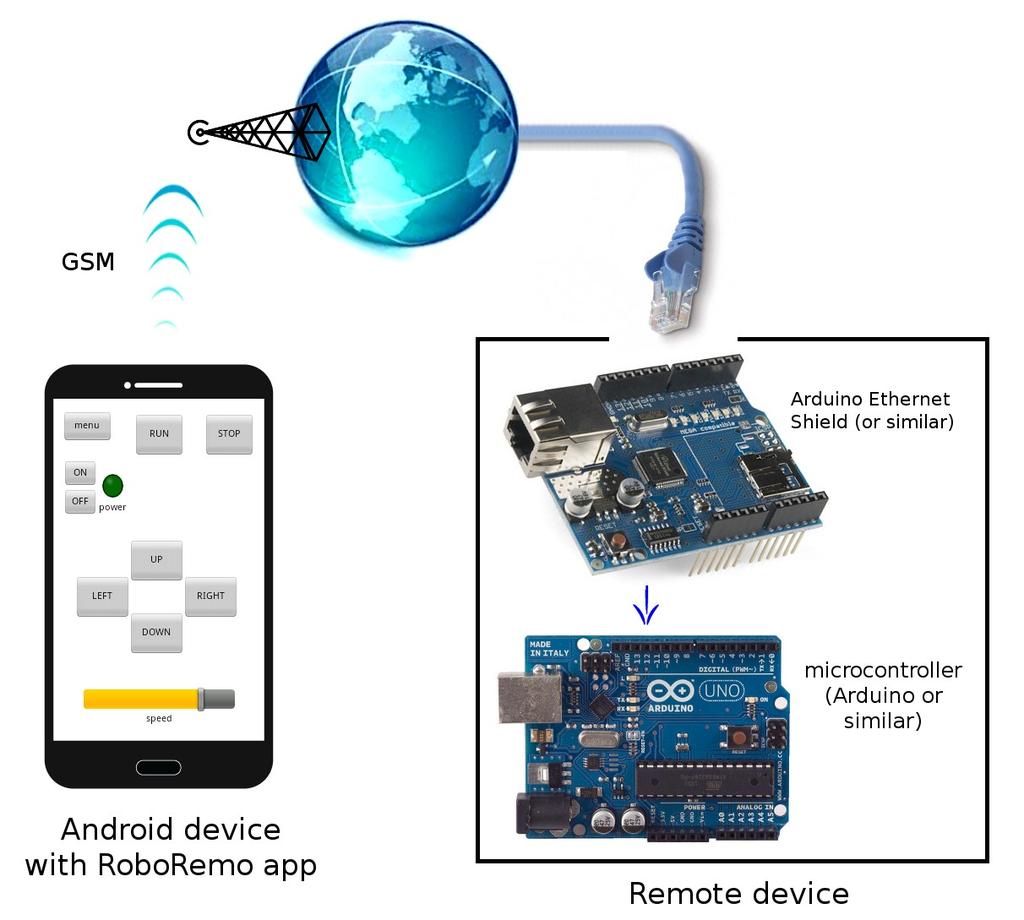
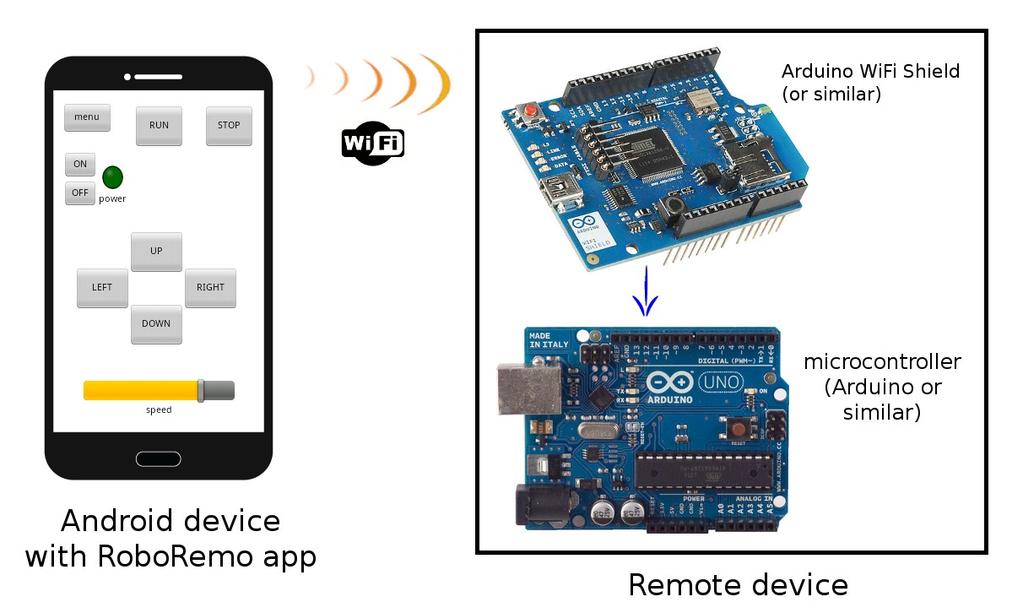
3 General Description RoboRemo is a user customizable remote control application intended mainly for electronics hobby projects. RoboRemo can connect over Bluetooth (RFCOMM), Internet or WiFi (TCP, UDP), and USB (CDC-ACM, FTDI, CP210X). Disclaimer: Don't use RoboRemo for life support systems or any other situations where system failure may affect user or environmental safety. Please don't use RoboRemo in projects where high-level security is required. To connect over Bluetooth, a remote device must contain a Bluetooth to Serial adapter like BlueSMiRF, BTM-222, HC-05, HC-06, etc. and a microcontroller programmed to interpret commands from RoboRemo. You can also find adapters for WiFi (like ESP8266) or Ethernet. For USB connection, your phone / tablet must have USB API and USB OTG. All the commands from RoboRemo are text strings, ending with command ending which is LF character '\n' (hex code 0x0A) by default, but user can change it. For example if you configure a button to send abc when pressed, it will send abc\n if command ending is '\n' or it will send abcqwerty123 if command ending is qwerty123. The command ending is used by the microcontroller program to know where each command ends. RoboRemo also can receive commands for updating some interface items (for example you can have a battery level indicator to monitor the battery level of the remote device). These input commands also must end with command ending. It is not recommended to set command ending to empty string, because receiving commands from microcontroller to app will not work properly. (App will think that command ends after each received character). However the commands from app to microcontroller will be sent as expected (a button configured to send abc will send abc ). 3
, but other modules should work too. When using Bluetooth module and microcontroller, please make sure the microcontroller uses same BaudRate as the module.")
4 Bluetooth / WiFi / Ethernet / USB modules RoboRemo was tested and works with these modules: BlueSMiRF, HC-05, HC- 06, BTM-222, ESP8266 (ESP-01), HUZZAH ESP, Arduino UNO, Arduino Mega (Arduino connected directly with USB cable), but other modules should work too. When using Bluetooth module and microcontroller, please make sure the microcontroller uses same BaudRate as the module. The default BaudRate for BlueSMiRF is usually , and for HC-05 / HC-06 is usually
5 5

6 Available interface items item name photo button Buttons can be used for sending commands to the remote device. A button can be configured to send one command when pressed and other command when released. slider led Sliders can be used to vary remote device parameters, for example volume control, or motor speed or light intensity. LEDs can be used as indicators for remote device states. level indicator text log A level indicator item can be used to display data from remote sensors, for example temperature or battery level. A text log item is a log screen that can be used to display debug messages from the remote device. accelerometer The accelerometer can be used for sending periodically the acceleration measured by the phone's accelerometer. You can set the ids the 3 axes and the repeat (refresh) period. text field text Text field item, to add some text to the interface. Note: if you want an item to be displayed on top of text field, copy the item, then remove it, then paste it. plot Plot item can be used to display some signals. 6


7 image* Image item can be used to display an image that is sent from the microcontroller. *available only in RoboRemo Full version touchpad Touchpad item can be used to send position and motion of your finger. kbd connector Kbd connector can be used to send commands using the keyboard. heartbeat sender heartbeat sender can be used to periodically send some string (like a heartbeat signal). The remote device can watch for this signal to make sure it is still connected. touch stopper vibrator* If you put a reset button for example, surround it with touch stoppers, so it doesn't get pressed when you touch the screen near to it. When you exit ui editor, touch stoppers become invisible, so they don't annoy you. Vibrator item gives the remote device access to the phone's vibrator (you can send a command from microcontroller to make your phone vibrate). *available only in RoboRemo Full version. 7

8 Building the interface First when you open the RoboRemo app, it will look like this: To edit the interface, click menu edit ui. Now in edit mode, click on blank space to add an item, then choose the item type. Item will appear on screen. You can move it by dragging the top left corner, and resize by dragging the bottom right corner. To edit item s, click on the desired item. 8
9 Common edit s copy remove lock edit Copies the item so you can paste it when adding a new item. Removes the item. Locks the item, so you can not edit it anymore. This is useful if you want to add other items on top of this item. You can unlock all items from menu interface unlock edit all. Button edit s set text set press action set release action set repeat delay set repeat period set local / set remote Sets the text that appears on button. For remote action type (default): Sets the string to send to the remote device when you press the button. (RoboRemo will append the command ending to mark the end for each command). For local action type: Sets the local action to execute when you press the button. For remote action type (default): Sets the string to send to the remote device when you release the button. (RoboRemo will append the command ending to mark the end for each command). For local action type: Sets the local action to execute when you release the button. Sets the button repeat delay in milliseconds. When you hold a button pressed, it will first repeat after this delay. Default is 0 (don't repeat) Sets the button repeat period in milliseconds. When you hold a button pressed, it will first repeat after delay, then after period. Default is 0 (don't repeat) Changes button action type from remote to local, from local to remote. Default is remote. 9
10 Local actions action iface n or interface n select the nth interface. (n from 0 to 7) echo abc send abc disconnect connect rfcomm 11:22:33:44:55:66 1 or connect rfcomm connect rfcomm e connect rfcomm d connect rfcomm f connect tcp :9876 connect udp :9876 will simulate the receiving of abc command. will send abc (followed by command ending) to the remote device. disconnect from the remote device connect over Bluetooth RFCOMM to the remote device with address 11:22:33:44:55:66 and port 1. Also use encryption. Connect using the default UUID Connect using the first UUID Connect over TCP/IP to the remote device with IP and port Connect over UDP. Packets will be sent to the port 9876 of the remote device with IP Phone / tablet will listen for packets on port connect usb Connect over USB using BaudRate Note: Starting with version 1.9.1, local action can contain multiple commands, separated by command ending. For example: - set command ending to \n - add a text log - add a button, set it local - set its press action to echo sending abc\nsend abc Now when you press the button, sending abc will appear in the text log and abc will be sent to the remote device. 10
11 Slider edit s set id set label Sets the slider id string. For example if id is s1 and you move the slider to the value 100 and command ending is \n, it will send s1 100\n (id followed by space followed by value followed by command ending). Sets the text string to appear under the slider. You can use the slider value inside the label. Also you can set the decimal count for the value that appears in the label. Examples for slider with value 100: label speed = #*0.1 will show speed = 10.0 label x = #*-5+10 cm will show x = -490 cm set min Sets the minimum value, default is 0. set max Sets the maximum value, default is 255. send when moved / send when released set color send space / don't send space auto return / don't auto return set return value set repeat period Sets the slider send mode, default mode it to send when released. Sets the slider color. Select if you want the slider to send space character after id or not. Select if you want the slider to return to its center when released or not. Set the return value to be used for auto return when released. You can enter an integer, or min/mid/max. Default is mid. Set the repeat period (in ms) for slider. 0 = don't repeat (default). When repeat enabled, the slider will also send its data periodically, in addition to normal operation. 11
12 Led edit s set id Sets the led id string. set on command Sets the led on command, default is 1. set off command Sets the led off command, default is 0. set label set color set on timeout set off timeout Sets the text string to appear under the led Sets the led color. Set the timeout after which led will turn off if it does not receive on command. You can program your remote device to periodically send a command to turn on an led, and set the on timeout so that you will see the led will turn off if the connection is lost. Set the timeout after which led will turn on if it does not receive off command. Led examples Led id led leda ledb Led on command 1 on #>=10 Led off command 0 off #<10 Interface command ending \n ; ok To turn the led on, microcontroller must send To turn the led off, microcontroller must send led 1\n leda on; ledb 10ok or ledb 11ok etc. led 0\n leda off; ledb 9ok or ledb 8ok etc. 12
13 Level indicator edit s set id set label Sets the level indicator id string. For example if id is batt and command ending is \n, you can set its level to 100 by sending batt 100\n from microcontroller. Sets the text string to appear under the level indicator. You can use the level indicator value inside the label. Also you can set the decimal count for the value that appears in the label. Examples for level indicator with value 100: label temp. = #* C will show temp. = 40.0 C label batt. #*1% will show batt. 100% set min Sets the minimum value, default is 0. set max Sets the maximum value, default is 255. set color Sets the level indicator color. Text log edit s set id set label set text size log to file* Sets the text log id string. For example if id is dbg and command ending is \n, you can append the message qwerty to the text log by sending dbg qwerty\n from microcontroller. Sets the text string to appear under the text log. Sets the font size for the text. Lets you choose a file where you want to log the data that is received by this text log. For each received string, it will first append a prefix, then the string. Default prefix is \n (new line) so that each received string will be written to the file in a new line. You can change the prefix. Multiple items can log to the same file. *available only in RoboRemo Full version. 13
14 Accelerometer edit s x config. y config. z config. Opens the configuration window for x axis. There you can set the id for x axis, the gain, the output type (float / int), the min. and max. values and enable / disable the value limiting. Accelerometer will periodically send the id followed by a space character (or not), followed by the processed acceleration value for that axis. You can disable an axis by setting the id to empty string. The value is processed as follows: The data from the accelerometer sensor is multiplied by gain, then it is mapped from (-9.8, 9.8) to (min, max), then it is limited (or not) to [min, max]. Opens the configuration window for y axis. Opens the configuration window for z axis. set repeat period Sets the repeat (refresh) period in ms for accelerometer. Default is 20. send space / don't send space Select if you want the accelerometer to send space character after ids or not. Text field edit s set id set text set text size Sets the id for the text field. For example if id is text1 and command ending is \n, you can change the text to abc by sending text1 abc\n from microcontroller. Sets the text to be displayed inside text field Sets the size of the displayed text Note: if you want an item to be displayed on top of text field, copy the item, then remove it, then paste it. 14
15 Plot edit s set id set label Sets the plot id string. For example if id is x and command ending is \n, you can add a new sample with value 100 to the plot by sending x 100\n from microcontroller. Sets the text string to appear under the plot. You can use the plot's last value inside the label. Also you can set the decimal count for the value that appears in the label. Examples for plot with last value 100: label temp. = #* C will show temp. = 40.0 C If you want it to show temp. = 40 C, set the decimal count to 0. label batt. #*1% will show batt. 100% set min Sets the minimum value, default is 0. set max Sets the maximum value, default is 255. set length Sets the length (number of samples) to fit in one frame, default is 256. Maximum length is set display mode Sets the display mode for the plot. Scrolling (default) plot scrolls from right to left, new data appears on the right. Oscilloscope plot doesn't scroll. Data appears from left to right. When it reaches the end, it waits for trigger event, then starts again from the left. set trigger Don't repaint / repaint log to file* Sets the trigger threshold and edge (rising / falling / both / none). If none edge selected, then the trigger is off, so it will not wait for trigger event. For scrolling display mode there is no trigger (The trigger settings are ignored). Disables / enables the UI repaint when new sample is received. Lets you choose a file where you want to log the data that is received by this plot. For each received value, it will first append a prefix, then the value. Default prefix is \n (new line) so that each value will be written to the file in a new line. You can change the prefix. Multiple items can log to the same file. *available only in RoboRemo Full version. 15
16 Image edit s set id set label keep / don't keep ratio filter / don't filter set image format import Sets the image id string. For example if id is img and image format is auto and command ending is \n, you can display an image by sending img [len]\n followed by the image data from microcontroller. [len] must be the size in Bytes of the image data that follows. The auto format accepts jpg, png and bmp data. Sets the text string to appear under the image. Sets if the image should keep the original w/h ratio, or should it fill the entire image item. Sets if the image should be filtered or not when scaled. Sets the image format. Default format is auto and accepts jpg, png and bmp data. For raw image format, you can choose RGB_888(w,h), GRAY_8(w,h), GRAY_4(w,h), GRAY_2(w,h) or GRAY_1(w,h), where you have to replace w and h with numbers (width and height in pixels). The pixels are scaned from left to right, lines from top to bottom. RGB_888 uses 3 bytes per pixel (the levels for red, green and blue). GRAY_8 uses 1 byte per pixel (has 256 gray levels). GRAY_4 uses 4 bits per pixel (1 byte for 2 pixels) and has 16 gray levels. GRAY_2 uses 2 bits per pixel (1 byte for 4 pixels) and has 4 gray levels. GRAY_1 uses 1 bit per pixel (1 byte for 8 pixels) and has 2 gray levels (0 is full black and 1 is full white) Import an image from the SD card. The image is stored in the RoboRemo interface. It is recommended to use small images (up to 100KB). set as background All other items will be displayed on top of the image. The image item is locked from editing. You can unlock it from menu interface unlock edit all. 16
17 Touchpad edit s set press id set drag id set release id set label Sets the id for press event. For example if press id is pressed and command ending is \n, when the user touches the touchpad, it will send pressed [x] [y]\n, where [x] and [y] are the point coordinates. For example: pressed \n Sets the id for drag event. Same as press id, but for drag events. Sets the id for release event. Same as press id, but for release events. Sets the text string to appear under the touchpad. set x min Sets the x coordinate coresponding to the left border of the touchpad. Default is 0. set x max Sets the x coordinate coresponding to the right border of the touchpad. Default is 640. set y min Sets the y coordinate coresponding to the top border of the touchpad. Default is 0. set y max Sets the y coordinate coresponding to the bottom border of the touchpad. Default is
18 Kbd connector edit s set id set label set local / remote send while typing / send at enter Sets the id for the kbd connector. (see examples below) Sets the text string to appear under the kbd connector.. Sets if the kbd connector should send the commands back to the interface, or should it send to the remote device. (see examples below) Sets if the kbd connector should send each character separately or should it wait for enter key. (see examples below) Kbd connector examples Assuming command ending is \n id local / remote send while typing / send at enter user is typing Result kbd remote while typing ab[enter] Remote device receives: kbd a\nkbd b\n kbd \n\n kbd remote at enter ab[enter] Remote device receives: kbd ab\n (empty string) remote while typing ab[enter]cde Remote device receives: ab\ncde (empty string) remote at enter ab[enter]cde Remote device receives: ab\n (and at next [enter] will receive cde\n ) echo local while typing abc Local interface receives a\nb\nc\n echo local at enter abc[enter] Local interface receives abc\n (empty string) local at enter echo abc[enter] Local interface receives abc\n 18
19 Heartbeat sender edit s set id set label set repeat period Sets the string that will be sent periodically to the remote device. Sets the text string to appear under the item. Sets the time interval (in ms) at which the heartbeat signal should be sent. Default is Touch stopper edit s Touch stopper does not have any special edit s. Vibrator edit s set id set label Sets the vibrator id string. For example if id is vib and command ending is \n, you can make it vibrate for 200 ms by sending vib 200\n from microcontroller. If you send only vib\n, it will use the default duration that is set with set duration. Sending vib 0\n will make it stop. Sets the text string to appear under the item. set duration Sets the default duration (in ms) for the vibration. Default is 500. set off timeout Set the timeout after which vibrator will turn on if it does not receive off command. (Off command means vib 0\n for a vibrator with id vib on an interface with command ending \n ). Default is 0 (timeout disabled). 19
20 Menu s connect / disconnect edit ui / don't edit ui interface help about undo enable / disable autoconnect lock / unlock autorotate keep / don't keep screen on set char delay RFCOMM settings Connects to a remote device / disconnects from a remote device. To connect to a Bluetooth remote device, it has to be paired. To pair with a Bluetooth device, open Android settings Bluetooth search for devices. Pin code for Bluetooth to serial adapter is usually 1234 or Select port 1 (if port selection is set to manual from RFCOMM settings). To connect over internet or WiFi, data connection or WiFi has to be activated from Android settings. Then in RoboRemo app choose menu connect internet and select the ip and port. You can also use the domain name instead of ip. Enters / exits the interface edit mode. Opens interface menu. Shows help link. Shows info about the app. Undo the last modification in the current interface. Enables / disables the auto connect. If enabled, the app will try to connect to the last connected device at next app start, if the user did not select disconnect before closing app. (App disconnects automatically when closed). Locks / unlocks the screen autorotate function for the app. Used to disable the automatic screen lock. Slow microcontrollers need time to process each character received over serial port. You can set the char delay so that RoboRemo will wait after each character sent. Change RFCOMM settings. RFCOMM is the name for the Bluetooth Serial protocol. Default settings are: automatic port selection, without encryption. 20
21 RFCOMM settings port (channel) selection UUID (for automatic) manual = will ask each time fixed(1) = will use port 1 auto = will select automatically Used only if port selection = auto. Ignored otherwise. default = use the well known UUID for Bluetooth to Serial modules, which is F9B34FB first = use first UUID of the remote device, from the local cache encrypted Use / don't use encryption. Note: Some devices may fail to connect with certain settings. In this case it is recommended to try different settings. Interface menu s select Select other interface. RoboRemo has 8 interfaces, numbered 0 to 7. rename set connect action set command ending import export unlock edit all clear Rename the current interface. Set a command string to be send to the remote devices after connecting. Change the command ending for the current interface. The default is \n. Command ending can also be set to empty string, but it is not recommended. Import an interface from file. Interfaces are stored in the roboremo folder on the SD card. The folder is created automatically at first app start. Export the current interface to a file. Interfaces are stored in the roboremo folder on the SD card. The folder is created automatically at first app start. Unlock all items that were locked with lock edit. Clear the current interface. 21
22 New features and fixed bugs App. version New features Fixed bugs accelerometer support - Internet / WiFi connectivity - for sliders to return to center when released to change command ending - string inputs from user are interpreted for escape characters ('\t', '\b', '\n', '\r','\f'). For '\' character, enter '\\' local action interface n same as iface n where n is the interface number (0 to 7) - auto connect - local actions for connecting and disconnecting by pressing buttons. - removed exit from menu (app can be closed by pressing back key) to use the slider or level indicator value inside their labels - made slider with "send when moved" send only when the value changes - to change on and off commands for leds - removed the dialog showing error when sending a non-integer value to a level indicator - undo in interface editor added to set repeat period for sliders - added text fields - added plots - improved touch processing algorithm so that it will send touch events only to interactive items (now you can have buttons / sliders hidden under leds, plots, etc) - added menu to change RFCOMM settings added to set text size for text fields and text logs - added to set id for text field so that user can change the text remotely N/A - fixed interface import / export for interfaces with non-ascii characters. - fixed text wrapping and auto scrolling when resizing text logs. - fixed the bug with \r\n string in interfaces. - fixed a bug where app crashed if n was not an integer in iface n or interface n local action. - fixed a bug in processing received commands. Now if there are more items with same id, all of them will respond to it. - fixed a bug in sliders where slider with auto return enabled did not send data when it was the same value as before return. - when command ending is empty string, do not apend \n at the end in text logs - fixed a bug where autoconnect 22
23 - added image item in RoboRemo Full version - reduced TCP connect timeout from 90000ms to 5000ms - improved menus (now they are scrollable) - added touchpad item - added to keep screen on - added kbd connector item added item to lock edit and interface to unlock edit all - added to set return value for slider - added to set led on/off timeout - added to import image from SD card and store it in RoboRemo interface - added items: heartbeat sender, touch stopper - changed default RFCOMM settings to automatic port selection - added to start a TCP server - can connect to domain name - added to use plot's last value inside the label added image to set as background - added USB connectivity - added don't repaint for plots - hw menu button also opens menu added UDP connectivity - added log to file (in RoboRemo Full version) for text log and plot. - added vibrator item in RoboRemo Full version - added for accelerometer to set gain, output type (float / int), min. and max. values and enable / disable the value limiting (replaced set x/y/z id with x/y/z config. ). - added local action send - now local action can contain multiple actions, separated by command ending - added in slider, level indicator and plot items label to set the decimal count. - slider and level indicator items now accept dialog could not be cancelled after screen orientation change - interface clear now also resets the command ending and connect action N/A - fixed bug with text size on text log and text field items - fixed bug with pasting an item after lock edit - fixed small menu bug - fixed touchpad bug where it was sending data even if id was empty string - fixed bug in USB connection where data sent too fast from microcontroller was not received correctly by the app. - fixed USB autoconnect and connect by local action. - fixed text log bug where it was stalling on some devices after receiving about characters. - clearing an interface now clears the interface name too. - fixed float numbers in exported interface files. - fixed a bug where app was craching when trying to connect over USB on devices that don't have USB API. 23
24 setting min. value greater than max. value and behave as expected. - improved some user interface (in RFCOMM settings, image import, plot set trigger). - now the s that are available only in RoboRemo full version, are shown (disabled) in RoboRemoFree too. - added 100% FREE mark on the icon of RoboRemoFree - on slider item, now selecting autoreturn or changing the return value updates the position of the handle. - fixed default aspect ratio of heartbeat sender item. 24
RoboRemo User Manual v1.9.2
 RoboRemo User Manual v1.9.2 Table of Contents General Description...3 Bluetooth / WiFi / Ethernet / USB modules...4 Available interface items...6 Building the interface...8 Common edit s...9 Button edit
RoboRemo v2.1.2 User Manual
 RoboRemo v2.1.2 User Manual Table of Contents General Description...3 Bluetooth / WiFi / Ethernet / USB modules...4 Available interface items...6 Building the interface...9 Common edit s...10 Button edit
To use the keyboard emulation, you must activate it in the tray icon menu (see 2.6 Enable keyboard emulation)
") LEA USER GUIDE Notice: To use LEA you have to buy the client and download the free server at: https://www.leaextendedinput.com/download.php The Client is available in the App Store for IOS and Android
LEA USER GUIDE Notice: To use LEA you have to buy the client and download the free server at: https://www.leaextendedinput.com/download.php The Client is available in the App Store for IOS and Android
Camera control software GigaCam
 Camera control software GigaCam Operation Manual Version 1.06 CONTENTS 1. Starting the software... 3 2. Discovery the Camera... 4 3. Open the Camera... 5 4. Image setting... 6 5. Acquisition start / stop...
13-1. This chapter explains how to use different objects.
 13-1 13.Objects This chapter explains how to use different objects. 13.1. Bit Lamp... 13-3 13.2. Word Lamp... 13-5 13.3. Set Bit... 13-10 13.4. Set Word... 13-13 13.5. Function Key... 13-21 13.6. Toggle
User manual. For Support Ring:
 www.wishtel.com User manual For Technical queries Email: query@wishtel.com Ring: 022 30010707 / 08 For Support Email: support@wishtel.com Ring: 022 30010700 Working temperature 40-5, don't put it at the
Matrox MuraControl for Windows
 Matrox MuraControl for Windows User Guide (for software version 6.00) 20179-301-0600 2017.09.25 Contents About this user guide... 6 Using this guide... 6 More information... 6 Overview... 7 Supported Matrox
Karbonn All rights reserved
 User Manual V97 HD Table of Contents Safety instructions ------------------------------------------------------------------ 3 Device overview --------------------------------------------------------------------
ASIC-200 Version 5.0. integrated industrial control software. HMI Guide
 ASIC-200 Version 5.0 integrated industrial control software HMI Guide Revision Description Date C Name change, correct where applicable with document 4/07 HMI Guide: 139168(C) Published by: Pro-face 750
Specifications. What s Inside The box
 Tablet of Contents Specifications.1 What s inside the box 1 Tablet Parts 2 Getting started...2 Connecting to the Internet..6 Task Bar..8 Install and Uninstall 9 Camera.10 HDMI.11 Trouble Shooting 11 Warranty..13
Project Editor 1.2 User s Guide
 TM Project Editor 1.2 User s Guide Getting Started Project Editor Software from BitWise Controls is used by professional Installers to create and manage project files for BitWise Controls hardware installations.
Trio Motion Technology 4-2. Motion Perfect v3
 MOTION PERFECT V3 4 Trio Motion Technology 4-2 Software Reference Manual Introduction to Motion Perfect 3 Motion Perfect 3 is an Microsoft Windows based application for the PC, designed to be used in conjunction
Secure+ Password Manager ver 1.1.1
 Secure+ Password Manager ver 1.1.1 Table of Contents 1. First setup & Auto lock functionality 1. Setup 2. Auto Lock 2. Add new item & edit 1. Icons 2. Edit Fields (Title, Category, ID, Password, URL) 3.
LIGHTCAST V1.2 Software Guide for projectors
 LIGHTCAST V1.2 Software Guide for projectors 009-1683-01 CONTENTS Introduction...3 Registration when using a LightCast Key...4 Basic Navigation... 7 Using the remote and projector keypad... 7 Using the
Remote Display User Manual
 Remote Display User Manual 1 Contents Features... 3 Hardware Overview... 4 Quickstart Guide... 5 Android Application Operation... 6 Launching and Connecting... 6 Main Display... 7 Configuring Channels...
IdeaTab A1000L-F. User Guide V1.0. Please read the Important safety and handling information in the supplied manuals before use.
 IdeaTab A1000L - UserGuide IdeaTab A1000L-F User Guide V1.0 Please read the Important safety and handling information in the supplied manuals before use. file:///c /Users/xieqy1/Desktop/EN UG/index.html[2013/8/14
ProVisionaire Control V1.0
 ProVisionaire Control V1.0 Setup Guide Thank you for downloading Yamaha ProVisionaire Control. ProVisionaire Control is an application for remotely controlling a system (consisting of devices that can
Studuino Programming Environment Manual
 Studuino Programming Environment Manual Created 04//0 Revised 07/0/3 Version History Date Content 04//0 First version 07/0/6 Updated for new Studuino website 07/03/8 Revised with added features for Windows
USER MANUAL. Mouldflo Software (GUI) Mouldflo A/S Copyright 2016
 Mouldflo A/S Copyright 2016") USER MANUAL Mouldflo Software (GUI) Mouldflo A/S Copyright 2016 Mouldflo Software (GUI) User Manual Version 2.3 19 May 2016 TABLE OF CONTENTS 1. Introduction... 4 1.1 Symbols Used in the Graphical User
USER MANUAL Mouldflo Software (GUI) Mouldflo A/S Copyright 2016 Mouldflo Software (GUI) User Manual Version 2.3 19 May 2016 TABLE OF CONTENTS 1. Introduction... 4 1.1 Symbols Used in the Graphical User
Komodo CAN Interface. Komodo TM CAN Interface GUI. Komodo GUI User s Manual v1.50 Octorber 26, 2012
 Komodo CAN Interface Komodo GUI User s Manual v1.50 Octorber 26, 2012 Summary The Komodo GUI is a graphical application for use with the Komodo CAN Interface. The application provides access to CAN Bus
RenameMan User Guide. ExtraBit Software
 RenameMan User Guide ExtraBit Software http://www.extrabit.com Version 3.1 August, 2005 Contents Introduction... 5 What does RenameMan do?... 5 Features... 5 Quick tour of RenameMan... 5 Getting started...
Contents. Get Started Install SIM Card
 Contents Get Started... 2 Install SIM Card... 2 Insert Micro SD card... 2 Charge Mobile Phone... 3 PC-Phone File Transfer... 4 Keys and Parts... 5 Fingerprint... 7 Lock and Unlock the Screen... 9 Notification
User Manual. pdoc Pro SDK Server. Copyright 2018 Topaz Systems Inc. All rights reserved. Version 2.1. Last Update: March 15, 2018
 User Manual pdoc Pro SDK Server Version 2.1 Last Update: March 15, 2018 Copyright 2018 Topaz Systems Inc. All rights reserved. For Topaz Systems, Inc. trademarks and patents, visit www.topazsystems.com/legal.
PENDOPAD 9.7 QUICKSTART GUIDE & USER MANUAL PNDPP42DG9BLK. > Please read carefully before use
 PENDOPAD 9.7 PNDPP42DG9BLK QUICKSTART GUIDE & USER MANUAL > Please read carefully before use This manual contains important safety precautions and information of correct use. Please be sure to read this
HUAWEI MediaPad T1 8.0 FAQ HUAWEI TECHNOLOGIES CO., LTD. Issue 01. Date 06/30
 HUAWEI MediaPad T1 8.0 FAQ Issue 01 Date 06/30 HUAWEI TECHNOLOGIES CO., LTD. 1 System and update... 1-1 1.1 Why does my HUAWEI MediaPad T1 8.0 constantly crash?... 1-1 1.2 Will data be erased if I update
PENDOPAD 10.1 QUICKSTART T GUIDE USER MANUAL PNDPP42DG10BLK. > Please read carefully before use
 PENDOPAD 10.1 PNDPP42DG10BLK QUICKSTART T GUIDE & USER MANUAL > Please read carefully before use This manual contains important safety precautions and information of correct use. Please be sure to read
Flex Series User Guide
 User Programmable Current 4..20mA Digital RS485 Dual & Single Axis Up to 360º 2016 Flex Series User Guide Sensor Installation, Wiring, Flexware App Instructions Page 1 of 33 Page 2 of 33 Table of Contents
EVOBOOK 2. User s Manual.
 EVOBOOK 2 User s Manual www.evolio.ro 0 User s Manual Content Page Introduction.... 2 Parts and Controls.... 3 Getting Started...... 6 Turning On/Off EvoBook2. 6 Charging EvoBook2... 6 Inserting SD card....
HP Notebook PCs - Keyboard and TouchPad or ClickPad Guided Troubleshooter
 HP Notebook PCs - Keyboard and TouchPad or ClickPad Guided Troubleshooter This document applies to HP notebook computers. The keyboard, TouchPad, or ClickPad on your laptop is not working as expected:
A Java multiplatform application to make your transceiver available for CAT and audio transfer securely over the LAN or WAN
 jarec (j)ava (A)udio and (Re)mote (C)ontrol A Java multiplatform application to make your transceiver available for CAT and audio transfer securely over the LAN or WAN Version 3.0 Dan Toma - YO3GGX - yo3ggx@gmail.com
Learn more about Pages, Keynote & Numbers
 Learn more about Pages, Keynote & Numbers HCPS Instructional Technology May 2012 Adapted from Apple Help Guides CHAPTER ONE: PAGES Part 1: Get to Know Pages Opening and Creating Documents Opening a Pages
Studuino Programming Environment Manual
 Studuino Programming Environment Manual Ver 0.9.7 Jun. 02, 204 This manual explains the Studuino Programming Environment and how to use it. As the Studuino Programming Environment develops, this manual
FAQ for KULT Basic. Connections. Settings. Calls. Apps. Media
 FAQ for KULT Basic 1. What do the Icons mean that can be found in notifications bar at the top of my screen? 2. How can I move an item on the home screen? 3. How can I switch between home screens? 4. How
NETWORK THE HOME 10 FOLDERS APPS
 NID-7006 NAXA NID Tablet User s Guide Table of Contents GETTING STARTED 4 CONNECTING TO A WIRELESS NETWORK 4 USING THE TOUCHSCREEN 4 USING THE HOME SCREENS 5 USING THE NAVIGATION ICONS 6 USING THE ALL
Merbon Menu Reader. Installation and setup V1.0 1
 Merbon Menu Reader Installation and setup V1.0 1 Contents Application description...2 Installation...2 ios...2 Android...2 Embedded Linux...2 Editing a value...5 Date and time...6 Analogue value...6 Digital
VANGUARD LOAD TAP CHANGER ANALYZER (LTCA) VERSION 2.xx SOFTWARE MANUAL. LTCA-10, LTCA-40, WRM-10P, WRM-40, TRM-20, TRM-40, TRM-203, and TRM-403
 VERSION 2.xx SOFTWARE MANUAL. LTCA-10, LTCA-40, WRM-10P, WRM-40, TRM-20, TRM-40, TRM-203, and TRM-403") VANGUARD LOAD TAP CHANGER ANALYZER (LTCA) VERSION 2.xx SOFTWARE MANUAL For Use with Vanguard s LTCA-10, LTCA-40, WRM-10P, WRM-40, TRM-20, TRM-40, TRM-203, and TRM-403 Load Tap Changer Analyzers and Winding
VANGUARD LOAD TAP CHANGER ANALYZER (LTCA) VERSION 2.xx SOFTWARE MANUAL For Use with Vanguard s LTCA-10, LTCA-40, WRM-10P, WRM-40, TRM-20, TRM-40, TRM-203, and TRM-403 Load Tap Changer Analyzers and Winding
DataView Release Notes Version Released
 DataView Release Notes Version 3.53.0013 Released 9-25-2018 CATEGORY (v 3.53.0013): Simple Logger II Version 1.01.0059 Open button is now active when selecting recordings from the session s list. Corrected
Commander User Manual Version 1.1
 Commander User Manual Version 1.1-1- Welcome Commander is a device control program for the E-Stim Systems Series 2B. This program allows you to directly control your 2B from a PC via the USB connection.
Contents. Introduction. Getting Started. Navigating your Device. Customizing the Panels. Pure Android Audio. E-Books
 Contents Introduction Getting Started Your Device at a Glance Charging Assembling the Power Adapter Turning On/Off, Unlocking Setting to Sleep and Waking Up Inserting and Removing a microsd Card Connecting
Embedded Modbus TCP Module GS11-MT. User Manual REV 1.1. SST Automation.
 Embedded Modbus TCP Module GS11-MT User Manual REV 1.1 SST Automation E-mail: SUPPORT@SSTCOMM.COM WWW.SSTCOMM.COM Catalog 1 About the Embedded Module... 4 1.1 General...4 1.2 Features... 4 1.3 Specifications...4
Lenovo TAB A User Guide V1.0. Please read the safety precautions and important notes in the supplied manual before use.
 Lenovo TAB A10-70 User Guide V1.0 Please read the safety precautions and important notes in the supplied manual before use. Chapter 01 Lenovo TAB A10-70 Overview 1-1 Appearance 1-2 Buttons 1-3 Turning
AMS COCKPIT USERS GUIDE. AMS Cockpit Version 1.1 USERS GUIDE
 AMS COCKPIT USERS GUIDE Table of Contents AMS Cockpit Version 1.1 USERS GUIDE Revision Date: 1/15/2010 A d v a n c e d M i c r o S y s t e m s, I n c. w w w. s t e p c o n t r o l. c o m i Table of Contents
Contents. Introduction
 Page 1 of 15 Contents Introduction Getting Started Your Device at a Glance Charging Assembling the Power Adapter Turning On/Off, Unlocking Setting to Sleep and Waking Up Inserting and Removing a microsd
Avigilon Control Center Standard Web Client User Guide. Version 5.6
 Avigilon Control Center Standard Web Client User Guide Version 5.6 2006-2015, Avigilon Corporation. All rights reserved. Unless expressly granted in writing, no license is granted with respect to any copyright,
MAGX2 TCP/IP, Wi-Fi, Bluetooth remote application
 MAGX2 TCP/IP, Wi-Fi, Bluetooth remote application MAGX2 BT, Wi-Fi, TCP/IP Application 0 V1.1 2016-07-29 List of Contents 1. INTRODUCTION... 2 1.2 SYSTEM REQUIREMENTS... 2 2. INSTALLATION INFORMATION...
User s Guide. Attainment s. GTN v4.11
 Attainment s User s Guide A printable PDF of this user guide is available from the Attainment Company website: https://www.attainmentcompany.com/gotalk-now Contents 1 Getting Started with GoTalk NOW 1
Battery Charging The tablet has a built-in rechargeable Li-polymer battery.
 Attention: This handbook contains important security measures and the correct use of the product information, in order to avoid accidents. Pls make sure to reading the manual carefully before use the device.
1. Introduction P Package Contents 1.
 1 Contents 1. Introduction ------------------------------------------------------------------------------- P. 3-5 1.1 Package Contents 1.2 Tablet Overview 2. Using the Tablet for the first time ---------------------------------------------------
User s Guide Version 0.5.1
 This App requires a WiFi enabled ELM or OBDLink MX module connected to your vehicle's OBDII port located under the dash, typically below the steering wheel. Make sure you PAIR your Android device to the
Using DataQuest on a Handheld
 Using DataQuest on a Handheld Appendix B This appendix gives an overview of using the Vernier DataQuest application on a TI-Nspire handheld. It includes information on accessing the common tools in the
Remote Display User Manual
 Remote Display User Manual 1 Contents: Introduction - Features... 3 Hardware Overview... 4 Quick-Start Guide... 5 Android Application Operation... 6 Launching and Connecting... 6 Main Display... 7 Configuring
Catalogue. Assembling... 1 Unpack Charge the Battery Install the Memory Card Product Basics Buttons and Connections...
 Catalogue Assembling... 1 Unpack... 1 Charge the Battery... 1 Install the Memory Card... 1 1 Product Basics... 2 1.1 Buttons and Connections... 2 1.2 Start Up and Shut Down... 2 2 Introduction of Google
v Annotation Tools GMS 10.4 Tutorial Use scale bars, North arrows, floating images, text boxes, lines, arrows, circles/ovals, and rectangles.
 v. 10.4 GMS 10.4 Tutorial Use scale bars, North arrows, floating images, text boxes, lines, arrows, circles/ovals, and rectangles. Objectives GMS includes a number of annotation tools that can be used
CREATING PANEL APPLICATIONS
 CREATING PANEL APPLICATIONS 3.1. Setting up the Panel Application... 1 3.1.1. General Settings...2 3.1.2. Custom Settings...5 3.1.3. Activating Multiple Overlapped Buttons by One Touch...7 3.1.4. Specifying
Please see the Quick Start Guide for details on Connecting and basic setup of your device.
 RELEASE NOTES CORIOgrapher v2.2 DESCRIPTION This is the installable release of the CORIOgrapher v2.2 software. NEW and improved application for controlling CORIOmaster and CORIOmaster mini. Firmware M401
Lesson 4 Implementing a VI
 Lesson 4 Implementing a VI A. Front Panel Design B. LabVIEW Data Types C. Documenting Code D. While Loops E. For Loops F. Timing a VI G. Iterative Data Transfer H. Plotting Data I. Case Structures A. Front
Innovative Electronics for a Changing World INDEX
 Innovative Electronics for a Changing World INDEX 1. SYSTEM DESCRIPTION 2. BOARD CONNECTIONS terminals and indicators 3. CONNECTION DIAGRAM 4. START UP GUIDE and passwords 5. HOME PAGE 6. STATUS PAGE 7.
User s Guide. LA5034 Operation Manual
 User s Guide LA5034 Operation Manual Content General safety summary... I Introduction... II Chapter 1 Getting started... 1 System Requirements... 2 Installing Hardware... 3 Installing Software... 6 User
MicroBot Push User Guide
 MicroBot Push User Guide Troubleshooting 24 My Microbot App does not detect my MicroBot Push 24 MicroBot Push keeps disconnecting 25 MicroBot Push is not updating 25 Getting Started 2 Meet MicroBot Push
OPERATION MANUAL. MV-410HS Layout Editor. Version higher. Command
 OPERATION MANUAL MV-410HS Layout Editor Version 3.0 - higher Command Command Table of Contents 1. Setup... 1 1-1. Overview... 1 1-2. System Requirements... 1 1-3. Operation Flow... 1 1-4. Installing MV-410HS
Introduction of Configure Software for 3.5'' Touch Panel
 Introduction of Configure Software for 3.5'' Touch Panel 1. Brief Introduction This Configure Software is used with the 3.5'' Touch Panel. After setting group address of different devices in ETS users
Small rectangles (and sometimes squares like this
 Lab exercise 1: Introduction to LabView LabView is software for the real time acquisition, processing and visualization of measured data. A LabView program is called a Virtual Instrument (VI) because it,
Serial console tool. To open the Serial console tool, select Serial console from the Tools drop-down menu in the toolbar.
 Serial console tool The Serial console tool allows you to interact with your radio modules without first discovering them and adding them to the list of radio modules. The layout and functionality of the
Software Release Notes V9.3.12
 CheckPoint Software Release Notes V9.3.12 B28 Software Release Notes V9.3.12 Build 28 Document No. D9311-27 Rev. A 21 February, 2014 CheckPoint Software Release Notes V9.3.12 B28 9.3.12 B28 Release: None
Motic Images Plus 3.0 ML Software. Windows OS User Manual
 Motic Images Plus 3.0 ML Software Windows OS User Manual Motic Images Plus 3.0 ML Software Windows OS User Manual CONTENTS (Linked) Introduction 05 Menus and tools 05 File 06 New 06 Open 07 Save 07 Save
Contents. Introduction. Getting Started. Navigating your Device. Customizing the Panels. Pure Android Audio. E-Books. Browsing the Internet
 Contents Introduction Getting Started Your Device at a Glance Charging Assembling the Power Adapter Turning On/Off, Unlocking Setting to Sleep and Waking Up Connecting to a Computer Navigating your Device
ProDVX Lite Signage Player
 ProDVX Lite Signage Player The ProDVX Lite Signage Player (LSP) is an easy to use tool to distribute your content to Android devices within your local or wide area network. The LSP app can be installed
TA0139 USER MANUAL ARDUINO 2 WHEEL DRIVE WIRELESS BLUETOOTH ROBOT KIT
 TA0139 USER MANUAL ARDUINO 2 WHEEL DRIVE WIRELESS BLUETOOTH ROBOT KIT I Contents Overview TA0139... 1 Getting started: Arduino 2 Wheel Drive Wireless Bluetooth Robot Kit using Arduino UNO... 1 2.1. What
Version N 2.0. LaurTec. RS232 Terminal. Debugging Embedded Systems. Author : Mauro Laurenti ID: PJ11004-EN. Copyright Mauro Laurenti 1/33
 Version N 2.0 LaurTec RS232 Terminal Debugging Embedded Systems Author : Mauro Laurenti ID: PJ11004-EN Copyright 2009-2017 Mauro Laurenti 1/33 License Copyright (C) 2009-2017 Author: Mauro Laurenti Web
Working with Charts Stratum.Viewer 6
 Working with Charts Stratum.Viewer 6 Getting Started Tasks Additional Information Access to Charts Introduction to Charts Overview of Chart Types Quick Start - Adding a Chart to a View Create a Chart with
Getting Started Guide. IMU Research I Measure U Limited
 Getting Started Guide IMU Research 9.53 g Impact Load Analysis 2018 I Measure U Limited Contents 1 Introducing the Sensor 3 2 IMU Research Mobile App 4 2.1 Installation on ios 4 3 Lightning Desktop App
User's Guide Album Express 7
 User's Guide Album Express 7 www.spc-international.com Index 1.0 2.0 Introduction Getting started and System Requirement 2.1 3.0 How to set the Preference of Album Express Workflow of Album Express 4.0
Managing Trends. About Trends CHAPTER. Send documentation comments to
 CHAPTER 11 Trends provides historical data of a node in the network over a period of time. When the value of a node in the specified trend changes, the changes are recorded in the trend logs and displayed
LYNK SINC Server. User Guide. Hotel Smart TV Solution
 Hotel Smart TV Solution LYNK SINC Server User Guide LYNK SINC Server is a web-based solution designed to construct widgets installed on TVs in hotel rooms. LYNK SINC Server allows you to manage TVs conveniently.
Instruction Manual. Wi-Fi Full HD 1080p IP Concealed Junction Box Hidden Camera. V 1.3
 Instruction Manual Wi-Fi Full HD 1080p IP Concealed Junction Box Hidden Camera After Sales Support techsupport@123anfang.com www.yooseecamera.com V 1.3 Hardware Installation 1. Connect the power supply
Color Customer Display
 Utiliy Color Customer Display Color Customer Display Utility Manual CONTENT GENERAL MANUAL... 2 SEARCH COM PORT... 2 UTILITY GENERAL INTERFACE... 2 BASIC CONNECTION WITH CUSTOMER DISPLAY... 3 BASIC SETTING...
User's Guide C
 User's Guide 012-14016C Contents Contents Contents i 1 Support and Resources 1 Online Videos 2 Teacher and Technical Support 3 3 Tour the Interface 4 Tour the Menu and Toolbar 5 Tour the Page Tools 8 Tour
WiFi Video Doorbell. User Manual
 WiFi Video Doorbell User Manual Introduction Content With Hisilicon Hi3518E processor and H.264 compression technology, this Wifi video intercom provides smooth realtime video transmission while keeps
<,W,EϬϱ E USER MANUAL
 USER MANUAL GETTING STARTED To get started with the Agora handset, please take both the phone and the battery out of the box. On the rear of the phone you will find a plastic backing cover with a small
HOME SECURITY KIT. USER MANUAL SMART PROTECTION WITH THE ALL-IN-ONE SOLUTION. SMART WINDOW SENSOR SMART POWER SOCKET SMART MOTION SENSOR SMART IP CAM
 HOME SECURITY KIT. SMART PROTECTION WITH THE ALL-IN-ONE SOLUTION. SMART WINDOW SENSOR SMART POWER SOCKET SMART IP CAM SMART MOTION SENSOR USER MANUAL SL-900100/900111 HOME SECURITY KIT A/B SHORT INSTRUCTION
IGSS 13 Configuration Workshop - Exercises
 IGSS 13 Configuration Workshop - Exercises Contents IGSS 13 Configuration Workshop - Exercises... 1 Exercise 1: Working as an Operator in IGSS... 2 Exercise 2: Creating a new IGSS Project... 28 Exercise
PAPERLESS RECORDER TR30 SERIES VIEWER SOFTWARE Model: TRViewer USERS MANUAL
 PAPERLESS RECORDER TR30 SERIES VIEWER SOFTWARE Model: TRViewer USERS MANUAL Contents 1. INTRODUCTION...3 1.1 CORRESPONDING VERSION...3 2. INSTALLATION...4 2.1 HOW TO INSTALL TRViewer...4 2.2 HOW TO UNINSTALL
Mini Mini GlobiLab Software Quick Start Guide
 Mini Mini GlobiLab Software Quick Start Guide This Guide is intended to help you get your Mini up and running quickly. For more detailed instructions, please see the Getting to Know Your Mini document
MindBoard (Classic) User Guide. Tomoaki Oshima
 User Guide. Tomoaki Oshima") MindBoard (Classic) User Guide Tomoaki Oshima Table of Contents Introduction............................................................................... 1 1. Key Features...........................................................................
MindBoard (Classic) User Guide Tomoaki Oshima Table of Contents Introduction............................................................................... 1 1. Key Features...........................................................................
HD32MTLogger Software Manual for the instrument HD32MT.1 Introduction
 HD32MTLogger Software Manual for the instrument HD32MT.1 Introduction WARNING: The software must always be run as administrator! The HD32MTLogger program allows management of the HD32MT.1 datalogger from
HD Ovi Digital Clock WiFi Hidden Camera. User s Guide WHEN YOU NEED TO KNOW.
 HD Ovi Digital Clock WiFi Hidden Camera User s Guide WHEN YOU NEED TO KNOW. HD Ovi Digital Clock WiFi Hidden Camera The HD Ovi Digital Clock WiFi Hidden Camera is a fully functional clock, displaying time
Android Mobile Client. User Guide. Version 2.9.1
 Android Mobile Client. User Guide Version 2.9.1 1. General information about the Android mobile client..................... 3 2. Connecting to the server and working with servers in the Android client........
Basic Setup Guide: 21, 27 & 32 IP PVMs with Axis M3045 Camera
 DC24V LAN ANALOG OUTPUT POWER AUTO UP HDMI DOWN MENU ALARM Basic Setup Guide 21, 27 & 32 IP PVMs with Axis M3045 Camera CE-M21A-PIR / CE-M27A-PIR / CE-M32A-PIR 24V POWER SUPPLY REQUIRED. SOLD SEPARATELY
SAS Mobile BI 8.1 for Windows 10: Help
 SAS Mobile BI 8.1 for Windows 10: Help Welcome Getting Started How Do I Use the App? Check out the new features. View the videos: SAS Mobile BI for Windows playlist on YouTube Use JAWS software? See the
User Manual. pdoc Forms Designer. Version 3.7 Last Update: May 25, Copyright 2018 Topaz Systems Inc. All rights reserved.
 User Manual pdoc Forms Designer Version 3.7 Last Update: May 25, 2018 Copyright 2018 Topaz Systems Inc. All rights reserved. For Topaz Systems, Inc. trademarks and patents, visit www.topazsystems.com/legal.
Chaos Culture. Multiclip Editor / Multiclip Note preview 1.5. Edited by Jason Cowling
 Chaos Culture Introduction... 2 Important stuff... 2 Setup... 3 Editing clips... 4 Using the editor... 5 Settings... 9 Workflow settings... 10 Performance... 13 Future updates... 13 Editor 1.6.61 / Note
LED show User Manual
 LED show User Manual Setup & Environment Introduction LEDshow is designed for LED program play and management. It mainly applied to full color LED display, both synchronous and asynchronous control system.
SmartWorks MFP V4 Help File
 SmartWorks MFP V Help File. Overview. Navigation - Select Function. Start/Stop. Reset. Program Timeout Reset. Default Presets Document Types. COPY Presets. SCAN Presets. PRINT Presets.7 Color Modes & Fine
MalaRom flashing Guide
 MalaRom 1.1.0 flashing Guide Introduction This guide is ONLY valid for MalaRom 1.1.0 and ONLY for 256 Mb devices! Please make sure to read the entire guide before you begin. Also if you have flashed your
Matrox MuraControl for Windows
 Matrox MuraControl for Windows User Guide (for software version 7.00) 20179-301-0700 2018.06.12 Contents About this user guide... 6 Using this guide... 6 More information... 6 Overview... 7 Supported Matrox
User Manual. pdoc Pro Client for Windows. Version 2.1. Last Update: March 20, Copyright 2018 Topaz Systems Inc. All rights reserved.
 User Manual pdoc Pro Client for Windows Version 2.1 Last Update: March 20, 2018 Copyright 2018 Topaz Systems Inc. All rights reserved. For Topaz Systems, Inc. trademarks and patents, visit www.topazsystems.com/legal.
Introduction to Microsoft Office PowerPoint 2010
 Introduction to Microsoft Office PowerPoint 2010 TABLE OF CONTENTS Open PowerPoint 2010... 1 About the Editing Screen... 1 Create a Title Slide... 6 Save Your Presentation... 6 Create a New Slide... 7
Rich Text Editor Quick Reference
 Rich Text Editor Quick Reference Introduction Using the rich text editor is similar to using a word processing application such as Microsoft Word. After data is typed into the editing area it can be formatted
SR272 User Guide Stanford Research Systems, Inc. All Rights Reserved
 SR272 User Guide 2001 Stanford Research Systems, Inc. All Rights Reserved Table of Contents INTRODUCTION... 3 HARDWARE/SOFTWARE CONFIGURATION... 4 CONFIGURING THE SR245 COMPUTER INTERFACE... 4 CONNECTING
emulation clients, with unique access to control device-specific technologies.
 Solutions for Mobile Access to Host Applications: Emulation For three decades, Ivanti, powered by Wavelink, has been the industry standard for mobile-host app connectivity. You ve depended on its sessionpersistent