3D Printing Getting Started!
|
|
|
- Clifford Lee
- 5 years ago
- Views:
Transcription
1 ARCHITECTURE & LANDSCAPE ARCHITECTURE 3D Printing Getting Started! White filament is free to students for academic use. Where do I buy filament? NORTH DAKOTA STATE UNIVERSITY What type of filament do I buy? 1.75mm PLA Do NOT buy ABS, 3mm stuff, or any combination of those two. Why should I buy filament? A student should buy filament for projects that are not academic in nature. IE they want to print a submarine or some other cool model or knick knack that is just for fun. How do I prepare my model for printing? We have documentation ready for this, please refer to it or ask a qualified person. Can I switch colours while printing? Yes, with the assistance of a supervisor. The colour will switch along a flat line as the change will occur across a flat plane. Please Do NOT Level the Bed Start Your Own Jobs Unload/Load Filament Please Do Remove Finished Prints after removing bed from machine. Please, ask for help if necessary. Label your file with your last name, so we can know who has printed what. If these are not followed, access will be restricted
2 So... You Want To Use The 3D Printers
3 3D Printing Overview When a student would like to use the 3D Printers: 1. They should contact a supervisor and prepare the build plate. 2. Supervisors will level the build plate and make sure the filament is loaded as the student opens their.stl in Makerware. 3. Supervisors should be present to double check Makerware settings before the.x3g (printable file) is saved to SD card or sent to print. * 4. Supervisors may then start the print job. 5. Students/Supervisors may label and remove completed jobs from the build plates and place them in the pick-up area. * A students may use Makerware on their own computer ahead of time to prepare a file, but should have a supervisor present to check the settings so that filament is not wasted and print-time is minimized.
 No internal geometry (We will be using software to clean it up later so it doesn")
4 Creating an STL from SketchUP. Make a model in SketchUp. When you are making your model keep in mind that you want: All of the external white faces showing Air-tight(no holes) No internal geometry (We will be using software to clean it up later so it doesn t need to be perfect) Installing the STL Plug-in. Install the Export to STL in SketchUp. Go to the Window Tab in SketchUp and Click on Extension Warehouse.


5 Search for SketchUp STL. Then Click on SketchUp STL. You will need a gmail account to login to download the extension. On the top right there will be a button to login to a gmail account. Once logged in the button should become an install button. Click the install button. Once it has installed click OK. Search for SketchUp STL. Then Click on SketchUp STL. You will need a gmail account to login to download the extension. On the top right their will be a button to login to a gmail account.


6 Click Accept for the Request for Permission. Once logged in the button should become an install button. Click the install button. Accept the Terms and Conditions of Use and Click Confirm. ***You may also wish to install CleanUp³ and its library TT_Lib². This plugin cleans up orphaned and unnecessary lines. It s really useful for creating a solid in SketchUp. Sometimes you don t even realize there are lines causing problems. This plug in will remove those for you. Running the cleanup script leaves you with a much cleaner model to work with


 Everything selected will be outlined or dotted in blue.")

7 Using the extension to export to an STL. With your model open in SketchUp, highlight the model or portion you wish to export. (If nothing is highlighted it will ask if you want to select the entire model.) Everything selected will be outlined or dotted in blue. Go to the File tab. Click on Export STL... Change the Export Unit to Millimeters. Leave the File format as ASCI. Click OK. Name your file with the extension {.stl} it will not automatically add that for you.

8 Cleaning up an STL. Go to Cloud.Netfabb.com Scroll down to the processing box. Click Choose File and select you stl. Enter your address. Select millimeters for units. Check the box, and accept the terms and conditions. Click Upload to Cloud.


9 Log into the you used with Netfabb Cloud. You should receive an confirming the upload. Shortly after, you will recieve an saying it was processed sucessfully or that it failed. If successful, click on the link in the second . Scroll down the page and download the REPAIRED FILE. (not the original) Congratulations you should now have a file ready to take into Makerware.


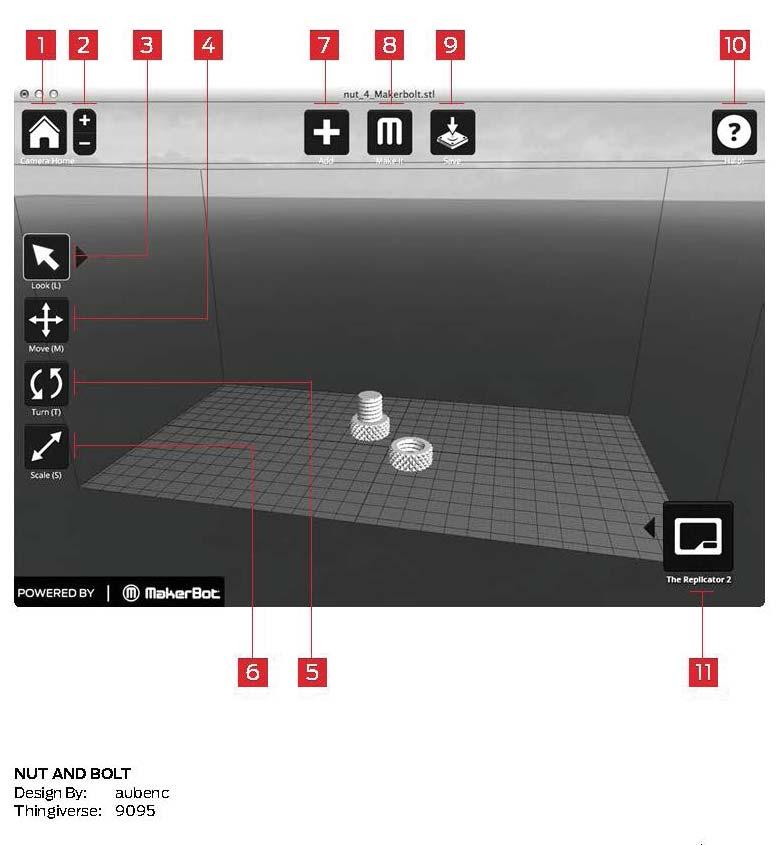
10 Using Makerbot Makerware. * Have supervisor present to double check settings Open Makerware. Click File > Open. Select your.stl file. Click Open. Select Move to Platform. Use the tools as described on the following page to move, rotate, and scale one or more models. Keep in mind that the less spaces between models, the less distance the extruder has to travel (so your job prints faster!). *Print one object at a time because if one part fails, the entire job will fail. Once you know the object will print successfully, then you can print multiple objects at once.
11

12 When your model(s) are postioned centrally with all of your desired adjustements, Click Make. Click Make It Now if you are printing directly from the computer to the attached 3D printer or select Export File if you wish to send the file to an SD Card. Use standard resolution, it has the best quality-time ratio. Make sure that Raft is checked (always) and that Supports also checked are if you have any spans (it should put it only where you need it, so couldn t hurt right?). The defaults of infill, shells, and layer height should be set at 10%, 2 and 0.20 mm respectively. Also, check the box for Preview before printing so that you can get an estimate of how long your print will take.


13 If you ve selected Make It Now, when you click Make It, Makerware will slice and verify the files. The Toolpath Visualization will show you a slice version of your model and give you an estimate for your print time. Click Export will send it to the connected 3D Printer. (*If the computer shutdown/ restarts you print will stop so we recommend printing from SD Cards.)

14 If you ve selected Export to a File, when you click Make It, you will be able to save the file to a SD Card. It will slice, verify, and show the preview like Make It Now. Do not use parathesis in the file name when saving your.x3g. Makerware will slice, verify and save the file. Name your files as: FirstInitialLastnameProject#_Part# ex.: BBernard1_3 This would be Ben Bernard s print part #3 of project No. 1. Eject your SD Card and have a supervisor start the print job in an open 3D printer.


 and then snap the front into place with the front tabs(b).")
15 Prepping and Placing the Build Plate We use acrylic build plates in the 3D Printers. A light layer of hairspray may be sprayed on the build plate before it is placed into the 3D printers to aid in the print job sticking to the build plate. **It is very important that you place it back then front so that you do not damage the tabs.** A When placing the acrylic build plates into the 3D printers, slide the back into the back tab(a) and then snap the front into place with the front tabs(b). B Build plate prep complete! Watch fist-bump!


16 Leveling the Build Plate! Why Leveling Is Important If the build platform is too far from the extruder nozzle, or if one part of the plate is farther away from the nozzle than another part, your builds might not stick to the build plate. If the build platform is too close to the extruder nozzle, the build plate can block the PLA Filament from extruding from the nozzle. This can also scratch the build plate. Leveling your build plate often will help ensure that objects adhere well to the plate. <- This is your Support card. We use NDSU business cards to level the build plates because they are thicker than plain paper.
17 To level the build plate, you must adjust the three knobs under the build platform. These three knobs lower and raise the build plate. Tightening the knobs [turning them to the right] moves the build plate away from the extruder nozzle. Loosening the knobs [turning them to the left] moves the build plate closer to the extruder nozzle. The distance between the extruder nozzle and the build plate should be about the thickness of the support card. How to Level the Build Plate Use the LCD Keypad on the 3D Printer to select Utlities -> Level Build Plate


18 The script will prompt you to adjust the knobs individually. As you adjust each knob, make sure the Support card just slides between the nozzle and build plate.


19 You should feel some friction on the support card, but still be able to easily pass the card between the plate and the extruder nozzle without tearing or damaging the card. The script will prompt you to adjust each knob again. This allows for fine tuning. This time, the Support card should slide between the build plate and nozzle with more friction.


20 After the second set of adjustments, the nozzle will move to the center of the build plate. Confirm that the MakerBot Support card slides between the nozzle and plate with a moderate amount of friction. NOTE: You can use these menus to return to the leveling script at any time. For a demonstration of this process, see the MakerBot Replicator 2 video page at makerbot.com/support/replicator2/videos.

21 Loading PLA Filament Rear-Mount Spool Holder For The Makerbot 3D Printer.! NOTE: To avoid filament jams, ensure that the PLA Filament feeds from the bottom of the spool toward the top of the spool to the guide. For the rear-mount, you may use either the left or the right side, but be sure that the filament feeds to the center where the guide tube is located. (leftside) (backside)


22 Top-Mount Spool Holder For The Makerbot 3D Printer. Filament Spool Extruder Filament goes around this way If the Makerbot you are using is set up with the top-mounted spool holder, no guide tube will be necessary.! NOTE: To avoid filament jams, ensure that the PLA Filament feeds over the top of the spool. (leftside) <-front, back ->

23 On the 3D Printer Menu, Press the arrow down to Utilites. Select Utilites -> Change Filament -> Load.! WARNING: Do not touch the extruder while it is heating it heats to 446 F. (230 C) Carefully remove the end of the filament guide tube from the hole in the top of the extruder. (Rear-mount only)


24 Free the end of the MakerBot PLA Filament from the filament spool. Be sure the filament has a clean edge. If not, use a pair of scissors or wire cutters to cut a clean edge. <- Like this, Not that -> Feed the free end of the MakerBot PLA Filament from the spool into the end of the filament guide tube where it attaches to the back of the MakerBot Replicator 2.


25 After the extruder reaches 230 C, the LCD panel will prompt you to load the PLA Filament into the extruder. Click through the message UNTIL your MakerBot Replicator 2 asks you to press the M when you see plastic extruding.

26 Take the end of the PLA Filament and firmly push it into the hole in the top of the extruder. Ensure that the filament goes into the center of the opening and doesn t get caught at the edge of the opening. Insert the free end of the MakerBot PLA Filament into the hole in the top of the extruder. Gently assist the filament into the extruder until you feel the motor pull the filament in.


27 Watch the extruder nozzle. After a few moments, you should see a thin string of the MakerBot PLA Filament that you loaded come out of the nozzle. Press the M button to stop extrusion. Wait a few seconds for the extruded PLA to cool, then pull it off the nozzle. You can discard this extra filament. Don t touch the nozzle; it may still be hot. Don t leave plastic clinging to the extruder nozzle. This can cause newly extruded plastic to stick to the nozzle instead of the build platform. Push the guide tube back into the opening on the top of the extruder.


 Carefully remove the end of the filament guide")
28 Unloading PLA Filament On the 3D Printer Menu, Press the arrow down to Utilites. Select Utilites -> Change Filament -> Unload.! WARNING: Do not touch the extruder while it is heating it heats to 446 F. (230 C) Carefully remove the end of the filament guide tube from the hole in the top of the extruder. (Rear-mount PLA only)


29 Once the guide tube is out, pull the filament gently out of the extruder. Press M to exit the menu when finished.


30 Printing an Object From the SD Card. After you have successfully leveled the build platform and loaded the PLA Filament into the extruder, place the loaded SD Card with the model into the SD port. The SD port is directly behind the LCD Panel. On the 3D Printer Menu, Press M to Select Build from SD. Then Use the up and down arrow buttons to navigate through the list of models on the SD card. To select a model, press M.


31 The MakerBot Replicator 2 will begin to build your object. You can use the LCD panel to monitor the temperature of the extruder and the status and progress of the object.


32 Removing Objects from the Build Plate. Release tabs at the back the build plate first. Then carefully lift the plate out of the 3D Printer. Take a thin metal craft spatula and carefully work the blade under the edge of the object on all the sides working it loose from the build plate. Be careful not to gouge the build plate itself.


33 Rafts on the model may be carefully removed in a similar manner.
34 NORTH DAKOTA STATE UNIVERSITY ARCHITECTURE & LANDSCAPE ARCHITECTURE
3D Printing Getting Started!
 ARCHITECTURE & LANDSCAPE ARCHITECTURE 3D Printing Getting Started! White filament is free to students for academic use. Where do I buy filament? NORTH DAKOTA STATE UNIVERSITY www.makerbot.com/store www.ultimachine.com/pla
Dremel Idea Builder 3D40. Various infill options are available from Simplify 3D software. Varies dependent on the infill and size of your object.
 Guide for Dremel Printing General information The Dremel Idea Builder 3D printer extrudes PLA plastic along a tool path to create layers much like our higher end Dimension. The Dremel however does not
ZHEJIANG FLASHFORGE 3D TECHNOLOGY CO., LTD. Creator Pro Start-up Guide
 www.ff3dp.com ZHEJIANG FLASHFORGE 3D TECHNOLOGY CO., LTD. Creator Pro Start-up Guide www.ff3dp.com Contents 1 What's Included in the Box? 2 2 Un-boxing 2 3 Initial Hardware Installation 6 4 Software Installation
Section 1- Sketchup (or other 3D modeler): How do render a file that can be printed
: How do render a file that can be printed") Using the 3D Printer (Makerbot) - BETA Contents: Section 1 Sketchup: How do draw a file that can be 3-D printed Section 2 Sketchup: Exporting STL Section 3 MakerWare: Preparing your file Section 4 Printing!
Using the 3D Printer (Makerbot) - BETA Contents: Section 1 Sketchup: How do draw a file that can be 3-D printed Section 2 Sketchup: Exporting STL Section 3 MakerWare: Preparing your file Section 4 Printing!
DeltaMaker 3D Printer Getting Started
 DeltaMaker 3D Printer Getting Started Last Updated: December 2014 Table of Contents TABLE OF CONTENTS 2 WELCOME 3 SECTION 1: UNPACKING/SETUP 4 REMOVING THE PRINTER FROM THE BOX 4 INSTALLING THE FILAMENT
We have two types of plastic printer (Makerbot and Up) and one powder printer at School of Architecture.
 and one powder printer at School of Architecture.") 3D printers are rapid prototyping tools which make solid, threedimensional objects out of melted plastic filament. Digital models are translated into instructions for the 3D printer (3d models are converted
3D printers are rapid prototyping tools which make solid, threedimensional objects out of melted plastic filament. Digital models are translated into instructions for the 3D printer (3d models are converted
ideamaker Manual
 ideamaker Manual Using ideamaker... 2 Basic information... 2 What is ideamaker?... 2 Where to download ideamaker?... 2 Install ideamaker... 3 Let s Print!... 6 How to use ideamaker?... 23 Interface...
Dreamer Series User Manual
 Dreamer Series User Manual Welcome to the world of the Dreamer. To ensure that you have the best possible user experience, it s important that you follow this user manual. Let s get started! In Parts I
Guide: 3D Printing Software: UP, Makerbot P 1
 Guide: 3D Printing Software: UP, Makerbot 02-09-2015 P 1 Disclaimer P 2 We can t guarantee your model will successfully print as there are many factors which can affect it. The guideline will help you
UP! Quick Start Guide
 Personal Portable 3D Printer UP! www.pp3dp.com 1. Assemble Printer Open the box, take out the printer and accessories. Assemble the parts contained in the box as following procedure: 1. Unscrew the M4
Figure 1: Diagram of a 3D printer. You can find the most up-to-date version of this manual in electronic format on our website:
 INTRODUCTION What is a 3D printer? A 3D printer (see Figure 1) is a device that is able to create solid three-dimensional objects using a design produced on a computer. Currently, there are various technologies
3d Printing with the Prusa I3 Operation & Printing via a USB Cable
 3d Printing with the Prusa I3 Operation & Printing via a USB Cable Instructions for: Prusa I3 Printer Set-up Slic3r Software Use Pronterface Software Use Prusa I3 - Parts Identification Prusa I3 Printer
think big, print huge
 think big, print huge quick start guide Table of Contents a Receiving and uncrating 5 b bed level & z home 11 c Loading filament 19 d SOFTWARE 23 e Setup 23 f preparing a print 26 g printing on gigabot
Cura (Documentation for version )
") Cura (Documentation for version 15.04.06) Getting Started Installation To start the installation of Cura, download it first. After downloading, open the installer and run the installation wizard to complete
Cura (Documentation for version 15.04.06) Getting Started Installation To start the installation of Cura, download it first. After downloading, open the installer and run the installation wizard to complete
Product User Manual. IdeaWerk 3D Printer WT150
 Product User Manual IdeaWerk 3D Printer WT150 Contents Contents 1. Unpack and checking... 1 1.1 Check the Machine... 1 1.2 Check the Accessories... 3 2. Brief Introduction... 3 2.1 Precautions and Safety...
Dremel Digilab 3D Slicer Software
 Dremel Digilab 3D Slicer Software Dremel Digilab 3D Slicer prepares your model for 3D printing. For novices, it makes it easy to get great results. For experts, there are over 200 settings to adjust to
USER MANUAL Resolution 0.02mm Speed 300mm/second Software: Wanhao Maker
 1 Duplicator 5S & 5S MINI Desktop 3D Printers USER MANUAL Resolution 0.02mm Speed 300mm/second Software: Wanhao Maker 2014/2015 Wanhao USA 3 Table of Contents Welcome 1 Printer Specifications 2 Unboxing
A GUIDE TO GETTING STARTED
 Florida Public Library Printing A GUIDE TO GETTING STARTED Prepared for the Florida Public Library by Robert Persing Table of Contents Section-A. Download the software... 3 Section-B. Install the software...
3-7. Set Materials (Touch Screen) Set Materials (Software) Material Weight adjustment (grams) Current material weight. Increase.
 Set Materials (Software) Material Weight adjustment (grams) Current material weight. Increase.") Set Materials (Touch Screen) 3-7 Decrease Material Weight adjustment (grams) Increase Current material weight Save current settings Stop extrusion and heating Back withdraw material change material extrude
Set Materials (Touch Screen) 3-7 Decrease Material Weight adjustment (grams) Increase Current material weight Save current settings Stop extrusion and heating Back withdraw material change material extrude
Geeetech Duplicator 5 3D printer. User Manual
 Geeetech Duplicator 5 3D printer User Manual Contents Safety Instructions... 4 1.Software Resources... 5 1.1 Repetier-Host... 5 1.2 Driver... 5 1.3 Arduino IDE... 6 2.Connect the Printer... 6 3.Printer
User Guide Creator Pro Desktop 3D Printer
 www.ff3dp.com User Guide Creator Pro Desktop 3D Printer i 1 www.ff3dp.com Contents Acknowledgment...3 Commitment... 4 PRECAUTIONS...5 Chapter 1: What s in the Box?...6 Chapter 2: Unpacking...7 Chapter
Portable Qi Charger. Created by Ruiz Brothers. Last updated on :20:38 AM UTC
 Portable Qi Charger Created by Ruiz Brothers Last updated on 2017-12-05 01:20:38 AM UTC Guide Contents Guide Contents Overview Prerequisite Guides Parts, Tool & Supplies Universal Qi Wireless Charging
Instruction Manual. RS 3D Printer
 Instruction Manual RS 3D Printer 1) GENERAL This instruction manual contains important information regarding the installation, operation, maintenance and storage for RS 3D Printer. Please read these instructions
Geeetech Aluminum Prusa I3. User Manual
 Geeetech Aluminum Prusa I3 User Manual 1 Safety Instructions Building the printer will require a certain amount of physical dexterity, common sense and a thorough understanding of what you are doing. We
ideamaker Manual
 ideamaker Manual www.raise3d.com 1 Using ideamaker... 3 1.1 What is ideamaker?... 3 1.2 Where to download ideamaker?... 3 2 Install ideamaker... 4 3 Let s Print!... 9 3.1 Import.STL files... 9 3.2 Slice
Technical Support: CUBE USER MANUAL
 CUBE THE DESKTOP 3D PRINTER USER MANUAL 2012-12-05 1 Contents 1 Installing software...3 1.1 Installing Python... 3 1.2 Installing ReplicatorG... 5 2 Pre-print checks...9 2.1 Power up...9 2.2 Connect to
ideamaker Manual
 ideamaker Manual www.raise3d.com 1 Using ideamaker... 3 1.1 What is ideamaker?... 3 1.2 Where to download ideamaker?... 3 2 Install ideamaker... 4 3 Let s Print!... 9 3.1 Import.STL files... 9 3.2 Slice
BFB Axon software manual
 Contents Install BFB Axon on your computer from the website for the latest version: www.bitsfrombytes.com > Downloads> Software. (Or from the SD card if supplied). If you are using Vista or windows 7,
ENJOY Introduction. Software Installation* Hardware. Calibration Settings. Print test. Appendex. Install print S/W Driver Install
 Quick Start Manual 1 ENJOY Introduction C O N T E N T S 6 5 Appendex 4 Print test 3 2 Hardware Calibration Settings Software Installation* Install print S/W Driver Install Hardware Intro Cable installation
Easy use of Repetier-Host software
 Easy use of Repetier-Host software Examples base on version Repetier-Host 1.06 1. Repetier-Host overview Repetier Host is an easy to use software for 3D printing. The main functions include manual debugging
Epilog Laser Cutter Instructions (Only the Essentials)
") Epilog Laser Cutter Instructions (Only the Essentials) How to export a file for SKETCHUP put it on the server, open it in Illustrator, and Prepare it for the Epilog Laser Cutter 1. In Sketchup: Draw a
Epilog Laser Cutter Instructions (Only the Essentials) How to export a file for SKETCHUP put it on the server, open it in Illustrator, and Prepare it for the Epilog Laser Cutter 1. In Sketchup: Draw a
MAKERBOT For use with MakerBot Replicator Desktop 3D Printer (Fifth Generation Model)
") MAKERBOT For use with MakerBot Replicator Desktop 3D Printer (Fifth Generation Model) YALE CENTER FOR ENGINEERING INNOVATION AND DESIGN Table of Contents p. 3-5... Using the MakerBot Desktop p. 6... Using
MAKERBOT For use with MakerBot Replicator Desktop 3D Printer (Fifth Generation Model) YALE CENTER FOR ENGINEERING INNOVATION AND DESIGN Table of Contents p. 3-5... Using the MakerBot Desktop p. 6... Using
2014 Simplify3D. Quick Start Guide
 Quick Start Guide Preparation Installing Simplify3D Software 3 The Configuration Assistant 4 The Interface Layout 5 3D Printing Workflow Import Process Settings Preview Print! Import 7 Process Settings
QUICK START GUIDE ENTER AN ENVIRONMENT OF PROFESSIONAL 3D PRINTING
 QUICK START GUIDE ENTER AN ENVIRONMENT OF PROFESSIONAL 3D PRINTING MEET THE ZORTRAX M200 Zortrax M200 3D printer transforms virtual projects into three-dimensional reality. It is used to prototype and
Quickstart Guide Kora Pro 3D PC Printer
 Quickstart Guide Kora Pro 3D PC Printer 1 Rev001/01/2018 Kora Pro PC General Precautions and Advice Only use original accessories from or approved by the manufacturer Always read the manual before initial
USING YOUR BIGBOT. 1/18/2017 V0.1
 USING YOUR BIGBOT www.bigbot-3d.com 1/18/2017 V0.1 FOREWORD: YOUR PRINTER IS REPRAP, WHICH STANDS FOR "REPLICATING RAPID PROTOTYPERS". THIS MEANS IT CAN PRINT THE PARTS THAT ARE CUSTOM FOR THIS MACHINE,
Replacing the TFM coupler
 Repair manual Replacing the TFM coupler Instructions The TFM coupler is a key component of the hot end. It allows filament to flow smoothly through it from the Bowden tube and towards the nozzle. The coupler
3D Printing. Kenny George
 3D Printing Kenny George What is 3D printing 3D printing is form or rapid prototyping that allows for one off manufacturing of physical objects. There are many types of 3D printing applications: SLS -
Objet30 Pro x 7.55 x mm. Acrylic-like plastic in solid color. White, gray, black, clear
 Guide for 3D Printing Table of contents: Objet30 Pro Estimation: Page 5 Dimension Estimation: Page 6 Form 1+ Estimation: Page 7 General Information Location:, 1232 Sullivan Access: Technician-run; Online
Loading paper and specialty media Learning about the printer. Stop all printer activity. 7 Back button Return to the previous screen.
 Quick Reference Use the 6 Stop or Cancel button To Stop all printer activity. Loading paper and specialty media Learning about the printer Using the printer control panel 0 Use the 9 To Display View the
M2 3D Printer V4 M2 3D Printer
 M2 3D Printer V4 Contents 2 Important Safeguards 3 Welcome 4 M2 Features 6 Other products included with your printer 7 Set up 9 Slicing.STL or.obj files 10 Maintenance and Support 11 Warranty 12 About
Introduction to 3D Printing
 Introduction to 3D Printing How Do 3D Printers Work? 2 The Parts of a 3D Printer 2 Find and Download an Object from Thingiverse 3 What is Thingiverse? 3 Finding Files to Download 3 Selecting a File to
Well Link Industries Limited
 Well Link Industries Limited 3D Printing 3D printing is no longer a science fiction. It helps to change from prosthetics and regenerative medicine to structures in space. In 2013, second term State of
Slic3r User Guide. By Lorenzo Cantini (Kent s Strapper) and Ivan Bortolin Translation by Linda Anticoli 10/08/2012
 and Ivan Bortolin Translation by Linda Anticoli 10/08/2012") Slic3r User Guide By Lorenzo Cantini (Kent s Strapper) and Ivan Bortolin Translation by Linda Anticoli 10/08/2012 2 Contents Overview i 1 Installation and first run 1 1.1 Installation........................................
Slic3r User Guide By Lorenzo Cantini (Kent s Strapper) and Ivan Bortolin Translation by Linda Anticoli 10/08/2012 2 Contents Overview i 1 Installation and first run 1 1.1 Installation........................................
SAFETY WARNINGS AND GUIDELINES... 3 INTRODUCTION... 4 FEATURES... 4 CUSTOMER SERVICE... 4 PACKAGE CONTENTS... 5 NAVIGATING THE MENU SYSTEM...
 CONTENTS SAFETY WARNINGS AND GUIDELINES... 3 INTRODUCTION... 4 FEATURES... 4 CUSTOMER SERVICE... 4 PACKAGE CONTENTS... 5 NAVIGATING THE MENU SYSTEM... 5 UNPACKING AND SETUP... 6 FINE TUNING PLATFORM HEIGHT...
Ender 3 Series 3D Printer Quick Start Guide
 Ender 3 Series 3D Printer Quick Start Guide This guide is for the Ender 3 Series of 3D printers. Select the correct input voltage to match your local mains (220V or 110V) Because of software/hardware upgrades
3D Printing Training Guide (FDM)
") 3D Printing Training Guide (FDM) Introduction 3D printing is coming out of its status as an emerging manufacturing technique and becoming a more commonly accepted means of manufacturing. This is due to
3D Printing Training Guide (FDM) Introduction 3D printing is coming out of its status as an emerging manufacturing technique and becoming a more commonly accepted means of manufacturing. This is due to
Cura - DUET Dual Extrusion Setup
 SeeMeCNC Guides Written By: SeeMeCNC 2018 seemecnc.dozuki.com/ Page 1 of 15 INTRODUCTION Please note that dual extrusion is for advanced users. You should have some advanced knowledge on some G-Code and
Operation Instruction
 JGAURORA 3D Printer Model:Z-603S Operation Instruction www.jgaurora3d.com Read it carefully before printing and keep it properly. - 0 - - 1 - Z- 603S model is designed FDM 3d printer by Shenzhen Aurora
Scroll through menus or move between screens and menu options. Increase the numeric value of an option or setting being displayed. Save settings.
 Quick Reference Learning about the printer Use the 5 Right arrow button To Scroll through menus or move between screens and menu options. Increase the numeric value of an option or setting being displayed.
3D Printing Introduction Workshop Plan. Introductions. Workshop Outline. The CD
 3D Printing Introduction Workshop Plan This workshop is 2 hours long and limited to 8 participants. Each participant is provided with a laptop loaded with Blender, Sketchup, and Sculptris as well as Makerware.
3D Prototyping X1 3D Printer. User Manual V1.3
 3D Printer User Manual V1.3 COPYRIGHT This document is copyrighted and contains proprietary information that is the property of 3D Prototyping Pty Ltd. The user does not have the right to copy, reproduce,
SeeMeCNC Guides 2 INTO 1 DUAL FILAMENT FEED ADAPTER INSTALL
 SeeMeCNC Guides 2 INTO 1 DUAL FILAMENT FEED ADAPTER INSTALL These are still in development - Be ready to troubleshoot firmware/software configuration for your setup when purchasing these adapters. Written
Steps to Print (without supports) This will take you from Meshmixer to the PSU PrintDepot
 This will take you from Meshmixer to the PSU PrintDepot") Steps to Print (without supports) This will take you from Meshmixer to the PSU PrintDepot Read this first to understand some of the dilemmas a model can have and ways to avoid printing problems: http://www.3dshook.com/2016/05/how-to-optimize-a-3d-model-for-3dprinting/#normal
Steps to Print (without supports) This will take you from Meshmixer to the PSU PrintDepot Read this first to understand some of the dilemmas a model can have and ways to avoid printing problems: http://www.3dshook.com/2016/05/how-to-optimize-a-3d-model-for-3dprinting/#normal
da Vinci Jr.1.0 April 2016 da Vinci Junior 1.0w 3D Printer da Vinci Jr.1.0w Quick Guide HD23F1JW0N1
 da Vinci Junior 1.0w 3D Printer w Quick Guide P 1 Product Overview A: Filament movement area B: Feed module C: Detector D: Extruder E: Filament F: Print bed G G: SD card port (Storage format: FAT32) H:
Written By: Josef Prusa
 6. Preflight check The last things you should check before the first print Written By: Josef Prusa 2018 manual.prusa3d.com/ Page 1 of 13 Step 1 P.I.N.D.A. adjustment, phase 1 Ensure the printer is turned
Panowin F1. User Manual
 Panowin F1 User Manual 1 PANOWIN TECHNOLOGIES CO.,LTD. WARNING power outlet. CAUTION: In case of emergency unplug the Panowin F1 from the WARNING: Carefully monitor the Panowin F1 during operation. Do
PowerSpec Ultra 3D Printer Start-up Guide Table of Contents
 PowerSpec Ultra 3D Printer Start-up Guide Table of Contents 1 What's Included in the Box?...Page 3 2 Un-boxing.Page 4 3 Initial Hardware Installation Page 6 4 Software Instruction.Page 8 5 Filament Page
Micro USB Dock for Circuit Playground
 Micro USB Dock for Circuit Playground Created by Ruiz Brothers Last updated on 2017-12-07 04:25:47 AM UTC Guide Contents Guide Contents Overview Parts, Tools & Components USB DIY Connector Shell - Type
TROUBLESHOOTING GUIDE
 TROUBLESHOOTING GUIDE YOU SHOULDN'T ENCOUNTER many problems when using your Vector 3 printer, however, occasionally things can go wrong. Before contacting Customer Services, please consult this list of
Select Mini 3D Printer V2
 Select Mini 3D Printer V2 P/N 15365, 21711, 21872, 24166 User's Manual CONTENTS SAFETY WARNINGS AND GUIDELINES... 3 INTRODUCTION... 4 FEATURES... 4 CUSTOMER SERVICE... 5 PACKAGE CONTENTS... 5 PRODUCT OVERVIEW...
Use the To. 4 Keypad Enter numbers, letters, or symbols on the printer. Stop all printer activity. 6 Indicator light Check the status of the printer.
 Quick Reference Learning about the printer Using the control panel Use the To 4 Keypad Enter numbers, letters, or symbols on the printer. 5 Stop or Cancel button Stop all printer activity. 6 Indicator
Quick Reference Guide. ineo 3301P
 ineo 3301P Contents 1 Learning about the printer... 3 Using the printer control panel... 3 Understanding the colors of the Sleep button and indicator lights... 4 Setting the paper size and type... 5 Configuring
Introduction. tthink[box] OMAX 5555 JetMachining Center Tutorial: Drawing and Toolpath Generation With Intelli-MAX LAYOUT
![Introduction. tthink[box] OMAX 5555 JetMachining Center Tutorial: Drawing and Toolpath Generation With Intelli-MAX LAYOUT](/thumbs/95/123924179.jpg "Introduction. tthink[box] OMAX 5555 JetMachining Center Tutorial: Drawing and Toolpath Generation With Intelli-MAX LAYOUT") tthink[box] OMAX 5555 JetMachining Center Tutorial: Drawing and Toolpath Generation With Intelli-MAX LAYOUT Introduction The OMAX 5555 Jetmachining Center is a precision abrasive jet machining tool. It
tthink[box] OMAX 5555 JetMachining Center Tutorial: Drawing and Toolpath Generation With Intelli-MAX LAYOUT Introduction The OMAX 5555 Jetmachining Center is a precision abrasive jet machining tool. It
KLIC-N-PRINT 3D User Manual
 KLIC-N-PRINT 3D User Manual http://knp3d.com/ September 29, 2016 1 Table of Contents 1. Introduction... 6 1.01 User Manual Options... 6 1.02 Safety... 7 1.03 Warranty... 7 1.04 Support... 7 1.05 Unpacking...
3 Sleep button Enable Sleep mode or Hibernate mode. Notes:
 Quick Reference Use the To 3 Sleep button Enable Sleep mode or Hibernate mode. Indicator light color and its corresponding printer status Indicator light Printer status Off The printer is off or in Hibernate
SeeMeCNC Guides. Setting Up Simplify 3D
 SeeMeCNC Guides Setting Up Simplify 3D This guide will walk you through the steps of setting up S3D for slicing and printing on your SeeMeCNC printer. Written By: Jim Carter 2017 seemecnc.dozuki.com Page
Personal 3D Printer. Quick Start Guide. See Inside for Use and Safety Information
 EKOCYCLE TM Personal 3D Printer Quick Start Guide See Inside for Use and Safety Information The USB Mass Storage Device Contains the User Guide and Quick Start Guide in other Languages Congratulations
Dremel 3D Printer 3D40 Workflow Computation + Construction Lab Iowa State University
 Dremel 3D Printer 3D40 Workflow Computation + Construction Lab Iowa State University Dremel Idea Builder 3D40 If you have any technical issues with this 3D printer please contact Dremel 3D Idea Builder
Why Sketchup? Underneath is a screenshot of a model I wanted to print.
 Means: (Steps) 1. Tighten up or adapt design as needed. No Open edges or extra lines or shapes. 2. Check all Faces Use the Style tool to color the backside of planes to be sure that they are facing correctly.
9 Start button Start a job, depending on which mode is selected. 10 Fax button Send faxes. 11 Back button Return to the previous screen.
 Quick Reference Use the To 9 Start button Start a job, depending on which mode is selected. > Settings > > Paper Menu > > Paper Size/Type > Learning about the printer Using the printer control panel 10
3D Printing. Rob Miles. Department of Computer Science University of Hull
 3D Printing Rob Miles Department of Computer Science University of Hull Agenda 3D Printing Overview 3D Printing Workflow Design something and Print it The future of 3D Printing 2 Printing Not that many
The following illustration demonstrates what you would see when the print jet nozzles are properly leveled.
 INF Printing Verify the Print Jet Nozzle Level Leveling the print jet nozzles is very important to ensure quality prints especially after replacing a print jet, an extruder assembly or the print pad. The
Removal and Installation8
 8 Screw Types 8-4 Top Cover Assembly 8-5 Left Hand Cover 8-6 Right Hand Cover 8-10 Front Panel Assembly 8-14 Left Rear Cover 8-15 Right Rear Cover 8-16 Extension Cover (60" Model only) 8-17 Media Lever
MONOPRICE. MP Mini Delta 3D Printer. User's Manual P/N 21666
 MONOPRICE MP Mini Delta 3D Printer P/N 21666 User's Manual CONTENTS SAFETY WARNINGS AND GUIDELINES... 3 INTRODUCTION... 4 FEATURES... 4 CUSTOMER SERVICE... 5 PACKAGE CONTENTS... 5 PRODUCT OVERVIEW... 6
3D SYSTEMS University CubeX 3D Printer
 3D SYSTEMS University CubeX 3D Printer Lesson Leveling the Print Pad and Print Tips, Setting the Z-Gap Revision date: 10/22/13 1 1 2016 年 6 月 14 日 Objectives After completing this lesson you will: Be able
da Vinci 1.0 Pro Quick Guide
 US da Vinci 1.0 Pro Quick Guide Product Description Print Parameters Description Support Details Product Model: da Vinci 1.0 Professional da Vinci 1.0 Pro Product Description Product Overview Cartridge
English. Quick Guide
 English Quick Guide Specification Product Overview Button and Indicator light Unpacking Accessory Checklist Important Safety Notes Extruder module installation Accessory installation XYZware operation
User Manual V 0.1. Download the full user manual at
 User Manual V 0.1 Download the full user manual at www.afinia.com/support Index Chapter 1 Product Description Chapter 2 Prepare for Your First 3D Print Chapter 3 Machine Settings Chapter 4 Print Settings
SOFTWARE SETUP Pronterface...2 Cura BED CALIBRATION Using Pronterface...11 Using LCD...13
 USER MANUAL TABLE OF CONTENTS SOFTWARE SETUP Pronterface...2 Cura 15.04...3 BED CALIBRATION Using Pronterface...11 Using LCD...13 LOAD/UNLOAD FILAMENT Using LCD (extruder 0 only)...14 Using PRONTERFACE...15
Certification Guide. Brownsburg Public Library
 Certification Guide Brownsburg Public Library 1 st Maker Space, LLC and Brownsburg Public Library have partnered to increase understanding and access to 3D printing and design technology. Brownsburg Public
M2 3D Printer V4 Rev. D
 M2 3D Printer V4 Rev. D Contents 2 Important Safeguards 3 Welcome 4 M2 Features 6 Other products included with your printer 7 Set up 9 Slicing.STL or.obj files 10 Maintenance and Support 11 Warranty 12
USER S GUIDE. Documentation Version 1.0.0
 Documentation version 1.0.0 tt USER S GUIDE INTRODUCTION 2 INTRODUCTION INTRODUCTION / 3 INTRODUCTION Target : Provide a visual guide of the different steps required to use an I3 Metal Motion 3D printer.
Quick Start Guide. including AutoMaker. Version 1.0
 Quick Start Guide including AutoMaker Version 1.0 NOT FOR MEDICAL USE Version 1.0 Welcome Package Contents Check your product package for the following items. 2m USB A-B Cable IEC C5 Power Cable Robox
3D Printing. Rob Miles. Department of Computer Science University of Hull
 3D Printing Rob Miles Department of Computer Science University of Hull Agenda 3D Printing Overview 3D Printing Workflow Design something and Print it The future of 3D Printing Printing Not that many years
Model: 3-Axis High Quality Self-Assembled 3D Printer Kit. Panowin F1
 ESTIMATE No.: Client: Telephone: E-mail: Address: City, State: Contact: Cell-Phone: Fax: Zip Code: Country: Panowin Technologies Co., Ltd. Model: 3-Axis High Quality Self-Assembled 3D Printer Kit Panowin
Agenda. Breaking the Ice Physical Setup Walkthrough of REPETREL First Print
 T1 Training Session Agenda Breaking the Ice Physical Setup Walkthrough of REPETREL First Print Breaking the Ice SYSTEM 30M ENGINE Breaking the Ice Protected build environment Slightly larger build area
Check the status of the printer. 7 USB port Connect a USB a flash drive to the printer. Note: Only the front USB port supports flash drives.
 Quick Reference Use the 6 Indicator light Check the status of the printer. Learning about the printer Using the printer control panel 7 USB port Connect a USB a flash drive to the printer. Note: Only the
imac Intel 21.5" EMC 2389 Stand Replacement
 imac Intel 21.5" EMC 2389 Stand Replacement Replace a broken or cosmetically unappealing stand on the imac 2389 21.5 Written By: Aaron Cooke ifixit CC BY-NC-SA www.ifixit.com Page 1 of 30 INTRODUCTION
Running a Job on the Large Mill
 Running a Job on the Large Mill Digital Media Tutorial Written by Trevor Williams Turning On the Machine Flip the breaker switch on the front right of the lower part of the controller box to the ON position.
Repetier-Host Documentation
 Repetier-Host Documentation Installation Prerequisites Before you start with the installation, you should check if your computer meets the requirements. Currently available computers should have no problems
1. 3DWOX add-in program user manual
 . 3DWOX add-in program user manual Install Guide When 3DWOX add-in installation is complete, 3DWOX add-in tab will appear. While SolidWorks model is open, click Print 3D on the 3DWOX tab. 2 Solidworks
Repetier-Host Documentation
 Repetier-Host Documentation Installation Prerequisites Before you start with the installation, you should check if your computer meets the requirements. Currently available computers should have no problems
Advanced Printing. This article will take you to get to know the advanced printing skills.
 Advanced Printing This article will take you to get to know the advanced printing skills. There are two modes are available for users, one is Basic Mode and the other is Expert Mode. Expert Mode grants
Repetier-Host Documentation for use with Kora Pro 3D PC
 Repetier-Host Documentation for use with Kora Pro 3D PC Installation Prerequisites Before you start with the installation, you should check if your computer meets the requirements. Currently available
Polar3D Printer Guide
 Polar3D Printer Guide Kristin Hubner January, 2018 Copyright 2017, 2018, Kristin Hubner. Autodesk, Autodesk 123D, Autodesk Fusion 360, Autodesk Maya, DWG, DXF, and Tinkercad are trademarks or registered
CAMERA ASSEMBLY. Removal/Replacement of the Camera Box Assembly APR-CA. Install Camera Assembly. Remove Camera Assembly
 CAMERA ASSEMBLY Removal/Replacement of the Camera Box Assembly APR-CA REQUIRED TOOLS: 9/64 hex key Small flat-tip screwdriver Remove Camera Assembly camera 1. Locate the camera assembly underneath the
Installing imac Intel 27" EMC 2390 Dual HDD or
 Installing imac Intel 27" EMC 2390 Dual HDD or SSD Drive Installing a secondary HDD or SSD in the mid 2010 27" imac EMC 2390. Written By: Brett Hartt ifixit CC BY-NC-SA www.ifixit.com Page 1 of 23 INTRODUCTION
3D Printing A Processing Approach CONTENTS
 3D Printing A Processing Approach 1 CONTENTS 3D Printing Workflow Digital Modeling Simple Rules for Printable Model Digital Modeling Tools Case 1 Battery Cover Case 2 Housing Case 3 Broken Edge Repair
Please carefully read the safety instructions before get started.
 Safety Instructions Please carefully read the safety instructions before get started. ANYCUBIC 3D printer generates high temperature. Do not reach inside of the printer during operation. Allow time for