NorthClark Computing, Inc. Cost Estimating. User Guide
|
|
|
- Barry Russell
- 5 years ago
- Views:
Transcription
1 ERP Consulting Web Development Custom Programming Solutions Desktop & Web Applications for Manfact Cost Estimating User Guide Web and Desktop Applications for Manfact by Epicor July 1, All Rights Reserved This document contains information that is the property of and proprietary to Any unauthorized duplication in whole or in part is prohibited. Epicor and Manfact are trademarks of Epicor Software Corporation. Microsoft, Windows and NT are trademarks or registered trademarks of Microsoft Corporation. Universe is a registered trademark of IBM Corporation. All other trademarks acknowledged. Published in the U.S.A. This document is for informational purposes only and is subject to change without notice. NorthClark makes no warranties, express or implied in this document. The contents of this document are believed to be current and accurate as of its date of publication.
2 TABLE OF CONTENTS INTRODUCTION... 1 COST ESTIMATING... 2 Open / Create an Estimate Database... 2 Creating a New Estimate... 3 Item Detail... 7 Cost Sources... 8 Summary Resources General Common Cost Estimating Procedure Main Menu Options Right Click Menu File Menu Find an Estimate Tools Menu Calculate Estimate Load Data From Manfact Load Project Initialize Resource Table Search for Part in Manfact Search for Project in Manfact Find an Item in the Estimate/Find Next View Estimate as Average Unit Cost Options GENERAL INFORMATION Printing a Spreadsheet Importing Data from Excel Exporting a Spreadsheet to Excel Exporting to Word Editing Features Customizing Your Display / Arranging Columns Wildcarding... 45
3 Introduction The Cost Estimating Module is an automated search, retrieval, and tabulation process to be used in the development of estimated costs. Although the program may be run in stand-alone mode, it is most powerful when connected to the Manfact database. While connected, various files are utilized to support the estimating process including; bills of material, routings, vendor quotes, purchasing history, and work order history. Once the desired data has been extracted, the user may continue to refine the estimate in "offline" mode. The estimate is developed using a hierarchical structure that allows costs to be rolled-up and reported at various levels. The application uses a flexible spreadsheet format that allows the user to easily add and delete items from the estimate, and change the structure of the estimate. Estimated hours and amounts are stored by user-defined cost categories called Resources. Various estimating parameters are defined for each resource including: labor rate, mark-up percent, escalation rate, complexity factor, etc. (See Resources Display for more information.) The estimate may be developed for a specified quote quantity, taking into account smaller perunit setup costs and more favorable prices due to larger purchasing quantities. A bill of material may be automatically loaded from the Manfact database and copied into the estimate. Each component of the BOM then becomes a line item on the estimate, which may be modified by the user as desired. (See Load Bill of Material for more information.) The system stores multiple cost sources for each estimate line item. Cost sources may be entered by the user, or obtained automatically from the Manfact database. For purchased parts, cost sources include purchase order history, vendor quotes, and current quantity on-hand. For assemblies, labor costs may be based on either a standard routing or work order history. (See Cost Sources Display for more information.) The system calculates a suggested selling price based on the desired profit percentage specified by the user. Profit requirements may vary by resource code if desired. To provide additional reporting flexibility, the estimate may be exported to Microsoft Excel or Microsoft Word. (See Exporting to Excel or Exporting to Word for more information.) Each estimate is maintained as an individual Access database. These files may be stored on the user s local hard-drive or on a network drive. Thus, estimates may be easily copied or shared among different users using standard Windows desktop tools. 1

4 Cost Estimating The main screen is comprised of six "tabs". Estimate: The Estimate Display is presented in spreadsheet format. Each row in the spreadsheet represents an item that will contribute to the total cost of the project. Item Detail: The Item Detail Display contains more in depth information, including detailed information on labor and operating costs, for each item or row from the Estimate Display. Cost Sources: The Cost Sources Display contains detailed cost source information for each item or row from the Estimate Display, and allows the user to choose from multiple cost sources. Summary: The Summary Display contains categorized project costs, calculated price and estimated profit for the project. Resources: The Resources Display contains detailed resource information for each item or row from the Estimate Display. General: The General Display contains estimate and customer information and user notes. Open / Create an Estimate Database To create a new Estimate, select Open/Create an Estimate from the File Menu. 2

![If the estimate file does not exist, the following message is displayed: Click [Yes] to create a new Estimate File.](/docs-images/95/125160371/images/5-1.jpg "Creating a New Estimate Each row in the Estimate Display represents an item that will contribute to the total cost of the project.")
5 Browse to the folder where you wish to store your estimates. Open an existing file, or type the name of a new Estimate File you wish to create and click the [Open] button. If the estimate file does not exist, the following message is displayed: Click [Yes] to create a new Estimate File. Creating a New Estimate Each row in the Estimate Display represents an item that will contribute to the total cost of the project. The item may be an assembly, a component part, a manual estimate, a separate project, or summary. 3


6 Any row in the Estimate Display that contains an error will be highlighted in RED. Most Errors that occur in the Cost Estimating Module stem from a lack of data. Note that in the above screen shot, no Cost Source data has been entered in the highlighted rows. If said data is not available 4
7 from Manfact, you will need to research and enter the correct information. In this example the missing data is a routing for a phantom assembly. This would be an example of when you can clear an error. By selecting "Errors" from the Edit menu, there are four options for handling Line Item (row) Errors. View Errors will display a line-by-line list of errors. Selectively Clear Current Line Errors allows the user to select which line errors to clear. Clear All Current Line Errors clears all errors on the current line. Clear All Errors on All Lines clears all errors on all lines. * Remember, if you clear line errors, and do not enter data in the cells in question, you will not be calculating that information in your Estimate. The following columns are displayed: Column Name Description [+] or [-] The estimate is a hierarchical structure displayed in outline form. Click [+] to expand an item and see constituent parts, or [-] to collapse and hide constituent parts. Level Description Type The roll up level of the item. The name or a brief description of the item. Select from the drop-down menu. Each item (row) will be one of the following types: Assembly: Bill of material and routing data may be loaded from the Manfact database. Labor costs may be estimated using routings and/or historical work order data. Part: Vendor quotes and purchasing history may be used to estimate the cost. Manual: the user must enter all values. Summary: A subtotal line. Flat Fee One Time Check for Flat Fee Items. Check for One-Time Items. 5
8 Column Name Part Number Qty Ext Qty Notes Source Source Doc Source Date Source Qty Inc Cost Sub Cost Total Cost Inc Hours Sub Hours Total Hours Material % Labor % Overhead % Description The Part Number is displayed for Assemblies and parts. Where applicable, the user may enter the part number, or it may be updated by the system when a bill of material structure is loaded onto the estimate. The quantity of this item required to produce one unit. The unit quantity of this item multiplied by the quote quantity. (See General Display.) Any applicable notes for each row. The source used to estimate cost for this row. (Routing, Work Order History, Vendor Quote, Purchase Order History, or Manual Estimate.) The identifier of the document used to estimate this row. (Work Order Number, Purchase Order Number, Quote Number, or Routing Identifier.) The date of the Source Document. Source Quantity as of the Source Date. The incremental cost of the row, excluding any costs rolled-up from lower levels of the estimate. The portion of the total cost rolled up from lower levels of the estimate (system calculated). Total estimated cost for the row (item). Incremental Hours of the row, excluding any hours rolled-up from lower levels of the estimate. The portion of the total hours rolled up from lower levels of the estimate (system calculated). Total estimated hours for the item. The total material cost of this row, divided by the total material cost of the estimate. The total labor cost of this row, divided by the total labor cost of the estimate. The total overhead cost of this row, divided by the total overhead cost of the estimate. 6

9 Column Name Other % Material $ Description Any other cost of this row, divided by the total miscellaneous cost of the estimate. Dollar amount for Material Cost of this row. Dollar amount for Labor Cost of this row. Overhead $ Dollar amount for Overhead Cost of this row. Other $ Item Detail This screen displays specific details, including labor and operating costs, for selected items or rows from your Estimate. The upper section displays Descriptive, Source, Quantity, and Cost data for the item. Use the "Scroll Box" to navigate to other line items. 7
10 The following columns are displayed: Column Name Resource Description Rate Description Resource Code or abbreviation. Resource Description. Resource Rate used for calculation. Base Unit Setup Hours Per-unit setup hours for each resource. Base Unit Run Hours Base Unit Setup Cost Base Unit Cost Adj. Unit Setup Hours Adj. Unit Run Hours Per-unit run hours for each resource. Per-unit setup cost for each resource. Total per-unit Cost for each resource, excluding any values rolled-up from lower levels of the estimate. Unit Setup Hours may be adjusted for unforeseen difficulties or to adjust final cost. Unit Run Hours may be adjusted for unforeseen difficulties or to adjust final cost. Adj. Unit Setup Cost Adj. Unit Cost Cost Sources This screen displays detailed cost source information and options for items selected from your estimate. The information shown on the Estimate Display represents the cost source currently selected for the row. You may scroll through a list of available sources and optionally select a different cost source for the item. Use the "Scroll Box" or the "Scroll Arrow" (next to the Part #) to navigate to other line items. Click the "Load Sources" Button to Load Cost Sources from Manfact. (The line directly below displays the last date and time Cost Sources were loaded.) Click "Best Fit" to allow the Cost Estimating Module to automatically select cost sources, based on order quantity and date. Click the checkbox to Freeze Source Selection. 8
![Click the [Recalculate] Button to recalculate Summarized Qty. and Order Qty. (You may edit Minimum Qty. and Order Multiple from this screen.](/docs-images/95/125160371/images/11-0.jpg ") The following columns are displayed: Column Name Use This Don t Use Source Type Source Doc Source Line Item Source Date Source Qty Unit Cost Setup Hours Description Click to select which cost")
11 Click the [Recalculate] Button to recalculate Summarized Qty. and Order Qty. (You may edit Minimum Qty. and Order Multiple from this screen.) The following columns are displayed: Column Name Use This Don t Use Source Type Source Doc Source Line Item Source Date Source Qty Unit Cost Setup Hours Description Click to select which cost source data to use in your Estimate. Click to ignore this data in your Estimate. Displays the source type for the line item. Cost Source Documentation. (Work Order, Purchase Order, or Routing Number). Line number on Cost Source Type (if applicable). The Date of the Cost Source documentation used. Source Quantity as of the Source Date. Per-unit Cost of the item. Hours required for Setup. 9

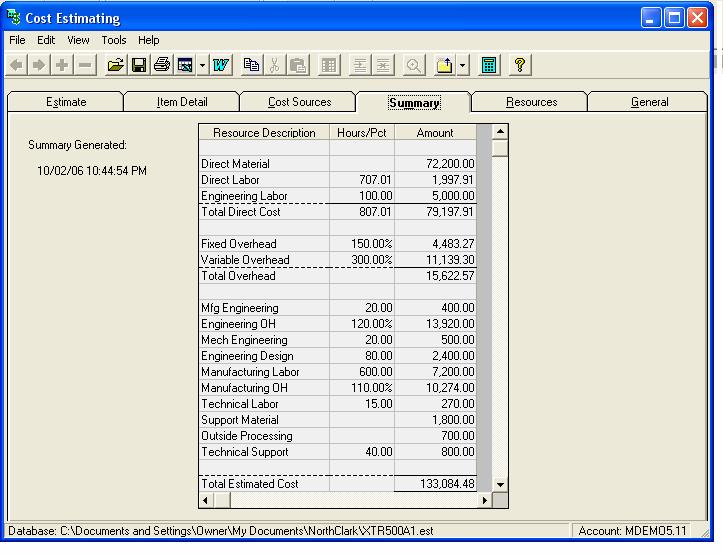
12 Column Name Description Unit Hours Summary After calculating your Estimate, this screen will display summarized Cost Information with user defined sub totals for related Resources. It also displays Total Estimated Cost, Calculated Price, and Estimated Profit for the project. Resources The cost of an item may be broken down into multiple user-defined cost buckets called resources. In the Manfact system, resources may be assigned to Work Centers to categorize labor. In addition to labor, your company defines other types of resources including material, outside processing, fixed overhead, variable overhead, miscellaneous overhead, cost of money, and profit. Scroll down to see definitions of all columns displayed. (Additional columns become visible as the screen is scrolled to the right.) 10
13 The following columns are displayed: Resource Code - Resources are coded by type or process. Type - Select Line Item Type from the pull down menu. Each Item will be one of the following types: Material: Any Material Resource used. Labor: Any Process that requires labor. Fixed Ovhd.: (Fixed Overhead) Resources with fixed overhead or cost. Var. Ovhd.: (Variable Overhead) Resources with variable overhead or cost. Other Ovhd.: (Other Overhead) Any miscellaneous overhead or cost. Outside Proc.: (Outside Process) Any cost incurred via outside services or processes. Other Cost: Any resource that does not fit the above categories. Subtotal: The Summary Display will show a subtotal for any sets of resources between Subtotal rows in this 11
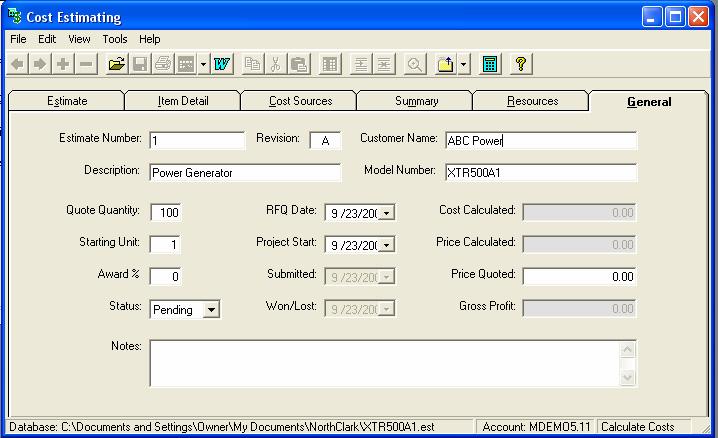
14 Display. Description - A description of Resource Code or Resource Type. Rate - Rate used for calculating Labor or Overhead. Hours or Amt. - For overhead resources, specify whether the calculation is based on labor hours or resource amounts. Complexity Factor - This factor may be used to inflate (or deflate) the estimated labor hours for a specific resource during the cost roll-up process. The hours are simply multiplied by the entry you make in this field. Escalation Rate - This is an inflation rate per year that may be applied to material costs. The following formula applies: Estimate = Q * ((R + 1) ^T) Q = Price Quoted R = Escalation Rate (expressed as a decimal) T = Time in years For example, we have a quote for $100 that is one year old, and we expect to begin production one year from now. So the quote will be two years old by the time we are ready to purchase the material. Assume an escalation rate of 3% per year. Our estimated cost is: 100 * (1.03)² = $106. Profit % - Profit percentage for item or process. Cost of Money % - Enter Cost of Money % or interest rate for resources that tie up capital over time. Base Resources - General This screen displays general information on your estimate, including customer, model, estimate history, project and profit information. Adjust Quote Quantity to calculate for the number of units. 12
15 13
 Enter Estimate Details (see Estimate) o If you have entered an assembly Load Data from Manfact Bill of Materials (see Load Data from Manfact).")
16 Common Cost Estimating Procedure Set Up Resources o Below is a sample copy of what a Resource view might look like. Set Cost Estimating Options (see Options) Enter Estimate Details (see Estimate) o If you have entered an assembly Load Data from Manfact Bill of Materials (see Load Data from Manfact). The following is how the view will look after the Bill of Material has been loaded. o If you have entered a part or exploded an assembly Load Data from Manfact Cost Sources (See Load Data from Manfact) o If you have entered a project Load Data from Manfact Project (see Load Data from Project). o Review the Cost Source information and verify the selection of the source is correct. For Projects select the Project line item on the Estimate page 14
 o Review the Estimate Results.")
17 Double click the Project line item. This will take you to a blank Item Detail view. Click on the Cost Source tab. Click on the [Load Sources] button Select the Project you want to use for the Estimate. o Calculate the Estimate (see Calculate Estimate) o Review the Estimate Results. As required review the Item Detail or Cost Source view. Note, you may show red/pink lines that indicate an error when there really isn t one. This will occur for assemblies coded as XP (Phantom) or Top Level Projects. Once everything appears accurate, check your Summary view to see the total costs and profits of this Estimate. Below is an example of the Summary view after all actions has been completed. 15
18 16

19 If the totals do not seem reasonable go back and review the details of your estimate. The last thing you can do is review the General Display. 17

20 Main Menu Options Following is a brief description of the options available from the Main Menu of the Cost Estimating application. Menu Option Description File Open/Create an Estimate Your cost estimating information is stored in a Microsoft Access Database. Use the Open Dialog screen as illustrated below to locate your file. Note, the file name will default to the last database you opened. Creating a New Database You can create a new database using this screen. Simply type in a new name at the file name prompt, and the system responds: Unable to Locate File. Do You Wish to Create It? 18
21 File File File File Find an Estimate Save Estimate Save Estimate As Revert to Last Save Click [Yes] to create the new database, or [No] to cancel. Locate an existing estimate. (See Find an Estimate). Save Estimate to the File. First save of an Estimate requires you to define the Save As file name and location. This option will restore your Estimate to its condition as of the last time you saved it to disk. File Export Export data from the active spreadsheet. File File File File Print Current Display Export to Excel Export to Word Import a Worksheet See Print in General Section. See Export to Excel in General Section. See Export to Word in General Section. File Exit Close the application See Import a Worksheet in General Section. Edit Copy Copy data to the Windows clipboard. Edit Cut Cut data from the field and copy it to the Windows clipboard. Edit Paste Paste data from the Windows clipboard. Edit Fill Update all of the selected cells from the Windows clipboard. Edit Edit Insert a Row Delete a Row Insert a Row immediately above the row you have your cursor on. Delete the Row you have your cursor on. Edit Indent Row Indent the Row you have your cursor on. Edit Outdent Row Outdent the Row you have your cursor on. Edit Errors See Errors in Estimate Section. View Expand All Expand and show all levels of the estimate. View Collapse All Collapse and show only the top level of the estimate. View Unhide All Expose all columns previously hidden. 19
22 View Columns Auto Fit Columns Automatically adjust the width of each column to accommodate your data. View Zoom View, print and/or edit the expanded contents of a field. View Tools Tools Tools Tools Tools Tools Display Options Calculate Estimate Load Data from Manfact Initialize Resource Table Search for Part in Manfact Search for a Project in Manfact Find an Item in the Estimate Set user preferences affecting the appearance of the screen. See Calculate Estimate See Load Data from Manfact See Initialize Resource Table Tools Find Next See Find Next. Tools View Estimate As Average Unit Cost Tools Options See Options. See Search for a Part in Manfact. See Search for a Part in Manfact. See Find an Item in the Estimate. See View Estimate as Average Unit Cost. Right Click Menu The following tasks can be found on various menu options. Copy - Copy data to the Windows clipboard. Cut - Cut data from the field and copy it to the Windows clipboard. Paste - Paste data from the Windows clipboard. 20
23 Fill - Update all of the selected cells from the Windows clipboard. Cancel - Cancel last action. Undo - Undo last action and return information as it was before the action. Select All - Select all transactions on the view. Sort by Ascending Order Sort by Descending Order Find an Item in an Estimate - Sort transactions in ascending order. - Sort transactions in descending order - See Find an Item in the Estimate. View Item Detail - Takes you to Item Detail View (See Item Detail) View Cost Sources Clear All Errors on All Lines - Takes you to Cost Sources View (See Cost Sources) - Clears all errors on all lines. (See Errors in Estimate section.) Zoom - View, print and/or edit the expanded contents of a field. File Menu Find an Estimate This feature allows you to search for a specific Estimate. When you select Find an Estimate from the File Menu the screen below appears. 21
 to locate the folder in which your file is located. If you skip this step, the system will search the entire Hard Drive.")
24 If you know the File Name and Path of the Estimate you wish to locate you may enter it manually, or Click the Browse Button. Use the Browse Dialog (illustrated below) to locate the folder in which your file is located. If you skip this step, the system will search the entire Hard Drive. (This may take several minutes, depending on the size of the selected Drive.) 22
 to define the parameters by which you wish to locate the Estimate.")
25 Highlight the row with the File Name you wish to work with. Then click [Open Database] Or you may click the Search Criteria Tab (illustrated below) to define the parameters by which you wish to locate the Estimate. If you skip this step, the system will return the entire contents of the selected folder. (matching the selected file extension) 23
 The following Items are available: Estimate Number, Revision, Customer Name, Description, Model Number, Quote Quantity, Starting Unit, Award %, Status, RFQ Date, Project Start, Submitted, Won/Lost,")
26 Select the Item you wish to use for your search. (Use the Scroll Bar to view the full list.) The following Items are available: Estimate Number, Revision, Customer Name, Description, Model Number, Quote Quantity, Starting Unit, Award %, Status, RFQ Date, Project Start, Submitted, Won/Lost, Cost Calculated, Price Calculated, Price Quoted, Gross Profit. Fill in the fields to the right of the selected Item. Contains: Select "Contains", "Starts With", or "Ends With" from the pull down menu. Text: Enter the text, or partial text, for which you wish to search. (In the example above, we are searching for a Customer Name that Contains " ABC (Note: The Contains and Text columns are disabled for any Item that is a date, set quantity, or dollar amount.) From and To: Use these columns to enter a range of values or dates for any Item that is a date, set quantity, or dollar amount. Click the Find Now Button when you have entered your search criteria. Your search results are displayed on the screen below. 24
![Click on any cell to select the database on that row. Use the [Open Database] Button to Open the selected file.](/docs-images/95/125160371/images/27-0.jpg "Tools Menu Calculate Estimate Select this option when you are ready to calculate the estimate. Be sure you have entered or imported data into all required fields.")
27 Click on any cell to select the database on that row. Use the [Open Database] Button to Open the selected file. Tools Menu Calculate Estimate Select this option when you are ready to calculate the estimate. Be sure you have entered or imported data into all required fields. (You may also use this feature to "find" any lines with missing data.) The Cost Estimating Module calculates the estimate in the following manner: Cost Sources for each Item are finalized and multiplied by Qunatity, Extended Quantity, Quantity Ordered, and any Adjusted Costs. Cost Source data is applied to Resources, such as Overhead, and calculated with consideration of Rate, Complexity Factor, Escalation Rate, Profit %, and Cost of Money %. 25
28 Incremental and Sub Costs are Rolled Up to each level. The dollar amounts for each row (Item) are calculated to percentages of over all cost for Material, Labor, Overhead, and Other cost. The Summary is generated, with consideration of all Cost Source data, Resource data, and user defined subtotals. Any lines containing Errors or incomplete data are highlighted. 26

29 Load Data From Manfact This process allows you to begin building or add to your estimate using the information available from Manfact. The following options are available: Load Bill of Material This option is available for any Assembly Item. Use the screen illustrated below to locate the desired Bill of Material. Select file type from which to load this data Production, Engineering (enter ECO Number), or Work Order (enter WO Number). Enter Assembly Number or Search by clicking the Icon to the right. (See Part Number Search) (If desired) Click to Explode Bill of Material Beyond First Level. Set Effective Date. Click [OK]. 27
30 Load Cost SourcesYou may manually enter Cost Source information or select from various Cost Sources stored in Manfact. When you select "Load Data From Manfact" > "Cost Sources" from the Tools Menu, the Cost Estimating Module searches Manfact for all Cost Source Data available for each Item in the estimate. All cost sources found for any given Item will be shown in the Cost Source Display. 28

31 Load ProjectThis option is available for any Project. Use the screen illustrated below to locate the desired Project. Enter the top level Project Number or you may perform a search by using the search icon to the right of the entry field. o If you perform a search below is the first screen that will appear. 29
32 o Once you have updated all of your selection criteria click on the [OK] button and you will be taken to the following screen. o Afterwards you will get the specified records on the Search Results Tab. Initialize Resource Table The following two methods are available to aid in Resource Initialization: Load From Manfact Information for several commonly used resources is available from existing Manfact Work Order Records. The system can load this data into your current estimate. For example: If your company s engineering labor has previously been calculated at the rate, complexity factor, profit %, and cost of money %, you wish to use in the current estimate, you may load these rates from an existing Manfact Work Order Record. (You may still edit any of this data after initializing the resource table.) 30

33 Copy From Estimate Information for commonly used resources may be available from an existing estimate. The system can copy this data into your current estimate. For example: If your company s engineering labor has previously been calculated at the rate, complexity factor, profit %, and cost of money %, you wish to use in the current estimate, you may copy these rates from an existing estimate. (You may still edit any of this data after initializing the resource table.) Use the screen illustrated below to browse for the estimate from which you wish to copy resource information. 31

34 Search for Part in Manfact The Part Number Search query helps you locate a Manfact Part Number using a variety of search criteria and provides you with an Inquiry Only process for users who do not have Parts Master Update authorization. Environment The main screen is composed of eight tabs. The Search and Results tab are the two tabs that will be utilized in locating a part number. The remaining tabs display information that is contained in the Manfact PARTS and Inventory files, organized by departments: Engineering, Planning, Material, Purchasing, Marketing and On Hand. Locating a Part Number When you enter the Part Number Search procedure, the first tab that you will be taken to is the Search tab. If you know the part number that you want to inquire on, you can simply enter the part number, press the Enter key and you will be immediately directed to the Engineering tab. If you don t know the specific part number, but know some basic information about the item, several fields are available to use in narrowing your search. The fields you may use in your search include: Part Number, Description, Vendor Description, Mfg#*Part#, Notes, Vendor #, Product Class, Sub-Class, Part Type, Category, Buyer, Planner, and Make/Buy Code. You may use as many of the search fields as necessary to narrow your search to the fewest number of records. If you don t know the specific details of a particular field, you might use wildcarding to enter only a portion of the item s part number, description, etc. To further assist you in locating the desired part number, you may Sort the search results by either the Manfact Part Number or the Engineering Description. 32
![Search Results After you choose the [Search] command, the results are displayed on Tab 2 Results, Part Number Search.](/docs-images/95/125160371/images/35-0.jpg "One part number and its associated description are displayed on each row of the list. You can Returning to the Search window and using the Sort By option sort change the way the information.")
35 Search Results After you choose the [Search] command, the results are displayed on Tab 2 Results, Part Number Search. One part number and its associated description are displayed on each row of the list. You can Returning to the Search window and using the Sort By option sort change the way the information. For more details on the Part Number Search application see the full documentation. Note: The NCC Part Number Search Query is sold separately. If this option is not currently available, please contact your System Administrator or to obtain a copy of NCC_PARTSQ. 33
36 Search for Project in Manfact If you perform a search below is the first screen that will appear. Once you have updated all of your selection criteria click on the [OK] button and you will be taken to the following screen. 34

37 Afterwards you will get the specified records on the Search Results Tab. Find an Item in the Estimate/Find Next You may search your Estimate for a specific item, or specific information. You may search for this data again by selecting Find Next. 35

38 Select the field you wish to search from the pull down menu. Enter the text for which you wish to search. Select to match Case or Whole Field Only. (You may leave both unselected to just jump to the next place the text occurs.) View Estimate as Average Unit Cost The view of an Estimate provides the user with a display that is identical but has been divided by the Estimate quantity. Below is an example of the Average Unit Cost view. 36

39 Compared o the original Estimate page. 37

40 Options You may customize your estimate as per the options displayed below: 38

41 Apply Overhead from work center: Overhead will be calculated automatically and included in the estimate. The calculation may be based on work center rates and/or overhead pools assigned to the estimate. Re-analyze Cost Sources for Best Fit: The system can select a Cost Source for each item based on the "best fit", taking into account the order quantity and the date of the Cost Source. Roll Up Labor Rates: Use Work Center Rates or Resource Rates: In the Manfact system, resources may be assigned to Work Centers to categorize labor, or you may modify Resource Rates from the Resources Display. Oldest Valid Vendor Quote, Purchase Order, and Work Order: Use the arrows to select age limits for Cost Source documentation. Maximum Number of Cost Sources: Use the arrows to limit total number of Cost Sources used. Purchase Parts Best Fit Per: Quantity on Hand or P.O., Vendor Quote: When selecting the "best fit" cost source for a part, the system can include Quantity on hand for any item, and increase to the Minimum Order Qty, rounded to the nearest Order Multiple for the part. You may alternately select to use Only a P.O. / Vendor Quote for your estimate. Reset Min/Mult. Quantity: Minimum Quantity and Order Multiple may be adjusted from the Cost Sources Display. Check this box to reset. Decimal Places: Select decimal places for summarized amounts. 39

42 General Information Printing a Spreadsheet Below is a sample of the screen that will appear when you select the Print option. This will print the current active spreadsheet, so be sure to click on the spreadsheet you wish to print before choosing the Print option. Range - Selecting a Print Range You may choose to print the entire spreadsheet (all), selected cells (those that you have highlighted on the current screen), the current page (only the rows that are currently visible on your screen), or a range of page numbers. Orientation - Portrait or Landscape You may print your report in portrait mode (normal) or landscape mode (sideways). Printing in landscape mode will allow you to fit more columns of information on your report. Margins - Report Margins You can make your report more attractive by setting the top, bottom, left, and right margins. Reduce the left and right margins if you need to fit more columns on the report. Units - Inches or Centimeters? Are the margins you entered expressed in inches or centimeters? Page Order 40
 column headers, row headers, grid lines, borders, shadow, and color.")
43 If your report is too wide, it may span multiple pages. When this occurs, do you want the report printed from top to bottom or left to right? What Do You Want to Print? You can customize the appearance of your report by printing (or not printing) column headers, row headers, grid lines, borders, shadow, and color. Headers and Footers Your report may have up to three lines for the heading, and one line for the footer. The system initially displays a default heading, which you may modify if desired. Tip: Use /p to designate a page number. Which Columns Do You Want to Print? The columns that are available for printing are listed. Select the columns you wish to include on your report. Importing Data from Excel This screen below is displayed when you choose the option to Import data from a Microsoft Excel spreadsheet, a tab-delimited text file, or a comma-separated text file. The data will be imported to the current active spreadsheet, so be sure to click on the desired spreadsheet before choosing this option. Import File Name Enter the path for the file that you wish to import. You may browse the files by clicking on the button next to the text box. 41

44 Header Rows Enter the number of rows at the beginning of the file that are not to be imported Import File Type Select the type of file that you are importing Data Mapping Enter the Column Number or Letter where data resides on the Excel file. You may revert to the original selections by clicking on the [Reset] button. Import Data Click OK to begin the import procedure. Exporting a Spreadsheet to Excel Below is a sample of the screen that will appear when you select the Export to Excel option. This will export the current active spreadsheet, so be sure to click on the spreadsheet you wish to print before choosing the Export option. Save As File Name Enter the pathname of the file you wish to create. You may Browse the files by clicking the button to locate the drive and folder where the file will be stored. Sheet Name Enter the Excel sheet name to create. This will automatically default to Sheet1. Export to Excel or to a File? 42

45 You may export the contents of the display directly to Excel, or you may choose to create a file in Excel format. Create a Log File? Select this option to create a log file. The log file contains error messages and other information about how your Excel file was created. The name of the log file is "CreateExcelFile.log", and it will be stored in the same folder as your spreadsheet. Data Mapping You may move data to alternate columns by changing the column number or letter. You may also remove a column by removing the row that contains the column information you do not wish to export. You may reset back to the original column by clicking the [Reset] button. Export Button After all required information has been entered click the [Export] button to export your data to Microsoft Excel. Exporting to Word This screen is displayed when you choose the option to export data to Microsoft Word. *You must specify a template, filename, and pathname prior to creating your Word Document. Use a Word Template You may browse for a Microsoft Word Template to use for your Estimate. Create Word Document After all required information has been entered, click this button to export you data to Microsoft Word. View Word Field Codes Click here to view or edit Word Field Codes to be used in your Estimate Document. 43
46 Editing Features Copy, Cut, Paste and Fill You may use the standard Windows Copy, Cut, and Paste features to copy data to the Windows clipboard, or to paste data from the clipboard into a cell. To copy data, hold down the left mouse button and highlight one or more cells, then choose Copy. There are multiple ways to enter this command: 1. From the Edit menu choose Copy. 2. Click the Right Mouse button, and then choose Copy from the pop-up menu. 3. Click the corresponding icon on the toolbar. 4. Hold down the Ctrl key and type the letter C (Ctrl-C). You can use the Cut command (Ctrl-X) and the Paste command (Ctrl-V) in similar fashion. To copy the contents of an entire row, click once on the row header (the number displayed on the left side of the first cell), and then choose Copy. Now click on the row header that you want to copy the data to and choose Paste. If you want to update several cells with the same value, highlight all of the cells you wish to update then choose Fill Cells. This command will update each cell with the current information from the clipboard. Zoom This feature allows you to view, print and/or edit the expanded contents of a field. It is especially useful for multi-line information such as notes and long descriptions. You may "Zoom in" on any selected item by selecting Zoom from the Edit Menu, clicking the magnifying glass on the toolbar, or selecting Zoom from the right click menu. The Column Name will appear in the Title Bar with "Edit" or "View". You may edit the field when it is allowed. Click "OK" when finished, or "Cancel" to revert to the original data. To print the selected item, click on the printer icon and the information will be sent to your local printer. Locked fields may be viewed but not modified using the Zoom Feature. If the field is locked, "View" will appear in the Title Bar, and there will only be a single command button labeled "Done". Customizing Your Display / Arranging Columns Use the Customize Display Screen to make the following changes: Each tab contains a list of fields that corresponds to a screen used in this application. Use the checkboxes to show or hide each field. Select the color to use for highlighting Summary Rows. Select the color to use for highlighting Rows that have errors. You may opt for the system to Remember Screen Size and Column Widths. Any changes you make to the screen's appearance will be saved and applied the next time you launch this application. 44

47 Indent Description by Level. Checking this box will allow you to view the estimate as indented structure. This may make it easier for you to follow the flow of the estimate. Click "OK" to apply any changes you have made or "Cancel" to revert to the previous settings. Note, these settings are stored in the Windows Registry for each user. Wildcarding Wildcarding is a powerful feature that allows you to search using a portion of the field. You tell the system you want to use a wildcard by typing three periods or an asterisk * at the beginning or end of your search entry. Here are some examples of wildcard commands and their expected results: Part Number: XTR (or XTR*) Description: VALVE (or *VALVE*) Returns part numbers that begin with XTR Returns parts with the word VALVE anywhere in the description. Category: A (or *A) Returns parts with a category ending with the letter A. 45
NorthClark Computing, Inc. MRP Planned Order Release User Guide
 ERP Consulting Web Development Custom Programming Solutions Desktop & Web Applications for Manfact NorthClark Computing, Inc. MRP Planned Order Release User Guide Web and Desktop Applications for Manfact
TABLE OF CONTENTS. TECHNICAL SUPPORT APPENDIX Appendix A Formulas And Cell Links Appendix B Version 1.1 Formula Revisions...
 SPARC S INSTRUCTIONS For Version 1.1 UNITED STATES DEPARTMENT OF AGRICULTURE Forest Service By Todd Rivas December 29, 1999 TABLE OF CONTENTS WHAT IS SPARC S?... 1 Definition And History... 1 Features...
Using Microsoft Excel
 Using Microsoft Excel Table of Contents The Excel Window... 2 The Formula Bar... 3 Workbook View Buttons... 3 Moving in a Spreadsheet... 3 Entering Data... 3 Creating and Renaming Worksheets... 4 Opening
Service Minder Plus Features/Helpful Hints
 Service Minder Plus Features/Helpful Hints This manual covers helpful hints and use of features. Note: These items will be addressed during the training sessions. This document is meant to be used as an
Objective 1: Familiarize yourself with basic database terms and definitions. Objective 2: Familiarize yourself with the Access environment.
 Beginning Access 2007 Objective 1: Familiarize yourself with basic database terms and definitions. What is a Database? A Database is simply defined as a collection of related groups of information. Things
Excel Select a template category in the Office.com Templates section. 5. Click the Download button.
 Microsoft QUICK Excel 2010 Source Getting Started The Excel Window u v w z Creating a New Blank Workbook 2. Select New in the left pane. 3. Select the Blank workbook template in the Available Templates
Rev. B 12/16/2015 Downers Grove Public Library Page 1 of 40
 Objectives... 3 Introduction... 3 Excel Ribbon Components... 3 File Tab... 4 Quick Access Toolbar... 5 Excel Worksheet Components... 8 Navigating Through a Worksheet... 9 Downloading Templates... 9 Using
Welcome to Cole On-line Help system!
 Welcome to Cole On-line Help system! Cole Online is an Internet based information directory that allows fast and efficient access to demographic information about residences and businesses. You can search
EXCEL BASICS: MICROSOFT OFFICE 2007
 EXCEL BASICS: MICROSOFT OFFICE 2007 GETTING STARTED PAGE 02 Prerequisites What You Will Learn USING MICROSOFT EXCEL PAGE 03 Opening Microsoft Excel Microsoft Excel Features Keyboard Review Pointer Shapes
Working with Charts Stratum.Viewer 6
 Working with Charts Stratum.Viewer 6 Getting Started Tasks Additional Information Access to Charts Introduction to Charts Overview of Chart Types Quick Start - Adding a Chart to a View Create a Chart with
Introductory Excel Walpole Public Schools. Professional Development Day March 6, 2012
 Introductory Excel 2010 Walpole Public Schools Professional Development Day March 6, 2012 By: Jessica Midwood Agenda: What is Excel? How is Excel 2010 different from Excel 2007? Basic functions of Excel
Tips & Tricks: MS Excel
 Tips & Tricks: MS Excel 080501.2319 Table of Contents Navigation and References... 3 Layout... 3 Working with Numbers... 5 Power Features... 7 From ACS to Excel and Back... 8 Teacher Notes: Test examples
Excel 2007 New Features Table of Contents
 Table of Contents Excel 2007 New Interface... 1 Quick Access Toolbar... 1 Minimizing the Ribbon... 1 The Office Button... 2 Format as Table Filters and Sorting... 2 Table Tools... 4 Filtering Data... 4
SmartView. User Guide - Analysis. Version 2.0
 SmartView User Guide - Analysis Version 2.0 Table of Contents Page i Table of Contents Table Of Contents I Introduction 1 Dashboard Layouts 2 Dashboard Mode 2 Story Mode 3 Dashboard Controls 4 Dashboards
Section 1 Microsoft Excel Overview
 Course Topics: I. MS Excel Overview II. Review of Pasting and Editing Formulas III. Formatting Worksheets and Cells IV. Creating Templates V. Moving and Navigating Worksheets VI. Protecting Sheets VII.
Advanced Excel. Click Computer if required, then click Browse.
 Advanced Excel 1. Using the Application 1.1. Working with spreadsheets 1.1.1 Open a spreadsheet application. Click the Start button. Select All Programs. Click Microsoft Excel 2013. 1.1.1 Close a spreadsheet
Word 2016 Advanced. North American Edition SAMPLE
 Word 2016 Advanced Word 2016 Advanced North American Edition WORD 2016 ADVANCED Page 2 2015 Cheltenham Group Pty. Ltd. All trademarks acknowledged. E&OE. No part of this document may be copied without
Rev. C 11/09/2010 Downers Grove Public Library Page 1 of 41
 Table of Contents Objectives... 3 Introduction... 3 Excel Ribbon Components... 3 Office Button... 4 Quick Access Toolbar... 5 Excel Worksheet Components... 8 Navigating Through a Worksheet... 8 Making
Kenora Public Library. Computer Training. Introduction to Excel
 Kenora Public Library Computer Training Introduction to Excel Page 2 Introduction: Spreadsheet programs allow users to develop a number of documents that can be used to store data, perform calculations,
Microsoft How to Series
 Microsoft How to Series Getting Started with EXCEL 2007 A B C D E F Tabs Introduction to the Excel 2007 Interface The Excel 2007 Interface is comprised of several elements, with four main parts: Office
Microsoft Excel 2010 Part 2: Intermediate Excel
 CALIFORNIA STATE UNIVERSITY, LOS ANGELES INFORMATION TECHNOLOGY SERVICES Microsoft Excel 2010 Part 2: Intermediate Excel Spring 2014, Version 1.0 Table of Contents Introduction...3 Working with Rows and
How to Import Part Numbers to Proman
 How to Import Part Numbers to Proman This is a brief document that outlines how to take an Excel spreadsheet and either load new parts numbers into Proman or update data on existing part numbers. Before
Office of Instructional Technology
 Office of Instructional Technology Microsoft Excel 2016 Contact Information: 718-254-8565 ITEC@citytech.cuny.edu Contents Introduction to Excel 2016... 3 Opening Excel 2016... 3 Office 2016 Ribbon... 3
Excel Tutorial 1
 IT٢.we Excel 2003 - Tutorial 1 Spreadsheet Basics Screen Layout Title bar Menu bar Standard Toolbar Other Tools Task Pane Adding and Renaming Worksheets Modifying Worksheets Moving Through Cells Adding
NorthClark Computing, Inc. Sales Forecasting Administrator s Guide
 ERP Consulting Web Development Custom Programming Solutions Desktop & Web Applications for Manfact NorthClark Computing, Inc. Sales Forecasting Administrator s Guide Web and Desktop Applications for Manfact
Contents. Launching Word
 Using Microsoft Office 2007 Introduction to Word Handout INFORMATION TECHNOLOGY SERVICES California State University, Los Angeles Version 1.0 Winter 2009 Contents Launching Word 2007... 3 Working with
1. Managing Information in Table
 1. Managing Information in Table Spreadsheets are great for making lists (such as phone lists, client lists). The researchers discovered that not only was list management the number one spreadsheet activity,
THE EXCEL ENVIRONMENT... 1 EDITING...
 Excel Essentials TABLE OF CONTENTS THE EXCEL ENVIRONMENT... 1 EDITING... 1 INSERTING A COLUMN... 1 DELETING A COLUMN... 1 INSERTING A ROW... DELETING A ROW... MOUSE POINTER SHAPES... USING AUTO-FILL...
Working with Data in Microsoft Excel 2010
 Working with Data in Microsoft Excel 2010 This document provides instructions for using the sorting and filtering features in Microsoft Excel, as well as working with multiple worksheets in the same workbook
User Guide. Web Intelligence Rich Client. Business Objects 4.1
 User Guide Web Intelligence Rich Client Business Objects 4.1 2 P a g e Web Intelligence 4.1 User Guide Web Intelligence 4.1 User Guide Contents Getting Started in Web Intelligence 4.1... 5 Log into EDDIE...
EXCEL BASICS: MICROSOFT OFFICE 2010
 EXCEL BASICS: MICROSOFT OFFICE 2010 GETTING STARTED PAGE 02 Prerequisites What You Will Learn USING MICROSOFT EXCEL PAGE 03 Opening Microsoft Excel Microsoft Excel Features Keyboard Review Pointer Shapes
Generating a Custom Bill of Materials
 Generating a Custom Bill of Materials Old Content - visit altium.com/documentation Modified by on 6-Nov-2013 This tutorial describes how to use the Report Manager to set up a Bill of Materials (BOM) report.
NuFlo TM. SCM Viewer TM. User Manual. Manual No , Rev. A
 NuFlo TM SCM Viewer TM User Manual Manual No. 30165020, Rev. A Revision History The following table shows the revision history for this document: Date Description Approved by 2-6-2006 Initial release of
Troubleshooting in Microsoft Excel 2002
 Page 1 of 8 Troubleshooting in Microsoft Excel 2002 Result: To understand how to work with the Excel software to enter data, navigate the page, and print materials. Tabs Look at the tabs at the bottom
Excel 2010 Level 1: The Excel Environment
 Excel 2010 Level 1: The Excel Environment Table of Contents The Excel 2010 Environment... 1 The Excel Window... 1 File Tab... 1 The Quick Access Toolbar... 4 Access the Customize the Quick Access Toolbar
Microsoft Excel 2010 Tutorial
 1 Microsoft Excel 2010 Tutorial Excel is a spreadsheet program in the Microsoft Office system. You can use Excel to create and format workbooks (a collection of spreadsheets) in order to analyze data and
NorthClark Computing, Inc. Quality Control and Supplier Corrective Action Requests User Guide
 ERP Consulting Web Development Custom Programming Solutions Desktop & Web Applications for Manfact Quality Control and Supplier Corrective Action Requests User Guide Web and Desktop Applications for Manfact
ACCT 133 Excel Schmidt Excel 2007 to 2010 Conversion
 ACCT 133 Excel Schmidt Excel 2007 to 2010 Conversion Note: Use this handout in connection with the handout on the parts of the Excel 2010 worksheet. This will allow you to look at the various portions
MICROSOFT OFFICE. Courseware: Exam: Sample Only EXCEL 2016 CORE. Certification Guide
 MICROSOFT OFFICE Courseware: 3263 2 Exam: 77 727 EXCEL 2016 CORE Certification Guide Microsoft Office Specialist 2016 Series Microsoft Excel 2016 Core Certification Guide Lesson 1: Introducing Excel Lesson
ECDL Module 4 REFERENCE MANUAL
 ECDL Module 4 REFERENCE MANUAL Spreadsheets Microsoft Excel XP Edition for ECDL Syllabus Four PAGE 2 - ECDL MODULE 4 (USING MICROSOFT EXCEL XP) - MANUAL 4.1 USING THE APPLICATION... 4 4.1.1 FIRST STEPS
Business Process Procedures
 Business Process Procedures 14.40 MICROSOFT EXCEL TIPS Overview These procedures document some helpful hints and tricks while using Microsoft Excel. Key Points This document will explore the following:
Microsoft Excel XP. Intermediate
 Microsoft Excel XP Intermediate Jonathan Thomas March 2006 Contents Lesson 1: Headers and Footers...1 Lesson 2: Inserting, Viewing and Deleting Cell Comments...2 Options...2 Lesson 3: Printing Comments...3
Excel Level 1
 Excel 2016 - Level 1 Tell Me Assistant The Tell Me Assistant, which is new to all Office 2016 applications, allows users to search words, or phrases, about what they want to do in Excel. The Tell Me Assistant
MS Excel Henrico County Public Library. I. Tour of the Excel Window
 MS Excel 2013 I. Tour of the Excel Window Start Excel by double-clicking on the Excel icon on the desktop. Excel may also be opened by clicking on the Start button>all Programs>Microsoft Office>Excel.
Data Should Not be a Four Letter Word Microsoft Excel QUICK TOUR
 Toolbar Tour AutoSum + more functions Chart Wizard Currency, Percent, Comma Style Increase-Decrease Decimal Name Box Chart Wizard QUICK TOUR Name Box AutoSum Numeric Style Chart Wizard Formula Bar Active
Océ Engineering Exec. Electronic Job Ticket
 Océ Engineering Exec Electronic Job Ticket Océ-Technologies B.V. Copyright 2004, Océ-Technologies B.V. Venlo, The Netherlands All rights reserved. No part of this work may be reproduced, copied, adapted,
Estimating Tips and Tricks
 Session 5 8 Estimating Tips and Tricks Presented By: Gary Simpson G L Simpson & Associates LLC Session Overview After completing this class, you will have a better understanding of the power of the Estimating
DataMaster for Windows
 DataMaster for Windows Version 3.0 April 2004 Mid America Computer Corp. 111 Admiral Drive Blair, NE 68008-0700 (402) 426-6222 Copyright 2003-2004 Mid America Computer Corp. All rights reserved. Table
Table of Contents. 1. Creating a Microsoft Excel Workbook...1 EVALUATION COPY
 Table of Contents Table of Contents 1. Creating a Microsoft Excel Workbook...1 Starting Microsoft Excel...1 Creating a Workbook...2 Saving a Workbook...3 The Status Bar...5 Adding and Deleting Worksheets...6
Item Number Change for Sage Accpac ERP
 SAGE ACCPAC Sage Accpac Options Item Number Change for Sage Accpac ERP User Guide 2008 Sage Software, Inc. All rights reserved. Sage Software, Sage Software logos, and all Sage Accpac product and service
Spreadsheet definition: Starting a New Excel Worksheet: Navigating Through an Excel Worksheet
 Copyright 1 99 Spreadsheet definition: A spreadsheet stores and manipulates data that lends itself to being stored in a table type format (e.g. Accounts, Science Experiments, Mathematical Trends, Statistics,
MS Excel Henrico County Public Library. I. Tour of the Excel Window
 MS Excel 2013 I. Tour of the Excel Window Start Excel by double-clicking on the Excel icon on the desktop. Excel may also be opened by clicking on the Start button>all Programs>Microsoft Office>Excel.
Advisor Workstation Training Manual: Working in the Research Module
 Advisor Workstation Training Manual: Working in the Research Module Overview of the Research module - - - - - - - - - - - - - - - - 1 What you will learn in this section - - - - - - - - - - - - - - - -
Getting Started With Estimating Extended
 Getting Started With Estimating Extended NOTICE This document and the Sage Timberline Office software may be used only in accordance with the accompanying Sage Timberline End User License Agreement. You
Technical White Paper
 Technical White Paper Via Excel (VXL) Item Templates This technical white paper is designed for Spitfire Project Management System users. In this paper, you will learn how to create Via Excel Item Templates
Microsoft Project 2007 Level 2. MICROSOFT PROJECT 2007 Level 2
 Contents MICROSOFT PROJECT 2007 Level 2 Contents CONTENTS LESSON 1 - ORGANISING PROJECT DATA... 4 Using the AutoFilter Feature... 5 Filtering Data... 5 Sorting a View... 6 Creating a Custom Sort... 6 Grouping
Introduction to Microsoft Excel 2007
 Introduction to Microsoft Excel 2007 Microsoft Excel is a very powerful tool for you to use for numeric computations and analysis. Excel can also function as a simple database but that is another class.
Links to Activities ACTIVITY 1.1. Links to Activities Links to Activities
 EXCEL Analyzing Data Using Excel Section 1 Skills Start Excel and identify features in the Excel window Enter labels and values Use the fill handle to enter a series Enter formulas Create a formula using
Excel 2013 for Beginners
 Excel 2013 for Beginners Class Objective: This class will familiarize you with the basics of using Microsoft Excel. Class Outline: Introduction to Microsoft Excel 2013... 1 Microsoft Excel...2-3 Getting
Lehigh University Library & Technology Services
 Lehigh University Library & Technology Services Start Word Open a file called day2 Microsoft WORD 2003 Day 2 Click the Open button on the Standard Toolbar Go to the A: drive and highlight day2 and click
Word - Basics. Course Description. Getting Started. Objectives. Editing a Document. Proofing a Document. Formatting Characters. Formatting Paragraphs
 Course Description Word - Basics Word is a powerful word processing software package that will increase the productivity of any individual or corporation. It is ranked as one of the best word processors.
Learning Worksheet Fundamentals
 1.1 LESSON 1 Learning Worksheet Fundamentals After completing this lesson, you will be able to: Create a workbook. Create a workbook from a template. Understand Microsoft Excel window elements. Select
Sage Estimating (SQL) v17.12
 v17.12") Sage Estimating (SQL) v17.12 Getting Started Guide October 2017 This is a publication of Sage Software, Inc. 2017 The Sage Group plc or its licensors. All rights reserved. Sage, Sage logos, and Sage product
Sage Estimating (SQL) v17.12 Getting Started Guide October 2017 This is a publication of Sage Software, Inc. 2017 The Sage Group plc or its licensors. All rights reserved. Sage, Sage logos, and Sage product
Creating an Excel resource
 Excel Mobile Excel Mobile is a Microsoft application similar to Excel, but designed to run on handhelds. This mobile version of Excel is a spreadsheet application that allows you to manipulate numbers,
PracticeMaster Report Writer Guide
 Copyright 2014-2015 Software Technology, Inc. 1621 Cushman Drive Lincoln, NE 68512 (402) 423-1440 Tabs3.com Tabs3, PracticeMaster, and the "pinwheel" symbol ( ) are registered trademarks of Software Technology,
ENTERING DATA & FORMULAS...
 Overview NOTESOVERVIEW... 2 VIEW THE PROJECT... 5 NAVIGATING... 6 TERMS... 6 USING KEYBOARD VS MOUSE... 7 The File Tab... 7 The Quick-Access Toolbar... 8 Ribbon and Commands... 9 Contextual Tabs... 10
Basic Microsoft Excel 2007
 Basic Microsoft Excel 2007 Contents Starting Excel... 2 Excel Window Properties... 2 The Ribbon... 3 Tabs... 3 Contextual Tabs... 3 Dialog Box Launchers... 4 Galleries... 5 Minimizing the Ribbon... 5 The
Introduction to Microsoft Excel 2010
 Introduction to Microsoft Excel 2010 THE BASICS PAGE 02! What is Microsoft Excel?! Important Microsoft Excel Terms! Opening Microsoft Excel 2010! The Title Bar! Page View, Zoom, and Sheets MENUS...PAGE
Spreadsheets Microsoft Office Button Ribbon
 Getting started with Excel 2007 you will notice that there are many similar features to previous versions. You will also notice that there are many new features that you ll be able to utilize. There are
Quick Reference Summary
 Microsoft Excel 2010 Quick Reference Summary Microsoft Excel 2010 Quick Reference Summary 3-D Chart, Rotate EX 462 3-D Rotation button (Chart Tools Layout tab Background, change rotation (Format Chart
Océ Engineering Exec. Advanced Import and Index
 Océ Engineering Exec Advanced Import and Index Océ-Technologies B.V. Copyright 2004, Océ-Technologies B.V. Venlo, The Netherlands All rights reserved. No part of this work may be reproduced, copied, adapted,
DATA WAREHOUSE BASICS
 DATA WAREHOUSE BASICS A Software Overview using the Retail Golf Model with version 9 NOTE: This course material was developed using Hummingbird version 9 with Windows XP. There will be navigational differences
Introduction to Microsoft Excel 2010
 Introduction to Microsoft Excel 2010 This class is designed to cover the following basics: What you can do with Excel Excel Ribbon Moving and selecting cells Formatting cells Adding Worksheets, Rows and
Guide to User Interface 4.3
 Datatel Colleague Guide to User Interface 4.3 Release 18 June 24, 2011 For corrections and clarifications to this manual, see AnswerNet page 1926.37. Guide to User Interface 4.3 All Rights Reserved The
Introduction to Microsoft Office 2016: Word
 Introduction to Microsoft Office 2016: Word Last Updated: September 2018 Cost: $2.00 Microsoft Word is a word processing software. You can use it to type letters, reports, and other documents. This class
Skills Exam Objective Objective Number
 Overview 1 LESSON SKILL MATRIX Skills Exam Objective Objective Number Starting Excel Create a workbook. 1.1.1 Working in the Excel Window Customize the Quick Access Toolbar. 1.4.3 Changing Workbook and
Using Open Workbench Version 1.1
 Version 1.1 Second Edition Title and Publication Number Title: Edition: Second Edition Printed: May 4, 2005 Copyright Copyright 1998-2005 Niku Corporation and third parties. All rights reserved. Trademarks
Microsoft Excel 2010 Basic
 Microsoft Excel 2010 Basic Introduction to MS Excel 2010 Microsoft Excel 2010 is a spreadsheet software in the new Microsoft 2010 Office Suite. Excel allows you to store, manipulate and analyze data in
Oracle General Navigation Overview
 Oracle 11.5.9 General Navigation Overview 1 Logging On to Oracle Applications You may access Oracle, by logging onto the ATC Applications Login System Status page located at www.atc.caltech.edu/support/index.php
SURVEYOR/400. Users Guide. Copyright , LINOMA SOFTWARE LINOMA SOFTWARE is a division of LINOMA GROUP, Inc.
 SURVEYOR/400 Users Guide Copyright 1996-2013, LINOMA SOFTWARE LINOMA SOFTWARE is a division of LINOMA GROUP, Inc. Surveyor/400 version: 4.0.0 Publication date: August 7 th, 2013 Table of Contents SURVEYOR/400
Lecture- 5. Introduction to Microsoft Excel
 Lecture- 5 Introduction to Microsoft Excel The Microsoft Excel Window Microsoft Excel is an electronic spreadsheet. You can use it to organize your data into rows and columns. You can also use it to perform
EVALUATION COPY. Unauthorized Reproduction or Distribution Prohibited
 INTRODUCTION TO MICROSOFT EXCEL 2016 Introduction to Microsoft Excel 2016 (EXC2016.1 version 1.0.1) Copyright Information Copyright 2016 Webucator. All rights reserved. The Authors Dave Dunn Dave Dunn
CHAPTER 4: MICROSOFT OFFICE: EXCEL 2010
 CHAPTER 4: MICROSOFT OFFICE: EXCEL 2010 Quick Summary A workbook an Excel document that stores data contains one or more pages called a worksheet. A worksheet or spreadsheet is stored in a workbook, and
COURSE CONTENT EXCEL BASIC ONE DAY
 COURSE CONTENT EXCEL BASIC ONE DAY SOME OF THE BENEFITS OF USING A SPREADSHEET STARTING EXCEL GETTING YOURSELF ORIENTATED WITH THE EXCEL SCREEN THE OFFICE BUTTON/FILE TAB THE TITLE BAR THE RIBBONS GROUPS
Microsoft Excel 2010 Basics
 Microsoft Excel 2010 Basics Starting Word 2010 with XP: Click the Start Button, All Programs, Microsoft Office, Microsoft Excel 2010 Starting Word 2010 with 07: Click the Microsoft Office Button with the
Learn more about Pages, Keynote & Numbers
 Learn more about Pages, Keynote & Numbers HCPS Instructional Technology May 2012 Adapted from Apple Help Guides CHAPTER ONE: PAGES Part 1: Get to Know Pages Opening and Creating Documents Opening a Pages
Introducing Gupta Report Builder
 Business Reporting Chapter 1 Introducing Gupta Report Builder You can use Report Builder to design reports. This chapter describes: Our approach to building reports. Some of the reports you can build.
Query Studio Training Guide Cognos 8 February 2010 DRAFT. Arkansas Public School Computer Network 101 East Capitol, Suite 101 Little Rock, AR 72201
 Query Studio Training Guide Cognos 8 February 2010 DRAFT Arkansas Public School Computer Network 101 East Capitol, Suite 101 Little Rock, AR 72201 2 Table of Contents Accessing Cognos Query Studio... 5
Frequency tables Create a new Frequency Table
 Frequency tables Create a new Frequency Table Contents FREQUENCY TABLES CREATE A NEW FREQUENCY TABLE... 1 Results Table... 2 Calculate Descriptive Statistics for Frequency Tables... 6 Transfer Results
Ms excel. The Microsoft Office Button. The Quick Access Toolbar
 Ms excel MS Excel is electronic spreadsheet software. In This software we can do any type of Calculation & inserting any table, data and making chart and graphs etc. the File of excel is called workbook.
Supplier SAP SNC User Guide
 Supplier SAP SNC User Guide Version 1.0 July 29, 2014 AGCO Corporation Page 1 1 Introduction AGCO has chosen SAP Supplier Network Collaboration (SNC) to improve visibility and capability in North America
Creating Reports in Access 2007 Table of Contents GUIDE TO DESIGNING REPORTS... 3 DECIDE HOW TO LAY OUT YOUR REPORT... 3 MAKE A SKETCH OF YOUR
 Creating Reports in Access 2007 Table of Contents GUIDE TO DESIGNING REPORTS... 3 DECIDE HOW TO LAY OUT YOUR REPORT... 3 MAKE A SKETCH OF YOUR REPORT... 3 DECIDE WHICH DATA TO PUT IN EACH REPORT SECTION...
Sage Getting Started Guide. September 2017
 Sage 100 2018 Getting Started Guide September 2017 2017 The Sage Group plc or its licensors. All rights reserved. Sage, Sage logos, and Sage product and service names mentioned herein are the trademarks
Shopper Guide v.3: 3/23/16
 Shopper Guide v.3: 3/23/16 SMARTOCI: ADMINISTRATOR Table of Contents 1) Getting Started...4 What is smartoci?...4 Shopper Browser Versions...5 Logging in...6 Issues Logging In (smartoci Access Issues)...6
Veco User Guides. Grids, Views, and Grid Reports
 Veco User Guides Grids, Views, and Grid Reports Introduction A Grid is defined as being a list of data records presented to the user. A grid is shown generally when an option is selected from the Tree
Microsoft Excel 2010 Linking Worksheets & Workbooks
 Microsoft Excel 2010 Linking Worksheets & Workbooks Email: training@health.ufl.edu Web Page: http://training.health.ufl.edu Microsoft Excel 2010: Linking Worksheets & Workbooks 1.5 hour Topics include
Section 2 Customisation and Printing
 Level 6 Spreadsheet 6N4089 Section 2 Customisation and Printing Contents 1. Customise Toolbars and Create Custom Menus... 2 Recognise the Features Available on Toolbars... 2 Display or Hide the Ribbon...
Making EXCEL Work for YOU!
 Tracking and analyzing numerical data is a large component of the daily activity in today s workplace. Microsoft Excel 2003 is a popular choice among individuals and companies for organizing, analyzing,
Microsoft Office. Microsoft Office
 is an office suite of interrelated desktop applications, servers and services for the Microsoft Windows. It is a horizontal market software that is used in a wide range of industries. was introduced by
2/10/2003 Version 1.1
 Entities...82 Print a List of Entity Records...84 Locate an Entity Record...85 Inquire into an Entity Record...88 Projects...95 Print a List of Project Records...97 Locate a Project Record...98 Inquire