VisualPST 2.4. Visual object report editor for PowerSchool. Copyright Park Bench Software, LLC All Rights Reserved
|
|
|
- Gordon Fox
- 5 years ago
- Views:
Transcription


1 VisualPST 2.4 Visual object report editor for PowerSchool Copyright Park Bench Software, LLC All Rights Reserved This software is not free - if you use it, you must pay for it. There is a yearly license cost to be allowed to continue using the program. Purchasing details at: Disclaimer This software is provided as is and any express or implied warranties, including, but not limited to, the implied warranties of merchantability and fitness for a particular purpose are disclaimed. In no event shall anyone (specifically Park Bench Software) be liable for any direct, indirect, incidental or consequential damages (including, but not limited to, procurement of substitute goods or services; loss of use, data, or profits; or business interruption) however caused and arising in any way out of the use of this software. Documentation Revision 7 1
2 Table of Contents About This Guide... 4 What s New in What s New in System Requirements... 5 MacOS X Version:... 5 Windows Version:... 5 Installation... 6 MacOS X Version:... 6 Windows Version:... 8 Entering Your License... 9 Getting Started The Main Window The Tool Palette Objects Box Object Circle Object Line Object Text Object Picture Object Standard Object Transcript Object Fee List Object
3 Sequence Object The Format Bar The Properties Pane The Objects/Layers Pane Report Settings Reference Menus Preferences Appendix A - PowerSchool Object Ordering Troubleshooting
4 About This Guide This user guide assumes that you have a basic knowledge of PowerSchool and Object Reports. Anything specific to the creation of a report using VisualPST is covered in this guide. Specific report and object parameters are described in the PowerSchool Object Reports documentation, and that documentation should be used in conjunction with this guide to fully understand all aspects of the reports. - New Standard Object - Ability to insert a page anywhere - Ability to use more layers What s New in 2.4 What s New in Improved bad layer handling (when importing Phoenix Designer files) - Teacher Photo option for Picture Object - Open recent documents menu - Contextual click for copy/paste/duplicate - Drag scrolling - Ability to turn tints into colors - By default, when copying and pasting objects, the layer information is retained - New option to paste objects to current layer - Returned ability to change layer from inspector - Ability to reorder codes list by dragging - Performance enhancements and bug fixes 4
5 System Requirements MacOS X Version: MacOS X 10.7 or greater (may run on earlier systems, but it has not been tested, and is not supported) 1024 x 768 or greater resolution monitor Windows Version: Windows 7 or greater (may run on earlier systems, but it has not been tested, and is not supported) 1024 x 768 or greater resolution monitor 5
 Find the downloaded file, wherever you chose")
6 Installation VisualPST is normally distributed as an internet download. Once you have downloaded the appropriate file - the following directions are for installing the software for each individual platform: MacOS X Version: 1) Find the downloaded file, wherever you chose to save it: VisualPST-OSX-...dmg (the icon will look something like this: ) 2) Double click on this image file - it will mount a virtual "disk" on your desktop named: VisualPST-... (the icon of this virtual disk will look something like this: ) 3) Double click on the virtual disk icon, and it will open a window similar to this: 6
7 4) Open and review the VisualPST License Agreement. 5) Drag the "VisualPST" icon to the Applications folder on your hard drive, or any other location of your choice. 6) (optional) Drag the VisualPST User Guide to a location of your choice. 7) When done, eject the virtual disk: select it and choose File->Eject from the menu bar 7
 2) Double-clck on this to install VisualPST on your computer (Follow any on-screen prompts) 3) When this is done, run")
8 Windows Version: 1) Find the downloaded file, wherever you chose to save it: VisualPST-WIN-...-Install.exe (the icon will look something like this: ) 2) Double-clck on this to install VisualPST on your computer (Follow any on-screen prompts) 3) When this is done, run VisualPST by choosing: Start->All Programs->VisualPST->VisualPST 8


9 Entering Your License New to version 2.2 is a new license file format, that is imported when adding or updating a license. When you first launch VisualPST you will be prompted to register your license. Click Register to enter your license information or click Use as a Non-Saving Demo try the product with out the ability to save. 9


10 Enter your serial number information or import a license file depending on which way you receive your license. To import a license file click Select under the License File section, navigate to your license file and click Open. Click Done when completed. To update an existing license: To manage your license: 1 - On Mac OSX click on the VisualPST Menu and then select About Visual PST. On Windows click on the Help Menu and select About Visual PST. 2 - On the lower left of the about window click Edit License Info. 3 - Here you can either enter a new license by selecting New or remove a license by selecting Remove. You can do this for all users if you have administrative rights to the computer or the current user by selecting from the appropriate area. 4 - When clicking New you will be prompted to enter your serial number information or import a license file depending on which way you receive your license. To import a license file click Select under the License File section, navigate to your license file and click Open. 10
11 The Main Window Getting Started The main window represents your report page(s). All work is done visually within this representation. Grey guidelines show the page borders and margins, and rulers show the actual dimensions of the page, and objects on the page. (The setup of the page, as well as other settings for the report can be found in the Report Settings section of this manual) Notice two controls at the lower left corner of the page : Zoom popup: Select a zoom factor from this popup to zoom in or out. Page controls: Use the arrows (left and right) to move forward and backward between existing pages. Click in the center to get a popup with options for jumping to a specific page, adding a page (after the current page), inserting a page (before the current page) and deleting pages.student 11
12 The Tool Palette Sequence: creating Sequence Objects Note: after creating an object, the tool will revert to the arrow tool. To make a tool sticky (so it won t revert to the arrow after use) double click on the tool. Objects Box Object Arrow: selecting and manipulating (moving, resizing) existing objects Box: creating box (square / rectangle) objects Circle: creating Circle Objects Line: creating Line Objects Text: creating Text Objects Picture: creating Picture Objects Standard Object List: creating legacy (old style) transcript list objects Transcript: creating (new style) Transcript Objects Fee list: creating Fee List Objects To create a box: 1) Select the box tool 2) Click where you want the top left corner to be 3) (while holding the mouse button down) drag to where you want the bottom right corner to be 4) Release the mouse button Once you have created a Box Object, you can: move it (by clicking and dragging) resize it (by clicking and dragging one of the 8 handles on the corners and sides 12
 The properties")

13 edit its properties (by double clicking on it) The properties for a box that can be edited are shown in the following pictures: 13

14 14
 Release the mouse button Once you have created a Circle Object, you can: move it (by clicking and dragging) resize it (by clicking and dragging one of the 8 handles on the corners and sides")
15 Circle Object To create a circle: 1) Select the circle tool 2) Click where you want the top left corner to be 3) (while holding the mouse button down) drag to where you want the bottom right corner to be 4) Release the mouse button Once you have created a Circle Object, you can: move it (by clicking and dragging) resize it (by clicking and dragging one of the 8 handles on the corners and sides edit its properties (by double clicking on it) The properties for a circle that can be edited are shown in the following pictures: 15
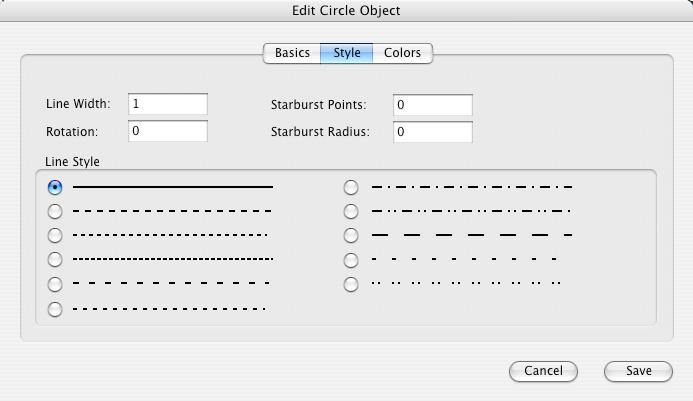
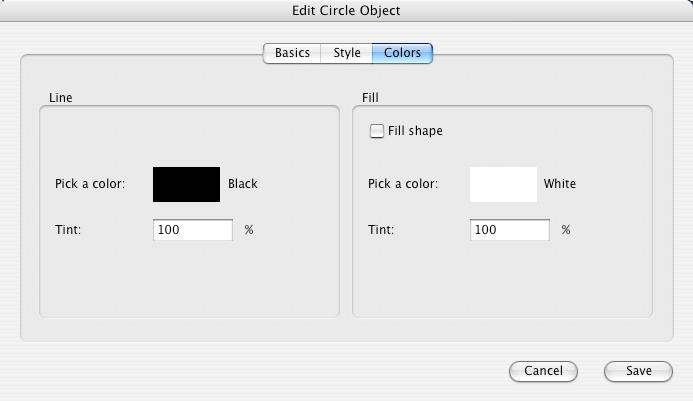
16 16
17 Line Object To create a line: 1) Select the line tool 2) Click where you want the starting point to be 3) (while holding the mouse button down) drag to where you want the ending point to be 4) Release the mouse button Once you have created a Line Object, you can: move it (by clicking and dragging) resize it (by clicking and dragging one of the handles on each end edit its properties (by double clicking on it) The properties for a line that can be edited are shown in the following pictures: 17
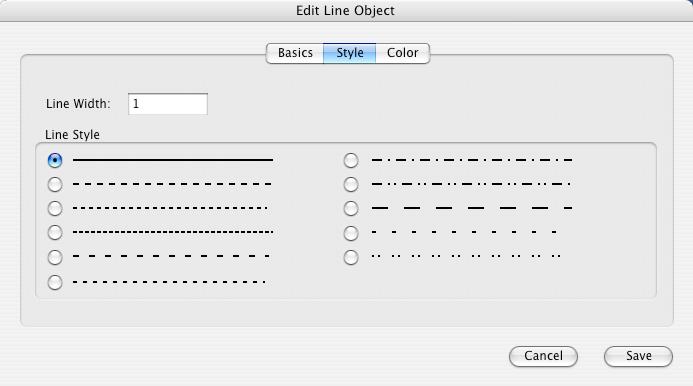
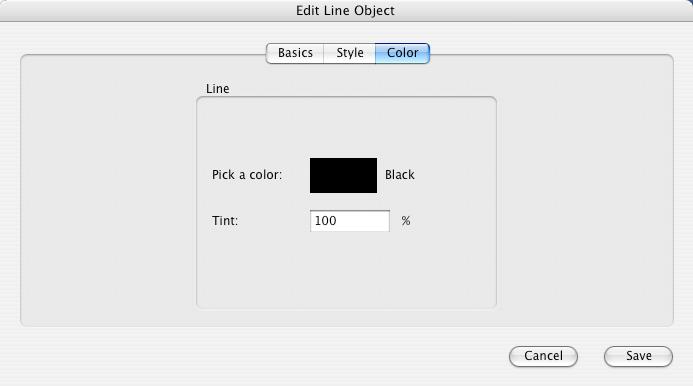
18 18
 edit its properties (by double clicking on it) The properties for a Text Object that can be edited are shown in the following")
19 Text Object To create a Text Object: 1) Select the text tool 2) Click (and release) where you want the bottom left corner (baseline) to be Once you have created a Text Object, you can: move it (by clicking and dragging) edit its properties (by double clicking on it) The properties for a Text Object that can be edited are shown in the following pictures: 19
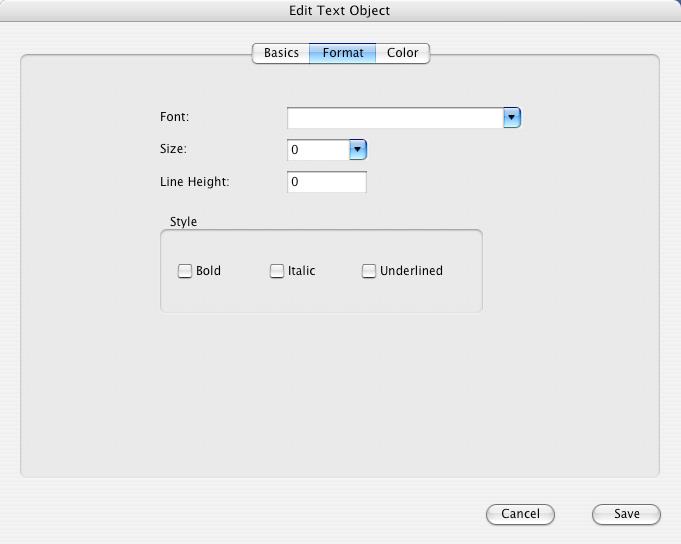

20 20
21 Notes: The text area includes controls for easily entering PowerSchool codes: Select a code from the popup and press the insert button to insert that code into the text box at the current insertion cursor. There are also controls for setting the style (bold, italic, underline) of selected portions of the text (you do not need to use html tags for this): Select the text you want to work with, and toggle the appropriate style button on or off. Move to next record after printing this text (checkbox) : Note: there are special considerations for using this option: PowerSchool determines what objects come after other objects based on the objects order in the layer, as well as an objects vertical position on the page. If you have Text Objects that have the move to next record after option checked, you need to be conscious of this. If you use this option, and objects are not in matching order based on their order in the layer, and their vertical position, VisualPST will warn you when saving. There is an option that will try and automatically fix these problems for you: Fix Object Ordering Issues... under the Report menu. 21
 Release the mouse button Once you have created a Picture Object, you can: move it (by clicking and dragging) resize it (by clicking and dragging one of the 8 handles on the")
22 Picture Object To create a Picture Object: 1) Select the picture tool 2) Click where you want the top left corner to be 3) (while holding the mouse button down) drag to where you want the bottom right corner to be 4) Release the mouse button Once you have created a Picture Object, you can: move it (by clicking and dragging) resize it (by clicking and dragging one of the 8 handles on the corners and sides edit its properties (by double clicking on it) The properties for a Picture Object that can be edited are shown in the following picture: 22
23 Picture: the name of the picture to be shown (or Student/Teacher Photo to show the appropriate Student/Teacher photo for a student/teacher record). Note: to preview pictures while designing reports in VisualPST, you can place all your picture files in a folder on your computer, and tell VisualPST (under the preferences dialog box) where this folder is. All the picture files will show up in the popup menu when editing a Picture Object. If you do not have the pictures on your local computer, you may still type the name of the picture into this field. 23
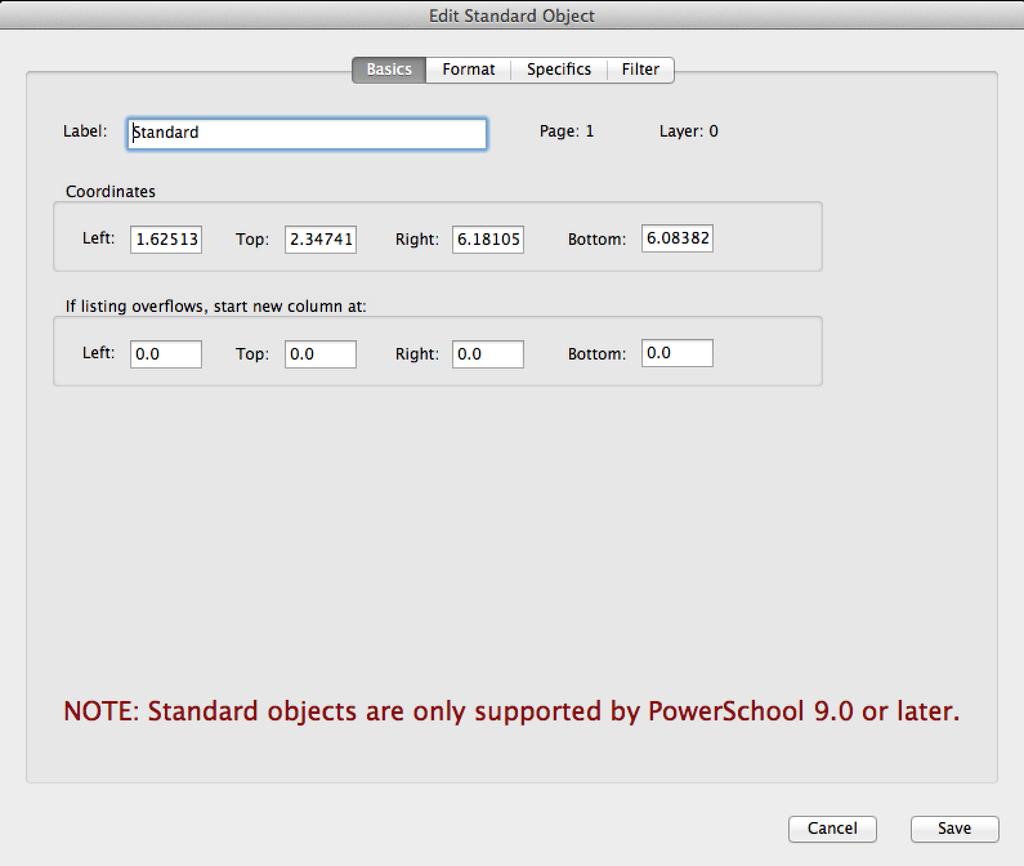
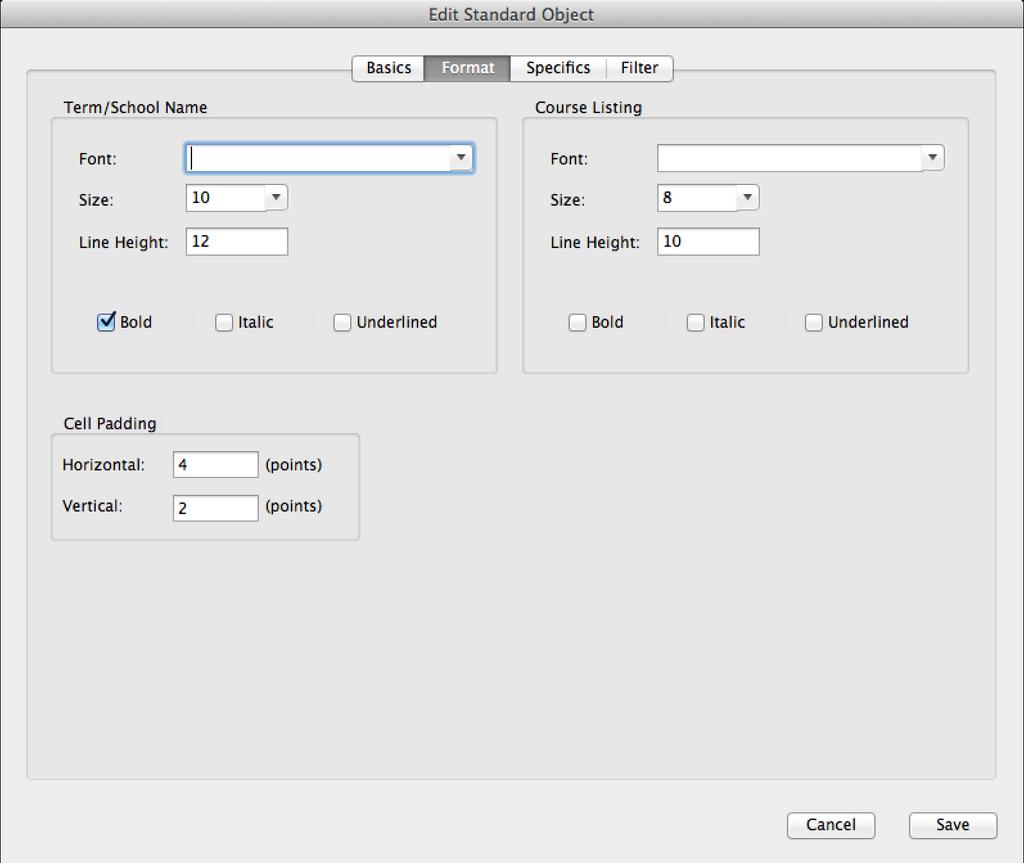
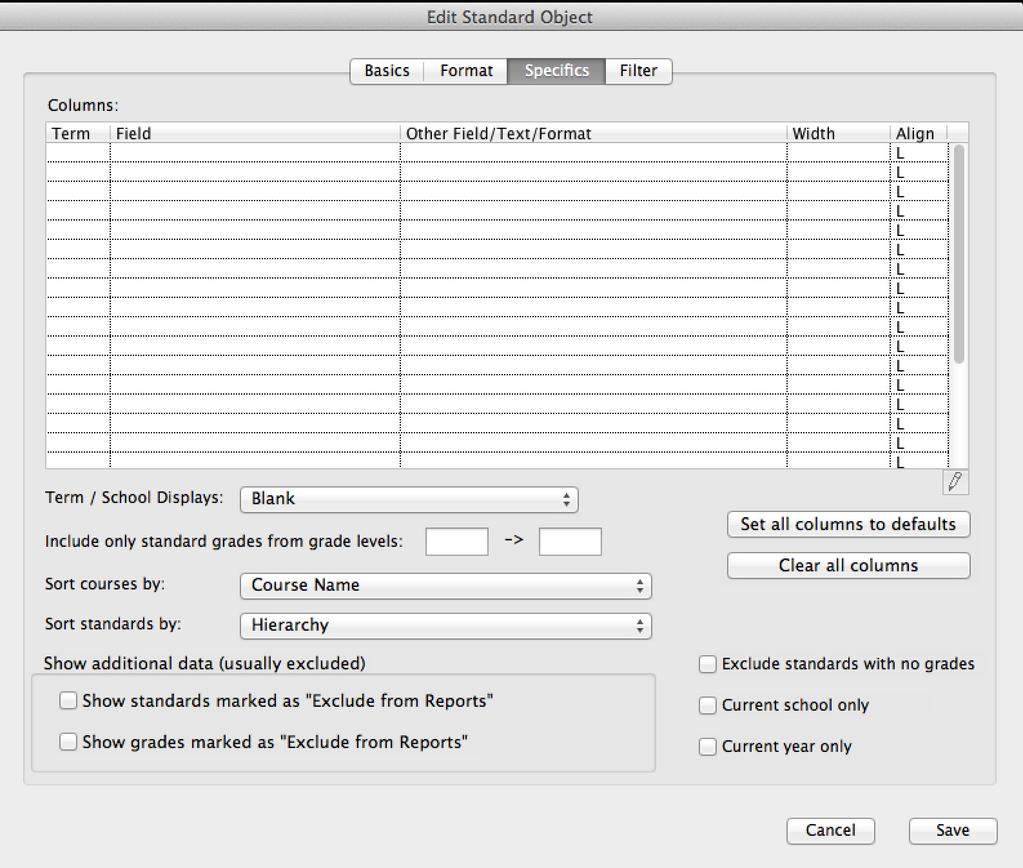
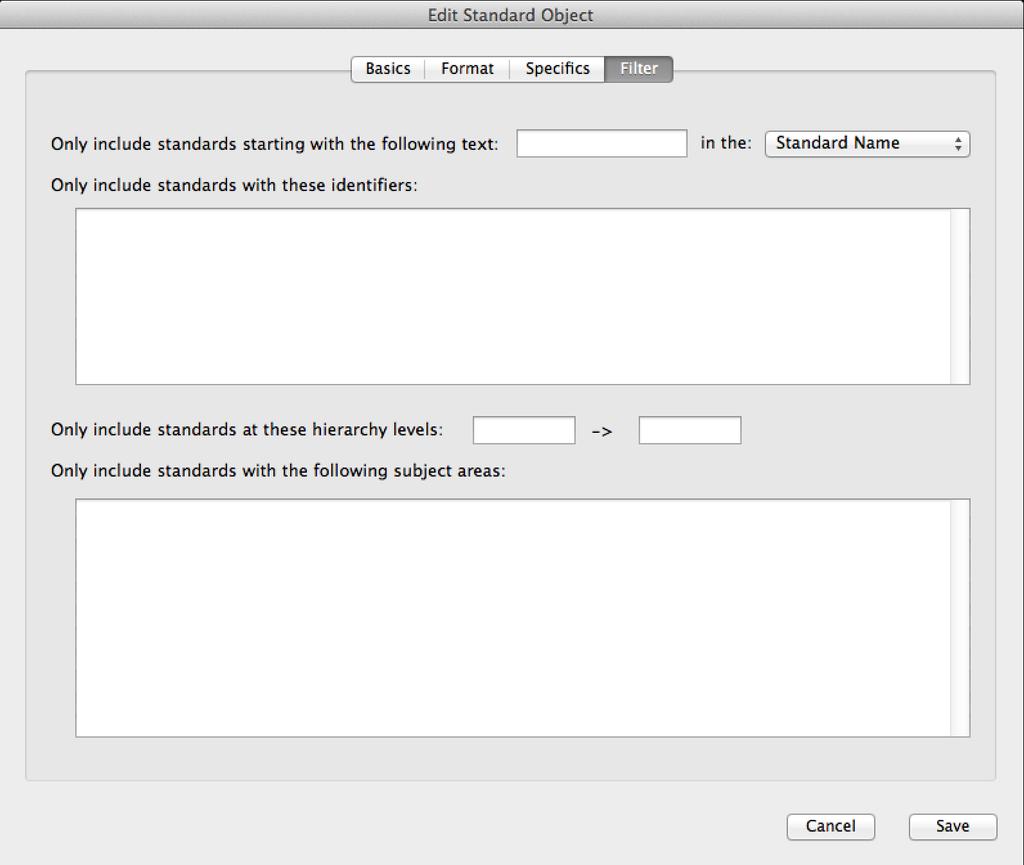
24 Standard Object The Standard Object introduced in PowerSchool 9 is designed to create a list of standards scores. The Standard Object is only supported in PowerSchool 9.x. To create a Standard Object: 1) Select the Standard Object tool 2) Click where you want the top left corner to be 3) (while holding the mouse button down) drag to where you want the bottom right corner to be 4) Release the mouse button Once you have created a Standard Object, you can: move it (by clicking and dragging) resize it (by clicking and dragging one of the 8 handles on the corners and sides adjust column widths and other properties visually using other handles edit its properties (by double clicking on it) Please refer to the PowerSchool Reports User Guide, which can be found on PowerSource, for details on all the attributes of the Standard Object. The properties for a Standard Object that can be edited are shown in the following pictures: 24
25 25
26 26
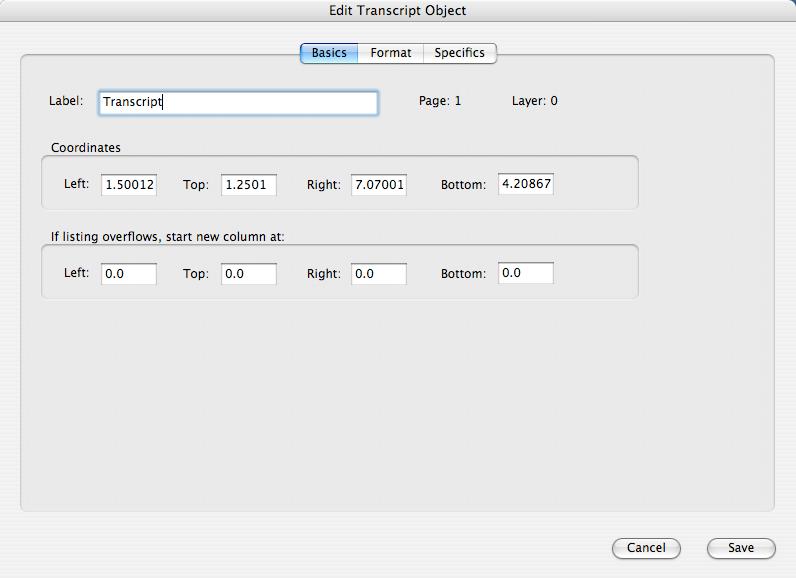
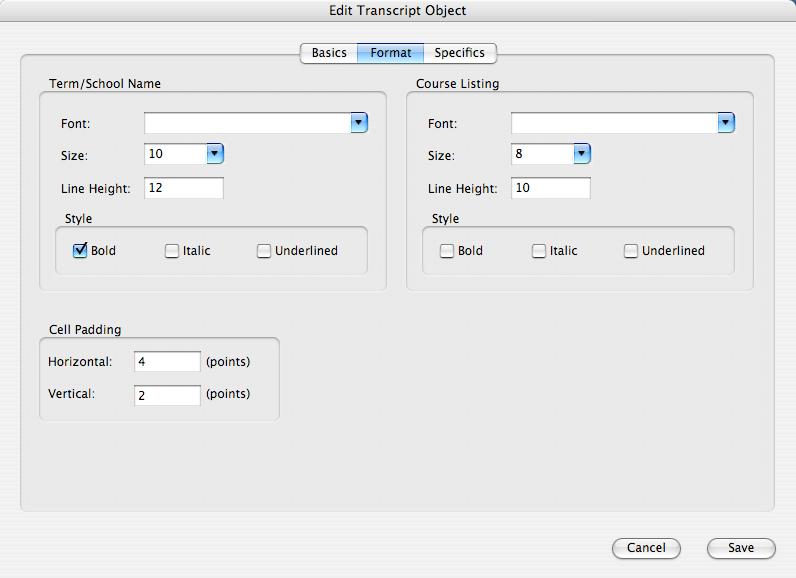
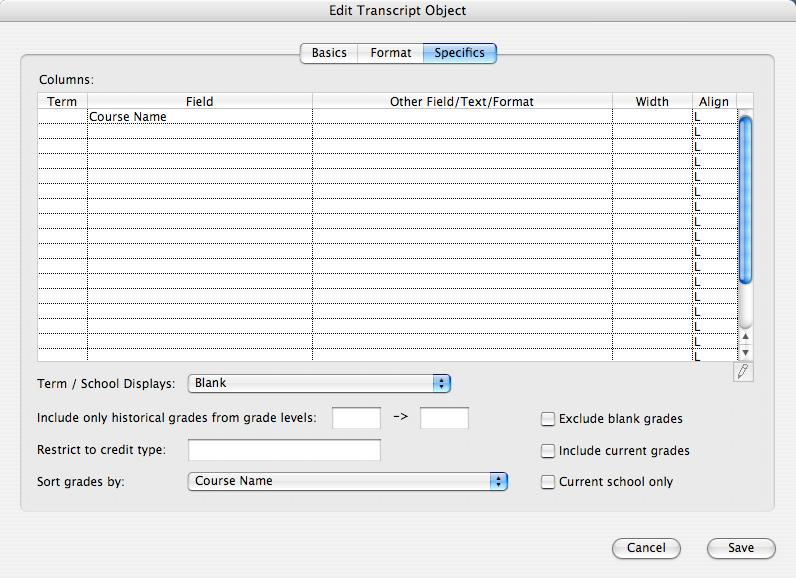
27 Transcript Object To create a Transcript Object: 1) Select the transcript tool 2) Click where you want the top left corner to be 3) (while holding the mouse button down) drag to where you want the bottom right corner to be 4) Release the mouse button 5) Double click on the newly created Transcript Object to open the edit dialog box 6) Select the specifics tab 7) Add information for one or more columns 8) Click save Once you have created a Transcript Object, you can: move it (by clicking and dragging) resize it (by clicking and dragging one of the 8 handles on the corners and sides adjust column widths (for columns that are not auto-width) and other properties visually using other handles edit its properties (by double clicking on it) Please refer to the PowerSchool Reports User Guide, which can be found on PowerSource, for details on all the attributes of the Transcript Object. The properties for a Transcript Object that can be edited are shown in the following pictures: 27
28 28
 Release the mouse button Once you have created a Fee List Object, you can: move it (by clicking and dragging) resize it (by clicking and dragging one of the 8 handles on the corners")
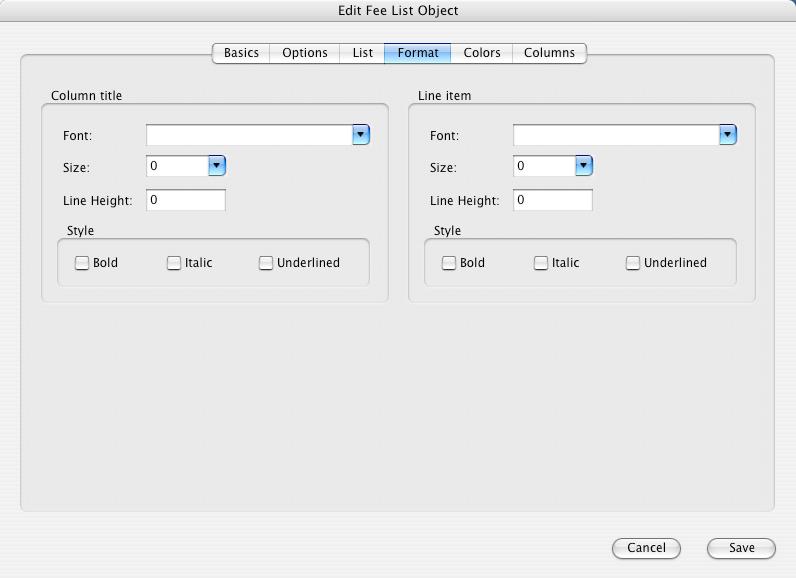
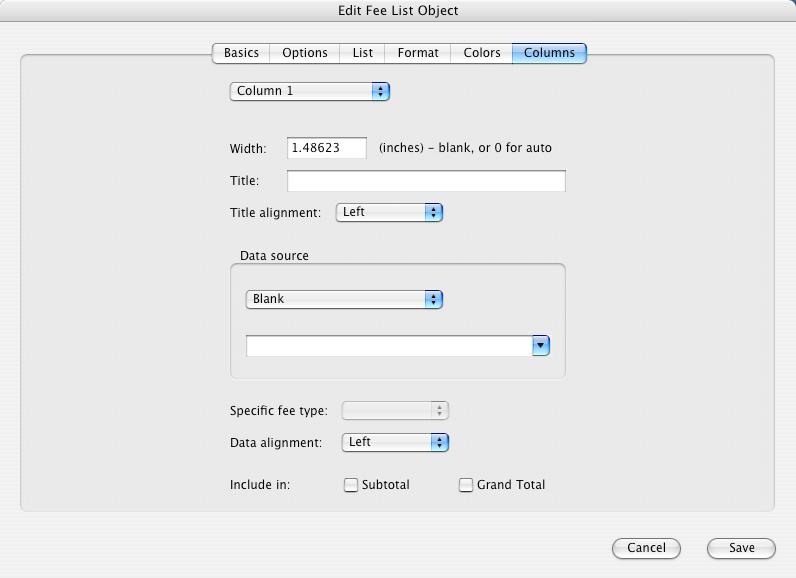
29 Fee List Object To create a fee list: 1) Select the fee list tool 2) Click where you want the top left corner to be 3) (while holding the mouse button down) drag to where you want the bottom right corner to be 4) Release the mouse button Once you have created a Fee List Object, you can: move it (by clicking and dragging) resize it (by clicking and dragging one of the 8 handles on the corners and sides adjust column widths and other properties visually using other handles edit its properties (by double clicking on it) The properties for a fee list that can be edited are shown in the following pictures: 29
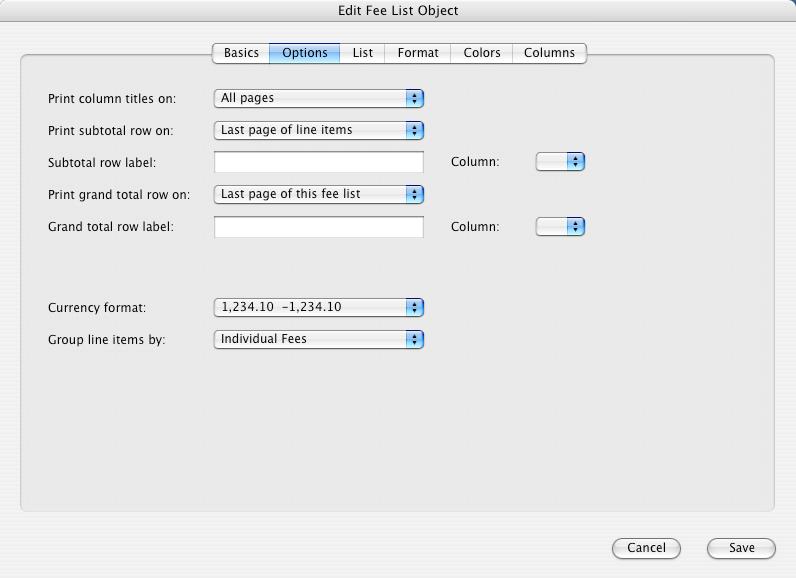
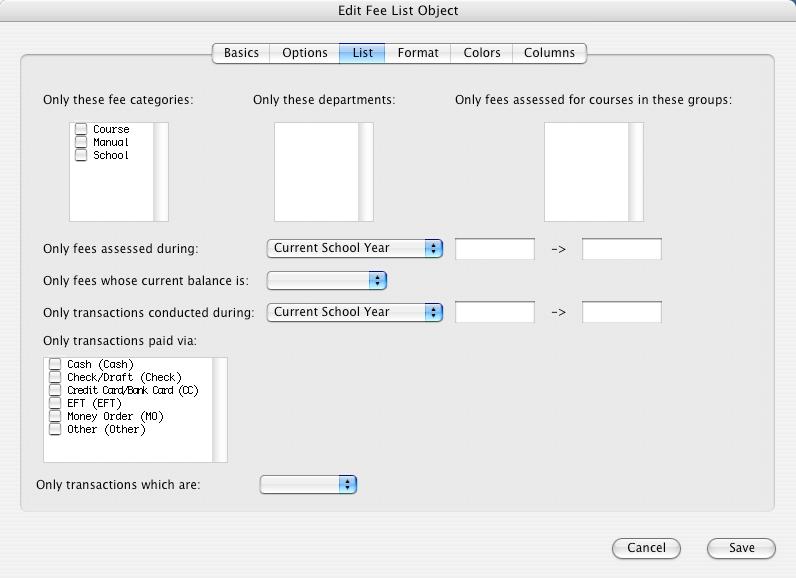
30 30
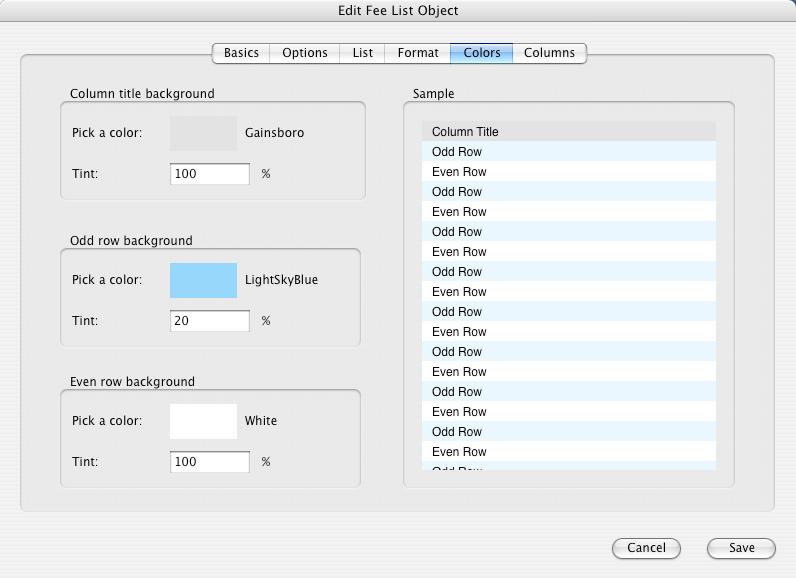
31 31
 edit its properties (by double clicking on it) The properties for a Sequence Object that can be edited are shown in the following picture:")
32 Sequence Object To create a Sequence Object: 1) Select the Sequence Object tool 2) Click (and release) where you want the bottom left corner (baseline) to be Once you have created a Sequence Object, you can: move it (by clicking and dragging) edit its properties (by double clicking on it) The properties for a Sequence Object that can be edited are shown in the following picture: 32
33 The Format Bar At the top of the window is the format bar: Here you can change the characteristics of a single object, or multiple objects, of the same type. The bar is separated into three parts. Text: (effects Text and Sequence Objects only) Font selection Font size Font style Font Line Height Font Color / Tint % Line: (effects Line, Box and Circle Objects only) Line color Line width Line style Fill: (effects Line and Box Objects only) Fill checkbox Fill color / Tint % To change a single object s characteristics using the format bar: 33
 Hold the shift key 2) Click on the objects (must be the same type) you wish to change (the objects will become highlighted) 2)")
34 1) Click on the object you wish to change (the object will become highlighted) 2) Click on the characteristic you wish to change 3) Select / input the change. To change a multiple objects characteristics using the format bar: 1) Hold the shift key 2) Click on the objects (must be the same type) you wish to change (the objects will become highlighted) 2) Click on the characteristic you wish to change 3) Select / input the change. The Properties Pane The Properties Pane is the section of the main window in the upper right corner (below the format bar) This area provides a contextual list of object settings. Settings can be a changed in this list without having to double click each object to view the settings. Settings can be changed for a single object or multiple selected objects of the same object type. Starting with VisualPST 2.3, you can change a layer to a number greater than 20. If you chose to do this you will not be able to modify 34

35 the objects in PowerSchool without customizing the PowerSchool edit object pages to allow more layers. If you do not, any layer above 20 will revert back to 20. The Objects/Layers Pane The Object/Layers Pane is the section of the main window in the lower right corner. This list of layers and objects can be used for manipulating objects order in a layer, moving objects between layers, selecting objects by name, etc. The list shows one row for each possible layer in a PowerSchool object report. 35
36 The first column shows the visibility of the objects in the particular layer. Visible layers are shown with an eye icon ( ) and hidden layers are shown with a crossed out eye icon ( ). You can toggle a layers visibility state by clicking on the eye icon in the appropriate row. Note: Layer visibility is for helping while designing a report in VisualPST only. The visibility state is not saved with the report - all layers will be visible once imported into PowerSchool. The second column is for displaying or hiding (in the list) all the objects in a particular layer. Layers with a grey right-pointing triangle ( ) have no objects to display. Layers with a black rightpointing triangle ( ) have objects that are currently hidden in the list. Layers with a black downward-pointing triangle ( ) have objects that are currently shown in the list. For layers with objects in them, you can toggle between showing and hiding them in the list by clicking on the black triangle in the second column. The third column shows the layer name/number. One of the layer names will be shown bold and underlined - this is the current layer - meaning all newly created objects will be in this layer. To switch the current layer, double click on the layer name. Clicking on an object name in the list will select that object in the front-most report window. Clicking on a layer name will select all objects in that layer in the front-most report window. You can drag objects (by clicking and dragging their names) to reorder them in their layer, or to move them to a different layer. Note: PowerSchool has some restrictions on object order in a layer - this is described in Appendix A. VisualPST will keep you from putting objects in an order that PowerSchool does not allow. Double-clicking an object s name will bring up the edit window for that object (the same as double clicking the object in the report window). Selecting an object in the list and hitting the return/enter key on the keyboard allows the object s label to be edited, without bringing up the edit window for that object. 36


37 Report Settings The overall report settings can be modified by selecting Settings or Layout from the Report menu. (Once you have the report settings dialog open, you can select between Basics and Layout from the tabs at the top.) The report settings dialog is shown in the following pictures: 37
38 Menus File Edit New Open - Create a new object report - Open an existing object report Close - Close the front-most object report Save - Save the front-most object report Reference Save As... - Save the front-most object report to a new location / name Undo Redo Cut Copy Paste - Undo the last action performed. The Undo menu item should give a basic description of the action to be undone. VisualPST supports multiple-undo -- as of this writing, you can go back 20 steps. - Redo the last undone action. The Redo menu item should give a basic description of the action to be redone. VisualPST supports multiple-redo -- as of this writing, you can go forward 20 steps. - Remove the currently selected objects and place them on the clipboard (to be pasted elsewhere) - Copy the currently selected objects to the clipboard (to be pasted elsewhere) - Paste the last copied or cut objects to the current report/page, keeping their layer as copied 38
39 Paste To Current Layer - Paste the last copied or cut objects to the current layer. Clear - Delete the currently selected objects from the report Duplicate - Duplicate the currently selected objects. When moving objects after duplicating, VisualPST will remember in which direction, and how far you moved the objects, and the next duplicate command will adjust to match the same movement. Select All None - Select all objects on the current report/page/layer - Unselect all objects All Text Objects - Select all Text Objects on the current report/page/layer All Line Objects - Select all Line Objects on the current report/page/layer All Box Objects - Select all Box Objects on the current report/page/layer All Circle Objects - Select all Circle Objects on the current report/page/layer All Standard Object List Objects - Select all Standard Object list objects on the current report/page/layer All Picture Objects - Select all Picture Objects on the current report/page/layer All Sequence Objects - Select all Sequence Objects on the current report/page/layer All Transcript Objects - Select all Transcript Objects on the current report/page/layer All Fee List Objects - Select all Fee List Objects on the current report/page/layer Replace... - In all selected Text Objects, this command replaces one string of text with another 39
40 Report Settings... - Edit the report s basic settings Layout... - Edit the report s layout settings Fix Object Ordering Issues... - Attempts to put all Text Objects with the move to next record after option in the proper order to work correctly with PowerSchool Objects Get Object Info... - Shows the selected object s (only one at a time) info/properties and allows editing Layer - Change the layer of all selected objects to the layer number selected. If no objects are selected, it will change the current layer to the selected layer number, so all newly created objects will start in that layer. Move Forward - Move the selected objects forward in their layer (Note: PowerSchool has some restrictions on object order in a layer - this is described in Appendix A.) Move To Front - Move the selected objects to the front in their layer (Note: PowerSchool has some restrictions on object order in a layer - this is described in Appendix A.) Move Backward - Move the selected objects backward in their layer (Note: PowerSchool has some restrictions on object order in a layer - this is described in Appendix A.) Move To Back - Move the selected objects to the back in their layer (Note: PowerSchool has some restrictions on object order in a layer - this is described in Appendix A.) Alignment 40
41 Align Left Edges - Moves the selected objects horizontally to make their left edges aligned Align Horizontal Centers - Moves the selected objects horizontally to make their centers aligned Align Right Edges - Moves the selected objects horizontally to make their right edges aligned Align Top Edges - Moves the selected objects vertically to make their top edges aligned Align Vertical Centers - Moves the selected objects vertically to make their centers aligned Align Bottom Edges - Moves the selected objects vertically to make their bottom edges aligned Pages Go To Page - Displays the selected page in the front-most report window Go To Next Page - Moves to the next page in the front-most report window Go To Previous Page - Moves to the previous page in the front-most report window Add Page - Adds a page after the current page Insert Page - Inserts a page before the current page Delete Page - Deletes the current page from the front-most report window (Note: This action cannot be undone) Convert Tint to Color - PowerSchool does not support the importing of tinted objects. This function converts the tints of the selected objects to actual colors so they can be imported. 41
42 View Display Full Codes Text - When this item is checked, Text Objects will show all codes fully. When it is not checked, they are shown abbreviated: ^() ^[] Window - Brings the selected report window to the front 42
, are shown in the following pictures: General Pictures folder: click the Choose.")
43 Preferences VisualPST has various program-wide preferences that can be changed. The preference options for the program, in four sections (General, Fonts, Codes, Fees), are shown in the following pictures: General Pictures folder: click the Choose... button to select the location of a folder on your computer where pictures will be placed for previewing on an object report in VisualPST. Option to use the New, Old or Both new and old PowerSchool XML tags. This fixes an issue when PowerSchool changed the alignment tag in the XML code. Most users should leave at the default Both 43
 To add a font to the list of fonts available in VisualPST, select it from the list on")
44 Fonts The fonts installed on the current computer are shown on the right. The fonts that are available for use within VisualPST are shown on the left. (Note: you must also have the selected fonts on your PowerSchool server for them to show up properly in reports) To add a font to the list of fonts available in VisualPST, select it from the list on the right, and click the copy font button( ). To delete a font from the list of fonts available in VisualPST, select it from the list on the left and click the - button ( ) below the list. To restore the list of fonts available in VisualPST to the default settings, click the restore defaults button ( ). 44
 button beneath the list.")
45 Codes To add a new code, click the ( ) button beneath the list. To delete a code, select it in the list and click the ( To edit a code, select it in the list and then click it again. To import a list of codes from a text file, click the Import button. To export the list of codes to a text file, click the export button. ) button beneath the list. To reorder the list of codes click hold and drag the codes up or down in the list. To reset all codes to the default that came with the program, click the button marked Restore Defaults 45
 button beneath the list.")
46 Fees In order to select certain settings when setting up a Fee List Object, you must enter the various fee related settings here, matching the settings on your PowerSchool server. To add a new item to one of the lists, click the ( To delete an item from a list, select it in the list and click the ( ) button beneath the list. To edit an item in a list, select it in the list and then click it again. ) button beneath the list. 46
47 Appendix A - PowerSchool Object Ordering PowerSchool forces certain restrictions on the ordering of different object types in a report layer. The object types fall into the following groupings, listed in the order they must follow in a layer. Objects in the first group will always be behind objects in the second, third, and fourth groups. Objects in the second group will always be behind objects in the third and fourth groups, and so on... First Group Box Circle Second Group Picture Third Group Line Fourth Group Text Sequence Standard Object List Transcript Fee List 47
48 Troubleshooting Please report all problems via our customer support portal at: Please be as specific as possible about the problem, and attach a copy of the object report if possible. 48
Microsoft PowerPoint 2016 Basics Unit 9 Final Review - Student Notes Directions: Fill in the blanks.
 Directions: Fill in the blanks. 1. PowerPoint Window Layout 2. File Tab When clicked, opens - automatically opens the Info option by default Holds the following options: - Info - New - Open - Save - Save
Nauticom NetEditor: A How-to Guide
 Nauticom NetEditor: A How-to Guide Table of Contents 1. Getting Started 2. The Editor Full Screen Preview Search Check Spelling Clipboard: Cut, Copy, and Paste Undo / Redo Foreground Color Background Color
Designer Reference 1
 Designer Reference 1 Table of Contents USE OF THE DESIGNER...4 KEYBOARD SHORTCUTS...5 Shortcuts...5 Keyboard Hints...5 MENUS...7 File Menu...7 Edit Menu...8 Favorites Menu...9 Document Menu...10 Item Menu...12
Microsoft Word Important Notice
 Microsoft Word 2013 Important Notice All candidates who follow an ICDL/ECDL course must have an official ICDL/ECDL Registration Number (which is proof of your Profile Number with ICDL/ECDL and will track
WEEK NO. 12 MICROSOFT EXCEL 2007
 WEEK NO. 12 MICROSOFT EXCEL 2007 LESSONS OVERVIEW: GOODBYE CALCULATORS, HELLO SPREADSHEET! 1. The Excel Environment 2. Starting A Workbook 3. Modifying Columns, Rows, & Cells 4. Working with Worksheets
MICROSOFT WORD 2010 BASICS
 MICROSOFT WORD 2010 BASICS Word 2010 is a word processing program that allows you to create various types of documents such as letters, papers, flyers, and faxes. The Ribbon contains all of the commands
InDesign CS Basics. To learn the tools and features of InDesign CS to create publications efficiently and effectively.
 InDesign CS Basics InDesign Basics Training Objective To learn the tools and features of InDesign CS to create publications efficiently and effectively. What you can expect to learn from this class: How
Word 2013 Beginning. Technology Integration Center
 Word 2013 Beginning Getting Started... 2 Quick Access Toolbar... 3 The Ribbon... 3 Help... 4 Compatibility Mode... 4 Document Views... 4 Navigating the Document... 5 Moving Around in the Document... 5
Rich Text Editor Quick Reference
 Rich Text Editor Quick Reference Introduction Using the rich text editor is similar to using a word processing application such as Microsoft Word. After data is typed into the editing area it can be formatted
PowerPoint 2010 Level 1 Computer Training Solutions Student Guide Version Revision Date Course Length
 Level 1 Computer Training Solutions Version 1.2 Revision Date Course Length 2012-Feb-16 6 hours Table of Contents Quick Reference... 3 Frequently Used Commands... 3 Manitoba ehealth Learning Management
MICROSOFT WORD 2010 Quick Reference Guide
 MICROSOFT WORD 2010 Quick Reference Guide Word Processing What is Word Processing? How is Word 2010 different from previous versions? Using a computer program, such as Microsoft Word, to create and edit
Microsoft Publisher 2013 Foundation. Publisher 2013 Foundation SAMPLE
 Microsoft Publisher 2013 Foundation Publisher 2013 Foundation Microsoft Publisher 2013 Foundation - Page 2 2013 Cheltenham Group Pty. Ltd. All trademarks acknowledged. E&OE. No part of this document may
Publisher 2016 Foundation. North American Edition SAMPLE
 Publisher 2016 Foundation Publisher 2016 Foundation North American Edition Microsoft Publisher 2016 Foundation - Page 2 2015 Cheltenham Group Pty. Ltd. All trademarks acknowledged. E&OE. No part of this
Excel 2016 Basics for Windows
 Excel 2016 Basics for Windows Excel 2016 Basics for Windows Training Objective To learn the tools and features to get started using Excel 2016 more efficiently and effectively. What you can expect to learn
Excel 2016 Basics for Mac
 Excel 2016 Basics for Mac Excel 2016 Basics for Mac Training Objective To learn the tools and features to get started using Excel 2016 more efficiently and effectively. What you can expect to learn from
Budget Exercise for Intermediate Excel
 Budget Exercise for Intermediate Excel Follow the directions below to create a 12 month budget exercise. Read through each individual direction before performing it, like you are following recipe instructions.
Excel Main Screen. Fundamental Concepts. General Keyboard Shortcuts Open a workbook Create New Save Preview and Print Close a Workbook
 Excel 2016 Main Screen Fundamental Concepts General Keyboard Shortcuts Open a workbook Create New Save Preview and Print Close a Ctrl + O Ctrl + N Ctrl + S Ctrl + P Ctrl + W Help Run Spell Check Calculate
Microsoft Word Chapter 1. Creating, Formatting, and Editing a Word Document with Pictures
 Microsoft Word 2010 Chapter 1 Creating, Formatting, and Editing a Word Document with Pictures Objectives Enter text in a Word document Check spelling as you type Format paragraphs Format text Undo and
ORGANIZING YOUR ARTWORK WITH LAYERS
 9 ORGANIZING YOUR ARTWORK WITH LAYERS Lesson overview In this lesson, you ll learn how to do the following: Work with the Layers panel. Create, rearrange, and lock layers and sublayers. Move objects between
Learning to use the drawing tools
 Create a blank slide This module was developed for Office 2000 and 2001, but although there are cosmetic changes in the appearance of some of the tools, the basic functionality is the same in Powerpoint
Excel 2013 Intermediate
 Excel 2013 Intermediate Quick Access Toolbar... 1 Customizing Excel... 2 Keyboard Shortcuts... 2 Navigating the Spreadsheet... 2 Status Bar... 3 Worksheets... 3 Group Column/Row Adjusments... 4 Hiding
ECDL Module 6 REFERENCE MANUAL
 ECDL Module 6 REFERENCE MANUAL Presentation Microsoft PowerPoint XP Edition for ECDL Syllabus Four PAGE 2 - ECDL MODULE 6 (USING POWERPOINT XP) - MANUAL 6.1 GETTING STARTED... 4 6.1.1 FIRST STEPS WITH
Microsoft Excel Keyboard Shortcuts
 Microsoft Excel Keyboard Shortcuts Here is a complete list of keyboard shortcuts for Microsoft Excel. Most of the shortcuts will work on all Excel versions on Windows based computer. Data Processing Shortcuts
BASIC MICROSOFT POWERPOINT
 BASIC MICROSOFT POWERPOINT PART ONE PHONE: 504-838-1144 IT Training Team Jefferson Parish Library EMAIL: jpltrain@jplibrary.net In this class you will learn to: Launch, close, and interact with Microsoft
Introduction to Microsoft Word 2010
 Introduction to Microsoft Word 2010 Microsoft Word is a word processing program you can use to write letters, resumes, reports, and more. Anything you can create with a typewriter, you can create with
Microsoft Word 2011 Tutorial
 Microsoft Word 2011 Tutorial GETTING STARTED Microsoft Word is one of the most popular word processing programs supported by both Mac and PC platforms. Microsoft Word can be used to create documents, brochures,
Guide to WB Annotations
 Guide to WB Annotations 04 May 2016 Annotations are a powerful new feature added to Workbench v1.2.0 (Released May 2016) for placing text and symbols within wb_view tabs and windows. They enable generation
End User Guide. 2.1 Getting Started Toolbar Right-click Contextual Menu Navigation Panels... 2
 TABLE OF CONTENTS 1 OVERVIEW...1 2 WEB VIEWER DEMO ON DESKTOP...1 2.1 Getting Started... 1 2.1.1 Toolbar... 1 2.1.2 Right-click Contextual Menu... 2 2.1.3 Navigation Panels... 2 2.1.4 Floating Toolbar...
Publisher 2016 Foundation SAMPLE
 Publisher 2016 Foundation Publisher 2016 Foundation Microsoft Publisher 2016 Foundation - Page 2 2015 Cheltenham Group Pty. Ltd. All trademarks acknowledged. E&OE. No part of this document may be copied
Microsoft Visio 2016 Foundation. Microsoft Visio 2016 Foundation Level North American Edition SAMPLE
 Microsoft Visio 2016 Foundation Microsoft Visio 2016 Foundation Level North American Edition Visio 2016 Foundation - Page 2 2015 Cheltenham Group Pty. Ltd. All trademarks acknowledged. E&OE. No part of
Word 2010 Beginning. Technology Integration Center
 Word 2010 Beginning File Tab... 2 Quick Access Toolbar... 2 The Ribbon... 3 Help... 3 Opening a Document... 3 Documents from Older Versions... 4 Document Views... 4 Navigating the Document... 5 Moving
OU EDUCATE TRAINING MANUAL
 OU EDUCATE TRAINING MANUAL OmniUpdate Web Content Management System El Camino College Staff Development 310-660-3868 Course Topics: Section 1: OU Educate Overview and Login Section 2: The OmniUpdate Interface
MS Word Basics. Groups within Tabs
 MS Word Basics Instructor: Bev Alderman L e t s G e t S t a r t e d! Open and close MS Word Open Word from the desktop of your computer by Clicking on the Start>All programs>microsoft Office >Word 2010
DOING MORE WITH WORD: MICROSOFT OFFICE 2010
 DOING MORE WITH WORD: MICROSOFT OFFICE 2010 GETTING STARTED PAGE 02 Prerequisites What You Will Learn USING MICROSOFT WORD PAGE 03 Viewing Toolbars Adding and Removing Buttons MORE TASKS IN MICROSOFT WORD
5. Canvas overview. Cricut Design Space User Manual. Design Panel
 5. Canvas overview The Canvas is where you ll design your projects. On the Canvas, you can add and edit projects, images, and text. You can also set a project template, which doesn t cut but helps you
Microsoft Office Training Skills 2010
 Lesson 3 - Creating Documents with MS word 2010 Introduction to Word Processing MS-Word 2010 is word processing application that is used create and edit documents such as: Books, letters, reports, newsletters,
Computer Nashua Public Library Introduction to Microsoft Word 2010
 Microsoft Word is a word processing program you can use to write letters, resumes, reports, and more. Anything you can create with a typewriter, you can create with Word. You can make your documents more
Basic Concepts. Launching MultiAd Creator. To Create an Alias. file://c:\documents and Settings\Gary Horrie\Local Settings\Temp\~hh81F9.
 Page 1 of 71 This section describes several common tasks that you'll need to know in order to use Creator successfully. Examples include launching Creator and opening, saving and closing Creator documents.
Sending image(s) to report Click Send Snapshot on any screen in Dolphin3D and choose the Send to Report option
 to report Click Send Snapshot on any screen in Dolphin3D and choose the Send to Report option") Dolphin 3D Reports Sending image(s) to report Click Send Snapshot on any screen in Dolphin3D and choose the Send to Report option Creating a report step by step 1. Generate the desired images in Dolphin3D
Dolphin 3D Reports Sending image(s) to report Click Send Snapshot on any screen in Dolphin3D and choose the Send to Report option Creating a report step by step 1. Generate the desired images in Dolphin3D
Word 2013 Quick Start Guide
 Getting Started File Tab: Click to access actions like Print, Save As, and Word Options. Ribbon: Logically organize actions onto Tabs, Groups, and Buttons to facilitate finding commands. Active Document
Learn more about Pages, Keynote & Numbers
 Learn more about Pages, Keynote & Numbers HCPS Instructional Technology May 2012 Adapted from Apple Help Guides CHAPTER ONE: PAGES Part 1: Get to Know Pages Opening and Creating Documents Opening a Pages
Getting Started Guide
 UX-App Getting Started Guide Contents Keyboard Shortcuts... 2 Basic Shortcuts... 2 Component Manipulation... 2 Working with groups... 3 Grid Control... 3 Context Menu... 4 User Interface... 5 Managing
Microsoft Excel 2010 Basic
 Microsoft Excel 2010 Basic Introduction to MS Excel 2010 Microsoft Excel 2010 is a spreadsheet software in the new Microsoft 2010 Office Suite. Excel allows you to store, manipulate and analyze data in
Microsoft Word: Steps To Success (The Bare Essentials)
") Microsoft Word: Steps To Success (The Bare Essentials) Workbook by Joyce Kirst 2005 Microsoft Word: Step to Success (The Bare Essentials) Page Contents 1 Starting Word 2 Save 3 Exit 5 Toolbars, Alignment,
Microsoft Word: Steps To Success (The Bare Essentials) Workbook by Joyce Kirst 2005 Microsoft Word: Step to Success (The Bare Essentials) Page Contents 1 Starting Word 2 Save 3 Exit 5 Toolbars, Alignment,
DOING MORE WITH WORD: MICROSOFT OFFICE 2007
 DOING MORE WITH WORD: MICROSOFT OFFICE 2007 GETTING STARTED PAGE 02 Prerequisites What You Will Learn USING MICROSOFT WORD PAGE 03 Viewing Toolbars Adding and Removing Buttons MORE TASKS IN MICROSOFT WORD
User Guide. FTR Reporter For more information, visit
 FTR Reporter 5.7.1 For more information, visit www.fortherecord.com TABLE OF CONTENTS INTRODUCTION... 5 Overview... 5 About This Document... 5 GETTING STARTED... 6 Installation... 6 Starting Reporter...
Beginners Guide to Snippet Master PRO
 Beginners Guide to Snippet Master PRO This document assumes that Snippet Master has been installed on your site. If not please contact the Bakas IT web team at webreg@bakasit.com.au. Initial Login Screen...
StitchGraph User Guide V1.8
 StitchGraph User Guide V1.8 Thanks for buying StitchGraph: the easy way to create stitch layouts for hardanger and other complex embroidery stitch types. StitchGraph is intended to allow you to create
L E S S O N 2 Background
 Flight, Naperville Central High School, Naperville, Ill. No hard hat needed in the InDesign work area Once you learn the concepts of good page design, and you learn how to use InDesign, you are limited
CREATING A POWERPOINT PRESENTATION BASIC INSTRUCTIONS
 CREATING A POWERPOINT PRESENTATION BASIC INSTRUCTIONS By Carolyn H. Brown This document is created with PowerPoint 2013/15 which includes a number of differences from earlier versions of PowerPoint. GETTING
Lesson 4 - Creating a Text Document Using WordPad
 Lesson 4 - Creating a Text Document Using WordPad OBJECTIVES: To learn the basics of word processing programs and to create a document in WordPad from Microsoft Windows. A word processing program is the
OS X keyboard shortcuts
 OS X keyboard shortcuts Summary Learn about common OS X keyboard shortcuts. A keyboard shortcut is a way to invoke a function in OS X by pressing a combination of keys on your keyboard. Original source:
Table of Contents Lesson 1: Introduction to the New Interface... 2 Lesson 2: Prepare to Work with Office
 Table of Contents Lesson 1: Introduction to the New Interface... 2 Exercise 1: The New Elements... 3 Exercise 2: Use the Office Button and Quick Access Toolbar... 4 The Office Button... 4 The Quick Access
Using Microsoft Word. Table of Contents
 Using Microsoft Word Table of Contents The Word Screen... 2 Document View Buttons... 2 Selecting Text... 3 Using the Arrow Keys... 3 Using the Mouse... 3 Line Spacing... 4 Paragraph Alignment... 4 Show/Hide
Help For TorontoMLS. Report Designer
 Report Designer Creating Report Designs... 2 Report Designer Toolbar... 6 Positioning Items... 8 Layout Basics... 11 Aligning Items... 14 Editing and Deleting Report Designs... 17 Report Designer Tips...
Excel 2003 Tutorial II
 This tutorial was adapted from a tutorial by see its complete version at http://www.fgcu.edu/support/office2000/excel/index.html Excel 2003 Tutorial II Charts Chart Wizard Chart toolbar Resizing a chart
Using Microsoft Excel
 Using Microsoft Excel Table of Contents The Excel Window... 2 The Formula Bar... 3 Workbook View Buttons... 3 Moving in a Spreadsheet... 3 Entering Data... 3 Creating and Renaming Worksheets... 4 Opening
San Pedro Junior College. WORD PROCESSING (Microsoft Word 2016) Week 4-7
 Week 4-7") WORD PROCESSING (Microsoft Word 2016) Week 4-7 Creating a New Document In Word, there are several ways to create new document, open existing documents, and save documents: Click the File menu tab and then
WORD PROCESSING (Microsoft Word 2016) Week 4-7 Creating a New Document In Word, there are several ways to create new document, open existing documents, and save documents: Click the File menu tab and then
Display Systems International Software Demo Instructions
 Display Systems International Software Demo Instructions This demo guide has been re-written to better reflect the common features that people learning to use the DSI software are concerned with. This
Microsoft Word 2007 on Windows
 1 Microsoft Word 2007 on Windows Word is a very popular text formatting and editing program. It is the standard for writing papers and other documents. This tutorial and quick start guide will help you
Introduction to Word 2010
 Introduction to Word 2010 Screen Elements 4 1 2 3 5 10 6 7 8 9 1. File Tab: The File tab will bring you into the Backstage View. The Backstage View is where you manage your files and the data about them
ChemSense Studio Client Version 3.0.7
 Quick Start Guide: ChemSense Studio Client Version 3.0.7 January 5, 2005 Comments/Questions/Bug Report? E-mail: chemsense-contact@ctl.sri.com Background The ChemSense Studio Client software supports the
Microsoft PowerPoint 2013 Beginning
 Microsoft PowerPoint 2013 Beginning PowerPoint Presentations on the Web... 2 Starting PowerPoint... 2 Opening a Presentation... 2 File Tab... 3 Quick Access Toolbar... 3 The Ribbon... 4 Keyboard Shortcuts...
DRAFT. Table of Contents About this manual... ix About CuteSITE Builder... ix. Getting Started... 1
 DRAFT Table of Contents About this manual... ix About CuteSITE Builder... ix Getting Started... 1 Setting up... 1 System Requirements... 1 To install CuteSITE Builder... 1 To register CuteSITE Builder...
button Double-click any tab on the Ribbon to minimize it. To expand, click the Expand the Ribbon button
 PROCEDURES LESSON 1: CREATING WD DOCUMENTS WITH HEADERS AND FOOTERS Starting Word 1 Click the Start button 2 Click All Programs 3 Click the Microsoft Office folder icon 4 Click Microsoft Word 2010 1 Click
Creating a Website with Publisher 2016
 Creating a Website with Publisher 2016 Getting Started University Information Technology Services Learning Technologies, Training & Audiovisual Outreach Copyright 2017 KSU Division of University Information
DOING MORE WITH WORD: MICROSOFT OFFICE 2013
 DOING MORE WITH WORD: MICROSOFT OFFICE 2013 GETTING STARTED PAGE 02 Prerequisites What You Will Learn USING MICROSOFT WORD PAGE 03 Viewing Toolbars Adding and Removing Buttons MORE TASKS IN MICROSOFT WORD
InDesign Part II. Create a Library by selecting File, New, Library. Save the library with a unique file name.
 InDesign Part II Library A library is a file and holds a collection of commonly used objects. A library is a file (extension.indl) and it is stored on disk. A library file can be open at any time while
Do It Yourself Website Editing Training Guide
 Do It Yourself Website Editing Training Guide Version 3.0 Copyright 2000-2011 Sesame Communications. All Rights Reserved. Table of Contents DIY Overview 3 What pages are editable using the DIY Editing
Understanding Word Processing
 Understanding Word Processing 3.0 Introduction In this chapter you are going to learn how to create a simple memo or note or a complex and complicated multi column business document using word processing
FM 4/100 USB Software for OSX
 FM 4/100 USB Software for OSX JLCooper makes no warranties, express or implied, regarding this software s fitness for a particular purpose, and in no event shall JLCooper Electronics be liable for incidental
Introducing Gupta Report Builder
 Business Reporting Chapter 1 Introducing Gupta Report Builder You can use Report Builder to design reports. This chapter describes: Our approach to building reports. Some of the reports you can build.
Microsoft Excel 2010
 Microsoft Excel 2010 omar 2013-2014 First Semester 1. Exploring and Setting Up Your Excel Environment Microsoft Excel 2010 2013-2014 The Ribbon contains multiple tabs, each with several groups of commands.
NoteList 3.3 User Guide
 ! NoteList 3.3 User Guide We Make Software - TensionSoftware.com 2005-2017 Tension Software all rights reserved. Every effort has been made to ensure that the information in this manual is accurate. Tension
11.1 Create Speaker Notes Print a Presentation Package a Presentation PowerPoint Tips... 44
 Contents 1 Getting Started... 1 1.1 Presentations... 1 1.2 Microsoft Office Button... 1 1.3 Ribbon... 2 1.4 Mini Toolbar... 2 1.5 Navigation... 3 1.6 Slide Views... 4 2 Customize PowerPoint... 5 2.1 Popular...
Windows Computer A to Z Shortcut Key list with PDF
 Windows Computer A to Z Shortcut Key list with PDF In the Computer world, a keyboard shortcut is a combination of one or more command to execute a particular action. These shortcuts are really helpful
Microsoft Excel Important Notice
 Microsoft Excel 2013 Important Notice All candidates who follow an ICDL/ECDL course must have an official ICDL/ECDL Registration Number (which is proof of your Profile Number with ICDL/ECDL and will track
Publisher 2010 Foundation. Publisher 2010 Foundation Level SAMPLE
 Publisher 2010 Foundation Publisher 2010 Foundation Level Microsoft Publisher 2010 Foundation - Page 2 1995-2012 Cheltenham Courseware Pty. Ltd. All trademarks acknowledged. E&OE. No part of this document
Word Processing. 2 Monroe County Library System
 2 Monroe County Library System http://monroe.lib.mi.us Word Processing Word Pad Quick Guide... 4 Help Menu... 6 Invitation... 7 Saving... 12 Printing... 13 Insert a Picture... 14 Saving to a CD... 15 In
Software User's Guide
 Software User's Guide The contents of this guide and the specifications of this product are subject to change without notice. Brother reserves the right to make changes without notice in the specifications
HYPERSTUDIO TOOLS. THE GRAPHIC TOOL Use this tool to select graphics to edit. SPRAY PAINT CAN Scatter lots of tiny dots with this tool.
 THE BROWSE TOOL Us it to go through the stack and click on buttons THE BUTTON TOOL Use this tool to select buttons to edit.. RECTANGLE TOOL This tool lets you capture a rectangular area to copy, cut, move,
PowerPoint 2007 Cheat Sheet
 ellen@ellenfinkelstein.com 515-989-1832 PowerPoint 2007 Cheat Sheet Contents Templates and Themes... 2 Apply a corporate template or theme... 2 Format the slide master... 2 Work with layouts... 3 Edit
Using SymPrint to Make Overlays, Templates & More...
 Welcome to SymPrint SymPrint is an easy-to-use tool for creating communication overlays, worksheets, classroom activities and more using a modern toolbar and common-sense interface modeled after the programs
Reference Services Division Presents WORD Introductory Class
 Reference Services Division Presents WORD 2010 Introductory Class CLASS OBJECTIVES: Navigate comfortably on a Word page Learn how to use the Ribbon tabs and issue commands Format a simple document Edit,
4) Study the section of a worksheet in the image below. What is the cell address of the cell containing the word "Qtr3"?
 Study the section of a worksheet in the image below. What is the cell address of the cell containing the word Qtr3?") Choose The Correct Answer: 1) Study the highlighted cells in the image below and identify which of the following represents the correct cell address for these cells: a) The cell reference for the selected
Choose The Correct Answer: 1) Study the highlighted cells in the image below and identify which of the following represents the correct cell address for these cells: a) The cell reference for the selected
Excel Select a template category in the Office.com Templates section. 5. Click the Download button.
 Microsoft QUICK Excel 2010 Source Getting Started The Excel Window u v w z Creating a New Blank Workbook 2. Select New in the left pane. 3. Select the Blank workbook template in the Available Templates
EDITOR GUIDE. Button Functions:...2 Inserting Text...4 Inserting Pictures...4 Inserting Tables...8 Inserting Styles...9
 EDITOR GUIDE Button Functions:...2 Inserting Text...4 Inserting Pictures...4 Inserting Tables...8 Inserting Styles...9 1 Button Functions: Button Function Display the page content as HTML. Save Preview
Board Viewer INSTRUCTION MANUAL
 Board Viewer INSTRUCTION MANUAL CheckSum, Inc. P.O. Box 3279 Arlington, WA 98223 (360) 435-5510 Fax (360) 435-5535 Web Site: www.checksum.com P/N 4400-048 Revision 3/2003 Copyright 1990-2003, CheckSum,
Chapter 2 Using Slide Masters, Styles, and Templates
 Impress Guide Chapter 2 Using Slide Masters, Styles, and Templates OpenOffice.org Copyright This document is Copyright 2007 by its contributors as listed in the section titled Authors. You can distribute
NiceForm User Guide. English Edition. Rev Euro Plus d.o.o. & Niceware International LLC All rights reserved.
 www.nicelabel.com, info@nicelabel.com English Edition Rev-0910 2009 Euro Plus d.o.o. & Niceware International LLC All rights reserved. www.nicelabel.com Head Office Euro Plus d.o.o. Ulica Lojzeta Hrovata
VHSE - COMPUTERISED OFFICE MANAGEMENT MODULE III - Communication and Publishing Art - PageMaker
 INTRODUCTION : It is one Adobe PageMaker 7.0 software is the ideal page layout program for business, education, and small- and home-office professionals who want to create high-quality publications such
Software User's Guide
 Software User's Guide Brother QL-series The contents of this guide and the specifications of this product are subject to change without notice. Brother reserves the right to make changes without notice
SETTING UP A. chapter
 1-4283-1960-3_03_Rev2.qxd 5/18/07 8:24 PM Page 1 chapter 3 SETTING UP A DOCUMENT 1. Create a new document. 2. Create master pages. 3. Apply master pages to document pages. 4. Place text and thread text.
Quick Reference Card Business Objects Toolbar Design Mode
 Icon Description Open in a new window Pin/Unpin this tab Close this tab File Toolbar New create a new document Open Open a document Select a Folder Select a Document Select Open Save Click the button to
SliceAndDice Online Manual
 Online Manual 2001 Stone Design Corp. All Rights Reserved. 2 3 4 7 26 34 36 37 This document is searchable online from s Help menu. Got an image that you want to use for navigation on your web site? Want
Impress Guide Chapter 11 Setting Up and Customizing Impress
 Impress Guide Chapter 11 Setting Up and Customizing Impress This PDF is designed to be read onscreen, two pages at a time. If you want to print a copy, your PDF viewer should have an option for printing
Software User's Guide
 Software User's Guide The contents of this guide and the specifications of this product are subject to change without notice. Brother reserves the right to make changes without notice in the specifications
WORD (2010) TIPS & TRICKS. Gail Weiss
 TIPS & TRICKS. Gail Weiss") WORD (2010) TIPS & TRICKS Gail Weiss Word (2010) Tips & Tricks Overview: Here are some tips and tricks to use in WORD to make you more productive. TABLE OF CONTENTS CUSTOMIZING THE QUICK ACCESS TOOLBAR...
WORD (2010) TIPS & TRICKS Gail Weiss Word (2010) Tips & Tricks Overview: Here are some tips and tricks to use in WORD to make you more productive. TABLE OF CONTENTS CUSTOMIZING THE QUICK ACCESS TOOLBAR...
SPARK. User Manual Ver ITLAQ Technologies
 SPARK Forms Builder for Office 365 User Manual Ver. 3.5.50.102 0 ITLAQ Technologies www.itlaq.com Table of Contents 1 The Form Designer Workspace... 3 1.1 Form Toolbox... 3 1.1.1 Hiding/ Unhiding/ Minimizing
Publisher 2013 Foundation SAMPLE
 Publisher 2013 Foundation Publisher 2013 Foundation Microsoft Publisher 2013 Foundation - Page 2 2013 Cheltenham Group Pty. Ltd. All trademarks acknowledged. E&OE. No part of this document may be copied