2013 Eon Technologies. 24 Banking Business U S E R G U I D E
|
|
|
- Brenda Barker
- 6 years ago
- Views:
Transcription


1 24 Banking Business U S E R G U I D E
2 CONFIDENTIALITY STATEMENT All materials on this document are protected as the copyrights, trademarks and/ or other intellectual properties owned by BCR Chisinau S.A., unless noted otherwise. All rights not expressly granted are reserved BCR Chisinau S.A. I
3 Table of Contents 1 Introduction Purpose Quick Reference Account Information Payments Salary Project Catalogs User Administration Reports and Enquiries Security Solution Overview Pre-requisites for using 24 Banking Login Services Logon Logon with Basic security Logon with Digital Signature security Logon with One Time Password security Forgot Password First Time Login(FTL) FTL for the user with Basic Security or with One Time Password security FTL for the user with Digital Signature Security Home Page Logout Account Information My Accounts Account summary Account Statement Request Account Statement Blocked Accounts Assign Account Nickname Customer Documents Payments Domestic Payment MDL Buy Currency Sell Currency Convert Currency International Payments Inter-Account Transfer Maintain Payments Instruction Templates Instruction Status/ History Salary Project Payroll Maintain Employee List Catalogs Setup Ordinary Beneficiary Maintain Ordinary Beneficiary Setup Treasury Beneficiary Maintain Treasury Beneficiary Setup Overseas Beneficiary II
4 8.6 Maintain Overseas Beneficiary Business Contacts User Administration Instruction Authorization Reports and Enquiries Exchange Rates Resource Privilege Report Authorisation Rules Report Requests Security Change Password Certificate Requests Upload Certificate Messages Appendix A. Session Management B. FAQ B.1. What should I do if I forget my login password B.2. What should I do if I have lost my smart card B.3. What should I do if I forget password of digital certificate B.4. What should I do if I have locked my 24 Banking facility B.5. What should I do if I my digital certificate is expired or revoked C. Setup Requirements for Digital Signature III
5 1 Introduction Internet Banking application 24 Banking for Business Customers offered by BCR Chisinau S.A. (BCRC) offers a comprehensive range of banking transactions in a highly secured environment and is implemented on the basis of BankFlex TM Customer undertakes to ensure the following requirements for computers to access and use the system "24 Banking": a computer with Microsoft Windows operating system minimum version 7; Internet connection with a minimum speed of 1024 kb/s for each user of the system; Internet Explorer browser minimum version 7, Firefox minimum version 3.6 or GoogleChrome. Applications required for proper operation of 24 Banking: - Minumum Java JRE 7.0 (Java Runtime Enviroment) - Minimum FlashPlayer 11.8, including FalshPlugin installed on the used browser 1.1 Purpose This document contains the instruction to run 24 Banking application implemented for BCRC Business clients. 1
6 2 Quick Reference This section gives a quick overview of the services of 24 Banking for business users. 2.1 Account Information Click Account Information -> My Accounts o Allows Business 24 Banking customers to view its own banking information, in case any contra party wants to make a transfer in the customer behalf. Click Account Information -> Account Summary o Allows Business 24 Banking customers to view summary of all accounts. Click Account Information -> Account Statement o Allows Business 24 Banking customers to view transaction history of any one of their accounts other than credit card account Click Account Information -> Request Account Statement o Allows Business 24 Banking customers to request for the account statement for current day or for a previous period that is within 6 months period. Click Account Information -> Blocked Accounts o Allows Business 24 Banking customers to view the details of their blocked accounts. Click Account Information -> Assign Account Nickname o Allows Business 24 Banking customers to assign account nicknames to their operational accounts only. Click Account Information -> Customer Documents o Allows Business 24 Banking customers to download documents assigned by bank to their profile. 2.2 Payments Click Payments -> Domestic Payment - MDL o Make payments to domestic beneficiaries, either ordinary or treasury. Click Payments -> Buy Currency o Allows business 24 banking user to buy currency. Click Payments -> Sell Currency o Allows business 24 banking user to sell currency. Click Payments -> Convert Currency o Allows business 24 banking user to convert currency. Buy and sell account are non-mdl ones. Click Payments -> International Payments o Make payments to international beneficiaries or import international payments from the accounting system Click Payments -> Inter-Account Transfer o Allows Business 24 Banking customers to transfer funds among their accounts. Click Payments -> Maintain Payments o Allows business 24 Banking customers to maintain payments. Click Payments -> Instruction Templates o Allows view/amend instruction templates, making payments using templates and delete unnecessary templates. Click Payments -> Instruction Status/History o Enables the Business Banking user to view the details of instructions set up by the user. 2
7 2.3 Salary Project Click Salary Project -> Payroll o Create Payroll instructions which can be either Account number driven or Account categories driven. Click Salary Project -> Maintain Employee List o Allows the business user to create or maintain their employee s lists in various groups of their choice, such as departments etc. 2.4 Catalogs Click Catalogs -> Setup Ordinary Beneficiary o Allows the business user to setting up new ordinary beneficiary for the company. Click Catalogs -> Maintain Ordinary Beneficiary o Allows the business user to maintain the available ordinary beneficiaries. Click Catalogs -> Setup Treasury Beneficiary o Allows the business user to setting up new budgetary or treasury beneficiary for the company. Click Catalogs -> Maintain Treasury Beneficiary o Allows the business user to maintain the available budgetary or treasury beneficiaries. Click Catalogs -> Setup Overseas Beneficiary o Allows the business user to setup beneficiaries for International Payments. Click Catalogs -> Maintain Overseas Beneficiary o Allows the business user to maintains beneficiaries for International Payments. Click Catalogs -> Business Contacts o Allows customer to create responsible person with whom bank can enquire. 2.5 User Administration Click User Administration ->Instruction Authorisation o Authorise or De-authorise instructions waiting for user s authorisation 2.6 Reports and Enquiries Click Reports and Enquiries -> Exchange Rates o Allows Business Banking customers to view the latest exchange rate to be applied for performing financial transactions Click Reports and Enquiries -> Resource Privilege Report o View Resource Privilege Report to know the resources and transactions assigned to each business user Click Reports and Enquiries -> Authorisation Rules Report o Authorisation Rules report to know the authorisation rules defined for each authorisers Click Reports and Enquiries -> Requests o Allows Business 24 Banking customers to view the details of the various requests made by him 2.7 Security Click Security -> Change Password o Allows Business Banking customers to change their password. Click Security -> Certificate Requests o Allows Business Banking customers to request certificate. 3
8 Click Security -> Upload Certificate o Allows uploading your digital certificate file. The file to upload should contain the public key of your digital certificate. The extension of the file is.cer. 3 Solution Overview This 24 Banking solution enables you to view the current state of your company accounts, to get account statements in various formats, to make transfers between accounts in national currency and foreign currency, to make various domestic and international payments, to transfer your company employee salaries, to communicate with the bank through secure messages and many other services, all of which can be performed in your office, fully online, without having to go to Bank offices. 3.1 Pre-requisites for using 24 Banking To use 24 Banking, following are required: 1. An Internet Explorer browser 8.0 or Firefox 3.6. Solution is recommended at a screen resolution of 1280x Customer should have a URL or a link on a existing bank s website using which they will access Business 24 banking website. It sets the working language throughout the site, tap the appropriate language flag, located in the top right of the site: Romanian - Russian - English - 3. Customer who is expected to use Digital certificates (issues by BCRC or any other 3 rd party) should have certificates on their workstation or on secure device. 4. For using 24 Banking application customer needs to perform First Time Login (FTL). For this do the following a. On the login screen, click the highlighted hyperlink in the text "If you are a first time user, please click here to complete the registration." b. As part of first time login, depending on security mechanism agreed with the bank in your profile, you will be prompted to setup one of the following mechanisms. i. Basic 1. You will be required to input one-time password which will be sent by Bank as part of the process on your mobile/ as per your choice given to the bank. ii. Digital Signature 1. You will be required to upload the digital certificate received from the 3 rd party. iii. Certificate Request 1. If Customer does not have digital certificate then To request the digital certificate, customer needs to select 4

9 Certificate Request security on login page and provide other credentials to enter into the application. 2. Customer will be provided with access to request & upload certificate services only. Please refer section 12.2 Certificate Requests and section 12.3 Upload Certificate. After uploading the certificate, they need to logout and login again to access the full applicable functionality c. Refer to section 5.3 of First Time Login for complete details of First time login process. 5. Once the first time registration process is complete along with digital certificate upload. Customer can access the services as per the assigned privileges. 4 Login Services 4.1 Logon This service will logon in to 24 Banking using the steps as mentioned below: Open Internet Explorer Enter the URL provided to access the application in the address Bar. This will open bank s website page. (The below screen is just an illustration and bank needs to decide the placeholder of launching the application from Bank s website). On the top menu bar of the page, please specify the language of choice by selecting the flag of that country (see English & Romania flags in green circle in screen above) and click Business Internet Banking link (see in orange circle in screen above) to open 24 Banking application for business customers. 5

10 The login page will open. You can login using any of the authentication mechanism assigned to you by bank or your corporate administrator Logon with Basic security Specify the user login/security credentials (To login as user with normal security, select Basic in Security dropdown.) either using keyboard attached to your computer or our On-Screen Keyboard of that user. On the top, please specify the language of choice by selecting the flag of that country. This service will logon in to 24 Banking using the steps as mentioned below: Other: Click Clear button to clear the contents of the text boxes. The user will get locked if the number of unsuccessful login attempts exceeds the number of tries allowed for login as defined in the configuration. 6

11 4.1.2 Logon with Digital Signature security To login as user with Digital Security, select Digital Certificate in Security. The login page will open with Digital Certificate screen. For security reasons, the use of digital signature requires Java JRE on your machine. Please refer Appendix C Setup Requirements for Digital Signature in user guide. Enter value of Company Id. Enter value of User Logon Id. Specify the location of digital signature There are 2 options to provide the digital signature. File Browser based digital signature load select File option and click Browse. Locate the certificate file and specify the certificate password 7
12 Secure Device based digital signature load select etoken / CryptoCard option. This option is applicable to the users who have digital signature available in secure device. You should have completed the steps mentioned to set up and configure the use of secure device according to the documentation on how to use etoken / CryptoCard. In IE, this option is visible when the required software has been installed. In FireFox, this option can be used when the configuration of secure device is complete. On selecting this option when the secure device is inserted in the system, you will be provided the list of available digital signature on the device and to provide the password. The password may not be asked if it has been provided earlier within the same browser window and this is browser specific behaviour. FireFox asks to provide password twice (one before selection of digital signature and one after selection) while IE asks once only. Other: For more details, please refer to the documentation downloaded on the use of secure device. The same documentation can also be downloaded through Miscellaneous Download etoken / CryptoCard Reader option. Password: Enter value of Logon Password. Click on Login button. Click Clear button to clear the contents of the text boxes. The user will get locked if the number of unsuccessful login attempts exceeds the number of tries allowed for login as defined in the configuration Logon with One Time Password security To login as user with One Time Password Security, select One Time Password in Security. 8
13 Enter value of Company Id Enter value of User Logon Id Enter value of Password Click on Login button. An OTP is sent to you either by SMS, or by , or both methods (in parts), depending on password receiving preferred method set for your login account. It will allow you to enter the One Time Password as shown below. 9

14 Enter value of One Time Password Click on Submit button. 4.2 Forgot Password Click Forgot Password button on the Login screen if the user has forgot the login Password or digital certificate password. If user has forgotten the login password then perform the below steps 10

15 Enter value of Company ID. Enter value of User Logon Id Enter value of First Name. Enter value of Last Name. Enter value of Identification No. Select Login Password in Type of Password drop down Click on Submit button. The system generates the password and sends it either by SMS, or by , or both methods (in parts), depending on password receiving preferred method set for your login account. If user is subscribed for Digital Certificate security and has forgotten the digital certificate password then perform the below steps 11
16 Enter value of Company ID. Enter value of User Logon Id Enter value of First Name. Enter value of Last Name. Enter value of Identification No. Select Certificate Password in Type of Password drop down Click on Submit button. The system generates a password and sends it either by SMS, or by , or both methods (in parts), depending on password receiving preferred method set for your login account. Specify the received password in the next screen 12

 You can select any of the authentication mechanism that is assigned to you by bank or your corporate administrator to perform first time login.")
17 If the password is verified then the following information message is given to user. The user can now login using Certificate Request option in the Security drop down on the login page. After login, the user will only be provided with access to request & upload certificate services only. Please refer section 12.2 Certificate Requests and section 12.3 Upload Certificate in this guide for steps. After uploading the certificate, you need to logout and login again using the new certificate to access the full applicable functionality. 4.3 First Time Login(FTL) You can select any of the authentication mechanism that is assigned to you by bank or your corporate administrator to perform first time login. If you choose 24 Banking or OTP now for first time login and wish to use DS later for login, then you would need to upload digital certificate from 24 banking. And if you wish to use smart card for login, you would need to register smart card using Re-register Smart Card link on Login page. 13
18 4.3.1 FTL for the user with Basic Security or with One Time Password security For doing the first time login for the user with normal or One Time Password Security, Click the click here hyperlink in the text "If you are a first time user, please click here to complete the registration." from the login screen to complete the registration process. Following screen will be displayed: Enter value of Company Id. Enter value of User Logon Id. Enter value of First Name. Enter value of Last Name. Enter value of Identification No. Click on Submit button. The system generates the password for first time login and sends it either by SMS, or by , or both methods (in parts), depending on password receiving preferred method set for your login account and following screen will be displayed. 14


19 Enter value of OTP generated by system received by /sms. Enter value of New Password. The password should be as per Bank s password policy. Enter value of Confirm New Password. Click Next button. Following screen will be displayed: 15

20 4.3.2 FTL for the user with Digital Signature Security For doing the first time login for the user with Digital Signature Security, Click the click here hyperlink in the text "If you are a first time user, please click here to complete the registration." from the login screen to complete the registration process. Following screen will be displayed: Enter value of Company Id. Enter value of User Logon Id. Enter value of First Name. Enter value of Last Name. Enter value of Identification No. Click on Submit button. The system generates the password for first time login and sends it either by SMS, or by , or both methods (in parts), depending on password receiving preferred method set for your login account and following screen will be displayed: 16

21 Enter value of OTP generated by system received by /sms. Enter value of New Password. The password should be as per Bank s password policy. Enter value of Confirm New Password Customer already has digital certificate Select the Upload Digital Signature option Select the Upload Digital Signature option - if you already have the digital signature available with you, you can choose to upload the file enabling you to logon to I24 Banking system. It also allows you to download the software to use etoken or CryptoCard secure devices in IE as well as documentation on how to configure and use the secure device for IE and FireFox. Click Next button. Following screen will be displayed: 17
 of your digital certificate Click on Read Certificate button. If the file is valid then the cerificate details will be presented to you.")
22 Click Browse to locate the file to upload. Choose the file containing the public key (the file with extension.cer,.crt,.pem) of your digital certificate Click on Read Certificate button. If the file is valid then the cerificate details will be presented to you. Click on Upload button to upload the digital certificate. The following screen will be displayed. 18

23 If the uploaded certificate is issued by 3rd party then the certificate will be submitted for Bank's approval. The customer will be notified when their certificate is approved or denied. Once approved, customer will be able to use the certificate for login and authorisation purpose. In case the certificate is issued by the Bank, the first time login process is successful and account is activated. The following screen opens on click of OK button. 19

24 Customer has no digital certificate Proceed without selecting the Upload Download Software option. The first time login process is successful and account is activated. The customer would be able to use the application only after uploading the digital certificate. To request the digital certificate, customer needs to select Certificate Request security on login page and provide other credentials to enter into the application. 20
25 Customer will be provided with access to request & upload certificate services only. Please refer section 12.2 Certificate Requests and section 12.3 Upload Certificate. After uploading the certificate, they need to logout and login again to access the full applicable functionality. 4.4 Home Page After the successful logon, the user will be presented with the services and the user s homepage in the work area. Home page provides the following information/functionality. User s last login date and time. Inbox Messages. 21

26 Home link in the top bar allows the User to come to Home Page from anywhere in the application. The links on top bar such as Help, FAQ and Contact Us, and on bottom frame such as Privacy, Online Security, Terms & Conditions and Disclaimer leads to static page. 4.5 Logout This service allows 24 Banking user to logout using the steps as mentioned below: On Logout page information about Duration, Login, Logout date and time are displayed. Click Close button to close the browser window. 22
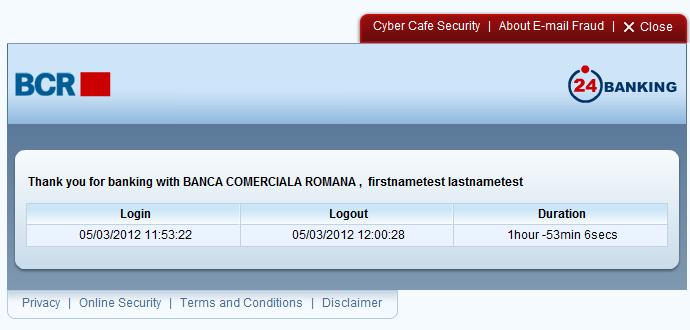
27 23


28 5 Account Information 5.1 My Accounts This service allows 24 Banking customers to view its own banking information, in case any contra party wants to make a transfer in the customer behalf. As a customer may have more than one current/card account and these may be in different currencies, so the accounts will be grouped by Currency. At the same time, the user will be provided with the list of Current Accounts and then with the of Cards accounts. Click on My Accounts sub option of the Account Information menu. Following screen will be shown. 5.2 Account summary This service allows 24 Banking customers to view summary of all accounts. To view summary of all accounts, follow the steps as mentioned below: 24

29 From Menu: Click on Account Information menu. Click on Account Summary sub option. Following screen will be displayed. To view the transaction done on the particular account click on the link on the account number. Following popup will be shown: 25


30 To download available transaction history, select the format/type of file to download into and click Download button. Transactions can be exported in various formats by clicking the export button. Click Cross button to close the opened popup page and navigate back to Account Summary. Click the tabs for other accounts type such as deposit, loan and business cards to view other accounts. On click of Deposit Accounts tab following screen will be shown: To view the Deposit Repayment Schedule of a particular account click on the link on the account number. Following popup will be shown: 26
31 Click Cross button to close the opened popup page and navigate back to Account Summary. On click of Loan Accounts tab following screen will be shown: 27

32 To view the Loan Repayment Schedule of a particular account click on the link on the account number. Following popup will be shown: 28

33 Click Cross button to close the opened popup page and navigate back to Account Summary. On click of Business Cards tab following screen will be shown: 29


34 To view the transaction done during the current day on the particular business card account click on the link on the account number. Following popup will be shown: To download available transaction history, select the format/type of file to download into and click Download button. 30

35 Transactions can be exported in various formats by clicking the export button. Click Cross button to close the opened popup page and navigate back to Account Summary. 5.3 Account Statement This service allows 24 Banking customers to view transaction history of any one of their accounts other than credit card account. Transaction History represents the history of financial transactions on an account for the specified period (configurable to 5 months). The customer can also view or download or print the transaction history onto his computer in text, excel or PDF format. To perform search on transaction history, follow the steps as mentioned below: From Menu: Click on Account Information menu. Click on Account Statement sub option. Following screen will be displayed. Specify the following Search Details Select Account Number to view the transaction history within the date range, say for 48 months, specify o From Date: Not earlier than 48 months o To Date: Not later than current date o Difference between the dates should not be more than 31 days. Clicks Submit Button to view the details of available transaction history as per the search criteria as shown in the following screen : 31


36 Click on the debit or credit amount hyperlink to view the details of the selected account number. Following pop up screen will be displayed: 32
37 33


38 Click on Print button to print the transaction details. File Download window will be displayed with Open, Save and Cancel buttons. Click Open button on File Download window to view the file in appropriate viewer based on the selected Statement format. Click Save button on File Download window to save the file in local folder of the file system. Click Cancel button to cancel the file download operation. Transactions can be exported in various formats by clicking the export button. 5.4 Request Account Statement This service allows Business 24 Banking customers to request for the account statement for current day or for a previous period that is within 6 months period From Menu: Click on Account Information menu. Click on Request Account Statement sub option. Following screen will be displayed. Specify the following details Specify Account Numbers for which account statements needs to be requested within the date range, say for 6 months, specify o From Date: Not earlier than 6 months o To Date: Not later than current date o Difference between the dates should not be more than 30 days. Clicks Submit Button to process the request. Click Close button to close the opened page and navigate back to Home Page Click Clear to clear the details entered. 34

39 5.5 Blocked Accounts This service allows 24 Banking customers to view the details of their blocked accounts. An account may be blocked by many institution for different reasons. One row per such blocking will appear for each account. Accounts will be grouped by currency. The information will be displayed in the descending order of the Blocking date. Click on Blocked Accounts sub option of the Account Information menu. Following screen will be shown. 5.6 Assign Account Nickname This service allows 24 Banking customers to assign account nicknames to their operational accounts only. The nickname helps customers to identify their accounts easily. The account nickname is unique for every account, i.e. no two account of a customer can have the same nickname. From Menu: Click on Account Information menu. Click on Assign Account Nickname sub option. Following screen will be displayed. 35

40 Specify the following details Check the account number for which nick name needs to be specified. Specify the Nick Name Clicks Submit Button to process the request. Click Cancel to cancel the Account Nick Name operation to and navigate back to Home Page. 5.7 Customer Documents This service allows 24 Banking customers to download the documents attached to their profile. From Menu: Click on Account Information menu. Click on Customer Documents sub option. Following screen will be displayed. Specify the date range for which customer needs to download their documents. Clicks Search Button to view the list of customer documents available as per the search criteria as shown in the following screen: 36


41 Select the document and click download button. The following pop-up will appear for user to open or the save the document file. 37

 To make payment against an invoice i.")
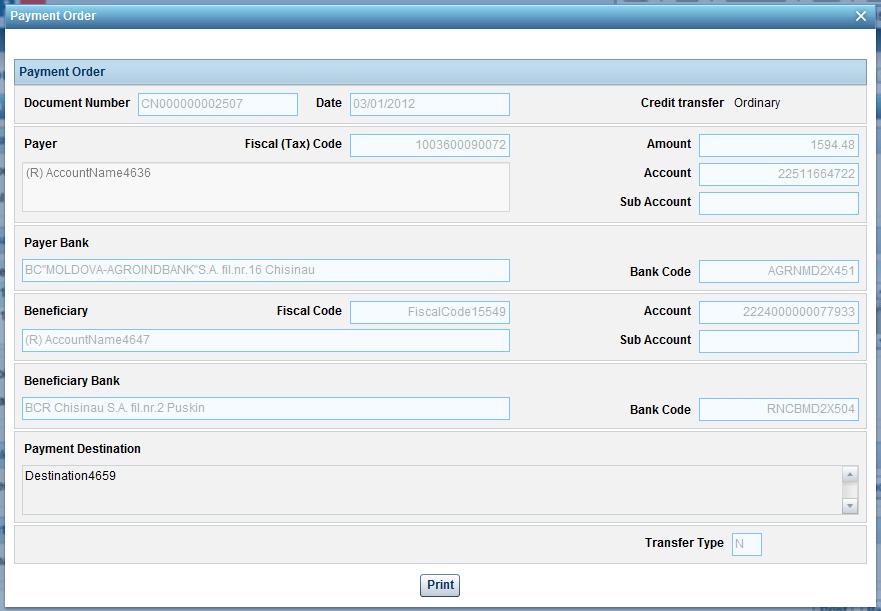
42 6 Payments 6.1 Domestic Payment MDL This service allows 24 Banking customers to create instructions to the company defined beneficiaries or bank defined beneficiaries. To perform Domestic Payment MDL, follow the steps as mentioned below: From Menu: Click on Payments menu. Click on Domestic Payment MDL sub option. Following screen will be displayed. User can make payment to either ordinary beneficiary or budgetary beneficiary, by selecting the respective radio buttons. Alternatively user can also create instruction using option for Import file a) To make payment against an invoice i. Select Import File and browse and specify the file in which invoice details are placed. ii. Click Import File radio button following screen will be displayed 38

 To make payment to a treasury beneficiary i. Select the Treasury radio button ii. Click Submit button.")
43 iii. Browse the file to be imported. iv. Click Submit button. System will validate the file format and data contents. v. Following screen will be displayed vi. vii. To make payment select instruction and Click Submit to proceed for confirmation of the instruction To view the full detail of the invoice user can click the hyper link at the instruction no and following screen will be displayed to the user. b) To make payment to a treasury beneficiary i. Select the Treasury radio button ii. Click Submit button. Following screen will be displayed. 39


44 iii. iv. Click the search button to retrieve all the treasury beneficiaries or can specify the search to retrieve particular beneficiary. Following screen will be displayed. v. User can select the one beneficiary and click next button. Following screen will be displayed 40
45 Specify the following details : o Edit Document Number, if required o Edit Payment Date, if required o Select Payer Account Number o Enter Sub-division code if required o Edit the Amount if required o Edit Payment Type if required o Enter any Payment destination to appear on Account Transaction History o Select the VAT indicator if required o Enter the VAT percentage if required o Enter the IVSP if required. Check the Save As Template option if the similar payment details are required for future use o Specify the Template Name o Specify if the template is for own purpose or available for other business users as well Click Save to save the instruction for future use Click Submit to proceed for confirmation of the instruction. Note: The instruction is now ready to authorise. c) To make payment to an ordinary beneficiary vi. vii. Select the Ordinary radio button Click Submit button. Following screen will be displayed. viii. ix. Click the search button to retrieve all the ordinary beneficiaries or can specify the search to retrieve particular beneficiary. Following screen will be displayed. 41


46 x. User can select the one beneficiary and click next button. Following screen will be displayed Specify the following details : o Edit Document Number, if required o Edit Payment Date, if required o Select Payer Account Number o Edit the Amount if required o Edit Payment Type if required o Enter any Payment destination to appear on Account Transaction History o Select the VAT indicator if required o Enter the VAT percentage if required o Enter the IVSP if required. Check the Save As Template option if the similar payment details are required for future use o Specify the Template Name o Specify if the template is for own purpose or available for other business users as well Click Save to save the instruction for future use 42
47 Click Submit to proceed for confirmation of the instruction. Note: The instruction is now ready to authorise. 43

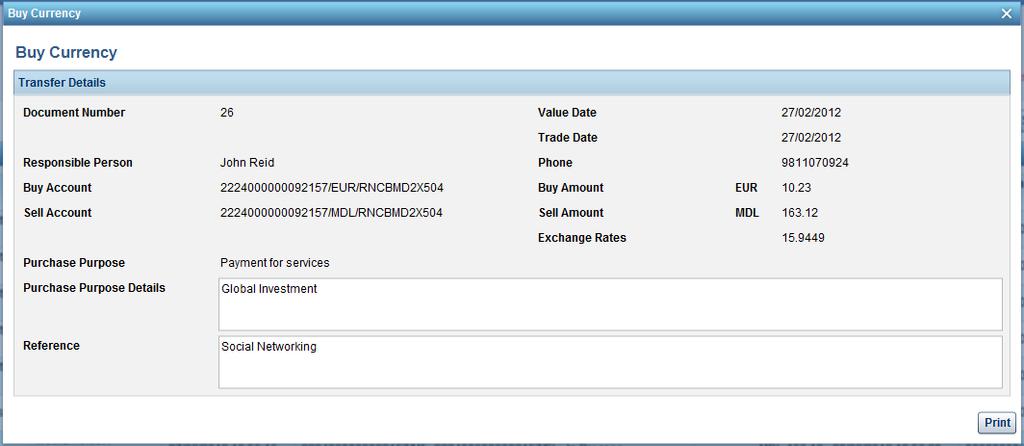
48 6.2 Buy Currency This service allows business 24 banking user to buy currency. The currency can be bought from MDL accounts. The Foreign currencies cannot be brought from any other currency. Click Buy Currency sub item from Payments menu item. Following screen will be displayed. Specify the following details o o o o o o o o o o o Edit Document Number, if required Edit Value Date, if required Enter the responsible person or select responsible person Enter the telephone number Select the Buy Account Select the Sell Account Enter the Buy Amount. Click the apply button to populate the exchange rates and sell amount. Select Purchase Purpose Enter Purchase purpose details Enter the Reference 44

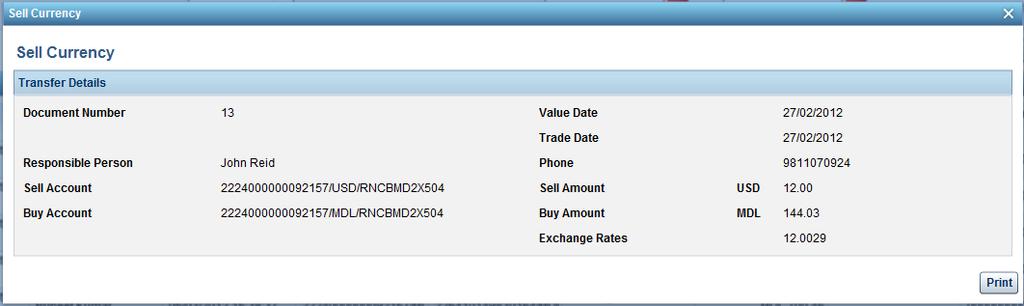
49 Click Save if you want to save the instruction for future use and exit Click Submit to proceed for confirmation of the instruction. Check the Save As Template option if the similar payment details are required for future use o o Specify the Template Name Specify if the template is for own purpose or available for other business users as well Click Cancel to cancel the Buy currency operation and navigate to the home page. Note: The instruction is now ready to authorise. 6.3 Sell Currency This service allows 24 Banking user to sell currency. The currency can be sold to MDL accounts. Click Sell Currency sub item from Payments menu item. Following screen will be displayed. 45


50 Specify the following details o o o o o o o o Edit Document Number, if required Edit Value Date, if required Enter the responsible person or select responsible person Enter the telephone number Select the Sell Account Select the Buy Account Enter the Sell Amount. Click the apply button to populate the exchange rates and buy amount. 46

51 Click Save if you want to save the instruction for future use and exit Click Submit to proceed for confirmation of the instruction. Check the Save As Template option if the similar payment details are required for future use o o Specify the Template Name Specify if the template is for own purpose or available for other business users as well Click Cancel to cancel the Sell currency operation and navigate to the home page. Note: The instruction is now ready to authorise. 6.4 Convert Currency This service allows 24 Banking user to convert currency. Buy and sell account are non-mdl ones. Click Convert Currency sub item from Payments menu item. Following screen will be displayed. Specify the following details o o o o o o o o o Edit Document Number, if required Edit Value Date, if required Enter the responsible person or select responsible person Enter the telephone number Select the Buy Account(Buy account (FX) is account of buying currency) Select the Sell Account(Sell account (FX) is the account to transfer funds from) Enter the Buy Amount. Enter Exchange rate. Click the apply button to populate the sell amount. 47

52 o o o Select Purchase Purpose Enter Purchase purpose details Enter the Reference Click Save if you want to save the instruction for future use and exit Click Submit to proceed for confirmation of the instruction. Check the Save As Template option if the similar payment details are required for future use o o Specify the Template Name Specify if the template is for own purpose or available for other business users as well Click Cancel to cancel the convert currency operation and navigate to the home page. Note: The instruction is now ready to authorise. 6.5 International Payments This service allows 24 Banking customers to create instructions for overseas beneficiaries. To perform International Payment, follow the steps as mentioned below: 48


53 From Menu: Click on Payments menu. Click on International Payment sub option. Following screen will be displayed. User can make international payment either by selecting the beneficiary or through import file. To make payment by Beneficiary Search. Click the Beneficiary Search radio button. Following screen will be displayed Click New to create overseas beneficiary. Setup Beneficiary- Overseas screen will be displayed. Click Search button to retrieve all beneficiaries alternatively user can retrieve the particular beneficiary by specifying the beneficiary name and account number. Following screen will be displayed Select specific beneficiary and click next button. Following screen will be displayed 49
 o Enter the Description of operation(optional) Check the Save As Template option if")
54 Specify the payment details o Edit Document Number, if required o Edit Payment Date, if required o Select Payer Account Number o Enter the Amount o Select the Commission type o Browse the contract document o Enter Payment details to appear on Account Transaction History o Enter the Other Information(Optional) o Enter the Description of operation(optional) Check the Save As Template option if the similar payment details are required for future use o Specify the Template Name o Specify whether the template is for own purpose or available other business users as well Click Save to save the instruction for future use Click Submit to proceed for confirmation of the instruction. Note: The instruction is now ready to authorise. To create International instruction through Import file select the import from file payment option on the International Payment screen. Following screen will be displayed 50


55 Browse the file and click submit button. Following screen will be displayed. To make payment select the checkboxes for the appropriate instructions, browse the contract document and click Submit to proceed for confirmation of the instruction. To view the full detail of the invoice user can click the hyperlink at the Instruction No and following screen will be displayed to the user. 51

56 6.6 Inter-Account Transfer This service allows 24 Banking customers to transfer funds among their accounts. Customers can specify only operational accounts as the Debit account and Credit accounts, Loan accounts or Credit Card accounts as the destination account to transfer their funds. Funds can be transferred only in the currency of debit account. Customer can perform immediate fund transfer or can schedule transfer for a future date. A transfer can only be schedule for a date not more than 30 days from the current date. To perform Inter Account Transfer, follow the steps as mentioned below: From Menu: Click on Payments menu. Click on Inter Account Transfer sub option. Following screen will be displayed. 52

57 specify the following details o Edit Document Number, if required o Edit Date, if required o Select the Debit Account o Select the Credit Account o Enter the Amount o Enter Payment details to appear on Account Transaction History Click Save if you want to save the instruction for future use and exit Click Submit to proceed for confirmation of the instruction. Check the Save As Template option if the similar payment details are required for future use o Specify the Template Name o Specify if the template is for own purpose or available for other business users as well Click Cancel to cancel the Inter Account Transfer operation and navigate to the home page. Note: The instruction is now ready to authorise. 6.7 Maintain Payments This service lists all the payments instructions that have been setup by the logged in business user and are with the status Saved, Awaiting Authorisation 1 and De-Authorized. Instructions with status as Saved, Awaiting Authorisation 1 and De-authorised are editable. The user can also view/delete the instructions created by other users if they have permission for the same. These instructions cannot be amended and can only be viewed and deleted. From Menu: Click on Payments menu. Click on Maintain Payment sub option. Following screen will be displayed. By default, Own option will be displayed in the Instructions dropdown which will retrieve and display the instructions created by the logged in user. 53

58 To edit or view the payment instruction details, click hyper link on the Payment Type. Based on the payment type appropriate payment instruction screen will be displayed. For e.g. for the domestic payment, following screen will be displayed. The screen opened from Maintain Payment allows creating templates. Specify the appropriate payment details. In case of domestic payment which is imported from a file, the below screen will open for treasury payment. 54

59 Edit or specify the payment details Check the Save As Template option if the similar payment details are required for future use o o Specify the Template Name Specify if the template is for own purpose or available for other business users as well Click Save to save the instruction for future use Click Submit to proceed for confirmation of the instruction. Click Cancel to cancel the operation and navigate to the home page. Note: The instruction is now ready to authorise. To delete the payment instructions, select the instructions by selecting the checkbox for the instruction/s or clicking on the checkbox in the table header to select all payment instructions. Click on Delete button to delete. To View/Print the Instruction history details, select the instructions by selecting the checkbox for the instruction/s or clicking on the checkbox in the table header to select all payment instructions. Click on View/Print button. Following pop up will be displayed: 55

60 View/Delete Instructions Created by Other Users Click on Instructions drop down and select All option to view and delete instructions created by other users. This All option is only visible to the users who have access to view instructions created by other company users. To view the payment instruction details, click hyper link on the Payment Type To delete the payment instructions, select the instructions by selecting the checkbox for the instruction/s or clicking on the checkbox in the table header to select all payment instructions. Click on Delete button to delete. 6.8 Instruction Templates This service enables executing payments from pre-defined templates that user has setup or from the company level templates. Company defined templates will only be visible if the user has privilege to view them From Menu: Click on Payments menu. Click on Instruction Template sub option. Following screen will be displayed. 56

61 Select a template and click Delete to delete the template. Select a template and click Make Payment to make a payment using the selected template The Payment Details page will open based on the template selected. The screens opened for different instruction templates are same as that of the corresponding instruction creation screen. Make the changes as appropriate Click Save to save the instruction for future use Click Submit to proceed for confirmation of the details entered 57


62 6.9 Instruction Status/ History This service enables the 24 Banking user to view the details of instructions set up or operated by the user. From Menu: Click on Payments menu. Click on Instruction Status/History sub option. Following screen will be displayed. Select Instruction Type and Instruction Status The user can also view all instructions of any type by selecting All option in Instruction Type drop down. The user can also view instructions in any status by selecting All option in Instruction Status drop down. The user can optionally filter the instructions based on Date Criteria. Click Search button. List of instructions matching the search criteria are displayed. The user can create a new payment instruction or save a template from an existing Transfer/domestic/international payment instruction. Select an instruction and click View to view details of the instruction. The instruction view screens will provide Print button to print the instruction details. On Click of Print button, File Download window will be displayed with Open, Save and Cancel buttons. 58


63 Click Open button on File Download window to view the file in appropriate viewer based on the selected Statement format. Click Save button on File Download window to save the file in local folder of the file system. Click Cancel button to cancel the file download operation. Instruction view screens will be different for different instructions as shown below. 59
64 60


65 Select an instruction and click Authorisation History to view the instruction version and authorisation details of the instruction. This section also contains authorisation history of previous versions, if they exist. The Instruction Authorisation Alternatives section indicates the next possible authorisers to take action on the instruction. The Authorisation History Screen will provide View Instruction Details button to view the instruction details. 61


66 7 Salary Project 7.1 Payroll Payroll instructions can be created either Account number driven or Account categories driven. From Menu: Click on Salary Project menu Click the Payroll sub menu. Following screen will be displayed 62


67 Payroll Creation Options: a) From Employee list Select Salary Project Select the From Employee list radio button and click Submit button. Following screen will be displayed. Select the Employee List Click the submit button. Following screen will be displayed. Select the checkbox against all the employees to whom salary is to be made. Enter respective amounts and click Recalculate button. Amount will be populated. Click Save if you want to save the instruction for future use and exit 63


68 Check the Save As Template option if the similar payment details are required for future use Specify the Template Name Specify whether the template is for own purpose or available other business users as well Click Submit to proceed for confirmation of the instruction. Note: The instruction is now ready to authorise. b) From Instruction Select the From Instruction radio button on Payroll Instruction Options screen. Following screen will be displayed To retrieve the particular files, specify the search criteria alternatively to retrieve all files click Search button. Following screen will be displayed To view the file select any file and click view button. Following screen will be displayed 64


69 Select Instruction to create instruction and click the Create new instruction button o. Following screen will be displayed Check or uncheck to include or exclude the employee to whom salary is to be made. Click Save if you want to save the instruction for future use and exit Check the Save As Template option if the similar payment details are required for future use Specify the Template Name Specify whether the template is for own purpose or available other business users as well Click Submit to proceed for confirmation of the instruction. 65


70 Note: The instruction is now ready to authorise c) From Instruction File Select the From Instruction File radio button on Payroll Instruction Options screen. Following screen will be displayed Browse the file Click Submit button Following screen will be displayed Check or Uncheck to include or exclude the employee to whom salary is to be made. Click Save if you want to save the instruction for future use and exit Check the Save As Template option if the similar payment details are required for future use Specify the Template Name Specify whether the template is for own purpose or available other business users as well Click Submit to proceed for confirmation of the instruction. Note: The instruction is now ready to authorise. 66

71 d) From Template Select the From Template radio button on Payroll Instruction Options screen. Click Submit button Following screen will be displayed To retrieve particular templates specify the name of the Template or Source Account. Alternatively all the available Template. Click search button. Following screen will be displayed Select the template Click delete button to delete the template. Click the Make Payment button Following screen will be displayed 67

72 Check or Un-check to include or exclude for the employee to whom salary is to be made. Click Save if you want to save the instruction for future use and exit Check the Save As Template option if the similar payment details are required for future use Specify the Template Name Specify whether the template is for own purpose or available other business users as well Click Submit to proceed for confirmation of the instruction. Note: The instruction is now ready to authorise. 7.2 Maintain Employee List This service allows the business user to create or maintain their employee s lists in various groups of their choice, such as departments etc. The Master Employees List can be populated in different ways such as manually edited/completed by company user or first completed and updated based on information received from the bank list and subsequently salary would be remitted to the Employees. From Menu: Click on Salary Project menu Click on the Maintain Employee list Following screen will be displayed 68

 Master Employee List To download the synchronised master list")
73 1. Salary Project Select salary project name 2. Employee List from Bank Click on the Synchronise button to update the master list obtained from Bank. 3. Maintain Employee List a) Master Employee List To download the synchronised master list selects the General List radio button in the Maintain Employee List section. Following screen will be displayed. 69


74 Click Download button to download the master list for future assessment. To View or edit master list click the View Edit Master list button. Following screen will be displayed To retrieve the list of all employee click search button alternatively to retrieve the specific employee, search can be performed either on the basis of first name, surname or Personal code. Click Clear button to clear the contents. Click Cancel button to cancel the Maintain Employee List operation and navigate to the Maintain Employee List page. Click Search button. Following screen will be displayed Select specific Employee Click View/Edit button. Following screen will be displayed. 70
 Employee Sub list Select the Sub list radio button on the Maintain Employee")

75 Edit employee details Click Submit button to update the employee details. b) Employee Sub list Select the Sub list radio button on the Maintain Employee List Following screen will be displayed a) Create New Employee Sub list Click Create New list button to create new sub list Following screen will be displayed 71


76 Specify the List name Retrieve the particular employee by entering the First name or surname or personal code to retrieve complete available Employee to be added in this list click the search button Following screen will be displayed 72
 Edit Employee Sub List Provide the name of the employee list/sub list of the company. Click Search button on Maintain Employee List screen.")
77 To Assign or Un-assign employees, select one or more employees using Shift or Ctrl keys and use Drag n Drop or Use the buttons provided between the list boxes Click the submit button to successfully assign employee to the sub list. b) Edit Employee Sub List Provide the name of the employee list/sub list of the company. Click Search button on Maintain Employee List screen. Following screen will be displayed. Select specific employee sub list radio button Click the delete button to delete the sub list. Click the Rename button to change the name of the sub list. The following screen opens 73


78 Click the View Edit button. Following screen will be displayed Click search button to retrieve the all the employee associated with selected Sub list or to retrieve the specific employee. Perform the search either by First name or Surname or Personal code. Following screen will be displayed 74


79 Click Assign/un-assign button to assign new employee to the list or un-assign employee from the list. Following screen will be displayed To Assign or Un-assign employees from sub list, select one or more employees using Shift or Ctrl keys and use o Drag n Drop or 75


80 o Use the buttons provided between the list boxes Click submit button to successfully assign or un-assign the employee from the list. Click Submit button to assign/un-assign employees to the employee sub list. Click cancel button to go back to the home page. 8 Catalogs 8.1 Setup Ordinary Beneficiary This enables the business user setting up new ordinary beneficiary for the company. Click on Catalogs link from menu. Click on Setup Ordinary Beneficiary sub option Following screen will be displayed 76
 o Enter the Transaction Amount o Enter Payment Destination o Specify the Resident indicator as appropriate o Enter Fiscal Code o Enter Account Number o Enter Bank Code.")
81 Specify the details as o Enter Beneficiary Name (do not use symbols, ex.,:,#.*, etc) o Enter the Transaction Amount o Enter Payment Destination o Specify the Resident indicator as appropriate o Enter Fiscal Code o Enter Account Number o Enter Bank Code. The search facility can be used by clicking the ^ button. However, the search works if as minimum 4 characters of bank code has been specified. Select one bank from the list provided and the bank code and bank name are populated from the selected row. Click Clear button to clear the bank code and bank name fields in case of any mistake. o Click Submit to create the beneficiary 8.2 Maintain Ordinary Beneficiary This enables the business user to maintain the available ordinary beneficiary. Click on Catalogs link from menu. Click on Maintain Ordinary Beneficiary sub option Following screen will be displayed i. To search beneficiary by Beneficiary Name o Specify beneficiary name (partial name can be specified) to perform search. 77
82 ii. To search beneficiary by Account Number o Enter Account Number (partial number can be specified) to perform search. iii. Both the above can also be specified. If no criteria are entered, it will retrieve all beneficiaries. iv. Click Search button v. All ordinary beneficiaries matching the search criteria will be retrieved. o To setup a new ordinary beneficiary, click on New button. The details can be specified as specified in section 9.1 Select a beneficiary and click on Amend button. The details can be amended as specified in section 9.1. Select a Beneficiary from the list and click Delete to delete the selected beneficiary 8.3 Setup Treasury Beneficiary This enables the business user setting up new treasury beneficiary for the company. Click on Catalogs link from menu. Click on Setup Treasury Beneficiary sub option Following screen will be displayed 78

83 Specify the Beneficiary details i. Enter Account Number ii. Enter the Treasury Account Number iii. Enter Bank Code Click Validate Treasury button to validate treasury beneficiary. Following values will get populated. Beneficiary Name (do not use symbols, ex.,:,#.*, etc) Beneficiary Account Name Fiscal code Payment Description Bank Name Specify Amount(Optional) Click Submit to Setup Treasury Beneficiary. Click Cancel button to cancel the Setup Treasury Beneficiary operation and go back to Home Page 8.4 Maintain Treasury Beneficiary This enables the business user to maintain the available treasury beneficiary. Click on Catalogs link from menu. Click on Maintain Treasury Beneficiary sub option Following screen will be displayed vi. vii. To search beneficiary by Beneficiary Name o Specify beneficiary name (partial name can be specified) to perform search. To search beneficiary by Account Number 79


84 o Enter Account Number (partial number can be specified) to perform search. viii. Both the above can also be specified. If no criteria are entered, it will retrieve all beneficiaries. ix. Click Search button x. All treasury beneficiaries matching the search criteria will be retrieved. o To setup a new treasury beneficiary, click on New button. The details can be specified as specified in section 9.3 Select a beneficiary and click on Amend button. The details can be amended as specified in section 9.3. Select a Beneficiary from the list and click Delete to delete the selected beneficiary 80

85 8.5 Setup Overseas Beneficiary This enables the business user setting up new overseas beneficiary for the company. Click on Catalogs link from menu. Click on Setup Overseas Beneficiary sub option Following screen will be displayed Specify the Beneficiary details o Enter Beneficiary Name (do not use symbols, ex.,:,#.*, etc) o Enter Account Number o Specify the Resident indicator as appropriate o Enter Country Code. The search facility can be used by clicking the ^ button. However, the search works if as minimum 1 character of country code has been specified. Select one country from the list provided and the country code and country name are populated from the selected row. o Click Clear button to clear the country code and country name fields in case of any mistake. o Enter City/Locality o Enter Address Specify Beneficiary Bank Details o Specify whether search facility is to use to provide bank details or details will be entered manually. Select Lookup or Manual radio button as appropriate o For Lookup option, enter first 6 letters of the Swift BIC and click ^ button. Select a bank from the list provided and the fields like Bank Name, Country Code, Country Name, City/Locality and Address will be auto populated based on selected bank from the list 81

86 o Click Clear button to reset the details in case of any mistake o For manual option, enter the details Enter Bank Name Enter Country Code. The search facility can be used by clicking the ^ button. However, the search works if as minimum 1 character of country code has been specified. Select one country from the list provided and the country code and country name are populated from the selected row. Click Clear button to clear the country code and country name fields in case of any mistake. Enter City/Locality Enter Address o Change the option between Lookup and Manual anytime if details are to be entered differently o Enter the Correspondent Account Specify Intermediary Bank Details o Specify whether search facility is to use to provide bank details or details will be entered manually. Select Lookup or Manual radio button as appropriate o For Lookup option, enter first 6 letters of the Swift BIC and click ^ button. Select a bank from the list provided and Bank Name will be auto populated based on selected bank from the list o Click Clear button to reset the details in case of any mistake o For manual option, enter the Bank Name manually. Click Submit button to setup the overseas beneficiary 8.6 Maintain Overseas Beneficiary This enables the business user to maintain the available domestic beneficiary. Click on Catalogs link from menu. Click on Maintain Overseas Beneficiary sub option Following screen will be displayed Specify the search criteria and click on Search button All overseas beneficiaries matching the search criteria will be retrieved. 82

87 To setup a new overseas beneficiary, click on New button. The details can be specified as specified in section 9.5 Select a beneficiary and click on Amend button. The details can be amended as specified in section 9.5 Select a Beneficiary from the list and click Delete to delete the selected beneficiary 8.7 Business Contacts This Service allows customer to create responsible person with whom bank can enquire. From Menu: Click on Catalogs menu. Click on Business Contacts sub menu. Following screen should be displayed 83


88 Select one of the business contacts to delete the contact. Click Delete button to delete the contact. Click Edit button to edit business contact details. Following screen will be displayed Make some changes and click Save Person button Click New Button to add new business contact. Following screen will be displayed 84

89 Specify the Responsible person name Specify the Phone number Click Save Person button to create business contact with the specified details. 85
90 9 User Administration 9.1 Instruction Authorization This enables the user to authorise the payment instructions under their privilege. Use the login credentials for a user who is authorised to perform the role of Authoriser. Authorization List This lists all instructions with status Awaiting Authorisation <n> and is waiting for the user to authorise. The value <n> represents the level of authorisation i.e. 1, 2 etc. Please refer the Instruction Authorisation Flow in the diagram in Section 3 of this user guide. User can authorise an instruction if they approve the details of the instruction. The instruction will go for further authorisation if required as per authorisation rules. However, if the authorisation of the user is the final authorisation, the instruction will be sent for processing. Instructions can be de-authorised if the user does not approve the details of the instructions and wish to return the instruction to instruction setter for amendment. The system will allow Reversal of Authorisation / De-authorisation process if no subsequent action has been taken by any other user or the instruction is not authorised by final authoriser. There will be a dropdown on Instruction Authorization screen that will have two values: Action Required, My Actioned. There is no additional privilege required for the second value in dropdown. By default, the screen will show Action required instructions only. The user can view previously actioned instructions on choosing the My Actioned value in dropdown. Deletion should not be allowed to authorizer on instructions that has come to him for second onwards level of authorization, i.e. the status is In authorization. Note: If at any point of time while an authoriser is logged in the business banking and a new instruction arrives for authorisation or there are instructions pending for authorisation for the user, the label on the right bottom corner of the screen will start blinking. Authoriser can click on this label to directly go to Instruction Authorisation service Instructions available for Authoriser s Action Click Instructions Authorisation under User Administration menu option. The instructions that require action by the authorizer are retrieved. The following screen is opened 86


91 Click on the Instruction Id hyperlink to view the instruction details. The screen opened will be different for different instruction types. 87


92 Select one or more instructions by selecting the appropriate checkbox. All the instructions can be selected by clicking on the checkbox in the table header. The total worth for the selected instructions will be displayed to the user. The total worth is displayed in MDL only by considering the National Bank of Moldova rates. Click on Delete button to delete the selected instructions. The system will ask for confirmation. Click Yes to continue or No to cancel the delete operation. Select any one Authorisation mechanism to authorise/de-authorise the instruction. Only the applicable options for you are shown in authorisation mechanism. Click on Authorise button to authorise the selected instructions. You can perform authorisation using any of the authorisation mechanism assigned to you by bank or your corporate administrator. In case, customer selected One Time Password as authorisation mechanism, the system generates OTP and sends it either by SMS, or by , or both methods (in parts), depending on password receiving preferred method set for your login account. Specify the OTP received to authorise the instructions. In case, customer selected Digital Signature as authorisation mechanism, the authorisation of instructions would require specifying the digital certificate. Following screen will be displayed: 88
93 o Specify the file location of the digital certificate. There are 2 options to provide the digital signature. File Browser based digital signature load select File option and click Browse. Locate the.pfx or.p12 file and specify the password For security reasons, the use of digital signature requires Java JRE on your machine. Please refer Appendix C Setup Requirements for Digital Signature in user guide. Secure Device based digital signature load select etoken / CryptoCard option. This option is applicable to the users who have digital signature available in secure device. You should have completed the steps mentioned to set up and configure the use of secure device according to the documentation on how to use etoken / CryptoCard. In IE, this option is visible when the required software has been installed. In Firefox, this option can be used when the configuration of secure device is complete. On selecting this option when the secure device is inserted in the system, you will be provided the list of available digital signature on the device and to provide the password. The password may not be asked if it has been provided earlier within the same browser window and this is browser specific behaviour. Firefox asks to provide password twice (one before selection of digital signature and one after selection) while IE asks once only. 89

94 Click on Submit button to continue authorising the selected instructions. Click on De-authorise button to de-authorise the selected instructions. The operation also requires specifying the digital certificate as per the authentication mechanism. o For authentication mechanism as DS, Specify the file location where of the digital certificate as mentioned above. Provide the reason of de-authorising the selected instructions. The same reason is applicable to all selected instructions. Click on Submit button to continue de-authorising the selected instructions. Instructions previously actioned by the Authoriser Click Authorisation List under Instructions- Authorisation menu option. The instructions that require action by the authorizer are retrieved. Select the My Actioned as Instruction Status drop down. The instructions that are available to revert the last decision are retrieved. Click on the Instruction Id hyperlink to view the instruction details. The screen opened will be different for different instruction types. Select one or more instructions by selecting the appropriate checkbox. All the instructions can be selected by clicking on the checkbox in the table header. The total worth for the selected instructions will be displayed to the user. The total worth is displayed in MDL only by considering the National Bank of Moldova rates. Click on Delete button to delete the selected instructions. The system will ask for confirmation. Click Yes to continue or No to cancel the delete operation. Click on Authorise button to authorise the selected instructions. The authorisation of instructions would require specifying the digital certificate 90

95 Click on De-authorise button to de-authorise the selected instructions. The operation also requires specifying the digital certificate. Specify the file location where of the digital certificate. Provide the reason of de-authorising the selected instructions. The same reason is applicable to all selected instructions. 10 Reports and Enquiries 10.1 Exchange Rates This service allows 24Banking customers to view the latest exchange rates. To view NBM exchange rates, follow the steps as mentioned below: Click on Reports and enquiries menu. Click on Exchange Rates sub option. Click on NBM Rates menu. To view BCRC Commercial rates that are applied on their financial transaction, follow the steps as mentioned below: From Menu: Click on Reports and enquiries menu. Click on Exchange Rates sub option. Click on BCR Commercial Rates sub item. Following screen will be displayed. 91
 and privilege(s)")
 and")
96 Select Type and click submit. Click Print to print the exchange rates Resource Privilege Report This service enlists the resource(s) and privilege(s) assigned to the users for the business company. Click Resource Privilege Details and a detailed report of the resource(s) and privileges(s) assigned to all business company users will be produced 92

97 10.3 Authorisation Rules Report This service enlists all users of business company with authorization privilege of various resources for subsequent payment services Click Authorisation Rules Report and a detailed report of users with authorization privilege on various resources for payment services will be produced 10.4 Requests This service allows 24 Banking customers to view the details of the various requests made by him. To view details of the request made by him, follow the steps as mentioned below: Click on Reports and enquiries menu. Click on Requests sub menu. Following screen will be displayed. 93


98 Following details will be displayed for the selected request: o Request Date o Status Click on View button. The details for the request are presented. Click Cancel button to cancel the Maintain Request operation and navigate back to Home Page. 94

99 11 Security 11.1 Change Password This service allows the 24 Banking customers to change the login password. From Menu: Click on Security menu. Click on Change Password sub option. Following screen should be displayed Enter old Login Password. Enter new Login password. Enter Confirm New Login password. Click Clear button to clear the text field s values. Click Cancel to cancel the Change Passwords operation and navigate back to Home Page. Click Submit button to process the change login password request Certificate Requests A digital signature is basically a way to ensure that an electronic document ( , spread sheet, text file, etc.) is authentic. Authentic means that you know who created the document and that it has not been altered in any way since that person created it Customer can request digital certificate from bank s certificate authority. This service allows user to request, view, download and read guidelines to export the certificate keys in a folder on their computer. Once the customer requests and downloads the certificate, it is to be uploaded. Please refer section 11.3 Upload Certificate. From Menu: Click on Security menu. Click on certificate request sub option. Following screen should be displayed which will list the certificate requests along with their request made by customer in the past. 95


100 A request can be in one of the below states. Pending The request for issue of certificate is yet to be reviewed by Bank. Accepted The request for issue of certificate is approved by the bank and certificate is available to be downloaded from CA server. Rejected - The request for issue of DS certificate is rejected by Bank. Downloaded The certificate has been downloaded by the customer from the CA server. Revoked The certificate has been revoked by Bank. Customer can request for a new certificate only if there is no request with Pending or Accepted status. Click Request Certificate to request for a new certificate. The below pop-up may appear, cutomer should click yes. Please note: In Firefox, the requesting of a certificate is a 2 step process. Customer would first need to click Step 1 - Request for Certificate which generates the keys to sign request and & then click Step 2 - Request for Certificate to actually generate request as shown in the screen below. 96


101 In case of Opera also, the requesting of a certificate is a 2 step process. Customer would first need to click Step 1 - Request for Certificate. Customer will be presented with a dialog box as below to select the key length. After selecting the key length, click Step 2 - Request for Certificate to actually generate the certificate request. The created request will be shown on top of the table. 97


102 The request will be processed manually by Bank on their certificate authority system. If the request is accepted by bank, the status Accepted will be shown for the certificate as in the screen below. Customer can download the certificate in their browser by clicking Download Certificate. Customer will be displayed the below pop-up when their certificate is in the browser. To export the public and private keys of the certificate onto their folder their computer, click Export & Save Certificate Keys. This will open the below popup that provides guidelines to the customer on how to export the keys from the certificate stored in their system/browser. 98

103 11.3 Upload Certificate A digital signature is basically a way to ensure that an electronic document ( , spread sheet, text file, etc.) is authentic. Authentic means that you know who created the document and that it has not been altered in any way since that person created it. Customer has a certificate either from 3 rd party Certificate authority or from BCRC certificate authority. They need to attach the certificate to their profile in order to use their Digital certificate for authentication or signing documents. This service allows customer to upload the digital certificate and attach to their profile. From Menu: Click on Security menu. Click on Upload Certificate sub menu. Following screen should be displayed Specify the details o Browse the Certificate for upload o Click the Read certificate After certificate is loaded successfully and Serial, Subject, Authority Name and Key Expiry date text field will be populated with the values. 99


104 Click upload button to upload of certificate. If the uploaded certificate is issued by 3rd party then the certificate will be submitted for Bank's approval. The customer will be notified when their certificate is approved or denied. Once approved, customer will be able to use this certificate for authorization of their payments and/or authentication if authentication mechanism in their profile is DS. 12 Messages This service allows business user to send/receive messages to/from Bank. This allows you to send your problems or suggestions to Bank. Click the link You have new messages on the home page. Following screen will be displayed Message details can be viewed by clicking on Subject link of the message as below. 100


105 To Delete a message o Select one or more messages by clicking their check boxes or click the check box in the table header row to select all the messages. Click Delete. o Confirm by clicking Yes button or No otherwise Click on Trash button to view all the deleted messages To delete the message permanently o From Trash, select one or more messages o click Delete o Click Yes to confirm the deletion and No otherwise o The messages will be deleted and will not be visible Click Compose button to create and send new message. Following screen will be displayed: 101

106 Specify the following details o o o o o Select the Account Number you want the message to be associated with. Select the Subject for the mail. Enter the message body. Click Send button to send the mail to the specified account number. Click Inbox to go back to your Inbox without sending the message. Click Sent Messages button to view all the messages sent 102
107 Appendix A. Session Management The application session can time out or expire due to the following scenarios: - The user clicks back/forward button or refresh button of the browser. - The user tries to re-login from another browser session. - There is no session activity for the configured period (currently 30 minutes). - The user tries to click to some other service while one service is in execution. B. FAQ B.1. What should I do if I forget my login password If you have forgotten your login password then follow the below options to generate the new login password. a) Perform Forget Password from the 24 Banking login page Please refer section 4.2 Forgot Password in this guide for steps. The system will generate a new password and send it to you through an or SMS. You can use this password for login. The system will ask you to change the password at the time of your login. b) Request Bank support staff to reset the password You may call the Bank s support staff for resetting your login password. The Bank staff will reset your password. The system will generate a new password and send it to you through an or SMS. You can use this password for login. The system will ask you to change the password at the time of your login. B.2. What should I do if I have lost my smart card If you have lost your smart card, first inform the Bank and request them to issue a new smart card for you. Once you have the new smart card then you need to re-register the new Card using re-register new smart card option from the 24 Banking login page. The smart card provided to you against your fiscal code will only be allowed to register Please refer section 4.4 Re-Register Smart Card in this guide for the steps. B.3. What should I do if I forget password of digital certificate If you have forgotten the password of the digital certificate then you need to perform Forget Password from 24 Banking login page and specify the required details and select Certificate Password in the drop down. The system generates a password and sends it either by SMS, or by , or both methods (in parts), depending on password receiving method set for your login account. On the next screen, enter the password received from system. You can then login using Certificate Request option in the Security drop down on the login page. After login, you will only be provided with access to request & upload certificate services only. 103
108 Please refer section 11.2 Certificate Requests and section 11.3 Upload Certificate in this guide for steps. After uploading the certificate, you need to logout and login again to access the full applicable functionality. B.4. What should I do if I have locked my 24 Banking facility Yes, the 24 Banking facility will be locked if you try login with incorrect login credentials for defined number of times. In this case, please contact Bank support staff for unlocking the 24 Banking facility. If you have forgotten your login password then perform the steps as mentioned in B.1 to get the new password. B.5. What should I do if I my digital certificate is expired or revoked When you perform login using the expired or revoked certificate, the system will inform you the same. In such a case, login using Certificate Request in Security drop down on the login page. After login, you will only be provided with access to request & upload certificate services only. Please refer section 11.2 Certificate Requests and section 11.3 Upload Certificate in this guide for steps. After uploading the certificate, you need to logout and login again to access the full applicable functionality. C. Setup Requirements for Digital Signature For using Digital Certificate using File Browse option on Logon or Authorization purposes, the system will check whether Java JRE is installed on the machine. If it is not found, then it will automatically prompt you to download it. Follow the instructions on the Java website for the installation and restart your browser after that. Once Java JRE is installed on your machine and you open the browser, the system may prompt you to enable the Java add-in as below. Please click the Allow button. Now, when you click File option to specify the location of your digital signature file, the system may prompt some security warning popups. In order to use the digital signature for Logon or Authorization purposes, you would need to continue with the security warning and allow Java Applet to run on your machine. Depending on JRE and browser, these security warning popups could be different. The below are provided as an example only to illustrate the popups that may appear. 104

109 Click Run to continue and then select Browse option to specify the location of the digital signature file. For further information, please contact support service 24 Banking, or phone number /
USER GUIDE. Version 2.0. Reflex Online Cash Management
 TM USER GUIDE Version 2.0 Reflex Online Cash Management Table of Contents USER GUIDE VERSION 2.0 Table of Contents... 2 1. Introduction... 4 1.1 What is Reflex?... 4 1.2 How do I access Reflex?... 4 1.3
BSP Fiji Digital User Guide for Personal Banking Customers
 BSP Fiji Digital User Guide for Personal Banking Customers This is an interactive document. You can click on the subject that you need assistance with from the Table of Contents below and go directly to
Quick Guide UOB TRANSACTION BANKING
 UOB TRANSACTION BANKING Table of Contents Welcome to UOB Business Internet Banking Plus (BIBPlus) 2 Things to note before you get started 2 1 BIBPlus Login 3 1.1 First Time Login 3 1.2 Activate User/Password
Registration & Payments User Guide
 Registration & Payments User Guide Contingency Payment Access Contents Contingency Payment Access 4 Introduction 4 1. Self-Registration 4 1.1. Password 4 1.2 Client Identification Number and Client Details
Quick start guide
 December 2016 Velocity@ocbc Quick start guide Help & Support Download the FAQs at www.ocbc.com.my/velocity2 You can also refer to the full User Guide, which can be downloaded from the help icon at the
Secure Transfer Site (STS) User Manual
 User Manual") Secure Transfer Site (STS) User Manual (Revised 3/1/12) Table of Contents Basic System Display Information... 3 Command Buttons with Text... 3 Data Entry Boxes Required / Enabled... 3 Connecting to the
Secure Transfer Site (STS) User Manual (Revised 3/1/12) Table of Contents Basic System Display Information... 3 Command Buttons with Text... 3 Data Entry Boxes Required / Enabled... 3 Connecting to the
Treasury Management User Guide. Online Banking
 Treasury Management User Guide Online Banking Released August 2018 Treasury Management... 4 Logging in to Treasury Management...5 Helpful Hints...10 User Menu... 12 Profile and Preferences... 12 Notification
Reference Guide (IRIS)
") Reference Guide For Santander Bank s Interactive Reporting & Initiation Services (IRIS) Equal Housing Lender. Santander Bank, N.A. is a Member FDIC and a wholly owned subsidiary of Banco Santander, S.A.
Reference Guide For Santander Bank s Interactive Reporting & Initiation Services (IRIS) Equal Housing Lender. Santander Bank, N.A. is a Member FDIC and a wholly owned subsidiary of Banco Santander, S.A.
Quick start guide
 November 2018 Velocity@ocbc Quick start guide Help & Support Click here for General FAQs You can also refer to the full User Guide, which can be downloaded from the Help icon at the top right corner of
UOB TRANSACTION BANKING. BIBPlus Cash Management User Guide
 UOB TRANSACTION BANKING BIBPlus Cash Management User Guide Table of Contents 1 Account Services 1.1 Account Summary 1.2 Account Statement 1.3 External Accounts 1.4 Trade Bill Summary 1.5 Global View 1.6
Production Assistance for Cellular Therapies (PACT) PACT Application System User s Guide
 PACT Application System User s Guide") Production Assistance for Cellular Therapies (PACT) PACT Application System User s Guide Version 1.0 February 9, 2017 Version 1.0 TABLE OF CONTENTS 1.0 Getting Started... 1 1.1 Access to the Internet...
Production Assistance for Cellular Therapies (PACT) PACT Application System User s Guide Version 1.0 February 9, 2017 Version 1.0 TABLE OF CONTENTS 1.0 Getting Started... 1 1.1 Access to the Internet...
business online plus user guide
 business online plus user guide 1 2 Login : 03-09 Administration : 11-32 Accounts : 33-41 Transfers : 43-47 Beneficiaries : 49-54 Payments : 55-75 Statements : 77-79 Preferences : 81-83 Messages : 86-87
Using the Telstra T-Suite Management Console. Customer Administrator s Reference Manual
 Using the Telstra T-Suite Management Console Customer Administrator s Reference Manual June 2011 Registering With TMC Notice Pivot Path is a registered trademark of Jamcracker, Inc. Registered trademark
OVERVIEW TIMING AND DEADLINES PERMISSIONS, LIMITS, AND APPROVALS PROCEDURES REPORTS STOP PAYMENTS PROCEDURES...
 TABLE OF CONTENTS TABLE OF CONTENTS... 1 ACCESSING THE SYSTEM... 4 LOGGING IN... 4 FIRST TIME LOG-IN ONLY... 4 UPDATING USER PROFILE, USER PASSWORD, AND SECURITY QUESTIONS... 6 ESTABLISHING USER PREFERENCES...
Online Banking Procedures
 Table of Contents Online Banking Procedures... 2 1.1 Sign into Online Banking- No Token...2 1.2 Sign into Online Banking- Token...3 1.3 Change Account Nickname...5 Stop Payments... 7 1.4 New Stop Payments...7
MOBILE INTERNET BANK MANUAL
 MOBILE INTERNET BANK MANUAL www.blueorangebank.com Approved on 29.05.2018 Valid as of 29.05.2018 B2.1/C7-1073/10 CONTENTS Terms and Definitions...3 1. General Description of the Mobile Internet Bank...3
Business Online Banking
 » Flagstar business Banking Business Online Banking Reference Guide Flagstar Bank Corporate Headquarters 5151 Corporate Drive Troy, MI 48098 (888) 324-4100 flagstar.com/business Member FDIC 1 Table of
RCB Remote Banking Services. User Guide
 RCB Remote Banking Services User Guide Contents 1. Introduction 2. First login and customer registration to RCB Remote Banking Services 2.1. Registration to RCB Online Banking 3. User login to RCB Online
BEEDS portal Bank of England Electronic Data Submission portal. User guide. New PRA Authorisations Version 1.1
 BEEDS portal Bank of England Electronic Data Submission portal User guide New PRA Authorisations Version 1.1 May 2018 Contents Document versions 3 1. Introduction 3 a. Bank of England contact details 4
Isi Net User Manual for Bank customers
 1 Table of Contents 1 Introduction and overview... 4 1.1 Isi Net User Types... 4 1.2 Accessing the Isi Net service... 5 1.2.1 User Login... 5 1.2.2 User Logout... 7 1.3 User Interface... 7 1.3.1 Menus...
Simply e C A S H M A N A G E M E N T U S E R G U I D E
 Simply e C A S H M A N A G E M E N T U S E R G U I D E Simply e Cash Management Rev. 06/01/15 Simply e Cash Management Rev. 06/01/15 Table of Contents 1. WELCOME TO 7 1A. TYPES OF ACTIVITY 7 1B. GETTING
Business e-banking Wires User Guide
 User Guide Business e-banking User Guide Tables of Contents Entering a One Time Wire Transfer 2 Deleting a Wire Transfer 5 Add Wire Template...8 Wire Money via Templates...12 Wire Money via Multiple Templates.....15
CitiDirect BE SM Mobile
 CitiDirect BE SM Mobile User Guide Treasury and Trade Solutions CitiDirect BE Mobile Table of Contents Table of Contents CitiDirect BE SM Mobile Introduction...2 How to use CitiDirect BE Mobile For Entitled
UOB TRANSACTION BANKING. BIBPlus Cash Management User Guide
 UOB TRANSACTION BANKING BIBPlus Cash Management User Guide Table of Contents Welcome to UOB Business Internet Banking Plus (BIBPlus) Things to note before you get started 1 BIBPlus Login 1.1 Activate User/Password
Business ebanking User Guide
 Business ebanking User Guide If you have any questions, please contact Business ebanking Support at 1-800-593-4345 Contents About Business Online Banking... 3 System Requirements/Considerations... 4 Password
Webster Web-Link. Table of Contents. Company System Administrator (CSA) User Guide
 User Guide") Table of Contents 1 Welcome... 4 1.1 Overview of the CSA role... 4 1.1.1 What a CSA cannot do... 4 1.2 What is included in this guide?... 5 1.3 How is this guide organized?... 5 1.4 Where to get help...
Table of Contents 1 Welcome... 4 1.1 Overview of the CSA role... 4 1.1.1 What a CSA cannot do... 4 1.2 What is included in this guide?... 5 1.3 How is this guide organized?... 5 1.4 Where to get help...
Employer Self Service (ESS) User Quick Guide
 User Quick Guide") Employer Self Service (ESS) User Quick Guide i Table of Contents Getting Started 6 Accessing the Employer Self Service (ESS) Portal 6 Maintaining Account Settings 7 Switching Employers within Session 7
Employer Self Service (ESS) User Quick Guide i Table of Contents Getting Started 6 Accessing the Employer Self Service (ESS) Portal 6 Maintaining Account Settings 7 Switching Employers within Session 7
Client.dotBANK users guide
 Client.dotBANK users guide I. How to connect to the system with mobile signature?... 2 II. How to sign documents with mobile signature?... 5 III. How do you view the statement from your account?... 7 IV.
Business ebanking User Guide May 2015
 Business ebanking User Guide May 2015 Contents INTRODUCTION... 5 Signing In... 6 Signing Off... 9 First Time Access... 10 Dashboard Setup Tool... 10 WELCOME... 11 Welcome Page... 12 Managing panels...
SIDC Online Application Portal
 SIDC Online Application Portal Corporate Account User Guide 1. Overview... 1 2. How to Register Corporate Account?... 1 3. How to Confirm Account?... 7 4. How to Fill Application Form?... 10 4.1 Fill Application
Sterling Virtual Terminal. User Guide
 Sterling Virtual Terminal User Guide Version 3.1.00 August 2015 Chapter 1: Getting started Table of Contents USER GUIDE... 1 CHAPTER 1: GETTING STARTED... 5 SYSTEM REQUIREMENTS... 5 STERLING VIRTUAL TERMINAL
SmartPay Express User Guide
 SmartPay Express User Guide Table of Contents INTRODUCTION... 4 SmartPay Express Overview... 4 System Requirements... 5 Trusted Sites... 5 Available Resources... 7 Additional Resources... 7 LOGGING IN...
SANTANDER TREASURY LINK USER GUIDE
 SANTANDER TREASURY LINK USER GUIDE Welcome to Santander Treasury Link Santander Treasury Link is a secure Web application that allows you to manage accounts, payments, transfers, reports, and users. This
INBUSINESS BANKING SYSTEM
 Introducing your new INBUSINESS BANKING SYSTEM Companion Guide to Business Banking Video Tutorials Updated 0.09.8 WELCOME TO THE INBUSINESS SYSTEM The InBusiness System will help you efficiently and securely
BBVA Compass Spend Net Payables
 User Guide BBVA Compass Spend Net Payables User Guide Vault Services Table of Contents Introduction 2 Technical Requirements 2 Getting started 3 Sign In 3 General Navigation 4 Upload/Create Payment 5
NETBANK USER GUIDE v
 LOG IN TO THE NETBANK Log in with Internet Access Code 1. Type in your Customer ID in the Customer ID field. (Your Customer ID is an eight digit unique numerical code sent to you in the Welcome Letter
Get Qualified User Manual
 MALTA ENTERPRISE Get Qualified User Manual Student Guide Contents 1. Logon... 3 2. Registration... 3 3. Profile... 3 Ongoing Applications... 3 Editing your profile... 4 Profile... 4 Account... 4 Password...
RBA Professional Data Systems, Inc. Employer ereporting Program
 RBA Professional Data Systems, Inc. Employer ereporting Program Release (2.3) Dated December 21, 2012 3 rd Party Provider Manual R B A P R O F E S S I O N A L D A T A S Y S T E M S Software Documentation
Business Online Banking User Guide
 Business Online Banking User Guide Table of Contents 1. WELCOME!... 3 1A. TYPES OF ACTIVITIES 3 1B. GETTING STARTED 3 1C. IF YOU NEED HELP 3 2. TRANSACTION ACTIVITY... 4 2A. ACCESSING YOUR BUSINESS ACCOUNTS
JITs Portal. User Manual
 JITs Portal User Manual November 2017 JITs Portal 1 Table of Contents Chapter 1 Introduction... 2 1.1 What is the JITs Portal?...3 1.2 User Guide structure...4 Chapter 2 Working with the JITs Portal...
ROCHE/GENENTECH PRACTICAL WORKING GUIDE FOR REQUESTORS
 ROCHE/GENENTECH PRACTICAL WORKING GUIDE FOR REQUESTORS Contents I. INTRODUCTION... 3 II. HOW TO REGISTER AND LOG-IN... 3 III. HOW TO SUBMIT AN APPLICATION... 7 IV. HOW TO PROVIDE ADDITIONAL STUDY INFORMATION...
Requisitioner Training Manual
 Requisitioner Training Manual Larry McWilliams Procurement Department lmcwilli@kent.edu Revised December 2018 0 Introduction The purpose of this training guide is to familiarize the user with FlashCart,
User Guide Published: 08/02/2010
 User Guide Published: 08/02/2010 Table of Contents 1 Revision History... 4 2 Introduction... 5 3 Accessing the TRAC Connect System... 5 3.1 Getting Started... 5 3.2 Registration... 8 3.3 Login... 11 3.4
Business Online and Mobile Banking User Guide
 Business Online and Mobile Banking User Guide 1. Online Enrollment 2. Login Process & Device Registration 3. Accounts & Accounts Details and Transaction History 4. Activity Center 5. Secure Messages 6.
Visa Payments Control
 Visa Payments Control Getting Started Guide Effective: June 2017 2017 Visa. All Rights Reserved. Notices and Disclaimers This document is protected by copyright restricting its use, copying, distribution,
Table of Contents 1. ABOUT THE GIS PANGEA SYSTEM 5 2. HOME DASHBOARD OVERVIEW MANAGER DASHBOARD OVERVIEW 66
 Table of Contents 1. ABOUT THE GIS PANGEA SYSTEM 5 PANGEA SYSTEM REQUIREMENTS 5 PANGEA MOBILE COMPATIBILITY 6 LOGGING IN TO PANGEA 6 MANAGING USER ACCOUNT SECURITY AND DELEGATE INFORMATION 13 ABOUT SESSION
Internet Banking. Getting Started Guide New Zealand
 Internet Banking Getting Started Guide New Zealand 2 Rabobank Internet Banking Welcome to Rabobank Internet Banking Access with peace of mind With Rabobank Internet Banking, you can control your money
Security We keep your security a priority
 Welcome Welcome to Berkshire Bank s Business Solutions. With Business Solutions, you may access your accounts 24 hours a day, seven days a week anywhere an internet connection is available. This guide
This document contains FAQs (Frequently Asked Questions) and answers about functionality of BusinessOnline.
 and answers about functionality of BusinessOnline.") Frequently Asked Questions (FAQs) about BusinessOnline Using the FAQ document This document contains FAQs (Frequently Asked Questions) and answers about functionality of BusinessOnline. It is recommended
Frequently Asked Questions (FAQs) about BusinessOnline Using the FAQ document This document contains FAQs (Frequently Asked Questions) and answers about functionality of BusinessOnline. It is recommended
Supplier Quick Reference and How To Guide
 and How To Guide For Help or Support support@primerevenue.com Toll Free USA & Canada: 1 800 557 8047 Toll Free Europe: 00800 7746 3000 Toll Free Asia: 001 800 7746 3000 Toll Free Australia: 1 800 217 718
Meritain Connect User Manual. for Employees. 1 Meritain Connect User Guide for Employees
 Meritain Connect User Manual for Employees 1 Meritain Connect User Guide for Employees Contents Introduction... 4 Accessing Meritain Connect... 5 Logging In... 5 Forgot Password... 6 Registration Process...
Overview. Business Online Banking BASIC OVERVIEW PAGE 1
 Overview Business Online Banking BASIC OVERVIEW PAGE 1 Basic Overview Business Online Banking Main navigation: My Accounts, Move Money, and Additional Services. Admins have full access to all accounts
PROST USER GUIDE FOR VENDORS
 PROST USER GUIDE FOR VENDORS Revised 06/18/2018 Introduction Setup Welcome Email Account Verification Vendor Login Preferences Services Provided Voucher Voucher Inbox Invoice Inbox Security My Profile
e-submission System User Manual Publication Related Matters
 e-submission System User Manual For Publication Related Matters May 2016 Version 2.12 Table of Contents 1 SUBMIT DOCUMENTS FOR PUBLICATION THROUGH THE E-SUBMISSION SYSTEM... 2 1.1 INTRODUCTION... 2 1.2
ETS Global E-Commerce Platform User Guide V2.1. Table of contents 1. LOGIN TO THE ONLINE ACCOUNT... 3
 Table of contents 1. LOGIN TO THE ONLINE ACCOUNT... 3 1.1. First Login - initialize your password... 3 1.2. Renewal of your password... 4 2. ACCOUNT MANAGEMENT... 6 2.1. B2B user creation / edition...
User Guide for Payroll Service (APS+)
") User Guide for Payroll Service (APS+) - Payment by File Upload - Payment by Preset Template No part of this document may be reproduced, stored in a retrieval system of transmitted in any form or by any
User Guide for Payroll Service (APS+) - Payment by File Upload - Payment by Preset Template No part of this document may be reproduced, stored in a retrieval system of transmitted in any form or by any
Oracle FLEXCUBE Direct Banking
 Oracle FLEXCUBE Direct Banking Retail Customer Services User Manual Release 12.0.3.0.0 Part No. E52543-01 April 2014 Retail Customer Services User Manual April 2014 Oracle Financial Services Software Limited
User Guide. Trade Finance Global. For customers using Guarantees. October nordea.com/cm OR tradefinance Name of document 5/8 2015/V1
 User Guide Trade Finance Global For customers using Guarantees October 2015 nordea.com/cm OR tradefinance Name of document 2015/V1 5/8 Table of Contents 1 Trade Finance Global (TFG) - Introduction... 4
My Publications Quick Start Guide
 IHS > Decision Support Tool My Publications Quick Start Guide January 28, 2011 Version 2.0 2011 IHS, All Rights Reserved. All trademarks belong to IHS or its affiliated and subsidiary companies, all rights
Quick guide to the SmartSimple on-line portal (making an application)
") EPA Research Programme 2014-2020 Quick guide to the SmartSimple on-line portal (making an application) POWERED BY SMARTSIMPLE Disclaimer Please read this document carefully prior to using the on-line portal.
EPA Research Programme 2014-2020 Quick guide to the SmartSimple on-line portal (making an application) POWERED BY SMARTSIMPLE Disclaimer Please read this document carefully prior to using the on-line portal.
HR21 USER MANUAL EMPLOYEE & MANAGER
 HR21 USER MANUAL EMPLOYEE & MANAGER Document: HR21 User Manual Employee & Manager Page 1 of 49 Table of Contents HR21 USER MANUAL... 1 EMPLOYEE & MANAGER... 1 HR21 USER MANUAL EMPLOYEE... 3 LOGIN PAGE
ishipdocs User Guide
 ishipdocs User Guide 11/8/2016 Disclaimer This guide has been validated and reviewed for accuracy. The instructions and descriptions it contains are accurate for ishipdocs. However, succeeding versions
JHA Payment Solutions ipay Solutions. Business Bill Pay. Funds Verification CSL Client Reference Guide. September 2018
 JHA Payment Solutions ... 1 Enrollment Process... 2 Home Page... 3 Message Center... 4 Attention Required... 4 Shortcut Method... 4 Scheduled... 4 History... 4 Since You Last Logged In... 4 Payees Tab...
ADMINISTRATORS GUIDE
 ADMINISTRATORS GUIDE Corporate Online Give your business the edge Contents Introduction 1 Overview 1 Preparatory steps to login 2 Logging in 4 Signing 5 Logging out 5 Navigating around the system 5 Section
Trusted Advisor User Guide. inty CASCADE v 2.9.0
 Trusted Advisor User Guide inty CASCADE v 2.9.0 Table of Contents 1. Overview... 2 2. Logging in to inty CASCADE... 2 2.1 Forgotten Password... 4 2.2 Password Complexity... 5 3. Home Page... 7 4. Navigation...
Creating Domestic Wire Transfer Payments Reference Guide
 Creating Domestic Wire Transfer Payments Reference Guide Table of Contents Creating and Working with Domestic Wire Transfers 3 Overview 3 Creating a Freeform Payment or Template 3 Approving or Rejecting
O N L I N E B A N K I N G C A S H M A N A G E M E N T End-User Guide
 ONLINE BANKING CASH MANAGEMENT End-User Guide TABLE OF CONTENTS LogIn Process...1 Company Login... 1 Cash User Login... 3 Cash Management User Single Sign On... 4 Navigation...5 Account Listing Page...6
Present and Pay. User Manual Payer Analyst
 Present and Pay User Manual Payer Analyst Table of Contents 1.0 Glossary of Terms... 1 2.0 How to Use this Manual... 3 3.0 Common User Features and Functions... 3 3.1 Present and Pay User Interface...
Business Online Banking
 First State Community Bank Business Online Banking End User Guide Table of Contents Logging In... 3 Navigation... 5 Account Activity Options... 7 Transactions... 8 Transfers... 9 Stop Payments...10 Statements...12
Maximo Self Service Center
 Maximo Self Service Center Once you have received an email regarding your registration approval, go to the following web address: https://maximo.mysodexo.com Log in to the Self Service Center: Your User
Probate Court E File System User Guide
 Probate Court E File System User Guide Honorable Anthony J. Russo Presiding Judge Honorable Laura J. Gallagher Judge Introduction This document will assist users in the electronic registration and submission
CLIQ Web Manager. User Manual. The global leader in door opening solutions V 6.1
 CLIQ Web Manager User Manual V 6.1 The global leader in door opening solutions Program version: 6.1 Document number: ST-003478 Date published: 2016-03-31 Language: en-gb Table of contents 1 Overview...9
ROAMpay TM. X4 User's Guide
 ROAMpay TM X4 User's Guide Last Modified: 06/14/2013 Contents 1 Activating ROAMpay X4 2 Using the System 2 Login 2 First-time Login 2 Default Settings 3 Retrieving Your Password 3 Online Sales 4 Saved
Creating International Wire Transfer Payments Reference Guide
 Creating International Wire Transfer Payments Reference Guide Table of Contents Creating and Working with International Wire Transfers 3 Overview 3 Creating a Freeform Payment or Template 3 Approving or
Bankline SEPA Money Transfer Guide
 Bankline SEPA Money Transfer Guide Table of Contents 1. Initial setup by the Bank... 2 2. Processing Timelines for SEPA Money Transfer... 2 3. Visibility of Debit... 3 4. Credit Limits... 3 5. Debit Accounts...
TABLE OF CONTENTS. Document: SDF Training Manual Client: CATHSSETA Rev Date: February 2017 Page 2
 Mandatory Grant Application Manual 2017 TABLE OF CONTENTS 1 INTRODUCTION...4 1.1 Purpose of this Document... 4 1.2 Scope of the Document... 4 2 INDICIUM ACCESS...4 2.1 Website... 4 2.2 Technical Information...
OPENING A NEW JACS ACCOUNT... 15
 JACS Online Help TABLE OF CONTENTS ACCESSING YOUR JACS ACCOUNTS ONLINE... 4 REGISTERING FOR A USER NAME AND PASSWORD... 4 Registration Instructions... 4 Step 1 - Terms and Conditions... 5 Step 2 Do You
Payments & Transfers User Guide
 Payments & Transfers User Guide Table of Contents Payee Maintenance...1 ACH Payments...4. Batch Creation...4 Creating a Manual Batch...4 Transaction Import...6 Templates & Recurring Payments... 7 Wire
Logging In to the Program
 Introduction to FLEX DMS F&I Introduction to FLEX DMS F&I Welcome to Autosoft FLEX DMS F&I, a Web-based program that fully integrates with the Autosoft FLEX Dealership Management System (DMS). The program
Vendor Deal Portal (VDP)
") Vendor s Guide to the Vendor Deal Portal (VDP) The Toys R Us, Inc On-line Application for Electronic Approval and Management of Credit Allowance Contracts 1 P a g e TABLE OF CONTENTS 1. ABOUT... 3 2. GETTING
Vendor s Guide to the Vendor Deal Portal (VDP) The Toys R Us, Inc On-line Application for Electronic Approval and Management of Credit Allowance Contracts 1 P a g e TABLE OF CONTENTS 1. ABOUT... 3 2. GETTING
BTA-ONLINE INTERNET-BANKING SYSTEMS FOR LEGAL ENTITIES
 User manual Customer Version 1.0 BTA-ONLINE INTERNET-BANKING SYSTEMS FOR LEGAL ENTITIES 1 Contents: 1. Logging-in.... 3 p. 2. Logging-out.. 3 p. 3. Change of password.... 4 p. 4. Creating documents in
Easthampton Savings Bank Online Business Banking User Guide
 Easthampton Savings Bank Online Business Banking User Guide Page 1 of 100 Table of Contents SECURITY...6 PASSWORD TAB FUNCTIONALITY...6 SECURE DELIVERY TAB FUNCTIONALITY...9 CHALLENGE CODE TAB FUNCTIONALITY...10
BKT KOSOVA BUSINESS E-BANKING USER MANUAL
 BKT KOSOVA BUSINESS E-BANKING USER MANUAL Copyright BKT 2017. All rights reserved No part of this publication may be reproduced, translated, adapted, arranged or in any way altered, distributed, communicated,
Welcome to ExACCT! Getting Started
 Please Note: To navigate through the ExACCT User Guide easily, please use the Books or Thumbnails available in the navigation pane. To show these navigation links, click on the button Show/Hide Navigation
ALL MEMBERS AND PAYEES
 Table of Contents Click a link to walk through a specific procedure. ALL MEMBERS AND PAYEES 1 GETTING STARTED How do I register? How do I log on? How do I update security questions? How do I retrieve/reset
ANZ TRANSACTIVE USER GUIDE
 ANZ TRANSACTIVE USER GUIDE DISCLAIMER Copyright Australia and New Zealand Banking Group Limited (ANZ) 100 Queen Street, Melbourne 3000, ABN 11 005 357 522. ANZ s colour blue is a trade mark of ANZ. The
Register yourself (for new applicants who are registering for Examination 2016)
") Carefully read this guide before you proceed for filling up the form. It will help you to gain knowledge as to how to fill up and submit your Application Form. This segment will guide you through the operational
Carefully read this guide before you proceed for filling up the form. It will help you to gain knowledge as to how to fill up and submit your Application Form. This segment will guide you through the operational
Internet Banking. Member Guide.
 Internet Banking Member Guide. Contents Introduction Register for Internet Banking 3 Log in to Internet Banking 4 Setting up your Internet Banking password 5 Resetting your Internet Banking password 6
USER GUIDE. June 2012 VERSION 1.0. Supplier Portal. Kimberly-Clark. E-sourcing
 USER GUIDE June 2012 VERSION 1.0 Supplier Portal Kimberly-Clark E-sourcing Copyright 2005, Kimberly-Clark Worldwide, Inc. All rights reserved. This document and its associated training materials are proprietary
ONLINE TRADE SERVICES USER GUIDE
 ONLINE TRADE SERVICES USER GUIDE Contents 1 Welcome 4 2 Using Online Trade Services for the first time 5 3 System Features (Service Administrator) 11 3.1 Overview 11 3.2 Change profile 11 3.3 Jurisdiction
Business Online User Guide July 2017
 Business Online User Guide July 2017 Business Online Account Holder 1 Introduction.. 1 Types of Activity 1 Log In 2 Multifactor Authentication. 2 MFA Device Print Security 2 MFA Enrollment 3 Registered
Enterprise Payment Solutions User Administrator. User Administrator Handbook
 Enterprise Payment Solutions 1999-2014 Jack Henry & Associates, Inc. All rights reserved. Information in this document is subject to change without notice. Printed in the United States of America. No part
CITO2 Installation & User Instructions
 CITO2 Installation & User Instructions DD 56107 Stoneridge Electronics Ltd 1. Installation...4 1.1. System Requirements...4 1.2. Installing CITO2...4 1.3. Uninstalling CITO2...4 2. Starting and closing
ActivePay CARDHOLDER GUIDE
 ActivePay CARDHOLDER GUIDE PNC - ACTIVEPAY CARDHOLDER TRAINING MANUAL TABLE OF CONTENTS Accessing the PNC ActivePay Web Application 2 Self Registration for Cardholders.. 3 Forgotten Username or Password
GUIDELINES ON BASIC BUSINES PORTAL TRANSACTIONS. Cards and E-Banking Division. January 2016
 National Bank of Malawi GUIDELINES ON BASIC BUSINES PORTAL TRANSACTIONS By Cards and E-Banking Division January 2016 1 Contents Page Logging on to Business Portal.. 3 Creation of Beneficiaries in Business
Associated Bank. Remote Deposit User Guide. Page 1 of 33
 Associated Bank Remote Deposit User Guide Page 1 of 33 Table of Contents CHAPTER 1: GETTING STARTED... 3 Minimum system requirements... 3 Currently supported scanners include the following operating systems:...
Sponsor Documentation
 CHAPTER 17 This chapter provides user documentation for sponsor users who create guest accounts. It contains the following sections: Introduction to Cisco NAC Guest Server Connecting to the Cisco NAC Guest
Welcome to the QParents Portal... 2
 Table of contents Welcome to the QParents Portal... 2 Introduction: about the QParents Portal... 2 Online security... 2 About this guide... 3 How to provide feedback in QParents... 4 Help and support...
USERS GUIDE. Revision 02
 USERS GUIDE Revision 0 06 I. TABLE OF CONTENTS... II. AVAILABLE SERVICES QUICK REFERENCE... 4 III. USEFUL SECURITY TIPS... 5. LOGIN AND NAVIGATION... 6.. The Login Screen... 6 Logging into Web Banking...
USER GUIDE FOR SUPPLIERS. OpusCapita Business Network
 USER GUIDE FOR SUPPLIERS OpusCapita Business Network Contents 1. Introduction... 3 2. Finalizing registration and changing your password... 4 2.1 Finalize your registration... 4 2.2 Change your forgotten