Introduction to Multimedia. Adobe Animate CC. Lab Manual
|
|
|
- Brittany Clark
- 6 years ago
- Views:
Transcription


1 Introduction to Multimedia Adobe Animate CC Lab Manual Semester 1
2 Table of Contents A. Introduction p. 1 About Animate Understanding the Workspace of Animate B. Getting Started with Animate.... p. 7 Animate Document Setup Create Animation Publishing Basic drawing C. Play with Text..... p. 19 Text Tool Transforming Text Skew, Break Apart and Color Text Vertical Text, Rotate Text and Zoom Text D. Symbols and Interactivity.. p. 26 Graphic symbol Buttons symbol ActionScript Movie clip symbol E. Special Effects p.41 Shape Tween Mask Spotlight Motion Guides Motion Tween Motion Presets
3 F. Combine Animate Movies p.53 Add Scenes Load Movies G. Play with Graphic.. p.64 Brightness Tint Alpha Remove background H. Play with Sound.... p.71 Add background music Add sound effect I. Video... p.76 Steps for importing video ALL RIGHTS RESERVED. This lab manual is only for use in the course Introduction to Multimedia in HKU SPACE Community College.
4 A. Introduction About Animate What is Animate? Animate is a development tool that allows you to create interactive animations with cutting-edge drawing tools and publish them to multiple platforms. Animate can be used for Web sites Web-based applications Interactive applications Video Where can you obtain Animate? You can download a 7 days Free Trial version of Animate from Download page: SD&mv=other p. 1
 Tools Panel Playhead Timeline")
5 Understanding the Workspace of Animate Menu Bar Stage Pasteboard Properties Panel (Properties inspector) Tools Panel Playhead Timeline p. 2

6 The followings are the important parts of the workspace: 1) Timeline, 2) Stage, 3) Panels and 4) Tools Panel. 1). Timeline The timeline is used to organize and control the movie s content by specifying when each object appears on the stage. The timeline has separate layers. Like transparent sheets of content stacked on top of one another. They allow users draw or place images on different layers without affecting other items on other layers. There is no limitation to the number of the layers. A well-categorized system of layers allows users to manage objects more efficiently. Adding a layer causes it to be placed on top of the other layers. Can be re-ordered by dragging up or down. The Front and Behind position of the object on the stage is related to sequence of the layers. Layer Show/Hide / Lock/Unlock / Show all Layer All Layers All Layers as Outline Insert layer Delete Layer Try to: 1. Insert / rename / delete layers 2. Show/Hide All Layers ( ) / Lock/Unlock ( ) All Layers / Show all Layer as Outline ( ) Note: When you choose any of the layers, a pen icon will be displayed on the layer. The timeline has a playhead. The playhead indicates which frame is playing. You can manually move the playhead by dragging it left or right. Dragging the playhead also allows you to do a quick check of the movie without having to play it. p. 3
7 Playhead Frames Current Frame The timeline is made up of individual units called frames. Content is displayed in frames as the playhead moves over them when the movie plays. The status bar indicates the current frame the playhead is on. 2). Stage Contains all objects that are seen by the viewer in the final movie. You can draw objects on, or import objects to the stage. 3). Panels Help you view, organize, and change elements or object in a file. The options available on panels control the characteristics of symbols, instances, colors, type, frames, and other elements. You can use panels to customize the Animate interface. Panels include Properties Panel, Library Panel, Tools Panel, Actions Panel, Color Panel, Swatches Panel, and etc. 4). Tools Panel Contains a set of tools used to draw and edit graphics and text. p. 4
8 Selection Free Transform Subselection 3D Rotation Lasso Pen Line Text Rectangle Pencil Brush Bone Eraser Hand Paint Bucket Eyedropper Zoom Stroke Color Fill Color p. 5
9 The followings are the tools and their functions: Tool Name Selection Function Selects objects on the work area; an object must be selected before it can be modified. Subselection Selects objects or parts of objects by dragging a rectangular selection marquee. Modifies specific anchor points in a line or curve. Free Transform Moves, scales, rotates, skews, or distorts objects. Lasso Pen Text Line Rectangle Oval Pencil Brush Ink Bottle Paint Bucket Eyedropper Eraser Hand Zoom Selects objects or parts of objects by dragging a free-form selection marquee. Draws lines or curves by creating a series of dots (anchor points technically) that are automatically connected. Creates and edits text. Draws straight lines (strokes) of varying lengths, widths and colors. Draws rectangles of different sizes and colors. Press and hold [Shift] to draw a perfect square. Draws oval shapes. Press and hold [Shift] to draw a perfect circle. Draws freehand lines and shapes. Draws / paints with brush-like strokes. Applies color, thickness and styles to lines. Fills enclosed areas of a drawing with color. Picks up styles of existing lines, fills, and text and applies them to other objects. Erases lines and fills. Moves the view of the Stage and Work Area. Increases or reduces the view of the Stage and Work Area. p. 6

10 B. Getting Started with Animate Animate Document Setup Animate document s size and speed setup Size: default pixels Speed: default 24 fps (frame per second) Try to do the setup as follows: 1. Click on pixels button in the Properties Panel to change the document size 2. Enter a value in the FPS edit box to change the speed. 3. Click on the Stage s swatch to choose background color. p. 7

11 Create Animation Starting Keyframe Ending Keyframe Basic animation requires two keyframes: the starting keyframe and the ending keyframe. A keyframe is a frame in which you define a change to an object s properties for an animation or include ActionScript code to control some aspect of your document. The number of frames between two keyframes determines the length of the animation. In Animate CC, there are 3 methods for creating an animation sequence: classic tweening, shape tweening and motion tweening. In this course, we focus on classic tweening and shape tweening. In classic tweening, you define properties such as position, size, and rotation for an instance (editable copies of symbols that are placed on the stage), group, or text block at one point in time, and then you change those properties at another point in time. In shape tweening, you draw a shape at one point in time, and then you change that shape or draw another shape at another point in time. p. 8
12 Basic steps to create a classic tweening in Animate: 1. Create a starting keyframe with object(s). 2. Select the starting keyframe on the layer of the timeline if it is not selected. 3. Insert on the menu bar > Choose Classic Tween. 4. Click the ending keyframe on the layer of the timeline, and then insert keyframe (Insert on the menu bar > Choose Timeline > Click Keyframe or by right-click Insert Keyframe). 5. Modify the content in the ending keyframe. Basic steps to create a shape tweening in Animate: 1. Create a starting keyframe with object(s). 2. Select the starting keyframe on the layer of the timeline if it is not selected. 3. Insert on the menu bar > Choose Shape Tween. 4. Click the ending keyframe on the layer of the timeline, and then insert keyframe (Insert on the menu bar > Choose Timeline > Click Keyframe or right-click Insert Keyframe). 5. Modify the content in the ending keyframe. p. 9
. 5. Use Oval Tool to draw a circle on the left hand side of the stage. 6. Select Frame 1 on Layer 1 of the timeline. 7. Click Insert on menu bar > Choose Classic Tween. p.")
13 Tutorial B1 Creating a Animate Movie (Classic Tween) Steps: 1. Open a new Animate document (with ActionScript 3.0). 2. Click File and Save it as tween-motion.fla. 3. Click Fill Color Tool ( ) to choose any color you like. 4. Choose the Oval Tool ( ). 5. Use Oval Tool to draw a circle on the left hand side of the stage. 6. Select Frame 1 on Layer 1 of the timeline. 7. Click Insert on menu bar > Choose Classic Tween. p. 10

14 8. Click Frame 40 on Layer 1 of the timeline. 9. Click Insert on the menu bar > Choose Timeline > Click Keyframe. 10. Click Selection Tool ( ) from Tools Panel. 11. Use the Selection Tool to drag the circle to the right hand side of the stage, as shown in the above picture. 12. Click Control on the menu bar > Choose Test Movie > Choose In Animate to play the movie. 13. Save your work. Playback Animate movies are viewable through a browser. The browser must have the Flash Player plug-in. Web users must download ( and install the player in order to view and interact with Animate content. Animate movies can be saved as executable files, called projector, which can be viewed without the need of Flash Player. Publishing Output File Formats Save: Publish: *.fla Animate documents, which have the.fla filename extension, contain all the information required to develop, design, and test interactive content. It can be modified. *.swf The Shockwave file, in order to view your Flash/Animate movies on the Web, you must change the movie to a Shockwave file (.swf) format. *. html It is an HTML Wrapper. Flash/Animate generates the HTML code that references to its Shockwave file. p. 11
 Publish a movie Steps: 14.")
15 For example, *.exe It is a stand-alone projector file for Windows. It cannot be modified. *.app It is a stand-alone projector file for Mac. It cannot be modified. File > Publish to export movies out of Animate By default, it will export to.swf format, and Will generate the HTML codes that reference the Shockwave file. e.g. Code specifying the Shockwave movie that the browser will play Tutorial B1 (cont d) Publish a movie Steps: 14. Find and Open the Animate file tween-motion.fla if you have closed it. 15. Click File on the menu bar > Click Publish. 16. Locate and open (by double-click) the tween-motion.html which you have just published. p. 12

16 (Note: tween-motion.fla - the Animate movie file which you can modify tween-motion.swf - the Flash Player file tween-motion.html - the HTML document) Create a projector (executable file) Steps: 17. Open Animate program tween-motion.fla if you have closed it. 18. Click File on the menu bar > Publish Settings > Click Win Projector check box > Click OK. 19. Click File on the menu bar > Click Publish. p. 13
17 20. Locate and Open (or double-click) the tween-motion.exe which you have just published. Exercise B1 Requirements: 1. Open tween-motion.fla. 2. Insert a new layer and rename it to square. 3. Draw a square (any color) on the square layer. 4. Create a classic tween on the square layer and make the square move from the top to bottom of the stage. 5. Save the movie. p. 14
18 Basic Drawing Selection Subselection Free Transform Lasso Pen Line Oval tool Rectangle tool PolyStar tool Paint Bucket Tutorial B2 Steps: 1. Open a new Animate document (with ActionScript 3.0). 2. Click File and Save it as tools.fla. 3. Click View on the menu bar > Grid > Show Grid 4. Use different tools such as Rectangle Tool, Oval Tool, Polystar Tool and Line Tool to draw the followings: p. 15
 to")


19 (Tips to draw stars: ) 5. Click Selection Tool ( ) to select objects as the following samples 6. Click Lasso Tool ( ) to select irregular objects just like the followings, p. 16


20 7. Click Free Transform Tool ( ) > Click the Rotate and Skew option in the Option section of the Tools panel. 8. Insert a new layer > Click Frame 5 and insert a keyframe in this new layer > Use Pen Tool to draw an arrow like the followings: p. 17

 to distort")


21 (Try to use Paint Bucket Tool to fill any color and use Ink Bottle Tool to change the stroke color and style.) 9. Click Subselection Tool ( ) to distort the arrow. (Hint: click the boundary of the arrow to display the handles, and then distort the arrow by dragging the handle at the tip of the arrow.) p. 18


22 C. Play with Text Text Tool Animate acts similar to a word processor. It provides a lot of flexibility when formatting text. The Properties panel allows you to change the font, size, style and color of a single character or an entire text block. You can use the Properties panel to set margins, indents and line spacing. You can also align paragraphs such as left, right, center and justified. Transforming Text Text is also an object, and can therefore be transformed like other objects in Animate. The entire block gets transformed. Use Break Apart command to transform individual letters. Break apart is a process of making each area of color in a bitmap image into a discrete element you can manipulate separately from the rest of the image. Also, the process of breaking apart text to place each character in a separate text block. Skewing a text block Reshaping a letter after the text block has been broken apart. p. 19
23 Skew, Break Apart, and Color Text Tutorial C1 Steps: 1. Open a new Animate document (with ActionScript 3.0). 2. Click File > Save it as text.fla. 3. Type a word Cat on the stage, you may change the font size (please choose a bigger size), font type and font color. 4. Skew the text like the above picture by selecting the word Cat and click Free Transform Tool ( ). 5. Type another CAT on the stage, and fill each letter with different colors (Tip: use the Properties panel) p. 20
24 6. Save your work. 7. Change the shape of the letter C into a cat shape like the picture below. (Tip: Use Selection Tool to select the text > Right-click Break Apart twice, then you will find that the letters become a dot pattern. It indicates that they can now be edited > Click the Subselection Tool > Click the edge of the letter C and reshape the letter to cat shape.) p. 21
 > Choose gradient color or use")


25 8. Change the word CAT with gradient color or multiple colors like picture below. Color Panel (Tip: Select each letter > Use Fill Color Tool ( ) > Choose gradient color or use Color Panel to change color) 9. Save your work. Vertical Text, Rotate Text and Zoom Text Tutorial C2 Before After Create Classic Tween for the vertical word Hello so that it can fly from the right to the left hand side of the stage starting from Frame 1 to Frame 10. Steps: 1. Open a new Animate document (with ActionScript 3.0). 2. Click File and Save it as TextVnR.fla. 3. Click File > Import to stage / Import to Library > Choose any picture such as Jellyfish.jpg. 4. Use Free Transform Tools to resize picture to make it the same size as the stage. 5. Rename Layer 1 as Background. p. 22

 9. Right-click in Frame 1 and select Create Classic Tween 10.")

26 6. Insert Frame in Frame 45 of Background layer. 7. Insert another new layer ( ) and rename it to V-Hello. 8. Use Text Tool to type a vertical Hello on the right hand side of pasteboard like the picture below. (Tip: Use the Properties Panel to set the text attributes: font size = 50, color = yellow, Text Direction button = Vertical.) 9. Right-click in Frame 1 and select Create Classic Tween 10. Insert Keyframe in Frame 10 > Drag the vertical word Hello to the left side on the stage. 11. Right-click in Frame 10 on Layer V-Hello > Select Remove Tween. This action will remove the tweening effect from Frame 10 to Frame 45) p. 23


27 Create Classic Tween for the word Hello so that it can fly and rotate from the top to the center of the stage starting from Frame 1 to Frame 20 of R-Hello layer like the picture below. Steps: 12. Insert a new layer and rename it as R-Hello. 13. In Frame 1 of the R-Hello layer, use Text Tool to type Hello on top of the picture like the following: 14. Right-click in Frame 1 on Layer R-Hello > Select Create Classic Tween. 15. Under the Properties window, select CW in the Rotate dropdown list and type 2 in the times input box. 16. Insert Keyframe in Frame 20 on Layer R-Hello. 17. Drag the word Hello to the center. 18. Right-click in Frame 20 on Layer R-Hello > Select Remove Tween. (This will remove the tweening effect from Frame 20 to Frame 45) 19. Save your work and test the movie. p. 24
 on the stage. 23.")
28 Create Classic Tween for the word Welcome which can zoom from large to small on the stage starting from Frame 21 to Frame 30 of the Welcome layer. Steps: 20. Insert a new layer and rename it as Welcome. 21. Insert Keyframe in Frame 21 on Layer Welcome. 22. Type a BIG word Welcome (such as size = 95) on the stage. 23. Right-click in Frame 21 on Layer Welcome > Select Create Classic Tween. 24. Insert Keyframe in Frame 30 on Layer Welcome > Click Free Transform Tool and drag the edge of the word Welcome to make it smaller. 25. Right-click in Frame 30 on Layer Welcome > Select Remove Tween. (This will remove the tweening effect from Frame 30 to Frame 45) 26. Save your work and test the movie. p. 25
 that can be re-used without adding file size. Symbols reside in the Library.")
29 D. Symbols and Interactivity What is symbol? In order to create a smaller file size, Animate allows you to create symbol (including graphic, button and movie clip) that can be re-used without adding file size. Symbols reside in the Library. Dragging a symbol from the Library to the stage creates an instance. Animate calls the original a symbol and the copies instances. Three types of symbols: 1) Graphic Graphic symbols are effective for re-usable single images. Can be static images or animated images. Can be changed in each instance of the image. Are tied to the main Timeline of the movie. 2) Button Animate can create interactive buttons that respond to mouse clicks, rollovers, or other actions. Each button has its own four-frame Timeline. When you select the button behavior for a symbol, Animate creates a Timeline with four frames. The first three frames display the button's three possible states; the fourth frame defines the active area of the button. The Timeline doesn't actually play; it simply reacts to pointer movement and actions by jumping to the appropriate frame. There are 4 states of buttons, they are: Up: A visual state representing how the button appears when the mouse pointer is not over it. Over: A visual state representing how the button appears when the mouse pointer is over it. Down: A visual state representing how the button appears after the user clicks the mouse. p. 26
30 Hit: A special, non-visual state that determines the area of the screen which the mouse sees as the interactive or hot area. ActionScript After you have created the button, you may need to add different actions to this button. Actions can be implemented by ActionScript. ActionScript is the scripting language of Adobe Animate. It allows you to create a movie that behaves exactly as you want. It has its own rules of syntax, reserves keywords, provides operators, and allows you to use variables to store and retrieve information. To add ActionScript, you can: Click Window on menu bar > Choose Actions to display Actions panel. Script pane Code Snippets 3) Movie Clip A movie within a movie. Retains independent timeline when you insert an instance of symbol into a movie. Keeps going even if the main timeline stops. Advantages to create a movie clip symbol Maintain its own independent timeline. Require only one layer and one frame in the main movie. Sound and associated ActionScript statement can be added. Can be used to animate a button. p. 27
. 6. Type ball in the name box and select Graphic. 7.")
31 Tutorial D1 Create Graphic Symbol 1. Open a new Animate document (with ActionScript 3.0). 2. Click File and Save it as ball.fla. 3. Draw a ball on the stage as shown in the picture: 4. Select the ball on the stage. 5. Click Modify on menu bar > Click Convert to Symbol (or right-click to choose Convert to Symbol). 6. Type ball in the name box and select Graphic. 7. Open the Library Panel (if necessary) and find the ball graphic symbol in the library. (To open the library panel, click Window > Choose Library). 8. Drag the ball symbol from the library to the stage so that your stage can have another copy of the ball. The original is called symbol and the copy is called instance. p. 28
 11. Click Scene 1 to exit the editing mode.")
32 9. Double-click a ball symbol (any one ball) to enter symbol-editing mode. The symbol indicates that you are in the edit symbol mode 10. Change the color of the ball from red to green (select the red part of the ball, and change the fill color of the ball from the Properties panel) 11. Click Scene 1 to exit the editing mode. You will find that the ball color of the instance on the stage reflects the color changes you made to the symbol. Break Apart an Instance 12. Use the Selection tool to select a ball (any ball you like) on the stage. 13. Click Modify on the menu bar > Click Break Apart. Now, the object is no longer linked to the symbol in the library. 14. Click a blank area of the stage to deselect the object. 15. Change the color of the ball from green to blue. 16. Check and compare the ball on the stage and the ball symbol in the library. p. 29
 Create Movie Clip Symbol 17. Select the blue ball. 18.")
33 (The color of the ball of the original symbol remains unchanged, but the one which you applied the Break Apart command is different from the original symbol in the library. It is because you used the Break Apart command to break the link of the instance to its symbol so it won t follow the original.) Create Movie Clip Symbol 17. Select the blue ball. 18. Click Modify on the menu bar > Convert to Symbol (or right-click to choose Convert to Symbol). 19. Type the name ball movie, then select Movie Clip and click OK. 20. Enter symbol-editing mode to edit the ball movie (you can double-click ball movie icon in the library to enter the editing mode or double-click the blue ball on the stage.) 21. Add Classic Tween to make the ball turning (Hit: use Free Transform tool.) p. 30


34 22. Click Scene 1 to exit the editing mode and return to normal mode. 23. Save your work and test the movie. Tutorial D2 Create Buttons 1. Open the Animate document namely TextVnR.fla. 2. Lock all layers in order to protect them from being modified unintentionally. 3. Insert a new layer > Rename the layer as buttons. 4. Draw two red (any red) buttons like the following picture. One button is for play and another is for stop. p. 31


35 5. Select the Play button on the stage > Modify on the menu bar > Convert to Symbol > Name the button as Playbutton > Choose the type Button > Click OK to confirm and exit. 6. Click Edit on the menu bar > Choose Edit Symbols. After entering into editing mode, you will see the button timeline like the following: 7. Select Frame Over > Right-click to Insert Keyframe. Repeat the same steps for Frame Down and Frame Hit. p. 32
 to cover it. 8. Click Scene 1 to quit the edit mode. 9. Click Control in menu bar > Click Test Movie to play the movie. p. 33")
36 Change the color of different button states: Up: No change Over: Green Down: Blue Hit: Draw a rectangle Select Frame Hit and draw a rectangle (any color, same size or a little bit bigger than the original graphic) to cover it. 8. Click Scene 1 to quit the edit mode. 9. Click Control in menu bar > Click Test Movie to play the movie. p. 33

37 10. Select the Stop button on the stage > Click Modify on the menu bar > Convert to Symbol > Name button as Stopbutton > Choose the type Button > Click OK to confirm and exit. 11. Click Edit on the menu bar > Choose Edit Symbols. After entering into editing mode, you will see the button timeline like the following: 12. Select Frame Over > Right-click to Insert Keyframe. Repeat the same steps for Frame Down, and Frame Hit. Change the color of different button states: 13. Select Frame Over and change color to green. 14. Select Frame Down and change color to blue. 15. Click Scene 1 to exit the editing mode. 16. Click Control on the menu bar > Click Test Movie. 17. Save your work. Add ActionScript to a frame - Stop Actions 18. In the same file TextVnR.fla, select Frame 1 on the buttons layer. 19. Click Window on menu bar > Choose Actions in order to open the Actions Panel. p. 34
38 20. Click the Code Snippets button. 21. On the Code Snippets Panel, expand ActionScript and Timeline Navigation. 22. Double-click Stop at this Frame. Then, the corresponding ActionScript will appear in the Script pane. p. 35
39 23. Save and test the movie. The movie stops playing, because we assigned a stop action to the first frame of the timeline, so the playhead stops playing. (Note: The piece of ActionScript has been added to Frame 1 of the automatically-created Actions layer.) p. 36


40 Add ActionScript to buttons Play and Stop buttons 24. Single click to select Playbutton on the stage. On the Properties Panel, type btn_play as the instance name. 25. Open the Actions Panel. Select Playbutton, and then click Code Snippets. 26. On the Code Snippets Panel, expand ActionScript, Time Navigation, and then double-click Click to Go to Frame and Play. p. 37
; 28. Save and test the movie. p.")
41 27. Modify the ActionScript from gotoandplay(5); to gotoandplay(1); 28. Save and test the movie. p. 38

42 Note: When Playbutton has been clicked and released, the playhead will move to Frame 1 and the movie will start playing. 29. Single-click to select Stopbutton. On the Properties Panel, type btn_stop as the instance name. 30. Open the Actions Panel. Select Stopbutton, and then click Code Snippets. 31. On the Code Snippets Panel, expand ActionScript, Time Navigation, and then double-click Click to Go to Frame and Stop. p. 39
43 32. Modify the ActionScript from gotoandstop(5); to gotoandstop(1); 33. Save all the work and test the movie. Note: When Stopbutton has been clicked and released, the playhead will move to Frame 1 and the movie will stop there. p. 40
44 E. Special Effects Shape Tween In classic tweening, we cannot change the shape of an object. But we can use a shape tween to change a shape into another one over time. Layer Layers are located on the Timeline. They are used to organize and control the movie s content by specifying when each object appears on the stage. Layer types: 1. Normal It is the default layer type. All objects on these layers appear in the movie. 2. Mask A layer that contains mask item(s) through which underlying masked layer(s) are visible. 3. Masked A layer that contains the objects that are hidden and revealed by a mask layer. 4. Folder A folder helps to organize layers. 5. Guide Guide layers are used to create a path for animated objects to follow. p. 41
45 Shape Tween Tutorial E1 - circle becomes square, number 1 becomes 2 before after Steps: 1. Open a new Animate document. 2. Click File > Save it as ShapeTween.fla. 3. Rename Layer 1 to shape. 4. Use Oval Tool ( ) to draw a circle (any color) on the lower left corner of the stage. 5. Click Frame 1 on shape layer > Right-click to choose Create Shape Tween. 6. Click Frame 20 on the shape layer > Right-click to choose Insert Keyframe. 7. Delete the circle and draw a square on the upper right corner of the stage. 8. Test the movie and save your work. 9. Insert a new layer and rename it as number. 10. Click Frame 1 on the number layer. 11. Use Text tool to type a number 1 in the middle of the stage. 12. Click Frame 20 on the number layer > Right-click to choose Insert Keyframe. 13. Delete the number 1 and type a number Select the number 2 > Right-click to choose Break Apart. 15. Select the number 1 > Right-click to choose Break Apart. (So that both 1 and 2 are broken apart.) 16. Click Frame 1 on number layer > Right-click to choose Create Shape Tween. 17. Test the movie and save your work. p. 42
46 Mask Tutorial E2 Steps: 1. Open a new Animate document (with ActionScript 3.0). 2. File > Save it as Mask.fla. 3. Double-click Layer 1 on the Timeline panel and rename it to Photo, and then click File > Import to stage (import any picture). 4. Insert a new layer and rename it to Text, and then type your name on the stage. 5. Create mask: Right-click Layer Text on the Timeline > Choose Mask. 6. Test and Save the movie. p. 43

47 Mask Spotlight Tutorial E3 1. Open a new Animate document (with ActionScript 3.0). 2. File > Save it as Spotlight.fla. 3. Rename Layer 1 to Text, and then type Catch me if you can! on the stage. 4. Set background color to black and the text to yellow. 5. Insert Frame in Frame 40 on Text layer. 6. Insert a new layer and rename it to Mask. 7. Click Oval tool on the toolbox to draw an oval (position at the beginning of the sentence) on the stage. 8. Right-click Frame 1 on Mask layer > Choose Create Classic Tween > Click Frame 40 on the same layer > Drag the oval to the end of the sentence. 9. Select the Mask layer > Right-click to choose Mask. 10. Test and save the movie. p. 44
. 5. Click Pencil tool > Click Pencil Mode (the lower part of the Tools panel) > Click Smooth option. 6.")
48 Motion Guides Tutorial E4 1. Open a new Animate document (with ActionScript 3.0). 2. Save file as Motion.fla. 3. Rename Layer 1 as Bean. 4. Right-click Layer Bean to choose Add Classic Motion Guide. (After that you will find that there are 2 layers). 5. Click Pencil tool > Click Pencil Mode (the lower part of the Tools panel) > Click Smooth option. 6. Click Frame 1 on the Guide layer > Draw a big S on the stage. 7. On the Guide layer, click Frame 40 > Right-click to choose Insert Frame. 8. On Layer Bean, draw an oval. Then, drag the oval over the beginning of the path (big S ) like the picture below. (The oval s registration point must intersect with the path). p. 45
49 9. On Layer Bean, click Frame 1 > Right-click to choose Create Classic Tween > Click Frame 40 on the same layer > Right-click and Insert Keyframe > Drag the oval to the end of the path (make sure that the registration point intersects with the path). 10. Test and save the movie. p. 46
50 Motion Tween Tutorial E5 1. Open a new Animate document (with ActionScript 3.0). 2. Save file as MT.fla. 3. Rename Layer 1 as face. 4. Import the file face.png to Frame 1 of the face layer. 5. Right-click Frame 1 of the face layer, and choose Create Motion Tween. p. 47

51 6. Convert the image into a symbol by clicking Ok in the Convert selection to symbol for tween dialog. 7. Right-click Frame 10, choose Insert Keyframe, and then Position. p. 48


52 8. Move the image to another position of the stage (e.g. the top right corner). 9. Right-click Frame 20, choose Insert Keyframe, and then Scale. 10. Move the image to another position of the stage (e.g. the bottom right corner). 11. Use the Free Transform Tool to scale down the image. 12. Right-click Frame 30, choose Insert Keyframe, and then Rotation. p. 49
. 17.")
53 13. Move the image to another position of the stage (e.g. the top left corner). 14. Use the Free Transform Tool to rotate the image. 15. Right-click Frame 40, choose Insert Keyframe, and then Rotation. 16. Move the image to another position of the stage (e.g. the bottom left corner). 17. Use the 3D Rotation Tool to rotate the image. 18. Test and save the movie. p. 50


54 Motion Presets Tutorial E6 1. Open a new Animate document (with ActionScript 3.0). 2. Save file as MP.fla. 3. Rename Layer 1 as ball. 4. Import the file ball.png to Frame 1 of the ball layer. 5. Move the image to the top left corner of the stage. 6. Use the Free Transform Tool to scale down the image. 7. Select the image. 8. On the menu, choose Window, and then Motion Presets. p. 51

55 9. On the Moton Presets Panel, choose Default Presets, and then bounce-out- 3D. 10. Convert the image into a movie clip by clicking Ok on the Convert selection to symbol for tween dialog. 11. Test and save the movie. p. 52


56 F. Combine Animate Movies Scenes Scenes provide a way to break up a long or complex document into smaller and more manageable sections. Each scene has its own Timeline. Open the Scene Panel: Window > Scene To add a Scene, choose Insert on the menu bar > Scene, or use the Scene Panel. Scene Panel allows you to manage and name your scenes Rename a scene Duplicate a scene Add a scene Delete a scene Reorder scenes New scenes can be created with new content. Existing content can be split into multiple scenes by copying and pasting frames from one scene s timeline to another. By default, Animate plays scenes in order. Buttons can cause a movie to jump from one scene to another. p. 53
 so that it can fly from the top to the upper middle of the stage")

57 Scenes Tutorial F1 - Click a button jumps to a scene 1. Open an Animate document Scenes.fla. 2. Create a classic tween for the title Main Menu (above and outside the stage) so that it can fly from the top to the upper middle of the stage like the picture below. (Before) (After) 3. Click Window on the menu bar > Select Scene to open the Scene panel. 4. Double-click Scene 1 to rename it to Menu. 5. Click the Add scene icon > Double-click Scene 2 to rename it to Ch1. 6. Click Menu in the Scene panel and notice that the timeline has changed to the Menu scene. p. 54


58 7. Click Ch1 in the Scene panel and notice that the timeline has changed to the Ch1 scene, which is blank. 8. Type a heading Chapter One in scene Ch1. 9. Save and test movie. There is no content or stop ActionScript in the Ch1 scene, so the movie just jumps from one scene to another. p. 55

59 Add interactivity to scenes 10. Make sure that the Menu scene is displayed. 11. Double-click Layer 1, and rename it to Title. 12. Insert a new layer and rename it to Chapter Create a button and name it as Chapter 1 in Frame 30 on Layer Chapter Select Frame 30 on Chapter 1 layer, right-click to choose Actions > Assign a stop statement to Frame 30. (The statement will then be added on the Actions layer.) p. 56

60 Add ActionScript on Chapter 1 button 15. Select the Chapter 1 button in the Menu scene. On the Properties Panel, type btn_toch1 as the instance name. 16. Right-click Frame 30 on Chapter 1 layer to open the Actions Panel. 17. Select the Chapter 1 button > Click Code Snippets > Expand ActionScript, Timeline Navigation on the Code Snippets Panel > Double-click Click to Go to Frame and Play. p. 57
 > Click Ch1 to go to Scene Ch1. 21. Right-click Frame 1 on Layer 1 to choose Actions > Assign a stop function to Frame 1.")
61 18. Change the ActionScript statement from gotoandplay(5); to gotoandplay(1, Ch1 ); 19. Save and test the movie. Create a back button in Chapter One and add actions to this button 20. Click the Scene list ( ) > Click Ch1 to go to Scene Ch Right-click Frame 1 on Layer 1 to choose Actions > Assign a stop function to Frame 1. (The stop statement will then be added to the Actions layer.) p. 58


62 22. Insert a new layer and rename it to Menu. 23. On Layer Menu, create a button called Home. Select the Home button. On the Properties Panel, type btn_tomenu as the instance name. 24. Select the Home button. Right-click Frame 1 on Actions layer to open the Actions Panel. 25. Select Code Snippets. On the Code Snippets Panel, expand ActionScript, Timeline Navigation, and then double-click Click to Go to Frame and Play. p. 59

; 27.")
63 26. Change the ActionScript statement from gotoandplay(5); to gotoandplay(1, Menu ); 27. Save and test movie. p. 60
64 Load Movies Load Movie action can be used to load a movie. You can split a single movie into a number of different movies and use ActionScript to load movies as needed. You must know the name and location of the movie file you want to load. Tutorial F2 - Use a button to a load movie 1. Open an Animate document called loadmovie.fla. 2. Select Chan s Project 1 button. On the Properties Panel, type btn_proj1 as the instance name. 3. Open the Actions Panel. 4. Select the Chan s Project 1 button, and then click Code Snippets. On the Code Snippets Panel, expand ActionScript, Load and Unload, and then double-click Click to Load/Unload SWF or Image. p. 61


65 5. Specify the target movie file by replacing the filename placeholder with Scenes.swf. p. 62

66 6. To remove the original movie from the screen before loading the target movie, the following piece of ActionScript needs to be inserted. 7. Save and test the movie. p. 63

67 G. Play with Graphics Understanding the Format 1. Vector graphics Vector graphics describe images using lines and curves, called vectors, which also include color and position properties. Vector graphics are usually based on mathematical formulas. For example, the image of a leaf is described by points through which lines pass, creating the shape of the leaf's outline. The color of the leaf is determined by the color of the outline and the color of the area enclosed by the outline. Animate is a vector-based application. All images and motion within the application are calculated according to mathematical formulas. This vector-based format results in smaller file size. 2. Bitmap graphics Bitmap graphics describe images using colored dots, called pixels. Bitmap image is based on pixels, not on a mathematical formula. For example, the image of a leaf is described by the specific location and color value of each pixel in the grid, creating an image in much the same manner as a mosaic. p. 64


68 Working with Graphics In Animate, graphic objects are items on the Stage. Animate lets you move, copy, delete, transform, stack, align, and group graphic objects. You can also link a graphic object to a URL. Keep in mind that modifying lines and shapes can alter other lines and shapes on the same layer. Basically, there are two ways to work with graphics. You can draw (graphics create by you) or import images / photos. Drawing You draw graphics by using tools in Animate. Image / Photo Import images or photo into your Animate. Changing the properties You can change the brightness, tint, and alpha of the graphics; redefine how the graphic behaves. For example, changing the color and transparency of a graphic p. 65


69 Brightness, Tint and Alpha Tutorial G1 Change photo brightness Steps: 1. Open a new Animate document (with ActionScript 3.0). 2. Save file as Photos.fla. 3. Rename Layer 1 to Photo1. 4. File > Import any photo and resize if necessary. 5. In Frame 1, Create Classic Tween > In Frame 10, Insert Keyframe. 6. Click Frame 1 > Select the photo > In the Properties Panel, choose Brightness in the Style dropdownlist and set the Bright parameter to 100%. 7. Insert Keyframe in Frame 20 > Insert Keyframe in Frame In Frame 30, select the photo > In the Properties Panel, choose Brightness in the Style dropdownlist and set the Bright parameter to 100%. 9. Save and test the movie. p. 66


70 Change photo colors - tint Green Red Blue Steps: 1. Use the same file. 2. Insert a new Layer and rename to Photo2. 3. In Frame 30 on Layer Photo2, Insert Keyframe > File > Import any photo and resize if necessary. 4. Right-click the photo > Choose Convert to Symbol > Choose Graphic > OK. 5. Insert Frame in Frame 60 on the same layer. 6. Insert Keyframe in Frame 40 and Frame 50 of the same Layer. 7. Click Frame 30 on Layer Photo2 > Select the photo. 8. In the Properties Panel, choose Tint in the Style dropdownlist. Set the color to green and the percentage to 50%. 9. Click Frame 40 on Layer Photo2 > Select the photo. 10. In the Properties Panel, choose Tint in the Style dropdownlist. Set the color to red and the percentage to 50%. 11. Click Frame 50 on Layer Photo2 > Select the photo. 12. In the Properties Panel, choose Tint in the Style dropdownlist. Set the color to blue and the percentage to 50%. 13. Save and test the movie. p. 67


71 Change photo transparency - Alpha 1. Use the same file. 2. Add Layer 3 and rename to Photo3. 3. In Frame 65 on Layer Photo3, Insert Keyframe > File > Import any photo and resize if necessary. 4. In Frame 65, Create Classic Tween. 5. In Frame 75, Insert Keyframe. 6. In Frame 85, Insert Keyframe. 7. In Frame 95, Insert Keyframe. 8. Click Frame 65 > Select the photo > In the Properties Panel, choose Alpha in the Style dropdownlist and set the percentage to 10%. p. 68

72 9. Click Frame 95, select the photo > In the Properties Panel, choose Alpha in the Style dropdownlist and set the percentage to 10%. 10. Remove Tween from Frame 75 to Frame Save and test the movie. p. 69


73 Remove Background Tutorial G2 1. Open the Animate document RemoveBg.fla. 2. Rename Layer 1 to Background. 3. File > Import any photo and paste it to the stage. 4. Select the imported photo > Right-click to Break Apart the photo. 5. Click Lasso button ( ) > Click Magic Wand ( ) in Option. 6. Pick any point in a particular region using the Magic Wand > Right-click to select cut or Press the Delete button on the keyboard to remove that region. 7. Save your work after you have finished. p. 70
74 H. Play with Sound Importing sounds You can place sound files into Animate by importing them into the Library for the current document. To import a sound to an Animate document: 1. Choose File > Import to Library. 2. In the Import dialog box, locate and open the desired sound file. To add a sound to a movie: 1. Import the sound into the Library if it has not already been imported. 2. Choose Insert > Layer to create a layer for the sound. (When placing a sound on the Timeline, it is recommended that you place it on a separate layer.) 3. With the new sound layer selected, drag the sound from the Library panel onto the Stage. Then, the sound is added to the current layer. Note: You can place multiple sounds on one layer, or on layers containing other objects. However, it is recommended that each sound be placed on a separate layer. Each layer acts like a separate sound channel. The sounds on all layers are combined when you play back the movie. p. 71

75 Sound Tutorial H1 Add background music Steps: 1. Open a new Animate document (with ActionScript 3.0). 2. Save file as Sound.fla. 3. Rename Layer 1 to Bg. 4. File > Import a photo to the Library. 5. Drag the photo to the stage. 6. File > Import a music file to the Library. 7. Insert a new layer > Rename Layer 2 to music. 8. Click Frame 1 on Layer music. 9. Go to the Library panel > Click to select the desired sound file > Drag it to the stage. 10. Save and test the movie. 11. Insert Frame in Frame 40 for both Layer photo and Layer music (to ensure that the whole movie lasts for 40 frames). 12. You may repeat the background music several times or loop the background music. p. 72


76 13. To avoid the background music from overlapping, Event should be changed to Start in Sync. p. 73
77 Tutorial H2 Use buttons to Play and Stop sound Steps: 1. Open a new Animate document (with ActionScript 3.0). 2. Save file as controlsound.fla. 3. Create a play button and stop button. 4. Double-click the play button to enter editing mode. 5. Insert a new layer in play button > Rename the layer to play sound. 6. Insert Keyframe at Down frame on that layer. 7. Import any sound file to the library. 8. Drag the sound file from library to the stage. (make sure you have selected down frame) 9. Save and test movie. 10. Use Selection tool to select the Stop button. On the Properties Panel, type btn_stop as the instance name. p. 74


78 11. Open the Actions Panel. 12. On the Actions Panel, click Code Snippets. On the Code Snippets Panel, expand ActionScript, Audio and Video, and double-click Click to Stop All Sounds. 13. Save and test movie. p. 75
 checks video files that you select for import, and alerts you if the video might not be in a format that Animate can play.")
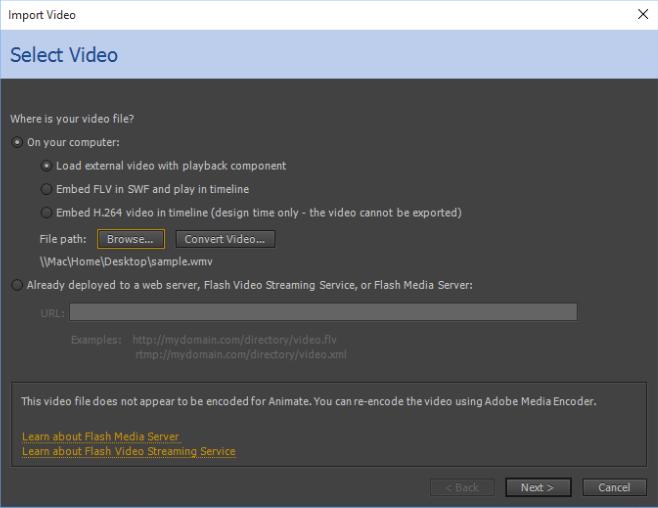
79 I. Video To import video into Animate you must use video encoded in the FLV or H.264 format. The Video Import Wizard (File > Import > Import Video) checks video files that you select for import, and alerts you if the video might not be in a format that Animate can play. In the event that the video is not in either the FLV or F4V format, you can use Adobe Media Encoder to encode the video in the appropriate format. Adobe Media Encoder Adobe Media Encoder is a stand-alone encoding application employed by programs such as Adobe Premiere Pro, Adobe Soundbooth, and Animate for output to certain media formats. Depending on the program, the Adobe Media Encoder provides a specialized Export Settings dialog box that accommodates the numerous settings associated with certain export formats, such as Adobe Flash Video and H.264. For each format, the Export Settings dialog box includes a number of presets that are tailored for particular delivery media. You can also save custom presets, which you can share with others or reload as needed. Import video file Tutorial I1 1. Open a new Animate program. 2. Save file as video.fla. 3. Click File on menu bar > Choose Import > Choose Import Video. 4. Browse to select any video file. p. 76

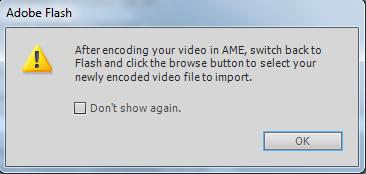
80 In case the video is not in a format that Animate can play, Adobe Media Encoder should be used to encode the video in the appropriate format. Adobe Media Encoder can be started by clicking the Convert Video button. p. 77
81 p. 78


82 Next, the new video file should be selected by clicking the Browse button again. Then, you may follow the steps in the Video Import Wizard. p. 79

83 The Skinning panel allows you to choose the playback controls used to play the video. Then, it will start importing the video. p. 80

84 5. Save and test movie. p. 81
Flash Domain 4: Building Rich Media Elements Using Flash CS5
 Flash Domain 4: Building Rich Media Elements Using Flash CS5 Adobe Creative Suite 5 ACA Certification Preparation: Featuring Dreamweaver, Flash, and Photoshop 1 Objectives Make rich media content development
Adobe Flash CS4 Part 1: Introduction to Flash
 CALIFORNIA STATE UNIVERSITY, LOS ANGELES INFORMATION TECHNOLOGY SERVICES Adobe Flash CS4 Part 1: Introduction to Flash Fall 2010, Version 1.0 Table of Contents Introduction...3 Downloading the Data Files...3
The Macromedia Flash Workspace
 Activity 5.1 Worksheet The Macromedia Flash Workspace Student Name: Date: Identify the Stage, workspace, Timeline, layers, panels, Tools panel, and Property inspector. The Macromedia Flash Workspace 5-35
Adobe Flash Course Syllabus
 Adobe Flash Course Syllabus A Quick Flash Demo Introducing the Flash Interface Adding Elements to the Stage Duplicating Library Items Introducing Keyframes, the Transform Tool & Tweening Creating Animations
1. Multimedia authoring is the process of creating a multimedia production:
 Chapter 8 1. Multimedia authoring is the process of creating a multimedia production: Creating/assembling/sequencing media elements Adding interactivity Testing (Alpha/Beta) Packaging Distributing to end
Macromedia Flash. ( Macromedia Flash) : - - Flash. Flash. 10. ( Frame ) . Motion Tween. . Flash
 : - - Flash. Flash. 10. ( Frame ) . Motion Tween. . Flash") Macromedia Flash ( Macromedia Flash).... : 233 - Ram - 16 64 600 - - Flash. Flash... Flash... Flash player Flash.. Flash Flash. Flash. Tweening 10. ( Frame ). Flash (10 1 ). Motion Tween :. Flash. Flash
Macromedia Flash ( Macromedia Flash).... : 233 - Ram - 16 64 600 - - Flash. Flash... Flash... Flash player Flash.. Flash Flash. Flash. Tweening 10. ( Frame ). Flash (10 1 ). Motion Tween :. Flash. Flash
Basics of Flash Animation
 Basics of Flash Animation The Stage is where you do your main design work The timeline is where you animate your objects by setting keyframes The library is where you store all your assets things you use
-Remember to always hit Command + S every time you make a change to your project going forward.
 -Open Animate -Under Create New - Select ActionScript 3.0 -Choose Classic as the Design type located in the upper right corner -Animate workspace shows a toolbar, timeline, stage, and window tabs -From
Animation is the illusion of motion created by the consecutive display of images of static elements. In film and video
 Class: Name: Class Number: Date: Computer Animation Basis A. What is Animation? Animation is the illusion of motion created by the consecutive display of images of static elements. In film and video production,
Adobe Flash CS4 Part 2: Working with Symbols
 CALIFORNIA STATE UNIVERSITY, LOS ANGELES INFORMATION TECHNOLOGY SERVICES Adobe Flash CS4 Part 2: Working with Symbols Fall 2010, Version 1.0 Table of Contents Introduction...2 Downloading the Data Files...2
Learning Flash CS4. Module 1 Contents. Chapter 1: Getting Started With Flash. Chapter 2: Drawing Tools
 Learning Flash CS4 Module 1 Contents Chapter 1: Getting Started With Flash The Flash Start Page...1-1 The Flash Screen...1-2 The Flash Workspace...1-2 The Properties Panel...1-4 Other Panels...1-5 The
Working with Graphics and Text
 Chapter 2 Working with Graphics and Text Learning Objectives After completing this chapter, you will be able to: Create vector graphics using drawing tools Modify the shape and size of the selected objects
Exploring the Flash MX 2004 Workspace
 1 Chapter Exploring the Flash MX 2004 Workspace COPYRIGHTED MATERIAL This first chapter is a warm-up to prepare you for your Flash MX 2004 adventure. It provides a quick introduction to Flash, and is a
Using Flash Animation Basics
 Using Flash Contents Using Flash... 1 Animation Basics... 1 Exercise 1. Creating a Symbol... 2 Exercise 2. Working with Layers... 4 Exercise 3. Using the Timeline... 6 Exercise 4. Previewing an animation...
Welcome to the world of Flash, one of today s hottest applications for
 Chapter 1: Getting Started with Flash 9 In This Chapter Creating and saving new documents Getting familiar with the workspace and tools Managing your workspace and panels Thinking about FLA and SWF file
Table of Contents. Preface...iii. INTRODUCTION 1. Introduction to M ultimedia and Web Design 1. ILLUSTRATOR CS6 1. Introducing Illustrator CS6 17
 Table of Contents Preface...........iii INTRODUCTION 1. Introduction to M ultimedia and Web Design 1 Introduction 2 Exploring the Applications of Multimedia 2 Understanding Web Design 3 Exploring the Scope
Adobe Animate Basics
 Adobe Animate Basics What is Adobe Animate? Adobe Animate, formerly known as Adobe Flash, is a multimedia authoring and computer animation program. Animate can be used to design vector graphics and animation,
GETTING AROUND STAGE:
 ASM FLASH INTRO FLASH CS3 is a 2D software that is used extensively for Internet animation. Its icon appears as a red square with a stylized Fl on it. It requires patience, because (like most computer
How to draw and create shapes
 Adobe Flash Professional Guide How to draw and create shapes You can add artwork to your Adobe Flash Professional documents in two ways: You can import images or draw original artwork in Flash by using
FLASH CS6 DIRECTIONS TO GET YOU STARTED!
 FLASH CS6 DIRECTIONS TO GET YOU STARTED! SYMBOL A symbol is a reusable image, animation or button. You will see a plus sign + in the object once it s been converted to a symbol. Insert>Convert to symbol
The Flash workspace. Student name: Identify the Stage, workspace, Timeline, layers, panels, Tools panel, and Property inspector.
 The Flash workspace Student name: Date: Identify the Stage, workspace, Timeline, layers, panels, Tools panel, and Property inspector. Page 176 Identify the selection tools, the drawing tools, the view
Working with Symbols and Instances
 Chapter 3 Working with Symbols and Instances Learning Objectives After completing this chapter, you will be able to: Create new symbols Edit the symbols and instances Create and edit button symbols Import
CREATING A MINI-LESSON MOVIE
 PROJECT 4 CREATING A MINI-LEON MOVIE Upon completion of this project, you should be able to: Create a simple animation. Create a text animation. Create sound clips. Create Drag and Drop learning interactions.
How to create an animated face
 Adobe Flash CS4 Activity 5.1 guide How to create an animated face This activity walks you step by step through the process of creating a simple animation by using Adobe Flash CS4. You use drawing tools
chapter 1. Create symbols and instances 2. Work with Libraries 3. Create buttons 4. Assign actions to frames and buttons AND INTERACTIVITY
 1-4283-1963-8_03_Rev3.qxd 6/27/07 9:04 PM Page 1 chapter 3 WORKING WITH SYMBOLS AND INTERACTIVITY ADOBE FLASH CS3 1. Create symbols and instances 2. Work with Libraries 3. Create buttons 4. Assign actions
Animating the Page IN THIS CHAPTER. Timelines and Frames
 e r ch02.fm Page 41 Friday, September 17, 1999 10:45 AM c h a p t 2 Animating the Page IN THIS CHAPTER Timelines and Frames Movement Tweening Shape Tweening Fading Recap Advanced Projects You have totally
2Understanding the. Interface. The Document Window 13. If you are new to Flash 8, don t skip this chapter. Although you might be
 2Understanding the Interface The Document Window 13 The Timeline 14 The Layer Controls 15 If you are new to Flash 8, don t skip this chapter. Although you might be tempted to jump right in with the hands-on
Part 1: Basics. Page Sorter:
 Part 1: Basics Page Sorter: The Page Sorter displays all the pages in an open file as thumbnails and automatically updates as you add content. The page sorter can do the following. Display Pages Create
Name: Date: Multimedia Graphics and Web Publishing Mr. Dietzler. Flash Topics TWEENING AND MOTION GUIDES
 Name: Date: Multimedia Graphics and Web Publishing Mr. Dietzler Flash Topics TWEENING AND MOTION GUIDES TWEENING: Motion Tweening: The most basic type of tweening is Motion Tweening in which you specify
Adobe InDesign CS6 Tutorial
 Adobe InDesign CS6 Tutorial Adobe InDesign CS6 is a page-layout software that takes print publishing and page design beyond current boundaries. InDesign is a desktop publishing program that incorporates
Adobe Flash CS4 Part 4: Interactivity
 CALIFORNIA STATE UNIVERSITY, LOS ANGELES INFORMATION TECHNOLOGY SERVICES Adobe Flash CS4 Part 4: Interactivity Fall 2010, Version 1.0 Table of Contents Introduction... 2 Downloading the Data Files... 2
BASICS OF MOTIONSTUDIO
 EXPERIMENT NO: 1 BASICS OF MOTIONSTUDIO User Interface MotionStudio combines draw, paint and animation in one easy easy-to-use program gram to save time and make work easy. Main Window Main Window is the
Illustrator 1 Object Creation and Modification Tools
 Illustrator 1 Object Creation and Modification Tools Pen Tool Creates a precision shape using points and curve handles. Shape Tools Creates geometric solids. Selection Tool Selects objects and groups.
Adobe Photoshop Sh S.K. Sublania and Sh. Naresh Chand
 Adobe Photoshop Sh S.K. Sublania and Sh. Naresh Chand Photoshop is the software for image processing. With this you can manipulate your pictures, either scanned or otherwise inserted to a great extant.
In this lesson, you ll learn how to:
 LESSON 5: ADVANCED DRAWING TECHNIQUES OBJECTIVES In this lesson, you ll learn how to: apply gradient fills modify graphics by smoothing, straightening, and optimizing understand the difference between
The Timeline records the actions in each Frame. It also allows multiple independent images and actions through Layers.
 Using Flash to Create Animated Environments Objectives: Understand the capabilities of Flash Gain a general overview of features and tools Understand layers, text, graphics, animation and buttons Import
Shape Tweening. Shape tweening requirements:
 Shape Tweening Shape Tweening Shape tweening requirements: Vector-based objects No grouped objects No bitmaps No symbols No type, type must be broken apart into a shape Keyframes concept from traditional
GETTING STARTED WITH. chapter
 1-4283-1963-8_01_Rev4.qxd 6/27/07 1:39 PM Page 1 chapter 1 GETTING STARTED WITH ADOBE FLASH CS3 1. Understand the Adobe Flash CS3 workspace 2. Open a document and play a movie 3. Create and save a movie
Sample Hands-On-Training Chapter Review Copy Only Contact Information Notice of Rights Notice of Liability Trademarks
 Sample Hands-On-Training Chapter Review Copy Only Copyright 2000-2003 by lynda.com, Inc. All Rights Reserved. Reproduction and Distribution Strictly Prohibited. This electronically distributed Hands-On-Training
Adobe Flash CS3 Reference Flash CS3 Application Window
 Adobe Flash CS3 Reference Flash CS3 Application Window When you load up Flash CS3 and choose to create a new Flash document, the application window should look something like the screenshot below. Layers
How to create interactive documents
 Adobe InDesign Guide How to create interactive documents You can use Adobe InDesign to create dynamic web content or interactive documents. InDesign supports export to web-ready HTML or interactive PDF.
Keyboard Shortcuts. Command Windows Macintosh
 S00ILCS5.qxp 3/19/2010 1:11 AM Page 477 Keyboard Shortcuts k Adobe Illustrator CS5 If a command on a menu includes a keyboard reference, known as a keyboard shortcut, to the right of the command name,
Adding Objects Creating Shapes Adding. Text Printing and Exporting Getting Started Creating a. Creating Shapes Adding Text Printing and Exporting
 Getting Started Creating a Workspace Pages, Masters and Guides Adding Objects Creating Shapes Adding Text Printing and Exporting Getting Started Creating a Workspace Pages, Masters and Guides Adding Objects
PLEASE NOTE THAT LECTURE NOTES ARE IN TRANSITION TO VERSION 8
 Flash MX Professional 2004/Flash 8 Introduction to Flash, Panels, Drawing tools Outline of lecture demo/hands on class practice (Reading Chapters Flash MX 2004 HOT CH 1-3) PLEASE NOTE THAT LECTURE NOTES
animation, and what interface elements the Flash editor contains to help you create and control your animation.
 e r ch02.fm Page 43 Wednesday, November 15, 2000 8:52 AM c h a p t 2 Animating the Page IN THIS CHAPTER Timelines and Frames Movement Tweening Shape Tweening Fading Recap Advanced Projects You have totally
Adobe Premiere Pro CC 2015 Tutorial
 Adobe Premiere Pro CC 2015 Tutorial Film/Lit--Yee GETTING STARTED Adobe Premiere Pro CC is a video layout software that can be used to create videos as well as manipulate video and audio files. Whether
The playhead, shown as a vertical red beam, passes each frame when a movie plays back, much like movie fi lm passing in front of a projector bulb.
 The project: AIRPLANE I will show you a completed version of this project.. Introducing keyframes and the Timeline One of the most important panels in the Flash workspace is the Timeline, which is where
vinodsrivastava.com FLASH
 vinodsrivastava.com FLASH 1. What is a Layer? Layer helps us to organize the artwork in your document. When we create a flash document it contain one layer but we can add more. Objects are placed in layer
Review Questions FL Chapter 3: Working With Symbols and Interactivity
 Review Questions FL Chapter 3: Working With Symbols and Interactivity TRUE/FALSE 1. One way to decrease file size is to create reusable graphics, buttons, and movie clips. 2. Flash allows you to create
INTRODUCTION TO FLASH MX
 INTRODUCTION TO FLASH MX The purpose of this handout is to introduce and briefly explore several functions within Flash MX. Step-bystep instructions for the different ways to animate are also included.
Paint/Draw Tools. Foreground color. Free-form select. Select. Eraser/Color Eraser. Fill Color. Color Picker. Magnify. Pencil. Brush.
 Paint/Draw Tools There are two types of draw programs. Bitmap (Paint) Uses pixels mapped to a grid More suitable for photo-realistic images Not easily scalable loses sharpness if resized File sizes are
Adobe Flash CS4 Part 3: Animation
 CALIFORNIA STATE UNIVERSITY, LOS ANGELES INFORMATION TECHNOLOGY SERVICES Adobe Flash CS4 Part 3: Animation Fall 2010, Version 1.0 Table of Contents Introduction...2 Downloading the Data Files...2 Understanding
ITEC185. Introduction to Digital Media
 ITEC185 Introduction to Digital Media ADOBE ILLUSTRATOR CC 2015 What is Adobe Illustrator? Adobe Illustrator is a program used by both artists and graphic designers to create vector images. These images
Dear Candidate, Thank you, Adobe Education
 Dear Candidate, In preparation for the Rich Media Communication certification exam, we ve put together a set of practice materials and example exam items for you to review. What you ll find in this packet
Adobe Flash CS5. Creating a web banner. Garvin Ling Juan Santa Cruz Bruno Venegas
 Adobe Flash CS5 Creating a web banner Garvin Ling Juan Santa Cruz Bruno Venegas Introduction In this tutorial, you will be guided through a step-by-step process on how to create your very own animated
Multimedia Creation. for Kids
 Multimedia Creation for Kids 1 Lesson 1: Setting Up Your Project In this lesson you will be storyboarding your entire project. It is important to know exactly where you are going with your project before
Flash offers a way to simplify your work, using symbols. A symbol can be
 Chapter 7 Heavy Symbolism In This Chapter Exploring types of symbols Making symbols Creating instances Flash offers a way to simplify your work, using symbols. A symbol can be any object or combination
InDesign Tools Overview
 InDesign Tools Overview REFERENCE If your palettes aren t visible you can activate them by selecting: Window > Tools Transform Color Tool Box A Use the selection tool to select, move, and resize objects.
Corel Draw 11. What is Vector Graphics?
 Corel Draw 11 Corel Draw is a vector based drawing that program that makes it easy to create professional artwork from logos to intricate technical illustrations. Corel Draw 11's enhanced text handling
HYPERSTUDIO TOOLS. THE GRAPHIC TOOL Use this tool to select graphics to edit. SPRAY PAINT CAN Scatter lots of tiny dots with this tool.
 THE BROWSE TOOL Us it to go through the stack and click on buttons THE BUTTON TOOL Use this tool to select buttons to edit.. RECTANGLE TOOL This tool lets you capture a rectangular area to copy, cut, move,
USO RESTRITO. AppleWorks 6. Quick Reference
 Page 2 (3,1) AppleWorks 6 Quick Reference F O R M A C O S 4:13 PM Page 1 (1,1) AppleWorks Help General keyboard shortcuts Step-by-step instructions and many more keyboard shortcuts are in AppleWorks Help.
ADOBE ILLUSTRATOR CS3
 ADOBE ILLUSTRATOR CS3 Chapter 2 Creating Text and Gradients Chapter 2 1 Creating type Create and Format Text Create text anywhere Select the Type Tool Click the artboard and start typing or click and drag
L E S S O N 2 Background
 Flight, Naperville Central High School, Naperville, Ill. No hard hat needed in the InDesign work area Once you learn the concepts of good page design, and you learn how to use InDesign, you are limited
Flash CS6 First Edition
 Flash CS6 Flash CS6 First Edition LearnKey provides self-paced training courses and online learning solutions to education, government, business, and individuals world-wide. With dynamic video-based courseware
OnPoint s Guide to MimioStudio 9
 1 OnPoint s Guide to MimioStudio 9 Getting started with MimioStudio 9 Mimio Studio 9 Notebook Overview.... 2 MimioStudio 9 Notebook...... 3 MimioStudio 9 ActivityWizard.. 4 MimioStudio 9 Tools Overview......
Utah Education Network Web Animation Flash MX. Jessica Anderson (801)
") Web Animation Flash MX 12/30/03 2 Utah Education Network Web Animation Flash MX Jessica Anderson janderson@media.utah.edu (801) 585-6849 www.uen.org Flash, a powerful vector graphics program, allows you
Web Animation Flash MX 12/30/03 2 Utah Education Network Web Animation Flash MX Jessica Anderson janderson@media.utah.edu (801) 585-6849 www.uen.org Flash, a powerful vector graphics program, allows you
Introduction to Flash CS3
 Introduction to Flash CS3 Danny Bishop, Carol Green & Nick Ford The files used in activities and exercises within this book are not available for evaluation. Introduction to Flash CS3 Danny Bishop, Carol
Chapter 5. Creating Special Effects Delmar, Cengage Learning
 Chapter 5 Creating Special Effects 2011 Delmar, Cengage Learning Chapter 5 Lessons 1. Create a mask effect 2. Add sound 3. Add video 4. Create an animated navigation bar 5. Create character animations
FLASH ANIMATION TUTORIAL
 FLASH ANIMATION TUTORIAL This tutorial will show you how to make a simple flash animation using basic graphic elements and sounds. It will also work as the display page for your Bullet Movie soundtrack
WEB GRAPHICS ADOBE PHOTOSHOP CS3. Learning Outcomes:
 WEB GRAPHICS ADOBE PHOTOSHOP CS3 Learning Outcomes: At the end of the course the participant will Design layouts for web pages, Paper Adverts, Brouchers, CD Covers, Package Designing Event and Exhibition
Drawing tool gallery 2 06/06/07 09:21:26. Illustrator provides the following drawing tools: The Add Anchor Point tool (+) adds anchor points to paths.
 adds anchor points to paths.") pport/adobe/adobehelpdata/cache/illustrator/12.0/en_us/htmłpage/ws714a382cdf7d304e7e07d0100196cbc5f-6266.html Drawing tool gallery Drawing tool gallery Illustrator provides the following drawing tools:
pport/adobe/adobehelpdata/cache/illustrator/12.0/en_us/htmłpage/ws714a382cdf7d304e7e07d0100196cbc5f-6266.html Drawing tool gallery Drawing tool gallery Illustrator provides the following drawing tools:
MULTIMEDIA AND ANIMATION
 MULTIMEDIA AND ANIMATION CURRICULUM HTML Document Overview The Structure Tags Components of the HTML Code Ge ng Started With HTML Wri ng the Code Head Elements HTML Tags HEAD Tags Title Tags Body Tag Displaying
CLEAR TOOL... 7 BASIC NAVIGATION... 7 PAGE SORTER... 7
 Interwrite Workspace WHAT IS WORKSPACE?...2 INSTALLATION...2 SETUP...2 CONNECTING DEVICES... 2 NAMING DEVICES... 3 CALIBRATING DEVICES... 3 THE PEN...3 INTERACTIVE MODE...4 THE TOOLBAR...4 MOVING THE TOOLBAR...
Director 8 - The basics
 Director 8 - The basics This tutorial covers the building blocks of Director, ignoring animation and interactive programming. These elements will be covered in the following tutorials. The idea is that
How to lay out a web page with CSS
 Activity 2.6 guide How to lay out a web page with CSS You can use table design features in Adobe Dreamweaver CS4 to create a simple page layout. However, a more powerful technique is to use Cascading Style
A QUICK TOUR OF ADOBE ILLUSTRATOR CC (2018 RELEASE)
") A QUICK TOUR OF ADOBE ILLUSTRATOR CC (2018 RELEASE) Lesson overview In this interactive demonstration of Adobe Illustrator CC (2018 release), you ll get an overview of the main features of the application.
A QUICK TOUR OF ADOBE ILLUSTRATOR CC (2018 RELEASE) Lesson overview In this interactive demonstration of Adobe Illustrator CC (2018 release), you ll get an overview of the main features of the application.
POWERPOINT 2003 OVERVIEW DISCLAIMER:
 DISCLAIMER: POWERPOINT 2003 This reference guide is meant for experienced Microsoft Office users. It provides a list of quick tips and shortcuts for familiar features. This guide does NOT replace training
SETTINGS AND WORKSPACE
 ADOBE ILLUSTRATOR Adobe Illustrator is a program used to create vector illustrations / graphics (.ai/.eps/.svg). These graphics will then be used for logos, banners, infographics, flyers... in print and
Adobe Illustrator CC 2018 Tutorial
 Adobe Illustrator CC 2018 Tutorial GETTING STARTED Adobe Illustrator CC is an illustration program that can be used for print, multimedia and online graphics. Whether you plan to design or illustrate multimedia
COMP : Practical 6 Buttons and First Script Instructions
 COMP126-2006: Practical 6 Buttons and First Script Instructions In Flash, we are able to create movies. However, the Flash idea of movie is not quite the usual one. A normal movie is (technically) a series
Quick Guide for Photoshop CC Basics April 2016 Training:
 Photoshop CC Basics Creating a New File 1. Click File > New 2. Keep Default Photoshop Size selected in the Preset drop-down list. 3. Click OK. Showing Rulers 1. On the Menu bar, click View. 2. Click Rulers.
INSRUCTION SHEET. Flash Lab #1
 Advanced Web Page Design STANDARD 5 The student will use commercial animation software (for example: Flash, Alice, Anim8, Ulead) to create graphics/web page. Student Learning Objectives: Objective 1: Draw,
2. If a window pops up that asks if you want to customize your color settings, click No.
 Practice Activity: Adobe Photoshop 7.0 ATTENTION! Before doing this practice activity you must have all of the following materials saved to your USB: runningshoe.gif basketballshoe.gif soccershoe.gif baseballshoe.gif
Animated Gif - Illustrator /Text and Shapes
 - Illustrator /Text and Shapes Use Adobe Illustrator to create an animated gif. Use a variety of shapes, outlined type, or live traced objects as your subjects. Apply all the skills that we have developed
Legal Notices. Toon Boom Animation Inc Saint-Laurent, Suite 1020 Montreal, Quebec, Canada H2W 2R2. Tel: Fax:
 Storyboard Pro 5.5 Keyboard Shortcuts Guide Legal Notices Toon Boom Animation Inc. 4200 Saint-Laurent, Suite 1020 Montreal, Quebec, Canada H2W 2R2 Tel: +1 514 278 8666 Fax: +1 514 278 2666 toonboom.com
Tutorial 4. Creating Special Animations
 Tutorial 4 Creating Special Animations Objectives Create an animation using a motion guide layer Create an animation using a mask layer Animate text blocks Animate individual letters within a text block
Adobe Illustrator CS5 Part 2: Vector Graphic Effects
 CALIFORNIA STATE UNIVERSITY, LOS ANGELES INFORMATION TECHNOLOGY SERVICES Adobe Illustrator CS5 Part 2: Vector Graphic Effects Summer 2011, Version 1.0 Table of Contents Introduction...2 Downloading the
Animatron Tutorial. Ronald Bourret
 Animatron Tutorial Ronald Bourret http://www.rpbourret.com Table of Contents License... 2 Lesson 1: Getting Started... 3 1.1 Creating an Animatron account... 3 1.2 Animatron screen... 3 Lesson 2: Drawing...
Adobe Illustrator CS Design Professional GETTING STARTED WITH ILLUSTRATOR
 Adobe Illustrator CS Design Professional GETTING STARTED WITH ILLUSTRATOR Chapter Lessons Create a new document Explore the Illustrator window Create basic shapes Apply fill and stroke colors to objects
Introduction to Flash - Creating a Motion Tween
 Introduction to Flash - Creating a Motion Tween This tutorial will show you how to create basic motion with Flash, referred to as a motion tween. Download the files to see working examples or start by
Learning Flash CS4 Professional
 Learning Flash CS4 Professional Rich Shupe HOCHSCHULE UECHTENSTEIN Bibliothek O'REILLY* Beijing Cambridge Farnham Koln Sebastopol -Taipei -Tokyo CONTENTS Foreword ". xv Preface xvii Chapter 1. Interface
Adobe Illustrator CC Advanced
 Copy/Paste Objects 1. Select with Selection-Tool 1. Hold Alt-Key Drag with Selection-Tool while still holding the Alt-Key (Additionally holding Shift will move straight or in 45/90/180 Degrees) Align Objects
Keynote 08 Basics Website:
 Website: http://etc.usf.edu/te/ Keynote is Apple's presentation application. Keynote is installed as part of the iwork suite, which also includes the word processing program Pages and the spreadsheet program
Notice of Rights. Notice of Liability
 Notice of Rights Copyright 2005 by Macromedia, Inc. All rights reserved. This manual may not be copied, photocopied, reproduced, translated, or converted to any electronic or machine readable form in whole
If you have been using CorelDRAW, you may have turned off this opening screen. If so, skip to step 5.
 Opening CorelDRAW If you have been using CorelDRAW, you may have turned off this opening screen. If so, skip to step 5. 1. When CorelDRAW is loaded, a new section is created on the Start Menu. To open
1otIDDD ~DDD. r.: ~.. Index
 1otIDDD r.: ~.. ~DDD The index is arranged hierarchically, in alphabetical order, with symbols preceding the letter A. Many second-level entries also occur as first-level entries. This is to ensure that
HO-FL1: INTRODUCTION TO FLASH
 HO-FL1: INTRODUCTION TO FLASH Introduction Flash is software authoring package for creating scalable, interactive animations (or movies) for inclusion in web pages. It can be used to create animated graphics,
Graphic Design & Digital Photography. Photoshop Basics: Working With Selection.
 1 Graphic Design & Digital Photography Photoshop Basics: Working With Selection. What You ll Learn: Make specific areas of an image active using selection tools, reposition a selection marquee, move and
Basic Operation of Flash MX Professional 2004
 Basic Operation of Flash MX Professional 2004 (Main Tutorial) This Tutorial provides you Basic Operation for Flash MX Professional 2004. After this training, you will be able to create simple animation.
In this exercise you will be creating the graphics for the index page of a Website for children about reptiles.
 LESSON 2: CREATING AND MANIPULATING IMAGES OBJECTIVES By the end of this lesson, you will be able to: create and import graphics use the text tool attach text to a path create shapes create curved and