Software Manual. Revision 1.3
|
|
|
- Mervin Atkinson
- 6 years ago
- Views:
Transcription

1 Software Manual Revision 1.3
2 Copyright 2015 by Kudo3D. This material may be distributed only subject to the terms and conditions set forth in the Creative Commons Attribution-NonCommercial-NoDerivatives 4.0 International License or later. The latest version is presently available at 2 of 16

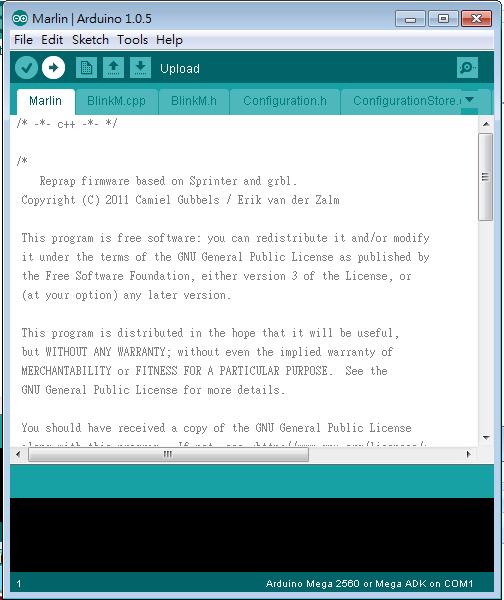
3 I. Installation 1. Download and Install Kudo3D_Titan-v1-setup.exe from This software is compatible with Windows 7 and Windows If you would like to increase the z build size to 25 cm from 24 cm, please upgrade the firmware to Kudo3D_Marlin_v1.1 with Arduino IDE. You can download Arduino IDE from and the firmware from our website ( a. Run the shortcut Arduino on your desktop b. Open Marlin.ino in your Marlin folder 3 of 16
4 4 of 16

5 c. Under Tools menu, set your board to Mega of 16

6 d. Under Tools menu, set you serial port to the right COM port 6 of 16

7 e. Upload Marlin firmware to your Mega 2560 board with the Upload button 3. Run the shortcut of Kudo3D Titan software on your desktop and the main window should pop up with Control and Print tabs. 7 of 16

8 II. Controlling (Control Tab) 1. The upper left portion of the window is for the z-axis control and zeroing. Please select the right com port number for your Mega If you don t see the corresponding port, please click Port and the com port drop down list will refresh. The right port should appear in the list now. If the port is still absent, the serial communication link between your computer and Mega 2560 is not established. You may need to download and install the USB serial port driver from the software section under After clicking the Connect button, please verify if the printer is connected in the information window on the right. In case you would like to manipulate the z axis manually, release the motor by clicking the Motor off button and then rotate the extruded shaft at the bottom of the stepping motor with your fingers. You can also send G-code command manually below the information window. Type in the code and press the Send button. Z-POS shows current Z position. Make a note of the position when you want to pause the print and lift the platform. Before resuming the printing, you would need to lower the platform to the position recorded before manual lifting. Z Zero Calibration (Calibrating the Build Platform): 8 of 16
9 1. Confirm the linear stage is powered. 2. Run the Kudo3D software. 3. Confirm the Kudo3D software is connected to the linear stage. 4. Roughly level the build platform with the knob on the ball head loosened. 5. To minimize the possibility of damage to the resin container, use the 2.5mm L- shaped Allen Wrench to slightly loosen the 4 (M4x20mm) hex screws connecting the linear stage to the build L-bracket that supports the build platform. With the four screws securing the L bracket slightly loosened, slide the L bracket to the up most position. The four slots on the short side of the L bracket are designed for this purpose. Make sure the L shape is only slightly loosened so it doesn t tilt. IMPORTANT: Additionally, loosen the knob to the right of the Kudo3D icon on the build platform so that when it makes contact with the resin container, it will be level in relation to the resin container. 6. Click Enable Z-zero. Note: This will establish where the position of the stepper motor. 7. Hold the L shape up with one hand the 4 screws will touch the bottom of the slot. Ensure that the L shape lies on the wall of the linear stage. Holding with your hand will ensure that the linear stage will only move up and down and not tilt. IMPORTANT: Make sure you hold the L shape up while lowering the Z position in step 8 with your hand to avoid damaging the resin container. 8. Click the Z-Zero-10, Z-Zero-1, and Z-Zero-0.1 buttons to lower the build platform until you hear the stopping sound. When you hear the stopping sound, the z axis is at its lowest position. 9. After the sound, the linear stage is at the lowest point. You can then release your hand and move the L shape slide down to have the build platform sit on the resin container. Make sure the build platform is flat. Before you release your hand, there will be a gap between the build platform and resin container. Apply pressure on the 4 corners of the build platform it shouldn t move. When the build platform doesn t move, it is sitting flat and there is no gap with the resin container. 10. Make sure the edge of the build platform is in parallel with the resin container. To adjust, rotate the build platform with top hand screw. Don t adjust the big knob on the side if the build platform is already flat on the resin container. 11. Confirm the build platform is level using the bubble level. 12. Press Disable Z-zero to lock the zero Z position. 13. Use the 2.5mm L-shaped Allen Wrench to tighten the 4 (M4x20mm) hex screws mounting the L-brack to the Linear Stage. Take turns tightening the four screws. Before you tighten the big knob, make sure the 4 screws are sitting on the same position of their corresponding slot to ensure that the L shape doesn t tilt. 14. Tighten the hand knob and the knob to the right of the Kudo3D icon on the build platform to keep it in position. 15. Click +Z(10) a couple of time to move the build platform up. After the zero position is set, please turn off the Enable Z-zero to avoid changing zero position by accident. You can bring the build platform back to zero by clicking Go Z- Home, but please do not use this button if there is resin in the container. Bubbles may 9 of 16
10 get trapped between the platform and the film. You can move the build platform up and down with the +Z and Z buttons. The down side is limited to 0 and the up side is limited to 257 mm which should give you a maximum z printable size of about 25 cm. You can also set the Z moving speed in Z Rate. In case your z zero is lost after calibration, you can simply set the zero again by moving the platform down with the Enable Z-zero buttons until hearing the stopping noise again. 2. The lower left portion in the Control window is for projector controlling. Similarly, after pressing Port, the com port list will refresh. Make sure that the HDMI cable and USB to RS-232 cable are connected. Also, the computer should be in the extended display mode not in the duplicate display mode. You can turn on the projector with the Power On button. The fan is turned on at the same time. After the projector logo disappears, click the Calibrate button and an image of red grid will be projected. Use this grid to calibrate the projected image size (resolution) with the ruler. Calibrate the focus with the red grid projected on the Teflon film directly. Look at the grid and adjust the focus ring at a small angle above the Teflon film. Do not stare into the lens!! 10 of 16

11 III. Support Generation and Slicing (Using Creative Workshop) 1. We recommend Envisionlab s Creative workshop to add supports and to slice. Download Creative Workshop from The link is located at the bottom of their home page. a. Support Generation: Press the + button under 3D view to open the Support Generation panel. If your model has a large flat base, you can do automatic Bed of Nails support generation with nail density specified in Automatic Support. If your model does not have a flat base, you need to add supports one by one manually. Click the Add Manual Support Button, one support will be generate in the center of the build area. Double click a support to select it. You can move the selected support by pressing the shift key and moving the mouse at the same time. Supports standing on the floor can be generated with creative workshop. Other types of supports as shown in the figure can be generated with stl editing software such as blender. You can generate the attachment layers with the base plate button. However, the base may be too thick. You would need to lower it below 0 so the sliced attachment base has only about 0.25mm thickness. 11 of 16

12 b. Slicing: b.i. Configure Machine: For first time slicing, you need to connect the computer to a HD display to obtain a resolution of 1920*1080 under Available Displays. Make sure to push the Refresh button to reflect the 1920*1080 resolution. Next, press the Plus button to add the 1920*1080 resolution to Configured Displays. Delete resolutions under Configured Displays that are not 1920*1080. Click Apply and you should see 1920*1080 under Output Resolution (px). You also need to set the correct build size. b.ii. Configure Slicing Profile: Set the slice thickness in mm. Check Export Images & GCode. Check PNG to Disk to save sliced images in a folder. Check Reflect Y under Image Reflection. 12 of 16

13 b.iii. Rename the model to be printed in a format of ABCD_1234.stl. Import this stl file. You can reposition, scale, mirror, rotate the model or add supports in the 3D view before slicing. Press the slice button in the tool bar to start slicing. After slicing is done, enter the folder that stores all sliced layer images. Select all layers except layer 0 and add all files to a zip file with the same name as that of the stl. Insert.3dlp extension and rename the zip file to ABCD_1234.3dlp.zip. This will be the file to be imported to Kudo3D Titan controlling software. 13 of 16
14 IV. Printing (Print Tab) 1. Underneath the control tab, there is a File drop down list. Select load model from the list and import the *.3dlp.zip file created after slicing. 2. Under Basic mode, you have five layer zones to customize printing parameters. Under Advanced mode, you need to set printing parameters for each layer in excel. Parameters can be imported or exported under File. If you export basic printing parameters through Export Advanced configuration, you can create an excel template file to work with. Please refer to printing tips to set up proper parameters. These saved configuration files can be imported later to run the same printing again. 14 of 16


15 3. Set the Layer Thickness, ProjectedX, X(px) and Y(px) 15 of 16
 and resume the print again.")
16 4. Click Run to start printing. 5. You can check the status under both Info and System Output. The image in the System Output is the layer printing now. Tip: To change to a different colored resin or to stir the resin during printing, you can pause the print, lift and drop back to the last position (layer) and resume the print again. If you want to change the printing parameters during printing, stop the print and modify the numbers. Change Begin Layer no to the number of the next layer to be printed then press Run again. 16 of 16
Geeetech Aluminum Prusa I3. User Manual
 Geeetech Aluminum Prusa I3 User Manual 1 Safety Instructions Building the printer will require a certain amount of physical dexterity, common sense and a thorough understanding of what you are doing. We
ENJOY Introduction. Software Installation* Hardware. Calibration Settings. Print test. Appendex. Install print S/W Driver Install
 Quick Start Manual 1 ENJOY Introduction C O N T E N T S 6 5 Appendex 4 Print test 3 2 Hardware Calibration Settings Software Installation* Install print S/W Driver Install Hardware Intro Cable installation
USER MANUAL Resolution 0.02mm Speed 300mm/second Software: Wanhao Maker
 1 Duplicator 5S & 5S MINI Desktop 3D Printers USER MANUAL Resolution 0.02mm Speed 300mm/second Software: Wanhao Maker 2014/2015 Wanhao USA 3 Table of Contents Welcome 1 Printer Specifications 2 Unboxing
Portabee GO. Mobile 3D Printer. Portabee 3D. Romscraj. Software & Support. Manufacturing & Engineering.
 Portabee GO Mobile 3D Printer Portabee 3D Software & Support http://portabee3d.com support@portabee3d.com Romscraj Manufacturing & Engineering http://romscraj.com contact@romscraj.com A. Software Package
Technical Support: CUBE USER MANUAL
 CUBE THE DESKTOP 3D PRINTER USER MANUAL 2012-12-05 1 Contents 1 Installing software...3 1.1 Installing Python... 3 1.2 Installing ReplicatorG... 5 2 Pre-print checks...9 2.1 Power up...9 2.2 Connect to
ideamaker Manual
 ideamaker Manual Using ideamaker... 2 Basic information... 2 What is ideamaker?... 2 Where to download ideamaker?... 2 Install ideamaker... 3 Let s Print!... 6 How to use ideamaker?... 23 Interface...
Cura (Documentation for version )
") Cura (Documentation for version 15.04.06) Getting Started Installation To start the installation of Cura, download it first. After downloading, open the installer and run the installation wizard to complete
Cura (Documentation for version 15.04.06) Getting Started Installation To start the installation of Cura, download it first. After downloading, open the installer and run the installation wizard to complete
Agenda. Breaking the Ice Physical Setup Walkthrough of REPETREL First Print
 T1 Training Session Agenda Breaking the Ice Physical Setup Walkthrough of REPETREL First Print Breaking the Ice SYSTEM 30M ENGINE Breaking the Ice Protected build environment Slightly larger build area
Ultra short throw lens installation
 Ultra short throw lens installation The ultra short throw lens 0.36 UST GS (P/N: 140-133108-XX) allows you to position your projector as close as possible to your screen or display. Unless otherwise indicated,
Panowin F1. User Manual
 Panowin F1 User Manual 1 PANOWIN TECHNOLOGIES CO.,LTD. WARNING power outlet. CAUTION: In case of emergency unplug the Panowin F1 from the WARNING: Carefully monitor the Panowin F1 during operation. Do
think big, print huge
 think big, print huge quick start guide Table of Contents a Receiving and uncrating 5 b bed level & z home 11 c Loading filament 19 d SOFTWARE 23 e Setup 23 f preparing a print 26 g printing on gigabot
2 x Dynamic Arms on 135 Post with C-Clamp
 Installation Guide AWMS-2-D13-C 2 x Dynamic Arms on 135 Post with C-Clamp COMPONENT CHECKLIST RANGE A AWM-LC Post Clamp B AWM-AD Dynamic Arm (x2) C AWM-P13 135 Post D AWM-FC C-Clamp CONTENTS C-Clamp Page
TROUBLESHOOTING GUIDE
 TROUBLESHOOTING GUIDE YOU SHOULDN'T ENCOUNTER many problems when using your Vector 3 printer, however, occasionally things can go wrong. Before contacting Customer Services, please consult this list of
Geeetech Duplicator 5 3D printer. User Manual
 Geeetech Duplicator 5 3D printer User Manual Contents Safety Instructions... 4 1.Software Resources... 5 1.1 Repetier-Host... 5 1.2 Driver... 5 1.3 Arduino IDE... 6 2.Connect the Printer... 6 3.Printer
Further Information can be found at
 Below is a step by step guide to assembling the Hurricane-Rig. Remember that this is a precision optical instrument. Excessive force can bend critical parts. If treated well it should give many years of
Repetier-Host Documentation for use with Kora Pro 3D PC
 Repetier-Host Documentation for use with Kora Pro 3D PC Installation Prerequisites Before you start with the installation, you should check if your computer meets the requirements. Currently available
Phase One. ixu-rs 1000 / ixu 1000 / ixu 150 UAV Camera Systems. For DJI M600 & M600 PRO. Installation Guide
 Phase One ixu-rs 1000 / ixu 1000 / ixu 150 UAV Camera Systems Installation Guide For DJI M600 & M600 PRO 1 Phase One ixu-rs 1000 / ixu 1000 / ixu 150 UAV Camera Systems Installation Guide For DJI M600
Contents. Introduction.1. Specification Data and Package.2. Working Environment Software Installation 3. Hardware Installation.
 User Manual V 1.0N Contents Introduction.1 Specification Data and Package.2 Working Environment...... 3 Software Installation 3 Hardware Installation.4 Calibration Software Manual 7 tboard Software Manual..
Bondtech QR Installation guide for the BCN3D Sigma
 Bondtech QR Installation guide for the BCN3D Sigma 1 Contents Introduction... 3 List of tool required... 3 Mechanical & Electrical Installation... 4 Adjustment of steps/mm...12 Change Log: 1) Added comment
Repetier-Host Documentation
 Repetier-Host Documentation Installation Prerequisites Before you start with the installation, you should check if your computer meets the requirements. Currently available computers should have no problems
Repetier-Host Documentation
 Repetier-Host Documentation Installation Prerequisites Before you start with the installation, you should check if your computer meets the requirements. Currently available computers should have no problems
Dreamer Series User Manual
 Dreamer Series User Manual Welcome to the world of the Dreamer. To ensure that you have the best possible user experience, it s important that you follow this user manual. Let s get started! In Parts I
The Nureva Span ideation system. Installation guide. Single panoramic system
 The Nureva Span ideation system Installation guide Single panoramic system Important SAFETY WARNINGS Prior to the installation of this product, the installation instructions should be completely read and
TeamBoard Quick Start #1
 www.touchboards.com 205 Westwood Ave.Long Branch, NJ 07740 1-866-942-6273 Sales@touchboards.com Quick Start #1 Welcome to! These Quick Start Cards address some basics, from installation steps to creating
Certification Guide. Brownsburg Public Library
 Certification Guide Brownsburg Public Library 1 st Maker Space, LLC and Brownsburg Public Library have partnered to increase understanding and access to 3D printing and design technology. Brownsburg Public
 Photography tripod Why do I Need a Tripod? http://www.bhphotovideo.com/explora/video/buying-guides/what-look-when-you-are-looking-videotripod Tripod Tricks? http://vimeo.com/videoschool/lesson/110/tripod-tricks
Written By: John Sutton
 Replacing the fan on your HP g7-2275 dx. Written By: John Sutton ifixit CC BY-NC-SA www.ifixit.com Page 1 of 20 INTRODUCTION Laptop cooking your lap? This guide will walk you through replacing your fan.
Instruction Manual. RS 3D Printer
 Instruction Manual RS 3D Printer 1) GENERAL This instruction manual contains important information regarding the installation, operation, maintenance and storage for RS 3D Printer. Please read these instructions
Documentation version Prusa i3 Rework USER GUIDE REV 1.5. Document Version 1.1.8
 Documentation version 1.1.8 Prusa i3 Rework USER GUIDE REV 1.5 2 INTRODUCTION Target : Prupose a visual guide of the differents steps to build and use a Prusa i3 Rework. Authors of this document : emotion
CIB 3047 (14B) 10-Button Voice Terminal Fixed Desk Stand and Wall Mount (32007)
 10-Button Voice Terminal Fixed Desk Stand and Wall Mount (32007)") CIB 3047 (14B) 10-Button Voice Terminal Fixed Desk Stand and Wall Mount (32007) CIB 3047 Comcode 845-659-325 Issue 1 CIB 3047 (14B) 10-Button Voice Terminal Fixed Desk Stand and Wall Mount (32007) This
CIB 3047 (14B) 10-Button Voice Terminal Fixed Desk Stand and Wall Mount (32007) CIB 3047 Comcode 845-659-325 Issue 1 CIB 3047 (14B) 10-Button Voice Terminal Fixed Desk Stand and Wall Mount (32007) This
3D SYSTEMS University CubeX 3D Printer
 3D SYSTEMS University CubeX 3D Printer Lesson Leveling the Print Pad and Print Tips, Setting the Z-Gap Revision date: 10/22/13 1 1 2016 年 6 月 14 日 Objectives After completing this lesson you will: Be able
Toucan LT board printer
 Toucan LT board printer Setup and Operating instructions Unpack the Toucan LT board printer as you would any Toucan LT. Follow all cautions associated with installing a standard Toucan LT. Change in wash
ideamaker Manual
 ideamaker Manual www.raise3d.com 1 Using ideamaker... 3 1.1 What is ideamaker?... 3 1.2 Where to download ideamaker?... 3 2 Install ideamaker... 4 3 Let s Print!... 9 3.1 Import.STL files... 9 3.2 Slice
SeeMeCNC Guides 2 INTO 1 DUAL FILAMENT FEED ADAPTER INSTALL
 SeeMeCNC Guides 2 INTO 1 DUAL FILAMENT FEED ADAPTER INSTALL These are still in development - Be ready to troubleshoot firmware/software configuration for your setup when purchasing these adapters. Written
Cura - DUET Dual Extrusion Setup
 SeeMeCNC Guides Written By: SeeMeCNC 2018 seemecnc.dozuki.com/ Page 1 of 15 INTRODUCTION Please note that dual extrusion is for advanced users. You should have some advanced knowledge on some G-Code and
BFB Axon software manual
 Contents Install BFB Axon on your computer from the website for the latest version: www.bitsfrombytes.com > Downloads> Software. (Or from the SD card if supplied). If you are using Vista or windows 7,
Dremel Digilab 3D Slicer Software
 Dremel Digilab 3D Slicer Software Dremel Digilab 3D Slicer prepares your model for 3D printing. For novices, it makes it easy to get great results. For experts, there are over 200 settings to adjust to
QUICK START GUIDE. Android or Windows Tablet. 1 Tower PC. Mount the RazorGage to your Own Table. Assembling the RazorGage ST with RazorGage Table
 QUICK START GUIDE Android or Windows Tablet If you have a Tablet Style Interface (PC or Android) then skip this step. 1 Mount monitor and attach legs to control tower using hardware provided and place
C-pan arm USERS INSTRUCTIONS
 C-pan arm USERS INSTRUCTIONS Designed 1 of 12 and made in Denmark Thanks for purchasing a 9.Solutions product. With great passion, we design our products to be as versatile as possible. We hope that our
A-MOD DESKTOP OWNER S MANUAL
 A-MOD DESKTOP OWNER S MANUAL GOJOTTO.COM 877-55-6886 IMPORTANT NOTICE: Please take a few minutes to read through this Owner s Manual before using the product to ensure that your A-MOD Desktop will be operated
Visual Physics - Introductory Lab Lab 0
 Your Introductory Lab will guide you through the steps necessary to utilize state-of-the-art technology to acquire and graph data of mechanics experiments. Throughout Visual Physics, you will be using
0.75x Vertical Compression
 FIXED LENS INSTALLATION GUIDE Patented cylindricalprism technology Phoenix Paladin Paladin DCR 1.33x Horizontal Expansion 0.75x Vertical Compression 0.80x Vertical compression Throw distance range 12 24
Quick Start Guide. Basic set-up for your Axis360 system
 Quick Start Guide Basic set-up for your Axis360 system Table of Contents 1 Setting up Slide slider assembly attach belt to cart attach ballhead to cart connect motor to controller attach slider to tripod(s)
3D SYSTEMS University Cube 3D Printer
 3D SYSTEMS University Cube 3D Printer Lesson Troubleshooting Machine Issues Revision date: 10/20/13 1 1 2016 年 6 月 14 日 Table of Contents Slide 3 Temperature Errors Slide 5 File Read Errors Slide 7 Filament
MONOPRICE. MP Cadet LCD Resin Printer. User's Manual P/N 21824
 MONOPRICE MP Cadet LCD Resin Printer P/N 21824 User's Manual 3D Printer Warranty Details The product is guaranteed to be free from defects in workmanship and motherboard for a period of 12 months from
ideamaker Manual
 ideamaker Manual www.raise3d.com 1 Using ideamaker... 3 1.1 What is ideamaker?... 3 1.2 Where to download ideamaker?... 3 2 Install ideamaker... 4 3 Let s Print!... 9 3.1 Import.STL files... 9 3.2 Slice
USING YOUR BIGBOT. 1/18/2017 V0.1
 USING YOUR BIGBOT www.bigbot-3d.com 1/18/2017 V0.1 FOREWORD: YOUR PRINTER IS REPRAP, WHICH STANDS FOR "REPLICATING RAPID PROTOTYPERS". THIS MEANS IT CAN PRINT THE PARTS THAT ARE CUSTOM FOR THIS MACHINE,
700TSU INSTALLATION MANUAL
 M 700TSU INSTALLATION MANUAL 2 Table of Contents Features...03 Specifications...04 Quick-Start...05 Remote Control...07 Hardware Installation...10 Software Installation...14 Touch Screen Driver Installation
Unpacking and Installing the Flora 2512 UV Printer. Steps 1: Unscrew the 10mm bolts holding the top. Then remove the top and put in a safe place.
 Unpacking and Installing the Flora 2512 UV Printer Steps 1: Unscrew the 10mm bolts holding the top. Then remove the top and put in a safe place. Step 2: Unscrew 10mm bolts holding the end panels. On the
UP! Quick Start Guide
 Personal Portable 3D Printer UP! www.pp3dp.com 1. Assemble Printer Open the box, take out the printer and accessories. Assemble the parts contained in the box as following procedure: 1. Unscrew the M4
Control Pad and Touch Unit Installation Guide
 Control Pad and Touch Unit Installation Guide About This Installation Guide This guide describes how to install the Control Pad and Touch Unit (BrightLink Pro 1430Wi) when using the ELPMB28 wall mount
USER GUIDE. UniFoilPrinter. for. User Guide for UniFoilPrinter
 1 USER GUIDE for UniFoilPrinter Version 2.9 March 2014 (UniFoilPrinter PC Tool version. 1.0.0.57, Firmware version 2.13, Hardware version 001) 2 TABLE OF CONTENTS 1 ABOUT THIS MANUAL... 6 2 ABOUT UNIFOILPRINTER...
VITEK QUICK START GUIDE VTD-TND30R3V2 VTD-TND30R5V2 VTD-TND30R4M2
 VITEK VTD-TND30R3V2 VTD-TND30R5V2 VTD-TND30R4M2 3.0, 4.0, and 5.0 Megapixel Indoor/Outdoor WDR IP IR Dome Cameras QUICK START GUIDE FEATURES 1/3 Megapixel Progressive Scan CMOS image sensor Up to 30fps
Be sure to read the attached "TO ENSURE SAFE AND CORRECT USE" prior to use. Otherwise, it may cause an unexpected accident or fire.
 CE6000 SERIES CUTTING PLOTTER SETUP MANUAL MANUAL NO.CE6000-UM-8M4 Preface Thank you for choosing this product. Carefully keep this manual in a handy location for quick reference as necessity prior to
Software Download. Slicing Settings (Advanced) Software Installation. Software Tutorial. Model Manipulation. Workflow .STL &.OBJ.
 Software Installation. Software Tutorial. Model Manipulation. Workflow .STL &.OBJ.") User Manual Ver.1 TABLE OF CONTENTS Software Download 2 Slicing Settings (Advanced) 8 DIAMETER Software Installation 2 SPEED TEMPERATURE Software Tutorial 3 Model Manipulation 9 ROTATION Workflow.STL &.OBJ
User Manual Ver.1 TABLE OF CONTENTS Software Download 2 Slicing Settings (Advanced) 8 DIAMETER Software Installation 2 SPEED TEMPERATURE Software Tutorial 3 Model Manipulation 9 ROTATION Workflow.STL &.OBJ
Contents. 1. Getting Started Preparations Preparing 3D Data Creating monofab Player AM Data Preparing the ARM-10 15
 Printing Guide Contents 1. Getting Started 1 2. Preparations 2 3. Preparing 3D Data 3 4. Creating monofab Player AM Data 4 5. Preparing the ARM-10 15 6. Printing 19 1. Getting Started What is layered projection
VITEK VTD-TND4RMS FEATURES
 VITEK VTD-TND4RMS Transcendent Series 4 Megapixel H.265 Indoor/ Outdoor WDR IP Dome Camera with 30 IR LED Illumination & Motorized Varifocal Lens QUICK START GUIDE FEATURES 1/3 4.0 Megapixel Progressive
Setup Information Panosaurus May 3, 2011
 Setup Information Panosaurus 2.0 www.gregwired.com May 3, 2011 Please take the time to read all of the setup information to ensure success and ease of use of this tripod head. Much of the setup is a one
25 Sport Scope Instruction Manual
 25 Sport Scope Instruction Manual Dear Customer, We appreciate your business and value your support for our product. At Sport Scope, we strive to provide our customers with quality, easy to use, and affordable
DIY PRINTER INSTALLATION AND OPERATION INSTRUCTION
 CTC DIY I3 PRINTER INSTALLATION AND OPERATION INSTRUCTIONS Thank you for buying and using DIY 3D printer produced by CTC Please read the installation and operation instruction carefully before use Company
SmartDCP User Guide (DOC-0073)
") SmartDCP User Guide (DOC-0073) October 2015 Rev.1.0 www.vertekcpt.com SmartDCP USER GUIDE All rights reserved. No part of this manual may be reproduced, distributed, or transmitted in any form or by any
SmartDCP User Guide (DOC-0073) October 2015 Rev.1.0 www.vertekcpt.com SmartDCP USER GUIDE All rights reserved. No part of this manual may be reproduced, distributed, or transmitted in any form or by any
Set Up Your Print. Overview. The main interface has five components: 1. 3D Viewer
 Set Up Your Print Overview Open Uniz Desktop and click Control Bu on to show the 3D model viewer. The main interface has five components: 1. 3D Viewer https://uniz3d.com/support/supportsetprint/ 1/23 2.
Product User Manual. IdeaWerk 3D Printer WT150
 Product User Manual IdeaWerk 3D Printer WT150 Contents Contents 1. Unpack and checking... 1 1.1 Check the Machine... 1 1.2 Check the Accessories... 3 2. Brief Introduction... 3 2.1 Precautions and Safety...
CLIMB2 DUAL MONITOR SIT/STAND WORKSTATION
 CLIMB2 DUAL MONITOR SIT/STAND WORKSTATION CLIMB2 Rev A 3/17 Model CLIMB2-SLV ASSEMBLY AND ADJUSTMENT CLIMB2 PARTS AND TOOLS PLEASE REVIEW these instructions before beginning the assembly and adjustment
Work Smart: Windows 7 New Features
 About Windows 7 New Features The Windows 7 operating system offers several new features to help you work faster and more efficiently, and enable you to access the files, folders, programs, and applications
HP Pavilion dv7-6c90us Cooling fan Replacement
 HP Pavilion dv7-6c90us Cooling fan Replacement This guide will walk you through the process of replacing the cooling fan in an HP Pavilion dv7 laptop. Written By: Angelina Clayton ifixit CC BY-NC-SA www.ifixit.com
Installing the Focus Motor
 The MicroTouch Autofocuser is designed to work with Feathertouch Focusers from Starlight Instruments. It allows automatic focusing with CCD and DSLR cameras. Included is FocusMax software to automatically
Titan Aero Repetier Configuration
 Titan Aero Repetier Configuration Set up your Repetier Firmware to support your new Titan Aero. Written By: Gabe S. 2017 e3d-online.dozuki.com/ Page 1 of 12 Step 1 Download Marlin First things first: you're
HP rp5700 Repair Central Processing Unit(CPU) Replacement
 Replacement") HP rp5700 Repair Central Processing Unit(CPU) Replacement The CPU is the "brains" of any computer. The CPU is the component that process all the information in a computer. Use cation when following this
HP rp5700 Repair Central Processing Unit(CPU) Replacement The CPU is the "brains" of any computer. The CPU is the component that process all the information in a computer. Use cation when following this
CP-WU5500/CP-WX5500/CP-X5550 CP-WU5505/CP-WX5505/CP-X5555
 LCD Projector CP-WU5500/CP-WX5500/CP-X5550 CP-WU5505/CP-WX5505/CP-X5555 User's Manual (detailed) Instant Stack Guide Thank you for purchasing this product. Features This projector can be used with another
HeRO. solo/duet. Version 3.1 Customer Assembly & Maintenance Procedure
 HeRO solo/duet Version 3.1 Customer Assembly & Maintenance Procedure Table of Contents 1. Purpose 3 2. Scope 3 3. Materials 3 4. Assembly Procedure Desktop Mount 3 5. Assembly Procedure Pole Mount 4 6.
Diamond Scribing on MDX-40 & JWX-10
 Diamond Scribing on MDX-40 & JWX-0 This document covers diamond scribing using the MDX- 40 and JWX-0 as well as the required accessories. Materials Required: BT-EGX-5, High Precision Spring Loaded Burnishing
SOFTWARE SETUP Pronterface...2 Cura BED CALIBRATION Using Pronterface...11 Using LCD...13
 USER MANUAL TABLE OF CONTENTS SOFTWARE SETUP Pronterface...2 Cura 15.04...3 BED CALIBRATION Using Pronterface...11 Using LCD...13 LOAD/UNLOAD FILAMENT Using LCD (extruder 0 only)...14 Using PRONTERFACE...15
AstroJet TM M2 Quick Start Guide
 AstroJet TM M2 Quick Start Guide Step 1 Remove Printer and Accessories from packaging. Place Printer on a flat, even surface. Step 2 Remove Service Station Transport Tab 1. Open Top Cover. 2. Open Print
VMC Touch: Mounting Monitor Bracket Ports Connection And Cables Installation
 The Touch Monitor with the application VMC touch expands a SeMSy III Workstation Software with a convenient multi-touch operation. Many functions of the individual modules of a SeMSy III Workstation Software
First-Time Setup. Summary Steps CHAPTER
 CHAPTER 4 Revised: May 9, 2012, This chapter describes the steps you take to configure the CTS 1300 to use it for the first time and includes the following sections: Required Tools and Accessories, page
Please carefully read the safety instructions before get started.
 Safety Instructions Please carefully read the safety instructions before get started. ANYCUBIC 3D printer generates high temperature. Do not reach inside of the printer during operation. Allow time for
Geeetech Rostock mini G2 & G2s pro Quick Starter Manual
 Geeetech Rostock mini G2 & G2s pro Quick Starter Manual Please DO NOT rush to start your first printing after assembly, as this is a DIY kit, some parameters of the printer may be different from each other,
BASIC MARLIN FIRMWARE CONFIGURATION USER GUIDE FOR THE SMARTRAP 3D PRINTER WITH LCD
 INTRODUCTION: This is a basic user guide on how to verify and/or modify the settings in the Marlin firmware for use with the RepRap SmartRap 3D printer. There are several settings not covered in this manual
Panther Probe Inc. Real Time DeadWeight Software Manual
 Panther Probe Inc. Real Time DeadWeight Software Manual November 2008 1 Table of Contents Communication page 3 Set Chart / Well Info page 5 Real-Time features page 7 Report Viewer page 11 View Report page
CHIEF Stand. K3F220/K3G220 (2x2) K3G320 (3x2) EX241UN / -H Multi-Screen Installation Manual
 K3G320 (3x2) EX241UN / -H Multi-Screen Installation Manual") CHIEF Stand K3F220/K3G220 (2x2) K3G320 (3x2) EX241UN / -H Multi-Screen Installation Manual Contents General Information and Cautions. 3 Chapter 1 Removing the Bezel 4 Purpose. 4 How to Remove the Bezel......................5
CHIEF Stand K3F220/K3G220 (2x2) K3G320 (3x2) EX241UN / -H Multi-Screen Installation Manual Contents General Information and Cautions. 3 Chapter 1 Removing the Bezel 4 Purpose. 4 How to Remove the Bezel......................5
Instructions for installing your QuiltCam on your Gammill quilt machine.
 Instructions for installing your QuiltCam on your Gammill quilt machine. The items include with your QuiltCam Items included in all packages: QuiltCam Control Box, See Figure 1 Power Supply, Figure 2 Video
Installation Guide In-Wall Rear Projection SMART Board Interactive Whiteboard
 Installation Guide In-Wall Rear Projection SMART Board Interactive Whiteboard Registration Benefits If you register your SMART product, we ll notify you of new features and software upgrades. Register
This guide will help you with many of the basics of operation for your Epson 485wi BrightLink Projector with interactive functionality.
 This guide will help you with many of the basics of operation for your Epson 485wi BrightLink Projector with interactive functionality. If you need further assistance with questions, you can refer to the
AVT Model Tripod.
 AVT Model Tripod www.ravelliphoto.com Product Overview: The Ravelli AVT professional tripod is a high performance, fluid drag tripod that provides smooth continuous drag control and operates on both pan
Silver Merchandising. DI and Car Audio Security. Interactive Technology Support technology made easy
 Silver Merchandising Interactive Technology Support technology made easy For security in the DI and GPS sections of the store, Best Buy primarily uses MTI s Freedom system to secure the devices. There
Model 2704 Parts List * = Standard Equipment 〇 = Circuit Diagram
 2704 11-05 99 98 97 82 88 89 83 84 85 86 87 101 103 100 106 81 71 105 104 73 74 75 76 77 78 80 79 57 62 58 56 63 65 66 67 68 64 69 70 59 60 61 31 30 29 32 34 35 41 40 42 36 37 38 39 43 4445 46 21 22 20
TV & Office Solutions by equip solutions with a high value of benefit
 TV & Office Solutions by equip solutions with a high value of benefit The brand equip stands for a product development driven by quality management and continuous adjustments to the requirements of the
OPERATING INSTRUCTIONS:
 List OPERATING INSTRUCTIONS: Preparation For Installation, Product Identification Charging The Batteries ing And Adjusting The Lift Mounting Head s Brackets Mounting Clamps And Quick-Locking Arms Installation
epos Touchkit Manual (for Windows XP)
") epos Touchkit Manual (for Windows XP) 1. Touchkit Devices in Windows Device Manager After driver installation completed, all of Touchkit touchscreen controller devices will be list in the Mice and other
epos Touchkit Manual (for Windows XP) 1. Touchkit Devices in Windows Device Manager After driver installation completed, all of Touchkit touchscreen controller devices will be list in the Mice and other
DOWNLOADING THE APP FOR APPLE PHONES: DOWNLOADING THE APP FOR ANDROID PHONES: For Android Phones go to Google Play or the Android Store.
 DOWNLOADING THE APP FOR APPLE PHONES: DOWNLOADING THE APP FOR ANDROID PHONES: For Android Phones go to Google Play or the Android Store. For Apple Phones go to the app store and click GET. Make sure your
Rotary Motion Servo Plant: SRV02. 2D Ball Balancer. User Manual
 Rotary Motion Servo Plant: SRV02 2D Ball Balancer User Manual Table of Contents 1. PRESENTATION...1 1.1. Description...1 1.2. Prerequisites...2 2. 2D BALL BALANCER COMPONENTS...2 2.1. Component Nomenclature...2
BPL SERIES INSTALLATION INSTRUCTIONS THIS SHEET CONTAINS IMPORTANT SAFETY INSTRUCTIONS. SAVE THESE INSTRUCTIONS.
 BPL SERIES INSTALLATION INSTRUCTIONS Important Warning THIS SHEET CONTAINS IMPORTANT SAFETY INSTRUCTIONS. SAVE THESE INSTRUCTIONS. This product must be installed in accordance with National Electrical
Addendum to the Actalyst Interactive Digital Signage Installation and User s Guide
 Addendum to the Actalyst Interactive Digital Signage Installation and User s Guide This addendum contains information about the Actalyst Interactive Overlay that has changed since the release of the Actalyst
3d Printing with the Prusa I3 Operation & Printing via a USB Cable
 3d Printing with the Prusa I3 Operation & Printing via a USB Cable Instructions for: Prusa I3 Printer Set-up Slic3r Software Use Pronterface Software Use Prusa I3 - Parts Identification Prusa I3 Printer
USER S GUIDE. Documentation Version 1.2.6
 Documentation version 1.2.6 USER S GUIDE INTRODUCTION 2 INTRODUCTION INTRODUCTION / 3 INTRODUCTION Objective: Provide a visual guide of the different steps to set-up and get started using the MicroDelta
Getting to Know Pages on ipad
 Getting to Know Pages on ipad This guide will give you the basic instructions of how to use the Pages App on ipad. Documents Step 1 To create new documents and find the ones you ve worked on before, go
Was this document helpful? smarttech.com/docfeedback/ SMART Ink 5.2 USER S GUIDE
 Was this document helpful? smarttech.com/docfeedback/171190 SMART Ink 5.2 USER S GUIDE Trademark notice SMART Ink, SMART Notebook, SMART Meeting Pro, Pen ID, smarttech, the SMART logo and all SMART taglines
NAV-1 Lens Support. NAV-2 Lens Support BEFORE YOU BEGIN
 INSTALLATION Lens Support INSTRUCTIONS The Lens Support is compatible with any RPA projector mount. The readily adapts to the following ScreenStar Conversion Lens from Navitar: SSW08 and SST120. LENS SUPPORT
Removal and Installation8
 8 Screw Types 8-4 Top Cover Assembly 8-5 Left Hand Cover 8-6 Right Hand Cover 8-10 Front Panel Assembly 8-14 Left Rear Cover 8-15 Right Rear Cover 8-16 Extension Cover (60" Model only) 8-17 Media Lever