DTT Reference Manual (v3.3)
|
|
|
- Anna Stephens
- 6 years ago
- Views:
Transcription

1 DTT Reference Manual (v3.3) DTT 8.2 Publication Date: August 3, 2012 Notice The content in this document represents the current view of the DTT (Direct-To-Test) 8.20 application as of the date of publication. Because Critical Logic responds continually to changing market conditions, this document should not be interpreted as a commitment on the part of Critical Logic. Critical Logic cannot guarantee the accuracy of any information presented after the date of publication Critical Logic, Inc. Prevent and Detect
2 We ve prepared this user guide to provide information for accessing and using DTT. We want this resource to be as useful to you as possible and will be updating it with additional information in the future. If you can t currently find something you need in this manual, please let us know and we ll try to include it in a future update. Please address your comments to: Critical Logic 505 Sansome Street, Suite 1925 San Francisco, CA support@critical-logic.com Copyright 2012 by Critical Logic, Inc. All rights reserved. Any reproduction, public display, public distribution, transmission or creation of derivative works (including but not limited to the creation of abstracts of information) of the content of this publication or authorized derivative works, in whole or in part, without the prior written consent of the copyright owner is strictly prohibited (except to the extent permitted by applicable law). Willful violations of the copyright law of the United States can result in civil statutory damages of up to $150,000 or the award of actual damages and any additional profits of the infringer and under certain circumstances, criminal penalties of up to 10 years imprisonment, a $250,000 fine, or both. Page 2
3 Table of Contents About This Manual... 7 About This Reference Manual... 7 What Can You Expect to Find in this Guide?... 7 How to Use the Reference Manual... 7 Services Provided by Critical Logic... 7 Additional Resources... 8 Left Side Buttons... 9 Model Button... 9 Model Menu Sample Open Open Recent New Save Save As Copy Paste Close Rename Delete Clear Tests Check Sequence Reports Print Import Model Functional Elements When Importing Models Import Model Window Sample Import CEG Ambiguities Project Context Project Context Sample Model Context Model Context Sample Node Context Node Context Sample Ambiguity Editor Ambiguity Editor Sample Dashboard Making the Button Accessible Hiding Models Page 3
4 Sorting Models Exporting Dashboard Information Getting Dashboard Help Totals Window Generate Button Generate Test from CEG Window Completed Test Generation Run New Run Old Run Both Save Tests Close Reports Button Accessing the Reports Center Window Sample Reports Window Run Reports Button Test Prep Button Close Button Matrix Button Model Review Matrix Window Matrix Elements Filters Options Test Prep Button Test Case Prep Window Test Case Prep Sample Test Case Prep Table Save Button Save & Close Button Data Options Datasheet.xls and Datasheet.csv Buttons Import Test Description Button Export Text Description Button Close Button Test/Node Fields Data Value Field Test Navigation Area Database Button Back up Copy DB Clear Locks Compact Admin Button Users Window Add Button Edit Button Page 4
5 Delete Button Database Configuration Screen Trace Points Top Toolbar CEM Review Mode Button Zoom Feature Node List Button Node List in the DTT Workspace Notes Button Notes in the DTT Workspace Constraints Button Attributes Button Grid Button Legend Button Legend Sample Logic Buttons Logic Buttons Description and Samples Online Help Button Status Feature Saved Feature AutoSave Feature Node Editor Node Editor Sample Accessing the Node Editor Window Node Name Field Characters Not Accepted Ambiguities Field Trace Point Field Node Logic Field UI Type Field Node Logic/UI Type Combination Note Allowed Node Usage Section Observability Section Node Editor User Fields Labels Description Tabs OK and Cancel Buttons Right Click Menu Right-Clicking on an Empty Space in a Model Right-Clicking on a Node Right-Clicking on a Node (con t) Right-Clicking on a Note Right-Clicking on a Constraint Right-Clicking on a Relationship Link Trace Points Converting Models from a Previous Version of DTT Page 5
6 Creating Trace Points from Values in a Converted Database Adding Trace Points Trace Points When Importing a Model Deleting and Updating Trace Points Trace Points Screen Sample Selecting and Deselecting Trace Points CEM Review Mode Model Button Reports Button Matrix Button Simulation Simulation Functionality Reports Report Overview Table Report Options Test Cases Standard Test Cases Standard Sample Test Cases Spreadsheet Test Cases Spreadsheet Sample Test Review Matrix - Spreadsheet Test Review Matrix Spreadsheet Sample Test Cases Tabular Test Cases Tabular Sample Functional Variation List Functional Variation List Sample Tests per Functional Variation Tests per Functional Variation Sample Cause Maps & Test Paths Cause Maps & Test Paths Sample Test Data Specification Test Data Specification Sample Test Datasheet Test Datasheet Sample Test Cases Quality Center Test Cases Quality Center Sample Test Cases Script File Test Cases Script File Sample Reports Options Matrix Page 6
7 About This Manual About This Reference Manual This manual is designed as a reference for those using Direct-to-Test (DTT ) software to complete Cause-Effect Models (CEM) for various needs. Although the manual cannot take the place of in-person training, it provides a basic introduction to DTT and a catalog of the various functions available to users. What Can You Expect to Find in this Guide? The DTT Reference Manual provides some basic information about many of the functions and options available in the software. The list below introduces some of these functions and options. The Model Button section explains the functions for manipulating models in the current DTT database. The Matrix Button section explains how to read and take advantage of the information the Matrix functionality provides. The Top Toolbar section provides information on the buttons and features included on the horizontal toolbar at the top of the screen. The Node Editor section explains how to edit or change different properties of a node placed in the workspace. The Reports section explains the primary functions for creating formatted reports from an open and generated model. Appendix A contains a list of keyboard shortcuts. How to Use the Reference Manual The DTT Reference Manual provides you with quick definitions of all the features and functions in DTT. We have included many examples in each of the chapters to provide you with additional support on how you can use DTT in different contexts. Services Provided by Critical Logic In addition to DTT, Critical Logic provides many services that support your testing efforts. Among the services are: Page 7
8 Service Requirements Analysis DTT Training DTT Mentoring Test Automation Test Execution TMX Training TMX Mentoring Project Management Description Experienced Critical Logic analysts review and analyze requirements for ambiguities before the ambiguities are coded incorrectly. Issues are identified, shared, tracked, and addressed in a timely manner. Modeling training is available to all purchasers of DTT. An experienced Critical Logic trainer begins by teaching basic How-To knowledge, and progresses to advanced modeling strategy. Detection and documentation of ambiguities is an integral part of this training. After DTT training is complete, mentoring is available to help any Critical Logic-trained modeler apply the correct modeling strategy. Models may be exported to Critical Logic s TMX application, and converted to automated test scripts. Critical Logic provides the expertise to customize Actions and Keywords within TMX to fit the test environment. Critical Logic can help with both manual and automated testing, including test execution, reverse engineering requirements, and root cause analysis. Testers are available to test remotely or on site. Training is available to all purchasers of TMX. An experienced Critical Logic scripter begins by teaching basic How-To knowledge, and progresses to explore the creation of new Actions and Keywords that make TMX adaptable. After TMX training is complete, mentoring is available to help any Critical Logic-trained scripter apply the correct scripting techniques, and develop TMX Actions and Keywords for the test environment. Critical Logic offers the expertise of our project managers to manage your projects, including assessing the impact of requirement changes and meshing DTT's report capability with the Test Management System you use. Additional Resources Critical Logic is the leading user of DTT software. You can find additional resources, such as webinars and whitepapers, about DTT on Critical Logic s website, Cause-effect modeling with DTT can help companies in multiple stages of software development, from requirements analysis to testing. Page 8
9 Left Side Buttons The buttons down the left side of the DTT screen provide access to the primary functions of DTT. A sample of the left side buttons is shown below. Model Button The Model button in DTT (shown below) contains primarily functions for manipulating your models in the current DTT database. It includes options that allow you to open models, save them, create new ones, or delete models. It also has options to copy and paste nodes, open reports, and print. Page 9

10 Model Menu Sample Shown below is a sample of the Model menu that displays after clicking on the Model button. Page 10
11 Open To open a model, click on the Model button and select Open from the menu. An Open Model window displays, containing a list of all models in the database. The list order defaults to alphabetical by model name and the dialogue box includes options to Open, Cancel, and List by Date Saved. Functional Element Open button Cancel button List by Date Saved checkbox Description To open an existing model, click on the model name in the displayed list, then the Open button from the dialogue box, or double-click on the model name. Click the Cancel button to return to the previously displayed DTT workspace without opening a model in the database. Check this checkbox to list the models in the database by date saved. Note: If you try to open a model when another model is already open and has a status equal to Changed, a message box appears asking if you wish to save the current model before opening the next one. Open Recent Click on Open Recent to display a list of recently opened models. The models are listed in order of when they were last opened, the most recent being listed first. To open a model, click on the model name in the list. A sample of the Open Recent sub-menu is shown below. Page 11

12 Note: If you try to open a model when another model is already open and has a status equal to Changed, a message box appears asking if you wish to save the current model before opening the next one. New To create a new model, select the Model button and then select New. DTT opens a new, blank workspace for you to begin creating a new model. Note: If you try to open a model when another model is already open and has a status equal to Changed, a message box appears asking if you wish to save the current model before opening the next one. Save To save an active model on the DTT workspace, click on the Model button and select Save from the menu. If the model has not been previously saved, DTT opens a Save As window and prompts you to name the model before saving it. Note: In an active model, this function is the same as if you clicked the Save icon in the Top Row Toolbar. Page 12
13 Save As To save the model under a new or different model name, click on the Model button and then select Save As. A Save As message box displays where you can enter a model name. Note: If the model name you enter already exists in the database, DTT asks you if you want to replace the current version. Copy To copy a node in an open model, select the node by clicking on it, then click the Model button and select Copy. You can also copy a node by either of the following methods: Right-click on the node, then select Copy. Select a node and then press [Ctrl + C]. To copy multiple nodes, highlight all the nodes you wish to copy, then select Copy. Paste To paste a node you have copied into an open model, click the Model button and select Paste. You can also paste a copied node by either of the following methods: Right-click on white space in the model and select Paste. Press [Ctrl +V] in some white space in the model. If you previously copied multiple nodes together, then all nodes copied will be pasted into the workspace. If a node you are pasting has a node name that already exists within the current model, DTT appends to the node name an underscore character (_) followed by an iteration number (e.g. XNODE copied and pasted will result in XNODE_1). Close To close an active model, click the Model button and select Close from the menu. If the active model has been altered or was not previously saved, a message box appears, prompting you to save the changes. Page 13
14 Rename To rename a model, open the desired model in the workspace. Click the Model button and select Rename from the menu. A message box displays allowing you to enter a new model name. If you enter the name of a model that already exists, a DTT message box appears, prompting you that renaming the model as such will overwrite the previous model with that name. Delete To delete a model, open the model that you wish to delete. Click the Model button and select Delete from the menu. A pop-up dialogue box prompts you with information that all associated.ceg,.d_b, and.csv files will be deleted along with the model. You must acknowledge the warning message to proceed with the deletion. Clear Tests The option to clear tests is available only for active models that have previously been generated. To clear the tests for a model, open the desired model. Click the Model button and select Clear Tests from the menu. Once DTT has cleared all tests, you cannot produce test case reports until you re-generate the model. Check Sequence To verify nodes within a model are sequenced correctly, click on the Model button and select Check Sequence from the menu. Selecting [Ctrl + Q] will achieve the same effect. If nodes are sequenced correctly, a dialog window will display the message, Node sequence is OK. If the nodes are not sequenced properly, the dialog window will display the names of the nodes that are out of order. Page 14
15 Reports To produce test case reports, click on the Model button and select Reports from the menu. Reference: For a detailed description of all available reports, see the expanded Reports section. For information about report functionality, refer to the Reports Button section. Print To print a model, open the model you wish to print. Click on the Model button and select Print from the menu. Selecting [Ctrl + P] will achieve the same effect. A pop-up dialogue box displays information on how to scale the model to fit the desired number of pages. Clicking Cancel will close the window. Clicking the Yes or No buttons will open the standard Windows print dialog. Import Model You can import files from other DTT databases into the current active database by use of the import model feature. To import a model from another DTT database into the active database, follow these steps: Step Action 1 Click the Model button and then select Import Model from the menu. 2 From the Import Model window that appears, select the Browse button and navigate to the DTT database you wish to import from. 3 Once you have designated a database, the mode of that database display in the Model field. 4 To import one of the listed models into the currently opened database, select the model and then click the Import button. Functional Elements When Importing Models The following table describes the buttons and field available when importing models. Functional Element Import button Browse button Close button Import From Database field Description Imports the models from one database to another. Reference: See the procedure above. Click the Browse button to locate the database you wish to import. Closes the Import Model window. You can manually enter a database name into this field. Also this field auto-populates when you select the database after browsing. Page 15
 file, click the Model button and select Import CEG from the menu. This action opens an Open window with options to select.ceg files. Importing a.")
16 Import Model Window Sample A sample of the Import Model window is shown below. Import CEG To import a.ceg (Cause Effect Graph) file, click the Model button and select Import CEG from the menu. This action opens an Open window with options to select.ceg files. Importing a.ceg file creates a new model in the current database based on the information in that.ceg file. Page 16
17 Ambiguities The ambiguity functionality is designed to allow a many to many relationship between nodes, models, projects and the ambiguity list. There are 3 distinct contexts for the ambiguity list: project, model and Node. Each context is represented by a separate screen. The ambiguity functionality requires setup through the Admin-Configuration screen. A project database must be created for the ambiguity functionality to be accessible. Once set up the ambiguity list is ready to use, by one of 3 ways. Project Context This version of the ambiguity list provides an overall view of all the ambiguities for the project and gives the user the most control over ambiguities. When there is no model open, press the Ambiguities button on the leftside panel or the hot key [Ctrl + B] to open the Project Context window. The Project Context provides the user with the ability to add new ambiguities through the ambiguity editor by pressing the Add button. The Project Context provides the user with the ability to edit an ambiguity through the Ambiguity Editor by pressing the Edit button. The Project Context provides the user with the ability to delete an ambiguity by pressing the Delete button. The Project Context provides the user with the ability to export a CSV report by pressing the Export CSV button. The Project Context provides the user with the ability to export an HTML report by pressing the Export HTML button. The Project Context provides the user with the ability to sort the columns in the Ambiguity List table. Page 17

18 Project Context Sample Shown below is a sample of the Ambiguity List Project Context window. Model Context This version of the ambiguity list is designed for linking ambiguities to nodes using the many-to-many link capabilities. When a model is open and saved, press the Ambiguity button on the left side panel or the hot key [Ctrl + B] to enter the Model Context ambiguity list. The Model Context provides the user with the ability to link ambiguities to nodes; this is done by highlighting an ambiguity and checking the link checkbox for the desired node. The Model Context provides the user with the ability to sort the columns in the ambiguity list table. Note: From the Model Context any number of ambiguities may be linked to any number of nodes. Page 18

19 Model Context Sample Shown below is a sample of the Model Context view. Node Context This version of the ambiguity list provides the user with the ability to easily link many ambiguities to the node selected. Press the Link button from within the node editor to enter the Node Context ambiguity list. Press the Add button to create a new ambiguity through the ambiguity editor. Press the Edit button to edit an existing ambiguity through the ambiguity editor. The Node Context provides the user with the ability to link any number of ambiguities to the node that is opened. The Node Context provides the user with the ability to sort the columns in the ambiguity list table. The ambiguities are tied to the node name, so changing the node name will break any ambiguities linked to that node. Page 19
20 Node Context Sample Shown below is a sample of the Node Context view. Ambiguity Editor The editor contains many fields used for explaining the ambiguity. The user can change any of the fields although many of them are required. Ambiguity Editor (con t) Press the Save button to save the currently open ambiguity. Press the Cancel button to close the editor without saving. The date fields are self-formatting and will alter the date to match the 1/1/2000 format. When creating a new ambiguity with the Ambiguity Editor some fields will automatically be populated. Note: The ambiguity cannot be saved unless all the required fields are filled in. Page 20

21 Ambiguity Editor Sample Shown below is a sample of the Ambiguity Editor screen. Dashboard The Dashboard is a list of models in the currently open DTT database, and includes statistics about each model. The following information fields are available for view in the Dashboard window. Model Name Last Save Owner Test Count Description Node Count Status Variation Count Status Note Ambiguity Count Generated Making the Button Accessible To access the Dashboard window, you need to turn on the button through the Configuration menu by checking the Activate Dashboard checkbox. Doing so makes the Dashboard button appear in the left-side buttons on the main DTT workspace. Page 21
22 Hiding Models If you do not want the statistics for all of the models in the database, you can hide them on the Dashboard. You can do that by unchecking the checkbox beside the models you no longer want to see, then clicking the Hide title header. This process removes the unwanted model and its corresponding data from the list. To un-hide the models that have been hidden, press the Show title header or the Show All button on the side. Sorting Models Sorting models is a very useful function for getting data in the format you want. This is done by clicking on the title headers for the selection you wish to sort by. Title Header Model Name Owner Description Status Status Note Generated Last Save Test Count Node Count Variation Count Ambiguity Count Description Name given to the model at the time of the first save. Name of the user who has logged in when the model was created. Text description of the model. A direct link to the Status dropdown in the main DTT workspace. A note that can be attached to the model about the status. Date the last time the model was generated. Date the last time the model was saved. Total number of test cases for the mode. Total number of nodes in the model. Total number of variations determined by the last generation. Total number of ambiguities linked to the nodes and the model. Exporting Dashboard Information CSV and HTML are the two format options for exporting the Dashboard information. Two buttons for these options, Export CSV and Export HTML, display on the side. Press either of the buttons to open the Save dialog and choose the location where you want to save the files. Getting Dashboard Help Another button, Screen Help also displays on the side, which opens a window within the Dashboard. The Screen Help window gives the user detailed information about how to use the Dashboard. Page 22

23 Totals Window The Totals window is a small window on the side of the Dashboard where you can easily see the totals for all unhidden models. The different totals viewable are: Models Tests Nodes FVs Ambiguities Generate Button Clicking the Generate button located in the left-side buttons list in the DTT screen opens the Generate Test from CEG window for the currently opened model. Generate Test from CEG Window The Generate Test from CEG window provides options to Run New, Run Old (non-default,) Run Both (non-default,) and Save Tests (non-default). A model must be open to access the generate feature. Save the current model before it can be generated. Reference: For information on how to turn on the Run Old and Run Both buttons, see the Configuration section. A sample of the Generate Test from CEG window is shown here: Page 23

24 Generate Test from CEG Window (con t) To open the Generate Test from CEG window, click the Generate button on the left-side of the main DTT screen. If no model is currently open, DTT displays a message box with text: No model to generate. If the current model has not been saved, DTT displays a Save Model Changes message box with the text: Save [Model Name] first? If the current model contains one or more orphan nodes (i.e., nodes that are not linked to another node in the model), DTT displays a message box with the message: Orphan nodes exist. Continue with generate anyway? Orphan nodes will cause test case errors and it is advised to remove them if at all possible. Completed Test Generation Upon completion of successful test generation, DTT displays a message box that specifies the number of tests generated. The Generate Test from CEG window also refreshes and displays the Close button, previous and current test generation variables (number of Statements, Variables, Paths, and Tests, and Run Time), and five lines of test generation summary information. Run New The Run New function is the most commonly used generate function. To generate tests for an open, saved model, select the Run New button from the options listed on the Generate Test from CEG window. Once DTT has completed the test generation, the Generate Test from CEG window refreshes and displays the test generation summary results. Page 24
25 Run New (con t) To stop test generation before the generate process is complete, either click the Cancel button or hit the [Enter] key on your keyboard. The table below explains some of the potential errors that can occur when you generate test cases. Error Message Test Case(s) ends with a cause. Untestable Functional Variations exist. Infeasible Functional Variations Must examine model error report Description This message indicates one or more test cases ends with a cause (indicating input, but not output), which is a serious issue. All test cases must end with an effect. Untestables are generally to be avoided. They are often a symptom of incorrect modeling, so try to adjust the modeling approach and reduce the number of intermediate nodes. Sometimes, however, untestables cannot be removed, which may point to a variation that cannot be tested given the design of the system. In such a case, you may wish to raise the issue with the system designers to determine the best course of action; e.g. inserting a flag in the code that allows verification that the event occurred. You can identify the untestables using the Functional Variation List report. Infeasibles are very common and usually unavoidable; most completed models contain infeasible variations. An example of an expected infeasible is the FLASE state of an effect node that is always only expected to evaluate to TRUE. The model error report can be handy for troubleshooting certain kinds of issues. Except for the very simple models, this will always be enabled when a model is generated. The errors contained in this report do not always affect test cases, but the following ones should be fixed when encountered: the error that identifies the node with the single or two single quotes as having a null description defined; the error when a node never turns true, and any error related to an undefined constraint. Triggering the Show Errors button displays a pop-up Notepad window with the title [Model Name]_errors.txt - Notepad. The Notepad window displays a list of model errors, including one error that identifies the node with the single or two single quotes as having a null description defined. Run Old This button is not seen by default. Use of the Run Old button may be enabled via Admin/Configuration, but this is a beta feature and not currently supported. Page 25
26 Run Both This button is not seen by default. Use of the Run Both button may be enabled via Admin/Configuration, but this is a beta feature and not currently supported. Save Tests This button is not seen by default. Use of the Save Tests button may be enabled via Admin/Configuration, but this is a beta feature and not currently supported. Close Click the Close button to close the Generate Test from CEG window after the model has been generated. Reports Button The Reports feature in DTT contains primary functions for creating formatted reports from an open and generated model. It includes report format options for test cases, requirements traceability, and test data setup. The reports within DTT provide different views of the information stored in the DTT database. This feature is a powerful capability of DTT, allowing users to generate much more than just the standard test case view. Accessing the Reports Center Window To access the Reports Center screen, click the Reports button on the left side of the main DTT screen. Note: If you try to open the Reports Center screen without a model open, DTT displays the following error message: No Model open for Reports. Once you open the Report Center screen you see a list of options available for customizing the report. These options and their suggested uses are described in the Reports Option Table. Note: Selections made before you close the Reports Center screen are displayed when you reopen the window. On the left side of the Reports Center screen are three buttons: Run Reports, Test Desc, and Close. Page 26

27 Sample Reports Window A sample of the Reports Center window is shown below: Run Reports Button After making a selection in the Report Center screen, click the Run Reports button to display the formatted report in another window. Note: You can also press the Enter key to trigger the Run Reports function. If you click Run Reports without first generating the model, DTT displays an error message. DTT also checks for sequencing errors; i.e., where an effect precedes its causes. In these situations, the system displays an error listing the nodes that need to be resequenced. Page 27

28 Test Prep Button Use the Test Prep button to create customized names and descriptions for specific test cases, or set of test cases. The Test Prep feature is where data values can be set up for the test suite. This button can also be accessed from the main workspace. Please refer to the Test Prep section of this document for more information about this feature. Close Button Use the Close button to close the Reports Center screen without generating a formatted report. Note: You can also press the Esc key to close the window. The selection you make before closing the Reports Center screen is what initially displays when you reopen the screen. Matrix Button You can access the Model Review Matrix window when a generated model is open within the main DTT workspace. To display the screen, click the left hand Matrix button. Page 28
29 Model Review Matrix Window The Model Review Matrix window gives a condensed view of the paths taken by each test case through the model and is useful for isolating specific test cases and nodes for further examination. Details of each node are also given in a condensed format and can be limitedly modified. A sample of the Model Review Matrix window is displayed below. Page 29
30 Matrix Elements The Model Review Matrix is constructed with the individual nodes represented as rows, and the node details and individual test case paths as columns. Element Close Filters Tab Descriptions Seq Column Node Column Type Column Verification (T/F) Column Test Columns Description Closes the Model Review Matrix window. Filters the displayed information based off various criteria. See the section below for details. Allows you to choose which of the three tab descriptions to display in the window. Note: These radio buttons only appear if more than one tab is displayed via the Configuration window. Displays the sequence order for the nodes in the model. Lists the node names for the nodes in the model. Specifies whether a given node is a cause, effect, or intermediate, represented by a C, E, or I respectively. Displays the True and False (if available) state descriptions for the nodes in the model. Displays every test in the model, and the state of any given node in a test. T : True F : False M : Masked X : Untestable I : Indeterminate Blank: State not exercised Page 30
31 Filters Options The table below describes elements in the Filters option. Element Options Rows (Select All): Select all filters to display all rows. Clicking this when already selected will deselect all row filters. Selected: Show only selected rows (click on a row to select it). Causes: Show only rows with cause nodes. Effects: Show only rows with effect nodes. Intermediates: Show only rows with intermediate nodes. Context: Show only rows with nodes flagged as Context. Setup: Show only rows with nodes flagged as Setup. Columns (Select All): Select all filters to display all columns. Clicking this when already selected will deselect all column filters. Seq: Displays only the Seq column. Node: Displays only the Node column. Type: Displays only the Type column. Verification (T/F): Displays only the Verification (T/F) column. Tests: Displays only the column(s) for the selected test(s). Page 31
32 Test Prep Button The Test Prep functionality is a way to assign literal test data values in each test case for nodes having UI Type of Input or Verify. Assigning literal values is generally done for purposes of automated testing, but it also can be useful for manual testing to provide testers with a specific value in the test cases. General test descriptions can be entered here as well. Note: In the Test Cases Standard report, selecting the Show Data Values option causes the Data Value column to appear, showing the data values entered here in data prep, per step. For more information on that report see Test Cases Standard in the larger Reports Center section. Test Case Prep Window Click on the Test Prep button to display the Test Case Prep window. If the model was previously saved, the Test Case Prep window will display. If the model was not previously saved, a Save Model Changes notification will appear. o o Clicking Yes on this notification will save the model and open up the Test Case Prep window. Clicking No on this notification will not save the model and not open up the Test Case Prep window. If no model is currently open, a warning pop-up displays that says, No model open. Page 32

33 Test Case Prep Sample Shown below is a sample of the Test Case Prep screen. Page 33
34 Test Case Prep Table As show in the sample on the next page, the Test Case Prep screen displays a table with all cause and effect nodes found in each of the test cases, one node per row. The columns show the data values, states, and other information about each node. The table below describes each of the columns in the Test Case Prep screen. Column Heading Description Test Displays the test case number for a specific node in a row. All nodes active in test cases have a row, and rows are grouped by test case number. The cells in this column are not editable. CE Displays whether the node is a cause or an effect: C for cause, E for effect. Intermediate nodes (except Intermediate Observable) are ignored and do not display. The cells in this column are not editable. Node Name Displays the node s name. The cells in this column are not editable. TF Displays the true/false for that node in that test case. The cells in this column are not editable. UI Type Displays the node s UI type. The cells in this column are not editable. Data Value Displays the node s current data value. Test Case Description Nodes with UI type inputs or Verify have editable cells in this column; all other cells are not editable. The editable cells are a light blue color. Displays the node s True State Description or False State Description (as appropriate for that test case), depending on its current logic state. This currently only works for descriptions that are contained in Tab 1. Contains an editable field for each test case. Save Button Click the Save button to save the latest changes to the Test Prep screen. All current test prep information saves, including Input and Verify values, without closing the Test Prep screen. Page 34
35 Save & Close Button Click the Save & Close button to save the latest changes to the Test Prep screen, and then close the window. DTT saves all current test prep information including Input and Verify values, and then closes the Test Prep screen. The focus returns to the DTT workspace. Note: The saved information is restored when you click the Test Prep button again. Data Options Click the Data Options button to display a list of options for the Data Value fields in the table. This option is only available when an Input or Verify node is selected. Data Option Set EMPTY NODE_NAME values to X Set ALL NODE_NAME values to X Clear NODE_NAME values Clear ALL Node values Description NODE_NAME is the name of the currently highlight node and X is a value determined by the current value in NODE_NAME s Data Value field. If you select this option, DTT sets all empty Data Value fields for NODE_NAME, in all test cases, to X. NODE_NAME is name of the currently highlighted node and X is a value determined by the current value in NODE_NAME s Data Value field. If you select this option, DTT sets all Data Value fields for NODE_NAME to X, regardless of its current value. NODE_NAME is the name of the currently highlighted node. If you select this option, DTT clears Data Values fields for NODE_NAME. If you select this options, DTT clears all currently saved data values and sets the fields to blank. Datasheet.xls and Datasheet.csv Buttons Click a Datasheet button to create a datasheet based on the current Test Case Prep table and accompanying information. If you have not saved the current test case prep information, DTT prompts you to save the changes before it can export them to the datasheet. When you click Datasheet.xls or the Datasheet.csv button on the datasheet displays in a new window in the format selected and a Save Report As dialog box also displays. Page 35
36 Import Test Description Button This button is used to import test descriptions that have been saved to a file. Export Text Description Button This button is used to export the test description to a.txt file. Close Button Click the Close button to close Test Prep screen and return focus to the DTT workspace. If you have not saved the current test prep information, DTT prompts you to save the changes before closing the Test Prep screen. Test/Node Fields Two fields found to the right of the above buttons represent the test case number and Node Name values. The Test field displays the test case number of the row that is currently highlighted. The Node field displays the node name of the row that is currently highlighted. Note: The node name displays in this field only if the highlighted row has a UI type Input or Verify. Note: These fields are not editable. Data Value Field The Data Value field displays the current data value of a highlighted row. A value displays only if the highlighted node has a UI type of Input or Verify. The field is editable and holds any value you choose to input. The value entered in the field also displays in the row cell. If you previously opted to save changes after entering a new value the value is saved for future use, even if you close the Data Prep screen. Page 36
37 Test Navigation Area The Test Navigation portion of the screen contains several elements, as described below. A text field automatically displays the test case number of the current highlighted row. You may enter a specific test case number to jump directly to that test case. Navigation arrows surround the text field. Use these arrows to navigate to other test cases. o o Left double arrow button: use to navigate to the first test case Left arrow button: use to navigate to the previous test case o o Right arrow button: use to navigate to the next test case Right double arrow button: use to navigate to the last test case Radio buttons o o o o All Nodes : When this radio button is selected all nodes in the model display in the Test Case Data Prep screen. Data Nodes : When this radio button is selected only Data Nodes (those having UI type Input or Verify) are visible in the Test Case Data Prep screen. Just NODE_NAME (where NODE_NAME is the node name of the currently highlighted node): When this radio button is selected just NODE_NAME displays in the Test Case Data Prep screen and only the test cases that node is visible in. Note: This radio button is only available if a node with UI type Input or Verify is highlighted. Test Only : When this radio button is selected only the test descriptions rows are displayed. Page 37
38 Database Button The Database button opens a menu containing four data database functions. Triggering these functions applies to the currently open database: Backup Copy DB Clear Locks Compact Back up This function saves the current database to a.dtt file with a timestamp that captures the current month, date, and time. Note: DTT uses the current system date of your workstation to create the timestamp. Copy DB The Copy DB function opens a dialogue box to create a copy of the current database. You may specify the file location for the copy. Checkbox fields specify the following options for the copied database: Clear models Clear test scripts Clear users When you click the Copy button a file save dialog box will appear. The default save name is the name of the current database with underscore Copy (_Copy) appended to it. You can change it if you wish. Clear Locks When you select the Clear Locks menu item, DTT displays a prompt asking you to confirm that you want all locks on models to be cleared. Clear Locks is used when a database has become locked due to multiple file accesses or to DTT being irregularly terminated. Page 38
39 Compact The Compact function creates a smaller, more efficiently structured copy of the DTT database. This is useful when sending or uploading a database. For recovery purposes, it is a good idea to regularly compact your DTT database. By default, compacting a database creates a copy of the former uncompacted version, in case you wish to return to that version. Admin Button The Admin feature enables you to access and set administrative features within DTT and includes four menu options: Users Configuration Trace Points UnRegister About Users Window The Users screen, accessed by selecting Users from the Admin pop-up menu, includes options to: Add a new user account. Edit an existing user account and configure permission options. Delete an existing user account. Page 39
40 Add Button The Add button opens a detail pop-up dialogue box containing the following fields and functional elements: Window Element User ID User Name Password Description Enter the new user s User ID in this field. o User ID is a required field at login. Note: Any of the following prompts an error message: o o o Entering more than 30 characters Entering a User ID identical to an existing User ID Entering a blank User ID, or including a (single quote) Enter the new user s name in this field. o o o User Name is not required information at login. Leaving this field blank will result in an error message After you click the Save button, DTT displays the name you entered in the list pane on the right of the pop-up window. Password is an optional field. If you enter one here, DTT will require a password at login. Admin o If you check this box, the user logging in under this account has full use of all DTT functions. TMX o If you do not check this box and you also do not check the Read Only checkbox, the user logging in under this account does not have the Admin or Database buttons. If you check this box, the user logging in under this account is able to access TMX without a separate login. Note: There is no change in the available buttons caused by checking or unchecking this box. Read Only o If you check Read Only, both the Admin checkbox is automatically changed to unchecked. Save Cancel o If you check the Admin checkbox, the Read Only checkbox changes to unchecked. A user logging in under a Read Only account does not have the Data Prep, Generate, Database, or Admin buttons. However, the user can view any model in the database, including the associated Test Matrix and Reports, but will not be able to make any changes to a model, create a new model, or import a model from another database. Clicking Save adds the new account as you have configured it and returns you to the main Users window. Clicking Cancel returns you to the main Users window without adding a new user. Page 40
41 Edit Button When you select a name from the list pane on the right of the dialogue box then click the Edit button, DTT opens a dialogue box containing the User ID, User Name, Password, and permissions checkboxes. All fields except User ID are enabled and editable. Delete Button Triggering the Delete button after selecting a name from the list pane deletes that user and their password and permissions. Before deleting the user, DTT prompts you to confirm that you wish to delete. Database Configuration Screen The Configuration screen, accessed by clicking Configuration from the Admin menu, enables you to set several DTT default settings. The table below describes the available settings. Setting Project Database Path to Bender RBT Minutes Between AutoSave Description User this editable text box to select the database you wish to use for ambiguities. The folder button opens the windows browse dialog. Note: You cannot access the ambiguity window if this configuration is not set up. Use this editable text box to select the licensed copy of the Bender RBT program. The folder button opens the window browse dialog. Note: You cannot access the RBT window if this configuration is not set up. This field accepts any integer between 0 and 30, inclusive. Note: A value of 0 turns the AutoSave feature off. When activated, DTT saves the database at the end of each AutoSave interval if it detects any changes from the previously saved database. If DTT does not detect any changes, it does not save the database. Note: When the Configuration window is closed you may verify current AutoSave settings as displayed in the top buttons tool bar on the right. Page 41
42 Database Configuration Screen (con t) Setting Set Initial Mask Link to True Activate Dashboard Node Editor User Fields Labels Default Node Description Node Editor Description Tabs Configuration Description When selected, this checkbox sets the default value of the first link created from a Mask to true. Note: By default the first link for a mask constraint is false. This checkbox option turns on or off the Dashboard button on the main workspace side menu. Entering a value in this field causes a textbox to display in the Node Editor screen. The label for this textbox corresponds to the entry made in the Configuration screen. No textbox will appear if the fields are left blank. This text field contains <Node Name> by default, but can be changed to any static value. The value entered in this field will appear as the description in every new node created. Leaving the <Node Name> value makes the default description value whatever the node name is when the node is created. This area contains three editable text boxes, one for each possible tab in the Node Editor. Use the text fields for changing the title of those tabs. The maximum tab title length is 50 characters. Leaving the text fields blank sets them to their default state. The Show checkboxes enable or disable the selected tab. Make them either viewable or hidden in the Node Editor. Selecting one of the Default radio button options makes the selected tab the default when opening the Node Editor. Note: The node hover over text will come from the default tab true state description. The TMX section is display only, to show by default which tabs are used with TMX. Reference: For more information see Description Tabs. Trace Points This option opens up the Trace Points screen. Reference: For information about how to use this screen, see the Trace Points section of this manual. Page 42
43 Top Toolbar The DTT Workspace window contains a toolbar running across the top of the screen that includes commonly used workspace display and model functions. Each button is identified by an icon, in addition to a tool tip that displays when you hover the cursor over the button. Shown below is a picture of DTT s top toolbar. CEM Review Mode Button The CEM Review Mode button allows users to enter a read-only mode where users are provided no edit options and limited features. The Review Mode button in the top row toolbar is shown below: For more information on review mode, please review the section on Review Mode. Zoom Feature The Zoom feature allows you to zoom in for a close-up view of the DTT Workspace window, or to zoom out to see more of the model displayed in the window. The picture below shoes the portion of the top row toolbar related to the zoom feature. Page 43
44 Zoom Feature (con t) As shown in this picture, the zoom feature consists of three functions: A drop-down list box that also allows direct data entry A zoom in (+) magnifier button A zoom out (-) magnifier button The zoom generally defaults to 100%, although if you have previously saved your model, DTT restores the zoom value of the saved model. DTT offers several options for changing the magnification of the screen: Select the magnification level from the zoom drop down list Type the desired magnification level into the Zoom field Click the (+) sign to increase the magnification by 10% Click the (-) sign to decrease the magnification by 10% Save Button The Save button allows you to save the model that is open in the workspace. The Save button in the top row toolbar is shown below: For an open model that was previously saved, DTT saves the model with its current model name and overwrites the previously saved version. The drop-down display box located in the top row toolbar shown below displays the date and time the model was saved, and the second panel from the left in the DTT window s footer indicates that the model has been saved. If the current model in the workspace is a new model that has not been saved previously, and the save button is clicked, DTT displays the Save As dialogue box prompting you to give the model is a file name. Page 44

45 Save and Close Button The Save and Close button allows you to save the model currently open, and immediately close it with a single press. Aside from closing the model after saving, functionality is the same as the Save button. The Save button in the top row toolbar is shown below: Find Button The Find button allows you to search for specific text in the currently open model. The Find button in the top row toolbar is shown here: Click on the Find button to display the Find dialogue box, shown here: The Find function is case insensitive and requires at least two characters DTT searches for the text string entered in the Find dialogue box by first scanning the node names, beginning with the node that is sequenced first in the model. o o If it finds a match to the search criteria within the node name, DTT sets the focus to that node. If no matches are found within the node names, DTT searches the text in the true and false state descriptions within the Node Editor Description fields (see the Node Editor section on page 12). If a match is found, DTT sets the focus to the particular node. Wild card searches are allowed. The search may include one alphanumeric character with a wildcard symbol (*) preceding or following it. An entry of ** does not return a meaningful search. Page 45
46 Find Again Button The Find Again button compliments the Find feature. Clicking on the Find Again button (shown below) returns the next match based on node sequenced of last used criteria of the Find feature. Node List Button The Node List button opens a pane on the left side of the Workspace window that contains a list of all the active nodes within the workspace. Node List in the DTT Workspace The following text discusses the Node List feature. Also shown below is a sample of the DTT Workspace displaying in the Node List. The order of the nodes within the list defaults to the order they were created in the workspace. You may re-sequence the nodes in the list by clicking to select and dragging the node to the desired position. You may select multiple nodes simultaneously by using the Control and/or Shift keys in conjunction with desired selections. Note: The Node List is blank if no nodes display in the workspace. Page 46
47 Node List in the DTT Workspace (con t) The sample below shows the Node List after nodes have been sequenced correctly. Notes Button The Notes button allows you to toggle the Notes feature on and off within the workspace window. Notes in the DTT Workspace The information below discusses the Notes feature. Also shown below is a sample of a note linked to a node. If you toggle off the Notes feature, then add another note, the newly added note(s) will display and you will be asked if you would like to turn Notes on. The previously existing notes, however, do not display unless you toggle the Notes feature on. If the Notes feature is off, the additional notes do not display once the model is saved, closed, and reopened. However, you will be notified that notes exist in the model, and you will be given the option to turn notes back on at this point. Page 47
48 Notes in the DTT Workspace (con t) Constraints Button The Constraints button allows you to toggle visibility of the constraints and their links on and off within the workspace window. Attributes Button The Attributes button allows you to toggle the UI type symbols in the left hand section of the nodes on and off. If the node s UI type attribute is set, the symbol toggles on and off. All nodes can possibly include the following, which the Attributes button toggles on or off. UI Type How it Displays in the Node Node/UI Type Example Action Red exclamation point Input Red right angle bracket Verify Green checkmark Attribute Blue A Page 48
 icons.")
49 Grid Button The Grid button allows you to toggle the grid on and off in the DTT workspace window. When the Grid feature is toggled on all nodes align to the vertical and horizontal grid points to the left hand edges of the node(s) icons. Legend Button The Legend button allows you to toggle on and off a static dialogue box that contains a legend for DTT node types (i.e., Cause, Effect, Intermediate, Intermediate Observable, and Orphan), UI Types, Node Logic, Constraint node shape, and Setup/Context indicator colors. Legend Sample The picture below is a sample of the Legend. Logic Buttons The Logic buttons control the display of the logic indicators within the nodes. Page 49


50 Logic Buttons Description and Samples The table below describes each of the three buttons and shows examples of the same set of nodes when each of the buttons is applied. Button Description Node Example Logic Symbols Left hand logic button that, when applied, uses a symbol to denote the node s logic. Logic Words Middle logic button that, when applied, uses a word to denote the node s logic. Logic EE Right hand logic button that, when applied, uses electrical symbols to denote the node s logic. Online Help Button The Online Help button opens a webpage with links to the DTT Software Reference Guide, the DTT How To Users Guide, and the DTT Installation Guide. Clicking any of the links opens the associated guide in a PDF format. Page 50


51 Status Feature The Status feature is user-controlled. This list is not pre-populated until statuses are added to models in the database and saved by typing it into the drop-down menu. This list will only ever display the statuses being currently used in the database. Status changes must be saved to be included in the drop-down list. A sample of the Status feature is shown below. There is no limit to the number of status a single database may have. Saved Feature The Saved feature contains data for the last time the model was: Saved Generated Test Imported Model Imported A sample of the Saved feature is shown below. AutoSave Feature The AutoSave feature displays the AutoSave setting that is set in the Admin > Configuration controls. Reference: For more about setting the AutoSave feature, see Configuration Window in the Admin Button section. Page 51
52 Node Editor The Node Editor feature in DTT allows you to enter information about nodes in the current model. Fields in the Node Editor screen include: Node Name Ambiguities Trace Points Node Editor User Field Labels (non-default option, see the Database Configuration Screen section) Test Descriptions Business Descriptions (non-default option, see the Database Configuration Screen section) Technical Descriptions (non-default option, see the Database Configuration Screen section) Fields to assign values to the: o o o o Node Logic UI Type Node Usage Observability The Node Editor functionality can be applied to existing or newly created nodes. To create a new node: (1) double-click within the DTT workspace window; (2) right-click with the workspace and select Add Node ; or (3) press [Ctrl+N]. Page 52


53 Node Editor Sample Shown below is a sample of a Node Editor screen: Accessing the Node Editor Window You can open the Node Editor screen in any of these ways: Double-click on the right side of a node Right-click on the node and select Edit Node Select the node and press the Enter key Node Name Field The Node Name field is an editable text field located at the top of the Node Editor screen. This field is pre-populated with a default node name, which you can accept as-is or edit. The default node name contains a unique prime number that also serves as the unique node handle. Editing the node name does not change the unique handle. The character limit in this field is based on the size/width of the characters entered; the field does not accept any more characters after reaching this maximum. Page 53
 right parenthesis ` accent [ left bracket * asterisk ] right bracket = equal sign.")
54 Characters Not Accepted The Node Name field does not accept the following special characters: $ dollar sign, comma \ back slash ; semi-colon double quotes : colon? question mark vertical bar ( left parenthesis / forward slash ) right parenthesis ` accent [ left bracket * asterisk ] right bracket = equal sign. period ~ tilde & ampersand single quote If you enter any of the above characters and click the Save button, DTT displays an error message. Ambiguities Field Ambiguities often arise as a natural part of the modeling process. These issues are tracked by creating a record into the project database and setting a point of reference in the model to the record. The Ambiguity field provides the ability to add new ambiguities, edit existing ambiguities, and to designate ambiguities to the selected node through linking. Ambiguities that are currently linked to the node will be listed in the field below the Link, Add, and Edit buttons. More details on this feature can be found in the Ambiguities section. Page 54
55 Trace Point Field Trace Points provide means to reference the functional or business requirement that is being exercised by the node. To fully activate the Trace Points feature, a master list of requirements must first be imported into or created in DTT. The Import Trace Points feature can be found in the Admin menu. Once a master list of requirements has been imported or created, the Select and Deselect buttons can be used for attaching the requirements from the master list to a given node. More details on this feature can be found in the Trace Points section. Node Logic Field The Node Logic field is a drop-down list of functional logic values (e.g., selecting Or determines that when more than one test path runs through that particular node, any of the logic that serves as an input will be valid.) The values available in the Node Logic drop-down list are: Primary (default value) Xor Simple Nand And Nor Or Xnor Page 55
56 UI Type Field Use UI type designations when you script models for automation. UI Types are user interface descriptions that provide the tester/user with instructions about elements of a test s functionality. The UI types available are: Action Input Verify Attribute Note: If you set the UI Type to Attribute, an Attribute of Input Node field appears. The field s dropdown box displays all input nodes, it will be linked to the attribute node. None (default value) Node Logic/UI Type Combination Note Allowed Some combination of Node Logic and UI Types are not acceptable. DTT displays an error message in the following circumstances: If you set Node Logic to anything other than Primary and UI Type to Input, then click the Save button. If you set Node Logic to Primary and UI Type to Verify, then click the Save button. Node Usage Section Page 56
 that must be set up before testing. Note: A Show Setup Only option is available in the Reports window to view only those nodes flagged as Setup.")
57 Node Usage Section (con t) The Node Usage section has two checkbox options as described below in the table below: Checkbox Setup Context Do Not Suppress No False State Description A flag that delineates a node as having condition(s) that must be set up before testing. Note: A Show Setup Only option is available in the Reports window to view only those nodes flagged as Setup. Serves the purpose of flagging a node that must occur before any functionality begins, and must always be true, in every test case in the model. Note: An option of Show context once is available in the Reports Center screen, which allows all the nodes labeled Context to be shown only one time with the test script. If checked, this node will override the report option to suppress redundant steps, and will never be suppressed in the Test Cases Standard report. If checked, removes the False State Description field and does display a false description in reports. If unchecked, the False State Description becomes available to input text that will show up in relevant reports. Observability Section The Observability section deals with how a node is portrayed within the test scripts. Three radio buttons display in this section as described below. Radio Button Default Forced Observable Intermediate Description Flags the node as following the default value for all nodes (i.e., non-observable intermediate). Within the test scripts, nodes flagged as Default are observable only if they are either a cause or an effect. Note: Default is the default value. Flags the nodes as being forced to be true at least one time within the test cases. Note: This option is not available for Primary Nodes Flags the node as viewable in the test scripts, even though it may be an intermediate node. Note: This option is not available for Primary Nodes Page 57


58 Node Editor User Fields Labels Use the Node Editor User Fields to create node-level flags (also commonly referred to as flex fields ). The Configuration screen, accessible through the Admin button, contains two fields that you can customize to create node-level flags. This is a general feature whose use will be project specific. Entering a value in the Node Editor User Fields within the Configuration screen causes the field to show up in the Node Editor screen. The label in the Node Editor screen corresponds to the entry made in this field while in the Configuration menu. Note: This field does not appear if an entry has not been made in the Node Editor User Fields Labels field in the Configuration menu. Currently, the values for these fields are not configured to output to any of the standard reports. They can be added to customized reports as part of a formal enhancement request process. Description Tabs Three tabs are available in this area, referred to as Tab 1, Tab 2, and Tab 3. The default names for these tabs are as follows: Test Description for Tab 1, Business Description for Tab 2, and Technical Description for Tab 3. The default names for these three (3) tabs are editable and can be changed by accessing the Configuration menu from the Admin button. There is a 50 character limit for each of the tab name fields. Note: For DTT functions, such as reports, to function properly at least one tab must be activated in the Configuration menu. The true state of at least one of the tabs must also contain text. Page 58
59 Description Tabs (con t) Each of the three possible tabs is described in the table below: Radio Button Tab 1 Tab 2 Tab 3 Description Contains two editable text field boxes, True State Description and False State Description in which you enter node definitions. A Clear button is also available for clearing the text from both of the editable text boxes. Contains two editable text field boxes, True State Description and False State Description. Both of these fields are optional fields into which you may enter information describing what is happening in the test (i.e., how the business system determines how a rule is interpreted/carried out). The same Clear button is also on this tab and work the same way. Contains two editable text field boxes, True State Description and False State Description. These fields are generally used for entering automation scripts for use with TMX. The same Clear button is also on this tab and work the same way. OK and Cancel Buttons The buttons to the far left of the Node Editor screen controls how data is represented in the node. The OK button will accept and store inputted data. Be aware that this information is not saved into the model database until the Save feature has been triggered for the overall model. The Cancel button will close the Node Editor without accepting any inputted changes. Note: If you have TMX installed, a Script button will appear allowing you to script inside DTT. See the TMX User Guide for information on how to do this. Page 59
60 Right Click Menu The Right-Click menu is a great asset to the user when on the main workspace. For the most part the Right-Click menu provides quick access to many of the functional options of the workspace. The areas of which the Right-Click menu is accessible are: Blank workspaces Nodes Notes Constraints Linking lines Right-Clicking on an Empty Space in a Model Opening the Right-Click menu on the blank workspace is generally done to access options for the model. The following menu options are available when right-clicking on the blank workspace: Add node Copy Add constraint Paste Save Print Save as Check Sequence Ambiguities (if enabled) Generate Dashboard (if enabled) Reports Add Note Exit Find Find again Setting Add Node Add Constraint Description Creates a node at the location where the right-click took place Displays a sub-menu to place a constraint at the location where the right-click took place. The options available are: ANCHOR MASK EXCL ONE INCL REQ Page 60
61 Right-Clicking on an Empty Space in a Model (con t) Setting Save Save as Ambiguities Dashboard Add Note Find Find again Copy Paste Print Check Sequence Generate Reports Exit Description Saves the current model. Opens the Save dialog window so you can save in a specific place or with a different name, etc. Opens the Ambiguity screen (if it has been turned on in the Configuration menu). Opens the Dashboard screen (if it has been turned on in the Configuration menu). Opens the Note Editor screen. Opens the Find dialog, allowing you to search for node names. Searches and finds the last thing you used in the Find dialog for. Copies any selected nodes, notes, and constraints Pastes the last copied node, note, or constraint at the location of the right-click. Will open the printer controls and allow you to print out what is on the workspace. Analyzes the logical order of defined nodes, indicating nodes that are out of sequence. Launches the Generate screen, unless no model is open (and an error pop-up appears) or if the model has not been saved (then save pop-up displays). Opens the Reports Center screen as long as the model is open and the latest changes have been saved. Opens an Exit prompt and closes any open model. Page 61
62 Right-Clicking on a Node Right-clicking a node provides many of the options that can be found within the Node Editor screen. The table below describes the menu options available when you right-click within a node: Note: If you select multiple nodes when right-clicking, only UI Type, Usage, Copy, and Delete Node of the options described below are available. Option Edit node Logic Description Use this option to open the Node Editor screen. Choosing this option expands the following list: - Primary - Xor - Simple - Nand - And - Nor - Or - Xnor Selecting any one of these options changes the node logic to the selected option. UI Type Transfer Links Choosing this option expands the following list: - Action - Attribute - Input - None - Verify Selecting any one of these options will change the node UI type to the selected option. Choosing this option expands the following list: Transfer Links In: Selecting this option closes the menu and changes the cursor into a black arrow with the text transfer links. To complete the link transfer, click on the desired node. This transfers all the link lines going into the first selected node to the second node. Transfer Links Out: Selecting this option closes the menu and changes the cursor into a black arrow with the text transfer links. To complete the link transfer, click on the desired node. This transfers all the link lines going out of the first selected node to the second selected node. Transfer All Links: Selecting this option closes the menu and changes the cursor into a black arrow with the text transfer links. To complete the link transfer, click on the desired node. This transfers all the link lines from the first selected node to the second selected node. Transfer Attributes: Selecting this option closes the menu and changes the cursor into a black arrow with the text transfer links. To complete the link transfer, click on the desired node. This transfers any attribute links associated with the UI Type Attribute to the newly selected node. Page 62
63 Right-Clicking on a Node (con t) Option Usage Copy Link Delete Node Description Choosing this option expands the following list: Normal Setup Context Selecting any of these options sets the Node Usage to the selected option. Context and Setup can be assigned to the same node, causing the node to be both yellow and orange. Select this option to copy the selected node, which can then be pasted elsewhere on the workspace. Selecting this option changes the cursor to a black arrow with the text Linking. Click another node to link the first node to the second. Select this option to delete the selected node. Right-Clicking on a Note Right-Clicking on a Constraint Right-click on a note to access options for the selected Note: Edit Note Select this option to open the Note Editor window. Delete Note Select this option to delete the selected note. Right-click on a Constraint to access several menu options for the selected Constraint: Change constraint Selecting this option opens the Constraing tlist. When you select any of these options from the list, DTT changes the constraint to the selected option. Delete constraint Select this option to delete the selected constraint. Link Selecting this option changes the cursor ibnto a black arrow with the text Linking. Click on a node to complete the link. Right-Clicking on a Relationship Link Right-click on a linking line to access options for the selected Linking Line: Make link false/true Select this option to change the true/false state of the selected link line. Delete link Select this option to delete the selected link line. Trace Points Trace points provide a means to reference the functional or business requirement that is being exercised by a node. Page 63
64 Trace points are stored in a project database and may be added, edited, and deleted from within DTT. Page 64
65 Converting Models from a Previous Version of DTT Creating Trace Points from Values in a Converted Database When upgrading from a version of DTT that does not have the enhanced Trace Point functionality to a later version that does, the Trace Points in the older version are automatically moved to the new version and appear in the nodes. The conversion, however, does not create.csv file for the Trace Points; therefore, to add new Trace Points, or to update or delete the original Trace Points, a.csv file must be created for the database. When a model with trace points is converted, use the following steps to save the trace points as a.csv file: 1. Click the Admin button on the left-hand side of the screen. 2. Select the Trace Points option (the Trace Points screen should then display.) 3. Click the Create button. DTT guides the user through the steps to create a.csv file from trace points already assigned to nodes in the database. Adding Trace Points Trace Points can be created via the Trace Points window or by importing a properly formatted.xsl file. You may import a file multiple times into any database with the Trace Point enhancement. To create a new Trace Point inside DTT, click the Add button in the Trace Points window. To import a list of Trace Points: 1. Click the Admin button on the left-hand side of the screen. 2. Select the Trace Points option. The Trace Points screen will display. 3. Click the Import button. 4. Select the.xls file desired. DTT will import the file. Click the Save button to finish importing trace points. A properly formatted Trace Point file must: Be in a.xsl file Not have empty columns to the left or between the two filled columns. All empty columns must occur to the right of the columns of data. Not have empty rows above or within the filled rows. All empty rows must occur under the rows of data. Page 65
66 Trace Points When Importing a Model Models that contain Trace Points may be imported into a different DTT database just like any other model. When imported, however, the Trace Points are considered invalid and do not contain a description. Reference: For general information about importing models, see Import Model. If you want the Trace Points to accompany the imported model to the second database, first import the Trace Points into the new database, then import the model. Follow the steps above to import the Trace Points into the second database. If you do not want the trace points to accompany the imported model, then after importing the model, open the Trace Points screen and remove all Trace Points from the model and database by clicking the Save button. Deleting and Updating Trace Points Trace Points Screen Sample Trace Points typically represent software requirements which can change throughout the life of the project. To update and delete Trace Points in the database, the user may make changes in the Trace Points screen or import a new.xsl file that contains the changes by using the steps above. Shown below is a sample of the Trace Points screen. Page 66

67 Selecting and Deselecting Trace Points Trace Point Field Sample Open the Node Editor. A Trace Point box displays in the upper right hand corner with two buttons above it: Select and Deselect. Selecting the Deselect button before selecting Trace Points will result in an error message. Selecting the Select button will provide a drop down list of Trace Points that are available in the.csv file. Double Clicking a single requirement will add it to the node, as does selecting it and pressing the Enter key. If multiple requirements are desired for one node, pressing the Ctrl key allows the user to select multiple Trace Points before pressing the Enter key to add them all. To delete requirements in a node, select one (or multiple, using the Ctrl key) from the Trace Point box and click the Deselect button. If requirements that are not present in the Trace Point.csv are deleted, they cannot be added to a node again without importing a new.csv. Show below is a picture of the Trace Points field. Page 67
68 CEM Review Mode When a DTT model is in CEM Review Mode, many of the normal DTT functionality is disabled or hidden from view. In addition, no changes to a model may be saved while in review mode. Users can set a DTT model to CEM Review Mode by selecting the eye icon near the Critical Logic logo in the top left corner of the main DTT workspace. Users can also be flagged as read only users which will only allow access to CEM Review Mode. The functionality that is usable in CEM Review Mode is: Model button with limited functionality Reports button Matrix button Exit button Many of the top tools also remain functional. A user can also move and open nodes although these effects are not savable. The sample below shows the workspace in CEM Review Mode. Model Button Clicking the Model button will display a submenu of options. Open lets a user open a model. Open Recent shows the user the models that have been open previously. Close lets a user close an open model. Reports opens the Reports window. See the Reports section for more information. Print allows a user to print a model. Page 68
69 Reports Button Clicking this button opens the Reports window, which functions the same as it does in Edit Mode. Reference: See the Reports section for more information. Matrix Button The Matrix functionality is the same in Review Mode as it is in Edit Mode. Reference: See the Matrix section for more information. Simulation Simulation Functionality The Simulation function allows the user to assert states on nodes within a model and see the logical implications that these assertions have on all other nodes within the model. This functionality is used by left or right clicking on the desired node. (Alt + Left or Right Click is also used) The Reset button clears all assertions on the model. Below is an example of the Simulation feature. Page 69
70 Reports After you have completed a model, DTT offers many report formats for different views of the information stored in the DTT database. This capability is a powerful aspect of DTT, and provides the ability to generate much more than just the standard test case view. The Report Options table below is a general overview of the different reports. Following the table is detailed information and a visual example about each of the reports. Reference: This section describes reports and how you can use them. For information about selecting report formats and important information about generating the reports, see the Reports Button section. Report Overview Table Report Type Test Cases Standard Test Cases Spreadsheet Test Review Matrix Spreadsheet Test Cases Tabular Functional Variation List Tests per Functional Variation Description Standard test case output in Cause-Effect-Cause-Effect narrative This output produces a.xls spreadsheet showing only the exercised true and false states for each test This output produces a.xls spreadsheet showing all of the modeled true and false states, and which states are exercised for which tests Test cases script in strict tabular format Definition of each Functional Variation generated by the model Inventory of Effect nodes, which Functional Variations each effect plays a part, and which test cases they play a part in Cause Maps & Test Paths Test Data Specification Test Datasheet Test Cases Quality Center Test Cases Script File Node-by-node representation of literal test data values, per test case, supplied using the Test Prep feature Matrix of Test Cases to Data Variables for use in manual/automated test execution Custom test case output in spreadsheet form to be used with Quality Center. Created automated script files (XML, WinRunner, etc.) Page 70
71 Report Options A number of additional options are available for many reports in DTT. The list below provides all of the options and a brief summary of what it does. There is a matrix at the end of the Reports section that details what options are available for which reports. Override Report Title: This feature allows you to replace the default report title with a custom title. You must check the Override Report Title checkbox, and then type in the name you want to use for the test report. If, after changing the report title, you wish to change it back to its default value, double-click on the text box. This field is limited to 35 characters. Test List: This feature outputs a separate document listing only the test number and any test description input into the Test Prep matrix. Select Test Cases: This feature allows you to select the test cases you wish to include in the report by checking or unchecking the corresponding checkbox. Use the All or None buttons to select all test cases or clear all selections, respectively. Note: Clicking Run Reports without selecting at least one test case results in an error. Tab Descriptions: This option produces test cases that show text only from a specific tab (or tabs) within the Node Editor. You have the option to select which descriptions are contained in the Test Cases Standard report by checking one or more of the check boxes. Note: Only appears if more than one tab is enabled. Reference: For information on how to customize tab descriptions, see the Database Configuration Screen section. Node Names: This option allows you to add or remove a column in the report to display the node name associated with a cause or effect. Action Results: This option allows you to add or remove a column in the report where you can track the results of a given step. The column is filled with blank lines for each node in the test case where you can enter the status of the node to help track potential issues. Trace Points: This option allows you to add a section to each step in the report displaying the Trace Point associated with a given cause or effect if a Trace Point has been linked to the given node. Reference: See the Trace Points and Node Editor sections for adding and linking Trace Points within a model. Page 71
72 Datasheet Values: This option allows you to add a column to the report where data values for a given input node are displayed. Reference: See the Test Prep section for entering information into the datasheet. Include Blank Steps: This option allows you to include in the report any steps that are blank. Suppress Redundant Steps: Note: This option cannot be selected with Flag Redundant Steps or Show Context Once Flag Redundant Steps: Note: This option cannot be selected with Suppress Redundant Steps or Show Context Once Exclude Setup Steps: This option allows you to remove all nodes flagged as Setup from the report. Note: This option cannot be selected with Only Setup Steps. Only Setup Steps: This option allows you to create a report in which only nodes flagged as Setup are listed for each test case. Note: This option cannot be selected with Exclude Setup Steps. Show Context Steps Only Once: This option allows you to format the report so that all nodes flagged as Context appear at the beginning of the report, and are omitted from subsequent test cases. Note: This option cannot be selected with Flag Redundant Steps or Suppress Redundant Steps Page 72


73 Test Cases Standard Select the Test Cases Standard radio button and click the Run Report button to open a formatted report in the Test Cases Standard window. The Test Cases Standard format reads in a cause, effect, cause, effect sequence. Test Cases Standard Sample Shown below is a sample Test Cases Standard report. Test Cases Spreadsheet Test Cases Spreadsheet Sample Shown below is a sample Test Cases Spreadsheet report. Page 73
74 Test Review Matrix - Spreadsheet Test Review Matrix Spreadsheet Sample Shown below is a sample Test Review Matrix Spreadsheet report. Test Cases Tabular Select the Test Cases Tabular radio button and click the Run Report button to open a window to save the selected test cases as a.csv file. The available options for this report are: Select Test Cases, Test Case Descriptions, and Tab Descriptions. Test Cases Tabular Sample Shown below is a sample Test Cases - Tabular report. Page 74
75 Page 75

76 Functional Variation List Select the Functional Variation List radio button and click the Run Report button to open a formatted report in the Functional Variations window. The Functional Variation List displays each effect node and each functional variation for the causes that elicit the effect. Functional Variation List Sample Shown below is a sample Functional Variation List report. Tests per Functional Variation Select the Tests per Functional Variation radio button and click the Run Report button to open a formatted report in the Test Coverage window. The report details unique and total variations per test and effect node. Tests per Functional Variation Sample Shown below is a sample Tests per Functional Variation report. Page 76
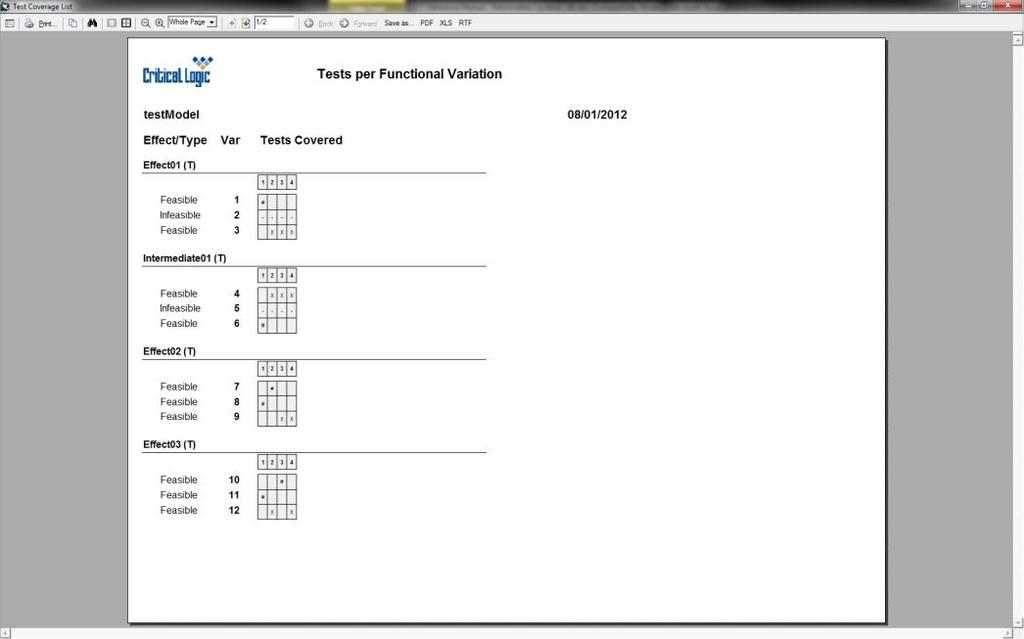
77 Page 77

78 Cause Maps & Test Paths Select the Cause Maps & Test Paths radio button and click the Run Report button to open a window to save the report as a.xls file. The report is over two tabs in a spreadsheet with one tab displaying each cause map and a unique identifier, and the second tab displays how the cause maps are exercised in each test case. Cause Maps & Test Paths Sample Shown below is a sample Cause Map tab of a Cause Maps & Test Paths report. Test Data Specification Select the Test Data Specification radio button and click the Run Report button to open a formatted report in the Test Data Specification by Node window. The report lists the true/false state descriptiosn entered for all nodes flagged as Input or Verify and includes the Attributes of Input nodes. Test Data Specification Sample Shown below is a sample Test Data Specification report. Page 78
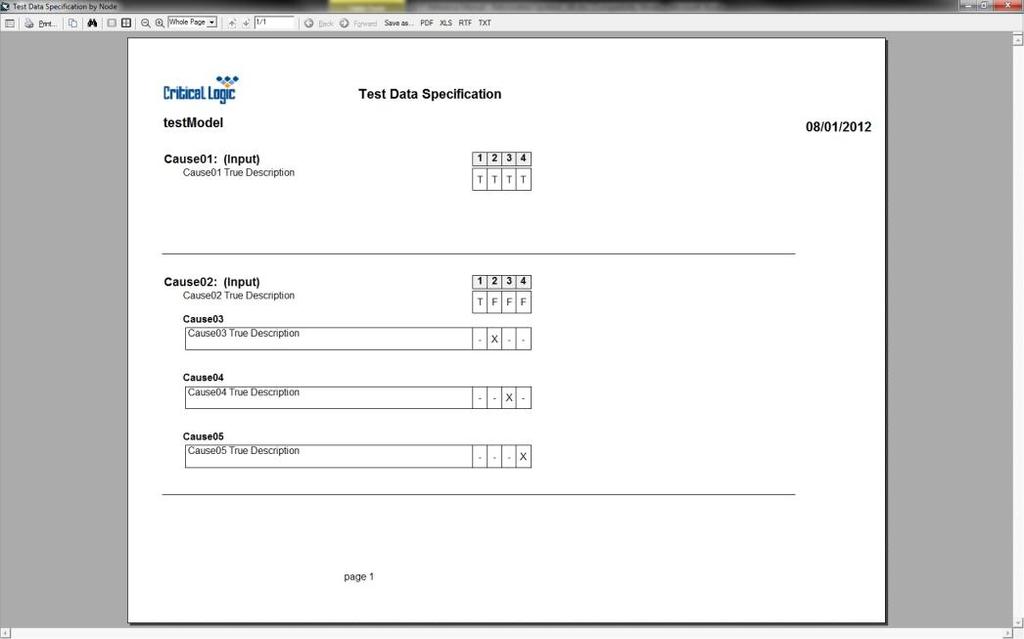
79 Page 79

80 Test Datasheet Select the Test Datasheet radio button and click the Run Report button to open a window to save the Test Case Prep information as a.xls file. Reference: See the Test Prep section for entering information into the datasheet. Test Datasheet Sample Shown below is an example of the Test Datasheet report. Test Cases Quality Center Select the Test Cases Quality Center radio button and click the Run Report button to open the Test Cases Quality Center window. You can export test cases in a Quality Center format from this window. Note: A macro may be required to format the report once you have exported it. Shown below is an example of the Test Cases Quality Center window. Page 80
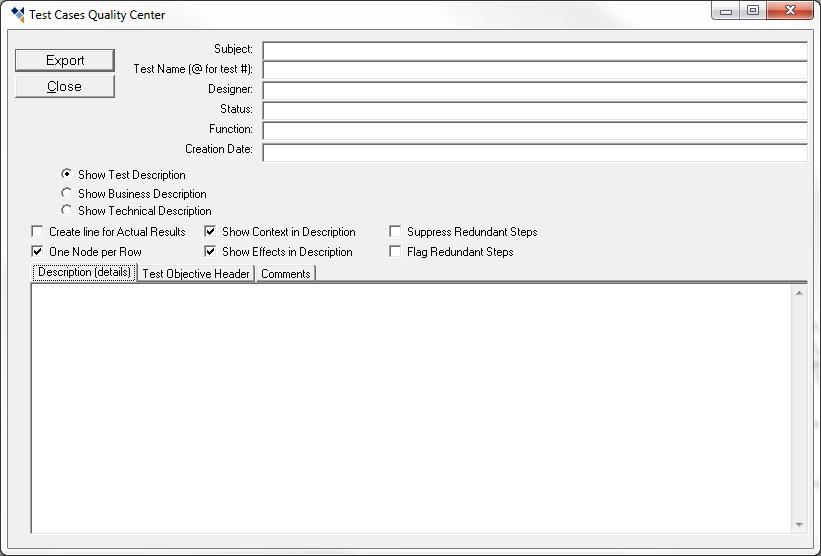
81 Page 81

82 Test Cases Quality Center Sample Shown below is a sample Test Cases Quality Center report. Test Cases Script File Select the Test Cases Script File radio button and click the Run Report button to open the Automation Script window. You can create automated script files (XMLs, WinRunner scripts, etc.) from this window. Shown below is an example of an Automation Script window. Page 82
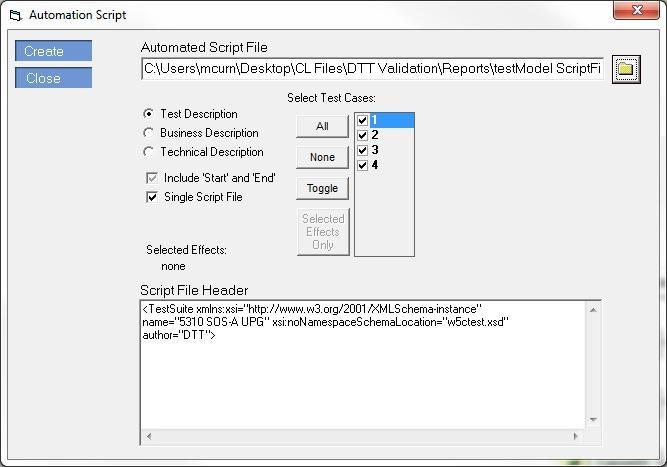
83 Page 83
Sourcing - How to Create a Negotiation
 Martin Baker Secure Source-To-Pay Sourcing - How to Create a Negotiation December 07 Contents To Create a Project... To Create a Negotiation... 5 Attachments... 7 Private File Archive... 7 Creating Lines,
Monitoring and Evaluation Tool
 Monitoring and Evaluation Tool USER MANUAL March, 2014 www.menarid.icarda.org THIS PAGE LEFT EMPTY INTENTIONALLY USER MANUAL Definitions and abbreviations Chart... Graphical representation of M&E project
User Guide. v7.5. September 4, For the most recent version of this document, visit kcura's Documentation Site.
 User Guide v7.5 September 4, 2013 For the most recent version of this document, visit kcura's Documentation Site. Table of Contents 1 User guide overview 4 2 Relativity objects 4 3 Workspace 6 3.1 Workspaces
Working with Mailbox Manager
 Working with Mailbox Manager A user guide for Mailbox Manager supporting the Message Storage Server component of the Avaya S3400 Message Server Mailbox Manager Version 5.0 February 2003 Copyright 2003
Parish . User Manual
 Parish Email User Manual Table of Contents LOGGING IN TO PARISH EMAIL... 3 GETTING STARTED... 3 GENERAL OVERVIEW OF THE USER INTERFACE... 3 TERMINATE THE SESSION... 4 EMAIL... 4 MESSAGES LIST... 4 Open
Technical White Paper
 Technical White Paper Via Excel (VXL) Item Templates This technical white paper is designed for Spitfire Project Management System users. In this paper, you will learn how to create Via Excel Item Templates
Managing Your Website with Convert Community. My MU Health and My MU Health Nursing
 Managing Your Website with Convert Community My MU Health and My MU Health Nursing Managing Your Website with Convert Community LOGGING IN... 4 LOG IN TO CONVERT COMMUNITY... 4 LOG OFF CORRECTLY... 4 GETTING
Copyright 2015 Integrated Environmental Solutions Limited. All rights reserved.
 Tabular Room Data User Guide IES Virtual Environment Copyright 2015 Integrated Environmental Solutions Limited. All rights reserved. No part of the manual is to be copied or reproduced in any form without
Administration. Training Guide. Infinite Visions Enterprise Edition phone toll free fax
 Administration Training Guide Infinite Visions Enterprise Edition 406.252.4357 phone 1.800.247.1161 toll free 406.252.7705 fax www.csavisions.com Copyright 2005 2011 Windsor Management Group, LLC Revised:
Specification Manager
 Enterprise Architect User Guide Series Specification Manager Author: Sparx Systems Date: 30/06/2017 Version: 1.0 CREATED WITH Table of Contents The Specification Manager 3 Specification Manager - Overview
S-Drive Lightning User Guide v2.1
 S-Drive Lightning User Guide v2.1 Important Note This user guide contains detailed information about S-Drive for Salesforce Lightning usage. Refer to the S-Drive User Guide for more information about S-Drive
GOBENCH IQ Release v
 GOBENCH IQ Release v1.2.3.3 2018-06-11 New Add-Ons / Features / Enhancements in GOBENCH IQ v1.2.3.3 GOBENCH IQ v1.2.3.3 contains several new features and enhancements ** New version of the comparison Excel
Oracle is a registered trademark of Oracle Corporation and/or its affiliates. Other names may be trademarks of their respective owners.
 Primavera Portfolio Management 9.0 What s New Copyright 1999-2011, Oracle and/or its affiliates. The Programs (which include both the software and documentation) contain proprietary information; they are
SmartJCForms User Guide
 SmartJCForms User Guide 6/18/2015 C O N T E N T S Part 1: Introduction and Getting Started... 4 Chapter 1 - Introduction SmartJCForms Overview... 5 System Requirements... 6 Installation... 6 Licensing...
Wholesale Lockbox User Guide
 Wholesale Lockbox User Guide August 2017 Copyright 2017 City National Bank City National Bank Member FDIC For Client Use Only Table of Contents Introduction... 3 Getting Started... 4 System Requirements...
IBM Rational Rhapsody Gateway Add On. User Guide
 User Guide Rhapsody IBM Rational Rhapsody Gateway Add On User Guide License Agreement No part of this publication may be reproduced, transmitted, stored in a retrieval system, nor translated into any
Calendar & Buttons Dashboard Menu Features My Profile My Favorites Watch List Adding a New Request...
 remitview User Guide 1 TABLE OF CONTENTS INTRODUCTION... 3 Calendar & Buttons... 3 GETTING STARTED.... 5 Dashboard.... 7 Menu Features... 8 PROFILE.... 10 My Profile... 10 My Favorites... 12 Watch List...
CRITERION Vantage 3 Admin Training Manual Contents Introduction 5
 CRITERION Vantage 3 Admin Training Manual Contents Introduction 5 Running Admin 6 Understanding the Admin Display 7 Using the System Viewer 11 Variables Characteristic Setup Window 19 Using the List Viewer
Investigator Site OC RDC PDF User Guide
 Investigator Site OC RDC PDF User Guide Version 1.0 Page 1 of 40 TABLE OF CONTENTS Accessing OC RDC Steps for Access 3 Logging On 4 Change Password 4 Laptop and System Security 5 Change Study 5 Navigating
Managing NDSR Projects
 Chapter 3 Managing NDSR Projects To enter data into NDSR, first create a project to organize the information in the form of records. Prior to creating a project, review your study protocol and methodology
17 - VARIABLES... 1 DOCUMENT AND CODE VARIABLES IN MAXQDA Document Variables Code Variables... 1
 17 - Variables Contents 17 - VARIABLES... 1 DOCUMENT AND CODE VARIABLES IN MAXQDA... 1 Document Variables... 1 Code Variables... 1 The List of document variables and the List of code variables... 1 Managing
ZENworks Reporting System Reference. January 2017
 ZENworks Reporting System Reference January 2017 Legal Notices For information about legal notices, trademarks, disclaimers, warranties, export and other use restrictions, U.S. Government rights, patent
HP ALM Overview. Exercise Outline. Administration and Customization Lab Guide
 HP ALM 11.00 Administration and Customization Lab Guide Overview This Lab Guide contains the exercises for Administration and Customization of HP ALM 11 Essentials training. The labs are designed to enhance
USING TMXWR & TMXWRX U PDATED
 USING TMXWR & TMXWRX U PDATED 8.30.06 CRITICAL LOGIC TRAINING & COMMUNICATIONS Using TMXwr & TMXwrx 2006 by Critical Logic, Inc. 851 Burlway Road, Suite 506, Burlingame, CA 94010 www.critical-logic.com
User Guide Product Design Version 1.7
 User Guide Product Design Version 1.7 1 INTRODUCTION 3 Guide 3 USING THE SYSTEM 4 Accessing the System 5 Logging In Using an Access Email 5 Normal Login 6 Resetting a Password 6 Logging Off 6 Home Page
IBM Rational Rhapsody Gateway Add On. User Manual
 User Manual Rhapsody IBM Rational Rhapsody Gateway Add On User Manual License Agreement No part of this publication may be reproduced, transmitted, stored in a retrieval system, nor translated into any
Objective 1: Familiarize yourself with basic database terms and definitions. Objective 2: Familiarize yourself with the Access environment.
 Beginning Access 2007 Objective 1: Familiarize yourself with basic database terms and definitions. What is a Database? A Database is simply defined as a collection of related groups of information. Things
Administrator Manual
 Administrator Manual CURA Technical Support Email: cura_support@mindscope.com Phone: 1.888.322.2362 x 55 Administrator Manual Page 1 Table of Contents The Setup Module... 3 Skills... 3 Adding or Modifying
BeAware Corporate Edition Admin Console. User Manual. BeAware Corporate Edition Admin Console Version 7.1. Ascentive LLC.
 User Manual BeAware Corporate Edition Admin Console Version 7.1 Ascentive LLC User Manual 1 Copyright Notice Copyright 2008 Ascentive LLC All Rights Reserved This document is protected by copyright law
BE Share. Microsoft Office SharePoint Server 2010 Basic Training Guide
 BE Share Microsoft Office SharePoint Server 2010 Basic Training Guide Site Contributor Table of Contents Table of Contents Connecting From Home... 2 Introduction to BE Share Sites... 3 Navigating SharePoint
FOUR SEASONS MARKETPLACE BUYER TRAINING
 FOUR SEASONS MARKETPLACE BUYER TRAINING Table Of Contents 1. INTRODUCTION... 2 2. LOGIN SCREEN... 3 3. FRONT PAGE... 5 3.1 LOGO PANEL... 6 3.2. SEARCH PANEL... 9 3.3 FRONT PAGE TABS... 10 3.4 CATALOGS
Getting Started with Penn State WikiSpaces
 Getting Started with Penn State WikiSpaces About Penn State WikiSpaces Penn State WikiSpaces is a platform intended to support Penn State-associated collaboration. Wikis are websites that allow for the
FDM RMS User Guide. Basic Navigation & Use
 FDM RMS User Guide Basic Navigation & Use Revised: May 31, 2016 Contents Contents... 1 Administrator Contacts... 3 Introduction... 3 Overview... 3 1 Logging In... 4 1.1 Log in to Citrix... 4 1.1.1 Change
OU EDUCATE TRAINING MANUAL
 OU EDUCATE TRAINING MANUAL OmniUpdate Web Content Management System El Camino College Staff Development 310-660-3868 Course Topics: Section 1: OU Educate Overview and Login Section 2: The OmniUpdate Interface
EXCEL Using Excel for Data Query & Management. Information Technology. MS Office Excel 2007 Users Guide. IT Training & Development
 Information Technology MS Office Excel 2007 Users Guide EXCEL 2007 Using Excel for Data Query & Management IT Training & Development (818) 677-1700 Training@csun.edu TABLE OF CONTENTS Introduction... 1
NETWORK PRINT MONITOR User Guide
 NETWORK PRINT MONITOR User Guide Legal Notes Unauthorized reproduction of all or part of this guide is prohibited. The information in this guide is subject to change for improvement without notice. We
AGENT123. Full Q&A and Tutorials Table of Contents. Website IDX Agent Gallery Step-by-Step Tutorials
 AGENT123 Full Q&A and Tutorials Table of Contents Website IDX Agent Gallery Step-by-Step Tutorials WEBSITE General 1. How do I log into my website? 2. How do I change the Meta Tags on my website? 3. How
Gradebook Entering, Sorting, and Filtering Student Scores March 10, 2017
 Gradebook Entering, Sorting, and Filtering Student Scores March 10, 2017 1. Entering Student Scores 2. Exclude Student from Assignment 3. Missing Assignments 4. Scores by Class 5. Sorting 6. Show Filters
Griffin Training Manual Grif-WebI Introduction (For Analysts)
") Griffin Training Manual Grif-WebI Introduction (For Analysts) Alumni Relations and Development The University of Chicago Table of Contents Chapter 1: Defining WebIntelligence... 1 Chapter 2: Working with
Griffin Training Manual Grif-WebI Introduction (For Analysts) Alumni Relations and Development The University of Chicago Table of Contents Chapter 1: Defining WebIntelligence... 1 Chapter 2: Working with
IP4 - Running reports
 To assist with tracking and monitoring HRIS recruitment and personnel, reports can be run from Discoverer Plus. This guide covers the following process steps: Logging in... 2 What s changed? Changed reference
Login: Quick Guide for Qualtrics May 2018 Training:
 Qualtrics Basics Creating a New Qualtrics Account Note: Anyone with a Purdue career account can create a Qualtrics account. 1. In a Web browser, navigate to purdue.qualtrics.com. 2. Enter your Purdue Career
Visual Workflow Implementation Guide
 Version 30.0: Spring 14 Visual Workflow Implementation Guide Note: Any unreleased services or features referenced in this or other press releases or public statements are not currently available and may
Grapevine web hosting user manual. 12 August 2005
 Grapevine web hosting user manual 12 August 2005 Grapevine web hosting user manual 2 Contents Contents... 2 Introduction... 4 System features... 4 How it looks... 5 Main navigation... 5 Reports... 6 Web
A dialog box will appear informing you that you will need to restart Enterprise to see the Calendar changes. Click Ok and then restart Enterprise.
 The tax Calendar in Premium Pro Enterprise includes due dates for annual, estimate, and monthly premium tax returns, due dates for various additional insurance related filings, and due dates for local
SURVEYOR/400. Users Guide. Copyright , LINOMA SOFTWARE LINOMA SOFTWARE is a division of LINOMA GROUP, Inc.
 SURVEYOR/400 Users Guide Copyright 1996-2013, LINOMA SOFTWARE LINOMA SOFTWARE is a division of LINOMA GROUP, Inc. Surveyor/400 version: 4.0.0 Publication date: August 7 th, 2013 Table of Contents SURVEYOR/400
RELEASE NOTES. Version NEW FEATURES AND IMPROVEMENTS
 S AND S Implementation of the Google Adwords connection type Implementation of the NetSuite connection type Improvements to the Monarch Swarm Library Column sorting and enhanced searching Classic trapping
Creating Interactive PDF Forms
 Creating Interactive PDF Forms Using Adobe Acrobat X Pro for the Mac University Information Technology Services Training, Outreach, Learning Technologies and Video Production Copyright 2012 KSU Department
User's Guide c-treeace SQL Explorer
 User's Guide c-treeace SQL Explorer Contents 1. c-treeace SQL Explorer... 4 1.1 Database Operations... 5 Add Existing Database... 6 Change Database... 7 Create User... 7 New Database... 8 Refresh... 8
Scorebook Navigator. Stage 1 Independent Review User Manual Version
 Scorebook Navigator Stage 1 Independent Review User Manual Version 11.2013 TABLE OF CONTENTS Getting Started... 1 Browser Requirements... 1 Scorebook Navigator Browser Compatability... 1 Logging in...
vbound User Guide vbound User Guide Version Revised: 10/10/2017
 vbound User Guide Version 4.1.1 Revised: 10/10/2017 Copyright 2014-2017 FFL Solutions Inc. Page 1 of 87 Table of Contents Using vbound...5 Starting vbound... 5 Bound Book List... 6 vbound Ribbon Menu...
TRAINING GUIDE. Web App End User Training
 TRAINING GUIDE Web App End User Training Web Application End-User Training In this booklet, we will introduce you to the Lucity Web application. The Web system allows you to utilize customized views, forms,
BasicScript 2.25 User s Guide. May 29, 1996
 BasicScript 2.25 User s Guide May 29, 1996 Information in this document is subject to change without notice. No part of this document may be reproduced or transmitted in any form or by any means, electronic
Adobe Acrobat Pro DC for Windows
 Adobe Acrobat Pro DC for Windows Creating Interactive PDF Forms University Information Technology Services Learning Technologies, Training & Audiovisual Outreach Copyright 2017 KSU Division of University
USER GUIDE. Forms & Surveys. Schoolwires Centricity
 USER GUIDE Schoolwires Centricity TABLE OF CONTENTS Introduction... 1 Audience and Objectives... 1 Major Components of a Form or Survey... 2 Overview... 2 Manage... 3 New Forms/Surveys... 3 Item Libraries...
My MessageMedia User Guide
 My MessageMedia User Guide Copyright and Trademark Statement 2011 MessageMedia All rights reserved. Apart from any use permitted under the Copyright Act 1968, no part of this publication may be reproduced,
Working with PDF s. To open a recent file on the Start screen, double click on the file name.
 Working with PDF s Acrobat DC Start Screen (Home Tab) When Acrobat opens, the Acrobat Start screen (Home Tab) populates displaying a list of recently opened files. The search feature on the top of the
StarTeam File Compare/Merge StarTeam File Compare/Merge Help
 StarTeam File Compare/Merge 12.0 StarTeam File Compare/Merge Help Micro Focus 575 Anton Blvd., Suite 510 Costa Mesa, CA 92626 Copyright 2011 Micro Focus IP Development Limited. All Rights Reserved. Portions
USER MANUAL. Calendar 365 TABLE OF CONTENTS. Version: 4.0
 USER MANUAL TABLE OF CONTENTS Introduction... 1 Benefits of Calendar 365... 1 Pre-requisites... 2 Installation... 2 Installation Steps... 2 Configuration Steps... 5 Calendar Management... 19 Calendar Activities...
Excel Tables & PivotTables
 Excel Tables & PivotTables A PivotTable is a tool that is used to summarize and reorganize data from an Excel spreadsheet. PivotTables are very useful where there is a lot of data that to analyze. PivotTables
CORPORATE ACCOUNT RECONCILIATION. SAM2CAR: Key Functions Manual for Program Administrators
 CORPORATE ACCOUNT RECONCILIATION SAM CAR SAM2CAR: Key Functions Manual for Program Administrators May 2012 2 How to Use This Manual This manual is designed to serve as a reference guide to help you perform
PC-Kits USER GUIDE. SOFTWARE SUPPORT Monday - Friday 8:00am - 4:00pm Pacific Time
 PC-Kits USER GUIDE SOFTWARE SUPPORT Monday - Friday 8:00am - 4:00pm Pacific Time 1-800-356-0709 Copyright Visual Health Information. All rights reserved. CONTENTS STARTING VHI PC-KITS... 1 ACTIVATING VHI
BASIC USER TRAINING PROGRAM Module 5: Test Case Development
 BASIC USER TRAINING PROGRAM Module 5: Test Case Development Objective Student will have an understanding of how to create, edit and execute a Test Case from Develop a Test Case Activity Page. Student will
Tabular Building Template Manager (BTM)
") Tabular Building Template Manager (BTM) User Guide IES Vi rtual Environment Copyright 2015 Integrated Environmental Solutions Limited. All rights reserved. No part of the manual is to be copied or reproduced
Tabular Building Template Manager (BTM) User Guide IES Vi rtual Environment Copyright 2015 Integrated Environmental Solutions Limited. All rights reserved. No part of the manual is to be copied or reproduced
Creating a Website in Schoolwires
 Creating a Website in Schoolwires Overview and Terminology... 2 Logging into Schoolwires... 2 Changing a password... 2 Navigating to an assigned section... 2 Accessing Site Manager... 2 Section Workspace
DocAve Content Shield v2.2 for SharePoint
 DocAve Content Shield v2.2 for SharePoint User Guide For SharePoint 2007 Revision A Issued August 2012 1 Table of Contents Table of Contents... 2 About DocAve Content Shield for SharePoint... 4 Complementary
Open. Select the database and click. Print. Set printing options using the dropdown menus, then click the
 The Original Quick Reference Guides Microsoft Access 2010 Access is a tool for creating and managing databases collections of related records structured in an easily accessible format such as a table,
Administrative Training Mura CMS Version 5.6
 Administrative Training Mura CMS Version 5.6 Published: March 9, 2012 Table of Contents Mura CMS Overview! 6 Dashboard!... 6 Site Manager!... 6 Drafts!... 6 Components!... 6 Categories!... 6 Content Collections:
Learn how to login to Sitefinity and what possible errors you can get if you do not have proper permissions.
 USER GUIDE This guide is intended for users of all levels of expertise. The guide describes in detail Sitefinity user interface - from logging to completing a project. Use it to learn how to create pages
Microsoft Windows SharePoint Services
 Microsoft Windows SharePoint Services SITE ADMIN USER TRAINING 1 Introduction What is Microsoft Windows SharePoint Services? Windows SharePoint Services (referred to generically as SharePoint) is a tool
Home Health Assessment Validation and Entry System (jhaven) User Guide
 User Guide") Home Health Assessment Validation and Entry System (jhaven) User Guide In Support of Software Version 1.0 January 01, 2015 Last updated: 12/12/2014 Table of Contents NAVIGATION TIP: To navigate directly
Home Health Assessment Validation and Entry System (jhaven) User Guide In Support of Software Version 1.0 January 01, 2015 Last updated: 12/12/2014 Table of Contents NAVIGATION TIP: To navigate directly
Importing and Exporting Data
 14 Importing and Exporting Data SKILL SUMMARY Skills Exam Objective Objective Number Importing Data Import data into tables. Append records from external data. Import tables from other databases. Create
SchoolDesk University
 SchoolDesk University Forms, Surveys, and Polls Module 101 Guided Walk-through for the basic fields, terminology, and location of tools. What is the NEW SD7 Forms Module? The NEW SchoolDesk Forms Module,
CASH MANAGEMENT HOW-TO
 Vision Municipal Solutions CASH MANAGEMENT How-To Guide Contents Set-Up... 4 Changing Your Default Period... 4 How to Change Your Default Period... 4 Payment Centers... 4 Adding a Payment Center... 4 Drawers...
LIMS QUICK START GUIDE. A Multi Step Guide to Assist in the Construction of a LIMS Database. Rev 1.22
 LIMS QUICK START GUIDE A Multi Step Guide to Assist in the Construction of a LIMS Database Rev 1.22 Contents Contents...1 Overview - Creating a LIMS Database...2 1.0 Folders...3 2.0 Data Fields...3 2.1
The PeopleSoft Financials System
 The PeopleSoft Financials System 2 Introduction...................... 14 Signing In and Out.................... 14 Signing In to the System.............. 14 Signing Out................... 17 Navigation
BackupVault Desktop & Laptop Edition. USER MANUAL For Microsoft Windows
 BackupVault Desktop & Laptop Edition USER MANUAL For Microsoft Windows Copyright Notice & Proprietary Information Blueraq Networks Ltd, 2017. All rights reserved. Trademarks - Microsoft, Windows, Microsoft
Useful Google Apps for Teaching and Learning
 Useful Google Apps for Teaching and Learning Centre for Development of Teaching and Learning (CDTL) National University of Singapore email: edtech@groups.nus.edu.sg Table of Contents About the Workshop...
Chapter 2 Autodesk Asset Locator... 3
 Contents Chapter 2 Autodesk Asset Locator....................... 3 Supported Operating Systems....................... 3 Installing Autodesk Asset Locator..................... 4 Define a Search...............................
Survey Creation Workflow These are the high level steps that are followed to successfully create and deploy a new survey:
 Overview of Survey Administration The first thing you see when you open up your browser to the Ultimate Survey Software is the Login Page. You will find that you see three icons at the top of the page,
[ Getting Started with Analyzer, Interactive Reports, and Dashboards ] ]
![[ Getting Started with Analyzer, Interactive Reports, and Dashboards ] ]](/thumbs/88/117545107.jpg "[ Getting Started with Analyzer, Interactive Reports, and Dashboards ] ]") Version 5.3 [ Getting Started with Analyzer, Interactive Reports, and Dashboards ] ] https://help.pentaho.com/draft_content/version_5.3 1/30 Copyright Page This document supports Pentaho Business Analytics
Version 5.3 [ Getting Started with Analyzer, Interactive Reports, and Dashboards ] ] https://help.pentaho.com/draft_content/version_5.3 1/30 Copyright Page This document supports Pentaho Business Analytics
KMnet Viewer. User Guide
 KMnet Viewer User Guide Legal Notes Unauthorized reproduction of all or part of this guide is prohibited. The information in this guide is subject to change for improvement without notice. We cannot be
ScholarOne Abstracts. Review Administrator Guide
 ScholarOne Abstracts Review Administrator Guide 17-October-2018 Clarivate Analytics ScholarOne Abstracts Review Administrator Guide Page i TABLE OF CONTENTS Select an item in the table of contents to go
SQL Server. Management Studio. Chapter 3. In This Chapter. Management Studio. c Introduction to SQL Server
 Chapter 3 SQL Server Management Studio In This Chapter c Introduction to SQL Server Management Studio c Using SQL Server Management Studio with the Database Engine c Authoring Activities Using SQL Server
OpenForms360 Validation User Guide Notable Solutions Inc.
 OpenForms360 Validation User Guide 2011 Notable Solutions Inc. 1 T A B L E O F C O N T EN T S Introduction...5 What is OpenForms360 Validation?... 5 Using OpenForms360 Validation... 5 Features at a glance...
Introduction to Qualtrics ITSC
 Introduction to Qualtrics ITSC August 2015 Contents A. General Information... 4 B. Login... 5 New Qualtrics User... 5 Existing Qualtrics User... 7 C. Navigating Qualtrics... 9 D. Create Survey... 10 Quick
HOW TO USE THE CONTENT MANAGEMENT SYSTEM (CMS) TABLE OF CONTENTS
 TABLE OF CONTENTS") HOW TO USE THE CONTENT MANAGEMENT SYSTEM (CMS) TABLE OF CONTENTS GETTING STARTED (LOGIN) 2 SITE MAP (ORGANIZE WEBPAGES) 2 CREATE NEW PAGE 3 REMOVE PAGE 6 SORT PAGES IN CHANNEL 7 MOVE PAGE 8 PAGE PROPERTIES
HOW TO USE THE CONTENT MANAGEMENT SYSTEM (CMS) TABLE OF CONTENTS GETTING STARTED (LOGIN) 2 SITE MAP (ORGANIZE WEBPAGES) 2 CREATE NEW PAGE 3 REMOVE PAGE 6 SORT PAGES IN CHANNEL 7 MOVE PAGE 8 PAGE PROPERTIES
Server Edition USER MANUAL. For Microsoft Windows
 Server Edition USER MANUAL For Microsoft Windows Copyright Notice & Proprietary Information Redstor Limited, 2016. All rights reserved. Trademarks - Microsoft, Windows, Microsoft Windows, Microsoft Windows
Intro to Excel. To start a new workbook, click on the Blank workbook icon in the middle of the screen.
 Excel is a spreadsheet application that allows for the storing, organizing and manipulation of data that is entered into it. Excel has variety of built in tools that allow users to perform both simple
OU Campus VERSION 10
 OU Campus VERSION 10 End User Manual Last Update: 9/8/2015 Contact Tish Sailer with comments or questions regarding this Manual. Contents INTRODUCTION...3 HELP DOCUMENTS AND SUPPORT... 3 ACCESSING PAGES
DSS User Guide. End User Guide. - i -
 DSS User Guide End User Guide - i - DSS User Guide Table of Contents End User Guide... 1 Table of Contents... 2 Part 1: Getting Started... 1 How to Log in to the Web Portal... 1 How to Manage Account Settings...
migration from iq.suite Store to contentaccess
 Email migration from iq.suite Store to contentaccess MAY 2, 2016 TECH-ARROW a.s. KAZANSKÁ 5, 821 06 BRATISLAVA, SLOVAKIA All Rights Reserved Table of Contents 1 Introduction... 2 2 Source and target environment...
VERSION ASSET TRACKING SYSTEM USER MANUAL STARTER EDITION
 VERSION 4.20.3 ASSET TRACKING SYSTEM USER MANUAL STARTER EDITION ATS USER MANUAL- STARTER EDITION TABLE OF CONTENTS ATS User Manual- Starter Edition... 2 Table of Contents... 2 Quick Start Overview...
Legal Notes. Regarding Trademarks KYOCERA MITA Corporation
 Legal Notes Unauthorized reproduction of all or part of this guide is prohibited. The information in this guide is subject to change without notice. We cannot be held liable for any problems arising from
FileLoader for SharePoint
 Administrator s Guide FileLoader for SharePoint v. 2.0 Last Updated 6 September 2012 Contents Preface 3 FileLoader Users... 3 Getting Started with FileLoader 4 Configuring Connections to SharePoint 8
User Manual. perfectionlearning.com/technical-support
 User Manual perfectionlearning.com/technical-support 1 User Manual Accessing Math X... 3 Login... 3 Forgotten Password... 3 Navigation Menu... 4 Logout... 4 Admin... 5 Creating Classes and Students...
WORKFLOW MANAGER RELEASE NOTES NEW FEATURES * OPEN ISSUES * ADDRESSED ISSUES RELEASE DATE: MAY 17, 2013 CS.THOMSONREUTERS.COM
 WORKFLOW MANAGER RELEASE NOTES NEW FEATURES * OPEN ISSUES * ADDRESSED ISSUES RELEASE DATE: MAY 17, 2013 CS.THOMSONREUTERS.COM Proprietary Materials No use of these Proprietary materials is permitted without
R EIN V E N TIN G B U S I N E S S I L E M A. MARK5 Basic guide. - All rights reserved
 R EIN V E N TIN G B U S I N E S S I L E M A MARK5 Basic guide 0.0 Welcome In this brief guide we will cover the basics of MARK5 such as starting up, understanding the MARK5 interface basics and sending
The Electronic Voting System - EVS
 The Electronic Voting System - EVS The electronic voting system is based on the MSU surveys application. Its primary purpose is to allow the MSU community to vote on a variety of issues, membership or
Administrator Quick Guide
 1 Administrator Quick Guide Login Screen The first page employees will see when visiting their training site is the login screen. This is where employees must enter their username and password to access
ZENworks Reporting Beta System Reference. December 2015
 ZENworks Reporting Beta System Reference December 2015 Legal Notices Novell, Inc. makes no representations or warranties with respect to the contents or use of this documentation, and specifically disclaims