Click on Add a layer style icon from bottom part of the Layers panel and select Gradient Overlay.
|
|
|
- Oswin Craig
- 6 years ago
- Views:
Transcription
1 Three Ornaments Start working by creating a new document (Ctrl+N) in Adobe Photoshop with the size 1280px by 1024px (RGB color mode) at a resolution of 72 pixels/inch. Take now the Rectangle Tool (U) and draw a rectangle on the whole canvas. Click on Add a layer style icon from bottom part of the Layers panel and select Gradient Overlay.
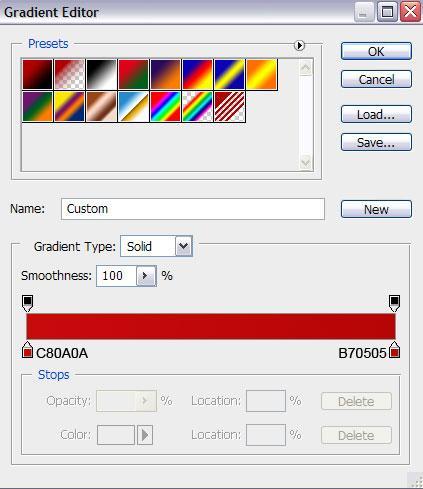
2 Click in the color bar to open the Gradient Editor and set the color stops as shown. Click OK to close the Gradient Editor dialog box.
3 We ve got the next background:
4 Next represent a kind of plane on the bottom part of the background, applying the same tool.

5 Set Fill to 0% for this layer and click on Add a layer style icon from bottom part of the Layers panel, select Inner Glow.

6 We ve got the next result:
7 Choose the Pen Tool (P), set the drawing mode on Shape Layers in Options bar and draw the next shape as shown.
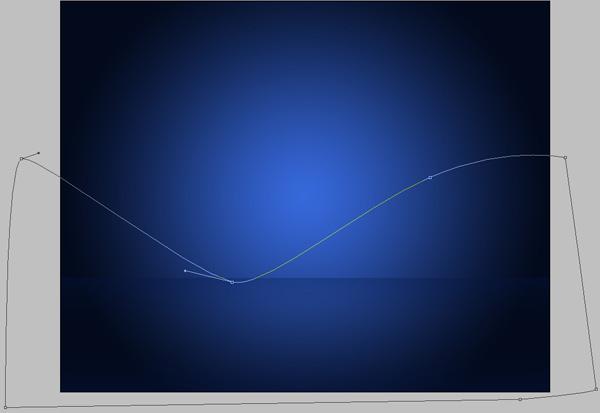
8

9 Set Fill to 0% for this layer and click on Add a layer style icon from bottom part of the Layers panel, select Stroke. Select Fill Type Gradient, click in the color bar to open the Gradient Editor and set the color stops as shown. Click OK to close the Gradient Editor dialog box.

10 We ve got the next ribbon:
11 Create one more shape, applying the previous tools (Pen Tool (P)).
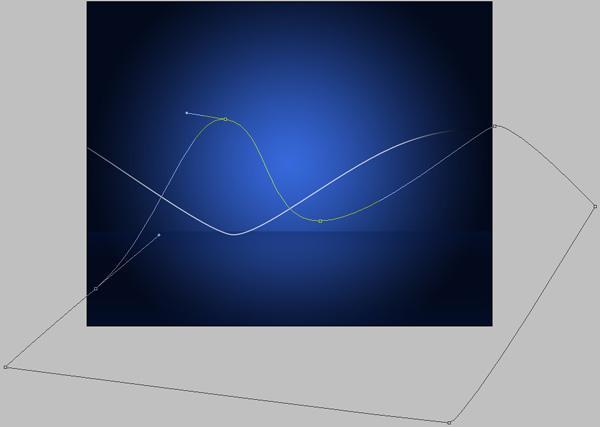
12

13 Set Fill to 0% for this layer and click on Add a layer style icon from bottom part of the Layers panel, select Stroke. Select Fill Type Gradient, click in the color bar to open the Gradient Editor and set the color stops as shown. Click OK to close the Gradient Editor dialog box.

14 We ve got the next result:
15 Use the Ellipse Tool (U) to draw the next ellipse as shown.

16 Click on Add a layer style icon from bottom part of the Layers panel and select Inner Shadow.

17 Apply Gradient Overlay
18 Click in the color bar to open the Gradient Editor and set the color stops as shown. Click OK to close the Gradient Editor dialog box.
19 We ve got the next result:

20 Using the same instrument, represent the next ellipse with #4472FC color.
21 Represent the next layer of the tree toy. For the beginning select the Ellipse Tool (U) and draw the next ellipse.

22 Use then the Convert Point Tool to change the shape as shown. The layer has the color

23 # Applying the described above method, try to represent another shape on the toy.

24 Set Fill to 0% for this layer and click on Add a layer style icon from bottom part of the Layers panel, select Inner Shadow.

25 Apply Gradient Overlay :

26 Click in the color bar to open the Gradient Editor and set the color stops as shown. Click OK to close the Gradient Editor dialog box.

27 We ve got the next result:

28 Using the Pen Tool (P), it s possible to draw the shadow on the right. Choose the color #152C8A.
29 Next represent the ball s support, applying the Rectangle Tool (U) draw the next rectangle, the color is #08258D.

30 Select again the Pen Tool (P) to draw the next element of the ball s support.

31

32 Set Fill to 0% for this layer and click on Add a layer style icon from bottom part of the Layers panel, select Drop Shadow. Apply Gradient Overlay :
33 Click in the color bar to open the Gradient Editor and set the color stops as shown. Click OK to close the Gradient Editor dialog box.

34 We ve got the next result:

35 Next we ll create the ring on the ball s support. Use the Ellipse Tool (U) to draw the next ellipse. The shape may be corrected with the Convert Point Tool. This new made layer must be situated under the previous layer on the Layers panel.

36 Set Fill to 0% for this layer and click on Add a layer style icon from bottom part of the Layers panel, select Drop Shadow.
37 Add Stroke:
38 Select Fill Type Gradient, click in the color bar to open the Gradient Editor and set the color stops as shown. Click OK to close the Gradient Editor dialog box.

39 We ve got the next result:

40
41 Combine in a group all the layers composing the Christmas ball (press CTRL button to select the necessary layers and hold on the left mouse s button while dragging the selected layers on Create a new group icon from bottom part of the Layers panel). Make two copies of the represented group and then select Free Transform (Ctrl+T) command to change the copies sizes, placing them under the layers belonging to the blue ball.

42 Change the Layer Styles for the copied layers to get a red and green nuance for the copies. The settings for the red ball. The primary layer: Inner Shadow:
43 Gradient Overlay :

44 Click in the color bar to open the Gradient Editor and set the color stops as shown. Click OK to close the Gradient Editor dialog box.
45
46 The next layer has the color #DA1818:
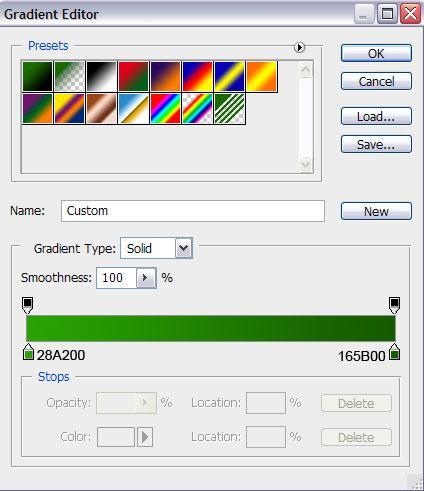
47 Next layer has the color #AF0102: Next we have to change the settings for the top part of the ball: set Fill to 0% and change the settings for Inner Shadow:
48 Settings for Gradient Overlay :

49 Click in the color bar to open the Gradient Editor and set the color stops as shown. Click OK to close the Gradient Editor dialog box.
50

51 This is the color of the lateral shadow #AE0001:
52 The color of the ball s support is #AC0500:
53 Next we ll change the settings for the green ball. The primary layer: Inner Shadow: Settings for Gradient Overlay

54 Click in the color bar to open the Gradient Editor and set the color stops as shown. Click OK to close the Gradient Editor dialog box.
55

56 The next layer has the color #2CAB02:

57 Next layer has the color #1B6802:
58 The Layer Styles for the top layer. SetFill to 0% and settings for Inner Shadow: Settings for Gradient Overlay :

59 Click in the color bar to open the Gradient Editor and set the color stops as shown. Click OK to close the Gradient Editor dialog box.
60

61 The color of the upper shadow on the right top is #124B00:
62 We ve got the next result: Make a copy of each ball s group. Merge Down into a single layer by pressing Ctrl+E. Do this operation with each copy. The copies may be turned over with the Free Transform (Ctrl+T) command, changing the sizes, as it is represented on the next picture. This way we ll get a reflection.
63 Insert the mask on each layer containing the reflection by choosing Add layer mask on the bottom part of the Layers panel. Take the Gradient Tool (G) and open the Gradient Editor from Options Bar. Choose the Foreground to Transparent gradient and apply the gradient from the bottom to top.
64 We ve got the next result: Use the Ellipse Tool (U), try to make three similar layers for shadows and after that place them under the balls layers. The color is white.
65

66 Set Fill to 20% for layers containing the shadows. Create a new layer, select Airbrush Soft Round brush from Brush Tool (B).

67 Use this brush to insert several white dots of different sizes, placed around the ribbons. Finished!
Today, I m going to show you how use custom shapes and Layer styles in Photoshop CS3 to create a creative Christmas illustration. Let s get started!
 Today, I m going to show you how use custom shapes and Layer styles in Photoshop CS3 to create a creative Christmas illustration. Let s get started! Final Image Preview Start working by creating a new
Christmas Card Final Image Preview Coach Christian s Example Ctrl+N 1920px 1200px RGB 72 pixels/inch Rectangle Tool (U)
") Christmas Card In this tutorial, you ll learn how a Christmas card can be designed with Photoshop. You will learn how to create Christmas ball, draw snowflakes, customize brushes etc. Let s get started!
Christmas Card In this tutorial, you ll learn how a Christmas card can be designed with Photoshop. You will learn how to create Christmas ball, draw snowflakes, customize brushes etc. Let s get started!
Graffiti Wallpaper Photoshop Tutorial
 Graffiti Wallpaper Photoshop Tutorial Adapted from http://photoshoptutorials.ws/photoshop-tutorials/drawing/create-your-own-graffiti-wallpaper-inphotoshop.html Step 1 - Create a New Document Choose File
Note: Photoshop tutorial is spread over two pages. Click on 2 (top or bottom) to go to the second page.
 to go to the second page.") Introduction During the course of this Photoshop tutorial we're going through 9 major steps to create a glass ball. The main goal of this tutorial is that you get an idea how to approach this. It's not
Introduction During the course of this Photoshop tutorial we're going through 9 major steps to create a glass ball. The main goal of this tutorial is that you get an idea how to approach this. It's not
Word 2007: Flowcharts Learning guide
 Word 2007: Flowcharts Learning guide How can I use a flowchart? As you plan a project or consider a new procedure in your department, a good diagram can help you determine whether the project or procedure
Using Masks for Illustration Effects
 These instructions were written for Photoshop CS4 but things should work the same or similarly in most recent versions Photoshop. 1. To download the files you ll use in this exercise please visit: http:///goodies.html
2. Drag and drop the cloud image onto your desktop to be used later in the tutorial.
 Do the following tutorial. You will use the Earth Map image and Photo image below. 1. Copy the Earth Map image and paste it into photoshop. Open photoshop. Go to menu/file/new. Name it lastname-earth.
Pen Tool, Fill Layers, Color Range, Levels Adjustments, Magic Wand tool, and shadowing techniques
 Creating a superhero using the pen tool Topics covered: Pen Tool, Fill Layers, Color Range, Levels Adjustments, Magic Wand tool, and shadowing techniques Getting Started 1. Reset your work environment
Quick Guide for Photoshop CC Basics April 2016 Training:
 Photoshop CC Basics Creating a New File 1. Click File > New 2. Keep Default Photoshop Size selected in the Preset drop-down list. 3. Click OK. Showing Rulers 1. On the Menu bar, click View. 2. Click Rulers.
Adobe Illustrator CS5 Part 2: Vector Graphic Effects
 CALIFORNIA STATE UNIVERSITY, LOS ANGELES INFORMATION TECHNOLOGY SERVICES Adobe Illustrator CS5 Part 2: Vector Graphic Effects Summer 2011, Version 1.0 Table of Contents Introduction...2 Downloading the
ADOBE PHOTOSHOP Using Masks for Illustration Effects
 ADOBE PHOTOSHOP Using Masks for Illustration Effects PS PREVIEW OVERVIEW In this exercise, you ll see a more illustrative use of Photoshop. You ll combine existing photos with digital art created from
The original image. Let s get started! The final result.
 Vertical Photo Panels Effect In this Photoshop tutorial, we ll learn how to create the illusion that a single photo is being displayed as a series of vertical panels. It may look complicated, but as we
Binder Part Two: Creating the Binder Rings
 Binder Part Two: Creating the Binder Rings Digi Scrap Tutorial by Nannette Dalton on January 22, 2013 Time to learn how to add the binding to those perfect row of holes that we created last week. (Binder
GIMP WEB 2.0 ICONS. Web 2.0 Icons: Circle Completed Project. Notice that the default new layer background fill is transparency. Click the Ok button.
 GIMP WEB 2.0 ICONS WEB 2.0 ICONS: CIRCLE ICON OPEN GIMP or Web 2.0 Icons: Circle Completed Project Step 1: To begin a new GIMP project, from the Menu Bar, select File New. At the Create a New Image dialog
Tip: Shift/Control/Alt- will reset entire Photoshop program in case someone has changed settings.
 Adobe Photoshop CS2 Class 1 Tip: Shift/Control/Alt- will reset entire Photoshop program in case someone has changed settings. Create New File: 1. Click on File/New 2. Choose setting below Resolution: Higher
Adobe photoshop Using Masks for Illustration Effects
 Adobe photoshop Using Masks for Illustration Effects PS Preview Overview In this exercise you ll see a more illustrative use of Photoshop. You ll combine existing photos with digital art created from scratch
Text Tricks Text # 1 Fill Text with an image
 Text Tricks Text # 1 Fill Text with an image (save as Image_Text_1.jpg) Make sure that the picture is bigger than the text. Open the image you want to put in the text. Click on CTRL+A to select it all.
Worn And Torn Text In Photoshop
 Worn And Torn Text In Photoshop Written by Steve Patterson. In this Photoshop text effects tutorial, we re going to learn how to create a worn and torn effect with our text. Here s the effect we re going
The Background layer now filled with black.
 GOLD PLATED TEXT In this Photoshop text effects tutorial, we re going to learn how to turn text into gold using Photoshop s Layer Styles. We ll even throw in some sparkles at the end to make our gold letters
Do Now # 1 Label the Photoshop Interface.
 Class Warmup AVTECH Do Now # 1 Label the Photoshop Interface. The Menu Bar The Options Panel The Canvas The Navigator Panel The History Panel Button The Workspace Button The Tool Bar The Layers Panel The
9 Using Appearance Attributes, Styles, and Effects
 9 Using Appearance Attributes, Styles, and Effects You can alter the look of an object without changing its structure using appearance attributes fills, strokes, effects, transparency, blending modes,
GIMP WEB 2.0 BADGES. GIMP is all about IT (Images and Text) OPEN GIMP
 OPEN GIMP") GIMP WEB 2.0 BADGES and Badges: Circle with Flap Completed Project WEB 2.0 BADGES: CIRCLE WITH FLAP GIMP is all about IT (Images and Text) OPEN GIMP Step 1: To begin a new GIMP project, from the Menu Bar,
GIMP WEB 2.0 BADGES and Badges: Circle with Flap Completed Project WEB 2.0 BADGES: CIRCLE WITH FLAP GIMP is all about IT (Images and Text) OPEN GIMP Step 1: To begin a new GIMP project, from the Menu Bar,
The Photoshop Workspace
 Adobe Photoshop: Chapter 2: The Photoshop Workspace When you first open or start Photoshop the work area is made up of a set of default or standard Tools, Palettes and menus. Photoshop s Tools are contained
DESIGNING A WEBSITE LAYOUT IN PHOTOSHOP CS4. Step 1
 DESIGNING A WEBSITE LAYOUT IN PHOTOSHOP CS4 Step 1 We ll be using the 960s Grid System (download here) to keep everything aligned. Once you have it, open the included Photoshop document called: 960_grid_24_col.psd.
Photoshop Fundamentals
 Lesson 3 Photoshop Fundamentals Photoshop Fundamentals How to Navigate your Document Zooming in and out To zoom in and out on your Photoshop document, hold down the Command key (Ctrl on Win) and press
Adobe Photoshop CS5 Advanced. Course Outline. Course Length: 1 Day. Course Overview
 Adobe Photoshop CS5 Advanced Course Length: 1 Day Course Overview Photoshop CS5: Advanced is the second of three titles in this series. In this course, students will learn how to use color fills, gradients,
2.) Open you re my documents folder, and then open you re my pictures folder. Now create a new folder called mask advert.
 Open you re my documents folder, and then open you re my pictures folder. Now create a new folder called mask advert.") PhotoShop Help File Sleeping mask advert lesson 1.) Open adobe Photoshop. 2.) Open you re my documents folder, and then open you re my pictures folder. Now create a new folder called mask advert. 3.) From
PhotoShop Help File Sleeping mask advert lesson 1.) Open adobe Photoshop. 2.) Open you re my documents folder, and then open you re my pictures folder. Now create a new folder called mask advert. 3.) From
CREATING A BUTTON IN PHOTOSHOP
 CREATING A BUTTON IN PHOTOSHOP Step 1: Create the Photoshop Document Our button will be exactly 170px wide and 50px tall, but we ll make a bigger canvas (600x600px) so that we have some breathing room
Add Photo Mounts To A Photo With Photoshop Part 1
 Add Photo Mounts To A Photo With Photoshop Part 1 Written by Steve Patterson. In this Photoshop Effects tutorial, we ll learn how to create and add simplephoto mounts to an image, a nice finishing touch
ADOBE PHOTOSHOP BOOK SAHALSOFTWARE. Frist Editing. Contents
 ADOBE PHOTOSHOP BOOK SAHALSOFTWARE Frist Editing Contents Lesson 01: Introduction of Adobe Photoshop Lesson 02: How to Open Photoshop Lesson 03: Environment Lesson 04: Tools in Adobe Photoshop Lesson 05:
In this exercise you will be creating the graphics for the index page of a Website for children about reptiles.
 LESSON 2: CREATING AND MANIPULATING IMAGES OBJECTIVES By the end of this lesson, you will be able to: create and import graphics use the text tool attach text to a path create shapes create curved and
Paint Tutorial (Project #14a)
") Paint Tutorial (Project #14a) In order to learn all there is to know about this drawing program, go through the Microsoft Tutorial (below). (Do not save this to your folder.) Practice using the different
Paint Tutorial (Project #14a) In order to learn all there is to know about this drawing program, go through the Microsoft Tutorial (below). (Do not save this to your folder.) Practice using the different
Drawing shapes and lines
 Fine F Fi i Handmade H d d Ch Chocolates l Hours Mon Sat 10am 6pm In this demonstration of Adobe Illustrator CS6, you will be introduced to new and exciting application features, like gradients on a stroke
With the help of Adobe and a dash of creativity, we can create all kinds of fun things just using the shapes found in our tool box.
 You Are the Bomb! digitalscrapper.com /blog/bomb/ You Are the Bomb! by Nannette Dalton With the help of Adobe and a dash of creativity, we can create all kinds of fun things just using the shapes found
Creating Digital Illustrations for Your Research Workshop III Basic Illustration Demo
 Creating Digital Illustrations for Your Research Workshop III Basic Illustration Demo Final Figure Size exclusion chromatography (SEC) is used primarily for the analysis of large molecules such as proteins
AGENDA. :: Homework Upload. :: Photoshop Lesson 4: Creating a PSD Wireframe [Homepage] I. DOCUMENT SET-UP: II. DRAWING SHAPES III.
![AGENDA. :: Homework Upload. :: Photoshop Lesson 4: Creating a PSD Wireframe [Homepage] I. DOCUMENT SET-UP: II. DRAWING SHAPES III.](/thumbs/85/92596427.jpg "AGENDA. :: Homework Upload. :: Photoshop Lesson 4: Creating a PSD Wireframe [Homepage] I. DOCUMENT SET-UP: II. DRAWING SHAPES III.") CLASS :: 04 MULTIMEDIA TOOLS :: CLASS NOTES 10.02 2017 AGENDA :: Homework Upload [ A-2 ] Ultimate Composite! Upload A-2 Project to Student PSD Folder :: Photoshop Lesson 4: Creating a PSD Wireframe [Homepage]
CLASS :: 04 MULTIMEDIA TOOLS :: CLASS NOTES 10.02 2017 AGENDA :: Homework Upload [ A-2 ] Ultimate Composite! Upload A-2 Project to Student PSD Folder :: Photoshop Lesson 4: Creating a PSD Wireframe [Homepage]
HAPPY HOLIDAYS PHOTO BORDER
 HAPPY HOLIDAYS PHOTO BORDER In this Photoshop tutorial, we ll learn how to create a simple and fun Happy Holidays winter photo border! Photoshop ships with some great snowflake shapes that we can use in
:: MULTIMEDIA TOOLS :: CLASS NOTES
 CLASS :: 04 02.15 2017 AGENDA :: Homework Upload [ A-2 ] Ultimate Composite! Upload A-2 Project to Student PSD Folder :: Photoshop Lesson 4: Creating a PSD Wireframe [Homepage] I. DOCUMENT SET-UP: a. Dimensions
Ombre Banner. Step One: Prepare the Workspace. Step Two: Create a Rectangle. digitalscrapper.com /blog/ombre-banner/ Ombre Banner by Jenifer Juris
 Ombre Banner digitalscrapper.com /blog/ombre-banner/ Ombre Banner by Jenifer Juris One of the fashion and design trends that has become very popular is ombre, or the change of a darker color to a lighter
ITP 101 Project 2 - Photoshop
 ITP 101 Project 2 - Photoshop Project Objectives Learn how to use an image editing application to create digital images. We will use Adobe Photoshop for this project. Project Details To continue the development
PHOTO in TEXT (FILLED TEXT) ( Using Photoshop Elements 2018 )
 ( Using Photoshop Elements 2018 )") PHOTO in TEXT (FILLED TEXT) ( Using Photoshop Elements 2018 ) Open a new blank file and a photo ( Sunset). File > New > Blank File Click on Document Type Choose Photo, Landscape 8 x 10 > OK File > Open
PHOTO in TEXT (FILLED TEXT) ( Using Photoshop Elements 2018 ) Open a new blank file and a photo ( Sunset). File > New > Blank File Click on Document Type Choose Photo, Landscape 8 x 10 > OK File > Open
Photoshop Basics A quick introduction to the basic tools in Photoshop
 Photoshop Basics A quick introduction to the basic tools in Photoshop Photoshop logo courtesy Adobe Systems Inc. By Dr. Anthony R. Curtis Mass Communication Department University of North Carolina at Pembroke
GIMP WEB 2.0 ICONS. GIMP is all about IT (Images and Text) OPEN GIMP
 OPEN GIMP") GIMP WEB 2.0 ICONS Web 2.0 Banners: Download E-Book WEB 2.0 ICONS: DOWNLOAD E-BOOK OPEN GIMP GIMP is all about IT (Images and Text) Step 1: To begin a new GIMP project, from the Menu Bar, select File New.
GIMP WEB 2.0 ICONS Web 2.0 Banners: Download E-Book WEB 2.0 ICONS: DOWNLOAD E-BOOK OPEN GIMP GIMP is all about IT (Images and Text) Step 1: To begin a new GIMP project, from the Menu Bar, select File New.
Create a Cool Vector Robot Character in Illustrator
 Create a Cool Vector Robot Character in Illustrator In this tutorial, we will use various tools and techniques to create a simple vector robot character and learn the basic of Adobe Illustrated. With this
GIMP WEB 2.0 ICONS. GIMP is all about IT (Images and Text) OPEN GIMP
 OPEN GIMP") GIMP WEB 2.0 ICONS WEB 2.0 ICONS: STICKY NOTE Web 2.0 Icons: Sticky Note GIMP is all about IT (Images and Text) OPEN GIMP Step 1: To begin a new GIMP project, from the Menu Bar, select File New. At the
GIMP WEB 2.0 ICONS WEB 2.0 ICONS: STICKY NOTE Web 2.0 Icons: Sticky Note GIMP is all about IT (Images and Text) OPEN GIMP Step 1: To begin a new GIMP project, from the Menu Bar, select File New. At the
Big City Lights- Using Photoshop 7.0
 Big City Lights- Using Photoshop 7.0 This Tutorial makes use of Defining Patterns and Layer Effects in order to create a word in lights. It is based on: Big City Lights by Scott Kelby and Felix Nelson,
To get a copy of this image you right click on the image with your mouse and you will get a menu. Scroll down the menu and select "Save Image As".
 The most popular lesson I teach is editing photographs. Everyone wants to put his or her brother's head on a monkey or something similar. This is also a lesson about "emphasis". You can cause more individuals
Interactive Tourist Map
 Adobe Edge Animate Tutorial Mouse Events Interactive Tourist Map Lesson 1 Set up your project This lesson aims to teach you how to: Import images Set up the stage Place and size images Draw shapes Make
Working With Images: Intermediate Photoshop
 Working With Images: Intermediate Photoshop Viewing Information in the Layers Palette 1. Choose File > Open and open the Start.psd file in the Lesson01 folder located in the PS_Workshop folder on the desktop.
Step 1: Create A New Photoshop Document
 Snowflakes Photo Border In this Photoshop tutorial, we ll learn how to create a simple snowflakes photo border, which can be a fun finishing touch for photos of family and friends during the holidays,
GIMP WEB 2.0 BADGES. and. Badges: Circle with Striped Border Completed Project
 GIMP WEB 2.0 BADGES and Badges: Circle with Striped Border Completed Project WEB 2.0 BADGES: CIRCLE WITH STRIPED BORDER GIMP is all about IT (Images and Text) The GIMP application is installed with a number
Advanced Special Effects
 Adobe Illustrator Advanced Special Effects AI exercise preview exercise overview The object is to create a poster with a unified color scheme by compositing artwork drawn in Illustrator with various effects
Paint/Draw Tools. Foreground color. Free-form select. Select. Eraser/Color Eraser. Fill Color. Color Picker. Magnify. Pencil. Brush.
 Paint/Draw Tools There are two types of draw programs. Bitmap (Paint) Uses pixels mapped to a grid More suitable for photo-realistic images Not easily scalable loses sharpness if resized File sizes are
Create a Swirly Lollipop Using the Spiral Tool Philip Christie on Jun 13th 2012 with 12 Comments
 Advertise Here Create a Swirly Lollipop Using the Spiral Tool Philip Christie on Jun 13th 2012 with 12 Comments Tutorial Details Program: Adobe Illustrator CS5 Difficulty: Beginner Es timated Completion
3. Let s say that we are unsure about what kind of
 Class Objectives Creating/mixing gradients Loading and using custom brushes Applying/modifying layer styles (drop shadow, glow, pattern overlay, stroke, etc.) Using transformations rotate, perspective,
2. If a window pops up that asks if you want to customize your color settings, click No.
 Practice Activity: Adobe Photoshop 7.0 ATTENTION! Before doing this practice activity you must have all of the following materials saved to your USB: runningshoe.gif basketballshoe.gif soccershoe.gif baseballshoe.gif
Overview of Adobe Fireworks CS6
 Overview of Adobe Fireworks CS6 Lesson topics: Work with the Adobe Fireworks CS6 workspace: tools, Document windows, menus, and panels. Customize the workspace. Change the magnification of a document.
Adobe Photoshop Sh S.K. Sublania and Sh. Naresh Chand
 Adobe Photoshop Sh S.K. Sublania and Sh. Naresh Chand Photoshop is the software for image processing. With this you can manipulate your pictures, either scanned or otherwise inserted to a great extant.
Illustrator Tutorial: How to create a stipple texture By Jason McConnell on Dec,
 Illustrator Tutorial: How to create a stipple texture By Jason McConnell on Dec, 19 2014 Have you ever wanted to add a stippled airbrush effect to your artwork in Illustrator? You might think you have
Webtorial: 2-Point Tracking
 This webtorial will show you how to use 2-point tracking to attach a missing arrowhead to its clock hand and track the hand s movement to ensure that the arrowhead stays on its hand as it rotates. You
Cell Phone. Adobe Illustrator Lesson 16 Working with Gradients Transparency Menu 1. START>PROGRAMS>ADOBE ILLUSTRATOR CS3
 L e s s o n 1 6, P a g e 1 Adobe Illustrator Lesson 16 Working with Gradients Transparency Menu Cell Phone 1. START>PROGRAMS>ADOBE ILLUSTRATOR CS3 2. File>New and use these settings. Be sure to change
RICE DMC SHORT COURSE. Creating a Digital Illustration in Photoshop (Advanced)
") RICE DMC SHORT COURSE Creating a Digital Illustration in Photoshop (Advanced) 1.Filter>Render>Clouds 2.Filter>Distort>Shear Image> Adjustments>Hue and Saturation Add Layer Style 3D>New 3D Layer from File
RICE DMC SHORT COURSE Creating a Digital Illustration in Photoshop (Advanced) 1.Filter>Render>Clouds 2.Filter>Distort>Shear Image> Adjustments>Hue and Saturation Add Layer Style 3D>New 3D Layer from File
4 working with SHAPE layers lesson overview
 4 Working with Shape Layers Lesson overview In this lesson, you ll learn to do the following: Create custom shapes. Customize a shape s fill and stroke. Use path operations to transform shapes. Animate
ITEC185. Introduction to Digital Media
 ITEC185 Introduction to Digital Media ADOBE ILLUSTRATOR CC 2015 What is Adobe Illustrator? Adobe Illustrator is a program used by both artists and graphic designers to create vector images. These images
Adobe Illustrator CC Advanced
 Copy/Paste Objects 1. Select with Selection-Tool 1. Hold Alt-Key Drag with Selection-Tool while still holding the Alt-Key (Additionally holding Shift will move straight or in 45/90/180 Degrees) Align Objects
Hand Drawn Stencil with a Stroke Outline
 Hand Drawn Stencil with a Stroke Outline digitalscrapper.com/blog/qt-hand-drawn-stencil by Jenifer Juris Hand Drawn Stencil with a Stroke Outline by Jenifer Juris With just the use of a stroke outline
Exercise One: Creating a Title 3D Effect
 1 Tutorials 2 Exercise One: Creating a Title 3D Effect The exercises in this section are designed to give you a hands-on introduction to the Boris Title Generators. You will need a project with some captured
Word 2003: Flowcharts Learning guide
 Word 2003: Flowcharts Learning guide How can I use a flowchart? As you plan a project or consider a new procedure in your department, a good diagram can help you determine whether the project or procedure
Recoloring with Custom Gradients
 digitalscrapper.com http://www.digitalscrapper.com/blog/custom-gradients/ Recoloring with Custom Gradients Recoloring with Custom Gradients by Nannette Dalton The Gradient tool is something that I don
Fireworks Basics. The Fireworks Interface
 Fireworks Basics Scenario Firework is a graphics application that allows you to create and manipulate Web (and other) graphics. It combines both bitmap and vector editing tools, and integrates well with
Exercise III: Creating a Logo with Illustrator CS6
 Exercise III: Creating a Logo with Illustrator CS6 Project 1: Creating Logos with the Shape Tools Now that we have some experience with Illustrator s tools, let s expand our goal to create a logo, web
Working with Symbols and Instances
 Chapter 3 Working with Symbols and Instances Learning Objectives After completing this chapter, you will be able to: Create new symbols Edit the symbols and instances Create and edit button symbols Import
Creative Effects with Illustrator
 ADOBE ILLUSTRATOR PREVIEW Creative Effects with Illustrator AI OVERVIEW The object is to create a poster with a unified color scheme by compositing artwork drawn in Illustrator with various effects and
Photoshop CS6 Section Notes 03
 Photoshop CS6 Section Notes 03 by Dr. Jim Watrous Objectives Converting Grayscale Photoshop file to RGB color files Creating and Saving a Separate Set of Color Swatches Loading and Using a Saved Color
ADOBE TRAINING CS6 PHOTOSHOP BASICS: EDITING PHOTOS & WORKING WITH TEXT - 1
 ADOBE TRAINING CS6 PHOTOSHOP BASICS: EDITING PHOTOS & WORKING WITH TEXT Photoshop is the leading professional software for editing and adjusting photos, images and other graphic projects. It is a very
Intersecting Frame (Photoshop)
") Intersecting Frame (Photoshop) Tip of the Week by Jen White on October 4, 2011 Sometimes you feel like a nut. Sometimes you don t. I ve got that little Almond Joy jingle stuck in my head! It was driving
Intersecting Frame (Photoshop) Tip of the Week by Jen White on October 4, 2011 Sometimes you feel like a nut. Sometimes you don t. I ve got that little Almond Joy jingle stuck in my head! It was driving
Circle Flower with the Elliptical Marquee Tool
 Circle Flower with the Elliptical Marquee Tool digitalscrapper.com/blog/qt-circle-flowers by Jenifer Juris Circle Flower with the Elliptical Marquee Tool by Jenifer Juris Get the most out of your digi
ILLUSTRATOR. Introduction to Adobe Illustrator. You will;
 ILLUSTRATOR You will; 1. Learn Basic Navigation. 2. Learn about Paths. 3. Learn about the Line Tools. 4. Learn about the Shape Tools. 5. Learn about Strokes and Fills. 6. Learn about Transformations. 7.
Sports Jersey Mania, Part 1 By Joel Day
 Sports Jersey Mania, Part 1 By Joel Day This tutorial will walk you through creating a photo rendering of a basketball jersey. I developed this process using a variety of different techniques, including
Transforming Selections In Photoshop
 Transforming Selections In Photoshop Written by Steve Patterson. In previous tutorials, we learned how to draw simple shape-based selections with Photoshop s Rectangular and Elliptical Marquee Tools. Using
MULTIMEDIA WEB DESIGN
 CLASS :: 02 02.02 2018 4 Hours THE AGENDA HOMEWORK 1 REVIEW [ Upload to Comm Arts Server ] :: Completed Questionnaire :: Best Works [Saved to Server] GIF ANIMATION DEMO :: Best Practices for GIF Animations
Captain America Shield
 Captain America Shield 1. Create a New Document and Set Up a Grid Hit Control-N to create a new document. Select Pixels from the Units drop-down menu, enter 600 in the width and height boxes then click
GIMP WEB 2.0 ICONS. GIMP is all about IT (Images and Text) OPEN GIMP
 OPEN GIMP") GIMP WEB 2.0 ICONS or WEB 2.0 ICONS: MEMO Web 2.0 Icons: Memo GIMP is all about IT (Images and Text) OPEN GIMP Step 1: To begin a new GIMP project, from the Menu Bar, select File New. At the Create a New
GIMP WEB 2.0 ICONS or WEB 2.0 ICONS: MEMO Web 2.0 Icons: Memo GIMP is all about IT (Images and Text) OPEN GIMP Step 1: To begin a new GIMP project, from the Menu Bar, select File New. At the Create a New
Expression Design Lab Exercises
 Expression Design Lab Exercises Creating Images with Expression Design 2 Beaches Around the World (Part 1: Beaches Around the World Series) Information in this document, including URL and other Internet
INKSCAPE BASICS. 125 S. Prospect Avenue, Elmhurst, IL (630) elmhurstpubliclibrary.org. Create, Make, and Build
 elmhurstpubliclibrary.org. Create, Make, and Build") INKSCAPE BASICS Inkscape is a free, open-source vector graphics editor. It can be used to create or edit vector graphics like illustrations, diagrams, line arts, charts, logos and more. Inkscape uses Scalable
INKSCAPE BASICS Inkscape is a free, open-source vector graphics editor. It can be used to create or edit vector graphics like illustrations, diagrams, line arts, charts, logos and more. Inkscape uses Scalable
 digitalscrapper.com http://www.digitalscrapper.com/blog/pumpkin-palooza/ Pumpkin Palooza Pumpkin Palooza by Syndee Rogers-Nuckles With Fall comes a chill in the air, leaves and pumpkins everywhere! My
12 APPLYING EFFECTS. Lesson overview
 12 APPLYING EFFECTS Lesson overview In this lesson, you ll learn how to do the following: Use various effects, such as Pathfinder, Scribble, and Drop Shadow. Use Warp effects to distort type. Create three-dimensional
Keyboard Shortcuts. Command Windows Macintosh
 S00ILCS5.qxp 3/19/2010 1:11 AM Page 477 Keyboard Shortcuts k Adobe Illustrator CS5 If a command on a menu includes a keyboard reference, known as a keyboard shortcut, to the right of the command name,
Adobe Illustrator A Hot Air Balloon Sky Scene In this tutorial, we'll explain how to create a fun sky scene with hot air balloons.
 Adobe Illustrator A Hot Air Balloon Sky Scene In this tutorial, we'll explain how to create a fun sky scene with hot air balloons. We will take advantage of the Blend Tool and the Symbol Sprayer Tool and
Making a Portrait From a Snapshot by Phil Russell
 Making a Portrait From a Snapshot by Phil Russell Wouldn t it be nice if you had a great snapshot of a friend that you could turn it into a studio portrait? With Photoshop 6 and 7, it is fairly simple.
Page Number Mouse Menu
 Adobe Photoshop CS5 Quick Reference Summary Adobe Photoshop CS5 Quick Reference Summary Number Mouse Adjustment Layer PS 187 Clip to Layer button on Adjustments Layer New Adjustment Layer Background Eraser
Actualtests.9A QA
 Actualtests.9A0-351.51.QA Number: 9A0-351 Passing Score: 800 Time Limit: 120 min File Version: 5.6 http://www.gratisexam.com/ 9A0-351 Adobe Illustrator CC Recertification Exam Marvelous planning guide
Adobe. Photoshop CC. Alberto Seveso. CLASSROOM IN A BOOK The official training workbook from Adobe. Andrew Faulkner & Conrad Chavez
 Adobe Photoshop CC 2015 ERRATA release 2015.5 RELEASE Alberto Seveso CLASSROOM IN A BOOK The official training workbook from Adobe Andrew Faulkner & Conrad Chavez ERRATA AND FEATURE UPDATES Errata and
Creating a Text Frame. Create a Table and Type Text. Pointer Tool Text Tool Table Tool Word Art Tool
 Pointer Tool Text Tool Table Tool Word Art Tool Picture Tool Clipart Tool Creating a Text Frame Select the Text Tool with the Pointer Tool. Position the mouse pointer where you want one corner of the text
How to Add Text to an Animated Image
 How to Add Text to an Animated Image In this tutorial, you ll learn how to create an inspirational animated file to use on social media using PhotoMirage and VideoStudio. We ll create an animated file
Ai Adobe. Illustrator. Creative Cloud Beginner
 Ai Adobe Illustrator Creative Cloud Beginner Vector and pixel images There are two kinds of images: vector and pixel based images. A vector is a drawn line that can be filled with a color, pattern or gradient.
Revit - Conceptual Mass. STEP 1: open Revit _ from the home screen under Families click on New Conceptual Mass _ open the Mass template file
 Revit - Conceptual Mass STEP 1: open Revit _ from the home screen under Families click on New Conceptual Mass _ open the Mass template file STEP 2: type LL to create a new level _ enter 100 _ create 2
Palestinian National Authority Ministry of Education & Higher Education Directorate of Education\North Gaza
 Palestinian National Authority Ministry of Education & Higher Education Directorate of Education\North Gaza 7.0 me New Options Status Bar Palettes Toolbox Toolbox Toolbox 4 5 6 7 8 9 : 4 5 6 7 8 9 : Ph0toShop
Creating Vector Shapes Week 2 Assignment 1. Illustrator Defaults
 Illustrator Defaults Before we begin, we are going to make sure that all of us are using the same settings within our application. For this class, we will always want to make sure that our application
Shape Cluster Photo Written by Steve Patterson
 Shape Cluster Photo Written by Steve Patterson Before After Step 1: Create A New Document Let's begin by creating a new Photoshop document. Go up to the File menu in the Menu Bar along the top of the screen