ScreenHunter 6.0 Pro User Guide
|
|
|
- Kerry Ward
- 6 years ago
- Views:
Transcription

1 ScreenHunter 6.0 Pro User Guide Designated trademarks and brands are the property of their respective owners. Notice of Non-Liability Wisdom Software Inc. and the authors assume no liability for errors or omissions, or for damages, resulting from the use of this Manual or the information contained in this Manual.
2 Table of Contents 1. Introduction 03 Installing ScreenHunter 05 Getting Started for First Time Users 06 Compare Versions Using ScreenHunter 13 Screen Capture 13 Main Window 15 From Tab 17 To Tab 25 Option Tab 37 Profiles 40 Image Editor 42 Menu & Toolbar 43 Bitmap Editing 1: Bitmap Tools 46 Bitmap Editing 2: Bitmap Menu 51 Object Editing 1: Object Tools 62 Object Editing 2: Object Menu 69 File Formats 73 Tasks Tab 75 ScreenZoom & ScreenDraw 78 Web Capture 80 Color Picker 82 Frequently Asked Questions (FAQ) and Support Registration and Licensing 84 Order and Registration 84 License Agreement 84 2
3 CHAPTER 1: INTRODUCTION Welcome to ScreenHunter 6 - A great screen capture solution! ScreenHunter 6 Pro is the most comprehensive and advanced version of ScreenHunter with all the necessary tools included for you to capture, process and edit. It is a total capture solution to save you time and boost productivity. What's New in ScreenHunter 6 New User Interface Newly designed user interface with better tabs for easy navigation Better Windows 7 compatibility for both 32-bit and 64-bit Profiles - You can save your settings to a profile that can be used by point and click New & Enhanced Capture Features Fixed size and flexible rectangular capture Auto-scroll for long web pages Webcam capture Captions Border with drop shadow and more Specific window 'lock-in' capture even they are minimized DirectX and game screen capture Timed capture on program startup Translucent Zoombox Color effects Web image capture Scanning images New & Enhanced Filing and Printing Features Multiple image file format saving Saving to a PDF file Automatic filenaming Creating new folders on the fly Wysiwyg printing New Image Editor A combination of a bitmap image editor and vector object editor On top of your capture as bitmap, you can add drawing objects such as arrows and bubbles that you can keep editing. Bitmap editor supports cropping, resizing, flood fill with tolerance and pen/brush with opacity Advanced bitmap image processing features for any selection of the bitmap. Objects includes arrows, rectangles, round-rectangles, ellipses, speech bubbles, polygons, freehand lines, symbols and pictures. You can draw an object with different fill and line style as well as opacity. Add and edit text on any drawing object 3
4 Other New and Enhanced Features New ScreenZoom and ScreenDraw You can enlarge your screen, draw directly on the screen on your presentation and take a screenshot. Screen-wide color picker One click to add to and remove from Windows Startup You can add or remove to run when Windows starts up anytime. New color scheme for your ScreenHunter. 4
5 Installing ScreenHunter System Requirements Pentium 166MHz PC or higher Windows XP, 2003, Vista or Windows 7 (32-bit or 64-bit) To install Run the setup package, SetupScreenHunter.exe, and follow the onscreen instructions. To uninstall Uninstall from your Windows Control Panel, Add/Remove Programs. - Or - Run Uninstall from the ScreenHunter program menu. 5

6 Getting Started for First Time User ScreenHunter is designed so that it's always in the standby mode ready for you to take a screenshot. The ScreenHunter main window only has four tabs. The first two, 'From' and 'To' are used to set the screen capture settings. The 'From' tab is for assigning how and what you want to capture, and the 'To' tab is for what to add how you want to do with the capture. The other two tabs, the 'Options' tab provides customize choices and the 'Tasks' tab lists other useful tools for your capture. The following example is to capture a part of screen with the mouse pointer, save it to a JPEG file and copy to the Clipboard. Step #1: Download & Install Download the setup package, save to your hard drive and run to install. To run, you can press Windows + E to open Windows Explorer, then locate the downloaded file and double click on it. After the install, run ScreenHunter 6 Pro from the Windows Start menu, or the icon on your desktop. When you run it, you will notice the ScreenHunter icon (hand) in your Windows system tray. Step #2: What and How to Capture: "From" Pick a Hotkey to start if you want A hotkey is the key you press on your keyboard to actually capture. You can choose any key combination or single key, say F6 only, as your hotkey. You can always click the "Capture Now" button to capture. 6

7 Pick a Hotkey to start if you want In this example, in the Capture What group, select Rectangular area and change the settings by clicking the button at right. In the Include group, check Mouse pointer. 7

8 Step #3: Choose Where to Save Capture: "To" In this example, on the To tab, check Clipboard to copy the capture to the Windows Clipboard, and check Editor if you want to edit right after. In the Save to File group, check JPG to save to a JPEG file. Select Automatic for the filename and click the filename button beside if you want to change the filenaming format. Click the folder button at the bottom, and select Desktop as the location for your captures. 8


9 Step #4: Capture Click Capture Now to capture. - or - Press your hotkey on your keyboard, F6 in this case, to capture a rectangular area on the screen. You can set to show a crosshair and a Zoombox magnifies the area. They can be customized on the Options tab. It uses the Highlight color to highlight the area. Press the left mouse button down and drag it to anywhere on the screen until the area is what you like, then release the mouse button. If Adjustable is checked on the Settings dialog, after you release your mouse, the selected area is shown highlighted. You can use your mouse or arrow keys to fine tune the selection and press the Enter or Space bar on your keyboard to finish. Step #5: Done - Get Your Screenshot Pick up your capture on your Desktop. If you use another location to save your captures, open Windows Explore (press Windows + E). Go to your file folder assigned in Step #3 to pick up your JPEG file. The capture is also copied to the Clipboard, that you can paste to another program, such as MS Word. To Cancel Right-click the mouse button to cancel. 9
10 When you have started capturing and Zoombox is shown or auto-scrolling, press the Esc key to cancel. To cancel auto-capturing, Press the hotkey again Open the main ScreenHunter screen and press the Stop button Press the Stop button on the toolbar in Image Editor. This is a very basic way to use ScreenHunter. Explore details on how to get the most out of ScreenHunter. 10
11 Compare Versions of ScreenHunter 6 CAPTURING FEATURES Free Plus Pro Rectangular area Adjustable rectangle, fixed size and locked aspect ratio Object / Window / Menu Auto-scroll and long web page Webcam capture Multi-object Text Active window Fixed area (user defined) Specific window (lock-in window) Full screen DOS program DirectX / Screen saver Movie / Video Freehand Ellipse Round rectangular area Polygon area Web capture Scanning images Mouse pointer Multiple monitors Translucent window Delayed capture Timed auto-capture Scheduled capture Recurring capture INCLUDING FEATURES Free Plus Pro TIMING FEATURES Free Plus Pro ADD EFFECTS FEATURES Free Plus Pro 11
12 Caption (date/time stamps, note) Watermark Border & Drop shadow Auto-scale Color effects SAVING FEATURES Free Plus Pro Automatic naming, saving to a file Clipboard Auto- Saving to PDF Optimized JPEG, GIF and PNG High quality and transparent GIF Saving to TIFF Creating folders on the fly IMAGE EDITING FEATURES Free Plus Pro Image editing, adding text and annotation Vector objects Cropping, cropping to shape and resizing Advanced image processing Bubbles, symbols & alpha blending Viewing captures & conversion Drag&drop images from the desktop & Web OTHER FEATURES Free Plus Pro Profile ScreenZoom & ScreenDraw Wysiwyg printing Flexible hotkey Color picker Translucent Zoombox Add to & remove from Windows startup Commandline switches PRICE Free Plus Pro Single license Free US$19.95 US$
13 CHAPTER 2: USING SCREENHUNTER ScreenHunter 6 is the definitive solution for professional screen capture and image production. It is a production environment to address and solve the special challenges facing non-technical users and professional designers. ScreenHunter is designed so that you're always ready to take a screenshot. When it's running, the ScreenHunter icon will appear in your Windows System Tray. In this section This section contains the following topics: Screen Capture Main Window From Tab To Tab Options Tab Profiles Image Editor Menu & Toolbar Bitmap Editing 1: Bitmap Tools Bitmap Editing 2: Bitmap Menu Object Editing 1: Object Tools Object Editing 2: Object Menu File Formats Tasks Tab ScreenZoom and ScreenDraw Color Picker Web Capture Image Scanner FAQ and Support 13
14 Screen Capture You can use ScreenHunter to capture any part of your screen, edit and annotate your screenshot in a professional environment. In ScreenHunter Image Editor, you can edit bitmap and vector objects in a single application. Everything is editable, all the time. For easy operation, ScreenHunter 6 Pro is also designed so that you see all the settings as much as you can. It basically has two parts, the Main Window for setting and taking a screen capture and Image Editor to further edit your capture. In this section Screen Capture related features can be found in the following sections. Main Window From Tab To Tab Options Tab Profiles 14

15 The Main Window The Main Window consists of top buttons, tabs, and bottom quick links. Top Buttons These buttons are always available even you change tabs. Capture Now Press this button to capture immediately using the current settings. Hotkey and Profile button Press this button to change the hotkey, or select a profile to use. You can press your hotkey on your keyboard to start capturing. 15
16 Tabs The ScreenHunter main window only has four tabs, and first two, From and To are used to set the screen capture settings. From - for assigning what you want to capture and, what to include. To - for assigning what to add and how you want to do with the capture. Options - provides customization choices. Tasks - lists other useful tools. Quick links These are quick links to quickly run some tasks including 'Exit' that ends ScreenHunter. 16

17 From Tab The From tab is for assigning what and how you want to capture and what to include. You can choose to show the currently selected settings information on the settings button face. Capture What Group Select what you want to capture. Rectangular area Capture a rectangular area on the screen. A dynamic Zoombox enlarges the corner area to size precisely. Zoombox can be customized on the Options tab. It uses the Highlight color (also set on the Options tab) to highlight the area. Settings Dialog More settings are available by clicking the settings button beside the radio button. 17
 Capture a square area.")
18 Non-fixed size Choose to make an non-fixed size area to capture. Adjustable rectangle Check to make the selected rectangular area adjustable. So you can further adjust the area using the mouse and keyboard. Lock aspect ratio Check to lock the area aspect ratio selected below. o 1:1 ( Square ) Capture a square area. o 4:3 ( Standard TV) Capture an area with the standard TV ratio. o 16:9 (Wide screen) Capture an area with the wide screen TV ratio. o Custom Capture an area with an aspect ratio of your choice (1-20). Fixed size Choose to make a fixed size area to capture. The max size is your main full screen size. This is useful when you want all your capture to be a certain size. Fixed area Capture a pre-defined fixed area on the screen. The area can be defined by clicking the fixed area size button at right. Use the mouse and keyboard to adjust the area and press Enter or Space to set. The defined area is shown on the button. Window / Object / Menu Capture windows or objects on a form, such as buttons, menus and toolbar controls. The object is highlighted in the Highlight color. 18

19 Multiple objects Check to capture more than one object, such as cascading menu blocks, buttons and windows. When capturing multiple objects, click the left mouse button to add an object, and press Enter or Space bar on your keyboard to finish. Text Check to capture the object text instead of image. The result is text and/or a text file. When Text is checked, on the 'To' tab, only controls related to the text file will be enabled. Multiple objects and Text are mutually exclusive, that only one of these can be checked at a time. Scrolling window / Web Capture a scrollable window or a web page that ScreenHunter can scroll it automatically, autoscroll. A scrollable window usually is a child window, the smallest part containing the scrollable contents. Because scrolling is application-dependent, auto-scroll may not work with all applications, such as windows that contain constantly changing content. The scrolling speed also depends on the machine and content of the window. Settings Dialog More settings are available by clicking the settings button beside the radio button. Auto-Scroll Direction You can set to auto-scroll vertically or horizontally Scroll Delay Auto-scroll interval is the time to allow the scrolled part to appear properly after each scroll. It depends on the machine speed and content of the window. Adjust this when not scrolling properly. 19

20 Active window Capture the currently active window immediately. The currently active window is the one that gets the focus, usually the window title bar is highlighted. Specific Window Capture a specific window even it's minimized. This is useful when you need to capture a specific window periodically, and it's sometime minimized that you may work on other things. Settings Dialog More settings are available by clicking the settings button beside the radio button. You can use the Window Picker tool to pick up your window to capture. To pick a window, press your mouse button down on the Window Picker icon and drag your mouse to find your target window and release the mouse button. Or, you can enter the exact window title of the window you want to capture. Choose the Refresh time before capturing. This is needed when the window is minimized. It is also application dependent that it takes time to open the window before capturing. Full screen Capture the full screen immediately. You may use this to capture some DOS program screens. Advanced Capture full menu, game and screen saver screens. To ensure smooth capturing, the mouse pointer will not be included, no default ing and printing, and no message box displayed. Video screen Capture video and movie screens. You may need to pause the movie and disable graphics hardware acceleration. The mouse pointer will not be included. Video Screen Capture Settings This is only available on Windows XP and earlier. Check the FAQ for how to set it on Windows Vista and Windows 7. 20


21 Webcam / Scan When you have a webcam or scanner installed, ScreenHunter can capture your webcam and scan images directly. Select Source to select your webcam or scanner The Sources list will show the webcam and scanner drivers installed on the PC. When click the Capture Now button or press your hotkey on your keyboard to capture, depending on the webcam driver, you may need to confirm on a webcam dialog box. E.g. 21

22 You can also capture your webcam and scan images from the Files menu in the Image Editor. Shape Capture a non-rectangular area on the screen. Shape Capture Settings Select a shape from Freehand, Ellipse, Round Rectangle and Polygon. Background color is used to mask a shape and multi-object capture. Include Group Mouse pointer Check to include the mouse pointer in the capture. Not available on DirectX or video screen capture. Multiple monitors Check to add multiple monitor support. Check it only if you have more than one monitor to capture. Translucent windows Check to include translucent windows. It's not available when Rectangular area, Window / Object / Window or Non-rectangular area is selected in the Capture What group. Timer Group Check only you need to use timed capture to set delay time, auto-capture or scheduled capture. Delay 22
23 Check to set delay from the time the hotkey is pressed to the time the actual capture is taking place. Auto-capture Check to capture automatically at given intervals. Available when Fixed area, Active window, Specific window or Full screen is selected in Capture What. for Select to assign duration to stop when the duration is reached. forever Select to keep auto-capturing until it is manually stopped. To stop auto-capturing when it has started Press the hotkey again. -Or- Open the main screen and press the Stop button. The button will only be enabled when autocapturing. -Or- Press the Stop button on the toolbar in Image Editor. If the interval is set to no more than 10 seconds, no messages are displayed after each capture. Start at Check to capture at a given date and time - scheduled capture. Available when Fixed area, Active window, Specific window or Full screen is selected in Capture What. Starting at a specific date/time Click the drop-down to select the date. Type or press the up and down arrows to set the hour, minute and second. Starting when program starts Choose when you need to take screenshot as soon as the program starts up. If you want to take a screenshot when your PC starts up, you can add to start ScreenHunter when your Windows starts up and choose this to take a screenshot automatically. Recurring Check to capture periodically. Available when Fixed area, Active window, Specific window or Full screen is selected in Capture What. 23

24 Start from Set the starting point of the recurrence. Click the drop-down to select the date. Type or press the up and down arrows to set the hour, minute and second. Recurrence pattern Weekly Check days you want to capture. Monthly Choose a day in the month, and month intervals. End of recurrence Forever Select to set no end date. End by Select to end at a specific date and time. 24

25 To Tab The To tab is for assigning what to add and how you want to do with the capture. You can choose to show the currently selected option information on the settings button face. Add Effects Group Select what to add to your capture. Caption Check to add a caption including date/time, computer name and user name, or text note you want to add to your capture. Caption Settings Dialog It's available by clicking the settings button beside the checkbox. 25

26 Caption Options Check to include the kind of text you want to add. A date and time format can be picked from the dropdown list. Filename will only be shown when the capture is saved to an image file. That is, one of the image files has to be checked. Order You can highlight an item in the list box and click the up and down buttons on the right to change the text sequence. Visual Options You can choose text font, color, background color and transparency of the caption, and choose the position, shadow/color, multiline and border as well. Watermark Check to add a watermark to your capture. 26

27 Watermark Settings Dialog Image File Click the folder icon at right to load your image as the watermark. Color Choose how your image will show as the watermark. Scale and Transparency Choose different scale and transparency options. Position Choose a position for the watermark to appear in the capture. Border Check to add a border to your capture. 27

28 Border Settings Dialog Visual Options Enter the total border width. Style Choose Shadow, Glow, Fade or 3D effect of the border and color options. Shadow Glow Fade 3D 28

29 Auto-scale Check to automatically scale the capture to a certain size. Keep aspect ratio, zoomed Select to keep the original capture width and height aspect ratio. To this width Scale the capture to this width, keeping the aspect ratio. To this height Scale the capture to this height, keeping the aspect ratio. Percentage Scale the capture by this percentage. E.g. 50% means half of the width and height. Zoomed to this fixed size Scale the capture to a fixed size regardless of the aspect ratio. Color effects Check to adjust the color of capture. 29

30 You can change brightness and contrast of the capture, or make it negative or gray automatically. True color Select to keep the true color, but adjust the brightness and contrast. Negative Select to change to negative. Gray scale Select to change to gray scale. Send Capture To Group Choose where you need to send your capture to. Editor Check to copy the capture to Image Editor to show and edit. Click the Editor... button at right to show Image Editor. Clipboard Check to copy the capture to the standard Windows Clipboard to be pasted in other programs, such as Microsoft Word. Printer Check to print the capture directly. 30

31 To change the printer and printing options, click the print settings button at right. The currently selected option information is shown on the button. (S) stands for smooth zooming. Printed image is previewed as it's printed on paper. Print size options Original image size Select to print the image in the original image size, pixel by pixel on the page. Since the normal image captured on the screen has a resolution of the screen, usually 96 dpi (dot per inch) or 120 dpi, and a modern printer can have 600 dpi or more, the image may look small in the original size. Fit to page Select to zoom the image to the page size, keeping the aspect ratio. Zoom to Select to print the image zoomed to your choice. The maximum will be the size that fits to the page size. 31

32 Smooth zooming Check to use high quality zooming when zoomed. Position options Choose a position for the capture to appear on the paper. Add title Enter a title only if you want have a title on the printed paper. Filename Check to include the filename if the capture is saved to a file. Add to the bottom Check to show the title at the bottom. If unchecked, it will show at the top. Printer Settings... Click to set up and change the printer. Print Now Click to print directly to the printer using the current settings. This button is only available when loaded from Image Editor. Print Multiple Copies... Click to show the print dialog where you can set the number of copies before printing. This button is only available when loaded from Image Editor. Check to send the capture via the default resident mail host on your PC with the capture as an attachment. 32
33 Send automatically Automatically send the capture as an attachment directly to the default outbox. Show the default dialog before sending Show the default dialog box each time. E.g. if you use Outlook as your on your PC, it loads the Outlook dialog box. It uses all settings on this dialog as the default. To... Click to select your recipients. Or, you can type addresses in the text box. CC... Click to select the CC list for your recipients. Or, you can type addresses in the text box. Check and Send a Test Press this button to check the correctness of all the mailing recipients and send an to your outbox with a sample image file attached. The attachment will be replaced by your capture in the future. Save to File Group Check to save the capture to a file, or multiple files. Click here for details on file format. BMP - Bitmap file JPG - JPEG file The JPEG Quality factor from 1 to 100, with 100 being the highest quality of the JPEG file. PDF - Adobe PDF file PNG - Portable Network Graphics file TIF - TIFF file GIF - GIF file Because a GIF file has only maximum of 256 colors, it needs to convert from a true color capture. Conversion using Solid color It converts to a solid color image and saves it to a GIF file. Dithered It converts to a dithered color image and saves it to a GIF file. Transparent color Check and choose a transparent color if you need to make the GIF file transparent. : Conversion algorithm speed & image quality comparison 33

34 SOLID COLOR Closest match Median cut Neural SPEED Fast Fastest Faster QUALITY Best Good Better DITHERED COLOR Error diffusion Floyd-Steinberg Uniform SPEED Fast Faster Fastest QUALITY Best Good Better Filename has 3 choices, Automatic, Ask me or Fixed name. They are only available when there is at least one file type is checked above. TXT - Save to a Text file. This will only be available when 'Window / Object / Menu' is chosen in the 'Capture What' group on the 'From' tab, and 'Text' is checked. Automatic naming Select to automatically save the capture with a generated filename. 34
35 Filename Format Check to include the text you want to add to your filename. Prefix Check to add a prefix text. Automatic number Check to add an automatically generated sequence number. Number of digits Check if you want to have a fixed number of digits, such as 2 for 01, 02, and 3 for 001, 002, etc. Next number ScreenHunter will keep increasing after each capture. You may enter any number to set, but it cannot be greater than the End at number. Reset 'Number number' to 1 when started Check to reset the number. If not checked, it will keep increasing. End at Check to set an end number. When the end number is reached, it will stop taking screenshots. Order You can highlight an item in the list box and click the up and down buttons on the right to change the text sequence. The Prefix or suffix can be set in any sequence. E.g. the prefix can be in the middle and suffix can be in the front. Overwrite Options When File Exists These options are only for actions when a newly generated filename already exists in the target folder. Never overwrite (generate a new filename) Select to always generate a new filename automatically. Ask Select to ask. Overwrite Select to overwrite all the time. Ask me Select if you need to name each file in a different way. A dialog box will be displayed after each capture. You can change the file format, name and location. Fixed name Select if you need to use this filename for all captures. It will overwrite the file if it exists. Folder The default location where captures will be saved. 35

36 Folder Picker button Click to assign a folder. Open Folder button Click to open the default folder using Windows Explorer. Folder Settings Dialog Click the button at right to show more folder settings. Use the last used folder Check to use the last used folder as the default capture folder. E.g. if you load an image file A in Image Editor, this will mean the folder where holds A will be used as the default folder to save captures. Self-check the folder on startup When ScreenHunter is launched, it will check the availability and permission, etc., to see the default folder is OK to save captures. Add new folders when capturing Create a new folder based on the creation date Check to create a new folder for your captures. It will be created in the default folder with date format of your choice. Create Now Click to create the new folder. 36

37 Options Tab The Options tab provides more options to further customize your ScreenHunter. User Interface Start in tray. Show the application icon in the system tray only Check to hide the main ScreenHunter window when ScreenHunter is launched. This option change will take effect when ScreenHunter is restarted. Show Screentips Check to show screentips if available. This option change will take effect when ScreenHunter is restarted. Show settings on button faces Check to show what you have chosen on the settings dialog on the button face. Color scheme Choose a color scheme from the list for your main window. Minimize to tray. Minimize the application icon to the tray when minimized If unchecked, it will show the standard application icon on your Windows taskbar, usually at the bottom of your screen. 37
38 Close to tray. Minimize the application icon to the tray when closed If unchecked, it will exit ScreenHunter when the close button at top-right of the main window is clicked. You can always click the Exit link at the bottom of the main window or on the Tasks tab to exit the program. When Capturing Hide the icon in the system tray when capturing Check to hide the ScreenHunter icon in the system tray when capturing. No crosshair Check to hide the screen wide crosshair when capturing. Highlight color Select a color used to draw the crosshair and highlight the rectangle, non-rectangle, object / window and video capture. Zoombox Zoom area size Select the area size around the crosshair on the screen to be zoomed. You can choose to hide the Zoombox. Zoom factor Select how many times the zoom area is enlarged. After Capture Play a sound Check to play a sound. Display a message Check to show a self-closing message box. It's not available for capturing DirectX screens. The duration is from 1 to 30 seconds. Show the saved files Check to show the saved file name, location and size. Show Image Editor when selected Check to show Image Editor only when Editor is checked on the To tab. Image Editor These options will only be effective when Editor is checked on the To tab. Show the Editor Options dialog with Editor Check to show the Editor options dialog when Image Editor is displayed. 38


39 Keep only the last 30 images Check to keep only the latest 30 files in Image Editor and discard the old ones to reduce memory usage. If not checked, the maximum number of images can be kept in Image Editor is 100. Show the new image dialog when creating a new image Check to show the new image dialog when creating a new image in Image Editor. Show the warning dialog when saving to an image file Check to show the warning dialog when saving to an image file format (other than.shf) if that contains any drawing objects. Profiles 39

40 A profile is a collection of settings you picked on the From and To tab, such as what to capture and where to save your captures. You can name a profile and define a new hotkey and use it anytime by point and click. The top-right button will show the current status that either a profile is used or no profile is used. Click the button to show the Profile Manager dialog. Profile Manager Use this hotkey with current settings Choose to use no profile and set a hotkey for all captures. It will use the currently selected settings on the From and To tab to capture. Use profile Choose to use a profile. Some profile details are listed on the right as the From and To settings. All profiles are listed and currently selected profile is highlighted. 40

41 Sync with current settings It will use the currently selected settings on the From and To tab to update the selected profile (Profile name and hotkey will not change). Add New Profile It will use the currently selected settings on the From and To tab to create a profile with your name and hotkey choices. Change You can select a profile and change the Profile Name and Hotkey. Export A profile can be exported to an external file that you can use it later or somewhere else. The Profile file is in the XML format. Import You can import and use any profile file exported previously. You may click the Up and Down buttons to change the order. You can Delete a profile by highlighting the profile and clicking this button. 41
, properties panel and main workspace.")
42 Image Editor ScreenHunter Image Editor is an intuitive and versatile multiple image editor. It's a unique combination of a bitmap and vector object editor. Image Editor interface is made up of four major elements: the menu & toolbar, tools panel (bitmap tools and object tools), properties panel and main workspace. On top of your captured image as bitmap, you can add drawing objects such as arrows and bubbles and adding text. It comes with an array of bitmap editing features, such as cropping to shape and advanced image processing. As well, you will find object features like adding boxes, highlighting cycles, symbols and speech bubbles. When you first launch ScreenHunter Image Editor, the main workspace displays nothing. Once you capture or open an image, the menu and panels become activated for you to use. 42


43 Menu & Toolbar ScreenHunter Image Editor menu and toolbar provide a convenient way for viewing and editing captures. Main Menu After a capture is copied to the editor or an image is loaded, the main menu will be available to use. To avoid confusion, depending on your current selection, either a bitmap or object selection, unavailable menu items will be disabled (grayed out). File A standard file menu with all image file related items are listed. Edit Editing menu items are for the bitmap and objects, depending your current selection. View This assigns which elements are visible, or what kind of zooming you set for viewing the image. 43


44 Bitmap More bitmap related operations can be found here. Objects More vector object related operations can be found here. Window Standard windows arrangement menu items. Toolbar Buttons View 44
45 Menu Item Press Key Function Ctrl++ or Enlarge image and objects (Scales: 150%, 200%, 400%, 800%, Zoom In Ctrl+= 1600%) Zoom Out Ctrl+- Reduce image and objects (Scales: 13%, 25%, 50%, 75%) Actual Size Ctrl+1 Back to 100% image and objects Fit to Window Smooth Zooming Show Grid Full Screen Enlarge or reduce to fit the View window, keeping the aspect ratio. When this is checked, Zoom In and Out are not available. Check if you want to have smooth effect when zooming. Otherwise, it will show each actual pixel when zoomed in. Check if you want to show grid when zoomed in 400% and more. Shift+Alt+Enter Toggle in the full screen mode. Hold down the Shift and Alt keys together and press Enter to toggle the mode. 45

46 Bitmap Editing 1: Bitmap Tools A bitmap (or raster) image is one of the two major graphic types (the other being vector objects). A bitmaps is composed of small colored dots called pixels in a grid. A photo or your screenshot is a bitmap. ScreenHunter Image Editor combines the functionality of photo-editing, painting and vectordrawing in one easy-to-use user interface. You can take your screenshot and edit it by drawing and painting with bitmap tools, by converting vector objects to bitmap images, or by opening or importing images. It has a powerful set of features for tone and color adjustment, as well as a number of ways to retouch your bitmap screenshots, including cropping, resizing, border adding and rotation. In addition, Image Editor has a set of artistic effect tools--dilate, Edge, Erode and Jitter. Bitmap Tools Panel Pixel Selection Tools The pixel selection tools draw selection marquees that define the area of selected pixels. After you draw the selection marquee, you can manipulate it by moving it, cut, copy, or apply other adjustments to the area selected, or delete pixels without affecting the pixels beyond the selection. The Marquee tool selects a rectangular area of pixels in an image. 46

47 The Lasso tool selects a freehand area of pixels in an image. Cropping and Resizing Tools The crop tools enables us to remove unwanted areas of an image. After an area is selected by one of the selection tools, you can click this cropping tool to crop right away. Crop to shape or resize image... Click this button to crop the entire image or a selected area to a shape or, resize the whole image. Select the options on the following dialog and click OK to finish. Crop to shape You can crop to a shape from the list as "cookie cutters". You can use the selection tools to select an area first. If no area is selected, it will apply to the whole image. 47

48 E.g. Resize the whole image Resize the entire image with your choice. Keep aspect ratio Choose to resize the image while keeping the aspect ratio. o To this width Resize to match this width in pixels. o To this height Resize to match this height in pixels. o Percentage Resize to this percentage. Zoomed to this fixed size Choose to zoom to this size regardless of the aspect ratio. Add space to sides, not zoomed Enter the number of pixels to the sizes you want to add space. Paint Tools The Flood Fill tool fills the pixels that you click, and neighboring pixels of similar color, with the Flood color and opacity set below. Flood Fill Tolerance Neighboring pixels are only filled if their values fall within this range. So it can be used as a magic wand. Eg. Click on the snowboard (both with 100% opacity) With 10% tolerance With 50% tolerance. 48


49 The Brush tool is for painting brush strokes on the image. It uses the width, color and opacity set below. Brush Width Flood Fill Color You can click and pick any color on your screen using the color picker. Brush Color You can click and pick any color on your screen using the color picker. The Flood Fill and Brush Opacity (2%: Mostly transparent - 100%: Complete opaque) 49

50 More bitmap features on the next section. 50


51 Bitmap Editing 2: Bitmap Menu More bitmap editing features are available from the Bitmap menu. Bitmap Menu Artistic Effects Sub Menu Menu Item Function Crop Selected Area Crop to Shape & Resize... Click here to see the details. 51


52 Add Border... Similar to adding a border to your capture right away on the To tab, you can add a border to your capture later or to any image. You can set width and choose a style and colors. Shadow Glow Fade 3D 52


53 Rotate Left Rotate Right Mirror On the Rotate dialog, you can choose a degree to rotate and a background color. Rotation will always apply to the whole image, not a selection. Flip Rotate... Brightness & Contrast... You can make a selection and then apply the brightness & contrast changes through the dialog. If no selection is made, it will apply to the whole image. 53


54 RGB & Hue... You can make a selection and then apply the color changes through the dialog. Smoothness... You can make a selection and then apply the smoothness changes through the dialog. 54


55 Gamma Correction... You can make a selection and then apply the Gamma Correction through the dialog. Threshold... You can make a selection and then apply the Threshold changes through the dialog. Auto Levels Gray Scale You can use Auto Levels to make tonal range adjustments for a selection or the whole image. It will adjust highlights, midtones, and shadows automatically. You can make it gray for a selection or the whole image. 55


56 Negative You can make it negative for a selection or the whole image. Artistic Effects Sub Menu You can add noise for a selection or the whole image. Add Noise Each time you choose the menu, it will add noise on top of the current image. 56
57 You can add a patterned glass effect for a selection or the whole image. Patterned Glass Dilate You can add a dilate effect for a selection or the whole image. Edge You can add an edge effect for a selection or the whole image. 57

58 Emboss You can add an emboss effect for a selection or the whole image. Erode You can add an erode effect for a selection or the whole image. 58
59 Jitter You can add a jitter effect for a selection or the whole image. Median You can add a median effect for a selection or the whole image. 59


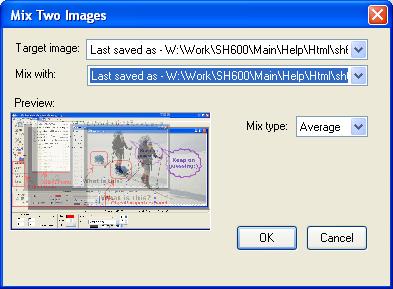
60 You can change the color depth of an image through the dialog. Change Bit Depth (Bpp)... You can count the number of colors used in an image. Count Colors Mix Two Images... You can mix two images together to be one new image. You can choose a mix type from the drop-down box. This menu item will be available only when there are two or more images open in the image editor. 60
61 61

62 Object Editing 1: Object Tools Rather than painting directly on an image, you can draw a vector object on a layer that is composited over the image. Object drawing is a shape-based process where every line, brush stroke, and shape is editable. Object Tools and Properties Panel ScreenHunter has many tools for drawing vector objects. You can draw basic shapes, arrows, freehand paths, load symbols and pictures. Once an object is created or selected, the Properties panel displays the properties of the currently selected objects, and changes depending on the type of object selected. The Object Selection tool selects one or more objects. Before you can do anything with any object, you must use this tool to select it. Once an object is selected, the properties panel displays the properties of the object and you can make changes on the panel. [To select an object] Click the object 62

63 Drag an selection area around the objects To add an object to the selection, hold down the Shift key and click the object To toggle an object in the selection, hold down the Ctrl key and click the object All objects can be converted to the bitmap. Once they are converted, painted, they become part of the bitmap and not editable anymore. Objects The Arrow and Line tool [To draw a vector object] 1. Click the object tool, e.g. arrow and line tool. It will appear as pressed down. 2. Point your mouse to the starting point on the image and press down the left mouse button. 3. Keep pressing down the mouse button and drag cross to the end point and release the left button. 4. Don't worry about the color, size or position of the object, you can change that on the properties panel. The last changed property values will be used as the default values to create a new object, such as Line Width, Color, etc. The Rectangle tool You can add text to any rectangles, round rectangles, ellipses, bubbles and shapes. [To add & edit text on an object] 1. Select the object, e.g. rectangle. 2. Do any of the following, o Double-click the object o Press the Enter key or o Press the Space key or o Press Ctrl + Alt + T or o Select from the Objects menu 63


64 The Round Rectangle tool To adjust the roundness, drag the yellow handle and move. You can add a drop shadow to any rectangles, round rectangles, ellipses and pictures. The Ellipse tool Please see the Rectangle and Round Rectangle tool for details. The Bubble tool 64


65 It uses the same way to add text as for rectangles above. The Shape tool You can change angle, sides color, and etc, on the Properties Panel. To adjust the side width, drag the yellow handle and move. The Freehand Line tool 65
66 To adjust the curves, drag a blue handle and move. The Symbol tool Symbols are like icons that you can place anywhere as an object. When the Symbol tool is clicked, you can choose a symbol from the Symbol Picker dialog. The Symbol group dropdown lists the available symbols. 66

67 To change a symbol that has been created, you can double-click on the symbol or click the Change Symbol button on the Properties Panel to change. The Picture tool A picture can be loaded using the Picture tool. As a picture object, you can resize and place anywhere on the image and remain float. 67

68 On the Properties Panel, When Lock size is checked, the picture will be kept in the original size and not resizable. When Lock aspect radio is checked, the picture can be resized but the width and height aspect ratio will be kept as in the original picture. Check Drop shadow to add a drop shadow. You can add a drop shadow to any rectangles, round rectangles, ellipses and pictures. 68
69 Object Editing 2: Object Menu More object editing features are available from the Object menu. Object Menu Menu Item Function Add & Edit Text Convert Objects to Bitmap Select All Objects Bring to Front Bring Forward Send Backward Send Back See above for details. When one or more objects are selected, you can convert them to bitmap. Once they are converted, painted, they become part of the bitmap and they are not editable anymore. If there is more than one object and when they overlap, ScreenHunter stacks objects based on the order in which they were created, placing the most recently created object on the top of the stack. You can change the order by selecting the object and choosing the menu items. Eg. for the blue start object order: Bring to Front Send Backward 69


70 Send Back Bring Forward Align Left You can select more than one object and apply the alignment functions. Alignment menu items are only available when there is more than one object selected. The red color handles indicate the first selected object and it is also the anchor object. 70


71 Align Center Vertically You can select more than one object and apply the alignment functions. Align Right You can select more than one object and apply the alignment functions. Align Top You can select more than one object and apply the alignment functions. 71


72 Align Center Horizontally You can select more than one object and apply the alignment functions. Align Bottom You can select more than one object and apply the alignment functions. Make Same Width You can select more than one object and apply the sizing functions. Make Same Height Make Same Size These items are only available when there is more than one object selected. The red color handles indicate the first selected and also anchor object. File Formats You can save your capture in any of the main file formats. You can also read other image files in Image Editor. Main File Format Extension Read Save File Format 72
73 .SHF ScreenHunter File This is a native ScreenHunter created file that keeps all objects editable when you read next time..bmp Windows Bitmap, the Microsoft Windows graphic file format, is a common file format used to display bitmap images. JPEG is a commonly used graphic file format. It was developed by the Joint Photographic Experts Group specifically for photographic or highcolor images. JPEG supports true colors (24-bit)..JPG JPG uses lossy compression. Lossy means that some image quality is lost when the JPG data is compressed and saved, and this quality can never be recovered. You can choose 1-100% for the quality factor, with 100 being no loss. GIF, or Graphics Interchange Format, is a popular web graphic format. GIFs contain a maximum of 256 colors. GIFs can also contain a transparent area and multiple frames for animation. Images with areas of solid color compress best when exported as GIFs. A GIF is usually ideal for cartoons, logos, graphics with transparent areas, and animations. You can use another our product, MotionGIF, to create animated GIF files..gif You can choose a different conversion algorithm to convert a high quality GIF. SOLID COLOR Closest match Median cut Neural Speed Fast Fastest Faster Image Quality Best Good Better DITHERED COLOR Error diffusion Floyd-Steinberg Uniform Speed Fast Faster Fastest Image Quality Best Good Better.PNG.TIF.PDF PNG, or Portable Network Graphic, is a newer format, designed to be both a lossless and royalty free web graphic format. A PNG can support up to 32-bit color. TIFF, or Tagged Image File Format, is a graphic format used for storing bitmap images. TIFFs are most commonly used in print publishing. Many multimedia applications also accept imported TIFF graphics. PDF, Portable Document format, a file format developed by Adobe Systems. PDF is also a common format to view and print. To view a file in PDF format, you need Adobe Reader, a free application by Adobe Systems. 73
74 Other Image Files Supported to Read Extension.ICO.CUR.ANI.TGA.PCX.PGM.DIB.RLE.WMF File Format Windows Icon Windows Cursor Animated Cursor or Animated GIF Truevision Advanced Raster Graphics Adapter (TARGA) PC Paintbrush format from ZSoft Corporation Portable Greymap format Microsoft Device Independent Bitmap Microsoft Run Length Encoding Windows Metafile 74

75 Tasks Tab The Tasks tab groups additional tasks, help information and version related items on a single tab. Tasks Group Image Editor ScreenZoom Web Capture Color Picker Open Image Open an existing image file to Image Editor to view and edit. ScreenHunter supports 16 popular image file formats. You can convert images to optimized JPEG, GIF, TIFF and PNG files. You can also drag & drop multiple image files from your desktop or Explorer. Add to Windows Startup... 75

76 Remove from Startup... Exit End the program and exit ScreenHunter completely. Help Group User Guide Show the external ScreenHunter help file. Getting Started Show the short guide of the external HTML file. Online Support Center Go to the online Support Center on the web. Wisdom-soft.com Website Go to License Group Register Show the license key dialog. If it has been licensed, this link will be grayed out. 76
77 Upgrade Go to the latest download page on web. About ScreenHunter 6 Pro Show the About box. 77

78 ScreenZoom & ScreenDraw ScreenHunter ScreenZoom provides a convenient way to enlarge your screen anytime to see what's going on on the screen and draw lines and notes on the screen. This can be integrated into your demo, discussion and training sessions, etc. You also can "freeze" the screen and directly draw on it by using ScreenDraw. To enlarge the screen, run ScreenZoom Press your ScreenZoom hotkey to enlarge, and you can then draw or highlight it on screen. To draw on the screen without ScreenZoom Press your ScreenDraw hotkey to enter the mode, and you can draw on screen. To cancel the ScreenZoom or ScreenDraw mode Press one of the following to cancel, The hotkey again Right-click the mouse The Esc key The Space key 78

79 ScreenZoom Settings Click the settings button beside the ScreenZoom link in the Tasks group on the Tasks tab to set up. Use these hotkeys to start/stop This group is for setting up the hotkeys you press on your keyboard to start or stop zooming the screen, or just ScreenDraw. Click the buttons to change the hotkeys. Change the pen color or clear You can press these keys on your keyboard to change the pen color when it's in the ScreenZoom or ScreenDraw mode. Change the pen width (2-14) You can press these arrow keys on your keyboard to change the pen width when it's in the ScreenZoom or ScreenDraw mode. The width can be 2 to 14 pixels. 79

80 Web Capture ScreenHunter Web Capture provides a convenient way to search and download images from a website on the Internet. URL Enter the website URL. Limit to this page plus 0-99 levels below Check to set the search level. Uncheck to search all from this page. Folder and button Assign the location where the downloaded files will be saved. Use this folder to store all files Select to use this folder to store all files. Overwrite files Check to overwrite files with the same filename. When it's unchecked, a new filename will be created if the file exists. Create a hierarchy of folders to store files Select to use the website name to create a new folder and store files according to the website structure. Store image files only Check to download image files only, no html files. Load images into Image Editor Automatically load downloaded image files into Image Editor. 80
81 On the Options tab, if Keep only the last 30 images is checked, Image Editor will keep only the latest 30 images and discard the old ones. If not checked, the maximum number of images can be kept in Image Editor is 100. Start Press to start searching and downloading. The current status is displayed at left. Stop Press to stop the process when it's started. Close Press to close the dialog. 81

82 Color Picker Wisdom-soft Color Picker provides a convenient way to pick a color anywhere on your screen. It shows both the RGB and hexadecimal color code. Pick color on screen Press down Press, Move-n-Pick and holding down your left mouse button. Then, move your mouse to anywhere on the screen where you want to pick a color from, and release the mouse button. Hide this when picking Check to hide the dialog when picking up a color on the screen. You can also enter a color code to set the color. You can select and copy the RGB field values to suit your needs. 82
ScreenHunter 7.0 Pro Help File
 ScreenHunter 7.0 Pro Help File 2017 Wisdom Software Inc. All rights reserved. Designated trademarks and brands are the property of their respective owners. Notice of Non-Liability Wisdom Software Inc.
User Guide Belltech Systems, LLC
 User Guide Belltech Systems, LLC http://www.belltechsystems.com May, 2006 1. Introducing Belltech CaptureXT 2. Installation and Uninstallation Installation Running the Application Uninstallation 3. User
Notice of Non-Liability
 Product Version: 5 Pro 2000-2006 Wisdom Software Inc. All rights reserved. Designated trademarks and brands are the property of their respective owners. Notice of Non-Liability Wisdom Software Inc. and
BASICS OF MOTIONSTUDIO
 EXPERIMENT NO: 1 BASICS OF MOTIONSTUDIO User Interface MotionStudio combines draw, paint and animation in one easy easy-to-use program gram to save time and make work easy. Main Window Main Window is the
How To Capture Screen Shots
 What Is FastStone Capture? FastStone Capture is a program that can be used to capture screen images that you want to place in a document, a brochure, an e-mail message, a slide show and for lots of other
How To Capture Screen Shots
 What Is FastStone Capture? FastStone Capture is a program that can be used to capture screen images that you want to place in a document, a brochure, an e-mail message, a slide show and for lots of other
An easy and powerful screen recorder to record your screen actions to Flash movies!
 2002-2006 All rights reserved. An easy and powerful screen recorder to record your screen actions to Flash movies! AutoScreenRecorder 2.1 Pro is an easy-to-use and powerful screen recording software for
Adobe Photoshop Sh S.K. Sublania and Sh. Naresh Chand
 Adobe Photoshop Sh S.K. Sublania and Sh. Naresh Chand Photoshop is the software for image processing. With this you can manipulate your pictures, either scanned or otherwise inserted to a great extant.
Getting Started Guide
 SnagIt Getting Started Guide Welcome to SnagIt Thank you for your purchase of SnagIt. SnagIt is the premier application to use for all of your screen capturing needs. Whatever you can see on your screen,
Getting Started. Microsoft QUICK Source 7
 Microsoft QUICK Windows Source 7 Getting Started The Windows 7 Desktop u v w x u Icon links to a program, file, or folder that is stored on the desktop. v Shortcut Icon links to a program, file, or folder
User Guide 701P Wide Format Solution Wide Format Scan Service
 User Guide 701P44865 6204 Wide Format Solution Wide Format Scan Service Xerox Corporation Global Knowledge & Language Services 800 Phillips Road Bldg. 845-17S Webster, NY 14580 Copyright 2006 Xerox Corporation.
FactoryLink 7. Version 7.0. Client Builder Reference Manual
 FactoryLink 7 Version 7.0 Client Builder Reference Manual Copyright 2000 United States Data Corporation. All rights reserved. NOTICE: The information contained in this document (and other media provided
Microsoft PowerPoint 2013 Beginning
 Microsoft PowerPoint 2013 Beginning PowerPoint Presentations on the Web... 2 Starting PowerPoint... 2 Opening a Presentation... 2 File Tab... 3 Quick Access Toolbar... 3 The Ribbon... 4 Keyboard Shortcuts...
Adding Objects Creating Shapes Adding. Text Printing and Exporting Getting Started Creating a. Creating Shapes Adding Text Printing and Exporting
 Getting Started Creating a Workspace Pages, Masters and Guides Adding Objects Creating Shapes Adding Text Printing and Exporting Getting Started Creating a Workspace Pages, Masters and Guides Adding Objects
AVS4YOU Programs Help
 AVS4YOU Help - AVS Document Converter AVS4YOU Programs Help AVS Document Converter www.avs4you.com Online Media Technologies, Ltd., UK. 2004-2012 All rights reserved AVS4YOU Programs Help Page 2 of 39
Creating Interactive PDF Forms
 Creating Interactive PDF Forms Using Adobe Acrobat X Pro for the Mac University Information Technology Services Training, Outreach, Learning Technologies and Video Production Copyright 2012 KSU Department
KODAK Software User s Guide. Software Version 9.0
 KODAK Create@Home Software User s Guide Software Version 9.0 Table of Contents 1 Welcome to KODAK Create@Home Software Features... 1-1 Supported File Formats... 1-1 System Requirements... 1-1 Software
Creating Vector Shapes Week 2 Assignment 1. Illustrator Defaults
 Illustrator Defaults Before we begin, we are going to make sure that all of us are using the same settings within our application. For this class, we will always want to make sure that our application
Table of Contents. Logos Imaging Application User s Manual Version Page 1
 Table of Contents About... 4 System Requirements... 5 Uninstall Previous Versions... 5 Install LIA 6.0... 6 Install the Device Drivers... 13 Register... 14 Getting Help... 14 Technical Support... 14 Workspace
Adobe Photoshop CS2 Reference Guide For Windows
 This program is located: Adobe Photoshop CS2 Reference Guide For Windows Start > All Programs > Photo Editing and Scanning >Adobe Photoshop CS2 General Keyboarding Tips: TAB Show/Hide Toolbox and Palettes
User Manual Version 1.1 January 2015
 User Manual Version 1.1 January 2015 - 2 / 112 - V1.1 Variegator... 7 Variegator Features... 7 1. Variable elements... 7 2. Static elements... 7 3. Element Manipulation... 7 4. Document Formats... 7 5.
What is Publisher, anyway?
 What is Publisher, anyway? Microsoft Publisher designed for users who need to create and personalize publications such as marketing materials, business stationery, signage, newsletters and other items
QUICK LOGO D E S I G N E R. User Manual
 QUICK LOGO D E S I G N E R User Manual Table Of Contents 1. Quick Logo Designer Overview 2. Logo Creation Methods 2.1 Create from Templates 2.2 Create a New Logo from Scratch 5 5 3. Creating and Saving
Getting Started Guide. Chapter 11 Graphics, the Gallery, and Fontwork
 Getting Started Guide Chapter 11 Graphics, the Gallery, and Fontwork Copyright This document is Copyright 2005 2008 by its contributors as listed in the section titled Authors. You may distribute it and/or
How to create interactive documents
 Adobe InDesign Guide How to create interactive documents You can use Adobe InDesign to create dynamic web content or interactive documents. InDesign supports export to web-ready HTML or interactive PDF.
Microsoft Word
 OBJECTS: Shapes (part 1) Shapes and the Drawing Tools Basic shapes can be used to graphically represent information or categories. The NOTE: Please read the Objects (add-on) document before continuing.
Chapter 11 Graphics, the Gallery, and Fontwork
 Getting Started Guide Chapter 11 Graphics, the Gallery, and Fontwork This PDF is designed to be read onscreen, two pages at a time. If you want to print a copy, your PDF viewer should have an option for
LinkMotion and CorelDraw 9, 10, 11, 12, X3, X4, X5, X6, X7 and X8:
 LinkMotion and CorelDraw 9, 10, 11, 12, X3, X4, X5, X6, X7 and X8: After you install LinkMotion software and set up all settings launch CorelDraw software. Important notes: Solustan s LinkMotion driver
KODAK Software User s Guide
 KODAK Create@Home Software User s Guide Table of Contents 1 Welcome to KODAK Create@Home Software Features... 1-1 Supported File Formats... 1-1 System Requirements... 1-1 Software Updates...1-2 Automatic
Contents. Introducing Clicker Paint 5. Getting Started 7. Using The Tools 10. Using Sticky Points 15. Free resources at LearningGrids.
 ClickerPaintManualUS.indd 2-3 13/02/2007 13:20:28 Clicker Paint User Guide Contents Introducing Clicker Paint 5 Free resources at LearningGrids.com, 6 Installing Clicker Paint, 6 Getting Started 7 How
USER GUIDE MADCAP CAPTURE 7. Getting Started
 USER GUIDE MADCAP CAPTURE 7 Getting Started Copyright 2018 MadCap Software. All rights reserved. Information in this document is subject to change without notice. The software described in this document
2010 by Microtek International, Inc. All rights reserved.
 2010 by Microtek International, Inc. All rights reserved. Microtek and DocWizard are trademarks of Microtek International, Inc. Windows is a registered trademark of Microsoft Corporation. All other products
HYPERSTUDIO TOOLS. THE GRAPHIC TOOL Use this tool to select graphics to edit. SPRAY PAINT CAN Scatter lots of tiny dots with this tool.
 THE BROWSE TOOL Us it to go through the stack and click on buttons THE BUTTON TOOL Use this tool to select buttons to edit.. RECTANGLE TOOL This tool lets you capture a rectangular area to copy, cut, move,
User Guide. DrawAnywhere.com: User Guide
 DrawAnywhere.com: User Guide DrawAnywhere.com is an online diagramming & flow charting application with the look & feel of a desktop application! User Guide http://www.drawanywhere.com August, 2007 Table
2. If a window pops up that asks if you want to customize your color settings, click No.
 Practice Activity: Adobe Photoshop 7.0 ATTENTION! Before doing this practice activity you must have all of the following materials saved to your USB: runningshoe.gif basketballshoe.gif soccershoe.gif baseballshoe.gif
Sending image(s) to report Click Send Snapshot on any screen in Dolphin3D and choose the Send to Report option
 to report Click Send Snapshot on any screen in Dolphin3D and choose the Send to Report option") Dolphin 3D Reports Sending image(s) to report Click Send Snapshot on any screen in Dolphin3D and choose the Send to Report option Creating a report step by step 1. Generate the desired images in Dolphin3D
Dolphin 3D Reports Sending image(s) to report Click Send Snapshot on any screen in Dolphin3D and choose the Send to Report option Creating a report step by step 1. Generate the desired images in Dolphin3D
Designer Reference 1
 Designer Reference 1 Table of Contents USE OF THE DESIGNER...4 KEYBOARD SHORTCUTS...5 Shortcuts...5 Keyboard Hints...5 MENUS...7 File Menu...7 Edit Menu...8 Favorites Menu...9 Document Menu...10 Item Menu...12
USER MANUAL Table of Contents Slide 00 of 66
 USER MANUAL 1.5 www.dgflick.com Table of Contents Slide 00 of 66 Table of Contents Table of Contents... 1 1.0. Getting Started... 2 1.1. What is Video Xpress Suite?... 3 1.2. System Requirements to Run
BDM s Annotation User Guide
 ETS :Foothill De Anza CC District April 17, 2014 1 BDM s Annotation User Guide Users with Read/Write access can annotate (markup) documents if they retrieve the document using Microsoft s Internet Explorer
Photoshop Basics A quick introduction to the basic tools in Photoshop
 Photoshop Basics A quick introduction to the basic tools in Photoshop Photoshop logo courtesy Adobe Systems Inc. By Dr. Anthony R. Curtis Mass Communication Department University of North Carolina at Pembroke
SMART Meeting Pro 4.2 personal license USER S GUIDE
 smarttech.com/docfeedback/170973 SMART Meeting Pro 4.2 personal license USER S GUIDE Product registration If you register your SMART product, we ll notify you of new features and software upgrades. Register
GOM Cam User Guide. Please visit our website (cam.gomlab.com) regularly to check out our. latest update.
 regularly to check out our. latest update.") GOM Cam User Guide Please visit our website (cam.gomlab.com) regularly to check out our latest update. From screen recording to webcam video and gameplay recording GOM Cam allows you to record anything
GOM Cam User Guide Please visit our website (cam.gomlab.com) regularly to check out our latest update. From screen recording to webcam video and gameplay recording GOM Cam allows you to record anything
HAPPY HOLIDAYS PHOTO BORDER
 HAPPY HOLIDAYS PHOTO BORDER In this Photoshop tutorial, we ll learn how to create a simple and fun Happy Holidays winter photo border! Photoshop ships with some great snowflake shapes that we can use in
Corel Draw 11. What is Vector Graphics?
 Corel Draw 11 Corel Draw is a vector based drawing that program that makes it easy to create professional artwork from logos to intricate technical illustrations. Corel Draw 11's enhanced text handling
User Manual Portable Laptop Console Crash Cart Adapter
 User Manual Portable Laptop Console Crash Cart Adapter GUC211V PART NO. M1458 www.iogear.com 2017 IOGEAR. All Rights Reserved. Part No. M1458. IOGEAR, the IOGEAR logo is trademarks of IOGEAR. Microsoft
Snagit Help Version 13.1 February 2017
 Snagit Help Version 13.1 February 2017 All rights reserved This manual, as well as the software described in it, is furnished under license and may be used or copied only in accordance with the terms of
Microsoft Office Publisher
 Microsoft Office 2007- Publisher Opening Microsoft Publisher Using the Start Menu, click on All Programs and navigate to the Microsoft Office folder. Click on Microsoft Office Publisher 2007. Choosing
Work with Shapes. Concepts CHAPTER. Concepts, page 3-1 Procedures, page 3-5
 3 CHAPTER Revised: November 15, 2011 Concepts, page 3-1, page 3-5 Concepts The Shapes Tool is Versatile, page 3-2 Guidelines for Shapes, page 3-2 Visual Density Transparent, Translucent, or Opaque?, page
Motic Images Plus 3.0 ML Software. Windows OS User Manual
 Motic Images Plus 3.0 ML Software Windows OS User Manual Motic Images Plus 3.0 ML Software Windows OS User Manual CONTENTS (Linked) Introduction 05 Menus and tools 05 File 06 New 06 Open 07 Save 07 Save
SnagIt 9.0. Help File PDF By TechSmith Corporation
 SnagIt 9.0 Help File PDF By TechSmith Corporation TechSmith License Agreement TechSmith Corporation provides this manual "as is", makes no representations or warranties with respect to its contents or
Starting Photoshop and Uiewing the Workspace
 UNIT Photoshop CS4 Starting Photoshop and Uiewing the Workspace STEPS The Application bar may appear as two rows, depending on your monitor resolution and if you are using a Macintosh. You can click the
Microsoft PowerPoint 2010 Beginning
 Microsoft PowerPoint 2010 Beginning PowerPoint Presentations on the Web... 2 Starting PowerPoint... 2 Opening a Presentation... 2 File Tab... 3 Quick Access Toolbar... 3 The Ribbon... 4 Keyboard Shortcuts...
How to...create a Video VBOX Gauge in Inkscape. So you want to create your own gauge? How about a transparent background for those text elements?
 BASIC GAUGE CREATION The Video VBox setup software is capable of using many different image formats for gauge backgrounds, static images, or logos, including Bitmaps, JPEGs, or PNG s. When the software
Edupen Pro User Manual
 Edupen Pro User Manual (software for interactive LCD/LED displays and monitors) Ver. 3 www.ahatouch.com Some services in Edupen Pro require dual touch capability. In order to use dual touch, your computer
Software User's Guide
 Software User's Guide The contents of this guide and the specifications of this product are subject to change without notice. Brother reserves the right to make changes without notice in the specifications
Programme. Introduction to Animation Shop
 HEART Trust NTA Vocational Training Development Institute Programme Course Animations Learning Objectives: Use the animation tools Prepare for an animation Create an animation with animation
Virtual MODELA USER'S MANUAL
 Virtual MODELA USER'S MANUAL Virtual MODELA is a program that simulates the movement of the tool on the screen. Contents Contents Part 1 Introduction 1-1 System Requirements... 4 1-2 Overview of Virtual
Adobe Flash CS4 Part 1: Introduction to Flash
 CALIFORNIA STATE UNIVERSITY, LOS ANGELES INFORMATION TECHNOLOGY SERVICES Adobe Flash CS4 Part 1: Introduction to Flash Fall 2010, Version 1.0 Table of Contents Introduction...3 Downloading the Data Files...3
Using SymPrint to Make Overlays, Templates & More...
 Welcome to SymPrint SymPrint is an easy-to-use tool for creating communication overlays, worksheets, classroom activities and more using a modern toolbar and common-sense interface modeled after the programs
Industrial Centre The Hong Kong Polytechnic University
 Industrial Centre The Hong Kong Polytechnic University Microsoft Image Composer 1.5 Simon C.S. Hui Kevin H.K. Yip Creating graphic for web page using Microsoft Image Composer 1.5 Background : Image Composer
VHSE - COMPUTERISED OFFICE MANAGEMENT MODULE III - Communication and Publishing Art - PageMaker
 INTRODUCTION : It is one Adobe PageMaker 7.0 software is the ideal page layout program for business, education, and small- and home-office professionals who want to create high-quality publications such
Getting Started Guide. Chapter 11 Graphics, the Gallery, and Fontwork
 Getting Started Guide Chapter 11 Graphics, the Gallery, and Fontwork Copyright This document is Copyright 2005 2010 by its contributors as listed below. You may distribute it and/or modify it under the
How to create shapes. Drawing basic shapes. Adobe Photoshop Elements 8 guide
 How to create shapes With the shape tools in Adobe Photoshop Elements, you can draw perfect geometric shapes, regardless of your artistic ability or illustration experience. The first step to drawing shapes
OpenForms360 Validation User Guide Notable Solutions Inc.
 OpenForms360 Validation User Guide 2011 Notable Solutions Inc. 1 T A B L E O F C O N T EN T S Introduction...5 What is OpenForms360 Validation?... 5 Using OpenForms360 Validation... 5 Features at a glance...
Quick Guide for Photoshop CS 6 Advanced June 2012 Training:
 3. If desired, click the desired tab to see the differences. Photoshop CS 6 Advanced Changing Workspace Note: Changing Workspace will change the Panel Group appears on the screen. The default Workspace
hdalbum User Designer Guide Collect Create Share Designer V 1.2
 hdalbum User Designer Guide 2017 Collect Create Share Designer V 1.2 Table of Contents Contents Welcome to the hdalbum Designer... 2 Features... 2 System Requirements... 3 Supported File Types... 3 Installing
EUROPEAN COMPUTER DRIVING LICENCE / INTERNATIONAL COMPUTER DRIVING LICENCE IMAGE EDITING
 EUROPEAN COMPUTER DRIVING LICENCE / INTERNATIONAL COMPUTER DRIVING LICENCE IMAGE EDITING The European Computer Driving Licence Foundation Ltd. Portview House Thorncastle Street Dublin 4 Ireland Tel: +
MS Publisher 2007: Graphics. Lesson Notes Author: Pamela Schmidt
 MS Publisher 2007: Graphics Lesson Notes Author: Pamela Schmidt Auto Shapes When a shape tool is selected, a precision pointer (cross hair) will appear when the mouse pointer is taken over the document.
SMART Meeting Pro PE 4.1 software
 Help us make this document better smarttech.com/feedback/170973 SMART Meeting Pro PE 4.1 software USER S GUIDE Product registration If you register your SMART product, we ll notify you of new features
Chapter 6 Formatting Graphic Objects
 Impress Guide Chapter 6 OpenOffice.org Copyright This document is Copyright 2007 by its contributors as listed in the section titled Authors. You can distribute it and/or modify it under the terms of either
Keyboard Shortcuts. Command Windows Macintosh
 S00ILCS5.qxp 3/19/2010 1:11 AM Page 477 Keyboard Shortcuts k Adobe Illustrator CS5 If a command on a menu includes a keyboard reference, known as a keyboard shortcut, to the right of the command name,
Overview of Adobe Fireworks
 Adobe Fireworks Overview of Adobe Fireworks In this guide, you ll learn how to do the following: Work with the Adobe Fireworks workspace: tools, Document windows, menus, and panels. Customize the workspace.
ILLUSTRATOR TUTORIAL-1 workshop handout
 Why is Illustrator a powerful tool? ILLUSTRATOR TUTORIAL-1 workshop handout Computer graphics fall into two main categories, bitmap graphics and vector graphics. Adobe Illustrator is a vector based software
IMAGE STUDIO LITE. Tutorial Guide Featuring Image Studio Analysis Software Version 3.1
 IMAGE STUDIO LITE Tutorial Guide Featuring Image Studio Analysis Software Version 3.1 Notice The information contained in this document is subject to change without notice. LI-COR MAKES NO WARRANTY OF
Matrox MuraControl for Windows
 Matrox MuraControl for Windows User Guide (for software version 6.00) 20179-301-0600 2017.09.25 Contents About this user guide... 6 Using this guide... 6 More information... 6 Overview... 7 Supported Matrox
Getting Acquainted with Paint Shop Pro X Meet Paint Shop Pro for the First Time p. 3 What Computer Hardware Do I Need? p. 4 Should I Upgrade or
 Acknowledgments p. xvii Introduction p. xix Getting Acquainted with Paint Shop Pro X Meet Paint Shop Pro for the First Time p. 3 What Computer Hardware Do I Need? p. 4 Should I Upgrade or Replace My Hardware?
AL-1633/1644 Online Manual Start
 AL-6/6 Online Manual Start Click this "Start" button. Introduction This manual describes the printer and scanner functions of the AL-6/6 digital multifunctional system. For information on the following
Creating Digital Illustrations for Your Research Workshop III Basic Illustration Demo
 Creating Digital Illustrations for Your Research Workshop III Basic Illustration Demo Final Figure Size exclusion chromatography (SEC) is used primarily for the analysis of large molecules such as proteins
Microsoft PowerPoint 2007 Beginning
 Microsoft PowerPoint 2007 Beginning Educational Technology Center PowerPoint Presentations on the Web... 2 Starting PowerPoint... 2 Opening a Presentation... 2 Microsoft Office Button... 3 Quick Access
ACDSee Video Studio User Guide. Contents
 Contents Welcome to ACDSee Video Studio 2 Creating, Saving, and Sharing Projects 3 Adding and Removing Media 4 Organizing, Adjusting, and Displaying Media 7 Timeline Tracks 7 Copying and Pasting Properties
SETTINGS AND WORKSPACE
 ADOBE ILLUSTRATOR Adobe Illustrator is a program used to create vector illustrations / graphics (.ai/.eps/.svg). These graphics will then be used for logos, banners, infographics, flyers... in print and
Cropping an Image for the Web
 Cropping an Image for the Web This guide covers how to use the Paint software included with Microsoft Windows to crop images for use on a web page. Opening Microsoft Paint (In Windows Accessories) On your
Breeze User Guide. Breeze Multiple Stream Video Processors. Light and Standard Editions Version 5.3.2
 Breeze User Guide Breeze Multiple Stream Video Processors Light and Standard Editions Version 5.3.2 Copyright 1989-2007 Discovery Scientific, LLC All rights reserved www.discoverybiz.net January 01, 2007
Inserting Information into PowerPoint
 LESSON 6 6.1 Inserting Information into PowerPoint After completing this lesson, you will be able to: Change the layout of a slide. Insert a clip art image. Scale an image. Insert and format a table. Insert
Google LayOut 2 Help. Contents
 Contents Contents... 1 Welcome to LayOut... 9 What's New in this Release?... 10 Learning LayOut... 12 Technical Support... 14 Welcome to the LayOut Getting Started Guide... 15 Introduction to the LayOut
To learn how to use Focus in Pix:
 Welcome To learn how to use Focus in Pix: Step-by-step guide Visit www.focusinpix.com/quick-guide for a quick overview of Focus in Pix software. You will also find many tips and tutorials on our site.
Libraries. Multi-Touch. Aero Peek. Sema Foundation 10 Classes 2 nd Exam Review ICT Department 5/22/ Lesson - 15
 10 Classes 2 nd Exam Review Lesson - 15 Introduction Windows 7, previous version of the latest version (Windows 8.1) of Microsoft Windows, was produced for use on personal computers, including home and
Software User's Guide
 Software User's Guide The contents of this guide and the specifications of this product are subject to change without notice. Brother reserves the right to make changes without notice in the specifications
L E S S O N 2 Background
 Flight, Naperville Central High School, Naperville, Ill. No hard hat needed in the InDesign work area Once you learn the concepts of good page design, and you learn how to use InDesign, you are limited
The Fundamentals. Document Basics
 3 The Fundamentals Opening a Program... 3 Similarities in All Programs... 3 It's On Now What?...4 Making things easier to see.. 4 Adjusting Text Size.....4 My Computer. 4 Control Panel... 5 Accessibility
Unit 21 - Creating a Navigation Bar in Macromedia Fireworks
 Unit 21 - Creating a Navigation Bar in Macromedia Fireworks Items needed to complete the Navigation Bar: Unit 21 - House Style Unit 21 - Graphics Sketch Diagrams Document ------------------------------------------------------------------------------------------------
Expression Design Lab Exercises
 Expression Design Lab Exercises Creating Images with Expression Design 2 Beaches Around the World (Part 1: Beaches Around the World Series) Information in this document, including URL and other Internet
OnPoint s Guide to MimioStudio 9
 1 OnPoint s Guide to MimioStudio 9 Getting started with MimioStudio 9 Mimio Studio 9 Notebook Overview.... 2 MimioStudio 9 Notebook...... 3 MimioStudio 9 ActivityWizard.. 4 MimioStudio 9 Tools Overview......
BASICS OF PIXLR EDITOR
 BASICS OF PIXLR EDITOR Pixlr is a website which you can edit your images professionally. It is a cloud cased system and founded in Sweden. It is similar to Photoshop (but it s free to use online) and you
Intermediate/Advanced. Faculty Development Workshop FSE Faculty retreat April 18, 2012
 Intermediate/Advanced Faculty Development Workshop FSE Faculty retreat April 18, 2012 Remote Desktop Sharing Quick Reference Guide for Moderators The Moderator or a Participant may request control of another
W-E
 Signage Suite V2.20 User Guide 605220-02-01-W-E-051613-02 Trademarks Windows XP, Windows Vista, Windows 7, and Microsoft are registered trademarks of Microsoft Corporation. All other trademarks are the
Adding Art to Office Documents
 Adding Art to Office Documents Introduction What You ll Do Although well-illustrated documents can t make up for a lack Locate and Insert an Online Picture of content, you can capture your audiences attention
WINDOWS NT BASICS
 WINDOWS NT BASICS 9.30.99 Windows NT Basics ABOUT UNIVERSITY TECHNOLOGY TRAINING CENTER The University Technology Training Center (UTTC) provides computer training services with a focus on helping University
Quick Guide for Photoshop CC Basics April 2016 Training:
 Photoshop CC Basics Creating a New File 1. Click File > New 2. Keep Default Photoshop Size selected in the Preset drop-down list. 3. Click OK. Showing Rulers 1. On the Menu bar, click View. 2. Click Rulers.
MANUAL NO. OPS647-UM-151 USER S MANUAL
 MANUAL NO. OPS647-UM-151 USER S MANUAL Software Usage Agreement Graphtec Corporation ( Graphtec ) hereby grants the purchaser and authorized User (the User ) the right to use the software (the Software