Construction Planning and Programming
|
|
|
- Norman Dylan Morrison
- 6 years ago
- Views:
Transcription


1 Construction Planning and Programming Course Notes CFO/ IVN - Revision /2010
2 Blank page
3 Index CHAPTER 1. INTRODUCTION & OBJECTIVES INTRODUCTION CANDY PLANNING OBJECTIVES COURSE OBJECTIVES...1 CHAPTER 2. STARTING UP STARTING CANDY COMPANIES AND THE COMPANY MANAGER CREATING A NEW COMPANY CREATE A NEW HEADING CREATING A NEW JOB...4 CHAPTER 3. CANDY PLANNING MODULE & PROGRAM MANAGER CANDY MENU BAR PROGRAM MANAGER CREATING A NEW PROGRAM...7 CHAPTER 4. CALENDAR ADDITIONAL CALENDARS HOLIDAYS AND NON-WORKING DAYS DAILY NOTEPAD YEAR PLANNER CHAPTER 5. DOCUMENT MANAGER...11 CHAPTER 6. PLANNING NOW TO THE REAL THING PLANNING LOGIC CREATE AND CUSTOMISE NEW SCREEN DOCUMENTS THE SCREEN BARCHART USING THE MOUSE TO CREATE, ADJUST AND LINK ACTIVITIES USING THE ACTIVITY LIST TO CREATE, ADJUST AND LINK ACTIVITIES AUTOMATIC LINKING AND UNLINKING BETWEEN ACTIVITIES SECTION HEADINGS BARCHART TOOLS AND FACILITIES DOCUMENT NAVIGATION MENUS ON THE DOCUMENTS MORE TIPS & TRICKS (SELF STUDY) CHAPTER 7. PROGRAM ANALYSIS INTRODUCTION USING THE COURSE JOB OPEN THE PROGRAM MANAGER CHECKLIST TIMELINES DEFINED AND POSITIONED CHAPTER 8. REPORTING BASIC REPORTING CHAPTER 9. RESOURCES DEFINITIONS, ALLOCATION AND HISTOGRAMS RESOURCE RESTRAINTS RESOURCE REPORTING iii
4 Index CHAPTER 10. PROCUREMENT INTRODUCTION LONG LEAD SCHEDULE LONG LEAD REPORTING LONG LEAD SCHEDULE PRO-ACTIVE USE INFORMATION SCHEDULE INFORMATION REPORTING INFORMATION SCHEDULE PRO-ACTIVE USE CHAPTER 11. WORKING TECHNIQUES FILTER, SORT AND COPY ACTIVITY FILTERING SORTING AND GROUP BY CODE ACTIVITY COPYING CHAPTER 12. PROGRESS UPDATE INTRODUCTION RECORD TIMENOW AND THE BASE PROGRAM RECORDING PROGRESS PROGRESS REPORTING SECOND PROGRESS UPDATE PROGRESS COMPARISON PROGRESS COMPARISON REPORTING CHAPTER 13. RE-EVALUATE REMAINING PROGRAM EVALUATE THE DELAY RE- EVALUATE THE DELAY CHAPTER 14. UPDATE CANDY CHAPTER 15. SUPPORT APPENDIX A CANDY GENERAL SETTINGS APPENDIX B KEYSTROKE COMBINATIONS APPENDIX C COPY AND PASTE iv
5 Introduction Chapter 1. Introduction & Objectives 1.1 Introduction Candy s planning application, also known as SitePlan, is much more than just a scheduling system for drawing programs. SitePlan is a simple yet powerful critical path networking and project control system designed for construction projects. It can be used effectively by a non-planner, but has all the features, functionality and sophistication required by the professional. SitePlan can be used to draw a Barchart or to maintain a detailed precedence network, or a mix of these two methods. The network may be entered in a precedence fashion (theoretical) or as a linked Barchart (logical schematic) that automatically creates the precedence network. 1.2 Candy Planning Objectives Candy Planning has four primary objectives: Planning and controlling the project and recording the as-built program. Managing the information flow from the design teams as required by the program. Effective reporting on the project status across all levels of management. Integration with the estimate to provide cost / value forecasts and cash flow analysis 1.3 Course Objectives The primary objective is to make the programming function easy and practical. Our objective is to ensure that everyone operating the planning software understands what is being produced, why it is being produced and how to produce the desired controls, reports and information required for both internal analysis and for external presentation or export. After completion of the course you should be able to: Create a properly structured program. Allocate planning resources and produce histograms for resource analysis & control. Produce Long lead and information schedules for procurement control. Do progress updates for the program comparing current progress with base program. Identify and analyze progress delays. Identify and analyze procurement and information delays. Produce a proposal program on how to adjust the remainder of the program and minimize the delays. Produce the relevant reports for the abovementioned points. 1


6 Introduction 2


7 Starting up Chapter 2. Starting up 2.1 Starting Candy Start Candy from the desktop shortcut or the Programs menu in the normal way and complete the User Login form. This is only required for the very first time when opening Candy. 2.2 Companies and the Company Manager The first time you use Candy, you will need to set up a company and job. You will arrive automatically at the Company Manager. Candy maintains the notion that while working for a company, you tender or contract for particular construction jobs. There is a two level hierarchy which allows you to organise and compartmentalise jobs by company. Of course, Company can mean anything you like. Company is usually the name of your actual employer, but need not be. For example, if you are doing a tender in joint venture with another firm, you can create a new company name in Candy for that bid, such as Stevedores/Troubadours Joint Venture, or some such. Or, you may want to just file old jobs under another company name, such as Tenders 2007, Tenders 2008, etc. You can create up to 24 companies in a given data area and each company can hold 99 jobs. 2.3 Creating a new company You can use the Candy Demonstration Company installed on the course material issued. Alternatively create a new company as follow: Do this: On the Company Manager, create a new entry for your own company by selecting New > Company from the Company Manager menu bar. Change the company name to read Candy Demonstration Company. There is no need to change the Company Code. Don t set a password. Note that the company logo can also be set in this properties box for use on reports. If you want to change these details later, you can right-click on the company name to get the Properties of this company. Click OK. 3

8 Starting up Now position the cursor on the company Candy Demonstration Company and click Select (or press Enter or just double-click with the mouse). This will automatically open the Job Manager for the Candy Demonstration Company. 2.4 Create a new heading Do this: On the Job Manager, choose Job > New heading. Rename this heading Candy training 2.5 Creating a new job Do this: On the Job Manager, choose Job > New job. Rename this job Planning and programming job Note: You can always get to the Job Manager using the folder icon next to the Candy button. 4

9 Program manager Chapter 3. Candy Planning module & Program manager In the application tabs at the top of the screen, click Planning. Your colleagues in other departments will be using the other tabs. 3.1 Candy menu bar The Candy screen consists of the Candy application menu bar at the top with the document area below. This is the menu bar: Candy button System toolbar Current Company Current Job Software version Application tabs Application menu General menu General toolbar Application toolbar Current program Toolbar button settings To select the job manager, system settings and to exit the software. Job manager and system settings toolbar buttons. Displays the company you are working in. Displays the job you are working in. Displays the software version installed on the computer. To select the application you want to work with. Displays the menus of the application selected. Menu for general utilities including telephone list, daily dairies, card games, etc. Displays general tool buttons for use on all applications. Displays shortcuts specific to the application selected. This tool bar changes when a different application tab is selected. Displays the current program you are working in. Only available on the planning application toolbar. To select the toolbar buttons displayed on the different toolbars. 5

10 Program manager 3.2 Program Manager Toolbar shortcut button The Program Manager is the entry point for all existing programs. As a contract may consist of many programs, sub-programs and section programs, the Program Manager is used to create, structure and manage your programs easily. Programs can also be copied, customised, backed up or recovered here. Each program will be unique and be customised as required. The Program Manager contains the names of the planning programs in this Job. They can be grouped under meaningful headings. The panel on the right shows information about the program selected. Below is a sample of a program manager with multiple programs. On the document menu, View>Expand or Collapse opens or closes a group (with the book icon). Double-clicking on a group heading also opens or closes it. 6

11 Program manager 3.3 Creating a new program Do this: Create a new program within Planning and programming job by right-clicking on it and choosing New > New Program. In the New Program dialog, enter the name Pipe laying example, and set the program start. Select the required week start day. Normally this is a Monday, but in some countries the work pattern is different, for e.g. in the Middle East the week start day would be Saturday. N.B. The first working day of the week cannot be changed later. The program start date can be changed at any stage, using the function button Customise. Note: The program start date is the date required for the earliest activity entered. 7

12 Calendar Chapter 4. Calendar - Toolbar shortcut button Time units are in working days, and all calendars work in these units. Calendars are used to store daily information and to specify non-working days and working day patterns for the project. The Project Calendar (PC) is generated automatically when a new program is set up with a work pattern using the Week Start Day and the Working Days Per Week, as specified in the New Program dialog above. It can be easily changed later to represent the actual contract calendar for the job. Additional calendars can be set up to handle work patterns required for unusual activities or trades etc. These calendars are allocated to activities; not resources. To force an activity to use a particular calendar, the calendar code must be specified against the activity. If no calendar is specified against an activity, it uses the project calendar. A total of 9 calendars; including the PC calendar, can be created in SitePlan. A single line remark can be entered in the daily diary column and each day has a daily notepad on which comprehensive notes may be recorded. These features are useful for keeping a journal of stoppages/no workdays for later reference. Do this: Select the new program Pipe laying Example on the program manager. From the application menu use Main > Calendars to open the program calendar list (or use the calendar shortcut). Carry out the following exercises on the calendar document. 4.1 Additional Calendars Do this: Add a 6-day calendar as in the example by using Tools > Add calendar. Fill in the required detail. 8


13 Calendar 4.2 Holidays and Non-Working Days Do this: Use the function buttons Set holiday and Set non-workday to record holidays and non-working days in the calendars. This will set a holiday or non-workday at the current cursor position ensure the input cursor is in the correct calendar. A holiday or non-work day can be set across multiple calendars for the specified day without moving into each calendar individually use the appropriate function button in combination with the SHIFT key. Use Tools > Workday pattern to change the workday pattern of the working week for any calendar. Bear in mind that the workday pattern is adjusted for the Calendar in which the cursor is positioned. 4.3 Daily Notepad Short information can be recorded for any day in the calendar document in the Daily Diary column. More detailed information may be entered on the Daily Notepad. This document has some simple cut, copy and paste facilities, and may be used to record comprehensive details about any day in the calendar. Do this: Call up the daily notepad with Tools > Daily notepad on the calendar. Enter the information as shown and close the notepad to return the calendar document. An asterisk (*) will appear next to the day with the notepad entry, to show that there is a notepad attached. 9
 offers an alternative method for editing and viewing calendars: Convert workdays to holidays/no workdays by clicking on the relevant")

14 Calendar 4.4 Year Planner Do this: The Year Planner (Tools > Year planner) offers an alternative method for editing and viewing calendars: Convert workdays to holidays/no workdays by clicking on the relevant day and then selecting the function buttons Set holiday and Set non-workday to record holidays and non-working days. The No-work and holidays created are indicated by red for holidays and blue for non-work days. Changes made to either document will be reflected in both. Notes can also be added and edited in the year planner by double-clicking on the relevant date. Note that there are two numbers displayed in the blocks. The top number represents the calendar day and the bottom number represents the workday number. This is a piece of the Year Planner: To add or edit a daily note on the year planner, double click on the desired day to display a zoomed view of the year planner. The zoomed view will open at the last day of the program calendar. Use the scroll bar on the right to scroll to the required day. Remember to Store & Exit after entering/ editing the notes. Note that the year planner only displays one calendar at a time and any entry or editing done; is only applicable to the calendar displayed. Use the dropdown menu to change calendars. 10

15 Document Manager Chapter 5. Document Manager - Toolbar shortcut button The Document Manager is the central work area for your programs. It is important to note that a precedence network and its calendar, resources and various procurement documents are all one program and that the documents just represent different ways of looking at the program. The program can be viewed and edited in many different screen document formats. These views are managed and customised in the Document Manager and are the central templates available to all programs on the computer. They should be designed to do specific tasks. These documents represent different data layouts on the screen, not reports. Presentation reports are managed in the Reports Manager. Do this: From the planning application menu select Documents > Planning documents to open the Planning Document Manager. When Candy is used for the first time, a standard set of screen documents will be displayed in the document manager (shown here). Documents can be changed, deleted or new documents added as required. Documents are organised under group headings indicated by book icons. The document manager shown here is divided into several groups, each group with a number of documents. These groups headings can be open or closed as required with the document menu View > Expand or Collapse. These standard documents are the most commonly used documents; however there are more standard documents, for example, the Activity list group only displays two of the five documents available. More document templates are available when selecting New document. Notice that a reference number identifies each default document and document group. Try to use the manager intelligently, such as for making documents that are suited to particular tasks. There is no limit to the number of documents that can be made, but too many may become confusing. 11

16 Document Manager It is possible to overwrite the current planning screen documents on your computer with the standard documents by using Tools > Install standard documents. This may become necessary after many changes have been made to the documents. Alternatively, single documents can be replaced by using the button New document. Do this: On the Document Manager, open heading 1. Barcharts and select 1.1 Standard Barchart. Select or double-click to open the standard Barchart document or press Enter. The screen document, on standard installation, should look something like this: The columns in a planning barchart document are regarded as the Activity List portion of the Barchart. Columns can be added, removed and reordered by customising it in the Document Manager. 12

17 Planning Chapter 6. Planning now to the real thing Candy planning system is specifically designed for contractors to transfer planning logic and program networking onto the screen for contract control and client presentation. We are now going to start programming proper, so let s refresh your memory of planning logic, and establish some terminology and basic principles of planning. 6.1 Planning logic Consider the following simple program: In this simple Gantt chart, the activities have been drawn in the logical sequence of occurrence, i.e. first the pipe trench will be excavated and only once some excavation has occurred can the pipe laying commence. Similarly backfilling can only begin once pipes are in the trench. Note that this chart does not show the dependencies between the activities, only the period in time in which they occur. The Gantt chart gives no indication of what happens if activities overrun or under run their allotted time. When we show the dependencies between activities, the result is generally known as a precedence network. With the logic now strictly enforced, something must happen before something else can start, or something must be finished before something else can start or finish etc. Most activities will thus have at least one predecessor and successor. In the example above the predecessor of Lay Pipes is Excavate Pipe Trench and the successor is Backfill. Using link lines reinforces this dependency logic: By drawing the links in place, the logic has been enforced and will be prevalent at the progress stage (i.e. laying of the pipes cannot take place unless the duration of excavation work, specified by the start lead, has taken place nor can the laying of pipes finish until the entire pipe trench is excavated) If there is no Successor Lead or Successor Lag, then the successor starts when the current activity is finished, i.e. it is an end-to-start relationship. 13

18 Planning The successor lead is used in a start-to-start relationship between two activities. It is the number of days from the start of the current activity after which the successor can start. If the lead is zero, the successor starts at the same time as the current activity. The successor lag is used in an end-to-end relationship between two activities. It is the number of days from the end of the current activity after which the successor can end. If the lead is zero, the successor ends at the same time as the current activity Candy allows a double link between activities, i.e. both a start-to-start relationship and an end-toend relationship between the same two activities. This principal assist in enhanced progress reporting. Let s set up a barchart to show the successors of each activity. 14
. The new document will be created below the position of the yellow cursor bar.")
19 Planning 6.2 Create and customise new screen documents By customising the Standard Barchart document, the activities and links can be recorded easily. We do this in the Document Manager. Do this: Create a new document Open the Document Manager (Documents > Planning documents). The new document will be created below the position of the yellow cursor bar. Use the New document button to add a 1.1 Standard Barchart document template within the Barcharts heading using document templates from the standard list. Select standard document template. Rename the new view to 1.1a Barchart with successor activities using Document > Rename document. Customise the screen document The Barchart with successor activities can now be customised accordingly. Position the cursor on the new document Barchart with successor activities, and use the button Customise to call up the customisation document. Select the activity list columns that are to be displayed on the screen using the Column pick-list. The left-hand panel of the pick-list contains all the available columns that can be used on a barchart document. Here they are all closed up into their headings, except for the group on Successors. There are a large number of columns defined and it is worth spending some time getting to know what is available. The right panel of the pick-list contains the columns that have been chosen for the document. The top-to-bottom order is the left-to-right order that will appear on the screen document. 15

20 Planning The pick-list is grouped into headings that can be opened and closed with Ctrl+Down Arrow and Ctrl+Up Arrow respectively. Ctrl+Spacebar opens all groups and Shifted, closes all groups. Double-clicking on a heading will also open or close it. Alternatively use the Close all Open all icons. Icon Function Open all group heading in the Available side Close all group heading in the Available side Select column from Available side to Selected side Remove column from Selected side to Available side Move highlighted column one line up in Available side Move highlighted column one line down in Available side Insert a double vertical line between columns. 6.3 The screen barchart Customise the Barchart Do this: To customise the Barchart display on the screen for the current document, use the document menu Barcharts > Options. Choose what to display on the screen, what text to display next to the bars and the bar and grid line graphic display. The screen barchart is a pictorial representation of the program. The time scale along the top shows working days in the project calendar (holidays are excluded). Columns of data can be attached to the left-hand side of the barchart. To customise the column layout use the document manager or use CTRL+F1 to go directly to the customisation document. Getting around the Barchart There are some basic functions in Candy that are useful for getting around the barchart that are worth repeating, together with shortcuts and keystrokes that are unique to this document. The Up/Down, Left/Right arrow keys move the black, flashing cursor around the screen, scrolling when the edges are reached. Page Up, Page Down, Home and End move up, down, left or right in screen pages - e.g.: Page Down will bring the next screen below into view. CTRL+Page Up/Down go to the very first and last lines of the barchart, respectively. 16
 field, followed by a description. An activity number will be automatically created.")
21 Planning We will perform these next exercises, using various techniques. Section headings - create section headings, together with the required levels by entering a number in the T (type) field, followed by a description. An activity number will be automatically created. Activities - for each section in turn, create the activities by entering their descriptions in the activity description column. As soon as the activity of work is allocated a duration, an activity is created with an automated activity number. Copying activities copy individual activities and families. Draw bars - for each section in turn, for each activity within that section, draw the bars by using the mouse. At this stage concentrate on getting the duration correct, rather than positioning the activity in the right place. Link activities - for each section in turn, link the activities within that section by using various methods. Activities may be created, edited and linked on the barchart using the mouse or keyboard. From the document manager select the document Barchart with successor activities, which you set up previously. Carry out the following exercises on the barchart. Create Section Headings Headings are used to summarise activities in a work breakdown structure. Create headings by entering a number in the T (type) field, followed by an activity number and a description. The number in the T (type) field defines that section heading's position in a hierarchy, where a level 1 is the most senior level and a level 9 is the most junior level in the hierarchy. Do this: Create two headings: - Pipe laying section A as a level 1 and within that heading a sub heading: - Pipe Ch 1 to 6 as a level 2 heading. NOTE: The headings are shaded according to level hierarchy and the shading colour can be customised using the Candy button > System settings > Line colours and styles. Type in the activities of work, in logical order, in the activity description column: Excavate Trench Lay Pipes Backfill Bear in mind that we are exploring the features and functionality of SitePlan. The descriptions, bar positions, durations and the like are not important at this stage. 17
 will also be copied, saving you the effort of re-doing each similar section individually.")
22 Planning Copying Individual Activities When programming, it is recommended to program and resource a section of work completely as it can be copied for similar sections or repetitive work. When copied, all activity related information such as links; resources and code definitions (if allocated) will also be copied, saving you the effort of re-doing each similar section individually. Copying will prove essential and extremely beneficial in creating the program. Combination keystrokes: Using Ctrl-R/Ctrl-D CTRL + R to Re-call an activity or random activities to a Candy clipboard CTRL + D to Drop an activity or activities from the Candy clipboard onto the barchart Copy the 3 activities and one heading for the next chainage of pipe laying, pipe laying chainage 7 to 12: Position the line cursor at the start of your copying selection, i.e. on section heading 2 Pipe Ch 1 to 6 and press CTRL + R notice that the cursor moves down, onto the next activity, to confirm that the line has been recalled to the Candy clipboard. Press CTRL + R again and Excavate Trench will also be added to the Candy clipboard. Repeat CTRL + R two more times to copy Lay pipes and Backfill to the Candy clipboard. Position the line cursor at the position you wish to drop the items, i.e. just below the Backfill activity. Press CTRL + D to drop the recalled lines onto the barchart (notice that a new activity number was generated). The section header can now be renamed to Pipe Ch 7 to 12. Note that the order that the lines are recalled is the same order that they will be dropped. If the copied activities had durations, links, code definitions and resources, this detail would also have been copied. 18


23 Planning 6.4 Using the MOUSE to Create, Adjust and Link activities Create Activities Create the activities by drawing the bars with the mouse. Wherever your mouse-pointer is positioned, the date and workday number will be reflected in detail on the status bar at the bottom left of your screen. In the barchart, in line with the first activity Excavate trench, click and hold the mouse button down, the mouse pointer will change to. Hold the left mouse button down, and drag the bar right. Notice the dialogue box, describing the activity s start and its duration. Using the mouse draw the bars as required for the first three activities. NOTE: The B in the T Column is automatically generated by the system to label the activity as not properly linked, i.e. it does not have links determining its start and/or end. Stretch Activities Position the mouse cursor immediately to the right of an existing bar, until the stretch symbol appears. Click and hold down the left mouse button and drag the mouse to the right to increase the activity duration or to the left to decrease the duration. A panel appears which displays the Previous duration and the Current duration of the activity that is being altered. Continue dragging the mouse to the required duration for the activity. At this point release the mouse button. 19


24 Planning Shift Activities Position the mouse cursor immediately to the left of an existing bar, until the move/shift symbol appears. Click and hold down the left mouse button and drag to the right to move the start date of the activity later or to the left to move the start date earlier. A panel appears which displays the Previous start and the New start of the activity that is being altered. Continue dragging the mouse to the required start date. At this point release the mouse button. Note: This feature can only be used for activities that have no incoming links, i.e. the network logic is determining the activities start. When the pointer symbol is displayed in red the action is not allowed or is restricted by network links/logic. The links always take preference. Useful keystrokes when creating activities Delete activity Select Delete from the right-click menu of the activity s record button in the record selector bar or use CTRL+DEL in combination. Insert blank line for new activity - Select Insert from the right-click menu of the activity s record button in the record selector bar or use CTRL+INS in combination. Change activity sequence Use CTRL + LEFT ARROW to move activity record one line UP or CTRL + RIGHT ARROW to move activity one line DOWN. Link using the Mouse Position the mouse cursor at a point on a bar from where a link is to start. The link-drawing symbol appears. Click and hold down the left mouse button. A panel appears which displays the link type, the start link activity and the end link activity, together with the lead days from the start. If the lead day number is not as required, move the mouse and click again until the required lead day is displayed in the panel. Hold the mouse button in and drag the mouse to a point on another bar to where the link is to finish. A green link-drawing symbol indicates a valid link point. A red link-drawing symbol indicates an invalid link point. 20


25 Planning Notice the link has been drawn and the activity list has been updated with the Successor and Successor start lead detail. Any detail adjusted in the activity list portion will update the barchart and vice versa. A wrong link can be re-drawn or delete using Delete links on the barchart right-click menu. Once all the links have been drawn click the Calculate button to calculate the network logic imposed by the links. The bars will move into position defined by the network logic. Note: SitePlan does not auto calculate at pre-defined intervals. The calculation function is controlled by the user and will only be executed when the calculation button is clicked. 6.5 Using the activity list to create, adjust and link activities. Create Activities Create the activities by typing in the durations. An activity is created when it is given a duration. Type 10 in the duration column of the second Excavate Trench item description and press the enter key. Notice that as soon as the duration is entered an activity number is also created. Proceed and type 10-day duration for all remaining descriptions. (Note that the activities default to start on the first workday visible on the barchart) Link using the successor columns By entering in the successor activity numbers and the appropriate start leads and end lags, the links will be drawn accordingly. Once all the links have been made, click the Calculate button to calculate the network logic imposed by the links. The bars will move into position defined by the network logic. 21

26 Planning Copying families of activities A family of activities will usually be grouped under an appropriate heading structure. These headings can be closed up to display a summary of the related activities. Using section headers thus makes for easy summarising of sections, navigation and copying. Instead of copying each line individually a section including applicable activities, links and resources can be copied. Section headings are explained in more detail later. Use the document menu View > View level > Close all or SHIFT+CTRL+SPACEBAR, to close all families /sections to the highest level. Notice the colour of the line cursor also changes when positioned over a closed family. Use the document menu View > View level > Open all or CTRL +SPACEBAR, to open all families /sections. Individual headings can be opened and closed with CTRL + Down Arrow and CTRL +Up Arrow respectively. Double-clicking on a heading will also open or close it. Assume we are doing another section of Pipe laying, Section B, also broken up into 2 chainages. Rather than creating all the activities and links again we can copy the previous section and make minor adjustments as necessary. With your line cursor on Pipe laying Section A close the heading using the icon on the left of the heading. Alternatively use the document menu View > View level > Close to level 1 or CTRL +Up Arrow. With your line cursor on the closed Pipe laying Section A, use the combination keystroke CTRL + R to recall the whole family (including links, resources, etc.) onto the CCS clipboard. Use the combination keystrokes CTRL+D to drop the family from the CCS clipboard onto the barchart at the required position. Select calculate and then open all families with CTRL+SPACEBAR. Section A was duplicated, retaining the links, duration and bar positions. This duplicate section must be renamed to Pipe Laying Section B and the chainages renamed accordingly. The links and activities for Section B can now be edited as required 22

27 Planning 6.6 Automatic Linking and Unlinking between activities Unlink existing links Using keystrokes common to Windows, a range of activities or random activities can be specifically selected. Once selected the links of the selected activities can be altered as required i.e. all links can be deleted or the links can be adjusted. (Selecting activities in this manner will also prove very useful for the application of coding and resources explained later) The keystrokes used are as follows: CTRL+ Left click on the record selection button to highlight a random selection of activities. SHIFT + Left click on the record selection button to start and end a range of activities, i.e. the range is defined as the activities between the initial SHIFT + Left click (start) and where SHIFT + Left click is used again, the range is ended. IMPORTANT- To select the full activity record you must click on the record button when making the selection Assume that Pipe laying Section B s logic will differ from Section A s, thus, we would like to remove the links quickly and link as necessary. As before, select Pipe laying Section B as a range. SHIFT + Left click on the first item of the range and SHIFT + Left click on the last item of the range. The selected range should now be highlighted. Right click on the highlighted area and select Link > Unlink between activities. A message will be displayed requesting confirmation that the links between the highlighted activities are to be deleted. Confirm and notice the links are removed for Section B. 23

28 Planning Auto link Link as drawn Usually the planner will draw the activities in the logical sequence that they will occur on site. Once created, a range of activities may be selected and auto linked by the system exactly as they have been drawn Using the three activities under the heading Pipe Ch 13 to 18, SHIFT +Click on the first activity Excavate trench in the required range and SHIFT +Click on the last activity Backfill in the required range. The selected activities are highlighted. Right click on the highlighted area and select Link > Link as drawn Notice that the links are automatically drawn. Auto link Link End to Start In certain cases, an activity must be complete before the next one can commence, i.e. no start leads or end lags exist between the activities. A range of activities may be selected and auto linked with end to start links. Using the three activities under the heading Pipe Ch 19 to 24, SHIFT +Click on the first activity Excavate trench in the required range and SHIFT +Click on the last activity Backfill in the required range. The selected activities are highlighted. Right click on the highlighted area and select Link > Link end to start Notice that the links are automatically drawn end to start. 24

29 Planning 6.7 Section headings As earlier emphasised, section headings may be created in order to arrange program activities into logical sections of work, headings and sub headings. There are advantages in taking the time to structure the headings in a sensible manner. Section headings are created by entering a number in the T (type) field, followed by an activity number and a description. The number in the T (type) field defines that section heading's position in a hierarchy, where a level 1 is the most senior level and a level 9 is the most junior level in the hierarchy. Sections may be opened and closed as required for both working on the screen and for reporting. To close up all the headings to show a summary with the minimum detail, click the document menu View>View level and select the option Close all from the option list displayed. All families will be closed up into the highest heading level. The View menu can also be used to view the program to the summary level of your choice, i.e. to a level 2 only which shows the level 2 headings as summary bars with the level 1 headings above them. To check the level hierarchy select the option Check level hierarchy Select this option to check the arrangement of hierarchical levels used for the section headers. Any changes that are necessary are suggested. An easy mistake is to have a section heading followed by some activities, followed by a heading of a lower level, for example: 6.8 Barchart Tools and Facilities The barchart right-click menu Bar charts and programs can be very large and complex and maximising the screen view makes it easier for the user to see and analyse the program. The Right-click menu allows for editing and analysing the program without adjusting your activity list by adding columns, which can take up valuable space on your screen. The right click menu provides a quick alternative for editing your program on screen Select Documents > Planning documents from the planning application menu. For the purposes of this section, from the Document Manager use the document 1.2. Barchart only. This document shows the barchart only; no activity list columns are included. Ensure that you open all families CTRL + Spacebar Position your line cursor on an activity (e.g. A030 Excavate trench) and right click on the activity in the barchart to view the right click menu options (an option with an arrow indicates that the option leads to a further menu and 3 trailing dots indicates that a further dialogue/screen will appear ) 25


30 Planning New / Edit Links Links for the relevant activity can be changed added or edited. As described earlier, the activities and links are drawn logically and the theoretical information, such as the type of link, is automatically created by the logic imposed. Follow Link A program network can comprise of multiple links to and from activities, in one section and across sections and following a link can prove to be difficult on screen. This option will assist you to follow existing activity links. This option is only available when the cursor is positioned on an activity. Delete Links This option is used to delete existing activity links. Selected links can be deleted or all links to and from an activity can be deleted. This option is only available when the cursor is positioned on an activity. Set Starts & End This option is used to set starts & ends for the selected activity. A symbol will appear indicating the type of start or end. This option is only available when the cursor is positioned on an activity. Already set start & end dates can also be deleted. The setting of start and end dates is explained in more detail later. 26


31 Planning Link Clipboard When linking the program, a situation may arise that an activity needs to be linked to another activity that has not yet been created and/or may be in another section not visible on screen. The link can be added to the link clipboard and picked up later to complete the link. Right click anywhere in the barchart area to display the context menu and select Link Clipboard. The Link Clipboard can be re-sized using the standard Window s resize arrows. Position the mouse cursor at a point on a bar from where a link is to start. The link-drawing symbol appears. Click and hold down the left mouse button and drag the mouse onto the link clipboard. At this point release the mouse button. The link is added to the link clipboard. To complete a link, position the mouse cursor on the required activity on the clipboard. The link-drawing symbol appears. Click and hold down the left mouse button and drag the mouse onto the bar to where the link is to finish. At this point release the mouse button. The link is drawn between the two activities and the activity is removed from the clipboard. If the same activity is to be linked to more than one activity, this activity can be duplicated in the clipboard by clicking on the copy icon of the clipboard. Restraints - Delay bar An activity start date can be delayed to a specific date. Place the cursor on the date to be used for the delay. From the barchart right-click menu select Restraints > Delay bar and then accept the date displayed or over type the date as required. Progress When the progress is recorded on a program this right-click menu can be used to set the actual start and actual finish dates or remaining duration based on the position of the cursor. Progress will be done in more detail later. 27

32 Planning 6.9 Document navigation Do this Let s open a document to see and name all of its components. On the Planning application menu, choose Main > Program manager. Select a program and then Document manager > Standard Barchart. Current program Document name Split screen buttons Escape Document menu bar Document toolbar Select all records button Calculation status indicator The current planning program in which you are working. The name of the document layout. Resizes the document to the top or bottom half of the screen. Go back to the document manager The menus available for this document Tool buttons for larger or smaller screen fonts, line deletion, find & replace, export to Excel and print screen (excluding Barchart). Selects all activity records of the program. Shows the calculation state of the program. It displays the earliest activity s start date and the latest activity s end date in the program or Not calculated if the program has not yet been calculated. 28

33 Planning Record selector bar Day number / date indicator Calculation button Barchart navigation buttons The record bar is broken up into record buttons for each activity, which are used for selecting the activity record or records. Displays the day number and date of the mouse pointer position when the mouse is used or moved in the Barchart section. To calculate the program after changes were made. A red button indicates that calculation of the program is required. (There is NO autocalculation) Used to move around rapidly in the Barchart section. They scroll half a screen in the direction of the arrows. If not needed, hide with the centre button Menus on the documents The Planning application menus are pretty straight-forward, most of the action takes place in the documents. All menu functions in Candy are context sensitive, i.e. the relevant functions associated with specific data will be available at the data. If you need to perform a specific task, think about what it acts on. A cell? the row? the activity? a column of data or the whole program? The menus are different according to how much the function will affect. There are right-click context menus on: Cells (individual data elements) Barchart (the activity) Record selector buttons (a particular row or record) Column headings (all the data in a column) Document menus (the whole program) Right-click on the appropriate data level and you are sure to find the function in its menu. a. Document menu bar 29

34 Planning b. Menu help topics The document menu at the top of each document has relevant sub-menu items suited for the type of document. Moving the pointer over most menu items brings up a help tip for a brief explanation of the menu function. If you click the help tip icon a detailed help topic appears. c. Record button right-click menu Select all records button Record selector button Record right click menu Selects all records in the program Select single records / rows (CTRL+click to select specific records; SHIFT+click to select a group of records). Once a selection is made, right-click to open the menu with required menu functions. 30


35 Planning d. Column menu Right-clicking on a column heading highlights the column data and shows a menu available for this data. e. Cell menu Right-clicking on a cell highlights it and shows a menu available for this data. 31
 There are more tools & facilities available for editing & analyzing the program without adjusting your activity list by adding columns a.")

36 Planning f. Barchart menu Right-clicking anywhere on the barchart will produce a menu for that activity More tips & Tricks (self study) There are more tools & facilities available for editing & analyzing the program without adjusting your activity list by adding columns a. Link using the filter tool Using the filter tools available in Candy you can make linking of activities much easier and faster. For example if you only have one excavation team you must link all the excavation activities in succession. Do this Filter out the activity descriptions with excavate in the description. Use the Select on the filter dialogue to select all the filtered activities. Right click on the selected activities and choose Link > Link end to start. 32


37 Planning b. Bar adjustments using the Insert and delete buttons You can adjust the activity duration and start date on the bar chart, using the Insert and Delete buttons on your keyboard. To change duration Place the cursor on/inside the activity bar in the barchart and press Insert to increase the duration or press Delete to decrease the duration. Note: Depending on the position of the cursor this action might also influence the lead and/or lags of the predecessors and successors. To change the start date Place the cursor in front of the activity bar in the barchart and press Insert to delay the activity start or press Delete to bring the start date forward. Note: This will only work if the activity you want to move has no predecessors. c. Move or Bubble activities You can move activities up or down using the key combination CTRL+ Left arrow or CTRL +Right Arrow. Do this Place your cursor on the activity you want to move. Press CTRL + Left arrow to move it up or CTRL + Right arrow to move it down. d. Find & Replace You can find and replace activity descriptions if required. Do this Select the document menu Edit > Find or use the keystrokes CTRL + F. Type in the text to find as well as the text to replace. Select Find next. Or use the icon on the top right of the screen document. 33


38 Program Analysis Chapter 7. Program analysis 7.1 Introduction The Estimation or Planning department often does a program at tender stage. Assuming the job is awarded; the program done at tender stage must be adjusted, re-engineered and checked to produce a Construction Program of how and when the work is going to be carried out. This process is normally the responsibility of the contract planning engineer and/or site team responsible for the work to be carried out according to program and to the satisfaction of the client and management. 7.2 Using the course job For the following exercises we will use the course job as supplied a. From the course material issued If you are running Candy from the flash drive issued, then you do the following: Do this: Open the heading Planning course Job Highlight and select the Planning Course Job We are going to use a duplicate of the course job to work in. This will allow you to redo the exercise again at a later stage. To duplicate you must right-click on the job name and choose Duplicate job to make a duplicate. b. Or - Recover the job into your job manager If you have installed Candy on your own computer you can recover the Planning course job in the job manager on your computer. Do this: 34
.")
39 Program Analysis Choose Job > Backup/recover job > Recover into a NEW job > from file and browse for the relevant backup file. For this course, recover the Planning Course Job Version 2 from the disks supplied. Once the job has been successfully recovered, select the job (Double-click, Enter or Select button). Select the close all documents toolbar button to close all documents. 7.3 Open the Program Manager From the document menu select Main > Program manager. Place the cursor on the program called Tender Program and select this program to be used for the following exercises. The Tender Program must be analysed, adjusted and checked to eventually become the Contractual Base Program for the contract according to which all progress and actual dates will be compared against. The Checklist that follows is a guide as to what needs to be checked and/or implemented: 35
40 Program Analysis 7.4 Checklist a. Calendars Check what calendar(s) have been defined in this program and to which activities they have been allocated Ensure all required holidays and non-working days have been defined for each calendar Check the workday patterns for each calendar b. Heading structure (Work Breakdown Structure) Analyse the level of detail Check/adjust the Section level structure / hierarchy c. Activities Check for open starts/ends and loops in the logic links Check and/or apply the different activity types Check for and/or impose defined starts and ends, e.g. phased and contract handover(s) Isolate the Critical path Check for/apply activity notes, remarks and yellow tags Check for/introduce calculation sheets and spreadsheets (recording duration, quantities and production calculations) d. Activity coding (Work Breakdown) and definitions Activity codes defined, including Zones, Areas, Responsibilities, Trades, etc. Timelines defined and positioned e. Format text f. Reporting Basic reporting Management reporting g. Resources Resources defined Resource allocation h. Procurement Long Lead schedules Information schedules The PROGRAM CHECKLIST is just a useful guide and will not be strictly adhered to in the notes. Many of the checks provide the opportunity to demonstrate and implement the functionality and flexibility of Candy as a planning medium. 36


41 Program Analysis From the planning toolbar use the program manager button to display the program manager. Position the cursor on the program called Tender Program. Select this program for the following exercises. a. Calendars The calendar set up has been dealt with in detail already. It is imperative to analyse the calendars and the allocation of specific calendars to specific activities as float results are affected by calendars. From the planning toolbar use the button to display the Calendar list, or select the application menu Main > Calendars Firstly noticeable is that 3 calendars have been set up, namely the default PC (Project Calendar), a 6D (6 Day Working Calendar) and a WE (Weekend Shutdown Calendar). Every activity is based on the PC calendar unless otherwise specified in the calendar column of the activity list. Also notice the holidays in this calendar and most importantly the two-week Christmas holiday in December. To identify which activities have been allocated to calendars other than the PC calendar, select the document manager icon and access 1.1. Standard Barchart. 37


42 Program Analysis Looking at the barchart, there is no calendar reference column. Customise the document View > Column layout and add the Calendar code column. The Calendar code column now appears to the right of the Activity List. Notice that 3 Activities are working on the 6D calendar. b. Heading Structure (Work Breakdown Structure) Analyse the level of detail Viewing the barchart and summarising it can quickly establish the level of detail to which the program has been done. For example a large office building with a basement and columns could be planned using grid lines, i.e. Excavate column bases for grid line A/1-4 and D/4 or each individual column base could be an activity. Scrolling through the whole program can be time consuming and cumbersome. Using the defined Section Headers effectively, one can easily establish the structure, content and section breakdown of the program. Use the document menu View > View level > Close all to summarise the program. From the summary it is clear that the job has been broken down into four main sections: Site Establishment, Fan Foundation (Section 2), Sub Station (Section 3) Contractual Handover 38


43 Program Analysis Check/adjust the Section level structure/hierarchy Each Section should also be adequately structured into suitable headings. To view the complete heading structure, select View > View Level > Close to lowest level this option will show all the headings specified. Both the Fan Foundation and Sub Station have been further broken down into logical headers. This program consists of only level 1 s and 2 s. Use View > Check level hierarchy and the computer will do a check to find any obvious hierarchal errors. The computer will make a suggestion as to the adjustments required. Type 2 in the T (type) column above activity A060 and below activity A040 to make EARTHWORKS a level 2 heading. 39

44 Program Analysis c. Activities Check for open starts/ends and loops in the logic links During the compilation of a program, there are likely to be activities that have not been properly linked into the network. Making use of the available filtering utilities, the activities that have not been properly linked can be identified, located and corrected as necessary. In the example on the left, the activity Excavate pipe trench has both an open start and end. The open start may be acceptable if this is the first activity of the program. The open end is a problem in this example because the logic now depicts that the completion of the excavation has no influence on the completion of the laying of pipes, i.e. the laying of pipes can finish before the excavation. Coincidentally, the backfill item also has an open end. The example on the right depicts a loop, i.e. the excavation of the pipe trench can only start once the backfilling has finished. A warning will automatically be displayed when a loop is detected. Using the filtering capabilities of the planning application, activities with open ends, starts and loops will be extracted from the entire program. Imagine doing this task by naked eye Also keep in mind that not every open end or start is necessarily a mistake but it is worth checking the program as these could affect your logic at progress and provide incorrect progress information. From the Document manager set up previously. select the document Barchart with successor activities, which you CTRL+Spacebar to open all the families and use the document menu View > Filter > Program debug > Activities that have open starts or ends. 40

 activities as usual.")
45 Program Analysis The filter toolbar will be displayed on the screen. Note you can move the toolbar around as required. The barchart is displayed highlighting only those activities that have open ends. The rejects are greyed out but are shown to maintain the context of the program. Using the Hide rejects button will only show the filtered out activities. Notice that each of the filtered activities has a B in the T (Activity type) column identifying them as incompletely linked Select Show rejects to show the full program to correct the necessary activities. When a program has been filtered, all the operating functions are still available to the user, i.e. highlighted activities can be linked to rejected (greyed out) activities as usual. Correct the necessary activities as follows: A180 - Link to activity A190 with an End to Start link (i.e. the walls must be complete before the beams commence) A190 - Link to activity A200 with an End to Start link A200 - Link to activity A320 with an End to Start link Erect offices (A030) is not necessary to link, as it is not necessary to complete before the commencement of the work. The Handover activities are open ends as a result of being the last two activities, which have no successors. These will be controlled with Imposed End dates Select Calculate and then Abandon to abandon the filter and display the complete list of activities. 41

46 Program Analysis Check and/or apply the different activity types Activity Types are defined in the Type (T) column of the activity list. This is a field that may be included on any document. Types specify how the activity behaves. The following are valid activity types: Activity Type Bar or incompletely linked activity Target Start Contractual start Target End Contractual end Floating activity Work through Holidays Key activity Marked activity Tied or hammock activity Free float only activity Letter B S s E e F H K M T V Double-click in the T column to allocate a type to an activity. A number (0 to 9) in this column indicates the hierarchical level of a section header (as explained above). Some of these activity types will be used and explained in sections that follow. To find out more about the type and its behavior, use the column help. In the program there may be activities that are required to work, or can work, continuously through holidays, weekends and non-work days. Any such activities may be identified with the letter H in the T (type) column. Effectively, they work on a 7-day working calendar with no stoppages for holidays, weekends and nowork days. Thus, an H type or a 7-day working calendar can be applied to these activities. Keep in mind that changing and allocating calendars and applying H types can and will have effects on float. Curing of concrete is one such activity that is not influenced by holidays, weekends and non-work days. By making use of a filter, all the curing related activities can be filtered out and the H type applied accordingly. In this instance, the column filter will be used to filter out a description or part thereof. Select the column to be filtered and right click on the column heading Activity description. The column right click menu is displayed select Filter > Start a new filter. Note the filter box title bar displays in which column the filter is used. Always check the title bar to ensure the filter is done in the correct column. Tick the option Reduce by keeping and then type CUR in the input field (to filter out all occurrences of ) and confirm. 42
 column.")

47 Program Analysis (Note: The filter is not case sensitive). All the activities that start with the cur in the first three letters, i.e. activities with descriptions of cure and curing will be displayed. Select Hide rejects to display only the filtered activities. For the first activity that is required to work continuously, A200, enter the letter H in the T (type) column. Move the cursor down to activity A280 and repeat the previous step. Now move down to activity A300, position the cursor in the T (type) column and use CTRL+J. This keystroke copies the entry immediately above, and moves the cursor down to the next line. This keystroke works anywhere in Candy and is useful for allocating the same code to many lines without retyping Calculate and Abandon the filter to display the complete list of activities. Check for and/or impose defined starts and ends, e.g. phased and contract handover(s) Certain activities in the program will determine the start or end of a phase, section or entire contract. Imposed Starts or Ends are allocated to these activities. These activities can also be identified with a specific type in the T (type) column. From the Document Manager create a new screen document. Use the New button at the bottom select 1.1 Standard Barchart from the template list and then Document > Rename document to Barchart with Imposed dates. (Tip: right click on the name to open the same menu). Select the columns in the order as shown on the right, using Customise button. The Imposed date column will reflect the date imposed by the start/end. The four types of imposed dates are: E Target End S Target Start s Contractual Start e Contract End Not later than (Floating end) Not earlier than (Floating start) Fixed start date Fixed end date (green indicates positive float) An imposed Target End date will force the activity to move earlier only if the network logic and progress dictates so and will never move later. A target end will thus consume any float that is shown to maintain critical activities. The symbol that indicates an activity has a target end is a symbol to the right of an activity and an E in the T (type) column. 43


48 Program Analysis Similarly a Target Start is shown to the left of an activity with a symbol and is flagged using an S in the T (type) column. An activity with a target start will move later only if the network logic and progress dictates so and will never move earlier. A Contract Start and End is fixed, and will remain fixed on the date imposed, i.e. the logic cannot force it earlier or later nor can the logic dictated from progress influence its position. The user only, can move a Contract Start/End date. A Contract Start is fixed and will force an activity to commence on that date and is represented by a symbol to the left of the activity and a s in the T (type) column. A Contract End does not move, irrespective of the network calculation and float is calculated based on the fixed end date. This will be easily noted at progress. A Contract End is represented by a symbol to the right of the bar and an e in the T (type) column. Target starts/ends and Contract ends/starts can be used in combination throughout the program where appropriate and necessary. Position the cursor on activity A590 in the barchart and right-click the mouse to display the context menu. Follow the path to Set start & End and select Set Contract End. The Contract End date is set and is indicated by a appear in the T (type) column. symbol to the right of the bar. Also notice the e The handover of the Sub station represents the completion of the contract. Type an e in the T (type) column to set a Contract End on activity A600. To move the two contract end dates into position, i.e. the handover of the substation, move the mouse pointer over each arrow and when the pointer change to a transparent arrow button down and drag the arrow into position, hold the left mouse A dialogue info box will appear detailing the original and adjusted position. Release the mouse button when the correct position is reached. 44
. Note that the required imposed date can also be over typed in the Imposed Date column.")
. Total float does not belong to the activity, but belongs to the chain/path of activities of which the current activity is a part.")
49 Program Analysis Do this for activity A590, dragging to the right on the same date as A600. Calculate to see the effect of implementing the fixed contract end dates. Notice the float generated on the Fan Foundation (Section 2). Note that the required imposed date can also be over typed in the Imposed Date column. Isolate the Critical path The critical path comprises of critical activities, which are activities that have zero total float and, if delayed, delays the end of the program or any intermediate imposed end date(s). Total float does not belong to the activity, but belongs to the chain/path of activities of which the current activity is a part. If any activity in the chain consumes a day of the total float, the chain and all the activities in the chain lose a day. Total float is zero when this chain finishes exactly at the end date required (this is the critical path). It is negative when the chain is going to over-run the end date (this is hypercritical). Using a filter the critical path can be extracted from the network easily. The contract end dates set previously will determine the critical path. On default, activities displayed in red on the barchart, are critical. Select the document menu View >Filter followed by Logic filters and select Critical activities. The Filter toolbar will display how many Critical activities were found and grey out the rejects. Use Hide rejects to show only the Critical Path and Abandon to see the full program. 45

50 Program Analysis Check for/apply activity notes, remarks and yellow tags Additional information can be recorded against activities using activity notes, remarks and yellow tags. There are notes available for each activity in the program that may be used for keeping notes about the activity, both at tender and post-tender stage. Notes, remarks or tags can be printed on the barchart reports to provide additional information regarding the relevant activity or progress. It is important to check the program for additional info, which was used for decision-making, productions or assumptions. Notes, remarks or tags can be also applied to provide further information for future reference and detail (detail of delays etc.). Remarks and tags are limited to 40 characters and used for short comments. Yellow tags are an emphasised remark that prints in a yellow box against marked activities with Start/End imposed dates only. Activity Note allows a more extensive commentary. A fast way to see if there are any notes in a program is to temporarily add the column 9.4 Activity note to the screen document. Use the column menu View > Column layout or CTRL + F1. Notice that you can also add notes & remarks using the Notes & remarks menu from the record button right-click menu. Remove the temporary column 9.4 Activity Note using the menu View > Column layout or CTRL + F1. Progress Notes and Remarks are useful for recording progress information against the activity, for example why the activity has not yet started or is ahead/behind. 46

51 Program Analysis Check for/introduce calculation sheets and spreadsheets (Recording duration, quantity and production calculations) An activity s duration, quantity, resource quantity, bill quantity allocation and production calculation can be recorded and stored using various free format calculation sheets and relevant activity list columns. From the Document manager open the heading Resources and select view Activity List with Production. Select the record button for activity A060 and call up right click menu and select Activity duration > Duration calc sheet Alternatively select the duration for activity A060 in the duration column and right-click. This will select the cell and display the right click cell menu, select Duration calc sheet Calculation line must always start with a number. Always Store to update and store a new calc sheet or any changes to an existing calc sheet. Similar detail, represented differently, can be entered in the Production columns in the document 4.1 Activity list with production. The production duration does not update the activity duration. The production duration is the dominant duration of the relevant activity and should be adjusted as necessary before updating the activity duration Double-click in the Quantity column to display a Production quantity calc sheet on which detailed calculations may be entered and stored To highlight the difference between the two calculation sheets for estimating activity duration carry out the following exercise. Press CTRL+ PAGE DOWN to take you to the bottom of the barchart and create a new activity Erect Decking for Slab with duration of 1 day. 47


52 Program Analysis Double-click in the Durn column or click to call up a blank Calc Sheet to record assumptions as displayed Remember to Store and note the Duration is updated to 18 days. The same information, showing the effect of using 2 teams, can be recorded in the Production columns as shown. Notice the Production duration calculated from the production spreadsheet is 9.1 days (i.e. with one decimal) while the Activity duration remains 18 days (with zero decimals) as calculated by the (Activity) duration calc sheet. Note that the duration calculation sheet rounds to one decimal using the 4/5 rule i.e days will be rounded to 18 days and 18.5 days will be rounded to 19 days. Try to overtype the activity duration of 18 days with 9 days and press enter and note the message! Click No and Delete the new activity by using CTRL + DEL with your line cursor on the activity. 48

53 Program Analysis d. Activity Coding (Work Breakdown) and definitions Activity codes defined, including Zones, Areas, Responsibilities, Trades, etc. Various secondary codes can be allocated to each activity in the program in order to filter and order by them, both for analysis on the screen and reporting purposes. Common definitions such as Zones, Areas and Responsibilities are available to allocate to activities in order to group activities into, for example, pre defined zones, trades of work and staff/professional team responsibilities. The secondary codes that are available in SitePlan are all 8-character alphanumeric codes and must be defined before they can be allocated to activities. Open the definitions settings dialogue using the application menu Main > Definitions & settings or use the toolbar icon The Definitions document is displayed. Select the Subcontractor names. Assume all the earthworks will be subcontracted to ABC Earthworks Co. A code, description and colour must be created for this Subcontractor. Enter the detail as shown. Code - This is an 8-character alphanumeric code. It is used to register responsibilities against activities. More than one responsibility code can be entered against an activity. Description - The description for responsibilities rather than the code can be displayed on the screen or on reports. Colour - Each Code may be given a colour that can be used for highlighting activities on a report. Click in the colour column next to the definition to display the style & basic colour palette where a colour may be selected. Edit style Change the bar / line type and colour style. Fg Change the foreground colour. Bg Change the background colour (for fill types other than solid ) Multiple design responsibility and site responsibility codes can be entered against an activity. Only one trade, zone, area, subcontractor and user code can be entered against an activity. 49

 or Ctrl + Click (Random selection) on the record selection buttons.")
54 Program Analysis Code Allocation From the document manager select the document 3.3 All Codes. Double-click in the respective code field to display a pick list of the defined codes. Select the required code and confirm to allocate it. The description for that code is copied from the respective definitions sheet. Note: You can allocate secondary codes by simply typing the required code in the respective field. Codes can also be allocated to multiple activities by first selecting the activities using Shift + Click (Selected Range) or Ctrl + Click (Random selection) on the record selection buttons. Allocate the balance of the Subcontractor codes under Earthworks using this method. Select all the activities under the earthworks heading. When the required selection has been made, use the right-click menu and select Code allocation > Subcontractors > Allocate... to allocate the codes. 50

55 Program Analysis Code Allocation using filter An easier way to do the allocation of codes is to filter out all the relevant activities and then allocate the codes by using the record right-click menu. For this exercise the Earthworks subcontractor s code must be allocated to all the earthworks related activities. All the relevant activities first need to be filtered out. Right click on the Activity description column heading to select all the activity descriptions. Select Filter > Start a new filter and the filter selection box will be displayed. Select the option Reduce by keeping and type in EXC ( the filter is NOT case sensitive) in the input box and confirm. All activities with EXC in their description will be displayed. The earthwork subcontractor will also be responsible for the backfilling on this project and this also needs to be included in the filter. Make sure the cursor is still in the Activity description column then select the plus symbol on the filter toolbar to adjust the current filter results. The earthwork subcontractor will also be responsible for the backfilling on this project and this also needs to be included in the filter. When the filter selection box is displayed, select the option Increase by adding and type BACK and confirm. All activities with BACK in their description will be added to the displayed activities. Now do the same with the word BED. Notice that amongst the filtered activities there are now also some unwanted activities i.e. surface bed which does not form part of the earthwork subcontractor s responsibilities. To unselect all the occurrences of this activity, adjust the filter again but this time select the option Reduce by excluding and type SURFACE and confirm. The final result should display all the activities done by the earthworks subcontractor. Click on the Select button on the filter toolbar to highlight all the filtered activities. Use the right-click menu to allocate the subcontractor code SCEW using the menu s as described before. 51

56 Program Analysis Allocate the codes as follow using a method of your choice 52

57 Program Analysis Group by Code The codes defined and allocated can now be used to group the program in any preferred breakdown. For example: What activities is the responsibility of the Earthworks subcontractor. From the document manager select Standard Barchart. Use the document menu View > Group by > Custom group by. Select the columns to group by as shown. Close the heading Subcontract: No allocation to hide all activities without a subcontractor code allocated. Scroll down to the next heading SCEW ABC Earthworks. All the activities displayed below this heading are the activities that the earthworks subcontractor has to do. The title option displayed for the group headings can be changed as required in the group by selection box. Press Abandon to remove the grouping. 53

 column onto the barchart view by using CTRL+F1, then rightclick on the Current Start column")

58 Program Analysis Sorting by columns The activities can also be sorted temporarily on different columns i.e. from earliest to latest or vice versa, smallest to biggest or vice versa etc. Use the document menu View > Sort > Custom sort and select the Current start date column from the available columns. Choose the Headers option Sort all items ignore headers and the Sort direction option Ascending and confirm. Alternatively add a Current Start Date (ES) column onto the barchart view by using CTRL+F1, then rightclick on the Current Start column heading to select the column contents and Sort > Ascending Notice that the sort on the column right-click menu by default will sort all items ignoring headers. To sort within headers will sort each group of activities below a heading. Press Abandon to remove the sort. 54
 or attached to the end of an activity (will move should the activity move). These lines will not influence any activity calculations.")
59 Program Analysis 7.5 Timelines defined and positioned Define timelines Vertical Time lines can be defined for display on the screen barchart and/or inclusion on a printed report. They can be specified at a fixed calendar date (cannot move) or attached to the end of an activity (will move should the activity move). These lines will not influence any activity calculations. From the Planning application menu select Main > Definitions & settings > Time line definitions Define some timelines with the following fields completed Description Activity Number Date Colour A 24 character field. Used for attaching a timeline to a program activity. Used for attaching a timeline to a specific date. A colour indicator that may be set for each timeline. The "Contract complete" timeline is linked to a specific date, and will be drawn at that date irrespective of the position of any program activities. The "Fan base complete" timeline is linked to an activity number, and will be drawn at the early finish date of that activity, based on the current calculated position of the activity. The Wet season timeline is dependent on a commencement and completion date. On the screen it will be displayed as a thin line at each of these two dates but on the report it will be displayed as a thick colour bar spanning between these two dates. The colour of the thick timeline on the printed report is based on the colour selected here. Ensure you select a light shade Confirm when complete and the definitions will be saved. 55


60 Program Analysis Display timelines From the document manager open the document Standard barchart. On the document menu select Barchart > Options to display the barchart display options dialog. Select the display option Show Timelines in order to display them on the screen barchart. Confirm to close the dialog. The defined timelines are displayed with their relevant definition attached. Note the thick timeline displayed as two timelines in the same colour on the screen. This will be represented as a thick strip in reports. 56
 have been typed in uppercase and some activity descriptions are not correctly indented (e.g. activities A250 to A300).")

61 Program Analysis Format text Before printing the reports the program needs to be made presentable, i.e. all unnecessary blank lines can be removed; activity descriptions can be sentence cased, headings and activities can be indented for clarity etc. Notice that some of the descriptions (e.g. in the EARTHWORKS section) have been typed in uppercase and some activity descriptions are not correctly indented (e.g. activities A250 to A300). This can be quickly rectified using the format text facility avoiding time-consuming manual editing. The Format Text Tool available in Planning, can quickly and easily format your program according to your preferences. First, right-click on the Activity description column heading to select all the activity descriptions. Select the right-click menu Edit > Format text. Make the same selection as displayed and confirm. On completion of the text formatting notice the conformity of the description casing, line spacing and indentation. 57


62 Reports Chapter 8. Reporting Contractual Program The following is a basic barchart report, illustrating the use of comment blocks and activity tags that will be created in this exercise of reporting. 58

63 Reports 8.1 Basic Reporting a. Report Manager - Toolbar shortcut button All reporting in Candy Planning is done through the report manager. A selection of pre-defined reports are available, any of which may be adapted to suit your specific requirements or you may choose to set up reports to your own specification. The Report Manager consists of two sets of reports. Use the Tab key to switch between the two sets of reports. The picture below indicates the default report manager. For the course all the default reports have been deleted from the course job supplied and new reports will now be created Job reports - Any reports that are set up here are only available to the program in which you are currently working, however, they are backed up as part of a program backup. Global reports - Any reports that are set up in global reports are available to all SitePlan programs on your computer; however, they are not backed up as part of a program backup. Report information - The report information panel displays various set up data about the report on which the cursor is positioned. Each of the two areas, that contain reports, contains one or more books. These books represent headings or groupings of reports. Any report may be copied between the Job Reports and My Reports area by using Windows copy and paste keystrokes Ctrl+C and Ctrl+V. A report may be deleted by using Ctrl+Del (delete). The operation of the Report Manager document is the same as described for the Program Manager. 59

64 Reports b. Report settings The following reports will be created: Contractual Program Contractual Program - Summary Barchart Contractual Program Earthworks Subcontractor Management Key date report Do this Select Reports from the application menu or from the planning tool bar. Select the function button New on the report manager. Select the Standard Barchart from the displayed list of default reports and confirm. Rename the report Contractual Program using the document menu Report > Rename report. Use the function button Customise to call up the report settings document. This document consists of a series of tab sheets that contain all the available options for each type of report. As a change is made to report setting, the sample image in the bottom half of the report settings document reflect that change. 60

65 Reports Tab Function Setting for first report Formatting Set the text size and page layout Fit to page 1 by 1 Line spacing 150% Layout Set the data presentation layout Keep default tick in Section backgrounds Printer Select printer, page size and page orientation Change to portrait Styles Adjust font and colour display styles Keep default Header Adjust header display information and logos Remove [program] Report specification - off Footer Adjust header display information and logos Keep default Content page Used for book printing Not part of this course Columns Select the columns & column headings to display on the report As shown below Sorting Use to sort or group activities for the report Nothing selected for this report Selection Select or filter out which activities to display on the report Keep default - Entire program for this report Calendar Select the calendar strip, calendar scale and / or time indicators to display on the report Calendar strip Year, month & day Calendar scale Project, Automatic & Weekly Time indicators tick Non-work days, Holidays & Timelines Bars / Links Documentation Long lead / Info Adjust display for Bars, Links and Bar references Select display of activity Tags, Notes, Remarks and calculation sheets Use to display procurement items from the Long Lead or Information documents on the barchart Keep the default setting for this report Tick Yellow tags and and bar reference for this report Nothing selected - No procurement documents for the program yet. 61


66 Reports Progress Use to set progress display Nothing selected - No progress on the program yet. Legend Display a legend as either a box or a strip on the report Legend select 1 st Page & tick strip position. Tick Non-critical, critical and contractual dates. Comments Use to add comments for display on the report Select New comment and add comments as shown To display the comment on the report ensure that the selection Print this object is ticked. If unticked the comment will not display. This feature allows you to select which comments to display or not without redoing the comments every time a report is printed. After customising the settings as shown, confirm to save changes to the report document. From the report manager the report may be previewed, printed or exported to PDF or Excel by using the function button Print report, hitting Enter or double-clicking on the report name. To export to PDF format ensure that Candy s PDF printer is installed on the machine (Available as a separate download from the CCS website) A report can be only exported directly into Excel if it is installed on the machine. Note when exporting to Excel, only the activity list section will be exported and not the barchart graphics 62
67 Reports You are required to create and customise the following reports to appear the same as the next pages. Contractual Program - Summary Barchart This is a summary barchart report, illustrating the use of section headings. This report illustrates the printing of a summarised barchart showing the current activities summarised to level 2. The contract end activity types are also shown Purpose of the report is to give a big picture of the project without too much detail. The hand-over activities with contractual end dates are highlighted separately underneath the summary bar; indicating the current position (yellow arrow) and current float (inside green / red arrow). Contractual Program Sub Contractor Earthworks This is a barchart report, illustrating the use of subcontractor codes to filter only those activities that have a subcontractor code, in this case for the earthworks. Purpose of the report is to give a report to the subcontractor indicating only the activities that are his responsibility. The bar colour is changed to the colour as per subcontractor definition I.e. the bars are not coloured by float and the subcontractor cannot see which activities have float or not. Key Date Report This report illustrates the printing of only scheduled end type (E, e) activities, for reporting to management. Purpose of the report is highlighting the current progress status for the hand-over (e-contract end) activities only. The current predicted finish date is compared with the imposed date. The current float is compared with the previous update period s float. The float difference between current and previous update period indicates the trend that is developing. I.e. the number of days gained or loss since the last update. 63


68 Reports Report: Summary Barchart with e type activities 64


69 Reports c. Contractual Program Sub Contractor Earthworks 65
70 Reports d. Key Date Report 66

71 Resources Chapter 9. Resources 9.1 Definitions, Allocation and Histograms - Toolbar shortcut button Resources may be defined and allocated to each activity in the program in order to assess and manage the resource requirements for the project. There are two types of resources: Simple resources - These are basic resources, examples of which might be LAB (for labourer) and CONC (for concrete). Simple resources may be allocated to activities or used to create resource gangs. Resource gangs - These are combinations of simple resources. Definitions From the application menu select Main > Resources or the icon to open the Resource List dialog. Code Every resource must have a code of up to eight alphanumeric characters. Type This controls the manner in which a resource is to be spread over an activity. a. The Daily type allocates a resource to each day of an activity's duration. b. The Total type spreads a resource uniformly over the activity duration. c. The Pool type accumulates a resource's utilisation until it is removed. Description The resource name, up to 30 characters long. Unit The unit in which this resource is measured, up to 6 characters long. Cost/Unit The cost per unit that will be used, if a histogram by value is required. Colour The colour to be used for highlighting activities by resource on a report. 67

72 Resources Resource Gangs A Gang may be created on the resource list. Click on the resource, in the resource list, that you want to make a gang. Click on the simple resources for the gang in the pick list below displayed on the left-hand side of the gang sheet. Use the button to add the required simple resources to the gang. The code, type and description for the selected resources are copied from the resource list. Enter the number of each resource that is required in the gang and close the resource list, changes will be saved automatically. Note: When the resource list is opened again the resources are sorted alphabetically according to the resource code. a. Resource allocation From the document manager, open the Resources heading and select the standard document Barchart with Resource Allocation. Double-click in the resource code field to display a pick list of the defined resources. Select the required resource(s) and confirm to allocate it. Note more than one resource code can be selected and allocated from the pick list to the same activity. Allocate the resources shown in the next illustration for activities A060 to A150. Type the required numbers into the No/Quant field. Each resource allocation on the bar may be precisely positioned in time by using the Start % Offset and End % Offset columns. 68

73 Resources Note: You can allocate resources by simply entering the required code in the resource code field. Resources can be allocated to multiple activities by first selecting the activities using Click + Shift-Click to select a group of activities or Ctrl + Click on the record selection buttons. Then use the right-click menu. Resources > Allocate resource codes. b. Screen histograms Resource histograms may be drawn on the screen barchart. Manual resource leveling may then be used to smooth out any peaks and troughs in the histogram. From the document manager select the standard document Standard Barchart, and use the document menu Histograms > Planning resources. A dialog containing a list of the defined resources for the current program is displayed. Select the UNSK (unskilled) labourer resource and confirm. 69
 that are included in the histogram.")
74 Resources The Early Start histogram is plotted on the screen barchart. A vertical scale is drawn on the right-hand edge of the barchart, indicating the resource code(s) that are included in the histogram. Use the document menu Histograms > Histogram type to plot Cumulative, Late Start or Base Program histograms. To remove the histogram from the screen barchart use Clear histogram from the same menu. Note: More than one resource may be selected. The summed histogram for the selected resources is then displayed on the screen. You may filter only those activities that are contributing to the current screen histogram by using the Histogram filter menu. Only those activities that contribute to the current screen histogram are displayed. The activities that do not form part of the current histogram are not displayed. Further filtering of these activities can be carried out as required. 70


75 Resources 9.2 Resource Restraints Activities may have a resource restraint applied to them in order to level or smooth the requirement for a resource. To apply a resource restraint, select the document menu Histograms > Move bar mode to put the cursor in move bar mode. Position the cursor at the start of an activity that you want to put a resource restraint on, until the green move symbol appears. Use the mouse to move the start of the bar to the point at which you want to delay the activity's start Note: Move the activities with float first as the float will be minimized without influencing the critical path. Tip: To see how far an activity with float can be moved before influencing the critical path, display the float on the screen. Use Barchart > Options > Show float. From the document manager select the default document 5.4 Barchart with Restraints. A resource restraint is set, which is indicated by the marker on the screen or displayed in the Imposed Delays field. The program is recalculated and the histogram updated. The consequential effect of a resource restraint may be seen throughout the chain of successor activities in the Delay Effects column. 71
76 Resources The program can be also calculated ignoring any resource restraints that have been set, by using the SHIFT + Calculate function button, and selecting the option Ignore Restraints. To remove a resource restraint, select the activity with the restraint by clicking on the select record button. Right-click on the highlighted activity, select Restraints > Remove restraints > Resource restraints. Press Calculate In order that the course can continue with us all using the same information, we will use another one of the programs that was recovered earlier. In the program manager select the program Tender program rev 01 This program has all required resources allocated to enable the following exercises. 9.3 Resource Reporting The following histogram reports must be created: Labour Histogram - Current Start - This is a resource histogram report, illustrating the printing of separate histograms for the selected resources, including both daily values as bars and cumulative curves. Total Labour Histogram Current/Late Start - This is a resource histogram report, illustrating the printing of a summed histogram for the selected resources, including both current and late starts curves. Concrete Histogram - This report illustrates the printing of current and late start histograms for the selected resource, including both daily values and cumulative curves. Concrete S- Curve Histogram - This report illustrates the printing of current and late start histograms cumulative curves. Barchart with Resource Histogram - This report illustrates the printing of a barchart, including selected histograms. 72


77 Resources Labour Histogram - Current Start 73


78 Resources Total Labour Histogram Current/Late Start 74

79 Resources Concrete Histogram 75

80 Resources Concrete S- Curve Histogram 76


81 Resources Barchart with Resource Histogram 77
82 Procurement Chapter 10. Procurement 10.1 Introduction There are usually activities or operations that have to happen "off-site" prior to the construction activity commencing. Such operations may be scheduled and monitored on either the long lead schedule or information schedule which are tabular documents linked to the activity list of the program. Long lead schedule is used when a series of off-site events with a dependent link between each event proceed the activity. In other words when the event is delayed all subsequent events and the activity is delayed. Information schedule is used when a group of off-site events has to happen in parallel before the activity can commence. A delay of one event will only delay the activity but not the other events Long lead schedule - Toolbar shortcut button Long lead manager From the planning toolbar use the button, or select Procurement > Long lead schedule from the application menu. The Long lead manager is displayed, on which the default long lead document is displayed. Rename this to Nominated Subcontractors & Suppliers using the document menu Long lead > Rename long lead and Enter. Further long lead documents may be set up on this selector as required. Select or double-click to open the document. Long Lead Document Activity numbers of activities used in the long lead schedule can be typed or imported into the document. The type-in method will be explained first. To assist with the typing in of activities the split screen function will be used. Create the long lead schedule using the following steps: Split the long lead document to display at the bottom half of the screen by using the split screen button. From the document manager open the Standard barchart and split the screen to the top half using the split screen button. Both documents are displayed on the screen. Click on the long lead document to activate the document. Use the Standard barchart document on the top screen as reference for typing in the activity numbers. Enter the Activity Numbers for the construction program activities and section headings as displayed in the ACT# column. (The activity number is case sensitive) Note that the all dates in the long lead schedule will be displayed automatically and need not be typed in. 78
,")
83 Procurement When complete, maximize the long lead document using the button. Below each imported construction activity, insert the long lead operations with a Description, Duration (in working days), Responsibility, Symbol and Remark. ( CTRL+ INS to insert a blank line) 79

84 Procurement Use the SHIFT+Calculate function button to set the calculation mode Early Start Base program Earliest of Base and Early start Calculates on current construction program bar positions. Calculates on the base program bar positions. Calculate on the earliest of current construction program bar positions or base program bar positions When the program is ahead of schedule and events are required earlier; then the early start date will be used in calculation of long lead items When the program is behind schedule; then the base program s dates will be used. Use Calculate to recalculate the required Start and Finish dates for the long lead operations. 80
85 Procurement Program activities and / or section headers may be imported from the activity list into the long lead schedule by using the Import function button to display a menu with the following options: Import All Activities Import Headers Only Import Selected Activities Only Merge New Activities Into Schedule Select this option to import the whole activity list from the program highlighted in the program manager. Select this option to import section headings only from the highlighted program s activity list. Select this option to import only those filtered activities that are currently displayed on the program s activity list by activity filtering. Select this option to import any activities that are not currently on the schedule such as additional activities that were added to the program Long lead reporting The following reports are required: a. From the long lead schedule. Use the document menu Tools > Print Long Lead Schedule - This report illustrates the printing of a long lead schedule in a tabular format. Long Lead Schedule filtered on responsibility code - This report illustrates the printing of a long lead schedule in a tabular format for one responsibility code only. b. From the Planning report manager. Detailed long lead barchart This default report illustrates the printing of a long lead schedule in a barchart format indicating long lead items as bars on a separate line to the activity s bar. Standard Barchart with LL items as bars -This report is a standard barchart report that illustrates the printing of a barchart with all the activities with each long lead item shown as a bar Standard Barchart with LL items as symbols -This report is a standard barchart report that illustrates the printing of a barchart with all the activities with each long lead item shown as symbols. 81

86 Procurement Long Lead Schedule 82

87 Procurement Long Lead Schedule filtered on responsibility code (example QS ) Only the long lead items for the QS are printed. To create these reports use Filter > Print as per selection below and select the following options Sorting - Sort by item start date Selection All items and tick the box Responsibility code and type QS in the blank space. (Filter is case-sensitive) 83


88 Procurement Detailed Long Lead barchart. 84


89 Procurement Standard Barchart with LL items as bars. 85


90 Procurement Long lead barchart with LL items as symbols 86

.")
91 Procurement 10.4 Long lead schedule Pro-active use The Actual finish date column can / should be used for the predicted finish date (different than the calculated required date). You do not have to wait for the information to be late before you record it. You can record the predicted finish date as soon as it is known; then export and see the anticipated effect on the program activities. Example: Refer to activity notes for activity A150 Fan base (use the record selector right-click menu or temporarily add the Activity note column as described in chapter 8). It is mentioned in the notes that the client / owner will only be able to approve the design after September, however according to the long lead schedule approval is required the beginning of August. What would the late approval effect be on the program? The client advice at the first site meeting that the earliest that he could approve the design would be on 03 October Type in this date in the Actual finish column and calculate to see the effect. Note the effect shown is the difference between the long lead item finish date and the actual finish date, in work days. This effect can be exported to the program to see the overall effect on the program and its completion dates. Use the document menu Tools > Export to program. 87


92 Procurement Important: The effect can only be exported to the program when the long lead schedule s calculation mode is using base program. If the long lead schedule calculation mode is in any other mode a message will be displayed advising to change the calculation mode. To change the calculation mode click on the next to calculate and select the option Calculate using base program. To see the effect on all the predecessor activities open the screen document 5.4 Barchart with restraints. Note the negative float delay effect on the handover activity. With this prove of the possible delay; the client/owner can now already see (before the incident actual happen), that he needs to make alternative arrangements for the approval of the long lead item on required date. To remove the long lead restraint, select the row for activity A150. Right-click and select Restraints > Remove restraints > Long lead restraints. 88
93 Procurement 10.5 Information schedule - Toolbar shortcut button Information schedule manager The information schedule has a similar function to the long lead schedule. The difference being that this schedule is used to schedule information that does not form part of a chain of events. The Required date for each operation is always calculated from the start of the construction activity to which it has been attached. From the planning toolbar use the button, or select Procurement > Information schedule from the application menu. The Information schedule manager is displayed, on which the default information schedule document is displayed. Similar to the Long lead document; activity numbers of activities used in the information schedule can be typed or imported into the document. The import method is used for this exercise. Select or double-click to open the document. Create the long lead schedule using the following steps: Select Import > Import all activities Below each imported construction activities insert the information items with a Description, Duration (in working days), Responsibility, Symbol and Remark. Keep or delete the activities not required, as per personal preference. (Note: deleting activities in the schedule will not delete them from the program.) Note that all activity dates in the information schedule will be displayed automatically and need not be typed in. 89

94 Procurement Use the SHIFT+Calculate function button to set the calculation mode Early Start Base program Earliest of Base and Early start Calculates on current construction program bar positions. Calculates on the base program bar positions. Calculate on the earliest of current construction program bar positions or base program bar positions When the program is ahead of schedule and information is required earlier; then the early start date will be used in calculation of long lead items When the program is behind schedule; then the base program s dates will be used..use Calculate to recalculate the required Start and Finish dates for the long lead operations. 90
95 Procurement As for the Long lead schedule program activities and / or section headers may also be imported from the activity list into the information schedule by using the Import function button to display a menu with the following options: Import All Activities Import Headers Only Import Selected Activities Only Merge New Activities Into Schedule Select this option to import the whole activity list from the program highlighted in the program manager. Select this option to import section headings only from the highlighted program s activity list. Select this option to import only those filtered activities that are currently displayed on the program s activity list by activity filtering. Select this option to import any activities that are not currently on the schedule such as additional activities that were added to the program Information reporting The following reports are required: a. From the Information Schedule Use the document menu Tools > Print Information Schedule - This report illustrates the printing of a information schedule in a tabular format. Information Schedule filtered on responsibility code - This report illustrates the printing of an information schedule in a tabular format for one responsibility code only. b. From the Program Report Manager Information required barchart -This report illustrates the printing of a barchart with each information item shown as an arrow head pointer on a separate line to the activity s bar. Standard Barchart with IS items as bars This report is a standard barchart report that illustrates the printing of a barchart with all the activities with each information required item shown as an arrow head pointer. Standard Barchart with IS items as symbols -This report is a standard barchart report that illustrates the printing of a barchart with all the activities with each information required item shown as symbols. 91


96 Procurement Information Schedule 92

97 Procurement Information Schedule filtered on responsibility code Only the long lead items for the Mechanical Engineer (ME) are printed. To create these reports use Filter > Print as per selection below and select the following options Sorting - Sort by item start date Selection All items and tick the box Responsibility code and type ME in the blank space. (This filter is case-sensitive) 93


98 Procurement Information required barchart 94


99 Procurement Standard Barchart with IS items as bars 95
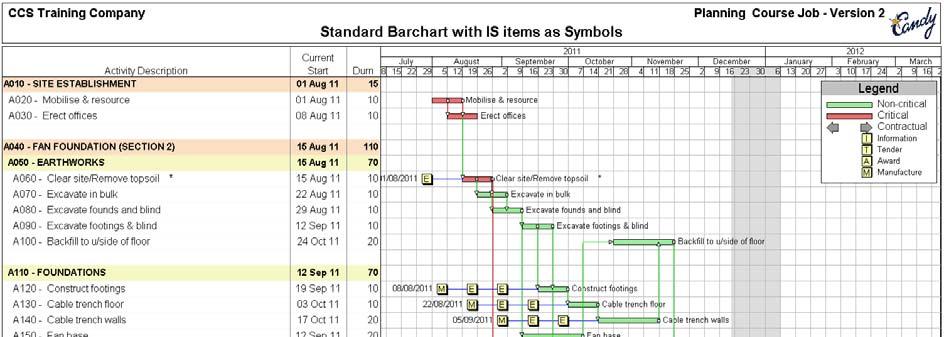


100 Procurement Standard Barchart with IS items as symbols 96
101 Procurement 10.7 Information schedule Pro-active use The Actual finish date column can / should be used for the predicted finish date (different than the calculated required date). You do not have to wait for the information to be late before you record it. You can record the predicted finish date as soon as it is known; then export and see the anticipated effect on the program activities. The same process as described under Long lead schedule Pro-active use can also be applied in the information schedule. Remember to change the calculation mode to Calculate using base program. 97

102 Filter, Sort and Copy Chapter 11. Working techniques Filter, sort and copy Using this program we are now going to recap what we have done so far prior to taking the program onto site and using it for recording and monitoring progress. In order that the course can continue with us all using the same information, we will use another one of the programs that was recovered earlier. From the program manager select Tender program rev 1 and use Program > Duplicate program. Rename and overtype the existing name with What if? 11.1 Activity filtering a. Filter critical activities only From the document manager select the document All codes, and use document menu View > Filter > Logic filter > Critical activities (no float). Those activities that satisfy the search criteria are displayed normally, and those activities that do not satisfy the search criteria are displayed grayed out. Use Hide rejects to display only the activities that satisfy the search criteria. b. Filter by description A further filtering of these activities can be carried out. Place the cursor on the activity A390 Excavate founds & blind Hold the mouse button in and swipe the first five letters Excav... Right-click and select Filter on fragment > Reduce by keeping and confirm. 98


103 Filter, Sort and Copy Filter by code - A further filtering of these activities can be carried out. Position the cursor in the Zone column for any activity with zone code SECTION3 and use the and select the required code from the pick list displayed and confirm. We have now achieved a list of activities that are Critical, have the word Excav in the description and are coded to zone Section3. By using any combination of the available filters, it is very quick to home in on selected activities for reviewing or for working on. Use Abandon to cancel all filters and display the complete list of activities Sorting and Group by Code The codes defined and allocated can now be used to group the program in any preferred breakdown. For example: Which activities fall under the responsibility of the Concrete foreman (Site Resp. Code) in the Superstructure (Area Code) of the Sub Station (Zone)? From the document manager select Standard Barchart. Use the document menu View >Group by > Custom group by. Select the columns to group by as shown. Scroll down to the Zone: Fan foundation, Area: Foundation and the Responsibility of the Concrete Foreman is the Construct footings activity A120 and Cable trench floor activity A130. You can also close the code headings to display only the relevant information as indicated in the picture. The title option display can be changed as required in the group selection box. 99
, and use Ctrl+Up Arrow to close the activity detail into the section heading.")
104 Filter, Sort and Copy 11.3 Activity Copying From the document manager select the document Barchart with Successor Activities, which you set up previously. Position the cursor on the section heading A360 Sub-Station (Section 3), and use Ctrl+Up Arrow to close the activity detail into the section heading. Position the cursor on the closed up section heading, and use CTRL+C to copy the line. Move the cursor down to a blank line beyond the last activity and use CTRL + V to drop the line. The complete section is copied with the system generating unique activity numbers for the copied activities. Use Calculate to recalculate the program. Using this method copies the Activity Logic, Resources and any Secondary Codes that have been allocated to the source activities. Therefore, the idea is that if you have to compile a program with many similar sections, create one section that is as complete as possible, with resources etc. and only then copy this section and edit it to become further similar sections. 100

105 Filter, Sort and Copy An activity can be moved up or down in the program by placing the cursor on the activity and using CTRL + Right arrow for down or CTRL + Left arrow for up. A closed heading section s sequence in the program can be changed using the same keystrokes. 101

106 Filter, Sort and Copy Activities by Resource From the document manager select the standard view Resource List with Barchart. This is a special view that arranges the activities by resource. Use the document menu Tools > Sort activities to sort the activities by current start. 102
107 Progress Update Chapter 12. Progress Update 12.1 Introduction The responsibility for planning and programming should be that of the construction team. A program should be produced because it is necessary for site and not only because the client insists that a program be produced. Every one of us plans his work, even if it is not formally put down on paper, our weakness is that we then omit to manage the work strictly according to what has been planned. Top management has to review, approve and enforce the detailed planning which is to be executed by the construction team. Plan for the benefit of the contract (and not to get the client off our backs) on a system which will assist the site to make day to day decisions. A program sets out the standard against which actual progress can be measured. It is important during the running of a contract that progress should be reported against the plan using a consistent, standard format, on a regular basis. Monitoring is the process of recording and reporting progress on a regular basis against the plan with the object of highlighting those areas of work, which deviate from the plan. Monitoring must:- Be on a regular basis Record progress against the established targets or rate of production Highlight those areas which deviate from the targets Be simple to understand Be quick enough to ensure that action can be taken in time to correct adverse trends From a contractual point of view, recording the progress of the activities provides an as-built record, which may contain valuable information in resolving cause and effect claims. In order that the course can continue with us all using the same information, we will use another one of the programs that was recovered earlier. From the program manager position the cursor on the program called Contractual program. Select Program > Duplicate program. Rename and overtype the existing name with Update 1. Select this program. 103

108 Progress Update 12.2 Record TimeNow and the base program a. Record TimeNow Before you can record actual information against program activities, you need to set TimeNow, which is the evening of the date that divides past and future. Progress for an activity is recorded as having an actual start date prior to TimeNow with a remaining duration beyond TimeNow. From the document menu select Update > Record TimeNow. The Progress Settings document is displayed. Set TimeNow to 26/08/2011 or work day number 20. Use the scroller buttons to scroll the Workday Number or the select/enter the date and confirm. The first time that you set TimeNow a message is displayed, which informs you that you must store a Base Program before you can start recording progress. Confirm to store your program as the Base Program prior to recording progress for the first time. b. Base Program The base program is a copy of the original program before any progress is added. It is made automatically the first time that TimeNow is changed. Any new activities that have been added to the program in the update period will be added to the base program when next there is a change to TimeNow. The base program forms a contractual record of the agreed program. When progress is entered it is recorded against the base program and forms an as-built record of the progress on the project. This can be printed out as a series of snapshots on the base program to show the history. On the screen barchart, the base bars can be shown against the current bars and progress can be indicated on either the base bars or the current bars. Before establishing the base program, you should consider if the program is ready. For example, logic errors, which are fine in a static tender program, such as open ends, could cause problems once progress is entered into the program. Errors such as these must be eliminated prior to setting TimeNow for the first progress update. 104


109 Progress Update 12.3 Recording progress Progress may be recorded on the screen barchart by using the mouse or on the activity list by entering information into the applicable columns. If an activity to be progressed has started in this period, then its actual start date should be entered. If it is finished, its actual end date must be entered, otherwise enter the remaining duration (i.e.: its forecast to completion). a. Progress Using the Mouse From the Document Manager select the standard view Progress Barchart below the Progress heading. Notice that elapsed time, as established by TimeNow, is shaded in on the barchart. Position the mouse cursor on an activity at the edge of the elapsed time shaded area, until it changes to progress mode, indicated by the symbol. Click and hold down the left mouse button and drag the pointer to the left or right on the bar. The TimeNow line is stretched along the bar and a panel appears which displays the Days Completed (as Percentage Complete) and Days Remaining for the activity that is being progressed. Continue dragging the mouse to the required progress status for the activity and release the mouse button. b. Progress using the barchart screen buttons Position the mouse pointer on the date to be used for progress update. (The date position of the mouse pointer is displayed in status bar in the left bottom corner of the document.) On the required date select the screen buttons Set actual start, Set actual end or Rem duration as required. The activity list will reflect the selection made based on the mouse pointer position when the rightclick menu was called. 105


110 Progress Update c. Progress using the barchart right-click menu Position the mouse pointer on the date to be used for progress update. (The date position of the mouse pointer is displayed in status bar in the left bottom corner of the document.) On the required date right-click and select Progress > Actual start, Actual end, Remaining duration or Complete activity as required. The activity list will reflect the selection made based on the mouse pointer position when the rightclick menu was called. d. Progress entering dates Progress data can also be entered directly into the activity list. Type in the required dates or doubleclick to select the required date from the calendar. Enter the progress using any of the aforementioned methods. Calculate after the progress has been entered. The barchart is redrawn taking into account the progress that has been recorded. 106

111 Progress Update e. Speaking Progress Progress may be presented on the screen or on a report in a form that can be understood by nonplanners. The numeric progress values are converted into textual information. From the document manager select the standard document Speaking Progress. This layout, which is a normal screen document, may be configured as required, and used to compare the previous situation with the current situation, both in terms of end slippage and change in float for the activities Progress Reporting The following progress reports must be viewed and / or created: Key date report (created previously) - This report illustrates the printing of only scheduled end type (E, e) activities, for reporting to management. Current & Base Barchart -This report illustrates the printing of a barchart showing the current and base positions of the activity bars after the update. Visual comparison can be made of the planned against the actual. Base barchart with snapshot -This report illustrates the printing of a barchart showing the base activity bars with progress superimposed as a jagged snapshot line. Summary Barchart with e type activities -This report illustrates the printing of a summarised barchart showing the current and base activities summarised to level 2. The contract end activity types are also shown. Note to show the % complete on the heading bars, select the tab Bars/links and tick the option Heading bars > Show % complete 107
112 Progress Update Key date report This report illustrates the printing of only scheduled end type (E, e) activities, for reporting to management. 108


113 Progress Update Current & Base Barchart This report illustrates the printing of a barchart showing the current and base positions of the activity bars after the update. Visual comparison can be made of the planned against the actual. 109


114 Progress Update Base barchart with snapshot This report illustrates the printing of a barchart showing the base activity bars with progress superimposed as a jagged snapshot line. 110

115 Progress Update Summary Barchart with e type activities This report illustrates the printing of a summarised barchart showing the current and base activities summarised to level 2. The contract end activity types are also shown. 111

116 Progress Update 12.5 Second progress update Carry out the following exercises to record progress for the month 2 on the contract. Copying Program In order that the course can continue with us all using the same information, we will use another one of the programs that was recovered earlier. From the program manager position the cursor on the program called Update 1-26 Aug 2011 and use the right-click Duplicate program Rename and overtype the existing name with Update 2. Select this program. Setting TimeNow From the SitePlan toolbar use the button, or select Progress > Record TimeNow from the application menu. The Progress Settings document is displayed. Set TimeNow to work day number 42 or 27/09/2002 by using the buttons to scroll the Dates or the Workday Number and use the button. Snapshots are saved automatically when you set TimeNow. You may access the list of saved snapshots to delete or edit them as required. Select the toolbar button to display the progress settings document. The following information is saved for each snapshot: TimeNow - The TimeNow date when the snapshot was taken. Description - A 30 character field in which the system creates the words TimeNow is dd /mm /yyyy where the date is when TimeNow was selected. The description may be edited as required. Recorded - The current date when a snapshot is recorded, automatically taken from the computer's internal clock. Sequence No - A number is automatically assigned to each snapshot that is saved, 1 = first snapshot, 2 = second snapshot etc. 112

117 Progress Update Record Progress Use any of the techniques that you learnt for Progress Update - Month 1, record progress as below. 113

118 Progress Update 12.6 Progress Comparison In order that the course can continue with us all using the same information, we will use another of the programs that was recovered earlier. From the Program manager select the program Update 2-30 Sep a. Screen Histograms Resource histograms may be drawn on the screen barchart for a progressed program, and used to compare the Base Program with the Current Program. From the document manager select the standard document Standard Barchart, and select the document menu Histograms > Planning resources. A selector containing a list of the defined resources for the current program is displayed. Select the UNSK(unskilled), SESK (Semi-Skilled) and the SKIL(skilled) Labourer resources and confirm. The Early Start histogram is plotted on the screen barchart. A vertical scale is drawn on the right-hand edge of the barchart, indicating the resource code(s) that are included in the histogram. Use Histogram > Histogram type to plot Cumulative, Current & Base Program histograms. You may filter only those activities that are contributing to the current screen histogram by using Histogram > Histogram filter. Only those activities that contribute to the current screen histogram are displayed. The activities that do not form part of the current histogram are not displayed. Further filtering of these activities can be carried out as required. 114


119 Progress Update b. Cause of the Delay Once the program is updated the actual progress need to be compared against the planned program. The float difference of the contract end dates will indicate if the project is ahead or behind program. If the current float of the contract end dates is negative it indicates that the project will not complete on time. The cause of the delay needs to be determined. This can be done using the filter facility in SitePlan. On the document manager use the right-click New > Insert a new document and select the Standard barchart from the list displayed. Right-click on new document and Rename document to Barchart with float Open document and use CTRL + F1 to add the Float (total) column to the document Right-click on the Float column heading and select Start a new filter > Reduce by keeping > Less than 0. Hide the rejects if required. All the activities with a float less than zero will be displayed. The filtered activities crossing the TimeNow line are the current problem activities that require attention. 115
120 Progress Update 12.7 Progress comparison reporting Create / view the following progress comparison reports Key date report - This report illustrates the printing of a barchart, comparing the previous update s key date status with the current update s key date status Cause of delay report - This report illustrates printing of the cause of the delay on a current barchart, by using a float range filter (of 6 [minus six]). The float range filter can be set under the Selection tab when customising the report Resource shortfall histogram - This report illustrates printing of the cumulative resource histogram comparing the base histogram with the current histogram. Notice the resource shortfall on each resource at the TimeNow line. 116
121 Progress Update Key date report 117


122 Progress Update Cause of delay report 118


123 Progress Update Resource shortfall histogram 119

124 Re-evaluate Program Chapter 13. Re-evaluate remaining program 13.1 Evaluate the Delay Every time the program is updated the actual progress need to be compared against the planned program. The float difference of the contract end dates will indicate if the project is ahead or behind program. If the current float of the contract end dates is negative it indicates that the project will not complete on time. The cause of the delay needs to be determined. Once the cause of the delay is determined, the remaining duration should be re-evaluated to ensure that the planned contract end dates will be met. From the program manager select the program Update 2-30 Sep 2011 and right-click Duplicate program. Then Rename and overtype the existing name with Rev 1 and select this program. Place the flashing cursor on activity A600 Handover sub-station. Notice that the float indicated as minus six days (i.e. the current completion date of this section of the project is six days later than planned.) With the cursor still on activity A600 Handover sub-station choose the document menu item View > Filter > Activity filters > Successors and predecessors with same float. Hide the reject if required. This will filter out all the successors and predecessor activities linked to the activity Displayed on the screen is the overrun critical path related to the Handover of the sub-station. The cause of the delay is the in-progress activity A400 Excavate footings & blind that has not progressed as planned and is predicted to complete later than planned. 120

125 Re-evaluate Program 13.2 Re- evaluate the Delay When the overrun critical path is identified it can be re-evaluated and adjusted to ensure that the contract end date will be met. The following adjustments can be applied: Check the remaining duration period of the in-progress activities on the overrun critical path. Additional resources can be added to minimise the remaining duration. The logic links to its successors could be revised (The successor could commence earlier than originally planned.) The workday pattern for the activity could be revised. (An activity with a five-day workweek could be changed to a six-day workweek.) Check the duration period of each of the remaining activities on the overrun critical path if still required Additional resources can be added to minimise the duration of an activity. The logic links to an activity s successors or predecessors could be revised (An activity could commence or complete earlier than originally planned.) The workday pattern for an activity could be revised. (An activity with a five-day workweek could be changed to a six-day workweek.) For this example add the Calendar code column onto the barchart with float view by using CtRL+F1 or right clicking on any column header and selecting Column layout. Select the document menu Barchart > Change display calendar and then select the Universal calendar from the list displayed and confirm. The barchart view will display in the 7-day calendar and all calendar days including weekends and holidays are displayed. The activities A400 Superstructure brickwork and A490 Roof construction are currently commencing before the December holiday break and continue after the break. Click on the document menu Tools > Add calendar and add a new calendar with the calendar code, name and days per week as shown Place the flashing cursor anywhere inside this new HO calendar and select Tools > Copy holidays. From the list displayed highlight the Project calendar and confirm. The workday pattern and all defined holidays from the PC calendar is copied into the new HO Holiday working calendar. 121


126 Re-evaluate Program In the HO Holiday working calendar change the holidays of the following days to working days with the Set workday function button: 16/12/ /12/ /12/ /12/ /12/ /12/2011 After the changes are made close the calendar list and Calculate Select document menu Barchart > Change display calendar and select the PC calendar to display the Project Calendar on screen. You can also select the year planner to add / change the holidays to work days. Select the menu Tools > Year planner. Remember to select the HO Holiday working calendar before you change the holidays to work days. 122

127 Re-evaluate Program In the calendar column, next to activities A480 Superstructure brickwork & A490 Roof construction, type in the calendar code HO or double-click in the calendar column and select HO Holiday working from the list displayed. Calculate the program. Add the float column to the current screen document using CTRL + F1 to customise the document. Notice that the float of activity A600 Handover substation has changed form a negative six days to a zero float. By shortening the holiday break period for two activities on the overrun critical path the project can be completed one day ahead of schedule! Remember to Abandon the filter. 123
128 Re-evaluate Program Key date report 124


129 Update Candy Chapter 14. Update Candy To keep our users up to date with the latest modifications and developments in the software, the software versions will expire at regular intervals prompting you to update the latest version. To update the latest version select Support > Update Candy From the dialogue displayed select Download the latest software, continue and follow the prompts. Note that you can also download the latest Help files from here. 125
130 Candy Support Chapter 15. Support 126
131 Candy Support 127

132 Appendix A Appendix A Candy general settings Do this: Use the Candy button > System settings or the settings paged dialog. icon on the System tool bar to open the system Fonts Desktop Documents Tool buttons Start tool button Folders and paths Number format Keyboard Sounds Languages Macro keys Toolbar keys Sets the font for the screen documents. Report fonts are set when customising the reports. Set an image and/or a calendar to the Candy desktop Sets heading colors and gridline colors for the screen documents Sets which tool buttons to display in the application toolbars Sets which document is to open immediately when a job is selected. Set the folders and network path for backups and network masters. The executable command can be located here for exporting document information directly to Microsoft Excel, if it is installed. Set number styles to use Set text input and Enter key direction Set sound settings for different actions Set the language file to use (other than English) Set keyboard shortcuts to activate recorded keystrokes in sequence Set keyboard short cut commands to activate tool button functions 128
Candy Version2 SwitchOver. Version2 Switchover. Course Notes
 Version2 Switchover Course Notes Feb 2008 i. ii. Chapter 1. Introduction...1 Chapter 2. What s new?...3 2.1 Fundamental intangible changes to the user interface... 3 2.2 Fundamental design changes... 3
Construction Estimating. Quick Start Guide
 Construction Estimating Quick Start Guide Feb 2018 Version 2.01c97 on Windows 7 was used for the screen shots in these notes. We enhance & update the software on a regular basis and minor deviations of
ProjectXpert Getting Started with your trial
 ProjectXpert Getting Started with your trial Do you find your building projects difficult to manage? Want to streamline your jobs? Looked for the ideal project management solution but never found one?
Using Open Workbench Version 1.1
 Version 1.1 Second Edition Title and Publication Number Title: Edition: Second Edition Printed: May 4, 2005 Copyright Copyright 1998-2005 Niku Corporation and third parties. All rights reserved. Trademarks
Excel 2013 Intermediate
 Excel 2013 Intermediate Quick Access Toolbar... 1 Customizing Excel... 2 Keyboard Shortcuts... 2 Navigating the Spreadsheet... 2 Status Bar... 3 Worksheets... 3 Group Column/Row Adjusments... 4 Hiding
MultiSite Suite: General Ledger
 MultiSite Suite: General Ledger User s Manual version 2.2.97 Copyright & Trademarks Copyright Notice and Trademarks 2003 by Brent Lawrence, LLC. All rights reserved. Reprinted and edited by MultiSite Systems,
ECDL Module 6 REFERENCE MANUAL
 ECDL Module 6 REFERENCE MANUAL Presentation Microsoft PowerPoint XP Edition for ECDL Syllabus Four PAGE 2 - ECDL MODULE 6 (USING POWERPOINT XP) - MANUAL 6.1 GETTING STARTED... 4 6.1.1 FIRST STEPS WITH
Staff Microsoft VISIO Training. IT ESSENTIALS Creating Organisation Charts Using Visio 2013 (ST560) August 2015
 August 2015") Staff Microsoft VISIO Training IT ESSENTIALS Creating Organisation Charts Using Visio 0 (ST0) August 0 Book online at: Royalholloway.ac.uk/it/training Self-Study packs also available 9 th August 0 Table
Staff Microsoft VISIO Training IT ESSENTIALS Creating Organisation Charts Using Visio 0 (ST0) August 0 Book online at: Royalholloway.ac.uk/it/training Self-Study packs also available 9 th August 0 Table
MICROSOFT PROJECT 2010 EXERCISE
 MICROSOFT PROJECT 2010 EXERCISE Copyright 2011 University of Warwick MICROSOFT PROJECT 2010 EXERCISE Introduction In MS Project there are typically several possible ways to do each desired action. This
Microsoft Word Part I Reference Manual
 Microsoft Word 2002 Part I Reference Manual Instructor: Angela Sanderson Computer Training Coordinator Updated by: Angela Sanderson January 11, 2003 Prepared by: Vi Johnson November 20, 2002 THE WORD SCREEN
MAXQDA and Chapter 9 Coding Schemes
 MAXQDA and Chapter 9 Coding Schemes Chapter 9 discusses how the structures of coding schemes, alternate groupings are key to moving forward with analysis. The nature and structures of the coding scheme
Supplier SAP SNC User Guide
 Supplier SAP SNC User Guide Version 1.0 July 29, 2014 AGCO Corporation Page 1 1 Introduction AGCO has chosen SAP Supplier Network Collaboration (SNC) to improve visibility and capability in North America
Excel 2010 Foundation. Excel 2010 Foundation SAMPLE
 Excel 2010 Foundation Excel 2010 Foundation Excel 2010 Foundation Page 2 2010 Cheltenham Courseware Pty. Ltd. All trademarks acknowledged. E&OE. No part of this document may be copied without written permission
OpenForms360 Validation User Guide Notable Solutions Inc.
 OpenForms360 Validation User Guide 2011 Notable Solutions Inc. 1 T A B L E O F C O N T EN T S Introduction...5 What is OpenForms360 Validation?... 5 Using OpenForms360 Validation... 5 Features at a glance...
A GET YOU GOING GUIDE
 A GET YOU GOING GUIDE To Your copy here MindView 5 June 2013 1 Learning Support Getting started with MindView 5 1) Click on Start 2) Move up to All Programs 3) Click on MatchWare MindView 5 MindView will
MICROSOFT PROJECT Level 2
 MICROSOFT PROJECT 2010 Level 2 Contents LESSON 1 - ORGANISING PROJECT DATA... 3 FILTERING DATA... 4 USING THE AUTOFILTER FEATURE... 4 SORTING A VIEW... 6 CREATING A CUSTOM SORT... 6 GROUPING DATA... 7
User Guide. FTR Reporter For more information, visit
 FTR Reporter 5.7.1 For more information, visit www.fortherecord.com TABLE OF CONTENTS INTRODUCTION... 5 Overview... 5 About This Document... 5 GETTING STARTED... 6 Installation... 6 Starting Reporter...
Project 2003 Introduction
 Microsoft Application Series Project 2003 Introduction Best STL Courses never cancelled: guaranteed Last minute rescheduling 24 months access to Microsoft trainers 12+ months schedule UK wide delivery
Construction Estimating and Valuations
 Construction Estimating and Valuations Course Notes MP - Revision 4-04/2010 Contents Chapter 1. Updating from the Internet... 1 1.1 Introduction... 1 Chapter 2. Starting Up... 3 2.1 Starting Candy...
Microsoft Project 2016 Foundation. Microsoft Project 2016 Manual - Foundation Level SAMPLE
 Microsoft Project 2016 Foundation Microsoft Project 2016 Manual - Foundation Level Microsoft Project 2016 Foundation - Page 2 2015 Cheltenham Group Pty. Ltd. All trademarks acknowledged. E&OE. No part
Microsoft How to Series
 Microsoft How to Series Getting Started with EXCEL 2007 A B C D E F Tabs Introduction to the Excel 2007 Interface The Excel 2007 Interface is comprised of several elements, with four main parts: Office
MS Office Word Tabs & Tables Manual. Catraining.co.uk Tel:
 MS Office 2010 Word Tabs & Tables Manual Catraining.co.uk Tel: 020 7920 9500 Table of Contents TABS... 1 BASIC TABS WITH ALIGNMENT... 1 DEFAULT TAB STOP... 1 SET MANUAL TAB STOPS WITH RULER... 2 SET MANUAL
MICROSOFT OFFICE. Courseware: Exam: Sample Only EXCEL 2016 CORE. Certification Guide
 MICROSOFT OFFICE Courseware: 3263 2 Exam: 77 727 EXCEL 2016 CORE Certification Guide Microsoft Office Specialist 2016 Series Microsoft Excel 2016 Core Certification Guide Lesson 1: Introducing Excel Lesson
Query Studio Training Guide Cognos 8 February 2010 DRAFT. Arkansas Public School Computer Network 101 East Capitol, Suite 101 Little Rock, AR 72201
 Query Studio Training Guide Cognos 8 February 2010 DRAFT Arkansas Public School Computer Network 101 East Capitol, Suite 101 Little Rock, AR 72201 2 Table of Contents Accessing Cognos Query Studio... 5
Open. Select the database and click. Print. Set printing options using the dropdown menus, then click the
 The Original Quick Reference Guides Microsoft Access 2010 Access is a tool for creating and managing databases collections of related records structured in an easily accessible format such as a table,
Word 2016 Advanced. North American Edition SAMPLE
 Word 2016 Advanced Word 2016 Advanced North American Edition WORD 2016 ADVANCED Page 2 2015 Cheltenham Group Pty. Ltd. All trademarks acknowledged. E&OE. No part of this document may be copied without
Specification Manager
 Enterprise Architect User Guide Series Specification Manager How to define model elements simply? In Sparx Systems Enterprise Architect, use the document-based Specification Manager to create elements
Microsoft Excel 2010 Basic
 Microsoft Excel 2010 Basic Introduction to MS Excel 2010 Microsoft Excel 2010 is a spreadsheet software in the new Microsoft 2010 Office Suite. Excel allows you to store, manipulate and analyze data in
Using Microsoft Excel
 About Excel Using Microsoft Excel What is a Spreadsheet? Microsoft Excel is a program that s used for creating spreadsheets. So what is a spreadsheet? Before personal computers were common, spreadsheet
Specification Manager
 Enterprise Architect User Guide Series Specification Manager Author: Sparx Systems Date: 30/06/2017 Version: 1.0 CREATED WITH Table of Contents The Specification Manager 3 Specification Manager - Overview
Using Microsoft Word. Paragraph Formatting. Displaying Hidden Characters
 Using Microsoft Word Paragraph Formatting Every time you press the full-stop key in a document, you are telling Word that you are finishing one sentence and starting a new one. Similarly, if you press
Easy Windows Working with Disks, Folders, - and Files
 Easy Windows 98-3 - Working with Disks, Folders, - and Files Page 1 of 11 Easy Windows 98-3 - Working with Disks, Folders, - and Files Task 1: Opening Folders Folders contain files, programs, or other
Microsoft Excel 2007
 Learning computers is Show ezy Microsoft Excel 2007 301 Excel screen, toolbars, views, sheets, and uses for Excel 2005-8 Steve Slisar 2005-8 COPYRIGHT: The copyright for this publication is owned by Steve
Microsoft Access II 1.) Opening a Saved Database Music Click the Options Enable this Content Click OK. *
 Opening a Saved Database Music Click the Options Enable this Content Click OK. *") Microsoft Access II 1.) Opening a Saved Database Open the Music database saved on your computer s hard drive. *I added more songs and records to the Songs and Artist tables. Click the Options button next
Microsoft Access II 1.) Opening a Saved Database Open the Music database saved on your computer s hard drive. *I added more songs and records to the Songs and Artist tables. Click the Options button next
Microsoft Project 2003
 Microsoft Project 2003 MANUAL - FOUNDATION LEVEL European Edition PAGE 2 - PROJECT 2003 - FOUNDATION LEVEL MANUAL 1995-2004 Cheltenham Courseware Ltd. Crescent House 24 Lansdown Crescent Lane Cheltenham
Published by SDL International ( Copyright SDL International. All rights reserved. Documentation for SDLX2004.
 Guide to SDL Edit & Translating ITDs Published by SDL International (http://www.sdlintl.com). Copyright SDL International. All rights reserved. Documentation for SDLX2004. Microsoft and Windows are registered
Working with PDF s. To open a recent file on the Start screen, double click on the file name.
 Working with PDF s Acrobat DC Start Screen (Home Tab) When Acrobat opens, the Acrobat Start screen (Home Tab) populates displaying a list of recently opened files. The search feature on the top of the
Astra Schedule User Guide Scheduler
 Astra Schedule User Guide 7.5.12 Scheduler 1 P a g e ASTRA SCHEDULE USER GUIDE 7.5.12... 1 LOGGING INTO ASTRA SCHEDULE... 3 LOGIN CREDENTIALS... 3 WORKING WITH CALENDARS... 4 CHOOSING A CALENDAR AND FILTER...
HBS Training - IT Solutions. PlanWeb. Intermediate
 HBS Training - IT Solutions PlanWeb Intermediate CONTENTS Logging on to the system...3 The PlanWeb Window...5 The Tool Bar...6 The Status Bar...6 The Map Window...6 The Information Window...7 Changing
Microsoft Word 2016 LEVEL 1
 TECH TUTOR ONE-ON-ONE COMPUTER HELP COMPUTER CLASSES Microsoft Word 2016 LEVEL 1 kcls.org/techtutor Microsoft Word 2016 Level 1 Manual Rev 11/2017 instruction@kcls.org Microsoft Word 2016 Level 1 Welcome
Microsoft Word: Steps To Success (The Bare Essentials)
") Microsoft Word: Steps To Success (The Bare Essentials) Workbook by Joyce Kirst 2005 Microsoft Word: Step to Success (The Bare Essentials) Page Contents 1 Starting Word 2 Save 3 Exit 5 Toolbars, Alignment,
Microsoft Word: Steps To Success (The Bare Essentials) Workbook by Joyce Kirst 2005 Microsoft Word: Step to Success (The Bare Essentials) Page Contents 1 Starting Word 2 Save 3 Exit 5 Toolbars, Alignment,
Data. Selecting Data. Sorting Data
 1 of 1 Data Selecting Data To select a large range of cells: Click on the first cell in the area you want to select Scroll down to the last cell and hold down the Shift key while you click on it. This
Introduction to Excel 2013
 Introduction to Excel 2013 Copyright 2014, Software Application Training, West Chester University. A member of the Pennsylvania State Systems of Higher Education. No portion of this document may be reproduced
Outlook 2010 One. Wednesday, August 7, 9-11 am. Agenda:
 Page 1 Outlook 2010 One Wednesday, August 7, 9-11 am Agenda: Outlook Search Options Working with Attachments Creating a Signature Marking a Message as Read Flag an item for Follow-Up Reply, Reply All &
Creating Reports using Report Designer Part 1. Training Guide
 Creating Reports using Report Designer Part 1 Training Guide 2 Dayforce HCM Creating Reports using Report Designer Part 1 Contributors We would like to thank the following individual who contributed to
Please note that this process must be repeated if a new PC is used.
 Appendix 2 - Using Smart Client This section of the user guide is relevant to first-time users of Agresso. There are some areas of the Agresso package that initially need to be configured by the individual
European Computer Driving Licence. Advanced Spreadsheet Software BCS ITQ Level 3. Syllabus Version 2.0
 ECDL Advanced European Computer Driving Licence Advanced Spreadsheet Software BCS ITQ Level 3 Using Microsoft Excel 2010 Syllabus Version 2.0 This training, which has been approved by BCS, The Chartered
Word 2013 Quick Start Guide
 Getting Started File Tab: Click to access actions like Print, Save As, and Word Options. Ribbon: Logically organize actions onto Tabs, Groups, and Buttons to facilitate finding commands. Active Document
ABOUT THIS COURSE... 3 ABOUT THIS MANUAL... 4 LESSON 1: MANAGING LISTS... 5
 Table of Contents ABOUT THIS COURSE... 3 ABOUT THIS MANUAL... 4 LESSON 1: MANAGING LISTS... 5 TOPIC 1A: SORT A LIST... 6 Sort a list in A-Z or Z-A Order... 6 TOPIC 1B: RENUMBER A LIST... 7 Renumber a List
Expedient User Manual Getting Started
 Volume 1 Expedient User Manual Getting Started Gavin Millman & Associates Pty Ltd 281 Buckley Street Essendon VIC 3040 Phone 03 9331 3944 Web www.expedientsoftware.com.au Table of Contents Logging In...
MultiSite Suite: Accounts Payable
 MultiSite Suite: Accounts Payable User s Manual version 6 Copyright & Trademarks Copyright Notice and Trademarks 2010 MultiSite Systems, All rights reserved. Microsoft, Windows, Excel, and Outlook are
In the fourth unit you will learn how to upload and add images and PDF files.
 Introduction Here at SUNY New Paltz, we use the Terminal Four (T4) web content management system (CMS). This puts the power of editing content on our college s webpage in the hands of our authorized users.
Status Bar: Right click on the Status Bar to add or remove features.
 Excel 2013 Quick Start Guide The Excel Window File Tab: Click to access actions like Print, Save As, etc. Also to set Excel options. Ribbon: Logically organizes actions onto Tabs, Groups, and Buttons to
Using Dreamweaver CC. Logo. 4 Creating a Template. Page Heading. Page content in this area. About Us Gallery Ordering Contact Us Links
 Using Dreamweaver CC 4 Creating a Template Now that the main page of our website is complete, we need to create the rest of the pages. Each of them will have a layout that follows the plan shown below.
Introduction to Personal Computers Using Windows 10 and Microsoft Office 2016
 Watsonia Publishing 47 Greenaway Street Bulleen VIC 3105 Australia www.watsoniapublishing.com info@watsoniapublishing.com Introduction to Personal Computers Using Windows 10 and Microsoft Office 2016 Quick
Ctrack Online User Guide
 Fleetstar Online A Guide to Winter Maintenance Reporting v1.1 Ctrack Online User Guide Title: Ctrack Online Quickstart Guide Date: 18/07/2013 Version: 1.0 Table of Contents 1. Ctrack Online Introduction...
Word - Basics. Course Description. Getting Started. Objectives. Editing a Document. Proofing a Document. Formatting Characters. Formatting Paragraphs
 Course Description Word - Basics Word is a powerful word processing software package that will increase the productivity of any individual or corporation. It is ranked as one of the best word processors.
Computer Training Centre University College Cork. Excel 2016 Level 1
 Computer Training Centre University College Cork Excel 2016 Level 1 Table of Contents Introduction... 1 Opening Excel... 1 Using Windows 8... 1 Using Windows 10... 1 Getting Started with Excel 2016...
TABLE OF CONTENTS CHAPTER
 TABLE OF CONTENTS CHAPTER 1...1 A QUICK OVERVIEW OF THE MICROSOFT EXCHANGE CLIENT...1 BASIC CONCEPTS AND FEATURES...1 STARTING THE MICROSOFT EXCHANGE CLIENT...1 SETTING OPTIONS FOR YOUR MESSAGES...3 LOOKING
Microsoft Project 2016 Foundation. Microsoft Project 2016 Manual - Foundation Level North American Edition SAMPLE
 Microsoft Project 2016 Foundation Microsoft Project 2016 Manual - Foundation Level North American Edition Microsoft Project 2016 Foundation - Page 2 2015 Cheltenham Group Pty. Ltd. All trademarks acknowledged.
Cheltenham Courseware Microsoft Project 2007 Manual - Foundation Level SAMPLE
 Cheltenham Courseware www.cctglobal.com Microsoft Project 2007 Manual - Foundation Level Page 2 - Project 2007 Foundation Level 1995-2010 Cheltenham Courseware Pty. Ltd. All trademarks acknowledged. E&OE.
Section 1 Microsoft Excel Overview
 Course Topics: I. MS Excel Overview II. Review of Pasting and Editing Formulas III. Formatting Worksheets and Cells IV. Creating Templates V. Moving and Navigating Worksheets VI. Protecting Sheets VII.
Microsoft Project 2010 Foundation. Microsoft Project 2010 Manual - Foundation Level SAMPLE
 Microsoft Project 2010 Foundation Microsoft Project 2010 Manual - Foundation Level Page 2 - Project 2010 Foundation Level 1995-2011 Cheltenham Courseware Pty. Ltd. All trademarks acknowledged. E&OE. No
Excel 2003 Essentials
 Table of Contents INTRODUCTION... 11 How to use this guide... 11 Objectives...... 11 Instructions... 11 Appendices...... 11 Keyboard... 11 Commands... 12 Notes...... 12 Tips... 12 SECTION 1...13 THE BASICS......13
Introduction to Microsoft Excel 2007
 Introduction to Microsoft Excel 2007 Microsoft Excel is a very powerful tool for you to use for numeric computations and analysis. Excel can also function as a simple database but that is another class.
Kenora Public Library. Computer Training. Introduction to Excel
 Kenora Public Library Computer Training Introduction to Excel Page 2 Introduction: Spreadsheet programs allow users to develop a number of documents that can be used to store data, perform calculations,
Word Select New in the left pane. 3. Select Blank document in the Available Templates pane. 4. Click the Create button.
 Microsoft QUICK Word 2010 Source Getting Started The Word Window u v w x z Opening a Document 2. Select Open in the left pane. 3. In the Open dialog box, locate and select the file you want to open. 4.
Introduction to Microsoft Excel 2010
 Introduction to Microsoft Excel 2010 This class is designed to cover the following basics: What you can do with Excel Excel Ribbon Moving and selecting cells Formatting cells Adding Worksheets, Rows and
Using Windows 7 Explorer By Len Nasman, Bristol Village Computer Club
 By Len Nasman, Bristol Village Computer Club Understanding Windows 7 Explorer is key to taking control of your computer. If you have ever created a file and later had a hard time finding it, or if you
Retain Wallchart Manual
 M Retain Wallchart Manual www.retaininternational.com Contents Table of Contents 1 Introduction 1.1 1.2 1.3 Introduction About Retain Scope of this userguide... 7... 8... 8 How to use this guide... 9 1.4
eschoolplus+ Cognos Query Studio Training Guide Version 2.4
 + Training Guide Version 2.4 May 2015 Arkansas Public School Computer Network This page was intentionally left blank Page 2 of 68 Table of Contents... 5 Accessing... 5 Working in Query Studio... 8 Query
Intermediate Excel 2003
 Intermediate Excel 2003 Introduction The aim of this document is to introduce some techniques for manipulating data within Excel, including sorting, filtering and how to customise the charts you create.
BASIC MICROSOFT POWERPOINT
 BASIC MICROSOFT POWERPOINT PART ONE PHONE: 504-838-1144 IT Training Team Jefferson Parish Library EMAIL: jpltrain@jplibrary.net In this class you will learn to: Launch, close, and interact with Microsoft
EXCEL BASICS: MICROSOFT OFFICE 2010
 EXCEL BASICS: MICROSOFT OFFICE 2010 GETTING STARTED PAGE 02 Prerequisites What You Will Learn USING MICROSOFT EXCEL PAGE 03 Opening Microsoft Excel Microsoft Excel Features Keyboard Review Pointer Shapes
DataMaster for Windows
 DataMaster for Windows Version 3.0 April 2004 Mid America Computer Corp. 111 Admiral Drive Blair, NE 68008-0700 (402) 426-6222 Copyright 2003-2004 Mid America Computer Corp. All rights reserved. Table
Project Advanced. Microsoft Application Series. Best STL
 Microsoft Application Series Project Advanced Best STL Courses never cancelled: guaranteed Last minute rescheduling 24 months access to Microsoft trainers 12+ months schedule UK wide delivery www.microsofttraining.net
Using Microsoft Excel
 Using Microsoft Excel Table of Contents The Excel Window... 2 The Formula Bar... 3 Workbook View Buttons... 3 Moving in a Spreadsheet... 3 Entering Data... 3 Creating and Renaming Worksheets... 4 Opening
Microsoft Word 2007 on Windows
 1 Microsoft Word 2007 on Windows Word is a very popular text formatting and editing program. It is the standard for writing papers and other documents. This tutorial and quick start guide will help you
Microsoft Office Excel
 Microsoft Office 2007 - Excel Help Click on the Microsoft Office Excel Help button in the top right corner. Type the desired word in the search box and then press the Enter key. Choose the desired topic
Gloucester County Library System EXCEL 2007
 Gloucester County Library System EXCEL 2007 Introduction What is Excel? Microsoft E x c e l is an electronic s preadsheet program. I t is capable o f performing many diff e r e n t t y p e s o f c a l
intellitrol Irrigation
 intellitrol Irrigation Irrigation Scheduling V5.61 User Reference Manual Contents Introduction... 4 Important Caveat... 4 Manual Irrigation Control... 5 Controlling from the Layout Screen... 5 Controlling
Slides & Presentations
 Section 2 Slides & Presentations ECDL Section 2 Slides & Presentations By the end of this section you should be able to: Understand and Use Different Views Understand Slide Show Basics Save, Close and
Table of Contents. Contents. 1 Introduction. 2 The Main Menu Notification Popups. 9 Service Calendar. 12 Generating Reports ...
 Contents I Table of Contents 1 Introduction...1 2 The Main Menu...1 3 The Equipment...3 Manager...6 4 Step #1 - Establishing Locations/Categories...6 5 Step #2 - Defining Your PM schedules...9 6 Step #3
Using SymPrint to Make Overlays, Templates & More...
 Welcome to SymPrint SymPrint is an easy-to-use tool for creating communication overlays, worksheets, classroom activities and more using a modern toolbar and common-sense interface modeled after the programs
SAMaRT User Guide Microsoft Excel (Advanced version)
") SAMaRT User Guide Microsoft Excel (Advanced version) Before you start...2 Macros...2 Exploring the tool...2 Using the tool for the first time...3 Introduction page...3 Changing the drop down list options...3
SAMaRT User Guide Microsoft Excel (Advanced version) Before you start...2 Macros...2 Exploring the tool...2 Using the tool for the first time...3 Introduction page...3 Changing the drop down list options...3
PowerPoint 2016 Building a Presentation
 PowerPoint 2016 Building a Presentation What is PowerPoint? PowerPoint is presentation software that helps users quickly and efficiently create dynamic, professional-looking presentations through the use
Making Windows XP work for you
 Making Windows XP work for you With each version of Windows that has been released over the past several years, Microsoft and other developers have been made aware of the issues surrounding accessibility
Numbers Basics Website:
 Website: http://etc.usf.edu/te/ Numbers is Apple's new spreadsheet application. It is installed as part of the iwork suite, which also includes the word processing program Pages and the presentation program
Using Microsoft Word. Working With Objects
 Using Microsoft Word Many Word documents will require elements that were created in programs other than Word, such as the picture to the right. Nontext elements in a document are referred to as Objects
Working with promotions
 Working with promotions Promotion calendar Introduction This Quick guide will give you an overview of options in the promotion calendar. You will learn how to navigate promotion calendar, promotion list,
The first time you open Word
 Microsoft Word 2010 The first time you open Word When you open Word, you see two things, or main parts: The ribbon, which sits above the document, and includes a set of buttons and commands that you use
Word Processing 1. Using a computer for Writing. Spreadsheets
 Word Processing 1 Using a computer for Writing Spreadsheets Microsoft Office 2016 Microsoft Word 2016 Table of Contents Table of Contents... 2 When/if things go wrong... 3 To delete a wrongly entered character:...
Veco User Guides. Grids, Views, and Grid Reports
 Veco User Guides Grids, Views, and Grid Reports Introduction A Grid is defined as being a list of data records presented to the user. A grid is shown generally when an option is selected from the Tree
Outlook Web App. Getting Started. QUICK Source. Microsoft. in Exchange Server 2010
 QUICK Source Microsoft Outlook Web App in Exchange Server 2010 Getting Started The Outlook Web App Window u v w x y u v w x y Browser Toolbars allow the user to navigate in the browser. Outlook Web Access
CHRIS Introduction Guide
 1 Introduction... 3 1.1 The Login screen... 3 1.2 The itrent Home page... 5 1.2.1 Out of Office... 8 1.2.2 Default User Preferences... 9 1.2.3 Bookmarks... 10 1.3 The itrent Screen... 11 The Control Bar...
Business Insight Authoring
 Business Insight Authoring Getting Started Guide ImageNow Version: 6.7.x Written by: Product Documentation, R&D Date: August 2016 2014 Perceptive Software. All rights reserved CaptureNow, ImageNow, Interact,
IBM Rational Rhapsody Gateway Add On. User Guide
 User Guide Rhapsody IBM Rational Rhapsody Gateway Add On User Guide License Agreement No part of this publication may be reproduced, transmitted, stored in a retrieval system, nor translated into any
To create a notebook on desktop version 1. Open One Note 2. File > New. o FILE. Options
 OneNote Training When you open OneNote for the first time there will be notebooks already started and you can see them on the left hand side. There is an introduction section that you can go through, if
Chapter 2: Clients, charts of accounts, and bank accounts
 Chapter 2: Clients, charts of accounts, and bank accounts Most operations in BankLink Practice are client specific. These include all work on coding transactions, reporting, and maintaining chart of accounts
Working with Mailbox Manager
 Working with Mailbox Manager A user guide for Mailbox Manager supporting the Message Storage Server component of the Avaya S3400 Message Server Mailbox Manager Version 5.0 February 2003 Copyright 2003