ECE2049 Embedded Computing in Engineering Design. Lab #0 Introduction to the MSP430F5529 Launchpad-based Lab Board and Code Composer Studio
|
|
|
- Ferdinand Cole
- 6 years ago
- Views:
Transcription
1 ECE2049 Embedded Computing in Engineering Design Lab #0 Introduction to the MSP430F5529 Launchpad-based Lab Board and Code Composer Studio In this lab you will be introduced to the Code Composer Studio development environment that we will be using to program and debug our custom MSP430F5529 Launchpad based Lab Board. Code Composer Studio is part of the ECE lab image and is on all of the computers in AK-113 and AK If you want, you can download a free version of Code Composer Studio (make sure it is version 7.2.0) to your own computer by following the links under Useful Links on the class website. This lab is straightforward and tutorial in nature and does not have a pre-lab. You are expected to sign-off each section of the lab and to answer all the questions highlighted in yellow in your lab report. You and you partner will be given a lab IO board to go with your MSP430F5529 Launchpad and Sharp Booster Pack LCD screen (available at bookstore or on-line). You are responsible for the board. Please treat it (and it's box) with care. You break it, you buy it! Getting Started 1. Slide your board out of the protective box. DO NOT RIP THE BOX OPEN! You are responsible for your lab board and you must return it in good working order. You will need the box to protect the board over the term. Check the bottom of the board to be sure it has little rubber feet on each corner. It should but please: DO NOT PLACE BOARD ON THE METAL COMPUTER CASE if it does not have the feet! Ask the TA or tutor for some feet. In the mean time place the board on the cardboard box to prevent the possibility of shorting the board. 2. Assemble the board as shown below and in the Introductory Slides (on the Course Website Lab page). Double check that BOTH parts are oriented correctly and are seated properly before you power up the board! Plug the USB cable into the board and into the computer. With the board connected via the USB cable, double click on the desktop link to Code Composer Studio (CCS) or navigate to it through Start menu under Texas Instruments->Code Composer Studio It is important for the cable to be connected when you open CCS this first time. 3. When asked to enter a workspace, enter something like the following to create a workspace for this lab. Although you don't have to, you can create a new workspace for each lab. Create your workspace on your WPI CCC network drive not on the local machines. The local machines can be re-imaged at any time and you will lose your work! R:\ECE2049_labs or R:\ECE2049_labs\Lab0 4. If the Welcome screen is not visible after CCS opens, click on Help and select Getting Started. The TI Resource Manager Explorer window should now be visible. 5. Watch the tutorial video, Getting Started with Code Composer Studio. This video contains a lot of very helpful tips on using the CCS debugger.


2 Figure 1: ECE2049 lab board with MSP430F5529 Launchpad & Sharp LCD screen properly mounted. Building your first project Don't Blink! Download the file blink.c from the class website to the Desktop then under Projects tab select New CCS Project. The window below will open. Enter a project name and set the other fields as shown below to match our processor, the MSP430F5529. It is critical that you select the right processor. Your project will not work if the wrong processor is given here. Select the Empty Project and then click Finish. This will return you to the main editor view and your new project should appear in bold the Project Explorer side pane. If it is not bold, click on it to select it as the active project and it should then be bold. Expand your project. If a skeleton main.c file was created you should delete it.
 and enter the debugger (bug icon).")
3 Now under the Project tab, select Add Files and add blink.c from the Desktop (choose the Copy option to copy the file to your new project directory). If blink.c doesn't open in the editor window. Click on the file in the side pane and it will open. Build your project (hammer icon) and enter the debugger (bug icon). If this is the first time you've run these steps, CCS can take a long time (several minutes). It's building cable drivers and libraries, etc. This is stuff it only needs to do once. If you get a pop-up window with MSP430 Ultra Low Power (ULP) warnings, you can dismiss it. You may also get a popup saying that there was an error in initialization and asking to update drivers. Click the UPDATE button. This, too, can take a few minutes. Be patient and DO NOT UNPLUG your MSP430 during the update. Once the Debug control panel appears hit the go button (green arrow). This was covered in the tutorial video. The red LED on the custom lab board should now be blinking. Blinking lights are cool. Demonstrate your first embedded programming success to a TA for sign-off. Optionally, take a video and send it to your mom to show her what you do at school. IMPORTANT NOTE: Never (ever!) unplug the board while it is programming or while in the Debug Window. Always exit to Editor or exit CCS entirely before unplugging the board Hit the Pause button on the debugger and then the reset (these were in the tutorial video) and then start the blinking again. Hit pause and this time use the Step button to step through the code. You can watch the value of P6OUT in the registers window (under View/Registers). Try setting a breakpoint on the line i = 50000; and repeatedly running to that breakpoint
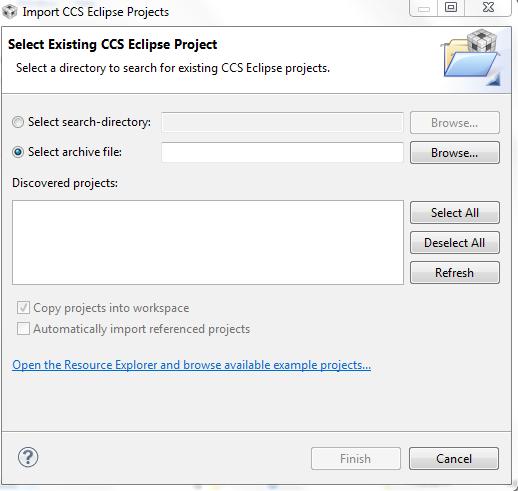
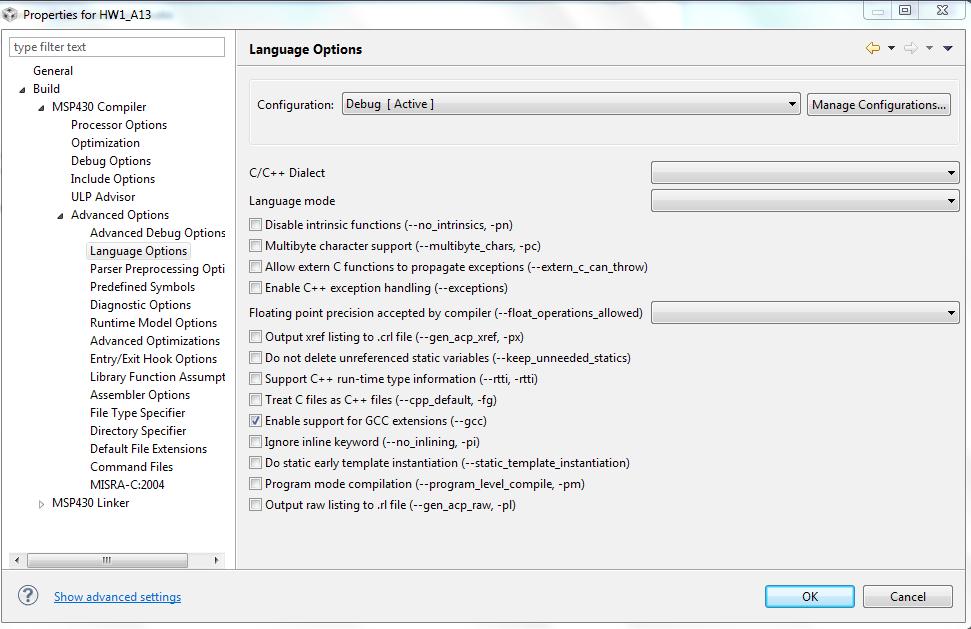
4 As shown in the comments in the code and in the schematic for the MSP430F5529 lab board, the RED is connected to digital I/O Port 6 Pin 2 (P6.2). The LED flashes on and off depending on whether a logic 1 or a logic 0 is written to that pin. In blink.c P6.2 is toggled by XOR'ing (^) the Port 6 Out register P6OUT with BIT2. BIT2 is a constant defined in msp430f5529.h as 0x0004. Explain how and why this works in your report. In blink.c there are 2 commented lines of code below the exclusive OR (XOR) statement. Test whether logic 1 or logic 0 lights the LED by commenting out the toggle statement and then successively uncommenting each of these lines of code. You can also determine which logic value lights the LED by stepping through the code and watching the value of P6OUT. Document which logic level (0 or 1) lights LED1 in your report. Importing and building your second project Download ece2049_demo_template.zip from the class website to the desktop. Inside CCS, return to the Editor window (i.e. press the red square) and select Project/Import Existing CSS Eclipse Project. In the window that appears (below) chose Select archive file and navigate to the Desktop and enter ece2049_demo_template.zip. Check the Copy Projects option and click finish. The project should now appear in the side pane. Click on it to expand the project and to select it as active. Now right click on this project and select Show Build Settings. Under MSP430 Compiler/Advanced Options/Language Options double check that the Enable Support for GCC Extensions option is selected. It should be but if it is not the project will not build and it's nasty to find! Build this project and enter the debugger. You may get warnings about some unused variables. You can ignore them for now. Run the project and demonstrate it to the TA for sign-off. Once you are done playing with the demo, stop the debugger and open main.c in the editor view. This project is actually quite a bit more complex than blink.c because it includes the libraries required to use the LCD screen. Most, if not all, of your labs this term will require the LCD screen, therefore, your labs will start by importing this demo. You will use the given graphics library functions as is and expand upon the other functions as needed. You will also add new capabilities.
5
6 Exploring the demo project Starting with example code and modifying it to perform desired tasks is an often used development strategy in embedded systems. Experiment with and modify main.c within the demo project to do at least the following. 1) Play with the LCD write commands to move the text to different positions on the screen. Document what controls the position of text on the screen in your report. 2) Right click on a function and select expand declaration. This should open the declaration and is a great tool during debugging. 3) Declare an array of char and initialize it to contain your name. Write your name to the LCD. Note: this is an array of char not a string so no NULL terminator is needed. 4) Step through the code until you get to the assignment for flt, X and tst. Answer the questions asked in the comments in your report. (Hint: Use the Variables window.) // What size does the Code Composer MSP430 Compiler use for the // following variable types? A float, an int, a long integer and a char? // What value stored in mygrade (i.e. what's the ASCII code for "A")? // What is the new value of tst? Explain? 5) When does the buzzer sound? More importantly, what turns it off? 6) What is the relationship between the keypad and the 4 colored LEDs? Does the keypad fuction return ASCII or integer values? Explain in your report. 7) Write a high quality lab report and submit your final (modified) demo code on-line to practice the process. Writing a High Quality Lab Report Your lab should be written in a professional style. It should be an electronically prepared technical document like what you would submit to a fellow engineer or your boss. The report should include: Introduction = 1-2 paragraphs (1/2 page tops) succinctly stating the objectives of the lab and giving an overview of what you accomplished. Discussion and Results = As many pages as it takes (without padding!). In this section you should thoroughly discuss what you did in each part of the lab. You should describe the approach you took to solving any problems. Again, this is a technical document. It should present your work in a clear and concise fashion. Include pseudo code or flow charts to explain any code that YOU developed (you do not need to include code from tutorials, code presented in class, etc). Results should also be thoroughly discussed. Any measurements should be tabulated, questions should be stated as given and answered completely (and in complete sentences). In general any figures should not be hand drawn, snippets of code may be included where useful but full listing should be submitted on-line as instructed.
7 **** Be SURE to clearly indicate your answers to any questions asked in the lab assignment. The TA can't give you credit if they can't find your answer! Summary and Conclusion = 1-2 paragraphs (1/2 page tops). Wrap-up and summarize what you accomplished in the lab. This should be a bookend to the introduction. Appendices = Include any relevant raw data sheets, or links to them. YOU MUST SUBMIT YOUR ORIGINAL SIGN-OFF SHEET WITH YOUR LAB REPORT!!! DON'T FORGET TO SUBMIT YOUR (modified) PROJECT ON-LINE (see below)! In industry, the FIRST view of YOUR work by anybody other than your immediate supervisor will see will probably be in WRITING! Learning to be an effective communicator of technical information is probably THE MOST IMPORTANT job skill you can have This lab used code provided to you but in all FUTURE LABS you will be writing your own code to solve a problem and will be REQUIRED to submit your CCS project on-line. We will start that submission procedure with this lab. Submit your modified demo project To submit your code for grading, you will need to create a zip file of your CCS project so that the TAs can build it. You can also use this method to create a complete backup copy of your project (perhaps to archive or send to your partner) for later. To do this: 1. Right click on your modified demo project and select "Rename..." 2. If you are submitting your project, enter a name in the following format: ece2049a17_lab0_username1_username2, where username1 and username2 are the user names of you and your partner. (NOTE: Failure to follow this step will result in points deducted from your lab grade!) 3. Click OK and wait for CCS to rename your project. 4. Right click on your project again and select "Export..." then select General and "Archive file" from the list and click Next. 5. In the next window, you should see the project you want to export selected in the left pane and all of
8 the files in your project selected in the right pane. Select all. You should not need to change which files are selected. 6. Click the "Browse" button, find a location to save the archive (like your R drive) and type in a file name using the EXACT SAME NAME used in Step (2). 7. Click "Finish". CCS should now create a zip file in the directory you specified. 8. Go to the Assignments page on the class Canvas website. Click the Lab 0 assignment. Attach the archive file of your project that you just created and hit the Submit button. Only one code submission per team.
9 ECE2049 D-Term 2017 Lab #0 -- Sign-off Sheet (This sheet MUST be attached to Lab Report!) Report due: Friday 3/23/2017 Student 1: ECE mailbox: Student 2: ECE mailbox: Board #: BOTH PARTNERS MUST BE PRESENT AT SIGN-OFF! Task Max points Max points TA s assessment Build and demonstrate blink.c tutorial 10 Download, build and demonstrate 10 MSP430 development board demo Demonstrate modified demo project 10 Answer to TA Questions 5 Student 1 Report 15 (Include answers to all questions and code submitted on-line) Total points 50 Student 2 TA s signature: Date: Note: Be sure to include your original sign-off sheet with your lab report!
10 ECE2049 Lab Report Grading Rubric Format -- 3 pts Did you follow instructions given above as to the format of your report? Is you code formatted, properly commented, etc.? What is expected for the following parts was already described above. Introduction 1 pts Discussion/Questions 7 pts Conclusion 1 pts Professionalism 3 pts Spelling, grammar, neatness, presentation, etc.
Lab 0 Introduction to the MSP430F5529 Launchpad-based Lab Board and Code Composer Studio
 ECE2049 Embedded Computing in Engineering Design Lab 0 Introduction to the MSP430F5529 Launchpad-based Lab Board and Code Composer Studio In this lab, you will be introduced to the Code Composer Studio
ECE2049: Embedded Systems in Engineering Design Lab Exercise #3 C Term Making a Time and Temperature Display
 ECE2049: Embedded Systems in Engineering Design Lab Exercise #3 C Term 2019 Making a Time and Temperature Display In this laboratory you will use the MSP430 and several of its peripherals to implement
Lab 1 Implementing a Simon Says Game
 ECE2049 Embedded Computing in Engineering Design Lab 1 Implementing a Simon Says Game In the late 1970s and early 1980s, one of the first and most popular electronic games was Simon by Milton Bradley.
Lab 1 Implementing a Simon Says Game
 ECE2049 Embedded Computing in Engineering Design Lab 1 Implementing a Simon Says Game In the late 1970s and early 1980s, one of the first and most popular electronic games was Simon by Milton Bradley.
ECGR 4101/5101, Fall 2016: Lab 1 First Embedded Systems Project Learning Objectives:
 ECGR 4101/5101, Fall 2016: Lab 1 First Embedded Systems Project Learning Objectives: This lab will introduce basic embedded systems programming concepts by familiarizing the user with an embedded programming
Tool Setup. Code Composer Studio
 Tool Setup Code Composer Studio Code Composer Studio Integrated Development Environment (IDE) Free for non-commercial use Eclipse based We will use this for our MSP432 and Console Based code development
The Road to CCSv4. Status Update
 The Road to CCSv4 Status Update Code Composer Studio v4 Summary What is it? Major upgrade to CCS Major architectural changes Based on Eclipse open source software framework New registration/licensing/updating
Click on the Start Icon. Click on All Programs
 Click on the Start Icon Click on All Programs Scroll down to a point where the Microsoft Visual Studio 2013 folder appears. Click on the Microsoft Visual Studio 2013 folder. Click on Visual Studio 2013
Lab 1: Space Invaders. The Introduction
 Lab 1: Space Invaders The Introduction Welcome to Lab! Feel free to get started until we start talking! The lab document is located on course website: https://users.wpi.edu/~sjarvis/ece2049_smj/ Be sure
Code Composer Studio. MSP Project Setup
 Code Composer Studio MSP Project Setup Complete the installation of the Code Composer Studio software using the Code Composer Studio setup slides Start Code Composer Studio desktop shortcut start menu
Lab 8 - Vectors, and Debugging. Directions
 Lab 8 - Vectors, and Debugging. Directions The labs are marked based on attendance and effort. It is your responsibility to ensure the TA records your progress by the end of the lab. While completing these
Electronic Portfolios in the Classroom
 Electronic Portfolios in the Classroom What are portfolios? Electronic Portfolios are a creative means of organizing, summarizing, and sharing artifacts, information, and ideas about teaching and/or learning,
Introduction. Key features and lab exercises to familiarize new users to the Visual environment
 Introduction Key features and lab exercises to familiarize new users to the Visual environment January 1999 CONTENTS KEY FEATURES... 3 Statement Completion Options 3 Auto List Members 3 Auto Type Info
Laboratory Assignment #3 Eclipse CDT
 Lab 3 September 12, 2010 CS-2303, System Programming Concepts, A-term 2012 Objective Laboratory Assignment #3 Eclipse CDT Due: at 11:59 pm on the day of your lab session To learn to learn to use the Eclipse
HOW TO USE CODE::BLOCKS IDE FOR COMPUTER PROGRAMMING LABORATORY SESSIONS
 HOW TO USE CODE::BLOCKS IDE FOR COMPUTER PROGRAMMING LABORATORY SESSIONS INTRODUCTION A program written in a computer language, such as C/C++, is turned into executable using special translator software.
Introduction to Computation and Problem Solving
 Class 3: The Eclipse IDE Introduction to Computation and Problem Solving Prof. Steven R. Lerman and Dr. V. Judson Harward What is an IDE? An integrated development environment (IDE) is an environment in
ECE2049 Homework #2 The MSP430 Architecture & Basic Digital IO (DUE Friday 9/8/17 at 4 pm in class)
") ECE2049 Homework #2 The MSP430 Architecture & Basic Digital IO (DUE Friday 9/8/17 at 4 pm in class) Your homework should be neat and professional looking. You will loose points if your HW is not properly
ECE2049 Homework #2 The MSP430 Architecture & Basic Digital IO (DUE Friday 9/8/17 at 4 pm in class) Your homework should be neat and professional looking. You will loose points if your HW is not properly
Getting Started in Assembly Programming with Keil uvision and MSP432
 Getting Started in Assembly Programming with Keil uvision and MSP432 This tutorial is written on uvision v5.15 and Texas Instruments MSP432 LaunchPad. Assembly Programming with MSP432 MSP432 has an ARM
ECE QNX Real-time Lab
 Department of Electrical & Computer Engineering Concordia University ECE QNX Real-time Lab User Guide Dan Li 9/12/2011 User Guide of ECE Real-time QNX Lab Contents 1. About Real-time QNX Lab... 2 Contacts...
Code::Blocks Student Manual
 Code::Blocks Student Manual Lawrence Goetz, Network Administrator Yedidyah Langsam, Professor and Theodore Raphan, Distinguished Professor Dept. of Computer and Information Science Brooklyn College of
Section 2: Getting Started with a FPU Demo Project using EK-LM4F232
 Stellaris ARM Cortex TM -M4F Training Floating Point Unit Section 2: Getting Started with a FPU Demo Project using EK-LM4F232 Stellaris ARM Cortex TM -M4F Training: Floating Point Unit Section 2 Page 1
STM32 Ecosystem Workshop. T.O.M.A.S Team
 STM32 Ecosystem Workshop T.O.M.A.S Team After successful code generation by STM32CubeMX this is the right time to import it into SW4STM32 toolchain for further processing 2 Handling the project in SW4STM32
ECE 362 Experiment 3: General Purpose I/O
 ECE 362 Experiment 3: General Purpose I/O 1.0 Introduction In this experiment, you will learn how to attach simple input devices (pushbuttons) and simple output devices (LEDs) to an STM32 development board.
Using Code Composer Studio IDE with MSP432
 Using Code Composer Studio IDE with MSP432 Quick Start Guide Embedded System Course LAP IC EPFL 2010-2018 Version 1.2 René Beuchat Alex Jourdan 1 Installation and documentation Main information in this
ECE2049 HW #1-- C programming and Binary Number Representations (DUE 9/1/2017 At the BEGINNING of class)
") ECE2049 HW #1-- C programming and Binary Number Representations (DUE 9/1/2017 At the BEGINNING of class) Your homework should be neat and professional looking. You will loose points if your HW is not properly
ECE2049 HW #1-- C programming and Binary Number Representations (DUE 9/1/2017 At the BEGINNING of class) Your homework should be neat and professional looking. You will loose points if your HW is not properly
ECE2049 HW #1-- C programming and Binary Number Representations (DUE 1/19/2018 At the BEGINNING of class)
") ECE2049 HW #1-- C programming and Binary Number Representations (DUE 1/19/2018 At the BEGINNING of class) Your homework should be neat and professional looking. You will loose points if your HW is not
ECE2049 HW #1-- C programming and Binary Number Representations (DUE 1/19/2018 At the BEGINNING of class) Your homework should be neat and professional looking. You will loose points if your HW is not
ECE2049 HW #1-- C programming and Binary Number Representations (DUE Friday 8/31/2018 At the BEGINNING of class)
") ECE2049 HW #1-- C programming and Binary Number Representations (DUE Friday 8/31/2018 At the BEGINNING of class) Your homework should be neat and professional looking. You will loose points if your HW
ECE2049 HW #1-- C programming and Binary Number Representations (DUE Friday 8/31/2018 At the BEGINNING of class) Your homework should be neat and professional looking. You will loose points if your HW
Debugging in AVR32 Studio
 Embedded Systems for Mechatronics 1, MF2042 Tutorial Debugging in AVR32 Studio version 2011 10 04 Debugging in AVR32 Studio Debugging is a very powerful tool if you want to have a deeper look into your
Lab 1: Simon. The Introduction
 Lab 1: Simon The Introduction Welcome to Lab! Feel free to get started until we start talking! The lab document is located on the course website: http://users.wpi.edu/~ndemarinis/ece2049/ You do not need
A Tutorial for ECE 175
 Debugging in Microsoft Visual Studio 2010 A Tutorial for ECE 175 1. Introduction Debugging refers to the process of discovering defects (bugs) in software and correcting them. This process is invoked when
Assignment 1. Application Development
 Application Development Assignment 1 Content Application Development Day 1 Lecture The lecture provides an introduction to programming, the concept of classes and objects in Java and the Eclipse development
DSP Development Environment: Introductory Exercise for TI TMS320C55x
 Connexions module: m13811 1 DSP Development Environment: Introductory Exercise for TI TMS320C55x Thomas Shen David Jun Based on DSP Development Environment: Introductory Exercise for TI TMS320C54x (ECE
LDC1000 SENT Bridge MSP-EXP430F5529LP based Getting Started
 LDC1000 SENT Bridge MSP-EXP430F5529LP based Getting Started Contents 1. Quick Start... 2 2. Needed Equipment... 2 2.1 Hardware... 2 2.2 Software... 2 2.3 Recommended Documents... 3 2.4 Additional Documents...
Welcome to Lab! Feel free to get started until we start talking! The lab document is located on the course website:
 Welcome to Lab! Feel free to get started until we start talking! The lab document is located on the course website: https://users.wpi.edu/~sjarvis/ece2049_smj/ We will come around checking your pre-labs
As CCS starts up, a splash screen similar to one shown below will appear.
 APPENDIX A. CODE COMPOSER STUDIO (CCS) v6.1: A BRIEF TUTORIAL FOR THE DSK6713 A.1 Introduction Code Composer Studio (CCS) is Texas Instruments Eclipse-based integrated development environment (IDE) for
Engr 123 Spring 2018 Notes on Visual Studio
 Engr 123 Spring 2018 Notes on Visual Studio We will be using Microsoft Visual Studio 2017 for all of the programming assignments in this class. Visual Studio is available on the campus network. For your
Getting Started with the Texas Instruments ez430
 1 of 6 03.01.2009 01:33 HOME Running Your Code>> Getting Started with the Texas Instruments ez430 Working with the Workbench Software Step 1: Each program needs an associated project. The project includes
Title of Resource Introduction to SPSS 22.0: Assignment and Grading Rubric Kimberly A. Barchard. Author(s)
") Title of Resource Introduction to SPSS 22.0: Assignment and Grading Rubric Kimberly A. Barchard Author(s) Leiszle Lapping-Carr Institution University of Nevada, Las Vegas Students learn the basics of SPSS,
Title of Resource Introduction to SPSS 22.0: Assignment and Grading Rubric Kimberly A. Barchard Author(s) Leiszle Lapping-Carr Institution University of Nevada, Las Vegas Students learn the basics of SPSS,
Software Setup and Introductory Assembly programs for the MSP430 *
 OpenStax-CNX module: m15976 1 Software Setup and Introductory Assembly programs for the MSP430 * Texas Instruments This work is produced by OpenStax-CNX and licensed under the Creative Commons Attribution
Section Objective: Acquaint with specifications of Launchpad Acquaint with location of switches, LEDs, power-on switch, powering the board.
 Lab-0: Getting started with Tiva C Series Launchpad and Code Composer Studio IDE ERTS Lab, CSE Department IIT Bombay Lab Objective: 1. 2. 3. 4. Familiarization with Tiva C series Launchpad Install Code
Getting Started in C Programming with Keil MDK-ARM Version 5
 Getting Started in C Programming with Keil MDK-ARM Version 5 Reason for Revision This document was revised for Keil MDK-ARM v5.14 on February 18, 2015. This document was revised for MSP432 LaunchPad on
Getting Started in C Programming with Keil MDK-ARM Version 5
 Getting Started in C Programming with Keil MDK-ARM Version 5 Reason for Revision This document was revised for Keil MDK-ARM v5.14 on February 18, 2015. This document was revised for MSP432 LaunchPad on
Embedded Systems - FS 2018
 Institut für Technische Informatik und Kommunikationsnetze Prof. L. Thiele Embedded Systems - FS 2018 Lab 0 Date : 28.2.2018 Prelab Filling the gaps Goals of this Lab You are expected to be already familiar
NIOS CPU Based Embedded Computer System on Programmable Chip
 1 Objectives NIOS CPU Based Embedded Computer System on Programmable Chip EE8205: Embedded Computer Systems This lab has been constructed to introduce the development of dedicated embedded system based
The purpose of this tutorial is to introduce you to the Construct 2 program. First, you will be told where the software is located on the computer
 Learning Targets: Students will be introduced to industry recognized game development software Students will learn how to navigate within the software Students will learn the basics on how to use Construct
Getting Started in C Programming with Keil MDK-ARM Version 5
 Getting Started in C Programming with Keil MDK-ARM Version 5 Reason for Revision This document was revised for Keil MDK-ARM v5.14 on February 18, 2015. This document was revised for MSP432 LaunchPad on
Turning Point Response System and Turning Point Anywhere
 What s in the TurningPoint Clicker Case? Each TurningPoint Clicker Case should have two primary components: USB input receiver (1) Clickers (30) How to Test the Response Devices Click TurningPoint AnyWhere
Welcome to Lab! You do not need to keep the same partner from last lab. We will come around checking your prelabs after we introduce the lab
 Welcome to Lab! Feel free to get started until we start talking! The lab document is located on the course website: http://users.wpi.edu/~ndemarinis/ece2049/ You do not need to keep the same partner from
Copyright 2015 by Stephen A. Zajac & Gregory M. Wierzba. All rights reserved..spring 2015.
 Copyright 2015 by Stephen A. Zajac & Gregory M. Wierzba. All rights reserved..spring 2015. Copyright 2015 by Stephen A. Zajac & Gregory M. Wierzba. All rights reserved..spring 2015. Copyright 2015 by Stephen
Prerequisites for Eclipse
 Prerequisites for Eclipse 1 To use Eclipse you must have an installed version of the Java Runtime Environment (JRE). The latest version is available from java.com/en/download/manual.jsp Since Eclipse includes
CPE 323: Laboratory Assignment #1 Getting Started with the MSP430 IAR Embedded Workbench
 CPE 323: Laboratory Assignment #1 Getting Started with the MSP430 IAR Embedded Workbench by Alex Milenkovich, milenkovic@computer.org Objectives: This tutorial will help you get started with the MSP30
CS520 Setting Up the Programming Environment for Windows Suresh Kalathur. For Windows users, download the Java8 SDK as shown below.
 CS520 Setting Up the Programming Environment for Windows Suresh Kalathur 1. Java8 SDK Java8 SDK (Windows Users) For Windows users, download the Java8 SDK as shown below. The Java Development Kit (JDK)
Com S 227 Assignment Submission HOWTO
 Com S 227 Assignment Submission HOWTO This document provides detailed instructions on: 1. How to submit an assignment via Canvas and check it 3. How to examine the contents of a zip file 3. How to create
The Alarm System: The alarm system to be designed has the following inputs.
 1 Introduction In this lab you will use the Xilinx CAD tools to complete the design of a simple home alarm system containing sensors for that indicate whether the Windows, Door, and Garage are secure.
BASICS OF THE RENESAS SYNERGY PLATFORM
 BASICS OF THE RENESAS SYNERGY PLATFORM TM Richard Oed 2018.11 02 CHAPTER 11 EVENT ANALYSIS WITH TRACEX CONTENTS 11 EVENT ANALYSIS WITH TRACEX 03 11.1 An Introduction to TraceX 03 11.2 Built-in Views and
CommCare for Android Smartphones
 CommCare for Android Smartphones The information on this page reflects the old design of CommCare This page is primarily useful for programs using older versions of CommCare. A page directed at the newer
Barchard Introduction to SPSS Marks
 Barchard Introduction to SPSS 22.0 3 Marks Purpose The purpose of this assignment is to introduce you to SPSS, the most commonly used statistical package in the social sciences. You will create a new data
3 Getting Started with Objects
 3 Getting Started with Objects If you are an experienced IDE user, you may be able to do this tutorial without having done the previous tutorial, Getting Started. However, at some point you should read
1.00 Lecture 2. What s an IDE?
 1.00 Lecture 2 Interactive Development Environment: Eclipse Reading for next time: Big Java: sections 3.1-3.9 (Pretend the method is main() in each example) What s an IDE? An integrated development environment
LAB #1: The CSM12C32 Module and PBMCUSLK Project Board
 CS/EE 5780/6780 Handout #1 Spring 2007 Myers LAB #1: The CSM12C32 Module and PBMCUSLK Project Board Lab writeup is due to your TA at the beginning of your next scheduled lab. Don t put this off to the
COMP2121 Introductory Experiment
 COMP2121 Introductory Experiment Objectives: In this introductory experiment, you will: Learn how to use AVR studio, an Integrated Development Environment (IDE) for developing AVR applications in Windows
Code::Blocks Student Manual
 Code::Blocks Student Manual Lawrence Goetz, Network Administrator Yedidyah Langsam, Professor and Theodore Raphan, Distinguished Professor Dept. of Computer and Information Science Brooklyn College of
Outlook Skills Tutor. Open Outlook
 Outlook Skills Tutor Lakewood School District Open Outlook Working with the Inbox Receiving new email Sorting your Inbox Reading email Using the Reading Pane Sending, replying to, and forwarding messages
Figure 1. Simplicity Studio
 SIMPLICITY STUDIO USER S GUIDE 1. Introduction Simplicity Studio greatly reduces development time and complexity with Silicon Labs EFM32 and 8051 MCU products by providing a high-powered IDE, tools for
Laboratory Assignment #4 Debugging in Eclipse CDT 1
 Lab 4 (10 points) November 20, 2013 CS-2301, System Programming for Non-majors, B-term 2013 Objective Laboratory Assignment #4 Debugging in Eclipse CDT 1 Due: at 11:59 pm on the day of your lab session
F28069 ControlCard Lab1
 F28069 ControlCard Lab1 Toggle LED LD2 (GPIO31) and LD3 (GPIO34) 1. Project Dependencies The project expects the following support files: Support files of controlsuite installed in: C:\TI\controlSUITE\device_support\f28069\v135
To install the Texas Instruments CCS Compiler, follow these steps: 1. Go to the TI Wiki page (http://processors.wiki.ti.com/index.
 Installation Guide This document describes the installation procedure for Embed 2017. Main Installer Before you begin the installation, you must install the following on your computer: Texas Instruments
Computer Science II Lab 3 Testing and Debugging
 Computer Science II Lab 3 Testing and Debugging Introduction Testing and debugging are important steps in programming. Loosely, you can think of testing as verifying that your program works and debugging
Instructions PLEASE READ (notice bold and underlined phrases)
") Lab Exercises wk02 Lab Basics First Lab of the course Required Reading Java Foundations - Section 1.1 - The Java Programming Language Instructions PLEASE READ (notice bold and underlined phrases) Lab Exercise
Lab Exercises wk02 Lab Basics First Lab of the course Required Reading Java Foundations - Section 1.1 - The Java Programming Language Instructions PLEASE READ (notice bold and underlined phrases) Lab Exercise
Recording Narration in PowerPoint using ispring Free
 Recording Narration in PowerPoint using ispring Free Narrated PowerPoint shows saved as-is tend to be very large files. This makes them cumbersome and difficult to upload and share with your students or
Creating a new CDC policy using the Database Administration Console
 Creating a new CDC policy using the Database Administration Console When you start Progress Developer Studio for OpenEdge for the first time, you need to specify a workspace location. A workspace is a
Using Windows 7 Explorer By Len Nasman, Bristol Village Computer Club
 By Len Nasman, Bristol Village Computer Club Understanding Windows 7 Explorer is key to taking control of your computer. If you have ever created a file and later had a hard time finding it, or if you
Intro to MS Visual C++ Debugging
 Intro to MS Visual C++ Debugging 1 Debugger Definition A program used to control the execution of another program for diagnostic purposes. Debugger Features / Operations Single-Stepping 100011101010101010
Setup support for RAMCHECK. Extensive, context-sensitive On-Line Help and Tutorials. HARD DISK INSTALLATION:
 RAMCHECK OWNER S MANUAL While RAMCHECK is a stand-alone unit, the product includes the RAMCHECK PC Communications programs that allow you to upgrade your RAMCHECK s flash EPROM from our Web site (www.innoventions.com).
Introduction to EZ430 RF2500
 Michigan State University Introduction to EZ430 RF2500 ECE480 Design Team 8 Daniel Sun 3/17/2015 Introduction The EZ430 RF2500 is an TI product that allows the user to practice real time control programming
You have a PC with a USB interface, running Microsoft Windows XP (SP2 or greater) or Vista You have the Workshop Installation Software Flash Drive
 or Vista You have the Workshop Installation Software Flash Drive") 03- COMPOSER STUDIO Stellaris Development and Evaluation Kits for Code Composer Studio The Stellaris Development and Evaluation Kits provide a low-cost way to start designing with Stellaris microcontrollers
03- COMPOSER STUDIO Stellaris Development and Evaluation Kits for Code Composer Studio The Stellaris Development and Evaluation Kits provide a low-cost way to start designing with Stellaris microcontrollers
BASICS OF THE RENESAS SYNERGY TM
 BASICS OF THE RENESAS SYNERGY TM PLATFORM Richard Oed 2018.11 02 CHAPTER 9 INCLUDING A REAL-TIME OPERATING SYSTEM CONTENTS 9 INCLUDING A REAL-TIME OPERATING SYSTEM 03 9.1 Threads, Semaphores and Queues
Eclipse Setup. Opening Eclipse. Setting Up Eclipse for CS15
 Opening Eclipse Eclipse Setup Type eclipse.photon & into your terminal. (Don t open eclipse through a GUI - it may open a different version.) You will be asked where you want your workspace directory by
Office of Information Technology
 WVU ecampus for Students Office of Information Technology ITS Service Desk: (304) 293-4444, ITSHelp@mail.wvu.edu Resources http://idesign.wvu.edu/ectutorial/ https://ecampus.wvu.edu/student-resources-learn-9
Tools Basics. Getting Started with Renesas Development Tools R8C/3LX Family
 Getting Started with Renesas Development Tools R8C/3LX Family Description: The purpose of this lab is to allow a user new to the Renesas development environment to quickly come up to speed on the basic
Code Check TM Software Requirements Specification
 Code Check TM Software Requirements Specification Author: Richard McKenna Debugging Enterprises TM Based on IEEE Std 830 TM -1998 (R2009) document format Copyright 2017 Debugging Enterprises No part of
Introduction to Dropbox Management Add a Category Add a Folder Set Availability for Dropbox Folders Add Special Access...
 Dropbox Introduction to Dropbox Management... 2 Add a Category... 3 Add a Folder... 4 Set Availability for Dropbox Folders... 8 Add Special Access... 10 Reorder Folders and Categories... 12 Delete a Folder...
Analyzing PDFs with Citavi 6
 Analyzing PDFs with Citavi 6 Introduction Just Like on Paper... 2 Methods in Detail Highlight Only (Yellow)... 3 Highlighting with a Main Idea (Red)... 4 Adding Direct Quotations (Blue)... 5 Adding Indirect
Application of Skills: Microsoft PowerPoint 2013 Tutorial
 Application of Skills: Microsoft PowerPoint 2013 Tutorial Throughout this tutorial, you will progress through a series of steps to create a presentation about yourself. You will continue to add to this
Embedded Systems Laboratory
 Embedded Systems Laboratory Using ARM Cortex M4 From the Basics to Applications Internet of Things Why M4? Market share Complexity Parallelism Verification 1 Outline 1. Objectives 2. Approach 5 Takeaways
Getting Started with Visual Studio
 Getting Started with Visual Studio Visual Studio is a sophisticated but easy to use integrated development environment (IDE) for C++ (and may other languages!) You will see that this environment recognizes
CME E-quotes Wireless Application for Android Welcome
 CME E-quotes Wireless Application for Android Welcome This guide will familiarize you with the application, a powerful trading tool developed for your Android. Table of Contents What is this application?
Accessing Muskegon Community College's Using Outlook Web Access and the Internet
 Accessing Muskegon Community College's Email Using Outlook Web Access and the Internet Muskegon Community College provides students with an email address and email storage on the college's email server--https://webmail.muskegoncc.edu/exchange.
1. Open PowerPoint and you will see the introductory screen that contains different themes and templates. From the selection displayed, choose Slice.
 PowerPoint Assessment ***Remember! This is a test and you cannot ask for help. This must be done completely on your own. If you have forgotten a skill, please go to my Tutorials page on my website and
Codewarrior for ColdFire (Eclipse) 10.0 Setup
 10.0 Setup") Codewarrior for ColdFire (Eclipse) 10.0 Setup 1. Goal This document is designed to ensure that your Codewarrior for Coldfire v10.0 environment is correctly setup and to orient you to it basic functionality
Codewarrior for ColdFire (Eclipse) 10.0 Setup 1. Goal This document is designed to ensure that your Codewarrior for Coldfire v10.0 environment is correctly setup and to orient you to it basic functionality
SQL Server. Management Studio. Chapter 3. In This Chapter. Management Studio. c Introduction to SQL Server
 Chapter 3 SQL Server Management Studio In This Chapter c Introduction to SQL Server Management Studio c Using SQL Server Management Studio with the Database Engine c Authoring Activities Using SQL Server
Using Virtual EEPROM and Flash API for Renesas MCUs RX600 Series
 Using Virtual EEPROM and Flash API for Renesas MCUs RX600 Series Description: This lab will take the user through using the Virtual EEPROM (VEE) project for RX. The user will learn to use the Virtual EEPROM
MLA Style: Step-By-Step Instructions
 MLA Style: Step-By-Step Instructions This document is a set of instructions in order to format a paper in MLA style with Microsoft Word. (It assumes you know how to access MS-Word on your computer.) This
CMPSCI 187 / Spring 2015 Hanoi
 Due on Thursday, March 12, 2015, 8:30 a.m. Marc Liberatore and John Ridgway Morrill I N375 Section 01 @ 10:00 Section 02 @ 08:30 1 Contents Overview 3 Learning Goals.................................................
1.2 - Introduction to the IAR Workbench IDE *
 OpenStax-CNX module: m13621 1 1.2 - Introduction to the IAR Workbench IDE * Naren Anand Based on Introduction to CrossStudio MSP430 IDE by Kileen Cheng This work is produced by OpenStax-CNX and licensed
IAR C-SPY Hardware Debugger Systems User Guide
 IAR C-SPY Hardware Debugger Systems User Guide for the Renesas SH Microcomputer Family CSSHHW-1 COPYRIGHT NOTICE Copyright 2010 IAR Systems AB. No part of this document may be reproduced without the prior
Module 3: Working with C/C++
 Module 3: Working with C/C++ Objective Learn basic Eclipse concepts: Perspectives, Views, Learn how to use Eclipse to manage a remote project Learn how to use Eclipse to develop C programs Learn how to
BASICS OF THE RENESAS SYNERGY PLATFORM
 BASICS OF THE RENESAS SYNERGY PLATFORM TM Richard Oed 2017.12 02 CHAPTER 9 INCLUDING A REAL-TIME OPERATING SYSTEM CONTENTS 9 INCLUDING A REAL-TIME OPERATING SYSTEM 03 9.1 Threads, Semaphores and Queues
ECSE-323 Digital System Design. Lab #1 Using the Altera Quartus II Software Fall 2008
 1 ECSE-323 Digital System Design Lab #1 Using the Altera Quartus II Software Fall 2008 2 Introduction. In this lab you will learn the basics of the Altera Quartus II FPGA design software through following
MSP430 Interface to LMP91000 Code Library
 Application Note 2230 Vishy Viswanathan July 13, 2012 MSP430 Interface to LMP91000 Code 1.0 Abstract The MSP430 is an ideal microcontroller solution for low-cost, low-power precision sensor applications