OPERATING MANUAL. WINDOWS Temperature Controller. Digi -Sense
|
|
|
- August Derrick Washington
- 6 years ago
- Views:
Transcription
1 OPERATING MANUAL WINDOWS Temperature Controller Digi -Sense
2 WinTC warranty information and licensing agreement The software and its accompanying documentation and instructions are provided AS IS without warranty of any kind, expressed or implied. In particular, there are no limited warranties or merchantability nor implied warranties of fitness for a particular purpose. The manufacturer allows and licenses you, the purchaser, to copy backup copies of the software. You are not provided with source code and we do not license you to use and/or extract portions or any of the software code for any other purposes. You are encouraged to complete and forward the Software User Registration form so that we may notify you of any available upgrades. The manufacturer warrants to the original purchaser that the disk(s) upon which the software is recorded are free from defects in materials and workmanship under normal use and service for a period of 12 months from the date of sale. Defective disk(s) returned, postage prepaid, to the manufacturer accompanied by proof of the date of purchase will be replaced with disk(s) that will be similarly warranted for the remainder of the original warranty or for thirty (30) days, whichever is longer. The duration of any implied warranty on the disk(s) is limited to 12 months, and the duration of any implied warranty of the replacement disk(s) is limited to the remainder of the original warranty or thirty (30) days, whichever is longer. Some states do not allow limitations on how long an implied warranty lasts, so the above limitation may not apply to you. This warranty is not transferable. The manufacturer does not guarantee nor make any representations, regarding the use or the results of use of the software, documentation, instructions, or disk(s) in terms of correctness, accuracy, reliability, currentness, or otherwise and will not be liable for any direct, indirect, incidental or consequential damages arising out of the use or misuse of the software, documentation, instructions, and disk(s). Some states do not allow the exclusion or limitation of incidental or consequential damages, so the above limitation may not apply to you. This warranty gives you specific legal rights, and you may have other rights that vary from state to state. The screen illustrations in this booklet are meant to be representative, not necessarily exact duplicates of those that will be produced by your system. Technical Assistance If you have any questions about the use of this product, contact the manufacturer or authorized seller. i
3 Contents WINTC WARRANTY INFORMATION AND LICENSING AGREEMENT i ABOUT WINTC 1 REGISTRATION 1 SYSTEM REQUIREMENTS 2 HARDWARE 2 SOFTWARE 2 INSTALLING THE WINTC SOFTWARE 3 ATTACHING THE CONTROLLER TO THE PC 5 LAUNCHING THE WINTC SOFTWARE 6 WORKING WITH WINTC 7 WINTC MENUS 7 SELECTING MENU OPTIONS WITH THE KEYBOARD 7 SELECTING MENU OPTIONS WITH THE MOUSE 7 USING DIALOG BOXES 8 OPTION BUTTONS 8 CHECK BOXES 8 LIST BOXES 8 TEXT BOXES 8 SPIN BOXES 8 PROCESSING DIALOG BOX CHOICES 8 RESPONDING TO WINTC MESSAGES 9 GETTING HELP ONLINE 10 ACCESSING WINTC HELP 10 FINDING HELP INFORMATION ONLINE 10 SEARCHING THE ENTIRE HELP SYSTEM 11 THE MAIN WINTC SCREEN 12 COMMUNICATION STATUS 12 CLEAR BUTTON 12 ACTUAL (PV) 12 HEAT OUTPUT 13 RUN TIME 13 SETPOINT (SP) 13 CONTROL STATUS 13 RUN BUTTON 14
4 THE MAIN WINTC SCREEN (continued) STOP BUTTON 14 TUNE BUTTON 14 ALARM BUTTON 14 FILE MENU TASKS 15 LOADING A SETUP FILE 15 SAVING A SETUP FILE 16 LOADING A GRAPH 16 SAVING A GRAPH 17 PRINTING INFORMATION FROM WINTC 17 SETTING UP THE PRINTER 18 PRINTING CONTROLLER SETUP 18 PRINTING RAMP/SOAK SETUP 19 PRINTING A RAMP/SOAK SETUP GRAPH 19 PRINTING A REAL TIME GRAPH 20 PRINTING A LOG FILE 20 SETUP MENU TASKS 21 SETTING UP THE COM PORT 21 SETTING UP THE CONTROLLER 21 SENDING SETTINGS TO THE CONTROLLER FROM WINTC 22 RETRIEVING SETTINGS FROM THE CONTROLLER 25 SETTING UP RAMP/SOAK 25 SPECIFYING RAMP/SOAK SETUP IN WINTC 26 RETRIEVING RAMP/SOAK SETUP FROM THE CONTROLLER 27 ENABLING AND DISABLING REMOTE MODE 28 ENABLING REMOTE MODE 28 DISABLING REMOTE MODE 28 LOG MENU TASKS 29 SETTING UP THE LOG 29 LOGGING DATA 31 GRAPH MENU TASKS 32 SETTING UP A GRAPH 32 GRAPHING DATA 35 HELP MENU TASKS 36
5 About WinTC The Windows Temperature Controller software (WinTC, for short) works with a temperature controller connected to a PC through a serial communication port. With WinTC and a temperature controller unit, you can----- Obtain settings from or send settings to the controller Maintain and use multiple user setup files Log and graph information collected by the controller Save and print setup files, log files, and graphs Specify separate settings for basic, advanced, alarms, and ramp/soak features Select and specify settings for the PC communications (com) port Share WinTC graphs and data with other Windows applications. For information about the temperature controller unit, refer to the Temperature Controller Operating Manual. Registration Don t forget to complete and return your customer registration card. This will help us to provide you with possible future updates. 1
6 System requirements To run WinTC, your hardware and software must meet the minimum requirements listed in this section. Hardware The minimum configuration required for WinTC is an IBM - compatible PC with a 386 or higher processor, 4 MB of RAM (random access memory) with an EGA, VGA, 8514, or compatible display, and a 3½-inch diskette drive. To print data and graphs, an 80-column ASCII printer is required. If a serial mouse is used, the PC must have two com ports. Software WinTC requires MICROSOFT WINDOWS 3.1 or MICROSOFT WINDOWS 95. 2

7 Installing the WinTC software Before you can use WinTC, you must install the software on the PC to which you will attach the controller. To install the software, follow these instructions: 1 Launch Windows. 2 Exit all Windows applications that are loaded. 3 Insert the WinTC program diskette into the PC s 3½-inch diskette drive. 4 Take one of the following actions: If you are running Windows 3.1, from the Program Manager File menu, select Run. If you are running Windows 95, click START and then click Run. The Run dialog box appears. 5 In the Command Line text box, type the following command, replacing drive with the letter of the diskette drive where you inserted the WinTC program diskette. drive:\setup.exe 3


8 Click OK. The system displays a message that indicates that setup is initializing, and then displays the Temperature Controller screen. 1 Take one of the following actions: To install the software in a new directory named WINTC, click CONTINUE. To install the software in another directory, type the name of the directory in the Install To field and click CONTINUE. The setup program creates the directory and installs the software. When setup completes, the Temperature Controller Setup dialog box displays this message: 2 To close the dialog box, click OK. In Windows 3.1, the setup program creates a program group named Temperature Controller. The Temperature Controller program group contains one icon, which is labeled Temperature Controller. In Windows 95, the setup program creates a new folder named Temperature Controller in the Programs folder. Before you can use the WinTC software with the controller, follow the instructions on the next page to attach the controller to the PC. 4
9 Attaching the controller to the PC Before you can use WinTC, you must connect the temperature controller to the PC with a serial communications cable. Warning: Turn power off to PC before connecting Temperature Controller Cable. The Temperature Controller unit that you attach to the PC must be a deluxe model. Note: The 25-pin female connector on the PC is not a serial com port; it is usually a parallel printer port. 1 Attach one end of the cable to the port on the back of the controller that is labeled RS Attach the other end of the cable to the serial communication port on the PC. Before you use the controller with the WinTC software, you must enter information in WinTC about the port to which the controller is attached. Refer to Setting up the com port on page 24 for instructions for setting up the RS-232 communications port. 5
10 Launching the WinTC software To launch the WinTC software in Windows 3.1, you must launch Windows. From the Program Manager, double-click on the Temperature Controller icon (illustrated at left) in the Temperature Controller program group. To launch WinTC in Windows 95, click START and select Programs. From the Programs list, select Temperature Controller. Click the Temperature Controller icon (illustrated above) to start the program. When WinTC opens, the main WinTC screen appears. The section entitled The main WinTC screen that begins on page 14 provides information about this screen. 6
11 Working with WinTC WinTC runs under Windows 3.1 or Windows 95, so you work with it just as you do with any other Windows software application. You use menus to access WinTC functions, enter and review information in dialog boxes, and view and respond to messages that WinTC displays. WinTC menus WinTC includes five menus: Provides options for working with the WinTC environment Provides options for working with the controller with WinTC Opens the Logging dialog box Opens the Real Time Graph dialog box Provides options for displaying help with Wi TC You can select options from WinTC menus by pressing key combinations or by using the mouse. Selecting menu options with the keyboard One letter of each menu title and menu option title is underlined. To select an option with the keyboard, you press the underlined letter while you hold down the ALT key to select the menu and then the option. To select options with the keyboard, WinTC must be the active window. For example, to select the Load Graph menu option, press the ALT key and type F to open the File menu. Type G to open the Load Graph File dialog box. Selecting menu options with the mouse To select an option with the mouse, move the cursor to the name of the menu on the WinTC menu bar. Click the left mouse button to drop the menu and move the cursor to highlight the option you want to select. Click the option name to select it. 7
12 For example, to select the Load Graph menu option with the mouse, click File on the WinTC menu bar to drop down the file menu. Click Load Graph to open the Load Graph dialog box. Using dialog boxes WinTC requests information from you and displays information for you in dialog boxes. Dialog boxes include several types of fields that you can use to specify information: Option buttons Check boxes List boxes Text boxes Spin boxes Option buttons Option buttons provide a choice for you. When you see a group of option buttons, you can select only one of the choices provided. To select an option button, move the cursor to that option and click the left mouse button. Check boxes Check boxes also provide choices. When you see a group of check boxes, you can select as many of the choices as you want. To select a check box, move the cursor to that option and click the left mouse button. List boxes List boxes also display choices. Click the arrow next to the box to open a drop-down list of choices. Click the choice that you want to select it. Text boxes Text boxes provide an area for you to type free-form text. Click the left mouse button in the text box field and begin typing. 8
13 Spin boxes Spin boxes enable you to display the number that you want. Click the up arrow to display a higher number. Click the down arrow to display a lower number. Processing dialog box choices After you specify options in a dialog box, click the OK or CANCEL button to tell WinTC how to act on your selections. Responding to WinTC messages From time to time, WinTC displays messages for your information. These messages appear in dialog boxes, too. Some messages are for informational purposes only, such as the messages that appear to indicate progress as WinTC sends controller setup or ramp/soak settings to the controller. Other messages indicate an error condition that you must resolve. When WinTC displays an error message, note the message text. To close the message dialog box, click OK. To get additional information about the error message, access the online help system by pressing F1 or selecting Contents from the WinTC Help menu. Click WinTC Messages to display a list of messages in alphabetical order. When you find the message that you received, click the message text to display the topic that describes probable causes and solutions for the condition. 9
14 Getting help online WinTC includes a robust help system with detailed information about all aspects of the software. The help system includes much more information than this manual includes. When in doubt, consult the WinTC help system for more detailed information. The WinTC help system is organized into six main sections: Using WinTC, which provides general information about working in the WinTC software. WinTC Menus, which describes all of the commands available on WinTC menus. WinTC Tasks, which provides steps for completing WinTC tasks. WinTC Dialog Boxes, which provides complete descriptions of all fields in all WinTC dialog boxes. WinTC Messages, which discusses possible causes and solutions for error messages you receive while using WinTC. WinTC Glossary, which defines terminology used on WinTC screens and menus. Accessing WinTC help You can access the online help system for WinTC in these three ways: By selecting Contents from the Help menu. By clicking HELP in any dialog box where the button appears. By pressing F1 anywhere in WinTC. Finding help information online Once you enter the WinTC help system, you can find information in any of these ways: Clicking on any text that appears in green on any help screen. Clicking the forward and back arrows on the Help toolbar to browse through the topics in the help system. Clicking the SEARCH button and entering text to search for in the help system s index. You can also use the FIND+ button to search the entire text of the WinTC help system for the text that you specify. The next section describes how to use the Find+ full-text-search feature. 10
15 Searching the entire help system The WinTC help system includes a full-text search function in addition to the standard Windows help search function. You can use the FIND+ button to search the entire text of the help system to find every occurrence of a word or phrase that you specify. To access the WinTC full-text search function, click the FIND+ button on any WinTC help system screen. The WinHelp Find+ dialog box appears. In the Enter Search Text field, type the text that you want to search for, and click FIND. After you click FIND in this dialog box, the Select a Topic field lists every topic in the WinTC help system that includes the text you entered. To view the text of the topic, click the topic title. The Topic Text field displays the text of the topic, highlighting each occurrence of the text you entered. From the WinHelp Find+ dialog box, you can also view or print selected topics that contain the text you entered. 11

16 The main WinTC screen The WinTC main screen works much like the display panel on the controller. It provides information about the current status of the controller and the data that it collects. The main WinTC screen provides several fields and buttons for your use in viewing data and sending information to the controller. Communication Status This field displays status and error messages related to communication with the controller through the PC s com port. The messages in this field reflect any problems that must be corrected. If the message No Reply appears in the Communication Status field, check to make sure that the controller is turned on and the serial connection between the PC and the controller is secure. Clear button Click the CLEAR button to remove all messages from the Communication Status field. Actual (PV) This field displays the actual temperature (process variable) received from the controller according to the temperature scale specified in the WinTC Setup dialog box on the Temperature Scale tab. 12
17 Heat Output The Heat Output field displays the percentage of full capacity that the heater is running at; for example, if the value in this field is 50%, the heater is running at half its capacity. Run Time When the controller runs in On/Off or PID mode and a run time is specified in the WinTC Setup dialog box on the Time tab, this field displays the amount of time remaining in the run time. If Continuous is specified as the run time, this field displays zeros (00:00:00). When the controller runs in ramp/soak mode, this field displays the amount of time remaining to run in the segment. SetPoint (SP) When the controller runs in On/Off or PID mode, click the SetPoint button to open the Enter New Setpoint dialog box to specify the controller s setpoint, the temperature that the controller must maintain. In Ramp/Soak mode, this field displays the current setpoint. Control Status This field displays the current status of the controller and any error or information messages, including the following: RUNNING The controller is controlling the heating or cooling output. LOGGING The controller is logging data. STOPPED The heating or cooling output is turned off. TUNING The controller is performing an auto tune. REMOTE The controller is not in remote mode. DISABLED Alarm messages Ramp/Soak mode When an alarm is triggered, these messages indicate the condition that caused the alarm (such as PROCESS HIGH or PROCESS DEVIATION). When the controller is in ramp/soak mode, WinTC displays the profile number, segment 13
18 Run button number, and status in the Control Status field. Click the RUN button to start the controller. Stop button Click the STOP button to stop running the controller. Tune button When the controller is performing an auto tune, the window next to this button changes from grey to yellow. Click the TUNE button to start auto tuning for the controller if Auto Tune is enabled in the WinTC Setup dialog box on the Control tab and if WinTC has finished sending setup to the controller. Alarm button When an alarm condition is triggered, the window next to this button flashes red. Click the ALARM button to acknowledge the alarm and turn off an audible alarm. 14

19 File menu tasks From the File menu, you can load and save setup files and graphs, print controller information, and access the Windows Print Setup dialog box. This section contains instructions for performing tasks using the options on the WinTC File menu. Loading a setup file You can load a setup file that contains controller, ramp/soak, log, and graph settings. A setup file enables you to run processes more than once under the same conditions. WinTC automatically loads the setup file named DEFAULT.SET when WinTC is launched. Use DEFAULT.SET for your most frequently used settings. 1 From the File menu, select Load Setup. The Load User Setup File dialog box appears. 2 Type the file name of the setup file you want to load and the drive where the file resides. 3 Click OK. The dialog box closes. WinTC loads the setup file and displays the name of the setup file at the top of the main WinTC window. The settings in the file are now in effect. 15
20 Saving a setup file You can save the controller, ramp/soak, log, and graph settings you define in a setup file. A setup file enables you to run processes more than once under the same conditions. 1 From the File menu, select Save Setup. The Save User Setup File dialog box appears. 2 Type the name you want to assign to the setup file and the drive and directory where you want to save the file. 3 Click OK. The dialog box closes. WinTC saves the setup file in the directory that you specified. Loading a graph When you save a graph, you can view or print it at a later time by loading the graph file you saved. The graph file contains a copy of a real time graph. 1 From the File menu, select Load Graph. The Load Graph File dialog box appears. 16

21 2 Type the file name of the graph file you want to load and the drive where the file resides. 3 Click OK. The dialog box closes. WinTC loads the graph file and opens the Real Time Graph dialog box so that you can view the graph. Saving a graph You can save the real-time graph to view or print again in a graph file. When you want to view the real-time graph again, you load the graph. 1 From the File menu, select Save Graph. The Save Graph File dialog box appears. 2 Type the name you want to assign to the graph file and the drive and directory where you want to save the file. 3 Click OK. The dialog box closes. WinTC saves the graph file in the directory that you specified. Printing information from WinTC You can print much of the information that WinTC collects and graphs. This section includes instructions for the following printing tasks: Printing controller setup Printing ramp/soak setup Printing a ramp/soak setup graph Printing a real time graph Printing a log file 17
22 Setting up the printer You can access the Windows Print Setup dialog box from WinTC in order to change printer settings before printing information from WinTC. 1 From the File menu, select Print. The Print dialog box appears. 2 Click SETUP PRINTER. The Windows Print Setup dialog box appears. For instructions on entering information in this dialog box, refer to the Windows documentation, or, if available, click the HELP button. Printing controller setup You can print a listing of all of the controller settings as defined in the Temperature Controller Setup dialog box. WinTC prints a report of the values for all settings on all tabs in the WinTC Setup dialog box. 1 From the File menu, select Print. The Print dialog box appears. 2 In the Print What field, select Controller Setup. 3 Click OK. The dialog box closes. WinTC prints the controller setup information. 18
23 Printing ramp/soak setup You can print information about Ramp/Soak setup settings. WinTC prints a report of the values for all profiles and segments in the Ramp/Soak Setup dialog box. 1 From the File menu, select Print. The Print dialog box appears. 2 In the Print What field, select Ramp/Soak Setup. 3 Click OK. The dialog box closes. WinTC prints the ramp/soak setup information. Printing a ramp/soak setup graph You can print a graph of the Ramp/Soak setup. WinTC prints a graph of each profile for which it has data. 1 From the File menu, select Print. The Print dialog box appears. 2 In the Print What field, select Ramp/Soak Setup Graph. 3 Click OK. The Ramp/Soak Setup dialog box appears, and WinTC displays a message that tells you that the graph is printing. WinTC prints the Ramp/Soak Setup Graph, and the Ramp/Soak Setup dialog box remains open. 19


24 Printing a real time graph You can print a copy of a real-time graph. WinTC prints a copy of the current Real Time graph. To print a graph, you must load a graph file or graph data in the Real Time Graph dialog box before you begin. 1 From the File menu, select Print. The Print dialog box appears. 2 In the Print What field, select Real Time Graph. 3 Click OK. WinTC displays a message that tells you that the graph is printing. WinTC prints the Real Time Graph. Printing a log file You can print the contents of a log file. 1 From the File menu, select Print. The Print dialog box appears. 2 In the Print What field, select Log File. The Select LOG File dialog box appears. 3 Type the file name of the log file you want to print and the drive where the file resides. 20

25 Setup menu tasks From the Setup menu, you can specify settings for the PC s com port, the controller, and ramp/soak. You can also enable or disable remote mode operation for the controller. This section contains instructions for performing tasks using the options on the WinTC Setup menu. Setting up the com port Before you use the controller with WinTC, you must attach the controller to the PC and identify the controller to the software. 1 From the Setup menu, select ComPort. The Setup RS-232 Com Port dialog box appears. 2 Specify the com port of the PC that the controller is attached to and its baud rate. 3 Click OK. WinTC saves the com port settings. Setting up the controller Before you run a process with the temperature controller and WinTC, you must set up the controller. You can set up the controller in one of two ways: By specifying controller settings in WinTC and sending them to the controller. By specifying settings on the controller and retrieving the controller setup into the WinTC Setup dialog box. 21


26 Sending settings to the controller from WinTC On the main WinTC screen, click STOP to stop the controller from running. The controller must be stopped to exchange settings with WinTC. 1 From the Setup menu, select Controller or press CTRL+c. 2 The WinTC Setup dialog box appears. Specify the necessary settings on each tab of the dialog box. Refer to the online help system for detailed information about the fields on these tabs. Click the Alarms tab and specify settings: Click the Control tab and specify settings: 22


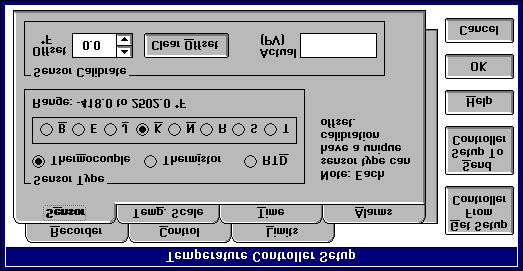
27 Click the Limits tab and specify settings: Click the Recorder tab and specify settings: Click the Sensor tab and specify settings: 23


28 Click the Temperature Scale tab and specify settings: Click the Time tab and specify settings: 3 After you specify all of the necessary settings on these tabs, click SEND SETUP TO CONTROLLER. The Sending Setup to Controller message dialog box indicates progress as WinTC sends the settings to the controller. When complete, click OK to close the message dialog box. 4 The WinTC Setup dialog box remains open. To close it, click OK. To start the controller, click RUN on the main WinTC screen. 24
29 Retrieving settings from the controller On the main WinTC screen, click STOP to stop the controller from running. The controller must be stopped to exchange settings with WinTC. 1 From the Setup menu, select Controller or press CTRL+c. The WinTC Setup dialog box appears. 2 To retrieve settings from the controller, click GET SETUP FROM CONTROLLER. The Getting Setup from Controller message dialog box indicates progress as WinTC retrieves the settings to the controller. When complete, click OK to close the message dialog box. 3 The WinTC Setup dialog box remains open. To close it, click OK. To start the controller, click RUN on the main WinTC screen. Setting up ramp/soak Before you run a ramp/soak process with the controller and WinTC, you must set up the controller for ramp/soak. You can set up the controller in one of two ways: By specifying ramp/soak settings in WinTC and sending them to the controller By specifying ramp/soak settings on the controller and retrieving them into the Ramp/Soak Setup dialog box. 25
30 Specifying ramp/soak setup in WinTC 1 From the Setup menu, select Ramp/Soak or press CTRL+r. The Ramp/Soak Setup dialog box appears. 2 Specify the settings for each profile and segment. 3 When you finish specifying settings for all of the profiles and segments, click SEND SETUP TO CONTROLLER. The Sending Ramp/Soak Setup to Controller message dialog box indicates progress as WinTC sends the settings to the controller. When complete, click OK to close the message dialog box. 4 The Ramp/Soak Setup dialog box remains open. To close it, click OK. To start the controller, click RUN on the main WinTC screen. 26

31 Retrieving ramp/soak setup from the controller On the main WinTC screen, click STOP to stop the controller from running. The controller must be stopped to send ramp/soak settings to WinTC. 1 From the Setup menu, select Ramp/Soak or press CTRL+r. The Ramp/Soak Setup dialog box appears. 2 To retrieve Ramp/Soak settings for all of the profiles and segments, click GET SETUP FROM CONTROLLER. The Getting Ramp/Soak Setup from Controller message dialog box indicates progress as WinTC retrieves the ramp/soak setup from the controller. When complete, click OK to close the message dialog box. 3 The Ramp/Soak Setup dialog box remains open. To close it, click OK. To start the controller, click RUN on the main WinTC screen. 27
32 Enabling and disabling remote mode When remote mode is enabled, WinTC sends and receives data from the controller. When remote mode is disabled, no communication takes place between WinTC and the controller. Normally, remote mode is always enabled unless it is necessary to run WinTC without disturbing the current state of the controller. Enabling remote mode The controller must be attached to the PC s com port and powered up to enable remote mode. When remote mode is disabled, Remote Mode: Disabled appears on the Setup menu. From the Setup menu, select Remote Mode: Disabled. WinTC puts the controller into remote mode. To start the controller, click RUN on the main WinTC screen. Disabling remote mode When remote mode is enabled, Remote Mode: Enabled appears on the Setup menu. A check mark appears to the left of the Remote Mode menu option. From the Setup menu, select Remote Mode: Enabled. WinTC takes the controller out of remote mode and changes the Setup menu option to Remote Mode: Disabled. 28
33 Log menu tasks You can record or log data collected by the controller, including the temperature (PV), setpoint, control output, alarms, date, time, and temperature units. If you want, you can save the log in text or spreadsheet format. Log file names typically end with the.prn extension. When you save log files in spreadsheet format, the data is separated by commas in ASCII text format. When you select the Log menu on the WinTC menu bar, the Logging dialog box opens. From the Logging dialog box, you can set up the log and log data. This section contains instructions for performing tasks using the Logging dialog box. Setting up the log Before you log data, you must specify setup information about the way you want WinTC to save the data. To set up the log, logging must be stopped. 1 Select the Log menu. The Logging dialog box appears. 29

34 2 Click SETUP LOG. The Log Setup dialog box appears. 3 Specify the setup information for the log: Select the parameters you want to include in the log. To save the logged information to a file, select the Log to File field and specify the file name in the Select LOG File dialog box. If you plan to import the file into a spreadsheet application, select the Spreadsheet Format field. Specify the frequency with which you want to log data in the Log Interval field. Specify the number of times you want to log data, or to log until the STOP LOG button is pressed, select Continuous. 4 Click OK. WinTC returns you to the Logging dialog box. To begin logging, click START LOG. 30

35 Logging data Before you log data, you must set up the log. 1 Select the Log menu. The Logging dialog box appears. 2 Click START LOG. WinTC displays the logged information in the area at the top left of the Logging dialog box. 3 As necessary, take the following actions: To clear the log list, click CLEAR LOG LIST. To reset the Total Logs count, click ZERO. To continue logging but close the dialog box, click OK. 4 When you want to stop logging, click STOP LOG in the Logging dialog box. The logged data appears in the Logging dialog box until you click CLEAR LOG LIST. 31
, setpoint, control output, and alarm setpoint.")
36 Graph menu tasks When you select the Graph menu on the WinTC menu bar, the Real Time Graph dialog box opens. From the Real Time Graph dialog box, you can set up a graph and graph data. The data that you can include in graphs includes the temperature (PV), setpoint, control output, and alarm setpoint. This section contains instructions for performing tasks using the Real Time Graph dialog box. Setting up a graph Before you graph data, you must specify setup information about the way you want WinTC to graph the data. To set up the graph, graphing must be stopped. 1 Select the Graph menu. The Real Time Graph dialog box appears. 2 Click SETUP. The Graph Setup dialog box appears. 32


37 3 Specify the setup information for the graph. Refer to the online help system for detailed information about the fields on these tabs: Click the Colors tab and specify settings. Click the Data tab and specify settings. Click the Titles tab and specify settings. 33


38 Click the X-Axis tab and specify settings. Click the Y-Axis tab and specify settings. 4 After you specify all of the necessary settings on the tabs, click OK. WinTC returns you to the Real Time Graph dialog box. To begin graphing, click START GRAPH. 34

39 Graphing data Before you graph data, you must set up the graph. 1 Select the Graph menu. The Real Time Graph dialog box appears. 2 Click START GRAPH. WinTC displays the graph of data at the top of the Real Time Graph dialog box. 3 As necessary, take the following actions: To reset the graph, click RESET. To continue graphing but close the dialog box, click OK. 4 When you want to stop graphing, click STOP GRAPH in the Real Time Graph dialog box. The graphed data appears in the Real Time Graph dialog box until you click RESET. 35
40 Help menu tasks From the Help menu, you can perform the following tasks: To display the Contents of the WinTC help topic, select Contents. To enable or disable the display of labels that describe the functions of WinTC when you move the cursor over the button, select Tips To view the version number and catalog number of the WinTC software, select About. Refer to the section entitled Getting help online that begins on page 11 for more information about using the WinTC online help system. 36
Instruction Manual. HH610-SW Application Software for Portable & Bench Meters
 Instruction Manual HH610-SW Application Software for Portable & Bench Meters Dear Customer, Thank you for choosing an Omega product. Please read this instruction manual carefully before using the software.
AnaWin User s Guide. Watlow Controls 1241 Bundy Blvd. Winona, MN Customer Service Phone: (800) Fax: (800)
 Fax: (800)") TM AnaWin User s Guide Watlow Controls 1241 Bundy Blvd. Winona, MN 55987 Customer Service Phone: (800) 414-4299 Fax: (800) 445-8992 Technical Support Phone: (507) 494-5656 Fax: (507) 452-4507 Email: wintechsupport@watlow.com
TM AnaWin User s Guide Watlow Controls 1241 Bundy Blvd. Winona, MN 55987 Customer Service Phone: (800) 414-4299 Fax: (800) 445-8992 Technical Support Phone: (507) 494-5656 Fax: (507) 452-4507 Email: wintechsupport@watlow.com
Card Encoder. PC Software. User Manual Software OPW Fuel Management Systems Manual No. M Rev 2
 Card Encoder PC Software User Manual Software 5.21 2002 OPW Fuel Management Systems Manual No. M51-01.05 Rev 2 OPW Fuel Management Systems - System and Replacement Parts Warranty Statement Effective September
ME scopeves 5.0. Reference Manual. Volume IIA Basic Operations. (August 2008)
") ME scopeves 5.0 Reference Manual Volume IIA Basic Operations (August 2008) i ME'scope Reference Volume IIA - Basic Operations ii Table Of Contents Notice Information in this document is subject to change
ME scopeves 5.0 Reference Manual Volume IIA Basic Operations (August 2008) i ME'scope Reference Volume IIA - Basic Operations ii Table Of Contents Notice Information in this document is subject to change
SmartScan. Barcode Translator for QuickBooks USER S MANUAL
 SmartScan Barcode Translator for QuickBooks USER S MANUAL Baus Systems 4727 44 th Ave. SW, Suite 202 Seattle, WA 98116 (206) 932-9986 Office (206) 923-0839 Fax E-mail: support@baus-systems.com 1 TABLE
Model GX-2001 Data Logging Software. User s Guide
 Model GX-2001 Data Logging Software User s Guide Part Number: 71-0056RK Edition: First Released: 6/29/2001 Warranty RKI Instruments, Inc., warrants gas alarm equipment sold by us to be free from defects
9934 LogWare User s Guide
 Hart Scientific 9934 LogWare User s Guide Rev. 592201 Fluke Corporation, Hart Scientific Division (Hart) warrants this product to be free from defects in material and workmanship under normal use and service
User Guide. Model Temperature Datalogger Kit Model Temperature and Humidity Datalogger Kit Model SW276 Datalogging Software SW276
 User Guide Model 42265 Temperature Datalogger Kit Model 42275 Temperature and Humidity Datalogger Kit Model SW276 Datalogging Software SW276 Introduction Congratulations on your purchase of Extech Instrument
FlukeView Forms. Documenting Software. Getting Started
 FlukeView Forms Documenting Software Getting Started PN 1574021 September 2000 2000 Fluke Corporation. All rights reserved. Printed in USA All product names are trademarks of their respective companies.
9935 LogWare II Real-Time Data Acquisition Software User s Guide
 Hart Scientific 9935 LogWare II Real-Time Data Acquisition Software User s Guide info@ 9935 ugeng0000 051001 info@ Fluke Corporation, Hart Scientific Division (Hart) warrants this product to be free from
English. TI.GRAPH LINK é 2 FOR THE MACINTOSH CONDENSED GUIDEBOOK
 English TI.GRAPH LINK é 2 FOR THE MACINTOSH CONDENSED GUIDEBOOK Note: This guidebook applies to the TI graphing calculators and accessories described on page 3. Graphic screens in this guidebook were captured
Battery Monitor Data Manager Report Generator Software. User s Guide
 Battery Monitor Data Manager Report Generator Software User s Guide 990 South Rogers Circle, Suite 11 Boca Raton, FL 33487 Tel: 561-997-2299 Fax: 561-997-5588 www.alber.com 1. Warranty and Limitation of
USER MANUAL. 26-inch LED Scrolling Messenger Display INSTALLATION: NOTE: READ BEFORE PROGRAMMING YOUR MESSENGER: To START your messenger:
 26-inch LED Scrolling Messenger Display USER MANUAL INSTALLATION: CAUTION: This display is for INDOOR USE ONLY. It can be mounted to a wall. Do not mount or attach the power supply to anything, do not
FitPlus for Windows Fit Test Software
 FitPlus for Windows Fit Test Software User s Manual September 2000 PN 1980284 Rev. C TSI Incorporated FitPlus for Windows Fit Test Software User s Manual September 2000 PN 1980284 Rev. C SHIP TO: TSI
Trademark. Cadex C5100 BatteryStore User Guide
 Trademark C5100 BatteryStore is a trademark of Cadex Electronics Inc. All other trademarks or registered trademarks mentioned herein are the property of their respective owners. Copyright Notice Copyright
GX-2009 Data Logger Management Program Operator s Manual
 GX-2009 Data Logger Management Program Operator s Manual Part Number: 71-0163RK Revision: P1 Released: 4/30/09 www.rkiinstruments.com Warranty RKI Instruments, Inc., warrants gas alarm equipment sold by
User's Guide. Temperature / Humidity Datalogger. Model 42270
 User's Guide Temperature / Humidity Datalogger Model 42270 Warranty EXTECH INSTRUMENTS CORPORATION warrants this instrument to be free of defects in parts and workmanship for one year from date of shipment
Newage hardness testing
 Newage hardness testing DataView Data Acquisition Software Operation Manual Version 1.4.3 Newage Testing Instruments, Inc. reserves the right to alter designs, materials, and specifications when conditions
9936A LogWare III. User s Guide. Revision
 9936A LogWare III User s Guide Revision 680301 Table of Contents 1 Introduction... 1 1.1 Symbols Used...1 1.2 Conventions...1 1.3 What is LogWare?...1 1.4 License Agreement...2 1.5 Requirements...2 1.6
TestLink Software for Software Instruction Manual
 TestLink Software for 800023 840004 Software Instruction Manual 1 Table of Contents Introduction... 3 System Requirements... 3 Minimum Hardware Requirement... 3 Quick Start Tutorial... 4 Recording real
9933 TableWare User s Guide
 Hart Scientific 9933 TableWare User s Guide 99 Washington Street Melrose, MA 02176 Phone 781-665-1400 Toll Free 1-800-517-8431 Visit us at www.testequipmentdepot.com Rev. 592101 Fluke Corporation, Hart
SNMPListener v2.0 User Guide
 SNMPListener v2.0 User Guide Copyright Atlantis Software 2001 All rights reserved. This manual is copyrighted by Atlantis Software, with all rights reserved. Under the copyright laws, this manual may not
10100 Royalton Rd. Cleveland, OH (440) (440)
 (440)") (Click on areas of the screen for more information) 10100 Royalton Rd. Cleveland, OH 44133 (440) 237-3200 (440) 237-1744 040100 LICENSE AND WARRANTY NOTICE SOFTWARE LICENSE AGREEMENT Instrument Service
(Click on areas of the screen for more information) 10100 Royalton Rd. Cleveland, OH 44133 (440) 237-3200 (440) 237-1744 040100 LICENSE AND WARRANTY NOTICE SOFTWARE LICENSE AGREEMENT Instrument Service
SmartStack SAE J1939 Communication Module
 User Manual for HE800JCM200 SmartStack SAE J1939 Communication Module 14 May 2002 PREFACE 14 MAY 2002 PAGE 3 PREFACE This manual explains how to use SmartStack SAE J1939 Communication Modules. Copyright
Report Viewer Version 8.1 Getting Started Guide
 Report Viewer Version 8.1 Getting Started Guide Entire Contents Copyright 1988-2017, CyberMetrics Corporation All Rights Reserved Worldwide. GTLRV8.1-11292017 U.S. GOVERNMENT RESTRICTED RIGHTS This software
vippaq Main App. User Guide
 vippaq Main App. User Guide Edition 1d July 2008 Contents 1 INTRODUCTION 3 1.1 3 2 SYSTEM PREPARATION 4 2.1.1 Measuring Head Connection 5 2.1.2 Position the Measuring Heads 5 2.1.3 Start Job 5 3 MEASURE
SC-01 Data Logger Management Program Operator s Manual
 SC-01 Data Logger Management Program Operator s Manual Part Number: 71-0138RK Revision: P1 Released: 9/12/07 www.rkiinstruments.com Warranty RKI Instruments, Inc., warrants gas alarm equipment sold by
Trademark. Cadex C5100 BatteryStore v1.5 User Guide
 v1.5 Trademark C5100 BatteryStore is a trademark of Cadex Electronics Inc. All other trademarks or registered trademarks mentioned herein are the property of their respective owners. Copyright Notice Copyright
Notice to Users. Serial Number
 E-SWIIPE Veerrssiion 2..0 USER S GUIDE Notice to Users The E-swipe user documentation has been written by Escan Technologies Corp. No part of this publication may be reproduced or distributed in any form
CL600 SIMPLE LOGGER RMS CLAMP-ON MODULE E N G L I S H. User Manual
 SIMPLE LOGGER RMS CLAMP-ON MODULE CL600 E N G L I S H User Manual Owner s Record The serial number for the Simple Logger Model CL600 is located on the back of the instrument. Please record this number
ProjectXpert Getting Started with your trial
 ProjectXpert Getting Started with your trial Do you find your building projects difficult to manage? Want to streamline your jobs? Looked for the ideal project management solution but never found one?
GX-2003 Data Logging Software Operator s Manual
 GX-2003 Data Logging Software Operator s Manual Part Number: 71-0096RK Revision: P2 Released: May 28, 2004 RKI Instruments, Inc. 1855 Whipple Rd. Hayward, CA 94544 (510) 441-5656 Warranty RKI Instruments,
Board Viewer INSTRUCTION MANUAL
 Board Viewer INSTRUCTION MANUAL CheckSum, Inc. P.O. Box 3279 Arlington, WA 98223 (360) 435-5510 Fax (360) 435-5535 Web Site: www.checksum.com P/N 4400-048 Revision 3/2003 Copyright 1990-2003, CheckSum,
Upgrading BMDM and BMRG Software and MPM, BDS and DCM Firmware
 Upgrading BMDM and BMRG Software and MPM, BDS and DCM Firmware 990 South Rogers Circle, Suite 11 Boca Raton, FL 33487 Tel: 561-997-2299 Fax: 561-997-5588 www.alber.com 1. Warranty and Limitation of Liability
ZP Recorder INSTRUCTION MANUAL. Force Data Analyzer. For Force Gauge Models: ZP, ZPH and ZPS
 ZP Recorder Force Data Analyzer For Force Gauge Models: ZP, ZPH and ZPS INSTRUCTION MANUAL 2 YEAR WARRANTY (RESTRICTIONS APPLY) Imada, Inc. warrants its products to the original purchaser to be free from
Firmware Loader. Software. For support mail to: tech mca.nl See also our website: mca.com. Software Manual. Revision 1.
 Firmware Loader Software For support mail to: tech support@smac mca.nl See also our website: www.smac mca.com Software Manual Revision 1.0 www.ingeniamc.com Firmware Loader Software Manual Copyright and
Panaboard Overlayer User's Guide. Image Capture Software for Electronic Whiteboard (Panaboard)
") Panaboard Overlayer User's Guide Image Capture Software for Electronic Whiteboard (Panaboard) Contents Introduction... 3 Functional Overview... 3 Operation Flow... 3 Abbreviations... 4 Trademarks... 4
Panaboard Overlayer User's Guide Image Capture Software for Electronic Whiteboard (Panaboard) Contents Introduction... 3 Functional Overview... 3 Operation Flow... 3 Abbreviations... 4 Trademarks... 4
Hart Scientific LogWare III User s Guide
 Hart Scientific 9936 LogWare III User s Guide Rev. 592002 Fluke Corporation, Hart Scientific Division (Hart) warrants this product to be free from defects in material and workmanship under normal use and
TOF-Watch SX Monitor
 TOF-Watch SX Monitor User manual Version 1.2 Organon (Ireland) Ltd. Drynam Road Swords Co. Dublin Ireland Contents General information... 3 Getting started... 3 File Window... 7 File Menu... 10 File Open
EPSON. VGA Utilities Guide. This manual is printed on recycled paper and is l00% recyclable.
 EPSON VGA Utilities Guide This manual is printed on recycled paper and is l00% recyclable. IMPORTANT NOTICE DISCLAIMER OF WARRANTY Epson America makes no representations or warranties, either express or
Datalogging IAQ Meter Instruction Manual
 Datalogging IAQ Meter 800050 Instruction Manual Datalogging IAQ Meter 800050 Copyright 2014 by Sper Scientific ALL RIGHTS RESERVED Printed in the USA The contents of this manual may not be reproduced or
Chapter 3 Operating instructions
 Chapter 3 Operating instructions Summary This chapter describes the how to control and navigate through the TVR 30 s menus and options. Content Control interfaces 10 Controlling the TVR 30 10 Front panel
DBS Manager. User Guide. Panasonic VB Please read these instructions completely before using DBS Manager.
 DBS Manager User Guide Panasonic VB-43993 Please read these instructions completely before using DBS Manager. Section 550 Part Number 552X00201 Issued April 2000 The contents of this manual are subject
FirePoint 8. Setup & Quick Tour
 FirePoint 8 Setup & Quick Tour Records Management System Copyright (C), 2006 End2End, Inc. End2End, Inc. 6366 Commerce Blvd #330 Rohnert Park, CA 94928 PLEASE READ THIS LICENSE AND DISCLAIMER OF WARRANTY
Allen-Bradley. User Manual. DeviceView Configurator (2707-DNC)
") Allen-Bradley DeviceView Configurator (2707-DNC) User Manual Important User Information Solid state equipment has operational characteristics differing from those of electromechanical equipment. Safety
Allen-Bradley DeviceView Configurator (2707-DNC) User Manual Important User Information Solid state equipment has operational characteristics differing from those of electromechanical equipment. Safety
SyncFirst Standard. Quick Start Guide User Guide Step-By-Step Guide
 SyncFirst Standard Quick Start Guide Step-By-Step Guide How to Use This Manual This manual contains the complete documentation set for the SyncFirst system. The SyncFirst documentation set consists of
COMTool User Guide Version /02/2013
 1 of 20 Contents Terms and Conditions of License for use of gratuitous software... 3 Purpose:... 3 Installation Instructions:... 4 Using COMTool:... 8 Select a COM Port... 8 Select a product... 8 Selecting
Reference Manager Version 9
 Reference Manager Version 9 Windows 98/95/NT Research Information Systems Copyright 1997 by Institute for Scientific Information February, 1999 COPYRIGHT NOTICE This software product and accompanying documentation
Cashbook. User Guide. User Guide
 Cashbook User Guide User Guide MYOB New Zealand Ltd WEBSITE www.myob.co.nz Copyright MYOB Technology Pty 1988-2010 All rights reserved. Trademarks MYOB is a registered trademark and use of it is prohibited
- RS232, RS422 - RS485 - TCP/IP
 Collect Data Acquisition & Integration Control Software User Manual Connect and control - RS232, RS422 - RS485 - TCP/IP Ethernet - communications......directly with existing spreadsheets, databases, files
Table Contents. Introduction Key Features...2. Getting Started Package Contents...3. Minimum System Requirements...3
 1 Table Contents Introduction... 2 Key Features...2 Getting Started... 3 Package Contents...3 Minimum System Requirements...3 Driver Installation...3 Applications Installed...7 BlueSoleil... 8 Main Windows...8
BlackBerry Wireless Handheld Getting Started Guide
 BlackBerry Wireless Handheld Getting Started Guide Phone button Open the phone screen Earpiece Headset jack USB port Notification LED Trackwheel Select or click an item Escape button Exit a screen Alt
User s Manual CAP 531*1.5 Configuration and Programming tool
 User s Manual CAP 531*1.5 Configuration and Programming tool This manual belongs to: Contents Chapter Page About this manual 1 Introduction 3 Technical descriptions 81 References 177 Customer feedback
T-Invoicer User Guide
 - 1 - T-Invoicer User Guide Introduction T-Invoicer is an entry level invoicing system designed for small & startup business's who need to invoice customers quickly & easily. T-Invoicer has all the basic
Video Management Software
 Video Management Software User Manual Web: europesecurity.eu Mail: info@europesecurity.eu Tel.: 0541 352 952 User s Manual 2 Contents CHAPTER : XMS CENTRAL USER MANUAL 1 PC REQUIREMENT 3 2 INSTALL 3 3
REMOTE FRONT PANEL EMULATION
 REMOTE FRONT PANEL EMULATION USER REFERENCE GUIDE 2500 Application Software Series Part Number: 3-9003-170 Revision 1.0 MARCH 1991 EMULATOR GUIDE DANIEL INDUSTRIES, INC. REMOTE FRONT PANEL EMULATION USER
DATALOGGER With DATA LAB GRAPHICAL SOFTWARE INSTRUCTION MANUAL SPER SCIENTIFIC
 2. Open the file by selecting All Types or Text in the Files of type: box. Find the file you saved. When open, choose Tab delineated file. 3. You can now work with the data as you would any other data
User's Guide. diskette drive. Rev. 6/1/97 Copyright 1997 Micro Solutions, Inc.
 diskette drive User's Guide Rev. 6/1/97 Copyright 1997 Micro Solutions, Inc. Micro Solutions, Inc., provides this manual as is, without warranty of any kind, either express or implied. Micro Solutions,
Eagle 2 Data Logger Management Program Operator s Manual
 Eagle 2 Data Logger Management Program Operator s Manual Part Number: 71-0170RK Revision: E Released: 4/14/17 www.rkiinstruments.com Warranty RKI Instruments, Inc. warrants gas alarm equipment sold by
PULSAworks Serial Communications Interface. Users Manual PULSAFEEDER Inc AIRPORT ROAD PUNTA GORDA, FLORIDA
 PULSAworks Serial Communications Interface Users Manual 72-385-00 PULSAFEEDER Inc. Rev. C 27101 AIRPORT ROAD PUNTA GORDA, FLORIDA 33982 www.pulsa.com PULSAworks Serial Communications Interface Copyright
9936A LogWare III. User s Guide. Revision
 9936A LogWare III User s Guide Revision 850701 Table of Contents 1 Introduction...1 1.1 Symbols Used... 1 1.2 Conventions... 1 1.3 What is LogWare?... 1 1.4 License Agreement... 2 1.5 Requirements...
MCDOUGAL LITTELL EASYPLANNER USER S GUIDE
 MCDOUGAL LITTELL EASYPLANNER USER S GUIDE 1 Introduction The McDougal Littell EasyPlanner allows you to quickly and easily access Resource materials such as tests, quizzes, books, and other supporting
Digital Torque Tester
 YEAR WARRANTY (RESTRICTIONS APPLY) Imada, Inc. warrants its products to the original purchaser to be free from defects in workmanship and material under normal use and proper maintenance for two years
zclock-200w User Manual
 zclock-200w User Manual Table of contents Product Diagram......Page 1 Alarm clock operation......page 5 Setting up Hidden Cam.....Page 7 Advanced set up......page 14 Windows......Page 15 Apple OSX...Page
INSTALLATION INSTRUCTIONS 5" SINGLE CHANNEL ULTIMATE TACH
 Instr. No. 2650-887C INSTALLATION INSTRUCTIONS 5" SINGLE CHANNEL ULTIMATE TACH MODEL 6871, 6872, 6873, 6874, 6875, 6877 IMPORTANT WEAR SAFETY GLASSES 5 4 6 COPYRIGHT PATENT PENDING 3 7 8 PLAYBACK 9 2 0
Learning to Get Along
 Learning to Get Along Talking books for teaching social skills Learning to Get Along Software is a social sk ill and character education program for children ages 4 8. The software series features 15 well-written,
TB-100 ControLynx Terminal Block
 TB-100 ControLynx Terminal Block TECHNICAL MANUAL Version 1.3 September 2006 Copyright This technical manual and the equipment, firmware and software described herein are copyrighted by INTENT DIGITAL
Operating Instructions. SartoCollect. Data Transfer and Integration
 Operating Instructions SartoCollect Data Transfer and Integration 98646-002-93 License and Warranty Agreement SartoCollect Installation Agreement This product is licensed for use by Sartorius AG and its
PowerView for the EnergyPro
 Data Analysis Software User's Guide PowerView User's Guide Copyright 2005 CANDURA INSTRUMENTS. All Rights Reserved. The information in this document is subject to change without notice. CANDURA INSTRUMENTS
Datalogging RH / Temperature Pen Instruction Manual
 Datalogging RH / Temperature Pen 800013 Instruction Manual 1 Datalogging RH / Temperature Pen 800013 Copyright 2014 by Sper Scientific ALL RIGHTS RESERVED Printed in the USA The contents of this manual
DL User s Manual
 DL Sm@rtSet User s Manual DL Sm@rtSet USER'S MANUAL DATALOGIC S.p.A. Via Candini, 2 40012 - Lippo di Calderara di Reno Bologna - Italy DL Sm@rtSet Ed.:11/2003 This manual refers to software version 1.40
BlackBerry Wireless Handheld Getting Started Guide
 BlackBerry Wireless Handheld Getting Started Guide Headset jack Earpiece Notification LED Phone button Open the phone screen Trackwheel Select or click an item Escape button Exit a screen Alt key Type
USER GUIDE DESIGN LAYOUTS
 USER GUIDE DESIGN LAYOUTS Introduction COPYRIGHT Copyright 1998-2016. Wilcom Pty Ltd, Wilcom International Pty Ltd. All Rights reserved. All title and copyrights in and to Digitizer Embroidery Software
COData. Carbon Monoxide Breath Analysis Software with integrated patient database. For use with the pico, pico-lo and Micro Smokerlyzers.
 COData Carbon Monoxide Breath Analysis Software with integrated patient database For use with the pico, pico-lo and Micro Smokerlyzers Page 1 of 12 Contents Page 2 of 12 INTRODUCTION Thank you for purchasing
ClassicMouse User Manual
 P73096-F8E201-US-man-qxd 3/9/00 8:14 AM Page 1 ClassicMouse User Manual P73096 F8E201 F8E201-BLK P73096-F8E201-US-man-qxd 3/9/00 8:14 AM Page 2 P73096-F8E201-US-man-qxd 3/9/00 8:14 AM Page 1 1. Introduction
MusicTel-Net/Net+ Installation and Operation Manual
 MusicTel-Net/Net+ Installation and Operation Manual NOTICE This manual is the MusicTel-Net/Net+ Installation and Operation Manual v2.0. All rights reserved. No part of this document may be reproduced or
B series Controller Communications VI Library
 B series Controller Communications VI Library User Manual: Version 1.0 Copyright 2009 Integrated Pro 2 Table of Contents 1. Introduction 2. Installation 3. Communications Setup 4. Using Example VIs 5.
CheckMark User s Manual
 CheckMark 1099 User s Manual 1099 Information in this manual is subject to change without notice. This manual ( Manual or Documentation ) and the software ( Software ) described in it are copyrighted,
PWRcheck Spring City Drive Waukesha, WI
 PWRcheck www.westmountainradio.com 1020 Spring City Drive Waukesha, WI 53186 262-522-6503 sales@westmountainradio.com 2018 West Mountain Radio, All rights reserved. All trademarks are the property of their
Introduction...1. Package Contents... 1 Product Features... 1 Specifications Product Schematic...2. HDD Installation...3
 1 Table of Contents Introduction...1 Package Contents... 1 Product Features... 1 Specifications... 1 Product Schematic...2 HDD Installation...3 Connecting to your Computer...6 Connecting to Mac...7 Connecting
NuFlo TM. SCM Viewer TM. User Manual. Manual No , Rev. A
 NuFlo TM SCM Viewer TM User Manual Manual No. 30165020, Rev. A Revision History The following table shows the revision history for this document: Date Description Approved by 2-6-2006 Initial release of
User Manual. Central Monitoring Software for TER-series recorders. CenPro
 EN User Manual Central Monitoring Software for TER-series recorders CenPro Contents CENPRO USER MANUAL 1 PC REQUIREMENT 3 2 INSTALL 3 3 UNINSTALL 5 4 BASIC OPERATION 7 4.1 Log In 7 4.2 Screen Layout 8
Redirector User Guide
 Redirector User Guide Revision B November 04, 2005 Part Number GC-800-235 Copyright and Trademark Copyright 2004, Grid Connect, Inc. All rights reserved. No part of this manual may be reproduced or transmitted
Microsoft Dynamics GP. Extender User s Guide Release 9.0
 Microsoft Dynamics GP Extender User s Guide Release 9.0 Copyright Copyright 2005 Microsoft Corporation. All rights reserved. Complying with all applicable copyright laws is the responsibility of the user.
Quick Start Guide Agilent Technologies 14565A Device Characterization Software for Windows 98, Windows NT 4.0, Windows 2000 and Windows XP
 Quick Start Guide Agilent Technologies 14565A Device Characterization Software for Windows 98, Windows NT 4.0, Windows 2000 and Windows XP sa Contents Description...3 System Requirements...3 Installing
BlackBerry Wireless Handheld Getting Started Guide
 BlackBerry Wireless Handheld Getting Started Guide Phone button Open the phone screen Earpiece Headset jack USB port Notification LED Trackwheel Select or click an item Escape button Exit a screen Alt
DPT - EN1 R1 Users Manual
 DPT - EN1 R1 Users Manual Revision Date: 4 September, 2002 Product User s Notice No part of this manual, including the products and software described in it, may be reproduced, transmitted, transcribed,
PV3500. Fuel Site Controller. Service Manual OPW Fuel Management Systems Manual M Rev. 1
 PV3500 Fuel Site Controller Service Manual 2002 OPW Fuel Management Systems Manual M11-00.03 Rev. 1 OPW Fuel Management Systems - System and Replacement Parts Warranty Statement Effective September 1,
EIL3000/SVS. Supervisory Software Operating Manual. page 1
 EIL3000/SVS Supervisory Software Operating Manual page 1 When you start the program for the first time you will be greeted by a blank screen. You now need to tell the program which controller ID s you
English OPERATION MANUAL CONTENTS
 OPERATION MANUAL English CONTENTS Introduction to Your ThumBoard... 2 Installing the Application... 3 Attaching Your Handheld... 5 Changing General Settings... 6 Keyboard Functions... 8 Keyboard layout...
Pocket ESA. Version 1. User s Guide. Copyright (c) GAEA Technologies Ltd. All rights reserved.
 GAEA Technologies Ltd. All rights reserved.") Pocket ESA Version 1 User s Guide Copyright (c) 2004. GAEA Technologies Ltd. All rights reserved. Not to be reprinted without the written consent of GAEA Technologies Ltd. Printed in Canada Pocket ESA
Pocket ESA Version 1 User s Guide Copyright (c) 2004. GAEA Technologies Ltd. All rights reserved. Not to be reprinted without the written consent of GAEA Technologies Ltd. Printed in Canada Pocket ESA
Digital Torque Screwdriver
 2 YEAR WARRANTY (RESTRICTIONS APPLY) Imada, Inc. warrants its products to the original purchaser to be free from defects in workmanship and material under normal use and proper maintenance for two years
Roland CutChoice. Ver. 1 USER S MANUAL
 Roland CutChoice Ver. 1 USER S MANUAL Thank you very much for purchasing the Roland cutter. To ensure correct and safe usage with a full understanding of this product s performance, please be sure to read
GX-2009 Data Logger Management Program Operator s Manual
 GX-2009 Data Logger Management Program Operator s Manual Part Number: 71-0163RK Revision: E Released: 4/14/17 www.rkiinstruments.com Warranty RKI Instruments, Inc. warrants gas alarm equipment sold by
NDA ISSUE 1 STOCK # MATWorX 32 User s Guide. December, NEC America, Inc.
 NDA-24215 ISSUE 1 STOCK # 151942 MATWorX 32 User s Guide December, 1997 NEC America, Inc. LIABILITY DISCLAIMER NEC America, Inc. reserves the right to change the specifications, functions, or features,
Download and Installation Instructions. Java JDK Software for Windows
 Download and Installation Instructions for Java JDK Software for Windows Updated October, 2017 The CompuScholar Java Programming and Android Programming courses use the Java Development Kit (JDK) software.
Welcome to Cole On-line Help system!
 Welcome to Cole On-line Help system! Cole Online is an Internet based information directory that allows fast and efficient access to demographic information about residences and businesses. You can search
SADL version 1.0 for Windows Satisfaction with Amplification in Daily Life
 SADL version 1.0 for Windows Satisfaction with Amplification in Daily Life For scoring and administering the SADL survey. Table of Contents page Software License Agreement 1 Technical Support 3 System
Authorizing the TCP/IP protocol
 Authorizing the TCP/IP protocol If you purchased TCP/IP capability initially with the printer, the printer is shipped with the protocol already authorized. If you are adding TCP/IP capability to your printer,
0Introduction. Overview. This introduction contains general information and tips for using your Avaya CD-ROM.
 0 Overview Purpose This introduction contains general information and tips for using your Avaya CD-ROM. Features This offer is designed for all users who want the ease of accessing documentation electronically.