ENGAGING SOLUTIONS MOBI and Workspace Beginners Manual
|
|
|
- Hubert McGee
- 6 years ago
- Views:
Transcription

1 ENGAGING SOLUTIONS MOBI and Workspace Beginners Manual MOBI VIEW Your local sales team: Merianne Wininger Kristen Rush Joe Musgrave Kim Brewer ei Tech Support: Join the einstruction Community to connect with other educators, find free high quality resources, and learn about the latest best practices and technologies in classroom instruction. Resources are searchable to make finding what you need fast and simple. Plus, check out blogs and discussion boards to find out what other education professionals are talking about. Register today at

 are charged before connecting to a computer. Charging the MOBI View MOBI KWIK When the MOBI battery is low, the Battery Status icon will display as an empty battery.")

2 1 What is Workspace? Workspace is a program that connects a computer to an EInstruction interactive whiteboard, panel or wireless pad, such as the MOBI. The program includes tools for writing and drawing during a presentation. Teachers can use Workspace to create and conduct interactive lessons. Getting Started MOBI View Before using the MOBI or the interactive pen for the first time, they should be charged for about 12 hours. Make sure the Pad and Pen(s) are charged before connecting to a computer. Charging the MOBI View MOBI KWIK When the MOBI battery is low, the Battery Status icon will display as an empty battery. Place the Interactive Pen in the Pen slot. NOTE: the View pen will charge when placed in the pen slot whether the MOBI is currently charging or not. Connect the Mini USB Cable to the Mini USB port at the top of the MOBI and then into a USB port on the computer OR into the provided AC adapter. Note: the MOBI can be used while it is charging. When fully charged the Battery Status icon will display a full battery. MOBI Learner You may also charge the MOBI View through its personal dock as seen below. Simply place the receiver inside the RF hub holder on the charging stand and then place your MOBI View on the charging stand. Allow approx. 8 hours to fully charge.

. This icon indicates that the einstruction Device Manager is now running in the background. The Device Manager can be opened through the icon menu.")
3 2 Installation of Software Ideally, software should be the newest version. Most often this will be found on the website at ALL einstruction DEVICES MUST BE UNPLUGGED FROM THE COMPUTER BEFORE INSTALLATION OF ANY einstruction SOFTWARE. You will know Interwrite Workspace has installed successfully by the appearance of the einstruction icon in the System Tray on the Windows Task Bar (if the icon does not appear, restart your computer). This icon indicates that the einstruction Device Manager is now running in the background. The Device Manager can be opened through the icon menu. Setup and Device Manager Open the Device Manager to observe the MOBI connections. Plug the RF Receiver into a USB port on the computer. The computer will automatically detect the USB device and install the new hardware for use. A blue LED light on the RF Receiver will light up when it is plugged in. Turn on the MOBI. In most cases the computer will automatically find the MOBI and it will be visible in the Device Manager. If it is NOT automatically discovered: o Press the lighted Activation button on the RF Receiver. The blue LED light will start blinking. o Turn on the MOBI View. It should tell you it s attempting to connect and should pick up the RF signal automatically. o This process can be used to add additional MOBIs to the Device Manager, as in Multi- User mode. Customize your device: o Highlight your device. o Click on Options and select Properties or click on the wrench Properties button.


4 3 Properties Menu General Tab: Here you can name your device. Type a device name in the Name text field. NOTE: You may also name your device by using the Touch Pad on the MOBI View: click Settings then click Device Name. Enter in a new name, hit the Enter button and then exit out to the main screen. Annotation Tab: Choose the tools to be made available for use as annotation options on the MOBI View. This screen is also accessible when you tap the Customize Tools icon on the MOBI View Annotate screen. A customized Annotate screen on the MOBI View will typically take the place of the Workspace toolbar and will allow you to leave the toolbar minimized on the Workspace screen thus providing more writing area.


5 4 Favorites Tab: The MOBI View has a Favorites screen. It will allow you to program up to 16 different websites, files or applications. This screen is also accessed by tapping Add Favorites on the Favorites screen of the MOBI View. Check for Updates: Open the Device Manager. Click on the picture of the MOBI. Choose File / Preferences from the menu options. Click the Firmware Update tab and click the Check for Updates box. Click the einstruction icon in the System Tray of the Windows Task Bar. Select the Check for Updates option. If a new version of the Workspace software is available download it now.

6 5 The MOBI View Screen The MOBI View Screen displays icons associated with the MOBI s status The Favorites and Annotate functions are modified within the device manager as noted above. Notes: Creating a new note will save the last note in the MOBI. Use the arrows to move through saved notes. The a and arrow icons in the bottom right corner will toggle between using the active writing area of the MOBI for writing notes or for mouse functions.

7 Annotate: The annotate screen works exactly like the toolbar. Press Customize Tools to open device manager and modify the available tool selection. When you choose a tool Workspace will move into Lesson mode. If there was a Workspace page open you will be able to utilize that tool with the page. If something else, such as a web page, is open on the computer screen a screenshot will be taken and the picture will be added as a page in the Workspace lesson. 6 Multiple MOBIs: Use the Device Manager window to connect all devices. Setting up Multi User Mode: o From the Annotate screen tap Multi User. o Choose the number of users/boxes you would like to use. o MOBI View is automatically designated as the presenter. o Tap Exit Multi User to close out. Favorites: Scroll through your Favorites list using the arrows. Press Add Favorites to open device manager and modify the favorites list. Keyboard: The keyboard can be used at any time: either in a Workspace lesson or to write in text fields in computer programs or the Internet. If in Workspace, using the keyboard will create a text box on the page. Press Exit to close the keyboard. Reports: If an einstruction student response system device is connected to the computer and is recognized in the Device Manager student responses to teacher managed questions will be visible in the Reports screen.


8 7 Questions engaged in student-paced assessment mode will not be visible. There are several different reports accessible by choosing Next Report or Prev Report: Question Status Session Summary Answer Distribution Session Results by Student Response Grid Response per Student

9 8 Settings: The Interactive Pen The MOBI requires an interactive pen. Tap on the pad with the pen tip to perform the left click action of a mouse. Hold the pen just above the surface of the MOBI and press the upper part of the rocker button to perform a right click. Hold the pen just above the surface of the MOBI and press the lower part of the rocker button to double click. Recharge the pen regularly. o Place the pen firmly in the recharging holder. o A pen and a battery icon will appear on the screen indicating the pen is charging. o Remember to return the pen to the recharging holder when not in use.

10 9 Using Workspace: Interactive Mode: There are multiple ways to open Interwrite Workspace. o The MOBI View can be set up so that when it is powered on Workspace will auto start. Do this in Settings. o Add Workspace to the Favorites screen and tap it to open when needed. o Click the einstruction icon in the Windows System Tray and choose Workspace. o Use the desktop icon or: Start / All programs / einstruction / Interwrite Workspace / Interactive mode. A toolbar will appear near the right hand side of the desktop. It will look thinner than the toolbar shown below. The toolbar will become translucent after a period of non-use. Moving the Toolbar: Position the mouse pointer at the top of the toolbar near the Interwrite icon. Click and drag the toolbar to a new location. Resizing the toolbar: Position the mouse pointer on the edge of the Toolbar until a doubleheaded arrow appears. Click and drag the double-headed arrow to change the size and layout of the Toolbar. Note: this is the default Intermediate toolbar with the 40 x 40 pixel sized icons
11 10 Setting Workspace Preferences: Dozens of preference changes can be made to the Interwrite Workspace program. 65 different tools are available to be added to a customized toolbar. Three groups of tools are available at all times: o Main Toolbar (always on screen) o Toolbox tools o Right click tools Three default toolbars are provided but may be customized: o Basic o Intermediate o Advanced Recommended Preferences: Click on the Workspace Menu button. Select Preferences. Toolbar Settings Tab: Classic Rectangle will give the greatest available page space or real estate within Workspace. Toolbar Button Size in Pixels the icons are most visible in the 40 x 40 size. Optional Custom Buttons - will allow one click linking to either files or websites. Options Tab: o click on P1 o Type in a description o Use the Application Path and browse to a file (such as a lesson) or program o Use the URL icon and type in a full website address (URL) Annotation Window Options checking the box will allow you to resize Workspace so it can be utilized side-by-side with another program, such as for note-taking. Cursor Orientation can be changed for a left-handed individual. Automatically Save Pages Every will allow the program to save the current activity/lesson at regular intervals. Snap Grid Settings Snap Objects to Grid is suggested for teachers who might be utilizing graphs. Spacing in Pixels can be set at 30 to allow drawn lines to snap to the premade graph lines on the grid page.

12 11 New Page Setup Tab: Blank Page studies have shown that a white page is not the best choice for student viewing. Use Change Background Color to change to off-white or other light color. Grid Page for graphing purposes check Vertical and Center Grid. Add Title Box if desired. Spacing should be set at 30 Pixels. Language Arts teachers may want to space the horizontal lines further apart to allow for easier writing by the students. Change background color as desired. Transparency & Language Tab: There are no specific suggestions for this tab. Gradient Page Setup Tab: School colors are good choices for the gradient pages. Customize Toolbar Tab: The current toolbar defaults to the pre-made Intermediate toolbar. Advanced and beginner toolbars are also available. The Toolbox is a group of secondary tools readily available by clicking the Toolbox icon in the Main Toolbar during Workspace use. Customize the toolbar by dragging icons from the Available Tools section into the Main Toolbar, Toolbox or Right Click Toolbar. Some popular, but unusual, tools are noted in the picture below: Freehand text Freehand shape Curtain Grid page Record and Playback Timer Hovering the pointer over an icon will provide the tool name. The P1 through P5 icons are only available if the Custom Buttons were created in the Toolbar Settings tab.
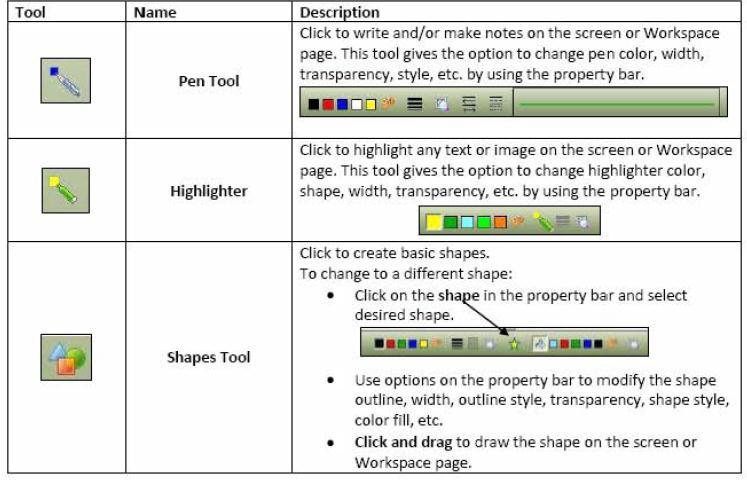
13 12 Main Tools and Descriptions Page Creation Tools: Click to create blank pages for lessons, notes, etc. The screen will now look similar to this: IMPORTANT: The Properties Bar will change depending on the tool being used. The above example shows the Pen tool and its properties: line color, width, transparency, ends, dash styles and the Preview showing the current settings.
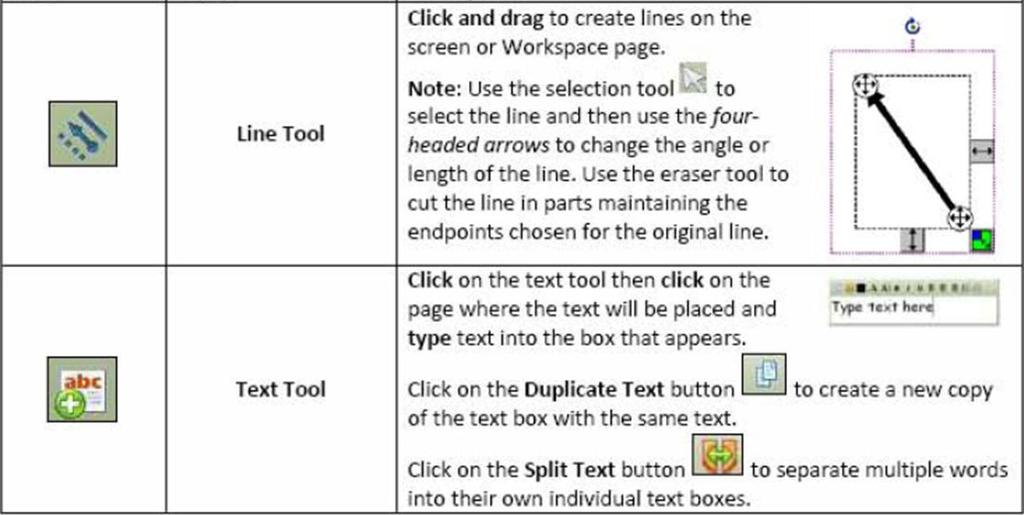
14 Annotation Tools: 13

15 Editing Tools: 14
 and then click and drag on the Workspace page to move in any direction across a page that is larger than the current")

16 15 Extending a Page and Panning: By clicking on either the downward extend button or the right side extend button the default blank page space will be widened or lengthened. Click on the Pan Tool in your toolbar or toolbox (if it was a chosen tool) and then click and drag on the Workspace page to move in any direction across a page that is larger than the current screen size, such as in a PDF. Layers Toolbar: By default, all items are organized in a single layer. To add layers: Locate the Layers Toolbar at the bottom left corner of the Workspace page. To view the layers click on the maximize layers button. Click the Add Layer button. The Layer Toolbar has additional options such as moving layers up/down, selecting layers, showing/hiding layers, editing layers and deleting layers.

17 File Management Tools: 16

18 See page 39 17
19 18


20 19 The Gallery NOTE: When you first launch the Gallery it must be built. The computer will find the location where the Interwrite Workspace Content was downloaded and you will need to allow it to fill the Gallery. Categories: Select different categories to view pre-existing files organized by subject. Select subject and sub-categories. Click on a resource in the lower window. Use the pen to drag the resource to an existing page in Workspace. Resources from Gallery: There are thousands of images, image pages and Flash files. Most images can be rotated, moved and resized. Files with a dog-eared corner are Image Pages and cannot be manipulated. Flash files are interactive. They can be identified by the blue circle with the f inside. They can be found in the Interactive Sims folder.

.")
21 Interwrite Sims: There are over 100 pre-created Flash simulations for use with a variety of curriculum areas. Any Flash tools can be utilized, including those created by students or found on copyright-free websites. To copy a Flash file from a copyright-free site right click on the file (for example, a game) and choose Save Target As 20 Searching for Resources: Type a keyword in the text field at the top of the Gallery window. Click on the Keyword Search button (magnifying glass). Scroll through the resources in the lower window to find search matches. Sample Lessons: Some sample lessons can be found under the category Workspace Lessons within the gallery.

.")

22 21 ei Community: Many more lessons are available from ei Community, which requires a free registration. ei Community is a searchable clearinghouse of lessons, images, ExamView content and more created both by einstruction employees and everyday teachers. ei Community can be accessed from and through the Interwrite Gallery (File / ei Community Portal). From within ei Community hover over Resources and click Search Resources. Use the Content Format window to choose specific file types. The most results will be returned when options are left open (such as Bloom s Taxonomy Level, etc.) although choosing grade levels is recommended. Save desired resources to My Materials and download them. Note: When downloading, opt to SAVE rather than OPEN the files.

23 22 Add Media from File: Click on the Gallery tool icon. Highlight the folder where you would like the file to reside. Click File / Add Files to Gallery. Alternately, an entire folder can be added by using File / Add Folder of Files to Gallery. Click Browse to find media. Click OK. Types (the Interwrite Content Gallery was designed to be open-architecture. You can import many different file types of your own: pictures,.pdf,.ppt, etc. into the gallery and store them for access during or while building lessons). o :Images: BMP, JPG, GIF, EMF, WMF, TIFF, PNG, ICO o Sound: WAV, MP2, MP3, MPA, MPEG, SND, WMA o Video: AVI, WMV, MOV, MPEG, SWF Note: You can also simply drag files straight into the gallery. Drag and drop! Add Files to Gallery: Objects created in a Workspace lesson can be added to the Gallery for future use. Use the Select tool (arrow) to select the object. Click the Add files to Gallery icon from the properties toolbar. Choose Add selection to Gallery or Add current page to Gallery. It will be added to the currently open category, or to the New Category folder. Lessons Click the Menu button and choose File / New Add a new blank page or grid page from the toolbar. Add text to a page using the Text tool o Type text into the text box. o Copy and paste text from existing documents. o Resize text box to desired size. o Use the Split function to break the text into individual words, if desired. Add images, sound files and simulations from the Gallery.

24 23 Add basic shapes using the shape tool, or convert freehand drawings to shapes with the freehand shape tool. Use the Selection tool to move, rotate, copy or resize items. o The Selection tool is very powerful. o Its properties bar has many functions, including ordering of objects, grouping, colors, notes, snap to grid, copier, lock, transparency, export, depending on the type of object selected. Navigate through lessons using the Previous Page and Next Page arrows. The Toolbox The Toolbox is a place for you to store the tools you do not need all the time, but that you d like to have quick access to. Click on the Toolbox tool on the toolbar. A sub-menu will appear displaying additional tools available in Workspace. The tools shown in the Toolbox are designated on the Customize Toolbar tab of Workspace Preferences. Below are some of the additional tools available for use in Workspace.

25 24

26 25
Interwrite Workspace v. 8.9 Beginning
 Interwrite Workspace v. 8.9 Beginning What is Workspace?... 2 Getting Started... 2 Charging the Interwrite Mobi... 2 Charging the Interactive Pens for the Interactive Whiteboard... 2 Installation of Software...
CLEAR TOOL... 7 BASIC NAVIGATION... 7 PAGE SORTER... 7
 Interwrite Workspace WHAT IS WORKSPACE?...2 INSTALLATION...2 SETUP...2 CONNECTING DEVICES... 2 NAMING DEVICES... 3 CALIBRATING DEVICES... 3 THE PEN...3 INTERACTIVE MODE...4 THE TOOLBAR...4 MOVING THE TOOLBAR...
Interwrite Workspace v. 8.7 Intermediate Technology Integration Center
 Interwrite Workspace v. 8.7 Intermediate The Toolbar... 2 Moving the Toolbar... 2 Resizing the Toolbar... 2 Toolbar Settings... 2 Enable the K-6 Toolbar... 2 Enable Properties with Right Click... 2 Customized
Interwrite Workspace v. 8.9 Intermediate Technology Integration Center
 Interwrite Workspace v. 8.9 Intermediate The Toolbar... 2 Moving the Toolbar... 2 Resizing the Toolbar... 2 Toolbar Settings... 2 Enable the Primary Toolbar... 2 Enable Properties with Right Click... 2
INSERVICE DAY - 11/11/11 TECHNOLOGY
 INSERVICE DAY - 11/11/11 TECHNOLOGY Converting PowerPoints into Movies (examples using imovie& Windows MovieMaker) (More detailed tutorials with pictures can be found at http://www.whsd.net/olc/teacher.aspx?s=1452).
WORKSPACE PC FOR NEW USERS
 WorkSpace PC for New Users 1 WORKSPACE PC FOR NEW USERS Before Class Charging the MobiView The MobiView should arrive partially charged and ready to be installed. Turning Technologies recommends that MobiView
GETTING STARTED. Interwrite Mobi. for Windows and the Mac
 GETTING STARTED for Windows and the Mac We at einstruction TM are proud of our family of Interwrite products. We strive to continue to bring you the best the technology has to offer. We urge you to visit
This course will introduce the user to a Mobi and the Workspace software. This tool allows the instructor to annotate and work alongside of the
 This course will introduce the user to a Mobi and the Workspace software. This tool allows the instructor to annotate and work alongside of the students as you model the lesson which helps everyone pay
~einstruction InterWrite Dual Board~
 Getting Started 1. Insert the RF Hub into the USB port on your computer. Press the RF Hub and press the Hub on the Dual Board until the blue dot stops flashing. You may need to Match the device. Do this
Mobi View. Charging: Turning on Mobi View: Using Your Mobi View: Writing Notes:
 Mobi View Charging: Remove the RF hub (jump drive-like device) from the back of the Mobi View. Store in the RF hub on the charging stand. Place Mobi View on charging stand. Plug into power outlet for about
WorkSpace for Java. User Guide 6.3
 WorkSpace for Java User Guide 6.3 WorkSpace for Java 2 TABLE OF CONTENTS ABOUT WORKSPACE 4 Technical Requirements 4 Getting Started 6 Downloading and Installing WorkSpace for Mac 6 Downloading and Installing
This guide will help you with many of the basics of operation for your Epson 485wi BrightLink Projector with interactive functionality.
 This guide will help you with many of the basics of operation for your Epson 485wi BrightLink Projector with interactive functionality. If you need further assistance with questions, you can refer to the
MimioClassroom User Guide
 MimioClassroom User Guide for Windows gkpglobalsolutions.com Mimio LLC. All rights reserved. Revised 10/21/2010. No part of this document or the software may be reproduced or transmitted in any form or
Creating Presentations with Prezi
 Creating Presentations with Prezi This document provides an introduction to using Prezi to create presentations. Prezi is a webbased tool that allows users to create a presentation using a map layout.
OnPoint s Guide to MimioStudio 9
 1 OnPoint s Guide to MimioStudio 9 Getting started with MimioStudio 9 Mimio Studio 9 Notebook Overview.... 2 MimioStudio 9 Notebook...... 3 MimioStudio 9 ActivityWizard.. 4 MimioStudio 9 Tools Overview......
Fundamentals. Training Kit. Presentation Products, Inc. 632 W 28th St, 7th fl New York, NY f presentationproducts.
 Fundamentals Training Kit Presentation Products, Inc. 632 W 28th St, 7th fl New York, NY 10001 212.736.6350 f 212.736.6353 presentationproducts.com Table of Contents Getting Started How Does the SMART
SMART Board Quick Reference
 The Ready Light Your SMART Board interactive whiteboard includes a Ready Light that indicates the status of your interactive whiteboard. Color of Ready Light Not lit Solid green Flashing green Solid red
USING SMART NOTEBOOK SOFTWARE
 USING SMART NOTEBOOK SOFTWARE THE NOTEBOOK INTERFACE The Notebook interface is easy to use and many functions (such as inserting pictures, saving files etc.) will be famillar as they are simillar to those
Fundamentals. Training Kit. Presentation Products, Inc. 632 W 28th St, 7th fl New York, NY f presentationproducts.
 Fundamentals Training Kit Presentation Products, Inc. 632 W 28th St, 7th fl New York, NY 10001 212.736.6350 f 212.736.6353 presentationproducts.com How Does the SMART Board Interactive Whiteboard Work?
Workspace Level 1 Training Workbook
 Intermediate Toolbar The default setting for the Workspace toolbar is the Intermediate toolbar shown below. There are also basic, advanced, and customized toolbars. Minimize Toolbar Workspace menu Mouse
SMART Board Interactive Whiteboard Basics
 SMART Board Interactive Whiteboard Basics This Quick Reference Guide provides an overview of the information you need to begin using a SMART Board interactive whiteboard. Before you begin, make sure the
Workspace Level 1 Training Workbook
 Workspace Level 1 Training Workbook Contact Information In addition to this training guide and the Workspace software help menu, following are other resources available to support your implementation of
Customizing FlipCharts Promethean Module 2 (ActivInspire)
") Customizing FlipCharts Promethean Module 2 (ActivInspire) Section 1: Browsers The browsers (located on the left side of the flipchart) are menus for various functions. To view the browsers, click Main
Customizing FlipCharts Promethean Module 2 (ActivInspire) Section 1: Browsers The browsers (located on the left side of the flipchart) are menus for various functions. To view the browsers, click Main
WORKSPACE ADDITIONAL TOPICS PC
 WorkSpace Additional Topics PC 1 WORKSPACE ADDITIONAL TOPICS PC Using Layers Use the Layers tool to manage all of the items that make up your WorkSpace page. A layer in WorkSpace is analogous to a clear
SMART Board Training Packet. Notebook Software 10.0
 SMART Board Training Packet Notebook Software 10.0 Bob Mallory SMART Certified Trainer Bob.Mallory@avispl.com Brian Leeser SMART Certified Trainer Brian.Leeser@avispl.com Chris de Treville Chris.deTreville@avispl.com
SmartBoard & Smart Notebook Software
 SmartBoard & Smart Notebook Software A SMART Board is an interactive whiteboard that is connected to a computer, touch sensitive display acting as both a monitor and input device. SMART Notebook software
Kidspiration 3 Basics Website:
 Website: http://etc.usf.edu/te/ Kidspiration is the visual learning tool for K-5 learners from the makers of Inspiration. With Kidspiration, students can build graphic organizers such as webs, concept
SMART Meeting Pro PE 4.1 software
 Help us make this document better smarttech.com/feedback/170973 SMART Meeting Pro PE 4.1 software USER S GUIDE Product registration If you register your SMART product, we ll notify you of new features
Basic Classroom Tools Promethean Module 1 (ActivInspire)
") Basic Classroom Tools Promethean Module 1 (ActivInspire) Section 1: Power On The Promethean ActivBoard is activated when the power cord is plugged into the wall outlet. The flame icon in the upper right
Basic Classroom Tools Promethean Module 1 (ActivInspire) Section 1: Power On The Promethean ActivBoard is activated when the power cord is plugged into the wall outlet. The flame icon in the upper right
Workspace Level 1 Training Workbook
 Workspace Level 1 Training Workbook Windows Version All Users Workspace Level 1 Training Workbook Contact Information In addition to this training guide and the Workspace software help menu, following
SMART Meeting Pro 4.2 personal license USER S GUIDE
 smarttech.com/docfeedback/170973 SMART Meeting Pro 4.2 personal license USER S GUIDE Product registration If you register your SMART product, we ll notify you of new features and software upgrades. Register
EASY INTERACTIVE WHITEBOARD
 EASY INTERACTIVE WHITEBOARD CONNECT COMPUTER/TURN ON PROJECTOR LAPTOP For the projectors in the labs, a computer is connected. These instructions are for you to connect a laptop computer to the projector.
What s New in Studio 6?
 What s New in Studio 6? mimio Toll Free Support: 877.846.3721 email: techsupport@mimio.com New Zoom Icon Right click on the Zoom Icon to choose from Zoom In, Zoom Out, and Zoom Full Import File Icon Insert
Hardware Basics for Front Projection SMART Board Interactive Whiteboards
 Hardware Basics for Front Projection SMART Board Interactive Whiteboards The SMART Board interactive whiteboard is touch sensitive and operates as part of a system that includes a computer and a projector.
Mobi 360. User Guide
 Mobi 360 User Guide Mobi 360 2 2014 Turning Technologies, LLC. All rights reserved. Portions Responsive Innovations, LLC, Microsoft Corporation No part of this document may be reproduced or transmitted
Welcome & Introduction
 Welcome & Introduction Welcome to ebeam Interactive Suite 3. Overview ebeam Interactive Suite 3 allows you to create lessons with provided resources and enhances curriculum delivery with dynamic annotation
ScreenBeam Touch90 Interactive Whiteboard
 ScreenBeam Touch90 Interactive Whiteboard Software User Guide xxxx-xxxx-000 rev. 1 Table of Contents Installing the Software 2 Software Installation 2 Using the Software 5 Pages 6 Pens 7 Figures 10 Erasers
SMART board Training. April 2014 Erika Kindoll
 SMART board Training April 2014 Erika Kindoll Lots of Resources My website: http://tulpytechteacher.wikispaces.com/smart%20res ources Links also on Turtlenet Under Shared Documents, Technology, SMARTboard
INTERACTIVE WHITEBOARDS: SMART Board Overview
 INTERACTIVE WHITEBOARDS: SMART Board Overview SMART Notebook Basic 2 SMART Board Equipment The SMART interactive whiteboard uses several main components. They include: THE BOARD The SMART Board has a touch-
Intermediate/Advanced. Faculty Development Workshop FSE Faculty retreat April 18, 2012
 Intermediate/Advanced Faculty Development Workshop FSE Faculty retreat April 18, 2012 Remote Desktop Sharing Quick Reference Guide for Moderators The Moderator or a Participant may request control of another
Discovering Computers & Microsoft Office Office 2010 and Windows 7: Essential Concepts and Skills
 Discovering Computers & Microsoft Office 2010 Office 2010 and Windows 7: Essential Concepts and Skills Objectives Perform basic mouse operations Start Windows and log on to the computer Identify the objects
Part 1: Basics. Page Sorter:
 Part 1: Basics Page Sorter: The Page Sorter displays all the pages in an open file as thumbnails and automatically updates as you add content. The page sorter can do the following. Display Pages Create
Code X Digital User s Guide
 Code X Digital User s Guide PDF0531 (PDF) Houghton Mifflin Harcourt Publishing Company Table of Contents Introduction... 4 Code X Digital and Scholastic Achievement Manager... 5 Enrolling Students and
Introduction. Download. SMARTBoard
 Page 1 of 21 SMARTBoard Introduction Interactive whiteboards are an excellent way to involve students in classroom learning by providing the look and feel of a regular whiteboard with computer-based technology
XPress 2.3 Annotation
 XPress 2.3 Annotation XPress is our popular desktop annotation and white boarding application. Starting with XPress version 2.2 you can create XPress documents using our Mac or Windows version and then
In the Insight console, access advanced features by right-clicking on a student computer in either the Detail or Thumbnail view.
 On the teacher computer, there is small Insight icon in the taskbar. The taskbar is located in the bottom right corner of the computer screen. Double-click the icon to open Insight. You can right-click
The Fundamentals. Document Basics
 3 The Fundamentals Opening a Program... 3 Similarities in All Programs... 3 It's On Now What?...4 Making things easier to see.. 4 Adjusting Text Size.....4 My Computer. 4 Control Panel... 5 Accessibility
Introducing Activstudio
 Introducing Activstudio Version 3 COPYRIGHT INFORMATION Introducing Activstudio Version 3 Copyright 2007 Promethean Limited. All rights reserved. If this guide is distributed with Activstudio software,
Left-click the Smart icon from the task pane ( ) and choose Orient.
 and choose Orient.") Orient Board Hold down the keyboard and mouse button on the smart board. Left-click the Smart icon from the task pane ( ) and choose Orient. Check for updates Click Smart icon from the task pane or go
Orient Board Hold down the keyboard and mouse button on the smart board. Left-click the Smart icon from the task pane ( ) and choose Orient. Check for updates Click Smart icon from the task pane or go
PowerPoint 2010: Basics Learning Guide
 PowerPoint 2010: Basics Learning Guide What s a PowerPoint Slide? PowerPoint presentations are composed of slides, just like conventional presentations. Like a 35mm film-based slide, each PowerPoint slide
Camtasia Studio 5.0 PART I. The Basics
 Camtasia Studio 5.0 Techsmith s Camtasia Studio software is a video screenshot creation utility that makes it easy to create video tutorials of an on screen action. This handout is designed to get you
Was this document helpful? smarttech.com/docfeedback/ SMART Ink 5.2 USER S GUIDE
 Was this document helpful? smarttech.com/docfeedback/171190 SMART Ink 5.2 USER S GUIDE Trademark notice SMART Ink, SMART Notebook, SMART Meeting Pro, Pen ID, smarttech, the SMART logo and all SMART taglines
BASICS OF MOTIONSTUDIO
 EXPERIMENT NO: 1 BASICS OF MOTIONSTUDIO User Interface MotionStudio combines draw, paint and animation in one easy easy-to-use program gram to save time and make work easy. Main Window Main Window is the
Lesson Planning and Delivery with Notebook Software
 Lesson Planning and Delivery with Notebook Software Before you start Before you begin your lesson, ensure that your computer is turned on and the SMART Board interactive whiteboard is connected and oriented.
The MimioTeach package contains the following items: 1 MimioTeach bar 5 Mounting plates. 2 USB power adapter 6 MimioStudio DVD
 Chapter 3 MimioTeach What's Included Using MimioTeach with a projector, you can deliver lessons and presentations directly from your whiteboard. Using MimioStudio Interactive mode, you control the movement
Microsoft PowerPoint 2013 Beginning
 Microsoft PowerPoint 2013 Beginning PowerPoint Presentations on the Web... 2 Starting PowerPoint... 2 Opening a Presentation... 2 File Tab... 3 Quick Access Toolbar... 3 The Ribbon... 4 Keyboard Shortcuts...
THE MICROSOFT WORD. Anna Quattrini
 THE TO MICROSOFT WORD Anna Quattrini The Grade School Teacher's Guide to Microsoft Word Microsoft Word 2016 on Windows Anna Quattrini December, 2017 Acknowledgments Thank you to Ms. McKenzie at Fairfield
Presenter Quick Guide
 101 V6.2 Presenter Quick Guide 1800 622 800 training@elb.com.au www.education.elb.com.au/training Contents Page This Quick Guide has been designed to help you get started with the Prowise Presenter software.
Tutorial.notebook. February 10, 2016
 Feb 10 2:03 PM Feb 10 2:10 PM Feb 10 2:20 PM Feb 10 2:25 PM Feb 10 2:49 PM Feb 10 2:58 PM 1 Feb 10 3:03 PM Feb 10 3:04 PM Feb 10 3:09 PM Feb 10 3:12 PM Feb 10 3:16 PM Feb 10 3:20 PM 2 Feb 10 3:26 PM Feb
Introduction to Microsoft Word 2010
 Introduction to Microsoft Word 2010 THE BASICS PAGE 02! What is Microsoft Word?! Opening Microsoft Word! The Title Bar! Page View and Zoom MENUS...PAGE 03! Quick Access Toolbar! The Ribbon! File Tab! Home
Press Input to open the on screen input menu. Then tap on any input to select it.
 Power LED Remote IR Sensor PC Home Screen USB Ports Not Used Power Input Exit Home Settings Vol. - Vol. + Screen Press Input to open the on screen input menu. Then tap on any input to select it. Page #:
Teaching with Primary Sources
 Teaching with Primary Sources Joining Educators and Students with Library of Congress Resources Creating a Presentation with PowerPoint 2007 Benefits of using PowerPoint in lectures: PowerPoint encourages
Acrobat X Professional
 Acrobat X Professional Toolbar Well Page Navigations/Page Indicator Buttons for paging through document Scroll Bar/box page indicator appears when using the scroll button to navigate. When you release
User Guide. DrawAnywhere.com: User Guide
 DrawAnywhere.com: User Guide DrawAnywhere.com is an online diagramming & flow charting application with the look & feel of a desktop application! User Guide http://www.drawanywhere.com August, 2007 Table
SoftChalk 10. Level 1. University Information Technology Services. Learning Technologies, Training, Audiovisual, and Outreach
 SoftChalk 10 Level 1 University Information Technology Services Learning Technologies, Training, Audiovisual, and Outreach Copyright 2018 KSU Division of University Information Technology Services This
Creating a Text Frame. Create a Table and Type Text. Pointer Tool Text Tool Table Tool Word Art Tool
 Pointer Tool Text Tool Table Tool Word Art Tool Picture Tool Clipart Tool Creating a Text Frame Select the Text Tool with the Pointer Tool. Position the mouse pointer where you want one corner of the text
Welcome To Smartboard Technology. What Will You Learn In This PPT.?
 Welcome To Smartboard Technology A Quick Fondy Tech Tutorial The Basics Of How To Get Started Using The Smartboard/Whiteboard What Will You Learn In This PPT.? This ppt. will focus on 6 basic areas of
PRESENTER RESOURCES. Notes: The Web Promethean Planet ActivInspire Help ActivInspire Cheatsheet (pdf) ActivInspire Basics (pdf)
 ActivInspire Basics (pdf)") PRESENTER RESOURCES Notes: The Web Promethean Planet ActivInspire Help ActivInspire Cheatsheet (pdf) ActivInspire Basics (pdf) Teacher Share Drive "Teacher_Share" Folder "Interactive Whiteboard Lessons
PRESENTER RESOURCES Notes: The Web Promethean Planet ActivInspire Help ActivInspire Cheatsheet (pdf) ActivInspire Basics (pdf) Teacher Share Drive "Teacher_Share" Folder "Interactive Whiteboard Lessons
Computer Essentials Session 1 Step-by-Step Guide
 Note: Completing the Mouse Tutorial and Mousercise exercise which are available on the Class Resources webpage constitutes the first part of this lesson. ABOUT PROGRAMS AND OPERATING SYSTEMS Any time a
Prezi: Moving beyond Slides
 [ Prezi: Moving beyond Slides ] by: Charina Ong Centre for Development of Teaching and Learning National University of Singapore Table of Contents About the Workshop... i Workshop Objectives... i Session
Microsoft PowerPoint 2007 Beginning
 Microsoft PowerPoint 2007 Beginning Educational Technology Center PowerPoint Presentations on the Web... 2 Starting PowerPoint... 2 Opening a Presentation... 2 Microsoft Office Button... 3 Quick Access
Overview Guide NEW. Improved Toolbar. Lockable Objects. Transparent Objects. Improved Gallery. Multimedia Support.
 Overview Guide NEW Improved Toolbar Lockable Objects Transparent Objects Improved Gallery Multimedia Support Import Documents mimio Toll Free Support: 877.846.3721 email: training@mimio.com Overview There
Basics of ēno board setup and usage
 Basics of ēno board setup and usage Contents Preparing to use ēno... 2 Add batteries... 2 Power on and off the stylus... 2 To install the Bluetooth adapter:... 2 To Pair the Bluetooth adapter with the
Easy School Net Evolution Specifications
 Easy School Net Evolution Specifications Version 14 (FEB-2012) INDEX 1. System Connection Diagram 2. Easy School Net Evolution Management Console 3. Easy School Net Evolution Digital Video Recorder (Option)
Microsoft Office Publisher
 Microsoft Office 2007- Publisher Opening Microsoft Publisher Using the Start Menu, click on All Programs and navigate to the Microsoft Office folder. Click on Microsoft Office Publisher 2007. Choosing
MINT Interactive User s Guide
 MINT Interactive User s Guide MINT Interactive is very powerful board software including rich functions and gallery software, which are very useful for lecture environment. It will be continuously upgraded
Quick Start Guide - Contents. Opening Word Locating Big Lottery Fund Templates The Word 2013 Screen... 3
 Quick Start Guide - Contents Opening Word... 1 Locating Big Lottery Fund Templates... 2 The Word 2013 Screen... 3 Things You Might Be Looking For... 4 What s New On The Ribbon... 5 The Quick Access Toolbar...
Adding Modules.. 4 Editing a Rich Text Module Publishing a Module Adding Media (Picture, Audio, Video, and PDF) Adding Media from the web (Videos)
 Adding Media from the web (Videos)") The Digication Environment Creating a Section Adding and Editing Sections Changing the Order of Sections Adding Pages to a Section Adding Modules 4 Editing a Rich Text Module Publishing a Module Adding
The Digication Environment Creating a Section Adding and Editing Sections Changing the Order of Sections Adding Pages to a Section Adding Modules 4 Editing a Rich Text Module Publishing a Module Adding
Clip Art and Graphics. Inserting Clip Art. Inserting Other Graphics. Creating Your Own Shapes. Formatting the Shape
 1 of 1 Clip Art and Graphics Inserting Clip Art Click where you want the picture to go (you can change its position later.) From the Insert tab, find the Illustrations Area and click on the Clip Art button
How to...create a Video VBOX Gauge in Inkscape. So you want to create your own gauge? How about a transparent background for those text elements?
 BASIC GAUGE CREATION The Video VBox setup software is capable of using many different image formats for gauge backgrounds, static images, or logos, including Bitmaps, JPEGs, or PNG s. When the software
BrightLink Welcome Kit
 BrightLink Welcome Kit Welcome to BrightLink! This kit has everything you need to get started with BrightLink. Here s how: 1 First, follow the steps on the Start Here card to get up and running. 2 Install
Word 2013 Quick Start Guide
 Getting Started File Tab: Click to access actions like Print, Save As, and Word Options. Ribbon: Logically organize actions onto Tabs, Groups, and Buttons to facilitate finding commands. Active Document
WORD 2010 TIP SHEET GLOSSARY
 GLOSSARY Clipart this term refers to art that is actually a part of the Word package. Clipart does not usually refer to photographs. It is thematic graphic content that is used to spice up Word documents
PowerPoint Launching PowerPointX
 PowerPoint 2004 Launching PowerPointX 1. Start PowerPoint by clicking on the PowerPoint icon in the dock or finding it in the hard drive in the Applications folder under Microsoft Office 2004. PowerPoint
Session 7 MS Word. Graphics. Inserting Clipart, and Graphics Modify graphics Position graphics
 Session 7 MS Word Graphics Inserting Clipart, and Graphics Modify graphics Position graphics Table of Contents Session 7 Working with Graphics... 1 The Toolbar... 1 Drawing Toolbar... 1 Picture Toolbar...
ActivInspire Main Tool Box
 Toolbox Options Docking Roll In/Out ActivInspire Main Tool Box Roll In must be unchecked to view the 3rd column of the Tool Box to display your Tool History.your most recently used tools. Constantly updates.
Computer Basics: Step-by-Step Guide (Session 2)
") Table of Contents Computer Basics: Step-by-Step Guide (Session 2) ABOUT PROGRAMS AND OPERATING SYSTEMS... 2 THE WINDOWS 7 DESKTOP... 3 TWO WAYS TO OPEN A PROGRAM... 4 DESKTOP ICON... 4 START MENU... 5
Table of Contents Computer Basics: Step-by-Step Guide (Session 2) ABOUT PROGRAMS AND OPERATING SYSTEMS... 2 THE WINDOWS 7 DESKTOP... 3 TWO WAYS TO OPEN A PROGRAM... 4 DESKTOP ICON... 4 START MENU... 5
Migration Guide. Notebook to ActivInspire
 Migration Guide Notebook to ActivInspire 1 DESKTOP ICON Once your software has been installed, you will notice an ActivInspire icon on your desktop. DASHBOARD The Welcome Center is now called your ActivInspire
Contents. Launching Word
 Using Microsoft Office 2007 Introduction to Word Handout INFORMATION TECHNOLOGY SERVICES California State University, Los Angeles Version 1.0 Winter 2009 Contents Launching Word 2007... 3 Working with
v Annotation Tools GMS 10.4 Tutorial Use scale bars, North arrows, floating images, text boxes, lines, arrows, circles/ovals, and rectangles.
 v. 10.4 GMS 10.4 Tutorial Use scale bars, North arrows, floating images, text boxes, lines, arrows, circles/ovals, and rectangles. Objectives GMS includes a number of annotation tools that can be used
Notebook collaborative learning software 10. Extraordinary made simple
 Notebook collaborative learning software 10 Extraordinary made simple Create extraordinary moments in the classroom Award-winning Notebook software is setting the worldwide standard for creating, teaching
From the dock at the left, right, top, or bottom of your monitor screen, open the Finder.
 GETTING STARTED Composition & Defamiliarization: Using Adobe Illustrator as a Tool Kristen Foster 2010 Drawing and Composition Module OTIS College of Art and Design Trash preferences + Open Illustrator
Promethean Board. Guide to Basics
 Promethean Board Guide to Basics 1 Table of Contents Introduction... 3 Aligning the Projector Image... 3 Calibrating the ACTIVboard... 4 Opening ACTIVstudio/Creating a Profile... 4 Features Located Within
Corel Grafigo User Guide The contents of this user guide and the associated Corel Grafigo software are the property of Corel Corporation and its
 Corel Grafigo User Guide The contents of this user guide and the associated Corel Grafigo software are the property of Corel Corporation and its respective licensors, and are protected by copyright. For
SMARTBOARD TRAINING HANDBOOK
 SMARTBOARD TRAINING HANDBOOK Created by Nicki Callahan Library Media Specialist, RLMS Computer Resource Teacher, FWMS Image from: Teacher Training Online, http://teacheronlinetraining.com/images/smartboard1.gif
Anatomy of a Window (Windows 7, Office 2010)
") Anatomy of a Window (Windows 7, Office 2010) Each window is made up of bars, ribbons, and buttons. They can be confusing because many of them are not marked clearly and rely only on a small symbol to indicate
Anatomy of a Window (Windows 7, Office 2010) Each window is made up of bars, ribbons, and buttons. They can be confusing because many of them are not marked clearly and rely only on a small symbol to indicate
PowerPoint X. 1. The Project Gallery window with the PowerPoint presentation icon already selected. 2. Click on OK.
 PowerPoint X Launching PowerPointX 1. Start PowerPointX by clicking on the PowerPoint icon in the dock or finding it in the hard drive in the Applications folder under Microsoft PowerPoint. PowerPoint
Word 3 Microsoft Word 2013
 Word 3 Microsoft Word 2013 Mercer County Library System Brian M. Hughes, County Executive Action Technique 1. Insert a Text Box 1. Click the Insert tab on the Ribbon. 2. Then click on Text Box in the Text
Adobe Premiere Pro CC 2015 Tutorial
 Adobe Premiere Pro CC 2015 Tutorial Film/Lit--Yee GETTING STARTED Adobe Premiere Pro CC is a video layout software that can be used to create videos as well as manipulate video and audio files. Whether
PowerPoint Basics (Office 2000 PC Version)
") PowerPoint Basics (Office 2000 PC Version) Microsoft PowerPoint is software that allows you to create custom presentations incorporating text, color, graphics, and animation. PowerPoint (PP) is available
PowerPoint Basics (Office 2000 PC Version) Microsoft PowerPoint is software that allows you to create custom presentations incorporating text, color, graphics, and animation. PowerPoint (PP) is available