Using Panorama with Bitwig Studio
|
|
|
- Felicia O’Brien’
- 6 years ago
- Views:
Transcription


1 Using Panorama with Bitwig Studio

2 Bitwig Studio Integration Setup and Configuration The Panorama Bitwig Studio Integration is compatible with Bitwig Studio and above or Bitwig 8-Track 1.0 and above. These instructions assume you have one of these programs installed running on either Windows or Mac OS X. If you are looking to run Bitwig Studio on Linux, please get in touch with our support. Installation Here are the steps you need to go through to get Bitwig Studio up and running with your Panorama: First make sure Bitwig Studio is installed and launched at least once. Locate the Panorama Installer in the zip file you downloaded with this guide. Run it and follow the onscreen instructions until complete Update your Panorama s firmware as described here In the zip file you downloaded with this guide, locate the Panorama_Bitwig_Support installer and run it. With installation complete, make sure your Panorama is connected to your computer and switched on. Launch Bitwig Studio and go to Options/Preferences/Controllers Click Detect available controllers. Your Panorama should now appear in the list. If Panorama is not automatically detected, add it manually. For OS X and above, select the ReWire Host port for MIDI control in and output. The middle keyboard port should be set to Panorama. Click Ok and exit Device Setup. That s it, setup is now complete and you can move on to the fun part, learning how it all works. 2 Using Panorama with Bitwig Studio


3 Navigation & Transport The following pages focus on how Bitwig Studio and Panorama work together. The aim is to provide a fundamental understanding of how Panorama interface with Bitwig Studio. From time to time, you may need to consult the Bitwig Studio documentation for additional information. Let s start by taking a look at the main panel buttons and then go deeper in to the Panorama menus from there. Navigation The six buttons pictured above allow you to navigate important parts of Bitwig Studio at any time. Here is what they do: Track - / +: Patch - / +: Bank < >: Zoom < >: View: Navigates to the next or previous track in Bitwig Studio s sequencer. This is the same as using the arrow up/down keys on your computer keyboard Changes the patch of the currently selected instrument or effect device Shifts the current selection of eight mixer channels in Mixer mode so the fader group assignments are changed from channels 1-8 to channels 9-16, for example. Hold [Shift] and press one of the [Track -/+] buttons to view an adjacent bank of channels. Controls the magnification of the arranger area in Bitwig Studio when its sequencer window is in focus. Hold [Shift] and press one of the [Patch -/+] buttons to zoom in and out on the sequencer window. Changes the display view on your computer display to open or close the Mixer window in Mixer mode and the device window in Instrument mode. Data Control: Scroll through the device chain in Mixer and Instrument mode. In Transport mode Data Control moves the song position indicator. In addition it s used for selection options in pages with a [Menu]. Transport Buttons The transport buttons allows you to activate or deactivate important transport functions as listed in the table below. As with the navigation buttons, these are available in any mode, at any time. Key Combination [F-Keys] Description Press and hold this button to use the transport buttons as F-keys. F-keys can be used to trigger QWERTY macro s to for example create tracks and trigger Bitwig Studio functions [ ] Goto the Left locator [ ] Goto the Right locator [Undo] [Click] [Mode] [Cycle] [Rewind] [Forward] [Stop] [Play] [Record] Same as Undo in Bitwig Studio Switch the metronome/click on or off Toggles the arranger Overdub function on or off Switch the loop/cycle between the Left and Right locators on/off Moves the Play Start Position backwards by 1 bar for each press Moves the Play Start Position forward by 1 bar for each press Stop playback and resume from Play Start Position. Press Stop again to go to Zero Activate play from the Play Start Position. Press again to pause Activate record. Press again to deactivate record but continue play Using Panorama with Bitwig Studio 3
4 Navigation & Transport In addition to the primary functions described on the previous page, there are several very useful secondary functions access by holding [Shift] while pressing a transport or navigation button. The secondary functions are outlined in the below chart. Key Combination Description [Shift]+[View] Toggles between Mix and Arrange view when Panorama is in Mixer mode. In Instrument mode the combination toggles the plugin window open/close. [Shift]+[ ] Sets the left loop point to current Play Start Position [Shift]+[ ] Sets the right loop point to current Play Start Position [Shift]+[Undo] [Shift]+[Click] [Shift]+[Mode] [Shift]+[Cycle] [Shift]+[Rewind] [Shift]+[Forward] [Shift]+[Stop] Redo Switch Metronome play ticks on/off Toggles the launchers automation write on/off Stop all launcher clips from playing on the selected track and switch the track to arrangement playback mode Select previous Bitwig Studio target Scene Select next Bitwig Studio target Scene Stop playback of current clip [Shift]+[Play] [Shift]+[Record] Activate playback or record of current clip. If clip is already playing, this will activate stop at end of clip. Activate clip overdub Learning the shortcuts is the real key to a fluent workflow. Once learned, you ll find yourself reaching much less for the computer mouse and keyboard when you are creating. We therefore recommend that you revisit this page once you are more familiar with how Panorama integrate with Bitwig Studio. You ll most likely rediscover some of the features in a new light. 4 Using Panorama with Bitwig Studio


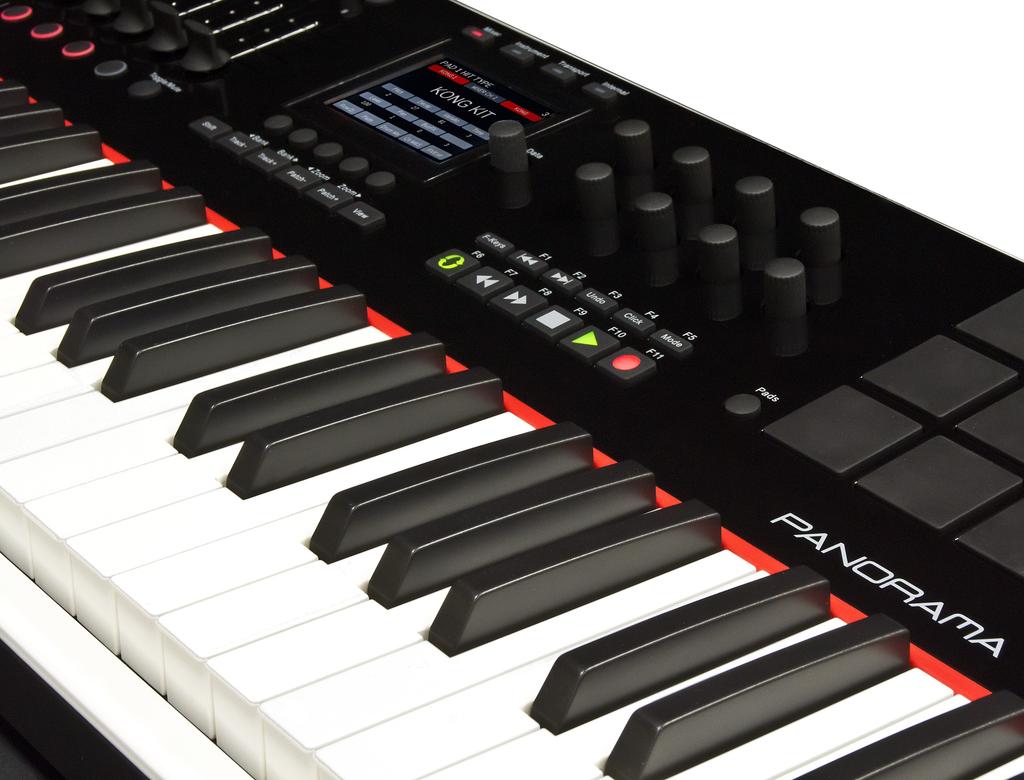
5 Modes and Display The Four Mode Buttons Each of the Mode navigation buttons will configure Panorama to control different aspects of Bitwig Studio. It s like having four control surfaces in one: Mixer: Instrument : Transport : Internal: Assigns all controls to the Bitwig Studio mixer, Clips and Scenes Assigns controls to the instrument of effect device currently selected for control Controls functions in the Bitwig Studio transport functions including tempo, shuffle and loop points Uses Panorama s internal MIDI controller functions so you can jump out of our dedicated Bitwig Studio protocol and use Panorama as a traditional MIDI controller Wherever you are in Panorama s menu structure, pressing one of the Mode buttons will jump to that mode. The last menu you accessed in each mode is remembered, so pressing the Mode button once from any other mode will take you back to the remembered menu; pressing it twice will take you to that mode's home page. What the Display Tells You The display Info-Bar is the top Red/Gray/Red area and provides the following status information for each of the three Bitwig Studio mode home pages: Mixer + Transport modes: TRACK NAME CHANNEL NUMBER SELECTED DEVICE Instrument mode: TRACK NAME DEVICE NAME CURRENT PAGE Display Buttons The five display buttons are used to navigate menus or activate functions. On most pages there will be labels above one or more of these buttons in the display. The first display image you will see after launching Bitwig Studio is the Mixer Home Page. The Macros label is red. The red color indicate that this menu is active and that the 2x4 encoders are currently controlling the macro parameters. Whenever you see a display button in red, it means that menu is active. If a button is used to control a parameter you will see a line above that s either white or red to indicate the current status of the button. The image on the right shows you an example where a parameters status is On. To exit any page, press a Mode button and navigate to whatever page you would like to edit next. If you navigated to the Macros page, therefore press the [Mixer] button to go back to the mixer mode home page. Using Panorama with Bitwig Studio 5
![Bitwig Studio Mixer Control Mixer Mode Home Page Start by creating a new project in Bitwig Studio and make sure [Mixer] mode is selected on Panorama.](/docs-images/76/73191661/images/6-0.jpg "The default Bitwig Studio project contains one audio track and one instrument track. Notice that the window in Panorama shows 9 faders corresponding to the 9 physical 45mm faders.")
6 Bitwig Studio Mixer Control Mixer Mode Home Page Start by creating a new project in Bitwig Studio and make sure [Mixer] mode is selected on Panorama. The default Bitwig Studio project contains one audio track and one instrument track. Notice that the window in Panorama shows 9 faders corresponding to the 9 physical 45mm faders. The info bar s first red field shows the track name. Try changing the track name in Bitwig Studio and you will see it update on Panorama as well. The first fader (of the group of 9) on Panorama now controls the mixer channel volume of the first track. Panorama displays the fader channel graphic and a square fader cap graphic shows the current volume setting in Bitwig Studio. The red line graphic shows the position of the physical fader. Moving the fader may not change the volume immediately because the fader position have to first match the position in Bitwig Studio, to allow for smooth change to the volume setting. So move the physical fader towards the position of the virtual fader and notice once the two match, the fader cap graphic will follow the fader movement and in Bitwig Studio you are now changing the volume setting for the mixer channel. Since the instrument track is empty, the right info-bar field is blank. Now insert a Bitwig Polysynth by dragging it from the Bitwig Studio browser and on to the track. You can now see clearly in the display info-bar center field, that the Polysynth device is selected on the current track. Next press the [Track+] button to navigate to the second track. Notice now that the background of track 1 has turned black and that the second track is now inverted with white background plus the track name has changed. The white background clearly shows you which track is currently selected. Next create an additional 6 tracks (audio or instrument) so you have a complete bank of 8 channels to control with the faders. Encoders & LED Buttons The encoders above the faders are by default assigned to Pan. Try adjusting the Pan setting for a few of the tracks in the Panorama Window. To the right of the 8 encoders you ll find a button labeled [Toggle/View]. Pressing this button will change the assignment of the 8 encoders to Send 1. Pressing it again will change the assignment to Send 2 etc until after Send 8 they are finally assigned to Pan again. A faster option is to press and hold [Toggle/View] and move the Data Control to scroll through Pan and send options. So this allows you to control send or pan across multiple channels. There is also an option to control all 8 sends for one channel only but we will cover that later. The 8 LED buttons below the faders are by default assigned to Select. Try pressing first LED button 1 and then LED button 8. Notice this is a quick way to jump from one track to another. Pressing the [Toggle/Mute] button will change the assignment of the LED buttons to Mute. Additional presses will assign them to Solo, Record Arm and then back to Select. As with the encoders, press and hold [Toggle/Mute] and move the Data Control to quickly scroll through the options. The display image shows you the location of the labels that tell you what the 8 encoders and 8 LED buttons are assigned to control. 6 Using Panorama with Bitwig Studio
7 Bitwig Studio Mixer Control Navigating Tracks & Channels Now create an additional 8 tracks in the Bitwig Studio song so we have a total of 16 channels to navigate. Use the [Track+] button to navigate to channel 14. That's a lot of button presses but thankfully there is a quicker way. Press and hold the [Shift] button on Panorama, then press the [Track-] button. This button combination activates the second menu layer on Panorama (in this case [<Bank]) so we now view channels 1-8 again. Make sure the LED buttons are assigned to Select, and press the LED button that corresponds to track 6. You have now learned how to navigate Bitwig Studio tracks from Panorama using 3 different methods: [Track-] and [Track+] buttons go to previous or next track in the Bitwig Studio sequencer [Shift]+[<Bank] or [Bank>] bank over the 8 channels you operate in Bitwig Studio but doesn t change the track selection Pressing the [LED buttons] when assigned to "Select" enables quick channel selection within the bank of 8 channels you are currently controlling from Panorama Macros By default, the 2x4 encoders are assigned to control Bitwig Studio s device macros. If the [Macros] label is colored red, it means the 8 encoders are already assigned to control macros and you can just start turning the 8 encoders to adjust macro settings. That of course assumes that macros have been set up for the currently controlled device. Some setup is required to get the most out of macros but it s worth the effort, both for performance and compositional workflows. Macros are very useful because : Macros can be set up per preset to control the parameters you want instant access to. Macros can be controlled both from Panorama s Mixer and Instrument mode Multiple parameters can be controlled from just one macro Parameters can be offset within a range and in both positive and negative directions To see which macros are assigned to the Panorama 2x4 encoders, press the [Macros] button. The page shows the name of each macro assigned to Panorama s controls and of course their current offset values. If you have multiple devices on a track, you can navigate the devices once you are in the Macros menu by moving the Panorama Data Control. The center info-bar field updates as you navigate through devices in your chain. Read more about macros in the Bitwig Studio manual page 278. Sends Earlier we covered how the encoders above the faders can control 1 send at a time for up to 8 channels. Pressing the [Sends] button in Mixer mode in addition allow control over up to 8 sends for the currently selected channel. To create active sends in the Bitwig Studio Mixer, first create effect tracks from the Create menu. Once a send is active you will see the current send value above the graphical encoder in the Panorama display. User The Panorama [User] menu allow you to learn up to 8 global controls across a Bitwig Studio project. Right-click any parameter you want access and select Learn Controller Assignment in the popup menu. In the Panorama [User] page, now turn one of the 2x4 encoders and the parameter will be assigned. All learned settings are saved with your Bitwig Studio project. Using Panorama with Bitwig Studio 7
8 Bitwig Studio Mixer Control Devices The Devices menu allows you to control devices from within Mixer mode. The functionality is largely the same as Instrument mode which is described on page 10. But there are two important workflow options due to the fact that Panorama has 2 devices menus. The Devices menu only utilizes the 2x4 encoders and the display buttons. This means that you can still control the mixer while for example tweaking effects on the selected track. Selection of a device is independent of Instrument mode device selection. You can therefore control one device in instrument mode, press [Mixer] (assuming the Devices menu was previously selected) and immediately control a different device on the same track. Motorized Fader (applicable to P4/P6 only) If your Panorama is equipped with a Motorized fader, you may already have noticed that the fader follows the currently selected track. When you make track changes, the fader will jump to the volume position of the track in Bitwig Studio and you can simply change it at any time by just moving the fader. Try setting the volume of a few tracks to different settings and notice how the fader will jump to the right position every time you select a new track. You also have Mute and Solo buttons with LED indicators that show if they are active for the current track. Try pressing the mute button for a track and notice now that when you change track, not only does the motorized fader update but also the status of the mute (and solo) button. 8 Using Panorama with Bitwig Studio
9 Bitwig Studio Instrument (Device) Mode Press the [Instrument] button to select Instrument mode. Instrument mode is really a second Device mode because from here you can control all devices regardless of whether they are instruments, effects or containers. In Instrument mode, the 16 encoders, 9 faders, 8 LED buttons and 4 display buttons are all dedicated to controlling the selected device. The Devices menu in Mixer mode by comparison is limited to the 2x4 encoders and 4 display buttons. In the following we will cover how Instrument mode works with devices in general. Controlling the Bitwig Studio Browser From the Create menu in Bitwig Studio, select Create Instrument Track. With no device on the track, the following button labels are visible in the Panorama display: Button Label Browser Description Press this button to open/close the Bitwig Studio Browser. < With the Browser open, press the arrow left button to tab left through the panes. > With the Browser open, press the arrow right button to tab right through the panes. Cancel OK Data Control Cancel to exit the Browser. Press Ok to create a device or load a preset. Scroll through options in the currently selected pane. Press [Browser] to open the Bitwig Studio Browser and move the [Data Control] to scroll through devices. Select a device and click [OK] to insert on the created instrument track. Next press [Browser] again and move the [Data Control] to scroll through available presets for the selected device. Press [Ok] when you have found the preset you want to load. To narrow the options you can set filters by using the arrow buttons to step to panes and then select the filter using the [Data Control]. With the browser open, you can also use the [Patch-] and [Patch+] buttons to audition patches before pressing ok. But note when the browser window is closed, the patch buttons on Panorama follow the preset filters as set on Panorama. Note: Bitwig and the browser have to be in focus to allow Panorama to control them. Device Preset Selection from Panorama With a device created and selected on a track, you also have the option to select [Preset] in addition to [Browser]. Press [Preset] opens the popup menu that allows you to scroll through the list of presets for the selected device. Press [Enter] to load a preset. To narrow down your search for patches you can also select a Category and/or Creator filter. Press [Category] and move the [Data Control] to select and then press [Preset] to scroll through the filtered preset selection using the [Data Control]. The process is of course the same to select a specific Creator. Changing Presets using the Patch Buttons You can step through device presets within the current Bitwig Studio directory from Panorama, by pressing [Patch+] to go to the next patch or [-Patch] to go to the previous patch. To scroll through quickly, press and hold one of the patch buttons and move the Data Control. Using Panorama with Bitwig Studio 9
10 Bitwig Studio Instrument (Device) Mode The first window you seen on the Panorama display is the Instrument home page. The page is designed to provide the visual feedback and tactile experience of a hardware workstation. If a track is selected without a device present, there are no parameters to control and the large character area will read No Device Navigating Devices The device you are currently controlling in Instrument mode, is called the Primary Device. If you have multiple devices on a track, you can navigate them from Panorama by moving the [Data Control]. You can also use your mouse to select which device Panorama should control. Right-click on the left-hand header of the device you want controlled and select Set as Primary Device from the menu. Use this method to control nested devices. Arp (Arpeggiator) If the Bitwig Arpeggiator is not already present on the track, pressing this button will insert the device at the start of the device chain. You can then navigate to it by moving the [Data Control]. Once Arpeggiator is present, you can switch it on/off from the device home page. Macros Press the [Macro] display button to assign the device macros to the 2x4 encoders. If no macro s are set up for the current device, show Device Macros in the device panel. The press the arrow for the macro you want to assign parameters and while it blinks, move the parameter or parameters you want to assign. 10 Using Panorama with Bitwig Studio

11 Bitwig Studio Instrument (Device) Mode Default, Panel and Nektar Mapping Device mapping can originate from 3 different sources: Default map The parameters a device/plugin sends when no other mapping is present. Panel map User definable controller pages in Bitwig Studio. Supersedes default mapping. Nektar map Nektar advanced device/plugin mapping that premaps all device parameters in easy to navigate menu pages. Supersedes panel mapping except the device home page. Nektar Mapped Devices Bitwig Studio s instrument devices are all Nektar mapped devices as well as many common and popular VSTi plugins. Selecting a track hosting Polysynth for example is a good place to start experiencing the power of Nektar mapping. When a Nektar map is present, the label of the 5th display button reads menu. Press this button and use the [Data Control] to scroll through the controller pages, each labeled clearly so you can find the section you want to control really quick. Press [Enter] to load the page or [Esc] to exit without loading. A controller page can show assignments for one of 3 sections: 2x4 encoders, faders + 1x8 encoders or faders + LED buttons. Each of these controller sections are of course active at any time so you get the full benefit of all Panorama s controls. Pressing the toggle buttons toggle the view so you can see what each of the sections control [Toggle/View] : Toggle between faders + 1x8 encoders and the 2x4 encoder views. Press the button again, to return to the previous page. [Toggle/Mute]: Toggle between faders + LED buttons and the 2x4 encoder views. Press the button again, to return to the previous page. Finally you can press [Instrument] at any time to return to the device home page. Nektar maps typically assign envelopes to the faders and since many instruments feature 4 stage ADSR type envelopes, the below table show typical assignments. Polysynth is no exception so even without looking at the display, you can with confidence move the faders and know what they control. Fader 1 Amp Attack Fader 5 Filter Attack Fader 2 Amp Decay Fader 6 Filter Decay Fader 3 Amp Sustain Fader 7 Filter Sustain Fader 4 Amp Release Fader 8 Filter Release Fader 9 Instrument Volume Using Panorama with Bitwig Studio 11
12 Bitwig Studio Instrument (Device) Mode Customizing the Device Home Page Pressing [Instrument] activates the Device Home Page so this is a quick way to get to your goto parameters at any time. The Device Home Page can be customized by using the Common Controls page in Bitwig Studio s Panel Mappings. To customize the page do the following: Right-click on the device panel, just below the device name. From the popup menu, select Edit Panel Mappings. Drag the parameters you want to control from the Devices Home Page, from the list on the left side and on to the control slots in the Common Controls page. If the device or VSTi is supported by a Nektar or Default map, you may find that dragging a parameter in to the Common Controls page clears the Device Home Page on Panorama. This happens if the Common Controls page is originally empty so the mapping on the Devices Home Page would be populated by the Nektar Map. But whenever a parameter or more are populating the Common Controls page, this mapping supersedes the Nektar map home page. You can still access the Nektar map home page from the Menu. Panel Mappings more Customization Options Devices or plugins that are not supported by a Nektar map can be customized further by using the Panel Mappings menu: Drag parameters to the Envelopes Controls to assign them to faders. Press the [Toggle/View] button on Panorama to view the assignments. Press the button again to revert back to the previous page. Click + in the Panel Mappings menu to create a new parameters page. Add parameters by dragging them on to that page. Click on the name header of the page and give it a name. Add more pages if desired. Make sure to click Save in the top left corner of the Panel Mappings menu so your assignments are preserved for future use. If a plugin is supported by a Nektar map, you can still access the Panel Mappings pages by pressing [Shift]+[Instrument] on Panorama. Press the button combination again to navigate back to the default Nektar map. Note: A track change may be required to force an update of the panel mapping when a plugin is first inserted. 12 Using Panorama with Bitwig Studio

13 Bitwig Studio Drum Machine Container Device Drum Machine Device Panorama controls the Bitwig Drum Machine container device similar to how a traditional drum machine would work but with lots of flexibility and some nice extra s. To get started, make sure to load a Drum Machine preset or drag some devices to the Drum Machine slots. The device home page shows the name of the preset loaded in the currently selected pad slot. The 2x4 encoders are mapped to the Device Home Page parameters. Here is how it all works in more detail: Select: When this button is active, hitting a pad will assign the 2x4 encoders to the Device Home Page parameters of the device populating the slot. If the [Select] button is left active, switching between slots in realtime and controlling parameters while building up parts can be really powerful. However the purpose of the function is to simply select the drum slot and we recommend that you deactivate this function when playing faster repeating notes. Otherwise some dropout may occur. Pads: Pressing the display button labeled [Pads] provides an overview of the preset loaded in the pad slots. Some additional functionality is available in this menu including: Row D: Switches Panorama s top row of pads from C to D. D = Drum Machine slots Mute: When enabled, Mute can be activated/deactivated for each of the Drum Machine slots, using either the pads or LED buttons. Solo: When enabled, Solo can be activated/deactivated for each of the Drum Machine slots, using either the pads or LED buttons. Clear M/S: Clears all Mute and Solo settings when pressed Preset: Opens the popup menu that allows you to scroll through the list of presets available for Drum Machine. Move the [Data Control] and press [Enter] to load a preset. Macros: Assigns Drum Machine macro s to the 2x4 encoders. Menu: Select mapping pages for the currently selected device. Faders: Faders 1-8 control volume for Drum Machine slots 1-8 by default. Fader 9 controls Drum Machine Output. Encoders 1x8: Control pan for Drum Machine slots 1-8 by default. LED buttons: Control Mute for Drum Machine slots 1-8 by default. Toggle/View: View current status of slot volume and pan. Change slot assignments by pressing [9-16] and [1-8]. 1-8: When active, assigns faders, 1x8 encoders and LED buttons to control Volume, Pan and Mute for slots : When active, assigns faders, 1x8 encoders and LED buttons to control Volume, Pan and Mute for slots 9-16 Clear M/S: Clears all Mute and Solo settings when pressed Changing Preset for Individual Slots It is possible to select presets for a device within a Drum Machine slot, however this does mean you no longer control the Drum Machine container itself. The device needs to be the Primary Device : In Bitwig Studio, right-click on the device panel, just below the device name. Select Set as Primary Device You can now control that device directly from Panorama including changing it s presets. Using Panorama with Bitwig Studio 13
14 Bitwig Studio Instrument Layer Container Device Panorama can control up to 12 device layers within the Bitwig Instrument Layer container device. The functionality is similar to the Drum Machine container but with some important differences. The device home page shows the name of the preset loaded in the currently selected pad slot. The 2x4 encoders are mapped to the Device Home Page parameters. Here is how it all works in more detail: Mix: When [Mix] is active (default), faders 1-8 control volume, the 1x8 encoders control pan and the 8 LED buttons control Mute for each of the layers. If you switch [Mix] to it s off position, the faders will be mapped according to the mapping of the currently selected layer device. Layers Pressing the display button labeled [Pads] provides an overview of the preset loaded in the pad slots. Some additional functionality is available in this menu including: Mute: When enabled, Mute can be activated/deactivated for each of the Drum Machine slots, using either the pads or LED buttons. Solo: When enabled, Solo can be activated/deactivated for each of the Drum Machine slots, using either the pads or LED buttons. Clear M/S: Clears all Mute and Solo settings when pressed. Presets: Opens the popup menu that allows you to scroll through the list of presets available for Instrument Layer. Move the [Data Control] and press [Enter] to load a preset. Macros: Assigns Layer macro s to the 2x4 encoders. Menu: Select mapping pages for the currently selected device. Toggle/View: View current status of slot volume and pan. Change slot assignments by pressing [9-16] and [1-8]. 1-8: When active, assigns faders, 1x8 encoders and LED buttons to control Volume, Pan and Mute for layers : When active, assigns faders, 1x8 encoders and LED buttons to control Volume, Pan and Mute for layers 9-12 Clear M/S: Clears all Mute and Solo settings when pressed Changing Preset for Individual Layers It is possible to select presets for a device within a Drum Machine slot, however this does mean you no longer control the Drum Machine container itself. The device needs to be the Primary Device : In Bitwig Studio, right-click on the device panel, just below the device name. Select Set as Primary Device You can now control that device directly from Panorama including changing it s presets. 14 Using Panorama with Bitwig Studio

15 Transport Mode Transport mode helps you to navigate and build up your song composition from Panorama. As explained earlier, the transport buttons are available in any mode but the dedicated Transport Mode provides access to extra tools that will make capturing ideas, beat creation and overdubbing easier. Transport Home Page Press the [Transport] button to enter Transport mode. Transport mode provides the visual feedback you need to know where you are in your project. Below the info-bar the large font readout shows the current Play Position which updates as you play the project. Below the Play Position readout, you see the position of the Left and Right locators. Here is how you set these location points: Move the Play Start Position to the location you want using the [Forward] or [Rewind] transport buttons. Press [Shift]+[Goto L] to set the left location point or [Shift]+[Goto R] to set the right location point. The 8 boxes show what each of 2x4 rows of encoders are assigned to control: Tempo Pre-Roll Shuffle Rate Control the tempo of your Bit- Sets the Punch Out point Adjusts the Shuffle Sets the Shuffle Rate wig Studio song in Logic s timeline Amount Accent Rate Phase <Loop> Sets the Accent Amount value Selects the Accent Rate Sets the Accent Phase Moves both the Left and Right loop points forward or backward The display buttons in addition control the following: Write: Tap Tempo: Punch: Groove: Launcher: Switch write automation on/off Press this button repeatedly in a steady beat to set Bitwig Studio s tempo Activate Punch in and punch out Activate the Groove parameters Activates the launcher menu (check next page for detail). You can combine Transport Mode with the global navigation, transport and F-keys functions to great effect. Use the F-keys to open Bitwig windows and menus for example, is an effective way to customize your setup and navigate Bitwig. Familiarity with the transport buttons and their secondary operations in addition will help you create a faster workflow. The transport buttons functionality is covered on page 3 but here is a summary of the less obvious functions: Key Combination [F-Keys] Description Press and hold this button to use the transport buttons as F-keys. F-keys can be used to trigger QWERTY macro s. Macro s can be used to create tracks or open windows [ ] Goto the Left loop point [ ] Goto the Right loop point [Shift]+[ ] Set Left loop point to the current song position [Shift]+[ ] Set Right loop point to the current song position [Mode] Toggle Overdub on/off Using Panorama with Bitwig Studio 15
![Transport Mode Launcher Pressing the [Launcher] button in Transport mode assigns the pads to trigger and record clips and opens the Launcher menu.](/docs-images/76/73191661/images/16-0.jpg "The display page illustrates the 12 pads and provides you with information about the status of the first 12 clips on the currently selected track.")
16 Transport Mode Launcher Pressing the [Launcher] button in Transport mode assigns the pads to trigger and record clips and opens the Launcher menu. The display page illustrates the 12 pads and provides you with information about the status of the first 12 clips on the currently selected track. If you use a lot of clips, moving the [Data Control] scroll through clips pages up to 60. Recording and Playing Launcher Clips Using Pads To record a clip using the pads, simply identify a pad that corresponds to an empty (gray) clip slot and do the following: Hit the pad. This will activate record (red) Hit the pad again. This will deactivate record and play the clip (green) Created clips that are not currently selected are marked yellow. If you hit the corresponding pad, the clip will turn green to indicate that it s selected. Color Gray Red Green Yellow Description The clip slot is empty Recording is active for this clips slot Playback is active for this clip slot The clip slot contains a recorded clip and can be launched Creating Clips With Fixed Length You can also create empty clips from Panorama at a pre-determined length. Press the [New Clip] button. Move the [Data Control] to set your clip length while the [New Clip] button is active. Press the target pad to create the clip at the desired length and exit New Clip. You can also create clips at any time (even if [New Clip] is not active) by pressing [Shift]+ [Hit a pad]. The length will correspond to current New Clip length. And finally, you can create a clip by pressing [New Clip] and [Enter]. Then Move the [Data Control] to select your destination slot and press [Enter] again. Overdub Existing Clips Activating the Overdub menu enables you to immediately start recording on a created empty clip or overwrite and existing performance. Press the [Overdub] button. Select the clip you want to record on by hitting the corresponding pad. Hit another pad to immediately start overdub recording another clip. When you are done, deactivate the Overdub menu. 16 Using Panorama with Bitwig Studio
17 Transport Mode Launcher Deleting Clips You can also delete an already created clip. Press [Shift]+[Hit a pad] and use the same button combination again, to create a new empty clip. Another option is to activate [New Clip] and hit the pad corresponding to the clip you want deleted. This method allows for multiple clips to be deleted. Naming Clips If you name your clips in Bitwig Studio s Clip Launcher Inspector Panel, Panorama will display the name in the [Clips] page. The max length is between 7-9 characters depending on which characters you choose. Read more about the Inspector panel in the Bitwig Studio User Guide. Scenes You can trigger Scenes from Panorama using the pads With the [Launcher] menu active, press [Scenes]. This immediately assigns the pads to trigger scenes As with clips, the display graphic shows which scenes are assigned to each pad. Hit a pad to trigger a scene. Naming Scenes If you name your scenes in Bitwig Studio, Panorama will display the name in the [Scenes] page. The max length is between 7-9 characters depending on which characters you choose. Accessing up to 144 Scenes You can navigate up to 144 Scenes from Panorama. To access more Scenes, turn the [Data Control] while the [Scenes] menu is active. As you move the Data Control you can scroll through pages each containing 12 scenes with the virtual pad display updating to show scene number and name (if applicable). Using Panorama with Bitwig Studio 17
18 Launching Clips Using Transport Buttons You can record and playback clips using Panorama s transport buttons or pads (P4 & P6 only). Using the pads is the most transparent and intuitive approach however the transport clip options do have the benefit of being available at any time, in any menu. Recording Launcher Clips Using Transport Buttons Clips can be launched, navigated and recorded using the transport buttons secondary functions. First start by pressing [Shift] +[View] on Panorama to bring the Bitwig Studio Mix window in to view. In our example we have set up 3 instrument tracks using the instruments E-Kick, E-Snare and E-Hat but of course any combination of tracks will work. You have already learned how to navigate the tracks using either the Track buttons or the LED buttons when assigned to Select. Let s start by first recording a Kick part by selecting that track. On Panorama, press [Shift]+[Record] to activate recording and play the Kick drum part on your keyboard or pads. Press [Shift]+[Stop] to stop record. If you want to record another kick drum clip, press [Shift]+[Forward] to go to the next scene and repeat the process. Next navigate to the E-Snare and E-Hat track and record clips by repeating the process described above. [Shift]+[Play] will activate record on the target clip if no clip is present and activate playback if a clip is present. Below is a chart showing the shortcut commands relevant to the clip launcher. Key Combination [Shift] [Shift]+[View] [Shift]+[Mode] [Shift]+[Cycle] [Shift]+[Rewind] [Shift]+[Forward] [Shift]+[Stop] [Shift]+[Play] [Shift]+[Record] Description The LED buttons corresponding to tracks with clips armed for playback in the target scene, will flash Toggles between Mix and Arrange view in Bitwig Studio Toggles the launchers automation write on/off Stop all launcher clips from playing and switch all tracks back to arrangement playback mode Select previous Bitwig Studio target Scene Select next Bitwig Studio target Scene Stop playback of current clip Activate playback or record of current clip. If clip is already playing, this will activate stop at end of clip. Activate clip overdub 18 Using Panorama with Bitwig Studio
19 Step Sequencer Step Sequencer In Transport Mode, press the display button labeled 'Step Seq' to access the Step Sequencer. This page allows you to enter notes into a currently selected Note clip by setting a note value (use the keyboard or data encoder to select a note for all steps, use the encoders above the faders to select notes for specific steps), setting a velocity value (velocity is set, per step, by the faders) and then create a note by pressing one of the LED buttons below the faders. You will see the LED button light up to indicate that there is an active note on that step. Getting started with the Step Sequencer: Here is what each of the controls on Panorama do when you activate the step sequencer: LED Buttons - Activate/Deactivate steps Faders - Set step Velocity Encoders above faders - Set step Note Data encoder - Sets Note for all steps Keyboard - Sets Note for all steps Creating Notes in the sequencer, step by step: 1. First create a Note clip in Bitwig Studio's clip launcher. 2. While on Panorama's Step Sequencer page, press the LED button below Fader Observe that a note is created at the start of the Note clip and the LED for the button lights up. The note is C1 with velocity of Press the LED button below Fader 1 again to remove the note and observe that the LED turns off Using Panorama with Bitwig Studio 19
20 Step Sequencer (continued) Setting Note values: 1. Press a key on Panorama's keyboard 2. Observe that the value displayed above the encoder graphics changes as you press different keys. By default the Note value is set to 36 (which corresponds to MIDI note C1) 3. Press the LED button below Fader 1 4. Observe that a note is created with the value of the last key you pressed on the keyboard You can also change the note value for all steps by turning the data encoder If you want to change the note value for one step, turn the encoder that corresponds to the step you want to change Note: Changing the note value with the keyboard or the encoders will set the note for the next step you create. It will not change the note value for active notes. The same is true for velocity. It's also important to note that each step of the sequence/note clip can have more than one active note, so you can actually create polyphonic sequences directly from Panorama. Setting Velocity values: 1. Move Fader 2 down to a value of 64. By default the Velocity value is set to Press the LED button below Fader 2 3. Observe that a new note is created with the same note value as the first step but with Velocity set to 64 rather than 100 Sequence length and Step size: 1. Click play on the Note clip in Bitwig Studio (you can also trigger the clip using Panorama's clip launcher, in Mixer Mode) 2. Observe that the LED buttons below the faders light up one by one to indicate which step is being played. If you created a 1 bar clip, there should be 16 steps in the sequence (as the step sequencer defaults to a step size of 1/16 notes, more about this later) but you can only access 8 steps at a time. To access the other steps you can either press the buttons below the display (labeled 1-8, 9-16, 17-24, and 25-32). You can also quickly access steps 9-16 by holding the Toggle/ Mute button. 3. The length of a sequence is always determined by the length of the clip but the maximum length of any sequence is 32 steps. 4. Press the display button labeled 'Step Size' to set the length of notes. Observe that the label s for the display buttons change, you can now select a step length of 1/4, 1/8, 1/16 or 1/32. If you select 1/32, all 32 steps will fit in a 1 bar clip. If you select 1/16, you will need a 2 bar clip to fit all 32 steps. 1/8 will require a 4 bar clip. 1/4 will require an 8 bar clip. Selecting Clips to sequence To select a clip for step sequencing, simply click on a Note Clip in the Clip Launcher or the Arranger. You can also select clips by tapping the pads when Panorama's Clip page is active in Mixer Mode. 20 Using Panorama with Bitwig Studio
Using Impact LX with Reason
 Using Impact LX with Reason Applicable to Impact LX25, 49, 61 & 88 www.nektartech.com www.nektartech.com Using Impact LX with Reason Reason Integration Setup and Configuration The Impact LX Reason Integration
Using Panorama with Cubase
 www.nektartech.com www.nektartech.com Using Panorama with Cubase Cubase Integration Setup and Configuration The Panorama Cubase Integration is compatible with Cubase 5, 6, 6.5, 7, 7.5 and 8 as well as
Using Nektar Impact LX with Cubase & Nuendo
 www.nektartech.com www.nektartech.com Using Nektar Impact LX with Cubase & Nuendo Cubase Integration Installation and Setup The Impact LX Cubase Integration is compatible with Cubase 5, 6, 6.5, 7 and 8,
Using Nektar Impact LX with Reaper
 www.nektartech.com www.nektartech.com Using Nektar Impact LX with Reaper Reaper Integration Installation and Setup The Impact LX Reaper Integration is compatible with Reaper 4.59 or later. We recommend
Using Panorama with Logic
 www.nektartech.com www.nektartech.com Using Panorama with Logic Logic Integration Setup and Configuration Panorama Logic Integration is compatible with Logic 9 and Logic X. These instructions assume you
FM 4/100 USB Software for OSX
 FM 4/100 USB Software for OSX JLCooper makes no warranties, express or implied, regarding this software s fitness for a particular purpose, and in no event shall JLCooper Electronics be liable for incidental
Push. Figure A4.1 Push.
 Push Figure A4.1 Push. Push is a hardware controller designed by Ableton and Akai to drive Live s Session View. Simply connect the Push unit using the provided USB cable to your computer and off you go.
Mackie Control. Chapter 22
 Chapter 22 Mackie Control The comprehensive Mackie Control mixing surface puts all of Live's real-time creative power at your ngertips. Mackie Control allows for mouse-free program operation and navigation.
User Guide English. Manual Version 1.0
 User Guide English Manual Version 1.0 Table of Contents Welcome to the MPC... 5 System Requirements and Product Support... 5 About This Manual... 6 Important Notes... 7 Installation... 7 MPC Hardware Overview...
Introduction: -The Beat Kangz
 Introduction: Thank you for choosing Beat Thang Virtual as part of your creative process. As artists ourselves, we know how important this decision is. We understand that you have many products to choose
Workshop. Automation ÂØÒňΠMV-8000
 ÂØÒňΠMV-8000 Workshop Automation 2006 Roland Corporation U.S. All rights reserved. No part of this publication may be reproduced in any form without the written permission of Roland Corporation U.S.
Installing energyxt2.5. Mac. Double-click energyxt2.5 disk image file. Drag the energyxt2.5 folder to your "Applica- tions" folder / your desktop.
 ENGLISH 2 Getting started Windows Installing energyxt2.5 Mac Linux Double-click the setup file and follow the on- screen instructions. i. i. Double-click energyxt2.5 disk image file. Drag the energyxt2.5
MCS 2 USB Software for OSX
 for OSX JLCooper makes no warranties, express or implied, regarding this software s fitness for a particular purpose, and in no event shall JLCooper Electronics be liable for incidental or consequential
User Manual. Drum Machine
 User Manual Drum Machine Overview Interface Overview Interface 1 Nithonat s interface is split into three parts: Internal sequencer Responsible for editing patterns in Int.Seq. mode. Internal sequencer
FaderPort 8 8-channel Production Controller
 FaderPort 8 8-channel Production Controller www.presonus.com English Table of Contents 1 Overview 1 1.1 Introduction 1 1.2 About this manual 1 1.3 FaderPort 8 Features 2 1.4 Studio One Artist Features
ypercontrol Guide Logic Pro Manual Version 1.0
 ypercontrol Guide Logic Pro Manual Version 1.0 Table of Contents Introduction... 3 System Requirements and Product Support... 3 Setup... 3 Operation... 4 Faders... 5 Fader Buttons... 6 Knobs... 7 Transport
MCS3 USB Software for OSX
 MCS3 USB Software for OSX JLCooper makes no warranties, express or implied, regarding this software s fitness for a particular purpose, and in no event shall JLCooper Electronics be liable for incidental
Axiom DirectLink for Cubase User Guide
 Axiom DirectLink for Cubase User Guide Legal Notices This guide is copyrighted 2010 by Avid Technology, Inc., with all rights reserved. Under copyright laws, this guide may not be duplicated in whole or
User Guide. English. Manual Version 1.0
 User Guide English Manual Version 1.0 Table of Contents (Click a chapter/section to skip to it.) Introduction... 5 Box Contents... 5 Support... 5 About This User Guide... 5 Initial Setup... 6 1. Software/Driver
EM-1 Main Features. EasyStart CONTENTS
 EasyStart EM-1 Main Features Pattern performance with emphasis on realtime operation All functions are right on the surface, with no menus or pages to slow you down! Familiar 16-step key interface to build
Manual addendum written by Nadine Raihani, Cornelius Lejeune Manual version: 1.3 (09/2008) Software version: 2.0.4
 Software version: 2.0.4") MANUAL ADDENDUM The information in this document is subject to change without notice and does not represent a commitment on the part of NATIVE INSTRUMENTS GmbH. The software described by this document
MANUAL ADDENDUM The information in this document is subject to change without notice and does not represent a commitment on the part of NATIVE INSTRUMENTS GmbH. The software described by this document
BeatMaker 3 User Manual. Revision:
 BeatMaker 3 User Manual Revision: 3.0.10 What s new in version 3.0.10 of this manual - Updated section Quick Start Guide: 1.3 Transport toolbar - Added section Performance View: 2.7 Select mode - Updated
Hardware Control Reference
 Hardware Control Reference Disclaimer The information in this document is subject to change without notice and does not represent a commitment on the part of Native Instruments GmbH. The software described
Pro Tools. Automation & Control Surface Manual. Version: 1.0
 Pro Tools Automation & Control Surface Manual Version: 1.0 Contents Control 2802 Fader Automation Page 3 Automation Overview Page 3 Automation Setup Page 3 Recording & Editing Automation Data Page 4 Automation
FL STUDIO 12. Dark green Mixer Pink Window. Light green Piano roll Purple Pattern. Yellow Playlist Dark blue Playback
 FL STUDIO 12 Categories Dark green Mixer Pink Window Light green Piano roll Purple Pattern Yellow Playlist Dark blue Playback Orange Both Playlist & Piano roll Light blue Navigation Red Help No color Mixed
WAVES BASS RIDER USER GUIDE
 WAVES BASS RIDER USER GUIDE TABLE OF CONTENTS Chapter 1 Introduction...3 1.1 Welcome...3 1.2 Product Overview...3 1.3 Concepts and Terminology...4 1.4 Components...5 Chapter 2 Quick Start Guide...6 Chapter
MV-8000 Production Studio. When asked So what s up with the new MV-8000? Here are the opening points to hit The MV-8000 has:
 The Main Points When asked So what s up with the new MV-8000? Here are the opening points to hit The MV-8000 has: Integrated Sampling, MIDI Sequencing, and Audio Recording 2 Samplers In One High Quality
Contents. Overview...3. Song Editor Clip Editor Browser and Rytmik Cloud Keyboard Controls Support Information...
 User Manual Contents Overview...3 Song Editor...4 Clip Library...4 Song Playback...4 Tracks...5 Export...5 Clip Editor...6 Note Sequence...6 Instrument...7 Instrument Effects...7 Tempo Setting...8 Other
New Features in Nuendo 4.2
 New Features in Nuendo 4.2 Cristina Bachmann, Heiko Bischoff, Marion Bröer, Sabine Pfeifer The information in this document is subject to change without notice and does not represent a commitment on the
AUDIO VIDEO MEDIA CONTROLLERS. EuCon Application Setup Guide. Document Revision: K
 EuCon Application Setup Guide Document Revision: K MC Control, MC Mix, MC Transport, Studio Monitor Express, Studio Monitor Pro, EuControl, EuCon and EuCon Powered are trademarks of Euphonix Inc. All other
Chaos Culture. Multiclip Editor / Multiclip Note preview 1.5. Edited by Jason Cowling
 Chaos Culture Introduction... 2 Important stuff... 2 Setup... 3 Editing clips... 4 Using the editor... 5 Settings... 9 Workflow settings... 10 Performance... 13 Future updates... 13 Editor 1.6.61 / Note
QUICK-START GUIDE ROLAND DJ-808
 QUICK-START GUIDE ROLAND DJ-808 Installation and Setup The Roland DJ-808 requires drivers for both Windows and MacOS operating systems. IMPORTANT NOTE: Please ensure you have the latest available drivers
User Guide Version 1.0.0
 obotic ean C R E A T I V E User Guide Version 1.0.0 Contents Introduction... 3 Getting Started... 4 Loading a Combinator Patch... 5 The Front Panel... 6 On/Off... 6 The Display... 6 Reset... 7 Keys...
FRONT PANEL OVERVIEW...1 REAR PANEL OVERVIEW...3 HOOKUP DIAGRAM...4 DISPLAYING INFORMATION...6
 TABLE OF CONTENTS FRONT PANEL OVERVIEW...1 REAR PANEL OVERVIEW...3 HOOKUP DIAGRAM...4 DISPLAYING INFORMATION...6 OCTAVE AND TRANSPOSITION...6 NOTE...6 NOTE AFTERTOUCH (Channel Pressure)...6 CONTROL CHANGE...6
ECLIPSECX Ethernet Software for OSX
 ECLIPSECX Ethernet Software for OSX JLCooper makes no warranties, express or implied, regarding this software s fitness for a particular purpose, and in no event shall JLCooper Electronics be liable for
Axiom DirectLink for Reason and Record User Guide
 User Guide Legal Notices This guide is copyrighted 2010 by Avid Technology, Inc., with all rights reserved. Under copyright laws, this guide may not be duplicated in whole or in part without the written
LiveProfessor 2. User Manual. Rev audiostrom.com
 LiveProfessor 2 User Manual Rev 1.0 - audiostrom.com Contents Introduction 4 System Requirements 4 License files 4 First Run 5 Installing Plugins Plugin Manager Audio Settings MIDI Inputs 7 Replacing A
and close the various Traktor Panels. Setup: click on the setup icon to open the setup dialog. Close: clicking this icon will close TRAKTOR DJ Studio.
 Welcome... TRAKTOR DJ Studio 2 Quick Reference...to TRAKTOR DJ Studio 2, the latest and most advanced version of the software that changed the way DJs think about computers. We ve introduced a number of
PS04 Pattern Editor. Last Update: Feb,
 PS04 Pattern Editor www.soundside.de Last Update: Feb,12 2004 Index 1. Introduction. 2. Overview of the Pattern Editor. 3. Setting up the Pattern Editor. 4. Loading and playing a Rhythm Pattern in the
Portable Music Studio
 Everything you need, all in one. いつでも どこでも 作曲 Instruction Manual (08-2018) Portable Music Studio 1 Contents Features... 3 Basic Controls...4 - Menus and saving.. 5 Pattern Mode... 6 Global Pattern Settings...7
Cristina Bachmann, Heiko Bischoff, Marion Bröer, Sabine Pfeifer, Heike Schilling The information in this document is subject to change without notice
 Operation Manual Cristina Bachmann, Heiko Bischoff, Marion Bröer, Sabine Pfeifer, Heike Schilling The information in this document is subject to change without notice and does not represent a commitment
FL STUDIO 20. Dark green Mixer Pink Window. Light green Piano roll Purple Pattern. Yellow Playlist Dark blue Playback
 FL STUDIO 20 Categories Dark green Mixer Pink Window Light green Piano roll Purple Pattern Yellow Playlist Dark blue Playback Orange Both Playlist & Piano roll Light blue Navigation Red Help No color Mixed
Emote 1.0 Users Manual
 Emote 1.0 Users Manual Part No: 141318 Rev A 2018 Eventide Inc., One Alsan Way, Little Ferry, NJ, 07643 USA 1 Table of Contents Introduction... 3 Downloading the Installer... 3 Making Sure Your H9000 Hardware
Kameleono. User Guide Ver 2.1
 Kameleono Ver 2.1 Table of Contents Overview...4 MIDI Processing Chart...5 Kameleono Inputs...5 Kameleono Core...5 Kameleono Output...5 Getting Started...6 Installing...6 Manual installation on Windows...6
Studio One Standard Mat rix Profile Setup and Quick Start Guide
 Document Version 1.0 Studio One Standard Mat rix Profile Setup and Quick Start Guide Introduction The first part of this tutorial details how to setup Studio One with your SSL Matrix. The second part details
uremote User Manual Version 1.3 Jan 2017
 Version 1.3 Table of Contents Table of Contents... 2 1 Introduction... 3 1.1. Operating Systems and Installations:... 3 1.2. How to Use this Manual Effectively... 4 2 WHERE TO USE UREMOTE... 4 2.1. Remote
Drum Machine Manual V1.2.0
 Drum Machine Manual V1.2.0 Rugged Circuits and Wusik Dot Com 2011 Welcome to Beat707 Arduino Shield This board requires an Arduino Board plugged on the bottom of the Beat707, you can also use a NetDuino
Inear Display AMALGAME
 Inear Display AMALGAME User Guide Version 1.1 Table Of Contents Introduction 3 Overview 4 Installation and First Launch 5 Interface Overview 6 Loading and Saving Presets 7 Effects 8 XY Pad 9 Sequences
User Guide English. Manual Version 1.8
 User Guide English Manual Version 1.8 Table of Contents Welcome to the MPC... 12 System Requirements and Product Support... 12 About This User Guide... 13 Important Notes... 14 Installation... 14 Windows...
Figure 3.3 Click+drag the right edge of the main Live screen to access Help View.
 Figure 3.3 Click+drag the right edge of the main Live screen to access Help View. things basic. Use the Session View to construct your musical ideas by importing and recording audio and MIDI into tracks.
v1.5 MIDI Implementation guide
 v1.5 MIDI Implementation guide GURU v1.5 MIDI Implementation guide 2007 FXpansion Audio UK Ltd. In this document: 3 Introduction 3 1: MIDI Channel mapping summary 3 2: A note about Pad MIDI Learn 4 3:
Reason Remote support for Mackie control surfaces
 Reason Remote support for Mackie control surfaces This document describes the Remote implementation for Mackie Control, Extender and C4. For general information about how to use Remote in Reason, please
Using the 01X with Cubase SX 3. To all 01X users thank you for your continued use of the Yamaha 01X Digital Mixing Studio!
 Supplementary Manual Using the 01X with Cubase SX 3 To all 01X users thank you for your continued use of the Yamaha 01X Digital Mixing Studio! Since the 01X was first released, software programs that can
18 DPP App_C 1/10/05 2:23 PM Page 31. }C Polar
 18 DPP App_C 1/10/05 2:23 PM Page 31 }C Polar Polar is a RAM-based, loop-style recording module that can be used in conjunction with normal audio track recording or as a self-contained, independent recording
Mixman StudioXPro QUICK REFERENCE GUIDE
 Mixman StudioXPro QUICK REFERENCE GUIDE THE CONTROL ROOM 1 Control Room Audio Meter Lights Mix name / Megs Display Go to Remixing Studio Go to Editing Studio Loaded Single Single Auto-Loader Go to Recording
Chapter 3 Operating instructions
 Chapter 3 Operating instructions Summary This chapter describes the how to control and navigate through the TVR 30 s menus and options. Content Control interfaces 10 Controlling the TVR 30 10 Front panel
Show Designer 1. Software Revision 3.11
 Show Designer 1 Software Revision 3.11 OVERVIEW The Show Designer 1 is a lighting controller based on the successful and simple to use Show Designer. The Show Designer 1 adds to the existing features of
Chapter 3 User Interface Basics
 Chapter 3 User Interface Basics Mode Buttons Navigation The Display Chapter 3 will show you how to get around the front panel of your K2500. Your interactions can be divided into three primary operations:
Cubase SX 3/Nuendo 3 with the TranzPort Plug-in
 Cubase SX 3/Nuendo 3 with the TranzPort Plug-in! NOTE: To use the TranzPort plug-in you must be running CubaseSX/Nuendo version 3.02 or greater. Changes v1.03 In this update: The Big Meter calibration
Akai Pro Advance Series and VIP - Setup with Logic Pro X
 Akai Pro Advance Series and VIP - Setup with Logic Pro X Akai Professional's Advance Keyboards are like nothing else you've ever played. Along with the VIP software, the Advance series gives you unprecedented
User Manual V
 By User Manual V1.0 http://polyversemusic.com/support support@polyversemusic.com Gatekeeper User Manual Table of Contents Getting Started 4 Installation 4 Presets 5 With or Without MIDI? 5 Ableton Live
1. Welcome to System 9 Pattern Sequencer
 Version 1.5 1. Welcome to System 9 Pattern Sequencer We would like to welcome you to our new Rack Extension, System 9! A multi pattern sequencer for the Reason Rack! About a year ago, in early 2014, we
StepPolyArp Unit. Step Polyphonic Arpeggiator / Sequencer App & Audio Unit MIDI effect for ios
 StepPolyArp Unit Step Polyphonic Arpeggiator / Sequencer App & Audio Unit MIDI effect for ios Presentation... 1 Application setup... 2 MIDI connections between ios applications... 2 MIDI over WiFi on macos...
WAVES JJP CYMBALS & PERCUSSION User Guide
 WAVES JJP CYMBALS & PERCUSSION TABLE OF CONTENTS CHAPTER 1 INTRODUCTION...3 1.1 WELCOME...3 1.2 PRODUCT OVERVIEW...3 1.3 COMPONENTS...4 1.4 A FEW WORDS FROM JJP...4 CHAPTER 2 QUICKSTART GUIDE...5 CHAPTER
OPERATION MANUAL VST / AU
 OPERATION MANUAL VST / AU This manual is under construction. If you want to help to improve it contact: info@audiorealism.se Introduction AudioRealism Bass Line 3 (ABL3) is an emulation of a classic pattern
The MPC Renaissance & MPC Studio Bible - Demo Tutorial (For MPC Software 2.x)
") The MPC Renaissance & MPC Studio Bible - Demo Tutorial (For MPC Software 2.x) This free tutorial is taken from MPC-Tutor s tutorial book The MPC Renaissance & MPC Studio Bible (MPC Software 2.1 Edition).
The MPC Renaissance & MPC Studio Bible - Demo Tutorial (For MPC Software 2.x) This free tutorial is taken from MPC-Tutor s tutorial book The MPC Renaissance & MPC Studio Bible (MPC Software 2.1 Edition).
QUICK-START GUIDE RELOOP MIXON4
 QUICK-START GUIDE RELOOP MIXON4 Installation and Setup The Reloop MIXON4 is a class compliant USB plug and play device for Mac, however requires drivers for Windows. You will find these on Reloop s website.
nativekontrol PXT-Live Plus User Manual Version 1.0.8
 nativekontrol PXT-Live Plus User Manual Version 1.0.8 1 CHANGES IN THIS VERSION 2 GENERAL OVERVIEW 3 SETUP 3.1 Live Settings 3.2 UserPlusPreferences 4 GLOBAL CONTROLS 4.1 Touch Strip 5 PLUS MATRIX MODES
MV-8800 Production Studio
 ÂØÒňΠWorkshop MV-8800 Production Studio Auto Chop 2007 Roland Corporation U.S. All rights reserved. No part of this publication may be reproduced in any form without the written permission of Roland
Major 49 Studio One. Instructions: Windows. Description. Jump To Comments. 1 of 14 11/30/2012 2:02 PM. View To Do Items Page Title Filed Under
 1 of 14 11/30/2012 2:02 PM Major 49 Studio One Version #4. Last time updated On 5 Oct 2012 by Justin Sullivan View To Do Items Page Title Filed Under Studio One (Status: Active) Parent Page: DAW support
MPC Essentials Release Notes
 MPC Essentials Release Notes About Akai Professional is continually updating and enhancing MPC Essentials. This document lists the new features, fixes and improvements made to your MPC Essentials software.
CS-32 Software User Guide
 CS-32 Software User Guide The CS-32 software allows you to map the controls on the CS-32 to perform various functions such as sending MIDI messages, keystrokes and even communicating directly with some
Grooving with Cyclone DXi
 } bonus Cyclone DXi is a virtual instrument included with both the Producer and Studio Editions of SONAR. It represents a major step forward in manipulating audio loops, allowing you to go beyond mere
FaderPort. Quick Start Guide. English.
 FaderPort www.presonus.com English Table of Contents 1 Introduction 1 1.1 About This Guide 1 1.2 What s in the Box 1 2 Hookup 2 2.1 Getting Started 2 3 Connections and Controls 3 3.1 Controls 3 3.2 Connections
User Guide. English. Manual Version 2.2
 User Guide English Manual Version 2.2 Table of Contents Introduction... 7 Tutorial... 12 System Requirements & Product Support... 7 Creating a Drum Kit... 12 About This User Guide... 8 Creating a Drum
CALIFORNIA PROP65 WARNING:
 Index Introduction 3 Box Content SE49 Features Minimum System Requirements Getting Started 4 Connection and Power Nektar DAW integration Using SE49 as a Generic USB MIDI Controller Keyboard, Octave, Transpose
HALion 4. Version history Known issues & solutions. Januar 2013 Steinberg Media Technologies GmbH
 HALion 4 Version history Known issues & solutions Januar 2013 Steinberg Media Technologies GmbH Table of contents About... 3 HALion 4.5.4... 4 Issues resolved... 4 HALion 4.5.3... 5 Improvements... 5 Issues
Microsoft Excel 2007
 Learning computers is Show ezy Microsoft Excel 2007 301 Excel screen, toolbars, views, sheets, and uses for Excel 2005-8 Steve Slisar 2005-8 COPYRIGHT: The copyright for this publication is owned by Steve
Setting Up the US-428 to Work with MOTU Digital Performer
 Setting Up the US-428 to Work with MOTU Digital Performer The US-428 is supported in Digital Performer v2.7 and later. Before setting up the US-428 to work with Digital Performer, please install the US-428
SOUND BROWSER SYSTEM PROTOTYPES SOUND FILE WINDOW. Click to update the list when files or directories have been added or removed by other programs.
 Each Sound in the list that is preceded by a cyan arrow (->) performs processing on an input (the replaceable input). These Sounds come with a default input, but a replacement input can be substituted
Ableton Live 9.1 MASCHINE Template Manual
 Ableton Live 9.1 MASCHINE Template Manual Disclaimer The information in this document is subject to change without notice and does not represent a commitment on the part of Native Instruments GmbH. The
RHIZOME HOST USER GUIDE V 2.1
 o RHIZOME HOST USER GUIDE V 2.1 1. INTRODUCTION... 5 2. UNIT WORKFLOW... 6 2.1. Displays... 6 2.2. Matrix Edit... 6 2.3. Transport bar... 7 2.4. Common function buttons... 8 2.5. Left zone white printed
NUAGE MASTER Ncs500-CT
 CONTROL SURFACE NUAGE MASTER Ncs500-CT Operation Manual Using this manual This operation manual supports keyword searching and linking as follows. Keyword searching Searching for keywords is performed
WAVES JJP GUITARS User Guide
 WAVES JJP GUITARS TABLE OF CONTENTS CHAPTER 1 INTRODUCTION...3 1.1 WELCOME...3 1.2 PRODUCT OVERVIEW...3 1.3 COMPONENTS...4 1.4 A FEW WORDS FROM JJP...4 CHAPTER 2 QUICKSTART GUIDE...5 CHAPTER 3 CONTROLS,
Blaze Audio Karaoke Sing-n-Burn
 Blaze Audio Karaoke Sing-n-Burn Manual Copyright 2005 by Singing Electrons, Inc. Contents 1.0 Getting Started...3 1.1 Welcome to Karaoke Sing-n-Burn!...3 1.2 Features...3 1.3 Learning to Use Karaoke Sing-n-Burn...3
Using Microsoft Word. Text Editing
 Using Microsoft Word A word processor is all about working with large amounts of text, so learning the basics of text editing is essential to being able to make the most of the program. The first thing
EasyStart. EMX1 Main Features. EasyStart CONTENTS
 EasyStart EMX1 Main Features ValveForce Technology adds tube warmth using two 12AX7 tubes with a separate gain knob. MMT Technology with 16 different types of synthesis for totally new and dynamic sounds.
Tracktion Shortcut Keys
 Tracktion Shortcut Keys General Flip between edit/project screens Go to project screen Go to edit screen Go to settings screen escape, ctrl + tab F1 F3 F2 Show colour-scheme editor window Save the current
Automated Video Redaction User Guide
 Automated Video Redaction User Guide INTRODUCTION VIEVU s Automated Video Redaction (AVR) module is the next generation, fully-hosted, cloud evidence redaction system. This guide describes how to operate
Chaos Culture. MIDI Modulators / Multiclip Note preview 1.6. Edited by Jason Cowling
 Chaos Culture Introduction... 2 Important stuff... 2 Setup... 3 Editing clips... 4 Using the editor... 5 Modulators... 8 Settings... 9 Work$ow settings... 10 Performance... 13 Future updates... 13 1.8.99
DROP-X. Drag & Drop - Beat Repeat Sampler USER MANUAL. VST / AU / AAX Plugin Mac OSX / WIN 32 / 64 bit
 DROP-X Drag & Drop - Beat Repeat Sampler VST / AU / AAX Plugin Mac OSX / WIN 32 / 64 bit USER MANUAL BEAT SKILLZ 10 SOUND BANKS - OVER 250 PRESETS Features: DropX is a very easy to use Drag & Drop Sampler
PT210M: Contents. Preface... xi Lesson 1. Preparing The Session... 1
 PT210M: Contents Preface... xi Lesson 1. Preparing The Session... 1 Customizing Sessions with MIDI Setup... 2 MIDI Connections to Pro Tools... 2 MIDI Studio Setup (Windows Only)... 3 Audio MIDI Setup (Mac
Crazy8 User Manual Mar 2017
 Crazy8 User Manual Mar 2017 Welcome! Welcome to Crazy8, your crazy companion to handle all your sequencing needs! Be sure to check out the walkthrough videos on the Crazy8 page Twisted-electrons.com/crazy8
Here's a summary of the SONAR features you can control from the Mackie Control:
 Page 1 of 37 Mackie Control Surfaces Help Working with the Mackie Control Configuring XT Units Mackie Control C4 Working with the Mackie Control When you install SONAR, you also install special software
D3200 Main Features. D3200 Connections and Navigation 2 Modes and Features Tour 3-5
 EasyStart D3200 Main Features 32 track recorder plus a dedicated stereo master track - a total of 272 virtual tracks! Up to 12 track simultaneous recording in both 16 and 24bit Record / playback @ 44.1
CONTROLLER API EXPLAINED
 CONTROLLER API EXPLAINED 1 Table of Contents Introduction...3 Where to put scripts...3 Controller Script Control-Flow...3 Defining & detecting the Controller...4 Loading the API...4 Defining the Controller...4
GarageBand 3 Getting Started Includes a complete tour of the GarageBand window, plus step-by-step lessons on working with GarageBand
 GarageBand 3 Getting Started Includes a complete tour of the GarageBand window, plus step-by-step lessons on working with GarageBand 1 Contents Chapter 1 7 Welcome to GarageBand 8 What s New in GarageBand
PSP Rhythm User s Manual
 PSP Rhythm User s Manual Introduction pg. 02 Main Menu pg. 03 Button Icon Legend pg. 03 User Interface pg. 04 Pattern View pg. 05 Track View pg. 07 Wave View pg. 09 Effects View pg. 11 Song View pg. 14
Version 4 Software. Version 4 - Supplement. Issue A, August 2007 for Version 4.0+ Software. D5 V4 Supp 1-1
 Version 4 - Supplement Issue A, August 2007 for Version 4.0+ Software D5 V4 Supp 1-1 D5 V4 Supp 1-2 Contents 1.0 Introduction... 1-4 1.1 Hardware Configuration Options... 1-4 1.2 Audio Sync Options...
Hindenburg Journalist Guide - Windows
 Hindenburg Journalist! 1 Hindenburg Journalist Guide - Windows Introduction! 4 Overview! 5 Menu Bar! 5 Tool Bar! 5 Tracks! 5 Workspace! 5 Transport bar! 6 QPPM Meter & Counter! 6 Clipboard! 6 Favorites!