SignWare-Pro. User s Guide. SignWare-Pro v1.2.
|
|
|
- Phyllis O’Brien’
- 6 years ago
- Views:
Transcription


1 SignWare-Pro User s Guide SignWare-Pro v1.2
2 Table of Contents Introduction... 3 Disclaimer Notice... 4 What s in the Box?... 5 Limited Warranty Statement... 6 Section 1 -Setting up the SignWare-Pro Server Software 1. Getting Started Installing SignWare-Pro Server Setting up the SignWare-Pro Client Navigating the SignWare-Pro Client Updating the SignWare-Pro Client Section 2 -Using the SignWare-Pro Server Software 6. Running SignWare-Pro Server Software for the first time Firewall User Manager Task Manager Creating and working with schedules Super Schedules Template Creator Creeping Line Editor Registration and Activation Specifications Server Requirements Alphabetical Index
3 Introduction Congratulations on your purchase of the SignWare-Pro Digital Signage Solution. Please read the instructions carefully before using. SignWare-Pro is a digital signage solution that creates new marketing and information sharing portals to reach target audiences with real time information. SignWare-Pro attracts audiences by displaying your message using vivid, high-quality video and animation replacing traditional signs and posters. SignWare-Pro uses your IP network to remotely manage, control, and broadcast your information to target audiences in specific locations across the globe. Because it uses a closed network, your information is safe and secure. SignWare-Pro is capable of playing back all industry standards, such as Flash files, Video.MPG, HTML, QuickTime, Power Point,.JPG s, Java Applets, and more. SignWare-Pro is the ultimate solution that provides both hardware and software for the display and management of your digital content. It is highly cost effective and easy to use. It is the perfect solution for both small-scale and large-scale projects. 3
4 Disclaimer Notice The information contained in this document is subject to change without notice. SmartAVI makes no warranty of any kind with regard to this material, including but not limited to, implied warranties of merchantability and fitness for particular purpose. SmartAVI will not be liable for errors contained herein or for incidental or consequential damages in connection with the furnishing, performance or use of this material. No part of this document may be photocopied, reproduced, or translated into another language without prior written consent from SmartAVI, Inc. 4

5 What s in the Box? PART NO. QTY DESCRIPTION AP-SNWP-8GS 1 SignWarePro Client* - Figure A AP-SNW-SW 1 SignWare-Pro Software -Figure B PS5VD3A* 1 5-Volt 3-Amp Power Supply* - Figure C 5
6 Limited Warranty Statement A. Extent of Limited Warranty 1. SmartAVI, Inc. warrants to the end-user customers that the SmartAVI product specified above will be free from defects in materials and workmanship for the duration of 1 year, which duration begins on the date of purchase by the customer. Customer is responsible for maintaining proof of date of purchase. 2. SmartAVI s limited warranty covers only those defects which arise as a result of normal use of the product, and do not apply to any: a. Improper or inadequate maintenance or modifications. b. Operations outside product specifications. c. Mechanical abuse and exposure to severe conditions. 3. If SmartAVI receives, during Applicable warranty period, a notice of defect, SmartAVI, Inc. will, at its discretion, replace or repair the defective product. If SmartAVI is unable to replace or repair the defective product covered by the SmartAVI warranty within a reasonable period of time, SmartAVI shall refund the cost of the product. 4. SmartAVI shall have no obligation to repair, replace or refund unit until customer returns defective product to SmartAVI. 5. Any replacement product could be new or like new, provided that it has functionality at least equal to that of the product being replaced. 6. SmartAVI limited warranty is valid in any country where the covered product is distributed by SmartAVI. 6
 and how to setup the SignWare-Pro client.")

7 Section 1 Setting up the SignWare-Pro Server Software 1. Getting Started This quick setup guide will instruct you on how to install and setup the SignWare-Pro software onto your Server (Host PC) and how to setup the SignWare-Pro client. To ensure proper installation of the server software; Please make sure you are running Windows XP Professional with Service Pack 2 or 3, Windows 2003 or Windows Vista. Make sure that you are logged in as the system administrator. Turn off the Windows firewall. (see Figure 1.1 for Windows XP) You can alternately select SignWare-Pro under the exceptions tab. (Figure 1.2) If you do not wish to turn off your firewall, please refer to Part 7.1 of the manual. Figure 1.1 Figure 1.2 7


8 2. Installing SignWare-Pro Server SignWare-Pro Server requires a unique serial number to be installed. You will find your key on back of the SignWare-Pro Server CD sleeve. In addition, you must complete the online registration for your copy of SignWare-Pro Server. If you do not register within the thirty-day window, your SignWare-Pro Server software will become disabled. A registration window will open automatically. If you wish to register at a later date, simply select Help/Registration. For more help on registration, refer to Part 13 of the manual. 1. Double click on the SignWare-Pro Server Setup executable. Read the License Agreement then click I Agree 2. Enter in your name and organization and enter the unique serial number (IN ALL CAPS) provided to you. Important: When entering the serial number, please make sure it is typed with ALL CAPS, or registration will not give you a 30 day grace period. (Figure 2.1) 3. The next window will be to choose components, make sure SignWare-Pro Server is checked. (Figure 2.2) 4. Choose the installation location you would like to install the SignWare-Pro Server. Click Next. 5. Before the installation completes, you will be asked to create a password for the Administrator account. You must sign in as the Administrator for the first time you load the SignWare-Pro Manager. For more information on the User Manager, go to Section 2 of the manual. Figure 2.1 Figure 2.2 8
 b. Attach the HDMI from the monitor or display to the HDMI port on back of the client. c. Connect the SignWare-Pro client to a router using CAT5 cable.")
9 3. Setting up the SignWare-Pro Client 1. Setting up the SignWare-Pro Client a. Connect the power supply cable to the SignWare-Pro client and plug the cable into a grounded power outlet. (Figure 3.1) b. Attach the HDMI from the monitor or display to the HDMI port on back of the client. c. Connect the SignWare-Pro client to a router using CAT5 cable. (If you will be using a wireless router, please refer to your router s manual for additional information). Turn on the display connected to the client. The monitor should display the SignWare-Pro splash screen. Once the kernel has booted, you will be brought to a black screen with a blue status bar at the bottom. Figure 3.1 9


10 4. Navigating the SignWare-Pro Client 1. Once you ve logged in, connect the keyboard and press CTRL+ALT+2 to open the SignWare-Pro Configuration Panel (Figure 4.1). (Figure 4.1) (Figure 4.2) 2. Network Settings i. DHCP Check this box if you would like your SignWare-Pro Client to receive an IP Address from your network. If you need to set a Static IP, uncheck this box to manually set your IP, Netmask, 10
11 Gateway, and DNS. 3. Resolution Settings (Figure 4.2) Use the Tab key (Figure 4.2) to tab to the Resolution drop down box and use the arrow keys to scroll through the different selections. Press the OK button to select the resolution. 4. SignWare-Pro Server Settings i. Server If your SignWare-Pro Client is unable to find your Server on the network, manually type in the IP Address of your Server. ii. User This is the default username that is linked to your Server. Please leave this setting as is. iii. Password This is the default password that is linked to the User. Please leave this setting as is. 11

 4. Right-Click the schedule and select Start to run the update. 5.")
12 5. Updating the SignWare-Pro Client In an effort to produce the best digital signage system on the market, we will continue to make upgrades to our products. To update to the newest version of the SignWare-Pro client, you will need to do the following; 1. Unpack the SignWare-Pro update file onto your server. 2. In Task manager create Update task and point to update.img as the task data. (Figure 6.1) Important: update.inf should be placed in the same directory as flash.img or the update will not work. 3. In Task manager, create a new schedule and add the update task you created in Step 2. (Figure 6.2) 4. Right-Click the schedule and select Start to run the update. 5. After updating, the SignWare-Pro client will reboot automatically. 6. You may need to reconfigure client settings again. IMPORTANT: DO NOT TURN OFF OR UNPLUG THE CLIENT during this operation. If you do so, the SignWare-Pro client will no longer operate and you will need contact customer support for a new system file. Figure 6.1 Figure

 3. Once the SignWare-Pro Server Station Manager is loaded. You will see the following; a. Connected SignWare-Pro clients b. Loopback IP. (127.0.0.1) c.")
13 Section 2 Using the SignWare-Pro Server Software 6. Running SignWare-Pro Server Software for the first time 1. Double click on the SignWare-Pro Server Station Manager icon either on your desktop or start menu. 2. You will first be prompted with a Server Logon settings dialog box. The default IP address is In the user name and password fields use the new Administrator user and password you created in the installation process and click OK. (Figure 6.1) 3. Once the SignWare-Pro Server Station Manager is loaded. You will see the following; a. Connected SignWare-Pro clients b. Loopback IP. ( ) c. Your user name and password. Click Save Password to stay logged in. (Figure 6.2) Figure 6.1 Figure
14 6.1 Firewall SignWare-Pro uses the TCP/IP suite to communicate between the server and client, proper settings of your firewall and routers will be needed. After the installation of SignWare-Pro Manager, and the initial start of the software, you will be asked to by the windows firewall to unblock, or keep blocking SignWare-Pro Manager. You want to make sure you unblock it. The port used for communication is UDP and TCP. This will be used when forwarding ports in your router, when using SignWare-Pro via WAN. 14


15 6.2 User Manager Our user manager now allows SignWare-Pro users to manage and control their own user database. Windows logins are no longer required. Each user created is allowed a set of permissions. The user rights are described as followed: Administrator: Full access to everything, only user that is able to create and manage users. Task Manager: Allowed to access and control the task manager and selectable clients assigned by the administrator. Station Manager: allowed to access and control the station manager. Client: used for the SignWare-Pro clients to connect to the signage server only. During the installation, you will be asked to create the administrator password. If you click Cancel, you will be assigned default usernames and passwords. (Figure 6.2.1) To have different users log in, always click on Configuration then Login server. Click Save Password while logged in. To log out, uncheck Save Password. (Figure 6.2.2) Figure Figure
 To create a new user, right click or click on User then New User. The user properties window will open.")

16 After you log into the SignWare-Pro manager, you can create new users by clicking Run, then clicking on User Manager (Figure 6.2.3) To create a new user, right click or click on User then New User. The user properties window will open. Here is where you enter in your new user information (Figure 6.2.4): User name: The name of the new user. Full name: The real name of the user. Description: The description of the user. Password: The password for that user. User rights: Select the rights you want this user to have. Figure Figure Click Save. You will then see the new user in the list. (Figure 6.2.3) 16
17 7. Task Manager The main feature of SignWare-Pro is the Task Manager. This is where you set up and manage all of your presentations. To open the Task Manager: Select Run then click on the Task Manager. (Figure 7.1) Figure 7.1 Once you are in the Task Manager you can begin setting up your presentations. Tasks: are individual presentations such as movies, PowerPoint presentations or Flash files; in order to run a Task it must be placed into a schedule. Schedules: are used to schedule a Task or a series of Tasks to run together at a specific time and day. 17
18 Setting up Tasks: In the Task menu option, you can create, delete, and view the properties of all the files you wish to run on SignWare-Pro. Figure 7.2 To create a new task: 1. Select Task and select New Task. (Figure 7.2) 2. Select the type of file you are going to use. (Figure 7.3) 3. Select the file located on your hard drive. Once the task has been added, you can configure the following properties; a. The duration of the task (setting the duration to 0:0:0 will cause the program to run indefinitely. b. Operation on End of Task, i. Here you can set what will happen upon completion of the Task if it is included in a schedule. ii. Run Next Task will open up the next task in the schedule upon completion. iii. Restart Current Task will cause the task to repeat itself. Note: You can override these configurations in the Schedule Properties menu. (Part 8) 18
 you will select which tasks will run in which window.")
19 Figure 7.3 Creating Schedules A schedule is where you combine all of the different tasks that you ve created in step 8 and put them into one place. From here you create the programming schedule. You can select a variety of task to run at specific times, run once, or loop continuously. If you use the template feature (described in step 10) you will select which tasks will run in which window. Schedules can be as complex or as simple as you like. You can control hundreds of tasks to run at specific times or simply have one or two tasks set to loop continuously. 19
 3. Begin populating the schedule with various tasks. These tasks can be videos, images, web pages, PowerPoint Presentations, etc. a. To do this you must use your mouse to highlight one of the tasks you created in the previous step.")
20 8. Creating and working with schedules 1. In the Task Manager select Schedule and click New Schedule. The Schedule Properties Dialog will appear. (Figure 8.1) 2. In the General tab give your schedule a name. (optional) 3. Begin populating the schedule with various tasks. These tasks can be videos, images, web pages, PowerPoint Presentations, etc. a. To do this you must use your mouse to highlight one of the tasks you created in the previous step. (Figure 8.2) b. With the task highlighted click the arrow just to move the task into your schedule. (Figure 8.2) c. The task within the schedule will run in order starting from the task at the top of the list. You can arrange tasks by selecting them and using the up and down buttons. d. You also have the option of deleting the task from the schedule or clearing the schedule entirely. Figure 8.1 Figure 8.2 Once you have added your tasks to the schedule, you are ready to modify the tasks properties 20
 a. Operation on end of task i.")

21 Modifying Tasks within the Schedule 4. While in the Schedule Properties dialog, double-click the task you wish to modify from the Scheduled Tasks section. This brings up the Schedule Task Properties dialog. From here you are given several options; (Figure 8.3) a. Operation on end of task i. Run next task in schedule: This option will run the next task that you ve added to the schedule once the task has ended. ii. Restart current task: This will restart the current task once it has finished. Use this selection to loop your task indefinitely. iii. Wait for end of task period and then start next task in schedule: Use this Selection if you ve set a specific duration for the task. b. Duration: Lets you configure how long you would like the task to be displayed on your screen. Setting this to 0:0:0 will automatically stop the task once it has ended. This is primarily used for video and flash movies. c. Use View: If you are using templates*, this control lets you select which view to display your task. (Figure 8.4) d. Click OK to save your settings. *More about templates in Part 10. Figure 8.3 Figure
 b.")
 d.")
22 5. Day and Time: Use the Day and Time tab to control when and for how long the schedule will play. The Day and Time dialog controls the following; a. Schedule start type: This feature selects how the schedule will operate. (Figure 8.5) b. Run at user logon: This will start the schedule as soon as the user is logged on. c. Run once: Select a specific time and date for the schedule to run. (Figure 8.6) d. Run periodically: Set the time and date for your schedule to play. This option allows you to alternately control a variety of schedules. Figure 8.5 Figure

23 8.1 Super Schedules Super Schedules were designed to allow multiple schedules to run in one, also allowing a drag and drop friendly user interface. To use the Super Schedule, open up the Task Manager and then click on Schedule then select New Super Schedule. 1. In the Setup Schedule tab, this is where you will setup your multiple schedules. Click on Add. In the window that opened you can name your schedule and select the duration. Then click Ok. (Figure 8.1.1) 2. Select a schedule in the list, then with the media icon, drag and drop it into the blue box. A Task Properties window will appear just like the normal Task Properties. Browse for your media. Click Save. You can now add more schedules to your Super Schedule. (Figure 8.1.2) 3. The Day & Time tab has the same functionality as the one in the normal Schedule. (Part 9) 4. The Client Filter tab will allow you to specify the clients that will download and run your Super Schedule. 5. The View tab must always remain checked on View 1. Click Ok and your new Super Schedule will be shown in the Schedule list. Figure Figure


24 9. Template Creator The Template creator is powerful feature of SignWare-Pro. Templates allow users to create and assign regions. This gives you the ability to run several tasks simultaneously on one screen. The result is the integration of high-resolution graphics with dynamic video and scrolling text messages and news feeds. To create a template and assign tasks: 1. Use your mouse to select the schedule you wish to use for your template. 2. From the schedule menu select New Template (Figure 9.1) 3. Select the resolution of your client s display. (Figure 9.2) Figure 9.1 Figure
25 4. To create your first region click on the Add View icon and drag your mouse across the white display editor. (Figure 9.3) Figure
26 5. You may continue adding, deleting, resizing, and moving regions until you are satisfied. (Figure 9.4) Figure

27 6. You can also assign a background image to your layout by clicking the Properties icon and selecting an image from your hard drive. (Figure 9.5) Figure

28 7. Once you are satisfied with your layout, save the template file on your computer hard drive. (Figure 9.6) Figure

29 Now you are ready to assign views. This is where you select which task will be displayed into the different regions you ve just created. 8. From the Schedule Properties dialog double click on any of the tasks for this schedule. This will bring up the Schedule Task Properties dialog. (Figure 9.7) Figure
 Figure 9.")
30 9. Select the view from the dropdown menu you where you would like the task displayed. Then click ok (Figure 9.8) Figure
31 10. Creeping Line Editor SignWare-Pro Creeping Line Editor enables you to create a scrolling marquis anywhere on your screen. You can use RSS feeds, text from a file, or simply type text directly into the editor. 1. Opening the Creeping Line Editor. a. From the SignWare-Pro Server Manager select Run and click Creeping Line Editor (Figure 10.1) Figure
 c. Use RSS: Input the URL of the RSS feed of your choice. (Figure 10.4) d. Control the speed of your scrolling text. e. Preview the text directly on your desktop.")
32 2. To create and edit scrolling text, select Options and click Creeping line options (Figure 10.2) a. In the General tab Creeping Line Property Sheet you are given several options; b. Input text: Type your text directly into the editor. (Figure 10.3) c. Use RSS: Input the URL of the RSS feed of your choice. (Figure 10.4) d. Control the speed of your scrolling text. e. Preview the text directly on your desktop. Figure


33 Figure 10.3 Figure Customizing fonts a. Select the Font tab to adjust the size, style and color of your font. (Figure 10.5) Figure

34 4. Adjust window text and transparency. (Figure 10.6) a. In the Text Window and Transparency dialog box you are given several adjustment options. i. Background Color ii. Window Border: Transparency Transparent Color Figure
 Figure 10.7 Note: You can preview your changes anytime by clicking the Preview button. 6.")
35 5. Set the position of your creeping text. a. The Window Position dialog lets you decide where you would like the scrolling text to appear on your screen. i. You have the option of either docking your window to the top or bottom of your screen. (Figure 10.7) Figure 10.7 Note: You can preview your changes anytime by clicking the Preview button. 6. Save your changes. a. To accept your changes click the OK button on your Creeping Line Property Sheet. b. To save your work select File and click either Save or Save As from the section menu. (Figure 10.8) c. Name your file and save on your hard drive. 35

36 Figure 10.8 The new Creeping Line Manager allows SignWare-Pro users to add multiple Creeping Lines in Tasks rather than in a Schedule. You can now add multi Creeping Lines into specific Tasks. 36


37 To add Creeping Lines into a Task: 1. Click on the Task Properties of the Task you want to add the Creeping Line into. 2. Click on the button that is labeled Background Manager (Figure 10.10) 3. In the Creeping Line Manager, you can add existing Creeping Lines or create new ones. To create a new one, click on Edit. To add existing Creeping Lines, click on Add and browse for your file. (Figure 10.11) 4. You can add more than one Creeping Line in each task. To stop a previous Creeping Line in a different Task that is running in one Schedule, click on Stop previous Background. 5. Enable Background documents below: must be checked for the Creeping Lines to play. 6. You can change the Creeping Lines in Tasks that are already placed in Schedules by going to your Task properties via the Schedule Properties. Figure Figure

 Next you want to fill out the form completely, and make sure the Product at the top says SignWare- Pro.")

 Lastly, click the button that says Save Changed Registration Information.")
38 11. Registration and Activation SignWare-Pro software requires registration and activation for successful use of the SignWare-Pro Manager software after 30 days. To register, go to Help and click Registration (Figure 11.1) Next, click the link that says Get key from WWW. (Figure 11.2) Next you want to fill out the form completely, and make sure the Product at the top says SignWare- Pro. After you have completed the form, click the Register Now button. A new window will open; this contains your activation code. Copy the code, close the window, and paste it in the Register Product window in the Activation key: field. (Figure 11.3) Lastly, click the button that says Save Changed Registration Information. The Product Registration Status will say Product has been registered (Figure 11.4) Click Ok to close the window. Note: Make sure you save your activation code in a safe place; it will be needed for product upgrades. Figure 11.1 Figure 11.2 Figure 11.3 Figure
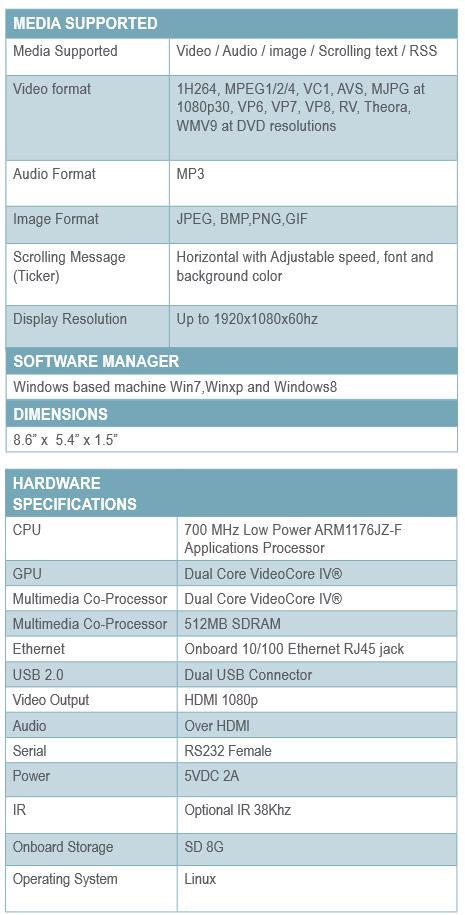
39 Specifications 39
40 Alphabetical Index Creating and working with schedules Creeping Line Editor Disclaimer Notice... 4 Firewall Getting Started... 7 Installing SignWare-Pro Server... 8 Introduction... 3 Limited Warranty Statement... 6 Navigating the SignWare-Pro Client Registration and Activation Running SignWare-Pro Server Software for the first time Server Requirements Setting up the SignWare-Pro Client... 9 Specifications Super Schedules Task Manager Template Creator Updating the SignWare-Pro Client User Manager What s in the Box?
41 Notes 41
42 Notes 42
43 Copyright 2011 Smart-AVI, All Rights Reserved NOTICE The information contained in this document is subject to change without notice. Smart-AVI makes no warranty of any kind with regard to this material, including but not limited to, implied warranties of merchantability and fitness for any particular purpose. Smart-AVI will not be liable for errors contained herein or for incidental or consequential damages in connection with the furnishing, performance or use of this material. No part of this document may be photocopied, reproduced or translated into another language without prior written consent from Smart-AVI. For more information, visit SmartAVI, Inc. / Twitter: smartavi Vanowen St. North Hollywood, CA Tel: (818) Fax: (818)
PRESENTERWALL. User s Guide PresenterWall v4.4.
 PRESENTERWALL User s Guide PresenterWall v4.4 www.smartavi.com 1 Table of Contents Introduction 3 Disclaimer 4 What s in the Box? 5 Limited Warranty Statement 6 Section 1 Installing the PresenterWall Hardware
SaviSign Manager User Manual
 SaviSign Manager User Manual Digital Signage Management Software For The P100 Signage Player For use with Windows 7 or Higher Easy-to-use, powerful software Perfect for crafting digital signage displays!
Made in U.S.A. 1
 Made in U.S.A. www.smartavi.com 1 1-800-AVI-2131 TABLE OF CONTENTS INTRODUCTION & FEATURES 2 Getting Started and Installation 3 Start-Up 4 Managing Streams and Environment 5 Frequently Asked Questions
HDR-8X8-Plus. User Manual. HDMI 4K 8x8 Switch Matrix Connect up to eight different HDMI video sources to eight different outputs.
 HDR-8X8-Plus User Manual HDMI 4K 8x8 Switch Matrix Connect up to eight different HDMI video sources to eight different outputs. Made in U.S.A. www.smartavi.com 1-800-AVI-2131 1 Table of Contents What s
MXWall-Pro. User Manual. Route Up to 32 sources to as many as 32 HD displays
 MXWall-Pro User Manual Route Up to 32 sources to as many as 32 HD displays All-in-one HD Switch / Converter / Scaler for Video Walls and Signage Displays Made in U.S.A. www.smartavi.com 1 1-800-AVI-2131
Installation Manual SM-RS Port RS232 Router with optional TCP/IP control
 Installation Manual SM-RS232 16-Port RS232 Router with optional TCP/IP control Control up to 16 RS232 compliant devices up to 50 feet away over UTP or from anywhere via TCP/IP (optional) What s in the
SignWall. Hardware Installation and Configuration. HD Video Wall System.
 SignWall HD Video Wall System Hardware Installation and Configuration Thank You & Congratulations Congratulations on your purchase of the SignWall information display netwrok. Please read the instructions
SKM 04. User Manual. 4-Port Keyboard, Mouse and Audio Switch with USB 2.0 Sharing
 SKM 04 User Manual 4-Port Keyboard, Mouse and Audio Switch with USB 2.0 Sharing Manage keyboard & mouse operations on four computers over multiple displays Made in U.S.A. www.smartavi.com 1 1-800-AVI-2131
SaviSign P100 Pro User Manual
 SaviSign P100 Pro User Manual 4K Wi-Fi enabled signage player with creative software manager. Create, distribute, and manage your signage from anywhere in the world over the Internet! 1 Made in U.S.A.
DVN 8Pro. User Manual. 8-Port DVI-D KVM Switch with Audio and USB 2.0 Sharing
 DVN 8Pro User Manual 8-Port DVI-D KVM Switch with Audio and USB 2.0 Sharing Access and control up to 8 computers with one USB keyboard, one USB mouse and a DVI-D monitor Made in U.S.A. www.smartavi.com
DVR16X port DVI-D Matrix Switch with Front Panel, RS-232, and TCP/IP Control
 NOTICE The information contained in this document is subject to change without notice. SmartAVI makes no warranty of any kind with regard to this material, including but not limited to, implied warranties
4K-WALL HDMI/DVI Video Wall Controller and 4x4 Switch Matrix. User Manual
 4K-WALL HDMI/DVI Video Wall Controller and 4x4 Switch Matrix. User Manual Integrated 2x2 Video Wall Controller and 4x4 Port HDMI, Real Time Switch Matrix with On Screen Display Control & No Software Required.
DPN-4 Duo. User Manual. 4-Port Dual-Head Displayport KVM switch with USB 2.0 and Audio Sharing
 DPN-4 Duo User Manual 4-Port Dual-Head Displayport KVM switch with USB 2.0 and Audio Sharing Access & Control up to 4 Computers from a single Workstation Made in U.S.A. www.smartavi.com 1 1-800-AVI-2131
EZWall Pro. User Manual. Multi Format Video Wall Processor
 EZWall Pro User Manual Multi Format Video Wall Processor 3x3 HD Video Wall Controller HDMI, VGA, Composite and Y/Pb/Pr Inputs Integrated USB Media Player Made in U.S.A. www.smartavi.com 1 1-800-AVI-2131
4K-WALL User Manual. HDMI/DVI Video Wall Controller and 4x4 Switch Matrix.
 4K-WALL User Manual HDMI/DVI Video Wall Controller and 4x4 Switch Matrix. Integrated 2x2 Video Wall Controller and 4x4 Port HDMI, Real Time Switch Matrix with On Screen Display Control & No Software Required.
Installation Manual SMTCP-2. Ethernet Control for SmartAVI Switches. Control most SmartAVI matrix switches from anywhere in the world
 Installation Manual SMTCP-2 Ethernet Control for SmartAVI Switches Control most SmartAVI matrix switches from anywhere in the world Introduction The SMTCP-2 is an RS-232 control module that allows most
DPN 4 Duo. User Manual. 4-Port Dual-Head DisplayPort 1.2 KVM Switch with USB 2.0 and Audio Sharing
 DPN 4 Duo User Manual 4-Port Dual-Head DisplayPort 1.2 KVM Switch with USB 2.0 and Audio Sharing Access and Control Four Computers with 2 DisplayPort Monitors each Using One KVM Workstation with Two DisplayPort
DVN 16Pro. User Manual. 16-Port DVI-D KVM Switch with Audio and USB 2.0 Sharing
 DVN 16Pro User Manual 16-Port DVI-D KVM Switch with Audio and USB 2.0 Sharing Access and Control 16 Computers with One USB keyboard, USB Mouse and DVI-D Monitor Made in U.S.A. www.smartavi.com 1 1-800-AVI-2131
StretcherPro-HD. User Manual. HDMI/DVI-D 2x2 Video Wall Controller. Made in U.S.A. 1
 StretcherPro-HD User Manual HDMI/DVI-D 2x2 Video Wall Controller Made in U.S.A. www.smartavi.com 1 1-800-AVI-2131 TABLE OF CONTENTS WHAT'S IN THE BOX? 2 INTRODUCTION 3 FEATURES 3 APPLICATIONS 3 TECHNICAL
D2H 4P Duo. User Manual. 8-Port DisplayPort in, 2-Port HDMI out, 4K Ultra-HD KVM Switch with USB and Audio
 D2H 4P Duo User Manual 8-Port DisplayPort in, 2-Port HDMI out, 4K Ultra-HD KVM Switch with USB and Audio Manage 4 computers with dual head, screen displays from a single workstation Made in U.S.A. www.smartavi.com
ETHERNET CONTROL FOR SMARTAVI SWITCHES. Control most SmartAVI matrix switches from anywhere in the world USER MANUAL
 ETHERNET CONTROL FOR SMARTAVI SWITCHES Control most SmartAVI matrix switches from anywhere in the world USER MANUAL TABLE OF CONTENTS Introduction... 4 Features... 4 Applications... 4 What s in the box...
SOFTWARE LICENSE LIMITED WARRANTY
 CYBEROAM INSTALLATION GUIDE VERSION: 5..0..6 IMPORTANT NOTICE Elitecore has supplied this Information believing it to be accurate and reliable at the time of printing, but is presented without warranty
UHDN 4P Duo. User Manual. 4-Port Dual Head Ultra 4K-60Hz HDMI KVM Switch with USB 2.0 and Audio Support. Manage 4 computers from a single workstation
 UHDN 4P Duo User Manual 4-Port Dual Head Ultra 4K-60Hz HDMI KVM Switch with USB 2.0 and Audio Support Manage 4 computers from a single workstation Made in U.S.A. www.smartavi.com 1 1-800-AVI-2131 TABLE
Advanced 2/4-Port DisplayPort Secure KVM Switch
 Document ID: DOC-IPG-2008 Revision: 1.10 Release Date: December 13, 2016 Advanced 2/4-Port DisplayPort Secure KVM Switch USER MANUAL SDPN-2S SDPN-2D SDPN-2S-P SDPN-2D-P SDPN-4S SDPN-4D SDPN-4S-P SDPN-4D-P
Advanced 8-Port DisplayPort Secure KVM Switch
 Document ID: DOC-IPG-2022 Revision: 1.10 Release Date: January 4, 2018 USER MANUAL SDPN-8S SDPN-2S-P 8-Port Secure DisplayPort KVM with Audio 2-Port Secure DisplayPort KVM with Audio and CAC Support Made
RS-1260 Digital Signage Player
 RS-1260 Digital Signage Player User Manual V1.3 Legal Notice and Disclaimer Thank you for choosing RapidSignage products. This user manual provides a description of the Player relevant guidelines for key
How to configure SecureW2
 How to configure SecureW2 Disclaimer The software described in this document is furnished under a license agreement and may be used only in accordance with the terms of the agreement. Copyright Notice
ADVANCED 4/8 PORT DVI-D MATRIX SECURE KVM SWITCH
 ADVANCED 4/8 PORT DVI-D MATRIX SECURE KVM SWITCH USM-2S0-3M1 REV: 1.00 DATE: 04/03/2018 CONSOLE 3 CONSOLE 4 SS8P-DVI-8X4-U 8 PORT DVI-D W/ AUDIO AND MODELS: SS4P-DVI-4X2-U SS4P-DVI-4X4-U SS8P-DVI-8X2-U
ADVANCED 4/8-PORT SECURE KM SWITCH
 ADVANCED 4/8-PORT SECURE KM SWITCH USM-2S0-1M0 REV: 1.1 DATE: 09/11/2017 1 2 3 4 SS4P-KM-U SECURE KM SWITCH 4 PORT W/ AUDIO MODELS: SS4P-KM-U SS4P-KM-UCAC SS8P-KM-U SS8P-KM-UCAC 4-Port Secure KM Switch
Document ID: DOC-IPG-2004 Revision: 1.10 Release Date: December 13th, Advanced 2/4-Port DVI-I Secure KVM Switch
 Document ID: DOC-IPG-2004 Revision: 1.10 Release Date: December 13th, 2016 Advanced 2/4-Port DVI-I Secure KVM Switch USER MANUAL SDVN-2S SDVN-2D SDVN-2S-P SDVN-2D-P SDVN-4S SDVN-4D SDVN-4S-P SDVN-4D-P
VMp Technical Support Phone: Online request:
 Copyright 2011 ViewCast Corporation. All rights reserved. ViewCast, Niagara SCX, ViewCast logo, Osprey, Niagara, SimulStream, Niagara logo, SchedulStream, GoStream, and ViewCast Media Platform (VMp) are
Advanced 2/4/8-Port DisplayPort Secure KVM Switch
 Document ID: USM-0S0-MM3 Revision: 1.11 Release Date: July 3rd, 2018 USER MANUAL SDPN-2S SDPN-2D SDPN-2S-P SDPN-2D-P SDPN-4S SDPN-4D SDPN-4S-P SDPN-4D-P SDPN-4Q-P SDPN-8S SDPN-8S-P 2-Port Secure DisplayPort
DataPort 250 USB 2.0 Enclosure User s Guide (800)
") DataPort 250 USB 2.0 Enclosure User s Guide WWW.CRU-DATAPORT.COM (800) 260-9800 TABLE OF CONTENTS PAGE Package Contents 1 Features and Requirements 2 Installation 4 Trouble Shooting 13 Technical Support
DataPort 250 USB 2.0 Enclosure User s Guide WWW.CRU-DATAPORT.COM (800) 260-9800 TABLE OF CONTENTS PAGE Package Contents 1 Features and Requirements 2 Installation 4 Trouble Shooting 13 Technical Support
File Transfer Tool Guide Version 1.0. Revision History. Revision Date Page(s) Changed Description of Change 4/2009 All pages First edition released.
 Changed Description of Change 4/2009 All pages First edition released.") 3M Digital Projector File Transfer Tool Guide Version 1.0 For Models: X62w / X64w / X90w / X95 Revision History Revision Date Page(s) Changed Description of Change 4/2009 All pages First edition released.
3M Digital Projector File Transfer Tool Guide Version 1.0 For Models: X62w / X64w / X90w / X95 Revision History Revision Date Page(s) Changed Description of Change 4/2009 All pages First edition released.
SKM-08. USER MANUAL (rev 2.0) 8-Port Keyboard and Mouse Switch with USB 2.0 Sharing
 8-Port Keyboard and Mouse Switch with USB 2.0 Sharing") SKM-08 8-Port Keyboard and Mouse Switch with USB 2.0 Sharing Allows sharing a single keyboard & mouse on up to eight computers with multiple displays USER MANUAL (rev 2.0) TECHNICAL SPECIFICATIONS USB
SKM-08 8-Port Keyboard and Mouse Switch with USB 2.0 Sharing Allows sharing a single keyboard & mouse on up to eight computers with multiple displays USER MANUAL (rev 2.0) TECHNICAL SPECIFICATIONS USB
Advanced 2/4 Port DisplayPort to HDMI Secure KVM
 Document ID: USM-0S0-1M4 Revision: 1.11 Release Date: July 3rd, 2018 Advanced 2/4 Port DisplayPort to HDMI Secure KVM USER MANUAL SDHN-2S-P SDHN-2D-P SDHN-4S-P SDHN-4D-P SDHN-4Q-P 2 Port Secure Single-Head
Upgrading to Sage ACT! 2013 from ACT! 3.x, 4.x, 5.x (2000), or 6.x (2004)
, or 6.x (2004)") Upgrading to Sage ACT! 2013 from ACT! 3.x, 4.x, 5.x (2000), or 6.x (2004) Copyright 2012 Sage Software, Inc. All Rights Reserved. Sage, the Sage logos, ACT!, and the Sage product and service names mentioned
Upgrading to Sage ACT! 2013 from ACT! 3.x, 4.x, 5.x (2000), or 6.x (2004) Copyright 2012 Sage Software, Inc. All Rights Reserved. Sage, the Sage logos, ACT!, and the Sage product and service names mentioned
ADVANCED 1/2/4-PORT DVI-I SECURE KVM SWITCH
 ADVANCED 1/2/4-PORT DVI-I SECURE KVM SWITCH USM-2S0-MM1 REV: 1.1 DATE: 08/11/2017 1 2 3 4 SS4P-SH-DVI-U SECURE KVM SWITCH 4 PORT DVI-I W/ AUDIO AND MODELS: SI1P-SH-DVI-U SS2P-SH-DVI-U SS2P-DH-DVI-U SS2P-SH-DVI-U
USER GUIDE TABLE OF CONTENTS TECHNICAL SPECIFICATIONS WHAT S IN THE BOX? SECURITY FEATURES SECURE KVM SWITCH FRONT AND REAR INSTALLATION
 ADVANCED 2/4/8-PORT DISPLAYPORT SECURE KVM SWITCH USM-2S0-MM3 REV: 1.1A DATE: 07/03/2018 1 2 3 4 SS4P-SH-DP-U SECURE KVM SWITCH 4 PORT DP W/ AUDIO AND MODELS: SS2P-SH-DP-U SS2P-SH-DP-U SS2P-DH-DP-U SS2P-DH-DP-U
Advanced 4/8 Port Secure KM Switch
 Document ID: DOC-IPG-2007 Revision: 1.10 Release Date: February 17th, 2017 Advanced 4/8 Port Secure KM Switch USER MANUAL SKMN-4S SKMN-4S-P SKMN-8S SKMN-8S-P 4-Port Secure KM with Audio 4-Port Secure KM
USB Server User Manual
 1 Copyright Notice Copyright Incorporated 2009. All rights reserved. Disclaimer Incorporated shall not be liable for technical or editorial errors or omissions contained herein; nor for incidental or consequential
Sedao Ltd SAM-MZ. Multi Zone Digital Signage Player User manual revised August 2012
 Sedao Ltd SAM-MZ Multi Zone Digital Signage Player User manual revised August 2012 Contents Introduction... 2 Unpacking your SAM-MZ... 2 Step 1) Installing your SAM-MZ... 3 What s on screen?... 4 Turning
Advanced 4/8-Port DVI-D Matrix KVM
 Document ID: USM-0S0-3M1 Revision: 2.10 Release Date: July 3rd, 2018 CONSOLE 3 CONSOLE 4 SDVN-44-X OR OR OR OR Advanced 4/8-Port DVI-D Matrix KVM USER MANUAL SDVN-42-X SDVN-44-X SDVN-82-X SDVN-84-X 4-Port
4-Port Single-head Secure Pro DVI-D KVM Switch with KB/Mouse USB emulation, CAC and Preview Screen
 4-Port Single-head Secure Pro DVI-D KVM Switch with KB/Mouse USB emulation, and Preview Screen USM-2S0-M21 REV: 1.1 DATE: 08/11/2017 1 2 3 4 Quad TQuad PIP Full Select Preview SECURE KVM SWITCH 4 PORT
Intelli-Signage Signage Designer Software
 Intelli-Signage (User Manual V1.0) version: V3.0.0.0 Contents 1. Introduction... 1 2. System requirement... 1 2.1 Signage Player Software... 1 2.2... 1 3. Installation/Uninstallation of... 2 4. interface...
QUICK START GUIDE FOR AVSIGNCLOUD
 Control Your Video VIDEO WALLS VIDEO PROCESSORS VIDEO MATRIX SWITCHES EXTENDERS SPLITTERS WIRELESS CABLES & ACCESSORIES QUICK START GUIDE FOR AVSIGNCLOUD QUICK START GUIDE FOR AVSIGNCLOUD ABOUT THIS DOCUMENT
hp l1619a smart attachment module
 hp l1619a smart attachment module user s guide Smart Attachment Module 1 Notice This manual and any examples contained herein are provided as is and are subject to change without notice. Hewlett-Packard
ImageMate 12-in-1 Reader/Writer User Guide
 ImageMate 12-in-1 Reader/Writer User Guide Model Number SDDR-89 Product Description The Multi-Function Hi-Speed USB 2.0 Reader/Writer CompactFlash Type I/II, SD TM, minisd TM, MultiMediaCard TM, RS-MMC
WIFI MEDIA PLAYER QUICK SETUP GUIDE
 WIFI MEDIA PLAYER QUICK SETUP GUIDE CONNECTING MEDIA PLAYER TO WIRELESS NETWORK: (*11n Wireless router is highly recommended) Connect the Media Player to TV with supplied A/V or HDMI (Not Supplied) cable.
Advanced 2/4/8/16-Port DVI-I Secure KVM
 Document ID: USM-0S0-MM1 Revision: 2.10 Release Date: July 3rd, 2018 Advanced 2/4/8/16-Port DVI-I Secure KVM USER MANUAL SDVN-2S SDVN-2D SDVN-2S-P SDVN-2D-P SDVN-4S SDVN-4D SDVN-4S-P SDVN-4D-P SDVN-4Q-P
QUICK START GUIDE. SMS 2500iX Appliance.
 QUICK START GUIDE SMS 2500iX Appliance www.24onlinebilling.com QUICK START GUIDE SMS 25iX Appliance www.24onlinebilling.com 1 DEFAULTS The sales packet of 24online includes following list of contents.
USB 3.0 Universal Dual Video Docking Station Installation Guide
 Introduction USB 3.0 Universal Dual Video Docking Station Installation Guide The USB 3.0 Universal Dual Video Docking Station is designed for a computer that has multiple connectivity demands. Features
Quick Setup & Getting Started
 Quick Setup & Getting Started HP Compaq Business PC Copyright 2007 Hewlett-Packard Development Company, L.P. The information contained herein is subject to change without notice. Microsoft, Windows, and
USB 3.0 Dual Head Docking Station
 Introduction USB 3.0 Dual Head Docking Station Installation Guide The USB 3.0 Dual Head Docking Station is a unique design for a computer that has extra connectivity demands. Features and Benefits Adds
11Mbps Wireless LAN Smart Station Adapter
 11Mbps Wireless LAN Smart Station Adapter Quick Start Guide Version 1.6 The next-generation wireless LAN device 11Mbps Wireless LAN Smart Station adapter, brings Ethernet-like performance to the wireless
Authorized Send User s Guide Version 4.0
 Canon Authorized Send User s Guide Version 4.0 08011-40-UD1-003 This page is intentionally left blank. 2 Authorized Send User s Guide Contents Preface...5 How to Use This Manual... 5 Symbols Used in This
LabelWriter. Print Server. User Guide
 LabelWriter Print Server User Guide Copyright 2011 Sanford, L.P. All rights reserved. 04/11 No part of this document or the software may be reproduced or transmitted in any form or by any means or translated
Installing Act! for New Users
 Installing Act! for New Users Installing Act! for New Users 2017 Swiftpage ACT! LLC. All Rights Reserved. Swiftpage, Act!, and the Swiftpage product and service names mentioned herein are registered trademarks
Advanced 4-Port DVI-I Secure KVM Switch
 Document ID: USM-0S0-421 Revision: 1.20 Release Date: July 3rd, 2018 SDMN-4S-P 1 2 3 4 Full PIP QuadT QuadQ Select Preview Advanced 4-Port DVI-I Secure KVM Switch USER MANUAL SDMN-4S-P 4-port Secure DVI-I
X-Sign 2.0 User Manual
 X-Sign 2.0 User Manual Copyright Copyright 2018 by BenQ Corporation. All rights reserved. No part of this publication may be reproduced, transmitted, transcribed, stored in a retrieval system or translated
Laser Beam Printer. Network Guide. IMPORTANT: Read this manual carefully before using your printer. Save this manual for future reference.
 Laser Beam Printer Network Guide IMPORTANT: Read this manual carefully before using your printer. Save this manual for future reference. ENG Network Guide How This Manual Is Organized Chapter 1 Before
USB 2.0 to DVI/VGA Pro
 Introduction USB 2.0 to DVI/VGA Pro Installation Guide The USB 2.0 to DVI/VGA Pro adds DVI or VGA port to your USB enabled system. Key Features and Benefits Quickly adds a monitor, LCD or projector to
Wireless USB to HDMI with Audio Kit Installation Guide
 Wireless USB to HDMI with Audio Kit Installation Guide Introduction The Wireless USB to HDMI with Audio Kit adds an HDMI port to your USB enabled system. Key Features and Benefits Up to 10 meters wireless
Océ Posterizer Pro Designer. POP into retail. User manual Application guide
 - Océ Posterizer Pro Designer POP into retail o User manual Application guide Copyright copyright-2010 Océ All rights reserved. No part of this work may be reproduced, copied, adapted, or transmitted in
Illuminate 25 Light Starter Kit What s included Light String Control Box Spare Fuses Safety Instructions Quick Start Guide
 Illuminate Password: 12345678 QR Codes to download App: IOS/Apple Android Quick Start Guide Illuminate 25 Light Starter Kit What s included Light String Control Box Spare Fuses Safety Instructions Quick
Avalanche Remote Control User Guide. Version 4.1
 Avalanche Remote Control User Guide Version 4.1 ii Copyright 2012 by Wavelink Corporation. All rights reserved. Wavelink Corporation 10808 South River Front Parkway, Suite 200 South Jordan, Utah 84095
11Mbps Wireless LAN Smart Access Point
 11Mbps Wireless LAN Smart Access Point Quick Start Guide Version 1.6 The next-generation wireless LAN device 11Mbps Wireless LAN Smart Access Point, brings Ethernet-like performance to the wireless realm.
x10data Application Platform v7.1 Installation Guide
 Copyright Copyright 2010 Automated Data Capture (ADC) Technologies, Incorporated. All rights reserved. Complying with all applicable copyright laws is the responsibility of the user. Without limiting the
factory field upgrade
 CK721-A Network Controller factory field upgrade version 3.1 build 25 24-10025-75 Revision B October, 2013 Copyright 2013 Johnson Controls, Inc. All Rights Reserved No part of this document may be reproduced
MFC790CW Windows Network Connection Repair Instructions
 Difficulty printing from your PC can occur for various reasons. The most common reason a networked Brother machine may stop printing, is because the connection between the computer and the Brother machine
Manual Download. Please visit SUNIX website by searching keyword isafe or KEY-256UN1 for detail.
 Manual Download Please visit SUNIX website http://www.sunix.com by searching keyword isafe or KEY-256UN1 for detail. 1 User s Manual Copyright Copyright 2014 SUNIX Co., Ltd. All Rights Reserved. No part
Installation Guide Installing / Licensing / Unlocking Kepware Products
 Installation Guide Installing / Licensing / Unlocking Kepware Products License Registration & Unlock online at www.kepware.com/mykepware Kepware is the world leader in communication software for automation.
NCD ThinPATH PC Installation Guide and Release Notes
 NCD ThinPATH PC Installation Guide and Release s Copyright Copyright 2001 by Network Computing Devices, Inc. (NCD).The information contained in this document is subject to change without notice. Network
Wireless USB to HDMI with Audio Kit Quick Installation Guide
 Wireless USB to HDMI with Audio Kit Quick Installation Guide Introduction The Wireless USB to HDMI with Audio Kit adds an HDMI port to your USB enabled system. Key Features and Benefits Up to 10 meters
TracerPlus Wireless Server for TracerPlus Windows Mobile/CE
 TracerPlus Wireless Server for TracerPlus Windows Mobile/CE User Guide TracerPlus Wireless Server Version 7.0 Portable Technology Solutions, LLC Telephone: 1-877-640-4152 Fax: 1-501-421-5085 Web www.tracerplus.com
Xerox Versant 3100 Press Stock Library Manager
 Software Version 8.0[0-9][0-9] Help Version 3.0 March 2016 2016 Xerox Corporation. All rights reserved. Xerox and Xerox and Design are trademarks of Xerox Corporation in the United States and/or other
Protect Your Investment In Asure ID. Thank You For Purchasing Asure ID Let s Get Started! Section 1 Installing Asure ID
 QuickStart Guide Protect Your Investment In Asure ID Save Valuable Time And Money With Asure ID Protect! Asure ID Protect is a comprehensive customer care program designed to ensure that you receive the
STYLE 6046 AKRO VIEW DIAGNOSTIC SOFTWARE INSTALLATION AND OPERATIONS MANUAL
 STYLE 6046 AKRO VIEW DIAGNOSTIC SOFTWARE INSTALLATION AND OPERATIONS MANUAL 123064 Contents Introduction...3 Software Installation...4 USB to CAN Adapter Installation...7 Windows XP... 7 Windows Vista
SonicWALL CDP 2.1 Agent Tool User's Guide
 COMPREHENSIVE INTERNET SECURITY b SonicWALL CDP Series Appliances SonicWALL CDP 2.1 Agent Tool User's Guide SonicWALL CDP Agent Tool User s Guide Version 2.0 SonicWALL, Inc. 1143 Borregas Avenue Sunnyvale,
Quick Reference Guide
 Media Player SB-L008KU Quick Reference Guide Version 1.1 NEC Display Solutions, Ltd. Notes The windows in the actual software may differ somewhat from those shown in this manual. No part of the contents
HDMI A/V over Gigabit Ethernet Adapter. User s Manual
 HDMI A/V over Gigabit Ethernet Adapter User s Manual HDMI A/V over Gigabit Ethernet Adapter User s Manual ABOUT THIS MANUAL This manual is designed for use with the HDMI A/V over Gigabit Ethernet Adapter.
SonicWall Secure Mobile Access SMA 500v Virtual Appliance 8.6. Getting Started Guide
 SonicWall Secure Mobile Access SMA 500v Virtual Appliance 8.6 Getting Started Guide Copyright 2017 SonicWall Inc. All rights reserved. SonicWall is a trademark or registered trademark of SonicWall Inc.
LiNC-NXG for Windows 8 Professional, Windows 7 Professional, Vista Business Edition and XP Professional
 LiNC-NXG for Windows 8 Professional, Windows 7 Professional, Vista Business Edition and XP Professional Installation Guide for LiNC-NXG 33-10067-001 REV: C PCSC 3541 Challenger Street Torrance, CA 90503
Copyright NeoAccel Inc. SSL VPN-Plus TM. NeoAccel Management Console: Network Extension version 2.3
 Copyright 2005-2009. NeoAccel Inc. SSL VPN-Plus TM NeoAccel Management Console: Network Extension version 2.3 NeoAccel makes no warranty of any kind with regard to this manual, including, but not limited
Authorized Send User s Guide for imagerunner Machines Version 4.1
 Canon Authorized Send User s Guide for imagerunner Machines Version 4.1 08011-41-UD1-003 This page is intentionally left blank. 2 Authorized Send User s Guide for imagerunner Machines Contents Preface...5
CellSync Manager. User Manual F8V7D006-SS F8V7D008-SS. Get online and synchronize anywhere. Web Access. Phone Book Manager
 CellSync Manager Get online and synchronize anywhere Web Access Phone Book Manager User Manual F8V7D006-SS F8V7D008-SS TABLE OF CONTENTS Introduction...2 Interactive Phone Menu...3 LG 5350 CellSync Software
DataPort 350 & 525 USB 2.0 and FireWire Enclosure User s Guide (800)
") DataPort 350 & 525 USB 2.0 and FireWire Enclosure User s Guide WWW.CRUINC.COM (800) 260-9800 TABLE OF CONTENTS PAGE Package Contents 1 Features and Requirements 2 Installation 6 Trouble Shooting 16 Technical
DataPort 350 & 525 USB 2.0 and FireWire Enclosure User s Guide WWW.CRUINC.COM (800) 260-9800 TABLE OF CONTENTS PAGE Package Contents 1 Features and Requirements 2 Installation 6 Trouble Shooting 16 Technical
Digital Signage Management Software
 Digital Signage Management Software VERSION 2.0 Quick Start Guide COPYRIGHT NOTICE The information in this document is subject to change without prior notice in order to improve reliability, design, and
cb 1500 quick start guide & user manual Time and Attendance Made Simple...
 cb 1500 quick start guide & user manual Time and Attendance Made Simple... and Smart! ABC Office 1142 West Flint Meadow Drive, Kaysville, UT 84037 (800) 658-8788 www.abcoffice.com Sign-up Thank you for
Authorized Send User s Guide Version 3.5
 Canon Authorized Send User s Guide Version 3.5 08011-35-UD1-004 This page is intentionally left blank. 2 Authorized Send User s Guide Contents Preface...5 How to Use This Manual... 5 Symbols Used in This
The Connector. Version 1.2 Microsoft Project to Atlassian JIRA Connectivity. User Manual
 The Connector Version 1.2 Microsoft Project to Atlassian JIRA Connectivity User Manual Ecliptic Technologies, Inc. Copyright 2008 www.the-connector.com Page 1 of 86 Copyright and Disclaimer All rights
Océ Posterizer Pro. POP into retail. User manual Quick Reference Manual
 - Océ Posterizer Pro POP into retail o User manual Quick Reference Manual Copyright copyright-2010 Océ All rights reserved. No part of this work may be reproduced, copied, adapted, or transmitted in any
Luminis AiO Dedicated Support Line: T: User Guide
 Luminis AiO Dedicated Support Line: T: 0844 561 0514 User Guide Contents Rear Connection Diagram 2 Introduction 3 Normal Usage 3 Manage my Media 4 Edit my Templates and Media 5 Manage Multimedia Playlist
Dolphin ebase. Communication Cradle for the Dolphin 9700 Mobile Computer. User s Guide
 Dolphin ebase Communication Cradle for the Dolphin 9700 Mobile Computer User s Guide Introduction The Ethernet Base (ebase) enables a single Dolphin 9700 computer to communicate with a host device over
Installation Guide 10 lb. Scale-Printer Combo
 Installation Guide 10 lb. Scale-Printer Combo ready? Model c210 Unpack Remove the items shown below from the box (tip: save the packing materials in case you move or need to return the unit). power adapter
Downloading and Licensing. (for Stealthwatch System v6.9.1)
") Downloading and Licensing (for Stealthwatch System v6.9.1) Contents Contents 2 Introduction 5 Purpose 5 Audience 5 Preparation 5 Trial Licenses 5 Download and License Center 6 Contacting Support 6 Registering
Downloading and Licensing (for Stealthwatch System v6.9.1) Contents Contents 2 Introduction 5 Purpose 5 Audience 5 Preparation 5 Trial Licenses 5 Download and License Center 6 Contacting Support 6 Registering
Adobe Dreamweaver CS5 Tutorial
 Adobe Dreamweaver CS5 Tutorial GETTING STARTED This tutorial focuses on the basic steps involved in creating an attractive, functional website. In using this tutorial you will learn to design a site layout,
Upgrading to Act! v20 from ACT! 3.x, 4.x, 5.x (2000), or 6.x (2004)
, or 6.x (2004)") Upgrading to Act! v20 from ACT! 3.x, 4.x, 5.x (2000), or 6.x (2004) 2017 Swiftpage ACT! LLC. All Rights Reserved. Swiftpage, Act!, and the Swiftpage product and service names mentioned herein are registered
Upgrading to Act! v20 from ACT! 3.x, 4.x, 5.x (2000), or 6.x (2004) 2017 Swiftpage ACT! LLC. All Rights Reserved. Swiftpage, Act!, and the Swiftpage product and service names mentioned herein are registered
User s Manual for H4S & NetPoint 2.2
 User s Manual for H4S & NetPoint 2.2 2015 BIGPOND TECHNOLOGY Co., Ltd. All rights reserved. www.sunde.net.pk USER MANUAL FOR NETPOINT2.2 AND H4S 1 2015 BIGPOND TECHNOLOGY Co., Ltd. All rights reserved.
SUNDE. User s Manual for NetPoint2.2 & H4S USER MANUAL FOR NETPOINT2.2 AND H4S 1
 SUNDE User s Manual for NetPoint2.2 & H4S USER MANUAL FOR NETPOINT2.2 AND H4S 1 2015 Huiyuan Co., Ltd. All rights reserved. www.sundenc.com THANK YOU FOR PURCHASING SUNDE NETWORK TERMINAL. PLEASE READ