(1) XDCAM Browser. Version 2.0. Help Sony Corporation
|
|
|
- Clifford Pope
- 6 years ago
- Views:
Transcription

1 (1) XDCAM Browser Version 2.0 Help 2010 Sony Corporation
2 Table of Contents Overview Operating Window Configuration [Explorer] window [Preview] window [Offline Media] window [Storyboard] window [Explorer] Windows Tab Path Toolbar Tree View pane Capacity Folder type Information about selected clips Component View pane List View pane List View Pane ([Explorer] Windows) Switching display modes Marks and icons in the List View pane Sorting the list Selecting the items to display in Details View Selecting the items to display in tooltips [Preview] Windows about the [Preview] window Viewer Tab Clip name Splitter Clip properties section Viewer ([Preview] Windows) Screen Clip type Number of essence marks Timecode Position bar Playline Command buttons [General] Tab (Clip Properties Section) [A/V Format] Tab (Clip Properties Section) [Related Info] Tab (Clip Properties Section)
3 [Essence Mark] Tab (Clip Properties Section) [Detail] button and Essence Mark detailed setting area Essence Mark list [Write to XDCAM Disc] and [Update] buttons [Add], [Edit], and [Delete] buttons [Acquisition] Tab (Clip Properties Section) [Flash Band] Tab (Clip Properties Section) [Offline Media] Window Tab Path Toolbar Tree View pane Capacity Folder type Information about selected clips List View pane [Storyboard] Window Clip list index picture Clip list name Clip list info viewer [Save] button Storyboard Subclip info viewer Customizing the Window Configuration Opening multiple windows Snapping windows to each other Tabbing windows Converting a tabbed window back into a separate window Other window operations Selecting the window configuration When the snap function is enabled Keyboard shortcuts for selecting tabs To select the previous or next tab from the keyboard Operation Precautions for Clips and Clip Lists Precautions About Handling 3D Clips To handle an L clip/r clip as a 3D clip Handling clips shot with a camcorder capable of shooting in 3D as 3D clips Handling clips shot with two camcorders as a 3D clip Releasing 3D clip pairing into separate L clip and R clip Supported and unsupported functions for 3D clips Copying Clips Selecting clips for copying To cancel the copy operation
4 Reasons why a copy operation may fail When you group split clips by gathering them into one place When you copy an XDCAM EX file to a copy destination with MXF attributes Copying all the clips on a media disc or folder When the [Specify the folder when "Copy All"] check box is checked on the [Edit] tab When the [Specify the folder when "Copy All"] check box is cleared on the [Edit] tab To cancel the copy operation Reasons why a copy operation may fail Copy error check option Copying Clip Lists Collectively copies materials used with clip lists To cancel the copy operation Reasons why a copy operation may fail Copying a clip list only in the same folder Moving Clips Move modes To cancel the move operation Reasons why a move operation may fail When you group split clips by gathering them into one place Deleting Clips and Clip Lists Reasons why a delete operation may fail Grouping Clips That Have Been Split Across Separate Media Creating Clips by Specifying Ranges To cancel creation of the clip Reasons why a new clip operation may fail Creating Still Images from Clips Editing Clip and Clip List Properties Editing clip and clip list properties Batch editing clip properties Renaming Clips and Clip Lists on Professional Discs Importing Clips To cancel the import operation Reasons why an import operation may fail Importing Clip Lists Exporting Clips To cancel the export If a file with the same name already exists at the output destination File Conversion Formats (Clip Export) Exporting Clip Lists Previewing Clips and Clip Lists Loading clips and clip lists into the [Preview] window To stop play
5 Preview operations To select full-screen playback To change the playback mode of MXF clips To select the audio channels to monitor during previews To edit a clip list Previewing Unregistered Media Files [Preview] window operations To preview media files with drag and drop Changing the Index Picture of a Clip Searching for Clips and Clip Lists To hide the search criteria in the Specified Folder tab To sort the search results To display the search results in an [Explorer] window To play the search results Correcting flash bands Detecting flash bands automatically Checking and editing detected flash bands Correcting flash bands Executing correction automatically after flash band detection Checking flash band corrected clips Setting an Essence Mark in a Clip Adding an essence mark called "_ShotMark1" Adding an essence mark with a specified name To input a random name when setting an essence mark Writing essence mark edits to recording media Editing an Essence Mark in a Clip Displaying the essence marks that are in a clip Deleting essence marks Renaming essence marks Writing essence mark edits to recording media Importing into Final Cut Pro Importing clips into Final Cut Pro Selecting and importing clips and clip lists from the [Explorer] window To change the name of a file to be imported To abort Displaying and importing clips and clip lists into the [Preview] window Exporting From Final Cut Pro Creating New Clip Lists Displaying Clip List Content Adding Subclips to a Clip List Adding from the [Explorer] window or [Offline Media] window Adding from the [Preview] window
6 Editing Clip Lists Previewing subclip content Moving subclips To move via drag and drop To move via cut and paste Copying subclips To copy via drag and drop To copy via cut and paste Deleting subclips Trimming subclips Specifying or editing the titles and descriptions of subclips Saving Clip Lists Operations from the [Storyboard] window Operations from the [Offline Media] window Folder and Media Precautions Folders for XDCAM EX Clips Folders for MXF Clips Creating Folders Reasons why a folder creation may fail Renaming Folders Deleting Folders Reasons why folder deletion may fail Backing up Folders When a folder is too large to save to your backup media or folder Splitting Folders Combining Folders Reasons why a folder combine operation may fail Checking/Editing Disc Metadata Changing the Index Picture of Disc Metadata Exporting Information about Clips and Clip Lists in Media or Folder To check the exported information Copying a Professional Disc To cancel the copy operation Reasons why a copy operation may fail Formatting Media Applicable media Formatting Professional Discs Formatting SxS memory cards Overview of Planning Metadata Functions [Planning Metadata] Window File name
7 Header [Properties] button and Properties pane [Shot Mark] buttons and the Shot Mark pane [Material] button and Material pane [Reference] button and Reference pane [Write to XDCAM Disc] and [Update] buttons Displaying and Editing Planning Metadata To display data To edit data Creating New Planning Metadata Changing the Planning Metadata Properties Pane Editing data Adding data Deleting data Changing the Planning Metadata Shot Mark Pane Changing the Planning Metadata Material Pane Linking clips and clip lists Editing information about related clips and clip lists Deleting links with clips and clip lists Adding related files Changing the Planning Metadata Reference Pane Linking files directly to planning metadata Adding files to be linked to clips and clip lists Editing the titles of related files Deleting related files Copying and Moving Planning Metadata Renaming Planning Metadata Deleting Planning Metadata Checking Related Clips and Clip Lists Checking in an [Explorer] window Checking in a [Preview] window Operating Related Files Batch copying related files Copying linked EX clips Batch exporting related files Batch editing clip properties Overview of Live Logging Functions [Live Logging] Window Tab Path Toolbar Tree View pane
8 8 Folder type Information about selected clips List View pane [Live] Window Tab Host name Live status and the number of essence marks Timecode and duration display Screen Position bar and control buttons Logging area Logging Area ([Live] Window) Essence mark setting area [General] tab and [Essence Mark] tab Live Logging Operations Connecting to the XDCAM device Logging [Live Logging] window operations Rewriting to media Disconnecting from the XDCAM device Loading Planning Metadata to a Device Loading recorded planning metadata to an SxS memory card Copying and loading planning metadata to a device Rewriting Live Logging Data to the Recording Media To abort To match names to source media Loading Clips and Clip Lists From Professional Discs and USB Flash Drives Editing Metadata Editable items For clips For clip lists For media (Disc metadata) Rewriting Edited Data to a Professional Disc To abort To match names to source media Copying High-Resolution Data Uploading Clips to an FTP Server Downloading Clips from an FTP Server Uploading Clips to XDCAM Station Devices Downloading Clips from XDCAM Station Devices Overview of XDCAM Station Control Functions Connection via NET-RMT
9 Connection via FTP Connection via CIFS [XDCAM Station] Window Tab Path Toolbar Tree View pane List View pane Capacity Information about selected clips Remote control panel Remote Control Panel ([XDCAM Station] Window) Port selection buttons and media Device status display area Playback control button Record media selection pane and record control button Playing in XDCAM Station To control playback Recording with XDCAM Station To control recording To stop simultaneous recording to Professional Disc Copying between Media in XDCAM Station To cancel the copy operation Reasons why a copy operation may fail Deleting Clips and Clip Lists from XDCAM Station Media Reasons why a delete operation may fail Finalizing XDCAM Station Professional Discs Applicable media Finalizing the disc Reasons why finalization may fail Opening the [Preferences] Dialog [General] Tab [Window] [Stereoscopic 3D Clip] [Edit] Tab [Priority in Move] [Copy] [Clip] [Display] Tab [Name] [Metadata displayed to thumbnails] [50p/60p Timecode Display Mode] [When no more clips can be previewed]
10 [Play] Tab [Resolution] [MXF Play mode] [Aspect Ratio] [Conversion] Tab [Country] [MP4 to MXF conversion] [Margin of Subclip] [Flash Band] Tab [Detection and Correction] [Where to save the corrected clips] [Offline] Tab [Work Folder] [Clip List] Tab [Storyboard] [Copy] [Default Start Timecode] [XMPilot] Tab [Planning Metadata] [Live Logging] [FCP] Tab [RegistrationFolder] [File Name] About Network Connections Registering Remote Hosts Registering a new host Editing the host information Deleting a host Registering Essence Mark Names and Categories Displaying the [Edit Essence Mark List] window Registering essence mark categories Registering essence mark names Editing Essence Mark Categories and Names Renaming essence mark categories Deleting essence mark categories Renaming an essence mark / Deleting an essence registered in a category Importing Essence Mark Lists Exporting Essence Mark Lists How XDCAM EX Clip Data are Configured Recording format Recording folders How MXF Clip Data are Configured
11 Recording format Recording folders Menu Lists [XDCAM Browser] menu [File] menu [Edit] menu [View] menu [Clip] menu [XDCAM Device] menu [Preview] menu [Window] menu [Help] menu Error and Warning Message List How to Obtain the MainConcept Plug-in Software Functions with "Trial" Displayed Licenses MPEG-4 Visual Patent Portfolio License MPEG-2 Video Patent Portfolio License AVC Patent Portfolio License VC-1 Patent Portfolio License Warranty Notice NOTICE TO USERS Trademarks How to Use This Help Starting the Help Help window configuration Tab buttons Search box Contents, Index, and Search tabs (navigation component) Topic area
12 Overview XDCAM Browser allows you to work with clips created with XDCAM EX/XDCAM devices. This software allows you to play back and confirm the content of clips and clip lists stored on SxS memory cards, Professional Discs, and hard disks, while also allowing you to copy the clips between media, and move, delete, and otherwise organize these clips. You can also create clip lists for editing later by sorting clips or subclips which extract a section of the master clip, or by adding marks to any part of the clip. This software supports the following clip formats. Clip File format Extension XDCAM EX format compatible clips MP4 DV-AVI Type2 a), b) AVI MP4 XDCAM format clips MXF b) MXF a) Referred to in this manual as DV-AVI clips or DV-AVI files. b) Some functions are not supported. Media (such as SxS memory cards) that contains HQ 1440 clips or DV-AVI clips is not recognized as usable media by the PMW-EX1/EX3/EX30. 12

13 Operating Window Configuration The default configuration of the operating windows is as follows. Window configuration can be customized depending on the intended use. See Customizing window configuration for more information. [Explorer] window See [Explorer] windows for more information. [Preview] window See [Preview] windows for more information. [Offline Media] window Display the [Offline Media] window when performing operations using proxy data (low resolution data) from Professional Discs. See [Offline Media] window for more information. [Storyboard] window Display the [Storyboard] window when you edit clip lists. See [Storyboard] window for more information. 13
![[Explorer] Windows [Explorer] windows are where you operate on clips (files) and folders, and where you check clip metadata.](/docs-images/76/74056648/images/14-0.jpg "You can operate on XDCAM EX/XDCAM format folders and media. You can have up to ten [Explorer] windows open at one time.")
14 [Explorer] Windows [Explorer] windows are where you operate on clips (files) and folders, and where you check clip metadata. You can operate on XDCAM EX/XDCAM format folders and media. You can have up to ten [Explorer] windows open at one time. When you have more than one window open, you can convert them into tabs on one window. 14
15 Tab The tab displays the name of the media or folder that is selected in the Tree View pane. When two or more [Explorer] windows are open, you can drag and drop the tab on another window to convert this window into a tab on the other window. See Customizing the window configuration for more information. Path This is the full path to the media or folder that is selected in the Tree View pane. Toolbar Contains tool buttons for operations on clips and folders. [New Folder] Creates a new folder in the currently selected media or folder. See Creating folders for more information. [Find] Opens the [Find] dialog. See Searching for clips for more information. [Copy All] Copies all of the clips in the selected media or folder to the specified folder. See Copying clips for more information. [Delete] Deletes the selected clip, clip list, or folder. See Deleting clips and clip lists or Deleting folders for more information. [Eject Media] Ejects the media selected in the Tree View pane, or puts it into a state in which it can be safely removed. Regardless of the target drive, clicking this button has the same effect as using the operating system Eject function. [Copy to Offline Media] Copies selected clips on Professional Discs and USB flash drives, or the entire media to offline media folders. See Loading clips and clip lists from Professional Discs and USB flash drives for more information. [Update Modified Data] This cannot be used in this window. See [Offline Media] window for more information. [Show XDCAM Station] Opens the [XDCAM Station] window. See [XDCAM Station] window for more information. [Show Offline Media] Opens the [Offline Media] window. See [Offline Media] window for more information. [Show/Hide the Folder Tree] Allows you to show or hide the Folder Tree pane. [Show/Hide Component View] Allows you to show or hide Component View. 15
16 [Filter By] Filters the display of XDCAM EX clips by file format (showing all clips, MP4 clips, or DV-AVI clips). [List View] Switches the clip view mode (thumbnails/details). Tree View pane Displays a tree of folders stored on media inserted in locally or remotely connected XDCAM devices, as well as folders stored on the computer. Local: Displays a tree of folders stored on media inserted in locally connected XDCAM devices, as well as folders stored on the computer. Remote: Displays media from XDCAM devices connected via the network. The following icons represent the type of the media or folder. Icon Type of media or folder Hard disk drive CD, DVD, or Blu-ray Disc drive XDCAM drive XDCAM device connected remotely (via FTP) XDCAM Station device connected via CIFS (used only for internal storage) SxS memory card drive SxS memory card drive that requires salvaging Mass storage device (removable drive) connected by USB a) Mounted network drive Normal folder, not managed by this application Folder with EX attributes Folder with MXF attributes Folder with clip list attributes Folder with planning metadata attributes a) The data cannot be edited directly on the USB flash drive when a USB flash drive containing data recorded with an XDCAM device that is capable of simultaneous recording of proxy data to USB flash drives is connected. See Loading clips and clip lists from Professional Discs and USB flash drives, and load the data onto the computer before editing. The Tree View pane supports the same kinds of operations as the folder tree view of your operating system. You can show or hide folder contents by clicking the [Show/Hide Folder Tree] button on the toolbar. 16 When you select a media item, a message may appear saying that salvage is required, and that you should salvage the media on the device that recorded it. This message appears when the data is defective, typically because the XDCAM device was powered off or the media was ejected too soon during recording. Return the media to the XDCAM device and salvage it
17 immediately. The data may become unrecoverable if you continue to operate without salvaging it. Capacity Displays the used capacity and remaining capacity of the media selected in the Tree View pane. The remaining capacity is shown as a numeric value and as a bar graph. Folder type Displays the type of the folder being selected in the Tree View pane. EX: Folder with EX attributes MXF: Folder with MXF attributes Information about selected clips Displays information on clips or clip lists selected in the List View pane (number of selected clips or clip lists, total length of clips or clip lists, total size (clips only)). If an SxS-1 memory card is inserted in an ExpressCard card slot of the computer on which this application is running, and that card is selected, the rewrite life of the card is also displayed. The total length of clips and total lengths of clip lists are approximate values, so take them as an approximate guide. Component View pane Displays the component files of a clip in temporal order. Component files are displayed by selecting [Show Component View], or by clicking the [Show/Hide Component View] button in the toolbar. When a single DV-AVI file is selected in the List View pane, this pane displays thumbnails of the clip s component files. This pane displays the component files of DV-AVI clips only. Copy, delete, and other file operations are not supported in the Component View pane. List View pane See List View pane ([Explorer] windows) for more information. 17
18 List View Pane ([Explorer] Windows) Displays the clips or clip lists stored in the media or folder that is selected in the Tree View pane. You can select one of the following view modes. Thumbnail view: Displays the index picture of each clip or clip list (or a thumbnail of the first frame) and its properties (default: the date and time of shooting and the name of the clip or clip list). Thumbnail View cannot be selected for remotely connected drives. Displayed attribute items can be changed. See [Display] tab for more information. Details view: Displays an icon indicating the type and status of the clip, as well as the name of the clip and its properties. Switching display modes Do one of the following. Select [Thumbnails] or [Details] from the [View] menu. Click the [List View] button in the toolbar, and then select [Thumbnails] or [Details]. Marks and icons in the List View pane A mark indicating clip status is displayed on each thumbnail or icon in both view modes. For Details View mode Icon / mark Description MP4 file DV-AVI file MXF file Proxy file of MXF file Clip list file Files with OK status a) Abnormal file (without data, cannot be decoded, etc.) A file in which some of the video cannot be displayed. However, the video that can be displayed is handled like a normal file, and clip operations are supported. a) Clips with OK status can be moved or deleted by this application. 18
19 For Thumbnails View mode Thumbnail display example Description Normal clips, and clip lists Clip with OK status a) The first part of a clip that spans several media discs or memory devices. b) The middle part of a clip that spans several media discs or memory devices. b) The last part of a clip that spans several media discs or memory devices. b) A clip or clip list in which some of the video cannot be displayed. However, the video that can be displayed is handled like a normal clip, and clip operations are supported. 3D clip (when the [Stereoscopic 3D] check box is checked in the [General] tab of the [Preferences] dialog.) 3D clip, but where the lengths of component L clip and R clip are different (when [Stereoscopic 3D] check box is checked) 3D L Clips 3D R Clips A clip that cannot be loaded. The clip cannot be previewed, and its properties c) d) cannot be edited. A clip list with no registered subclips A clip list containing subclips for which a compatible clip cannot be found. a) Clips with OK status can be moved or deleted by this application. b) When a clip spans several media discs or memory devices, parts on other discs or memory devices are not played back. 19
20 c) A clip that cannot be played or displayed properly by this application. The file may be corrupt or thumbnail creation may have failed. d) A clip that cannot be played or displayed properly by this application. Another application is using the clip file. Sorting the list Select one of the following items that you want to use as the sort key from [Sort By] in the [View] menu. [Name] [Size] [Length] ( appears for a 3D clip if the component L clip and R clip are different lengths) [Status] [Creation Date] [Last Update] [Rec Mode] [Media Spanning] [Folder Path] Selecting the items to display in Details View Open the dialog by selecting [Customize Columns...] from the [View] menu, and then proceed as follows. To select items to display: Check the check box. You can click the [Show All] button to check all of the check boxes. To select items to hide: Uncheck the check box. You can click the [Hide All] button to clear all of the check boxes except Name. To change the display order: Click an item to highlight it, and click the [Up] or [Down] button. To reset default settings: Click the [Restore Defaults] button. To confirm changes: Click the [OK] button. To cancel changes: Click the [Cancel] button. Selecting the items to display in tooltips You can select the items that appear in tooltips when the pointer is moved over a clip in the List View pane. Select [Customize Tooltip...] from the [View] menu to open the dialog, and select the items that you want to display. 20
21 [Preview] Windows Preview windows are where you preview clips and check clip properties. You can have up to five [Preview] windows open at one time. When you have more than one window open, you can convert them into tabs on one window. about the [Preview] window Playback in this window is preview playback. Note the following points. Depending on the performance of your computer and the processing load, dropped frames may occur, timecode may differ from the actual values, the clip may not be played smoothly, and some time may be required before the screen is updated. When the playback clip is defective, video breakup may occur and the playback may freeze. Not all of the original recorded video is played back when a split clip is played back. It may not be possible to play clips created on devices other than XDCAM EX/XDCAM devices. Improper playback may occur if the screen properties of your computer are changed during playback. If this occurs, restart the application. When playing clips on XDCAM Drives connected by IEEE1394 cable, the proxy data (low resolution data) is played, regardless of the [MXF Play mode] setting in the [Play] tab of the [Preferences] dialog. 21
22 22
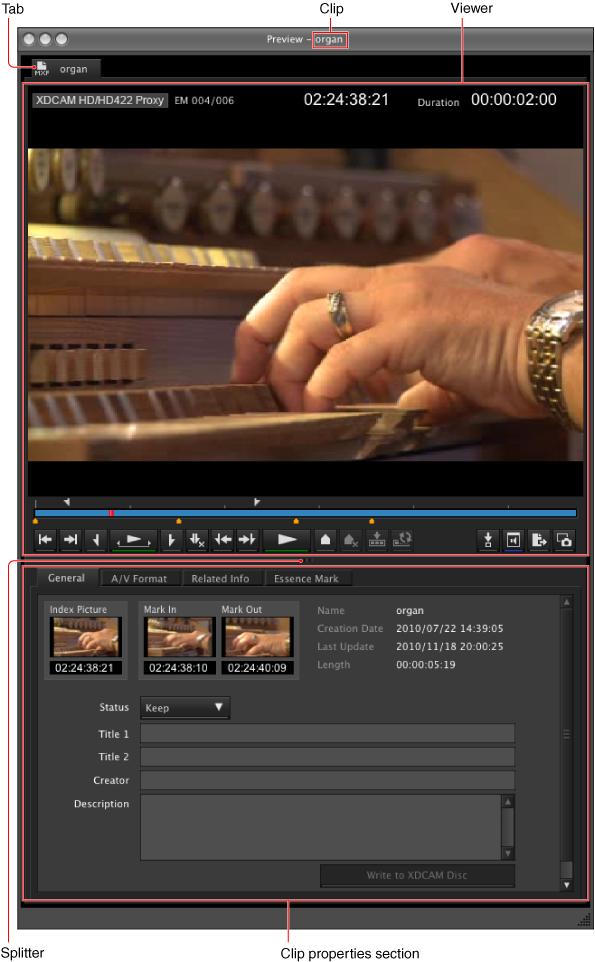
23 Viewer See Viewer ([Preview] windows) for more information. Tab Displays an icon indicating the type of the clip or clip list, and the name of the clip or clip list. When previewing unregistered media files, the media file icon ( ) is displayed. Also, the icons below are used when a subclip is loaded from the [Storyboard] window. Icon Description Subclip using MXF files Subclip using MXF proxy files See List View pane ([Explorer] windows) for more information about other icons. When two or more [Preview] windows are open, you can drag and drop the tab on another window to convert this window into a tab on the other window. See Customizing the window configuration for more information. Clip name Displays the name of the clip or clip list of the selected tab. Splitter You can drag the splitter up and down to change the relative sizes of the viewer and the clip properties section. Clip properties section Allows you to check clip and clip list properties. The following tabs appear. [General] tab [A/V Format] tab [Related Info] tab (for clips only) [Essence Mark] tab (for clips only) [Acquisition] tab (for clips only) [Flash Band] tab (for clips only) 23
![Viewer ([Preview] Windows) The viewer is where you preview clips and clip lists. Screen Displays the playback video.](/docs-images/76/74056648/images/24-0.jpg "You can double click the screen or select [Full Screen] from the [View] menu to enlarge the size to full screen size.")
24 Viewer ([Preview] Windows) The viewer is where you preview clips and clip lists. Screen Displays the playback video. You can double click the screen or select [Full Screen] from the [View] menu to enlarge the size to full screen size. To return to the original screen size, double click the screen or press the Esc key. Complete display of all video data, audio data, and timecode data is not guaranteed with the playback function of this software. Smooth playback may not be possible due to CPU and memory performance, media properties, connection methods, and other factors. 24
25 Clip type Displays the type of the clip being viewed on the viewer. XDCAM EX (MP4): XDCAM EX clip (MP4 file) XDCAM EX (DV-AVI): XDCAM EX clip (DV-AVI file) XDCAM HD/HD422: MPEG HD file created from XDCAM HD or XDCAM HD422 clip (MXF file) XDCAM MPEG IMX: MPEG HD file created from XDCAM MPEG IMX clip (MXF file) XDCAM DVCAM: MPEG HD file created from XDCAM DVCAM clip (MXF file) XDCAM HD/HD422 Proxy: Proxy file created from XDCAM HD or XDCAM HD422 clip (MXF file) XDCAM MPEG IMX Proxy: Proxy file created from XDCAM MPEG IMX clip (MXF file) XDCAM DVCAM Proxy: Proxy file created from XDCAM DVCAM clip (MXF file) When a clip list is selected, the format of the first subclip in the clip list is displayed. (Subclips are clips or parts of clips that make up a clip list.) Number of essence marks Displays the number of the essence marks set in the clip (in the format of: actually set number/maximum allowable number). Not displayed for DV-AVI files and clip lists. Timecode Displays the timecode of the current position (playline position), and the duration of the section between In and Out points in the clip. A counter value is displayed when no timecode is recorded in the clip. For NTSC clips, a period (.) between the minutes and seconds of the current position indicates dropframe, and a colon (:) indicates non-drop-frame. It is possible to jump to a specified position by clicking the current position timecode, entering a numeric value, and pressing the return key. (This operation is ignored when invalid timecode is entered.) When 720/50p or 720/60p is selected, you can change the timecode display format. For more information, see [Display] tab on the [Preferences] dialog. Position bar Displays the time scale of the clip or clip list. The following marks are shown on the position bar to provide information about the clip or clip list. Mark Meaning In point Out point Essence mark a) Timecode break point (discontinuous timecode) Split point between component files 25
26 Mark Meaning Border between sub-clips Flash band correction has not been applied a) Flash band correction has been applied a) a) The display of flash band correction marks takes priority over display of essence mark marks. Playline Displays the current position on the time scale. You can drag the playline or click anywhere on the position bar to move to a desired position. Scrubbing (repeatedly dragging to the left and right) is also supported. Command buttons These buttons perform various clip and clip list preview operations. The functions of these buttons can also be accessed from the keyboard. Icon Button name Keyboard shortcut Function [Jump to Start] Home Jumps to the start point (first frame) of the clip or clip list. [Jump to End] End Jumps to the end point (last frame) of the clip or clip list. [Mark In] a) [Play In to Out] [Mark Out] a) I Shift + space O Sets an In point at the current position. Can be done during play (play continues). Plays the section from the In point to the Out point. (During play, the button icon lights green.) Stops play if clicked during play. Sets an Out point at the current position. Can be done during play (play continues). [Clear Mark In/Out] Shift + X Clears the In and Out points. Can be done during play a) (play continues). [Jump to In Point] [Jump to Out Point] [Play] Space Jumps to the In point. Jumps to the Out point. Plays the clip. (During play, the button icon lights green.) Stops play if clicked during play. b) Adds an essence mark at the current position. Can be [Add Essence Mark] E done during play (play continues). However, an essence a) mark cannot be set at a position where one already exists. [Delete Essence Mark] a) Shift + E Deletes the essence mark at the current position. Can be done during play (play continues). 26
27 Icon Button name Keyboard shortcut Function [Add Subclip] return Adds the section between the set In point and Out point as a subclip to the storyboard clip list. [Update Modified Subclip] N/A Applies the results of subclip trimming to the clip list. [Set Index Picture] P Sets the frame at the current position as the index picture. c) Can be done during play (play stops). [Set Audio Channels] [Import into Final Cut Pro] [Capture Still Image] N/A N/A N/A Opens the [Set Audio Channels] dialog. Imports the displayed clip or clip list into Final Cut Pro. Opens the [Save Still Image] dialog. a) Editing of edit points (In and Out points) and essence marks is not supported for the following clip types. DV-AVI clips Clip list b) The maximum number of essence marks that you can set in a single clip is as follows, depending on the clip format. XDCAM EX clip (MP4 file): 126 marks XDCAM clip (less than 126 seconds): the number of seconds + 1 (for example, 46 marks for a 45-second clip) XDCAM clip (126 seconds or more): 126 marks If the list includes a clip with 126 or more Essence Marks, it can be output, but the only operation possible is deletion. c) Index pictures cannot be set for DV-AVI clips. 27
28 [General] Tab (Clip Properties Section) This tab displays general information about the clip or clip list. [Index Picture] Displays the index picture of the clip, or a thumbnail of the first frame if no index picture has been set. See Changing the Index Picture of a Clip for more information about setting an index picture. In the case of a clip list, the In point image of the first registered subclip will become the index picture. [Mark In] Displays a thumbnail of the In point, or a thumbnail of the first frame if no In point has been set. [Mark Out] Displays a thumbnail of the Out point, or a thumbnail of the last frame if no Out point has been set. [Name] [Creation Date] [Last Update] [Length] ( appears for a 3D clip if the component L clip and R clip are different lengths) [Start Timecode] Appears only for clip lists. The first timecode specified in the clip list. [DF/NDF] Appears only for clip lists. [Status] Select from among OK, NG, KEEP, and None. This cannot be changed for clip lists. [Title 1] Allows you to assign a title up to 63 ASCII bytes in length. [Title 2] Allows you to assign a subtitle up to 127 bytes in length. [Creator] Allows you to enter the name of the person who shot the clip, up to 127 bytes in length. 28
29 [Description] Allows you to enter a description of the scene depicted in the clip, up to 2047 bytes in length. To apply any changes to the information, click the [Update] button ([Write to XDCAM Disc] button for Professional Discs). The changes are discarded if you close the window or tab without clicking the button. If any unapplied changes exist, an asterisk (*) will appear at the top of the tab. You can batch edit the information if you wish to share them among all clips in a folder or on a media device. See Editing clip and clip list properties for more information. The properties of DV-AVI clips cannot be edited. Properties of clips or clip lists on an XDCAM drive can only be edited during playback of proxy data. The Status of clip lists cannot be edited. The properties of unregistered media files cannot be edited. 29
![[A/V Format] Tab (Clip Properties Section) This tab displays information about a clip list or the recording format of a](/docs-images/76/74056648/images/30-0.jpg "clip. The screenshot shows the screen that appears when a clip is selected.")
30 [A/V Format] Tab (Clip Properties Section) This tab displays information about a clip list or the recording format of a clip. The screenshot shows the screen that appears when a clip is selected. [Video Format] [Audio Format] [Clip list] 30
31 [Related Info] Tab (Clip Properties Section) This tab displays information related to clip recording conditions. This tab does not appear for clip lists. [Model] [Lens Model] [Rec Mode] [Media Spanning] [File Name] [Number of Files] [UMID] [Key Frame] [User Bit] [Proxy AV Data] [Used in Clip List] [Stereoscopic 3D] [LUT Name] [Hardware/Software] 31
32 [Essence Mark] Tab (Clip Properties Section) This tab displays a list of essence marks in the current clip, with the timecode of the essence marks and their names. The [Essence Mark] tab does not appear for clip lists. [Detail] button and Essence Mark detailed setting area The [Detail] button is used to toggle between the displayed and hidden essence mark detailed setting area. Controls, such as the [Category] drop-down list and page switching buttons, are located in the essence mark detailed setting area to allow easy setting of different essence mark types for clips. When you select a category and page, previously assigned essence marks will appear for the [F1] to [F10] buttons which correspond to the computer function keys. If you press the Shift key, essence marks assigned to the Shift + F1 to Shift + F10 button operations will appear. Three pages are available for each category, for a total of 60 assignable essence marks for each category. You can set assigned essence marks to the clip by clicking the [F1] to [F10] or [*F1] to [*F10] buttons from the Essence Mark detailed setting area, or by pressing the F1 to F10 or Shift + F1 to Shift + F10 buttons on the keyboard. Place a check mark in the [Edit Input] check box if you want to specify a name when setting an essence mark for the clip. The essence mark setting dialog appears and you can enter a name for the essence mark that will be set. Essence Mark list This displays a list of essence marks in the current clip, with the timecode of the essence marks and their names. You can select an essence mark in this list to move the Viewer playback position to that frame. 32
33 [Write to XDCAM Disc] and [Update] buttons The [Write to XDCAM Disc] button is displayed for MXF file clips recorded on Professional Discs, and the [Update] button is displayed for MXF file clips recorded on other media. Click one of these buttons to apply essence mark edits and [General] tab edits in the clip. Edits are immediately applied if the clip is an MP4 file; there is no need to click a button. [Add], [Edit], and [Delete] buttons The [Add] button adds an essence mark called "_ShotMark1" to the frame displayed in the current Viewer. The [Edit] button edits the name of the essence mark that is selected. The [Delete] button deletes the essence mark that is selected from the clip. The essence marks in DV-AVI clips cannot be set or edited. During playback on XDCAM EX devices, essence marks set by this application are displayed next to the frames where they were set. Properties of clips or clip lists on an XDCAM drive can only be edited during playback of proxy data. The properties of unregistered media files cannot be edited. 33
![[Acquisition] Tab (Clip Properties Section) [Animation View] [Text View] This tab displays information about the shooting conditions in each frame for MXF-format and EXformat (MP4) clips.](/docs-images/76/74056648/images/34-0.jpg "There are two display methods, Animation View and Text View, that you can select from the dropdown list at the top left. Text View has many more parameters you can check than in Animation View.")
34 [Acquisition] Tab (Clip Properties Section) [Animation View] [Text View] This tab displays information about the shooting conditions in each frame for MXF-format and EXformat (MP4) clips. There are two display methods, Animation View and Text View, that you can select from the dropdown list at the top left. Text View has many more parameters you can check than in Animation View. [Model Name: Camera/Lens] [Video Format] [Date and Time] 34
35 [Auto Mode: AE/AF/WB] (Auto-exposure/Auto-focus/White balance) [Lens Setting: Macro/Opt.Extender] [Lens Parameter: Lens Parameter: Iris/Focus/Zoom/Angle of View/Focusing] [Filter Wheel: ND/CC] (ND filter/cc filter) [Capturing: Mode/Rate/Shutter] (shooting mode/frame rate in Slow & Quick Motion shooting/shutter speed) [Processing: Gain/Elec.Extender/White Balance/Black/Gamma] The [Acquisition] tab does not appear for DV-AVI clips. Acquisition metadata is not displayed for imported clips and clips containing recorded line input signals. Also, the [Acquisition] tab appears but acquisition metadata is not displayed for MXF-format clips when [MXF Play mode] is set to "Proxy" in the [Play] tab of the [Preferences] dialog. 35
![[Flash Band] Tab (Clip Properties Section) This tab displays information about frames where flash banding has occurred.](/docs-images/76/74056648/images/36-0.jpg "This tab appears only for MP4 and DV-AVI clips that allow flash band detection and correction. This tab does not appear for MXF clips or clip lists.")
36 [Flash Band] Tab (Clip Properties Section) This tab displays information about frames where flash banding has occurred. This tab appears only for MP4 and DV-AVI clips that allow flash band detection and correction. This tab does not appear for MXF clips or clip lists. [Timecode]: Timecode of the frame where flash banding was detected (or timecode of a frame added by the user) [Field]: In the case of interlaced video, the field where correction starts (1st/2nd) [Detection]: The detection method ([Auto]/[Manual]) [Status]: Correction status ([Blank (not corrected)]/[corrected]) See Correcting flash bands for more information. 36
![[Offline Media] Window You can open the [Offline Media] window by selecting [Show Offline Media] from the [File] menu.](/docs-images/76/74056648/images/37-0.jpg "The Offline Media window is where you operate on clips and folders copied to offline media (proxy files), and where you check clip metadata.")
37 [Offline Media] Window You can open the [Offline Media] window by selecting [Show Offline Media] from the [File] menu. The Offline Media window is where you operate on clips and folders copied to offline media (proxy files), and where you check clip metadata. Only folders and files that have been copied to offline media can be displayed and operated. Tab The tab displays the name of media or folders under the offline media folder. Path This is the path to the media or folder that is selected in the Tree View pane. 37
38 Toolbar Contains tool buttons for operations on clips and folders under the offline media folder. See [Explorer] windows for more information about tool buttons. The following buttons cannot be used in the [Offline Media] window. [New Folder] [Find] [Copy All] [Eject Media] [Copy to Offline Media] [Show Offline Media] [Show/Hide Component View] [Filter By] [Delete] Deletes the selected clip or folder. See Deleting clips and clip lists or Deleting folders for more information. [Update Modified Data] Writes offline media file edit results back into the original media. See Rewriting edited data to a Professional Disc for more information. [Show/Hide Folder Tree] Allows you to show or hide the Folder Tree pane. [List View] Switches the clip view mode (thumbnails/details). Tree View pane Displays a tree of folders stored under the "Offline Media" folder. The following icons represent the type of the folder. Icon Type of folder Folder with MXF attributes Folder with clip list attributes You can show or hide folder contents by clicking the [Show/Hide Folder Tree] button on the toolbar. Capacity Displays the used capacity and remaining capacity of the folder selected in the Tree View pane. The remaining capacity is shown as a numeric value and as a bar graph. Folder type When a folder with MXF attributes is selected in the Tree View pane, "MXF" is displayed. Information about selected clips Displays information on clips or clip lists selected in the List View pane (number of selected clips or clip lists, total length of clips or clip lists, total size (clips only)). The total clip or clip list length is an approximate value, so take it as an approximate guide. 38
39 List View pane Displays the clips or clip lists stored in the media or folder that is selected in the Tree View pane. See List View pane ([Explorer] windows) for more information. 39
![[Storyboard] Window The [Storyboard] window appears when editing clip lists. You can also display it by selecting [Show Storyboard] from the [File] menu.](/docs-images/76/74056648/images/40-0.jpg "Clip list contents are confirmed and edited in this window. Multiple windows cannot be opened simultaneously in the [Storyboard] window.")
40 [Storyboard] Window The [Storyboard] window appears when editing clip lists. You can also display it by selecting [Show Storyboard] from the [File] menu. Clip list contents are confirmed and edited in this window. Multiple windows cannot be opened simultaneously in the [Storyboard] window. Clip list index picture Displays the thumbnail of the In point of the first subclip in the currently displayed clip list. Clip list name Displays the file name of the currently selected clip list. Clip list info viewer This tab displays information related to currently displayed clip lists. Index picture The image of the In point of the first subclip is displayed as the index picture. "No Clip" is displayed when there is no registered subclip. No. of subclips The number of subclips that make up the clip list. Length Total length of the clip list. Video format Video format of the clip list. This is determined by the first subclip added to the clip list. Subclips with differing formats cannot be added. Start timecode You can change this to your required timecode. DF/NDF settings (NTSC only) DF/NDF settings can be changed. [Save] button Saves edits made to the clip list. This button is enabled when you edit the clip list that is displayed. Otherwise, this button will be disabled, as saving is not necessary. 40
41 Storyboard Displays thumbnails of the subclips that make up the clip list and clip names. They are displayed from the left in playback order. Creates a clip list by adding clips or part of a clip from an [Explorer] or [Preview] window. The playback order can also be changed by rearranging the subclips. Displays the current position mark in the bottom left corner of the subclip thumbnail ( during playback) for the displayed clip list that is loaded in the [Preview] window. Thumbnails View example Description Normal subclip Subclip for which a compatible clip cannot be found. Subclip matching the current playback position in the [Preview] window. Subclip info viewer Selected subclip info can be confirmed in the storyboard window. [Subclip Title] Allows you to assign a title up to 127 bytes in length. [Subclip Description] Allows you to insert comments up to 511 bytes in length. 41
42 Customizing the Window Configuration Opening multiple windows Select [New Explorer Window] or [New Preview Window] from the [File] menu. A new [Explorer] or [Preview] window opens. Multiple windows cannot be opened simultaneously in the [Storyboard] window or [Offline Media] window. Snapping windows to each other Drag one of the windows close to another window. The windows snap together when they approach each other. To enable the snap function, select [Enable Window Snapping] in the [General] tab of the [Preferences] dialog. 42
![Tabbing windows You can convert windows of the same type ([Explorer] window or [Preview] window) into tabs in a single window. To tab a window, drag it and drop it on another window.](/docs-images/76/74056648/images/43-0.jpg "When one [Preview] window is already open, you can open a new [Preview] window tab by doing one of the following in an [Explorer] window. Double click a media file in the List View pane.")
43 Tabbing windows You can convert windows of the same type ([Explorer] window or [Preview] window) into tabs in a single window. To tab a window, drag it and drop it on another window. When one [Preview] window is already open, you can open a new [Preview] window tab by doing one of the following in an [Explorer] window. Double click a media file in the List View pane. Select a media file in the List View pane, and then select [Play] from the menu. If the selected media file is already loaded into its own Preview window or a Preview tab, that window or tab is activated. 43

44 Converting a tabbed window back into a separate window Drag the tab of the window that you want to separate away from the other window. Other window operations Drag the window title bar to move a window. Resize a window by dragging on any window border. Maximize a window or return it to its original size by each clicking the + (zoom) button in the upper left corner. Close a window you do not need by clicking the x (close) button in the upper left corner. The application remembers your most recent configuration and recreates it the next time it starts. 44
45 Selecting the window configuration Depending on your operating conditions (e.g., when you are using a [Storyboard] window), you can select the window display configuration. Select [Window Layout] in the [Window] menu, and select your required configuration from the displayed menu. [Default]: Displays 2 [Explorer] windows and a [Preview] window. [Storyboard]: Displays an [Explorer] window, a [Preview] window, and a [Storyboard] window. [Storyboard (Offline)]: Displays an [Offline Media] window, a [Preview] window, and a [Storyboard] window. When the snap function is enabled When you resize a window by dragging its border, neighboring windows are also resized while preserving the window layout. You can disable the snap function. To disable the snap function, clear [Enable Window Snapping] in the [General] tab of the [Preferences] dialog. Tips You can operate with the Shift key pressed to temporarily reverse the snap function setting. When the snap function is enabled: The function is temporarily disabled. When the snap function is disabled: The function is temporarily enabled. Keyboard shortcuts for selecting tabs You can use keyboard shortcuts to select tabs. To select the previous or next tab from the keyboard Press Shift + Command + { or Shift + Command + }. 45
46 Operation Precautions for Clips and Clip Lists Always observe the following precautions during processing of folder and media operations. o Do not power off the computer or media drive before the operation completes. o Do not use Finder or another file management tool to delete folders that contain the clips being processed. o Do not eject the media before the operation completes. It may be possible to copy and move clips to media with this application even when the display on an XDCAM EX device indicates that the media is full. However, it will not be possible to play back or delete those clips when the media is inserted into the XDCAM EX device again (a message will appear saying that the media must be salvaged). For the folders created on a hard disk or other media by copying from XDCAM drive with Finder or another file management tool, editing operations such as adding and deleting of clips cannot be performed. If the NAMING FORM menu item of an XDCAM device is set to "C**** (standard format)", any user-defined file names (names in a format other than C****) are changed automatically to the standard format (C****) when the clips are written to the XDCAM drive. Writing a 50p or 60p frame rate clip to XDCAM drive moves the essence marks and Out points at the odd frames to the previous or next even frames. For example, the essence mark at the 15th frame moves to the 14th, while the Out point at the 19th frame moves to the 20th. However, the Out point will be deleted if an essence mark already set at the move destination frame. For details about the menu operations of the XDCAM device, refer to the Operating Instructions or Operation Manual supplied with the XDCAM device. 46
 are recorded from left and right cameras, respectively.")
47 Precautions About Handling 3D Clips The handling of clips shot in 3D is supported by this application. When shooting in 3D, two clips (L clip and R clip) are recorded from left and right cameras, respectively. When the [Stereoscopic 3D] check box is checked in the [General] tab of the [Preferences] dialog, the L clip and R clip are paired together and handled as a single 3D clip.) To handle an L clip/r clip as a 3D clip, the following operations are required. To handle an L clip/r clip as a 3D clip Handling clips shot with a camcorder capable of shooting in 3D as 3D clips Sony camcorders capable of shooting in 3D record L clips and R clips to separate media. To handle as 3D clips, copy the L clip/r clip into the same folder, as described in Copying all the clips on a media disc or folder. Handling clips shot with two camcorders as a 3D clip When using two regular camcorders to shoot a 3D clip, the clips shot by left/right camcorders must be paired by copying them to the same folder, and then specifying which is the L clip and R clip. This operation is possible only if the two selected clips are EX format clips (MP4 clips) with the same video format (angle of view, frame rate, bit rate). 1. Copy the L clip and R clip shot with two camcorders into the same folder. See Copying all the clips on a media disc or folder for more information. 2. In the Tree View pane of an [Explorer] window, select the folder where you copied the clips. 3. From the List View pane, select the L clip and R clip you wish to handle as a 3D clip. Hold down the Command key on the keyboard and select first the L clip and then the R clip. 4. Select [Stereoscopic 3D] and then [Pair with...] from the [Clip] menu. The [Pair with] dialog opens. The names of the clips selected in step 3 are displayed. 5. Select the L clip (Left) or R clip (Right) as the clip in the upper section. If [Left] is selected as the clip in the upper section, [Right] is automatically displayed as the clip in the lower section. 6. Click the [OK] button. The two clips selected in step 3, representing the L clip/r clip, are paired together and displayed as a single 3D clip. 47
48 Releasing 3D clip pairing into separate L clip and R clip 1. Select the 3D clip that you want to release in the List View pane of an [Explorer] window. 2. Select [Stereoscopic 3D] and then [Unmake pair] from the [Clip] menu. A confirmation message appears. 3. Click the [Yes] button. The 3D clip selected in step 1 is separated in two, and displayed as individual L clip/r clip components. Supported and unsupported functions for 3D clips The clip and media functions of this application can be separated into three, as shown below: Functions that can be used for 3D clips in the same way as for normal clips; functions that can be used in the same way as for normal clips, but which operate on L clips only; and functions that cannot be used for 3D clips. Function Display, edit, and batch edit of properties Clip copy, move, and delete Copy all clips on a media disc or folder Copy In/Out selection, Create new clip using In/Out selection Copy clips with format conversion Clip import and export Import into Final Cut Pro Play Create still image Flash band detection and correction Find Export information about clips/clip lists in media or folder Folder split and combine Link clips to planning metadata Batch edit of properties of clips linked to planning metadata Batch copy of clips linked to planning metadata 3D clip operation Operates on L clips only. However, when the clip status (OK/NG/KEEP/None) is changed, the R clip status is also changed. Can be used in the same way as for normal clips. Can be used in the same way as for normal clips. Not supported Not supported Not supported Can be used in the same way as for normal clips. The L clip is played. Creates image from L clip. Not supported Finds L clips. List of L clips is exported. Not supported Can be used in the same way as for normal clips. Operates on L clips only. However, when the clip status (OK/NG/KEEP/None) is changed, the R clip status is also changed. Can be used in the same way as for normal clips. 48
49 Function Batch export of clips linked to planning metadata 3D clip operation Not supported 49
50 Copying Clips You can duplicate clips on your media or computer, and copy clips between media and the computer. You can also copy the entire clip content of a media disc or folder in a single operation. Selecting clips for copying 1. Select a clip to copy in the List View pane of an [Explorer] window. o Abnormal clips can be selected, but they are not copied. o The folder that contains the selected clips cannot be specified as the copy destination. When copying to a new folder Create a new folder in the copy destination media or folder. See Creating folders for more information about the operation. 2. Do one of the following. o Drag the clips selected in step 1 and drop them in the List View pane of another window, or on a copy destination media or folder in the Tree View pane of the same window or another window. o Select [Copy] from the [Edit] menu. Then click the List View pane of another window, or a copy destination media or folder in the Tree View pane of the same window or another window, and select [Paste] from the [Edit] menu. A message appears asking if you want to execute the copy. 3. Place a check mark in the [Copy In/Out selection] check box displayed with the message to copy only the section between the In point and Out point of the selected clip. Leave the check box cleared to copy the whole clip. 4. Click the [Yes] button to execute the copy, or the [No] button to cancel it. A dialog illustrating the progress of the copying opens when the copying starts. Once it has been completed, you cannot undo the copy operation. To cancel the copy operation Click the [Cancel] button in the progress dialog. Reasons why a copy operation may fail Copy operations may fail for the following reasons. In these cases, an error message appears and the copy is not executed. There is not enough free capacity at the copy destination. A clip with the same name as one of the selected clips already exists at the copy destination. Even if the clip names are different, clips are recognized as the same clip if they share the same ID (UMID). You do not have delete/write privileges to the destination media or folders. The destination media or folder is write protected. When copying MXF format clips to the XDCAM drive, and the recording format of the copy source clip differs to that of the clip in the copy destination. You may not be able to copy depending on the XDCAM drive you are using and its settings. 50
51 When you group split clips by gathering them into one place XDCAM EX devices automatically save video that exceeds 4 GB in size as multiple clips. If you collect these clips into one media or folder, they are automatically grouped so that you can handle them as a single clip. See Grouping clips that have been split across separate media for more information. When you copy an XDCAM EX file to a copy destination with MXF attributes Copying an XDCAM EX MP4 file to an XDCAM drive or an MXF folder automatically converts the file to the MXF format. This makes EX material available on your XDCAM device more easily than the export function. Copied files have the same recording format as that of the existing files in the destination. a) However, the bit rates are determined as specified in [Bit Rate] under [MP4 to MXF conversion] in the [Conversion] tab of the [Preferences] dialog. a) If no file exists in the destination, the bit rate is determined as specified in [Format settings: when folder is empty.] under [MP4 to MXF conversion] in the Conversion tab of the Preferences dialog. Tips When the [Convert XDCAM EX files to MXF when copying to a normal folder] check box in the [Edit] tab of the [Preferences] dialog is checked, files are converted to MXF format files even if the copy destination is a normal folder. Since the clip management folders for the XDCAM device are automatically created, the files converted in this application can be viewed. (The files which were output to a normal folder by the export function cannot be viewed in this application.) DV-AVI format EX files cannot be converted into MXF format files. It is not possible to convert MXF files to the EX format. File conversion may be disabled depending on the recording format of the original clip and the clips in the copy destination folder. Unless plug-in software provided by MainConcept is installed, the video after conversion will contain a MainConcept watermark. Further, only 30 seconds of audio are saved, and following audio is lost. File conversion may degrade the image quality. When copying with format conversion, it is not possible to extract and copy only the section between In and Out points. The [Copy In/Out selection] check box does not appear. This copy operation takes longer to complete since it requires format conversion. The files produced by converting XDCAM EX MP4 files to MXF format are MPEG HD files only. Proxy files are not produced by this application. Copying all the clips on a media disc or folder You can copy all of the clips in a folder or a media disc or card in a single operation. This function can be useful when transferring the data recorded on the media onto a computer's hard drive, or when copying L clips/r clips for 3D clips to the same folder. When batch copying clips, you cannot copy only the section between In and Out points of each clip. This operation varies depending on the setting of the [Specify the folder when "Copy All"] check box on the [Edit] tab in the [Preferences] window. When the [Specify the folder when "Copy All"] check box is checked on the [Edit] tab 1. In the Tree View pane of an [Explorer] window, select the media or folder that contains the clips you want to copy. 2. Do one of the following. o Click the [Copy All] button. 51
52 o Select [Copy All] from the [Edit] menu. The [Copy All] dialog appears. 3. Select the copy destination folder in the [Copy All] dialog. To create a new folder in the selected folder, click the [Make New Folder] button and enter the desired folder name. 4. Place a check mark in the [Show folder after copy] check box if you want to display the copy destination folder after copying is completed. 5. Click the [Start] button. All the clips saved in the selected media or folder are copied to the copy destination folder. The copy destination folder is displayed if a check mark was placed in the [Show folder after copy] check box in step 4. When the [Specify the folder when "Copy All"] check box is cleared on the [Edit] tab 1. In the Tree View pane of an [Explorer] window, select the media or folder that contains the clips you want to copy. 2. Do one of the following. o Click the [Copy All] button. o Select [Copy All] from the [Edit] menu. A message appears asking if you want to execute the copy. Check the destination folder. You can change the copy destination folder. See [Edit] tab for more information. 52
53 3. Click the [Yes] button to execute the copy, or the [No] button to cancel it. A dialog illustrating the progress of the copying opens when the copying starts. To cancel the copy operation Click the [Cancel] button in the progress dialog. Reasons why a copy operation may fail Copy operations may fail for the following reasons. In these cases, an error message appears and the copy is not executed. There is not enough free capacity at the copy destination. A clip with the same name as one of the selected clips already exists at the copy destination. Even if the clip names are different, clips are recognized as the same clip if they share the same ID (UMID). You do not have delete/write privileges to the destination media or folders. The destination media or folder is write protected. When copying MXF format clips to the XDCAM drive, and the recording format of the copy source clip differs to that of the clip in the copy destination. You may not be able to copy depending on the XDCAM drive you are using and its settings. Copy error check option For greater copy reliability, you can enable the CRC (cyclic redundancy check) error check option. However, copy operations take longer to complete when this option is enabled. See [Edit] tab for more information about settings. 53
54 Copying Clip Lists You can duplicate clip lists on your media or computer, and copy clip lists between media and the computer. The following describes 2 ways to copy clip lists with this application. Copy: Copies clip lists and materials used with clip lists collectively. Duplicate: Copies clip lists only in the same folder. Materials are not copied by the function used to create multiple clip lists that differ partially. Also, copy destination folders cannot be selected. Collectively copies materials used with clip lists. The only copy destinations that can be specified are clip list folders indicated by the icon, or general folders indicated by the icon. MXF and EX attribute folders cannot be specified as copy destinations. When general folders are specified as a copy destination, the ClipList folder is automatically created in the specified folder and the clip list will be copied to the ClipList folder. Clip materials will be copied directly below the specified folder. Abnormal clip lists, such as those in which parts of subclips cannot be decoded, cannot be copied even if selected. The folder that contains the selected clips cannot be specified as the copy destination. If the same clip list exists in the copy destination, that clip list will be overwritten. Clip lists including Voice Over data can only be copied to the XDCAM drive. You can set whether to copy the whole source clip linked to clip list subclips or only copy the section between the In and Out points on the [Clip List] tab in the [Preferences] dialog. If you are only copying the section between the In and Out points, the surrounding margins can also be set. However, this setting is ignored and all of the source clip will always be copied if the copy destination is an XDCAM drive, except when copying between remotely connected XDCAM drives, or XDCAM drives connected by IEEE1394 or USB cable. When copying the section between the In and Out points only, the clip may be less than 2 seconds in length even with margins added before and after the section. When the copy destination is an XDCAM drive, margins are added automatically so that the clip is longer than 2 seconds, regardless of the margin setting in the [Preferences] dialog Select a clip list to copy in the List View pane of an [Explorer] window. When copying to a new folder Create a new folder in the copy destination media or folder. See Creating folders for more information about the operation. 2. Do one of the following. o Drag the clip list selected in step 1 and drop them in the List View pane of another window, or on a copy destination folder in the Tree View pane of the same window or another window. o Select [Copy] from the [Edit] menu. Then click the List View pane of another window, or a copy destination folder in the Tree View pane of the same window or another window, and select [Paste] from the [Edit] menu. A message appears asking if you want to execute the copy. 3. Click the [Yes] button to execute the copy, or the [No] button to cancel it. A dialog illustrating the progress of the copying opens when the copying starts.
55 Once it has been completed, you cannot undo the copy operation. To cancel the copy operation Click the [Cancel] button in the progress dialog. Reasons why a copy operation may fail Copy operations may fail for the following reasons. In these cases, an error message appears and the copy is not executed. There is not enough free capacity at the copy destination. You do not have delete/write privileges to the destination media or folders. The destination media or folder is write protected. When source clips (MXF format clips), which are linked to subclips that make up the clip list, are copied to the XDCAM drive or MXF attribute folders, clips cannot be copied if the recording formats of source and copy destination clips differ. You may not be able to copy depending on the XDCAM drive you are using and its settings. Copying a clip list only in the same folder 1. Select a clip list to copy in the List View pane of an [Explorer] window. 2. Select [Duplicate Clip List] from the [Clip] menu. A duplicate of the selected clip list is created in the same folder. 55
56 Moving Clips You can move clips on your media or computer, and move clips between media and the computer. Clip lists, clips recorded on Professional Discs or XDCAM Station devices connected via CIFS, and clips in the [Offline Media] window cannot be moved. XDCAM EX format files cannot be moved to folders or media with MXF attributes, and MXF format files cannot be moved to folders or media with EX attributes Move modes You can specify whether to give priority to processing speed or to data protection when moving clips. Processing speed: Normal move processing, without creating a duplicate of the clip Data protection: Creation of a duplicate before deletion of the original clip See [Edit] tab for more information about settings. 1. Select a clip to move in the List View pane of an [Explorer] window. o Abnormal clips can be selected, but they cannot be moved. o The folder that contains the selected clips cannot be specified as the move destination. 56 When moving clips to a new folder Create a new folder in the move destination media or folder. See Creating folders for more information about the operation. 2. Do one of the following. o Drag the clips selected in step 1, and while holding down the Command key, drop them in the List View pane of another window, or on a move destination media or folder in the Tree View pane of the same window or another window. o Select [Cut] from the [Edit] menu. Then click the List View pane of another window, or a move destination media or folder in the Tree View pane of the same window or another window, and select [Paste] from the [Edit] menu. A message appears asking if you want to execute the move. 3. Click the [Yes] button to execute the move, or the [No] button to cancel it. A dialog illustrating the progress of the move opens when the move starts. o o o Once it has been completed, you cannot undo the move operation. Do not exit this application during the move. Doing so can break the links between clips and their metadata. The link information for split clips can be lost, causing them to become abnormal clips. If the selected clips are important, we recommend that you set the move mode to data protection mode. When an MXF clip on a Professional Disc is moved, the clip list that includes the moved clip will be deleted. To cancel the move operation Click the [Cancel] button in the progress dialog. Reasons why a move operation may fail Move operations may fail for the following reasons. In these cases, an error message appears and the move is not executed.
57 There is not enough free capacity at the move destination. A clip with the same name as one of the selected clips already exists at the move destination. Even if the clip names are different, clips are recognized as the same clip if they share the same ID (UMID). You do not have delete/write privileges to the source or destination media or folder. The source or destination media or folder is write protected. When you group split clips by gathering them into one place XDCAM EX devices automatically save video that exceeds 4 GB in size as multiple clips. If you collect these clips into one media or folder, they are automatically grouped so that you can handle them as a single clip. See Grouping clips that have been split across separate media for more information. 57
58 Deleting Clips and Clip Lists Clips with OK status can be deleted by this application. When you delete a clip that is included in an MXF format clip list on a Professional Disc, the entire clip list is deleted. 1. In the List View pane of an [Explorer] window, select a clip or clip list to delete. 2. Do one of the following. o Press the Command + Delete keys. o Click the [Delete] button. o Select [Delete] from the [Edit] menu. A message appears asking if you want to execute the deletion. 3. Click the [Yes] button to execute the delete, or the [No] button to cancel it. Deletions cannot be undone after they finish. Reasons why a delete operation may fail Folder deletion operations may fail for the following reasons. In these cases, an error message appears and folder is not deleted. You do not have delete/write privileges to media or folder where the clips or clip lists are stored. The media or folder where the clips or clip lists are stored is write protected. The clips you are trying to delete is used in a clip list being edited. You tried to delete a clip list that is being edited. 58
59 Grouping Clips That Have Been Split Across Separate Media When you have split clips that have been saved on separate media as a result of an extended recording session, you can group those clips by collecting them in a single location. You can collect split clips by copying them, by moving them, or by combining split folders. Grouped clips can be handled as a single clip. See Copying clips, Moving clips, and Combining folders for more information about each operation. This operation is limited to XDCAM EX clips. You cannot operate on clips in other formats (for example, XDCAM clips). Split clips which are not continuous along the time axis are not grouped. Abnormal clips are not grouped. Clips with altered UMIDs are not grouped. Grouping is performed on the basis of the UMIDs of split clips, and not on the basis of their file names. 59
60 Creating Clips by Specifying Ranges You can create a new clip in the same folder by setting In and Out points in an existing clip. The new clip can be handled in the same way as the original clip. This is a convenient way to create clips during online editing. 60 This operation cannot be executed for DV-AVI clips. This operation cannot be executed for clips on an XDCAM drive connected by IEEE1394 or USB cable. Tips See Copying Clips if you want to copy the section between In and Out points to a different folder as a new clip. 1. Preview a clip in a [Preview] window, click the [Mark In] button at the position you want to use as the first frame, and click the [Mark Out] button at the position you want to use as the last frame. In and Out points are set in the clip. Tips You can also set the Out point by specifying the In point and duration. Duration can be specified by clicking the timecode display of the duration, entering a numeric value, and pressing the Return key. In and Out points cannot be set at the same frame. When you try to set an Out (or In) point at a frame where an In (or Out) point has been set, the Out point is automatically set at the next frame after the In point. 2. Play the section specified in step 1, and adjust the In point and Out point positions as required. After changing the position of In or Out points for MXF clips, click the [Update] button or [Write to XDCAM Disc] button to apply the changed In/Out points. 3. In the List View pane of an [Explorer] window, find the clip where you set the In and Out points, and click the clip to select it. To batch process clips You can create several clips in one operation. Carry out steps 1 and 2 in several clips stored in the same folder or on the same media, and then select those clips here. 4. From the [Clip] menu, select [New clip using In/Out selection]. A confirmation message appears asking if you want to create the clips. When In and Out points have not been set A confirmation message appears and if you proceed it will have the same result as a copy operation. 5. Click the [Yes] button to create a new clip, or the [No] button to cancel the operation. A progress dialog opens when creation of the clip starts. To cancel creation of the clip Click the [Cancel] button in the progress dialog. Reasons why a new clip operation may fail Creation of a new clip may fail for the following reasons. In these cases, an error message appears and the clip is not created. There is not enough free capacity at the clip creation destination. You do not have delete/write privileges to the destination media or folders.
 Clips stored on a USB flash drive (proxy files) 1.")
61 Creating Still Images from Clips You can save the image from a desired position on a clip as a still image. Still images cannot be created from the following clips and files. Clips loaded from an [Offline Media] window (proxy files) Clips stored on a USB flash drive (proxy files) 1. Preview a clip in a [Preview] window, and stop at the scene from which you want to create a still image. 2. Do one of the following. o Click the [Capture Still Image] button in the [Preview] window. o Select [Capture Still Image] from the [File] menu. The [Save Still Image] dialog appears. If the image is blurred If the source clip is interlaced video (frame frequency: 59.94i, 50i, etc.), you may be able to reduce the blurring by changing the Interpolated Field setting. 61
62 [Interpolated Field] o [1st]: Interpolate field 1 into field 2. o [2nd]: Interpolate field 2 into field 1. o [Frame]: Create a composite of field 1 and field 2. The Interpolated Field setting is set to Frame and cannot be changed if the source clip is progressive video (frame frequency: 59.94p, 50p, etc.). 3. Specify the file name and storage destination and click the [OK] button. A bitmap still image is created from the frame selected in step 2. 62
63 Editing Clip and Clip List Properties Some clip and clip list properties (metadata) can be edited with this application. In addition, properties for all the clips in a single media or folder can be batch edited. The following properties can be edited. Status (for clips only) Title 1 Title 2 Creator Description Start TC (for clip lists only) DF/NDF setting (for clip lists and NTSC only) The properties of DV-AVI clips cannot be edited. Properties of clips or clip lists on an XDCAM drive can only be edited during playback of proxy data. The Status of clip lists cannot be edited. Also, the Start TC and DF/NDF settings of the clip list properties are made in the [Storyboard] window. See [Storyboard] window for more information. The properties of unregistered media files cannot be edited. Editing clip and clip list properties 1. Load the clip or clip list for which you want to edit properties into the [Preview] window. 2. Edit the properties in the [General] tab in the properties section of the [Preview] window. 3. If the clip is recorded on a Professional Disc, click the [Write to XDCAM Disc] button. Click the [Update] button if the clip is recorded on the computer or any other drive. Batch editing clip properties 1. In the Tree View pane of an [Explorer] window, select a media device or a folder. 2. In the List View pane, select the batch editing target clips. (You can skip this step if you want to edit all clips, or all clips in the format selected by the current display filter.) 63
![3. From the [Edit] menu, select [Batch Edit Clip Properties...]. The [Batch Edit Clip Properties] dialog opens. 4. Select the edit range.](/docs-images/76/74056648/images/64-0.jpg "o [All]: All clips in the selected media or folder o [Displayed Clips (MP4)]: Clips displayed in the List View pane o [Selected Clips]: Clips selected in the List View pane 5.")
64 3. From the [Edit] menu, select [Batch Edit Clip Properties...]. The [Batch Edit Clip Properties] dialog opens. 4. Select the edit range. o [All]: All clips in the selected media or folder o [Displayed Clips (MP4)]: Clips displayed in the List View pane o [Selected Clips]: Clips selected in the List View pane 5. Check the check box for each batch edit item that you want to change, and then select a value from the list box or enter a string in the edit box. o [Status]: Select from among OK, NG, KEEP, and None. o [Title 1]: Up to 63 ASCII bytes in length o [Title 2]: Up to 127 bytes in length o [Creator]: Up to 127 bytes in length o [Description]: Up to 127 bytes in length To overwrite existing contents Check the [Overwrite existing metadata values] check box. If this check box is cleared when the batch edit is executed, the changes made here are reflected only to empty fields. 6. Click the [Execute] button. A confirmation message appears, asking if you want to execute the batch edit. 7. Click the [Yes] button to execute the batch edit, or click the [No] button to cancel it. A progress bar appears to show the progress of the batch edit. A completion dialog appears when the processing finishes. 8. Click the [OK] button to close the dialog. 64
65 Renaming Clips and Clip Lists on Professional Discs Clips and clip lists recorded on Professional Discs can be renamed. To enable renaming of clips and clip lists, you must set the "File Naming" setting to "Free" in the Professional Disc's configurations. The following clips and clip lists cannot be renamed. o Clips and clip lists under the MXF folder in the UserData folder o Clips and clip lists in the [Offline Media] window o Clips and clip lists being previewed 1. In the Tree View pane of an [Explorer] window, select the clip or clip list in the XDCAM drive. 2. Do one of the following. o o Select [Rename] from the [File] menu. Click the file while holding down the Control key, and select [Rename] from the context menu. 3. Enter a name for the clip or clip list. Up to 56 alphanumeric characters can be entered for the name. Other character sets can be used, and the maximum number of characters that can be entered varies depending on the language and characters used. (For example, approximately 18 characters can be entered in Japanese.) Alphanumeric file names are not case sensitive, and do not differentiate between 1-byte and 2- byte characters. File names cannot include spaces or the symbols ", *, /, :, <, >,?, \,, or. (period). 4. Click the [OK] button. 65

66 Importing Clips You can import MP4, DV-AVI, and MXF files and register them as clips that can be handled by this application. 1. In the Tree View pane of an [Explorer] window, select the folder or media where the files to be imported are stored. Remote media and folders and offline media folders cannot be selected. 2. Do one of the following. o o Select [Import...] from the [File] menu. Click the media or folder while holding down the Control key, and select [Import...] from the context menu. The [Import] dialog opens. 3. Select a file format from the [Type] list, and specify the files to import by selecting them from the file list. 4. Click the [Start] button to start the import, or the [Cancel] button to cancel it. A dialog illustrating the progress of the import operation opens when the import starts. To cancel the import operation Click the [Cancel] button in the progress dialog. Reasons why an import operation may fail File import operations may fail for the following reasons. In these cases, an error message appears and the files are not imported. You do not have delete/write privileges for the import destination media or folder. The import destination media or folder is write protected. 66
67 This software checks import files for compatibility with the XDCAM EX/XDCAM format. Files that are found to be incompatible cannot be imported. The properties of imported clips are set automatically. It may not be possible to play imported clips on XDCAM EX/XDCAM devices and with this application. 67
68 Importing Clip Lists Clip lists created by another XDCAM browser can be imported to and registered in this application. See Exporting clip lists for information about exporting created clip lists to use in other XDCAM browsers. This function only registers clip lists. Be sure to note that the clip of the material included in the clip list will not automatically be copied. If a clip of the used material does not exist, the corresponding subclip will not be played. 1. In the Tree View pane of an [Explorer] window, select the "ClipList" folder where the clip lists to be imported are stored. Remote folders and offline media folders cannot be selected. 2. Do one of the following. o o Select [Import...] from the [File] menu. Click the folder while holding down the Control key, and select [Import...] from the context menu. The [Import] dialog opens. 3. Select the clip list file (*.SMI) to be imported, and click the [Start] button. The clip list appears in the selected "ClipList" folder. Clip lists can be played if the clip of the material used by the clip list is controlled by this application. 68
69 Exporting Clips You can export files handled with this software (MP4, DV-AVI, MXF) for use in various other environments. (To export is to convert files into other formats and output them.) The optional MainConcept plug-in software must be installed to use some conversion formats. Unless the software is installed, the video after conversion will contain a MainConcept watermark. Further, only 30 seconds of audio are saved, and following audio is lost. Depending on the specified parameters, image quality may be degraded due to the image compensation process. Converted files may not be exactly the same with native files in the target format. Video metadata may not be inherited after format conversion. Image quality may be degraded if format conversion requires re-encoding. Image quality may be degraded and duration may vary if files are converted to a format with a different bit rate, resolution, or frame rate parameters. Before exporting, ensure that the export destination media or folder is write enabled. 1. In the List View pane of an [Explorer] window, select the clip to export. 2. Do one of the following. o From the [File] menu, select [Export] and then select the format that you want to convert to. o Click the clip while holding down the Control key, and select [Export] and then the format that you want to convert to from the context menu. The formats available for export will vary depending on the format of the selected clip. See File conversion formats for more information about conversion formats. Format of selected clip MP4 DV-AVI MP4+DV-AVI Format available for export All formats are available for selection. MXF for XDCAM DVCAM All formats are available for selection. However, if a file format that cannot be exported from DV-AVI is selected, DV-AVI file export will not be performed. MXF o o Windows Media File Video hosting service The [Export] dialog opens for the selected format. 3. Change the following settings as required. o [Export Destination]: Specifies the export destination folder. Enter a path beginning with a drive name in the edit box. Or click the [...] button to open a browse dialog where you can select a folder, and then click the [OK] button. Remote host folders cannot be selected. Make sure that the export destination media has adequate free space before you execute the export. An error occurs at the point where the free space is used up. o [Type]: Click the [Codec Details...] button to open the [Codec Details] dialog, set parameters as required, and click the [OK] button. This item does not appear for some 69
70 conversion formats. Depending on the number of audio channels in the clip, the audio output corresponds as shown below to the setting of the [Channels] list in the [Audio] section. Number of audio channels in clip Setting in [Channels] list Audio output 1CH Mixed signal of channels 1 and 2 2 4CH Channel 1: Channel 1 signal Channel 2: Channel 2 signal Channel 3: Channel 1 signal Channel 4: Channel 2 signal 1CH Mixed signal of channels 1 to 4 4 2CH Channel 1: Mixed signal of channels 1 and 3 Channel 2: Mixed signal of channels 2 and 4 1CH Mixed signal of channels 1 to 4 a) 8 2CH Channel 1: Mixed signal of channels 1 and 3 Channel 2: Mixed signal of channels 2 and 4 a) o o a) Channels 5 to 8 are ignored. [Range of Export]: Select [In/Out Selection] if you want to output the range between the In and Out points in the current clip. This item does not appear for some conversion formats. To modify the output file name In the List View pane, do one of the following to make the file name changeable. o o Click the file name. Click the highlighted part while holding down the Control key and select [Modify the output filename] from the context menu. 70 Enter the desired file name and press the Return key, or click outside of the file name. Extension does not need to be entered. 4. Click the [Execute] button to start the export. A progress bar appears to show the progress of the export. The progress also appears in the [Status] column of the List View pane. To cancel the export Click the [Cancel] button. If a file with the same name already exists at the output destination A dialog appears to ask how you want to proceed. Read the explanation in the dialog and click one of the buttons.
71 File Conversion Formats (Clip Export) File conversion formats can be selected with the Export subcommands in the following table. Export subcommand [MXF for NLEs] a) Extension after conversion MXF Description Converts to MXF file format without changing the bit rate, resolution or other parameters. This is for non-linear editors that support MXF files only. [MXF for XDCAM HD] MXF Converts to an MXF format that is compatible with MXF files b) recorded by XDCAM HD devices. [MXF for XDCAM HD422] MXF Converts to an MXF format that is compatible with MXF files b) recorded by XDCAM HD422 devices. [MXF for XDCAM MPEG IMX] [MXF for XDCAM DVCAM] [Raw DV] [AVI DV] [Windows Media File] MXF MXF DV AVI WMV Converts to an MXF format that is compatible with MXF files recorded by XDCAM MPEG IMX devices. Converts to an MXF format that is compatible with MXF files recorded by XDCAM DVCAM devices. Converts to RAW DV format. This is for DV format editing. Depending on the editing environment, use either this subcommand or the [AVI DV] subcommand. Converts to AVI Type-2 format. This is for DV format editing. Depending on the editing environment, use either this subcommand or the [RAW DV] subcommand. Converts to Windows Media Player 9 compatible format. Converts to a format that allows clips to be previewed on the [Sony PSP (H.264/AVC)] MP4 PlayStation Portable (PSP) game console from Sony c) Computer Entertainment. [Apple ipod (H.264/AVC)] MP4 Converts to a format that allows clips to be previewed on the c) ipod portable media player from Apple Inc. [Video Hosting Service] WMV Converts to a format optimized for Internet video hosting services. a) When outputting the range between the In and Out points in the current clip, the duration may be prolonged after conversion. b) Clips of two seconds or less can be converted to MXF files, but they cannot be written to export destination devices. c) Improper playback may occur if the converted file is viewed on a viewer other than the specified devices. 71
72 Exporting Clip Lists Clip lists you have created can be exported to writable locations except for currently saved folders. If the clip of used materials is being managed in an XDCAM browser installed on another computer, exported clip lists can be imported and used by that browser. See Importing clip lists for more information about importing exported clip lists. This function exports clip list files. Be sure to note that clips of materials which use clip lists will not be copied. You may not be able to export media or folder specified in the export destination as expected depending on the attribute of that media or folder. In such a case, execute the operation after specifying a writable location for the general file such as the HDD folder or General folder. Folders on a remote host cannot be selected. 1. Display the clip list to be exported in the [Storyboard] window. 2. Select [Clip List] and then [Export] from the [Clip] menu. The [Export] dialog opens. 3. Specify the export destination folder and click the [Open] button. Clip lists displayed by step 1 will be exported to the designated folder. 72
73 Previewing Clips and Clip Lists Clips and clip lists can be previewed in the [Preview] window. Several limitations apply to playback in the [Preview] window. See [Preview] windows for more information. Complete display of all video data, audio data, and timecode data is not guaranteed with the playback function of this software. Smooth playback may not be possible due to CPU and memory performance, media properties, connection methods, and other factors. Loading clips and clip lists into the [Preview] window Display the clip or clip list that you want to preview in the List View pane of an [Explorer] window, and then do one of the following. Double click the clip or clip list. Click the clip or clip list, and press the Return key. Drag and drop the clip or clip list on a [Preview] window (this operation is disabled if multiple clips are selected). Click the clip while holding down the Control key, and select [Play] and then the format that you want to convert to from the context menu. The clip or clip list is loaded into the [Preview] window (and playback starts, if you loaded the clip or clip list by selecting [Play] or pressing the space bar). The timecode of the current playback position (or a counter value) appears in the upper part of the screen, together with the duration of the section between In and Out points in the clip or clip list. To stop play Click the [Play] button. Smooth playback is not possible when previewing clips or clip lists saved to DVD-R or CD-R discs. Preview operations You can use the following methods to control playback in the [Preview] window. Use the command buttons in the [Preview] window. Select the operation from the [Preview] menu. Drag the playline. Press the J, K, or L key. J: Change the reverse playback speed. Each press selects 1, 2, 4, 8, or 16 times normal speed. K: Stop playback. L: Change the forward playback speed. Each press selects 1, 2, 4, 8, or 16 times normal speed. No audio is output in playback at speeds greater than or equal to ±4 times normal speed. To select full-screen playback Double click the screen, or select [Full Screen] from the [View] menu. To return to the original screen size, double click the screen or press the Esc key. 73
74 To change the playback mode of MXF clips Select "Original (high resolution)" or "Proxy (low resolution)" in the [Play] tab of the [Preferences] dialog. Selecting "Original" makes it possible to preview with high definition images when the screen size is enlarged. You cannot change the playback mode when a clip or clip list is being played. Clips or clip lists without proxy AV data are played at a high resolution regardless of this setting. Clip lists on an XDCAM drive connected by IEEE1394 cable are played at low resolution regardless of this setting. Clips or clip lists in the [Offline Media] window are played at a low resolution regardless of this setting. High resolution data may not be played smoothly due to its large file size. To select the audio channels to monitor during previews In the [Set Audio Channels] dialog, check the [L] (left) or [R] (right) check box to monitor that channel. To open the [Set Audio Channels] dialog, do one of the following. Select [Set Audio Channels...] from the [Preview] menu. Click the [Set Audio Channels] button. To edit a clip list Clip lists can be created and edited in the [Storyboard] window of this application. See Displaying Clip Lists, Adding Subclips to Clip Lists, and Editing Clip Lists for more information about editing clip lists. 74
75 Previewing Unregistered Media Files You can check media files in formats other than the XDCAM EX and XDCAM formats, without having to import them. This application can preview media files in MXF a), MP4, and DV-AVI format. a) Proxy files cannot be previewed. 1. Select [Open Media File] from the [File] menu while the [Preview] window is active. 2. Select the file you want to preview in the dialog. The media file is displayed in the [Preview] window. [Preview] window operations You can use the command buttons in the [Preview] window to perform the same operations as those for standard clips. However, you cannot perform editing operations such as the deletion of In and Out points and essence marks. The [General] tab and [A/V Format] tab appear in the clip properties section, allowing you to check the metadata of media files. Unregistered media files cannot be imported to Final Cut Pro. Always import clips using the [Import] command in the [File] menu, and then import to Final Cut Pro. To preview media files with drag and drop Media files can also be previewed by dragging the media file from the Finder to the [Preview] window. 75
76 Changing the Index Picture of a Clip Index pictures can be changed in the clip preview. The index pictures of DV-AVI clips cannot be changed. 1. Play a clip, and display the frame you want to use as the index picture. 2. Select [Edit] - [Set Index Picture] from the [Preview] menu, or click the [Set Index Picture] button. The currently displayed frame becomes the clip s index picture, and the index picture in the [General] tab of the clip properties section changes to show it. Index pictures of clips on an XDCAM drive can be changed only during proxy data playback. If you are previewing a clip that is stored on removable media, do not eject the media until the operation finishes. Do not power the computer off until the operation finishes. On XDCAM EX devices, a frame near the specified frame may be displayed as the index picture, instead of the specified frame itself. If you press the Set Index Picture button during play of the clip, the thumbnail view may show no change before the play is finished. 76
: When you know where the clip or clip list is located, you can search a specified folder for clips or clip lists with specified properties.")
77 Searching for Clips and Clip Lists You can search for a clip or clip list in either of the following ways, depending on whether you know where the clip or clip list is located. Search for specified folder ([Specified Folder] tab): When you know where the clip or clip list is located, you can search a specified folder for clips or clip lists with specified properties. Search for keyword ([Keyword Searching] tab): When you know only the fact that the clip or clip list is located on the computer on which this application is installed, you can perform a keyword search. Always observe the following precautions during a search. o Do not delete the target folder. o Do not eject the media before the operation completes. You cannot search for clips or clip lists in the [Offline Media] window. Also, you cannot search for proxy clips or clip lists in USB memory that are indicated with an icon in [Explorer] windows. 1. Activate an [Explorer] window and do one of the following. o Click the [Find] button. o Select [Find] - [Find...] from the [Edit] menu. The [Find] dialog opens. 2. Specify search criteria. [Specified Folder] tab To change the search target Click the [...] button to open a [Browse Folder] dialog, select the target folder, and click the [OK] button. 77
![To specify search criteria Select at least one item from the [Items] list, and enter the matching condition in the text box for that item, or select the condition from the list.](/docs-images/76/74056648/images/78-0.jpg "To specify the type of search Click \"Include all keywords\" (AND search), \"Include any of the keywords\" (OR search), or \"Exclude keywords\" (NOT search).")
78 To specify search criteria Select at least one item from the [Items] list, and enter the matching condition in the text box for that item, or select the condition from the list. To specify the type of search Click "Include all keywords" (AND search), "Include any of the keywords" (OR search), or "Exclude keywords" (NOT search). To specify search options As required, check "Case sensitive" and "Narrow down search" (narrow down the search within the results of the previous search). When [Clip Name] is selected from the [Items] list, search is performed based on the [Clip Name] settings in the [Display] tab of the [Preferences] dialog. [Keyword Searching] tab o o Keyword search uses the Mac OS Spotlight which is an indexed search system. The index is updated at times when the computer is not being used for other tasks. Therefore, even if clips exist on the hard disk of the computer, they will not be found if they have not yet been indexed. XDCAM drive content is not searched. To specify the keywords to find: Enter the keywords to find in the Keywords box. You can enter multiple keywords. An AND search is performed (partial match). Uppercase and lowercase are not distinguished. 3. Click the [Start] button. A list of search results appears in the [Find] dialog, containing clips or clip lists that match the conditions specified in step 2. To hide the search criteria in the Specified Folder tab Click the [Criteria] button. Click the [Criteria] button when conditions are hidden to show them again. 78
79 To sort the search results Click the header of the column that you want to use as the sort key. With each click, the list is sorted in ascending or descending order. To display the search results in an [Explorer] window Select one of the search results and do one of the following. Select [Find] - [Go to Explorer] from the [Edit] menu. Click the search result while holding down the Control key, and select [Go to Explorer] from the context menu. To play the search results Select one of the search results and do one of the following. Click the search result while holding down the Control key, and select [Play] from the context menu. 79

80 Correcting flash bands Flash banding can occur when the CMOS sensor of a camera or camcorder captures a subject that is illuminated by a flash or other momentary light source. It is characterized by a bright band at the top or bottom of a frame, instead of the entire frame. The term flash band is also used to describe a frame that is divided vertically into a bright half and a dark half. This software creates copies of frames where flash banding has occurred, and corrects the flash banding on the copies. You can operate on multiple clips at once. Operations on MXF clips are not supported. Flash band detection and correction are not possible for the following clip types. o Import material, material containing recorded line input signals, and so on o Clips shot in 23.98p and converted to 59.94i by 2-3 pulldown o Write-protected clips, and clips on write-protected media o Clips in the UserData folders on XDCAM drives o Clips stored on remote drives Detecting flash bands automatically 1. Select the clips that you want to check for flash bands in the List View pane of an [Explorer] window. 2. In the [Clip] menu or the context menu, select [Flash Band], [Detect], and [In/Out Selection] or [Entire Clip], in that order. Flash band detection begins, and a progress bar appears to show the progress of the processing. A message appears when processing finishes. Editing of In and Out points is not supported for DV-AVI clips. Regardless of range specifications, the entire clip is searched. Detection of all flash bands is not guaranteed. For example, this function may fail to detect flash bands in the following cases. o When flash bands are located near the first or last frames o When a section contains continuous flash bands o When the scene changes dramatically between adjacent frames o When the bright area caused by the flash is small in size o When it is difficult for the software to determine whether a bright area is a flash band. To detect and correct flash bands when shooting scenes with the electronic shutter enabled, check the [Enable detection and correction mode for using an electronic shutter.] check box in the [Flash Band] tab of the [Preferences] dialog. 80
![Checking and editing detected flash bands 1. Load the clip that you want to check into the [Preview] window. 2.](/docs-images/76/74056648/images/81-0.jpg "Check that a [Flash Band] tab is displayed in the clip properties section of the [Preview] window, and click the [Flash Band] tab. 3. Click the [Load] button.")
81 Checking and editing detected flash bands 1. Load the clip that you want to check into the [Preview] window. 2. Check that a [Flash Band] tab is displayed in the clip properties section of the [Preview] window, and click the [Flash Band] tab. 3. Click the [Load] button. A list appears, showing the timecode locations of frames with detected flash bands. 4. Select a timecode value from the list in the [Flash Band] tab, and then check the picture that appears on the screen. To confirm an image after correction Check the [Preview] check box, and then select the timecode of the frame that you want to check. When it is judged that correction is unnecessary With the frame selected, click the [Delete] button, or select [Delete] from the frame s context menu. The information for that frame is deleted from the list and the position bar. To correct frames not automatically detected Display the frame you want to correct, and click the [Add] button. Information for that frame is added to the list and the position bar. Manual appears in the [Detect] field of the list. Image quality may be impaired if you correct where flash banding has not occurred. To change the correction start field If the correction target clip is interlaced video, from the context menu of the target frame, select [Field], and [1st] or [2nd], in that order. Regardless of how the frame was added to the list, "Manual" appears in the [Detect] field whenever you change the correction start field. 5. If you changed anything in step 4, click the [Save] button. The changes are not reflected if you execute the correction without performing this step. Correcting flash bands After the preparations explained in the previous procedure, proceed as follows to execute the flash band correction. 1. In the List View pane of an [Explorer] window, select the clip to correct. 81
![2. Select from the [File] menu, or select [Flash band], [Correct], and [In/Out Selection] or [Entire Clip] from the context menu.](/docs-images/76/74056648/images/82-0.jpg "The selected clip is duplicated, and flash band correction of the duplicated clip starts. A progress bar appears to show the progress of the processing.")
82 2. Select from the [File] menu, or select [Flash band], [Correct], and [In/Out Selection] or [Entire Clip] from the context menu. The selected clip is duplicated, and flash band correction of the duplicated clip starts. A progress bar appears to show the progress of the processing. Editing of In and Out points is not supported for DV-AVI clips. Regardless of range specifications, the entire clip is searched. No correction processing is performed on the duplication source clip. Flash band correction of the first and last frames is not supported. Depending on the flash burst characteristics, a white band may remain even after correction. Executing correction automatically after flash band detection In step 2 of the procedure in "Detecting flash bands automatically", select the [Detect and Correct] command instead of the [Detect] command. Correction starts automatically after automatic detection. Checking flash band corrected clips 1. In the Tree View pane of an [Explorer] window, select the folder or media where corrected clips are stored. You can specify the destination where corrected clips are stored in the [Flash Band] tab of the [Preferences] dialog. See [Flash Band] tab for more information. 2. Load the clip that you want to check into the [Preview] window. 3. Click the [Flash Band] tab in the [Preview] window. 4. Click the [Load] button. A list showing the timecode of correction target frames appears. Check that the mark in the position bar has changed to dark green (indicating flash band corrected), and that "Corrected" appears in the "Status" column. 5. Select the timecode and check the picture displayed on the screen. 82
83 Setting an Essence Mark in a Clip Essence marks can be set in the clip in the [Preview] window, and the edits can be written back to XDCAM drives. There are two setup methods: Adding an essence mark called "_ShotMark1" Add an essence mark with a specified name Multiple essence marks cannot be set in the same frame. Set them 1 to 2 frames apart. Essence marks cannot be set in DV-AVI clips. Adding an essence mark called "_ShotMark1" 1. Play the clip in the [Preview] window to display the location where you want to add an essence mark. 2. Do one of the following. o Press the E key on the keyboard. o Click the [Add Essence Mark] command button. o In the [Preview] menu, select [Edit] - [Add Essence Mark]. o Click the [Add] button on the [Essence Mark] property tab. Added essence marks are labeled (e.g. "_ShotMark1"). The added essence mark appears in the [Essence Mark] tab list. Select essence marks on the position bar or the [Essence Mark] tab to display frames with these essence marks in the [Preview] window. Adding an essence mark with a specified name Call up the categories of previously registered essence marks and set an essence mark with a registered name. A name of your choice can be entered when setting an essence mark. See Registering Essence Marks and Categories for more information about registering essence mark categories and names. 1. Click the [Detail] button on the [Essence Mark] tab in the [Preview] window to display the essence mark detailed setting area. 83
![2. Select the required category in the [Category] drop-down list. 3.](/docs-images/76/74056648/images/84-0.jpg "If required, use the and buttons to switch displayed pages, and ensure that the name of the essence mark you want to set is displayed.")
84 2. Select the required category in the [Category] drop-down list. 3. If required, use the and buttons to switch displayed pages, and ensure that the name of the essence mark you want to set is displayed. In each page, essence marks are each registered as F1 to F10 and Shift+F1 to Shift+F10 (displayed as *F1 to *F10 in the list) corresponding to the Function keys on the keyboard. The name of essence marks allocated Shift+F1 to Shift+F10 are displayed in the essence mark advanced setting area by pressing the Shift key on the keyboard. 4. Play the clip in the [Preview] window to display the location where you want to add an essence mark. 5. Do one of the following. o Click the item corresponding to the name of the required essence mark using the [F1] to [F10] and [*F1] to [*F10] buttons. o Press any of the F1 to F10 or Shift+F1 to Shift+F10 function keys on the keyboard depending on the required essence mark. The essence mark of the name corresponding to the clicked button or pressed key is added. The F1 to F10 or Shift+F1 to Shift+F10 function keys on the keyboard for setting essence marks can only be used when the essence mark detailed setting area is displayed. Note that the function keys are also inactive if the names for essence marks registered with the [F1] to [F10] and other buttons are not displayed. To input a random name when setting an essence mark Check the [Edit Input] checkbox in the Essence Mark detailed setting area to display the [Edit Essence Mark] dialog for essence marks set with [F1] to [F10] buttons or function keys, or the [Add] button on the [Essence Mark] tab. Type in the required string in this dialog and click the [OK] button. Select [Unicode] in the [Character Code Type] field if not using US-ASCII. 84
85 Writing essence mark edits to recording media Edited essence marks on MXF file clips can be written to recording media after editing. When any essence mark edits are not yet written to a Professional Disc, an asterisk (*) appears at the top of the [Essence Mark] tab. Click the [Write to XDCAM Disc] or [Update] button on the [Essence Mark] or [General] tab to apply edits to the disc. Which button is displayed depends on whether the clip is recorded on Professional Disc or different media. Tips Edits are immediately applied if the clip is an MP4 file. There are no additional operations. 85
86 Editing an Essence Mark in a Clip Essence marks can be added to and deleted from the clip in the [Preview] window, and the edits can be written back to XDCAM drives. Displaying the essence marks that are in a clip Essence marks are displayed at the following locations. On the position bar of the [Preview] window On the [Essence Mark] property tab in the [Preview] window Select essence marks on the position bar or the [Essence Mark] tab to display frames with the selected essence marks in the [Preview] window. Deleting essence marks 1. On the [Essence Mark] tab or position bar, select an essence mark to delete. 2. Do one of the following. o Click the [Delete Essence Mark] button in the toolbar. o In the [Preview] menu, select [Edit] - [Delete Essence Mark]. o Click the [Delete] button on the [Essence Mark] tab. Renaming essence marks 1. On the [Essence Mark] tab or position bar, select an essence mark to rename. 2. Do one of the following. o Double-click essence marks. o In the [Preview] menu, select [Edit] - [Edit Essence Mark]. o Click the [Edit] button on the [Essence Mark] tab. The [Edit Essence Mark] dialog appears. 3. Edit the essence mark name, and click [OK]. Essence mark names can be up to 32 characters when the [Character Code Type] field is [US- ASCII] or 16 characters when [Character Code Type] field is [Unicode]. Select [Unicode] if not using US-ASCII. Writing essence mark edits to recording media Edited essence marks on MXF file clips can be written to recording media after editing. When any essence mark edits are not yet written to a Professional Disc, an asterisk (*) appears at the top of the [Essence Mark] tab. Click the [Write to XDCAM Disc] or [Update] button on the [Essence Mark] or [General] tab to apply edits to the disc. Which button is displayed depends on whether the clip is recorded on Professional Disc or different media. Tips Edits are immediately applied if the clip is an MP4 file. There are no additional operations. 86
87 Importing into Final Cut Pro MP4, DV-AVI, and MXF clips processed by this program can be converted to mov format and imported to Final Cut Pro for editing. Selecting the clip list allows the included subclips to be imported to Final Cut Pro. When the clip list is selected, this function will import clip list subclips as individual clips in Final Cut Pro. In this case, margins that you set in [Margin of Subclip] in the [Conversion] tab in the [User Configuration] dialog are added before the In point and after the Out point of the clip. Importing clips into Final Cut Pro 1. Start Final Cut Pro. 2. In Final Cut Pro, open the project in which you want to import the clip. 3. Create a sequence in the project. Create the sequence using the preset format for the material to be imported. 4. In the Final Cut Pro [File] menu, select [Import] - [Sony XDCAM Browser]. The XDCAM Browser opens. If it is already open, the XDCAM Browser becomes active. 5. Select and import the clip list containing the clips or subclips to be imported by the XDCAM browser. Importing can be performed from the [Explorer] or [Preview] window. When importing from an [Explorer] window, multiple clips or clip lists can be selected for importing. From the [Preview] window, clips being previewed or subclips included in the clip list can be imported. Selecting and importing clips and clip lists from the [Explorer] window 1. In the [Explorer] window, select the clip(s) or clip list(s) to be imported. Multiple clips and clip lists can be selected. 2. Do one of the following. o o Select [Import into Final Cut Pro] from the [Clip] menu. In the context menu displayed by clicking a clip or clip list while holding the Control key, select [Import into Final Cut Pro]. The [Import into Final Cut Pro] window appears. 87
![3. Make settings for the project and/or clip(s) to be imported. [Destination]: Select the project to be imported. Select from the projects created by Final Cut Pro in the Project list.](/docs-images/76/74056648/images/88-0.jpg "[Range]: Select whether to register the whole clip, or only the section between the In and Out points. When the clip list is selected, it will always import the section between the In and Out points.")
88 3. Make settings for the project and/or clip(s) to be imported. [Destination]: Select the project to be imported. Select from the projects created by Final Cut Pro in the Project list. [Range]: Select whether to register the whole clip, or only the section between the In and Out points. When the clip list is selected, it will always import the section between the In and Out points. [Importing Clip Object Display]: The clip(s) selected in the [Explorer] window is displayed. When a clip list is selected, it is individual subclips included in the clip list that are actually imported and the clip list appears here. Other XDCAM Browser operations cannot be performed while importing clips. To change the name of a file to be imported When selecting a clip for importing, the name of individual clip files can be changed in the [Import into Final Cut Pro] dialog. When selecting a clip list for importing, the default file name is used and cannot be changed. (However, it is possible to change a part of the file name by changing the clip list if the clip list name is included in the file name.) The default name of the file to be imported can be changed with the [FCP] tab in the [Preferences] dialog. See [FCP] tab for more information about default settings. 1. Do one of the following. 88 o o Click a file name in the [Import file] list. From the context menu displayed by clicking a file name while holding the control key, select [Modify the output file name].
89 The file name is selected so you can edit it. 2. Edit the file name. In the case of clip lists, "E0000E01," "E0100E01" to "E9999E01," "E0000," and "E0100" to "E9999" cannot be used. To accept the edited name, click outside of the file name. 3. Click the [Execute] button. The import process starts. The progress and conversion status of each clip are displayed in the [Import into Final Cut Pro] dialog. To abort Click the [Cancel] button. Importing is not possible in the following cases. o When the In and Out point time codes are reversed o While editing an import file name While editing a clip to be imported, edits are not imported. Displaying and importing clips and clip lists into the [Preview] window 1. Load the clip or clip list to be imported into the [Preview] window. 2. Click the [Import into Final Cut Pro] button. The import processing of the project open in Final Cut Pro starts. The import range is the section between the In and Out points of each clip or subclip if the clip or the clip list is selected. Progress is displayed in the dialog. [Offline Media] window clips or subclips included in [Offline Media] window clip lists cannot be imported. High-resolution data will be imported to Final Cut Pro, even if a proxy file is displayed. Unregistered media files cannot be imported to Final Cut Pro. Always import clips using the [Import] command in the [File] menu, and then import to Final Cut Pro. 89

90 Exporting From Final Cut Pro Files edited in Final Cut Pro can be converted to the formats supported by this program (MP4 and MXF) and written back to media or folders. Conversion to DV-AVI format is not available. 1. In Final Cut Pro, select the sequence to be exported, and select [Export] - [Sony XDCAM Browser] from the [File] menu. The Sony XDCAM Export plug-in starts, and the [Sony XDCAM Export] dialog appears Select the output destination. Select the output destination media in the [Exporting 'Sequence name' to] list box, or click the [Choose...] button to select a folder on the hard disk. To name the file to be exported If the output destination supports arbitrary file names, a name can be applied to the file to be exported. Enter a name in [With filename] in the [Sony XDCAM Export] dialog. o Names of files and folders can be composed of numbers, characters, and symbols in the Unicode 2.0 character set. However, the following control characters and symbols cannot be used. Control characters: U+0000 to U+001F and U+007F o Symbols: ", *, /, :, <, >,?, \, and To export a 50p or 60p MXF file, the duration must be an even number. Exporting is not possible when an odd-numbered duration is selected. 3. In the [As format] list box, select the sequence format (MXF or MP4) and the clip to be exported. 4. In the [Using settings] list box, select the export presets. The video and audio formats of the clip or sequence are displayed. If exporting is not possible with the current settings, a message indicating the reason appears.
91 Normally, the current presets are automatically selected from the sequence, but other presets can be selected from the Preset list. [Recompress all frames] check box: The Final Cut Pro export sequence can be re-rendered. Export operations are faster when this box is not checked. [Anamorphic 16:9] check box: Anamorphic 16:9 material can be exported. See the Final Cut Pro User Manual for details about handling anamorphic material. 5. To select the save destination for intermediate files, click the [Choose...] button in [Create intermediate files in]. Several temporary intermediate files are generated while exporting a sequence, and these are automatically deleted once the sequence has been recorded to XDCAM. However, these intermediate files can be quite large, so we recommend specifying an appropriate save destination for them. Select a disk with plenty of empty space as the save destination for intermediate files. We recommend using a folder on the Video Render scratch disk. To write to a Professional Disc, up to 50 GB is required for the longest sequence. 6. Click the [Export] button. Sequence exporting starts, and a clip is rendered. Export progress is indicated by a dialog. Final Cut Pro is usable while exporting. The operation progress is displayed in the [Exporter] window. In the audio output settings for Final Cut Pro sequences, select the appropriate number of audio outputs (2, 4, 8) based on the XDCAM settings, and select Dual Mono grouping for all the outputs. Exporting is not possible if the sequence and output destination settings do not match. Check the settings, and click the [Export] button again. Exporting is not possible when the output destination is set to prohibit recording. 91
92 Creating New Clip Lists You can create new clip lists using clips from a single media and edit them. 1. In the [Explorer] window or [Offline Media] window, right click the ClipList folder of the media on which you want to create the clip list while holding down the Control key, and select [New Clip List] from the context menu. A new clip list is created, and a dialog for entering the clip list name appears. The canonical name of the clip list will be displayed in the dialog. 2. Edit the displayed canonical name of the clip list to the required name (56 bytes maximum. However, "E0000E01," "E0100E01" to "E9999E01," "E0000," and "E0100" to "E9999" cannot be used.), and click the [OK] button. A blank clip list appears in the [Storyboard] window. Add subclips from the [Explorer] window, [Offline Media] window, and [Preview] window, and create the clip list. You cannot create clip lists composed of clips stored on multiple media. Up to 99 clip lists can be created on a single media. Clip list editing is performed in the work area of this application. Please save to the selected media after editing is complete. See Saving Clip Lists for more information about the save operation. 92
93 Displaying Clip List Content You can check and edit the content of clip lists in the [Storyboard] window. 1. In the [Explorer] window or [Offline Media] window, select the desired clip list, and do one of the following. o o Select [Edit Clip List] from the [Clip] menu. Click the item while holding down the Control key, and select [Edit Clip List] from the context menu. When a clip list that is being edited is displayed in the [Storyboard] window, a dialog asking whether you want to save the clip list or not appears, so save it if necessary. The selected clip list appears in the [Storyboard] window. Add subclips from the [Explorer] window, [Offline Media] window, and [Preview] window, and create the clip list. You cannot create clip lists composed of clips stored on multiple media. It is not possible to edit a clip list if it contains voice-over data. Clip list editing is performed in the work area of this application. Please save to the selected media after editing is complete. See Saving Clip Lists for more information about the save operation. 93
94 Adding Subclips to a Clip List You can perform one of the following procedures to add subclips to the clip list displayed in the [Storyboard] window. Up to 300 subclips can be added to a single clip list. It is not possible to add subclips to a clip list if the clip list contains voice-over data. You cannot create clip lists composed of clips stored on multiple media. 94 You cannot create clip lists composed of clips with different video formats. Clip list editing is performed in the work area of this application. Please save to the appropriate media after editing is complete. See Saving Clip Lists for more information about the save operation. Adding from the [Explorer] window or [Offline Media] window You can add entire clips, or sections between the In and Out points when specified, directly to a clip list as subclips. 1. Specify the positions where the subclips will be added in the [Storyboard] window as required. When adding subclips using menu commands, the new subclips will be inserted after the selected subclip. 2. From an [Explorer] or [Offline Media] window, select the clip you want to use (multiple clips can be selected by clicking them while holding down the Command key or Shift key), and then execute any of the following operations. o Drag and drop the selected clip to the desired position in the clip list displayed in the [Storyboard] window. With this method, the subclip will be inserted at the dropped position, regardless of the position specified in step 1. o o Select [Add Subclip] from the [Clip] menu. Click the selected area while holding down the Control key, and select [Add Subclip] from the context menu. The new subclip(s) appear in the [Storyboard] window. 3. In the subclip information section of the [Storyboard] window, enter a title (up to 127 bytes) and description (up to 511 bytes) for the added subclip as required. Click the [Subclip Title] or [Subclip Description] field, enter the desired text, and then press the Return key or click outside of the fields. Adding from the [Preview] window You can check scenes before adding them to the clip list. This is a convenient way to add sections specified by In and Out points as subclips. 1. Specify the positions where the subclips will be added in the [Storyboard] window as required. The new subclips will be inserted after the selected subclip. 2. Load the desired clip into the [Preview] window, and check the scene. See Previewing Clips and Clip Lists for more information. 3. Click the [Mark In] button at the position you want to use as the first frame of the subclip, and click the [Mark Out] button at the position you want to use as the last frame. In and Out points are set in the clip. Tips You can also set the Out point by specifying the In point and duration. Duration can be specified by clicking the timecode display of the duration, entering a numeric value, and pressing the Return key.
95 In and Out points cannot be set at the same frame. When you try to set an Out (or In) point at a frame where an In (or Out) point has been set, the Out point is automatically set at the next frame after the In point. 4. Play the section specified in step 3, and adjust the In point and Out point positions as required. 5. Do one of the following. o Click the [Add Subclip] button in the [Preview] window. o Press the Return key on the keyboard. o o Select [Edit] and then [Add Subclip] from the [Preview] menu. Click within the [Preview] window tab while holding down the Control key, and select [Add Subclip] from the context menu. The new subclip(s) appear in the [Storyboard] window. 6. In the subclip information section of the [Storyboard] window, enter a title (up to 127 bytes) and description (up to 511 bytes) for the added subclip as required. Click the [Subclip Title] or [Subclip Description] field, enter the desired text, and then press the Return key or click outside of the fields. 95
96 Editing Clip Lists You can perform the following edits for subclips included in clip lists displayed in the [Storyboard] window. See Adding Subclips to a Clip List for more information about how to add new subclips to a clip list. It is not possible to edit a clip list if it contains voice-over data. Clip list editing is performed in the work area of this application. Please save to the appropriate media after editing is complete. See Saving Clip Lists for more information about the save operation. Previewing subclip content You can check scenes by loading the source clip of the subclip into the [Preview] window. When you double click the desired subclip in the [Storyboard] window, the clip will be loaded into the [Preview] window. See Previewing Clips and Clip Lists for more information about [Preview] window operations. Moving subclips You can move subclips within the clip list to change their playback order. To move via drag and drop Select the subclip to move in the [Storyboard] window, and drag and drop the subclip to the desired position. Hold down the Command key on the keyboard while clicking to select multiple subclips for moving. To move via cut and paste 1. Select the subclip to move in the [Storyboard] window. Hold down the Command key on the keyboard while clicking to select multiple subclips. 2. Do one of the following. o Press the Command + X keys on the keyboard. o o Select [Cut] from the [Edit] menu. Click the selection while holding down the Control key, and select [Cut] from the context menu. The selected subclip(s) are cut. 3. Specify the destination for moving. To select a destination, click a subclip. The cut subclip will be inserted after this subclip. 4. Do one of the following. o Press the Command + V keys on the keyboard. o o Select [Paste] from the [Edit] menu. Click the selection while holding down the Control key, and select [Paste] from the context menu. The cut subclip is inserted after the selected subclip. Copying subclips You can copy subclips in a clip list. 96
97 To copy via drag and drop 1. Select the subclip to copy in the [Storyboard] window. Hold down the Command key on the keyboard while clicking to select multiple subclips. 2. Move the subclip(s) selected with the drag and drop operation to the desired copy destination while holding down the Option key on the keyboard. The subclip(s) are copied. To copy via cut and paste 1. Select the subclip to copy in the [Storyboard] window. Hold down the Command key on the keyboard while clicking to select multiple subclips. You can also select [Select All] from the [Edit] menu to select all the subclips in the clip list. 2. Do one of the following. o Press the Command + C keys on the keyboard. o o Select [Copy] from the [Edit] menu. Click the selection while holding down the Control key, and select [Copy] from the context menu. The selected subclip(s) are copied to the clipboard. 3. Specify the copy destination. To select a copy destination, click a subclip. The copied subclip will be inserted after this subclip. 4. Do one of the following. o Press the Command + V keys on the keyboard. o o Select [Paste] from the [Edit] menu. Click the selection while holding down the Control key, and select [Paste] from the context menu. The subclip(s) copied to the clipboard are inserted after the selected subclip. Deleting subclips 1. Select the subclip to delete in the [Storyboard] window. Hold down the Command key on the keyboard while clicking to select multiple subclips. You can also select [Select All] from the [Edit] menu to select all the subclips in the clip list. 2. Do one of the following. o Press the Delete key on the keyboard. o o Select [Delete] from the [Edit] menu. Click the selection while holding down the Control key, and select [Delete] from the context menu. The selected subclip(s) are deleted from the clip list. 97
98 Trimming subclips You can select subclips in a clip list, and change their In and Out points. 1. Double click the desired subclip in the [Storyboard] window to load it into the [Preview] window, and check the scene. See Previewing Clips and Clip Lists for more information about [Preview] window operations. 2. Click the [Mark In] button at the position you want to use as the first frame of the subclip, and click the [Mark Out] button at the position you want to use as the last frame to change the In and Out points as required. Tips You can also set the Out point by specifying the In point and duration. Duration can be specified by clicking the timecode display of the duration, entering a numeric value, and pressing the Return key. In and Out points cannot be set at the same frame. When you try to set an Out (or In) point at a frame where an In (or Out) point has been set, the Out point is automatically set at the next frame after the In point. 3. Play the section specified in step 2, and adjust the In point and Out point positions as required. 4. Do one of the following. o Click the [Update Modified Subclip] button in the [Preview] window. o Select [Edit] and then [Update Modified Subclip] from the [Preview] menu. The new In and Out points are applied to the selected subclip. Specifying or editing the titles and descriptions of subclips 1. Select the subclip for which to specify the title and description in the [Storyboard] window. If a title and description have already been specified for the selected subclip, text will appear in the subclip information section at the right side of the [Storyboard] window. 2. Click the [Subclip Title] or [Subclip Description] field, edit the text, and then press the Return key or click outside of the fields. Up to 127 bytes can be entered in the [Subclip Title] field, and up to 511 bytes can be entered in the [Subclip Description] field. 98
99 Saving Clip Lists Clip list editing is performed in the work area of this application. After creating or editing a clip list, save it to the original media. Operations from the [Storyboard] window 1. Click the [Save] button in the [Storyboard] window, or select [Clip List] and then [Save] from the [Clip] menu. The [Save] button in the [Storyboard] window is enabled when the clip list is edited and the edits have not yet been saved. The selected clip list is saved to the media. Operations from the [Offline Media] window 1. Connect the media on which to rewrite data. 2. In the [Offline Media] window, select the clip list that you want to save. An asterisk in front of a file name indicates a clip list that has been edited but not yet saved. 3. Do one of the following. o Click the [Update Modified Data] button. o o Select [Update Modified Data] from the [Edit] menu. Click the item while holding down the Control key, and select [Update Modified Data] from the context menu. When preparation for saving the selected clip list is complete, a confirmation message is displayed. 4. Click [Yes]. Progress is displayed in the dialog. See Rewriting Edited Data to a Professional Disc for more information on updating results of editing in an [Offline Media] window. 99
100 Folder and Media Precautions Always observe the following precautions during processing of folder and media operations. Do not power off the computer or media drive before the operation completes. Do not eject the media before the operation completes. 100
101 Folders for XDCAM EX Clips XDCAM EX clips are stored together with a BPAV folder. (This folder does not appear in the [Explorer] window, but it can be seen in the Finder.) See About EX format clip data configuration for more information about the BPAV folder. Whenever you copy or move clips with this application, the BPAV folder is copied or moved along with the clips. You cannot work with clips separately from the BPAV folder. Simultaneous access to files may not be possible when you attempt to access the same folder at the same time from several computers over a network connection. 101
102 Folders for MXF Clips A folder for managing MXF clips must have three subfolders: Clip, Edit, and Sub. See Data Configuration MXF Format Clips for more information about the folder configuration. Clips cannot be saved in the Clip folder on a Professional Disc unless the following characteristics match those of the existing clips in that folder. Frame rate (NTSC/PAL/24p) Codec (MPEG IMX/DVCAM/HD4:2:0/HD4:2:2) Resolution width (coincidence of resolution height not required). Bit rate when the codec is MPEG IMX These conditions are determined by the format of the clip first saved in the Clip subfolder. When copying MXF clips, it is necessary to check the source clips and the clips existing in the copy destination folder to be sure that these conditions are satisfied. 102
103 Creating Folders Folders cannot be created within the following folders. A Clip folder on an XDCAM drive A clip list folder Folders on a remote host 1. In the Tree View pane of an [Explorer] window, select the media or folder where you want to create the folder. 2. Do one of the following. o Click the [New Folder] button. o o From the [File] menu, select [Folder] and then select [New Folder]. Select [New Folder] on the context menu displayed by pressing the Control key while clicking a media or folder. A new folder is created in the media or folder selected in step 1. Reasons why a folder creation may fail Folder creation operations may fail for the following reasons. In these cases, an error message appears and the folder is not created. You do not have write privileges media or folder selected in step 1. The media or folder selected in step 1 is write protected. Folders cannot be created when writing is not allowed by the computer file system. New folders are created as normal folders. But once the first clip is copied or moved to the new folder, the folder is formatted as an XDCAM EX or XDCAM work folder. (The required subfolders and metadata files are created automatically.) 103
104 Renaming Folders 1. Select a folder and do one of the following. o From the [File] menu, select [Folder] and then select [Rename]. o Click the folder while holding down the Control key, and select [Folder] - [Rename] from the context menu. The folder name is selected, so that now you can edit the name. 2. Enter the desired folder name and press the Return key, or click outside of the folder name. The following folders cannot be renamed. o ClipList folder o EX and MXF folders within a UserData folder o Folders on a remote host Folders cannot be named BPAV and XDROOT. Characters forbidden by the operating system cannot be used in folder names. A folder name comprised of 200 or more characters may not be recognized. 104
![Deleting Folders 1. In the Tree View pane of an [Explorer] window, select the folder to delete. 2. Do one of the following. o Press the Command + Delete keys. o Click the [Delete] button.](/docs-images/76/74056648/images/105-0.jpg "o Select [Delete] from the [Edit] menu. o Click the folder while holding down the Control key, and select [Delete] from the context menu. A message appears asking if you want to execute the deletion.")
105 Deleting Folders 1. In the Tree View pane of an [Explorer] window, select the folder to delete. 2. Do one of the following. o Press the Command + Delete keys. o Click the [Delete] button. o Select [Delete] from the [Edit] menu. o Click the folder while holding down the Control key, and select [Delete] from the context menu. A message appears asking if you want to execute the deletion. 3. Click the [Yes] button to execute the delete, or the [No] button to cancel it. Be careful when deleting folders, because all data in the folder is deleted. The following folders cannot be deleted. o ClipList folder o EX and MXF folders within a UserData folder o Folders on a remote host Deletions cannot be undone after they finish. Reasons why folder deletion may fail Folder deletion operations may fail for the following reasons. In these cases, an error message appears and folder is not deleted. You do not have delete/write privileges for the selected folder. The selected folder is write protected. Other folders exist beneath the selected folder. a) a) The following example shows a situation in which a folder (Work1) cannot be deleted. To delete the Work1 folder, the Work2 folder must be deleted first. However, if you use an operating system function to create a folder or file in Work1 while this application is running, then Work1 may be deleted even while the Work2 folder still exists. 105
106 Backing up Folders To create a backup of a folder, perform the following. 1. In the Tree View pane of an [Explorer] window, select the folder that you want to back up. 2. Do one of the following. o o Select [Show in Finder...] from the [File] menu. Click the folder while holding down the Control key, and select [Show in Finder...] from the context menu. Finder starts. 3. Perform your backup operations in Finder by copying the folder to other media or to another folder. When a folder is too large to save to your backup media or folder You can split the folder into smaller folders, and save them on separate discs. Split folders can later be combined to restore the original large folder. For details, see Splitting Folders and Combining Folders. 106

107 Splitting Folders You can split large folders into smaller folders. This allows you to back up all of the clips in a large folder to media that is not large enough to save the entire folder without splitting. For example, you can split an 8 GB folder into two 4 GB folders in order to save them on 4 GB DVD-R media. The individual files in split folders are not split. This operation is not applicable to non-xdcam EX format folders (such as MXF). It applies only to XDCAM EX folders. 1. In the Tree View pane of an [Explorer] window, select the folder to split. 2. Do one of the following. o Click the [Split Folder] button. o o Select [Split Folder...] from the [Edit] menu. Click the folder while holding down the Control key, and select [Split Folder...] from the context menu. The [Split Folder] dialog opens. The individual files in split folders are not split. Clips are assigned to the split folders in such a way that the split folders have the specified size. This means that it is not possible to specify a split folder size smaller than the largest file in the original folder. It is also not possible to specify a split folder size smaller than 4 GB. 3. Select the type of media from the [Media] list box. The size of the folder after splitting, as determined by the selected media type, appears in the edit box beneath the list box. If you select Arbitrary Size, enter the size (an integer from 4 to 100) in the edit box. 4. Click the [Start] button. The folder is split into the minimum number of folders that will produce the specified folder size, and clips are assigned to the smaller folders. The folders produced as a result of the split have the same name as the original folder, followed by serial numbers. Once it starts, a split operation cannot be canceled before it finishes. Split clips may be assigned to different folders. If you would prefer that split clips be assigned to other folders, you can move them manually after the folder split. 107
. It applies only to XDCAM EX folders.")
108 Combining Folders You can combine specified folders into another folder. This allows you to restore the original folder from split folders. This operation is not applicable to non-xdcam EX format folders (such as MXF). It applies only to XDCAM EX folders. To become the target of combining, folders must reside on the same directory level and be under the management of this application. For details about folders, see About EX format clip data configuration. 1. In the Tree View pane of an [Explorer] window, select the destination folder into which other folders will be combined. 2. Do one of the following. o o Select [Combine Folders...] from the [Edit] menu. Click the folder while holding down the Control key, and select [Combine Folders...] from the context menu. The [Combine Folders] dialog opens. 3. Check the check boxes of the folders that you want to combine into the folder selected in step 1. Check the [Delete the folder after combine] check box if you want to delete the split folders after the combine. The combined folders are not deleted when: o o o They contain other folders. You do not have delete/write privileges to the original folders. The folders are write protected. 108
109 4. Click the [Start] button. The folders selected in step 3 are combined into the destination folder specified in step 1. The clips in all of the folders are gathered into the destination folder. If any of the clips are split clips, they are automatically grouped, allowing them to be handled as a single clip. Reasons why a folder combine operation may fail Folder combine operations may fail for the following reasons. In these cases, an error message appears and the combine is not executed. There is not enough free capacity in the combine destination folder. You do not have write privileges to the source or destination folders. The source or destination folders are write protected. Multiple instances of the same clip exist. 109

110 Checking/Editing Disc Metadata You can check and edit the disc metadata (DISCMETA.XML) saved on XDCAM drives, on UDFformatted SxS memory cards, or in folders with MXF attributes. See Data Configuration for MXF Format Clips for more information about the DISKMETA.XML save destination. Changes to the index picture of disc metadata are performed in the [Preview] window. See Changing the Index Picture of Disc Metadata for more information about this operation. 1. In the Tree View pane of an [Explorer] window or [Offline Media] window, select an XDCAM drive, a UDF-formatted SxS memory card, or a folder with MXF attributes. Remote hosts cannot be selected. 2. Do one of the following. o o Select [Edit Disc Metadata...] from the [Edit] menu. Click the XDCAM drive, SxS memory card, or MXF attribute folder while holding down the Control key, and select [Edit Disc Metadata...] from the context menu. The [Edit Disc Metadata] dialog opens. 110
111 3. Edit the following items as required. o [User Disc ID] (up to 127 bytes) o [Title 1] (up to 63 bytes) o [Title 2] (up to 127 bytes) o [Description] (up to 2047 bytes) 4. Enter subtitles for the disc in the "Subtitle" field as required. You can enter up to eight entries. To add an entry, click the [Add] button located above the "Subtitle" list, enter the subtitle in the [DiscMetaSubtitle] dialog that appears, and then click [OK]. To modify an existing entry, double-click the entry to be modified, or select the entry and click [Edit], then modify the information in the [DiscMetaSubtitle] dialog and click [OK]. To delete an existing entry, select the entry and click [Delete]. Click [OK] when the confirmation message asking if you want to delete the entry appears. o [Subtitle 1] (up to 63 bytes) o [Subtitle 2] (up to 127 bytes) 5. Enter shooting dates and other information in the "User-specified Date" field as required. You can enter up to eight entries. To add an entry, click the [Add] button located above the "User-specified Date" list, enter a date and time specification and description in the [Userspecified Date] dialog that appears, and then click [OK]. To modify an existing entry, double-click the entry to be modified, or select the entry and click [Edit], then modify the information in the [User-specified Date] dialog and click [OK]. To delete an existing entry, select the entry and click [Delete]. Click [OK] when the confirmation message asking if you want to delete the entry appears. o [Date Time] (time zone, date, and time specification) o [Description] (up to 63 bytes describing the specified date and time) 6. Click the [OK] button. 111
112 Changing the Index Picture of Disc Metadata During a clip preview, you can change the index picture of the disc on which the clip being previewed is stored. The index picture of a clip is a part of disc metadata. The index picture can be similarly changed even with the SxS memory card or the MXF attribute folder formatted with UDF apart from a Professional Disc. 1. Play a clip stored on the disc or folder, and display the frame to be used as the index picture. 2. In the [Preview] menu, select [Edit] - [Set Disc Metadata Index Picture]. The frame currently displayed will be used as the index picture of the disc metadata. You can check changes to the index picture in the [Edit Disc Metadata] dialog. See Checking/Editing Disc Metadata for more information about [Edit Disc Metadata] dialog operations. If you are previewing a clip that is stored on removable media, do not eject the media until the operation finishes. Do not power the computer off until the operation finishes. 112

113 Exporting Information about Clips and Clip Lists in Media or Folder You can export list information about the clips and clip lists stored in media or in a folder. List information is exported in XML format, and can be displayed and printed using the Safari web browser. If clip lists are present, information about the subclips that comprise the clip list is exported in addition to the information about each clip list. Tips The display and printing of exported information has been verified using Safari In the Tree View pane of an [Explorer] window, select the desired media device or folder. 2. Select the desired clips or clip lists in the List View pane if you want to export information for only some of the clips or cliplists in the media or folder. 3. Select [Output Clip/ClipList Information] from the [File] menu. The [Output] dialog opens. 4. Change the following settings as required. o [Output Destination - Folder]: Specifies the export destination folder. Enter a path beginning with a drive name in the edit box. Or click the [...] button to open a browse dialog where you can select a folder, and then click the [OK] button. o [Output Destination - Data Name]: Enter a name for the exported XML file and subfolders created in the export destination folder. Due to browser limitations, it may not be possible to view some characters used in data names properly. We recommend that you use ASCII characters and numbers only in file names. o [Output Option - Thumbnails]: When checked, exports thumbnails (JPEG files) together with text information for the clips and subclips. 113
114 o [Output Option - Detailed Essence Marks]: When checked, exports detailed information about the essence marks in the clips. o [Output Range]: Select [All] to export information for all clips and clip lists in the selected media or folder, or select [Displayed Clips] to export information for only the clips and clip lists currently displayed in the List View pane for XDCAM EX formats. Select [Selected Clips] to export information only for the clips and clip lists selected in step Click the [Execute] button to start the export. A progress bar appears to show the progress of the export. The following dialog appears when the export finishes. 6. Click the [OK] button to close the dialog. Place a check mark in the [Display the output file] check box before clicking the [OK] button to automatically launch a web browser and display the exported information. The [Output Clip/ClipList Information] command is inactive, and clips or clips lists cannot be exported in the following cases. When a planning metadata folder with attributes (Planning folder) is selected When a remotely-connection drive is selected When USB memory with saved proxy file recorded simultaneously during shooting is selected When media or a folder in the [Offline Media] window is selected When media or a folder in the [Live Logging] window is selected When media or a folder in the [XDCAM Station] window is selected To check the exported information A folder is created with the name specified using [Data Name] in the specified output destination folder. When you double click a.xml file or.xsl file with the same name in the folder, the web browser launches and displays the exported clip and clip list information. Also, you can print the information using the [Print] command. 114
115 Copying a Professional Disc The contents of Professional Discs inserted in XDCAM drives that are connected via FTP, IEEE1394, or USB cable can be copied between discs. The copy destination should be an empty formatted Professional Disc. Copying is not possible to an unformatted disc, or to one with data already present. If the source Professional Disc and device support arbitrary clip names but the destination device does not, all copied clips are renamed with canonical names starting from "C0001". When clips are to be renamed, a message is displayed before copying. Arbitrary clip names are supported only by version 1.50 or later Professional Disc devices when arbitrary file naming is enabled. When a Component folder (a clip list recorded with voice-over data) exists on the copy source Professional Disc, the Component folder must be created beforehand on the destination disc. Component folders are created automatically when the firmware version of the destination Professional Disc device that supports HD422 recording is 1.6 or later, and when the firmware version of the XDCAM drive is 2.3 or later. When a UserData folder exists on the copy source Professional Disc, the UserData folder must be created beforehand on the destination disc. UserData folders are created automatically when the firmware version of the destination Professional Disc device that supports HD422 recording is 1.2 or later, and when the firmware version of the XDCAM drive is 2.1 or later. 1. Select the source Professional Disc from the List View pane in an [Explorer] window. 2. Do one of the following. o Select [Disc Copy] from the [Edit] menu. o Click the disc while holding down the Control key, and select [Disc Copy] from the context menu. The [Disc Copy] dialog appears. 3. Select the destination Professional Disc from the [Destination Media] list. 4. Click the [Execute] button. A dialog shows the copy progress. To cancel the copy operation Click the [Cancel] button in the progress dialog. Reasons why a copy operation may fail Copy operations may fail for the following reasons. In these cases, an error message appears and the copy is not executed. There is not enough free capacity at the copy destination. Writing on the destination Professional Disc is not authorized. The destination Professional Disc is write-protected. 115
116 Formatting Media Professional Discs and SxS memory cards can be formatted. Formatting erases all data on the media. Applicable media Professional Discs inserted in USB-connected XDCAM drives SxS memory cards inserted in the card slot on a computer running this program, or in an SxS memory card reader/writer SxS memory cards cannot be formatted in USB-connected devices. Formatting Professional Discs 1. In the Tree View panel of an [Explorer] window, select the Professional Disc to format. 2. Do one of the following. o Select [Format Media] from the [File] menu. o Click the drive while holding down the Control key, and select [Format Media] from the context menu. The XDCAM drive utility starts. Use the utility to format the disc. See the utility's help for details. Formatting SxS memory cards Depending on the access privileges of the user logged into the operating system, formatting of SxS memory cards may not be possible. If formatting is attempted in such cases, a message will appear and formatting will not be performed. 1. In the Tree View panel of an [Explorer] window, select the SxS drive to format. 2. Do one of the following. o o Select [Format Media] in the [Tools] menu. Click the drive while holding down the Control key, and select [Format Media] from the context menu. The [Format] dialog appears. 116
![3. Make format settings. [File System]: You can select UDF or FAT32 (XDCAM EX format). [Volume Label]: You can enter a volume label.](/docs-images/76/74056648/images/117-0.jpg "[Option]: If you want to completely erase the recorded data, clear the [Quick Format] check box.")
117 3. Make format settings. [File System]: You can select UDF or FAT32 (XDCAM EX format). [Volume Label]: You can enter a volume label. [Option]: If you want to completely erase the recorded data, clear the [Quick Format] check box. Regardless of the file system selected, the following symbols cannot be used in volume labels: " * / : < >? \. (period) +, (comma) ; = [ ] Depending on the file system, the following limitations also exist. o For UDF: Up to 63 characters. Japanese characters and similar are allowed. o For FAT32: Up to 11 characters. 4. Click the [Start] button. A confirmation message appears. 5. Click the [Yes] button. Formatting starts, and progress is displayed in the dialog. A message appears when formatting finishes. 117
118 Overview of Planning Metadata Functions Planning metadata is a metadata file consisting of information about shooting and recording collection. Planning metadata is recorded on the media used for shooting and is useful for managing recorded materials. This application supports the following planning metadata operations. Display planning metadata recorded in media Create and edit planning metadata Since planning metadata can be edited, it can be corrected to cover cases where fewer or extra clips or clip lists than planned are generated in the field, rather than having to shoot and record based on planning metadata prepared in advance. Also, planning metadata can include auxiliary information about video, audio, text, and other generic files saved on the media together with the clips and clip lists when shooting and recording, which can be utilized in systems that support planning metadata. "XMPilot" Sony is promoting workflows that make use of planning metadata under the name XMPilot (TM). This documentation uses the "XMPilot" name in the display of planning metadata and in the [Preferences] dialog. 118
![[Planning Metadata] Window The [Planning Metadata] window is displayed when planning metadata files are double-clicked in an [Explorer] window](/docs-images/76/74056648/images/119-0.jpg "or when a new planning metadata file is created in the Planning folder. Planning metadata can be checked, edited or created in this window.")
119 [Planning Metadata] Window The [Planning Metadata] window is displayed when planning metadata files are double-clicked in an [Explorer] window or when a new planning metadata file is created in the Planning folder. Planning metadata can be checked, edited or created in this window. 119
120 File name Displays the name of the selected planning metadata file. Header Main planning metadata items can be found in the header, such as ID, created information, and title etc. The below items are displayed and can be edited. [Assignment ID]: Planning Metadata ID (up to 128 bytes of alphanumeric characters) [Title 1]: Title displaying the objective of the material (up to 44 bytes of alphanumeric characters for planning metadata files in an SxS memory card and 50 bytes for all other files) [Title 2]: Title displaying the objective of the material (up to 44 bytes of alphanumeric characters for planning metadata files in an SxS memory card and 50 bytes for all other files. Japanese allowed) [Media Name]: Name of recorded media (up to 127 bytes). Japanese allowed) When files are loaded to XDCAM devices, a user disc ID is set for disc metadata based on this media name. [Creation Date]: File creation date (cannot be edited) [Last Update]: Date the file was last modified (cannot be edited) [Author/Modifier]: The file creator/last updater (cannot be edited) [Load] check box: Sets whether to load a file in an XDCAM device. Set to ON to enable a file to be loaded. [Properties] button and Properties pane The [Properties] button is used to toggle between the displayed and hidden Properties pane. Up to 4 properties are displayed in the Properties pane. Instructions and comments specified in "Assignment" and "Memo" properties can be edited, such as assigning a task operator and specifying the task contents. The required information can be specified in "Assignment" properties when creating a new planning metadata file. [Shot Mark] buttons and the Shot Mark pane The [Shot Mark] button is used to toggle between the displayed and hidden Shot Mark pane. There are "_ShotMark1" to "_ShotMark0" fields in the Shot Mark pane, and a string can be entered as an essence mark in each field. When a file is loaded into the XDCAM device, the essence marks specified here will appear as a category in the [Live] window and become selectable. [Material] button and Material pane The [Material] button is used to toggle between the displayed and hidden Material pane. Clips and clip lists linked to selected planning metadata files are displayed in the Material pane. Displays clip information such as the shot category and coordinates (latitude and longitude). The following icons are used in the Material panel to display information about linked clips. Icon Type MXF file clip MP4 file clip AVI file clip Clip list 120
121 Icon Type Unknown clip types (displayed when the linked clip cannot be located) In the Material pane, it is possible to add and delete clips and clip lists that link to planning metadata files or edit clip information. It is also possible to link audio and picture files to clips and clip lists displayed here. Linked files are displayed in the below described Reference pane, while the Material pane only shows whether there are any files linked to clips and clip lists. [Reference] button and Reference pane The [Reference] button is used to toggle between the displayed and hidden Reference pane. Files apart from clips and clip lists linked to selected planning metadata files are displayed in the Reference pane. Files linked to clips and clip lists shown in the Material pane are displayed here. Files directly linked to selected planning metadata files are also displayed here. The following icons are used in the linked file display of the Reference pane. Icon Type Picture files (bmp, jpg, jpeg, png files, etc.) Audio files (wav, mp3, wma, aiff files, etc.) Other files In the Reference pane, it is possible to link audio and picture files to the displayed clips and planning metadata files or delete linked files. [Write to XDCAM Disc] and [Update] buttons The [Write to XDCAM Disc] button is displayed for planning metadata files recorded in a Professional Disc, while the [Update] button is displayed for files recorded elsewhere. Click one of these buttons to save planning metadata file edits. 121
122 Displaying and Editing Planning Metadata This program can display and edit planning metadata files saved on discs and in folders. Planning metadata you want to display and edit must be saved in any of the below folders. "/General/Sony/Planning" in Professional Disc and MXF attribute folders "/BPAV/General/Sony/Planning" in XDCAM EX SxS memory cards and EX attribute folders Folders for planning metadata files specified in the [Work folder] field in [Planning Metadata] in the [XMPilot] tab in the [Preferences] dialog. This folder is displayed as the Planning folder directly beneath the local folder in the [Explorer] window. To display data 1. In an [Explorer] window, select the Planning folder where the planning metadata file you want to display is saved. 2. Double-click the planning metadata file you want to display. The [Planning Metadata] window opens. Details about the selected planning metadata file are displayed in the window. Alternatively, you can display data by dragging the planning metadata file to an open [Planning Metadata] window. See [Planning Metadata] Window for more information about [Planning Metadata] windows. To edit data Planning metadata cannot be edited if it contains properties other than the "Assignment" and "Memo" properties. 1. Follow the steps below to display the planning metadata file you want to edit. 2. Change the required items. Assignment ID, titles 1 and 2, and media name in the header can be edited by selecting the item. After editing, select another item and press the Return key. The [Load] check box switches between checked and unchecked every time it is selected. When it is checked, this planning metadata is loaded to the relevant XDCAM device during recording. When it is unchecked, planning metadata is saved to set devices but it is not loaded to devices during recording. See the below for more information about changing about other items. o Properties pane: Changing the Planning Metadata Properties Pane o Shot Mark pane: Changing the Planning Metadata Shot Mark Pane o Material pane: Changing the Planning Metadata Material Pane o Reference pane: Changing the Planning Metadata Reference Pane 3. Click the [Write to XDCAM] or [Update] button in the [Planning Metadata] window. The [Write to XDCAM Disc] button is displayed for planning metadata files recorded on a Professional Disc or SxS memory card, while the [Update] button is displayed for files recorded elsewhere. Click one of these buttons to save planning metadata file edits. 122
123 Creating New Planning Metadata This program can create new planning metadata files consisting of information about shooting and materials collection. 1. In the Tree View pane of an [Explorer] window, select the folder where you want to save the new planning metadata file. New planning metadata can be created in the any of the below folders. o Planning folder of Professional Disc and MXF attribute folders o o Planning folder of XDCAM EX SxS memory cards and EX attribute folders Planning folder directly beneath the local folder This Planning folder corresponds to the folder specified by the [Work Folder] field in [Planning Metadata] in the [XMPilot] tab of the [Preferences] dialog. 2. Do one of the following. o Select [Planning Metadata] and then [Create New...] from the [Clip] menu. o Click the folder while holding down the Control key, and select [Planning Metadata] and [Create New...] from the context menu. The [Create New Planning Metadata File] dialog appears. 3. Enter a name for the planning metadata file you want to create. 4. If the file name you entered also applies to the planning metadata "Title 2" field, place a check mark in the [Apply to title 2] check box. Clear the [Apply to title 2] check box to leave the "Title 2" field blank. 5. Click the [OK] button in the [Create New Planning Metadata File] dialog. The new planning metadata file is created and the [Planning Metadata] window opens. 6. Edit the new planning metadata file. See Displaying and Editing Planning Metadata for more information about this operation. 123

124 Changing the Planning Metadata Properties Pane Information such as assigned operators or material instructions are described in the Planning Metadata Properties pane. Planning metadata usually contains "Assignment" and "Memo" properties and these are displayed in the [Planning Metadata] window. If it contains other properties these will be displayed in the window, but they cannot be added or changed in this program. Editing data 1. Display the planning metadata file you want to edit in the [Planning Metadata] window. See Displaying and Editing Planning Metadata for more information. Or, click the [Properties] button to display the Properties pane if it is not displayed in the [Planning Metadata] window. 2. Select the data you want to change while holding down the Control key, and select [Edit] from the menu. The [Edit Property] dialog opens. Details about the selected data are displayed in the dialog. 3. Select the [Description] field and edit it. You can enter up to 128 bytes (approximately 42 Japanese characters) if [Property type] is "Information", and up to 2048 bytes (approximately 682 Japanese characters) for "Description". The [Property type] and [Items] fields cannot be changed. 4. Click the [OK] button in the [Edit Property] dialog. Adding data Up to 53 items of data can be added for the "Information" type and up to 8 for "Comments." 1. Click the [Add] button in either the "Assignment" properties or "Memo" properties, corresponding with the property to which you want to add data, in the [Planning Metadata] window. In either case, the [Add Property] dialog appears. 2. Specify the type of data you want to add. Select either Information or Comments. 124
125 3. Select the "Title" field to edit the title. Up to 64 bytes can be entered if the [Property type] is "Information". Up to 32 bytes of alphanumeric data only can be entered if the type is "Comments". 4. Select the "Content" field and edit it. You can enter up to 128 bytes if [Property type] is "Information", and up to 2048 bytes for "Description". 5. Click the [OK] button in the [Add Property] dialog. Deleting data Property data added to planning metadata can be deleted prior to clicking the [Write to XDCAM] or [Update] button in the [Planning Metadata] window and saving the data. Once data is saved to the Professional Disc it cannot be deleted. 1. In the [Planning Metadata] window, select the data you want to delete while holding down the Control key, and select [Delete] from the menu. A confirmation message appears. 2. Select [Yes] to delete the data. 125
![Changing the Planning Metadata Shot Mark Pane There are "_ShotMark1" to "_ShotMark0" fields in the Shot Mark pane in the [Planning Metadata] window, and a string can be entered as an essence mark in](/docs-images/76/74056648/images/126-0.jpg "each field. When the planning metadata file is loaded in the XDCAM device, the entered string will appear in the [Live] window as an essence mark category and become selectable. 1.")
126 Changing the Planning Metadata Shot Mark Pane There are "_ShotMark1" to "_ShotMark0" fields in the Shot Mark pane in the [Planning Metadata] window, and a string can be entered as an essence mark in each field. When the planning metadata file is loaded in the XDCAM device, the entered string will appear in the [Live] window as an essence mark category and become selectable. 1. Display the planning metadata file you want to edit in the [Planning Metadata] window. See Displaying and Editing Planning Metadata for more information. Or, click the [Shot Mark] button to display the Properties pane if the Shot Mark pane is not displayed in the [Planning Metadata] window. 2. Select the Shot Mark field and edit it. Up to 32 bytes (32 ASCII characters or 16 Japanese characters) can be entered. 126
127 Changing the Planning Metadata Material Pane Information about clips and clip lists linked to selected planning metadata is displayed in the Material pane in the [Planning Metadata] window. In the Material pane, clips and clip lists can be newly linked to planning metadata, and information can be edited. Linking clips and clip lists Clips and clip lists can be linked to planning metadata files if they are in the same media and folders. 1. Display the required planning metadata file in the [Planning Metadata] window. See Displaying and Editing Planning Metadata for more information. Or, click the [Material] button to display the Material pane if it is not displayed in the [Planning Metadata] window. 2. In an [Explorer] window, select clips and clip lists you want to link. Then, drag the clips or clip lists from the [Explorer] window and drop them in the Material pane of the [Planning Metadata] window. Multiple clips and clip lists can be selected. The dropped clips and clip lists are added to the list in the Material pane. Editing information about related clips and clip lists 1. In the Material pane of the [Planning Metadata] window, select the clip or clip list you want to change while holding down the Control key, and select [Set additional information]. The [Set Additional Information] dialog opens. The information added to the selected clip or clip list is displayed in the dialog. 2. Select the Setting field to edit the setting. Setting field [Shot Category] [Location Lat] Description Category information. Up to 105 bytes can be entered. Latitude [Location Lon] Longitude 3. Click the [OK] button in the [Set Additional Information] dialog. 127
128 Deleting links with clips and clip lists Delete the selected clip or clip list from the Material pane in the [Planning Metadata] window. The clip and clip list itself are not deleted just by removing the link with the planning metadata. 1. Select the clip or clip list you want to delete in the Material pane of the [Planning Metadata] window. Multiple clips and clip lists can be selected. 2. Click the [Delete] button. A confirmation message appears. 3. Select [Yes] to delete the clip or clip list. The selected clip or clip list is deleted from the list in the Material pane. The clip and clip list display in the Reference pane will be deleted if picture and audio files are linked to deleted items. Adding related files Picture and audio files can be linked to clips and clip lists displayed in the Material pane. 1. In the Material pane of the [Planning Metadata] window, select the required clip or clip list while holding down the Control key, and select [Set related file]. The [Set Related File] dialog opens. 2. Select the setting field to specify settings. Setting field [Type] [File] Description Class of file. Select from Picture, Audio, and Others. Files to be linked. Click the [...] button and specify the required file in the dialog. [Title] Titles of the files to be linked. Up to 128 bytes can be entered. 3. Click the [OK] button in the [Set Related File] dialog. The specified file will be displayed in the Reference pane along with the name of the linked clip and clip list. 128
129 Changing the Planning Metadata Reference Pane Information about files apart from clips and clip lists linked to selected planning metadata is displayed in the Reference pane of the [Planning Metadata] window. This includes both files directly linked to planning metadata files, and files linked to planning metadata file-related clips and clip lists. In the Reference pane, files can be newly linked to planning metadata, and information can be edited. Linking files directly to planning metadata Link picture and audio files to displayed planning metadata files. 1. Display the required planning metadata file in the [Planning Metadata] window. See Displaying and Editing Planning Metadata for more information. Or, click the [Reference] button to display the Reference pane if it is not displayed in the [Planning Metadata] window. 2. Click the [Add] button in the Reference pane. The [Add File] dialog opens. 3. Select the setting field to specify settings. Setting field [Type] [File] Description Class of file. Select from Picture, Audio, and Others. Files to be linked. Click the [...] button and specify the required file in the dialog. [Title] Titles of the files to be linked. Up to 128 bytes can be entered. 4. Click the [OK] button in the [Add File] dialog. The specified file is displayed in the Reference pane. Adding files to be linked to clips and clip lists Picture and audio files can be linked to clips and clip lists displayed in the Reference pane. Adding related files to clips and clip lists linked to planning metadata can also be performed in the Material pane. See Changing the Planning Metadata Reference Pane for more information about this operation. 1. In the Reference pane, select the required clip or clip list while holding down the Control key, and select [Set related file] in the displayed menu. 129
![The [Set Related File] dialog opens. 2. Select the setting field to specify settings. Setting field [Type] [File] Description Class of file. Select from Picture, Audio, and Others. Files to be linked.](/docs-images/76/74056648/images/130-0.jpg "Click the [...] button and specify the required file in the dialog. [Title] Titles of the files to be linked. Up to 128 bytes can be entered. 3. Click the [OK] button in the [Set Related File] dialog.")
130 The [Set Related File] dialog opens. 2. Select the setting field to specify settings. Setting field [Type] [File] Description Class of file. Select from Picture, Audio, and Others. Files to be linked. Click the [...] button and specify the required file in the dialog. [Title] Titles of the files to be linked. Up to 128 bytes can be entered. 3. Click the [OK] button in the [Set Related File] dialog. The specified file will be displayed in the Reference pane along with the name of the linked clip and clip list. Editing the titles of related files The titles of files directly linked to planning metadata files, and the titles of files linked to clips and clips lists can be edited in the same way. 1. In the Reference pane, select the file you want to change while holding down the Control key, and select [Set Title] in the displayed menu. The [Set Title] dialog opens. The title of the selected file is displayed in the dialog. 2. Select the [Title] field to edit the title. Up to 128 bytes can be entered. 3. Click the [OK] button in the [Set Title] dialog. Deleting related files Delete the selected file from the Reference pane in the [Planning Metadata] window. Files directly linked to planning metadata files, and files linked to clips and clips lists can be deleted in the same way. 1. Select the file you want to delete in the Reference pane. Multiple files can be selected. 2. Click the [Delete] button. A confirmation message appears. 3. Click [Yes] to delete the file. The selected file is deleted from the list in the Reference pane. The clip and clip list display is deleted from the Reference pane when you delete files linked to clips and clip lists. 130
131 Copying and Moving Planning Metadata Planning metadata files can be moved and copied within media and computers or between media and computers. Planning metadata you want to copy or move must be saved in any of the below folders. "/General/Sony/Planning" in Professional Disc and MXF attribute folders "/BPAV/General/Sony/Planning" in XDCAM EX SxS memory cards and EX attribute folders Folder specified in the [Work folder] field in [Planning Metadata] in the [XMPilot] tab of the [Preferences] dialog. It is useful to insert planning metadata files received by in this folder and copy them to media used for materials. 1. In an [Explorer] window, select the Planning folder containing the required planning metadata file. 2. Select the required planning metadata file in the List View pane of an [Explorer] window. Multiple files can be selected. 3. Do one of the following. o When copying a file, drag the planning metadata file you selected in step 2 and drop it in the destination Planning folder. o When moving a file, drag the Planning Metadata file you selected in step 2 and drop to the destination Planning folder while holding down the Shift key. o Select [Copy] or [Cut] in the [Edit] menu. After that, click the destination Planning folder and then select [Paste] in the [Edit] menu. The selected planning metadata file is copied or moved. Related files will not be copied with this operation even when files such as clips are linked to the planning metadata files that you want to copy or move. Be sure to note that links will not function normally if the file you want to link to does not correspond to media or folders in the copy/move destination. See Operating Linked Files for more information about how to batch copy linked files. 131
![Renaming Planning Metadata Rename the planning metadata file. 1. In an [Explorer] window, select the Planning folder containing the planning metadata file you want to rename. 2.](/docs-images/76/74056648/images/132-0.jpg "Click the planning metadata file you want to rename in the List View pane of the [Explorer] window. 3. Select [Rename] from the [File] menu. The [Rename] dialog appears. 4. Enter the required name. 5.")
132 Renaming Planning Metadata Rename the planning metadata file. 1. In an [Explorer] window, select the Planning folder containing the planning metadata file you want to rename. 2. Click the planning metadata file you want to rename in the List View pane of the [Explorer] window. 3. Select [Rename] from the [File] menu. The [Rename] dialog appears. 4. Enter the required name. 5. If the file name you entered also applies to the planning metadata "Title 2" field, place a check mark in the [Apply to title 2] check box. Clear the [Apply to title 2] check box to leave the "Title 2" field unchanged. 6. To ensure a unique Assignment ID, that does not match the Assignment ID of other planning metadata, when changing the Assignment ID, place a check mark in the [Apply Assignment ID] check box. Clear the [Apply Assignment ID] check box to leave the Assignment ID unchanged. 7. Click the [OK] button in the [Rename] dialog. The planning metadata file is renamed. 132
133 Deleting Planning Metadata 1. In an [Explorer] window, select the Planning folder where the planning metadata file you want to delete is saved. 2. Select the planning metadata file you want to delete in the List View pane of the [Explorer] window. Multiple files can be selected. 3. Do one of the following. o Press the Command + Delete keys. o Click the Delete button. o o Select [Delete] from the [Edit] menu. Click the selection while holding down the Control key, and select [Delete] from the context menu. A message appears asking if you want to execute the deletion. 4. Click the [Yes] button to execute the deletion, or the [No] button to cancel it. Planning metadata files loaded to an XDCAM device cannot be deleted during live logging. 133
134 Checking Related Clips and Clip Lists Clips and clip lists linked to planning metadata files can be checked in the following ways. Checking in an [Explorer] window 1. Display the required planning metadata file in the [Planning Metadata] window and click the [Material] and [Reference] buttons to display the respective panes as necessary. See Displaying and Editing Planning Metadata for more information. 2. In the Material or Reference pane, click the required clip or clip list while holding down the Control key, and select [Go to Explorer] from the context menu. The folder containing the selected clip or clip list is displayed in an [Explorer] window and the corresponding clip or clip list is selected. Checking in a [Preview] window 1. Display the required planning metadata file in the [Planning Metadata] window and do one of the following. o To start playback, click the required clip or clip list while holding down the Control key, and select [Play] from the context menu. o Double-click the required clip or clip list only when loading the [Preview] window. The relevant clip or clip list is loaded in the [Preview window] and playback will start when [Play] is selected. See [Explorer] Window for more information about [Preview] windows, or Previewing Clips and Clip Lists for more information about playback operations. 134
. 1.")
135 Operating Related Files Using planning metadata enables linked files to be batch copied or exported and the properties of linked clips to be batch changed. Batch copying related files Batch copy planning metadata files and their related clips or clip lists displayed in the Material pane (high-resolution clips, proxy AV files, and metadata). 1. Select the required planning metadata file in an [Explorer] window. Multiple files can be selected. 2. Do one of the following. o o Select [Related Clip] and then [Copy All] from the [Clip] menu. Click the required planning metadata file while holding down the Control key, and select [Related Clip] and then [Copy All...] from the context menu. The [Copy All] dialog appears. 3. Select the copy destination folder in the [Copy All] dialog. To create a new folder in the selected folder, click the [Make New Folder] button and enter the desired folder name. 4. Place a check mark in the [Show the Folder after copying] check box if you want to display the copy destination folder after copying finishes. 135
136 Click the [Start] button. The selected planning metadata files and related clips or clip lists are copied to the destination folder. The copy destination folder is displayed if a check mark was placed in the [Show the Folder after copying] check box in step 4. Copying linked EX clips When EX clips (MP4 files) are linked to planning metadata, copying the planning metadata to an XDCAM drive or a folder with MXF attributes automatically converts and copies the clip to an MXF format file. When the [Convert XDCAM EX files to MXF when copying to a normal folder] check box in the [Edit] tab of the [Preferences] dialog is checked, clips are converted to MXF files even if the copy destination is a normal folder. Batch exporting related files You can batch export all related clips displayed in the Material pane of the planning metadata file (exporting converts files into other formats and outputs them.) The optional MainConcept plug-in software must be installed to use some conversion formats. Unless the software is installed, the video after conversion will contain a MainConcept watermark. Further, only 30 seconds of audio are saved, and following audio is lost. Depending on the specified parameters, image quality may be degraded due to the image compensation process. Converted files may not be exactly the same with native files in the target format. Video metadata may not be inherited after format conversion. Image quality may be degraded if format conversion requires re-encoding. Image quality may be degraded and duration may vary if files are converted to a format with a different bit rate, resolution, or frame rate parameters. Before exporting, ensure that the export destination media or folder is write enabled. 1. Select the required planning metadata file in an [Explorer] window. Multiple files can be selected. 2. Do one of the following. o Select [Related Clip], [Export] and then the conversion file format from the [Clip] menu. o Click the required planning metadata file while holding down the Control key, and from the context menu select in the following order [Related Clip], [Export] and the conversion file format. The formats available for export will vary depending on the format of the linked clip. See Exporting clips for more information. See File conversion formats for more information about conversion formats. The [Export] dialog opens for the selected format. 3. Change the following settings as required. o [Export Destination]: Specifies the export destination folder. Enter a path beginning with a drive name in the edit box. Or click the [...] button to open a browse dialog where you can select a folder, and then click the [OK] button. Remote host folders cannot be selected. Make sure that the export destination media has adequate free space before you execute the export. An error occurs at the point where the free space is used up.
137 o o [Type]: Click the [Codec Details...] button to open the [Codec Details] dialog, set parameters as required, and click the [OK] button. This item does not appear for some conversion formats. See Exporting clips for more information about audio output because it varies according to the number of audio channels in the clip and the setting of the [Channels] list in the [Audio] section. [Range of Export]: Select [In/Out Selection] if you want to output the range between the In and Out points in the current clip. This item does not appear for some conversion formats. To modify the output file name In the List View pane, do one of the following to make the file name changeable. o o Click the file name. Click the highlighted part while holding down the Control key and select [Modify the output filename] from the context menu. Enter the desired file name and press the Return key, or click outside of the file name. Extension does not need to be entered. 4. Click the [Execute] button to start the export. Export progress is indicated by a progress bar. Batch editing clip properties Batch edit the properties of all clips linked to the selected planning metadata file. 1. Select the required planning metadata file in an [Explorer] window. Multiple files can be selected. 2. Do one of the following. o o Select [Related Clip] and then [Batch Edit Clip Properties] from the [Clip] menu. Click the selection while holding down the Control key, and select [Related Clip] and then [Batch Edit Clip Properties] from the context menu. 137
![The [Batch Edit Clip Properties] dialog appears. 3. Check the check box for each batch edit item that you want to change, and then select a value from the list box or enter a string in the edit box.](/docs-images/76/74056648/images/138-0.jpg "o [Status]: Select from among OK, NG, KEEP, and None.")
138 The [Batch Edit Clip Properties] dialog appears. 3. Check the check box for each batch edit item that you want to change, and then select a value from the list box or enter a string in the edit box. o [Status]: Select from among OK, NG, KEEP, and None. o [Title 1]: Up to 63 byte alphanumeric characters in length o [Title 2]: Up to 127 bytes in length o [Creator]: Up to 127 bytes in length o [Description]: Up to 2047 bytes in length To overwrite existing contents Check the [Overwrite existing metadata values] check box. If this check box is cleared when the batch edit is executed, the changes made here are reflected only to empty fields. 4. Click the [Execute] button. A confirmation message appears, asking if you want to execute the batch edit. 5. Click the [Yes] button to execute the batch edit, or click the [No] button to cancel it. A progress bar appears to show the progress of the batch edit. A completion dialog appears when the processing finishes. 6. Click the [OK] button to close the dialog. 138
139 Overview of Live Logging Functions Live logging is a function to transfer proxy AV data to a computer during recording or shooting, and to perform logging functions. Computers operating this application and devices that support live logging transfer data via the Internet or wireless LAN. The following operations can be executed. Display proxy AV data of compatible devices' EE video and video being recorded Add or change disc metadata (titles and comments) during shooting Add titles and comments to clips during shooting Set appropriate essence marks to each scene during shooting Newly entered, added and modified data is transferred to compatible devices from computers and saved to the recording media. To execute live logging, it is necessary to use devices that support live logging functions. It may be necessary to upgrade programs or purchase options depending on the device. Refer to your device's Operating Instructions for information about whether live logging is supported and operating restrictions. The CBK-WA01 Wi-Fi Adapter (sold separately) for camcorders is necessary to transfer data via wireless LAN between live logging-compatible camcorders. Refer to the Operating Instructions of CBK-WA01 Wi-Fi Adapter or your camcorder for more information. 139
![[Live Logging] Window You can open a [Live Logging] window by selecting [Show Live Logging Window] from the [Window] menu.](/docs-images/76/74056648/images/140-0.jpg "Logging operations, such as metadata entry, essence mark setting, and clip list creation, can be performed in this window for the clip currently recording.")
140 [Live Logging] Window You can open a [Live Logging] window by selecting [Show Live Logging Window] from the [Window] menu. Logging operations, such as metadata entry, essence mark setting, and clip list creation, can be performed in this window for the clip currently recording. Logging results will be sent to the XDCAM device automatically via the network at the end of the recording session, and stored on the recording media together with the clip data. Tab Displays the names of the selected media or folders. Path Displays the host name of the XDCAM device selected in the Tree View pane. Toolbar Contains tool buttons for live logging operations on clips and folders. See [Explorer] window for more information about tool buttons. The following buttons cannot be used in the [Live Logging] window. [New Folder] [Find] 140
141 [Copy All] [Eject Media] [Copy to Offline Media] [Show Offline Media] [Show/Hide Component View] [Filter By] [Delete] Deletes the selected clip or folder. See Deleting clips and clip lists or Deleting folders for more information. [Update Modified Data] Writes live logging results back into the original media. See Rewriting Live Logging Data to the Recording Media for more information. [Show/Hide Folder Tree] Allows you to show or hide the Folder Tree pane. [List View] Switches the view mode for clips, clip lists, and other files (thumbnails/details). Tree View pane Displays the XDCAM device registered as the live logging device and a tree of media and folders under the device. You can show or hide folder contents by clicking the [Show/Hide Folder Tree] button on the toolbar. If a Professional Disc or other medium is exchanged on the device, the removed medium will be displayed under the "offline" folder. An asterisk in front of the name of a medium or folder indicates that the results of live logging edits to data have not yet been applied to the medium on which the clip is stored. The following icons represent the media or folder type. Icon Type of media or folder Registered XDCAM device XDCAM drive SxS memory card drive SxS memory card drive that requires salvaging Folder with MXF attributes Folder with clip list attributes Folder with planning metadata attributes Folder with MXF attributes that is offline Folder with clip list attributes on an offline medium When an offline folder is selected, the free space is displayed beneath the Tree View pane. 141
142 Folder type When a folder with MXF attributes is selected in the Tree View pane, "MXF" is displayed. Information about selected clips Displays information on clips or clip lists selected in the List View pane (number of selected clips or clip lists, total length of clips or clip lists, total size (clips only)). The total clip or clip list length is an approximate value, so take it as an approximate guide. List View pane Displays clips that were recorded and clip lists that were created during live logging to the medium or folder currently selected in the Tree View pane, in addition to clips that are currently recording. Clips or clip lists that existed in the selected medium or folder prior to the live logging operation will not be displayed. The mark indicates clips that are currently recording. An asterisk in front of the name of a clip or clip list indicates that the results of live logging edits to data have not yet been applied to the medium on which the clip is stored. See List View pane ([Explorer] windows) for more information on the displayed clips and clip lists. 142
![[Live] Window The [Live] window allows you to view a live image or clip that is currently recording.](/docs-images/76/74056648/images/143-0.jpg "When connection to the XDCAM device selected in the [Live Logging] window is enabled, the proxy data (low resolution data) that is recording is obtained and the [Live] window appears")
143 [Live] Window The [Live] window allows you to view a live image or clip that is currently recording. When connection to the XDCAM device selected in the [Live Logging] window is enabled, the proxy data (low resolution data) that is recording is obtained and the [Live] window appears automatically. When the connection to the device is terminated, the [Live] window closes automatically. 143
144 Tab When the [Live] window first appears, the [Live Mode] tab is displayed at the front. Live images (EE video) that are being recorded from the connected XDCAM device are displayed in the [Live Mode] tab. When you double-click a clip that is currently recording in the [Live Logging] window, that clip is loaded and the [Playback Mode] tab is displayed at the front. Images (REC video) of currently recording clips are displayed in the [Playback Mode] tab. When the clip recording finishes, the [Live Mode] tab appears at the front again. Host name Displays the host name of the connected XDCAM device. Live status and the number of essence marks Status information received from the connected XDCAM device is displayed in the Live Status column in the [Live Mode] tab and the [Playback Mode] tab. The status information background changes to red during the REC operation. In addition, it changes to yellow when recording is not possible, such as when media is not inserted. The following table explains the status information that is displayed when Professional Discs are used as recording media. When SxS Memory Cards are used as recording media, some of the following items may not be displayed. Status NO CONNECT DISC OUT REC INHI UNLOADING LOADING THUMBNAIL PREROLL STANDBY OFF STOP REC EDIT PLAY REC-PAUSE EDIT-PAUSE PLAY-PAUSE Meaning Not connected Disc not inserted Recording disabled Disc ejecting Disc loading Thumbnail displayed Preroll in progress Standby/off Stopped Recording in progress Editing in progress Playing Recording paused Editing paused Playback paused 144
145 Status F.FWD F.REV TOP END NEXT PREV PAUSE JOG VAR Meaning Fast forward playback in progress Fast reverse playback in progress Jumped to top position Jumped to last position Jumping to next clip Jumping to previous clip Paused Jog playback in progress Variable playback in progress SHUTTLE Shuttle playback in progress The number of essence marks does not appear on the [Live Mode] tab. On the [Playback Mode] tab, the number of essence marks that were set at the time the clip was loaded and the maximum number of essence marks that can be set for that clip are displayed. (The format of this display is "set marks / maximum marks".) Timecode and duration display On the [Live Mode] tab, the timecode received from the connected XDCAM device is displayed. Duration is not displayed. On the [Playback Mode] tab, the current timecode position and the duration of the clip at the time it was loaded are displayed. For NTSC clips, a period (.) between the minutes and seconds of the current position indicates dropframe, and a colon (:) indicates non-drop-frame. Screen Live images (EE video) from the connected XDCAM device are displayed in the [Live Mode] tab and images (REC video) of currently recording clips are displayed in the [Playback Mode] tab. You can double click the screen or select [Full Screen] from the [View] menu to enlarge the size to full screen size. To return to the original screen size, double click the screen or press the Esc key. Smooth playback may not be possible due to connection status, CPU and memory performance, and other factors. Position bar and control buttons On the [Live Mode] tab, the position bar is displayed in orange to indicate live images. Only the [Set Audio Channels] button is enabled at this time. The position bar, similar to the standard [Preview] window, displays on the [Playback] Mode tab the time scale at the time the recorded clip was loaded. The control buttons function identically to those in the [Preview] windows. See Viewer ([Preview] windows) for more information on the marks that appear on the position bar and the control buttons. 145
146 Logging area See Logging Area ([Live] window) for more information. 146
![Logging Area ([Live] Window) The logging area of the [Live] window allows you to set essence marks for the clip currently recording.](/docs-images/76/74056648/images/147-0.jpg "Essence mark setting area Controls such as a [Category] drop-down list and page switching buttons are located in the essence mark setting area to allow easy setting of different essence mark types")
147 Logging Area ([Live] Window) The logging area of the [Live] window allows you to set essence marks for the clip currently recording. Essence mark setting area Controls such as a [Category] drop-down list and page switching buttons are located in the essence mark setting area to allow easy setting of different essence mark types for clips. If a string was entered beforehand in planning metadata for use as an essence mark, loading planning metadata to a device automatically selects the planning metadata file name in the [Category] drop-down list, and the string entered in the planning metadata's Shot Mark pane can be used as an essence mark. When you select a category and page, previously assigned essence marks will appear for the [F1] to [F10] buttons which correspond to the keyboard function keys. If you press the Shift key, essence marks assigned to the Shift + F1 to Shift + F10 button operations will appear. Three pages are available for each category, for a total of 60 assignable essence marks for each category. You can set assigned essence marks to the clip by clicking the [F1] to [F10] or [*F1] to [*F10] buttons from the Essence Mark detailed setting area, or by pressing the F1 to F10 or Shift + F1 to Shift + F10 buttons on the keyboard. If you want to configure a name when setting an essence mark to the clip, select the [Edit Input] check box. The essence mark setting dialog appears and you can enter a name for the essence mark that will be set. [General] tab and [Essence Mark] tab In the [General] tab of the logging area, the properties below of currently recording clips can be set and edited if the [Live Mode] tab or [Playback Mode] tab is selected. Select the required item and input or edit it. 147
148 [Status] Select from among OK, NG, KEEP, and None. [Title 1] Allows you to assign a title up to 63 ASCII bytes in length. [Title 2] Allows you to assign a subtitle up to 127 bytes in length. [Creator] Allows you to enter the name of the person who shot the clip, up to 127 bytes in length. [Comment] Allows you to enter a description of the scene depicted in the clip, up to 2047 bytes in length. On the [Essence Mark] tab, the timecode and names of the essence marks set in the currently recording clip appear in a list. If the [Live Mode] tab is selected, the essence mark name can be edited by double-clicking the essence mark to open the [Edit Essence Mark] dialog. If the [Playback Mode] tab is selected and you select an essence mark from the list, the playback image in the [Live] window will jump to the frame at which the essence mark is set and the image can be checked. 148
149 Live Logging Operations Live logging allows you to load clips that are currently recording on an XDCAM device to a computer via the network, and allows you to enter metadata, set essence marks, create clip lists, and create other data that is useful for editing while recording is in progress. The results of live logging are saved to the work folder, sent to the XDCAM device automatically when recording is finished, and stored on recording media together with the clip data. You can also manually write the data back to the media. Connecting to the XDCAM device The XDCAM device you want to use must be registered beforehand as a remote host. See Registering Remote Hosts for more information about this operation. 1. Set [Live Logging Mode] on the XDCAM device to [Live Mode] or [Live View Mode]. Note that when set to [Live Mode], you cannot check proxy AV data while shooting or perform live logging operations that use metadata. Refer to the Operating Instructions of the device for information about this setting. 2. Select [Show Live Logging Window] from the [Window] menu to display the [Live Logging] window. 3. In the Tree View pane of the [Live Logging] window, select a device for which to perform live logging from the list of XDCAM devices that are currently recording. When connection to the selected XDCAM device is enabled, the [Live] window appears and live images (EE video) from the connected XDCAM device are displayed. Logging While performing live logging, you can confirm live images of the currently recording clip in the [Live Mode] tab of the [Live] window. When you double click a clip that is currently recording (marked with ), that clip is loaded and the [Playback Mode] tab that shows the REC video is displayed at the front of the [Live] window. If you double click a clip that has finished recording, the images for that clip will be displayed in the [Preview] window. You can also edit clip properties and set essence marks for clips that are currently recording during live logging operations. See Logging Area ([Live] Windows) for more information. [Live Logging] window operations You can perform the following operations in the [Live Logging] window. Loading planning metadata to devices: See Loading Planning Metadata to Devices Displaying and editing planning metadata: See Displaying and Editing Planning Metadata and Operating Related Files for more information about planning metadata. Displaying and editing disc metadata: See Checking/Editing Disc Metadata for more information. Creating clip lists: See Creating New Clip Lists for more information. Renaming files stored on Professional Discs: See Renaming Clips and Clip Lists on Professional Discs for more information. 149
150 Rewriting to media Apply live logging data back to the original media. See Rewriting Live Logging Data to the Recording Media for more information. Disconnecting from the XDCAM device When live logging operations are finished, or when you want to perform live logging for a different XDCAM device, disconnect from the XDCAM device currently in use. 1. Do one of the following. o From the Tree View pane of the [Live Logging] window, select the XDCAM device currently in use, and then select [Remote] and [Disconnect] from the [XDCAM Device] menu. o From the Tree View pane of the [Live Logging] window, select the XDCAM device currently in use while holding down the Control key, and select [Disconnect] from the context menu. o Select the XDCAM device you want to use next from the Tree View pane of the [Live Logging] window. o Close the [Live Logging] window. o Quits this application. 2. Close the [Live] window and [Live Logging] window as necessary. 150
151 Loading Planning Metadata to a Device Loading planning metadata to a connected XDCAM device enables recording based on that planning metadata. Loading recorded planning metadata to an SxS memory card If the planning metadata you want to use is recorded in an SxS Memory Card set to a connected device, the required planning metadata can be loaded by following the below steps. 1. In the [Live Logging] window, select the Planning folder of the device you are using. 2. Do one of the following. o Select the desired planning metadata file, and then select [Planning Metadata] and [Set to Current File] from the [Clip] menu. o From the List View pane click the required planning metadata while holding down the Control key, and select [Planning Metadata] and then [Set to Current File] from the context menu. The selected planning metadata file is loaded to the XDCAM device. In the List View pane of the [Live Logging] window, an icon representing the load target is displayed in the planning metadata file loaded to the device. This operation cannot be executed in a Professional Disc device. Copying and loading planning metadata to a device If planning metadata is not recorded in media set to a device, dragging the required planning metadata to the device's Planning folder enables that planning metadata to be copied and loaded to the device. This operation cannot be executed in a Professional Disc device. 1. In an [Explorer] window, select the Planning folder containing the planning metadata file you want to load to a device. 2. In the List View pane, select the planning metadata file you want to load. 3. Drag the selected planning metadata file and drop it on the Planning folder of the load destination XDCAM device in the Tree View pane of the [Live Logging] window. Depending on the type of XDCAM device you are using, a message is displayed asking you to confirm whether the planning metadata is to be loaded to a device or copied without loading. 4. Click [Yes] to load planning metadata to a device. The dropped planning metadata file is copied to the media's Planning folder set to the selected XDCAM device, and loaded to the device. In the List View pane of the [Live Logging] window, an icon representing the load target is displayed in the planning metadata file loaded to the device. Planning metadata cannot be loaded to XDCAM devices that are currently recording. When a planning metadata file is copied, related files will not be copied even when files such as clips are linked to that planning metadata file. Be sure to note that links will not function normally if the file you want to link to does not correspond to media in the copy destination. See Operating Linked Files for more information about how to batch copy linked files. 151
152 Rewriting Live Logging Data to the Recording Media This application stores data from live logging in a live logging work folder. This data is automatically written to the recording media when the clip finishes recording, but it can also be rewritten to the media as follows. 1. Connect the media on which to rewrite data. 2. In the [Live Logging] window, select the clip, clip list, file, folder, or disc containing the data to rewrite. An asterisk in front of a file name indicates data that has been edited but not yet rewritten. 3. Do one of the following. o Click the [Update Modified Data] button. o o Select [Update Modified Data] from the [Edit] menu. Click the item while holding down the Control key, and select [Update Modified Data] from the context menu. A confirmation message is displayed when ready to rewrite. 4. Click [Yes]. Progress is displayed in the dialog. To abort Click the [Cancel] button. When aborting refresh of multiple clips or clip lists, those files that have already been refreshed remain valid. To match names to source media When the names of files in the live logging work folder no longer match those on the source media, the live logging data can be changed to match the source file names. In the [Live Logging] window, select the media folder, then select [Avoid Media Conflicts] from the [File] menu. Files are renamed, and those not present on the source media are deleted. 152
153 Loading Clips and Clip Lists From Professional Discs and USB Flash Drives You can load proxy (low-resolution) data of MXF-format clips recorded on a Professional Disc to confirm its contents. You can use the proxy data that you loaded to create and edit clip lists. In addition, if you are using an XDCAM device that can record proxy data and metadata to a USB flash drive, you can load the proxy data from the USB flash drive to confirm its contents or edit clip lists. In either case, select the clip or clip list recorded on the Professional Disc or USB flash drive, and copy the proxy data to the work folder of this software before you begin editing. 1. In an [Explorer] window, select the clip(s) or clip list(s) you want to copy. Multiple items can be selected. Media folders and clip list folders can be selected. 2. Do one of the following. o Select [Copy to Offline Media] from the [Edit] menu. o Click the [Copy to Offline Media] button. The proxy data is copied to the work folder. You can configure settings for this work folder from the [Offline] tab in the [Preferences] dialog. Copying is not available if the same clip or clip list already exists at the destination. If the name of a file in a previously loaded clip or clip list does not match the source media, the name is changed to match that of the source media. When a previously loaded clip or clip list is deleted from the source media, it is also deleted from the work folder. When you edit a clip list or metadata that was loaded from a USB flash drive, the editing results are not rewritten to the USB flash drive from which the data was loaded, but to the Professional Disc to which the data was simultaneously recorded. See Rewriting edited data to a Professional Disc for more information. 153
154 Editing Metadata You can edit clip and clip list metadata that has been copied to the [Offline Media] window. 1. Do one of the following to open the [Offline Media] window. o Select [Show Offline Media] from the [File] menu. o Click the [Show Offline Media] button in an [Explorer] window. 2. Select a clip or clip list in the [Offline Media] window to display it in the [Preview] window. 3. Edit the metadata in the [Preview] window. Clips, clip lists and media can be deleted. Editable items For clips Status Title1 and Title2 Creator Descriptions (comments) Essence mark editing (add, delete and rename) In/out points For clip lists Edit the Start TC and DF/NDF settings in the [Storyboard] window. See [Storyboard] window for more information. Title1 and Title2 Creator Descriptions (comments) Start TC DF/NDF setting (NTSC only) For media (Disc metadata) See Checking/Editing Disc Metadata for more information about editing disc metadata. User Disc ID Titles 1 and 2 Description Subtitles 1 and 2 (up to eight entries) User specified date (up to eight entries) 154
155 Rewriting Edited Data to a Professional Disc 1. Connect the media on which to rewrite data. When you edit a clip list or metadata that was loaded from a USB flash drive, the editing results are not rewritten to the USB flash drive from which the data was loaded, but to the Professional Disc to which the data was simultaneously recorded. 2. In the [Offline Media] window, select the clip, clip list, or folder containing the data to rewrite. An asterisk in front of a file name indicates data that has been edited but not yet rewritten. 3. Do one of the following. o Click the [Update Modified Data] button. o o Select [Update Modified Data] from the [Edit] menu. Click the item while holding down the Control key, and select [Update Modified Data] from the context menu. A confirmation message is displayed when ready to rewrite. 4. Click [Yes]. Progress is displayed in the dialog. To abort Click the [Cancel] button. When aborting refresh of multiple clips or clip lists, those files that have already been refreshed remain valid. To match names to source media When the names of files imported to offline media no longer match those on the source media, the offline media file names can be changed to match. In the [Offline Media] window, select the media folder, then select [Avoid Media Conflicts] from the [File] menu. Files are renamed, and those not present on the source media are deleted. 155
156 Copying High-Resolution Data High-resolution clip data that has been copied to the [Offline Media] window can be copied to other media or devices. High-resolution data can be copied to the following devices. Professional Discs other than the source disc The computer running this program 1. Connect to the source Professional Disc. 2. In the [Offline Media] window, select the clip(s) to copy. Multiple clips can be selected. 3. Do one of the following. o Select [Copy] from the [Edit] menu. o Click the clip(s) while holding down the Control key, and select [Copy] from the context menu. 4. In the [Explorer] window, select the destination disc or folder, and do one of the following. o o Select [Paste] from the [Edit] menu. Click the item while holding down the Control key, and select [Paste] from the context menu. The copy process starts. Progress is displayed in the dialog. You can also copy high-resolution data via drag and drop operations. Drag the clip selected in the [Offline Media] window and drop it in a disc or folder in the [Explorer] window. Copying is not available if the same clip already exists at the destination. When clip metadata in the [Offline Media] window has been edited and not yet rewritten to the source disc, the edits must be refreshed before rewriting, so copying is slower. 156
 to be uploaded. 2.")
157 Uploading Clips to an FTP Server Clips on an XDCAM drive can be uploaded to a server using FTP. The server you want to use must be registered beforehand. See Registering Remote Hosts for more information about this operation. 1. In an [Explorer] window, select the XDCAM drive (or clips on the XDCAM drive) to be uploaded. 2. Select [Remote] and then [Upload...] from the [XDCAM Device] menu. The [Upload Clip] dialog appears. 3. In the [Registration Name] drop-down list in the [To] field, select the destination server for file uploading. Connect to the selected server, so the server's folders and files are displayed. 4. Select the destination folder for the clips. 5. When selecting the clips in step 1, select the [High resolution material only] check box to specify the material type to be uploaded. Check: High resolution material only is uploaded. Do not check: High resolution material, proxy data, and metadata is uploaded. When an XDCAM drive is selected in step 1, the [High resolution material only] check box cannot be selected. All materials on the XDCAM drive are uploaded. 6. Click the [Upload] button. The clips are uploaded. Progress is displayed in the dialog. When an XDCAM drive is selected, a folder with the upload date is immediately created under the specified folder at the upload destination, and the clips are uploaded to that folder. 157

158 Downloading Clips from an FTP Server Clips stored on an FTP server can be downloaded to an XDCAM drive. The server you want to use must be registered beforehand. See Registering Remote Hosts for more information about this operation. 1. In an [Explorer] window, select the destination XDCAM drive for the downloaded clips. 2. Select [Remote] and then [Download...] from the [XDCAM Device] menu. The [Download Clip] dialog appears. 3. In the [Registration Name] drop-down list in the [From] field, select the server from which to download clips. Connect to the selected server. The server's folders and files are displayed. 4. Select the clips to download. 5. Click the [Download] button. Downloading starts, and progress is displayed in the dialog. 158

159 Uploading Clips to XDCAM Station Devices You can upload clips stored on an XDCAM drive to the internal storage of an FTP-connected XDCAM Station device (Professional Media Station). The XDCAM Station device you want to use must be registered beforehand as a remote host connected via FTP. See Registering Remote Hosts for more information about this operation. 1. In an [Explorer] window, select the clips on the XDCAM drive to be uploaded. 2. Select [Remote] and then [Upload...] from the [XDCAM Device] menu. The [Upload Clip] dialog appears. 3. In the [Registration Name] drop-down list in the [To] field, select the destination XDCAM Station for clip uploading. When connection to the selected XDCAM Station device is enabled, the files stored on the device appear. The setting of the [High resolution material only] check box cannot be changed. You can only upload the high resolution material of the selected clips. 4. Click the [Upload] button. The clips are uploaded. Progress is displayed in the dialog. 159
160 Downloading Clips from XDCAM Station Devices You can download clips stored on the internal storage of an FTP-connected XDCAM Station device (Professional Media Station) to an XDCAM drive. The XDCAM Station device you want to use must be registered beforehand as a remote host connected via FTP. See Registering Remote Hosts for more information about this operation. 1. In an [Explorer] window, select the destination XDCAM drive for the downloaded clips. 2. Select [Remote] and then [Download...] from the [XDCAM Device] menu. The [Download Clip] dialog appears. 3. In the [Registration Name] drop-down list in the [From] field, select the XDCAM Station device from which to download clips. When connection to the selected device is enabled, the files stored on the device appear. 4. Select the clips to download. 5. Click the [Download] button. Downloading starts, and progress is displayed in the dialog. 160
161 Overview of XDCAM Station Control Functions This application supports connection with and remote control of XDS-1000 family Professional Media Station devices (hereinafter referred to as XDCAM Station devices). XDCAM Station devices are equipped with an MPEG HD422 codec full HD-compatible (1920x1080, 1280x720) hybrid media deck with internal storage, SxS memory card slots, and Professional Disc drive (depending on the model). This application and XDCAM Station devices support connection using the 3 protocols below. NET-RMT: Remote operation of media clips on XDCAM Station devices from this application. FTP: Uploading/downloading of clips using the internal storage on the XDCAM Station device as a server. CIFS: Internal storage on the XDCAM Station device is displayed in an [Explorer] window, and can be treated as a regular, local drive. Connection via NET-RMT The following remote operations can be performed for NET-RMT-connected XDCAM Station devices. Play: Plays clips and clip lists recorded in media in the XDCAM Station. Record: Records clips in media in the XDCAM Station. Copy between media: Copies clips and clip lists between media in the same XDCAM Station device. Delete: Deletes clips and clip lists recorded in media in the XDCAM Station. Finalize quad-layer WO disc: Finalizes quad-layer WO discs mounted in the XDCAM Station. The only media that can be used for recording and playback is internal storage or Professional Discs.. The operations below are supported for copying between media. From SxS memory cards to internal storage or Professional Disc From Professional Disc to internal storage From internal storage to Professional Disc Connection via FTP The internal storage of an FTP-connected XDCAM Station device can be used as a server for uploading and downloading clips. See Uploading Clips to XDCAM Station Devices and Downloading Clips from XDCAM Station Devices for more information about this operation. The XDCAM Station device you want to use via NET-RMT or FTP connection must be registered beforehand as a remote host. See Registering Remote Hosts for more information about this operation. Connection via CIFS Internal storage on the XDCAM Station device appears in an [Explorer] window. Internal storage is treated as a regular local-connection drive to and from which clips can be edited. Devices connected via CIFS, where the device and computer already have CIFS connection, need not be registered as remote hosts beforehand. 161
162 Refer to the device operation manual for more information about CIFS connection for XDCAM Station devices. The following limitations apply to operations of XDCAM Station devices connected via CIFS. When playing clips, the original data (high resolution data) is played, regardless of the [MXF Playback Quality] setting in the [Play] tab of the [Preferences] dialog. [Copy All] batch copying of clips in a folder cannot be executed. New folders cannot be created. Disc metadata cannot be edited. Cannot copy with XDCAM Station device set as copy destination. Files stored in internal storage on XDCAM Station devices can be renamed. For more information on renaming files, see Renaming Clips and Clip Lists on Professional Discs. 162
![[XDCAM Station] Window The [XDCAM Station] window can be displayed by clicking the [Show XDCAM Station] button in an [Explorer] window toolbar.](/docs-images/76/74056648/images/163-0.jpg "Connected XDCAM Station devices can be controlled, and playback and record functions can be executed in this window.")
163 [XDCAM Station] Window The [XDCAM Station] window can be displayed by clicking the [Show XDCAM Station] button in an [Explorer] window toolbar. Connected XDCAM Station devices can be controlled, and playback and record functions can be executed in this window. Clips and clip lists, called EDL (Edit Decision Lists) on XDCAM Station devices, can be copied between media in the same XDCAM Station device. The [XDCAM Station] window consists of a section similar to an [Explorer] window and a section that displays an image of the XDCAM Station device's front panel. Tab Displays the name of the currently selected media. Path Displays the host name of the XDCAM Station device selected in the Tree View pane and the path name of the media or folder. Toolbar Arranges tool buttons to operate media and folders in XDCAM Station devices and to operate recorded clips. See [Explorer] window for more information about tool buttons. Tree View pane All registered XDCAM Station devices, and media and internal storage folders inserted in those selected devices are displayed in the tree. 163
164 The following icons represent the type of the media or folder. Icon Type of media or folder XDCAM Station device Internal Storage XDCAM drive XDCAM drive (quad-layer WO disc inserted) SxS memory card drive (MXF attributes) SxS memory card drive (EX attributes) Folder with clip list attributes The Tree View pane supports the same kinds of operations as the folder tree view of your operating system. You can show or hide folder contents by clicking the [Show/Hide Folder Tree] button on the toolbar. List View pane Displays the clips or clip lists stored in the media or folder that is selected in the Tree View pane. See List View pane ([Explorer] windows) for more information. However, clip list thumbnails cannot be displayed in the [XDCAM Station] window. The icons in the table below are used instead for clip lists and for clips with thumbnails that cannot be displayed. Icon Description Clip list Clip with thumbnail that cannot be displayed The status of clips and clip lists during recording or playback is displayed in the [XDCAM Station] window by the marks in the following table. Mark Clip and clip list status Recording (for clips only) Playing Chasing playback (for clips only) Cannot be played 164
165 Capacity Displays the used capacity and remaining capacity of the folder selected in the Tree View pane. The remaining capacity is shown as a numeric value and as a bar graph. Information about selected clips Displays information on clips or clip lists selected in the List View pane (number of selected clips or clip lists, total length of clips or clip lists, total size (clips only)). The total clip or clip list length is an approximate value, so take it as an approximate guide. Remote control panel Displays status and buttons to remotely control connected XDCAM Station devices. See Remote Control Panel ([XDCAM Station] window) for more information. 165
![Remote Control Panel ([XDCAM Station] Window) Remotely control connected XDCAM Station devices.](/docs-images/76/74056648/images/166-0.jpg "When PB (playback) port is selected When REC (record) port is selected Port selection buttons and media Select the XDCAM Station PB (playback) port or the REC (record) port.")
166 Remote Control Panel ([XDCAM Station] Window) Remotely control connected XDCAM Station devices. When PB (playback) port is selected When REC (record) port is selected Port selection buttons and media Select the XDCAM Station PB (playback) port or the REC (record) port. Media allocated to each port is displayed under the buttons. Icon Media Internal Storage SxS A slot SxS B slot Professional Disc Device status display area When the playback port is selected, icons showing the type of clip or clip list loaded to the playback port, the clip or clip list name, and the status and timecode of the current clip or clip list are displayed. 166
167 Tips When the XDCAM Station device is playing back at 24P pull-down, the timecode is displayed at 30 frames/second to match the output video signal. Display Description When timecode data type is TC, COUNTER, or UB: Displayed at 24 frames/second. When timecode data type is PDT: The pulldown conversion timecode (30 frames/second) is displayed. To switch the display, select [XDCAM Station] and [Timecode Data Type] from the [XDCAM Device] menu and then select either [TC], [COUNTER], [UB], or [PDT]. Enter the required timecode in the timecode field and press the Return key to jump to the position of the entered timecode. In this area, an "Error" or "Warning" sign is displayed if there is error or warning information, and copy source and destination icons are displayed when copying between media in equipment with the selected XDCAM Station device. When the record port is selected, an icon showing the type of clip being recorded, the clip's name, and the current status and timecode are displayed. With the record port, it is not possible to enter the timecode in the timecode field to jump to the required position. When the record port is selected, an "Error" or "Warning" sign, and copy source and destination icons if copying between media in devices are displayed. Playback control button Playback control buttons are shown in the below table. Icon Button name Keyboard shortcut Function [PREV] (previous) button Alt + Jumps to the first frame of the current clip. Jumps to the head of the previous clip if the current position is at the head of the clip. [PLAY] button Space Starts playing from the current position. [NEXT] button Alt + Jumps to the first frame of the next clip. [STOP] button Space Stops playback. [TOP] (to the top frame) button Home Jumps to the first frame of the selected media's first clip. 167
168 Icon Button name Keyboard shortcut Function [F REV] button A Starts a high-speed reverse search from the current position. [F FWD] button S Starts a high-speed search from the current position. [END] (to the last frame) button End Jumps to the last frame of the selected media's last clip. Moving from the currently selected clip list to a different clip list cannot be performed using the [PREV] and [NEXT] buttons. Record media selection pane and record control button Media for recording in XDCAM Station is selected in the record media selection pane. The only media that can be used for direct recording is internal storage. Or, you can record simultaneously to internal storage and Professional Disc. Only "INTERNAL" and "INTERNAL + DISC" recording media is available; other media cannot be selected. Record control buttons are shown in the below table. Icon Button name Keyboard shortcut Function [STOP] button Space Stops recording. [REC] (record) button Shift+N Starts recording. 168
169 Playing in XDCAM Station XDCAM Station devices connected via NET-RMT can be played remotely from the XDCAM Browser. Check the playback video from the front panel display of the XDCAM Station device or from an external monitor connected to the XDCAM Station device. Playback video is not displayed in the XDCAM Browser [Preview] window. Only clips and clip lists recorded in the internal storage or on Professional Disc in XDCAM Station devices can be played. Plays only the clips and clip lists recorded in internal storage that are selected. A Professional Disc is played in tape-like playback fashion. 1. From the Tree View pane of the [XDCAM Station] window, select the XDCAM Station device for playback. 2. From the Remote Control Panel in the [XDCAM Station] window, click the [PB] button to select the playback port. The [PB] button is lit. 3. From the Tree View pane, select the media you want to play. A list of clips and clip lists recorded in the selected media is displayed in the List View pane. 4. Select the clip or clip list you want to play, and do one of the following. o Double click the clip or clip list. The relevant clip or clip list is loaded to the playback port. o Click the clip or clip list while holding down the Control key, and select [Play] from the context menu. Playback starts immediately in this case. The following steps are not required. 5. Click the [Play] button in the remote control panel to start playback. o To play recorded clips or clip lists in other media during playback, stop playback and then select the required media. o Select [Play PB Port] in the [Clip] menu to load the clip into the playback port and start playing. To control playback You can use the following methods to control playback of clips and clip lists loaded in the playback port of the XDCAM Station device. Use the command buttons in the Remote Control Panel. Press the J, K, or L key. J: Change the reverse playback speed. Each press selects 1, 2 times normal speed. K: Stop playback. L: Change the forward playback speed. Each press selects 1, 2 times normal speed. Press,. : Jumps and stops + 1 frame from the current position. : Jumps and stops -1 frame from the current position. 169
170 Recording with XDCAM Station Media in XDCAM Station devices can be recorded remotely by controlling the devices from the XDCAM Browser. Clips can be recorded directly to internal storage of XDCAM Station devices only. Clips recorded to internal storage can be simultaneously recorded to Professional Disc. 1. From the Tree View pane of the XDCAM Station window, select the [XDCAM Station] device for recording. To simultaneously record to Professional Disc, insert a Professional Disc to use. 2. From the Remote Control Panel in the [XDCAM Station] window, click the [REC] button to select the recording port. The [REC] button is lit. 3. In the record media selection pane in the remote control panel, select [INTERNAL] (recording to internal storage) or [INTERNAL + DISC] (simultaneous recording to internal storage and Professional Disc). Other media cannot be selected. 4. Click the [Record] button in the remote control panel to start recording. When chasing playback and chasing copy become possible for a clip during recording, the clip will be displayed in the List View pane of the [XDCAM Station] window. Check the clip video during recording from the front panel display of the XDCAM Station device or from an external monitor connected to the XDCAM Station device. To control recording You can use the following methods to stop clips that are being recorded by the XDCAM Station device. Use the command buttons in the Remote Control Panel. Press the Space bar to stop recording. Press Shift + N key to start recording. To stop simultaneous recording to Professional Disc When "INTERNAL + DISC" is selected in step 3 for simultaneous recording to both internal storage and Professional Disc, the recording to Professional Disc only can be stopped. If this application is running on several computers, this operation can be executed only on the computer that started the simultaneous recording. 1. Select the Professional Disc, during simultaneous recording, in the Tree View pane of the [XDCAM Station] window. 2. Select the clip being recorded simultaneously in the List View pane. 3. Do one of the following. o Select [XDCAM Station] and then [Stop Simul Record to Disc] from the [XDCAM Device] menu. o Click the clip while holding down the Control key, and select [Stop Simul Record to Disc] from the context menu. 170
171 Copying between Media in XDCAM Station Clips and clip lists can be copied between media in the same XDCAM Station device connected via NET-RMT and controlled from the XDCAM Browser. Content can be copied using the following combinations of media under control from the XDCAM Browser. Some media cannot be specified as a copy source or destination depending on the model and version of the XDCAM Station device. From SxS memory cards to internal storage or Professional Disc From Professional Disc to internal storage From internal storage to Professional Disc 1. Set the media in the XDCAM Station device you want to use. 2. From the Tree View pane of the [XDCAM Station] window, select the XDCAM Station device for copying. 3. From the Tree View pane, select the media where the source clip or clip list is recorded. A list of clips and clip lists recorded in the selected media is displayed in the List View pane. 4. From the List View pane, select the clip or clip list you want to copy. Multiple clips and clip lists can be selected. 5. Do one of the following. o Drag the clip or clip list selected in Step 4 and drop it on the copy destination media in the Tree View pane. o Select [Copy] in the [Edit] menu. After that, click the copy destination media, and then select [Paste] in the [Edit] menu. A message appears asking if you want to execute the copy. 6. Click the [Yes] button to execute the copy, or the [No] button to cancel it. A dialog illustrating the progress of the copying opens when the copying starts. Copying-inprogress icons for the copy source and destination media are displayed in the device status display area of the Remote Control Panel. To cancel the copy operation Click the [Cancel] button in the progress dialog. Reasons why a copy operation may fail Copy operations may fail for the following reasons. In these cases, an error message appears and the copy is not executed. The XDCAM Station is copying. There is not enough free capacity at the copy destination. Writing to the copy destination media is not authorized. The copy destination media is write-protected. Media other than the internal storage is specified as the copy source or copy destination, and playback is currently in progress on that media. The recording format of the copy source clip is different from the recording format of clips in the copy destination, when Professional Disc is specified as the copy destination. You may not be able to copy depending on the XDCAM drive you are using and its settings. 171
172 Deleting Clips and Clip Lists from XDCAM Station Media You can delete clips and clip lists recorded in media in XDCAM Station devices connected via NET- RMT. Clips and clip lists recorded in SxS memory cards cannot be deleted. Clips and clip lists recorded in write-protected media cannot be deleted. When you delete a clip that is included in an MXF-format clip list, all clip lists that reference the clip are deleted. 1. In the List View pane of the [XDCAM Station] window, select a clip or clip list to delete. 2. Do one of the following. o Press the Command + Delete keys. o Click the [Delete] button. o Select [Delete] from the [Edit] menu. A message appears asking if you want to execute the deletion. 3. Click the [Yes] button to execute the delete, or the [No] button to cancel it. Deletions cannot be undone after they finish. Reasons why a delete operation may fail Folder deletion operations may fail for the following reasons. In these cases, an error message appears and folder is not deleted. You do not have delete/write privileges to the media where the clips or clip lists are stored. The media where the clips or clip lists are stored is write protected. You tried to delete a clip used in a clip list being played. You tried to delete a clip that is protected. You tried to delete a clip or clip list that is being copied. You tried to delete a clip or clip list loaded in a playback port that is not in the "STOP" condition. 172
173 Finalizing XDCAM Station Professional Discs You can finalize quad-layer WO discs mounted in the XDCAM Station. The amount of free space after finalization will be 0, even if there was some space remaining before finalization. Applicable media Quad-layer WO discs inserted in XDCAM Station devices connected via NET-RMT Finalizing the disc 1. In the [XDCAM Station] window tree view pane, select the quad-layer WO disc ( ). 2. Do one of the following. o Select [XDCAM Station] and then [Finalize Media...] from the [XDCAM Device] menu. o Click the drive while holding down the Control key, and select [Finalize Media...] from the context menu. A confirmation message appears, asking if you want to finalize the disc. 3. Click the [Yes] button to execute finalization, or the [No] button to cancel it. A dialog opens showing the finalization is in progress. Do not cancel the operation once it has started. Reasons why finalization may fail Finalize operations may fail for the following reasons. In this case, an error message appears and the finalize is not executed. Writing to the target media is not authorized. The target media is write-protected. The target media is in use. 173
174 Opening the [Preferences] Dialog You configure settings for this application in the [Preferences] dialog. To open the [Preferences] dialog, select [Preferences...] from the [XDCAM Browser] menu. 174
175 [General] Tab [Window] Selects whether to enable the snap function. The snap function works as follows. When you drag a window close to another window, the window snaps into position so that the windows edges come into contact. When you resize a window by dragging its border, neighboring windows are also resized while preserving the window layout. [Stereoscopic 3D Clip] Selects whether clips that satisfy the conditions for 3D clips are treated are as 3D clips. When this check box is checked, clips shot with left and right cameras are paired and treated as a single 3D clip. When this check box is checked, a check mark is also automatically placed in the [Specify the folder when "Copy All"] check box on the [Edit] tab in the [Preferences] window so that the copy destination folder can be specified for batch copying of clips in media or folders. See about Handling 3D Clips for more information about the handling of 3D clips. 175
176 Tips Clearing the [Stereoscopic 3D] check box does not automatically clear the [Specify the folder when "Copy All"] check box on the [Edit] tab. 176
177 [Edit] Tab [Priority in Move] Specifies whether to prioritize processing speed or data protection when moving clips. [Processing speed]: Moves the clip, without creating a duplicate of the clip. [Data protection]: Creates a duplicate of the clip in the move destination, and deletes the original clip. [Copy] [Convert XDCAM EX files to MXF when copying to a normal folder]: When EX format files are copied to a normal folder (without EX or MXF attributes) with this check box checked, the copies are automatically converted to the MXF format. [Perform CRC check after copy]: When this check box is checked, the application performs a CRC (cyclic redundancy check) error check after copying a file, and displays a message if a copy error is detected. [Specify the folder when "Copy ALL"]: When this check box is checked, the copy destination folder can be specified for batch copying of clips in media and folders. When the check box is cleared, the folder specifed in ["Copy ALL" destination folder] below is the copy destination folder. 177
178 This check box is automatically checked when the [Stereoscopic 3D] check box above is checked on the [General] tab. ["Copy ALL" destination folder]: Specifies the destination folder when [Copy All] is executed from the toolbar or menu if the [Specify the folder when "Copy All"] check box is cleared. Enter a path beginning with a drive name in the edit box. Or click the [...] button to open the [Browse Folder] dialog where you can select a folder, and then click the [OK] button. [Clip] [Prefix]: When MP4 or DV-AVI files that do not follow the file naming convention of the XDCAM EX device ("<up to four characters><four digit number>_<two digit number>") are imported, this specifies up to four characters added to the start of the file names. This prefix is used in the name of the imported clip, and the name of the folder where the clip will be saved. 178
![[Display] Tab [Name] Selects what to display for names in the List View pane. [By Title]: Displays titles for names. [By File Name]: Displays file names for names.](/docs-images/76/74056648/images/179-0.jpg "If a title does not exist, the file name is displayed, regardless of this setting.")
179 [Display] Tab [Name] Selects what to display for names in the List View pane. [By Title]: Displays titles for names. [By File Name]: Displays file names for names. If a title does not exist, the file name is displayed, regardless of this setting. [Metadata displayed to thumbnails] Displays list boxes that allow you to select metadata properties to be displayed on the first and second lines beneath thumbnails. The properties appear when thumbnails are displayed in the List View pane of an [Explorer] window. Select a property for each line from the following. [Format] [Name] [File Name] [Creation Date] [Bit Rate] [Frame Rate] [Resolution] [Length] 179
180 [50p/60p Timecode Display Mode] Specifies the timecode display format when the frame frequency of the playback clip is 50p or 60p. [Show all frames]: The frame number increases on each frame. (Example of frame number display for 60p clips: ) [Show *]: The frame number increases on every second frame. An asterisk (*) is added to indicate the second frame in each frame number pair. (This is the display format used by Sony VTRs.) (Example of frame number display for 60p clips: 00 00* * 00...) Display of all timecode data is not guaranteed with the playback function of this software. Depending on the display processing load on the computer, asterisks (*) may not be displayed. [When no more clips can be previewed] Specifies what to do when the maximum number of clips that can be previewed in the [Preview] window at one time (total number of open windows and tabs) is exceeded. [Show a warning before replacing a clip that has been edited.] [Always replace the least recently viewed clip, even if it has been edited.] 180
181 [Play] Tab [Resolution] Specifies the preview playback resolution. This setting is not applied when playing proxy AV data. [Auto]: Decodes the playback video at a resolution which is automatically adjusted to match the screen size. [Normal]: Decodes the playback video at the original resolution of the clip, regardless of the screen size. [1/2], [1/4]: Decodes the playback video at half or quarter resolution. The image quality is lower, but response is better because of the lower demands placed on the decoder. [MXF Play mode] Specifies the playback mode of MXF clips. [Original]: Plays the clips at high resolution (plays MXF clips as is). [Proxy]: Plays the clips at low resolution (plays the proxy AV data). [Aspect Ratio] Specifies the aspect ratio of the index pictures and preview images for SD clips. [Auto]: Selects 16:9 or 4:3 automatically, according to the aspect ratio of the clip. [16:9] [4:3] 181
![[Conversion] Tab [Country] Specifies the video system adopted in the region where the application is used.](/docs-images/76/74056648/images/182-0.jpg "[NTSC (Includes 24p)] [PAL] [MP4 to MXF conversion] Specifies the recording format to be used when converting files from MP4 to MXF format.")
182 [Conversion] Tab [Country] Specifies the video system adopted in the region where the application is used. [NTSC (Includes 24p)] [PAL] [MP4 to MXF conversion] Specifies the recording format to be used when converting files from MP4 to MXF format. [Bit Rate] For files in the 4:2:0 color format, specifies the bit rate of the converted file when file format conversion is performed by a copy operation. Select from the following. (The bit rate for clips in the 4:2:2 format is fixed at 50Mbps.) [18Mbps] [25Mbps] [35Mbps] 182
183 [Aspect Ratio] Specifies the angle of view to use when converting to MPEG IMX or DVCAM format. [4:3 (Squeeze)]: Compresses the 16:9 image from the left and right sides. [4:3 (Letter Box)]: Masks the top and bottom of the 4:3 screen with black bars, and displays the 16:9 image in the center of the screen. [4:3 (Edge Crop)]: Crops the left and right edges of the 16:9 image. [Format settings: when folder is empty.] Specifies the frame rate and format to use when no clip exists at the copy destination during a conversion by copy operation. The following combinations of the values can be set. Country Frame Rate Format 4:2:0 18Mbps (x1080) 4:2:0 25Mbps (x720) 4:2:0 25Mbps (x1080) 4:2:0 35Mbps (x720) 60i/60p/30p 4:2:0 35Mbps (x1080) 4:2:2 50Mbps (x720) NTSC 4:2:2 50Mbps (x1080) MPEG IMX 50Mbps DVCAM 25Mbps 4:2:0 18Mbps (x1080) 24p 4:2:0 25Mbps (x1080) 4:2:0 35Mbps (x1080) PAL 50i/50p/25p 4:2:2 50Mbps (x1080) 4:2:0 18Mbps (x1080) 4:2:0 25Mbps (x720) 4:2:0 25Mbps (x1080) 4:2:0 35Mbps (x720) 4:2:0 35Mbps (x1080) 4:2:2 50Mbps (x720) 4:2:2 50Mbps (x1080) MPEG IMX 50Mbps DVCAM 25Mbps 183
184 [Margin of Subclip] Specify the length of the margins that are inserted before the In points and after the Out points when a clip list (and its included sub clips) is selected for import into Final Cut Pro. Margins with durations determined by the number of seconds you selected will be inserted before the In points and after the Out points. These margins are not added when you select a clip for import into Final Cut Pro. 184
![[Flash Band] Tab [Detection and Correction] [Enable detection and correction mode for using an electronic shutter]: When this check box is checked, flash band detection and correction are enabled](/docs-images/76/74056648/images/185-0.jpg "while shooting scenes with the electronic shutter enabled. When this check box is cleared, flash band detection and correction are disabled while shooting scenes with the electronic shutter disabled.")
185 [Flash Band] Tab [Detection and Correction] [Enable detection and correction mode for using an electronic shutter]: When this check box is checked, flash band detection and correction are enabled while shooting scenes with the electronic shutter enabled. When this check box is cleared, flash band detection and correction are disabled while shooting scenes with the electronic shutter disabled. [Where to save the corrected clips] Specifies the destination folder where this software will save duplicate clips created by the flash band correction function. [Same location as the original] [Specify the location]: Enter a path beginning with a drive name in the edit box. Or click the [...] button to open the [Browse Folder] dialog where you can select a folder, and then click the [OK] button. 185
186 [Offline] Tab [Work Folder] Specifies the storage folder for offline media. If you change the work folder setting, existing offline media is not carried over. To continue using the offline media, use Finder to copy the offline media to the new work folder. Operations for the new folder can be performed in the same way as before the change. 186
![[Clip List] Tab [Storyboard] [When loading in Preview, open also in Storyboard]: When this check box is checked and you double-click a clip list in the [Explorer] window or [Offline Media] window,](/docs-images/76/74056648/images/187-0.jpg "the [Storyboard] window appears in addition to the clip list being loaded into the [Preview] window.")
187 [Clip List] Tab [Storyboard] [When loading in Preview, open also in Storyboard]: When this check box is checked and you double-click a clip list in the [Explorer] window or [Offline Media] window, the [Storyboard] window appears in addition to the clip list being loaded into the [Preview] window. [Copy] [Copy range of Subclip is conformed to Clip List]: When this check box is checked and you copy a clip list, only the sections between the In and Out points of each material clip will be copied. When this check box is cleared, clips are copied in their entirety. [Margin of Subclip]: When the [Conform copy range of Subclip to Clip List] check box above is checked, this specifies the length of the margins that are inserted before the In points and after the Out points. Margins with durations determined by the number of seconds you selected will be inserted before the In points and after the Out points. When the check box is cleared, this setting is ignored. [Default Start Timecode] Configure the initial hour value for the start timecode that is specified during the creation of a new clip list. You can modify the start timecodes for individual clip lists in the [Storyboard] window. When you configure an hour value, a sample of the initial start timecode that will be specified appears to the right. 187
![[XMPilot] Tab [Planning Metadata] [Author/Modifier]: Specifies the name of the creator/editor when the planning metadata was created and edited. You can enter up to 32 bytes.](/docs-images/76/74056648/images/188-0.jpg "[Work folder]: Specifies a folder for saving single planning metadata files. The folder specified here is displayed as the Planning folder directly beneath the local folder in the [Explorer] window.")
188 [XMPilot] Tab [Planning Metadata] [Author/Modifier]: Specifies the name of the creator/editor when the planning metadata was created and edited. You can enter up to 32 bytes. [Work folder]: Specifies a folder for saving single planning metadata files. The folder specified here is displayed as the Planning folder directly beneath the local folder in the [Explorer] window. [Live Logging] [Work folder]specifies a work folder for saving data during live logging. If you change the [Work folder] setting, existing live logging data is not carried over. If you continue to use live logging data, use Windows Explorer to copy data in the pre-change folder to the post-change folder. Operations for the new folder can be performed in the same way as before the change. The [Work folder] cannot be changed during live logging. 188
189 [FCP] Tab [RegistrationFolder] Specify the folder to which files are saved when clips are imported into Final Cut Pro. [File Name] Specify the method in which files are named when clips are imported into Final Cut Pro. Use the check boxes to specify whether to include items, such as the media name, title of the clip, and, when importing the subclips of a clip list, the clip list name, in the file name. A sample file name based on your specifications will be displayed. 189
190 About Network Connections Files can be transferred between XDCAM devices, XDCAM Stations, and servers over a network. Communicating objects may include devices and servers connected using FTP. Files can be transferred between networked XDCAM devices by drag and drop or by menu operations, the same as for local devices. Files are transferred between XDCAM devices and servers/xdcam Stations by using the upload and download functions. Networked devices and servers must be registered as remote hosts beforehand. Tips Connection may be blocked if the firewall is enabled on the computer being used. In such cases, connection can be made by checking "PASV Mode" in the Register Remote Host dialog. See Registering remote hosts for more information. 190

191 Registering Remote Hosts To use an XDCAM device, XDCAM Station, or server on a network, it must first be registered as a remote host. You can register up to 16 remote hosts. Registering a new host 1. Select [Register Remote Host...] from the [XDCAM Device] menu. The [Register Remote Host] dialog appears. 2. Click the [New Host] button. The [Settings] dialog appears. 3. Select a device (XDCAM, Server or XDCAM Station). 4. If you selected an XDCAM Station, select one or both of the connection protocol check boxes (FTP and NET-RMT). Use NET-RMT to perform remote control of the XDCAM Station, and use FTP to upload and download clips to and from the XDCAM Station. 5. Enter the host information. For XDCAM Stations using only NET-RMT connection, only the registration name and host name are required. [Registration Name]: Enter the name to appear in the [Connection] dialog. [Host Name (IP Address)]: Enter the host name or IP address of the host to be connected. [User Name]: Enter the user name for connecting to the host. 191
192 [Password]: Enter the password for connecting to the host. Entered password characters are displayed as asterisks. [Port Number]: Enter the port number of the host. The default setting is port 21. [PASV Mode]: Select this check box to transfer using passive mode. 6. Click the [Register] button. The host is registered and the [Settings] dialog closes. Editing the host information If a host is currently connected, only the registration name can be edited. 1. Select the host to edit in the [Register Remote Host] dialog. 2. Click the [Edit] button. The [Settings] dialog appears. 3. Edit the host information. 4. Click the [Register] button. Deleting a host Click the [Delete] button in the [Register Remote Host] dialog. 192

193 Registering Essence Mark Names and Categories Essence marks are markers that can be named and placed on particular frames in a clip to aid in editing operations. XDCAM Browser allows you to name essence marks beforehand to simplify the process of setting them to the clips. You can also manage essence marks in groups by categorizing the essence marks by their intended use and type. See Setting an Essence Mark in a Clip for more information about setting essence marks in clips. Displaying the [Edit Essence Mark List] window To display the [Edit Essence Mark List] window, select [Edit Essence Mark List] from the [Tool] menu. This window allows you to add new essence mark names and categories, as well as edit registered names and categories. Registering essence mark categories XDCAM Browser allows up to 16 categories to be registered. You can copy existing categories, and use them as a base for creating new categories. 1. To create a completely new category, click the [New] button in the [Edit Essence Mark List] window. To create a copy of a previously registered category, select the category you want to copy and click the [Copy] button. The [Create New Category] dialog appears. 193
194 2. Enter a name for the category you want to create, and click the [OK] button. The new category is added to the list. 3. To enable selection of this category when setting essence marks to clips, select the check box that appears in front of the category name in the [Edit Essence Mark List] window. Only the categories with check boxes selected will be available in the [Category] field found in the Essence Mark detailed setting area under the [Essence Mark] tab of the [Preview] window. Registering essence mark names Select a category and register names for essence marks. Essence marks can be assigned to F1 to F10 and Shift+F1 to Shift+F10 (displayed as *F1 to *F10 in the list), which correspond to the function keys on a keyboard. Three pages are available for each category, for a total of 60 essence marks that can be registered for each category. 1. Select a category in the [Edit Essence Mark List] window. When you select a category, the essence marks that are included in that category are displayed in the essence mark list. 2. Select the row to which you want to add the new name. If you want to switch pages, use the and buttons at the top right of the essence mark list. 3. Double-click the selected row or press the Return key. The essence mark edit dialog appears. 4. Enter a name for the essence mark. Select [Unicode] in the [Character Code Type] field if not using US-ASCII. 5. Click the [OK] button in the [Edit Essence Mark] dialog. The essence mark name added appears in the [Edit Essence Mark List] window. 194
195 Editing Essence Mark Categories and Names The "Sony_Essence_Mark" category that is created during installation of this application cannot be deleted or renamed. Renaming essence mark categories You can rename categories that have been registered. 1. If the [Edit Essence Mark List] window is not open, select [Edit Essence Mark List] from the [Tool] menu to open it. 2. Select the category you want to rename from the category list. 3. Do one of the following. o o Press the Return key. Click the category while holding down the Control key, and select [Rename] from the context menu. The selected category name can be edited. 4. Enter a name for the category. Press the Return key, or click anywhere on the screen to complete renaming of the selected category. Deleting essence mark categories 1. If the [Edit Essence Mark List] window is not open, select [Edit Essence Mark List] from the [Tool] menu to open it. 2. Select the category you want to delete from the category list. 3. Click the [Delete] button. A confirmation message appears. 4. Click the [Yes] button. The selected category is deleted. Renaming an essence mark / Deleting an essence registered in a category 1. If the [Edit Essence Mark List] window is not open, select [Edit Essence Mark List] from the [Tool] menu to open it. 2. From the category list, select the category in which the essence mark you want to rename/delete is registered. The essence marks registered to the selected category appear in the essence mark list. 3. Select the essence mark you want to rename/delete. If you want to switch pages, use the and buttons at the top right of the essence mark list. 4. Double-click the selected row or press the Return key. The [Edit Essence Mark] dialog appears. 5. Edit the essence mark name that appears. Select [Unicode] in the [Character Code Type] field if not using US-ASCII. To delete an essence mark registration from the category, use the Delete key to delete the name. 6. Click the [OK] button in the [Edit Essence Mark] dialog. The new name appears in the [Edit Essence Mark List] window. 195
196 Importing Essence Mark Lists By importing essence mark categories that were exported from other XDCAM Browser or PDZ-1 applications, you can use the same categories that are used at those locations. 1. Copy the essence mark list file you want to import onto the hard disk of the computer running XDCAM Browser or onto a network drive. 2. If the [Edit Essence Mark List] window is not open, select [Edit Essence Mark List] from the [Tool] menu to open it. 3. Click the [Import] button in the [Edit Essence Mark List] window. The [Import] dialog opens. 4. Select the essence mark list file (*.xml or *.csv) you want to import, and click the [Open] button. The category registered in the imported file appears in the [Edit Essence Mark List] window. The file name will appear as the category name. XDCAM Browser allows up to 16 categories to be registered. If 16 categories are already registered, the [Import] button will be disabled. XDCAM Browser allows up to 60 essence marks (separated into three pages) to be registered to each category. Although essence mark list files exported from PDZ-1 applications include four pages of up to 80 registered essence marks, the fourth page of 20 essence marks will not be imported. 196
197 Exporting Essence Mark Lists The essence mark categories managed by XDCAM Browser can be exported as a definition file. By importing this file, the categories used on this application can be used on other XDCAM Browser applications. 1. If the [Edit Essence Mark List] window is not open, select [Edit Essence Mark List] from the [Tool] menu to open it. 2. Select the category you want to export in the [Edit Essence Mark List] window. The essence marks in the selected category appear in the list. 3. Click the [Export] button. The [Export] dialog opens. 4. Select a folder in which to save the exported file, and click the [Save] button. An XML file named after the selected category is created. If you want to change the file name, edit the file name before you click the [Save] button. 197
198 How XDCAM EX Clip Data are Configured Recording format This application supports the format specified for XDCAM EX devices. This format has the following specifications. Folder names and the folder configuration are as shown in the following figure. Files contain link information pertaining to links between files and folders. Do not use tools that do not support the XDCAM EX format to edit, delete, move, or rename the files and folders used by this application. Unless the format specifications are observed, files can become unreadable by XDCAM EX devices and by this application. Clips that were created on, copied to, or moved to media other than SxS PRO and SxS-1 memory cards using this application may not play on XDCAM EX devices in some cases. Recording folders The configuration of video and metadata folders is as shown in the following figure. In the XDCAM EX format, the data beneath the BPAV folder is handled as a single set of data. One BPAV folder exists when a work folder is opened in Finder. To copy and backup your data, select the folders beneath the BPAV folder. When a work folder is selected in a Tree View pane of an [Explorer] window, a list of clips registered in the BPAV folder appears in the corresponding List View pane. AV data is saved in the folders beneath the CLPR folder. On the media used by XDCAM EX devices, the BPAV folder is created beneath the root folder of the media. 198
199 When MP4 files are imported to a work folder, new folders are created beneath the CLPR folder, and the imported clips are moved to those folders. Folder names are assigned automatically. When a work folder is selected in a Tree View pane of an [Explorer] window and the CLPR folder in the work folder has some MP4 files, new folders are created beneath the CLPR folder, and the MP4 files are moved to those folders (the effect is the same as importing the MP4 files). a) When unregistered AVI files exist in the CLPR folder, and that folder is accessed from an [Explorer] window, those AVI files are registered as management targets (processed like import files). However, importing cannot be performed if the file names do not follow the XDCAM EX naming conventions. On media supported by XDCAM EX devices, up to 600 clips can be registered in one recording folder. a) This process does not work in the UserData folders on XDCAM drives. Folder and file names are linked to metadata files. Do not change them. 199
200 How MXF Clip Data are Configured Recording format This application supports the format specified for XDCAM devices. This format has the following specifications. Folder names and the folder configuration are as shown in the following figure. Files contain link information pertaining to links between files and folders. Do not use tools that do not support the MXF format to edit, delete, move, or rename the files and folders used by this application. Unless the format specifications are observed, files can become unreadable by XDCAM devices and by this application. It may not be possible for XDCAM devices to play clips that this application has created on, copied to, or moved to media other than Professional Discs (XDCAM drives). Recording folders The configuration of video and metadata folders is as shown in the following figure. This application recognizes a folder containing the four subfolders -- Clip, Component, Edit, and Sub -- as a folder with MXF attributes, and browses the Clip folder. If file format conversion is executed by copying files to a normal folder, DISCMETA.XML and MEDIAPRO.XML files, and Clip, Component, Edit, Sub, and General folders are automatically created, and then the format-converted files are copied to the Clip folder. (For example, when the file named ABC0000.MP4 is copied to a work folder, the format is converted to MXF and the files named ABC0000.MXF and ABC0000M01.XML are automatically created and saved in the Clip folder.) 200
201 Files other than MXF format files can also be stored in the UserData folder, without converting the files. This application can also browse and handle files stored in the UserData folder. Folder and file names are linked to metadata files. Do not change them. Even if you configure clip data like MXF clip data in an EX folder using Finder or other file management tools, this application gives priority to the XDCAM EX format so that you cannot operate MXF clips. For details about the data configuration for MXF clips, refer to the Operating Instructions or Operation Manual supplied with the XDCAM device. 201
202 Menu Lists [XDCAM Browser] menu Command Subcommand Keyboard shortcut Function [About XDCAM Browser] Displays the version of this application. [About MainConcept Conversion Pack] Displays the version of the MainConcept plug-in software. [Preferences...] Command +, Opens the [Preferences] dialog. [Edit Essence Mark List...] Opens the [Edit Essence Mark List] window. [Register Serial Number] Executes the activation process to enable use of a retail option for this application. [Services] Mac OS Commands Execute various commands provided by the Mac OS. [Hide XDCAM Browser] Command + H Hides this application. [Hide Others] Option + Command + H Hides other applications. [Show All] Shows all applications. [Quit XDCAM Browser] Command + Q Quits this application. [File] menu Command Subcommand Keyboard shortcut Function [New Explorer Window] [New Preview Window] [Show Offline Media] Opens a new [Explorer] window. Opens a new [Preview] window. Opens the [Offline Media] window. [Show Storyboard] Opens the [Storyboard] window. [Show XDCAM Station] Opens the [XDCAM Station] window. 202
203 Command Subcommand Keyboard shortcut Function [Show Live Logging Window] [Show Live Window] Opens the [Live Logging] window. Opens the [Live] window. [New Tab] Command + T Adds a new tab in the active window. [Close Window] Command + W Closes the active window. [Close Tab] Closes the active tab. [Show in Finder...] Shows the selected folder in Finder, so that you can back up the folder contents. [Folder] [Create New...] [Rename] Shift + Command + N Option + Command + R Creates a new folder in the currently selected media or folder. Renames the selected folder. [Open Media File] Opens the [Open Media File] dialog. [Import...] Imports a file to the selected folder. [MXF for NLEs...] Converts the selected clip to MXF format, for use on non-linear editors. [MXF for XDCAM HD...] Converts the selected clip to XDCAM HD format. [MXF for XDCAM HD422...] Converts the selected clip to XDCAM HD422 format. [Export] [MXF for XDCAM MPEG IMX...] [MXF for XDCAM DVCAM...] Converts the selected clip to XDCAM MPEG IMX format. Converts the selected clip to XDCAM DVCAM format. [Raw DV...] Converts the selected clip to RAW DV format. [AVI DV...] Converts the selected clip to AVI DV format. [Windows Media File...] Converts the selected clip to Windows Media file format. 203
204 Command Subcommand Keyboard shortcut Function [Sony PSP(H.264/AVC)...] Converts the selected clip to a format for viewing on the PlayStation Portable (PSP) game console. [Apple ipod(h.264/avc)...] Converts the selected clip to a format for viewing on the Apple ipod. [Video Hosting Service...] Converts the selected clip to a format for uploading to video hosting service. [Capture Still Image...] [Output Clip/ClipList Information...] Opens the [Save Still Image] dialog. Opens the [Output] dialog. [Rename...] Renames the selected file. [Avoid Media Conflicts] Matches offline media folders or live logging work folders with file names on the original media. [Eject Media] Ejects the media, or puts it into a state in which it can be safely removed. [Format Media...] Formats the selected media. [Finalize Media...] Finalizes the selected quad-layer WO disc. [Edit] menu Command Subcommand Keyboard shortcut Function [Undo] Command + Z Undoes the previous edit operation in the [Storyboard] window. [Redo] Shift + Command + Z Redoes the previously undone edit operation in the [Storyboard] window. [Cut] Command + X Cuts the selected clip. [Copy] Command + C Copies the selected clip. [Paste] Command + V Pastes a clip that has been cut or copied. [Delete] Command + Delete Deletes the selected clip or folder. [Select All] Command + A Selects all of the clips in the selected media or folder. 204
205 Command Subcommand Keyboard shortcut Function [Copy All] Option + Command + C Copies all of the clips in the selected media or folder. [Disc Copy...] Copies the selected Professional Disc to a separate disc. [Copy to Offline Media] Copies the selected clip to offline media. [Update Modified Data] Writes edits made on offline media back to the original media. [Batch Edit Clip Properties...] Opens the [Batch Edit Clip Properties] dialog. [Edit Disc Metadata...] Opens the [Edit Disc Metadata] dialog. [Split Folder] Shift + Command + W Splits the selected folder into folders of the specified size. [Combine Folders] Shift + Command + J Combines the selected folder to another specified folder. [Find...] Command + F Opens the [Find] dialog. [Find...] [Start] Starts the search. [Stop] Stops the search. [Go to Explorer...] Opens the selected clip or clip list in an [Explorer] window. [View] menu Command Subcommand Keyboard shortcut Function [Show/Hide Toolbar] Option + Command + T Shows or hides the tool buttons. [Show/Hide Folder Tree] [Show/Hide Disk Space] [Show/Hide Status Bar] Shows or hides the Tree View pane. Shows or hides the disk space. Shows or hides the status bar. 205
206 Command Subcommand Keyboard shortcut Function [Show/Hide Component View] Shows or hides the Component View. [Up] Command + Moves up one level in the folder hierarchy. [Thumbnails] Puts the List View pane into thumbnail view mode. [Details] Puts the List View pane into details view mode. [Being Modifying] [Name] [Size] [Length] [Sort By] [Status] Sorts the clip list on the selected key, in ascending or descending order. [Creation Date] [Last Update] [Rec Mode] [Media Spanning] [Show All] [Filter By] [MP4] Filter the display to show XDCAM EX clips in a specified file format. [DV-AVI] [Customize Columns...] [Customize Tooltip...] Opens the [Customize Columns] dialog. Opens the [Customize Tooltip] dialog. [Message Options] [Restore Defaults] Subsequently displays the message box which was set to be hidden by the setting of the [Do not show this message in the future.] check box. [Refresh] Refreshes the information displayed in the active tab of the [Explorer] window. [Full Screen] Puts the Viewer into Full Screen mode. 206
207 [Clip] menu Command Subcommand Keyboard shortcut Function [New clip using In/Out selection] Creates a new clip from the section between In and Out points of the selected clip. [Detect - In/Out selection Detect - Entire Clip] Detects frames where flash banding has occurred on the selected clip. [Flash Band] [Correct - In/Out selection Correct - Entire Clip] Corrects frames where flash banding has occurred on the selected clip. [Detect and Correct - In/Out selection Detect and Correct - Entire Clip] Detects and corrects frames where flash banding has occurred on the selected clip. [Import into Final Cut Pro...] Command + I Opens the [Import into Final Cut Pro] dialog. [Create New...] Creates a new clip list. [Clip List] [Close] [Save] Command + S Closes the clip list loaded into the Storyboard. Saves the selected clip list. [Export...] Opens the [Export] dialog. [Duplicate Clip List] [Edit Clip List] [Add Subclip] Creates a copy of the selected clip list on the same media. Displays the content of the selected clip list in the [Storyboard] window. Adds the selected clip to the clip list as a subclip in the [Storyboard] window. [Load into Preview] [Clip List] [Subclip] Loads the current clip list into the [Preview] window. Loads the selected subclip into the [Preview] window. [Stereoscopic 3D] [Pair with...] Opens the [Pair with] dialog. [Unmake pair] Releases the L clip and R clip pairing displayed as a 3D clip. [Planning Metadata] [Create New...] Opens the planning metadata [Create New Planning Metadata File] dialog. 207
208 Command Subcommand Keyboard shortcut Function [Set to Current File] Loads the selected planning metadata to an XDCAM device. [Copy All...] Opens the [Copy All] dialog for the clips and clip lists linked to the selected planning metadata. [Related Clip] [Export] Converts the format and exports the clips and clip lists linked to the selected planning metadata. [Batch Edit Clip Properties...] Opens the [Batch Edit Clip Properties] dialog for clips linked to the selected planning metadata. [XDCAM Device] menu Command Subcommand Keyboard shortcut Function [Register Remote Host...] Opens the [Register Remote Host] dialog. [Connect] Connects to the selected remote host. [Remote] [Disconnect] Disconnects from the selected remote host. [Upload...] Opens the [Upload Clip] dialog. [Download...] Opens the [Download Clip] dialog. [Port selection] Select the playback port or record port of the XDCAM Station device. [XDCAM Station] [Timecode Data Type] [Stop Simul Record to Disc] Selects the type of timecode displayed in the [XDCAM Station] window. Stops recording to Professional Disc only when simultaneously recording to internal storage and Professional Disc in an XDCAM Station device. [Finalize Media...] Finalizes the quad-layer WO disc selected in the [XDCAM Station] window. [Preview] menu Command Subcommand Keyboard shortcut Function [Play] L Plays the selected clip. 208
209 Command Subcommand Keyboard shortcut Function [Stop] K Stops clip play. [Play Reverse] J [Play In to Out] Shift + space Plays the selected clip in the reverse direction. Plays the range from the In point to the Out point of the selected clip. [-1 Frame] Steps one frame back. [+1 Frame] Steps one frame forward. [Jump to Start] Home Jumps to the clip start point (first frame). [Jump to End] End Jumps to the clip end point (last frame). [Jump to In Point] [Jump to Out Point] Jumps to the In point. Jumps to the Out point. [Previous Clip] Option + [Next Clip] Option + Jumps to the In point of the previous clip or subclip. Jumps to the In point of the next clip or subclip. [Previous Essence Mark] [Next Essence Mark] Shift + Jumps to the previous essence mark. Shift + Jumps to the next essence mark. [Add Subclip] Return Adds the section between the In and Out points to the clip list as a subclip. [Update Modified Subclip] Applies the results of subclip trimming to the clip list. [Set Disc Metadata Index Picture] Sets the frame at the current position as the disc metadata index picture. [Edit] [Set Index Picture] P Sets the frame at the current position as the clip index picture. [Mark In] I Sets an In point at the current position. [Mark Out] O Sets an Out point at the current position. [Clear Mark In] Shift + I Clears the In point. [Clear Mark Out] Shift + O Clears the Out point. [Clear Mark In/Out] Shift + X Clears the In and Out points. 209
210 Command Subcommand Keyboard shortcut Function [Add Essence Mark] E Sets an essence mark at the current position (up to 126). [Delete Essence Mark] Shift + E Deletes the essence mark at the current position. [Set Audio Channels...] Opens the [Set Audio Channels] dialog. [Import into Final Cut Pro] Imports the subclip In/Out selection for the selected clip or clip list into the project currently open in Final Cut Pro. [Window] menu Command Subcommand Keyboard shortcut Function [Previous Tab] Shift + Command + { Selects the previous tab. [Next Tab] Shift + Command + } Selects the next tab. [Minimize] Command + M Minimizes the active window. [Zoom] Maximizes the active window or returns it to its original size. [Bring All to Front] Brings all the currently open windows to the front of the screen. [Default] Optimizes the positions of [Explorer] and [Preview] windows. [Window Layout] [Storyboard] Optimizes the positions of [Explorer], [Preview], and [Storyboard] windows. [Storyboard (Offline)] Optimizes the positions of [Offline Media], [Preview], and [Storyboard] windows. [Help] menu Command Subcommand Keyboard shortcut Function [XDCAM Browser Help...] Displays the online Help. 210
211 Error and Warning Message List Messages Failed to initialize OLE. Please confirm whether the OLE library version is correct. Failed to read libraries for Export. An incomplete clip has been detected. Please attempt to salvage the clip using the recording equipment. Reason: The clip database is incorrect. Reason: The clip database created by other application. Reason: The media may be incorrect or corrupted. The clip cannot be displayed in Explorer. Failed to save sort order. What to do There may be a problem with the installation of this application. Try installing it again. Data on the media is incomplete, probably because the XDCAM EX device was powered off during recording, or because the media was ejected prematurely. Return the media to the XDCAM EX device and salvage it immediately. The data may become unrecoverable if you continue to operate without salvaging it. The XDCAM EX format may be corrupt. Try to salvage the material, for example by importing an MP4 file to another folder. The selected clip database (registration folder) was not created by this application. Use the application that created the database to edit the clips and perform other clip operations. The selected clip is in an unsupported format, or there is an error in the material data. Check the properties of the clip. Importing and list display is disabled, as the selected clip is not of an XDCAM EX-compatible format. Check the properties of the clip. Try restarting this application, or restarting the computer. If the problem persists, install the application again. The copy destination drive you specified doesn't exist or isn't ready. Please specify an available drive. The move destination drive you specified doesn't exist or isn't ready. Please specify an available drive. The drive specification is invalid, or no media is loaded in the drive. Specify an available drive, or load media into the drive. The import destination drive you specified doesn't exist or isn't ready. Please specify an available drive. The clip database is incorrect, so it cannot be copied. The clip database is incorrect, so it cannot be moved. The XDCAM EX format may be corrupt. Try to salvage the material, for example by importing an MP4 file to another folder. Failed to update properties. 211
212 Messages A file exceeding 4 GB needs to be split, so the file cannot be copied. A file exceeding 4 GB needs to be split, so the file cannot be moved. Because AVI clip is included, the clip cannot be created. Because AVI clip is included, it cannot be copied converting to MXF. What to do Files larger than 4 GB cannot be managed on media like the SxS memory cards used by XDCAM EX devices. Use editing software or some other tool to split the file into files smaller than 4 GB and then try again. This function does not support DV-AVI clips. Delete DV-AVI clips from the clip specification and try again. The operation was cancelled for one of the following reasons. Failed to create a clip. You do not have delete and write privileges to the selected media or folder, or these operations are inhibited. The data is in an incompatible format, or it is corrupt. Check the properties of the selected media or folder. Reason: Unmatched frame rate. Reason: The video format is different. Reason: Default format hasn't been set. Please check Conversion tab in [Preferences]. Reason: Bit Rate hasn t been set. Please check Conversion tab in [Preferences]. MainConcept Conversion Pack is the trial version, so the conversion output may contain a watermark. For output without the watermark, please purchase the full version MainConcept Conversion Pack. Reason: Failed to convert. The selected clip cannot be copied due to difference in frame rate between that clip and clips existing in the copy destination folder. Check the frame rate (NTSC/24p/PAL) of the clip you want to copy and then perform copy by selecting a destination folder in which all the existing clips are of the same frame rate as the selected clip. The selected clip cannot be copied due to difference in resolution between that clip and clips existing in the copy destination folder. Check the resolution of the clip that you want to copy and then perform copy by selecting a destination folder in which all the existing clips are of the same resolution as the selected clip. Set the frame rate and bit rate in the [Rates to apply when rec format is unknown] section of the [Conversion] tab in the [Preferences] dialog. Make settings in [Bit Rate] of the [MP4 to MXF conversion] section of the [Conversion] tab in the [Preferences] dialog. Purchase the full version plug-in software (MainConcept Conversion Pack) at the MainConcept website, and install it on your system. You can access the MainConcept website by selecting [About MainConcept Conversion Pack...] from the [Help] menu, and then clicking the URL in the dialog that appears. Check the recording format of the clip that you want to copy and that of the clips existing in the copy destination folder. File conversion may be disabled depending on the recording format of the original clip and the clips in the copy destination folder. 212
213 Messages Reason: The clip is less than 2 seconds, so it cannot be written. It cannot be copied because a Clip less than 2 seconds is included. Failed to import the clip. UserData folder cannot be specified as the output destination. The name is already used. Specify another name. xxxx already exists in the output folder. Please specify another name. The file name is invalid or too long. Error occurred during the export. Please refer to the details from the context on each clip. What to do XDCAM devices do not support writing of clips shorter than two seconds. You may not have access privileges to the clip, or the clip may be an MP4 file that is not compatible with the XDCAM EX format. Check the properties of the clip. Change the output destination. Specify another name or change the output destination. The save destination may not be recognized if the full path to the save destination is too long. Change to a save destination with a shorter path name. Open the export dialog to check the report which is displayed when [Error detail] is selected from the context menu of the clip with the error. The conversion failed for one of the following reasons. Reason: An error occurred during conversion. You do not have delete and write privileges to the output folder, or these operations are inhibited. The selected clip is in an unsupported format, or the material data is corrupt. Check the properties of the folder and clip. Reason: Unsupported XDCAM. Reason: Unsupported codec. Failed to create a folder. You cannot use [XXX] as a folder name. Specify another name. It contains a string reserved by the system, so it cannot be set. Reason: The clip file name has already been reserved. The selected XDCAM drive is not supported. The codec of the selected clip on the XDCAM drive is not supported. You may not have delete and write privileges to the media or folder, or these operations may be inhibited. Check the properties of the selected media or folder. Specify a name other than BPAV. The name contains characters reserved by the operating system. Enter a name that does not contain these characters. Change the file name or copy destination. 213
214 Messages Failed to change the folder name. Failed to delete the folder. Failed to split the folder. Failed to combine the folders. The folder [XXX] cannot be split. Reason: The folder contains a file exceeding the specified split unit of [XXX GB]. Failed to save disc metadata. Reason: The number of audio samples is not enough. Failed to eject xxxx. The media is in use. Please make sure that the file is not being accessed. What to do You may not have delete and write privileges to the folder, or these operations may be inhibited. Check the properties of the combine source or destination folder. You may not have delete and write privileges to these folders, or these operations may be inhibited. Check the properties of the merge source or destination folder. Clip name: The folder cannot be split into folders of the specified size because at least one file larger than that size exists. Specify a split size that is larger than the size of the largest file. You may not have delete and write privileges for the selected XDCAM drive, or these operations may be inhibited. Check the properties of the selected XDCAM drive and the state of the write protect tab on the disc. The audio after conversion may contain noise, because the number of audio samples is lower than the specified number. Check the number of audio samples in the conversion source clip. If a media clip is being accessed, stop the access. 214
215 How to Obtain the MainConcept Plug-in Software The optional MainConcept plug-in software can be purchased and downloaded from the following website
216 Functions with "Trial" Displayed This application may contain both retail and free functions. Retail option functions may be provided for a certain period of time free of charge, depending on how the product was obtained. Commands for which "[Trial]" is displayed in the menus are retail option functions which are available for use for a limited time. When you select a command with "[Trial]" displayed, a message indicating when the trial period expires appears before the command is executed. When the trial period expires, the commands are grayed-out and cannot be selected. You can continue to use these functions by purchasing a serial number for the options or purchasing the XDBZ-AD1 Professional Application Software (Advanced pack for XDCAM Browser), then registering the serial number. Refer to the Installation Guide for the XDBZ-AD1 application for information about purchasing a serial number and the required registration procedure. "[Trial]" is no longer displayed in menu commands after the serial number has been registered. 216
217 Licenses MPEG-4 Visual Patent Portfolio License THIS PRODUCT IS LICENSED UNDER THE MPEG-4 VISUAL PATENT PORTFOLIO LICENSE FOR THE PERSONAL AND NONCOMMERCIAL USE OF A CONSUMER FOR (i) ENCODING VIDEO IN COMPLIANCE WITH THE MPEG-4 VISUAL STANDARD ( MPEG-4 VIDEO ) AND/OR (ii) DECODING MPEG-4 VIDEO THAT WAS ENCODED BY A CONSUMER ENGAGED IN A PERSONAL AND NON-COMMERCIAL ACTIVITY AND/OR WAS OBTAINED FROM A VIDEO PROVIDER LICENSED BY MPEG LA TO PROVIDE MPEG-4 VIDEO. NO LICENSE IS GRANTED OR SHALL BE IMPLIED FOR ANY OTHER USE. ADDITIONAL INFORMATION INCLUDING THAT RELATING TO PROMOTIONAL, INTERNAL AND COMMERCIAL USES AND LICENSING MAY BE OBTAINED FROM MPEG LA, LLC. SEE MPEG LA is offering licenses for (i) manufacturing/sales of any storage media storing MPEG-4 Visual video information (ii) distribution/broadcasting of MPEG-4 Visual video information in any manner (such as online video distribution service, internet broadcasting, TV broadcasting). Other usage of this product may be required to obtain license from MPEGLA. Please contact MPEG LA for any further information. MPEG LA. L.L.C., 250 STEELE STREET, SUITE 300, DENVER, COLORADO Home page: MPEG-2 Video Patent Portfolio License ANY USE OF THIS PRODUCT OTHER THAN CONSUMER PERSONAL USE IN ANY MANNER THAT COMPLIES WITH THE MPEG-2 STANDARD FOR ENCODING VIDEO INFORMATION FOR PACKAGED MEDIA IS EXPRESSLY PROHIBITED WITHOUT A LICENSE UNDER APPLICABLE PATENTS IN THE MPEG-2 PATENT PORTFOLIO, WHICH LICENSE IS AVAILABLE FROM MPEG LA, L.L.C., 250 STEELE STREET, SUITE 300, DENVER, COLORADO AVC Patent Portfolio License THIS PRODUCT IS LICENSED UNDER THE AVC PATENT PORTFOLIO LICENSE FOR THE PERSONAL AND NON-COMMERCIAL USE OF A CONSUMER TO (i) ENCODE VIDEO IN COMPLIANCE WITH THE AVC STANDARD ( AVC VIDEO ) AND/OR (ii) DECODE AVC VIDEO THAT WAS ENCODED BY A CONSUMER ENGAGED IN A PERSONAL AND NON-COMMERCIAL ACTIVITY AND/OR WAS OBTAINED FROM A VIDEO PROVIDER LICENSED TO PROVIDE AVC VIDEO. NO LICENSE IS GRANTED OR SHALL BE IMPLIED FOR ANY OTHER USE. ADDITIONAL INFORMATION MAY BE OBTAINED FROM MPEG LA, L.L.C. SEE 217
218 VC-1 Patent Portfolio License THIS PRODUCT IS LICENSED UNDER THE VC-1 PATENT PORTFOLIO LICENSE FOR THE PERSONAL AND NON-COMMERCIAL USE OF A CONSUMER TO (i) ENCODE VIDEO IN COMPLIANCE WITH THE VC-1 STANDARD ( VC-1 VIDEO ) AND/OR (ii) DECODE VC-1 VIDEO THAT WAS ENCODED BY A CONSUMER ENGAGED IN A PERSONAL AND NON-COMMERCIAL ACTIVITY AND/OR WAS OBTAINED FROM A VIDEO PROVIDER LICENSED TO PROVIDE VC-1 VIDEO. NO LICENSE IS GRANTED OR SHALL BE IMPLIED FOR ANY OTHER USE. ADDITIONAL INFORMATION MAY BE OBTAINED FROM MPEG LA, L.L.C. SEE 218
219 Warranty Notice NOTICE TO USERS Documentation 2010, 2011 Sony Corporation All rights reserved. This manual or the software described herein, in whole or in part, may not be reproduced, translated or reduced to any machine readable form without prior written approval from Sony Corporation. SONY CORPORATION PROVIDES NO WARRANTY WITH REGARD TO THIS MANUAL, THE SOFTWARE OR OTHER INFORMATION CONTAINED HEREIN AND HEREBY EXPRESSLY DISCLAIMS ANY IMPLIED WARRANTIES OF MERCHANTABILITY OR FITNESS FOR ANY PARTICULAR PURPOSE WITH REGARD TO THIS MANUAL, THE SOFTWARE OR SUCH OTHER INFORMATION. IN NO EVENT SHALL SONY CORPORATION BE LIABLE FOR ANY INCIDENTAL, CONSEQUENTIAL OR SPECIAL DAMAGES, WHETHER BASED ON TORT, CONTRACT, OR OTHERWISE, ARISING OUT OF OR IN CONNECTION WITH THIS MANUAL, THE SOFTWARE OR OTHER INFORMATION CONTAINED HEREIN OR THE USE THEREOF. Sony Corporation reserves the right to make any modification to this manual or the information contained herein at any time without notice. The software described herein may also be governed by the terms of a separate user license agreement. 219
220 Trademarks XDCAM, XDCAM EX, SxS, Professional Disc, and XMPilot are trademarks of Sony Corporation. Mac OS, Final Cut Pro, and Safari are trademarks of Apple Inc., registered in the U.S. and other countries. Intel, Intel Core and Pentium are trademarks or registered trademarks of Intel Corporation or its subsidiaries in the United States and other countries. MainConcept is a trademark of MainConcept AG and its subsidiaries. All product names and brand names are registered trademarks or trademarks of their respective owners. 220
![How to Use This Help Starting the Help Select [XDCAM Browser Help] from the [Help] menu. Help window configuration The Help window consists of the following items.](/docs-images/76/74056648/images/221-0.jpg "Tab buttons Switches between navigation component displays using the following buttons. : Contents button Displays the topics of this Help. Click a topic title to display the topic in the topic area.")
221 How to Use This Help Starting the Help Select [XDCAM Browser Help] from the [Help] menu. Help window configuration The Help window consists of the following items. Tab buttons Switches between navigation component displays using the following buttons. : Contents button Displays the topics of this Help. Click a topic title to display the topic in the topic area. : Index tab Displays the indexed keywords of this Help. Click a keyword to display topics related to that keyword. : Search button Displays the search tab for searching words within this Help. The search results display related topics in order of relevance. You can enable [Highlight search results] to highlight all instances of the search word in the topic area. Search box Enter text to search for words in the Help. Related topics are displayed in order of relevance in the Search tab. Search results are identical to those obtained using the Search tab button. 221
XDCAM Browser. Installation Guide Before operating the unit, please read this manual thoroughly and retain it for future reference.
 4-261-700-16 (1) XDCAM Browser Installation Guide Before operating the unit, please read this manual thoroughly and retain it for future reference. 2010 Sony Corporation NOTICE TO USERS Documentation 2010,
PUB. DIE A. Canon XF Utility. Instruction Manual. Macintosh. Version 1.2
 PUB. DIE-0408-000A 1 C Y P O Canon XF Utility Instruction Manual Macintosh Version 1.2 Table of Contents 02 03 Introduction 03 About Canon XF Utility 03 Conventions in the Manual 04 Running XF Utility
Sony XDCAM HD & XDCAM EX Workflows. Sony Vegas 8
 Sony XDCAM HD & XDCAM EX Workflows Sony Vegas 8 1 - Introduction..................................................4 XDCAM HD Overview............................................4 XDCAM EX Overview............................................4
Broadcast. User Guide. 1 Before Installation P2 Option VARICAM Option XDCAM Option GXF Option...
 Broadcast User Guide Contents 1 Before Installation................ 1 2 P2 Option....................... 2 3 VARICAM Option................ 12 4 XDCAM Option.................. 16 5 GXF Option.....................
Adobe Premiere pro cs4 Using Adobe Premiere Pro with Sony XDCAM content
 Adobe Premiere pro cs4 Using Adobe Premiere Pro with Sony XDCAM content Workflow Guide Adobe Premiere Pro CS4 software provides native support for Sony XDCAM, XDCAM EX, and XDCAM HD cameras and content
The following table lists the formats and resolutions available when you work with XDCAM media: 8 MPEG 30 MPEG 40 MPEG 50 MPEG-4 (proxy media) 4 or 8
 4 or 8") XDCAM Users Guide XDCAM and AVID...2 Working with XDCAM HD Media...2 Connecting the XDCAM Device...3 Importing XDCAM Media...4 Setting the XDCAM Import Options...5 Automatically Importing Proxy Media...6
XDCAM Users Guide XDCAM and AVID...2 Working with XDCAM HD Media...2 Connecting the XDCAM Device...3 Importing XDCAM Media...4 Setting the XDCAM Import Options...5 Automatically Importing Proxy Media...6
Ariel Dynamics, Inc. TRIM MODULE. Revision 1.0. Ariel Dynamics, Inc. C3D TRANSFORM MODULE
 Ariel Dynamics, Inc. TRIM MODULE Revision 1.0 Ariel Dynamics, Inc. C3D TRANSFORM MODULE Contents i Contents ARIEL TRIM PROGRAM 1 INTRODUCTION...1 WHAT S NEW IN TRIM 1.0...1 SYSTEM REQUIREMENTS...2 TO START
Adobe Premiere pro cs3 Using Adobe Premiere Pro with Sony XDCAM content
 Adobe Premiere pro cs3 Using Adobe Premiere Pro with Sony XDCAM content Workflow Guide Adobe Premiere Pro CS3 software provides native support for Sony XDCAM cameras with no transcoding, real-time editing,
Wi-Fi Adapter. Operating Instructions Before operating the unit, please read this manual thoroughly and retain it for future reference.
 4-181-312-12 (1) Wi-Fi Adapter Operating Instructions Before operating the unit, please read this manual thoroughly and retain it for future reference. CBK-WA01 2010 Sony Corporation NOTICE TO USERS Documentation
 S4B Split Movie Soft4Boost Help S4B Split Movie www.sorentioapps.com Sorentio Systems, Ltd. All rights reserved Contact Us If you have any comments, suggestions or questions regarding S4B Split Movie or
XDCAM, XDCAM EX, XAVC, XAVC S, NXCAM, SxS and Professional Disc are trademarks of Sony Corporation.
 Revised Monday, April 9, 2018 XDCAM, XDCAM EX, XAVC, XAVC S, NXCAM, SxS and Professional Disc are trademarks of Sony Corporation. Avid and DNxHD are trademarks or registered trademarks of Avid Technology,
OpenForms360 Validation User Guide Notable Solutions Inc.
 OpenForms360 Validation User Guide 2011 Notable Solutions Inc. 1 T A B L E O F C O N T EN T S Introduction...5 What is OpenForms360 Validation?... 5 Using OpenForms360 Validation... 5 Features at a glance...
Editing in Premiere Pro CC 2015
 Editing in Premiere Pro CC 2015 Lesson 1: Exploring the Interface Exploring the Interface The Source Window The Program Window The Settings Menu Revealing the Video Scopes The Workspace Bar The Project
MagicInfo VideoWall Author
 MagicInfo VideoWall Author MagicInfo VideoWall Author User Guide MagicInfo VideoWall Author is a program designed to construct a VideoWall layout and create VideoWall content by adding various elements
Central Management Software. Cam Viewer 3 Lite. User Manual
 Central Management Software Cam Viewer 3 Lite User Manual Version 1.0.0 Table of Contents 1. System Requirement...4 2. Software Installation...5 3. Configuration Wizard...9 3.1 Channel...10 3.1.1 Adding
Media Commons Workshop: Final Cut Pro X
 Media Commons Workshop: Final Cut Pro X mediacommons@psu.edu mediacommons.psu.edu/instruction/workshops Description This is the Final Cut Pro Video Basics workshop. In this workshop we will cover how to
XDCAM, XDCAM EX, XAVC, XAVC S, NXCAM, SxS and Professional Disc are trademarks of Sony Corporation.
 Revised Tuesday, March 12, 2019 XDCAM, XDCAM EX, XAVC, XAVC S, NXCAM, SxS and Professional Disc are trademarks of Sony Corporation. Avid and DNxHD are trademarks or registered trademarks of Avid Technology,
The Muvipix.com Guide to Sony Movie Studio Platinum 13
 The Muvipix.com Guide to Sony Movie Studio Platinum 13 Chapter 1 Get to know Sony Movie Studio Platinum 13... 5 What s what and what it does The Sony Movie Studio 13 interface 6 The Project Media window
EDIUS Broadcast & Sony XDCAM
 How To Guide EDIUS Broadcast & Sony XDCAM Edit XDCAM efficiently with Grass Valley EDIUS & Sony PDZ-1 www.thomsongrassvalley.com www.canopus.com 2006 Thomson. All rights reserved. Grass Valley is a trademark
Parish . User Manual
 Parish Email User Manual Table of Contents LOGGING IN TO PARISH EMAIL... 3 GETTING STARTED... 3 GENERAL OVERVIEW OF THE USER INTERFACE... 3 TERMINATE THE SESSION... 4 EMAIL... 4 MESSAGES LIST... 4 Open
5.2. Click these tabs to jump to the Table of Contents, Index or start of each chapter.
 5.2 Click these tabs to jump to the, or start of each chapter. Click this button to advance to the next page. Click this button to return to the previous page. (Since this is the starting page, the [Back]
SeeSnake HQ User Guide
 SeeSnake HQ User Guide SeeSnake HQ Version 1.53.85.1426 23 May 2010 About SeeSnake HQ 3 Digital Technology 3 Installation and Updates 5 Windows XP 5 Windows Vista 5 Windows 7 5 The Home Window 6 Home Toolbar
idvd Authoring Program
 idvd Authoring Program idvd 7.0 is the standard DVD authoring program on all PSU Macs as of Fall 2008. The interface has changed slightly from previous versions and the media browser is better integrated
Digital Video Software
 Digital Video Software Instruction Manual Version 25 English Contents Read This First... 4 Checking Supplied Accessories... 4 System Requirements... 5 What is Digital Video Software?... 6... 7 CameraWindow...
How to Make a Movie in imovie How to Make a Movie Trailer in imovie How to Color Correct a Movie in imovie
 How to Make a Movie in imovie How to Make a Movie Trailer in imovie How to Color Correct a Movie in imovie 1. Make sure you are using the Mac. Make a Movie in imovie 2. If your files are on an external
Nero Recode Manual. Nero AG
 Nero Recode Manual Nero AG Copyright and Trademark Information The Nero Recode manual and all its contents are protected by copyright and are the property of Nero AG. All rights reserved. This manual contains
PowerPoint 2016 Building a Presentation
 PowerPoint 2016 Building a Presentation What is PowerPoint? PowerPoint is presentation software that helps users quickly and efficiently create dynamic, professional-looking presentations through the use
USER MANUAL. Version May 2015
 USER MANUAL Version 6.60 - May 2015 USER MANUAL IPClipLogger 6.60 Disclaimer This manual and the information contained herein are the sole property of EVS Broadcast Equipment SA and/or its affiliates
Flip4Mac XDCAM. Components Version 2.1 T E L E S T R E A M Telestream, Inc.
 Flip4Mac XDCAM Components Version 2.1 T E L E S T R E A M 2005-2007 Telestream, Inc. Table of Contents Overview Flip4Mac XDCAM..................................... 1 Flip4Mac XDCAM Features..............................
Chapter 3 Operating instructions
 Chapter 3 Operating instructions Summary This chapter describes the how to control and navigate through the TVR 30 s menus and options. Content Control interfaces 10 Controlling the TVR 30 10 Front panel
Avigilon Control Center Player User Guide. Version 5.10
 Avigilon Control Center Player User Guide Version 5.10 2006-2016, Avigilon Corporation. All rights reserved. AVIGILON, the AVIGILON logo, AVIGILON CONTROL CENTER, ACC and HDSM, are trademarks of Avigilon
1 ZoomBrowser EX Software User Guide 5.0
 1 ZoomBrowser EX Software User Guide 5.0 Table of Contents (1/2) Chapter 1 Chapter 2 Chapter 3 What is ZoomBrowser EX? What Can ZoomBrowser EX Do?... 4 Guide to the ZoomBrowser EX Windows... 5 Task Buttons
Windows Movie Maker / Microsoft Photo Story Digital Video
 Windows Movie Maker / Microsoft Photo Story Digital Video http://intranet/technology/index.html TRC HELP DESK X5092 April 2006 Photo Story and Movie Maker Microsoft Photo Story 3 allows you to create fantastic
PIVOT CMS CLIENT SOFTWARE USER MANUAL
 PIVOT CMS CLIENT SOFTWARE USER MANUAL 1 CMS USER GUIDE 1.1 PC REQUIREMENT Recommended PC Requirement OS CPU VGA RAM HDD Graphics Card OS CPU VGA RAM HDD Windows Vista, 7 or higher Intel Core2Quad Q9400
Windows Movie Maker 2 (aka MM2) Tutorial
 Tutorial") Windows Movie Maker 2 (aka MM2) Tutorial - 1 - Introduction This tutorial is designed as a basic introduction and guide to Microsoft s digital video editing program, Windows Movie Maker 2 (MM2) and will
Windows Movie Maker 2 (aka MM2) Tutorial - 1 - Introduction This tutorial is designed as a basic introduction and guide to Microsoft s digital video editing program, Windows Movie Maker 2 (MM2) and will
USER MANUAL. Database Explorer. Version December 2014 USO RESTRITO
 USO RESTRITO USER MANUAL Database Explorer Version 6.57 - December 2014 USER MANUAL IPDirector 6.57 Database Explorer Copyright EVS Broadcast Equipment SA Copyright 2005-2014. All rights reserved. Disclaimer
Microsoft PowerPoint 2013 Beginning
 Microsoft PowerPoint 2013 Beginning PowerPoint Presentations on the Web... 2 Starting PowerPoint... 2 Opening a Presentation... 2 File Tab... 3 Quick Access Toolbar... 3 The Ribbon... 4 Keyboard Shortcuts...
Premiere Pro CC 2018 Essential Skills
 Premiere Pro CC 2018 Essential Skills Adobe Premiere Pro Creative Cloud 2018 University Information Technology Services Learning Technologies, Training, Audiovisual, and Outreach Copyright 2018 KSU Division
Digital Video Software
 Digital Video Software Instruction Manual Version 27 English Contents Read This First... 4 Checking Supplied Accessories... 4 System Requirements... 5 What is Digital Video Software?... 6... 7 CameraWindow...
5.2. Click these tabs to jump to the Table of Contents, Index or start of each chapter.
 5.2 Click this button to advance to the next page. Click this button to return to the previous page. (Since this is the starting page, the [Back] button cannot be used.) Click these tabs to jump to the,
Word Select New in the left pane. 3. Select Blank document in the Available Templates pane. 4. Click the Create button.
 Microsoft QUICK Word 2010 Source Getting Started The Word Window u v w x z Opening a Document 2. Select Open in the left pane. 3. In the Open dialog box, locate and select the file you want to open. 4.
Excel Select a template category in the Office.com Templates section. 5. Click the Download button.
 Microsoft QUICK Excel 2010 Source Getting Started The Excel Window u v w z Creating a New Blank Workbook 2. Select New in the left pane. 3. Select the Blank workbook template in the Available Templates
Multi-NVR Manager. Quick Start Configuration Usage
 Multi-NVR Manager Quick Start Configuration Usage 2014. All rights are reserved. No portion of this document may be reproduced without permission. All trademarks and brand names mentioned in this publication
Windows Movie Maker. Panes (Movie and. Menu Bar. Tool Bar. Monitor. Rewind. Play. Storyboard/Timeline. Playhead. Audio. Microphone Playback
 Menu Bar Panes (Movie and Tool Bar Monitor Rewind Play Storyboard/Timeline Playhead Audio Microphone Playback Zoom In/Out 2004 Teaching Matters, Inc.-Page 1 Importing Video (Transfer the footage from the
Digital Video Software
 Digital Video Software Instruction Manual Version 23 E Contents Read This First... 4 Checking Supplied Accessories... 4 System Requirements... 5 What is Digital Video Software?... 6... 7 CameraWindow...
Apple idvd 11 Tutorial
 Apple idvd 11 Tutorial GETTING STARTED idvd is a program that allows you to create a DVD with menus and graphics of a professionally made commercial disc to play on your home DVD player. To Begin your
1617 APPDC Lesson 2 Worksheet Review sheet for Lesson 2 (This assignment is worth 100 POINTS!) KEY
 KEY") 1617 APPDC Lesson 2 Worksheet Review sheet for Lesson 2 (This assignment is worth 100 POINTS!) Premiere Pro Default Workspace KEY 1. Name, and then describe, the panel located in the top right corner of
1617 APPDC Lesson 2 Worksheet Review sheet for Lesson 2 (This assignment is worth 100 POINTS!) Premiere Pro Default Workspace KEY 1. Name, and then describe, the panel located in the top right corner of
Working with Windows Movie Maker
 518 442-3608 Working with Windows Movie Maker Windows Movie Maker allows you to make movies and slide shows that can be saved to your computer, put on a CD, uploaded to a Web service (such as YouTube)
EOS MOVIE Utility Ver. 1.5
 ENGLISH Software for Playing, Merging and Movies EOS MOVIE Utility Ver. 1.5 Content of this Instruction Manual 1D C 1D X Mk II 1D X 5DS/5DS R 5D Mk III 6D 7D Mk II 70D EMU is used for EOS MOVIE Utility.
JVC HM100U BASIC OPERATIONS
 JVC HM100U BASIC OPERATIONS by EMMANUEL ALEXANDRE Jr./CUNY-TV!!!! Feb. 29, 2012 Ver.6 1. Intro This is a basic summary based on both the menu settings and the actual buttons on the camera. I ve omitted
USER MANUAL. Version April 2013 USO RESTRITO
 USER MANUAL Version 2.1 - April 2013 Copyright EVS Broadcast Equipment Copyright 2011-2013. All rights reserved. Disclaimer The information in this manual is furnished for informational use only and subject
USER MANUAL. VTR Control Panel. Version December 2014 USO RESTRITO
 USO RESTRITO USER MANUAL VTR Control Panel Version 6.57 - December 2014 USER MANUAL IPDirector 6.57 VTR Control Panel Copyright EVS Broadcast Equipment SA Copyright 2005-2014. All rights reserved. Disclaimer
EDIUS 7. Release Notes EDIT ANYTHING. Software Version 7.3 (April 2014)
") EDIUS 7 EDIT ANYTHING Release Notes Software Version 7.3 (April 2014) www.grassvalley.com Grass Valley Product Support For technical assistance, to check on the status of a question, or to report a new
EDIUS 7 EDIT ANYTHING Release Notes Software Version 7.3 (April 2014) www.grassvalley.com Grass Valley Product Support For technical assistance, to check on the status of a question, or to report a new
Impress Guide. Chapter 1 Introducing Impress
 Impress Guide Chapter 1 Introducing Impress Copyright This document is Copyright 2005 2009 by its contributors as listed in the section titled Authors. You may distribute it and/or modify it under the
Product and company names appearing in this document are trademarks of each respective company or organization.
 . CMS_beta LEGAL INFORMATION Reproduction, transfer, distribution or storage of part or all of the contents in this document in any form without the prior written permission of the company is prohibited.
icms Pro USER s MANUAL Ver 1.0
 icms Pro USER s MANUAL Ver 1.0 Contents Target Audience for this Document... 5 Copyright, Trademarks and Important Information... 5 Copyright... 5 Disclaimer... 5 Introduction... 6 Tabs... 6 Panes... 7
Libraries. Multi-Touch. Aero Peek. Sema Foundation 10 Classes 2 nd Exam Review ICT Department 5/22/ Lesson - 15
 10 Classes 2 nd Exam Review Lesson - 15 Introduction Windows 7, previous version of the latest version (Windows 8.1) of Microsoft Windows, was produced for use on personal computers, including home and
icms Pro USER S Manual Ver 1.4
 icms Pro USER S Manual Ver 1.4 Contents Panes... 7 How Can User Rights Affect Your Use of icms Pro SW?... 10 Minimum System Requirements... 11 Installing the icms Pro SW... 12 Download icms Pro from icatchinc
DVD Production I: Introduction to idvd
 DVD Production I: Introduction to idvd Assemble your movies and still images Before you create your DVD, assemble your materials and check that your movies are in the correct format for idvd. All movies
How to create interactive documents
 Adobe InDesign Guide How to create interactive documents You can use Adobe InDesign to create dynamic web content or interactive documents. InDesign supports export to web-ready HTML or interactive PDF.
Microsoft Office 2007
 Microsoft Office 2007 Adding Slide Transitions Transition Sound Transitions Transition Speed Apply to All A slide transition is the way one slide changes to the next in Slide Show view. Animations Tab:
USER MANUAL. Version May 2015
 USER MANUAL Version 6.60 - May 2015 USER MANUAL IPBrowse 6.60 Disclaimer This manual and the information contained herein are the sole property of EVS Broadcast Equipment SA and/or its affiliates (EVS)
TI-SmartView Emulator Software for the TI-84 Plus Family (Windows and Macintosh )
") TI-SmartView Emulator Software for the TI-84 Plus Family (Windows and Macintosh ) Important Information Texas Instruments makes no warranty, either express or implied, including but not limited to any
TI-SmartView Emulator Software for the TI-84 Plus Family (Windows and Macintosh ) Important Information Texas Instruments makes no warranty, either express or implied, including but not limited to any
DATA PROJECTOR XJ-H1650/XJ-H1750 XJ-ST145/XJ-ST155
 DATA PROJECTOR XJ-H1650/XJ-H1750 XJ-ST145/XJ-ST155 E Data Projector USB Function Guide Be sure to read the precautions in the separate Setup Guide. Be sure to keep all user documentation handy for future
BUCKVIEW Advanced. User Guide
 BUCKVIEW Advanced User Guide Inside This Manual I. Inside This Manual... 2 II. Viewing and Managing Your Images... 3 Manage Image Folders...5 Manage Sites...6 Manage Locations...10 Erase Memory Card...14
Scouting Assistant v1.x Release Notes
 Scouting Assistant Build 1.6.0.1 January 3, 2014 Implemented a new feature for the Professional edition for Stamping Photos using Date/Time, Moon Phase, Custom Caption, and Custom Logo. There is a new
How You Use the Timeline
 How You Use the Timeline The Timeline and the Canvas display two different views of the same sequence. The Timeline shows the chronological arrangement of clips and layered video and audio clip items,
Hybrid Camera Easy Video Editing
 The intent of this Guide is to assist you with performing the functions using the included Cyberlink software. If this is your first time using the software it is recommended that you follow this Guide
Using These Manuals. How to Use the Software User Guide. Display examples: 1. Understanding How to Use Your Camera.
 Software User Guide Read all safety precautions thoroughly to ensure safe use. Types of software installed on your computer varies depending on the method of installation from the Software CD-ROM. For
Word 2013 Beginning. Technology Integration Center
 Word 2013 Beginning Getting Started... 2 Quick Access Toolbar... 3 The Ribbon... 3 Help... 4 Compatibility Mode... 4 Document Views... 4 Navigating the Document... 5 Moving Around in the Document... 5
Basic Video Editing in Final Cut Pro X
 Basic Video Editing in Final Cut Pro X 10.2.1 May 19, 2015 Gary Roll, Post Production Specialist, CAPS Media v20150519.1 1 of 13 1. Plan what you want to do 2. Get organized before you start 3. Gather
Digital Video. Part II: Introduction to Editing and Distribution
 Digital Video Part II: Introduction to Editing and Distribution Contact Information The University of Utah Student Computing Labs Macintosh Support mac@scl.utah.edu We Will Cover History of video editing
Creating Interactive PDF Forms
 Creating Interactive PDF Forms Using Adobe Acrobat X Pro for the Mac University Information Technology Services Training, Outreach, Learning Technologies and Video Production Copyright 2012 KSU Department
User s Guide. Controller. Be sure to keep all user documentation handy for future reference.
 E User s Guide Controller Be sure to keep all user documentation handy for future reference. Read this first! The contents of this User s Guide are subject to change without notice. Copying of this manual,
Help. About Hi-Res Audio Recorder. Getting Ready to Use Your Computer. Operation Flow from Recording to Editing to Saving
 This Help describes the features of and provides the instructions on using it. In this Help, screens that appear on a Windows computer connected with the turntable are used as examples. About What Is?
XnView 1.9. a ZOOMERS guide. Introduction...2 Browser Mode... 5 Image View Mode...15 Printing Image Editing...28 Configuration...
 XnView 1.9 a ZOOMERS guide Introduction...2 Browser Mode... 5 Image View Mode...15 Printing... 22 Image Editing...28 Configuration... 36 Written by Chorlton Workshop for hsbp Introduction This is a guide
MS Word 2010 An Introduction
 MS Word 2010 An Introduction Table of Contents The MS Word 2010 Environment... 1 The Word Window Frame... 1 The File Tab... 1 The Quick Access Toolbar... 4 To Customize the Quick Access Toolbar:... 4
Microsoft Word: Steps To Success (The Bare Essentials)
") Microsoft Word: Steps To Success (The Bare Essentials) Workbook by Joyce Kirst 2005 Microsoft Word: Step to Success (The Bare Essentials) Page Contents 1 Starting Word 2 Save 3 Exit 5 Toolbars, Alignment,
Microsoft Word: Steps To Success (The Bare Essentials) Workbook by Joyce Kirst 2005 Microsoft Word: Step to Success (The Bare Essentials) Page Contents 1 Starting Word 2 Save 3 Exit 5 Toolbars, Alignment,
Operating Instructions
 Operating Instructions For Digital Camera PC Connection QuickTime and the QuickTime logo are trademarks or registered trademarks of Apple Inc., used under license therefrom. VQT1H07 Connection with the
Mirasys N series. Network Video Recorder Quick Guide
 Mirasys N series Network Video Recorder Quick Guide 2006-2007 Mirasys Ltd. All rights reserved. No part of this document may be reproduced for any purpose, even in part. TRADEMARKS Mirasys and Mirasys
University of Sunderland. Microsoft Word 2007
 Microsoft Word 2007 10/10/2008 Word 2007 Ribbons you first start some of the programs in 2007 Microsoft Office system, you may be surprised by what you see. The menus and toolbars in some programs have
New Features in Final Cut Pro 6
 New Features in Final Cut Pro 6 This is an overview of the new features in Final Cut Pro 6. For more information about these features and their use, see the Final Cut Pro 6 User Manual. Open Format Timeline
User Guide for Leawo Prof. Media - How to Use Leawo Prof. Media
 User Guide for Leawo Prof. Media - How to Use Leawo Prof. Media Leawo Prof. Media is an all-in-one total video converter solution. This total media converter suite could do various things for you: convert
Introduction to Personal Computers Using Windows 10 and Microsoft Office 2016
 Watsonia Publishing 47 Greenaway Street Bulleen VIC 3105 Australia www.watsoniapublishing.com info@watsoniapublishing.com Introduction to Personal Computers Using Windows 10 and Microsoft Office 2016 Quick
Avigilon Control Center Standard Web Client User Guide. Version 5.4
 Avigilon Control Center Standard Web Client User Guide Version 5.4 2006-2014 Avigilon Corporation. All rights reserved. Unless expressly granted in writing, no license is granted with respect to any copyright,
W-E
 Signage Suite V2.20 User Guide 605220-02-01-W-E-051613-02 Trademarks Windows XP, Windows Vista, Windows 7, and Microsoft are registered trademarks of Microsoft Corporation. All other trademarks are the
Adobe Premiere Elements Workspace overview. Creating a new project. About projects. Start a new project
 Adobe Premiere Elements Workspace overview The Adobe Premiere Elements workspace is optimized for the four major phases of a project: organizing footage (video, stills, and audio), editing a movie, creating
It s All About Speed! Customizing DS and Learning How to Edit Faster Saturday, April 17 th, 10:15 11:30am
 It s All About Speed! Customizing DS and Learning How to Edit Faster Saturday, April 17 th, 10:15 11:30am INTRO Avid DS is a powerful and flexible tool for post production. Its open architecture enables
Table of Content. Nero Video Manual
 Video Manual Table of Content 1. Start Successfully... 6 1.1. About Nero Video... 6 1.2. Versions of Nero Video... 6 1.3. System Requirements... 7 2. Application Workflow and Interface... 8 2.1. Working
Digital Video Software
 Digital Video Software Instruction Manual Version 20 E Contents Read This First... 4 Checking Supplied Accessories... 5 System Requirements... 6 What is Digital Video Software... 7... 8 CameraWindow...
Creating Reports in Access 2007 Table of Contents GUIDE TO DESIGNING REPORTS... 3 DECIDE HOW TO LAY OUT YOUR REPORT... 3 MAKE A SKETCH OF YOUR
 Creating Reports in Access 2007 Table of Contents GUIDE TO DESIGNING REPORTS... 3 DECIDE HOW TO LAY OUT YOUR REPORT... 3 MAKE A SKETCH OF YOUR REPORT... 3 DECIDE WHICH DATA TO PUT IN EACH REPORT SECTION...
Table of Contents. Index
 Index Table of Contents Chapter 1 Notice for All Users...1-1 Chapter 2 Installation...2-1 2-1 HD NVR Manager Setup...2-1 2-1-1 Installation Steps...2-2 2-1-2 License Activation...2-9 Chapter 3 SCM Program...3-1
Hi-Res Audio Recorder
 Stereo Turntable System Application Hi-Res Audio Recorder About Hi-Res Audio Recorder What Is Hi-Res Audio Recorder? [1] Supported Stereo Turntable System [2] Audio File Formats Supported for Recording
CAPTURE. USER GUIDE v1
 CAPTURE USER GUIDE v1 INTRODUCTION About The Logitech Capture app makes creating content with your webcam as easy as lights, camera, Capture. Start recording high-quality videos the second you plug in
Basic Editing. Back to Contents. Tutorial PREMIERE 5.0. Lesson 1
 Back to Contents Tutorial PREMIERE 5.0 Lesson 1 Basic Editing Editing a video program is at the heart of the work you ll do with Adobe Premiere. Adobe Premiere makes it easy to trim video clips or other
End User Guide. 2.1 Getting Started Toolbar Right-click Contextual Menu Navigation Panels... 2
 TABLE OF CONTENTS 1 OVERVIEW...1 2 WEB VIEWER DEMO ON DESKTOP...1 2.1 Getting Started... 1 2.1.1 Toolbar... 1 2.1.2 Right-click Contextual Menu... 2 2.1.3 Navigation Panels... 2 2.1.4 Floating Toolbar...
Operating Instructions
 Operating Instructions For Digital Camera PC Connection QuickTime and the QuickTime logo are trademarks or registered trademarks of Apple Computer, Inc., used under license. Connection with the PC Offers
User Guide for Web application
 User Guide for Web application Wireless LAN Upgrade Software Key Model No. Using ipad for Connecting Follow the steps below to connect to the P2 cam using an ipad. STEP 1: Tap the [Safari] icon to start
Editing & Color Grading 101 in DaVinci Resolve 15
 Editing & Color Grading 101 in DaVinci Resolve 15 1. Exploring Resolve Exploring Resolve The Media Page The Edit Page The Fusion Page The Color Page The Fairlight Page The Deliver Page The Processing Pipeline
org How to Import and Edit with Premiere Pro school Uploading Files Determine what kind of camera you used to film for your project.
 j tech org school Uploading Files How to Import and Edit with Premiere Pro Determine what kind of camera you used to film for your project. This document has been written to accommodate the JVC and CanonHD