Table of Contents Control Description... 4 Basic Connections... 5 Features... 6 Software Flow Chart... 7 Menu Flow Chart... 8 Menu Notes...
|
|
|
- Rosalind Robinson
- 6 years ago
- Views:
Transcription
1
2 2 Table of Contents Control Description... 4 Basic Connections... 5 Features... 6 Software Flow Chart... 7 Menu Flow Chart... 8 Menu Notes... 9 Preset Section Performance Control Section P Upgrade Notes Sens Control Factory Presets Clock Display Midi Switch Chorus Midi Received Midi Panic PG-200 Support SysEx Dump Sequencer Writing / Editing Seq Overdub Edit Playing Arpeggiator Pattern Play Chord Mode Setting up with External Devices Editing a Patch Edit Parameters TONE - DCO TONE - VCF TONE - VCA TONE - LFO TONE - ENV 1 & TONE - Chorus TONE - Aftertouch Control TONE - Modulation Control TONE - Bend Control TONE - Voice Mode Control GLOBAL - Arpeggiator Control GLOBAL - Sequencer Control GLOBAL - Pattern Generator GLOBAL - Key Control GLOBAL - Fine Tune GLOBAL - Midi and General Settings...30
3 Special Functions Upgrade install Optional Chorus Speed Mod Optional Fixes for the JX-3P Adjustments for the JX-3P Labels for the JX-3P Midi Data Continuous Controllers Real Time Commands Midi Sysex Support Midi Sysex Data
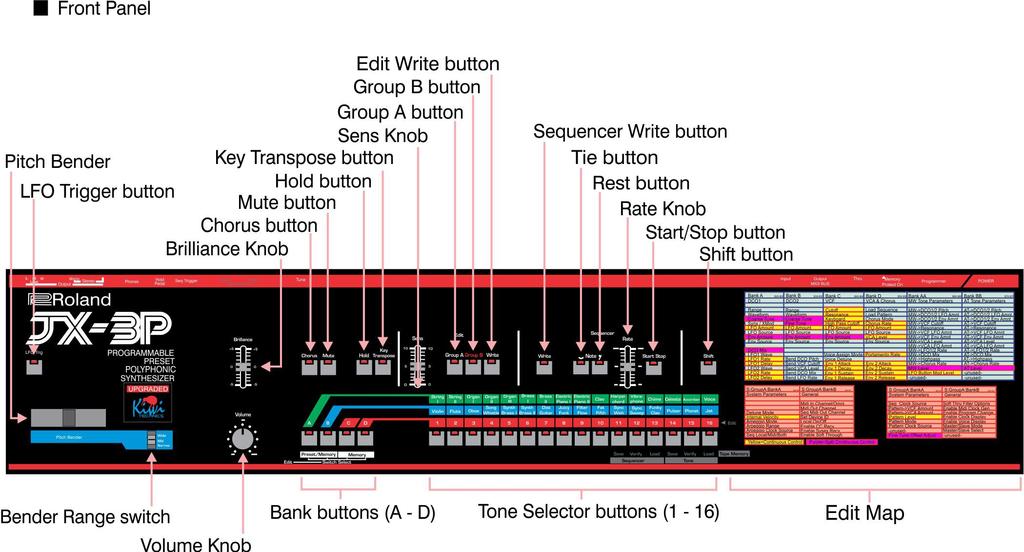
4 4 Control Description
5 5 Basic Connections
6 6 Features 256 Tones, 8 Sequences & 16 Patterns can be stored and edited, Sequences & Patterns can be optionally linked to tones. It is also possible to temporarily edit any Tone, Seq or Pattern MidiCC support for all parameters, Midi Sysex support for Tone Dump & Load Patch Editor Control of Parameters (requires PE v 4.1 or later), Tones have 85 editable parameters 8 separate 122 max step polyphonic sequences. These can be clocked from the internal/external sequencer clock, Pattern Generator, LFO2 or midi clock divided by 3,4,6,9,12,18,24,36,48,72,96,128,144,168 or 192 Polyphonic, Unison and Mono Key Assign Modes Portamento in Unison, Mono & Chord modes DCO Key Assign Detune available in all key modes, DCO 1 & 2 have separate Tune controls (+12 semitones) Master Synth Fine Tune adjust Two independent envelope generators Two independent Low Frequency Oscillators. LFO2 random2 can be clocked from the sequencer clock. The Arp, Pattern and Sequence clocks can be optionally sourced from the LFO2 16 stored Pattern Generator patterns. These can be clocked from the internal/external clock, LFO2 or midi clock divided by 3,4,6,9,12,18,24,36,48,72,96,128,144,168 or 192. The pattern can be any length between 2 and 16 steps Pattern Play Mode. This can be faded from no effect to full effect. Aftertouch, Modulation Level and dynamics via midi Modulation options include Aftertouch and midi modulations that can be used in any combination. Each ENV Mod can select from ENV 1 or 2 and is a split control with add (normal) and subtract (inverted) LFO Button can inject mod control to any mod destination(s) LFOs can be plus and minus base note or plus only Bend Lever can be directed to Osc, Filter, LFO Rate and VCA Level in any combination Chord Mode. Any chord with up to 6 notes can be set and played from any key Enhanced Parameter editing to allow editing of all 85 Tone parameters and 27 Global Parameters from the front panel Sequencer, LFO 1 and LFO 2 clocks and voice use can optionally display on the front panel Greater speed range and 6 waveforms for LFO1 and LFO2, LFO2 has a second Random mode that can be clocked from the Sequence Clock The Arpeggiator can be clocked from the internal/external clock, Pattern Generator, LFO2 or midi clock divided by 3,4,6,9,12,18,24,36,48,72,96,128,144,168 or 192. Arp modes are Up, Down, Up and Down and Random, 0, 1 or 2 octaves Key transpose allows transposition to any key. Sequencer key can be shifted to any key while playing by using Key Transpose Sequencer can be Started, Stopped & Continued using Midi Commands Sequences can be edited Appeggiator will Output Midi Data and Sequencer can optionally Output Midi Chorus has Manual Mode & variable speed

7 7 Software Flow Chart

8 Menu Flow Chart
9 9 Menu Notes The menu system in the 3P Upgrade is complex. This is unavoidable due to the number of features and the limited number of buttons available. Shift Menu Many sections of the menu are accessed using the Tape button which acts as the Shift button. This button sets the Shift level (flashing) and also cancels from any menu back to play mode. Sysex Dumps The output from these can be recorded using midi software (e.g. midiox) These can be played into the 3P at any time to restore the 3P Tone, Sequence or Pattern back to the same state that it was when the recording was made. The parameters for editing can all be accessed using menu system. Tone parameters are all saved with the Tone and will be changed whenever a Tone is loaded. Global Parameters will remain unchanged on Tone loads. Note - Write Protect must be off to Load Dumps NOTE - some of the output files are large. IMPORTANT - All of the dumps Loading and Saving will overwrite the working buffers with the saved copy. Save any edits before any dumps in or out. IMPORTANT - When a Tone, Sequence or Pattern is dumped it is the saved copy that is dumped and not the edited version Sysex details can be found at the end of this manual. Most SysEx dumps include the number which the Tone, Sequence or Pattern was stored under at the time of the dump. The dump will always load back to this same position. To load it to a different memory position the number can be edited in the SysEx file. Details of file layouts can be found in the Sysex Section at the end of the manual.

 32 different")

 Note - The memory protection switch on the rear of the 3P will prevent")
10 10 Preset Section Bank Buttons (A~D) There are 4 Bank 'Sets' in the 3P Upgrade giving a total of 256 Tones. Sets are changed by pressing the same Bank button twice. The Bank lights will show which Bank is selected as follows Bank Set 1 Bank Set 2 Bank Set 3 Bank Set 4 Selected Bank On Steady - others Off Selected Bank On Flashing - others Off Selected Bank Off - others On Steady Selected Bank Flashing - others On Steady Tone Selector Buttons (1~16) 32 different patches have been preprogrammed in the 3P Upgrade. These have been made close to the original 3P patches. All these can be edited and restored. When selecting a patch select a combination of the Bank button and the Tone button. The Bank and Tone buttons will light to show the selection. You can only select one patch at a time All tones on Banks C to P contain a generic tone only from the factory and can be programmed with your own synthesized sounds All patches on all banks can be programmed (256 in total) Note - The memory protection switch on the rear of the 3P will prevent memory writing. The write button will not function if the rear panel switch is in the middle position. All the Tone lights will flash once if a write is attempted with the protect on.


11 11 Performance Control Section Pitch Bender This allows you to change the pitch of the DCOs individually or together depending on the selection made using the B-12 parameter edit. The pitch bender can also be directed to the Filter Cutoff, DCO Mix and LFO rate using parameters B-13 to B-16. These can be applied in any combination. Bend Range Switch This sets the Maximum effect of the bender. Wide...Maximum effect. This will be an Octave for DCOs Mid...Medium effect. This will be a major perfect 5th for DCOs Narrow...Smallest effect. This will be a two semitones for DCOs Brilliance Knob This control sets the overall tone of the 3P. It achieves this by altering the filter cutoff level for all voices. This is done using hardware and will alter any programmed filter settings. LFO Trigger Button This button will add modulation. The destination of this modulation can be any of the AA-1 to AA-13 modulation parameters and the level is set by the AA-14 & AA-15 level controls. On all factory programs the LFO button has been configured to a moderate level of DCO LFO level on both DCOs to give a vibrato effect. Volume Knob This sets the overall output level of the 3P.

12 12 Chorus button Press this button to turn on the chorus effect. The indicator LED will light when the effect is on. Press this button again to turn this effect off. If manual mode has been selected then this button will flash. Mute button If you press this button the volume of the lower two octaves will be decreased. The indicator LED will light when the effect is on. Pressing this button again will turn the mute function off. This will also effect sequence play. This effect will not apply to midi note data. Hold button The Hold button is used for several different functions Hold button pressed only will switch on the hold function and the indicator LED will light. Press this button again to turn this effect off. While hold is on notes played will continue to sound at the envelope sustain or gate level depending how the VCA mode has been selected using D-8. If notes are played after all notes were released the held notes are cleared and a new hold is started. To hold multiple notes play them all before releasing the last note. This differs from the original 3P hold method. Pressing and releasing the TAPE button and then pressing the Hold button will enter Arp mode. This is indicated by the Hold LED flashing. If the Hold function is active while in Arp mode the Hold light will remain on overriding the Arp indication but will not effect Arp Play. Pressing and releasing the TAPE button and then pressing the Mute button will Enable/Disable Pattern Play. Key Transpose button. Transposition to any key is possible. By using the appropriate key you can shift the pitch of the entire keyboard. This is set by pressing the Key T button and pressing any key on the keyboard while the Key T button is held. The Key T LED will light if the keyboard is transposed. To clear this, press the Key T button and press any C key. This is available in all playing modes except Chord Mode. The Key T light will flash when the 3P is in Chord mode. Note - if the 3P is in Chord Mode any previous transpose will stay set but it will not be possible to change or cancel this until Chord Mode is exited as the Key Transpose button is used to set the Chord. See the section on assignment modes. Pressing and releasing the Key Transpose button in Chord mode without keys down will exit Chord Mode. Note - Key Transposing will also apply to midi note data sent to the 3P. It is possible to have the 3P playing a different note to another keyboard using the same midi note data if the Key Transpose has been set.
13 13 3P Upgrade Notes Sens Control The behavior of the Sens control during parameter editing has been changed from the way the original 3P works. When editing a parameter the current value of the parameter must be matched before the Sens Control will have any effect on the parameter value. e.g. if the filter cutoff is set to 7 the Sens must be moved to 7 before it will begin to edit the setting. This has been done so that a parameter will not jump to the Sens setting which can cause unpredictable and sometimes unpleasant results. Factory Presets The factory presets have been made close to the original 3P presets. Clock Display The two LFOs and the Sequencer clock can display on the front panel. LFO 1 & 2 will display on the Group A and Group B buttons and the Sequence Clock will display on the Rest button light if enabled. The LFO's will stop displaying while the 3P is not in normal play mode and the Sequence Clock will not display while a sequence is being edited. Midi Switch The 3P should be run with the protect switch in the center position. This can be moved to 'Protect off' to change patches. The Midi select position is not used. Chorus When the Chorus Upgrade is installed Chorus Speed and a Chorus Manual Mode will be available. The Sense Slider will alter Chorus Speed when not in edit mode Midi Received Midi data received will flash the Tape Memory button light if it is recognized by the 3P. The switch settings are no longer changed using the Bank buttons. They are now also changed using the Sens control. See the section on Parameter Editing for details on this.
14 14 Midi Panic PG-200 Support SysEx Dump The Group A button also acts as Midi Panic and will cancel any sounding notes including internal. To stop all output from the 3P press Group A. Note - This will only work when not in Edit Mode. PG-200 support has been removed from release 2.50 or higher. SysEx Bulk Load/Dump facilities have been provided in the 3P system. Manual Dumps of the Currently Selected Tone, All Stored Tones, the Currently Selected Sequence and the Currently Selected Pattern can be Loaded or Dumped. The button sequence required is detailed in the Menu Map. Other Dump types are available via SysEx messages which are detailed in the SysEx section. Note - All Dumps and Loads use the edit buffer to transfer data. Any unsaved edits will be lost. e.g. If you dump Tone 1 the saved version will be dumped not the edit buffer. Note - Write Protect must be off to Load Dumps


 into the sequence.")

15 15 Sequencer The JX-3P Upgrade contains a polyphonic sequencer that has the capacity of 124 step automatic playing. Up to 6 notes can be played at a time so writing a chord is possible. Note - if more than 6 notes are used in one step only the last 6 notes will play. Rate Knob Sequencer Write Button Press this button, followed by the sequence number using the tone buttons (1-16), to write data into the built in sequencer. Sequencer Tie Button In sequencer edit mode this button will join notes by repeating the last step. In Play mode the Tie button will enable one of 16 saved sequences to be loaded. Press Tie followed by Tone number The currently loaded Seq will flash. The loaded sequence will begin to play after the current one has reached the last position if currently playing. Sequencer Rest Button In sequencer mode this button will write rests (no sound) into the sequence. This controls the speed of the Sequencer clock if the clock source is selected as internal using parameter control A-13. If the clock source is from any other source this control will have no effect. Also if a clock source is plugged into the external socket in the rear of the 3P this will override the internal clock and this control. If the 3P has been configured to send midi Clocks then the Rate control will set the speed of these. Note - if anything is plugged into the External Input the internal Clock will stop. This is a hardware function of the 3P. Start/Stop Button This is to start or stop the sequencer playing. Each time you press this button the sequencer will start or stop. Note - If the clock source is midi, pattern or external the sequence will not begin playing until the first clock is received.
16 16 A) Writing / Editing The 3P Upgrade differs from the original 3P in that the sequence write is always in edit mode. The only way to erase or blank a sequence is by using the Seq Erase Menu Option (Shift:Seq Write:Tone Number - see the menu map). If you choose an existing sequence when Seq Write is pressed then any step(s) you write will overwrite all notes in the existing step(s) already in the sequence. The Group A (backwards) and Group B (forwards) buttons will allow non destructive stepping within a sequence. e.g. if the existing sequence is C, D, E, F, G and you step to the third step and play the chord C E G the resulting sequence will now be C, D, CEG(chord), F, G. You will have overwritten the third step. You can write the pitch by playing the keyboard (or midi keyboard), and the rhythm by pressing the Tie button and the Rest button. (The pitch and rhythm should be simultaneously written). (1) Find the shortest time value in the phrase you wish to write. Then divide the longer time values by that shortest one. (e.g) (3) Press the Sequence Write button followed by the Tone button for the Sequence to Write/Edit. The current Sequence number will flash on the Tone lights. The Write button lights up and the JX-3P will be in the writing/editing mode. (4) By playing the keyboard and using the Tie button and Rest button, write steps one after another. (5) If writing is complete press the Write button followed by a Tone button to Save the Sequence to permanent memory or the Start button or Shift Button to exit edit mode. The Start button will also start the sequence playing on the next clock received. If the Seq is not saved the sequence will be lost if the 3P is powered off or another sequence is loaded. Pressing the Start/Stop button again will stop the sequence playing and the Start indicator will go out. (refer to B->Playing) (6) Return the Ext Switch to the Memory Protect Position. (2) The external selector switch should remain in the PG-200 position when writing to memory.
17 17 A) Seq Overdub Edit Overdub editing is possible by pressing Bank A during a sequence edit while playing Sequence note(s). When Bank A is pressed the existing Sequence step is loaded into the sequence step edit buffer and any notes played are added to the existing note(s). Sequence steps can be nondestructively stepped forward or backwards by using the Group A button to step backwards (closer to the start of the sequence) or Group B to step forwards. A sequence can be stopped at the current step by pressing Bank B at the last step required. All steps beyond this point will be lost. For example, if the sequence being edited has 5 steps and you are on the 3rd step and press Bank B the length of the sequence will be 3 and steps 4 & 5 will be lost.
18 18 B) Playing Load Sequence A Sequence can be loaded in two ways. A Sequence is loaded manually by pressing Seq Tie and then a Tone button The Sequence that is stored under the Tone button selected will be loaded to memory. A Sequence can be assigned to a Tone and can load automatically when the Tone is loaded. To do this place the Sequence number 1-16 in the Load Sequence Field (D-1) in the Tone Parameter Editing. Place a zero in this field (no editing lights on) if you do not want a Sequence to load. The last Sequence will stay in memory and continue to play (if enabled) in this case. It is possible to play along with the sequencer. The 3P has 6 voices in total and if not enough voices remain for all the sequence note(s) then these will be lost. i.e. if the sequence step has four notes and three are being played then one sequence note will not sound. Note - If a new sequence or tone is loaded while a sequence is playing the load of the tone and Seq and pattern will delay until the current sequence reaches the end and is about to loop back to the start. At this point the Tone and Sequence (if auto load enabled) and Pattern (if auto load enabled) will then load and the next note(s) to sound will be with the new selection. If you press the Start/Stop button the indicator will light up and the data written into the sequencer will be played. If the seq clock is set to ext or midi the first note of the sequence will only sound once a clock has been received. This allows a seq to be queued to start. When all the notes are played the data will return to the beginning and be played again from the start. Pressing the Start/Stop button once more (it's indicator will go out) will stop playing immediately. The temp of the playing will be determined by the clock source. If the clock source is internal then the tempo will be set by the Rate Knob. The Rate Knob will have no effect if the clock source is anything other than the internal clock. * If you stop the Sequence part way through and then restart it the data will start from the beginning. * If you wish to only play the data once, put some rests are the end so it is easier to stop the sequence in the correct place.
19 19 Arpeggiator The KiwiTechnics 3P Upgrade has a built in Arpeggiator that can be applied to any sound. Arpeggiator Mode is entered by pressing and releasing the Tape button and then pressing the Hold button. The Hold button will begin to flash. Note - if Hold Mode is applied during Arp Mode the Hold Mode Light will override the Arp Mode light and the Hold light will stay on. This will not effect Arp Mode which is still active. Note - If the Arpeggiator notes held are spread over more than 1 octave and more than one octave is selected in the Arp Range the notes played will be as follows. All the first octave notes held will play followed by the same pattern moved up one or two octaves. The result of this will be the first note of the second pass can be lower than the last note of the first pass. This can sound odd if you have selected one direction for the Arp Mode. The clock for the Arpeggiator can be chosen from a number of sources using Global A-7. These can be Int/Ext, Pattern, LFO2 or the midi clock divided by 3, 4, 6, 9, 12, 18, 24, 36 48, 72, 96, 128, 144, 168 or 192. The behavior or the Arpeggiator can be set using Global A-5 to set the style and Global A-6 to set the range. The style can be up only, down only, up & down and random. The range can be 0-2 octaves. Canceling Arpeggiator Mode. Arpeggiator mode can be cleared by pressing and releasing the Tape button and then pressing the Hold button.
20 20 Pattern Play The KiwiTechnics 3P Upgrade has a pattern system that can be applied to any Tone. There are 16 independent patterns which are stored under the Tone buttons Pattern Play. Pattern Play can be toggled on and off by pressing and releasing the Tape button and then pressing the Mute button. Pattern Level is set using Global Parameter A-12. Note: If the Pattern Level is set to off, Pattern > VCF or VCA is not enabled or the Pattern is blank the Pattern Selected will not sound even if Play is enabled. Load Pattern A Pattern can be loaded in two ways. A pattern is loaded manually by pressing Group B and then a Tone button 1-16 (the current pattern will flash). The pattern that is stored under the Tone button selected will be loaded to memory and begin to play only if pattern play and pattern destination (VCF or VCA) is enabled, and the Pattern Level is not zero. A pattern can be assigned to a Tone and can load automatically when the Tone is loaded. To do this place the pattern number 1-16 in the Load Pattern Field (D-2) in the Tone Parameter Editing. Place a zero in this field (no editing lights on) if you do not want a pattern to load. The last pattern will stay in memory and continue to play (if enabled) in this case. Edit Pattern Edit mode is entered by pressing and releasing Tape and then pressing the Group B button followed by a Tone button 1-16 to select the pattern to edit. The currently selected Pattern will flash. Clock Speed can be set using Global Parameter A-14. The clock for the Pattern System can be chosen from Int/Ext, LFO2 or the midi clock divided by 3, 4, 6, 9, 12, 18, 24, 36 48, 72, 96, 128, 144, 168 or 192. The Pattern clock will show on the 16 Tone lights while in Pattern Edit mode. Exit Pattern Edit mode by pressing the Edit Write button followed by the Tone number 1-16 to store the pattern under that number or the Tape button to abort editing without storing the Pattern. If aborted the edited pattern will remain in the temporary buffer and continue to sound until it is overwritten or the 3P is powered off. To create a pattern press the tone buttons to add or remove sections of the pattern. If a tone button light is dark the pattern step will sound at the Pattern Level parameter setting (Global Parameter A-12) and if the tone button light is on the pattern step will sound at normal play level. Pattern Length. The pattern length can be changed from This is set by pressing and holding the Group A button and then pressing a tone button between 2 and 16 while in Pattern edit mode. The current Length will flash on the Tone Lights while Group A is pressed. Canceling a Pattern. A pattern can be cleared by setting all the tone lights on.
21 21 Chord Mode Chord Mode is entered by pressing and releasing the Tape button and then pressing the Key Transpose button. The Key Transpose button light will flash while in this mode. A Chord is set by playing the Chord and then pressing and releasing the Key Transpose button while the keys of the chord are being held. The chord that is set will then play for each key pressed as the base note. Note - it is best to set the chord using middle 'C' as the base note. As only one chord can be played at a time the keys played have lowest or highest note priority depending on the Unison or Mono Key Assign Mode setting, this will be low note priority if in either poly. Changing a chord. To change a chord play the new chord and press and release the Key Transpose button while the chord keys are pressed. Canceling Chord Mode. To cancel chord mode press Key Transpose with no notes pressed. Note - If the keyboard has been previously transposed to another key this will remain in effect. It will not be possible to change the key transpose setting while in Chord Mode.
22 22 Setting up with External Devices You can adjust the tempo, and start or stop the Sequencer of the JX-3P with the controls on the external unit. Before starting external synchronization with the external unit, make sure that the built-in sequencer in the JX-3P is not running. Press the Start/Stop button and it's indicator will light then start the synchronization. Midi Notes If your JX-3P has Midi though fitted this should be used if multiple units are being used on the midi chain to reduce delays. While every effort has been made to make the midi as fast as is possible within the KiwiTechnics JX-3P Upgrade there will always be small delays between the midi input and midi output as the commands need to be interpreted which cannot be done until a full command arrives. Full midi command details are at the end of the manual. Hold Pedal The Roland DP-2 is shown but any pedal that shorts the tip to ground when not pressed can be used. It will need to go open circuit when pressed to suit the JX-3P The operation of the hold has changed from the original 3P. Pressing the hold pedal will set the envelope release time to maximum if the VCA mode has been set to 'Envelope' or toggle the Hold button if the VCA mode has been set to 'Gate'. This has a more natural piano like operation for the Envelope mode.
23 23 Editing a Patch The Edit Parameter table on the next page shows all the parameters that can be edited with the KiwiTechnics 3P Upgrade. To change from Bank A to Bank AA or Bank B to Bank BB press the Bank button twice Use the menu map as a guide to the editing key sequence. For example to edit the filter cutoff press Tape then Edit Write then Bank C then Tone Button 1 and edit the value using the Sense Slider The Groups are identified as follows: Bank A Bank B Bank C Bank A light on steady Bank B light on steady Bank C light on steady Bank D Bank D light on steady Bank AA Bank A light slow flash Bank BB Bank B light slow flash All Parameters are edited using the Sens control unlike the original 3P which used the Bank buttons to set switches. These are now changed using the Sens slider as well. Raising a control towards 10 will deepen an effect. Each parameter being edited is identified by the Bank A to D buttons and the Tone buttons 1-16 Flashing. Note - The behavior of the Sens control during parameter editing has been changed from the way the original 3P works. When editing a parameter the current value of the parameter must be matched before the Sens Control will have any effect on the parameter value. Switch values are displayed as follows on the Bank lights. No lights showing is off Light 1-16 on - Setting 1-16 Light 1-16 flashing - Setting e.g. if the filter cutoff is set to 7 the Sens must be moved to 7 before it will begin to edit the setting. This has been done so that a parameter will not jump to the Sens setting which can cause unpredictable and sometimes unpleasant results.
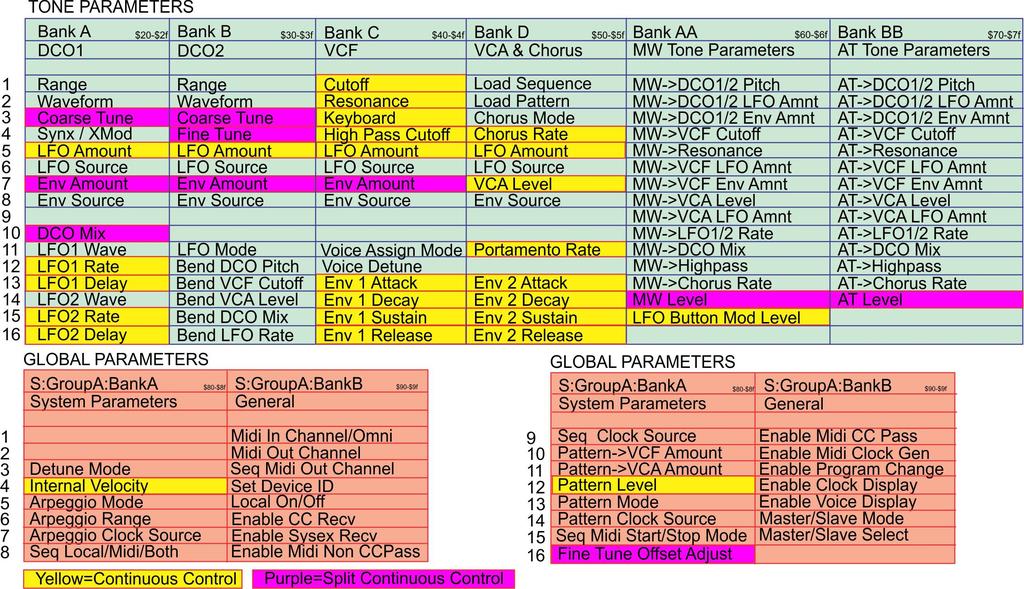
24 24 Edit Parameters
25 25 TONE - DCO (Digitally Controlled Oscillator) Parameter Edit Location Values Range 16', 8', 4' A-1 B-1 DCO 1 DCO ', 28', 34' Wave A-2 B-2 DCO 1 DCO 2 1 Saw, 2 Pulse, 3Square 1 Saw, 2 Pulse, 3Square, 4 Noise Saw, Pulse, Square Noise (DCO2 Only) DCO Coarse Tune ± 1 Octave A-3 B-3 Range (-1200 cents -> cents) ± 1 Octave DCO 2 Fine Tune B-4 Range (~-50 cents -> +50 cents) DCO 1 LFO Modulation Depth DCO 2 LFO Modulation Depth A-5 B-5 Range DCO 1 LFO Source DCO 2 LFO Source A-6 B-6 1 LFO 1, 2 LFO 2 DCO 1 Env Modulation Depth DCO 2 Env Modulation Depth A-7 B-7 Range ±63 - Note - this control is center off DCO 1 Env Source DCO 2 Env Source A-8 B-8 1 ENV 1, 2 ENV 2 DCO 2 Cross Modulation A-4 1 Off, 2 Sync, 3 Metal DCO Mix A-10 Range (0DCO1, 64 50/50, 127 DCO2) TONE - VCF (Voltage Controlled Filter) Parameter Edit Location Values VCF Cutoff C-1 Range VCF Resonance C-2 Range VCF Pitch Follow C-3 Range HPF Cutoff Frequency C-4 Range VCF LFO Modulation Depth C-5 Range VCF LFO Source C-6 1 LFO 1, 2 LFO 2 VCF Env Modulation Depth C-7 Range ±63 - Note - this control is center off VCF Env Source C-8 1 ENV 1, 2 ENV 2
26 26 TONE - VCA (Voltage Controlled Amplifier) VCA LFO Modulation Depth D-5 Range VCA LFO Source D-6 1 LFO 1, 2 LFO 2 VCA Level D-7 Range VCA Mode D-8 1 Gate, 2 Env 1, 3 Env 2 TONE - LFO (Low Frequency Oscillator) LFO 1 & 2 Wave Sine, Triangle, Saw, Rev Saw Square, Random LFO 2 - Seq Clocked Random A-11 LFO 1 1 Sine 2 Triangle 3 Saw 4 Rev Saw 5 Square 6 Random 7 Seq Clocked Random (LFO 2 Only) A-14 LFO 2 LFO 1 & 2 Rate A-12 A-15 LFO 1 LFO 2 Range (0slowest) LFO 1 & 2 Delay A-13 A-16 LFO 1 LFO 2 Range (0no delay) LFO 1 & 2 Mode B-11 1 LFO 1 & 2 Normal (above and below base note) 2 LFO 1 & 2 Plus (above base note only) TONE - ENV 1 & 2 (Envelope Generators) Envelope 1 & 2 Attack C-13 D-13 ENV 1 ENV 2 Range Envelope 1 & 2 Decay C-14 D-14 ENV 1 ENV 2 Range Envelope 1 & 2 Sustain C-15 D-15 ENV 1 ENV 2 Range Envelope 1 & 2 Release C-16 D-16 ENV 1 ENV 2 Range Envelope 1& 2 Speed D-12 ENV 1/2 1 Normal Speed, 2 Half Speed TONE - Chorus Chorus Off/Auto/Manual (with upgrade fitted) D-3 1 Off, 2 Auto, 3 Manual Chorus Rate (with fitted) D-4 Range 0-127
27 27 TONE - Aftertouch Control DCO Freq BB-1 0Off, 1DCO1, 2DCO2, 3Both DCO LFO Level BB-2 0Off, 1DCO1, 2DCO2, 3Both DCO ENV Level BB-3 0Off, 1DCO1, 2DCO2, 3Both VCF Cutoff BB-4 0 Off, 1 On VCF Resonance BB-5 0 Off, 1 On VCF LFO Level BB-6 0 Off, 1 On VCF ENV Level BB-7 0 Off, 1 On VCA Level BB-8 0 Off, 1 On VCA LFO Level BB-9 0 Off, 1 On LFO Frequency BB-10 0Off, 1LFO1, 2LFO2, 3Both DCO Mix BB-11 0 Off, 1 On HighPass Filter BB-12 0 Off, 1 On Chorus Rate BB-13 0 Off, 1 On Aftertouch Level BB-14 Range ±63 - Note - this control is center off TONE - Modulation Control (midi and LFO button) DCO Freq AA-1 0Off, 1DCO1, 2DCO2, 3Both DCO LFO Level AA-2 0Off, 1DCO1, 2DCO2, 3Both DCO ENV Level AA-3 0Off, 1DCO1, 2DCO2, 3Both VCF Cutoff AA-4 0 Off, 1 On VCF Resonance AA-5 0 Off, 1 On VCF LFO Level AA-6 0 Off, 1 On VCF ENV Level AA-7 0 Off, 1 On VCA Level AA-8 0 Off, 1 On VCA LFO Level AA-9 0 Off, 1 On LFO Frequency AA-10 0Off, 1LFO1, 2LFO2, 3Both DCO Mix AA-11 0 Off, 1 On HighPass Filter AA-12 0 Off, 1 On Chorus Rate AA-13 0 Off, 1 On Modulation Level AA-14 Range ±63 - Note - this control is center off Modulation Button Level AA-15 Range TONE - Bend Control
28 28 DCO Pitch B-12 0Off, 1DCO1, 2DCO2, 3Both VCF Cutoff B-13 0 Off, 1 On VCA Level B-14 0 Off, 1 On DCO Mix B-15 0 Off, 1 On LFO Rate B-16 0Off, 1LFO1, 2LFO2, 3Both TONE - Voice Mode Control Voice Assign Mode C-11 0 Poly 1 (7th note override) 1 Poly 2 (7th note ignored) 2 Unison 1 (Low note priority) 3 Unison 2 (High note Priority) 4 Mono 1 (Low note priority) 5 Mono 2 (High note Priority) Voice Assign Detune Amount C-12 Range GLOBAL - Arpeggiator Control Arpeggiator Mode A-5 0Up, 1Down, 2Both, 3Random Arpeggiator Range A-6 00 Oct, 11 Oct, 2 2 Octs Arp Clock Source A-7 0 Int/Ext 1 LFO 2 2 Pattern Generator 3 Midi Clock / 3 (1/32 Note) 4 Midi Clock / 4 (1/32 Note Dotted) 5 Midi Clock / 6 (1/16 Note) 6 Midi Clock / 9 (1/16 Note Dotted) 7 Midi Clock / 12 (1/8 Note) 8 Midi Clock / 18 (1/8 Note Dotted) 9 Midi Clock / 24 (1/4 Note) 10 Midi Clock / 36 (1/4 Note Dotted) 11 Midi Clock / 48 (1/2 Note) 12 Midi Clock / 72 (1/2 Note Dotted) 13 Midi Clock / 96 (Whole Note) 14 Midi Clock / 128 (Whole + 1/4 Note) 15 Midi Clock / 144 (Whole + 1/2 Note) 16 Midi Clock / 168 (Whole + 1/2 Dotted) 17 Midi Clock / 192 (2 Notes) GLOBAL - Sequencer Control Seq Mode A-8 0 Both 1 Local Only 2 Midi Only Seq Start/Stop Midi Command Mode A-15 0 Disabled - 3P will ignore midi Start/Stop 1 Enabled - 3P will Action midi Start/Stop
29 29 GLOBAL - Sequencer Control Seq Clock Source A-9 0 Int/Ext 1 LFO 2 2 Pattern Generator 3 Midi Clock / 3 (1/32 Note) 4 Midi Clock / 4 (1/32 Note Dotted) 5 Midi Clock / 6 (1/16 Note) 6 Midi Clock / 9 (1/16 Note Dotted) 7 Midi Clock / 12 (1/8 Note) 8 Midi Clock / 18 (1/8 Note Dotted) 9 Midi Clock / 24 (1/4 Note) 10 Midi Clock / 36 (1/4 Note Dotted) 11 Midi Clock / 48 (1/2 Note) 12 Midi Clock / 72 (1/2 Note Dotted) 13 Midi Clock / 96 (Whole Note) 14 Midi Clock / 128 (Whole + 1/4 Note) 15 Midi Clock / 144 (Whole + 1/2 Note) 16 Midi Clock / 168 (Whole + 1/2 Dotted) 17 Midi Clock / 192 (2 Notes) GLOBAL - Pattern Generator Pattern -> VCF A-10 0 Off, 1 On Pattern -> VCA A-11 0 Off, 1 On Pattern Level A-12 Range Pattern Mode A-13 0 Off, 1 On Pattern Clock Source A-14 0 Int/Ext 1 LFO 2 2 Midi Clock / 3 (1/32 Note) 3 Midi Clock / 4 (1/32 Note Dotted) 4 Midi Clock / 6 (1/16 Note) 5 Midi Clock / 9 (1/16 Note Dotted) 6 Midi Clock / 12 (1/8 Note) 7 Midi Clock / 18 (1/8 Note Dotted) 8 Midi Clock / 24 (1/4 Note) 9 Midi Clock / 36 (1/4 Note Dotted) 10 Midi Clock / 48 (1/2 Note) 11 Midi Clock / 72 (1/2 Note Dotted) 12 Midi Clock / 96 (Whole Note) 13 Midi Clock / 128 (Whole + 1/4 Note) 14 Midi Clock / 144 (Whole + 1/2 Note) 15 Midi Clock / 168 (Whole + 1/2 Dotted) 16 Midi Clock / 192 (2 Notes) GLOBAL - Key Control Voice Detune Mode A-3 0 Unison & Mono Only 1 All Key Modes
30 30 Internal Velocity A-4 Range Sets Velocity Level for internal keys GLOBAL - Fine Tune Fine Tune Offset A-16 Range ±63 (~±200 cents) - Note - this control is center off This will adjust the entire 3P and is independent of the tune control on the rear of the 3P GLOBAL - Midi and General Settings Midi In Channel B-1 Range 0-16 for Channels 1-16 & Omni (Default 0) All Tone Lights will flash for OMNI Midi Out Channel B-2 Range 0-15 for Channels 1-16 (Default 0) Seq Midi Out Channel B-3 Range 0-15 for Channels 1-16 (Default 0) Device ID B-4 Range 0-16 for ID 1-16 & Omni All Tone Lights will flash for OMNI (Default 0) Local On/Off B-5 0 Local Keyboard Off 1 Local Keyboard On (Default 1) 0 Midi CC Receive Disabled 1 Midi CC Receive Enabled (Default 1) 0 Midi Sysex Receive Disabled 1 Midi Sysex Receive Enabled (Default 1) Enable Midi CC Receive Enable Midi Sysex Receive B-6 B-7 Enable Midi Soft Through note - real time midi commands will always pass and B:8 will have no effect B-8 0 No Midi Passed (Default 0) 1 Midi Passed depending on B-9 filter Midi Soft Through Filter note - if Midi In B:1 is set to omni all midi will pass and B:9 will have no effect note - SysEx intended for the 3P will not be passed and B:9 will have no effect B-9 0 No Filter - all midi passed (Default 0) 1 Filter all midi on 3P Input Channel 2 Filter only midicc on 3P Input Channel* * bank select, panic & MW CC will still be passed Enable Midi Clock Generation B-10 0 Midi Clock not generated (Default 0) 1 Midi Clock Generated from Internal Enable Program Change Command B-11 0 Program Change not sent 1 Program Change sent Enable Clock Display B-12 0 Clock Display Disabled 1 Clock Display Enabled Enable Voice Display note - this setting is lost on power down B-13 0 Voice Display Disabled 1 Voice Display Enabled (Default 0) (Default 1) (Default 0)
31 31 3P Upgrade Special Functions Setting Incoming Midi Channel The incoming midi channel can be set to any channel from Omni 116channel number This is set using the Global Parameter Edit B-1 Setting Outgoing Midi Channel The outgoing midi channel can be set to any channel from This is set using the Global Parameter Edit B-2 Setting Sequencer Outgoing Midi Channel The Sequencer outgoing midi channel can be set to any channel from This is set using the Global Parameter Edit B-3 Factory Restore 1 Programs 1-32 can be restored to factory original by the following actions 1) Press 'Tape Memory'. The Tape Memory Light will begin to flash 2) Press 'Bank D' button. The 'D' light will start to flash 3) Press 'Tone 16' button. The Tone 16 and Edit Write buttons will begin to fast flash. 4) Press Edit Write to start restore or Tape Memory to cancel Only Programs 1-32 (Banks A & B) are overwritten and Memory Protect must be set to off. To Cancel press Tape Memory before Write is pressed The 3P will stop responding for a short period while the restore is being done. Factory Restore 2 Programs can be restored to factory settings by the following action Press and hold Edit Write and Seq Write while powering the 3P on. WARNING - There will be no confirmation and all Tones, Sequences & Patterns will be cleared. The Memory Protect must be set to off. The 3P will stop responding while the restore is being done. Program Update The KiwiTechnics 3P Upgrade has built in ability to update the firmware should updates become available. This section is entered by pressing the Tape button while the 3P is powered on. The Update file is then 'played' into the 3P using midiox or similar. The update progress is displayed on the Tone Lights. Once complete the Bank D button will light and the 3P should be repowered. WARNING - If this procedure fails the 3P will be rendered unusable and will require a replacement CPU from KiwiTechnics. Use at your own risk. The current releases are displayed on the Tone Selector lights for about 1 sec at power on. Tone 1-6 display the program release and 7-8 display the Bootloader release. e.g. Tone 2, 3 & 7 would mean Prog v2.3 and BL v 1

32 32 Upgrade install The KiwiTechnics 3P Upgrade must be installed by a competent technician with the correct tools or damage to your 3P can occur. The cpu needs to be removed and replaced with a 40 pin socket which is supplied with the KiwiTechnics 3P Upgrade. These instructions are supplied as a guide for your technician only and it is your responsibility to have this done professionally. This can take 1-2 hours depending on your skill level. KiwiTechnics will not be responsible for damage done to your precious 3P if this upgrade is not fitted correctly. Step 1) Opening the 3P - After removing the four screws located in the end panels and the 4 screws on the underside at the rear the top can be opened. Step 2) Removing the main board. Remove the screws securing the keyboard from the underside of the 3P so the keyboard can be moved forward and give access to the main board. Remove the 8 screws shown in Photo 1. Photo 1 - Screw Locations in the 3P main board Step 3) Remove the 6 cable plugs and turn the board over.


33 33 Step 4) Desolder the CPU (IC44) and fit the supplied 40 pin IC Socket. It is very important that this step is done correctly. On the top side of the board underneath the IC44 CPU are some fine tracks that will be damaged and difficult to repair if all the solder is not removed correctly. All the solder must be removed from all the 40 holes and the pins free of the hole edges before the CPU is lifted. The CPU pins should be able to move freely in the hole which shows that they are not still soldered to the hole sides. The best way to achieve this is with a good vacuum desoldering tool. The photo shows a Hakko being used. A hand vacuum can be used but these can cause damage to the board as they can jump and damage tracks as they are triggered. Quality Solder wick is a better approach than a hand desolderer.


34 34 Step 5) Carefully solder in the supplied 40 IC socket. Step 6) Fit the KiwiTechnics Upgrade Board into the socket. Pin 1 on the upgrade board is marked and this end MUST be at the pin 1 end of the socket. Pin 1 is marked on the board, socket & upgrade board by a notch in one end (see pictures). It is most important to make sure all the pins are located inside all the socket holes before pressing the upgrade firmly into the socket. This will need a firm push to seat and if pins are not located correctly they will bend and are likely to break off which will require a replacement. Step 7) If the Chorus speed mod is also being fitted do not screw this board back yet

35 35 Step 8) A link needs be cut or removed on the Midi board to allow the midi to work when the memory protect is on. If this is not done the midi input will stop when the Selector switch is on the Protect position or PG-200 setting. This link is labeled 'W5' and is marked in the photo with the green arrow and can be cut with the board in place. On 3P Jack boards that do not have a midi through the link is still labeled as 'W5' and is in a similar part of the board. The PG-200 is no longer supported and all control needs to be via midi input. If you are fitting the Chorus Speed mod upgrade then this will require the front panel control board to be removed which is best done next. If you are also changing the LED operation described under the optional mods then this should also be done at the same time. If not then skip to Adjustments
 Remove the front panel board.")

 Remove IC2 (green arrow in picture) Step 3) Clean and dust or dirt from the labeled space on the board in the photo using a damp cloth and then dry.")


36 36 Optional Chorus Speed Mod The Chorus Upgrade will allow control of the Chorus Speed in the 3P which can be controlled via midi and saved with a program patch. There is also a manual mode to allow the chorus sweep to be stopped in any position or controlled at any speed. Step 1) Remove the front panel board. To do this it will be necessary to remove the Jack board to allow access to the mounting screws for the front panel. This is done by removing the four screws at the ends of the jacks on the rear of the 3P. The front panel can then be removed by removing the slider knobs and then undoing the mounting screws. Step 2) Remove IC2 (green arrow in picture) Step 3) Clean and dust or dirt from the labeled space on the board in the photo using a damp cloth and then dry. Bend down C15 as much as will easily bend away from the IC2 holes. Do not force. Remove the tape from the double sided sponge on the Chorus Mod PC board and press the board onto this spot. Solder in the 8pin header into the IC2 holes with the cable going over C15 (see photo). Make sure the bottom of the Chorus Board does not touch any of the wire links. Step 4) Uncoil the shielded cable and tie this to the existing wiring loom down to the main voice board. Step 5) Carefully Solder the end of the cable to pin 4 of IC28 making sure you have not bridged the IC pins with solder. This is arrowed on the picture. This will need to be done fairly quickly so the IC does not get too hot which will damage it. The cable can be soldered to the top or bottom of the board. The cable should be tied to the hole in the board next to IC28 (see photos).


37 37 Optional Fixes for the JX-3P The following are optional modifications that can be made. The first changes the way the LEDs are powered which will reduce the flickering that occurs as LED are changed on the display. This is more noticeable once the KiwiTechnics Upgrade is fitted due to the enhanced use of the LEDs. Step 1 Remove the front panel board. To do this it will be necessary to remove the Jack board to allow access to the mounting screws for the front panel. This is done by removing the four screws on the rear of the 3P. The front panel can then be removed by removing the slider knobs and then undoing the mounting screws. Step 2 Remove all of the nine 100R resistors identified with arrows. The photo shows these already removed. Step 3 Place a link in place of R84 which is identified by the yellow arrow and fit the eight supplied 220R resistors to the eight green arrow locations. There is a resistor numbering error in the service manual so use the photo as your guide. Step 4 Replace the front panel board, the rear jack board and front panel knobs The second modification improves the stability of the Sens slider. On my test 3P I had noise issues with the Sens pot which caused it to be noise prone and jumpy. This can be improved by fitting the supplied 0.1uF cap to ground on the junction between the Sens Edit Pot slider connection and R95. This is most easily fitted on the underside of the front panel board as shown in the photo. The Sens Pot is located near the center of the front panel board and has the word 'EDIT' next to it.


38 38 Adjustments for the JX-3P Before the cover is screwed back on is a good time to check the Bend Lever Range, 3P reference voltage setting and the DCO Master Clocks tuning. Master DCO Clock Tuning The two DCOs in the 3P each have an independent clock and if these are not set correctly it is difficult to fine tune the tones correctly. These are tuned as follows. 1) Get something to measure the frequency output of the 3P. I recommend APTuner from 2) Choose any of the blank factory tones from banks C-P. These all have both DCOs on the same tune setting and fine tune set to the center. Switch off the Chorus. 3) Set the tune adjust on the rear of the 3P to the center position 4) Edit the mix parameter (A:10) to DCO1 only ( left on the lights) and tune the preset marked DCO1 in the photo. Note - these tune adjusters are sensitive to ferrous (metal) screw drivers. If you do not have a nonferrous screw driver (plastic or similar) you will need to move the screw driver well away from the trim after each adjustment. 5) Play A3 (the second A from the left) and adjust DCO1 trim to get it exact. 6) Change the Mix parameter to 50% so that both DCOs can be heard 7) Adjust the trim for DCO2 until no beating can be heard. 3P Reference Voltage Adjustment There is a test point on the 3P board marked VREF TP9. This is just visible in the photo at the top left of the picture. Connect a digital voltmeter to this point and adjust the trim near it marked VREF ADJ VR1 until the voltmeter reads 4.70v Bend Lever Adjustment With the bend switch set to Wide Range check the the bend range is one octave up and down. The maximum and minimum settings can be adjusted using VR6 (-) and VR7 (+).
39 39 Midi Data Function Transmitted Recognized Notes Basic Channel If Omni selected the 3P will recognize any midi channel Note Number 24(C1)-108(C8) Notes that are received outside the JX-3P range of are transposed to the nearest octave within range. Mode X X Voice Modes need to be changed using Midi Control or Sysex commands Velocity Note On O O X X X X X O Pitch Bender O O Midi & internal bends are additive within the 3P. Midi bend input is effected by the Range switch. Control Change O O Only if Midi CC option is Enabled. See Control Change Tables for details Program Change X If CC0, Selects If CC0, Selects System Exclusive O O Only if Midi Sysex option is Enabled - See Sysex Table for details System Real Time Clock Commands O O Will Transmit from Seq Clock if Clock Output is enabled. Input clocks passed through to midi out unaltered. Recognized within the 3P only if the clock source has been set to midi on the Pattern, Arp or Sequence clocks Modulation O O Will adjust patch value(s) as a temporary effect if enabled. Note Off Aftertouch Keys Channels Notes XNo All keys sent from the JX-3P have a velocity set by the Global Parameter A4 (or midicc 107) Due to the small number of keyboards supporting Key AT only Channel AT has been implemented. CC32 Tone CC32 Tone is 0,0 then 0-63 selects Tone Bank 1, Bank 2 is 0,1 then 0-63 selects Tone Bank 3, Bank 4 OYes Supported Midi Messages Status Second Third Notes Note Off $8n ( ) $kk $ n kk 0-15 midi channel note number (0-127) -outside range are ignored Don't care (ignored) Note On $9n ( ) $kk $ n kk 0-15 midi channel note number (0-127)-outside are transposed to the nearest Octave 0Off, Note Velocity. Continuous Controllers $bn ( ) $kk $ n 0-15 midi channel $kk & $ see CC table Program Change $cn ( ) Channel Aftertouch $dn ( ) $kk --- n kk 0-15 midi channel Channel Pressure (0-127) Pitch Bend $en ( ) $kk $ n kk 0-15 midi channel Least Significant 7 bits Most Significant 7 bits n If CC0, CC selects If CC0, CC selects 0-15 midi channel is 0,0 then Tone Bank 1, Selects Tone Bank 2 is 0,1 then Tone Bank 3, Selects Tone Bank 4 Note $xx hex number
40 40 Continuous Controllers Continuous Controllers Second Third Notes Bank Select MSB $00 (00) $00-$01 0Bank Selection, 1Pattern Selection, 2Seq Selection Used in conjunction with CC32 Bank Select LSB Modulation Wheel Level $01 (01) Breath Controller $02 (02) Portamento Time $05 (05) NRPN MSB $06 (06) Not Supported Overall Volume $07 (07) Sets VCA Level DCO 1 Range $08 (08) $ $00-$1f (0-31) $20-$3f (32-63) $40-$7f (64-127) 16' 8' 4' DCO 1 Wave $09 (09) $ $00-$1f (0-31) $20-$3f (32-63) $40-$7f (64-127) Ramp Pulse Square DCO 1 Tune $0a (10) Split Control +-63 (+- 1 octave cents) DCO Cross Mod $0b (11) $ $00-$1f (0-31) $20-$3f (32-63) $40-$7f (64-127) Off Sync Metal DCO 1 LFO Mod Amount $0c (12) DCO 1 LFO Source $0d (13) $ $00-$3f (0-63) $40-$7f (64-127) LFO 1 LFO 2 DCO 1 Envelope Mod Amount $0e (14) Split Control below 63 will subtract effect, above 63 will add effect DCO 1 ENV Source $0f (15) $ $00-$3f (0-63) $40-$7f (64-127) ENV 1 ENV 2 LFO Mode $10 (16) $ $00-$1f (0-31) $40-$7f (64-127) LFO1&2 Normal LFO1&2 Plus DCO Source Mix $11 (17) 0DCO1 only, 6350/50 mix, 127DCO2 Only LFO 1 Wave $12 (18) $ $00-$0f $10-$2f $20-$3f $30-$5f $40-$6f $50-$7f (0-16) (17-31) (32-47) (48-63) (64-79) (80-127) Sine Triangle Saw Rev Saw Square Random LFO 1 Rate $13 (19) LFO 1 Delay $14 (20) LFO 2 Wave $15 (21) $ $00-$0f $10-$1f $20-$2f $30-$3f $40-$4f $50-$5f $60-$7f (0-16) (17-31) (32-47) (48-63) (64-79) (80-95) (96-127) Sine Triangle Saw Rev Saw Square Random Random 2 - clocked from Sequencer Clock LFO 2 Rate $16 (22) LFO 2 Delay $17 (23) DCO 2 Range $18 (24) $ $00-$1f (0-31) $20-$3f (32-63) $40-$7f (64-127) 16' 8' 4' DCO 2 Wave $19 (25) $ $00-$1f $20-$3f $40-$5f $60-$7f Noise Ramp Pulse Square DCO 2 Tune $1a (26) Split Control +-63 (+- 1 octave cents) DCO 2 Fine Tune $1b (27) Split Control +-63 (~ +-50 cents) Not Supported (0-31) (32-63) (64-95) (96-127)
Table of Contents Kiwi-106 Features...5 Kiwi 106 Flow Chart...6 Kiwi 106 Front Panel...7 Control Description...8 Key Transpose...
 2 Table of Contents Kiwi-106 Features...5 Kiwi 106 Flow Chart...6 Kiwi 106 Front Panel...7 Control Description...8 Key Transpose...8 Poly 1- Key Modes...9 Poly 2 - Hold...9 Midi Channel...9 Group A/B...10
Table of Contents Kiwi-30 Features...5 Kiwi 30 Flow Chart...6 Kiwi 30 Front Panel...7 Kiwi 30 Parameter Edit Map...8 Front Panel Description...
 2 Table of Contents Kiwi-30 Features...5 Kiwi 30 Flow Chart...6 Kiwi 30 Front Panel...7 Kiwi 30 Parameter Edit Map...8 Front Panel Description...9 Kiwi-30 BUTTONS...10 MIDI CHANNEL...10 PARAMETER BUTTON...11
JX-3P. PLUG-OUT Software Synthesizer Owner s Manual Roland Corporation 01
 JX-3P PLUG-OUT Software Synthesizer Owner s Manual 2018 Roland Corporation 01 Introduction When using the JX-3P for the first time, you must specify the MIDI Input/Output setting in the Setting window
Jx-10 OWNER S MANUAL 2016 UPDATE. Vecoven upgrades 3.x AND 4.x. Manual Version 3.21 Page. 1 of 73
 P O L Y P H O N I C S Y N T H E S I z E R S U P E R J X Jx-10 OWNER S MANUAL 2016 UPDATE Vecoven upgrades 3.x AND 4.x Page. 1 of 73 SECTION 1 - PANEL DESCRIPTION Page. 2 of 73 1.1 INTRODUCTION This manual
Jx-10 POLYPHONIC SYNTHESIZER SUPER JX OWNER S MANUAL 2014 UPDATE. by
 POLYPHONIC SYNTHESIZER SUPER JX Jx-10 OWNER S MANUAL 2014 UPDATE by wavesequence@gmail.com Thanks to coolveco and Quavermass for their friendly an invaluable help Pag. 1 of 53 1 - PANEL DESCRIPTION Pag.
OWNER S MANUAL rev. 2.02
 Model 8-422 ver. 2.0 OWNER S MANUAL rev. 2.02 Om._03637 2010 CHD Elektroservis Table of contents: page 1. Product description.......................................... 4 1.1. DCB communication..........................................
SH-2. PLUG-OUT Software Synthesizer Owner s Manual
 SH-2 PLUG-OUT Software Synthesizer Owner s Manual Copyright 2014 ROLAND CORPORATION All rights reserved. No part of this publication may be reproduced in any form without the written permission of ROLAND
DER OTO. With this firmware revision, you can use your Biscuit as a standard one (Revision 1.2) or as Der OTO.
 or as Der OTO.") User Manual Rev 2.3 February 2012 1 DER OTO PRESENTATION Der OTO is the new Biscuit firmware (revision 2) and turns your Biscuit into a monophonic synth. You can play Der OTO with a standard MIDI keyboard,
User Manual Rev 2.3 February 2012 1 DER OTO PRESENTATION Der OTO is the new Biscuit firmware (revision 2) and turns your Biscuit into a monophonic synth. You can play Der OTO with a standard MIDI keyboard,
Bass Station II v4.14 New Features User Guide
 Bass Station II v4.14 New Features User Guide New Features: AFX Mode Fixed-Duration Sustain Envelopes Envelope Retrigger Count Glide Divergence Extended Sub-Oscillator Tuning 1 CONTENTS AFX Mode... 3 Overlays...
Procussion operation manual Basic Operation 15 BASIC OPERATION
 Basic Operation 15 BASIC OPERATION 16 Main Controls 17 BASIC OPERATION MAIN CONTROLS MIDI ACTIVITY EDIT MENU SELECT CURSOR CONTROL VOLUME CONTROL I/O MASTER EDIT ENTER C01 Vol127 Pan=K CURSOR DATA VOLUME
User Guide. Manual Version 1.0
 User Guide Manual Version 1.0 Table of Contents Introduction... 3 System Requirements and Product Support... 3 Installation... 3 Windows... 3 Mac OS X... 3 Quick Start... 4 Operation... 5 Global Controls...
TWO-VOICE PRO. Quickstart Guide. Version 1.0 October 2015 MARION SYSTEMS CORPORATION Moraga Road Suite i-394 Moraga, CA USA
 TWO-VOICE PRO Quickstart Guide Version 1.0 October 2015 MARION SYSTEMS CORPORATION 1480 Moraga Road Suite i-394 Moraga, CA 94556 USA Two-Voice Pro QuickStart Guide 1 This equipment has been tested and
Roland Boutique JP-08 FAQ
 Q&A I cannot transmit the data using a micro USB cable........................................................ 2 When I put the JP-08 in Dual mode, the UPPER part is no longer heard; why is this?...............................
User Guide. English ( 3 16 ) Appendix English ( )
 Appendix English ( )") User Guide English ( 3 16 ) Appendix English ( 17 19 ) USB SUSTAIN C17 POWER ON OFF User Guide (English) Box Contents Oxygen 25 USB Cable Ableton Live Lite Software Download Card Quickstart Guide Safety
User Guide English ( 3 16 ) Appendix English ( 17 19 ) USB SUSTAIN C17 POWER ON OFF User Guide (English) Box Contents Oxygen 25 USB Cable Ableton Live Lite Software Download Card Quickstart Guide Safety
Table of Contents KiwiSix Features...3 KiwiSix Flow Chart...4 KiwiSix Front Panel...5 Kiwisix Notes...6 KiwiSix Preset Section...7 Chord Mode...
 2 Table of Contents KiwiSix Features...3 KiwiSix Flow Chart...4 KiwiSix Front Panel...5 Kiwisix Notes...6 KiwiSix Preset Section...7 Chord Mode...8 Sequencer...14 A) Writing / Editing...15 C) Playing...17
OPERATION MANUAL VST / AU
 OPERATION MANUAL VST / AU This manual is under construction. If you want to help to improve it contact: info@audiorealism.se Introduction AudioRealism Bass Line 3 (ABL3) is an emulation of a classic pattern
Appendix 1: Upgrading the system software
 THE APPENDICES A.1 THE APPENDICES Appendix 1: Upgrading the system software Infection Music strongly recommends that you read through this section before you attempt to perform any kind of software upgrade.
JX-3P MIDI Expansion Kit. User manual
 J-3P MIDI Expansion Kit User manual Language: English Manual Version: 3.01 Date: January 5, 2018 Website: http://www.riversynths.com Email: info@riversynths.com Please note: * Roland is a registered trademark
Menu Flow Chart KiwiSix Upgrade User Manual v4.2
 2 KiwiSix Features 512 Tones can be stored and edited. It is also possible to temporarily edit any Tone Tones are stored in Flash memory so no battery is required. MidiCC & Sysex support all parameters
Model ver OWNER S MANUAL Rev CHD Elektroservis
 Model 8-431 ver. 1.1 OWNER S MANUAL Rev. 2 7 2018 CHD Elektroservis Contents page 1 INTRODUCTION..................................................................... 3 1.1 INTERFACE FUNCTIONS.............................................................
BRUTE VRS User Manual Version 1.0 November 2014
 BRUTE VRS User Manual Version 1.0 November 2014 INTRODUCTION Thank you, and congratulations on your choice of the Amazing Machines Brute VRS. The BRUTE VRS is a Virtual Recall Sheet for the MINIBRUTE Analog
Information Sheet For. MSRK Module. fitted inside the
 Information Sheet For MSRK Module fitted inside the WARNING DO NOT ADJUST THE TRIMMERS ON THE KENTON MODULE BOARD. These are for factory setup ONLY. All adjustments to scale and tuning of the module board
Q170 MIDI Gates. Q170 MIDI Gates Specifications. Aug 23, 2018
 Aug 23, 2018 The MIDI Gates module produces gate signals from a stream of MIDI messages, either from a keyboard, a DAW or any MIDI source. Each of the 8 outputs can be programmed for one or more MIDI note
CV.OCD USER MANUAL. CV.OCD has four assignable continuous analog CV outputs and twelve assignable gate/trigger outputs. MIDI-TO-CV
 six4pix.com/cvocd CV.OCD USER MANUAL Introduction CV.OCD is a device which converts MIDI signals to the Control Voltage (CV) and Trigger/Gate signals which are used to control traditional analog synthesizers.
PX-360M/PX-560M MIDI Implementation
 PX360M/PX560M MIDI Implementation CASIO COMPUTER CO., LTD. Contents I Overview 3 1 Product Configuration as a MIDI Device 3 1.1 System Section.......................................... 3 1.2 Performance
µmidi MIDI Implementation Chart
 1. Basic information MIDI channels Note numbers Program change Bank select response? (Yes/No) If yes, list banks utilized in remarks column Modes supported: Mode 1: Omni-On, Poly (Yes/No) Note-On Velocity
FRONT PANEL OVERVIEW...1 REAR PANEL OVERVIEW...3 HOOKUP DIAGRAM...4 DISPLAYING INFORMATION...6
 TABLE OF CONTENTS FRONT PANEL OVERVIEW...1 REAR PANEL OVERVIEW...3 HOOKUP DIAGRAM...4 DISPLAYING INFORMATION...6 OCTAVE AND TRANSPOSITION...6 NOTE...6 NOTE AFTERTOUCH (Channel Pressure)...6 CONTROL CHANGE...6
Scythe Synthesizer for iphone
 Scythe Synthesizer for iphone http://www.bitmaskstudio.com/ https://twitter.com/bitmaskstudio Scythe is a polyphonic wavetable synthesizer which can load custom sounds and has a Wavetable Creator tool.
[KRM-100] MIDI-CV-Arpeggiator
![[KRM-100] MIDI-CV-Arpeggiator](/thumbs/91/107539188.jpg "[KRM-100] MIDI-CV-Arpeggiator") [KRM-100] MIDI-CV-Arpeggiator 2016-12-02 Manual v1.7 Hardware v1.1 Firmware v1.08 Table of Contents 1 Quick Setup Instructions...1 1.1 MIDI Controllable Features...1 1.2 Arpeggiator, Mini Sequencer, and
[KRM-100] MIDI-CV-Arpeggiator 2016-12-02 Manual v1.7 Hardware v1.1 Firmware v1.08 Table of Contents 1 Quick Setup Instructions...1 1.1 MIDI Controllable Features...1 1.2 Arpeggiator, Mini Sequencer, and
MOOG SUB 37 - FIRMWARE UPDATE UPDATE INSTRUCTIONS FOR WINDOWS (Skip to the next section for Mac OSX instructions)
") MOOG SUB 37 - FIRMWARE UPDATE 1.2.0 WHAT YOU WILL NEED A computer A program for sending MIDI SysEx data to your Sub 37. We recommend Bome SendSX for Windows, or SysEx Librarian for Macintosh. DOWNLOAD
MOOG SUB 37 - FIRMWARE UPDATE 1.2.0 WHAT YOU WILL NEED A computer A program for sending MIDI SysEx data to your Sub 37. We recommend Bome SendSX for Windows, or SysEx Librarian for Macintosh. DOWNLOAD
User Manual. for ArcTrax UWP version
 User Manual for ArcTrax UWP version 1.0.3.0 Table of Contents 1 Overview... 2 1.1 Introduction... 2 1.2 Structure... 2 2 Panel Reference... 3 2.1 Overview... 3 2.2 Controls... 4 2.3 Oscillator... 5 2.4
F 0 2 M I D I R e f e r e n c e EN
 F02 MIDI Reference EN MIDI Channel Message : Can be transmitted and recognized. : Cannot be transmitted by the panel operations, but can be transmitted by song playback data. : Cannot be transmitted or
QUICKSTART GUIDE ENGLISH
 QUICKSTART GUIDE ENGLISH WWW.AKAIPRO.COM BOX CONTENTS LPK25 USB cable Software CD SOFTWARE CD Safety Instructions & Warranty Information PC Users: To install the Akai Professional LPK25 Editor, open the
Music Technologies Group. MTG Pro One Turbo CPU User Guide
 Music Technologies Group MTG Pro One Turbo CPU User Guide Version 1.41 November 2015 CONTENTS 1: Introduction... 4 CPU Features... 4 CPU+MIDI Features... 4 CPU+MIDI+CV Features... 4 Condition of Pro One...
Last sine waveform is output constantly to allow test of audio output. Board must be reset to exit test mode and return in normal mode.
 DREAM Special NRPN Controls NRPN sending method: CTRL#99=high byte, CTRL#98=low byte, CTRL#6=vv Example: In order to set General Master Volume (NRPN 3707h) to value 64 (40h), send CTRL#99=56 (37h) (MIDI
Digitakt OS 1.06 Release Information
 Digitakt OS 1.06 Release Information Elektron Music Machines February 12, 2018 How to upgrade: Upgrading from within the OS Select SYSTEM in the SETTINGS menu, and then select OS UPGRADE. Send the SysEx
DOEPFER System A-100 Midi-to-CV/Gate A Introduction
 1. Introduction Module A-190-2 is an economically priced alternative to the Midi-CV/SYNC interface A-190-1. It can be used in all cases where the additional features of the A-190-1 are not required (e.g.
TB-303. Software Bass Line Owner s Manual Roland Corporation 01
 TB-303 Software Bass Line Owner s Manual 2019 Roland Corporation 01 Introduction For details on the settings for the DAW software that you re using, refer to the DAW s help or manuals. About Trademarks
Axiom. User Guide. English
 Axiom User Guide Table of Contents.......................................................................... 3 Introduction...................................................................... 3 What
Menu Flow Chart KiwiSix Upgrade User Manual v4.0
 2 KiwiSix Features 512 Tones can be stored and edited. It is also possible to temporarily edit any Tone Tones are stored in Flash memory so no battery is required. MidiCC & Sysex support all parameters
for ipad Version 1.2.2
 for ipad Version 1.2.2 Overview CoreMIDI Scale/Chord Remapper Arpeggiator Patch OSC1 Sync/Ring OSC2 Sync/Ring OSC3 Filter 1 Filter 2 LP, BP, HP LP, BP, HP AMP Pan Saturator EQ Delay 1 Pan Filter Delay
MIDI Reference CLP- 525
 MIDI Reference CLP- 525 Table of Contents MIDI Functions... 2 MIDI Transmit/Receive Channel Selection...2 Local Control ON/OFF...2 Program Change ON/OFF...3 Control Change ON/OFF...3 MIDI Data Format...
Chapter 2: Basic Operation...17
 Chapter 1: Introduction...1 Top Panel...1 Front Panel...7 Rear Panel...8 Bottom Panel...9 Output Connectivity Example...10 Analog Input Connectivity Example...10 Digital Connectivity Example...11 USB Connectivity...11
New Features in Digital Performer 5.13
 New Features in Digital Performer 5.13 OVERVIEW This document provides late-breaking information about new features in Digital Performer 5.13 not covered in the DP5 manuals. Current system requirements.....................................
Digitakt OS 1.07 Release Information
 Digitakt OS 1.07 Release Information Elektron Music Machines March 9, 2018 How to upgrade: Upgrading from within the OS Select SYSTEM in the SETTINGS menu, and then select OS UPGRADE. Send the SysEx firmware
Axiom DirectLink for Reason and Record User Guide
 User Guide Legal Notices This guide is copyrighted 2010 by Avid Technology, Inc., with all rights reserved. Under copyright laws, this guide may not be duplicated in whole or in part without the written
Grandstage 88/73 MIDI Guide
 Grandstage 88/73 MIDI Guide E 1 Table of contents MIDI settings----------------------------------------------------------------------------------------2 About MIDI--------------------------------------------------------------------------------------------2
Mono/Fury. VST Software Synthesizer. Version by Björn Full Bucket Music
 Mono/Fury VST Software Synthesizer Version 1.1 2010-2016 by Björn Arlt @ Full Bucket Music http://www.fullbucket.de/music VST is a trademark of Steinberg Media Technologies GmbH Mono/Poly is a registered
Something you should know before using the MIDI Functions
 Preface Congratulations on purchasing the MIDIPLUS-61 master MIDI controller keyboard. It is one of the finest products made of its kind after users of resaerch into what customers require form a MIDI
Autodafe. OSCar for Kontakt V1.0
 Autodafe OSCar for Kontakt V1.0 MAIN SYNTHESIZER WINDOW 2 ARPEGGIATOR WINDOW 8 GLIDE - UNISONO WINDOW 9 INSTALLATION 10 COPYRIGHT INFO 12 Main Synthesizer Window GENERAL INFO Autodafe OSCar is a recreation
DOEPFER SYNTHESIZER SEQUENCER INTERFACES.
 DOEPFER SYNTHESIZER SEQUENCER INTERFACES 2015-01 DOEPFER DARK ENERGY II Monophic Analog Synthesizer with USB and Midi Interface As the Dark Energy I had to be discontinued because an important electronic
INSTRUCTIONS FOR MIDI INTERFACE
 INSTRUCTIONS FOR MIDI INTERFACE MICROMOOG USING THE MIDI INTERFACE - - - When you turn on the synthesiser for the first time, you will be in omni-on mode for receive (all channels). When you select a receive
Kameleono. User Guide Ver 2.1
 Kameleono Ver 2.1 Table of Contents Overview...4 MIDI Processing Chart...5 Kameleono Inputs...5 Kameleono Core...5 Kameleono Output...5 Getting Started...6 Installing...6 Manual installation on Windows...6
Aeolian Meditation. User Manual. All that we see or seem is but a dream within a dream. - Edgar Allan Poe
 Aeolian Meditation User Manual All that we see or seem is but a dream within a dream. - Edgar Allan Poe The ultimate soundscape generator. Pure and meditative or an alien landscape. Ocean waves or an industrial
Mono/Fury. VST Software Synthesizer. Version by Björn Full Bucket Music
 Mono/Fury VST Software Synthesizer Version 2.1 2010-2017 by Björn Arlt @ Full Bucket Music http://www.fullbucket.de/music VST is a trademark of Steinberg Media Technologies GmbH Windows is a registered
Digitakt OS 1.10 Release Information
 Digitakt OS 1.10 Release Information Elektron Music Machines June 29, 2018 How to upgrade: Upgrading from within the OS Select SYSTEM in the SETTINGS menu, and then select OS UPGRADE. Send the SysEx firmware
MIDIPLUS ORIGIN 37. Owner's Manual
 MIDIPLUS ORIGIN 37 Owner's Manual Preface Congratulations on purchasing the MIDIPLUS ORIGIN 37 master MIDI controller keyboard. It is one of the finest products of its kind, made after etensive research
WAVES ELEMENT USER GUIDE
 WAVES ELEMENT USER GUIDE TABLE OF CONTENTS CHAPTER 1 INTRODUCTION...3 1.1 Welcome...3 1.2 Product Overview...3 1.3 Concepts and Terminology...4 1.4 Components...5 CHAPTER 2 QUICK START GUIDE...6 CHAPTER
StepPolyArp Unit. Step Polyphonic Arpeggiator / Sequencer App & Audio Unit MIDI effect for ios
 StepPolyArp Unit Step Polyphonic Arpeggiator / Sequencer App & Audio Unit MIDI effect for ios Presentation... 1 Application setup... 2 MIDI connections between ios applications... 2 MIDI over WiFi on macos...
CV Arpeggiator Rev 2 Build Documentation.
 CV Arpeggiator Rev Build Documentation. Last updated 8-0-03 The CV Arpeggiator is a modular synth project used for creating arpeggios of control voltage. It utilizes a custom programmed PIC 6F685 micro
USB / MIDI / CV KEYBOARD CONTROLLER
 USB / MIDI / CV KEYBOARD CONTROLLER 1. MAX49 2. AC 3. USB 4. CD (Vyzex AKAI CONNECT ) 5. DVD (Ableton Live Lite Akai Edition) 6. () AC () () () () 1. CD CD 2. : Windows : CD Vyzex installer (.exe) Mac:
Firmware Version 1.60 User s Guide
 MZ-X500 EN MZ-X300 Firmware Version 1.60 User s Guide MZX500/300-160-E-1A 1 Updates Provided by Firmware Version 1.10 Firmware changes provided by Version 1.0X are those described below. Addition of a
Sounds of the Delta Kontakt instrument.
 Sounds of the Delta Kontakt instrument. INDEX 1...How to Install/Load presets. 2...Overview of instrument. 3...Sequencer 4...Effects section and controls. 5...Credits. Thank you for buying our latest Kontakt
2006 ROLAND CORPORATION
 sampling groovebox Model: MC-808 MIDI Implementation Date: December. 14, 2006 Version: 1.00 1. Receive data (Sound Source Section) Channel Voice Messages Note off 8nH kkh vvh 9nH kkh 00H kk = note number:
INSTALLATION. UNDERSCORE is a sample library for Native Instruments Kontakt 5.3 and later. It will NOT work with the free Kontakt Player.
 INSTALLATION UNDERSCORE is a sample library for Native Instruments Kontakt 5.3 and later. It will NOT work with the free Kontakt Player. Before loading any of the instruments in the Instruments folder,
Konarie REASON RACK EXTENSION SYNTHESIZER WITH OPTIONAL HARDWARE CONTROL. 1
 Konarie REASON RACK EXTENSION SYNTHESIZER WITH OPTIONAL HARDWARE CONTROL 1 www.konarie.com Introduction The Konarie chirp is a sample based Rack Extension synthesizer instrument made exclusively for the
Modal SKULPTsynthesiser Polyphonic Virtual Analogue Synthesiser. User Manual. OS Version - 1.6
 Modal SKULPTsynthesiser Polyphonic Virtual Analogue Synthesiser User Manual OS Version - 1.6 1 Important Safety Information WARNING AS WITH ALL ELECTRICAL PRODUCTS, care and general precautions must be
mlab OB-SX MIDIcontrol R.MEURER
 mlab MIDIcontrol R.MEURER MIDIcontrol REV.3C 207-05-0 is a plug & Play MIDI-Interface for The OBSX 37Pin COMPUTER PORT. All parameters are editable in Real Time via MIDI c ontroller change messages. This
Worlde TUNA MINI MIDI Controller User s Manual
 HANGZHOU WORLDE DIGITAL PIANO CO.,LTD WEBSITE: WWW.WORLDE.COM.CN EMAIL:SALES@WORLDE.COM.CN TEL:86 571 88730848 Worlde TUNA MINI MIDI Controller User s Manual -1- Contents 1. INTRODUCTION... 3 2. FEATURES...
Owner s Manual 取扱説明書 Bedienungsanleitung Mode d emploi Manuale dell'utente Manual del usuario Manual do Proprietário Gebruikershandleiding
 Owner s Manual 取扱説明書 Bedienungsanleitung Mode d emploi Manuale dell'utente Manual del usuario Manual do Proprietário Gebruikershandleiding JD-XA Structure Diagram Analog Part 04 Analog Part 03 Analog Part
CLP-370/340/330 CLP-S308/S306
 CLP-370/340/330 CLP-S308/S306 MIDI Data Format / MIDI-Datenformat / Format des données MIDI / Formato de datos MIDI MIDI Channel Message : Can be transmitted and recognized. : Cannot be transmitted by
ControlKey 49, ControlKey 61, ControlKey 88 MIDI keyboard
 ControlKey 49, ControlKey 61, ControlKey 88 MIDI keyboard user manual Musikhaus Thomann Thomann GmbH Hans-Thomann-Straße 1 96138 Burgebrach Germany Telephone: +49 (0) 9546 9223-0 E-mail: info@thomann.de
R3 Main Features. R3 Connections 2
 EasyStart R3 Main Features MMT (Multi Modeling Technology): The R3 offers a wide range of synth waveforms and oscillator algorithms Powerful 16-channel Vocoder with Formant Motion recording Up to five
PROGRAMMER OPERATIONS MANUAL
 MODEL 700 PROGRAMMER OPERATIONS MANUAL Sequential Circuits Inc. 1979 PDF Version by the Emulator Archive 2002 PROGRAMMER OPERATIONS MANUAL 1.0 Operation The Model 700 Programmer consists of two envelope
Supplementary Manual
 MUSIC SYNTHESIZER Supplementary Manual Contents New Functions in MONTAGE Version 1.60... 2 Additional New Effect Types... 3 Additional New Performances... 4 Motion Control... 5 Common/Audio Edit (Common/Audio)...
User Manual. Manual Sections. Download a PDF version of the manual here: carbon-manual.pdf
 CARBON User Manual Download a PDF version of the manual here: carbon-manual.pdf Manual Sections Introduction Precautions Getting Started User Interface Sequencer Song Mode Arpeggiator Loading and Saving
x0xb0x Bassline Synthesizer ( Sokkos OS ) User Manual
 User Manual") x0xb0x Bassline Synthesizer ( Sokkos OS 1.9.1 ) User Manual Contents Synthesizer Section 1. Knobs, buttons & LED s 1.1 Function knob 1.2 Bank knob 1.3 Tempo knob & LED 1.4 Bank LED s 1.5 Buttons & LED
x0xb0x Bassline Synthesizer ( Sokkos OS 1.9.1 ) User Manual Contents Synthesizer Section 1. Knobs, buttons & LED s 1.1 Function knob 1.2 Bank knob 1.3 Tempo knob & LED 1.4 Bank LED s 1.5 Buttons & LED
Portable Music Studio
 Everything you need, all in one. いつでも どこでも 作曲 Instruction Manual (08-2018) Portable Music Studio 1 Contents Features... 3 Basic Controls...4 - Menus and saving.. 5 Pattern Mode... 6 Global Pattern Settings...7
MIDIPLUS Co, Ltd.
 MIDIPLUS Co, Ltd. http://www.midiplus.com.tw Preface Congratulations on purchasing the MIDIPLUS Classic 25/49 master MIDI controller keyboard. It is one of the finest products of its kind, made after etensive
PEDSCAN rev. C. standalone micro MIDI controller USER MANUAL
 PEDSCAN rev. C standalone micro MIDI controller USER MANUAL www.midi-hardware.com Roman Sowa 2016 1 Overview This little board is standalone controller for 32 keys and 1 potentiometer or external voltage
CZPL PATCH LIBRARY OWNER S MANUAL
 CZPL PATCH LIBRARY OWNER S MANUAL Firmware Version 4.05 This manual is a complete guide to using your CZPL for the Casio CZ series. Your CZPL is also a fully functional PL88 Universal Patch Library. For
DATA LIST Daten-Liste Liste des données Lista de datos
 DATA LIST Daten-Liste Liste des données Lista de datos EN DE FR ES MIDI Data Format / MIDI-Datenformat / Format des données MIDI / Formato de datos MIDI MIDI Channel Message : Can be transmitted and recognized.
Workshop. Automation ÂØÒňΠMV-8000
 ÂØÒňΠMV-8000 Workshop Automation 2006 Roland Corporation U.S. All rights reserved. No part of this publication may be reproduced in any form without the written permission of Roland Corporation U.S.
Written by Jered Flickinger Copyright 2013 Future Retro
 Written by Jered Flickinger Copyright 2013 Future Retro www.future-retro.com TABLE OF CONTENTS 1 INTRODUCTION - Overview - Precautions - Disclaimer - Warranty 2 CONNECTIONS - MIDI In - MIDI Thru - MIDI
Supplementary Manual. Contents MUSIC SYNTHESIZER. New Functions in MONTAGE Version New Functions in MONTAGE Version
 MUSIC SYNTHESIZER Supplementary Manual Contents New Functions in MONTAGE Version 2.00... 2 Additional New Performances...3 Common/Audio Edit (Common/Audio)...4 Part Edit (Edit)...6 Utility...7 Envelope
PSP Rhythm User s Manual
 PSP Rhythm User s Manual Introduction pg. 02 Main Menu pg. 03 Button Icon Legend pg. 03 User Interface pg. 04 Pattern View pg. 05 Track View pg. 07 Wave View pg. 09 Effects View pg. 11 Song View pg. 14
PX-3 MIDI Implementation
 PX-3 MIDI Implementation CASIO COMPUTER CO., LTD. Contents Part I MIDI Message Overview 1 Product Configuration as a MIDI Device... 6 1.1 System Section... 6 1.2 Sound Generator Section... 6 1.2.1 Sound
Version 2.0 Release Notes for Kurzweil Mark 150/10 & Young Chang DG 150
 Version 2.0 Release Notes for Kurzweil Mark 150/10 & Young Chang DG 150 This document describes the changes and new features that are part of version 2.0 software for the Kurzweil Mark 150/10 and Young
About this manual. Conventions in this manual. The manuals and how to use them
 Operation Guide E 1 Thank you for purchasing the Korg KROSS music workstation. To ensure trouble-free enjoyment of your new instrument, please read this manual carefully and use the product as directed.
User Guide. English. Manual Version 1.0
 User Guide English Manual Version 1.0 Table of Contents (Click a chapter/section to skip to it.) Introduction... 5 Box Contents... 5 Support... 5 About This User Guide... 5 Initial Setup... 6 1. Software/Driver
DMPro Midi Sysex Specification v /25/99
 DMPro Midi Sysex Specification v. 1.00 01/25/99 This document contains the system exclusive documentation for the DMPro SYSTEM EXCLUSIVE FORMAT...2 OPCODE SUMMARY:...2 OPCODES:...3 00h - MIDI User Drum
User Manual for the Devil Fish MIDI In system V1.0.4
 User Manual for the Devil Fish MIDI In system V1.0.4 Robin Whittle 7 February 2016 www.firstpr.com.au/rwi/dfish/ (There are separate manuals for the V1.0.0 to V1.0.3 MIDI In systems and for the MIDI In
Contents. Overview...3. Song Editor Clip Editor Browser and Rytmik Cloud Keyboard Controls Support Information...
 User Manual Contents Overview...3 Song Editor...4 Clip Library...4 Song Playback...4 Tracks...5 Export...5 Clip Editor...6 Note Sequence...6 Instrument...7 Instrument Effects...7 Tempo Setting...8 Other
PCR-300_500_800_e.book 1 ページ 2007年2月28日 水曜日 午後7時10分 Owner s Manual
 Owner s Manual Contents Names of things and what they do...4 Panel... 4 Side panel... 7 Using control maps...8 What is a control map?... 8 Control maps and the current memory... 8 Switching control maps...
Main Features. 8 Assignable Knobs Deliver Real-time Control of Your Musical Software
 Table of Contents Main Features... 3 Preparation... 4 Using a Wireless Connection... 4 Using a USB Connection... 5 Software setup... 6 Functions and Operation of Controls... 7 Keyboard... 8 Touchpad...
Gotharman s FuZioN. Music WorkStation. User Manual V 10.60
 Gotharman s FuZioN Music WorkStation User Manual V 10.60 Contents Of This Manual Introduction 5 Very special thanks to 7 Getting Started 8 Structure 14 User Interface 16 Preset Select Screen 19 Synth Triggers
Machines for Musicians. Modal Electronics 008R 8 voice polyphonic analogue synthesiser. User Manual. OS Version
 Machines for Musicians Modal Electronics 008R 8 voice polyphonic analogue synthesiser User Manual OS Version - 1.02-02 1 Important Safety Information WARNING AS WITH ALL ELECTRICAL PRODUCTS, care and general
What s needed is a reasonably priced, versatile, low-hp module that can effectively bridge the gap between MIDI and CV.enter, the Mutant Brain!
 The Mutant Brain 16 output MIDI to trigger, gate, polyphonic cv and more Thank you for your interest in/purchase of the Mutant Brain. We would like to thank you for considering a place for the Mutant Brain
Show Designer 1. Software Revision 3.11
 Show Designer 1 Software Revision 3.11 OVERVIEW The Show Designer 1 is a lighting controller based on the successful and simple to use Show Designer. The Show Designer 1 adds to the existing features of
AdrenaLinn III MIDI Implementation Version Software
 AdrenaLinn III MIDI Implementation Version 3.0.0 Software Channel Mode messages Document revision data: Wednesday, August 01, 2007 Status Second Third Description 1001 nnnn 0kkkkkkk 0vvvvvvv Note On; nnnn