Drum Machine Manual V1.2.0
|
|
|
- Lucy Carroll
- 5 years ago
- Views:
Transcription

1 Drum Machine Manual V1.2.0 Rugged Circuits and Wusik Dot Com 2011


2 Welcome to Beat707 Arduino Shield This board requires an Arduino Board plugged on the bottom of the Beat707, you can also use a NetDuino or FEZ Panda, but currently there s no software design for the.net platform. You can use an Arduino 2009, Uno or Mega boards, which features compatible software to run with. Step 1 The first step we will take is to plug the Arduino Board and power up the device. We will not discuss any Arduino related information here, we will use another document for that. So, if you are new to the Arduino and just received your Beat707, be sure to read the Beat707 Arduino Introduction first. Top of the Beat707 Board Arduino Connection Headers Bottom of the Beat707 Board

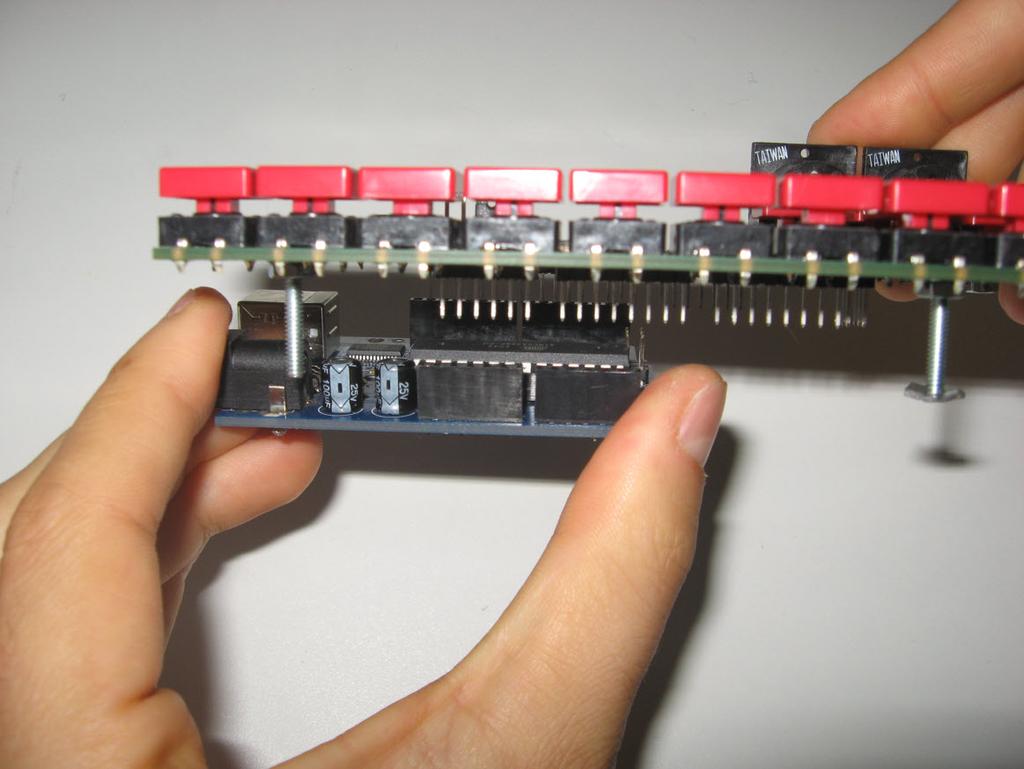
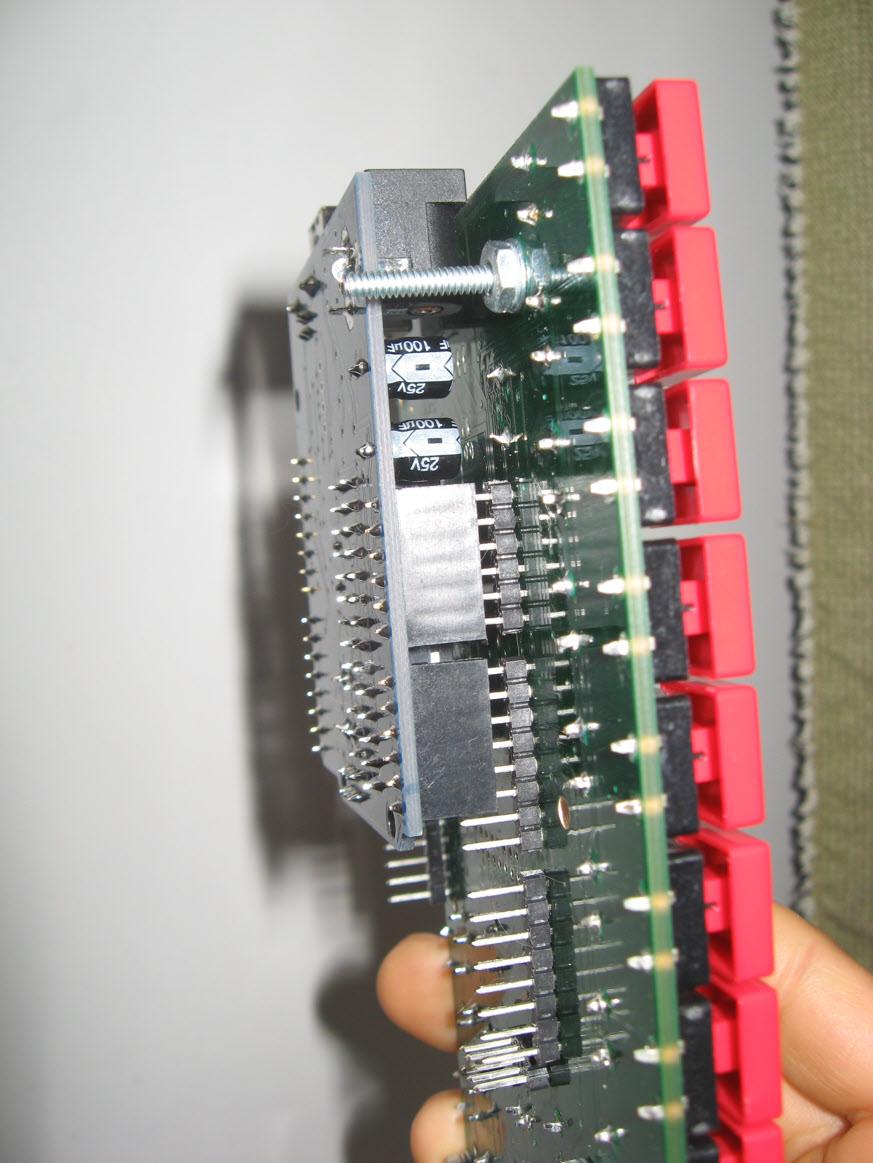
3 Arduino Connection


4 Power Up and you are ready to go... (if you already flashed your Arduino with the Software)


5 Pattern Mode Interface When you power up the device, the first mode it enters is the Pattern Mode. Be sure to check what each navigation key does, so you can start up quickly and easy. Cursor Indicator Play Stop Record Shift / OK Up / Down / Left / Right The Cursor Indicator tells you where you are, we call it a Zone. In Pattern Mode we have several zones to edit. The Next / Right keys will navigate between zones. The Up / Down will change a Zone selection value, or when required, a Shift will act as OK.
6 List of Zones while in Pattern Mode: 1. Pattern Selector - Up / Down will select the next playing pattern while the Clock is running. Otherwise the change is instant. Here you also select patterns A and B when AutoStepsEdit is Off or the Clock is not running. 2. BPM (Tempo) Selector (Beats Per Minute) 3. Track Selector: T 01 to 14 + Synth Track 1, 2 (S1/S2) and Accents Tracks 1 and 2. (A1/A2) - Note that by default you can hit Shift + Step buttons to go directly to any track. 4. Midi Note Number - When in a regular Track (01 to 14) you get the select which note number is output when this track Step is played. A1/A2 tracks has no option here, S1/S2 tracks let you chose the current editing step note. 5. Track Selector again, just like Zone #3. 6. Midi Channel selector for the current selected Track. By default all Drum tracks are set to Midi Channel 10 and Synth Tracks to Channels 1 and 2. But this can be changed and saved in the Setup/Song. (anytime you hit Play, Stop or change a pattern, the system checks what was changed and saves to the internal EEPROM memory, which is retained even if power is lost) 7. Speed Mode: 1/16 or 1/ Midi Clock Sync Mode: None, Slave or Master. 9. Auto Steps Editing: On / Off. When On, the system will always let you edit the current A / B playing pattern. When Off, you get to select if you want to edit A or B by using the Up / Down keys in the Pattern Selector. (Zone #1) 10. Mirror Editing Mode: On / Off. When you select this mode, any changes done in the Steps will effect both A and B patterns in a flip-flop mode. For example, if Pattern A Step #1 has a Step, but Pattern B Step #1 has no Step, and you hit Step Button #1, it will flip the result of each Patterns A and B Step #1. In normal situations you would just use this to quickly create a pattern, turn Off this feature and add changes to Pattern B, getting a 32 step pattern done very quickly. A shortcut for this feature is to slowly click twice the Shift key. The cursor will change to a X instead of the regular > indication that this feature is currently On. 11. Midi Clock Shuffle: 00 = Off, anything above 0 will start shuffling the Midi Clock, which produces a Swing Type Effect to the notes. 12. GoTo: another mode, just select with Up / Down and click Shift / Ok to change the mode. A shorcut is to press Left + Right at the same time, this will change to the next mode which would be the Song Mode in this case.
7 Shift Function while in Pattern Mode: Quick Shift: (when Record is Not On) turns On / Off the extra hidden 1/32 (or 1/64, depending on the selected speed mode) steps editing. The A / B pattern indicator will show a small dot at the top of the A / B letter. This indicates that you are now editing the in-between 1/32 (or 1/64) extra steps. Just do a quick test to understand what this does: start with a blank pattern, add all closed hihat steps, now hit shift and release quickly, the A / B pattern will show a small dot, now add, for example, steps 13, 14, 15 and 16 and hear the result. In total a pattern holds 64 steps, 32 for A and 32 for B, while 16 is the regular steps and 16 are the hidden 1/32 (or 1/64) in-between steps. When you have Record On, Quick Shift will just Show/Hide the Beat Indicator. Hold Shift: when you hold the Shift Key, you can use Up / Down to select different options. If you hit Record while holding the Shift Key, you can release and it will stick. When you want to un-stick, just press Record again. Below are the multi options for when you hold the Shift Key. While holding Shift, press any of the 16 Steps Buttons. ü Direct Track Selector - The last 2 Step Buttons: #15 and #16 allows you to select a Synth or Accent Track. Just press twice for Accent Tracks or once for Synth Tracks. ü Mute Tracks - Steps #15 and #16 are the Synth Tracks 1 and 2. ü Solo Tracks - Same for the Mute Tracks option. Clicking twice will turn Solo Off. ü Init Pattern - when you release Shift its going to ask to press Shift again to confirm. If you want to cancel, just wait 12 seconds to abort. ü Copy Pattern - this will copy the current pattern to a special area of the EEPROM, so you copy a pattern from a Song, load a different Song, and paste the Pattern. Just release Shift to confirm. ü Copy Pattern Accents - same as above, but will copy only the accent-steps of a pattern. ü Paste Pattern - this will copy back any pattern stored in the EEPROM special Copy/Paste area. You will need to hit Shift again to confirm, or wait 12 seconds to abort. ü Paste and Merge Pattern - this will merge the current pattern with a copy you stored previously in the EEPROM memory. (with the Copy Pattern function) Slow Double Shift Click: toggles Pattern Mirror Editing On/Off. Shift + Left: goes directly to Zone #1 Shift + Right: goes directly to Zone #12
8 List of Key Shortcuts: Left + Right = Go to the Next Mode: Pattern -> Song -> File -> Pattern ->... Stop while Midi Clock not running = flips patterns A and B editing. Record Mode: When Record is selected you can use the Step Buttons to play Notes and Record in the Pattern while the Midi Clock is Playing. Quick Shift will hide / display the Beat Indicator. Keep in mind that there s no Undo function, so be sure to make a copy of your pattern before recording. In the future we may introduce an Undo feature for the Record option. Synth Tracks: (S1/S2) When editing a Synth Track, the Step Buttons will select which Step will be edited. Pressing a Step more than once will rotate from: No-Note, (None) Previously Edited Note Number, Current Note-Number Slide. By pressing Up/Down while in Zone #4 you get to change the note number. When a step has No-Note (None) you can press Up to select Note-Off, which will stop the previously playing note. If you keep pressing Up it will start going up in the note numbers. Any note number set will be used for the next steps double-click. (if a step is not set) Keep in mind that unless you set a Note-Off in a step, the previous note will keep playing until a new note is set or Stop is hit. Velocity is set by the Accent tracks, just like with regular Drum Steps. (Tracks 01 to 14) Accent Tracks: (A1/A2) Beat707 has 2 Accent Tracks, getting you a total of 4 different velocity values for each step. None, A1, A2 and A1+A2, which results into the following velocities: 87, 107, 107, 127. (you can tweak the code to get different results)

9 Song Mode Interface This is the next Mode, where you can arrange Patterns in any playing order you want. You also have the option to Repeat a pattern N number of times and also Loop the entire Song. List of Zones while in Song Mode: 1. Song Pattern Position: you have up to 99 positions, each position is a pattern # and repeat value. 2. BPM (Tempo) Selector: (Beats Per Minute) this is global and also used by the Pattern Mode. 3. Pattern Selector: just use Up / Down to select patterns. Selecting End will stop the song and Lop will Loop the entire Song. 4. Repeat Selector: just use Up / Down to set the number of times this pattern will repeat itself before going to the next Song Pattern Position. 5. GoTo Next Mode Selector. (See Pattern Mode Zone #12) List of Key Shortcuts: Left + Right = Go to the Next Mode: Song -> File -> Pattern ->... Stop while Midi Clock not running = returns Song Position to Start (01) and Zone Editing to Zone #1. Record = Edits the current playing Pattern. Just hit Left + Right to go back to Song Mode in the current Song Pattern Position. (where you left) Shift + Left = Previous Song Position / Shift + Right = Next Song Position

10 File Mode Interface This is the next Mode, where you can work with the internal Songs Memory, which are saved in a special Flash Chip. Currently V1.2.0 holds up to 21 Songs in the Flash Memory. Here you can do the following tasks with each Song: Load, Save, Dump to Midi and Erase. List of Zones while in File Mode: 1. Song # Selector: you have up to 21 Song Memory Locations in the internal Flash Memory. 2. Task Selector: Load, Save, Dump to Midi, Erase. Hit Shift / Ok to execute the task. 3. Song Name Editor: click Shift / Ok to edit. To exit, scroll at the edges of the name with the Left or Right navigation keys until it exits editing mode. (the > cursor will be back) Shift will toggle Uppercase or Lowercase; if in an empty space or with anything lower than a letter A, it will turn the character into a letter A. Holding Shift will clear the space. 4. System Exclusive Midi ID Selector. (SysEx ID) This is the number used while sending a Midi SysEx Dump. (in case you have more than one Beat707 units connected via Midi to a SysEx device, such as a Computer or Midi Storage unit) 5. System Initiation: this will erase everything in the unit and put back the factory memory. You will need to confirm twice with the Shift key before proceeding. This usually takes less than 1 minute to complete. By default an Empty Song will be stored in the Song Flash Memory and any other stored Song will be erased. 6. GoTo Next Mode Selector. (See Pattern Mode Zone #12) List of Key Shortcuts: Left + Right = Go to the Next Mode: Song -> File -> Pattern ->...
EM-1 Main Features. EasyStart CONTENTS
 EasyStart EM-1 Main Features Pattern performance with emphasis on realtime operation All functions are right on the surface, with no menus or pages to slow you down! Familiar 16-step key interface to build
Digitakt OS 1.07 Release Information
 Digitakt OS 1.07 Release Information Elektron Music Machines March 9, 2018 How to upgrade: Upgrading from within the OS Select SYSTEM in the SETTINGS menu, and then select OS UPGRADE. Send the SysEx firmware
MV-8000 Production Studio. When asked So what s up with the new MV-8000? Here are the opening points to hit The MV-8000 has:
 The Main Points When asked So what s up with the new MV-8000? Here are the opening points to hit The MV-8000 has: Integrated Sampling, MIDI Sequencing, and Audio Recording 2 Samplers In One High Quality
Digitakt OS 1.06 Release Information
 Digitakt OS 1.06 Release Information Elektron Music Machines February 12, 2018 How to upgrade: Upgrading from within the OS Select SYSTEM in the SETTINGS menu, and then select OS UPGRADE. Send the SysEx
Digitakt OS 1.10 Release Information
 Digitakt OS 1.10 Release Information Elektron Music Machines June 29, 2018 How to upgrade: Upgrading from within the OS Select SYSTEM in the SETTINGS menu, and then select OS UPGRADE. Send the SysEx firmware
Using Panorama with Bitwig Studio
 www.nektartech.com www.nektartech.com Using Panorama with Bitwig Studio Bitwig Studio Integration Setup and Configuration The Panorama Bitwig Studio Integration is compatible with Bitwig Studio 1.3.5 and
EasyStart. EMX1 Main Features. EasyStart CONTENTS
 EasyStart EMX1 Main Features ValveForce Technology adds tube warmth using two 12AX7 tubes with a separate gain knob. MMT Technology with 16 different types of synthesis for totally new and dynamic sounds.
Crazy8 User Manual Mar 2017
 Crazy8 User Manual Mar 2017 Welcome! Welcome to Crazy8, your crazy companion to handle all your sequencing needs! Be sure to check out the walkthrough videos on the Crazy8 page Twisted-electrons.com/crazy8
Procussion operation manual Basic Operation 15 BASIC OPERATION
 Basic Operation 15 BASIC OPERATION 16 Main Controls 17 BASIC OPERATION MAIN CONTROLS MIDI ACTIVITY EDIT MENU SELECT CURSOR CONTROL VOLUME CONTROL I/O MASTER EDIT ENTER C01 Vol127 Pan=K CURSOR DATA VOLUME
User Manual. Drum Machine
 User Manual Drum Machine Overview Interface Overview Interface 1 Nithonat s interface is split into three parts: Internal sequencer Responsible for editing patterns in Int.Seq. mode. Internal sequencer
Tracktion Shortcut Keys
 Tracktion Shortcut Keys General Flip between edit/project screens Go to project screen Go to edit screen Go to settings screen escape, ctrl + tab F1 F3 F2 Show colour-scheme editor window Save the current
MACROS by Bevoss. Because of the 6 action limit, I had to spread this over 2 macros.
 MACROS by Bevoss (Caveat - Some of these may depend on my preference settings, ie I set the cursor to go to the start of loop selections when changed, in Prefs-Audio-Playback-seek on loop selection change,
Version 2.0 Release Notes for Kurzweil Mark 150/10 & Young Chang DG 150
 Version 2.0 Release Notes for Kurzweil Mark 150/10 & Young Chang DG 150 This document describes the changes and new features that are part of version 2.0 software for the Kurzweil Mark 150/10 and Young
PS04 Pattern Editor. Last Update: Feb,
 PS04 Pattern Editor www.soundside.de Last Update: Feb,12 2004 Index 1. Introduction. 2. Overview of the Pattern Editor. 3. Setting up the Pattern Editor. 4. Loading and playing a Rhythm Pattern in the
Using Impact LX with Reason
 Using Impact LX with Reason Applicable to Impact LX25, 49, 61 & 88 www.nektartech.com www.nektartech.com Using Impact LX with Reason Reason Integration Setup and Configuration The Impact LX Reason Integration
Chaos Culture. Multiclip Editor / Multiclip Note preview 1.5. Edited by Jason Cowling
 Chaos Culture Introduction... 2 Important stuff... 2 Setup... 3 Editing clips... 4 Using the editor... 5 Settings... 9 Workflow settings... 10 Performance... 13 Future updates... 13 Editor 1.6.61 / Note
REAL WORLD INTERFACES
 REAL WORLD INTERFACES Hardware and Software Design and Consulting rw@firstpr.com.au http://www.firstpr.com.au/rwi/ 5 December 2010 midi-808-rwi.pdf This is a copy of my documentation from July 1996 of
MOOG SUB 37 - FIRMWARE UPDATE UPDATE INSTRUCTIONS FOR WINDOWS (Skip to the next section for Mac OSX instructions)
") MOOG SUB 37 - FIRMWARE UPDATE 1.2.0 WHAT YOU WILL NEED A computer A program for sending MIDI SysEx data to your Sub 37. We recommend Bome SendSX for Windows, or SysEx Librarian for Macintosh. DOWNLOAD
MOOG SUB 37 - FIRMWARE UPDATE 1.2.0 WHAT YOU WILL NEED A computer A program for sending MIDI SysEx data to your Sub 37. We recommend Bome SendSX for Windows, or SysEx Librarian for Macintosh. DOWNLOAD
Operator's Manual MIDI PRODUCTION CENTER. Software version 3.1 WARNING SOFTWARE UPDATE
 SOFTWARE UPDATE MIDI PRODUCTION CENTER Software version 3.1 WARNING To prevent fire or shock hazard, do not expose this appliance to rain or moisture. Operator's Manual New Features of Version 3.1 Saving
1. Welcome to System 9 Pattern Sequencer
 Version 1.5 1. Welcome to System 9 Pattern Sequencer We would like to welcome you to our new Rack Extension, System 9! A multi pattern sequencer for the Reason Rack! About a year ago, in early 2014, we
MIDI Player Pro v1.3.0 basic users guide By Hans Petter Selasky, November 2015
 MIDI Player Pro v1.3.0 basic users guide By Hans Petter Selasky, November 2015 1. Device configuration Before you can start using MIDI Player Pro you need to select the «Config» tab and press the «DEV»
FaderPort 8 8-channel Production Controller
 FaderPort 8 8-channel Production Controller www.presonus.com English Table of Contents 1 Overview 1 1.1 Introduction 1 1.2 About this manual 1 1.3 FaderPort 8 Features 2 1.4 Studio One Artist Features
QUICK-START GUIDE ROLAND DJ-808
 QUICK-START GUIDE ROLAND DJ-808 Installation and Setup The Roland DJ-808 requires drivers for both Windows and MacOS operating systems. IMPORTANT NOTE: Please ensure you have the latest available drivers
LiveProfessor 2. User Manual. Rev audiostrom.com
 LiveProfessor 2 User Manual Rev 1.0 - audiostrom.com Contents Introduction 4 System Requirements 4 License files 4 First Run 5 Installing Plugins Plugin Manager Audio Settings MIDI Inputs 7 Replacing A
nativekontrol PXT-Live User Manual Version 1.1.5
 nativekontrol PXT-Live User Manual Version 1.1.5 1 CHANGES IN THIS VERSION 2 GENERAL OVERVIEW 3 SETUP 3.1 Installing PXT-Live 3.2 Live Settings 3.3 UserPreferences 4 GLOBAL CONTROLS 4.1 Buttons/Pedals
DER OTO. With this firmware revision, you can use your Biscuit as a standard one (Revision 1.2) or as Der OTO.
 or as Der OTO.") User Manual Rev 2.3 February 2012 1 DER OTO PRESENTATION Der OTO is the new Biscuit firmware (revision 2) and turns your Biscuit into a monophonic synth. You can play Der OTO with a standard MIDI keyboard,
User Manual Rev 2.3 February 2012 1 DER OTO PRESENTATION Der OTO is the new Biscuit firmware (revision 2) and turns your Biscuit into a monophonic synth. You can play Der OTO with a standard MIDI keyboard,
User Manual V
 By User Manual V1.0 http://polyversemusic.com/support support@polyversemusic.com Gatekeeper User Manual Table of Contents Getting Started 4 Installation 4 Presets 5 With or Without MIDI? 5 Ableton Live
Chapter 2: Basic Operation...17
 Chapter 1: Introduction...1 Top Panel...1 Front Panel...7 Rear Panel...8 Bottom Panel...9 Output Connectivity Example...10 Analog Input Connectivity Example...10 Digital Connectivity Example...11 USB Connectivity...11
KARMA Motif Getting Started
 KARMA Motif Getting Started Revision 07-Oct-2014 by Stephen Kay www.karma-lab.com Prerequisites Please perform the steps in the Installation and First Launch tutorial before beginning this one. Note: the
Using the 01X with Cubase SX 3. To all 01X users thank you for your continued use of the Yamaha 01X Digital Mixing Studio!
 Supplementary Manual Using the 01X with Cubase SX 3 To all 01X users thank you for your continued use of the Yamaha 01X Digital Mixing Studio! Since the 01X was first released, software programs that can
Using Nektar Impact LX with Cubase & Nuendo
 www.nektartech.com www.nektartech.com Using Nektar Impact LX with Cubase & Nuendo Cubase Integration Installation and Setup The Impact LX Cubase Integration is compatible with Cubase 5, 6, 6.5, 7 and 8,
Chapter 3 User Interface Basics
 Chapter 3 User Interface Basics Mode Buttons Navigation The Display Chapter 3 will show you how to get around the front panel of your K2500. Your interactions can be divided into three primary operations:
LITTLE MIDI MACHINE v3.0
 LITTLE MIDI MACHINE v3.0 Welcome to Little MIDI Machine! This little app will let you turn your ipad into a vintage analog-style step sequencer so that you can use your ipad to control your hardware synthesizers
DMX Revision 3 Firmware / Memory Expansion Owner's Manual Addendum 12/12/83
 DMX Revision 3 Firmware / Memory Expansion Owner's Manual Addendum 12/12/83 The DMX memory expansion board with Revision 3 software makes the DMX a more powerful ally of the composer/performer than ever
TB-303. Software Bass Line Owner s Manual Roland Corporation 01
 TB-303 Software Bass Line Owner s Manual 2019 Roland Corporation 01 Introduction For details on the settings for the DAW software that you re using, refer to the DAW s help or manuals. About Trademarks
RELEASE NOTICE FOR SWAR STUDIO
 RELEASE NOTICE FOR SWAR STUDIO Version 2.0.4 Corrected a problem on El Capitan ( OS X 10.11) where the user interface of the plugins would initially appear empty. This is now solved by an automatic minimize/maximize
Show Designer 1. Software Revision 3.11
 Show Designer 1 Software Revision 3.11 OVERVIEW The Show Designer 1 is a lighting controller based on the successful and simple to use Show Designer. The Show Designer 1 adds to the existing features of
SUPERSWITCHER 2 USER MANUAL V1.2.
 V1.2 www.ecpedals.com Please read all the warnings and installation instructions thoroughly before using this product. Get to know your switcher Safety & Warnings INPUT TUNER OUT INPUT BUFFER FX LOOP SEND
User Manual. Manual Sections. Download a PDF version of the manual here: carbon-manual.pdf
 CARBON User Manual Download a PDF version of the manual here: carbon-manual.pdf Manual Sections Introduction Precautions Getting Started User Interface Sequencer Song Mode Arpeggiator Loading and Saving
v1.5 MIDI Implementation guide
 v1.5 MIDI Implementation guide GURU v1.5 MIDI Implementation guide 2007 FXpansion Audio UK Ltd. In this document: 3 Introduction 3 1: MIDI Channel mapping summary 3 2: A note about Pad MIDI Learn 4 3:
Chaos Culture. MIDI Modulators / Multiclip Note preview 1.6. Edited by Jason Cowling
 Chaos Culture Introduction... 2 Important stuff... 2 Setup... 3 Editing clips... 4 Using the editor... 5 Modulators... 8 Settings... 9 Work$ow settings... 10 Performance... 13 Future updates... 13 1.8.99
Using apps You interact with ipad using your fingers to tap, double-tap, swipe, and pinch objects on the touchscreen.
 Basics 3 Using apps You interact with ipad using your fingers to tap, double-tap, swipe, and pinch objects on the touchscreen. Opening and switching between apps To go to the Home screen, press the Home
Toon Boom Harmony Essentials V15.0
 Essentials Toon Boom Harmony Essentials V15.0 Keyboard Shortcuts Guide TOON BOOM ANIMATION INC. 4200 Saint-Laurent, Suite 1020 Montreal, Quebec, Canada H2W 2R2 +1 514 278 8666 contact@toonboom.com toonboom.com
User Guide. English. Manual Version 1.0
 User Guide English Manual Version 1.0 Table of Contents (Click a chapter/section to skip to it.) Introduction... 5 Box Contents... 5 Support... 5 About This User Guide... 5 Initial Setup... 6 1. Software/Driver
Using Nektar Impact LX with Reaper
 www.nektartech.com www.nektartech.com Using Nektar Impact LX with Reaper Reaper Integration Installation and Setup The Impact LX Reaper Integration is compatible with Reaper 4.59 or later. We recommend
About this manual. Conventions in this manual. The manuals and how to use them
 Operation Guide E 1 Thank you for purchasing the Korg KROSS music workstation. To ensure trouble-free enjoyment of your new instrument, please read this manual carefully and use the product as directed.
Introduction: -The Beat Kangz
 Introduction: Thank you for choosing Beat Thang Virtual as part of your creative process. As artists ourselves, we know how important this decision is. We understand that you have many products to choose
TR-808. Software Rhythm Composer Owner s Manual. Copyright 2018 ROLAND CORPORATION 01
 TR-808 Software Rhythm Composer Owner s Manual Copyright 2018 ROLAND CORPORATION 01 Introduction For details on the settings for the DAW software that you re using, refer to the DAW s help or manuals.
Working with PDF s. To open a recent file on the Start screen, double click on the file name.
 Working with PDF s Acrobat DC Start Screen (Home Tab) When Acrobat opens, the Acrobat Start screen (Home Tab) populates displaying a list of recently opened files. The search feature on the top of the
SMARTClock Gen3. User Manual
 SMARTClock Gen3 User Manual 2 of 9 Revision History: vbeta4 reworked MIDI thru settings added INT interface mode vbeta3 vbeta2 Initial Release SMARTClock Gen3 Quick Start 3 of 9 Thanks for purchasing a
Using The Akai MPC With Ableton Live
 Using The Akai MPC With Ableton Live Written By Andy Avgousti (MPC-Tutor) Copyright Andy Avgousti 2012 Published by MPC-Samples.com 2012 All rights reserved. No part of this book, nor any of its associated
Table of Contents. Introduction 2 1. Intelligent Remote Control 2 2. Charging the Remote Control 3
 Table of Contents Introduction 2 1. Intelligent Remote Control 2 2. Charging the Remote Control 3 Getting Started 6 1. Activating the Remote Control 6 2. Selecting a Device 7 3. Operating a Device 8 4.
Fast response: 0.3 to 0.6 millisecond delay from the end of each MIDI Note On message (2 or 3 bytes) to the start of the drum channel's sound.
 to the start of the drum channel's sound.") TR-808 MIDI In Robin Whittle 17 June 2018 www.firstpr.com.au/rwi/tr-808/ Robin Whittle 2018. TR-808 is a trademark of the Roland Corporation. This is a preliminary version of the manual for the 2018 version
TR-808 MIDI In Robin Whittle 17 June 2018 www.firstpr.com.au/rwi/tr-808/ Robin Whittle 2018. TR-808 is a trademark of the Roland Corporation. This is a preliminary version of the manual for the 2018 version
GCC vinyl cutter, cutting plotter for sign making
 Plotter Setup In "Plotter Setup," you can choose "Plotter List," "Environment," "Pen," and so on. [Plotter list] In this area, you can choose the machine type and set some basic information for your plotter
Using Microsoft Word. Paragraph Formatting. Displaying Hidden Characters
 Using Microsoft Word Paragraph Formatting Every time you press the full-stop key in a document, you are telling Word that you are finishing one sentence and starting a new one. Similarly, if you press
Software Revision 1.13
 Software Revision 1.13 OVERVIEW...1 REAR PANEL CONNECTIONS...1 TOP PANEL...1 MENU AND SETUP FUNCTIONS...3 CHOOSE FIXTURES...3 PATCH FIXTURES...4 PATCH CONVENTIONAL DIMMERS...4 COPY FIXTURE...5 LOAD FIXTURE
Workshop. Automation ÂØÒňΠMV-8000
 ÂØÒňΠMV-8000 Workshop Automation 2006 Roland Corporation U.S. All rights reserved. No part of this publication may be reproduced in any form without the written permission of Roland Corporation U.S.
The Bean Machine For Windows
 The Bean Machine For Windows Contents 1 Introduction... 7 Chapter 1 Installation... 11 Chapter 2 Quick Start... 15 Quick Bean Machine... 16 Quick Bead Box... 16 Quick Chip Box... 17 Quick Funnel... 17
LED Dot Matrix Digital Clock. Instructions. Contents. v (5x7-1x6 Module)
") LED Dot Matrix Digital Clock v1.0.2 (5x7-1x6 Module) Instructions Designer: Yan Zeyuan. China Website: E-mail: yanzeyuan@163.com Contents Attention... 2 Functional Features... 2 Technical Specifications..
LED Dot Matrix Digital Clock v1.0.2 (5x7-1x6 Module) Instructions Designer: Yan Zeyuan. China Website: E-mail: yanzeyuan@163.com Contents Attention... 2 Functional Features... 2 Technical Specifications..
Portable Music Studio
 Everything you need, all in one. いつでも どこでも 作曲 Instruction Manual (08-2018) Portable Music Studio 1 Contents Features... 3 Basic Controls...4 - Menus and saving.. 5 Pattern Mode... 6 Global Pattern Settings...7
User Guide English. Manual Version 1.0
 User Guide English Manual Version 1.0 Table of Contents Welcome to the MPC... 5 System Requirements and Product Support... 5 About This Manual... 6 Important Notes... 7 Installation... 7 MPC Hardware Overview...
New Features in RealBand 2019
 Summary List of New Features New Features in RealBand 2019 There are over 30 new features in RealBand 2018, including... The new toolbar background color and icon set is available. You can select either
MK2 Programmer s Reference Manual
 MK2 Programmer s Reference Manual Version 1.02 Written by Lottie Thomas FFFA001298-03 Focusrite Audio Engineering LTD Table of Contents About this Guide 3 Number Systems and MIDI conventions 3 For Max
MPC1000 Product Overview
 Product Overview Product Description The Akai Professional MPC1000 Music Production Center combines a 64-Track MIDI Sequencer and a 32-voice Stereo Digital Sampler, with 16 velocity and pressure sensitive
MCS3 USB Software for OSX
 MCS3 USB Software for OSX JLCooper makes no warranties, express or implied, regarding this software s fitness for a particular purpose, and in no event shall JLCooper Electronics be liable for incidental
CV.OCD USER MANUAL. CV.OCD has four assignable continuous analog CV outputs and twelve assignable gate/trigger outputs. MIDI-TO-CV
 six4pix.com/cvocd CV.OCD USER MANUAL Introduction CV.OCD is a device which converts MIDI signals to the Control Voltage (CV) and Trigger/Gate signals which are used to control traditional analog synthesizers.
KEYBOARD SHORTCUTS AND HOT KEYS
 KEYBOARD SHORTCUTS AND HOT KEYS Page 1 This document is devoted to using the keyboard instead of the mouse to perform tasks within applications. This list is by no means the "be all and end all". There
Instruction Manual. Astro-AXS580DS
 Instruction Manual Astro-AXS580DS 1 Congratulations! We at Astro Drums would like to congratulate you on the purchase of the Astro AXE580DS Electronic drum kit. The included module, the AXE800DM, is designed
EE261 Computer Project 1: Using Mentor Graphics for Digital Simulation
 EE261 Computer Project 1: Using Mentor Graphics for Digital Simulation Introduction In this project, you will begin to explore the digital simulation tools of the Mentor Graphics package available on the
WAVES CLA UNPLUGGED USER GUIDE
 WAVES CLA UNPLUGGED USER GUIDE Table of Contents Chapter 1 Introduction...3 1.1 Welcome...3 1.2 Product Overview...3 1.3 Concepts and Terminology...4 1.4 A Few Words from CLA...4 1.5 Components...5 Chapter
trapkat VERSION 4.0 SOFTWARE GUIDE
 trapkat VERSION 4.0 SOFTWARE GUIDE ATTENTION Upgrader's Please make sure that you reinitialize your trapkat after installing the new software chip. Your original User Kits will be lost. After reinitializing,
How to use the Advanced Copy/Paste tool in SynthFont2
 How to use the Advanced Copy/Paste tool in SynthFont2 This tool lets you copy, paste, move delete blocks of MIDI events between tracks. You can display this tool by pressing the button Copy/Paste to the
Appendix J: Using Shortcut Keys and Shortcut Menus
 Appendix J: Using Shortcut Keys and Shortcut Menus Introduction This appendix covers shortcuts to many of the menu options, dialog boxes, and commands used in PC-DMIS. Using shortcuts will speed up your
Axiom DirectLink for Cubase User Guide
 Axiom DirectLink for Cubase User Guide Legal Notices This guide is copyrighted 2010 by Avid Technology, Inc., with all rights reserved. Under copyright laws, this guide may not be duplicated in whole or
and close the various Traktor Panels. Setup: click on the setup icon to open the setup dialog. Close: clicking this icon will close TRAKTOR DJ Studio.
 Welcome... TRAKTOR DJ Studio 2 Quick Reference...to TRAKTOR DJ Studio 2, the latest and most advanced version of the software that changed the way DJs think about computers. We ve introduced a number of
CZ PATCH LIBRARY MANUAL
 CZ PATCH LIBRARY MANUAL Firmware Version 2.2 CONNECTION Connect the CZPL as follows: USB POWER If using the USB cord for power, connect to an appropriate USB compliant (5V) power source. POWER If using
GETTING STARTED GUIDE. Features of the SP6
 GETTING STARTED GUIDE This Getting Started Guide will give you a quick overview of the SP6. A full manual with additional information is available from www.kurzweil.com. Features of the SP6 FlashPlay technology
CZPL PATCH LIBRARY OWNER S MANUAL
 CZPL PATCH LIBRARY OWNER S MANUAL Firmware Version 4.05 This manual is a complete guide to using your CZPL for the Casio CZ series. Your CZPL is also a fully functional PL88 Universal Patch Library. For
Word 1 Module 2. Word 1. Module 2
 Word 1 Module 2 Revised 5/1/17 Contents Create a New Document...2 Class Walkthrough 2.1...2 Entering Text into a Document...2 Class Walkthrough 2.2...2 Lines of Text vs. Paragraphs...2 Insertion Point...3
x0xb0x Bassline Synthesizer ( Sokkos OS ) User Manual
 User Manual") x0xb0x Bassline Synthesizer ( Sokkos OS 1.9.1 ) User Manual Contents Synthesizer Section 1. Knobs, buttons & LED s 1.1 Function knob 1.2 Bank knob 1.3 Tempo knob & LED 1.4 Bank LED s 1.5 Buttons & LED
x0xb0x Bassline Synthesizer ( Sokkos OS 1.9.1 ) User Manual Contents Synthesizer Section 1. Knobs, buttons & LED s 1.1 Function knob 1.2 Bank knob 1.3 Tempo knob & LED 1.4 Bank LED s 1.5 Buttons & LED
+ => Pattern Edit Tap mode. + => Config mode (To access the Second page press SHIFT + TEMPO again) => Select pattern to be Played (0 to 15)
 => Select pattern to be Played (0 to 15)") Yocto² user manual Yocto² user manual 1 1. selecting mode => Ptrn Play / Ptrn Edit + => Pattern Edit Tap mode => Track Play / Track Edit + => Config mode (To access the Second page press SHIFT + TEMPO
Yocto² user manual Yocto² user manual 1 1. selecting mode => Ptrn Play / Ptrn Edit + => Pattern Edit Tap mode => Track Play / Track Edit + => Config mode (To access the Second page press SHIFT + TEMPO
D90 Camera Kit and Laptop. How to Navigate the D90, etrex GPS and RoboGeo Revised: 14 Dec 2015 Prepared by: Bill Hughes
 D90 Camera Kit and Laptop How to Navigate the D90, etrex GPS and RoboGeo Revised: 14 Dec 2015 Prepared by: Bill Hughes 1 D90 Switches and Buttons The Menu Display is navigated by pressing the up, down,
version 7.6 user manual
 version 7.6 user manual 2 Copyright JAVS 1981-2014 Table of Contents Introduction... 4 Getting Started... 5 Login... 5 JAVS Publisher 7 Overview... 6 Search Tool Overview... 7 Search Tool-Detailed Operation...
Mastertracks Pro 4 Review
 Mastertracks Pro 4 Review Introduction The Macintosh sequencer wars are really starting to hot up with the release of Mastertracks Pro 4 from Passport Designs Inc. First this year there was OpCode s Vision,
NAVIGATING THE ipad SETTINGS
 NAVIGATING THE ipad SETTINGS What can you do in the ipad settings screen? There are a number of great tweaks you can make in the settings screen that will change how your ipad behaves. Some of these are
Toon Boom Harmony Essentials 16.0
 Essentials Toon Boom Harmony Essentials 16.0 Keyboard Shortcuts TOON BOOM ANIMATION INC. 4200 Saint-Laurent, Suite 1020 Montreal, Quebec, Canada H2W 2R2 +1 514 278 8666 contact@toonboom.com toonboom.com
OPERATION MANUAL VST / AU
 OPERATION MANUAL VST / AU This manual is under construction. If you want to help to improve it contact: info@audiorealism.se Introduction AudioRealism Bass Line 3 (ABL3) is an emulation of a classic pattern
TABLE OF CONTENTS TABLE OF CONTENTS... 1 INTRODUCTION... 2 USING WORD S MENUS... 3 USING WORD S TOOLBARS... 5 TASK PANE... 9
 TABLE OF CONTENTS TABLE OF CONTENTS... 1 INTRODUCTION... 2 USING WORD S MENUS... 3 DEFINITIONS... 3 WHY WOULD YOU USE THIS?... 3 STEP BY STEP... 3 USING WORD S TOOLBARS... 5 DEFINITIONS... 5 WHY WOULD
CARBON. User Manual - firmware ver Manual Sections. Download a PDF version of the manual here: carbon-manual.pdf
 CARBON User Manual - firmware ver. 1.12 Download a PDF version of the manual here: carbon-manual.pdf Note that PDF manuals are automatically generated from webpages. Links and embedded media will not be
ProntoPro Intelligent Remote Control. User Guide
 ProntoPro Intelligent Remote Control User Guide Table of Content Taking a First Look... 3 Intelligent Remote Control... 3 Before You Start... 5 Getting Started... 7 Activating the Remote Control... 7 Defining
ECLIPSECX Ethernet Software for OSX
 ECLIPSECX Ethernet Software for OSX JLCooper makes no warranties, express or implied, regarding this software s fitness for a particular purpose, and in no event shall JLCooper Electronics be liable for
Settings. Customize OnSong to fit your needs
 Settings Customize OnSong to fit your needs Settings Screen Provides quick, in-app access to all settings Displays all settings in a categorized manner Accessible without running OnSong in the Settings
Mastermind GT. User s Manual. RJM Music Technology, Inc.
 Mastermind GT TM User s Manual RJM Music Technology, Inc. Mastermind GT TM User s Manual Version 3.4 10/17/2016 RJM Music Technology, Inc. 2525 Pioneer Ave. Suite 1 Vista, CA 92081 +1-760-597-9450 email:
MCS 2 USB Software for OSX
 for OSX JLCooper makes no warranties, express or implied, regarding this software s fitness for a particular purpose, and in no event shall JLCooper Electronics be liable for incidental or consequential
Table of Contents. Taking a First Look 2 Intelligent Remote Control 2 Before You Start 4
 Table of Contents Taking a First Look 2 Intelligent Remote Control 2 Before You Start 4 Getting Started 6 Activating the Remote Control 6 Defining the Brands of Your Devices 7 Working with the Home Panel
LIQUID FOOT+ SERIES MIDI FOOT CONTROLLERS. FIRMWARE PLATFORM V6.00beta. This documentation will be updated
 LIQUID FOOT+ SERIES MIDI FOOT CONTROLLERS FIRMWARE PLATFORM V6.00beta This documentation will be updated REV 1.0 - NOV 3, 2018 Table of Contents V6.00 BETA FIRMWARE INSTALLATION NOTES... 3 V6.00 System
Star Bright. Remote Controller User Manual
 DOCUMENT NO.: E-M-0039-01 DATE OF ISSUE: December 20, 2010 REVISION: August 10, 2011 PUBLISHED BY: Noritake Co., Inc. Noritake Co., Inc. East Coast Midwest West Coast New Jersey Chicago & Canada Loss Angels
Pronto. User Guide. User Guide
 Pronto EN 1 Pronto Copyright 2005 Royal Philips Electronics, Interleuvenlaan 72-74, 3000 Leuven (Belgium) Remark: All rights are reserved. Reproduction in whole or in part is prohibited without prior consent
Xequence MIDI Workstation Quickstart Guide
 Xequence MIDI Workstation Quickstart Guide 2017 Seven Systems Cross-Platform Media Limited iphone and ipad are trademarks of Apple Inc., registered in the U.S. and other countries. Contents Introduction
Created by: Alarm System Store Quick Start Guide. for Interlogix NetworX NX4, NX6 & NX8
 Quick Start Guide for Interlogix NetworX NX4, NX6 & NX8 Programming Code = 9713 Master User Code=1234 Program Mode= *8 + 9713 To exit programming hit the Exit key until you reach the home screen If this