Central Management Software for NVR-915 / NVR-1615 CV5-M256
|
|
|
- Rosa Norman
- 5 years ago
- Views:
Transcription


1 Central Management Software for NVR-915 / NVR-1615
2 Table of Contents Chapter 1. Main Console Tool Bar NVR List Division List Group List PTZ Panel Operation with sub-screen Change display channel Switch divisions Remove Camera Display Snapshot Full Screen Restore Division Default Function menu Maintenance menu NVR Management Dialog: NVR Management NVR Configuration NVR Remote UI Control Dialog Division Management Dialog Division Channel Management Dialog Group Management Dialog Group Channel Management Dialog e-map e-map Setting Change map from e-map setting dialog Place configuration Camera Configuration...32 Chapter 2. Playback Screen Division Playback Functions Search Backup Convert To AVI Audio Snapshot (Snapshot all) Information Setting Maintenance Playback control button(s) Operation with sub-screen Motion Search Sequential Search Define search time period Start search and rollback Detail window for snapshots Preview mode of search result
3 Minimum System Requirements CPU RAM HDD Display card Ethernet interface OS Intel Core i7 or above Minimum 2GB, 4GB or above is recommended SATA 1TB or above is recommended Independent display card suggested Note: Make sure your display DPI setting is set to default at 96DPI To set DPI value, right-click on desktop, choose settings tab >> advanced Gigabit Ethernet card or above Windows 2000(SP4), Windows XP, Windows 2003, Windows Vista, and Windows 7 Also it is strongly recommend to close the unnecessary programs while running to monitor and record video streams from NVR. 3

4 Chapter 1. Main Console This is the main control panel of CMS that provides live stream preview, system setup, playback, snapshot and PTZ controls. Control Panel 1.1 Tool Bar Division Switch: You can switch to a screen division by these ways as shown below: 1. Division Menu: Click on Division on the menu bar and select the new division that you need. 4

5 2. Division Buttons: Click on the division button to switch to a new division. Division 1 button Division 4 button Division 6 button Division 9 button Division 16 button Division 32 button Division 64 button Full-Screen button 3. Snapshot All: Click on the snapshot button and the snapshot all dialog will appear. Select the images that you need and save it. 1.2 NVR List List the NVR and the cameras. You can connect them or go to the NVR setting page. 5


6 Sort NVR List: Click on the sort button and select the one you need from the menu. NVR Management: Go to the NVR Management Setting page. Sub Menu of NVR List: Right-click mouse on the NVR. Connect Connect to the selected NVR to preview live 6


7 Multi Screen Playback NVR Setting Remote UI Control NVR Advanced Setting streaming. Create current preview window to selected screen. Bring on the playback application. Show the NVR setting dialog. Bring on the remote NVR s UI control dialog. Bring on the IE browser to setting with NVR. 1.3 Division List List the existing division and the cameras. You can connect them or go to division setting page from here. Sort Division List: Click on the sort button and select the one you need from the menu. 7

8 Division Management: Go to the Division Management Setting page. Sub Menu of Division List: Right-click mouse on the division. Connect Multi Screen Playback Division Setting Connect to the selected Group to preview live streaming or disconnect the division. Create current preview window to selected screen. Bring on the playback application with the division setting. Go to the Division Setting page. 8
9 1.4 Group List Central Management Software for NVR-915 / NVR-1615 List Groups and their cameras. You can connect them or go to Group setting page from here. Sort Group List: Click on the sort button and select the one you need from the menu. 9


10 Group Management: Go to the Group Management Setting page. Sub Menu of Group List: Right-click mouse on the group. Connect Playback Multi Screen Group Setting Connect to the selected Group to preview live streaming or disconnect the group. Bring on the playback application. Create current preview window to selected screen. Go to the Group Setting page. 10


11 1.5 PTZ Panel Pan /Tilt: Direction button Click it to move PTZ camera direction. Home button Click it to make camera return to home position. PTZ Speed Control Relative Move / Continuous Move Adjust the increment of the PTZ movements. The default speed is 5. You can adjust it from 1 to10. Select the moving mode. Tour Preset Select a tour setting from combo box and click go button to start tour. Click Stop button to stop tour. Select a preset position from combo box. Camera will move to preset position after clicking. 11

12 IRIS Focus Zoom Pan Adjust camera s IRIS setting, or set it as Auto. Adjust camera s focus setting, or set it as Auto. Zoom-in or zoom-out focus. Begin camera auto pan or stop. 1.6 Operation with sub-screen Right-click mouse and select the operation from popup menu. Some functions have quick link button on main console. You can call the functions from buttons, too Change display channel Right-click mouse and move cursor to Show Live Camera, and select a new camera from list. The current channel will change to selected camera. 12


13 1.6.2 Switch divisions Right-click mouse and move cursor to Division item, and select a new division type Remove Camera Display Select Remove Camera Display to remove current channel display. 13


14 1.6.4 Snapshot Right-click mouse on the focus channel and select the Snapshot item. System will snapshot the current image and save it on an assigned path or print it. 14

15 1.6.5 Full Screen Switch to full screen mode from popup menu s Full Screen item Restore Division Default Select the Restore Division Default item on the popup menu and all sub screen channels will restore to default channels. 15

16 1.7 Function menu Central Management Software for NVR-915 / NVR-1615 Click on the Function item on the menu bar and select a function. Connect Multi Screen Playback NVR Function Division Function Group Function e-map User Management Connect cameras under the currently selected NVR or Division or Group. And disconnect the current connection. Show the currently selected cameras on the assigned screen. Choose Playback as the current mode. NVR Management: Shows the all installed NVR list dialog. NVR Setting: Shows the NVR s channels Management setting dialog. NVR Remote UI Control: Shows the Remote UI Control dialog with the currently selected NVR. NVR Advanced Setting: Connect to NVR s web service via IE browser. Division Management: Shows the all created division list dialog. Division Setting: Shows the selected division setting dialog. Group Management: Shows the Group Management setting dialog. Group Setting: Shows the Group s channels Management setting dialog. e-map: Shows e-map window. e-map Setting: Shows e-map setting dialog. Shows the User Management setting dialog. 16


17 1.8 Maintenance menu Central Management Software for NVR-915 / NVR-1615 Login / Logout: Login the system or Logout with the current login user. Options: Language System Backup System Restoration Select the language from list. Backup CMS setting files to assigned path. Restore backup setting file from assigned path. View: Select which toolbar items will show or hide. 17

18 Display Style: Select the current display style from list. About: Show the CMS s About information. Exit: Leave the CMS. 1.9 NVR Management Dialog: NVR Management 18
19 Filter NVR List Key-in NVR Name and then click the Filter button. System will display match result in NVR List table. If you have many NVRs, maybe you should set filter to find out the NVR that you need to manage. If you search without any filter rule, system will show all NVRs from database. Display search result with filter and select an NVR from list to modify NVR s settings. Select all / Un-Select all Add Remove Click check box in the header will select or un-select all NVR in the list. Shows NVR setting dialog with empty setting, and click on to add a new NVR to CMS. Click Remove button to remove all selected NVRs from database. 19

20 Modify Search Select an NVR from list and modify selected NVR s setting. Search local LAN to find out NVR NVR Configuration 20
 from the combo box.")
21 ID Name NVR Type IP / Domain / DIPS Connect Type HTTP Port RTSP Port Playback Port Account Password NVR s ID generate by system. Key-in the NVR s name. Select the NVR type from the combo box. IP: Key-in the NVR s IP address. Domain: Key-in the NVR s domain name. DIPS: Key-in the NVR s DIPS ID. Select a connection type (HTTP/TCP/UDP) from the combo box. Key-in the NVR s HTTP port number, default is 80. Key-in the NVR s RTSP port number, default is 554. Key-in the NVR s Playback port number; only SecuGuard needs to set this port. Default is The User ID to login NVR. Key-in the password to login NVR. If you need to confirm password, you can check the box of 21

22 Model MAC Remark Synchronization button Camera List Camera Name Low Bit-Rate Show Password. Shows NVR s model name. Shows NVR s MAC address. Key-in the remark about this NVR. CMS will synchronize with NVR to get the current camera setting and NVR information. Select the cameras of NVR; only selected cameras will display on NVR preview. Modify camera s name in CMS; new name can only be effective in CMS. CMS will only connect lower bit rate stream only for saving bandwidth NVR Remote UI Control Dialog You can configure NVR s display UI at CMS like a TV wall function. UI Style Select a UI style from the UI Style combo box. 22
23 Camera Full Screen Reset Quad Division Submit 1. Click on the division widow to select a focus channel. 2. Select a new camera number from Camera combo box. 3. The focus channel s camera number will become the selected number. Enable full screen by checking the Full Screen check box. Reset the division windows to default camera number. Switch NVR s division by clicking the 1, 4, 9, 16 button. After you finish UI setting, click the Submit button to submit setting to the NVR. NVR will change style soon Division Management Dialog Management Division s setting begins here. 23
24 Filter Division List Select / Un-Select all Add Delete Modify Key-in the search filters by division name and then click the Filter button. System will display the search result in Division List table. If you have many division settings, maybe you should set filter to find out the division that you need for management. If you search without filter, system will show all divisions from database. Display search result with filter; select a division from list to modify division s settings. Click check box on header row to select / un-select all divisions in the list. Shows division setting dialog with empty setting, and click on to add a new division to CMS. Click Delete button to remove all selected divisions from database. Select a division from list, and modify selected division s setting. 24


25 1.12 Division Channel Management Dialog Division ID Division Name Division Type Remark Camera List Add Remove Automatically generated by system to identify group. Please key-in division s name here. Select a division type from the combo box. Please key-in division s remark at here. List all cameras of current Channel List table division. Click check box on header Select / Un-Select All row to select / un-select all cameras in the list. Add all selected cameras from NVR s camera list to current division. Remove all selected cameras in the list from current division. 25
26 NVR list NVR Camera List Select an NVR from NVR list for its cameras. List all cameras of the currently selected NVR Group Management Dialog Management Group s setting begins here. Filter Key-in the search filters by group name and then click the Filter button. System will display the search result in Group List table. If you have many group settings, maybe you should set filter to find out the Group that you need for management. 26
27 Group List Select / Un-Select all Add Delete Modify If you search without filter, system will show all Groups from database. Display search result with filter and select a Group from list to modify Group s settings. Click check box on header row to select / un-select all Groups in the list. Shows Group setting dialog with empty setting, and click on to add a new Group to CMS. Click Delete button to remove all selected Groups from database. Select a Group from list and modify selected Group s setting Group Channel Management Dialog 27

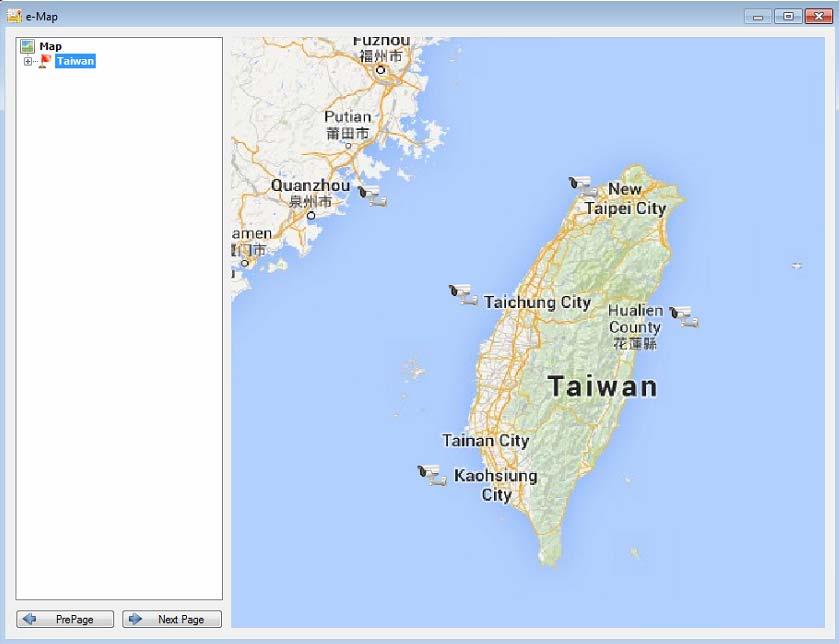
28 Group ID Group Name Remark Camera List Add Remove Automatically generated by system to identify group. Please key-in group s name at here. Please key-in group s remark at here. List all cameras of the current Channel List table Group. Click check box on header row to Select / Un-Select All Select / un-select all cameras in the list. Add all selected cameras from NVR s camera list to current group. Remove all selected cameras in the list from the current group e-map CMS has a 3-layer e-map, which enables you to easily manage lots of cameras. Each layer could be added with several sub-layers and many cameras. You could move camera to any position on the map. 28
29 29

30 Live Preview: Select a map from list; the map will be shown on the dialog. Double click on the camera icon that you need to preview and e-map will pop-up a new preview widow with selected camera s video. PrePage / Next Page: Move current layer to previous layer or the sub-layer e-map Setting Configure e-map s layers, map and camera setting dialog. 30

31 Change map from e-map setting dialog 1. Select a place in the list in e-map setting dialog. 2. Right-click mouse and select Change map. 3. Select a new map for selected place Place configuration 1. Right-click mouse on a selected layer. 2. Select Place configuration. 3. Pop-up the place configuration dialog. 31

32 Add a new place Modify Place Remove Place Map Preview Filter place in table 1. Select a place from table. 2. Key-in place name. 3. Click Add button. 4. Select a picture for map. 5. Click OK button to save new setting. 1. Select a place from table. 2. Change place name. 3. Click change map button to select a new map. 4. Click modify button to update new setting. 1. Select places from table. 2. Click remove button to remove selected place from database. Select a place from table and the select map will be displayed on the upper right corner. Check or un-check layer1/layer2/layer3 check boxes to filter the places displayed in the table Camera Configuration 1. Select a place in the list in e-map setting dialog 32


33 2. Right-click mouse to select Camera Configuration. Add Cameras to current place Remove existing cameras from place Save to database 1. Select an NVR from NVR list in Camera Configuration dialog. 2. Select the cameras in the NVR Camera list that you want to add to current place. 3. Click add button to move selected cameras to left list. 1. Select cameras in the list. 2. Click remove button. Click OK button to exit setting dialog. If you click cancel button, all settings will be aborted. 33


34 Chapter 2. Playback Playback provides historically recorded files where playback search can be converted into a file format. NVR Playback: Select NVR playback from menu bar, or right-click on NVR to select Playback from popup menu. If NVR playback from menu bar is selected, you should select an NVR to play back from the search NVR dialog. 34

35 Division Playback: Select Division playback from menu bar, or right-click on Division to select Playback from popup menu. If Division playback from menu bar is selected, you should select a Division to play back from the search Division dialog. Group Playback: Select Group playback from menu bar, or right-click on Group to select Playback from popup menu. If Group playback from menu bar is selected, you should select a Group to play back from the search Group dialog. 2.1 Screen Division You can switch to screen division by these ways as shown below: 35

36 1. Division Menu: Click on Division on the menu bar and select the new division that you need. 2. Division Buttons: Click on the division button to switch to new division. Division 1 button Division 4 button Division 6 button Division 9 button Division 16 button Full-Screen button 3. Popup Menu of sub-screen: Right-click mouse on the sub-screen and select a new division from the Division sub-menu. 36


37 2.2 Playback Functions Central Management Software for NVR-915 / NVR-1615 You can have the playback on the menu bar by clicking on the function button directly Search Click the button or select Function item on the menu bar and the search dialog will define playback time period. 37

38 Search Dialog: Time Period Record Type Camera Low Bit rate Start Time Select a start time for search. End Time Select an end time for search. Select which record type will be searched. Select which camera will be searched. Enable Low Bit Rate if you need faster streaming, or PC cannot decode too many channels at the same time Backup Click the button or select Function item on the menu bar and the search dialog will define playback time period. Backup Dialog: Time Period Record Type Camera Save To Start Time Select a start time for backup. End Time Select an end time for backup. Select which record type will be back up. Select which camera will be back up. Select a path for output backup files. 38
39 2.2.3 Convert To AVI Click the button or select Function item on the menu bar and the search dialog will define playback time period. Convert Dialog: Time Period Record Type Camera Save To Start Time Select a start time for convert. End Time Select an end time for convert. Select which record type will be converted into AVI. Select which camera will be converted into AVI. Select a path for output converted files. 39


40 2.2.4 Audio Click button, or select Audio item from the menu bar and select audio mode from the sub menu. Mute Live Audio Playback Audio Mute the audio output. Play the live audio, not the playback audio. Play the current playback audio Snapshot (Snapshot all) Click button or select Snapshot item from menu bar and system will snapshot all channels, and show them on the snapshot dialog. Check the picture s check box that you need, and select a path to save these images. You could save these pictures to Jpeg or bitmap format. 40


41 2.2.6 Information Setting Set the information on the playback channel to enable the item to show on the channel when playing back. You could click button to get Information Setting menu too. 2.3 Maintenance Display Style: Select the display style for playback. View: Enable which toolbars will be shown. About: Show the playback version information. Exit: Leave the playback. 2.4 Playback control button(s) Play Video Button: Play video forward 41

42 Pause playing video Stop playing video Play video backward Seek to previous frame when in pause mode Seek to next frame when in pause mode Speed Button: Change playback speed Video Time Bar You could move the slider bar thumb to change current playback time. 42

43 2.5 Operation with sub-screen Central Management Software for NVR-915 / NVR-1615 Right-click the mouse on the sub-screen to enable you to select these items shown on the sub-screen. Show Playback Camera Division Remove Camera Display Digital zoom Snapshot Full Screen Restore Division Default Motion Search Sequential Search Change current channel to another camera. Switch to sub-screen division mode. Remove current channel from playback list. Enable or disable digital zoom mode. Snapshot current channel and you could modify the snapshot picture from snapshot dialog. Switch to full screen or normal mode. Reset all channels in division to default camera. Shows the motion search dialog. Please refer to the Motion Search chapter. Shows the sequential search dialog. Please refer to the Sequential Search chapter. 43

44 2.6 Motion Search Central Management Software for NVR-915 / NVR-1615 Right-click mouse on the channel that you want to do motion search, and then select the Motion Search from the popup menu. Define motion search area: Click the Default button to select full image for Default motion detection. Click the Add button and then drag a rectangle Add area where you want to check. The search area will overlay a transparent red mask. Define a rectangle area on the image first and then Delete click Delete button to remove the region that was defined. Enable the Show Search Image to display the Show Search Image searching video sequence or un-check this box to only show the image once the event is found. Enable the Show Detect Mark to display the Show Detect Mark detect result on the image by pink rectangles. Select the Sensitivity to define the sensitivity of Sensitivity detection. The higher value means the event will be triggered easier. Select the Detect Interval to define the interval of motion detection. If set longer value, it means Detect Interval system will use less CPU computing power to check motion detection. When the event has been triggered, the window on the right side will display the triggered image. If the event does not match your expectation, click the Continue button to search next event. If you found the matched event, click the OK button to return to the playback 44

45 panel, and all playing channels will be synchronized to the same timestamp of the event. Click Cancel button to abort this motion search job. 2.7 Sequential Search Right-click mouse on the channel which you want to do sequential search, and then select the Sequential Search from the popup menu. Quick start with sequential search: 1. Choose sequential search channel and time period. 2. Select two images from these sequential pictures by clicking on the images, and then click the Search button. 3. Repeat this procedure until time period is into one second resolution. 4. Click Detail picture button to approach snapshot images dialog. 5. Select these snapshot images, and save them to assigned folder Define search time period We need to define time period for the sequential search task. We could define time period by two ways and the selected time period will display on the upper 45


46 left corner. 1. Select two images from these sequential pictures to define search time period. Click on the image to select it and click it again to un-select it. Selected Un-selected 2. Or drag on the timeline to define search time period directly. Start time End time Blue bar: The time period of selected images for sequential search. Green transparent bar: New time period to be searched Start search and rollback After search time period is defined, click the Search button to display next search result. Click Pre search button for rollback to previous search result Detail window for snapshots The dialog will display small snapshot images by search result. In case you need bigger image of snapshots, you could enable Show Detail Window to get a resizable window for displaying the detail snapshot. You could move the detail window and resize it to get bigger preview image size Preview mode of search result You could define the preview mode of search result by these parameters below: 46
47 Time Split Division Switch page buttons Define the number to divide the search time period equally, and take a snapshot at the beginning of each part. Select the display division mode of search result. In case the search result couldn t be displayed within one page, then these buttons will be enabled. Click these buttons to switch the pages of snapshots. 47
SecuGuard. Basic 5.0. Version: xxx
 SecuGuard Basic 5.0 Ł` ˆª Ø Version: 5.0.2.xxx SecuGuard Basic ` Ø ˆ ˆ...6 ˆ Ø...7 Ł ˆ Ø»ˆÆ ˆ`... 7 ˆŁ` ˆ Ø»ˆÆ ˆ`... 7 Ø Æ Ł...10 Ø IP Camera(s)... 10 Ł` IP Camera(s)... 10 ˆ Ø Ł ˆ ˆ :... 14 Playback:...
SecuGuard. Basic 5.0. User s manual. Dec Version: 5.0.x
 SecuGuard Basic 5.0 User s manual Dec. 2009 Version: 5.0.x SecuGuard Basic System Requirement...5 Installation...6 Before Installing the Software... 6 Starting the Installation... 6 Quick Start...9 Install
Hardware Specification... 3 Parts and Functions Quick Install / Start Main Console... 14
 Hardware Specification... 3 Parts and Functions... 5 R-09A / R-16A Package check list:... 5 R-36A Package check list:... 7 Quick Install / Start... 10 1. Main Console... 14 1.1 System Information:... 15
Central Management Software. Cam Viewer 3 Lite. User Manual
 Central Management Software Cam Viewer 3 Lite User Manual Version 1.0.0 Table of Contents 1. System Requirement...4 2. Software Installation...5 3. Configuration Wizard...9 3.1 Channel...10 3.1.1 Adding
Video Management Software
 Video Management Software User Manual Web: europesecurity.eu Mail: info@europesecurity.eu Tel.: 0541 352 952 User s Manual 2 Contents CHAPTER : XMS CENTRAL USER MANUAL 1 PC REQUIREMENT 3 2 INSTALL 3 3
USER MANUAL. Mac Version
 USER MANUAL Mac Version Contents 1 Software Introduction... 1 1.1 Summary... 1 1.2 Install and Uninstall... 1 1.2.1 Install the Software... 1 2 Login Software... 3 2.1 Login... 3 2.2 Control Panel Instruction...
User Manual. Central Monitoring Software for TER-series recorders. CenPro
 EN User Manual Central Monitoring Software for TER-series recorders CenPro Contents CENPRO USER MANUAL 1 PC REQUIREMENT 3 2 INSTALL 3 3 UNINSTALL 5 4 BASIC OPERATION 7 4.1 Log In 7 4.2 Screen Layout 8
VMS-A1 Client Software. User Manual
 VMS-A1 Client Software User Manual Contents Contents... 2 Chapter1. Overview... 4 1.1 Description... 4 1.2 Features & Functions... 4 Chapter2. Update Info... 6 Chapter3. Starting VMS-A1... 7 3.1 Installing
CoreNVR 9/16. User s Manual
 CoreNVR 9/16 User s Manual Copyright and Disclaimer Copyright & Disclaimer No part of this publication may be reproduced in any form or by any means, whether electronic, mechanical, photocopying, or recording
Viewer for Luma Fisheye IP Surveillance Camera. Software Manual
 Viewer for Luma Fisheye IP Surveillance Camera Software Manual Important Notes This software is a third-party program that allows you to view, in a normal view, surveillance recordings that were made in
NetClient software user manual
 NetClient software user manual 1-1. General information Net Client is an application which provides users not only viewing and controling remote DVRs, but also receiving realtime event data or alarm signals
PIVOT CMS CLIENT SOFTWARE USER MANUAL
 PIVOT CMS CLIENT SOFTWARE USER MANUAL 1 CMS USER GUIDE 1.1 PC REQUIREMENT Recommended PC Requirement OS CPU VGA RAM HDD Graphics Card OS CPU VGA RAM HDD Windows Vista, 7 or higher Intel Core2Quad Q9400
Manual Version: V1.15. Video Management Software Guard Station User Manual
 Manual Version: V1.15 Video Management Software Guard Station User Manual Thank you for purchasing our product. If there are any questions, or requests, please do not hesitate to contact the dealer. Disclaimer
NVMS User Manual
 NVMS-1000 User Manual Contents 1 Software Introduction...1 1.1 Summary... 1 1.2 Operation Environment... 1 1.3 Install and Uninstall... 2 1.3.1 Install the Software... 2 1.3.2 Uninstall the Software...
9-Channel Network Video Recorder
 9-Channel Network Video Recorder Copyright 9-Channel Network Video Recorder Copyright 2014 by PLANET Technology Corp. All rights reserved. No part of this publication may be reproduced, transmitted, transcribed,
NVMS User Manual. Version 2.1.0
 NVMS-1000 User Manual Version 2.1.0 Contents 1 Software Introduction... 1 1.1 Summary... 1 1.2 Operation Environment... 1 1.3 Install and Uninstall... 2 1.3.1 Install the Software... 2 1.3.2 Uninstall
Avigilon Control Center Web Client User Guide
 Avigilon Control Center Web Client User Guide Version: 4.12 Standard PDF-WEBCLIENT-S-E-Rev2 Copyright 2013 Avigilon. All rights reserved. The information presented is subject to change without notice.
Manual Version: V1.01. ISS Manager Video Management Software User Manual
 Manual Version: V1.01 ISS Manager Video Management Software User Manual Notice The information in this manual is subject to change without notice. Every effort has been made in the preparation of this
NVMS1000. User Manual
 NVMS1000 User Manual Contents 1 Software Introduction... 1 1.1 Summary... 1 1.2 Operation Environment... 1 1.3 Install and Uninstall... 2 1.3.1 Install the Software... 2 1.3.2 Uninstall the Software...
User Manual. CENTRAL MANAGEMENT SYSTEM of H.264 DIGITAL VIDEO RECORDER
 User Manual CENTRAL MANAGEMENT SYSTEM of H.264 DIGITAL VIDEO RECORDER 1 TABLE of CONTENTS I. SYSTEM REQUIREMENTS...3 A. MINIMUM REQUIREMENTS...3 B. SUGGESTED REQUIREMENTS...3 II. CENTRAL MANAGEMENT SYSTEM
Multi-NVR Manager. Quick Start Configuration Usage
 Multi-NVR Manager Quick Start Configuration Usage 2014. All rights are reserved. No portion of this document may be reproduced without permission. All trademarks and brand names mentioned in this publication
NVMS User Manual
 NVMS-1000 User Manual Contents 1 Software Introduction...1 1.1 Summary... 1 1.2 Operation Environment... 1 1.3 Install and Uninstall... 2 1.3.1 Install the Software... 2 1.3.2 Uninstall the Software...
W Box VMS BOX T E C H N O L O G I E S.
 W Box VMS BOX T E C H N O L O G I E S www.wboxtech.eu Contents Contents... 1 Overview... 3 1.1 Description... 3 1.2 Running Environment... 3 1.3 Function Modules... 3 Live view... 6 2.1 User Registration
SmartWatch Eco/Eco Compact
 SmartWatch Eco/Eco Compact Digital Video Recorders SmartWatch Eco SmartWatch Eco Compact Quick User Guide Index Box Contents...3 Front Panel Controls...4-5 SmartWatch Eco Compact...4 SmartWatch Eco...5
VMS2.0 Client Software. User Manual
 VMS2.0 Client Software User Manual Chapter 1 Contents Brief Introduction...1 1.1 Description... 1 1.2 Running Environment...1 Chapter 2 Installation... 2 Chapter 3 Live View... 4 3.1 User Login...4 3.2
Table of Contents Surveillance Center Overview...3 Log...30 Live Camera Panel...31 Live Camera Panel Explained I...32
 Surveillance Center Overview...3 Introduction...3 System Requirements... 4 Features... 5 Checking the Hardware Requirements... 6 Installing and Accessing the Module... 8 Connecting a Camera to the Network...
JVS-D7216 Standalone DVR User Manual
 Menu JVS-D7216 Standalone DVR User Manual JVS-D7216 Standalone DVR Instructions 1. Introduction..4 1.1 Product Description...4 1.2 Features..4 1.3 Specifications...4 2. Product Features....6 2.1 Panel
NVMS1000. User Manual
 NVMS1000 User Manual Contents 1 Software Introduction... 1 1.1 Summary... 1 1.2 Operation Environment... 1 1.3 Install and Uninstall... 2 1.3.1 Install the Software... 2 1.3.2 Uninstall the Software...
Table of Contents. Product Overview 3 System Requirements 4 Installing MicroView 5 Managing Users & Groups 8
 User s Manual Table of Contents Product Overview 3 System Requirements 4 Installing MicroView 5 Managing Users & Groups 8 Add a new user 8 Modify Group Privilege 9 How to Add a new camera 10 Add a new
Quick Operation Guide of ivms-4200
 Quick Operation Guide of ivms-4200 V1.02 2012-02-22 Description ivms-4200 is a video management software using a distributed structure to manage all the connectable devices. It can manage the NVR, DVR,
Network Video Recorder Software 2.2 User Manual. Table of Contents
 Network Video Recorder Software 2.2 User Manual Table of Contents Chapter 1. Using NVR Software 2.2... 6 Chapter 1-1. System Settings... 6 Chapter 1-2. HDD Settings... 7 Chapter 1-3. Device Settings...
Overview CMS2. Features. Minimum System Requirements (Single site mode) Preferred System Requirements (Multi-site mode) What is CMS2?
 Preferred System Requirements (Multi-site mode) What is CMS2?") CMS2 1 Overview CMS2 What is CMS2? CMS2 is NUVICO s new central management software compatible with our EV2 (960H) Series, Hydra HD Series, EasyNet DVR, NVR Series, and our HDoCS HD-TVI series. CMS2 has
CMS2 1 Overview CMS2 What is CMS2? CMS2 is NUVICO s new central management software compatible with our EV2 (960H) Series, Hydra HD Series, EasyNet DVR, NVR Series, and our HDoCS HD-TVI series. CMS2 has
Guarding Expert (Android) Mobile Client Software
 Mobile Client Software") Overview Guarding Expert (Android) V3.2 mobile client software, which is designed for mobile phone on the basis of Android OS (Version 2.3.3 or higher), can be used to remotely monitor the live video from
Overview Guarding Expert (Android) V3.2 mobile client software, which is designed for mobile phone on the basis of Android OS (Version 2.3.3 or higher), can be used to remotely monitor the live video from
Genie XMS Central Management Software
 Enterprise-Level, Intelligent Analysis, Distributed Connectivity User s Manual Copyright EverFocus Electronics Corp, Release Date: January, 2015 Notice: The content is subject to change without notice.
User Manual. CENTRAL MANAGEMENT SYSTEM of H.264 NETWORK VIDEO RECORDE H.264 DIGITAL VIDEO RECORDER
 User Manual CENTRAL MANAGEMENT SYSTEM of H.264 NETWORK VIDEO RECORDE H.264 DIGITAL VIDEO RECORDER 1 TABLE of CONTENTS I. SPECIFICATION... 3 II. HARDWARE REQUIREMENTS... 5 A. MINIMUM REQUIREMENTS... 5 B.
User s Manual. Surveillance Client PC Software for Windows OS & Mac OS Central Management Software. Surveillance Client
 User s Manual Surveillance Client PC Software for Windows OS & Mac OS Central Management Software Surveillance Client Contents 1 Product Description...4 1.1 Important Disclaimer...4 1.2 Software Related
Figure 4-9. Click Finish button, system pops up a dialogue box. Click the OK button, the startup wizard is complete. See Figure 4-10.
 For detailed information, please refer to chapter 4.11.4.1.1. Figure 4-9 Finish button, system pops up a dialogue box. the OK button, the startup wizard is complete. See Figure 4-10. Figure 4-10 4.4 Preview
Contents Contents. Chapter 1. Program Installation. Chapter 2. For the start of CMS. Chapter 3. Monitoring. Chapter 4. E-Map Mode
 CMS User's Manual Contents 0 Contents Chapter 1. Program Installation 1.1 PC specifications 1.2 Program Installation Chapter 2. For the start of CMS 2.1 Site Registration Setup (Network Camera Registration)
VSPlayer Software User Manual
 VSPlayer Software User Manual UD03888B User Manual COPYRIGHT 2016 Hangzhou Hikvision Digital Technology Co., Ltd. ALL RIGHTS RESERVED. Any and all information, including, among others, wordings, pictures,
LOREX CLIENT 3.0 SOFTWARE MANUAL IRMS Integrated Remote Management Software
 LOREX CLIENT 3.0 SOFTWARE MANUAL IRMS Integrated Remote Management Software Instruction Manual English Version 2.0 Copyright 2007 Lorex Technology Inc. www.lorexcctv.com Table of Contents Overview... -
PCMS User Manual. User Manual PCMS. A-Series DVR (Cloud)
") PCMS User Manual A-Series DVR (Cloud) User Manual PCMS User Manual PCMS A-Series DVR (Cloud) 1 PCMS User Manual A-Series DVR (Cloud) Contents 1. Brief Introduction... 3 2. Application... 3 3. OS Compatibility...
PCMS User Manual A-Series DVR (Cloud) User Manual PCMS User Manual PCMS A-Series DVR (Cloud) 1 PCMS User Manual A-Series DVR (Cloud) Contents 1. Brief Introduction... 3 2. Application... 3 3. OS Compatibility...
Network Video Monitor Software
 Network Video Monitor Software V2.0.0.7 Operation menu 1 www.opax.com Chapter 1 Product Overview 1.1 Performance instruction Network video monitoring software is a centralized management software for I8
DiViS Net (Integration)
") DiViS Net (Integration) Installation and User s Guide Ver 12.00.1 Digital Video Security System Digital Video Recorder www.divisdvr.com Chance-i USA Corp. *All contents of this document may change without
DiViS Net (Integration) Installation and User s Guide Ver 12.00.1 Digital Video Security System Digital Video Recorder www.divisdvr.com Chance-i USA Corp. *All contents of this document may change without
NUBIX H.264 DVR Setup Guide
 Package Content NUBIX H.264 DVR Setup Guide Inspect the packaging carton. Make sure the NUBIX H.264 DVR is properly delivered. Remove all items from the box and make sure the box contains the following
icms Central Management Software User Manual
 icms Central Management Software User Manual 1 Contents 1. icms Installation... 3 1-1. System Requirements... 3 1-2. Bandwidth Requirements... 3 1-3. Installation... 4 2. Start to icms... 6 2-1. icms Introduction...
DiViS Net (Integration)
") DiViS Net (Integration) Installation and User s Guide Ver 12.12.0 Digital Video Security System Digital Video Recorder www.divisdvr.com DiViS DVR.com *All contents of this document may change without prior
DiViS Net (Integration) Installation and User s Guide Ver 12.12.0 Digital Video Security System Digital Video Recorder www.divisdvr.com DiViS DVR.com *All contents of this document may change without prior
RAS (Remote Administration System)
") RAS (Remote Administration System) Digital Video Recorder Software User Guide Document 900.0314 Rev 2.00 RAS User Guide Revisions Issue Date Revisions 1.00 08/04 New document. 1.01 04/05 Update template,
RAS (Remote Administration System) Digital Video Recorder Software User Guide Document 900.0314 Rev 2.00 RAS User Guide Revisions Issue Date Revisions 1.00 08/04 New document. 1.01 04/05 Update template,
Intelligent Security & Fire Ltd
 Copyright 2007-2009 Cortex Global Table of contents: Introduction... 3 1. Login... 3 1.1 Advanced login options... 4 2. Preview... 5 2.1 Main menu... 6 2.2 Camera list... 6 2.3 Main display... 6 2.4 Maps...
NVMS-5000 NVMS User Manual
 NVMS-5000 NVMS-5000 User Manual NVMS-5000 User Manual Contents 1 Introduction... 4 1.1 NVMS-5000 Brief Introduction... 4 1.1.1 Summerization... 4 1.1.2 Software Architecture... 4 1.2 System Components...
User Manual of VSPlayer Software. VSPlayer Software. User Manual UD06784B
 VSPlayer Software User Manual UD06784B i User Manual COPYRIGHT 2017 Hangzhou Hikvision Digital Technology Co., Ltd. ALL RIGHTS RESERVED. Any and all information, including, among others, wordings, pictures,
Camera Control for Windows
 Camera Control for Windows 1910012275 REV1.1.0 Contents Chapter 1 Introduction... 1 1.1 Overview... 1 1.2 System Requirement... 1 Chapter 2 Software Installation... 2 Chapter 3 Quick Start... 5 3.1 Create
The SW can manage 16CH devices and support 16Ch live view simultaneously. Supported functions are
 RMS User Manual 1. Introduction 1.1 Introduce This SW can manage and control several DVRs from Remote site through network at the same time. This SW provides live image monitoring, Playback and DVR configuration.
Table of Contents. Tops Digital Solutions DVS 2000 Series Users Manual Ver.2.0 2
 DVS 2000 Series Table of Contents Ch. 1. Preface 4 How to Use This Guide... 4 Conventions 4 Related Documents... 4 Support.. 5 Safety Warnings and Information.. 5 Ch. 2. Overview. 6 Overview 6 Features..
PC NVR Professional Software
 PC NVR Professional Software Free Bundle Rev. 1.5.1 Thanks for adapting our product. Before install the software, please read the instructions carefully and keep this manual for future reference. i Table
Control Software centralized HEM. User Manual
 Control Software centralized HEM User Manual Page: - 2-1. Product Overview This software (HEM-HyperElectronicsMappers) for remote control is designed to be installed into a PC for use within a surveillance
Railroad Crossing Pilot Study Video System User s Guide. Provided by:
 Railroad Crossing Pilot Study Video System User s Guide Provided by: 1 Table of Contents Installation and Login... 4 Minimum System Requirements... 4 Installation... 4 Logging in with the Ocularis Client...
Table of Contents. Chapter 1 Introduction Features System Diagram... 2 Multi-Server... 2 Single-Server... 3
 inex Standard Table of Contents Chapter 1 Introduction... 1 1.1 Features... 1 1.2 System Diagram... 2 Multi-Server... 2 Single-Server... 3 Chapter 2 Installation... 5 2.1 Product Information... 5 Package
VSPlayer Software User Manual
 VSPlayer Software User Manual UD.6L0202D1505A01 Thank you for purchasing our product. This manual applies to VSPlayer software, please read it carefully for the better use of this software. This manual
Manual Version: V1.01. Video Management Server Client Software User Manual
 Manual Version: V1.01 Video Management Server Client Software User Manual Thank you for purchasing our product. If there are any questions, or requests, please do not hesitate to contact the dealer. Notice
ICMS. Tale of Contents. icms
 ICMS Tale of Contents 0 I. SYSTEM REQUIREMENT... 3 II. INSTALLING... 4 III.EXECUTING ICMS... 6 IV. FEATURES... 7 1. ICMS Overview... 7 1. On/Off button...7 2. Device Manager...7 3. Tree...9 4. Live...9
Surveillance_client Software Operation Manual
 Surveillance_client Software Operation Manual Contents 1 Product Description... 3 1.1 Important Disclaimer... 3 1.2 Software Related Files...3 1.2.1 Software Installation Directory... 3 1.3 Application
Grandstream Networks, Inc. GSurf User Manual
 Grandstream Networks, Inc. GSurf User Manual GSurf Contents Contents Introduction 3 Installation 4 Minimum Recommended Requirements 4 Login 4 Main Window 5 Menu Items 5 Toolbar Items 6 Play Bar Items 7
INSTRUCTION MANUAL. NC-Titanium. Please read this manual thoroughly before use, and keep it handy for future reference.
 INSTRUCTION MANUAL NC-Titanium Please read this manual thoroughly before use, and keep it handy for future reference. Table of Contents Chapter 1 Introduction... 1 1.1 Features... 1 1.2 System Requirements...
Table of Contents. Chapter 1 Overview In This Manual RASplus Features Product Information Chapter 2 Installation...
 Remote Administration System Plus (RASplus) Table of Contents Chapter 1 Overview... 1 1.1 In This Manual... 1 1.2 RASplus Features... 1 1.3 Product Information... 1 Chapter 2 Installation... 3 Chapter
Table of Contents. Chapter 1 Introduction Features System Diagram... 2
 inex Standard Table of Contents Chapter 1 Introduction... 1 1.1 Features... 1 1.2 System Diagram... 2 Chapter 2 Installation... 5 2.1 Product Information... 5 Package Contents... 5 System Requirements...
Central Management System
 Central Management System NCS System Installation User Manual Ver. 1.6.0.110630.001 Table of Contents Table of Contents Table of Contents... ii Part 1: NCS Overview... 4 System Introduction... 5 Client/Server
Contents. 1 Introduction... 4
 DMS64 User Manual Contents 1 Introduction... 4 1.1 Summary... 4 1.2 System Requirements... 4 1.3 Installing Guide... 5 1.4 Reinstalling Guide... 8 1.5 Device Register... 10 1.6 DMS64 Display Mode... 16
NVR some functions manual
 NVR some functions manual 1. Move image to centre... 2 2. Time modify... 2 3. Camera title modify... 3 4. Mask area setup... 4 5. Record before alarm and record after alarm... 5 6. Record setup... 5 7.
ENFORCER. DVRJavaView Software. User s Manual SECO-LARM. Version 0.3.9
 ENFORCER DVRJavaView Software User s Manual Version 0.3.9 SECO-LARM Table of Content 1. Overview...2 1.1 System Requirements...2 1.2 Software Limitation...2 2 Startup DVRJavaView Software...3 2.1 Main
EMS 2.0. Light Version 1.1V. Supported Device: EVL, EV2, Hydra NVR
 EMS 2.0 Light Version 1.1V Supported Device: EVL, EV2, Hydra NVR Tale of Contents I. SYSTEM REQUIREMENT 3 II. INSTALLING...4 III. EXECUTING EMS 2.0.. 6 IV. FEATURES.7 1. EMS 2.0 Overview... 7 1. Online/Offline
Central Manager System
 Central Manager System User s Manual 3.42 i 2 nd Edition (Aug-17-11) Content CCOONNTTEENNTT...I 1. PREFACE...1 2. INSTALLATION...2 2-1. Install CMS...3 3. PROFILE MANAGER...5 3-1. Create a New User Profile...5
Bosch Video Client. Operator s manual
 Bosch Video Client en Operator s manual Bosch Video Client Table of Contents en 3 Table of Contents 1 Introduction 6 1.1 System requirements 6 1.2 Software installation 6 1.3 Conventions used in the application
RemoteManager Software
 RMS RemoteManager Software User Manual Contents of this user manual are protected under copyrights and computer program laws. Functions or configurations are subject to be changed or modified without prior
Table of Contents. Index
 Index Table of Contents Chapter 1 Notice for All Users...1-1 Chapter 2 Installation...2-1 2-1 HD NVR Manager Setup...2-1 2-1-1 Installation Steps...2-2 2-1-2 License Activation...2-9 Chapter 3 SCM Program...3-1
Live Viewing Using Remote Applications
 CHAPTER 8 Live Viewing Using Remote Applications The system is supplied with three remote applications. Remote View System IP Multicast System Remote View Remote View is used to remotely monitor live videos
Server Application. ACTi NVR v2.2. User s Manual
 Server Application ACTi NVR v2.2 User s Manual ACTi APP-2000 This document is copyrighted, 2003-2008 by ACTi Corporation. All rights are reserved. ACTi Corporation reserves the right to make improvements
Local Playback Software User Manual
 Local Playback Software User Manual UD.6L0202D1299A01 Thank you for purchasing our product. This manual applies to Local Playback software, please read it carefully for the better use of this software.
1. Web Viewer program
 1. Web Viewer program 1-1. General Remote DVR can be connected via network using IE (Internet Explorer) without prior installation of monitoring program. Live monitoring, remote playback, backup and PTZ
Table of Contents. Chapter 1 Overview In This Manual ATVision Pro Features Product Information... 1
 Remote Management Software (ATVision Pro) Table of Contents Chapter 1 Overview... 1 1.1 In This Manual... 1 1.2 ATVision Pro Features... 1 1.3 Product Information... 1 Chapter 2 Installation... 3 Chapter
Pro71600N3 NVR User Manual
 Pro71600N3 NVR User Manual User Information Admin User Name: Admin Password: IP Address: System Name: Table Of Contents 1. Menu Operation...4 1.1 Main Menu...4 2. Start & Shutdown System...5 2.1 Start
GV-IP Decoder Box Plus User s Manual
 GV-IP Decoder Box Plus User s Manual Before attempting to connect or operate this product, please read these instructions carefully and save this manual for future use. DBPV10-UM-A 2015 GeoVision, Inc.
User s Manual of DVR ULTIMAX. Remote Client Software V wersja 2.40
 User s Manual of DVR ULTIMAX Remote Client Software V 4.0.1 ULTIMAX-304 ULTIMAX-308 ULTIMAX-316 ULTIMAX-504 ULTIMAX-508 ULTIMAX-516 ULTIMAX-704 ULTIMAX-708 ULTIMAX-716 wersja 2.40 Index 1 Software Install,
960H H.264 DVR Setup Guide
 Package Content 960H H.264 DVR Setup Guide Inspect the packaging carton. Make sure the 960H H.264 DVR is properly delivered. Remove all items from the box and make sure the box contains the following items.
Standard H.264 DVR Setup Guide
 Package Content Standard H.264 DVR Setup Guide Inspect the packaging carton. Make sure the Standard H.264 DVR is properly delivered. Remove all items from the box and make sure the box contains the following
MAC ACS CLIENT SOFTWARE USER MANUAL
 MAC ACS CLIENT SOFTWARE USER MANUAL 1 MAC ACS USER GUIDE 1.1 System Requirement Recommended System Requirement OS CPU VGA RAM HDD OS CPU VGA RAM HDD Mac OS X 10.6(snow leopard) Built-in Intel CPU MAC Recommended
Table of Contents. Chapter 1 Overview In This Manual RASplus Features Product Information Chapter 2 Installation...
 Remote Administration System Plus (RASplus) Table of Contents Chapter 1 Overview... 1 1.1 In This Manual... 1 1.2 RASplus Features... 1 1.3 Product Information... 1 Chapter 2 Installation... 3 Chapter
Lite H.264 DVR Setup Guide
 Package Content Lite H.264 DVR Setup Guide Inspect the packaging carton. Make sure the Lite H.264 DVR is properly delivered. Remove all items from the box and make sure the box contains the following items.
Central Management Software. For use with HAI 68A00-1 Network Digital Recorder
 Central Management Software For use with HAI 68A00-1 Network Digital Recorder Document Number 68R00-1 Rev. A January, 2008 Table of Contents 1. Introduction... 3 1.1. CMS (Central Management Software)...
CMS PRO Software Manual - Beta. Copyright Digimerge 2010
 CMS PRO Software Manual - Beta Copyright Digimerge 2010 [CMS] Manual (Revision Record) Revision Record Date Description Author Version 2010. 02. 05 Development Version 2/66 [CMS] Manual (Contents) Contents
Product and company names appearing in this document are trademarks of each respective company or organization.
 . CMS_beta LEGAL INFORMATION Reproduction, transfer, distribution or storage of part or all of the contents in this document in any form without the prior written permission of the company is prohibited.
IP Solution Intelligent Surveillance Solution
 IP Solution Intelligent Surveillance Solution user s manual Table of Contents TABLE OF CONTENTS TABLE OF CONTENTS...1 SYSTEM REQUIREMENT...5 INSTALLATION...6 QUICK START...10 1. MAIN CONSOLE...14 1.1 Start...16
eview Network Video Recorder User s Manual
 eview Network Video Recorder User s Manual Version 1.02 2010/02/09 Copyright 2010, All rights reserved. Contents 1. Starting / Closing...1 2. Monitoring...4 2.1. Monitoring Windows Layout...4 2.2. Full
ALIBI Witness 2.0 v3 Smartphone App for Apple ios Mobile Devices User Guide
 ALIBI Witness 2.0 v3 Smartphone App for Apple ios Mobile Devices User Guide ALIBI Witness 2.0 v3 is a free application (app) for Apple ios (requires ios 7.0 or later). This app is compatible with iphone,
Avigilon Control Center Enterprise Web Client User Guide. Version 5.8.4
 Avigilon Control Center Enterprise Web Client User Guide Version 5.8.4 2006-2016, Avigilon Corporation. All rights reserved. AVIGILON, the AVIGILON logo, AVIGILON CONTROL CENTER and ACC are trademarks
Table of Contents. Chapter 1 Overview. Chapter 2 Installation & Operation. Chapter 3 RAS Watch. Chapter 4 RAS Search
 Table of Contents Chapter 1 Overview 1.1 In This Manual 1.2 Overview 1.3 RAS Features 1.4 Product Information Chapter 2 Installation & Operation 2.1 Installation Procedures 2.2 Operation Procedures Chapter
SKY l SYS DVR USER S MANUAL TABLE OF CONTENTS. Skydreamers Systems DVR Page 1
 TABLE OF CONTENTS Main System Application (Control) SERVER Startup Screen 6 Login/Logout/Shutdown 7 Control Screen 7 Setup 7 System Power Management 8 Auto Switching Interval 8 E-map 8 TV-Out 8 On-screen
Pro7804N1 NVR User Manual
 Pro7804N1 NVR User Manual Pro7804N1 User Manual BW R6.indd 1 User Information Admin User Name: Admin Password: IP Address: System Name: Table Of Contents 1. Menu Operation...4 1.1 Main Menu...4 2. Start
Video Management Software User Manual
 Video Management Software User Manual Manual Version: V1.02 i Thank you for choosing our product. If there are any questions, or requests, please do not hesitate to contact the dealer. Disclaimer CAUTION!
Avigilon Control Center Standard Web Client User Guide. Version 5.6
 Avigilon Control Center Standard Web Client User Guide Version 5.6 2006-2015, Avigilon Corporation. All rights reserved. Unless expressly granted in writing, no license is granted with respect to any copyright,
HIP2P Network Video Camera Client Terminal User Manual
 HIP2P Network Video Camera Client Terminal User Manual Document version:5.1 Page 1 of 34 } Preface Thank you for using our company's products. The network video camera client terminal is used to implement