Circulation. Sierra Training Manual
|
|
|
- Barbra McDaniel
- 5 years ago
- Views:
Transcription
1 Circulation Sierra Training Manual 1


2 Overview Sierra Circulation allows staff to do the following: check out items, check in items, search all patrons, place holds, maintain hold queues, maintain course reserves lists, manage fines and bills, and perform other Circulation-related functions. Log In Double click on the Sierra icon on your computer s desktop: When the Login and Password dialog box appears, enter your Sierra Circulation login name and password. Your assigned login and password determine the privileges and functions you can perform in Sierra. Click the OK button or press the <Enter> key twice. This connects you to the server and loads the Sierra Circulation software. Sierra Circulation Window Once logged into Sierra, the circulation window opens. The right side dropdown box lists the various functions assigned to the login. 2
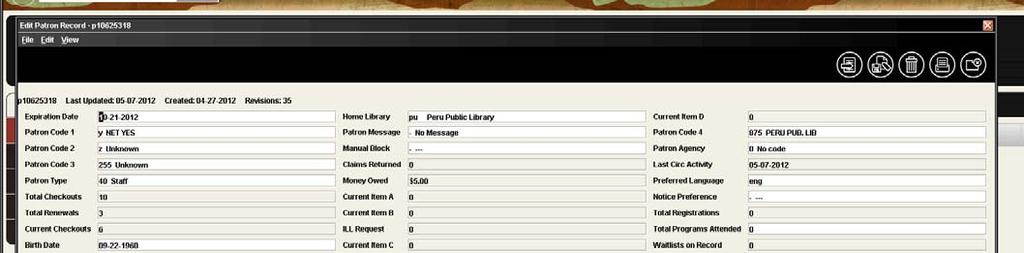
3 Custom Settings and Preferences Many Sierra functions are customizable (for example: screen and text colors, font and font size, new record template creation and maintenance, print templates, and a number of other Sierra functions.) Changing the font size and screen color is a decision of the local library New Record Templates The Sierra system uses new record templates to create new records. A new record template can be configured by the local library to prompt the staff member to fill in specific fields. A new record template can also be configured by the library to contain default data in certain fields which is automatically inserted into the record during the new record creation process. The library may configure an unlimited number of new record templates in the Sierra System. Record Structure Review Patron Record Fields Along the top, at the far right, are icons for Editing, Save, Delete, Print and Close. Tip: Always Save before closing the patron s record. The first half of the Patron record are fixed-length fields, containing information on expiration date, birth date, money owed, notice preference and last circ activity. The record s second half are variable-length fields, containing the patron s name, address, messages, notes, and barcode. 3

4 4


5 Review Item Record Fields Along the top, at the far right, are icons for Insert Field, Save, View, Edit, Summary, Export, Print and Close. Tip: Always Save before closing the item record if you made any changes. The first half of the Item record are fixed-length fields, containing information on location, item type, # of renewals and overdues, status, checkout date, total checkouts and last circ activity. The record s second half are variable-length fields, contacting the call #, item field and barcode. Sierra Circulation Modes Circulation Desk Mode 5
6 Circulation Desk mode is where most of the daily circulation functions take place, check in, check out, paying fines, creating a new patron record.. Pull down the Function list on the right and choose Check in (Circulation Desk) Mode to open. 6
 and search by the patron s last name, first name.")
. Do not insert a space after the letter e.")
. Do not insert a space after the letter u. This informs the system that it should search the Unique ID index. 6.")
7 Patron Records Search for a Patron record Patron records may be searched by any indexed field in the Patron record. 1. Go to Check Out (Circulation Desk) function 2. Type or Scan the patron barcode into the query box in the upper left-hand portion of the screen. 3. Or Type the letter n (to designate the name index) and search by the patron s last name, first name. Do not insert a space after the letter n. This searching option informs the system that it should search the Name Index instead of the Barcode Index. 4. Or Type the letter e to search the personal information index (address, telephone or ). Do not insert a space after the letter e. This searching option informs the system that it should search the Personal Information Index instead of the Barcode index. Personal information reads left to right and is a phrase search. 5. Or Type the letter u to search the Unique ID (formerly AltID). Do not insert a space after the letter u. This informs the system that it should search the Unique ID index. 6. After typing your search term, press the <Enter> key or click the Search button. If necessary, select the appropriate index from the drop down list of Name, Barcode, or Record number. Type the appropriate data into the query box and press the <Enter> key (or click the Search button) 7. From a browse screen of a list of Patron records, double click on the line for the selected patron name or highlight the line for the patron name and click the Select button. 7


8 Create New Patron Record 1. Search the Sierra database for the patron. If there isn t already a patron record, create a new patron record. 2. Click the New Patron Record button or use the dropdown menu File New Patron 3. Select a new record template from the preferred list or use the default new record template, if that is the appropriate template. Patron Record templates can be selected as preferred templates in the dropdown menu Admin Settings Record Template. 4. Insert patron information in the fixed- and variable-length fields as prompted by the new record template. To skip a field, click Next [ Tip to enter the expiration date, type either t or c in the box. Typing t enters today s date, and you can change the year. Typing c displays a calendar to choose the expiration date. 5. Double-click with the mouse in the white part of the desired field to display a list of valid codes and/or meanings for that specific field, and click on the appropriate line for the chosen field to select it. 6. Type the necessary data into the white area of the variable-length field display box. 8


9 Note: enter primary telephone number in Telephone. Ten digits are required with hyphens (including area code). Use Telephone 2 for alternate numbers. Scan or type 14 digit barcode in barcode field. Type the last four digits of the barcode as the user s PIN, then enter the four digits again to confirm. Once you have added the PIN and hit OK, it will appear as an encrypted code. To edit the PIN in the future, you will need to highlight the encrypted text and replace it with the last four digits of the barcode again. 9


10 Adding Another Variable Length Field There are three ways to add another variable field. 1) Click at the end of the field above where you want to insert a field, and press <enter>. A field will be entered with a blank pink field label and question mark. The? indicates that you must insert a valid field tag which is appropriate for the field to be inserted. Or 2), you can right click and choose Insert Field. Or 3), you can use <control>i. Both of these latter methods will open the Insert a Non-MARC Field box at the top of the record. List of variable fields and their codes: n=name a = address h = address 2 t = telephone p = telephone 2 o = mobile telephone s = alias u = unique ID No. (Public libraries should enter Alt ID in this field) m = message (displays as pop up for circulation staff) x = note (displays in record but does not pop up for staff) b = barcode c = patron status z = 10
11 = = PIN 11

12 To move a field within the same field group (i.e.: rearrange the displayed order of several NOTE fields), position the cursor inside the field to move, right-click on the mouse, and select Move Up, Move Down, or Move to Top, or Move to Bottom of Group from the pop-up menu. Check the other fixed fields to add other desired information such as Notice Preference. Click the Save button when you have finished entering all the needed data in the patron record: Save button Copy a Patron Record It is possible to create a new Patron record by copying an existing record. This is useful for entering multiple patrons from a group (for example: a classroom or a family). Retrieve a Patron record by searching by name or any other appropriate field. If a browse list is presented, select the appropriate line by doubleclicking on the line or by clicking in the Select button. Then, click on the Edit icon on the toolbar button. With the selected Patron record open, use the dropdown menu Edit Copy Record to copy the selected record and simultaneously create a new Patron record from the selected record. The data from the original record will be copied into a new record according to the fields you have selected. It is necessary to edit the new Patron record for changes as appropriate. When all changes have been completed, click on the Save icon on the toolbar. 12

13 Check Out Check Out Tab 1. To check out an item, retrieve the Patron record using any of the methods above. 2. A brief version of the Patron record displays in the upper part of the display screen. Along the record s left side are tabs with allowable actions: Check Out, Checked Out Items, Holds, Fines, Check In and Linked Patrons. 3. Scan or type the item barcode in the blank field in the upper left-hand corner of the screen. 13
14 4. After checking an item out to a patron, it is possible to override the systemselected Due Date. To override the system-selected Due Date, click on the Change Due Date button. Select an appropriate due date from the calendar box presented and click the OK button. It is possible to retain the changed due date by selecting the checkbox at the bottom of the calendar display. 5. It is essential to close the Patron record to complete the checkout transaction and to move checked out items into the Checked-Out Items tab. Use <Alt> +Q or click the Close icon in the toolbar to close the patron s record. Closing a Patron record assures that the Patron record does not unnecessarily remain in use and also protects the privacy of patron information. Once the patron record is closed, the items move from Check Out to Checked Out Items. 14
15 Checked-Out Items Tab Click Checked Out Items tab on the left to display the Checked-Out Items. Several functions may be performed using the Checked-out Items tab, including Renew, Claim Returned, Mark Lost Item, and Change Due Date.. Fines Within a Patron record, it is possible to view current fines, view a history of fines paid, manually add a charge, waive charges or collect money. The Fines tab displays in a warning color if a patron s fines exceed a library-defined limit. Collect money 1. To collect money for an unpaid fine, retrieve the Patron record using any method and click the Fines tab 15


16 2. Select the appropriate fine(s) by clicking on and highlighting the appropriate line(s). 3. Click the Collect Money button. The checkbox at the left side may also be used to select the appropriate fine or fines. The system displays the total amount owed for that particular fine but it is possible to accept partial payment of a fine or bill. This is determined by library policy. There are no special settings to accept partial payments. If a patron chooses to pay a partial amount of a specific fine, the system will ask if the remaining amount of the fine or bill should be waived. Only staff who is authorized via their initials and password will be permitted to waive fines. 4. Enter the amount being collected/paid into the box, click Ok. 5. If the Payment Types table has been enabled, the system will propose the option to enter the type of payment received (for example: cash, credit card, check, etc.). 6. Printing a receipt for the patron is an optional feature. During the fine collection process, if a receipt is desired by the patron, click on the print button at the bottom of the payment display box. This is an option, and may be performed as needed. View Fines Paid 1. To view the fines paid by the patron, click the Fines Paid button within the Fines Tab. 16

 This function is used to add miscellaneous charges to a patron s account, anything not automatically generated from an overdue")
17 2. To view details about the item pertinent to a fine paid, highlight the appropriate line and click the View Item button. The View Item option is not available for manual charges since such charges are normally not associated with a specific item. It is possible to print the resulting screen with the Print button. 3. Click the View Fine button to view the details of a fine or to reinstate a fine. Add a Fine (Manual Charge) This function is used to add miscellaneous charges to a patron s account, anything not automatically generated from an overdue item. Examples are: Book Drop Fee, Damaged Book, Hold Not Picked Up, etc. 17

18 1. In the Fines Tab, click the Add Charge button. 2. Click the Predefined drop-down menu and choose the desired charge. The reason and amount will be automatically entered. The amount can be adjusted as needed. 3. If you don t want to use a Predefined Charge, you can simply add a charge and type in the Reason for the charge. A reason is required to assess a manual charge. Click OK. Waive Fines 1. To waive a fine, select the appropriate fine or fines and click the Waive Charges button. 2. Only users authorized to waive fines will be permitted to complete this function. Renew Material Renew with Patron 1. Retrieve the Patron record and click on the Checked Out Items tab. 2. Select the item to be renewed from the displayed list by highlighting the appropriate line and then click the Renew button. Renew without Patron The Renew mode can be used to renew items without accessing a patron record: 1. Change the current mode to Renew (No Patron) in the function box 2. Two methods of renewing an item are possible: o Search by Item record number, and then select the item to be renewed o Scan or type in the barcode of the item to be renewed 3. Click the Close button 18
19 Holds Holds may be added to a Patron s account from their Patron Record tab. Or holds may be placed in the Search/Holds function. It is also possible to cancel or modify existing holds in both places. The number of holds already on a title displays from the Holds/Bookings tab summary, in the last column to the right on the Holds/Bookings tab. If the patron already has a bibliographic-level hold on this title, the system will not accept the hold. There are two types of holds: Bibliographic level holds, which are also called Title level or Copy Returned Soonest holds. The first copy checked back in will be selected to satisfy the hold. This is the level of hold that should be used normally for all patron holds. Item level holds is the second type. For item level holds, only a specific copy will satisfy the hold (for example, a particular volume, or particular autographed copy, etc.) This level of hold should only be used when you want to retrieve a specific copy, such as to have it returned to technical services for repair. Holds can be placed on: A title or item that is checked out A title or item that is not checked out A Bibliographic record with an attached On Order record Holds cannot be placed on: An item currently checked out to this patron 19
 level holds - Copy returned soonest It is possible to place a bibliographic-level hold from Check Out (Circulation Desk) mode or from Search/Holds mode on the navigation bar.")
20 An item with status o ( library use only ) An item pointing to a Loan rule whose Code element is N (noncirculating) An item pointing to a Loan rule whose HOLDABLE element is set to N (no) Place Bibliographic (Title) level holds - Copy returned soonest It is possible to place a bibliographic-level hold from Check Out (Circulation Desk) mode or from Search/Holds mode on the navigation bar. Placing a hold from the Check Out (Circulation Desk) mode: 4. Select Check Out (Circulation Desk) mode r 5. Retrieve the Patron record using any method. 6. Click the Holds tab 7. Click the Add Holds button 8. A browse window pops open; retrieve the desired Bibliographic record by performing a search, using an appropriate index (author, title, subject) for searching. 9. Select the record for the request by highlighting the appropriate results line in a browse screen then clicking Select. Or double click on the wanted item. If there is a direct hit for a title, the Bib record automatically displays. 10.From the Summary tab list of attached Item records, click the Hold Copy Returned Soonest button. 20


21 Type in or select the desired hold parameters for pickup location, not wanted after date and click OK. Hold parameters are configured in Circulation Parameters. Placing a bibliographic level hold from Search/Holds mode 1. Go to Search/Holds mode on the Function box on the right side of the screen. 2. Retrieve the Bibliographic record by searching an appropriate index (author, title, subject) for searching. 3. If the search results in a browse list, select the Bibliographic record on which the hold will be placed by highlighting the line of the appropriate title. If the search results in a direct hit for only one Bibliographic record, the Bibliographic record will display on the screen). 4. From the Summary tab list of Item records, click the button for Hold Copy Returned Soonest. 5. Retrieve the desired Patron record by using the Add Patron button and searching for the patron 6. Type in the desired hold values for pickup location and not wanted after date and click OK If no Item records for this title are eligible for hold placement (for example, they all contain a status of Library Use Only ), the system will display a REQUEST BLOCKED message. The system will place, instead, a bibliographic-level hold. By using the bibliographic level hold option, if the library later changes the 21

22 status of any attached item record or acquires new items for that title for which holds may be placed, the HOLD will be fulfilled. If item level holds are placed, only that particular item may satisfy the hold and if that item becomes unavailable, the hold will never be satisfied. The number of holds already on a particular title displays on the summary tab on the left. Click on the Bib-Level Hold tab to display the current holds. If the copy being held has a Status of AVAILABLE (meaning on the shelf and available to be checked-out), the system can print a paging list (formerly known as the picklist) so that staff may retrieve the hold and place it on the hold shelf for the patron. The item must be scanned at the desk, using Check-In mode, after which the system will generate a hold pickup notice. If the desired item cannot be located on the shelf, it is possible to change the item status to missing, and to place another bibliographic level hold for the patron. Changing the item status to missing places the item in the On Search File. The library will need to periodically create a list of missing items to determine disposition of missing items in the collection. Place Item level Holds It is possible to place an item-level hold from Check Out (Circulation Desk) mode or Search/Holds mode. Placing an item-level hold from Check Out (Circulation Desk) mode: 1. Retrieve the patron record using any method. 2. Click the Holds tab in the patron s record 22
23 3. Click the Add Holds button 4. Retrieve the desired Bibliographic and Item record using an appropriate search index. 5. From the Summary tab of attached Item records, select the desired Item record by highlighting the line, and click the Hold Selected Item button. 6. Type in the desired hold parameters and click OK Placing an item-level hold from Search/Holds mode: 1. Go to Search/Holds mode on the navigation bar on the left side of the display. 2. Retrieve the Bibliographic and Item record, using any appropriate search index. 3. From the Summary tab of attached Item records, select the desired Item record by highlighting the appropriate summary line of the Item record and click the Hold Selected Item button. 4. Retrieve the desired Patron record using the Add Patron button 5. Type in the desired hold parameters and click OK Modify Holds The hold parameters (for example: not-wanted-before or after dates, hold note, pickup location, etc.) can be changed by staff members. Holds can be modified from Check Out - Circulation Desk mode and Search/Holds mode. The procedure is the same in both modes: 1. Retrieve the Patron record (Check Out Circulation Desk mode) or Bibliographic and Item record (Search/Holds mode) 2. Select the appropriate Holds tab. 3. Highlight the line or lines of the hold(s) to be modified. 4. Click the Modify Holds button to modify the required field of pickup location, the optional not-wanted-before date, the optional not-wanted-after date and the optional hold note. The Pickup Location is required. Other values are optional. Cancelling Holds Holds may be cancelled from Check Out (Circulation Desk) mode and Search/Holds mode on the navigation bar. The procedure is the same in both modes: 1. Retrieve the Patron record (Check Out - Circulation Desk mode) or Bibliographic/Item record (Search/Holds mode) 2. Select the appropriate Holds tab. 3. Highlight the line or lines of the hold(s) to be cancelled. 23


24 4. Click the Cancel Holds button to cancel all of the selected holds and to generate hold cancellation notices (if you have chosen to send notices for cancelled holds). Viewing Cancelled Holds When staff cancels a hold, there is an option to create a notice confirming the hold has been cancelled. This notice can be printed or ed to the patron, this is a local decision. 1. To view the patron s cancelled holds, to the patron s record 2. Choose the Holds tab, then choose the View Cancelled Holds button. 3. The screen displays a list of all holds cancelled on the patron record. This list can be printed. Check in items with holds If a patron returns an item which has a hold on the item, Sierra Circulation will present a message alerting the staff that there is a hold on the item. It is possible to print a slip or wrapper to insert in the item before it is placed on the Hold Shelf. At the exact moment an item which satisfies a hold is returned, the system sets the item status to On Holdshelf for patron pickup. If the item is on hold for another library, the item status will be changed to In Transit. See the In Transit section for more information. Depending on the library s notice settings, a hold pickup notice may be generated that night for the patron. If the item has a hold, the screen display s this pop-up message. Staff has the option of Fulfill Hold, Check in, do not fulfill hold and Cancel hold. Choose Fulfill Hold. Once Fulfill Hold is clicked, the screen displays this message. Click Yes to print a transit slip. Staff may be prompted to select 24
25 a printer, if the default printer has not been set. This is a local decision. 25

26 Check In Check in with Patron Present When an item is checked in using Check Out - Circulation Desk, the patron s record displays. This allows staff to perform patron-specific circulation functions such as collecting fines and viewing the history of fines paid while the patron is at the desk. 1. Go into Check Out (Circulation Desk) 2. Retrieve the Patron record and click on the Check In tab 3. Scan the item barcode to check it in. It is possible to backdate the check-in date by using the Backdate button. It is essential to click the Backdate button before scanning the item barcode to check it in It is possible to waive charges or to collect money immediately by selecting the checked in item and clicking the Collect Money or Waive Charges button, which will become active if the user is authorized to perform this function. If printing a receipt acknowledging the return of an item, the system will print the date & time, title, barcode, patron name, and record number on the receipt. It is also possible to check in items from different patrons using this same tab without closing the previous Patron record. Check in without Patron Present 26
: Choose Check In (No Patron) from the Function box.")
.")
27 In the function dropdown box, choose Check In (No Patron) and begin scanning item barcodes. Should the item be needed to fill a hold/request, the screen will display the appropriate pop-up screen. Backdate Check Ins To backdate checked in items (assign a return date earlier than the current date): Choose Check In (No Patron) from the Function box. Click the Backdate button before checking in the materials. Choose the desired date of return (checked in date) from the popup calendar. Depending on local decision, the waive fines box may also be checked. Scan the item barcode (or type in the item barcode). Should the item be needed to fulfill a hold/request, the appropriate pop-up screen will appear. Check in overdue items If a patron returns an overdue item (i.e., the time of check-in is later than the Item record's DUE DATE field), Sierra Circulation generates a fine as established in the Loan Rules, and adds the fine to the charges assessed in the Patron record.. 27

28 Check in billed items When a patron returns an item which is billed, the system will change the amount assessed in the Patron record to the amount specified by the library. The library has the following options: Reduce the billed amount to: the BILLING FEE the greater of the BILLING FEE or the overdue fine the lesser of the BILLING FEE or the overdue fine no charge; Sierra Circulation waives the fine automatically if this option is selected. Note that it may be necessary to enter your initials and password to waive the fine. The ability to waive fines is controlled by authorizations associated with individual initials and password. This option is set in the Circulation Options, Check-In of Billed Item: Reduce bill to option. Patron Record Maintenance Recent Patron Record To access the last 5 patrons without scanning their barcodes, go to File Recent Patrons, then choose the patron. This option only appears when in the Check Out (Circulation Desk) function. Locating and Searching by p Number The software automatically assigns each patron a unique number, called the p number. The p number stays with the patron through any changes to their barcode, address, name, etc. The p number is in the patron s record and is also in the item record of their checked out items. Additionally, the p number may be located Last Patron field of the item record. 28


29 In the Patron record 1. Search for the patron in Check Out (Circulation Desk) 2. Click the Edit Patron Record icon 3. When the Edit Patron Record pop up window appears, the p number is at the top of the window. In the Patron No. field of the item record When the item record displays, the Patron No. is listed in the fixed fields, under the Date Due field. The number does not begin with p and only shows 7 digits. In the Last Patron field of the item record Sometimes damage to an item is not discovered until after the item is checked in. The last patron to have borrowed that item can still be determined by using the Last Patron field in the item record. When the item record displays, the Last Patron field is listed just below Patron No. Again, the number does not display with a leading p and is only 7 digits long. PraireCat convention permits the last three patrons to be lists in the Last Patron field. Searching by p number 1. To find the patron connected to the p number, in Check Out (Circulation Desk) click on the Search button 2. Select Search by Record No. from the drop down box 3. Type in the p number, if the number is onlr 7 digits, add the letter a to the end of the digits to make 8 characters 4. Click Search button 5. The patron s record displays 29
30 Adding Patron Messages The circumstance for adding a pop-up message to a patron s account is a local decision. These messages display on the staff side (Sierra), not on the patron side. 1. Search the Sierra patron database for the patron. 2. Once the patron s account is displayed, click on the Edit Patron Record icon in the upper right side of the screen. 3. Next, click the Insert Field icon, in the upper right. 4. The variable field (Insert non-marc field) box appears. From the drop down box, choose Message. 5. Type the Message in the long rectangular box. The message field can hold 10,000 characters. Include your initials and the date (mm/dd/yyyy). 6. Click Ok and then Save. The new message will appear the next time the patron s account is accessed by staff. Removing Patron Messages 1. Search the Sierra patron database for the patron. 2. Once the patron s account is displayed, click on the Edit Patron Record icon in the upper right side of the screen. 3. Next, click in the Message field. 4. Right click once in the Message field. From the drop down box, choose Delete Field. 5. Click Save. Merging Duplicate Patron Records advanced login permissions If two patron records were created for one patron, the two records can be merged. To merge two patron records into a single record, the p number is needed for both records. 1. Display the patron records to see the p number, choose Edit Patron Record. The p is at the top left, above the fixed fields. Tip: it helps to print both patron records before beginning to merge the records. 2. Choose Merge Duplicate Patron Records from the Function box. If this choice does not appear, the login does not have merging permissions/privileges. 30


31 3. Two boxes appear, the first/top box is for the p number you want to remove, or merge into the Destination (second/lower) box. 4. Enter the p numbers for the patron records into the appropriate box. 5. Press Enter key 6. Confirm the merger. Clicking the Cancel button stops the merge. If either record has items on the hold shelf, the two records cannot be merged until the item is checked out to the patron. 7. Add a note to the merged patron record indicating both p numbers, staff initials, library name and date. Linking Patrons Local Decision Linked patrons may be used to link family groups, university graduate assistants, or for any other purpose deemed useful by the library. Using this option is a local decision. Note: if you link Patron A to Patron B who is already linked to multiple patrons (Patrons C-E), all the patrons are automatically linked to each other. For example, Bob Smith is linked to Mary and Billy Smith. Then later Sally Smith is linked to Bob, Sally will also be linked to Mary and Billy. All four are linked together. 1. In Check Out (Circulation Desk) display the patron record and click the Linked Patrons tab. 2. Click the Link button and search for the Patron record to link to the original patron record. 3. A list of possible choices appears. Highlight the Patron record to be linked to the original record and click the Select button. Repeat the process to link multiple patrons to one patron. 31

32 If you search by the full name, the software presents likely matches and automatically links the two patrons. Moving Between Linked Patrons Once linked, if any of the patrons within the linked group has a hold, fine, or overdue, the joint Linked Patron tab displays in red. 1. At a patron record, go to the Linked Patrons tab 2. Select the desired linked patron by highlighting the appropriate line. Click the Go To Patron button to retrieve a linked patron record. You are now at the patron record for the linked record. You can check out, pay fines, and all other functions associated with the patron record. Unlinking Patrons Note: if two patrons are unlinked, it unlinks all the patrons who were linked. For example, if Bob Smith is linked to Sally Smith, Mary Smith and Billy Smith. And Bob is unlinked from Sally, Mary and Billy are also unlinked from Sally. 1. At a patron record, go to the Linked Patrons tab 2. Select the patron to unlink 3. Then click the Unlink button to remove the link. Assigning New Barcodes If a new barcode needs to be assigned to a patron, the old barcode number is moved to a Note field with the comment this is an old barcode, staff initials, library name and date. 1. Retrieve the patron s record in Check Out (Circulation Desk) 2. Click the Edit Patron Record icon 3. Copy the patron s current (soon to be former) barcode from the Barcode Field 4. Click the Insert Field icon 5. Scroll through the field choices, selecting Note 6. Paste the barcode into the new Note field, adding the comment Previous Barcode, include your initials, library name and the date 7. Next move the mouse cursor to the Barcode Field, remove the old barcode from the field and scan the new Barcode into the Barcode Field. 8. Click the Save icon. Item Messages 32
 4. Now click the Insert Field icon 5.")

33 Periodically circulation staff may need to add a message to the item s record. Adding Item Message at Check-out 1. Check out the item to the patron. 2. Right click on the item, click View this Item 3. The item s record displays, click on the Edit button (not the icon, but the button) 4. Now click the Insert Field icon 5. Choose Message from the Insert Field drop down box. 6. Add the message, remember to include your initials, library name and date with the message. 7. Click the Save icon 8. Continue checking out to the patron. The message will appear/display the next time the item s barcode is scanned. Removing Item Message 1. In Check-in (No Patron), scan the item s barcode. 2. Right click on the item, click View this Item 33

 1. Select Check-in (No Patron) from the Function drop down box 2.")

34 3. The item s record displays, click on the Edit button (not the icon, but the button) 4. Scroll down to the Message field; click the mouse cursor on the Message. 5. Right click, choose Delete Field 6. Click the Save icon Note: Item messages must be manually deleted. Paging (Pick List) 1. Select Check-in (No Patron) from the Function drop down box 2. Scan the item s barcode 3. If the item is for a patron at your library, a message displays with instructions to put the item on the hold shelf. If the item is for a patron at another library, a message display with instructions to put the item in transit for delivery to the other library. 34

35 4. Repeat steps 2-4 until all the items pulled for the Paging list have been handled. Holds Check-in without triggering hold When checking in an item with a hold, the pop-up screen displays four options: Fulfill Hold; Check in, do not fulfill hold; Cancel hold; and Cancel. Usually, the Fulfill hold option is chosen. But if the item cannot be used to fill the hold because of damage, choose Check in, do not fulfill. This moves the hold to the next available item. Once the damaged item is repaired, check it in using Check-in (No Patron) to put the item back in circulation for holds, etc. Choosing Cancel hold terminates the hold. DO NOT CHOOSE Cancel hold Cancel ends the transaction, the item is not checked in and the hold remains outstanding. Note: Staff should not choose Check in, do not fulfill hold unless the item needs to be processed, mended or other technical services. The option is not to be used because the current patron wants to renew the item or because staff does not want to send the item to another library. Viewing Outstanding Holds Advanced Login Permissions Use view outstanding holds on a weekly basis to find holds for bibliographic or volume records that no longer have any holdable items, for items that are billed or claimed returned, and for high-demand items whose holds are not filled in a timely manner. To see the outstanding holds by all the library s patrons, 1. Go to the Function box, selecting View Outstanding Holds from the Function box 2. The software displays Limit Display To and Pickup Location choices 3. Modify the Holds placed before date to view holds placed before a different date. Today's date displays by default. 4. For Pickup Location, choose the location(s) for viewing outstanding holds 5. Choose View Outstanding Holds to generate the Outstanding Holds Report. 35

36 This report can be sorted by the entries in the table. By default, the report sorts by hold status, then by title. To sort the table manually, click the top of each column. View more information about a specific hold, right-click the entry in the table. The system displays an options menu. Print the report by choosing the Print icon, or selecting the Print Report from the right-click menu. Once you have printed the report, you can cancel or transfer holds for items that are no longer holdable. Clearing the Hold shelf. Once the applicable items are pulled from the hold shelf, they should be checked in to activate the next hold or send the item back home or return the item to the library shelves. 1. Select Check In (No Patron) from the Function box 2. Scan the item s barcode 3. Follow the screen directions displayed by the software 4. Repeat steps 2-4 until all the items removed from the hold shelf have been handled. Claim Items Returned local decision If a patron claims to have returned an item but the item has not yet been checked in, it is possible to mark the item as claim returned. It is a local decision whether to make an item claims returned and who at the library may make the change. 8. Retrieve the Patron record and click on the Checked Out Items tab 36

37 9. Select the appropriate item(s) from the list of items checked out and click the Claim Returned button 10.When the calendar screen appears, select the date the patron claims to have returned the item by clicking in the appropriate day. If the patron does not indicate a specific date, click the Blank Date button. 11.Choose from the displayed options. All three options place the item into the ONSEARCH FILE (a missing items report) and a note is added to the Patron and Item records indicating that the item has been claimed returned by the patron. It is not possible to automatically select or display only one of the three choices presented when the Claim Returned button is selected. An appropriate choice must be made in order to continue with the claims returned process. Choice 1 item is declared MISSING and removed from the Patron record, no fines are assessed. The patron is no longer responsible for the item. Choice 2 item is declared CLAIMS RTRND and is removed from the Patron record, no fines are assessed. The patron is no longer responsible for the item. Choice 3 the system leaves the Item record checked out to the patron and the system will continue to send overdue notices, generate a bill, accrue fines, etc., and the status of the item changes to CLAIMS RTRND. The patron remains responsible for the item. Clearing Claims Returned If an item with a claims returned status is checked (or out), using any normal check-in or check-out function the system prompts the staff member: in It is a local decision which staff members are authorized to check in a claims returned item. If the selection is No, the item remains checked out to the patron. The only way to clear the item status of claims returned is to answer Yes to the prompt. 37

38 Marking Items Lost To indicate that one or more items have been reported lost by a patron: 1. Retrieve the patron s record and click the Checked Out Items tab. 2. Select the item by clicking in the appropriate line and clicking the Mark Lost Items button. 3. The Mark Lost Items pop-up window displays. 4. Clicking the Update Bill button allows staff to adjust sections of the bill. Always click Update Bill if ANY changes are made to the bill, then click Add Bills 5. Clicking the Add Bills button adds the bill to the patron s account. NOTE: You must Update Bill if there are any changes or adjustments before clicking the Add Bills button. Appropriate charges and fees are added to the Patron record. The status fixed-field of the lost item is changed to n: BILLED, not yet paid when a bill is calculated by the system. A note is added to the Item record by the system indicating that the item is billed. The Fines tab is used to collect money for the lost item. Fines Reinstating Fine If a fine is mistakenly paid or waived, the fine can be reinstated. You can reinstate all types of fines except: Any Manual charge added as a fine Adjustment charges for billed rental items Any library notice printing charges Any charge with a payment status of Adjustment To reinstate a fine: 1. View the fine you want to reinstate from Fines Paid, either from the patron's list of paid fines or within the Fines Paid function. 38

39 2. Choose a fine to view within the Fines Paid function 3. Choose the Reinstate Fine button. 4. The Reinstate Fine dialog box prompts you: This fine will be reinstated. Original fine payment information will be removed. 5. Choose the Confirm button. Count Use Local Decision The Count Use functions enable the collection of in-house usage statistics for library materials that do not circulate. For example, collecting use statistics on items found unshelved among the stacks, items left by a copy machine, or non-circulating items that are part of a special collection. Sierra enables you to count usage in categories: internal use, copy use, item use 3 and portable reader. If the library uses a portable, handheld barcode reader, that data can be uploaded by using Count Use Portable Reader. 1. In the Functions box, choose the applicable Count Use option. 2. Scan the item(s) barcode 3. Reshelve the item(s) 4. The number of Count Use transactions now displays in the item(s) record. The Count Use transaction numbers are not included in the regular checkout statistics, but appear in the Internal Use statistics box. 39
Circulation I Sierra Training Manual
 Circulation I Sierra Training Manual PrairieCat website: http://support.prairiecat.info/ Copyright 2009 by Innovative Interfaces, Inc. This publication is supplied for the exclusive use of customers of
Union List Circulation / OPAC Training Manual. To get to the PrairieCat Encore catalog for searching, go to:
 Union List Circulation / OPAC Training Manual To get to the PrairieCat Encore catalog for searching, go to: http://search.prairiecat.info Revised October 27, 2015 1 Table of Contents Searching in Encore
Moving graphic examples are included on some pages. To view them you need the Flash plugin on your
 Print: Introduction Introduction Understanding the basic components of the Millennium circulation environment and how each function works is key to efficiently using Millennium Circulation. Because there
Leap Patron Services & Circulation. Polaris ILS 5.0 SP3 Training THE LIBRARY IS OPEN
 Leap Patron Services & Circulation Polaris ILS 5.0 SP3 Training THE LIBRARY IS OPEN Leap Overview What is Leap? What are some of the features that are available in Leap? Do we still need the Polaris Client?
C/W MARS Evergreen Circulation
 C/W MARS Evergreen Circulation This document is an introduction to using Evergreen Circulation to check items in and out, to renew items, to pay fines, and to place and search item holds. It also includes
Sierra Circulation MILS
 Sierra Circulation MILS Copyright 2009-2015 by Innovative Interfaces, Inc. This publication is supplied for the exclusive use of customers of Innovative Interfaces with the understanding that it shall
LEAP MANUAL AN OVERVIEW ON THE PUBLIC SERVICES/FRONT DESK FUNCTIONS IN POLARIS LEAP
 LEAP MANUAL AN OVERVIEW ON THE PUBLIC SERVICES/FRONT DESK FUNCTIONS IN POLARIS LEAP MARCH 2018 MARIGOLD POLARIS LEAP MANUAL Last Update: March 2018 This manual provides an overview on the public services/front
INSIGNIA LIBRARY SYSTEM TRAINING GUIDE FOR TORONTO CATHOLIC SCHOOL DISTRICT DATE: AUG 25 -SEP 05/2014 INSIGNIA SOFTWARE CORPORATION
 INSIGNIA LIBRARY SYSTEM TRAINING GUIDE FOR TORONTO CATHOLIC SCHOOL DISTRICT DATE: AUG 25 -SEP 05/2014 INSIGNIA SOFTWARE CORPORATION Table of Contents Welcome to Insignia Software... 4 System Requirements...
Sage Library System Evergreen Circulation
 Sage Library System Evergreen Circulation This document is a more comprehensive introduction to using Evergreen Circulation to check items in and out, to renew items, to pay fines, and to place and search
SirsiDynix Symphony Training Guide
 SirsiDynix Symphony Training Guide Circulation April 2013 N a m e o f T r a i n i n g G u i d e i Publication Name: SirsiDynix Symphony Training Guide Updated: April 2013 Additional copies of this document
ALEPH/McGill Circulation Module Part One: Basic Circulation
 ALEPH/McGill 1. Training schedule and online calendar... 3 2. Introduction... 4 a) Structure of the course... 4 b) Terminology... 5 c) Shortcuts... 5 d) Help... 5 e) Feedback... 5 3. Getting started...
SirsiDynix Symphony Training Guide
 SirsiDynix Symphony Training Guide Circulation December 2010 N a m e o f T r a i n i n g G u i d e i Publication Name: SirsiDynix Symphony Training Guide Updated: December 2010 Additional copies of this
SirsiDynix Symphony Training Guide
 SirsiDynix Symphony Training Guide Circulation January 2015 N a m e o f T r a i n i n g G u i d e i Publication Name: SirsiDynix Symphony Training Guide Updated: January 2015 Additional copies of this
WorkFlows Learning to Use the Staff Client. Version 3.5
 WorkFlows Learning to Use the Staff Client Version 3.5 Contents Basic Terms... 4 SAILS... 4 Symphony... 4 WorkFlows... 4 Enterprise... 4 Getting Started... 5 Logging into WorkFlows... 5 The WorkFlows screen...
Workflows Reports Training. 1. Report Session 2. Schedule New Reports 3. Finished Reports
 Workflows Reports Training 1. Report Session 2. Schedule New Reports 3. Finished Reports Report Session 1 Report Session Configuration harringtonlc.org Workflows Help Report Session Configuration For Internet
Mandarin M3. Daily Use Handbook ver 1.7SP5g 2014
 Mandarin M3 TM Daily Use Handbook ver 7SP5g 2014 Table of Contents Table of Contents Getting Started with M3...3 Using Circulation...4 Using the OPAC...12 Maintenance...19 Contacts & Credits...20 Getting
Mandarin Oasis TM Library Automation System
 Mandarin Oasis TM Library Automation System Daily Use Handbook This handbook explains routine library tasks using Mandarin Oasis. It is designed to supplement Oasis training by providing simple, step-by-step
Sierra Procedures Manual
 Educational Technology and Library Services Sierra Procedures Manual A library operations guide for DPS Library Media Specialists, Library Techs, and Library Paraprofessionals. Sierra Procedures Manual
Unicorn WorkFlows Academic Reserves Training Guide
 Unicorn Library Management System Unicorn WorkFlows Academic Reserves Training Guide Sirsi 101 Washington Street SE Huntsville, Alabama 35801 (256) 704-7000 Doc No. 400 1100 000 04 1 2002 Sirsi Corporation
WorldShare Management Services Release Notes. Introduction Administrative Actions... 3 Follow-up Actions... 3
 WorldShare Management Services Release Notes Release Date: January 18, 2015 Contents Introduction... 3 Administrative Actions... 3 Follow-up Actions... 3 Browser Support... 4 Acquisitions... 5 New Features...
Marigold Polaris Manual. An overview on the public services/front desk functions in Polaris
 Marigold Polaris Manual An overview on the public services/front desk functions in Polaris www.marigold.ab.ca/pd January 2016 Marigold Polaris Best Practices Manual Last Update: January 2016 This manual
Basic Workflows Training
 Basic Workflows Training 1. Menu Bar 2. Tool Bar a. Common Tasks b. User Information and Maintenance c. Item Information and Maintenance d. Holds Information and Maintenance e. In-Transit Items f. Special
INSIGNIA LIBRARY SYSTEM LIBRARIAN TRAINING GUIDE DATE: NOVEMBER 9, 2017 INSIGNIA SOFTWARE CORPORATION
 INSIGNIA LIBRARY SYSTEM LIBRARIAN TRAINING GUIDE DATE: NOVEMBER 9, 2017 INSIGNIA SOFTWARE CORPORATION TABLE OF CONTENTS TABLE OF CONTENTS... 2 WELCOME TO INSIGNIA SOFTWARE... 4 SYSTEM REQUIREMENTS... 4
DEVELOPED BY THE SHARE BIBLIOGRAPHIC SERVICES TEAM SPRING 2013 REVISED MAY
 ITEM RECORDS DEVELOPED BY THE SHARE BIBLIOGRAPHIC SERVICES TEAM SPRING 2013 REVISED MAY 2014 Table of Contents General cataloging steps... 3 Matching... 3 General match points... 3 Creating Item Records...
All The News That Fits! What s New in Polaris 4.1
 Enter bullet text here Second level All The News That Fits! What s New in Polaris 4.1 Bill Schickling, President and CEO MidAtlantic PUG, April 20, 2012 1 1 Polaris PowerPAC Redesigned! Easier to use,
Qwik Start Guide. For Destiny 9.5 MEDT Dr. Phyllis Snipes. Whitney Fletcher. Natalie Hamlin. Tiffany Johnson
 Qwik Start Guide For Destiny 9.5 MEDT 6468 Dr. Phyllis Snipes Whitney Fletcher Natalie Hamlin Tiffany Johnson 1 Table of Contents Section I: In the Beginning Page # 4 Setting up Patrons types 4 Adding
Overview. Resources to help you. Getting Started with Destiny Library Manager
 Overview Destiny brings all your library automation together on one server: circulation, cataloging, searching, and reporting. It is completely browser-based providing access to your library from virtually
Mandarin M5. Daily Use Handbook 2016
 Mandarin M5 Daily Use Handbook 2016 Table of Contents Table of Contents Mandarin M5...3 Getting Started with M5...4 The M5 Interface...5 Patron Mode...6 Librarian Mode...7 Using Circulation...9 Circulation
Visiting the Library s *New* Website Using the My Account Feature
 Visiting the Library s *New* Website Using the My Account Feature 1 Overview The My Account feature enables you to manage your library account online. You can see which items you have checked out along
Florida Virtual Campus.
 I nt erl i br aryloan Al ephver si on20 Florida Virtual Campus www.flvc.org Contents Unit 1: Overview of the ILL Module... 1 LESSON 1: UNDERSTANDING IMPORTANT LINCC ILL TERMS... 1 LESSON 2: NAVIGATING
Icons what they mean. - Checks the authority files. - Validates the MARC fields. - Checks for duplicates. - Place a hold.
 What to notice when looking at bibliographic record: and the mouse wheel allows for one to zoom in and out but only in the MARC display Owner most bibliographic records are owned by SHARE If owned
INFOLIB2015 USER INSTRUCTION GUIDE
 INFOLIB2015 USER INSTRUCTION GUIDE Welcome to Infolib2015. This is the step-by-step tutorial on how to use Infolib2015. To enter the program, Double click the Infolib Icon from the desktop. For the first
Library Staff Instructions
 Requesting and Providing Items Request Procedure Library Staff Instructions 1. Login and Search for the title. 2. Click on the title to review holdings. 3. Click on the Request button for the request form.
Reports: SQL & SimplyReports. Fall 2014
 Reports: SQL & SimplyReports Fall 2014 General Links on BCCLS Staff page Username/Password the same as Polaris software. Statistics Page SQL Reports: Custom & Delivered http://rpts.bccs.org/reports Use
WRLSWEB Missing /Damaged Items Procedure
 WRLSWEB Missing /Damaged Items Procedure This procedure is intended to provide a systematic tool for addressing items which have missing pieces or have been damaged. If all libraries follow these practices
Unit 2: Managing Patron Records
 LINCC Circulation Unit 2 Unit 2: Managing Patron Records This unit provides an overview of patron records and describes searching for a patron record, editing patron information, and adding a new patron
Mandarin Oasis. Daily Use Handbook ver
 TM Mandarin Oasis Daily Use Handbook ver 2.9.1 2014 Table of Contents Table of Contents Mandarin Oasis...3 Getting Started with Oasis...4 The Oasis Interface...5 Patron Mode...7 Librarian Mode...8 Using
Using Standalone/Offline Mode
 Using Standalone/Offline Mode Use standalone/offline mode is for use if your library loses Internet connectivity, and one cannot log into Evergreen. Download Offline Patron List Once a week, download the
Mandarin M3 Tutorial
 Mandarin M3 Tutorial TM How to use Mandarin M3 2014 Last Update: 05/30/2014 Table of Contents Table of Contents Introduction...3 Windows OPAC...4 Circulation...13 Cataloging...20 Group Editor...25 Inventory...31
Missouri Evergreen II. November, 2017
 Missouri Evergreen II November, 2017 1 Table of Contents Welcome Back 3 Patron Registration 3 Checking Out UPIs 5 Renewing Items 7 Renewing an Expired Account 10 Searching the Catalog and Placing a Hold
What s New in 4.1 R2. Count on us.
 What s New in 4.1 R2 Count on us. Highlights from 4.1 R2 Administration/System wide PowerPAC and Mobile PAC Circulation Cataloging Acquisitions What s New in 4.1 R2 Documentation PolarisTown: http://www.polarislibrary.com/polaristown/
Welcome to our new catalog!
 Welcome to our new catalog! Use this guide to become familiar with the new catalog's features and functions. To get started, choose one of these topics: Finding your way around Searching Working with search
Encore Catalog User Guide
 Encore Catalog User Guide Classic Catalog vs. Encore Catalog...3 Check My Account...4 Access My Account... 4 Create New PIN Number... 4 Reset Forgotten PIN Number... 4 Change PIN Number... 4 Check Due
The terms Offline Interface and Standalone Mode mean the same thing a separate program to handle simple circulation tasks while the network is down.
 Chapter 10 - Standalone Mode The terms Offline Interface and Standalone Mode mean the same thing a separate program to handle simple circulation tasks while the network is down. Several features are available
Pop up of Loan Notes when an Item is Returned Loan Notes will now pop up if the Display Loan Notes checkbox is clicked in Return Options.
 ALEPH VERSION 23 New Features and Functionality CIRCULATION New Buttons Go to Patron Button in the Items tab The List of Items page in the Circulation module has been enhanced to include a Go to Patron
Don t forget to change the IP address BACK to and uncheck the Show this window on next startup when you are finished.
 WF Refresher Course Setup: Click on Preference then Configuration Log into the TEST server: Change the IP address to 199.242.176.189 Click the Show this window on next startup Login as your library. Don
Evergreen Standalone Client Procedures
 Evergreen 2.7.2 Standalone Client Procedures Questions? Contact the PINES staff by putting in a Help Desk ticket or calling 404-235-7210. Table of Contents Introduction... 2 One-Time Setup... 2 Receipt
Circulation Parameters Quick Start Guide
 Circulation Parameters Quick Start Guide Copyright 2015 by Innovative Interfaces, Inc. This publication is supplied for the exclusive use of customers of Innovative Interfaces with the understanding that
MLS Polaris Reports. Updated August 2013
 This document lists all reports available through the Utilities menu of the Shortcut bar in Polaris deemed to be necessary, recommended or useful to Marigold Library System member libraries. It includes
What's New in Destiny Version 13.5, Including Automatic Updates
 What's New in Destiny Version 13.5, Including Automatic Updates Table of Contents Destiny 13.5 Features 1 All Products 4 Overdue Notices 5 Block Override Code (SSO only) 7 Destiny Library Manager 8 Simplified
Client-Account Receivable
 Nexsure Training Manual - Accounting Client-Account Receivable In This Chapter Client Accounts Receivable Entity Definition Receive Payments from Clients Relating to Policies Allocation of Payment Leave
Page 2 of6. "Available" Locations for Holds in Demand Management
 ~.- Key Enhancements Additional Recommended Reading Lists Available Reserve Items on the Hit List "Available" Locations for Holds in Demand Management \/Barcode Validation -WorkFlows Java Client Only BWI
INSIGNIA LIBRARY SYSTEM USER MANUAL VERSION 6.4
 INSIGNIA LIBRARY SYSTEM USER MANUAL VERSION 6.4 Insignia Software Corporation Copyrights 1999-2014 2 Welcome Table of Contents Welcome INSIGNIA LIBRARY SYSTEM... 1 USER MANUAL... 1 VERSION 6.4... 1 STARTING
Horizon Serials. User s and Administrator s Guide
 Horizon Serials User s and Administrator s Guide Microsoft, Windows, and Windows NT are registered trademarks of Microsoft Corporation. Sybase is a registered trademark of Sybase, Inc. Adobe and Acrobat
Sierra Essentials Training Manual
 Training Manual PrairieCat website: http://support.prairiecat.info/ Copyright 2009 by Innovative Interfaces, Inc. This publication is supplied for the exclusive use of customers of Innovative Interfaces
Table of Contents: Use your Library System for Textbook Distribution
 G4 for TEXTBOOKS Use the LRMS Library System for Textbook Distribution This document addresses Textbook Distribution is available with all versions of the G4 Library Management System. No Licensing is
As a member of the Bridges Library System, Menomonee Falls Public Library primarily serves residents of Waukesha and Jefferson Counties.
 CIRCULATION POLICY: LIBRARY CARD ELIGIBILITY As a member of the Bridges Library System, Menomonee Falls Public Library primarily serves residents of Waukesha and Jefferson Counties. Most Wisconsin residents
Basic Millennium INTRODUCTION
 Basic Millennium INTRODUCTION Welcome to the Basic Millennium tutorial. Navigation tools, such as the Continue button, will display as you progress through the presentation, while playback functions are
Mandarin M5. Users guide ver Mandarin Library Automation, Inc. All rights reserved. Last Update: 02/03/2016
 Mandarin M5 TM Users guide ver 1.0.0 2016 2016 Mandarin Library Automation, Inc. All rights reserved. Last Update: 02/03/2016 Table of Contents Table of Contents Mandarin M5 Overview...4 Introduction...5
This session will cover new features, enhancements, improvements, and bug fixes for Acquisitions & Circulation
 1 This session will cover new features, enhancements, improvements, and bug fixes for Acquisitions & Circulation In addition we will provide links to recent updates of related services. 2 3 New Feature
WHAT S NEW IN HTML5 TABLE OF CONTENTS
 WHAT S NEW IN HTML5 Insignia Software is proud to announce that our HTML5 version is now available to all our customers. Our major focus in the HTML5 release was making Insignia customizable to your needs.
Spectrum CIRC/CAT Getting Started A guide for getting started with Winnebago Spectrum CIRC/CAT 5.0
 Spectrum CIRC/CAT Getting Started A guide for getting started with Winnebago Spectrum CIRC/CAT 5.0 1995-2001 Sagebrush Corporation, All Rights Reserved. 1995-2001 Sagebrush Corporation, Minneapolis, Minnesota.
VDX Manual for Member Libraries
 Contents How to Access VDX... 3 Searching VDX... 3 Making an ILL Request... 6 The Work Queue... 8 The Borrower Work Queue... 10 Borrower Work Queue Statuses... 10 Idle Requests Sending requests to lenders...
G3 for TEXTBOOKS. Library Resource Management Systems, Inc. PO Box 727, Sedona, Arizona,
 G3 for TEXTBOOKS Use your Library System for Textbook Distribution, this document addresses Hosted services that is our Internet based system, however Textbook Distribution is available with all versions
Sierra Circulation URSUS
 Sierra Circulation URSUS Copyright 2009 by Innovative Interfaces, Inc. This publication is supplied for the exclusive use of customers of Innovative Interfaces with the understanding that it shall not
Report Session Setting pathway to print/view reports
 Report Session Report Session Setting pathway to print/view reports When you first load Sirsi on a computer, after a major software update, or if your computer has been reimaged, you will need to set your
Session 1 Navigation & Administration
 Session 1 Navigation & Administration Agenda Launching ACPM from AC AC/ACPM Integration Basic Navigation Tips in ACPM Administration Overview ACPM Help Launching ACPM from AC Amazing Charts Practice Management
USING STANDALONE 11/12/2010
 USING STANDALONE We are recommend that libraries use the Off-Line circulation function that is built into Workflows for check-out only. Here are some important things to know about this before you begin:
What's New in Destiny Version Early Adopter Program Version
 What's New in Destiny Version 16.5 Early Adopter Program Version Table of Contents Overview 3 All Destiny Products 4 Destiny Library Manager 5 Destiny Resource Manager 6 All Products 7 Jobs and Reports
4. Once you re in the Catalog interface, login in with your credentials and click OK (or hit Enter):
:") Procedure for creating a record in Millennium for checking out newly received ILLiad loans Watch these quick Jing tutorials on how to create a Millennium record for ILLiad items: http://screencast.com/t/swfvukpq53qf:
Procedure for creating a record in Millennium for checking out newly received ILLiad loans Watch these quick Jing tutorials on how to create a Millennium record for ILLiad items: http://screencast.com/t/swfvukpq53qf:
Alma. Resource Sharing - Borrowing. Limor Cohen Head of Circulation and Interlibrary Loan Department. Technion Israel Institute of Technology
 Alma Resource Sharing - Borrowing Limor Cohen Head of Circulation and Interlibrary Loan Department Israel Institute of Technology Table of Content Borrowing Request Books via on-line form Books via email
RPL's Library Catalogue User Guide
 RPL's Library Catalogue User Guide Checklist START In the Fall of 2014, Richmond Public Library (RPL) switched to a brand new Library Catalogue search system. This guide will explain how RPL members can
VDX. VDX Web Admin Manual Pt.1
 VDX VDX Web Admin Manual Pt.1 OCLC, 2012. OCLC owns the copyright in this document including the content, page layout, graphical images, logos, and photographs and also owns all trademarks so identified.
How to add an item with no template:
 How to add an item with no template: 1. From the Bibliographic record, choose the. 2. Fill in price, barcodes in the upper parts. Check the boxes necessary. 3. In the lower part, fill in number of items,
Introduction... 3 Recommended actions Administrative actions... 3 Follow-up actions Acquisitions... 4
 Contents WorldShare Management Services Release Notes Release Date: March 8, 2015 Introduction... 3 Recommended actions... 3 Administrative actions... 3 Follow-up actions... 3 Acquisitions... 4 Enhancement...
Searching in WorkFlows
 Searching in WorkFlows Searching in WorkFlows for patrons: User search To search for patron (user) records, use the Display User Wizard found under the Users Wizard heading. This wizard will provide information
Resource Sharing. Hands-On Activities Borrowing Requests (ART / ) Ex Libris Training Services
 Ex Libris Training Services") Resource Sharing Hands-On Activities Borrowing Requests (ARTEmail/Email) Ex Libris Training Services Table of Contents Prerequisites for this Exercise... 2 Create a Borrowing RS Request (ARTEmail)... 3
Resource Sharing Hands-On Activities Borrowing Requests (ARTEmail/Email) Ex Libris Training Services Table of Contents Prerequisites for this Exercise... 2 Create a Borrowing RS Request (ARTEmail)... 3
Wi-Fi hotspots are devices which broadcast internet access over Wi-Fi connections.
 Answers to some of your questions about Wi-Fi hotspots What is a Wi-Fi hotspot? Wi-Fi hotspots are devices which broadcast internet access over Wi-Fi connections. What types of devices can access a Wi-Fi
Introduction... 3 Recommended actions Administrative actions... 3 Follow-up actions Acquisitions... 4
 Release Date: November 22, 2015 Contents Introduction... 3 Recommended actions... 3 Administrative actions... 3 Follow-up actions... 3 Acquisitions... 4 New Features... 4 Alert when receiving an item with
What's New in Polaris and Leap 5.2
 2016 World Headquarters 5850 Shell-mound Way Emeryville, CA 94608 +1.510.655.6200 Eastern US - New York 103 Commerce Blvd., Suite A Liverpool, NY 13088 +1.800.272.3414 Polaris Installation Note 1 New and
Patron Self Loan Copyright CyberTools Inc All rights reserved.
 Patron Self Loan 2008.3.20 Copyright CyberTools Inc. 2008 All rights reserved. 1 Workstation Setup...2 1.1 Overview to My URL and My CyberJ Client Setup...2 1.2 My URL and My CyberJ Client Setup... 3 1.3
Destiny. Checking Student Status and Fines. Destiny URL: Click District Users... Login
 Destiny Checking Student Status and Fines Destiny URL: http://destiny.psd.local Click District Users... Login Before getting started, make sure you have the Student ID and current location of the student.
POLARIS 5.0 ILS. User Manual. Marina Maffia November 17, 2017
 POLARIS 5.0 ILS User Manual November 17, 2017 Marina Maffia marina.maffia@mainlib.org Table of Contents Introduction to Polaris... 5 Polaris Basics... 8 Logging On... 8 Logging Off... 9 Obtaining Your
8/28/2014. Patron Records. About. Patron Records. Patron Records. Patron Records. Patron Records. Overview of Creating and Maintaining.
 About These instructions should serve as a basic overview of creating and updating patron accounts. Overview of Creating and Maintaining Please refer to the PINES Circulation Policies and Procedures Manual
***** Archive and Backup your Data before updating*****
 Alexandria 6.1.0 Release Notes 5/6/2010 ============================================================ Current Alexandria v5 customers will need to contact COMPanion prior to updating to version 6. This
SirsiDynix Director s Station Measures
 SirsiDynix Director s Station Measures All Acquisitions Measures Information is taken directly from the order, fund, and vendor records that are entered into the Symphony database. Note: The information
Lab 11-1 Lab User Profiles and Tracking
 In the following lab instructions, you will be setting up groups, users, and passwords to require password-protected login to Kofax Capture modules. Rights will be assigned to the groups and users that
AUTOGRAPHICS ILUMINAR/WISCAT. Training and Reference Guide
 AUTOGRAPHICS ILUMINAR/WISCAT Training and Reference Guide Updated 2/2012 Auto-Graphics-Iluminar/WISCAT Help Files Courtesy of: Jennifer Bernetzke, Schreiner Memorial Library, Lancaster Vicki Woolley, Dodgeville
Meritain Connect User Manual. for Employees. 1 Meritain Connect User Guide for Employees
 Meritain Connect User Manual for Employees 1 Meritain Connect User Guide for Employees Contents Introduction... 4 Accessing Meritain Connect... 5 Logging In... 5 Forgot Password... 6 Registration Process...
Transactions: Transaction List
 Transactions Transactions: Transaction List Purpose The Transaction List allows you to view transactions for selected dates; create new transactions; open, edit or delete existing transactions; open client
Using Evergreen s Acquisitions Module. Documentation Interest Group
 Using Evergreen s Acquisitions Module Documentation Interest Group Using Evergreen s Acquisitions Module Documentation Interest Group Report errors in this documentation using Launchpad. Table of Contents
https://iii2.basecamphq.com/projects/ /file/ /prcat_sierra_circulation _Migration_Manual.docx
 Quad Cities Libraries Implementation Team Meeting Agenda Wednesday, April 6, 2016 2:00 p.m. Via videoconference at Bolingbrook, Coal Valley and Rockford, or conference call. For conference call, dial 1-800-503-2899.
Unicorn WorkFlows Cataloging With Authority Training Guide
 Unicorn Library Management System Unicorn WorkFlows Cataloging With Authority Training Guide Sirsi 101 Washington Street SE Huntsville, Alabama 35801 (256) 704-7000 Doc No. 400 2300 000 03 1 2002 Sirsi
Imagicle Hotel User Guide
 Imagicle Hotel User Guide 2016 Copyright 2010-2016 Imagicle Spa All rights reserved. Imagicle and the Imagicle logo are Imagicle spa registered trademarks. All other trademarks belong to their respective
NRE/VDX. Web Admin Manual: Managing Requests
 NRE/VDX Web Admin Manual: Managing Requests OCLC, 2014. OCLC owns the copyright in this document including the content, page layout, graphical images, logos, and photographs and also owns all trademarks
FLP Merchant Website. User Guide. Version 0.14
 FLP Merchant Website User Guide Version 0.14 Revision History Responsible Revision Date Version Vitalii Vysotskyi Created the initial version of the user guide 2017-11-28 0.1 Vitalii Vysotskyi Small updates
2010 College Center for Library Automation
 Cat al ogi ng Al ephver si on20 2010 College Center for Library Automation Contents Unit 1: Overview of the LINCC Cataloging Module... 1 LESSON 1: NAVIGATING THE CATALOGING MODULE... 1 LESSON 2: USING
CATALOGUING MANUAL. Summer SirsiDynix. All Rights Reserved.
 CATALOGUING MANUAL Summer 2008 2008 SirsiDynix. All Rights Reserved. Table of Contents SIRSI RECORD STRUCTURE AND DISPLAY... 1 ITEM SEARCH AND DISPLAY WIZARD... 2 CALL NUMBER AND ITEM MAINTENANCE WIZARD...
Operator s Manual Version 5.4 MEMO FINANCIAL SERVICES, INC. BILL PAYMENTS TERMINAL VERSION OPERATOR S MANUAL
 Operator s Manual Version 5.4 MEMO FINANCIAL SERVICES, INC. BILL PAYMENTS TERMINAL VERSION 5.1-5.4 OPERATOR S MANUAL MEMO Technical Support 800-864-5246 MEMO Financial Services Bill Payments Terminal Page
User Guide. Trade Finance Global. For customers using Guarantees. October nordea.com/cm OR tradefinance Name of document 5/8 2015/V1
 User Guide Trade Finance Global For customers using Guarantees October 2015 nordea.com/cm OR tradefinance Name of document 2015/V1 5/8 Table of Contents 1 Trade Finance Global (TFG) - Introduction... 4