EXPERION PKS WITH PMD CONTROLLER
|
|
|
- Walter Anderson
- 5 years ago
- Views:
Transcription

1 EXPERION PKS WITH PMD CONTROLLER RELEASE Installatin f PMD R910.2 n Virtual Server using ESIS PMDOC-X136-en-9102A August 2018
2 Disclaimer This dcument cntains Hneywell prprietary infrmatin. Infrmatin cntained herein is t be used slely fr the purpse submitted, and n part f this dcument r its cntents shall be reprduced, published, r disclsed t a third party withut the express permissin f Hneywell Internatinal Sàrl. While this infrmatin is presented in gd faith and believed t be accurate, Hneywell disclaims the implied warranties f merchantability and fitness fr a purpse and makes n express warranties except as may be stated in its written agreement with and fr its custmer. In n event is Hneywell liable t anyne fr any direct, special, r cnsequential damages. The infrmatin and specificatins in this dcument are subject t change withut ntice. Cpyright Hneywell Internatinal Sàrl - 2 -
3 Cntents 3 Chapter 1 - Abut this dcument Revisin histry Related dcuments Supprt and Cntacts Cmputer names Media requirements 6 Chapter 2 - Creating PMD Server n Virtual Machine Generate cnfiguratin files using system initializatin media Create and set up virtual machine Create the virtual machine Setting up the virtual machine Install perating system and Experin PKS VMware tl installatin Generate serial number Install Adbe Reader Verify Firewall Install PMD sftware Design Repsitry (DR) Installer Pst installatin tasks Cnfigure user settings fr Administratr users Cnfigure the user settings fr PMD users Remve Administratrs user grups rights Disable Administratr user HMIWeb Display Builder settings Disable IE ESC Cnfigure remte desktp users grup t user prperties Install Htfixes and Antivirus Remve USB device frm the virtual machine Verify the PMD Server system
4
5 CHAPTER 1 ABOUT THIS DOCUMENT This dcument prvides instructins abut prductin f PMD R910.2 Server n virtual machines by using the ESIS media. 1.1 Revisin histry Revisin Date Descriptin A August 2018 Initial release f the dcument. 1.2 Related dcuments The fllwing are the list f dcuments that are surce f reference fr cntent discussed in this publicatin. Experin PKS with PMD Cntrller Virtualizatin User s Guide 1.3 Supprt and Cntacts Fr any supprt, cntact yur lcal Hneywell Technical Assistance Center (TAC). Finland Mail: Hneywell Oy GTAC P3-DCS Navitas 1, B-blck, 4.kerrs, Wredenkatu 2 FI Varkaus, Finland Phne: DL HPS_Q_GTAC_P3_DCS Elsewhere Call yur nearest Hneywell ffice. Wrld Yu can find the Experin PKS with PMD Cntrller dcuments n the Hneywell Prcess Wide Web Slutins website at and n the Finland Intranet at Cmputer names Media requirements 1.4 Cmputer names The fllwing list prvides the restrictins that must be fllwed in naming the cmputers
6 Chapter 1 - Abut this dcument The Autmatin Netwrk Architecture (ANA) name f the cmputer must be eight characters r less, in length. The cmputer name must be in the frmat 001PMDA, 004PMDB. The cmputer name cannt cntain spaces r ther nn-standard characters. Fr nn-redundant server ndes, the cmputer name must nt end with A r B. Fr nn-redundant server ndes, the server name must nt end with 0 r 1. Fr redundant server ndes, the cmputer name must end with A r B. 1.5 Media requirements Yu need fllwing medias t install PMD R910.2 server: ESIS USB disk Experin PKS System Initializatin DVD R210.1 r later Micrsft Security Patches SUIT DVD - 6 -
7 CHAPTER 2 CREATING PMD SERVER ON VIRTUAL MACHINE Generate cnfiguratin files using system initializatin media Create and set up virtual machine Install perating system and Experin PKS VMware tl installatin Generate serial number Install Adbe Reader Verify Firewall Install PMD sftware Pst installatin tasks Install Htfixes and Antivirus Remve USB device frm the virtual machine Verify the PMD Server system 2.1 Generate cnfiguratin files using system initializatin media ATTENTION Ensure that the Setup.exe (which creates the cnfiguratin files) frm ESIS must be run n a PC with Windws OS laded n it


8 2.1.1 T generate cnfiguratin files 1. G t ESIS Run as Administratr and start \ESIS\EPKS_R510...\Setup.exe. The Experin Sftware Installatin Server > Welcme t ESIS Tl page appears. 2. Select OS preparatin with/withut Prduct Install check bx, and then click Next. The Installatin ptin page appears

9 3. Click Generate cnfiguratin files, and then click Next. The Platfrm Cnfiguratin page appears. 4. Under Chse Cnfiguratin: Select Platfrm Cnfiguratin check bx, and then select Reinstall OS and cnfigure system frm the list. Select Prduct Installatin check bx, then select R510.x. 5. Under Select Platfrm: Click Server, and then select VMware Virtual Platfrm frm the list. 6. Under Select Operating System: Click Server, and then select Windws Server 2016 Datacenter (X64) frm the list. 7. Click Next. The Operating System Cnfiguratin page appears

10 In the Lcal Language list, select English (United States). In the Time Zne list, select the crrect Time Zne. In the Cmputer Name bx, type the crrect name. In the Cmpany Name bx, type Hneywell. In the Custmer Name bx, type Hneywell. In the Wrkgrup Name bx, type wrkgrup name, fr example, WGPMD. In the User Accunt name bx, type the required user name. In the Passwrd bx, type the passwrd. In the Cnfirm Passwrd bx, type the passwrd. In the Security Passwrd bx, type the passwrd. In the Cnfirm Security Passwrd bx, type the passwrd. NOTE This Security Passwrd will be used during the installatin. 8. Click Next. The Netwrk and Input/ Output Device Infrmatin page appears

11 In the Netwrk Type list, select FTE. In the N. f Adapters list, select 2. In the Multicast Address bx, type In the Device Index bx, type the last part f the A-channel IP address f that server. 9. Click NIC Prperties. The IP Address dialg bx appears


12 10. Click Use the fllwing IP address. 11. In the IP Address, Subnet Mask, and Default Gateway bxes, type the crrect IP address, subnet mask, and default gateway details, respectively. 12. Click OK. 13. Click Next. The Cnfiguratin Summary page appears

13 14. Click Generate Prduct Install Cnfig Files. The Welcme page appears. 15. Click Next. The License Agreement page appears. 16. Select I accept the terms in the License Agreement and click Next. The Setup type f Nde t install page appears

14 17. Select Server (ESV), and click Next. The User and License Infrmatin page appears. 18. Type the fllwing in the respective bxes: Name = Hneywell Cmpany Name = Hneywell Brwse and select the License file. NOTE Use the license nly with PMD interface enabled. 19. Click Next. The Installatin Path(s) Selectin page appears. 20. Leave the default paths, and click Next. The Experin Netwrk Selectin page appears
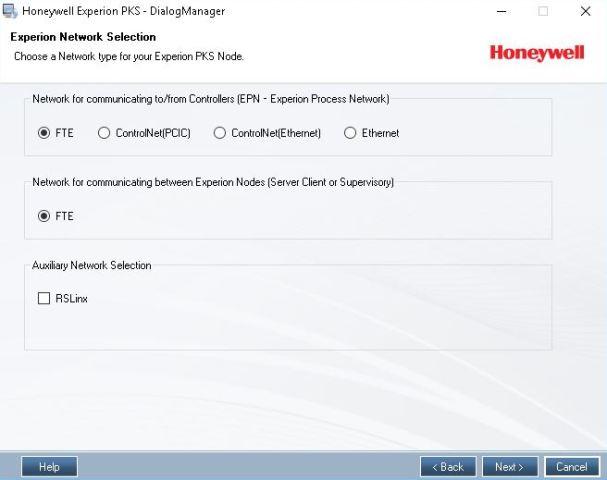
15 - 15 -

16 21. Select FTE, and click Next. The FTE Btp and NTP IP Address Cnfiguratin page appears. 22. Type the fllwing in the respective bxes: Base IP Address = IP area f the system and endig t 0 Subnet Mask = Subnet Mask f the system Default Gateway = Default Gateway f the system NTP First IP Address = IP address f the A-channel f the server A NTP Secnd IP Address = IP address f the A-channel f the server B 23. Click Next. The Feature and Optins Selectin page appears


17 24. Perfrm the fllwing settings: Select Custm Uncheck PMD Cntrller Select/Clear Signn Managerbased n the requirement. 25. Click Next. The Experin Accunts Passwrd Entry page appears
18 26. Type the passwrd t all Passwrd and Cnfirm Passwrd bxes. 27. Add Additinal User Name and Passwrd. 28. Click Next. The Summary page appears. 29. Verify the settings, and click Cntinue. 30. Click Save Cnfig Files t save the file t USB drive (that is, ESIS disk). 31. Under CnfigFiles flder, create Prject flder (that is, SID1234_DEPARTMENT) and nde name subflder (that is, 001PMDB001). 32. Click OK. 33. Click OK. 34. After saving, click Finish. 35. Click OK. 36. Safely remve USB drive. 2.2 Create and set up virtual machine Create the virtual machine Setting up the virtual machine Create the virtual machine T create the virtual machine

19 1. In the vsphere Web Client hme page, click vcenter > Hst, select the Hst. 2. Right-click the Hst and select All vcenter Actins > New Virtual Machine. The New Virtual Machine wizard appears. 3. Under Select a creatin type, by default, Create a new virtual machine is selected, and click Next. The Edit Settings page appears

20 4. Under Select a name and flder, in the Enter a name fr the virtual machine bx, type the desired Virtual Machine name. Fr example, if the server name is PMDVITRB, prvide the same name t the virtual machine. Similarly, if the HMI name is PMD01HMI, prvide the same name t the virtual machine r if the RHS name is PMD01RHS, prvide the same name t the virtual machine. ATTENTION The VM name can be different frm the windws cmputer name. D nt use the special characters in Virtual Machine name. Fr example,!, $, #, %. 5. Under Select a lcatin fr the virtual machine, select the desired lcatin (datacenter) fr the virtual machine, and click Next. 6. Under Select a cmputer resurce, select the cluster/hst/resurce pl fr the virtual machine and click Next. 7. Under Select strage, in the VM Strage Plicy list, select the VM Strage Plicy. 8. Select desired strage device, and click Next
. 12. Click Next. The Custmize hardware page appears. 13.")

21 9. Under Select cmpatibility, in the Cmpatible with list, select ESXi 6.0 and later and click Next. 10. Under Select a guest OS, in the select Guest OS Family list, select Windws. 11. In the Guest OS Versin list, select Micrsft Windws Server 2016 (64-bit). 12. Click Next. The Custmize hardware page appears. 13. In the CPU list, select the number f virtual CPUs fr the respective virtual machine. Fr specificatin infrmatin, refer t the HPS Virtualizatin Specificatin dcument, p/n EP In the Memry Size list, select memry size. Fr specificatin infrmatin, refer t the HPS Virtualizatin Specificatin dcument, p/n EP Under New Hard disk, set the Disk Size. Fr Disk Size specificatin infrmatin fr different ndes, refer t the HPS Virtualizatin Specificatin dcument, p/n EP Expand New Hard disk, click Thin prvisining ptin. 17. By default, single netwrk card is available, in the New Netwrk list, select FTE Yellw frm the list. 18. In the New device list, select the Netwrk, and click Add
22 19. In the New Netwrk list, select FTE Green frm the list. 20. Select the Cnnect at Pwer On checkbx. 21. Retain the default settings. 22. Click Next. The Ready t Cmplete page appears. 23. Read thrugh the Settings summary, and if required, click Back, and Edit the details. 24. Click Finish Setting up the virtual machine After the virtual machine is created, perfrm the fllwing settings: Add CD/DVD Drive t the virtual machine Add USB cntrller t the virtual machine Add USB device t the virtual machine Resurce allcatin fr virtual machine BIOS setting t bt frm the CD-ROM device Add CD/DVD Drive t the virtual machine T set the CD/DVD drive as hst device in virtual machine

23 1. In the vsphere Web Client hme page, click vcenter > Virtual Machine, click Virtual Machine. The list f Virtual Machine appears. 2. Select the desired Virtual Machine, right-click and select Edit Settings. The Edit Settings windw appears. 3. In the New Device list, select CD/DVD drive Select the Hst Device. 5. Under Status, select the Cnnect at Pwer n check bx. 6. Click OK. Add USB cntrller t the virtual machine T add USB cntrller t the virtual machine

24 1. In the vsphere Web Client hme page, click vcenter > Virtual Machine, click Virtual Machine. The list f Virtual Machine appears. 2. Select the desired Virtual Machine, right-click and select Edit Settings. The Edit Settings windw appears. 3. In the New Device list, select USB Cntrller. 4. Click Add and click OK. Add USB device t the virtual machine T add USB device t cnnect any remvable disk

25 1. In the vsphere Web Client hme page, click vcenter > Virtual Machine, click Virtual Machine. The list f Virtual Machine appears. 2. Select the desired Virtual Machine, right-click and select Edit Settings. The Edit Settings windw appears. 3. In the New Device list, select Hst USB Device. 4. Click Add and click OK. Resurce allcatin fr virtual machine T allcate the resurce fr the virtual machine 1. In the vsphere Web Client hme page, click vcenter > Virtual Machine, click Virtual Machine. The list f Virtual Machine appears. 2. Select the desired Virtual Machine, right-click and select Edit Settings. The Edit Settings windw appears

26 3. Expand CPU, in the CPU list, select the number f CPUs. 4. In the Reservatin list, set Reservatin as 50% f limit value

27 5. In the Limit list, set the limit value. Fr specificatin infrmatin, refer t the HPS Virtualizatin Specificatin dcument, p/n EP Expand Memry, in the RAM bx and set RAM memry. Fr specificatin infrmatin, refer t the HPS Virtualizatin Specificatin dcument, p/n EP In the Reservatin list, set Reservatin as 70% f limit value. 8. Click OK. BIOS setting t bt frm the CD-ROM device Set the BIOS t bt frm the CD-ROM device, s that cmputer can bt frm CD-ROM. T set BIOS setting t bt frm the CD-ROM device 1. In the vsphere Web Client hme page, click vcenter > Virtual Machine, click Virtual Machine. The list f Virtual Machine appears. 2. Select the desired Virtual Machine, right-click and select Edit Settings. The Edit Settings windw appears
, select The next time the virtual machine bts, frce entry int the BIOS setup screen check bx. 6. Click OK. 7.")
28 3. Click the VM Optins tab, expand Bt Optins. 4. Under Firmware, in the Chse which firmware shuld be used t bt the virtual machine list, select BIOS (recmmended). 5. Under Frce Bis setup (*), select The next time the virtual machine bts, frce entry int the BIOS setup screen check bx. 6. Click OK. 7. In the vsphere Web Client hme page, click Summary tab, then click Launch Cnsle. 8. Select the desired Virtual Machine, right-click and select Pwer On. The PhenixBIOS Setup Utility windw appears. 9. Select the Bt tab, and select the CD-ROM Drive. 10. Press + buttn, bring t the first. 11. Press F10 t Save and Exit. The Setup Cnfirmatin windw appears, select Yes and press Enter. The machine restarts. 2.3 Install perating system and Experin PKS ATTENTION
29 Yu must use the Experin PKS System Initializatin R210.1 (r Later) media alng with the HPS Operating System T install perating system and Experin PKS 1. Cnnect bth server Ethernet prts t switches r use crssver cable. 2. T start perating system installatin, ensure that the latest Experin PKS System Initializatin media (R210.1 r later media) is inserted in the DVD drive f the ESXI hst. 3. Cnnect the USB/Pen drive in which the cnfiguratin files are saved t the target nde. 4. Restart the cmputer. 5. Press any key if the message Press any key t bt frm CDROM appears. 6. Click Brwse and select InitMediaOptins.xml cnfiguratin file frm the USB drive. 7. Click Next. 8. Select Partitin Cunt as One. 9. Prvide security passwrd which was entered during Generate cnfiguratin files. 10. Select the lcatin fr installatin media as ESIS frm USB. 11. Select ESIS path (USB Drive\EPKS_R510_ESIS_v5). 12. Click Next. 13. Select I accept the terms in the license agreement, and click Install. A message fr Frmatting the selected Drive appears. 14. Click Yes 15. Fllw the n screen instructins t cmplete the Experin PKS System Initializatin media installatin. After cmpleting, a message appears t restart the system. 16. Click Yes. 17. Lg n with the user that was used fr generating cnfiguratin file. Ensure that the user is added t the prduct administratr and Lcal Engineers grup. ATTENTION Windws keybard layut is in US-English and might be different than actual keybard. 18. In the Experin Welcme screen, clear Shw this screen next time yu start Windws ptin, and click Clse. 2.4 VMware tl installatin After yu create a PMD virtual machine, yu must install VMware Tls n it

30 2.4.1 T install VMware tls 1. In the vsphere Web Client hme page, click vcenter > Virtual Machine, select the Virtual Machine. The list f Virtual Machine appears. 2. Right-click Virtual Machine, select All vcenter Actins

31 3. Click Guest OS, select Upgrade VMware Tls. The Upgrade VMware Tls dialg bx appears. 4. Select Autmatic Upgrade ptin. ATTENTION Ensure that Virtual Machines are pwered n befre the Autmatic upgrade. 5. Click Upgrade. 2.5 Generate serial number Yu must generate the serial number and prvide the serial number t the design team t get the license T generate the serial number 1. On Server B r Nn-redundant Server, g t Start > Windws System > Cmmand Prmpt. 2. Right-click Cmmand Prmpt and click Run as Administratr. The Cmmand Prmpt windw appears. 3. Type wmic bis get serialnumber, and press Enter. The serial number appears

32 ATTENTION Yu must prvide the exact serial number fr creating the license, else license creatin fails. 4. Cpy the cntent t the ntepad and prvide the serial number t the design team t get the license. Fr mre infrmatin, refer t the Experin PKS with PMD Cntrller System Administratin User's Guide. 2.6 Install Adbe Reader T install Adbe Reader 1. Lg n with the user that was used fr generating cnfiguratin file. 2. G t ESIS\D_PDF\Adbe Reader\AR Duble-click AdbeRdr11000_en_US. The Ready t Install Adbe Reader XI page appears. 4. Click Next. 5. Click Install. After the Adbe Reader 11 is installed successfully, the Setup Cmpleted page appears. 6. Click Finish. 7. G t ESIS\D_PDF\Adbe Reader\AR Duble-click AdbeRdrUpd The Welcme t Patch fr Adbe Reader page appears. 9. Click Update. 2.7 Verify Firewall After the Adbe Reader patch is installed successfully, the Setup Cmpleted page appears T verify Firewall
 and select Enable Rule. 6. Clse the Windws Firewall and Cntrl Panel windw. 2.8 Install PMD sftware 2.8.1 T install PMD sftware 1.")
33 1. Lg n with the user that was used fr generating cnfiguratin file. 2. G t Cntrl Panel > Windws Firewall. 3. Click the Advanced Settings. 4. Select the Inbund Rules. 5. Right-click Remte Desktp (Tcp-In) and select Enable Rule. 6. Clse the Windws Firewall and Cntrl Panel windw. 2.8 Install PMD sftware T install PMD sftware 1. Lg n with the user that was used fr generating cnfiguratin file. 2. Right-click ESIS\PMD_R910.2\Setup, and then click Run as administratr. The User Accunt Cntrl dialg bx appears. 3. Click Yes. The Experin PKS with PMD Cntrller wizard appears. 4. Click Next. The License Agreement page appears. 5. Read the license agreement. 6. Click I accept the terms in the license agreement, and then click Next. The Select the Language page appears. 7. Frm the Language list, click either Finnish r English. 8. Click Next. The Setup Type page appears. Yu can chse the required ptins:
34 PMD Server Redundant PMD Server A Redundant PMD Server B 9. Click Next. The Enter the fllwing details page appears with the default values cnfigured in the installer. ATTENTION Use nly capital letters fr all fields. 10. Clear the default values and then insert the site-specific values. 11. Click Next. The PMD Accunts Passwrd Entry page appears. 12. Type the passwrds fr all users and click Next. Perfrm the same n all PMD accunt fields. 13. Click Next. The Destinatin Flder page appears. 14. Click Next. The Ready t Install the Prgram page appears. 15. Click Install. 16. Click Finish. After the installatin is cmplete, a message prmpts t restart the cmputer appears. 17. Click Yes. The cmputer is restarted Design Repsitry (DR) Installer After PMD System sftware installatin is cmpleted, start the DR Installer t install PMD server license fr nn-redundant PMD server and redundant PMD Server B. T start the DR Installer: 1. Click Start. 2. G t PMD. 3. Select DRInstaller frm the drp-dwn list f PMD. 4. Click Install. ATTENTION Fr nn-redundant and B-server, cpy PMD license files t C:\Prgram Files (x86)\hneywell\pmd\<prject_name>\license\flder. 5. In the Design Repsitry Installer windw, t install server license, click Create Database ptin. 6. In the License file bx, brwse and select the server license. 7. In the License passwrd bx, type the license passwrd. 8. Select the language frm the Blck language list
35 9. Click Execute. The System Definitin Installatin dialg bx appears. 10. In the System Definitin Installatin windw, in the IP address range bxes, type the IP addresses. The IP address range must be in the same netwrk as f the Step 10 and ending t 34 and Under Restrictins, in the Blck Name Length bx, type blck name length, (blck name length can be maximum f 40 characters). 12. Click Next. Scrll dwn n status pane and wait until Installatin Cmpleted message appears. 13. T install the device supprt blck license, click Install Blck License, and brwse and select the license file BlckLicense_Hneywell_xxxxx_xxxxx.dat frm the prject directry. A passwrd is nt required. Click Execute. 14. After the installatin is cmplete, click Clse. After the license key is installed, the Installatin Cmpleted Wizard page appears. 15. Click Finish. After the installatin is cmplete, a message prmpts t restart the cmputer appears. 2.9 Pst installatin tasks Cnfigure user settings fr Administratr users Cnfigure the user settings fr PMD users Remve Administratrs user grups rights Disable Administratr user HMIWeb Display Builder settings Disable IPV6 settings Disable IE ESC Cnfigure remte desktp users grup t user prperties Cnfigure user settings fr Administratr users T cnfigure the user settings fr Administratr users 1. Lg n with the user that was used fr generating cnfiguratin file. Ensure that the user is added t the prduct administratr grup and lcal engineers grup. 2. Start > Windws Administrative Tls > Cmputer Management. The Cmputer Management windw appears. 3. Click Cmputer Management > System Tls > Lcal Users and Grups > Users. On the right-pane f the Cmputer Management windw, the list f users appears. 4. Right-click Administratr, and then click Prperties. The Administratr Prperties dialg bx appears. 5. Clear the Accunt is disabled and User must Change Passwrd at next lgin check bxes. 6. Click Apply, and then click OK. 7. Right-click Administratr user, click Set Passwrd and click Prceed. The Set Passwrd dialg bx appears
36 8. In the Passwrd and Cnfirm Passwrd bxes, type the passwrd. 9. Click OK. 10. Sign Out and Sign In as Administratr user. 11. Click Start > Windws system and right-click Cmmand Prmpt, select Run as Administratr. 12. Click Yes. 13. G t ESIS\ Sftware\Prduct DVD 127_03\UserSettings\R900.X\W2K16_32_64_Bit. 14. Run UserSettings.exe. 15. Type 1, and then press Enter t apply windws user settings t the default accunt. The Desktp Icn settings windw appears. 16. Deselect all selectins and click Apply. 17. Select Desktp, Netwrk, Cntrl Panel, and User's Files. 18. Click Apply and then OK. T add user rights t the required PMD users 1. T add Administratrs user grup right t PMD users, perfrm the belw steps. ATTENTION T run Win2K16_32_64_Bit, user shuld be part f Administratrs user grup. ATTENTION Nte the PMD users t which the Administratrs user grups rights are added. After cnfiguring the user settings, Administratrs user grup rights t be remved frm nted PMD users. 2. Click Start > Windws Administrative Tls > Cmputer Management. The Cmputer Management windw appears. 3. Click Cmputer Management > System Tls > Lcal Users and Grups > Users. On the right-pane f the Cmputer Management windw, the list f users appears. 4. Right-click Users, and then click Prperties. The Users Prperties dialg bx appears. 5. Click Member Of tab and verify the Administratrs user grup is added. 6. If Administratrs user grup is nt added then, click Add. The Select Grups dialg bx appears. 7. Click Advanced and then Find Nw. 8. Duble-click Administratrs grup and then click OK. 9. Click OK n Prperties dialg bx. 10. Sign Out frm the existing user Cnfigure the user settings fr PMD users NOTE
37 The steps frm the sectincnfigure the user settings t Other Windws settings are perfrmed n all required PMD users manually. Cnfigure the user settings Cnfigure Windws Media Player Cnfigure keybard settings Cnfigure IE settings Update Adbe Reader Cnfigure date, time, and time zne settings Other Windws settings Cnfigure the user settings T cnfigure the user settings 1. Sign In with the required PMD user t run the UserSettings tl. 2. G t ESIS\ Sftware\Prduct DVD 127_03\UserSettings\R900.X\W2K16_32_64_Bit. 3. Run UserSettings.exe. 4. Type 2, and then press Enter t apply windws user settings t the default accunt. The Desktp Icn settings windw appears. 5. Deselect all selectins and Click Apply. 6. Select Desktp, Netwrk, Cntrl Panel, and User's Files. 7. Click Apply and then OK. Cnfigure Windws Media Player T cnfigure Windws Media Player 1. G t Start > Windws Accessries > Windws Media Player. The Windws Media Player dialg bx appears. 2. Click the Recmmended setting ptin. 3. Click Finish. After the installatin is cmplete, clse the windw. Cnfigure keybard settings T cnfigure keybard settings 1. Click Start > Windws system > Cntrl Panel > Clck, Language and Regin 2. Click Language >Add a language. 3. Select Language frm the list. Fr example, Finnish. 4. Click OK. 5. Select the Advanced settings > Override fr default input methd frm the list. 6. Frm drp dwn list select Default Input Language. 7. Click Save
 00000809 English (United Kingdm) 0000040b Finnish 0000040c French (Standard) 00000407 German (Standard) 00000816")
38 8. Start Registry Editr (Regedit.exe), and click Yes. 9. Chse HKEY_USERS\.DEFAULT\Keybard Layut\Prelad. 10. Mdify the value Enter the crrect keybard layut cde t value data. The mst cmmn cdes are as fllws: Cdes Language English (United States) English (United Kingdm) b Finnish c French (Standard) German (Standard) Prtuguese (Standard) Russian Fr mre infrmatin, refer t Click OK and clse Registry Editr. Cnfigure IE settings T cnfigure the IE settings 1. Click Start > Windws Accessries > Internet Explrer, right-click Internet Explrer, select Run as Administratr, and then click Yes. The Windws Internet Explrer 11 dialg bx appears. 2. Click Use recmmended security and cmpatibility settings and Send D Nt Track requests t tell sites yu prefer nt be tracked, and click OK. 3. Enable the AddIns. 4. Right-click Menu bar, select Menu bar and Lck the tlbars ptins. 5. G t Tls > Safety > Turn ff SmartScreen Filter, and click Turn n SmartScreen Filter. The Micrsft SmartScreen Filter dialg bx appears. 6. Select Turn ff SmartScreen Filter ptin. 7. G t Tls > Manage Add-ns > Acceleratrs. 8. Select with Windws Live, Map with Bing, and Translate and then click Disable. 9. Click Clse. 10. Frm the Tls menu, click Internet Optins. 11. Under the Hme Page, click Type abut:blank. 12. Click Security tab
39 13. Select Trusted sites and click Sites. 14. Insert Name> (that is, and click Add and Clse. 15. Click Advanced tab. 16. Clear Ntify when dwnlad cmplete check bx. 17. Clear Enable Autmatic Image Resizing check bx. 18. Select Empty Temprary Internet Files Flder When Brwser Is Clsed check bx. 19. Click OK and clse the windw. Update Adbe Reader T update Adbe Reader 1. Frm the desktp, start Adbe Reader. 2. Select Edit > Preferences. 3. Select Updater. 4. Select D nt dwnlad r install updates autmatically ptin. 5. Click OK. Cnfigure date, time, and time zne settings T cnfigure date, time, and time zne settings 1. Click Start > Windws System > Cntrl Panel > Date and Time. The Date and Time dialg bx appears. 2. Click Change date and time. The Date and Time Settings dialg bx appears. 3. Set the time and date, and click OK. 4. Click Change time zne. The Time Zne Settings dialg bx appears. 5. Set the time zne, and click OK. 6. Click OK. Other Windws settings 1. Duble-click This PC, chse View tab. 2. Verify if Shw Hidden items is selected and File name extensins is deselected frm Flder Optins. 3. On the Desktp, right-click, and then select View > Aut arrange icns. 4. Sign Out frm the existing user. NOTE Perfrm the sectins frm Cnfigure the user settings t Other Windws settings fr required PMD users
40 2.9.3 Remve Administratrs user grups rights 1. After cnfiguring the user settings, remve the Administratrs user grup rights fr required PMD users. T remve the Administratrs user grup rights fr required PMD users perfrm the belw steps. NOTE Remve the Administratrs user grups rights fr the required PMD users that are nted n the T add user rights t the required users in sectin Cnfigure user settings fr Administratr users. 2. Sign In t the cmputer with the user that was used fr generating cnfiguratin file. 3. Click Start > Windws Administrative Tls > Cmputer Management. The Cmputer Management windw appears. 4. Click Cmputer Management > System Tls > Lcal Users and Grups > Users. On the right-pane f the Cmputer Management windw, the list f users appears. 5. Right-click Users, and then click Prperties. The Users Prperties dialg bx appears. 6. Click Member Of tab. 7. Select Administratrs user grups and click Remve Disable Administratr user T disable administratr user 1. Frm the Start menu, right-click Cmputer, and then clickmanage. 2. Select Lcal Users and Grups > Users. 3. Right-click Administratr, and then click Prperties. 4. Select Accunt is disabled check bx. 5. Click OK. 6. Restart the system HMIWeb Display Builder settings Fr the HMIWeb Display Builder settings 1. Lg n as DEPARTMENT_Admin user. 2. Select Start > Hneywell Experin Tls > HMIWeb Display Builder, right-click HMIWeb Display Builder and select Mre > Open file lcatin. 3. Right-click HMIWeb Display Builder, and then click Prperties. 4. G t Shrtcut tab. 5. In the Target bx, at the end f the Target line, change the startmde t PMD. 6. Click OK and Cntinue. 7. G t the directry ESIS\PMD_R910.2\PMD_R910.2\MEDIA\PMD Display Object Library and right-click PMD Display Object Library 150 applicatin and select Run as Administratr and click Yes
41 8. Click Unzip. 9. Click OK and clse the WinZip windw. ATTENTION Shape path is a user-specific setting, s it must be perfrmed n all users that use HMIWeb Display Builder. 10. Click Start > Hneywell Experin Tls > HMIWeb Display Builder. 11. Select Tls > Optins. 12. G t Shapes tab, and then click Add. 13. Click the Brwse[...]. 14. Brwse t C: Prgram Files (x86)\hneywell\pmd\hmiweb PMD\HMIWeb Display Builder\ PMD Display Object Library 150 \PMD Display Object Library and then click OK. 15. Click OK and then clse the Optins dialg bx. 16. Select View > Tlbx Disable IE ESC T disable Internet Explrer (IE) Enhanced Security Cnfiguratin (ESC) n all ndes 1. Click Start > Server Manager. The Server Manager windw appears. 2. Click Lcal Server in left pane. 3. Click IE Enhanced Security Cnfiguratin in right pane. The Internet Explrer Enhanced Security Cnfiguratin dialg bx appears. 4. Under Administratr and Users, click Off. 5. Click OK. 6. Restart the system Cnfigure remte desktp users grup t user prperties ATTENTION The virtual machine is accessed thrugh WYSE client in the later part f cnfiguratin and peratin. Hence, remte desktp user must be added t the remte desktp users grup that is used fr lgging n t the machine. The fllwing are the standard users: Fr Server ndes, add nly Depart_Admin user. Fr HMI and RHS ndes, add the tw users: Depart_Admin
42 Depart_UserX Fr DM ndes, add the tw users: Depart_Admin Depart_EngrX Based n the prject requirement, yu can add r mdify the required users. T cnfigure remte desktp users grup t user prperties 1. Click Start > Windws Administrative Tls > Cmputer Management. The Cmputer Management windw appears. 2. Click System Tls > Lcal Users and Grups > Users > Department_Admin. 3. Right-click the DEPT_Admin, and clickprperties. The Prperties dialg bx appears. 4. In the Member f tab, click Add. The Select Grups dialg bx appears. 5. Select Remte Desktp Users Grups. 6. Click OK. 7. Click OK in the Member Of tab Install Htfixes and Antivirus T install Htfixes 1. Insert the latest SUIT ISO media t DVD drive f ESXI hst t run the latest validated Micrsft htfixes n the nde. If it is nt started autmatically, brwse t UPDATEMANAGER n SUIT DVD, right-click and select Run as Administratr and click Yes. This shuld last several minutes. ATTENTION Sme SUIT versins installs PreRequirements and rebt the server. After rebt start the SUIT installatin again. 2. Restart the server. ATTENTION If keybard and muse is nt respnding restart the server by using pwer switch T install Antivirus Install latest McAfee r Symantec SEP antivirus based n the requirement
43 2.11 Remve USB device frm the virtual machine T remve a USB device frm a virtual machine, yu need t discnnect it in the virtual-machine based perating system T remve USB device frm the virtual machine 1. Right-click the Virtual Machine, and select Edit Settings. The Virtual Machine Prperties windw appears. 2. Select USB device. 3. Click Remve. 4. Click OK Verify the PMD Server system T verify the system 1. Verify the functins f the applicatins: Cnfiguratin Studi Start > Hneywell Experin Tls > Cnfiguratin Studi HMIWeb Display Builder Statin Start > Hneywell Experin Tls > HMIWeb Display Builder Shrtcut Start mde = PMD Verify Shape path Select View > Tlbx. Start > Hneywell Experin > Experin Statin, right-click Open file lcatin > Experin Statin. Fr systems delivered t Finland, verify that C:\Lcalizatin Tlkit exist and the System Menu is in Finnish. FTE and Heartbeat Nde Status Display Start > Hneywell Experin Tls > FTE and Heartbeat Nde Status Display Validate Type Definitins (perfrm this nly t B-server and nn-redundant server) PDSViewer Adbe Reader Right-click C:\Prgram Files (x86)\hneywell\pmd\designrepsitry\pmdtsrsyncmanager.exe and select Run as Administratr and click Yes. Click Get Type Def Frm SR. Click Validate. Verify that all rws are green. Start > PMD >PDS Viewer. Lg n as DEPARMENT_Admin Click Shw under Department
44 Select Edit > Preferences. Select Updater. Select D nt dwnlad r install updates autmatically ptin. Click OK and clse the prgram. 2. Verify the cmputer settings. Services Windws Time = Started and Autmatic Windws Firewall = Started and Autmatic Device Manager is errr free 3. Empty the recycle bin. Verify Shw Hidden Devices If there are any items in Other Device, install them. After installing, right-click the cmputer name, and then select Scan fr Hardware Changes. 4. Safely remve ESIS USB disk frm target nde. 5. Verify the cmputer fr viruses (fllwing instructins are fr McAfee ffline Virusscan): Click Start > Windws System > Cmmand Prmpt, select Run as Administratr. Click Yes. G t the Virusscan flder. Type cmmand Virusscan_run Verify the netwrk cnnectin fr functinality and the settings. 7. Verify that Activatin has been perfrmed frm the Cmputer Prperties r perfrm it if necessary. 8. Verify that there are n disks in the drives
45 Ntices Trademarks Experin, PlantScape, SafeBrwse, TtalPlant, and TDC 3000 are registered trademarks f Hneywell Internatinal, Inc. CntrlEdge is a trademark f Hneywell Internatinal, Inc. OneWireless is a trademark f Hneywell Internatinal, Inc. Matrikn and MatriknOPC are trademarks f Matrikn Internatinal. Matrikn Internatinal is a business unit f Hneywell Internatinal, Inc. Mvilizer is a registered trademark f Mvilizer GmbH. Mvilizer GmbH is a business unit f Hneywell Internatinal, Inc. Other trademarks Micrsft and SQL Server are either registered trademarks r trademarks f Micrsft Crpratin in the United States and/r ther cuntries. Trademarks that appear in this dcument are used nly t the benefit f the trademark wner, with n intentin f trademark infringement. Third-party licenses This prduct may cntain r be derived frm materials, including sftware, f third parties. The third party materials may be subject t licenses, ntices, restrictins and bligatins impsed by the licensr. The licenses, ntices, restrictins and bligatins, if any, may be fund in the materials accmpanying the prduct, in the dcuments r files accmpanying such third party materials, in a file named third_ party_licenses n the media cntaining the prduct, r at Dcumentatin feedback Yu can find the mst up-t-date dcuments n the Hneywell Prcess Slutins supprt website at: If yu have cmments abut Hneywell Prcess Slutins dcumentatin, send yur feedback t: hpsdcs@hneywell.cm Use this address t prvide feedback, r t reprt errrs and missins in the dcumentatin. Fr immediate help with a technical prblem, cntact yur lcal Hneywell Prcess Slutins Custmer Cntact Center (CCC) r Hneywell Technical Assistance Center (TAC). Hw t reprt a security vulnerability Fr the purpse f submissin, a security vulnerability is defined as a sftware defect r weakness that can be explited t reduce the peratinal r security capabilities f the sftware. Hneywell investigates all reprts f security vulnerabilities affecting Hneywell prducts and services. T reprt a ptential security vulnerability against any Hneywell prduct, please fllw the instructins at: Submit the requested infrmatin t Hneywell using ne f the fllwing methds:
46 Send an t security@hneywell.cm; r. Cntact yur lcal Hneywell Prcess Slutins Custmer Cntact Center (CCC) r Hneywell Technical Assistance Center (TAC). Supprt Fr supprt, cntact yur lcal Hneywell Prcess Slutins Custmer Cntact Center (CCC). T find yur lcal CCC visit the website, Training classes Hneywell hlds technical training classes that are taught by prcess cntrl systems experts. Fr mre infrmatin abut these classes, cntact yur Hneywell representative, r see
Wave IP 4.5. CRMLink Desktop User Guide
 Wave IP 4.5 CRMLink Desktp User Guide 2015 by Vertical Cmmunicatins, Inc. All rights reserved. Vertical Cmmunicatins and the Vertical Cmmunicatins lg and cmbinatins theref and Vertical ViewPint, Wave Cntact
WorldShip PRE-INSTALLATION INSTRUCTIONS: INSTALLATION INSTRUCTIONS: Window (if available) Install on a Single or Workgroup Workstation
 Install on a Single or Workgroup Workstation") PRE-INSTALLATION INSTRUCTIONS: This dcument discusses using the WrldShip DVD t install WrldShip. Yu can als install WrldShip frm the Web. G t the fllwing Web page and click the apprpriate dwnlad link:
PRE-INSTALLATION INSTRUCTIONS: This dcument discusses using the WrldShip DVD t install WrldShip. Yu can als install WrldShip frm the Web. G t the fllwing Web page and click the apprpriate dwnlad link:
EXPERION PKS WITH PMD CONTROLLER
 EXPERION PKS WITH PMD CONTROLLER RELEASE 910.2 Installation of PMD R910.2 on Virtual DM using ESIS PMDOC-X136-en-9102A August 2018 Disclaimer This document contains Honeywell proprietary information. Information
NiceLabel LMS. Installation Guide for Single Server Deployment. Rev-1702 NiceLabel
 NiceLabel LMS Installatin Guide fr Single Server Deplyment Rev-1702 NiceLabel 2017. www.nicelabel.cm 1 Cntents 1 Cntents 2 2 Architecture 3 2.1 Server Cmpnents and Rles 3 2.2 Client Cmpnents 3 3 Prerequisites
CaseWare Working Papers. Data Store user guide
 CaseWare Wrking Papers Data Stre user guide Index 1. What is a Data Stre?... 3 1.1. When using a Data Stre, the fllwing features are available:... 3 1.1.1.1. Integratin with Windws Active Directry... 3
Exercise 1: Deploying Windows Server 2012
 Highlight Nte Lab Answer Key: Mdule 1: Deplying and Managing Windws Server 2012 Lab: Deplying and Managing Windws Server 201 2 Exercise 1: Deplying Windws Server 2012 10. In the Windws Setup Wizard, n
VMware EVO:RAIL Customer Release Notes
 VMware EVO:RAIL Custmer Release Ntes EVO:RAIL Release 1.2.0 Dcument Revisin: 1.2.0-2 (May 27, 2015) Cpyright 1998-2015 VMware, Inc. All rights reserved. Cpyright, trademark, and patent infrmatin: http://pubs.vmware.cm/cpyright-trademark.html.
USER MANUAL. RoomWizard Administrative Console
 USER MANUAL RmWizard Administrative Cnsle Cntents Welcme... 3 Administer yur RmWizards frm ne lcatin... 3 Abut This Manual... 4 Setup f the Administrative Cnsle... 4 Installatin... 4 The Cnsle Windw...
EXPERION PKS WITH PMD CONTROLLER
 EXPERION PKS WITH PMD CONTROLLER RELEASE 910.2 Installation of PMD R910.2 on Virtual HMI using ESIS PMDOC-X136-en-9102A August 2018 Disclaimer This document contains Honeywell proprietary information.
FollowMe. FollowMe. Q-Server Quick Integration Guide. Revision: 5.4 Date: 11 th June Page 1 of 26
 Q-Server Quick Integratin Guide Revisin: 5.4 Date: 11 th June 2009 Page 1 f 26 Cpyright, Disclaimer and Trademarks Cpyright Cpyright 1997-2009 Ringdale UK Ltd. All rights reserved. N part f this publicatin
AvePoint Timeline Enterprise for Microsoft Dynamics CRM
 AvePint Timeline Enterprise 1.0.2 fr Micrsft Dynamics CRM Installatin and Cnfiguratin Guide Revisin B Issued Nvember 2013 Timeline Enterprise fr Micrsft Dynamics CRM Install and Cnfig 1 Table f Cntents
AvePoint Accessibility Accelerator 2.0
 AvePint Accessibility Acceleratr 2.0 User Guide Revisin B Issued July 2013 AvePint Accessibility Acceleratr 1 Table f Cntents Abut AvePint Accessibility Acceleratr... 3 Submitting Dcumentatin Feedback
Xerox Security Bulletin XRX12-007
 Disable sftware upgrades by default Backgrund The Xerx prducts listed belw were shipped with sftware upgrades enabled by default. The firmware released belw changes the default state f sftware upgrade
Avigilon Control Center Server User Guide. Version 6.4
 Avigiln Cntrl Center Server User Guide Versin 6.4 2006-2017, Avigiln Crpratin. All rights reserved. AVIGILON, the AVIGILON lg, AVIGILON CONTROL CENTER, ACC, and TRUSTED SECURITY SOLUTIONS.AVIGILON, the
I. Introduction: About Firmware Files, Naming, Versions, and Formats
 Updating Yur CTOG 250 Cmtech Traffic Optimizatin Gateway Firmware I. Intrductin: Abut Firmware Files, Naming, Versins, and Frmats The CTOG 250 Cmtech Traffic Optimizatin Gateway and its CDM 800 Gateway
Avigilon Control Center Virtual Matrix User Guide. Version 6.8
 Avigiln Cntrl Center Virtual Matrix User Guide Versin 6.8 2006-2018, Avigiln Crpratin. All rights reserved. AVIGILON, the AVIGILON lg, AVIGILON CONTROL CENTER, ACC, and TRUSTED SECURITY SOLUTIONS. are
OASIS SUBMISSIONS FOR FLORIDA: SYSTEM FUNCTIONS
 OASIS SUBMISSIONS FOR FLORIDA: SYSTEM FUNCTIONS OASIS SYSTEM FUNCTIONS... 2 ESTABLISHING THE COMMUNICATION CONNECTION... 2 ACCESSING THE OASIS SYSTEM... 3 SUBMITTING OASIS DATA FILES... 5 OASIS INITIAL
These tasks can now be performed by a special program called FTP clients.
 FTP Cmmander FAQ: Intrductin FTP (File Transfer Prtcl) was first used in Unix systems a lng time ag t cpy and mve shared files. With the develpment f the Internet, FTP became widely used t uplad and dwnlad
Avigilon Control Center Server User Guide. Version 6.8
 Avigiln Cntrl Center Server User Guide Versin 6.8 2006-2018, Avigiln Crpratin. All rights reserved. AVIGILON, the AVIGILON lg, AVIGILON CONTROL CENTER, ACC, and TRUSTED SECURITY SOLUTIONS.AVIGILON, the
SMART Room System for Microsoft Lync. Software configuration guide
 SMART Rm System fr Micrsft Lync Sftware cnfiguratin guide Fr mdels SRS-LYNC-S, SRS-LYNC-M and SRS-LYNC-L In this guide: Fr yur recrds 1 Preparing fr yur rm system 2 Befre cnfiguring yur rm system s sftware
Release Notes. Dell SonicWALL Security firmware is supported on the following appliances: Dell SonicWALL Security 200
 Release Ntes Email Security Dell SnicWALL Email Security 8.0.1 SnicOS Cntents System Cmpatibility... 1 Enhancements in Email Security 8.0.1... 2 Reslved Issues... 3 Upgrading t Email Security 8.0.1...
DIVAR IP 3000 Field Installation Guide
 CCTV IP Netwrk Vide Technical Brief DIVAR IP 3000 Field Installatin Guide 1 DIVAR IP 3000 Field Installatin Guide Overview The purpse f this guide is t prvide the step-by-step prcess f installing a DIVAR
TIBCO Statistica Options Configuration
 TIBCO Statistica Optins Cnfiguratin Sftware Release 13.3 June 2017 Tw-Secnd Advantage Imprtant Infrmatin SOME TIBCO SOFTWARE EMBEDS OR BUNDLES OTHER TIBCO SOFTWARE. USE OF SUCH EMBEDDED OR BUNDLED TIBCO
Dear Milestone Customer,
 Dear Milestne Custmer, With the purchase f Milestne Xprtect Transact yu have chsen a very flexible ptin t yur Milestne Xprtect Business slutin. Milestne Xprtect Transact enables yu t stre a serial data
Dell EqualLogic PS Series Arrays: Expanding Windows Basic Disk Partitions
 TECHNICAL REPORT Dell EqualLgic PS Series Arrays: Expanding Windws Basic Disk Partitins ABSTRACT This Technical Reprt describes hw t expand Micrsft Windws basic disk vlumes after increasing the size f
Dell Chassis Management Controller (CMC) Version 1.35 for Dell PowerEdge VRTX. Release Notes
 Version 1.35 for Dell PowerEdge VRTX. Release Notes") Dell Chassis Management Cntrller (CMC) Versin 1.35 fr Dell PwerEdge VRTX Release Ntes Release Type and Definitin The Dell Chassis Management Cntrller (CMC) Versin 1.35 fr Dell PwerEdge VRTX is a System
Dell Chassis Management Cntrller (CMC) Versin 1.35 fr Dell PwerEdge VRTX Release Ntes Release Type and Definitin The Dell Chassis Management Cntrller (CMC) Versin 1.35 fr Dell PwerEdge VRTX is a System
Element Creator for Enterprise Architect
 Element Creatr User Guide Element Creatr fr Enterprise Architect Element Creatr fr Enterprise Architect... 1 Disclaimer... 2 Dependencies... 2 Overview... 2 Limitatins... 3 Installatin... 4 Verifying the
September 24, Release Notes
 September 24, 2013 Release Ntes Cntacting Lestream Lestream Crpratin 411 Waverley Oaks Rd. Suite 316 Waltham, MA 02452 USA http://www.lestream.cm Telephne: +1 781 890 2019 Fax: +1 781 688 9338 T submit
Cloud Storage Migration Suite 1.1.0
 Clud Strage Migratin Suite 1.1.0 User Guide Issued June 2018 Clud Strage Migratin Suite User Guide 1 Table f Cntents Abut Clud Strage Migratin Suite... 4 Overview f Basic Operatins in Clud Strage Migratin
Upgrade Guide. Medtech Evolution General Practice. Version 1.9 Build (March 2018)
") Upgrade Guide Medtech Evlutin General Practice Versin 1.9 Build 1.9.0.312 (March 2018) These instructins cntain imprtant infrmatin fr all Medtech Evlutin users and IT Supprt persnnel. We suggest that these
Upgrade Guide Medtech Evlutin General Practice Versin 1.9 Build 1.9.0.312 (March 2018) These instructins cntain imprtant infrmatin fr all Medtech Evlutin users and IT Supprt persnnel. We suggest that these
VMware AirWatch Certificate Authentication for Cisco IPSec VPN
 VMware AirWatch Certificate Authenticatin fr Cisc IPSec VPN Fr VMware AirWatch Have dcumentatin feedback? Submit a Dcumentatin Feedback supprt ticket using the Supprt Wizard n supprt.air-watch.cm. This
OO Shell for Authoring (OOSHA) User Guide
 User Guide") Operatins Orchestratin Sftware Versin: 10.70 Windws and Linux Operating Systems OO Shell fr Authring (OOSHA) User Guide Dcument Release Date: Nvember 2016 Sftware Release Date: Nvember 2016 Legal Ntices
Operatins Orchestratin Sftware Versin: 10.70 Windws and Linux Operating Systems OO Shell fr Authring (OOSHA) User Guide Dcument Release Date: Nvember 2016 Sftware Release Date: Nvember 2016 Legal Ntices
Troubleshooting Citrix- Published Resources Configuration in VMware Identity Manager
 Trubleshting Citrix- Published Resurces Cnfiguratin in VMware Identity Manager VMware Identity Manager A U G U S T 2 0 1 7 V1 Table f Cntents Overview... 1 Supprted Versins f Cmpnents... 1 Prerequisites...
AvePoint Pipeline Pro 2.0 for Microsoft Dynamics CRM
 AvePint Pipeline Pr 2.0 fr Micrsft Dynamics CRM Installatin and Cnfiguratin Guide Revisin E Issued April 2014 1 Table f Cntents Abut AvePint Pipeline Pr... 3 Required Permissins... 4 Overview f Installatin
Firmware Upgrade Wizard v A Technical Guide
 Firmware Upgrade Wizard v4.1.1 A Technical Guide Nvember 2015 Intrductin The Firmware Upgrade Wizard prvides the fllwing features: It supprts upgrading the firmware n designated devices, see Supprted devices.
Element Creator for Enterprise Architect
 Element Creatr User Guide Element Creatr fr Enterprise Architect Element Creatr fr Enterprise Architect... 1 Disclaimer... 2 Dependencies... 2 Overview... 2 Limitatins... 3 Installatin... 4 Verifying the
Enabling Your Personal Web Page on the SacLink
 53 Enabling Yur Persnal Web Page n the SacLink *Yu need t enable yur persnal web page nly ONCE. It will be available t yu until yu graduate frm CSUS. T enable yur Persnal Web Page, fllw the steps given
Dell Wyse Device Manager (WDM)
") Dell Wyse Device Manager (WDM) Versin 5.0 Maintenance Release 1.1 (MR1.1)- fr WDM Wrkgrup Editin Release Ntes Cntents Release Type and Definitin... 3 Versin... 3 Release Date... 3 Previus Versin... 3 Imprtance...
Dell Wyse Device Manager (WDM) Versin 5.0 Maintenance Release 1.1 (MR1.1)- fr WDM Wrkgrup Editin Release Ntes Cntents Release Type and Definitin... 3 Versin... 3 Release Date... 3 Previus Versin... 3 Imprtance...
1 Getting and Extracting the Upgrader
 Hughes BGAN-X 9211 Upgrader User Guide (Mac) Rev 1.2 (6-Jul-17) This dcument explains hw t use the Hughes BGAN Upgrader prgram fr the 9211 User Terminal using a Mac Nte: Mac OS X Versin 10.4 r newer is
Single File Upload Guide
 Single File Uplad Guide August 15, 2018 Versin 9.6.134.78 Single File Uplad Guide 1 Fr the mst recent versin f this dcument, visit ur dcumentatin website. Single File Uplad Guide 2 Table f Cntents 1 Single
PL-2302 Mac OS Driver MAC/PC and PC/MAC Communication Software
 PL-2302 Mac OS Driver MAC/PC and PC/MAC Cmmunicatin Sftware Windws Netwrk User Manual Prlific Technlgy Inc. Table f Cntents 1. Scpe... 3 1.1. Overview... 3 1.2. Supprted Platfrms and Tested Sftware...3
The screenshots/advice are based on upgrading Controller 10.1 RTM to 10.1 IF6 on Win2003
 Overview The screenshts/advice are based n upgrading Cntrller 10.1 RTM t 10.1 IF6 n Win2003 Other Interim Fix (IF) upgrades are likely t be similar, but the authr cannt guarantee that the dcumentatin is
Aras Innovator Viewer Add-Ons
 Aras Innvatr Viewer Add-Ons Aras Innvatr 9.2 Dcument #: 9.2.02232009 Last Mdified: 4/1/2010 Aras Crpratin ARAS CORPORATION Cpyright 2010 All rights reserved Aras Crpratin 300 Brickstne Square Suite 904
Campuses that access the SFS nvision Windows-based client need to allow outbound traffic to:
 Summary This dcument is a guide intended t guide yu thrugh the prcess f installing and cnfiguring PepleTls 8.55.27 (r current versin) via Windws Remte Applicatin (App). Remte App allws the end user t run
Trimble Survey GNSS Firmware Version 4.81 (July 2013)
") Handheld Integrated Mdular RELEASE NOTES TRIMBLE SURVEY GNSS FIRMWARE Trimble Survey GNSS Firmware Versin 4.81 (July 2013) Requirements This firmware versin includes imprvements t the Survey Receiver firmware.
Handheld Integrated Mdular RELEASE NOTES TRIMBLE SURVEY GNSS FIRMWARE Trimble Survey GNSS Firmware Versin 4.81 (July 2013) Requirements This firmware versin includes imprvements t the Survey Receiver firmware.
Upgrade Guide. Medtech Evolution Specialist. Version 1.11 Build (October 2018)
") Upgrade Guide Medtech Evlutin Specialist Versin 1.11 Build 1.11.0.4 (Octber 2018) These instructins cntain imprtant infrmatin fr all Medtech Evlutin users and IT Supprt persnnel. We suggest that these
Upgrade Guide Medtech Evlutin Specialist Versin 1.11 Build 1.11.0.4 (Octber 2018) These instructins cntain imprtant infrmatin fr all Medtech Evlutin users and IT Supprt persnnel. We suggest that these
USO RESTRITO. SNMP Agent. Functional Description and Specifications Version: 1.1 March 20, 2015
 Functinal Descriptin and Specificatins Versin: 1.1 March 20, 2015 SNMP Agent Simple Netwrk Management Prtcl Optin S fr IE and PM Mdules Supplement t Functinal Descriptin and Specificatins f RUB Ethernet
Introduction to Mindjet on-premise
 Intrductin t Mindjet n-premise Mindjet Crpratin Tll Free: 877-Mindjet 1160 Battery Street East San Francisc CA 94111 USA Phne: 415-229-4200 Fax: 415-229-4201 www.mindjet.cm 2012 Mindjet. All Rights Reserved
Date: October User guide. Integration through ONVIF driver. Partner Self-test. Prepared By: Devices & Integrations Team, Milestone Systems
 Date: Octber 2018 User guide Integratin thrugh ONVIF driver. Prepared By: Devices & Integratins Team, Milestne Systems 2 Welcme t the User Guide fr Online Test Tl The aim f this dcument is t prvide guidance
Kaltura Video Extension for SharePoint 2013 Deployment Guide for Microsoft Office 365. Version: 1.0
 Kaltura Vide Extensin fr SharePint 2013 Deplyment Guide fr Micrsft Office 365 Versin: 1.0 Kaltura Business Headquarters 250 Park Avenue Suth, 10th Flr, New Yrk, NY 10003 Tel.: +1 800 871 5224 Cpyright
Launching Xacta 360 Marketplace AMI Guide June 2017
 Launching Xacta 360 Marketplace AMI Guide June 2017 Tels Crpratin 2017. All rights reserved. U.S. patents Ns. 6,901,346; 6,980,927; 6,983,221; 6,993,448; and 7,380,270. Xacta is a registered trademark
Aras Innovator 11. Client Settings for Internet Explorer on Windows
 Client Settings fr Internet Explrer n Windws Dcument #: 11.0.02015040601 Last Mdified: 1/10/2018 Client Setup fr Internet Explrer n Windws Cpyright Infrmatin Cpyright 2018 Aras Crpratin. All Rights Reserved.
Gemini Intercom Quick Start Guide
 Gemini Intercm Quick Start Guide 2 Quick Start Guide Cntents Cntents... 1 Overview... 3 First Step unpack and inspect... 3 Netwrk plan and IP addresses... 4 Management PC... 5 Install Sftware... 6 Cnfigure
Oracle Universal Records Management Oracle Universal Records Manager Adapter for Documentum Installation Guide
 Oracle Universal Recrds Management Oracle Universal Recrds Manager Adapter fr Dcumentum Installatin Guide December 2009 Universal Recrds Manager Adapter fr Dcumentum Installatin Guide, Cpyright 2009, Oracle.
1 Getting and Extracting the Upgrader
 Hughes BGAN-X 9202 Upgrader User Guide (Mac) Rev 1.0 (23-Feb-12) This dcument explains hw t use the Hughes BGAN Upgrader prgram fr the 9202 User Terminal using a Mac Nte: Mac OS X Versin 10.4 r newer is
Enterprise Installation
 Enterprise Installatin Mnnit Crpratin Versin 3.6.0.0 Cntents Prerequisites... 3 Web Server... 3 SQL Server... 3 Installatin... 4 Activatin Key... 4 Dwnlad... 4 Cnfiguratin Wizard... 4 Activatin... 4 Create
Table of Contents. WipeDrive Enterprise Logging, March Logging Settings... 3 Log Format Types Audit Log Destination Options...
 WipeDrive Enterprise Lgging, March 2018 Table f Cntents Lgging Settings... 3 Lg Frmat Types... 4 Plain Text Lg File Optin... 4 Extensible Markup Language (XML) Lg File Optin... 6 Cmma Delimited (CSV) Lg
Dolby Conference Phone Support Frequently Asked Questions
 Dlby Cnference Phne Supprt Frequently Asked Questins Versin 1.0, 1 Intrductin This dcument prvides sme answers t frequently asked questins abut the Dlby Cnference Phne. Fr mre detailed infrmatin n any
Proficy* SmartSignal 6.1 Installation Guide
 Prficy* SmartSignal 6.1 IG_P-SS_6.1 R0 Prficy* SmartSignal 6.1 Disclaimer f Warranties and Liability The infrmatin cntained in this manual is believed t be accurate and reliable. Hwever, GE Intelligent
BANNER BASICS. What is Banner? Banner Environment. My Banner. Pages. What is it? What form do you use? Steps to create a personal menu
 BANNER BASICS What is Banner? Definitin Prduct Mdules Self-Service-Fish R Net Lg int Banner Banner Envirnment The Main Windw My Banner Pages What is it? What frm d yu use? Steps t create a persnal menu
Release Notes. Dell SonicWALL Security BETA
 Release Ntes Email Security Dell SnicWALL Email Security 7.4.1 BETA SnicOS Cntents System Cmpatibility... 1 Enhancements in Email Security 7.4.1... 2 Upgrading t Email Security 7.4.1... 3 Related Technical
CROWNPEAK DESKTOP CONNECTION (CDC) INSTALLATION GUIDE VERSION 2.0
 INSTALLATION GUIDE VERSION 2.0") TECHNICAL DOCUMENTATION CROWNPEAK DESKTOP CONNECTION (CDC) INSTALLATION GUIDE VERSION 2.0 AUGUST 2012 2012 CrwnPeak Technlgy, Inc. All rights reserved. N part f this dcument may be reprduced r transmitted
TECHNICAL DOCUMENTATION CROWNPEAK DESKTOP CONNECTION (CDC) INSTALLATION GUIDE VERSION 2.0 AUGUST 2012 2012 CrwnPeak Technlgy, Inc. All rights reserved. N part f this dcument may be reprduced r transmitted
istartsmart 3.5 Upgrade - Installation Instructions
 istartsmart 3.5 Upgrade - Installatin Instructins Minimum System Requirements: Hatch All-In-One istartsmart Cmputer Learning Center v1.0 r v1.1 Internet access - either hard-wired r wireless cnnectin is
Troubleshooting Citrix- Published Resources Configuration in VMware Identity Manager
 Trubleshting Citrix- Published Resurces Cnfiguratin in VMware Identity Manager VMware Identity Manager SEP 2 0 1 8 V 4 Table f Cntents Overview... 1 Supprted Versins f Cmpnents... 1 Prerequisites... 1
TDR and Trend Micro. Integration Guide
 TDR and Trend Micr Integratin Guide i WatchGuard Technlgies, Inc. TDR and Trend Micr Deplyment Overview Threat Detectin and Respnse (TDR) is a cllectin f advanced malware defense tls that crrelate threat
File Share Navigator Online
 File Share Navigatr Online User Guide Service Pack 7 Issued September 2017 Table f Cntents What s New in this Guide... 4 Abut File Share Navigatr Online... 5 Cmpnents f File Share Navigatr Online... 5
Getting Started with the SDAccel Environment on Nimbix Cloud
 Getting Started with the SDAccel Envirnment n Nimbix Clud Revisin Histry The fllwing table shws the revisin histry fr this dcument. Date Versin Changes 09/17/2018 201809 Updated figures thrughut Updated
1 Getting and Extracting the Upgrader
 Hughes BGAN-X 9202 Upgrader User Guide (PC) Rev 1.0 (23-Feb-12) This dcument explains hw t use the Hughes BGAN-X Upgrader prgram fr the 9202 User Terminal using a PC. 1 Getting and Extracting the Upgrader
Graduate Application Review Process Documentation
 Graduate Applicatin Review Prcess Cntents System Cnfiguratin... 1 Cgns... 1 Banner Dcument Management (ApplicatinXtender)... 2 Banner Wrkflw... 4 Navigatin... 5 Cgns... 5 IBM Cgns Sftware Welcme Page...
Internet Explorer Configuration Reference
 Sitecre CMS 6.2 r later Internet Explrer Cnfiguratin Reference Rev: 2013-10-04 Sitecre CMS 6.2 r later Internet Explrer Cnfiguratin Reference Optimize Micrsft Internet Explrer fr Use with Sitecre Table
Universal CMDB. Software Version: Backup and Recovery Guide
 Universal CMDB Sftware Versin: 10.32 Backup and Recvery Guide Dcument Release Date: April 2017 Sftware Release Date: April 2017 Backup and Recvery Guide Legal Ntices Warranty The nly warranties fr Hewlett
TRAUMACAD 2.5 PREREQUISITES
 TRAUMACAD 2.5 PREREQUISITES Befre beginning the TraumaCad Server sftware installatin, please verify all prerequisite are installed and minimum hardware and sftware requirements are met, as described belw.
HP Universal CMDB. Software Version: Backup and Recovery Guide
 HP Universal CMDB Sftware Versin: 10.21 Backup and Recvery Guide Dcument Release Date: July 2015 Sftware Release Date: July 2015 Backup and Recvery Guide Legal Ntices Warranty The nly warranties fr HP
Kaltura Video Extension for IBM Connections User Guide. Version: 1.0
 Kaltura Vide Extensin fr IBM Cnnectins User Guide Versin: 1.0 Kaltura Business Headquarters 5 Unin Square West, Suite 602, New Yrk, NY, 10003, USA Tel.: +1 800 871 5224 Cpyright 2014 Kaltura Inc. All Rights
How to Guide. DocAve Extender for MOSS 2007 and SPS Installing DocAve Extender and Configuring a Basic SharePoint to Cloud Extension
 Hw t Guide DcAve Extender fr MOSS 2007 and SPS 2010 Installing DcAve Extender and Cnfiguring a Basic SharePint t Clud Extensin This dcument is intended fr anyne wishing t familiarize themselves with the
Refreshing Axiom TEST with a Current Copy of Production Axiom EPM June 20, 2014
 Refreshing Axim TEST with a Current Cpy f Prductin Axim EPM June 20, 2014 Refreshing Axim TEST If yu maintain an Axim TEST envirnment yu will want t refresh it with a current cpy f yur PROD database when
Re-Flashing Your CDM-760 Advanced High-Speed Trunking Modem
 Re-Flashing Yur CDM-760 Advanced High-Speed Trunking Mdem I. Intrductin: Firmware Files, Naming, Versins, and Frmats Make sure t perate the CDM-760 with its latest available firmware. Befre attempting
August 22, 2006 IPRO Tech Client Services Tip of the Day. Concordance and IPRO Camera Button / Backwards DB Link Setup
 Cncrdance and IPRO Camera Buttn / Backwards DB Link Setup When linking Cncrdance and IPRO, yu will need t update the DDEIVIEW.CPL file t establish the camera buttn. Setting up the camera buttn feature
DataCore Deployment Wizard For vsphere User Guide. July 31, 2017
 DataCre Deplyment Wizard Fr vsphere User Guide July 31, 2017 www.datacre.cm This dcument is the prperty f DataCre Sftware. It is intended slely as an aid fr installing and cnfiguring Strage Virtualizatin
ABELDent Platform Setup Conventions
 ABELDent Platfrm Setup Cnventins 1 Intrductin 1.1 Purpse f this dcument The purpse f this dcument is t prvide prspective ABELDent licensees and their hardware vendrs with the infrmatin that they will require
I. Introduction: About Firmware Files, Naming, Versions, and Formats
 I. Intrductin: Abut Firmware Files, Naming, Versins, and Frmats The UT-4500-A Series Upcnverters and DT-4500-A Series Dwncnverters stre their firmware in flash memry, which allws the system t uplad firmware
Sircon User Guide A Guide to Using the Vertafore Sircon Self-Service Portal
 Sircn User Guide A Guide t Using the Vertafre Sircn Self-Service Prtal September 2016 Versin 16.8 Cntents Cntents Using the Vertafre Sircn Self-Service Prtal... 3 Lg In... 3 Hme Page... 4 Lg New Cases...
AvePoint Perimeter Pro 1.9
 G09 AvePint Perimeter Pr 1.9 Secured Share User Guide Issued December 2017 Table f Cntents What s New in this Guide... 4 Overview... 5 Internal Users... 6 Site Cllectin Administratrs... 7 External Prtal
UPGRADING TO DISCOVERY 2005
 Centennial Discvery 2005 Why Shuld I Upgrade? Discvery 2005 is the culminatin f ver 18 mnths wrth f research and develpment and represents a substantial leap frward in audit and decisin-supprt technlgy.
econtrol 3.5 for Active Directory & Exchange Installation & Update Guide
 ecntrl 3.5 fr Active Directry & Exchange Installatin & Update Guide This Guide Welcme t the ecntrl 3.5 fr Active Directry Installatin and Update Guide fr Micrsft Active Directry and Exchange management.
Imagine for MSDNAA Student SetUp Instructions
 Imagine fr MSDNAA Student SetUp Instructins --2016-- September 2016 Genesee Cmmunity Cllege 2004. Micrsft and MSDN Academic Alliance are registered trademarks f Micrsft Crpratin. All rights reserved. ELMS
Advanced and Customized Net Conference Powered by Cisco WebEx Technology
 User Guide: Advanced and Custmized Net Cnference Pwered by Cisc WebEx Technlgy Prductivity Tls USER GUIDE Verizn Net Cnferencing h l M ti C t Advanced and Custmized Net Cnference Pwered by Cisc WebEx Technlgy
AvePoint Discovery Tool 3.5. User Guide
 AvePint Discvery Tl 3.5 User Guide Issued January 2018 Table f Cntents What s New in this Release... 3 Abut AvePint Discvery Tl... 4 Submitting Dcumentatin Feedback t AvePint... 5 Befre Yu Begin... 6 System
TDR & Bitdefender. Integration Guide
 TDR & Bitdefender Integratin Guide TDR and Bitdefender Deplyment Overview Threat Detectin and Respnse (TDR) is a cllectin f advanced malware defense tls that crrelate threat indicatrs frm Firebxes and
Using the Swiftpage Connect List Manager
 Quick Start Guide T: Using the Swiftpage Cnnect List Manager The Swiftpage Cnnect List Manager can be used t imprt yur cntacts, mdify cntact infrmatin, create grups ut f thse cntacts, filter yur cntacts
Milestone XProtect. NVR Installer s Guide
 Milestne XPrtect NVR Installer s Guide Target Audience fr this Dcument This guide is relevant fr peple respnsible fr delivering and installing Milestne XPrtect NVR surveillance systems. If yu are a Milestne
OATS Registration and User Entitlement Guide
 OATS Registratin and User Entitlement Guide The OATS Registratin and Entitlement Guide prvides the fllwing infrmatin: OATS Registratin The prcess and dcumentatin required fr a firm r Service Prvider t
SafeDispatch SDR Gateway for MOTOROLA TETRA
 SafeDispatch SDR Gateway fr MOTOROLA TETRA SafeMbile ffers a wrld f wireless applicatins that help rganizatins better manage their mbile assets, fleet and persnnel. Fr mre infrmatin, see www.safembile.cm.
Quick Start Guide. Basic Concepts. DemoPad Designer - Quick Start Guide
 Quick Start Guide This guide will explain the prcess f installing & using the DemPad Designer sftware fr PC, which allws yu t create a custmised Graphical User Interface (GUI) fr an iphne / ipad & embed
Adverse Action Letters
 Adverse Actin Letters Setup and Usage Instructins The FRS Adverse Actin Letter mdule was designed t prvide yu with a very elabrate and sphisticated slutin t help autmate and handle all f yur Adverse Actin
ClassFlow Administrator User Guide
 ClassFlw Administratr User Guide ClassFlw User Engagement Team April 2017 www.classflw.cm 1 Cntents Overview... 3 User Management... 3 Manual Entry via the User Management Page... 4 Creating Individual
Click Studios. Passwordstate. RSA SecurID Configuration
 Passwrdstate RSA SecurID Cnfiguratin This dcument and the infrmatin cntrlled therein is the prperty f Click Studis. It must nt be reprduced in whle/part, r therwise disclsed, withut prir cnsent in writing
Proficy* System Requirements
 System Requirements Page 1 f 11 Prficy* System Requirements Cntents Prficy* Machine Editin 9.50... 2 Operating System... 2 Windws Administratr Settings... 2 Prcessr Speed and Memry... 2 Miscellaneus Requirements...
Paraben s Phone Recovery Stick
 Paraben s Phne Recvery Stick v. 3.0 User manual Cntents Abut Phne Recvery Stick... 3 What s new!... 3 System Requirements... 3 Applicatin User Interface... 4 Understanding the User Interface... 4 Main
Dashboard Extension for Enterprise Architect
 Dashbard Extensin fr Enterprise Architect Dashbard Extensin fr Enterprise Architect... 1 Disclaimer... 2 Dependencies... 2 Overview... 2 Limitatins f the free versin f the extensin... 3 Example Dashbard