If your CNC machine memory is full, the PocketDNC gives you more storage, enabling you to store and reload proven programs at a later date.
|
|
|
- Jessica Houston
- 5 years ago
- Views:
Transcription

1 Page 1 of 54
2 Introduction...3 Important! PocketDNC Licence File...3 What s in the Box...4 Setting up Windows Mobile (Win7 Win8 Win10) Without Setting Up Device...6 Setting Up The Synchronization Of The PocketDNC And Your PC...9 Setting Up The Synchronization Of The PocketDNC And Your PC For Windows XP And Earlier Only Using The Built-in On Screen Keyboard Using The Stylus Starting The PocketDNC Software Screen Layout The Menu System (File Menu) The Menu System (About Help Menu) Storing Your Files Selecting & Editing Machine Setups Selecting & Editing Machine Setups (Serial Port Tab) BAUD PARITY DATA BITS STOP BITS HANDSHAKE XON/XOFF (SOMETIMES REFERRED TO AS DC CODES) RTS/CTS (SOMETIMES REFERRED TO AS HARDWIRE HANDSHAKE) Selecting & Editing Machine Setups (Send / Receive Tab) LEADER TRAILER END OF LINE (SOMETIMES REFERRED TO AS EOB OR END OF BLOCK) LINE DELAY START OF FILE CLOSE DELAY Selecting & Editing Machine Setups (Folder Tab) Selecting & Editing Machine Setups (Exit Machine Setup Screen) Creating A New Machine Setup Sending A File From PocketDNC To Machine Receiving A Single File From Machine To PocketDNC Receiving Multiple Files From Machine To PocketDNC Make New Folder Editing Existing Files Ascii Codeset Page 2 of 54
3 Introduction The PocketDNC is a Stand-alone Handheld DNC System. The PocketDNC offers many benefits and It is convenient and easy to use. If your CNC machine memory is full, the PocketDNC gives you more storage, enabling you to store and reload proven programs at a later date. When the PocketDNC is connected to your PC, any new programmes will be automatically synchronised between both devices, thus ensuring you always have the latest program. These can then be included in your normal PC backup routine to ensure no loss of vital NC programmes. Pocket DNC comes preloaded with two pre-set machine tool setting files for the more common controls such as Fanuc and Heidenhain. However it is easily configurable by the operator for most CNC machine controls that have an RS232 port. The only exceptions are controls that do not use a standard ISO protocol like Mazak controls running in Mazatrol mode. Rugged design Meets MIL-STD-810F and 810G military specifications for drops, vibration, immersion and temperature extremes. Meets IP65 to IP68 waterproof and dust ratings. Capacity to hold tens of thousands of CNC programmes. Long 15 hour battery life. Important! PocketDNC Licence File The PocketDNC Licence is valid for the unit it is supplied with and the company it is supplied to. It is not transferable, unless under prior agreement with Cambridge Numerical Control. The licence file provided is linked to the unit and uses the user name and company name setup on the unit. Do not change the user name or company name on the PocketDNC as this will prevent the software from working correctly and will put it into Trial mode. Page 3 of 54

4 What s in the Box On opening the box you will find the following Getac PocketDNC Unit - it will be pre-loaded with the pocket Dnc software and your licence file. USB Sync cable - used to connect the PocketDNC unit to your PC. Power supply - for charging the unit when not running on battery power. Also in the box are various international adaptors (not shown) to suit non UK customers these are interchangeable on the power supply. RS232 Machine Tool Cable - used to connect the PocketDNC unit directly to the Serial Port on your Machine tool. Page 4 of 54
 Turn on the unit using the power")
 into the")
5 Setting up Windows Mobile (Win7 Win8 Win10) Turn on the unit using the power button. Plug the USB cable (small plug) into the bottom of the Getac unit. Page 5 of 54

6 On plugging in the unit windows should automatically install the device drivers and start up the windows mobile software. If the driver does not install and or windows mobile does not load, check it is installed on your PC. If not follow this link to install it. Page 6 of 54

7 Connect Without Setting Up Device Connect and transfer Files or Folders without setting up your device. Click on Connect without setting up your device. Click on File Management. Click on Browse the contents of your device. Page 7 of 54

8 If you are copying files or folders to the internal storage, you must place the files or folders in the My Documents folder. Any folders placed here can only be 1 level i.e. no sub folders. Page 8 of 54
9 Files or folders copied to the external storage will just be placed in the root folder, any folders placed here can only be 1 level i.e. no sub folders. Setting Up The Synchronization Of The PocketDNC And Your PC Click on set up your device. Page 9 of 54

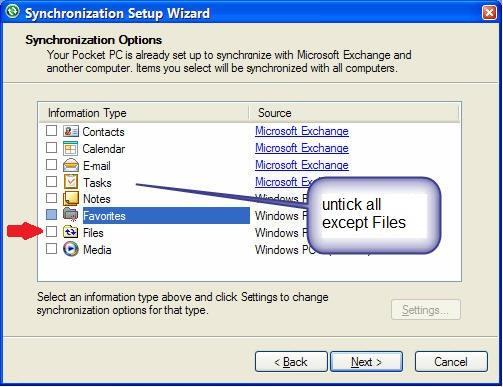
10 Un-tick all options except for Files. Page 10 of 54


11 Give the device a name. Click on Set Up. Windows will now setup the partnership. Page 11 of 54
12 Your Pc is now set up and ready to synchronize programmes. Click on the Red cross top left of the box to exit windows mobile and return to the desktop. Page 12 of 54
. Double click this shortcut to open the folder.")

13 On your desktop you will now see a new folder shortcut to the documents synchronization folder for your PocketDNC unit. It will be called Documents on Name?? (the name you gave it previously). Double click this shortcut to open the folder. Any files or folders that you copy to or create in this folder will be automatically synchronized to the PocketDNC unit every time you connect the device. Any files or folders you create or save on the PocketDNC unit will be synchronized to the PC every time you connect the device. Page 13 of 54

14 With the device connected you can manually transfer files and folders to and from the PocketDNC unit by clicking on File Management. Click on Browse the contents of your Device. From here you can copy files to and from either the internal storage or the extended storage. Page 14 of 54
15 If you are copying files or folders to the internal storage, you must place the files or folders in the My Documents folder. Any folders placed here can only be 1 level i.e. no sub folders. Files or folders copied to the external storage will just be placed in the root folder, any folders placed here can only be 1 level i.e. no sub folders. Also note that any files or folders placed in the external storage of the PocketDNC unit, will not be automatically synchronized, any synchronization will have to be done manually. Page 15 of 54
16 Setting Up The Synchronization Of The PocketDNC And Your PC For Windows XP And Earlier Only If you are using the PocketDNC unit on Windows XP or earlier version of Windows, you will need to install a programme called ActiveSync. It can be down loaded here: After downloading the software install it on your PC by following the on screen instructions. You will see the following appear on your computer screen. Page 16 of 54

17 Page 17 of 54

18 Page 18 of 54

19 Using The Built-in On Screen Keyboard The PocketDNC unit has a built-in on screen keyboard. How this is activated depends on where you are within the operating system. If you are in the Windows side of the system then the keyboard is activated by taping the keyboard icon at the bottom of the screen. If you are in the PocketDNC software then the keyboard is activated by taping the keyboard icon at the bottom right hand side of the screen. Page 19 of 54


20 Using The Stylus The PocketDNC unit has a touch screen and you navigate around by Tapping on the menus and icons using the supplied stylus. Important! Do not use anything sharp or with a point, such as pens or pencils. This will permanently damage the screen and will invalidate any warranties. The screen cannot be repaired or replaced, if the screen gets damaged to the point the unit stops working, it would need to be replaced with a new unit. The retractable stylus is located in a socket at the back of the unit. Pull the stylus from its socket and extend it. Page 20 of 54


21 You can now start navigating your way around the PocketDNC unit. Do not stab at the screen with the stylus, this could damage the screen and also the stylus. A minimum amount of pressure is all that is needed to navigate thought the menus and buttons Try and keep the stylus and screen as clean as possible. It s a good habit to get into to wipe clean the stylus and screen after use. Also try and get in the habit of alsways putting the stylus back in its socket when not in use, that way it will be there next time you use it. If your stylus gets lost or damaged, replace it as soon as possible, a replacement stylus is cheaper than a replacement unit. Page 21 of 54


22 Starting The PocketDNC Software Turn on the unit with the power button. Tap the Windows start menu. Tap on the PocketDNC icon. Page 22 of 54

23 This displays the PocketDNC Splash screen, now tap on the OK button. Page 23 of 54
 Tap the File Menu option. From this menu you can Send a file. Receive a file. Receive Multiple Files. Make a New Folder. Edit an existing File.")
24 Screen Layout Here we see the screen layout. It shows the selected default machine (Fanuc). The current communication settings. The main display area. And the menu bar. The Menu System (File Menu) Tap the File Menu option. From this menu you can Send a file. Receive a file. Receive Multiple Files. Make a New Folder. Edit an existing File. Exit the PocketDNC Software. Page 24 of 54
25 The Menu System (Setup Menu) Tap the Setup Menu option. From this menu you can Create a new Machine setup. Edit an existing setup. Delete an existing setup. The Menu System (About Help Menu) Tap the Help Menu option. From this menu you can; Find Information about the Version of software and your License details. Access the PocketDNC Help file. Storing Your Files IMPORTANT! The way the files are stored on the PocketDNC unit is as a single level file structure. What this means is that your files cannot be stored in sub folders. All files are by default stored in the unit s main memory under the My Documents Folder. In this folder you can create your file folders as one level (no sub folders). This can be organized in several ways, an example may be by machine or by customer. Examples My Documents Page 25 of 54
26 (folders) (files) Puma Lathe Nc files Lynx Lathe Nc files Haas Mill Nc files My Documents (folders) (files) Customer 1 Nc files Customer 2 Nc files Customer 3 Nc files The unit comes with built in main memory of 178mb and extended memory of 7.4 GB. Both memory areas can be used to store files. However, the automatic synchronization only synchronises with the main memory not the extended memory, copying from extended memory to and from your Pc would need to be done manually using file Explorer in Windows mobile or directly in my computer. Selecting & Editing Machine Setups The PocketDNC software comes with two standard machine setups; one to suit most Fanuc based controls and another to suit most Heidenhain based controls. These can be selected by tapping on the machines tab. Page 26 of 54
 Com Port should always be set to 1 Page 27")
27 To edit an existing setup first select the machine. Then tap the menu Setup / Edit Setup. Selecting & Editing Machine Setups (Serial Port Tab) Com Port should always be set to 1 Page 27 of 54


28 Baud The baud rate is the speed at which the CNC programme is transferred between the PocketDNC and the machine control. The most popular setting is 4800, which corresponds to a transfer rate of approximately 480 characters per second. This should be set the same on the PocketDNC as it is on the machine control. Parity The parity bit maintains the 'evenness' or 'oddness' of the number of bits in a character. Thus when a character with EVEN parity is transmitted over a communication line it should still have an EVEN number of bits at the receiver. If an error occurs during transmission, which changes a 1 bit to a 0 (or vice versa), the total number of bits will no longer be EVEN and the receiver can detect the error. You can see from this that it is very important for the sender and receiver to be configured for the same type of parity. Parity checking in this way is not very effective. For example; if two bits in a character are corrupted then the parity will be correct at the receiver. The most common setting for parity is Even. Data Bits Data bits sometimes referred to as word length, this is the total number of bits which are recognised as comprising a unit of data transfer i.e. a word. Stop Bits During data transfer, or 2 extra bits may be added onto the end of each character by the RS232 interface so that the receiving equipment can detect the end of the character. These are the stop bits and depending on the quiescent state of the line may be 0's or 1's. The generation of the stop bits at the sender and then their removal at the receiving equipment is totally transparent to the user and is carried out by the RS232 interfaces. Page 28 of 54

29 Handshake Typically, if this is not set correctly then a number of characters from the CNC program may be lost during transmission. If characters are lost during transmission then the program will not run correctly on the machine. Xon/Xoff (Sometimes referred to as DC codes) A simple form of data transfer protocol, which is used to control the flow of data. If the receiving system wishes to stop the transmission, for example, to save the data it has already received into a disc file, then it sends an XOFF signal to the host. When the sender receives an XOFF signal, it stops transmission and will not resume until it receives an XON signal from the receiver. XOFF is usually the ASCII character 19 (CTRL-S) and XON is ASCII 17 (CTRL-Q). RTS/CTS (Sometimes referred to as hardwire handshake) A method of controlling the transfer of data between two devices by means of hardware signals. Hardware flow control is the preferred means of regulating the flow of data between the PocketDNC and the CNC machine control. It works by using the clear to send (CTS) and request to send (RTS) signals on the RS232 interface to start or stop the flow of data in each direction. In order to operate correctly hardware flow control requires a suitably wired connecting cable. Selecting & Editing Machine Setups (Send / Receive Tab) Leader This is a list of characters that are to be sent to the control immediately before the programme. To enable you to enter codes that are not normally available on the keypad these must be entered as ASCII codes and proceeded with a back slash (\). (See Appendix for list of ASCII codes). Trailer This is a list of characters that are to be sent to the control immediately after the programme. To enable you to enter codes that are not normally available on the keypad these must be entered as ASCII codes and proceeded with a back slash (\). (See Appendix for list of ASCII codes). Page 29 of 54

30 End of Line (Sometimes referred to as EOB or End of Block) When receiving a program the PocketDNC will always store the programme with a CR (carriage return) and LF (line feed) as the end of line so that it displays better on the screen. When sending back to the CNC control we add the required End of Line characters. Normally this is set to CRLF. Line Delay This is the period of time in milliseconds that the DNC software pauses after sending each line of programme. This delay is only used when sending a programme to the machine control. As some controls receive a line of programme it then moves this information around in its memory which causes the port to lose a couple of characters. If you find that a programme that has been sent to the control has lost any data try increasing this value or check that the Handshake is working properly. Start of File Type into this box the characters that signify the start of the programme. Normally this is the % sign. Close Delay This value is in seconds and is the period of time that the DNC software waits after receiving the last character before closing the file. This also means that if there is a pause in data transmission when receiving a program to the PocketDNC of 3 seconds then the file will be closed. If you find that you are not receiving a complete program then increase this value. Selecting & Editing Machine Setups (Folder Tab) Folder Name of folder where the files are stored for this machine type. Extension File extension to be used for this machine type. Extensions can be a max of 3 characters and can be any alphanumeric character. You cannot use non alphanumeric characters like /\,.)(@#~][}{! $%^&*=+-`. Example: (characters after the. are the extension) 1234.pm nc 1234.txt 1234.tap 1234.dat 1234.H This is not a full list of extensions and you may already use Page 30 of 54
31 something different, if you re not familiar with file extensions the most common would be either.txt or.nc It doesn t matter what extension you use as the extension is not sent to the machine during the file transfer. Extensions are also a good way of organising your files for different machines. For example the file structure you have chosen is by customer name, you have 3 puma lathes that all do jobs for this customer, they all use the same program number, but the programs are slightly different. Normally if you saved the same program number file from different machines in the same folder each file would be over written by the newest file. If you used a different extension for each machine it would then allow the same program number to be used without it over writing the existing file for the other machines. It also means that the files can be sorted by extension so in a file list it only shows the files relevant to the given machine. Example: (folder) Customer 1 O1234.pm1 O1234.pm2 O1234.pm3 (where.pm1 is for puma 1.pm2 is puma2 etc) You would need to create a machine setup for each of the Puma lathes, each one using a different extension. (See next section on how to do this). Description Enter in a comment to describe the machine. Could be the machine name i.e. Puma or type of control i.e. Fanuc or machine type i.e. Lathe or Mill. Page 31 of 54
32 Selecting & Editing Machine Setups (Exit Machine Setup Screen) Once you have finished editing the machine settings you need to press the Fn button on the units key pad then press the ESC key. This will take you back to the main PocketDNC screen. Page 32 of 54

33 Creating A New Machine Setup (See Selecting & Editing Machine Setups for explanation of settings) To create a new machine setup, tap on the setup / new setup menu option. Now give the machine a name. As with the editing of the machine setting, change the required settings for each tab to suit the machine you are setting up. Page 33 of 54


34 Serial port Tab. Send / Receive Tab. Folder Tab To exit machine setting, press the Fn key on the keypad once, then press the ESC key on the keypad. Page 34 of 54

35 Your new machine setup is now ready to use. Deleting A Machine Setup From the main screen top right, tap the machine selection and highlight the machine setup you wish to delete. Tap on Setup / Delete Setup menu option. Page 35 of 54

36 Deleting A Machine Setup You will be asked to confirm deletion of the file, on taping YES the setup is deleted. You are returned to the main screen, you must now select another machine to be able to send or receive files. Page 36 of 54

37 From the main screen top right, tap the machine selection and choose a Machine Setup. Help Menu Tap on Help / Help File menu option to enter the help file. Tapping on any of the highlighted options brings up help on that subject. Page 37 of 54


38 To exit help tap twice on the icon at the bottom right hand corner of screen. About Menu Tap on Help / About menu option to enter the About Screen This screen displays information about the PocketDNC. Sending A File From PocketDNC To Machine First select the machine type you are sending to. Page 38 of 54
39 Tap on File menu & Tap on Send. Select the folder the files are saved in for the selected machine. Select the type, to show all files regardless of extension, select All Files. If you wish to narrow down the search of files displayed select from the list a specific extension, for example; You may have files for different machines with the extensions of.nc Page 39 of 54
40 .TAP.PM1 (etc) If in the Type box you select say.nc then only.nc files will be listed in the file window. From the displayed list of files tap on the file you wish to send to the machine. Your file is now ready to send to the machine. Before tapping on the green start comm button, ensure that the RS232 cable is securely plugged into the PocketDNC serial port and the other end is securely plugged into your machine controls RS232 port. The procedure for reading in programs on your machine will vary depending on the control type, this is not covered in this manual, please refer to your machine control manual on how to do this. If you are unsure or don t have a machine tool manual, you can call the CNC office and one of our engineers will try to guide you through the procedure that is required. Page 40 of 54
41 Tap the green start comm button to start sending your file. On tapping the green start comm button, the file will be sent to your machine. As it is being sent you will see a percentage of transfer counting up until it reads 100%. The communication can be stopped at any time by tapping on the red Stop Comm button. Page 41 of 54

42 On completion of the file send the screen will revert back to the normal screen ready to send or receive another file. Receiving A Single File From Machine To PocketDNC First select the machine type you are sending to. Tap on File menu & Tap on Receive. Page 42 of 54

43 Tap in the name box and then use the keypad area to tap in a filename. Select a folder in which to store the programme, the folder name is normally the name of the machine tool. Tap in the Type box to select the extension you wish to use. Tap in the Location box to store the programme in either the internal or storage card memory. Tap on the Save button when you have set the options required. You can now select if you want to display the programme after it has been received. This is useful to ensure that the entire programme has been received successfully by scrolling to the bottom and verifying that the M30 or M02 or M99 is present. Warning the process of displaying the programme after receive does slow down the process so for very large programs we recommend that you don t display the program during the receive process but check it later. Before tapping on the YES or NO button, ensure that the RS232 cable is securely plugged into the PocketDNC serial port and the other end is securely plugged into your machine controls RS232 port. The procedure for sending programs from your machine will vary depending on the control type, this is not covered in this manual, please refer to your machine control manual on how to do this. If you are unsure or don t have a machine tool manual, you can call the CNC office and one of our engineers will try to guide you through the procedure that is required. Tap on the Yes or No button (as required). Page 43 of 54
44 The PocketDNC is now ready to receive the program from the machine tool. On the CNC machine press the buttons to activate the punching of the program. As the program is being received a block counter will be displayed at the bottom of the screen. If you tapped on the Yes button, when the file has been received it will be displayed on the screen for you to check, if you tapped on the No button then the screen will revert back to the normal screen ready to either send or receive a file. To abort the receive operation, tap on the red Stop Comm button at bottom of screen. You will then be asked if you want to abort receive Yes or No. Page 44 of 54
45 Receiving Multiple Files From Machine To PocketDNC First select the machine type you are sending to. Tap on File menu & Tap on Receive Multiple. Page 45 of 54

46 The option to receive multiple files is only available for Fanuc based machines. Tap Yes. Tap in the name box and then use the keypad area to tap in a filename. As in the example below use a file name that will act as a prefix to the saved file name. Example: You are saving from the control 5 different programmes O0100 O0101 O0102 O7689 O8345 Page 46 of 54
47 The files will be saved as Prog0100 Prog0101 Prog0102 Prog7689 Prog8345 the PocketDNC reads the O number from the programme and uses that as the file name. On the Fanuc control you type in O0101,O8345 Punch Exc, this will send out all programmes between the two numbers. Select a folder in which to store the programme, the folder name is normally the name of the machine tool. Tap in the Type box to select the extension you wish to use. Tap in the Location box to store the programme in either the internal or storage card memory. Tap on the Save button when you have set the options required. You can now select if you want to display the programme after it has been received. This is useful to ensure that the entire programme has been received successfully by scrolling to the bottom and verifying that the M30 or M02 or M99 is present. Warning The process of displaying multiple programmes after receiving will slow down the process considerably. So for multiple program receiving we recommend that you don t display the program during the receive process but check them later. Before tapping on the YES or NO button, ensure that the RS232 cable is securely plugged into the PocketDNC serial port and the other end is securely plugged into your machine controls RS232 port. Page 47 of 54

48 The procedure for receiving programs from your machine will vary depending on the control type, this is not covered in this manual, please refer to your machine control manual on how to do this. If you are unsure or don t have a machine tool manual, you can call the CNC office and one of our engineers will try to guide you through the procedure that is required. Tap on No. The PocketDNC is now ready to receive the programmes from the machine tool. On the CNC machine press the buttons to activate the punching of the programme. As the programme is being received a block counter will be displayed at the bottom of the screen. Because you tapped on the No button, at the end of the transfer the screen will revert back to the normal screen ready to either send or receive a file. To abort the receive operation, tap on the red Stop Comm button at bottom of screen. You will then be asked if you want to abort receive Yes or No. Page 48 of 54
49 Make New Folder To help you organize your files, it makes sense to store them in folders rather than as one long list of files. These folders could be by Machine Name or Customer or Part Number, or any other way you wish to organize your programs. The folders can only be 1 level i.e. no sub folders, only folders stored in the My Documents folder on the internal storage area is automatically synchronized. Any files outside of this folder or in the external storage area, would have to be synchronized manually. Tap on the file menu then new folder menu option. At the prompt type in the folder name you require and tap on Ok. Page 49 of 54


50 Folders can be placed on the external storage area, but you would have to do this manually via widows mobile explore or via My Computer / Windows Explore. Editing Existing Files It is possible if required to edit small changes to your files that are saved on the PocketDNC Unit. Tap on the file menu then Tap on the Edit menu option. 1. Select the required folder. 2. Select the required file type. 3. Using the side scroll bar navigate to the file to be edited and double Tap the file. Tap on the keyboard icon at the bottom of the screen and make your edits. When making changes be careful to ensure that all letters you type in are upper case, as all Fanuc based controls and most others, will only except uppercase characters, this may differ on some controls, but it s a good habit to get into, this could save any errors getting programs into your control, also be careful to ensure that any decimal points are in the correct place and not missing. Treat the editing as you would on the control, and before saving the changes make sure and check your edits. Page 50 of 54


51 When you have finished editing your file Tap the Ok button. You will then be asked if you wish to save the file. 1. Tap on Yes to save the file. 2. Tap on No to abandon the edit and return to the main screen. 3. Tap on Cancel to return to the edit screen. Page 51 of 54
52 Ascii Codeset Null NUL Start of Heading SOH Ctrl A Start of Text STX Ctrl B End of Text ETX Ctrl C End of Transmit EOT Ctrl D Enquiry ENQ Ctrl E Acknowledge ACK Ctrl F Bell BEL Ctrl G Back Space BS Ctrl H Horizontal Tab TAB Ctrl I Line Feed LF Ctrl J A Vertical Tab VT Ctrl K B Form Feed FF Ctrl L C Return CR Ctrl M D Shift Out SO Ctrl N E Shift In SI Ctrl O F Escape DLE Ctrl P Control Code1 DC1 Ctrl Q Control Code2 DC2 Ctrl R Control Code3 DC3 Ctrl S Control Code4 DC4 Ctrl T Negative Acknowledge NAK Ctrl U Synchronous Idle SYN Ctrl V End of Transmit Block ETB Ctrl W Cancel CAN Ctrl X End of Medium EM Ctrl Y Substitute SUB Ctrl Z A Escape ESC Ctrl [ B File Separator FS Ctrl \ C Group Separator GS Ctrl ] D Record Separator RS Ctrl ^ E Unit Separator US Ctrl _ F Space Exclamation! Shift Double Quote " Shift Pound Sign Shift Dollar Sign $ Shift Percent Sign % Shift Ampersand & Shift Single Quote Left Bracket ( Shift Right Bracket ) Shift Asterisk * Shift A Plus Sign + Shift = B Comma,, C Minus Sign D Period E Forward Slash / / F Zero One Page 52 of 54
53 Two Three Four Five Six Seven Eight Nine Colon : Shift ; A Semicolon ; ; B Less-Than < Shift, C Equals Sign = = D Greater-Than > Shift E Quest Mark? Shift / F At Shift Capital A A Shift A Capital B B Shift B Capital C C Shift C Capital D D Shift D Capital E E Shift E Capital F F Shift F Capital G G Shift G Capital H H Shift H Capital I I Shift I Capital J J Shift J A Capital K K Shift K B Capital L L Shift L C Capital M M Shift M D Capital N N Shift N E Capital O O Shift O F Capital P P Shift P Capital Q Q Shift Q Capital R R Shift R Capital S S Shift S Capital T T Shift T Capital U U Shift U Capital V V Shift V Capital W W Shift W Capital X X Shift X Capital Y Y Shift Y Capital Z Z Shift Z A Left Bracket [ [ B Back Slash \ \ C Right Bracket ] ] D Caret ^ Shift E Underscore _ Shift F Back Quote ` ` Lower-case A a A Lower-case B b B Lower-case C c C Page 53 of 54
54 Lower-case D d D Lower-case E e E Lower-case F f F Lower-case G g G Lower-case H h H Lower-case I I I Lower-case J j J A Lower-case K k K B Lower-case L l L C Lower-case M m M D Lower-case N n N E Lower-case O o O F Lower-case P p P Lower-case Q q Q Lower-case R r R Lower-case S s S Lower-case T t T Lower-case U u U Lower-case V v V Lower-case W w W Lower-case X x X Lower-case Y y Y Lower-case Z z Z A Left Brace { Shift [ B Vertical Bar Shift \ C Right Brace } Shift ] D Tilde ~ Shift ` E Delta F Page 54 of 54
FD-011WU. 2D Barcode Reader User Guide V1.6CC
 FD-011WU 2D Barcode Reader User Guide V1.6CC Table of Contents 1 Getting Started... 1 1.1 Factory Defaults... 1 2 Communication Interfaces...2 2.1 TTL-232 Interface... 2 2.2 Baud Rate... 3 2.3 Data Bit
MK D Imager Barcode Scanner Configuration Guide
 MK-5500 2D Imager Barcode Scanner Configuration Guide V1.4 Table of Contents 1 Getting Started... 3 1.1 About This Guide... 3 1.2 Barcode Scanning... 3 1.3 Factory Defaults... 3 2 Communication Interfaces...
ASCII Code - The extended ASCII table
 ASCII Code - The extended ASCII table ASCII, stands for American Standard Code for Information Interchange. It's a 7-bit character code where every single bit represents a unique character. On this webpage
Number Systems II MA1S1. Tristan McLoughlin. November 30, 2013
 Number Systems II MA1S1 Tristan McLoughlin November 30, 2013 http://en.wikipedia.org/wiki/binary numeral system http://accu.org/index.php/articles/18 http://www.binaryconvert.com http://en.wikipedia.org/wiki/ascii
1. Character/String Data, Expressions & Intrinsic Functions. Numeric Representation of Non-numeric Values. (CHARACTER Data Type), Part 1
, Part 1") Character/String Data, Expressions Intrinsic Functions (CHARACTER Data Type), Part 1 1. Character/String Data, Expressions Intrinsic Functions (CHARACTER Data Type), Part 1 2. Numeric Representation of
Character/String Data, Expressions Intrinsic Functions (CHARACTER Data Type), Part 1 1. Character/String Data, Expressions Intrinsic Functions (CHARACTER Data Type), Part 1 2. Numeric Representation of
OOstaExcel.ir. J. Abbasi Syooki. HTML Number. Device Control 1 (oft. XON) Device Control 3 (oft. Negative Acknowledgement
 Device Control 3 (oft. Negative Acknowledgement") OOstaExcel.ir J. Abbasi Syooki HTML Name HTML Number دهدهی ا کتال هگزاد سیمال باینری نشانه )کاراکتر( توضیح Null char Start of Heading Start of Text End of Text End of Transmission Enquiry Acknowledgment
OOstaExcel.ir J. Abbasi Syooki HTML Name HTML Number دهدهی ا کتال هگزاد سیمال باینری نشانه )کاراکتر( توضیح Null char Start of Heading Start of Text End of Text End of Transmission Enquiry Acknowledgment
1.1. INTRODUCTION 1.2. NUMBER SYSTEMS
 Chapter 1. 1.1. INTRODUCTION Digital computers have brought about the information age that we live in today. Computers are important tools because they can locate and process enormous amounts of information
2a. Codes and number systems (continued) How to get the binary representation of an integer: special case of application of the inverse Horner scheme
 How to get the binary representation of an integer: special case of application of the inverse Horner scheme") 2a. Codes and number systems (continued) How to get the binary representation of an integer: special case of application of the inverse Horner scheme repeated (integer) division by two. Example: What is
2a. Codes and number systems (continued) How to get the binary representation of an integer: special case of application of the inverse Horner scheme repeated (integer) division by two. Example: What is
EXPERIMENT 8: Introduction to Universal Serial Asynchronous Receive Transmit (USART)
") EXPERIMENT 8: Introduction to Universal Serial Asynchronous Receive Transmit (USART) Objective: Introduction To understand and apply USART command for sending and receiving data Universal Serial Asynchronous
EXPERIMENT 8: Introduction to Universal Serial Asynchronous Receive Transmit (USART) Objective: Introduction To understand and apply USART command for sending and receiving data Universal Serial Asynchronous
EXPERIMENT 7: Introduction to Universal Serial Asynchronous Receive Transmit (USART)
") EXPERIMENT 7: Introduction to Universal Serial Asynchronous Receive Transmit (USART) Objective: To understand and apply USART command for sending and receiving data Introduction Universal Serial Asynchronous
EXPERIMENT 7: Introduction to Universal Serial Asynchronous Receive Transmit (USART) Objective: To understand and apply USART command for sending and receiving data Introduction Universal Serial Asynchronous
Characters Lesson Outline
 Outline 1. Outline 2. Numeric Encoding of Non-numeric Data #1 3. Numeric Encoding of Non-numeric Data #2 4. Representing Characters 5. How Characters Are Represented #1 6. How Characters Are Represented
BD-6500BT Bluetooth 2D Barcode Scanner Configuration Guide
 BD-6500BT Bluetooth 2D Barcode Scanner Configuration Guide V 2.1 Table of Contents 1 Getting Started. 3 1.1 About This Guide.. 3 1.2 Barcode Scanning.. 3 1.3 Factory Defaults.. 3 1.4 Pairing Cradle 4 1.5
2D Barcode Reader User Guide V 1.2.1
 2D Barcode Reader User Guide V 1.2.1 Table of Contents 1 Getting Started... 3 1.1 About This Guide... 3 1.2 Barcode Scanning... 3 1.3 Factory Defaults... 3 1.4 Firmware Version Number... 3 2 Communication
DATA REPRESENTATION. Data Types. Complements. Fixed Point Representations. Floating Point Representations. Other Binary Codes. Error Detection Codes
 1 DATA REPRESENTATION Data Types Complements Fixed Point Representations Floating Point Representations Other Binary Codes Error Detection Codes 2 Data Types DATA REPRESENTATION Information that a Computer
S-Series Sensor ASCII Protocol v8.1.0
 S-Series Sensor v8.1.0 Legend: ADR Node/Slave Address TIME STAT Status Byte ERR CTRL Control Byte SP # POS Position DATA TARG Target CHAR VEL Velocity OFF SN CODE PAR # Serial Number Security Code Parameter
2D BARCODE SCANNER CA-SC-20200B
 D BARCODE SCANNER CA-SC-B Quick Start Guide Getting Familiar with Your Device Thank you for choosing Capture Bar Code Scanner. All Devices deliver world-class performance for a broad range of applications
The simple way to read, write, store, and edit CNC Machine Tool G-Code programs.
 Machine Tool CncGcoder Version 1.7.311 as of 7/11/2003. The simple way to read, write, store, and edit CNC Machine Tool G-Code programs. Getting Started: First connect the CncGcoder device to the machine's
Number System (Different Ways To Say How Many) Fall 2016
 Fall 2016") Number System (Different Ways To Say How Many) Fall 2016 Introduction to Information and Communication Technologies CSD 102 Email: mehwish.fatima@ciitlahore.edu.pk Website: https://sites.google.com/a/ciitlahore.edu.pk/ict/
Number System (Different Ways To Say How Many) Fall 2016 Introduction to Information and Communication Technologies CSD 102 Email: mehwish.fatima@ciitlahore.edu.pk Website: https://sites.google.com/a/ciitlahore.edu.pk/ict/
PD1100 STAND-ALONE PROGRAMMING & USER S GUIDE. use the freedom
 PD1100 STAND-ALONE ALPHANUMERIC POLE DISPLAY PROGRAMMING & USER S GUIDE use the freedom Forward The information contained in this user s guide is subject to change without notice. This Programming and
The following are the data types used in the C programming language:
 Data Types in C The following are the data types used in the C programming language: Type Definition Size in memory void This particular type is used only in function declaration. boolean It stores false
2D Hand-held Barcode Scanner User Guide
 2D Hand-held Barcode Scanner User Guide 2 / 66 Version History Version Description Date V1.0 Initial release. 2016-11-10 V1.01 Add Data Matrix and PDF417 2017-04-25 3 / 66 Content Chapter 1 Getting Started...
Serial I/O. 4: Serial I/O. CET360 Microprocessor Engineering. J. Sumey
 4: Serial I/O CET360 Microprocessor Engineering J. Sumey Introduction serial, i.e. bit-at-a-time, interfacing techniques are useful when parallel interfacing limitations become problematic distance limitations
Data Representation and Binary Arithmetic. Lecture 2
 Data Representation and Binary Arithmetic Lecture 2 Computer Data Data is stored as binary; 0 s and 1 s Because two-state ( 0 & 1 ) logic elements can be manufactured easily Bit: binary digit (smallest
Datalogic Scanning, Inc. 959 Terry Street Eugene, Oregon Telephone: (541) Fax: (541)
 Fax: (541)") Datalogic Scanning, Inc. 959 Terry Street Eugene, Oregon 97402 Telephone: (541) 683-5700 Fax: (541) 345-7140 An Unpublished Work - All rights reserved. No part of the contents of this documentation or
Datalogic Scanning, Inc. 959 Terry Street Eugene, Oregon 97402 Telephone: (541) 683-5700 Fax: (541) 345-7140 An Unpublished Work - All rights reserved. No part of the contents of this documentation or
Fundamentals of Programming (C)
") Borrowed from lecturer notes by Omid Jafarinezhad Fundamentals of Programming (C) Group 8 Lecturer: Vahid Khodabakhshi Lecture Number Systems Department of Computer Engineering Outline Numeral Systems
Borrowed from lecturer notes by Omid Jafarinezhad Fundamentals of Programming (C) Group 8 Lecturer: Vahid Khodabakhshi Lecture Number Systems Department of Computer Engineering Outline Numeral Systems
A GUIDE TO RS-232 COMMUNICATION WITH FX PLCS
 A GUIDE TO RS-232 COMMUNICATION WITH FX PLCS Page 1 of 35 A GUIDE TO RS-232 COMMUNICATION WITH FX PLCS This document has been written specifically for FX and FX0N users that are unfamiliar with RS-232
Connecting UniOP to Datalogic Barcode Readers
 Connecting UniOP to Datalogic Barcode Readers This Technical Note contains the information needed to connect UniOP to Datalogic Barcode Scanners. Contents 1. Introduction...1 2. Designer setup...1 2.1
Visual KeyMaker. Programming Software Instructions. Contents A B
 Visual KeyMaker Programming Software Instructions for TLM2260 Programmable Keyboard REV.E May 31, 2007 Quick Start Map A B Introduction Install Visual KeyMaker Contents C Connect Programmable Keyboard
PS232. RS-232 to PS/2 Keyboard Port Adapter Part # SA0009 (Version 4.0) Copyright 2003 L3 Systems, Inc. Redmond
 Copyright 2003 L3 Systems, Inc. Redmond") PS232 RS-232 to PS/2 Keyboard Port Adapter Part # SA0009 (Version 4.0) Copyright 2003 L3 Systems, Inc. Redmond Quick Reference Command Description Pg ~H Help Screen Displays short command reference 4 ~V
PS232 RS-232 to PS/2 Keyboard Port Adapter Part # SA0009 (Version 4.0) Copyright 2003 L3 Systems, Inc. Redmond Quick Reference Command Description Pg ~H Help Screen Displays short command reference 4 ~V
Table of Contents Sleep Settings How to Configure the Scanner. 7 Chapter 2 System Setup
 Table of Contents Chapter 1 System Information 1.1 Setup Scanner with PC 1.2 Setup Scanner with Mobile Device 1.3 Configure ios On-Screen Keyboard 1.4 Memory Mode 3 4 4 5 1.5 Sleep Settings 6 1.6 How to
LANCNC FTP LAN network data server for CNC Controls
 FTP LAN network data server for Controls 2008-2009 LLC, All rights reserved LLC 9909 Topanga Canyon Blvd. #322 Chatsworth, CA 91311 www.calmotion.com -1 2008-2009 LLC, All rights reserved Introduction
Addmaster Corporation
 IJ-1000 Ink-Jet Validation Printer Specification Addmaster Corporation Address: 225 East Huntington Drive Monrovia, CA 91016 Web: www.addmaster.com Phone: (626) 358-2395 FAX: (626) 358-2784 Document: ij1w.doc
CMSC 313 Lecture 03 Multiple-byte data big-endian vs little-endian sign extension Multiplication and division Floating point formats Character Codes
 Multiple-byte data CMSC 313 Lecture 03 big-endian vs little-endian sign extension Multiplication and division Floating point formats Character Codes UMBC, CMSC313, Richard Chang 4-5 Chapter
USB Indexer USB Indexer for CNC Controls
 USB Indexer USB Indexer for CNC Controls 2009-2011 Calmotion LLC, All rights reserved Calmotion LLC 9909 Topanga Canyon Blvd. #322 Chatsworth, CA 91311 www.calmotion.com -1 2009-2011Calmotion LLC, All
CncGcoder Models HD & HDx Manual
 CncGcoder Models HD & HDx Manual Table of Contents WELCOME... 3 IN THE BOX... 4 Optional Accessories...4 HANDHELD OVERVIEW... 5 Overview...5 Charging the Battery...6 Turning On and Off...6 Plugging in
Mounting Dimensions / Viewing 2 Mounting Options 3. Wiring Configuration 4. Quick Set up Procedure 5. Changing Intensity 6.
 Section Mounting Dimensions / Viewing 2 Mounting Options 3 Section 2 Wiring Configuration 4 Section 3 Quick Set up Procedure 5 Section 4 Changing Intensity 6 Section 5 Option Summary 7 Section 6 Option
FactoryWiz DNC - Installing FactoryWiz DNC 2. Table of Contents
 FactoryWiz DNC - Installing FactoryWiz DNC 2 Table of Contents Installing FactoryWiz DNC... 4 Minimum Specifications:... 4 Download FactoryWiz DNC Software... 4 Install FactoryWiz DNC... 4 License your
LC UNI - SSI PUMPS. Clarity Control Module. Code/Rev.: M038/40D Date:
 LC UNI - SSI PUMPS Clarity Control Module ENG Code/Rev.: M038/40D Date: 24.10.2017 Phone: +420 251 013 400 DataApex Ltd. Fax: +420 251 013 401 Petrzilkova 2583/13 clarity@dataapex.com 158 00 Prague 5 www.dataapex.com
User s Manual. Xi3000 Scanner. Table of Contents
 Xi3000 Scanner User s Manual Table of Contents Restore Default Settings... 1 Exit Setup without Changes... 1 Configure Through RS232... 1 List Setting... 1 Buzzer Settings... 2 Reading Redundancy Setting...
Menu & commands booklet FOR BAR CODE SCANNERS * *
 Menu & commands booklet FOR BAR CODE SCANNERS *201002993520* Caution! This menu book may be revised or withdrawn at any time. Copyright 1993-99, Datalogic S.p.A. All Rights Reserved. No part of this publication
Chapter 3. Information Representation
 Chapter 3 Information Representation Instruction Set Architecture APPLICATION LEVEL HIGH-ORDER LANGUAGE LEVEL ASSEMBLY LEVEL OPERATING SYSTEM LEVEL INSTRUCTION SET ARCHITECTURE LEVEL 3 MICROCODE LEVEL
Chapter 2 Bits, Data Types, and Operations
 Chapter Bits, Data Types, and Operations How do we represent data in a computer? At the lowest level, a computer is an electronic machine. works by controlling the flow of electrons Easy to recognize two
Beijer Electronics AB 2000, MA00453,
 VT100 emulation This manual presents installation and handling of the driver VT100 to the terminals in the E-series. The functionality in the E-terminals and in MAC Programmer+ are described in the E-manual.
CS/ECE 252: INTRODUCTION TO COMPUTER ENGINEERING UNIVERSITY OF WISCONSIN MADISON
 CS/ECE 252: INTRODUCTION TO COMPUTER ENGINEERING UNIVERSITY OF WISCONSIN MADISON Prof. Gurindar Sohi TAs: Pradip Vallathol and Junaid Khalid Midterm Examination 1 In Class (50 minutes) Friday, September
RS-422 Code-Operated Switches
 JUNE 2000 SW421A-R2 SW422A-R2 RS-422 Code-Operated Switches COS/4 TEXT TRANSPARENT GRAPHICS MODE RESET ST LO CUSTOMER SUPPORT INFORMATION Order toll-free in the U.S. 24 hours, 7 A.M. Monday to midnight
CS/ECE 252: INTRODUCTION TO COMPUTER ENGINEERING UNIVERSITY OF WISCONSIN MADISON
 CS/ECE 252: INTRODUCTION TO COMPUTER ENGINEERING UNIVERSITY OF WISCONSIN MADISON Prof. Gurindar Sohi TAs: Junaid Khalid and Pradip Vallathol Midterm Examination 1 In Class (50 minutes) Friday, September
Chapter 2 Bits, Data Types, and Operations
 Chapter 2 Bits, Data Types, and Operations How do we represent data in a computer? At the lowest level, a computer is an electronic machine. works by controlling the flow of electrons Easy to recognize
QTERM-J10/N15 USER'S MANUAL REVISION 13
 QTERM-J0/N5 USER'S MANUAL REVISION 3 M0-009-00 Rev 3 QSI CORPORATION 222 South West Temple #50 Salt Lake City, UTAH 845-2648 USA Phone 80-466-8770 Fax 80-466-8792 Email info@qsicorp.com Web www.qsicorp.com
Unit 3, Lesson 2 Data Types, Arithmetic,Variables, Input, Constants, & Library Functions. Mr. Dave Clausen La Cañada High School
 Unit 3, Lesson 2 Data Types, Arithmetic,Variables, Input, Constants, & Library Functions Mr. Dave Clausen La Cañada High School Vocabulary Variable- A variable holds data that can change while the program
Characters & Strings in C
 Recently, we saw this: Characters & Strings in C % cat charweird.c #include main () { /* main */ char c; c = 75; printf("c = %d\n", c); printf("c = %c\n", c); if (c) { printf("c is true\n");
IPDA014-2D. Embedded 2D Barcode Scan Engine. User Guide
 IPDA014-2D Embedded 2D Barcode Scan Engine User Guide 1 Table Of Contents Chapter 1 Getting Started...8 Introduction...8 About This Guide...8 Barcode Scanning...9 Barcode Programming...9 Factory Defaults...9
CMSC 313 COMPUTER ORGANIZATION & ASSEMBLY LANGUAGE PROGRAMMING LECTURE 02, FALL 2012
 CMSC 33 COMPUTER ORGANIZATION & ASSEMBLY LANGUAGE PROGRAMMING LECTURE 2, FALL 22 TOPICS TODAY Bits of Memory Data formats for negative numbers Modulo arithmetic & two s complement Floating point formats
Configuration Manual PULSAR C CCD SCANNER. Table of Contents
 Table of Contents PULSAR C CCD SCANNER Configuration Manual Metrologic Instruments GmbH Dornier Strasse 2 82178 Puchheim Germany Tel +49 89 890190 Fax +49 89 89019200 www.europe.metrologic.com Metrologic
BARCODE SCANNER. FUZZYSCAN FAMILY Quick Start Guide
 BARCODE SCANNER FUZZYSCAN FAMILY Quick Start Guide Getting Familiar with Your FuzzyScan Thank you for choosing Cino FuzzyScan Bar Code Scanner. All FuzzyScan scanners deliver world-class performance for
Wireless 2D Pocket barcode scanner
 * Wireless 2D Pocket barcode scanner Quick Guide Model no.: i DC9607L Introduction Designed primarily for P.O.S. retail environments, the idc9607l is a wireless pocket barcode scanner that allows you to
User s Manual. Addendum to. Ranger Wedge Interface. Part No. 25-WEDGE-06A Ver. April 1999
 Addendum to User s Manual Ranger Wedge Interface Part No. 25-WEDGE-06A Ver. April 1999 8 Olympic Drive Orangeburg, NY 10962 Tel 845.365.0090 Fax 845.365.1251 www.opticonusa.com Table of Contents Read Me
Wearable 2D Pocket barcode scanner
 * Wearable 2D Pocket barcode scanner Quick Guide Model no.: idc9607lw Introduction Designed primarily for P.O.S. retail environments, the idc9607lw is a Wearable pocket barcode scanner that allows you
Hand Held Linear Imager
 Hand Held Linear Imager Disclaimer Welch Allyn reserves the right to make changes in specifications and other information contained in this document without prior notice, and the reader should in all cases
Experiment 3. TITLE Optional: Write here the Title of your program.model SMALL This directive defines the memory model used in the program.
 Experiment 3 Introduction: In this experiment the students are exposed to the structure of an assembly language program and the definition of data variables and constants. Objectives: Assembly language
User s Manual Version 1.10
 User s Manual Version 1.10 P.O. Box 1529 1931 Sanford Rd. Wells, ME 04090 p. 207.646.6071 f. 207.646.6983 www.caron-eng.com AutoComp Information in this document or the software it reflects is subject
DNC2go
 DNC2go Striker Systems P.O. Box 41 White House, TN 37188 Version 1.0.0.2 www.striker-systems.com Revision 8/2/2005 1 Contents Introduction... 3 Installing DNC2go... 4 Using DNC2go... 5 Setting up a Machine
NC-1200 BARCODE SCANNER. Configuration Guide - 1 -
 NC-1200 BARCODE SCANNER Configuration Guide - 1 - Table of Contents Chapter 1 System Information 1.1 About this manual 3 1.2 How to set up the parameter-i 3 1.3 How to set up the parameter II 4 1.4 Resetting
Bits and Bytes. Data Representation. A binary digit or bit has a value of either 0 or 1; these are the values we can store in hardware devices.
 Bits and Bytes 1 A binary digit or bit has a value of either 0 or 1; these are the values we can store in hardware devices. A byte is a sequence of 8 bits. A byte is also the fundamental unit of storage
Xi2000-BT Series Configuration Guide
 U.S. Default Settings Sequence Reset Scanner Xi2000-BT Series Configuration Guide Auto-Sense Mode ON UPC-A Convert to EAN-13 OFF UPC-E Lead Zero ON Save Changes POS-X, Inc. 2130 Grant St. Bellingham, WA
ADDMASTER. Addmaster Corporation. IJ-3080 Journal/Validation Printer. Specification. IJ-3080 Specification
 IJ-3080 Journal/Validation Printer Specification Provides the electrical, mechanical, and interface specifications of the IJ-3080 Journal/Validation Printer. Cover Models: IJ-3080 The Addmaster Model IJ-3080
Chapter 2 Bits, Data Types, and Operations
 Chapter 2 Bits, Data Types, and Operations Original slides from Gregory Byrd, North Carolina State University Modified slides by Chris Wilcox, Colorado State University How do we represent data in a computer?!
Laser Barcode Scanner ARP Nr User s Manual
 Laser Barcode Scanner ARP Nr. 853782 User s Manual FCC Compliance This equipment has been tested and found to comply with the limits for a Class B digital device, pursuant to Part 15 of the FCC Rules.
Delivery content * Pocket Barcode scanner x 1 * Mini USB cable x 1 (for charging only) * Quick instructions x 1 * Strap x 1
 * Quick instructions x 1 * Strap x 1") Bluetooth 2D Pocket barcode scanner Quick Guide M o de l no.: idc9607l Introduction Designed primarily for P.O.S. retail environments, the idc9607l is a Bluetooth pocket barcode scanner that allows you
Bluetooth 2D Pocket barcode scanner Quick Guide M o de l no.: idc9607l Introduction Designed primarily for P.O.S. retail environments, the idc9607l is a Bluetooth pocket barcode scanner that allows you
plc numbers Encoded values; BCD and ASCII Error detection; parity, gray code and checksums
 plc numbers - 3. 3. NUMBERS AND DATA Topics: Number bases; binary, octal,, hexa Binary calculations; s compliments, addition, subtraction and Boolean operations Encoded values; BCD and ASCII Error detection;
BARCODE SCANNER. Configuration Guide - 1 -
 BARCODE SCANNER Configuration Guide - 1 - Table of Contents Chapter 1 System Information 1.1 About this manual 3 1.2 How to set up the parameter 3 1.3 How to set up the parameter - II 4 Chapter 2 System
CMSC 313 COMPUTER ORGANIZATION & ASSEMBLY LANGUAGE PROGRAMMING LECTURE 02, SPRING 2013
 CMSC 313 COMPUTER ORGANIZATION & ASSEMBLY LANGUAGE PROGRAMMING LECTURE 02, SPRING 2013 TOPICS TODAY Bits of Memory Data formats for negative numbers Modulo arithmetic & two s complement Floating point
KB232. PS/2 Keyboard RS-232 Adapter Part # SA0008 (Version 3.0) Copyright 2003 L3 Systems, Inc. Redmond
 Copyright 2003 L3 Systems, Inc. Redmond") KB232 PS/2 Keyboard RS-232 Adapter Part # SA0008 (Version 3.0) Copyright 2003 L3 Systems, Inc. Redmond Command C Displays Configuration String CW= D Lkk=aa,bb P E H V T Quick Reference Notes Field
KB232 PS/2 Keyboard RS-232 Adapter Part # SA0008 (Version 3.0) Copyright 2003 L3 Systems, Inc. Redmond Command C Displays Configuration String CW= D Lkk=aa,bb P E H V T Quick Reference Notes Field
COPYRIGHT 2009,SCSC. Manual P/No: SCCM - 80S-01A Released Date: Oct 31, 2009
 To begin the configuration procedures Thank you for purchasing the scanner. Inside each packaging box, you may find the scanner, the interface cable and user's fuide. Configuration manual might be optional
Lecture (09) x86 programming 8
 x86 programming 8") Lecture (09) x86 programming 8 By: Dr. Ahmed ElShafee 1 Basic Input Output System BIOS BIOS refers to a set of procedures or functions that enable the programmer have access to the hardware of the computer.
Lecture (09) x86 programming 8 By: Dr. Ahmed ElShafee 1 Basic Input Output System BIOS BIOS refers to a set of procedures or functions that enable the programmer have access to the hardware of the computer.
RS-232 Control of the Advantage EQ281/8, EQ282/8 and Advantage SMS200
 RS-232 Control of the Advantage EQ281/8, EQ282/8 and Advantage SMS200 Biamp Systems, 14130 N.W. Science Park, Portland, Oregon 97229 U.S.A. (503) 641-7287 an affiliate of Rauland-Borg Corp. Introduction
Wireless 2D Pocket barcode scanner
 * Wireless 2D Pocket barcode scanner Quick Guide Model no.: idc9507l Introduction Designed primarily for P.O.S. retail environments, the idc9507l is a wireless pocket barcode scanner that allows you to
PureScan - ML1. Configuration Guide. Wireless Linear Imager Wireless Laser scanner - 1 -
 PureScan - ML1 Wireless Linear Imager Wireless Laser scanner Configuration Guide - 1 - Table of Contents Chapter 1 System Information 1.1 About this manual 3 1.2 How to set up the parameter 3 Chapter 2
FA269 - DIGITAL MEDIA AND CULTURE
 FA269 - DIGITAL MEDIA AND CULTURE ST. LAWRENCE UNIVERSITY a. hauber http://blogs.stlawu.edu/digitalmedia DIGITAL TECHNICAL PRIMER INCLUDED HERE ARE THE FOLLOWING TOPICS A. WHAT IS A COMPUTER? B. THE DIFFERENCE
SPEECH RECOGNITION COMMON COMMANDS
 SPEECH RECOGNITION COMMON COMMANDS FREQUENTLY USED COMMANDS The table below shows some of the most commonly used commands in Windows Speech Recognition. The words in italics indicate that many different
Pins 2, 3 - Baud rate select - Selects the baud rate for the serial transmission.
 General The CSI Model DB1000 Decoder is available in a PLCC-44 pin package. The list below describes the function of each pin. The basic connection schematic shows connections that are common to all configurations.
Dostek 440A BTR. Software Guide
 Dostek 440A BTR Software Guide Table of Contents Introduction... 1 Installing Dostek DNC... 1.1 Installing Dostek DNC... 1.2 Installing Your Software License Key... 1.2.1 Install Automatically (Recommended)...
User s Guide. Linear Imager
 User s Guide 3200 Linear Imager Disclaimer Hand Held Products, Inc. ( Hand Held Products ) reserves the right to make changes in specifications and other information contained in this document without
Application Note #2437
 Application Note #2437 The CW Command This application note describes the CW Galil command. The CW command has three uses: it (1) prints the controller s copyright message, (2) sets or clears the most
Introduction to Decision Structures. Boolean & If Statements. Different Types of Decisions. Boolean Logic. Relational Operators
 Boolean & If Statements Introduction to Decision Structures Chapter 4 Fall 2015, CSUS Chapter 4.1 Introduction to Decision Structures Different Types of Decisions A decision structure allows a program
ph/orp CONTROLLER PH/ORP800 INSTRUCTION MANUAL
 R ph/orp CONTROLLER PH/ORP INSTRUCTION MANUAL Table of Contents Introduction... Order Code... Mounting... Electrical Connections... Operator Interface... Operation... Calibration... Digital Communication...
Delivery content * Pocket Barcode scanner x 1 * Mini USB cable x 1 (for charging only) * Quick instructions x 1 * Strap x 1
 * Quick instructions x 1 * Strap x 1") * Wireless 2D Pocket barcode scanner Quick Guide M o de l no.: idc9607l Introduction Designed primarily for P.O.S. retail environments, the idc9607l is a wireless pocket barcode scanner that allows you
* Wireless 2D Pocket barcode scanner Quick Guide M o de l no.: idc9607l Introduction Designed primarily for P.O.S. retail environments, the idc9607l is a wireless pocket barcode scanner that allows you
n NOPn Unary no operation trap U aaa NOP Nonunary no operation trap i
 Instruction set Instruction Mnemonic Instruction Addressing Status Specifier Mode Bits 0000 0000 STOP Stop execution U 0000 0001 RET Return from CALL U 0000 0010 RETTR Return from trap U 0000 0011 MOVSPA
Mx1100 UMI Serial BTR Installation & User s Manual
 Page 1 Mx1100 UMI Serial BTR Installation & User s Manual For Sanyo Denki 2400 Series Tape Readers Copyright 2011 All rights reserved. Memex Automation Inc. 200 3425 Harvester Rd., Burlington, Ontario
marson MT8200S 2D Handheld Scanner User Manual V / 6 / 25 - I -
 marson MT8200S 2D Handheld Scanner User Manual V1.1 2018 / 6 / 25 - I - Table of Contents 1 Gettting Started...1 1.1 Introduction...1 1.2 Configuring MT8200S...1 1.2.1 Barcode Configurability...1 1.2.2
IB-3 PC Keyboard Wedge User s Manual. P/N Rev B
 IB-3 PC Keyboard Wedge User s Manual P/N 83-210040 Rev B Copyright 2006 by Microscan Systems, Inc., 1201 S.W. 7th Street, Renton, WA, U.S.A. 98057 (425) 226-5700 FAX: (425) 226-8682 ISO 9001:2000 Certification
GS100. CCD Barcode Scanner. User Manual
 GS100 CCD Barcode Scanner User Manual 1 Table of Contents Ch. 1 Description... 1 1.1 General... 1 1.2 Introduction... 1 1.3 Codes Read... 1 1.4 Installation... 1 Ch. 2 Configuration... 2 2.1 Flow Chart...
APPENDIX B. ASSEMBLER DIRECTIVE SUMMARY
 APPENDIX B. ASSEMBLER DIRECTIVE SUMMARY Assembler directives are summarized alphabetically in this the contents of directive fields. The following terms are used 10 describe NOTATION Term Expression Numerical
Data Representa5on. CSC 2400: Computer Systems. What kinds of data do we need to represent?
 CSC 2400: Computer Systems Data Representa5on What kinds of data do we need to represent? - Numbers signed, unsigned, integers, floating point, complex, rational, irrational, - Text characters, strings,
WSR Commands. WSR Commands: Mouse Grid: What can I say?: Will show a list of applicable commands
 WSR Commands Updated September 10, 2010 WSR Commands: What can I say?: Will show a list of applicable commands Refresh speech commands: Updates the list of speech commands that are currently available
Data Representa5on. CSC 2400: Computer Systems. What kinds of data do we need to represent?
 CSC 2400: Computer Systems Data Representa5on What kinds of data do we need to represent? - Numbers signed, unsigned, integers, floating point, complex, rational, irrational, - Text characters, strings,
UniOP VT100 Terminal Emulation - Ver. 3.16
 UniOP VT100 Terminal Emulation - Ver. 3.16 This tech note describes the operation of the VT100 emulation software on UniOP. This document is a short reference for VT100 Terminal Emulation software. It
Setup Procedures 2 Batch Setup 3. Bar Code Setup Menu 5. 1 Device Selection and Default. 2 Beep and Delay Keyboard Wedge..
 Contents Setup Procedures 2 Batch Setup 3 Bar Code Setup Menu 5 1 Device Selection and Default 5 2 Beep and Delay... 7 3 Keyboard Wedge.. 9 4 RS232 Serial Setting.... 11 5 Scanner.. 13 7 Symbologies(I):
Do not start the test until instructed to do so!
 Instructions: Print your name in the space provided below. This examination is closed book and closed notes, aside from the permitted one-page formula sheet. No calculators or other electronic devices
User Guide. Remote Support Tool
 Remote Support Tool Remote Support Tool... 1 User Guide... 1 Overview... 1 Starting the Support Tool... 1 Starting a Remote Support Session... 2 Using TeamViewer... 3 Using the Support Tool in an Office...
User Guide. Remote Support Tool
 Remote Support Tool Remote Support Tool...1 Overview...1 Starting the Support Tool...1 Starting a Remote Support Session...2 Using the Support Tool in an Office...3 Remote Support Tool At a glance...4