aaxa TECHNOLOGIES User Guide
|
|
|
- Felix Martin
- 5 years ago
- Views:
Transcription

1 aaxa TECHNOLOGIES User Guide
2 Caution! WARNING: Please use this product as instructed. Misuse may cause injury or death. DO NOT use while driving DO NOT expose to water or wet surfaces. Electric shock may occur. DO NOT expose the projected LED image to your eyes or the eyes of others DO NOT block or restrict airflow from ventilation holes as this may cause the projector to overheat Caution for Battery Use Do not pierce or puncture the battery with sharp objects Do not heat the product or expose it to high temperature. Do not wet it or place it in any liquid Caution for Headphone Use Prolonged use at high volume may impair your hearing. High volume during walking or driving may cause distractions and result in injury or death Keep the projector, battery, or charger away from any heat sources
3 Table of Contents Chapter 1: P2-B at a Glance P2-B Introduction Remote Accessories Chapter 2: Getting Started Powering On / Off Focus Adjustment / Throw Distance External Input/Outputs Connecting to Digital Input Connecting to Composite Video Connecting to Digital Input Video Connecting to Speaker or Headphones Connecting a TF Card Connecting a USB Stick Chapter 3: Menu Screens Main Menu Video Player Menu Photo Viewer Menu Music Player Menu Text Viewer Menu Chapter 4: Setup Menu Settings Chapter 5: Technical Details Troubleshooting Specifications Notes

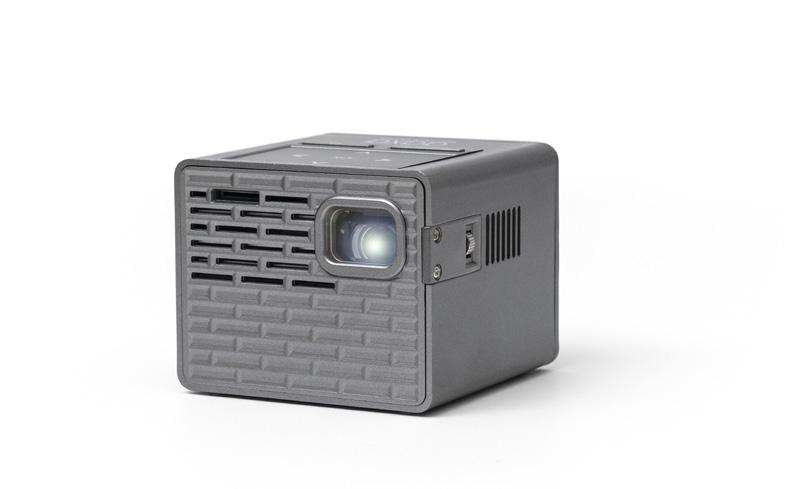
4 P2-B at a Glance Main Unit Front/Back Chapter 1 TF Card Slot Focus Adjustment Touchpad USB Port Headphone Out AV Port Digital Input Power Button Power Port 1

5 Remote & Touchpad Power On/Off Main Menu Select Source Mute Navigation Volume Down Volume Up Video Play Menu Back Remote * The remote control is not able to POWER ON the projector NOTE: Pressing power on the remote once will only enable or disable the remote control. In order to fully turn the projector off, hold the power button down on the remote or projector for at least 3 seconds. 2

6 Remote & Touchpad Cont. The P2-B includes a touchpad directly on top of the projector. The touchpad allows users to navigate through the menu options. In order to select an option, OK needs to be tapped. 3

7 Accessories Tripod Remote Power Adapter A/V Cable *Under various circumstances, the actual accessories may be different from those shown in the pictures above. Additional accessories are available for purchase at 4
8 Getting Started Chapter 2 Powering ON the projector 1. To power-on a fully charged P2-B, hold down the power button for approximately three seconds until the projector turns on. Powering OFF the projector 1. Hold down the power button for approximately three seconds until the projector turns off. NOTE: The P2-B Projector battery does not charge when it is in operation. 5

9 Focus Adjusment / Throw Distance Focus Adjustment Spin the focus wheel up or down until the image becomes clear. Throw Distance Chart Throw Distance Unit: Inches Diagonal Size Unit: Inches DIAGONAL SCREEN SIZE 16:9 Aspect Ratio Throw Ratio 1.20 Projection Angle: 100% Offset *minimum throw distance: 10 inches 6


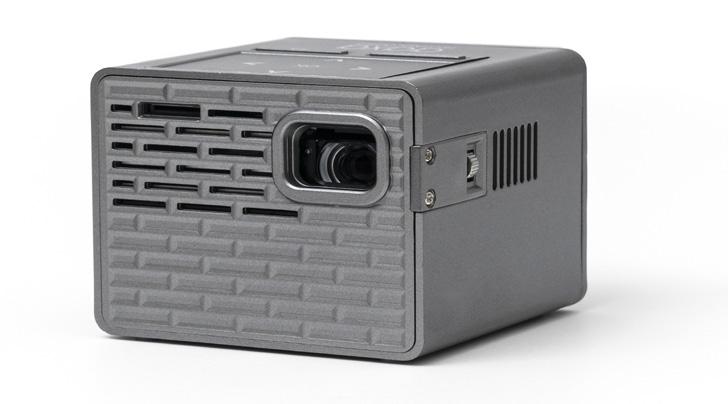
10 External Inputs and Outputs TF Card Digital Input (Mini) USB Stick Headphones/speakers Composite AV 7
11 Connecting to a Computer via Digital Input Step 1: Connect one end of the mini-digital Input Cable (purchased separately) to your computer s Digital Input port. Step 2: Connect the other end of the mini-digital Input Cable to your P2-B s Digital Input port. Step 3: In the Main Menu, select the INPUTS icon and then the VIDEO icon. Select the INPUTS icon Select the VIDEO icon 10


12 Connecting to a Computer Cont. Step 4: To enable Digital Video output on your computer, most computers require turning on the video output feature. Each computer is different. Please consult your computer s manual for instructions to enable Digital Video output. Below are standard instructions for a Windows 10 computer not all systems are the same. Step 5: Press Windows+P to toggle through display settings. Select either Duplicate or Extend depending on your viewing option. *NOTE: different operating systems may differ Step 6: 1. Right click on computer desktop and select Screen Resolution 2. Display Properties window will pop up 3. If a secondary monitor is grayed out, click on it and select Extend these displays in the Multiple Displays drop down 4. If the image is blurry or the text is not legible, adjust the screen resolution. We recommend 1920x


13 Connecting to Composite Video Step 1: Connect the 3.5mm Composite A/V Cable to the back of the P2-B. Step 2: Plug the composite end of the AV Cable (Red, White,Yellow) to your device. 12
14 Connecting to Composite Video Cont. Step 3: In the Main Menu Select the INPUTS icon Step 4: Turn on your multimedia device. Select the RCA icon Connectivity with multimedia devices through Composite AV The P2-B can connect to many media devices including: VHS players, DVD players, cameras, video game consoles and other peripherals with ease. 13
 to your device s Digital Input port.")

15 Connecting to Digital Video Input Step 1: Connect one end of the mini- Digital Input Cable (purchased separately) to your device s Digital Input port. Step 2: Connect the other end of the mini-digital Input Cable to your P2-B s Digital Input port. Note: Apple devices require a specialized Digital Input adapter (Sold separately by Apple) 14
16 Connecting to Digital Video Input Cont. Step 3: In the Main Menu Select the INPUTS icon Select the VIDEO icon Step 4: Turn on your multimedia device. If available, select 1920x1080. Connectivity with multimedia devices via Digital Video Input The P2-B can connect to many media devices including: ipod, iphone, ipad, DVD players, Blu-Ray players, smart phones, cameras, video game consoles and other peripherals with ease. *Some smart phones require video out capabilities to work with the P2-B. Check with your phone manufacturer. 15


17 Connecting Speakers / Headphones Step 1: Step 2: Connect your speakers/headphones to the projector s audio port. Ensure that the projector and/or the headphones are powered on. Step 3: Place the headphones on and enjoy! CAUTION: Prolonged use of headphones at a high volume may impair hearing. 16

18 TF Card How to insert your TF Card Slide in your TF card into the TF card slot on the back of the P2-B (facing down as shown in picture). Gently slide the TF card until it clicks into place. How to access your TF Card Once your TF Card has been inserted, you can navigate to any media content in the main menu. After selecting the media content, choose the TF card selection. You can now access the data on your TF card through the onboard media player *Review the Specifications section of this manual to read about the supported file formats. (up to 32 GB) Note: Microsoft Office and PDF file formats are not supported directly. In order to view a slideshow, you need to convert your slideshow into JPEG pictures first. 17
19 TF Card Cont. Media Player menu In the main menu, select the type of file you wish to play. Select the TF Card icon to access your files. File Menu System The P2-B will show all folders and files you have on your TF Card in the C: drive. Use the remote or touchpad to navigate to different folders or files. Return: Brings you back to the main menu 18


20 USB Drive How to insert your USB Drive Slide your USB Drive into the USB port. Gently slide the drive until it cannot go in any further. How to access your USB Drive Insert your USB Drive into the projector. Use the remote or touchpad to choose the USB Drive icon from the main menu to access your files. Choose your desired file. *Review the Specifications section of this manual to read about the supported file formats. Note: Microsoft Office and PDF file formats are not supported directly. In order to view a slideshow, you need to convert your slideshow into JPEG pictures first. 19
21 USB Drive Cont. Media Player menu In the main menu, select the type of file you wish to play. File Menu System The P2-B will show all folders and files you have in the C: drive. Use the remote or touchpad to navigate to different folders or files. Select the USB Drive icon to access your files. Return: Brings you back to the main menu 20
22 TF Card and USB Drive If both TF Card and USB Drive are inserted, depending on which one inserted first, the first one will show in the C: drive and the second one will show in the D: drive. 21

23 Menu Screens Chapter 3 Main Menu The P2-B features a built-in PMP (Portable Media Player) function. This function allows the projector to play videos, pictures, music files, and text directly from your connected devices. Press the left and right directional buttons on the remote or the directional arrows on the touchpad to choose an icon from the main menu. To select a menu option, press the OK button on the remote or in the middle of the touchpad. To go back to the previous screen, press the Back button. To Jump to the INPUTS menu, press the Source button on the projector once. 22
24 Video Player Menu Opening a file: Select the VIDEOS icon (Fig. 3.1). From the sub menu (Fig. 3.2), select the storage media with the stored files. Choose which file you wish to play. Fig. 3.1 Fig. 3.2 The P2-B will show all folders and files you have on your USB or TF card. Use the remote or touchpad to select folders or files. 23
25 Video Player Menu While Playing Videos While playing videos, the volume is adjustable. You can simply adjust volume by pressing the volume buttons on the remote or the up & down arrows on the touchpad. Further controls of the video are available in the video player submenu - which is accessed through the OK button. Volume Down Volume Up OK Enter Video Player Submenu To open/hide the video playback menu, use the Down arrow on the remote or touchpad. 24
26 Video Player Sub-Menu Playing Videos The Video Player Sub-Menu can be accessed by pressing OK during video playback. To exit the Video Player Sub-Menu, press the Down arrow on the remote or touchpad. To navigate the Playback Menu, use the directional buttons on the remote or touchpad to highlight the option you wish to choose (Fig 3.3). OK Move selection left Move selection right OK Confirm selection Fig :00:59 / 00:04:20 Pause FB FF Prev. Next Stop Repeat Random 25
27 Video Playback FAQ How do I loop a video? 1. Choose either USB or TF Card for playback 2. Navigate the folders until you reach the file you wish to play. 3. Choose the file you want to play. 4. Press OK when video is playing, then move left on the video player menu to select Repeat and press OK until it shows Repeat The video will now loop after playback is finished. 26

28 Photo Menu Opening A File: Select the PHOTOS icon (Fig. 3.4) From the sub menu (Fig. 3.5), select the storage media with the stored files. Choose the file you wish to play. Fig 3.4 Fig 3.5 The P2-B will show all folders and files you have on your USB or TF card drive. Use the navigation buttons to select folders or files. 27
29 Photo Menu While Viewing Pictures While viewing pictures, you can simply navigate through all images by pressing the left and right buttons on the remote or touchpad. Further controls are available in the Photo Submenu - which is accessed through the OK button. OK Previous Picture Next Picture OK Enter Photo Player Submenu To open/hide the Photo Playback menu, use the Down Arrow on the remote or touchpad. 28
30 Photo Sub-Menu Viewing Pictures: After pressing OK during picture slide-show playback, the Photo Sub-Menu appears. To exit the Photo Sub-Menu, press the Down arrow on the remote or touchpad. Every picture is able to be rotated and zoomed in or out based on the option you wish to choose on the Sub-Menu. To navigate the Sub-Menu, use the remote or touchpad to move selection (Fig 3.6). Move selection left OK Move selection right OK Confirm selection Fig

31 Photo Slideshow FAQ How do I convert PPT to JPG? 1. First open your presentation on your PC or MAC. 2. Go to Save As and save your presentation as.jpg files. (Fig 3.6.1) 3. Choose All slides. (Fig 3.6.2) 4. *If you have more than 10 slides, you must rename Slides 1-9 with a 0 in front of it or the playback order will be mixed up. If you have more than 100 slides you will need to use a 00 format. (Fig 3.6.3) 5. Copy the files either to your TF Card or to the USB memory stick. 6. insert the TF Card or Memory stick into the projector. 7. View the slidershow under PHOTOS Fig Fig Fig
32 Music Player Menu Opening A File: Select the MUSIC icon (Fig. 3.7). From the Sub-Menu (Fig. 3.8), select the storage media with the stored files. Choose the file you wish to play. Fig. 3.7 Fig. 3.8 The P2-B will show all folders and files you have on your USB or TF card drive. Use the remote or touchpad to select folders or files. 31
33 Music Player Menu Listening To Audio: To adjust the volume, use the volume keys on the remote or Up and Down arrows on the touchpad. To navigate the playback menu, push the OK button to open the menu and use the directional buttons on the remote or touchpad to highlight the option you wish to choose (Fig 3.9). To hide the music playback menu, press Down arrow on the remote or touchpad. OK Move selection left Move selection right Volume Up Volume Down OK Confirm selection Fig
34 Music Playback FAQ How do I loop a song? 1. Choose either USB or TF Card for playback 2. Navigate the folders until you reach the file you wish to play. 3. Highlight the file you want to play, then confirm the selection. 4. Move selection on music player menu to Repeat 1, and confirm the selection. 5. The song will now loop after playback is finished. How do I create a song playlist? 1. Insert your media device (either TF card or USB) into computer. 2. Make a new folder on media device (folder name will be the name of the playlist). 3. Transfer songs from computer to the new folder, name accordingly. 4. Remove media device from computer and insert into projector. 5. Navigate to Audio section, then choose appropriate media device. 6. Navigate to your playlist folder. 7. Start at first song. 8. Playback will follow each successive song on the list. *To create a special order for the list, add numerical numbering to the beginning of each file. 33
35 Text Viewer Menu Opening A File: From the Sub-Menu, select the storage media with the stored files. (Fig 3.10) Choose which file you wish to play. Fig The P2-B will show all folders and files you have on your USB or TF card drives. Use the navigation buttons to select folders or files. Viewing Text Files: The P2-B Projector allows you to view text files. Select the file you want to view in the file menu for the particular storage device on which the file is stored. You can press the left and right arrow buttons on the remote to flip through the pages you have in the present folder. Note: Microsoft Office and PDF file formats are not supported directly. In order to view a slideshow, convert your slideshow into JPEG pictures first. 34
36 Setup Menu Chapter 4 The Settings Menu can be accessed by selecting Setting on the Main Menu Within the settings menu, there are four more submenus that allow you to customize your P2-B the settings you want. Picture Picture Mode Color Mode Aspect Ratio Brightness Mode Projection Sound Sound Mode Balance Auto Volume Time Sleep Timer Auto Sleep Option OSD Language Restore Factory Default 35
37 Picture Settings Picture Mode Changes the picture mode to different settings depending on your usage Color Mode Adjusts the color temperature from warm to cool (red to blue) Aspect Ratio Changes the aspect ratio of the picture - Auto, 4:3, 16:9*, etc. Brightness Mode Choose between Eco, Standard, and Boost** Projection Flips the projected image *Caution: Some pictures may be cut off when aspect ratio is set incorrectly **Boost mode should only be used in low temperature environments with adequate clearance of exhaust / intake vents. A tripod is highly recommended. DO NOT block vents while operating in Boost mode. 36
38 Sound Settings Sound Mode Changes the sound mode depending on what is currently playing Balance Adjusts the sound balance manually Auto Volume When the auto volume function is turned on, it normalizes the incoming audio signal so that the video will be played at a moderate volume 37

39 Time Settings Sleep Timer Sets when projector goes to sleep Auto Sleep Sets auto sleep function where projector will turn off when not in use or if there is no signal. 38
40 Option Settings OSD Language Changes the language of the device. Options include English, Spanish, Chinese, German, French, Korean, Japanese Restore Factory Default Restores the projector to factory settings 39
41 Technical Details Chapter 5 Troubleshooting IMAGE IS BLURRED Possible Causes The Projector is not in focus Solution Adjust the focus with the focus adjustment dial until the image comes into focus The Projector is offset from plane / angle of operation Move the projector so that it is both 180 degrees and on an evern plane with the screen. NO SYNC, NO SIGNAL 1. Be sure to setup the computer to enable a video signal output. On some laptops this is done by pressing and holding Function F5 key. If using the P2-B as an external monitor on Windows based systems, this can be done by selecting extend my desktop to this monitor. The native resolution of the P2-B projector is 854x480 (WVGA). Depending on the video driver different resolutions may need to be selected for proper output. 40
42 Technical Details Troubleshooting THE PROJECTOR DOES NOT TURN ON Possible Causes There is no power The power button was not held long enough NO PICTURE / FILE NOT SUPPORTED Possible Causes The video source is not properly connected or selected Solution Check to ensure the power outlet source is good. Check the Power Adapter to ensure a proper connection with the wall outlet as well as the projector. Confirm that the unit is charged and has enough power To power on the projector, the power button needs to be depressed for a full 3 seconds. Try holding the power button until the optical engine turns on Solution Check the video source signal to ensure that it is properly connected. Select the current input source by choosing the input desired from the main menu Incorrect file extension / Video is encoded with incorrect codec Please refer to Specifications page to see which file types and codex are supported. Verify that the file was encoded properly. 41
43 Specifications Brightness: Max Resolution: Native Resolution: Contrast Ratio: Aspect Ratio: Projection Lens: Image Size: Lamp: Video in: Audio Out: Color: TF Card: USB: Dimensions: Weight: Power Consumption: Battery Life: Throw Ratio: Projection Offset: Conformances: Supported File Formats: 130 Lumens 1920x1080 (1080P) 854x480 (WXGA) 1000:1 16:9 Manual Focus 8~100 inches Triple RGB LEDs with Vibrant Color Technology Life 20,000hrs Composite A/V (3.5mm Jack) Digital Input (Mini) (compatible) 3.5 mm Stereo Headphone Jack Gray TF Card Slot (32GB maximum) Full Size USB 2.0 (32GB maximum) 2.8 x 2.8 x lbs 11 W 150 Minute Li-Ion Rechargeable Battery (Eco Mode) % CE, FCC Class A MP3, WMA, OGG, WAV, AVI, BMP, JPG,TXT, GIF 42
44 Notes 43
45 Please direct all customer service inquiries to: AAXA Technologies, Inc Mitchell N., Unit #B Irvine, CA (714)
aaxa TECHNOLOGIES User Guide
 aaxa TECHNOLOGIES User Guide Caution! WARNING: Please use this product as instructed. Misuse may cause injury or death. DO NOT use while driving DO NOT expose to water or wet surfaces. Electric shock may
aaxa TECHNOLOGIES User Guide
 aaxa TECHNOLOGIES User Guide Vertical Operation The HD Pico can be used for vertical operation (Ceiling projection). To use the HD Pico for Ceiling projection set the HD Pico in "Eco mode". Only an TF
aaxa TECHNOLOGIES User Guide
 aaxa TECHNOLOGIES User Guide Caution! WARNING: Please use this product as instructed. Misuse may cause injury or death. DO NOT use while driving DO NOT expose to water or wet surfaces. Electric shock may
aaxa TECHNOLOGIES User Guide
 aaxa TECHNOLOGIES User Guide Caution! WARNING: Please use this product as instructed. Misuse may cause injury or death. DO NOT use while driving DO NOT expose to water or wet surfaces. Electric shock may
aaxa TECHNOLOGIES User Guide
 aaxa TECHNOLOGIES User Guide Caution! WARNING: Please use this product as instructed. Misuse may cause injury or death. DO NOT use while driving DO NOT expose to water or wet surfaces. Electric shock may
aaxa TECHNOLOGIES User Guide
 aaxa TECHNOLOGIES User Guide Caution! WARNING: Please use this product as instructed. Misuse may cause injury or death. DO NOT use while driving DO NOT expose to water or wet surfaces. Electric shock may
TECHNOLOGIES. P2jr Pico Projector. User Guide
 aaxa TECHNOLOGIES P2jr Pico Projector User Guide Caution! WARNING: Please use this product as instructed. Misuse may cause injury or death. DO NOT use while driving DO NOT expose to water or wet surfaces.
aaxa TECHNOLOGIES PICO PROJECTOR User Guide
 aaxa TECHNOLOGIES PICO PROJECTOR User Guide Caution! WARNING: Please use this product as instructed. Misuse may cause injury or death. DO NOT use while driving DO NOT expose to water or wet surfaces. Electric
aaxa P4X Pico Projector TECHNOLOGIES User Guide
 aaxa TECHNOLOGIES P4X Pico Projector User Guide Caution! WARNING: Please use this product as instructed. Misuse may cause injury or death. DO NOT use while driving DO NOT expose to water or wet surfaces.
aaxa Pico Projector TECHNOLOGIES User Guide
 aaxa TECHNOLOGIES Pico Projector User Guide Caution! WARNING: Please use this product as instructed. Misuse may cause injury or death. DO NOT use while driving. DO NOT expose to water or wet surfaces.
aaxa P3OO Pico Projector TECHNOLOGIES User Guide
 aaxa TECHNOLOGIES P3OO Pico Projector User Guide Caution! WARNING: Please use this product as instructed. Misuse may cause injury or death. DO NOT use while driving DO NOT expose to water or wet surfaces.
aaxa P3 Pico Projector TECHNOLOGIES User Guide
 aaxa TECHNOLOGIES P3 Pico Projector User Guide Caution! WARNING: Please use this product as instructed. Misuse may cause injury or death. *Do not operate the Projector in direct sunlight or near heat sources
aaxa P4 Pico Projector TECHNOLOGIES User Guide
 aaxa TECHNOLOGIES P4 Pico Projector User Guide Caution! WARNING: Please use this product as instructed. Misuse may cause injury or death. DO NOT use while driving DO NOT expose to water or wet surfaces.
aaxa TECHNOLOGIES User Guide
 aaxa TECHNOLOGIES User Guide Caution! WARNING: Please use this product as instructed. Misuse may cause injury or death. DO NOT use while driving. DO NOT expose to water or wet surfaces. Electric shock
aaxa TECHNOLOGIES User Guide
 aaxa TECHNOLOGIES User Guide Caution! WARNING: Please use this product as instructed. Misuse may cause injury or death. DO NOT use while driving. DO NOT expose to water or wet surfaces. Electric shock
aaxa TECHNOLOGIES User Guide
 aaxa TECHNOLOGIES User Guide Caution! WARNING: Please use this product as instructed. Misuse may cause injury or death. DO NOT use while driving. DO NOT expose to water or wet surfaces. Electric shock
aaxa TECHNOLOGIES User Guide
 aaxa TECHNOLOGIES User Guide Caution! WARNING: Please use this product as instructed. Misuse may cause injury or death. DO NOT use while driving. DO NOT expose to water or wet surfaces. Electric shock
TECHNOLOGIES. User Guide
 aaxa TECHNOLOGIES User Guide Quick Start Guide Step 4: Settings Button Step 1: Power Adapter Port Step 2: Power Button Step 3: Adjust Focus Step 1: Connect the power adapter Step 2: Press the Power button
*Do not operate the projector near water such as by the sink or bathtub as this may cause electric shock.
 Table of Contents Table of Contents 1 Warnings 2 Overview 3 Remote Control Functions 4 Packing List 5 General Operation 6 Startup and control Shutdown Positioning / Throw Distance / Focus 7 Connecting
WARNINGS. *Do not operate the Projector in direct sunlight or near heat sources such as heaters, fires, and stoves as this may cause a fire hazard.
 WARNINGS *Do not operate the Projector in direct sunlight or near heat sources such as heaters, fires, and stoves as this may cause a fire hazard. *Do not operate the projector close to sources of steam
aaxa TECHNOLOGIES User Guide
 aaxa TECHNOLOGIES User Guide Caution! WARNING: Please use this product as instructed. Misuse may cause injury or death. DO NOT use while driving. DO NOT expose to water or wet surfaces. Electric shock
User s Manual BeamPod User Manual
 User s Manual BeamPod General Safety Information 1. Keep the device and packaging materials out of reach of infants and children. 2. Keep the power adapter and other contacts from water, Dry your hands
AAXA Technologies P700 HD LED Pico Projector - Troubleshooting & Firmware Update Guide
 Troubleshooting: Image is blurred/picture not bright enough The Projector is not in focus Adjust the focus with the focus adjustment dial until the image comes into focus. Move the projector so that it
Adapt ADPP-305 Projector User Manual
 Adapt ADPP-305 Projector User Manual I IMPORTANT: Please read before use Before using the product, please read the manual carefully. This product has 4GB memory, and can receive an additional TF/Micro
DVR 514 Digital Video Recorder
 DVR 514 Digital Video Recorder User Manual 2010 Sakar International, Inc. All rights reserved. Windows and the Windows logo are registered trademarks of Microsoft Corporation. All other trademarks are
Ultra High Brightness Professional Monitor User Manual
 Manual Version UHBA1.0 Safety Instructions Please keep the display away from any heat sources. Place the display in a stable and well-ventilated place. Please handle with care as product contains glass.
 Glossary Warranty and support information Introduc tion ------------------------------------------------------------------------------ Safety instructions ----------------------------------------------------------------------
EziNav G3 User Manual
 EziNav G3 User Manual 4.3 Touchscreen GPS with Bluetooth About this User Manual Congratulations on your purchase of your Kogan EziNav G3 GPS. This user manual provides information regarding the various
/ QUICK START GUIDE. Mobile Projector
 / QUICK START GUIDE Mobile Projector 1 STEP 1 - POWER UP Power Button Press and hold the power buttons for 5 seconds to turn on the device. (It may take a few seconds for the Cube to start projecting an
Before Operation. Basic Operation. Operating Instructions
 PF1501 14 Before Operation Basic Operation 2 3 3 6 6 7 Connect to PC 7 Operating Instructions Set-Up... 9 Selecting Which Media to View... 9 Viewing Photos... 9 Adjust Speed of Slideshow... 10 Adjust the
Visual Land V TOUCH PRO
 Visual Land V TOUCH PRO Information in this manual are subject to change without notice. FEATURES 2.8 inch wide touch screen, 320X240 dot matrix full color high speed TFT screen Support MP3, WMA, RA, WAV
English. If the time arises to throw away your product, please recycle all the components possible.
 Welcome: Thank you kindly for purchasing this fine product. Much investment in time and effort has gone into its development, and it is our hope that it will give you many years of trouble-free service.
IMPECCA DFM-1512 USER S MANUAL
 IMPECCA DFM-1512 USER S MANUAL Table of Contents Introduction... 3 Installing your Unit... 3 Connecting to a computer... 4 Using Your Remote Control... 5 Using Your Digital Photo Frame... 6 Browsing Images...
CONTENT COMPONENTS OF PROJECTOR... 2 SPECIFICATION... 3 INSTRUCTION MANUAL... 3 CHARGING THE PROJECTOR... 3 SET UP... 4
 MP50M User Manual CONTENT COMPONENTS OF PROJECTOR... 2 SPECIFICATION... 3 INSTRUCTION MANUAL... 3 CHARGING THE PROJECTOR... 3 SET UP... 4 POWERING UP AND VIEWING MEDIA... 4 ADJUSTING VOLUME... 5 ADJUSTING
PORTABLE VIDEO RECORDER AND CASSETTE CONVERTER. Item No User Guide
 PORTABLE VIDEO RECORDER AND CASSETTE CONVERTER Item No. 206557 User Guide Thank you for choosing the Sharper Image Portable Video Recorder and Cassette Converter. Please take a moment to read this guide
Overview 1. Foreword 2. Warnings
 Overview 1. Foreword Thank you for choosing our product. Please read this manual carefully before using the product. Specifications and software updates may be subject to change without notice. Some pictures
XEMIO-950 MP5 PLAYER / 4GB MEMORY / TOUCH SCREEN. For information and support,
 XEMIO-950 MP5 PLAYER / 4GB MEMORY / TOUCH SCREEN For information and support, www.lenco.eu To the customer: Thank you for purchasing this MP5 player. When opening the box for the first time, please check
15" HD Digital Photo Frame
 15" HD Digital Photo Frame Table of Contents 2 SAFETY INFORMATION...3 PACKAGE CONTENTS...3 FEATURES...4 REMOTE...5 QUICK START...6-7 PHOTO PLAYBACK...8-9 MUSIC PLAYBACK...10-11 MOVIE PLAYBACK...12-13 CALENDAR...14
EVOBOOK 2. User s Manual.
 EVOBOOK 2 User s Manual www.evolio.ro 0 User s Manual Content Page Introduction.... 2 Parts and Controls.... 3 Getting Started...... 6 Turning On/Off EvoBook2. 6 Charging EvoBook2... 6 Inserting SD card....
Network Digital Menu Board Hardware User Manual
 Network Digital Menu Board Hardware User Manual Manual Version DMA1 Safety Instructions Please keep the display away from any heat sources. Place the display in a stable and well-ventilated place. Please
Hi-Res 8 Wi-Fi Digital Picture Frame with MP3 player Table of Contents
 Hi-Res 8 Wi-Fi Digital Picture Frame with MP3 player Table of Contents Before Using the Digital Picture Frame...3 Introduction...3 Features and Specs...3 Package contents...4 Digital Picture Frame Layout...5
Mini Projector User s Guide with Integrated Multimedia Player
 Mini Projector User s Guide with Integrated Multimedia Player Please read this manual before Model P50M Table of Contents 1. Table of Contents---------------------------------1 2. Warnings-----------------------------------------2
 Glossary Warranty and support information Introduc tion ------------------------------------------------------------------------------ Safety instructions ----------------------------------------------------------------------
IP65 Rated Freestanding Outdoor Monitor User s Manual
 IP65 Rated Freestanding Outdoor Monitor User s Manual Manual Version OTA1.0 Safety Instructions Please handle with care so as to not damage the LCD panel. The holes or openings on the display are designed
CommBox Interactive Classic 4K User Manual. Revision: 5
 CommBox Interactive Classic 4K User Manual Revision: 5 Table of Contents 1 Preparations 4 1.1 Parts List 4 1.2 Control Lights & Buttons 4 1.2.1 Light indicators 4 1.2.2 Control buttons 4 1.3 Input/Output
Portable Hi-Res Movie Projector
 Care Instructions Portable Hi-Res Movie Projector Instructions Part No. COMP9256 B Portable Hi-Res Movie Projector Projector - Accessories 1 Projector 2 Lens cover 3 Remote control 4 Speaker 5 AV cable
MICRO 2+ USER MANUAL
 MICRO2+ USER MANUAL Wintal MICRO2+ USER MANUAL Contents BRIEF INTRODUCTION... 1 FEATURE... 1 BASIC PERFORMANCE... 1 PRODUCT DETAILS... 2 PACKING LIST... 2 FRONT VIEW... 2 BACK VIEW... 3 REMOTE CONTROL...
Precautions If you do not use your Trio for over 24 hours, please switch it to OFF.
 Congratulations on purchasing your Trio Personal Media Player! To get the most out of your purchase, please take the time to carefully read through this manual. Foreword If any problems occur during while
quick start Multi_3M-MP220-QSG-4-75x7.indb 1 11/29/2011 5:38:44 PM
 quick start quick start... 4 démarrage rapide... 14 kurzanleitung... 24 inicio rápido... 34 guida rapida... 44 snelstartgids... 54 快速入门指南... 64 快速入門指引... 74 クイックスタートガイド... 84 빠른시작가이드... 94 3 English Français
ADPF10XN Instruction Manual
 ADPF10XN Instruction Manual 1 ADPF10XN Digital Photo Frame User Guide Thank you for purchasing the ADPF10XN 10.4 digital photo frame (DPF). Before operating your new digital photo frame please carefully
Innovative K5 Palm Size LED Projector.
 Innovative K5 Palm Size LED Projector www.innovative.com.sg 1 CONTENT COMPONENTS OF PROJECTOR... 2 SPECIFICATIONS... 3 CHARGING THE PROJECTOR... 3 SET UP... 4 POWERING UP AND VIEWING MEDIA... 4 ADJUSTING
Digital MP3 & Video Player
 Models 215/415/418/818 Digital MP3 & Video Player Table of Contents: Product Overview... 2 Features & Notes... 2 Charging...2 Button Overview.. 3 Button Descriptions....3 Mini SD Card...3 Loading music,
PRESTIGIO LIBRETTO. e-book Reader PER307.
 PRESTIGIO LIBRETTO e-book Reader PER307 www.prestigio.com Table of Contents Disclaimer 3 Introduction 3 Package Content 3 Getting Started 4 Charging the Reader 5 Power On/Off, Reset Device, Insert MicroSD
DVR 710HDv2 Digital Video Recorder
 DVR 710HDv2 Digital Video Recorder User Manual 2009-2011 Sakar International, Inc. All rights reserved. Windows and the Windows logo are registered trademarks of Microsoft Corporation. All other trademarks
HD Ready and LED technology - amazing colour reproduction and long-life
 ML750ST Short throw LED projector HD Ready and LED technology - amazing colour reproduction and long-life Great connectivity - MHL, HDMI and optional wireless PC free viewing - native office viewer, built-in
DVR 520 / 1.8 Digital Video Recorder
 DVR 520 / 1.8 Digital Video Recorder User Manual 2010 Sakar International, Inc. All rights reserved. Windows and the Windows logo are registered trademarks of Microsoft Corporation. All other trademarks
BLUETOOTH "SOUNDBAR" WITH SUBWOOFER
 BLUETOOTH "SOUNDBAR" WITH SUBWOOFER Quick Installation Guide DA-10294 Thank you for purchasing DIGITUS DA-10294. Specially designed to play music through Bluetooth from your mobile phone or computer (through
HD Ready and LED technology - amazing colour reproduction and long-life
 ML750ST Short throw LED projector HD Ready and LED technology - amazing colour reproduction and long-life Great connectivity - MHL, HDMI and optional wireless PC free viewing - native office viewer, built-in
Warranty Details. 7 Colour ebook Reader and Media Player. 7 Colour ebook Reader and Media Player INSTRUCTION MANUAL
 7 Colour ebook Reader and Media Player Warranty Details The product is guaranteed to be free from defects in workmanship and parts for a period of 12 months (dependant on product) from the date of purchase.
MP4 PLAYER Ref.: MP16 BTH
 MP4 PLAYER Ref.: MP16 BTH User Manual Thanks so much for purchase our MP4 player. Please read this manual carefully before you using this unit. We will not contact individuals with any changes of this
RAVE MANUAL. 607 Series
 RAVE MANUAL 607 Series TABLE OF CONTENTS Table Of Contents Basic Features Caution Adding Files and Connecting Buttons Powering On/Off the Player Charging the Player Main Menu Music Video Pictures FM Radio
Polaris G50 Dash cam incident recorder.
 Polaris G50 Dash cam incident recorder. Operation manual Quick Guide Thank you for purchasing the Polaris G50 DVR. The Polaris G50 DVR is a great product for capturing adventures and incidents both on
Slide the switch to On and the player will be powered on in 1 second. The player will prompt "Welcome" and then enter the main interface.
 NMV-179X For the correct use and good performance of the player, the user must fully understand the manual as well as strictly follow the instructions provided. Avoid high temperature (above 35 C) or
Classroom Equipment Guide
 Classroom Equipment Guide General Help Help Center 412.268.457 (HELP) advisor@andrew.cmu.edu Classroom Help Media Technology 412.268.8855 mediatech@andrew.cmu.edu Cluster Help Cluster Services 412.268.8776
V-TOUCH PRO MANUAL. 905L Series
 V-TOUCH PRO MANUAL 905L Series TABLE OF CONTENTS Table Of Contents Buttons Basic Features Caution Turning On/Off the Player Charging the Player Inserting the MicroSD Card Removing the McroSD Card Connecting
HD Ready and LED technology - amazing colour reproduction and long-life
 ML750ST Short throw LED projector HD Ready and LED technology - amazing colour reproduction and long-life Great connectivity - MHL, HDMI and optional wireless PC free viewing - native office viewer, built-in
12.1 Digital Photo Frame
 12.1 Digital Photo Frame KGNDPFC12 Instruction Manual TABLE OF CONTENTS SAFETY INFORMATION. 1 PACKAGE CONTENTS....1 SPECIFICATION SUMMARY 2 DPF INTRODUCTION... 3 QUICK START.. 4 OPERATION GUIDE.. 5 Movie
III INDEX. Product List 1. Overview 1. Projector Specification 2. Basic Functions: 2. MP4 key functions description: 3.
 Version A I IMPORTANT This product is a micro projector with MP4 player function that can connect to mobile/iphone, MP4/iPod, PSP, PDA, DVD, PC/Notebook and other digital products which have video and
WATCH MP4 PLAYER USER MANUAL. Ref.: WATCH04 BTH + WATCH04 BASIC FUNCTION PREPARATIONS BEFORE USE 1. KEY DEFINITION
 WATCH MP4 PLAYER Ref.: WATCH04 BTH + WATCH04 USER MANUAL BASIC FUNCTION 1 Display: 1.5 inch capacitive touch TFT, 128x128 resolution 2 Audio Format: MP3, WMA, AAC, OGG, FLAC, APE 3 Voice record format:
Bringing memories to life!
 The moment keeps going Jackie on holidays - Great ocean road, Melbourne 15" Mirage Series Bringing memories to life! Product User Manual (Model No's: DF-F1504b & F1506t) 1. Welcome! Congratulations on
TCC8803 PAD User Manual
 TCC8803 PAD User Manual Important Safety Instructions Please read the following instructions carefully before using this player. Do not remove the T-Flash card while it s in use to avoid damage to the
USER MANUAL. Please read this user manual carefully before using your unit.
 USER MANUAL MULTIMEDIA LED PROJECTOR Please read this user manual carefully before using your unit. CONTENTS Contents...1 Caution... 2 What's in the box...3 Product Introduction...4 Remote Control Introduction...5
Contents FCC COMPLIANCE STATEMENT PRECAUTIONS GETTING READY
 USER MANUAL Contents FCC COMPLIANCE STATEMENT PRECAUTIONS GETTING READY Package Contents Knowing the device BASIC OPERATIONS OF THE PROJECTOR Turning On/Off the Projector Adjusting Focus Resizing the Projection
Features. Warnings and Precautions READ BEFORE OPERATING EQUIPMENT SAVE THESE INSTRUCTIONS
 SENTA Warnings and Precautions READ BEFORE OPERATING EQUIPMENT SAVE THESE INSTRUCTIONS To prevent damage to your radio or possible injury to you or others, read these safety precautions and instructions
ipod classic User Guide
 ipod classic User Guide Contents 4 Chapter 1: ipod classic Basics 5 ipod classic at a glance 5 Using ipod classic controls 7 Disabling ipod classic controls 8 Using ipod classic menus 8 Adding or removing
Table of contents Introduction Getting Started Taking still images or videos
 User Manual Table of contents Introduction Features............................................1 Package contents.....................................2 Camera overview.....................................2
DVR 560HD Digital Video Recorder
 DVR 560HD Digital Video Recorder User Manual 2010 Sakar International, Inc. All rights reserved. Windows and the Windows logo are registered trademarks of Microsoft Corporation. All other trademarks are
TV1 Digital Player User s Manual
 TV1 Digital Player User s Manual Note: Screen shots taken in this manual may appear different on the player itself. Table of Content: Computer System requirements... 1 Notes... 2 Product Introduction...
Register your product and get support at SPE9010 SPE9015 SPE9020 SPE9025 SPE9030. EN Multimedia Hard Disk
 Register your product and get support at www.philips.com/welcome SPE9010 SPE9015 SPE9020 SPE9025 SPE9030 EN Multimedia Hard Disk 1 Contents Contents... 2 Your Multimedia Hard Disk... 3 What s in the box...3
TL240C/TL321C Transparent Display User Manual
 TL240C/TL321C Transparent Display User Manual Disclaimer BenQ Corporation makes no representations or warranties, either expressed or implied, with respect to the contents of this document. BenQ Corporation
NID- 7006A. Memory Powered by Android TM OS 4.1
 THE NEW GENERATION IN TECHNOLOGY NID- 7006A Core TM 7 Tablet PC with 8GB Built- In Memory Powered by Android TM OS 4.1 Basic Introduction... 1 Quick Start... 1 Battery management and charging... 1 Boot
19 32 Slimline High Definition Digital Advertising Display User s Manual
 19 32 Slimline High Definition Digital Advertising Display User s Manual Manual Version PF19-32HD2.0 Our Full Product Range Page 1 Safety Instructions Please keep the display away from any heat sources.
ACTION CAMERA INSTRUCTION MANUAL MODEL: DV6000AF. Li-ion
 ACTION CAMERA Li-ion INSTRUCTION MANUAL MODEL: DV6000AF INTRODUCTION Congratulations on the purchase of this product. This device is perfect for capturing all those important moments in stunning 4k using
FEATURES: Screen. Return Direction and OK button On/Off Audio Play Mode Record Button POWER and DATA
 With PVRC49 AV Recorder, you can convert your old video tapes or camcorder tapes to digital format with one click of button, record and digitalize video from VHS, VCR's, DVD Players, DVR's, Camcorders,Hi8,
10.1 HD Memory View Instruction Manual
 10.1 HD Memory View Instruction Manual Cautions Precautions and maintenance For indoor use only To avoid risk of fire or electric shock, do not expose the unit to moisture or condensation. To avoid overheating,
TL240C Transparent Display User Manual
 TL240C Transparent Display User Manual Disclaimer BenQ Corporation makes no representations or warranties, either expressed or implied, with respect to the contents of this document. BenQ Corporation reserves
USER MANUAL KAHVG28XXXA
 USER MANUAL KAHVG28XXXA Quick Reference Dear Customers Thank you for choosing our portable game device. To ensure you can use our product efficiently please read this user manual carefully. Safety Safety
Adapt Pico Play ADPP-99 User Manual
 Adapt Pico Play ADPP-99 User Manual Operating Instructions Notice: Please read the user manual carefully before using this product NTable of Contents Safety and Maintenance Instruction 2 Functions Overview
Operation Manual Defender Car Vision 2020 HD Car DVR
 Operation Manual Defender Car Vision 2020 HD Car DVR 1 Thank you for buying Defender Car Vision 2020 HD car DVR. Before using the device read carefully this manual. mini-usb connector HDMI connector Function
< W&ϭϱyyy USER MANUAL
 USER MANUAL Safety Information Keep away from water, moisture and dusty areas. Working temperature of 0-40 C. Never store in a very hot or very cold place. Be careful not to drop or knock the Digital Photo
MP60 TABLE OF CONTENTS. HD Media Player
 INSTRUCTION L MANUAL TABLE OF CONTENTS MP60 HD Media Player 1. Caution 2. Features and Specifications 3. Unit and Accessories 4. Functions of Buttons on the Remote Control 5. Media Player s Connections
iq DIGITAL PICTURE FRAME iq Digital Picture Frame DPF701SB USER GUIDE
 iq Digital Picture Frame DPF701SB USER GUIDE 1 Table of Contents Important Safety Precautions... 3 Cleaning the LCD Screen... 3 Cleaning the Digital Picture Frame... 3 Introduction... 4 What s in the Box...
POS Android Digital Advertising Display (Network) Hardware User Manual
 Hardware User Manual") POS Android Digital Advertising Display (Network) Hardware User Manual Manual Version POSW3.0 Safety Instructions Please keep the display away from any heat sources. Place the display in a stable and well-ventilated
POS Android Digital Advertising Display (Network) Hardware User Manual Manual Version POSW3.0 Safety Instructions Please keep the display away from any heat sources. Place the display in a stable and well-ventilated
2600 lumen brightness with native WXGA (1280 x 800) 16:10 widescreen screen resolution.
 16:10 widescreen screen resolution.") VPL-SW620 2,600 lumens WXGA Ultra Short Throw projector Overview Bright, high contrast widescreen projector with easy installation, environmentally friendly features ideal for mid size rooms, with optional
VPL-SW620 2,600 lumens WXGA Ultra Short Throw projector Overview Bright, high contrast widescreen projector with easy installation, environmentally friendly features ideal for mid size rooms, with optional
EYEZONE P User Manual. FCC Notices
 FCC Notices It s herewith confirmed to comply with the requirements of FCC Part 15 Rules. Operation is subject to the following two conditions: EYEZONE P102-6 User Manual This device may not cause harmful
DV 5470 User Manual Package Contents:
 DV 5470 User Manual Package Contents: Manual Camera Pouch Installation CD Earbuds AV Cable CONTENTS 1. NOTICE...2 2. SETUP...3 2.1 BATTERY INSTALLATION...3 2.2 MEMORY CARD...4 2.3 CONFIGURATION & INSTALLATION...4
User s Manual. Welcome: Safety Notice: Page 1
 Welcome: Thank you for purchasing this PocketCinema V50 from Aiptek. PocketCinema V50 is the latest generation of Pico Projectors with DLP technology inside. DLP offers a brighter picture which much higher
Game Mode...29 Settings Mode...30 Using the AVI Converter Software...36 Troubleshooting...40
 Contents Important Notice...3 Safety Instructions...4 Product feature...5 Front view...7 Minimum System Requirements...8 Connect USB...8 Get Started...9 Power ON / Power OFF...9 Set Key Lock...9 Music
14 Digital Photo Frame Instructional Manual
 14 Digital Photo Frame Instructional Manual aluratek.com mnl M10423 model ADMPF214B Copyright 2017 Aluratek, Inc. All Rights Reserved. Table of Contents Frame Features... Frame Control Close-up... Remote
Slimline Digital Advertising Display - Standalone (ANDROID) Hardware User Manual
 Hardware User Manual") Slimline Digital Advertising Display - Standalone (ANDROID) Hardware User Manual Manual Version PFHD5.3 Safety Instructions Please keep the display away from any heat sources. Place the display in a stable
Slimline Digital Advertising Display - Standalone (ANDROID) Hardware User Manual Manual Version PFHD5.3 Safety Instructions Please keep the display away from any heat sources. Place the display in a stable