10.1 HDMI LCD. 1. Introduction. 2. Bracket Mounting. 3. Usage with a PC 3.1 Device Connection
|
|
|
- May Small
- 5 years ago
- Views:
Transcription
1
2 Index 1. Introduction 2. Bracket Mounting 3. Usage with a PC 3.1 Device Connection 4. Usage with a Raspberry Pi 4.1 Installation 4.2 Device Connection 5. Usage with a BeagleBone Black 5.1 Device Connection 5.2 Installation 6. Usage with a Banana Pi 6.1 Raspbian OS 6.2 Device Connection 6.3 Loading the WiFi-Drivers 7. Support 8. EU-Declaration-of-Conformity Published: Copyright by Joy-IT 2
3 1. Introduction Dear customer, thank you for choosing our product. If you encounter any unexpected problems during use, please do not hesitate to contact us. Published: Copyright by Joy-IT 3

4 2. Bracket Mounting Simply follow the illustrated step-by-step instructions below for quick and easy mounting of the bracket. Published: Copyright by Joy-IT 4
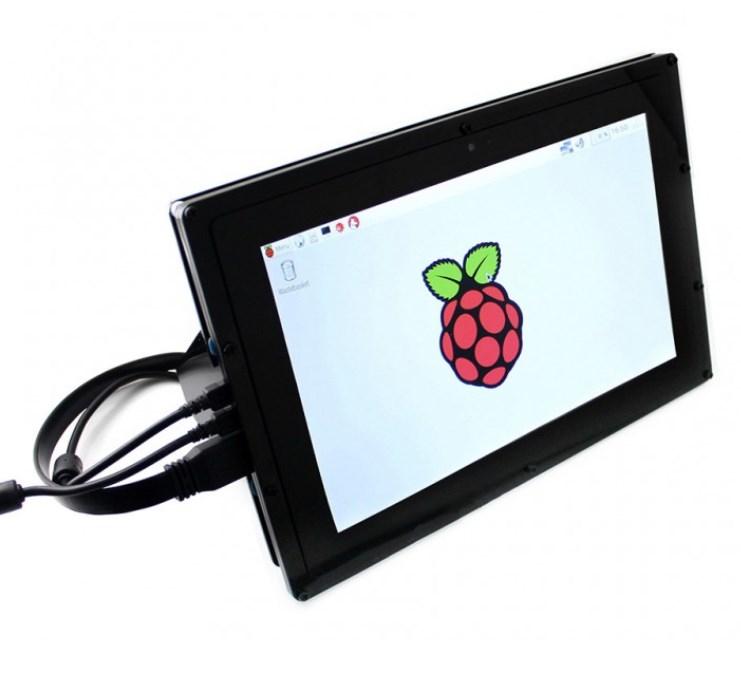
5 3. Usage with a PC This product supports Windows 7/8/8.1/10 operating systems. Multi-touch gestures with up to 10 points are supported for Windows operating systems 8 and above. Some Windows 7 operating systems only support single-touch gestures. 3.1 Device Connection Please make sure that the connections are made in the correct order, or the LCD may not work properly. 1. Connect the 5V 2.5A Power Only Port of the LCD to a Type A to Micro USB adapter. 2. Connect the touch port of the LCD to one of the USB ports of your computer. Connect the HDMI port of the LCD to the HDMI port of your computer using an HDMI cable. When multiple screens are registered from your PC, the LCD can only control the cursor of the main screen. It is recommended to use the LCD as main screen. Generally, the screen will show the interface from the image below. In this interface, tap to perform the left mouse action and hold to perform the right mouse action. (You can also adjust the backlighting of the screen with the "backlight adjustment button", please note the 1 in the following picture.) Published: Copyright by Joy-IT 5
6 4. Usage with a Raspberry Pi 4.1 Installation For the Windows operating systems on the PC, the resolution of the LCD is automatically identified. Therefore, no further settings of this type need to be made. When working with the Raspberry Pi you should set the resolution manually or the LCD screen will not work. For more detailed information, please read the following section. First you should download the latest image file, RASPBIAN or UBUNTU MATE, from the website Download the image file (.zip format) to your PC, after unpacking the file you will receive a file with the extension.img. 2. Connect a micro SD card to your PC and format it with the SD Formatter program. 3. Start the Win32DiskImager program and select the downloaded image file in the first step, then click the "Write" button to write the file to the card. 4. When the process is finished, open the config.txt file in the root directory of the micro SD card and add the following lines to the end of the file. Then save the modifications and remove the micro SD card. max_usb_current=1 hdmi_group=2 hdmi_mode=1 hdmi_mode=87 hdmi_cvt Note: The memory size of your micro SD card should be more than 4GB. In this operation you will also need a micro SD card reader which must be purchased separately. Published: Copyright by Joy-IT 6
 2. Connect the HDMI interface of the LCD to the HDMI interface of your Raspberry Pi with an HDMI cable. 3.")
7 4.1 Device Connection 1. Connect the "Power Only interface" of the LCD with a 5V 2.4A adapter. This should be equipped with a Type A to micro USB cable. (Normally the LCD will reset the output on the screen and perform a selftest.) 2. Connect the HDMI interface of the LCD to the HDMI interface of your Raspberry Pi with an HDMI cable. 3. Connect the touch interface of the LCD to one of the USB ports of your pi. 4. Insert a micro SD card into the card socket of the Raspberry Pi and then turn on the Pi. After a waiting time you should see the following interface. (Now you can adjust the backlight of the LCD with the "backlight adjustment button". See marker 1 in the following figure. Published: Copyright by Joy-IT 7
8 5. Usage with a BeagleBone Black 5.1 Device Connection 1. Connect the LCD to the HDMI interface of the BeagleBone using an HDMI-microHDMI cable (sold separately). 2. Connect the touch interface of the LCD to the "Host" USB interface of the BeagleBone with a type A- microusb cable. (The BeagleBone has a "Host" and a "Slave" USB interface. This LCD should be connected to the "host" interface. 3. Connect the "Power Only interface" of the LCD with a 5V 2.5A adapter. This should be equipped with a type A-microUSB cable. 5.2 Installation If the LCD is used as a normal screen, you only need to load the last Angstrom image file onto the BeagleBone Black without making any further settings. The BeagleBone will then read in the parameters of the 10.1 inch HDMI LCD and automatically set the resolution to 1280x800. If the LCD is used as a touch monitor, you must install this Image-File: 1. Download the compressed image file to your PC, after extraction you will receive a file with the extension.img. 2. Connect a micro SD card to your PC and format it with the SD Formatter program. 3. Start the Win32DiskImager program and select the downloaded image file in the first step, then click the "Write" button to write file to the card. 4. When the image file is written to the micro SD card, you can insert the card into the BeagleBone Black. It will automatically use the operating system on the card. After a short time you will see the graphical interface. Note: If the emmc of the BeagleBone Black has an operating system installed, you should start the BeagleBone Black from the micro SD card. Do not release the start button until the "User LEDs" start flashing. Published: Copyright by Joy-IT 8
9 6. Usage with a Banana Pi 6.1 Raspbian OS Install the Image-File Raspbian for Banana Pi. This image file supports BananaPi Pro and BananaPi. 1. Download the packed image file to your PC. After extraction, you receive a file with the extension.img. 2. Connect a microsd card to your PC and format the card with the SD Formatter program. Note: The memory size of your micro SD card should be more than 4GB. 3. Start the Win32DiskImager program and select the image file in the first step. Then click on "Write" to write the image file to the card. 6.2 Device Connection 1. Connect the LCD to the HDMI interface of the Banana Pi. 2. Connect the touch interface of the LCD to one of the USB interfaces on the Banana Pi. 3. Connect the "Power Only interface of the LCD with a 5V 2.5A adapter. This should have a Type A to micro USB cable. 6.3 Loading the WiFi-Driver Compared to the Banana Pi, the BananaPi Pro has an additional WiFi model built in. If you have a BananaPi Pro, you can use SSH as a method to connect it. The following command can be used to load the WiFi drivers: sudo modprobe ap6210 Published: Copyright by Joy-IT 9
10 7. Support We also support you after your purchase. If there are any question left or if you encounter any problems please feel free to contact us by mail, phone or by our ticket-support-system on our website. Ticket-System: Phone: (0) (11-18 Uhr) Please visit our website for more informations: Published: Copyright by Joy-IT 10
11 8. EU-Declaration-of-Conformity Manufacturer: Article Name: Description Purpose of use: JOY-iT Europe GmbH Pascalstr Neukirchen-Vluyn RB-LCD10 Display für Raspberry Pi und andere SBC Einsatz für Prototyping / Versuchsaufbauten Declares that the product is in compliance with the essential requirements of the following directives when used as intended: 2014/30/EU (EMC) & 2011/65/EU (Rohs) The following standards have been applied to assess the device: EN 55022:2010+ AC:2011 EN 55024:2010 EN :2014 EN :2013 Date Name of the person responsible Signature Position in the company Yue Yang executive manager Published: Copyright by Joy-IT 11
10.1 HDMI LCD. Index. Published: Copyright by Joy-IT 2
 Index 1. Introduction 2. Bracket Mounting 3. Usage with a PC 3.1 Device Connection 4. Usage with a Raspberry Pi 4.1 Installation 4.1.1 Basic installation 4.1.2 Rotating the display with touch function
10.1inch HDMI LCD (B) User Manual
 User Manual") 10.1inch HDMI LCD (B) User Manual CONTENT Introductin... 3 The LCD and Control Board... 3 How to Use... 4 Holder Assembly... 4 Working with PC... 4 Hardware Connection... 4 Tablet PC Settings... 5 Workign
10.1inch HDMI LCD (B) User Manual CONTENT Introductin... 3 The LCD and Control Board... 3 How to Use... 4 Holder Assembly... 4 Working with PC... 4 Hardware Connection... 4 Tablet PC Settings... 5 Workign
Robot-Arm-Assembly-Kit Calibration
 Robot-Arm-Assembly-Kit Calibration Robot 02 Release 18.08.2017 Copyright by Joy-IT 1 Index 1. Introduction & general Informations 2. Connecting the motors & using the right values 3. Code to calibrate
7inch HDMI Display-B. User Manual. product description
 7inch HDMI Display-B User Manual product description 7 standard display, 800 480 Hardware resolution, Up to 1920x1080 software configuration resolution. capacitive touch screen, maximum support 5 point
5inch HDMI LCD (B) User Manual
 User Manual") 5inch HDMI LCD (B) User Manual Description 5 inch Resistive Touch Screen LCD, HDMI interface, supports various systems Features 800 480 high resolution, touch control Supports Raspberry Pi, and driver
5inch HDMI LCD (B) User Manual Description 5 inch Resistive Touch Screen LCD, HDMI interface, supports various systems Features 800 480 high resolution, touch control Supports Raspberry Pi, and driver
TABLE OF CONTENTS. StromPi Introduction. 2. Overview. 3. Power Sources. 4. Serial Console. 5. Input Prioritization
 3 StromPi 3 TABLE OF CONTENTS 1. Introduction 2. Overview 3. Power Sources 4. Serial Console 5. Input Prioritization 6. Time-Controlled Applications 6.1 Real Time Clock 6.2 Shut-Down Timer & Power-Off
5 inch HDMI Display-B
 5 inch HDMI Display-B User Manual 1 / 5 product description 5 standard display, 800x480 resolution,maximum HDMI resolution 1920X1080 is supported Capacitive touch screen, support 5 point touch maximum
7 inch Capacitive Touch Screen LCD, HDMI interface, resolution, supports various systems.
 7inch HDMI LCD (B) User Manual Description 7 inch Capacitive Touch Screen LCD, HDMI interface, 800 480 resolution, supports various systems. Features 800 480 high resolution, touch control Supports Raspberry
3.2 / 3.5 Touch-Display
 Ausgabe 13.10.2017 Copyright by Joy-IT 1 Index 1. Connection 2. Installing the software 3. Using the buttons on the 3.2 TFT 4. Calibrating the touchscreen 5. Simultaneously using the LCD and the HDMI output
StromPI V2 User manual
 StromPI V2 User manual www.joy-it.net Dear customer, thank you that you have decided to buy this product. Following we have listed the things which you have to care for the first use: The StromPi 2 expansion
7inch HDMI LCD (H) User Manual
 User Manual") (H) User Manual 7inch HDMI LCD (H) 7inch HDMI LCD (H) (with case) CONTENT Introduction... 3 Features... 3 Differences betteen two versions... 4 How to Use... 5 Working with PC... 5 Tablet PC Settings...
(H) User Manual 7inch HDMI LCD (H) 7inch HDMI LCD (H) (with case) CONTENT Introduction... 3 Features... 3 Differences betteen two versions... 4 How to Use... 5 Working with PC... 5 Tablet PC Settings...
5inch HDMI Display User Manual
 5inch HDMI Display User Manual product description 5 standard display, 800 480 resolution With resistive touch screen, support touch control support backlight control alone, the backlight can be turned
5inch HDMI Display. User Manual. product description
 User Manual product description 5 standard display, 800 480 resolution With resistive touch screen, support touch control support backlight control alone, the backlight can be turned off to save power
Buck and Boost Voltage Converter
 3 Buck and Boost Voltage Converter TABLE OF CONTENTS 1. Device Overview 2. Usage and functions 3. Additional Informations 4. Support Published: 24.01.2019 Copyright by Joy-IT 2 1. DEVICE OVERVIEW Dear
MAKEVMP " 320 x 480 TOUCHSCREEN FOR RASPBERRY PI (ILI9341) USER MANUAL
 USER MANUAL") 3.5" 320 x 480 TOUCHSCREEN FOR RASPBERRY PI (ILI9341) USER MANUAL USER MANUAL 1. Introduction To all residents of the European Union Important environmental information about this product This symbol on
3.5" 320 x 480 TOUCHSCREEN FOR RASPBERRY PI (ILI9341) USER MANUAL USER MANUAL 1. Introduction To all residents of the European Union Important environmental information about this product This symbol on
Raspberry Pi 3 Model B RetroPi Set
 Ausgabe 24.11.2017 Copyright by Joy-IT 1 Index 1. General Informations & Security Informations 2. Connection 3. First Setup 4. Transferring ROM-Files 5. Emulators 5.1 Emulator-Listing 5.2 Emulator-Setup
TABLE OF CONTENTS. 1.8 TFT Display. 1. Introduction. 2. Usage with an Arduino 2.1 Connecting the display 2.2 Installing the library 2.
 3 1.8 TFT-Display TABLE OF CONTENTS 1. Introduction 2. Usage with an Arduino 2.1 Connecting the display 2.2 Installing the library 2.3 Example-Code 3. Usage with a Raspberry Pi 3.1 Connecting the display
HTT Series. Quick Start Guide. For all variants of the HTT35A, HTT50A, HTT70A and HTT104A. Revision 1.1
 HTT Series For all variants of the HTT35A, HTT50A, HTT70A and HTT104A Quick Start Guide Revision 1.1 Contents Revision History... 2 Introduction... 3 Features... 3 Functional Diagram... 3 Headers... 4
LCD Display 16x2 with Buttons
 Ausgabe 10.11.2017 Copyright by Joy-IT 1 Index 1. Connecting the Display 2. Installing the System 3. Usage & Example-Code 4. Support Ausgabe 10.11.2017 Copyright by Joy-IT 2 Dear customer thank you for
JOY-iT TFT-Display 1.8
 Ausgabe 07.07.2017 Copyright by Joy-IT 1 Index 1. Using with an Arduino 1.1 Connecting the display 1.2 Installing the libraries 1.3 Example-code 2. Using with a Raspberry Pi 2.1 Connecting the display
This Game HAT will turn your Raspberry Pi into a classic game console in a. 60 frame experience, smoothly display, no more frame loss
 Game HAT User Manual OVERVIRE This Game HAT will turn your Raspberry Pi into a classic game console in a second, recalls you all the gaming pleasures in the memory. FEATURES 3.5inch IPS screen, 480 320
5.5" HDMI OLED-Display with Capacitive Touchscreen V1.0 SKU:DFR0524
 5.5" HDMI OLED-Display with Capacitive Touchscreen V1.0 SKU:DFR0524 This is a 5.5" HDMI OLED-Display with Capacitive Touchscreen. It has 1920 1080 HDMI highdefinition output and comes with a capacitive
Adafruit 5" and 7" 800x480 TFT HDMI Backpack
 Adafruit 5" and 7" 800x480 TFT HDMI Backpack Created by lady ada Last updated on 2017-10-22 09:01:29 PM UTC Guide Contents Overview Pinouts EDID EEPROM Port Backlight Control Power Output Raspberry Pi
I2C Serial 2.6 LCD Module
 Ausgabe 08.09.2017 Copyright by Joy-IT 1 Index 1. Using with an Arduino 1.1 Connecting the display 1.2 Installing the library 1.3 Example-Code 2. Using with a Raspberry Pi 2.1 Installing the software 2.2
VMP " 320 x 480 TOUCHSCREEN FOR RASPBERRY PI (ILI9341) USER MANUAL
 USER MANUAL") 3.5" 320 x 480 TOUCHSCREEN FOR RASPBERRY PI (ILI9341) USER MANUAL USER MANUAL 1. Introduction To all residents of the European Union Important environmental information about this product This symbol on
3.5" 320 x 480 TOUCHSCREEN FOR RASPBERRY PI (ILI9341) USER MANUAL USER MANUAL 1. Introduction To all residents of the European Union Important environmental information about this product This symbol on
BeagleBone Black: Installing Operating Systems
 BeagleBone Black: Installing Operating Systems Created by Justin Cooper Last updated on 2017-12-05 07:31:58 PM UTC Guide Contents Guide Contents Overview Choosing an Operating System Angstrom Download
PRODUCT OVERVIEW. Industrial Grade Monitors. POS-Line 15 up to 65. Brilan 4K 75. Fire Load Optimized. Monitors 32 up to 55.
 POS-Line 15 up to 65 Brilan 4K 75 Industrial Grade Monitors Fire Load Optimized Monitors 32 up to 55 High Brightness Monitors 32 up to 55 VideoWall Monitors 46 Xtra-Line 27 up to 46 PRODUCT OVERVIEW Customized
StromPi 3 Softwaremanual
 3 StromPi 3 Softwaremanual TABLE OF CONTENTS 1. Overview 2. Real Time Clock 2.1 Function 2.2 Installation 3. Automatic Shutdown 3.1 Function 3.2 Installation 4. E-Mail Notificiations 4.1 Function 4.2 Installation
BeagleBone Black: Installing Operating Systems
 BeagleBone Black: Installing Operating Systems Created by Justin Cooper Last updated on 2014-01-17 11:30:27 AM EST Guide Contents Guide Contents Overview Choosing an Operating System Angstrom Download
StromPi 3 Softwaremanual
 3 StromPi 3 Softwaremanual TABLE OF CONTENTS 1. Overview 2. Real Time Clock 2.1 Function 2.2 Installation 3. Automatic Shutdown 3.1 Function 3.2 Installation 3.3 Manual Shutdown 4. E-Mail Notificiations
Lesson 7 Programming Embedded Galileo, Raspberry Pi, BeagleBone and mbed Platforms
 Lesson 7 Programming Embedded Galileo, Raspberry Pi, BeagleBone and mbed Platforms 1 Development Of Programs For Prototype Development Platforms Done using an IDE The cycles of edit-test-debug used When
OpenROV. Update Software Image From SD Card
 OpenROV Update Software Image From SD Card This guide will walk you through the steps for update your software to the latest image. The steps are for computers running Microsoft Windows or Apple OSx. Written
Joy-IT Ultrasonic Distance Sensor
 Joy-IT Ultrasonic Distance Sensor Export 03.11.2017 Copyright by Joy-IT 1 Index 1. Using with an Arduino 1.1 Connecting the Module 1.2 Code-Example 2. Using with a Raspberry Pi 2.1 Installing the System
Installation guide. Step1. Install the OS for Raspberry Pi 3. Go to to download Raspbian to the PC.
 Installation guide Step1. Install the OS for Raspberry Pi 3 Go to https://www.raspberrypi.org/downloads/ to download Raspbian to the PC. Unzip 2017-01-11-raspbian-jessie.zip and you will get a disc image
Arduino Digispark. Ausgabe Copyright by Joy-IT 1
 Ausgabe 25.08.2017 Copyright by Joy-IT 1 Index 1. Preparing the installation 2. Connecting the device 3. Programming Pin P5 4. Tranferring the example code 5. Support Ausgabe 25.08.2017 Copyright by Joy-IT
Open your package. Your phone at a glance EN-1. Micro USB port. Headset. jack Rear camera. Earpiece. Front camera. Volume. button. Power.
 Open your package Prestigio MultiPhone Battery Travel charger Headset USB cable Quick start guide Your phone at a glance Earpiece Front camera Headset jack Rear camera Micro USB port Touch screen Volume
84x48 LCD Display. 1. Usage with an Arduino 1.1 Connecting the display 1.2 Pin assignment 1.3 Code example
 Index 1. Usage with an Arduino 1.1 Connecting the display 1.2 Pin assignment 1.3 Code example 2. Usage with a Raspberry Pi 2.1 Connecting the display 2.2 Pin assignment 2.3 Installation of the operating
O ptima S aver P i. User Guide. January 2017 Version 1.0
 O ptima S aver P i User Guide January 2017 Version 1.0 T able O f C ontents Page 1. What is OptimaSaverPi -------------------------- 2 2. Why OptimaSaverPi -------------------------- 2 3. Requirement --------------------------
ELI Launcher Configuration
 ELI Launcher Configuration Future Designs, Inc., All Rights Reserved Important Legal Information Information in this document is provided solely to enable the use of Future Designs, Inc. (FDI) products.
Raspberry Pi Setup. 5 HDMI NightScout Display Notes: Instructions to switch to chromium-browser highlighted in yellow.
 Raspberry Pi Setup 5 HDMI NightScout Display 2017-09-30 Notes: Instructions to switch to chromium-browser highlighted in yellow. Items Needed: Raspberry Pi with Debian Jessie loaded and configured. See
Preparing SD card for Pi
 Preparing SD card for Pi Sarwan Singh Assistant Director(S) NIELIT Chandigarh Education is the kindling of a flame, not the filling of a vessel. - Socrates 1 sarwan@nielit Using NOOBS- New Out Of Box Software
Programming the Raspberry Pi
 Programming the Raspberry Pi contents introduction unboxing and setup flashing an SD card logging in for the first time the JOE text editor running the hello world program a (slightly) more complex example
Experiments 1 How to set up Raspberry Pi B+ The little computer you can cook into DIY tech projects
 Experiments 1 How to set up Raspberry Pi B+ The little computer you can cook into DIY tech projects The Raspberry Pi is a computer about the size of a credit card. The darling of the do-it-yourself electronics
3.5 Inch TFT Display
 3.5 Inch TFT Display Resistive&Capacity Touch Screen Website: www.inno-maker.com Contact: sales@inno-maker.com, support@inno-maker.com 1 Website: www.inno-maker.com Contact: sales@inno-maker.com, support@inno-maker.com
Raspberry Pi. Quick-Start Guide. Rev 1.0, Mar 2017
 Raspberry Pi Quick-Start Guide Rev 1.0, Mar 2017 Table of Contents 1. Raspberry Pi Start Kits... 2 A. Generation Introduction:... 2 B. Package including:... 2 2. Assembly... 3 A.16GB Micro SDPre-Loaded
Adafruit's Raspberry Pi Lesson 1. Preparing an SD Card for your Raspberry Pi
 Adafruit's Raspberry Pi Lesson 1. Preparing an SD Card for your Raspberry Pi Created by Simon Monk Last updated on 2016-12-03 03:20:15 AM UTC Guide Contents Guide Contents Overview You Will Need Downloading
UM2375 User manual. Linux driver for the ST25R3911B/ST25R391x high performance NFC frontends. Introduction
 User manual Linux driver for the ST25R3911B/ST25R391x high performance NFC frontends Introduction The STSW-ST25R009 Linux driver enables the Raspberry Pi 3 to operate with the X-NUCLEO-NFC05A1. This package
Gateway, routing data between sensors and cloud
 Data Sheet, routing data between sensors and cloud for routing data between sensors/repeaters and the cloud, ReCalc. Route data to and from up to 500 sensors. Transmits data to ReCalc using Ethernet, mobile
Raspberry Pi Setup Tutorial
 Raspberry Pi Setup Tutorial The Raspberry Pi is basically a miniature linux- based computer. It has an ARM processor on it, specifically the ARM1176JZF- S 700 MHz processor. This is the main reason why
Installation instructions for the LEICA D-LUX 4 - Firmware 2.2
 Installation instructions for the LEICA D-LUX 4 - Firmware 2.2 Dear Customers, By installing the firmware you can enhance the LEICA D-LUX 4 s operation in the areas listed below. Update Contents Model
Lab2 - Bootloader. Conventions. Department of Computer Science and Information Engineering National Taiwan University
 Lab2 - Bootloader 1 / 20 Cross-compile U-Boot. Connect to Raspberry Pi via an USB-TTL cable. Boot Raspberry Pi via U-Boot. 2 / 20 Host Machine OS: Windows Target Machine Raspberry Pi (2 or 3) Build Machine
Atlas iot. Installation guide V 1.0
 Atlas iot Installation guide V 1.0 Necessary items Before we begin have the following items readily available: SanDisk ultra micro SDHC, 16 gb card USB micro SD card reader Raspberry Pi 7 touchscreen Raspberry
Gateway, routing data between sensors and cloud
 Data Sheet Gateway, routing data between sensors and cloud Revised: April 2019 Gateway for routing data between sensors/repeaters and the cloud, ReCalc. Route data to and from up to 500 sensors. Transmits
Bush Baby Stealth Fan Manual SKU: BBSFAN
 Bush Baby Stealth Fan Manual SKU: BBSFAN 1 Version 1.1 THANK YOU FOR PURCHASING THE BBS FAN HIDDEN CAMERA Please read this manual before operating the camera and keep it handy. Your purchase should include:
i.mx 6UltraLite Evaluation Kit Quick Start Guide s datasheet has been downloaded from at this pag
 i.mx 6UltraLite Evaluation Kit Quick Start Guide s datasheet has been downloaded from http://www.digchip.com at this pag Quick Start Guide About the i.mx 6UltraLite Evaluation Kit The i.mx 6 UltraLite
Model: K0073. Smart Robot Car Kit Quick Start Guide
 Model: K0073 Smart Robot Car Kit Quick Start Guide Smart Robot Car Kit Smart Robot Car Kit M2 nuts 4 pieces M24 micro servo screws 2 bars PTZ self-tapping screws 4 bars M210 round head screws 4 bars 15
XLink Kai Raspberry Pi Beginners Tutorial
 XLink-Kai-Raspberry-Pi-Beginners-Tutorial.md XLink Kai Raspberry Pi Beginners Tutorial Hi! This tutorial will guide you through setting up XLink Kai on a Raspberry Pi to play multiplayer system link Xbox
Specifications. What s Inside The box
 Tablet of Contents Specifications.1 What s inside the box 1 Tablet Parts 2 Getting started...2 Connecting to the Internet..6 Task Bar..8 Install and Uninstall 9 Camera.10 HDMI.11 Trouble Shooting 11 Warranty..13
Getting started with Raspberry Pi (and WebIoPi framework)
") Getting started with Raspberry Pi (and WebIoPi framework) 1. Installing the OS on the Raspberry Pi Download the image file from the Raspberry Pi website. It ll be a zip file as shown below: Unzip the file
Getting started with Raspberry Pi (and WebIoPi framework) 1. Installing the OS on the Raspberry Pi Download the image file from the Raspberry Pi website. It ll be a zip file as shown below: Unzip the file
Communication over Modbus protocol Connection with multiple controllers Application upgrade by using an SD 1) card or a USB stick
 card or a USB stick") Climatix Climatix touch panel POL8T.4X/STD POL8T.7X/STD POL8T.8X/STD The Climatix touch panel offers the following features: Power supply over DC 24V Ethernet port and serial port connection SD ) card
Climatix Climatix touch panel POL8T.4X/STD POL8T.7X/STD POL8T.8X/STD The Climatix touch panel offers the following features: Power supply over DC 24V Ethernet port and serial port connection SD ) card
Bluetooth Keyboard Setup Instructions
 Bluetooth Keyboard Setup Instructions Setup Using GUI (NOOBS/Raspbian) 1. Insert your micro SD card into the micro SD card slot on the Raspberry Pi. 2. Connect an HDMI cable from your Raspberry Pi to your
Banana PI M3 User Manual. SinoVoip CO.,LTD. Banana PI BPI-M3 User Manual <Version: V1.0 > pi.com 1
 SinoVoip CO.,LTD Banana PI BPI-M3 User Manual www.sinovoip.com.cn www.banana pi.com 1 Banana PI BPI-M3 is the open source hardware platform, Banana PI BPI-M3 is an Octa-core version of
Davide Cavaliere 18 th February 2017
 Davide Cavaliere www.monocilindro.com dadez87@gmail.com 18 th February 2017 This guide explains how to set in read mode your Raspberry Pi 3, running the latest Raspbian Jessie (January 2017). This feature
LotOS Framework. Getting Started Guide for Banana Pi. Copyright (C) 2015 ilbers GmbH Revision 1.1,
 2015 ilbers GmbH Revision 1.1,") LotOS Framework Getting Started Guide for Banana Pi Copyright (C) 2015 ilbers GmbH Revision 1.1, 2015-10-20 Mango hypervisor and LotOS framework are copyright (C) 2014 2015 ilbers GmbH. All rights reserved.
LotOS Framework Getting Started Guide for Banana Pi Copyright (C) 2015 ilbers GmbH Revision 1.1, 2015-10-20 Mango hypervisor and LotOS framework are copyright (C) 2014 2015 ilbers GmbH. All rights reserved.
HD Ovi Digital Clock WiFi Hidden Camera. User s Guide WHEN YOU NEED TO KNOW.
 HD Ovi Digital Clock WiFi Hidden Camera User s Guide WHEN YOU NEED TO KNOW. HD Ovi Digital Clock WiFi Hidden Camera The HD Ovi Digital Clock WiFi Hidden Camera is a fully functional clock, displaying time
IAD18000/18001 Hardware User Manual
 IAD18000/18001 Hardware User Manual 10.1 HD Smart Signboard IAdea Corporation 綠創科技 Warning: Changes or modifications to this unit not expressly approved by the party responsible for compliance could void
Chromebook Owner s Manual
 CMT Chromebook Owner s Manual Before using, please read these operating instructions carefully. They contain important advice concerning the use and safety of your Chromebook. Use for its intended purpose
Pianoteq 6 Raspberry Pi 3 Station. By Edgar Bustamante
 Pianoteq 6 Raspberry Pi 3 Station By Edgar Bustamante 1 Contents 1 Introduction...4 2 Parts...5 2.1 Raspberry Pi 3...5 2.2 Fan/Heat Sinks...5 2.3 Digital to Analog Converter (DAC)...5 2.4 Micro SD Card
Manual of ET-LCD SW HAT
 ET- LCD SW HAT ET-LCD SW HAT is Board I/O that is specifically designed for connection with Board Raspberry Pi through Connector 40-PIN; this board includes LCD 16x2, SW, Buzzer, RTC DS3231 with Connector
RETROPIE INSTALLATION GUIDE
 RETROPIE INSTALLATION GUIDE CONTENTS THE FOLLOWING GUIDE WILL COVER THE INSTALLATION, SETUP AND CONFIGURATION OF THE RASPBERRY PI, RASPBIAN OS AND RETROPIE Author: http://rpiarcadebuild.wordpress.com/
Portable Media Center - Article by Craig A. Lindley 07/28/2016
 Introduction My wife and I like to travel in our small Rialta RV. We usually dry camp without connecting up to any services like power, water or sewer but sometimes we need to take showers or do laundry
Raspberry Pi Introduction
 ECE 1160/2160 Embedded Systems Design Raspberry Pi Introduction Wei Gao ECE 1160/2160 Embedded Systems Design 1 Raspberry Pi Classic embedded computer Single board computer Size of a credit card ECE 1160/2160
Installation Guide TH-55LFE8. Content of box: 1 x Touch overlay 4 x Brackets 14 x Phillips screws
 Installation Guide TH-55LFE8 Content of box: 1 x Touch overlay 4 x Brackets 14 x Phillips screws Table of Contents Introduction 2 Capabilities 3 Unpacking the Unit 4 Installation Instructions 5-6 USB Installation
IOT HARDWARE SUBSTRUCTURE
 Chapter 2 IOT HARDWARE SUBSTRUCTURE A IOT of hardware components are used in IOT ecosystem circuit developmen boards form the basic structrue.arduino, Rasspberyy Pi,Beagle Bone, Cubie Borad, Texas Insuments
Lab: Setting up PL-App with a Raspberry Pi
 Lab Topology Objectives Set up a Raspberry Pi board as a PL-App device Use PL-App Launcher to provision and discover PL-App devices Background Cisco Prototyping Lab is a set of hardware and software components
ACV-8305W Quick start guide ENG 1
 Overview DENVER 360 Camera is a digital panoramic camera with two lenses. Through the application of up-to-date technologies, it enables you to get panoramic videos and photos,creating an experience of
IP116 Plus HD WiFi Camera
 IP116 Plus HD WiFi Camera Instruction Manual 1 Introduction Thank you for choosing the IP116 Plus HD WiFi Camera. We understand that whenever we purchase something new, we want to enjoy it as soon as possible.
1. Introduction P Package Contents 1.
 1 Contents 1. Introduction ------------------------------------------------------------------------------- P. 3-5 1.1 Package Contents 1.2 Tablet Overview 2. Using the Tablet for the first time ---------------------------------------------------
imx6 TinyRex Development Kit QUICK GUIDE
 imx6 TinyRex Development Kit QUICK GUIDE Last updated: June 30, 207 About Voipac imx6 TinyRex Development Kit Packing List Connectors Locations Connecting the Components and Cables The First Steps Controlling
How do I setup a Raspberry Pi?
 If you would like to setup a Raspberry Pi to run QRUQSP code, the following steps will walk you through downloading an SD image and configuring your Raspberry Pi. Step 1 of 17 - Equipment Required In order
VP101-BT Installation Guide
 VP101-BT Installation Guide Package Contents 1 VP101-BT system unit 6 Mounting screws for Mini PCIe module 1 Quick Installation Guide 1 Disk includes: - Drivers / Manual Note: The CD that came with the
DATASHEET. MK-070C-HP High Performance 7 Inch Capacitive Touch Display. Amulet. Technologies. July 2015 Revision A
 High Performance 7 Inch Capacitive Touch Display DATASHEET July 2015 Revision A Introduction The MK-070C is the newest family member in the Display Module product line. The new 7 Capacitive Display Module
ZP-PI335GK-BT User s Manual
 291-MB387-02ZTF ZP-PI335GK-BT User s Manual No part of this manual, including the products and software described in it, may be reproduced, transmitted, transcribed, stored in a retrieval system, or translated
Rapoo E6700 Setup Instructions
 Rapoo E6700 Setup Instructions Setup Using GUI (NOOBS/Raspbian) 1. Insert SD card into Raspberry Pi. 2. Connect HDMI cable from Raspberry Pi to monitor. 3. Connect a standard USB keyboard and mouse into
DATASHEET. 38.1cm (15 ) POS-LINE MONITOR. DATA DISPLAY GROUP
 POS-LINE MONITOR. DATA DISPLAY GROUP") DATASHEET 38.1cm (15 ) POS-LINE MONITOR DATA DISPLAY GROUP www.datadisplay-group.com Data Display Group POS-Line monitor 15 inch - October 2017 Page 2 Robust industrial monitor with 15 (38.1 cm) display
DATASHEET 38.1cm (15 ) POS-LINE MONITOR DATA DISPLAY GROUP www.datadisplay-group.com Data Display Group POS-Line monitor 15 inch - October 2017 Page 2 Robust industrial monitor with 15 (38.1 cm) display
1. Introduction P Package Contents 1.
 1 Contents 1. Introduction ------------------------------------------------------------------------------- P. 3-5 1.1 Package Contents 1.2 Tablet Overview 2. Using the Tablet for the first time ---------------------------------------------------
5.0 HDMI TFT Modules
 User Guide 5.0 HDMI TFT Modules Newhaven Display International 2661 Galvin Court Elgin IL 60124 Phone: 847.844.8795 Fax: 847.844.8796 www.newhavendisplay.com Sales: nhsales@newhavendisplay.com Technical
Ubuntu Install Instructions Mac Usb In Windows 7 Using
 Ubuntu Install Instructions Mac Usb In Windows 7 Using Burning from Windows, Burning from Mac OS X, Burning from Ubuntu, Burning from Kubuntu For instructions, please see HowToMD5SUM and HowToSHA256SUM.
Sigma Tile Workshop Guide. This guide describes the initial configuration steps to get started with the Sigma Tile.
 Sigma Tile Workshop Guide This guide describes the initial configuration steps to get started with the Sigma Tile. 1 Contents Contents... 2 Chapter 1: System Requirements... 3 Chapter 2: Configure Your
ActivPanel AT A GLANCE GENERAL SPECIFICATIONS. Call or PROMETHEAN PRODUCT SPECIFICATIONS DESCRIPTION
 PROMETHEAN PRODUCT SPECIFICATIONS ActivPanel INTERACTIVE FLAT PANELS 55, 65, 75 and 84 DESCRIPTION Introducing the ActivPanel, the next generation interactive flat panel with Full HD and 4K Ultra HD displays
EOS REBEL T2i / 550D Firmware Update Procedures Precaution
 EOS REBEL T2i / 550D Firmware Update Procedures Precaution A power failure during the firmware writing operation may disable the camera. Use a fully charged Battery Pack or dedicated AC Adapter Kit (Optional)
This guide covers the basic operation and use of your PCAN-Diag FD. You can find a detailed documentation in PDF format...
 PCAN-Diag FD Quick Start Guide This guide covers the basic operation and use of your PCAN-Diag FD. You can find a detailed documentation in PDF format...... on the PCAN-Diag FD memory card in the directory:
291-MB309-02N6F. PI331 pico
 291-MB309-02N6F PI331 pico ZOTAC ZBOX pico User s Manual No part of this manual, including the products and software described in it, may be reproduced, transmitted, transcribed, stored in a retrieval
Adafruit's Raspberry Pi Lesson 1. Preparing an SD Card for your Raspberry Pi
 Adafruit's Raspberry Pi Lesson 1. Preparing an SD Card for your Raspberry Pi Created by Simon Monk Last updated on 2013-07-08 12:15:38 PM EDT Guide Contents Guide Contents Overview You Will Need Downloading
Die Brummbeere Documentation
 Die Brummbeere Documentation Release 0.0.1 Peter Bouda February 21, 2016 Contents 1 owncloud Music Player 1 2 Contents 3 2.1 Compile for desktop........................................... 3 2.2 Embedded
SBC3100 (Cortex-A72) Single Board Computer
 Single Board Computer") (Cortex-A72) Single Board Computer Ultra High Performance SBC with RK3399 (Cortex-A72 x2 + Cortex-A53 x4) @ 2Ghz : Single Board Computer H310: Input (receiver) Module : Output (display) Module D120: 4xCOM
(Cortex-A72) Single Board Computer Ultra High Performance SBC with RK3399 (Cortex-A72 x2 + Cortex-A53 x4) @ 2Ghz : Single Board Computer H310: Input (receiver) Module : Output (display) Module D120: 4xCOM
DATASHEET cm (15,6 ) POS-LINE MONITOR. DATA DISPLAY GROUP
 POS-LINE MONITOR. DATA DISPLAY GROUP") DATASHEET 39.6 cm (15,6 ) POS-LINE MONITOR DATA DISPLAY GROUP www.datadisplay-group.com Data Display Group POS-Line monitor 15.6 inch - September 2017 Page 2 Robust industrial monitor with 15.6 (39.6 cm)
DATASHEET 39.6 cm (15,6 ) POS-LINE MONITOR DATA DISPLAY GROUP www.datadisplay-group.com Data Display Group POS-Line monitor 15.6 inch - September 2017 Page 2 Robust industrial monitor with 15.6 (39.6 cm)
DATASHEET cm (21.5 ) POS-LINE MONITOR. DATA DISPLAY GROUP
 POS-LINE MONITOR. DATA DISPLAY GROUP") DATASHEET 54.7 cm (21.5 ) POS-LINE MONITOR DATA DISPLAY GROUP www.datadisplay-group.com Data Display Group POS-Line monitor 21.5 inch - September 2017 Page 2 Robust industrial monitor with 21.5 (54.7 cm)
DATASHEET 54.7 cm (21.5 ) POS-LINE MONITOR DATA DISPLAY GROUP www.datadisplay-group.com Data Display Group POS-Line monitor 21.5 inch - September 2017 Page 2 Robust industrial monitor with 21.5 (54.7 cm)
A64-OLinuXino 64-bit open source embedded computer
 A64-OLinuXino 64-bit open source embedded computer QUICK START GUIDE Document revision B, October 2017 Designed and manufactured by OLIMEX Ltd, 2017 All boards manufactured by OLIMEX LTD are RoHS compliant
FriendlyELEC NanoPi Fire3 - Octa-Core Samsung S5P6818 Cortex-A53, 400M Hz - 1.4G Hz
 FriendlyELEC NanoPi Fire3 - Octa-Core Samsung S5P6818 Cortex-A53, 400M Hz - 1.4G Hz EAN CODE 4 0 3 8 8 1 6 1 4 8 6 4 3 Introduction Overview Front Back The NanoPi Fire3 is a high performance ARM Board